 Venetian lace of the xvi century.
Venetian lace of the xvi century.
Venetian lace of the xvi century.
In general, to the uninitiated, the word «lace» signifies exclusively the delicate and elaborate fabrics that owe their origin to Venice and the Netherlands and were thence imported into other countries. But besides Venetian, French, English, Chantilly, Brussels, Sedan point, names familiar to every one, there are all kinds of other laces, likewise of great antiquity, and named as the above are, after the country they belong to.
As it would be impossible in these pages to give a comprehensive account of them all, we have restricted ourselves to such as seem more especially suited to the amateur, to whom needlework is a mere recreation and pastime.
Worked like the above-named entirely with the needle, but much less elaborate and minute in character and workmanship, they are quicker and easier to make and we are sure that by the help of the directions that accompany the illustrations, any careful worker will be able to imitate them without difficulty.
Materials.—It will be observed that we do not bind ourselves in the following directions to one size of cotton, that as in point of fact, one and the same piece of work can be executed in either fine or coarse cotton, we have only indicated the most suitable kind of material to use: as for instance for Armenian lace, Fil à pointer D.M.C[A] or Cordonnet 6 fils D.M.C[A], for Smyrna or knotted lace, Fil à pointer D.M.C, Cordonnet 6 fils D.M.C and Fil à dentelle D.M.C[A], for Reticella and Venetian lace, Fil d'Alsace D.M.C[A], for Brussels lace, the finest numbers of Fil à dentelle and for pillow lace, any one of those enumerated, excepting Coton à broder surfin.
Pillow lace and the necessary articles for its manufacture.—Pillow lace derives its name from the cushion or pillow on which all bobbin lace is made, which distinguishes it from point lace, so-called because it consists of «points» or stitches made with a needle and thread.
Various articles are required for the making of pillow lace; in the first place a cushion or pillow, then bobbins and a winder, parchment patterns, pins and a pricker.
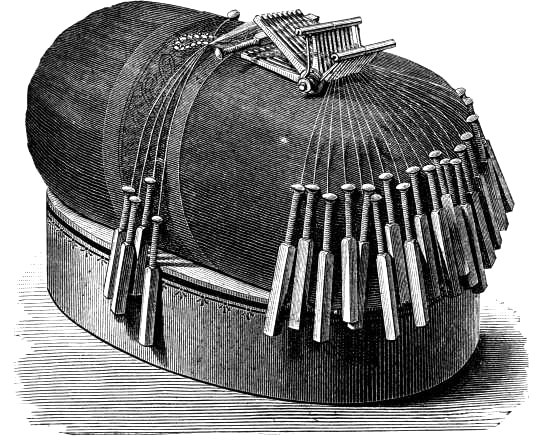
The lace pillow (figs. 774, 775, 776).—The pillows used for pillow lace are of different kinds and vary in shape with where the country, and the manner in which the lace is made.
Fig. 774 represents the shape in use in the mountains of Bohemia and Saxony, where pillow lace has always been one of the chief industries of the inhabitants. Any one can make a cushion of this kind themselves with a piece of stuff, 60 c/m. long and 40 wide. The long sides are firmly sewn together and the short ones turned in with a narrow hem through which you run a cord to draw them up. A disc of stout cardboard is put inside the case after you have gathered up the one end; you then stuff the case as full as possible with bran, sawdust or horsehair, lay a second disc of cardboard in at the top and draw up the other end.
These pillows are then put into cardboard boxes with rather high sides, or into a kind of basket, weighted at the bottom, to keep it firm and steady. Pillows of this most primitive kind have the great advantage of being perfectly easy to make.
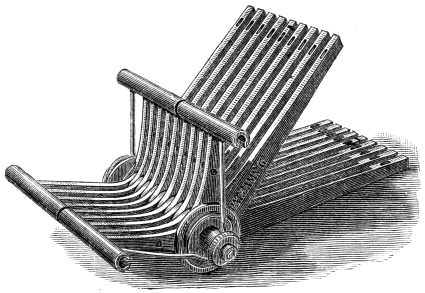
Fig. 775 represents a pillow of a more complicated kind, which can be stood upon the table or mounted on a stand. The cylinder is movable so that you can go on working without interruption.
The whole apparatus consists of a board or stand, 50 c/m. long and 40 wide, resting upon two transverse pieces of wood, 3½ c/m. high behind and 1 c/m. in front.
The board should be covered, first with a very thick flannel or Bath coating and then with a fine dark green flannel or cloth.
Two small supports are fixed on to the outside edge of the stand to hold the cylinder, which consists of two discs that revolve on a rod about 22 c/m. long.
This rod should be covered, in the first place with a thick layer of tow and then with flannel or cloth.
On the left side of the cylinder is a cog-wheel and a metal spring is attached to the board, by means of which the wheel is prevented from turning the wrong way.
Fig. 776 shows how the bobbins are placed upon the pillow. In Normandy a kind of stuffed box is used instead of a pillow. The board is 3 c/m. higher behind than in front and is deeply grooved to hold the cylinder, which is stuffed and shaped like the one represented in fig. 775.
This cylinder scarcely projects above the stand, a second groove in the back edge receives the lace as it is worked off the cylinder.
The pillows used for Valenciennes lace are of again a different construction, but as it is not our intention in the present work to describe the finer kinds of lace it appeared superfluous to give any illustration of the pillows on which they are made.
The bobbins (fig. 777).—A bobbin is a sort of little wooden spool with a handle to it; there are several varieties of them but we have confined ourselves to a representation of the kind considered best for beginners.
As a considerable number are wanted for every pattern and they are apt to slip about and get entangled in inexperienced hands, they are now to be had with the handles weighted with lead to steady them and counteract any independent motion of their own. We cannot help again laying great stress on the importance of seeing that the size of the bobbins and the number of the cotton be well assorted to the kind of lace.
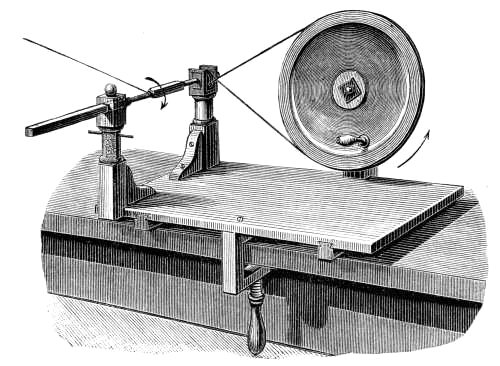
The winder (fig. 778).—Every one who means to take the work seriously should provide themselves with a winder, as here represented, which is affixed to a polished wooden stand.
This stand has to be firmly screwed to the table and the bobbin is squeezed in between the two little rods fitted into the supports at the left end of the stand; one of these rods serves as the axle to the little wheel, the other can be drawn in and out and fitted to the length of the bobbin.
When the bobbin is fixed in its place, you take the thread in the left hand and wind it round it, turning the wheel with the right hand from right to left in the direction indicated by the arrow.
The thread is wound round the handles of the bobbins that are used for making very fine lace, and a wooden shield that is so contrived that you can slip it over the handle prevents the thread from getting soiled.
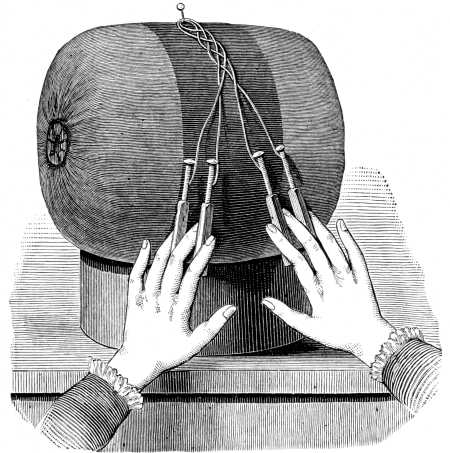
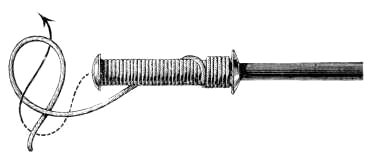
Stoppage of the thread at the end of the bobbin (fig. 779).—After cutting off the thread, you make a loop close to the top of the bobbin to prevent it from unwinding too easily. This loop is formed by taking the bobbin in the right hand, the thread between the fourth and fifth fingers of the left hand and laying it away from you round the left thumb; then lifting up the bottom thread with the second finger of the left hand you pass the bobbin upwards from below through the loop on the left hand.
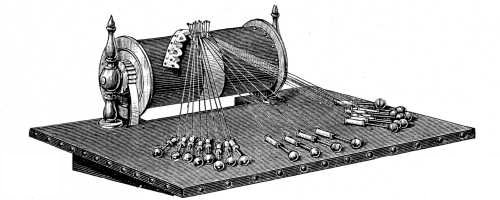
Machine for crossing the threads (fig. 780).—This ingenious little machine is of great assistance in making straight running patterns and Irish lace braids, and is particularly useful for Russian lace and braid lace of all kinds.
It renders the even crossing of the threads in those parts of a pattern that imitate linen in texture comparatively easy.
Two implements like combs, fitting into one another, and movable, are mounted at two thirds of their length on a steel axle. The long teeth have holes bored through the ends, from the sides to the middle of the points and through these holes the threads from the bobbins are passed.
The short teeth also are pierced with transverse holes, through which a needle with the threads threaded in the long teeth resting upon it, is passed. The points of the short teeth are covered with a hollow metal cylinder, split through from end to end, which can be removed when new threads have to be added.
When the threads are all on, a small spring is fixed to the two ends of the axle, which is independent of the machine, and the two ends of the spring are introduced into the hollow of the cylinder.
By the pressure you exercise on the teeth in the cylinder, the long teeth change their position, the lower ones rise and the upper ones fall and the threads cross each other, as in a loom. After each movement of the machine, the bobbin that makes the woof must be passed between the crossed threads; the edges are made like those of any other kind of lace.
Fig. 781 explains how the bobbins are passed between the threads that are held between the teeth of the machine.
The pattern.—The pattern is one of the most important things in making pillow lace.
The outlines must be clear and exact, as upon that in great measure the perfection of the lace depends.
The drawing transferred to parchment, paper or cardboard, usually of a yellowish tint, should be lined with a very thin stuff such as muslin to prevent its tearing.
A stripe of quadrille, or point paper as it is called, should be laid upon the pattern and then holes pricked with a medium-sized needle at every intersection of the lines.
All the curved long lines of the pattern must first be traced upon the point paper with ink and then pricked.
The pattern should be adapted to the thickness of the thread the lace is to be made of; for a coarse lace large point paper should be used and small, for the finer kinds of lace. The pricking of the pattern beforehand is particularly important in the case of the common torchon lace, where the real beauty of the design consists in its regularity; in the case of fine close patterns the pricking can only be done as you proceed.
Prickers and holders of the kind represented in fig. 782 or very much resembling it, are to be had at every stationer's shop.
The holes made by the prickers are to receive the pins, stuck in as you go along, round which you form and by which these are kept in their place.
The pins must be long, with round heads and of a size suited to the thread. When your pattern is ready fasten it to the pillow or cylinder as the case may be, stretching it as smoothly as possible and being careful in so doing to fit the lines of the pattern together. If it be too long it must be cut to the required length or you may make the cylinder bigger by wrapping several folds of flannel round it.
The value of lace depends not only on the work but on the thread it is made of; all the D.M.C cottons[A] can be recommended for lace-making and coloured laces of all kinds are greatly improved by the addition of a little Chiné d'or D.M.C or Or fin D.M.C pour la broderie.[A]
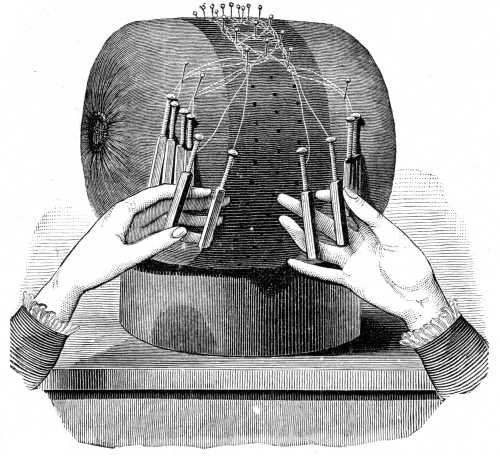
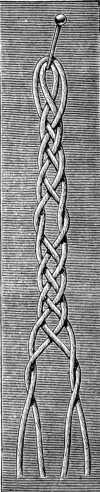
Position and movements of the hands (fig. 783).—Pillow lace is always made with two pairs of bobbins at once and the «stitches» are formed by the different ways of passing, plaiting, crossing and twisting the threads.
To begin with the simplest operation, making a plait, hang 2 pairs of bobbins to a pin, take 2 bobbins in each hand and lay the right bobbin of each pair over its left fellow and draw up the threads slightly. Then take the bobbins in the 2nd, 3rd and 4th fingers of the right hand and with the same fingers of the left, lay the 2nd bobbin over the 3rd with the 2nd and 3rd fingers of the left, so that the two middle bobbins are crossed, then take the 4th bobbin in the 2nd and 3rd fingers of the right hand and the bobbin that is now the 2nd, in the 3rd and 4th fingers of the left hand and lay the former over the 3rd, the latter over the 1st. This constitutes a «half passing».
The plait, fig. 784, is formed by the repetition of the half passing. Two half passings make a whole or «double passing».
On the kind of lace you are making, depends how many pairs of bobbins you will have to use. But as one part of the lace is often made before the other, or you have to put on supernumerary bobbins, you fasten up those not in use on one side with pins, as shown in fig. 783.
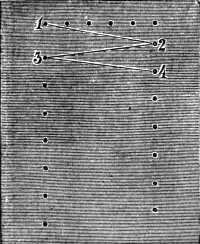
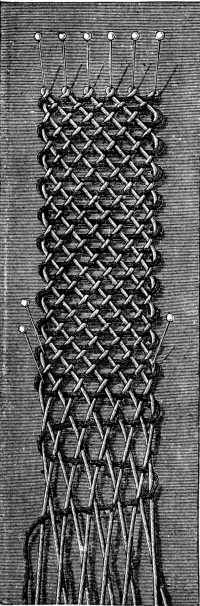
Net pattern or ground (figs. 785 and 786).—This consists of half passings, worked in rows to and fro; the pins are stuck in at the end of each row.
The pattern, fig. 785, is fastened upon the pillow and 6 pins are stuck in at the top, at regular intervals from each other; hang one pair of bobbins on every pin and lay the second bobbin of each pair over its fellow, so that the threads cross each other.
1 half passing with the 1st and 2nd pair = lay the 1st pair aside = 1 half passing with the 2nd and 3rd pair = lay the 2nd pair aside = 1 half passing with the 3rd and 4th pair = lay the 3rd pair aside = 1 half passing with the 4th and 5th pair = lay the 4th pair aside = 1 half passing with the 5th and 6th pair = stick in a pin at point 2, then work back from right to left = surround the pin with a half passing made with the 5th and 6th pair = lay the 6th pair aside = 1 half passing with the 5th and 4th pair = lay the 5th pair aside = 1 half passing with the 4th and 3rd pairs = lay the 4th pair aside = 1 half passing with the 3rd and 2nd pair = lay the 3rd pair aside = 1 half passing with the 2nd and 1st pair = stick in a pin at point 3 and repeat from the beginning.
Fig. 786 shows the net ground completed; the thread that runs to and fro, to make it more clear, is represented in a darker shade than the others.
Before proceeding further, it is as well to prepare our readers for the many trials they will have to make, even with the help of the most minute explanations, before they succeed in carrying out the directions; for the whole art of making pillow lace lies in a manual dexterity, only attainable by practice.
Even copying the patterns from description is only possible at first in a qualified sense; the surest way of attaining a satisfactory result is by constantly comparing the drawing and the work in progress and wherever the latter does not correspond with the former, trying at once to rectify the difference.
Linen or cloth ground.—The pattern used for net passing can also be used for linen passing or ground but 7 pins, instead of 6, have to be stuck in at the top first. As in net passing, you work first from left to right, running 2 threads to and fro in perfectly horizontal lines, so as to produce a ground resembling linen in its texture.
The threads that run to and fro are held at the edge with pins and changed by a half passing, so that the one that was first in going, is first also in returning.
The use of the machine for crossing the threads is especially to be recommended in working linen ground; by pressing the short branches of the machine, the position of the threads is changed and the bobbin is pushed through; by a second pressure the second bobbin is driven through, the pin is stuck in for the picot or the cord, when the bobbins are taken back again, four movements being thus all that is required.
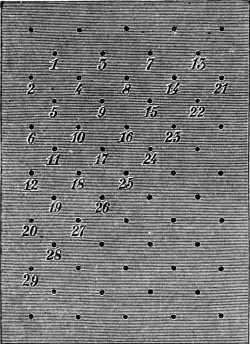
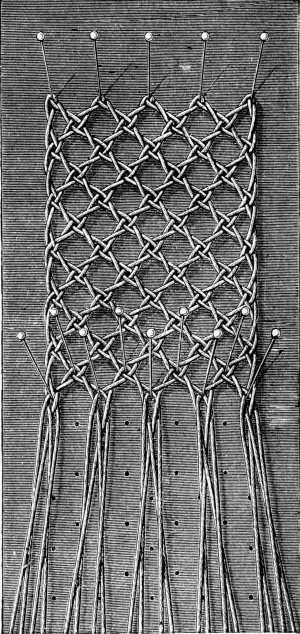
Plain hole ground (figs. 787 and 788).—Hole ground can be worked in various ways; we will begin by describing the plain hole ground, which as a rule forms the ground of all torchon laces. After fixing the pattern, as represented in fig. 787, upon the pillow, stick in 5 pins, hang 2 pairs of bobbins on to each and throw the 2nd bobbin of each pair over its fellow = 1 half passing with the 2nd and 3rd pairs = put up a pin at point 1 = 1 half passing with the same pair = this encloses the pin = lay the 3rd pair aside = 1 half passing with the 2nd and 1st pair = put up a pin at point 2 = enclose it with the same pairs = 1 half passing with the 5th and 4th pair = put up a pin at point 3 = enclose it with the same pairs = lay the 5th pair aside = 1 half passing the 4th and 3rd pair = put up the pin at point 4 = enclose the same = lay the 4th pair aside = work on in the same way over points 5 and 6 = 1 half passing with the 6th and 7th pair = put up the pin at point 7 = enclose the same = work on in the same way over points 8, 9, 10, 11 and 12 = 1 half passing with the 8th and 9th pair = put up the pin at point 31 = enclose the same = work on over points 14, 15, 16, 17, 18, 19 and 20 = 1 half passing with the 9th and 10th pair = put up the pin at point 21 = enclose the same and proceed as in the preceding rows, from point 22 to 29.
Hole ground with twisted thread is made in the same way we have just been describing, only that after every half passing enclosing the pin, each pair of bobbins is twisted once. A ground which is worked in this way is stronger than the other. Twisted hole ground is seen again in figs. 792 and 794.
Wheels in hole ground (figs. 789 and 790).—For the wheels, which are often worked on pillow-made grounds, 4, 6, 8 pairs of bobbins, sometimes even more are used (see likewise fig. 801).
In fig. 789, the wheel is worked with the 4 middle pairs of bobbins. Each pair has first to be twisted once = 1 linen passing with the 3rd and 2nd pair = lay aside the 3rd pair = 1 linen passing with the 2nd and 4th pair = lay both pairs aside = 1 linen passing with the 4th and 3rd pair = lay aside the 4th pair = 1 linen passing with the 3rd and 2nd pair = put up the pin at the next point and between the 2nd and 3rd pair = 1 linen passing with the 3rd and 2nd pair = lay aside the 3rd pair = 1 linen passing with the 2nd and 1st pair = lay both pairs aside = 1 linen passing with the 4th and 3rd pair = lay the 4th pair aside = 1 linen passing with the 3rd and 2nd pair = the last passing completes the wheel, such as it is represented in fig. 790.
Twist the pairs of bobbins again as you did before beginning the wheel and then proceed with the plain ground.
Rose ground (figs. 791 and 792).—After preparing the pattern, as in fig. 791, put up pins at a, b, c, d, e, f, g, h and i and hang on 2 pairs of bobbins to the first pin, and one pair to each of the other 8 = 1 half passing with the 1st and 2nd pair = twist each pair once = take out the pin at point a and put it up again at the same point between the pairs = enclose the pin with 1 half passing = twist the pair once = lay the 1st pair aside = 1 half passing with the 2nd and 3rd pair = twist the pair again = take out the pin at b, put it in again at the same point between the pair = enclose the pin = twist the pairs again = lay the 2nd pair aside = 1 half passing with the 3rd and 4th pair = twist the pair again = take out the needle at c and put it in again at the same point between the pairs = enclose the pin = twist the pair again = 1 half passing with the 3rd and 2nd pair = twist the pair again = put up a pin at point 1 = enclose the pin = twist the pair again = 1 half passing with the 2nd and 1st pair = twist the pair again = put up a pin at point 2 = enclose the pin = work point 2 and 1 with the 3rd and 2nd pair = 1 half passing with the 4th and 5th pair = twist the pairs again = take out the pin at d and put it in again at the same point between the pair = work point e exactly like point d with the 5th and 6th pair = work point 4 like point 3 with the 4th and 5th pair = work points 5, 6 and 7 in a slanting direction from right to left = carry out point 8 with the 5th and 4th pair = lay both pairs aside = work point 9 with the 3rd and 2nd pair = work point f like point e with the 6th and 7th pair = work point g like point f with the 7th and 8th pair = then work points 10 to 15 with the 6th and 7th pair = point 16 with the 7th and 6th pair = point 17 with the 5th and 4th pair = point 18 with the 3rd and 2nd pair = point h like point g with the 8th and 9th pair = point i with the 9th and 10th pair = points 19 to 26 with the 9th and 10th pair = point 27 with the 9th and 8th pair = point 28 with the 7th and 6th pair = point 29 with the 5th and 4th pair = point 30 with the 3rd and 2nd pair. Proceed in this manner until the whole ground be finished.
Double or ornamental ground (figs. 793 and 794).—This ground should be worked in a comparatively fine material; we should recommend Fil à dentelle D.M.C Nos. 30 to 100. Put up pins at points a and g in the pattern and hang on a pair of bobbins = put up pins likewise at b, c, d, e and f and hang on a pair of bobbins to each = 1 half passing with the 2nd and 3rd pair = take out the pin at point b and put it in again between the pair at the same place = enclose the pin with a half passing = 1 half passing with the 2nd and 1st pair = put up a pin at point 1 = enclose the pin = 1 half passing with the 4th and 5th pair = take out the pin at point l and put it in again between the pairs at the same place = enclose the needle = 1 half passing with the 4th and 3rd pair = put up a pin at point 2 = enclose the needle = 1 half passing with the 3rd and 2nd pair = put up a pin at point 3 = enclose the needle = 1 half passing with the 3rd and 4th pair = 1 half passing with the 2nd and 1st pair = put up a needle at point 4 = enclose the needle = work point d like point c with the 6th and 7th pair = 1 half passing with the 6th and 5th pair = put up a pin at point 5 = enclose the pin = work over point e like point d with the 7th and 8th pair = 1 half passing with the 7th and 6th pair = put up a pin at point 6 = enclose the pin = 1 half passing with the 6th and 5th pair = put up a pin at point 7 = enclose the pin = 1 half passing with the 6th and 7th pair = lay the 2 pairs aside = 1 half passing with the 5th and 4th pair, by which the threads are made to cross each other in the square = work over point f as over point e with the 10th and 11th pair = work over points 17 to 19 as over points 5 to 7 = when the square is finished 1 half passing with the 10th and 11th pair = half passings between all the squares.
Tulle ground (fig. 795).—Prepare your pattern for the ground represented here on a magnified scale, by pricking holes at regular distances so as to form diagonal lines intersecting each other, as shown in the engraving, and set more or less closely together, according to the thickness of the thread you use.
1 half passing = put up the pin at the next point, twist both pairs twice, but without enclosing the pin, and pass the inner left thread over the inner left one = twist the two pairs again = cross as before and so on.
Valenciennes ground (fig. 796).—The Valenciennes ground is formed of little plaits for which 2 pairs of bobbins are used. These plaits are often used in other kinds of lace as well, as may be seen for instance in figs. 801, 802 and 806 which are not Valenciennes patterns.
According to the size of the squares the plaits are made with either 4, 6 or 8 half passings, 2 pairs of bobbins being invariably used. The plaits are joined by a half passing, made with the last pair of the left plait and the first of the right = stick the pin into the hole = enclose the pin by a half passing and work the next plait on the left with the two left pairs and the next plait on the right with the two right pairs.
Brussels ground (fig. 797).—For the sake of greater clearness, this ground too has been worked and reproduced here on a magnified scale.
It is worked in diagonal lines, as follows: 1 double passing with 2 pairs of bobbins = put up a pin at the next point = enclose the pin with a double passing, twist both pairs each time once and so on. This ground, when it is worked by the hand in very fine thread, takes a long time to do and is therefore often made by machinery.
Eternelle with two rows of holes (fig. 798).—The so-called «eternelle» laces have no definite pattern; they can be made of any width, in the form of insertions or edgings.
For a single row of holes, you want 6 pairs of bobbins; for two rows, 7; for three, 9, adding two pairs of bobbins for every additional row of holes. The upper part of fig. 798 shows how the points are distributed; here 7 pairs of bobbins are used.
Put up a pin at the topmost point = hang on 2 pairs of bobbins = 1 double passing = take out the pin and put it in again between the two pairs = tighten the pair = hang on 1 pair of bobbins again on the left = 1 double passing with the 1st pair of the bobbins you hung on first and with the new pair = push the double passing close to the pin = twist the first pair once and then lay it aside = 1 double passing with the 2nd and 3rd pair that enclose the pin = hang on 2 pairs of bobbins in the middle = 1 double passing with both pairs = lay the 5th pair aside = 1 double passing with the 4th and 3rd pair = lay the 4th pair aside = 1 double passing with the 2nd and 1st pair = twist the 1st pair once and lay it aside = 1 double passing with the 2nd and 3rd pair that enclose the pin = put up 1 pin at the 3rd lower point, hang on 2 pairs of bobbins = 1 double passing with these bobbins = lay the 7th pair aside = * 1 double passing with the 6th and 5th pair = lay the 6th pair aside = 1 double passing with the 5th and 4th pair = lay the 5th pair aside = 1 double passing with the 4th and 3rd pair = lay the 4th pair aside = 1 double passing with the 3rd and 2nd pair = put up a pin at the next point = 1 double passing with the 2nd and 1st pair = twist the 1st pair once = 1 double passing with the 2nd and 3rd pair, to enclose the pin = lay the 3 first pairs aside = 1 double stitch with the 4th and 5th pair = lay the last two pairs aside = 1 double passing with the 6th and 7th pair = put up a pin at the next point = enclose the pin with the last pairs = repeat from *.
Lace with torchon ground and edge in net ground (fig. 799).—Worked with 10 pairs of bobbins.
 Fig. 799.
Put up a pin at * = make net passings, fig. 786, to point 1 = put up a pin at point 1 = enclose the pin with the two last pairs on the right = net passings to point 2 = put up a pin at point 2 = lay one pair of bobbins aside = net passings to point 3 = put up a pin at point 3 = enclose the pin = net passings to point 4 = put up a pin at point 4 = lay one pair of bobbins aside = net passings to point 5 = put up a pin at point 5 = net passings, back to point 6 = put up a pin at point 6 = take up the bobbins on the left again = 1 half passing with the 1st pair on the left = put up a pin at point 7 = work the torchon ground, at the top of the lace, as in fig. 788, with the 2nd and 3rd pair = 1 half passing with the 3rd and 4th pair = put up a pin at point 8 = twist the 1st and 2nd pair = 1 double passing with the 1st and 2nd pair = put up a pin at point 9 = 1 double passing with the 2nd and 3rd pair = lay the 2nd pair aside = make hole or torchon stitch, fig. 788, with the 3rd and 4th pair = put up a pin at point 10 = work on to point 11 in hole ground = put up a pin at point 11 = cross the 1st and 2nd pair on the left = put up a pin at point 12 = enclose the pin = lay 5 pairs of bobbins aside on the left = take up 5 pairs on the right = put up a pin at point 13 = net passings with the 5 pairs on the right = take up, in addition, the 6th pair on the left = hole ground with the 5th and 6th pair = put up a pin at point 14 = net passings to point 15 with 5 pairs of bobbins = put up a pin at point 15 = net passings with 6 pairs of bobbins = take up a 7th pair of bobbins in addition = hole ground with the 6th and 7th pair = put up a pin at point 16 = net passings with 6 pairs of bobbins = put up a pin at point 17 = net passings with 6 pairs of bobbins = put up a pin at point 18 and then repeat from the first point * on the left.
Pillow lace (figs. 800, 801, 802).—We here give as an example the same pattern of lace worked in two thicknesses of thread; fig. 801 in Cordonnet 6 fils D.M.C No. 25[A], fig. 802 in Fil à pointer D.M.C No. 30[A], which is of course much thicker. As this pattern is especially suitable for trimming household articles, made of unbleached linen, such for instance as table-covers, curtains and hangings of all kinds, we prefer it made in the thicker thread; even then it looks very well as a trimming for articles of dress.
It is worked with 40 pairs of bobbins = hang them on one after the other in a row = put up a pin at point 1 = twisted linen passing = work all the pairs to point 2 with linen passing = put up the pin at the last pair = go back through 3 pairs with linen passing = twist 2 pairs once = go back with linen passing through all the pairs to point 3 = twist each pair separately = at point 4 twist the 2 pairs and put up the pin = twist the last pair twice and so on and coming back to point 5 = put up the pin = come back again to point 6 = return to point 7 = put up the pins at the two points.
Divide the 30 other pairs into twos = put up a pin between every set of two pairs = linen passing. The ground is all worked alike: twist the pairs twice = linen passing = put up the pins = linen passing to points 6 and 7 = twist the threads in taking them through = make a plait, fig. 796, for the scallop point 8 = put up a pin at the point marked for the picot = pass the thread of the outside bobbin from right to left, round the pin, to form the picot = continue the plait to the next picot = put up a pin = form the picot = continue the plait to point 9 = connect the plait with the bobbins of points 9 and 7 = make 4 linen passings with 3 pairs = continue the plait = carry the last pair to point 10 = twist the threads = make 1 linen passing = put up a pin and enclose it = go on in this manner to point 12 = make the wheel, as in figs. 789 and 790, with 6 pairs of bobbins, hanging on 4 new pairs at point 12 = work with twisted linen passing = twist the 4 pairs once and cross with linen passing = take the last pair out from the middle to point 13, join it to the first pair of the scallop = make all the wheels before continuing the ground = then go back from point 13 to 14 = cross the pairs again = at point 12 twist 4 pairs = 2 twisted linen passings right and left with the bobbins of points 14 and 15 = 1 twisted linen passing = put up the pins and work all the spiders alike.
Pillow lace insertion (figs. 803 and 804).—Hang on 12 pairs of bobbins.
Divide the bobbins and put 2 pairs at point 1 = put up a pin = twist once = 2 linen passings = from point 2 to point 8 = 5 twisted linen passings = add one pair of bobbins = put up a pin = add one pair of bobbins = put up a pin = lay one pair of bobbins aside = twist = 2 linen passings = 5 twisted linen passings to point 10 = 2 linen passings = twist the 2 last pairs = go back with linen passing through 2 pairs = join together with the two pairs and the first pair by means of a twisted stitch = put up the pin = lozenge stitch (for lozenge stitch in which the lozenges or close leaves are made, you take 4 or 6 threads; in the execution it resembles the darning stitch represented in figs. 646 and 647) to point 11 = twist at point 12 = take 2 pairs from point 10 = plait to point 13 = twist with the bobbins of point 1 = double passing = plait on the right, twist on the left = put up the pin = tie up as described.
Take the second pair at points 13 and 15 = put up the pin = 2 twisted double passings on the right = 2 linen passings = twist the 2 latter = put up the pin = at point 16 lay one pair of bobbins aside = with simple passing go back through 2 linen passings = join the latter and the former with linen passing = put up the pin at point 17 = lozenge stitch with the bobbins of points 15 and 17 to point 18 = connect the same at point 11 = carry on the lozenge stitch to points 19, 20 and 21 = put up a pin at each number and enclose with a linen passing = with the first pair of bobbins of point 21, 2 linen passings to the left and 2 twisted linen passings, that is to say, crossing the threads = put up the pin at point 22.
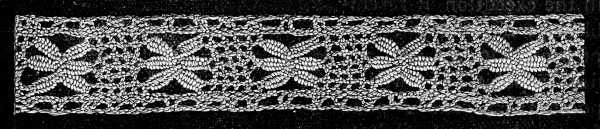 Fig. 804. Pillow lace insertion.
Twist the threads from point 16 to point 23 = make a plait from point 15 to point 23 = then join the two parts together by half passings = put up a pin = twist the threads and make plaits to point 24 = join the threads as at point 23.
On the left and with the first pair of point 19, 2 linen passings = with the 2 latter 1 twisted passing = put up the pin at point 25 = returning, 2 linen passings to point 26 = 2 linen passings to the left = with the 2 latter pairs 2 double passings and put up the pin.
Pillow lace (figs. 805 and 806).—Hang on 14 pairs of bobbins.
These are divided into 3 groups = 3 pairs at point 1 = put up a pin = twisted linen passing = twist both pairs once = put up the pin at point 3 = add on 5 pairs at point 2 = put up the pin = go back through 3 pairs = twist the 2 last pairs = linen passing = put up the pin at point 3 = twist both pairs = linen passings, as seen in the illustration, to the right and left as far as point 11 = at point 13 intervert 6 pairs by a twisted linen passing = make a plait at point 14 = put up a pin in the middle of the same = pass through 2 pairs of bobbins with twisted linen passing = put 1 pair of bobbins aside at point 22 = put up a pin at the 2 first pairs at point 15 = work the leaf in lozenge stitch = put up a pin at point 16 near the first pair = twist both pairs once = linen passing = put up the pin at point 17 = go back in the same manner = work on in the same way to point 21 = put up the pin at point 22 = twisted linen passing to point 11 = tie up the first pair of the scallop with the bobbins of point 11 = bring the last pair back and work as at point 1 = then repeat and proceed in the same way to point 27 = twist the 2 pairs up to point 26 = put up the pin = make one lozenge stitch and join the plait, stitch to point 28 = continue the lozenge stitch to point 29 = join the bobbins of point 29 to those of point 21 by a plait = put up the pin = linen passing = twist the two last pairs once = put up the pin = linen passing = put up the pin at point 31 = twist both pairs once = 2 linen passings = put up the pin at point 82 = 2 linen passings = tie up the bobbins of point 33 with those of point 29 = plait stitch = put up the pin = join to point 34 with lozenge stitch = with the bobbins at point 28 make lozenge stitch to point 27 = put up a pin = twist 3 pairs once = make 2 linen passings = join with linen passing = continue the scallop according to the preceding description, from point 27 to point 35.
At point 34 make a leaf in lozenge stitch = put up the pin = continue from point 33 to point 36 with twisted linen passings = carry the first pair of bobbins of the lozenge to point 35 by means of 2 twisted linen passings = put up a pin in the middle of the 2 pairs = make a plait to point 37 = cross the pairs again as at point 13, in the beginning.
Pillow lace (figs. 807 and 808).—Worked with 30 pairs of bobbins.—These are divided: 14 pairs at point 1 = put up a pin on the left and right = with the last pairs make plaits to point 12 = add 2 pairs = make a double passing as for a plait = put up a pin in the middle of the pairs = plait with 2 pairs of bobbins to point 3 = add 2 pairs of bobbins = make a double passing as for the plait = put up a pin in the middle of the pairs = then go on in the same manner to point 4 = add 4 pairs of bobbins = put up the pin = at point 5, add 2 pairs of bobbins = make a plait = put up a pin and join to point 4 by a double passing.
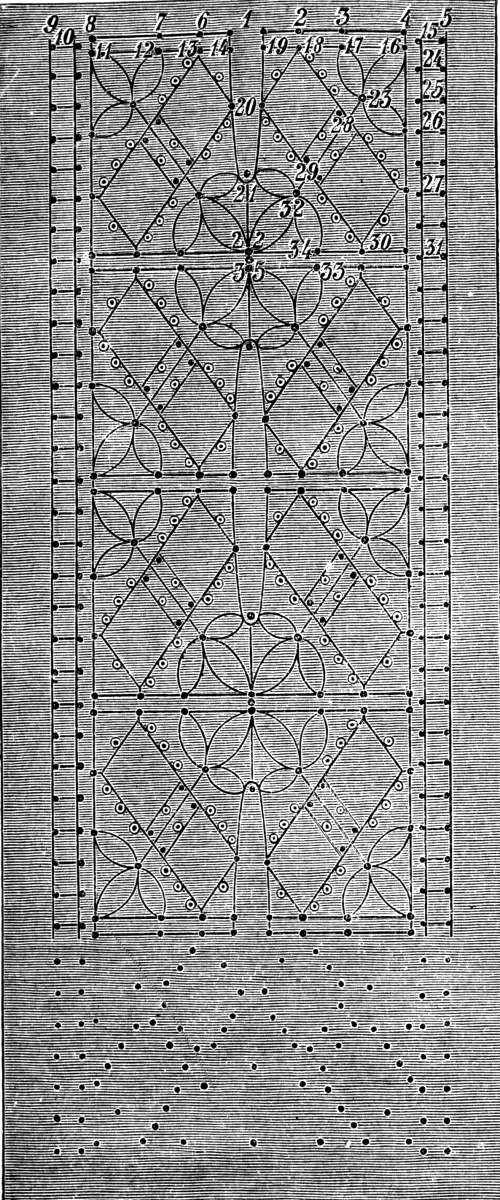 Fig. 807.
Pattern for pillow lace fig. 808.
Fig. 807.
Pattern for pillow lace fig. 808.
 Fig. 808. Pillow lace.
At point 1, lay the two last pairs to the right = put up a pin = make a plait to point 6 = add 2 pairs of bobbins = 1 double passing = put up a pin = make a plait to point 7 with a pairs of bobbins = add 2 pairs of bobbins = 1 double passing = put up the pin = make a plait to point 8 = add 4 pairs of bobbins = 5 linen passings = put up a pin at the last passing = at point 9 add 2 pairs of bobbins = make a plait = put up a pin = join to point 8 with linen passing = make plaits from point 9 to point 10 = put up a pin = leave the pairs hanging = 5 linen passings with the bobbins of point 10 = put up the pin at point 11 = go back to point 10 with 5 passings = put up the pin = make a plait and tie up the bobbins at point 6 = leave these bobbins hanging down.
With the two first pairs at point 11, make a plait to point 12 = 1 linen passing at point 7 and join to point 12 by a plait = plait stitch = put up a pin = then plait stitch to point 13 and make the same connection as at points 12 and 7 = continue to plait to point 14 = put up the pin at the first pair = 7 linen passings = leave these bobbins hanging down = tie up the plait of point 5 with the 1st pair of point 4 = make a plait on the left = put up a pin at point 15 = make 5 linen passings on the right and put up the pin at point 16 = make a plait to point 17 = make the same connection as at point 7 and 12 = the same connection also at point 18 = make a plait to point 19 = put up the pin = make a plaited lozenge with one pair = leave 2 pairs hanging at point 20, left and right = continue to point 21 = leave 2 pairs hanging, left and right = make a plait to point 22 = begin again at point 17 and make a leaf in lozenge stitch to point 23 = make a second leaf from point 16 to point 23 = join the leaves at point 23 = make a plait with the first pair of point 16 to point 24 = put up a pin = enclose it with a double passing and make a plait = tie up the bobbins at point 15 = continue the edge to point 26 = make a leaf in lozenge stitch from point 32 to point 26 = tie up the bobbins at point 26 and make linen passings with the united bobbins to point 27 = with the bobbins of point 18 and point 20, therefore with 4 pairs, make a square in lozenge stitch = join the 3 leaves at point 23 = from point 23 to point 28 make a plait with the two first pairs of bobbins = put up a pin at point 28 = make a plait with picots to point 29 = lozenge stitch from point 32 to point 22 and point 33 = join to point 30 by a plait = plait to point 22 = work from point 34 to 35 in the same way as from point 1 to point 33 = at point 22 and point 35 the pairs cross each other.
Pillow lace (figs. 809 and 810).—Hang on 28 pairs of bobbins. Begin at point 1 with a plait, fig. 790 = put up a pin = * hang on 5 pairs at point 2 and put up a pin at the last pair = with the last pair make a plait to point 3 * = hang on a pair of bobbins = 1 linen passing = hang on a pair of bobbins = 1 linen passing = hang on 3 pairs of bobbins = 1 linen passing = 3 linen passings = put up a pin = 1 leaf in lozenge stitch to point 4 = hang on 2 pairs of bobbins = 2 plait stitches = put up a pin = make a leaf to point 5 = hang on 2 pairs of bobbins = 1 plait stitch = put up a pin = repeat in the reverse order to point 3.
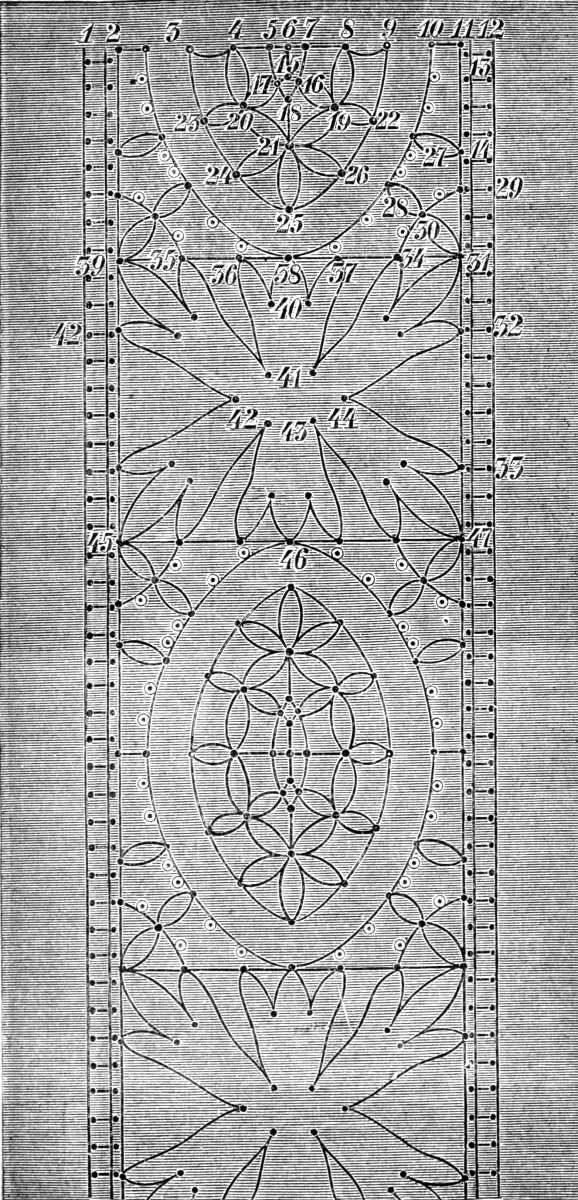 Fig. 809. Pattern for the lace fig. 810.
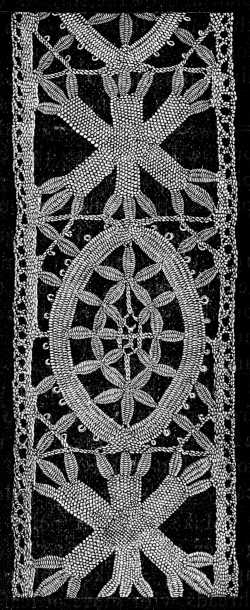 Fig. 810. Pillow lace.
Put up a pin at point 9 = hang on a pair of bobbins = 1 linen passing = hang on a pair of bobbins = 1 linen passing = hang on a pair of bobbins = make a plait to point 11 = put up a pin = hang on 2 pairs of bobbins at point 12 = make a plait and tie the threads together with those of point 11 = on the left with 2 pairs, on the right with 3 pairs to point 13 for the edge = put up 2 pins and continue the edge with linen passings to point 14.
Return to point 15 and make a plait = put up a pin = divide the bobbins and put one pair on the right, the other on the left = take the bobbins at point 5 and 7 and make plaits to points 16 and 17 = make linen passings with the two pairs to point 18 = put up a pin and make a plait to point 21.
Make leaves in lozenge stitch from points 4 and 8 to points 19 and 20 = one leaf from point 16 to point 19 = make another leaf to point 22 and one to point 21 = make the same leaves on the left to points 20, 21 and 23 = cross the bobbins at point 21 = make leaves from point 21 to points 24, 26 and 26.
Make lozenge stitch with picots, with 3 pairs of bobbins from points 9 and 10 to point 22 = join the bobbins to leaf 22 = carry on the braid to point 26 = join 2 pairs of bobbins to the leaf = leave the 2 pairs at point 28 hanging down = carry on the braid to point 25.
Make a leaf at point 27 to point 14 = tie the threads together as at point 10 = carry on the edge to point 29 = put up a pin = make a plait with picots to point 30 = tie up the threads with those of leaf 28 = make a leaf to point 31 = introduce the threads into the edge = put up a pin = tie the threads together.
Make a plait on the left = leave 4 pairs of bobbins hanging down on the right, 2 pairs for the plait and 2 for the leaf = carry on the edge to point 32 = leave 2 pairs hanging for another leaf = continue the edge to point 33. Make a plait from point 21 to point 34.
Begin again on the left at points 1 and 2 and work, as on the right, to point 35 = cross the threads at point 25 = linen passing = distribute the pairs to point 36 = 2 pairs at point 37 = 2 at point 38 = 3 pairs at point 34 = plait to point 37 = join to point 38 = continue the plait and join to points 36, 35, 39 = at points 35, 36, 37 lozenge stitch with every 2 pairs of bobbins to point 40 = then join the next 6 pairs together = and work on with lozenge stitch to point 41 = work exactly in the same manner at points 31, 32, 34, 35, 39, 42 as at points 36, 37, 38, 40 to 41 = at point 41, all the threads are interwoven, and then divided into 3 sets = continue the leaves to points 45, 46 and 47. Then repeat in the reverse order from points 31, 38, 25, 32 and 39.
Armenian lace (figs. 811 and 812).—The dresses of the Turkish women are often ornamented with flowers and leaves, executed in needlework which take the place of fringe and braid trimmings and are often even employed as adornments for the neck and arms instead of necklets and bracelets in metal work; though, as such, they do not always accord with our Western notions of good taste, the Armenian work is in itself, both sufficiently interesting and easy of execution, to deserve description here amongst other kinds of needlework that are adaptable to use. It may be imitated with capital effect in strong stiff washing materials, such as those indicated in our illustration, either upon a linen or cotton foundation or upon plush or silk.
 Fig. 811. Armenian lace.
The thread is first drawn into the edge of the stuff; you then carry it from right to left, determine the length of the squares, and working from left to right make on this first thread as many knots as you have room for.
Fig. 812 shows the formation of the knot, the manner in which the thread, passing from left to right, forms a loop, and how to pass your needle under the straightly extended thread and through the loop. You leave a space of one or two m/m. between the knots, according to the thickness of the thread you are using. Having covered the first thread with knots, you return to the edge for the next row of knots, but passing your needle this time under three threads.
The number of knots should be the same in each row, and the four sides of the square should be all equal.
When the squares are finished they are edged with picots on the two lower sides, as shown in fig. 812.
Thread of two colours was used for fig. 811, the squares being worked alternately in Écru and Brun-Caroubier and the picots, all in the latter colour.
Lace and insertion in knotted stitch (fig. 813).—Excepting in the case of the returning thread, the same stitches are used for the pretty border and insertion given in fig. 813, as for the Armenian lace.
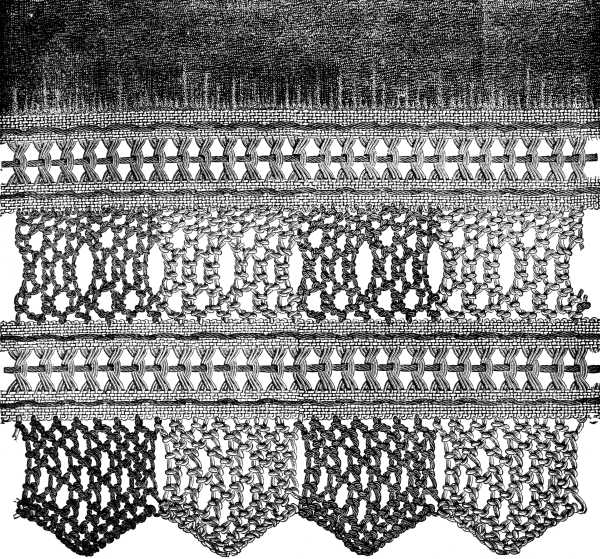 Fig. 813. Lace and insertion in knotted stitch.
The stitches that form the insertion are attached, on both sides, to an English braid, something of the nature of Rhodes linen, which is open-worked before the knotted work upon it is begun.
As in the preceding figure, two colours are used alternately, the change from one to the other is distinctly marked in the engraving.
The outside edge consists of light scallops, formed by the regular increase and decrease of the stitches. The original piece of work from which our drawing was taken, forms the border of a dark blue plush carpet; the red and écru hues of the lace harmonize exceedingly well with the soft colour of the plush.
Insertion in knotted stitch (figs. 814 and 815).—This kind of work, similarly composed of knotted stitches, can be used instead of crochet insertion or single and cut openwork in linen. It looks exceedingly well as a trimming for bed and table linen and is executed on foundation threads or cords, which connect the different figures together, with closely connected rows of knots between.
 Fig. 814. Insertion in knotted stitch.
Insertion in knotted stitch (figs. 816 and 817).—The mode of making the insertion in knotted stitch, which is represented in the two accompanying engravings, is supposed to be of Italian origin, but we have met with quite as perfect specimens of work done in the same way, which were the products of Persia and Asia Minor. We have called it by the same name as the preceding patterns, for even the way in which the stitch is worked is almost the same. Through some slight difference however in the interlacing of the threads, shown by the open loops in fig. 817, the stitches lie closer together and are alike on both sides of the work.
No difficulty will be found in making out the course of the rows; it is best to begin by the two rows of stitches that form the perpendicular bars and make the stitches, that compose the 4 staves between the bars next. For the little picots see fig. 700.
Lace in knotted stitch (figs. 818 and 819).—This charming little lace, which is of Italian origin, was taken from a cushion cover, used for church purposes. The stitches, made in the order indicated in the working detail, fig. 819, are overcast at the last with a fleecy thread, such as Coton à repriser D.M.C, of a rather sober colour, such for instance as Bleu-Indigo 334, Rouge-Géranium 352, or Jaune-Rouille 363.
 Fig. 818. Lace in knotted stitch.
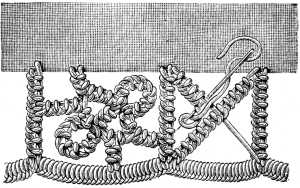 Fig. 819.
Working detail of fig. 818.
Fig. 819.
Working detail of fig. 818.
You overcast the slanting bars and pass over the stitches that connect the two picots.
Reticella lace (figs. 820 and 821).—The Reticella laces are generally made on a design traced upon parchment, similar to those required for the laces described later on. But as the manner of working has been modified in the lace represented here, we thought it as well to adopt the same simplification, often used in beautiful pieces of old needlework, which consists in substituting a braid made upon a pillow, for the bars made with the needle.
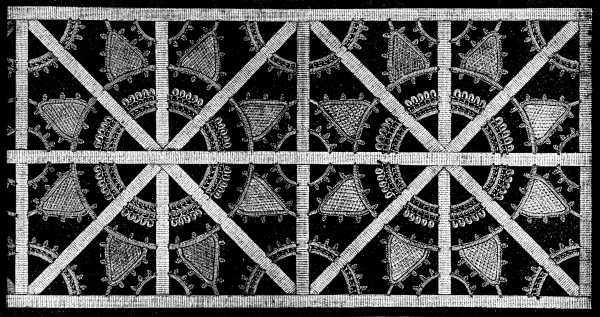 Fig. 820. Reticella lace.
You begin by laying and fastening down the braid by means of very small stitches upon the lines of the pattern, which should be traced upon black paper; you next proceed to make the centre bars, covered with plain buttonhole stitches, on which you mount a row of stitches, like those of fig. 755; these are followed by another bar, to make which, you pick up the loop of the stitches of the preceding row and by another row like the second, finished off with picots, like those illustrated in fig. 700. The bases of the pyramids likewise consist of bars, buttonholed on both sides and edged on the inside with picots.
The stitches of the first row should not be too close together, that there may be room for those of the second row between, as we have already explained in fig. 702, in the chapter on Irish lace.
The inside of the pyramids is worked in the stitch represented in fig. 755, the picots round them are like the ones in fig. 599.
The lace, represented in fig. 820 in its original size, was worked in Fil à dentelle D.M.C No. 80, whilst the second engraving, representing the same subject, shows us how perfectly well it can also be made in heavier and coarser materials, these being in this instance, Lacets superfins D.M.C No. 4 and Cordonnet 6 fils D.M.C No. 20.
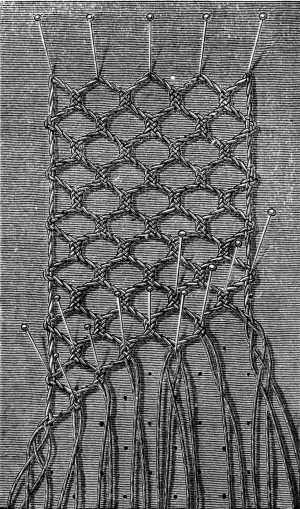
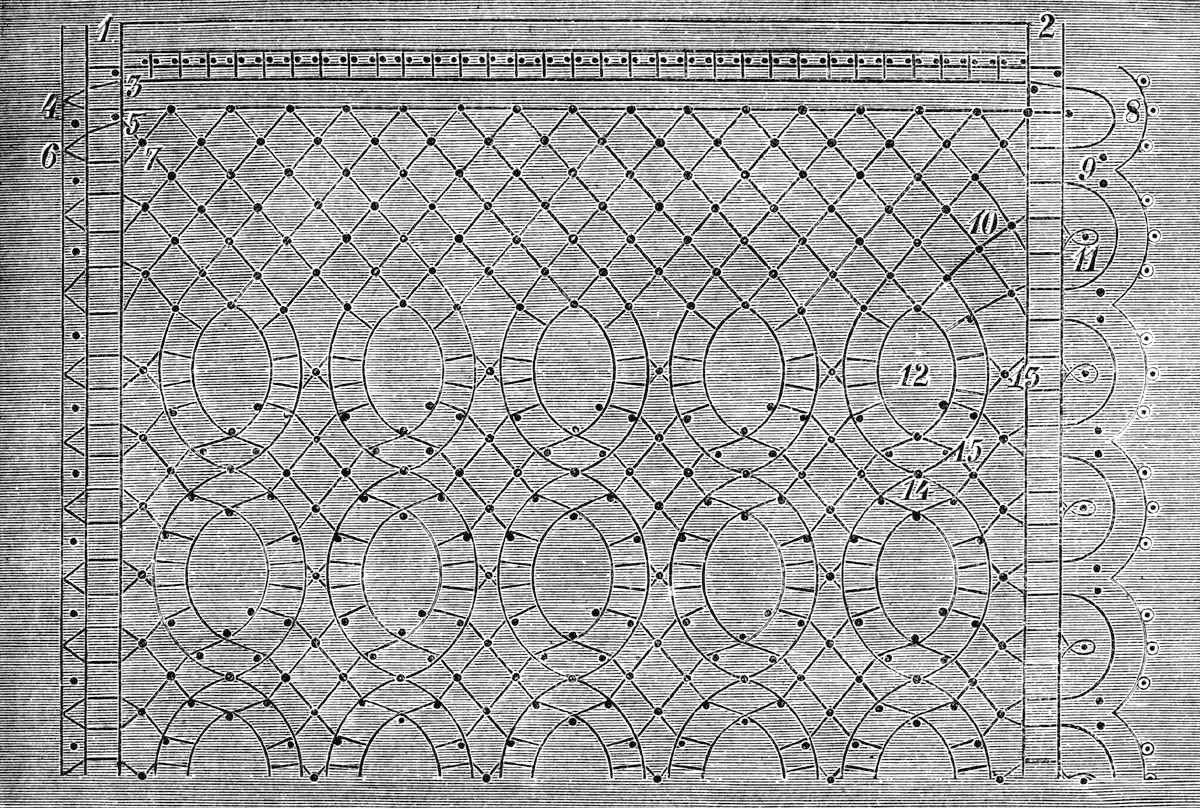
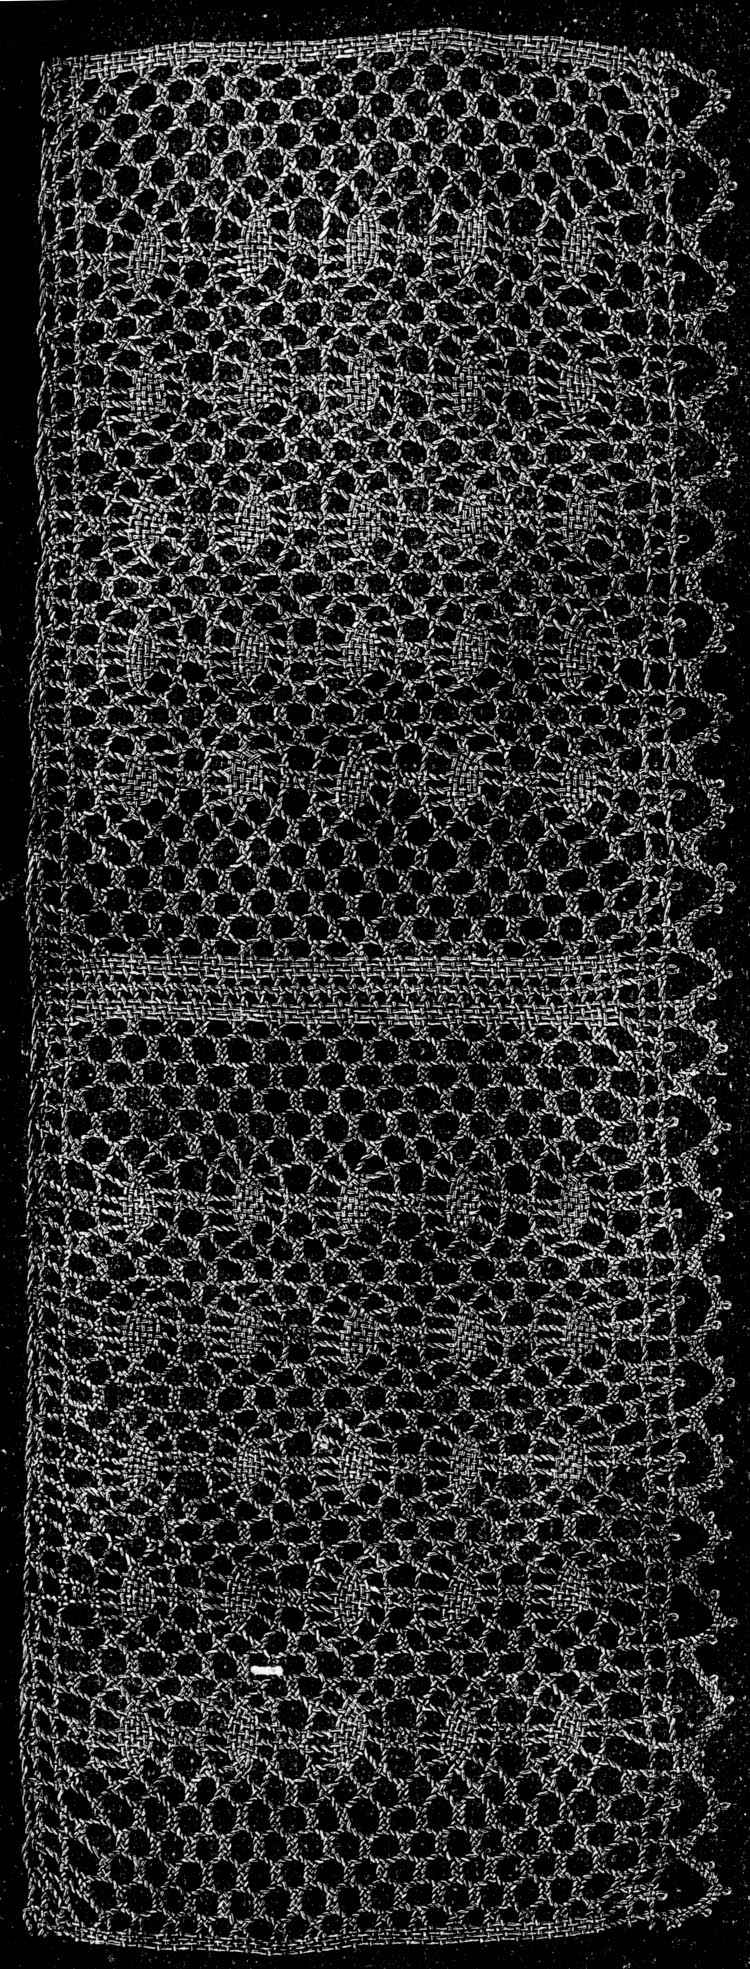
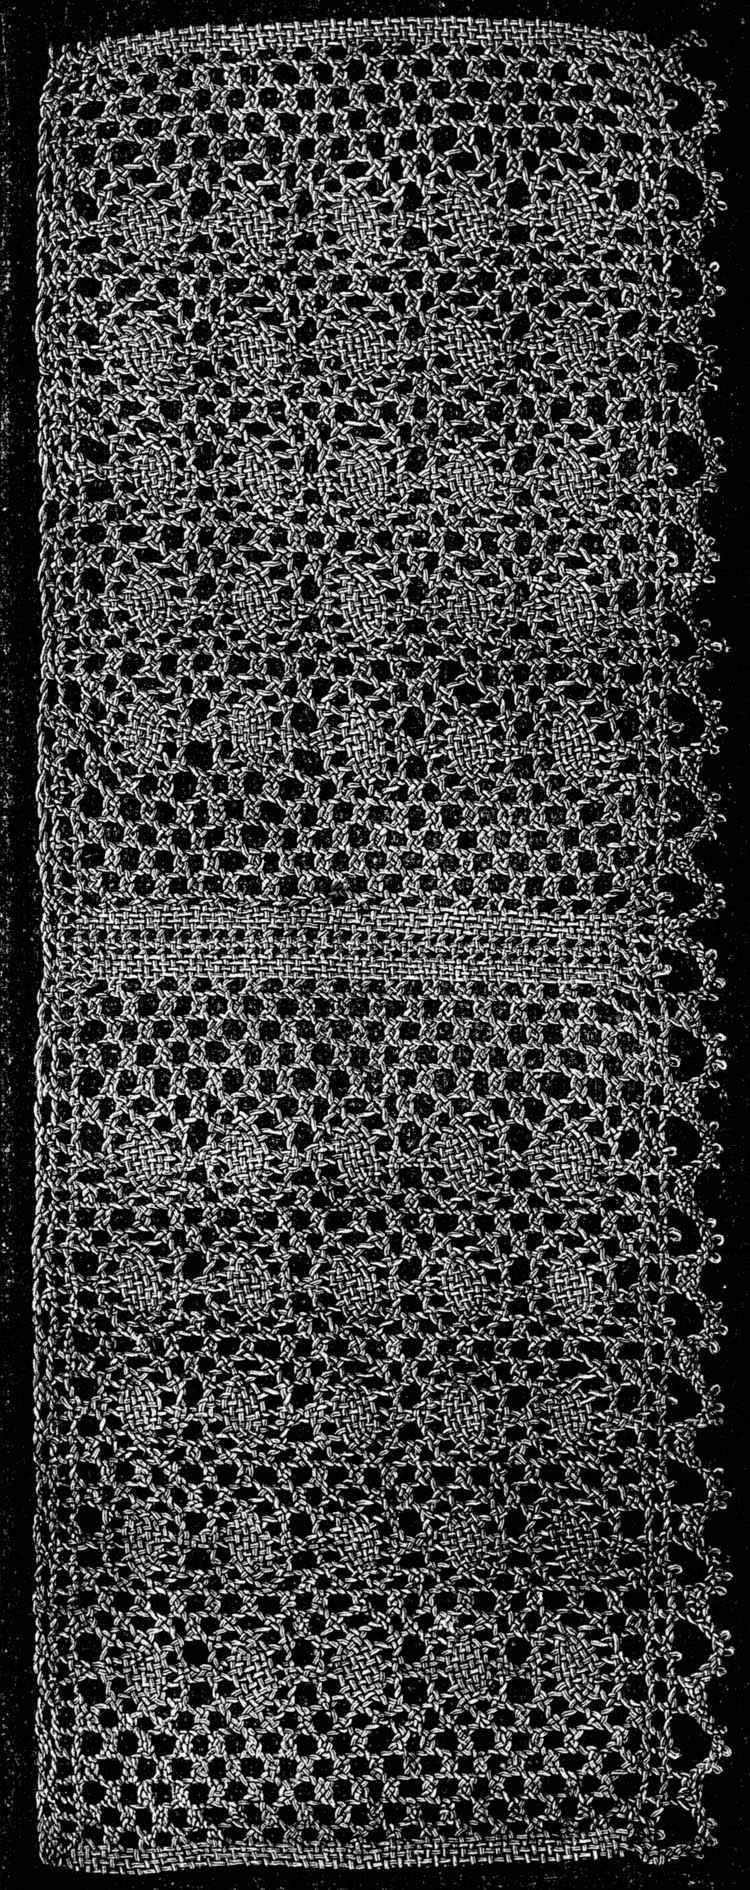
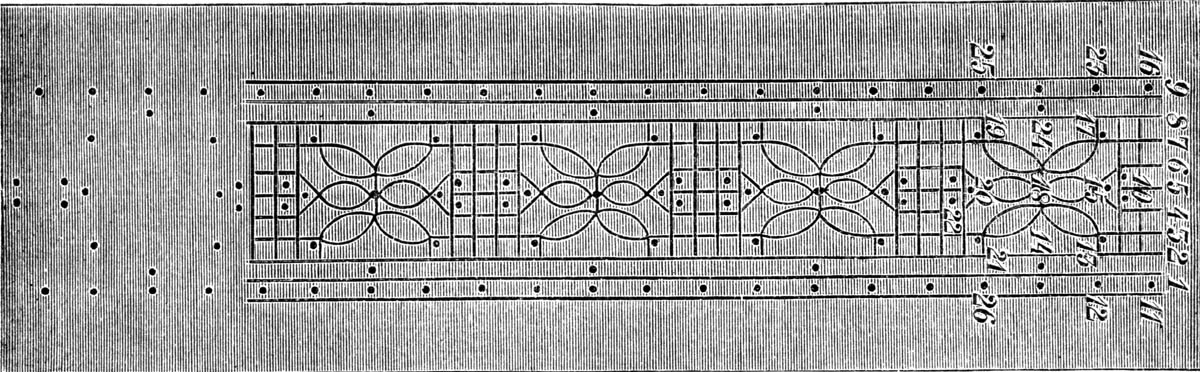
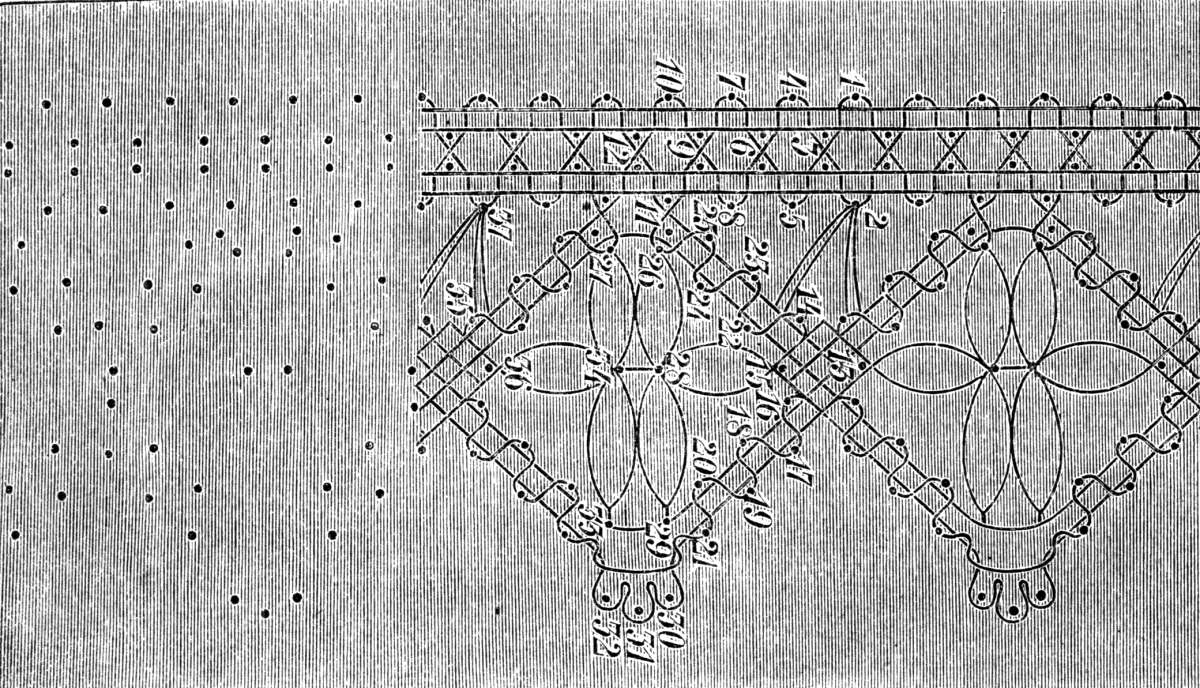
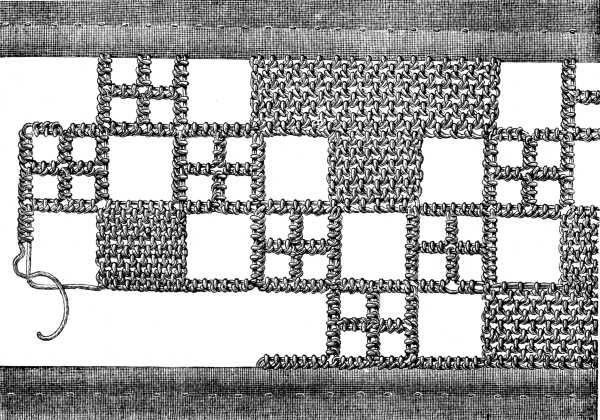
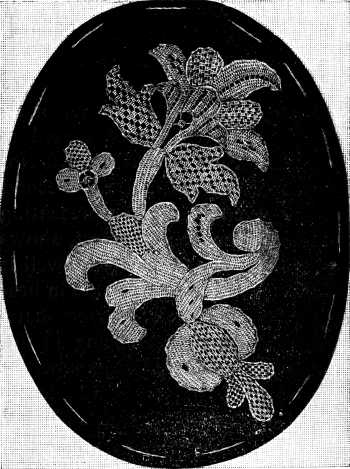
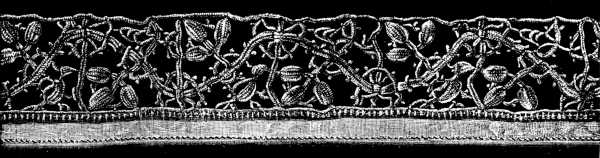
Venetian laces (figs. 822, 823, 824, 825, 826, 827, 828).—Under the name of «Venetian point» are comprised, not only certain kinds of pillow lace, but even more generally, the beautiful needle-made lace, the outlines of which are bordered with handsome scallops in high relief.
We shall confine our attention in the present instance to the needle-made Venetian lace as the other can be learnt without any great difficulty by following the instructions already given for the making of pillow lace.
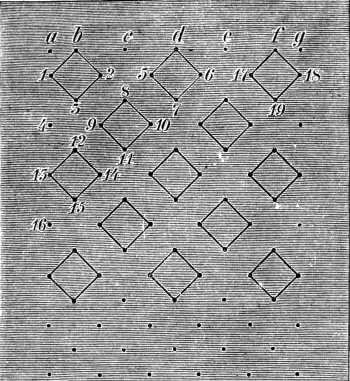
The preparation of the pattern, in most kinds of needlework, is a most important matter and one requiring the greatest care, but in the case of needlemade lace and pillow lace the processes are different.
The paper on which the design is traced must first be backed or lined with unglazed black paper (made specially for this purpose). Prick holes all along the lines of the pattern, at exactly the same distance from each other, remove the tracing and tack the black paper upon rather coarse linen.
This done, you take from three to five lengths of the thread of which the lace is to be made, lay them down together upon the lines marked by the prickings and secure them at each hole by a stitch made over the threads.
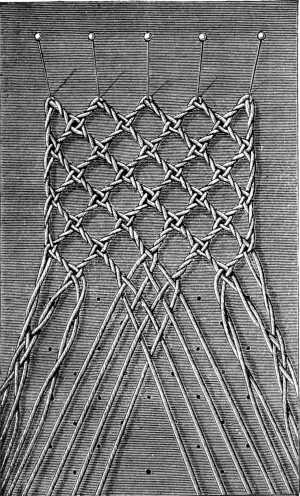
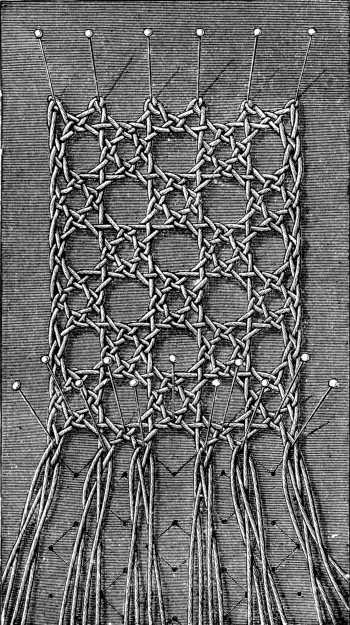
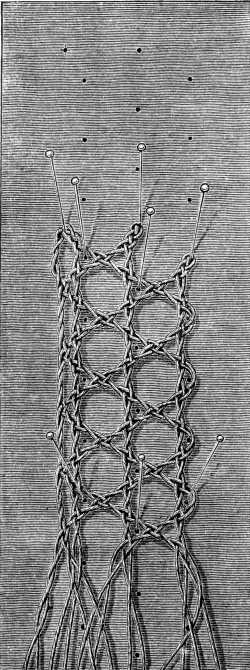
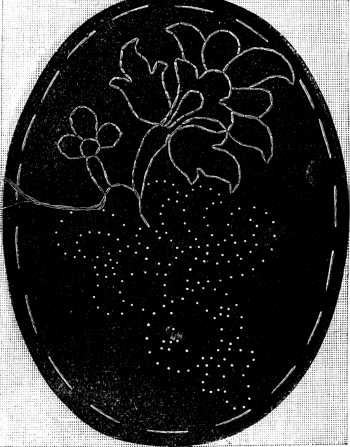
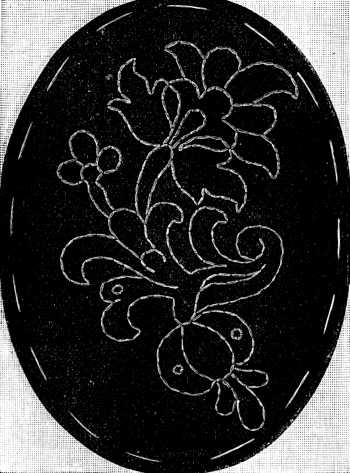
Fig. 822, with the others of the same series in their natural size, show the proper distance that should be left between the prickings, and the laying down of the threads begun; whilst in fig. 823, we have the threads laid down throughout, even for the little eyelet holes, which are to be openworked afterwards.
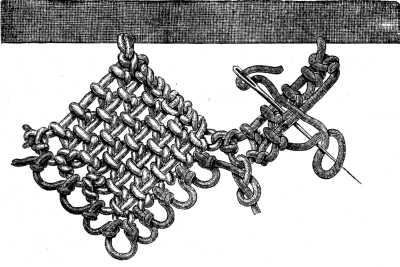
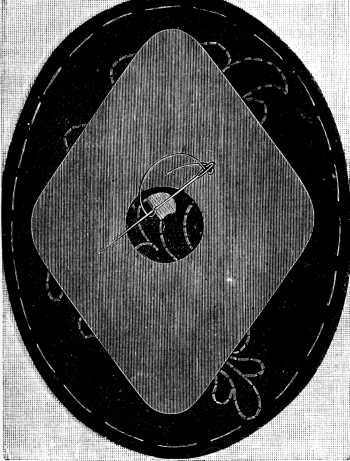
When all this preliminary work is finished, the pattern is ready for the lace stitches that are to form the filling in, between the raised outlines. In order to keep your work perfectly clean and preserve it from unnecessary contact with your fingers, cover all those parts of the pattern you are not immediately engaged on, with a piece of blue paper with a hole, about the size of a pea, cut in it. This you move along as you go, working only at the part of the pattern which is visible through the hole, keeping all the rest carefully covered up and sewing paper over each part as soon as it is finished; this should not be removed until you are ready to join all the separate parts together with bars or latticed ground and work the buttonhole edges.
All the different lace stitches that are used as fillings must be begun and fastened off at the outline threads, which you must be careful not to drag out of their place.
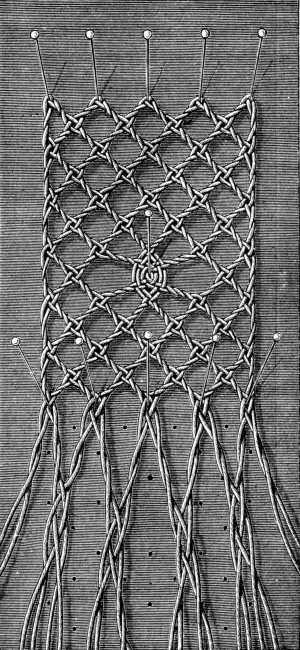
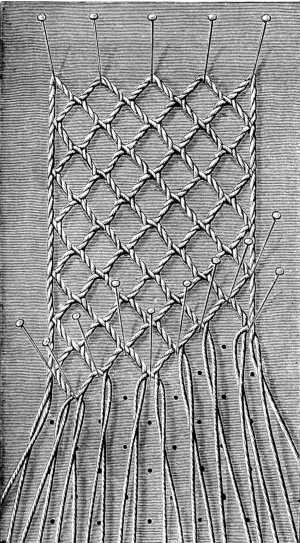
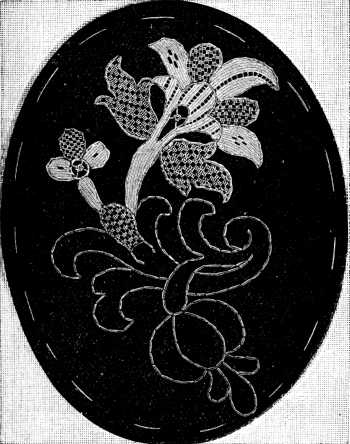
We again remark, for the benefit of those of our readers who may not have read the preceding chapter attentively, that in working all the finer lace stitches, the needle should be held with the eye towards the worker and the point turned outwards. All the inside portions of the pattern have to be worked in separately; (for a choice of stitches to serve as fillings see figs. 720 to 762) until all the spaces are filled, as represented in figs. 825 and 826. The stitches should be selected as far as possible, to suit the style of the design. Flowers look best worked in an open or lattice stitch, leaves on the other hand in a thick close stitch.
When all the insides are done, the edges and outlines have to be closely buttonholed.
The old Venetian laces are bordered with scallops in high relief, worked over a thick pad of laid threads, as described on p. 83, fig. 191, relating to Venetian embroidery.
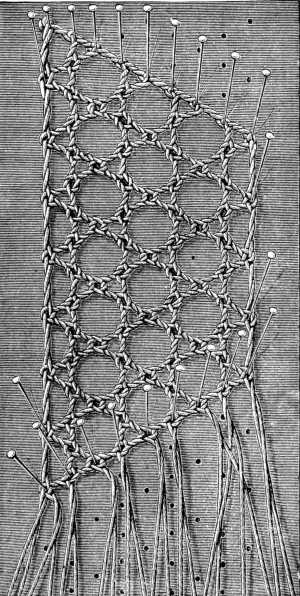
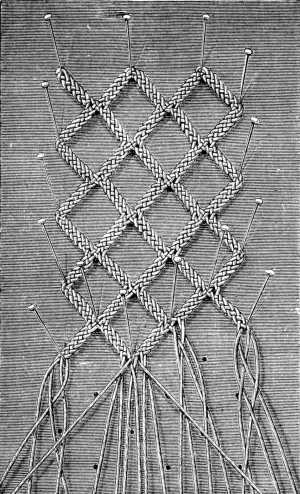
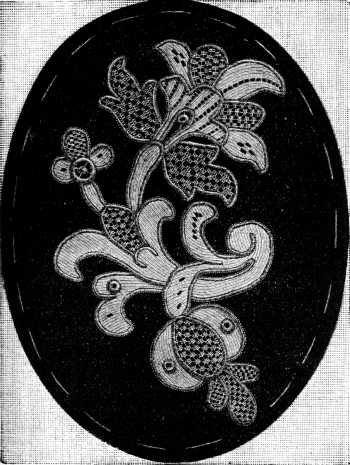 Fig. 828. Venetian lace.
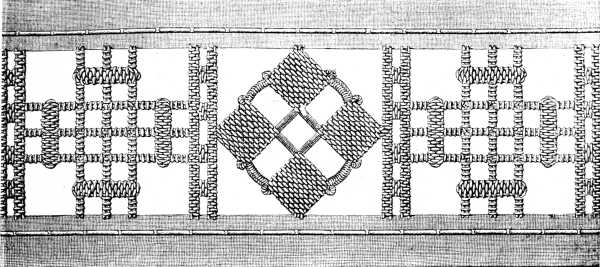
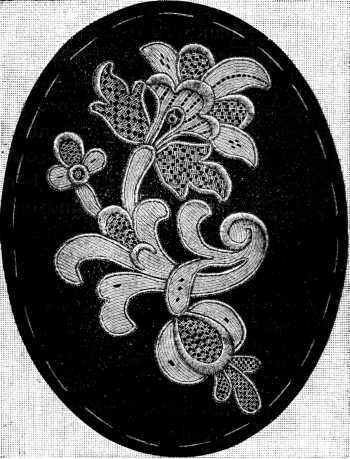
Venetian lace with net ground (fig. 829).—The outlining of the figures with several strands of Coton surfin D.M.C, should, in the case of detached pieces of lace, be done at once, but where the figures are connected by bars or by a net ground as in fig. 825, the buttonholed outlines should be done last. Thus in making the lace, fig. 829, you should begin by working all the insides of the flowers and foliage, then the net ground which may be replaced by bars with picots and then only proceed to the outside buttonholing and the scallops.
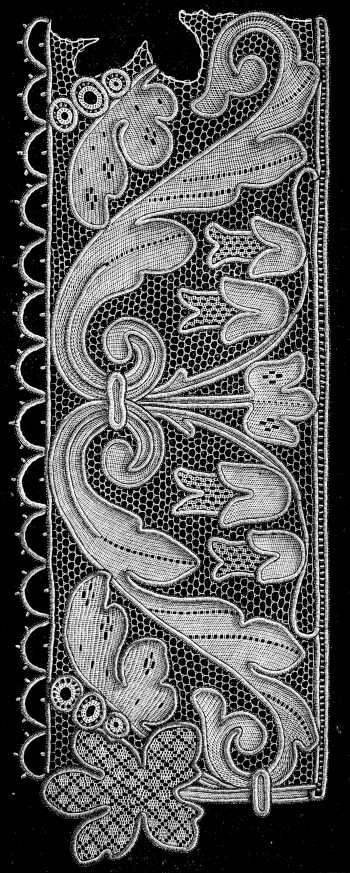 Fig. 829. Venetian lace with net ground.
As all this kind of lace-work is very laborious and takes a long time to do, we advise our readers to use thread that is slightly tinted; in the first place it does not turn yellow as white thread is liable to do and secondly, being softer and less twisted it takes every bend and turn more readily than the stiffer white material does.
Of all the different kinds of thread, so frequently alluded to in these pages, the higher numbers of Fil d'Alsace D.M.C and Fil à dentelle D.M.C are the best for the finer kinds of lace, and they all have the soft ivory tint, we so admire in the old needlework.
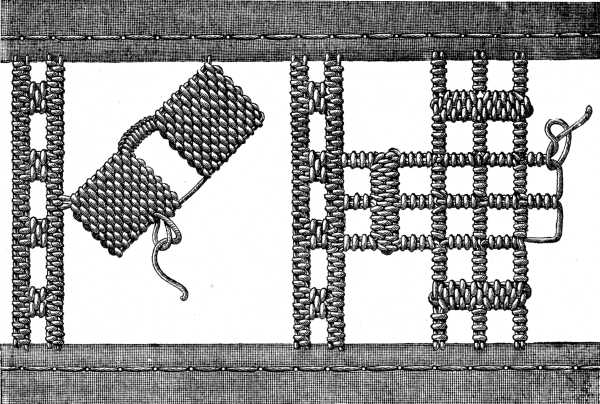
Spray in needle-point (fig. 830).—Needle-point lace, also called Brussels lace, requires the same preparatory work as Venetian lace; but it seldom contains such a variety of stitches and openwork as the latter.
 Fig. 830. Spray in needle-point.
The flowers are generally worked in one of the stitches, represented in figs. 720 and 740; the outlines are less thickly buttonholed and the stitches, set everywhere less closely.
Here also, the finished parts should be carefully covered with paper to keep them from getting soiled.
The needle-point lace designs are ordinarily speaking more realistic and as regards the composition, less artistic and severe than the Venetian point ones.
The spray, represented in our engraving, is a specimen of an ordinary Brussels lace pattern and of the stitches it is worked in.