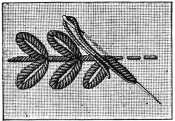
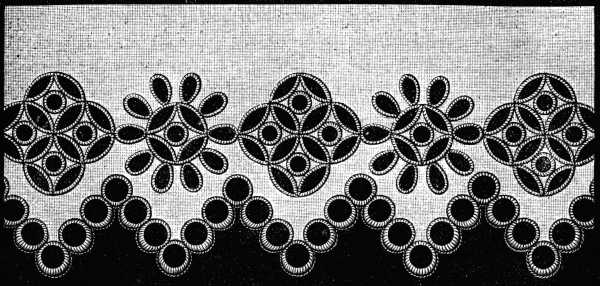
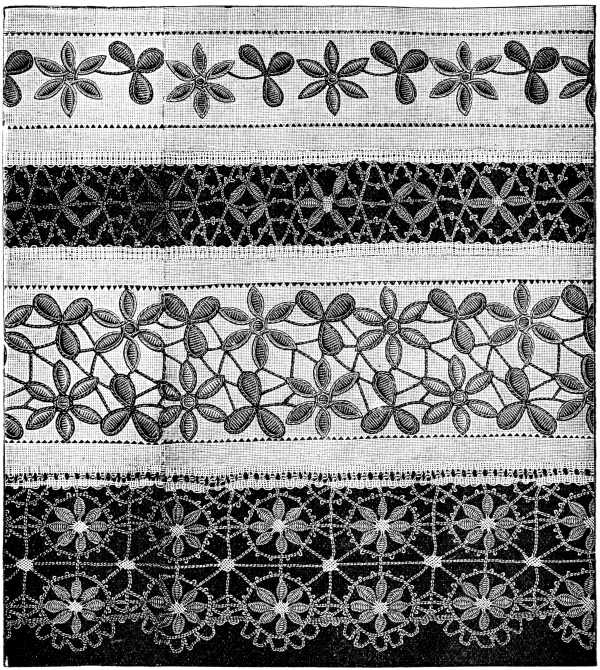
 Stripe in flat and raised satin stitch, and madeira embroidery.
Stripe in flat and raised satin stitch, and madeira embroidery.
Stripe in flat and raised satin stitch, and madeira embroidery.
We have retained the familiar term, white embroidery, for this kind of needlework, for convenience sake, in spite of its inaccuracy, now that coloured materials are quite as much used for it as white.
It is executed, either on a backing of oil-cloth, or in an embroidery frame, called «tambour-frame». Only skilful workers can dispense with these, for an untrained hand can hardly avoid puckering. If you work without a foundation, the material must be held, quite smoothly over the forefinger, so that the threads lie perfectly straight, otherwise, the pattern is very apt to get pulled out of shape in the working. With your three other fingers you hold the material fast, the thumb resting on the work itself, beyond the outline of the pattern, which must be turned towards the worker. It is always the outside line of a pattern that is drawn in double lines, that should be turned towards the palm of the hand.
Tracing patterns.—Patterns are generally to be had ready traced, but as it is often necessary to repeat, enlarge, or reduce them, descriptions of several modes of doing so, will be found at the end of the concluding chapter.
Materials.—A loose, soft make of cotton, the looser the better, and very little twisted, is the best material for embroidery. We recommend for white embroidery in general, Coton à broder D.M.C Nos. 16 to 150; for monograms on cambric, Coton à broder surfin D.M.C Nos. 100, 120, 150;[A] and for English or Madeira embroidery, Coton Madeira D.M.C Nos. 40, 50, 60;[A] for padding, or raising the embroidery, all the different kinds of Coton à repriser D.M.C[A] can be used.
Outlining and padding.—The outlining of a pattern is a very important preliminary. A want of precision in the ultimate effect is often due, merely to careless outlining. This part of the work should be done with rather a coarser cotton than the embroidery itself. Fasten in the thread by a few running stitches, never with a knot, a rule to be observed also in embroidering, except in very rare cases. Finish off your thread by drawing it through the tracing stitches, or through some part of the pattern that is already finished. Fill in the spaces between the lines with a padding of run threads, run loosely, and so that they lie thickly and solidly in the centre, and shade off on both sides. The fullness, and roundness of embroidery, depends on the firmness of this sub-stratum of threads. The outlining and the padding of the different rounded and pointed scallops, as well as of other figures that occur in white embroidery, are illustrated in figs. 181, 182, 183, 184, 185, 187, 189, 190 and 191.
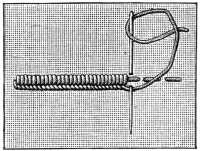
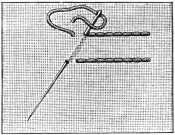
Blanket, or button-hole stitch (fig. 171).—Work from left to right; run in a foundation line, hold down the working thread below the run line with the right thumb; insert the needle above and bring it out below the run line but above the working thread; tighten the loop thus formed, without drawing up the stuff, and continue in this manner, setting your stitches closely and regularly, side by side.
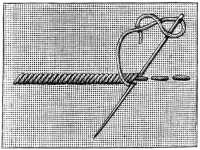
Straight stem stitch (fig. 172).—Work from left to right. The needle must always be inserted above the run thread, and brought out underneath it. In the case of a very delicate pattern, take up only just as much stuff as the run thread covers.
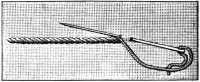
Sloping stem stitch (fig. 173).—Work without a run thread; insert the needle from right to left in a slanting direction, under 1 or 2 horizontal threads, and 5 or 6 perpendicular ones; so that each stitch reaches halfway back to the last.
This kind of stem stitch is chiefly used for the fine upstrokes of letters and numbers, and for linen embroidery.
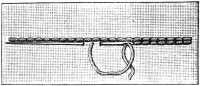
Back-stitching (fig. 174).—Back-stitching, that is small, even stitches set closely together, is done from right to left, along a straight line, and is chiefly used for filling in the centres of letters, leaves and flowers.
Crossed back-stitch (figs. 175 and 176).—Used, generally speaking, only for very transparent materials; it forms a close seam of cross-stitch, on the wrong side, and two straight rows of back-stitching on the right. To work, insert the needle as if for an ordinary back-stitch, pass it under the stuff, sloping it a little towards the second outline of the pattern, and draw it out almost in front of the first stitch. After making a back-stitch, pass the needle up again under the stuff and bring it out at the spot where the next stitch is to be.
Fig. 176 shows the interlacing of the stitches on the wrong side, and the way in which this stitch, when it is used for filling in centres, can be worked on the right side.
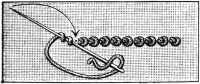
Simple knot stitch (fig. 177). This consists of two back-stitches, side by side, covering the same threads; it is chiefly used for filling in leaves, embroidered on very thin materials, or in conjunction with flat stitch.
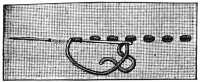
Twisted knot stitch (fig. 178). To work hold the working thread down with the thumb close to the spot where you first brought it out, twist it twice round the needle, turn the needle round from left to right, following the direction indicated by the arrow, pass it through the fabric at the place which is marked by a dot, and draw it out at the place where the next stitch is to be.
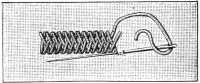
Post stitch (fig. 179).—Something like knot stitch and much used for patterns, composed of small flowers and leaves, where it often takes the place of raised satin stitch. The illustration represents five leaves finished, and the sixth in process of being worked.
To work, bring the needle up from the back and twist the thread round it as many times as the length of the stitch requires, hold the left thumb on the species of curl thus formed, and passing the needle and thread through it, insert it at the end of the leaf where it first came out, and draw it out at the right place for the next stitch.
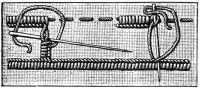
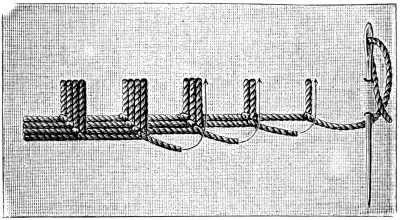
Button-hole bars (fig. 180).—When a pattern is ornamented with open-work bars, begin by tracing the outside parallel lines. Then button-hole the whole lower line and the upper one, till you come to the place where the first bar is to be; then you carry your thread across and bring up the needle from below through one of the loops, as, shown in the figure; lay three threads in this manner, inserting your needle the third time one loop further on. Then cover the three threads thickly with button-holing.
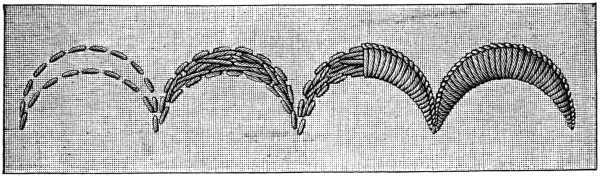
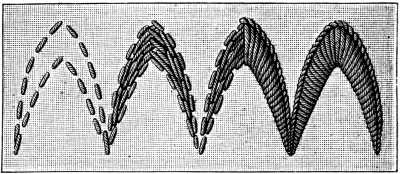
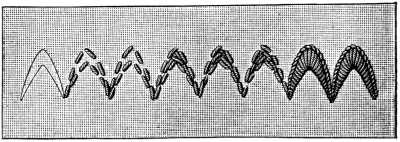
Different kinds of scallops (figs. 181, 182, 183).—The outlining, padding and button-holing of these scallops is executed in the manner already described. Be careful to adapt the length of the stitches to the shape and size of the scallops. If they are pointed (figs. 182, 183), the stitches will have to be set very closely together on the inner line, and a little play allowed them on the outer, to come exactly to the point, which should be very sharply defined.
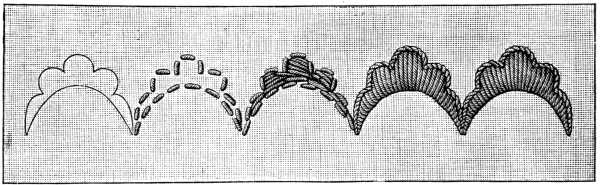
Rose scallops (figs. 184 and 185).—These are, large button-holed scallops with indented edges, in the one case, rounded at the top and sharply pointed at the join; in the other, pointed at the top, and joined at the bottom by a straight bar of button-holing.
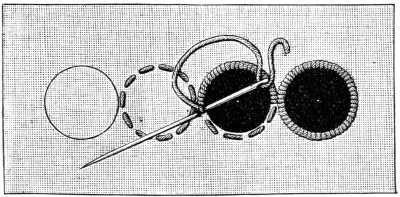
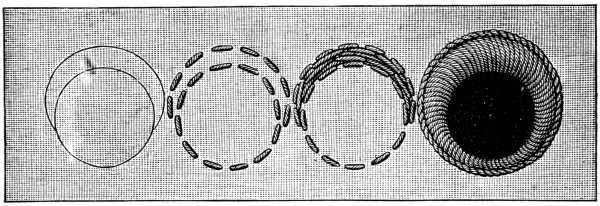
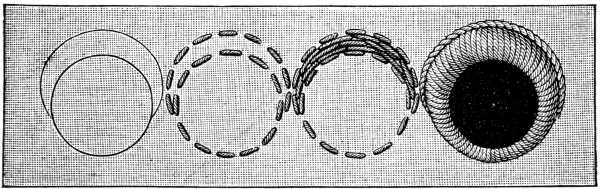
Eyelet holes (figs. 186, 187, 188).—Outline the eyelet holes very carefully first by running a thread round them, then cut out the enclosed stuff with a sharp pair of finely pointed scissors, and edge the hole with plain overcasting stitches, worked from left to right.
When you have a long row of eyelet holes to make, outline the upper and lower halves alternately, first on one side and then on the other, using two threads, and then overcast them in the same way. The double crossing of the working threads between the eyelet holes makes them much stronger, than if each hole were finished off separately, and the thread passed underneath from one to the other.
The lower halves of shaded eyelet holes, (see figs. 187 and 188), are worked with very short stitches, and the upper halves with long ones; they may be edged entirely, either with button-holing or overcasting, or half with one and half with the other.
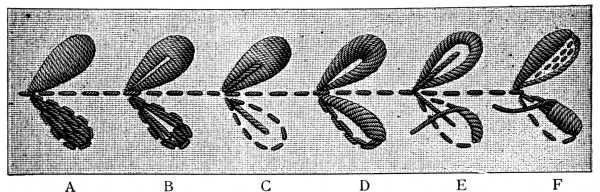
Six leaves in raised satin stitch (fig. 189).—Raised satin stitch is chiefly used for working flowers, leaves, petals, dots, initials and monograms. After tracing the outline of the design, fill in the centres with a padding of long, close stitches for which you can again take Coton à repriser D.M.C[A] and then, beginning always at the point of the leaf, see letter A, cover it with flat, perfectly even stitches, worked from right-to-left. B illustrates a leaf, divided through the middle by a line of overcasting; C, one with a corded vein; D, a divided leaf worked in sloping satin stitch; E, a leaf, with a corded vein and framed in sloping satin stitch; F, a leaf worked half in satin stitch, half in back-stitch and straight stem stitch.
Leaves and flowers of all descriptions, can be executed in any of these stitches, and in different combinations of the same.
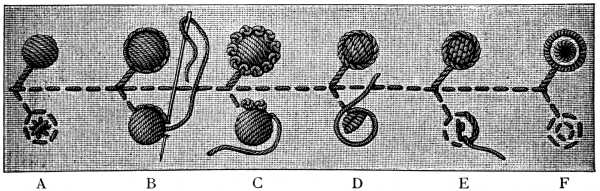
Six ways of making dots (fig. 190).—Dots, when they are well made, are exceedingly effective in white embroidery, particularly if they are worked in a variety of stitches. Dot A is worked in raised satin stitch; B, in raised satin stitch, framed in back stitch; C, in raised satin stitch, framed in twisted knot stitch; D is composed of several post stitches of different lengths, set in a frame of stem stitches; E is worked in back-stitch, and F consists of a small eyelet hole, with a corded setting, which forms the centre.
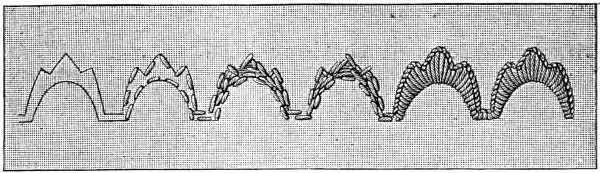
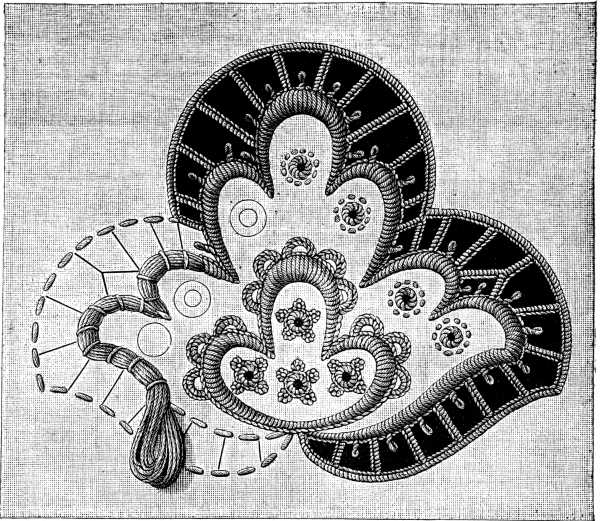
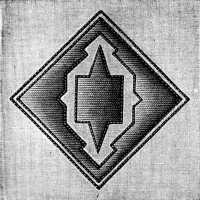
Venetian embroidery (fig. 191).—Scallops, worked in very high relief, called Venetian embroidery, are an imitation on stuff of Venetian lace.
Real Venetian point is entirely needle-made; in the embroidered imitations of it, the stuff takes the place of the needle-made lace foundation. To make it more like the original however, the ground is seldom left plain, but is covered with fancy stitches, such as are represented in the illustration, or with one or other of the damask stitches in figs. 146 to 170. The button-hole bars may be made with or without picots. A full description of the latter will be found in the chapters on net embroidery, and Irish lace. The space to be buttonholed, must be well padded, for thereon depends the roundness of the embroidery. For this purpose take 6 or 8 threads of Coton à repriser D.M.C No. 25,[A] and fasten them down on to the pattern with loose stitches, laying on extra threads, and cutting them gradually away, according to the width the line is to be. The stuff underneath the bars should only be cut away when the embroidery is quite finished.
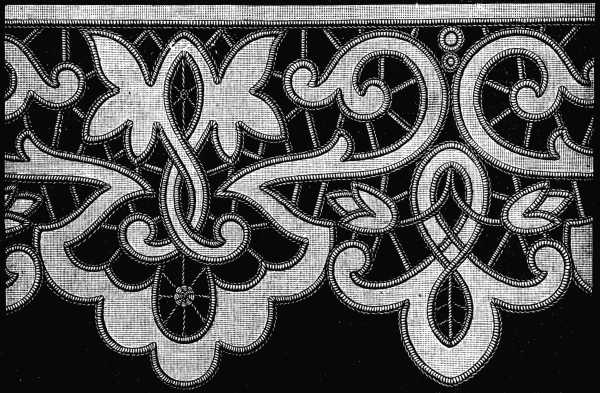
Renaissance embroidery (figs. 192 and 193).—This is the term applied, more especially in France, to embroidery patterns, which are worked entirely in button-holing, and connected by button-hole bars without picots, as shewn in the two accompanying figures. The outside edge in fig. 193, is embellished with picots, described in the chapters just referred to.
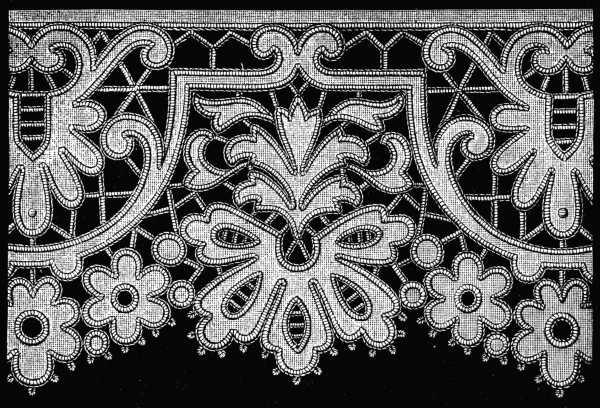
Richelieu embroidery (fig. 194).—The name given to embroidery of a similar kind to the former, but in which the connecting bars, instead of being left plain as they are in the Renaissance embroidery, are ornamented with picots.
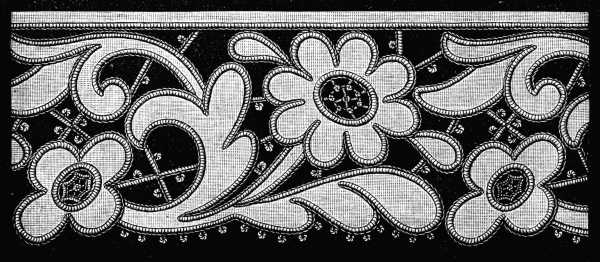
Madeira work (figs. 195, 196, 197).—This kind of embroidery, which consists chiefly of eyelet holes, and is distinguished for the excellence of its workmanship used to be known as English, but is now generally called Madeira work, from the island where it originated. The scallops in figs. 195 and 197, are bordered with shaded eyelet holes, worked half in button-hole stitch, half in overcasting; the finely scalloped edge, in fig. 196, is entirely button-holed. In working eyelet holes, the material must always be turned in, up to the inside line, and completely worked in, underneath the in order that no loose threads may be visible on the wrong side.
 Fig. 196. Madeira work.
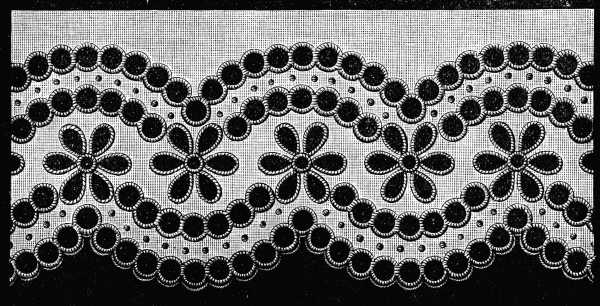 Fig. 197. Madeira-work.
Swiss embroidery frame (fig. 198).—Letters, monograms, coronets and the like, require extreme care in the working, and can only be really well done in a frame. The round Swiss frame, or tambour frame, is the one most commonly used. It consists of two wooden hoops, fitting loosely into each other; the inner one, fastened to a support with a wooden screw let into the lower part of it, with which to fasten the frame to the table. The outside hoop is loose.
Place the fabric to be embroidered over the smaller hoop, the pattern in the middle, and press the other down over it so that it is tightly stretched and fixed between the two hoops.
A leathern strap with holes and a buckle, sometimes takes the place of the second hoop.
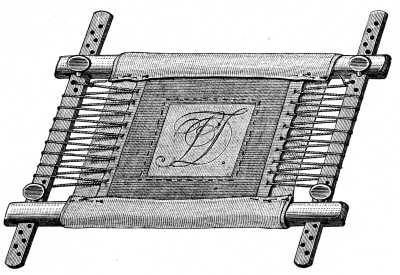
Ordinary embroidery frame (fig. 199).—Tambour frames can only be used for embroidering pocket-handkerchiefs and other small articles; all larger work has to be done in an ordinary frame. Sew a piece of strong stuff into the frame, stretch it as tightly and evenly as possible, and cut out a square in the middle to the size of the pattern. Then tack your work in underneath, straight to the thread, dividing it out carefully with pins first, to ensure its being set in perfectly evenly. Roll or fold up the rest of the stuff over the edges of the frame, and secure it with a few stitches or pins, to keep it out of the way of your hand as you work.
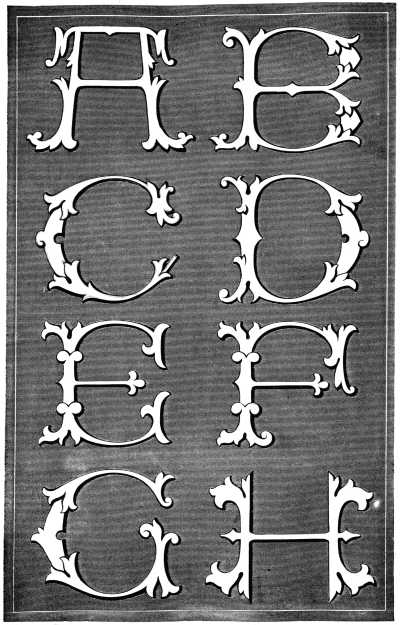
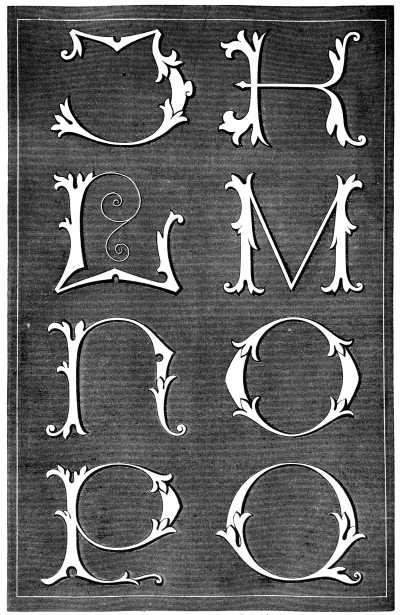
Alphabets for monograms (figs. 200 to 205).—On account of the difficulty of devising a good monogram for marking under-linen, we subjoin two alphabets, by the aid of which our workers will be able to compose their own.
The letters are of a good medium size, which can be magnified or reduced according to the worker's own taste.
For any such modifications, we would again draw our reader's attention to the directions given in the concluding chapter. The three first plates represent large wide letters, intended to contain or encompass the more elongated ones, represented in the fourth and fifth plates, figs. 203 and 204.
The interlacing of the letters requires to be carefully done, and our workers should study the following specimens, so as to learn the stitches also, which are most suitable for this branch of embroidery.
Monogram composed of letters A and D (fig. 206).—Here, letter A is worked in flat satin stitch, in Bleu-Indigo 312, and set in stem stitch, worked in Rouge-Turc 321. D as a contrast to A, is embroidered in transverse bars, the left part in pale blue and white, the right in pale blue and dark blue. The little ornaments may be worked according to fancy, either in white, or in one of the given colours.
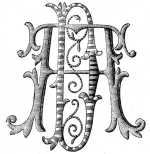 Fig. 206. Monogram composed of letters A and
D drawn from the alphabets of
monograms.
Fig. 206. Monogram composed of letters A and
D drawn from the alphabets of
monograms.Monogram composed of letters V and S (fig. 207).—The flat satin stitch in both letters is worked in white; the setting, is in red, in short stem stitch, or if preferred, in knotted back stitch.
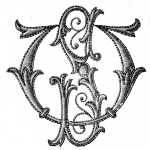 Fig. 207.
Monogram composed of letters V and
S drawn from the alphabets of
monograms.
Fig. 207.
Monogram composed of letters V and
S drawn from the alphabets of
monograms.Monogram composed of letters R and C (fig. 208).—These are worked in black and grey, for mourning; the way C is divided, admits of a variety in the stitch; for instance, the back-stitches, in the illustration, may be replaced by very small eyelet holes.
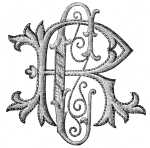 Fig. 208.
Monogram composed of letters R and
C drawn from the alphabets of
monograms.
Fig. 208.
Monogram composed of letters R and
C drawn from the alphabets of
monograms.Monogram composed of letters G and E (fig. 209).—The flat satin stitching and back-stitching in E, and the stem-stitched edges of G are worked in white Coton à broder D.M.C; the inside of G in ivory white Coton surfin D.M.C.
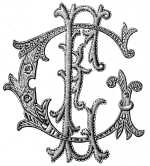 Fig. 209.
Monogram composed of letters G and
E drawn from the alphabets of
monograms.
Materials: Coton à broder D.M.C
No. 120 white
and Coton surfin D.M.C No. 120,
unbleached.
Fig. 209.
Monogram composed of letters G and
E drawn from the alphabets of
monograms.
Materials: Coton à broder D.M.C
No. 120 white
and Coton surfin D.M.C No. 120,
unbleached.
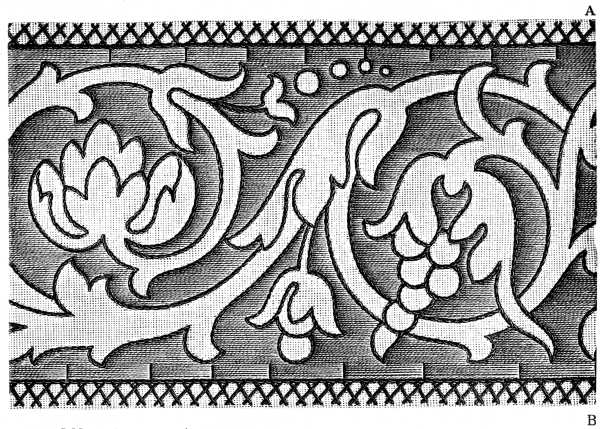
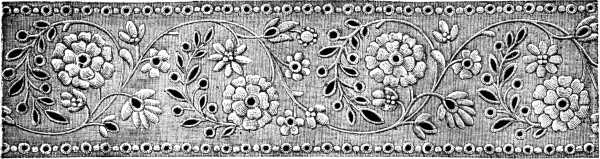
Border in Gobelin stitch (fig. 210).—Gobelin embroidery is merely raised satin stitch, worked directly upon the pattern, without any foundation, or padding. The effectiveness of this kind of embroidery, which appears so complicated and is really so easy, and the many ways in which it can be utilised, soon brought it into favour. It can be worked on the article itself, or on stripes, laid on afterwards, with a hem-stitch bordering. The original of fig. 210 was in blue and red; Bleu Indigo 312 for the grounding, Rouge-Turc 321, for the setting in stem-stitch. The herringboning along the edges of the pattern, top and bottom, is also in red.
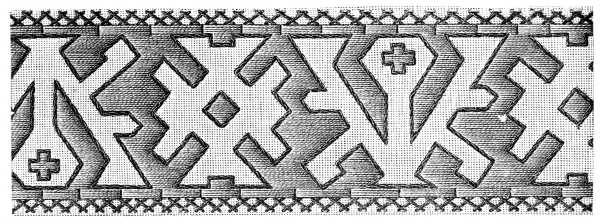 Fig. 210. Border in gobelin stitch.
Should a different selection of colours be made, it is important to remember that in all cases a sharp contrast is desirable.
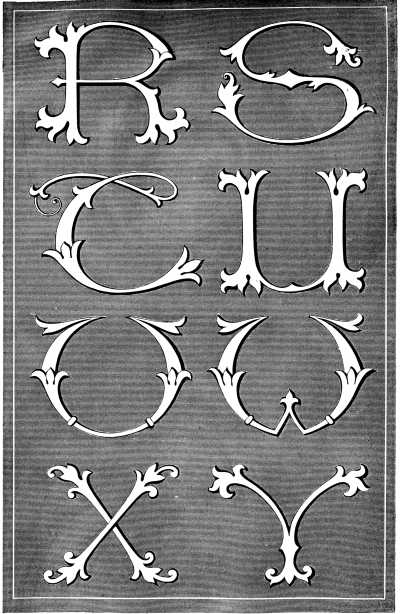
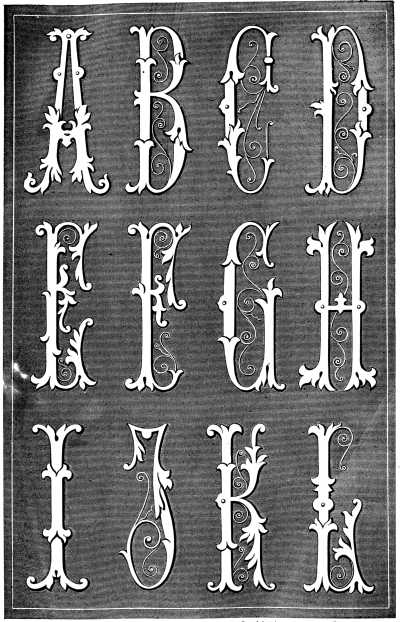
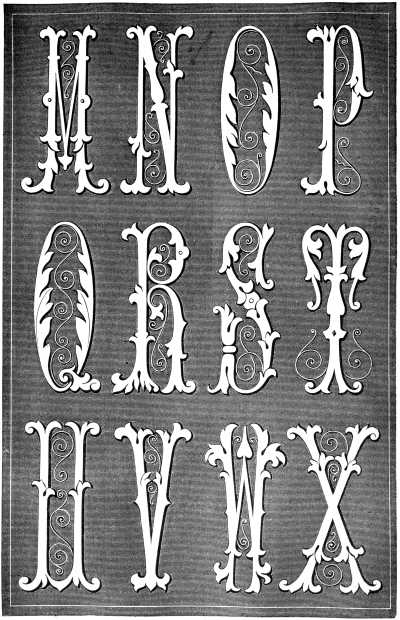
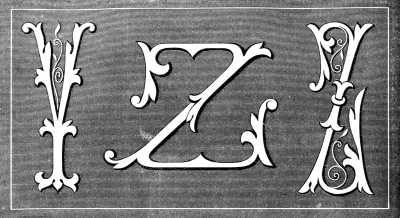
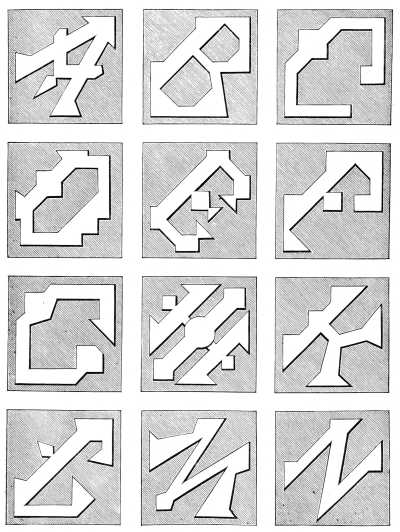
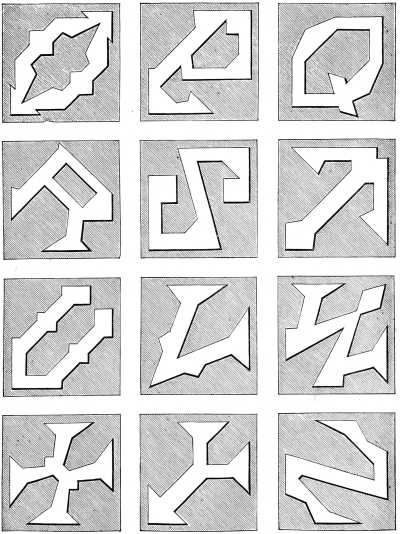
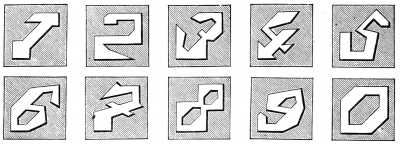
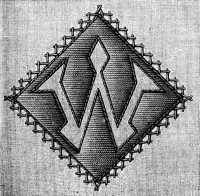
Alphabet and numerals, left blank, and outlined by the grounding, worked in Gobelin stitch (figs. 211 to 215).
The border worked in Gobelin stitch, illustrated in fig. 210, suggested to us the idea of an alphabet and numerals, to be executed in a similar style, left blank, that is to say, and outlined by a grounding in Gobelin stitch, which are better suited to embroideries of the kind than those generally used. Our limited space prevents us from giving all the letters in the diagonal position they are intended to occupy on the article itself. O and W only, are represented in the right position. No difficulty will be found in copying the other letters, in giving them the proper direction.
In order to economize room, J and H are represented in one square, but they are easily distinguishable from each other.
Fig. 214 represents the numerals, executed in the same way. We should like to draw our readers attention to a few other ways in which letters and numerals may be outlined by the back-ground; for example, the solid parts can be worked either in plain or twisted knot stitch (figs. 177 and 178); in very fine chain stitch; in old German knot or bead stitch (fig. 873), or even in piqué embroidery (fig. 877).
Border outlined by grounding, worked in Gobelin and stem stitch (fig. 216). The grounding of this pattern is worked on stiff white linen, and entirely in Rouge-Turc 321, and the outlining in Noir grand Teint 310. The same pattern can equally well be worked on gauzes and other transparent stuffs, but with Coton à repriser, instead of Coton à broder D.M.C, for the solid parts. Two shades of Rouge-Grenat, one dark and one very light, may be taken instead, or two of Jaune-Rouille, or of Violet-Mauve, employing always the lighter shade for the grounding and the darker for the setting.
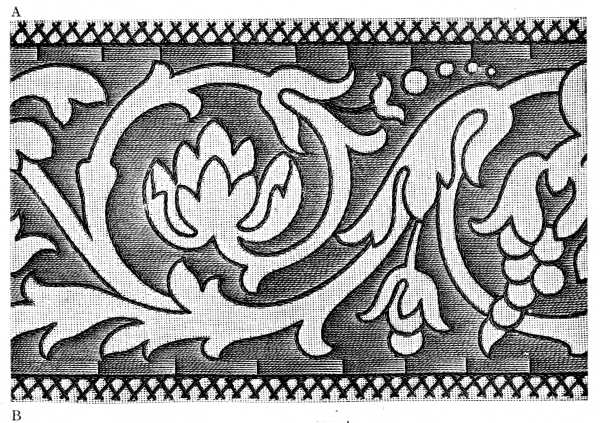 Fig. 216. Second part.
Be careful, in the grounding, not to make the red stitches near the edge, longer than they are represented in the illustration and to set the black stem stitches as close as possible to the grounding.
The pattern, which could only be reproduced in the original size, had to be divided in two, to fit the page. In copying it, join the A and B of the first part to the A and B of the second; the same in fig. 217, each time the pattern is repeated, the flowers are to droop from the + as seen from the position of the buds in the first part, at the beginning of the drawing.
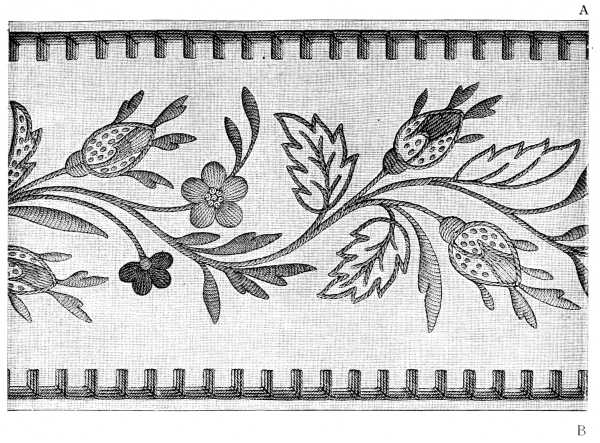
Flower garland in different kinds of stitches (figs. 217 and 218).—Most of the stitches, described at the beginning of this chapter, will be found in this graceful garland, in the execution of which a considerable variety of colours can be introduced. The rose-buds may be worked in two shades of Vert-Pistache and of Rouge-Grenat, in the stitches described in figs. 173, 177, 189 A; the forget-me-nots, in two or even three shades of Bleu-Indigo, in raised satin stitch and knotted stitch; the slender green leaves in Vert-de-gris, or Gris-Tilleul, the stamens in Jaune-Citron, and the stalks of the roses in Brun-Acajou.
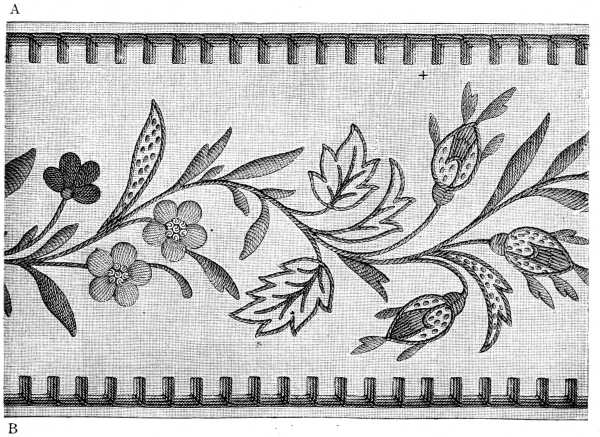 Fig. 217. Second part.
The border that completes this charming pattern, consists of four rows of button holing, worked in four colours. The first row in our illustration is worked in pale pink, followed by three shades of green, the palest of which is used for the second row of stitches.
When these rows are worked upon a satine or cambric foundation, it is advisable to begin by making a small drawing, in which the height of the stitches and the distance between them is accurately marked out, then prick the pattern through and pounce it upon the material beneath.
When they are worked on a material, the threads of which can be counted no such precaution is necessary.
Insertion in Gobelin and stem stitch (fig. 219).—Owing to the shortness of the stitches, this pattern is easier to work than the foregoing ones. The little flowers are embroidered alternately in dark and light red; the setting varies to correspond, the light red flower being set in dark red, and vice versa. The interior of the leaves is in light green and the setting, as well as the connecting bars, in dark green.
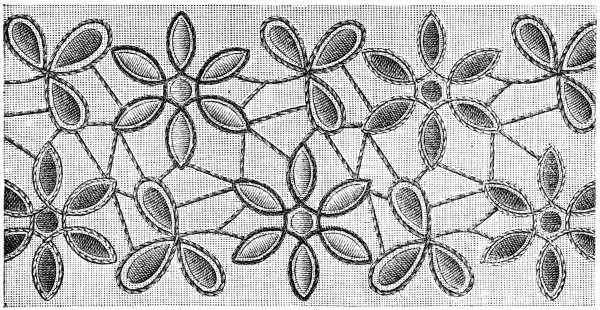 Fig. 219. Insertion in gobelin and stem stitch.
Stripes of embroidery with lace insertion between (fig. 220).—We conclude this chapter, by showing how stripes of embroidery can be used alone, or in conjunction, either with bands of open-work, or lace, crochet, or net insertion. Such combinations are useful for ornamenting aprons, table-cloths, curtains etc., every description in short of household linen and of children's garments. One great advantage, moreover, which stripes of this kind, have over larger pieces of embroidery is that they require neither frame nor pillow, nor wearisome counting of stitches, but can be worked in the hand, at all times and places.