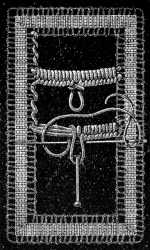
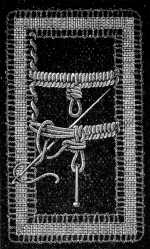
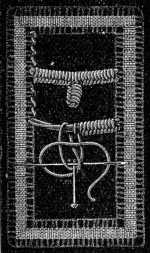
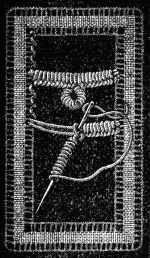
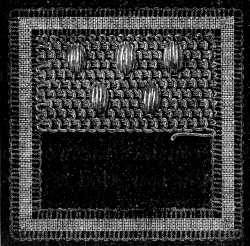
 Insertion.—Irish lace with raised ornaments.
Insertion.—Irish lace with raised ornaments.
Insertion.—Irish lace with raised ornaments.
Irish lace, also known under the name of Renaissance lace, from its having been first made in the sixteenth century, is an imitation of the earliest pillow laces; it ought, properly speaking, to be called French lace, having been invented in France and thence introduced into England and Ireland.
It is composed of braid or tape, formed into figures, joined together by needlemade, corded or buttonhole bars and fillings of different kinds, or by bars alone.
The lace stitches and bars are almost the same as those used in fine Venetian point, but they are executed in a coarser material so that this section of our work may be considered as a preparation for the different kinds of lace, to be described in the next chapter.
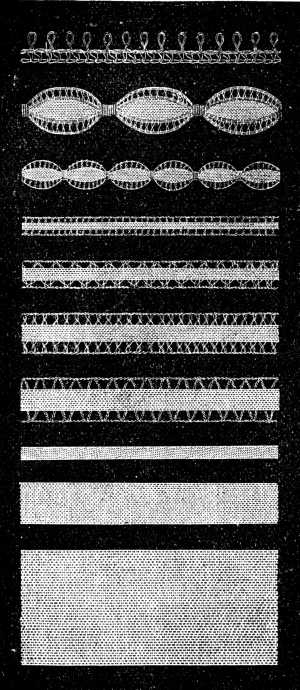
Materials (fig. 692).—The braids used for making Irish lace are an English speciality and manufactured exclusively in England; they are very various in shade, width and thickness, and are to be had white, unbleached, grey and pale yellow, narrow and wide, coarse and fine in texture, with and without holes, open edge and picots, with large medallions and small.
Fig. 692 represents the kinds most commonly used, in their original size, together with a specimen picot, or purl, as they are called in England, for the outside edge, also to be had ready made, for those who do not care for the trouble of making them themselves.
For the stitches and bars by which the braids are joined together, the best material is Fil à dentelle D.M.C,[A] (lace thread) a smooth even thread, now made in every colour to match the braids.
Transferring designs for Irish lace.—The best way is to trace them on oiled tracing linen with a watery ink, free from greasy matter. This tracing linen, which is of English make, is white, glazed on one side only; the unglazed surface should be turned uppermost, as it takes the ink better.
As this tracing linen is quite transparent, the pattern can be transferred to it at once without recourse to any other process.
It will be found less trying for the eyes to lay a piece of transparent coloured paper, or stuff, under the pattern whilst you are copying it. The Irish lace designs are almost all drawn with double lines, between which the braid is tacked on with small back stitches. We may mention at once that it is advisable to make the stitches longer on the right side than on the other, or at any rate to make them of the same length.
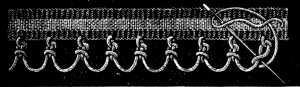
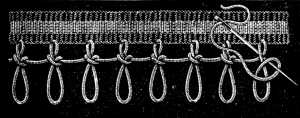
Tacking down and gathering in the braids (fig. 693).—Where the lines of the pattern describe a curve or a circle, the outside edge of the braid, as shown in fig. 693, must be sewn down firmly, so as to form little folds or gathers on the inside edge, which are first tacked down and then gathered in with small overcasting stitches in fine thread, so as to fit exactly to the pattern.
The stitches, made for the bars and the fillings, must never be drawn so tightly as to drag out the edges of the braids and thus spoil the outlines of the pattern. Nor should the stitches be caught into the tracing cloth, but only rest upon it.
When the embroidery is finished, turn the work the wrong side up, cut every second or third tacking stitch and pull the threads carefully out, from the wrong side, when the lace will separate itself from the backing without difficulty; it has then to be damped and ironed also on the wrong side. (See the concluding chapter on the different processes for finishing off needlework).
It is of no consequence which are made first, the bars or the fillings; we however incline to the former, more especially in the case of buttonhole bars, as they are easier to do than the fillings and once done, there is less risk of puckering or drawing the edges together, in making the fillings.
The stitches.—We shall now proceed to describe a series of bars and stitches, which, if carefully studied, will serve as a preparation for making all the finer kinds of laces described in the ensuing chapter.
Without pretending to have exhausted the infinite variety of lace stitches that exists, we hope to have brought before our readers' notice a sufficiently numerous selection to satisfy all tastes and capacities.
With regard to the names, the same stitches are known by so many different ones, that excepting in the case of those universally accepted, we have disregarded them altogether and merely numbered the stitches in their order.
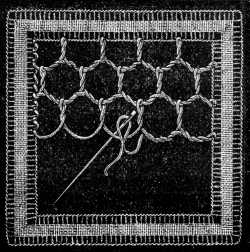
Plain twisted bar (fig. 694).—Secure the thread to the braid and throw it across from one braid edge to the other, put the needle in downwards from above, and overcast the first thread, so as to form the two into a cord. If you do not make enough overcasting stitches to tighten the two threads, the bars will be loose and untidy and spoil the general appearance of the work.
Double twisted bar (fig. 695).—Throw three foundation threads across the space to be filled and overcast them loosely, so that they remain visible between the stitches.
Plain buttonhole bar (fig. 696).—Throw three threads across and cover them with buttonhole stitches, made from right to left.
In making this and the subsequent bars, we recommend turning the needle round and holding it as it were the reverse way, so that the eye not the point passes first under the threads; strange as it may seem, it is easier in this manner to avoid splitting the threads. The working thread should always issue from the edge of the braid, one or two threads before the foundation threads of the bar, to prevent the bars being of unequal width, or getting twisted at the beginning.
Buttonhole bars with pinned picots (figs. 697 and 698). After covering half, or a third of the bar with buttonhole stitches, pass the thread without making a loop, under the foundation threads, and fasten the loop with a pin, fig. 697, then slip the needle, horizontally from right to left, under the 3 threads and tighten the knot close to the last buttonhole stitch.
Fig. 698 shows a picot made in the same manner, but with several buttonhole stitches inserted between the loop and the buttonholed bar.
Bar with lace picot (fig. 699).—Here the picot is made by bringing the thread out through the loop and beginning the buttonhole stitches, 4 or 5 in number, according to the size of the thread, quite close to the pin, so that they entirely cover the loop. The pin must be stuck in the width of 4 stitches, distant from the bar, and the foundation threads should be completely hidden under the bar.
Bar with picot made in bullion stitch (fig. 700).—Put the needle halfway into the last buttonhole stitch, twist the thread ten or twelve times round it from left to right, draw it through and tighten the thread, so that the spiral on the thread form a semicircle, then continue the bar (see also for the bullion stitch figs. 179 and 661).
Bar with buttonhole picot (fig. 701).—Cover rather more than half the bar with buttonhole stitches, carry the thread three times to the 6th stitch and back, then buttonhole these threads that are attached to the bar in the same way as the bar itself and finish the bar in the usual way.
These buttonhole picots are generally used for edging lace; they may in their turn be adorned with small pinned picots to produce a richer effect.
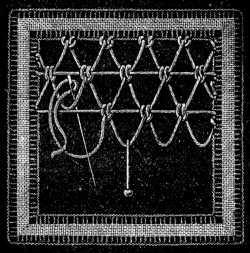
Bar with two rows of knots (fig. 702).—Over two foundation threads, make double knots, far enough apart to leave room for the knots of the next row between.
These double knots consist, in the first place, of one plain buttonhole stitch and then one reversed, that is, made by bringing the needle out in front of the thread and passing it under the loop; the result being that the thread will lie behind the thread and not before it, as in an ordinary buttonhole stitch.
Branched bars (fig. 703).—Where you have a larger surface to cover with bars, you are generally obliged to make them with branches. For this purpose you prepare the threads as for an ordinary bar and cover them halfway with buttonhole stitches; then you carry on the foundation thread to the next bar, buttonhole it also halfway, lay the next foundation thread, and finally buttonhole all the half-covered bars till you reach the dotted line, from whence you lay the last foundation threads.
The last bar is worked over 2 or 4 threads, so that the working thread can be taken back to the edge of the braid by means of the last buttonhole stitches.
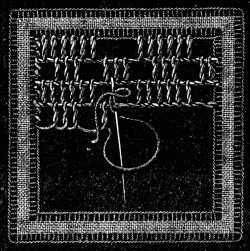
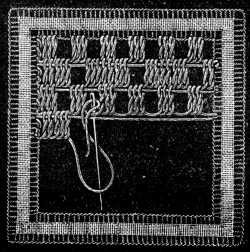
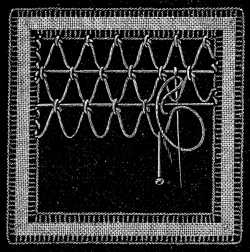
Plain Russian stitch (fig. 704).—Stitches of all kinds can be used, as well as bars, for joining braids together that run parallel to each other, and for filling up the spaces between. These stitches, which serve as an insertion, are some of them very elementary, whilst others require great skill and patience to execute.
The simplest of all is the Russian stitch, which bears a great resemblance to the crossed stitch, shown in fig. 39, and the crossed back-stitch, fig. 176.
You pass the needle from left to right, under the edge of the braid, then again from right to left under the opposite edge, taking care always to leave the thread in front of the needle.
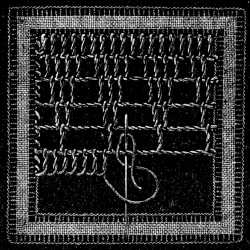
Twisted Russian stitch (fig. 705).—Instead of passing the needle behind the thread, pass it before it and round it, so that the needle always comes out again beneath the thread, which will then be twice twisted.
Column Stitch (fig. 706).—At the bottom, the stitch is made like the plain Russian stitch, and at the top, like the one in fig. 705, with the difference that the second thread is passed three times round the first.
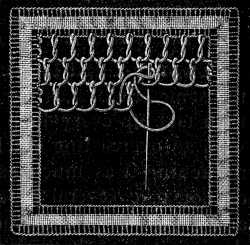
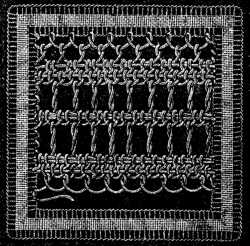
Insertion of single buttonhole stitches (figs. 707 and 708).—Make very loose buttonhole stitches along both edges of the braid, all the same size and the same distance apart, and vertically, opposite to each other.
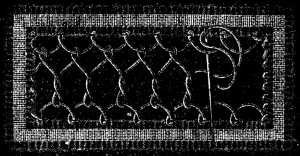 Fig. 707. Insertion of single buttonhole stitches.
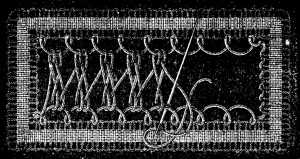 Fig. 708. Insertion of plain buttonhole stitches.
When these two rows are finished, pick up each loop with Russian stitch, either single, fig. 704, or twisted, fig. 705. Fig. 708 shows the double Russian stitch made in each loop; it may be trebled or quadrupled, according to whether you wish your insertion to be very transparent or not.
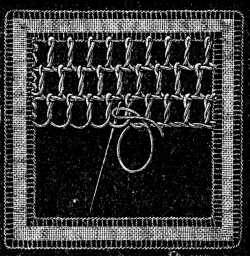
Insertion with bead stitches (fig. 709).—Join the opposite rows of loops together by four stitches. The threads of these stitches must lie quite flat, side by side, and not one on the top of the other. After the fourth stitch, you wind the thread round the bottom loop and then carry it on to the next, whence you repeat the four stitches as above.
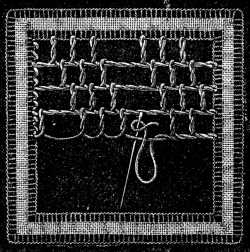
Cluster insertion (fig. 710).—Over the middle of two finished plain bars and one half-finished one, a short distance apart, you make five buttonhole stitches and overcast the remainder of the third bar. The first bar of the next cluster must be set quite close to the last.
Insertion with branches (figs. 711 and 712).—Throw the thread across the middle of the space between two edges of braid, and lengthways, from one end to the other, pass the needle horizontally under four or five threads of the braid, across the insertion; then carry it in a similar manner, first to the left and then to the right, take up the same number of threads of the braid and connect the three loops together by a knot, as is clearly shown in fig. 711.
Fig. 712 represents a similar beginning, and a similar interlacing of the threads, but ornamented this time with a wheel, added after the knot has been made over the loops.
Insertion with leaves in darning stitch (fig. 713).—Fasten on the thread where, according to the illustration, the first leaf in the insertion ought to come, carry it across to the opposite side, draw it through the edge of the braid and bring it back to the point whence it started, lay threads across to both sides, like in figs. 711 and 712, unite them by a knot, such as described in fig. 711, lay the thread once more round the middle leaf, and finish the leaf in darning stitch, working downwards from the top, as described in the preceding chapter in figs. 646 and 647. As may be seen from the second middle leaf, your darning stitches have to be made over five threads, subdivided into two and three.
Insertion with small wheels (fig. 714).—Here, you have to make two rows of Russian stitches opposite each other and carry the thread to the point of intersection, then, you make a wheel over five threads and pass the needle under the completed wheel to reach the next point of intersection. Half wheels may also be added at the edge of the braid, as in figs. 658 and 659.
Insertion with big wheels (fig. 715).—Carry the thread horizontally across the middle of the space intended for the insertion, to the opposite side, and then conduct it by means of overcasting stitches into the corner; thence make a loose loop over to the opposite corner, pass the needle under six or eight threads of the braid edge, slip it under the horizontal thread first laid and behind the loop, and finish the stitch on the other side in the edge of the braid.
Throw the thread again across the empty space and over the first thread, bring your needle back to the middle, make a big wheel over four threads, passing each time under the same threads, then overcast the single thread, come back to the edge of the braid and make the second loop, bringing out the thread at the same place where the other stitches came out.
Insertion with cones (figs. 716 and 717).—Over plain but very distended Russian stitch, make darning stitches backwards and forwards, beginning at the point and reaching to the middle, so as to form small cone-shaped figures.
To reach the point of the next cone you overcast the thread of the Russian stitch several times.
You may also, as in fig. 717, double the Russian stitch and make the darning stitches in such a manner that the points of the cones touch each other and their bases meet the edge of the braid. The same thing, worked the reverse way, that is, with the points turned outwards to the edge, produces a not less pretty effect.
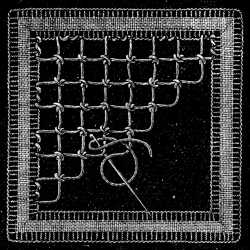
Insertion with embroidered squares (fig. 718).—After making rows of loose buttonhole stitches along the braid edges, as in figs. 707, 708, 709, run a thread through the buttonhole stitches; this thread serves as the foundation to the Russian stitches by which the two edges are joined together. The empty square space left between the Russian stitches is then filled up with buttonhole stitches, like those in fig. 651, in the foregoing chapter.
Insertion with half bars (fig. 719).—Fasten on the thread in one of the corners of the braid and conduct it by means of overcasting stitches to the middle of the insertion, draw it through the edge of the braid on the right and make buttonhole stitches over it, to the middle of the space to be filled, then carry the thread to the left, draw it through the left edge, a little higher up than on the other side, and make the same number of stitches over it as over the first. You can vary this insertion with very good result by making more stitches on one side than on the other, but it should never be more than 10 or 12 stitches wide.
Plain net stitch. First lace stitch (fig. 720).—Make rows of buttonhole stitches to and fro, loose enough to form loops into which the stitches of each subsequent row are set. You must be careful to make the same number of stitches in all the spaces that are of the same size, and also, when you begin a row with a whole stitch, to begin the return row with a half, and so on, in regular rotation.
The number of stitches should vary with the width of the pattern and the decreasing and increasing should always be done at the edge.
The loops must be as many threads of the braid edge long, as they are wide.
Double net stitch. Second lace stitch (fig. 721).—You leave the same distance between the stitches here as in the preceding figure, but in each of the loops of the first row, you must make two buttonhole stitches close together. It is as well to round the loop a little less than is usually done in net stitch.
Third lace stitch (fig. 722).—Here, you make three buttonhole stitches close together, joined to the next three by a loop of thread, just long enough to hold the three buttonhole stitches of the subsequent row.
Fourth lace stitch (fig. 723).—Working from left to right, make two buttonhole stitches rather near together, and leave twice as long a loop between them and the next two stitches as between the two first.
In the next row, which is worked from right to left, make one stitch in the loop between the two stitches that are close together and three or four in the long loop.
Fifth lace stitch (fig. 724).—As in fig. 723, you begin this stitch from left to right, but making three stitches very close together with an intermediate loop as long as the three stitches in one.
In the second row, you make one buttonhole stitch in each of the loops between the three stitches and six or eight in the long intermediate loop.
Sixth lace stitch (fig. 725).—Over wide loops, made from left to right in the first row, make in the second, enough buttonhole stitches entirely to cover the thread.
In the third row of stitches, put the needle into the small loop between two sets of buttonhole stitches, so that the close stitches shall form vertical lines across the surface they cover.
This stitch admits of every sort of modification, such as, for instance, making the third row of stitches on the buttonhole stitches, in the middle of the ones on the small loop; or making one row of close stitches first, and then three open rows; in the former case you should always make an uneven number of buttonhole stitches, so that you have the same number on both sides of the needle, which you must put in between the two threads that form the middle buttonhole stitch.
Seventh lace stitch (fig. 726).—Begin, working from right to left, by making one row of pairs of buttonhole stitches, a very short distance apart; in the second row you make one buttonhole stitch between each of these pairs, and in the third row, two buttonhole stitches in every long loop. Here, the stitches must not be crowded together but have a small gap left between them.
Eighth lace stitch (fig. 727).—This stitch is generally known as the "pea-stitch" on account of the holes occasioned by the different distribution of the stitches.
The first row consists of stitches, set rather closely together, and all the same distance apart. In the second row, you make one buttonhole stitch in the last stitch of the first row, then, missing two loops and three buttonhole stitches, you make two stitches in the next loops and so on. In the third row, you make three stitches in the big loop, and one in the loop between the stitches of the second row.
Ninth, and tenth lace stitch (figs. 728 and 729).—Both, the small and the big pointed groups of stitches, begin with a row of close buttonhole stitches.
Fig. 728 requires three rows; in the second you miss two stitches and make two in the next loops; in the third, only one stitch is introduced between the two loops of the lower row.
Fig. 729 requires five rows. The stitches of the first must be set as closely together as possible; in the second row you make four stitches and miss two of the first row, in the third row you make three stitches, in the fourth, two and in the fifth, one only. The long loops of the last row must not be too slack so that the first stitches of the next scallop may quite cover them.
Eleventh lace stitch (fig. 730).—This stitch is not really more difficult to work than those we have been describing, but requires rather more attention to learn.
The first row consists of plain net stitches; in the second, you have three buttonhole stitches in the middle net stitch; in the third, three buttonhole stitches in the whole loops on either side of the three buttonhole stitches of the second row, and one stitch in the half loops that precede and immediately follow them; the fourth row is similar to the second.
In the fifth row the close stitches are changed. The three buttonhole stitches are made in the third whole loop, before and after those of the fourth row, so that between two groups of three stitches you have six single buttonhole stitches and seven loops.
Twelfth lace stitch (fig. 731).—Fasten on your thread, take it by overcasting stitches over the braid edge, half a c/m. from the corner, and make three buttonhole stitches downwards, quite close together. The next loops, over four or six threads of the braid, must be left long enough to be on a level with the first stitch reaching downwards from the edge.
In the second row, you cover the long loops with three buttonhole stitches and draw the intervening thread quite tight.
The third row is like the first, with the difference, that you put the needle in between the two threads of the buttonhole stitch, instead of through the loops.
Thirteenth lace stitch (fig. 732).—The stitch here represented, as well as the two next ones are looped from left to right and then again from right to left.
As it is more unusual to make the loops from left to right than the reverse way, the proper position of the needle and the course of the thread are shown in the illustrations.
Fig. 732 requires, in the first place, two buttonhole stitches very close together in the edge of the braid, then a third stitch covering the two first stitches and set quite close to them; the connecting thread between these stitches must be tightly stretched so as to lie almost vertically, that the stitches may form straight lines.
Fourteenth lace stitch (fig. 733).—This begins, likewise, with two buttonhole stitches, above which you make two buttonhole stitches instead of one, as in fig. 732, producing an open ground with vertical bars.
Fifteenth lace stitch (fig. 734).—This resembles the two foregoing stitches and consists of three buttonhole stitches, made over the edge of the braid or the intermediate bars, and joined together afterwards under one transverse stitch.
Sixteenth lace stitch (fig. 735).—You begin this by a row of net stitches worked from right to left, or as the engraving shows, by a row of stitches called «seed stitches».
The second row, worked from left to right, consists of short bars, set slanting and shaped like a seed, and made the same way as the picot in fig. 699. The first stitch is carried through the loop of the row below, the second over both threads and far enough from the loop to leave room for three other stitches. The first of the four buttonhole stitches of the next group must be set quite close to the last.
Seventeenth lace stitch (fig. 736).—Here we have the same pattern as the preceding one without the row of net stitches; the engraving shows us at the same time, the proper direction of the needle and thread for the row that is worked from right to left.
Eighteenth lace stitch (fig. 737).—This is the first of a series of lace stitches, often met with in old Venetian lace, and which can therefore with perfect right be called, Venetian stitches.
Owing to the manner and order in which the rows of stitches are connected and placed above one another, they form less transparent grounds than those we have hitherto described.
In these grounds you begin by making the row of loops, then you throw a thread across on the same level and in coming back, pass the needle through the row of loops under the thread stretched across, and under the stitch of the previous row.
Nineteenth lace stitch (fig. 738).—The close stitch here represented is more common in Venetian lace than the loose stitch given in fig. 737.
Twentieth lace stitch (fig. 739).—By missing some loops of the close ground in one row and replacing them by the same number in the next, small gaps are formed, and by a regular and systematic missing and taking up of stitches, in this way, extremely pretty grounds can be produced.
Twenty-first lace stitch (fig. 740).—These close lace stitches, can be varied in all sorts of other ways by embroidering the needle-made grounds.
In fig. 740, you have little tufts in darning stitch, and in a less twisted material than the close stitches of the ground, worked upon the ground.
If you use Fil à dentelle D.M.C (lace thread) for the ground, you should take either Coton à repriser D.M.C (darning cotton), or better still, Coton surfin D.M.C[A] for the tufts. The ground can also be ornamented with little rings of buttonholing, stars or flowerets in bullion or some other fancy stitch.
Twenty-second lace stitch (fig. 741).—For the above three stitches and the three that follow, the work has to be held, so that the finished rows are turned to the worker and the needle points to the outside of the hand. In the first row, from left to right, take hold of the thread near the end that is in the braid, lay it from left to right under the point of the needle, and bring it back again to the right, over the same. Whilst twisting the thread in this way round the needle with the right hand, you must hold the eye of the needle under the left thumb.
When you have laid the thread round draw the needle through the loops; the bars must stand straight and be of uniform length. Were they to slant or be at all uneven, we should consider the work badly done.
In the row that is worked from left to right, the thread must be twisted round the needle, likewise from left to right.
Twenty-third lace stitch (fig. 742).—This is begun with the same stitches as fig. 741, worked from right to left. You then take up every loop that comes between the vertical bars with an overcasting stitch, drawing the thread quite out, and tightening it as much as is necessary after each stitch. You cannot take several stitches on the needle at the same time and draw out the thread for them all at once, as this pulls the bars out of their place.
Twenty-fourth lace stitch (fig. 743).—This is often called the Sorrento stitch.
Every group of three bars of stitches is separated from the next by a long loop, round which the thread is twisted in its backward course. In each of the succeeding rows you place the first bar between the first and second of the preceding row, and the third one in the long loop, so that the pattern advances, as it were in steps.
Twenty-fifth and twenty-sixth lace stitches (figs. 744 and 745).—These two figures show how the relative position of the groups of bars may be varied.
Both consist of the same stitches as those described in fig. 741. The thread that connects the groups should be tightly stretched, so that the rows may form straight horizontal lines.
Twenty-seventh lace stitch (fig. 746).—Begin by making two rows of net stitches, fig. 720, then two of close ones, fig. 738, and one row like those of fig. 741.
If you want to lengthen the bars, twist the thread once or twice more round the needle. You can also make one row of bars surmounted by wheels, as shown in fig. 765, then one more row of bars and continue with close stitches.
Twenty-eighth lace stitch (fig. 747).—Between every group of three bars, set close together, leave a space of a corresponding width; then bring the thread back over the bars, as in figs. 737, 738 and 739, without going through the loops. In the second row, you make three bars in the empty space, two over the three bars of the first row and again three in the next empty space. The third row is like the first.
Twenty-ninth lace stitch (fig. 748).—This stitch, known as Greek net stitch, can be used instead of buttonhole bars for filling in large surfaces.
Make bars from left to right, a little distance apart as in fig. 741, leaving the loops between rather slack, so that when they have been twice overcast by the returning thread, they may still be slightly rounded. In the next row, you make the bar in the middle of the loop and lift it up sufficiently with the needle, for the threads to form a hexagon like a net mesh.
Thirtieth lace stitch (fig. 749). After a row of pairs of buttonhole stitches set closely together, with long loops between, as long as the space between the pairs, throw the thread across in a line with the extremities of the loops, fasten it to the edge of the braid and make pairs of buttonhole stitches, as in the first row above it.
The loops must be perfectly regular, to facilitate which, guide lines may be traced across the pattern, and pins stuck in as shown in the figure, round which to carry the thread.
Thirty-first lace stitch (fig. 750).—At first sight this stitch looks very much like the preceding one, but it differs entirely from it in the way in which the threads are knotted. You pass the needle under the loop and the laid thread, then stick in the pin at the right distance for making the long loop, bring the thread round behind the pin, make a loop round the point of the needle, as shows in the engraving, and pull up the knot.
Thirty-second lace stitch (fig. 751).—To introduce a greater variety into lace stitches, netting can also be imitated with the needle. You begin with a loop in the corner of a square and work in diagonal lines. The loops are secured by means of the same stitch shown in fig. 750, and the regularity of the loops ensured, as it is there, by making them round a pin, stuck in at the proper distance. The squares or meshes must be made with the greatest accuracy; that being the case, most of the stitches described in the preceding chapter can be worked upon them, and the smallest spaces can be filled with delicate embroidery.
Thirty-third lace stitch (fig. 752).—This stitch is frequently met with in the oldest Irish lace, especially in the kind where the braids are joined together by fillings not bars. At first sight, it looks merely like a close net stitch, the ground and filling all alike, so uniform is it in appearance, but on a closer observation it will be found to be quite a different stitch from any of those we have been describing.
The first stitch is made like a plain net stitch, the second consists of a knot that ties up the loop of the first stitch. Fillings of this kind must be worked as compactly as possible, so that hardly any spaces are visible between the individual rows.
Thirty-fourth lace stitch (fig. 753).—To fill in a surface with this stitch, known as the wheel or spider stitch, begin by laying double diagonal threads to and fro, at regular distances apart, so that they lie side by side and are not twisted. When the whole surface is covered with these double threads, throw a second similar series across them, the opposite way. The return thread, in making this second layer, must be conducted under the double threads of the first layer and over the single thread just laid, and wound two or three times round them, thereby forming little wheels or spiders, like those already described in the preceding chapter in figs. 653 and 654.
Thirty-fifth lace stitch (fig. 754).—Begin by making a very regular netted foundation, but without knots, where the two layers of threads intersect each other.
Then, make a third layer of diagonal threads across the two first layers, so that all meet at the same points of intersection, thus forming six rays divergent from one centre. With the fourth and last thread, which forms the seventh and eighth ray, you make the wheel over seven threads, then slip the needle under it and carry it on to the point for the next wheel.
Thirty-sixth lace stitch (fig. 755).—After covering all the surface to be embroidered, with threads stretched in horizontal lines, you cover them with loops going from one to the other and joining themselves in the subsequent row to the preceding loops.
The needle will thus have to pass underneath two threads. Then cover this needle-made canvas with cones worked in close darning stitches, as in figs. 648, 716 and 717.
Thirty-seventh lace stitch (fig. 756).—Here, by means of the first threads that you lay, you make an imitation of the Penelope canvas used for tapestry work, covering the surface with double threads, a very little distance apart, stretched both ways. The second layer of threads must pass alternately under and over the first, where they cross each other, and the small squares thus left between, must be encircled several times with thread and then buttonholed; the thicker the foundation and the more raised and compact the buttonholing upon it is, the better the effect will be. Each of these little buttonholed rings should be begun and finished off independently of the others.
Thirty-eighth lace stitch (fig. 757).—Plain net stitch being quicker to do than any other, one is tempted to use it more frequently; but as it is a little monotonous some openwork ornament upon it is a great improvement; such for instance as small buttonholed rings, worked all over the ground at regular intervals. Here again, as in the preceding figure the rings must be made independently of each other.
Thirty-ninth lace stitch (fig. 758).—Corded bars, branching out into other bars, worked in overcasting stitches, may also serve as a lace ground.
You lay five or six threads, according to the course the bars are to take; you overcast the branches up to the point of their junction with the principal line, thence you throw across the foundation threads for another branch, so that having reached a given point and coming back to finish the threads left uncovered in going, you will often have from six to eight short lengths of thread to overcast.
Overcasting stitches are always worked from right to left.
Fortieth lace stitch (fig. 759).—Of all the different kinds of stitches here given, this, which terminates the series, is perhaps the one requiring the most patience. It was copied from a piece of very old and valuable Brabant lace, of which it formed the entire ground. Our figure of course represents it on a very magnified scale, the original being worked in the finest imaginable material, over a single foundation thread.
In the first row, after the three usual foundation threads are laid, you make the buttonhole stitches to the number of eight or ten, up to the point from which the next branch issues, from the edge of the braid, that is, upwards.
Then you bring the needle down again and buttonhole the second part of the bar, working from right to left.
A picot, like the one described in fig. 701, marks the point where the bars join. More picots of the same kind may be added at discretion.
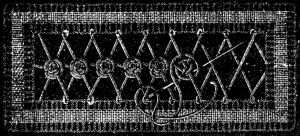
Wheel composed of buttonhole bars (figs. 760, 761, 762, 763).—As we have already more than once given directions for making wheels, not only in the present chapter, but also in the one on netting, there is no need to enlarge on the kind of stitches to be used here, but we will explain the course of the thread in making wheels, composed of buttonhole bars in a square opening.
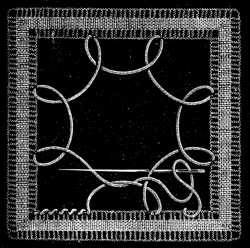 Fig. 760. Wheel composed of buttonhole bars.
Making and taking up the loops.
Fig. 760. Wheel composed of buttonhole bars.
Making and taking up the loops.
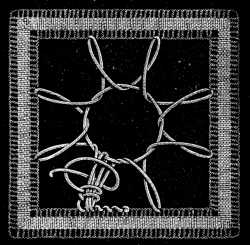 Fig. 761. Wheel composed of buttonhole bars.
The buttonholing begun.
Fig. 761. Wheel composed of buttonhole bars.
The buttonholing begun.
Fig. 760 shows how the first eight loops which form the foundation of the bars are made.
In fig. 761 you will see that a thread has been passed through the loops, for the purpose of drawing them in and making a ring in addition to which, two threads added to the loop serve as padding for the buttonhole stitches; the latter should always be begun on the braid side. Fig. 762 represents the bar begun in fig. 761 completed, and the passage of the thread to the next bar, and fig. 763 the ring buttonholed after the completion of all the bars.
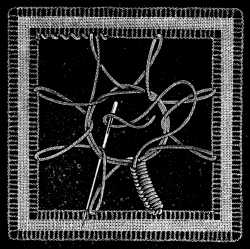 Fig. 762. Wheel composed of buttonhole bars.
Passing from one bar to the other.
Fig. 762. Wheel composed of buttonhole bars.
Passing from one bar to the other.
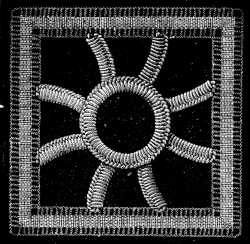 Fig. 763. Wheel composed of buttonhole bars.
Bars and ring finished.
Fig. 763. Wheel composed of buttonhole bars.
Bars and ring finished.
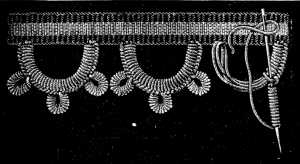
Filling in round spaces (figs. 764, 765, 766).—The stitches best adapted for filling in round spaces are those that can be drawn in and tightened to the required circumference, or those that admit of the number being reduced, regularly, in each round.
In tacking braids on to circular patterns, the inside edges, as we pointed out at the beginning of this chapter, have to be drawn in with overcasting stitches in very fine thread.
Fig. 764 shows how to fill in a round space with net stitches. It will be observed that the loop which begins the row, has the thread of the loop with which it terminates, wound round it, which thread then passes on to the second series of stitches. In the same manner you pass to the third row after which you pick up all the loops and fasten off the thread by working back to the braid edge over all the rows of loops, following the course indicated by the dotted line.
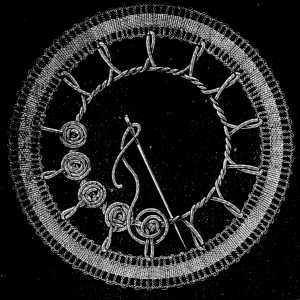 Fig. 765. Filling in round spaces.
First circle of wheels begun.
Fig. 765. Filling in round spaces.
First circle of wheels begun.
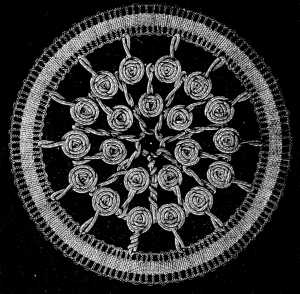 Fig. 766. Filling in round spaces.
The two circles of wheels finished.
Fig. 766. Filling in round spaces.
The two circles of wheels finished.
Fig. 765 shows how to finish a row of loops with wheels worked upon three threads only. In the first row, you make a wheel over each bar; in the second, you make a bar between every two wheels; in the third, the wheels are only made over every second bar; a fourth row of bars which you pick up with a thread completes the interior of the circle, then you work along the bars with overcasting stitches, fig. 766, to carry the thread back to the edge of the braid where you fasten it off.
Needle-made picots (figs. 767, 768, 769).—The edges and outlines of Irish lace are generally bordered with picots, which as we have already said can be bought ready-made (see fig. 692). They are not however very strong and we cannot recommend them for lace that any one has taken the pains to make by hand.
In fig. 767, the way to make picots all joined together is described. You begin, as in fig. 762, by a knot, over which the thread is twisted as indicated in the engraving.
It is needless to repeat that the loops should all be knotted in a line, all be of the same length and all the same distance apart.
Fig. 768 represents the kind of needle-made picots which most resemble the machine-made ones, and fig. 769 show us the use of little scallops surmounted by picots, made in bullion stitch.
One or two rows of lace stitch fig. 736, or the first rows of figs. 749, 750, can also be used in the place of picots.
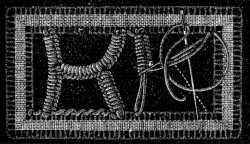
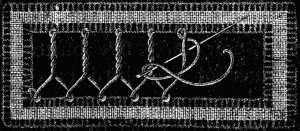
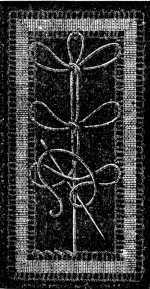
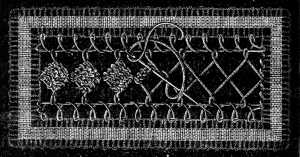
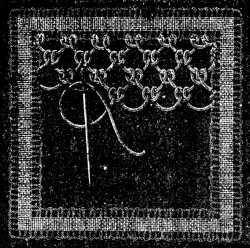
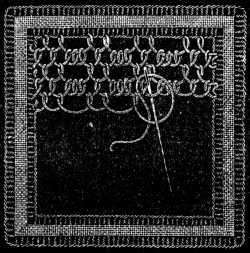
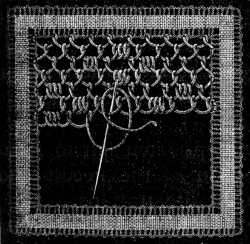
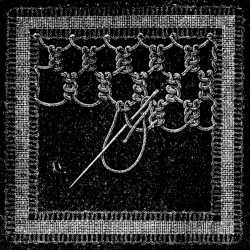
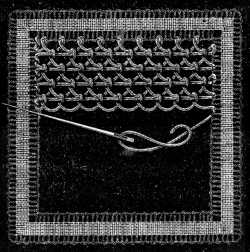
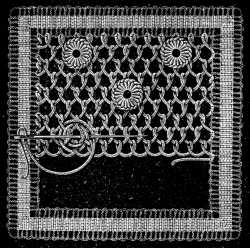
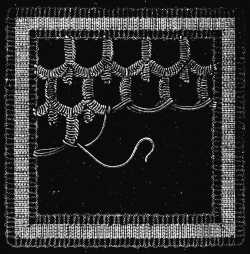
Irish lace (fig. 770).—English braids or those braids which are indicated at the foot of the engraving must be tacked down on to the pattern and gathered on the inside edge, wherever the lines are curved, as explained in fig. 693; in cases however where only Lacet superfin D.M.C[A] is used, the needle should be slipped in underneath the outside threads, so that the thread with which you draw in the braid be hidden.
The braids are joined together where they meet with a few overcasting stitches, as shown in the illustration.
Here, we find one of the lace stitches used instead of picots; the first row of fig. 736 always makes a nice border for Irish lace.
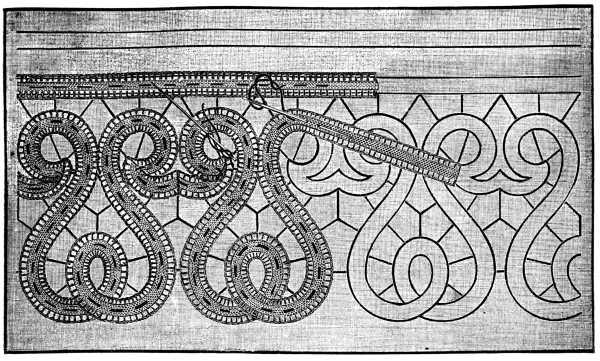
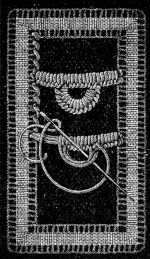
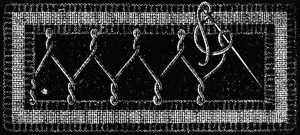
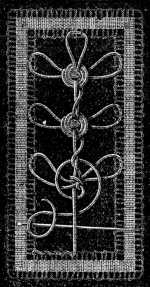
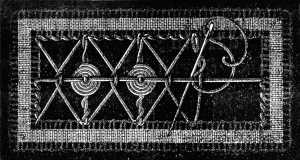
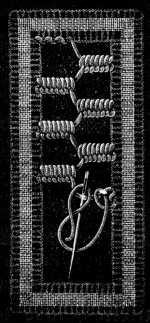
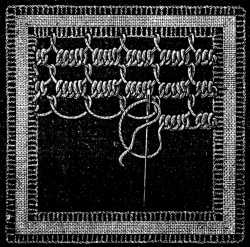
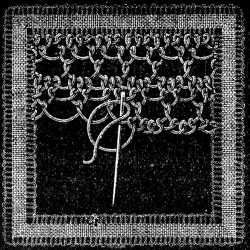
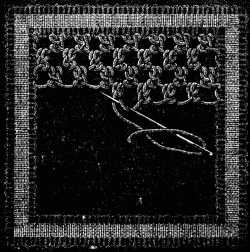
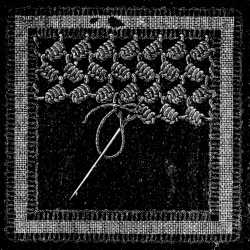
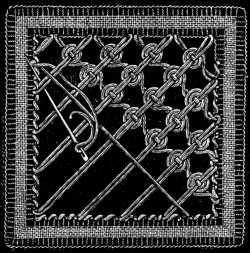
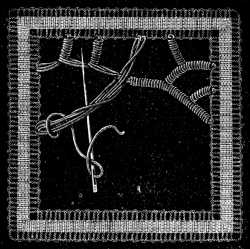
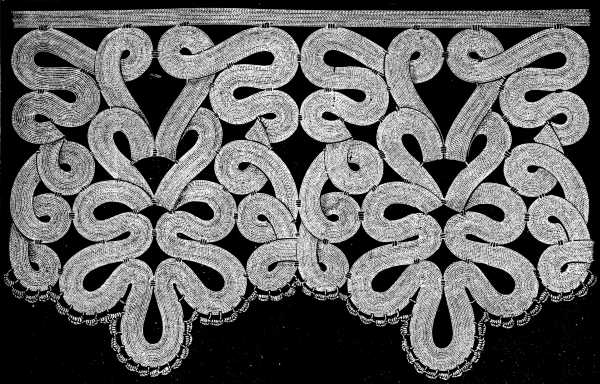
Irish lace (fig. 771).—This pattern, which is more complicated and takes more time and stitches than the preceding one, can also be executed with one or other of the braids mentioned at the beginning of the chapter; but it looks best made with a close braid.
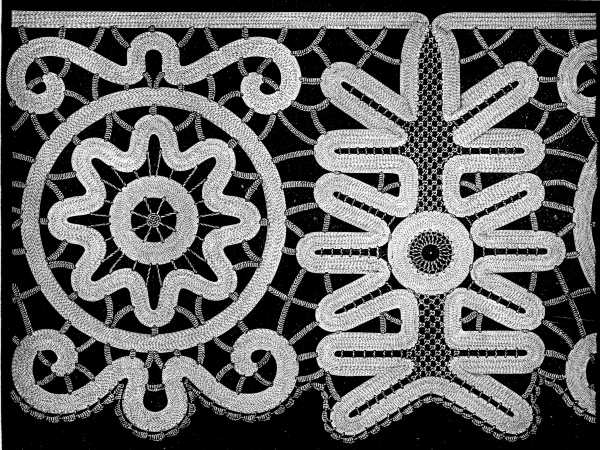 Fig. 771. Irish lace.
The bars, which in the illustration are simply buttonholed may also be ornamented with picots of one kind or another; the interior spaces of the figure on the left can be filled, instead of with corded bars, with one of the lace stitches we have described, either fig. 720, 721, or 732, any one of which is suitable for filling in small spaces like these.
In the figure on the right, the ring of braid may be replaced by close buttonhole stitches, made over several foundation threads or over one thick thread, such as Fil à pointer D.M.C No. 10 or 20[A] to make them full and round.
You begin the ring on the inside and increase the number of stitches as the circumference increases.
Any of the stitches, from fig. 720 to fig. 743, can be introduced here.
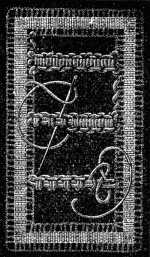
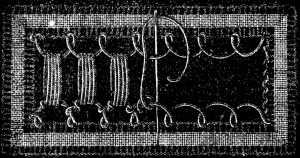
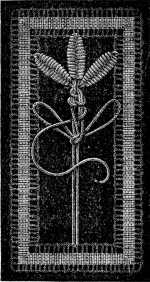
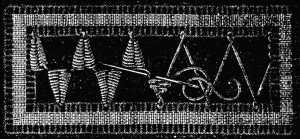
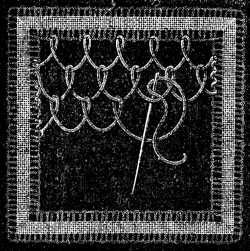
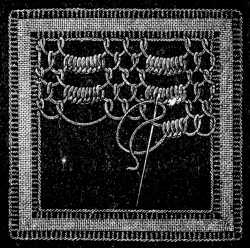
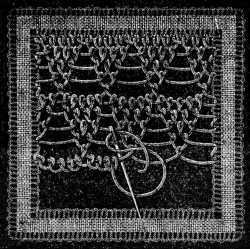
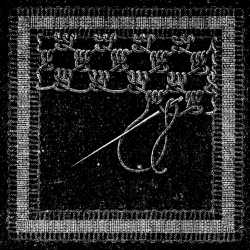
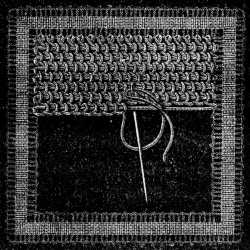
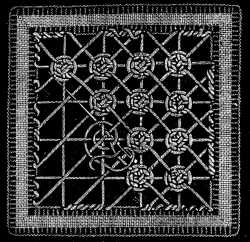
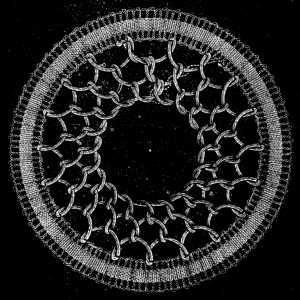
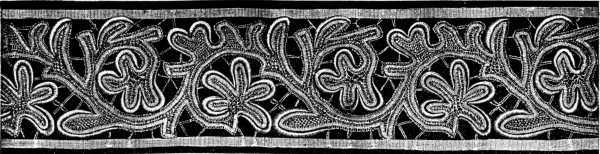
Irish lace (fig. 772).—Here we find one of the fillings above alluded to, fig. 751, used as a ground for the flowers and leaves. For the design itself some of the closer stitches described in this chapter, should be selected. When the actual lace, is finished you sew upon the braid a thin cord, made of écru Cordonnet 6 fils D.M.C, as described in the chapter on different kinds of fancy work. Cords of this kind can be had ready made, but the hand-made ones are much to be preferred, being far softer and more supple than the machine-made.
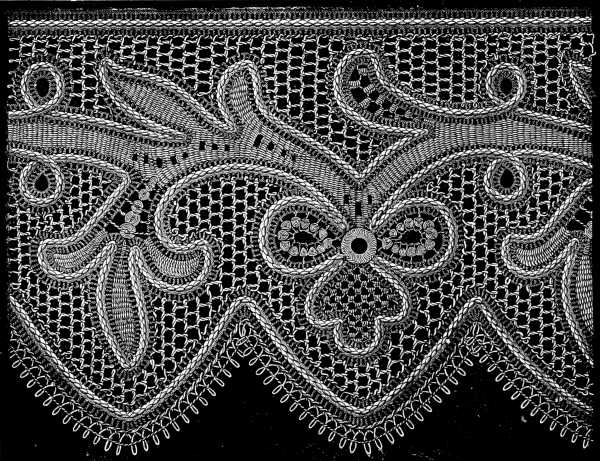 Fig. 772. Irish lace.
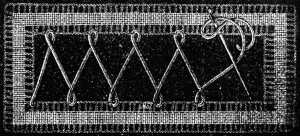
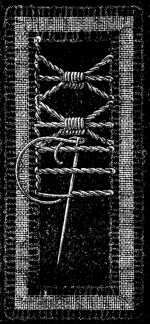
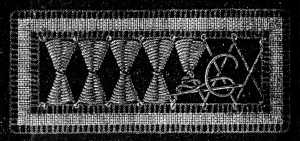
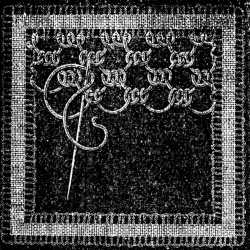
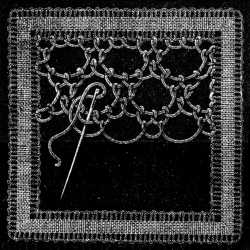
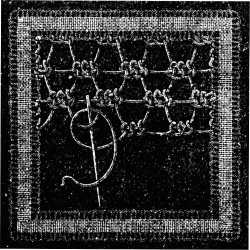
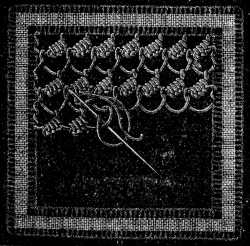
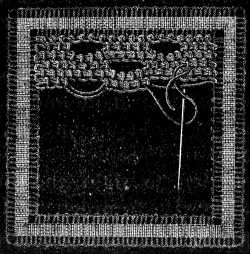
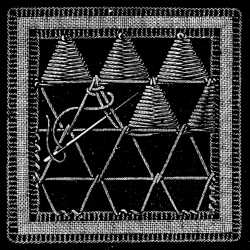
Irish lace (fig. 773).—This lace, more troublesome than the preceding ones to make, is also much more valuable and effective. The ground is composed entirely of bars, like the ones described in fig. 761, the branches, true to the character of the work are worked in the close stitch represented in fig. 755, and the flowers in double net stitch, fig. 721.
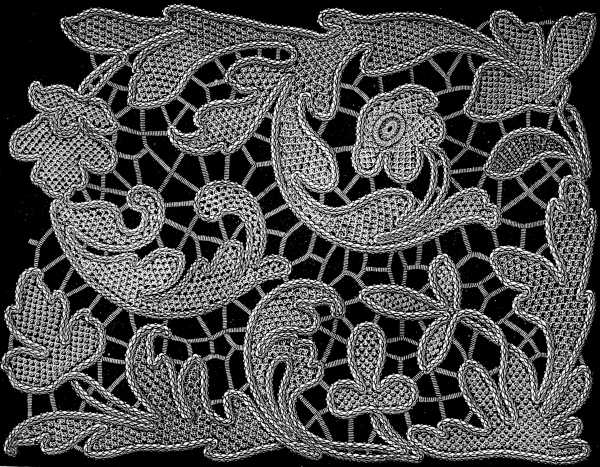 Fig. 773. Irish lace.
In working the above fillings, the thread must not, as in lace made with braid, be carried on from one point to the other by overcasting stitches along the braid edges, but should be drawn out horizontally through the cord and back again the same way, giving the needle in so doing a slightly slanting direction.