 Insertion in embroidered netting.—Ornament with various stitches.
Insertion in embroidered netting.—Ornament with various stitches.
Insertion in embroidered netting.—Ornament with various stitches.
Netting is a handicraft, so ancient that it would be difficult to trace it to its origin, or determine the date of its invention. There is evidence to show that the making of nets for fishing and game catching was as familiar to the earlier races of mankind as it is to us.
Practised in the first instance for the wants of life, it by degrees developed into an art, in conjunction with embroidery, to which it was made to serve as a foundation. The netting of every country, almost, has a distinctive character of its own: that of Persia is known by its fine silken meshes and rich gold and silver embroidery; that of Italy, by the varied size and shape of its meshes and a resemblance in the style of its embroidery to the Punto tagliato; whilst the netting of France, known by the name of Cluny guipure, consists of a groundwork of fine meshes with stiff close designs embroidered upon it, outlined in coarse glazed thread.
Netting, which divides itself under two headings, netting proper, or plain netting and net embroidery, has never yet gone out of fashion and places are still to be found where the entire population is engaged in this industry.
Plain netting and the implements used in netting (figs. 611, 612, 613).—Plain netting consists of loops, secured and rendered independent of one another by knots. For forming and tightening these loops and knots the following implements are necessary; in the first place, a netting needle; these are generally made of steel, split and flattened at both ends, with a hole bored through them below the fork at the one end, in which the thread, fig. 611, is secured, before it is wound on lengthwise between the forks. They are numbered as to size like knitting needles. There are netting needles likewise of bone, ivory, wood and tortoise-shell for twine and thick materials; these are without hole, fig. 612.
The thread must be wound on very tightly, and not too much of it at a time, that the needle may slip easily through the loops. The mesh, or spool, fig. 613, whether of ivory, bone, steel or wood, should be smooth and round and of the same thickness throughout, so that the loops, made upon it, may be all of one size and easily slipped off.
For long loops a flat mesh is best, and in all cases, the needle and mesh should be selected with a view, both to the material employed, and the size of loop required.
In addition to these two implements, a cushion, weighted with lead will be required, to pin the foundation loop to, on which the first row of netting is worked.
Materials suitable for netting.—These, of course depend on the purpose of the netting: silk, twine, wool and cotton, can all be used and each possesses its advantages and disadvantages. Silk has the finest gloss but when it is strongly twisted it is very apt to knot, and when loosely twisted, does not make firm knots. It is difficult to get linen thread with a smooth uniform twist and moreover it soon frays in the working; wool is too elastic a fibre and is unsuitable for washing purposes, cotton remains therefore, in every respect the most desirable material, being both smooth and uniformly twisted; as qualities, more especially adapted for netting we may mention the following: Fil à pointer D.M.C, Cordonnet 6 fils D.M.C (crochet cotton), Fil à dentelle D.M.C (lace thread), and even Coton à tricoter D.M.C[A] (knitting cotton).
Netting stitches.—The loops are always the same—four-cornered whether they be square or oblong—and connected together, though secured and rendered independent of one another by knots. By different ways of passing the thread over the mesh and connecting the loops together, the following stitches are produced: 1º plain loop, 2º double loop, 3º oblong loop, 4º honeycomb loop, 5º twisted loop.
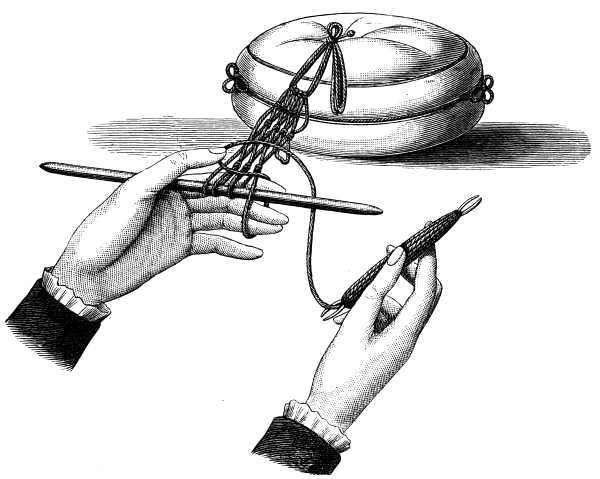
1º Plain loop. First position of the hands (fig. 614).—Every kind of netting requires a foundation loop, from 10 to 20 c/m. long, made either of Cordonnet 6 fils D.M.C Nos. 3 to 10, or Fil à pointer D.M.C No. 10[A], which is pinned to the cushion. Fasten the working thread to the foundation loop; then take the mesh in the left hand, holding it between the thumb and forefinger, with the other fingers extended beneath. Take the needle filled with thread in the right hand and pass the thread downwards over the mesh and over the second, third and fourth fingers, inside, carry it up behind the third finger and lay it to the left under the thumb by which it has to be held fast.
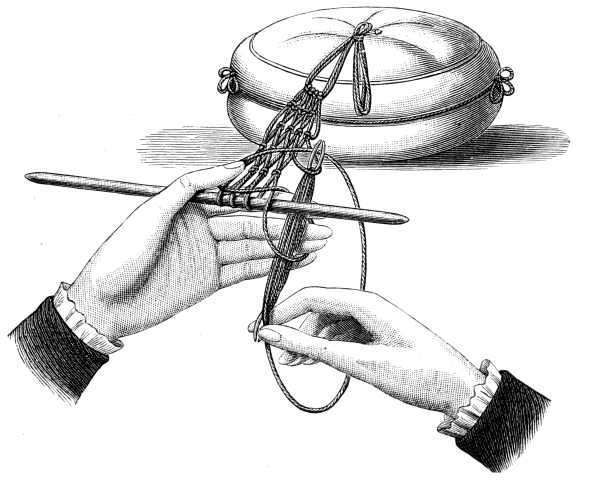
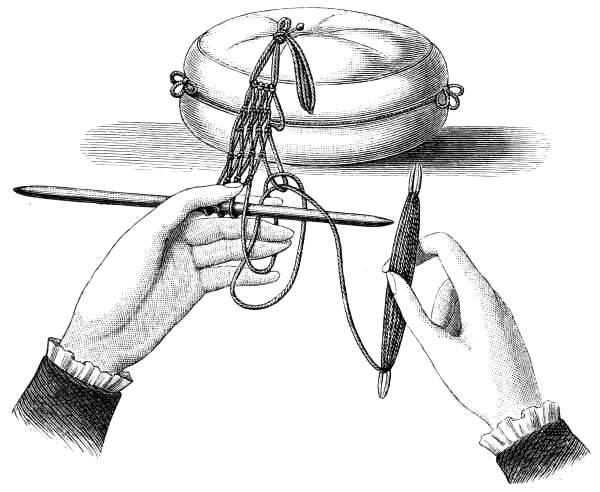
Second and third position of the hands (figs. 615 and 616).—Carry the thread down behind the second, third, fourth and fifth fingers, and put the needle through the loop on the fingers and behind the mesh, through the foundation loop, thus forming a second loop, which you hold back with the little finger of the left hand. Then gradually drawing up the thread that runs from the mesh, let go the loop held down by the thumb; then by degrees let go also, the loop which lies over the second, third and fourth fingers, still holding the last loop fast with the little finger; finally you release this too and pull up the knot thus formed close to the mesh with the right hand. This completes the stitch. The next stitches are made in the same way; whether they are to serve for casting on or for a netted foundation. The mesh is drawn out at the end of each row, the work turned and the mesh held beneath the last row, in readiness for the next, in making which you pass your needle through each loop. These diamond-shaped loops form a diagonal net.
2º Double loop.—To make a double loop put the thread two or three times round the mesh.
3º Oblong loop.—For oblong loops, the knots must be made a little distance from the mesh.
4º Honeycomb loop.—Make an oblong loop, pass the thread round the fingers, but not over the mesh as in plain netting, put the needle, not into the loop of the previous row, but between the loop, just made. The knot which is made in the same way as in plain netting, must be drawn close up to the mesh; the two threads of the loop should lie side by side on the mesh. The loops in honeycomb netting are six-sided.
5º Twisted loops.—Pass the thread, as in plain netting, over the mesh and fingers, but before letting the thread which is under the thumb go, pass the needle from right to left under the loop you are making and the thread, and only then draw up the knot.
Although in netting the loops cannot be formed in as many different ways as in knitting or crochet, they admit of a certain variety, as the following explanations will show.
Patterns produced in netting by using meshes of different widths.—Plain netting can be varied by making one row of loops over a large mesh and one over a small one, or several rows over the large and several over the small, alternately, changing the meshes at regular intervals.
Patterns produced in netting by increasing and decreasing (fig. 617).—Patterns of this kind are made by netting the meshes together in regular sequence and taking up as many meshes as you have netted together, or vice versa. You may increase and decrease in the same rows, or at an interval of so many rows.
Two sizes of thread should be used for this patterns. To show the relation they should bear to one another, we instance: Fil à pointer D.M.C No. 30 with Fil à dentelle D.M.C No. 50[A], or Coton à tricoter D.M.C Nos. 14 and 30[A], with Coton à tricoter D.M.C No. 50[A], or Coton à repriser D.M.C No. 25 with No. 100.[A]
Begin by 3 rows of plain netting with the finer thread over the small mesh, followed by one row with the coarser thread over the large mesh; then, with the coarse thread over the large mesh, one row, in which you net every two loops together and one row, with two loops in every one, so that the number of loops remains the same. These are followed by 3 rows of plain netting with the fine thread on the small mesh.
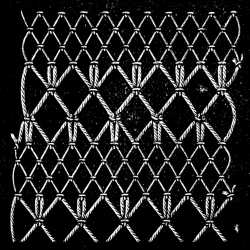
Loose loops in clusters (figs. 618 and 619).—These clusters of loose loops are made in the following manner:
1st row—one loop, the knot of which must be a little distance from the mesh; put the thread over the mesh and the needle through the loop where the knot is; repeat this three or four times, making the loops all of the same length. Then unite all the loops with one knot, carrying the needle from right to left, round the loops, instead of putting it through the loop of the previous row.
2nd row—make one loop over each loop of the first row, leaving out the loops that form the cluster.
As may be gathered from the drawing, many different patterns can be worked upon the netting in this manner.
Netting composed of plain, double and oblong loops (fig. 620).—Netting composed of large and small loops is the kind generally used as a groundwork for embroidery. The loops of it are straight; diamond netting will serve the same purpose, but as it is less commonly used we have given the preference to the straight.
The whole first row consists of a double and a plain loop alternately; the second, entirely of oblong loops, which are made by passing the thread only once over the mesh, and so, that in netting on the double loop, the knot is brought close to the needle, where as, in netting the plain loop, it hangs free; so that, as shown in fig. 620, all the loops of the 2nd row are of the same length. In the 3rd row, which is like the first, the plain loops should come between the small holes and the double ones between the large holes.
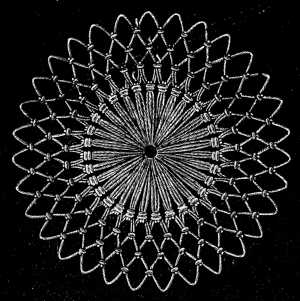
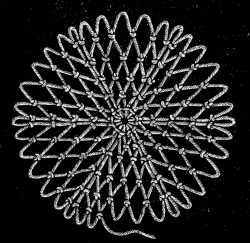
Circular netting composed of long and short loops (fig. 621).—Make thirty or thirty one loops over a large mesh with a very stout material, such as Fil à pointer D.M.C No. 20, or a double thread of Cordonnet 6 fils D.M.C No. 30, then draw up the thread on which the loops are strung, as tightly as possible, so as to form quite a small ring for the centre, and fasten off.
For the next row, also made in coarse thread, fasten the thread on to a long loop and make one loop into each loop of the first row, over a small mesh. Use the same mesh for all the subsequent rows, which should be worked in a finer thread, such as Cordonnet 6 fils D.M.C No. 50 or 60.
If you want to avoid fastening on the thread afresh for each row, make a loop over the thumb.
Making loops over the thumb.—Put the thread, as for a plain loop over the mesh and fingers, and put the needle through the loop, likewise as for a plain loop, but before tightening the knot, draw the mesh out of the loop just made and make it exactly as long as the loop above.
Circular netting formed by increases (fig. 622).—Make 10 loops on the foundation loop, close the ring, then go on, making a row with one knot in the first loop and two knots in the second, until the net attains the right circumference; in the subsequent rows, increase by one loop, that is to say, make two knots in each of the previous increases.
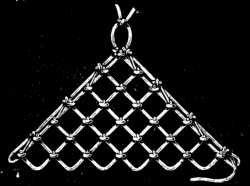
Square of netting (figs. 623 and 624).—To make squares of netting with straight loops, begin by making two loops or three knots. Make two knots in each of the following rows so that each row is increased by one loop. Continue to increase until you have one loop more than the square should number.
Following this row with the extra stitch, make a row without either increase or intake and begin the intakes in the next row, joining the two last loops of each row together by a knot. Finish the two last loops over the thumb.
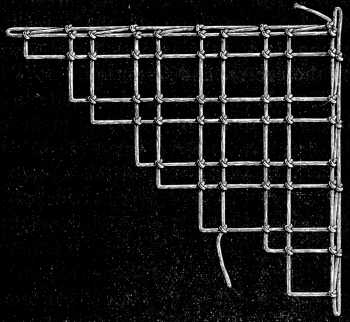
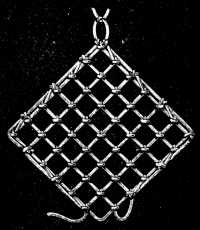
Square of netting begun from the middle (figs. 625 and 626).—Instead of beginning a square from the corner, in the manner just described, it may be begun from the middle.
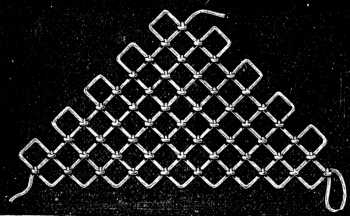 Fig. 625. Square of netting begun from the middle. Begun.
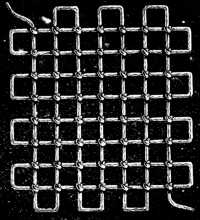 Fig. 626. Square of netting begun from the middle. Completed.
Cast on the required number of loops, make an intake in each row, by omitting to take up the last loop of a row. In coming back, your first knot will thus be made over the last loop but one of the previous row, fig. 625. To complete the square, fasten the thread on again, to the end of the thread of the last row, then make a similar to it, and repeat the same rows you made at the beginning (see fig. 626).
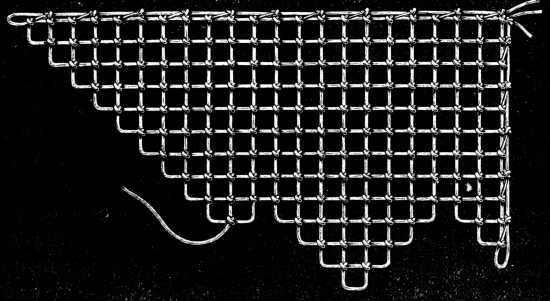
Stripes of straight netting (figs. 627 and 628).—These can be begun and finished in two ways. The simplest way, more especially when they are to be embroidered afterwards, is to cast on the necessary number of loops, to decrease on one side by dropping a loop, fig. 627, or by joining two loops together with a knot, fig. 628, and to increase on the other side, by making two knots over one loop.
Great care must be taken not to change the order of the intakes and increases, as any mistake of the kind would break the lines of squares, and interfere with the subsequent embroidery, unless there happened to be more loops in the stripe than stitches in the pattern, in which case the superfluous loops might be cut away when the embroidery is finished.
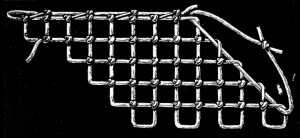
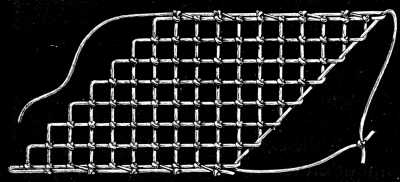
Straight netting with a scalloped edge (fig. 629).—The second way of making stripes of straight netting is to begin by a square. After making two loops on the foundation loop, make rows with increases, until you have the required number of loops. Then make an increase in every row to the left and leave the last loop empty in every row to the right. Continuing the increases on the left, you net 4 rows, without increasing or decreasing on the right, whilst in the next 4, you again leave the outside loop empty.
Square frame of netting (fig. 630).—Handkerchief, counterpane and chair-back borders can be netted in one piece, leaving an empty square in the centre. After casting on the loops as for an ordinary square of netting, letter a, increase them to double the number required for the border. Thus, for example, if the border is to consist of 3 squares, you make 6 loops, then leave 3 loops empty on the left and continue to work to the right and decrease to the left, up to the dotted line from c to c. After this you begin to decrease on the right and increase on the left, up to the dotted line from e to e.
Leaving the right side of the net, you now fasten on the thread at c, where the 3 empty loops are, and here you make your increases on the right side and your intakes on the left, till you come to the corner, from whence you decrease on the right and increase on the left, up to letter g. Stop on the left side and then work from left to right, passing over the row that is marked e. The fourth corner, letter b, is worked like any other piece of straight netting, with an intake in each row, until there are only two loops left.
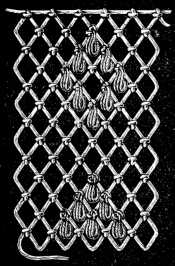
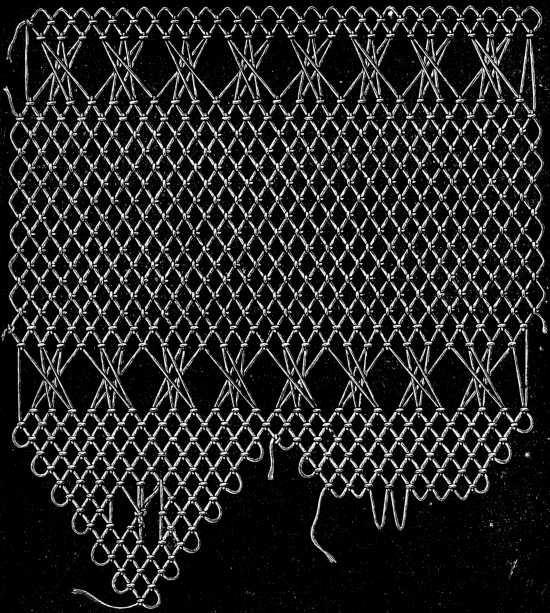
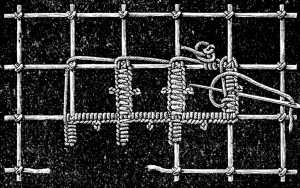
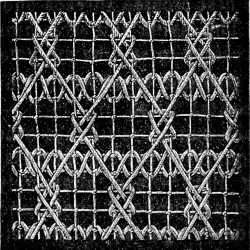
Diagonal netting with crossed loops (figs. 631 and 632). To work this simple and effective pattern, begin by making a stripe of plain netting, 14 loops in width, for the middle. When it is long enough for your purpose, take up all the loops on one side on a strong thread; fasten the work to the cushion again and work 3 rows, along the other edge in the following manner.
 Fig. 631. Diagonal netting with crossed loops.
1st row—long loops, to be made by the thread being passed thrice over the mesh.
2nd row—here, 3 loops are so made as to cross each other, that is, you begin by putting your netting-needle at first into the 3rd loop, counting from left to right, then into the 1st, and lastly into the middle one of the three, so that the right loop leans to the left and the left one to the right.
3rd row—one plain loop in each of the loops of the previous row. You now, draw out the thread, run in on the other side, and run it in through the loops last made, in order to make 3 rows again, as above described, on the bottom side.
When this is done, you begin the scallops, composed of 12 knots or 11 loops, or 14 loops and 15 knots = net 5 rows, leaving the outside loops empty, fig. 632, stop on the left and proceed with: 6 knots or 5 plain loops, 2 or 3 long loops with 3 overs, 3 plain loops = turn the work = 3 plain loops, 3 knots = turn the work = 2 loops with 3 overs, 3 knots = turn the work = 2 plain loops, 2 knots = turn the work = cross 2 or 3 loops, according to the number you crossed in the middle, then carry the working thread to the middle of the long loops, and connect them by 2 knots = pass the needle under the knot of the last long loop, then, on the right side net: 3 plain loops = turn the work = 3 plain loops, 3 knots = turn the work = 2 plain loops, 2 knots = turn the work and continue the rows of plain netting until you have only 2 loops left.
To reach the next scallop, pass the netting-needle through each hole of the net and round each thread.
Finish off the scallops with a row of plain netting, made with a coarser thread than the foundation.
These netted edgings are generally made in unbleached cotton, because the patterns afterwards embroidered upon them in coarse, white knitting or darning cotton, show best upon it. The thread for this purpose should be used double, and the pattern worked in darning stitches, made over 8 squares of the netting; the 8th knot is then encircled by a loop and the thread carried down over 8 squares and a loop again made round the 8th knot. After making 4 rows of stitches on the netting, cut 3 bars between the rows of white stitches.
The row of openwork produced in this way has a very good effect and greatly improves the look of the lace.
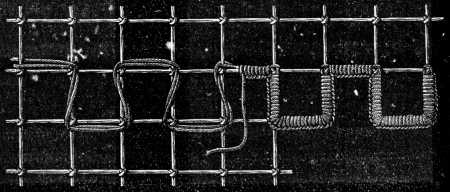
Netted fringe (fig. 633).—Plain netting, pretty as it is, looks rather poor, unless ornamented with embroidery of some kind. The double netting, illustrated in fig. 633, will prove a welcome novelty. The footing is worked in crochet, with braid, secured on both sides by chain stitches.
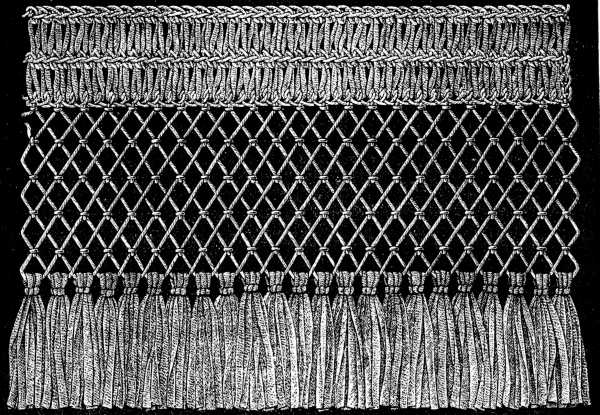 Fig. 633. Netted fringe.
Into every fourth of these chain stitches, net one loop, missing the 3 between. At the end of the row, turn the work and make the knot in the middle of the 3 chain stitches, so that the 2 loops of netting cross each other.
In the second, or rather the third row, the knots are again made first into the front loops, into those of the first row that is; in the fourth row, into those of the second row.
When the stripe is sufficiently wide, finish it off with tassels, made of Soutache D.M.C No. 3. Instead of tying up the lengths of braid with a thread, twisted round them and fastened off with a stitch, make 2 looped knots round them with an end of the braid, where the neck of the tassel should come.
Embroidered netting.—Embroidered netting, also known as Filet Guipure, Cluny Guipure, and Richelieu Guipure, is a netted ground, with patterns of one kind or another, worked upon it in a variety of stitches.
Implements required for embroidered netting.—Besides scissors, needles and thread, a light steel frame is the only thing required, and this renders embroidered netting very popular.
The needles should be long, and blunt; those called saddlers needles are the best.
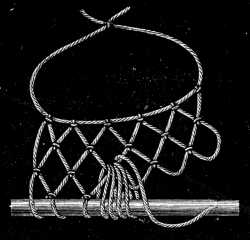
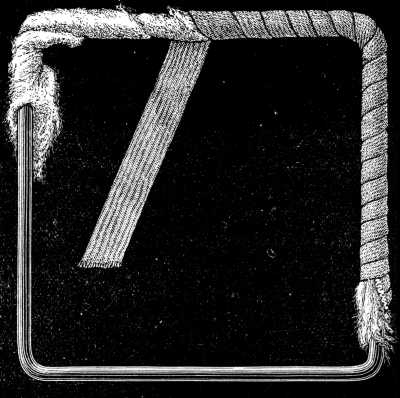
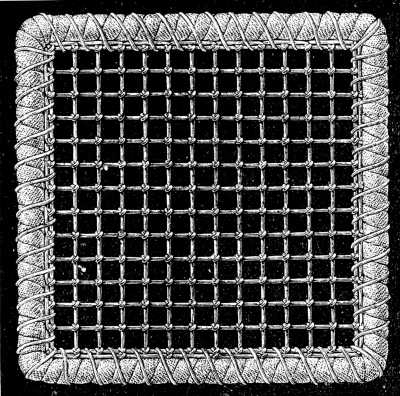
Wire frame for embroidered netting (fig. 634).—The frame on which the net is stretched should be made of strong iron wire, that will not bend in the using. In shape, it may be square or oblong, according to whether squares or edgings are to be made upon it, but the sides must be straight, so that the net can be evenly stretched.
This wire frame must be covered, first with wadding or tow, as shown in fig. 634, and then with silk ribbon, which must be wound tightly round it, and more particularly at the corners, very closely, so that it may be quite firm and not twist about when the netting is sewn in. The ends of the ribbon should be secured by two or three stitches.
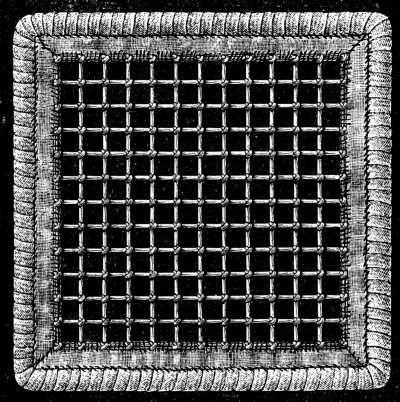
Mounting the netting on the frame (fig. 635).—When the netting is exactly the size of the inside of the frame, it need only be secured to it with overcasting stitches, set very closely at the corners.
Mounting the netting on the frame with an auxiliary tape (fig. 636).—When the netting, is smaller, the space between it and the frame, must be filled up with strong very evenly woven, linen tape, sewn on all round the netting.
The tape must be very tightly held in the sewing, so that it even forms little gathers all round; this will help you to stretch the netting in mounting it without injuring it, and is especially necessary when the netting is not quite evenly made. Fig. 636 shows how the tape is sewn on, the fold that has to be made at the corners, and the way to fix the netting into the frame.
Long stripes or large pieces of work, can be mounted on waxcloth, but we cannot recommend shortening the preparatory work in this manner, as the squares of netting are never so regular as when they are made in a frame.
Materials for embroidered netting.—Thick threads with a strong twist are the best for darned, or embroidered netting, such as Cordonnet 6 fils D.M.C[A] (crochet cotton), or Fil à dentelle D.M.C[A] (lace thread).
There are however certain old kinds of embroidered netting made in soft loose silk, for imitating which it is best to use, Coton à repriser D.M.C[A] that being quite the best substitute for the original material.
The stitches used for embroidered netting.—These are so multifarious and admit of so many different combinations, that not a few of them seeing that be quite new to our readers, willsome we have never yet come across in any book on the subject that has come under our notice.
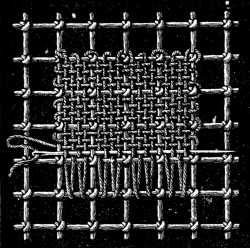
Ordinary darning stitch (fig. 637).—The simplest stitch of all for covering a netted ground is the ordinary darning stitch; drawing the thread, that is to say, in and out of the number of squares, prescribed by the pattern, and backwards and forwards as many times as is necessary to fill them up.
The number of stitches depends, to a certain extent, on the material employed; with Coton à broder D.M.C for example, you will have to make more stitches than with one of the coarser numbers of Coton à repriser D.M.C.
This is the stitch generally used for reproducing a cross stitch pattern on a netted ground and is especially to be recommended for covering large surfaces, curtains, counterpanes and so forth, as it is quickly done and shows up the pattern well.
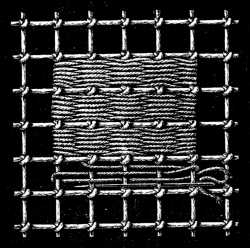
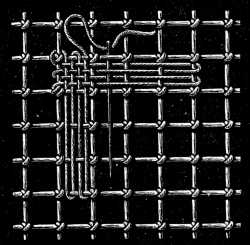
Linen stitch (figs. 638 and 639).—This is the stitch most often met with in the old embroideries, it being the one the solid parts of the leaves and flowers, and the borders are generally worked in.
Fasten on the thread to a knot of the netting and carry it twice to and fro, over and under the threads of the netting, so that at the end of the row, every second thread passes under and over the thread of the netting, as it is carried upwards again.
This constitutes the first layer of threads, the second completes the linen stitch and is made in the same way, only across the first, alternately taking up and missing a thread as is done, in darning. The thread may also be carried both ways over the threads of the squares. In this case you must draw an uneven number of threads through the squares, otherwise the crossing of the threads will be irregular in the last square.
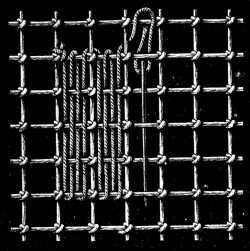
Linen stitch. Formation of the corners (fig. 640).—When linen stitch is used for the border of a pattern, and a corner has to be formed, you begin by carrying the threads over a given number of squares. This first layer, especially in the case of long stripes, must be kept very slack, and to ensure the threads being all of the same length, lay a fine mesh or a thick knitting needle at one end and stretch the threads over it. After carrying the second layer across a few squares, take away the mesh or needle. The threads of the first layer become gradually shorter, from the passage of the cross threads in and out between them, and end by being just long enough to prevent the last embroidered squares from being too tightly stretched.
On reaching the corner, you cross the threads of the next row, as shown in fig. 640. The first threads of the second side form the foundation of the corner square; from the second corner square you pass to the third; from the third to the fourth, carrying your thread alternately over and under the threads that were stretched for the first corner.
Loop stitch (point d'esprit) (figs. 641 and 642).—This is a light open stitch, chiefly used for making a less transparent foundation than plain netting. Fasten the thread to the middle of one bar of the netting, then make a loose loop to the middle of the top bar of the same square, fig. 641, by carrying the thread, from left to right, over one vertical and one horizontal bar of the net and inserting the needle downwards from above under the bar and in front of the working thread. For the second row back, also represented in fig. 641, you draw the needle through, underneath the bar above the loop stitch and make the loop upwards from below; in doing this the working thread must lie to the left, in front of the needle. Fig. 642 shows how to join the rows and pass the needle through the stitches of the preceding row.
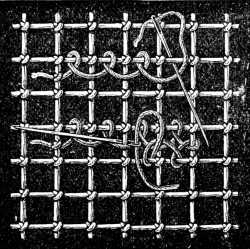 Fig. 641. Loop stitch.
1st and 2nd course of the thread.
Fig. 641. Loop stitch.
1st and 2nd course of the thread.
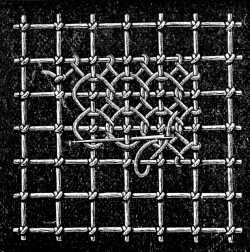 Fig. 642. Loop stitch.
Several rows completed.
Fig. 642. Loop stitch.
Several rows completed.
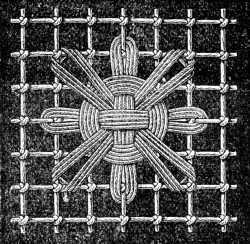
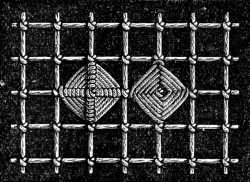
Star composed of loose threads (figs. 643, 644, 645).—This star covers 16 squares of netting. Fasten the thread to the middle knot of the 16 squares, then carry it diagonally over 4 squares, three times from left to right under a knot of the foundation and three times from right to left. In this way, the bottom rays of the star are formed. For the stitches that complete the figure, you start from the middle and following the direction of the little arrow in the illustration, you cover the netting with 3 horizontal and 3 vertical threads, carried over 4 squares. When you have laid the vertical threads, slip the needle 4 or 5 times round in a circle, under the diagonal and over the straight threads, but always over the bars of the netting. This completes the star, as it is represented in fig. 645. Care must be taken to make the stitches lie quite flat side by side, and not one on the top of the other.
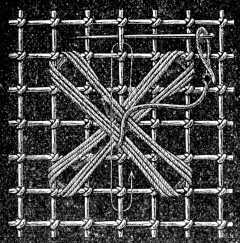 Fig. 643.
Star formed of loose threads
laying the underneath threads.
Fig. 643.
Star formed of loose threads
laying the underneath threads.
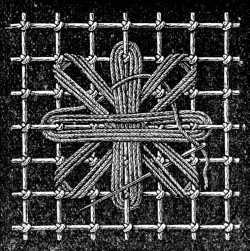 Fig. 644.
Star formed of loose threads.
Laying the upper threads.
Fig. 644.
Star formed of loose threads.
Laying the upper threads.
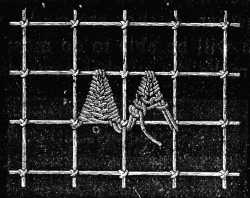
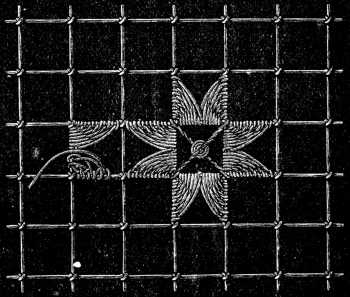
Darning stitch (point de reprise) (figs. 646 and 647).—Little flowers and leaves are generally executed in this stitch; the first course of the thread is shown in fig. 646. Leaves can be made with one, two or three veins. Carry the needle, invariably from the middle, first to the right and then to the left, under the threads of the foundation and push the stitches close together, as they are made, with the point of your needle. This you will be able to do most easily by holding the work so as to make the stitches towards you.
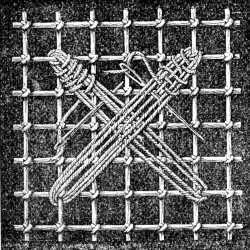 Fig. 646.
Leaves worked in darning stitch.
Begun.
Fig. 646.
Leaves worked in darning stitch.
Begun.
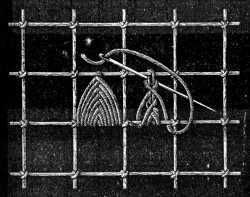
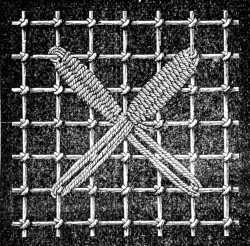 Fig. 647.
Leaves worked in darning stitch.
Completed.
Fig. 647.
Leaves worked in darning stitch.
Completed.
For a leaf with only one division or vein, like the left leaf in fig. 646, merely run the needle through the middle of the threads, whereas for a leaf with two or three veins, you must run it, over and under, either one, or two threads (see the right leaf in fig. 646).
In working leaves of this kind in darning stitch, you must draw your stitches at the top and bottom of the leaf rather tighter than in the middle, so as to give them the proper shape. If you wish to make them very slender at the bottom, you can finish them off with a few overcasting stitches.
Fig. 647 represents two leaves completed, one with one vein and the other, with two.
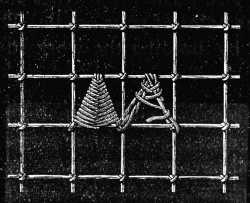
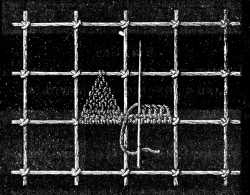
Pointed scallops in darning stitch (fig. 648).—The simplest way to work these scallops is to carry a thread, as shown in the illustration, to and fro over the square, from the knot in one corner to the middle of the bar above and downwards to the opposite knot, round which the thread is carried and passed upwards again to the middle. As the scallop must always be begun from the top, you will have, two foundation threads on one side and three on the other. Here likewise, you must push the threads as closely together as possible with the needle.
Pointed scallops in buttonhole stitch (fig. 649).—Another quite as pretty and easy way of working pointed scallops on a netted foundation is by making two buttonhole stitches before crossing to the opposite side. As shown in the foregoing illustration, you begin by stretching single or double foundation threads across; then beginning at the point, you make, alternately right and left, 2 buttonhole stitches over the foundation threads, so that the working thread is only carried across to the opposite side after every second stitch.
Veined pointed scallops (fig. 650).—A third way of making pointed scallops is by first stretching a thread to and fro across the middle of the square, after which you slip the needle from left to right under the middle thread, and underneath the left bar from above. Then you carry the needle, from right to left, over the foundation thread and under the right bar and so on. The one thread must be drawn tightly round the other, in order that the stitches may form close and evenly shaped veins, like small cords, on the wrong side of the scallop. There must be enough stitches to completely cover the foundation thread that crosses the middle of the square.
Pointed scallops in Venetian stitch (fig. 651).—The prettiest scallops of all are those worked in Venetian stitch. You begin, by making from 8 to 10 buttonhole stitches over one bar of the netting, then you work on with the same stitch backwards and forwards, making one stitch less in each row, until you come to the one which forms the point of the scallop and is fastened to the bar above; you carry the working thread back on the wrong side to the lower bar, and then under the buttonhole stitches to the next square of the netting. Scallops worked in this manner, can be overcast round the edges in the way described further on, in fig. 660.
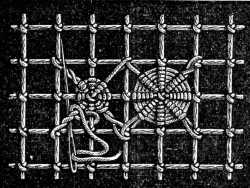
Wheels embroidered on netting (figs. 652 and 653).—To make wheels or spiders, as they are also called, you have first to fasten the thread to the middle knot of four squares, thence you carry it diagonally right and left, fig. 652, right detail, across the empty squares of netting and the knot, and return to the middle, overcasting your first thread by the way, so as to form a closely twisted cord. This is called cording a thread.
Having reached the centre, carry the working thread round and round, under and over the corded threads and under the bars of the netting till the wheel covers half the bars.
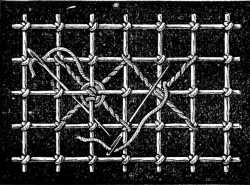 Fig. 652.
Laying the threads for a wheel
and beginning of the wheel.
Fig. 652.
Laying the threads for a wheel
and beginning of the wheel.
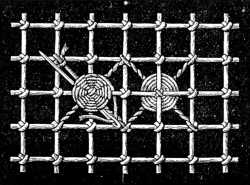 Fig. 653.
Wheels worked in
two ways.
Fig. 653.
Wheels worked in
two ways.
Fig. 653 shows, on the right, a finished wheel, and on the left, another way in which it can be made, and indicates the course of the thread over and under the lines, as in a darn. These details show also how, when the foundation thread of the wheel starts from a corner, it is left single in the first square until the wheel is finished; then the needle is slipped back along the little spoke, opposite to the single thread, and through the wheel, and the single thread is corded like the others.
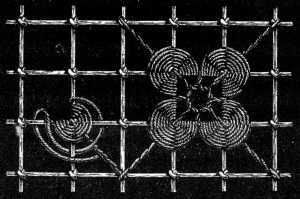
Ribbed wheels (fig. 654).—Make the foundation of the wheels as before, over 8 threads. To form the ribs at the back of the wheels, see fig. 654; make a back stitch, on the right side, over a bar of the netting, and carry on the needle under one bar, so that the thread that lies outside always crosses 2 bars of the netting.
In this case you must make circles of thread enough, to cover the bars completely, not half, as before.
The same stitches, as fig. 654 shows, can be made on either side of the embroidery, and so as to form, either a square or a lozenge (see fig. 655).
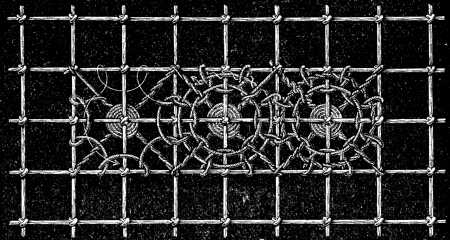
Wheels set with buttonholing (fig. 656).—A very pretty lace-like effect is produced by encircling the wheels in large squares of netting with a double setting of stitches. The left detail of fig. 656 shows how the thread, having been passed under the wheel and twisted once round the single thread, is carried all round the square and forms 8 loops.
The arrow shows the way in which the loops are taken up, and the first ring of stitches round the wheel is finished.
The second detail of the same figure explains the course the thread, that forms the second ring, has to take through the loops and between the bars; whilst the white line shows the passage of the thread over the second ring. The third detail represents a wheel, completed.
Star with one-sided buttonhole stitches (fig. 657).—The pattern represented in fig. 657, is the quickest to work that we know of. Two buttonhole stitches made upon the outside bar of a square and a simple crossing of the thread at the bottom, produce elongated triangles which should always be begun from the knot. Two triangles stand exactly opposite to each other in one square, and the square that comes in the middle of the four thus filled, is ornamented with a small wheel.
Rounded corners of netting (fig. 658).—Darning stitches, made over a thread carried diagonally across one square and the adjacent corners of that and two other squares, produce the figure illustrated in fig. 658. The accompanying detail shows the mode of working.
The number of stitches depends on the material you use; there should be no more than can lie quite flat, side by side, on the diagonal thread.
Linen stitch, set with darning stitch (fig. 659).—There are some patterns it would hardly be possible to work on netting unless you could soften the outlines by darning stitches, as shown in the foregoing figure.
When employed as a setting to linen stitch, there should be fewer than in fig. 658; you may also, instead of interrupting them at every corner, carry them all round a square, (see the right detail of the figure).
Linen stitch set with cord stitch (fig. 660).—Many figures are also either corded or edged with twisted thread; both ways are represented in the illustration. In the latter case you can use the same thread as for the linen stitch, or if you wish the setting to be very pronounced, a thicker one. For instance, if the netting be made of Cordonnet 6 fils D.M.C No. 25[A] we recommend Fil à pointer D.M.C No. 15 or 20[A] for the setting. This difference of material is especially noticeable in the old Cluny Guipure, where the figures worked in linen stitch are edged with a thread like a cord. But if the linen stitch be bound with cord stitch, the same thread must be used for it, as for the foundation. A soft material, like Coton à repriser, makes the best padding for the overcasting stitches.
Flower in dot stitch on a foundation of linen stitch (fig. 661).—With the help of this stitch, which is described in the chapter on white embroidery and represented in fig. 179, a great variety of little supplementary ornaments can be made, on every description of netted ground.
Bordering in buttonhole stitch (fig. 662).—Scalloped edges in netting should be buttonholed; 2 or 3 padding threads should be run in first, following the bars of the netting, over which the buttonholing is done; the bars of the netting must not be cut away until the edge be finished.
Cut work in embroidered netting (fig. 663).—Cut work here means half covering the bars of the netting with button-hole stitches and half cutting them away with scissors. The inner bars are frequently ornamented with a double buttonhole edging and knotted picots, see figs. 698 and 699 in the next chapter. You slightly separate the stitches of the first row of buttonholing so as to be able to introduce the thread of the second row between them.
Straight loop stitch (fig. 664).—In the first row you carry the thread over one bar and slip it through behind a knot; in the second you do the same thing, only that above, your needle will pass under 3 threads, two of them the threads of the loop of the first row and the third a bar of the net. In every square 4 threads cross each other.
Waved stitch (fig. 665).—This stitch, which forms a close waved ground, is produced by passing the thread in each row of the netting over a square and behind a knot. When the pattern admits of it, as it mostly does, a considerably thicker thread is used for this stitch and for the stitches represented in figs. 667, 668, 669 and 670, than that in which the netting is made. When the netted ground is of Fil à dentelle D.M.C No. 50,[A] the embroidery upon it may very well be done in Cordonnet 6 fils. D.M.C No. 10[A], or Fil à pointer D.M.C No. 30.[A]
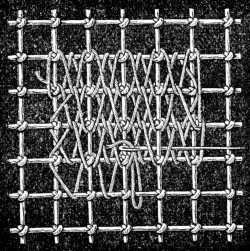
Intersected loop stitch (fig. 666).—Begin by covering the whole surface to be embroidered with plain loop stitches, then stretch threads diagonally across the squares of the netting and the loop stitches; one set of threads running over the stitches and under the knots of the netting, the other under the first and second threads of the loop stitches and over the first crossed threads and the knots.
The laying and stretching of these threads must, it is hardly necessary to say, be systematically and regularly done.
Ground worked in horizontal lines (fig. 667).—Make half cross stitches over 4 squares of netting, by passing the thread alternately over and under 3 knots, and under 3 squares of the netting. In the second row, cross the threads over those of the first row, as is shown in our engraving.
Ground worked in stitches placed one above the other (fig. 668).—Cover a whole row of squares with cross stitches and leave 3 rows of squares empty. When you have a sufficient number of rows of cross stitches, take a long needle and pass it upwards from below, and from right to left, under the two bars of the third upper square; then pass downwards to the first square of the 3 bottom rows and under the bars from right to left, so as again to leave 3 squares between the fresh stitches. The next row of stitches is made in the same manner, so that the stitches are not only set contrary ways but reciprocally cover each other.
Latticed ground (fig. 669).—Begin by running the thread, to and fro, under two vertical bars and over three horizontal ones. When the ground is entirely covered, carry your thread from right to left, under the bars over which the first rows of threads are crossed; then take it over the long crosses, that correspond to 5 squares of netting, and pass it in the same line under the bars of the netting. In coming back, the long stitches cross each other over the stitches of the first rows.
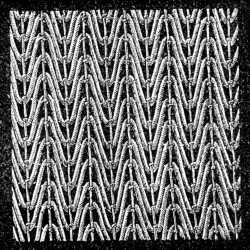
Ground worked in Russian stitch (fig. 670).—Pass the thread from left to right, under a bar of the netting, carry it downwards over 4 squares and pass it again, from left to right, under the bar, then upwards, again over 4 squares of netting and so on. The stitches of the next rows are made in the same manner; you have only to see that the loops formed by the stitches all come on the same line of knots.
Ground worked in two sizes of thread (fig. 671).—Herewith begins the series of stitches, referred to at the beginning of the chapter, copied in part from one of the oldest and most curious pieces of embroidered netting we have ever met with. The copies were worked with Cordonnet 6 fils D.M.C No. 25 and écru Fil à dentelle D.M.C No. 70[A]; the former being used for the darning and the almond-shaped stitches between; the latter for the buttonhole stitches. Wherever two sizes of thread are used for one pattern, all the stitches in the coarse thread should be put in first and those in the fine, last.
Ground with wheels and loop stitch (fig. 672).—You begin with the coarse thread and finish all the wheels first, making them each over 4 threads of the netting; then with the fine thread, you make loop stitches between them, in rows, as shown in figs. 641 and 642.
Ground worked in darning and loop stitch (fig. 673).—The darning stitches are made in the coarse thread, over 4 squares of the netting, in a horizontal direction, with loop stitches, in the fine thread, made between them, over the same number of squares.
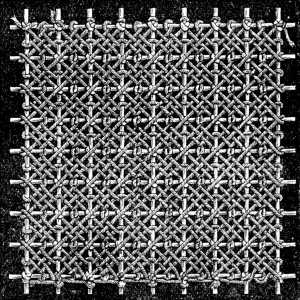
Ground worked in two sizes of thread (fig. 674).—Carry the coarse thread, from right to left, under the first knot of the netting, and then under the next, from left to right. This has to be done twice, to and fro, so that the squares of the netting are edged on both sides with a double layer of threads.
When the whole foundation has been thus covered, take the fine thread and make loop stitches in the squares between the other rows of stitches, passing the needle for that purpose over the double stitch. Lastly, intersect the loop stitches with straight threads and pass the needle each time through the knot of the netting.
Ground worked with cross stitches in one size of thread (fig. 675).—This pattern, very like the foregoing one, consists of 3 diagonal rows of stitches, worked to and fro, with cross stitches made over them.
You may also begin with the cross stitches, in the fine thread, and work the triple stitches over them, in the coarse.
Ground worked with darning and cord stitches (fig. 676).—Patterns, executed chiefly in darning stitches, in a comparatively coarse thread, present a closer and heavier appearance than those we have been describing. Here, every other square of the netting is filled, as closely as possible, with stitches; the empty squares between are intersected diagonally with corded threads.
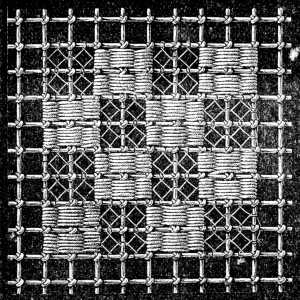
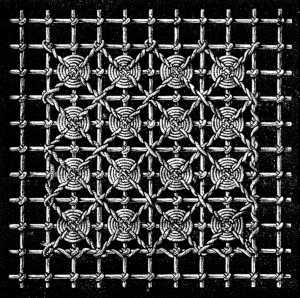
Ground worked with squares and wheels (figs. 677, 678, 679).—A ground very often met with in old embroidered netting, consists of diagonal lines of squares, closely filled with darning stitches, alternating with diagonal lines of squares, each with a small wheel in the middle.
 Fig. 676. Ground worked with darning and cord stitches.
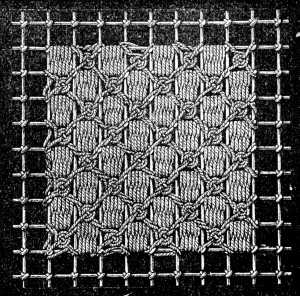 Fig. 677. Ground worked with squares and wheels.
In fig. 678, the darning stitches, and the wheels, which are both worked with the same material, cover 4 squares of the netting.
Larger expanses of netting may also be entirely filled with wheels, fig. 679. To make a really satisfactory grounding of this kind, you should be careful always to carry your thread over the bars of the netting and under the threads that are stretched diagonally across.
Ground worked in cross and darning stitch (fig. 680).—You begin, as before, by making the close darning stitches, and then proceed to the cross stitches. To give them the right shape, finish all the rows of stitches one way first; in the subsequent rows, that cross the first ones, you introduce the thread between the stitches that were first crossed.
Ground of geometrical figures (fig. 681).—This pattern, quite different from all the others, consists of simple geometrical lines. Fasten the thread to a knot of the netting, then carry it, always diagonally, under 3 other knots and repeat this 3 times, after which, carry it once round the bar of the netting, to fasten it, and back again to the knot which it already encircles, and from thence begin a new square. Owing to your having always to bring the thread back to the knot whence the next square is to begin, you will have 4 threads on two of the sides and 6 on the two others.
In the second and subsequent rows, the needle has to pass twice under the angles that were first formed, in order that, over the whole surface, all the corners may be equally covered and connected.
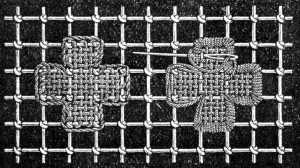
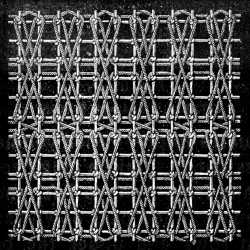
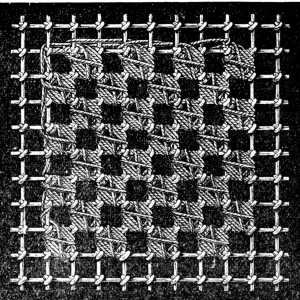
Netted insertion worked in plain darning stitch (fig. 682).—The taste for ornamenting not only curtains but bed and table linen also, with lace and insertion of all kinds, to break the monotony of the large white surfaces, is becoming more and more general and the insertion here described will be welcome to such of our readers as have neither time nor patience for work of a more elaborate nature.
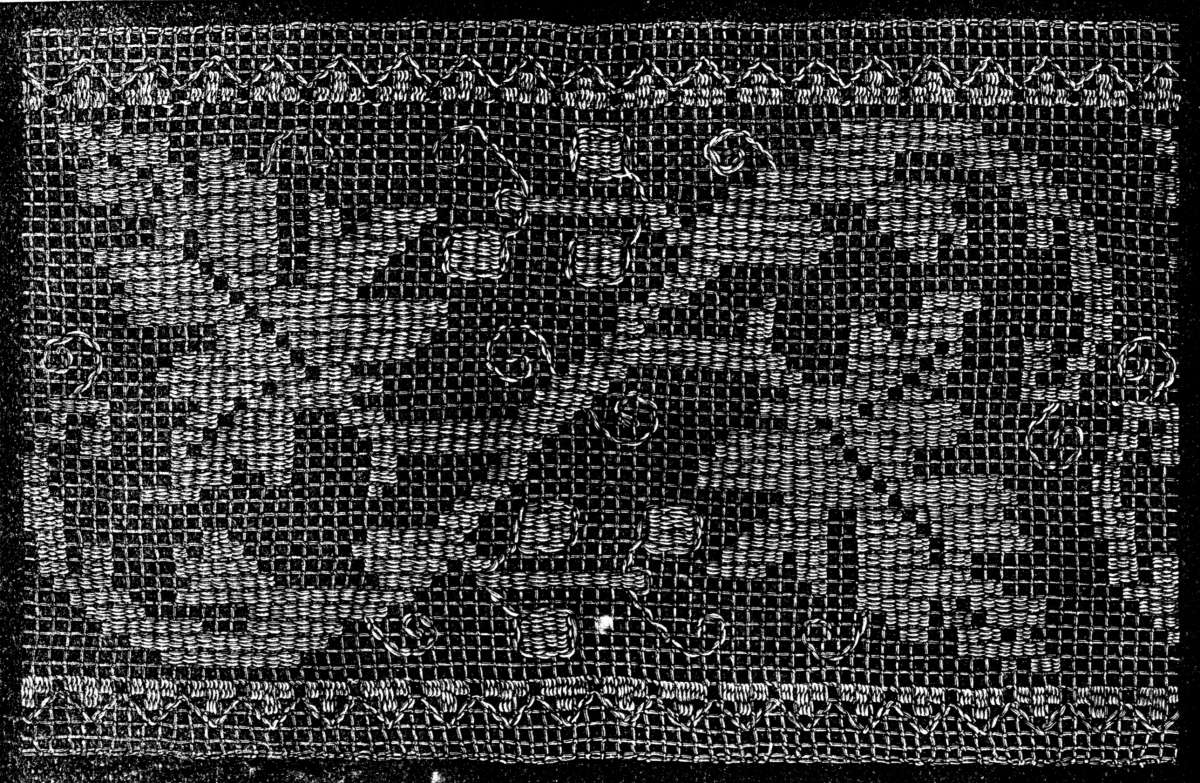 Fig. 682. Netted insertion worked in plain darning stitch.
The way to make straight netting has already been fully described in figs. 625, 626, 627, 628, 629 and 630, and darning stitch in fig. 637.
To those who wish to be saved the trouble of making the netting themselves, we can strongly recommend various fabrics, intended to take its place, more especially Filet Canevas, which is an exact imitation of the finest hand-made netting. The centre part of the pattern in fig. 682, is worked in rows of horizontal darning stitches, the narrow border in vertical ones.
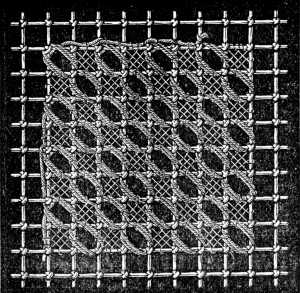
Ground of netting embroidered (fig. 683).—We have already had occasion, in the foregoing explanations, to point out the advantage of embroidering with two sizes of thread, but it is only in a piece of work of a certain size that it is possible really to judge of the excellent effect produced by the use of two threads of different sizes.
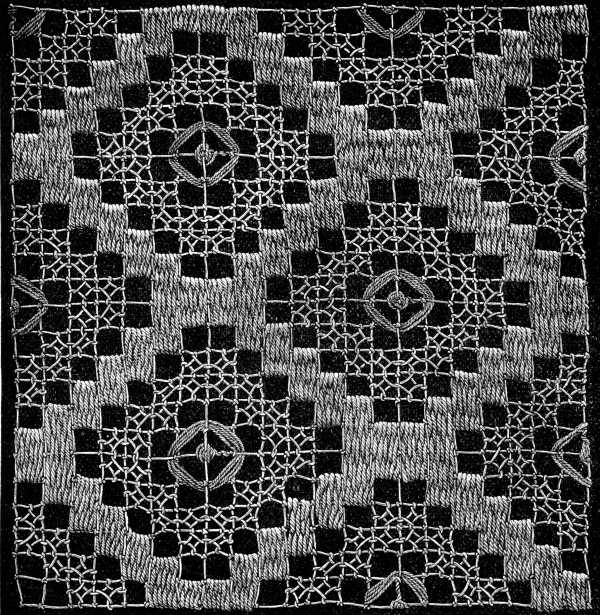 Fig. 683. Embroidered ground of netting.
The principal lines of the pattern, which are in darning stitch, are worked in a very coarse thread with a strong twist, Fil à pointer D.M.C, whilst the loop stitches are in Cordonnet 6 fils D.M.C.
Our model was worked in écru thread but there is nothing to prevent several colours being introduced, for instance écru, black or Gris-Ficelle 462 for the netted foundation; Rouge-Cardinal 346, for the darning stitches, and Chiné d'or D.M.C green and gold or blue and gold, for the loop stitches and the threads that are carried across inside.
Embroidered square of netting with two kinds of lace suitable for the border (figs. 684, 685, 686).—Large pieces of embroidered netting are generally made up of squares and stripes, joined together with ribbon and fine linen insertions. It is easier and less cumbrous to make the netting in separate pieces. Squares of different patterns can also be combined with crochet and pillow lace, in this case of course the squares have to be arranged with some system.
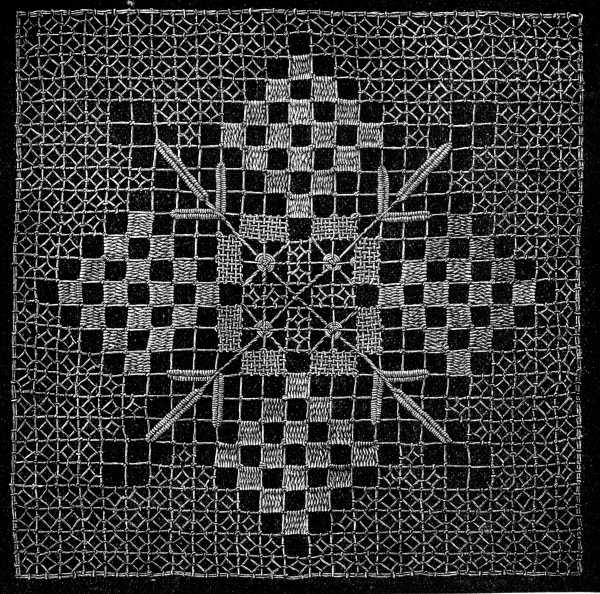 Fig. 684. Embroidered square of netting.
Fig. 685 represents a lace edging intended for the square fig. 684, which shows how even in such a simple pattern as this, several colours may be successfully introduced.
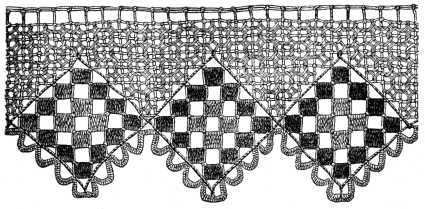 Fig. 685. Lace edging for the square, fig. 684.
Fig. 686 is a handsomer and more elaborate pattern for the same kind of purpose. The loop stitches and the linen stitches should be worked in a very light shade; instead of the colour indicated at the foot of the engraving, Rouge-Géranium 353, Violet-Mauve 377 or Jaune-Rouille 365 may be used; for the netting and the loop stitches you may combine, with the first shade, two shades of Brun-Caroubier 303 and 357, with the second, two shades of Jaune-vieil Or 678 and 680 and with the third, two shades of Rouge-Cardinal 346 and 348.
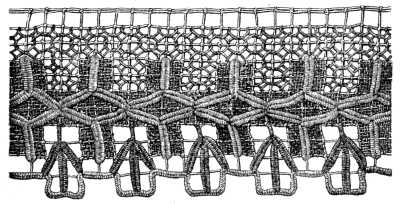 Fig. 686. Lace edging.
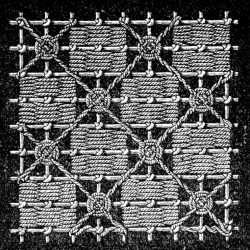
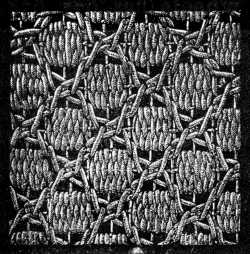
Pattern for ground (fig. 687).—The peculiar charm of this most unpretending pattern is chiefly due to the variety of material and colour introduced into it. The netted ground is made of dark brown Cordonnet 6 fils D.M.C No. 25, worked over, in the first instance, with loop stitches in a pale grey, which are afterwards connected by darning stitches in Coton à repriser Gris-Tilleul 392.
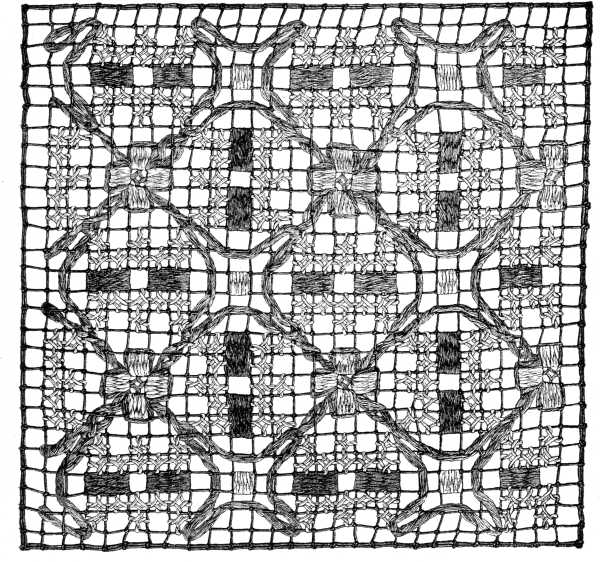 Fig. 687. Pattern for ground.
The same material in Rouge-Géranium, is used for the little centre squares and the pink crosses, and isolated darned squares are framed with loose cord stitches in Coton à repriser colour Jaune-vieil-Or 680.
We can also recommend, for the same pattern, the following combination of colours, all to be found on the D.M.C colour card; namely, Bleu pâle 668 for the netting; Chiné d'or, gold with dark blue for the loop stitches; Ganse turque D.M.C No. 12 (Turkish gold cord) for the darning stitches, between the loop stitches; Coton à broder or Cordonnet 6 fils in Rouge-Cornouille 450, for the detached darned squares and Coton à repriser, in Jaune-d'Or 667 for the setting of all the different parts of the pattern.
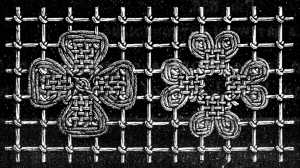
Embroidery on netting with different-sized loops (fig. 688).—The netting, described and represented in fig. 620, with plain, oblong and double loops, here forms the ground for the embroidery.
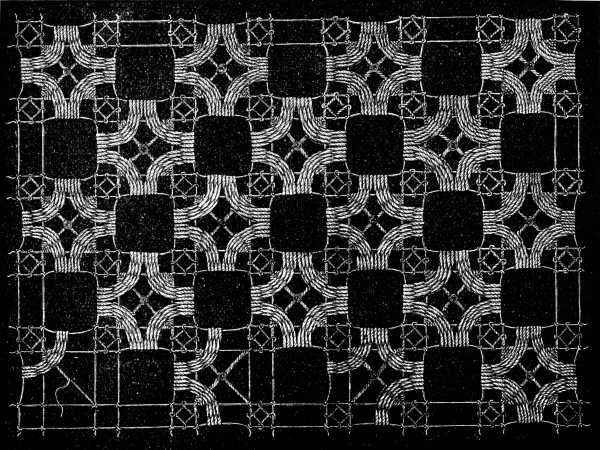 Fig. 688. Embroidery on netting with different-sized loops.
 In order to make the isolated loop stitches, the thread which forms the cross in the middle must be carried to the middle of the bar, the loops that form the stitches must be finished and the thread carried back to the knot whence it started. It must then be taken three times backwards and forwards over the foundation thread and the two bars of the netting, when the stitches, into and over 3 squares of the netting, should be made. The last row in the engraving shows the pattern in the successive stages of its development.
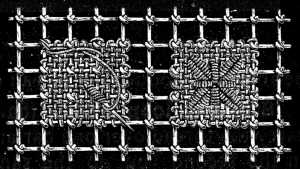
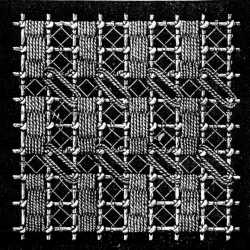
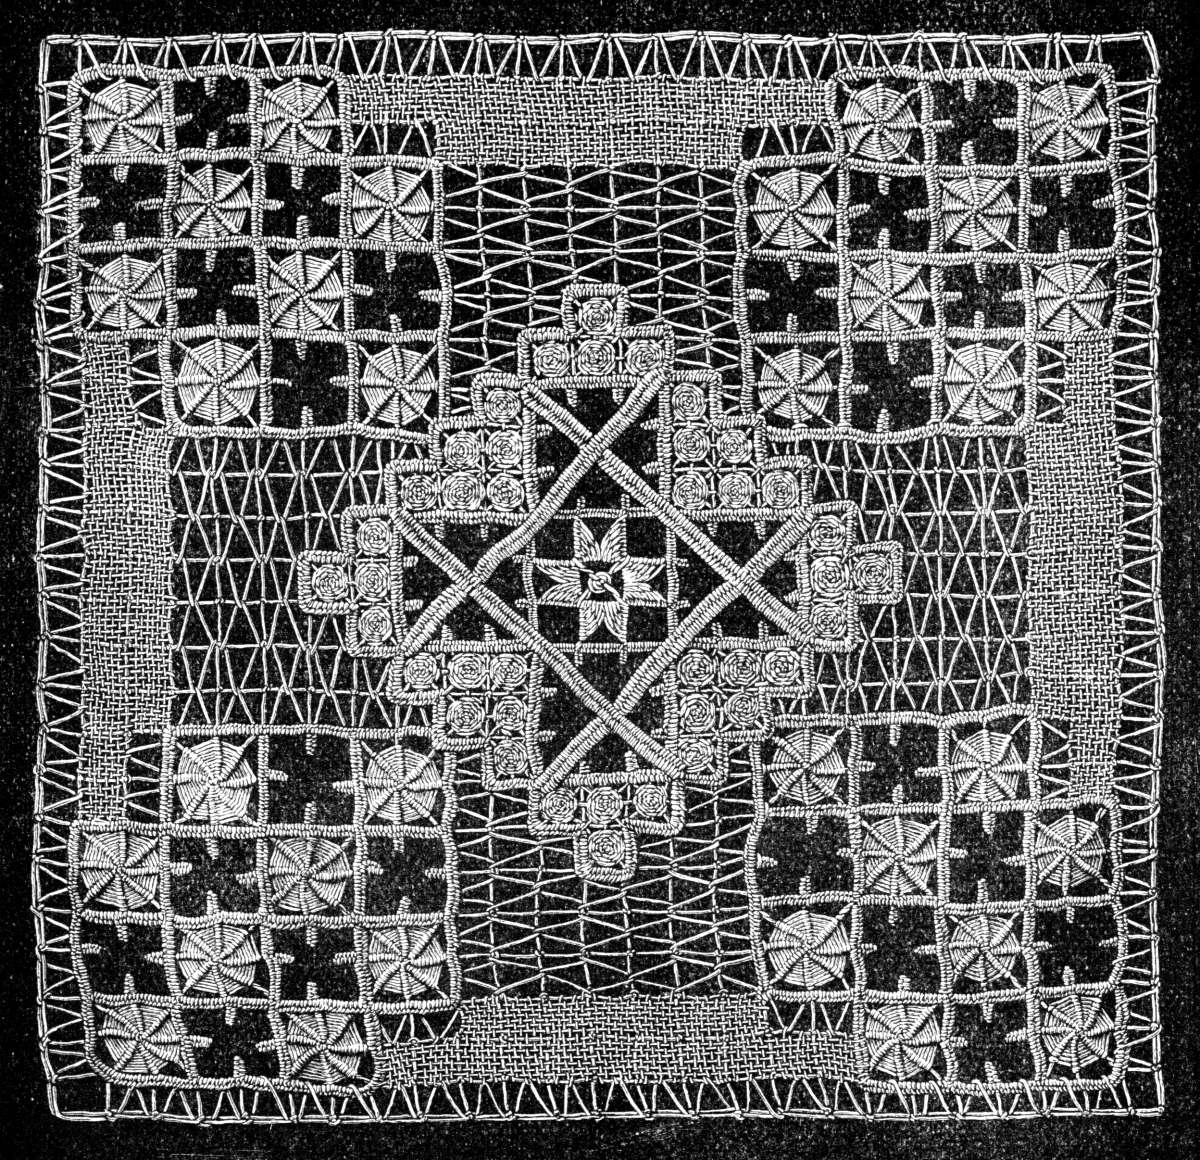
Square and edging in cut netting (figs. 689 and 690).—Few patterns admit of such a successful application of all the stitches hitherto described, as the square and edging presented to our readers in the two subjoined figures. On a netted ground of rather fine thread, we have in the first place, linen stitch, in the border, worked in rather a coarser thread than the ground; then raised wheels, buttonholed bars with picots in the centre, plain wheels very close together, and long ribbed bars worked in darning stitch.
The edging, to match the square, is worked in the original in pale shades, in contrast to the square which is executed entirely in écru thread. The squares in the netted footing of the lace are loosely overcast with pale Violet-Mauve 316, the same colour is also used for the wheels in the outside edge, each of which fills a square, and for the loop stitches round them; whilst the middle one of the three upper ribbed wheels and the star are worked in dark Violet-Mauve 315. The crosses in linen stitch, the three lower ribbed wheels and the long ribbed bars in darning stitch, are in Gris-Tilleul 392.
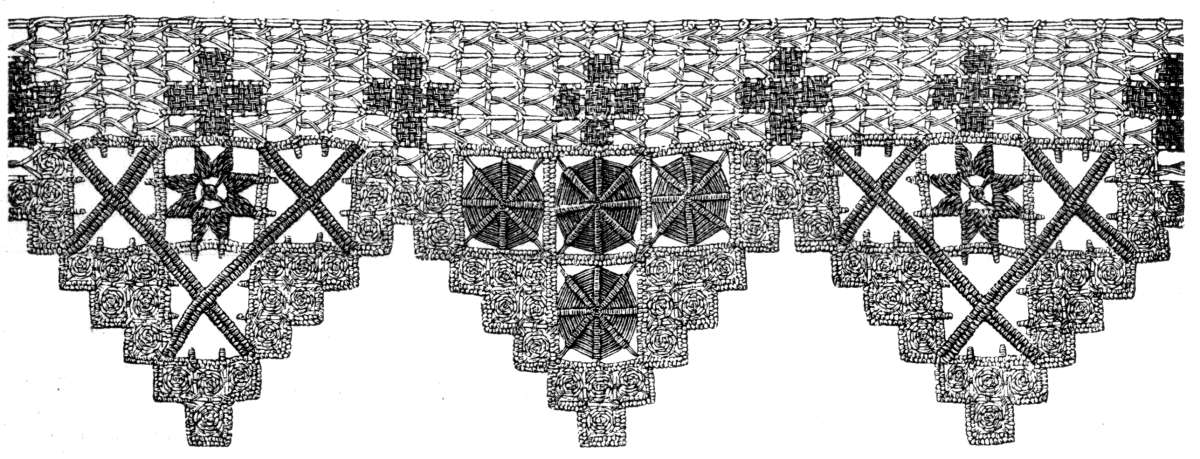 Fig. 690. Lace edging in cut netting.
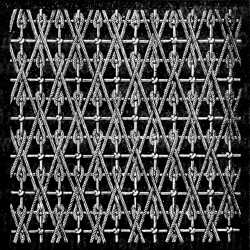
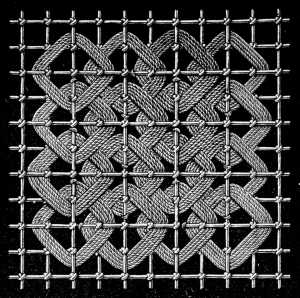
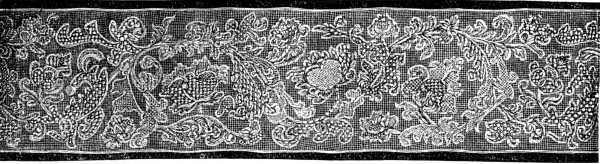
Netted insertion (fig. 691).—This is a copy of a beautiful piece of embroidered netting, to all appearance, several centuries old, and in a state that rendered, even the most delicate handling almost impossible.
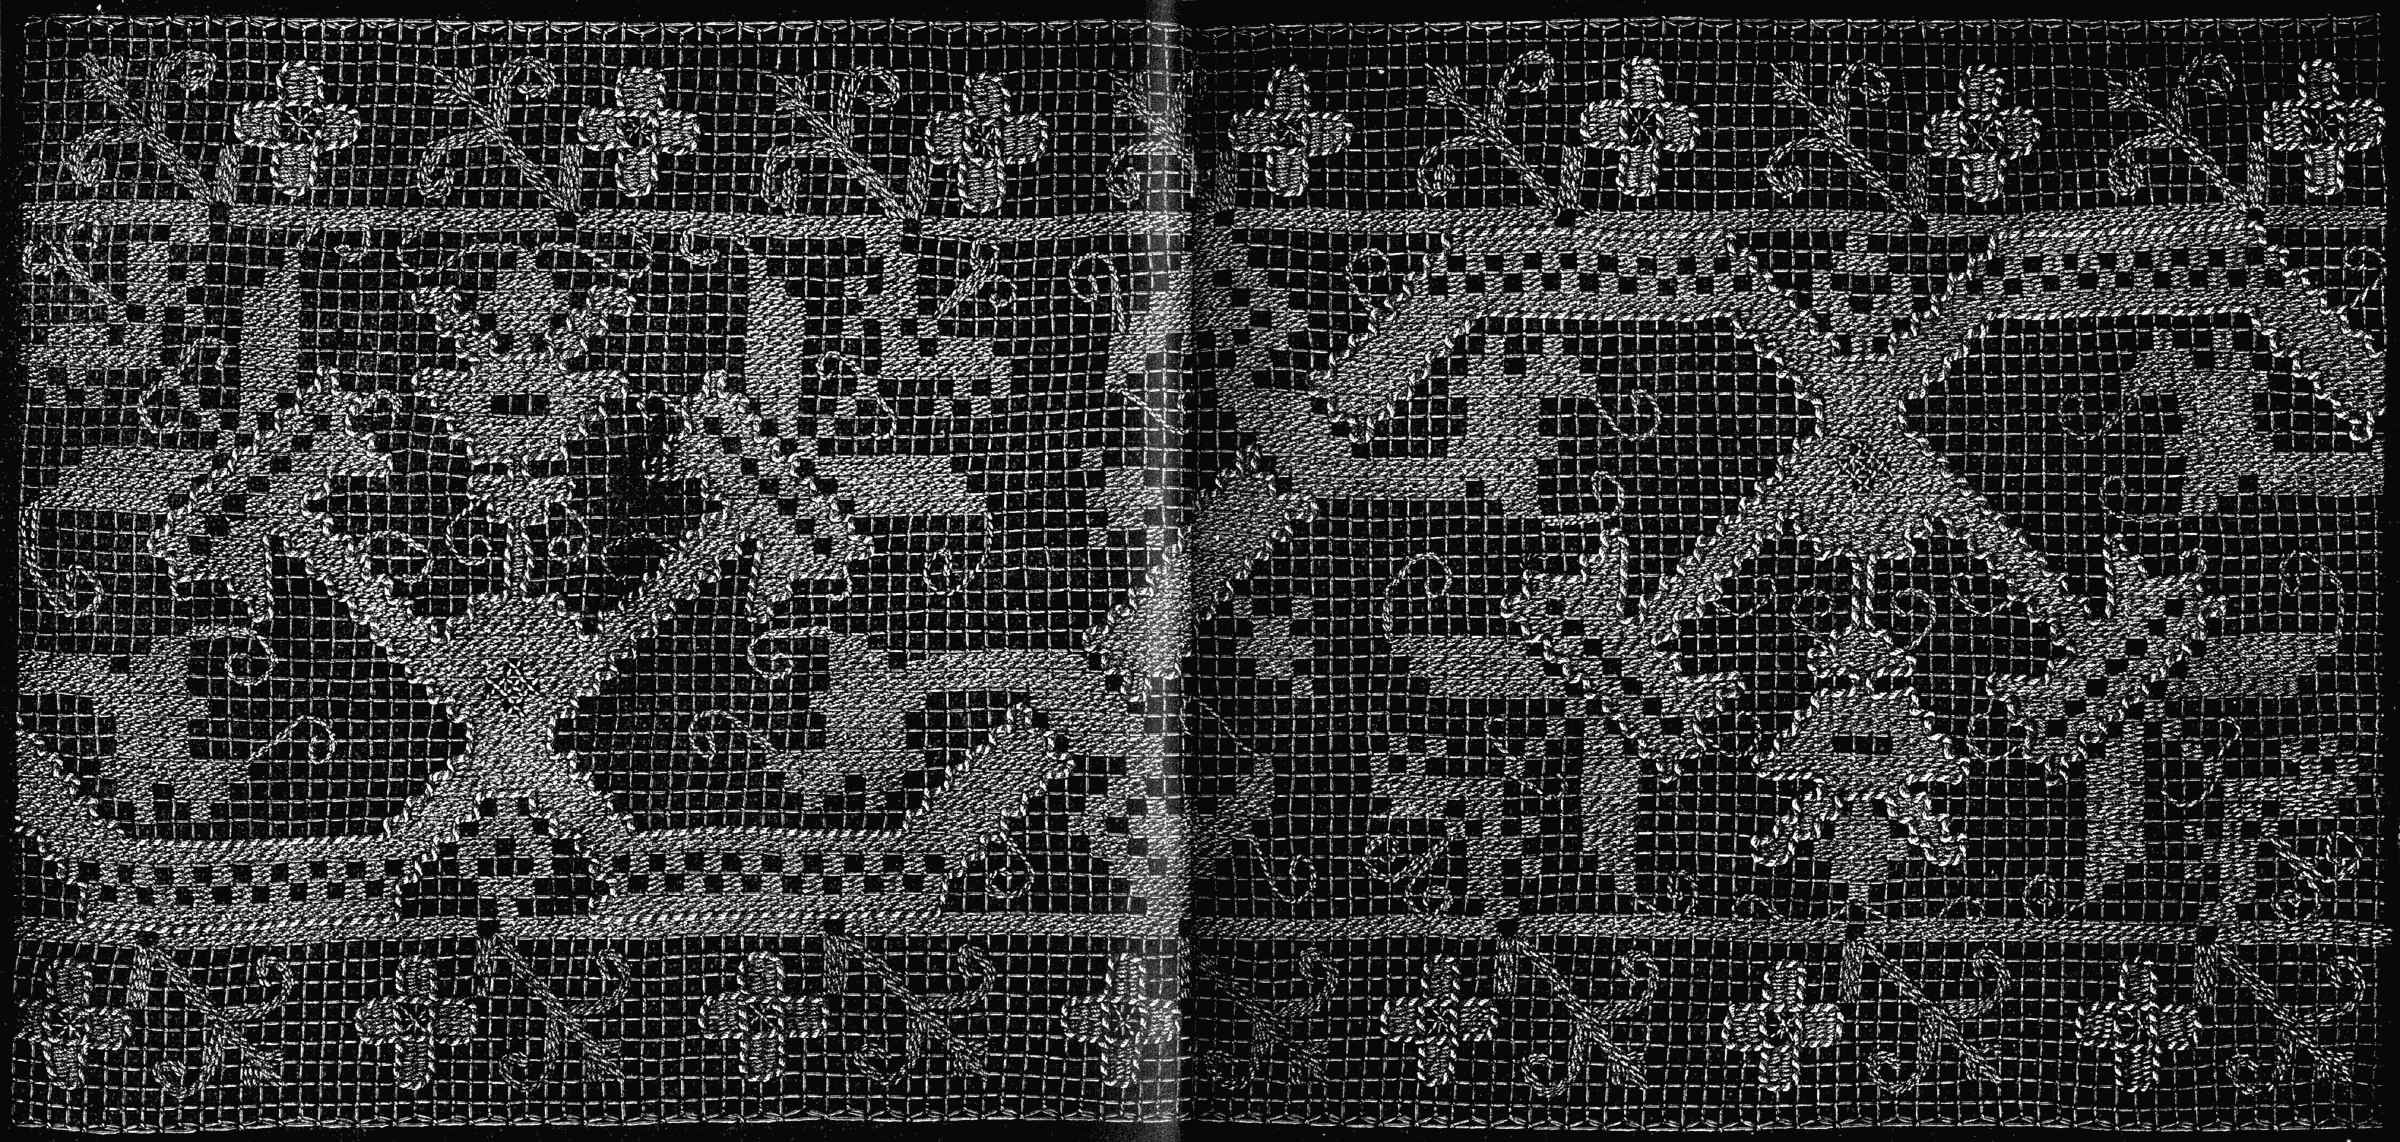 Fig. 691. Netting insertion—For the netting: Cordonnet 6 fils D.M.C No. 40 white or écru.
—For the embroidery: Ganse turque D.M.C Nos. 6 and 12.
Fig. 691. Netting insertion—For the netting: Cordonnet 6 fils D.M.C No. 40 white or écru.
—For the embroidery: Ganse turque D.M.C Nos. 6 and 12.
After several experiments, the best result has been arrived at, and the Turkish cord in which the original is made, has now been manufactured for netting purposes, as well as for other kinds of decorative work, already alluded to, and referred to again later on.
The first foundation, that is, the actual netting, for a thing of this kind, should be made in white or écru thread, with very small meshes; the pattern itself is embroidered on the netting with Ganse turque D.M.C No. 12; this material, écru and gold mixed, gives the work a glittering and peculiarly elegant appearance, unobtainable in any other.
The execution is extremely easy, it being worked entirely in darning stitch; but the drawing should be copied with great accuracy and the wide braid very carefully sewn on with close stitches round the squares, which are filled in with darning stitches made in Ganse turque No. 12.
Any netting pattern can be copied in this braid, and the simplest piece of work of the kind is worth mounting on a rich foundation of silk, brocade, velvet or plush. To give a single example, the insertion here described and illustrated, was mounted on slate-blue plush and has been universally admired.