The Project Gutenberg eBook of The Palmer Method of Business Writing, by A. N. Palmer
This eBook is for the use of anyone anywhere in the United States and
most other parts of the world at no cost and with almost no restrictions
whatsoever. You may copy it, give it away or re-use it under the terms
of the Project Gutenberg License included with this eBook or online
at
www.gutenberg.org. If you
are not located in the United States, you will have to check the laws of the
country where you are located before using this eBook.
Title: The Palmer Method of Business Writing
A Series of Self-teaching in Rapid, Plain, Unshaded, Coarse-pen, Muscular Movement Writing for Use in All Schools, Public or Private, Where an Easy and Legible Handwriting is the Object Sought; Also for the Home Learner
Author: A. N. Palmer
Release Date: October 6, 2021 [eBook #66476]
Language: English
Produced by: Richard Tonsing and the Online Distributed Proofreading Team at https://www.pgdp.net (This file was produced from images generously made available by The Internet Archive)
*** START OF THE PROJECT GUTENBERG EBOOK THE PALMER METHOD OF BUSINESS WRITING ***
Transcriber’s Note:
The cover image was created by the transcriber and is placed in the public domain.
THE PALMER METHOD of BUSINESS WRITING
A Series of Self-teaching Lessons in Rapid, Plain, Unshaded,
Coarse-pen, Muscular Movement Writing for Use in All
Schools, Public or Private, Where an Easy and Legible Handwriting
is the Object Sought; Also for the Home Learner
BY A. N. PALMER, EDITOR OF THE AMERICAN PENMAN
| Published by THE A. N. PALMER COMPANY |
| |
| NEW YORK |
BOSTON |
CHICAGO |
CEDAR RAPIDS, IOWA |
| COPYRIGHT, 1901, BY A. N. PALMER |
COPYRIGHT, 1908, BY A. N. PALMER |
COPYRIGHT, 1913, BY A. N. PALMER |
COPYRIGHT, 1915, BY A. N. PALMER |
2
An explanation.—The object of this book is to
teach rapid, easily-executed, business writing. It has
not been written to exploit any one’s skill as a pen
artist. It aims to be of use to those who are ambitious to
become good, practical business writers. The lessons it contains
are not experimental, but have been the means of
guiding millions of boys and girls, young men and women to
a good business style of writing.
As will be seen at a glance, the Palmer Method of Business
Writing has nothing in common with copy-books which have
been so largely used in public schools for more than half a
century. If they are right, this book is wrong. The two
methods of teaching writing are absolutely antagonistic.
In teaching writing, as in other subjects, the final result
should be the criterion. Pupils who follow absolutely the
Palmer Method plan never fail to become good penmen.
On the other hand, no one ever learned to write a good, free,
rapid, easy, and legible hand from any copy-book that was
ever made.
The copy-book has but one purpose—to secure absolute
mechanical accuracy. The copy-book headline is usually
first carefully penciled by a skilled penman after a given
model, and shows none of the individuality of the penman
employed in its construction. The penciled copy is given to
a skilled script-engraver, who engraves it by hand and further
perfects it wherever possible. This impossible and lifeless
ideal the child is required to imitate through long, dreary
pages of copying. No wonder he fails!
It has been proved, through at least two generations, that
the copy-book kills individuality and makes freedom of
movement impossible. It compels slow finger-action in the
formation of letters, giving a fair degree of accuracy where
only slow writing is required; but the pupil’s work inevitably
becomes scribbling when the least speed is attempted. In
the Palmer Method, freedom of movement is the foundation,
and, through a constantly repeated series of rapid drills, the
application of movement becomes a fixed habit of the learner.
Under this plan the pupil’s first attempt is naturally crude,
but every drill practiced in strict accord with the printed
instructions tends to add grace and accuracy to his work.
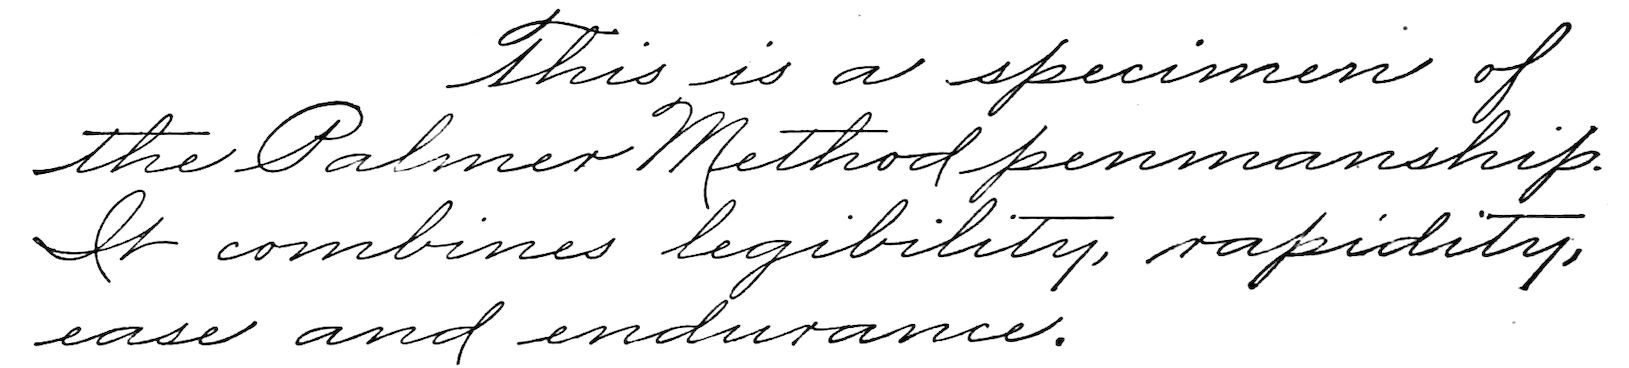
The sure result is a handwriting that embodies these four
essentials—legibility, rapidity, ease, and endurance.
The drills and copies in this book are actual writing,
executed with a rapid, easy, muscular movement, and then
photo-engraved, thus retaining the individuality of the writer.
Pupils practicing from these lessons acquire the general
style of the copies, but, at the same time, there is left to them
the possibility of developing their own individuality.
3
SOME PALMER METHOD FACTS—A PERSONAL TALK
Read and Carefully Consider Everything on These Three Pages Before Beginning the
Study and Practice of the Lessons. Failing to follow These Simple Suggestions,
You are Likely to Waste Many Hours, Weeks, and Months in Useless Practice.
The Palmer Method is a text-book on practical
writing and should be studied as such—not treated as
a copy-book. The printed instructions are the author’s
direct personal talks to pupils—the same things he would
say to you from day to day were he personally to teach you.
These instructions are of more importance than the copies.
They tell you how to develop and use the muscular movement
in writing. If you do not follow the instructions, you will fail.
Pupils who followed absolutely the Palmer Method plan
have always learned to write well. Pupils who have not first
studied the plainly printed directions and followed them absolutely,
have partly or completely failed. Failure is unnecessary.
Thousands of young men and women have made the
Palmer Method of Business Writing the stepping-stone to
positions in business offices, where commercial advancement
rewarded faithful service.
In hundreds of classes where the Palmer Method has
been faithfully studied and completely mastered, periods
devoted to written spelling, composition, examinations, and
other written work have been reduced more than half. Time
thus saved has been put to very good use in other directions.
In the beginning stages of the work, until good position,
muscular relaxation, correct and comfortable penholding,
and muscular movement as a habit in writing have been
acquired, extra practice may be necessary; but the extra
time will be saved many times over in all written work later.
Muscular movement writing means good, healthful posture,
straight spinal columns, eyes far enough away from the
paper for safety, and both shoulders of equal height. These
features alone should be sufficient to encourage boys and girls
to master a physical training system of writing such as is presented
in the following pages, remembering that it is impossible
to do good muscular movement writing in twisted,
unhealthful positions, or with stiff and rigid muscles.
Straight line and oval drills are of no value except as they
lead to writing. They are the means through which to gain
the muscular control that will enable pupils to master an
ideal permanent style of rapid, plain-as-print writing.
When pupils have learned good posture, correct penholding,
and how to use muscular movement in making a good
two-space compact oval, they are ready to begin to learn how
to write well. Too many pupils think they have really
learned how to write well when they are able to make some
of the very simple drills in correct posture at the right speed
and in correct rhythm. That is really the starting-point
toward good penmanship, and should be followed immediately
by the practice of words, and, indeed, by the use of the
movement in all written work.
4Study and practice go hand in hand in securing the best
results in the shortest possible time. Keep the Manual open
before you as you practice; study and make frequent and
careful comparisons of your work with the drills if you wish
to make rapid progress.
Your letters, words, and sentences should occupy the same
amount of space they do in the Manual. Always, before
beginning practice, the drill should be studied in every little
detail until the correct picture is in your mind.
Just how and where does the first line in a letter begin; is
it made with an upward or downward stroke; how high is
the letter; how wide is each part; how much running space
does it occupy; in what direction should the pen move in
beginning, continuing, and completing the letter; and at
what rate of speed should the letter or word be written?
These are questions that should constantly occupy you as
soon as automatic muscular movement has been established.
In fact, as was said before, study and practice must go hand
in hand, if good results are to be the outcome.
Blackboard copies, though written by expert penmen, are
seen at many different angles, and at different distances, and
do not give correct mental impressions.
It is highly important not only that pupils have copies of
the Manual, but that they study the printed instructions and
drills, closely and constantly.
The plainly printed instructions in the Palmer Method
tell you step by step exactly what to do and how to do it,
in order to progress steadily and surely toward the desired end.
Millions of American boys and girls have learned a
permanent style of rapid, easy, legible, and beautiful writing
by carefully and patiently following the printed directions
found in the Palmer Method of Business Writing. Final
results have then been delightful to pupils, teachers, parents,
and school officials.
The first step is a correct understanding of the required
position. Study the pictures on pages twelve, fourteen, and
fifteen, of a pupil who has learned how to sit so as to use the
large tireless muscles of his arms to the best possible advantage.
Study every little detail of these pictures from the
crown of the head to the shoes. Study particularly and
closely the arms, the relation of one arm to the other, the
position at the desk, the distance of the body from the desk,
and the positions of the fingers preparatory to taking the
penholder.
As progress is made in the more advanced lessons, you
should refer frequently to these pictures and try to sit as
this pupil sat when his photographs were taken for the
Palmer Method. When writing, he always sits as shown in
these photographs, and he knows that it would be physically
impossible to use muscular movement writing in a cramped,
unhealthful position.
There is an old saying, “Practice makes perfect.” That
is only partly true in relation to writing. Practice of the
right kind leads toward perfection, but the wrong kind of
practice leads just as surely in the opposite direction. It is
not so much the exercise that is practiced as the manner in
which it is practiced. Millions of pupils have wasted the
time given to movement exercises because they thought it
was the exercise that counted and not the manner in which
it was made.
There is no value in any penmanship drill ever invented
unless it is practiced with correct positions of body, arms,
5fingers, penholders, paper, and with exactly the right movement,
and at exactly the right rate of speed.
If you study the instructions in the Palmer Method, and
follow them absolutely in daily practice, you will make steady
progress and, within a short time, become a splendid penman.
But, even should you spend a great deal of time practicing
the drills in a poor position with cramped muscles and
with the wrong movement, you not only will make no progress
toward good writing, but will contract bad habits, or firmly
fix those already established, and, under such conditions, the
possibility of learning to write well will constantly become
more and more remote.
It is a fact, that among the thousands of men and women
employed in business offices who do longhand writing constantly,
rapidly, and well, none can be found who do not use
muscular movement, because it is the only movement through
which penmanship embracing in the highest degree legibility,
rapidity, ease, and endurance can be developed.
It is now generally conceded that systems of copy-books
have inevitably resulted in a poor finished product of penmanship.
Public school officials and teachers were satisfied
with copy-books so long as they did not consider good posture,
muscular relaxation, easy, tireless movement and reasonable
speed, as important factors. Then the discovery was made
that pupils were able to draw the letters slowly and very
accurately in close imitation of mechanically engraved copies,
but that when rapid, continuous writing was required in the
penmanship employed in written spelling, compositions,
examinations, etc., the letter forms became dissipated in
appearance and soon approached the stage of scribbling.
It must be conceded by everyone that any system of
writing which does not lead to an automatic style embodying
legibility, rapidity, ease, and endurance is a failure.
The term “Copy-book” has been applied for many years
to sheets of paper bound together with a cover, containing at
the top of each page, a line of writing or an exercise to be
imitated by the pupils on the lines below. Sometimes the
headlines are made from carefully penciled copies, mechanically
perfected through a system of hand engraving.
There are also bound books, with copies at the top of the
pages that were really written with some show of muscular
movement and afterward photo-engraved, but the copy-book
principles are involved in the publication of such books—principles
which preclude the teaching of good writing through
their use. The mental attitude of pupils who see before
them the immaculate page upon which they must make
reproductions, as nearly facsimile as possible of the copies at
the top, is wholly unfavorable to the process.
Another recent copy-book system is the pad with the copy
at the top, and sometimes at the top and center of each page,
there being blank lines below for practice purposes. These
modified copy-books are probably doing just as much harm to
the cause of practical writing as the former kind. Unless the
mental attitude is right, physical conditions will be wrong.
Sincerely,
6
FIRST SPECIMENS
Beginning pupils should write three sets of first specimens
on paper about 8×10½ inches. One set should be kept
by the teacher, another retained by the pupil, and one set
sent to the nearest office of The A. N. Palmer Company.
The value of these first specimens will be clearly apparent
as the work of muscular movement development and application
progresses and comparisons are made. Those sent to
the publication office are alphabetically arranged and kept
for future reference. When pupils have mastered the movement
and become good business writers, their second specimens
should be sent to be filed with the first. The improvement is
often so great that the first and second specimens may be
engraved and published with great credit to the schools, the
pupils, and the Palmer Method.
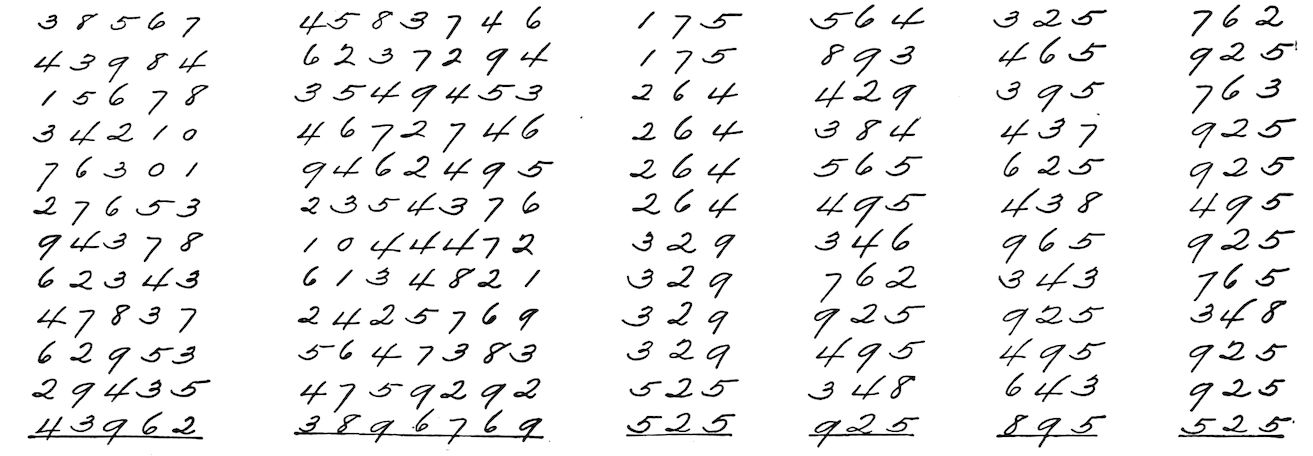
In these specimens the following form should be followed:
On the first line write the name, the age, and the grade; on
the second line, the name of the school, city or town, and the
date. Skip one line and make a set of capitals; skip a line
and make two lines of miscellaneous figures; skip a line and
write, “A specimen of my best writing before I began to
practice muscular movement writing from the lessons in the
Palmer Method of Business Writing.” The above was
written in ............ minutes and ............
seconds.
CLOTHING FOR THE RIGHT FOREARM
As the muscles of the right forearm play an important part
in the movement, it is necessary that they should be so clothed
as to permit, at all times, unrestricted action. Many good
writers consider this of such importance that they cut off the
right undersleeve at the elbow. To the Teacher: See that
pupils’ arms are free of heavy clothing.
WRITING MATERIALS
Not much progress can be made with poor paper, poor
pens, or poor ink. Good materials are a necessity. Do not
use a penholder covered with metal where the fingers
rest if another can be procured. Never use an oblique
penholder in business writing. It is out of place and of
no advantage whatever. Nothing equals an oblique holder
for ornamental writing, but there its utility ends. Use
paper of generous size for your practice, a medium coarse
pen, and ink that flows well. Blue-black writing fluid is
the best.
Study the instructions; they are of more importance than the copies.
7
LESSON 1
CORRECT POSITIONS FOR CLASS ROOM WRITING
In the following pages are reproduced photographs of a class of students
who are experts in the Palmer Method writing. While they knew
that their photographs were to be taken, they did not change their
every-day penmanship positions in the least particular. It was not
necessary, because they had all acquired the habit of sitting in positions
that are comfortable and which at the same time permit muscular freedom
and control.
In elementary schools in cities, space is so limited that the use of
tables or desks large enough to permit the square front position for
writing is usually impossible. If the desks are too small for the square
front position the half-right side position may be used.
Study these pictures closely; it will pay.
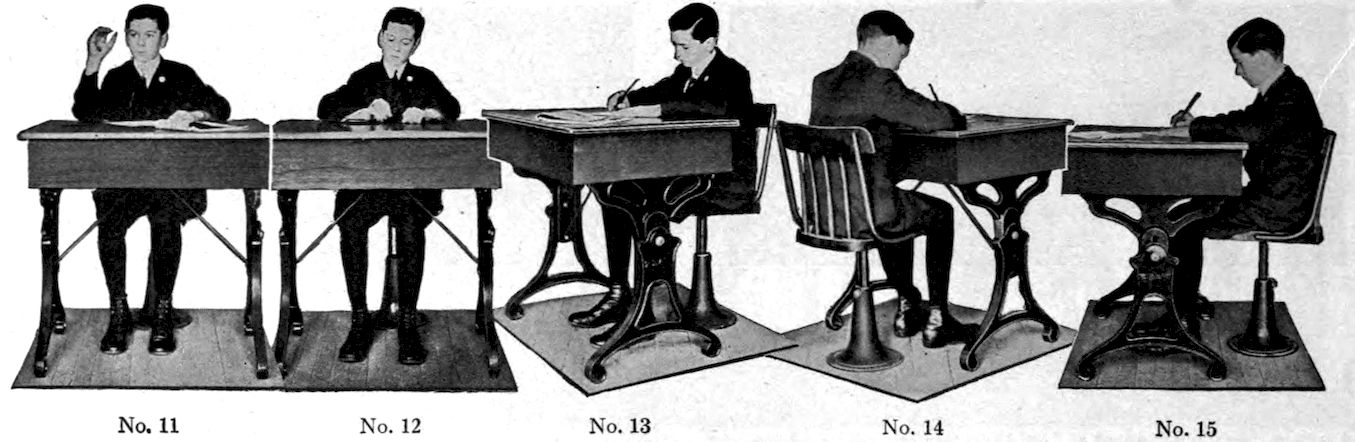
In the first picture, notice that the right elbow rests on or near the
lower right corner of the desk. This position may be occasionally modified
to suit the needs of pupils. As an example, a very fat boy or girl may
find it necessary to let the right arm rest over on the desk a little farther.
A good rule to follow in finding the correct position of the right arm
on the desk for writing is as follows: Place the body at the desk in the
correct square front position, raise the entire right arm a few inches,
and withdrawing control, let it drop. Wherever it strikes the desk it
should remain. To draw the arm toward the side would force the right
shoulder upward into an uncomfortable, unhealthful position, or would
force the pupil to lean backward. On the other hand, to place the
right arm farther over on the desk would force the body too far forward.
These photographs show that the pupils sit comfortably in the
seats; that the upper ends of their penholders point a little to the right
of their right shoulders—usually half way between the elbow and the
shoulder; that the Palmer Method is placed at the upper left corner of
the desk—being held open at the required drill with a rubber band; that
the left forearm is on the desk in such a position as will keep the body
upright, the left shoulder from drooping, reserving the free use of the left
hand for changing the positions of the Manual and the paper as required.
In this position it is easy to push the sheet of paper forward as progress
is made toward the bottom of the page; also to move the paper to the
left when the writing has reached a third or half the distance across a
line, and back into the first position for a new line.
The exact position of the body at the desk and the relative positions
of the left and right arms in writing are very clearly shown in illustration
two, while the position of the left arm in its relation to desk, Manual,
and paper, is best shown in illustration three.
No student who fails in the matter of position will master muscular
movement writing. Correct position is of the greatest importance, and
it should be studied and thoroughly mastered before the writing itself is
considered.
To the Teacher: At this point, pupils should be required to close
their Methods and show their familiarity with the preceding discussion
of position by answering questions relating to it, and also to assume the
position described several times, to prove their working knowledge of it.
8
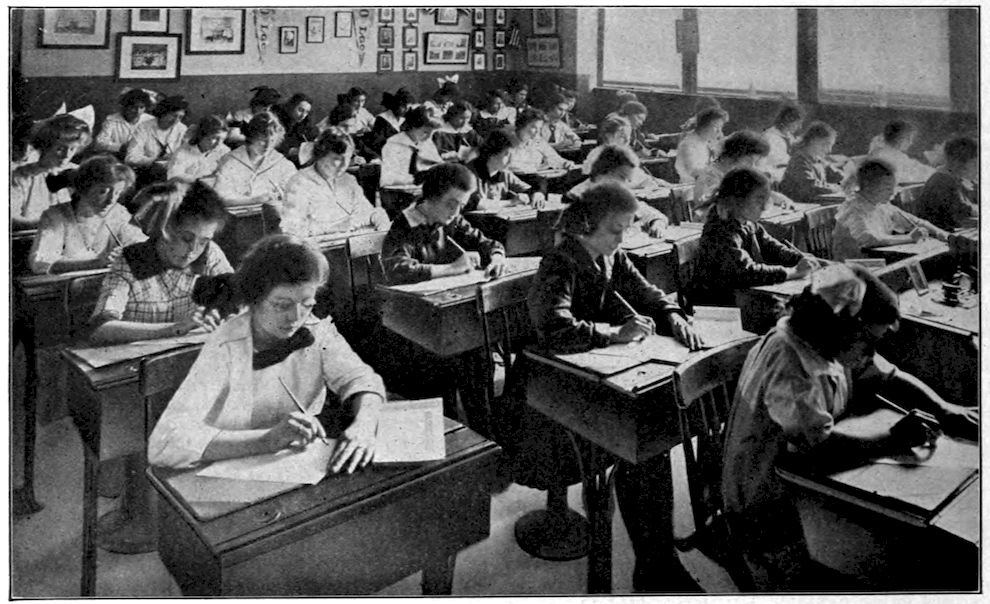
Position illustration number 1. Read page 7 for instructions.
9
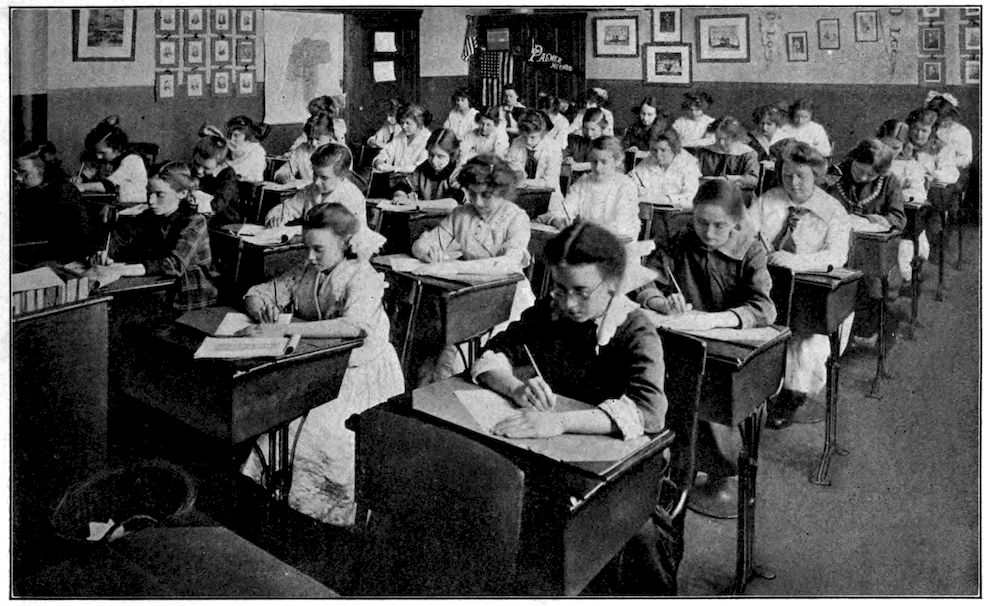
Position illustration number 2. Read page 7 for instructions.
10
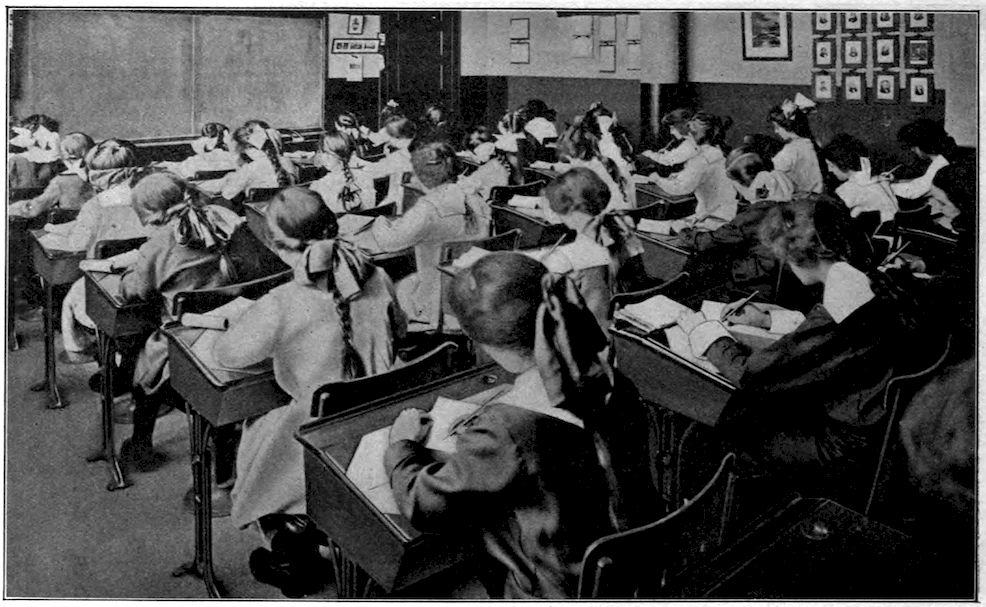
Position illustration number 3. Read page 7 for instructions.
11
LESSON 2
PHYSICAL TRAINING IN PENMANSHIP PRACTICE
Correct Posture, Relaxing Exercises, Movement Practice, and Penholding, Taught in Pictures
No progress can be made in mastering good muscular movement writing
until there is a correct understanding of the important steps and
the order in which they must be taken.
No written or spoken words can explain these more fully and plainly
than the fifteen accompanying pictures given as models. They tell all
that could be told about the important beginning steps, and they should
be studied with thoroughness now, and often during future practice periods.
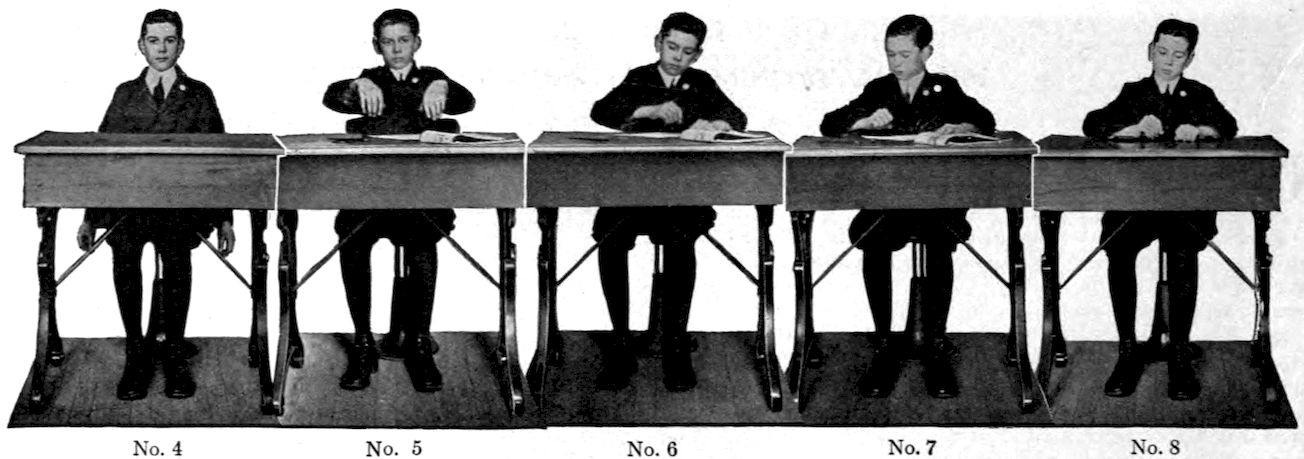
Step one, illustration four: Position in seat with arms hanging limply
at the sides. Step two, number five: Body turned a little to the left
and arms extended above the desk, wrists and fingers limp. Step three,
number six: After permitting both arms to drop to the desk, raise right
arm as shown in the picture, withdraw control and let it drop, repeating
the operation until the arm drops comfortably into the writing position,
with a square turn at the elbow and fingers bent naturally. Step four,
number seven: Learn to run the writing machine.
Notice the closed fingers making a fist, and the absorbed interest with
which this boy studies his arm near the elbow. The arm is the machine,
and the engine that moves it is above the elbow. With the arm lying on
the desk in that position, it requires but little effort to drive the wrist
forward out of, and to pull it backward into, the sleeve; this is “muscular
movement.” Fix in your mind the following facts: In muscular movement
writing the arm is never raised above, but lies on the desk all the time in
a perfectly natural, comfortable position; the sleeve remains in one place
on the desk at all times, and the flesh on the arm moves, the action being
inside the sleeve.
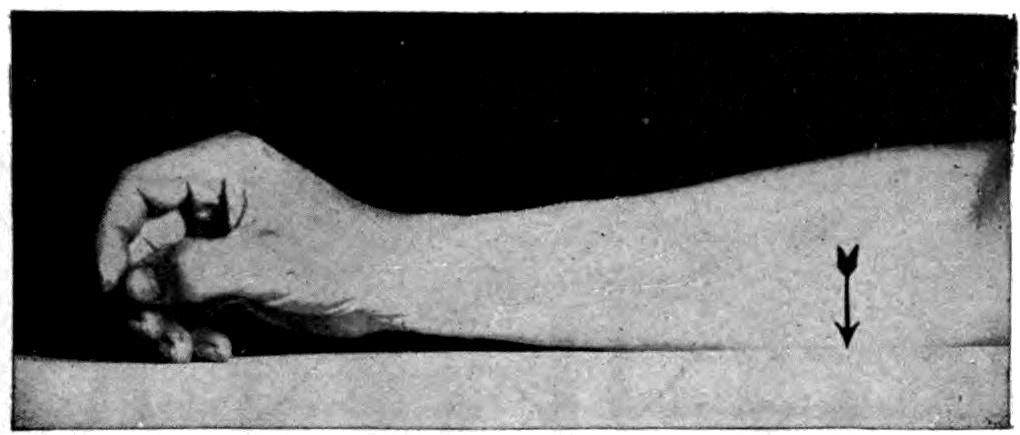
Careful study of illustrations nine and ten at this point will be helpful.
The arrow points to the main rest, which should always be the larger part
of the forearm near the elbow. In writing, the wrist and side of the hand
should never touch the paper. There are only two rests, the muscle near
the elbow, as explained, and the third and fourth fingers, those fingers supplying
a movable rest, and gliding over the paper in the various directions
in which the pen moves.
Do not think of writing or penholding at this point, but give all your
attention to position, muscular relaxation, and the running of the writing
machine, until good position and easy movement have become natural.
It often pays primary grade pupils to practice on position, relaxing exercises,
and movement, from three to six weeks before taking writing instruments.
It is best that all beginners on muscular movement practice should
devote several periods to these things before thinking of penholding or
writing.
Future progress depends upon present understanding of these first
important steps. Even after beginning the movement drills, and when
muscular movement is used in all writing, parts of practice periods should
be devoted to the study of the writing machine, and to the calisthenic
exercises suggested.
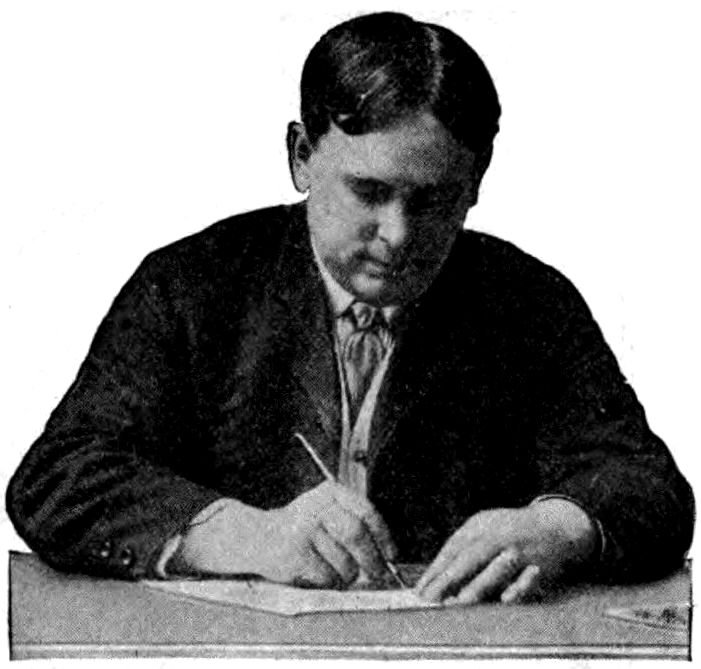
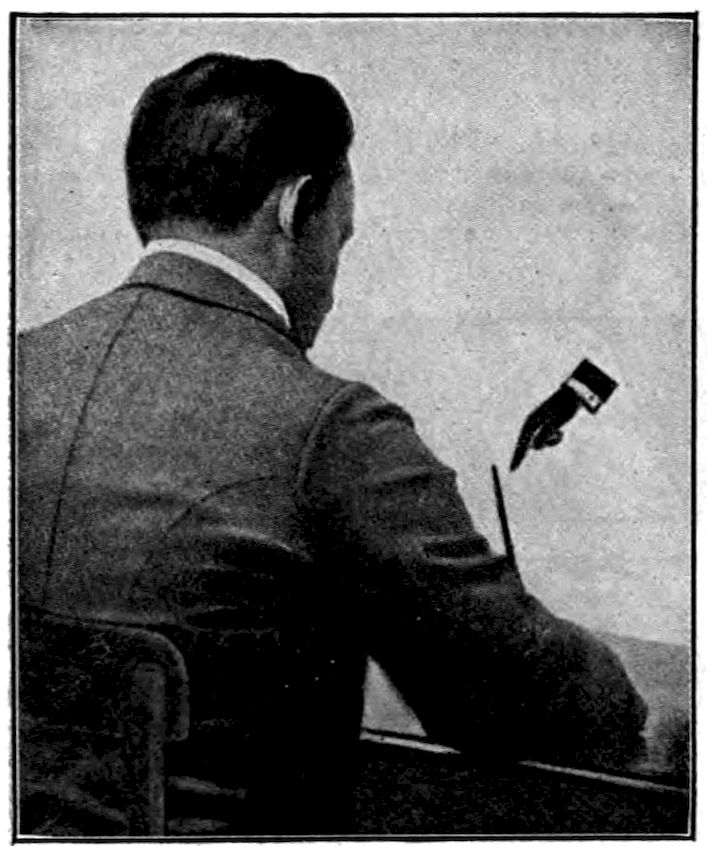
Illustration number eight is worthy of close study and imitation. This
boy was looking at some object at a distance. In this position you should
practice the movement. Test the movement here, and see if you can feel
the action of the muscle of the forearm as it rests on the desk.
12
DEFINITION OF MOVEMENT
Muscular movement as applied to writing, is the movement of the
muscles of the arm from the shoulder to the wrist, with the larger part
of the arm below the elbow on the desk, the fingers not being held rigid,
but remaining passive, and neither extended nor contracted in the formation
of letters. In this movement the driving power is located above the elbow
in the upper muscles of the arm.
Examine your right arm. Notice the increasing size from the wrist
to the elbow. Note particularly the elasticity of the muscles. On the
elasticity and development of those muscles depends your success in learning
a good style of writing. (Reread this and make sure that you thoroughly
understand what muscular movement means before going ahead,
because your success depends upon it.)
HOW TO DEVELOP MUSCULAR ACTION
Place your arm on the desk and close the fingers of the right hand
tightly. (Number nine.) See how far you can move the hand forward
and backward without slipping the sleeve or without any motion of the
wrist or fingers.
Can you move that hand through space a sufficient distance to make
any capital? Could you make a capital through two or three lines of the
paper, two or three times larger than necessary, without any action of the
fingers?
To the Teacher: You should again examine your students on lesson
one and also on this lesson.
13

On page fourteen are five pictures of a boy who sits in a splendid
position for writing. He is never found in a cramped or poor position.
In number eleven, the right elbow is placed on the lower
right corner, the hand pointed toward the upper left corner, of the desk.
The arm may then be lowered until it rests in a writing position. In
number twelve, the left arm is placed on the desk as shown in pictures
one, two, and three, and then the exercise of the muscles begins. The
entire right arm is on the desk, and this is the best position, except when
the arm is so thin that the bone of the elbow grates on the desk. Then
the elbow may be extended off the desk enough to relieve the discomfort.
In no case will it be necessary to extend the elbow more than an inch;
and not one pupil in a hundred will need to take advantage of this exception
to the rule, that the entire right arm should be on the desk.
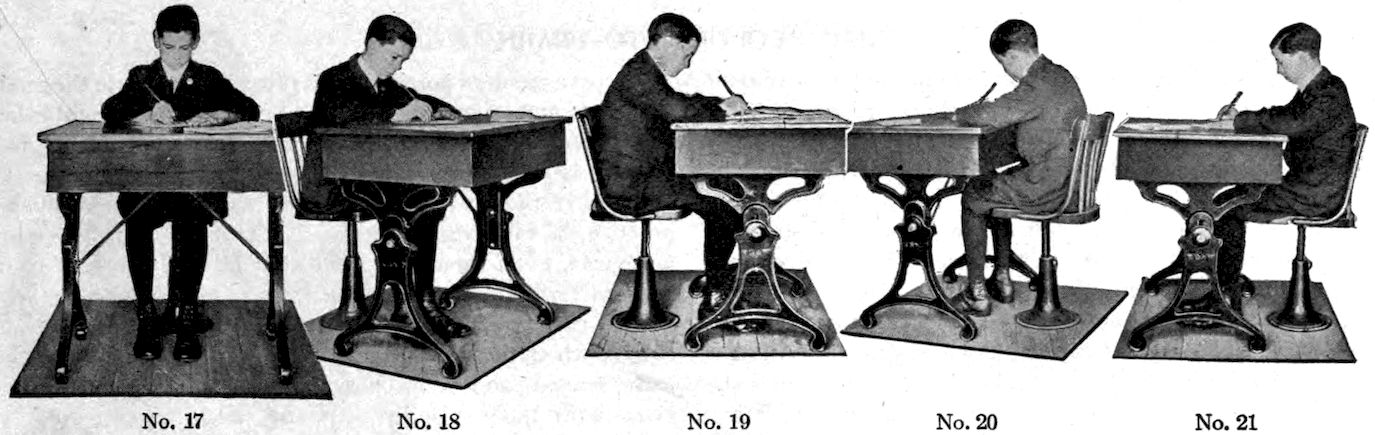
In number thirteen, make a special study of the upper part of the penholder.
It does not point toward the right shoulder, and never will, if
the arm, wrist, and hand are allowed to retain natural positions, providing
pupil and desk are fitted to each other. In number fourteen, again study
the right arm, and, in particular, notice its distance from the right side,
also look at the portion of the penholder in sight.
In number fifteen, notice carefully the distance between the boy and
the desk. You should always sit well back in your seat, so far back that
the body will not touch the desk. This boy is none too far back; his
writing is well in front of the eyes, and it is easy for him to retain the
very important square turn at the right elbow. You should follow his good
example in the matter of position, and if you practice faithfully you can
soon become an expert penman.
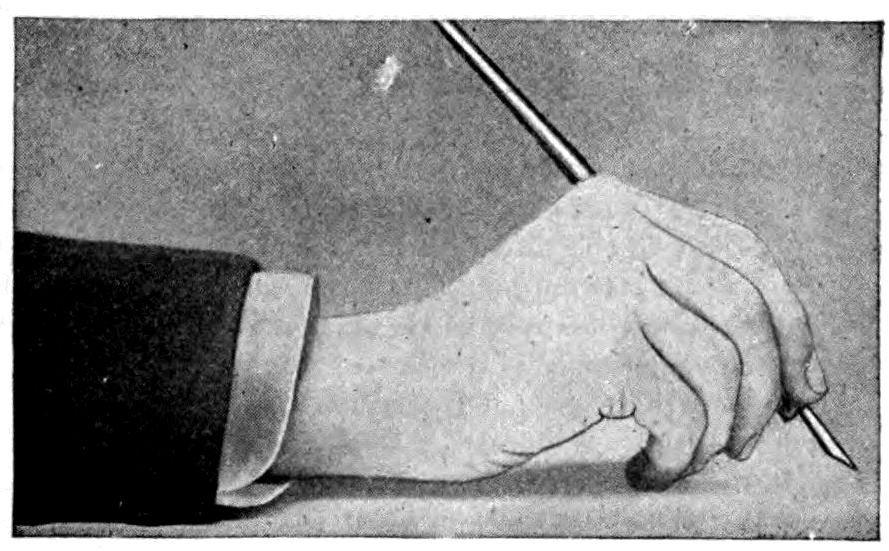
Number sixteen shows the position in which many good business penmen
carry the penholder when writing. Others who write just as well
let the holder drop below the knuckle joint, as shown in illustrations
twenty-four and twenty-five, page seventeen. The best position is
determined by the length of the fingers and the shape of the hand. It is
not necessary that the pupil with a long, slim hand and long, tapering
fingers, should carry his penholder in exactly the same position as the
pupil with the short, thick hand and short, stubby fingers.
14
15
LESSON 3
Here are additional pictures from which you are expected to learn
more about the best position for muscular movement writing. See the
right (square) turn of his right arm at the elbow; the position in the seat;
the position of the back; the distance between the boy and the desk;
the positions of the left arm and the left hand; and the distance between
the eyes and the paper.
In this lesson you should review all that was said in lessons one and
two about important beginning steps, position, muscular relaxation, and
penholding. Practice movement (running the writing machine) a few
minutes without the penholder, then slip the penholder into the right
hand from the left, and practice the movement without touching the pen
to the paper, still watching the arm closely, and giving more attention to
correct position and movement than to anything else.
Are you comfortable in your seat; do your arms feel comfortable;
and are you holding the penholder lightly in the hand without pinching
it? Give close attention to these things.
In the next lesson more particular attention will be given to penholding.
16
TIME REQUIRED TO LEARN
The process of learning a good style of muscular movement
writing may be made easy or difficult, short or long, possible
or impossible, according to the mental attitudes of teacher
and pupil, and the exactness with which directions in this
Manual are followed.
Pupils who constantly practice the movement drills in
poor positions with incorrect movement never even get
started, and pupils who practice from fifteen to thirty
minutes a day in good positions with correct movement, but
who fall back into the old bad cramped positions and finger
movement habits in all other writing, do not get beyond the
beginning stages, no matter how many years they may practice.
The pupil who becomes the absolute master of a finished
style of muscular movement writing within the limits of six
months or one school year is he who gives the closest attention
to every detail relating to the beginning steps, who follows
the printed instructions closely, who sits in correct position
at all times, and uses muscular movement throughout the
writing lessons, and in all his written work within a month
from the time he begins to study the Palmer Method.
Without conflicting with other subjects it is possible to lay
the foundation for an excellent handwriting in one school year,
with but fifteen to thirty minutes daily study and practice,
and the employment of muscular movement in all written
work just as soon as possible. As progress is made in the grades
the use of muscular movement can be permanently established.
The boy becomes an expert ball-player by playing ball.
At first he is awkward and uncertain, but, as he studies the
methods of those who have become experts, and continues to
practice, he takes on self-confidence, and finally develops into
an expert, even though he could not hit a single ball during
his first few games. Boys and girls who learn to skate with
almost consummate grace must pass through the awkward
stages, when they sit down instead of standing up as they
had planned, and when their feet take possession and run
away with them. In instrumental music of any kind one
does not become an expert without first learning how to
practice and then practicing in exactly the right way according
to methods prescribed by master teachers. It is the same in
penmanship: first, learn how to practice and then practice
faithfully. Acquire elasticity, lightness, and freedom, and
do not mind if the pen runs away at first and makes some
awkward letters. This is to be expected. But stick to the
right plan, and gradually you will gain control of the writing
muscles of the arm, and with close attention to general form,
size, slant, spacing, and correct movement application, you
will become a splendid muscular movement penman in a few
short months.
17
HAND, FINGER, AND PENHOLDER STUDIES
Study closely the illustrations on this
page. In number 22, the fingers
bend naturally as in repose, and
their positions should remain the same
when the penholder is in the hand.
In numbers twenty-four and twenty-five,
you should study the relation of the
penholder to the hand. As you see, it is a
little below the knuckle joint. The first
finger bends naturally, and rests on top
of the holder about one inch from the
point of the pen; the thumb rests on
the holder nearly opposite the
first joint of the first finger,
and the third and fourth
fingers are bent, touching the
paper and forming a movable
rest. Whether these fingers
bend exactly as the illustrations
show will depend upon
their shape and length. It
does not matter whether they
rest on the nails or sides, if
they are comfortable and can
be used easily as the movable
rest.
18
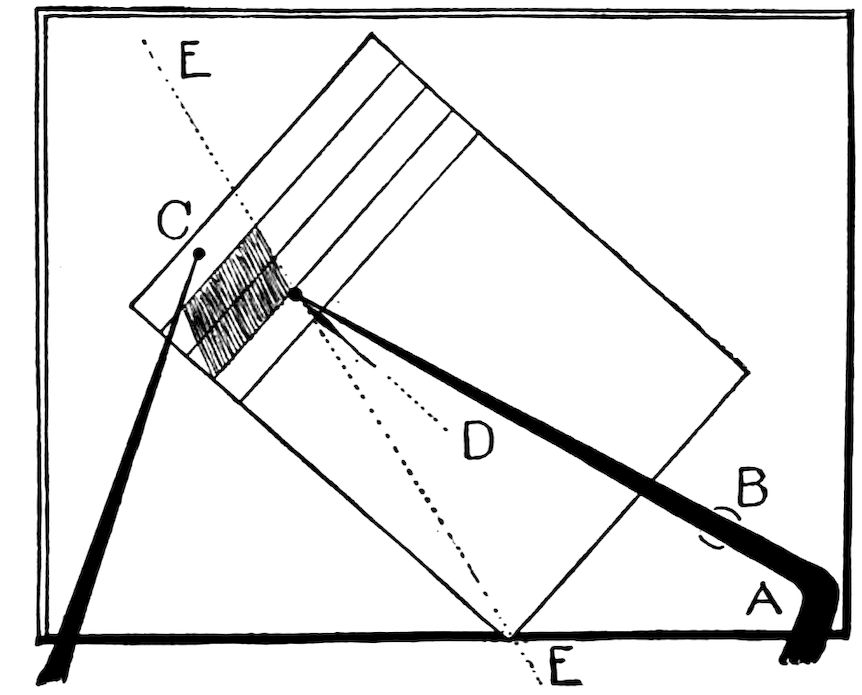
These diagrams are intended to show clearly the position of the
writing paper on the desk, the relative positions of arms, paper and
desk, and the direction in which the pen moves to secure uniform
slant. Number twenty-six is the half-side position mostly used in public
schools and best adapted to them, because of the character of the desks.
Number twenty-seven is the square front position.
In both diagrams, A represents the square turn at the right elbow
and its position on the desk, B is the muscular rest of the forearm, C
the position of the left hand in its relation to the paper and the right
hand, D the penholder, and E E the imaginary line between the eyes
along which the pen should travel in upward and downward strokes.
With the right forearm crossing the lower edge of the paper a little
to the right of the center, the pen should progress one-fourth or one-third
of the distance across a sheet of paper eight inches wide, before the
position of the paper is changed. Always use the left hand to move the
paper. Paper 8×10½ inches in width should be moved three or four times
in the progress of the pen across it. When the end of the line has been
reached, the paper should be returned to its original position, and should
be moved up on the desk the width of one line. Lift the pen before
moving the paper.
19It is not Palmer Method if the lines are tremulous. Study instructions for speed requirements.
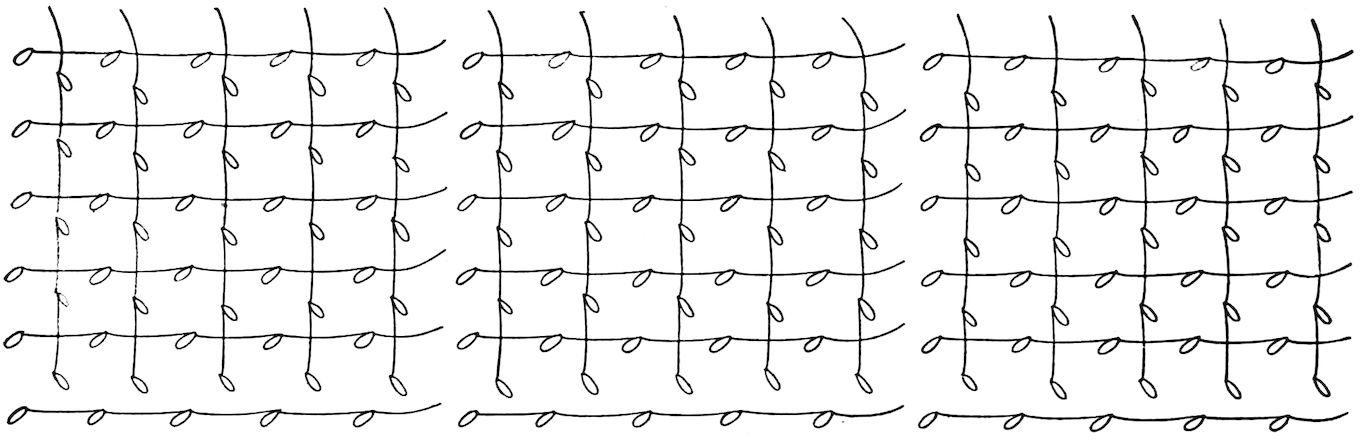
LESSON 4
Now the serious work of using and applying the correct movement
begins. Before attempting to make any part of drill one, review lessons
one, two, and three, and give the closest possible attention to position,
muscular relaxation, and penholding. Don’t practice before you know
how. With the left hand, move the paper to the left three times at equal
intervals, in the progress of the pen across it.
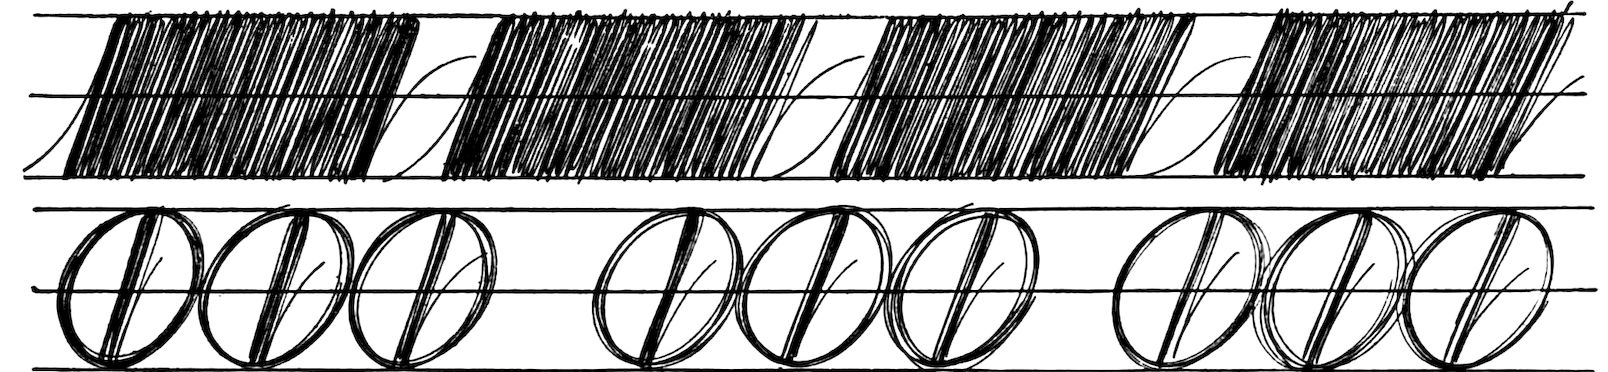
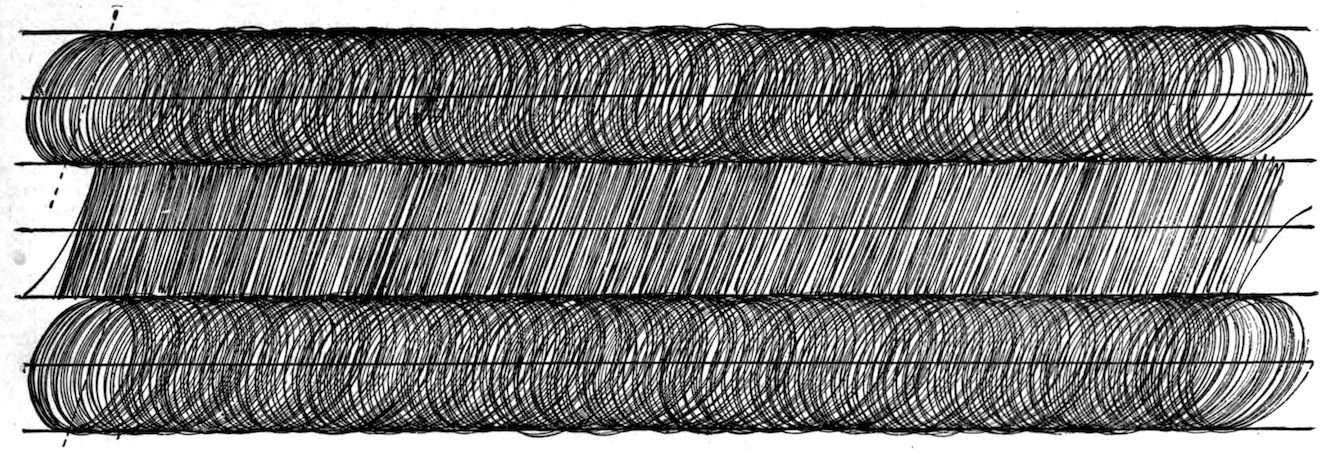
Letting the distance between the two ruled lines, three-eighths of an inch
apart, represent one space in height, any part of this drill should be two
spaces high. Look at these drills until you have a good mental picture
of the height, proportions, and general appearance.
In connection with the straight line part of the drill, study closely
diagrams twenty-six and twenty-seven on page eighteen. There is no
value in this straight line exercise unless practiced with a forward and
backward motion, from and toward the center of the body, with the paper
held in the correct position.
If you cannot make the several parts of drill one high enough at first
with pure muscular movement, practice without touching the pen to the
paper until you have developed more muscular freedom.
In the second line of drill one, the traced oval should first contain six,
and later, as a lighter movement is developed, ten revolutions. In this drill
it will be well to make first the straight line on the correct slant, and then the
oval enclosing it. This order may be changed frequently and the ovals made
first. This is an important drill as it has a very specific bearing upon slant.
To the Teacher: It may be profitable for third, fourth, and fifth year
pupils to spend the practice periods of one week in studying and practicing
the two movement drills given in this lesson, reviewing each day everything
that has gone before. Pupils in the sixth, seventh, and eighth
years, and in high schools classes should be able to progress more rapidly.
It is not safe to say how rapidly, as that depends upon the knowledge of
the teacher, the mental caliber of the pupils, their interest in the work,
the length of the daily lessons, and the amount of the right kind of outside
practicing that pupils do.
20
Study the accompanying
illustration,
number twenty-eight.
Notice the direction in
which the upper part
of the penholder points,
the distance between
the elbow and the side,
the self-supporting
position of the body in
the chair, and the distance
of the eyes from
the paper. Do not
forget that the force
that moves the hand
and carries the pen
along without bending
the fingers is above the
elbow. It is not located
in the fingers,
hand, wrist, or forearm.
The fingers hold
the pen easily and
firmly without pinching;
the third and
fourth fingers are bent
backward and form
the movable rest under
the hand; neither the wrist nor side of the hand touches the paper, and
the arm should rest all the time on the largest portion in front of and
near the elbow.
If the paper you are using has lines eight inches long, divide the page in
the center from left to right with a dot; then divide the halves in the center
with other dots. Beginning at the left for the straight line drill, make
one hundred downward strokes to the first quarter mark, and continue in
the same manner for each quarter. Thus, four hundred downward strokes
and, of course, an equal number of upward strokes should be made in
the four sections extending across a line. See drill one; page nineteen.
COUNTING TO REGULATE MOTION
In developing light, uniform motion in class penmanship practice,
counting is important. It makes the work more interesting, tones down
the movement of the naturally nervous pupil, acts as a constant spur to the
habitually slow boy or girl, and keeps the indolent student busy. In the
oblique straight line and the oval exercises given in drill one, the downward
strokes only should be counted. The other parts of the drills, being
what are termed connective lines, are not counted.
ABOUT SPEED
Speed is so important in the development of good writing that it should
receive close attention in all practice work until correct speed has become
a habit. Too much speed is just as bad as too little. Correct speed forces
a light, firm line; too little speed results in shaky tremulous lines; while
excessive speed means irregular letter formation. If you develop a light,
firm, elastic motion, and the proper degree of speed in straight line and
oval making, you will find the work of the following lessons comparatively
easy.
The straight line and oval exercises in drills one, two, and three
should be made at a speed of two hundred downward strokes to a
minute; one hundred in one-half a minute; and then move the
paper.
The most convenient count for continuous straight line or oval
exercises as given in drill two is 1, 2, 3, 4, 5, 6, 7, 8, 9, 10—1, 2, 3, 4, 5, 6,
7, 8, 9, 20—1, 2, 3, 4, 5, 6, 7, 8, 9, 30—1, 2, 3, 4, 5, 6, 7, 8, 9, 40—1, 2, 3,
4, 5, 6, 7, 8, 9, 50, continuing until two hundred has been reached. Until
correct speed habits have been developed, the second hand of a watch
should be used as a guide.
A few minutes in the right way are worth more than hours of practice in the wrong way.
21
LESSON 5
Begin this lesson with a review of position and movement, without
the penholder. At least five minutes should be devoted to energetic
practice of the straight line and oval drills in this way.
Do you see the dotted lines at the left in drill two? They are to show
you the general direction in which the pen moves in making the downward
strokes.
ABOUT SLANT
Slant needs no special study, but will take care of itself if the instructions
have been studied and heeded. Especially is this true in
relation to the position at the desk, the position of the paper and arms
on the desk, the relation of each to the other, and the changing of the
paper with the left hand, to keep it in the right position in regard to the
desk, body, and arms. See diagrams—page eighteen.
If the position is correct, and if all downward strokes are made
toward the center of the body, each pupil will develop uniform slant,
though different pupils may develop individual slants. Following the
same rules, and practicing at the same time under similar conditions,
different slants result, because of the variations in length of arms, and
other physical conditions. The degree of slant is not a matter of grave
importance so long as each writer develops uniform slant in his own
writing.
22In drill two, see how many compact ovals you can make with one
dip of ink, and try to develop a motion so light and elastic that you will
soon be able to make from five hundred to a thousand, and one thousand
or more on a line eight inches long.
Many young pupils have developed such control of muscular movement
that they have made more than two thousand ovals with one dip
of ink, in a space not more than eight inches long. Indeed, one boy of
twelve made three thousand within the limits of a page eight inches
across, maintaining a uniform speed of two hundred to a minute. The
pen used was of the ordinary large, business variety.
Skill in oval making should be developed gradually from day to day,
as two or three minutes at the beginning of each practice period are
devoted to ovals. Never make ovals on the “back slant.” Avoid this by
pulling the strokes toward the center of the body.
LESSON 6
Each practice period should begin with a review of position, careful
study of the arm, fingers, and penholding, and practice of the preceding
movements without touching the pen to the paper. While going through
these preliminary drills, the eyes should travel up and down the arm
from finger-tips to elbow, and the pupils should be sure that the writing
machine has been carefully adjusted, and is in perfect working order
before the pen touches the paper. See that the arm is perfectly relaxed
and that the wrist does not touch the desk.
PREPARATORY MOTION
Read the following carefully until thoroughly understood. It is of
especial value to beginners. Before making the oval drill or attempting
any part of it, move the pen in the air rapidly over the path of the first
oval several times. While doing this, watch closely the movement of the
muscles of the arm. While the pen is moving rapidly, and without
checking its motion, let it strike the paper. The force thus gathered will
compel light, quick action, break up finger motion, give smooth lines,
and aid form building.
FORM BUILDING
The compact oval is the repeated form of a large capital O. Keep
this constantly in mind, and learn at once to criticise it with special
reference to the slant, width, and general formation of a capital O a little
more than twice the size used in writing.
Mind and muscle must work in perfect harmony to secure the best
results.
Before beginning the practice of any drill or letter, study its form
closely, part by part, and as a complete whole. In what direction does
the pen move to make the first line? See that the pen moves in that
direction before coming in contact with the paper. Be sure that the speed
is neither too fast nor too slow, but such as will make two hundred complete
ovals to a minute. Do not guess about the speed, but use a watch.
If the oval is too wide, it is because of too nearly circular motion,
and you should use more of the forward and backward motion of the
straight line exercise. If too narrow, it is because too much of the straight
line motion was used, and the movement should be more nearly circular.
Remember the connection between mind, muscle, and motion.
When the oval is too narrow, repeat to yourself, “Wider, wider,
rounder, rounder, rounder, rounder,” until it is wide enough. If the
oval presents a back slant appearance when finished, it is because the
downward strokes were made toward the right elbow instead of the center
of the body.
On the other hand, if the oval slants too much, it is because the
downward strokes were made toward the left shoulder instead of the
center of the body—always providing that instructions relating to position
have been strictly followed.
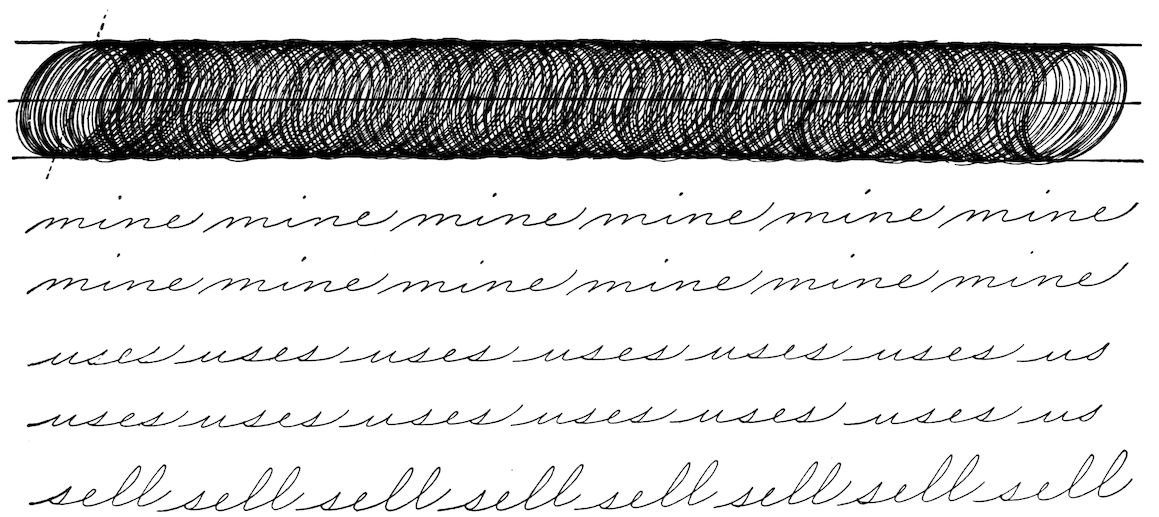
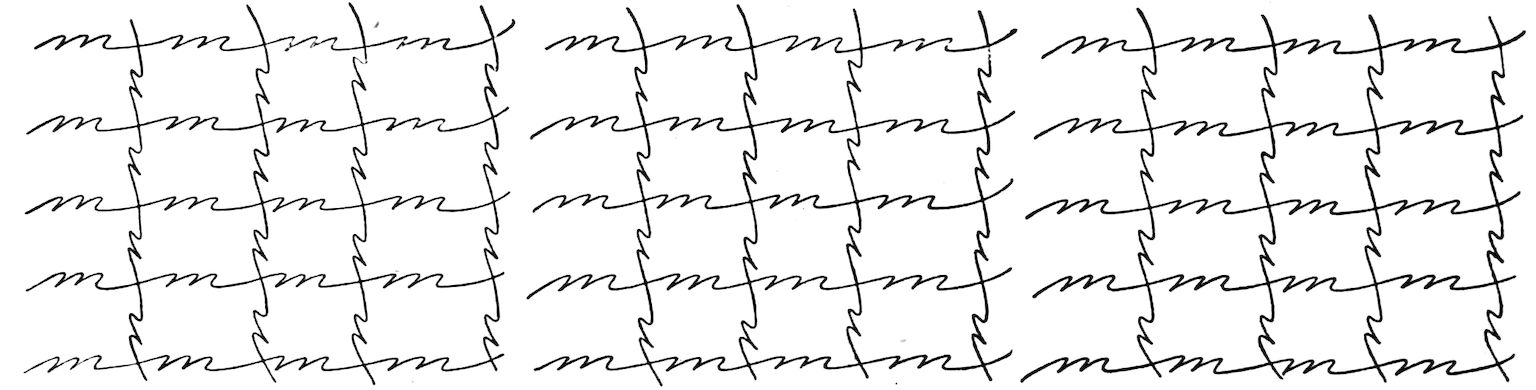
When pupils make the ovals fairly well, they are ready to begin to
apply muscular movement to words and sentences. The ovals given above
are twelve-sixteenths of an inch high, and the letters in the word “mine”
(called minimum letters) are about one-twelfth as high, or one-sixteenth
of an inch. Thus, these ovals are twelve times as high as the minimum
letters; therefore little force is required to make a minimum letter, compared
with the muscular effort used in making ovals. To make the m and
n round at the top, the over-motion must be used, while to make the
connective lines of the i and e the use of the under-motion is necessary.
In the words “uses” and “sell” the under-motion is used in forming the
first lines in all letters as well as in connective lines. The speed should
be such as will permit good formation, and produce sharp, clear-cut
lines.
Good practice speed for these words is “mine,” eighteen; “uses,”
twenty; and “sell,” twenty-two, to the minute. These words should be
practiced now until they can be written well, and should be reviewed
frequently. Practicing them at this stage with muscular movement will
give students confidence and should encourage them to use, constantly,
muscular movement in all written work. Other easy words may be
selected from the Manual and practiced occasionally. It is a distinct
advantage to study frequently at this stage lessons 15, 16, 17, 19, 20, and
32, and to practice drills 13, 14, 15, 17, 18, and 33.
24
LESSON 7
Begin, as usual, with careful study of the writing machine, adjust
it carefully and test the movement. Then practice the two-space compact
oval in drill three.
In drill four the special object is to develop a uniform, continuous
motion. Preparatory to the first oval, the movement should be tested
by carrying the pen rapidly in the air, the arm resting, and the hand in
a good writing position. Without checking the motion, the pen should
be brought to the paper, thus forcing it to make sharp, clean-cut lines.
In passing from one oval to another, the pen should be lifted from the
paper at the base line without checking the motion, should swing below
the base line to the right and to the beginning of the next oval, a uniform
speed being maintained throughout. Thus, the motion is continuous
and no shaky lines are possible. Finish the final oval in each group with
an upward right curve as shown in the drill. Move the paper with the
left hand after each group of six.
Pupils should study the above instructions in connection with the
oval practice until fully understood. These instructions are important,
having a direct bearing upon the practice of capital letters.
Drill five is what we term a forcing movement drill, and is one of
the best for the beginner to practice.
In the direct traced oval make six revolutions to a count of “1, 2,
3, 4, 5, 6,” lifting the pen at the base line on the sixth count without
checking the motion and swinging it in the air to the beginning stroke
of the capital A. Thus the pupil will be impelled from a slow, lagging
movement to one that is elastic and rapid. The form may not be entirely
satisfactory at first, but it will improve rapidly if this process is continued
long enough and frequently repeated.
The rate of speed should be about twenty complete traced ovals,
and as many capitals to the minute.
Before beginning to practice, count the ovals and letters. There
are seven of each. You are expected to make the same number on a
line of equal length.
25
LESSON 8
Assume correct position; practice the movement without, and then with, the penholder. Be sure that you are using exactly the right movement,
and practice the two-space compact ovals two or three minutes at the rate of two hundred to a minute. (Drill three.)

When two lines are connected in an angle, a positive stop at the
point of connection is necessary. This principle applies to the top of
capital A where the upward and the last downward strokes are joined.
This stop is such a small fraction of a second in duration that it can
hardly be detected. Without the stop at the top of capital A, a loop will
be made. To emphasize this stop in connection with capital A, the following
conversational count has been developed. “You stop, you stop,
at the top, you stop, every time, at the top. How long do you stop at
the top? Not long, but you stop, every time, at the top. What for, what
for, what for? Oh! To close them up, to close them up, to close them
up,” and repeat. Other conversational counts that may be used with
capital A are, “Roll the arm, on the muscle; see it roll, on the muscle;
slide the hand, on the fingers, see them slide, over the paper, make them
glide.” Make your letters the same size as in the drill, and begin each
letter as the pen moves downward. Make capital A in groups of five,
and move the paper a little to the left after each of the first two groups
as indicated by the check mark. When the third group of five has been
finished, move the paper to the right to its correct position for beginning
a line. Learning to move the paper in this and in other drills is very important.
There are three groups of five, making fifteen letters to a line in
drill six, and five lines, seventy-five letters, should be made in a minute.
The dotted line between the first and second letters shows the path
over which the pen should move without touching the paper, in passing
from one letter to the next. A count of ten should be used in each group
of five, and the count for each line should be 1–2, 3–4, 5–6, 7–8, 9–10, move
the paper, 1–2, 3–4, 5–6, 7–8, 9–10, move the paper, 1–2, 3–4, 5–6, 7–8, 9–10,
move the paper. In beginning every practice period hereafter, your program
should be the two-space compact oval, one minute—two hundred
ovals, and capital A, at a speed that will produce at least sixty-five and
very soon seventy-five in a minute. For the present, three minutes could
very profitably be spent in repeating the capital A with an easy, swinging,
rhythmic motion. Select your best capital and compare it with the models
giving close attention to size, slant, width, distance between letters, and
the beginning and finishing lines.
26If muscular movement is taught to pupils of the first and second year
primary classes according to the Palmer Method plan, they will enter the
third year of their school life well prepared to use the movement in all their
writing. If pupils in classes from the third to the eighth year inclusive have
copies of this Manual, study it closely, and follow it absolutely in daily
practice under teachers who have mastered the lessons before attempting
to teach them, rapid improvement will be evident from week to week, and
the ideal in rapid, easy, legible writing will soon be attained.
LESSON 9
Do not neglect the compact oval practice; one line across the paper
will no doubt be enough if very compact.
The method of practice in drill seven should be the same as in capital A,
drill five. After each traced oval, lift the pen while in motion, swinging it
below the base line and around to the beginning point of capital O without
checking it. Drive the pen rapidly and bring the muscles of the arm into
active play. First make ten revolutions for the traced oval, gradually decreasing
the number to six; count six for the ovals and two for each capital O.
This capital O is very popular with many excellent business penman
and teachers of modern writing. Study the letter and make a mental
photograph of it. Note particularly the curves of the left and the right
sides; also the loop at the top, its general direction and size.
In finishing O the final stroke should be pushed upward. If it is
pulled downward it will too nearly resemble A.
Capital O should be made at the rate of seventy or more to a minute.
Count 1–2 for each O.
LESSON 10
Devote the time of this lesson to a general review of the preceding lessons.
LESSON 11
27The plan of practice for drill nine should be the same as for drills five and seven. The count should be 1, 2, 3, 4, 5, 6,—1, 2, and repeat. No matter
what may precede capital C, when the pen comes in contact with the paper in the beginning line it must move downward in the direction of a left curve.
How many are there on a line? Count them. Swing the pen in the path of a C several times before making the first letter; in fact, aim before you
shoot. Lift the pen from the paper while in motion in finishing a capital; continue the motion with the pen in the air and bring it to the paper
to begin the next capital—all without checking the motion. Make about seventy letters to the minute. Count 1–2 for each C.
LESSON 12
See instructions for drill eleven on following page.
28Hereafter, each lesson should begin with practice of the compact
two-space oval, drill three, drill six, and drill eleven, and there should
be frequent reviews of the other drills so far practiced.
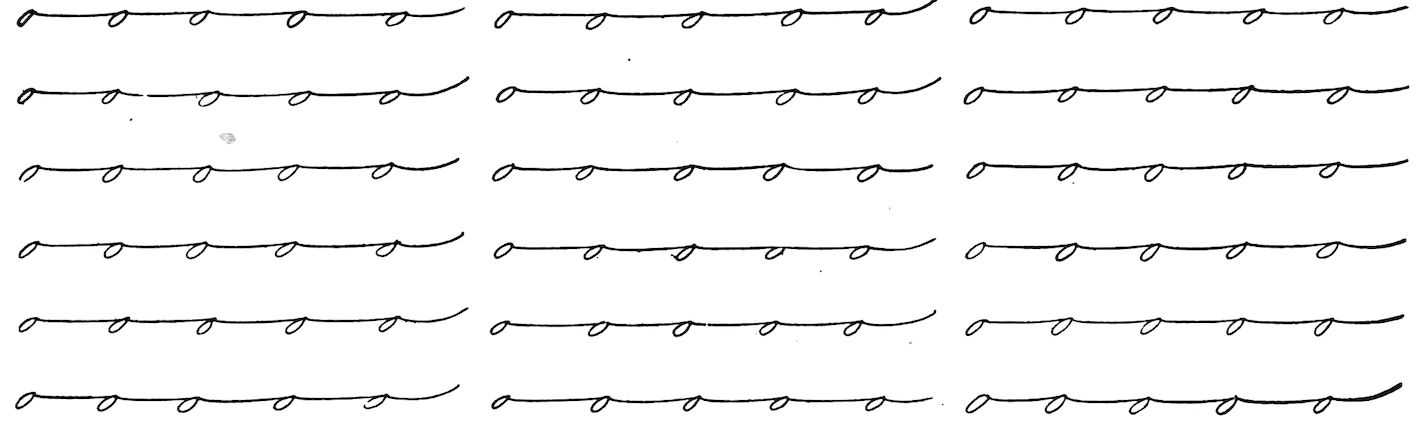
In the large oval drill and its modifications in capitals A, O, and C,
the motion has been mainly forward and backward, while that used in
the connected small o drill is mainly toward the right, developing the
lateral movement. If too much driving force from above the elbow is
used, the letter will be too large. If the position is just right, the least
possible force will drive the hand far enough to form the o. The line
connecting the letters should be as nearly straight as is possible to make
it at the required speed. If too pronounced an under-curve is used in
the connective lines the result will be a form more nearly resembling
small a than o.
In this style of writing, small o and letters in its class should be
one-sixteenth of an inch high. The letter in this drill is of that height,
and it should be used as a basis of comparison in determining the height
of the other minimum letters a, c, e, i, m, n, r, s, u, v, w, and x. Small
r and s may be made one-fourth higher than the other letters in the minimum
class.
Wherever there is an angular connection as in closing small o at the
top, there must be a checking of the motion at that point; in fact, a stop.
The closing of o is so quickly done that the stop can hardly be seen even
by the closest observer.
To the Teacher: In connection with this drill we urge teachers
to use a conversational count. In passing from desk to desk, criticise the
work in correct rhythm. Suppose one student is making o too large,
another not closing it at the top, another using a slow, dragging movement,
another making a narrow, flat letter, and still another bending
over his desk too far. The criticisms would be as follows: “Make it
smaller, make it smaller; close it up, close it up; you stop, at the
top, you stop, you stop, every time, at the top. How long? Not
long; but you stop, every time, at the top. Slide along, slide along;
round o, round o; sit up, sit up.” Each criticism or admonition may
be repeated until the error has in a measure been corrected. The
influence will not be lost upon the rest of the pupils, but those who have
been making the same errors will almost unconsciously show marked
improvement.
A speed of ninety or more to a minute should be developed and maintained.
Ninety in a minute is by no means fast, but, while permitting
good form, it is fast enough to force light motion.
In drill eleven, there are three groups of five letters in a line, and
there are six lines in the drill, making ninety letters. These should be
made in a minute, and that should be the practice speed. As in capital
A, the plan is to make each group to a count of ten, and then move the
paper. For an entire line the count would be 1–2, 3–4, 5–6, 7–8, 9–10,
move the paper, 1–2, 3–4, 5–6, 7–8, 9–10, move the paper, 1–2, 3–4, 5–6,
7–8, 9–10, move the paper. The conversational count may be fitted nicely
to the rhythm of the count of ten. Hereafter, drill eleven should be practiced
with the two-space compact oval, and drill six at the beginning of
each practice period.
LESSON 13
Make this a general review lesson.
The Palmer Method is a text-book on practical writing. The instructions should be studied and followed.
29
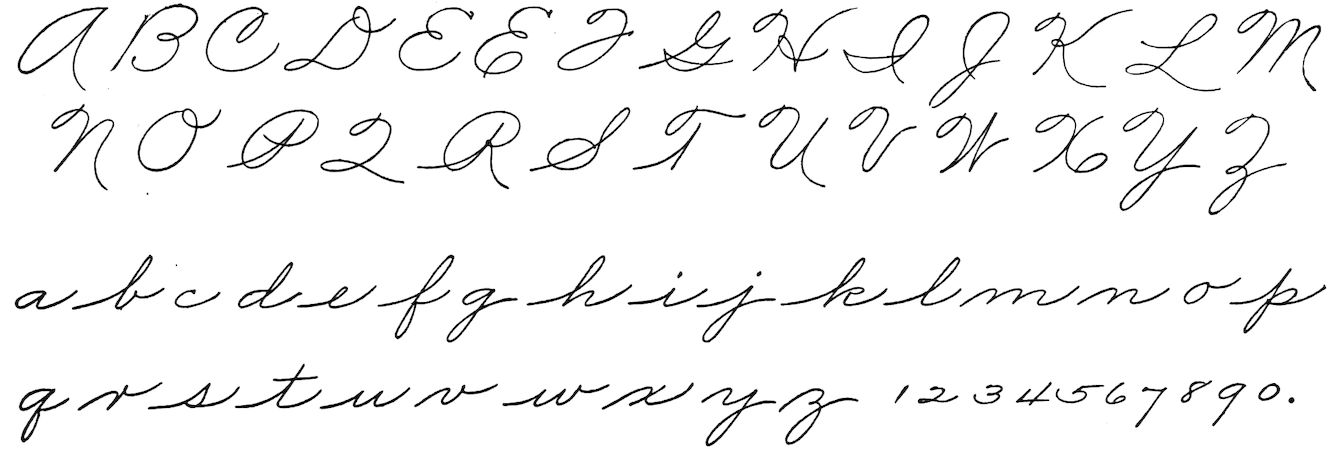
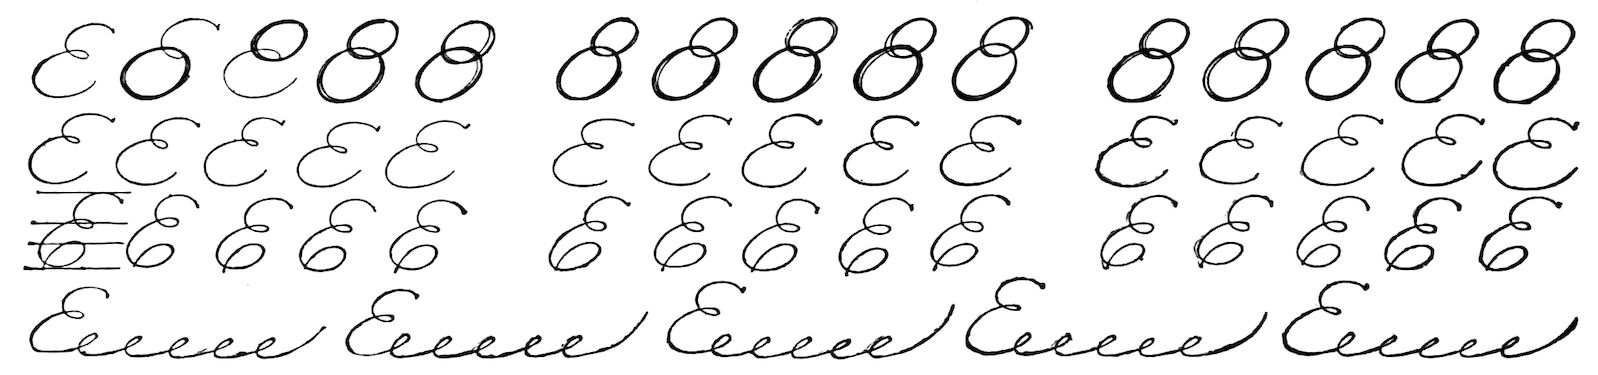
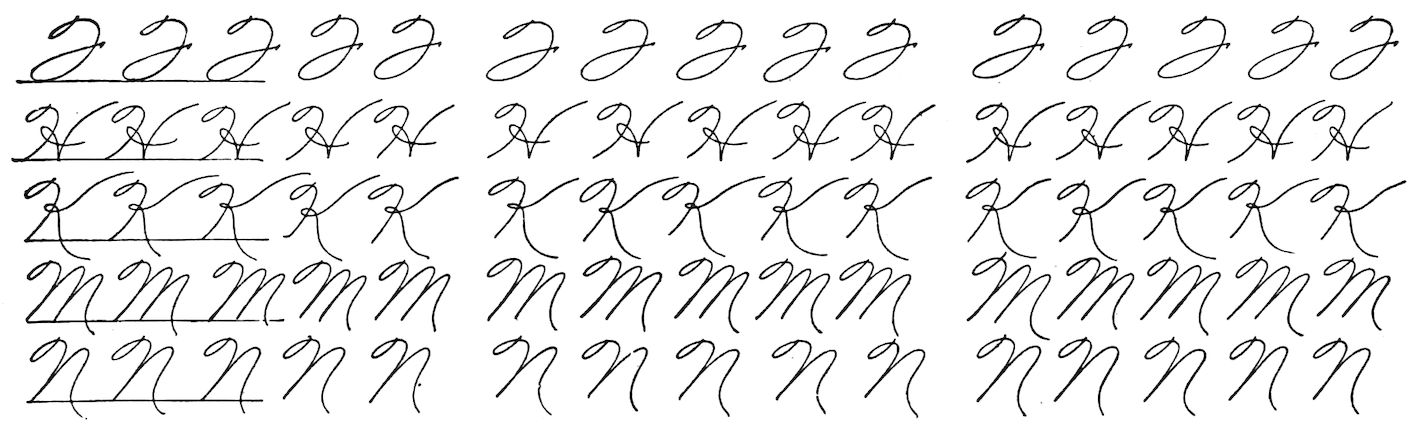
SPECIAL STUDIES OF THE CAPITALS, SMALL LETTERS, AND FIGURES
Pupils who have studied and followed the explanations, suggestions,
and instructions so far, will have sufficient control of the muscular movement
to master easily the letters on this page.
Those who have not been thorough in studying the instruction and
practicing the drills should review. Nothing less than failure can follow
superficial study.
The capitals, small letters, and figures are given at this point for
convenient reference, and an effort should be made hereafter to employ
these forms in all the written work.
One lesson each week should be devoted to special study
and practice of the capitals until they are mastered.
Capitals, small letters, and figures will all be taught thoroughly in
the following lessons.
A few minutes in the right way are worth more than hours of practice in the wrong way.
30
LESSON 14
Cross line practice is very helpful in developing light, elastic, gliding motion.
First make the letters on the lines; then turn the paper and make them across.
LESSON 15
MORE ABOUT COUNTING
In writing, as in music, regularity of movement is an important
factor. A jerky, spasmodic motion is to be avoided, and successful teachers
of writing have found that some method to mark the time of making
parts of letters is helpful. Some use a metronome, some a chalk box
and a ruler, others musical instruments; but we prefer that wonderful
machine, the human voice, and a process of counting to fit the letters.
In individual home practice the counting process is of as much value as
in the school-room, and pupils should learn to use it.
When a letter is poorly made, it may be due to one or all of four
causes—first, the position may be poor; second, the muscles may be rigid,
preventing easy action; third, the mind may not have a good picture
of the form; and fourth, movement direction may be wrong. As an
example, when small m and n are made too sharp at the top, it is because
there is not enough over-motion.
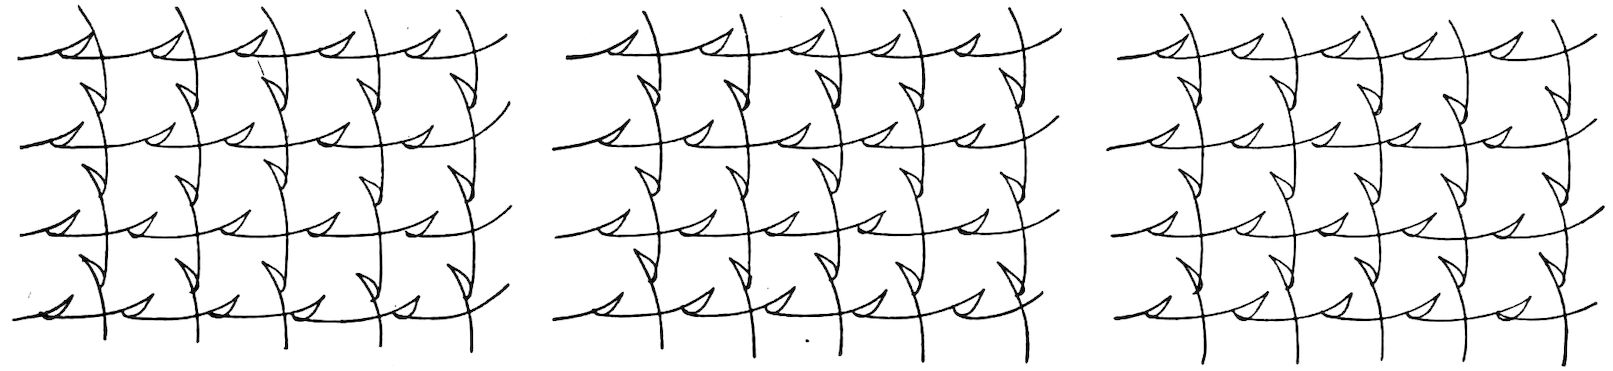
The special object of drill thirteen is to develop the over-motion for
m and n. As you practice this drill, count 1, 2, 3, 4, 5, 6, 7, 8, 9, 10, for
each section, or use a verbal count as follows: Over, over, over, over,
over, light, light, light, light, light. In the first line the exercise should
occupy one-half the space between ruled lines; and in the second, the
height should be the same as small o, one-sixteenth of an inch.
Remember that the larger part of the right arm just in front of the
elbow, should rest on the desk, and the third and fourth fingers of
the right hand be bent well under; that the position of the pen in the
hand must be comfortable and the right arm well out from the side.
Now push the hand forward and backward to test the freedom and movement
power. If the muscles move easily, let the pen touch the paper,
moving lightly and rapidly. About fourteen completed sections of the
first line should be made in a minute and sixteen of the second.
LESSON 16

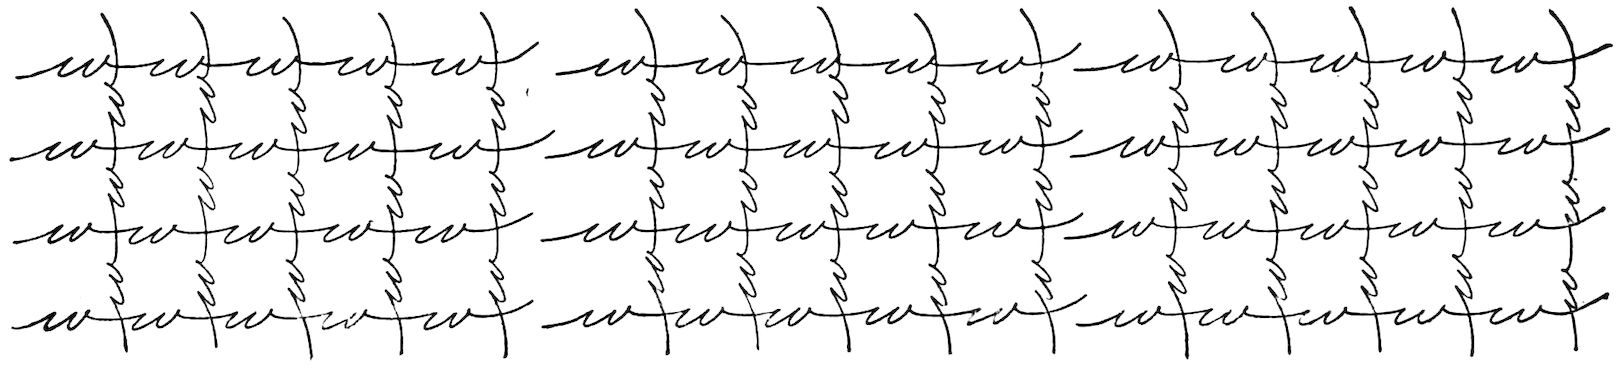
Test the movement by tracing the first stroke in the air. Start the
motion below the base line, and as the pen moves rapidly upward let it
strike the paper at the beginning point. Drive the pen through the exercise
rapidly and lightly. Make four connected m’s before lifting the pen,
and three such groups across a line. You will make the letters too large,
irregular, and awkward at first, and will have trouble with the union
(connecting lines), but keep right on. Make the four lines in a minute
and move the paper after each group. As taught in drill thirteen, lesson
fifteen, the parts of small m are made with over-motion, but to use an
over-motion between letters would give no connective line and hence no
dividing line between the letters. Keep in mind as you practice, that the
over-motion makes the parts of m, and that the opposite or under-motion
forms the connecting lines. You may count 1, 2, 3; or slide, 2, 3; or over,
over, under. Drill fourteen should be practiced a minute or more at the
beginning of each practice period. Four drills have now been suggested
for use at the beginning of every practice period. They should be practiced,
not only in the beginning stages, but until the entire course has been
mastered. These drills furnish the very best movement exercises, and at
the same time give the right kind of practice in form building. Students
who thoroughly master them in size, form, and speed application will find
the remaining drills easy. As it teaches the correct use of the under-motion
in connecting letters, small m is perhaps the most important of the four.
32
LESSON 17
From this point each lesson should start with the compact two-space oval; drill eleven, small o; and drill fourteen, small m. It will pay to
devote from three to five minutes of each practice period to these three drills.
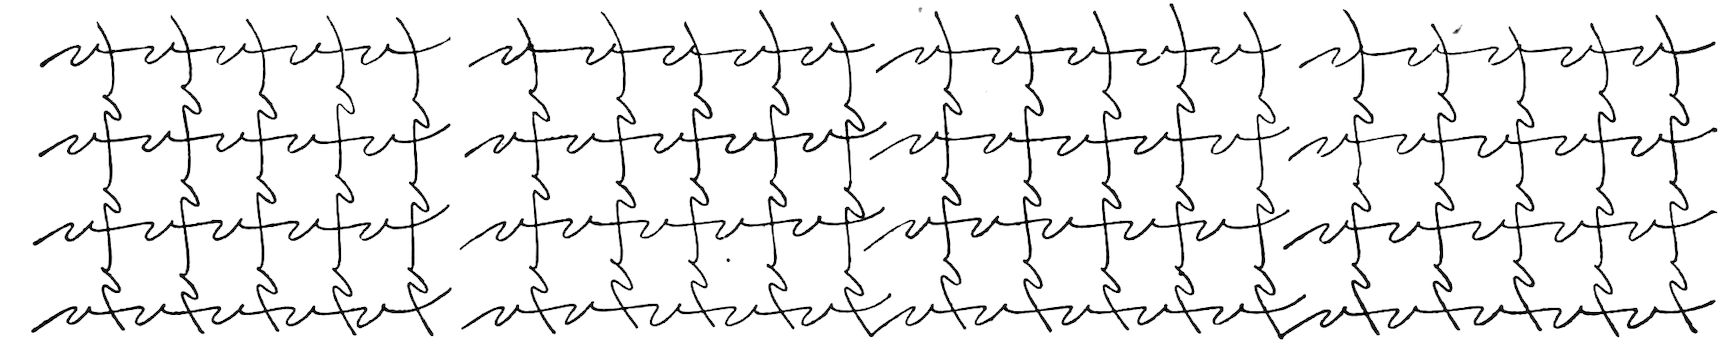
For small m, a count of three is used; and in n, a count of two. Thus, the count for drill fifteen will be 1, 2, 1, 2, 1, 2, 1, 2, etc., or for five connected
letters, 1–2, 3–4, 5–6, 7–8, 9–10. The speed should be the same relatively as in the small m drill.
LESSON 18
Make the small m in groups of four, three groups to a line, and five or more rows; then turn the paper and make groups of small n. Make
frequent comparisons with the drill as you practice.
33
LESSON 19
Small i being made entirely with an under-motion, has a sharp point at the top. Count 1, 2, 3, 4, 5, for each group; make the downward
as light as the upward strokes and try to make them equal distances apart.
A space in width is the distance between the points of small u. This is sometimes called a lateral space. For each group of four connected
letters, count 1–2, 3–4, 5–6, 7–8.
Extend small i about two and one-half times its height, cross with a
short horizontal line, and the result will be small t. An effort should be made
to bring the upward and downward strokes of small t together at the top,
but if a very short narrow loop is sometimes made as a result of rapid movement,
it will not conflict with legibility. The small t should always be a
little shorter than the small l and its companions, b, h, k, and f. The practice
speed for t in groups of five is twenty groups, or one hundred letters,
to the minute. There is no special value in this letter as a movement
drill, but a little practice of it in group formation will be an aid to its
mastery.
34As you gain more control of the muscular movement, you should become more skillful in its application, and the result should be constant
improvement in form, spacing, and uniformity of size. Use your eyes constantly, comparing your letters with the drills you are trying to imitate;
do your best, and rapid improvement is sure to follow.
LESSON 20
After the usual practice of the compact two-space oval and the small m and n review lesson nineteen.
The count for small e in groups of five, is 1, 2, 3, 4, 5. Try to
make the letter but one-sixteenth of an inch high. For purposes of
comparison, it would be well occasionally to make rows of small o’s and
m’s on lines close to your small e drills. The three letters should be of
the same height. Making small e in groups of five, twenty-eight groups,
or one hundred and forty letters, should be made in a minute.
LESSON 21
Wrong practice will lead you in the wrong direction! The instructions tell you how to practice.
35Number twenty-one is our first word drill with a capital. Do not
neglect the study of the motion and its applications to form.
Write fourteen or more words to a minute, and do not let them occupy
more space than the copies. In drill six the final line in capital A drops
below the base line. This is done to give a rhythmic movement drill.
In writing words beginning with capital A it is better to connect the last
line with the small letters following, as in the second line in drill twenty-one.
LESSON 22
Write fourteen words in a minute. Write a few lines and then compare your work with the drill. Review often.
LESSON 23
Be sure that the motion is oval in starting capital O. Trace the letter with the pen in the air. Let the pen strike the paper when moving
rapidly downward.
If all conditions are favorable and the movement is free, about sixteen of these should be written in a minute.
36
LESSON 24
Study the upper line closely, and notice particularly that the nine
exercises at the right are the enlarged form of an inverted figure six.
Fix clearly in your mind the direction of the moving pen as it comes
into contact with the paper in making the beginning loop. Do not make
this loop larger than it is in the drill. For business writing it would be
better to make a dot than a large loop. Energetic practice of the drill
at the left in the first line will help to develop the right motion. In that
part of the drill a count of 1, 2, 3, 4, 5, should be used. In the nine forms
at the right in the first line, the count may be 1–2, down over; or down,
over; or one stop for each; but each form should stop abruptly at the
base line in a blunt stroke.
As this form is used for the beginning of twelve capitals, it should
be thoroughly studied and practiced now, and frequently reviewed.
In the lower line, observe that five drills extend across the page, with
ten parts in each drill; with the paper held in the right position, the downward
strokes should be made toward the center of the body, and the over-motion
is applied in making the turns at the top. The count should
be 1, 2, 3, 4, 5, 6, 7, 8, 9, 10, and sixteen completed exercises should be
made to the minute.
Turn to page twenty-nine and pick out the twelve capitals in which the
inverted figure six is used. Use this style hereafter in beginning those capitals.
This is a lesson that should be reviewed frequently.
LESSON 25
You should not forget the usual three to five minute practice period devoted to the compact oval, and the small o and m drills.
37Study capitals M and N closely before trying to make them. Compare
their parts in relation to slant, height, and width. Your attention
is particularly directed to the finishing lines in M and N. Dropping this
line below the base, and lifting the pen without stopping the motion, forces
freedom, continues the rotary motion and develops an automatic movement
preceding and following each letter, so that the motion is continued,
even when you are not actually forming the letters.
The capital M should be made in a count of 1, 2, 3, 4, at the rate of
thirty a minute, and capital N in a count of 1, 2, 3, at the rate of forty
a minute.
LESSON 26
Review lessons twenty-four and twenty-five.
LESSON 27
Perhaps you have forgotten something; perhaps you were about to begin your practice of drill twenty-eight without the review of the compact
oval, and small o and m. If so, do not forget again.
In penmanship, constant repetition is essential, and in connection
with drill twenty-eight the best results will be secured by practicing the
word several minutes. We prefer to have pupils at first use the style
of capital given in the first line, in which the finishing stroke is carried
below the base, and the pen lifted from the paper before the small letters
are made. Later the final stroke in capital M may be connected directly
with any small letters following, as in the second line. You are expected
to write six words on a line, as in the copy, writing from fourteen to
seventeen a minute.
To the Teacher: If you have studied the lessons in advance, have
practiced the different drills and mastered them before giving them to
your pupils, a good plan to follow in word-practice is sometimes to sit
at your desk, or a pupil’s desk writing the words with them and spelling
as you write. Thus: M-o-o-n, M-o-o-n. This will enable you to help
your boys and girls to master the correct speed, and to secure uniform
motion.
Never attempt to use the count for individual letters when practicing
words; it is confusing.
38
LESSON 28
Make a few lines of capital N as a movement drill before practicing
the word Noon. Repeated letters and words should always be considered
movement drills. Strive for a firmer, lighter motion constantly. Examine
all letters and words practiced with special reference to firm, smooth
lines, their direction, size, distances between letters, height and width
of the different parts, connecting lines, the finishing lines in the final
letters, and every little detail.
Write from fifteen to eighteen words a minute.
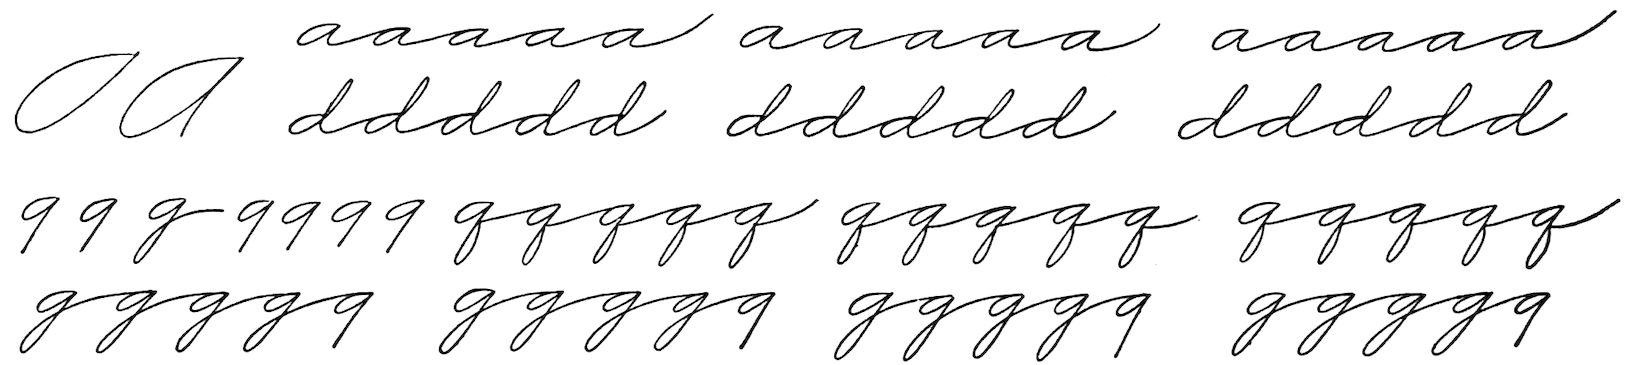
LESSON 29
FOR STUDY AND COMPARISON
Small a is, in the main, a reduced copy of capital A, and the first parts
of small d, g, and q are identical with it. Fix the resemblance in the
mind; it will help you. In business writing it is best to make the looped
small d. It is just as legible as the stem and can be made more rapidly.
The loop below the base line in small g should be made without finger
motion. We favor the blunt style of small g and y at the end of words,
and this ending should be shorter than the loop. Fix in your mind the
length of this abbreviated g. Small q is a little shorter below the base
line than g. The g ending bluntly below the base line, is just like the
figure nine.
It will pay you to practice the small a drill a great deal. Try to
make a half-dozen or more lines of letters as small and as uniform as the
copy. Students should not forget to study the copy constantly and to
make frequent comparisons of their work with it. A count of 1, 2, should
be used for each small a, and in connecting five letters it is a good plan
to count 1–2, 3–4, 5–6, 7–8, 9–10.
Small a in groups of five should be made at the rate of seventy a
minute.
LESSON 30
Reckoning small o, one-sixteenth of an inch high, as one space, small g
should extend three spaces, or three-sixteenths of an inch below the base line,
while the loop of q and abbreviated g should extend two spaces below.
The loop of d extends about two and one-half spaces above the base.
Writing which is good in other respects is often spoiled in the written
page because the loops are too long, extending into the lines above and
below.
The count for each letter in groups of five should be 1–2, 3–4, 5–6,
7–8, 9–10, and the speed should be: small d, from sixty-five to seventy;
g, from sixty to sixty-five; and q, about fifty to the minute.
Are you studying the instructions? They tell you just how to succeed.
40
LESSON 31
Review lesson thirty before you study and practice this drill.
If you use your eyes to good advantage, you will see that the first
g begins one space above the base line, there being no initial line starting
from the base; also that the first parts of small g and d are of the same
height as a, o, m, and n, to which special reference has already been made.
Practice speed, twelve words in a minute.
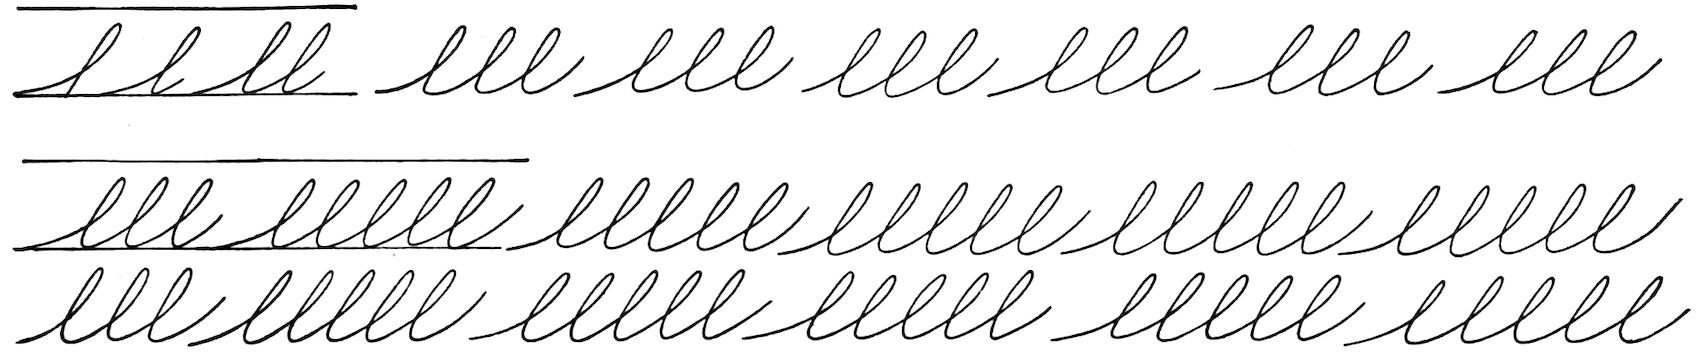
LESSON 32
The basis of the extended loop letters, b, f, h, and k, is small l.
These five letters should extend the same distance above the base line.
The practice of small l should be thorough now, and it should be
reviewed often. In fact, it would be well to add it to the group of
compact ovals, and small m’s and o’s, to be practiced at the beginning
of each lesson.
Height—Reference has already been made to one-sixteenth of an
inch as representing a space in height for the minimum (one-space)
letters a, c, e, i, m, n, o, u, v, w, and x. The small r and s are in the same
class, but are made a quarter space higher than the others.
These minimum letters should always be used as a standard of one-space
measurement to regulate the height of all other small letters. On
that basis small l should be four spaces—four-sixteenths, or one-fourth
of an inch high. As there are six-sixteenths of an inch between the ruled
lines in the practice paper generally used, and in all the Palmer Method
practice paper, there should be two-sixteenths (one-eighth) of an inch
between the top of the loop and the ruled line above.
It should be remembered that a space in height is the height of the
minimum letters in the style you are practicing. As an example, in copy-books
used in former years, the one-space letters were one-eighth of an
inch, or twice as high as in these lessons. The loop letters were three
spaces, or three-eighths of an inch high, which is two-sixteenths of an inch
higher than the loops in these lessons.
Movement Used—In business writing, all loops below the line
should be made with pure muscular movement. In making those above
the line, the fingers should be relaxed, and as the arm slides forward, a
slight extension of the fingers will help to make the upper part of the loop.
The combination of the two movements is perfectly natural to most hands,
and little encouragement need be given to the use of the fingers. The
student must guard against using much of it. Keep an eye on your wrist
to see that it moves forward and backward in unison with the other movements.
Under no circumstances allow the fleshy part of the hand in
front of the wrist to touch the paper.
Cautions—You will find your first difficulty in getting enough curve
on the upward stroke. A half hour’s determined practice will do much
to overcome this. Keep the paper at such an angle as will make the
downward strokes straight toward the middle of the body. Above all,
preserve unity in height, in slant and in spacing. Do not shade.
There is a slight check in the motion on the downward strokes, but no pause at the base line. After a little practice, loops as good as the
above should be made at the rate of from one hundred to one hundred and twenty-five to the minute. The count in groups of five is 1, 2, 3, 4, 5—one
for each letter.
LESSON 33
More study, more practice. Study and practice should be constant
companions in developing good writing. One without the other will
lead to one-sided results. Don’t be one-sided.
Drill thirty-four offers good movement practice. Close observation
will indicate just how it is done. The small traced oval is about one-half
the capital in height, and the upper loop is also one-half the entire
height of the letter. If you have a sharp eye and a responsive mind,
you have been able to grasp these details without any suggestions, and
you have gone further. You have noted the curve in the main downward
stroke, the flatness of the lower loop on the base line, and the dropping
of the finishing stroke below the base.
Six is the count for the traced oval and two for L, as follows,
1–2–3–4–5–6, 1–2. The count of 1–2, for the capital L should be a little
slower than for the ovals. This exercise should be made ten times
on a line, in groups of five, and two lines, or twenty exercises a
minute.
A few minutes in the right way are worth hours of practice in the wrong way.
Swing for the L, swing for the L, swing for the L. In other words,
study the letter closely, and swing the pen in its direction a few times
before making it. The first line starts about one-half the distance from
the base to the top, and dips under; the upper loop is one-half the entire
length of the letter; the lower loop rests on the base line; and the finishing
line is carried below the base. This letter makes one of the best movement
drills so far given. After each group of five the paper should be
moved.
The count is 1–2, for each letter, or slide two, or slide L, or swing L.
From fifty to fifty-five should be made in a minute.
LESSON 34
Review lesson thirty-three.
Study, practice, and compare.
Begin small a at the top just as it is in drill thirty; make the abbreviated g short below the base line, and be sure to write four words to a
line. Practice speed, ten to twelve words a minute.
LESSON 35
Write two lines and then make careful comparisons with the models.
Are your small l’s shorter than the capitals; are both l’s the same height;
and do they cross one space above the base? Compare slant, the parts
of letters and letters complete. Study the spacings between the letters,
and try to show improvement in each line. Practice speed, the same as
for drill thirty-six.
You cannot fail, if you study the instructions and follow them.
43
LESSON 36
Small a should be reviewed frequently as a movement drill.
The first part of small a serves as the foundation of small c. In
making connective lines, an over-motion must be used. If an under-motion
is used from the ending of one c to the dot at the top of the next,
there will be a loop, and the letter will be too large. After making a few
lines, compare the height of c with o, a, m, and n. You will, of course,
frequently compare with the copy. The count is 1–2, 3–4, 5–6, 7–8, 9–10;
or dot over, dot over, dot over, dot over, dot over, for each group of five.
The speed should be sixteen groups of five, or eighty letters a minute.
44
LESSON 37
The small r given in the first line in drill forty cannot be made at
a high rate of speed, as the form requires a checking of movement at the
top to form the shoulder. Study the parts of the letter shown before
the first completed form.
The form in the second line can be made at much higher speed, and,
while somewhat difficult to learn, is much easier in execution when mastered.
The first part of it is just like the first part of small m or n. The
downward stroke is retraced to a point about one-fourth of a space above
the first part; a stop (hardly noticeable) and a dot are made before the
swinging curve to the next letter. If the connective lines between letters
of this style are made with too much under-curve, perhaps touching the
base line, they will more nearly resemble small x than r. Guard against
this fault.
Close study of the form while practicing will be necessary. After
its mastery, ninety connected letters to the minute will be a good rate
of speed. Unquestionably, the first few trials will be discouraging, but
faithful practice will be rewarded. Stick to it.
Eighteen groups of five should be made to the minute.
The count for this small r in drill forty-one for each group of five
is 1–2, 3–4, 5–6, 7–8, 9–10; or one-dot, two-dot, three-dot, four-dot,
five-dot; or one-stop, two-stop, three-stop, four-stop, five-stop. A conversational
count similar to that in small o, drill eleven, may be used
to advantage in small r, thus—You-stop, you-stop, you-stop, you-stop,
at-the-top. How long, do you stop, at the top? Not long, but you
stop, every time at the top. What for, what for, what for? To make
a dot, to make a dot, to make a dot, etc.
The rate of practice speed in this drill should be twenty or more words to the minute.
There is no initial line before small o; it begins at the top.
LESSON 38
As before mentioned, small r and s are companion letters, and both
may be made one-fourth higher than other letters of the minimum class;
not because of any technical rule, but rather because it generally is agreed
that they look better so made. Small s should be pointed, not looped,
at the top, and entirely closed on the base line. Be sure to use just the
right amount of under-curve in the beginning stroke, and the width will
depend upon the amount of curve in the last part. Practice, study, and
compare.
The count for each group of five is 1–2, 3–4, 5–6, 7–8, 9–10. A conversational count similar to that given in the small o drill could be used to
advantage; thus, swing one, swing two, swing three, swing four, swing five; or curve one, curve two, curve three, curve four, curve five. Nearly
or quite seventeen groups of five should be made to the minute.
LESSONS 39, 40, 41, 42, AND 43
At least five lessons at this point should be devoted to reviewing all the lessons that have gone before.
THE FREQUENCY OF REVIEWS
To Teachers: Assuming that teachers of the Palmer Method
master the lessons in their order before attempting to teach them, they
are to decide when lessons and drills have not been mastered and need
reviewing. Without knowing the pupils and seeing their daily work in
penmanship, it would hardly be possible for the author to decide with
unerring accuracy, when they should review.
46
LESSON 44
The first two parts of small w form u. As explained in lesson
nineteen, the distance between the points in small u represents a lateral
(running) space. Keeping this space in mind, carry the third or
finishing part of small w one-half space to the right of the second, or
finishing point in small u. The connecting stroke is slightly curved.
Eighteen or twenty groups of three should be made to the minute
and the count for each letter is 1, 2, 3; 1, 2, 3; 1, 2, 3; or one, two, dot;
one, two, dot; one, two, dot.
LESSON 45
Small x is simple in construction. Study closely before practicing it. The crossing may be made either upward or downward. In writing
a word containing it, complete the word before crossing the letter. Make the crossing short.
47

LESSON 46
The first part of small v is the same as the first part of small x, and it is ended with the form used in finishing small w. Don’t close this
letter at the top. It must be left open. Count 1–2, 3–4, 5–6, 7–8, 9–10, for each group of five letters.
48
LESSON 47
The loop in h is small l, brought to the base in a straight line on the
main slant, the second part is one section of small m. Notice that the
first and last parts of small h meet on the base in a point. Study until
you see just how it is done.
A count of 1–2, should be used for one h, and a count of 1–2, 3–4, 5–6,
7–8, 9–10, for a group of five. From fourteen to fifteen groups of five
should be made in a minute.
Study an inverted h, and if correctly made you will see that in that
position it is small y. At this point it would be well to study and practice
small y. Count 1–2, 3–4, 5–6, 7–8, 9–10, for each group of five.
LESSON 48
Review lessons forty-seven and forty-eight, and then give attention to the following.
The practice speed should be twenty or more of the first two words and sixteen or more of the third word to the minute.
Guard against making h higher than l. All loop letters above the base should be the same length.
49
LESSON 49
THE REVERSE OVAL AND ITS APPLICATION
An application of the reverse oval motion is made in forming capital
J. The reverse oval, it must be understood, begins with an upward
stroke on the left side. Before attempting capital J, make reverse ovals
four or five minutes, and if the movement is then light and uniform, the
copy may be safely practiced. The oval is used as the developing and
driving force.
Make the oval to a count of six, lift the pen from the paper at
the top, and without checking the motion swing the pen in its natural
course above the paper, to the right and below the base to the point
of contact with the paper in starting the letter. Do not stop the
motion, but strike the paper in an upward course at full speed for
the beginning stroke of J. If the explanation of applied motion is not
fully understood, study until it is, and then fill at least a half page with
the copy.
Do not neglect the form, but note carefully the following points:
J should begin with an upward stroke from a point just below the base
line; the turn at the top should be round; the upper part should be a little
longer than the lower part, and twice its width.
LESSON 50
If slant is troublesome, study and practice this drill faithfully.
This copy is given as a drill on both movement and form. From the beginning stroke of J to the finishing of small s the pen should not
be lifted. Write the word from beginning to end with a steady, light and uniform movement. Eighteen or twenty words to the minute will
be a fair rate of speed for practice.
50
LESSON 51
Make capital I, and continue with the reverse oval. The count should be two for I and six for the oval, as follows: 1, 2; 3, 4, 5, 6, 7, 8. Apply
enough speed to make the lines smooth and clear-cut.
Question: Where and how does capital I begin? Answer: Below
the base line with upward motion. Question: How wide is the upper
part? Answer: A little less than half the width of the lower part.
Question: How is it finished? Answer: With a full left curve and a
dot at the end. Question: Where do the first upward and the first
downward lines cross? Answer: At the height of small o. Question:
What part of the space between the ruled lines is occupied by I? Answer:
About three-fourths. You should analyze every letter you practice just
as completely as is done in these questions and answers. Then you
will have good mental pictures of the letters, will see at once when
they are poorly made, and will make them well as soon as you have
good control of the movement. Without the good mental picture, you
will never write well, no matter how perfect your control of motive power
may be.
With a count of 1, 2, for each letter, make forty-five or more to a
minute.
To form the angle at the left, there must be a full stop in this style of capital I. It is hoped that you have remembered and tried to apply
the instructions of an earlier lesson about stops in making all angular connections.
This is a particularly good style of capital I to use in beginning a word, as shown in the following drill. Count 1, 2, 3; or 1, 2, swing.
51
MOVEMENT DRILL DESIGN
It is often a good plan to encourage students to give full play to
their inventive and constructive ability in adapting the drills to
different designs. Such work, however, should be done largely
out of school hours. A great variety of such designs from schools
where the Palmer Method is in use may be seen on the walls of the
author’s offices. In the drills mentioned are mainly used the straight
line; compact, open and interlaced ovals, large and small; small m,
n, e, o, c, l, h, and b. Among these designs are houses, carriages,
crosses, battleships, and many curious designs for which we do not
find names. Many are worked out in colored inks and the effect,
on the whole, is pleasing.
Herewith we give a drill that is a favorite exercise with many
teachers. Let the student use pencil outlines to indicate length of
lines and width of ovals.
YOU CANNOT FAIL, IF YOU STUDY THE INSTRUCTIONS AND FOLLOW THEM
52
LESSONS 52 AND 53
53Not forgetting or neglecting the two-space compact oval drill with which each lesson should start, the practice periods of two days might
well be spent in study and practice of the letters on page 52.
LESSON 54
This copy furnishes all the movement drill necessary in beginning this lesson. Count ten for each drill, two for capital S, and eight for
the reverse traced oval. About sixteen complete drills should be made to the minute. This drill is especially recommended to those who find
the development of a light, quick movement difficult.
Study the curve of the first stroke; study the loop at the top, and give especial attention to the fact that the loop (upper part of S) is one-half
the entire length of the letter. With an easy, light movement make from forty-five to fifty letters to the minute. Count 1, 2, for each letter.
The angular finishing stroke shown in drill sixty-three is very popular with many excellent teachers of business writing. Almost the same
number of letters should be made in a minute as in drill sixty-two. Its practical feature is the direction taken by the finishing stroke, which
may be joined to any letter following. Count 1, 2, swing; or 1, 2, 3, for each letter.
LESSON 55
Write a page of this copy; more if you have sufficient time. A continuous steady movement should be used. Do not lift the pen from
the beginning to the ending of the word.
54
LESSON 56
In this drill, capital G is made first to a count of three, and then, without lifting the pen, followed with six revolutions of the reverse traced oval.
Make seventeen completed exercises in a minute. Count as follows: 1, 2–3, 4, 5, 6, 7, 8, 9.
Study the form of capital G closely before attempting to make it; be sure that you not only know when you make a poor letter, but that
you know why it is poor. One bad stroke may spoil an otherwise good letter. Learn to locate the bad strokes. Make from forty to fifty letters
to the minute. Count 1, 2, 3; or 1, stop, 3, for each letter.
This is a good business form. Special instruction is unnecessary. Use your eyes. Make as many as fifty in a minute.
The angular finishing stroke gives a connective line for any letter that may follow, and admits of joining the capitals for an extended drill
as well. Count 1, 2, for each letter, or 1–2, 3–4, 5–6, for each group of three. Make eighteen groups in a minute.
You aim before you shoot. You should study the instructions before you practice the drills.
55
LESSON 57
Nothing can be better at this stage of the work than easy words constantly repeated. Through a series of repetitions, strength in movement
is developed, and faults are seen. Twelve or fourteen words to a minute should be the practice speed.
LESSON 58
CAUTION TO THE STUDENT
Never begin to practice until you are sure you know how. Languid,
thoughtless practice should be avoided. Put ambition, put energy, put the
fire of determined will behind your practice, and the results will be astonishing.
Take advantage of all favorable conditions. Not only keep the
muscles of the right arm in a relaxed condition, but guard against tension
in any part of the body. Keep the side of the hand and the wrist free from
the desk; keep the right arm well out from the side; keep the right hand
in front of the eyes; keep a right angle at the right elbow, and remember
that the propelling power is located above the right elbow. If you think
you are in a good position for writing, test the movement without touching
the pen to the paper, and study the conditions under which you are
trying to work. Be sure you are right before you go ahead.
Not much movement drill of a special character is necessary in
opening this lesson, the connected small p affording an excellent exercise.
Study the form with care. Note particularly the point at the top, the
loop below the base line, the length above and below the base, and the
point where the left curve from below the base crosses the main line.
Sixty connected letters should be made to the minute. Make frequent
comparisons and write a page.
The count for each group is 1–2, 3–4, 5–6, 7–8, 9–10.
Average rate of speed, twenty words to the minute. If small l is difficult, turn to drill thirty-three, study the instructions, and practice small l
as there presented.
The practice speed should be fourteen words to a minute.
LESSON 59
Make a few imaginary letters as a preliminary movement drill before
beginning active work. As will be seen, nearly all the main oval part is at
the left of the beginning stroke. Count 1, 2, and repeat; or 1–2, 3–4, 5–6,
7–8, 9–10 for each group of five. Move the paper after each group of five.
From fifty to sixty letters should be made to the minute. Make a full
page and practice steadily, not spasmodically. This letter lends itself
readily to a light, easy, swinging, and rhythmic movement. For that reason,
it is an excellent movement drill, and the best style of capital P to adopt.
Also make a page of this letter. It is a good movement drill. Count three and be sure to join the last part to the first with a loop a little
above the center of the letter. Forty-five good letters should be made to the minute. Count 1, 2, 3.
Count 1–2, 3–4, 5–6, 7–8, 9–10, for each group of five, and make twelve groups or sixty letters to the minute.
LESSON 60
Review lessons fifty-eight and fifty-nine.
Write from ten to twelve words a minute, four to a line, eight inches long. This is a good movement drill if properly practiced.
LESSON 61
BUSINESS FIGURES
Nothing is more important to the average bookkeeper or office clerk
than good figures. In many lines of accounting, thousands of business
figures are made without the writing of a single word.
This, in a measure, is true in many branches of statistical work connected
with railroad bookkeeping where headings are printed and page
after page is filled with figures. The first requisite is legibility, and its
importance cannot be emphasized too much. Letters in a word may be
known by the context, but each figure must depend upon itself for legibility.
It is very important, then, that each figure should be so formed that its
value, in groups or by itself, cannot be mistaken.
AN OBJECT-LESSON, FOR STUDY
Through the adoption of the Palmer Method figures, made small
and well within the spaces, the New England Telephone Co. has reduced
errors of its employes to a minimum, and saved thousands of dollars a year.
Figures should be made small; students sometimes think that large
figures are necessarily plainer, but such is not the case. Examine carefully
the diagram. At the left are figures that are absolutely plain; one
could not be mistaken for another, and yet their extreme size in the small
spaces makes them difficult to read. At the right are the same figures,
no more perfect, but not so large. Please note carefully that these,
surrounded by white paper, and much smaller, are more legible, even at a
distance, than the large figures at the left.
Students who have practiced in copy-books almost invariably make
figures three or four times too large. Our models are large enough for
ordinary use. If occasion demands, it will be easy to make them larger.
One-eighth of an inch is perhaps high enough for ordinary figures, while
in some places it will be an advantage to make them even smaller.
58
FOR STUDY
HOW TO PRACTICE
In making figure one, draw the hand toward you with a quick light
motion, sliding on the third and fourth fingers. Uniformity in the height
and slant are the two important points to observe.
The development and application of a lateral oval motion will aid in
the construction of figure two. In making it in class drill a count of
three should be used, thus—one, two, three, one, two, three, etc., or dot,
two, three.
Notice the exercise preceding figure three in lesson sixty-five. The
motion used in that exercise will produce a good figure if properly applied.
One, two, three, or dot, two, three, is the count used. A count of three
is used in figures four and five also, but for figures six, seven, and nine,
use a count of two.
Several lessons should be given to drilling on the figures singly before
grouping them, but as soon as the forms are mastered and the student
can make them at a fair rate of speed, it is best to drill in miscellaneous
order somewhat as follows: 1, 0, 2, 6, 9, 8, 5, 4, 3, 0, 9, 6, 7, 2, 2, 8, 9, 3,
5, 6, 9, 1, 5, 8, 6, 9, 5, 4, 6, 9, 3, 7, 8, etc. No particular order is necessary,
but the aim should be to repeat one as often as another.
LESSON 62
LESSON 63
59It is truly interesting to watch the development and improvement
in figure practice in a class where the work is well and systematically done.
Two weeks should be devoted to this practice and there should be frequent
reviews.
Some teachers place great emphasis upon the order of simplicity, but
as a matter of fact, no two students will be able to agree on this and,
since we are going to devote some time to drilling on each figure during a
period of two weeks, there is little use in attempting any arrangement on
such a basis. If there is a difference, the difficult figures should be given
most practice.
LESSON 64
As soon as fair progress has been made in making figure two, an effort should be made to bring the rate of speed to seventy-five a minute. Count
one, two, three, or dot, two, three, for each figure made in class practice.
LESSON 65
In the author’s classes the method here presented of teaching figure 3 has proved more satisfactory than any other that he has tested. The
motion produces the figure; learn this motion thoroughly. Count one, two, three, or dot, two, three, and make seventy figures a minute.
The Palmer Method is a text-book on practical writing. The Instructions should be studied, and followed.
60
LESSON 66
Figure five is in a large measure dependent upon the horizontal stroke at the top for its legibility. This horizontal line should be made
last. Study the form as well as practice it. About seventy good figures should be made to the minute. This speed may be increased later.
Count one, two, three.
LESSON 67
Seven extends below the base. Make this figure in a count of one, two, at the rate of about eighty-five to the minute.
LESSON 68
Four rests on the base line, and usually the last part extends above the first. Count one, two, three, and make from sixty to seventy a minute.
61
LESSON 69
The compound curve at the left on the first line in drill 84, and the
arrow in the first figure show how 8 begins.
After a few minutes’ drill on figure eight at a speed of sixty to seventy
a minute, miscellaneous figures should be introduced. In class work these
figures should be made from the dictation of the teacher, and the practice
speed should be from ninety to one hundred figures to the minute. The
author usually makes the figures on the blackboard as they are dictated
to the class. A fairly rapid penman can make from one hundred to one
hundred and twenty-five of these in a minute. Compare your figures with
the copies and make all figures small and disconnected.
MISCELLANEOUS FIGURES FOR STUDY AND PRACTICE
62
LESSON 70
SPECIAL POINTS TO OBSERVE
Capital E is made with an application of the oval motion, as developed
in capitals O, A and C, the application varying but little.
The upper part of capital E is about one-third the entire height of the
letter. The finishing oval should not exceed one-half the entire height,
and the loop marking two-thirds the height of the letter points downward
at about a right angle with the main slant.
Practice the first row as a movement drill. Make the small (upper)
oval first, and swing into the lower and larger oval without lifting the pen.
Make five traced ovals for the upper, and the same for the lower part,
thus permitting a count of ten for each completed exercise.
The abbreviated E in the second line is used by good business penmen
more than any other, but the form used in the next line, finished with an
oval, should be practiced and mastered. The count for each should be 1,
2, 3, or dot, 2, 3. From forty-five to fifty of the abbreviated form and
but few less of the other should be made to the minute. Count the
number of letters on a line, and make as many in the same space. The
abbreviated capital E, followed with the small e, may be practiced as a
movement drill to good advantage now and during future practice periods.
The count for it is 1, 2, 3, 4, 5, 6, 7, or dot, 2, 3, 4, 5, 6, 7.
Review this lesson often until you make a good capital E.
It is not Palmer Method if the lines are tremulous. Study the instructions for speed requirements.
63
LESSON 71
The framework of capital B is clearly shown in the models below.
The straight line starting at a point about three-fourths of the distance
from the base is purely a guide line, a prop upon which the remainder rests.
Without it, beginners make very feeble letters. Although usually lost
in the retraced line, the author considers it a very essential part of the
letter.
Definiteness is essential in business writing. There should be a
definite starting-point and a definite ending-point in every letter. Every
curve and every loop should be definite and have a definite place in the
plan of construction. In studying the forms of the letters here given,
bear this in mind. Capital B may end in a dot as shown above, or it
may end in an angular form, furnishing a connective stroke for the letters
following.
The count for capital B is 1, 2, 3, and a fair practice speed is forty to
the minute when the letters are disconnected, and a little higher rate
when the letters are connected as in drill eighty-seven.
LESSON 72
Study small b. The lower part of the letter should be as wide as the
loop through the widest part, and some good penmen make it a little wider
than this. Do not make your letters larger than those in the copy.
Make line after line until you are able to make the letters easily and at
a fair rate of speed. Sixteen groups or eighty letters to the minute is not
a high rate for this drill. The count for each group is 1–2, 3–4, 5–6, 7–8,
9–10, with the emphasis on the finishing point in each letter. The connective
stroke is slightly curved.
64
LESSON 73
Students are expected to practice the above words as movement drills. The speed in the first two lines should be from twenty to twenty-five
words a minute. At this rate, form can be improved while movement is being developed. The word “billing” may be practiced at from twelve to
fourteen a minute.
LESSON 74
Study the form before attempting the drill. Make ten sets of five each, or fifty small k’s to the minute. Keep the letters down to the size
of the copies. Count 1, 2, 3, for each letter with a slight check on the 2.
LESSON 75
This writing is large enough. In studying size, students should make frequent comparisons. The practice speed should be, for the first word,
twenty, and for the word “killing” twelve to the minute. See the following page.
65
LESSON 76
TO RELIEVE MUSCULAR TENSION
It is often advantageous to go over the path of the letter, or exercise,
with a dry pen. This method is especially helpful to a student whose
muscles are hard, and who finds difficulty in overcoming the tendency
to keep the muscles of the arm and body in a rigid condition. This plan
has been suggested in former lessons, and we consider it of sufficient importance
to receive emphasis here.
Another plan which the author has found helpful to students who
write with strained muscles, is to place a weight on the paper, and write
with the left arm hanging down. The tension of the right arm is relieved
at once.
Still another plan to relieve this tension, so common among beginners,
is to select some easy drill like o or m, and make it across the ruled lines
with the eyes fixed upon some object at a distance on a level with them
when the body is fairly erect.
66Small f is a little shorter below than above the base line, and is closed on the base line. A fair rate of practice speed is fourteen groups of five
letters each, or seventy letters to the minute. Count 1–2, 3–4, 5–6, 7–8, 9–10, for each group.
LESSON 77
Write several lines of the first word before changing to the second. Write twenty or more words in a minute.
LESSON 78
Rate of practice speed, fourteen words to the minute. Good movement leads to good writing; good position leads to good movement. Watch
the position; watch the movement.
LESSON 79
Let us emphasize the statement made in a preceding lesson that constant repetition is necessary in developing a good style of writing for business.
Another thing for the student to bear in mind is the fact that the only way to learn to execute business writing is to practice business writing.
Review as many lessons as time permits.
67
LESSON 80
Compare the oval of capital D with capital O. Do not neglect to make
a careful study of D, each part by itself, and the letter as a whole. Do
not drag the hand over the paper, but keep it well up in front of the eyes,
and drive it along firmly but lightly. It takes a little time, energy, and
enthusiastic practice to make a good business penman, but it is encouraging
to know that under the muscular movement plan there are no failures
when favorable conditions prevail. Practice capital D until you can make
forty-five fairly good letters to the minute. Count 1, 2, 3, for each letter.
In writing the word “Drumming” do not lift the pen from the beginning
stroke in small r to the ending stroke of small g. Regularity and
continuity of motion are very essential. Keep the pen on the paper.
The word should be practiced at a rate of nine to a minute.
LESSON 81
Do not make the beginning part of capital T too high; it should be
but little more than two-thirds the entire height of the letter. Note
particularly that the last part curves over the top of the main (first)
part without touching it. Time and hard work will be important factors
in developing this letter. Be earnest, be faithful. The count is 1, 2, 3, 4,
and about forty letters should be made to the minute.
You will see that this capital F is a copy of capital T, with the crossing added. This is not recommended as a business form, since it cannot be
made rapidly. Many of the forms in this book are not given for their beauty, but because ninety per cent. of our best business penmen use them.
LESSON 82
In twelve of the business capitals we have the small loop beginning.
Turn it up-side-down and you will see that it is the inverted figure six.
Most pupils find this style of starting capital letters somewhat difficult
at first, but when mastered it becomes a favorite. It is of sufficient
importance to be given considerable study and practice.
A careful study and comparison of these capitals will show that in
F, Q, W, X and Z the main downward strokes are curved much more
than in H, K, M and N, while compound curves are used in the main
strokes of U, V and Y.
Practice the first part at the left of the line.
LESSON 83
Capital Q, as shown above, is the enlarged form of figure two preceded by a movement drill. Curve the main downward strokes liberally.
Make the lower loop flat on the base line and drop the finishing curve below. Students should frequently compare their writing with the copies.
The mind directs, the arm and hand perform; both mind and muscle must work in harmony.
No matter how perfectly the muscles of the arm are trained, good letters cannot be made unless a good conception of form is in the mind.
Capital Q should be made well at the rate of sixty to the minute, and the figure two faster. The count in each case is 1, 2, 3.
In the style of writing here presented the loop of small g extends
three spaces below the base line. The paper should be held in such a
position that the downward strokes are pulled toward the center of the
body, the paper being changed from time to time with the left hand to
keep its position relatively the same. The motion should be purely
muscular throughout, and the movement in making the loop particularly
quick and elastic. Study the form closely and note the crossing of the
loop with a left curve on the base. Pull the loops toward the center of
the body and not toward the left elbow.
In groups of five connected letters a speed of sixty-five letters to the
minute should be attained. A count of ten for each group of five will
aid in regulating the movement.
By comparison it will be seen that q is a little shorter below the base than g; that the turn at the bottom is made to the right, instead of,
to the left; and that the lower part connects on the base line with the first. On account of the check at the connective point, fewer letters are
made to the minute than of small g, but the movement should be quick.
LESSON 84
See suggestions at the top of the following page.
70The inverted small e preceding capital H in page sixty-nine will not
only aid in developing the small loop beginning but will insure freedom
of movement and lightness of stroke.
Count 1, 2, 3, 4, for the drill and first part of capital H, and 1, 2, for the
last part. In making the last part, swing the hand to the same direction
as for the beginning of capital O, but straighten the stroke from its center
to its base. Let nothing escape you; observe closely every stroke, no
matter how minute or unimportant it may appear.
With an easy, swinging movement, make thirty-five or more capitals of the above form to the minute with a count of 1, 2, 3, 4.
The beginning loop may be made smaller than in the copy, but no larger in business writing.
Capital K is a natural companion to capital H. The beginning strokes in both letters are identical in size and shape.
LESSON 85
Careful study of the last part of K will be very much to the advantage of every student. Study it with the first part covered with a piece of
paper. Turn the copy upside down and study it in that position. Notice particularly that the loop grasps the first part a little above the center.
Thirty-five to forty to the minute will be a fair rate of speed. Compare your capitals frequently with the copy.
Are you studying the instructions? They tell you just how to succeed.
71
LESSON 86
This is a most excellent word to practice at this stage of the work. It is a good movement-developer. Give close attention to size, general
appearance, and space between letters, and guard against irregular movement. Keep the hand well up in front of the eyes and drive the pen lightly.
Write a half page of the copy and then make a careful study of your work. Try to write each line better than the preceding. Three words should
be written to the line.
LESSON 87
A REVIEW
Work faithfully on every letter. Repeat the forms over and over until decided improvement can be seen. Make frequent comparisons.
Study length, breadth, curves, and connections closely.
Rate of speed to the minute: F, fifty; H, thirty-five; K, thirty-five; M, thirty-five; N, forty.
72
LESSON 88
A REVIEW
Rate of practice speed: Q, sixty; U, forty-five; V, fifty-five; W, forty to the minute.
Points to Observe—Capital Q is the enlarged form of figure two. The last parts of U, V, and W are shorter than the other parts, and the first
strokes in U and V are exactly alike. In capital W, check the motion a little at the base line in the first main downward stroke, as this will aid in
the construction of the last part.
LESSON 89
Practice this compact oval as a beginning drill. Make it between two ruled lines, carry the pen lightly and see how many you can make in
one row, with one dip of ink.
Study and compare as you practice. Drill speed to the minute in the following capitals: X, thirty-five; Y, forty; Z, fifty.
REVIEW WORK
At this point it would be a good plan to review all the essential work of the preceding lessons. From one to two weeks should be spent
in such practice.
LESSON 90
Some authors make the loop of j and z shorter below the base than small y and g, but we make no distinction. The j begins like a small i and
ends with a loop. Small z should receive careful attention.
LESSON 91
SOMETHING MORE ABOUT SIZE
In these lessons is presented a style of writing that is easily and rapidly executed, and though large enough to be perfectly legible it is small enough
for general use. Examine the writing of the best business penmen in the large mercantile centers and it will be seen that this is true.
74It is a grave error to present for practice models larger than the pupils are expected to employ in their ordinary writing. And yet many
professional penmen continue to present models not only two or three times larger than good business writing is expected to be, but forms that
cannot possibly be executed at commercial speed.
CAPITAL AND WORD PRACTICE AS MOVEMENT DRILLS
In the following copies the capital and word practice is intended to
encourage free movement, continuity in execution, and better control of
the writing muscles than has, perhaps, been gained. The plan is to
repeat the capital until it can be made at the speed designated, and to
follow with word practice. In the word drills the value of a continuous
movement must not be lost sight of, and the pen should remain on the
paper from the beginning to the ending of the small letters. In fact,
all the copies should be treated as movement drills. Words ending in
“ing” have been purposely selected and their value will not be questioned
if they are rightly practiced.
The rate of speed for capital A is from seventy-five to eighty-five to the minute and for the word “Alling”, about fifteen to the minute.
LESSON 92
75Practice the word “Calling” at fifteen or more a minute, and “Chiming” at the same rate.
LESSON 93
LESSON 94
Open the lesson with a drill on capital O, making fully sixty to the
minute, and write the word “Oiling” at the rate of fourteen to the minute.
Watch position; watch movement.
Capital L, rightly practiced, is always an excellent movement drill.
Questions you should be able to answer intelligently: Where and how
does the beginning stroke start? How long is the upper loop, compared
with the length of the letter? Is the downward stroke a straight line
or a curve? Is the lower loop round or flat, and what part rests on the
base line? Is the final stroke finished on or below the base line?
Compare your work with the copy in reference to these questions.
Practice speed, sixty letters to the minute. Write the word “Lanning”
with a very light motion at a speed not less than twelve to the minute.
76
LESSON 95
Do not overlook the proportions of capital M. It should fill a square. Practice speed for M, about forty to the minute, and of the word “Milling”,
fourteen words a minute; a higher rate of speed may be applied by some pupils.
LESSON 96
Special Notice—Pupils who cannot use and apply the muscular movement fairly well, should return to the beginning lessons and review
them, studying carefully all the instructions regarding position, penholding, and methods of developing movement.
Capital N should be made at the rate of fifty-five a minute. Practice speed for “Nulling”, fourteen or sixteen to the minute.
LESSON 97
77Capital H should be made at the rate of thirty-five or forty a minute, and the word “Hauling” about fifteen to the minute.
LESSON 98
Forty capital K’s to the minute is a fair rate. Pupils should not
lose sight of the fact that motion determines form. Take care of the
motion and the forms of the letters will develop easily and naturally. A
careful study of the movement as applied to capital K will be helpful.
After making the first part of the letter, the hand (with the pen in the
air) should swing below the base line, describing an oval and returning
upward to the beginning point of the last part of the letter. Be sure to
connect the parts with a loop, as shown in the copy. Drop the finishing
part below the base line. Don’t forget the word practice; about twelve
words to the minute is a fair rate of speed.
LESSON 99
Practice capital P at the rate of fifty to sixty letters a minute; the word “Pulling”, twelve words a minute. Some pupils will be able to
write the word at higher speed and still do good work.
LESSON 100
Be sure to fix in mind the image of the letter before attempting it. Study closely the proportions and the direction of every stroke. Make
about fifty capital R’s to the minute, as given in the next page.
78Do not forget that your advancement depends upon movement, and
that movement depends much upon position. The body should be self-supporting,
with the feet resting squarely on the floor, and should not
crowd against the desk; the right arm should be well out from the side;
the right hand well in front of the eyes; and the paper twelve or fourteen
inches from the eyes.
If the wrist or side of the hand rests on the paper, all motion coming
from the muscles of the arm will stop at the wrist and it will be an impossibility
to use muscular movement. Watch the wrist and the side
of the hand closely. Remember that the propelling power is above the
elbow, in the upper arm and shoulder.
Write line after line of the word “Running” with a light, quick motion,
and compare with the copy frequently. Twelve to fourteen words
should be written to the minute.
LESSON 101
Turn to lesson fifty-four and practice and study capital S in accordance with the instructions. Enough time should be reserved to write at least
one page of the word “Swelling”.
LESSON 102
Pupils who cannot make good loop letters should make a special study of lesson thirty-two.
79

LESSON 103
As explained in a former lesson, capital Q is simply a large figure two. It is a good movement drill. Practice it as such.
In all your word practice a special effort should be made to space the letters evenly. Study your written lines with that in mind.
LESSON 104
Pupils should give particular attention to the appearance of their
finished pages, making letters and words conform to spaces. The capitals
should occupy only from two-thirds to three-fourths the distance between
the ruled lines, assuming that they are about three-eighths of an inch apart.
From fifteen to twenty capitals should be made to a line. If the forms
are well made, a page of capitals written in accordance with these
suggestions will present a very pleasing appearance. See drill 126.
The crossing of capital F at the top of the following page is above
the center, and the final stroke at the crossing is small. In practice, write
the full word every time the capital is made. Do not let your practice
work approach scribbling. Do the very best you can, not part of the
time, but all the time.
You aim before you shoot. You should study the instructions before you practice the drills.
LESSON 105
Always start capital I with an upward stroke from below the base line. The upper part should be about one-half the width of the lower. The
crossing of the beginning with the main downward stroke should be one space above the base line. Practice the detached capital as well as the
word until there is an improvement in the movement and its application.
LESSON 106
Practice and compare, and then practice again. Capital J is twice as wide above as below the base, and the lower part is a little shorter than
upper part. Pupils who find the letter troublesome should review lessons forty-nine and fifty.
81
LESSON 107
Write a page of capital E’s and another page of the words.
LESSON 108
Capital B was discussed at considerable length in lesson seventy-one, and students who have failed to master the letter should turn to that
lesson for review.
LESSON 109
Make your letters no larger than the copies. Write line after line of the detached capitals before writing the word. Rate of speed for practice,
fifty to fifty-five capitals and fourteen words in a minute.
82
LESSON 110
The first part of capital T should be no more than two-thirds the height of the entire letter. Give attention to the abrupt stop on the base
line in the first part of the letter. Carry the last part up and over the first part in a graceful curve. Practice the word as well as the detached capital.
LESSON 111
Capital W should be very closely studied. The tendency is to slant
the last part too much, tipping it away from the first part. The upward
stroke beginning the second part is a right curve, and the construction of
the last part and the appearance of the entire letter are to a considerable
extent dependent upon that line.
In making the first part there should be a stop at the base line. This
will aid very much in the construction of the last part of the letter. The
last line in the letter, it will be noticed, is shorter than the two center
strokes. It is unlikely that students who fail to study its construction
closely will learn to make a good capital W. The rate should be between
forty and fifty letters to a minute. Do not neglect the word practice.
Write about sixteen words to the minute.
LESSON 112
The last part of capital U is shorter than the first part. Study the letter until you have a good mental picture of it. Make U at the rate of
forty-five to a minute, and do not neglect the word practice.
83

LESSON 113
An otherwise good capital V will be spoiled if the finishing line is too long. Notice its length. Study and practice should go hand in hand.
Do not neglect either.
CAUTION TO TEACHERS AND PUPILS
The development of good business writing is dependent, first, upon
proper clothing of the writing arm; second, upon a substantial desk or
table of the right height; third, upon a good position at the desk; fourth,
upon a relaxed condition of the writing muscles; fifth, upon the freedom
of the wrist and the side of the hand from the paper; and sixth, upon
concentration, determination, and constantly repeated effort.
Teachers who cannot maintain enthusiasm throughout the writing
period, and who do not realize the necessity of constantly repeated cautions
and admonitions, must never expect to secure flattering results.
Teachers, see that your pupils are alert, watchful, and practicing
under the most favorable conditions. Force upon the inner consciousness
of every pupil the harmfulness of careless practice and the necessity for
making every stroke according to instructions and in the right direction.
Pupils, do not vehemently assert that you are very anxious to
become good penmen, and then abuse the opportunities within your
reach. Learning to write well is not difficult to the earnest, careful,
hard-working pupil; and with such, results almost immediately follow
correct methods of practice.
Finger movement and muscular movement are antagonistic, and
the student who makes an effort to use muscular movement in the writing
class only, need not hope for success.
Home students, not having the advantage of the directing counsel of
good teachers, should frequently review the beginning lessons. You cannot
fail if you follow the instructions.
Practice the above copy in sections. Repeat capital I until the form is good when made rapidly, follow with several lines of the word “am,”
and continue to practice each word in the copy until uniformity in spacing, height, and slant have been developed. Then write a page of the
complete copy and criticise it.
As simple as it looks, there is material for several hours’ practice in this copy.
LESSON 114
The same method of practice should be followed in this drill as in the preceding one.
LESSON 115
Begin this lesson with your usual movement drills.
First practice drill one hundred and thirty-eight in sections, word by word. Follow with a full page of the completed copy, and do not neglect
to criticise results. Height, spacing, and slant should receive special attention.
85In the following lessons are given copies in line-writing from which pages should be written. It may be easy for some students who cannot
maintain uniform excellence throughout a page to write one or two lines well. The object of your practice should be attractive work and commercial
speed. To attain this end, study the appearance of the finished line and page from time to time, and always try to harmonize the writing with the
space it occupies.
LESSON 116
Practice this copy as given. Write each word over and over, until the motion used is almost automatic and a marked improvement is shown
in the general appearance. Then write a few lines of the drill complete, and study the appearance.
LESSON 117
Do not rest a moment until you have filled one page with this copy; then judge the appearance as a whole. Do not write larger than the copy.
LESSON 118
Make a few lines of capital D before writing the line.
Do not lose sight of the fact that position at the desk has much to do with the development of writing. Position refers to feet, body,
arms, wrist, fingers, pen, head, and paper. In preceding lessons enough has been said about these to make extended instructions here unnecessary.
LESSON 119
Uniformity may be hard to maintain in this copy. After writing a few lines pick out the faults and endeavor to correct them.
86
LESSON 120
Solid pages are wanted; not haphazard writing.
LESSON 121
Practice capital H as a movement drill a few minutes before writing the complete line.
Maintain equal distances, not only between letters, but between the words.
LESSON 122
LESSON 123
LESSON 124
87
LESSON 125
LESSON 126
Practice capital O as a movement drill for a few minutes and then do your best on the entire copy.
LESSON 127
LESSON 128
This drill is difficult enough to merit careful practice for a full writing period. It will be best first to practice capital Q as a movement drill.
88
LESSON 129
LESSON 130
LESSON 131
LESSON 132
LESSON 133
It is always a good plan, where time permits, to practice each capital at the beginning of the line as a drill.
89
LESSON 134
Do not neglect the movement drills, although they are not specially mentioned in every lesson.
LESSON 135
LESSON 136
Capital X is made with a figure six inverted, and a figure six right side up. Keep this in mind when making it.
LESSON 137
LESSON 138
90
LESSON 139
LESSON 140
Work up to the complete copy by a systematic practice on the capitals and words separately.
LESSON 141
The author, in common with many teachers of business writing, has found the practice of combinations of capitals very helpful in developing
accuracy and freedom. This is an excellent part of the course in which to introduce such drills, but tangled and difficult combinations should be avoided.
Drill one hundred and sixty-five, if rightly practiced, will insure light movement and develop constructive ability. About twenty-two of this
combination should be made to a minute. It will be profitable to devote a full session to it.
LESSON 142
Practice the combinations of capitals several minutes before practicing the small letters. A perfect mastery of the following combinations will
help students in the work that follows. A few scattered lines will not meet the requirements. Write a full page.
91

LESSON 143
Use uniform motion from beginning to end, and make about twenty-five to a minute.
LESSON 144
This affords a good drill and a good test of accuracy in applying movement. The last downward stroke in capital H is a left curve, is it not?
Study the direction of the pen in making it, and then strike boldly. This will be a good drill to practice frequently at the beginning of a lesson.
Use your eyes, focus your mind upon your work, study and practice earnestly, and you will be pleased with the results.
92
LESSON 145
Movement drills for a few minutes and then the following:
Practice the combination of capitals several times before making the small letters. Such repeated effort will be helpful.
LESSON 146
93

94
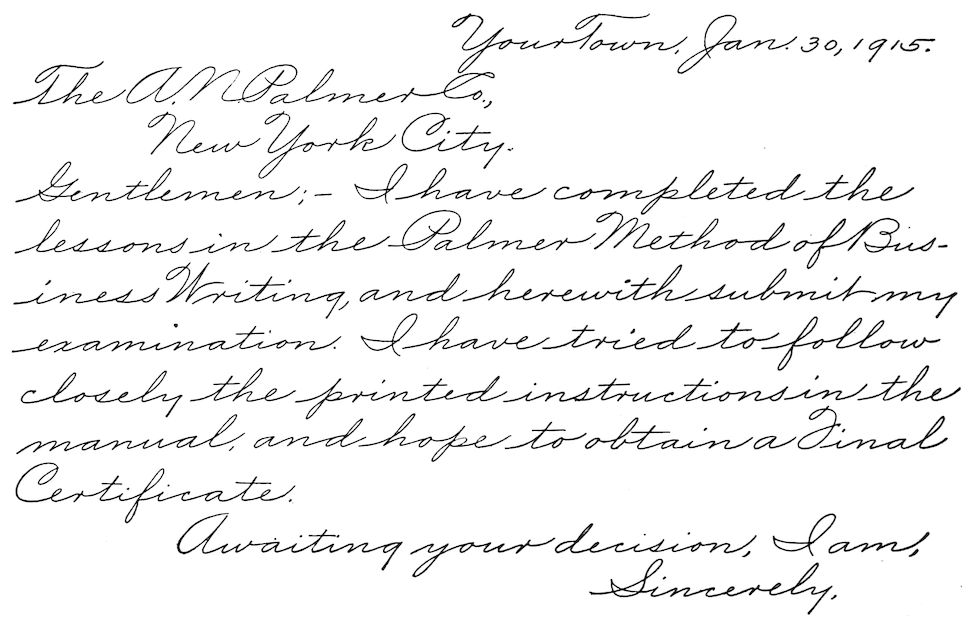
| 95 |
|
Count |
Number per Minute |
| |
|
|
 |
1–2 |
75 |
| |
|
|
 |
1–2–3 |
40 |
| |
|
|
 |
1–2 |
70 |
| |
|
|
 |
1–2–3 |
45 |
| |
|
|
 |
1–2–3 |
45 to 50 |
| |
|
|
 |
1–2–3 |
50 |
| |
|
|
 |
1–2–3 |
40 to 50 |
| |
|
|
 |
1–2–3–4 |
35 |
| |
|
|
 |
1–2–3 |
45 |
| |
|
|
 |
1–2 |
60 to 70 |
| |
|
|
 |
1–2–3–4 |
35 to 40 |
| |
|
|
 |
1–2 |
50 to 55 |
| |
|
|
 |
1–2–3–4 |
30 to 35 |
| |
|
|
 |
1–2–3 |
40 |
| |
|
|
 |
1–2 |
70 |
| |
|
|
 |
1–2 |
50 to 60 |
| |
|
|
 |
1–2–3 |
60 |
| |
|
|
 |
1–2–3 |
45 |
| |
|
|
 |
1–2 |
45 to 50 |
| |
|
|
 |
1–2–3–4 |
40 |
| |
|
|
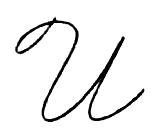 |
1–2–3 |
45 |
| |
|
|
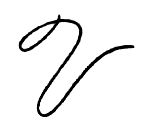 |
1–2 |
55 |
| |
|
|
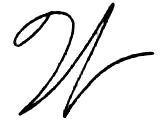 |
1–2–3–4 |
40 |
| |
|
|
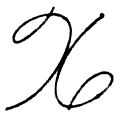 |
1–2–3 |
35 |
| |
|
|
 |
1–2–3–4 |
40 |
| |
|
|
 |
1–2–3 |
50 |
| |
|
|
 |
1–2 |
14 groups of 5 or 70 |
| |
|
|
 |
1–2 |
16 groups of 5 or 80 |
| |
|
|
 |
1–2 |
16 groups of 5 or 80 |
| |
|
|
 |
1–2 |
13 groups of 5 or 65 |
| |
|
|
 |
1 |
28 groups of 5 or 140 |
| |
|
|
 |
1–2 |
14 groups of 5 or 70 |
| |
|
|
 |
1–2 |
13 groups of 5 or 65 |
| |
|
|
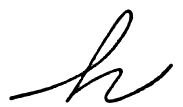 |
1–2 |
14 groups of 5 or 70 |
| |
|
|
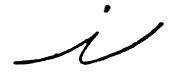 |
1 |
10 groups of 5 or 50 |
| |
|
|
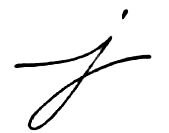 |
1–2 |
14 groups of 5 or 70 |
| |
|
|
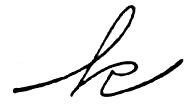 |
1–2–3 |
10 groups of 5 or 50 |
| |
|
|
 |
1 |
25 groups of 5 or 125 |
| |
|
|
 |
1–2–3 |
12 groups of 4 or 48 |
| |
|
|
 |
1–2 |
18 groups of 5 or 90 |
| |
|
|
 |
1–2 |
18 groups of 5 or 90 |
| |
|
|
 |
1–2 |
12 groups of 5 or 60 |
| |
|
|
 |
1–2 |
10 groups of 5 or 50 |
| |
|
|
 |
1–2 |
18 groups of 5 or 90 |
| |
|
|
 |
1–2 |
17 groups of 5 or 85 |
| |
|
|
 |
1 |
20 groups of 5 or 100 |
| |
|
|
 |
1–2 |
12 groups of 4 or 48 |
| |
|
|
 |
1–2 |
12 groups of 5 or 60 |
| |
|
|
 |
1–2–3 |
12 groups of 5 or 60 |
| |
|
|
 |
1 |
18 groups of 5 or 90 |
| |
|
|
 |
1–2 |
14 groups of 5 or 70 |
| |
|
|
 |
1–2 |
14 groups of 5 or 70 |
96
PUPIL’S CERTIFICATE, KNOWN AS THE DIPLOMA

THIS HAS BEEN GREATLY REDUCED. ORIGINAL SIZE, 14×17 INCHES
- Silently corrected obvious typographical errors and variations in spelling.
- Retained archaic, non-standard, and uncertain spellings as printed.
*** END OF THE PROJECT GUTENBERG EBOOK THE PALMER METHOD OF BUSINESS WRITING ***
Updated editions will replace the previous one—the old editions will
be renamed.
Creating the works from print editions not protected by U.S. copyright
law means that no one owns a United States copyright in these works,
so the Foundation (and you!) can copy and distribute it in the United
States without permission and without paying copyright
royalties. Special rules, set forth in the General Terms of Use part
of this license, apply to copying and distributing Project
Gutenberg™ electronic works to protect the PROJECT GUTENBERG™
concept and trademark. Project Gutenberg is a registered trademark,
and may not be used if you charge for an eBook, except by following
the terms of the trademark license, including paying royalties for use
of the Project Gutenberg trademark. If you do not charge anything for
copies of this eBook, complying with the trademark license is very
easy. You may use this eBook for nearly any purpose such as creation
of derivative works, reports, performances and research. Project
Gutenberg eBooks may be modified and printed and given away--you may
do practically ANYTHING in the United States with eBooks not protected
by U.S. copyright law. Redistribution is subject to the trademark
license, especially commercial redistribution.
START: FULL LICENSE
THE FULL PROJECT GUTENBERG LICENSE
PLEASE READ THIS BEFORE YOU DISTRIBUTE OR USE THIS WORK
To protect the Project Gutenberg™ mission of promoting the free
distribution of electronic works, by using or distributing this work
(or any other work associated in any way with the phrase “Project
Gutenberg”), you agree to comply with all the terms of the Full
Project Gutenberg™ License available with this file or online at
www.gutenberg.org/license.
Section 1. General Terms of Use and Redistributing Project Gutenberg™ electronic works
1.A. By reading or using any part of this Project Gutenberg™
electronic work, you indicate that you have read, understand, agree to
and accept all the terms of this license and intellectual property
(trademark/copyright) agreement. If you do not agree to abide by all
the terms of this agreement, you must cease using and return or
destroy all copies of Project Gutenberg™ electronic works in your
possession. If you paid a fee for obtaining a copy of or access to a
Project Gutenberg™ electronic work and you do not agree to be bound
by the terms of this agreement, you may obtain a refund from the person
or entity to whom you paid the fee as set forth in paragraph 1.E.8.
1.B. “Project Gutenberg” is a registered trademark. It may only be
used on or associated in any way with an electronic work by people who
agree to be bound by the terms of this agreement. There are a few
things that you can do with most Project Gutenberg™ electronic works
even without complying with the full terms of this agreement. See
paragraph 1.C below. There are a lot of things you can do with Project
Gutenberg™ electronic works if you follow the terms of this
agreement and help preserve free future access to Project Gutenberg™
electronic works. See paragraph 1.E below.
1.C. The Project Gutenberg Literary Archive Foundation (“the
Foundation” or PGLAF), owns a compilation copyright in the collection
of Project Gutenberg™ electronic works. Nearly all the individual
works in the collection are in the public domain in the United
States. If an individual work is unprotected by copyright law in the
United States and you are located in the United States, we do not
claim a right to prevent you from copying, distributing, performing,
displaying or creating derivative works based on the work as long as
all references to Project Gutenberg are removed. Of course, we hope
that you will support the Project Gutenberg™ mission of promoting
free access to electronic works by freely sharing Project Gutenberg™
works in compliance with the terms of this agreement for keeping the
Project Gutenberg™ name associated with the work. You can easily
comply with the terms of this agreement by keeping this work in the
same format with its attached full Project Gutenberg™ License when
you share it without charge with others.
1.D. The copyright laws of the place where you are located also govern
what you can do with this work. Copyright laws in most countries are
in a constant state of change. If you are outside the United States,
check the laws of your country in addition to the terms of this
agreement before downloading, copying, displaying, performing,
distributing or creating derivative works based on this work or any
other Project Gutenberg™ work. The Foundation makes no
representations concerning the copyright status of any work in any
country other than the United States.
1.E. Unless you have removed all references to Project Gutenberg:
1.E.1. The following sentence, with active links to, or other
immediate access to, the full Project Gutenberg™ License must appear
prominently whenever any copy of a Project Gutenberg™ work (any work
on which the phrase “Project Gutenberg” appears, or with which the
phrase “Project Gutenberg” is associated) is accessed, displayed,
performed, viewed, copied or distributed:
This eBook is for the use of anyone anywhere in the United States and most
other parts of the world at no cost and with almost no restrictions
whatsoever. You may copy it, give it away or re-use it under the terms
of the Project Gutenberg License included with this eBook or online
at
www.gutenberg.org. If you
are not located in the United States, you will have to check the laws
of the country where you are located before using this eBook.
1.E.2. If an individual Project Gutenberg™ electronic work is
derived from texts not protected by U.S. copyright law (does not
contain a notice indicating that it is posted with permission of the
copyright holder), the work can be copied and distributed to anyone in
the United States without paying any fees or charges. If you are
redistributing or providing access to a work with the phrase “Project
Gutenberg” associated with or appearing on the work, you must comply
either with the requirements of paragraphs 1.E.1 through 1.E.7 or
obtain permission for the use of the work and the Project Gutenberg™
trademark as set forth in paragraphs 1.E.8 or 1.E.9.
1.E.3. If an individual Project Gutenberg™ electronic work is posted
with the permission of the copyright holder, your use and distribution
must comply with both paragraphs 1.E.1 through 1.E.7 and any
additional terms imposed by the copyright holder. Additional terms
will be linked to the Project Gutenberg™ License for all works
posted with the permission of the copyright holder found at the
beginning of this work.
1.E.4. Do not unlink or detach or remove the full Project Gutenberg™
License terms from this work, or any files containing a part of this
work or any other work associated with Project Gutenberg™.
1.E.5. Do not copy, display, perform, distribute or redistribute this
electronic work, or any part of this electronic work, without
prominently displaying the sentence set forth in paragraph 1.E.1 with
active links or immediate access to the full terms of the Project
Gutenberg™ License.
1.E.6. You may convert to and distribute this work in any binary,
compressed, marked up, nonproprietary or proprietary form, including
any word processing or hypertext form. However, if you provide access
to or distribute copies of a Project Gutenberg™ work in a format
other than “Plain Vanilla ASCII” or other format used in the official
version posted on the official Project Gutenberg™ website
(www.gutenberg.org), you must, at no additional cost, fee or expense
to the user, provide a copy, a means of exporting a copy, or a means
of obtaining a copy upon request, of the work in its original “Plain
Vanilla ASCII” or other form. Any alternate format must include the
full Project Gutenberg™ License as specified in paragraph 1.E.1.
1.E.7. Do not charge a fee for access to, viewing, displaying,
performing, copying or distributing any Project Gutenberg™ works
unless you comply with paragraph 1.E.8 or 1.E.9.
1.E.8. You may charge a reasonable fee for copies of or providing
access to or distributing Project Gutenberg™ electronic works
provided that:
• You pay a royalty fee of 20% of the gross profits you derive from
the use of Project Gutenberg™ works calculated using the method
you already use to calculate your applicable taxes. The fee is owed
to the owner of the Project Gutenberg™ trademark, but he has
agreed to donate royalties under this paragraph to the Project
Gutenberg Literary Archive Foundation. Royalty payments must be paid
within 60 days following each date on which you prepare (or are
legally required to prepare) your periodic tax returns. Royalty
payments should be clearly marked as such and sent to the Project
Gutenberg Literary Archive Foundation at the address specified in
Section 4, “Information about donations to the Project Gutenberg
Literary Archive Foundation.”
• You provide a full refund of any money paid by a user who notifies
you in writing (or by e-mail) within 30 days of receipt that s/he
does not agree to the terms of the full Project Gutenberg™
License. You must require such a user to return or destroy all
copies of the works possessed in a physical medium and discontinue
all use of and all access to other copies of Project Gutenberg™
works.
• You provide, in accordance with paragraph 1.F.3, a full refund of
any money paid for a work or a replacement copy, if a defect in the
electronic work is discovered and reported to you within 90 days of
receipt of the work.
• You comply with all other terms of this agreement for free
distribution of Project Gutenberg™ works.
1.E.9. If you wish to charge a fee or distribute a Project
Gutenberg™ electronic work or group of works on different terms than
are set forth in this agreement, you must obtain permission in writing
from the Project Gutenberg Literary Archive Foundation, the manager of
the Project Gutenberg™ trademark. Contact the Foundation as set
forth in Section 3 below.
1.F.
1.F.1. Project Gutenberg volunteers and employees expend considerable
effort to identify, do copyright research on, transcribe and proofread
works not protected by U.S. copyright law in creating the Project
Gutenberg™ collection. Despite these efforts, Project Gutenberg™
electronic works, and the medium on which they may be stored, may
contain “Defects,” such as, but not limited to, incomplete, inaccurate
or corrupt data, transcription errors, a copyright or other
intellectual property infringement, a defective or damaged disk or
other medium, a computer virus, or computer codes that damage or
cannot be read by your equipment.
1.F.2. LIMITED WARRANTY, DISCLAIMER OF DAMAGES - Except for the “Right
of Replacement or Refund” described in paragraph 1.F.3, the Project
Gutenberg Literary Archive Foundation, the owner of the Project
Gutenberg™ trademark, and any other party distributing a Project
Gutenberg™ electronic work under this agreement, disclaim all
liability to you for damages, costs and expenses, including legal
fees. YOU AGREE THAT YOU HAVE NO REMEDIES FOR NEGLIGENCE, STRICT
LIABILITY, BREACH OF WARRANTY OR BREACH OF CONTRACT EXCEPT THOSE
PROVIDED IN PARAGRAPH 1.F.3. YOU AGREE THAT THE FOUNDATION, THE
TRADEMARK OWNER, AND ANY DISTRIBUTOR UNDER THIS AGREEMENT WILL NOT BE
LIABLE TO YOU FOR ACTUAL, DIRECT, INDIRECT, CONSEQUENTIAL, PUNITIVE OR
INCIDENTAL DAMAGES EVEN IF YOU GIVE NOTICE OF THE POSSIBILITY OF SUCH
DAMAGE.
1.F.3. LIMITED RIGHT OF REPLACEMENT OR REFUND - If you discover a
defect in this electronic work within 90 days of receiving it, you can
receive a refund of the money (if any) you paid for it by sending a
written explanation to the person you received the work from. If you
received the work on a physical medium, you must return the medium
with your written explanation. The person or entity that provided you
with the defective work may elect to provide a replacement copy in
lieu of a refund. If you received the work electronically, the person
or entity providing it to you may choose to give you a second
opportunity to receive the work electronically in lieu of a refund. If
the second copy is also defective, you may demand a refund in writing
without further opportunities to fix the problem.
1.F.4. Except for the limited right of replacement or refund set forth
in paragraph 1.F.3, this work is provided to you ‘AS-IS’, WITH NO
OTHER WARRANTIES OF ANY KIND, EXPRESS OR IMPLIED, INCLUDING BUT NOT
LIMITED TO WARRANTIES OF MERCHANTABILITY OR FITNESS FOR ANY PURPOSE.
1.F.5. Some states do not allow disclaimers of certain implied
warranties or the exclusion or limitation of certain types of
damages. If any disclaimer or limitation set forth in this agreement
violates the law of the state applicable to this agreement, the
agreement shall be interpreted to make the maximum disclaimer or
limitation permitted by the applicable state law. The invalidity or
unenforceability of any provision of this agreement shall not void the
remaining provisions.
1.F.6. INDEMNITY - You agree to indemnify and hold the Foundation, the
trademark owner, any agent or employee of the Foundation, anyone
providing copies of Project Gutenberg™ electronic works in
accordance with this agreement, and any volunteers associated with the
production, promotion and distribution of Project Gutenberg™
electronic works, harmless from all liability, costs and expenses,
including legal fees, that arise directly or indirectly from any of
the following which you do or cause to occur: (a) distribution of this
or any Project Gutenberg™ work, (b) alteration, modification, or
additions or deletions to any Project Gutenberg™ work, and (c) any
Defect you cause.
Section 2. Information about the Mission of Project Gutenberg™
Project Gutenberg™ is synonymous with the free distribution of
electronic works in formats readable by the widest variety of
computers including obsolete, old, middle-aged and new computers. It
exists because of the efforts of hundreds of volunteers and donations
from people in all walks of life.
Volunteers and financial support to provide volunteers with the
assistance they need are critical to reaching Project Gutenberg™’s
goals and ensuring that the Project Gutenberg™ collection will
remain freely available for generations to come. In 2001, the Project
Gutenberg Literary Archive Foundation was created to provide a secure
and permanent future for Project Gutenberg™ and future
generations. To learn more about the Project Gutenberg Literary
Archive Foundation and how your efforts and donations can help, see
Sections 3 and 4 and the Foundation information page at www.gutenberg.org.
Section 3. Information about the Project Gutenberg Literary Archive Foundation
The Project Gutenberg Literary Archive Foundation is a non-profit
501(c)(3) educational corporation organized under the laws of the
state of Mississippi and granted tax exempt status by the Internal
Revenue Service. The Foundation’s EIN or federal tax identification
number is 64-6221541. Contributions to the Project Gutenberg Literary
Archive Foundation are tax deductible to the full extent permitted by
U.S. federal laws and your state’s laws.
The Foundation’s business office is located at 809 North 1500 West,
Salt Lake City, UT 84116, (801) 596-1887. Email contact links and up
to date contact information can be found at the Foundation’s website
and official page at www.gutenberg.org/contact
Section 4. Information about Donations to the Project Gutenberg Literary Archive Foundation
Project Gutenberg™ depends upon and cannot survive without widespread
public support and donations to carry out its mission of
increasing the number of public domain and licensed works that can be
freely distributed in machine-readable form accessible by the widest
array of equipment including outdated equipment. Many small donations
($1 to $5,000) are particularly important to maintaining tax exempt
status with the IRS.
The Foundation is committed to complying with the laws regulating
charities and charitable donations in all 50 states of the United
States. Compliance requirements are not uniform and it takes a
considerable effort, much paperwork and many fees to meet and keep up
with these requirements. We do not solicit donations in locations
where we have not received written confirmation of compliance. To SEND
DONATIONS or determine the status of compliance for any particular state
visit
www.gutenberg.org/donate.
While we cannot and do not solicit contributions from states where we
have not met the solicitation requirements, we know of no prohibition
against accepting unsolicited donations from donors in such states who
approach us with offers to donate.
International donations are gratefully accepted, but we cannot make
any statements concerning tax treatment of donations received from
outside the United States. U.S. laws alone swamp our small staff.
Please check the Project Gutenberg web pages for current donation
methods and addresses. Donations are accepted in a number of other
ways including checks, online payments and credit card donations. To
donate, please visit: www.gutenberg.org/donate
Section 5. General Information About Project Gutenberg™ electronic works
Professor Michael S. Hart was the originator of the Project
Gutenberg™ concept of a library of electronic works that could be
freely shared with anyone. For forty years, he produced and
distributed Project Gutenberg™ eBooks with only a loose network of
volunteer support.
Project Gutenberg™ eBooks are often created from several printed
editions, all of which are confirmed as not protected by copyright in
the U.S. unless a copyright notice is included. Thus, we do not
necessarily keep eBooks in compliance with any particular paper
edition.
Most people start at our website which has the main PG search
facility:
www.gutenberg.org.
This website includes information about Project Gutenberg™,
including how to make donations to the Project Gutenberg Literary
Archive Foundation, how to help produce our new eBooks, and how to
subscribe to our email newsletter to hear about new eBooks.