
VOL. NO. 5 by HERO
$1.00
ORIGINAL
“CRAZY DAISY”
DESIGNS
VOLUME 5
All directions in this book have been checked for accuracy. We cannot be responsible for typographical errors or misinterpretation of directions.
•
Copyright
SCOVILL MANUFACTURING
COMPANY
DRITZ DIVISION
350 Fifth Avenue
New York, N.Y. 10001
•
Published in U.S.A.

Article No. 650
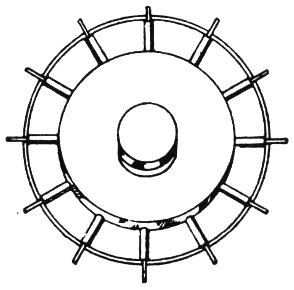
The Original Regular Size “Crazy Daisy” Winder.
Makes Daisies up to 2″ diameter.

“CRAZY DAISY” WINDERS
cut crochet time in half and are used to make afghans, sweaters, stoles, baby items, doilies, and decorative flowers.
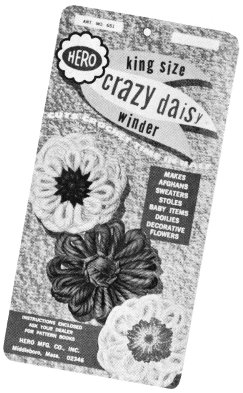
Article No. 651
The Original King Size “Crazy Daisy” Winder.
Makes Daisies up to 3″ diameter.
OTHER FAMOUS HERO PRODUCTS ...
SCOVILL DRITZ DIVISION
SCOVILL MANUFACTURING COMPANY
350 FIFTH AVENUE, NEW YORK, N. Y. 10001
HOW TO DETERMINE SIZE TO MAKE: Directions are based on standard measurements listed below. Allowance has been made to size, stitch, yarn and style of garment for best results. These are general body measurements and may vary with each individual.
| SIZE | 10 | 12 | 14 | 16 |
|---|---|---|---|---|
| BUST | 32½″ | 34″ | 36″ | 38″ |
| WAIST | 24″ | 25½″ | 27″ | 29″ |
| HIP | 34½″ | 36″ | 38″ | 40″ |
Consult chart to determine size to make not overlooking the fact that these are body measurements and not measurements of finished garment.
Crochet Hooks are made in steel, plastic and aluminum. Steel crochet hooks range in size from 00 the largest to size 14 the smallest. Aluminum crochet hooks range in size from C through K and plastic crochet hooks come in the following sizes: OD, 1-2E, 3-4F, 5G, 6H, 8I, 9J. The size of needle affects the gauge and therefore the measurements of the finished garment. It also affects the texture of the work. A needle that is too fine for the yarn makes the garment stiff and a needle that is too coarse makes the garment stretchy.
Tapestry Needles are large-eyed blunt pointed needles used for sewing garments tog or embroidery.
An asterisk (*) indicates that instructions immediately following are to be repeated the given number of times, in addition to the original. “Repeat from * 4 times” means 5 times in all.
Even means that a row or rnd is to be worked without increasing or decreasing.
Work means to continue in same stitch you have been working.
Directions in parentheses are repeated as often as specified. “(Ch 3, sc in next sp of petal) 3 times” means whatever is enclosed in parentheses is to be repeated for 3 times in all.
ch—chain, sc—single crochet, dc—double crochet, sdc—short double crochet, hdc—half double crochet, trc—treble crochet, sl st—slip stitch, dec—decrease, inc—increase, st—stitch, tog—together, rnd—round, beg—beginning, sp—space.
These directions can be used for the HERO Crazy Daisy Winder and for the HERO King Size Crazy Daisy Winder.
A: Hold winder in left hand with flat side in palm of hand. Turn knob to release spokes (see illustration A).
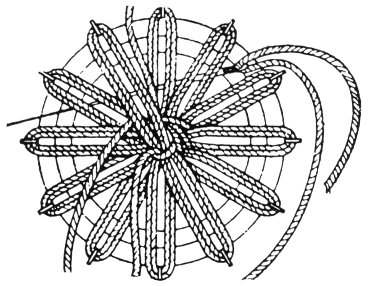
B: Turn winder over with knob underneath and flat side with spokes extended facing you. Hold winder in left hand. With left thumb hold yarn at center leaving end to extend about 1″; with right hand, pass yarn from left to right around spoke No. 1; then across center from right to left around spoke No. 2 directly opposite. Wrap around these 2 spokes once more in the same manner, or as many times as desired (the number of wraps depends upon the thickness of the yarn you will be using). Bring yarn across center and wind from left to right around spoke No. 3; then across center from right to left around spoke No. 4. Wrap around these 2 spokes once more, or as many times as you wrapped around spoke 1 and 2. Bring yarn across center and wind from left to right around spoke No. 5; then across center and from right to left around spoke No. 6. Wrap around these 2 spokes once more or as many times as you wrapped around spoke 1 and 2. Continue in this manner to wrap yarn around 2 spokes directly opposite each other and then passing onto the next 2 spokes until all spokes are wrapped, ending with spoke No. 12. Bring yarn across center and cut leaving 1″ extended beyond center (see illustration B). Do not remove from winder.
A

B
C: Center: Thread tapestry needle with yarn. The side facing you will be the wrong side of the daisy. Fasten at center of wrong side as for embroidery. Insert needle under 4 petals and draw yarn through; bring yarn back over last 3 of the 4 petals; insert needle under these 3 petals plus 1 more, making 4 petals in all; draw yarn through. Continue in this manner to bring yarn back 3 petals and then draw it under 4 petals each time until you have made 13 sts. Be sure to have 13 sts or center will be incomplete. As the center sts are worked, weave around the starting end of daisy for a few sts to fasten it securely. Fasten on wrong side. Cut ends (see illustration C). Turn knob to draw in spokes and release daisy.
D. Right side of daisy.
C
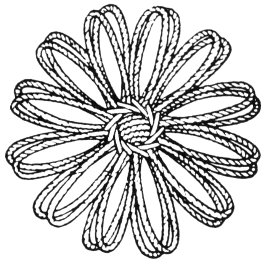
D
JOINING A: Picot Joining of Daisies: These directions can be used for the Crazy Daisy Winder and for the King Size Crazy Daisy Winder. Note: Connections for daisy have been written for a sport yarn or knitting worsted. The number of chains used in connecting the daisies to each other may have to be adjusted if any other type of yarn or cotton is used.
1st BLOCK: Using crochet hook, sc in sp of petal of daisy (make sure to take up as many of the 4 petals as you wrapped around for each petal when winding). * (ch 4, sc in sp of next petal) 3 times, ch 5, sl st in side-top of last sc (picot); repeat from * twice more, ending (ch 4, sc in sp of next petal) twice, ch 4, join with a sl st to first sc, ch 5, sl st in side-top of last st (picot), 4 picots around. Leave a 2″ thread and fasten off securely on back.
2nd BLOCK: Sc in sp of petal of 2nd daisy. (Ch 4, sc in sp of next petal) 3 times, place daisy back to back to first block, ch 2, sl st in sp of picot on first block, ch 2, sl st back into last sc on 2nd block to complete the picot joining. (Ch 2, sl st in next ch-4 sp on 1st block, ch 2, sc back into next petal on 2nd daisy) 3 times. Ch 2, sl st in center of corner picot on first block, ch 2, sl st back into last sc on 2nd block to complete picot joining. (Ch 4, sc in sp of next petal on 2nd daisy) 3 times, ch 5, sl st in side-top of last sc for a picot, (ch 4, sc in sp of next petal), twice, ending ch 4, join with a sl st to first sc, ch 5, sl st back into last st to complete the picot. Leave a 2″ thread and fasten off securely on back.
3rd BLOCK: Join a 3rd block to another side of first block as follows: Sc in sp of petal of 3rd daisy. (Ch 4, sc in sp of next petal) 3 times, hold 3rd daisy back to back to first block, ch 2, sl st in sp of picot on first block, ch 2, sl st back in last sc on 3rd block, (ch 2, sl st in next sp on first block, ch 2, sc back into next petal on 3rd block) 3 times, ch 2, sl st in center st between the 2 picots that join the first and second block, ch 2, sl st in last sc on 3rd block, (ch 4, sc in sp of next petal) 3 times, ch 5, sl st in side-top of last sc (picot), (ch 4, sc in sp of next petal) twice, ch 4, join with a sl st to first sc, ch 5, sl st in last st to form a picot. Leave a 2″ thread and fasten off securely on back.
4th BLOCK: Join to one side of 3rd and one side of 2nd block as follows: Sc in sp of a petal of 4th daisy. (Ch 4, sc in sp of next petal) 3 times. Hold 4th daisy back to back to 3rd block, ch 2, sl st in sp of picot on 3rd block, ch 2, sl st in last sc on 4th block to complete picot joining. (Ch 2, sl st in next sp on 3rd block, ch 2, sc back into next petal on 4th block) 3 times, ch 2, sl st in center of the 3 joined picots that connect blocks 1, 2 and 3, ch 2, sl st back into last sc on 4th block (this completes a 4 picot joining). (Ch 2, sl st in next sp on 2nd block, ch 2, sc back into sp of next petal on 4th block) 3 times, ch 2, sl st in sp of picot on 2nd block, ch 2, sl st back into last sc on 4th block to complete picot joining. (Ch 4, sc in sp of next petal on 4th daisy) twice, ch 4, join with a sl st to first sc, ch 5, sl st back into last st worked to complete picot. Leave a 2″ thread and fasten off securely on back. Continue to make and join daisies for desired shape and size in this manner.
Joining A

Joining B
JOINING B: 1st BLOCK: Rnd 1: With hook, sc in sp of petal (make sure to take up as many of the petals as you wrapped around for each petal when winding), * ch 4, sc in sp of next petal; repeat from * around, end ch 4, join with a sl st to first sc. Rnd 2: Sc in first sp, * (ch 4, sc in next sp) 3 times, ch 5, sl st back into sc to form a picot; repeat from * around, ending (ch 4, sc in next sp) twice, ch 4, join with a sl st to first sc, ch 5, sl st back into sc to complete picot. Leave a 2″ thread and fasten off securely on back.
2nd BLOCK: Rnd 1: Repeat rnd 1 of first block. Rnd 2: Sc in first sp, (ch 4, sc in next sp) 3 times, place daisy back to back to first block, ch 2, sl st in sp of picot on first block, ch 2, sl st back into last so on 2nd block to complete the picot joining. (Ch 2, sl st in next ch-4 sp on 1st block, ch 2, sc back into next ch-4 sp on 2nd block) 3 times. Ch 2, sl st in center of corner picot on 1st block, ch 2, sl st back into last sc on 2nd block to complete picot joining. (Ch 4, sc in next ch-4 sp on 2nd block) 3 times, ch 5, sl st back into sc to form a picot, (ch 4, sc in next ch-4 sp on 2nd block) twice, ch 4, join with a sl st to first sc, ch 5, sl st back into sc to form a picot. Leave a 2″ thread and fasten off securely on back.
3rd BLOCK: Rnd 1: Repeat rnd 1 of first block. Join 3rd block to another side of first block as follows: Rnd 2: Sc in first sp, (ch 4, sc in next ch-4 sp on 3rd block) 3 times, hold 3rd block back to back to first block, ch 2, sl st in sp of picot of first block, ch 2, sl st back into sc on 3rd block for completion of picot joining. (Ch 2, sl st in next ch-4 sp on first block, ch 2, sc back into next ch-4 sp on 3rd block) 3 times. Ch 2, sl st in center of joined picots of first and second block, ch 2, sl st in sc on 3rd block to complete picot joining. (Ch 4, sc in next sp on 3rd block) 3 times, ch 5, sl st back into sc to form a picot, (ch 4, sc in next sp on 3rd block) twice, ch 4, join with a sl st to first sc, ch 5, sl st in sc to complete picot. Leave a 2″ strand and fasten off securely on back.
4th BLOCK: Rnd 1: Repeat rnd 1 of first block. Join 4th block to one side of 3rd and one side of 2nd block as follows: Rnd 2: Sc in first sp, (ch 4, sc in next sp of 4th block) 3 times, hold 4th block back to back to 3rd block, ch 2, sl st in sp of picot on 3rd block, ch 2, sl st in last sc on 4th block to complete picot joining. (Ch 2, sl st in first ch-4 sp on 3rd block, ch 2, sc in next ch-4 sp on 4th block) 3 times, ch 2, sl st in center of the 3 joined picots that connect block 1, 2 and 3, ch 2, sl st back into last sc on 4th block (this completes a 4 picot joining). (Ch 2, sl st in first ch-4 sp on 2nd block, ch 2, sc in next ch-4 sp on 4th block) 3 times, ch 2, sl st in sp of picot on 2nd block, ch 2, sl st back into last sc on 4th block to complete picot joining. (Ch 4, sc in next ch-4 sp on 4th block) twice, ch 4, join with a sl st to first sc, ch 5, sl st in sc to complete picot. Leave a 2″ thread and fasten off securely on back. Continue to make and join daisies for desired shape and size in this manner.
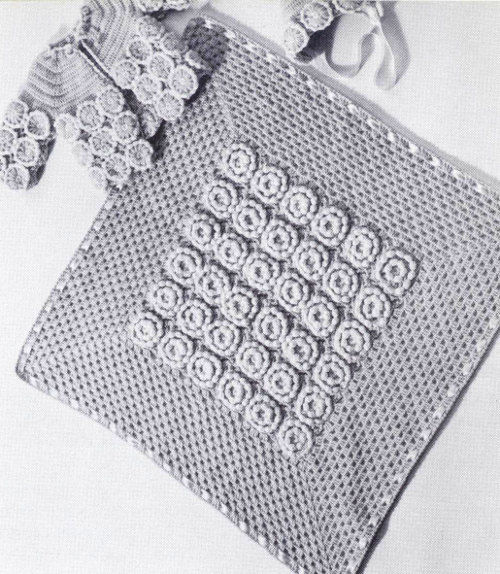
Shown on front cover
SIZES: Directions are for Small (size 8-10). Changes for Medium (size 12-14) are in parentheses.
MATERIALS: HERO Crazy Daisy Winder and King Size Crazy Daisy Winder. Sport Yarn, 2 oz. pull skein, 4 (5) Royal Blue (A) and 4 (5) White (B). HERO No. 1 steel crochet hook and tapestry needle.
GAUGE: Two connected blocks—6″.
NOTE: Shape of neck on medium size is slightly different in order to attain proper sizing.
TO MAKE DAISIES: Make 77 (91) daisies on King Size Crazy Daisy Winder, winding twice around spokes and sewing centers all with color A. Make 77 (91) daisies on Crazy Daisy Winder, winding twice around spokes with color B and sewing centers with color A. See page 3 for directions to make daisies.
1st BLOCK: Place smaller B daisy on top of A daisy and tack securely. Rnd 1: With B, sc in space of petal, going through both loops of petal of A daisy, ch 4, 2 hdc into sp of same petal (half corner), * (ch 1, 3 hdc in sp of next petal) 3 times, ch 1, 3 hdc back into last petal worked in to complete a corner; repeat from *, end (ch 1, 3 hdc in sp of next petal) twice, ch 1, 3 hdc in first petal, ch 1 and join with a sl st to top of starting ch to complete 4th corner. Fasten off B and attach A. Rnd 2: With A, sl st in sp of corner, * (ch 4, sl st in next sp under ch-1 of previous rnd) 4 times, ch 5, sl st back into base of last sl st in center of corner to form a picot; repeat from *, end with the completion of picot in 4th corner, join with a sl st to first sl st. Fasten off.
2nd BLOCK: Work as for first block until completion of rnd 1. Rnd 2: With A, sl st in sp of corner, (ch 4, sl st in next sp under ch-1 of previous rnd) 4 times, hold back to back to first block, ch 3, sl st in sp of picot on first block, ch 3, sl st back into base sl st to complete picot joining, (ch 4, sl st in next ch-4 sp on first block, ch 4, sl st in next ch-1 sp on 2nd block) 4 times, ch 3, sl st in picot on first block, ch 3, sl st back into base sl st to complete picot joining. * (Ch 4, sl st in next ch-1 sp) 4 times, ch 5, sl st back into base sl st to complete picot; repeat from * once more, ending with the 4th picot being worked in starting corner. Join with a sl st to first sl st. Fasten off.
3rd BLOCK: Work as for first block until completion of rnd 1. Third block is joined to another side of first block. With A, sl st in sp of corner, (ch 4, sl st in next sp under ch-1) 4 times, hold back to back to first block, ch 3, sl st in sp of picot on first block, ch 3, sl st back into base sl st to complete picot joining, (ch 4, sl st under next ch-4 sp on first block, ch 4, sl st under next ch-1 sp on 3rd block) 4 times, ch 3, sl st in center between joined picots of block 1 and 2, ch 3, sl st back into base sl st to complete picot joining. *(Ch 4, sl st under next ch-1 sp) 4 times, ch 5, sl st back into base sl st to form a picot; repeat from * once more, ending with the 4th picot being worked in starting corner. Join with a sl st to first sl st. Fasten off.
4th BLOCK: Work as for first block until completion of rnd 1. Fourth block is joined to one side of block 3 and one side of block 2. Rnd 2: With A, sl st in sp of corner, (ch 4, sl st in next ch-1 sp) 4 times, hold back to back to third block, ch 3, sl st in sp of picot on third block, ch 3, sl st back in base st to complete picot joining, (ch 4, sl st under next ch-4 sp on third block, ch 4, sl st under next ch-1 sp on 4th block) 4 times, ch 3, sl st in center of the 3 joined picots, ch 3, sl st back into base sl st to complete a 4 picot joining, (ch 4, sl st under next ch-4 sp on 2nd block, ch 4, sl st under next ch-1 sp on 4th block) 4 times, ch 3, sl st in sp of picot on 2nd block, ch 3, sl st back in base sl st to complete picot joining, (ch 4, sl st under next ch-1 sp) 4 times, ending in first corner, ch 5, sl st in base sl st to form 4th picot, join with a sl st to first sl st. Fasten off. Join all blocks in this manner.
BODY: Join 5 rows of 11 (13) blocks across to underarm (this includes right front, back and left front). RIGHT FRONT: Connect 2 rows of 2 (3) blocks for right front onto body. For medium size only, leave off 1 block at front edge for neck. For both sizes, connect 1 more row of 2 blocks. BACK: Leave off the 3rd (4th) block from right front edge for armhole and for the 6th row of back, connect next 5 blocks across back. Add 1 more row of 5 blocks for back armhole. LEFT FRONT: Leave off the 3rd (4th) block from left front edge for armhole and work to correspond to right front. Connect blocks from fronts to back for shoulders, leaving out center block on back for neck.
FINISHING: Block lightly on wrong side. TRIM: Row 1: Attach B at lower right front corner and sc under ch-4 sp, * ch 4, sc in next sp (1 pattern); repeat from * along right front edge, around neck, along left front edge and across lower edge, placing 2 patterns in each corner, ending join with a sl st to first sc (see that work lies flat). Row 2: With B, * ch 4, sc in next sp; repeat from * around all edges worked on row 1, placing 2 patterns in each corner, ending join with a sl st. Row 3: With B, ch 4, 2 dc in first sp, ch 1, * 3 dc in next sp, ch 1; repeat from * around all edges, placing 2 patterns in each corner, ending join with a sl st to top of starting ch (check to see that work lies flat). Fasten off B. Attach double strand A, and work backwards (counter clockwise) as follows: * Ch 1, hdc in next ch-1 sp (1 pattern); repeat from * around all edges, placing 2 patterns in each corner. Join with a sl st and fasten off.
ARMHOLE TRIM: Work same as for trim around edges of bolero.
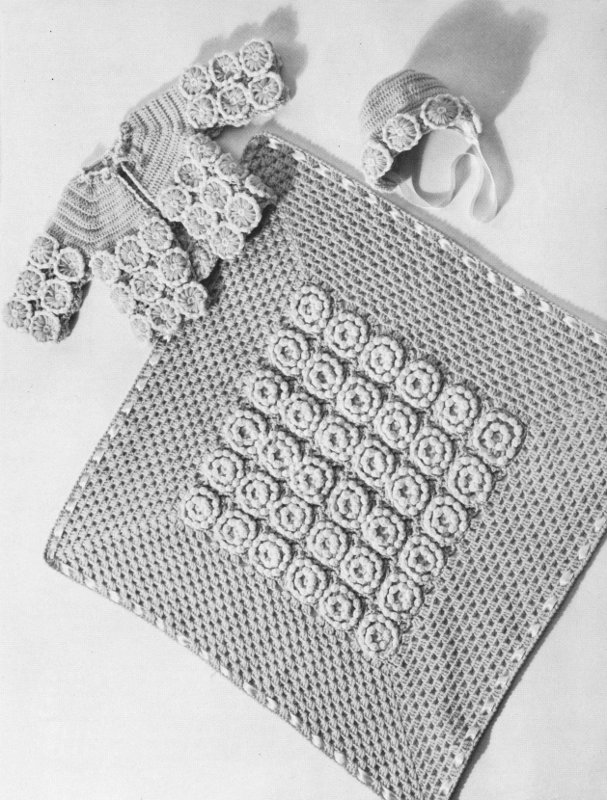
Shown on page 7
SIZE: 6 mo. to 1 yr.
MATERIALS: HERO Crazy Daisy Winder. Sport Yarn, 2 oz. pull skein, 3 Mint Green (A) and 1 White (B). HERO No. 1 steel crochet hook and No. C aluminum crochet hook. Tapestry needle. 1 yd ½″ wide satin ribbon.
TO MAKE DAISIES: Make 62 daisies (57 for sacque, 5 for cap) following directions on page 3. Use A for petals and B for sewing centers, winding A 3 times around each spoke.
CONNECTING DAISIES: With B and No. 1 steel crochet hook, sc in sp of a petal (go through 3 loops of petal), * ch 3, yo and pick up a loop in first ch, yo pull through 2 loops (2 loops remain on hook), yo pick up a loop back in same first ch (4 loops on hook), yo pull through all 4 loops (cluster), sc in sp of next petal; repeat from *, end join with a slip st to first sc (12 clusters). Fasten off. Crochet around all 62 daisies with B in this manner.
FIRST BLOCK: Attach A, with No. 1 crochet hook, sc in back loop of sc of B cluster on previous rnd, * (ch 4, sc in back loop of sc of next B cluster of previous rnd) 3 times, ch 5, slip st back into base sc to form a picot; repeat from * around end (ch 4, sc in back loop of sc of next B cluster) twice, ch 4, join with a sl st to first sc, ch 5, slip st into base sc to complete the 4th picot. Fasten off.
SECOND BLOCK: Attach A and sc in back loop of sc of B cluster, (ch 4, sc in back loop of sc of next cluster) 3 times. Place daisy back to back with first block, ch 2, slip st in sp of picot of first block, ch 2, slip st back into base sc to complete picot joining, (ch 2, slip st in first space of first block, ch 2, sc in back loop of sc of next B cluster on 2nd block) 3 times, ch 2, slip st in picot of first block, ch 2, slip st back into base sc to complete picot joining, (ch 4, sc in back loop of sc of next B cluster) 3 times, ch 5, slip st in base sc to complete picot, (ch 4, sc in back loop of sc of next B cluster) twice, ch 4, join with a slip st to first sc, ch 5, slip st back into base sc to complete 4th picot. Fasten off.
THIRD BLOCK: The third block is joined to another side of the first block. With A, sc in back loop of sc of B cluster on previous rnd, (ch 4, sc in back loop of sc of next B cluster) 3 times. Hold daisy back to back to first block, ch 2, slip st in picot of first block, ch 2, slip st back into base sc to complete picot joining, (ch 2, slip st in first space on first block, ch 2, sc in back loop of sc of next B cluster on 3rd daisy) 3 times, ch 2, slip st in center between 2 picots, ch 2, slip st back into base sc to complete picot joining, (ch 4, sc in back loop of sc of next B cluster) 3 times, ch 5, slip st back into base so to complete picot, (ch 4, sc in back loop of sc of next B cluster) twice, ch 4, join with a slip st to starting sc, ch 5, slip st back into base sc to complete picot. Fasten off.
FOURTH BLOCK: The fourth block is joined to one side each of both the 2nd and 3rd blocks. Attach A and sc in back loop of sc of B cluster, (ch 4, sc in back loop of sc of next B cluster) 3 times, place daisy back to back with 3rd block, ch 2, slip st in picot on 3rd block, ch 2, slip st back into base sc on 4th block to complete picot joining, (ch 2, slip st in next space on 3rd block, ch 2, sc in back loop of sc of next B cluster on 4th daisy) 3 times, ch 2, slip st in center of the 3 joined picots, ch 2, slip st back into base sc to complete the 4th picot at the joining, (ch 2, slip st in next space on 2nd block, ch 2, sc in back loop of sc of next B cluster on 4th daisy) 3 times, ch 2, slip st in picot on 2nd block, ch 2, slip st back into base sc to complete picot joining, (ch 4, sc in back loop of sc of next B cluster) twice, ch 4, join with a slip st to first sc, ch 5, slip st back into base sc to complete 4th picot. Fasten off.
BODY: Connect 3 rows of 11 blocks across.
SLEEVES: Make 2. Connect 3 rows of 4 blocks across; then join undersleeve seam as you join the rest of the blocks.
YOKE: With C hook, A and right side facing, work 26 sc across 3 blocks of body (right front), place a marker, work 33 sc around one sleeve, place a marker, work 44 sc across 5 blocks of body (back), place a marker, work 33 sc around other sleeve, place a marker, work 26 sc across last 3 blocks (left front). Ch 1 to turn. Row 2: * 1 dc in each st to within 2 sts from next marker, yo pull up a loop in next st, yo pull through 2 loops leaving 2 loops on hook, yo pull up a loop in next st, yo pull through 2 loops, yo pull through 3 loops (1 dc decreased), slip marker, decrease 1 dc on next 2 sts; repeat from * across (8 sts dec on row). Ch 1 to turn. Repeat row 2 for 10 times more. Fasten off.
FINISHING: With A, right side facing, No. 1 hook and starting on right front at start of yoke, work sc along right front yoke, around neck and along left front yoke edge, placing 3 sc at each corner of neck. Fasten off A and attach B. Working backwards along row just completed (counter clockwise), * ch 1, skip 1 sc, hdc in next sc; repeat from * around yoke edges and neck. Fasten off. With double strand A, make a ch long enough to pull through neck edge and tie. Pull ch through neck edge. End of Tie: With A and No. 1 hook, ch 3, join with a sl st to form a ring. Rnd 1: 6 sc in ring. Rnd 2: 1 sc in each sc. Roll end of tie into cup shape and sew tog. Block lightly.
With A and No. C hook, ch 64 loosely. Row 1: Dc in 4th ch from hook, * dc in next ch; repeat from * across, 62 dc (to measure about 10″ across). Ch 1 to turn. Row 2: 1 dc in each dc. Ch 1 to turn. Repeat row 2 for pattern st. Work even 3¾″. Next row: Leave off 20 sts, attach yarn and work dc on center 22 sts, leaving off the last 20 sts. Work even on the center 22 sts until piece measures the width of left off 20 sts at each side edge. Fasten off. Sew seams placing length of center piece to width of left off 20 sts at each side edge. Work 4 rows of sc across back of cap taking it in on first row to measure about 9″. Connect 5 daisies across in one line as shown for cuff. Crochet lower edge of daisies to front edge of cap with a row of sc. Tack daisies at each side edge. Sew on ribbon for ties.
Instructions for Carriage Robe on page 19.
Shown on front cover
SIZE: Approx. 50″ × 58″.
MATERIALS: HERO Crazy Daisy Winder and HERO King Size Crazy Daisy Winder. Bulky Knitting Worsted, 2 oz. skein, 14 Gold (A) and 13 Cardinal Red (B). Four oz. skein of Navy Knitting Worsted (C) for centers. HERO No. J aluminum crochet hook. Tapestry needle.
SMALL DAISY: With A, make 98 daisies on the Crazy Daisy Winder, winding yarn around spokes twice (see page 3 and instructions included with Crazy Daisy Winder), using C for sewing the centers.
LARGE DAISY: With B, make 97 daisies on the King Size Crazy Daisy Winder, winding yarn around spokes twice (see page 3 and instructions included with King Size Crazy Daisy Winder), using C for sewing the centers.
FIRST BLOCK: Small daisy. Rnd 1: With A, sc in back loop of a petal of small daisy leaving the top loop free, * ch 1, sc in back loop of next petal leaving top loop free; repeat from * around, end ch 1, join with a sl st to first sc. Rnd 2: * Ch 2, sc in next sp; repeat from * around, end join with a slip st. Fasten off A. Rnd 3: Attach B and sc in first sp, * ch 2, sc in next sp, ch 2, sc in next sp, ch 2, sc in next sp, ch 4, sl st back in base sc of ch for picot; repeat from * around, ending with ch 4, sl st in base sc to form 4th picot, join with a sl st to first sc and fasten off.
SECOND BLOCK: Large Daisy. With B, sc in double loop of a petal of large daisy, (ch 2, sc in next double loop of petal) 3 times, hold first block back to back with 2nd daisy, ch 2, sl st in sp of picot of first block, ch 2, sl st back into base sc on 2nd daisy to complete picot joining. (Ch 2, sc in first sp of first block, ch 2, sc in next double loop of 2nd daisy) 3 times, ch 2, sl st in picot of first block, ch 2, sl st back into base sc on 2nd daisy to complete picot joining. (Ch 2, sc in next double loop on 2nd daisy) 3 times, ch 4, sl st back into base sc to form a picot, (ch 2, sc in next double loop of petal on 2nd daisy) twice, ch 2, join with a sl st to first sc, ch 4, sl st back into base sc to form 4th picot. Fasten off securely.
THIRD BLOCK: Join a large daisy for third block to another side of first block. With B, sc in double loop of a petal of 3rd daisy, (ch 2, sc in next double loop of petal of 3rd daisy) 3 times, hold 3rd daisy back to back to first block, ch 2, sl st in sp of picot of first block, ch 2, sl st back into base sc on 3rd daisy to complete picot joining. (Ch 2, sc in first sp of first block, ch 2, sc in next double loop of petal of 3rd daisy) 3 times, ch 2, sl st in center between the 2 joined picots of first and second blocks, ch 2, sl st back into base sc on 3rd daisy. (Ch 2, sc in next double loop on 3rd daisy) 3 times, ch 4, sl st back into base sc to form a picot, (ch 2, sc in next double loop of petal) twice, ch 2, join with a sl st to first sc, ch 4, sl st back into base sc to form 4th picot. Fasten off securely.
FOURTH BLOCK: Join a small daisy to one side each of 2nd and 3rd blocks as follows: With A, work rnd 1 and rnd 2 as explained for first block. Rnd 3: Attach B and sc in first sp. * (Ch 2, sc in next sp) 3 times, hold 4th daisy back to back to 3rd block, ch 2, sl st in picot on 3rd block, ch 2, sl st back in base ch on 4th daisy to complete picot joining. (Ch 2, sc in first sp on 3rd block, ch 2, sc back in next sp on 4th block) 3 times, ch 2, sl st in center of picots, ch 2, sc back into base sc on 4th block (completion of a 4th picot at joining). (Ch 2, sc in next sp on 2nd block, ch 2, sc in next sp on 4th daisy) 3 times, ch 2, sl st in picot of 2nd block, ch 2, sl st back into base sc on 4th daisy (completion of connection picot), (ch 2, sc in next sp on 4th daisy) twice, ch 2, join with a sl st to first sc, ch 4, sl st back into base sc to form the 4th picot. Fasten off securely. Connect daisies in this manner, alternating a small and large daisy until there are 13 daisies across for width and 15 rows for length.
FINISHING: Block lightly on wrong side. Attach A at corner, with right side facing and working backwards (counter clockwise), ch 1, sc in corner space, * ch 1, sc in next space; repeat from * around always working 2 patterns in each corner and ending with 1 pattern in the starting corner. Join with a sl st and fasten off.
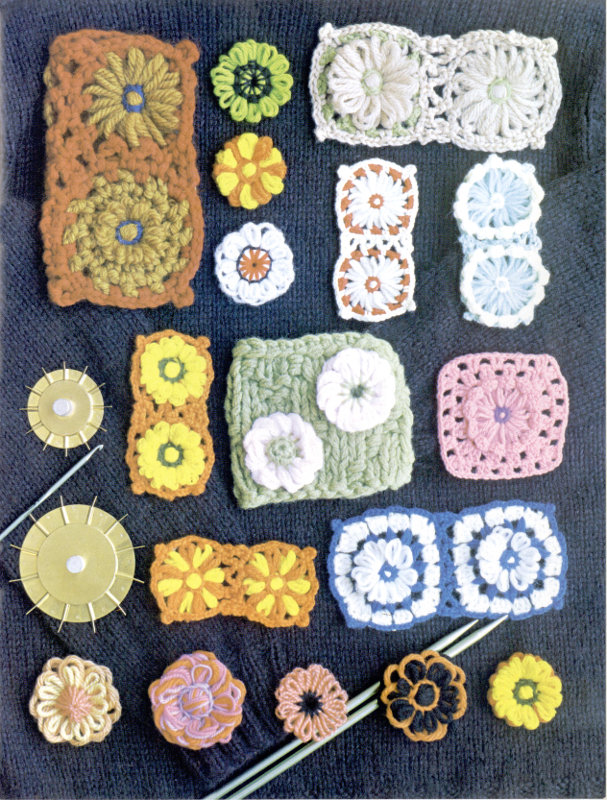
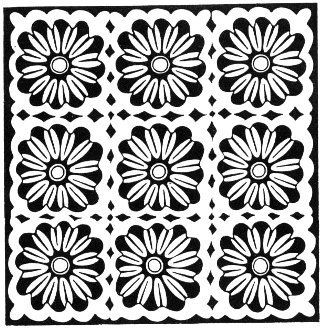
Shown are several types of daisies and joinings used in making the garments in this book. Also shown are some suggestions for variations that can be made with the Hero “Crazy Daisy” Winder and the Hero King Size “Crazy Daisy” Winder.
Shown here and on page 13
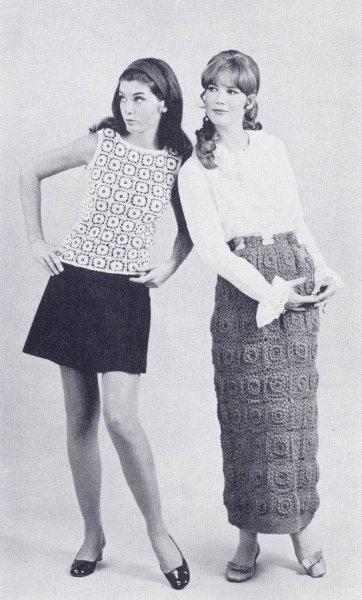
SIZES: Directions are for size 8. Changes for sizes 10-12, 14-16 and 18-20 are in parentheses.
MATERIALS: HERO Crazy Daisy Winder. Sport Yarn, 2 oz. pull skein, 5 (6-7-8) Ecru (A) and 2 (2-3-3) Burnt Orange (B). HERO No. 1 steel crochet hook and tapestry needle.
GAUGE: Two connected daisies—4″.
TO MAKE DAISIES: See page 3 for directions for making daisies. Make petals in A and sew centers with B. Wind A twice around each spoke. Make 144 (165-198-219) daisies.
TO CONNECT DAISIES: See page 4 for JOINING B. Work rnd 1 of joining with B; then work rnd 2 with A. Connect 16 (18-20-22) daisies all around for body of shell. Connect 7 rnds of daisies for length to underarm.
BACK: Divide work in half allowing 8 (9-10-11) daisies for back and 8 (9-10-11) daisies for front. Leave off 1 daisy at each end for underarm, 6 (7-8-9) daisies. Connect 3 (3-4-4) rows of 6 (7-8-9) daisies for back armhole. For size 10-12, next row, connect 1 daisy, leave off next 5 daisies for neck, connect 1 daisy.
FRONT: Leave off 1 daisy at each end for underarm, 6 (7-8-9) daisies. Connect 2 (2-3-3) rows of 6 (7-8-9) daisies for front armhole. SHAPE NECK: Connect 1 daisy, leave off center 4 (5-6-7) daisies for neck, connect 1 daisy. Connect front shoulder to back.
FINISHING: Block lightly. LOWER TRIM: Attach A at seam edge, * ch 3 loosely, sc in next sp; repeat from * around (be sure work lies flat and doesn’t draw in). Next row: Working backwards (counter clockwise), ch 1, hdc in space, * ch 1, hdc in next space; repeat from * around. Join with a slip st and fasten off.
NECK TRIM: Rnd 1: Attach A yarn at shoulder, * ch 3 loosely, sc in next space; repeat from * around (see that work lies flat and doesn’t draw in). Rnd 2: * Ch 2, sc in next space; repeat from * around. Rnd 3: * Ch 1, sc in next space; repeat from * around. For sizes 10-12, work 1 or 2 more rnds as for rnd 3 to fill in neck if necessary. Next rnd: Work as for last rnd as on lower edge. Fasten off.
ARMHOLE TRIM: Attach A yarn at underarm. Rnd 1: * Ch 3, sc in next sp; repeat from * around. Rnd 2: Repeat rnd 1 (see that work takes in armhole slightly and shapes it). Next rnd: Work as for last rnd as on lower edge. Fasten off.
NOTE: Directions for short skirt are included in these directions.
SIZES: Directions are for Small (size 8-10). Changes for Medium (size 12-14) are in parentheses.
MATERIALS: HERO Crazy Daisy Winder. Sport Yarn, 2 oz. pull skein, 10 (11) Hot Pink (A) and 1 skein of Purple (B). HERO No. 1 steel crochet hook and No. C aluminum crochet hook. Tapestry needle. Skirt zipper, lt. weight lining fabric and 2 hooks and eyes.
GAUGE: Two connected blocks—7″.
Note: Use No. 1 steel crochet hook to crochet around daisies and connect blocks. Use No. C aluminum crochet hook for lower border and waistband.
TO MAKE DAISIES: See directions on page 3 for making daisies. Make 108 (126) daisies with A, winding 3 times around each spoke and sewing center with double strand B.
FIRST BLOCK: Rnd 1: With wrong side of daisy facing, with A, sc in petal of daisy (go in space through the 3 loops of petal), * ch 5, yo and pull up a loop in first ch, yo pull through 2 loops and leave 2 loops on hook, yo pull up a loop in first ch (same as first st), yo pull through 2 loops, yo pull through 3 loops, sc in next petal (cluster); repeat from * around (12 clusters). Join with a sl st to first sc. Turn. Rnd 2: Ch 5, sc in back of st between next 2 clusters, * ch 4, sc in back of st between next 2 clusters; repeat from *, end ch 4, join with a sl st (12 spaces). Rnd 3: Sc in first sp, ch 5, dc in first sp (half corner), * (ch 2, 2 dc in next sp) 3 times, ch 2, 2 dc back into last sp worked in to complete corner; repeat from * twice more, end (ch 2, 2 dc in next sp) twice, ch 2, 2 dc in first sp, ch 2, join with a sl st to top of starting ch to complete other half of corner. Rnd 4: Ch 5, dc back into corner sp for a half corner, * (ch 2, 2 dc in next sp) 4 times, ch 2, 2 dc back in last sp worked in to complete corner; repeat from * twice more, end (ch 2, 2 dc in next sp) 3 times, ch 2, 2 dc in first sp, ch 2, join with a sl st to top of starting ch to complete corner. Rnd 5: * (Ch 3, sc in next sp) 5 times, ch 6, sc back into last sp worked for picot; repeat from *, end ch 6, sc back into last sp worked (4th picot). Join with a sl st and fasten off. Crochet around the 107 (125) remaining daisies in the same manner as for first block.
TO JOIN BLOCKS: Working with two blocks and holding them back to back, leave picots free, sc in first ch-3 sp after a picot on block 1, ch 3, sc in first ch-3 sp after a picot on block 2, * ch 3, sc in next ch-3 sp on block 1, ch 3, sc in next ch-3 sp on block 2 (corresponding ch-3 sp to ch-3 sp worked on block 1); repeat from * along this side edge to within the picots. Fasten off securely leaving picots from block 1 and 2 free.
TO JOIN BLOCK 3: Block 3 is joined to another side of block 1. Hold block 3 back to back to block 1. Leave picots free, sc in first ch-3 sp after picot on block 3, ch 3, sc in first ch-3 sp on block 1, * ch 3, sc in next ch-3 sp on block 3, ch 3, sc in next ch-3 sp on block 1 (corresponding ch-3 sp to ch-3 sp worked on block 3); repeat from * along this side edge to within the picots. Fasten off securely leaving picots free.
TO JOIN BLOCK 4: Block 4 is joined to one side of block 3 and one side of block 2. Leave picots free and holding block 4 back to back to block 3, sc in first ch-3 sp after picot on block 4, ch 3, sc in first ch-3 sp on block 3; * ch 3, sc in next ch-3 sp on block 4, ch 3, sc in next ch-3 sp on block 3; repeat from * along this edge to within picots. Fasten off securely leaving picots free. Sc in first ch-3 sp after picot on block 4, ch 3, sc in first ch-3 sp after picot on block 2, * ch 3, sc in next ch-3 sp on block 4, ch 3, sc in next ch-3 sp on block 2; repeat from * along this edge to within picots. Fasten off securely leaving picots free. At intersection where 4 picots meet from block 1, 2, 3 and 4, join the 4 picots at center using a tapestry needle and B yarn with a secure st (4 picots joined at center form a 4 leaf clover effect). Fasten yarn securely.
Join 7 rows of 12 (14) blocks around. Join 2 more rows leaving an opening on one side for zipper. Finished skirt with lower band and waistband is about 37″ in length (there is an allowance for 1″ stretch).
LOWER BORDER: Rnd 1: With No. C hook, attach yarn and sc in a ch-3 sp. Working backwards (counter clockwise), * ch 1, hdc in next ch-3 sp; repeat from * around (see that work lies flat). Rnd 2: Continue to work backwards (counter clockwise), * ch 1, hdc under ch 1 of previous rnd. Repeat rnd 2 until border is 2″ or desired size. Fasten off.
WAISTBAND: With No. C hook, work 2 rows of sc around waistline, taking it in to measure 25″ (26½″) or desired waist size. Row 1: Working backwards (counter clockwise), ch 1, hdc in next st, * ch 1, skip 1, hdc in next st; repeat from * across, end hdc, ch 1 on turn. Row 2: Hdc in first sp under ch-1 of previous row (continue to work backwards—counter clockwise), * ch 1, hdc under next ch-1 of previous row; repeat from *, end hdc in last ch-1 sp, ch 1 to turn. Repeat row 2 until waistband is 2″. Fasten off.
FINISHING: With No. 1 hook, work 1 row of sl st and 1 row of sc around zipper opening. Block skirt lightly. Cut lining and sew tog. Stitch lining to first row of waistband, gathering it in to size of waistband and leaving lower edge free. Face waistband with a double strip of lining, leaving a 1½″ extension from back edge for closing tab. Sew in zipper. Sew on 2 hooks and eyes for closing.
MATERIALS: 8 (9) skeins color A and 1 skein color B. Work 72 (84) blocks as for long skirt. Join blocks as for long skirt. Join 4 rows of 12 (14) blocks around; then join 2 rows of 12 (14) blocks leaving 1 side open for zipper. Finish as for long skirt, working a 1″ border at lower edge. This will be about a 24″ length skirt. Adjust length by working a shorter or longer lower border and waistband.
Instructions on page 14.

Instructions for Shell on page 10.
Instructions for Long Shirt on page 11.
Instructions for the same skirt in a street length on page 11.
Shown on page 12
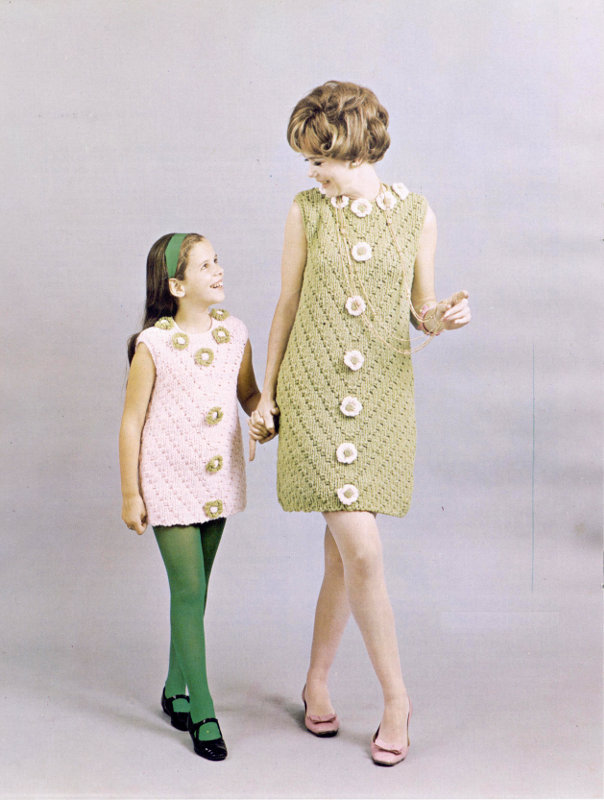
SIZES: MOTHER: Directions are for Small (size 10-12). Changes for Medium (size 14-16) are in parentheses.
DAUGHTER: Directions are for Small (size 6-8). Changes for Medium (size 10-12) are in parentheses.
MATERIALS: MOTHER: 4 Ply Knitting Worsted, 4 oz. skein, 6 (8) Green (A) and 2 ozs. of Pink (B) for trim. DAUGHTER: 4 Ply Knitting Worsted, 4 oz. skein, 3 (4) Pink (B), 2 ozs. of Green (A) for trim. HERO No. 17 knitting needles, OR SIZE REQUIRED TO OBTAIN THE GIVEN STITCH GAUGE. HERO Crazy Daisy Winder and No. 0 steel crochet hook. Tapestry needle. 14 Button molds for mother and 9 button molds for daughter.
GAUGE: 3 strands on No. 17 needles: 5 sts—2″.
PATTERN No. 1: Row 1: * k 3; p 1; repeat from * across. Row 2: * k 1, p 3; repeat from * across. Row 3: K 2, * p 1, k 3; repeat from *, end p 1, k 1. Row 4: P 1, * k 1, p 3; repeat from *, end k 1, p 2. Row 5; K 1, * p 1, k 3; repeat from *, end k 2. Row 6: P 2, * k 1, p 3; repeat from *, end k 1, p 1. Row 7: * P 1, k 3; repeat from * across. Row 8: * P 3, k 1; repeat from * across. Repeat these 8 rows for pattern 1.
PATTERN No. 2: Row 1: * P 1, k 3; repeat from * across. Row 2: * P 3, k 1; repeat from * across. Row 3: K 1, * p 1, k 3; repeat from *, end p 1, k 2. Row 4: P 2, * k 1, p 3; repeat from *, end k 1, p 1. Row 5: K 2, * p 1, k 3; repeat from *, end p 1, k 1. Row 6: P 1, * k 1, p 3; repeat from *, end k 1, p 2. Row 7: * K 3, p 1; repeat from * across. Row 8: * K 1, p 3; repeat from * across. Repeat these 8 rows for pattern 2. Note: Use 3 strands of yarn tog unless otherwise specified.
BACK: With 3 strands A and No. 17 needles, cast on 48 (56) sts. Work first 24 (28) sts in pattern 1, place a marker on needle, work next 24 (28) sts in pattern 2. Work even as established for 18″ from beg. Dress is planned for 29″ length to underarm. Any changes in length should be made before the first dec row. Dec 1 st each end of next row; then every 3″ (2½″) for 2 (3) times more, 42 (48) sts. Work even until 29″ from beg or desired length to underarm. SHAPE ARMHOLES: Bind off 2 sts at beg of next 2 rows. Dec 1 st each end every other row twice, 34 (40) sts. BACK OPENING: Work 17 (20) sts and place on a holder, work on remaining 17 (20) sts. Work even in pattern as established until armhole is 6¾″ (7¼″). SHAPE SHOULDER: At arm edge, bind off 5 sts once; then 4 (5) sts once, 8 (10) sts. Bind off remaining sts loosely. Attach 3 strands at center opening and work other side to correspond.
FRONT: Work same as for back until completion of armhole shaping, 34 (40) sts. Work even until armholes are 5″ (5½″). SHAPE NECK: Work 11 (13) sts and place on a holder, bind off center 12 (14) sts loosely, work 11 (13) sts. At neck edge, dec 1 st every other row 2 (3) times. Work even to shoulder shaping as for back. SHAPE SHOULDER: At arm edge, bind off 5 sts once; then 4 (5) sts. Attach 3 strands of yarn at neck edge and work other side to correspond.
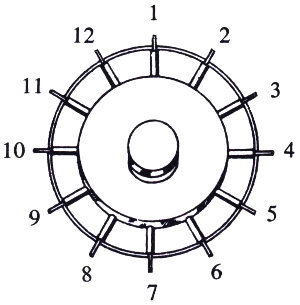
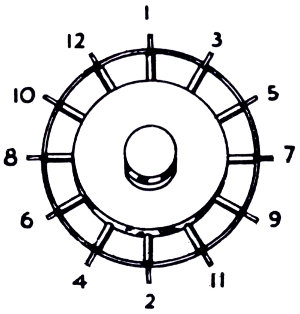
FINISHING: Make 14 daisies on the Crazy Daisy Winder in B as follows: With left thumb hold yarn at center allowing end to extend 1″. With right hand pass yarn from left to right around spokes No. 1 and No. 2, across center from right to left around No. 7 and No. 8; repeat last wind twice more; across center and pass yarn from left to right around spokes No. 2 and No. 3, across center from right to left around No. 8 and No. 9; repeat last wind twice more; across center from left to right around spokes No. 3 and No. 4, across center from right to left around No. 9 and No. 10; repeat last wind twice more; across center and pass yarn from left to right around spokes No. 4 and No. 5, across center from right to left around No. 10 and No. 11; repeat this last wind twice more, across center from left to right around spokes No. 5 and No. 6, across center from right to left around No. 11 and No. 12; repeat last wind twice more; across center from left to right around spokes No. 6 and No. 7, across center from right to left around No. 12 and No. 1; repeat this last wind twice more. Bring yarn to 1″ beyond center and cut. Do not remove.
CENTER: Note that there is a hole in center after all winds are completed. Keep left thumb in center to keep the hole in center as you sew the center. Thread tapestry needle with B. Insert tapestry needle in space between 2 petals working from outside to center hole (leave a small end for fastening) and draw through, go back into same space and draw needle from outside edge to inside to fasten; * insert needle in next space between petals from center edge to outside edge, wind yarn around the tapestry needle from left to right as to make a buttonhole st, draw through and tighten; repeat from * until all petals are secured (secure loose ends in as you are sewing around). Fasten off securely. Remove from winder.
BUTTONS: Make 14. With single strand A, ch 3, join with a sl st to form a ring. Rnd 1: 6 sc in ring. Rnd 2: 2 sc in each sc. Rnd 3: 1 sc in each sc. Rnd 4: Insert mold. * Skip 1 sc, sc in next sc; repeat from * until completely closed over mold. Fasten off. Sew shoulder and side seams with single strand. With double strand A, work 1 row of slip st around neck edge. Next row: Working backwards (counter clockwise), ch 1, * sc in next st; repeat from * around neck. Fasten off. Work trim around armhole edges as for neck. With double strand A, work 1 row of slip st around back opening. Tack daisies along center of front edge and around neck as shown (on neck place one at top of back opening so button can be used for closing). Sew a button in center of each daisy as shown.
BACK: With 3 strands B and No. 17 needles, cast on 40 (48) sts. Work first 20 (24) sts in pattern 1, place a marker on needle, work next 20 (24) sts in pattern 2. Work even 12″ from beg. Dress is planned for 15½″ (17″) from beg to underarm. Any changes in length should be made before first dec. Dec 1 st each end of next row; then every 2″ (1½″) 1 (2) times more, 36 (42) sts. Work even until 15½″ (17″) from beg or desired length to underarm. SHAPE ARMHOLES: Bind off 2 sts at beg of next 2 rows. Dec 1 st each end every other row twice, 28 (34) sts. BACK OPENING: Work 14 (17) sts and place on a holder; then work across remaining 14 (17) sts. Work even until armhole is 5¼″ (5¾″). SHAPE SHOULDER: At arm edge, bind off 4 sts once, 3 (4) sts once, 7 (9) sts. Bind off remaining sts loosely. Attach 3 strands at center opening and work other side to correspond.
FRONT: Work same as back until completion of armhole shaping, 28 (34) sts. Work even until armhole is 4″ (4¼″). SHAPE NECK. Work 9 (11) sts and place sts on a holder, bind off center 10 (12) sts, loosely, work across the remaining 9 (11) sts. At neck edge, dec 1 st every other row twice. For medium size only, dec 1 st at neck edge every row once, 7 (8) sts. Work even to shoulder shaping as on back. SHAPE SHOULDER: At arm edge, bind off 4 sts once, 3 (4) sts once. Attach 3 strands at neck edge and work other side to correspond.
FINISHING: Make 9 daisies and 9 buttons using color A for daisies and color B for buttons. See instructions as given for Mother’s dress. Crochet neck, armholes and back opening with B as explained for Mother’s dress.
Shown on page 16
MATERIALS: HERO Crazy Daisy Winder. 4 Ply Knitting Worsted, 4 oz. Skein, 2 Loden Green (A), 1 Orange (B) and 1 Maize (C). HERO No. F aluminum crochet hook. Yarn darning needle. Pillow to fit.
TO MAKE DAISIES: Follow directions for making daisies on page 3. Make 40 daisies, winding twice around each spoke with C and then winding around same spokes twice with B (4 winds on each spoke). Sew centers with A.
TO JOIN DAISIES: Follow directions for JOINING B (see page 4), only picking up the B petals and leaving the C petals free. Work rnd 1 of joining with C and rnd 2 with B. Connect 2 pieces of 4 rows of 4 daisies across.
FRONT PIECE: Rnd 1: Attach A at a corner, ch 4, dc back in corner sp (half corner), # * ch 1, 2 dc in next sp; repeat from * 14 times more (this should bring you along one side edge to next corner—see that work lies flat), ch 1, 2 dc, ch 1, 2 dc all in next corner sp #; repeat between #’s ending with 15 patterns along 4th side, ch 1, 2 dc in starting corner sp, ch 1 and join with a sl st to top of starting ch to complete corner. Rnd 2: Ch 4, dc in sp of corner (half corner), # * ch 1, 2 dc in next sp; repeat from * to corner, ch 1, 2 dc, ch 1, 2 dc all in corner sp #; repeat between #’s around, end ch 1, 2 dc in first corner sp, ch 1, join with a sl st to top of starting ch. Repeat rnd 2 four times more or until you attain the desired size. Fasten off.
BACK: Work to correspond to front piece.
FINISHING: Place front and back tog and sl st 3 sides tog, insert pillow and sl st 4th side tog. TRIM: Attach A, * 5 dc in one sp (pull each dc up to ¾″), sc in next sp; repeat from * around, placing 8 dc in the corners. Join with a sl st and fasten off. Sew a daisy to each corner on back and front as shown.
Shown on page 16
MATERIALS: HERO Crazy Daisy Winder. 4 Ply Knitting Worsted, 4 oz. skein, 2 Orange (A) and 1 Maize (B). HERO No. F. aluminum crochet hook. Yarn darning needle. Pillow to fit.
TO MAKE DAISIES: Follow directions for making daisies on page 3. Make 16 color A daisies winding yarn around spokes 4 times and sewing centers with A. Make 56 daisies, winding yarn around spokes 4 times, alternating colors (wind every other spoke 4 times with A; then break off A and wind those spokes that were skipped 4 times with B) and sew centers with A. See diagram and directions for winding this type daisy included with instruction for Crazy Daisy Cardigan on page 23.
TO JOIN DAISIES: Follow directions for JOINING A on page 3. Use color A for joining.
FRONT PIECE: Connect 2 rows of 8 A&B combination daisies; 1 row of A daisies (8 across); 3 rows of A&B combination daisies; 1 row of A daisies and 2 rows of A&B combination daisies.
BACK PIECE: Note: If desired, back piece may be worked with daisies as for front piece, or crocheted with A.
CROCHETED BACK: With A, ch long enough to fit width of front piece. Row 1: Dc in 4th ch from hook, * dc in next ch; repeat from * across. Ch 3 to turn. Row 2: Ch 3 on turn is counted as first dc, * dc in next dc; repeat from * across. Ch 3 to turn. Repeat row 2 until piece measures size of front piece.
FINISHING: Place 2 pieces tog and sl st 3 sides tog, insert pillow and sl st 4th side tog. Using double strand A, attach yarn at a corner and working backwards (counter clockwise), * ch 1, skip 1, hdc in next st (1 pattern); repeat from * around, placing 2 patterns in each corner. Fasten off.
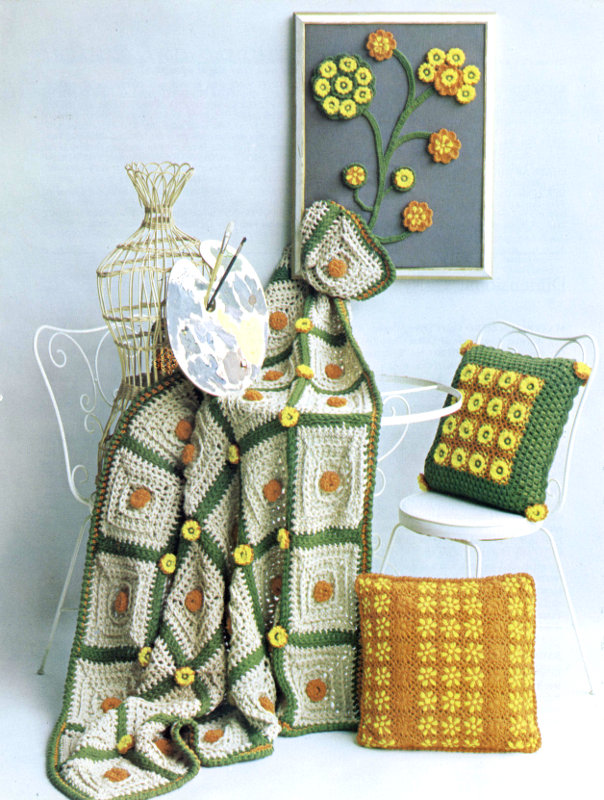
Shown on page 16
MATERIALS: HERO Crazy Daisy Winder. 4 Ply Knitting Worsted, 4 oz. skein, 1 Maize (A), 1 Orange (B) and 1 Loden Green (C). HERO No. G aluminum crochet hook. Yarn darning needle. Illustration board 18″ x 24″, 1 yd of brown heavy denim or canvas material, picture frame to fit, points to tack illustration board to frame and picture wire.
Cover illustration board with fabric, securing it firmly on back with heavy scotch tape or glue.
TO MAKE DAISIES: Follow basic instructions for making daisies on page 3. Make 16 daisies winding color A twice around each spoke; then winding around same spoke twice with color B. Sew centers with C (type D daisy). Make 4 daisies winding every other spoke 3 times with A; then winding those spokes that were skipped 3 times with B. Sew centers with B (type E daisy).
B PETAL BACKGROUND: Make 5. With B and No. G hook, ch 3, join with a slip st to form a ring. Rnd 1: Ch 3, 15 dc in ring (bring each dc up to measure 1″). Join with a slip st to top of ch 3. Rnd 2: Ch 1, sc in first space between 2 dc * 6 dc in next space (each dc 1″), sc in next space between 2 dc; repeat from * around, end 6 dc in last space. Join with a slip st and fasten off. Sew an E type daisy to center of 3 B petal backgrounds. Sew a D type daisy to center of 2 B petal backgrounds.
C SHELL: Make 2. With C, ch 3, join with a slip st to form a ring. Rnd 1: Ch 3, 19 tr c in ring (each tr c to measure 1¼″). Join with a slip st to top of ch 3. Rnd 2: Ch 1, working backwards (counter clockwise), * sc in next st; repeat from * around. Fasten off. Sew an E daisy in center of one shell and a D daisy in the other shell.
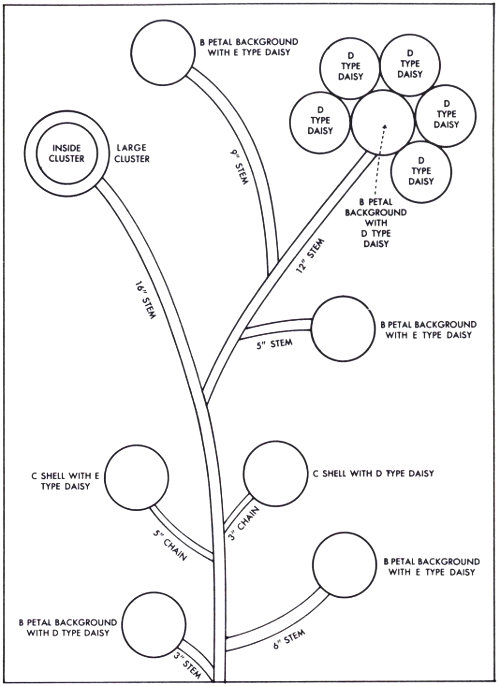
LARGE CLUSTER: First Daisy: With C, sc in a B petal of a D type daisy (go through both B petals). Work only in B petals and leave A petals free, * ch 2, sc in next B petal; repeat from * around, end ch 2, sl st in first sc. Fasten off. Second Daisy: With C, sc in a B petal of a D type daisy. Work only in B petals and leave A petals free. * (ch 2, sc in next B petal) 3 times, place daisy back to back with previous daisy worked, (ch 2, sl st under ch-2 space of first daisy, ch 2, sc in next B petal on second daisy) 3 times, ** ch 2, sc in next B petal; repeat from ** around, end ch 2, join with a sl st in first sc. Fasten off. Connect 4 more type D daisies to first 2 daisies in this manner. Join the 7th D type daisy to the first to form a circle as follows: With C, sc in B petal, (ch 2, sc in next B petal) 3 times, (ch 2, sl st in ch-2 space of 6th daisy, ch 2, sc in next B petal of 7th daisy) 3 times, (ch 2, sc in next B petal) 3 times, (ch 2, sl st in ch-2 space of first daisy, ch 2, sc in next B petal) twice, ch 2, sl st in ch-2 space of first daisy, ch 2, join with a sl st in first sc of 7th daisy. Fasten off. Stretch outside edge to form a flat circle. Rnd 1: Attach C to back center of first daisy (go through sewing sts) and work a sc, * ch 6, sc in between 2 daisies in the back of the top st, ch 6, sc in back center of next daisy; repeat from * around, end ch 6, join with a sl st. Fasten off. Rnd 2: With C, work a sc, 6 dc (all dc 1″ high) and a sc all in space under ch-6, * work a sc, 6 dc and a sc all in space under next ch-6; repeat from * around. Join with a sl st and fasten off.
INSIDE CLUSTER: Rnd 1: With C, sc in a B petal of a type D daisy. Work in B petals only, leaving A petals free, * sc in next B petal (work sc loosely); repeat from * around. Rnd 2: * Sc, 2 dc and a sc all in next sc (shell); repeat from * around until there are 11 shells around. Join with a sl st and fasten off.
STEMS: Stems are worked with C. Chain a little longer than length needed to allow for drawing in. Row 1: Dc in 4th ch from hook, * dc in next ch; repeat from * across. Fasten off. Make the following sizes: 16″, 12″, 9″, 5″, 6″, 3″. With 3 strands of C, work a chain of 5″ and a chain of 3″.
FINISHING: See chart for arrangement or show off your artistic talent and arrange daisies to create a picture that will be an original. Pin pieces to fabric first and then with needle and thread sew to fabric. Attach to frame and attach picture wire to back.
Shown on page 16
SIZE: Approx. 55″ x 64″.
MATERIALS: HERO Crazy Daisy Winder. 4 Ply Knitting Worsted, 4 oz. skein, 16 Beige (A), 3 Loden Green (B), 2 Orange (C) and 1 Maize (D). HERO No. Q crochet hook and No. K aluminum crochet hook. Yarn darning needle.
GAUGE: Each square approx. 9″ x 9″.
TO MAKE DAISIES: Follow directions for making daisies on page 3. Make 42 daisies with C, winding 4 times around each spoke and sewing centers with B. Make 30 daisies, winding twice with D around each spoke; then twice with C around each spoke (4 winds in all around each spoke), and sewing centers with B.
CROCHETED SQUARE: With 3 strands A and No. Q hook, ch 3, join with a sl st to form a ring. Rnd 1: Ch 3, 11 dc in ring. Join with a sl st to top of starting ch 3. Ch 1 and turn. Rnd 2: On this rnd pick up the 2 loops of each st. Sc back in same st as ch 1 (half corner), * 1 sc in each of 2 sts, 3 sc in next st (corner); repeat from * around, end 1 sc in each of 2 sts, sc in same st as starting sc, join with a sl st to complete 4th corner. Ch 1 to turn. Rnd 3: Sc back in same st as ch 1 (half corner), * 1 sc in back loop of next 4 sts, 3 sc in back loop of next st (corner); repeat from *, end 1 sc in back loop of 4 sc, sc in same st as starting sc, join with a sl st to complete 4th corner. Ch 1 to turn. Rnd 4: On this rnd pick up both loops of each st. Sc back in same st as ch 1 (half corner), * 1 sc in each of 6 sc, 3 sc in next st (corner); repeat from *, end 1 sc in each of 6 sc, sc in same st as starting sc, join with a sl st to complete 4th corner. Ch 1 to turn. Rnd 5: Sc back in same st as ch 1 (half corner), 1 sc in back loop of next 8 sc, 3 sc in back loop of next st (corner); repeat from *, end 1 sc in back loop of 8 sc, sc in same st as starting sc, join with a sl st to complete 4th corner. Ch 1 to turn. Rnd 6: On this rnd pick up both loops of each st. Sc in same st as ch 1 (half corner), * 1 sc in next 10 sts, 3 sc in next st (corner); repeat from *, end 1 sc in next 10 sc, sc in same st as starting sc, join with a sl st to complete 4th corner. Pull through 3 strands of B and fasten off A securely. Ch 1 and turn. Rnd 7: On this rnd pick up both loops of each st. Sc in same st as ch 1 (half corner), * 1 sc in next 12 sc, 3 sc in next sc (corner); repeat from *, end 1 sc in next 12 sc, sc in same st as starting sc, join with a sl st to complete 4th corner. Fasten off. Crochet 42 squares in this manner.
FINISHING: Fluff C daisies so that they resemble a pom-pon and sew one to center of each square. Weave squares tog with B and yarn darning needle, picking up back loop of st. Sew 6 squares across in width and 7 rows for length. Sew 5 Orange-Maize combination daisies across each row at the joinings of squares as shown. OUTER TRIM: With No. K hook and 3 strands C, work 1 rnd of sc around all sides of afghan, working 3 sc in each corner st (make sure work lies flat). Fasten off C and attach 3 strands of B. LAST RND: With No. K hook and working backwards (counter clockwise), work a sc in each st, working 3 sc in each corner st. Fasten off.
Shown on page 22 and back cover
MATERIALS: HERO King Size Crazy Daisy Winder. 4 Ply Knitting Worsted, 4 oz. skein, 5 Beige (A) and 1 Green (B). HERO No. E aluminum crochet hook. Tapestry needle.
TO MAKE DAISIES: Make 48 daisies winding yarn 4 times around each spoke. Use color A for petals and B for sewing center. Make 80 daisies winding yarn 3 times around each spoke. Use A for petals and B for centers. See page 3 for directions for making daisies.
TO CONNECT DAISIES: BORDERS: Work on those daisies where loops were wound 4 times around spokes. Rnd 1: Attach B and work a sc in the 2 lower loops of a petal leaving the 2 upper loops of same petal free, * ch 4, sc in next petal picking up the 2 lower loops and leaving the 2 upper loops of same petal free; repeat from * around, end ch 4, join with a sl st to first sc. Fasten off securely. Work rnd 1 on the 48 daisies for borders in this manner. Connect 3 rows with 8 daisies across with A. Follow directions for JOINING B, starting with rnd 2 for each block (rnd 1 has been worked already with the B) (see page 4 for directions for JOINING B.) Connect another piece in the same manner for other border.
BODY OF STOLE: Connect 10 rows of 8 daisies across with A. Follow directions for JOINING B, starting with rnd 1 for each block (see page 4 for directions for JOINING B).
FINISHING: Connect the 3 rows for border to each side of body of stole with A in the same manner as the rest of the stole was connected. Block lightly. TRIM: Rnd 1: With A, starting in a corner and right side facing, sc in first sp, * ch 4, sc in next sp; repeat from * to corner; then in corner, ch 4, sc back in same corner; repeat from * around, ending ch 4, sc in first corner, ch 4, join with a sl st to first sc. Rnd 2: Working backwards (counter-clockwise), * ch 2, hdc in next sp; repeat from * around, placing 2 patterns in each corner. Fasten off.
Shown here and on page 7
MATERIALS: HERO King Size Crazy Daisy Winder. 4 Ply Knitting Worsted, 4 oz. Skeins, 5 Mint Green (A) and 1 White (B). HERO No. E aluminum crochet hook. Yarn darning needle. 4 yds ½″ satin ribbon for trim.
TO MAKE DAISIES: Follow directions for making daisies on page 3. Wind color A around each spoke twice and sew centers with B. Make 36 daisies.
TRIM DAISY: Outside Trim: With B, sc in sp of petal (go through both loops of petal), * ch 3, yo and pull up a loop in first ch, yo pull through 2 loops (2 loops remain on hook), yo pick up a loop back in first ch (4 loops on hook), yo pull through all 4 loops on hook (cluster), sc in sp of next petal; repeat from * around, ending with a cluster, join with a sl st to first sc. Fasten off securely. 12 clusters around.
Inside Trim: With B, sc in side of petal near center (go through both loops), * work a cluster as for outside trim, skip 1 petal, sc in side of next petal; repeat from * around, end with a cluster and join with a sl st to first sc. 6 clusters around. Fasten off. Attach A, sc in back of sc of an outside B cluster, * ch 4, sc in back of next sc of a B cluster; repeat from * around, end ch 4, join with a sl st. Fasten off. 12 spaces around.
FIRST BLOCK: Attach A, sc in ch-4 sp, * (ch 4, sc in next ch-4 sp) 3 times, ch 5, sl st back in sc to form a picot; repeat from * around, end (ch 4, sc in next ch-4 sp) twice, ch 4, join with a sl st to first sc, ch 5, sl st back in sc to complete 4th picot. Fasten off.
SECOND BLOCK: Attach A, sc in ch-4 sp, (ch 4, sc in next sp) 3 times, place back to back with first block, ch 2, sl st in sp of picot on first block, ch 2, sl st back in sc to complete picot joining on 2nd block, (ch 3, sl st in sp of first block, ch 3, sc in next sp on 2nd block) 3 times, ch 2, sl st in sp of picot on first block, ch 2, sl st in sc on 2nd block to complete picot joining, (ch 4, sc in next sp on 2nd block) 3 times, ch 5, sl st in sc to complete picot, (ch 4, sc in next sp) twice, ch 4, join with a sl st to first sc, ch 5, 31 st in sc for 4th picot. Fasten off.
THIRD BLOCK: This block is joined to another side of first block. Attach A, sc in ch-4 sp, (ch 4, sc in next sp) 3 times, place back to back to first block, ch 2, sl st in picot of first block, ch 2, sl st back in sc on 3rd block for picot joining, (ch 3, sl st in next sp on first block, ch 3, sc in next sp on 3rd block) 3 times, ch 2, sl st in center of picot joining, ch 2, sl st back in sc on 3rd block for picot joining, (ch 4, sc in next sp on 3rd block) 3 times, ch 5, sl st back in sc for picot, (ch 4, sc in next sp) twice, ch 4, join with a sl st to first sc, ch 5, sl st back in sc to complete 4th picot. Fasten off.
FOURTH BLOCK: This block is joined to one side each of 2nd and 3rd blocks. Attach A, sc in ch-4 sp, (ch 4, sc in next sp) 3 times, place back to back to 3rd block, ch 2, sl st in picot of 3rd block, ch 2, sl st back in sc on 4th block for picot joining, (ch 3, sl st in next sp on 3rd block, ch 3, sc in next sp on 4th block) 3 times, ch 2, sl st in center of 3 joined picots, ch 2, sl st back in sc on 4th block to complete 4th picot joining, (ch 3, sl st in next sp on 2nd block, ch 3, sc in next sp on 4th block) 3 times, ch 2, sl st in picot on 2nd block, ch 2, sl st in sc on 4th block to complete picot joining, (ch 4, sc in next sp on 4th block) twice, ch 4, join with a sl st to first sc, ch 5, sl st back in sc to complete picot. Fasten off. Connect 6 rows of 6 blocks across for center piece.
Rnd 1: Attach A at a corner and work ch 3, 2 dc in corner sp (half corner), # * ch 1, 3 dc in next sp (1 pattern); repeat from * across to next corner (18 patterns) (see that work lies flat), in next corner sp work ch 1, 3 dc, ch 1, 3 dc all in the one sp #; repeat between #’s around, ending with 18 patterns on the 4th side, ch 1, 3 dc in starting corner, ch 1 and join with a sl st to top of starting ch.
Rnd 2: Ch 3, 2 dc in corner sp (half corner), # * ch 1, 3 dc in next sp; repeat from * to corner, ch 1, 3 dc, ch 1, 3 dc in corner sp #; repeat between #’s around, ending with ch 1, 3 dc in first corner, ch 1, join with a sl st to top of starting ch. Repeat rnd 2 for 12 times more or until desired size.
Last rnd: Working backwards (counter clockwise) sc in each st around, working 2 sc in each corner (see that work lies flat). Fasten off.
FINISHING: Weave ribbon in and out around last eyelet row as shown. Sew ends of ribbon tog.
Shown on page 21
SIZE: Approximately 52″ x 52″
MATERIALS: HERO King Size Crazy Daisy Winder. Coats & Clarks O.N.T. “Speed-Cro-Sheen”, 100 yd ball, 16 Yellow (A) and 6 Hunter Green (B). HERO No. C aluminum crochet hook. Tapestry needle.
TO MAKE DAISY: With left thumb hold yarn at center allowing end to extend 1″. With right hand pass yarn from left to right around spokes No. 1 and No. 2, across center from right to left around No. 7 and No. 8; repeat the last wind twice more (3 times in all); across center and pass yarn from left to right around spokes No. 2 and 3, across center from right to left around No. 8 and 9; repeat last wind twice more; across center from left to right around spokes No. 3 and No. 4, across center from right to left around No. 9 and No. 10; repeat last wind twice more; across center and pass yarn from left to right around spokes No. 4 and No. 5, across center from right to left around No. 10 and No. 11; repeat last wind twice more, across center from left to right around spokes No. 5 and No. 6, across center from right to left around No. 11 and No. 12; repeat last wind twice more, across center from left to right around spokes No. 6 and No. 7, across center from right to left around No. 12 and No. 1; repeat last wind twice more. Bring yarn to 1″ beyond center and cut. Do not remove from winder.
CENTER: Thread tapestry needle and use double strand for sewing center. Follow directions on page 3 for center, going completely around 3 times in all. Fasten off securely. Make 200 daisies with A and sew centers with B. Make 25 daisies with B and sew centers with A.
CONNECT DAISIES: Follow directions for JOINING A (see page 3). Connect 5 rows of A daisies 15 across with A. Next row, connect 5 A daisies with A; then 5 daisies made with B for center and using B to connect them; then 5 A daisies connected with A. Repeat the last row 4 times more. Work 5 rows of A daisies connected with A.
FINISHING: Block lightly.
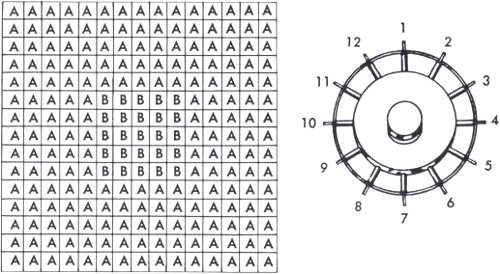
Pattern
| A | A | A | A | A | A | A | A | A | A | A | A | A | A | A |
| A | A | A | A | A | A | A | A | A | A | A | A | A | A | A |
| A | A | A | A | A | A | A | A | A | A | A | A | A | A | A |
| A | A | A | A | A | A | A | A | A | A | A | A | A | A | A |
| A | A | A | A | A | A | A | A | A | A | A | A | A | A | A |
| A | A | A | A | A | B | B | B | B | B | A | A | A | A | A |
| A | A | A | A | A | B | B | B | B | B | A | A | A | A | A |
| A | A | A | A | A | B | B | B | B | B | A | A | A | A | A |
| A | A | A | A | A | B | B | B | B | B | A | A | A | A | A |
| A | A | A | A | A | B | B | B | B | B | A | A | A | A | A |
| A | A | A | A | A | A | A | A | A | A | A | A | A | A | A |
| A | A | A | A | A | A | A | A | A | A | A | A | A | A | A |
| A | A | A | A | A | A | A | A | A | A | A | A | A | A | A |
| A | A | A | A | A | A | A | A | A | A | A | A | A | A | A |
| A | A | A | A | A | A | A | A | A | A | A | A | A | A | A |
Shown on page 21
MATERIALS: HERO Crazy Daisy Winder. Coats & Clark’s O.N.T. “Speed-Cro-Sheen”, 100 yd ball, 5 spools Yellow (A) and 1 spool Hunter Green (B). HERO No. C aluminum crochet hook and a tapestry needle.
With A, ch 134 loosely. Row 1: Pick up a loop in 3rd ch from hook and retain on hook, skip 1 ch, pick up a loop in next ch (3 loops on hook), yo pull through 3 loops, ch 1, * pick up a loop in last ch worked in and retain on hook, skip 1 ch, pick up a loop in next ch (3 loops on hook), yo pull through 3 loops, ch 1 (1 pattern); repeat from * across, 66 patterns. One extra ch on turn. Row 2: Pick up a loop in first ch and retain on hook, pick up a loop in next st (3 loops on hook), yo pull through 3 loops, ch 1, * pick up a loop in last st worked in and retain on hook, skip 1 st, pull up a loop in next st (3 loops on hook), yo pull through 3 loops on hook, ch 1; repeat from * across. One extra ch on turn. Repeat row 2 for pattern st (should measure 21″ across in width). Work even for 1½″ for lower border. Next row: Work 5 patterns for side border as established, * ch 1, skip 1 st, dc in next st; repeat from * to within last 5 patterns, work 5 patterns for side border as established. Next row: Work 5 patterns for border as established, * ch 1, dc in next space; repeat from * across to last 5 patterns, work 5 patterns for border as established. Work last row until 12½″ from beg. Next row: Work 5 patterns for border as established, * dc in next space; repeat from * to within last 5 patterns, work 5 patterns for border as established. Work pattern st on all sts as for lower border for 1½″. Fasten off.
TIES: Make 2. With A, ch 14 loosely. Work even in pattern st as for lower border for 12½″. Fasten off.
POCKETS: Make 2. Make 18 daisies following directions on page 3, winding petals with color B and sewing centers with color A. JOIN DAISIES: Follow instructions for JOINING A (see page 3), using color B for joining. Join 3 rows of daisies with 3 daisies across. Attach B at one corner and working backwards (counter clockwise), * ch 1, hdc in next space; repeat from * around all sides, going twice in each corner st. Fasten off. Block pieces lightly. Sew a pocket to each side as shown. Sew on ties.

Shown here and on back cover
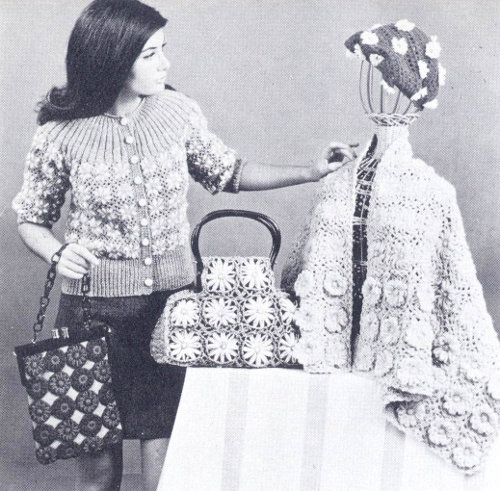
MATERIALS: HERO King Size Crazy Daisy Winder. Spinnerin Mardi Gras, 45 gram ball, 3 Brown and 1 White. HERO No. C aluminum crochet hook and tapestry needle. HERO 7″ Bag Handle. Lining and buckram.
TO MAKE DAISIES: Make 28 daisies following instructions on page 3. Wind first row of petals with white and second row with brown. Sew centers with brown. Connect 6 rows of 4 daisies across with brown, following instructions for JOINING A on page 3. Connect 1 row of 2 daisies to the center 2 daisies on each end row.
SIDE PIECES: Make 2. With C crochet hook and brown, ch 6. Row 1: Sc in 2nd ch from hook, 1 sc in each ch, 5 sc. Ch 1 to turn. Row 2: Sc in each st, picking up back loop only. Ch 1 to turn. Repeat row 2 for 5 times more. Continue in sc picking up back loop and increasing 1 st at each end of every row until 29 sts on row (to inc—work 2 sc in one st). Work even for 7 rows. Next row: Dec 1 st each end of row (to dec—work off 2 sc as one sc). Repeat the last row once more. Fasten off.
FINISHING: Starting at top corner, with brown, work 1 row of sc along side and bottom edges. With brown, work 4 rows of sc along each top edge. Using pieces as pattern, cut 2 linings and buckram making an allowance for seams. Use a double buckram for flat bottom to make it stiffer. With brown, sc side pieces to bag. Sew linings tog with buckram in between and double buckram for bottom. Sew in lining. With lining material sew a slot to each top edge and sew over bar of handle on each side.
Shown here and on back cover
MATERIALS: HERO Crazy Daisy Winder. Sport Yarn, 2 oz. pull skein, 2 Red and 1 White. HERO No. 0 steel crochet hook. 1 yd of tubular elastic.
TO MAKE DAISIES: Make 25 white daisies following directions on page 3. Wind white yarn twice around each spoke and sew centers with red.
SNOOD: Ch 85 loosely. Row 1: Dc in 4th ch from hook, * ch 1, skip 1 ch, 1 dc in each of next 2 chs (1 pattern); repeat from * across, 28 patterns. Ch 6 to turn. Should measure about 14″ across in width. Row 2: * Skip 2 dc, dc in space under ch 1 of previous row, ch 2; repeat from * across, end dc in end turning ch, 28 spaces. Ch 4 to turn. Row 3: Ch 4 on turn is counted as first dc, dc in first space, * ch 1, 2 dc in next space; repeat from * across. Ch 6 to turn. Repeat row 2 and 3 for 14″, ending with row 3. Fasten off.
FINISHING: Work 4 rnds of sc around all 4 edges of piece taking it in to fit head size. Work 1 rnd of sc over tubular elastic. Tie ends of elastic and fasten off. Sew on daisies as shown, placing 12 around sc band and spacing the others all over as shown.
Shown here and on back cover
MATERIALS: HERO Crazy Daisy Winder. HERO Smart-Set Interchangeable Bag Handle. 4 Ply Knitting Worsted, 2 oz. skein, 1 Royal Blue, 1 Turquoise and 1 Olive Green. HERO No. F aluminum crochet hook and a yarn darning needle. Two pieces lt. blue felt, 7½″ × 11-¼″ each. Two pieces dk. blue Indian-Head for lining 7⅛″ × 11⅛″. Press-on non woven interfacing.
TO MAKE DAISIES: Follow general directions for winding daisies on page 3. TO SEW CENTERS: Insert darning needle under 2 petals and draw yarn through tightly, * bring yarn back over the last one of the 2 petals, insert yarn under this petal and next petal and draw through tightly; repeat from * until you have completed 3 rnds of sts around center. Make 20 daisies in Royal blue with Turquoise centers. These daisies are shown with the back st center as the right side. Make 20 daisies in Turquoise with Royal Blue centers, however on the Turquoise daisies the side facing you as you sew the center will be used as the right side so be sure to work all ends in neatly.
TO MAKE CIRCLE: With Olive Green, sc in end of petal (go through the 2 loops of petal), * ch 2, sc in next petal; repeat from * around, ending ch 2, join with a sl st to first sc. Fasten off.
TO ASSEMBLE: Alternating the color of daisy, with Olive Green join each daisy at one st with a sc (center it at the 6th and 12th petal) until 10 daisies are joined. Make 1 more strip of 10 in the same color arrangement and 2 more strips of 10 in the alternate color arrangement. Join the 4 strips tog in the same manner, making sure to alternate color of daisy. From wrong side, fold in half and join side daisies leaving the upper 2 rows free to be tacked to lining at opening. With wrong side facing, sew Indian-Head tog with ¼″ seams, rounding corners at bottom and leaving 3½″ open at each side. Assemble felt in the same manner, leaving 4¼″ open at top. Cut press-on material to fit and press on to felt. Fold felt 1″ at top edge to wrong side and machine st in place. With wrong sides facing, slip Indian-Head into felt and blind st in place (lining slightly smaller than felt). Pull daisies over felt and tack at top of side seams and top of bag. Slip bars of handle through top bands and fasten ends.
Shown on page 22 and back cover
SIZES: Directions are for Small (size 8-10). Changes for Medium (size 12-14) and Large (size 16-18) are in parentheses.
MATERIALS: HERO Crazy Daisy Winder. Wool and Shetland Wool, 2 oz. skein, 7 (8-9) Grey (A) and 2 (2-3) Ecru (B). HERO No. 5 straight knitting needles and No. 6 circular knitting needle. No. 1 steel crochet hook. Tapestry needle. 9 small button molds.
GAUGE: 4 connected daisies—7½″.
TO MAKE DAISIES: Turn knob to release spokes. With left thumb hold A at center leaving end to extend at center for about 1″. With right hand, pass yarn from left to right around spoke No. 1 at top, across center, from right to left around spoke No. 2 directly opposite; wrap around these spokes once more in the same manner. Bring yarn across center from left to right around spoke No. 5 at right of first spoke wrapped, across center from right to left around spoke No. 6 at left of 2nd spoke wrapped, wrap around these 2 spokes once more. Bring yarn across center from left to right around spoke No. 9, across center and from right to left around spoke No. 10, wrap around these 2 spokes once more. Bring yarn across center and cut about 1″ beyond center (you have been winding around every other spoke). Continue with B in this manner wrapping twice around 2 spokes exactly opposite then passing on to the next 2 free spokes until all spokes are wrapped twice, ending with spoke No. 12—thus wrapping with B the spokes that were skipped when you were winding with A. Bring yarn across center and cut about 1″ beyond center.
TO MAKE CENTER: See instructions to make centers on page 3. Use color A for centers. Make 174 (186-214) daisies in this manner.
TO CONNECT DAISIES: Follow directions given for Joining A on page 3 using A yarn. Join daisies until there are 5 rows of 18 (20-23) daisies for body of cardigan—2 fronts and back. Next row: Join 4 (5-6) daisies for front, skip 1 daisy for underarm, join 8 (8-9) daisies for back, skip 1 daisy for underarm, join 4 (5-6) daisies for other front.
SLEEVES: Join 4 rows of 7 (7-8) daisies. Lower Cuff: With No. 6 needle and right side facing, with A pick up and k 55 (57-59) sts across lower edge of sleeve. Row 1: K 1, * p 1, k 1; repeat from * across. Row 2: P 1, * k 1, p 1; repeat from * across. Repeat these 2 rows for ribbing for 2″. Bind off loosely in ribbing. Join seam of sleeve the same as joining daisies. Join another row of 6 (6-7) daisies across top of sleeve, leaving 1 daisy free for underarm. Note: Circular needle is used as two straight knitting needles.
YOKE: Join last row of top edge of sleeve to top edges of last row of fronts and back. With circular needle, A and right side facing, pick up and k 41 (46-51) sts on right front; 58 (58-63) sts along top of sleeve; 85 (85-90) sts across top of back; 58 (58-63) sts across top of sleeve and 41 (46-51) sts across top of left front, 283 (293-318) sts. Row 1: Wrong side. * P 3, k 2; repeat from *, end p 3. Row 2: * K 3, p 2; repeat from *, end k 3. Repeat these 2 rows for 1½″ (2″-2½″), ending with row 1. Dec Row: * K 1, k 2 tog, p 2; repeat from *, end k 1, k 2 tog. Continue in pattern as established for 1½″, ending on wrong side. 2nd Dec Row: K 2, p 2 tog; repeat from *, end k 2. Continue in pattern as established for 1″, ending on wrong side. 3rd Dec Row: K 2 tog, p 1; repeat from *, ending k 2 tog. Change to No. 5 needles and continue in ribbing for 1″. Bind off in ribbing.
LOWER BORDER: With No. 6 needle, A and right side facing, pick up and k 163 (175-187) sts along lower edge. Work in ribbing as for cuff of sleeve for 4″. Bind off in ribbing.
FINISHING: Block lightly. With A, work 1″ of sc along left front edge, working a ch 1 to turn all rows. Last Row: Work backwards (counter clockwise), sc in each sc along front edge. Fasten off. Mark position of 9 buttons evenly spaced, placing first 1″ from lower edge and last ½″ below neck edge. Work right front border as for left front for ¾″. Buttonhole Row: Opposite each marker for button, ch 3, skip 2 sts, sc in next st. Next row: Work 2 sc under each ch-3 space. Complete as for left front. Work 1 row of sc around neck, holding in slightly. Work 1 more row around neck as for last row on left front edge. Fasten off.
CROCHETED BUTTONS: Make 9. With B, ch 3 and join with a sl st to form a ring. Rnd 1: 6 sc in ring. Rnd 2: 2 sc in each sc. Rnd 3: 1 sc in each sc. Rnd 4: Insert mold. * skip 1 sc, sc in next sc; repeat from * around until mold is covered. Fasten off. Join underarms and sleeves to back and front.
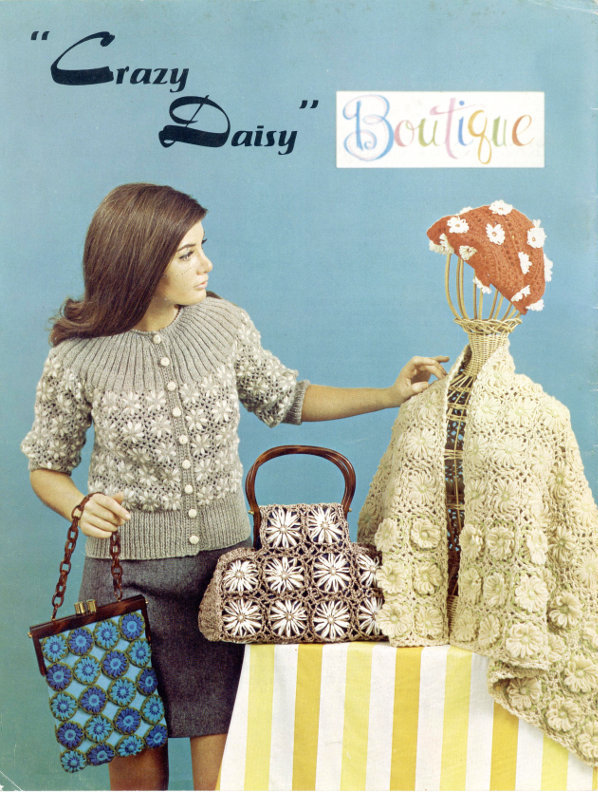
Back cover: “Crazy Daisy” Boutique