ILLINOIS YARN COMPANY
ROCHELLE, ILLINOIS
12/64 PRINTED USA
All directions in this book have been carefully checked for accuracy. We cannot be responsible for typographical errors or misinterpretation of directions.
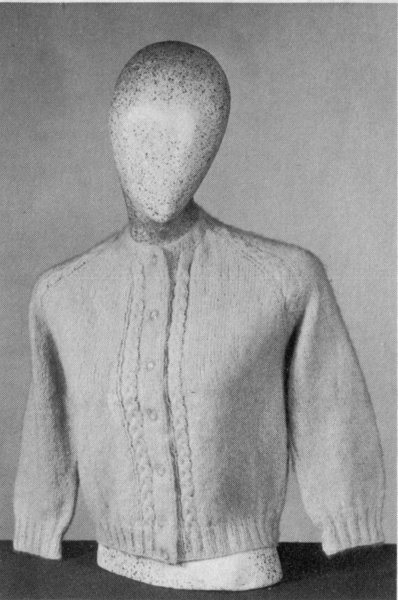
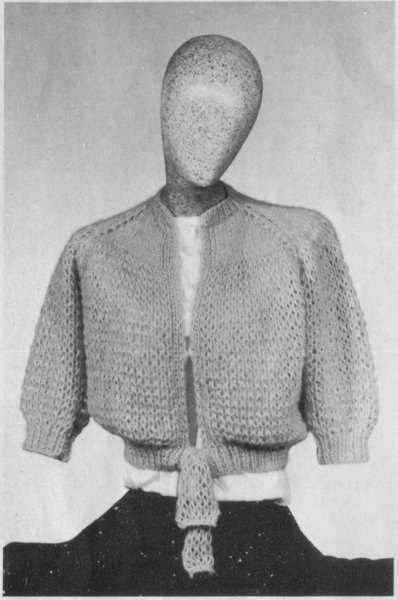
Starting at collar edge with three strands of yarn, cast on 47 (51-55) sts.
DO NOT JOIN, WORK IN ROWS AS FOLLOWS: Row 1: K 1, * P 1, K 1. Repeat from * across. Repeat Row 1 for Seed Stitch Pattern. Work in Seed stitch for 4 (4½-5) inches. Divide sts for raglan shaping as follows:
Row 1: For left Front, work in Seed St across first 9 sts—front band, K next 4 (5-6) sts, place a marker on needle; for Left Sleeve K next 4 sts, place a marker on needle; for Back K next 13 (15-17) sts, place a marker on needle; for Right Sleeve K next 4 sts, place a marker on needle; for Right Front K next 5 (5-6) sts, work in Seed St across remaining 9 sts—front band.
Row 2: Work in Seed st across the 9 sts of front band; * P across to next marker, slip marker. Repeat from * 3 times more; P to within last 9 sts for front band, work Seed St across remaining 9 sts.
Row 3: Work in Seed st across the 9 sts of front band, * K to within one st before next marker, K in front and back of next st; slip marker; K in front and back of next st. Repeat from * 3 times more; K to within front band, work Seed St across remaining 9 sts—8 sts increased. Repeat last 2 rows (2nd and 3rd Row) 18 (20-22) times more. There are 199 (219-239) sts on needle, ending with a P row. Break off yarn. Removing all markers, slip the first 32 (35-38) sts on a stitch holder to be worked later for Left Front; slip the following 42 (46-50) sts on another holder to be worked later for Sleeve; slip next 51 (57-63) sts on another for Back.
SLEEVE: Attach yarn to next st at left-hand point of needle, cast on 3 sts for underarm, then K over these 3 sts and across to next marker, cast on 4 sts for underarm. Slip remaining 32 (35-38) sts on a holder to be worked later for Right Front. Work over these 49 (53-57) sts on needle in Stockinette St (P 1 row, K 1 row), decreasing one st at both ends of every 5th (5th-4th) row 8 (9-10) times in all. Work even on 33 (35-37) sts until length from underarm is 11 (11½-12) inches. Work in Seed St for 2 inches. Bind off. Slip sts from Left Sleeve holder on needle, work same as previous sleeve.
BODY: Slip sts of one Front, Back and other Front on needle. With right side facing, attach yarn to first st of Left Front and work Seed St across first 9 sts, K across remaining sts of Front, cast on 7 sts for underarm, K across sts of Back, cast on 7 sts for underarm, work across Right Front as before. Keeping front edges in Seed St, work in Stockinette St over these 129 (141-153) sts until length from underarm is 28 inches: Work in Seed St for 2 inches. Bind off.
FINISHING: Sew Sleeve seams. Sew cast-on sts at underarm together.
FOR BEST RESULTS: Coat should be lined.
1262
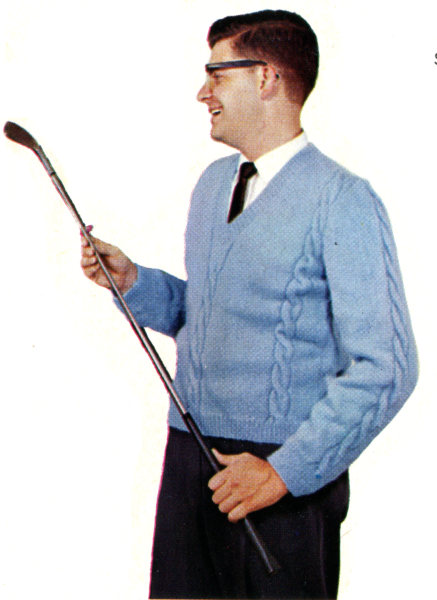
PATTERN STITCH Row 1: K 13 (15-17) P 2, K 10, P 2, K 26 (30-34) P 2, K 10, P 2, K 26 (30-34) P 2, K 10, P 2, K 13 (15-17). Row 2: P 13 (15-17) K 2, P 10, K 2, P 26 (30-34) K 2, P 10, K 2, P 26 (30-34) K 2, P 10, K 2, P 13 (15-17). Row 3: K 13 (15-17) P 2, K 10, P 2, K 26 (30-34) P 2, K 10, P 2, K 26 (30-34) P 2, K 10, P 2, K 13 (15-17). Row 4: P 13 (15-17) K 2, P 10, K 2, P 26 (30-34) K 2, P 10, K 2, P 26 (30-34) K 2, P 10, K 2, P 13 (15-17). Row 5: K 13 (15-17) * P 2, sl next 5 sts on cable needle and hold in back of work, K next 5 sts, K 5 sts from cable needle (cable twist) P 2, K 26 (30-34), repeat from * once more, P 2 cable twist on next 10 sts, P 2, K 13 (15-17). Rows 6, 8, 10, 12, 14, 16; Repeat row 2. Rows 7, 9, 11, 13, 15; Repeat row 1. Repeat these 16 rows for Pattern Stitch.
BACK: With #2 needles cast on 115 (123-135) sts. K 1, P 1 for 2 inches. K 1 row inc at even intervals to 120 (132-144) sts. Change to #4 needles and work in pattern stitch, starting with row 2, until piece measures 15 (15½-15½) inches.
SHAPE ARMHOLES: At the beg. of each of the next 2 rows bind off 5 (7-8) sts. Dec 1 st each end of needle every other row 4 (5-7) times. Work even on 102 (108-114) sts until armhole measures 8 (8½-9) in. SHAPE BACK OF NECK: Work 36 (39-42) sts; put center 30 sts on a holder; join another ball of yarn and work last 36 (39-42) sts. Working on both sides at once, at each center edge bind off 2 sts 3 times and AT THE SAME TIME when armholes measure 8½ (9-9½) in. SHAPE SHOULDERS: At each arm edge bind off 10 (11-12) sts 3 times. FRONT: Work in same manner as back until piece measures 14 (14½-14½) inches. SHAPE NECK: Work 60 (66-72) sts; join another ball of yarn and work last 60 (66-72) sts. Working on both sides at once, at each center edge dec 1 st and repeat this dec every 4th row 20 times more, and AT THE SAME TIME, when piece measures 15 (15½-15½) in SHAPE ARMHOLES: At each arm edge bind off 5 (7-8) sts and dec 1 st at same edge every other row 4 (5-7) times. Work even on 30 (33-36) sts of each side until armholes measure 8½ (9-9½) in. SHAPE SHOULDERS: At each arm edge bind off 10 (11-12) sts 3 times.
SLEEVES: With #2 straight needles cast on 72 (72-76) sts, K 1, P 1 for 2 inches inc at even intervals to 82 sts on last row. Change to #4 needles. Row 1: K 34, P 2, K 10, P 2, K 34. Row 2: P 34, K 2, P 10, K 2, P 34. Row 3: Repeat row 1. Row 4: Repeat row 2. Row 5: Work cable twist on 10 center sts. Continue in this manner, work a cable twist on center 10 sts every 16th row and inc 1 st each end of needle every 1¼ (1¾) in. 8 (11-14) times. Work even on 98 (104-110) sts until piece measures 19 (19¼-19½) in. SHAPE CAP: At the beg of each of the next 2 rows bind off 5 (7-8) sts. Dec 1 st each end of needle every other row for 4½ (5-5½) ins. and every row for 1½ ins. At the beg of each of the next 6 rows bind off 2 sts. Bind off remaining sts.
FINISHING: Sew shoulder, underarm and sleeve seams. Sew in sleeves.
NECKBAND: With DP needles with right side facing you and starting at point of V, pick up and K 152 (160-168) sts around neck edge, including sts from holder. Put a marker on center st at point of V. Work in ribbing K 1, P 1, for 1½ in, dec 1 st each side of center st every other row 5 times. Bind off in ribbing.
1225
BACK: With No. 4 needles, cast on 120 (128-136) sts. K 1 P 1 for 1½ inches. (On K st, knit in back of stitch instead of front for ribbing.) Add 1 st at end of last row 121 (129-137). Change to No. 8 needles and start pattern stitch which consists of 4 rows.
Row 1: knit across.
Row 2: * K 3, P 1, * repeat from * to * across row ending with K 1.
Row 3: * K 1, Sl 1 (as if to K) * repeat from * to * across row ending with K 1.
Row 4: * P 1, Sl 1 (as if to P) * repeat from * to * across row ending with P 1.
Follow this pattern until 12½ (12½-13½) inches have been completed from start of sweater—or desired length.
Raglan Armholes: Bind off 3 (3-3) sts beg. of next 2 rows. Dec 1 st each end every other row on right side in following manner. (K 2, sl 1, K 1, psso,—follow pattern stitch to last 4 sts, then K 2 tog, K 2). On wrong side, purl first 3 sts and last 3 sts of row. Do the rest of sts in pattern st. Decrease every other row 39 (41-43) times. Put remaining 37 (41-45) sts on holder.
Left Front: With No. 4 needles, cast on 56 (60-68) sts. K 1, P 1, for 1½ inches, the same as ribbing in back. Add 1 st at end of row—57 (61-69). Change to No. 8 needles and follow pattern until 12½ (12½-13½) inches have been completed.
Raglan Armhole: On next row, bind off 3 sts at start of row on armhole side. Then continue to decrease 1 st at armhole side every other row (right side) the some as on back. Decrease every other row 36 (38-40) times.
Shape neck: At front edge, bind off 5 (6-7) sts every other row twice and 5 (4-6) sts once, at the same time, dec 1 st at arm edge every other row 3 more times. Bind off.
Right front: Work to correspond to left front reversing shaping.
Sleeves: With No. 4 needles, cast on 58 (58-62) sts. K 1, P 1 for 2 inches, same as back. Add 1 st at end of last row 59 (59-63) sts. Change to No. 8 needles and start pattern, increasing 1 st at each side every ¾ inch 19 (21-23) times to 97 (101-107) sts. Knit until 12 (13-14) inches have been completed.
Raglan Armholes: On next two rows, bind off 3 sts at start of row. Then continue to decrease 1 st at each side every row (right side) in same manner as back. Dec every other row 39 (41-43) times. Put remaining 13 (13-15) sts on holder. Sew sweater together. Sew sleeves to back and fronts to sleeves.
Front Band: With No. 4 needles, cast on 15 sts, right side K 7, P 1, K 7; wrong side P 7, K 1, P 7. Knit in this manner until band is right length for sweater. Make a band for each side. Sew bands to front of sweater. Fold on purl stitch and slip stitch to wrong side of sweater.
Neckband: Knit the neck band very tight. With
right side facing and with No. 4 needles
pick up 22 sts on right front, (being sure
to go through both thicknesses of front band),
then 13 (13-15) sts from sleeve holder, then
39 (41-43) from back holder, then 13 (13-15)
from other sleeve holder, then 22 sts from
left front.
K 1, P 1, in ribbing for 1¼ inches, working
button hole in second row on right front.
Bind off in ribbing.

1221
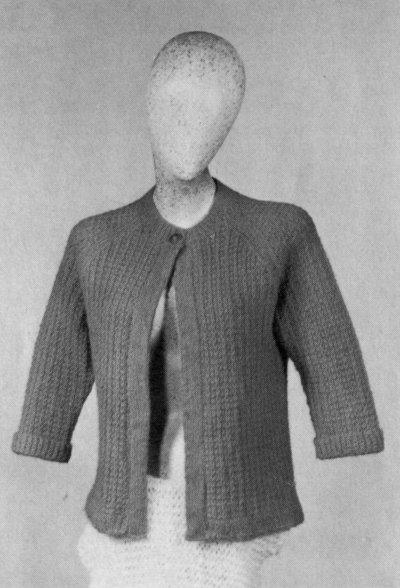
These directions are for small size (36-38). Changes for medium size (40-42) and large size (44-46) are in parentheses.
CABLE PATTERN STITCH. To be worked on 18 sts as designated.
Row 1: P 2, sl next 3 sts to d p needle and hold in back of work, K next 3 sts, K 3 sts from d p needle (cable twist), P 2, work cable twist on next 6 sts, P 2.
Row 2 and all even rows: K 2, P 6, K 2, P 6, K 2.
Rows 3, 5 and 7: P 2, K 6, P 2, K 6, P 2.
Rows 9 through 24: Repeat Rows 1 through 8 twice more.
Row 25: Repeat Row 1.
Rows 27 through 43: Repeat Row 3.
Row 44: Repeat Row 2.
Repeat these 44 rows for cable pattern stitch.
BACK: Using No. 3 needles, cast on 114 (126-138) sts.
Row 1: P 2, * K 2, P 2, repeat from * across row. Row 2: K 2, * P 2, K 2, repeat from * across row. Repeat these 2 rows until piece measures 3 inches, ending with Row 2. Change to No. 5 needles and work as follows: K 16 (20-24), put a marker on needle, work Row 1 of cable pattern st on next 18 sts, put a marker on needle, K 46 (50-54), put a marker on needle, work Row 1 of cable pattern st on next 18 sts, put a marker on needle, K 16 (20-24) sts. Keeping each group of 18 sts between markers in cable pattern st and remaining sts in stockinette st, work even until piece measures 15 (15½-15½) inches. SHAPE ARMHOLES: At the beg of each of the next 2 rows bind off 4 (6-8) sts. Dec 1 st each end of needle every other row 3 (4-5) times. Work even on 100 (106-112) sts until armholes measure 9 (9½-10) inches. SHAPE SHOULDERS: At the beg of each of the next 8 (10-8) rows bind off 8 (7-9) sts. Bind off remaining 36 (36-40) sts.
RIGHT FRONT: Using No. 3 needles, cast on 77 (81-85) sts.
Row 1: K 9, sl 1, K 9, P 2, * K 2, P 2, repeat from * across row. Row 2: K 2, P 2 in ribbing for 56 (60-64) sts, K 2, P 19. Repeat these 2 rows until piece measures 3 inches, ending with Row 2. Change to No. 5 needles. Row 1: K 9, sl 1, K 33, put a marker on needle, work Row 1 of cable pattern st on next 18 sts, put a marker on needle, K 16 (20-24). Row 2: P 16 (20-24), work Row 2 of cable pattern st on next 18 sts, P 43. Keeping 18 sts between markers in cable pattern st and all other sts as established, work even until piece measures 15 (15½-15½) inches ending with Row 2. SHAPE NECK: K 9, sl 1, K 9, K 2 tog (dec), work in pattern as established to end of row. SHAPE ARMHOLE: Continuing to dec 1 st inside front border every 4th row 16 times more and every other row 2 (0-0) times, at arm edge bind off 4 (6-8) sts. Dec 1 st at arm edge every other row 3 (4-5) times. Work even on 51 (54-55) sts until armhole measures 9 (9½-10) inches. SHAPE SHOULDER: At arm edge bind off 8 (7-9) sts 4 (5-4) times. Work even on remaining 19 sts in pattern as established for 3 inches. Sl 19 sts on a holder.
LEFT FRONT: Work to correspond to right front, reversing the placing of the cable pattern st, borders and all shaping and forming the first double buttonhole when piece measures 1 inch. DOUBLE BUTTONHOLE: Starting at front edge, work 3 sts, bind off the next 3 sts, work 7 sts, bind off the next 3 sts, work to end of row. On the next row cast on 3 sts over each group of 3 sts bound off previous row.
SLEEVES: Using No. 3 needles, cast on 60 (64-66) sts. K 2, P 2 in ribbing for 3 inches. Change to No. 5 needles and work in stockinette st. inc 1 st each end of needle every ¾ 6 inch 17 (18-20) times. Work even on 94 (100-106) sts until piece measures 19 (19¼-19½) inches. SHAPE CAP: At the beg of each of the next 2 rows bind off 4 (6-8) sts. Dec 1 st each end of needle every other row for 5 (½-6) inches and EVERY ROW for 1 inch. At the beg of each of the next 6 rows bind off 3 sts. Bind off remaining sts.
FINISHING: Sew underarm, shoulder and sleeve seams. Set in sleeves. Fold border on sl st and hem in place. Weave border sts tog and sew to back neck edge. Finish double buttonholes. Sew on buttons.
1230
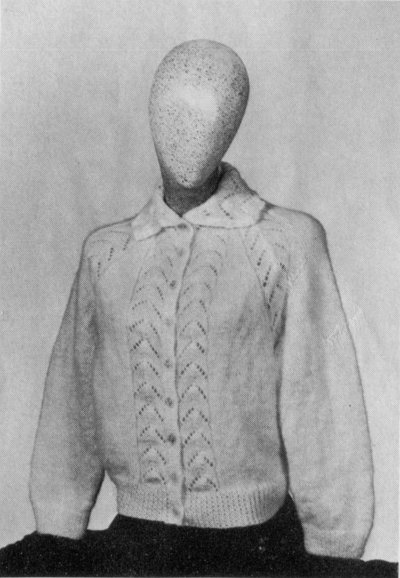
These directions are for size 12. Changes for sizes 14, 16 and 18 are in parentheses.
PATTERN STITCH FOR COLLAR: Multiple of 13 sts plus 2.
Row 1: P 2, * yo, K 4, sl 1, K 2 tog, psso, K 4, yo, P 2, repeat from * across row.
Row 2: and all even rows: K 2, * P 11, K 2, repeat from * across row.
Row 3: P 2, * K 1, yo, K 3, sl 1, K 2 tog, psso, K 3, yo, K 1, P 2, repeat from * across row.
Row 5: P 2, * K 2, yo, K 2, sl 1, K 2 tog, psso, K 2, yo, K 2, P 2, repeat from * across row.
Row 7: P 2, * K 3, yo, K 1, sl 1, K 2 tog, psso, K 1, yo, K 3, P 2, repeat from * across row.
Row 9: P 2, * K 4, yo, sl 1, K 2 tog, psso, yo, K 4, P 2, repeat from * across row.
Row 10: Repeat row 2.
Repeat these 10 rows for pattern stitch for collar.
PATTERN STITCH FOR SWEATER: To be worked on 15 sts as designated.
Row 1: P 2, * yo, K 4, sl 1, K 2 tog, psso, K 4, yo, P 2.
Row 2: and all even rows: K 2, P 11, K 2.
Row 3: P 2, K 1, yo, K 3, sl 1, K 2 tog, psso, K 3, yo, K 1, P 2.
Row 5: P 2, K 2, yo, K 2, sl 1, K 2 tog, psso, K 2, yo, K 2, P 2.
Row 7: P 2, K 3, yo, K 1, sl 1, K 2 tog, psso, K 1, yo, K 3, P 2.
Row 9: P 2, K 4, yo, sl 1, K 2 tog, psso, yo, K 4, P 2.
Row 10: Repeat Row 2.
Repeat these 10 rows for pattern stitch.
Note: When working K 1, P 1 ribbing, always work in BACK of each K st.
BACK: Using No. 3 needles, cast on 86 (92-98-104) sts. K 1, P 1 ribbing for 2 (2-2½-2½) inches. Change to No. 5 needles and work in stockinette st, inc 1 st each end of needle every ½ inch 10 times. Work even on 106 (112-118-124) sts until piece measures 8½ (8½-9-9) inches, ending with a P row. Break off and sl sts onto a holder.
SLEEVES: Using No. 3 needles, cast on 54 (58-62-68) sts. K 1, P 1 in ribbing for 2 inches. Change to No. 5 needles and work in stockinette st, inc 1 st each end of needle every ¾ inch 12 times. Work even on 78 (82-86-92) sts until piece measures 12½ (12½-13-13) inches, ending with a P row. Break off and sl sts onto a holder.
LEFT FRONT: Using No. 3 needles, cast on 44 (46-48-52) sts. K 1, P 1 in ribbing for 2 (2-2½-2½) inches, inc 0 (0-1-0) st at end of last row—44 (46-49-52) sts. Change to No. 5 needles. Row 1: K 29 (31-34-37), put a marker on needle, work Row 1 of pattern st on last 15 sts. Row 2: Work Row 2 of pattern st on first 15 sts, P to end of row. Keeping 15 sts at front edge in pattern st and remaining sts in stockinette st, at arm edge inc 1 st every ½ inch 10 times. Work even in pattern as established on 54 (56-59-62) sts until piece measures 8½ (8½-9-9) inches, ending with a wrong side row. Break off and sl sts onto a holder.
RIGHT FRONT: Work to correspond to left front, reversing placing of front border and all shaping. Do not break yarn.
TO JOIN PIECES: With wrong side facing you, sl onto circular needle 54 (56-59-62) sts of left front, 78 (82-86-92) sts of one sleeve, 106 (112-118-124) sts of back, 78 (82-86-92) sts of other sleeve and 54 (56-59-62) sts of right front—370 (388-408-432) sts. Work back and forth as follows:
Row 1: Starting at right front edge, continue in pattern st on first 15 sts, put a marker on needle, K 31 (33-36-39), put a marker on needle, work same row of pattern st on next 15 sts, put a marker on needle, K 64 (68-72-78), put a marker on needle, work same row of pattern st on next 15 sts, put a marker on needle, K 90 (96-102-108), put a marker on needle, work same row of pattern st on next 15 sts, put a marker on needle, K 64 (68-72-78), put a marker on needle, work same row of pattern st on next 15 sts, put a marker on needle, K 31 (33-36-39), put a marker on needle, work last 15 sts in pattern st.
Row 2: Work in pattern st on first 15 sts, * P to next marker, work in pattern st on next 15 sts, repeat from * across row.
RAGLAN SHAPING: Keeping each group of 15 sts between markers in pattern st and remaining sts in stockinette st, work as follows:
Row 1: Work 15 sts in pattern st, * K to 2 sts. before next marker, sl 1, K 1, psso (dec), work in pattern st to next marker, K 2 tog (dec), repeat from * 3 times more, work to end of row—8 sts decreased.
Row 2: Work even in pattern as established. Continue in this manner to dec 8 sts every other row 21 (24-29-34) times more and then every 4th row 9 (8-6-4) times—122 (124-120-120) sts.
SHAPE NECK: Discontinuing raglan decreases and continuing in pattern as established, at the beg of each of the next 8 rows bind off 8 (8-7-7) sts. Bind off remaining 58 (60-64-64) sts.
COLLAR: Using No. 5 needles, cast on 93 sts. Work even in pattern st for collar 3½ inches. Bind off.
FINISHING: Sew underarm and sleeve seams. LEFT FRONT BAND: Starting at neckedge, firmly work 4 rows sc on left front edge. Band should measure 18½ (18½-19-19) inches. Fasten off. RIGHT FRONT BAND: Starting at lower right front edge, work 2 rows sc to correspond to left band. BUTTONHOLES: On next row work 3 sc, ch 3, skip 3 sc, 1 sc in next st; make 8 more buttonholes, evenly spaced—the last one to be made just below start of neck shaping. Work 1 more row sc; do not break off. Starting at lower edge, work 1 row sc around front and neck edges, holding in neck to desired size, ending at lower left front. Fasten off. Work 2 rows sc on bound off and short edges of collar, inc 1 sc in point of each scallop. Sew on collar and buttons.
1222
NECK: With No. 6 Needle, cast on 47 (47-55) sts for beg. of neck edge. Work back and forth on circular needle.
Row 1: Wrong side. P 3(3-3), * k 1, p 3, k 1, p 3, k 1, p 3, k 1 * p 15 (15-23) repeat between *’s once, p 3, (3-3).
Row 2: Inc 1 st in first st as if to k, * inc 1 st in next st as if to k, k 1, place a marker on right needle, p 1, inc 1 st in each of next 3 sts as if to k, p 1, place a marker on needle as before for end of raglan cable stripe, inc 1 st in next st as if to k *; repeat between *’s once, k 12 (12-20); repeat between *’s twice, increase 1 st in next st as if to k, k 1; 69 (69-77) sts.
Row 3: Inc 1 st in first st as if to p, * p to marker, slip marker to right needle, k 1, p 6, k 1, slip marker as before *; repeat between *’s 3 times, p to within 1 st of end, inc 1 st in last st as if to p; 71 (71-79).
Row 4: Cable twist, inc 1 st in first st, *k to within 2 sts of marker, inc 1 st in next st. K 1, slip marker as before; p 1; slip next 2 sts to cable holder and hold at back of work, k next 2 sts, then bring the 2 sts on cable holder to front of work, k next 2 sts, k the 2 sts from cable holder. (Double Cable twist) p 1, slip marker as before, inc 1 st in next st *; repeat between *’s 3 times, k to within 2 sts of end, inc 1 st in next st, k 1; 81 (81-89).
Row 5: Same as row 3: 83 (83-91).
Row 6: Inc 1 st in first st, *k to within 2 sts of marker, inc 1 st in next st, k 1, slip marker, p 1, k 6, p 1, slip marker, inc 1 st in next st *; repeat between *’s 3 times, k to within 2 sts of end, inc 1 st in next st, k 1: 93 (93-101).
Row 7: Same as row 3; 95 (95-103).
Row 8: Same as row 6; 105 (105-113).
Row 9: Same as row 3; 107 (107-115).
Row 10: Cable twist—same as row 4; 117 (117-125).
Row 11: Same as row 3; 119 (119-127).
Row 12: Same as row 6; 129 (129-137).
Row 13: Same as row 3; 131 (131-139).
Row 14: Same as row 6; 141 (141-149).
Row 15: Same as row 3; 143 (143-151).
Row 16: Cable twist—same as row 4; 153 (153-161) sts; cast on 15 sts at end of row; 168 (168-176).
Row 17: P the 15 cast-on sts for right front border and facing, k 1, p 6, k 1 for cable stripe, continue as for row 3 to within 8 sts of end, k 1, p 6, k 1 for cable stripe on left front; cast on 15 sts at end of row for left front border; 183 (183-191).
Row 18: k 7, with yarn at back, slip next st as if to p for turning st, k 7, p 1, k 6, p 1; repeat between *’s of row 6, 4 times, k to within 23 sts of end, p 1, k 6, p 1, k 7, slip next st as before for turning st, k 7; 191 (191-199).
Row 19: P 15, k 1, p 6, k 1; repeat between *’s of row 3, 4 times, p to within 23 sts of end, k 1, p 6, k 1, p last 15 sts. 191 (191-199).
Row 20: Same as row 18; 199 (199-207).
Row 21: Same as row 19; 199 (199-207).
Row 22: K 7, slip 1, k 7, p 1, work double cable twist on next 6 sts; p 1, repeat between *’s of row 4, 4 times, k to within 23 sts of end, p 1, work double cable twist on next 6 sts, p l, k 7, slip 1, k 7; 207 (207-215) carry up markers.
Continue to work with care to keep pat., increasing 1 st each side of each 4 raglan cable stripes every 2nd row, twisting cables every 6th row on all 6 cable stripes until 20 rows above last cast-on row of front borders, end on wrong side; 263 (263-271).
Row 38: First buttonhole row, right side—work pat. and inc as before to within 13 sts of end, bind off next 2 sts for buttonhole, k 2 sts, slip 1, k 2, bind off next 2 sts for buttonhole, finish row; 271 (271-279).
Row 39: Work pat., casting on 2 sts over bound off sts. Continue as before, repeating buttonholes every 21st and 22nd row until there are 375 (391-415) sts on needle, end on wrong side.
This row completes raglan shaping and raglan cable stripes. Continuing to work 15 border and facing sts on each front edge as before and cable pat. on 8 sts of each front cable stripe only, divide as follows, removing markers and discontinuing cable pat. on remaining 4 cable stripes.
Dividing Row: Work 15 border sts and 8 sts of front cable stripe; then k next 39 (41-43) st; remove marker, k 4 raglan seam sts, omitting pat., slip these 66 (68-70) sts on holder for left front; k next 77 (81-85) sts and place them on separate holder for left sleeve; k 89 (93-105) sts and place them on holder for back; k next 77 (81-85) sts, keep these sts on needle for right sleeve, place remaining 66 (68-70) sts on holder for right front. Continue as follows on right sleeve.
Right Sleeve: Work in stockinette st, p 1 row, k 1 row—decreasing 1 st each side every 6 rows, 8 (9-9) times; 61 (63-67) sts until 10 inches below dividing row, end on wrong side.
Cuff: Decrease row, right side. K decreasing 12 (13-15) sts evenly spaced across row; 49 (50-52). Work firmly in k 2, p 2 ribbing for 2 inches. Bind off in ribbing. Pick up sts for left sleeve from holder and work same as right sleeve.
Body: Beg at front edge of left front, from right side, take up 66 (68-70) sts of left front; 89 (93-105) sts of back, slip last 66 (68-70) sts of right front on left-hand side of circular needle. Join yarn, finish right front working as before on front border facing and cable twist.
Work for 9 (9½-10) inches in this manner.
Dec. Row, right side: Work 15 sts of facing and border, k 2, *k 2, k 2 tog; repeat from * across row to within 20 sts of end, k 5, work 15 sts of border.
Ribbing: Work facing as before and k 2, p 2 in ribbing for 2 inches. Bind off in ribbing.
Neck ribbing: Working from right side, pick up and k 15 sts on 15 sts of facing and border; 18 (18-19) along shaped edge of neck to end of 2nd cable stripe, 3 sts across top of sleeve; 24 (26-28) across back of neck to end of 4th cable stripe; 3 sts across top of sleeve; 18 (18-19) sts along shaped edge to end of 6th cable stripe; 15 sts on sts of border and facing; 96 (98-102) sts.
Rows 1, 2 and 3: K 2, P 2.
Row 4: (Buttonhole row) K 2, bind off 2 sts, k until 13 sts from last bind off, bind off 2, k 2. P 2 across row.
Row 5: Work in ribbing, casting on 2 sts over 9 each set of bound off sts.
Repeat ribbing for 1½ inches.
Finishing: Turn back front facings along turning st and hem to wrong side. Sew open ends of front borders and facings tog, neatly at neck and lower edge. Finish buttonholes in blanket st working through both thicknesses.
1227
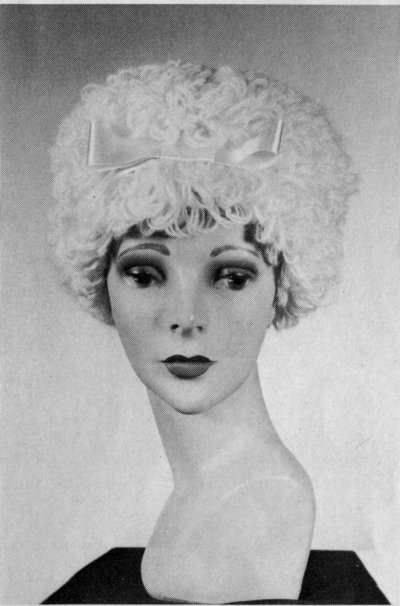
With 2 strands of Mohlon, cast on 80 sts. Row 1: K 1, * insert needle in next st., (wind yarn around right hand needle and first 3 fingers of left hand) twice, then around right hand needle again, draw loops through st., sl onto left hand needle and K loops tog with st., repeat from * to last st, K 1. Row 2: K. These 2 rows form the pattern. Repeat Row 1. Next row: (K 6, K 2 tog) to end (70 sts.). Work 12 rows in stockinette st. Begin pattern. Repeat Pattern Rows 1 and 2 twice, then Row 1 again. Shape top thus: Row 1: (K 5, K 2 tog) to end. Row 2 and even number rows, do row 1 of Pattern. Row 3: (K 4, K 2 tog) to end. Row 5: (K 3, K 2 tog) to end. Row 7: (K 2, K 2 tog) to end. Row 9: (K 1, K 2 tog.) to end. Row 11: (K 2 tog.) to end. Break yarn, run end through remaining sts., draw up and fasten off. Join back seam. Cut ribbon to fit head size with 1 inch turning, join seam, slip on to hat with seam at front. Make up remaining ribbon into bow and sew over the seam of ribbon band.
Loop Stitch: * Using a double strand of yarn, with wrong side facing you, insert hook in next st., y.o. hook and draw through this st., y.o. and draw through 1 loop on hook, holding third finger of left hand in back of work over yarn, insert hook in same st., yarn over hook and pull through st., y.o. hook and pull through 3 loops on hook, remove finger, repeat from * for loop st.
Crown: Chain 3, join with sl. st. to form ring. 6 sc in ring. 2nd round. Work 2 loop sts. in each sc around (12 loop sts.) 3rd round: * 2 sc in first st, 1 sc in next st. * repeat between * around. (18 sc.) 4th round: Work * 2 loop sts in next st., 1 loop st. in each of next 2 sts, repeat from * around (24 sts). 5th round: Work * 2 sc in next st., 1 sc in each of next 3 sts. repeat from * around (30 sts.) Continue to work this way increasing 6 sts. every round until there are 66 sts. in round. (Piece should measure about 7 inches in diameter.)
Brim: Round 1: Work loop st. to end of round, join with slip st. to first st., chain 1, turn. Round 2: With right side facing you, 1 sc in each st., join with slip st. to first st., chain 1, turn. Repeat last 2 rounds 2 times more. Continuing on right side work 6 rounds of sc. Repeat rounds 1 and 2 for 3 times. Fasten off. Trim with ribbon or cord around hat at the 6 rounds of sc.
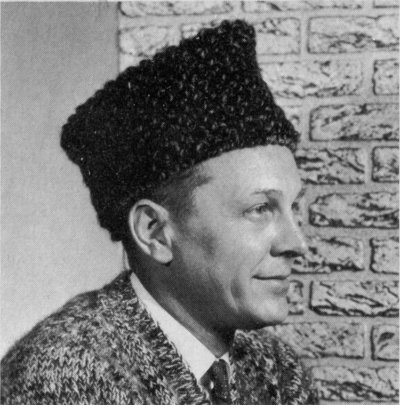
1229
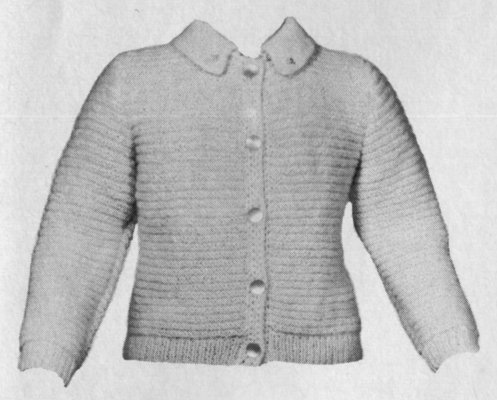
With 1 strand knitting worsted, cast on 59 sts for facing.
Row 1—wrong side—P 1, * K 1, P 1; repeat from * to end.
Row 2—K 1, * P 1, K 1; repeat from * to end. Repeat these 2 rows 4 more times for ribbed facing. Dec. row—wrong side—Work 8 sts in ribbing, * p 2 tog., work next 12 sts in ribbing; repeat from *, end last repeat work 7 sts in ribbing; (55 sts.) Work remainder of hat with 1 strand knitting worsted and 2 strands of mohlon worked tog. K 1 row. K next row from wrong side for turning ridge. K 1 row.
PATTERN—Row 1—wrong side—K.
Row 2—P 1, * work 3 sts in next st by knitting in front, back and front of st, ** then pass 2nd st on end of right needle over first st and drop st from needle; repeat from ** once more—a popcorn—, P 1 *; repeat between *’s to end.
Row 3—K.
Row 4—P 2, repeat between *’s of row 2, end last repeat P 2. Repeat these 4 rows for pat. Work even in pat. until 6 ins. above turning ridge, end with pat. row 1. Divide for Top of Hat—Work in pat. until there are 26 sts on right needle p 2 tog., slip these 27 sts to holder for one side of top; work pat. on remaining 27 sts as follows; p 1, * work popcorn in next st, p 1; repeat from * to end.
Top Shaping—K 1 row.
Dec. row—P 2 tog., * work a popcorn in next st, p 1; repeat from * to within 2 sts of end, p 2 tog. (25 sts.) Repeat last 2 rows 3 more times; (19 sts.) Bind off. Beg. at side edge, take up 27 sts from holder. Join yarn at center and work to correspond to other side.
FINISHING—With 1 strand knitting worsted, sew edges of facing tog. with a weaving st. With 2 strands mohlon, sew side edges tog.; sew shaped edges tog. to bound-off edge, whip bound-off edges tog. at top, sew shaped edges tog. at other side. Turn back facing along turning ridge to wrong side. With 2 strands mohlon, sew through both facing and hat with a running st just above turning ridge. Tack cast-on edge of facing to wrong side at seam. Fold in top of hat, with edge of fold 5 ins. above turning ridge. With 1 strand mohlon, tack back seam to seam at shaped edge, about 2 ins. below edge of fold; tack at center front to correspond.
Band: With 1 strand of knitting worsted chain 15 sts. Working in back loop, s.c. in second chain from hook and in each ch. st. across. (14 s.c.) Chain 1, turn. Continue in this way until piece measures 20 inches in length. (About 34 ridges.) Crochet or sew short ends together. Break yarn.
Hat: Using 1 strand of knitting worsted and 2 strands of Mohlon, attach to one edge of band. S.C. in each st. around (68 s.c.) (This is turning row.)
1st round: * 1 s.c. in next st., yarn over crochet hook 2 times, insert hook in next st., yarn over and pull through 2 loops 3 times in succession (a long st. made), repeat from * around.
2nd round: Work * 1 long st. in first s.c., then 1 s.c. in next long st. repeat from * around. Repeat these 2 rounds until piece measures 6 inches above turning row.
Divide for top of hat: ** Work in pattern on 34 sts. * Chain 1, turn. Skip first st, s.c. in each stitch across to within 1 stitch at end of row. Chain 1, turn. Skip first s.c. Work in pattern across to within 1 stitch at end of row. * Repeat between *’s. Continue in this manner decreasing 1 stitch at each end of each row for 7 rows. (14 sts. decreased) (20 stitches remaining). Break yarn. Attach yarn to other side and repeat from **.
Finishing: Sew shaped top edges together. Turn back facing on turning row. With 2 strands Mohlon sew through both facing and hat with a running stitch ½ in. above turning row. Fold in top of hat with edge of fold 5 inches above turning row. With 2 strands Mohlon tack seams of shaped top to front and back of hat about 2 inches below edge of fold.
1228
Back: Using smaller needles, cast on 72 (76-82-88-94) sts. K 1, P 1 in ribbing for 1½ inches. Change to larger needles and work even in pattern stitch until piece measures 8 (9-10-10½-11) inches.
Shape Armholes: At the beg. of each of the next 2 rows bind off, 4 (4-4-5-6) sts. Dec. 1 st. ea end of needle every other row 3 (3-4-5-5) times. Work even on 58 (62-66-68-72) sts until armholes measure 5 (5½-6-6½-7) inches.
Shape Shoulders: At the beg. of each of the next 4 (6-4-6-4) rows bind off, 5 (6-7-7-8) sts. At the beg. of each of the next 2 rows bind off 6 (0-6-0-7) sts. Bind off remaining 26 (26-26-26-26) sts.
Left Front: Using smaller needles, cast on 36 (38-42-44-48) sts. K1, P 1 in ribbing for 1½ inches. Inc. at end of last row 1 (1-0-1-0) sts. Change to larger needles and work even in pattern st. on 37 (39-42-45-48) sts until piece measures 8 (9-10-10½-11) inches, ending same row of pattern st as on back at underarm.
Shape Armhole: At arm edge bind off 4 (4-4-5-6) sts. Dec 1 st at same edge every other row 3 (3-4-5-5) times. Work even in pattern st on 30 (32-34-35-37) sts until armhole measures 3½ (4-4½-5-5½) inches ending at front edge.
Shape Neck: At front edge bind off 8 (8-8-8-8) sts. Dec 1 st at same edge every other row 6 (6-6-6-6) times and AT THE SAME TIME when armhole measures 5 (5½-6-6½-7) inches SHAPE SHOULDER. At arm edge bind off 5 (6-7-7-8) sts. 2 (3-2-3-2) times and 6 (0-6-0-7) sts once.
Right Front: Work to correspond to left front, reversing all shaping.
Sleeves: Using smaller needles, cast on 42 (44-46-48-50) sts. K 1, P 1 in ribbing for 1½ inches. Change to larger needles and work in pattern stitch, inc. 1 st each end of needle every 1 inch 8 (8-10-11-11) times. Work even on 58 (60-66-70-72) sts until piece measures 10½ (11½-12½-13½-15) inches. Shape Cap: At the beg of each of the next 2 rows bind off 4 (4-4-5-6) sts. Dec 1st each end of needle every other row for 3¼ (3½-3¾-4-4¼) inches. At the beg. of each of the next 6 (6-6-6-6) rows bind off 2 sts. Bind off remaining sts.
Collar: Using smaller needles, cast on 93 (97-97-101-105) sts.
Row 1: K 1, * P 1, K 1, repeat from * across row.
Row 2: P 1, * K 1, P 1, repeat from * across row. Repeat these 2 rows 2 (2-2-2-2) times more. Then work as follows:
Row 1: Work in ribbing for 46 (48-48-50-52) sts. Put a marker on needle, K 1, put a marker on needle, work in ribbing to end of row.
Row 2: Work in ribbing as established, inc. 1 st each end of needle and each side of marker—4 sts increased.
Row 3: Work in ribbing.
Row 4: Repeat Row 2. Change to larger needles and continue to inc 4 sts every other row in same manner as before 4 times more. Bind off remaining 117 (121-121-125-129) sts.
Finishing: Sew underarm, shoulder and sleeve seams. Set in sleeves.
Right Front Band: With right side facing you, work 3 (3-3-3-3) rows SC on right front edge. Buttonholes: On next row starting at lower edge, work 2 SC, ch 2, sk 2 SC, 1 SC in next SC, make 4 more buttonholes evenly spaced—the last one to be made ½ inch below start of neck shaping work 3 (3-3-3-3) rows more in SC. Fasten off.
Left Front Band: Work to correspond to right front band, omitting buttonholes. Sew cast on edge of collar to neck edge to within ½ inch of each front edge. Sew on buttons. If desired, sew small flower motif on each point of collar.
1231
USE TWO STRANDS MOHLON THROUGHOUT ENTIRE JACKET.
Pattern Stitch: Row 1 (right side): * K next st wrapping yarn twice (instead of once) around needle, repeat from * across. Row 2: * P next st dropping extra wrap off left-hand needle, repeat from * across row. Repeat these 2 rows for pat st.
JACKET: Yoke: Beg at neck edge, with No. 10½ needles, cast on loosely 50 sts. Shape Raglan: Row 1 (wrong side): Work in ribbing of k 1, p 1 on 5 sts (center band), P to last 5 sts, work in ribbing of k 1, p 1 on last 5 sts (center band). Row 2 (right side): Yarn in back, sl 1 as if to p, (K 1, p 1) twice, k 9 for left front, yo (an inc), k 1 (seam st), mark this st and following seam sts, yo, k 2 for sleeve, yo, k 1 (seam st), yo, k 14 for back, yo, k 1 (seam st), yo, k 2 for sleeve, yo, k 1 (seam st), yo, k 9, (p 1, k 1) twice, sl 1 right front—8 increases made.
Row 3: Repeat row 1. Keeping center bands each side as established, continue in stockinette st (k on right side, p on wrong side) and inc 1 st as before each side of each seam st every k row 7 times, end on p row—114 sts.
Keeping center bands as established, work pattern st (see Pattern Stitch) between center bands and inc 1 st each side of each seam st as before every row on right side 6 times more, end on wrong side—162 sts. Piece measure about 9′′ from start (measured at center back). Divide Work: From right side, work as established on first 28 sts, put these sts on a holder for left front; work next 32 sts, put these sts on a holder for left sleeve; work next 42 sts, put these sts on a holder for back; work next 32 sts, leave these sts on needle for right sleeve; put last 28 sts on a holder for right front.
RIGHT SLEEVE: Beg on wrong side, with No. 10½ needles, cast on 1 st at beg of next row for underarm, work in pat st across row, cast on 1 st at end of row for underarm—34 sts. Continue in pat st, dec 1 st each side every 6th row 3 times—28 sts. Work until piece measures 8′′ from underarms, end on p row. Change to No. 9 needles. Work in ribbing of k 1, p 1 for 2′′. Bind off in ribbing.
LEFT SLEEVE: Sl sts from holder to No. 10½ needle. Work as for right sleeve.
BODY: Sl sts from right front holder to No. 10½ needle. From right side, join yarn at underarm, work in established pat to front edge. Turn. NEXT ROW: (wrong side): Work sts of right front, cast on 2 sts for underarm, work sts of back, cast on 2 sts for underarm, work sts of left front—102 sts. Working center bands as established and pat st between center bands, dec 1 st at center of each underarm (for side seams) every 4′′ twice—98 sts. Work even until piece measures 1′′ from underarms, end on wrong side and inc 1 st at center of last row—99 sts. Change to No. 9 needles.
WAISTBAND RIBBING: Row 1 (right side): Yarn in back, s 1 as if to p, k 1, * p 1, k 1, repeat from * across, ends sl 1. Row 2: k 1, * p 1, k 1, repeat from * across. Repeat these 2 rows for 2′′, end on row 1. Bind off loosely in ribbing.
NECKBAND: From right side, with No. 9 needles, pick up and k 1 st in each cast-on st across neck edge, skipping 1 st at center back of neck—49 sts. Beg with row 2, work as for waistband ribbing for 4 rows. Bind off loosely as for row 2 of ribbing.
TIES: From right side, with No. 9 needles, pick up and k 8 sts on side of right front waistband. Work in ribbing of k 1, p 1 for 2′′, end on wrong side. Change to No. 10½ needles. Work in pat st for 12 rows, end on p row. Bind off loosely in k. Make tie on side of left front waistband in same way. Weave underarm and sleeve seam.
1239
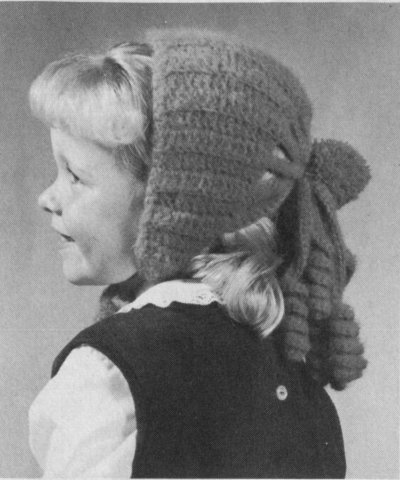
No doubt this cute head covering will be a hit with the young crowd. The yarn curls are fashioned to resemble a pony tail.
With 2 strands of Mohlon chain 15, turn.
Row 1: Skip 3 sc (counts as 1 dc), dc in each of next 12 chs, chain 3, turn.
Row 2: Dc in each of 12 dc, chain 3, turn. Always work in back loop only to form a ridge.
Row 3: Same as row 2. Chain 40 at end of row 3, turn. 2 sc in each back loop of first 20 chain sts, 1 sc in remainder of chain. You are now in position to work next row.
Row 4: 2 dc in first dc, dc in each dc across. 14 dc in all, chain 3, turn.
Row 5: Work 15 dc across, inc 1 dc at end of row, chain 45, turn. 2 sc in each back loop of first 20 sts, sc in remainder of chain.
Row 6: 2 dc in first dc, dc in each dc across, 16 dc in all, chain 3, turn.
Row 7: Work 17 dc across, increase 1 dc at end of row, chain 50, 2 sc in each back loop of first 20 chain sts, sc in remainder of chain.
Repeat the same as previous rows, inc 1 dc in each row, and inc the chains to 52, 55, 55, then dec to balance first half making chains 55, 55, 52, 50, 45, 40. Work 3 more rows to correspond to first 3 rows.
Each end of cap may be left straight or join yarn and decrease sts to form a point. Attach yarn to end of cap, chain 40. 2 sc in each of first 20 sts, sc in remaining chain.
Make a pompon over a 3 inch cardboard by winding yarn about 50 times around. Fasten yarn, leaving a short length. Gather all curls together and fasten pompon around them. Work 1 row sc across front of hat. You may use a contrasting color for pompon and sc across front if desired.
1252
With #11 needles and 2 strands of Mohlon cast on 30 sts.
Row 1: With #11 needles, K 1, *yo, K 1, repeat from * across row.
Row 2: With #6 needles, K 1, drop the yo. Repeat across row.
Repeat rows 1 & 2 until piece measures 24 inches long, ending with row 2.
Thread end of yarn into tapestry needle. Weave loops of last row to cast-on edge of first row.
If 2 colors are desired, cast on 15 sts of 1 color, tie on 2nd color and cast on 15 sts.
Work same as above, being sure to twist yarn when changing color.
1223
With 2 strands of yarn, cast on 80 sts.
Rows 1, 3 and 5: Knit.
Rows 2 and 4: Purl.
These 5 rows are turned under later for hem.
Rows 6, 8, 10, 12 and 14: Knit.
Rows 7, 9, 11 and 13: Purl.
Rows 15, 17 and 19: Knit.
Rows 16 and 18: Purl.
Rows 20, 22, 24 and 26: Knit.
Rows 21, 23 and 25: Purl.
Repeat from row 15 once more.
Crown: Rows 1 and 3: Knit.
Rows 2 and 4: Purl.
Row 5: Knit 2 together across.
Row 6: Purl.
Row 7: Knit.
Row 8: Purl.
Row 9: K 2, K 2 together across.
Row 10: Purl.
Row 11: K 1, K 2 together across.
Row 12: Purl.
Row 13: K 2 together, leave 12 inches yarn, draw through 10 sts and fasten securely. Sew up seam. Tack up hem.
Leave plain or decorate with pin as desired.
NOTE: When changing colors, twist yarns by bringing new color under yarn you have been working with to avoid holes in work.
(USE DOUBLE STRAND OF MOHLON THROUGHOUT)
BACK: With No. 7 needles and color A, cast on 64 (68-72-76) sts. Work in stockinette st for 5 rows, K 1 row on wrong side for hemline. Change to No. 9 needles and work in stockinette st for 8 (8-10-10) rows. Start design on next row as follows: 1st row: K 26 (28-30-32) A, attach a ball of B, k 6 B; attach another ball of A and k 32 (34-36-38) A. 2nd Row: P 31 (33-35-37) A, 8 B, 25 (27-29-31) A. Starting with 3rd row follow chart for design, starting and ending at size you are making and follow chart from right to left knit rows and left to right on purl rows. Continue to follow chart and work even until 86th row has been completed. TO SHAPE ARMHOLES: Bind off 4 (5-5-5) sts at beg of next 2 rows. Dec 1 st at beg and end of every other row 2 (2-2-3) times. Work even on 52 (54-58-60) sts until armholes measure 6½″ (7″-7½″-8″), ending with wrong side row. TO SHAPE SHOULDERS: Bind off 6 sts at beg of next 2 rows, then 5 (5-6-7) sts at beg of next 2 rows (30 (32-34-34) sts). P 2 rows. K 1 row, p 1 row. Bind off.
FRONT: Work same as back until armholes measure 5¼″ (5½″-6″-6½″). TO SHAPE NECK: Work over 17 (17-18-19) sts and place these sts on a holder to be worked later; work next 18 (20-22-22) sts and place these sts on another holder for neck; work remaining 17 (17-18-19) sts. Working on one side only, bind off 2 sts at neck edge every other row 3 times. Work even on 11 (11-12-13) sts, until 15 armhole measures same as back. TO SHAPE SHOULDERS: At arm edge, bind off 6 sts once, then 5 (5-6-7) sts once. Attach yarn at neck edge and work other side to correspond.
SLEEVES: With No. 7 needles and A, cast on 32 (34-36-38) sts. Work as for back until 4 (6-10-12) rows have been completed from hemline. Then follow chart for design and inc 1 st at beg and end of every 8th row 7 times. Work even on 46 (48-50-52) sts until 72nd row of chart has been completed. TO SHAPE CAP: Bind off 4 (5-5-5) sts at beg of next 2 rows. Dec 1 st at beg and end of every other row 13 (13-14-15) times. Bind off 3 sts at beg of next 2 rows. Bind off remaining 6 sts.
FINISHING: Front Neck Facing: With right side of work facing, using No. 9 needles and A, pick up and K 36 (38-40-40) sts across front neck edge, including sts from holder. K 2 rows, then p 1 row, k 1 row, Bind off.
Sew underarm, shoulder and sleeve seams. Sew sleeves in place. Turn hems and facing to wrong side and slip stitch in place.
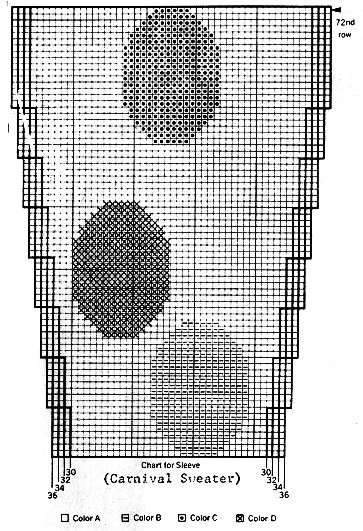
Chart for Sleeve (Carnival Sweater)
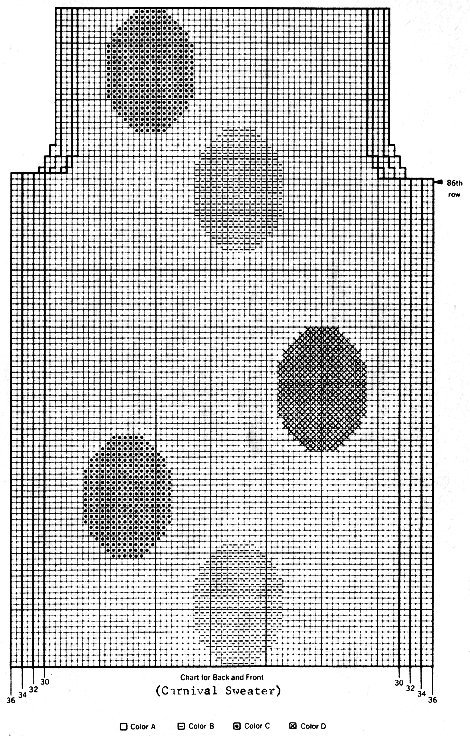
Chart for Back and Front (Carnival Sweater)
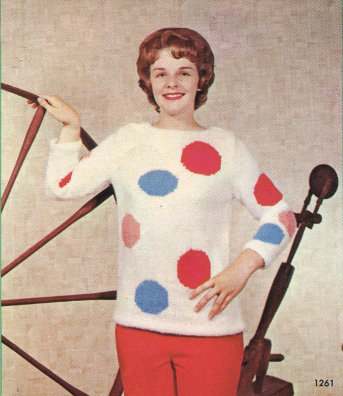
1261