T. F. BELL
NATIONAL SCHOLAR IN DESIGN (1875-8) AND
THIRD GRADE CERTIFICATED ART MASTER,
SCIENCE AND ART DEPARTMENT, S. K.: MEDALLIST IN HONOURS AND
CERTIFICATED TEACHER IN ‘LINEN MANUFACTURING,’ AND IN
‘WEAVING AND PATTERN DESIGNING,’ CITY AND GUILDS OF LONDON INSTITUTE
CONTENTS
| CHAPTER | | PAGE |
| I. | INTRODUCTION |
1 |
| II. | JACQUARD MACHINES |
27 |
| III. | FULL-HARNESS MOUNTINGS |
69 |
| IV. | DESIGNING AND DRAUGHTING |
110 |
| V. | CARD-CUTTING AND LACING |
139 |
| VI. | SPECIAL JACQUARDS AND HARNESSES |
155 |
| VII. | GAUZE |
196 |
| VIII. | DOUBLE CLOTH |
233 |
| IX. | TAPESTRY AND PILE WORK |
255 |
| X. | CARPETS |
264 |
| XI. | LAPPETS AND SWIVELS |
294 |
| | INDEX |
301 |
[1]
JACQUARD WEAVING AND DESIGNING
CHAPTER I
INTRODUCTION
Though the term ‘jacquard weaving’ is properly applied to work
done by the jacquard machine, it will here be taken to apply to all
harness weaving, or work that extends beyond the range of shafts, or
leaves of heddles.
The question arises, When is the limit to the number of shafts that
ought to be used reached? It apparently used to be when no more
could be got into the loom, as up to ninety-six shafts were used; and
this seems to be quite enough for any weaver to get the yarn through,
or for any loom to hold, but it must be remembered that at present the
appliances are much more suited to the work than they formerly were;
and now, except in woollen or worsted goods, where it is desirable to
use shafts on account of their firmness in comparison with that of a
harness, from twelve to sixteen shafts are as many as it is generally
thought desirable to have in a power loom. I have seen thirty-five
shafts, all in one tier or set, working diaper very conveniently in a
hand loom, and more than double that number of leaves working
worsted in a power loom; but whether the latter was desirable, or not, I
must leave to the judgment of the manufacturer who possessed it.
Many ingenious inventions have been made for the purpose of
simplifying the working of a large number of shafts, but as a description
of them would be out of place here, we may pass on to the draw
loom, which appears to be the first form of harness of which we have[2]
an accurate description. How the cloths of Babylon were woven, in
which
Men’s figured counterfeits so like have been
That if the party’s self had been in place,
Yet Art would vie with Nature for the grace—
is not known, though in Gilroy’s report of Arphaxad’s description of
his loom to Deioces, king of the Medes, it is stated to have been
accomplished by means of carved blocks of wood acting on needles,
which wrought the harness or heddles and thus formed the pattern;
but as Gilroy has admitted that the introduction to his work on weaving
is a pure invention of his own, for the purpose of making it appear
that the Ancients were acquainted with motions
similar to those on our modern looms, or as a ‘take-off
on those who angle hourly to surprise, and bait
their hooks with prejudice and lies,’ we need not
dwell further on the subject. In any case, figured
cloths must have attained considerable excellence
in very early ages. The curtains of the Tabernacle
were embroidered with figures, and the veil of the
Temple was, according to Josephus, embroidered with all sorts of
flowers, and interwoven with various ornamental figures, the door
curtain being embroidered with blue and purple and scarlet. The
ephod of the High Priest was similarly embroidered.

Fig. 1
The Egyptians worked coloured patterns in the loom so rich that
they vied with the Babylonian cloths, which were embroidered with
the needle. The method of working is unknown, but cloths taken from
the tombs in Egypt, which may be seen in South Kensington Museum
and in the Gobelins tapestry manufactory, Paris, appear to be made on
a principle similar to that of the Gobelins tapestry; the warp is of flax
and the weft of coloured wool: and the looms depicted on the catacombs
in Egypt are very similar in appearance to tapestry looms.
Embroidering was practised in Egypt prior to the Exodus of the
Israelites; and gold and silver threads or wires were used both for
embroidering and weaving, being known nearly 4,000 years.
The Babylonish garment taken by Achan, whose sin brought much[3]
woe upon the Israelites, is said, by Josephus, to have been a Royal
garment woven entirely of gold; but it might only have been embroidered
with gold, and was probably wrought in the plain of Shinar,
as it was not till long after that Babylon was celebrated for its manufactures.
Pliny says that weaving cloth with gold thread was invented by
Attalus, an Asiatic king, and that the Babylonians were most noted for
their skill in weaving coloured cloths. This was in Homer’s time,
about 900 B.C., when weaving and embroidering appear to have attained
great excellence, and to have been very gorgeous. At that time the
labour of the loom was considered an accomplishment, which ladies
and even princesses tried to excel in.
As before stated, the draw loom is the first form of machine for
figured weaving of which we have any record. It is not known where
it was invented, but it probably passed from China to Western Asia with
the silk manufacture. The ancient Egyptians, Greeks, and Romans
do not appear to have known it. The Chinese have still in use a draw
loom in which the drawboy stands on the top and draws up the parcels
of twines which have been previously arranged for him. After
being established in Damascus (hence the name damask), the draw
loom passed on to Europe, where the Chinese method of working was
used till 1604, when M. Simblot, in France, connected to the neck a
separate series of cords, called the ‘Simple’ (perhaps a corruption of
his name), so that the drawboy could work when standing at the side
of the loom. It is said to have been introduced into England in 1567.
The next improvement was to dispense with the drawboy’s services,
and for this purpose a patent was taken out in 1687, by Joseph Mason,
for ‘a draw boy engine by which a weaver may performe the whole
worke of weaving such stuffe as the greatest weaving trade in Norwich
doth now depend upon without the help of a draught boy.’ In 1779
William Cheape patented a plan to dispense with the drawboy by
having the ‘simple’ above his head, and drawing it down with knots
which were held in notches, as described in Fig. 2.
Before beginning to describe the draw loom it may be better first to
describe what it is required to do.
[4]
Its principal use appears to have been for the weaving of damask,
which is one of the simplest forms of figured weaving. Reduce a
damask texture to its elementary form, and it consists of twilling, or,
more correctly, turned or reversed twilling. If we take a common dice
pattern woven with shafts, it will easily be seen that one dice is formed
by a warp twill, and the next one by a weft twill, or that the dices are
formed by warp and weft twills alternately.
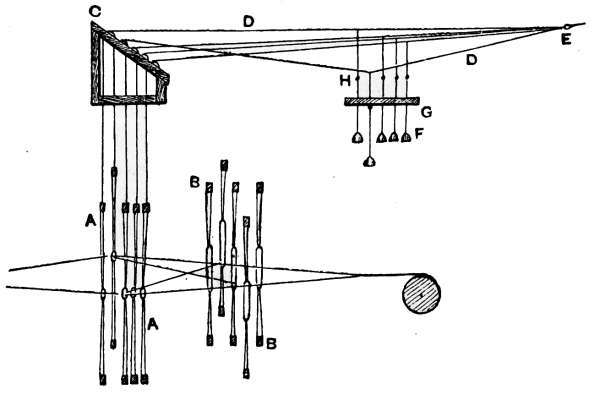
Fig. 2
Now, what forms the pattern? The yarn may be all of one colour,
the threads may be so closely set together as to make them individually
invisible, or to appear as a plain surface, and yet the dices come out
distinctly in two shades of colour. The play of light on the longitudinal
and latitudinal threads produces this effect. The dices formed
by the latitudinal or horizontal threads will always appear darker than
the yarn in the cloth when the latter is placed between the observer
and the light, whether these threads be warp or weft, as there is a
certain amount of shade on each of them, and of shadow cast by them,
whereas the longitudinal or vertical threads are illuminated, without
any shade or shadow, and appear lighter than the yarn did before being
woven; and this is the reason why a good side light is the best for
showing up the pattern on damask, it developing the above to the
utmost. In a good material the difference of shade between the
ground and figure is very considerable, but in some thin, coarse goods[5]
it is hardly visible, requiring them to be held in a favourable light to
show the distinction: the pattern will appear light on a darker ground,
or the reverse of this, according as the surface threads forming it run
across the light or in the direction of it.
This is the reason of the pattern appearing on the cloth; then it
is the business of the designer to regulate what form it is to partake
of, by preparing a suitable design; and according to instructions
furnished to him by the design, it is the duty of the drawboy to raise
the warp by regulating the cording of his harness, and drawing it so
as to reverse the twill from a weft one to a warp one wherever the
figure is to be formed on the cloth, and to do so in such order as to
produce the pattern required.
The draw-loom mounting consists of two parts—the drawboy
mounting, or the harness with its tail and simples, to be wrought by
the drawboy; and the shaft mounting, which is required to form the
texture of the cloth, or to interlace the warp and weft through both
ground and figures; the harness only interlaces them at the edges of
the pattern, or causes either warp or weft to be above, to form the figure
en bloc, but without interlacing them together.
It is therefore a ‘compound mounting,’ and is known as a ‘presser’
or ‘pressure’ harness. For simplicity’s sake let us suppose the
principle of the drawboy to be applied to shafts or healds, and take
a simple figure, as Fig. 1.
For it there are 5 parts, or it could be wrought with 5 leaves of
heddles with a straight draught. Fig. 2 shows the mounting; A A
is the back mounting, which in this case is a shaft mounting, but
would be a harness for a more extensive pattern. B, B are the pressure
heddles or front mounting. These are 5 in number, as the ground or
texture is taken as a 5-end satin or twill, C is the pulley box with the
tail cords, D, D, passing over the pulleys, and tied to the wall or to the
loom framing as at E. The knobs F hang over the weaver’s head,
and are attached by cords H, passing through a hole board G, to the
tail cords, D, D. There are heads on the cords H, and the holes in the
hole board are made thus  ; so that when the weaver pulls down
a knob the bead can pass through the round hole, and the shaft or[6]
shafts of the back mounting attached to it will be raised, and can be
kept in this position by drawing the cord into the notch or narrow
part of the hole, which the bead will not pass through. Any number
of shafts can be raised that are required to form the pattern, either by
pulling down the knob for each shaft, or by having the knots corded
to the shafts, so that each one will raise the proper number of shafts.
Thus, in the figure, each knob is only tied to one of the tail cords;
therefore a knob must be pulled down for each leaf of heddles to be
raised, but each knob might be attached to any number of the tail
cords according to the number of leaves of heddles it is required to
raise, so that pulling down each knob in succession will complete the
pattern. It might require too many knobs to do this, and then the
former method would have to be adopted. When the weaver begins
to work he draws the first figure shed with the back mounting by
pulling down one or more of the knobs as is required; he then works
over the ground treadles, b, b, till a change of pattern is required. Next
he releases the drawn shed by pulling the cord out of the notch in the
hole board; draws another shed, and works over the ground treadles as
before. This gives the principle of how the draw loom works, but
the principle of forming the texture with the back and front mountings
combined will be fully explained under ‘Pressure Harness.’
; so that when the weaver pulls down
a knob the bead can pass through the round hole, and the shaft or[6]
shafts of the back mounting attached to it will be raised, and can be
kept in this position by drawing the cord into the notch or narrow
part of the hole, which the bead will not pass through. Any number
of shafts can be raised that are required to form the pattern, either by
pulling down the knob for each shaft, or by having the knots corded
to the shafts, so that each one will raise the proper number of shafts.
Thus, in the figure, each knob is only tied to one of the tail cords;
therefore a knob must be pulled down for each leaf of heddles to be
raised, but each knob might be attached to any number of the tail
cords according to the number of leaves of heddles it is required to
raise, so that pulling down each knob in succession will complete the
pattern. It might require too many knobs to do this, and then the
former method would have to be adopted. When the weaver begins
to work he draws the first figure shed with the back mounting by
pulling down one or more of the knobs as is required; he then works
over the ground treadles, b, b, till a change of pattern is required. Next
he releases the drawn shed by pulling the cord out of the notch in the
hole board; draws another shed, and works over the ground treadles as
before. This gives the principle of how the draw loom works, but
the principle of forming the texture with the back and front mountings
combined will be fully explained under ‘Pressure Harness.’
Fig. 3 gives the draw-loom harness; A, A is the carriage, or the
rails that support the harness, which rests on the capes or side rails
of the loom. Supported by the carriage is the pulley box P, which is
a frame fitted with small pulleys, and must be sloped at such an angle
as will allow the tail cords to sink when opening the sheds without
obstructing the pulleys underneath them. The neck twines extend
from the figures 1 to 8 to the knots above the hole board D D. The
cords which connect the neck twines to the mails E, E are called
sleepers, and those which connect the mails with the leads F, F are
called hangers. The hole board is made of hardwood perforated with
holes, which run from front to back in diagonal rows from right to
left; it should be a little finer than the set of the reed, to allow for
empty holes that are sometimes caused by the tie of the harness ending
with broken rows of hooks in some or all of the repeats. In Scotland,[8]
for this reason, when the reed is set on 37 in., the cumber board, or
hole board, is set on 36 in.
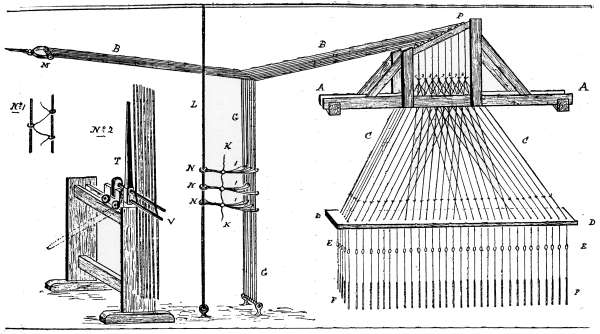
Fig. 3
B, B are the tail cords, attached to the neck of the harness at one
end, and at the other end all of them are fastened to the tail stick M,
by means of which they are secured to the roof of the house. There
must be a tail cord for each part of the harness; here only eight are
shown for the front row of the harness, and if there were eights rows
of harness in the hole board, 64 tail cords would be required, and the
complete harness would be made up of several repetitions of the 64
neck twines; four of these repetitions are here given for the first row
of the hole board. Of course there might be 400 to 600 tail cords in a
full mounting.
From each tail cord descends a vertical cord to the ground, as
shown at G, G. These are the simple cords, which, taken collectively, are
termed the ‘Simple.’ It is on these cords that the pattern is read, or,
rather, tied up. The simple cords are gathered together, according to
the pattern, by passing twines round them and forming the twines
into lashes or leashes, as shown at I, I. Heads of stronger cord, to
which the lashes are attached, are shown at N, N. The leashes or
lashes are made of cotton yarn No. 48, from six to eighteen plies of
which are moderately twisted together so that the twine will not curl;
the heavy twine is used for coarse work, where only a small number of
lashes is necessary. The length of the lashes is from 8 to 12 in.,
according to the breadth of the simple. The heads are about 4-1/2 in.
long, of good cord, as foot twine, which is used finer or coarser according
as more or less heads are required. The heads are made with a
noose on them that will run up or down on the gut cord L, which is a
strong cord, generally extending from the ground to the roof of the
house. K, K are the bridles connected with the lashes, and used to
draw them down in succession as they are wanted by the drawboy.
When there are a great number of lashes, two gut cords are used, as
shown at No. 1 (Fig. 3), and the lashes are looped alternately on each
and bridled accordingly. In coloured work, where three or four draws
are required for each weft line of the pattern—that is, one draw for
each colour—it is usual to have two gut cords with cross bridles from[9]
the one to the other which will slide up and down on them. On these,
cross bridles the heads of the lashes are fastened, about 1 in. apart, so
that the drawboy can take them in succession and draw the shed for
each colour.
The method of preparing and mounting the draw-loom harness is
much the same as that now in use for jacquard harnesses, and, as it is
entirely out of use, it is unnecessary to describe it.
In order to make the neck twines draw evenly, rollers are placed
between each set of cords at the points 1, 2, 3, &c.; these rollers keep
the cords straight and make them all rise the same height at the mails,
which they would not do unless they all sloped to the hole board at
the same angle.
READING OR LASHING THE PATTERN
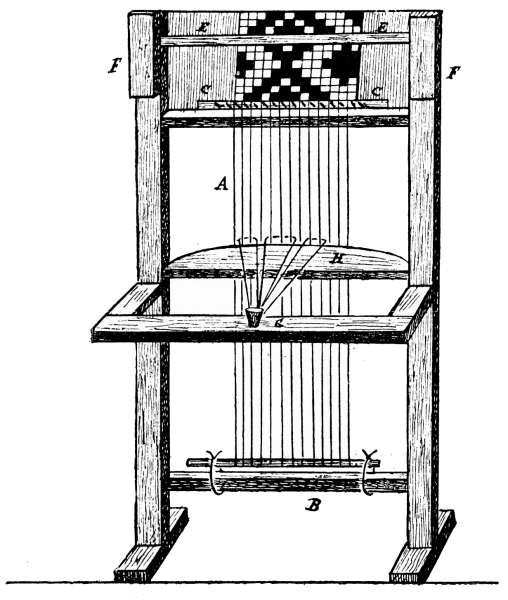
Fig. 4
The pattern, painted on design paper, same as for pressure-harness
damask, is fixed upon a lashing frame, as shown in Fig. 4, and the
lower ends of the simples are passed over it and fastened to the crossbar
B. The simple cords are held in position over the design by the
comb C, C, which must be of such a fineness as to make each simple
cord stand directly opposite that space of the pattern to which it corresponds,
one simple cord being placed between each pair of teeth of
the comb. It will thus be seen that there must be a simple cord for
each vertical line on the pattern, or rather for each vertical space between
the black lines. In the same way, there must be a head of lashes
for each horizontal space, or line, as it is usually called, and which
would answer to a card for the jacquard or dobby. The straight-edge
E E is made so that it will slide up and down in the frame, to mark
the line on the design paper that is to be next read by the lasher. Now
refer to the line of the pattern above the straight-edge, and it will be
seen that the first square or check to the left is blank, and it is accordingly
passed over by the lasher; the second and third checks are
painted, and as the simple cords corresponding to them have to be
drawn to form the pattern, the lasher twists one end of his lash over
the pin G, and takes a turn of it round the second and third simples,[10]
again passing it round the pin G. The fourth check, being blank, is
passed over, and a turn or tack of the lash twine is taken round the
fifth, sixth, and seventh simples, as the checks on the design paper
opposite these are painted. The reading and lashing proceeds in this
way till the line is finished, as shown in the figure; then the two ends
of the lash twine are tied together round the pin G, which is then taken
out, and the loop made round it by the lash twine is twisted round
and formed into a snitch for the purpose of fastening it to the head.
The lash is now pushed down behind the board H, to make room
for another; the straight-edge is then shifted to the next line, and the
lashing proceeded with as before. If too many painted squares of the
design paper come together, all the simple cords corresponding to them
must not be looped or lashed together, but can be taken in two or more[11]
loops or tacks, never taking more than six or seven simple cords into
one tack of the lash twine.
It will be observed that the board H is rounded at the back;
this is for the purpose of having all the simples at an equal distance
from the pin G when they are tacked up by the lash twine, and consequently
a more regular shed will be produced when they are drawn in
the process of weaving.
The method of fastening the head to the lash is to loop the cord
for the head, which should be double, round the gut cord, then knot
the two ends of it together, and take this knot through the snitch formed
on the end of the lash, and when the snitch is drawn tight the knot
prevents the head from slipping out.
In weaving with the draw loom two persons are required—the
weaver, who works over the ground treadles, throws the shuttle, beats
up the weft, &c.; and the drawboy, who takes the lashes in succession
as he draws them down by the bridle, and by pulling out the simples
raises the harness and holds it in this position till the weaver has
worked as many shots as are required to be given to each draught.
When some thousands of twines were required for the harness, and
with a simple of three or four hundred cords, the weight and friction
made it very severe work for the drawboy. To assist him a fork, as
shown at V, No. 2, Fig. 3, was used. It was made to run to and fro
on a carriage, so that when the simples were drawn forward by the
lashes, one spike of the fork could be run in behind those drawn forward,
while the other spike was in front of them. When the fork was depressed,
till the handle T came to the position shown by the dotted
lines, it drew down the simple cords, and they could easily be held in
that position till a change of draught was required.
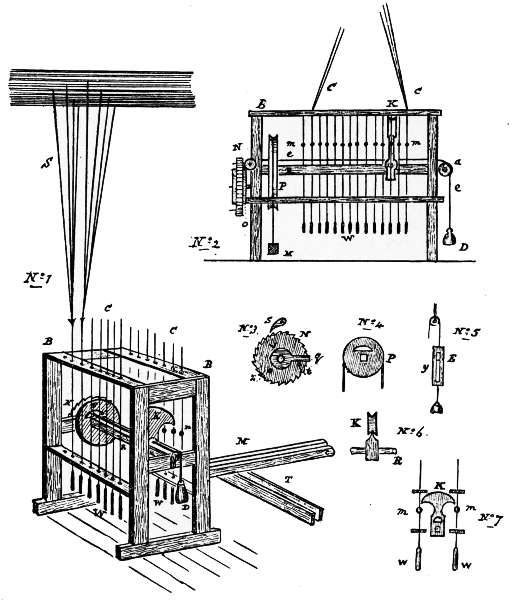
Fig. 5
When the mounting of the draw loom was very extensive, it was
necessary to employ from two to ten pulley-boxes and as many drawboys,
so that it is not surprising that many endeavours were made to
work without the aid of a drawboy. One of these machines, known
as the ‘Parrot’ or ‘Pecker,’ is shown in Fig. 5. It is wrought by the
treadles T, which are attached to the marches M, and these are connected
by the pulley P, on the rocking shaft R, by a cord which passes[12]
over and is fastened to it. When one of the treadles is pressed down
the pulley rocks and turns the shaft to one side, and when the other
treadle is pressed down the shaft will rock to the other side. The
parrot or pecker K is movable on the rocking shaft—that is, it can
slide along it—but it must rock from one side to the other with the
shaft. The cords C, C are passed through holes in the boards B, B, for
the purpose of keeping them in position, and they have knots or beads
on them at m, m, and weights, W, W, at their ends to keep them in[13]
tension. Fastened to the cords C, C is another set of cords, S, connected
with the tail cords of the draw-loom harness, and so corded or arranged
as to draw those tail cords required to be sunk to raise the harness to
form the pattern. As the shaft R is rocked from side to side by depressing
the treadles in succession, it carries with it the pecker K, and
the groove or notch at the point of the pecker, shown clearly in Nos. 2
and 6, coming into contact with the knots or beads on the cords,
draws them down alternately, first at one side of the machine and then
at the other, until the pecker, as it slides along the rocking shaft, has
passed over all the cords; it is then released and drawn back to its
original position by means of the weight D, attached to it by the cord e.
At the end of the rocking shaft is a ratchet wheel, N. The cord e passes
from the pecker through the segmental hole in the pulley P, as shown in
No. 4, and is fastened to a boss, O, on the inner side of the ratchet
wheel. This wheel receives its motion from a catch, as shown at E,
No. 5, which is simply a pin fixed in a slotted piece of wood. The pin
y forms the catch, and the slot acts as a guide, which passes over the
edge of the ratchet wheel, and keeps the catch in position. The catch
is attached to the marches and works vertically. It is raised by the
treadles, and when released is drawn down by the weight attached to
it, the wire y catching one of the teeth of the ratchet and moving it
round. There are two pins, z and t, in the ratchet, as shown in No. 3,
and it is according to their distance apart that the length of traverse
of the pecker is determined. The bar q, shown in No. 3 attached to
the pulley V, which is loose on the axle, is raised by the stud t, as the
ratchet wheel is advanced tooth by tooth, till it comes into contact
with the catch S, and raises it; this allows the ratchet wheel to be
reversed by the weight D on the end of the cord e till the stud z comes
round and draws away the bar, which allows the catch to fall into
position again and stops the pecker where the pattern is to begin.
Thus, the distance between the studs z and t must be arranged to suit
the number of cords the pecker has to pass, or to give the number of
threads in the pattern. The teeth of the ratchet wheel and traverse of
the catch must be of such a pitch that as each tooth is moved round
the pulley will be turned the exact distance required to move the[14]
pecker from one cord to the next one. No. 2, Fig. 5, is an elevation of
a ‘parrot’ arranged for a single row of cords, as these machines were
first made. There was only one treadle, as shown in section at M, No.
2, and the pecker only rocked to one side. Either this or the double
machine could be used for a shaft mounting where a large number of
treads are necessary. The cords C pass over pulleys, and are fastened
to long coupers or levers with their fulcrum at the side of the loom,
and to these the shafts are hung from jacks or otherwise. These
machines were made to work very exactly. In the double machine
the pecker would travel over three or four hundred cords in consecutive
order.
To avoid confusion the beads are not shown on the front cords in
No. 1.
CROSS’S COUNTERPOISE HARNESS
About the year 1816 Mr. James Cross, of Paisley, invented a
machine to do away with the drawboys.
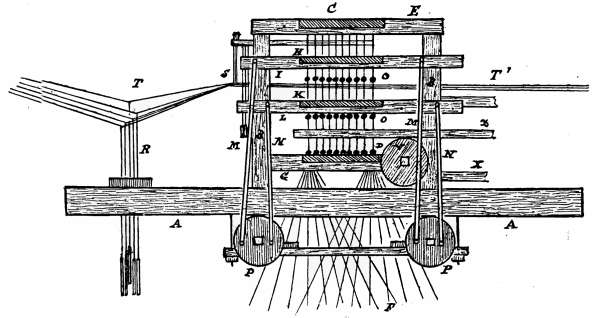
Fig. 6
This machine is fully described by Murphy and Gilroy in their
works on weaving. Only the general principle of it will be given here,
as an introduction to the jacquard. The detail of drawing the lashes
and treading, though ingenious, is not of any practical importance
now, and it requires rather a lengthy description to explain it. The
harness F is the same as in the common draw loom till it reaches the
tail cords, where the counterpoise apparatus commences. The framing
B B (Fig. 6) of this machine is supported by the carriage A A, which
rests on the capes or top rails of the loom. In this frame are two
boards, C and D, perforated with holes corresponding in number with
the tie of the harness or cords in the simple. The top board is called
the suspension board, and is mortised into the bar E. From this
board the harness hangs, the neck being taken up through the holes
in it, and fastened above them. The lower board, D, which is mortised
into the bar G, is called the neck board, or directing board, as it keeps
the harness in its proper place. H and K are two other boards, perforated
as shown in Fig. 7, mortised into the sliding bars I and L respectively;
these are called the trap boards, M, M and N, M are four[15]
bars, called pushers, which are fastened to the sliding bars I and L as
well as to the pulleys P, P, and when the pulleys are oscillated by
means of a treadle the sliding bars will be moved up and down. The
knot cords or tail cords O, O are fastened to the suspension board C,
and pass through the two trap boards, then through the neck board,
and are tied to the harness. Only two of these cords are shown tied
to the harness, to avoid confusion. These knot cords have knots or
beads on them as shown, and the round
holes in the trap boards H and K, as
shown in Fig. 7, must be sufficiently large
(about 1/4 in. in diameter) to allow the knots
or beads to pass freely through. There
are notches or saw-cuts at the sides of
the holes to admit the cords, but support
the knots. T, T1 is the simple, extending
horizontally through the knot cords. It is
fastened to the ceiling beyond T, and to
the frame of the machine beyond T1. S is a half-leaf of heddles for the
purpose of supporting the simple cords. Each simple cord is tied to a
knot cord, and beyond T1 the simple is lashed according to the pattern.
In working the machine the lashes are drawn by means of hooked[16]
levers, wrought by a treadle connected with the pulley V, and those
simple cords that are drawn down pull the knot cords into the notches or
saw-cuts in the trap boards, so that when the trap board is raised the
harness fastened to those knot cords that are drawn into the saw-cuts
will also be raised. R is a set of cords with weights on their ends for
the purpose of drawing the knot cords out of the saw-cuts as soon as
the simple is released by the lashes. The two trap boards rise and
fall alternately, and this is why the machine is called a counterpoise.
Fig. 7
Some time after an improvement was made upon this machine
which was known as
THE COMB DRAW LOOM
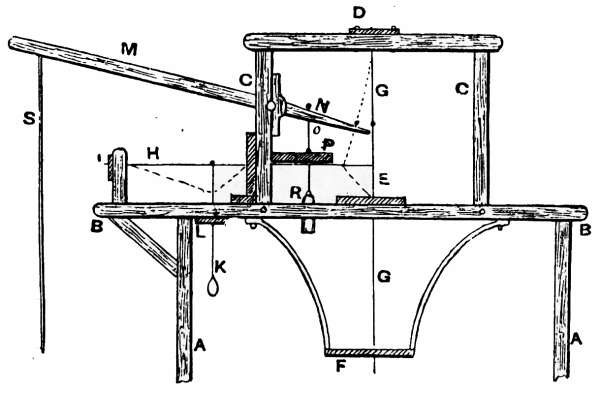
Fig. 8
This machine appears to have been invented in both Scotland and
Ireland, as Gilroy describes it as an invention of Dr. McLaughlin, of
Ballyshannon, County Donegal; and Murphy describes a similar machine
invented by Mr. Bonnar, of Dunfermline. The machine is shown in Fig.
8. A, A are the posts of the loom, and B B the top rail; C C is the
framing of the machine. The harness G, G is suspended from the
suspension board D, and passes through the guide board E and the
cumber board F. The upper portion of the harness is composed of tail
or knot cords, as in Cross’s machine. From each of the tail cords a
simple cord, H, extends horizontally over the weaver’s head, and is
fastened to the board I. The lashes K hang from the simples over the[17]
weaver’s head, and have a knob on the end of each, so that the weaver
can catch them and draw his own draught.
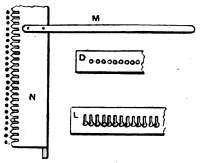
Fig. 9
The lash cords have a knot or bead on them, so that when drawn
they can be held in the cuts of the board L, also shown in plan at L
(Fig. 9). M, N (Fig. 8) is a side view of the comb and handle, or
lever, shown in plan at M, N (Fig. 9). S is a cord or chain attached to
the end of the lever M, and passing down to a treadle. When the
weaver draws one of the knobs, the tail cords connected with the
simples in this lash are drawn between the teeth of the comb, as
shown by the dotted lines in
Fig. 8. He then depresses the
treadle, which raises the comb,
and the harness along with it;
he holds the treadle down with
his left foot, and works over the
ground treadles with his right
one. The comb is recovered or
counterbalanced by the cord O,
which passes from the comb
through the board P, and has
a weight, R, suspended on it. D (Fig. 9) is a plan of the boards D, E,
F and I (Fig. 8).
THE BARREL OR CYLINDER LOOM
This machine was introduced by Mr. Thomas Morton, of Kilmarnock.
The harness and tail or knot cords are arranged similarly to
those in the comb draw loom; but instead of the simple cords for
drawing out the tail cords, each tail cord in the barrel loom passes
through a slide, or horizontal wire. The points of these slides are
acted upon by the pattern cylinder or barrel, and those held back press
out their tail cords from the others, and the knots on these tail cords
are caught by the teeth on the comb or roller, and the harness
raised.
The pattern is arranged upon the barrel much in the same way as
a tune is arranged on the cylinder of a barrel organ or musical box.[18]
A section of the barrel is shown at A (Fig. 10), with wire staples driven
into it to form the pattern.
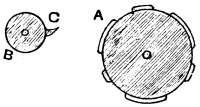
Fig. 10
Each of these staples represents so many lines of the design paper,
or so many lashes or draughts. The pattern is ruled out and painted
on the barrel, and staples are driven into it so as to cover the painted
squares of the pattern. The barrel is so
arranged on the loom that exactly the
space of one line of the design paper is
turned round for each draught, and the
slides are drawn back by cords attached
from their ends to a roller when the shift
of the barrel is being made. B is a section of the comb; it is a cylinder
with teeth, C, like a parrot’s beak fixed to it. The teeth are made of
this shape to hold the knot cords when they are caught by them, and
they rise or fall as the roller is rocked upwards or downwards by a
treadle.
Whilst these improvements on the draw loom were being made in
this country for the purpose of producing a convenient method of
harness weaving, the French were endeavouring to obtain the same
result, but on a different principle, and their method has proved successful.
In 1725 M. Bouchon employed a band of pierced paper, pressed by
hand against a row of horizontal needles, so as to push back those
which were opposite the blank spaces, and thus bring loops on the
extremities of vertical wires into connection with a comb-like rack
below, which, being depressed, drew down the wires, pushed on the pins
in it, and raised the harness.
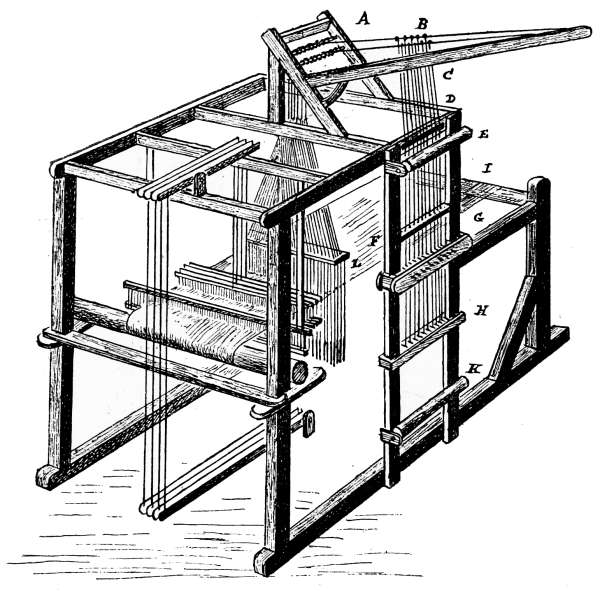
Fig. 11
Fig. 11 is a sketch of a model of this loom in the Conservatoire des
Arts, Paris. A is the pulley-box with two rows of pulleys in it; B the
tail cords; C the simples, tied to rings on their upper ends, which run
on the tail cords at B; the other ends of the simples pass over a small
roller at D to prevent them rubbing against the side of the loom, then
down through the hole board F, under which they are tied to wire
hooks or loops, as shown under A (Fig. 11a). Next these wires pass
through the needle box G, also shown at B, Fig. 11a, and down to the[19]
comb H (Fig. 11), and C (Fig. 11a). The perforated paper is rolled on
the roller E, and passing downwards, is pressed against the needles with
a hand bar, as shown at L, Fig. 11b. The roller K is for rolling up
the paper as it passes down from the upper roller.
Fig. 11b is a back view of the mounting. A shows where the
simples are connected with the tail cords P; B shows the connection
of the tail cords with the harness; C is the cumber board; D the mails
and E the leads. F and K are the two rollers for the paper, H the
needle box, and I the comb. This was the first attempt at forming the
pattern by means of perforated paper acting upon needles and wires.
In 1728 M. Falcon adopted a chain of perforated cards in lieu of
the perforated paper, and placed his horizontal wires or needles in
several rows or ranks, thereby admitting the use of a greater number[20]
of them in a moderate space. He also used a square prism or cylinder,
as it is called, for the cards to pass over.
Fig. 11a
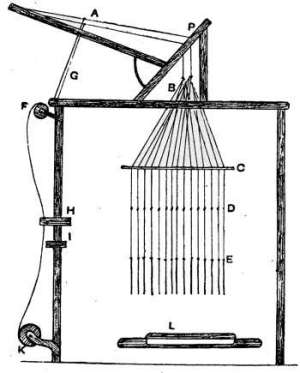
Fig. 11b
Fig. 12 is a sketch from a model of his loom, also in the Conservatoire
des Arts. The principle of it is much the same as the preceding.
A is the pulley box for four rows of pulleys, B the connection of the
simple with the tail cords, C the hole board for the simple to pass
through and also the support for the cylinder H, D is the needle box,
E the comb or griffe, F the levers for drawing down the griffe, and G
the treadle. The cards are laced in a chain and pass over the cylinders
I and H, but they are pressed against the needles by a hand bar, similar
to that used by Bouchon. There are two racks or receptacles for
holding the cards, as shown. The cylinders H and I are simply used as
rollers to support the cards, and not for pressing them against the
needles, as in the jacquard.
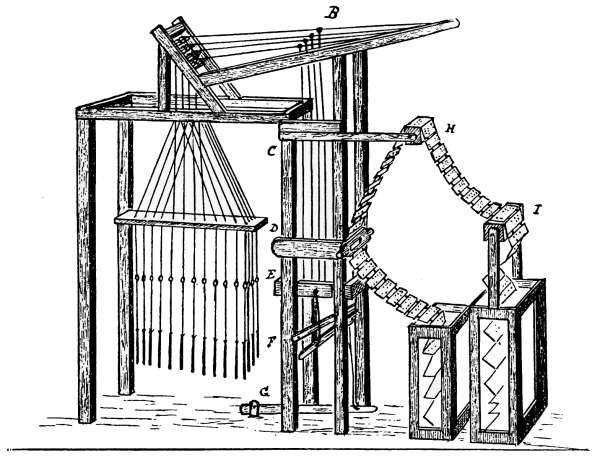
Fig. 12
Figs. 12a and 12b give detailed views of the hooks, etc., for drawing
the harness: the letters in both refer to the same parts as are marked
with similar letters in Fig. 12. The simples B are tied to loops on the
hooks under the hole board C. In Fig. 12b it will be clearly seen how[21]
the needles in four rows act upon the hooks. The griffe consists of
four round iron rods or wires set in the frame E, Fig. 12a, which can
be drawn down by the treadle G, connected with the levers F by the
cords 3 and 4. One of the levers has its fulcrum at one side and the
other has it at the opposite side, and the points of the levers are tied
to the griffe frame by the cords 1 and 2. The griffe, when sunk, is
brought back to its place again by weights hanging on cords running
over pulleys. It may be seen that the hooks hang in front of the rods
or bars of the griffe; therefore, those hooks will be pushed on the griffe
whose needles come against the solid portions of the cards, thus acting
similarly to Bouchon’s machine. The hand bar for pressing the cards
against the needles is shown at F. The needles can pass through the
slot in it, and, when a card is pressed against the needles, the bar can
be fastened with hooks for the purpose, so that the operator is free to
depress the treadle. There are no springs on the needles, but a clap
board comes behind them, which is pressed in by means of a cord
passing over each end of it and fastened to a spiral spring. There are[22]
ten leaves of heddles in front of the harness. They are plain clasped
heddles, and apparently act as five, the front five being raised by the
top levers connected with the treadles, as shown in Fig. 11, and the
back five are held up by a set of levers at each side, with weights on
the ends of them, similarly to those now used for hand-loom damasks,
and tied to the treadles below, so that sinking a treadle would cause
one of the back leaves to sink and one of the front ones to rise. Only
the harness mechanism of Falcon’s loom is given in Fig. 12, the front
portion being similar to that of Bouchon, or to any hand loom.
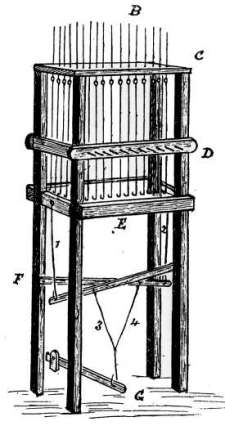
Fig. 12a
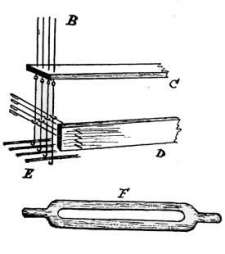
Fig. 12b
In 1746 the accomplished mechanician, Vaucanson, altogether dispensed
with the cumbrous tail cords and simple of the draw loom, and
made the draw-boy machine completely self-acting by placing the
hooks upright on the top of the loom, and hanging the harness from
them. This loom may be seen in the Conservatoire des Arts, as well[23]
as a model of it on the same scale as those already mentioned—viz.,
one-third the size. The machine for drawing the harness is exactly
like a small jacquard, with two rows of hooks and two rows of needles,
as shown in Fig. 13. Instead of a square cylinder and cards, the
pattern is punched on a band of paper, which passes over a round or
true cylinder. This cylinder is fitted with a rack wheel, so that a tooth
can be passed for each change of pattern, the cylinder moving out and
turning one tooth, then pressing in against the cards again. The diameter
of the cylinder is about twelve inches. The hooks are raised
with a griffe, similar to that in a jacquard, which is fastened to a lever
connected to a treadle below. This treadle, and four others for working
the heddles, is wrought by tappets, made of wood, on a shaft
running along the side of the loom and turned by a wince handle in
front. Altogether, the loom is a nice mechanical
contrivance, and a great step in advance of
its predecessors.

Fig. 13
Joseph Marie Jacquard, a working mechanic
of Lyons, having invented a fishing net loom,
turned his attention to improving the means
of drawing the harness in looms for figured
weaving, about 1790. A model of a machine
by him, dated 1790, to dispense with the drawing of the harness, is
in the Conservatoire des Arts. It is made with cords and rollers,
and has no resemblance to the machine bearing his name. He
was brought to Paris to repair Vaucanson’s loom about 1804, and
it appears to be then that he combined the best qualities of the
machines of his predecessors, and produced the jacquard, a model
of which, dated 1804, is in the Conservatoire des Arts. This is very
much like our present jacquard, but with four rows of hooks and
needles made similar to those of Vaucanson, Fig. 13. He dispensed
with Vaucanson’s cylinder and band of paper, and used instead a
square prism with a chain of cards passing over it. The cylinder (or
prism) he set in a frame or carriage, made to run on four wheels or
pulleys on the top of the frame of the loom. The carriage is drawn
out by depressing a treadle, and brought back again to press the[24]
cylinder against the needles, by means of weights tied to cords running
over pulleys. The griffe is raised by means of two levers, one at each
side; one end of each is connected with the griffe, and the others to a
crossbar at the bottom of the loom, and this crossbar is fastened from
its centre to a treadle. In all these looms the cards or paper hang at
the side of the loom, the mounting being on the principle known as
the London tie. Jacquard was born in 1752, and died in 1834.
Vaucanson died in 1782.
FRENCH DRAW LOOM
Shortly after the introduction of Cross’s counterpoise harness, a
machine was imported from France, which is shown in Fig. 14, and
described in Murphy’s ‘Art of Weaving’ as a French draw loom. This
machine far surpassed any attempts at the improvements at the draw
loom that had hitherto appeared, in simplicity of construction and
operation. From the neck upwards the harness is similar in construction
to Cross’s counterpoise, having the knot cords arranged in the
same manner, but with only one trap board. Instead of the cumbrous
tail, the knot cords are acted upon by wires or needles, on each of which
is a loop, through which one of the knot cords passes. D is the cylinder
or barrel, perforated with holes, as in the common jacquard cylinder,
and C, C shows the chain of cards for forming the pattern; E is the
lever for raising the trap board, to which it is connected by means of
pieces of iron at each side, with a bar across between them, to the centre
of which the lever is connected with a piece of wire. O O are crossbars
of wood, with holes in their centres, through which run pieces of strong
iron wire, which are fixed into the trap board at each end to keep it
steady while in operation. There is no spring box for the needles as is
now used in the jacquard, but into the crossbar or frame F is inserted
a flat piece of wood moving on springs, which yields to the pressure of
the needles that are forced back by the barrel, and recovers them again
when the barrel is withdrawn. The lever E is drawn down by the cord
H, attached to a treadle, when the trap board is to be raised, and the
barrel is drawn back by the cord G, which is attached to another treadle.
The barrel is pressed against the needles by springs, and when it is[25]
relieved by the treadle and is moving inwards, it is turned by one of
the catches shown in Fig. 14a. Either of these catches can be brought
into action, so as to turn the barrel either way, by raising or lowering
them with a cord. When at rest the knot cords stand in the notches
or saw cuts of the trap board, but when the cards are pressed against
the needles, except where there are holes in the cards, the needles are
pressed back and the cords are pushed out of the notches so that the
knots stand above the holes in the trap board, and pass through them
when the board is raised by depressing the treadle connected with the
lever E. The trap board is shown in Fig. 7.
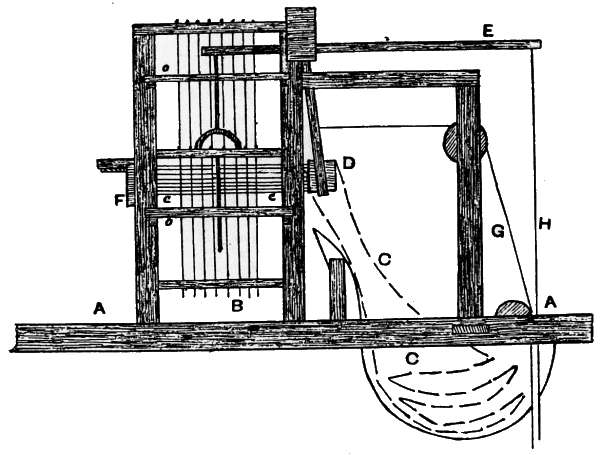
Fig. 14
Fig. 14a
Whether this machine was Jacquard’s invention or not, I have not
been able to ascertain; but Gilroy states that Jacquard’s first machines
were made with cords and trap boards, like Cross’s counterpoise
machine. It is also recorded that William Jennings, of Bethnal Green,
invented a machine, similar to the above, about 1830, as an improvement
on the jacquard, on account of its simplicity, as the latter appears
to have given the weavers some trouble, and notice was taken of his
machine by the Society of Arts.
Fig. 15
Machines similar to the above are still in use for hand-loom work,
and answer very well. They have also been used for power looms, but[26]
the cords do not stand the friction long. As at present made about
Glasgow, the cylinders of these machines work on slide rods, and
receive their motion from the rising of the trap board, same as the
cylinders in jacquards are sometimes wrought by the rising of the griffe
with what is known as the ‘swan neck’ motion. The spring board
at the ends of the needles is held back by a spring and drawn in by the
cylinder frame as it moves outwards,
which brings all the needles forward,
and the cords into the saw cuts in the
trap board, or comb as it is frequently
called. The knots on the cords for
these machines are made as at B,
Fig. 15, which, when drawn tight, are
as shown at A. The cord is a good twisted cord, such as whipcord, and
the holes in the trapboard are about 3/16 in. in diameter, which the
knots on the cords must pass freely through. The upper ends of the
cords pass through a perforated board on the top of the machine, and
another cord is drawn through loops on their ends, which prevents
them from being drawn through the holes.
[27]
CHAPTER II
JACQUARD MACHINES
The jacquard machine was introduced into England about 1818 and
came into general use from 1824 to 1832. It was introduced into
Scotland about 1824. Fig. 16 is a representation of the early form of
jacquard, and of course intended for hand-loom work. Although the
present machines for power-loom work are very different in make,
nearly all the working parts as here used are to be found in different
machines at present working, or still being made, though the best
machine makers have adopted newer and better principles for fast working
and withstanding wear and tear. Fig. 16a is a view of the interior
of the machine. The working of the machine will be explained further
on; only those parts that will not be given in the new machines will
now be noticed. The griffe or frame for raising the hooks is lifted by
the straps A, A, Fig. 16, which are attached to the pulleys B, B, and a
cord C over a pulley on the same shaft as B, B, is attached to a treadle
beneath the loom. As the weaver presses down this treadle the griffe
is raised, and when the treadle is released the griffe falls of its own
weight. The cylinder is moved out and in by the pulley E, fastened on
the bent iron bar, attached to the frame which carries the cylinder,
when the griffe rises and falls. D, D is a frame which lies in the
turned-up portion of the hooks; only a few hooks are shown, and the
outer bars of the frame. There should be a bar in the frame for each
row of hooks. This frame rises up and down with the hooks, the turn
on the ends of which must be of such length that when the frame is
raised by the hooks lifted by the griffe, it will not be raised out of the
turns on those that are left down. This frame is for the purpose of
preventing the hooks from turning round, so that the turns on the[28]
upper end of them, as shown at A, A, Fig. 16a, cannot get out of
position to be caught by the blades or crossbars of the griffe. The
lower ends of the hooks rest on a perforated board as shown in
Fig. 16a, and tail cords are looped on them and pass through the
perforated board as shown. To these cords is fastened the neck of the
harness. Machines with these perforated boards and frames to keep
the hooks in position are still (1890) being made in Yorkshire. In
Fig. 16a is shown a section through the spring box B. This box contains
a spiral spring for each of the horizontal needles, the ends of
which press against the springs, which allow them to yield or move
back as the cards press on their points; but recover them again
when the card is moved away by the cylinder. Similar spring-boxes
are now used.
Fig. 16
It might be interesting to describe the various changes and attempted
improvements that have been made on the original jacquard, but it
would take up too much space, and many of them are of more historical[29]
than practical importance; some of them will be mentioned that
may be interesting from a mechanical point of view, in connection with
the descriptions of the machines, even though they have only been
partially successful. Though a very different machine from what it
originally was, the principle of the jacquard remains the same, and is
not likely to be altered or superseded till a revolution takes place in the
process of weaving.
Fig. 16a
A jacquard machine is simply a shedding motion by which a great
variety of sheds can be formed; the larger the machine, or the greater
the number of hooks it contains, the greater is the variety of shedding
that can be produced by it.
If a jacquard is made small, with, say, from 16 to 48 hooks, it is
called a dobby or shedding motion, and is used for working shaft
mountings; but the ordinary jacquard machines have from 200 to 600
hooks, which have long cords, called the harness, connected to them,
no shafts being required, as each hook has only a few cords tied to it,
which can be raised independently of the others. The fewer the cords
that are tied to each hook, the greater is the variety of shedding that
can be made on the same number of warp threads, till, when there is
but one cord to the hook, any thread or any number of threads can be
raised independently of any of the others.
[30]
Jacquards may be divided into four classes—viz. single-acting,
double-acting lift, double acting with double cylinders, and twilling
jacquards; and besides these there are several other varieties made for
special purposes. The single-acting is the real jacquard, and much
the simplest machine. It has the disadvantage which all single-acting
shedding motions have—viz. that one shed must be closed before the
following one begins to open. This is on account of the same lifter
having to open each shed; it must bring down the set of hooks that
are raised, and then raise the next set.
This constitutes the true jacquard lift; and while it makes a clear
shed, and is desirable for some purposes, it is generally considered the
most imperfect form of shedding—that is, so far as the making of a
good cloth is concerned. It is not suitable for making a heavy, well-covered
cloth, nor for working at a high speed, 120 to 140 picks per
minute being a very good speed to drive it.
A single-acting jacquard is a very simple machine, and when
properly made should give very little trouble in working, particularly
if the motions are properly set in relation to each other, and if such
methods of working are adopted as will cause the least wear and tear
on it.
In whatever way jacquards are made, the principle of working is
much the same. There are a number of upright hooks set in a frame;
attached to each hook is a horizontal wire or needle, one end of which
is pressed upon by a spring, which keeps both it and the hook steady
and in position, while the other end, or point, passes through a perforated
plate, beyond which it projects about half an inch (see Fig. 16a).
To lift the hooks there is a set of bars or knives arranged in a frame,
just below the heads of the hooks; this frame is called the ‘griffe’ or
‘brander,’ and if raised would draw all the hooks up with it. What
hooks will be lifted for each shed is regulated by perforated cards being
pressed against the points of the needles. A perforation in the card
allows the point of a needle to pass through and the hook to be raised;
but where there is no perforation the card comes against the point of
the needle, pressing it back, and holding the head of the hook clear of
the blade of the griffe, so that the griffe will pass without raising the[31]
hook. It will thus be seen that any variety of shedding can be made
by punching the cards to suit it. Fig. 17 shows one of the best makes
of single-acting jacquards. One of the best methods of driving is shown
in this and the following figure. The griffe is raised by means of the
lever G, which is sometimes supported on a beam fastened to the roof
or pillars of the shed, or it may be supported by an upright fastened
on the frame of the loom. A portion of this upright is shown in Fig.
17, and as well as being fastened to the loom frame, it should be stayed
to the top of the machine. One end of the lever is fastened by a link
connection to the centre of the bar across the griffe frame, care being
taken that the connection is so made as to draw up the griffe vertically,
and not have any strain on the slide rods or spindles that are used for
keeping the griffe horizontal when rising.
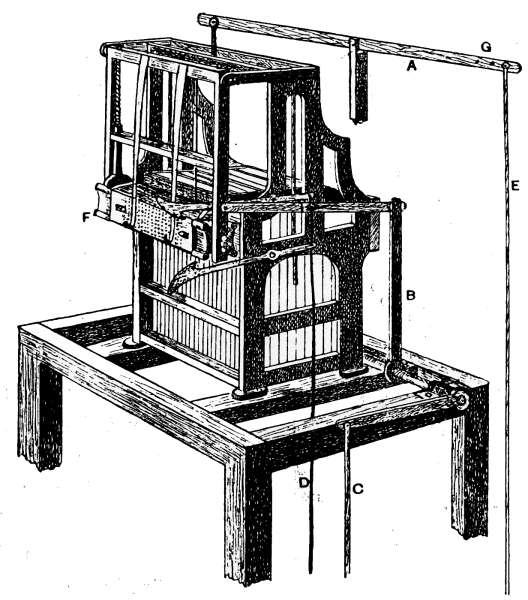
Fig. 17
The other end of the lever is connected to a crank on the crank-shaft[32]
of the loom by a rod, E (Fig. 17); also shown at A (Fig. 18), where
the crank is also given.
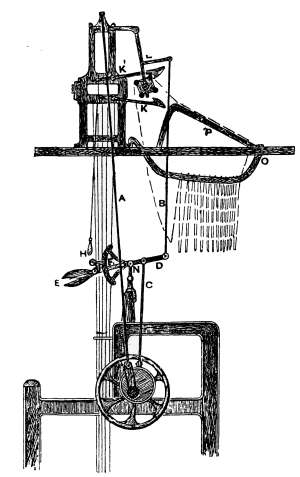
Fig. 18
In hand-loom machines the griffe is frequently pushed up from
below instead of being drawn up from the top as is shown in Fig. 17.
The method of doing this
is similar to that given
for lifting the griffes of
twilling jacquards.
F (Fig. 17) is called
the cylinder or barrel,
evidently taking its name
from the round cylinders
or barrels used in the old
machines, but is in reality
a square prism. It is
made of wood, and perforated
on each side with
a set of holes—a hole for
each needle in the machine;
its use is to draw
round the chain of cards
and press each one against
the needles, or horizontal
wires, in the machine. In
order to keep the cards
firmly on the cylinder,
flat steel springs are sometimes
used, as shown,
attached to the top rail of the frame which holds the cylinder; and
there are also steel wires which pass down in front of the cylinder over
the ends of the cards. These springs are useful when only a small
number of cards is used and the machine driven quickly; with a
large set of cards, where there is plenty of drag on them from their
own weight, they are not necessary, and but seldom used; but they
are in common use in the Yorkshire districts.
[33]
It will be seen from the illustrations (Figs. 17 and 18) that the
cylinder hangs in a frame suspended from the top of the machine; this
is called the swing or batten motion, to distinguish it from the horizontal
or sliding motion which is shown at Fig. 20 (No. 1) and in Fig.
27. The swing motion is the simpler of the two, and is cleaner,
requiring less oil; but the sliding motion is steadier, and does not
swing the cards so much, consequently is more suitable when the
cylinder has to travel quickly. The swing motion also requires the
machine to be higher; with a slide motion the frame is usually cut off
a little above the griffe.
The cylinder has to travel out and in when the machine is working,
so that it may be turned round and bring a fresh card against the
needles for each shot. There are many methods of accomplishing this,
which may be divided into two classes—viz. independent motions, or
those which are driven from the loom independently of the machine;
and self acting motions, or those which drive the cylinder out and in
through the rising and falling of the griffe. The latter are the simpler,
but the former are much better, causing less wear and tear on
both the cards and machine, as will be explained further on.
It will be seen in Fig. 18 that as the cylinder travels out it will be
caught by the hook K1, and turned round; the head or lantern of the
cylinder is made of iron, as shown, so that the hook, or shears, will
take a firm catch on it. To prevent the cylinder from turning more
than one card at once, and to keep it steady so that it will always come
in fair against the needles, it is held firm by a hammer pressed on it
by a spring. This pressure is applied in different ways, one of which
may be clearly seen in Fig. 17, and another in Fig. 27. When taking
out the cylinder, or wanting to run it round quickly to draw over a
number of cards, the hammers can be held up by a hook or sliding
catch, which should be fitted to the machine for the purpose.
One of the best independent motions for driving the cylinder is
shown in Fig. 17; and that shown in Fig. 18 is also a very good one for
small machines, perhaps the most convenient that is made; but the
former is much stronger. In Fig. 17 a connecting-arm from the frame
of the cylinder is attached to the lever B. The connecting-arm should[34]
have a slotted joint, so that it can be made shorter or longer, if required,
for the purpose of regulating the pressure of the cylinder on
the needles.
The lever B is on a horizontal shaft, bracketed to the frame of the
loom, or to the beams on which the machine rests; or some machines
have bearings attached to their framing for it. There is, of course, a
lever, as B, and a connecting-arm at each side of the machine. There
is another lever on the end of the shaft, at right angles to B, which is
connected with an eccentric on the crank-shaft of the loom by a rod, C,
in the same way as the rod C is connected with the eccentric in Fig. 18.
The eccentric can be set to bring the cylinder against the needles at
any required time, independent of the lifting motion of the machine,
which cannot be done when the self-acting motions are used. The
larger the eccentric, the greater dwell the cylinder will have against
needles. The method of working the cylinder in Fig. 18 is somewhat
similar, and can easily be seen; but it will be observed that a good deal
of pressure will be put upon the studs on which the cylinder frame, or
batten, hangs, particularly when the cylinder is being pressed in, as
this is effected by drawing down the lever L; however, in a light
machine this does not matter much.
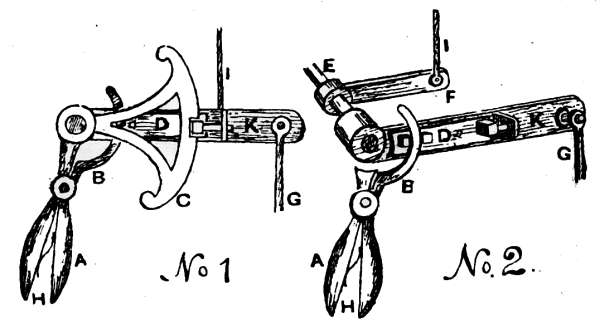
Fig. 19
The principal feature in this motion is the escapement apparatus
for the purpose of disengaging the cylinder from its connection with
the driving eccentric when it is required to turn some of the cards back.
Fig. 19 (Nos. 1 and 2) shows this arrangement. The motion is not quite
the same as that given in Fig. 18, but is on the same principle, and
one may be easily understood from the other. In Fig. 18 the latch G[35]
comes out of the notch in the quadrant F, when the handle E is pressed
close; the handle is on the lever D, having its fulcrum on the shaft N,
and the quadrant F is connected to the eccentric rod C. The quadrant
is loose on the shaft, and the lever is fast on it. Fig. 19 is a more
convenient motion. The two halves of the handle A are held apart by
the spring H, and this, through the hook B on the inner end of the
handle, presses the latch or catch on the slide D into the notch on the
quadrant C. The quadrant and handle are one piece, and are fast on
the shaft E, and a lever F on this shaft is connected to the batten of
the machine, in the same manner as shown by D and B in Fig. 18.
When there are two or more machines, one of these levers would be
required for each. The lever K is loose on the shaft E, and the rod G
connects it with the eccentric, same as is shown by the rod C in Fig. 18.
In No. 2, Fig. 19, the quadrant is left out to show clearly how the hook
B acts on the slide D, and also to show the lever K on the shaft. The
two halves of the handle, being pressed out by the spring, keep D in
position, firmly pressed inwards; but when the handle is pressed the
hook B presses the slide D outwards, leaving the quadrant free to pass
up or down; and by pulling down the cord H (Fig. 18), which raises the
shears K and K1, the cards can easily be turned back by working the
handle up and down, as the under shears will catch the cylinder and
turn it the reverse way. The weaver must be careful not to jerk the
motion and throw the cards off the cylinder or damage them; but a
very little practice will enable anyone to turn them back quite easily
and quickly. This motion answers very well for one, or perhaps two,
small machines; for a 400 or 600 machine, or any smaller size working
spottings, &c., it is very convenient, but when large mountings are
required, as in 800 to 2400 machines, it is quite too weak for the
work; even if made strong enough it would not be satisfactory, as the
strength of spring that would be required to bear the strain and keep
the catch in the notch would make it a very difficult matter to use the
motion for reversing the cylinder. For heavy machinery the method
of working the cylinder shown in Fig. 17 is far preferable, and separate
motions for turning back the cards can be fixed on the machine.
These will be explained further on.
[36]
Instead of the eccentric and crank for driving the cylinder and
raising the griffe being as they are shown in Fig. 18, though a plan
frequently in use, it is neater, and perhaps better, to have the eccentric
at the back of the fly-wheel, and the fly-wheel either cast with one
half solid, or have a plate fastened across two or more of the spokes, to
which the connecting-rod can be attached with a bolt fastened in a slot.
The amount of lift can be increased or diminished, either by shifting
the top of the connecting-rod along the lever G (Fig. 17), or by increasing
or reducing the throw of the crank at the fly-wheel.
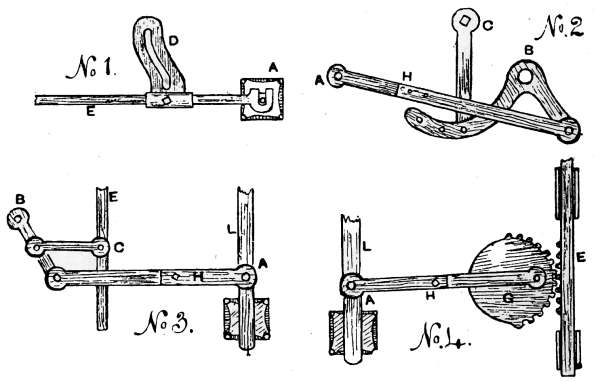
Fig. 19a
Self-acting motions actuate the cylinder through the rising and
falling of the griffe without requiring any special connection from the
loom. One of the most convenient of these is that frequently used
on hand-loom machines, and known as the S iron or swan-neck motion.
It is shown in Fig. 19a (No. 1), and another form of it on a swing
cylinder motion is shown in Fig 16. D is the swan-neck or S iron. In
the groove in it a roller stud on the griffe frame travels, sliding in and
out the cylinder A as the griffe falls and rises. E is the slide bar, which
may be flat or round; if round, there must be some means of keeping
it from turning in its bearings, which is generally accomplished by
having a crossbar bolted across the two slide bars behind the machine.
No. 2, Fig. 19a, is a motion for the same purpose, but consists of a[37]
series of levers; and No. 3 is an arrangement of a similar nature. B is
the fulcrum of the levers, or fast pin by which they are connected to
the machine. C shows the attachment of the levers to the slide rod of
the machine. A is the connection with the cylinder frame. As the
griffe rises or falls it will easily be seen that the cylinder will be driven
out or in.
The connecting-bar H is in two parts, slotted and bolted together at
H to admit of regulating the position of the cylinder.
No. 4 is a motion on a different principle; it is a French motion.
It will readily be seen that the cylinder is driven out and in by the
toothed wheel, which is wrought by a rack on the slide rod E. This
slide rod works outside the framing of the machine, as is common in
the French machines. One point must be observed about these
motions—viz. that they must have a certain amount of dwell at the
bottom of the stroke, or when the cylinder is in. The reason of this
dwell will be explained further on, but the method of obtaining it may
be given here. In the swan-neck motion (No. 1), any desired dwell
can easily be obtained at either top or bottom by the length of the slot
that is in a vertical direction, as when the stud is passing through this
portion of the slot no motion is given to the cylinder. In the lever
motions Nos. 2 and 3, as well as in No. 4, the dwell is got by the levers
or arms passing the centres; in Nos. 2 and 4 it is by the lever or arm
H passing the back centre, which may be considered as a crank; and in
No. 3 it is the short lever C passing the centre that gives the dwell.
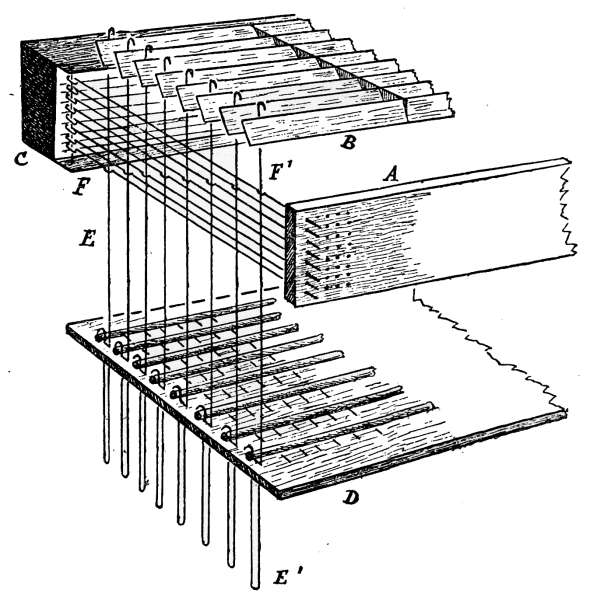
Fig. 20
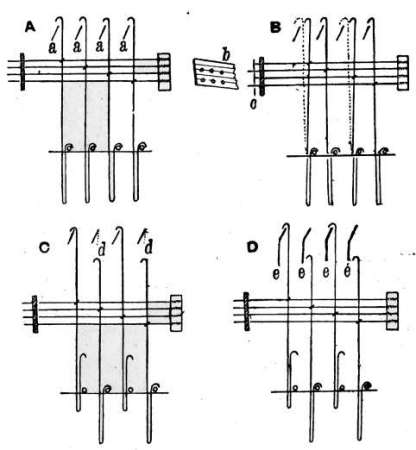
Fig. 21

Fig. 22
Fig. 20 is a view of the interior of a single-acting jacquard machine
with the framework removed; only one row of hooks and needles are
given, to avoid confusion. The blades or knives of the griffe, with a
support running across their centres, are shown at B. A is the face-plate
or needle board, sometimes made of iron, but better to be of hard
wood. C is the spring-box, the detail of which is given in Fig. 24.
E, E1 are the hooks, and F, F1 the needles. D is the grating through
which the hooks pass, and are supported by it. It will be seen that
the hooks and needles are arranged in rows of eight: a 400 machine
would have 50 or 51 of these rows in it; 500 machines are usually
arranged in rows of 10, and 600 machines in rows of 12. The hooks[38]
should be set perfectly upright or vertical, and should be close up
against the knives, but not pressing against them. There should be
a provision made for shifting both the grating and the knives, so as to
admit of both them and the hooks being properly set in relation to
each other; but if set correctly by the maker, which they should be, no
alteration is necessary. A (Fig. 21) is a side view of four hooks and
needles, with the ends of the knives of the griffe shown at a, a, a, a.
When the machine is working the needles are acted upon by perforated
cards cut from the pattern. Suppose we take plain cloth—that is, a
pattern in which each half of the warp, or every alternate thread, is
raised and sunk alternately; then, if the first card acts on all the odd
numbers of the needles, and the second card on all the even numbers,
this repeated would make plain cloth. Whenever a hook of the
jacquard is to be raised a hole is cut in the card for the needle connected
with that hook, and a card with all the even numbers of holes[39]
cut in it will cause the griffe to raise all the even-numbered hooks.
Refer to b (Fig. 21), where the second and fourth holes are cut in the
card. If the card is pressed against the needles, as at c, the first and
third needles will be pressed back, and will push the first and third
hooks back from their position—shown by the dotted lines—to the
position in which they are shown in B (Fig. 21); but the second and
fourth hooks are not moved, as their needles pass through the holes in
the card. If the griffe is now raised, the blades or knives will pass the
first and third hooks, but will lift the second and fourth; and if the
odd numbers of holes are cut on the next card, the first and third
hooks will be lifted when it is pressed against the needles, as shown at
C (Fig. 21), thus making the cross-shed; and this explains the principle
of working any pattern by the jacquard without taking into consideration
the intricacies of mounting, &c. In C (Fig. 21), it will be seen
that if the knives d, d were upright instead of slanting, they would
come down on the heads of the hooks that are under them, but, being[40]
slanted, their lower edges pass the heads of the hooks, and press them
away as the griffe descends. Sometimes, even with slanting knives, if
there is much vibration in the hooks, or if the loom ‘bangs off,’ some
of the hooks are liable to get under the knives and be ‘crowned,’ or
bent down. To avoid this deep blades are often used, principally in
double-acting machines, so that the lower edges of the blades will not
pass the bottom hook, as shown at D (Fig. 21). This prevents any
danger of crowning, but it darkens the machine a little—that is, makes
it more difficult to see down into it if any of the wires require to be
examined; it also requires the heads of the hooks to be somewhat
higher above the heads of the needles than is necessary with the
narrow blades. Another principle has been tried—viz. that of making
the heads of the hooks as shown in Fig. 22, and using narrow blades.
This effects its object well, but there is too much friction of the knives
against the hooks, and the latter are liable to wear out too quickly. A
good machine with firmly set hooks should work very well without
these protections if it is steadily placed above the loom, and it is better
not to be resting on the loom framing, if convenient to have it so. It
will be seen from the foregoing explanation that the proper time, or,
rather, the necessary time, for the cylinder to press against the needles
is just after the griffe begins to rise. When the griffe is down the top
edges of the knives should be 3/16in. or 1/4in. lower than the turned points
of the hooks, and before this edge rises up to the hooks those that are
not to be lifted should be full back, or the cylinder should be close in,
having the front of the head of the hooks 3/16in. or 1/4in. behind the
blades. The cylinder should have a short dwell in this position; and
if it has a longer dwell it may assist to reduce the friction of the heads
of the hooks against the knives; but if it has too great a dwell it may
have to travel out and in too quickly to make up for the lost time, which
will probably not be compensated for by the advantage of the increase
in the dwell. Now, when the cylinder is driven with an independent
motion, as in Figs. 17 and 18, it is easy to set the eccentric so that it
can be brought in at any required time; but when a self-acting motion
is used, it is plain that if the cylinder must press against the needles
when the blades of the griffe are passing the heads of the hooks in rising,[41]
it must also press against them in the same position when the griffe
is falling, unless some special escapement motion could be devised
to avoid it, and this is where the dwell is required, and where the evil
effect of the motion takes place; and it is worse in a double-lift
machine with one cylinder, as the heads of the hooks in it are larger,
or have a longer turn on them. A little consideration will suffice to
show that when the brander or griffe is falling, say, with one-half of
the hooks hanging on its knives, and the cylinder is brought in against
the needles before the hooks are quite down, as it must be, it will
either cause the hooks to be shot off the knives, or will put a considerable
strain on them, as well as upon the needles and cards. It is for
this reason that these motions are objectionable, particularly in power-loom
work, where the speed is high and the hooks are strong. In
hand-loom work it is not so objectionable, as there is more spring in
the wires, and the heads of the hooks need not be too large, and,
besides, the speed is less and the wear and tear not so great; but, even
with this, if a hand-loom machine that has been in use for some time
be examined, it will be seen that the points of the hooks are considerably
worn, and that the edges of the knives are hollowed out like a
coarse saw by the friction of the hooks on them. This latter will partly
arise from the lifting of the hooks.
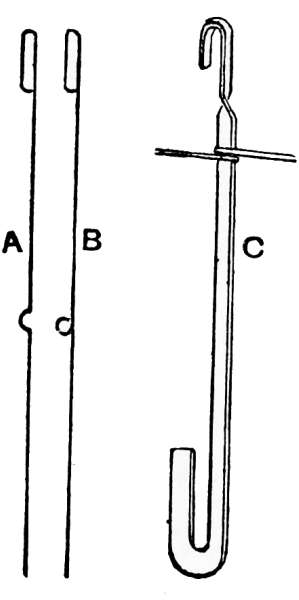
Fig. 23
In the old Jacquard, given in Figs. 15 and 16, the hooks are shown
resting on a perforated board, and it was mentioned that in order to
prevent them from turning round a frame lay in the turned-up portion
of the hooks. The grating in Fig. 20, through which the turned-up
bottoms of the hooks pass, readily accomplishes this object. Sometimes
flattened hooks are used, as in C (Fig. 23), with the needles twisted
once or twice round the hooks; this makes a firm arrangement, but if
anything goes wrong with a hook it is not easy to get it clear of the
needle. When the needles were made with a full twist or loop on
them, as at B, the same was the case; they are now usually made as
at A, and if arranged in the machine as in Fig. 20, there is no danger
of the hooks sliding out of the recess in the needle, and if a hook gets
bent or broken, it can be taken out and replaced by a new one without
disturbing the needles.
[42]
Fig. 16 shows how the needles press against the springs in the
spring-box, which is much the same as that at present in use. Fig.
24 is the present arrangement. No. 1 gives a plan of the end of a
needle, B. C C is the horizontal wire which supports it as shown in
section at C C in No. 2. D (No. 1) is a section of the vertical wire
shown at D D (No. 2), which passes through the loops or eyes on the
ends of the needles, and keeps the springs from shooting them too far
forward. A (No. 2) is a wire which passes down at the outside of the
box over the ends of a row of springs, so that by drawing out this wire
any of the springs can be drawn out without taking off the spring-box,
as the springs pass through the box. The springs should be strong
enough to keep the hooks and needles steady, but if unnecessarily
strong they give the card and cylinder unnecessary work.
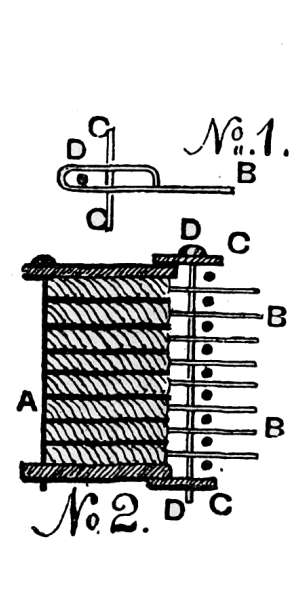
Fig. 24
In some machines there is no spring-box. The hooks are made
double, as shown in Fig. 25, and rods, as a, a, run along between the
rows of hooks; the spring of the double wire keeps the hooks steady.
There is a clap-board used, similar to that in the French draw loom,
(Fig. 13), which is pressed against the needles with springs; this board
is connected with the face-plate by a bar at each end, forming a frame.
The needles do not project much through the face-plate, but when the
cylinder is pressed against it, it slides back on the needles, and presses[43]
the clap-board back, which also allows those needles to go back which
the card presses against. The needles are not looped on the hooks,
but have a turned catch in front of them as shown. The bottom of the
hook rests on a hole board, C, through which the tail cords pass; and
through the hooks at D are wires fixed in a frame which rises and falls
when the hooks are raised, and keeps them from turning round, same
as explained in Fig. 15. Machines of this description are at present
being made in France, and work with a rising and falling shed, which
will be hereafter explained (see Fig. 30).
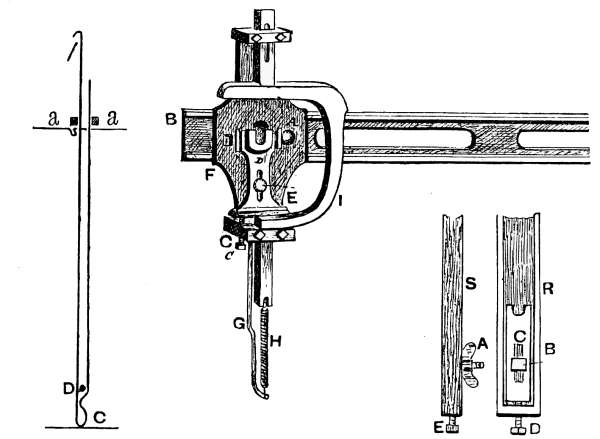
Fig. 25
Fig. 26 Fig. 27
In working, the card cylinder must be so set that it will come forward
fair on the needles—that is, that when it comes forward the
points of the needles will enter fair into the centres of the holes in it.
For the purpose of setting it there must be provision made in the
fittings so that it can be moved laterally or vertically. In the swing
motion the frame can be moved laterally by means of the two screw
studs on which it hangs. C, Fig. 27, shows the bearing on which the
stud of the cylinder revolves. This bearing can be raised up or down
in the frame R—a side view of which is given at S—by slackening the[44]
bolt B with the wing nut A, and adjusting the bearing with the set
screw D or E.
A method commonly adopted by tacklers or tuners to see that the
needles are perfectly fair in the centres of the holes in the cylinder, is
to rub their fingers on some dirty oil, and touch over the points of the
needles with it. They then bring in the cylinder against the needles
with a card on it, in which about half of the holes are cut. The
points of the needles mark the card where there are no holes, and
it can easily be seen whether the mark is in the centre of where a
hole should be, or not.
One of the best bearings and attachments for a cylinder with a
horizontal slide motion is given in Fig. 26. D is the bearing for the
cylinder E, and C the bolts for setting it. F F is the bracket which
holds the hammer and bearings, which can be set in position on the
slide bar B by the bolt A. I is the hammer held down by the spring H
attached to the rod G.
The cards are kept in position on the cylinder by pegs or studs,
originally made of wood, and driven into the cylinder. Now they are
made of brass, and set in a slotted bracket, so that they can be shifted
in order to have the holes in the cards corresponding exactly with
those in the cylinder. The pegs should also be set on springs, so
that if a card gets off them, and between them and the needle plate,
they will yield or sink into the cylinder, and not break the card. In
all good machines they are made in this way.
When the motion for driving the cylinder is not fitted with an
escapement for the purpose of turning back the cards, it is necessary
for the convenience of the weaver to have a motion on the machine
for the purpose.
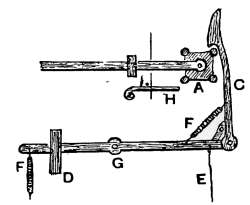
Fig. 28
Figs. 28 and 29 show two varieties of these motions. A is the
cylinder head; C, the catch for reversing the cylinder; F, the spring
for returning the catch to its position; E, a cord which hangs down,
with a knob on the end of it, in a convenient position for the weaver to
catch and work the motion. In Fig. 28 the motion is on the opposite
side of the machine to the shears, but might be on either side, and the
weaver has to raise the shears to turn the cylinder, which she can[45]
easily do by catching the knob for raising the shears in one hand, and
working the reversing motion with the other. The cylinder must be
full out for this motion to turn it properly, and this prevents the
weaver from tearing the cards on the
needles, as she might easily do by
trying to turn the cylinder when it is
too close in. In Fig. 29, B is the
shears for turning the cylinder, and
both it and the pushing catch, C, pass
through a keeper or bracket, D, on
the side of the machine. There is a
rise on C a little back from the point,
and when the cord E is pulled down
C is shot forward by the lever, which has its fulcrum at G, and in going
forward the rise on it comes into contact with the bend in the shears,
and raises them up so that it can turn the cylinder when it catches on
the head of it. Both these are good and convenient motions. For the
latter the cylinder should
be about half-way out
when the cards are being
turned back.
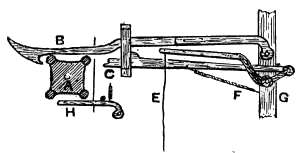
Fig. 29
Sometimes the cylinder
may not be completely
turned by the
shears when the machine
is working, by reason of
the cards catching, or if the shears are too long, or it may arise from
other causes. In this case the cylinder would come in with one corner
against the needles, and be pressed heavily against the needle plate.
Some of the levers would probably be broken, or the cylinder might be
shot out of its bearings and fall, breaking the yarn, or perhaps injuring
the weaver. To avoid this, small snecks, as at H, Figs. 28 and 29, are
set so that when the cylinder is square it will pass over them; but if
turned angularly its lower edge will catch on the point of the sneck, as
the cylinder is coming in, and turn it square. The sneck is held up[46]
with a spring so as to allow the cylinder in turning to depress it.
Sometimes the sneck, as at H, is liable to cause broken shots; for if the
weaver turns back the loom, and the cylinder moves out sufficiently
far to be turned to its angular position, and remains there, it will, in
coming in, be turned square by the sneck, and thus a card would be
passed over without a pick being put in for it. This is sometimes
remedied by putting the sneck above the cylinder, instead of below it,
which would turn it the reverse way; but this might come wrong at
other times. The better plan is to keep it below, and let the weaver
get to understand what she is doing, as it is not very difficult to learn.
The setting of a jacquard machine for working consists in adjusting
the cylinder motion so as to bring in the cylinder at the proper time,
and press it sufficiently close against the face-plate to keep the hooks
clear of the knives of the griffe, without pressing it too close; and
regulating the lifting of the griffe to suit the time for shedding, and
to give the size of shed required. The shed must be open for the
shuttle to pass through; the time for picking is when the cranks of
the crank-shaft of the loom are at the bottom centre, therefore the
shed should be almost fully open at this time. The lifting of the griffe
can be made a little earlier or later to suit circumstances, but very little
alteration can be made, as it takes a full revolution of the crank to
raise and lower the griffe. Further consideration will be given to
jacquard shedding after double-acting machines have been explained.
The motion for working the cylinder, if an independent one,
should be rigid and strong; for if there is any spring in it, though the
cylinder may be brought in sufficiently close when there is much
cutting on the card, if a blank card or one with very little cutting on
it comes on, the extra pressure on the needles, especially with a large
machine, may prevent it from getting in sufficiently close to clear the
hooks from the griffe. With self-acting motions there may sometimes
be some trouble in this way, as the weight of the griffe may not be
sufficient to press in the cylinder. In this case the griffe may be
weighted, or may be allowed to drop quicker, or the lifting rod and
lever may be made to assist in pressing it down somewhat.
Before starting the machine the needles should be examined to see[47]
that they are all free, and that they will spring out easily after being
pressed back. The griffe should be perfectly horizontal and all the
knives properly set; the holes in the cards and cylinder should
exactly correspond, and when the cylinder comes in the needles should
be fair in the centre of the holes; if not, the cylinder must be set as
described (see description of Figs. 26 and 27).
The driving of heavy single-acting jacquards will be further considered
under Twilling Jacquards.
When any of the hooks or needles in a jacquard get bent or broken,
they can easily be straightened, or taken out and replaced by others.
By putting a thin blade of iron or wood down through the needles
alongside of the hook to be replaced, and springing open the passage,
the old hook may be drawn out and a new one put into its place. The
tail cord must, of course, be cut off the bottom of the hook, and a new
one tied on. For changing a needle take off the spring-box and draw
up the pin which fastens the row of needles at the back; then the
needles in this row may be taken out till the defective one is reached,
and the row made up again; or, the old one may be renewed without
taking any of the others out. A flat blade is used to slide through the
hooks and keep clear the place for the needle to be put in.
Card Frames.—The cards for jacquard work are usually hung on
a frame as O, Fig. 18, wires sufficiently long to catch on both sides of
the frame being tied to the lacing of the cards. The number of cards
between each wire may vary to suit the space and the quantity of cards.
Sixteen to twenty suit very well, the former for small and the latter for
larger sets, and for very small sets twelve or fourteen might be more
convenient. The frame may be made of round iron rod, or of flat or
bar iron, and should be of the shape shown in the sketch, and not semicircular,
as is usually the case, which presses the cards together in the
centre; almost flat at the bottom, with just enough of a slope to
make the cards slide back, is much the best. Of course, for a few
cards it does not matter much what shape it is. P (Fig. 18) is the
frame for the rollers over which the cards travel to the cylinder. They
should be so sloped as to make the cards travel up nicely with sufficient
drag on them, and not too much; on this depends a good deal the[48]
proper working of the cards, particularly when the machine is running
at a high speed, and when springs are not used to steady them on the
cylinder. It is usual to have a roller below the cylinder, attached to
the frame which holds the cylinder, and the falling cards pass over it.
Sometimes the cards, when falling, are shaken, so that some of the wires
may not catch on the frame, but pass through it, or the ends of some
of the wires may be bent and cause the same result; if the weaver
neglects to put these up on the frame before the cards work round to
those that have fallen, the wire may catch on it and prevent the
cylinder from turning, or, perhaps, pull it out. Sometimes a crank or
bend is made in the frame at the outer end, so that the wires can pass
up through it without catching. The frame should just be sufficiently
wide to enable the cards to pass freely through it with, say, one-eighth
of an inch clearance at each side; then, if three or four inches at the
outer end is cranked, or set out so as to be a little wider between the
two bars than the length of the wires, they will pass up through without
catching. Frames of the shape described are, of course, only suitable
when the cards are to be wrought forwards—that is, with the
cards falling between the cylinder and the machine; but if they
require to be wrought both backwards and forwards, as is sometimes
the case, the card frame must be made more of a semicircular shape,
and the rollers must be set so as to give a sufficient fall to the cards,
and keep them firm on the cylinder.
As has already been said, the nature of the shedding of a single-acting
jacquard is objectionable for speed in working, for ease on the
yarn, and for heavy work, or for well-covered work. The jacquard harness
is levelled so that the yarn is all sunk, and the shed is entirely a rising
one; it can easily be understood that when the griffe rises to open one
shed, it must again fall before it can begin to rise to form the next
shed. Now, mostly all tappet motions, and a great many dobbies or
shedding motions, either have the yarn springing up and down from
the centre, or have one portion rising and the other portion falling at
the same time, so that in them the second shed could be open at the
same time that the griffe in the single-acting jacquard had fallen to
begin to rise the second shed; but as this would be much too soon,[49]
they can take a greater time to accomplish the work, and thus have a
much slower and steadier motion.
It has been attempted to work the single-acting jacquard on the
centre-shedding principle, and machines are at present being made in
France of this class. It is only necessary to let the board on which
the upright hooks rest fall at the same time that the griffe is rising in
order to accomplish what is required, and the method of working is
good, and would suit well in dobbies where the heddles can be taken
firmly down. But in the jacquard the drawback is in the harness:
the constant rising and falling causes a vibration in it, and does not
admit of nearly so firm work as when the rising shed alone is used.
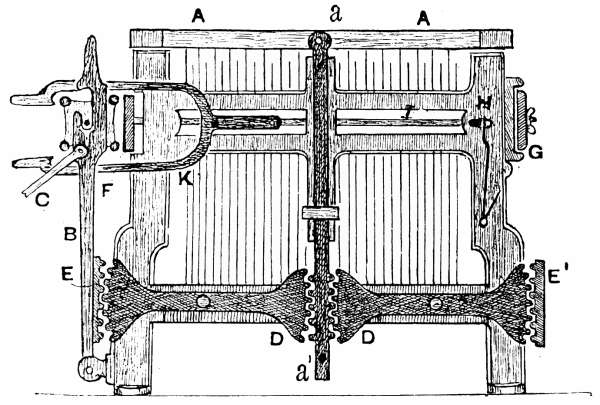
Fig. 30
One of these machines is shown in Fig. 30; they are a very compact
and neatly made machine, and contain a much greater number of
hooks than one of the English machines. Fig. 26 gives one of the
hooks in this machine, and the way in which it acts is there explained.
It will be seen that the frame for the cylinder is inverted; F is the face-plate
or needle board as it rests when the cylinder is not pressing
against it, being held in this position by the spring H pressing on a
stud on the bar I, which extends from the face-plate to the clap-board
G. The cylinder frame is driven by a rod, C, connected with a lever. E,[50]
E1 are two racks on the ends of the hole board on which the hooks rest,
and D, D are two levers with quadrant racks on each end, which work
into the racks E and E1, and also into the racks on the slide bar a1.
This slide bar is fastened to the griffe A A, which is raised by a connecting-rod
from a horizontal lever to the stud a. As the griffe is
raised one end of the racked levers, D, is also raised, and the other end
sinks, taking down the hole board by pressing on the racks E and E1.
The hole board is fixed so that it will easily slide up and down. If the
griffe is raised two inches, the hole board falls rather more than one
inch.
This is a very good motion, perhaps could not be surpassed for the
purpose, but, as I said before, has the objection which all similar contrivances
for the purpose must have—viz., causing too much vibration
in the harness. All the cords constantly dancing up and down causes
an unsteadiness and swinging that is not to be found in the ordinary
jacquard harness. These machines have sixteen rows of needles in
them, which are much closer set together than those in this country,
and give a large number of hooks in a small-sized machine, which is a
great advantage when extensive patterns are required. In this
machine the half-card contains 440 holes, or 880 holes to the full or
double card. The pitch is shown at A, Fig. 31, which represents the
end of one of these cards, and a piece of one of the usual 8-row cards
as here used is shown at B for contrast, the black dots in both cases
representing holes.
These machines have not been adopted here, nor is it likely that
they will be, although they are said to work well in France. They
have been tried here, and the difficulty lay in setting the cards properly
so as to act correctly on the needles, and keeping them so for any
length of time. The least contraction or expansion of the paper, or
any irregularity in the cutting, any bend in the points of the needles,
or, in fact, anything but perfect exactness, interferes with the working:
there is too great compactness in the machine, and in the ordinary
wear and tear of work a little allowance is necessary for success.
Considering that these are working, it would appear that the pitch and
size of the holes in our cards are unnecessarily large, except where[51]
small machines answer and saving of space is no consideration; in that
case the extra paper required for the cards might be more than compensated
for by the strength of the machine, and the saving of trouble
in attending to it.
Fig. 31
The method already mentioned of getting over the disadvantage of
the single-acting jacquard is not likely to gain general favour, and is
not required, as it is surpassed by the double-acting jacquard, or that
in which there are two griffes, one rising when the other is falling,
forming a counterpoise as well, making the shed more after the
principle of ordinary tappet shedding. In a loom fitted with a single-acting
jacquard, if there is much weight to be lifted, it will turn round
the loom so that it will rest in no position but with the griffe down,
and this is frequently of so much annoyance to the weaver as to
necessitate a counterpoise being applied to balance it. Sometimes
weights are used, and sometimes springs. With the double-acting lift
nothing is required, and this was first used in Cross’s counterpoise
harness (about 1816).
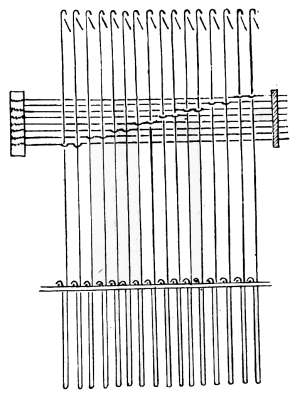
Fig. 32
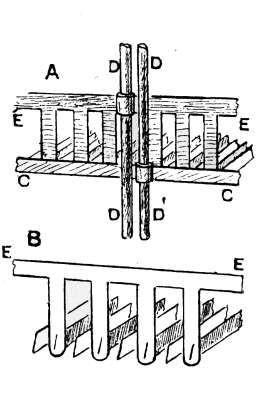
Fig. 33
In the double-lift machine there are double the number of hooks[52]
that there would be in a single-lift machine of the same size, but the
same number of needles; each needle is connected with two hooks, as
shown in Fig. 32, which gives one row of hooks and needles for an
8-row or 400 machine. There are two griffes, one working above the
other, as shown at A and B, Fig. 33. E, E is the top griffe in both; C, C
is the bottom griffe, shown complete at A, but at B the side-bar of the
frame is omitted, leaving only the knives to show how they fall in
between those of the bottom griffe; D, D1 are the two slide rods or
spindles which keep the griffes steady in their traverse. There must
be a sufficient space between the frame C of the lower griffe and that
of the upper griffe, E, to allow of the required draw being given to form
the sheds without them coming into contact. In these machines,
although there are 16 hooks in the row, they only act as eight, so far
as forming the pattern is concerned, as two hooks are governed by one
needle; the additional hooks are solely for the purpose of obtaining a
rising and falling shed. Each pair of hooks is connected together at
the bottom by a piece of strong cotton cord, called the tail cord or tug
cord, as shown in Fig. 35. The griffes are raised by two levers
arranged side by side, and similar to the one shown in Fig. 17. These[53]
levers are wrought by rods connecting them to a double crank, or
sometimes to a tappet, on the tappet shaft of the loom. The common
form of crank is shown at A, Fig. 34. B is the tappet shaft, and on
the end of it is fastened a disc. A second disc, which carries the
double crank, G, is bolted against this one, and can be shifted to whatever
position is required to give the tread at the correct time. The
cylinder is driven from an eccentric on the crank-shaft as before
described. One of the griffes rises for each shot, the other falling at
the same time; but the cylinder must come in for every shot, and
it is here that the principal fault in this machine lies. Not only
has the cylinder to travel at a high speed, but when one griffe is at its
highest position, it has to press against the needles, so as to clear away
those hooks that are not to be lifted by the lower griffe, which should
now be beginning to rise; and in consequence of the needles being
attached to two hooks, one belonging to the upper griffe, and the other
to the lower one, it follows that those needles that are pressed in by
the cards have to spring back the hooks connected with them that are
raised by the upper griffe, which is a severe strain on both needles
and cards. To prevent the hooks being pushed off the upper griffe,
they must have larger turns on them than would otherwise be
necessary.
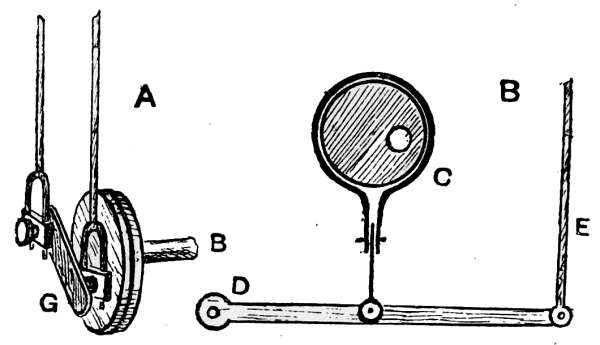
Fig. 34
Fig. 35 shows how the raised hooks can be allowed to yield to
the pressure of the needles. A, B, C, D are four hooks connected with
two needles, 1 and 2. When the hook A is raised, if B, which raises
the same warp—as will be seen by the connection of the tail cords with[54]
the harness at E—is not to be raised for the next shot, the needle 1 is
pressed back by the card, and presses the hook B back from its knife as
shown, the dotted line being its original position; the A hook, being
connected with the same needle, must also be sprung back, but its
head cannot get back, as it is held on the blade of the griffe, so that
the wire would require to spring, if some escape were not made for it.
The lower ends of the hooks are made V-shape in the grating, so that
when raised, if pressed on by the needles, they can move forward as
shown, the dotted line showing the original position of the hook A.
When the hooks fall, they fill the slots in the grating, and are thus
kept steady. G shows the tail cords as connected with the harness
when both hooks are down; E shows them when one hook is up and
the other down, and if the hook B was raised for the next shot, the
tail cord on it would be tightening up as that on A would be falling,
and the harness attached to them would be caught up a second time
from the middle position, thus forming centre shedding with any
portion of the harness that is raised several times in succession. With
plain-texture cards the upper and lower portions of the shed would
pass each other in the centre when the sheds are being reversed, all
the even numbers of hooks being on one griffe, and all the odd numbers
on the other.
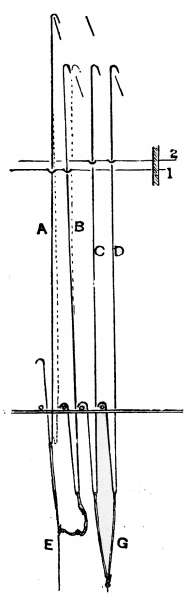
Fig. 35
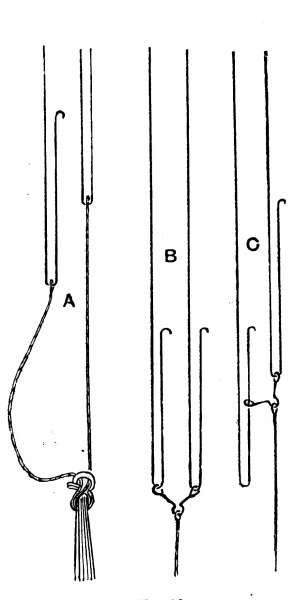
Fig. 36
The tail cord consists of two pieces of cotton cord, one fastened to
each hook of a pair, then the two ends are together tied to the bunch
of neck twines that are to hang from these hooks, as shown in Fig. 35,
and at A, Fig. 36. When one hook is raised and the tail cord drawn
up with it, the other portion of the tail cord, which is tied to the other
hook, is slackened—as shown at A, Fig. 36—which causes a certain
amount of friction on them. Also, when one hook of the pair is falling
with the descending griffe, and the other hook rising, the pluck
occasioned thereby on the cords, when the hooks are passing at the
centre, has a tendency to wear and break them. Although this does
not occur when the lingoes are of a moderate weight (18 to 25 per lb.),
and when only a few neck twines are tied to each tail, yet when a large
number of neck twines (say 20) are tied to each tail, with weighty
lingoes, as may frequently be the case in weaving small patterns on[55]
woollen and worsted goods, the breakage of the tail cords is a common
source of complaint, which not only gives the trouble of renewing
them, but is liable to cause defects in the cloth, by the weaver not
observing the breakage for some time, as one hook of the pair may be
raising the neck twines—that is, in case of the tail cord to only one of
the hooks breaking. To remedy this Messrs. Hancock, Rennie, and
Hudson have this year (1890) introduced a patent link connection for
joining the tail to the hooks, which only requires one cord, or double
cord, to be used, instead of two as before. This is shown in Fig. 36 at[56]
B. When one hook is raised and the other down, the link is in the
position shown at C. The old method is shown at A. When one hook
is rising and the other falling, the partial turning of the link causes a
loss of time equal to about a quarter of an inch of lift, and this eases
the sudden pluck on the tail cord. When both hooks are down there
is also a loss of a quarter of an inch in the lift when one hook begins
to rise, caused by the turning of the link.
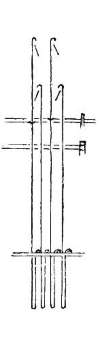
Fig. 37
Fig. 38
This patent works very well, but, except when heavy weights are
on the hooks, is not likely to supersede the older methods. These
links are fitted to machines by makers in Manchester and Bradford.
Before the form of griffe shown in Fig. 33 was adopted the hooks
were made of two heights, as shown in Fig. 37, and one griffe wrought
above the other, instead of the one set of blades or knives passing
through each other; but this method was given up on account of the
vibration of the long hooks, which made it uncertain whether they
would remain on the knives or keep clear of them when required.[57]
Fig. 37 shows this arrangement of hooks for a double-cylinder machine;
for a single-cylinder machine with two griffes the heights of the hooks
would be similar, but the heads would all be turned in the same
direction, and the knives sloped to suit this, as is done when the hooks
are all of the one height; each needle would be connected to a short
hook and a long one. The short hooks give much more certain work,
and can have the cylinder set so as to press back the hooks only as
much as is required, whereas with long and short hooks allowance had
to be made for the uncertainty of the vibration and the difference in
the length of the two sets of hooks.
Fig. 38 is a view of one of the best makes of double-lift jacquards
with a single cylinder.
The machine is made by Devoge & Co., of Manchester, but is not
here given as being specially recommended in preference to others; it
is only given as an illustration. Those wanting to buy a machine had
better see what are in the market, and select what they consider most
suitable to their work and price. This applies to all the machinery
given in these articles. There is rarely a best machine for all
purposes.
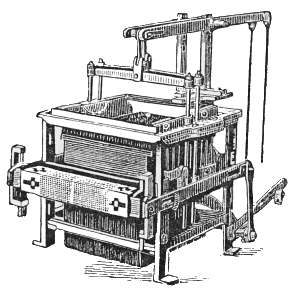
Fig. 39
These machines are much in use, and can be run at a high speed,
say 160, or even 180, and by
many are preferred to the double-cylinder
machines, as there is no
danger of one cylinder getting
before the other, and the cards
are all laced in one set; besides,
it may be more convenient for
working, as some arrange their
machines so that the cards for
one loom hang to the back, and
those of the next to the front.
When these machines are to work
at a high speed, the slide-motion
cylinder will probably be found the most satisfactory. Fig. 39
illustrates one of these machines with slide cylinder motion and the[58]
levers for driving it, the connections being as before given. The levers
for raising the griffes are also shown, but here go to the back, whereas
they are usually at the side.
The most perfect jacquard machine in the market is undoubtedly
the
DOUBLE-ACTING JACQUARD WITH TWO CYLINDERS
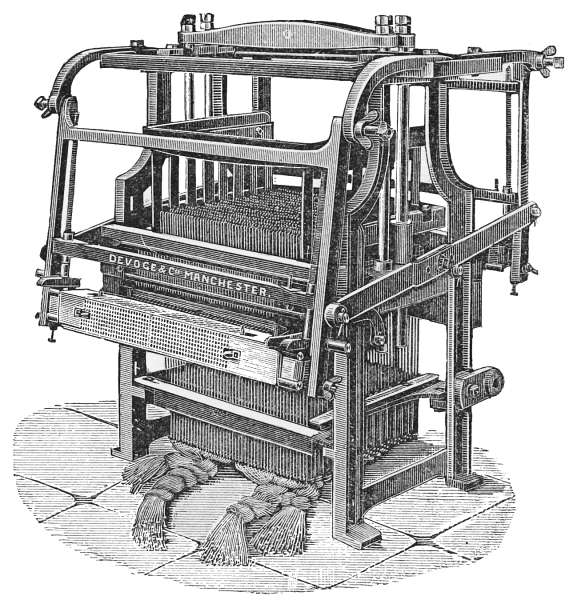
Fig. 40
The only drawback to this machine is, except what may be said against
the method of shedding, the liability of one cylinder to be turned out
of time, or get a shot or two before the other, so as to put the cards off
their proper rotation; but this is only a difficulty in the hands of inexperienced
weavers; nevertheless it exists. The effect will be to spoil
the pattern on the cloth, giving the twill a mixed or broken-up appearance.
There are motions in use for stopping the loom, unless the cards
come in rotation, but many prefer to work without them. Fig. 40 is a
view of a two-cylinder machine made by Messrs. Devoge & Co., with[59]
swing-motion cylinders, which are, perhaps, the best motions for these
machines, as they do not require to travel quickly. A very good speed
for the machines to work at is 160 to 180 or 200 picks per minute, and
the cylinders would only travel at half this speed. The cylinders should
be driven by an eccentric, same as given for the single-acting machines,
but instead of being on the crank shaft, it should be on the tappet
shaft, which runs at half the speed; and as the two cylinder frames
are connected together, when the one is going out the other is coming
in, so that one eccentric making a revolution for two beats of the slay
will drive both cylinders. Sometimes the eccentric is on the tappet
shaft, inside the framing of the loom, and is connected with the
top lever, as shown in Fig. 34 (B). C is the eccentric, D the
fulcrum of a short lever attached to it, and E the upright rod attached
to an arm or lever on a horizontal shaft supported by the machine, or
on the top of the loom. A lever from this shaft on each side of the
machine drives the cylinders. The eccentric may be on the end of the
tappet shaft, same as it is shown on the crank shaft in Fig. 18; but it
might not always be convenient to have it here, and perhaps the most[60]
desirable way to have it at any time is to have a pinion on the crank
shaft with, say, twenty teeth in it, and a stud wheel alongside with
forty teeth gearing into it. On this stud the eccentric can be fixed,
and will give a very steady and convenient method of driving. The
griffes are raised in the same way as for the double-lift jacquard with
one cylinder. (See Fig. 34 (A)).
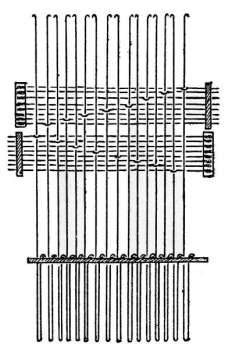
Fig. 41
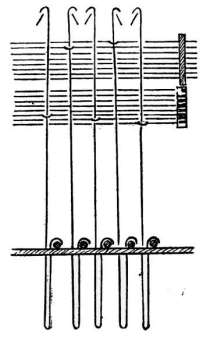
Fig. 42
Fig. 41 shows the arrangement of a row of hooks and needles for
a double-cylinder machine. The top needle of the upper set and
the bottom needle of the under set are attached to two adjoining
hooks, which are connected together with the same tail cord. This
arrangement is to enable the cards when working at both sides to act
on the correct hooks, which will be better understood by referring to
the description of lacing cards for these machines. In Fig. 41 it will
be observed that all the hooks are vertical. Sometimes the hooks are
slanted a little, as in Fig. 42, to give more space between the hooks at
the top, without increasing the width of the machine, and there is a
slight difference in the arrangement of the hooks and needles, as is
shown. Both work very well.
Fig. 43 shows a two-cylinder machine, by Messrs. Devoge & Co.,
with a slide motion for the cylinders, which would be driven in the
same way as the swing motion.
It has been said that the shedding of a single-acting jacquard is of
the worst description for general weaving. That of the double-acting
machine is by no means perfect either; some prefer the single-to the
double-acting for making fine damask. Jacquard shedding cannot be
regulated in the same way as tappets or the best shedding motions can.
In tappets the dwell can be regulated to suit the cloth required, and the
time of the shedding can be made early or late as desired. In jacquards
this cannot be done to anything like the same extent. The shed must
always be open in time for the pick, and the pick should begin when
the cranks are about the bottom centre, a little earlier or later, as
desired. The jacquard must have the shed open at this time, and must
keep it open till the shuttle passes through.
It has been said that the usual method of raising the griffe or
griffes is by a crank (or a stud in the wheel, which is practically a[61]
crank) on the crank shaft for a single-acting machine, and by a double
crank on the tappet shaft for a double-acting machine. Now, a crank
gives a continuous eccentric motion with a slight dwell when it is at
both top and bottom centres. Sometimes a tappet is used to raise the
griffes instead of a crank, and of course any required dwell can be
made on a tappet; but then it must suit the jacquard, and the greater
the dwell, the less time is occupied in the rising and falling of the
harness. If the harness is plucked up or dropped down too quickly,
the result is a dancing or unsteadiness of the cords, and in a double-lift
machine there will be a considerable plucking when the hooks that
are rising take up the cords that are falling. In order to keep the cords
as steady and free from vibration as possible, if there is any swinging
in the weights or lingoes, it is a common practice to put a frame
round these, with wires run through it at whatever distance apart is
thought desirable, so as to partition them off in bunches and keep
them from swaying about.
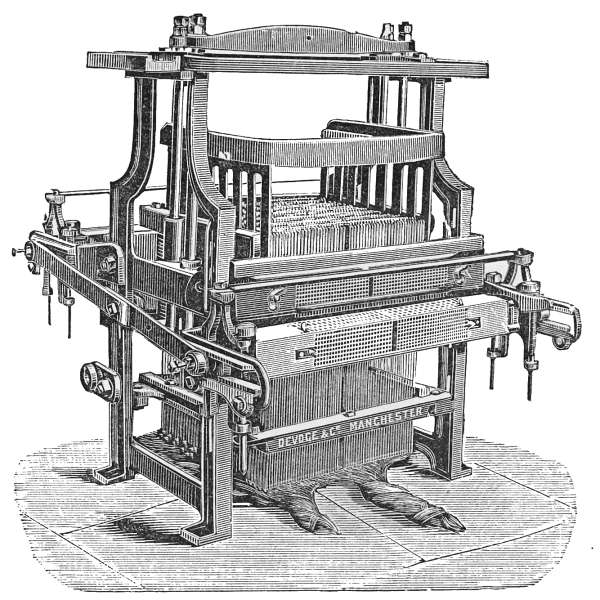
Fig. 43
[62]
The smoother and slower the harness can be raised and lowered,
the better. Therefore, to get a high working speed, the time or the
portion of a revolution of the crank shaft given to the rise and fall
must be as great as possible, so that very little could be gained by
using a tappet. If a tappet is to be used, a box tappet will be required,
or is more satisfactory for a single-acting machine, in order to make
the griffe in falling follow the tappet and avoid any plucking or jerking;
sometimes a fork lever, with the tappet or wiper working between
the prongs of the fork, is used for the same purpose. For a double-acting
machine double wiper tappets, acting on levers or treadles, are
sometimes used, the griffes falling of their own weight; the tappets are
nearly round eccentrics, or like plain tappets with a very short dwell,
not more than one-fourth of a revolution of the crank shaft. It may
therefore be considered that the harness should always be moving
either up or down, with a small pause when the griffes are at the top
and bottom, to admit of an easy turn and to allow the shuttle time for
its passage through the shed. With the crank drive the shed will require
to be opened a little wider than if the dwell was as great as it
should be, especially in wide looms, in order to let the shuttle get
through freely; but it would be more desirable, and a saving of strain
on the yarn, to have the dwell greater, and not open the shed any
wider than is necessary to admit the shuttle.
Speaking generally, the usual rule for the time of shedding may be
said to be to let the shed be closed when the cranks of the loom are at
the top centre, or perhaps one-sixteenth of a revolution farther forward,
and let the shed be full open when the cranks are about the bottom
centre. It therefore follows that the single-acting jacquard must open
the shed in a little less than half a revolution of the crank shaft, and
close it in the same time; but the double-acting machine takes nearly
a full revolution (three-quarters, or a little more, should do) to either
rise or let fall one of the griffes. It will be evident that there is a considerable
difference in the nature of the shedding. A single-acting
machine requires the weft to be beaten up on a closed shed (the time of the
crank in coming from the top to the front centre being taken up with
rising the griffe from the bottom up to catch the hooks), whereas in a[63]
double-acting machine the case is different; though the shed is closed
at the same place, or in the same position of the cranks, the griffes are
in an entirely different position. The closed shed with the single-acting
jacquard is when the griffe is down, but with the double-acting
machine it is when the two griffes are on a level—that is, halfway up.
Of course, more or less of the yarn may be at the bottom position, so
that there may be no closed shed, or in no position of the griffes may
the yarn be all on a level, unless none of the hooks are on either of
the griffes, or if one griffe has all the hooks on it. When the single-acting
machine begins to open the shed, the driving-crank of the griffe
is upright or at the top centre, and in the position to give the slowest
motion to the griffe; whereas for the double machine the lifting
cranks are horizontal when the shed is closed, and in the position to
give the griffes the quickest motion; therefore, when the lay gets to
the fell of the cloth in a single-acting machine, the shed is still close,
whereas with a double-acting machine it is fully half open. From
this it follows that, to get a close covered cloth, the double-acting
machine is the better, as the weft is beaten up in a crossed shed; but
to get a clean-surfaced fabric, with the weft lying straight between the
two portions of the warp, the single-acting jacquard is better. It is
for this reason that the single-acting machine is preferred by many
workmen for making fine damask, which does not require much covering
to give it a good appearance, and there is less chance of having
cut weft and of looping when striking on the open shed. Of course
the weft may be cut in a hard fabric by the reed having to strike too
heavily against it, and in this case striking on a crossed shed might
prevent the cutting, by the weft going on easier.
In hand-loom linen damask the shot is struck up when the shed is
about half closed; the warp is held so firm in the loom that there is
no spring in it, and the weft does not rebound. A cleaner surface
is thus made on the cloth than if the weft was struck up in a closed
or cross shed.
In a single-acting machine the faults in the cloth are more readily
seen than with a double-acting one, as, in case of a hook missing the
knife, in a single machine it would show in a short time, whereas in[64]
a double-lift machine one hook of the pair might be missing the knife
and the other taking it, so that it might be some time before it would
be observed. One of the tail cords breaking might have a similar
effect.
The foregoing gives a general description of working the jacquard;
but no hard-and-fast lines can be laid down—a little variation may
be necessary at any time, to suit circumstances and the class of work.
JACQUARD STOP MOTION
When working with two cylinders, one may happen to be turned at a
time when it should not, and thus put the cards out of rotation. Many
attempts have been made to overcome this difficulty by stopping the
loom when the cards get out of the proper order, but none of the
methods adopted have ever gained much favour. Recently a new
motion has been patented, and is being applied to machines by Messrs.
Devoge & Co., of Manchester.
It is called the ‘Devoge
jacquard stop motion.’
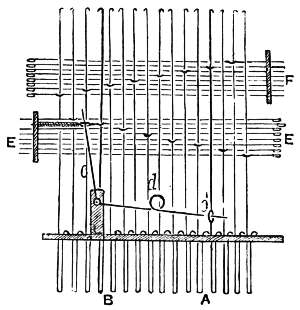
Fig. 44
Fig. 44 shows how it may
be applied to a machine.
The hooks A and B and the
needles E and F are those
here used to work the motion.
They may be at either side
of the machine, but should
be at the side of the belt
handle. One hook must belong
to the front cylinder
needles, and the other to the
back ones. The hook A requires
a lingo attached to it to draw it down after being lifted. The
hook B is attached to a lever connected to the side of the loom, so that
when one end is raised a hammer on the other end pushes off the belt
[65]handle (a lever and bracket are supplied for the purpose). C C1 is a wire
bell-crank lever with a turn or loop on it at D to act as a spring. The
fulcrum is at L, on a piece of iron bolted to the edge of the machine;
the lower end of this lever passes through an eye in the hook A at C1,
and the upper end passes through an eye in the needle E. There is a
spring on the point of the needle E, between the face-plate and the eye,
which the lever goes through, and which holds the needle back as
shown.
Each time the hook A is raised the lever presses forward the
needle E, and with it the hook B, which would then be raised by the
lower griffe, unless the card pressed the needle back again and pushed
it off. Thus, by having a hole cut in the cards for the needle F, and
none for the needle E, the hook B would never be raised; but if a hole
is cut for E in a card following one in which a hole was cut for F,
the hook B would be raised and the loom stopped. It is, therefore, only
necessary to arrange the cutting of the cards to allow the loom to work
when they are following each other in rotation; but as soon as one
card gets out of order the loom should be stopped, though, perhaps,
not till it has run for a few shots. Thus—
Number of cards—
Cut the large dots for the needle E.
Cut the large dots for the needle F.
This gives a repeat of twelve cards; but any number to suit may be
used. Thus—
Number of cards—
Cut the large dots for the needle E.
[66]
Number of cards—
Cut the large dots for the needle F.
This gives a repeat of sixteen cards. The even numbers of cards
go to the front or top cylinder, and the odd numbers to the low
cylinder, and it may be seen that a hole in an even-numbered card
following one in an odd-numbered card will not stop the loom; but a
hole in an odd number following one in an even number will stop the
loom, as it is the hook B rising after A that stops it; therefore any
suitable rotation of cutting may be adopted, and the stoppage can take
place either at short or long intervals, as desired, the principle being
to raise the hook A two or three times, and push the hook B back again
by having no hole cut for the needle E. Then leave A down for three
or four shots, and cut holes for E, which have no effect unless the cards
get out of rotation, and one of those with a hole cut to raise the hook
A comes before one with a hole cut for the needle E, when B will be
raised and the loom stopped. This is a good arrangement, and works
very well.
Another motion for a similar purpose, invented by the writer, is
shown in Fig. 45. It is based on the following principle: Suppose a
cord is taken from any two hooks of the jacquard, and passed round a
pulley on the ‘hound tail’ or long lever of the weft fork motion; if
the cord is left slack, so that raising one of the hooks will just tighten
it, then raising both hooks together will lift the lever, and can be made
to stop the loom. The difficulty to be got over is that one of the hooks
must belong to one griffe, and the other to the other one, in order to
make the motion act with the two sets of cards. As the two griffes
pass each other at the centre, or at the half-lift, this must be taken as
the full lift, the cord must be stopped here, and not drawn any farther;
for the remaining portion of the lift the hooks must draw a spring.
This can be easily arranged by having loops on the cord passing round
wires in the cumber board, or by having the two ends of the cord[67]
passing through a small hole board, and having knots or beads on them,
beneath it. Other methods may also be adopted.
One of the most desirable arrangements is shown in the figure:
A, A are the two hooks; B, B are two small springs by which the two
levers, C, C are attached to the hooks with cords; D is the frame for
holding the levers, and is fastened to the top rail of the loom, under
the jacquard, or in any convenient
place. It will be observed that the
front bar of the frame passes above
the levers, so that it will prevent
them rising above the half-draw of the
hooks, in which position they are
shown. E, E are two cords connected
with a jack or tumbler, F, on the end
of a bell-crank lever, G H L, having
its fulcrum at H, which may be on
the same stud as the weft fork lever,
or in any convenient place.
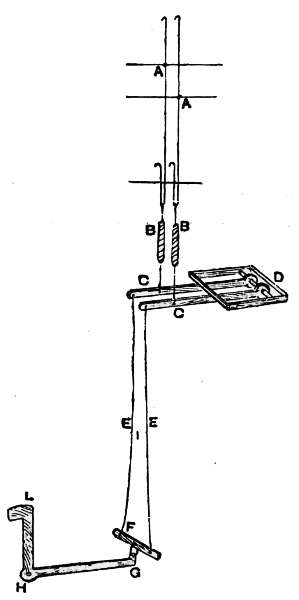
Fig. 45
The weight of F and G keeps the
cords in tension, and the point L of
the lever is set behind the lever on
the loom which carries the weft fork,
at such a distance from it that when
one of the cords E is drawn it does
not act on it; but when both hooks
are raised, drawing up the two cords,
the point L of the lever presses against
the weft fork lever, pushing off the belt handle and stopping the
loom.
The lever G H L may act directly on the belt handle, if desired; in
this case it would be fixed outside the loom framing. The cards are
cut on the same principle as for the last motion, but the same holes
will do in both sets of cards, as the two needles are acted upon by the
same number of holes in both back and front sets; that is, for two
hooks coming beside each other.
[68]
The following order of cutting will answer:—
Number of cards—
Cut the large dots on the number of cards given, and of course they
must be cut to suit the needles connected with the hooks used.
The above gives a continuous working of the motion, but it would
be sufficient for it to work at intervals having 8 or 10 shots between
them, as—
Number of cards—
This will not allow the loom to run for more than 20 shots after the
cards get out of order.
Some other motions are in use, but these are simpler.
Before describing twilling machines or any special make of jacquards,
it may perhaps be better to explain the mounting of ordinary machines,
according to the usual methods adopted in some of the leading
districts.
[69]
CHAPTER III
FULL-HARNESS MOUNTINGS
The mountings that will be alluded to in this section are all intended
for ‘full harness’; that is, the ordinary method of jacquard weaving
when applied to such fabrics as damask, dress goods, and, in many
cases, to double cloths, handkerchiefs, &c.
Full harness, or, as it is termed in some hand-loom districts, shot
and draft, to distinguish it from the ‘pressure harness’ system, holds
the first place amongst mountings, as by it can be done what cannot
be done by any other method, and everything can be done by it that
can be done by any harness, or combination of harness or heddles;
though it does not follow that it would be desirable to adopt it in every
case. In a full harness each thread in any part of the tie can be lifted
independently of the others; in wide fabrics, or in order to reduce expense
in narrow ones, recourse is had to gathering or repeating the tie,
and like threads in each repeat must be lifted together; but in a single
tie any one thread can be lifted independently of any other. In full
harness there is one thread of warp drawn into each mail or eye of the
harness, and one shot is given to each change of card. Other descriptions
of harnesses are known as ‘half harness,’ ‘split harness,’
‘pressure harness,’ ‘gauze harness,’ double-cloth and quilt harnesses,
&c.
Half harness is the term applied to that description of harness in
which the half of the warp (every alternate thread) is drawn into the
harness, and the other half passes through it loosely. This is mostly to
be found in the manufacture of gauze or leno curtains, and is wrought
with a shaft mounting in front of the harness.
Split harness is applied when two threads are governed by each[70]
hook of the jacquard, and the ground of the cloth is wrought by some
other means, as shafts through the harness. This is to be found in
the silk trade.
Pressure harness is when several threads of warp are drawn into
each mail, and when the harness is drawn it remains stationary for
several shots of ground texture, for which the sheds are sprung or
pressed open by heddles.
Gauze harness is a harness fitted up with doups for weaving leno
and gauze, and is mostly full harness.
Double-cloth and quilt harnesses are for weaving these fabrics.
Mounting, or gaiting, is a term that may be taken to apply to the
building of the harness and the preparing of everything in connection
with it. The form of ‘tie’ to be adopted will depend to a great extent
on the nature of the fabric to be made, and to the style of pattern
which is to be applied to it. For instance, dress goods may be required,
and the pattern may consist of small sprigs or objects repeated
over the surface of the cloth, forming a simple repeating pattern.
Again, handkerchiefs, napkins, or table-covers may be wanted,
which will require a bordered ‘tie,’ and may have both single and
double mounting in them. Sometimes the manufacturer mounts
his looms to what he considers a desirable ‘tie’ (or arrangement of
cords) to admit of having a good variety of patterns wrought on it for
whatever class of goods he is likely to make, and then he has the
patterns made to suit the tie or mounting. Sometimes patterns are
procured which will give the best possible effect on the least possible
machinery, or the least number of hooks of the jacquard, and the
mounting is then arranged to suit the pattern. On this method often
a very considerable saving of machinery can be effected by turning
over or gathering the harness; or, by arranging a variety of turns over,
or gathers, and repeats, a very diversified effect can be obtained with a
small number of hooks, as those accustomed to the larger forms of
shaft mountings will readily understand. Thus, if we take 100 hooks
of the jacquard as equal to 100 shafts, it will easily be understood that
a large variety of beautiful patterns can be produced with either a
straight or zigzag draft, though they will be mostly of a set or conventional[71]
type. The objection to mounting a loom in this way is, that
if a change of pattern to a free or running style is required, it is
necessary to cut down the harness and remount it, probably requiring
new machinery as well. It may, however, suit to adopt both methods;
that is, to have a few looms for working conventional patterns on small
jacquards, say 200 hooks, and others mounted for free patterns
requiring, say, 400 or 600 hooks in the machine. Of course this entirely
depends on the nature of the orders likely to be received, and manufacturers
must use their own judgment, in which, however, they are more
likely to err on the narrow than on the liberal side of the question, the
result being cramped and stiff patterns, with a probable loss instead of
gain. Two styles of mounting harness are in general use—one, known
as the ‘London tie,’ being used in Spitalfields by the silk weavers; the
other is called the ‘Norwich tie,’ as it was there adopted in the early
days of weaving. About 1830 the Norwich style was adopted in
London, as the weavers’ houses were too low to admit of the jacquards
being set high enough to suit the London method, which, having a
quarter-twist in the harness, requires more height than is necessary
for the Norwich system, in which the harness passes direct from the
jacquard to the cumber board in flat rows without any twist.
The Harness.—When about to mount a loom the first process is
to prepare the harness. A harness is built up of several parts, the
methods of preparing and building varying in different districts. A
few of the best methods will be given. Fig. 46, Nos. 1, 2, and 3, show
a complete cord of the harness in three methods of preparing it—A
(Nos. 1 and 2) are the tail or tug cords looped to the hooks of the
jacquard; these cords are only necessary on double-lift machines, and
are usually put on by the machine-makers. They are made of twisted
cotton, and are soft and pliable. L shows the knot, known as the ‘tug
knot,’ by which the tail cords are looped on the hooks. B, B are two
methods of knotting the neck or body of the harness to the tail cords;
that in No. 1 is the usual method. C, C are the hecks, or guide reeds,
through which the harness passes. G, G are the lingoes, or leads,
formerly made of strips of lead, but now of wire. From the lingo to
the mail or eye, F, through which the warp passes, is a double cord[72]
called the bottom piece, or hanger. From the mail, passing through
the cumber board or harness reed E, is another piece of double cord,
called the top or mid-piece, or the ‘sleeper’; to this is looped or tied
the neck twine in various ways, two methods of which are shown at
D d d1 (No. 1) and at D (No. 2); No. 3
shows levelling below the cumber board,
with two methods for tying H and H1. M is
the snitch knot, which is much used for
fastening cords that require careful adjusting.
Sometimes it is a matter of choice to
adopt any method of mounting, and sometimes
one plan may suit circumstances better
than another.
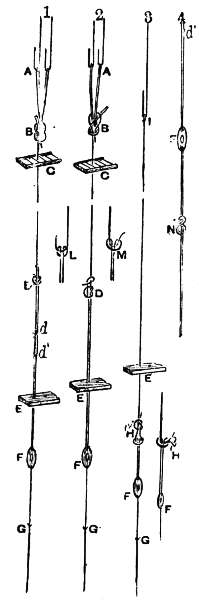
Fig. 46
Preparing Lingoes.—A prepared lingo
is shown at No. 4, Fig. 46, this work being
generally done by little boys or girls, or by
old women. One of the commonest methods
of preparing them is as follows:—Having
prepared the mails, which are small eyelets
of brass, copper, or steel of the shape shown
at F, sometimes with round holes in the
centre and sometimes with elliptical or long
shaped ones, they are put into a dish or
pan; a boy takes a piece of wire and strings
a number of them on it. The wire is then
fastened on a rack, or in any convenient
place, by both ends, in a horizontal position.
A bunch of small pieces of twine is tied up
in a convenient place; these are to form the
hangers, or to connect the lingoes with
the mails. Having the lingoes conveniently
placed, and being provided with a pair of shears, the boy sets
to work. Taking a piece of twine, and pulling it through an end hole
of a mail, he doubles it evenly, and, lifting a lingo, puts both ends
through the eye in it, and casts on a knot, as shown at N (No. 4).[73]
The loop on the twine there shown requires to be pushed up over the
top of the lingo, then drawn tight, and the ends clipped off. This mail
is then pushed along the wire, and the others proceeded with. The
pieces of twine for forming the hangers, as well as the sleepers, are
prepared by warping them off spools round two pins, and then cutting
them across. Of course the pins must be set apart at such a distance
as will suit the length of the sleepers and hangers required. The
usual length of the hanger (when doubled) is 7 or 8 in., and that of
the sleeper or mid-piece when it passes through the cumber board, as
in Nos. 1 and 2, Fig. 46, and as shown at No. 4, is 15 or 16 in. When
a quantity of lingoes are hung on the mails, the top cords or sleepers
may be put through the top holes in the mails, and tied with a weaver’s
knot, the ends being neatly clipped off.
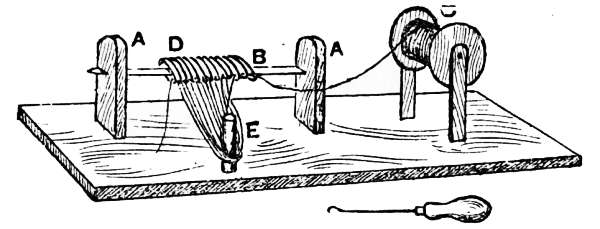
Fig. 47
A quicker method of preparing lingoes is as follows:—Two upright
pieces of iron, as A, A, Fig. 47, are fastened on a board, or on a bench or
table. A cut is made in each of these, so as to hold a piece of flat wire
such as is used for coarse reeds. This wire is pointed at one end, so
that by taking a handful of mails they can easily be gathered up on it.
It is then placed in position, as shown at B; the mails, D, are shown on
it, and C is a spool containing twine for the hangers. By rubbing the
end of this twine with wax, so as to stiffen it, and gathering all the
mails on the wire evenly together, the end of the twine may be run
through the holes in all of them at once. This end is fastened, and with
a hook, as shown at F, the twine can be drawn through the mails, beginning
at the one farthest away from the spool, and passing from one to
the other in succession, looping the twine round the pin E, which
should be at such a distance from the mails as is required to make the
hangers the proper length. If many mails are to be threaded at once[74]
there should be two or three pins as E, so as to avoid too much slope
from them to the mails, which would increase the length of the
hangers. The twine can be cut when the mails on the wire are completed,
and the other ends of the mails turned round and treated
similarly for the sleepers; but the pegs will require to be shifted, so as
to get the required length of twine. When finished, these can be cut
also, and the wire tied up in a convenient place, so that the lingoes
may be hung on, as before described. The sleepers can then be
knotted, if required to be.
After the lingoes are thus prepared the twine is frequently varnished,
and sometimes twisted so as to prevent that of the hangers
from rising up through the hole of the mail and getting in between
the two halves of the yarn when the shed is crossing. This frequently
happens if anything prevents the lingo from dropping. A common
method of twisting them is for a boy to give them a coat of flour-paste
or a light coat of varnish, then, having them hung on a rod
which passes through the loops of the sleepers, he takes a handful of
the lingoes, and, placing them on his knee, rolls them round with his
hand till they are sufficiently twisted, then lets them hang down, and
proceeds with another handful.
When the paste or varnish on these is set they can be well varnished.
About two inches at the top of the sleepers must be left
without varnish, to leave it soft and pliable for tying the neck to; the
knots on all the sleepers must be brought up to about the point before
they are twisted or varnished. When the lingoes are thus prepared
and dry they can be tied in bunches, to be used as required.
Some do not varnish the twines till the harness is all mounted, and
then varnish it all over. Others do not varnish at all. In this case
the hangers are not twisted, and for light open sets of harness they
need not be twisted at any time.
LINGOES OR LEADS
For pressure harness work the weights for drawing down the
harness were originally made of lead, about the length and thickness
of a thin pencil, but tapering to the lower end. The weight varied[75]
with the number of ends to the mail, the strength of the yarn, and the
weight of the cloth to be made, ranging from 10 to 18 per lb., or
lighter if for fine hand-loom work. For a linen damask as formerly
made, with 6 or 8 threads in the mail, a very heavy lead was required,
even in the hand loom, whilst a fine cotton two-thread harness would
do with a comparatively light lingo. Strips of lead cut from sheets
were used for lighter weights; these were then reduced to the proper
size for drawing them through holes in steel plates. Now, lingoes for
power looms are made of wire, and for ordinary damask or full harness
work should range from 25 to 40 to the lb.; for heavier work, such as
linen towels, worsteds, &c., 16 or 18 per lb., according to the weight of
the fabric, are required. Lighter ones answer for hand looms: Murphy
mentions as light as 110 per lb. for the centres of shawls, but 35 to 60
per lb. will be more frequently found. 25’s to 30’s are a good size
for power looms; 12 in. long for 25’s or 30’s, 14 in. for 16’s or 18’s,
and 16 in. for 10’s or 12’s are good lengths.
When there is a great slope in the border twines of a harness, it is
often necessary to put heavier lingoes on it than on the centre, to keep
the warp down. Of course, the less weight that has to be lifted is
always a saving of power, and easier on the harness; therefore it is
better to have two sizes of lingoes than to have them all weighty
enough for the borders.
HARNESS TWINE
The size of harness twine used varies greatly; some prefer a fine,
and others a heavy, twine. For the sleepers and hangers, 4 ply of 22’s
or 5 ply of 30’s linen yarn is a very good medium size, and 4 ply of
14’s or 5 ply of 18’s or 20’s is a very good size for the neck or body of
the harness.
Sometimes, for heavy damask, cable cord is used for the body of the
harness, and is a good wearing cord; it is especially suited when the
neck cords are fastened to the sleepers below the cumber board. This
cord is made of good flax yarn; 5 ply of 30’s are twisted together, and
three of these cords are then twisted together, or 3 ply of 18’s afterwards
made 3 ply. A better size for medium work is 5 ply of 35’s[76]
made 3 ply, or 3 ply of 20’s or 22’s made 3 ply. Heavy harness twine
requires to have heavier lingoes, particularly on those parts of the
harness that are much slanted, in order to have the same effect on
them that they would have on light twine. Some go to the opposite
extreme, and use very light twine, such as 4 ply of 30’s, which is only
fit for very light work in a narrow loom, where there will be but little
friction on the cumber board, and where no heck is required. Lighter
twine will suit better for a hand loom than for a power loom; 4 ply of
30’s for the harness of a hand loom, with lingoes of 50 or 60 to the lb.,
would do very well for a light cotton warp.
SETTING THE JACQUARD
The proper position for the jacquard, when only one is required on
the loom, is so that the centre hook in it will be above the centre
hole of the cumber board. This can easily be found by tying a plumb
line to the centre hook of the machine and moving it, if necessary, till
the plummet rests over the centre of the cumber board. In case the
cumber board is not fixed in position, that of the jacquard may be
found by having the plumb line to pass about half an inch more than
the half breadth of the harness at the cumber board behind the top
rail of the lay when it is full back, and it should also be at equal
distances from each side of the loom. When more than one jacquard
is required, they should be arranged evenly over the cumber board, and
as close together as possible.
Sometimes the jacquard may be set farther forward or back to
suit circumstances, such as getting card space, the only disadvantage
being that there will be more slanting of the cords at one side than
the other, and more friction on them in the cumber board, also more
drag on the hooks on this side if no heck is used, and if a heck is used
the cords will have to bear the friction on it. The more direct the
cords of the harness can be, the better, and the above setting of the
jacquard should be adhered to when possible, but it is not absolutely
necessary for working to have it so.
It is always well to have the jacquards so arranged that they can[77]
be raised or lowered a little by having them resting on bars, which
can be raised or lowered with screws. This is in case the harness is
levelled higher or lower than might afterwards be desired; but if the
breast beam of the loom, with the lay and back rail, can be raised or
lowered, it will suit the same purpose, and it is better not to move the
machine once it is fixed and the harness tied up.
The height the jacquard is to be above the loom must in many cases
be regulated by circumstances; for instance, the height of the roof,
or if the beams of the roof interfere with the working of it; sometimes
the machines rest on the framing of the loom—that is, if the loom is
made for a jacquard—and sometimes plain looms are used, and the
machines rest on beams supported from columns, or from the roof of
the house. This latter is the best plan, as it keeps the jacquard free
from the shaking of the loom, which is particularly useful in the case
of looms fitted with the knock-off motion. A good height for a jacquard,
independent of circumstances, is to have 8 ft. or 8 ft. 6 in. from the mails
to the bottoms of the hooks for a 10/4 loom—that is, one with about
100 in. reed space; 7 ft. to 7 ft. 6 in. for an 8/4 (82 in. reed space),
and 5 ft. 6 in. to 6 ft. for a 4/4 (40 in. or 42 in. reed space), are very
good heights. 5 ft. 6 in. is about right for a narrow harness, say 20 in.
to 27 in. wide; 6 ft. would do for 80 in. wide, and 7 ft. or 7 ft. 6 in. for
90 in. wide, if necessary.
HECKS OR GUIDE REEDS
A heck is a frame of hard wood with wires across it, a wire for each
row of hooks in the machine, from back to front. It should be made
to suit the machine, so that when the harness passes from the hooks
between the wires, it will go vertically down, and have no slant in it.
In narrow hecks, there is usually one cross-stay to support the wires,
but for broader machines there should be at least two. The wire should
be iron, as brass soon cuts with the friction of the cords, and then in
turn cuts the cords. For a single-acting machine the wires should be
loose, so that they can roll with the cords; but for a double-acting
machine this would be of no advantage, as a portion of the cords are
falling when the remainder are rising. If the machine is very wide,[78]
or has to be set forward or back on the loom, there should be cross
rollers of hard wood above the wires, at right angles to them, to prevent
the bottoms of the hooks from being drawn either backwards or forwards,
which might push their heads on or off the griffe knives.
Sometimes glass rollers are used in the silk trade for this purpose,
with mountings of the London tie, and while they are very smooth and
polish the twines, they get too hot if used in warm power-loom factories
working at a high speed. Hecks are not required for very narrow
harnesses, as the cords do not diverge much from the vertical, and the
friction on the heck being saved, the cords wear much longer.
In a wide harness it is impossible to draw an even shed without a
heck, although in some districts they are hardly known, and the more
any portion of the harness diverges
from the vertical, the more irregular
will the shed be.
Fig. 48
Suppose we take an extreme
case of a loom having three or four
jacquards on it, the harness to be
96 in. wide, and the pattern to be
for a table-cover; then, if we deduct
2 ft. from the width of the harness,
it is possible some of the border
twines may have to slant across 6 ft., or 72 in. Now make a triangle
as No. 1, Fig. 48. Let the base, A B, be 72 in., and take it as the
level of the cumber board. Take the vertical side, A C, as the
height of the harness to the heck, viz., 84 in. Now calculate the
length of the hypotenuse B C by squaring 84 and 72 and finding
the square root of the sum, and it will be found to be 110·63 in.
Again: Make another triangle, as No. 2, with base 72 in.; vertical
side 3-1/2 in. longer than that of the former triangles, viz., 87·5 in.
(this 3-1/2 in. is to represent the draw or lift of the harness). Calculate
the length of the hypotenuse as before, and it will be found to be
113·31 in. From this deduct 110·63 in., the length of B C in No. 1,
and the remainder, 2·68 in., equals the height that the cord B C has
been raised, while the cord A C, which is vertical, has been raised 3-1/2[79]
in.; and if we take into consideration that the side draw of the sloping
cords, as B C, will pull the tail cord a little to one side and rise the
vertical cords a little higher, while the sloping ones remain proportionately
lower, 1 in. may be safely taken as the difference of the height
that the two cords, B C and A C, would be raised by the jacquard, and
all the other cords in the harness would vary, being less than this in
proportion to their divergence from the straight or vertical line. It
can thus be seen how the shed would require to be opened to let the
shuttle through, and the irregular strain that would be on the yarn;
and for any cloth that requires a fine surface, any irregularity of strain
on the warp has a deleterious effect, very well known by experienced
overlookers.
Some consider that the London style of harness is more suitable
for working without a heck than the Norwich style, and adopt it to
avoid using one, as it is severe on the harness twines. Some raise the
machines very high to avoid using them, but for particular work with
border ties they must be used to give a proper working harness. With
the London mounting rollers should be, and are, used when there is
no heck. These rollers are set as a coarse heck in a frame under the
machine, and lie lengthways under it, just as they would do when used
above a heck. The heck should be about 3 in. below the knots which
fasten the tail cords to the neck twines. Some have the tugs, or tail
cords, coming down through the heck; in this case the heck only takes
the strain off the hooks of the machine, and has no effect on the shed,
though sometimes this is mitigated by having more than one tug or
tail cord, and the neck twines that slant in different directions are tied
to different tail cords. The only point in favour of this is that it saves
some trouble in tying broken harness twines when they begin to wear
away by their friction on the heck.
PREPARING THE NECK OF THE HARNESS
The twine for the neck, as well as that for the other portions of
the harness, is usually wound on spools, and when the neck is to
be prepared it is warped from these spools to the length required, either[80]
on a hand warping mill or round two pins fastened in a wall or on a
bench, as far apart as the length of the harness; three or four spools
are put on pins, and the ends from them are taken and wound round the
pins fixed for warping them on. When warped the twines may be cut
at one end, and can either be tied in a bunch or stretched on a board
and tied down on it, so that they may be kept straight and admit of
any number of them being pulled out as they are wanted.
In some methods of mounting the neck twines are first tied to the
tail cords; perhaps this is the plan most commonly adopted with
double-acting machines. Sometimes they are tied to the sleepers
first, and fastening them to the tail cords is the last process. This is
called ‘beeting’ the harness. When single-acting machines are made
with the hooks resting on a perforated board, they have tugs on the
hooks; but when the wire hooks pass down through a perforated
grating, tugs are unnecessary, and the neck twines are fastened to the
hooks. When fastened to the hooks, or even when fastened to the tail
cords, and a heck is not to be used, the neck twines should be formed
into heads, either before they are tied up or afterwards, as may be
desired. The reason of this is, that when a number of neck twines are
tied to a hook or tail cord, and the hook is raised by the machine when
working, the twines will be slanting in different directions, and when
coming down again would be liable to catch on the knots of those that
were not raised; and the head is for the purpose of keeping them
together, so that they cannot separate for a short way down. One
method of doing this is, after the bunch of neck twines is tied to a
tail cord or hook, to take one of the twines and knot it round the others
about 3-1/2 in. below the tail cord, and the same may be done with a
second twine, if there are many in the parcel.
Sometimes the neck twines are all prepared in heads, and the
following is a convenient method of doing so:—Fasten four flat pins
of wood, as A, B, C, D, Fig. 49, on a board as F, or on the edge of a
bench or table. C and D are firmly fastened, but A and B can be
turned round to the position shown by the dotted lines when the
screws holding them are slackened. The distance from C to D must
be the length required for the neck twines. E is the twine coming[81]
from a spool on a wire. The pin A is pushed round to the position
shown by the dotted line, and the twine is warped round C, B, D,
passing over B and under C, so as to form a lease. When a sufficient
quantity is warped, the crossing of the lease is pushed up towards C,
and the pin A turned round into the centre of the twines, taking the
place of B, which is turned back. The use of the two pins is to allow
room for warping, C and A being too close together. The distance
from the outside of C to that of A should be the length the head is
required to be (about 3-1/2 in. or 4 in.). The twines may now be cut at
D, and a piece of cord looped round them and tied to D, so as to hold
them steady, but allow them to be drawn out as required. The number
of twines for each head can now be drawn out and tied round the two
pins C and A, and when a number are done they can be slipped off the
pins and put on cords or rods; the lease keeps the heads in order, and
the bunch can be hung up at the loom, and each head be taken in
rotation by the mounter. The number of twines for each head is
regulated by the tie of the harness.
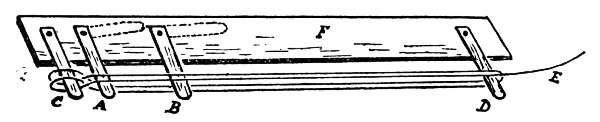
Fig. 49
Suppose a double-acting machine is to be mounted with the harness
similar to that shown in No. 1, Fig. 46. The tail cords are usually
put on the machine by the makers, but if they are worn out, or if new
cords are required, putting them on is the first process. This can be
done when the machine is on the ground, and the neck may also be
tied to the tail cords before the machine is put on the loom. Some
mounters prefer one method, and some the other, and the one which
most conveniently suits the circumstances may be used. When the
neck is attached to the machine before putting it on the loom, it is
usual to turn it on its side on blocks or on a table. If the machine is
on the loom, a board is tied up to make a seat for the mounter, and
the bunch of neck twines is fixed convenient to his reach; or he may[82]
have a boy to draw them out for him, and hand him the number he
requires. Beginning at the first hook, he takes a pair of tail cords, and
having drawn them down straight and stretched them firmly, he loops
the neck twines on them in the way shown in Fig. 46, and draws the
knot fast. The distance from the bottom of the hooks to the neck
twines should be 11 in. or 12 in. The first of these in each row is
measured, and the mounter can then regulate the others so as to have
all the knots in a line.
The number of neck twines that are to be tied to each hook is regulated
by the tie of the harness. For each time that any repeat or
portion of a pattern is to be repeated on the cloth there must be a twine
attached to those hooks of the machine that are to work this repeat.
For instance, if a 400 machine is used, and the pattern consists of a
simple repeat on these 400 hooks, and this has to be repeated six
times on the cloth, then six neck twines must be tied to each hook of
the machine. Again: The pattern might be made for a 400 machine,
200 hooks to be repeated six times, 100 four times, and 100 three
times; then six twines would be tied to the first 200 hooks, four to the
second set of hooks (100), and three to the third set (100), and any
mounting would be regulated in a similar manner.
Full particulars of ties will be given further on.
If all the hooks in the machine are not required, any number of
rows or portions of rows can be left idle at one end, or at both ends if
desired, or even at the back or front.
When all the neck twines are tied up, the next process is to draw
them through the heck, which should be fastened firmly 2 in. or 3 in.
below the knots connecting the tail cords and neck.
The jacquard is supposed to have been levelled and set in its proper
position on the loom, and firmly fastened there, and the same may
now be done with the cumber board.
CUMBER BOARDS AND HARNESS REEDS
These are both for the same purpose—viz., that of regulating the
space which the harness is to occupy—and both answer the purpose[83]
equally well, generally speaking. The reed being stronger is, perhaps,
more suitable for coarse work; and the cumber board, giving a more
evenly distributed harness, is perhaps preferable for fine work. Be
that as it may, both suit for any medium work, though some workmen
are all against the reeds, and others all against the boards. Harness
reeds are strong-made reeds of cane or iron, of the depth and fineness
to suit the harness. Bridges are fixed in them about 6 in. apart, with
perforations for stiff wire to be run through; as many wires as are required
to suit the number of rows of the harness. A wire should be
outside the harness at both sides, to prevent it rubbing against the ribs
of the reed. The wires are made straight, drawn tight, and fastened
at each end to holes in the yoke of the reed. The reed is set in a
frame of wood or iron, so that it can be bolted to brackets on the
loom.
Cumber or comber boards, also called hole boards, are made in
various ways. Sometimes they are of wood about 3/4 in. thick, and bored
in a piece. These boards are strong enough to bolt to brackets on the
frame of the loom. Sometimes they are thin, about 1/4 in. thick, bored
in the same way, and framed. The wood used is beech, sycamore, and
sometimes walnut. The objection to these boards, particularly the
thin ones, is that if the wood is not very well seasoned they are liable
to warp and split. A great many prefer to use what are called ‘slips’—that
is, small pieces of wood of the depth required for the harness,
and about 1-1/2 in. long or broad. The length, or long way of a cumber
board or harness reed, is frequently called the width or breadth, same
as weaver’s reeds, as this is the width of the loom. The cross-way, or
from back to front, would, in the same way, be the depth. These slips
are made of boxwood, beech, or other clean hard wood. Some prefer
beech or sycamore to boxwood. The twines cut into them all in time,
but the hardness of the boxwood causes a very fine cut to be made in
it, which cuts the twine. The others will not cut the twine so readily,
and by the time the wood is cut too much the harness would require
to be renewed as well as the cumber board. These slips are made
about 1/4 in. or 5/16 in. thick, and are set in a grooved frame. The usual
way of arranging the holes in a board is shown at A (Fig. 50), which is[84]
for an 8-row harness. B shows a patent method, devised for the
purpose of giving more space between any two holes in each horizontal
row. The arrangement of the holes is in 4-shaft satin order, and gives
double the space between the
holes of each horizontal line
that A does, and of course it
would take so much longer for
the twines to cut through; but
this would only be an advantage
if the holes were set very
close together, as otherwise the
harness would be considerably off the level before the twines had cut
from one hole into another. In any case, the irregularity of the holes
will likely prevent it from ever taking the place of the older method
shown at A, though it may be desirable sometimes.
Fig. 50
The cumber board is fastened on two brackets—one at each side of
the loom—and should be perfectly level and firm. It should be so far
advanced as to allow the harness to pass within half an inch of the
handrail of the lay when full back, and should be from 8 in. to 10 in.
above the mails, the lower the better, as it keeps them steady; but the
height may have to be regulated by the swords of the lay, as they must
be clear of it, and in some looms they are higher than in others. When
the cumber board is levelled and fastened, it should not be moved
after the harness is tied up, as any change in its position must alter
the level of some portion of the harness. This cannot in every case
be adhered to, as in some cases it may be necessary to move it. In a
small harness a good deal of shifting can be made that could not be
attempted in a large or intricate one. In many places the harnesses
are built in a separate room, or by the machine maker, and sent to the
manufacturer; but practical experience with particular work will teach
anyone that it is most desirable to have everything about the harness as
level and true as possible, and it takes a good deal of care to effect this,
even without any shifting.
[85]
SLABSTOCKS AND LEVELLING FRAMES
‘Slabstock’ is a name given to the board used for fastening the
mails on before they are levelled. It is about 6 in. deep and 1 in. thick,
and should be as long, or longer, than the loom is broad, according to
the way it is to be fixed in the loom, which is usually by being bolted
to brackets fastened on the sides of it.

Fig. 51
There is a groove or rebate in the top edge of it for holding the
mails, as shown in Fig. 51 at A and B. Sometimes the grooves are at
both sides, as shown at A1.
All the mails required for the
harness are put on the one
slabstock, which is set directly
under the cumber board when
the harness is being levelled.
Fig. 52
A levelling frame is better
than a slabstock; it is for the
same purpose—that of keeping
the mails firm and level when being tied to the neck twines. It
consists of two flat bars of iron, C, C (Fig. 52), which can be bolted
together in the form of a frame by the use of two stays, one at each[86]
end, and by the same screws be bolted to slotted brackets, A A, B B,
fastened to the frame of the loom. Sometimes two hanging brackets,
as D, are used, fastened from the top or heddle-bearer of the loom.
The levelling bars, C, C, rest in these brackets, and can be fixed firm
in them with a pin or cotter. If there is any yield or spring in the
brackets, they can be stayed from the front of the loom as well, as
the frame should be made very firm. The distance between the two
bars should be 4 in. or 4-1/2 in., which will suit any harness; if only
narrow harnesses, as 8-row, are required, it may be an inch narrower.
The length of the frame must suit the breadth of the loom. It should
be perfectly straight and level on the upper edges, and should have
two rows of holes bored in it, about 2 in. apart, for pins and skewers to
pass through above and below the wires on which the mails are strung,
so as to keep them firm.
LEVELLING THE SLABSTOCK OR FRAME
Levelling a harness, or rather levelling the mails of the harness, is
the most important part of the mounting, as, if the mails are not levelled
as true as a straight-edge, good work need not be expected from the
loom. The position in which they are levelled, in relation to the
breast beam and back rail, will depend upon the nature of the cloth to
be made, to a certain extent; but as a general rule, for ordinary work,
the eyes of the mails should be half the depth of the shed required to
be drawn below the level of the breast beam for hand loom work, and
a little more than that for power-loom work. This is to have the top
and bottom portions of the shed of an even tension, and to make both
sides of the cloth equally good. The position of the back roll can be
altered a little afterwards, if it is required to slacken either the top or
bottom portions of the shed. Raising the back roll throws up the weft
pattern to the under side of the cloth, and sinking the back roll gives
the upper surface of the cloth a finer appearance, by tightening the top
portion of the shed. A 3-1/2-in. draw of the harness is sufficient for
power-loom work, and perhaps less would sometimes be preferable.
Levelling the harness mails 1-3/4 in. for light work, and 2 in. for heavy[87]
work, below the breast beam should be a good average standard for a
3-1/2 in. draft of harness. The levelling frame or slabstock is levelled to
this height by means of a spirit level and straight-edge, making
allowance for whatever spring there may be in the harness after it is
tied, and the wires drawn out of the mails. This can only be ascertained
by experience, and depends principally on the tension the
mounter puts on the twines when tying them; it will also depend upon
whether the harness twines have any spring in them or not, but they
should be well stretched before being used, to avoid this. A mounter
who ties slackly will generally make a more level harness than one
who ties tightly. About 1/8 in. may be allowed for the mails to rise if
the cords are slackly tied, and if tightly tied 1/4 in. may have to be
allowed, and sometimes more than this.
Sometimes the level is taken by placing a straight-edge on the
race of the lay, when the cranks are at the back centre; then the under
edge of the straight-edge should give the position for the tops of the
mails on the slabstock, when it is fixed in its position in the loom. In
levelling by this method the race must first be set at the proper height,
and it must also be properly bevelled. From 1/2 in. to 3/4 in. below the
breast beam is a good level at which to have the race, when the cranks
are at the top centre, the latter for a low harness. The angle, or bevel,
of the race may not at all times suit for levelling in this way. If not,
the race should be made correct when possible; if it cannot be corrected,
the harness must be levelled a little lower and the back rail
kept down for working. A loom with the race bevelled for plain
work is not suited for damask; the angle between the race and reed
should, for damask, be about 93°, whereas for plain 87° would be more
suitable.
TYING UP THE HARNESS
Having the neck attached to the tail cords and the levelling frame
and cumber board fixed in position, the next operation is to get the
prepared lingoes placed in the loom, whether on the levelling frame or
slabstock. Suppose the levelling frame to be used. According to the
number of rows in the harness or cumber board, pieces of reed wire[88]
are procured, one for each row, and as many lingoes are strung on each
of these as will be required for each row of the harness, by running
the wires through the mails. These wires are then placed in the frame
and secured by skewers being put through the frame above and below
them. The frame is then levelled and firmly bolted to the loom.
The sleepers or mid-pieces of the lingoes are next drawn up through
the cumber board, one through each hole required to be used, any
surplus holes being previously marked out to suit the tie of the harness,
which will be afterwards explained. When all are drawn through, the
tying of the neck twines to the sleepers may be proceeded with.
This must be done in accordance with the tie of the harness. Thus,
if there are four cords tied on the first hook of the machine, these must
be taken down to the lingoes in the proper place in the cumber board,
which may be seen by examining the particulars of the mountings, to
be given further on. One method of fastening the neck to the sleepers
is shown in No. 1, Fig. 46, at D, d, d1. The twine is put through the
loop of the sleeper at d1 (or better to have a snitch on the sleeper,
unless the knots are to be varnished afterwards), then a loop is thrown
on at d, and the end tied at D, and clipped close. This method suits
very well when the harness is liable to be altered, for if the knots are
brushed over with paste they hold sufficiently firm, and can be loosed
again at any time, if necessary. If varnished, it also answers equally
well for any coarse harness; but if it is fine and much crossed, especially
if the twines are strong or coarse, the knots are liable to catch on
each other and raise more warp than should be when the loom is
working.
A second plan is shown in No. 2, Fig. 46. In this case there are
no sleepers on the lingoes; they are put on the levelling frame or
slabstock without them, the mails and lingoes being connected by the
hangers; the levelling frame is set in the loom as before, and the
neck twines must be long enough to go down through the cumber
board, through the top hole of the mail, and up again through the
cumber board to where they are tied. The mounter, when about to
tie them, takes one of the twines and casts a single knot on it, leaving
the loop open, then puts the end of it through a hole in the cumber[89]
board and through a mail, and with a small wire hook draws it up
again through the same hole in the cumber board, and through the
open knot or loop he made on it, at the same time; then, turning round
the awl or piercer in the other end of the handle of the hook, he puts
it through the knot and runs it up about 6 in. above the cumber
board, draws it tight, and casts another knot above it with the end of
the twine, as shown at D, No. 2, Fig. 46. This makes a neat harness,
and when a mounter gets accustomed to it he can proceed very expeditiously.
This method is used in England; the former is Scotch.
The instrument used for drawing the twines through the cumber board
consists of a wooden handle, in one end of which is a hook or barbed
wire, same as is used for drawing the warp through mails, and in the
other end is a round awl or piece of steel wire, tapered to a blunt
point, which is used for running up the loop or knots so as to have
them all about the same distance above the cumber board.
Beeting is another Scotch method of mounting. The harness may
be beeted either above or below the cumber board; beeting above it
was the old method, and single slabstock was used, as shown in Fig.
51 at A. When preparing it for the loom, the lingoes and mails are
connected by the hangers in the usual way, and hung on the slabstock
with the mails in the groove in it, as shown at B, Fig. 51. A piece of
flat wire (reed wire) is run through the eyes of the mails, as many as
are required for the whole harness, and is then tied down by cords
fastened round it and the slabstock, at short distances apart. The
slabstock is now put into a frame, or rack, with a rail as high above it
as is required for the length of the sleepers. A spool of twine is fixed
on a wire pin at the side of the frame, and with a needle, or otherwise,
the end of the twine is run through a number of the mails and fastened.
With a hook the sleepers can be reeled up to pins in the rail
above the slabstock, on the same principle that they are done in Fig.
47. When the sleepers are all finished they can be slipped off the pins
and cut.
The slabstock is next fixed in the loom and levelled with the upper
edge of the rebate or groove touching the under edge of a straight-edge
placed on the race of the lay when it is full back (for power looms).
[90]
The sleepers are then drawn up through the cumber board without
their ends being knotted; they should be long enough to reach
about 8 in. above it, and say 7 in. below, making 15 in. for their entire
length.
Now, to beet the harness: Say there are two beeters, standing on
the ground, with a supply of neck twines convenient to them; they
pick up the sleepers from the first set of holes in the cumber board—that
is, those that are to be connected with the first hook in the
machine—and, having tied neck twines to them, hand them to the
harness tyer, who is up at the machine. He takes the lot of twines
and draws them all to an even tension, then, having drawn down the
tail cords firmly and evenly, knots the neck twines to them.
One method of knotting the neck to the tail is to have the tail cords
tied together so as to form loops; then, having straightened both the
neck and tail cords, lay the neck against the loop of the tail, and take
both firmly between the finger and thumb of the left hand, being careful
not to let them slip, and casting a knot, as at C or D, Fig. 51,
round the tail, with the ends of the neck draw it fast. In order to
have all the tail cords plumb and the knots of a uniform height, the
harness tyer sometimes has a cord tied across the top of the loom
frame, at each end of the machine, at the height the knots are to be.
On these he lays a straight-edge, marked as a guide for where the tail
cords are to hang, so that he can regulate those of one row and have
them plumb, and the knots even; when one row is finished, he moves
the straight-edge to the next, and goes on with it. A newer method of
beating is to prepare the lingoes with sleepers and hangers, the sleepers
to be about 5-1/2 in. long. The slabstock A1, Fig. 51, is used, or the
other if preferred.
The mails are put upon flat wires as before, but instead of all going
on one wire, half the number is put on each of two wires, and one of
them is placed at each side of the slabstock, where it can be fastened
with small staples. To facilitate getting the mails on the wires, when
reeling the sleepers on the pin, as in Fig. 47, a lease can be made on
the loops by giving them a twist when putting them over the pin.
A piece of twine can be fastened in this case, and the loops afterwards[91]
cut. The mails can then be taken off in order, and run on the
wire for the slabstock. When the mails are fixed on the slabstock it
may be laid on the ground, or set in a frame, and the neck twines
tied to the sleepers; and when all are tied, they can be drawn through
the cumber board or harness reed. Afterwards, all are taken and fixed
in the loom. The cumber board must be set so high above the knots
on the sleepers that they will not come into contact with it when the
shed is opened (that would be 4 in. or 4-1/2 in. above it). The neck
twines are then tied to the tail cords as before.
This makes a very good harness, and has the advantage of having
no knots on the neck twines above the cumber board, which is very
important in an intricate harness with the cords close together, as the
knots when varnished are liable to catch on each other, or on twines
slanting across them, and lift them as they are being drawn up.
When a harness is mounted in this way it is not easy to make any
alteration on it, or to re-level any portion of it if necessary. If the
sleepers are tied in loops, same as used in No 1, Fig. 46, they can be
connected to the neck twines by having the latter double and putting
both ends of the neck through a snitch on the sleeper, or the neck
twines may be double and the two ends of the sleeper when untied
may be put through a snitch on the looped end of the neck twine and
tied; in this way they could be altered or adjusted afterwards if
necessary, but if they had to be varnished the knots would be rather
rough.
The following method of mounting is adopted in the damask hand-loom
districts of the North of Ireland, and is used for particular power-loom
work as well. It is a slower process than the preceding, but
cannot be surpassed for getting a level harness, and the mails can be
regulated as desired—that is, to have the back rows getting gradually
a little higher than the front ones, which can only be accomplished in
the preceding methods by tying them a little tighter, or by having
the frame sloped a little.
The lingoes may be prepared as before, with the sleepers 5 in. long
when tied and clipped. The neck twines are put down through the
cumber board and knotted loosely in bunches underneath.
[92]
The levelling frame is set in the loom, the top edge of it being at
the level that the eyes of the mails in the front row are to be hung.
No wires are required. The lingoes are taken in bunches and put
astride on the frame as required, and boys fasten them up to the neck
twines by throwing on a snitch and running them up to somewhere
about the height they will be wanted when level; in doing so the
knots on the sleepers must be kept up as close to the snitch as is convenient
for tying them, as, if left too low, they would interfere with the
warp in shedding. When all the lingoes are hung inside the levelling
frame—or they may be hung first, and the levelling frame put up afterwards
and levelled—the mounter may begin to level the mails.
He uses a fine piece of waxed cord with a small weight at each end,
which he lays across the levelling frame as a guide, and levels each
row from back to front in succession. The front mail may hang with
the top of its eye level with the cord, and the others rise a little higher,
till the back one is perhaps, with the bottom hole, level with the levelling
cord, or 1/8 in. higher than the front one. The levelling can easily
be accomplished by sliding the snitch up or down the neck twines; and
when the correct height for the mail is got, the neck twine is tied as
at H, No. 3, Fig. 46, when it is to be varnished, or as at H1 when it
need not be varnished; in the latter case cable cord is used for the
neck, and it is split at the end, when drawn through the snitch, and
then knotted.
VARNISHING A HARNESS
Varnishing is for the twofold purpose of making the harness twines
wear better, and keeping them from being affected by the atmosphere.
Sometimes the harness is only partly varnished, particularly when
it is liable to be changed in a short time, and then it can be loosed
down and used again.
If it is to remain for a length of time—that is, for steady work—it
should be varnished all over, but care should be taken to get a good
varnish, as some of them destroy the twines, and others come off and
are useless.
The common varnishes are made principally from shellac, beeswax,[93]
and turpentine, and can be procured at any heddle-maker’s. Sometimes
white wax dissolved in turpentine is used to rub the twine at the
cumber board, for fine harnesses for silk and other light work, the
remainder being left unvarnished. Sometimes the neck of the harness
and the sleepers are varnished, and the knots above the cumber board
are brushed with paste, as each row is tied, to keep them from
slipping.
Perhaps the best varnish is boiled oil, which, when well dried, gets
very smooth after working for some time, and keeps the twines soft
and pliable. It takes some time to dry, and does not suit well for using
in a dusty place, but answers very well when the harness is built in a
room for the purpose, and is afterwards taken to the loom.
Sometimes a very small quantity of beeswax or white wax is added
to the oil to give it more firmness, and sometimes driers are used to
make it dry more quickly; but it is better to do without driers, as they
harden the twines and are injurious. Varnish should not be disturbed
till quite dry, as, if the twines are separated and the loom started when
it is soft, the outer surface will rub up and make a rough harness.
The twines are separated by running a wire skewer between each cross-row.
French chalk dusted down through the harness assists in
smoothing it, and prevents too much friction when it is being started
to work.
TO ARRANGE THE TIE OF A HARNESS
What is known as the tie of a harness is the arrangement or
manner in which the harness twines are connected to the hooks of the
jacquard—i.e. the number of twines that are tied to each hook, and the
position they are to occupy in the cumber board. Ties for ordinary
damask work may be divided into three classes—viz. straight, or
single; lay over, or repeating; and gathered, or centred.
Straight or Single Tie.—This tie is only required when there is no
repetition of any portion of the pattern, as in silk markers, and occasionally
in handkerchiefs, d’oyleys, tablecloths, &c. Only one harness
twine is tied to each hook of the jacquard, and there must be as many
hooks as there are threads of warp. The twines are tied to the jacquard[94]
and taken down through the cumber board in regular order from first
to last, and the warp is drawn into the mails in the same order. Any
pattern that it is possible to put on the cloth can be wrought with this
method of mounting.
Lay Over or Repeating Tie.—This is, perhaps, the commonest tie,
and is used for all such
patterns as Fig. 53, where
one small portion, as that
enclosed by the dotted
lines, will, when repeated
several times, cover the
entire surface of the cloth.
Fig. 53
Gathered or Centred
Tie.—This tie can be used
when both halves of any
figure or border, &c., are
alike when turned over; it
will only require half the number of hooks to work a figure or border,
when gathered or centred, that would be required for a single pattern.
All other ties are combinations of these.
Fig. 53 shows a pattern for a lay over, or repeating tie, such as
might be used for dress goods, handkerchiefs, &c. The complete
extent of the pattern is enclosed by the dotted line; this is called one
‘repeat’ of the pattern, because this portion repeated over the cloth
makes up the entire figuring on it. To ascertain how this may be
woven, or what number of hooks of the jacquard will be required to
weave it, the number of threads contained in 1 in., or other given space,
of the cloth required must be known. If the pattern is to be on the
cloth say 2 in. × 2-3/8 in., and there are to be 100 threads of warp and
120 threads of weft per inch, then 200 hooks of the jacquard and 240
cards would be required to weave it, each hook representing one thread
of warp, and each card representing one shot of weft.
Fig. 54
Figs. 54 and 55 show mountings on jacquards with 208 hooks in
each, the former tied on the Norwich principle, and the latter in the
London style. In both cases only 200 hooks are used, the remaining[95]
eight hooks being left idle for selvages, if required. These mountings
are made for four repeats of the pattern, which would only make 8 in.
of cloth; but there may be any number of repeats, say 13, to make 27
in. of cloth or 28-1/2 in. of warp in the loom, with, say, 92 threads per
inch. There must be a harness twine for each repeat of the pattern
tied to each hook of the machine; when four repeats are used, four
twines are tied to each hook, as in Figs. 54 and 55. The harness reed
or cumber board, G, must be of the same set or fineness as the weaver’s
reed (if finer, it can be used by passing over the surplus holes). It is
divided into four portions, leaving 200 holes for each repeat, and the
twines are, in Fig. 54, taken straight down from the hooks to the holes
in it, as can easily be seen. In this figure the cross-rows of the
cumber board at the first of each repeat are shown filled; but in
mounting, the back row, taken from the hooks A to B, would be filled[96]
first. In Fig. 55 the reverse is the case, the cross-rows, as shown,
being the first filled; this is owing to the twist in the harness, as the
machine is sitting so that the cards will hang over the side of the loom.
The letters A, B, C, and D in both figures denote the same corners of
the machines, showing that in Fig. 55 there is a quarter twist in the
harness. In Fig. 54, the dotted lines from the 200th hook show the
last cord of each repeat; L is the first cord of the last cross-row, and E
and F are the same in Fig. 55. In these figures only the skeleton of
the mounting is given; it must, of course, be filled up as the first rows
which are given.
Fig. 55
For this description of mounting the yarn is drawn into the mails
in regular order, beginning at No. 1, and proceeding with the numbers[97]
as given. In this case the back hook to the left-hand corner must be
taken as the first hook of the machine, and the cards cut to suit this.
Sometimes the first hook to the front left-hand corner is considered
the first hook, but if so it must be remembered when cutting the cards.
Sometimes the mounting is begun at the right-hand side, but in any
case it is only necessary to see that the draft of the yarn and cutting
of the cards correspond with the order of mounting; the result of the
work should be the same in all cases.
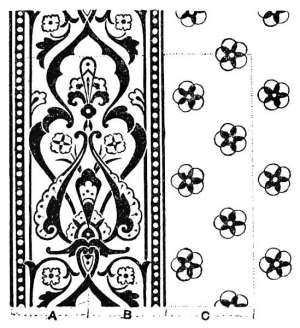
Fig. 56
Fig. 56 shows a pattern for a gathered border with a repeating
centre, which is a very common style of design. It will be seen that
the two halves of the border,
A and B, are alike, if taken
from the centre outwards;
or if one-half of the border
were traced on tracing paper,
it would, if turned over, form
the other half. For this
reason it is also called a ‘turn-over’
border. In the same
way, if two cords are tied to
each hook of the jacquard for
the border, and those to the
first hook taken down to the
cumber board for the two outside
threads of the border
(that is, one to the right and the other to the left), then those from
the next hook taken to the two next outer holes, and so on, coming from
the outsides to the centre, the first half of the pattern would be repeated
by the mounting in exactly the same way as by turning over
the tracing paper.
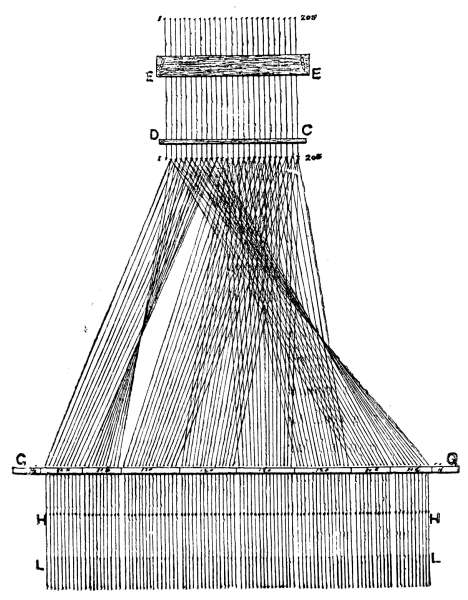
Fig. 57
Fig. 57 shows a mounting for a gathered border and four repeats of
the centre. Eighty hooks are taken for the border, which are repeated
four times in the cumber board, as at 80a, 80b, 80c, and 80d, and 120
hooks are allowed for the centre repeat (see also Fig. 58). This
mounting is made up for a 200 machine with 208 hooks, the extra[98]
eight hooks being left for working the selvages. Only the front row
of the harness is shown, but they are all alike. By following the cords
from the hooks to the cumber board, it can be easily seen how they are
taken through it. The first eight hooks are left idle, for the selvage
to be fixed to if required. The next ten rows = 80 hooks, are for the
border; these 80 hooks, with one twine on each, taken down through
the cumber board at 80a, would work the first half of the border, as A.
The other half of the border, B, can be wrought by the same hooks,
with another set of twines tied to them, and taken through the cumber
board at 80b; but the twine from the first hook must be crossed over to
the right-hand side of the border, being the 160th twine in the cumber
board; the twine from the second hook is the 159th in the cumber[99]
board, and so on, coming in towards the centre to meet the first set of
twines; hence the name, ‘centred tie.’

Fig. 58
The border must also be repeated on the other side, and two more
sets of twines must be tied to the same hooks (four
to each hook in all), which are taken down through
the cumber board at 80c and 80d, to work the
two halves of the border marked G and H, Fig. 58.
The next 15 rows of hooks = 120, work the repeat
of the centre pattern, C, Figs. 56 and 58; and as
this is repeated four times, at C, D, E, and F, Fig.
58, there must be four twines tied to each of the
120 hooks, which are taken down through the
four divisions of the cumber board marked 120;
one twine from each hook being taken through
each division, beginning at the left and working
to the right side, alike in them all, as this portion
is a simple repeating tie. Fig. 58 gives a portion
of the pattern in Fig. 56 completed across, as it
would be on the cloth by the mounting in Fig. 57;
the cumber board is laid across the top of the
pattern and marked, showing, in conjunction with
the mounting, Fig. 57, how the harness repeats
the pattern so that a large surface can be figured
with a small machine by adopting a suitable tie.
When drawing the warp into the harness,
wherever there is a gather in the tie, or a turn in
the harness, there must be a turn in the draft
also; not that there is any real change in the draft,
but when the harness is turned in the direction
it is drawn through the cumber board, the draft
must also be changed to follow the mails in regular
order. Fig. 59 shows a draft for a gathered border,
with 48 hooks for the border and three repeats of the centre. It will
be seen that the first half of both borders A and B and the three repeats
of the centre are drawn in the same direction, but that the two turned-over[100]
portions of the borders C and D are drawn in the reverse direction.
The numbers on Figs. 62 and 62a may assist in explaining this, the
border A in 62 and B in 62a being taken; in these it will be seen from
the numbers, which are those of the harness twines, that 1 to 8 in
border A (Fig. 62) run in the reverse direction of 1 to 8 in border A
(62a), and both are from the same hooks.
Fig. 59
Fig. 60
When two borders are to be woven on any piece of cloth, though
the pattern for each border may be single in itself, as Fig. 60 (which
is single except the two outlying lines, A and C), they will to each other
form a gathered tie, provided they have to be turned in the same way
to the centre of the cloth—that is, if the inside of one border on one
side is to be the inside of the other border on the other side. In such
a pattern as Fig. 60 it would not matter much if the inside of one
border was the outside of the other, as the border is much alike either
way, and if wrought in this way the twill on the cloth would not be
reversed, as is always the case in a turned-over border. In many[101]
patterns this would not do, and it is therefore necessary to gather
the tie and turn the twill. Fig. 61 shows how, in the London style of
tying, the harness can be turned so that a turn in the draft is not
necessary, but this will not alter the
reverse twill on the cloth. It will
be seen that one of each of the two
cords tied to the eight hooks goes
to one border, and the other to the
opposite border, but instead of both
going to the same row of the cumber
board, the cord from the first
hook goes to the back row in one
border, and to the front row in the
other. All the cords follow in this
way, which has the same effect as
turning the draft, as would require to
be done in the Norwich mountings,
and could also be done on this
principle. Fig. 62 shows the draft
of the two borders for Fig. 61
mounting, A and B being a plan of
the warp passing through the mails.
The numbers refer to the hooks of the jacquard. C and D are the two
innermost threads of the borders, both on the 48th hook of the machine.
Fig. 62a shows how the draft would be if the cords were not brought
from front to back of the cumber board, as the numbers will show.
No. 1 shows where the cords from the first hook pass through the[102]
cumber board. Fig. 62a gives the right-hand border only, the left-hand
one remaining the same as in Fig. 62.
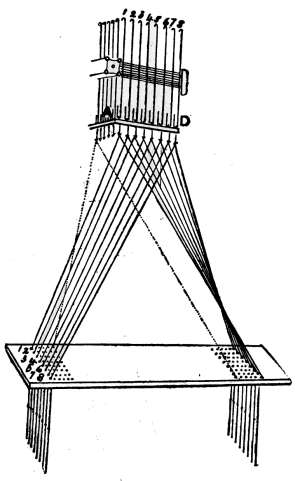
Fig. 61
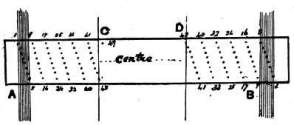
Fig. 62
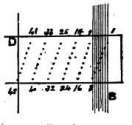
Fig. 62a
In Fig. 60, the two bars A and C could be wrought from the same
hooks, and, unless they might be required to be different from each
other on another pattern to work on the same loom, it would be unnecessary
to allow machinery for the two; either the outer or inner
one could be tied up, and the other repeated from it, but the one that
is tied up must be painted on the design paper.
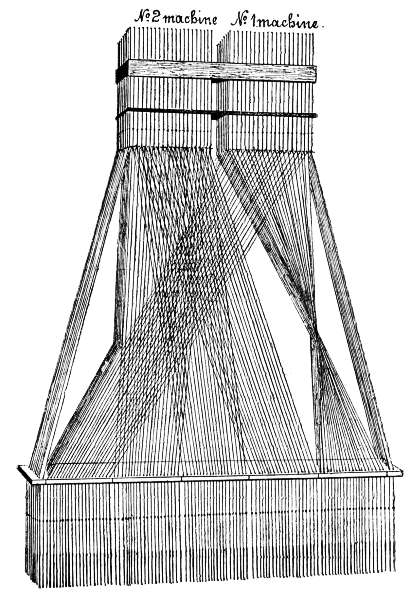
Fig. 63
Fig. 63 shows the front view of a mounting for weaving a pattern[103]
such as that given on Fig. 60, one machine being used for the border,
and another for the centre. Usually the border machine would be to
the left-hand side, to correspond with the pattern; but in Fig. 63 it
will be observed that No. 1 machine is to the right-hand side, and that
it works the borders. It does not matter which machine is used for
border or centre; the mounter can use the one he considers most suitable
for the borders, and the pattern may be painted and the cards cut
without any consideration of this, it being only necessary to put the
border cards to the border machine, and those for the centre to the centre
machine. The only consideration is to avoid any unnecessary slanting
of the harness twines, which the present arrangement does; and it
also keeps the turned portion of the harness (that for the right-hand
border) separate from the twines of the centre, thus avoiding any
unnecessary friction.
TO MARK OUT A CUMBER BOARD
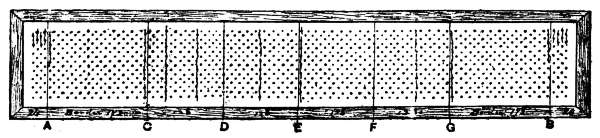
Fig. 64
Cumber boards may be either the exact fineness of the harness, or
any set finer; they are better to be a little finer, to allow for any
broken rows at the beginning or end of any of the repeats. When
the cumber board is finer than the harness, the surplus rows are left
idle. A convenient plan of marking off a cumber board is as
follows:—Let the pattern be as Fig. 60—that is, with a border at
each side and the centre to be repeated several times to make up the
width of the cloth. Let 24 cords be required for the selvage, 172
cords for the border, and 128 for a repeat of the centre; there are
to be four repeats of the centre. Now mark off on the cumber board
whatever width the harness is to stand, which should be the same or
rather wider than the warp occupies in the reed, and let it be so as to
have the harness in the centre of the loom. Suppose Fig. 64 to give[104]
the width of cumber board required. The selvages are wrought
from 6 hooks, and there are 8 hooks in each row of a 400 jacquard;
therefore 4 rows of the cumber board will be required for each selvage.
Mark these off by drawing the lines A and B on the cumber board.
Now find out the width the borders are each to occupy, by calculating
how wide the yarn will be in the reed, and mark them off by the
lines C and G; then mark off the width of each repeat by the lines
D, E, and F. Counting the number of holes marked off for the margin,
it will be found that there are 32; but as the selvage is on six hooks,
the two back holes of each row of the cumber board are marked out,
as shown, not being required. The portion marked off for the borders
contains 23 rows on each side, whereas only 21-1/2 are required for 172
cords. As the centre repeat is on even rows, and it is usual to leave
broken rows to the left-hand side of the painting, the first 4 hooks of
the border portion of the machine will be idle; therefore the 4 back
holes of the cumber board for both borders are marked out; this still
leaves a row too much, which may be marked out at any place. For
the repeats, 128 cords, 16 rows are required, and the surplus rows are
marked out, as shown. This mounting is supposed to be on a 400
machine, leaving 100 hooks idle to the left-hand side of the mounting,
then using 1 row for the selvages, and the remaining 38 rows for the
pattern, all but the half of the first row, which is not required.
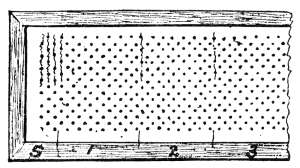
Fig. 65
In marking out a cumber
board for a lay-over, or repeating
pattern—if, say, 108 hooks are
required for each repeat, which
makes 13-1/2 rows of an 8-row
machine—if the broken row is
to the left-hand side of the
painting, and the harness
mounted from left to right, then the first four holes of the first row
of each repeat of the pattern are marked out in the cumber board to be
left empty, as shown in Fig. 65. When mounting, no attention would
be paid to the cords on the half-row of the machine till the first four
rows along the cumber board have been filled, the mounter beginning[105]
with the back cord on the first full row of the machine, which is the
fifth hook of the tie. Three rows for the selvage, which is on four
hooks at the front of the harness, are shown at S, Fig. 65.
The front of a jacquard is generally considered by workmen to be
the cylinder side. Of course, when there is a cylinder on each side
there is neither front nor back to it. Sometimes it is very confusing
talking of the front and back, one considering it to mean the front of
the harness, or front of the loom, and another taking it to be the front
or cylinder side of the jacquard, which is usually at the back of the
loom for Norwich ties. Of course, the front of the loom is where the
weaver stands, or where the cloth is made, and the front of the harness
is towards the front of the loom. It simplifies matters greatly by not
minding the back or front of the machine, but speaking of every part
of the harness, &c., towards the front of the loom as the front of it.
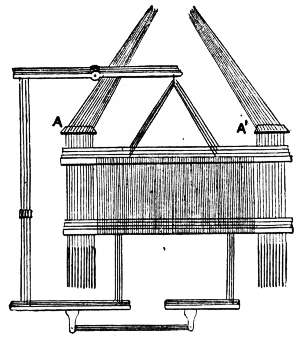
Fig. 66
It frequently happens that figured stripes are required, running up
plain or fancy textured goods, either forming borders to the outer edges,
or merely ornamental stripes, say 3 or 4 inches from the edges
of the cloth, as in towels, toilet-covers,
&c. For this class of
work it is generally most advisable
to work the stripes with a
small jacquard, and the plain or
fancy texture of the body of the
cloth with a shaft mounting.
Fig. 66 shows a mounting of this
class; the shafts can be wrought
by tappets in the usual way, and
small cumber boards, as A, A1,
are fastened to the top rail of
the loom for the harness to pass
through. It is usual to keep the
harness behind the heddles, and
it is levelled in the usual way. The yarn may or may not be on the
same beam for both portions, according to whether the take-up, or
shrinkage, will be the same for both portions or not. Sometimes the[106]
shrinkage may be regulated to be alike in both by using different counts
of yarn, or drawing it thicker into the reed; but perhaps in most cases
two beams would be desirable, unless the texture is much alike for both
the stripes and body of the cloth.
The lease rods for the yarn in the harness will not, probably, do to
be the same as those for the body yarn, as the action of the heddles
will be different from that of the harness. If the same rods will not
suit, it is easy to have a pair for each warp, those for the harness being
farthest back. Stripes of this description are frequently made in towels,
glass-cloths, &c., for clubs or hotels, with the name of the company
woven into them. A gathered tie is mostly used for these mountings,
except when letters are required to be woven, in which case a gathered
tie is not suitable. (See Letters and Monograms.)
TO VARY THE SET OF THE HARNESS
It may often be that in weaving figured piece-goods it would be an
advantage to have a harness that would weave different degrees of
fineness, so that the loom could be utilised for one when the other is
not required. For weaving small quantities, for samples or special
orders, this is often an advantage.
The usual method of procedure is to draw the warp into a finer
or coarser reed if only a slight difference is required, and to pay no
attention to the strive in the warp between the harness and reed.
The better the quality of the warp, the greater the strive may be, but
from 1 in. to 2 in. at each side is as far as it can safely be run when the
harness is wider than the yarn in the reed; and if the reed is coarser
than the harness, 1 in. at each side will probably be the maximum limit.
When changes of this kind are liable to take place, the cumber
board should not be too low down, nor should the mails hang too close
to the back of the slay; with the cumber board high and the harness
a little back the strive will not tell so severely on the warp. When
the cumber board is made of boxwood slips, they can be spread out a
little in the frame, but when there is much of a slant in the harness
this would take the mails off the level; though this can sometimes be[107]
counteracted a little by raising the cumber board slightly higher at one
end than at the other.
The best plan when much of a change is required is to pass over the
surplus rows of mails in the harness, as in harness work, as well as in
shaft mountings, the mounting may be used for any coarser set of
warp than it is built for—of course, if the width is suitable. This
would necessitate the warp, or at least a part of it, being drawn out
of the harness, and also requires a new set of cards for the new pattern,
or for the same pattern on a new set of cloth. The surplus mails may
be cast out in rows across the loom if many are to be rejected, or in
rows across the harness (from back to front) if found more suitable,
or when a small number of mails are to be left idle. Suppose for an
8-row harness, 400 machine, with 6 repeats = 2400 mails on 30 in., or
80 threads per inch, and it is required to weave a piece of cloth on this
having 74 threads per inch. Drawing the yarn into a coarser reed, and,
if only 30 in. wide is required, throwing off the surplus yarn at each side,
would probably be the simplest method; but if the cloth to be woven
is to have 60 threads per inch, every four throw of mails across the
harness, or one-fourth of the harness, might be left idle, or the two
back rows of the harness may be left empty. In the latter case the
pattern could be painted on 6-row design paper as if for a 6-row machine,
and in the former case the number of designs across the painting would
be reduced by one-fourth, the card-cutter taking care that he omitted
those rows on the card that have been thrown idle on the machine.
In order to reduce this trouble and expense to a minimum Messrs.
Devoge & Co. have patented an expanding harness which is intended
to admit of cloths of different degrees of fineness being woven without
any trouble but a little setting of the cumber board and re-reeding the
warp. The method of doing so is as follows:—There are two cumber-board
frames, one above the other, as shown in the sketch Fig. 67;
these frames are filled with slips which can be moved along when
desired. The harness can be set for two degrees of fineness of warp,
as is shown in the sketch. The slips in the upper frame, B, are
set midway above the two positions for a slip in the lower frame
[108]indicated by the letters a and a1. The black lines show the position of
the cords when weaving the finer set. The only change required to be
made is to shift the lower slip, a, to the position a1, and to re-reed the
warp; other changes can be made on the same principle, or by altering
both sets of slips in relation to each other. When the slips are moved
in the frames, they can be kept in position by interposing blank slips
between them.
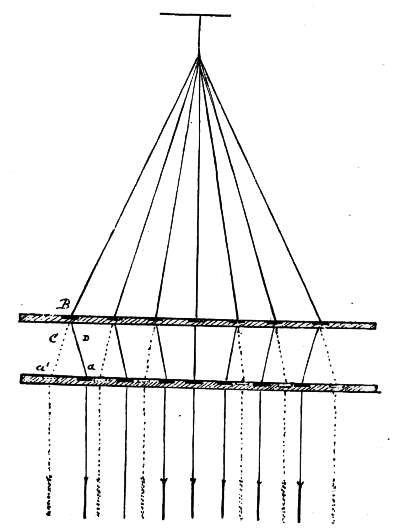
Fig. 67
The same cards will suit in this case for several sets of cloth, if
required. Of course it is plain that the friction on the harness twines
working through the two cumber boards must be greatly increased
from that of the ordinary method of working; but for light work, and
when the harness is not required to last long, it may prove very
serviceable when frequent changes are required, as it furnishes a ready
means of accomplishing the desired object, which cannot be done
without cost in some direction. For wide looms or intricate mountings[109]
it will not be of much service. In the Figure only one hook of the
jacquard is given, for simplicity, but the harness would be filled up in
the usual manner. If the harness is built with long mails having
several eyes in them, the second cumber board is not required; the
slips can be shifted and the warp levelled by drawing it through suitable
holes in the mails.
[110]
CHAPTER IV
DESIGNING AND DRAUGHTING
Designing is the composing, drawing, and colouring, if necessary, of
the sketches for jacquard patterns, and in some cases planning the
texture of the cloth; and draughting (or drafting) is the term usually
applied to the painting of the patterns upon design paper.
A designer should be a first-class draughtsman, and have a thorough
knowledge of the various styles of ornament; he should also be well
practised in drawing floral forms from Nature, without which there is
generally a stiffness and want of freedom in his style of work. For
coloured work, such as carpets, &c., skilful colouring is the most essential
point. No drawing will atone for bad colouring; at the same time,
good colouring should not be wasted on bad drawing.
A designer may draught his own patterns, and if he is an experienced
draughtsman with a good knowledge of weaving, perhaps this is the
most successful method of working; but if the greater portion of his
time is to be taken up with draughting, his talent as a designer will be,
to a great extent, lost, and he will probably deteriorate; besides, he will
not have the same opportunity for getting up a variety of designs that
he would have if he had nothing else to attend to. A designer for any
class of work should have a knowledge of the technicalities of the
material for which he is designing a pattern; at the same time, a very
slight knowledge is essentially requisite, provided the sketch be given
into proper hands to be worked out. It must be remembered, however,
that in this case a sketch may often have to be taken only as an idea
for a pattern, and not be handed by the manufacturer to the draughtsman
with directions to make a truthful reproduction of it on the cloth.
A draughtsman may be a skilful designer as well, or he may be a skilful[111]
draughtsman and have very little powers of designing. When he
is a designer, the most successful method of getting a variety of patterns
would be for the manufacturer to purchase sketches for ideas and hand
them over to his designer, who will be considered to have a thorough
knowledge of the practical work, to prepare them to suit the fabrics for
which they are intended, perhaps completely altering them, making
two or three out of one, or combining two or more to make one pattern
if necessary—in fact, using them as material to work from. They may
then be handed over to the draughtsmen, or be sent to a designing
establishment for draughting and cutting. In case the manufacturer
has no designer in his place, but only a draughtsman, the sketches
must be bought prepared to suit his fabrics, or it would be better to
have the complete work done, in many cases, at a designing establishment.
Of course, in draughting, as in all classes of work, a great deal
of the less important portions may be done by junior hands, but a
knowledge of drawing is required, if only to guide the eye, by them all,
except the twillers.
Sometimes designers accustomed to selling sketches get them up in
a very deceptive manner in order to deceive manufacturers or their
agents, who may have very little knowledge of the work; but this can
easily be checked by submitting them to a practical designer before
purchasing them.
A design that may be very suitable for one class of cloth may be
equally unsuitable for another class, and in many cases fashion
regulates the suitability quite independently of its artistic merits.
For coloured work, designs should be of such forms as lend themselves
to the disposing of colours, no style being more suitable than Persian;
whereas in plain work, as damask, the flow of line or the variation of
the forms, assisted by portions of fancy shading or twilling, must give
the complete effect. Again, different degrees of fineness of cloth will
suit for different designs; of course, any pattern that can be put on a
coarse cloth can also be put on a fine one, but many patterns are very
suitable for fine work that could not be put on a very coarse fabric.
When it comes to fine coloured silks, anything that the artist can
paint can be fairly represented, as may be seen in the work from the[112]
Coventry silk marker looms, so that any design can be put upon cloth;
but the question is, Is the cloth suitable for the design?
Fig. 68
Fig. 68 shows a piece of 8 × 9 design or point paper; 8 × 9 meaning
that each of the large squares, or
designs, contains 72 small checks or
squares, 8 in breadth and 9 in length,
but the 9 should occupy the same space
as the 8. Ten by ten appears to have
been the standard design, as patterns are
still counted by the 100 designs, each
containing 100 checks, or 100 checks in
length and the same in breadth: and in
some places machines are known as so-many-design
machines; thus, a 400
jacquard is called a 40-design machine.
When each design contains as many checks in length as it does in
breadth, the paper is intended for work that is to have equal quantities
of warp and weft threads in it; thus 8 × 8, 10 × 10, 12 × 12 paper
would all suit for cloth with, say, 80 threads of warp and 80 picks of
weft per inch, the difference being that 8 × 8 is intended for a jacquard
with 8 needles in the row, and 10 × 10 and 12 × 12 for 10 and 12 row
machines respectively. It is not necessary to have different papers to
suit, as one could be used for all, and after the pattern is painted it
could be ruled in rows to suit the machine, but it is much more
convenient to get the correct size of paper.
If 80 threads of warp required to have 100 picks per inch, then to
find the size of the paper state as 80: 100:: the number of needles in
one row of the machine to the number of cards in each design, giving
8 × 10, 10 × 12-1/2, or 12 × 15; but 10 × 12, or 12 × 14 would have to be
used for the last two, as a half could not be made, and 12 × 15 is an
unusual size. Either would do by drawing out the design a little
when enlarging it for the point paper. Square paper might also be
used by counting off the number of checks required, and drawing an
elongated pattern to cover them; but it is more desirable to have
suitable paper for work that is at all particular, and in case of such as[113]
12 × 15 paper, 8 × 10 is the same proportion, and could be used for it,
the squares afterwards being ruled in 12’s for the card-cutter.
Each upright space on the design paper, between the lines,
represents a thread of warp or one hook of the jacquard, and each
space between the horizontal lines represents a pick, or shot, of weft,
or one card of the pattern; so that a painted pattern is a magnified
view of the texture of the cloth, in common jacquard work.
Fig. 69
Fig. 70
Fig. 69 is a small sketch for a border with spot filling, which is
shown on design or point paper in Fig. 70. The paper is 8 × 8; the
first four checks are used for a selvage, and the pattern is on 12-1/2
designs or 100 threads of warp, and 22 designs or 176 cards would be
required for the weft, the pattern being made about three times the
size on the design paper that it is on the sketch. The design paper
has 16 checks per inch, consequently the cloth would have about 48
threads to the inch to make the pattern appear as the sketch. If the
cloth were finer, say with 72 threads per inch, then 150 checks on the
design paper would be required for the pattern, which means that 150
hooks of the jacquard would be required for working it. Whatever
width the sketch occupies (one repeat of the pattern), multiply this by
the number of threads of warp per inch to be in the cloth required,
and the product will be the number of hooks required for the jacquard,
and the number of checks or spaces required on the design for the
warp. The number of cards is found similarly from the weft of the
cloth. If, on the other hand, a pattern is to be made for a jacquard,[115]
and it is required to find what size of pattern will work on it, divide
the number of hooks in the jacquard by the number of threads per inch
in the cloth required, and the quotient will be the size of the pattern
warp-ways, in inches. The length or weft-way of the pattern can then
be arranged to suit the number of cards, or the pattern can be made
any length to suit the style of design. Fig. 71 is a pattern of the
same style as Fig. 69, and it might be wanted to use it instead of Fig.
69 for cloth of the same make, say 40 to 45 threads per inch. This
could not be done, as it could not be put on the design paper, but it
would suit very well if intended for cloth with 80 to 100 threads per
inch, which would admit of its being sufficiently enlarged (say four
times the size of the sketch) to be correctly represented by the checks.
Fig. 69 would be better on cloth having 50 to 60 threads per inch,
coarser sets requiring larger forms.
Fig. 71
In preparing a design for point paper, the sketch is usually first
made out and selected by competent judges as suitable for the fabric
required, as well as for the taste of the market in which the goods are
to be sold. When selected it has to be enlarged to suit the size it is to
cover on the point paper. Sometimes the enlargement is made on
another piece of paper, and is then transferred to the point paper; this
is perhaps one of the best methods of proceeding, but it is not so quick
as if the enlargement were made upon the point paper direct. It is usual[116]
to rule squares on both the sketch and design paper, which bear to
each other the same proportion that the size of the sketch does to the
size of the design paper required to be covered. This guides the
draughtsman, as everything in the small squares on the sketch should
be put into the corresponding large squares on the enlarging paper or
point paper.
A pantagraph is sometimes useful, and proportional compasses are
a great assistance if very correct enlargements are required. When a
careful outline of the pattern is made upon the design paper, it is then
painted. Some painters dot round the outlines, and in large forms
leave them to be filled in by assistants; others paint in solid as they go
along. Vermilion and scarlet and crimson lakes are the paints mostly
used. The first is easily washed out, but the lakes are more transparent,
and admit of the checks on the paper being clearly seen through
it, which is a benefit to both twiller and card-cutter. Scarlet lake, with
from a half to a quarter its quantity of crimson lake mixed with it,
makes a very good paint. The ordinary water-colour cakes are the
best paints to use, but powdered colour is sometimes preferred on
account of its cheapness. In Fig. 70 the painting is all black, with
white twilling on the flowering.
Simple flat ornamental forms, if of sufficient size, are not difficult
to put on the design paper, but more intricate forms and shaded effects
require a considerable amount of skill, and are tedious, unless to an experienced
hand, the difficulty being to get the checks on the design
paper to express the figures in the best possible manner, and frequently
it is necessary to slightly alter the forms to make them come nicely on
the paper.
When the sketch has to be enlarged to, say, three or four times its
size, a slight inaccuracy in the painting will have but little effect, as it
will be reduced on the cloth. At the same time, advantage should not
be taken of this to employ inferior hands at the work, as, the more
correct the painting, the more correct will be the pattern on the cloth,
although it be reduced in size; and a ragged-edged painting will never
have a clear, defined appearance on the cloth. It is in coarse coloured
work, such as carpets, that the accuracy of the painting is of the utmost[117]
importance, as the pattern on the cloth is as large as, or may be much
larger than, it is on the design paper; therefore all inaccuracies are
magnified, and no forms that do not come satisfactory on the squares
of the paper will have a good appearance on the cloth, so that to a
great extent the design must be made to suit the paper. When the
pattern is all painted on the design paper, both the ground and pattern
for ordinary full-harness work have to be dotted over with the texture
of the cloth. This is called twilling. In Fig. 70 the texture is a 5-end
satin on both ground and flower. For twilling the ground the same
colour is used as the flower or figured portion is painted with, and for the
figured portion black is mostly used, sometimes white. The twilling dots
on the figure mean blanks, as if these checks were left without any
colour on them, or as the ground, and they are passed over by the card-cutter
when the cards are being cut.
In twilling care must be taken not to run the dots up against the
edges of the flowering so as to injure the form of the figures. In some
cases, as at any flat portion, such as a horizontal or vertical line, or
any portion of one, this cannot be avoided, but the red dots on the
ground should here fall in against the black dots on the figure.
It is necessary to begin one set of dots against the other set to carry
this out as far as possible, and in some cases, when they will not
join, the dots are set out of their places to make them come
together. The two dots coming together bind the threads and keep
the last thread of the ground on one side, and of the figure on the
opposite side—according as it is the weft or warp that is forming the
line—from hanging loose or sliding out from the others. The direction
of the twill on the ground or flower may vary so as to suit the
twill used, and whether a satin or sateen effect is required. Various
kinds of twills are frequently used to give effect, but too great an irregularity
of texture should be avoided, though a plain ground, with an
8-or 10-end satin for the flowering, may be used for handkerchiefs with
a good effect; for heavier work a 5-end satin ground and an 8-end satin
figuring may be used, but for firm, strong cloth an 8-end satin for both
ground and figure is much better, letting either warp or weft predominate
largely in the cloth.
[118]
Fig. 72 shows how a leaf or any piece of ornament may be shaded;
care should always be taken not to let the texture be too close at any
part in the shaded portion so as to make hard pieces in the cloth, as
would be the case if a plain texture were used in a firm cloth.
Fig. 72
Fig. 73 shows how a flower and bud should be painted so as to
give a natural, or rather semi-natural, representation. The shading
should be made to express the form as well as possible; a variety may
also be made in the twilling on the flower, as may be seen on the front
petal, where a straight twill is used; this makes the cloth richer and
the petal come out fuller. This pattern is rather small on the design
paper to come well on the cloth; it would be better twice as large, as
it may be seen that in many cases single lines of the design paper
have to be used for divisions, and for full-harness work it is generally
better to have at least two lines, representing two threads.
Fig. 73
This painting, omitting the twilling, would suit for a pressure
harness, with each line of the design paper representing two or three
threads of both warp and weft. No twilling is required on a pressure-harness[120]
pattern, as the texture is wrought by the front mounting;
otherwise the pattern is the same, bearing in mind that as each check
represents two or three threads, it will not be reduced on the cloth as
a full-harness pattern would. The twilling of this pattern is the
8-leaf satin, which is generally used for fine damask, giving a much
richer effect than the 5-leaf satin.
It will perhaps be well to make some reference as to the desirability
of using these natural forms for designs, though it would be useless
to enter into the oft-disputed point of whether it is correct or in
good taste to attempt to imitate natural forms upon cloth, or whether
even shaded or rounded forms should be treated upon a flat surface.
To the latter I would answer without hesitation, by all means do so,
but make the appearance satisfactory and keep them in good taste; and
this can be done if the subject treated is duly considered.
The former, it must be admitted, is rather pandering to the popular
taste than following the dictates of decorative art. One thing is certain,
that the ‘million’ are better satisfied with floral forms than any other
class of ornament, and the more loosely treated these are, or the further
they are from ornament, the more pleasing they are to those uninitiated
in the beauty of line, wanting which no ornamental forms can be pleasing
to those educated in art. However, these natural forms suggest Nature,
and their admirers have so little idea of Nature’s beauties that they
do not see the defects in the attempted representations. At the same
time, it must not be understood that a pleasing design, or one in good
taste, cannot be composed of natural forms—quite the contrary; for
small, simple patterns, principally for light fabrics, they are perhaps
more suitable than any other ornament, giving lightness and gracefulness
of appearance, as may frequently be seen from the designs on the
better class of dress goods, whether woven or printed; but the natural
treatment must be kept subservient to the flow of the design. Generally,
a moderately flat treatment without any strong attempts at light
and shade is most successful, the treatment consisting of a graceful
arrangement of forms drawn from nature. Everyone knows the beauty
and grace of the Japanese designs; but this is not simply because they
are natural forms: it is the arrangement of the forms that gives the[121]
effect. Very effective patterns can be made for dadoes of coloured
curtains from natural objects, as here they can have the upright forms
suited to them; but for coloured work, generally speaking, and for
carpets in particular, natural forms, unless treated flatly and conventionally,
are rarely either pleasing or in good taste. With them it
is difficult to obtain that intermingling of colours, be they bright or
dull, that produces a neutral bloom and a satisfactory result. Another
important point in a pattern, and often overlooked, or not understood,
is that, unless the pattern, as a whole, is satisfactory, no variety or
beauty of detail can make it a good design. The general character or
lines of the pattern must first be made satisfactory, after which the
detail may be made as interesting as possible, provided it does not
injure the general effect, and is not incongruous to the nature of the
design. As to whether flat surfaces should be treated with shaded
ornament or not is a point that will always be in dispute, but it may
be asked why should a designer be hampered with such restrictions?
If he can produce a satisfactory pattern by using either flat or shaded
ornament, or both, why not let him do so? The criterion should be
whether the result is satisfactory or not. Of course such barbarous work
as representing leopards or tigers prowling over carpets or hearthrugs, or
even decorating them with the more homely duck or drake nestling,
or waddling through water, cannot be too strongly condemned, highly
though they were once appreciated, and though they still find favour
with many: even shading forms or objects in such a manner as will
produce a feeling of weakness, insecurity, or danger, can never be upheld—that
is, such a practice as shading ribbons flowing over carpets
or hearthrugs like snares, and buttoned down at certain points; or
making the surface of the carpet appear very irregular, which has often
been done, and is often seen in coloured tile pavements. Of course
these remarks refer more or less to any fabric, but a little relief in a
curtain would not be nearly so objectionable as on a carpet, so that
almost everything turns upon whether the result produced is satisfactory
or not—of course, to those competent to judge, and who are
not overcome by biassed prejudices. Natural or semi-natural floral
ornament will rarely be injured by a little shading, whether on a white[122]
or coloured fabric, but it should not be overdone—a moderate amount
of shading or a half-flat treatment generally giving a more pleasing
effect. Conventional floral ornament is, perhaps, best treated flatly,
or with a very little shading on some portions that require a little
relief. A richer and purer effect in colour can be got with flat than
with shaded colours.
Fig. 74
Fig. 74 is an example of a small floral pattern of a class much
used for dress goods, either woven or printed, and gives a very
pleasing effect. One repeat of the pattern is bounded by the lines
a b c d, or the whole might be taken as one repeat, and instead of
having a row of pears on a line, have a pear and some other fruit
alternately, and the same with the apples. This pattern is a semi-natural
floral treatment, and if on a larger scale a little more shading
on the fruit and a few turned-over leaves or half-open flowers would
not injure it, but would add to its richness.
Fig. 75 is a sort of floral ornamental, or flatly and symmetrically
treated floral pattern, somewhat after the Persian style, and though
some would consider it stiff in comparison with the previous one, it[123]
has a very pleasing effect, and could be used the size indicated for
dress goods, &c., or if enlarged to two or three times the size it would
make a very good curtain pattern. Small sprigs of flowers, grasses,
grain, &c., scattered about over the surface of the cloth make generally
a favourite style of pattern.
So far the patterns given are such as would require the designer to
have a good knowledge of
drawing and of ornamental
and floral forms, and many
consider that a designer
must be a draughtsman;
but such is not the case.
Fig. 75
Large quantities of patterns
are made that do not
necessarily require the designer
to have any knowledge
of drawing; this is
called ‘small pattern’ or
‘texture’ designing.
A designer of this class
should have a thorough
knowledge of weaving and of the effect which the patterns on design
paper will produce on the cloth. He must, of course, have a taste for
the arrangement of forms, and can produce considerable variety by a
judicious arrangement of fancy threads through the cloth, particularly
in worsted or woollen goods. The following examples will show how
great a variety of patterns can be produced without any knowledge of
drawing. But a knowledge of drawing will be a great assistance, as it
trains the eye to correctness of form. Fig. 76 is a pattern for dress
goods; it may be made of cotton only, or with a cotton warp and
worsted weft, and a good effect is produced by having the warp a
different colour from the weft, say a gold cotton warp and a brown or
giraffe worsted weft. Warp 60 to 80 threads per inch, and weft about
the same. This is a pattern of the bird-eye class, and a very large
range can be made in this style, both bold and effective, or fine and[124]
neat, as may be desired. The smaller patterns may, of course, be
woven with shafts, but larger ones require a jacquard.
Fig. 77 is another pattern, of the flushed stripe class, also suited
for dress goods; this is a silk handkerchief pattern for 90 threads and
96 picks per inch; 60/2 China silk for warp, and 60’s single China
silk for weft. If the small dots on the pattern are cut on the cards, a
finer and closer pattern will be produced than if the black squares
only are cut, but of course it would be less effective unless on a coarser
fabric.
Fig. 76
Fig. 77
Fig. 78 is a pattern that would suit for dress goods if woven
similarly to Fig. 76; and if woven much coarser, say 25 to 30 threads
per inch, it is suited for quiltings. Great variety can be made in this
style of quilts, particularly when floral and other forms are interspersed
through the texture, and also when the honeycomb texture is
employed, an example of which is given in Fig. 79 in combination
with diaper or bird-eye figures; only a portion of this pattern is given,[125]
but it shows all that is required. In either pure white, or with a warp
of one colour and a weft of another colour, these patterns are very
effective when made from good twist yarn and coarsely set in the reed;
the flushing might be over twice as many threads as is shown in the
patterns, and then more threads of warp and weft be used. It is
perhaps to the woollen and worsted trades we must turn to find the
greatest variety of patterns of the description we are now dealing with.
True, the greater portion of them can be wrought on shafts, and
perhaps a greater number of shafts are used in these trades than in
any other branch of textile work, as shafts produce a firmer cloth than
a harness; but when large fancy patterns are required, recourse must
be had to the jacquard. Fig. 80 is an example of a fancy twill stripe
which could be wrought on 48 shafts if desired, but might also be
wrought on a small jacquard with greater simplicity, unless very heavy
cloth is required. Patterns of this description require considerable
skill in designing, and are in some cases more difficult as they increase[126]
in size. It may be seen that the pattern or figure is composed of
different textures, and to make a perfect cloth the various textures
should all work together at an even tightness, or so that there will be
an equal amount of take-up of shrinkage of the warp for each. When
checks or large patterns are to be formed this is most essential, but in
smaller patterns it can in a great measure be remedied by letting the
various textures follow each other, so that if one tightens a little
another will make a corresponding slackness, and all together will
balance each other. Another important point is to join the edges of
the various textures together so that there will be no break, or floats
of warp and weft greater or less than in the textures themselves. In
some cases tight and loose textures are wrought together to give a[127]
special effect, and figures may be formed by the close texture pressing
the looser threads together.
Fig. 78
Fig. 79
Another class of pattern by which a very good effect can be
obtained by very simple means, is the hair line or tricot style. Fig. 81
is a dice pattern on this principle. The texture is plain cloth throughout,
and the effect of pattern is obtained by using two colours of warp
and weft, say black and white, and by arranging the draught and
treading so that the black weft will pass over the black warp and the
white weft over the white warp on one dice, and the reverse of this for
the next one, a horizontal and vertical lined effect will be produced,
giving a subdued pattern. The dark checks on the design paper are
the tricot or horizontal line effect; the grey checks the vertical lines
or hair line effect. It will be seen at the edge of each dice how the
colours are changed in both warp and weft by the two dots coming[128]
together. The crosses along the bottom and to the left side of the
design show the dark threads and dark picks coming alternately with
the white ones.
Fig. 82 is a small figure pattern arranged in this manner, the
reversing of the colours being done by the jacquard, as may be seen
from the dots on the design. Almost any figure may be treated in
this manner, but simple patterns, not too irregular or broken in
outline, will perhaps be found most successful.
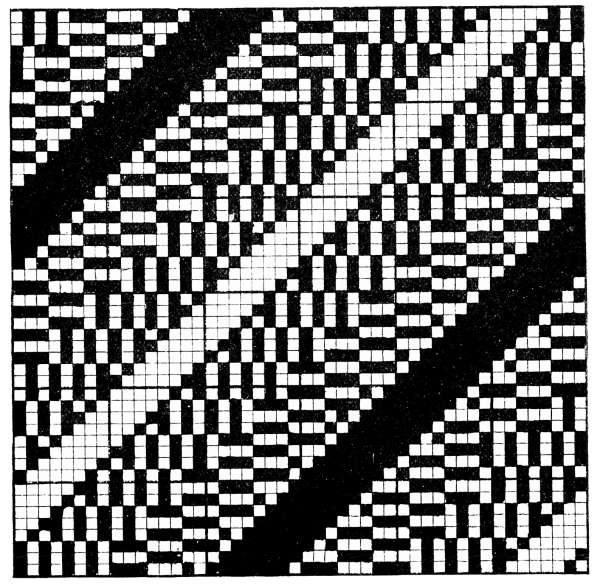
Fig. 80
These fabrics may be made in either woollen, worsted, or cotton
for dress goods. About 36 threads of warp per inch of 2/30’s worsted,
and 32 threads of weft per inch, is a good setting for them; and in[129]
any mild contrasts of yarns, such as two shades of grey, they are very
pleasing.

Fig. 81

Fig. 82
Coming now a step further towards the damask or figure patterns,
we have still great scope for variety, without much, if any, knowledge
of drawing being required from the designer. This consists of
spotting small geometrical figures over the cloth, the body or ground
of which may be plain, twill, or any texture desired. Fig. 83 is a
pattern of this description with a plain ground. The figures are
arranged in satinette or 4-end satin order. Of course, the ground
might be a twill if desired, and the figures may be of any form that[130]
ingenuity can suggest. They may be solid, and a twilled texture used
to bind them if the flushes of warp or weft are too great, and part of
the figure might be warp flush and part weft flush; in fact any variety
that the designer can arrange to produce a good effect on the cloth,
which, if the warp and weft are of different colours, may be made very
effective. Any arrangement for the figures may be used if suited to
the size of the figure and the space they have to occupy to suit the
repeat of the pattern. The 4-end satin gives two figures on one
diagonal, and two on the other diagonal alternately; one figure on
each diagonal may be used, and also three figures on each with equally
good effect, subject, of course, to some extent to the size and form of
the figures. Five and eight-thread satin arrangements are two of the
best that can be used if a greater number of figures are required in
each repeat of the pattern. To arrange a pattern in satin order, the
usual way is to rule the repeat into as many squares in length and
breadth as there are threads in the satin to be used. Thus, for a[131]
5-thread satin, rule the repeat into five squares in length and the same
in breadth, or twenty-five squares in all, then place one of the figures
into each of five of these squares, the order being that of the 5-end
satin twill. A draughtsman would either sketch these figures on the
design paper, or sketch one of them on a piece of plain paper, trace it,
and transfer it to the different positions it would occupy on the design
paper, and then paint each of them independently. But a designer,
without a knowledge of drawing, would mark out the spaces on the
design paper for each figure, and, having made one of the figures the
required shape on the checks or small squares, would copy the others
from this. In Fig. 83 let 2a be the first figure formed, it being
started in the second square upwards and first row. Now, the second
figure can be similarly begun in 4-thread satin order, which would
bring it to square No. 2, and it is begun in the same position in this
square that the first one was begun in square No. 2a. The third
figure falls to the third square from 3a and 3, but as this figure is
turned round for variety, the point for beginning it at figures 1 and 2[132]
must be marked, and an imaginary square run round it, and it must
be kept in its position in the square, or the centre of the figure may
be found by counting the checks in either of the first or second figures
and this figure wrought from the centre; or, again, as the figure is six
checks greater in length than in breadth, it must be set three checks
to one side, and the top point should rise three checks higher up
above the large square of the design paper on which it should be
started; but with a plain ground it is sometimes necessary to move the
figures one check out of position to allow the plain to fall in regularly
all round them. This figure is set one check down. Fig. 4 is copied
from Fig. 3, and is in the same position. With a twilled ground or
irregular figures, it will not matter if the ground does not fall in quite
regularly round them.
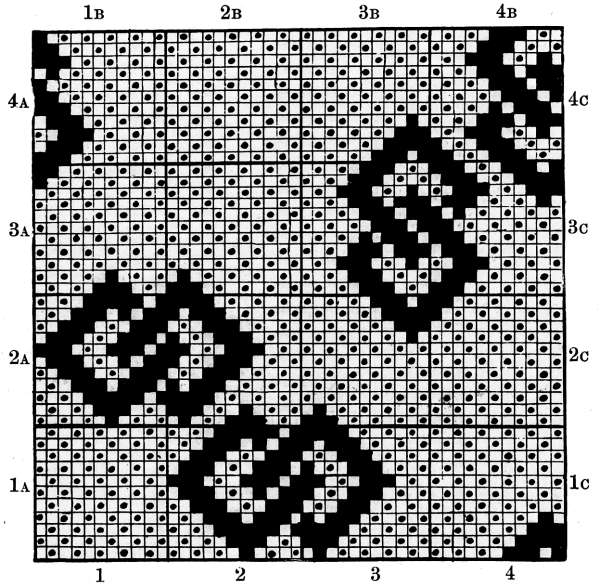
Fig. 83
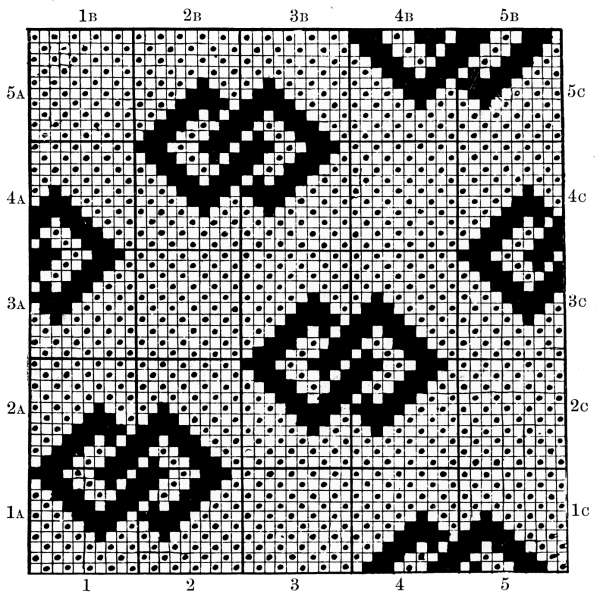
Fig. 84
If it was required to make a pattern similar to Fig. 83, but with
five figures instead of four, and preserve the same density of ground[133]
structure round them, it could be calculated as follows:—Fig. 83 is on
44 checks broad and 44 long. Now 44 × 44 = 1936, and on this there
are four figures, then 1936 ÷ 4 = 484. As five figures are required
484 × 5 = 2420 checks for design. If there are to be as many checks
across the design as up it, find the square root of 2420 for the number
of checks, as [sqrt]2420 = 50 nearly. If the pattern is not to be square,
the proportion may be found for each side by making two calculations,
one for the greater number of checks squared, and the other for the
lesser number of checks squared, and extracting the square roots for
the two sides of the required pattern; or, suppose the warp to be to
the weft in the proportion of 10 to 12, then state, as 12 is to 10, so is
50 to 42, the number of checks across the bottom of the pattern; and
as 10: 12:: 50 to 60, the number of checks in the length of the
pattern, and 42 x 60 = 2520, which is nearly the same as 50 squared
= 2500 for a square pattern. But if this is for adding extra weft to
the cloth, the size of the pattern would be reduced, which might bring
the figures too close together and would alter the shape of them; in
this case the addition should be made to the number of checks in
length, making the pattern 50 broad and 60 long, or to contain 3000
checks, and the length of the figures should be increased in proportion.
Of course this will produce a finer cloth. Fig. 84 is a pattern arranged
with five figures on it.
A great variety of patterns may also be formed by arranging dice
or squares in various ways, some of which, as may be seen on the
Indian fabrics, make very pretty patterns. It will thus be seen that
there is plenty of scope for the ingenuity of a textile designer without
his being of necessity a draughtsman; but a knowledge of drawing
will generally be of assistance to him. For the more elaborate
patterns, the designer does not require to have the same knowledge of
manufacturing that is required for these small patterns.
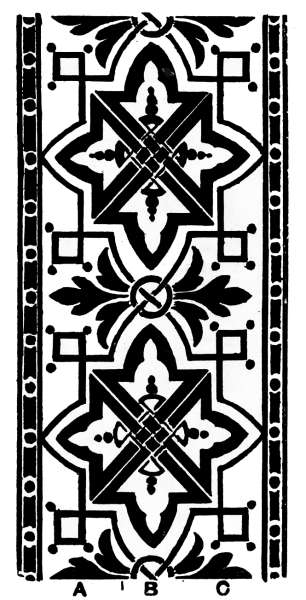
Fig. 85
Twilling.—It has already been shown how the patterns are bound
or twilled to form the texture of the cloth for ordinary repeating
patterns on a straight over-tie; but when a turn-over or gathered tie
is used, the twilling of one half of the gathered portion will, on the
cloth, be the reverse, or run in the reverse direction to that of the other[134]
portion, and this is often a disadvantage to this description of tie, as
one half of the border or pattern, whatever it may be, will look coarser
than the other. It frequently happens that to avoid the stiffness of a
clean turn-over pattern, which must always have a clear cutting line
through the centre of it, so that, if cut up, one half would, if turned over,
be exactly the same as the other, a portion of single, or a turning
portion, is placed in between the two turned-over portions, which in
many cases adds very considerably to the effect of the pattern, though
it is often almost useless. Fig. 85 is a
pattern of the turn-over type, and, but for
the interlacing of the bands in the centre,
might be wrought with a simple gathered
tie. For this pattern the portion marked
B would require to be single, and A turned
over to C. Perhaps it is in floral patterns
that this form of tie is of most service.
When a single tie takes up too much
machinery, and a double over or gathered
tie would make the pattern too stiff, a
small portion of single introduced, as at
B, is of great service to the designer in
making a pleasing pattern.
Fig. 86
When twilling a pattern of this description,
the portion marked A would be
twilled straight across, and this twilling
would be continued to the centre of B, as
shown in Fig. 86, which gives the idea, the
spots in the centre being taken as the single portion. The portion marked
C is repeated from the first part A by the harness, and does not require
to be put on the painting; in the figure it is shown (in different type) as
it would fall on the cloth. It may be seen that the twilling dots on the
last line of A and the first line of C are alike, and that every pair of
lines corresponds, moving from these to the edges of the pattern. Now
a turn must be made in the twill in the single portion so as to make it
join correctly with C, and this should be done in such a manner as to[135]
prevent it from showing plainly on the cloth, or having too long floats
on some of the threads while others are too closely bound. This must
be done by setting the dots out of their places on a few lines in the
centre, so as to make the join produce as even a texture as possible.
Advantage should always be taken of any portions of the pattern that
come on this part, such as the spots in Fig. 86, to turn the twill round[136]
the edges of them. By following the dots on the design paper, it will
be seen how they are brought in at the join. Any twill may be broken
similarly, but a different number of threads in the single will alter the
arranging of the dots to join the two twills together; however, when
the principle is understood, it can easily be worked out.
LETTERS, MOTTOES, ETC.
A turned-over mounting or gathered tie will reverse any ornament,
but while for borders it makes the ornament come correctly, it prevents
letters or words from falling in as they should be read. Thus, if the word
CLUB were woven at one side of a cloth, as at A,
and the harness mounted as a gathered repeat so
as to turn over a similar border to the other side,
the letters would fall as at B, making them read
correctly to the under side of the cloth instead
of to the upper side. Instead of making a
gathered tie, it would be better to make a plain repeating tie for
the second border, making the word CLUB on both borders as either
A or B, according as they are to read correctly on the under or upper
side of the cloth; but if it is desired to make the letters read correctly
from both sides or edges of the cloth, as at C, it is plain that there
must be hooks in the jacquard to work each border independently,
as one is not a repeat of the other. Of course letters on damask will
only read correctly on either the face or back of the cloth, not on
both. The same principle holds good when putting names across the
cloth, or for coats of arms and mottoes in the centre, as is frequently
done in quilts, tablecloths, &c., but in this case it would be the cards
that would do the work. Suppose the word  to be put across
a cloth at one end, and it was required to have the same at the opposite
end to read similarly from that end of the cloth, it would require to be
painted thus,
to be put across
a cloth at one end, and it was required to have the same at the opposite
end to read similarly from that end of the cloth, it would require to be
painted thus,  , or the cards might be cut from the painting of
the former, turned upside down. Provided it was required to make these
words read correctly on the under side of the cloth in the loom instead of[137]
on the upper side, then the first border would be painted and cut as
, or the cards might be cut from the painting of
the former, turned upside down. Provided it was required to make these
words read correctly on the under side of the cloth in the loom instead of[137]
on the upper side, then the first border would be painted and cut as
 and the second border as
  . This
will be best understood by printing the letters on tracing paper and
turning it round into the position required. In case of a motto or
coat of arms wanted for a large cloth
with two centres in it, one centre to be
correct from one end of the cloth, and
the other from the opposite end, as
shown by the girdles at A and B, Fig.
87, the painting would be as in this
figure if the upper side of the cloth is
to be the right side, but if the under
side is to be the right side, the first
centre would require to be painted as
shown in Fig. 88, and the second one
would be as this turned round, the top
where the bottom is, not turned over.
It might be thought that the same
painting would do for both; either that
cutting the cards from top to bottom,
or backwards, or lacing them backwards,
or working them backwards on
the loom, would do for the second
centre; but it would not unless the
cards were turned over as well—that
is, to have the outsides of the cards
turned inwards, and the right-hand
end to the left. This would suit if it could be done, but could only
be done when the jacquards are made with an equal number of needles
to each side of the machine, as 25 rows, or 200 needles, to each half
of the card for a 400 machine, instead of 26 rows to one side and 25 to
the other, making 408 needles, as is usually the case.
. This
will be best understood by printing the letters on tracing paper and
turning it round into the position required. In case of a motto or
coat of arms wanted for a large cloth
with two centres in it, one centre to be
correct from one end of the cloth, and
the other from the opposite end, as
shown by the girdles at A and B, Fig.
87, the painting would be as in this
figure if the upper side of the cloth is
to be the right side, but if the under
side is to be the right side, the first
centre would require to be painted as
shown in Fig. 88, and the second one
would be as this turned round, the top
where the bottom is, not turned over.
It might be thought that the same
painting would do for both; either that
cutting the cards from top to bottom,
or backwards, or lacing them backwards,
or working them backwards on
the loom, would do for the second
centre; but it would not unless the
cards were turned over as well—that
is, to have the outsides of the cards
turned inwards, and the right-hand
end to the left. This would suit if it could be done, but could only
be done when the jacquards are made with an equal number of needles
to each side of the machine, as 25 rows, or 200 needles, to each half
of the card for a 400 machine, instead of 26 rows to one side and 25 to
the other, making 408 needles, as is usually the case.
Fig. 87
In hand-loom districts, where old makes of machines are used, it is
common to have 400, 500, or 600 needles to the machine, and the
cards can be turned on the cylinders if required, and are also wrought[138]
backwards or forwards to suit. By cutting the cards from the painting
in the reverse order—that is, beginning at the end of the painting and
reading and fingering backwards—cards
from a painting of a first centre
could be cut to suit for a second centre,
as it has exactly the same effect as
turning over the card; but all the
rows of needles must be used except
any left at the first, and these and any
selvage must be brought to the end of
the painting when cutting the second
set of cards, so as to get them to the
first end of the card. The cutting
begins, as is usual, at the numbered
end of the card. Repainting the centre
to suit is the safest way to avoid mistakes.
Fig. 88
When a name is running up the side of the cloth, lacing or working
the cards backwards will reverse the reading of the letters from one
side to the other, but not when they are running across the cloth. If
the loom is mounted with the cards hanging to the front instead of to
the back, the letters would also be turned from one side of the cloth to
the other, and to be correct they would have to be painted or cut the
reverse, unless the machine or mounting was built to suit.
[139]
CHAPTER V
CARD-CUTTING AND LACING
The mountings which have been given are of two descriptions—the
Norwich, with the straight harness, and the London or twisted
harness, with the cards hanging to either side of the loom, as the
machine can be turned either way to suit. For the Norwich ties the
cards are supposed to hang to the back of the loom, but it often happens
that there is not space between the looms to admit of all the cards
being hung at the back, and it is usual for one loom to have the cards
to the back and the next one to the front. When the cards hang to
the front of the loom the mounting is tied up so that when finished it
will be the same as if mounted for the cards to hang at the back; and
afterwards turned round so that the back will be at the front. In case
the back left-hand corner twine is the first cord of the harness with
the cards at the back, the front right-hand twine would be the first if
the cards are at the front, and the drawing in of the yarn must begin
at it. If the loom is mounted in this way, and the yarn drawn in from
the opposite side, as if the cards were to hang at the back, the result
will be a toothed or broken-up appearance round the edges of the pattern.
The same cards will do for either mounting, but the pattern and twill
will be reversed on the cloth—that is, they will run from left to right on
the one, and from right to left on the other. The effect produced on
letters was mentioned when speaking of them.
It was mentioned that jacquards are usually made with 51 rows of
hooks or needles, of 8, 10, or 12 in the row, being for 400, 500, and 600
machines respectively, which are those most used; 200 and 300 machines
are used for small mountings, but they may be considered as half 400
[140]and 600 machines. Sometimes the machines are made of any size
required—that is, with any desired number of rows of holes in the
needle boards. The objection to this is that the cards cannot be copied
on the ordinary repeating machines; but piano card-cutting machines
can be made with the index to suit for cutting any length of card. When
using 400, 500, or 600 machines, or the double sizes, 800, 1000, or 1200,
and more than one is required for the mounting, a second must be
used, such as an 8 and a 4, or a 12 and a 6; a 12 and a 5 would not do
so well, as the 12 has 12 needles in the row and a 5 has but 10. It
would be better to use a 12 and a 6 and leave 100 hooks idle, if only
1700 are required. If a 12 and a 5 is to be used it may be done by
having the cumber board made 12 in the row, but made finer in the
proportion of 12 to 10; then, where the 12-row harness is to pass
through it, every sixth row of holes can be left empty, and it will be
all right for the 10-row harness from the 500 machine.
Designs are painted upon the point paper for the purpose of enabling
them to be transferred to the cards, which act on the needles
of the jacquard, and cause the proper warp threads to be raised. The
pattern is put upon the cards by punching holes in them, one hole
being punched for each check on the design paper that is filled in with
colour, or it may be the reverse of this, or otherwise, according to circumstances.
The common method is to cut the red, and leave the
ground or unpainted portion, and the black, which stands for ground.
There is a card for each line of the design paper for damask patterns;
the holes in the cards represent the dots on these lines, if each line
was cut off and cut into separate designs or larger squares, then these
squares set up lengthways and laid together. Take the pattern, Fig.
70, and cut the first line from left to right. The card is shown at
Fig. 89 at A. Turn the pattern upside down and examine the first
line to the right-hand side. The two first checks are empty; two
holes in the card or two punches of the piano machine are passed over;
the next three checks are painted, for these three holes are cut in the
card, and the remaining three checks in the design being empty are
passed over. The next design has the second and seventh checks filled
and these are cut on the card, and so on with the others. The two
small holes at each end of the card are for the lacing twine, and the[141]
large one at each end for the peg on the cylinder of the jacquard.
The intersections of the fine lines on the card show where the holes
fall when required to be cut.
This card would be for a 200 machine, the empty or unused needles
being left at the first half of the card;
26 rows of 8 needles to the card.
The card B given in this figure is the
first of the heavy cutting, No. 17 on
the pattern. Reading from the pattern
as before, pass 2, cut 2, pass
one which is black, cut 3, and
so on, cutting the red and passing
the black or twilling dots whether
they be white, black, blue, yellow,
or green; they are only there for
convenience, to avoid the trouble
of leaving the spaces empty when
painting the pattern at first, it being
simpler to dot them over afterwards.
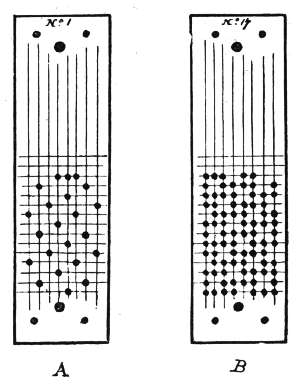
Fig. 89
The cards are numbered at the selvage end, which goes to the sneck
side of the jacquard when working. The design may be read from
left to right, but the usual method is to turn it upside down, and read
from right to left, which comes to the same thing, beginning to cut
from the numbered end of the card. Some begin to cut at the other
end of the card, and read from right to left on the design without
turning it, which is still the same. If the loom is mounted or the yarn
drawn in, beginning with the front row of the harness instead of with
the back row to the left-hand side, the cards should be read the reverse
way from the design paper; or, what would be the same, turn them
over after cutting them. This changes the top row of holes in the
cards to the bottom, or from the back to the front of the cumber board.
In case of the loom being mounted from back to front, and the yarn
being drawn into the harness beginning with the front row in the
cumber board, the cards, if cut in the ordinary way, would give the
pattern a broken or toothed appearance. Turning the cards upside[142]
down would remedy this, but would only answer if each part of the
mounting consisted of full rows of needles, for, if any part began or
ended on a broken row, turning the card would take the holes in it
for this part row away from the needles: that is, say if the harness
was connected with four needles at the top of the row and the card cut
for these, the holes would fall on the four needles at the bottom of the
row, if the card was turned upside down. The cards should be
numbered on the side which is uppermost when they are being cut,
and this side should come against the needles if the work is properly
carried out.
Fig. 90
The old method of cutting cards was for one to take the pattern
and call out the holes to be punched, and they were punched out by a
second person, a perforated plate over the card being sometimes
used as a guide to place the holes in their correct positions. A
better method was found in the punching plates shown in Fig. 90.
A and B are two plates hinged together. B No. 2 shows the full
upper plate. The card is placed on the lower plate, and the upper
one closed down on it. Punches are then filled by hand into the
holes in the upper plate according as the pattern is read from the
design; then the plates are passed through a roller press, which
pushes the punches through the card. With small machines this
suited very well; but the filling in of the punches was tedious for
larger machines, and shortly after the introduction of the jacquard by
Mr. S. Wilson, in 1821, he introduced a method for filling the plate[143]
with punches to correspond with each line of the design paper, as
follows:—Over, or in front of, the design a set of upright cords is
placed, as in reading the patterns on the simple of the draw-loom. On
these cords the pattern is picked, and weft threads drawn in, one for
each line of the design paper, for plain damask. When all the design
is finished the threads compose one repeat of the pattern in a loosely-woven
cloth. The upright cords or leashes pass through eyes in a set
of needles, arranged like those in a jacquard machine and each weft
thread put in, when picking the pattern, shows which of the leashes
are to be drawn. As each set of leashes is drawn the needles connected
with them come into contact with a set of punches arranged in
a frame or plate, and push them into a punching plate, which is then
placed over the card, as in Fig. 90, and passed through a roller press.
This method of picking the pattern for card-cutting is still in use, and
an improved method of using the plates and rollers is still found very
convenient for many
purposes, such as copying
cards and small
patterns, &c. (See Copying
Machines.)
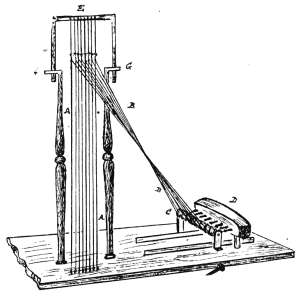
Fig. 91
Card cutting is now
almost entirely done by
‘piano machines.’ They
take the name of piano
from the pins or keys
which are arranged for
the cutter’s fingers, and
to distinguish them from
an older machine, which
is similar in make,
but in it the pins or keys which act as locks on the punches are
wrought with cords instead of by the fingers. The cord machine
is similar in make to the piano machine; but the cutter usually sits
at one side, and has the board or stand for the pattern facing him.
The treadles are also turned sideways; but the cord is put in at[144]
the end, as in the piano machine. Fig. 91 shows how the cords
are arranged. AA are the cords, 12 in number, which the cutter
draws. BB are another set from the former ones to the keys, passing
under pulleys at C. D is the punch-box. The keys have springs on
them, which press them in over the heads of the punches; but at the
top of the cords are indiarubber springs, fastened to the crossbar E on
the frame which supports the cords, and these springs are strong enough
to draw out the keys. When any of the cords AA are drawn down
the cords BB connected with them are slackened, and the keys spring
in over the punches, locking them, and punching holes when the
treadle is pressed down.
The cords BB can be connected from the right-hand side of AA to
the right-hand side of the punch keys, and run from right to left, or
they may be the reverse of this, according to the way the cutter reads
the pattern. Sometimes piano machines are fitted to work with cords
to suit the cutter. In this case there is only one set of cords, as AA,
set behind the punch block, and the cutter sits at the end of the
machine. Instead of springs, weighted levers, or tumblers, may be
used at the top of the cords on the bar E. When springs are used
the bar should be lowered when the cutter is not working, by slackening
the set screws at GG, so as to relieve the strain on the springs.
When working the cord machine the cutter uses only one hand to
draw the cords; but on the piano machine he uses both hands, and
can proceed quicker with the cutting.
Fig. 92 is a view of Devoge’s piano cutting machine. In these
machines one cross row of the card is punched at each tread; the
cutter sits in front of the machine, with the design fastened on the
frame before him, as shown in the figure. The straight-edge, or ruler,
across the design is for the purpose of guiding the cutter’s eye along
the line of the design paper that he is cutting from, and he screws it
up or down a line, as the case may be, for every card he cuts. He
keeps one foot on each treadle and his fingers on the keys in the punch
block, the arrangement of which is shown in Fig. 93, and presses in a
key to correspond with each dot on the line of the design paper on one
design, or large square, for each tramp.
[145]
The numbered end of the card is put into the clip on the index
carriage, and the guide for the card set to suit the width of the card
used, so that the punch will cut the holes in the centre of the card.
The lacing and cylinder peg holes are first cut, by pressing in the keys
E for the peg hole, and for the lacing 2 and 7 for an 8-row card, 1 and
8 for a 10-row, and a and c for a 12-row. Any blank designs, or rows
of the card, are now passed over, by running back the index carriage, if
the design does not occupy the full length of the card, it being the
usual custom to leave all empty rows to the selvage or numbered end
of the card, though it may in some cases be advisable to be otherwise.
The selvage, if any, is usually cut first, and then the pattern.
Fig. 92
Pressing down the right foot treadle, when any of the keys are
pushed in, punches holes in the card with the punches locked, and the[146]
left foot treadle, which works alternately with the other, is for moving
the index carriage, which shifts the card from one row of holes that
have been punched to the next one, so as to place it in position for the
punches. In Fig. 93 the black dots represent the heads of the punches,
12 in number. The keys 1 to 8 are used for cutting an 8-row card;
when any key is pressed in it passes over the head of its corresponding
punch, and locks it, so that when the cutter presses down the treadle
and the punch block is brought down on the card, the locked punch is
pressed through it, while those not locked rise up. The keys a and c
added to the 8 suit for cutting 10-row cards, and b and d added to
these suit for 12-row cards. The four keys a b and c d can be pressed
in with the two thumbs. E is the key for the peg hole.
A good cutter can cut from 100 to 150 cards per hour, but this is
laborious for constant work. Sometimes the cutting machines are
driven by power, but as yet (1894) this is not general.
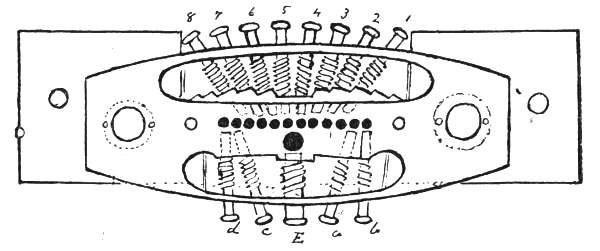
Fig. 93
Messrs. Devoge & Co. can attach an arrangement to their machines
so that they can be driven with a belt. The punch block is wrought
by a lever driven by an eccentric, and is kept constantly rising and
falling; the cutter fingers the pins so as to keep time with the punch
block, and should he wish to stop, or should anything go wrong, he
can stop the card at once by raising one treadle and pressing down the
other, which throws the motion for shifting the index carriage out of
gear, and the card stands stationary, and although the punch block
continues to work it takes no effect when the punches are not locked by
the keys. The machine works very smoothly, with very little noise,
and with a little practice any boy or girl accustomed to card cutting can[147]
easily become acquainted with working it. The index of the piano
machine is generally made for 51 rows of holes in the cards, 400, 500,
and 600 machines being those generally employed: 51 rows of 8 = 408
needles; 51 rows of 10 = 510 needles; and 51 rows of 12 = 612 needles,
which, with a few odd needles on the 25-row side, represent the number
of needles in a 400, 500, and 600 machine. If larger machines with
longer cords are required, the index of the cutting machine must be
altered to suit them.
Card paper should be of such a quality as will not be easily affected
by the atmosphere. When cards are for small machines, and are only
required to work for a short time, an inferior paper will do for them,
and save expense; but for large patterns which are intended to work for
years it will come cheaper in the end to get a good quality of paper—in
fact, the best that can be made. Specially prepared oil-saturated
paper is made for the purpose of preventing the atmosphere taking too
much effect on it. For hand looms, sometimes the cards are painted
with red lead, and sometimes with shellac varnish, or shellac (best red)
dissolved in methylated spirits.
Cards are made of different weights of paper; some prefer them
thin, and others thick. A moderately thin, tough paper is the best.
About 16 to 18 cards to 1 lb., for 400 cards, is a good medium weight.
After the cards are cut they have to be laced into a chain to revolve
round the jacquard cylinder on the loom. The usual method of lacing
is to have a frame with pegs or studs set in it at a distance apart to
suit the size of the jacquard cylinder. The cards are spread on this
frame as shown at A, Fig. 94, and laced with a steel needle, thicker in
the centre than at the ends; it is about 2-1/2 in. long, and has an eye in the
centre, through which a piece of fine twine is tied in a loop, and the
lacing tape can easily be drawn through this. The cards at A are
numbered 1, 3, 5, but all the numbers would follow in rotation if the
jacquard had only one cylinder; if a double-cylinder machine, half the
cards would be laced forward, as at A, and the other half (the even
numbers) backward, as at B. The odd numbers usually go to the back
of the loom, and the even ones to the front.
Several kinds of cord and tape are used for lacing cards, but two[148]
plies of round cotton cord, well soaped or waxed, is usually the most
satisfactory for wear.
When lacing cards, the lacings should be crossed over, each one
passing from left to right of the other in turn, at each hole and between
the cards. This is important, to keep the cards straight.
The cards should be tightly laced, as the lacing is almost certain to
stretch a little; so that they are better for being rather tight for the
cylinder at first, otherwise they are liable to become too slack after a
little wear, and if such is the case they will not fall properly on the
cylinder pegs. This and other causes—such as irregular expansion or
contraction of the cards, badly cut cards, and a long draw on the cards—occasion
considerable wear on the peg holes, and now eyelets are
being tried in them to avoid the breaking-up of the holes; but it is
probable that good paper and careful work will prove a more suitable
remedy. The card should not be deeper than the face of the cylinder;
better a trifle less, to allow for the lacing to pass between them, and
then if laced as tightly as possible they will still be pliable and work
freely. Cards are usually numbered with pen and ink, but the
numbers may be stamped on with an indiarubber stamping machine
similar to that used for paging books.
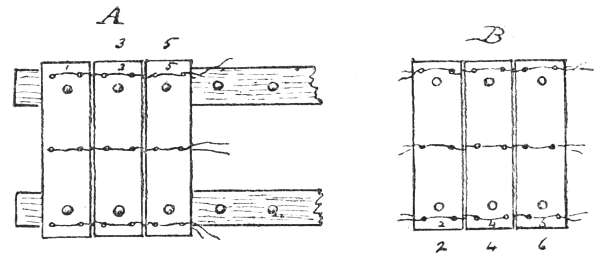
Fig. 94
Lacing Machines.—The Singer Sewing Machine Company brought
out a machine some years ago for lacing cards, and it performs its
work very well, though many object to it, as it stitches a lacing tape
along the cards, instead of lacing them in the usual way. The machine
is a 3-or 4-head sewing machine, according as three or four rows of
lacing are to be used on the cards. The lacing is a tape; one tape is[149]
laid below the cards at each row of lacing, and another above, and both
are stitched together through the cards.
Another machine was invented by Count Sparre more recently
which laced or sewed the cards through the ordinary lacing holes, much
in the same manner as hand lacing, except that the lacings are looped
on each other through the holes instead of passing up and down through
alternate holes.
A still later one, by Messrs. Reid & Fisher, of Dunfermline, and
Mr. Parkinson, of Bradford, has further improvements; this machine
is now working very satisfactorily. Other machines have since followed.
Copying or Repeating Machines.—There are several varieties of
machines for copying or repeating a set of cards after they have been
cut by the piano machine, and it often happens that this is required
in case of several looms being put on the same pattern; or it may be
that a set of cards for one loom is made up of two or three parts
repeated several times.
One of the simplest of the repeaters is a small treadle machine in
which the card is repeated by rows, the holes of the cut card acting upon
needles that push in the pins above the punches, which are similar to
those in the piano machine; and each row is punched by depressing a
treadle. This is a slow method of repeating, but suits for small factories
where it is not worth while having a more expensive machine.
Any boy or girl can repeat the cards, instead of requiring a card-cutter
to read them.
A more useful machine is the railway press repeater; it is taken
from the old method of cutting described on page 142. The cards to be
repeated are placed on a cylinder the same as that used in the jacquard,
and pass down over the ends of long needles similar to the jacquard
needles, but arranged in a box, and with long helical springs on them.
In a thick plate, or box, in front of the needles is a set of punches, and
the stamping plate rests in front of the punch box, close up against it.
By means of a treadle the needle box can be drawn forward, and where
there are holes in the card to be copied the needles pass through them,
and, pressing on the punches, push them from the box into the stamping
plate. The punches have heads on them that will not pass through[150]
the stamping plate, but will go into the holes in the box or frame, and
when they are pushed into the plate it can be drawn away and turned
over so as to prevent them from falling out. The plate is then placed
on a box-plate made to hold the card to be cut, and somewhat similar
to that shown in Fig 90. The box or hinged plates are set on a slide
frame with rollers to travel on, and at the end of the frame is a strong
roller press. The plates can easily be run forward to the press, and
the card punched by running them under the roller; it may then be
taken out, and as many impressions from the plate cut as are required.
When finished, the stamping plate is taken back to the punch box and
placed against it as before; then, with a comb, or block of wood, set
with pins, all the needles are pushed out of the plate into the punch
box. Another card can be brought before the needles, and the plate
filled as before.
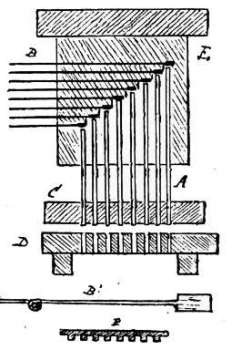
Fig. 95
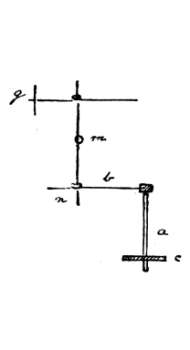
Fig. 96
This machine is very useful for copying damaged cards, even when
a repeater as those about to be described is at hand. A damaged card
can be held between the needles and punches, and the plate filled,
same as when copying a set.
Figs. 95, 97, and 98 show the principle of working three of the
best-known repeating machines, which will copy a set of cards at the
rate of from 40 to 60 per minute. Fig. 95 shows the arrangement of
the punches in Nuttall’s patent repeater. The punches are shown at[151]
A, and the stoppers or keys at B; the cards to be punched pass in between
the blocks C and D. B1 shows the shape of one of the stoppers
which, when over a punch, locks it, and causes a hole to be cut in the
card. The stoppers all stand over the punches when at rest; the cards
to be copied are hung on a cylinder, and act on a set of horizontal
needles, g (Fig. 96); these
needles have upright
wires, m, n, passing
through eyes in them, and
also through eyes in the
stoppers b. The upright
wires act as levers, working
on centres, m; and
when one of the horizontal
needles g is pushed back
by the card to be copied,
the corresponding stopper
b is drawn from above the
punch a, which allows it to
rise when the card to be
cut is raised up against it
by the block D (Fig. 95),
between which and the
punch block c the cards to
be cut pass, so that no hole
is punched in the card;
but where there are holes
in the card to be copied,
the needles g are not
pressed back, and the
stoppers are allowed to remain over the punches, locking them, and
causing holes to be cut in the card pressed up against them.

This machine has been superseded by one in which upright rods
act as stays on the punches. These rods stand on the punches, which
have concave tops on them; the upper ends of the rods rest under the[152]
bars of a grid, or rebated plate, shown in section at P (Fig. 95). When
in this position the punches are all locked. A set of needles are connected
with these rods, and when the card to be copied presses on them,
those that are pushed back move the top of the rods connected with
them from under the bars to the spaces between them, which allows
the rods to rise up with the punches when the card to be cut is pressed
up.
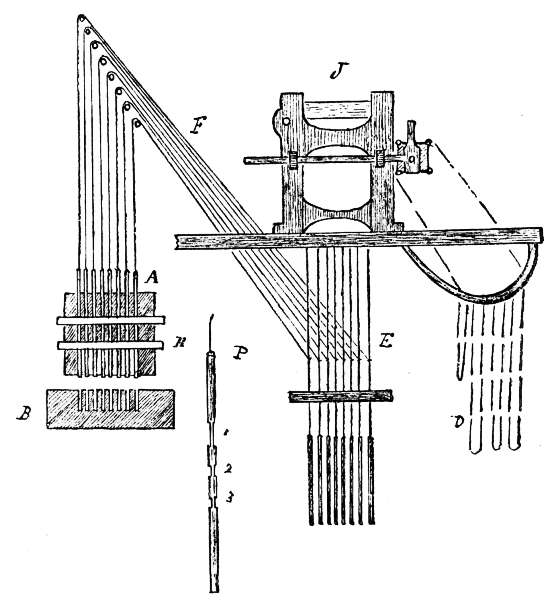
The principle of a repeating machine made by Mr. McMurdo, of
Manchester, is shown in Fig. 97. The cards to be copied hang on the
card frame of a jacquard, as shown at C. From the hooks of the jacquard
to the punches A are wires in the form of a single harness. The
blank cards D pass in over the block B, which is stationary. Enlarged
front and side views of a punch are given at G and H. At 1, 2, and 3[153]
are shown the notches cut in the punch, through which the slide bars
E and F pass. These slides are also shown at E1 and F1. The bar E
is stationary, acting as a stay for keeping the punches in the box, and
the notches in them, at 1, are long enough to let them slide up and
down on the bar. The slide F is drawn out before the jacquard is drawn,
and pushed in again afterwards; if any of the punches are raised by
the jacquard, the notch 3 will be raised to the position of the notch 2,
and the slide bar will pass through the lower notch, thus holding the
punch up, and when the punch block is pressed down, holes will be cut
in the card where the punches are locked in the upper notch. When
the punch block is being sunk to punch the cards, it is necessary to
have a spring in the wires that connect the punches to the jacquard
hooks, and this is effected by having the wires made with a sliding
joint and a small spiral spring on them, as shown at L.
The principle of Devoge’s repeater is shown in Fig. 98. This is
one of the oldest machines in the market, and there are various opinions
as to whether it is excelled by any of the others, or not. It is somewhat
on the principle of the French repeating machines, being wrought by
a jacquard and harness, E, to which a second harness or set of cards, F,
is attached, and passes over pulleys to the punches A. When the harness
E is drawn by the jacquard, the cords F are slackened, allowing
the punches to drop, and they are locked in the punch box by the slide
bar, H. The cards to be copied are shown at D, and those to be cut
pass through at C. The punch block is stationary, and the block B
rises against the punches with the card on it.
The blank cards require to be laced to make them ready for the
repeaters, and also to have the peg holes cut in them; blocks are provided
for the purpose of cutting the lace and peg holes. An enlarged
view of a punch is shown at P.
WIRING CARDS
After the cards are laced, if intended to be wrought on power looms
in the usual way, they require to be ‘wired’—that is, to have pieces of
straight stiff wire, about 2 in. longer than the cards, tied across them[154]
to the lacing, so that they may be hung on the racks or frames prepared
for them on the looms. The wires should project 1 in., or rather
more, at each end of the cards; they should be tied to the under side
of the cards, so as not to come against the jacquard cylinder, and it
also bears them better, being under the lacing. A piece of waxed twine
is mostly used for tying them on.
The distance between the wires depends upon the number of cards,
and the height they are when on the loom. For a small set, a wire
to every fourteen or sixteen cards is a very good distance apart, but for
a large set a wire to every twenty or twenty-four cards will be sufficient
in order to give a longer drop and take up less lateral space.
[155]
CHAPTER VI
SPECIAL JACQUARDS AND HARNESSES
CROSS-BORDER JACQUARDS
A difficulty has always existed in working cross borders on handkerchiefs,
cloths, &c., so as to avoid having to shift or change the cards,
and also to do without the expense of getting a complete set of cards
cut for the whole cloth. It may be also that different patterns are
required on the cloth, such as cross bands of small figures, and if, say,
twenty cards would make a repeat of one figure, and it was required to
weave, say, 100 repeats of this, and then change to, say, fifty repeats of
some other figure, the same difficulty would arise as with cross borders.
When there is only a short distance between the changes of pattern, it
will generally be found more profitable, all things considered, to have
the complete set of cards cut, so as to require no changing, particularly
if the pattern will run for a length of time; but when the patterns or
cloths are long, the cards become very expensive, and even if it would
be desirable to get a complete set for the full cloth, it may be that there
would not be space on the looms to hold them, over 15,000 cards being
sometimes required to weave a complete tablecloth.
Many methods have been adopted to remedy the inconvenience
and to save expense. A few of them will be given, but it must be
left to manufacturers to judge whether they would prove an advantage
to them or not.
For weaving cloths or curtains it is a common practice to have the
cross-border cards and one repeat of the centre pattern cut. The card
rack is made as in No. 2 (Fig. 99).
When either the border or centre cards are working, they are put[156]
into the hollow part of the rack or card frame, as at F, and the other
set is hung on the flat rest of the frame, at either D or E. When a
change is to be made, a card-shifter has to go up and change from one
set to the other, lifting the set that had been working out of the hollow
of the frame, and putting it back or forward on the rest D or E, and
bringing the set which is to work down into the place of those removed.
This, of course, is expensive, gives a great deal of trouble, and is
severe on the cards; at the same time, in many cases it is found to
answer as well as any method yet adopted, particularly where space is
a consideration, and when two or more sets of cards are used, in case of
two or more machines.
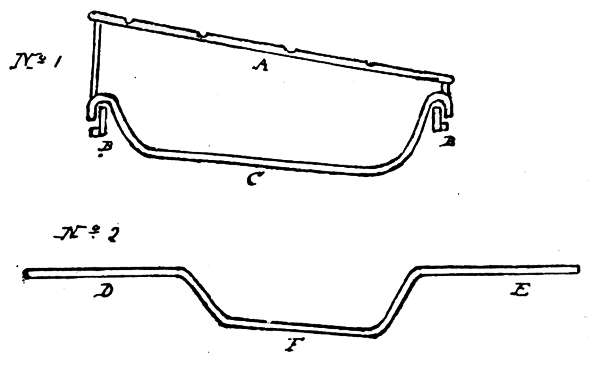
A better plan is to have a sliding-card frame, as shown in No. 1 of
the same figure. A is the frame for the rollers over which the cards
travel, B, B are two bars on which the card frame C, with the roller
frame A attached, travels. The card frame is only shown in end view.
Two of these must be for each set of cards, and the whole frame must
be fastened together complete for all the cards required, so that it will
all slide on the bars B, B. Suppose there are two machines working
there must be four card racks; on two of these the centre cards are
hung, and on the other two the border cards. Either set can be placed
opposite the cylinders of the jacquard, and wrought as long as is required;
then they must be taken off the cylinders, the card frame shifted till
the other set of cards comes into their place, when they can be put on
the cylinders and wrought over. This is a very good plan for working[157]
long cloths, but takes up a good deal of space, and for more than two
machines might in many cases be unsuitable.
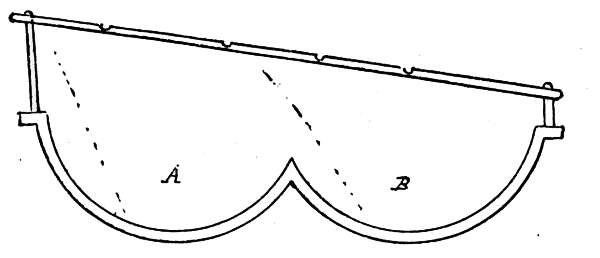
Fig. 100
Another method is to have two sets of card irons, one above the
other; the border cards are hung on the lower frame, and the centre
cards on the upper one. The centre cards will work in the usual way,
and when the border is to be wrought the cards for it are taken round
the centre set, which, of course, are taken off the cylinder. The rollers
must be made to shift so as to direct the cards properly into their
respective frames; the top frame is smaller than the bottom one, and
farther out from the machine. If hooks and eyes are sewn on the first
and last cards of these sets, the weaver can hook them together when
a fresh pattern is required, so that the one set will carry the other
round the cylinder. Then, by drawing a cord, the rollers should
change position so as to direct the falling cards into the proper frame.
The card irons are of the usual shape, and the distance between the
upper and lower ones may be regulated by circumstances.
Another simple method is to have the card frame made with a
double curve in it, as shown in Fig. 100. One set of cards hang in each
of these curves, as at A and B. The set in the curve A can be wrought
over as long as required; then these cards can be taken off the cylinder
and the set at B put over it. One thing must be observed: that the
frame and rollers be so placed that the cards can be guided into the
receptacle B, and to do this there must be a considerable fall for
the cards, so that for a loom with a low framing this might not be
feasible. Otherwise, it is a simple method of arranging two small lots
of cards, and if one lot is much larger than the other, let A be a narrow[158]
curve, and the small lot of cards hang in it, which will lessen the slant
of the cards falling to B.
Although such arrangements as the foregoing are required where
there is much machinery used, it is evident that for frequent changes
they would take up quite too much time. Several machines have been
made for the purpose of changing from one set of cards to another
without having to move the cards. The principle of these machines is
to have two cylinders, one at each side; one set of cards is placed on one
cylinder, and the other set on the other cylinder, so that by working
one or other cylinder, as required, either border or centre may be woven.
No. 1 (Fig. 101) shows a plan that was tried some time ago, but did
not work satisfactorily. The needles passed through a needle board at
each side of the machine, as at A and B, and had small spiral springs
fastened on them inside the needle boards. The border cards could be
put on the cylinder at A, and the centre cards on that at B. The cylinder
at A could be wrought as a single-acting machine till a change of
pattern was required; then the cylinder at B could be brought into action,
and that at A remain stationary and clear of the needles. The heads
of the hooks were made heart-shape, as shown, and the blades of the
griffe could revolve into the position shown by the dotted lines, so as to
suit the working of the cylinder at B; this was effected by the weaver
pulling a cord. This machine was given up, as it was difficult to keep
it in order.
Another method is shown at No. 2 (Fig. 101), where there are two
griffes—one at F, and the other at G; one cylinder works at E, and the
other at D. Only one set of springs is required on the needles—behind
the needle board E—as the spring of the hooks is sufficient to act in
the opposite direction. When the cylinder D is working the lower
griffe is stationary, and when the cylinder E is working the upper griffe
is stationary. The cylinders and griffes are brought into action as required
by suitable mechanism. This machine has not been considered
sufficiently successful to make it worthy of being persevered with.
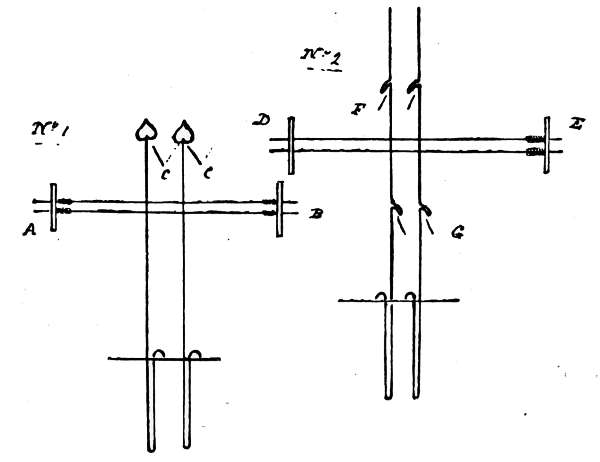
Fig. 101
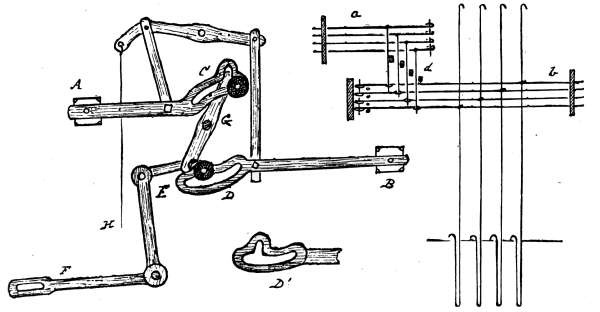
Fig. 102
The principle of Davenport & Crossley’s border jacquard is shown
in Fig. 102. The upright hooks are as in an ordinary machine.
Four of the needles are shown at b, and are made in the ordinary way,[159]
with the exception of the eyes in them for the small upright needles d
to pass through. These needles d are connected with a set of horizontal
ones, as shown at a, and act as levers between them and the needles b,
the bars behind them serving as fulcrums; so that when the needles a
are pressed back by the cards, the needles b are also drawn back through
the medium of the uprights d. The cards least in action are put on[160]
the cylinder for the needles a, and the others act on the needles b. The
cylinders can be brought in or out of action by the motion shown at
A, B, C, D, E, F, G. A and B are the cylinders, working on swing motions;
C A, D B, are connecting-rods for giving motion to the cylinders; either
of these can be brought into action as required. G is a rocking lever
carrying a stud on each end, which work in the slots C and D; these
slots are shown at D1 where the notch at one side of them will be clearly
seen. When the stud on the bar G gets into this notch, the cylinder
will be driven out and in, but when not in the notch the stud can slide
along the slot, allowing the cylinder to remain stationary. By pulling
the cord H either cylinder can be wrought as required through the connections
shown, one of the connecting-rods being raised and the other
lowered. F, E are the levers for driving the rocking bar G. This
machine works very well, though the principle of its construction is
not all that could be desired, and it requires a considerable space. It
can be made a double-lift machine by having two hooks to each needle
and two griffes as in the ordinary double-lift, single-cylinder machine.
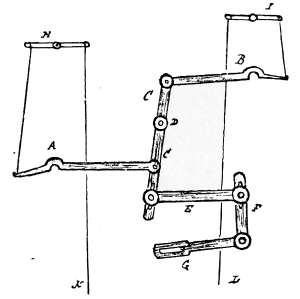
Fig. 103
The principle of Devoge’s border jacquard is shown in Fig. 103. C C
is the rocking bar, for driving the
cylinders, working on the centre
D. It is driven by the levers F,
G, and the connecting-rod E.
The notches A and B fall over
the studs on the cylinder frame,
and can either be let down or
raised, as required, by the cords
K, L and the levers H, I. The
machine is an ordinary double-cylinder
one, and either griffe can
be wrought to suit the cylinder
that is in action. This machine
can be used as an ordinary double-acting
one, as a single-acting one raising both griffes together and
bringing in both cylinders together, or as a border machine working
one griffe and one cylinder at the same time.
[161]
Another method, similar to the above, is to have a double-cylinder
machine with the cylinders wrought by the griffes, then have a stud
on the crank-shaft wheel for raising one griffe, as for an ordinary
single-acting jacquard, and the two connecting-rods from the griffes made
so that either will work on it. A hook or catch can be put in any convenient
place, so that when one connecting-rod is on the stud the other
can be hooked out of the way. The rods can be made to slide on to
the stud easily, and be fastened with a pin, so that the weaver can readily
change from one to the other.
OPEN-SHED JACQUARDS
To obviate the vibration of the harness as much as possible, as
well as to economise the wear and tear of it and to minimise the friction
on the warp threads, especially in weaving patterns requiring
heavy lifts, such as warp-faced patterns, Messrs. Priestley & Co., of
Bradford, patented an open-shed jacquard, the principle of which is
shown in Fig. 104. It did not, however, prove successful, as the
tacklers found some difficulty in working it.
The machine is an ordinary double-lift jacquard with one cylinder,
and works in the ordinary way. The hooks are made as in Fig. 104,
where it may be observed there is a turn or catch on the lower portion
of the hook, at A. Above these catches is a set of bars, b, like a stationary
griffe, and when the hooks are raised by the upper griffe, in the
ordinary way, they spring over these lower bars and rest on them when
the griffe begins to fall. All the hooks raised would thus remain up,
were it not that the cylinder, pressing in for the second griffe (the
machine being double-acting), which begins to rise as the upper one
begins to fall, presses back those hooks that are not to be raised for the
following shot, and as they are held by the griffe above, they spring
back at the bottom, and, clearing the bars b, come down with the falling
griffe. In this way the hooks, when once raised, remain up till pressed
off by the card, so that in the case of working a warp stripe with an 8-leaf
satin binding the hooks would only fall for every seventh pick.

Fig. 104
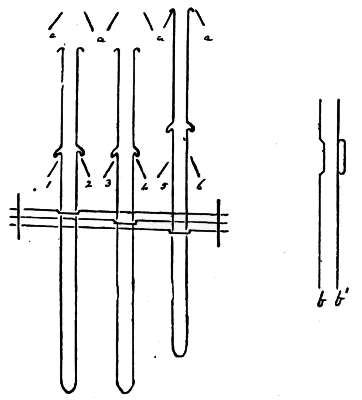
Fig. 105
Another machine has since been tried, but did not work satisfactorily.[162]
In this machine the lifting hooks are formed with loops or hooks, in
addition to the top hooks. The hooks are lifted in the ordinary way by
the griffes; and upper knives, made to reciprocate horizontally, catch
the raised hooks and support them. By suitably timing the motions of
the card cylinder the hooks may be kept up as long as required by being
transferred from one set of knives to the other. The shape of the hooks
and needles is shown in Fig. 105. The needles may be as at b or b1.
This machine acts as an ordinary double-lift jacquard, but has only
one set of needles, which pass through needle boards at each side of
the machine, and are acted upon by two card cylinders. No springs
are required, the hooks acting as springs to keep the needles in position.
The cylinders are driven by a tappet, and can be held against the
needles as long as required; one cylinder must press on them when
the griffes are passing, so as to prevent those hooks which are descending
from being taken up by the ascending griffe. There are two griffes;
three of the knives of the one are shown at 1, 3, 5, and three of the
other at 2, 4, 6. When these knives lift the hooks by the lower loops[163]
or hooks on them, they deposit them on to a set of knives, a, a, a, a, in
an upper grid or grating, which has a lateral or horizontal motion.
The lower knives raise the tops of the hooks slightly above these
upper knives, so as to clear them, and the upper grid is then moved
sideways, taking the knives from under one set of heads of the hooks
and placing them under another set. Each time the griffe rises all the
hooks not acted upon by the cards will be deposited on the upper grating,
and will be transferred from one knife to another at each lift, till the
card acting upon the needles keeps them clear of the upper grating and
allows them to fall with the descending griffe. In this machine the
tugs or tail cords, as used with double-lift machines, are not required,
the double hooks serving for two single ones. Other efforts have been
made in this direction, but the plan of using small pulleys on the tail
cords, between the pairs of hooks, to which the neck twines are hung,
is the only one worth mention. The same principle will be found for
working the shafts in Fig. 115, and is more suitable for a few shafts than
for 400 to 600 hooks, or pairs of hooks.
THE VERDÔL JACQUARD
Everyone accustomed to work large patterns on jacquards, especially
on power looms, must have found the inconvenience resulting from a
large set of cards. The space taken up, the time and trouble required
for changing them, to say nothing of the cost, have been sufficiently
felt, but have hitherto had to be borne with as a matter of necessity.
For working fine tablecloths with from 150 to 180 picks per inch,
or for curtains where from 3 to 6 cards are required for each weft line
of the design, and when from 2 to 4 jacquards are used, the inconvenience
and cost of a set of cards ranging from 10,000 to 50,000 are
very considerable. The small jacquards described at Fig. 30 make a
great saving in the space taken up by the cards, as well as in the quantity
of card paper used; but it has been thought that a still greater saving
could be effected.
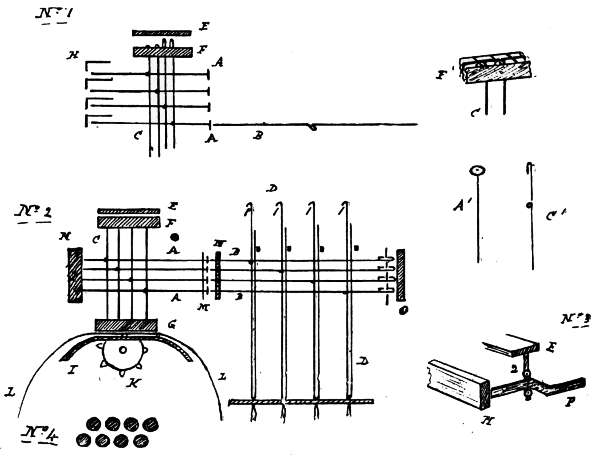
Fig. 106
M. Verdôl, of Paris, has for a length of time been endeavouring to
perfect a system of substituting a continuous roll of perforated paper[164]
for the cards, and has succeeded in doing so, though it is doubtful if
he will be so far successful as to supersede our present method of
working. These machines were taken up by Benson’s Patent Jacquard
Company, of Belfast, in the year 1876, but did not then give satisfaction,
the greatest obstacle in the way being the effect of the atmosphere on
the paper; and as the needles are very closely set together, it was found
impracticable to keep the paper set so as to act correctly on them.
This difficulty is now claimed to be overcome by having procured paper
which is said to be less liable to be affected by the atmosphere than the
brass plates of the machine. Several of these machines have been
tried in Scotland, but it will take some time to prove them thoroughly
and get the workmen accustomed to them, as they are much finer than
the jacquards in general use.
The Verdôl machine consists of a small jacquard, the ordinary
French make of machine, which is usually made with 440 and 880
hooks for the single and double machines respectively. In addition
there is a frame or box attached to the front of the machine, against
the needle board, containing another set of horizontal and vertical
needles or wires, which act upon the ordinary needles of the jacquard,
according as they are acted upon by the perforated paper. Fig. 106,
Nos. 1, 2, and 3, shows the principle of the machine. B, B show the
needles, and D, D the uprights or hooks of the ordinary jacquard; only
four of each are given, but sixteen are used. N is the face-plate or
needle board, and O is the clap-board used for bringing back the needles,
which have no springs on them; but the hooks are turned up double,
and the back or turned-up portion of them, coming against horizontal
wires or bars, shown in section above the needles, acts as a spring to
keep them steady. This portion of the machine is a complete jacquard
of the ordinary French make. In addition to this there is the apparatus
on which the perforated paper acts, and which communicates this
action to the jacquard. It consists of a box or frame containing two
sets of wires—one set horizontal, as A A, about 6 in. long, and terminated
at one end by a small head, as shown separately at A1, which are
called hitting wires. The other set is vertical, as C C, of fine wire,
having a loop on one end, by which they are suspended in a frame, and[165]
a loop in the centre, which passes round the horizontal wires. These
are called the vertical needles or feelers; one of them is shown separately
at C1. The points or lower ends of these needles pass through a
horizontal brass plate, G, called a guide-bar. The hitting wires pass
through a guide-plate, M, placed so that their heads will come exactly
against the points of the needles in the jacquard, as shown in the figure.
The other ends of the hitting wires lie loosely in the loops of the vertical
needles, C. Underneath the guide-bar G is the curved brass
plate I, which is in lieu of a cylinder. Between the cylinder and the
guide-bar G the perforated roll of paper I I passes; there is just sufficient
room between them for it to pass freely through, as it is moved
forward by the stud wheel K. The paper may pass from one cylinder
or reel to another, or may hang in folds in the same way as cards
usually hang. At the points of the hitting wires is a grid or pushing
frame, H, with an iron angle-bar across above each row of wires, as
shown in section in No. 1 at H. There is a clap-board above the small
vertical needles, which is shown raised at E in No. 1, and down in No.[166]
2; this is raised and lowered with these needles, and serves to bring
them all down when raised. E1 shows the way in which these needles
are hung in the frame that supports them. When the machine is
working the frame H has a horizontal traverse coming against the ends
of the hitting wires when they are pressed up by the card on the
cylinder, and, pressing them against the needles of the jacquard, push
them back as an ordinary card cylinder would. It may be seen in No.
1 that two of the feelers are down and two are pressed up, as they
would be if two holes were cut in the paper and two uncut; the two
that are up raise the hitting wires connected with them, and it will be
observed that this raises the points of the hitting wires so as to come
against the angle-iron of the grid H when it is coming forward; whereas
the two hitting wires that are not raised will pass through, and not be
pushed back. This enables the card paper to act on the needles of the
jacquard in the same way as if coming directly on them, as cards do.
The cylinder has a slight vertical motion, rising about 1/8 in. The
needles, when the cylinder is down, do not pass through the plate G;
it is perforated through and raised by the cylinder ascending. When
the frame H is pressed forward the clap-board O is pressed back.
The card paper is of a special make, thin and tough, and is strengthened
along both sides and in the centre by strips of paper pasted
along it where the stud holes fall. No. 3 shows the motion by which
the clap board E is raised and lowered by the sliding of the cranked bar
F between the two studs 2. No. 4 shows the size and pitch of the
holes in the hard paper. These are traced from the paper, and lie
diagonally, two rows of 8 making one row of 16 hooks in the
jacquard.
These machines are working in large numbers in France, and appear
to give more satisfaction there than here, partly because they are
better known, and the French workmen are better adapted to handle
the small parts belonging to them. A coarser machine is more suited
for the ordinary workmen to be found in the factories of this country.
But it is strange if a machine of a pitch about half-way between the
French jacquards and ours would not be better than either; not taking
up so much room as ours, and not so minute as the French. However,[167]
in many cases the machines we have in use are none too large to give
sufficient latitude for the errors often found cropping up in work, none
of which should occur, of course, though they often do, through carelessness
or otherwise. For instance, the card cylinder may be a little
off the pitch, and the cards may be affected by damp, or may not be
correctly cut to suit the cylinder; the points of the needles may be
a little bent by the cylinder, or by the carelessness of the weaver when
turning back her cards, and the
cylinder may not be set quite fair
for the needles. Mr. McMurdo, of
Manchester, has made a very nice
machine of the same pitch as the
French ones, with 1,296 hooks, 16
row cards. It works as a double-acting
machine with two cylinders
and two griffes, but only one set of
needles acting on the two sets of
hooks. Two of the hooks are shown
in Fig. 107; each needle clasps two
hooks and passes through a needle
board at each side of the machine.
There is no spring on the needle,
the hooks forming the spring, the
tops of the hooks coming against
the cross-rods at A A. Otherwise,
this machine works in the usual
way, and is very compact where a large number of hooks are required
in a small space.
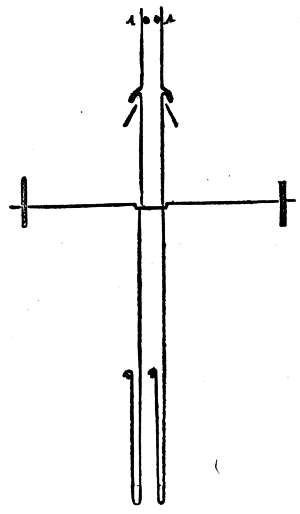
Fig. 107
The card-cutting machine used for the French system of work is a
very elaborate contrivance, being more like a jacquard loom than any
of our card-cutting machines, at least in so far as the harness is concerned.
The principle of it is seen in Fig. 108. a shows the set of
cords by which the punches are wrought. The method of preparing
the pattern to attach to these cords has been referred to before, but
will be repeated again further on. These cords pass over the pulleys[168]
B and down through a reed to the lingoes C, which keep them in tension.
Another set of cords pass from these over the pulleys D and
down to the punches F. When any of the cords at A are drawn the
punches connected with them are dropped, as raising the lingoes lets
the cords pass over the pulleys D. When a punch is let fall, it is
caught by one of the angle-irons of the grid G, which is pressed forwards
when a card is to be cut. The card paper is on the roller JH,
and passes down in front of the punches at I, which, when pressed
forward, punch the paper between them and the block K. Any punches
that are held up pass through the grid over the angle-iron bars. Only
four punches are given, but sixteen are used in the machine; they are
here drawn out of scale to show them more clearly. This portion constitutes
the cutting machine; it is worked by two persons, one behind,
to draw the cords, and another in front, to punch the paper by depressing
a treadle each time a draw is made. In addition to cutting from the
pattern the paper can be cut from other sets of cards, as in a repeating[169]
machine—cut either on the English or French system. N is the
French machine, and a set of cards can be put on it and copied, the
cords O acting on the punches; English-cut cards can be put on the
machine at L and copied, the cords M acting on the punches. Of
course, when one portion of the machine is working, the other parts
remain idle, and it might be better to have them separate if much work
is wanted.
The pattern is prepared for this machine by hand, working one
repeat of it as follows:—The design, painted on point paper, is placed
on a frame in an upright position, and over each line on it is stretched a
vertical cord, which is taken as warp. The picker then takes a bobbin
of weft and inserts it under every cord that passes over a painted dot
on the first weft line of the pattern, keeping it in front of all the cords
that pass over blank spaces, just in the same order as a shuttle would
pass through if the shed were to be opened by a jacquard. When this
is done the next line of the design paper is picked similarly, and so on,
till a complete repeat of the design is loosely woven with cords, which
are made of well-twisted harness twine. This process is somewhat
similar to reading the pattern for the draw loom, which see. For
coloured work a shot would require to be worked in for each colour on
any weft line, the same as it is to be woven. When this is prepared,
it is taken to the cutting machine and the warp tied to the cords A,
the weft showing the warp ends to be drawn for each card.
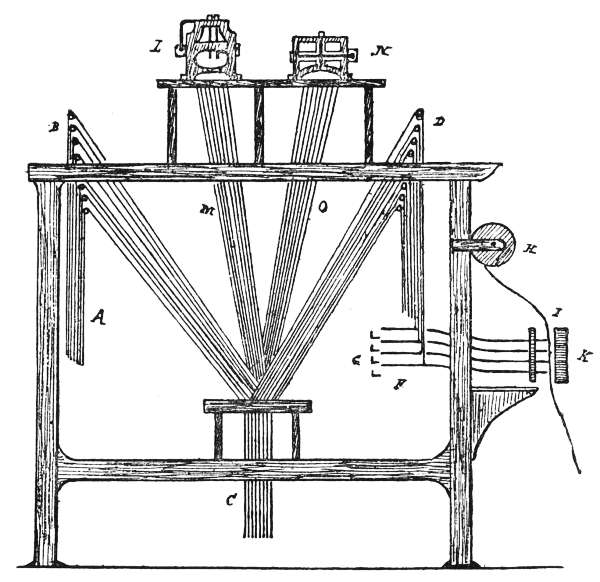
Fig. 108
HALF HARNESS AND MUSLIN HARNESSES
So far we have been speaking entirely of ‘full-harness’ work.
Though the principle of mounting is much the same in all classes of
harnesses, there are certain deviations peculiar to each.
One drawback to the full harness is the amount of machinery
required to give a large extent of pattern, an upright hook and a needle
being required for each thread in one repeat of the pattern. In a half
harness only half the amount of machinery is required on the same
fineness of cloth to give an equal extent of pattern; but it is only for
a few classes of goods that this method of working is suitable, leno[170]
curtains and muslins being the principal. Leno curtains will be
mentioned under gauzework, as they are wrought with a gauze
mounting, but on the half-harness principle. Figured muslin curtains,
with a plain ground and coloured flowering, are called ‘crêtes,’ or
‘crête curtains’; these are now generally wrought in a full harness.
Figured muslins are much of the same class of cloth, but are not
figured with colour and tint for the half harness, known as the
‘common spotting harness,’ or ‘book harness.’ For working them the
harness is mounted in the ordinary manner, but only half as many
cords are required for it as there are threads of warp. Only half of
the warp is drawn into the harness, the other half—every alternate
end—passing through it, and being drawn into a plain leaf of heddles,
which is hung close in front of the harness. In fine work two leaves
of heddles may be used as one, to prevent crowding.
The ground of the cloth is a plain texture, and was formerly
wrought by having two leaves of long-eyed heddles in front of the
harness, into which all the warp was drawn, this probably being more
convenient for the hand-loom weaver; and besides, a more even plain
ground can be made with the heddles than with the harness and one
leaf of heddles. Two shots of ground, or fine weft, are given to one
shot of figuring, or coarse weft, usually cotton rove; but to avoid
using a pick-and-pick loom when working by power, the coarse shot
may be made by throwing two finer ones into the same shed. In
power looms the ground is wrought by raising the plain leaf of heddles
and all the harness alternately, and the figuring shed is formed by
drawing the harness with a card acting on the machine. The pattern
is painted solid, without any twilling or binding on either ground or
flower, so that the figuring shot will be in a plain shed for the flower,
but will be loose or unbound over the ground, and is afterwards cut off
in a cropping machine.
Fig. 109
The plain shed, into which the thick weft is thrown, must also
contain the shot of thin weft thrown in either before or after it,
according as the figuring shed follows the plain shed made by raising
the harness or the heddles; for supposing the heddle shaft to be raised
and a ground shot thrown in, then the shed reversed by raising the[171]
harness and another ground shot thrown in, then the figure shed
formed by raising 50 or 100 hooks of the harness, this opens portion
of the last shed, and the figure weft will be thrown in along with the
last shot of ground. When both wefts are white this is of but little
consequence, but when using coloured wefts for the figure the ground
weft would be liable to show along with them and injure the pattern.
This was originally overcome by adopting the ‘paper harness’ from
the shaft mounting for weaving paper spots. In this mounting two
sets of shafts and two harnesses are used, one behind the other. Half
of the warp—all the odd numbers of threads—was drawn on the back
harness, and the other half—all the even numbers—on the front
harness; this would be sufficient to make the cloth, but a pair of leaves
of long-eyed heddles were used for working the ground, acting as
pressers. On this method of working, a ground and a figuring shot are
thrown in alternately, as either half of the warp can be raised by the
harness for the figuring shed, and a richer spot is thus given; but still,
the rove or figuring shot would fall into the same shed as the ground
shot, which may be seen by examining the two spots given in Fig. 109,
A being wrought on the common spot or half-harness mounting, and
B on the paper-spot mounting. The grey shots are the ground, and
the black ones the figure. However, in the paper-spot mounting it is[172]
not necessary to throw the rove into a plain shed; any suitable twill
may be used for binding the figure, and will give a much richer effect
on one side of the cloth than plain, and tie down the ground shot, which
will go into a plain shed.
This principle of mounting is now done away with, as it has no
advantage over the ordinary full-harness mounting, which can also
have a pair of presser leaves of heddles in front for working the ground,
if desired; but they are unnecessary in a power loom, except when a
very level ground is required.
A twilled or flushed figure may be formed with the common half
harness, but only having half the warp for binding causes it to be
loose and ragged round the edges.
To work a large pattern, perhaps the most economical way, at least
in the hand loom, is to use a pressure harness with two threads in the
mail, and with four presser heddle leaves in front. The number of
leaves regulates the twill on the figure. The cloth may be woven
pick-and-pick, ground and figure, or 2 picks ground to 1 of figure.
When the harness is drawn for the figure all the heddles must be sunk
but one leaf, and sinking the two front and two back leaves alternately,
raising the back ones when the front ones are sunk, and vice versa, will
form plain cloth with the draft 1, 2, 3, and 4 over the leaves. A 4-leaf
twilled figure can be made with this mounting, but still it will not
have the advantage of the full harness, in which the figure can be
varied in twill, and bound round the edges.
SPLIT HARNESS
The term ‘split harness’ is sometimes applied to the pressure
harness when wrought with two threads in the mail, this constituting
a splitful of warp, so that each cord of the harness controls a splitful
of warp; but this is only the finest description of pressure harness.
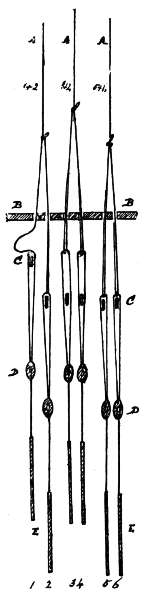
Fig. 110
The split harness, or ‘shaft monture,’ was invented in the silk
district of Bethnal Green, shortly after the introduction of the jacquard,
for weaving rich silks which have about 400 threads of warp per inch,
but much less weft—perhaps about one-fifth of that number of threads.[173]
The harness is wrought with the ordinary jacquard, but there are two
mails and lingoes attached to each neck cord, as shown in Fig. 110.
A, A are the neck twines, B is the cumber board, and D the mails. If
this mounting were wrought with the jacquard only, it would produce
the same effect upon the cloth as if two threads
were drawn into each mail of an ordinary harness.
This would, of course, take away the fine appearance
of the cloth. To avoid this a set of shafts, C,
C, are passed through loops in the twine above the
mails, and are attached to a set of hooks in front
of the jacquard, or at each side of it, or may be
wrought by a separate dobby. Twenty-four shafts
are mostly used, and are usually flat enamelled
iron bars. These shafts are for working the ground
of the cloth, and can raise each row of mails separately,
as shown at No. 1 leash, thus splitting the
pairs of threads that are connected with each hook
of the jacquard. One or more of these shafts,
according to the texture required for the ground,
are raised at the same time that the jacquard draws
the figuring shed. No ground texture is put on
the pattern for the cards, but the figure must be
twilled, or have the binding marks cut on the cards
for it. The binding of the figure will be in pairs
of threads—that is, two threads of warp must
sink together under a weft shot, though on the
design these two threads will appear as one, as
they are wrought by the same hook of the machine.
On account of the number of warp threads, rising
and sinking in pairs will not much affect the appearance
of the figure; though it must be coarser
than if the threads were bound separately, and will also have a rougher
or more ragged outline; but to get a large figure with so much warp
would necessitate a great amount of machinery if the threads were
drawn into separate mails with one to each cord of the harness.
[174]
This method of working is surpassed by the twilling machines now
in use (see Twilling Jacquards), though they are more intricate, and
would not suit well for a hand loom, as they are heavy to draw.
PRESSURE HARNESS
This is the old draw-loom system of working, and, old as it is, is
still in use on our modern hand and power looms on the finest description
of damasks, and is not likely to be surpassed for making a good
piece of cloth. Much firmer than a harness, and producing the largest
possible pattern with the least possible cards, mounting, and machinery
it took up its position in the days of the drawboy, and has held its own,
with the aid of the jacquard, against all the inventions of modern times.
The principal advantage of this system of working is that a much
larger pattern can be produced with the same quantity of cards, mounting,
and machinery, than by any other means; but the pattern wrought
by a pressure harness will not compare with one wrought by a full
harness for fineness of outline or detail. When weaving large tablecloths
with 100 or 120 threads of warp per inch, and from 50 to 72, or
even 90 in. in the single pattern—that is, when the pattern is all, or
nearly all, single—the amount of machinery that would be required
to work it on a full harness could not be crowded on a loom, the French
system being the only one by which it might be attempted; and even
then the difficulty of keeping the machinery and cards in perfect working
order would be very great, not to mention the cost of mounting,
patterns, cards, &c. The quantity of harness and machinery is reduced
in a pressure harness by drawing two or more warp threads into each
mail in the harness. Suppose we take 60 in. of cloth with 100 threads
per inch = 6,000 threads, and allow 3 threads to each mail in the harness,
or each hook of the jacquard, 2,000 hooks, or four 500 jacquards, would
be required to work the pattern. As many as six 600 jacquards are
sometimes required on this description of work when very fine; but
three or four 500 or 600 machines are more commonly used on either
hand or power looms. To work one of these finest patterns in a full
harness 10,800 hooks would be required—say, six 600 machines with[175]
3 threads to each mail = 10,800; and almost double this number of
cards, even with working them backwards and forwards, would be
necessary.
In early times, when the drawboy took the place of the jacquard,
6, 8, or 10 threads were put to each mail, or went to what would now
be one hook of the jacquard; and patterns were not usually so extensive
as they are now, so that the cords of the harness were greatly reduced
in number, but with a proportionately coarser effect of pattern. The
difference between a pattern wrought with a full harness and one
wrought with the pressure or any of the twilling harnesses, is that the
outline is clear and defined in the full harness, and the detail and points
of the figures can be turned on a single thread, whereas in the others
the edges of the figures will be jagged or in steps, and the points must
turn on whatever number of threads are lifted together. The pattern
on the cloth must therefore have somewhat of the rough, square effect
of the design on point paper, though, of course, reduced in size, but
will be worse in this respect—viz. that whereas the edges of the figure
on the point paper are clear and well defined, on the cloth they are not
so, the rough edges to some extent blending the figure into the ground,
and not giving the clean, sharp effect of a full-harness pattern. Shaded
effects are also coarse on a pressure harness, but can be made effective
if broadly treated. Cloth with 100 or 120 threads per inch does very
well to have three threads to the mail, and from 80 to 100 threads per
inch suits very well for two to the mail. Any coarser set than 80
threads per inch requires to be woven in a full harness to produce good
work, and for superior work nothing less than 100 threads per inch
should have two threads to the mail, though 80 per inch does very
well.
When several threads are put to the mail, it is also usual to put
several picks to each card. The fewer picks, the finer will be the
pattern; but a good method of regulating this is to make the checks
formed on the cloth square, a little more or less according to the fineness
of the pattern required. Thus, if the cloth is wefted square, or a
little over that—say, 100 warp by 100 to 110 weft threads per inch—paint
the design on, say, 8 × 8 or 8 × 9 paper, and give as many shots[176]
to the cards as there are threads in the mail. If the cloth is to be
wefted one-half over square (100 × 150) the same pattern will still do,
but with half as many more shots to the card than there are threads in
the mail. If there are two threads in the mail there will be three
picks to the card, but if there are three threads to the mail there must
be four picks to one card and five to the next one. This would be for
a pattern on 8 × 8, or square paper. If painted on 8 × 9 paper,
which would give an extra card to every eight, and if the weft must not
be increased, then four or five picks must be taken off the number given
to the eight cards and put to the ninth one, for four cards with four
picks to each and four with five picks to each = 36 picks, and thirty-six
picks put to nine cards would allow four picks to each. This would
make the edges of the pattern a little finer; and if the design was
painted on 8 × 10 paper it would be finer still, as there would be more
cards to a given number of picks.
In this way any alteration required can be made on the number of
picks per inch given to cloth woven on a pressure or twilling harness,
without distorting the pattern by varying the number of picks given to
each card to suit the shotting. Neither is it necessary to have the
same number of threads in each mail; the warp might be mailed 2’s
and 3’s or 3’s and 4’s, but the more regular they are, the better. If the
fineness of the cloth requires to be altered, it may be woven in the same
harness without any alteration by varying the number of threads in
the mails. For instance, a warp of ninety threads per inch mailed 3’s
and one with 120 threads per inch mailed 4’s would work in the same
harness. Similarly, the same set of cards would suit for making
different widths of cloth by making the harness narrower in the cumber
board and altering the mailing so as to keep the cloth the same set, or
it may be made a finer set and not alter the mailing. In either case
the pattern would be reduced in size.
Fig. 111 shows a portion of a pressure-harness mounting which is
similar to that of the draw loom. It is mounted in the same manner
as described for full harness, only that the warp must be divided by the
number of threads to be drawn into each mail in order to find the
quantity of harness required. The kinds of mails used are shown at A[177]
and B, Fig. 111; it does not do to have more than two threads drawn
into each eye of the mail, as they are liable to twist round each other;
two will separate easily, but a greater number will not. Ordinary full-harness
mails answer very well for a two-thread harness. The mails
are levelled in the same position as for full-harness work, viz. about
1-1/2 in. below the level of the back and front beams for hand-loom work,
and a little lower for power looms. The lingoes are heavier than those
required for a full harness; the weight depends upon the strength of
the yarn and the number of threads in the mail; 10 to 12 to 1 lb. are
used in power looms for linen damask with two threads in the mail,
having about eighty to one hundred threads of warp per inch. For
hand looms they are usually made of lead, thicker and shorter than
the wire lingoes, and called ‘leads’; 11 to 15 per lb. suits for three- or
four-thread harnesses. Light cotton work, such as muslin curtains,
only requires lingoes of about sixty or seventy to 1 lb. for hand looms,
but from twenty-five to thirty per lb. are used in power looms for two-thread
harnesses.

Fig. 111
The principle of working the pressure harness is best explained by[178]
the diaper mounting shown in Fig. 2, where a back set of heddles takes
the place of the harness, and a set of ground leaves of long-eyed
heddles stands in front of the back ones. After the yarn is drawn into
the harness or back mounting in the usual way, it must be drawn into
the front or presser heddles, using, generally, a straight draught for a
satin ground. If Figs. 2 and 111 are examined, it will be seen that
when the shed is opened by the harness or back mounting, the heddles
in front sink part of the raised warp and raise part of the sunk warp.
The mounting raises all the warp of the figuring portion on each card
or line of the design paper, and leaves down all the ground warp, so
that it is necessary to have the heddles in front to bind the warp
and weft, or form the texture of the cloth. For an 8-leaf satin eight
shafts are required; one of these must be raised and another sunk for
each shot, so as to raise the binding threads of the sunk warp and sink
those of the raised warp, the harness forming the outline of the
pattern, or raising the warp of it in a mass. The other six leaves of
heddles stand in a middle position, and the long eyes allow the warp
drawn by the harness to rise. When the machine is drawn it is held
up till as many shots as are to be given to the card are thrown in, but
the shed formed by the heddles must be changed for each shot. In
working bars up the cloth one card would be sufficient, and when the
machine is drawn it would be held so, and the cloth wrought with the
heddles; of course, no machine would be required in this case, one leaf
of heddles with the stripes of warp drawn into it would be sufficient
for the back mounting. For dices two leaves of heddles would be
sufficient for the back mounting, the warp of one dice to be drawn on
one leaf, and that of the other on the other leaf; then one leaf would be
raised and held up till one dice was wrought, when it would be lowered,
and the other one raised and held up for the other dice. For fancy
dices and diapers the plan of mounting in Fig. 2 is very suitable and
simple, but for a variety of figuring or flowering the jacquard is necessary.
It will be seen that the presser heddles have three positions, viz.
a sunk, a raised, and a middle position. The length of the eyes is to
allow the harness to open the shed when the heddles are stationary, or
in their middle position. They must be a little longer than is required[179]
to open the shed at the back leaf of the heddles; for a 2-in. shed a
2-1/4-in. to 2-1/2-in. eye is used. When the heddles are stationary the lower
loop of the eye should be fully 1/8 in. under the sunk warp, and there
should be the same clearance at the top when the shed is drawn; some
allow more. The shed for a pressure harness is usually very small in
front of the reed, and requires a very small shuttle to be used, from 1/2 in.
to 1 in. deep being the usual sizes. The depth of the shed that can
be made depends principally on the elasticity of the yarn. With a
linen warp a very small shed can be made, as the yarn has but little
elasticity, and if overstrained will hang slack. For it the distance
between the harness and the back shaft of the front mounting should
be 10 in. to 12 in., and there should be a stretch of 27 in. to 34 in.
behind the harness. The draw of the harness may then be 3 in. to 3-1/2 in.,
and the shed at the back shaft will be 1-3/4 in. to 2 in.; this will allow
a shuttle of 3/4 in. to 7/8 in. deep to be used. For hand looms the shed
is about 1-1/4 in. at the back shaft, and a shuttle of 1/2 in. deep is employed.
The shed must be made very clear and regular, and the smaller it can
be kept, the better. With a good cotton warp 7 in. is a sufficient
distance to have between the harness and heddles, and will admit of a
larger shed being formed; but it is not desirable to have too large a
shed, as there is a considerable strain on the yarn, and a small, clear
shed is more satisfactory. This would be assisted by bringing the
harness as close as possible to the heddles.
One drawback to this method of working is the distance which
separates the harness from the fell of the cloth, or even from the reed;
and if there is any obstruction to the warp rising or falling, such as
roughness in the heddles or reed, or lumps on the yarn, it will not,
unless very tight, fall into its proper place, and the shuttle may pass
over or under it when it should not do so, giving a picked or darned
effect to the cloth; slack threads may cause the same.
The warp must be kept as tight as possible, and all the threads
should be at a uniform tension, the heddles straining each thread alike;
the harness should be as close to the heddles as the yarn will permit
it to be. The space occupied by the harness, heddles, and traverse of
lay should be no greater than is necessary; then, with a small but clear[180]
shed satisfactory work can be produced. When drawing a warp into
the harness, a boy or girl sits behind, and hands the threads to the
drawer-in, who takes them into the mails with a wire hook, and then
either hands them to a second drawer-in sitting in front of the heddles,
to be drawn into them, or passes them over and under a pair of rods
tied across the harness so as to form a lease as she draws them in;
and when she has all drawn into the harness, she begins to draw
them into the heddles, a straight draught being mostly used for a twill
or satin.
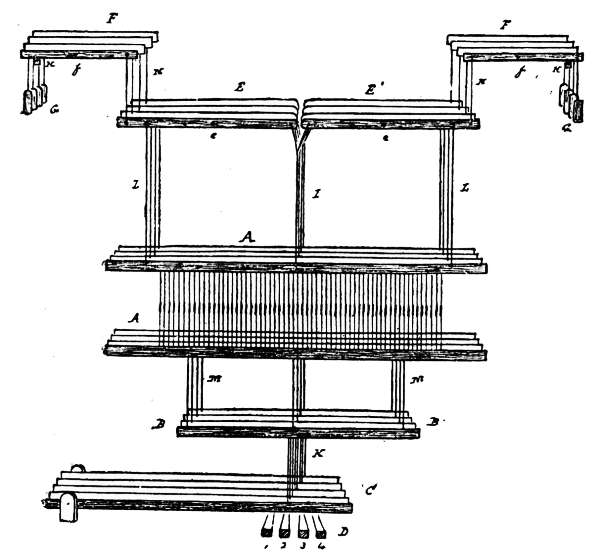
Fig. 112
The front mounting of a damask hand loom is shown in Fig. 112.
A, A are the shafts, four in number, but eight are generally used for an
8-leaf satin; B, B are the jacks; C the lams, which require to be
one more in number than the leaves of heddles; D the treadles; E, E1
the upper marches or jacks; F, F1 two sets of coupers or levers, with
their fulcrums at f, and loaded at the outer ends with the weights G.
Under the ends of these levers is a bar N, to which the weights draw
them, and keep the heddles up to their middle position. The cords I
are not fastened to the heddles, but pass down through them to the[181]
lams C. The cords L connect the coupers with the heddle shafts.
Each lam has two cords tied to it, except the two outer ones—i.e. the
first and last one—which together act as one, to avoid crossing the
cords. One of the cords I is tied to each lam, and also one from the
jacks B; but the first and last lams have only one cord tied to each of
them, one having the cord I, and the other that from B. Both these
lams are connected with one treadle, and the others are each connected
with a treadle. Of course, the cording is made in the usual way, agreeably
to the pattern, two methods of twilling being shown in Fig. 113.
When the weaver presses down a treadle, one leaf of heddles is raised
by the cord I connected from one of the levers E, E1 to one of the
marches or lams C, and one leaf is at the same time sunk by the
cord connected from one of the jacks B to the lam connected to the
treadle. The other treadles act similarly when corded for a twill or
satin.
Fig. 113
The cording generally used for an 8-shaft satin is shown at A, Fig.
113. Sometimes the twill is run in
the reverse direction. In either case
it will be observed that the twill on
both ground and figure run in the
same direction, which makes one a
sateen, or coarse twill, and the other
a satin, or fine twill. In order to
have both twills alike they require
to be run in the opposite direction on the cloth, as shown at B, which
will give a fine twill on both ground and figure, on both sides of the
cloth, with single yarn. This does not hold good with every twill.
When weaving, the weaver presses down the treadle which is connected
with the jacquard (another treadle being required for this purpose) with
his left foot, then works over the twilling treadles with his right foot,
holding down the machine treadle till he gives as many shots to the
cards as are required. When the card is to be changed the weaver lets
down the machine and draws another shed, striking up the weft again
without throwing in a shot or taking his right foot off the treadle.
This clears up the shed, and makes the yarn steady before he springs[182]
another shed with the presser leaves, giving a regularity and firmness
to the work which it is impossible to get otherwise, but which has to
be done without in the power loom. The weft is struck up on the
open shot, or before the heddles have closed the shed. Sometimes a
sort of dobby is used below the lams, which enables the weaver to work
the heddles with one treadle. In power looms a similar principle of
front mounting is sometimes adopted, substituting a wyper tappet for
the weaver’s foot; but a better plan, as it avoids having the cords
passing through the yarn and heddles, is to have a box tappet, on the
Woodcroft style, made with solid plates, and struck to give the rising
and falling motion. The connections from the tappet to the heddle
shafts are made in the same way as the ordinary Woodcroft tappet.
The jacquard may either be a single or double-lift one. Some prefer
the one, some the other. The single-lift is more easily fitted up,
especially if the number of shots to the card varies. When the shots
on each card are alike, perhaps the steadiest method of lifting the
machine is to have a box tappet struck one up and three down, or one
up and two down, according to the number of shots on the card. This
tappet acts on a bowl on a treadle, to which the rod for raising the
machine is connected. For a double-acting machine there must be two
treadles and tappets acting alternately. The cylinder can be driven
from the rising and falling of the machine with a swan-neck or lever
motion, or may be driven from an eccentric on the loom with a pinion
on the crank shaft turning it one to three or four shots, as may be
desired. When the shotting to the card is irregular there are several
methods adopted for lifting the machine griffes, one of the best of
which is shown in Fig. 114 for a single-lift machine.
A is the treadle to which the connecting-rod from the machine is
fastened by a bolt through the slot at H, or the slot may be in any
desirable place. B is a rack in which the end of the lever works,
which keeps the treadle bowl steady to the tappet. E is the tappet on
the tappet shaft of the loom, and is made so as to act at every shot.
D is the fulcrum of the lever, and C is the stand, which is bolted to the
ground and fastened to the side of the loom. This portion of the
motion working alone would raise the griffe for every shot, the same as[183]
would be required for a full-harness, single-acting jacquard; but when
the griffe is raised by the tappet E, it can be held up as long as is
desired by letting the bell-crank catch F fall in over it as shown.
When the treadle A is in this position the tappet merely touches the
bowl, depressing it about 1/8 in., so as to clear it off the catch; this is to
allow the catch to be easily pushed off when it is required to let the
treadle up, or to drop the griffe. The catch is moved by the cam or
tappet G acting on the bell-crank F. This tappet can be driven by a
pinion on the crank shaft or by a catch on the slay. It may be a
tappet struck to suit, or a barrel with a set of lags or pins on it, so
that the machine griffe may be raised and lowered in any order that is
desired.
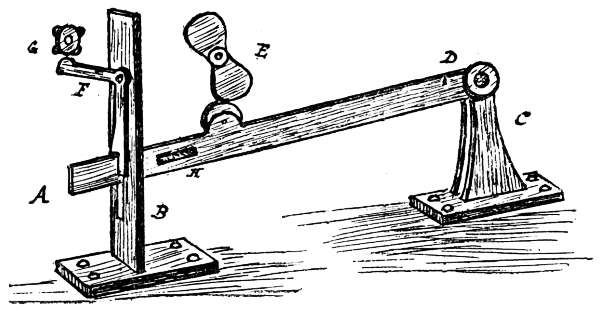
Fig. 114
An ingenious method of working the heddles of a pressure harness
by the jacquard was invented in Bethnal Green shortly after the introduction
of the original machine. It was used for weaving the richest
silk damask, which had 400 threads of warp per inch and about one-fifth
that number of weft shots, so that five threads of warp might be
drawn into each mail without making the pattern appear any coarser
in the warp than in the weft. A sketch of this mounting is given in
Fig 115. A shows the hooks for working the heddles, and B those for
working the harness. Eight hooks are given for working four leaves
of heddles. It will be seen that a cord from two hooks passes round
one of the pulleys C, and each of the heddle shafts is attached to one
of these pulleys. These hooks may be raised by the griffe of the
jacquard, which would require to rise and fall for every shot, or the[184]
griffe may be held up for the number of shots to the card, and the
hooks for working the shafts may be wrought by a small dobby.
When one of each pair of the hooks A is raised, the heddle shaft connected
with it is raised to the middle position, as shown by the pulleys
1 and 2, and the leaves connected with them. If neither of the hooks
is raised for any shaft, it will remain sunk, as shown in No. 3; and if
both the hooks are raised, the leaf will be raised to its top position, as
No. 4. The leaves are drawn down by weights or springs.
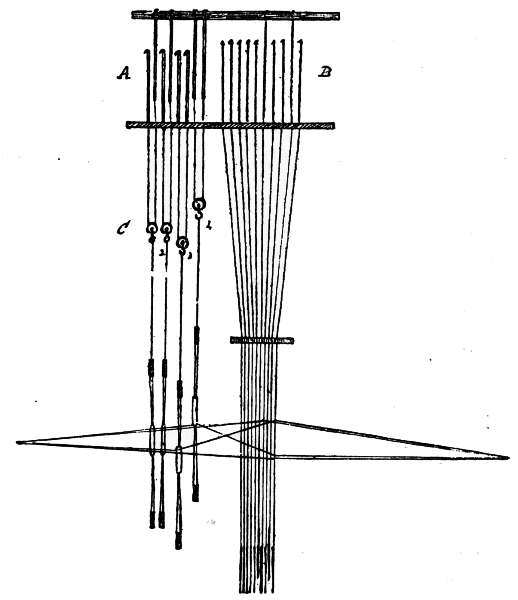
Fig. 115
[185]
TWILLING JACQUARDS

Fig. 116
As has been stated before, one of the drawbacks to a pressure
harness is the strain which the warp has to undergo when forming the
shed. This necessitates having a good warp, which adds to the cost
of the cloth, and in low-class goods this consideration may hinder the
sale. Many methods have been adopted for working the ground of
the cloth without using a pressure mounting. Some of these are
explained under ‘half harness’ and ‘split harness,’ but none of these
methods would produce cloth like the pressure harness. A twilling
jacquard to act similar to the pressure harness, but without using the
front mounting, or by dispensing with the leaves of heddles, was
patented by Mr. Shields, of Perth, in 1859. This machine underwent
several improvements, and now there are two varieties of it in use,
one known as the Irish or Bessbrook machine, being patented by
Mr. Barcroft, of the Bessbrook Spinning Company Limited, county
Armagh; the other as the Scotch machine, the improvements being
made by Mr. Shields and others. The principal difference between
the two machines is that the blades or knives of the griffe have a
horizontal or sliding motion in the Scotch machine to enable them to
get clear of the heads of the hooks, whereas in the Bessbrook machine
they turn out of the way or partly revolve. A full description of the
Bessbrook machine is here given. Fig. 116 is a view of the framing
of the machine. K is the cylinder, which may be wrought by the
swan-neck motion, as shown, but it is better to be wrought by a
separate motion from the loom. D is a cord attached to the handle of
the shears for reversing the cylinder; E is a brass bushing through
which a shaft passes for raising the griffe. The shedding of this
machine is exactly the same as that of an ordinary single-acting
jacquard. The griffe rises and falls for every shot; the cylinder
travels out and in, but does not turn till two or three or whatever
number of impressions required are given by each card. To prevent
the cylinder turning it is only necessary to raise the shears so that
they will not catch it. This is done by means of the tappet A, shown[186]
in Figs. 116 and 117. The roller H on the shears rests on the tappet,
which is turned by means of the rack wheel, which is fast on it,
and the lever L, which is loose on the stud. This lever is pushed
backwards and drawn forwards by the rod I, which is connected to
an arm, either on the shaft for raising the griffe, or on one for working
the cylinder, and the catch on the lever takes a tooth of the ratchet
wheel at each draw, so that with four divisions on the tappet, and
12 teeth in the ratchet, three shots would be given to each card. If
it is required to work the cylinder the reverse way, it is only necessary
to tie the cord D on the end of the shears to a spiral spring made
fast to any convenient part of the loom, then the roller C will be acted
upon by the underside of the tappet, and the under hook of the
shears will turn the cylinder when required. B is a spring acting
as a pawl to keep the ratchet from moving backwards, and there is
also a spring shown over the catch which moves it forward; both
these springs serve to keep the tappet steady. There are two sets of
hooks and needles in this machine—the ordinary set for working the
harness, as shown at A (Fig. 118), and a set of twilling hooks, one row
at each side of the machine, which are much stronger than the others.
The ends of the twilling hooks are hooked round bars, which pass[187]
through the loops at the lower ends of the ordinary hooks, as shown
at C (Fig. 118). These bars are kept in their places by a grid D,
which is between the ordinary hooks and the twilling hooks. Each of
the needles of the jacquard is connected with two or more of the
ordinary hooks, as shown at A. The twilling hooks have also needles
on them, but they are only for the purpose of keeping them in their
places, and are not acted upon by the cards. The springs of these
needles are on the ends next the cards, or at the back of the faceplate
or needle, as shown at E. The centre support for the knives of the
griffe is shown at F, with an end view of two knives G G. The ends of
the knives enter the griffe frame at each side, so as to allow them to
oscillate or partly revolve.
This motion is given to them
by a set of bars or flat needles,
as shown at A (Fig. 119). A
single needle is given at A1.
These needles have each the
notch in them over the top
edge of two or more of the
knives, and are acted upon
by a barrel C with studs in it,
set to the twill. This barrel
rises and falls with the griffe,
and is turned from one row of pegs or studs to the next one each
time the griffe falls by the head or lantern on it coming down on a
finger, as shown at A (Fig 120). B in the same figure is a strong
spring to keep the barrel steady and make it turn the correct distance.
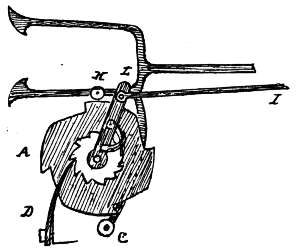
Fig. 117
The number of knives in the griffe must be regulated to suit the
twill to be put on the cloth; they must be a multiple of the twill, and
this to some extent regulates the number of needles that must be in
each upright row. For example, an 8-leaf twill may have 16 or 24
knives, which would be twice or three times over the twill. If there
are 8 rows of needles to 16 knives, or 16 rows of hooks, that would be
2 hooks to each needle, or if there are 24 rows of hooks there must be
3 hooks to the needle; but if only 2 hooks to the needle are required,[188]
there must be 12 rows of needles to 24 rows of hooks. The same
principle holds good for a 5-leaf, or any twill. Eight or 12 rows of
needles would not be suitable for a 5-leaf twill, neither would 10 rows
of needles be suitable for an 8-leaf twill, if the same number of hooks
have to be connected with each needle; but 10 rows of needles with
20 rows of hooks or 20 knives will answer for a 5-leaf twill with 2
hooks to the needle, or would answer for an 8-leaf twill with 24 rows
of hooks, 4 of the needles to have 3 hooks to each, and 6 of them to
have 2 hooks to each.
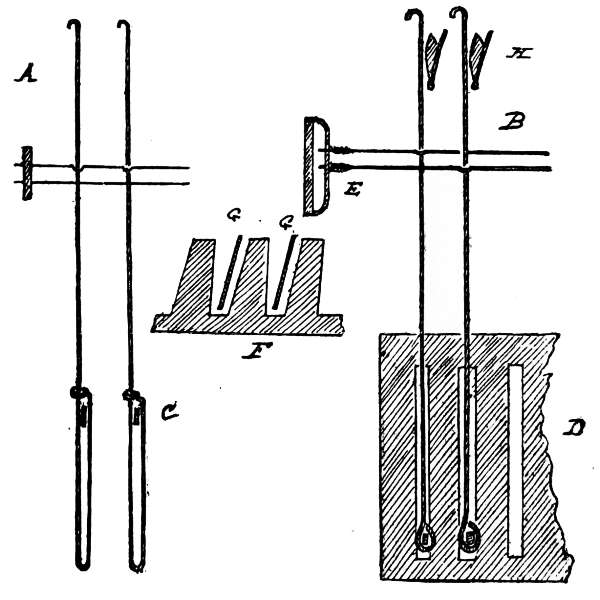
Fig. 118
Each of the twilling needles, A, Fig. 119, must be connected with
as many of the knives as there are repeats of the twill; thus, for 24
with an 8-leaf twill, the 1st, 9th, and 17th knives would be acted upon
by the one needle, and so on with the others.
Now as to the action of the machine. When the pattern card
presses upon the needles the griffe begins to rise, and when rising it
must lift all the hooks required for the pattern except 1/8th part of them[189]
which must be left down (in an 8-leaf twill) to form the binding or
texture of the cloth. In addition to this, 1/8th part of the ground warp
must be raised for the weft to pass under it and form the ground
texture. This is all accomplished by the one rising of the griffe.
When the griffe is down, one of the twilling needles, A, Fig. 119, is
pressed back by a peg or stud in the barrel, which causes the knives
connected with this needle to turn out of the way of the heads of the
hooks, so that when the griffe is rising these knives will pass clear of
them, leaving every eighth row of hooks down to form the binding of
the raised or pattern warp. In the Scotch machines the knives slide
back instead of revolving. As shown at H, Fig. 118, there are projecting
pieces of brass fastened on the knives between the twilling
hooks. These hooks stand clear of the knives, but when the latter
revolve the projections on them push the hooks forward to the next
knife, which lifts them when the griffe is rising. The hooks draw up
the bars to which their lower ends are looped, and raise the rows of[190]
ordinary hooks through which the bars pass, thus forming the twill on
the ground in the same way, but in the reverse direction, that the
knives passing clear of the adjoining rows of hooks form the twill on
the figure.
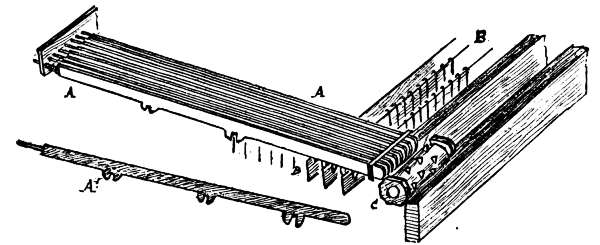
Fig. 119
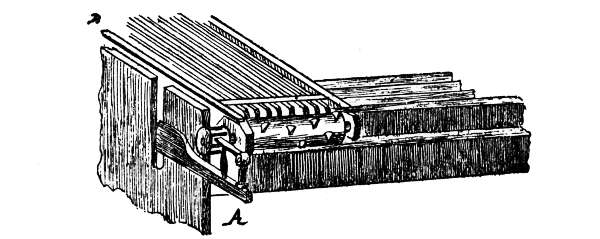
Fig. 120
The working of the texture requires the griffe to fall for every shot,
which would be otherwise unnecessary, and the card must come in
against the needles each time to push off the hooks that are not to be
raised. This causes wear and tear, which cannot be avoided with this
machine, but they work very well, though they are not by any means
perfect. There is a good deal of friction on the needles, which causes
them to wear quickly; but being so much easier on the warp than the
pressure harness, and more easily managed, they are extensively used
for large patterns in the fine linen damask trade. They will not make
so firm a cloth as the pressure harness, and have the objection that all
twills formed with the harness have when there is a gathered tie—viz.
that a portion of the cloth will have the twill running in one direction
and a portion in the reverse direction.
Like all single-acting jacquards, these machines have no counterpoise
in themselves, and being very heavy require one added to assist
the loom to raise them. Sometimes this is accomplished by means of
a carriage spring placed on a beam or on the top rail of the loom frame;
and an arm from the shaft, which raises the griffe resting on the spring,
will form a sufficient counterpoise, the spring being made as strong as
is required for the purpose. Unless the springs, which are made similar
to those used for carriages, are nicely tempered, and the different pieces
made so as to slide freely on each other, they are liable to snap when
the loom is running quickly. The griffe is generally driven from the
fly-wheel on the crankshaft in the same manner as for ordinary single-acting
jacquards. It is, however, a better plan to drive it from a crank
on a stud wheel gearing into the tappet-shaft wheel. This does away
with the necessity for a counterpoise unless the machinery is very heavy,
in which case a few strong spiral springs will suffice. The horizontal
shaft for raising the griffe, or griffes if two or more machines are used,
must be very strong, so as not to twist with the tortuous strain, which
is very great. Three of these machines, with 500 or 600 needles to each,[191]
are required for tablecloth mountings when tied up for centred patterns—one
machine to work the border, one the centre, and one the portion
between the border and the centre; or two machines to work the double[192]
portion, and one the single portion. Fig. 121 gives a view of a mounting
tied up in this way, Nos. 1 and 2 machines being double mounting
and No. 3 single.
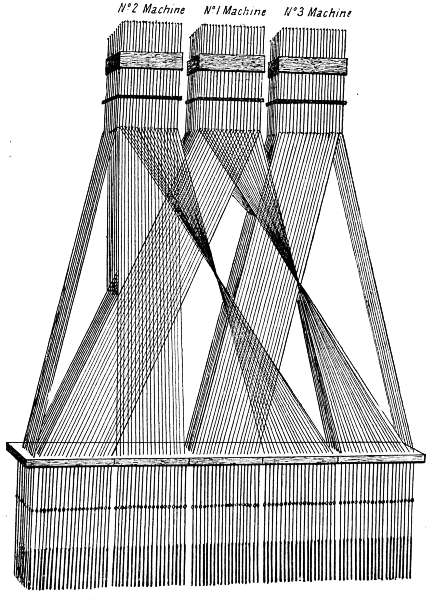
Fig. 121
The Karl Wein Jacquard.—This machine is a twilling jacquard on
the same principle as that last described, but performs its work in a
more scientific manner. It was patented by Messrs. J. Tschörner
and K. Wein, Kesmark, Hungary, and was first introduced into this
country at the Glasgow Exhibition of 1888.
The following is a description of the machine exhibited there: The
principal feature of this machine is perhaps that each knife acts independently
in a grid, and is wrought by a tappet at the side of the loom,
so that any row of hooks can be raised or
lowered at pleasure, and this without any
change of card. Fig. 122 gives an end
view of the framing, showing the upper
and lower grids in which the knives or
lifters slide. An end view of four of the
lifters is given at A, 1 and 3 belonging to
the top set, which work in the upper grid,
and 2 and 4 to the bottom set, which work
in the lower grid.
Fig. 122
A perspective view of eight of these
lifters is given at B C, Fig. 123, with upright
slide bars D attached to them, which
slide in the rack or frame E. These bars are for the purpose of making
the lifters rise steadily and horizontally, as (which may be seen) they
are not all lifted at their centre. Only one connection is fair in the
centre, which would no doubt be an objection with a heavy harness to
lift; but this arrangement is made to suit for the machine sitting across
the loom, for a London tie, and some method of making vertical connections
from the levers to the lifters is necessary. The above does
very well for a narrow harness if light.
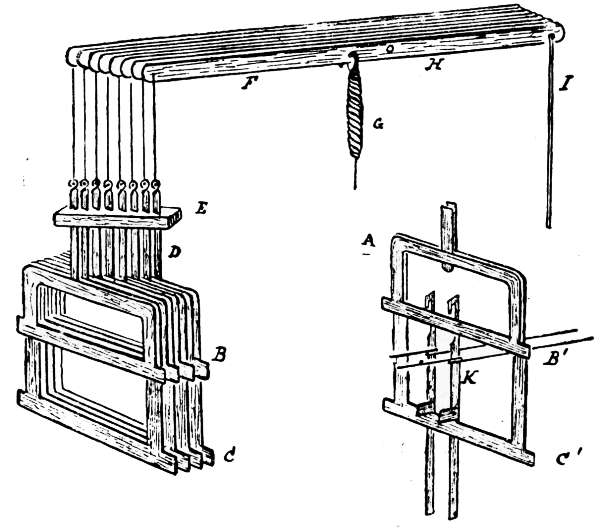
Fig. 123
Fig. 124
If the machine was fixed on the loom for a Norwich tie, or with
the cards to hang over the back, then the connections from the levers
might all be at the centres of the lifters and the bars D would only be[193]
required to steady them. The levers for raising the lifters are shown
at F, with their fulcrum at I. G is a spring, one of which is attached
to each lever to keep it down, as the tappet has not a positive rising
and sinking motion, only raising the levers and allowing their own
weight and the draw of the springs to recover them. One of the connecting
rods from the lever to the tappet is shown at I. Fig. 124 gives
the principle of this tappet. A is the lever or treadle with its fulcrum
at A; the connecting rod B connects the point of it to one of the top
levers F (Fig. 123), and C is a bowl at the other end of it which travels
on the tappet plate D. The tappet is made up of 17 plates struck
to suit; 16 of these are for working the lifters and 1 for the cylinder;
it sits at the side of the loom like a Woodcroft tappet. For an 8-end
satin twill 16 levers are required, 8 for the bottom set of lifters and
8 for the top set. Fig. 123a shows two lifters B1 and C1 with hooks
and needles. A hook and a needle on a larger scale are shown in
Fig. 125. The hooks are flat pieces of iron cut to the shape shown,
with small projecting pieces, as a, riveted to them, by which they can
[194]rest on the bottom lifting knives, as at C1 (Fig. 123a), so that when
any of these knives are lifted a row of hooks will be raised by them.
As before explained in reference to the Bessbrook machine, it is necessary
when the pattern card presses on the needles for all the knives
except one to act, and also for one of the
bottom lifters to rise to form the texture
of the cloth; the same must be in this
machine, and can easily be regulated by
the tappet, which should hold up the warp
required for the pattern and work the
ground texture as well. This is done in
the following manner: Suppose there are
16 lifters, 8 top and 8 bottom ones. When
the card presses on the needles, 7 of the
top and 1 of the bottom lifters should be raised by the tappet, and the
top lifter, which is left down, should be raised so far as to catch the
heads of those hooks in the row belonging to it that are not pushed
back by the card. For the next shot this lifter is raised and another
one let down, but it is not let down far enough for the hooks to get
off it, stopping at the same height that the first one was raised to,
which is easily regulated by the tappet. If there are 3 shots to the
card, another similar change takes place; then for the fourth shot all
the lifters are dropped, the cylinder presses in, and all but one of the
top lifters and one of the lower ones are again raised, and the twill
proceeded with as before. It will thus be seen that the shedding for
the twill acts as in a double-acting jacquard, but the lift at the change
of card is similar to that of a single-acting jacquard. Of course the
tappet must be struck to change the lifters according to the twill required
on the cloth. In the Bessbrook machine there could be 16, 24,
or 32 rows of hooks to 8 rows of needles by having 2, 3, or 4 hooks
to each needle, or the number of hooks to each needle might vary
and any number of needles might be used. There must be a knife
for each row of hooks, but all the knives belong to the one griffe. In
the Karl Wein machine there must be 2 lifters for each row of hooks,
and 16 of them are enough to have for convenience. In the machine
exhibited, 16 hooks, or 2 rows of 8, were attached to 6 needles, 4[195]
needles having 3 hooks to each and 2 needles 2 hooks to each, as shown
at B (Fig. 125), the thick vertical lines representing 1 row of hooks,
and the thin lines the next row. There were 6 rows of needles in the
needle board, and the point of each needle was cranked as shown at
C; each row of holes for the needles in the needle board, or face-plate,
stood between 2 rows of
hooks: the first 3 needles
were connected with 1 row
of hooks and the second
3 with the next row, the
cranks of the first and
second set of needles being
turned in the opposite
direction so as to enable
them to fall in with the
rows of hooks. Of course
there might as well have
been 8 rows of needles
with 2 hooks to each, or
4 needles to each row of
hooks.
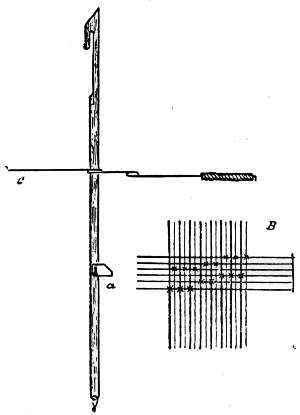
Fig. 125
If necessary to use
more than one machine,
some arrangement would
require to be made for
lifting them. It might be done by using a double set of levers with
connecting rods similar to those used for twilling looms.
The twilling of the ground might be wrought by a griffe and hooks
as in the Bessbrook machine, thus doing away with seven treadles and
seven tappet plates, but this would make the twilling a single-acting
shedding motion.
Since this was written the machine has been altered so as to make
it more suitable to the requirements of the work in this country, but
does not appear to gain favour, and this class of weaving is not very
extensively used.
[196]
CHAPTER VII
GAUZE
The principle of weaving gauze with shafts and healds applies
equally to making it with a harness, though perhaps the latter is simpler,
as there is not the same trouble in the arranging of drafts; and, in intricate
work, the number of doup leaves required for shaft mountings
adds considerably to the trouble of the weaver and tackler.
The simplest, or in any case the most ready, method of weaving
gauze in a harness, is to use an ordinary harness, and form the gauze
by means of one or more doups and standards in front of it. Suppose
we have have a 400 machine with the harness tied up in simple repeats of
400; any desired pattern can be put upon the cloth to the extent of
400 hooks of the jacquard as in ordinary harness work, but it cannot
be made of any texture desired—it must be made to suit the working
of the doups in front of the harness. If the open work is to be a plain
gauze with one shot into each shed, then the pattern must be plain
cloth, as the doup standard must be raised and sunk alternately for each
shot; but any desired form or figure can be made in plain texture on
the 400 hooks, and the cloth will consist of a plain figure on a gauze
ground; or it might as well be a gauze figure on a plain ground.
Those not acquainted with figured gauze work, have considerable
difficulty in understanding how to make plain or gauze as required on
the cloth.
It is easy to understand that working the harness without the
doups can make plain cloth, and also that working the doups and
standards, and portion of the harness, for alternate shots, can make
gauze; but the difficulty is to thoroughly comprehend how, when
working gauze, to neutralise the crossing of that portion of the warp[197]
that is to form the plain figure. There are two ways of neutralising
the crossing effect of the doups on any thread or number of threads that
may be required for the figure: first, by not raising the mail or mails
carrying the crossing threads, or threads in the doups, but forming the
plain by raising the mails carrying the threads not in the doups, alternately
with the doup standard; and, secondly, if the threads not in the
doups are raised along with the doup standard, no crossing can take
place; but this would not suit for working plain cloth, as these mails
must be down when the doup standard is up in order to form plain cloth.
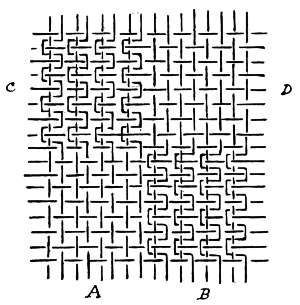
Fig. 126
If a different gauze is required, say one with 2 shots into each
shed, or between the crossings,
then the solid texture might be
a rib or mat; or if it suited the
pattern, as in the case of dice
work, two doups could be employed,
so that one could rest
when the other is working the
gauze. Fig. 126 is a plain gauze
and plain texture, common dice
pattern, which could be wrought
with shafts, but shows the principle
of working with the harness
as well. This could be wrought
with one doup in front of the
harness. To work the dice A the
mails carrying the threads not in the doups would be raised alternately
with the doup standard, and thus form plain cloth; and at the same time,
to make the dice B a gauze, the mails carrying the threads in the doups
would be wrought alternately with the doup standard. For the dices C
and D, this would be reversed. In case of the gauze having to be made
with, say, 3 shots into each shed, and 2 threads twisting round 2 to
give openness of texture, it will be seen that it could only be wrought
with one doup, provided 3 shots went to each shed of the solid dice,
as the doup would require to be up for 3 shots in succession, and
down for the same. If plain cloth were required it would be necessary[198]
to have a doup and standard for each dice, so that one could remain
down when the other is raised for gauzing; this would allow the
harness to work any texture on the solid dice, the doup of which is not
gauzing. If it were required to work a diagonal stripe of plain and
gauze, as shown in Fig. 127, with 2 weft shots coming in between
each crossing of the gauze, 6 doups would be required in front of the
harness, whereas if only one shot came between the crossings only one
doup would be required. It will be seen that there are 6 splitfuls of
warp to one repeat of the
pattern, and that the change
from the plain to the gauze
is at a different time for
each; therefore, on account
of the doup standards having
to be raised for 2 shots
in succession when a portion
of the cloth is plain texture,
it is necessary for each splitful
of warp to have its own
doup so that it can be crossed
without interfering with the
plain texture in the other
portion of the cloth.

Fig. 127
This pattern would be
better suited for a shaft
mounting than for a harness
with doups in front, but could be wrought with a gauze harness
more easily than with either. The advantage of using a harness with
doups in front, in this case, over a shaft mounting, would be that the
plain stripe could be figured if desired, and the gauze stripe might go
in steps of two or three splitfuls alike, which would give much bolder
stripes.
When more than one or two sets of doups would be required to be
used in front of a harness, it is advisable to adopt a true gauze harness,
as the doup shafts come in the way of the weaver. A gauze harness[199]
has the doups in the harness, so that they can be lifted independently,
which admits of indiscriminate figuring on either the gauze or solid
portion of the cloth.
When using doups in front of the harness it is not necessary that
the plain or solid cloth should be all a plain or unfigured texture; any
suitable warp figure may be formed on the plain by the harness, but
weft figures cannot be made on the upper side of the cloth, because,
though the harness can be raised for any number of shots in succession
to form a figure by the warp, having it sunk would not in the
same way form a weft figure, as in crossing the gauze a portion of the
yarn would be raised by the doup standard, which cannot be prevented,
unless by having more doups than one. A harness with doups in
front is better suited for working stripes than any other class of work,
and it is in this class of work that gauze can be made most effective.
When figuring with gauze, unless several shots are thrown into
each shed, or between the crossings of the gauze threads, and 3 or
more warp threads are twisted together, the openness of the texture is
not sufficient to make a good contrast between the plain and gauze
unless the fabric is very light; and even with 2 threads round 2,
and throwing 4 to 6 shots into each twist, the contrast is not so
great as might be desired when the cloth is heavy. A portion of the
weft, say every second or third shot, might be made to pass either over
or under the gauzed texture and interwoven only with the solid portion
of the cloth, the flushed or loose weft to be cropped off afterwards. In
stripes, not only can this be done, but the warp may be set much
thinner or wider in the reed for the gauze: say every second or third
split may be left empty; or it may be of a different description of yarn—a
fancy twist if desired, or in threads of different colours. A fancy
stripe with three threads to the split in a reed, set 30 splits per inch,
and every second split of the gauze portion left empty, makes a very
effective pattern for fine work, with say 80 picks per inch; or 120
picks might be used, and every third or fourth one not wrought into
the gauze, but flushed over to be cut off afterwards. There might be
2 thick threads or 4 finer ones to each split of the gauze, and 4 to 6
shots into each crossing, this, of course, to be regulated to suit circumstances[200]
and taste; one thing must, however, be remembered—viz.
that when made too bold or open the warp ribs are liable to slide on
the weft, and this is the chief defect in gauze when made open,
especially when a smooth, clean yarn, as linen, is used.
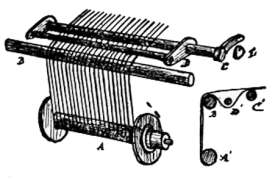
Fig. 128
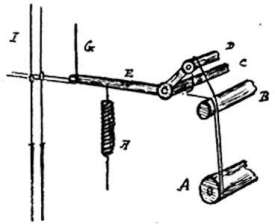
Fig. 129
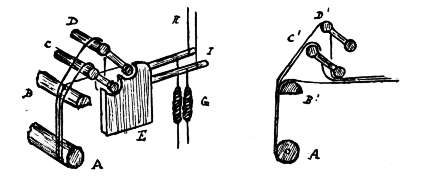
Fig. 130
When working stripes, any pattern, or any texture or style of cloth,
whether single, double, or pile work, may be used for the solid stripes,
or the whole cloth may consist of stripes made of combinations of
gauze and solid textures. One set of stripes may be wrought quite independently
of the other by having the yarn on separate beams, and
when only one set of stripes is gauzed, the others are not drawn into
the doup heddles, so are quite independent of them. The doup heddles
may be spaced or otherwise as desired. When working with doups in
front of the harness, there must be a slackener for the crossing threads
for each doup standard, same as for heddle work. Figs. 128, 129, and
130 show some of the methods of slackening in use. In Figs. 128 and
129, A is the yarn beam, B the back rail, C and D the vibrating bars
or slackeners, C acts as a fulcrum; and in Fig. 128 the bar D presses[201]
the crossing yarn down and is raised by the tappet E, which may be
either above or below a lever on the end of the bar C, a spring on the
lever regulating it, to hold it against the tappet. In Fig. 129 the bar
D is sunk to relieve the crossing yarn, by drawing up the cord G, which
is attached to the jacquard or dobby, the spring H holding the lever E
down when it is relieved. Fig. 130 is similar to Fig. 129, but for two
doups; it is shown both in perspective and in end view, and will be
clearly understood. C and D must be set at such a distance above
each other as will permit of the traverse of D without C being moved.
Two or more shafts of heddles might also be used which could hold
the crossing yarn either up or down, same as the bars, till they are
acted on by the jacquard or by a tappet.
Fig. 131
Fig. 132
Designing.—When designing a pattern for gauze, with doups in
front of the harness, it is only necessary to set off a few hooks of the
jacquard to work the doups and slackener, and design the fancy portion
on the remaining hooks; or if the gauze and slackener are wrought
with tappets the full jacquard will be available for the figured portion,
the same as if no gauze were being made. If the doups and slackener
are to be wrought by the jacquard the pattern can be painted on the
remaining hooks, and the dots for working these can be added afterwards,
agreeably to the texture of the gauze required. The doup standard
and slackener should act together, and the doup or half leaf should
rise when the harness carrying the crossing threads rises. If the doup
standard is to be raised every second shot, as is required when plain
cloth has to be wrought with one doup, it might be wrought by a
tappet, and the doup or loose heald might be raised by the machine
for every shot, as it must rise with its standard as well as when the
harness raises any of the yarn drawn into the doup. The doup shaft
is best held down by a light spring. Indiarubber about 3/16 or 1/4 in. in
diameter suits very well. One spring at each side of either one or two
ply of this should be sufficient. If the number of rows in the harness
is such that it will correspond with the number of threads to be twisted
together, or be a multiple of them, it will be all the more convenient,
though it is not necessary for it to be so. For instance, if 1 thread
is twisted round 1, =2, an 8-row harness would give 4 repeats of this[202]
in each row; but if 1 thread were twisted round 2, =3, then 1 row of the
harness would give 2 repeats, or hold 2 splitfuls of warp and 2 threads
over, so that another thread would have to be taken from the back of
the next row. For this a 6-row harness would be more convenient,
which could be got by leaving 2 rows of the machine idle, and designing
the pattern on 6-row paper, or ruling 8-row paper to 6-row after
the design is painted. To work fancy textures with gauze by means
of a harness with doups in front, both must be arranged to suit each
other, unless a large number of doups be employed. For instance, a
2-and-2 twill could be wrought with 1 doup leaf in front of the harness
by making 1 thread of the gauze twist round 3, and throwing 2 shots
into each crossing, as shown in Fig. 131. If 1 thread were to be twisted
round 1 with a 2-and-2 twill, and 2 shots to the gauze crossing, 2 doup
leaves would be required, as shown in Fig. 132. A 4-thread fancy twill
can be wrought with 1 doup, as shown in Fig. 133, 1 thread twisting
round 3 and 4 shots into each crossing of the gauze. Satins or
regular twills are more difficult to work, unless by making an irregular
gauze. Take a 5-end satin, which has the threads over 4 and under 1.
The gauze might have 4 shots and 1 shot into each crossing alternately,
and be easily wrought with 1 doup; but if 2 or 3 shots had to go to each
crossing it would be different, as the doup would require to sink for
1 shot out of 5, in order to let the threads drawn into it bind in the[203]
twilled portion of the cloth, or otherwise the binding would have to
take place on these threads when the doup is down, which it could
do if it suited otherwise. But it must be remembered that when
solid cloth and gauze are
working together, the former
is made by raising the doup
standard and those mails
which carry the threads that
are not drawn into the doup,
leaving stationary the mails
carrying the crossing threads,
except where gauze is being
made; therefore, in working
a 5-end satin, if the doup
held up any of the threads
for, say, 3 shots, and then
sank for 3, there would be no
way of holding up these
threads in the twill portion to make them pass over 4 shots, as a 5-end
satin must do, for if the harness twines carrying these threads are
raised, they will cause a cross to be made instead of completing the
twill. Patterns of this description should all be wrought in a gauze
harness. In the figures given the gauze crossings are represented by
dotted lines where they are raised by the harness, for sake of distinction.
Fig. 133
HAND-LOOM GAUZE HARNESS.
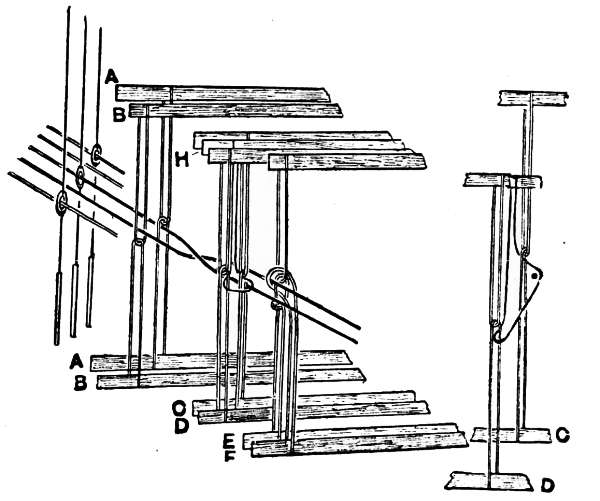
Fig. 134 Fig. 134a
A large quantity of goods are still being made in the hand loom
on the gauze principle. These are mostly for curtains known as
Cretes or Madras muslins, and for antimacassars or chair backs.
They are chiefly woven in and about Glasgow, and in Newtownards in
the North of Ireland. These goods are made on the half-harness
principle—that is, half the warp is drawn into the harness and the
other half passes through the harness and is drawn into a set of heddles
in front. This mounting is shown in Fig. 134. It will be seen[204]
that every alternate thread is drawn into one of the harness mails and
all the threads are drawn through a pair of clasped leaves of heddles
A B; those that are drawn into the mails are drawn through the
under clasp of the leaf A, and those that are not in the mails through
the upper clasp of the leaf B. The threads are next drawn through the
doups as shown, those in the mails being in the back set, or upper
doups. These doups are made different from those generally used,
the doup or half-heald being connected with two standards; this is
for the purpose of throwing less strain on the yarn. When the
harness is drawn the shaft A is also raised, B being sunk, as well as
the front set of doups. As the yarn in the harness is also drawn
through the back set of doups, it follows that they must be relieved to
allow the harness to raise the yarn. This might be done, and sometimes
is done, by sinking the ordinary doup shaft and letting the
yarn draw the doup through its standard; but in this case the standard
C is raised, which allows the thread to rise in the doup, as shown at
Fig. 134a, without having to draw it up, and at the same time all the
doups are kept firm in their places by the standard D, thus preventing
any entanglement in a fine set of doups. The distance between the
harness and back leaves is 4 in., and between the back leaves and gauze[205]
mounting 3 in. The cloth is a plain gauze, and the figure is formed
by throwing one or more shots of rove weft, either white or coloured,
into the shed formed by the harness flushing over the ground and
clipped off afterwards. To form the figure shed, draw the harness,
raise the leaf A and the standard C, and sink the other leaves, making
a rising and falling shed, or centre shedding. To form the gauze, for
the open shed raise B C D and F, and to form the cross shed raise E
and F, in both cases sinking the others. For these sheds fine or ground
weft is thrown in, the flowering shots coming between them. The
shafts A and B are for the purpose of keeping a clear shed, but might
be done without. These goods are now largely made by power looms,
principally with gauze reeds, which see.
GAUZE HARNESS
In a true gauze harness the doups are connected with the mails or
leashes of the harness, the harness twines, or leashes, acting as standards
for the doups, so that any splitful of warp may be crossed or
twisted differently from the others, and any kind of texture can be
wrought along with the gauze without having to consider the one in
connection with the other, as in the previous harness. Figs. 135 and
136 show how these harnesses are tied up; the letters refer to the
same parts in both figures. The harness is shown with four cords in
the row, for the back harness and the doup mail in front, and this
could be repeated twice for an eight-row harness. It is better to have
the rows of the harness regulated in this way to suit the gauze to be
made, and have the doup leashes in one or two rows at the front, but
it is not necessary for it to be so, as the doups could come on any of
the mails through the harness, if desired, in case of a harness being
tied up, and it being wanted to add the doup leashes for gauzing; but
this is rather confusing. In any case, this method of working is now
superseded.
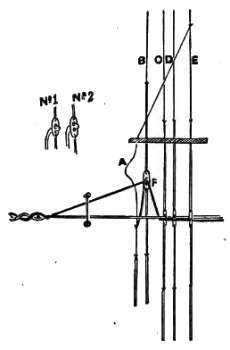
Fig. 135
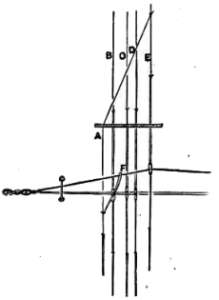
Fig. 136
A is the doup or dead leash, B the doup standard, or what answers
to the doup standard in heald work. C and D are the leashes carrying
the plain or lying threads, and E the leash carrying the crossing[206]
thread, the crossing in this case being one thread round two. F is the
doup. Fig. 136 shows the harness drawn for the open shed, and it
will be observed that the dead leash A is connected with the back
harness E, so that when this leash is raised to form the shed it draws
up the dead leash, also relieving the doup. There was one trouble
with these dead leashes—namely, that they were liable to twist round
the standards when close to them in the cumber board, sometimes being
put through the same hole or the next one; but by having them
in front and a little distance off this could be avoided. Wires or cords
were sometimes stretched across between the lingoes to prevent the
twisting. Fig. 135 shows the harness drawn for the cross shed, the
doup standard being drawn up, drawing the doup up with it. The
doup was fastened into the mails as shown at No. 1, Fig. 135; but a
better plan is to have double-eyed mails, and fasten the doup as at
No. 2. This form of harness is now superseded by one having all the
doups on a shaft in front of the harness, which consists of two parts—namely,[207]
the back harness and the douping harness (which is about
3/4 in. to 1-1/2 in. in front of the former); the doups are connected with
this latter harness, and all the doups may be on one shaft, whether
for one, two, or more rows of standards in the front harness. The
doups on the shaft are known as a ‘slip heald’ or ‘slip.’ This is a much
simpler and more convenient method of working than the preceding.
Fig. 137 shows a simple and effective gauze mounting for a 400
jacquard, the cords being carried up to the machine in the usual way.
A is the breast beam of the loom, B the reed, C the back rail, and N
the yarn beam. D is the slip heald, or doup, which is simply a half-leaf
of ordinary clasped
heddles, made of cotton
or worsted, fine or coarse,
as may be desired for the
quality of work to be
wrought. E is the front
or doup mounting, connected
with the two front
rows of the machine, and
passing through a small
cumber board in front of
that for the body of the
harness; it is bolted so
that it can be shifted to
regulate the distance between the doup harness and that of the figuring.
The distance between the two harnesses may range from 3/4 in. to 1-1/2 in.,
or whatever is found most suitable to ease the strain on the yarn and
make a clear shed. G is the cumber board, and F the body of the
harness for working the figure.
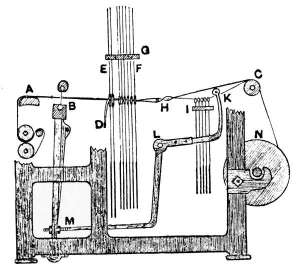
Fig. 137
The method of slackening the threads that are drawn into the doups
is perhaps the principal feature of this mounting. When one or more
slackening bars are used it is plain that all the threads that pass over
the bar that is oscillated will be slackened at once, though for figured
work it may be that only a very few of these threads should be slackened,
and if the remainder or any portion of them are raised by the back[208]
leashes they should be kept tight at the back so as to enable them to
draw up the slack doups. It follows, therefore, that for giving good
work and keeping the threads at a regular tension, every thread in the
doups should have its own independent slackener. It is not absolutely
necessary that this should be so; strong twist cotton or worsted yarn
will work very well in a harness with one slackening bar vibrating for
each shot, though it must throw an irregular strain on the yarn, and it
requires to be tightly paced.
In Fig. 137 the slackening arrangement consists of a small back
harness, as shown at I, through which all the whip threads are drawn;
these threads then pass over one lease rod and under the next one, as
shown, and then on to the harness to be drawn in according to the
draught of the gauze. The harness consists of small mails attached
to lingoes with twines in the same way as the lower portion of the
ordinary harness is prepared, but the mails are rounded off above the
eye or centre hole without having the top hole for threading the upper
portion of the harness to. The cumber board of this harness must be
nicely set, so that the lingoes will hang on the yarn without drawing
the mails quite close on the cumber board, which soon would cut the
twines. To regulate this the cumber board and back rail must be
set in relation to each other and the mails of the harness so as to produce
the desired effect. A medium position for working may be taken
as follows:—Cumber board 12 in. behind harness and 6 in. in front of
back rail. Back rail 2 in. above the level of the mails in the main harness,
and cumber board of small back harness 3 in. below the level of
the mails, or 5 in. lower than the top of the back rail. The back lease
rod might then come in about 8 in. behind the harness. The weight
of the lingoes on the back harness must be regulated to suit the strength
of warp to be wrought; about 30 to 40 per lb. for, say, from 40/2 to
80/2 cotton would suit. The mails for the body of the harness may be
25’s or 30’s, or the same as for ordinary work, and those for the doup
standards heavier, say 18’s or 20’s. In addition to this harness for
slackening, or rather for keeping a yielding tension on the whip, there
is a slackening bar supported by a lever K L M at both sides of the
loom. This lever has its fulcrum at L, and is attached to the swords[209]
of the lay at M, and therefore vibrates at every beat up. The slackener
acts as a positive motion, and keeps the threads from tightening up or
being drawn forward by the twisting; it acts on the body of the threads,
and the harness acts on them individually.
This, when properly set, is an easy motion, and produces a good
firm gauze. It is a Bradford patent. Now, in reference to the working
of the gauze: The harness is levelled much in the same way as for
ordinary work, the mails being 1-1/2 in. or 1-3/4 in. below the level of the
breast beam. The doup mails should be a little lower than those for
the harness, say 3/16 in. or 1/4 in.
The shed should be closed, and begin to open again when the reed
is at the fell of the cloth. Too large a shed should not be made with
the doups, on account of the strain on the yarn: a small clear shed
gives much more satisfactory work. The front cumber board, containing
the doup leashes, may be shifted a little forward or back if thought
desirable, so as to get the cross shed to spring as easily as possible, the
amount of elasticity in the warp varying this considerably. The slip
heald is raised for every shot by cording it to the brander or griffe of
the jacquard, which for gauze work is generally a single-acting one.
Springs are used for holding down the slip—a light wire spring, or,
better, a piece of round indiarubber about 3/16 in. in diameter, doubled
if necessary. Bridles should be attached from the shaft of the slip
heald at each end and fastened to the cumber board so as to bear the
draw of the springs when the harness is down; the cords connected
with the jacquard for raising this shaft may then be left slack, and the
size of shed may be regulated or made less than the draw of the
machine, if required.
It is very important to have the doups nicely adjusted; on this
depends their lasting capacity, and sometimes a very short time is sufficient
to cut them to pieces if badly set. But if correctly done they will
generally last for a length of time, particularly if occasionally turned
on the shaft, which is more essential in working with a linen than with
a cotton warp.
One of the doup standard mails with a doup through it is shown at
No. 1 (Fig. 138), where it may be seen that the doup is simply drawn[210]
through the eye of the mail, and not connected with it in any way. It
is only held in this position by the warp thread passing through it, and
whenever the thread breaks the doup falls out of the mail. This is a
trouble to the weaver, at least till she gets accustomed to it, and mails,
as shown at No. 2, have been made to hold up the doup. The remedy
here is often worse than the evil. The mails wear the doups, particularly
if the springs draw them tight down on the eyes of the mails; and
besides, they have the disadvantage that the slip heald has to be built
in them after the harness is mounted, whereas with the open mails the
slips can be procured anywhere quite independent of the harness. The
slip heald must be set so that when the harness is down the yarn will
not be drawn through the eyes of the mails by the doup sinking too low.
This may be guarded against by adjusting the bridles at each side,
between the slip shaft and the cumber board. The loops of the doups
should pass about 1/4 in. through the eyes of the mails when at the
lowest or bottom position, and the front mails being about 1/4 in. lower
than the others allows the loops of the doups to be just bearing lightly
on the warp, all being held up straight. The slackening bar must be
arranged to work in time with the doup standards, and should not
slacken the yarn too much nor too little, just keeping it at a uniform
tension. The great point with tender or weak yarn is to reduce all friction
to a minimum, no matter by what it is caused, and if this is done the
yarn and doups, if they are of a fair quality to begin with, should both
work well; but a very slight difference in setting the doup may make
a great deal of difference in the working of it. A doup that may be
cut to pieces in working 20 yards of cloth might work 400 or 500 yards
with so little alteration as not to be noticeable to those not accustomed
to the work. The slackening bar must not rise so high as to raise the
yarn that is above it, nor must it sink so low as to press the whip down
on the back harness board, and it must be so regulated that within
these limits it will give the proper amount of slackening, and prevent
the whip warp from getting tight and drawing up the small back
harness.
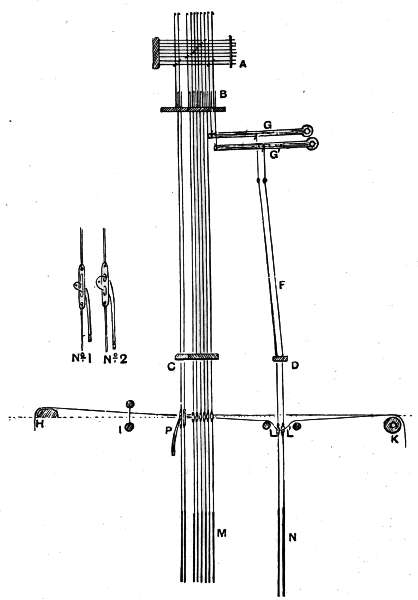
Fig. 138
Worsted makes the best weaving doups for strong work, but for
lighter work cotton is mostly used, being finer and cheaper. Sometimes[212]
polished linen yarn is used and makes a very smooth doup, but
does not give the wear.
Small metallic rings are sometimes used on the loops of the doups,
and the warp drawn through these rings; this suits for yarn with much
fibre on it, as it keeps the fibre from getting twisted into the doups, but
the rings cut the doups faster than ordinary yarn working in them
would.
Instead of a slip heald in front, doups with a lingo on each have
been used, with the mails for the standards as shown at No. 2, Fig.
138, so that the doups cannot fall out of them, and the yarn when
drawn up by the back harness in shedding raises the doups and lingoes
up with it. The weight of the lingoes must be such as will suit the
strength of the warp to be used—not too heavy for it to lift nor too
light, so that in the cross shed the doups would be drawn through the
mails. These doups being separate, are easily built in the harness and
very easily repaired by the weaver when they break, but they break too
frequently. It is, of course, only for a strong warp that this method
of working is suitable, and even for it, although it works very well, the
principle is not good.
The gauze harness which will probably be most frequently met
with, at least in the cotton trade, is shown in Fig. 138. It is an older
harness than that described, having been patented in Macclesfield in
1876 in a somewhat different form. The difference between this and
the preceding chiefly consists in the method adopted for slackening
the yarn, and the jacquard may also be specially built to suit for this.
In setting this loom the harness and mails are tied up and levelled as
before, but when working the back rail is kept down, as it usually is
for gauze work, say about 1/2 in. lower than the eyes of the mails. Each
whip thread has its own slackener, the slackening apparatus consisting
of a harness wrought either by the same jacquard that works the figure,
or by an extra one, when much pattern is required.
The connections of the needles with the hooks are shown at A, the
two bottom needles being connected with the two front and two back
hooks, the former for working the gauze and the latter for working the
slackeners. This harness is intended for a 1-round 3-gauze, and is[213]
mounted on a 10-row machine with an 8-row cylinder on it. It is not
necessary that the back harness for slackening should be raised so high
as the figuring harness is, and for this reason, as well as that it makes
the harness more direct and avoids friction, it is tied to two sets of
levers as shown at G and G1; they are made of brass and are fastened
on two rods, one about 4 in. above the other, so as not to come into contact
with each other when rising or falling. The points of the levers
are fastened to the two back rows of hooks as shown, and the harness
is tied to wire hooks on these levers; F is the neck of the harness, D
the cumber board, and N the lingoes, which are much heavier than
those used for the figuring harness, from 6 to 10 per pound being the
weights frequently used, according to the class or weight of the work.
The mails used on the back harness are similar to those used for
the doups—that is, such as are shown at No. 1 (Fig. 138); but if these
cut with the warp sawing through them, glass mails should be used.
L L1 are two rods or bars which support the warp that is drawn down
between them by the slackening harness. The closer these bars are
set together the greater will be the amount of slackening given to the
warp when the harness is drawn; therefore these bars should be made
to slide either way so that the desired slackness is obtained by setting
them. About 3 in. to 4 in. apart is a good working width; the tops
of the bars should be about 1 in. lower than the mails in the figuring
harness, and the tops of the eyes of the mails in the back harness should
be 1 in. or 1-1/4 in. lower than the rods.
Another method of arranging the needles in a jacquard for a gauze
mounting is shown in Fig. 139, which is, perhaps, more convenient
for the designer, as will afterwards be seen. In this harness there are
10 rows of hooks, the same as before—6 for the figuring harness
and 2 for the doup standards. The doup standards are here on the
hooks connected with the fourth and eighth needles, and come after
the threads that the whip in them twists round, and fall in this position
on the design paper, instead of both being at the end of a design—that
is, on the seventh and eighth checks. For any order of twisting,
the arrangement of the hooks and needles might be made to suit
on the same principle.
[214]
It will be seen that in the leno jacquard, shown in Fig. 138, a
number of levers and attachments are required to work the slackening
harness. In order to simplify this, Messrs. Devoge & Co. have brought
out a leno jacquard with which none
of these levers, &c., are required, the
slackening harness being tied to the
two back rows of hooks in the machine.
These two rows of hooks are lifted by
a separate griffe, the lift of which is
much less than that for working the
body hooks of the machine, and which
can be varied to suit the amount of
slackening required. This machine
is shown in Fig. 140, a view of the
motion for raising the griffes of both
back and body harness being given in
Fig. 140a. c d (Fig. 140a) is the link connection between the bar of
the griffe a a and the top lever L (Fig. 140), somewhat similar to
what is used for an ordinary jacquard. To raise the small griffe at
the back, it will be seen that there is a cross lever e from the links
d, c to its fulcrum h on a bracket g attached to the top of the
machine. The small or back griffe b is connected to this lever by
the link f. The amount of lift given to the small griffe in proportion
to that given to the large one will be as the length of the lever from
the stud in h to that in f is to its length from the stud in h to that
in d. The farther the fulcrum is pushed back in the slot in which it
is fastened, the more the back griffe will be raised, the link f being
always vertical. The back griffe is arranged to commence lifting
slightly in advance of the front one, in order to lessen the strain on
the doups. The needles are connected with the back and front hooks
in this machine similarly to those in Fig. 138.
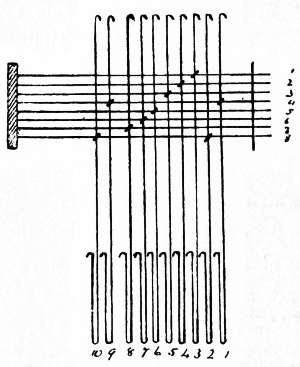
Fig. 139
The draft of a gauze in the harness is just the same as regards the
doups as for shaft work; the crossing may be made from left to right,
or the reverse, but the pattern must be made to suit. Some mount
the harnesses and paint the patterns from right to left. About Bradford[215]
this appears to be the usual method, and it does not matter provided
the mounting, drawing and designing be kept in accord; but
here we shall keep to the same principle as is recognised all through—viz.
mounting and designing from left to right, which is the correct
method so far as drawing is concerned, and equally convenient in other
respects.
Fig. 140
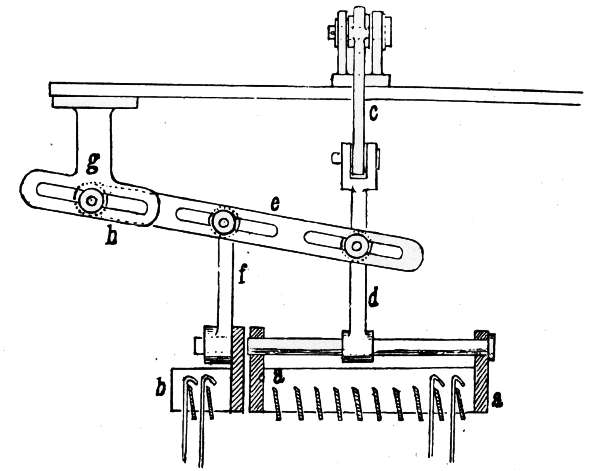
Fig. 140a
To design a pattern for gauze: if it is to be a simple geometrical
pattern it may be put direct on the design paper; but if to be a
figured pattern, a sketch should be prepared for it in the same manner
as for ordinary figured patterns, whether for dress goods, curtains, or
any other material. Any desired figuring can be made, providing
sufficient space be left between the figures to admit of the open work
being made. The figuring should be treated as the ornamentation of
a plain or short twill ground figure, which is woven on a gauze ground;[216]
the figure may be entirely plain or twill upon a gauze ground, in which
case it must be sufficiently plain and solid to be effective, or it may be
treated as damask figuring on ornamental patches of plain or twill on
a gauze ground; or, again, the gauze may form the figure and the
ground be plain or twill. Any variety may be made that ingenuity
can suggest, and figuring with extra warp or weft may also be adopted
if desired. When about to put the pattern on design paper, it may be
observed that out of the 8 rows of needles in the machine only 6
are used for figuring, the other 2 being employed for gauzing;
therefore, some means must be devised for getting the pattern on the
paper so as to suit this. The simplest plan is that adopted in America—viz.
instead of using two rows of hooks along the jacquard for the
doup standards, to leave as many hooks at the first of the machine as
will correspond with the number of doup standards required for one
repeat of the pattern. Suppose for the same ties as those given—100
hooks for the doups and 300 for the figure—then the cords from the
first or last 100 hooks would be taken down through the two front[217]
rows of the cumber board, and those from the 300 hooks would make
up the body of the harness. When mounting in this way, the
jacquard would be better turned with the cards hanging over the
side of the loom, as for the ‘London tie.’ This method of mounting
enables the pattern to be designed for 300 hooks and painted on
the design paper independently of the gauze, which can be filled in
afterwards.
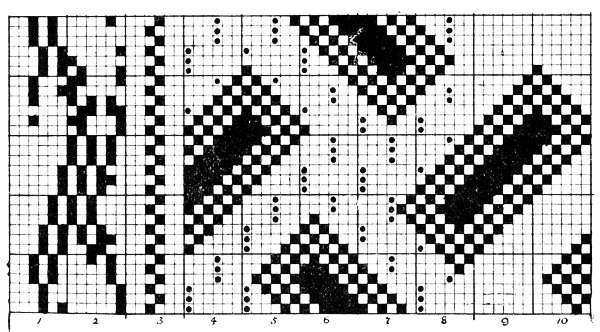
Fig. 141
Fig. 141 is an example of designing in this manner, using 6 rows
of hooks, to suit the gauze. The pattern is put on the rows of
designs numbered 4, 5, 6, 7, and 8. No. 3 is for the selvage, and the
working of the doups is on Nos. 1 and 2. This is for a 1 round 2
gauze, 6 checks, or 2 splitfuls of gauze to the design; there would
be 10 doups required for the 5 designs in the repeat of the pattern,
and for these 10 checks are used of designs Nos. 1 and 2. The rising
of the back leash of the harness to form the crossing is shown by the
dots marked on the design, and as gauze is formed by raising this leash
and the doup alternately, it is only necessary to take each line of the
design paper for the doups, and, following up the markings for the
back leashes, fill in for the doups to rise when the back leash is sunk
for the gauze, taking care to keep clear of the figuring. In making
gauze the doup should always rise immediately after the figuring ends,
to form the first crossing, and it should also be up immediately before[218]
the next portion of the figuring begins, so that in an irregular figured
pattern the gauze might frequently require to be broken to effect this,
as may be seen in Fig. 141. Take the first upright line of the pattern,
design No. 4: the back leash is raised for three, then the doup for
three, and the figure follows. Passing on to the tenth line it will be
seen that the doup rises for three after the figure, and is also up for
three before the next figure begins; but, passing on to designs 7 and
8, it will be seen that the risings of the doup and back leash would not
fall in regularly in threes against the figure, as it would be better if
they did, and therefore the gauze is broken so as to fall in; but in small
patterns of this description, when it is of importance to keep the outline
of the figure as regular as possible, this can and should be
remedied; instead of the outline of the figure running diagonally on
the design paper in steps of one check, it should go in steps of as
many checks as there are threads to the twist of the gauze in the
warp and shots in each twist in the weft. This is shown in Fig. 142,
where all the twisting falls in regularly with the figure. This may to
a great extent be carried out with irregular figures by the designer
exercising a little judgment, and when filling in the gauze make up
the plain edging of the figuring to fall in with it—that is, only to
break the gauze where there is room to do it effectively, and where
there is not, a few dots can be added to the plain. If Figs. 141 and[219]
142 be compared, it may be seen how this could be done: examining
designs 4 and 8 above the figures, the latter below as well; but Fig. 142
shows the proper method of treating these small geometrical figures.
Another point to be observed is whether all the doup leashes are to be
raised together to form the gauze, or whether it is to be formed by
raising every alternate doup leash and every alternate back leash, as is
done in these figures. The latter method is preferable for working, as
it makes an even tension on every shed, whereas if one shed is a full
cross shed formed by the doups, and the reverse of this an open shed
with no crossing, the cross shed will be the tighter, and produce a
certain amount of plucking, with a tendency to shire in some
patterns; but in case of working dices or any pattern where the
top and bottom of the figure extend some distance straight across
the design paper, it would be impossible for the first shed of the gauze
to be formed by the doup if only every alternate doup leash was raised.
Some judgment must therefore be exercised in these matters, and the
best effect obtained that will suit circumstances.
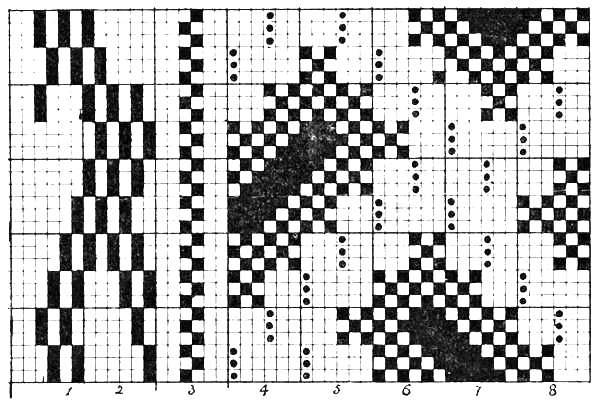
Fig. 142
Now to put the patterns on design paper to suit the harness when
the two front rows of the jacquard are used to work the doups, as in
Fig. 138, also when any other rows are used, as in Fig. 139: the
simplest way to do this—at least, for those not well accustomed to the
work—is to design them on 6-row paper, as Fig. 142, and afterwards
transfer them to 8-row paper, leaving the lines for the doups empty,
the doup lines being afterwards filled in, as in Figs. 143 and 144. Fig.
144 has the advantage that each splitful of gauze stands alone, whereas
when filling in the markings for the doups in Fig. 144, two splitfuls
stand together; but a little practice makes one method as simple as
the other. The dots represent the markings for the doups, and the
shaded squares those for raising the back leashes to form the open
shed of the gauze. The transferring of the designs from one sheet of
design paper to another is, of course, a matter of trouble and expense,
and may be avoided if an experienced card-cutter is to cut the cards.
The design need not be transferred, but have the marks for raising the
doups put on the same lines of the design paper as those for raising
the back leashes for the open shed. This is shown in Fig. 145, the[220]
shaded squares being the same as in Figs. 143 and 144; but the dots,
instead of being put on lines left for them, as in these figures, are put
on the same lines as the shaded squares, and the card-cutter sees to
their being cut on the correct lines, as in Figs. 143 and 144. In designing,
different colours would be used. The shaded square should
be the same colour as the figure, as they are to be cut for the lines
they are on, but the dots should be of a different colour, to be cut for[221]
a different line of the card from that on which they are placed on the
design—the dot on the first check of a design being the seventh hole
in a row of the card, and that on the third check of a design being the
last hole of a row on the card.
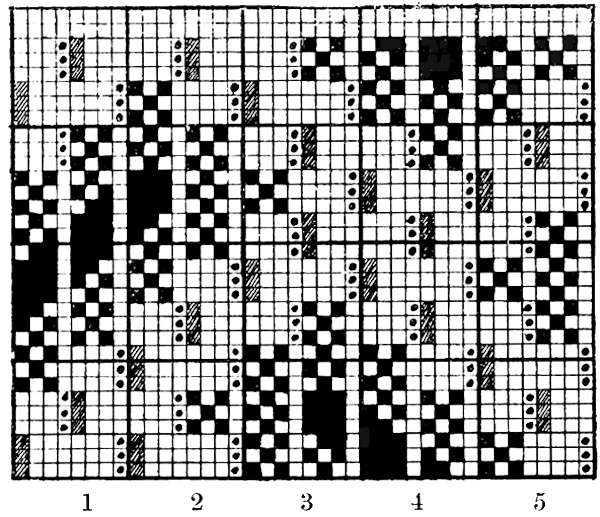
Fig. 143
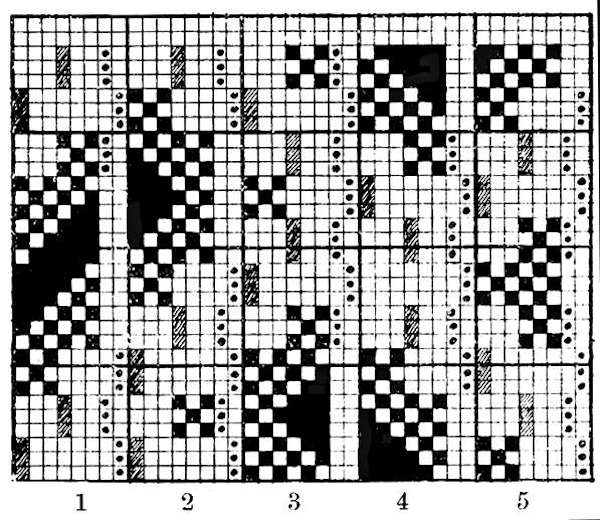
Fig. 144
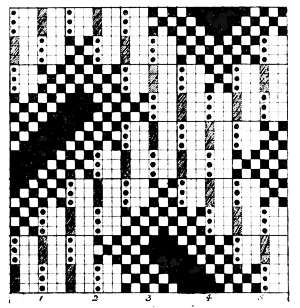
Fig. 145
Fig. 146 shows a portion of an ornamental pattern as it would be
designed for a gauze ground of two threads of warp twisting round
two = 4 in the split and 4 picks
into each crossing of the gauze.
This would require a 10-row
machine, eight rows for the figuring
harness and two rows for the doup
standards. When two threads are
twisting round two, it is not necessary
to have a doup for each, though
it may be desirable; but it suits very
well to have both threads drawn
through the same doup. It will be
necessary to have a stronger doup
in this case, but if the warp is very
light it would have so much more to do in drawing up the heavy
doup than if each thread was drawn through a very light doup that
the latter had better be adopted; otherwise a stronger doup, with both
threads through one, is simpler. On the pattern, the doups are raised
by the dots, which must be cut on the proper line of the card, as before;
both lines are dotted as if each thread had its own doup, but only the
front dots of each pair are necessary. The shaded squares are for raising
the crossing threads with the leashes for the open shed of the gauze. In
this pattern it is necessary that the outline of the figure should go in
steps of four warp ways, as there are four threads to the twist; but it
is not necessary that it should go in steps of four weft ways. A better
outline can be given to the figure by not adhering to this, though the
perforations in the gauze will be to some extent sacrificed by being
irregular; but this would be so in any case in order to raise the doup
standard after the figure when the doups and leashes are gauzing alternately;
they might be regularly started at one side of the figure, but[222]
this would probably make them more irregular at the other side. By
following round the edges of this figure it will be seen that by a little
care no blemish of any consequence need be left, though it will not be
so perfect as when calculated to fall in as Fig. 145.
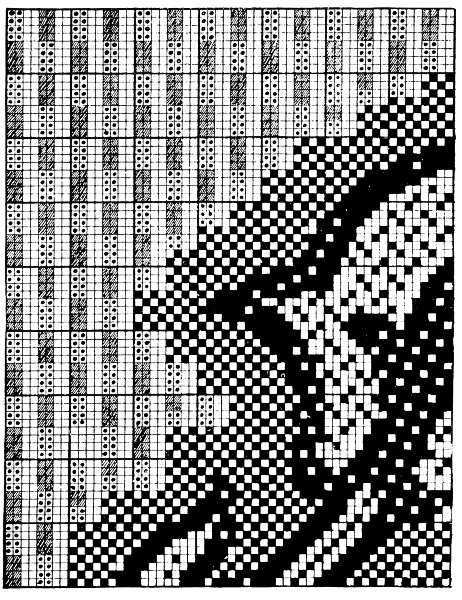
Fig. 146
Any variety of simple gauze texture may be used, as well as the
plain and honeycomb gauze, but unless there is plenty of space and the
figures are plain and large, no very intricate crossings should be
attempted, unless for stripes, as they would probably mar the outline
of the figure; but if not, they may be used where suitable.
[223]
Another important point in designing for gauze is that if the
texture of the solid cloth is loose and that of the gauze pretty firmly
twisted, the take-up of the warp may be very different when weaving.
To avoid this the gauze and figure should be well intermixed, and not
be in too great quantities in any one part—in fact, the gauze and
plain should be constantly interchanging, and when the pattern is such
that this cannot be, the textures must be regulated so that there will
be about an equal quantity of warp taken up for each. A little practice
will soon show this.
Nothing has been said about the description of jacquard used for
working gauze, but the same principle holds good as for working with
shafts. A gauze shed is taken to be a plain jacquard lift—that is, the
shed formed by the single-lift jacquard raises the yarn and lets it down
again before beginning to raise the following shed. This enables the doup
and doup yarn to fall into their places before being drawn away to form
a following shed. At the same time, we are not limited to a single-lift
jacquard. If you have a double-lift jacquard, and want to work a small
piece of gauze, do so; but do it correctly, or, in other words, take means
to make a good job of it. Before explaining how to do this, it will be
well to show where the difficulty exists. In a double-acting machine
one griffe is rising when the other is falling, and in plain gauze the
doup standard and leash carrying the crossing thread are raised alternately,
one shot being thrown into the shed formed by each. Therefore,
the same thread is up for every shot, and the thread round which it twists
is always down. Now, when one griffe has raised the doup standard
and the next one raises the leashes carrying the same threads, both
will pass in the centre of the shed, and, as shown in Fig. 147, the
crossing thread will be dragging up the lying thread from the position
shown by the under dotted line, thereby causing considerable friction
on the yarn, which must be detrimental to a fine or weak warp, and is
inclined to drag the doup through the eyes of their standards; but as
the harness in coming to the centre slackens the warp threads, and
also as the slackener begins to act when the harness begins to rise, the
threads will be further slackened in those sheds where the doups follow
the back leashes, and this reduces the friction. It may, however, be[224]
entirely avoided by raising the lying threads to the mid position to meet
the descending griffe, and then let down with it. A simple method of
doing this is to have the leashes carrying the lying threads through a
separate slip of cumber board at the back, and knots on them above it,
so that when it is raised all the lying threads will be drawn up with it.
The cumber board can be raised by a cam, or in any other suitable
way. (See Journal Weaving for Scotch Carpets.)
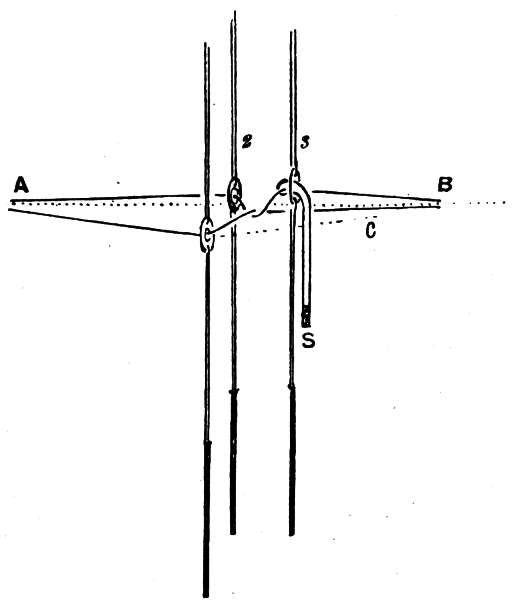
Fig. 147
These leashes might also be raised by means of a shaft through
loops in them, or with bars under the jacquard hooks, in the same way
as is done in twilling harnesses (which see), but with a special motion to
raise and lower them. In Fig. 147, the dotted line A, B shows the
middle position or centre of the traverse of the yarn in shedding.
Although this is the proper means to adopt to work gauze satisfactorily
with a double-acting jacquard, or with any double-acting shedding
motion, it may be that small portions of gauze, such as a few
stripes up a web, are wanted without the trouble of making any special[225]
arrangements for it. Good strong twist cotton yarn will work very
well, if nicely tempered, in a double-acting machine. The slackeners
can be arranged by leaving a few hooks apart to work them with, and
cords tied to these hooks and let down at the back, in the same manner
as in the gauze harness (Fig. 138), which will do very well. When three
or more shots are thrown into each shed of the gauze—that is, between
the crossings—there will be much less friction than when the crossing
takes place at each shot, as it is only at the crossing the friction takes
place.
One source of annoyance in working gauze is the wear on the doups,
which requires them to be changed frequently and adds cost to the
production. It has often been attempted to work the gauze by other
means, and for some classes of work this has proved successful. One
of the best arrangements, and one that is largely used, is the gauze
reed, which is almost entirely adopted about Glasgow for weaving leno
curtains in the power loom; it is also employed for other classes of
work, but is limited in its use. It will not supply the place of a gauze
harness.
THE GAUZE REED.
This is principally used for working leno curtains or Madras muslins
in power looms. The texture of these fabrics is a plain gauze ground, the
figure being formed by one or more colours of thick soft weft, thrown
in and bound for the figure, but flushed or floated over the ground, to
be cut off afterwards. The reed is wrought in conjunction with a
harness, the reed forming the ground of the fabric and the harness
the figuring. The harness is mounted in the same way as a half-harness,
or for half the warp, and the reed does the work of the doups.
The gauze reed will suit for gauze up to 55 threads per inch in the
reed, but is more used for fabrics ranging from 30 to 50 threads per
inch. A portion of the reed is given in Fig. 148, in which it will be
seen that it consists of the usual dents set in ribs, and a set of half-dents,
perforated at the points which are set into the lower rib of the
reed behind the others, and lie about half-way through the splits in a[226]
slightly slanting position. The gauze reed works behind the slay and
in front of the harness. It should be about 1/2 in. behind the slay when
the cranks are at the back centre, so as to leave sufficient room for
clearance between them.
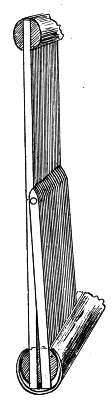
Fig. 148
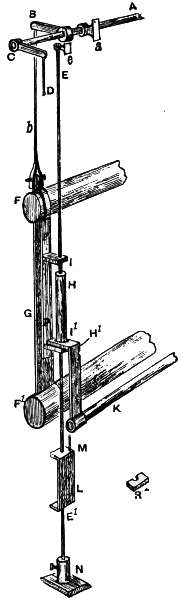
Fig. 149
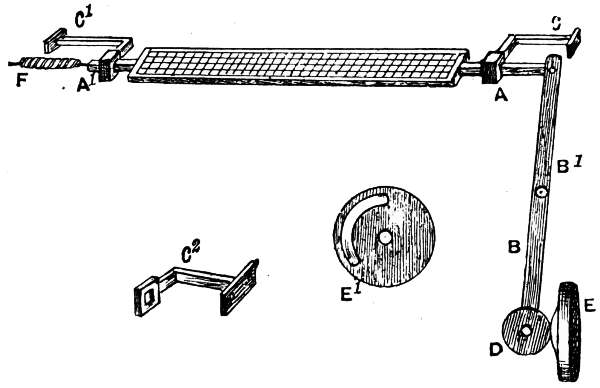
Fig. 150
A good method of working the reed is shown in Fig. 149, which
is a back view. A is a rocking shaft supported by brackets, as a, on
the top rail of the loom; B is a lever projecting towards the front of
the loom, and the rod b from it supports one end of the reed; C is
another lever on the shaft A, projecting backwards, and the rod D connects
it with the tappet treadles, so that when the treadle is pressed
down the reed rises; about 3-1/2 in. is the usual height for it to rise. F
is the upper rib of the gauze reed, and F1 the lower one. G is the
yoke of the reed. On the yoke is fastened a bar P P, connected with
the strap which passes round the top rib of the reed. I I are two projections
on the bar P P, through which the slide rod E E1 passes and
is fastened at the top to a bracket C on the top of the loom, and at the
bottom it fits into a socket or stand N fixed to the ground; the reed
slides up and down on this rod. H is a tube round the slide rod
between the projections I I, and is about 1/2 in. shorter than the distance
between them; to the bottom of this tube is fixed the support H1 for
the dipping rod K, which, when the yarn under it is very tight, can
yield 1/2 in., along with the tube H. The reed is not positive in falling,
but when raised by the tappet it falls by its own weight and that of
the weight-box L, which slides on the rod E E1. The weight-box is
fastened by a rod M to the crank on the bar which supports the dipping
rod, and weights it as well as the reed. Small weights, as R,
about 1/4 lb. weight, can be placed in the weight-box till as much weight
as is required is put on. Fig. 151 gives a view of the gauze reed
mounting, with the gauze or cross-shed open. Every alternate thread
of the warp is drawn into one of the gauze dents, and every other one
into the harness, as shown. The harness is levelled 2 in. or 2-1/2 in.
below the level of the breast beam; or, having the slay levelled with
the race 1/2 in. below the breast beam when the cranks are at the top
centre, push back the slay till the cranks are at the back centre, and
place a straight-edge across the race, and the under edge of the[228]
straight-edge where it passes the front row of the harness will give the
height for the eyes of the mails. The back shell E should be set 1/2 in.
below the level of the breast beam, and should be made to vibrate with
a tappet, which should lower it when the gauze shed is opened, and
keep it raised for the figuring shots. A shows the position of the
weaver’s reed, B is the gauze reed, C the dipping rod, D the heck or
ravel which is on the harness under the harness reed or cumber board
F; the ravel should be about 6 in. above the yarn and 3 in. below the
cumber board, making the latter 9 in. or 10 in. above the yarn. The
ravel is like a small harness reed with only one rib on it, which is
placed behind the harness, being covered with an iron tube to
strengthen it; in front a flat iron rod is fastened above the ends of the
dents and serves as the second rib. Three wires are stretched along
the ravel to keep the harness steady, in the same way that they are
stretched along a harness reed, but three are sufficient, instead of having
one for each row of harness. The ravel is shown in full in Fig. 150;
it is about 1-1/2 in. deep (or across it), and the cumber board 3 in. deep; it
is for the purpose of drawing the yarn in the harness to either side, so
that when the gauze reed is rising the half dents may pass to the right
and left of the threads in the harness alternately; it is this which gives
[229]the gauze twist. Two bars A A1 (Fig. 150) extend from the ends of the
frame of the heck; these slide in brackets C C1 fastened to the sides of
the loom. The lateral motion is given to it by a lever B B1 with its
fulcrum at B1; this lever has a bowl D on its lower end, which is acted
on by a wheel E driven at the proper speed to suit the shedding. E1
is a face view of this wheel, which has a projection on it for shifting
the lever.
Sometimes the motion is imparted to the lever so as to shift the
ravel just when it is required—that is, before the gauze reed has risen
to form the shed; and sometimes the ravel is shifted a part of the way
at each shot of figuring, and has completed its traverse before the
gauze reed has risen; this latter makes a more gradual pressure on the
harness, and avoids any sudden plucking. When the wheel E acts
upon the lever the ravel is drawn to the right, and when released the
spring F, fastened from the side of the loom to the end of the ravel,
draws it back again. The traverse of the ravel should be about 3/4 in.
C2 is a separate view of the brackets C and C1.
Sometimes the heck is on the yarn between the reed and the
harness, instead of being on the harness; in this case there must be
about 8 in. between the reed and the harness, and the heck or ravel
rests about half-way between them. The harness is wrought with a
double-lift machine and three tappets. One tappet which is much
like a plain wyper tappet, but with less dwell on it, acts on one of the
treadles, which is connected by a rod and lever to one of the griffes:
this raises the flowering shed, the lift being about 3-1/2 in., and the flowering
shot is thrown in as in ordinary work, the sheds being close when
the cranks are at the top centre or a little over it. As soon as this
shot is thrown in, when the cranks are a little over the back centre,
the second griffe is raised by another tappet. As this takes place
before the cylinder is in against the needles, all the yarn in the harness
is raised; the reason for raising it is to get all the harness yarn clear
of the half dents of the reed, so that it can be shifted over them by
the ravel. The gauze reed is raised by the third tappet; it begins to
rise shortly after the second griffe, or when the cranks are a little past
the top centre during the same revolution. The yarn raised by the
first griffe begins to fall at the same time that the reed begins to rise;[230]
the second griffe raises the bottom yarn till it meets the top yarn of
the first shed descending, at which time the ravel should be fully shifted,
and the points of the half dents rising should be 3/4 in. below the harness
yarn. As the harness falls and the reed rises, the yarn in the former will
pass down at the opposite sides of the half-dents to which it was before
being raised; a ground shot is then thrown in (this is the second
ground shot), and the reed descends, taking the yarn in it down level
with that in the harness. The harness is again raised as before for
the next flowering shot.
When the reed is raised to form the shed for the ground shot no
card is required to pass over the cylinder of the jacquard, and to prevent
one passing the sneck or shears is raised for this shot, so that the
cylinder is not turned. The reed must be raised in time to have the
shed open for the passage of the shuttle, but keeping it a little late
requires less lift to be given to the second shed which is being raised
to get the bottom yarn clear of the half dents of the reed. The above
description is intended for weaving fabrics with one cover, or one
colour of flowering shot, as when the pattern is in white or a single
colour, as it often is; but when two or more colours of figuring weft
are used, the flowering sheds might be opened with one griffe working
the machine single-acting, and constructing and timing the tappets to
suit. One tappet would then open two or more sheds for the flowering;
the second and third tappets would act on the bottom yarn and
reed as before. It is, however, usual to work the machine double-acting,
and to construct the tappets to raise the griffes alternately for two
covers. No. 1 tappet would raise one griffe, No. 2 tappet would raise
the other griffe; then a small wing on No. 1 tappet would lift the
bottom yarn, and No. 3 tappet would raise the reed, the sneck being
lifted at the last beat of the cylinder to prevent it from turning. For
three or more covers the tappets would require to be arranged to
suit in a similar manner. Fig. 151a is a front view of the position of
the yarn in the reed when the flowering shed is drawn. Only a portion
of the harness would be raised for each shot, as, say, the threads 1, 1,
the remainder 2, 2, being sunk. After the flowering shots are thrown
in, the bottom yarn in the harness 2, 2 has to be shifted to the other[231]
side of the half dents for the gauze shed. It is therefore raised up to
meet the threads 1, 1 coming down. All are then shifted together,
and when the reed is raised the position of the harness yarn is shown
at the crosses; 0000 shows the position it was in at the previous
ground shot. The dots on the half dents show the position of the
yarn in them in relation to that in the harness 2, 2 when the reed is at
rest, the yarn in both reed and harness being on a level. The reed
could be wrought turned upside down with a harness, but all the loose[232]
flowering weft would require to be below. In this case there is no
necessity for getting the under shed clear of the gauze dents for
changing it with the ravel to form the ground shed; but this is an
objectionable method of working, particularly with a light pattern, on
account of the heavy shed that has to be raised. If the flushed yarn
was thrown to the top and the reed turned upside down, the only way
to work the heck would be on the harness below the mails, which would
require it to be as deep as a reed or cumber board, in order to let the
lingoes fall, and this would not answer very well.
[233]
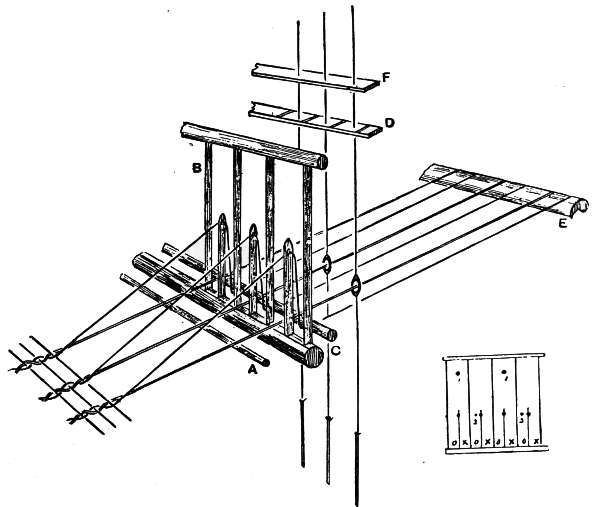
Fig. 151 Fig. 151a
CHAPTER VIII
DOUBLE CLOTH
DOUBLE CLOTH AND QUILTING HARNESSES
A very great variety of cloths come under the heading of double cloth;
in fact, almost every description of coloured cloth figured in the loom,
excepting coloured damasks and the commoner descriptions of dress
goods, as well as many uncoloured fabrics, are generally woven more
or less on this principle. Quiltings are mostly made on the double-cloth
principle, and have nothing to specially distinguish them,
except that some makes of cloth appear to be more suitable for goods
of this description, though frequently other fabrics of a much more
costly nature are woven in the same way; as, for instance, matelasses
may be made in the richest silk and worsted for jackets, as well as in
coarse cotton for quilts. One of the largest sections of double cloth
is carpetings, but these will be described in a separate section.
For figuring double cloths the same principles of the structure of
the cloth, &c., hold good as when weaving them plain, or in fancy texture.
Any suitable pattern can be put upon any description of double
cloth with a full harness mounting mounted in the ordinary manner;
but the pattern must be spread over the design paper to suit the description
of cloth to be made, which often necessitates its being in a
very distorted form, unless it can be arranged in different colours so
that the card-cutter can cut several cards from each line of the design
paper. For instance, if three colours are required to form one complete
weft line, then three lines of the design paper would be taken up
with these, unless the colours could be arranged that the three cards
could be cut from the one line, as frequently can be done; and the[234]
same for the warp when there is a face and back warp, or several
colours to be brought up for one warp line. When there are two warp
threads, one for the face and one for the back, two hooks of the jacquard
are required to weave them, and two lines on the design paper are also
required, unless two colours are painted on one line to guide the card-cutter
in cutting the cards.
It is a great saving of work to the designer when the pattern has
not to be spread over the paper so as to give each line separately, as
doing so generally puts the pattern so much out of shape that it
requires first to be designed square, or of the proper dimensions, on
suitable design paper, and afterwards transferred to the working design
for the card-cutter. When goods are being largely made this can
often be avoided by special mechanism or mounting, to act instead
of the cards, it being then worth the trouble of having a specially prepared
mounting, and it is in these cases where double-cloth mountings
are used. Perhaps the simplest class of the double-cloth range, though
not really a double cloth, is figuring with extra weft. The figuring
weft may be thrown in as a spotting intermittently, or may be every
alternate shot, a ground shot following each figure shot.
Suppose the cloth to be a plain ground and a twill figure, and that 500
cards would be required to weave the figure if it were plain damask;
it is then evident that 1,000 cards would be required if every alternate
shot is ground, and the others for figure, and that the 500 plain cards for
the ground would be two cards repeated 250 times. Now, instead of this,
if we use a double-cylinder jacquard, and put the figuring cards on one side
and four plain cards on the other side, we can save 496 cards, as the four
cards on the cylinder will work the plain at every alternate shot. Or
suppose a single-cylinder machine to be used, then shafts might be put
through loops in the harness; or the cumber board might be made in
sections, with knots on the harness twines above it, so that in either
case the harness could be raised in rows to form plain cloth.
The plain shed could be formed with a tappet and levers, as in
journal weaving, and the griffe would only be raised for every figuring
shot. Plain cloth might also be wrought with a twilling motion on the
machine, such as is used on twilling jacquards. A pair of pressure[235]
heddles in front of the harness is a common method of accomplishing
this in the hand loom. The harness is drawn for one shot, then let
down, and one of the pressure heddles sunk and the other raised for
the second shot. For the third shot the harness is again drawn, and
for the fourth shot the plain shed is crossed with the heddles. A twill
or any figure may be used, as well as a plain ground.
The next step in double cloth is perhaps double-weft-faced cloth—that
is, when the surface of the cloth on both sides is formed by weft,
the warp lying in the centre, and merely acting as binders to bind the
two wefts together. The warp may occasionally be brought to the surface
to give additional effect, or to add a third colour; or the body of
the weft may be kept on one side, the warp forming the ground on the
other side, with a weft figure on it, producing a one-sided cloth.
This class of work is best wrought in a pick-and-pick loom; but
a check loom—that is, one with extra boxes at one side only—can
frequently be used, and gives much less trouble. For a check loom
two fine shots may be used as one, having each pair of cards alike,
except at the selvage, and throwing two shots into each shed. Of course
this takes twice the number of picks and cards (unless two picks be
given to each card), but in some cases, as for borders, this may be an
advantage in comparison with working pick-and-pick. Often two
succeeding cards of the pattern for the same colour are made to follow
each other, as may be found in tapestries, &c., and the weft knocks up
into its place without showing any defect; but in a heavy cloth, with
a thick or stiff warp, the weft could not be knocked close together on
this principle. With a fine binding, warp of cotton and a thicker weft
of woollen or worsted, there is no difficulty in this working.
For double-weft-faced patterns the simplest method of designing is
to paint the pattern as if for plain damask, and then cut two cards for
each line of the design paper, one card being cut exactly the reverse of
the other; that is, the cutter cuts the painted squares for one card and
the ground squares for the next card. In lacing these two cards are
kept together, a ground and a flowering card coming alternately. There
is, however, an objection to this method of binding the texture of the
cloth, though in many cases it works very well. The objection is that[236]
the warp has to be brought from the face of one side through to the
face of the other side for the succeeding shot to form the binding,
instead of being brought from the centre only to the face as it should be.
Fig. 152
Fig. 152 shows a portion
of a stripe pattern designed
to produce 8-end twilled
stripes. If a black and a
white weft are used pick-and-pick,
the white pick coming
first, A would be a solid
black stripe and B a solid white stripe, or the appearance would
be as on the design paper, but much reduced in size. On the under
side of the cloth the colours would be reversed.
Fig. 153
The first card would be cut as the painting, cutting black, and the
second card would be exactly
the reverse of this, cutting
the white or ground squares
on the same line of the design
paper. The texture
formed on the cloth by these
cards is shown in Fig. 153,
each line of the design paper representing one card.
Fig. 154
The correct method of binding is shown in Fig. 154, where it will
be observed that the binding of two succeeding weft shots does not fall
on the same warp thread,
and that the binding dot
will be covered by the floats
of the preceding and succeeding
weft shots when the
weft is knocked up close.
There are other squares on
which the binding dots
might be placed as well as those in Fig. 154, one check to the left of
where they are being frequently used. A stripe pattern, as Fig. 152,
can be put upon design paper with each line representing two[237]
cards, and be twilled to give the texture in Fig. 154, as is shown in
Fig. 155.
When cutting this the cutter cuts the shaded squares and black
dots for the first card, and for the second card he cuts white and
crossed squares on the stripe B, and the solid black squares on the
stripe A, which it will be seen is exactly the same as cutting the black
for the first two lines of Fig. 154.
Fig. 155
When painting the design the shaded squares may be red, the black
ones black, the black dots yellow or white, and the crosses green; or
any other convenient colours may be adopted. It will be observed that
in Figs. 152 and 155, where the raised and sunk twills come together
at the junction of the two stripes, there are no binding dots on the two
threads lying beside each other. It is not necessary to have any binding
for these threads, as the two wefts crossing bind them sufficiently.
Any desired figure may be woven on cloth on this principle, which is a
very convenient one, as the colours can be so readily changed, and
three or more colours may be used as well as two; but in this case
there is generally a right and a wrong side to the cloth, the body of the
wefts being at the back and each colour brought through to the face to
form the figure. Instead of the body of the weft, or that portion not
required for the figure, being at the back of the cloth, it may be in the
centre of the warp, and an equally good face made on both sides of the
cloth; but this requires more wefting, makes a thicker and harder cloth,
and is more expensive and more troublesome to weave.
Warp figuring may be done in exactly the same way as described
for weft figuring, and the pattern turned sideways shows how it would[238]
be for warp; the only difference in the work all through is to treat the
warp as explained for weft. Of course, in the designing and card-cutting,
cutting two cards, one the reverse of the other, from a design
painted as if for a damask, would not fall in, but the designs that are
wrought fully out on the design paper would be all right. A contraction
of the work similar to cutting two cards from one line of the design
paper would have to be sought for in the mounting in the first place,
and in the card-cutting, to suit it.
Fig. 156
Suppose the design to be as in Figs. 152 and 155, and to be
painted for a 200-jacquard, then to allow for double the quantity of[239]
warp a 400-jacquard would be required, the machinery being increased
instead of the number of cards. Now, to mount a loom for this class
of work the simplest plan is to divide the machine and cumber board
into two divisions, one half being used for one warp, which may be
called the face warp, and the other half for the other warp, which we
may call the back warp. A mounting of this description is shown in
Fig. 156, in which the machine is divided into two portions, 1 and 2,
with 200 hooks in each; the cumber board is also divided into two
sections, marked A and B. Here only four rows of needles are given,
but any number can be used. The cords from the hooks 1 to 200 are
taken through the back cumber board A, and those from the hooks 201
to 400 through the front cumber board B.
When entering the yarn, one thread is taken from the back warp
and drawn into the first mail of the back harness, and the next thread
is taken from the face warp and drawn through the first mail of the
front mounting. Now, in reference to the card-cutting: instead of cutting
two cards one the reverse of the other, one half of the card must
be cut the reverse of the other half, the card-cutter cutting the coloured
squares of the design (200 checks) on the first half of the card, and
going back again and cutting the blank squares on the second half of
the card; or, when there is any variation in the twill, the pattern for
the face may be painted on 200 checks, and that for the back on 200
checks, and when cut on the card the threads of the warp will be raised
in proper order by the mounting.
Fig. 157 shows this principle of mounting with a straight or Norwich
tie, for which it is not so suitable as for the London tie (Fig. 156)
on account of the crossing over of the harness, though it is not very
objectionable if a narrow cumber board be used. Instead of having two
separate cumber boards with four or eight rows in each, one broad board
with eight or sixteen rows is better for the Norwich tie; then let the
first row of the back harness pass down through the back row of the
cumber board, and the first row of the front harness pass through the
second row of the cumber board, and so on, the back harness filling the
odd rows and the front the even rows; and when drawing in the yarn,
taking an end from the back and face warps alternately and drawing[240]
them regularly over the harness causes them to fall correctly on their
respective mountings. Instead of dividing the card in this way and
reducing the machine to half its figuring capacity, a double-cylinder
machine might be used, the hooks from one set of needles being used
for one mounting, and those from the other set of needles for the other
mounting; then cutting the face pattern on one set of cards and hanging
them on one cylinder, and using a second set of cards containing
the back pattern for the other cylinder, should attain the same results,
and give double the extent of pattern on the same size of machine, both
griffes being raised and sunk together, and both cylinders being also
brought in and out together.
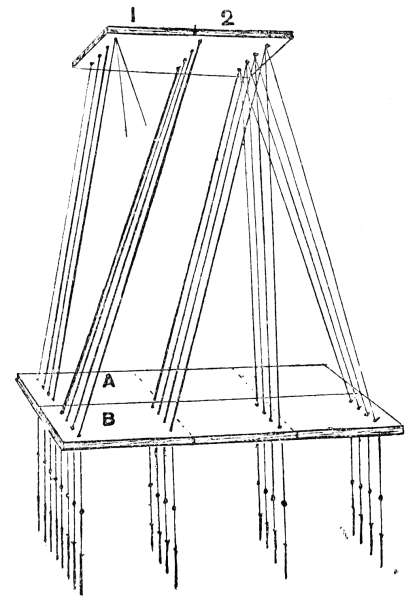
Fig. 157
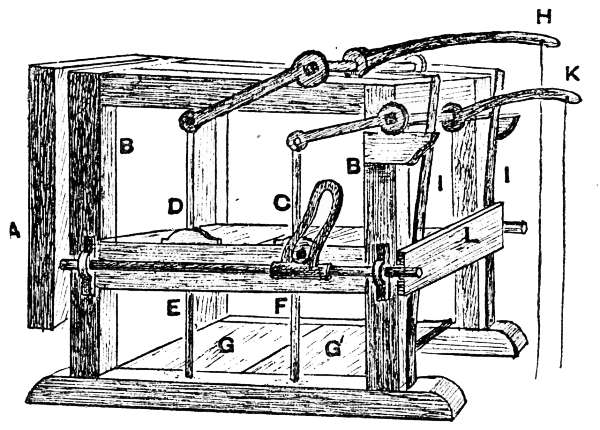
Fig. 158
A modification of cutting the back and face pattern on its own half
of the card is to be found in the double-cloth quilting mounting[241]
common about Paisley. These quilts are generally of a plain texture,
and the figuring is formed by passing one cloth up and down through
the other. The machine generally used is an improvement on the old
French draw loom, and is shown in Fig. 158 as it is made, principally
of wood, for hand looms. In this sketch the needles and cords in lieu
of hooks are not shown, but one row of them is shown in Fig. 159 with
only four hooks to each section instead of eight. H and K are the two
lifting levers for raising the griffes or trap-boards A and A1 (Fig.
159). Nos. 1, 2, 3, and 4, and 1a, 2a, 3a, and 4a are the cords in lieu
of hooks to which the harness is connected. A and A1 are two perforated
boards with the slotted holes through which the cords pass,
turned in the reverse direction in one from what they are in the other.
Each needle is connected to two of these cords—one through each hole-board—and
the knots on the cords above the holes stand over the slots
or saw-cuts of the holes in the board A and over the round or open
portion of the holes in the board A1, clearly shown at F (Fig. 159), so
that if the lever H (Fig. 158) were pressed down and the board A
raised without any card acting upon the needles, all the harness tied to
this portion of the machine would be lifted, and if the board A1 were
raised by the lever K, none of the harness tied to this portion of the
machine would be lifted. Now, if a blank card were placed on the[242]
cylinder, the reverse of this would be the case, and anything between
these two extremes can be got by cutting the cards.
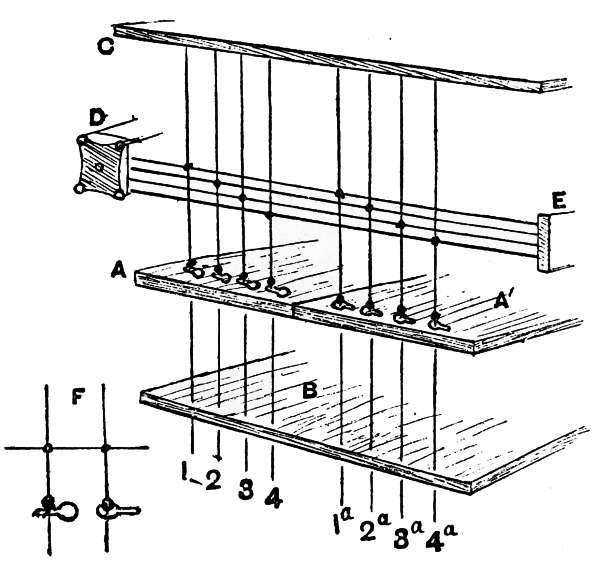
Fig. 159
The cylinder is connected with the back griffe only, and remains in
for two shots. The griffe A is first raised, and a shot thrown in; it is
then lowered, and the griffe A1 raised, which presses out the cylinder
and changes the card; a second shot is thrown in, and so on. E and
F (Fig. 158) are two slide rods or spindles to steady the griffes or trap-boards
when rising: G and G1 are bottom hole-boards to steady the
cords; L is a clap-board for pressing back the needles instead of springs
(it is fastened on springs I I, which hold it out a little from the needles,
and these springs are fastened from the top by cords to the cylinder
frame, which slides out with the cylinder, and draws in the clap-board,
pressing forward all the needles). Now to mount this machine for double
cloth. Suppose each frame to have 400 cords, and that there are 400
needles, the same as an ordinary 400-machine. Let the texture of the
cloth be plain, and to work this 80 needles may be set off, leaving
320 for figuring. These 80 needles will be connected to 80 upright
[243]cords in the trap-board A, and the same in A1. The harness for
the face cloth is tied to the remaining 320 cords in the trap-board a, and
that for the back cloth to the 320 cords in the trap-board A1, and this
portion of the harness works the figuring only without the texture.
The texture is wrought by the 80 cords in each board connected
to the first 80 needles. To each of these upright cords a number of
harness twines are tied, one of which is fastened to each twine of the
harness from the 320 cords, just above the cumber board; but in doing
so the twines from the 80 hooks on the cords in the trap-board A
must be connected with the twines of the harness from the trap-board
A1, and the reverse for the other set. In this way all the back harness
could be raised with either griffe, and the same with the front harness.
Either griffe could raise one warp with the plain harness, and the other
with the figuring harness. When cutting the cards plain texture is cut
on each card for the first 80 needles, and the figuring portion without
any texture is cut on the remainder of the card. The 80 cords
open the texture or plain shed, and the 320 cords keep the two warps
in their proper places, raising what should be above the weft, and leaving
down what should be below it for each shot according to the
pattern. In these mountings the cards hang over the side of the
loom.
The same method of working can be applied to a jacquard with upright
hooks, by having the heads of the hooks for each machine or set
turned in opposite directions, as shown in Fig. 160. One set of hooks
stand with their heads over the knives in the usual way, as at A, and
the others require to be pushed back by the card to bring them over
the knives, as shown at B, so that pushing any needle back pushes the
front hook connected with it off the knife and the back one over the
knife. The mounting may be made up as before, or a twill or any
smaller texture may be used instead of plain; or a different texture
may be made on face and back cloths.
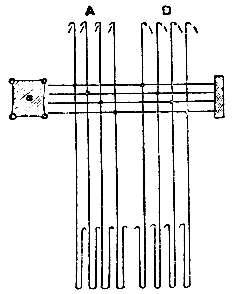
Fig. 160
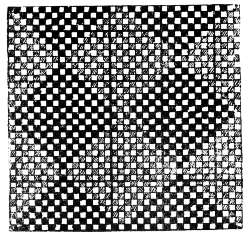
Fig. 161
Fig. 162
This description of cloth is much used for other makes of goods as
well as quilts. Kidderminster or Scotch carpets are woven on the
same principle, and curtains, cotton vestings, &c., are frequently woven
with the same texture. It can always be woven with a full harness
mounting by preparing the design to suit it. Fig. 161 is a pattern for[244]
a diagonal figure in plain texture for this class of work. The black
squares represent the face warp raised to the face of the cloth, and the
shaded squares represent the back warp raised to the face also. The
blank squares represent weft on the face of the cloth. This would give
a magnified view of the face of the cloth if it were woven with a
black face warp, a grey back warp, and a white or light-coloured weft.
If each warp had a weft of its own colour the effect would be as shown
in Fig. 162, which would be the way the pattern would be painted on
the design paper if intended for weaving on looms
specially mounted, or with special machines as
described; but if a full harness is to be used,
then the pattern must be spread over the design
paper so as to give a line of the paper for each
thread of warp and pick of weft. Fig. 163 is the
same pattern arranged in this way. The black
and grey squares represent the face and back warp
raised for the pattern. The crosses show where the back warp is raised
for the texture of the back cloth at the back of the face cloth, and the
dots represent the face warp raised for the texture where the face cloth[245]
goes behind the back cloth, or where the back cloth comes to the face.
Of course, on a cloth of this kind the warps are alike, face and back.
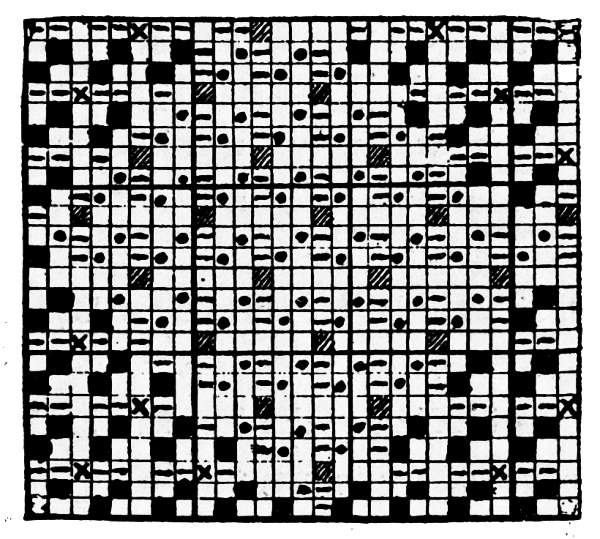
Fig. 163
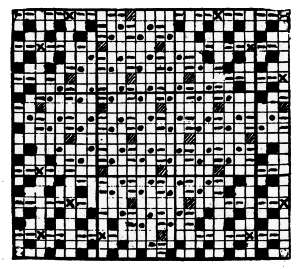
Fig. 164
It will be understood that, when the threads of the back cloth are
being raised to form a shed, all the face threads of the corresponding
portions must also be raised to clear
them out of the way of the shuttle,
and the raising marks for these are
the short dashes on the painting.
Fig. 164 is the same pattern arranged
for two threads face to one
of back, which admits of a heavy
backing with a fine face, and is
suitable for quilts, &c. The markings
are similar to those in Fig.
163, but the number of threads is
not such as to admit of the plain
texture repeating on the back cloth. It is therefore broken round
the edges of the figure where it would least show.
Instead of having the extra harness for working the plain texture[246]
as explained in connection with the quilt harness, Fig. 159, it might be
done with four leaves of long-eyed heddles in front of the harness, or
by having shafts through loops in the harness to act as heddles, or by
having the cumber board divided into strips for each row of the harness,
and knots on the harness twines above them, so that raising any strip
will raise a row of the harness, or the machine may act as a twilling
machine to work the texture.
A Marseilles quilt is a double cloth with a fine face and a coarse
back, both stitched together round the edges of the pattern, and a
wadding shot thrown in between them, which causes the pattern to be
embossed or to rise up full and rich. The face is usually a plain texture,
and the back the same; but the face has double the number of
threads in it that the back has, and the yarn for the face is proportionately
finer than that for the back. Two picks of fine and two of coarse
weft are thrown in alternately—one pick of the fine goes into the face
cloth only, and the other, also a face pick, stitches the face to the back.
One of the coarse picks is thrown in between the two fabrics, and is
called the wadding, and the other pick goes into the back cloth. In
these fabrics a very fine effect can be produced by covering the ground
with a small bird-eye pattern, stitching the back and front closely
together, then having a bold floral pattern for the figuring, which, being
only bound round the edges of the pattern and along veins, &c., is
comparatively loose and produces a rich embossed effect. These fabrics
may be woven with a twilled as well as a plain ground.
Matelasses are a similar description of fabric, but usually more
ornamented, the face fabric being any fancy texture. When used for
ladies’ jackets or mantles they are made of fine worsted or silk for
the face, with perhaps a woollen back and a woollen or cotton wadding.
The binding of the face and back cloths together takes place round the
edges of the figure, and in any other portion, such as veins of leaves,
&c., that may be thought desirable. The binding may be effected
either by leaving down a portion of the face warp when the back pick
is being thrown in, or by raising a portion of the back warp when the
face pick is being thrown in, this depending upon the pattern and the
counts of yarn used. The finer threads should be used for stitching,[247]
so as not to injure the face by bringing any coarse threads through
to it. If the face of the cloth is a warp pattern it will be best
to stitch by raising a back thread over a face pick, but if the face is
a weft pattern then sinking the face warp for the back picks will
probably be more satisfactory. If the cloth is made, as is frequently
done, with a mohair or lustre worsted warp face with a cotton weft,
and a cotton warp back with a woollen weft, and a woollen wadding,
then the binding would be effected by raising some of the back warp
thread over the face picks. One pick (woollen) for wadding would be
thrown into a shed formed by raising all the face warp; the next
pick would be for the back, thrown into a shed formed by raising all
the face warp and that portion of the back warp required to form the
texture of the back cloth; the third pick would be for the face, thrown
into a shed formed by raising the portion of face warp required for the
pattern, as well as those ends of the back warp that are to form the
stitchings.
Quiltings.—A great variety of the cheaper description of quiltings,
toilet covers, &c., consist of a face cloth with an additional
thick weft. This thick weft is woven into the ground, which may be
a twill, mat, &c., but flushed loosely at the back of the figure, which
is a plain texture. Sometimes there is a small quantity of thin warp
for binding the thick weft loosely at the back of the figure, making a
double cloth in this portion, but all working together for the ground,
making it a solid cloth.
Of more recent origin are the satin quilts made by Messrs. Barlow
and Jones, of Bolton, and some other firms. They consist of two
plain cloths, intimately bound together; one cloth has a fine warp and
a very coarse weft, and the other has a fine weft and a coarser warp.
When binding, the fine warp is made to catch on the fine weft, and the
thick warp and weft cover the bindings. Suppose the fine warp to be
white and the thicker warp to be blue, and let the warping be two
threads blue and one white. Let the white warp be wefted with a
thick twist weft—say four times as thick as the warp—and this coarse
weft will form the figure. Let the blue warp be wefted with a blue
weft perhaps double the count of its warp, and in binding this weft[248]
catches on the fine white warp. The thick white weft, which is fully
double the thickness of the thick warp, effectually covers the tie, and
when the yarns are properly proportioned the pattern stands out,
producing a clear stamped or embossed effect. These cloths may
be made with a twilled ground, and either all white or white and
coloured. They are a good firm fabric and wear well, but are liable
to have a coarser appearance after being washed. (See also Terry-Pile
Quilts.)
Woollens and Worsteds.—Weaving woollen and worsted cloths in
the jacquard loom is merely an extension of the patterns produced with
shaft mountings, or sometimes the same patterns are woven on small
jacquards by those who prefer the jacquard to working a larger
number of healds when the cloth is not so heavy as to require the
latter to be used, healds as a rule making a firmer and heavier
cloth than a jacquard will. Light worsted goods for dress fabrics,
&c., are figured like damask, or as double weft or double warp-faced
cloths, or may be as double cloths.
Curtains and Tapestries.—These, though sometimes of damask,
are usually made on some principle of double cloth, as indeed all
cloths must be when a rich brilliant effect of colours is required.
One of the simplest methods of making these fabrics, and which produces
a very good effect, is to employ a fine binding warp of twist
cotton and produce the pattern on it with two, three, or more coloured
wefts of worsted, mohair, or silk—say a spun silk ground weft and a
mohair or fine worsted figure. A small portion of a diamond pattern,
greatly reduced for want of space, is given in Fig. 165. It is intended
for three colours of weft—one for the ground and two for the figure.
The ground weft might be black or gold, and the figure wefts olive
green and dull red, or claret, the warp to be black or a deep navy blue.
For this pattern three cards must be cut from each line of the
design paper—one for the ground weft and one for each colour of
the figure. The design is painted in various colours, which are
here represented by different markings on the squares. Let the black
squares represent the olive and the dotted squares the red of the
figure. The white squares represent the ground weft, and the shaded[249]
squares on it are for binding the face weft down, while the crosses
are for binding up the weft at the back. The cutting of the cards is
as follows:—For the ground shuttle cut all the shaded, black, and
dotted squares—that is, the shaded squares on the ground and all the
figure. For the first figure shuttle (olive) cut all the ground except
the crosses (that is, the white and shaded squares) and the dotted
squares of the figure. For the second figure shuttle (red) cut all the
ground except the crosses, as before, and the black squares of the
figure.
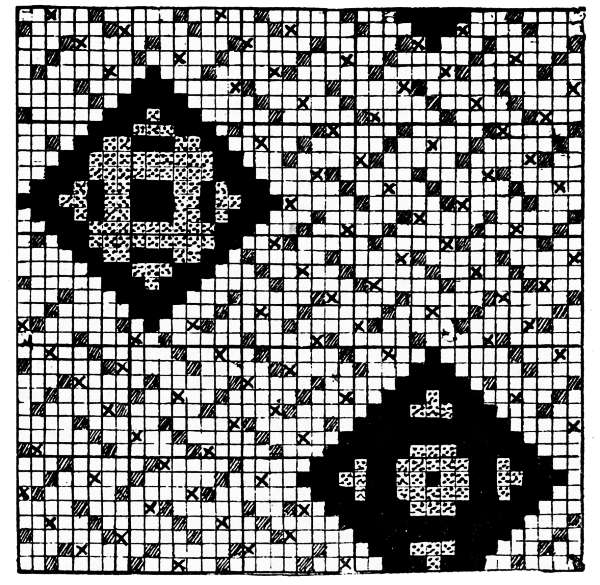
Fig. 165
In this example the figure is so small as not to require binding
dots over it, but for a large figure the ground weft threads would
require to be bound up at the back of the figure in the same way that
the figure threads are bound up at the back of the ground in the design
given. The figure wefts might also require to be bound at both face
and back. On the design these binding marks would be dotted over
the figure in the same way as they are dotted over the ground on
the design given, using any suitable texture that may be desired.
[250]
To make the cutting clear, five lines of the pattern (Fig. 165)
are put upon design paper in Fig. 165a, as they would be cut on the
cards, beginning with the ground weft, olive and red following, in all
making 15 lines or 15 cards. This cutting would make the upper
side of the cloth in the loom the right side or face; but it may, in some
cases, be desirable to weave the cloth with the face down to avoid heavy
lifts in the harness. This pattern would suit for a warp of about 50
threads of warp per inch, and say 60 to 80 shots per inch of each colour.
Fig. 165a
For the convenience of the designer and card-cutter, a much better
plan of working this class of fabric is to have an additional binding
warp, which may be in heddles or in a front row of the harness. This
warp can work plain twill or satin as required, and, being light and
openly set, can bind the back weft up and the face weft down, or the
face may be bound by the warp in the harness and the back bound by
the binding weft; but in this case there should be a fine thread of weft
thrown in every fourth pick, which should pass over the warp in the
harness, or a portion of it, and under that in the heddles, so as to bind
both warps together. In this case the twilling dots on the design are
omitted, which simplifies the cutting and designing of the pattern. If
the face is to be twilled with the harness warp, the dots for binding
must, of course, be put on the design, or the figure only may be twilled
on the design, and let the ground be bound by the binders. Shafts
mounted in this way may be wrought from tappets if the loom is mounted
with them, or may be wrought by strong hooks at each side of the
jacquard and sunk with springs. The principle of working fabrics of
this description has been given in detail, as from it many other[251]
varieties can be wrought out, and any number of shuttles used to suit
the colours wanted.
Figuring with two warps and one weft is a common method of
working, and gives three colours on the face of the cloth. An extra
warp of fine yarn may be used for binding the wefts, admitting of the
coloured weft being more used for figuring. Extra warps cannot be
used to so great an extent as extra wefts, as they crowd up the reed
and prevent proper shedding, particularly when soft or hairy yarns are
used; but when properly suited to the reed they make a firmer and
more regular cloth than a weft cloth, and on account of less picking
the weaver gets over the work much faster. Two warps, each having
its own weft, are a good method of figuring, but unless for goods with
a large number of threads and picks per inch, so that fine yarn can
be used, it makes a heavy cloth. Two warps and two wefts, all of
different colours, with a fine binding warp in addition, to admit of the
colours of the wefts being kept comparatively pure, gives a still richer
effect. In this case the binding warp may be of fine black cotton, the
two figure warps of thicker cotton, and two threads drawn into each
mail; the colours may be, say, dark blue and dark citrine, or clear
sage. The wefts are soft wool or worsted, say light gold and deep dull
red. In this method of weaving, pure red and pure gold can be got
from the wefts, as the black binders show but little. Pure blue and
pure citrine can be got in small quantities by floating the warps, and
an admixture of the warps and wefts can be got in any place desired.
A very handsome curtain fabric can be made as follows:—There
are 120 to 140 threads of warp per inch; every second or every fourth
thread of the warp is used for binding the ground, which may be a
plain texture or a three-shaft twill. The binders may be an extra
warp, wrought with heddles, forming plain all over the cloth, or may
be in the harness and be portion of the ordinary warp working plain
for the ground, but rising to assist in forming the figure, which may
be bound as desired, say 8-or 10-end satin. The warp is of fine silk
yarn loosely twisted, and may be one or more ply, of a rich olive-green or
deep scarlet colour. There are two wefts, one a rich silk, say a golden
colour, of twist yarn; the other is a backing weft of the same colour[252]
as the warp, and of cotton yarn, about the same thickness as the silk
weft. There are from 50 to 60 threads of weft per inch of each colour.
The gold weft forms the ground of the pattern, and the warp the
figure, which is bound with an 8-end satin binding. The cotton weft
goes to the back when the silk weft is on the face, forming the ground
of the pattern, the warp lying between them; but when the warp is on
the face for figuring, the gold weft goes to the back and the cotton
weft lies under the warp face, binding it and giving an embossed effect
to the figure. The gold weft is bound up by sinking a portion of the
warp. The ground may be formed with the warp, and the figure with
the weft, if desired, producing a sunk figure on a raised ground; but
this is just a reversal of the process, or making the ground in this case
as the figure in the previous case. This makes a light, close, and very
rich fabric.
Figured Poplins are among the richest description of curtain
fabrics; they may be made of all silk, or silk and fine wool, the latter
forming the weft. The ground is a clean, sharp cord running across
the cloth, and the figure is formed by flushing the warp over the cords,
binding it with a long twill or satin binding. The weft may also be
used for figuring; but in this case it should be a silk weft put in for
the purpose of figuring.
Two portions of patterns of good makes of figured poplins or repps
are given in Figs. 166 and 167. Fig. 166 is warped two threads of rich
crimson silk and one thread of rich golden yellow silk, 180 threads per
inch. The weft is pick-and-pick, 50 picks per inch, one thread a
round, firm cord of firmly twisted worsted of the same colour as the
warp, and the other yellow silk, the same as the warp. This thread
passes over the crimson warp and under the yellow, the crimson cord reversing
this, thus producing a very fine yellow line between each pair
of cords. The method of forming the figure can easily be seen from
the pattern. Instead of a thick cord being put in for the weft to form
the rib, several fine shots could be thrown in as one, as in repp figuring,
and these threads could be brought out for figuring as well as
the warp; but they would in this case require to be of silk, which
would make the cloth very expensive.
[253]

Fig. 166
Fig. 167
Fig. 167 makes a very rich and handsome fabric. It is warped all
a rich purplish-brown silk, 180 threads per inch. There are four weft
picks in the pattern. The first is a clear olive-green silk about double
the thickness of the warp silk, the second shot is a round, firmly
twisted worsted cord of the same colour as the warp, the third is the
same as the first, and the fourth is silk of the same colour as the warp.
There are 100 picks per inch, but the two green silks go along with the
cord to form the complete cord or ridge. These silk picks can be
brought out to the surface for figuring, as shown by the shaded squares
in the pattern, which are not cut on the cards. The black squares are
the warp figuring, the dots the warp raised for the ground, and the
crosses the warp of the binding threads raised. These binding threads
rise over the brown silk pick, and are similar to the yellow warp in the
previous pattern.
For richer fabrics than these we must go to pile work, which is,
perhaps, the most exquisite production of the loom. Curtains or
hangings can be made extremely rich by figuring a rich corded silk
ground with a pile of different lengths and colours. The long pile can
be cut to form a plush or velvet pile, and the shorter pile may be left
uncut to form a looped or terry pile. By a judicious arrangement of
colours and length of pile, fabrics of extreme beauty can be made (see[254]
Pile Work). For curtains of a heavy description chenille is much used,
and makes a very rich, warm-looking fabric; but it is too heavy and
of too coarse a nature for small rooms unless they are very well lighted.
It is very suitable for screens, or curtains dividing two portions of a
room (see Chenille).
[255]
CHAPTER IX
TAPESTRY AND PILE WORK
Tapestry.—What are generally known in trade as tapestries, are
figured fabrics for curtains, hangings, &c., not damask, which is
distinct, being woven with only one warp and weft. Real tapestry is
a hand-made fabric of very ancient origin, being in use since the days
of the ancient Egyptians, who wove or worked it in a manner very
similar to that employed at the present time. It does not belong to
‘jacquard weaving,’ but being the first in point of the excellence of its
patterns amongst figured fabrics, a short description of it may not be
out of place. Henry VIII. tried to establish tapestry weaving in this
country, but failed, but James I. had a flourishing factory at Mortlake.
Tapestry weaving appears to have been introduced into France about
the ninth century. The Flemish were celebrated for it from the
twelfth century. Arras work surpassed all the others, and tapestry
was commonly known as arras work. The sixteenth century gave a
new impulse to the trade in France. Francis I. founded the manufactory
of Fontainebleau, and Henry IV. re-established tapestry making
in Paris in the years 1595 to 1606. About the year 1666 Louis XIV.
bought the Gobelins Works (which take their name from the original
owners, a rich family of wool dyers), and established the Royal Gobelins
Tapestry Manufactory, which is now one of the sights of Paris.
There were two methods of working tapestries—one known as
‘basse lisse,’ or low warp, the threads of warp being placed in a
horizontal position in the loom; the other was called ‘haute lisse,’ or
high warp, as the threads of warp were placed in an upright or vertical
position. It is the latter method of working that is now adopted.
The loom consists of an upright frame of wood of a size to suit the[256]
cloth to be made. There is a strong roller at the top, which acts as a
warp beam, and another at the bottom for the cloth beam. Both these
rollers have ratchet wheels on one end, and are held with pawls or
catches so as to allow the warp to be wound off and the cloth to be
wound up when required, and then hold the stretch of warp steady to
be woven. The warp is coarse, but a clean, regular thread of twist,
cotton, or linen, about 12 to 18 threads per inch (more or less, as
desired,) and of such a thickness that the spaces between the threads
are somewhat less than the diameter of the threads. The weft is
usually of fine wool but a fairly thick thread, say 4’s or 6’s worsted.
This is generally used alone, of whatever shade of colour is required,
and there is no end to the shades used; but in some places, to give
brilliancy and richness of effect, silk is used along with the wool, and
sometimes tinsel or gold cord. These are put in separate threads along
with the woollen or worsted weft. The silk is much finer than the
worsted, say about equal to 12’s or 16’s cotton, and, of course, can be
regulated to give the effect required. The gold is sufficient to give
sparkle to the portion it is employed in.
After leaving the warp beam the warp is divided by two thick glass
lease rods. Then every alternate thread, those to the front of the
frame, is drawn through a doup of a half-leaf of heddles which is fixed
in a horizontal position above the weaver’s head. This enables a plain
shed to be formed, as the thick lease rod divides the threads and forms
one shed. Then, when the weaver, sitting at the back of the loom,
draws back the half-leaf of heddles, all the front threads or any portion
of them can be drawn back past the back set, and form a cross shed.
As the doups of the heddles are long and strong, the weaver can take
any number of them he requires and draw the front warp back; then
putting his fingers into the shed thus formed, clear it down to the fell
of the cloth and insert his bobbin.
Fig. 168
The pattern is painted on design paper, shaded in the way it is to
appear on the cloth, and the weaver must have a bobbin of weft to suit
each tint or shade of colour on the design. The outline of the pattern
is traced on the warp to guide the weaver, and the painted pattern is
fastened up either before him or to one side of him, so as to be convenient[257]
to read the stitches off it. When ready for work he looks
at the pattern and finds perhaps 20 stitches of blue; then he selects
a bobbin of the correct shade and passes it through the open shed of
the warp round 10 threads; then he draws the 10 doups of the
heddles that are round the 10 threads intermediate with and in front
of these, pulling them back through the others and forming a cross
shed. The same bobbin is now passed through this shed, and the
weft pressed down with a pin or comb, both of which articles the
weaver uses for straightening and beating up the weft. This covers
20 threads of warp with blue weft. The texture of the cloth is
plain throughout, the weft being bent round the warp and pressed
close together, forming a rib. Now, instead of completing this
weft line all along the cloth, as is usual in coloured weaving, the
weaver goes on working with the bobbin he has taken up, following
the colouring on the pattern, and may change his bobbin when required
for a new shade or colour, and go on working this portion for some
distance upwards, and then begin an adjoining portion and work it up
in the same way. This will come all right when the outlines of the
portion he is working run obliquely; but if they should run upright
for any distance in the same direction
as the warp, it is plain there
would be two selvages coming together
without any connection
between these portions of the cloth,
as shown in Fig. 168. When the
pattern runs in a diagonal direction,
the weft threads passing across from
one warp thread to the next one
make a sufficient binding or connecting
link between the two colours,
as may be seen at the upper portion
of this figure, which would be
quite sufficiently connected when it is considered that the weft threads
are pressed so closely together as to entirely cover the warp. To
remedy the objection of a slit or division between the two portions of[258]
a pattern in the case of a vertical line, it is customary to tack the
bobbin of one colour of weft round the first warp thread of the adjoining
colour, at intervals of, say 3/16 in. This produces a toothed appearance,
but is not very remarkable. The only other remedy would be to
link the two wefts on each other occasionally. In many of the old
tapestries it may be seen that this was neglected, even when the
distance was as much as 3 in. or 4 in. Sometimes they were stitched
afterwards in these places with a needle and thread. When there are
many long straight lines running in one direction, as in architectural
subjects, it is best to work the pattern so that these will run in the
direction of the weft, to avoid any joining being required. Patterns
can be wrought sideways or upright on the cloth as desired to suit the
size, subject, &c.
Fig. 169
As the weaver sits at the back of his frame or loom when working,
he has to come round occasionally to examine the face of his work.
Sometimes he keeps a looking-glass in front to show him how he is
getting on. He has also a rough pattern on the back of the cloth
similar to that on the front, as the nature of the weave must give him
the same on both sides were it not for the loose ends at each change[259]
of bobbin, which have to be tacked up at the back. Tapestry weaving
is a very tedious process of working, but in skilful hands very beautiful,
and artistic results can be produced.
Figured Pile Fabrics.—When we come to pile work we have a
great scope for the ornamentation of fabrics, but the nature of the
work is such that it is only suited to heavy or moderately heavy
cloth, and a large number of either threads or picks per inch are
required.
Forming stripes of plain or figured pile alternately with twilled or
figured stripes can easily be accomplished with either a weft or warp
pile, but when we come to figure indiscriminately over the cloth there
is more trouble. For a length of time there was a difficulty in cutting
weft-pile figured fabrics, as the knife or cutter would not always enter
the proper ‘race’ round the edges of the figure, and the floats were
cut irregularly. This has now been overcome by arranging the design
to suit. Fig. 169 is a common velveteen designed for a weft
pile figure. Only a portion of the pattern is given, but enough to
show the method of arranging the design. It will be seen that the
figuring is produced by flushing the weft on one side of the cloth, and
for the ground it passes to the other side. The edges of the pattern
are moved across the design paper in steps of two, and no flush or
float is less than over four threads. In addition to this the figure
should be turned in the centre on an odd number of ends, which in
cutting keeps the race end on the inside of the step into which the
knife enters. The knife is run up on all the odd numbers of ends
moving across in steps of two, and, leaving no flushes of less than four,
gives it a better chance of entering in the proper place along the edges
of the pattern.
Fig. 170 is another make of velvet for a heavier fabric, with 60
threads of warp per inch, and from 350 to 400 picks. It makes a good
firm cloth, suitable for curtains or furniture coverings. The principle
of designing is the same as for Fig. 169. Both these patterns are
portions of a diamond figure.
When the figure is produced with a warp pile, it is only necessary
to raise the proper warp threads with the jacquard for the insertion[260]
of each wire, but the difficulty to contend with is that there will be an
irregular take-up of the warp pile threads, and this can only be
remedied by having a number of small warp beams. In some cases
a separate spool for each warp thread may be required, which, of
course, for a fine velvet means a very intricate arrangement, though
it suits very well for pile carpets. Different heights of pile can be
formed through a pattern in this way—say, a short pile to be left
looped, and a longer pile to be cut, which, in suitable colours of
pile and ground, forms a very beautiful though costly fabric.
Fig. 170
Another method of warp pile weaving, more easily accomplished,
is that known as terry, or Turkish towel weaving. It is largely
used for quilts, toilet covers, towels, &c., and any bold figure can be
woven on it with almost as much ease as on ordinary damask work.
There are two methods of forming figures on the cloth in this style
of weaving, one by having two colours of pile warp and changing
them from one side to the other to form the figure or ground—that is,
supposing the one pile warp to be red and the other white—pile would
be thrown up on both sides of the cloth at the same time; on one side
the figure would be formed by the red pile and the ground by the white[261]
pile, and the other side would be the reverse of this. Fig. 171 is a
portion of a pattern of this style. The black squares represent, say,
the red warp-forming loops on the face of the cloth, and the shaded
squares the same for the white warp. The crosses are the ground or
binding threads; and the dots represent the pile threads of the colours
they are on, raised to bind with the weft, when these threads are forming
pile on the underside of the cloth.
Fig. 171
The other method is to have only one colour of pile warp—in fact,
to have only one pile warp, it might be said, instead of two, as in the
previous case. The cloth consists of a pile figure and a plain or solid
ground on one side, and the reverse of this on the other side. The
pile and ground may be of the same colour, or of different tints if
desired—say a rich cream ground and a white pile. This style of[262]
working is very suitable for quiltings, toilet covers, &c. Fig. 172 is a
portion of a pattern for weaving in this way. The black squares represent
the pile-warp raised to form loops, and the round dots are also
pile-warp raised, but only for binding when the loops are being formed
at the other side of the cloth. The shaded squares show the ground
warp raised to form the body texture. This cloth has about 60 threads
of warp per inch, and the same or a little more weft.
Fig. 172
Figs. 173 and 174 are two examples of six-shot pile cloth for quilts;
it is made with 50 to 60 threads of warp per inch, and double that
quantity of weft. The same method of marking the design paper is
used as that for 172 pattern. It will be seen that in Fig. 173 the
loops or flushes of pile are over five and under one, and in Fig. 174
they are over two, under one, over one, and under one, thus making a
fast pile fabric, whereas the floats of five in Fig. 173 would be rather
loose unless the cloth is over-wefted. Both these piles may be used in
the one cloth, one for the face and the other for the back, as is given
in the figures; the light portion of Fig. 173 being of the same texture
as the dark portion of Fig. 174. One pattern may be taken as the face
of the cloth and the other as the back. Of course they may also be
used separately if desired. Any full-harness mounting that will suit[263]
the pattern will answer for these fabrics, the loops being thrown up in
the usual way, by leaving a few shots standing out from the fell and
then knocking all up, drawing forward the pile warp, which is slackened
at this beat, but sliding on the ground warp, which is held firm.
Fig. 173
Fig. 174
Another method of forming figure pile is to weave a plain pile, and
when cut press or stamp a pattern on it with heated blocks cut to the
pattern; the standing pile is then shorn off, and afterwards that which
was pressed down is brushed up again, forming a full-pile figure on a
shorn-pile ground.
[264]
CHAPTER X
CARPETS
The manufacture of carpets has been in existence since the days
of the ancient Egyptians, who made rugs and carpets of various
kinds and ornamented them with animals and various devices.
The manufacture passed on to the East, and we find India, Turkey
and Persia celebrated for the richness of their carpets in early times.
The Moors of Spain introduced the Oriental floor coverings into
Western Europe, and the Belgians and French took up the manufacture
and produced excellent imitations of them. Even in the Middle Ages
carpets were only used as a luxury by the rich. Queen Elizabeth had
a carpet spread upon rushes, while Queen Mary had rushes only. These
rushes were the Acorus Calamus (sweet reed of Norfolk), which were
the usual floor coverings down to about this time.
Tapestry weaving was started in this country in the beginning of
the seventeenth century, but the first we hear of carpet manufacturing
in England was at Kidderminster about 1735, the carpets then made
being, no doubt, the Kidderminster or Scotch carpet. The making of
Brussels carpet was introduced about 1750; they were first made in
this country at Wilton, near Salisbury.
The Axminster carpets take their name from being first made in
the town of Axminster about 1755. They rivalled the work of the
Eastern looms for beauty, durability, and colour; but owing to the cost
of their manufacture, and the introduction of the cheaper Brussels and
patent tapestry carpets, the demand became very small, and the work
was removed to Wilton in 1835. The patent Axminster or chenille
carpet was brought out by Messrs. Templeton, of Glasgow, in 1839.
[265]
In the early ages carpets or rugs were used for spreading on the
floor or grass to lounge upon. It is recorded that in Babylon the guests
of despotic sovereigns lounged on rich carpets, and walked over priceless
works of textile art; also how figured carpets made of the finest wool
were strewed under golden couches, and rugs richly embroidered with
figures were spread over daïs, stool, and table.
The Egyptian carpets may have been tapestries and embroidered
fabrics. They also had a method of making tufted carpets by drawing
a portion of the weft threads out of a piece of coarse linen and sewing
tufts of coloured worsted to the warp threads, enough of the weft being
left in to bind the warp threads together.
Fig. 175
Persian and Indian carpets were made of wool; the latter were
occasionally made of silk, and sometimes an inferior description of
carpet was made of cotton. These, as well as Turkey carpets, are
made on a very simple loom consisting of two posts fitted at a suitable
distance apart to form a vertical frame. There is a roller at the top
and another at the bottom between which the warp threads are stretched,
much in the same manner as in tapestry weaving. The weaver sits
in front of the loom with a design before him, and is provided with a
quantity of bobbins of the colours required for the pattern; he looks to
the design for the colour, and, taking a bobbin of the colour required,
forms a loop round two of the warp threads with the weft, cutting it off
as shown in Fig. 175. After having completed
a row along the cloth forming one
weft line of the design, he opens a shed
and inserts a ground shot all across the
web, each ground shot going into a shed the
reverse of the preceding one, forming a plain
texture ground with a row of tufts between
the ground shots. The ground shots are beaten down with a comb.
Instead of going across in even rows of tufts, where there is a
patch of colour several rows of tufts may be put in at this place
with a ground thread between the rows, leaving the ends of these
threads projecting so that they can be carried across when the remaining
portions of the rows are completed. The ends of the tufts are cut[266]
off roughly at first, and afterwards shorn level with a pair of shears.
Persian carpets are sometimes very costly, a small-sized carpet, when
made of fine cashmere wool, costing 500l. or 600l.
Axminster carpets are made on the same principle, and other art
carpets are being made similarly. There are about sixteen or twenty
warp threads per inch of strong cotton or linen thread; the weft is of
fine wool, three or four ply being put into each tuft; the ground weft
is soft hemp or flax, eight ply of yarn going to each shot. This makes
a full soft cloth. These carpets are about three-quarters of an inch
thick, and, like tapestries, there is no end to the variety of pattern or
colour that can be introduced.
Kidderminster or Scotch Carpet.—This carpet, also called ingrain
carpet, is the oldest machine-made carpet in this country; it was
originally made at Kidderminster, but the chief centre now is Scotland.
Originally it was a two-ply cloth, the pattern being formed by passing
the two cloths, which were of different colours, through each other.
Mr. Morton, of Kilmarnock, improved on this by making it a three-ply
cloth, which enabled it to be made a thicker cloth with a richer pattern.
It is now made both two-and three-ply, and when made of all-wool is
a rich and durable article, taking a position between the jute and felt
carpets and the tapestry and Brussels; it is, however, sometimes made
with cotton warps and woollen wefts, and is in this case an inferior
article.
Both two-and three-ply carpets may be woven with only one colour
of weft, in which case the pattern is formed by the warp threads, which
must be much thicker so as to close in over the weft and hide it as much
as possible; on the other hand, there may be two warps and four
colours of weft, two of which are the same colours as the warp, and in
this case the weft is much thicker than the warp. The best of these
carpets are made with as many colours of weft as warp, as, in order to
get a pure effect, it is necessary to have wefts traversing warps of their
own colour; but a variety of effects can be produced by using additional
colours in both warp and weft.
One advantage in this style of carpet is that it is reversible; for
when one cloth rises to the face the other passes to the back, making[267]
the pattern on both back and face alike, but of different colours. This
is the case when the carpet is two-ply cloth woven in the ordinary way,
but sometimes the back has to a certain extent to be sacrificed to give
more ornamentation to the face, at least in the ordinary method of
weaving. Whether woven two- or three-ply, the principle of working
is the same. Take a two-ply carpet. The fabric is a double or two-ply
plain cloth, figured in the usual way by passing the two cloths
through each other, there being no binding between the cloths except
what is formed by the one passing through.
The warps are of different colours—as, say, scarlet and black, green
and black, &c.—and each warp should have a weft of its own colour if
pure effects in the cloth are required. Usually four sets of warp threads
are employed instead of two—that is, two colours, end-and-end, for each
warp—and each colour of warp has its own colour of weft. Say we
take red and black for the face or figuring warp, and white and olive for
the back or ground warp. Various effects can be produced from this arrangement—viz.
the effect of the figuring cloth, formed by weaving the
red and black warps and wefts together, which in plain texture with
one weft will produce a rich brown effect; the ground cloth produced by
the white and olive warps and the weft will be of a light olive colour;
then lined, or what are known as ‘shot-about’ effects can be produced
by throwing in a light and a dark shot alternately—as white and black,
olive and red—and binding them on the face by warps of the same
colour. All the weft on the face of the cloth should be bound by warp
of its own colour in order to give pure effects. When a thread of one
cloth is raised, the corresponding thread of the other cloth goes to the
back (white and red and olive and black correspond in this case), but
the red weft will be bound with black warp on the under side of the
cloth, and the black weft will be bound with red warp, and the same
with the others, as in the system of working the harness with journals
to form the texture, all the black warp is controlled by one of the
journals and must all rise with it. Therefore when the black shot is
being thrown in, the black warp must be raised to make the pattern
correct on the face of the cloth, and this will also cause it to be raised
for that portion of the cloth that goes to the back, and when the black[268]
is up the red is down; therefore the black weft must be bound by red
warp on the under side of the cloth, and the same with the other
colours. It is easy to understand that if an end-and-end warp—black and
red—be wrought plain on two shafts or leaves of heddles, and shot pick
and pick of the same colours, when the black weft is bound with the
black warp on one side it must be bound with red (which is the other
half of the warp) on the other side, and if the red is bound with red on
one side it must also be bound with black on the reverse side. To
apply this to the double cloth or carpet weave it is only necessary to
consider this piece of cloth as passing up and down through another
one of a different colour. Had we the power of raising any portion of
the black or red warps required, we could bind a portion of the black
weft with black on one side, and any other portion of it with black on
the other side; to do this we require a full or thread harness.
Fig. 176
A section through the weft of a piece of two-ply carpeting is given
in Fig. 176, showing the position of the threads when arranged to give
the different effects of face cloth up as at A, back cloth up as at B, shot-about
effect of red and olive on the face as at C, and shot-about effect
of white and black on face as at D. The warp threads are marked W,
O, R, B, the initial letters of the colours; and the numbers 1 to 32 give
the order of picking. The shot-about effect is here produced with the
opposite threads—that is, the first thread of one warp and the second
thread of the other warp—as white and black; but it might be preferred
to produce the effect the corresponding or mate threads (white and red,
or olive and black) would give. In working with journals, two picks
face and two picks back would be required to obtain this, and the
needles of the jacquards would require to be acted upon by the cards
for each shot, thus requiring double the number of cards. With a full[269]
harness any effect desired can be produced. Extra colours of weft may
also be used (as drab) in addition to the white and olive—to work, say,
white, olive, drab, olive, &c.; and dark green or blue in addition to the
red and black, which would come in as red, green, black, green, &c.,
a shot of the light and one of the dark colours following each other in
succession. Stripes of a bright colour may be introduced into the
warp or weft and kept in the back cloth, only being brought to the face
in small portions, at intervals, to sparkle up the centres of flowers, &c.
Ingrain carpets are made 36 in. wide, and with, say, 832 or 1088
threads of warp, according to quality. The former can be woven on a
200 jacquard (say 208=416), as the machine is double; and as there
are two repeats of the pattern in the width of the cloth, 416 × 2 = 832
threads of warp. For the latter 272 needles are required = 544 × 2
= 1088 hooks.
When woven with journals, the jacquards used for figuring these
carpets are similar to those explained under ‘Quilt Weaving’—that is,
double machines with trapboards and knot cords; and when the card
is pressed against the needles it is held in for two shots, one trapboard
raising the harness for the first shot, and the other reversing the shed
for the second shot. The journals are four sections of the cumber
board, as shown in Fig. 177; each section contains two rows of the
harness and one colour of warp. No. 1 journal controls the white
warp, No. 2 the olive, No. 3 the red, and No. 4 the black; the draft is
shown by the numbers 1 to 8 alongside the harness cords. These eight
cords only represent half a row from each machine, as there are eight
rows of hooks to the machine. One row of the two machines fills two
rows across the journals, or 16 holes. A represents the trapboard of
the machine for the ground or dark warp, and B that of the machine
for the figuring or light warp.
The harness twines are furnished with large knots above the
cumber board or journals, so that when one of the journals is raised
the harness will be lifted with it. The journals may be raised by
strong cords or wires from the machine, or by a tappet or shedding
motion working either above or below them. If the machine is divided
into two parts, four hooks in succession going to each colour of warp[270]
for each cloth, the cords from these four hooks making two rows of
the journal, there will be no crossing of the harness in a straight or
Norwich tie.
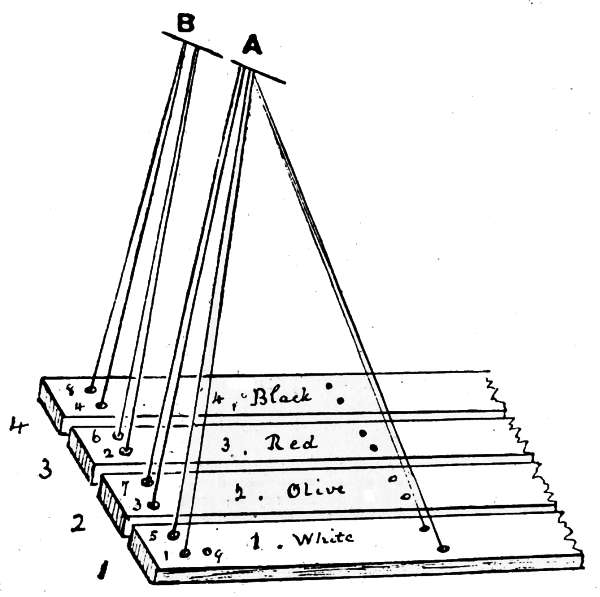
Fig. 177
The order of working for the section Fig. 176 would be as follows:—For
the first pick, which is white, raise the trapboard B and the first
journal; for the second pick, which is red, raise the trapboard A and
the third journal; for the third pick, raise the trapboard B and the
second journal; for the fourth pick, raise the trapboard A and the
fourth journal. This is the general order of lifting for a pattern; but
a simple lined effect across the cloth as the section could be wrought
with the journals without the machine, using them as heddle shafts.
It could also be wrought by the machine without the journals. The
use of the journals in conjunction with the machine is to pass the cloths
through each other and make a pattern. For figure work, when a card
is pressed in against the needles, all the warp for the figure on the
design paper is raised by the trapboard B, which clears this portion of
the red and black warps out of the way of the ground shed; and as the
first pick of the ground is white, the white journal is raised to bind the
white pick, leaving the olive warp down to bind it at the back. For[271]
the next shot the same card acts, and the trapboard A is raised, which
lifts all the white and olive warp corresponding with the portion of the
red and black that was left down at the last shot, so as to clear this
portion out of the way of the face shed. As a red pick follows white,
the red journal (No. 3) is raised to bind the red on the face, leaving the
black warp down to bind it on the back. The other picks follow
similarly. This shows the defective binding common to journal weaving,
the white being bound with olive and the red with black at the
under side of the cloth. To have pure binding, instead of all the white
or red being raised by a journal as above, only as much of either should
be raised as is required to bind its own colour of weft on the face of
the cloth. The olive or black in respective cases should be raised for
the remainder of the shed, leaving the white and red down to bind their
own wefts where these colours come out on the back or under side of
the cloth, thus giving pure colours on both sides of the cloth, and letting
the mixed or impure binding be in the centre between the two cloths.
This, however, is beyond the range of journals, and requires a harness.
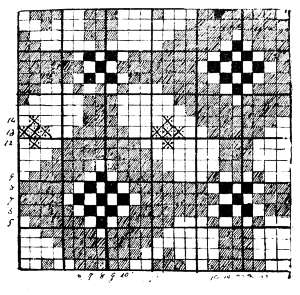
Fig. 178
Fig. 178 gives a neat pattern on a small scale for a two-ply cloth
with, say, a red and a pale olive warp for ground and figure cloths
respectively, the shaded squares
being red and the ground or
white squares olive; the weft
for each cloth to be the same
colour as the warp, or sometimes
a tint one or two shades lighter
and brighter, or deeper and duller,
according to the colours or
shades of colours used, gives a
good effect. A further effect in
this can be produced by having
the 6th to 10th and 18th to
22nd threads black, brown,
or dark green, end-and-end with pale olive, for the back warp,
and picking similarly on the 5th to the 9th picks for the ground
cloth. This would, of course, make a striped effect on the under side[272]
of the cloth, as where the additional colours do not show above they
must appear below. A still better effect can be produced by having an
additional weft lying between the two cloths which can be flushed on
the face in spots as at picks 12, 13, and 14, and of course a three-ply
cloth will be a step farther in advance; lined effects can then
be produced anywhere desirable, in portions to suit the nature of
the design, to vary and enrich it, at the same time the breadth of effect
is maintained by working the greater portion of the pattern in masses
of pure colour, whether they be large or small. For full-harness work
the harness is divided into two sections, four rows for the back cloth
and four rows for the face cloth, on an 8-row machine; no journals
are used, the machine doing all the work. The harness is tied up in
the usual way, the cord from the first hook passing through the first
hole of the cumber board, and the cord from the second hook passing
through the second hole, and so on.
The harness is nominally divided into two sections, the front four
rows being for the face cloth and the back four for the back cloth;
when drawing the warp into the harness the mails are taken in the
following order: 1, 5, 2, 6, 3, 7, 4, 8, the back or ground warp coming
on 1, 2, 3, 4 mails, and the face or figure warp on 5, 6, 7, 8.
Suppose the pattern to be a dice, as Fig. 179, the warps to be
white and olive, and red and black, with the same colours of weft.
Each upright line of the design represents two threads of warp, one
of which will be drawn on the front half of the harness and the other
on the back half; and each horizontal line of the design represents
two weft shots, for which there must be two cards cut. Let the order
of drawing the warp into the harness be as Fig. 180. The white is on
the odd and the olive on the even numbers of the four back rows of
the harness, and the red is on the odd and the black on the even
numbers of the four front rows.
Now to cut the cards:—Take the first line of the design Fig. 179,
cut the odd numbers of holes (that is, the first and third) on the first
half, or first four holes, of the card, and cut the white and olive on
the second half of the card. For the second card, from the same line
of the design cut red and black on the first half of the card, and the[273]
odd numbers of holes on the second half of the card. For the third
card, take the second line of the design and cut even numbers of holes
on the first half of the card, and white and olive on the second half
of the card. For the fourth card, from the second line of the design
cut red and black on the first half of the card, and the even numbers
of holes on the second half of the card. Of course when there is none
of a colour raised, as in the first line there is no black, no notice is
taken of it. For the pattern in Fig. 178 the cutting would be the
same, except that there are only two colours of warp to be dealt with
instead of four. No. 1 card: cut odd numbers of holes on the first
half of the card, and olive on the second half of the card. No. 2: cut
red on the first half of the card, and odd numbers of holes on the
second half of the card, &c.
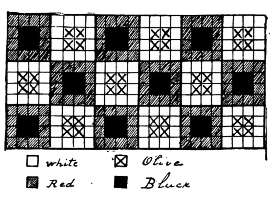
Fig. 179

Fig. 180
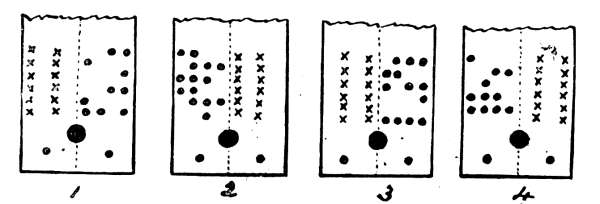
Fig. 181
The cutting of four cards is given is Fig. 181. The crosses indicate
the cutting of the odd and even holes in the cards, and the dots are
the figure. It will be seen that the crosses in No. 3 card would reverse[274]
the shed formed by those in No. 1 card, thus working plain texture on
the back cloth, and the same would take place with Nos. 2 and 4 cards
for the face cloth. This is simply the action of the journals included
in the harness, which it will be seen requires double the number of
needles in the machine, and double the quantity of cards; but an
ordinary machine and mounting will answer, instead of having to get
a double machine and journals.
The above cutting acts the same as journals, and is all right in
both cases when one warp with its own weft is used for each cloth;
but it has been pointed out that when each warp is end-and-end of
different colours with wefts to match, the under side of the cloth is
defective when wrought with journals, and so it would be with the full
harness if the cards were cut as above. To get each colour of weft
bound with its own colour of warp on both sides of the cloth, the
following change must be made:—Take the small piece of pattern
given in Fig. 182, and let the warps be as before—white and olive,
red and black. The card
cutting for this pattern will
be as follows, the warp being
drawn through the harness
as before:
For the first card, cut
odd numbers of red and even
numbers of white on the
first half, or first four holes,
of the card, and white solid
on the second half. This will form a shed for the red shot.
Second card: Cut from same line of the design red solid on the
first half of the card, and even numbers of white and odd numbers
of red on the second half of the card. This is for the white shot.
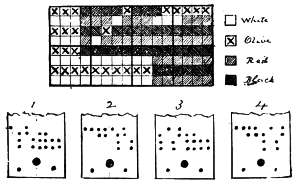
Fig. 182
Third card, for black shot: Cut from the second line of the design
even numbers of black and odd numbers of olive on the first half of
the card, and olive solid on the second half of the card.
Fourth card, for olive shot: From the same line cut black solid on[275]
the first half, and odd numbers of olive and even numbers of black on
the second half of the card.
These four cards are shown in Fig. 182, from which the cutting
may be traced. It must not be supposed, however, that cutting odd
numbers of red and even numbers of white as on the first card, means
that these colours of threads are to be raised; the colour has no
reference to the threads—only to the coloured checks on the design paper.
For the first card the white checks on the design paper are cut
solid on the second half of the card; this raises the white and olive
warp corresponding to the white portion of the design. Then, to form
the plain shed in the other warp, the even numbers of the white checks
and the odd numbers of the red checks are cut on the first half of the
card, which acts on the other warp. As the black warp is drawn on
the even numbers of harness twines it will be raised for that portion
of the design that is white, and the red will remain down to bind the
red weft; but passing along the design till the red weft is above, it
will be seen that the red warp should here be up to bind it, and the
black should therefore be down, so, as the red warp is on the odd
numbers of the harness and on the second half of the card, the odd
numbers must be cut on the card for the red portion of the design.
This gives a pure binding on both sides: and the same applies to the
other colours. It will be seen that the first halves of the 1st and
3rd cards together work a broken plain texture, and the second
halves of the 2nd and 4th cards do the same.
In case the card-cutter cannot follow this method of cutting, and if
the design is so varied in order of weaving that a gamut or index for
cutting cannot be arranged, then it will be necessary to paint the full
texture of the pattern on the design paper in the same manner as is
done for double cloth. The first row of designs of the pattern given
in Fig. 178 is painted out in full in Fig. 183. The shaded lines underneath
represent the back warp, and the white lines the face warp.
The black squares are the figure, and the large crosses the ground, or
the white squares in Fig. 178. The dots are the rising marks for the
texture of the back cloth, as would be formed by the back warp journals,
and the small crosses are the same for the face warp.
[276]
This method of weaving is not confined to carpets, but is equally
applicable to quilts, curtains, &c., and a plain texture need not be
adhered to; a twill or any simple fancy texture may be used. With
80 to a 100 threads per inch, one warp peacock green in satin texture
for the figure, and the other warp gold for the ground in a crêpe
or mottled texture, all shot peacock, a handsome curtain can be made.
Fig. 183
Brussels Carpets.—Brussels carpets, with their less expensive allies,
the tapestries, are the commonest of the better class of carpets. They
are a loop-pile fabric, the pile being formed by the figuring warp,
which is wool, the ground warp and weft being hemp or flax. As the
pattern is formed by raising the figuring warp threads of the required
colours, and as any thread of any colour may require to be raised, it
follows that all the threads must be on separate spools or small warp
rolls, so that any one thread can be drawn forward without slackening
any of the others. Large frames are therefore made to hold the
number of spools of each colour, and these are placed one above the
other in a slanting position, at the back of the loom, and when filled
with spools the whole set of threads are brought forward to the
harness as if from a warping creel or bank. According to the number
of these frames used the carpet is styled a 3, 4, or 5-frame carpet, the
greater the number of frames the richer the carpet both in colour
(generally speaking) and in body of warp. Sometimes 6 frames are
used; but 4 or 5 are more frequent, 3 and 4 frame being the lower
qualities.
The texture of a Brussels carpet is shown in Fig. 184, which is a
section through the weft. A and B are two of the ground warp
threads, a pair of these coming between the rows of pile loops, a
portion of one row being shown in the section. The weft threads are[277]
shown in section coming under the loops of the ground warp at the
top, and above them below. Both this warp and weft are of coarse
hemp, about 3’s: the weft is steeped in glue size before being
thrown into the cloth, which makes it stiff and firm when dry. The
pile warp threads are numbered, 1, 2, 3, 4, and 5; they are of soft-spun
worsted, about 2/24’s, 2 and sometimes 3 threads being drawn
in together as one through the mails and reed. These five warp
threads go to form one line of loops, being raised over the wires as is
required for the pattern, and lying straight between the weft threads
when not raised. By considering this it will easily be understood that
each thread must be on a separate bobbin so as to admit of being drawn
forward independently of any of the others. In low qualities of these
carpets one or two threads of hemp warp are used to each splitful or
row of pile threads; the hemp thread lies in a straight line below the
worsted threads in the same way that No. 5 thread is shown in the
section. These stuffing threads add to the weight and thickness when
the worsted is reduced in quantity, but make a harsher and stiffer
carpet. This warp, when used, is put on a beam or warp roll, as is
also the ground warp of the carpet.
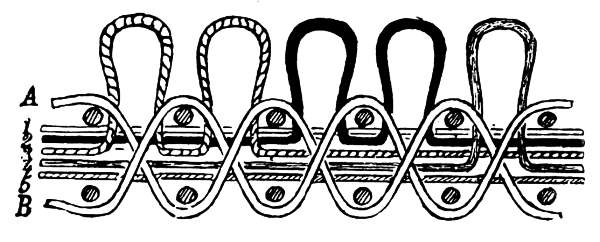
Fig. 184
Fig. 185
Fig. 185 is the plan of drawing-in and weaving a carpet similar to
that shown in section in Fig. 184. The draft is given at A, and the[278]
treading and cording for a hand loom at B. A 10-row jacquard should
be used for a 5-frame carpet, as twice over the 5 threads makes one
row of the cumber board. Five threads are drawn into the harness,
one from each frame, then two ground warp threads are brought
through and drawn on two leaves of heddles. In weaving, one ground
thread is raised and a shot thrown in; then all the pile warp and the
same ground thread are raised for the next shot; the third tread
raises the harness and a wire is inserted to draw up the pile; the
fourth tread crosses the ground warp threads; the fifth tread raises
this thread again, as well as all the pile warp, and the sixth tread
raises the harness for the insertion of the second wire; this completes,
the order of treading. For the second and fifth treads it will be observed
that all the warp in the harness must be raised; this was
usually done by having shafts through the harness or by raising the
cumber board to act as a journal in the manner explained for Scotch
carpet weaving; but now jacquards are made with bottom boards or
gratings that can be raised or lowered to form these sheds.
The pile wires are now commonly inserted at the time the adjoining
pick is being thrown in, a double shed being formed, and both the wire
and shuttle passed across at the same time, the former being uppermost;
in power looms the wires are both inserted and withdrawn by
machinery; about twenty-five are inserted before any are drawn
out, to prevent the loops from slipping. Jacquard machines are made
specially for the purpose of forming this double shed, the grating
raising the hooks from the bottom to the centre position, thus raising
the worsted or figuring warp above the shuttle, while the griffe carries
the figuring hooks on to the top, making a second or upper shed for
the wire. The old method was to form the lower shed by raising
the cumber board, and the upper one by the griffe. Jacquards with
cords instead of hooks are frequently used.
Brussels carpets are made 27 in. wide, with nominally 260 loops or
rows of pile in the width; but 256 rows are commonly used instead of
260 for the better classes of goods, and a further reduction of 30 or 40
loops is made for lower classes, the reduction going to cheapen the
goods or to the credit of the manufacturer. Although only 256 loops[279]
are on the surface of the cloth, it must be remembered that for a 5-frame
carpet there are 5 times this number of threads, and that 1,280
cords will be required for the harness, and an equal number of needles
in the jacquard when the pattern is single, or not repeated on the
cloth; but the design only covers 256 spaces on the point paper, each
space or check across it representing 5 threads. In Scotland a reed with
350 splits on 37 in. is used, one row of pile warp with its ground warp
going into each split. A carpet known as Axminster Brussels is made
in Scotland. It is similar in structure to the common Brussels, but
has in addition a woollen weft, which is thrown in pick-and-pick with
the usual hemp weft. The addition of the wool weft adds to the softness
and thickness of the carpet, giving more elasticity or spring to it,
and making it wear better.
Designs for Brussels carpets are sketched out and coloured in the
usual way; the method of repeating the patterns is much the same as
is adopted for wall papers. Usually there is one repeat in the width of
the cloth (27 in.), and the length of the repeat may be shorter or longer
to suit the pattern, expense, &c.; 256 checks, = 3/4ths of a yard, is a
common length, and 1-1/2 yard for bolder effects. The number of colours
must be regulated to suit the frames to be employed in the weaving,
unless the frames can be made to suit the pattern. Say five frames
are to be used, this would suggest five colours; but it does not
follow that only five colours can be used. A clever designer may work
out most patterns so that six or more colours may be used on five
frames, by arranging the design so that two colours may be put to one
or more of the frames, which process is called ‘planting.’ But it may
be that an extra number of colours will not improve the design, in
which case they should not be used. The process of ‘planting’ or
striping the warp—which is on the same principle as ‘chintzing’ by
striping the weft in other makes of goods—will be best understood by
referring to Fig. 186, which is a Brussels carpet pattern on a small
scale for working with five frames. The colours are indicated by different
markings on the squares of the design-paper, as shown by the
index or gamut below the design. On the first line of the gamut there
are two varieties of markings, and as this line indicates reds, there are[280]
two colours of red used on this frame. Following up the design above
these markings, it will be seen that one colour of red is used in one of
the sets or rows of octagonal figures, and the other colour on the intermediate
rows, and that the two colours of red are not required in the
same portions of the design, the gamut showing where each is required.
It is only necessary to arrange the spools on the frame in the loom and
draw the threads through the harness, as shown by the gamut, to make
this fall in correctly.
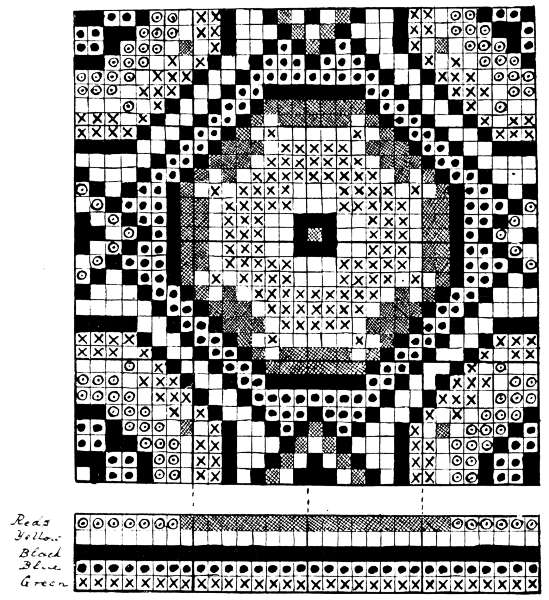
Fig. 186
What the designer must guard against is giving the pattern a
striped appearance, which would be the case if the planted colours[281]
were brought to the surface too frequently; but if they are judiciously
brought up at intervals, the effect of a 5-frame can be made almost as
good as that of a 6-frame pattern, and this can be carried still further
if desired; every frame may contain two colours, or one frame may contain
several colours.
Carpet patterns are sometimes painted on small-sized design paper—that
is, the ordinary paper with, say, two designs per inch; but
before working it is more satisfactory to have them put on large-sized
paper, so as to show the exact effect they will have on the cloth, the
design-paper giving the pattern full-cloth size.
When painting patterns that are as large or larger on the cloth than
they are on the design-paper, much more care and skill are necessary
than when the pattern is one that is much larger on the design-paper
than it will be on the cloth, as is usually the case; and in consequence
of the large size of the checks required for carpet design-paper, it is
evident that representations of any small objects—unless those of a
very simple nature—cannot be put on it without being greatly enlarged.
After the sketch is made the forms should be carefully adapted to suit
the paper, so as to give a satisfactory effect on it, rather than be a
rigid adherence to the sketch. Natural floral forms should not be
attempted unless to satisfy the demands of trade, and when they must
be used they should be made on so large a scale as to be fairly represented
in a semi-conventional manner. Large wild-floral patterns are
frequently to be seen on carpets, but they are rarely, if ever, satisfactory.
Persian, Indian, and other geometric or conventional forms that
lend themselves readily to a harmonious admixture of colours so that
the carpet will, when on the floor, present a rich glow of colour instead
of obtrusive masses of floral misrepresentations, are much to be preferred.
Dull colouring is not essential to good taste—rather the
reverse; but it is less obtrusive and more easily managed, particularly
in the hands of an inferior artist. No matter how brilliant the colours
are, if properly blended and broken up into masses in proportion to
their intensities in the spectrum scale they need not be in the least
offensive; but it requires skilful hands to do this.
Fig. 187
The pattern given in our last figure (186) is a simple repeating pattern,[282]
so that two pieces of the carpet laid side by side will join correctly
together. Another method of arranging patterns so that they will
repeat is shown in Fig. 187. In this figure it will be seen that the
two sides will not join as an ordinary repeat, but if two pieces are
taken the right-hand side of
one will, if turned round, join
against the left-hand side of
the other, and two pieces thus
joined will form a repeat.
This is objectionable in the
case of cut pile, which usually
has a slope in one direction;
and when two pieces are
joined, one running one way
and the other the reverse, the
effect will be that of shaded
stripes, somewhat similar to
that of a grass field when
rolled. Another method of
forming repeating patterns is
by making what is known as
a ‘drop repeat,’ which is
shown in Fig. 188; though
the two sides will not join in
against each other, as in an
ordinary repeat, if two pieces
of the carpet be laid side by
side, and one of them drawn
a little down, the point A in
the figure of one piece will
fall in against B and B1 of the other piece, and repeat.
These show the usual principles on which repeats are based, and
of course it is for the ingenuity of the designer to form the best arrangements
of pattern he can to suit them, or any other method he
may think of.
[283]
When cutting cards for carpet patterns the usual method of picking
out the various colours for each cutting must be adopted by the card-cutter.
Refer to Fig. 186 for the pattern, and to Fig. 185 for the
draft. The order of drawing is green, blue, black, yellow, reds, which
gives five rows of holes on the card, and this twice over makes the ten
rows; therefore, green would be cut on the first and sixth rows;
blue on the second and seventh; black on the third and eighth; yellow
on the fourth and ninth; and reds
on the fifth and tenth rows. These
may be all cut when passing the
card once along the cutting
machine, giving more than one
tramp, if necessary, to each shift
of the card index; or the cutter,
if not accustomed to this, may
pass the card along once for each
colour, working two of the punches
at each passage of the card, and
of course remembering to select
the punches which correspond to
the colour being read.
Fig. 188
It must be remembered that
two checks on the design-paper
correspond with a row of ten holes
on the cards, as each check may
have any of five colours on it in
the case of a 5-frame carpet pattern,
and there must be a space
for a hole in the card for any of these colours; therefore the designs
or large squares on the design-paper would consist of two checks each.
Suppose one of these checks—the first one—to be green, the first hole
in the card would be cut for it; if the second check is also green, the
sixth hole on the card would be cut; but if it is black, the eighth hole
in the card would be cut, not the third hole, as it, being the second
check, comes on the second half of the card. The first check stands[284]
against the first five rows of holes in the card, and the second check
against the second five rows, each check on the design-paper representing
five threads, five mails and five needles, or five spaces on the
card; but only one hole is cut on the card for it, and that must suit the
colour the check is painted.
Fig. 189
Wilton Carpets.—These carpets are made much in the same manner
as Brussels, but the pile is cut, and they are of a better quality of
wool with a longer pile, and altogether a superior article. As the pile
is cut, the method of binding it into the ground is somewhat different
from that adopted for Brussels, in order to secure a firmer binding. A
section of the cloth through the weft is given in Fig. 189, showing two
pile loops cut and one uncut, and also the method of binding the
pile warp threads Nos. 1, 2, 3, 4, and 5, with the ground warp A and
B, and the weft is shown in section, or end view.
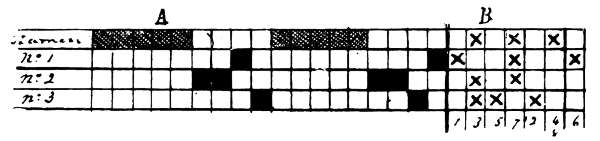
Fig. 190
The warp or pile threads are cut similarly to velvet by drawing the
wires out of the loops and having each wire furnished at its end with
a cutting edge. Fig. 190 shows the draft and treading of a Wilton
carpet arranged for a hand loom. The back is the harness, and Nos.
1, 2, and 3 the shafts. No 2 shaft is only required when an extra
or silent warp is used for the purpose of giving weight and thickening
the fabric. This warp, if used, lies straight between the weft, and
must be on a separate beam from the ground warp.
[285]
Tapestry Carpets.—These carpets, though they do not require a
jacquard to weave them, are so closely allied to Brussels, and patterns
so similar can be produced on them, that it is thought desirable to give
a short description of them. Though figured weaving, they are not so
in the strict sense of the term, as the pattern is printed on the warp
instead of being formed by various coloured warps; they are simply an
imitation of figured weaving in colours. Any pattern that can be put
on a Brussels carpet can also be put on a tapestry, and with further
variation if desired. The effect is not so sharp and rich on the tapestry,
as the colours, being printed on the warp, run into each other more or
less, and produce a slight blurring round the edges of the pattern;
whereas the pattern on the Brussels is so sharp and clear round the
edges as to make it harsh if two very contrasting colours come together,
so that in some cases the tapestry patterns are softer and more
pleasing.
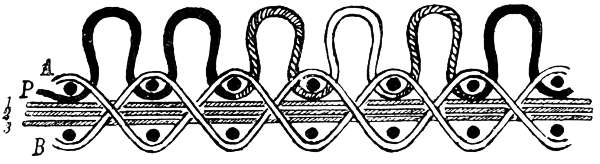
Fig. 191
Fig. 191 shows the texture of a tapestry carpet. A and B are the
ground warp threads which bind the weft, the same as in Brussels;
these threads go on one warp roll. 1, 2, and 3 are the lying or
filling warp threads of linen, hemp, or jute, used for giving weight
and thickness to the cloth; these threads go on a second roll. P is the
pile, which, it will be observed, is of various colours and looped all along
the cloth, or passes over every wire that is inserted, and the pattern is
formed entirely by the colours that these threads are printed. The
pile goes on a third warp roll. All the pile can go on the one roll, as
every thread is looped alike by each wire inserted. A pair of shafts
for the ground warp—one for the lying warp and one for the pile—is
all that is required for weaving the cloth. The pile consists of two or
three ends of two-fold worsted yarn, according to the quality of the[286]
carpet. As the fabric is made up to a great extent with the three lying
ends of stiffened hemp or flax to each row of pile loops, the carpet is
of a harder and less pliable nature, with less spring in it than a Brussels
(which has the five pile worsted threads in it), and it is also less durable.
The number of pile loops in the width of the cloth is the same
as for a low-class Brussels carpet, say 216 to 225, and the width of the
cloth is the same—about 27 in. Five threads go to each split of the reed—viz.
one pile, two ground warp, and the three lying or filling ends.
In these carpets, as well as in Brussels, it will be seen from the
sections that one weft thread is above a lower one, with a straight
tightly-stretched warp between them. A method of weaving has been
adopted on the Continent in which both sheds are formed and both
wefts picked at the same time. One shed is raised above the centre
warp, and one is sunk below it, and both shuttles are driven through
simultaneously; then a pile shed is raised and a wire inserted; and
this repeated, reversing the ground sheds, makes the order of weaving
for tapestry carpets. Another method is to have double mails, one
mail above the other on the same harness cord or heald; the wool warp
goes to the upper mail, and the lying warp to the lower one. When
the mails are raised a double shed is formed, and a pile wire and a pick
can be inserted at the same time. The ground or binding warp is in
two additional leaves of healds. To apply the former method to Wilton
carpets, two picks are put in below to balance with the two above, instead
of one pick below, as shown in Fig. 189.
For tapestry carpets the pattern is prepared in the same way as for
Brussels. The repeat of the pattern may be of any length, but 27, 36,
or 54 in. are usual lengths. The pattern, though prepared as if for the
jacquard, is only a guide for the printer when printing the colours on
the warp.
The pattern is printed on the warp in an elongated form, the amount
of elongation coinciding exactly with the reduction the pile loops make
in the length of the warp when it is woven.
The pattern was originally printed on the woven cloth by means of
blocks; next it was printed on the warp in an elongated form in the
same manner; now it is printed by means of small rollers. The yarn[287]
for each thread of the warp, or of a number of warps, is wound separately
on a large reel or drum, of such a size as will hold a suitable
quantity of yarn (about 18-3/4 feet in circumference). Six or eight threads
are wound on together, so as to lie closely together side by side and
not overlap each other, till the drum is full, or the required length is
wound on it. This has now to be printed with the pattern in an elongated
form.
The right-hand edge of the drum is divided into as many divisions
as a length of yarn equal to the circumference of the drum will make
loops on the cloth. This is called the index, and 648 is a common
number of divisions for it to have, or 864 for a larger size. Of course
the number of loops any length of yarn will make depends upon the
size of them, and the reduction in length from the yarn to the cloth
depends upon the height of the pile and the number of loops in a
given space. The number of loops per inch varies with the quality of
the cloth; 7 or 8 is usual for loop pile, and 9 or 10 for cut or velvet
pile. The design must contain such a number of checks in length as
will divide evenly into the index number, such as 108, 162, 216, 324.
When painted the design is cut into strips in the direction of its length,
one line or row of checks in each strip. When the yarn is wound on
the drum, and the printer is ready to begin work, he takes one of these
strips and pins it up before him to guide him in the colours he is to
print. The printing is done by means of a trough of colour with a
roller in it, set on a carriage beneath the drum, so that when passed
across the roller will press firmly on the yarn. The printer finds the
first colour on the design, and setting the drum to the first tooth of
the rack or index, he passes a trough of the proper colour across the
drum and back again; if the second check on the design is the same
colour, he turns the drum round a tooth of the index and passes the
same colour across; if the third check is a different colour, this requires
a second colour trough, and passing another tooth on the index
this colour is passed, and so on with the remainder; or, all one
colour is printed first, then the drum revolved again with the second
colour, and so on. When this is all printed the yarn is taken off
the drum and marked No. 1 thread, and the beginning and end of[288]
the thread should be marked in some way as a guide for the setters.
A fresh lot of yarn is wound on for the second thread, which is printed
according to the second strip of the design. This must be continued
for all the threads in the warp. After being printed, the colours are
fixed by a steaming process, and afterwards wound on bobbins and
marked to their numbers. The design may be cut into strips of two
checks each, instead of one check, which will be less liable to get torn.
One side of the strip can then be printed first, and the other after.
The warp is made up by ‘setters,’ who arrange the threads together
in proper order in a frame for the purpose, and set them so that the
colours of each thread come together at the proper place to form on
the warp a correct elongated copy of the pattern; when correct it is
wound on the beam for the loom.
In printing and steaming, the colours are liable to run into each
other; some colours are worse in this respect than others, but it is
reduced to a minimum by the use of an absorbent in steaming; and
sometimes the designer makes a little allowance on the design-paper
for such colours as he knows will be liable to run and injure the pattern.
The pile of tapestry carpets is usually left uncut; but sometimes it is
cut, forming a velvet pile. In this case the carpet is made of a better
quality, and the pile is longer.
The present method of preparing tapestry warps was invented by
Richard Whytock, of Edinburgh, in 1832, and perfected by Messrs.
Crossley, of Halifax.
Axminster Carpets.—Real Axminster carpets, as already said, are
made by hand much in the same manner as Turkish or Persian carpets,
and attempts have also been made to produce them by machinery,
several patents having been taken out for the protection of the inventions.
These carpets, with other art carpets now being made, may be
classed with tapestry as works of art.
The Axminster carpets of commerce are the Royal Axminster or
Moquette carpets, and the patent Axminster or chenille carpets.
Royal Axminster carpets are made by a peculiar process of weaving
and tufting on a loom made specially for the purpose. A number of
little funnels carrying from spools threads of the different colours of[289]
yarn required for the pattern are fixed on the loom above the reed, and
these threads, by suitable mechanism, are brought down and bound
into the backing cloth by the weft. These threads, which form the
pile, are cut off, and afterwards the surface of the carpet is shorn level.
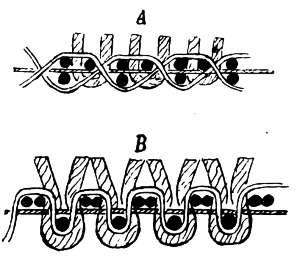
Fig. 192
The texture of Moquette carpets
is shown in section in Fig. 192, two
varieties of texture being given, one at
A, the other at B. In both these textures
the pattern shows through on the
back of the cloth.
Another variety is given in Fig.
193. A is the section through the
weft, B the texture, C D E F shows the
interlacing of each of the four warp
threads in the pattern with the weft, and G shows the pile. Similar
numbers in these figures represent the same threads in the cloth.
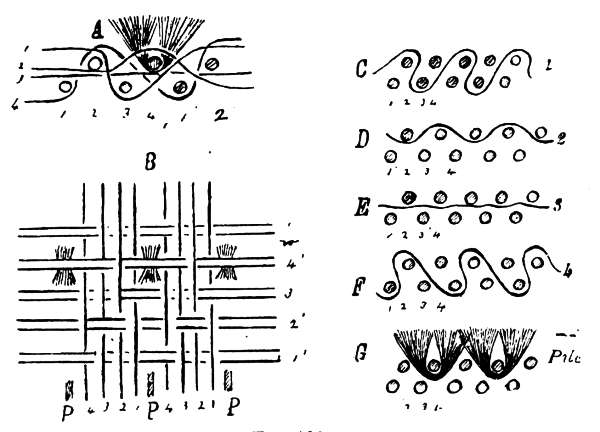
Fig. 193
Patent Axminster Carpets.—These were invented by Mr. Jas.
Templeton, of Glasgow, about 1839, and are a description of chenille
weaving. They do not require to be wrought by a jacquard any more
than the other Axminster carpets, but as the figures formed on them
are so similar to those produced by the jacquard, and as the method[290]
of designing the patterns is the same for both them and other classes
of chenille as it is for jacquard work, it may not be considered out of
place to give a full description of chenille here.
Chenille is made by a double process of weaving. First the weft
or chenille thread is woven, if for a figured pattern in various colours,
which corresponds to the printing of the warp in tapestry carpet weaving,
which gives a warp figure, whereas chenille gives a weft figure.
When the weft is woven in a piece it is cut up into strips and twisted,
if for curtains or any fabric on which the chenille weft is to show on
both sides; but for carpets, where all the pile is raised to one side, the
weft is doubled up, bringing all the pile in one direction. Twisting
machines are now in use for making the weft for plain chenille fabrics,
but for figured ones it is still woven. If twisted for figured work it
would afterwards have to be printed somewhat similar to tapestry
carpet warps, but without elongating the pattern, and the uneven
surface is a difficulty in the way.
The method of weaving chenille weft is as follows:—A loom fixed
for working gauze is supplied with a thinly laid warp, which, according
to the class of chenille required, is drawn through the heddles either
as plain gauze, two threads working plain with one crossing them, or
this doubled, as is shown in Fig. 194. The two, three, or six threads
of the draft are drawn into one split of the reed, which is finer or
coarser to suit the fabric required. For shawls or curtains there would
be six to eight full splits of the reed per inch; say in a reed of thirty to
forty splits per inch, four splits empty to one full. For carpets there
would be two or three full splits per inch; say in a reed of ten to fifteen
splits per inch, four empty and one full, coarser or finer to suit the
length of pile required.
For plain work this is tied up and woven as gauze, the warp being
cotton of a dark colour, and the weft woollen, noil silk, or other fibre if
desired; but it should consist of several ends and be of such a nature
as will divide easily to form a rich pile. If for figured work, the pattern
must be woven in stripes across the piece, which will be explained
after the designing.
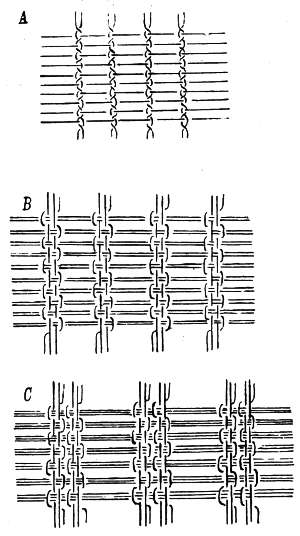
Fig. 194
When the piece is woven it will be as shown at A, B, or C (Fig. 194)[291]
and must next be cut into strips midway between the ribs. Sometimes
this is done in the loom as the cloth is being woven, by having cutting
knives arranged to divide it as it passes over the breast beam; but it
is usually taken off in the
piece and cut afterwards in a
machine for the purpose. The
piece is fed through rollers in
the cutting machine over a
grooved roller, shown at B
(Fig. 195), the grooves being
at such a distance apart that
the ribs of the piece will fall
into them. Above this roller
is a set of cutting blades
fixed in a spiral form round
a roller; one of these blades
is shown at A (Fig. 195), with
a section of the roller. The
blades are set at such a distance
apart that when revolving
they fall into the cuts in
the roller B, and running at a
high speed they sever the piece
into strips as it passes through
the machine.
So far the process is alike
for all classes of chenille work.
The weft is now in strips similar to that shown at A (Fig. 196) if for
carpets, and much smaller if for curtains or shawls. For ordinary
chenille the weft is next twisted so as to make the projecting fibres
stand out round the rib or core, and when finished it has the appearance
shown at B (Fig. 196). If for carpets, the fibres are turned up so
that all will project in one direction, as shown at C and in the cross-section
at d. This is done by running the strips over a grooved roller,
as C (Fig. 195), which is heated with steam, and as the projecting ends[292]
are doubled up by the grooves in the roller the heat sets them in this
position. The weft is now prepared, and is wound on bobbins and
woven in large shuttles.
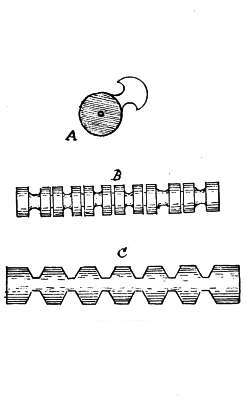
Fig. 195
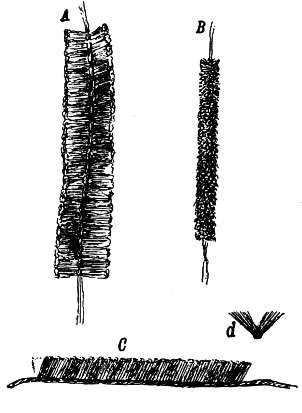
Fig. 196
The texture for chenille is the same as for plain cloth. A fine black
warp of cotton is used, with twenty to twenty-five threads per inch
(more or less, to suit the fabric required), and twelve to sixteen shots
per inch of the chenille weft are used, which must also be varied to
suit circumstances and the thickness of the weft used. The fibres or
points of the thread of weft project through the warp, and a pile fabric
is produced which should entirely conceal the warp on both sides of
the cloth. For carpets the pile is, as a rule, only allowed to project on
one side, though some rugs are made with a twisted chenille weft, and
the colours on it are shown partly through the backing as the fibres of
the thread get mixed up with the ground or backing in weaving, but
usually all the pile projects through to the face.
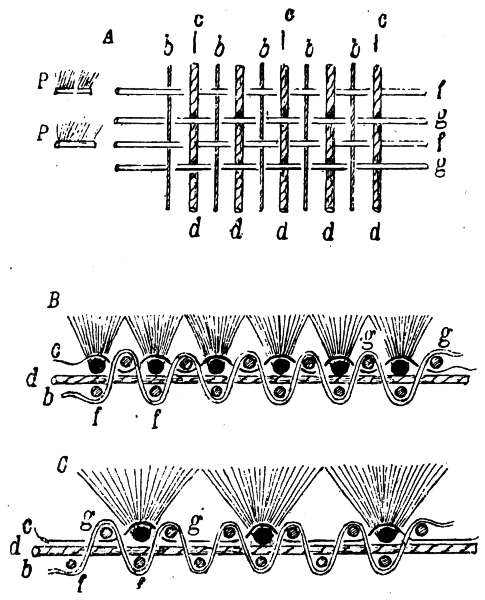
Fig. 197
The texture for patent Axminster carpets is shown at A (Fig. 197),[293]
and sections of the cloth through the weft are shown at B and C in the
same figure, B is a section of the texture A with two picks between
the pile or chenille picks, and C is for a coarser description of work
with four ground picks between the pile picks. In A only the ground
texture is given complete; the pile weft P lies over the picks f f, and
is bound down by a fine black stitching thread C, which passes over it
and under the picks g g. The different thicknesses of the threads are
represented in the drawing: C are cotton, and the others hemp, flax, or
jute. There are about ten thick and ten fine warp threads per inch,
and five binding threads, and about seven chenille picks per inch, with
two ground picks between these. When there are four ground picks
between the pile picks the pile is coarse, and only about four picks per
inch are used. The chenille weft is wound on large wooden needles[294]
like huge netting needles, about 4 ft. long, so that it may come off without
any twist in it, and the weaver pushes these through the shed, laying
the weft nicely in and combing it forward so as to get it straight
and even and have all the pile standing upright; he then knocks in two
ground picks and puts in another pile thread, as before.
This is all hand-loom work, but power looms are sometimes used
for the purpose. The ground of the fabric can be woven with heddles,
as before, but the binding warp threads are through needles, somewhat
like gauze dents inverted, and not through the heddles; and the beam
or spools containing them is above the loom in front. The chenille
weft is wound on a reel, and is through a guide or carrier. When the
chenille weft is to be laid in, the needles carrying the binders are raised
and the guide passed along, laying in the weft. The loom stands
stationary for a short time to give the weaver time to comb up the pile,
and then moves on and throws in the ground picks. Everything is
done automatically but the combing up of the pile.
The foregoing is a description of chenille weaving provided no
pattern has to be attended to; we must now consider the pattern.
The design paper used is the same as for ordinary work, with a
greater number of warp than weft threads, but it is ruled on a large
scale so that the pattern will be exactly cloth size. Fig. 198 is a sample
of this design-paper for seven picks per inch. The small checks, or
what in ordinary weaving would represent the warp threads, have here
no reference to them, nor do the warp threads require any consideration
when preparing the pattern. The narrow way of the checks is a guide
to the weaving of the weft threads. This paper might have been
square, seven by seven, and would thus suit for such a pattern as is
shown in Fig. 199—supposing seven shots of chenille weft per inch to
be correct; but there is an advantage in many cases to have it as it is,
or even more off the square, say seven by twenty, which is one of the
papers used. This will be most readily understood by following the
working out of the pattern.
The pattern given (Fig. 199) is necessarily very simple for want
of space. The different markings on the squares are to indicate
different colours. Here nine are used, but there may be any number—say[295]
from eight to twenty—the only restriction on the number of
colours employed is that so many shades of yarn are required to match
them, and that the weaver has a greater number of shuttles to pass over
when weaving the weft. When the pattern is painted it is cut cross-ways
into strips, as A, B, two rows of checks in each strip; one row of
checks may be in each strip if desired; but this is unnecessary, and
besides, they are more easily torn. These strips are a guide to the
weaving of the weft, just in the same way as the pattern in tapestry
carpet work is a guide to the printer.
Fig. 198
Fig. 199
The weaver takes a strip of the pattern and puts it through a widened
split in the reed and pins one end of it to the cloth; to the other end
he attaches a cord and light weight, which he hangs over the back rail
of the loom so that the strip of design will be held steady and move
forward as the cloth is drawn up. The strip must be pinned to the
cloth so that the first check of the design projects over the fell of the
cloth. Suppose the strip to be A, Fig. 199: C is the first check; the
weaver sees that this is black, and proceeds to weave the gauze with
black weft for the length of this check (one-seventh of an inch). The
next check, moving along the strip in the loom, or from left to right
on the design, is a different colour, say scarlet; the weaver changes his
shuttle and weaves as many checks as there are of this colour, which[296]
in this case is only one. Another change of shuttle is made, and so on
till the end of the strip is reached; it is then turned, the other end of
it being brought to the fell of the cloth, and the checks on the second
line of the design are woven in order as before, only they must run from
right to left on the design instead of from left to right, as the first line
did, which will be caused by the turning of the strip of paper; for it
must be borne in mind that if the first shot of chenille weft is put into
the carpet from left to right, the next one will be put in from the
reverse side or from right to left, so that all the odd numbers of lines
on the design-paper should be begun by the weft weaver at the left-hand
side, and all the even numbers at the right-hand side, provided
the weaver works in this way; in any case one must be the reverse
of the other. When all the strips of the pattern are woven, each
rib of the piece of weft will be long enough to weave as many shots
as are in one repeat of the pattern, and if there be 40 ribs in the
piece, it would, when cut up, furnish weft for 40 repeats of the
pattern. For weaving this weft large needles are used, somewhat
similar to netting needles, which are about 4 ft. long for wide looms;
the chenille is wound on these, free from twist, and must be put on so
that it will come off correctly to suit the pattern. The strips of chenille
are marked to show which end is to be put on the needle first. These
needles are pushed through the shed by the weaver when weaving the
carpet—put in at one side and drawn out at the other. He lays in the
weft as correctly as possible, combing it up to the fell of the cloth, and
makes the colours fall in nicely together, drawing it tighter or leaving
it slacker as is necessary. Now the advantage of using the special
design-paper will be more readily understood. It is plain that if 14
by 7 design-paper be used, instead of 7 by 7, any of the colours may be
changed in 1/14 in. on the design; and also in the chenille weaving, when
it is desirable to do so, instead of in each 1/7 in. when 7 by 7 paper is used.
And if 20 by 7 paper were used, the changes might be still more frequent;
besides, in flowing patterns the advantage also comes in to
assist in getting the forms more correct, in the same way as paper over
square in either warp or weft assists in getting the form of the figure
in damask designing over that where only the coarser way of the paper[297]
square is used; though the effect is not by any means so satisfactory
as if the paper were finer both ways, and square. Yet when one way
is fixed by circumstances it is in many cases preferable to alter it in
the other way than to leave both alike coarse; but not always so, as,
for example, the pattern given in Fig. 199. When these carpets are
woven they are passed through a shearing machine, which makes the
surface of the pile quite level. They are rich handsome carpets, as
well as very durable.


