
PRESS OF SPRINGFIELD PRINTING AND BINDING COMPANY, SPRINGFIELD, MASS.
PRESS OF SPRINGFIELD PRINTING AND BINDING COMPANY, SPRINGFIELD, MASS.
Introduction.
Fancy Work Books.
Hints Upon the Selection of Material.
Embroidery Stitches.—Described and Illustrated.
Centerpieces and Doilies.
Photograph Frames.
Corticelli Doily Book.
Tea Cloths, Tray Cloths, and Bureau Scarfs.
Bicycle and Golf Stockings.
CORTICELLI
... SPOOL SILK
and BUTTONHOLE TWIST.
made expressly for
dressmaking and family sewing.
It works EQUALLY WELL for hand
or machine use.
Corticelli is the Smoothest,
Strongest, and Best
Sewing Silk made.
Both Spool Silk and Buttonhole
Twist are made in
colors to match all seasonable
dress goods found in
the market.
For Sixty Years
CORTICELLI SILK
has been the favorite with
the leading dressmakers
of this country.
they RECOMMEND and
USE IT.
NONOTUCK SILK COMPANY,
Bridge Street, Florence, Mass.

Corticelli Pansy Design No. 605 B.
Colored Plate I.
——1898——
A Manual of Art Needlework, Embroidery and Knitting.
EDITED BY
Mrs. L. Barton Wilson,
Of the Art Amateur and Art Interchange.
Mrs. Emma Haywood,
Of the Ladies' Home Journal and The Delineator.
Miss Alice C. Morse,
Formerly Designer for the New York Society of Decorative Art.
Miss Elizabeth Moore Hallowell,
Of the Art Interchange and the Ladies' Home Journal.
Mrs. Amalia Smith,
Head of the Needlework Department Nonotuck Silk Company.
(Formerly with the New York Society of Decorative Art.)
AND OTHER NEEDLEWORK AUTHORITIES.
PRICE 10 CENTS.
Copyrighted and Published by
The Nonotuck Silk Company,
FLORENCE, MASS., 1898.
All Rights Reserved.

Corticelli Silk Mills, situated at Florence, Leeds, and Haydenville, Mass., Hartford, Conn., and St. Johns, P. Q.
IN the endeavor to make this book larger and better than any previous edition we have called to our aid some of the best needleworkers and designers in this country, and the result is that we have the choicest collection of embroidery designs for home decoration it has ever been our privilege to present.
We have been fortunate in securing the services of Mrs. Wilson, Mrs. Haywood, Miss Morse, Miss Hallowell, and Mrs. Smith. Their designs are always greatly admired, and undoubtedly many of our readers will prefer to embroider their patterns, taking advantage of this opportunity to study the treatment these well known authorities furnish for their special designs.
Special attention is called to the Corticelli Colored Plates, which are the only accurate reproductions of embroidery in natural colors ever published. Aside from their beauty they will be found of great value to every needleworker, as they show not only the correct shading of each flower, but also the length and direction of the stitches.
We show several very attractive designs for knitted fancy tops for golf and bicycle stockings, and the rules given are from practical patterns knit from wool and silk.
To many needleworkers this may be the first Corticelli instruction book they have seen. From such we invite the closest examination of our goods, feeling confident that intelligent women can in this way readily appreciate the superior quality of Corticelli Silk.
The Nonotuck Silk Company.
From 1887 to 1896 we published an illustrated instruction book in the use of silk called "Florence Home Needlework." The subjects treated in the different editions embrace every variety of useful and decorative needlework. There are ten different editions, each containing 96 pages, as follows:
1887 "Florence Home Needlework."
Subjects.—Crochet silk bead-work, crocheted and knitted silk purses, ladies' silk mittens and stockings, baby's socks, men's silk half hose, lamp shades, lace edgings and insertions. 96 Illustrations.
1888 "Florence Home Needlework."
Subjects.—Drawn-work; damask stitches; Italian, tapestry, outline, and cross-stitch embroidery; and crochet. 239 Illustrations.
1889 "Florence Home Needlework."
Subjects.—Tatting, netting, and embroidery. Also rules for knitting ladies' fancy silk mittens. 135 Illustrations.
1890 "Florence Home Needlework."
Subjects.—Crochet and embroidery. Rules for four-in-hand scarfs (six engravings). 90 Illustrations.
1891 "Florence Home Needlework."
Subjects.—Crochet, embroidery, bead-work, and macramé lace. Rules for ladies' silk slippers, men's ties (three new styles), belts, crocheted silk bags, and umbrella cases. 141 Illustrations.
1892 "Florence Home Needlework."
Subjects.—Crochet and embroidery. Rules for Roman picture throw, easel scarf, Irish lace, plain sewing, crocheted wheels, cornucopias, belts, and garters. 160 Illustrations.
1893 "Florence Home Needlework."
Subjects.—Corticelli darning or mosaic embroidery, drawn-work, crocheted lamp shades, pillow lace and its manufacture, and embroidery. 85 Illustrations.
1894 "Florence Home Needlework."
Subjects.—Corticelli darning, knitting, and crochet. Designs for men's four-in-hand scarfs and ladies' linen set in mosaic embroidery. Also rules for baby's crocheted silk sack. 90 Illustrations.
1895 "Florence Home Needlework."
Subjects.—Honiton work, lace embroidery, mosaic embroidery, men's ties and suspenders, college pillows. Rules for crocheted wheel, and three patterns in crocheted edgings. 66 Illustrations.
1896 "Florence Home Needlework."
Subjects.—Tea cloths, centerpieces and doilies in popular designs, including Rose, Jewel, Delft, Empire, Festoon, Wild Flower and Fruit patterns. Also rules for knitting baby's shirt and cap and crocheting baby's bonnet. Over 60 Illustrations.
One Florence Home Needlework book will be mailed to any address on receipt
of 6 cents; any 5 books for 25 cents, or the entire series will be sent for
50 cents. In ordering mention editions wanted by year. ![]() There is no book
for 1897.
There is no book
for 1897.
Nonotuck Silk Company,
Bridge Street, Florence, Mass.
The price of this book—"Corticelli Home Needlework for 1898"—is 10 cents.
Often the most difficult task for many women is choosing the proper shades of silk to embroider a certain stamped linen. Usually the dealer from whom you purchase your Corticelli Silk will advise you in regard to this, but when one lives in one of the smaller towns no store will be found which carries a good stock of embroidery materials from which to make a selection. In this case the best thing to do is to send six 2 cent stamps to the Nonotuck Silk Co., Bridge Street, Florence, Mass., for a Corticelli Color Card, showing over 325 different shades in which Corticelli Wash Silk is made. The card also shows samples of the various silks, as Filo Silk, Roman Floss, Persian Floss etc. The owner of a Color Card can order by number Corticelli Silk from her storekeeper, either by mail or in person. Few realize what a convenience this is.

Corticelli Color Card.
Mailed to any address for six 2 cent stamps.
Many do not understand the great difference in embroidery silks, and often inferior kinds are sold them by unscrupulous clerks. Corticelli Silk is smooth working, of high luster, and is free from imperfections in stock or finish, while the dyes used are remarkable for brilliancy and absolute fastness of color. Magnificent mills, modern machinery, and sixty years experience in manufacturing silk enable the Nonotuck Silk Company to produce as perfect embroidery silk and floss as can be made.
Many realize only too late that they should have been more careful in buying the right brand of Wash Silk. The old saying, "The best is always the cheapest," comes back to those who have had some disappointing experience with a patiently worked centerpiece or doily which failed to stand the final test—the test of washing. Corticelli Silk took the highest award at the Cotton States and International Exposition held at Atlanta, Ga., 1895, as well as first prize at the Chicago World's Fair, 1893, and at the California Midwinter Exposition, 1894. Besides this we call your attention to the large number of well known needlework authorities that recommend its use. These[Pg 6] facts alone should induce you to give Corticelli a trial in case you have never done so.
For fine and delicate shading on any smooth closely woven material, especially linen, use Corticelli Filo Silk (sometimes called Filo Floss). Owing to its fine size and loose twist a skillful worker can blend the shades with the utmost nicety, so that flowers, leaves, fruits, or other objects are most faithfully reproduced.
Corticelli Persian Floss is a silk of two strands, loosely twisted and of high luster, for work where two threads of Filo would ordinarily be required. Persian Floss is used extensively for the buttonhole edges of doilies and centerpieces, first padding the scallops with a few stitches as shown in Fig. VI a, page 17; or the buttonhole edge may be worked without padding as desired. Corticelli Filo Silk and Corticelli EE Embroidery Silk are also sometimes used for this work.
Corticelli Roman Floss is somewhat coarser than Corticelli Persian Floss and is intended for embroidering large designs on heavier material. Curtains, counterpanes, and cushions are worked with this thread, although for very bold designs Corticelli Rope Silk is preferable.
Corticelli Etching Silk, as its name implies, is for outline embroidery and etching. Corticelli Lace Embroidery Silk should be used for Honiton and lace work of similar nature. Corticelli EE Embroidery Silk is best suited for general fancy work and crazy patchwork. This silk is quite hard twisted and is therefore very durable.
To Wash Embroidered Linens.[1]
By L. Barton Wilson.
Avoid all risk of rust or stain by using an earthen wash bowl in preference to a tin or wooden tub. Wash by dipping in suds as hot as the hand can comfortably bear, made with "Ivory" or any other pure soap.
If there are any spots on the article wash them out first, before wetting the entire piece. Beyond this do not rub or fold, but plunge the linen up and down in the suds. If it is very much soiled or yellow, a half teaspoonful of borax may be added without the least danger to the silk. Carefully avoid washing powders and cheap soaps. When clean rinse by plunging up and down in several tepid waters or until the water remains perfectly clear. If the soap is not entirely removed by rinsing, the linen will yellow quickly.
Dry partially by laying between two soft cloths or towels for a few minutes. A new and very successful method for drying and pressing, especially small sized linens, is as follows: Lay them close and smooth on a marble slab or board. The woof and warp should be drawn perfectly straight and the stitches of the embroidery should be brought into position—that is, so they will lie as placed when worked. To dry a large article, place a sheet on the[Pg 7] carpet and pin the piece through it to the carpet straight by the edges, stretching a little. The drying may be hastened by fanning or by holding a hot iron within half an inch of the surface. Doilies pinned to a board or frame may be dried in a minute by holding them in front of a register, and thus treated they should need no pressing with an iron.
Larger linens may be placed on a fine sheet, face downward, and "touched up" with a moderately hot iron; the marks of the pins may be removed by dampening and pressing. Imperfections in the linen's smoothness may be dampened but the silk should not be wet. The hem will likely need firm pressing; fringe should be brushed and lightly combed out; it will then likely need a little trimming.
All Corticelli Silk will remain fast in color if these directions for washing are followed, and the laundered embroidery will appear no different from that just finished. The peculiar luster, or bloom, of this beautiful silk will be retained if the new method of quick drying, under tension, is carried out.
To set embroidery for the first time, dampen the linen and silk on the wrong side and dry quickly before removing from the hoop. In all cases of fabrics that are not washable set embroidery by pasting on the reverse side.
The Size of Needle to Use.
By Mlle. G. Corsini.
Many ladies who embroider frequently complain that wash silk does not work smoothly, that the silk snarls or ravels, making a bad-looking piece of work, without saying anything about trying one's patience.
"Now, what makes my silk snarl?" is heard only too often. They frequently assign the cause of the trouble to the silk, when, in reality it is the fault of the needle they are using.
Some teachers recommend the use of an ordinary sewing needle with a round eye, but I prefer the long eye or "Crewel" needle. If you want to do fine work, shading closely, and are using double (two threads of) Corticelli Filo Silk, use a No. 8 "Crewel" needle. For single (one thread of) Corticelli Filo Silk use a No. 9 or a No. 10 needle, depending on the material upon which you are working. Generally speaking, use a No. 10 needle, especially for bolting cloth, Chinese linen, or grass linen. Corticelli Persian Floss requires a No. 8 needle. In working Corticelli Etching Silk choose a No. 7 needle. For Corticelli Roman Floss use a No. 6 needle. Use a No. 3 or a No. 6 needle for Corticelli Rope Silk.
Harper's Queen Crewel Needles are the best, and I advise all needleworkers to insist upon having them.
By following the above instructions there will be no excuse for unsatisfactory working of Corticelli Silk.
Note.—If you cannot buy the needles you want in your city, send six cents to the Nonotuck Silk Company, Bridge Street, Florence, Mass., and they will send you four Queen Crewel needles each, of sizes 7, 9, and 10.
Silk Required to Work a Piece of Given Size.
As a matter of fact no two needleworkers will use the same quantity of silk to work the same centerpiece or doily. One will require nearly or quite twice as much as another, perhaps, owing to the method of treatment or the way the shading is done. It is therefore almost impossible to advise customers just how much silk they will need.
In nearly all the instructions we have given the maximum quantity of silk required to embroider a 22 inch centerpiece. You may not need as much as the directions call for. Of course smaller sizes of linen will take less silk to work them, and the necessary quantity can readily be estimated.
If you are in doubt as to how much material you will want, you can order from your dealer one skein of some shades, and two of others, even if the instructions called for three or four skeins of a shade, and then order again when you find you will require more. However, it is always safer to buy at one time all the silk necessary for one piece, and we cannot too strongly recommend this plan.
Points for Beginners.
Embroidery is very fascinating work, but to attain perfection one must study the subject. We have been fortunate in securing so well known an authority on Art Needlework as Mrs. L. Barton Wilson to furnish a chapter on Embroidery Stitches. This article, which even the experienced worker will be glad to read, is especially valuable to beginners, who will find no difficulty in making the different stitches by following the directions and examining the illustrations.
Beginners should read "Hints upon the Selection of Material," and "The Size of Needle to Use," as well as "To Wash Embroidered Linens." In shading flowers in which many colors are required, have a separate needle threaded with each shade; in fact, this is a good plan even if you are using only a few shades.
Choose a simple design to begin with, such as a Violet, a Buttercup, or a Daisy, and get a small size stamped linen, not over nine inches square. At the end of the instructions for each design we have printed the words (Easy), (Not Difficult), (Somewhat Difficult), or (Difficult), which show the degree of skill necessary to embroider each piece successfully.
No printed instructions can help a beginner as much as a lesson, or better still a course of lessons, under a good teacher. However, we have tried to make the instructions explicit, and we think further details will be unnecessary; still, should you find trouble in working any of the designs, or want to know where materials can be obtained, we will gladly answer questions and give you any desired information. A stamp should be enclosed for reply.

By L. Barton Wilson.
The stitches used in modern embroidery are not productions of this age. They belong to the art of to-day through adaptation. They have a value because of their antiquity far above any value which new inventions in this line could possess. Their application has been tried without limit and the extent of expression and delineation through them is well known. The science of embroidery is established; its methods are perfected. The art is rich in its heritage.
With the revival of needlework has naturally come a demand for silks of such quality and durability as that possessed by the wonderful threads of centuries ago, which are found in a perfect state of preservation in many examples of old embroidery, and which seem even to grow more mellow and beautiful in color with age. What modern science has done to meet this demand is shown by the brilliancy and beauty of shading, and fastness of color, which such silks as the "Corticelli" are known to possess. This ought to be among the chief inspirations to best efforts in this line of decorative art.
The form of embroidery which is most truly artistic, and at the same time scientific, is that known as "Opus Plumarium"[3] or "Feather Stitch." (The so-called "seamstress feather stitch" should not be confounded with this.) The exceedingly beautiful 16th century examples of the embroidery still in existence prove what is its durability and how adequate the method. The "long and short" stitch, which is the constituent of the work, is widely used on linens. When this stitch is correctly laid the effect is very beautiful, and, like all primary things, its beauty lies in its simplicity and perfect adaptability. It is proposed to describe and illustrate the long and short stitch first, in order that in the light of a clear understanding of this first principle, the opus plumarium (which is considered the most difficult embroidery, but which is really an advanced use of this simple element) may become less formidable to amateurs.
Feather stitch should never be attempted on an unframed fabric. A certain degree of excellence may be attained in embroidery by working such fabrics as linen in the hand, but perfect stitch direction and proper tension cannot be secured unless the fabric is stretched.
Embroidery stitches hold a certain definite relation to each other and may therefore be classified into groups. A glance at the classification will give one[Pg 10] a clear idea of the fundamental principles of the Art. A little study of it will furnish the key to the forms and styles of the embroideries of the different centuries and countries and so enable one fully to appreciate collections of antiques which are invaluable to the learner.
Classification of Embroidery Stitches.
| I. Long and Short Stitches. | a. Simple Long and Short Stitch. | |
| b. Feather Stitch. | ||
| c. Overlap Stitch. | ||
| d. Tapestry Stitch. | ||
| II. Satin Stitches. | a. Simple Satin Stitch. | |
| b. French Laid Work. | ||
| III. Couching Stitches. | a. Simple Couching Stitch. | |
| b. Twisted Stitch. | ||
| c. Brick Couching Stitch. | ||
| d. Diaper Couching (Over Satin Stitch). | ||
| e. Other Elaborate Couching Stitches. | ||
| IV. Outline Stitches. | a. Kensington Outline Stitch. | |
| b. Bulgarian Stitch. | ||
| c. Split Stitch. | ||
| d. Stem Stitch. | ||
| e. Twisted Outline Stitch. | ||
| V. Wound Stitches. | a. Simple French Knot. | |
| b. French Knot, combined with Stem. | ||
| c. Bullion Stitch. | ||
| VI. Buttonhole Stitches. | a. Simple Buttonhole Stitch. | |
| b. Blanket Stitch. | ||
| c. Honeycomb Stitch. | ||
| d. Double Buttonhole Stitch. | ||
| e. Ladder Stitch. | ||
| f. Cat, Brier, or Seamstress Feather Stitch. | ||
| VII. Chain Stitches. | a. Common Chain Stitch. | |
| b. Rope Stitch. | ||
| c. Single Reverse Chain Stitch. | ||
| d. Double Reverse Chain Stitch. | ||
| e. Double Chain Stitch. | ||
| f. Cable Stitch. | ||
| g. Beading Stitch. | ||
| h. Bird's Eye Stitch. | ||
| VIII. Darning Stitches. | a. Simple Darning Stitch. | |
| b. Brick Darning Stitch. | ||
| c. Seed Stitch. | ||
| d. Queen Anne Stitch. | ||
| IX. Fancy Stitches. | a. Herringbone Stitch. | |
| b. Ismit Stitch. | ||
| c. Janina Stitch. | ||
| d. Border Stitch. |
The above table will be found of great value to beginners, enabling them easily to master the scientific or theoretical as well as the practical part of this article.
"Long and short" stitch as commonly used on linens is a border work. That is, the forms of the design are not filled in entirely; the stitches are carried round the outline and such space as they do not cover within the form is allowed to remain in a low relief. This is known as "half work," sometimes as "half solid Kensington," while the solid "opus plumarium" is often called "Kensington." While it is true that the Kensington school revived this ancient embroidery it is doubtful if this is sufficient reason why it should give[Pg 11] to it the name. The history of art will be better preserved if we adhere to the old terms. The effect of the contrasted surfaces, through the half work, of the ground material and the embroidery, is very pleasing, and such a method is more suitable on linen than solid embroidery. It is less conventional and therefore is in harmony with the fabric. On the other hand solid embroidery is rich in itself and should be used to decorate rich fabrics. This is not an invariable rule but its restrictions are reasonable. Such exceptions as these may be noted,—tiny forms such as the fronds of maiden hair fern may be made solid to advantage, and the Bulgarian embroidery, fully described elsewhere in this book, is heavy and complete. Conversely, good effects are sometimes obtained with heavy silks in half work on rich fabrics. The artistic principle involved in the "half work" is suggestiveness. If the design is good to start with, a great deal of spirit may be put into it by the simple border embroidery.
I. "Long and Short" Stitches.

Fig. I a. Simple Long and Short Stitch.
A. Simple Long and Short Stitch.—This stitch may be done in the hand, but as already intimated it can be perfectly done only in a frame or hoop, which should be rested on the table edge and held by a weight. The material should be stretched straight with the woof and warp. The stitches are then laid by using both hands, one below and the other above the frame, to send the needle up and down perpendicularly. To make the stitch, bring the needle up on the outline of the design and send it down within the form. When the fabric is held in the hand the needle takes the stitch over and down on the outline and up within the form. Let the first stitch be a long one, one-quarter of an inch to an inch in length in proportion to the size of the form. The next stitch should be but two-thirds as long and should lie parallel with the first or closer to it within the form, if it is a narrowing one, than on the outline; or vice versa, if it is a form increasing in width. The contour of the design must decide the stitch direction. The third stitch should be long, followed by a short one, and so on alternating long and short. We are sometimes told that these stitches should be "irregular." This is both true and it is not. The long stitches should certainly not be all of one length and the short all of another. In this they should vary, but they should be absolutely regular in that they should be even on the surface without piling or yet having spaces between them, and they should form a perfect unbroken surface and the edge[Pg 12] should exactly coincide with the outline. This, then, is the "long and short" stitch, and it may be considered complete in itself as far as it goes. It is the first stage of solid embroidery or "opus plumarium." See Fig. I a.

Fig. I b. Feather Stitch.
B. Feather Stitch.—The next step is to lay another row of stitches over these, differing from them in that they shall be long and short on both edges. The long stitch should commence just below the outline and should end further within the form than any of the first row. It should be taken in exactly the same direction as the first row and over them. The next stitch should be started below the first, something less than a third of its length, just beside it, and should reach the same distance below the end of the first. The third should be similar to the first, and so on. It is obvious that every other stitch of this second row is the long one at its start and the short one at its finish. The second row is the same as the first, except that it is long and short on both edges. This is not "irregularity," but absolute regularity. The more regular and the more accurate the alternating is, the smoother the surface will be. This second row should lap well over the first. It should indeed cover two-thirds of it if the colors are to blend instead of appear as rows. This is the secret, or rather, the real principle of shading. It will not do to economize material and expect a rich result. This is likely to be the fault of American embroidery. The preceding rows of stitches must be solid under the succeeding ones. There may be as many rows as are necessary to cover the form, and these should all lap deep over each other so that the under rows show only because of the difference in length of the stitches of the upper edge of the over rows. In this way one shade passes into the next as tones in painting, perfectly clear in themselves yet, because they are distinct, making a luminous and unbroken whole. If the stitches are not placed according to such a method the effect will be—again as in painting when the colors are muddled—broken and harsh and expressionless. By this means shades that differ greatly can be blended and the whole is brought into relief by the raising of one row over the other. The lower ends of the stitches of the last row may adapt themselves in terminating to the form. See Fig. I b.

Fig. I c.
Overlap Stitch.
C. Overlap Stitch.—This is the "long and short" on a curved line, not[Pg 13] form. The first stitch is taken from the end of the line along its length, the next stitch is taken just below the start of the first on the line, over to the other side of the first and to a point just above the finish of the first, thus lapping. Continue these stitches long and short. This is the way to work round the circumference of a circle. Curved tendrils are very effective embroidered in the overlap stitch. See Fig. I c.

Fig. I d. Tapestry Stitch.
D. Tapestry Stitch.—A stitch similar to feather stitch except that its lines are all in one direction. The stitches do not slant to accommodate themselves to a form but are all straight and in all cases parallel and terminate abruptly as they come against the outline of the form whether they are within it or are used to fill the background. This is essentially a filling stitch and is the most beautiful way to embroider backgrounds. In composition with opus plumarium it is wonderfully rich. There are many superb examples of this work in the old opus anglicanam, where it was largely used to represent drapery, and, in its most perfect application, faces. In a word it is parallel "opus plumarium." Its rows should be well lapped. See Fig. I d. The light shade in the engraving is intended simply to show the system of stitches; there are three rows, each worked in the same color, completely covering the linen and presenting an absolutely smooth surface.

Fig. II a. Simple Satin Stitch.
The above four stitches are based upon the "long and short" element.
II. Satin Stitches.
A. Simple Satin Stitch.—The next stitch in importance is the "Satin Stitch," and it has various applications. This stitch forms an unbroken surface not only in effect but in reality. The stitches are taken parallel and from side to side of the outline or over the space they are to cover. On coarse material and with one of the heavier silks, such as Corticelli Roman Floss or Rope[Pg 14] Silk, it is possible to make them quite long, but when fine material is used they must be short to lie well. Embroidery in this stitch is more or less mechanical and does not allow of shading. It is used principally in narrow bars, which are often first raised by stitches laid at right angles to the direction the satin stitch is to take. We show two very good examples of satin stitch.

Fig. II a.
Simple Satin Stitch.
B. French Laid Work. The French white or laid embroidery is an especial application of the satin stitch. It is the method of initialing and is done in the Corticelli EE Twisted Embroidery Silk and Corticelli Etching Silk with best effect. It is also the form of work for covering cartoons in church embroidery. The stitches may be taken from side to side at any angle so that they are kept parallel to each other.
III. Couching Stitches.

Fig. III a.
Simple Couching Stitch.
A. Simple Couching Stitch.—As methods of work, appliqué and couching are of great importance and possibility and through them a large variety of stitches are employed. Designs cut out of fabrics are applied to ground fabrics by couching. The simple stitch taken at right angles over cords is the one most commonly used, as shown in Fig. III a. This and other couching may be used independently or on the edges of applied forms.

Fig. III b.
Twisted Stitch.
B. Twisted Stitch.—In this stitch one cord is twisted around another and the over stitch is taken through the ground at right angles to the direction of the outline. See Fig. III b. Two silk cords may be carried over outlines, one each side of a gold thread.

Fig. III c. Brick Couching Stitch.
C. Brick Couching Stitch. Lay rows of cords close to each other and couch them down with perpendicular stitches, alternating in each row with the spaces between them. This is very effective work. See Fig. III c.
D. Diaper Couching Stitch. This work is done over satin stitch. Many examples of it are to be found in the rich antique diapered work. This[Pg 15] embroidery has many uses in modern work. (See article on Bulgarian Embroidery.) Circular forms within conventional flowers may be covered with satin stitches as long as the forms require, then cross-barred with stitches placed at a decided angle from the satin work. This set of cross-bar stitches should be recrossed with another at the opposite angle, thus forming little squares over the first work, which should be couched down at their intersections. This diapering over satin embroidery may be done in a variety of designs and color combinations. Original ways will suggest themselves to the worker. See Fig. III d.

Fig. III d.
Diaper Couching Stitch.
E. Elaborate Couching Stitches.—There are a large number of elaborate couching stitches usually executed in gold and purse twist.
The old work is rich in examples of couching over a system of foundation cords which raise the covering layer of cords or silk threads. The "Basket" and the "Frill Basket" are the most beautiful of these stitches. Corticelli Filo Silk should generally be used for the over stitch and the heavier silks, such as Corticelli Roman Floss and Rope Silk, should be the threads laid on the surface. When it is desired to have the over stitches invisible yet strong the Filo Silk may be split and waxed.
IV. Outline Stitches.

Fig. IV a.
Kensington Outline Stitch.
A. Kensington Outline Stitch.—Outline stitches, especially the one known as "Kensington outline," form a very prominent part in the work on linens. When the lines of designs are close very satisfactory results are obtained by outlining alone. This embroidery is very serviceable, and a housekeeper needs an ample supply of the simple linens to insure freshness in the dining room and about the toilet tables. Linens outlined in all white are very dainty, and all blue or delft green monochromes are pretty for summer. The outline is a hand embroidery stitch, so that the work is very convenient. The point of care-taking lies in the fact that the outline must be accurately followed. The stitch itself is a reverse backstitch. The work should proceed from left to right. The needle should be brought up in the outline, drawn out the full length of the thread, then sent down in advance and carried out on the outline again a short distance in front of the point at which it was put in. Again the needle should be sent through in advance on the line, thus forming an unbroken, partly double line on the face and a series of short backstitches on the wrong side of the fabric. The thread must be kept always on one side of the needle. It is more convenient to some workers to throw it back. See Fig. IV a.

Fig. IV b.
Bulgarian Stitch.
B. Bulgarian Stitch.—Two or more lines of outline stitch laid parallel and close together is known as "Bulgarian Stitch." See Fig. IV b.

Fig. IV c. Split Stitch.
C. Split Stitch.—An outline backstitch with the needle brought up through the previous stitch instead of beside it. See Fig. IV c.

Fig. IV d. Stem Stitch.
D. Stem Stitch.—This is also but a modification of the outline. The backstitches are taken so as to slant slightly in towards the interior of the form, thus giving a little width to the outline. It is necessary to take the stitches a little closer than the cut would indicate in order to avoid spaces between them. This is a very satisfactory way of working stems when it is desired that they should have more width than the simple outline would give. See Fig. IV d.

Fig. IV e. Twisted Outline Stitch.
E. Twisted Outline Stitch.—This stitch should be worked in a frame or hoop, and it will be found a most effective way of working ribbed stems. A double thread of Filo is best adapted to the work. The thread should be brought up on the outline its full length above the framed fabric and the needle turned in the fingers until the thread is well twisted, then holding the twisted thread over the fore-finger of the left hand send the needle down a quarter of an inch in advance on the line; bring it up again close beside the stitch thus laid, about a third back on its length, then send it down again in advance. The width of the stem should be covered with parallel lines of these stitches. One line is not satisfactory, but two or more lie well together. The stitches must be taken uniformly all on one side of the lines. They may be much longer than those of the simple outline. See Fig. IV e.
V. Wound Stitches.
A. Simple French Knot.—A very useful little stitch, especially for flower centers, where it may be used to cover small spaces or may represent the anthers. The thread is brought out its full length and twisted round the needle near the point where it leaves the fabric, the needle point is then inserted perpendicular to the ground, the twist drawn against it and the needle pushed through to the eye. Before drawing it through, the middle[Pg 17] finger of the right hand should be placed on the twist to insure the knot's lying firm on the surface. Turn the thread around the needle but once for a fine knot or several times for a coarse one. The simple French Knot is shown in Fig. V b. by the single knot at the left of the illustration.

Fig. V b. French Knot, Combined with Stem.
B. French Knot, Combined with Stem.—The French Knot with tiny stern is made as one stitch. Instead of placing the knot at the point where the thread leaves the ground material, it is placed at a desired distance with the thread laid in a simple stitch on the ground surface. This is a very satisfactory way to work flower centers. The stamen, both filament and anther, is thus one stitch. See Fig. V b.

Fig. V c. Bullion Stitch.
C. Bullion Stitch.—Made by twisting the thread on the needle. When a coil is so formed the needle and thread are drawn through it; it is then placed on the surface and the needle sent down through the ground material to fasten it. This is a Turkish stitch and in that embroidery is usually done in gold passing. See Fig. V c.
VI. Buttonhole Stitches.

Fig. VI a.
Simple Buttonhole Stitch.
A. Simple Buttonhole Stitch.—The Buttonhole Stitch is capable of more elaborate work on its own account than is generally supposed. Aside from the buttonhole scallop shown by Fig. VI a. which is now so popular as a finish on linens and for which the Corticelli Persian Floss and Corticelli EE Twisted Embroidery Silk are so suitable, it has many possibilities in large work. It is also a hand stitch and surfaces can be covered rapidly by its use, two points most acceptable to amateurs. Short stitches laid close carry better color effects than long ones far apart, although the color of the background, which shows through the long stitches, has a large influence upon the effect. Deep stitches in the buttonhole work must have a certain proportionate space between them, for stitches more than a quarter of an inch deep do not lie well close together. The line on which the loop is to fall should be held toward one. The needle should be put in on the opposite line of the width of the space to be covered and brought out directly below on the lower line. The thread should lie in front of the needle and under it, so that as it is drawn through and the stitch laid the knot will lie formed. The work is done from left to right and the stitches should be kept perpendicular. See Fig. VI a.

Fig. VI b. Blanket Stitch.
B. Blanket Stitch.—A wide-apart loose buttonhole stitch used principally on flannels. Corticelli Etching Silk or Corticelli EE Twisted Embroidery Silk is best suited for this work. See Fig. VI b.

Fig. VI c. Honeycomb Stitch.
C. Honeycomb Stitch.—An adaptation of buttonhole stitch, and is very nice for large work such as portieres. The first row of stitches is laid like the blanket buttonhole, quite loose. The next is fastened to the fabric only at the beginning and end of the row; between these points the loop stitches are caught into the loops of the first row, and so on with the succeeding rows, fastening through only where the rows terminate against the outline. It is necessary to keep the stitches very loose, as each row has a tendency to narrow. When the form is covered draw the last row in place and fasten it by a row of buttonhole stitches taken through the fabric like the first. It is possible to work back and forth. It is well to reverse the needle and send it through the loops eye end first, to avoid splitting the silk. The same form of stitch may also be taken through the material. See Fig. VI c.

Fig. VI d.
Double Buttonhole Stitch.
D. Double Buttonhole Stitch.—A very pretty way of treating narrow bars from one-half to three-quarters of an inch wide is to use the double buttonhole stitch. Bring the needle up in the center of the width of the bar the full length of the thread and take the regular buttonhole stitch from this point over the upper line to a point a little above the start; draw this stitch through. The point of the needle in this case was directed down. Now put in the needle on the lower line of the bar and send it up to a point a little below the start and a trifle to the right; keeping the thread to the right. Draw the stitch through and proceed to make another from above like the first, always keeping the thread to the right to form the loop. The effect of this is that of a satin stitch on the top and bottom of the bar with a braided line through the center. It is very effective and pretty. The braid may be made wider by making the stitches shorter. See Fig. VI d.

Fig. VI e.
Ladder Stitch.
E. Ladder Stitch.—Many of the lace stitches are buttonhole. The "Ladder" for instance is two rows of buttonhole stitch a short distance apart[Pg 19] and parallel, connected by regular overcast stitches. The ground material is cut away between the rounds or overcast lines. The honiton lace is applied by buttonhole stitch, using Corticelli Lace Embroidery Silk. Fig. VI e. shows the so-called ladder.

Fig. VI f. Cat or Brier Stitch.
F. Cat, Brier, Coral, or Seamstress Feather Stitch.—An alternate buttonhole loop first to the right and then to the left. The loops may be alternated singly or in pairs, or in threes or fours. It is almost too well known to need explanation. See Fig. VI f. (Also see Sofa Pillow Design No. 508.)
VII. Chain Stitches.
The chain stitches are closely related to the buttonhole stitches.

Fig. VII a.
Common Chain Stitch.
A. Common Chain Stitch.—The common chain stitch may be said to be the buttonhole stitch carried down a line by its length instead of from left to right proceeding by its width. The consecutive stitches are started from within the lower end of each preceding loop; a line of link-like loop stitches will thus be formed. See Fig. VII a.

Fig. VII b. Rope Stitch.
B. Rope Stitch.—This is a modification of the common chain stitch. It is commenced the same as the chain but the successive stitches are taken by sending the needle down back of the last-loop instead of through it. The loop is formed as in the chain. This makes a very pretty ridged line when done in heavy silks such as Corticelli Roman Floss or Rope Silk. See Fig. VII b.

Fig. VII c. Single Reverse Chain Stitch.
C. Single Reverse Chain Stitch.—To outline with the Reverse Chain Stitch it is necessary first to lay a simple stitch on the surface; bring the needle up below the end of this, at a distance of the length of a stitch from it; now pass the needle, eye first, behind the first stitch, not through the fabric; then draw through the length of the thread, insert the point of the needle close beside the point where it came up, and bring it out below again, the distance of the length of the preceding stitch; again pass the needle back of the chain loop, just laid, as it was in the first place passed back of the simple stitch; continue these laid loops along the line to be covered. See Fig. VII c.

Fig. VII d. Double Reverse Chain Stitch.
D. Double Reverse Chain Stitch.—To form the double reverse chain proceed in the same way to the point of the first "single reverse chain stitch," but instead of sending the needle down the distance[Pg 20] of a stitch below, insert it the same but bring it out just to the right or at about the point where the thread leaves the fabric. Draw this tiny stitch through and pass the needle again back of the simple stitch, thus forming a double loop. Send it down again on the point to the left of the start and out the length of a stitch below on the outline. The next stitches are taken in the same way, passing the needle back of the loops as in the first case back of the simple stitch. See Fig. VII d.

Fig. VII e. Double Chain Stitch.
E. Double Chain Stitch.—Formed by laying two rows of simple chain parallel to each other and catching them together by a regular over stitch passed through the inner edges of each of the two rows alternately. See Fig. VII e.

Fig. VII f. Cable Stitch.
F. Cable Stitch.—Similar to the rope stitch. The difference lies in sending the needle down a little below the point where the thread leaves the ground material at the base of the loop instead of back or within the loop. This forms a chain of open links. See Fig. VII f.

Fig. VII g. Beading Stitch.
G. Beading Stitch.—A chain stitch taken horizontally over the thread as it is carried along an outline, thus forming a knot at regular spaces on a seemingly placed line of the silk. See Fig. VII g.

Fig. VII h. Bird's Eye Stitch.
H. Bird's Eye Stitch.—Formed like the chain loops but grouped about a center. Small radiating devices can be very successfully embroidered in this way; the effect of small petals as in daisies is very good. The loop is fastened by a tiny stitch at its base and the needle again brought out at the center. See Fig. VII h.
The "Tambour Stitch" is the chain executed with a small hook, which is pushed up and down through the fabric. It is a Turkish embroidery and very like machine work. There are various other modifications of these chain stitches.
VIII. Darning Stitches.
Darning is a very satisfactory sort of embroidery. In this work the greater part of the silk is laid on the right side of the material so that it carries large[Pg 21] masses of color. Darning is generally considered a filling embroidery and is often used in background work. Backgrounds darned around a design may be made very artistic.

Fig. VIII a. Simple Darning Stitch.
A. Simple Darning Stitch.—The simple darning stitch is a short stitch on the back and a long one on the face "running" on a straight line, the second row alternating with the first in the positions of the long and short stitches, and lying parallel to it. Care and practice are necessary to make these rows of equal tension. They should keep their straight direction and terminate where they meet the outline. There are ways of accommodating them to the outline when they are used within the design. See Fig. VIII a.

Fig. VIII b. Brick Darning Stitch.
B. Brick Darning Stitch.—If it is desirable to increase the color effect the first series of rows may be crossed at right angles by a similar series. This is known as the "Brick Darning Stitch." The straight bars should be laid by darning one way and back, alternately. By a little planning very pretty coloring may be gained through relating the background shade to the imposed work. See Fig. VIII b.
C. Seed Stitch.—This may be considered a darning stitch, having however the short stitches on the surface and the long ones on the back. This is largely used in combination with satin stitch for lettering. (See Designs Nos. 612 A, B, D, E, and F.)

Fig. VIII d.
Queen Anne Stitch.
D. Queen Anne Stitch.—Another form of darning is the "Queen Anne Stitch." In this the silk is not sewed through the fabric but first laid in long parallel lines from side to side of the outline, then crossed at right angles by weaving in threads alternately. This is rather mechanical and not so artistic as the first method, though we may see very curious examples of it in the old English embroideries. See Fig. VIII d.
IX. Fancy Stitches.
There are many other so-called "fancy stitches." Among them the pretty "Herringbone" and its modifications are worthy of note.

Fig. IX a. Herringbone Stitch.
A. Herringbone Stitch.—A short[Pg 22] stitch taken from right to left, and as it proceeds the thread is drawn to the right and the work is carried in this direction. It is essentially a cross stitch. See Fig. IX a.

Fig. IX b. Ismit Stitch.
B. Ismit Stitch.—A slight difference in the plan of taking a stitch changes the entire effect. This is obvious in the "Ismit Stitch." It is taken exactly as the herringbone and the radical difference in the result is due simply to making the lines meet at a point. See Fig. IX b. When the lines are very long they may be fastened by couching stitches at the intersections.

Fig. IX c. Janina Stitch.
C. Janina Stitch.—A very satisfactory way of filling in the petals of conventional flowers or flower forms. It may be used with really beautiful effect on the canvas materials with Corticelli Roman Floss or Rope Silk. It is also a good method for filling bars on borders. While it is not heavy unless worked close, it carries a decided color effect. It is one of the prettiest of the conventional stitches. See Fig. IX c.

Fig. IX d. Border Stitch.
D. Border Stitch.—This stitch is not unlike herringbone. It is however carried perpendicularly, while herringbone proceeds horizontally. The side or fastening stitches of the border work are very short. See Fig. IX d.
"Doily" or "Doiley."
The Inland Printer, a journal devoted to the printing and publishing trades, and a magazine generally considered authority on questions of orthography gives the proper spelling as "doily." The following explains itself.
Question.—Kindly give us the correct spelling of the word variously printed as "doily" and "doiley," and also the plural of the same. There has been considerable discussion in regard to the proper way to spell this word, and we will leave you to render the final verdict.
Answer.—Our final verdict in this case is simply that of all the dictionaries. Every one of them enters the word as "doily," and they are right in doing so, because, though the name from which it is derived was variously spelled as "Doily" and "Doyley," and maybe otherwise also, it is well to select one spelling—presumably the prevalent one—for the common name. At any rate, this is what the lexicographers have done, and no good reason to dissent from their choice is apparent. The plural of the form chosen is "doilies."
Bulgarian Centerpiece Design No. 55,
And Set of 3 Doilies, Nos. 55A, 55B, and 55C.
Colored Plate VII.
By L. Barton Wilson.
Materials: Corticelli Filo Silk, 6 skeins each 526, 626; 4 skeins 123; 3 skeins 645; 2 skeins each 125, 128, 130, 527; 1 skein each 126, 528, 542, 544. Corticelli Etching Silk, 12 skeins each 626, 645; 4 skeins 612. Dealers can furnish stamped linen of this design in 22 inch size. They can also furnish stamped linen 7 and 9 inches square of the set of three doily designs (Nos. 55A, 55B, 55C), to match this centerpiece. See page 92.

Bulgarian Centerpiece Design No. 55.
The Bulgarian embroidery as we know it on the brown linen squares is valuable chiefly for its durability and pleasing coloring. These squares embroidered in the bright cottons make beautiful cushions and their use with Turkish rugs and hangings is very appropriate. The stitching is effective rather than accurate. The figures of the characteristic designs are crude, but they are full of suggestions and it is possible in carrying out these to obtain most graceful and dainty drawings. When they are adapted to fine white linens and embroidered in silks the result is at once orientally rich and sufficiently dainty for table use.
Heavy colorings are more and more to be urged for centerpieces and doilies which are to be placed under gas light. The color combinations for this set may seem at first startling, but when the shades are properly distributed the result is rich and harmonious.

Bulgarian Doily No. 55 A.
Border.—Buttonhole the scalloped edge in blue and gold brown Corticelli Etching Silk, using shades 626 and 645 alternately for each scallop. One connecting scallop should be blue and the next one yellow. The inner edge[Pg 24] of scallops should be outlined in Black Etching Silk, 612, also the straight lines enclosing the scroll and the bars of the doilies. The same Blue, 626, in Corticelli Filo Silk with Brown, 526, may be used for the scroll. Keep the blue on one edge and the brown on the other. Embroider in the "overlap" long and short stitch. Work the little trefoils within the scallop in satin stitch with Pink, 128, 130, and cross-bar them alternately with the scallop colors. See Colored Plate VII.

Bulgarian Doily No. 55 B.
Flower and Leaf Forms.—These should carry the colors of the edge with a few in addition. Use in the leaf forms, in combination with Brown, 526, 527, and 528, the Greens 123, 125, and 126. In the flower forms use beside the blue and yellow, Pink, 128 and 130, and Red, 542 and 544. The leaf forms should be embroidered in long and short stitch. The flower forms may be made altogether or nearly solid or filled with feather stitch or satin stitch diapered. The satin stitch may be done in Filo Silk cross-barred with the Etching Silk. Distribute the colors in masses, that is, confine certain colors to certain forms, combine the colors rather than mix them. The effect of cross-bar diapering in the flower forms of these figures is very pretty and the work is firm as well.

Bulgarian Doily No. 55 C.
Corticelli Filo Silk alone should be used in the figures of the doilies even for the cross-barring, though the scallops and black lines should be of the Etching Silk. It is possible to introduce the red into the doily scallops in the little connecting points and to so combine the colors as to make all the edges different. Four of each of the doily designs form the dozen, and these may be still further varied by a little planning as to color schemes. The centerpiece and doilies may be embroidered with good effect in simple outline or rows of outline, known as the "Bulgarian stitch." If desired the entire work on the centerpiece may be done with Corticelli Etching Silk, and the effect will be really very beautiful, and novel as well, but the figures of the doilies are too small for such treatment. (Not Difficult.)

Corticelli Bulgarian Design No. 55. Colored Plate VII.

Corticelli Japanese Design No. 51. Colored Plate VIII.
Colored Plate VIII.
By Emma Haywood.
Materials—22 inch Size: Corticelli Filo Silk, 4 skeins, 779.5; 2 skeins each 655.7, 525.7, 525.8, 525.9, 655.8, 655.9, 656, 780; 1 skein 115. Corticelli Persian Floss, 8 skeins 780.
Materials—9 inch Size: Corticelli Filo Silk, 1 skein each of above shades. Corticelli Persian Floss, 2 skeins 780. Dealers can furnish stamped linen of this design in 9, 12, 18, and 22 inch sizes. See page 92.
It has been aptly said of Japanese designers that they know how to occupy a space without filling it, thus producing very beautiful effects with little labor. This remark applies well to this design, since it can be quickly worked, and it will prove very charming and effective for either a centerpiece or doily.

Japanese Design No. 51.
Border.—Work in indented (long and short on the inside) buttonhole stitch in two shades of pale soft green. For the outside edge use Corticelli Persian Floss, 780; into this blend Filo Silk, 779.5, still keeping the indented effect in the shading.
Almond Blossoms.—Work solid, beginning the edges of petals with Corticelli Filo Silk, 656, shading lighter to the center, using 655.9, 655.8, 655.7. In the center of the flower make French knots in Golden Brown, 115.
Stems.—Work solid in shades of Golden Brown, 525.7, 525.8, 525.9. The shading should be darker near the flowers and at the bottom of the stem than elsewhere. Use the lighter shades for working the small stems branching out from the main stalk.
Calyx and Small Buds.—Use Green, 780, for the upper part and Brown, 525.7, near the stems.
The work should be pressed before the edge is cut. If desired a double strand of Corticelli Filo Silk may be used for working the blossoms and stems. Great care must be taken, however, not to allow the strands to twist around each other. They should lie side by side, giving their full value. Even when[Pg 26] working with a single strand great attention should be paid to keeping it from twisting. Keep it in its normal condition by occasionally untwisting; otherwise it will become like a wisp and all the beautiful gloss of this lovely silk will soon be lost. (Easy.)
Pansy Design No. 603 A.
Materials—22 inch Size: Corticelli Filo Silk, 1 skein each 507, 644.8, 645, 649.9, 650, 651, 652, 653, 654, 729.5, 754, 778, 781, 782, 783, 784. Corticelli Persian Floss, 6 skeins 615. Dealers can furnish stamped linen of this design in 22 inch size. See page 92.

Pansy Design No. 603 A.
Border.—Work the scallop in buttonhole stitch with Persian Floss, 615. Work the cross-bar in the four corners in border in outline stitch with one thread of Filo in Brown, 644.8. Where the lines meet make a cross stitch in Brown, 645. In the center space between the bars make an X in Brown, 778. See Colored Plate IX for method of working border and cross-bar.
Flowers.—Work solid in Purple, 649.9, 650, 651, 652, 653, 654, 729.5. Begin edge of upper petals with 649.9, shading gradually darker to the center with 650, 651, 652. Work the edge of the three lower petals with 651, and shade gradually darker to center, using 652, 653, 654, 729.5. Put a few stitches of Yellow, 507, in the center.
Leaves.—Work solid in Green, 781, for points. Shade darker toward the center, using 782, 783, and for veins, 754. Some leaves should be worked with 781 on edge, 754 for center, and work veins with 784.
Scroll Lines and Cross-bar.—Outline the cross-bar lines with 645 and the scroll with 646.
A study of Pansy Design 605 B, Colored Plate I (Frontispiece), will give some hints as to how the pansies should be shaded, although the coloring is different. (Somewhat Difficult.)
Violet Design No. 603 C.
Materials—22 inch Size: Corticelli Filo Silk, 2 skeins each 725, 727, 728, 781, 782; 1 skein each 506, 644.8, 645, 729, 778, 783. Corticelli Persian Floss, 6 skeins 615. Dealers can furnish stamped linen of this design in 22 inch size.

Violet Design No. 603 C.
Border.—Work the scallop in buttonhole stitch with Persian Floss, 615. Work the cross-bar in the four corners in the border in outline stitch with one thread of Filo, Brown, 644.8. Where the lines meet make a cross stitch in Brown, 645. In the center space between the bars make an X with Brown, 778. See Colored Plate IX for method of working border and cross-bar.
Flowers.—Work solid in the shades of violet, making some flowers lighter than others. Work some of the petals darker on the edge and lighter toward the center, and reverse, some lighter on the edge and darker toward the center. Make a few solid stitches of yellow in the center of the open flowers. Work the buds solid in 728, 729, and the calyx solid with Green, 782.
Leaves.—Work the edge and points with 781 and shade darker to the center with 782. Use 783 for veins and stem. (Easy.)
Colored Plate IX.
By Amalia Smith.
Materials—22 inch Size: Corticelli Filo Silk, 2 skeins each 636, 655.7, 781, 782; 1 skein each 504, 637, 638, 639, 640, 644.8, 645, 755, 778, 780, 783. Corticelli Persian Floss, 6 skeins 615. Dealers can furnish stamped linen of this design in 22 inch size.
Border.—Work the scallop in buttonhole stitch with Persian Floss, 615. Work the cross-bar in the four corners in border in outline stitch with one thread of Filo in Brown, 644.8. Where the lines meet make a cross stitch in[Pg 28] Brown, 645. In the center space between the bars make an X in Brown, 778. See Colored Plate IX.

Wild Rose Design No. 603 E.
Flowers.—Work solid. Begin the edge of petals of open flowers with Pink, 639. Shade lighter to the center, using 636, 637, 638, 655.7. Make some lighter and some darker. Put three stitches of Green, 780, in the center, and surrounding center but 1⁄4 inch away make a few French knots in Yellow, 504. Work the back petals in the half flowers with Pink, 639, 640, and the front petals or those in the foreground with 637, 638, 639.
Buds and Calyx.—Work the buds with Pink, 639, 640, and the calyx points with Green, 780, 781. For the bulb and stem use 782.
Leaves.—Work solid. For the edge and points use 781, shading toward the center with 782, 783. The veins and stem work with 783, 755.
The Wild Rose is always a popular subject for embroidery, and even a beginner should have no difficulty in working the design as the Colored Plate IX gives the exact shading and stitch direction, (Easy.)
Sweet Pea Design No. 603 F.
Materials—22 inch Size: Corticelli Filo Silk, 1 skein each 644.8, 645, 678, 679, 680, 673, 674, 726.5, 727, 778, 780, 781, 782, 783. Corticelli Persian Floss, 6 skeins 615. Dealers can furnish stamped linen of this design in 22 inch size. See page 92.
Border.—Work the scallop in buttonhole stitch with Corticelli Persian Floss, White, 615. Work the cross-bar in the four corners in the border in outline stitch with one thread of Corticelli Filo Silk, Brown, 644.8. Where the lines meet make a cross stitch in Brown, 645. In the center space between the bars make an X with Brown, 778. See Colored Plate IX for method of working border and cross-bar.

Corticelli Wild Rose Design No. 603 E.
Colored Plate IX.
Flowers.—Work solid in shades of purple and pink Corticelli Filo Silk. Begin some flowers with Pink, 680, shading gradually lighter toward the center with 679 and 678. In others combine purple and pink. Begin with 674 and shade gradually to light pink; then darker toward the center, or reverse,[Pg 29] using different shades in each flower. Reference to the Colored Plate of Sweet Pea Design 407G will be found quite a help in getting the proper shading, although the colors used are not identical with those suggested for this design.

Sweet Pea Design No. 603F.
Leaves.—Work the points with Green, 781, shading darker toward the center with 782, 783. Work the veins and stems in 783. For the tendrils use 780. (Difficult.)
Colored Plate I.
(Frontispiece.)
By Amalia Smith.
Materials—22 inch Size: Corticelli Filo Silk, 2 skeins each 725, 727; 1 skein each 645, 726, 728, 729, 729.5, 740, 741, 742, 743, 743.5 743.7, 754, 766, 780, 781, 782. Corticelli EE Embroidery Silk, 6 skeins 615. Smaller pieces take less silk. Dealers can furnish stamped linen of this design in 18 and 22 inch sizes. See page 92.

Pansy Design No. 605 B.
Pansies always have a peculiar charm of their own, and as subjects for embroidery afford opportunity for very skillful, as well as artistic, treatment. The range of color is so varied and the possibility of pleasing combinations is so great that the following instructions are given simply as a suggestion. However, the directions will be found ample for the less experienced needleworker who does not care for a color scheme of her own.
Border.—Work the scallop in buttonhole stitch with Corticelli EE Embroidery Silk, White, 615; or Persian Floss, 615, can be used.
Flowers.—Work solid in combination of Purple, 725, 726, 727, 728, 729, 729.5, and Yellow, 740, 741, 742, 743, 743.5, 743.7. It would be effective to work some flowers all in purple, others in yellow with purple rays. Commence with the two upper back petals of the open flower nearest to the border. Work the edge of the petal with Yellow, 743; shade into that 743.5, 743.7, and use 645 near the center for shadow. Begin the edge of the three lower petals with 743, shading lighter to the center with 742, 741, 740. See Colored Plate I (Frontispiece). To lend variety the three lower petals in some yellow flowers can be made lighter on the edge and darker toward the center.
From the center of the flower, extending into the three lower petals make rays of Purple, 729. Work a few solid stitches of Scarlet, 766, in the center of the flower. Now begin with the two upper back petals of the purple flowers using 728 for edge of the petal, shading gradually darker to the center with 728, 729, and make a few stitches of 729.5 in rays, and as shadows. Begin the edge of the lower petals with 725 and gradually shade darker to the center, making rays in the three lower petals with 729.5. Work a few solid stitches of Scarlet, 766, in the center of the flowers. See Colored Plate I (Frontispiece) for shading and proper direction of the stitches.
Buds and Calyx.—Work the buds solid, using 727, 728, 729. Work the edge with 727 and shade gradually darker to the stem, using a little of 729.5 near the stem. Work the points of the calyx in Green, 781, shading toward the stem with 782 and 754.
Leaves.—Work the points of the leaves solid, in 780, shading gradually darker toward the midvein and base of the leaf, using 781, 782. (Difficult.)
Garland Wild Rose and Forget-me-not Design No. 54.
By Alice C. Morse.
Materials—22 inch Size: Corticelli Filo Silk, 2 skeins each 623, 624, 637, 638, 639, 640, 741, 742, 805, 806; 1 skein each 504, 625, 626, 780, 807, 808. Corticelli Persian Floss, 8 skeins 616.5. Smaller pieces take less silk. Dealers can furnish stamped linen of this design in 18 and 22 inch sizes only. See page 92.
This garland design when embroidered will be a surprise to any one who has never tried a similar pattern. The coloring has a very rich, subdued tone which is quite different from that found in any other style of design.
Border.—Work the scallop in buttonhole stitch with Corticelli Persian Floss, 616.5.
Wild Roses.—Work solid, using all the shades of Pink Corticelli Filo Silk, 637, 638, 639, 640, working the edge of the petals dark, shading gradually lighter toward the center of the flowers. Use three shades in each flower. Vary the flowers, making some darker than others. In the center work four or five stamens with one thread of Filo, 780, and at the end of each stamen make a French knot with Yellow, 504. (See Photo Frame No. 60.)

Garland Wild Rose and Forget-me-not Design No. 54.
Forget-me-nots.—Work in satin stitch with Blue, 623, 624, 625, 626. Don't try to shade each petal, but get light and shade effect by making some petals in 623, some in 624, etc. Use 626 for an occasional petal only, as the color is rather strong. Work in the centers one French knot with 742.
Leaves.—Work solid with Green, 805, 806, 807, 808. Make the larger leaves in the darker shades; the points of the leaves in 805. Veins and stems work with 808.
Ribbons.—Work in satin stitch, slanting across the ribbon, using Yellow, 741, 742. To give the effect of the twisted ribbon, work one turn of the ribbon with 741, the next fold with 742, and so on. If you prefer, Green, 125, 126, 127, can be used for the ribbon, carrying out the same idea as directed above. (Somewhat Difficult.)
Colored Plate X.
Materials—22 inch Size: Corticelli Filo Silk, 2 skeins each 615, 692.8, 781, 782; 1 skein each 506, 661, 662, 663, 780, 783, 784. Corticelli Persian Floss, 6 skeins 615. Smaller sizes take less silk. Dealers can furnish stamped linen of this design in 18 and 22 inch sizes. See page 92.

Easter Lily Design No. 605 D.
Border.—Work in buttonhole stitch with Corticelli Persian Floss, 615.
Flowers.—Work solid, beginning the edge of the petals with Corticelli Filo Silk, White, 615, shading into it Green, 692.8, 661, 662, using 663 for the center. Work six or seven stamens in 781, putting three[Pg 32] small stitches of Yellow, 506, at the end of each to form the top or head. Work the point of the buds with Green, 692.8, shading darker with 661, 662, 663, to the stem. See Colored Plate X.
Leaves.—Work solid, with Green, 781, for points, and shading gradually darker with 782, 783, and 784 to the stem. The leaf is worked straight from the point without veins. Use Green, 782, for the stems. When well done the shading in this design is very delicate. (Not Difficult.)
Colored Plate XI.
By Amalia Smith.
Materials—22 inch Size: Corticelli Filo Silk, 2 skeins each 725, 726, 781, 782; 1 skein each 650, 651, 652, 676, 780, 783, 784. Corticelli Persian Floss, 6 skeins 615. Smaller sizes take less silk. Dealers can furnish stamped linen of this design in 18 and 22 inch sizes. See page 92.

Orchid Design No. 605 F.
Border.—Work the scallop in buttonhole stitch with Corticelli Persian Floss, White, 615.
Flowers.—Make a few stitches at the middle of the point of each petal with Corticelli Filo Silk, Purple, 676, shading toward the bottom of the petal with 652, 651, 650, 726, 725. Begin back edge, or lip, of cup with 651, shading darker toward the center with 652, 676. Do the front lip in similar manner, but use 650 for the edge and 651 to shade toward the center. Under the lip make the shadow with 676. From the center of the cup make a pistil in Green, 781. Careful study of Colored Plate XI will show the proper shading and correct direction of the stitches.
Leaves.—Work solid, using 780 for the point and shading gradually darker with 781, 782, 783, 784. Work the stems near the flower, with 783, shading darker with 784 toward the base of stem. (Somewhat Difficult.)

Corticelli Orchid Design No. 605 F.
Colored Plate XI.

Corticelli Easter Lily Design No. 605 D.
Colored Plate X.
Buttercup Design No. 610 B.
Materials—22 inch Size: Corticelli Filo Silk, 1 skein each 502, 504, 505, 506, 507, 582, 753, 754, 755, 781. Corticelli Persian Floss, 5 skeins 615. Smaller sizes take less silk. Dealers can furnish stamped linen of this design in 9 and 22 inch sizes. See page 92.

Buttercup Design No. 610 B.
Turning over one of the corners adds to the novelty of this design and the 9 inch size makes an especially dainty doily. The 22 inch size is for a centerpiece.
Border.—Work the scallop in buttonhole stitch with Corticelli Persian Floss, 615. One corner is turned under on the wrong side and buttonholed on the right side through both thicknesses of linen. Work the straight line, or slit, in the turned over corner in fine buttonhole stitch with Corticelli Persian Floss, 615. The stems, which apparently come through the slit, should be worked in outline stitch with Filo Silk, Green, 755. Colored Plate V.
Flowers.—Make the edge with Corticelli Filo Silk, Yellow, 507, shading lighter to the center with 506, 505, 504, 502. Some flowers should be darker than others. In the center of the flower work a few stitches of Green, 781, and around these stitches make a few French knots in 781 also. For the back petals of the buds use 507, shading lighter to the stem with 506, 505. Use Green, 582, for the points of calyx, and shade 573 into the stem, using this shade also for a part of each stem.
Leaves.—Make the points in Green, 781, shading gradually to midvein with 582, 753, 754. Omit 781 in some of the leaves, thus making them darker, and adding 755 at the bottom of the leaf. Use 755 for the stems. (Easy.)
Carnation Design No. 610 C.
Materials—22 inch Size: Corticelli Filo Silk, 1 skein each 635.5, 636, 637, 638, 640, 780, 781, 782, 783. Corticelli Persian Floss, 5 skeins 615. Smaller sizes take less silk. Dealers can furnish stamped linen of this design in 9 and 22 inch sizes. See page 92.

Carnation Design No. 610 C.
These turned corner patterns are very simple, taking but a small quantity of silk and little time to work them.
Border—Work the scallop in buttonhole stitch with Corticelli Persian Floss, 615. One corner is turned under on the wrong side and buttonholed on the right side through both thicknesses of linen. Work the straight line, or slit, in the turned over corner, in fine buttonhole stitch with Corticelli Persian Floss, 615. The stems, which apparently come through the slit, should be worked in outline stitch with Green, 783. Colored Plate V.
Flowers.—Begin the edge of the petals with 640, shading gradually lighter toward the calyx with 638, 637, 636, 635.5. Make some petals lighter than others by omitting 638, using only 637, 636, 635.5. For the calyx use Green, 780 and 781, shading darker to the stem with 783.
Leaves.—Work solid, using 780 for the points and shading gradually darker with 781 and 782. Work the stems with 783. (Easy.)
Colored Plate XII.
Materials—22 inch Size: Corticelli Filo Silk, 2 skeins 615; 1 skein each 542, 644.6, 644.7, 644.8, 646, 649.9, 650, 651, 780, 781, 782, 783. Corticelli EE Embroidery Silk, 6 skeins 615. Smaller sizes take less silk. Dealers can furnish stamped linen of this design in 12, 18, and 22 inch sizes. See page 92.

CORTICELLI BOHEMIAN GLASS DESIGN No. 606 B.
COLORED PLATE XII.
Border.—Work the scallop in buttonhole stitch with Corticelli EE Embroidery Silk, White, 615. Work the scrolls near the border in outline stitch with Filo Silk, Brown, 644.8. See Colored Plate II. Between the lines work innumerable small stitches with 946 to represent seeds. (See article on Stitches—"Seed Stitch.")
Pointed Figure.—Cross-bar the center of the pointed figure running inward from the border with 644.7, catching down the lines where they intersect with 646, and outline the figure with the same shade. See Colored Plate XII.

CORTICELLI NASTURTIUM DESIGN No. 607 A.
COLORED PLATE XIII.
Flowers.—Work solid in Violet, 649.9, 650, 651, making each flower in[Pg 35] one shade, choosing the lighter shades for the flowers having five petals and making the flowers in the rear of the bunch in the darker shades. Put one French knot in the center of the open flower, using Green, 780. See Colored Plate XII.

BOHEMIAN GLASS DESIGN No. 606 B.
Leaves and Vine.—Begin point of leaf with Green, 780, shading to center with 781, 782. Make some of the leaves darker by omitting 780. Work the veins and stems with 783. Along the vine work in seed stitch several groups of three or four little dots each, using Red, 542.
Inside Scrolls.—Work solid, making ends or points in Brown, 644.6, shading darker in the middle with 644.7, 644.8. For the shadow on each side of the fold use 646. For the half circle scroll use 644.6. Make the points of the Fleur-de-lis in White Filo, 615, shading darker to base with Brown, 644.6, 644.7, 644.8. Work the round dot solid in 646. (Not Difficult.)
Nasturtium Design No. 607 A.
COLORED PLATE XIII.
Materials—22 inch Size: Corticelli Filo Silk, 2 skeins each 782, 783, 809, 812; 1 skein each 743.6, 743.7, 779, 781, 784, 813, 814. Corticelli Persian Floss, 6 skeins 615. Smaller sizes take less silk. Dealers can furnish stamped linen of this design in 9, 12, 18, and 22 inch sizes. See page 92.
Border.—Work the scallop in buttonhole stitch with Corticelli Persian Floss, White, 615, working the shell shaped scallop long and short on the inside. Into this shade work 809, using one thread of Filo Silk, still leaving the indented effect (alternate long and short stitches) on the inside. See Colored Plate III. Work the scroll near the border in seamstress feather stitch or outline stitch with Green, 781.

Nasturtium Design No. 607 A.
Flowers.—Work solid. Begin the edge with 814, using 813, 743.7, 743.6, 812, 809, toward the center. Make some flowers lighter than others. All the shades mentioned are not required for each flower. In each petal of the open flower make three rays in Brown, 779. The part of the calyx shown[Pg 36] between the petals work in Green, 782. See Colored Plate XIII. Use 814 for the edge of the buds, shading lighter to the calyx with 813, 743.7. Put a touch of 743.7 at the end of calyx, work remaining part in 781, 782, using the lighter shade nearest the petals.
Leaves.—Work each leaf in one shade of Green, making all the stitches come to the center. Use 781 for the small leaves, and 782, 783, for the larger ones. For stems and veins use 784, and for the small buds 781. (Not Difficult.)
Colored Plate XIV.

Bachelor's Button Design No. 607 B.
Materials—22 inch Size: Corticelli Filo Silk, 2 skeins each 661, 744; 1 skein each 662, 663, 664, 675, 745, 746, 781. Corticelli Persian Floss, 6 skeins 615. Smaller pieces take less silk. Dealers can furnish stamped linen of this design in 9, 12, 18, and 22 inch sizes. See page 92.
Border.—Work the scallop in buttonhole stitch with Corticelli Persian Floss, White, 615. The edge of the shell scallop in the border should be worked with 615. Into this white shade Corticelli Filo Silk, Blue, 744, leaving a long and short effect on inside. See Colored Plate III. The scroll near the border should be worked with Green, 661.

Corticelli Batchelor's Button Design No. 607 B.
Colored Plate XIV.
Flowers.—Work solid. Begin the edge of the petals with Corticelli Filo Silk, Blue, 746, shading lighter to the center with 745 and 744. Fill the center with[Pg 37] stamens in Red Purple, 675, placing a French knot at head of each stamen in Green, 781. See Colored Plate XIV. Work the part of calyx nearest the petals with Green, 662, and that nearest the stem with 663. Over this green make a few stitches like an inverted V "Λ," in 675. Work the seed pod in the same shades as the calyx, putting a few stitches in 675 on the edges as shown by Colored Plate XIV.
Leaves.—Work solid, making the points in 661, shading gradually darker to the center with 662, 663. For the stem use 664, making two lines of stem stitch, or use outline stitch, but slant the stitches more than usual. (Not Difficult.)
Colored Plate XV.
Materials—22 inch Size: Corticelli Filo Silk, 2 skeins each 655.7, 678, 679, 782, 783; 1 skein each 680, 682, 781. Corticelli Persian Floss, 6 skeins 615. Smaller pieces take less silk. Dealers can furnish stamped linen of this design in 9, 12, 18, and 22 inch sizes. See page 92.

Red Clover Design No. 607 D.
Border.—Work the scallop in buttonhole stitch with Corticelli Persian Floss, White, 615. The shell shaped scallop buttonhole irregularly long and short on the inside. Over this work Corticelli Filo Silk, Pink, 655.7, into which shade Pink, 678, leaving a long and short effect on the inside. See Colored Plate III. The scroll near the border can be done in either outline or seamstress feather stitch in Green, 781.
Flowers.—Work solid in shades of Pink, 655.7, 678, 679, 680, 682. Use only one shade for a petal. Make the back petals in 679, 680; the middle or center petals with 655.7, 678; and those nearest the stem in 680, 682. Be careful to keep the petals separate. See Colored Plate XV.
Leaves.—Work the leaves under the flower solid with green, using 782 for the edge, and 781 for the crescent or horseshoe. At the base of the leaves near the stem work a few stitches of 783, using the same shade for the stems. (Easy.)
Chrysanthemum Design No. 607 D.
Materials—22 inch Size: Corticelli Filo Silk, 2 skeins each 506, 507, 508, 781, 782, 783; 1 skein each 504, 505, 616.5, 784, 813, 814. Corticelli Persian Floss, 6 skeins 616.5. Smaller pieces take less silk. Dealers can furnish stamped linen of this design in 9, 12, 18, and 22 inch sizes. See page 92.

Chrysanthemum Design No. 607 D.
Border.—Work the scallop in buttonhole stitch with Corticelli Persian Floss, White, 616.5. Buttonhole the shell scallop long and short on the inside, and over this work one thread of Corticelli Filo Silk 616.5, leaving a long and short effect on the inside. See Colored Plate No. III. The scroll near the center work in outline stitch with 813.
Flowers.—Begin the edge of the petals in Yellow, 504, shading darker to the base of petal with 505, 506, 507, 508, 813, 814. It is not necessary to use all these shades in every petal; make some lighter and some darker. Work the center of the full flower in 504. For the petals that curl inward and over the center use 508, shading darker to base with 813, 814. Work the edge of petals of buds in 507, shading darker toward the calyx with 508, 813, 814. Use Green, 781, for the points of calyx, shading darker towards the stem with 782, 783.
Leaves.—Work the edges with 781, shading darker toward the center with 782, 783. Vein with 784. Work the stems in two rows of stem stitch with 784. (Not Difficult.)
Colored Plate XVI.
Materials—22 inch Size: Corticelli Filo Silk, 2 skeins each 504, 505, 506, 507, 754, 781; 1 skein 503, 782. Corticelli Persian Floss, 6 skeins 615. Smaller pieces take less silk. Dealers can furnish stamped linen of this design in 9, 12, 18, and 22 inch sizes. See page 92.

Corticelli Clover Design No. 607 C.
Colored Plate XV.

Corticelli Buttercup Design No. 607 E.
Colored Plate XVI.

Buttercup Design No. 607 E.
Border.—Work the scallop in buttonhole stitch with Corticelli Persian Floss, White, 615. Work the shell scallop in buttonhole stitch, long and short on the inside; work over the white with one thread of Corticelli Filo Silk, Yellow, 503, leaving on the inside a long and short effect. See Colored Plate III.
Flowers.—Work solid. Begin the edge of the petals with Yellow, 507, shading lighter to the center with 506, 505, 504, 503. Some flowers should be darker than others. In the center of the flower work a few stitches of Green, 781, and around these stitches make a few French knots in 781 also. See Colored Plate XVI.
Leaves.—Work solid. Begin the points with 781, and shade into 754 toward the center. Work the stems in outline stitch with Green, 754. (Easy.)
Holly Design No. 607 F.
Materials—22 inch Size: Corticelli Filo Silk, 2 skeins each 582, 583, 754, 781, 785; 1 skein each 586, 615, 767, 768. Corticelli Persian Floss, 6 skeins, White, 615. Smaller pieces take less silk. Dealers can furnish stamped linen of this design in 9, 12, 18, and 22 inch sizes. See page 92.

Holly Design No. 607 F.
For a Christmas or New Year's present nothing is more appropriate than a centerpiece or doily embroidered with the handsome holly. This design is quite simple and is easily worked.
Border.—Work the scallop in buttonhole stitch with Corticelli Persian[Pg 40] Floss, White, 615. Work the shell-shaped scallop long and short on the inside. Over this indented buttonhole work, shade in one thread of Filo Silk, White, 615, leaving a long and short effect on the inside. See Colored Plate IV, Borders. Work the scroll near the border in seamstress feather stitch or in outline stitch with Filo Silk, White, 615, or in Green, 781.
Berries.—Work in satin stitch with Corticelli Filo Silk, Red, 767, 768, using only one shade in each berry.
Leaves.—Work solid, using Green, 781, for the edge. Shade darker toward the center with 754, 582, 583, 785, 586. Make some leaves darker than others. Use 781 for the turned over parts of the leaves. Work the stems and veins in 584 and 785. (Easy.)
Violet Design No. 402 A.
Fringed Doily.
Materials—12 inch Size: Corticelli Filo Silk, 1 skein each 506, 726, 727, 728, 729, 781, 782, 783. Smaller sizes take less silk. Dealers can furnish stamped linen of this design, ready fringed, in 7, 9, 12, and 18 inch sizes. See page 92. They can also furnish stamped and fringed linen for tray cloth, 10 x 14 inches, to match this doily. The above quantity of silk will be more than enough for the tray cloth.

Violet Doily Design No. 402 A.
These fringed doilies are imported goods of fine quality. They are neat and dainty, require little silk to work, and together make as pretty a set of six patterns as we have seen.

Violet Tray Cloth Design No. 402 A.
Flowers.—Work solid. Use 726 for the edge of some of the petals, working darker to the center with 727, 728, 729. Use three shades to a flower. Commence other flowers with 727 on the edge and use 728, 729 toward the center. In the center of the open flowers work three stitches of Yellow, 506. Work the buds in 727, 728, and 729, and use 782 for the calyx.
Leaves.—Use Green, 781, for edge of leaf, shading toward the midvein with 782. Use 783 for the veins and stems. (Easy.)
Clover Design No. 402 B.
Fringed Doily.
Materials—12 inch Size: Corticelli Filo Silk, 1 skein each 655.7, 678, 679, 680, 681, 781, 782, 783. Smaller sizes take less silk. Dealers can furnish stamped linen of this design, ready fringed, in 7, 9, 12, and 18 inch sizes. See page 92. They can also furnish stamped and fringed linen for tray cloth, 10 x 14 inches, to match this doily. The above quantity of silk will be more than enough to work the tray cloth.

Clover Design No. 402 B.
These fringed doilies are imported goods of fine quality. They are neat and dainty, require little silk to work, and together make as pretty a set of six patterns as we have seen.
Instructions for working this design are the same as given for Red Clover Design No. 607 C, page 37, and illustrated by Colored Plate XV, although of course the rules for working the border do not apply to this design. (Easy.)
Buttercup Design No. 402 C.
Fringed Doily.
Materials—12 inch Size: Corticelli Filo Silk, 1 skein each 503, 504, 505, 506, 754, 781, 782. Smaller sizes take less silk. Dealers can furnish stamped linen of this design, ready fringed, in 7, 9, 12, and 18 inch sizes. See page 92. They can also furnish stamped and fringed linen for tray cloth, 10 x 14 inches, to match this doily. The above quantity of silk will be more than enough to work the tray cloth.

Buttercup Design No. 402 C.
These fringed doilies are imported goods of fine quality. They are neat and dainty, require little silk to work, and together make as pretty a set of six patterns as we have seen.
Instructions for working this design are the same as given for Buttercup Design No. 607 E, page 39, and illustrated by Colored Plate XVI, although of course the rules for working the border do not apply to this design, (Easy.)
Daisy Design No. 402 D.
Fringed Doily.
Materials—12 inch Size: Corticelli Filo Silk, 1 skein each 503, 505, 582, 615, 661, 662, 692.8, 753, 754. Smaller sizes take less silk. Dealers can furnish stamped linen of this design, ready fringed, in 7, 9, 12, and 18 inch sizes. See page 92. They can also furnish stamped and fringed linen for tray cloth, 10 x 14 inches, to match this doily. The above quantity of silk will be more than enough to work the tray cloth.

Daisy Design No. 402 D.
These fringed doilies are imported goods of fine quality. They are neat and dainty, require little silk to work, and together make as pretty a set of six patterns as we have seen.
Instructions for working this design are the same as given for Daisy Design No. 612 D, page 49, and illustrated by Colored Plate XX, although of course the rules for working the border do not apply to this design. (Easy.)
Maiden-hair Fern Design No. 402 E.
Fringed Doily.
Materials—12 inch Size: Corticelli Filo Silk, 1 skein each 527, 780, 781, 782, 783, 783.5. Smaller sizes take less silk. Dealers can furnish stamped linen of this design, ready fringed, in 7, 9, 12, and 18 inch sizes. See page 92. They can also furnish stamped and fringed linen for tray cloth, 10 x 14 inches, to match this doily. The above quantity of silk will be more than enough to work the tray cloth.

Maiden-hair Fern Design 402 E.
These fringed doilies are imported goods of fine quality. They are neat and dainty, require little silk to work, and together make as pretty a set of six patterns as we have seen.
Ferns.—Work solid. Slant the stitches toward the bottom, and thus bring them to a point at the stem. Make each leaf of one shade. Begin the leaves at the top of the spray with Corticelli Filo Silk, 780, and work down gradually darker, using 783.5 for those at the bottom of the spray. Work the stems with a split thread of Filo Silk, Brown, 527, making the stitches very fine. (Easy.)
Forget-me-not Design No. 402 F.
Fringed Doily.
Materials—12 inch Size: Corticelli Filo Silk, 1 skein each 504, 519, 520, 521, 678, 781, 782, 783. Smaller sizes take less silk. Dealers can furnish stamped linen of this design, ready fringed, in 7, 9, 12, and 18 inch sizes. See page 92. They can also furnish stamped and fringed linen for tray cloth, 10 × 14 inches, to match this doily. The above quantity of silk will be more than enough to work the tray cloth.

Forget-me-not Design No. 402 F.
These fringed doilies are imported goods of fine quality. They are neat and dainty, require little silk to work, and together make as pretty a set of six patterns as we have seen.
Forget-me-not.—Work solid in satin stitch, working all stitches toward the center. Make each flower of one shade, using 519, 520, 521, for the different flowers. Make a French knot of Yellow, 504, in the center. Work most of the buds with Pink, 678, and work the calyx with 782.
Leaves.—Work solid, using 781 on the edge, and shade toward the midvein with 782. Veins and stems make with 783. (Easy.)
Conventional Wild Rose Design No. 52.
By Emma Haywood.
Materials—22 inch Size: Corticelli Filo Silk, 4 skeins each 106, 107, 108, 109; 3 skeins each 101, 102, 103, 105; 2 skeins each 525.7, 525.8, 525.9; 1 skein each 113, 647. Corticelli Persian Floss, 8 skeins, 616.5.
Materials—9 inch Size: Corticelli Filo Silk, 1 skein each of above shades. Corticelli Persian Floss, 2 skeins, 616.5. Dealers can furnish stamped linen of this design in 9, 12, 18, and 22 inch sizes. See page 92.
This dainty design of semi-conventional roses and leaves is quite unique in style. For the handsomer kinds of embroidery there is a decided leaning toward conventionalized forms, but many of the designs offered are so intricate and stilted as to be hardly practical. This, however, is both rich and graceful, with the added attraction that it is not difficult to work. The treatment, as well as the design, is somewhat conventional.
Border.—Work the scallop in buttonhole stitch with Corticelli Persian Floss, Cream White, 616.5.
Roses.—For the roses we suggest a most delicious new shade of pink Corticelli Filo Silk, 101, 102, 103, 105. Take the darkest for the curled over edge, working in a slanting direction. The outer edge, however, should not[Pg 44] be put in until the middle part is worked, so that the edge can be worked over it. The inner part should be graduated, putting the lightest next to the center so that one begins with 103 next the outer edge; 104 is left out so as to make a more decided break from the curled over edge. The round center is very effective worked in pale Gold Color, 113. This is covered with a network of crossed bars in a dark, rich shade of Brown, 647, and outlined with the same.

Conventional Wild Rose Design No. 52.
Leaves.—The leaves are worked mainly with a soft shade of green, but to avoid monotony golden brown is blended into the green at frequent intervals, sometimes half a leaf is brown, sometimes it is tipped with brown on one or both sides, or a little brown is worked in at the base of the leaf. For the green shades take 106, 107, 108, 109, and for the golden brown use 525.7, 525.8, 525.9. The stems and thorns are likewise put in with the three shades of brown. In working the leaves let the stitches take the direction of the veins; by this means the veining will be expressed much better than by putting it in. (Not Difficult.)
Colored Plate XVII.
By Amalia Smith.
Materials—22 inch Size: Corticelli Filo Silk, 2 skeins each 672, 673, 678; 1 skein each 616.5, 655.7, 674, 755, 780, 781, 782, 783. Corticelli Persian Floss, 5 skeins 615. Dealers can furnish stamped linen of this design in 22 inch size. See page 92.
This is a very effective design, pleasing in coloring, and capable of very artistic treatment.
Border.—Work the scallop in buttonhole stitch with Corticelli Persian Floss, White, 615, with a long and short (indented) effect on the inside line. Work the under scallop with Corticelli Filo Silk, 678, using two threads in the needle. See Colored Plate IV for coloring and method of working border.

Corticelli Japanese Chrysanthemum Design No. 609 B.
Colored Plate XVII.
Flowers.—Work the back petals in 672, 673, 674, making the points dark[Pg 45] and the shading lighter toward the center. The petals in the foreground should be made as follows: points in 672, shading lighter toward the base with 678, 655.7, 616.5. See Colored Plate XVII. Work the buds solid. Use 674 for the back petals of buds and for those in the foreground; use 672 for points, and shade lighter to the calyx, using 678, 655.7. Work the calyx solid in Green, 781 and 782.

Japanese Chrysanthemum Design No. 609 B.
Leaves.—Begin the edges with 781, shading gradually darker to the center with 782 and 783. Make some lighter by using 780 on the edge and 782 for the darkest shade. Vein with 783. For the stems use Green, 782, 783, and 755, working solid and making the end of the stem darker than the part nearest the flower. (Difficult.)
Thistle Design No. 609 E.
Materials—22 inch Size: Corticelli Filo Silk, 2 skeins each 684, 685, 686, 754, 781, 782, 783, 784; 1 skein each 672, 675, 726, 727, 729. Corticelli Persian Floss, 4 skeins 615; 3 skeins 672. Dealers can furnish stamped linen of this design in 22 inch size. See page 92.

Thistle Design No. 609 E.
Border.—Work the scallop in buttonhole stitch with Corticelli Persian Floss, 672 and 615. Work the outside scallop with Persian Floss, White, 615, and the small twining scallop with 672. See Colored Plate IV for method of working border.
Thistles.—Work the thistle with Corticelli Filo Silk, Purple, 672, 726,[Pg 46] 727, 675, 729. Make each strand very fine and make each with as much of a feathery effect as possible. At the top of the thistle use 672, 726, and a little of 727. Make the upper part light; near the center use the darker shades, 675, 727, 729, but use 675 and 729 sparingly. Work the bulb of the thistle solid in Green, 781, 782, 783, 784. Near the top of the bulb work one or more rows, according to the size of the bulb, with Green, 782; the next two rows near the middle of the bulb, with 781, then gradually darker to the bottom near the stem. Another way to work the bulb is to work it solid with Green, 781, and cross-bar with Bronze Green, 852.
Leaves.—Work solid. Make one spray of leaves with Green, 781, 782, 783, 784. Use 781 for the points of the leaves and shade darker toward the center. Vein with 782, 783, 784. For another spray of leaves use 754, 684, 685, 686, working in the same manner as described above. Work the stems in stem stitch with 784, giving quite a slant to the stitches. (Not Difficult.)
Buttercup Design No. 611 A.
Rococo Border.
Materials—22 inch Size: Corticelli Filo Silk, 2 skeins each 615, 692.8; 1 skein each 503, 504, 505, 506, 507, 692.9, 753, 754, 780, 781, 782. Corticelli Persian Floss, 5 skeins 615. Dealers can furnish stamped linen of this design in 22 inch size. See page 92.

Buttercup Design No. 611 A. Rococo Border.
Border.—Work the scallop with Corticelli Persian Floss, White, 615, in buttonhole stitch long and short to the inside line. Shade into the white with one thread of Corticelli Filo Silk, 692.8., making an even line or finish on the narrow part of the scallop but leaving an uneven edge at the points. Shade these points with a few stitches of 692.9, thus giving them a darker effect.
Four Corners in Border.—Work the cross-bar in outline stitch with one thread of Corticelli Filo Silk, 692.8. Make a cross stitch with 692.9 where the lines intersect. Stuff the two jewels with cotton, or, better still, Corticelli Persian Floss, to raise the work, and then work over in satin stitch with Filo, 692.8, and outline with the same shade.

Corticelli Violet Design No. 611 B.
Rococo Border.
Colored Plate XVIII.

Corticelli Carnation Design No. 612 B.
Colored Plate XIX.
Scroll.—Work the even side of the scroll around the cross-bar lines with Filo Silk, White, 615. Shade 692.8 and 692.9 into the white, giving the same effect as the border. The shading is shown on Colored Plate XVIII, but the colors are different.
Flowers and Leaves.—Instructions given for working the flowers and leaves in Buttercup Design No. 607 E, page 39, and illustrated by Colored Plate XVI, apply equally well to this pattern. (Not Difficult.)
Rococo Border.
Colored Plate XVIII.
Materials—22 inch Size: Corticelli Filo Silk, 2 skeins each 615, 644.6, 644.7, 644.8; 1 skein each 505, 645, 725, 727, 728, 729, 781, 782, 783. Corticelli Persian Floss, 5 skeins, 615. Dealers can furnish stamped linen of this design in 22 inch size. See page 92.

Violet Design No. 611 B. Rococo Border.
Border.—Work the scallop with Corticelli Persian Floss, White, 615, in buttonhole stitch long and short to the inside line. Shade into the white one thread of Corticelli Filo Silk, 644.6, making an even line or finish on the narrow part of the scallop. Shade the points in the border with a few stitches of 644.7 and 644.8, thus giving them a darker effect. See Colored Plate XVIII.
Four Corners in Border.—Work the cross-bar in outline stitch with one thread of Corticelli Filo Silk, 644.8. Make a cross stitch with 645 where the lines intersect. Stuff the two jewels with cotton, or, better still, Corticelli Persian Floss, to raise the work, and then work over in satin stitch with Filo, 644.7, and outline with the same shade. (See Jewel Design No. 50, for directions for working jewels.)
Scroll.—Work the even side of the scroll around the cross-bar lines with Filo Silk, White, 615. Shade 644.7 and 644.8 into the white, giving the same effect as the border. See Colored Plate XVIII.
Flowers.—Begin the edge of the petals with 725, shading darker to the[Pg 48] center with 727, 728, 729. Make some petals darker by omitting 725 and 727. In the center of the open flowers work a stitch in Yellow, 505. Work the calyx solid with Green, 782.
Leaves.—Begin the edge in Green, 781, shading to the center with 782. Vein and stem with 783. (Not Difficult.)
Violet Design No. 612 A.
Materials—22 inch Size: Corticelli Filo Silk, 4 skeins 615; 3 skeins 645; 2 skeins each 644.6, 727, 728, 729; 1 skein 505, 725, 781, 782, 783. Smaller sizes take less silk. Dealers can furnish stamped linen of this design in 9, 18, and 22 inch sizes. See page 92.

Violet Design No. 612 A.
This design is square, the edges are doubled under and securely sewed with silk. For this reason only a small quantity of silk is required for working, as none is used for the edge.
Border.—Outline the scroll in each corner with Corticelli Filo Silk, 645. Work the scallop inside the scroll with Filo Silk, White, 615, to the depth of half an inch. Shade into the white, Lemon, 644.6, leaving a long and short effect on the inside of the scallop. Fill the space between the outside scroll and the scallop with fine seed stitches with 645. Work the scroll inside of stitching solid with 645 in satin stitch. See Colored Plate XX.
Flowers.—Begin the edge of the petals in 725, shading darker to the center with 727, 728, 729. Make some petals darker by omitting 725 and 727. In the center of open flowers work a stitch of Yellow, 505. Work the calyx solid in Green, 782.
Leaves.—Begin the edge in 781; shade to center with 782. Vein and stem with 783. (Easy.)
Colored Plate XIX.

Corticelli Daisy Design No. 612 D.
Colored Plate XX.
Corticelli Apple Blossum Design No. 612 F.
Colored Plate XXI.
Materials—22 inch Size: Corticelli Filo Silk, 4 skeins 615; 3 skeins 645; 2 skeins each 636, 637, 638, 639, 644.6, 780; 1 skein each 655.7, 781, 782, 783. Smaller[Pg 49] sizes take less silk. Dealers can furnish stamped linen of this design in 9, 18, and 22 inch sizes. See page 92.

Carnation Design No. 612 B.
This design is square, the edges are doubled under and securely sewed with silk.
Border—Use same instructions as given for working border of Daisy Design 612 D. See below.
Flowers.—Begin the edge of the petals with 639, shading lighter to the calyx with 638, 637, 636, 655.7. Make some petals light and others dark. In the full flower it is better to make the back petals lighter and those in the foreground darker. See Colored Plate XIX. Work that part of the calyx near the petals with Green, 780, 781, and the bottom with 782.
Leaves.—Work solid, using 780 for the points and shading gradually darker with 781, 782. Use 783 for the stems. (Not Difficult.)
Colored Plate XX.
Materials—22 inch Size: Corticelli Filo Silk, 7 skeins 615; 3 skeins 645; 2 skeins 644.6, 1 skein each 503, 505, 582, 661, 662, 692.8, 753, 754. Smaller sizes take less silk. Dealers can furnish stamped linen of this design in 9, 18, and 22 inch sizes. See page 92.

Daisy Design No. 612 D.
This design is square, the edges are doubled under and securely sewed with silk.
Border.—Outline the scroll in each corner with Corticelli Filo Silk, 645. Work the scallop inside the scroll with White, 615, to the[Pg 50] depth of half an inch. Into the white shade 644.6, leaving a long and short effect on the inside of the scallop. Fill the space between the outside scroll and the scallop with fine seed stitches made with 645. Work the scroll inside of stitching solid in satin stitch with 645. See Colored Plate XX.
Flowers.—Begin the points of the petals with White, 615, shading to the center with Green, 692.8, 661, and 662. Fill the centers with French knots in Yellow, 503 and 505. See Colored Plate XX. Work the buds in 692.8 and 661. (These small buds are darker than open flowers.) In the large buds use some white also. Work the calyx with Green, 754.
Leaves.—Begin the points with Green, 753, shading gradually darker with 754 to the center. Use 582 for the stems and veins. (Easy.)
Wild Rose Design No. 612 E.
Materials—22 inch Size: Corticelli Filo Silk, 3 skeins each 638, 639, 645; 2 skeins each 644.6, 655.8, 655.9, 781, 782; 1 skein each 504, 615, 780, 783, 784. Smaller sizes take less silk. Dealers can furnish stamped linen of this design in 9, 18, and 22 inch sizes. See page 92.

Wild Rose Design No. 612 E.
This design is square, the edges are doubled under and securely sewed. No silk is therefore required for buttonholing the edge.
Border.—Use same instructions as given for working Border of Daisy Design 612 D, page 49.
Flowers.—Begin the edge with 639 and shade lighter to center with 638, 655.9, 655.8. Make some petals lighter and some flowers lighter than others. Vary the shading. In the center of the open flower work a few stitches of Green, 780, and irregularly around these stitches make French knots in Yellow, 504. A study of Colored Plate IX will assist one in shading this design.
Leaves.—Work solid. Begin the edge with Green, 780, shading gradually darker to the center with 781, 782, 783. Vary the shading. Make the leaves under the flowers much darker. Use but a little of 780 and only on tips. Work the veins and stems with Green, 784. (Easy.)
Colored Plate XXI.
Materials—22 inch Size: Corticelli Filo Silk, 4 skeins 615; 3 skeins 645; 2 skeins each 636, 637, 644.6, 655.7, 655.8, 781, 782; 1 skein each 527, 616, 755, 783, 852. Smaller sizes take less silk. Dealers can furnish stamped linen of this design in 9, 18, and 22 inch sizes. See page 92.

Apple Blossom Design No. 612 F.
This design is square, the edges are doubled under and securely sewed with silk. For this reason only a small quantity of silk is required for working, as none is used for buttonholing the edge.
Border.—Use same instructions as given for working border of Daisy Design 612 D, page 49.
Flowers.—Begin the edge of the petals with 636, shading lighter to the center with 655.8, 655.7, 616. Make some petals lighter by omitting 636 and use 615 in place of 616 toward the center. Vary the shading by making some flowers almost white. In each petal make two or three stamens with Green, 781, and place a small French knot of 645 at the end of each stamen. See Colored Plate XXI.
Buds and Calyx.—Begin the edge of the petals with 637, shading lighter to the base with 636. Work all the buds darker than the flowers. Work the calyx in Green, 782.
Leaves.—Work solid. Use Green, 781, for the points, shading gradually darker to the center with 782, 783, 755, with a touch of 852 near the base and midvein. Vary the shading as usual. Work the stems solid with 755, 852, 527, using most of 527. (Not Difficult.)
Violet Design No. 613 A.
Materials—22 inch Size: Corticelli Filo Silk, 1 skein each 506, 725, 727, 728, 729, 781, 782, 783. Corticelli Persian Floss, 1 skein 615. Smaller sizes take less silk. Dealers can furnish stamped linen of this design in 9 and 22 inch sizes. See page 92.

Violet Design No. 613 A.
These octagon shaped patterns require no buttonhole work on the edges,[Pg 52] as the linen is folded under and securely sewed as shown by the illustration. The effect is quite novel, and as the designs are simple only a small quantity of silk is needed to work the pattern.
Flowers.—Work solid. Use Corticelli Filo Silk, Violet, 725, for the edge of the petals, shading darker toward the center with 727, 728, 729. Make the three lower petals lighter than the upper two. In the center of the open flowers work a few stitches of Yellow, 506, and a stitch of Green, 781, on each side of the yellow. Work the buds with 729, 728, and 727. Work the calyx solid with 781 and 782, the darker shade nearest the stem.
Leaves.—Work solid, using 781 for the edge and shading darker to the center with 782. Work the veins and stems in 783. The slit in corner, or the line across the ends of the stems, work in fine buttonhole stitch with Persian Floss, White, 615. (Easy.)
Buttercup Design No. 613 B.
Materials—22 inch Size: Corticelli Filo Silk, 1 skein each 503, 504, 505, 506, 507, 754, 781, 782. Corticelli Persian Floss, 1 skein 615. Smaller sizes take less silk. Dealers can furnish stamped linen of this design in 9 and 22 inch sizes. See page 92.

Buttercup Design No. 613 B.
These octagon shaped patterns require no buttonhole work on the edges, as the linen is folded under and securely sewed as shown by the illustration. The effect is quite novel, and[Pg 53] as the designs are simple only a small quantity of silk is needed to work the pattern.
Flowers and Leaves.—Instructions for working this design are the same as given for Buttercup Design No. 607 E, page 39, and illustrated by Colored Plate XVI. (Easy.)
Daisy Design No. 613 D.
Materials—22 inch Size: Corticelli Filo Silk, 2 skeins 615; 1 skein each 503, 505, 582, 661, 662, 692.8, 753, 754. Smaller sizes take less silk. Dealers can furnish stamped linen of this design in 9 and 22 inch sizes. See page 92.

Daisy Design No. 613 D.
These octagon shaped patterns require no buttonhole work on the edges, as the linen is folded under and securely sewed as shown by the illustration. The effect is quite novel, and as the designs are simple only a small quantity of silk is needed to work the pattern.
Flowers and Leaves.—Instructions for working this design are the same as given for Daisy Design, 612 D, page 49, and illustrated by Colored Plate XXI, although of course the rules for working the border do not apply to this design. (Easy.)
Forget-me-not Design No. 613 E.
Materials—22 inch Size: Corticelli Filo Silk, 1 skein each 504, 518, 519, 520, 678, 781, 782, 783. Corticelli Persian Floss, 1 skein 615. Smaller sizes take less silk. Dealers can furnish stamped linen of this design in 9 and 22 inch sizes. See page 92.

Forget-me-not Design No. 613 E.
These octagon shaped patterns require no buttonhole work on the edges, as the linen is folded under and securely sewed as shown by the illustration.
Flowers.—Work solid. Make the petals in Corticelli Filo Silk, Blue, 518, 519, 520. Vary the shading by making one or more petals in some of the flowers of a lighter shade. Tip some of the petals with a touch of Pink, 678. Put a French knot in Yellow, 504, in the center of the open flowers. Make some of the buds in Pink, 678, and others in Blue, 519.
Leaves.—Work solid, using Green, 781, for the points, shading gradually darker to the stem with 782, 783. Make some leaves lighter than others. Work the stems in 783. The slit in corner, or the line across the ends of the stems, work in fine buttonhole stitch with Persian Floss, White, 615. (Easy.)
Chrysanthemum Design No. 613 F.
Materials—22 inch Size: Corticelli Filo Silk, 1 skein each 502, 503, 504, 505, 507, 716, 717, 718, 719, 781, 782, 783, 784. Corticelli Persian Floss, 1 skein 615. Smaller sizes take less silk. Dealers can furnish stamped linen of this design in 9 and 22 inch sizes. See page 92.

Chrysanthemum Design No. 613 F. Octagon Hem.
Red Flowers.—Work the points of the petals in the background in Corticelli Filo Silk, 719, shading lighter to the base with 718, 717. Work the points of the petals in the foreground with 719, shading lighter with 718, 717, 716. The petals that droop in the foreground make lighter by omitting 719.
Yellow Flowers.—Work the points in the petals with Yellow, 507, shading lighter with 505, 504, 503, 502. Change the shading in different petals by using either lighter or darker shades of silk. The petals that are on top make light, using the lightest shades toward the center of the upper petals. Use your taste in arranging the colors. You can work red and yellow flowers in one spray, or make each spray different, either way will be pretty. Use Green, 782, 783, for the calyx.
Leaves.—Work the points with Green, 781, shading to the stem with 782, 783. Use 784 for the stems. (Not Difficult.)
And Set of 4 Doilies, No. 56A, 56B, 56C, and 56D.
Colored Plate XXII.
By Elizabeth Moore Hallowell.
Materials—22 inch Centerpiece: Corticelli Filo Silk, 4 skeins 785; 3 skeins 784; 2 skeins each 725, 726, 727, 728, 729, 783; 1 skein each 621, 622, 779.5, 780, 781, 782. Corticelli Persian Floss, 8 skeins 615. Smaller pieces take less silk. Dealers can furnish stamped linen of this design in 22 and 27 inch sizes. They can also furnish stamped linen, 9 inch square, of the set of four doily designs (Nos. 56A, B, C, D), to match this centerpiece. See page 92.

Purple Clematis Centerpiece Design No. 56.
One can always do better embroidery, as is the case in all branches of art, if thoroughly familiar with one's subject; then the mind, which is really the source of intelligent work, can act through the pencil, the pen, or the needle, and give to the result the added touch of knowledge at first hand. Therefore, if possible, before working this design secure a spray of the real clematis, choosing the variety known as Clematis Jackmanni, which is probably one of the best known.
The Purple Clematis blossoms in June, July, or August, according to the climate, but it can be secured from florists during other months. Notice that the flowers often have four petals, and nearly as often five. This is a marked peculiarity of the plant. Observe also the buds and sprays of leaves, starting from the axils of the branches; the curling tendency of the stems, by which tendril-like quality the plant climbs. Sometimes the leaves will drop off from these stems, leaving occasionally what looks like a real tendril, but what is in reality the leaf-stem.
This centerpiece may be worked in heavy outline, which produces a very decorative effect with less labor, but this is not recommended, the design being of a large and handsome flower, which calls for stronger and more lasting treatment, and the instructions given therefore are for solid embroidery, in long and short stitch. (See article on Stitches—"Feather Stitch.") While purple is the usual color of the flower, it is sometimes very pale laven[Pg 56]der, but for a decorative design merely, the flowers might be worked in white with greenish shadings.

Clematis Doily No. 56 A.
Flowers.—Begin the edge of petals with Purple, 729, shading gradually lighter toward the base of the petal, using 728, 727, 726, 725. The lightest shades should come into a vein in the center of the petal. For the under side, or turned over parts, of the petals use 725 and 726. The contrast between the color of upper and under sides is very marked. Work the pistil solid, using 781 for the upper and 782 for the lower half. See Colored Plate XXII.

Clematis Doily No. 56 B.
Centers.—Outline the stamens with Green, 780, 781. Make the outer stamens, which are heavier than those inside and somewhat irregular, with a double thread of Corticelli Filo Silk, and the inner stamens with a single thread. At the point of each stamen make a French knot with Purple, 729. Use 780 and 781 also for the center from which the petals have dropped. Work the buds solid, in 725, 726. At the base of each shade into the stem a few stitches of 780.

Clematis Doily No. 56 C.
Leaves.—Work solid in long and short stitch, with 779.5, 780, 781, 782, 783, 784, 785, being careful to slant the stitches in the same direction as the veins, that is, from the edge in toward the central vein, but sloping toward the base of the leaf. Shade from light on the edge to dark near the midvein, See Colored Plate XXII. The leaves are large and many shades can be used with advantage. Work some of the smaller leaves in lighter shades than the large leaves at the bottom of the spray. The veins in the leaves should not be indicated too distinctly. They are shown with clearness in the illustration so that the correct direction may be easily followed. One shade lighter than the darkest shade used in the leaf will be correct for the veins. For the turned over parts of leaves use 780 or 781.
Stems.—Work solid in 783, 784, 785, and where the stems are largest use a little Reddish Brown, 621, 622. The stems from buds, also the tendrils, should be made in 782, 783, 784.

Corticelli Purple Clematis Design No. 56.
Colored Plate XXII.

Clematis Doily No. 56 D.
Border.—Work the scallop in buttonhole stitch with Corticelli Persian Floss, White, 615, or if desired use Light Green Persian Floss, 780. If fringe is wanted buy the 27 inch square of stamped linen, buttonhole the edge very fine and even all around with Corticelli Etching Silk. Then fringe the linen to the buttonhole edge, comb out the threads evenly and trim to any length wanted. (Not Difficult.)
Purple Clematis Doily Designs Nos. 56A, 56B, 56C, and 56D.
Three of these doilies are designed so that the decoration will show even should a tumbler or a finger bowl be placed upon them, and if six or a larger number of doilies are desired for a set, repeat these three patterns. In the fourth design, No. 56 A, the decoration is confined to the center of the doily, this being intended for a bread or cake covering, or for any purpose where a central decoration is most useful. The instructions given for the clematis centerpiece will be ample for working these doilies. (Not Difficult.)
Violet Design No. 615 A.
Materials—22 inch Size: Corticelli Filo Silk, 1 skein each 505, 661, 725, 727, 728, 729, 781, 782, 783, 784. Corticelli Persian Floss, 6 skeins 615. Smaller sizes take less silk. Dealers can furnish stamped linen of this design in 6, 9, 12, 18, and 22 inch sizes. See page 92.

Violet Design No. 615 A.
Border.—Work the scallop in buttonhole stitch with Corticelli Persian Floss, White, 615. In the three shell shaped scallops the stitches should be irregular on the inside. Now shade Corticelli Filo Silk, Green, 661, into the white (in these three shell shaped scallops), giving a long and short effect on the inside. See Colored Plate VI for method of working border.
Flowers.—Work solid in Violet, 729, 728, 727, 725. Make the three lower petals lighter, the two upper[Pg 58] petals darker, working the edge of the petal lighter and darker toward the center. Make a few solid stitches of Yellow, 505, in the center of the flower.
Leaves.—Work solid with Green, 781, 782, 783. For the stems and veins use 784. (Easy.)
Daisy Design No. 615 B.
Materials—22 inch Size: Corticelli Filo Silk, 1 skein each 505, 615, 661, 781, 782, 783. Corticelli Persian Floss, 6 skeins 615. Smaller sizes take less silk. Dealers can furnish stamped linen of this design in 6, 9, 12, 18, and 22 inch sizes. See page 92.

Daisy Design No. 615 B.
Border.—Use same instructions as given for Violet Design No. 615 A, page 57.
Flowers.—Work solid; the edge of the petals with White, 615, using 661 toward the center. Make French knots in the center of the open flower with Yellow, 505.
Leaves.—Work solid. For the points use Green, 781, shading darker toward the center with 782. Work the veins and stems with 783. (Easy.)
Rosebud Design No. 615 C.
Materials—22 inch Size: Corticelli Filo Silk, 1 skein each 642, 657, 659, 661, 781, 782, 783. Corticelli Persian Floss, 6 skeins, 615. Smaller sizes take less silk. Dealers can furnish stamped linen of this design in 6, 9, 12, 18, and 22 inch sizes. See page 92.

Rosebud Design No. 615 C.
Border.—Use same instructions as given for Violet Design No. 615 A, page 57.
Rosebuds.—Work the edge of some of the back petals with Red, 659, shading in with 657. The center should be lighter. Make some of the petals darker by using 642 on the edge and shading in with 659. The petals in the foreground should be lighter, using 659 and 657. Make the points of the calyx in Green, 781, and shade gradually darker toward the bulb, using 782, 783.
Leaves.—Work solid. For the edge use Green, 781, shading darker toward the center with 782. Work the veins and stems with 783. (Not Difficult.)
Buttercup Design No. 615 D.
Materials—22 inch Size: Corticelli Filo Silk, 1 skein each 503, 504, 505, 506, 781, 782. Corticelli Persian Floss, 6 skeins 615. Smaller sizes take less silk. Dealers can furnish stamped linen of this design in 6, 9, 12, 18, and 22 inch sizes. See page 92.

Buttercup Design No. 615 D.
Border.—Work the scallop in buttonhole stitch with Corticelli Persian Floss, White, 615. In the three shell shaped scallops the stitches should be irregular on the inside. Now shade Corticelli Filo Silk, Yellow, 503, into the white (in these three shell shaped scallops), giving a long and short effect on the inside. See Colored Plate VI for method of working border; the coloring however will be found different from that intended for this design.
Flowers.—Work solid. Use 505 for the edge, and gradually shade lighter to the bottom of the petal with 504, 503. Three shades to a flower are sufficient. Make some petals darker by using 506 on the edge instead of 505. In the center of the open flowers work a few stitches of Green, 781, and around these make a few French knots in 781, also. See Colored Plate XVI.
Leaves.—Work the leaves with 781 in satin stitch, slanting the stitches across the leaf. For the stems take 782. (Easy.)
Maiden-hair Fern Design No. 615 E.
Materials—22 inch Size: Corticelli Filo Silk, 1 skein each 527, 780, 781, 782, 783. Corticelli Persian Floss, 6 skeins 615. Smaller sizes take less silk. Dealers can furnish stamped linen of this design in 6, 9, 12, 18, and 22 inch sizes. See page 92.

Maiden-hair Fern Design No. 615 E.
Border.—Work the scallop in buttonhole stitch with Corticelli Persian Floss, White, 615. In the three shell shaped scallops the stitches should be irregular on the inside. Now shade Corticelli Filo Silk, Green, 780, into the white (in these three shell shaped scallops), giving a long and short effect on the inside. See Colored Plate VI for method of working border.
Leaves.—Work solid, making each leaf of one shade. Make the leaves at the top of each spray with 781, the next two leaves with 782, and those next below with 783. Continue to make the leaves darker toward the bottom of the spray. Work the stems in very fine stem stitch with a thread of Filo Silk, 527, split in two parts. (Easy.)
Forget-me-not Design No. 615 F.
Materials—22 inch Size: Corticelli Filo Silk, 1 skein each 504, 517, 519, 520, 679, 781, 782. Corticelli Persian Floss, 6 skeins 615. Smaller sizes take less silk. Dealers can furnish stamped linen of this design in 6, 9, 12, 18, and 22 inch sizes. See page 92.

Forget-me-not Design No. 615 F.
Border.—Work the scallop in buttonhole stitch with Corticelli Persian Floss, White, 615. In the three shell shaped scallops the stitches should be irregular on the inside. Now shade Corticelli Filo Silk, Blue, 517, into the white (in these three shell shaped scallops), giving a long and short effect on the inside. See Colored Plate VI for method of working border; the coloring however, will be found different from that intended for this design.
Flowers.—Work solid. Use Blue, 517, 519, 520, for the petals, varying the shading. Give a touch of Pink, 679, to some of the petals. Make a French knot of Yellow, 504, in the center of the open flowers. Work some of the buds with Blue, 519, and some with Pink, 679. Use Green, 782, for the calyx.
Leaves.—Work solid. For the points use Green, 781, shading toward the stem with 782. Work the stems with 782. (Easy.)
Colored Plate XXIII.
By Emma Haywood.
Materials—22 inch Size: Corticelli Filo Silk, 4 skeins each 113, 114, 809, 810, 811; 3 skeins each 752.9, 753; 2 skeins each 700, 701, 786, 787, 788; 1 skein each 646, 650, 656, 812. Corticelli Persian Floss, 4 skeins 786. Corticelli EE Twisted Embroidery Silk, 8 skeins 809.
Materials—9 inch Size: Corticelli Filo Silk, 1 skein each of above shades. Corticelli Persian Floss, 1 skein 786; Corticelli EE Twisted Embroidery Silk, 2 skeins 809. Dealers can furnish stamped linen of this design in 9, 12, 18, and 22 inch sizes. See page 92.

Jewel Design No. 50.
Jewel embroidery is more than ever popular, and deservedly so, not only on account of the scope it gives for daintiness of design, but more especially because of the splendid possibilities in the arrangement of color. Of course one is not slavishly tied to copying the exact color of any particular gem; the decorator's license is available here just the same as in reproducing flowers, an artistic and harmonious scheme of color must be the first consideration. Unless the jewels be of unusual size it is better to work each individual gem in one shade, varying the tone if repeated in the same group. It must be remembered that embroidery, like any textile fabric, to a great extent shades itself, especially when the surface is glossy. In this style of design it is well to introduce as great a variety of coloring as possible, avoiding however very violent contrasts.
We suggest a scheme that will be found to work beautifully, but many others might be thought out with equally good results. It should be observed, however, that in formulating a scheme all the colors employed should be chosen in about the same tone to avoid the spottiness so often found in amateur work; the very best designs can easily be spoiled through inattention to this rule. The task of following exactly the directions given is rendered easy by means of the numbers on the labels attached to each skein of Corticelli Silk and by reference to Colored Plate XXIII.

Jewel Embroidery. Filling and Covering.
The work is solid throughout except where the scallops are filled in beneath the scrolls with crossed bars; these are laid in place from side to side, and caught down at each intersection. The jewels are put in with satin stitch. (See article on Stitches.) They should be raised a little by filling. This can be done in two ways, either by filling one way in satin stitch and crossing the filling in the opposite direction in finishing (see engraving), or by working a circle in stem stitch and following the circle inside until quite filled in, then covering with satin stitch. When covering the filling, always start in the center and work out each way. It will then be found easy to preserve the form. It is hardly worth while to use a different kind of silk for the filling; it is poor economy and saves very little after all, while the additional fastenings off are liable to make the work lumpy. The jewels are more pronounced if outlined, but this is optional. If outlined, a rich Burnt Sienna shade, such as No. 646, will be very effective and not at all heavy. The jewels should be worked with Corticelli Filo Silk.
For the four sections composed of scrolls, and for the scallop exactly beneath them, choose three delicate shades of Apricot, 809, 810, 811. Use the lightest in Corticelli EE Embroidery Silk for the scallop, and shade the scrolls with the three tones in Filo Silk. Put in the crossed bars with Green Filo Silk, 752.9, and catch them down with 753. The outside scrolls are also worked with 752.9. The small scrolls at the apex and on either side, also the upper bars in stem stitch, are of a golden hue, for which take 113, 114. The large central jewel and those heading the golden bars, are green. Use 700 for the large one and 701 for the small ones; those on either side on the[Pg 63] bars are Violet, 650; the three below and one above the large center jewel are also worked with 650; the remaining single gems on either side of the center are Red, 656. See Colored Plate XXIII.

Corticelli Jewel Design No. 50.
Colored Plate XXIII.
We now come to the intervening forms embracing three scallops. Work the lily forms with Filo Silk in three shades of Blue, 786, 787, 788. Work the three scallops in Persian Floss, with Blue, 786. The jewels are golden, being worked with Filo Silk, 113, 114. The diamond shaped jewel is put in with 812, representing a pink topaz. (Somewhat Difficult.)
Apple Blossom Design No. 406 A.
Hemstitched Edge.
Materials—12 inch Size: Corticelli Filo Silk, 1 skein each 636, 637, 645, 655.7, 781, 782, 783. Dealers can furnish stamped and hemstitched linen of this design in 6, 7, 9, 12, 15, 18, and 21 inch sizes. See page 92. They can also furnish stamped and hemstitched linen for tray cloths and bureau scarfs to match this design, 18×27, 18×36, 17×54, and 17×72 inches. See page 92.

Apple Blossom Design No. 406 A.
These designs are especially adapted for beginners. The 7 and 9 inch sizes make pretty doilies, and the larger linens work up into very attractive centerpieces, tray cloths and bureau scarfs.
Flowers.—Work solid. Begin edge of petals with Corticelli Filo Silk, 637, shading lighter toward center with 636, 655.7. In the center of the open flowers make a few stitches in 781 to represent stamens, and make three or four French knots around these stitches with 645. Work the buds solid, using 637 for edge and 636 near calyx. Use 782 for calyx. A study of Colored Plate XXI will assist one in getting the right shading and stitch direction.
Leaves.—Work solid, beginning points with 781, shading darker to midvein with 782. Stems should be worked solid or with two or three rows of outline stitch, using 783. Use 783 also for veins. (Easy.)
Buttercup Design No. 406 B.
Hemstitched Edge.
Materials—12 inch Size: Corticelli Filo Silk, 1 skein each 503, 505, 506, 781, 782. Dealers can furnish stamped and hemstitched linen of this design in 6, 7, 9, 12, 15, 18, and 21 inch sizes. See page 92. They can also furnish stamped and hemstitched linen for tray cloths and bureau scarfs, to match this design, 18×27, 1×36, 17×54, and 17×72 inches. See page 92.

Buttercup Design No. 406 B.
These designs are especially adapted for beginners. The 7 and 9 inch sizes make pretty doilies, and the larger linens work up into very attractive centerpieces, tray cloths, and bureau scarfs. Only a small quantity of silk is required for these patterns.
Flowers.—Work solid. Begin the edge of petals with Corticelli Filo Silk, Yellow, 506, shading gradually lighter to center with 505, 503. Vary the shading in petals, making some light and some dark. Work the calyx with Green, 781. The buds should be worked darker than the open flowers. A study of Colored Plate XVI will be found helpful to beginners.
Leaves.—Work solid, beginning points with 781 and shading to midvein with 782. Work the stems in outline stitch with 782. (Easy.)
Chrysanthemum Design No. 406 C.
Hemstitched Edge.
Materials—12 inch Size: Corticelli Filo Silk, 1 skein each 673, 674, 678, 781, 782. Dealers can furnish stamped and hemstitched linen of this design in 6, 7, 9, 12, 15, 18, and 21 inch sizes. See page 92. They can also furnish stamped and hemstitched linen for tray cloths and bureau scarfs to match this design, 18×27, 18×36, 17×54, and 17×72 inches. See page 92.

Chrysanthemum Design No. 406 C.
These designs are specially adapted for beginners. The 7 and 9 inch sizes make pretty doilies, and the larger linens work up into very attractive centerpieces, tray cloths, and bureau scarfs.
Flowers.—Work solid. Begin the edge of petals with Corticelli Filo Silk, 674, shading lighter to the calyx with 673 and 678. Make some petals lighter by omitting 674. The petals in the background should be darker than those in the foreground. Use 781 for the calyx. A study of Colored Plate XXII will be found helpful to beginners.
Leaves.—Work solid, beginning the points with 781, shading darker to midvein with 782. Work the stems in outline stitch with 782. (Not Difficult.)
Daisy Design No. 406 D.
Hemstitched Edge.
Materials—12 inch Size: Corticelli Filo Silk, 1 skein each 503, 505, 615, 660.5, 661, 662, 754. Dealers can furnish stamped and hemstitched linen of this design in 6, 7, 9, 12, 15, 18, and 21 inch sizes. See page 92. They can also furnish stamped and hemstitched linen for tray cloths and bureau scarfs to match this design, 18 x 27, 18 x 36, 17 x 54, and 17 x 72 inches. See page 92.

Daisy Design No. 406 D.
These designs are especially adapted for beginners. The 7 and 9 inch sizes make pretty doilies, and the larger linens work up into very attractive centerpieces, tray cloths, and bureau scarfs.
Flowers.—Begin the edge of the petals with Corticelli Filo Silk, White, 615, shading toward the center with 660.5. Work the centers in fine French knots in Yellow, 503, 505, placing those in 505 above those in 503. Work the calyx in 661. See Colored Plate XX for method of shading.
Leaves.—Begin the points with 661. Shade darker to the center with 662 and 754. Vein with 754 and work the stems in outline stitch with same shade. (Easy.)
Sweet Pea Design No. 406 E.
Hemstitched Edge.
Materials—12 inch Size: Corticelli Filo Silk, 1 skein each 123, 124, 126, 128, 129, 501, 680, 725, 726.5, 727. Dealers can furnish stamped and hemstitched linen of this design in 6, 7, 9, 12, 15, 18, and 21 inch sizes. See page 92. They can also furnish stamped and hemstitched linen for tray cloths and bureau scarfs to match this design, 18 x 27, 18 x 36, 17 x 54, and 17 x 72 inches. See page 92.

Sweet Pea Design No. 406 E.
These designs are especially adapted for beginners. The 7 and 9 inch sizes make pretty doilies, and the larger linens work up into very attractive centerpieces, tray cloths, and bureau scarfs.
Flowers.—Sweet Peas are always difficult owing to the great variety of shades found in the flower. Begin the edge of the two upper petals with Corticelli Filo Silk, Pink, 128, shading darker to center with 129 and 680. For the lower petals use the same shades; at the base work a[Pg 66] few solid stitches of Green, 123 and 124, for calyx. For a purple and yellow flower begin the edge with Yellow, 501, into which shade Purple, 725, and near the base, or where the petals meet, use 726.5 and 727. For the turn over part use 725. The buds should be darker than the open flowers. Carefully examine Colored Plate XXVII, before beginning to embroider this design.
Leaves.—Work the leaves in 123, 124, 126, shading from light on points to dark near the center and base of leaf. Work the stems and tendrils in 123, 126, using the former for the ends of tendrils only. (Somewhat Difficult.)
Forget-me-not Design No. 406 F.
Hemstitched Edge.
Materials—12 inch Size: Corticelli Filo Silk, 1 skein each 504, 518, 519, 521, 678, 781, 783. Dealers can furnish stamped and hemstitched linen of this design in 6, 7, 9, 12, 15, 18, and 21 inch sizes. See page 92. They can also furnish stamped and hemstitched linen for tray cloths and bureau scarfs to match this design, 18 x 27, 18 x 36, 17 x 54, and 17 x 72 inches. See page 92.

Forget-me-not Design No. 406 F.
These designs are especially adapted for beginners. The 7 and 9 inch sizes make pretty doilies, and the larger linens work up into very attractive centerpieces, tray cloths, and bureau scarfs.
Flowers.—Work solid, making each petal of one shade. Corticelli Filo Silk, Blue, 518, 519, 521, are the forget-me-not shades. Make an occasional petal in Pink, 678. Put one or two French knots in the center of every open flower with Yellow, 504. Work the buds darker than the open flowers. Use Green, 781, for the calyx.
Leaves.—Work solid, beginning the points with 781, shading darker to midvein with 783. Work the stems in outline stitch with 783. (Easy.)
The "Queen" Embroidery Hoop.
Most professional needleworkers use a large frame, and work with both hands. For amateurs a hoop is the next best thing. Mrs. Haywood recommends the "Queen" hoop. It is, in fact, quite superior to the ordinary wooden or rubber ones. It is a smooth wooden hoop, true in circle, with rounded edges; the outer hoop is a stiff spring wire band, interlaced with braid. This hoop requires no wrapping for either light or heavy material as the spring band will keep the goods stretched to a uniform tension. It is made in 4, 5, 6, and 7 inch sizes, and can be had at nearly all dry goods stores.

Corticelli Maréchal Neil Rose Design No. 602 B.
Colored Plate XXIV.
Colored Plate XXIV.
By Amalia Smith.
Materials—22 inch Size: Corticelli Filo Silk, 2 skeins each 615, 616, 616.5, 740, 741, 742, 780, 781; 1 skein each 692.8, 743, 743.5, 782, 783, 784. Corticelli Persian Floss, 6 skeins 615. Smaller pieces take less silk. Dealers can furnish stamped linen of this design in 18 and 22 inch sizes. See page 92.

Maréchal Niel Rose Design No. 602 B.
For the more experienced worker this design has many attractions, and aided by the Colored Plate many who otherwise would be unable to embroider this rose will find no difficulty in following the directions. It is as handsome a design as the most ambitious could desire, affording opportunity for very artistic treatment.
Border.—Work the scallop in buttonhole stitch with Corticelli Persian Floss, 615. For the flowers in the border choose Corticelli Filo Silk, 615, shading to center with Green, 692.8. Put a few French knots of Yellow, 742, in the center. Or work the centers of these border flowers in Yellow, 740, instead of Green, 692.8, shading outward with 616.5 and 616.
Large Rose.—Begin the edge of some of the petals with Corticelli Filo Silk, Yellow, 743.5, shading gradually lighter to 616 at base. The edge of the other petals can be done with Yellow, 740, shading darker toward base with 741, 742, 743, 743.5. The turn over petals must be raised high by filling in with long stitches of Corticelli Roman Floss, although darning or embroidery cotton can be used; over this filling work Filo Silk, Cream White, 616, care being taken to slant the stitches in almost the opposite direction from those in the rest of the petal. See Colored Plate XXIV. In working the roses remember to use the darker shades for the back petals, as well as for the hollows or deep places and choose the lighter shades for the high-lights or the raised parts, such as turn over petals and those on the outside.
Buds.—Work solid, using 743.5 for the point of the buds, shading lighter toward calyx with Yellow, 743, 742. Work the points of calyx with Green, 780, shading darker toward the bulb with 781, 782, 783, 784.
Leaves.—Work solid. For edge of some of the leaves use Green, 781, shading toward the center with 782, 783. Vein with 784. For the smallest leaves 780 can be used for the points, shading toward the center with 781, 782, and veining with 783. A study of Colored Plate XXIV will repay one, as it gives the shading of the leaves as well as of the roses. (Difficult.)
Colored Plate XXVI.
Materials—22 inch Size: Corticelli Filo Silk, 2 skeins each 134, 136, 137; 1 skein each 105, 140, 534, 561, 645, 646, 647, 656, 779.5, 781, 782, 783, 784. Corticelli Persian Floss, 8 skeins 781. Smaller sizes take less silk. Dealers can furnish stamped linen of this design in 9 and 22 inch sizes. See page 92.

Rabbit Chafing Dish Design No. 53.
Border.—Work the scallop in buttonhole stitch with Corticelli Persian Floss, Green, 781. See Colored Plate XXVI.
Rabbits.—The rabbits can be worked in outline, or a better way would be to work them partly solid. These instructions are for the partly solid work. Begin working all around the rabbits' ears in long and short stitch with Gray, 134; shade 105 into the gray, and inside the ear use very light pink, 534. Around the eyes and nose make irregular stitches with 136, working the eyes solid with Pink, 656. A few stitches will give expression. Choose 137 for the back of the rabbit, and, using long and short stitch, slant the stitches a little toward the tail downward. Now shade lighter to the side, using 136, 134. Begin the under side of the rabbit with 137, and with 136 and 134 shade lighter upward and toward the center in the direction the fur would seem to take. Shade under the head and bend of the legs with 137. Care must be taken in working the rabbits to give the right direction to the stitches, otherwise the effect will not be good. See Colored Plate XXVI.
Grasses.—Work solid in long and short stitch with Green, 779.5, 781, 782, 783, 784, and Bronze, 561, 140, making each spear of grass of one shade.
Scrolls.—Work in outline stitch with Brown, 645, 646, 647, shading from light at end to dark at base. (Somewhat Difficult.)
Directions for Mounting and Framing.
Embroidered frames are now always mounted under glass. This preserves both the needlework and the picture, besides greatly enhancing the beauty of both. After carefully examining all ready made frames in the market we recommend the "Imperial Passepartout Frame" as the best. It is strongly and yet neatly made, having a white leather binding, holding the glass firmly in place. It has a sliding back, with strong gilt wire easel, and suitable cardboard mounts with die cut openings for pictures. It is self-contained and absolutely dust proof. The embroidered linen can be removed at any time and a new design substituted. These frames are made in two sizes, viz.: 8 x 10 inches and 10 x 13 inches; the former has an opening for one photograph; the latter, openings for two pictures. Square or oval openings are used according to the design of the stamped linen. See page 92.
After the embroidery is finished, proceed to complete the frame as follows: cover the face of the frame with cotton wadding, and lay the embroidered linen on top, being careful to see that the design is in proper position, the plain part being over the opening in the frame. Draw the linen tightly and tack with pins on each corner. Now place the frame on its face, stretch the linen over its edges and fasten it on the back with good, strong glue or mucilage,—glue is preferable. Be careful to draw tightly and avoid creases. Allow plenty of time to dry; then with a sharp penknife, cut the opening, if it be a square one, making four cuts from the center to each of the four sides of the opening, thus: X. Draw the four pieces cut through the opening and paste them on the back. If the opening is an oval, begin at the center and cut the linen in slits toward edge; draw tightly and evenly and glue down. Place the photograph in position over the opening; over this put the cardboard, which will hold the picture in place. Clean the glass and slip the linen, cardboard and all, into the frame. Now slide the back into place and the frame is complete.
If you do not want to purchase a ready made frame, any good stationer will mount your embroidered linen, or you can do it yourself and then have it framed by a stationer. A small gilt beading made to order will increase the beauty of the frame. In mounting follow these instructions: cut a frame from heavy cardboard, the stiffer the better, about 7 x 9 inches, noting the size of the linen and allowing an inch margin on sides, top, and bottom. Cut a hole in the cardboard for opening for picture, and proceed to mount as per directions for "Imperial" frames. If the embroidery is not to be put under glass, cut out another piece of thin cardboard, size of first, cover with silk,[Pg 70] sateen, or linen, and then sew front and back together on sides and bottom, leaving enough space at top to slip in the picture. Use white silk and make stitches as fine as possible. If you cannot obtain a ready made easel to put on the back, make one from stiff cardboard, covered with linen.
Holly Photograph Frame Design No. 1.
By Amalia Smith.
Materials—8 x 10 inch Frame: Corticelli Filo Silk, 1 skein each 582, 583, 584, 586, 754, 767, 768, 781, 785. Dealers can furnish stamped linen of this design 10 x 12 inches. See page 92.

Holly Photograph Frame Design No. 1.
It would be impossible to find a more appropriate Christmas present than this pretty Holly design, embroidered and neatly framed ready for inserting the picture.
Berries.—Work in satin stitch similar to working jewels (see page 62), with Corticelli Filo Silk, Red, 767, 768, using only one shade in each berry.
Leaves.—Work solid, using Green, 781, for the edge. Shade darker toward the midvein with 754, 582, 583, 785, 586. Make some leaves darker than others. Work the stems and veins in 584 and 785. For directions for mounting and framing see page 69.
Pansy Photograph Frame Design No. 5.
Instructions by Elizabeth Moore Hallowell.
Materials—8 x 10 inch Frame: Corticelli Filo Silk, 1 skein each 504, 672, 674, 676, 726, 727, 729.5, 743, 783, 785. Dealers can furnish stamped linen of this design 10 x 12 inches. See page 92.
"Pansies for thoughts" are always pleasant to associate with tokens of friendship; and the needlewoman who selects this subject for her skill may be sure that her choice will prove a welcome gift to a friend.
Pansies.—Use Corticelli Filo Silk, Purple, 726, 727, 729.5. For another shade of purple, which will give variety, yet will combine well with the above, take 672, 674, and 676.
Flowers.—In working the flowers use the ordinary long and short stitch, keeping each petal with the stitches tending towards the center of the flower; let the darkest shading be at the edge of the petal, shading gradually to light at[Pg 71] the base; and in several of the flowers let the two upper petals be quite dark. More than this will give too heavy an effect; therefore work the other blossoms in the lighter shades, letting the veinings only, be dark. One large French knot of Yellow, 504, will be needed in the center of each pansy.

Pansy Photograph Frame Design No. 5.
Leaves.—The leaves may be worked in long and short stitch, with 783 and 785, keeping the direction of the stitches toward the central vein, but inclining downward to the base of the leaf. A careful study of Colored Plate I (Frontispiece) will give one suggestions as to the proper shading, and will be found as helpful as more elaborate directions would be, although the colors are not identical with those for this design.
Before mounting the embroidery be sure that it is well pressed; if it has become in any way soiled, it should be carefully washed according to the directions given on page 6. Rules for mounting and framing will be found on page 69.
Violet Photograph Frame Design No. 3.
Double Frame for Two Pictures.
Materials—10 × 13 inch Frame: Corticelli Filo Silk, 1 skein each 506, 726, 727, 728, 729, 781, 782, 783. Dealers can furnish stamped linen of this design 12 × 15 inches. See page 92.

Violet Photograph Frame Design No. 3.—(Double Frame.)
Violets.—Use same instructions as given for working Violet Design No. 402 A, page 40. Directions for mounting and framing will be found on page 69.
Forget-me-not Frame Design No. 60.
By Emma Haywood.
Materials—8 × 10 inch Frame: Corticelli Filo Silk, 1 skein each 115, 623, 624, 678, 780, 781, 782. Dealers can furnish stamped linen of this design, 10 × 12 inches, which allows ample margin for mounting. See page 92.

Forget-me-not Frame Design No. 60.
The simple Forget-me-not design for a photograph frame for a cabinet sized photograph should be very popular. To present one's picture thus framed to a valued friend carries with it a pretty sentiment, the favorite little flower of heavenly blue pleading for us that we may be remembered. The treatment is of the simplest kind. Both blossoms, buds, and leaves are worked in satin stitch, with French knots for the centers. The stems are in outline or stem stitch. For such small flowers Corticelli Filo Silk should be used in preference to any other kind of silk. Work the blossoms with 623, 624; the leaves and stems with 780, 781, 782. A very artistic effect can also be gained by working the blossoms with 699, 700, putting in the leaves and stems with 107, 108, 109. Make the French knots for the centers with 115. The buds may be of a delicate Pink, 678. Rules for mounting and framing will be found on page 69. (Easy.)
Jewel Photograph Frame Design No. 61.
By Emma Haywood.
Materials—8 × 10 inch Frame: Corticelli Filo Silk, 1 skein each 105, 138, 139, 141, 142, 501, 624, 646, 647, 656, 657, 701, 702. Dealers can furnish stamped linen of this design, 10 × 12 inches. See page 92.
There has always been a great demand for embroidered photograph frames, and recently those in simulated jewels have been among the most popular patterns. When worked the color effect will be found very rich and pleasing.
Leaves and Stems.—Work the leaves and stems in Olive Green Corticelli Filo Silk. For the leaves take 138, 139, 141, and 142, shading the spray from light to dark, working in satin stitch. Make one leaf in one shade and the next one in another.

Corticelli Garland Photograph Frame
Design No. 62.
Colored Plate XXV.
Corticelli Rabbit Design No. 53.
Colored Plate XXVI.
Jewels.—Work the three jewels at each corner to represent rubies, using 656, 657, the darker shade for the one in the middle. Working horizontally toward the center at top and bottom, the next group of three jewels should[Pg 73] represent the topaz, and for this choose Yellow, 501. Still following the scroll toward the center, work the next three to represent the turquoise, using 701, 702; the darker shade for the jewel in the middle of the group, the lighter shade for the one on each side. We now come to the center of the frame. Work this group of three jewels in Salmon Pink, 105.

Jewel Frame Design No. 61.
For the side scrolls, begin at the center, using 701, 702. The three jewels on each side of these work in 105, and the remaining group between those in 105 and the corner, should be made in 624. All jewels must be outlined with 646 or 647. Full directions for working jewels are given in the instructions for the Jewel Centerpiece Design No. 50, page 61. Rules for mounting and framing will be found on page 69. (Somewhat Difficult.)
Colored Plate XXV.
By Alice C. Morse.
Materials—8 x 10 inch Frame: Corticelli Filo Silk, 1 skein each 124, 125, 126, 127, 503, 504, 505, 623, 624, 625, 636, 637, 638, 639. This quantity is more than enough. Dealers can furnish stamped linen of this design, 10 x 12 inches. See page 92.

Garland Photograph Frame Design No. 62.
Wild Roses.—Work the petals solid with Corticelli Filo Silk, beginning at the edge with 639, shading towards the center with 638, 637, 636. Work the petals that seem to be in the background darker than those that overlap them. Vary the shading in some of the flowers. In the center work a few French knots with 505. See Colored Plate XXV.
Forget-me-nots.—Work in satin stitch each petal or all petals in one flower in one shade of Blue, 623, 624, 625. Place one French knot in the center of the open flowers, using Yellow, 503.
Ribbon.—Work in satin stitch, in Yellow, 503, 504, slanting the stitches[Pg 74] across the ribbon. Be careful to preserve the correct effect of the twisted part by working one side of the fold in 503, the next fold in 504, and so on. See Colored Plate XXV.
Leaves.—Work in satin stitch, using Green, 124, 125, 126, 127, making half of each leaf in one shade. Outline the stems with 127. Rules for mounting and framing will be found on page 69. (Somewhat Difficult.)
Jonquil Photograph Frame Design No. 63.
By Elizabeth Moore Hallowell.
Materials—8 x 10 inch Frame: Corticelli Filo Silk, 1 skein each 502, 503, 504, 506, 507, 750, 751, 752, 781, 782, 783, 783.5, 784. Dealers can furnish stamped linen of this design, 10 x 12 inches. See page 92.

Jonquil Photograph Frame Design No. 63.
For an Easter greeting, or a birthday present in early spring, a frame worked in this design will prove a welcome offering. This design may also be used for a magazine or book cover.
Flowers.—These may be worked in long and short stitch, or half solid Kensington, in which case somewhat less than the quantity of silk named above will be sufficient. However, we strongly advise working the whole design in solid embroidery, as the effect is very handsome and will repay one for the extra labor. Begin working the edge of the cup with Yellow, 504, gradually shading darker to the base with 506, 507, keeping the stitches perfectly straight. Work the edge of petals in Yellow, 502, and shade darker with 503, 504, to the cup. That part of the flower between cup and stem should be worked in 506 and 507. The curious paper-like shell which surrounds the flower at the point of attachment to the stem, work with 750, 751, 752, using 750 for the point, and shading darker to the stem.
Leaves.—Work solid, beginning at the point with 781, shading gradually darker to the base, using 782, 783, 783.5, 784. Work the stems solid in Olive Green, 782, 783, 783.5, 784, shading from dark near the bottom to light nearest the flowers. A little of 782 should be worked at one side of some of the stems.
Opening.—Outline the opening for the picture and the other straight lines in the design with Yellow, 507. Rules for mounting and framing will be found on page 69. (Not Difficult.)
Materials—Corticelli Filo Silk: 3 skeins each of two shades. (See below.) 1 piece linen, either Blue, Green, Tan, or Terra Cotta, 12 x 20 inches, stamped with this design; 1 Doily Book. Dealers can furnish all the above material. See page 92.
For Blue Linen use Corticelli Filo Silk, Yellow, 741, 743.5, or Pink, 678, 680.
For Green Linen use Corticelli Filo Silk, Green, 693, 695, or Purple, 650, 651.5.
For Tan Linen use Corticelli Filo Silk, Scarlet, 537, 539, or Pink, 572, 573.5.
For Terra Cotta Linen use Corticelli Filo Silk, Pink, 635.5, 638, or Green, 124, 127.
When working either Blue, Green, or Terra Cotta Colored Linen the proper color numbers can easily be substituted in the following instructions.

Corticelli Doily Book.
Every needleworker usually has several choice doilies that when not in use should be kept in some clean place where they will remain smooth and flat. This book holds twelve doilies. It contains thirteen leaves of tinted cardboard, each measuring 8-1/2 by 8-1/2 inches. The covers are stiff and the binding is strong.
Tan Linen and Scarlet Silk.—For the word "Doilies" use the darkest shade (539) Corticelli Filo Silk. First stuff the letters with embroidery cotton (or better still with Corticelli Roman Floss of same shade as silk) similar to the manner of working jewels. (See page 62.) Then cover the filling in satin stitch. The letters should appear as if raised. Work the four corner figures with long and short stitch in two shades of silk, using the lightest (537) for the outside and the darkest (539) for the inside, which includes the dot in the center. Work the stem or scroll in outline stitch in the lightest shade (537), and make the leaves running from it solid, in long and short stitch, with alternating shades of silk. The jewels in the scroll and the four just inside it should be first stuffed and then covered similar to the letters in the word "Doilies."
When completed, stretch the linen firmly over the stiff pasteboard covers and glue down on the inside. Sew two short ribbons, the color of the silk, to the linen on the inside, for tying the covers together. (Not Difficult.)
Initials and Monograms.
By Della V. Whipple.

The newest way for marking handkerchiefs is one's own writing transferred with carbon, then worked in a very narrow satin stitch, with a decided slant to the stitches. The accompanying monogram is a pretty and practical one. Embroider the single lines same as described above, fill in the broad portions with perpendicular stitches, piling high, and cover with satin stitch same slant as the lines. Make the dots in French knots. If one is partial to French knots a good way is to outline all of the lines of letters, using Kensington outline stitch and fill in the broad parts with the knots.
The initial letters shown on the opposite page were drawn for 1898 Corticelli Home Needlework by a St. Louis artist. They are specially adapted to the purpose for which they are intended and are very pretty when worked according to the following instructions.
All letters look best if given a raised effect. To do this stuff the space between the lines with Corticelli Roman Floss, after the manner of working jewels (see page 62), taking care to have the stitches of the filling laid in the opposite direction to that which the covering stitches will take. With two threads of Corticelli Filo Silk cover the stuffing in satin stitch. Color 615, White, is usually used, although some prefer Cream White, 616, or Cream, 616.5. The Roman Floss used for stuffing should be of the same shade as the Filo Silk. A pretty way for making very small letters is to just follow the outline with small cross stitches.
Marking Clothing.
While the neatest way to mark clothing is by one's initials embroidered in Corticelli Filo Silk, as above suggested, this is not practical for many articles. Tablecloths, napkins, sheets, pillow cases, white spreads, towels, shirts, collars, and cuffs, also, must be plainly marked for convenience in sorting and identifying personal articles in the family wash and to avoid being lost when entrusted to public laundries. For this nothing is better than Payson's Indelible Ink. With a bottle of this ink and a common pen one can easily mark all necessary articles. A good idea is to keep on hand a few yards of linen tape, on which your name is written many times with this ink. Cut the tape as wanted and sew on to stockings, or other articles having too rough a surface for pen work.

Corticelli Initial Letters.
See opposite page for directions for embroidering.
The original letters from which the above engravings were made measure 11⁄4 inches high. If the size shown above is large enough for your work transfer the letters direct from the book to the linen with carbon paper. If, however, the larger sized letters are desired get your dealer to order the perforated pattern for you, or, if he refuses to do this send direct to the Nonotuck Silk Co., Florence, Mass. Perforated pattern of the entire set of twenty-six letters, 11⁄4 inches high, costs 20 cents, postpaid. Perforated patterns of single letters cost 10 cents each, postpaid.

Purple Clematis Tea Cloth Design No. 437 A.
Drawn Work and Hemstitched Edge.
By Elizabeth Moore Hallowell.
Materials—Tea Cloth 45 x 45 inches: Corticelli Filo Silk, 6 skeins 729; 5 skeins 728; 4 skeins 727; 3 skeins each 725, 726, 781, 782, 783, 784, 785; 1 skein each 621,[Pg 79] 622, 779.5, 780. The smaller size takes less silk. Dealers can furnish hemstitched stamped linen of this design, with drawn work edge, in two sizes, as follows: 436 A, 36 × 36 inches, 437 A, 45 × 45 inches. See page 92.
Use same instructions for embroidering this tea cloth as given for Purple Clematis Design No. 56, page 55, and illustrated by Colored Plate XXII. (Not Difficult.)

Cosmos Tea Cloth Design No. 437 B.
Cosmos Tea Cloth Design No. 437 B.
Drawn Work and Hemstitched Edge.
Materials—Tea Cloth 45 × 45 inches: Corticelli Filo Silk, 6 skeins each 655.7, 655.8; 5 skeins 655.9; 4 skeins 616.5; 2 skeins each 109, 110, 123, 504, 506, 781, and[Pg 80] 782. The smaller size takes less silk. Dealers can furnish hemstitched stamped linen of this design, with drawn work edge, in two sizes as follows: 436 B, 36×36 inches; 437 B, 45×45 inches. See page 92.
Flowers.—Work solid. For the edge of petals use 655.7, 655.8, shading lighter gradually to the center with 616.5, 123. Give a touch of Pink, 655.9, to some of the petals to give an effect of shadow where the petals lap; but not too much, as the flowers should be quite pale. In the center work a number of short stamens with Green, 781, and make French knots at the points of stamens in Yellow, 504 and 506. Work the buds and half flowers in the same manner, although choose the darker shades for the very small buds. Work the upper part of calyx with Green, 781, and the part near the stem with 782.
Leaves.—Slant the stitches downward as you would to work stems. Tip the points of the leaves with Green, 781, shading gradually darker toward the stems with 782, 109, 110. Work the stems with 109, 110. (Not Difficult.)
Hemstitched and Silk Corded Edge.
Colored Plate XXVII.
(See Illustration on Page 81.)
By Amalia Smith.
Materials—Corticelli Filo Silk: 2 skeins each 501, 502, 503, 616, 616.5, 678, 679, 680, 681, 725, 726, 727, 729, 757, 780, 781, 782, 783, 784. Dealers can furnish hemstitched stamped linen of this design, 36 × 36 inches. See page 92.
Sweet peas grow in such a variety of exquisite colorings that the utmost license is available in selecting the colors for each flower. However, be careful to avoid startling combinations. The following suggestions for a color scheme will be found to give a very pretty effect.
Flowers.—Work solid, being careful to start the stitches in the right direction. Begin the edge of the petal with a dark shade, shade gradually lighter to the stem. The stitches should be taken in a downward curve to the stem. Make some flowers pink on the edge and yellow near the stem; make others shade from pink to violet; still another flower violet and yellow, and again working some all of one color, shading from dark on edge to light near the stem. Work the calyx in Green, 781, 782, the darker shade near the stem.
Leaves.—Work solid, using Green, 781, 782, 783, 784, making the points of the leaves light and shading darker near the center, using two shades in a leaf. Make the larger leaves near the base of the spray in the darker shades of green. Use 757 for the stems. For tendrils choose 780 and 781.
Carefully examine Colored Plate XXVII. This shows the proper stitch direction and the shading of the flowers and leaves. Unless you thoroughly understand "long and short" stitch and "feather stitch," make a study of[Pg 81] the article on "Embroidery Stitches—Described and Illustrated," especially of pages 11 and 12. (Difficult.)

Corticelli Sweet Pea Design No. 407 G.
Colored Plate XXVII.

Sweet Pea Tea Cloth Design No. 407 G.
Wild Rose Bureau Scarf Design No. 434 B.
Hemstitched and Drawn Work Edge.
Materials—Corticelli Filo Silk, 2 skeins each 639, 782; 1 skein each 504, 636, 637, 638, 640, 655.7, 755, 780, 781, 783. Dealers can furnish stamped linen of this design with hemstitched and drawn work edge, 18 × 36 inches. See page 92.
Roses and Leaves.—Use same instructions as given for Wild Rose Design No. 603 E, page 28, and illustrated by Colored Plate IX. If desired the petals of the roses may be worked "half solid," using the long and short stitch. The leaves also can be worked in the same manner. The more effective way, however, is to work both roses and leaves solid, as described in the instructions to which reference is given.

Wild Rose Bureau Scarf Design No. 434 B.
Colored Plate XXVI.
Materials—Corticelli Filo Silk: 2 skeins each 134, 136, 137, 779.5, 781, 782; 1 skein[Pg 83] each 105, 140, 534, 561, 645, 646, 647, 656, 783, 784. Corticelli Persian Floss, 10 skeins 781. Dealers can furnish stamped linen of this design, 18×27 inches. See page 92.

Rabbit Chafing Dish Tray Cloth Design No. 53 A.
A Chafing Dish is to be found in nearly every home, and many are the choice concoctions that owe their existence to the little alcohol lamp and the simmering pan of water. The design shown here is especially appropriate for a chafing dish tray cloth.
Use the same instructions as given for working Design No. 53, page 68, and illustrated by Colored Plate XXVI.
Daisy Tray Cloth Design, No. 406 D.
Hemstitched Edge.
Materials—For Silk necessary to embroider this tray cloth, and instructions for same, see Daisy Design, page 65. Made in sizes, 18 x 27 and 18 x 36 inches. Also for bureau scarfs, 17×54 and 17×72. Dealers can furnish stamped linen, with hemstitched edge, of this design, in all of the above sizes. See page 92.

Daisy Tray Cloth Design No. 406 D.
Hemstitched linen, similar to Daisy Tray Cloth Design No. 406 D, can also be furnished by dealers in the above sizes, stamped with the following designs: 406 A, Apple Blossom; 406 B, Buttercup; 406 C, Chrysanthemum; 406 E,[Pg 84] Sweet Pea; 406 F, Forget-me-not. For instructions for working and silk required, see pages 63, 64, 65, and 66.
Sofa Pillow Design No. 508.
Materials—1 piece plaid cambric, 24 x 48 inches, stamped with a wide colored check, with 5 yards double ruffling of same material; Corticelli Roman Floss, 9 skeins (6 of the light shade, and 3 of the dark shade). For colors see below. Dealers can furnish all of above material. See page 92.

Sofa Pillow Design No. 508.
For Green Pillow use Corticelli Roman Floss, 549, 551.
For Yellow Pillow use Corticelli Roman Floss, 743, 743.6.
For Blue Pillow use Corticelli Roman Floss, 793, 796.
This pillow is a pretty one for summer use. The material is plaid cambric, a white ground with a colored check. The check comes in three different colors: green, yellow, and blue.

Showing Method of Working Sofa Pillow.
The engraving shows exactly how the work is done, using the lighter shade of silk and the seamstress' feather stitch for the four corners around each square. The center figure is worked in the darker shade of silk, with the X in the lighter shade. When the decoration is complete, finish the pillow as follows: Gather the ruffle double on the raw edge, and, putting it between the front and back pieces of the cushion, sew together on the wrong side on three sides of the pillow. Blind-stitch the fourth side after the down cushion has been placed inside. Other figures and methods of working will suggest themselves to every needleworker. This pillow is a very inexpensive one. (Easy.)

Pattern A, with Strap.
(The Stocking Leg shows the light brown mixed yarn.)
The increasing popularity of the wheel and the game of golf has revived the interest in knitting, especially since desirable and exclusive patterns in bicycle and golf stockings are not easily obtained in the ready made goods.
The designs given here are knit from wool and silk. The silk is made especially for this work and in combination with wool the effect is very handsome. The best results can only be secured by the use of the exact material called for in the instructions. Corticelli Bicycle and Golf Silk is made of specially selected stock dyed in fast colors, and will be found easy to knit. Fleisher's German Knitting Worsted, Golf and Cycle Mixtures, is just the right size to use in connection with the silk. To identify this yarn look for the name "Fleisher's" on the ticket attached to each hank. The colors of silk to go with the different colors of yarns harmonize perfectly. Ordinary yarn, no matter of what kind or color, will not do to work these patterns.
Those who do not care to knit the complete stocking can make the tops alone. These are frequently made separate, but the stocking (purchased at any store) on which they are put should not be cut, but the top sewn on just in place to turn over in the right position. The extra thickness is no disadvantage, in fact, rather the contrary. This suggestion is entirely practical, especially since stockings with fancy tops and plain legs are now the vogue.
Care must be taken to knit the top of stockings quite loosely, allowing plenty of slack in the thread especially when changing from silk to yarn and vice versa. Without this slack the tops of Patterns B and C will not give or stretch, making it difficult to draw them on and off. To knit these patterns four No. 13 steel needles are required. The quantity of silk and yarn necessary for each pair of stockings is given on the following pages. Among the twelve patterns will be found one which cannot fail to suit every individual taste as to the proper color combinations of yarn and silk.
Explanation of Terms and Abbreviations.
K—Knit plain.
P—Purl (or seam). Knit with thread before the needle.
N—Narrow, and means to knit two stitches together.
PN—Purl (or seam) two stitches together.
SL—Slip a stitch from the left needle to the right without knitting it.
SL and B—Slip and bind, that is slip one stitch, knit the next, and pass slipped stitch over.
*—Stars or Asterisks indicate repetition.
Complete illustrated directions for these stitches will be found in "Florence Home Needlework" for 1894. A copy will be mailed to any address for 6 cents in stamps.
Stocking No. 1, Pattern A. Dark Green Yarn and Red Silk.
Materials—1 pair Stockings: Fleisher's German Knitting Worsted, Golf and Cycle Mixture, 2 skeins No. 211; Corticelli Bicycle and Golf Silk, 2 skeins No. 543.
Stocking No. 2, Pattern A. Dark Green Yarn and Dark Brown Silk.
Materials—1 pair Stockings: Fleisher's German Knitting Worsted, Golf and Cycle Mixture, 2 skeins No. 211; Corticelli Bicycle and Golf Silk, 2 skeins No. 529.
Stocking No. 3, Pattern A. Light Brown Mixed Yarn and Dark Green Silk.
Materials—1 pair Stockings: Fleisher's German Knitting Worsted, Golf and Cycle Mixture, 2 skeins No. 207; Corticelli Bicycle and Golf Silk, 2 skeins No. 586.
Stocking No. 4, Pattern A. Green and Brown Mixed Yarn and Old Purple Silk.
Materials—1 pair Stockings: Fleisher's German Knitting Worsted, Golf and Cycle Mixture, 2 skeins No. 200; Corticelli Bicycle and Golf Silk, 2 skeins No. 678.
Stocking No. 5, Pattern A. Tan and Brown Mixed Yarn with Dark Red Silk.
Materials—1 pair Stockings: Fleisher's German Knitting Worsted, Golf and Cycle Mixture, 2 skeins No. 214; Corticelli Bicycle and Golf Silk, 2 skeins No. 543.
Stocking No. 6, Pattern A. Brown and Blue Mixed Yarn with Blue Silk.
Materials—1 pair Stockings: Fleisher's German Knitting Worsted, Golf and Cycle Mixture, 2 skeins No. 218; Corticelli Bicycle and Golf Silk, 2 skeins No. 794.
Dealers can furnish all the above material. See pages 92 and 94.
Pattern A.
For Stockings Nos. 1, 2, 3, 4, 5, and 6.
Cast 100 stitches Yarn on to 4 No. 13 Steel Needles and knit as follows: Knit 4 rounds, 2 plain, 2 purl Yarn;—5th and 6th rounds, k plain Yarn;—7th round, k 1 Silk, 9 Yarn;—8th round, k 2 Silk, 7 Yarn, 1 Silk;—9th round, k 3 Silk, 5 Yarn, 2 Silk;—10th round, k 4 Silk, 3 Yarn, 3 Silk;—11th round, k 5 Silk, 1 Yarn, 4 Silk;—12th round, k 4 Silk, 3 Yarn, 3 Silk;—13th round, k 3 Silk, 5 Yarn, 2 Silk;—14th round, k 2 Silk, 7 Yarn, 1 Silk;—15th round, k 1 Silk, 9 Yarn;—16th round, k Yarn;—17th and 18th rounds, purl Yarn and reduce 16 stitches;—19th round, k plain Yarn;—20th round, * k 1, n; turn, sl 1; p 1; turn,[Pg 87] k 3; turn, p 3; turn, k 3, n; turn, p 4; turn, k 5; repeat from * all the way around in Yarn.—*21st round, in Silk, pick up 5 stitches behind; turn, k 5; turn, p 4; p 1 Silk and 1 Yarn together; turn, k 5; turn, p 4; p 1 Silk and 1 Yarn together; turn, k 5; turn, p 4; p 1 Silk and 1 Yarn together; turn, k 5; turn, p 4; p 1 Silk and 1 Yarn together; turn, k 5; turn, p 4; p 1 Silk and 1 Yarn together; repeat from * all around;—*22d round, pick up 5 stitches in Yarn the other way around; turn, p 5; turn, k 4; k 1 Yarn and 1 Silk together; turn, p 4; turn, k 3; k 1 Yarn and 1 Silk together; turn p 3; turn, k 2; k 1 Yarn and 1 Silk together; turn, p 2; turn, k 1; k 1 Yarn and 1 Silk together; turn, p 1; turn, k 2 and repeat from * all around. (Note, when you change color, always work reverse way.) Pick up stitches till you have 100 on your needles.—23d round, k Yarn;—24th and 25th rounds, p Yarn;—26th to 35th rounds, same as rounds 7th to 16th;—36th to 40th rounds, k plain Yarn;—41st and 42d rounds, p Yarn. This completes the top.
To Knit the Leg.—Knit 3 rounds plain, then purl 1, k 1 for 2 inches. Now turn the stocking inside out and proceed to knit the leg by the instructions given below. (The part just knitted forms the turn over top of stocking. It will be wrong side out while the leg is being knitted, but turns over right side out when the work is completed as shown by the engraving.)

Stocking Top of Pattern A.
Purl 3 rounds, knit 15 rounds plain; then p 1, k 4 all around; knit this way for 3 inches. The narrowing begins at the center rib of the back of the stocking and ends at the center rib in the front of the stocking. Make the first or center back narrowing as follows: on one of the needles which begins, p 1, k 4, purl the purled stitch, k 1, sl 1, k 1, pass slipped stitches over and k 1. This completes the first narrowing and the rib now consists of 1 purled stitch and 3 plain ones only. All the narrowings are made the same way. * Knit 3 rounds. In the fourth round knit to the rib preceding the narrowed center rib and narrow that rib as before; then knit to the rib, following the narrowed center rib, and narrow it; also repeat from *, always narrowing in every fourth round at each side of the previous narrowing until all the ribs, including the front center one, are narrowed. After knitting 4 inches more the leg is complete, and you are ready to begin the strap or the foot.
The strap is commonly used on bicycle and golf stockings although some prefer the complete foot. Below we give directions for knitting both.
To Knit the Strap.—Divide the stitches into two parts for the strap, making the division at the center back, and center front ribs. Beginning at the center back rib, * k 1, n, knit across the needle till but 3 stitches are left, sl and b, k 1; turn, purl back across the needle, repeat three times from *. After this do not to sl and b at the end of the needle but continue to narrow at the beginning of the needle each time in knitting[Pg 88] across, till the number of stitches is decreased to 16. Then knit the other half of the strap to match, as follows: beginning at the center front rib *k 1, n, knit across the needle till but 3 stitches are left, sl and b, k 1, turn, purl back across the needle, repeat three times from *. After this do not narrow at the beginning of the needle, but continue to sl and b at the end of the needle till the stitches are decreased to 16.
Now fold the right sides of the two parts just knitted together; k 1, then k 2 stitches (one from each needle) together and bind the stitch previously knitted over them; continue till all the stitches are bound off. Work in single crochet once around the edges of the strap to give extra strength.
To Knit the Foot.—Divide the stitches so that there will be 34 stitches on one needle for the heel. Decrease 3 stitches, and keeping the center back stitch in the center of the heel, knit plain on the right side and purl back on the wrong side until there are 15 loops at each side. Then knit across 19 stitches, n, k 1, turn, sl 1, purl back 9 stitches, n, p 1, turn, * sl 1, k across, knitting the stitch following the last narrowing together with the next of the stitches left on the needle; k 1, turn, sl 1, purl back and purl the stitch following the last narrowing together with the next stitch, purl 1; repeat from * until all the stitches on each side of the needle are used.
Pick up the 15 loops on each side of the heel for stitches. Place the stitches of the instep on one needle and the stitches of the sole on two more needles; work to the beginning of the first sole needle, k 1, n; knit across to within 3 stitches of the end of the 2d sole needle, n, k 1; repeat the narrowing in every other round till the number of stitches is decreased by 18. Then k 24 rounds without narrowing, continuing the ribs along the instep. Now knit one round narrowing 7 times across instep. Then knit 2-1/2 inches plain and narrow at the toe, as follows: place half the stitches on the instep needle and the other half on the two sole needles; at the beginning of the instep needle k 1, n, k across to within 3 stitches of the end of the needle, n, k 1; first sole needle k 1, n, knit to within 3 stitches of the end of second sole needle, n, k 1; narrow in this way in every other round until 12 stitches are left on the instep needle and 6 on each of the sole needles.
Bind off in this way, k 1, then knit 2 stitches together (one from the sole and one from the instep needle) and bind the stitch previously knitted over them; continue till all the stitches are bound off.
Stocking No. 7, Pattern B. Light Brown Mixed Yarn with Olive Green and Dark Brown Silk.
Materials—1 pair Stockings: Fleisher's German Knitting Worsted, Golf and Cycle Mixture, 2 skeins No. 207; Corticelli Bicycle and Golf Silk, 1 skein each Nos. 110 and 528.
Stocking No. 8, Pattern B. Green and Brown Mixed Yarn with Dark Green and Old Purple Silk.
Materials—1 pair Stockings: Fleisher's German Knitting Worsted. Golf and Cycle Mixture, 2 skeins No. 200; Corticelli Bicycle and Golf Silk, 1 skein each Nos. 586 and 676.
Stocking No. 9, Pattern B. Tan and Brown Mixed Yarn with Dark Green and Dark Red Silk.
Materials—1 pair Stockings: Fleisher's German Knitting Worsted, Golf and Cycle Mixture, 2 skeins No. 214; Corticelli Bicycle and Golf Silk, 1 skein each Nos. 586 and 543.
Dealers can furnish all of the above material. See pages 92 and 94.
Pattern B.
For Stockings Nos. 7, 8, and 9.
Notice—Y = Yarn; Olive = Olive Silk, No. 110; Brown = Brown Silk, No. 528.
For knitting Stocking No. 7 follow directions given below.
For knitting Stocking No. 8 use Green Silk where "Brown" is mentioned, and Old Purple Silk where "Olive" is mentioned.
For knitting Stocking No. 9 use Green Silk where "Brown" is mentioned, and Red Silk where "Olive" is mentioned.
The choice of three combinations in different colors of yarn and silk are offered for this pattern. See page 88.

Stocking Top of Pattern B.
To make the Top.—Cast 160 stitches Y on 4 No. 13 steel needles. P 2, k 2, for 6 rounds;—7th and 8th rounds, k plain;—9th and 10th rounds, k 1 stitch with Brown, 7 with Y, 3 with Olive, 7 with Y, 2 with Brown;—11th and 12th rounds, k 2 Brown, 5 Y, 5 Olive, 5 Y, 3 Brown;—13th and 14th rounds, k 3 Brown, 2 Y, 2 Olive, 1 Y, 3 Olive, 1 Y, 2 Olive, 2 Y, 4 Brown;—15th and 16th rounds, k 3 Brown, 1 Y, 11 Olive, 1 Y, 4 Brown;—17th and 18th rounds, k 3 Brown, 2 Y, 2 Olive, 1 Y, 3 Olive, 1 Y, 2 Olive, 2 Y, 3 Brown, 1 Y;—19th and 20th rounds, k 3 Brown, 5 Y, 3 Olive, 5 Y, 3 Brown, 1 Y;—21st and 22d rounds, k 1 Y, 3 Brown, 3 Y, 5 Olive, 3 Y, 3 Brown, 2 Y;—23d, 24th, and 25th rounds, k 2 Y, 3 Brown, 1 Y, 2 Olive, 3 Y, 2 Olive, 1 Y, 3 Brown, 3 Y;—26th and 27th rounds, k 3 Y, 3 Brown, 1 Olive, 5 Y, 1 Olive, 3 Brown, 4 Y;—28th and 29th rounds, k 4 Y, 2 Olive, 1 Brown, 5 Y, 1 Brown, 2 Olive, 5 Y;—30th and 31st rounds, k 2 Y, 3 Olive, 1 Y, 2 Brown, 3 Y, 2 Brown, 1 Y, 3 Olive, 3 Y;—-32d and 33d rounds, k 1 Y, 3 Olive, 3 Y, 2 Brown, 1 Y, 2 Brown, 3 Y, 3 Olive, 2 Y;—34th and 35th rounds, k 3 Olive, 5 Y, 3 Brown, 5 Y, 3 Olive, 1 Y;—36th round, k 2 Olive, 7 Y, 1 Brown, 7 Y, 3 Olive;—37th and 38th rounds, k 1 Olive, 8 Y, 1 Brown, 8 Y, 2 Olive. This ends the decoration.
With yarn knit 10 rounds plain, but in the 10th round narrow 60 stitches, so that there will be 100 stitches on the four needles. Now proceed by directions given for knitting the leg of Pattern A, page 87.
Stocking No. 10, Pattern C. Brown and Blue Mixed Yarn, with Old Blue and Golden Brown Silk.
Materials—1 pair Stockings: Fleisher's German Knitting Worsted, Golf and Cycle Mixture, 2 skeins No. 218; Corticelli Bicycle and Golf Silk, 1 skein each Nos. 794 and 528.
Stocking No. 11, Pattern C. Green and Brown Mixed Yarn with Dark Green and Old Purple Silk.
Materials—1 pair Stockings: Fleisher's German Knitting Worsted, Golf and Cycle Mixture, 2 skeins No. 200; Corticelli Bicycle and Golf Silk, 1 skein each Nos. 676 and 586.
Stocking No. 12, Pattern C. Light Brown Mixed Yarn with Olive Green and Dark Brown Silk.
Materials—1 pair Stockings: Fleisher's German Knitting Worsted, Golf and Cycle Mixture, 2 skeins No. 207; Corticelli Bicycle and Golf Silk, 1 skein each Nos. 110 and 528.
Dealers can furnish all the above material. See pages 92 and 94.
Pattern C.
For Stockings Nos. 10, 11, and 12.
Notice—Y = Yarn; Brown = Brown Silk; Blue = Blue Silk.
For knitting Stocking No. 10 follow directions given below.
For knitting Stocking No. 11 use Green Silk where "Brown" is mentioned, and Purple Silk where "Blue" is mentioned.
For knitting Stocking No. 12 use Dark Brown Silk where "Brown" is mentioned, and Green Silk where "Blue" is mentioned.
The choice of three combinations in different colors of yarn and silk are offered for this pattern. See above and page 89.

Stocking Top of Pattern C.
Cast on 136 stitches Y and knit as follows: Rounds 1 to 4, k 2, p 2 Y;—5th round, p Y;—6th round, k 4 Y, 4 Brown;—7th round, k 2 together Y, k 3 Y, 4 Brown, 4 Y, 4 Brown, and repeat 4 Y, 4 Brown all the way around;—8th round, k 1 Brown, 4 Y, 3 Brown;—9th round, k 2 Brown, 4 Y, 2 Brown;—10th round, k Y;—11th round, p Y;—12th round, k Y and increase 1 stitch;—13th round, k 9 Y, 6 Blue, 2 Y;—14th round, k 8 Y, 2 Brown, 6 Blue, 1 Y;—15th round, k 7 Y, 4 Brown, 6 Blue;—16th round, k 1 Blue, 5 Y, 6 Brown, 5 Blue;—17th round, k 2 Blue, 3 Y, 6 Brown, 2 Y, 4 Blue;—18th round, k 3 Blue, 1 Y, 6 Brown, 4 Y, 3 Blue;—19th round, k 3 Blue, 6 Brown, 6 Y, 2 Blue;—20th round, k 2 Blue, 6 Brown, 8 Y, 1 Blue;—21st round, 1 Blue, 6 Brown, 10 Y;—22d round, 1 Brown, 6 Blue, 10 Y;—23d round, 2 Brown, 6 Blue, 8 Y, 1 Brown;—24th round, 3 Brown, 6 Blue, 6 Y, 2 Brown;—25th round, 3 Brown, 1 Y, 6 Blue, 4 Y, 3 Brown;—26th round,[Pg 91] 2 Brown, 3 Y, 6 Blue, 2 Y, 4 Brown;—27th round, 1 Brown, 5 Y, 6 Blue, 5 Brown;—28th round, 7 Y, 4 Blue, 6 Brown;—29th round, 8 Y, 2 Blue, 6 Brown, 1 Y;—30th round, k 9 Y, 6 Brown, 2 Y;—31st round, k Y;——32d round, k Y;—33d round, purl Y;—34th round, k 4 Y, 4 Brown;—35th round, increase 1 Y, k 3 Y, 4 Brown, * 4 Y, 4 Brown and repeat from *;—36th round, k 3 Y, 4 Brown, 1 Y;—37th round, k 2 Y, 4 Brown, 2 Y;—38th round, k Y;—39th round, purl Y. This ends the decoration.
With yarn knit 10 rounds plain, but in the 10th round narrow 37 stitches, so that there will be 100 stitches on the four needles. Turn the work inside out, and proceed by directions given for knitting leg and strap or foot of Pattern A, page 87.
Corticelli Color Card.
To obtain the greatest benefit from using this book one should have a Corticelli Color Card, showing the 325 different colors in which Corticelli Filo Silk is made. With this card you can see at a glance the exact colors of silk called for in the instructions. We will send a Corticelli Color Card to any address for 12 cents in stamps.
Teachers' List.
We have prepared a list, which includes many of the best teachers throughout the United States, and to any of our readers desiring instruction in Art Needlework we shall be glad to recommend a competent teacher in your city or vicinity, qualified to give lessons to private pupils and to classes. Often-times where there is no teacher in a town one will be glad to come from a neighboring city if a small class can be formed so as to make it an object for the teacher. In this way the expense to each member of the class would be comparatively small.
Teachers of Art Needlework who are pleased with this book and wish information regarding our goods are invited to write for prices or samples. Our line of stamped linens is large, and varied enough to suit all tastes, and we are constantly issuing new designs. We have the helps such as every teacher wants for her pupils, instruction books, Color Cards, Colored Flower Plates, etc., and we think our co-operation cannot fail to increase your business. Feel at liberty to write us at any time. Questions gladly answered.
Any teacher may have her name added to our Teachers' List (see above) upon filling out a blank giving name and address, experience, usual prices charged for lessons, and other necessary information. Copies of this blank will be sent free on application. Address
NONOTUCK SILK COMPANY, Bridge St., Florence, Mass.
All designs shown in this book, as well as Corticelli Wash Silk for embroidering them, can be obtained from dry goods stores or fancy goods stores ready stamped on good quality round thread bleached linen. If merchants do not have these stamped linens in stock they will order them for you if you specially request them to do so. If one should refuse, try another dealer, or write direct to us, giving the dealer's name, and we will give you the name of a dealer in your vicinity from whom you can purchase what you want.
The above remarks apply to all doilies, centerpieces, tea cloths, tray cloths, and stamped linens for photograph frames, as well as to the yarn and silk required for knitting bicycle and golf stockings.
Be particular to see that you get the exact patterns illustrated in this book. Most dealers keep them. In any case it will pay you to insist upon having these original patterns and Corticelli Silk in order to take advantage of the treatment of the designs given herein. We will not hold ourselves responsible for failure if other material, either linen or silk, than that called for in the instructions is used for any design.
We shall be glad to estimate the cost of stamped linen and silk for any design shown in the book. Please inclose a 2 cent stamp for reply.
The Imperial Passepartout Frame, described on page 69, is sold by nearly all dealers in fancy goods and embroidery materials. If your local dealers do not keep these frames, and decline to order one for you, we will give you the name of a dealer who will supply you.
The Corticelli Doily Book, described on page 75, can be obtained in the same manner as the Imperial Passepartout Frame.
While we guarantee the dyes used for Corticelli Wash Silk are fast in color when ordinary care is taken in the laundrying, we cannot be held responsible for the result when even so small a quantity as a single skein of some other kind of silk has been used in connection with Corticelli Wash Silk to embroider any design. Needleworkers should use the greatest caution in this particular and avoid taking any chances.
In the washing be careful to use a good soap, like the Ivory, for instance, which is always satisfactory. "Washing powders," liquids, or chemicals of any nature should be let severely alone. Before beginning read the article by Mrs. Wilson on "To Wash Embroidered Linens," page 6. Mrs. Wilson gives some valuable suggestions which all our readers will be glad to profit by.
SPRINGFIELD PRINTING AN BINDING COMPANY.
For a Christmas Gift
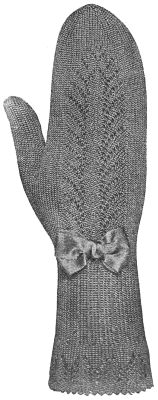
Nothing is more appropriate
than a pair of genuine
Florence Silk Mittens,
Or a pair of
Florence Silk Baby's Socks.
————
If your dealer will not supply you,
write direct to the Nonotuck Silk
Company, Bridge St., Florence, Mass.
————
![]() Send for our "Mitten Circular,"
Send for our "Mitten Circular,"
free. It tells all about the different
patterns and sizes. Write for it to-day.
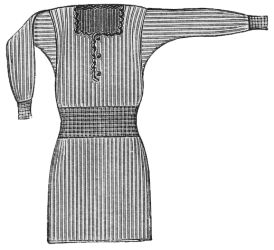
Florence Silk Underwear
. . . For Men and Women.
Silk is a non-conductor of heat.
Silk Underwear is healthful and hygienic.
No irritation, but perfect protection and comfort.
Soft and agreeable to the skin.
Especially desirable for ladies and invalids.
![]() Send for samples and price list.
Send for samples and price list.
NONOTUCK SILK COMPANY, Bridge St., Florence, Mass.
Corticelli Bicycle and Golf Silk.
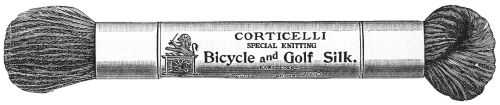
MADE expressly for knitting the fancy tops of Bicycle and Golf Stockings. In combination with yarn the effect is very handsome. It is dyed in the following colors, which are guaranteed fast:
Put up in one-half ounce skeins. Sold by dry goods merchants generally.
Nonotuck Silk Company, Bridge St., Florence, Mass.
Corticelli
Domestic Cord Edge Braid.
THIS braid makes a perfect edge, giving the dress a handsome and substantial finish. It is a SKIRT PROTECTOR, and one adapted to all kinds of weather.

It is made in two sizes, wide and narrow, and is furnished in colors to match the latest dress goods.
ASK YOUR DEALER FOR IT.
FREE! The Best,
Most Authentic
Knitting Manual
For using Worsted and Woolen Yarns of all kinds. Fully illustrated, 210 pages.
... Send 3 inside tickets taken from Fleisher's German Knitting Worsted and 7c in stamps to cover postage on book.
Address,
Fleisher's Worsted Works,
![]() Philadelphia, Pa.
Philadelphia, Pa.

Fleisher's German Knitting Worsted,
Spanish, Saxony, Flosses,
Germantown, Etc.
Fleisher's yarns contain half again as many yards to the pound as any other brand. They last longer and wear better. The black and all colors are guaranteed absolutely fast.
See that the name "FLEISHER'S" is on every hank.
Embroidery Hoops (Sizes 4, 5, 6, 7 inch.)

THE "QUEEN"
REQUIRES NO WINDING,
the cushioned elastic spring band gives a uniform pressure all the way round and holds a light or heavy fabric tightly and with equal firmness.
MRS. EMMA HAYWOOD,
of the "Ladies' Home Journal," writes:—"I consider your 'QUEEN' Embroidery Hoop a great advance on the old-fashioned Hoops. It holds the material firmly without injury."

The "Special-Select" Hoops
are made of selected wood, lathe turned with rounded edges and smoothly finished. Perfectly true in circle and will never warp out of shape. This style of hoop requires slight winding.
Sample, any size, by mail, 10 cents.
Address, GIBBS MFG. CO., (Dept. B) Canton, Ohio.
PAYSON'S INDELIBLE INK.
"Payson's" has been A HOUSEHOLD WORD for over 60 years.
It is still "the Oldest and the Best."
Received Highest Award, Medal and Diploma, Centennial, Philadelphia, 1876, and World's Fair, Chicago, 1893.
SOLD BY ALL BOOK, DRUG, AND FANCY GOODS STORES.
Corticelli Crochet and Knitting Silk.

Famous for its high lustre, even size, great strength, and absolutely fast dye. Its good qualities are already known to our readers. It is the best silk made for crocheting. Made in two sizes:
No. 300 (coarse) is the more popular size for all kinds of crochet work. Dyed in a great variety of colors which are guaranteed fast.
No. 500 (fine) furnished in Black and shades of White only. Each ball contains 1/2 oz. of pure silk.
Sold by Dry Goods Dealers and Merchants Generally.
Florence Knitting and Crochet Silk.
Strictly pure. Suitable for knitting mittens, stockings, and other articles of wearing apparel which require washing. The soft finish of this silk makes the work of knitting easy. It is equally desirable for crochet work. Made in two sizes:
No. 300, coarse, and No. 500, fine. Made in a great variety of colors. Each ball contains 1/2 oz. of silk.
Sold by Dry Goods Dealers and Merchants Generally.

1st. To get the most benefit from using this book you should have a "Corticelli Color Card," showing the 325 different shades in which Corticelli Filo Silk is made. With one of these Color Cards you can see at a glance the exact colors of silk called for in the instructions given in this book. We will send a Corticelli Color Card to any address for 12 cents in stamps.
2nd. If you are pleased with this book, the designs and Colored Plates, you can do us a great favor by showing it to your friends. They may want to send for one like it. We will be glad to send a copy to any address on receipt of 10 cents.
3rd. We published no book for 1897. Please don't ask us for one. From 1887 to 1896 we published Florence Home Needlework. These back numbers can still be obtained. Price 6 cents each. See page 4.
NONOTUCK SILK COMPANY,
Bridge St., Florence, Mass.
[1] Copyright, 1897, by Mrs. L. Barton Wilson. All rights reserved.
[2] Copyright, 1897, by Mrs. L. Barton Wilson. All rights reserved.
[3] The ancient Phrygian workers who introduced this embroidery into Rome were accustomed to represent by it figures, chiefly of birds, and likely this is the source of its name. The name might also have been suggested by the effect of the stitch itself, which is that of close, evenly laid plumage.
Transcriber notes:
P. 26. '653, 654, 729 5.', changed '729 5' to '729.5.'
P. 45. 'with 678, 655.7, 616 5.' changed '616 5' to '616.5.'
P. 49. 'and other dark', changed 'other' to 'others'.
P. 63. 'with 636, 655 7.', changed '655 7' to '655.7.'
Fixed various punctuation.
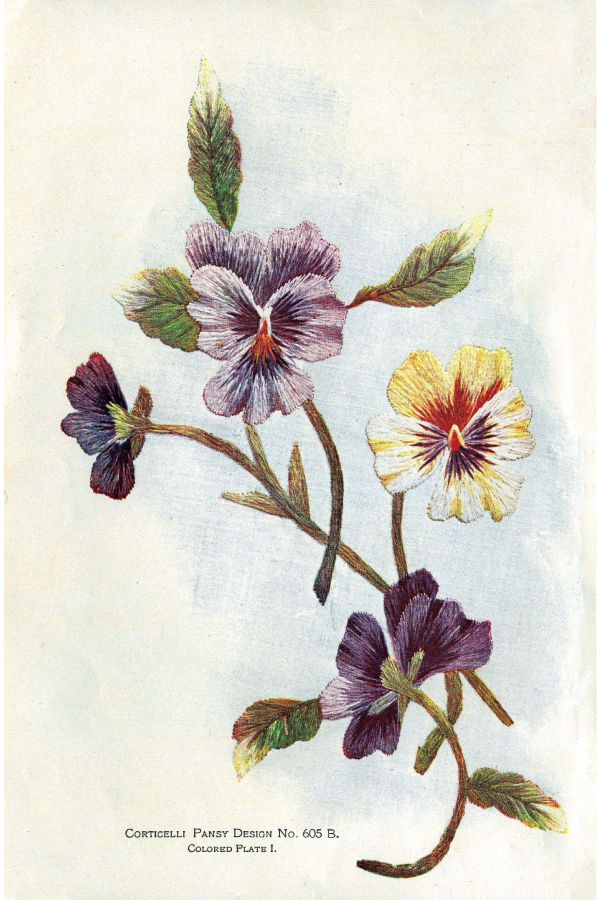
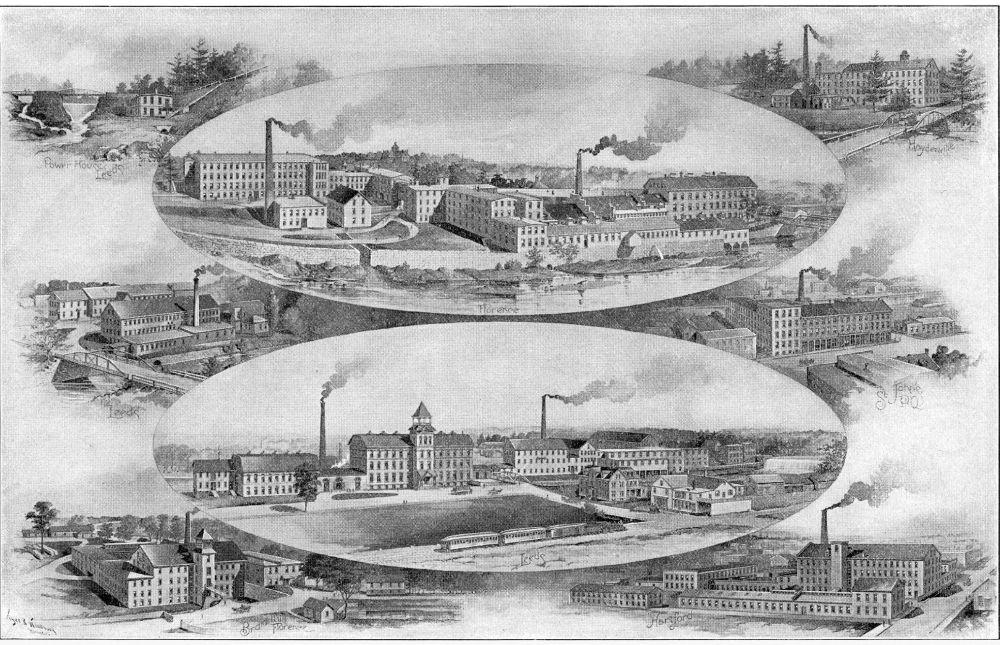
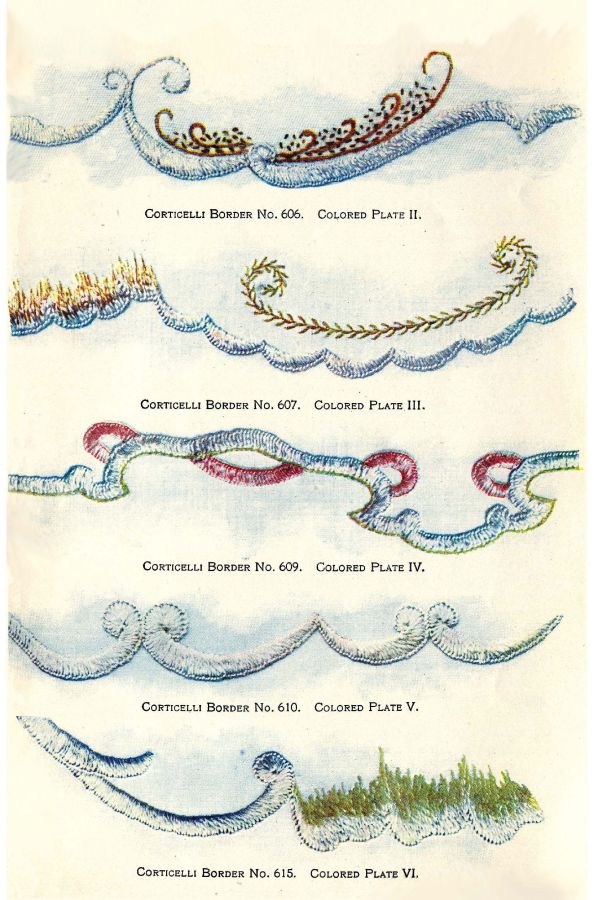
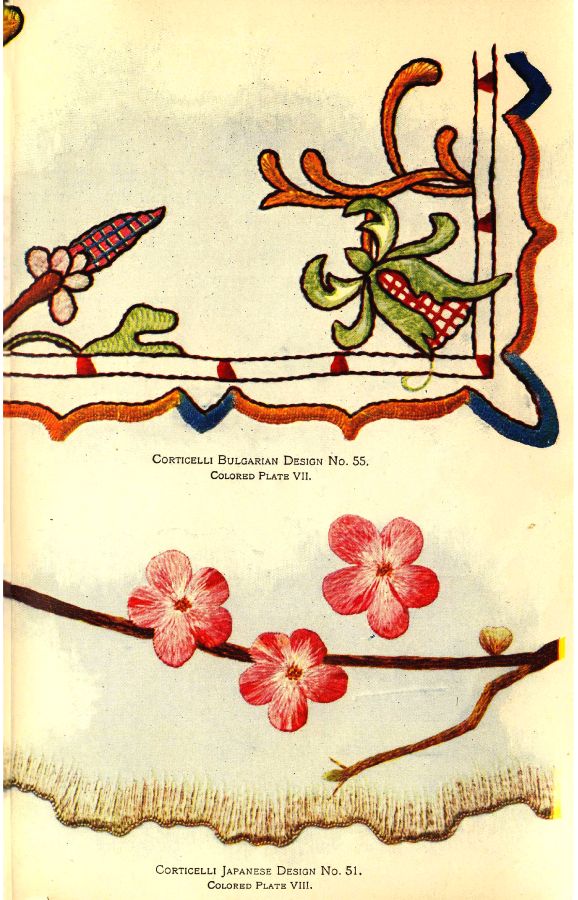
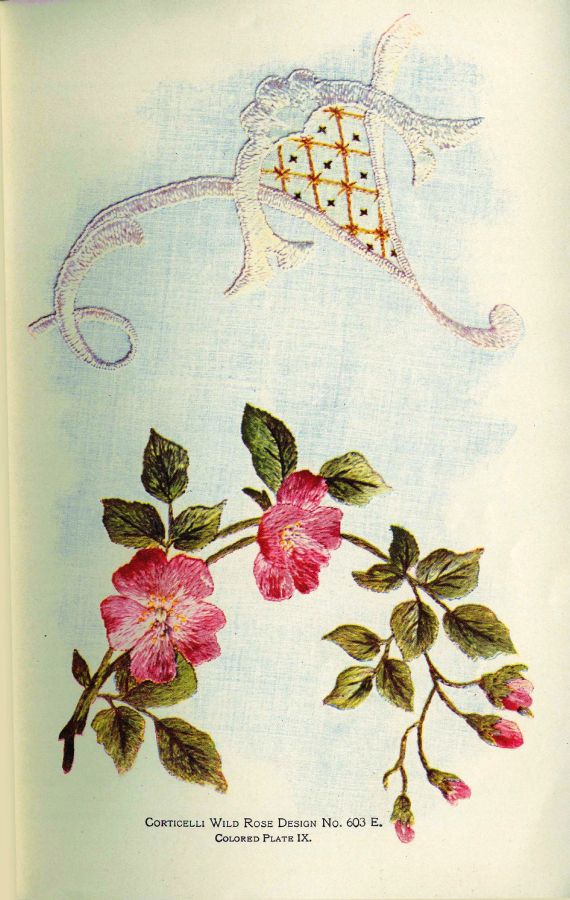
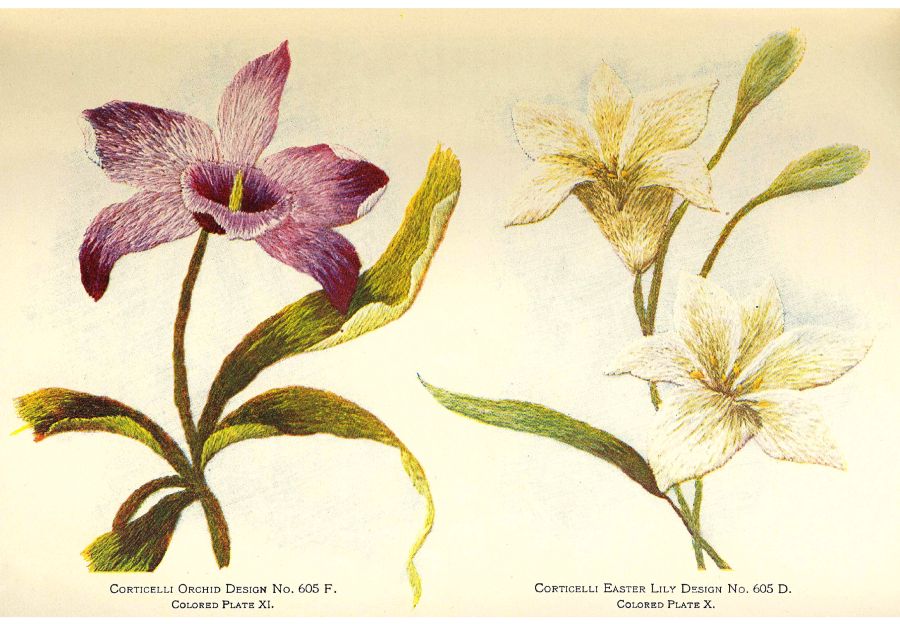
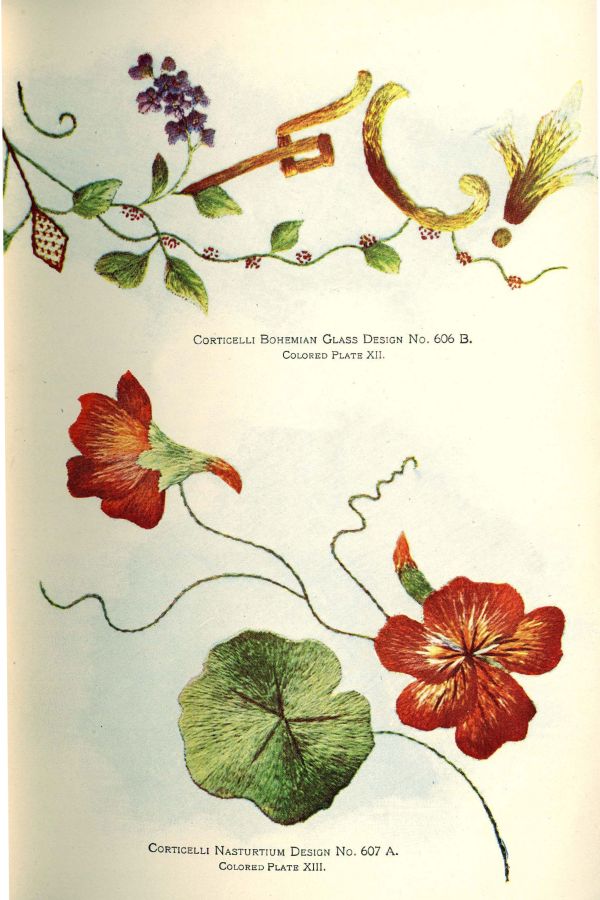
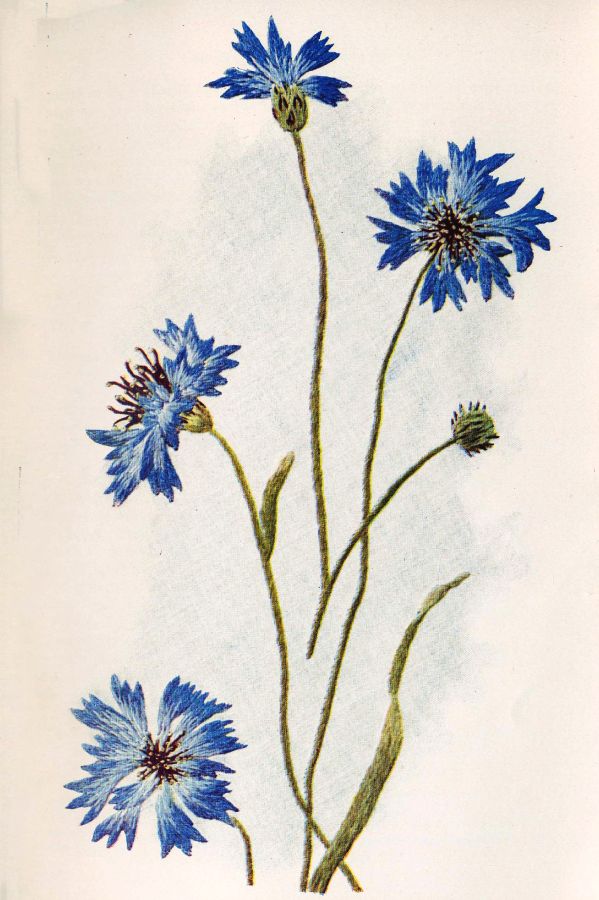
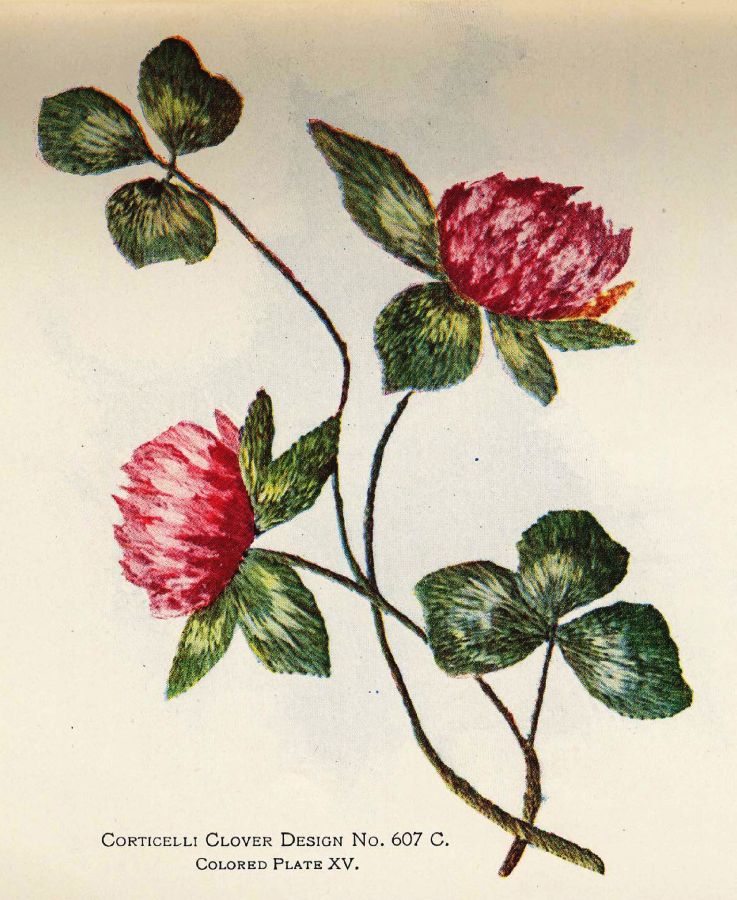
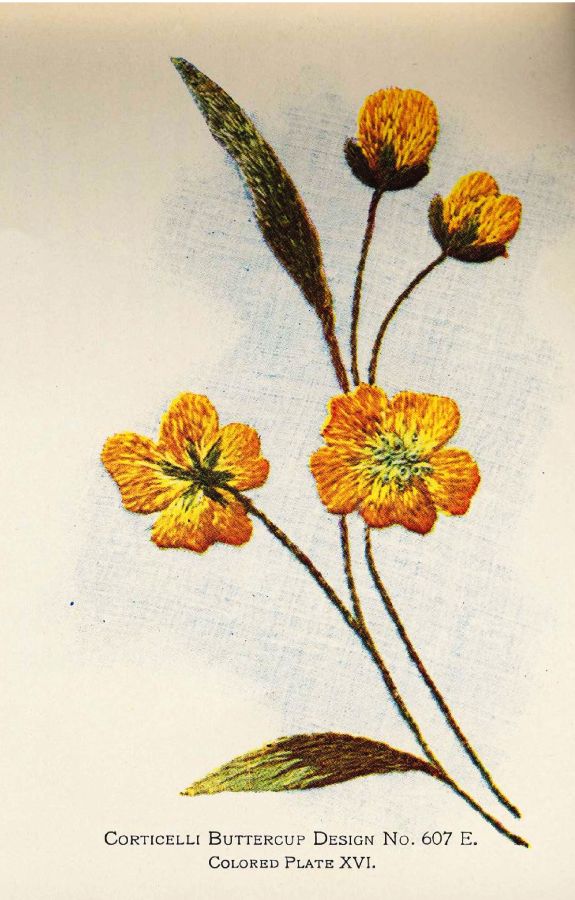
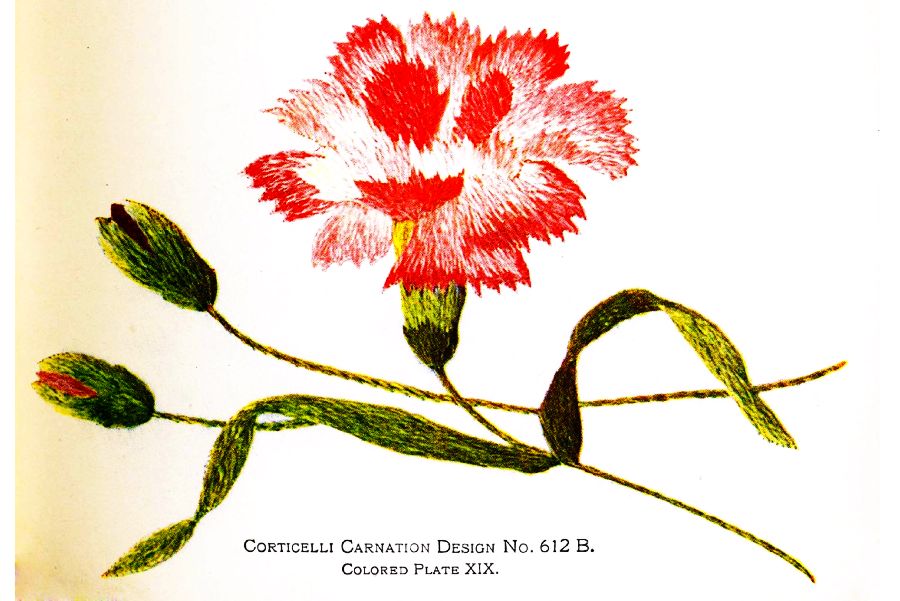
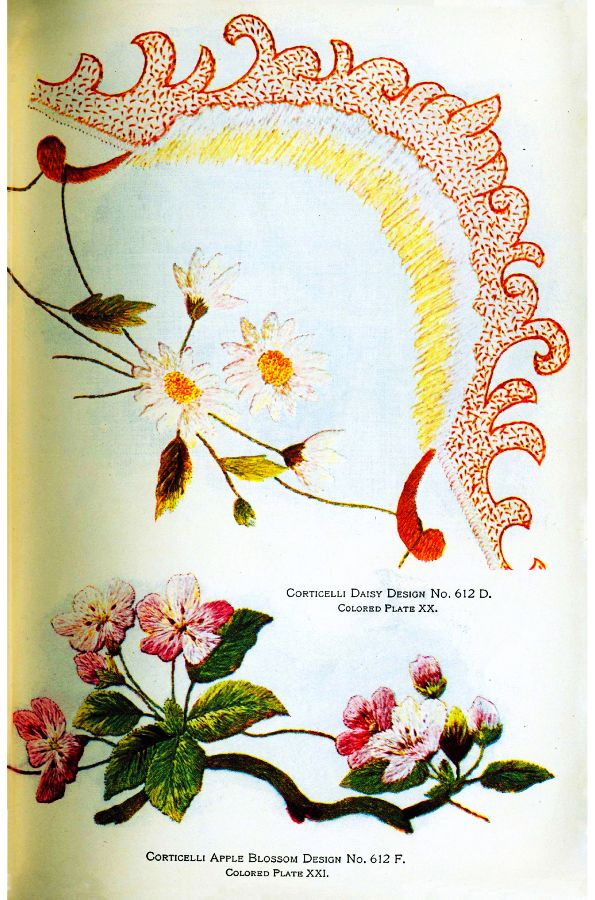
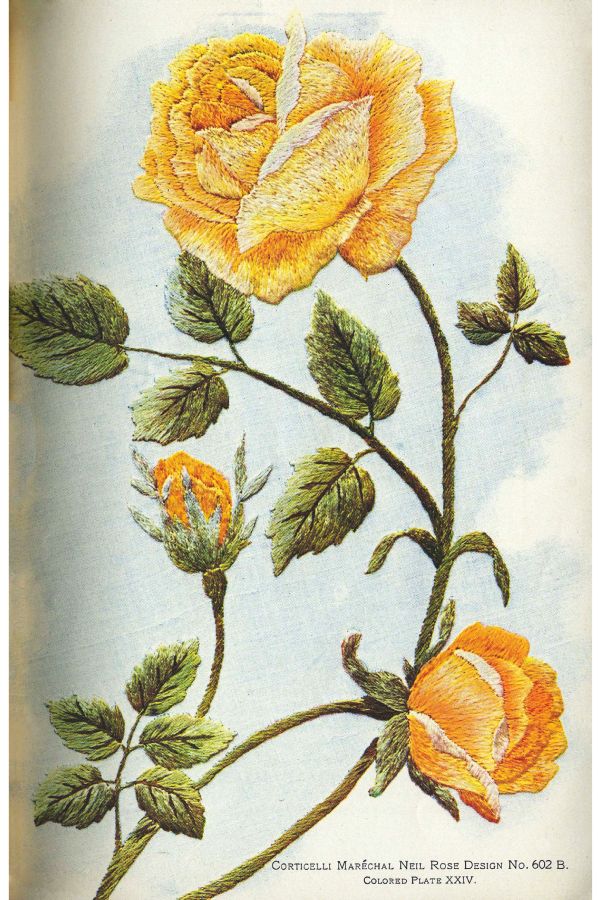
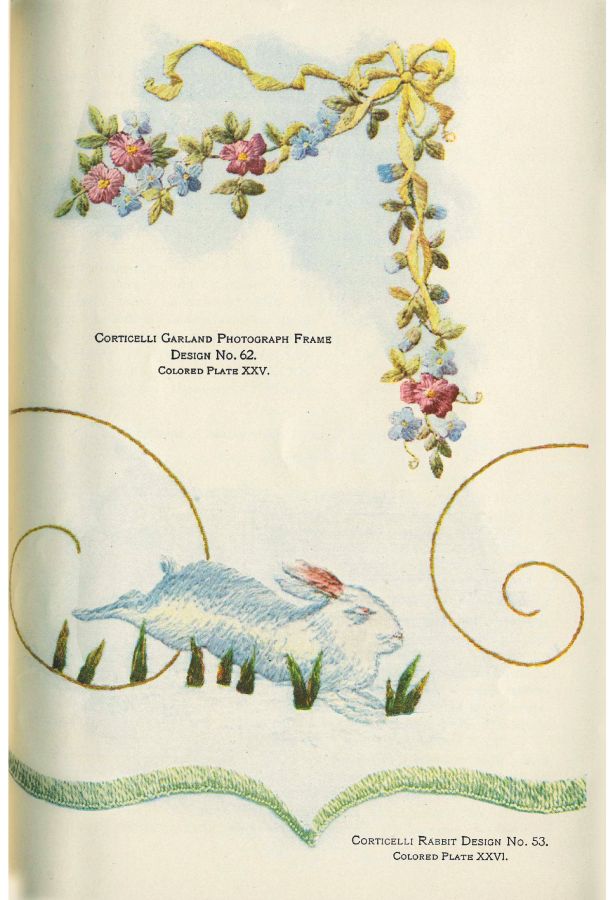
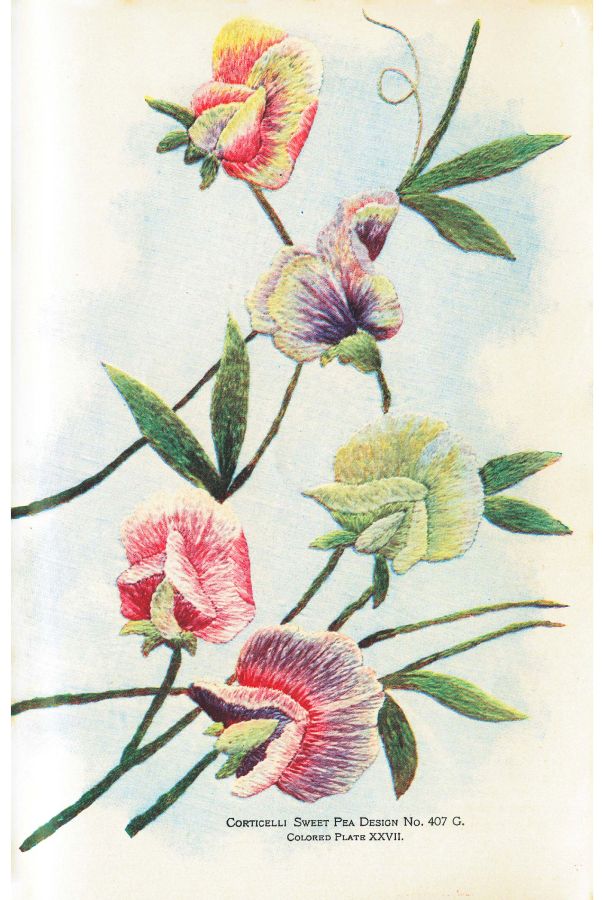