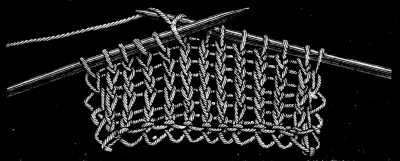
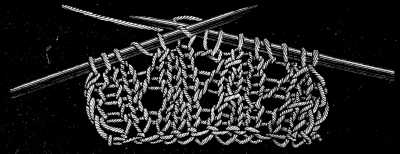
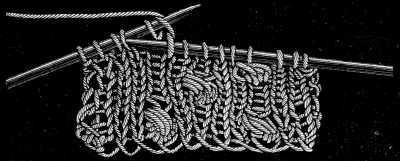
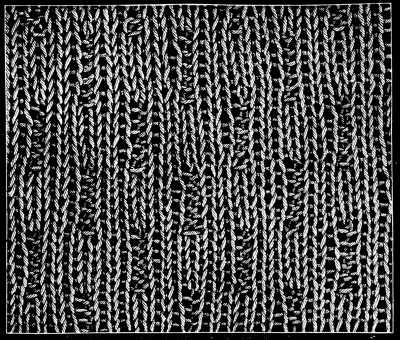
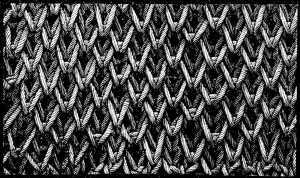
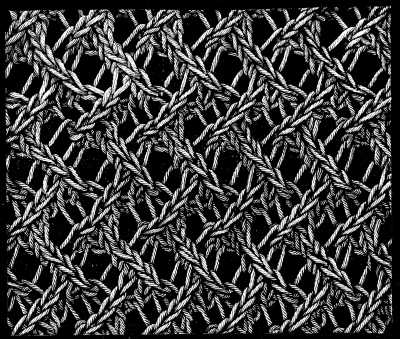
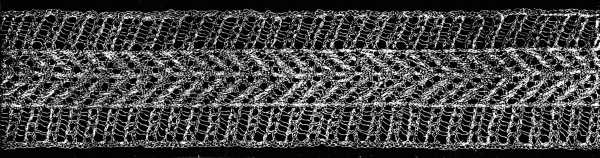
 Insertion—Plain stitches and overs
Insertion—Plain stitches and overs
Insertion—Plain stitches and overs
Knitting is one of the earliest forms of needlework, and one, which has been carried to the highest perfection. It would be difficult to invent new stitches or patterns and, we shall therefore confine ourselves to describing the stitches in general use, and reproducing those of the old patterns we consider the most useful, that our readers may make their own selection.
In former days, knitting served mainly for the manufacture of stockings, and even now, in spite of machines, handknit stockings, and numberless other useful and ornamental articles, such as shawls, counterpanes, cradle-coverings, gloves, laces etc. are in great request.
Besides its practical use, knitting is an easy and pleasant pastime that can be taken up at odd minutes and even carried on, whilst talking, or reading.
Knitting consists of loops, or stitches, as they are generally called, formed by means of a thread and two needles.
In round knitting, four, or five needles are necessary for the better handling of the work.
Through the loops formed in knitting, being connected together in unbroken continuity, a very elastic fabric is produced, which is specially suitable for making warm, and closely-fitting wearing-apparel.
Materials.—Threads with a slight twist, such as Coton à tricoter D.M.C, are the best. With regard to the thickness of the needles, whether they be of steel, wood, or bone, your choice must be determined by the quality of the thread used.
The accompanying table is intended to help inexperienced knitters to match their needles and thread, we advisedly say, help, as it is impossible exactly to determine the numbers that will correspond, because every hand knits differently, and a loose knitter has to use finer needles than a tight knitter.
Other materials are enumerated here, besides, what is properly speaking, called knitting-cotton, as for caps, lace edgings, insertions and so forth, finer kinds of thread and threads with a stronger twist which show up the pattern better, should be used.
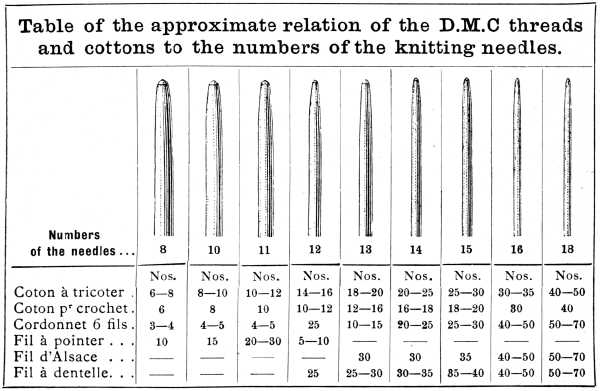 Table of the approximate relation of the D.M.C threads
and cottons to the numbers of the knitting needles.[A]
Table of the approximate relation of the D.M.C threads
and cottons to the numbers of the knitting needles.[A]
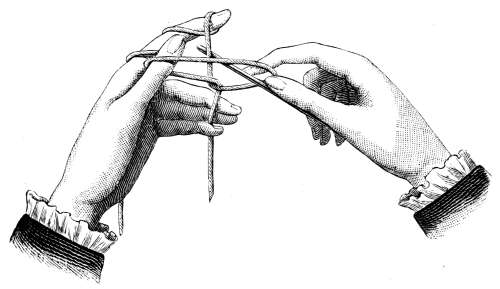
Position of the hands in knitting (fig. 341.)—Lay the thread over the fifth finger of the right hand, and twist it round it, then carry it over the forefinger, which should be kept close to the work, the work being held between the third finger and the thumb. The left hand remains more or less inactive, having merely, by a slight movement of the forefinger to pass the loops, in succession, on to the needle in the right hand, which forms the stitches. This position of the hands, which is the one usually adopted in England and France, is the one represented in our illustration. The Germans on the contrary, lay the thread over the left hand, and can move the hands much more quickly, in consequence. There are some ways of casting on, which can only be done in the German fashion.
To prevent the irregularity in stitches, the needles should never be allowed to protrude more than 1 or 1½ c/m, from the work. All exaggerated movement of the arms, which renders knitting a very tiring occupation, should be avoided.
Casting on.—Casting, or, setting on, as it is sometimes called, is the formation of the first row of stitches which are to constitute the foundation of the work.
There are four methods of casting on: (1) crossed casting on, done in four different ways; (2) knitting on; (3) slipping on, also done in two ways; (4) casting on with picots.
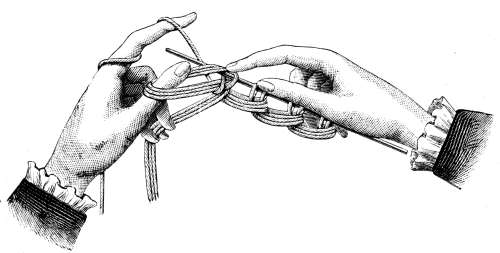
(1) Crossed casting on with a single thread (fig. 342). Lay the thread over your fingers as though you were beginning a chain of plain stitches, fig. 403, leaving a long end, sufficient to make the number of stitches required, lying within the palm of the hand. Put the needle in from below, into the loop on the thumb, and pass it from right to left under that part of the thread which lies between the forefinger and the thumb. Then bring the thread through the loop on the thumb, draw the thumb out, and lay the loop on the needle. In making the next stitches, lay the thread over the thumb, so that the end lies outside. Put in the needle under the front thread and complete the stitch as before. This method of casting on is generally done over two needles, one of them being drawn out before the knitting-off is begun, to ensure a loose edge.
Crossed casting on with a threefold thread.—This method is similar to the last, only that the thread is taken threefold and is drawn by the needle through the loop, which is formed at the bend of the thread. Then you pass the single thread over the left hand, and the triple one over the thumb, as shown in fig. 342, and make the same stitches, as above. The threefold thread makes a broad chain at the bottom of the loops.
Double crossed casting on (fig. 343).—This can be done either with a single or a threefold thread. In our drawing it is done with the latter. The first stitch is made as we have already described, only that you have to keep the loop on your thumb, put the needle into it a second time, lay hold of the thread behind, cast on a second stitch, and then only, withdraw your thumb. In this manner two loops are made at once, close together.
Crossed casting on, forming a chain (fig. 344.)—Begin by making one such stitch, as we have described in fig. 341; for the second and following stitches, bring the end of the thread to the inside of the palm of the hand, so that it lies between the thumb and the forefinger.
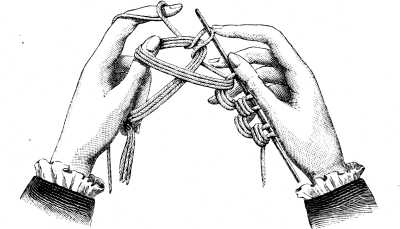
(2) Knitting on stitches (fig. 345).—Begin with a plain crossed stitch; then take the thread and the needle in the left hand, a second needle in the right, and catch it into the stitch on the left needle, lay the thread under the right needle and draw it through in a loop, through the loop on the left needle. Then transfer it as a fresh stitch to the left needle; catch the needle into this second stitch, and draw the thread through it, to form the third, and so on.
This method of casting on is used for articles, that are to have a double edge, (see figs. 355, 356), because stitches, made in this way, are easier to pick up than the tighter ones; but it should not be used, where it will form the actual edge, as the loops are always too open.
(3) Casting on with slip loops (fig. 346).—Begin by casting on one loop in the ordinary way, next, lay the thread, as in German knitting, over the left hand, twisting it once only round the forefinger, then put the needle in, upwards from below, under the thread that lies on the outside of the forefinger; draw out the finger from the loop, put the loop on the needle to the right, take the thread on the forefinger again, and so on.
Casting on with double slip loops (fig. 347).—Begin by casting on a stitch in the ordinary way, then lay the thread over the forefinger, the reverse way, so that it crosses between, not outside the hand and the body of the knitter. Pass the needle upwards from below, under the inside thread, and slip this thread as a loop on to the needle. Continue to cast on, inserting the needle under the front and back threads alternately. This method is specially suitable for open patterns, where you have to increase several times, in succession.
(4) Casting on with picots (fig. 348).—Cast on two stitches in the ordinary way and turn the work. Lay the thread over the needle, put the needle into the first stitch, from right to left, and slip it on to the right needle, knit off the second stitch plain, and draw the slipped one over it.
Cast on as many stitches as you want in this manner and then pick up the picots thus formed, with an auxiliary needle, and knit them off like ordinary stitches.
This method of casting on may be varied thus in the following manner: having cast on the stitches as in fig. 348, throw the thread over the needle and knit two stitches together.
Plain stitch (fig. 349).—This is the easiest stitch and the first which a knitter has to learn. It is executed as follows: Put the right-hand needle in, upwards from below, under the front part of the first stitch on the left-hand needle, lay the thread from right to left under the needle, draw it through the loop, and drop the loop off the left needle.
Plain knitting is employed wherever a perfectly smooth, even surface is required. It looks quite differently on the wrong side from what it does on the right where it presents the appearance of vertical rows of plaiting.
Back, or seam-stitch (fig. 350).—You may intentionally knit the wrong side of plain knitting. This is called purling and is done, in the following way: lay the thread over the left needle, and put the right one, downwards from above, behind the thread, into the loop on the left needle, lay the thread upwards from below, over the right needle, draw it through the loop, and drop the loop off the left needle. This stitch is used in knitting patterns, and for marking horizontal lines in smooth surfaces, such as the seam of a stocking, for instance.
Plain stitch taken from behind (fig. 351).—Put the needle in from right to left, under the back part of the stitch; leave the thread behind the needle, then pass it from right to left over the needle and draw it through the stitch.
Back, or seam-stitch taken from behind (fig. 352).—Put the needle into the second part of the stitch, upwards from below, and knit it as a back or seam-stitch.
In plain stitch, taken from behind, the two threads of the loop are crossed, instead of lying side by side, as they do in plain knitting.
Back-stitch taken from behind, is only used for certain open-work patterns.
Overs (fig. 353).—These form holes in plain knitting, and are used for open-work patterns and for increasing.
To make an over, lay the thread over the needle, and in the next row, knit this loop like any other stitch.
Each over adds one to the existing number of stitches. In cases, therefore, where the number is to remain the same, you have to make as many intakes as overs. Overs can only be used in conjunction with other stitches.
Knot stitch (fig. 354).—This forms a raised spot in plain knitting and is executed as follows: knit 1, and leave it on the left-hand needle; put the stitch you have made with the right needle back on the left, and knit it off. Make 4 or 5 similar stitches, all issuing from the same stitch on the left needle, so that you have 4 or 5 loops on the right needle; then drop the stitch off the left needle, and pull the 4 first loops over the last one.
Cable or chain stitch.—Chain stitches are used for strengthening and equalizing the edges of articles that are made in stripes. They can be made in two ways; either, you knit off all the stitches on one needle, turn the work, put the needle into the first stitch, as if you were going to knit it from the back, and take it off the left needle without knitting it, the thread to lie behind the needle; or, you knit off all the stitches on one needle, turn the work, and knit off the first stitch.
The names of the stitches.—Out of the stitches that have been already described, other stitches are formed, which, as they are frequently alluded to in knitting directions, we shall here enumerate, explaining all the terms, usually employed in such directions.
Over, or increase.—Explained in fig. 353. Throwing the thread once over the right needle.
Double over, or two increases.—Throwing the thread twice over the needle.
Plain intake.—Knitting two stitches together plain. This is done when the intake is to lie from left to right.
Purled intake.—Purling two stitches together. This is done to make the stitches, that are knitted together, visible; or in the case of a piece of work composed of stripes, on the wrong side, when the intake is to lean to the right, on the right side.
Plain decrease, taken from behind.—Knitting off two stitches together, plain from behind. This is done when the intake is to lie to the left.
Purled decrease, taken from behind.—Purling two stitches together, from behind. This is done when, in articles composed of stripes, the decrease has to be made on the wrong side, and is to lie to the left on the right side.
Pulling over.—Slipping a stitch from the left needle to the right without knitting it, knitting the next plain, and pulling the slipped stitch over the knitted one. In this manner two or three stitches can be pulled over the knitted one.
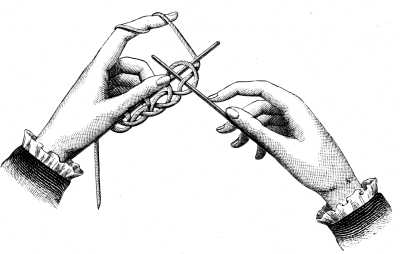
Casting off.—To prevent the stitches from unravelling they are finished off in the following manner. Knit off two plain, pull the first over the second and drop it, so that only one remains on the needle. Knit the next stitch, and pull the one behind over it, and so on. This chain of stitches, must neither be too tight, nor too loose, but just as elastic as the rest of the work.
Materials for stockings.—Stockings can be made of silk, wool or cotton, entirely according to fancy, but for coloured stockings, we cannot too highly recommend the D.M.C knitting cottons, as more durable, in all respects, than either silk or wool. They are manufactured in 360 different shades, whereas, wool and silk are only to be had in a very limited assortment of colours. For hand-knit stockings, Nos. 25, 30, 35[A] are the best, for machine-knit, Nos. 40 and 50.
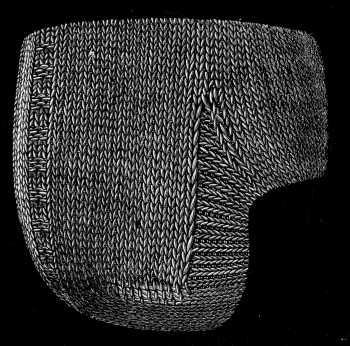
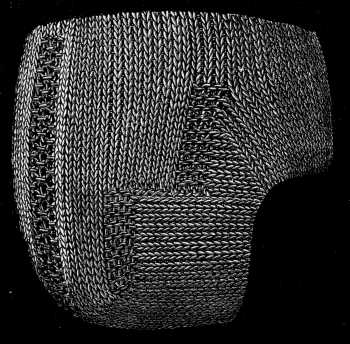
Stocking knitting.—A stocking consists of five parts: (1) the top, (2) the knee, (3) the leg, (4) the heel, (5) the foot.
(1). The top may be either ribbed, or knitted in an openwork stitch of same kind or with a double-toothed edge, fig. 356.
(2) and (3). The knee, and the leg down to the heel, are generally plain knitted; it is only children's stockings that are fancy knitted.
(4). The heel, is worked as straight knitting backwards and forwards; by knitting first one row plain and then turning back and knitting it purl. It is shaped to the foot by the intakes at the top.
(5). The foot is knitted plain, with intakes from the heel onwards, to get rid of the superfluous stitches. Then knit a plain piece, without a seam-stitch, till you begin to decrease for the toe, which can be worked in several different ways.
To ensure the right proportions between the several parts of a stocking, the following directions should be attended to. An ornamental top must never be taken into account, in measuring the length of the leg. When the top part is finished, you make the seam, at the beginning of the first needle of the round, of one, or two purled stitches, or sometimes, a narrow pattern of purled stitches. This marks the middle of the stocking. For ordinary-sized stockings, knit plain from the top-band, till the knitted piece, forms a square.
For stockings that are to cover the knee, knit half as much again, that is one and a half times the width of the stocking. This brings you to the calf of the leg. Pull the third stitch after the seam, over the second, and knit together the two last but one before the seam. There should be 12 rounds between each of the first 3 or 4 intakes, and after that 8, until this part is one and a half times the width of the knee in length, and a quarter narrower.
For the ankle, knit a plain piece, half the width of the knee in length, without intakes.
For the heel, count the stitches on the four needles, exclusive of the seam, and put two stitches more than the quarter of the whole number on to the needles, to the right and left of the seam.
For a heel to fit well, it should be as long as it is wide. In order that they should wear better, the heel and the toe are often knitted with double thread. Coton à feutrer D.M.C[A] is made expressly for that purpose, and should be wound round the thread of which the whole stocking is made. For the instep, the part between the heel and toe, you must go on decreasing from the heel, until you have 2 stitches less on each needle, than you had at the ankle. Then knit the plain part of the foot, which should be as wide as the ankle, after which proceed to decrease for the toe, which should be a quarter the length of the whole foot. In spite of this careful subdivision, it is always well to count the stitches, to ensure perfect regularity. The number of stitches cast on, at the outset, for the same-sized stockings, must depend upon the size of the wool or cotton; we can only give the numbers approximately. Our calculation is based on the use of 5 needles; the given number has therefore to be cast on four times.
| Coton à tricoter D.M.C Numbers to be used | Number of stitches to be cast on one needle for stocking ordinary-sized | Number of stitches to be cast on one needle for stockings that are to reach above the knee |
| 25 | 32 | 36 |
| 30 | 34 | 38 |
| 35 | 36 | 42 |
| 40 | 40 | 46 |
| 50 | 42 | 50 |
Scalloped edge (figs. 355 and 356).—This is the simplest and strongest edge you can have for a stocking, and is called the cat's-teeth edge.
 Fig. 355.
Scalloped stocking edge.
Edge open.
Fig. 355.
Scalloped stocking edge.
Edge open.
 Fig. 356.
Scalloped stocking edge.
Edge folded together.
Fig. 356.
Scalloped stocking edge.
Edge folded together.
Having cast on the stitches, knit 6 to 10 rounds plain, according to the size of the cotton, then one round of alternate intakes and overs. Knit as many plain rounds as before, and with a sixth needle take up as many of the cast on stitches, as you have stitches on one of the upper needles. Turn this needle inwards, and place it against the outside needle and knit off both needles together. See that you knit the corresponding stitches off together, otherwise the scallops that form the edge will be crooked.
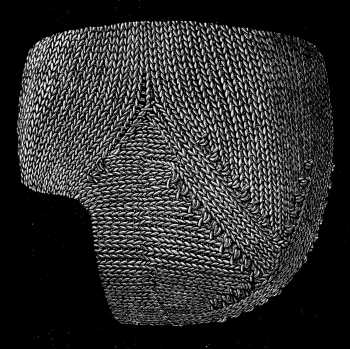
Common heel (fig. 357).—This is the simplest form of heel, and can be knitted either with or without an outside seam. Divide the stitches into four, and put two more on each of the heel needles than on the others, then make, according to the size of the cotton, from 15 to 20 seams; knit off all the stitches on the right needle and a third of those on the left. Supposing that you have 24 stitches, knit off 8, then slip 1, knit 1, and pull the slipped stitch over, knit 2 plain, turn the work, slip the first, and purl the next 8 stitches of the second needle; purl the 9th and 10th together, purl 2, turn the work to the right side, and slip the first stitch on to the right needle. By means of these successive intakes after the 8 stitches, the knitting forms a plait on both sides of the heel.
In all heels that are made after this pattern, the intakes must begin on the right side and the last one must be made on the wrong, so that once the heel is finished and the work turned, you can go on knitting plain.
When you have finished the stitches of the two heel needles up to the outside seams, take up the stitches on the sides of the heel with a spare needle and knit them on to the left heel needle, then knit the stitches reserved for the instep, take up the stitches on the right side of the heel again and knit them on to the fourth needle.
In the next round, knit all the stitches of the first needle plain, excepting the 4 last; knit the first and second of these together and the two last plain. Knit the two first stitches of the fourth needle plain, slip the third, knit the fourth and pull the slipped stitch over.
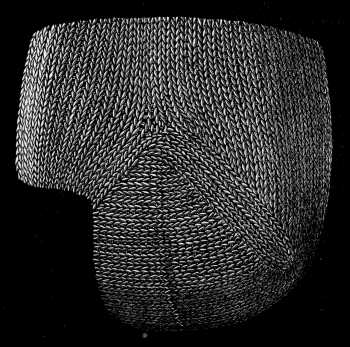
Heel in steps (fig. 358).—After dividing the stitches, make from 12 to 14 seams. Then knit as many stitches of the first needle as you have seams at the side; turn the work, and begin the needle with the seam you made first. Knit off as many stitches from the second needle as from the first. Make the same number of seams, as for the first part of the heel. When the seams are finished, take up the chain stitches, on both sides, make a decrease by knitting the last stitch of the small part and the first of the large, together; knit two; turn the work; slip the first stitch, knit to the second side, and decrease as in the first part.
When you have decreased all the stitches up to the last, take up the slipped stitches of the first part, and begin the intakes for the instep in the ordinary way.
There is not more work in this pattern of heel than in any other; it fits closely and consequently wears well.
Plain heel (figs. 359 and 360).—Those who are not fond of purling will appreciate this and the following pattern for a plain heel.
Knit off the stitches of the first needle after the seam; then on to two spare needles, cast on, 8 more stitches than you had on one needle after dividing the stitches; put the stitches of the third and fourth needles together and knit the first round plain.
2nd round—knit together the 1st and 2nd, and the 9th and 10th of the first auxiliary needle; and the 10th and 9th and 2nd and 1st of the second.
3rd round—plain.
4th round—knit together the 1st and 2nd and the 7th and 8th of the first needle.
5th round—plain.
6th round—knit together the 1st and 2nd and the 5th and 6th of the first auxiliary needle; and the 6th and 7th and the last but one and the last, of the second.
7th, 10th, 11th, 13th, 14th, 16th, 17th, 19th, 20th rounds all plain.
8th round—knit together the 1st and 2nd, and the 3rd and 4th of the first auxiliary needle, and the 4th and 3rd, and the last stitch but one and the last, of the second.
9th round—After the two last intakes, purl together the 4th and 3rd stitches before the end of the 1st and 3rd needle, and the 3rd and 4th at the beginning of the 2nd and 4th needles.
12th, 15th, and 18th rounds—Decrease, the same as in the 9th round.
21st round—knit 2 plain, at the beginning of the 1st and 3rd needles; knit the next 2 together; knit together the 4th and 3rd, before the end of the 2nd and 4th needles; knit the last stitches plain; go on decreasing in this way until the purled stitches meet. After the plain round over the intakes, add four plain rounds, divide the stitches that remain for the sole, on two needles and cast off on the wrong side.
Now take up the auxiliary stitches, and in the first 3 plain rounds, knit together the last and the first of the 1st and 2nd needles, and the last and the first of the 3rd and 4th.
With the rest of the extra stitches make purled intakes, knitting two plain rounds after each round with an intake.
For the other kind of plain heel also (fig. 360), auxiliary stitches are required. Supposing that you have 20 stitches on each needle, you must cast on 28 stitches on to each auxiliary needle; knit together the 4th and 3rd stitches at the end of the 1st and 3rd needles, and the 3rd and 4th of the 2nd and 3rd needles, so that you may have 4 plain stitches between both intakes. Go on decreasing, knitting 2 plain rounds after each round with an intake, until you have 6 stitches left on each needle. Then knit together the first and last stitches of each needle, one plain round over it, and finish with a chain on the wrong side of the heel. Then take up the auxiliary stitches and knit the instep.
Italian stocking (fig. 361).—The heel, sole and toe of a stocking always wear out before the instep. The Italians and Greeks economise time and material and facilitate the renewal of those parts that wear out, by knitting the upper part of the foot in two pieces. After knitting the heel in on or other of the above ways, work the foot as straight knitting with the two upper needles only, until you have the necessary length. Then knit the underneath part separately, in the same way. You must keep a chain along all edges and a narrow seam of one or two stitches. In the sole, which you make after finishing the upper part, your intakes must come directly after and before the seam. When you have got the same number of rounds in each piece, join them together and begin the toe.
Sew up the slits left open on either side, with a needle and thread taking care to fit the corresponding stitches together.
In this manner, when one part wears out, you have only to unpick these side-seams and re-sole or re-heel the stocking as the case may be.
Toe (fig. 362).—To begin as before, with the simplest and most ordinary way of making this part of the stocking, divide the stitches equally on to the 4 needles; knit together the 4th and 3rd stitches before the end of the 1st and 3rd needles, knit the 2 last and 2 first stitches of the 2nd and 4th needles plain, and make an intake by slipping the 3rd stitch, knitting the 4th, and pulling the slipped stitch over. Begin by knitting 2 plain rounds after each of the first 4 rounds with an intake, and afterwards only one. When you have only 4 stitches left on each needle, collect them on two, and knit them together, two and two, on the wrong side of the stocking.
Toe (fig. 363).—Here, before beginning to decrease, divide the stitches by 8, 10, or 12. Supposing that they have been divided by 10, knit 8 plain; knit the 9th and 10th together, 8 plain, knit two together, and so on, the whole way round. Then knit as many plain rounds as there are plain stitches between 2 intakes. In the next rounds with intakes, you will have one stitch less between each intake, in the second therefore, there should be 7 plain stitches between each intake, and you knit 7 plain rounds; and so on to the 7th round, when 2 stitches will remain, followed by 2 plain rounds; when there are only 4 stitches left on the needles, turn them in to the wrong side of the stocking, and finish off with a chain.
Toe (fig. 364).—Begin the intakes with the two first stitches of each needle, by the slip and pull over process, knit one plain round after each round with an intake. In the following rounds, make the intake in the 2nd round with the 3rd and 4th stitches, in the 3rd, with the 5th and 6th stitches, in the 4th, with the 7th and 8th stitches, so that when finished the intakes form a kind of spiral. Finish off in the ordinary way.
Toe (fig. 365).—We will describe one other kind of toe, quite as shapely and easy to make as the others.
1st round—purl the first 2 stitches on each needle together.
2nd and 3rd, 5th and 6th, 8th and 9th, 11th and 12th, 14th and 15th, 17th and 18th rounds—plain.
4th round—1 plain, 1 intake with the 2nd and 3rd stitches, and with the last 2 on each needle.
7th round—knit the 2 first plain, make 1 intake with the 3rd and 4th stitches, and 1 with the 2 last.
In each of the next rounds with intakes, knit 1 plain stitch more.
When the two seams meet, pull the last stitch on each needle over the first of the next; knit the stitches between the intakes plain. Continue to decrease in this manner until the last stitches are reached.
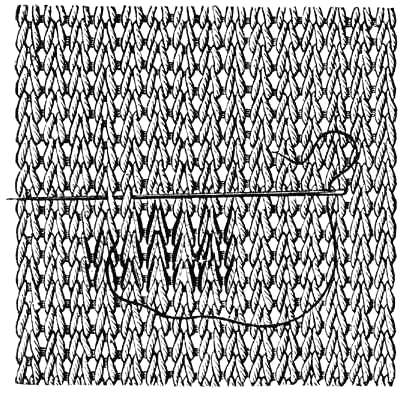
Mending knitting.—Knitted articles are repaired by reconstructing the web with a needle and thread. When the stitches are not actually broken, they can be strengthened by new ones made over them, by means of a needle and thread.
Materials for darning stockings.—The thread used for darning a stocking should be a little finer than that of which it is made. Coton à repriser D.M.C[A] is the best, for as it consists of several strands it can be subdivided as occasion requires.
Strengthening the stitches (figs. 366 and 367).—This can be done in two ways. In fig. 366, the thread is brought out between two horizontal bars, passed upwards over a perpendicular bar, put in by the side of the same and brought out between the next horizontal bars.
Work the second row of stitches backwards; take up two threads on the left, pass downwards to the right, over one thread, take up the thread you passed over, and so on.
The other way, fig. 367, is, when you have brought out your needle, to carry it over one thread to the right and upwards over two, take up the next two threads on the left, pass downwards over two horizontal threads, and over one thread to the right, and put in the needle where it first came out; then working from right to left, take up two threads, pass over one to the right, and downwards over two horizontal ones, and so on. In the next row, hold your work, the finished part uppermost, carry the needle downwards over one horizontal thread, bring it out between two threads that lie separately and take it downwards again over two horizontal threads, pick up two threads, working from right to left, pass upwards over two threads and over one to the right, take up two to the left, and so on.
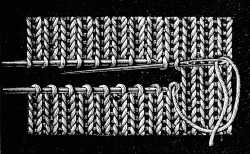
Repairing plain knitting (fig. 368).—When a broken piece of stocking web requires to be replaced by new, draw the new and the old pieces together with a needle and thread, using the same thread the stocking is made of.
For this purpose, you must clear the loops, by ravelling them out top and bottom, and slip them on to knitting needles. The loops that are to be connected must lie exactly opposite to each other. Enter your threaded needle upwards from below through the first disengaged upper loop, and slip it off the knitting needle, then enter the needle, downwards from above through the first lower loop, and upwards from below through the next, and draw out just enough thread to make the new loop the same size as the old ones. Then enter the needle, downwards from above, through the same upper loop you took up before, taking up also the one next to it, and passing your needle through it from underneath; draw out the thread to form the new loop and descend again to the next, and so on.
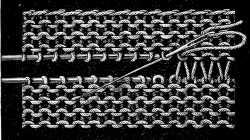
Repairing purled knitting (fig. 369).—To repair ribbed surfaces consisting of alternate rows of plain and purl, proceed as follows: hold the article so that the row of purled stitches is exactly opposite the upper part. Enter your needle upwards from below, through the first loop of the upper part; join the two lower loops together as in fig. 368; carry the needle upwards again, and enter it upwards from below through the first loop of the upper part and downwards from above, through the loop next it. Join the lower loops again, as in plain knitting.
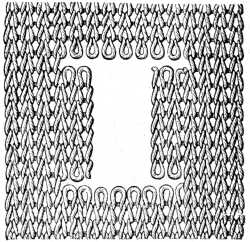
Disengaging the loops for darning (fig. 370).—Where the threads are broken, new loops have to be made, and the broken ones ravelled out and cut, so that the horizontal loops may stand out clear and distinct. Cut the threads on the vertical sides so that the loops form an edge and the hole is square, clear two or four loops in the corners of the hole, fold them in and fasten them off at the back by a stitch or two. The darns we are next going to describe should be made upon a ball to prevent drawing the threads too tightly.
Darning on threads stretched horizontally (figs. 371 and 372).—Carry a horizontal thread across on the wrong side, in the place of each broken thread, securing it in the sound part of the stocking, about two threads from the edge of the hole. When you have made this foundation, put the needle in on the right side near the stitch that is nearest to the sound part on the left, fig. 371.
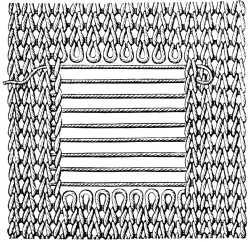 Fig. 371.
Darning on threads stretched
horizontally.
Position of the horizontal threads.
Fig. 371.
Darning on threads stretched
horizontally.
Position of the horizontal threads.
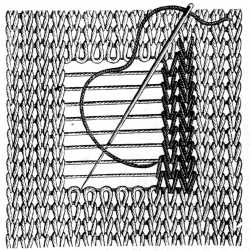 Fig. 372.
Darning on threads stretched
horizontally.
How to cover the horizontal threads.
Fig. 372.
Darning on threads stretched
horizontally.
How to cover the horizontal threads.
Then descending, pick up the nearest horizontal thread from below, so that the working thread lies to the right of the needle, and cover all the horizontal threads you have laid in this manner.
When you have taken up the last thread, pass the needle downwards from above, through the nearest loop, and bring it back through the one at which you entered it.
To make, in reascending, the second half of the loop, you must lay your thread to the right of the needle, fig. 372.
When you have reached the last thread, enter the needle at the loop, opposite the one it came out of.
Darning on threads stretched obliquely across (figs. 373 and 374).—As the illustration shows, you have to pick up all the cleared loops, besides two or three on either side of the empty space. The number and length of the threads which you carry across, must correspond with those of the threads you have to replace.
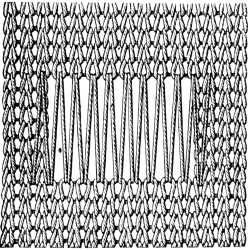 Fig. 373. Darning on threads stretched
obliquely across.
Position of the threads.
Fig. 373. Darning on threads stretched
obliquely across.
Position of the threads.
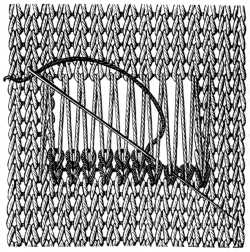 Fig. 374. Darning on threads stretched
obliquely across.
How to cover the oblique threads.
Fig. 374. Darning on threads stretched
obliquely across.
How to cover the oblique threads.
Fasten in, from the right side, a rather finer thread than the one the original web is made of, and make a few stitches over the existing ones, in the row you are about to complete.
Enter the needle upwards from below, through the first disengaged loop, pass it under two threads issuing from one loop, and then bring it back again into the same loop between the two slanting threads, drawing it out again upwards from below, through the next loop, and so on. The new loop must be just equal to the old ones in size. Make in the same manner as at the beginning, two or three stitches at the end of the row, within the edge of the hole. Work back in a similar way, with this difference only, that you turn your work round.
Piqué pattern (fig. 375).—The following patterns are suitable for making counterpanes, petticoats, vests and other articles of clothing. Select a suitable number of Coton à tricoter D.M.C. Cast on a number of stitches divisible by 7, and begin by 6 rows of 5 plain stitches and 1 purled, taken from behind.
7th row—purl from behind the 3rd of the 5 plain, and knit 5 plain more and so on.
Piqué pattern (fig. 376).—Cast on a number of stitches divisible by 14.
1st and 2nd row—* purl 7, knit 1, purl 1, knit 1, purl 1, knit 1, purl 1, knit 1; repeat from *.
3rd and 4th row—* knit 7, purl 1, knit 1, purl 1, knit 1, purl 1, knit 1, purl 1; repeat from *.
Repeat the whole from the 1st row.
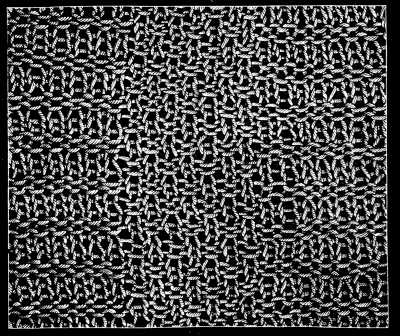 Fig. 376. Piqué pattern.
Piqué pattern (fig. 377).—Cast on a number of stitches divisible by 4.
The 8 first rows—knit 2, purl 2.
9th and 10th row—knit 2 over the 2 purled, purl 2 over the 2 knitted of the 8th row.
11th and 12th rows—the same as the first 8 rows.
13th and 14th row—the same as the 9th and 10th row.
15th to the 23rd—the same as the first 8 rows.
Stripes for counterpanes (fig. 378).—This pattern is to be worked in stripes, of two colours; we may here take occasion to mention that in choosing two colours, one dark and one light, for a piece of work, the dark cotton should always be one or two numbers finer than the light, because the dark dyes thicken the cotton more than the light ones do. The blue, red and dark brown dyes sink into the cotton more and cause it to swell, whereas the lighter dyes do not affect its thickness.
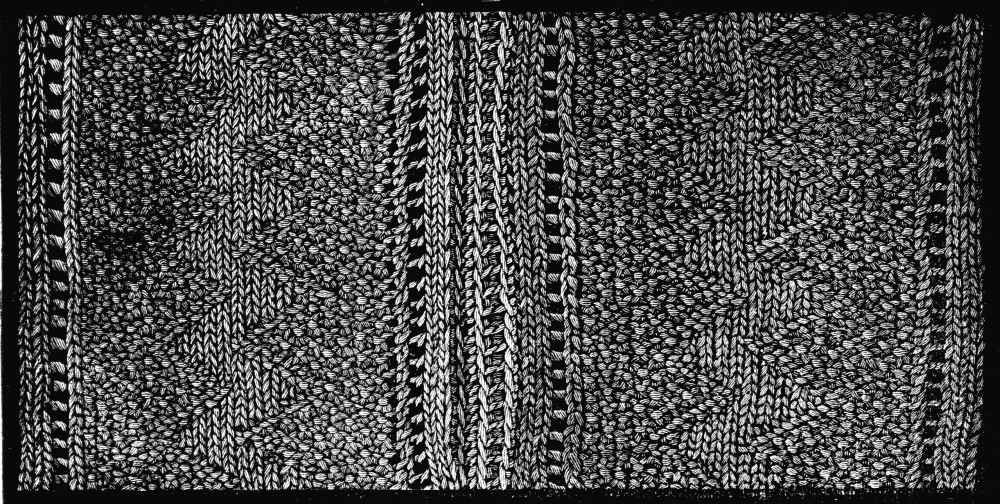 Fig. 378. Stripes for counterpanes.
Hence it comes, that for the stripes, here described, we were obliged to take No. 8 of the red cotton and No. 6 of the green, in order that the same number of stitches should make the same length of stripe.
Cast on 28 stitches:
1st needle—slip 1, knit 2, over, knit 1, knit 1 from behind, purl 1 from behind, knit 1 from behind, purl 2, knit 5, purl 2, knit 1 from behind, purl 1 from behind, knit 1 from behind, purl 1 from behind, knit 1 from behind, purl 1 from behind, knit 1 from behind, purl 1 from behind, knit 1, over, knit 3, 1 chain stitch.
2nd needle—wrong side: slip 1, purl 2, purl 2 together, purl 1 from behind, knit 1 from behind, purl 1 from behind, knit 1 from behind, purl 1 from behind, knit 1 from behind, purl 1 from behind, knit 2, purl 5, knit 2, purl 1 from behind, knit 1 from behind, knit 2 together, purl 2, 1 chain stitch.
3rd needle—right side: slip 1, knit 2, over, knit 1, knit 1 from behind, purl 1 from behind, knit 1 from behind, purl 1 from behind, knit 1 from behind, purl 2, knit 5, purl 2, knit 1 from behind, purl 1 from behind, knit 1 from behind, purl 1 from behind, knit 1 from behind, purl 1 from behind, knit 1, over, knit 2, 1 chain stitch.
4th needle—wrong side: slip 1, purl 2, purl 2 together, purl 1 from behind, knit 1 from behind, purl 1 from behind, knit 1 from behind, purl 1 from behind, knit 2, purl 5, knit 2, purl 1 from behind, knit 1 from behind, purl 1 from behind, knit 1 from behind, purl 1 from behind, knit 1 from behind, purl 2 together, purl 2, 1 chain stitch.
5th needle—on the right side: slip 1, knit 2, over, knit 1, knit 1 from behind, purl 1 from behind, knit 1 from behind, purl 1 from behind, knit 1 from behind, purl 1 from behind, knit 1 from behind, purl 2, knit 5, purl 2, knit 1 from behind, purl 1 from behind, knit 1 from behind, purl 1 from behind, knit 1, over, knit 2, 1 chain stitch.
6th needle—on the wrong side: slip 1, purl 2, purl 2 together, purl 1 from behind, knit 1 from behind, purl 1 from behind, knit 2, purl 5, knit 2, purl 1 from behind, knit 1 from behind, purl 1 from behind, knit 1 from behind, purl 1 from behind, knit 1 from behind, purl 1 from behind, knit 1 from behind, purl 2 together, purl 2, 1 chain stitch.
7th needle like the 5th, 8th needle like the 4th, 9th needle like the 3rd, 10th needle like the 2nd, 11th needle like the 1st. Five plain stitches form a zigzag in the middle of the stripe.
Join the stripes with crochet stitches; of which several kinds are described in the next chapter.
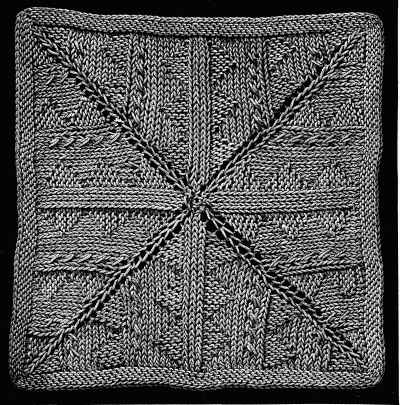
Knitted square (fig. 379).—Cast on 2 stitches on to each of the 4 needles. Repeat always 3 times after the asterisk.
1st row—over, knit 1, over, knit 1 *.
2nd row—knit 1, over, knit 1, over, knit 2 *.
3rd row—knit 1, purl 1, over, knit 1, over, purl 2, knit 2 *.
4th row—knit 1, purl 2, over, knit 1, over, purl 2, knit 2 *.
5th row—knit 1, purl 3, over, knit 1, over, purl 3, knit 2 *.
6th row—knit 1, purl 4, over, knit 1, over, purl 4, knit 2 *.
7th row—knit 1, purl 5, over, knit 1, over, purl 5, knit 2 *.
8th row—knit 1, purl 4, knit 2, over, knit 2, over, knit 1, purl 4, knit 2 *.
9th row—knit 1, purl 3, knit 4, over, knit 1, over, knit 4, purl 3, knit 2 *.
10th row—knit 1, purl 2, knit 6, over, knit 1, over, knit 6, purl 2, knit 2 *.
11th row—knit 1, purl 1, knit 8, over, knit 1, over, knit 8, purl 1, knit 2 *.
12th row—knit 1, purl 2, knit 5, cross 2 stitches (that is, first knit off the second stitch plain and then the first), knit 1, over, knit 1, over, knit 1, cross 2, knit 5, purl 2, knit 2 *.
13th row—knit 1, purl 3, knit 8, purl 1, over, knit 1, over, purl 1, knit 8, purl 3, knit 2 *.
14th row—knit 1, purl 4, knit 4, cross 2, knit 1, purl 2, over, knit 1, over, purl 2, knit 1, cross 2, knit 4, purl 4, knit 2 *.
15th row—knit 1, purl 5, knit 6, purl 3, over, knit 1, over, purl 3, knit 6, purl 5, knit 2 *.
16th row—knit 1, purl 4, knit 3, cross 2, knit 1, purl 4, over, knit 1, over, purl 4, knit 1, cross 2, knit 3, purl 4, knit 2 *.
17th row—knit 1, purl 3, knit 7, purl 5, over, knit 1, over, purl 5, knit 7, purl 3, knit 2 *.
18th row—knit 1, purl 2, knit 5, cross 2, knit 1, purl 4, knit 2, over, knit 1, over, knit 2, purl 4, knit 1, cross 2, knit 5, purl 2, knit 2 *.
19th row—knit 1, purl 1, knit 9, purl 3, knit 4, over, knit 1, over, knit 4, purl 3, knit 9, purl 1, knit 2 *.
20th row—knit 1, purl 2, knit 5, cross 2, knit 1, purl 2, knit 6, over, knit 1, over, knit 6, purl 2, knit 1, cross 2, knit 5, purl 2, knit 2 *.
21st row—knit 1, purl 3, knit 7, purl 1, knit 8, over, knit 1, over, knit 8, purl 1, knit 7, purl 3, knit 2 *.
22nd row—knit 1, purl 4, knit 3, cross 2, knit 1, purl 2, knit 6, cross 2, knit 1, purl 2, knit 5, cross 2, knit 1, over, knit 1, cross 2, knit 5, purl 2, knit 1, cross 2, knit 3, purl 4, knit 2 *.
23rd row—knit 1, purl 5, knit 3, purl 3, knit 7, purl 1, over, knit 1, over, purl 1, knit 7, purl 3, knit 5, purl 5, knit 2 *.
24th row—knit 1, purl 4, knit 3, cross 2, knit 1, purl 4, knit 3, cross 2, knit 1, purl 2, over, knit 1, over, purl 2, knit 1, cross 2, knit 3, purl 4, knit 1, cross 2, knit 3, purl 4, knit 2 *.
25th row—knit 1, purl 3, knit 8, purl 5, knit 5, purl 3, over, knit 1, over, purl 3, knit 5, purl 5, knit 5, purl 3, knit 2 *.
26th row—knit 1, purl 2, knit 5, cross 2, knit 1, purl 4, knit 3, cross 2, knit 1, purl 4, over, knit 1, over, purl 4, knit 1, cross 2, knit 3, purl 4, knit 1, cross 2, knit 5, purl 2, knit 2 *.
27th round—knit 1, purl 1, knit 9, purl 3, knit 7, purl 5, over, knit 1, over, purl 5, knit 7, purl 3, knit 9, purl 1, knit 2 *.
Finish the square with several rows of purl and a chain.
Plain patent knitting, or brioche pattern (fig. 380).—This easy and extremely elastic stitch is used for all sorts of articles of clothing, and is worked in two rows.
Cast on a number of stitches that divides by 3, with 4 extra for the edge.
1st row—slip 1, knit 1, * over, put the needle into the next stitch, as if to purl it, slip the stitch from the left needle to the right, knit 1, repeat from *, and finish with 2 plain.
2nd row—begin with 1 chain, knit 1, knit the slipped stitch and the over together, over, slip the single stitch that remains, from the left needle to the right. When the knitting is round, you purl and knit the intake alternately.
Double patent knitting (fig. 381).—Begin on the wrong side.
1st row—like the 1st row of fig. 380.
2nd row—knit all the stitches, pass the over by putting the needle into it from right to left.
3rd row—like the second row of fig. 380. Now, it is only the second and third row that should alternate.
Patent knitting has a charming effect, done in two colours, by working them alternately backwards and forwards.
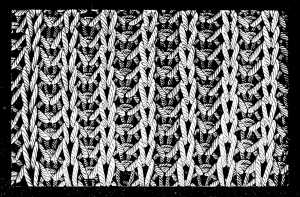
Plaited stitch (fig. 382).—This kind of stitch is worked in stripes, which, for scarves, counterpanes, etc., are generally joined together with stripes of plain knitting. For counterpanes, the lower numbers of D.M.C cottons are most suitable, for smaller articles the higher numbers. Plaited stitch is formed by crossing the stitches, that is, by knitting the second stitch on the left needle to begin with, and then the first stitch.
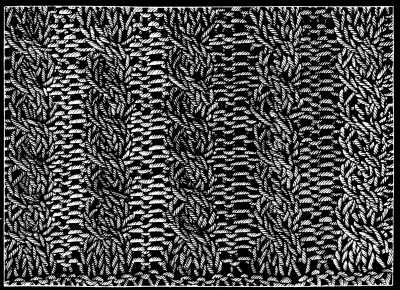 Fig. 382. Plaited stitch.
If you cross two or more stitches in a few successive rows without slipping them, the stitches will be seen by degrees, to form a plait, as shown in fig. 382.
1st row—purl 4, cast on 3 stitches on to an auxiliary needle, and leave it hanging on the inside of the work; knit 3 and then knit the 3 stitches on the extra needle, purl 4.
Then follow 5 rows, in which you purl all the purled stitches and knit all the plain ones. After which 5 rows you repeat from the beginning.
Turkish stitch (fig. 383).—1st row—slip 1, knit 1, over, knit 2 together, over, knit 2 together, and so on to the 2 last stitches, which you knit plain.
2nd row—slip the 1st, knit the 2nd and the 3rd plain, the latter having been formed by the last over on the 1st needle; 1 over, 1 intake with the stitch and the over, 1 over, 1 intake and so on.
Turkish stitch with beads (fig. 384).—String the beads on the thread before you begin to knit. When you only use one kind of bead, thread a needle with your knitting cotton and run it through the thread on which the beads are strung.
When you use several kinds, you must count and thread them on in the required order. Beaded knitting is little in request now, excepting for tobacco pouches and purses; for which you should use Cordonnet 6 fils D.M.C Nos. 35, in any colour, and small beads.
For close beaded knitting, plain stitch is the best. Run the beads down singly at each stitch. The beads will fall on the reverse side of the work so that in knitting with beads, remember that the reverse side will be the right side.
To work fig. 384, which represents the same stitch as fig. 383, you run down 2 or sometimes 3 beads before knitting each stitch.
Knitting pattern with two kinds of cotton (fig. 385).—A variety of pretty things, such as open-work stockings, shawls, curtains etc. can be made in this pattern, worked with two sizes of thread. To give it its full effect it ought to be knitted with coarse needles, Nos. 10, 11, or 12.
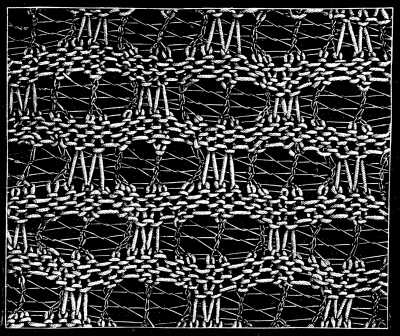 Fig. 385.
Knitting pattern with two kinds of cotton.
Fig. 385.
Knitting pattern with two kinds of cotton.Cast on a number of stitches that divides by 8. Take the coarse thread to begin with.
1st and 2nd row—purl.
3rd row—purl 5, 2 overs, purl 5.
4th row—with the fine thread: over, knit 2 together, slip the next stitch of the previous row, drop the double over, slip the next stitch, 1 over, knit 2 together.
5th row—over, knit 2 together, over, knit 2 together, and so on.
6th row—like the last. See that the 2 slipped stitches, in the coarse thread, always come on the right side of the work.
7th row—with the coarse thread: purl 4, purl the 2 slipped stitches of the 3rd row together, then repeat from the 1st row.
See that in the 3rd row the 2 overs come between the stitches formed by the 2 stitches that were formed by the 1st over, and the 2 stitches of the 6th row, that were knitted together.
Knitting pattern with two kinds of thread (fig. 386).—Cast on a number of stitches that divides by 4.
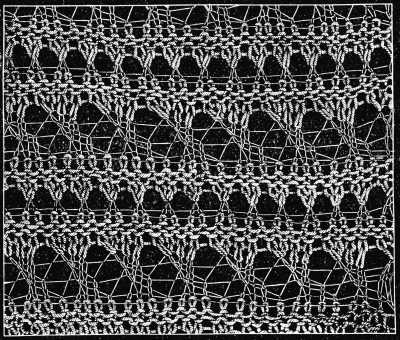 Fig. 386.
Knitting pattern with two kinds of thread.
Fig. 386.
Knitting pattern with two kinds of thread.1st row—with coarse thread: purl.
2nd row—plain.
3rd row—with fine thread: over, 1 intake, knit 2.
4th row—plain.
5th row—knit 1, over, 1 intake, knit 1.
6th row—plain.
7th row—knit 2, over, 1 intake.
8th row—plain.
9th and 10th row—with the coarse thread: purl.
11th row—plain.
12th row—with the fine thread: over, knit 2 together.
13th row—plain.
14th row—purl. Then repeat from the 1st row.
Knitting pattern with dropped stitches (fig. 387).—Cast on a number of stitches that divides by 9.
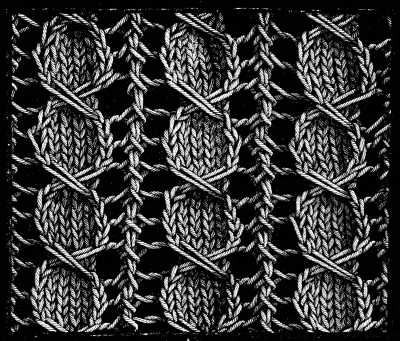 Fig. 387. Knitting pattern with dropped stitches.
1st row—over, slip 3, knit 1, 2 overs, knit 3, 2 overs, knit 1.
2nd row—knit 3, slip the next, drop the 2 overs, knit 4, turn the work, purl 4, turn the work, knit 4, drop the 2 overs, slip the next stitch.
3rd row—over, slip 2, knit 1, pull slipped stitches over, drop the first of the 4 stitches, knit first the stitch that follows the second double over, then the 4 others plain, and lastly, take up the dropped stitch and knit it plain on the right side of the work.
4th row—knit plain.
5th row—over, slip 3, over, knit 6.
6th row—knit plain, and repeat from the 1st row.
Knitting pattern (fig. 388).—This pattern may be worked with any one of the D.M.C cottons recommended for fig. 387, but in the case of anything that is not wearing apparel, Fil à pointer D.M.C will be found more suitable. Cast on a number of stitches that divides by 18.
1st row—over, knit 2 together, over, knit 2 together, over, knit 2 together, over, knit 4, knit 2 together, over, slip 2, knit 1, pull slipped stitches over, over, knit 3.
Each row marked by an even number is to be knitted plain throughout.
3rd row—knit 1, over, knit 2 together, over, knit 2 together, over, knit 2 together, over, slip 1, knit 1, pull slipped stitch over, knit 2, knit 2 together, over, knit 3, over, slip 1, knit 1, pull slipped stitch over, knit 1.
5th row—knit 2, over, knit 2 together, over, knit 2 together, over, knit 2 together, over, slip 1, knit 1, pull slipped stitch over, knit 2 together, over, knit 5, over, knit 2 together.
7th row—knit 3, over, knit 2 together, over, knit 2 together, over, knit 2 together, over, slip 1, knit 1, pull slipped stitch over, knit 1, over, slip 1, knit 1, pull slipped stitch over, knit 1, knit 2 together, over, knit 2.
9th row—knit 4, over, knit 2 together, over, knit 2 together, over, knit 2 together, over, slip 1, knit 1, pull slipped stitch over, knit 1, over, slip 2, knit 1, pull slipped stitches over, over, knit 2.
11th row—knit 5, over, knit 2 together, over, knit 2 together, over, knit 2 together, over, knit 2 together, over, slip 1, knit 1, pull slipped stitch over, knit 6.
13th row—knit 7, over, knit 2 together, over, purl 2 together, over, slip 1, knit 1, pull slipped stitch over, knit 5.
Repeat from the beginning.
Knitting pattern (fig. 389).—Cast on a number of stitches that divides by 9.
1st row—2 overs, slip 1, knit 1, pull slipped stitch over, knit 5, knit 2 together.
2nd row—2 overs, slip the first over on to the right needle, knit the second over, slip 1, knit 1, pull slipped stitch over, knit 3, knit 2 together.
3rd row—2 overs, slip the overs of the two first rows on to the right needle, slip 1, knit 1, pull slipped stitch over, knit 1, knit 2 together.
4th row—drop the overs of the 3 first rows and knit 8 double stitches, that is, knit 1 stitch on the over, slip it on to the left needle and knit it again.
These 8 stitches finished, make 2 overs, and slip 3, knit 1, pull slipped stitches over. Repeat from the beginning.
Each time you repeat the 4th row, make double stitches on 4 overs, that is, on 4 threads.
Knitting pattern (fig. 390).—This pattern is suitable for children's braces. For Coton à repriser D.M.C Nos. 6 to 20, which is the best for the purpose, you will require fine bone needles.
Cast on a number of stitches that divides by 4.
1st row—over, slip 1, knit 1, pull slipped stitch over, knit 2.
2nd row—knit 1, over, slip 1, knit 1, pull slipped stitch over, knit 1.
3rd row—knit 2, over, slip 1, knit 1, pull slipped stitch over.
4th row—slip 1, knit 1, pull slipped stitch over, knit 2, over.
5th row—knit 2 together, over, knit 2.
6th row—knit 1, knit 2 together, over, knit 1.
7th row—knit 2 together, over, knit 2.
8th row—knit 2, knit 2 together, over.
Repeat from the beginning.
Knitting pattern (fig. 391).—The patterns shown in figs. 391 and 392, are more particularly useful for comforters, shawls, hoods and the like. The needles, which may be either of bone or steel must match the cotton in size; steel needles are the best for any thing finer than No. 16, of D.M.C Coton à tricoter.
Cast on a number of stitches that divides by 3.
1st row—over, slip 1 stitch on to the right needle, knit the 2 next stitches, and draw the first stitch over them.
2nd row and 4th row—knit plain.
3rd row—like the first, but note, that the stitch that was the third in the first row, will be the first here.
Repeat from the beginning.
Knitting pattern (fig. 392).—Cast on a number of stitches that divides by 3.
1st row—over, knit the 2 first together, draw the 3rd stitch through the stitch formed by the intake and knit it off plain, then knit the stitch that was pulled over it.
2nd and 4th row—knit plain.
3rd row—like the first; the third stitch here is the same that was drawn through the third stitch in the first row.
Knitting pattern (fig. 393).—Cast on a number of stitches that divides by 14.
1st row—over, knit 1, over, knit 2, purl 3, knit 3 together, purl 3, knit 2.
2nd row—knit 5, purl 7, knit 2.
3rd row—over, knit 3, over, knit 2, purl 2, knit 3 together, purl 2, knit 2.
4th row—knit 7, purl 5, knit 2.
5th row—over, knit 5, over, knit 2, purl 1, knit 3 together, purl 1, knit 2.
6th row—knit 9, purl 3, knit 2.
7th row—over, knit 7, over, knit 2, knit 3 together, knit 2.
8th row—knit 11, purl 1, knit 1.
Repeat from the beginning but in the reverse order, that is, purling the knitted stitches and knitting the purled.
Knitted lace (fig. 394).—Knitted lace looks best, made of a smooth, silky thread which shows up the pattern better than any other material. As a knitted edging makes a very pretty finish to almost any kind of knitted article, we give a selection of some of the easiest and most effective patterns that we consider suitable for the purpose.
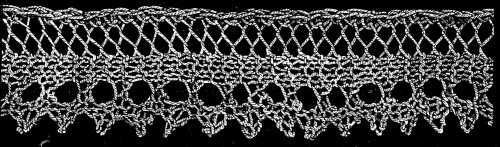 Fig. 394. Knitted lace.
Cast on 8 stitches.
1st needle—1 chain, knit 2, over, knit 2 together, knit 2, 2 overs, knit 2.
2nd needle—knit 3, purl 1, knit 4, over, knit 2 together, 1 chain.
3rd needle—1 chain, knit 2, over, knit 2 together, knit 6.
4th needle—2 chain, knit 5, over, knit 2 together, 1 chain.
Repeat from the first needle.
Knitted lace (fig. 395).—Cast on 10 stitches.
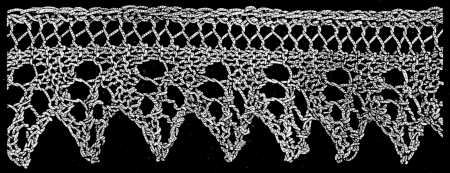 Fig. 395. Knitted lace.
1st needle—knit 2 together, 2 overs, knit 2 together, 2 overs, knit 3, over, knit 2 together, 1 chain.
2nd needle—1 chain, knit 2, knit 2 together, knit 2, purl 1, knit 2, purl 1, knit 1.
3rd needle—knit 2 together, 2 overs, knit 2 together, 2 overs, knit 4, over, knit 2 together, 1 chain.
4th needle—1 chain, knit 2, knit 2 together, knit 3, purl 1, knit 2, purl 1, knit 1.
5th needle—knit 2 together, 2 overs, knit 2 together, 2 overs, knit 5, over, knit 2 together, 1 chain.
6th needle—1 chain, knit 2, knit 2 together, knit 4, purl 1, knit 2, purl 1, knit 1.
7th needle—knit 10, over, knit 2 together, 1 chain.
8th needle—1 chain, knit 2, knit 2 together, knit 8.
9th needle—4 chain, 2 overs, knit 2 together, 2 overs, knit 3, over, knit 2 together, 1 chain.
Repeat from the second needle.
Knitted lace (fig. 396).—Cast on 13 stitches.
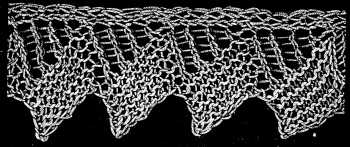 Fig. 396. Knitted lace.
1st needle—1 chain, purl 1, purl 2 together, over, knit 8, 1 chain.
2nd needle—1 chain, knit 8, over, knit 2, knit 1 from behind, 1 chain.
3rd needle—1 chain, purl 2, over, purl 2 together, over, knit 8, 1 chain.
4th needle—1 chain, knit 8, over, knit 2 together, over, knit 2, knit 1 from behind, 1 chain.
5th needle—1 chain, purl 2, over, purl 2 together, over, purl 2 together, over, knit 8, 1 chain.
6th needle—1 chain, knit 8, over, knit 2 together, over, knit 2 together, over, knit 2, knit 1 from behind, 1 chain.
7th needle—1 chain, purl 2, over, purl 2 together, over, purl 2 together, over, purl 2 together, over, knit 8, 1 chain.
8th needle—1 chain, knit 8, over, knit 2 together, over, knit 2 together, over, knit 2 together, over, knit 2, knit 1 from behind, 1 chain.
9th needle—1 chain, purl 2, over, purl 2 together, over, purl 2 together, over, purl 2 together, over, purl 2 together, over, knit 8, 1 chain.
10th needle—8 chain, knit 10, knit 1 from behind, 1 chain.
Repeat from the first needle.
Knitted lace (fig. 397).—Cast on 11 stitches.
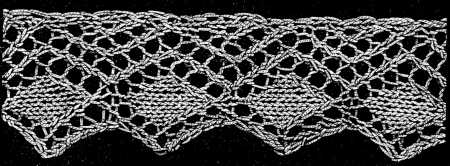 Fig. 397. Knitted lace.
1st needle—1 chain, knit 1 from behind, over, knit 1, over, slip 1, knit 1, pull slipped stitch over, over, slip 1, knit 1, pull slipped stitch over, over, slip 1, knit 1, pull slipped stitch over, knit 1, 1 chain.
The 2nd, 4th, 6th, 8th, 10th, 12th, 14th, and 16th needle, purled.
3rd needle—1 chain, knit 1 from behind, over, knit 3, over, slip 1, knit 1, pull slipped stitch over, over, slip 1, knit 1, pull slipped stitch over, over, slip 1, knit 1, pull slipped stitch over, 1 chain.
5th needle—1 chain, knit 1 from behind, over, knit 5, over, slip 1, knit 1, pull slipped stitch over, over, slip 1, knit 1, pull slipped stitch over, knit 1, 1 chain.
7th needle—1 chain, knit 1 from behind, over, knit 7, over, slip 1, knit 1, pull slipped stitch over, over, slip 1, knit 1, pull slipped stitch over, 1 chain.
9th needle—1 chain, slip 1, knit 1, pull slipped stitch over, over, slip 1, knit 1, pull slipped stitch over, knit 3, knit 2 together, over, knit 2 together, over, knit 2, 1 chain.
11th needle—1 chain, slip 1, knit 1, pull slipped stitch over, over, slip 1, knit 1, pull slipped stitch over, knit 1, knit 2 together, over, knit 2 together, over, knit 2 together, over, knit 1, 1 chain.
13th needle—1 chain, slip 1, knit 1, pull slipped stitch over, over, knit 3 together, over, knit 2 together, over, knit 2 together, over, knit 2, 1 chain.
15th needle—1 chain, slip 1, knit 1, pull slipped stitch over, knit 1, knit 2 together, over, knit 2 together, over, knit 1, 1 chain.
Repeat from the first needle.
Rose for knitting (fig. 398).—Repeat all the directions, 8 ending with the sign *, 7 times.
 Fig. 398. Rose for knitting.
Cast on 8 stitches, on to 4 needles, two on each; close the ring.
2nd round—8 times: over, knit 1.
The 3rd, 5th, 7th, 9th, 11th, 13th, 15th, 17th, 19th, 21st, 23rd, and 25th round, knit plain.
4th round—over, knit 3, over, knit 1 from behind *.
6th round—over, knit 4, over, knit 1 from behind *.
8th round—over, knit 7, over, knit 1 from behind *.
10th round—over, slip 1, knit 1, pull slipped stitch over, knit 2 together, over, knit 1 *.
12th round—over, knit 2 together, over, knit 3 *.
14th round—over, knit 1 from behind, over, knit 5 *.
16th round—over, knit 1 from behind, over, knit 7 *.
18th round—over, knit 1 from behind, over, knit 9 *.
20th round—over, knit 1 from behind, over, knit 11 *.
22nd round—over, knit 1 from behind, over, knit 13 *.
24th round—over, knit 1 from behind, over, knit 15 *.
26th round—over, knit 3, over, knit 5, knit 2 together, purl 1, slip 1, knit 1, pull slipped stitch over, knit 5 *.
27th round—knit 11, purl 1, knit 6 *.
28th round—over, knit 5, over, knit 4, knit 2 together, purl 1, slip 1, knit 1, pull slipped stitch over, knit 4 *.
29th round—knit 12, purl 1, knit 5 *.
30th round—over, knit 1, over, slip 1, knit 1, pull slipped stitch over, knit 1, knit 2 together, over, knit 1, over, knit 3, knit 2 together, purl 1, slip 1, knit 1, pull slipped stitch over, knit 3 *.
31st round—knit 13, purl 1, knit 4 *.
32nd round—over, knit 3, over, slip 2, knit 1, pull slipped stitches over, over, knit 3, over, knit 2, knit 2 together, purl 1, slip 1, knit 1, pull slipped stitch over, knit 2 *.
33rd round—knit 14, purl 1, knit 3.
34th round—over, knit 11, over, knit 1, knit 2 together, purl 1, slip 1, knit 1, pull slipped stitch over, knit 1 *.
35th round—knit 15, purl 1, knit 2.
36th round—over, knit 1, over, slip 1, knit 1, pull slipped stitch over, knit 1, knit 2 together, over, knit 1, over, slip 1, knit 1, pull slipped stitch over, knit 1, knit 2 together, over, knit 1, over, knit 2 together, purl 1, slip 1, knit 1, pull slipped stitch over *.
37th round—knit 16, purl 1, knit 1.
38th round—over, knit 3, over, slip 2, knit 1, pull slipped stitches over, over, knit 3, over, slip 2, knit 1, pull slipped stitches over, over, knit 3, over, knit 2, over, slip 2, knit 1, pull slipped stitches over *.
39th, 41st and 43rd round—knit plain.
40th round—over, knit 4, knit 2 together, over, knit 5, over, slip 1, knit 1, pull slipped stitch over, knit 4, over, knit 1.
42nd round—knit 1, over, slip 1, knit 1, pull slipped stitch over, knit 1, knit 2 together, over, knit 1, over, slip 1, knit 1, pull slipped stitch over, knit 1, knit 2 together, over, knit 1, over, slip 1, knit 1, pull slipped stitch over, knit 1, knit 2 together, over, knit 2 *.
44th round—knit 2, over, slip 2, knit 1, pull slipped stitches over, over, knit 3, over, slip 2, knit 1, pull slipped stitches over, over, knit 3, over, slip 2, knit 1, pull slipped stitches over, over, knit 3 *.
Finish with three purled rounds.
Knitted edging (fig. 399).—Cast on 43 stitches.
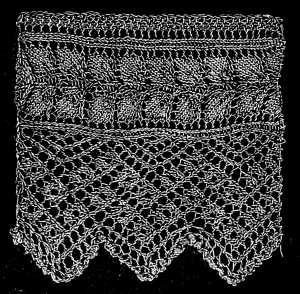 Fig. 399. Knitted edging.
1st needle, make a chain of 2 stitches, over, knit 1 from behind, over, knit 1 from behind, over, knit 1, over, slip 1, knit 1, pull slipped stitch over, knit 1, knit 2 together, over, knit 1, over, slip 1, knit 1, pull slipped stitch over, knit 1, knit 2 together, over, knit 1, knit 1 from behind, purl 1, knit 1 from behind, over, knit 1, knit 2 together, purl 1, slip 1, knit 1, pull slipped stitch over, knit 1, purl 1, knit 1, knit 2 together, knit 1 from behind, slip 1, knit 1, pull slipped stitch over, knit 1, over, knit 1 from behind, purl 1, knit 1 from behind, over, knit 2 together, knit 1, 1 chain.
2nd needle—1 chain, knit 2, purl 1, purl 1 from behind, knit 1, purl 1 from behind, purl 3, knit 1, purl 2, knit 1, purl 2, knit 1, purl 3, purl 1 from behind, knit 1, purl 1 from behind, purl 14, purl 1 from behind, purl 4.
3rd needle—slip 2 stitches over for a chain, over, knit 1 from behind, over, knit 1 from behind, over, knit 3, over, slip 2, knit 1, pull slipped stitches over, over, knit 3, over, slip 2, knit 1, pull slipped stitches over, over, knit 2 together, over, knit 1 from behind, purl 1, knit 1 from behind, over, knit 1, over knit 2 together, purl 1, slip 1, knit 1, pull slipped stitch over, purl 1, knit 2 together, purl 1, slip 1, knit 1, pull slipped stitch over, over, knit 1, over, knit 1 from behind, purl 1, knit 1 from behind, over, knit 2 together, knit 1, 1 chain.
4th needle—slip 1, knit 2, purl 1, purl 1 from behind, knit 1, purl 1 from behind, purl 4, knit 1, purl 1, knit 1, purl 1, knit 1, purl 4, purl 1 from behind, knit 1, purl 1 from behind, purl 15, purl 1 from behind, purl 4.
5th needle—slip 2 stitches over for a chain, over, knit 1 from behind, over, knit 1 from behind, over, knit 2, over, slip 1, knit 1, pull slipped stitch over, knit 2 together, over, knit 2, over, slip 1, knit 1, pull slipped stitch over, knit 2 together, over, knit 2 together, over, knit 1, knit 1 from behind, purl 1, knit 1 from behind, over, knit 3, over, slip 2, knit 1, pull slipped stitches over, purl 1, slip 2, knit 1, pull slipped stitches over, over, knit 3, over, knit 1 from behind, purl 1, knit 1 from behind, over, knit 2 together, knit 1, 1 chain.
6th needle—slip 1, knit 2, purl 1, purl 1 from behind, knit 1, purl 1 from behind, purl 6, knit 1, purl 6, purl 1 from behind, knit 1, purl 1 from behind, purl 16, purl 1 from behind, purl 4.
7th needle—slip 2 stitches over for a chain, over, knit 1 from behind, over, knit 1 from behind, over, knit 1, over, slip 1, knit 1, pull slipped stitch over, knit 1, knit 2 together, over, knit 1, over, slip 1, knit 1, pull slipped stitch over, knit 1, knit 2 together, over, knit 2 together, over, knit 2 together, over, knit 1 from behind, purl 1, knit 1 from behind, over, knit 5, over, slip 2, knit 1, pull slipped stitches over, over, knit 5, over, knit 1 from behind, purl 1, knit 1 from behind, over, knit 2 together, knit 1, 1 chain.
8th needle—slip 1, knit 2, purl 1, purl 1 from behind, knit 1, purl 1 from behind, purl 15, purl 1 from behind, knit 1, purl 1 from behind, purl 17, purl 1 from behind, purl 4.
9th needle—slip 2 stitches over for a chain, over, knit 1 from behind, over, knit 1 from behind, over, knit 3, over, slip 2, knit 1, pull slipped stitches over, over, knit 3, over, slip 2, knit 1, pull slipped stitches over, over, knit 2 together, over, knit 2 together, over, knit 1, knit 1 from behind, purl 1, knit 1 from behind, over, knit 1, knit 2 together, purl 1, slip 1, knit 1, pull slipped stitch over, knit 1, purl 1, knit 1, knit 2 together, purl 1, slip 1, knit 1, pull slipped stitch over, knit 1, over, knit 1 from behind, purl 1, knit 1 from behind, over, knit 2 together, knit 1, 1 chain.
10th needle—slip 1, knit 2, purl 1, purl 1 from behind, knit 1, purl 1 from behind, purl 3, knit 1, purl 2, knit 1, purl 2, knit 1, purl 3, purl 1 from behind, knit 1, purl 1 from behind, purl 18, purl 1 from behind, purl 4.
11th needle—slip 2 stitches over for a chain, over, knit 1 from behind, over, knit 1 from behind, over, knit 2, over, slip 1, knit 1, pull slipped stitch over, knit 2 together, over, knit 2, over, slip 1, knit 1, pull slipped stitch over, knit 2 together, over, knit 2 together, over, knit 2 together, over, knit 2 together, over, knit 1 from behind, purl 1, knit 1 from behind, over, knit 1, over, knit 2 together, purl 1, slip 1, knit 1, pull slipped stitch over, purl 1, knit 2 together, purl 1, slip 1, knit 1, pull slipped stitch over, over, knit 1, over, knit 1 from behind, purl 1, knit 1 from behind, over, knit 2 together, knit 1, 1 chain.
12th needle—slip 1, knit 2, purl 1, purl 1 from behind, knit 1, purl 1 from behind, purl 4, knit 1, purl 1, knit 1, purl 1, knit 1, purl 4, purl 1 from behind, knit 1, purl 1 from behind, purl 19, purl 1 from behind, purl 4.
13th needle—slip 2 stitches over for a chain, over, knit 1 from behind, over, slip 1, knit 1, pull slipped stitch over, over, slip 1, knit 1, pull slipped stitch over, knit 1, knit 2 together, over, knit 1, over, slip 1, knit 1, pull slipped stitch over, knit 1, knit 2 together, over, knit 1, over, slip 1, knit 1, pull slipped stitch over, over, slip 1, knit 1, pull slipped stitch over, over, slip 1, knit 1, pull slipped stitch over, knit 1 from behind, purl 1, knit 1, from behind, over, knit 3, over, slip 2, knit 1, pull slipped stitches over, purl 1, slip 2, knit 1, pull slipped stitches over, over, knit 3, over, knit 1 from behind, purl 1, knit 1 from behind, over, knit 2 together, knit 1, 1 chain.
14th needle—slip 1, knit 2, purl 1, purl 1 from behind, knit 1, purl 1 from behind, purl 6, knit 1, purl 6, purl 1 from behind, knit 1, purl 1 from behind, purl 18, purl 1 from behind, purl 4.
15th needle—slip 2 stitches over for a chain, over, knit 1 from behind, over, slip 1, knit 1, pull slipped stitch over, over, slip 2, knit 1, pull slipped stitches over, over, knit 3, over, slip 2, knit 1, pull slipped stitches over, over, knit 3, over, slip 1, knit 1, pull slipped stitch over, over, slip 1, knit 1, pull slipped stitch over, over, knit 2 together, purl 1, knit 1 from behind, over knit 5, over, slip 2, knit 1, pull slipped stitches over, over, knit 1 from behind, over, knit 2 together, knit 1, 1 chain.
16th needle—like the 8th.
17th needle—slip 2 stitches over for a chain, over, knit 1 from behind, over, slip 1, knit 1, pull slipped stitch over, over, slip 1, knit 1, pull slipped stitch over, knit 2 together, over, knit 2, over, slip 1, knit 1, pull slipped stitch over, knit 2 together, over, knit 2, over, slip 1, knit 1, pull slipped stitch over, over, slip 1, knit 1, pull slipped stitch over, knit 1 from behind, purl 1, knit 1 from behind, over, knit 1, knit 2 together, purl 1, slip 1, knit 1, pull slipped stitch over, knit 1, purl 1, knit 1, knit 2 together, purl 1, slip 1, knit 1, pull slipped stitch over, knit 1, over, knit 1 from behind, purl 1, knit 1 from behind, over, knit 2 together, knit 1, 1 chain.
18th needle—slip 1, knit 2, purl 1, purl 1 from behind, knit 1, purl 1 from behind, purl 3, knit 1, purl 2, knit 1, purl 2, knit 1, purl 3, purl 1 from behind, knit 1, purl 1 from behind, purl 16, purl 1 from behind, purl 4.
19th needle—slip 2 stitches over for a chain, over, knit 1 from behind, over, slip 1, knit 1, pull slipped stitch over, over, slip 1, knit 1, pull slipped stitch over, knit 1, knit 2 together, over, knit 1, over, slip 1, knit 1, pull slipped stitch over, knit 1, knit 2 together, over, knit 1, over, slip 1, knit 1, pull slipped stitch over, over, knit 2 together, purl 1, knit 1 from behind, over, knit 1, over, purl 1, slip 1, knit 1, pull slipped stitch over, purl 1, knit 2 together, purl 1, slip 1, knit 1, pull slipped stitch over, over, knit 1, over, knit 1 from behind, purl 1, knit 1 from behind, over, knit 2 together, knit 1, 1 chain.
20th needle—like the 4th.
21st needle—slip 2 stitches over for a chain, over, knit 1 from behind, over, slip 1, knit 1, pull slipped stitch over, over, slip 2, knit 1, pull slipped stitches over, over, knit 3, over, slip 2, knit 1, pull slipped stitches over, over, knit 3, over, slip 1, knit 1, pull slipped stitch over, knit 1 from behind, purl 1, knit 1 from behind, over, knit 3, over, slip 2, knit 1, pull slipped stitches over, purl 1, slip 2, knit 1, pull slipped stitches over, over, knit 3, over, knit 1 from behind, purl 1, knit 1 from behind, over, knit 2 together, knit 1, 1 chain.
22nd needle—slip 1; knit 2, purl 1, purl 1 from behind, knit 1, purl 1 from behind, purl 6, knit 1, purl 6, purl 1 from behind, knit 1, purl 1 from behind, purl 14, purl 1 from behind, purl 4.
23rd needle—slip 2 stitches over for a chain, over, knit 1 from behind, over, slip 1, knit 1, pull slipped stitch over, over, slip 1, knit 1, pull slipped stitch over, knit 2 together, over, knit 2, over, slip 1, knit 1, pull slipped stitch over, knit 2 together, over, knit 2, over, knit 2 together, purl 1, knit 1 from behind, over, knit 5, over, slip 2, knit 1, pull slipped stitches over, over, knit 5, over, knit 1 from behind, purl 1, knit 1 from behind, over, knit 2 together, knit 1, 1 chain.
24th needle—slip 1, knit 2, purl 1, purl 1 from behind, knit 4, purl 1 from behind, purl 15, purl 1 from behind, knit 1, purl 1 from behind, purl 13, purl 1 from behind, purl 4.
Repeat from the first needle.