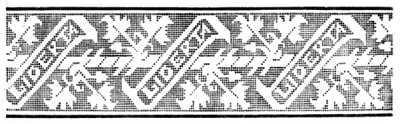
 Stripe of cut open-work on white linen.
Stripe of cut open-work on white linen.
Stripe of cut open-work on white linen.
The above heading comprises every sort of needle-work, to which the drawing out of threads is a preliminary. By sewing over the single threads that remain, and drawing them together in different ways, an infinite variety of patterns can be produced. Many pretty combinations also, can be made of open-work, cross-stitch, and other kinds of embroidery.
Materials suitable for open-work.—For all the coarser stuffs, such as Holbein-linen, Java and linen-canvas and the like, now in such favour for the imitation of old needlework, it will be best to use: Fil à pointer D.M.C, No. 30[A] and Cordonnet 6 fils D.M.C, Nos. 10 to 20,[A] and for the finer stuffs, such as antique-linen and linen-gauze; Cordonnet 6 fils D.M.C Nos. 50 to 150,[A] Fil d'Alsace D.M.C, Nos. 20 to 100, and Fil à dentelle D.M.C, Nos. 25 to 80.
Coloured patterns can also be executed in open-work, with Coton à broder D.M.C Nos. 16 to 35, and Coton à repriser D.M.C, Nos. 25 to 50[A] .
The two different kinds of open-work.—The one is called, single open-work, the Italian Punto tirato, in which the first step is to draw out one layer of threads; the other, cut open-work, the Italian Punto tagliato, for which, both the warp, and the woof threads, have to be drawn out.
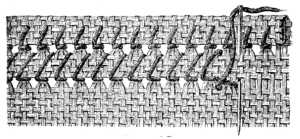
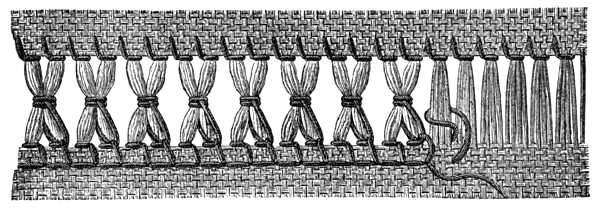
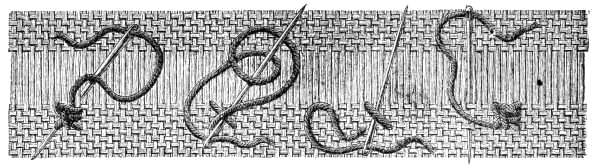
Single open-work (Punto tirato).—This, in its simplest form, is the ornamental latticed hem, in common use where something rather more decorative than an ordinary hem (fig. 8) is required, and consists in drawing out one layer of threads, either the warp or the woof.
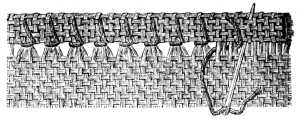
Single hem-stitch (fig. 55).—Draw out, according to the coarseness of the stuff, two or four threads, below the edge of the turning, and tack your hem down to the line thus drawn. Fasten your thread in to the left, and work your hem from right to left, taking up three or four cross-threads at a time, and inserting your needle, immediately above, into the folded hem, three or four threads from the edge, and then drawing it out.
The same stitch is used for preventing the fringes, that serve as a finish to so many articles of house-linen, from ravelling.
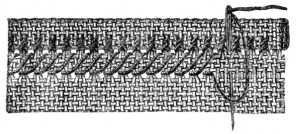
Second hem-stitch (fig. 56).—Prepare your hem as for fig. 55, and work from left to right; with this difference, that after drawing two or three cross-threads together, from right to left, you skip the same number of perpendicular threads you took up below, and insert your needle downwards from above, bringing it out at the bottom edge of the hem.
These stitches, which can be used for the right side also, form a kind of little tress, along the edge of the hem.
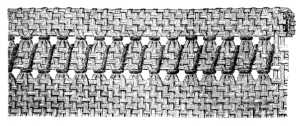
Ladder stitch hem (fig. 57). Complete the hem, as already directed in fig. 55, then draw out three or five threads more, turn the work round, and repeat the process, taking up the same clusters of threads which you took up in the first row of stitches, thus forming little perpendicular bars.
Double hem-stitch (fig. 58). Begin as in fig. 55, forming your clusters of an even number of threads; and then, in making your second row of stitches, draw half the threads of one cluster, and half of the next together, thereby making them slant, first one way and then the other.
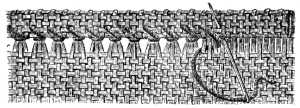
Antique hem-stitch (figs. 59, 60, 61 and 62). In the old, elaborate, linen needlework, we often meet two kinds of hem-stitching seldom found in modern books on needle-work. Figs. 59 to 62 are magnified representations of the same. At the necessary depth for forming a narrow hem, a thread is drawn, in the case of very fine textures where the edge is rolled, not laid; then fasten in the working thread at the left, and work the stitches from left to right. Passing your needle, from right to left, under three or four threads, draw the thread round the cluster and carry your needle on, through as many threads of the upper layer of stuff, as you took up below, so that the stitch may always emerge from the middle of the cluster.
Antique hem-stitch (figs. 61 and 62).—These show, the right and wrong sides of the hem; here the rolled hem is prepared as above, but the stitches are worked from right to left, and the thread is carried round the little roll, so that, as shown in fig. 62, it is visible on both sides of the hem. The needle does not enter the stuff, but is carried back at once, from the outside, and put in again between two clusters of threads.
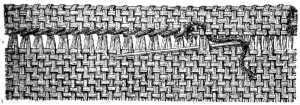
Slanting hem-stitch (figs. 63 and 64).—Bring out your needle and thread, two or three threads above the edge of the turning, between the first and second of the three cross-threads that compose the cluster, and then slip it under the cluster, from right to left. The loop must lie in front of the needle. When you have drawn up the stitch, put the needle in, one thread further on, and take up two threads. Fig. 64 shows the stitch on the right side.
Double-rowed ornamental seam (figs. 65, 66, 67).—Begin with any one of the hems already described, then counting as many threads downwards, as are clustered together in the first row, draw out a second thread, and cluster the perpendicular threads in this second line together, as shown in figs. 65 and 66. On the right side the stitch is straight (fig. 67). Coloured cottons should be used for all the above patterns of hem-stitch, when they are to be introduced into coloured embroideries.
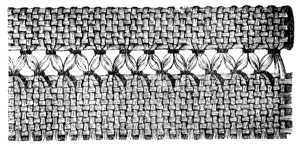
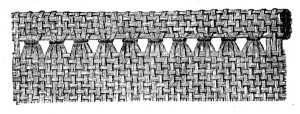
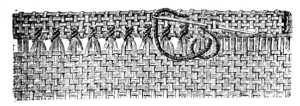
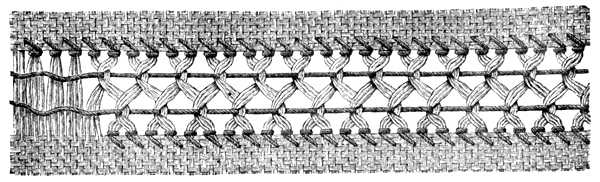
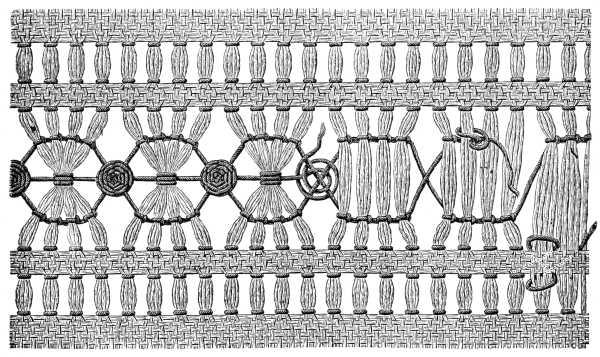
Single three-rowed open-work (fig. 68).—This, and the following patterns, are suitable for the headings of hems, and for connecting stripes of embroidery, and are also often used instead of lace, and lace insertion.
Fig. 68 will be found specially useful, in cases where the object is, to produce a good deal of effect, at the cost of as little labour as possible. Make six rows of hem-stitching, as in fig. 55; the first and sixth rows to serve as a finish, above and below.
The second and third, after drawing out six threads, the third and fourth after drawing out eight. The clusters must all consist of an even number of threads. The upper and the lower band of open-work is to be copied from fig. 58, the centre one, from fig. 57. Divide the threads of the perpendicular clusters in two; insert the needle, from left to right, underneath half the second cluster, turn the needle's eye, by a second movement, from left to right, and take up the second part of the first cluster, drawing it under, and at the same time, in front of the first half of the second cluster. Be careful not to draw your thread too tightly.
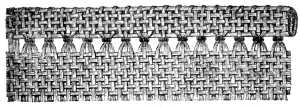
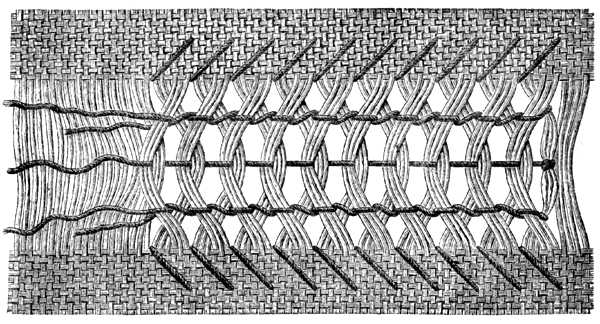
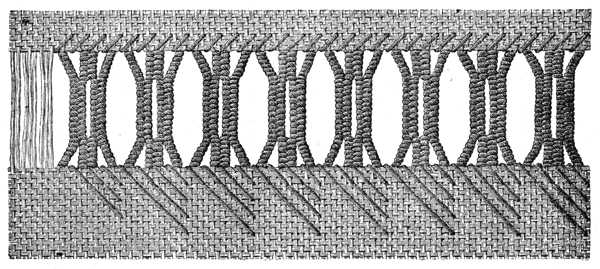
Open-work with two threads drawn through (fig. 69).—One such wide lane of open-work, between two finishing rows of stitches, may have two threads drawn through it.
Open-work with three threads drawn through (fig. 70). Overcast both edges with single stitches; draw the clusters together in the middle, as in fig. 68; then above and below the middle thread, draw in first one thread and then a second, straight above it, securing the latter with back-stitches to enclose the clusters between two threads.
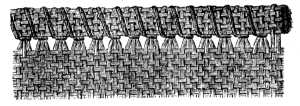
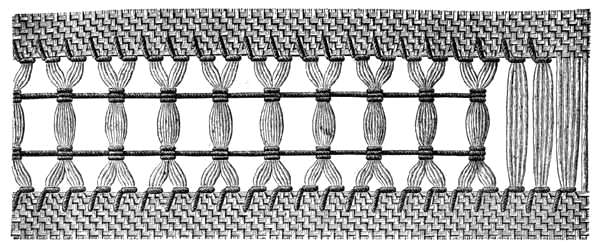
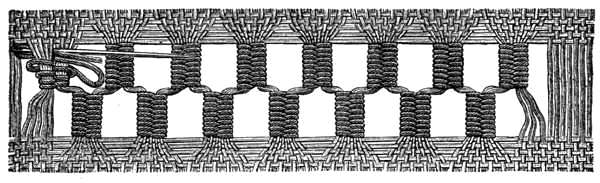
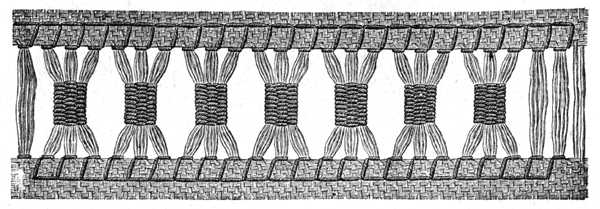
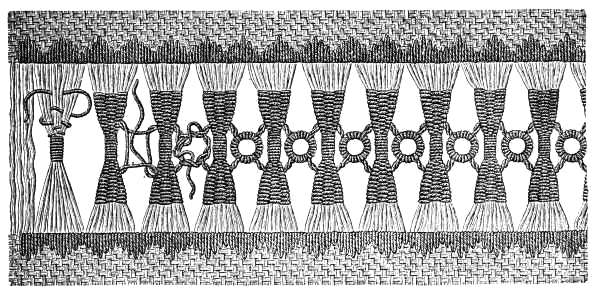
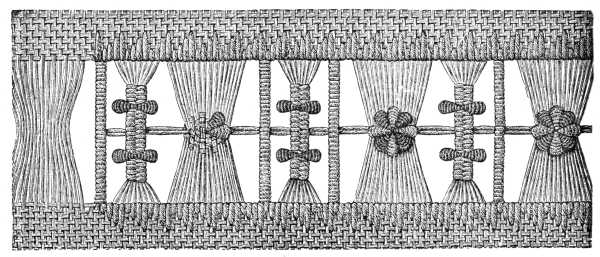
Clustered open-work (fig. 71).—Draw out from sixteen to eighteen threads, between two hem-stitched edges. Fasten your thread in, 3 m/m. above the seam-edge, and wind it three times round every two clusters, passing the needle, the third time, under the two first rounds, to fasten the thread. The thread, thus drawn through, must be left rather slack. A second row of stitches, similar to the first, and at the same distance from the bottom edge, completes this pattern. To give it greater strength, you may if you like, work back over the first thread, with a second, taking care to pass it under the knot, which was formed by the first.
Double-rowed cluster-open-work (fig. 72).—A very good effect can be obtained by making the above stitch in such a manner, as to form groups of three clusters each, between hem-stitched bands of the stuff.
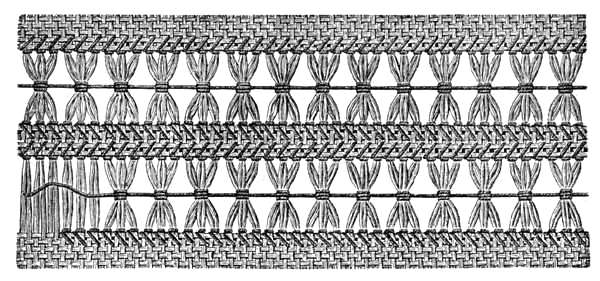
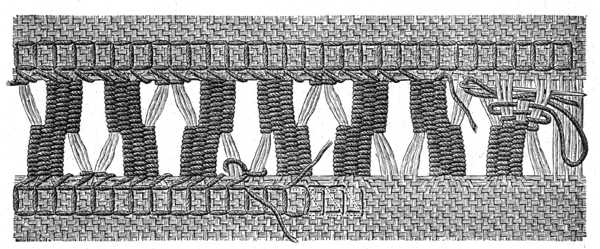
Turkish cluster open-work (fig. 73).—After portioning off, and sewing up the clusters on one side, draw out twelve or fourteen threads, and make your connecting-stitch and hem, all in one, as follows: bring out the thread before the cluster, and pass it round it, then from right to left, over three horizontal and under four perpendicular threads, again from left to right, over the four threads just passed over, and out at the second cluster; laying it over this, you bring it out behind the first cluster, wind it round the middle of them both, and pass it through, between the over-casting stitches back to the hem; encircle the second cluster with a loop-stitch, and carry your thread again over three horizontal and four perpendicular threads, and upwards, slanting underneath the stuff, out in front of the next cluster.
Open-work with darning stitch (fig. 74).—Draw out from eight to twelve threads, according to the quality of the stuff. Insert your needle and thread between two clusters, and pass it, as if you were darning, backwards and forwards over them, until they are encased half way down with stitches. In so doing, work with the eye of the needle forward, and the point towards your thimble. To pass to the next cluster, take one stitch back, under the one just darned, and bring your thread underneath the threads of the stuff, to the second cluster.
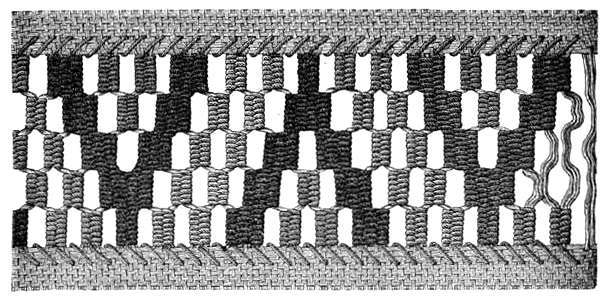
Open-work in three colours (fig. 75).—This pattern which is to be done in the same way as fig. 74, requires the drawing out of, at least, eighteen threads. Every cross-line of three clusters is to be worked in one colour. The colours may all be different, or you may if you prefer, take shades of the same colour.
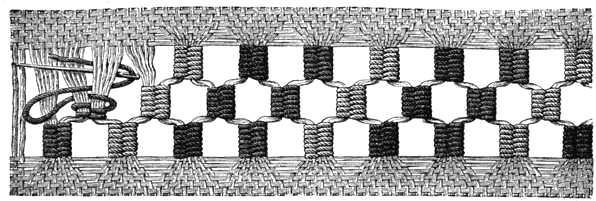 Fig. 75. Open-work in three colours.
Open-work insertion (figs. 76 and 77).—For both these, the edges are to be overcast, and the darning stitches packed sufficiently closely together, for the threads of the stuff to be entirely covered.
Fig. 76 requires the drawing out of eighteen threads, fig. 77, of thirty. Both admit of several colours being used.
Open-work insertion (fig. 78).—After drawing out sixteen or eighteen threads, bind both sides with stitches made over four horizontal and four perpendicular threads, as follows; make one back-stitch over four disengaged threads, then bring up your thread from right to left, over four horizontal and under four perpendicular threads, back over the four last threads, and draw it out beside the next cluster. The clusters, as they now stand, are bound together in the middle, three by three, with darning-stitches. The thread must be fastened in and cut off, after each group is finished.
Open-work insertion (fig. 79).—First bind the two edges with stitches, in the ordinary way. At the last stitch introduce the thread slanting, according to the dotted line, pass it under four horizontal and three perpendicular threads of the stuff and draw it out; then over three threads from right to left, and back under the same, from left to right, and out again; over four horizontal threads, and, under and again over, three perpendicular ones; for the next stitch, you again follow the dotted slanting line.
Then make the darning stitch over nine threads, or three clusters. At half their length, you leave out three threads, first on the right, then on the left, whilst in the other half, you, in a similar manner, take in three; so that you have two darned and two undarned clusters, standing opposite each other. Finally, you overcast the single clusters, and connect every two with a lock-stitch, as shown in the accompanying illustration.
Open-work insertion (fig. 80).—Draw out twenty threads, overcast both edges with stitches, made over three threads. Then, make slanting stitches, proceeding out from these, over three, six and nine threads respectively, all three terminating in a perpendicular line, one below the other.
For the open-work, twist the thread five times, quite tightly round and round one cluster, bring it to the edge, between the second and third clusters, and connect these by means of six darning-stitches to and fro: join the first and second clusters in the same way by twelve stitches, and finish, by twisting the thread five times round the remaining length of the first cluster. The second half of the open-work figure is carried out in a similar manner over the third and fourth clusters.
Open-work insertion in four colours (fig. 81).—Draw out, from twenty-five to thirty threads. The outside figures are executed over six clusters, of three threads each, in a dark and light shade alternately of the same colour. Each of the middle figures combines three clusters of the two figures above it, and may be executed, either in a different colour altogether, or in a lighter shade of the one employed in the top row. The little star in the centre should be worked in dark red, or black.
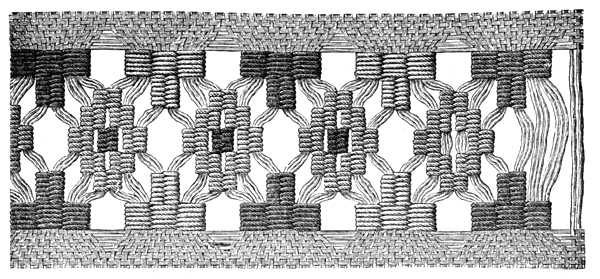 Fig. 81. Open-work insertion in four colours.
Open-work insertions (figs. 82, 83, 84).—For each of these draw out forty threads. Fig. 82 worked in white, and Rouge-Grenat clair 309, comprises fourteen clusters, of four threads each. Begin at the top of the big pyramid, so that the threads which you run in, can be more closely crowded together.
In fig. 83, the two rows of short clusters are worked in Gris-Tilleul moyen, and, Gris-Tilleul clair, 392 and 330; [A] the pyramid of steps, in Brun-Chamois moyen, 324;[A] the three inner clusters in Brim-Chamois très clair, 418. One figure consists of fourteen clusters, of three threads each.
Fig. 84 also is to be worked in three colours; the light squares in unbleached cotton, the middle figure in Bleu-Indigo très clair, 334, the large squares on either side in Brun-Cuir clair 432. Each figure contains eighteen clusters, of three threads each.
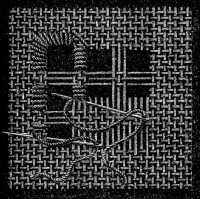
Open-work insertion with spiders (fig. 85).—The edges are to be herring-boned, as described in fig. 39. In the middle, the so-called spiders are made, over every group of four clusters. The thread that runs out from the spider, passes over two clusters and under one, and then three or four times, over and under the clusters, as in darning, and so back, under the spider, at the place at which it was drawn in, and then on, to the next four strands of thread.
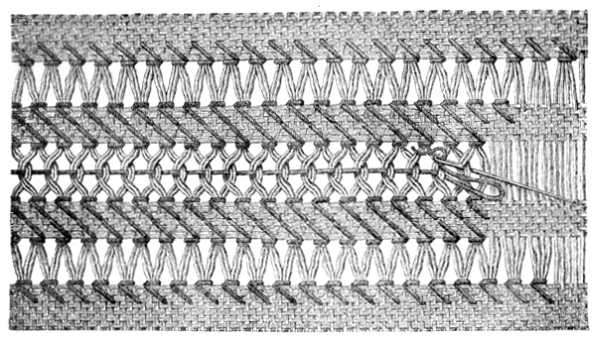
Three-rowed open-work (fig. 86).—Draw out five threads for the narrow stripe, and from fourteen to sixteen for the wide one. Each cluster should consist of four threads. The narrow bands between, are to be herring-boned on either side. The dotted line shows the course of the thread, on the wrong side. Then unite each separate cluster in the middle, with a back-stitch, as shown in the illustration, and finally, join every group of four clusters together, with three stitches, and make a spider in the middle of the open-work, at the point where the threads intersect each other.
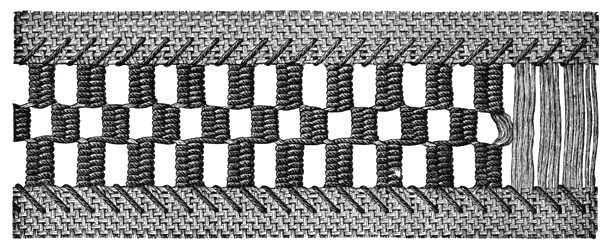
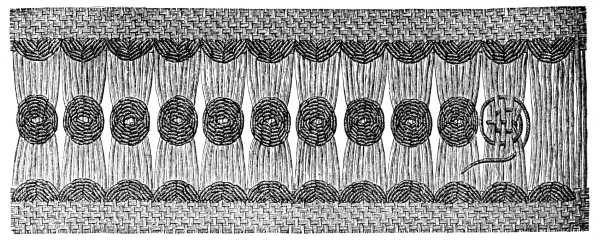
Open-work insertion with rings (fig. 87).—Bind the edges on both sides, with straight, two-sided, stitches. Take, for this, Coton à broder D.M.C, No. 30, (embroidery cotton), using it double. Draw out, from twenty-four to thirty threads. Wind your thread six or seven times round the middle of each cluster of nine threads, and then make darning-stitches, above and below, to a length of 3 m/m. When you have completed two clusters, join them together, by four interlocked stitches; wind your thread three times round the single thread, and sew it over with close stitches.
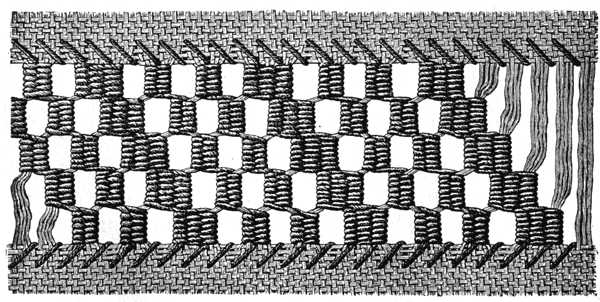
Open-work insertion with spiders (fig. 88).—Draw out twenty-four threads. Ornament the two edges with half-spiders. You begin these over two threads, and go on taking in others, to the number of eight. The whole spider in the middle, is made as above described.
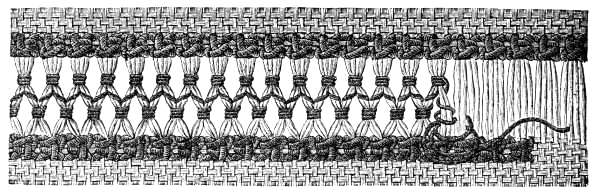
Open-work insertion (figs. 89 and 90).—The beauty of this otherwise simple pattern, lies in the peculiar knot, with which the edges of the stuff are ornamented.
Carry the working thread, as shown in fig. 90, from right to left, (see the description of the right side) over and under four threads; then bring the needle back, under the thread which lies slanting, form a loop with the forefinger of the left hand, slip it on to the needle, and draw it up close to the first stitch; pull the needle through the knot, and proceed to the next stitch.
The illustration explains how the open-work in the middle should be carried out.
Open-work with winding stitch (fig. 91).—For this pattern, which is a very laborious one to work, draw out twenty-eight threads. Bind the edges with two-sided stitches, over two, three, four and five threads, respectively. For the middle figures, you must reckon four threads for the clusters, round which the working thread is tightly twisted, eight for the darned clusters, ornamented with picots (see fig. 165), and sixteen for the rectangular rosettes, in two colours.
Make a loose spider over the threads, as a background for the rosette. Work the picots in a different colour from the cluster, and the rosettes, likewise, in two colours. The connecting loops between the figures should be made as you go along, the thread being always carried back into the loop just made.
Cutting out threads at the corners (figs. 92, 93, 94, 95). If you want to carry a latticed-hem or a simple open-work pattern, round a corner, you must cut and loosen the threads, on both sides, about one c/m. from the edge of the hem, as seen in fig. 92. The loose threads can be pushed into the turning, and the edge button-holed, as in fig. 93.
If however, on the other hand, the stitching be continued without interruption, as indicated in the upper part of fig. 94, the loose threads must be brought to the wrong side, and as represented in the lower part of fig. 94, fastened down with a few stitches.
 Fig. 92.
The cutting and loosening of
the threads at the
corners.
Fig. 92.
The cutting and loosening of
the threads at the
corners.
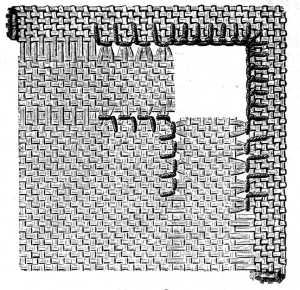 Fig. 93.
The over casting of the disengaged
edge at the corner, the threads being
turned in within the hem.
Fig. 93.
The over casting of the disengaged
edge at the corner, the threads being
turned in within the hem.
 Fig. 94.
Bordering the disengaged edge with
hem-stitching, the threads being
turned over
Fig. 94.
Bordering the disengaged edge with
hem-stitching, the threads being
turned over
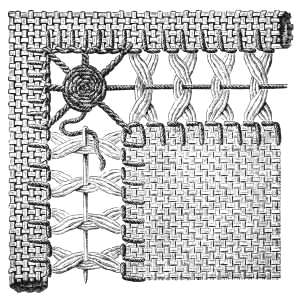 Fig. 95.
Filling in the corner with a spider,
and continuation of the lattice-work
thence.
Fig. 95.
Filling in the corner with a spider,
and continuation of the lattice-work
thence.
Cut open-work (Punto tagliato).—For cut open-work, threads have to be drawn out both ways, the number of course to depend on the pattern. Threads, left between others that have been cut out, serve as a foundation on which a great variety of stitches can be worked. Stuffs, equally coarse in the warp and woof, should be chosen for all cut open-work, for then the empty spaces that remain, where threads have been drawn out both ways, will be perfectly square.
Drawing out threads both ways (fig. 96).—The same number of threads must be drawn out each way; most patterns require the same number of threads to be left as are drawn out. In fig. 96, three threads have been drawn out and three left.
Cutting out threads (fig. 97).—We often meet with cut open-work patterns, set in another kind of embroidery. In such cases, the threads that are to be cut out, must be cut a few millimetres within the edge, and then drawn out, so that there may be a frame of the stuff left intact outside.
Button-holing the raw edges (fig. 98).—In very fine linen textures, the threads can simply be cut out, but in the case of coarser stuffs, and when a pattern ends in steps as in figs. 103, 104, 105, the raw edges must be button-holed as in fig. 98, or 99.
Overcasting the raw edges (fig. 99).—Cording the raw edges, is even better than button-holing them. Count the number of threads carefully that have to be cut out, run in a thread to mark the pattern, and then only, cut the threads through, at least two threads within the line.
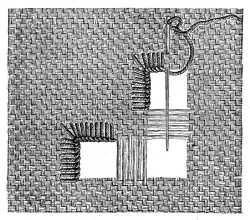
Overcasting the trellised ground (fig. 100).—If you only have a small surface to embroider, you can draw out all the threads at once. But in the case of a large piece of work it is better to begin by removing the threads in one direction only, and completing all the little bars, one way first; after which you draw out the threads the other way and embroider those you leave. In this way you will secure greater equality and finish in your work.
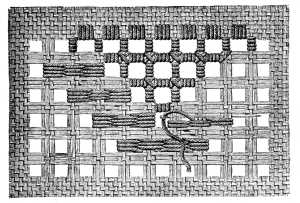
Ground for square, fig. 105 (figs. 101 and 102).—Finish the first row of bars along the edge completely, to begin with. In the second row, overcast the bar, down to half its length, then carry your thread over two empty spaces, see the letter a, come back to the bar, overcasting the thread which you threw across first, and passing the needle under the bars of the stuff. In the second rows that intersect the first, marked by letter b, the threads meet in the middle of the empty space.
In fig. 102, finish the bars, overcast both ways first, and then fill in the ground with interlaced threads, worked row by row, throwing the thread from one square to the other as you go, and doubling it, as you return. For the bars, see the chapters on net embroidery, and Irish lace.
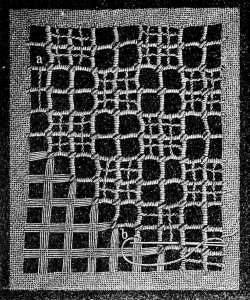 Fig. 101. Lattice-ground for square
in fig. 105, showing the course
of the stitches.
Fig. 101. Lattice-ground for square
in fig. 105, showing the course
of the stitches.
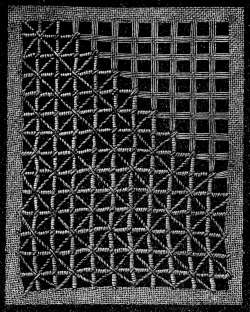 Fig. 102. Lattice-ground for square
in fig. 105.
Fig. 102. Lattice-ground for square
in fig. 105.
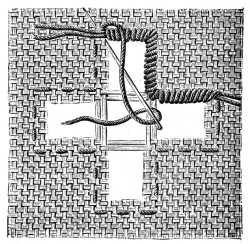
Lattice-ground and damask stitch for square, fig. 105 (fig. 103).—Our illustration shows a third kind of openwork ground with one corner in damask stitch, of the square represented in fig. 105. The little bars which intersect each square crossways, are made in two divisions, by carrying the thread to the opposite bar and back. In the same way, the second thread is carried over the first. The damask stitches are described in the next chapter, in figs. 143 and 144.
Lattice-ground and damask stitches for square, fig. 105 (fig. 104).—Damask, or gobelin stitches, are given in figs. 152, 153, 154. The ground of this part of the square (fig. 104) is adorned with narrow bars, worked in darning stitch. From the centre of one bar, proceed three bars made on three foundation-threads, and a fourth made on two, on account of the passage to the next bar.
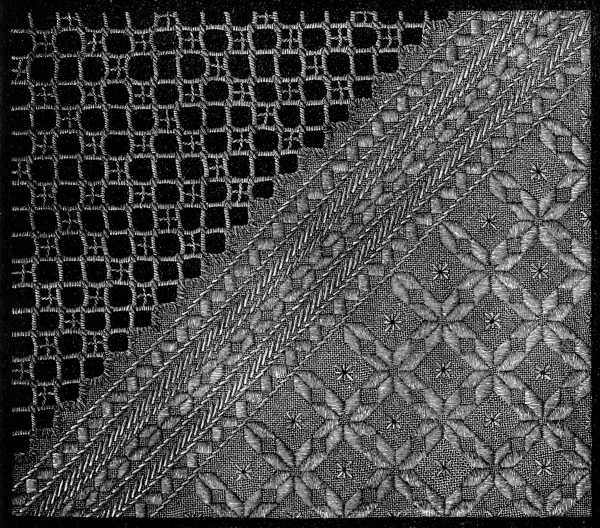
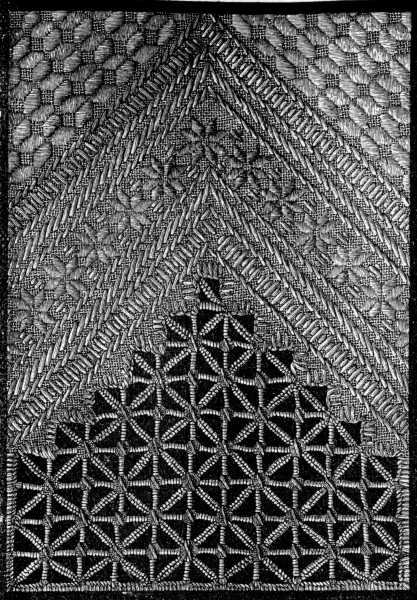
Quarter of the square in single and cut open-work, and damask-stitch (fig. 105).—Original size 48 c/m. square. This handsome square is worked in unbleached cotton on a white ground; it may also be worked in colours. A very good effect is produced by using Chiné d'or D.M.C[A] red, blue, or green for the gobelin stitch, and a uniform pale tint for the cut open-work.
Figs. 101, 102, 103, 104 illustrate in detail, one quarter of the square, which is represented here one third of the original size. The centre piece (fig. 104) is bordered by four stripes, two long and two short; the former containing two lozenge-shaped open-work figures separated and finished off by damask stitches; the latter, only one such figure. For the insertion in single open-work, that recurs three times, you will find a variety of designs in figs. 81, 82, 83, 84, 87, 88.
 Fig. 105. Quarter of the square in single and cut open-work,
and damask stitch.
Fig. 105. Quarter of the square in single and cut open-work,
and damask stitch.Drawing in the pattern (fig. 106).—Darning in the threads, as you do into a net foundation is a slower process and one that requires greater skill than drawing them in. The illustration shows the proper order and direction of stitches for Fig. 108. In this case likewise, the little bars must be finished, before the actual pattern is filled in.
Darning in the threads (fig. 107)—In old needle-work we often find the pattern reserved, that is, left blank and outlined by the grounding. As it is difficult, especially in executing minute, and delicate figures, to withdraw the threads partially, without injuring the linen foundation, they are withdrawn throughout, and new ones drawn in, to form the pattern. To explain this more clearly, the original threads of the material are represented in a lighter shade than the new ones that are drawn in; the course of the stitches is indicated in a darker shade.
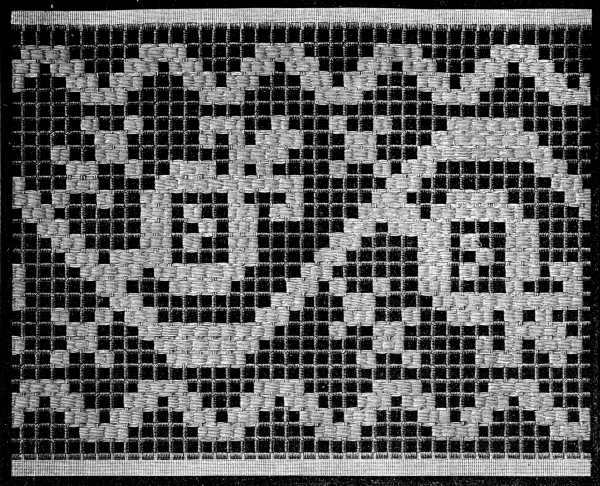
Broad insertion in cut open-work, with the pattern drawn in (fig. 108).—This insertion, suitable according to the foundation it is worked on, for the decoration either of curtains, table-covers, bed-linen or underclothing, is made as shown in fig. 106. If intended for the decoration of any article made of white linen, we recommend unbleached materials for the lattice-work, and bleached for the pattern, to bring it out in strong relief.
Insertion in cut open-work, with pattern darned in (fig. 109).—This insertion can be introduced into any kind of linen material, and used for ornamenting towels, aprons, bed-linen and table-linen. When it is used to connect bands of cross-stitch embroidery, the open-work should be of the same colour as the embroidery, and the pattern worked in white or unbleached cotton, to correspond with the foundation. In fig. 109, the pattern is half as large again as in the original.
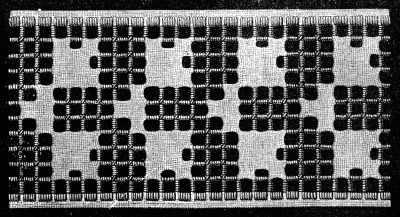 Fig. 109. Insertion in cut open-work, with pattern darned in.
Cut open-work pattern (figs. 110 and 111).—This pattern, more of the nature of lace than any of the former, is well adapted for trimming, not only household articles but also church furniture, altar-cloths and the like, which are required to wash, as it can be worked in any width.
Fig. 110, a magnified representation of the work in process of execution, shows alternately, ten threads withdrawn each way and six left, with open spaces between. The arcs are worked over three carefully laid threads, carried across from the middle of one bar to the middle of the bar at right angles to it, the wheels on the other hand are begun and finished at the same corner. Overcast the cut edges, and hem-stitch the outside layer of stuff (figs. 61 and 62).
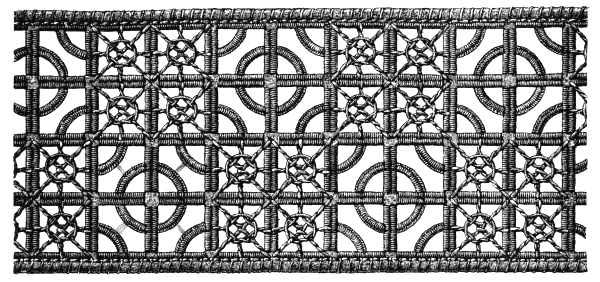 Fig. 111. Cut open-work pattern.
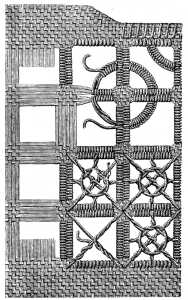
Greek cut open-work pattern (fig. 112).—After the foregoing explanations, no difficulty will be found in copying the beautiful Greek cut open-work pattern, illustrated in fig. 112. Here, we have in the original, 48 threads drawn out in the middle, both ways, from one straight bar to another, (these bars being darned) with open spaces between; and in the lower and narrower division, 21 threads drawn out each way. The cut edges, from bar to bar, are hem-stitched on both sides, leaving four threads of the stuff between.
The long bars, in the second figure, are button holed on both sides, those with the picots, on one side only.
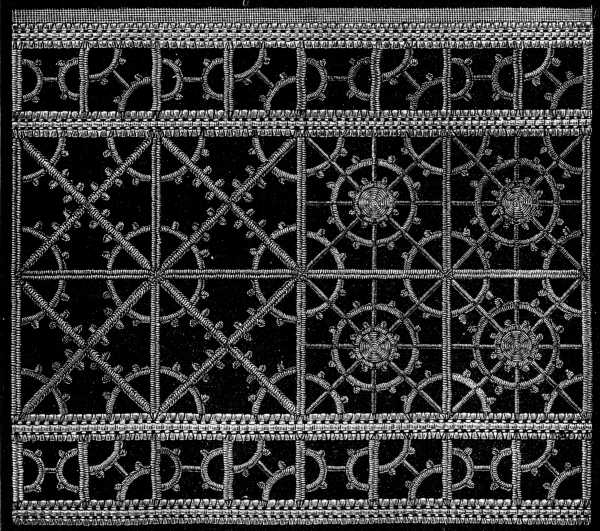 Fig. 112. Greek cut open-work pattern.