Figure 1
Title: Bookbinding self taught
Author: Ben Davidson
Editor: E. Haldeman-Julius
Release date: January 23, 2026 [eBook #77757]
Language: English
Original publication: Girard: Haldeman-Julius Publications, 1927
Other information and formats: www.gutenberg.org/ebooks/77757
Credits: Carol Brown, Tim Miller and the Online Distributed Proofreading Team at https://www.pgdp.net
| LITTLE BLUE BOOK NO. | 1192 |
| Edited by E. Haldeman-Julius |
Ben Davidson
HALDEMAN-JULIUS PUBLICATIONS
GIRARD, KANSAS
Copyright, 1927,
Haldeman-Julius Company
PRINTED IN THE UNITED STATES OF AMERICA
| Page | |
| 1. Little Blue Book Covers | 5 |
| 2. Tools and Materials | 12 |
| 3. Stitching | 15 |
| 4. Binding | 19 |
| 5. Rebinding Old Books | 28 |
| 6. Loose Leaf Scrap Books | 29 |
| 7. Lettering | 30 |
The satisfaction derived from rebinding torn covered books from my library has actuated me in preparing this Little Blue Book. I am the possessor of several hundred copies of the Little Blue Books, for which I have made a number of linen holders. To begin, therefore, with just such a simple proposition as the making of a linen cover or holder for one of the Blue Books would be a good start.
All you need is a piece of linen cloth, some thin card-board, white paste, scissors and a small brush which can be purchased at the five and ten-cent store. Also a ruler.
The Blue Book being 5 inches high and 3½ inches wide, cut two pieces of cardboard to measure 5¼ inches high and 3⅝ inches wide, thus making the card-board protrude ⅛ of an inch at the top and bottom and ⅛ of an inch on the side.
Now, measure the back of the Blue Book. As there is no uniform size, and since the backs of the Blue Books vary from ⅛ to ⅜ of an inch, [Pg 6]allow ¼-inch for the back. If you were making a permanent cover for the Blue Book, you would have to measure its back exactly, but for a removable linen holder ¼-inch will suffice.
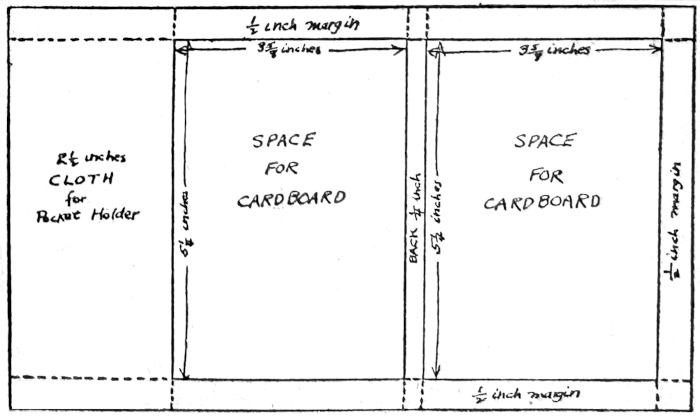
You are now ready to measure and cut the cloth. Be sure to measure your cloth at a right angle and leave ½-inch extra at the top and bottom and right side. In cutting the length and width of your linen, you will be guided by the following figures: Length, ½ plus 5¼ plus ½ or 6¼ inches from top to bottom; width, 2½ plus 3⅝ plus ¼ plus 3⅝ plus ½ or 10½ inches from left to right (the 2½ inches at the left is for the holder or pocket). Having cut your cloth 10½ inches by 6¼ inches, lay it down flat upon the table, and draw parallel lines ½ inch from the top and ½ inch from the bottom. Then draw perpendicular lines from the right as follows: ½-inch, 3⅝ inches, ¼-inch, and 3⅝ inches again. By drawing these parallel and perpendicular lines correctly, you will know just where to place the two (5¼ × 3⅝) cardboards. The diagram on your cloth will look something like Figure 1.
You are now ready to paste the card-boards in the spaces outlined in Figure 1. Place the cardboard on a piece of waste or newspaper; [Pg 7]then dip your brush in a little water before applying the paste so as to get an even moisture; and give the cardboard a smooth coating of paste. In doing this paste work properly, it is good to have a supply of waste or newspaper at hand; also, a rough towel and a wastebasket. Having applied a smooth coating of paste to the cardboard, place it within the lines of the right frame (see Figure 1) and rub the surface of the cardboard with a clean piece of cloth; until you feel sure that it has been properly pasted. Do the same with the remaining cardboard and place it in the adjoining frame (see Figure 1).
Figure 1
[Pg 8]
Fold and crease the 2½ inches of cloth at your left, so that it will lay flat upon the left cardboard. At the top and bottom ends of this crease, and within the ½-inch of the overlapping margins of each end, cut out a piece of cloth in the shape of a V (see Figure 2). Also, at the top and bottom end of the 2½ inches of cloth, and within the ½-inch margins of both these ends, cut out two more pieces of cloth in the shape of V (see Figure 2).
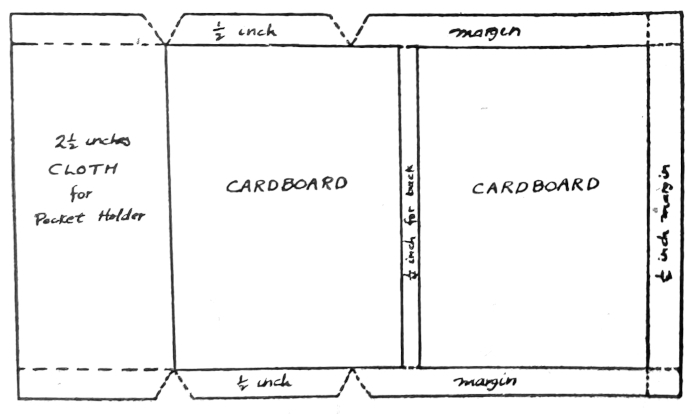
Figure 2
As the cloth pocket-folder at your left is lying flat upon the left cardboard, fold both ends of the ½-inch margins of the pocket-folder inside, so that the margins will rest [Pg 9]between the left cardboard and the pocket cloth. Take a piece of white paper 5⅛ × 2¼ and insert ¾-inch of the left side in the pocket-folder, so that ¾-inch at the top and bottom of the left sheet will rest right into the folded crease on the inside of the pocket-folder. Paste the back of the right side of the sheet on the left cardboard and the ¼-inch back of the book; there will still be left ¼-inch which can be pasted on the adjoining right cardboard. Now, paste the ½-inch margins at the top and bottom of the pocket holder, and fold them over so that they will rest outside the pocket (see Figure 3). Paste the remaining ½-inch margins at the top, bottom and right (one at a time) and turn them in; first, the top margin, then the margin at the bottom, the margin at the right being last. It will be necessary to cut out a small bit of cloth at the top and bottom of the right margin corners. As two margins meet each other at the corner of a book—each margin being ¼-inch wide—you find a corner margin ½-inch square that is not needed, and can be cut out; but, by a little practice, the corner can be so manipulated, as to make two right-angled triangles and by cutting the triangle facing toward you, make a more finished corner.
[Pg 10]
The margins being properly pasted inside the covers, take a sheet of paper (white) 5 × 3½ and paste over the right cardboard and part of the pasted margins, leaving ⅛-inch from the top, bottom and right side. This finishes your linen book holder and you can now insert the left cover of your Blue Book into the pocket of the linen holder.
[Pg 11]
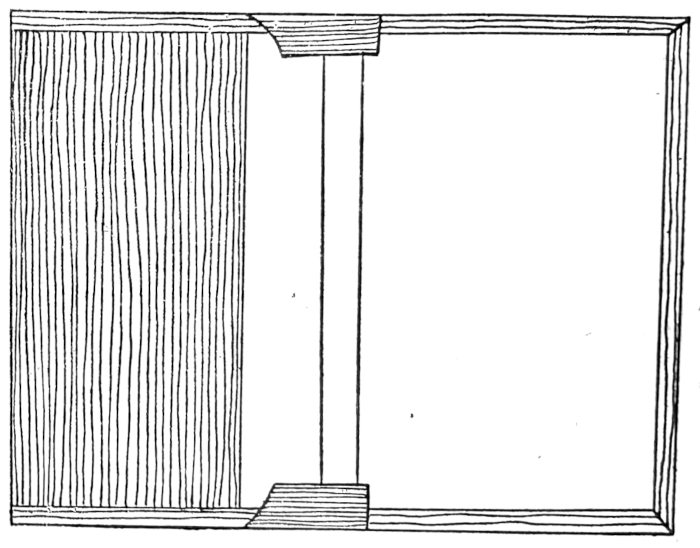
Figure 3
[Pg 12]
The Sewing Bench is a wooden frame, consisting of four attached pieces of wood—1 flat piece 18 inches long by 8 inches wide; two upright pieces of wood, each piece being 1 foot long and an inch square. These two pieces of wood are attached at the left and right front ends of the flat piece perpendicularly, so that the two pieces are parallel to each other. Another piece of wood 18 inches long and 1 inch square connects the two uprights, and you have a sewing bench (see Figure 4).
[Pg 13]

Figure 4—Sewing Bench with 3 cords attached.
A small wooden press, which is used to give the book or its number of parts a good squeeze before the binding, can be made of two flat pieces of strong wood and made to come as close together with the aid of a metal vise. (The press can also be purchased for about $3.75.)
The steel-faced backing boards are used after the book is finished; the book being placed between the two boards with the protruding pieces of brass resting in the creases of the book. This can also be done with the aid of a metal vise. The steel-faced backing boards are [Pg 14]made up of two pieces of strong wood 18 inches long and 12 inches wide and about 1 inch thick. At one of the long ends of each of these boards a piece of steel or brass is so attached as to protrude about ⅛ of an inch. These boards can also be purchased at a nominal cost at any business house dealing in Bookbinders’ Supplies.
The other tools, such as paste, hammer, brush, scissors, etc., can be purchased at any hardware or five and ten-cent store.
[Pg 15]
For the beginner who wishes to learn book binding in all its parts, it is advisable to take apart some old inexpensive book or magazine. In doing so, he will observe how the numerous pages are joined together by parts or “signatures” and then stitched. In taking an old book apart, one can’t help noticing how the covers were attached and how the back of the book was glued.
The average book, containing several hundred pages, is divided into a certain number of parts or sections. A section is made up of 8 pages or 16 sides. A book of 320 sides consists of 160 pages or 20 sections.
In preparing to stitch the sections of a book together, be sure to have each section in its proper place, before placing it on the sewing bench. Mark the first page of each section 1, 2, 3, etc. In order to insure a uniform width of all the sections, place them into the wooden press, so that the back of each section will be properly squeezed. Now, have all the backs protrude ¼-inch out of the press; and with a [Pg 16]plain hack saw, make the holes as follows: ½-inch across from each end of the section, across the center, and two times across, between the center and each end-hole. (The last two being half way between the center and end-holes.) These holes are made for the cotton or stitching cord to pass through. Be careful in cutting, so as not to make the holes too deep. Cut as deep as the teeth of the saw.
Three cords are attached to the bar of the sewing bench. These cords are fastened to the base. As a section of the book is placed upon the sewing bench, the center hole and the ones to the left and the right of the center, are placed in front of these cords, so that the three cords will cover the three holes. Thread your needle, and begin stitching from the outside of the end-hole at your right; and, as the cotton is drawn inside and outside of the section, it will entwine the three cords. As you finish stitching one section, run your needle around the stitch underneath it and make a knot. These knots hold all the sections together.
After all the sections are properly stitched, cut the three cords, leaving an inch or so from each end. These extra pieces of cord are threaded and later used as part of the attachment of the book to the covers (see Figure 5).
[Pg 17]
When all the sections are stitched and properly knotted, the book is ready to be bound. End-sheets are then cut to measure the length and width of the book to be bound.
[Pg 18]
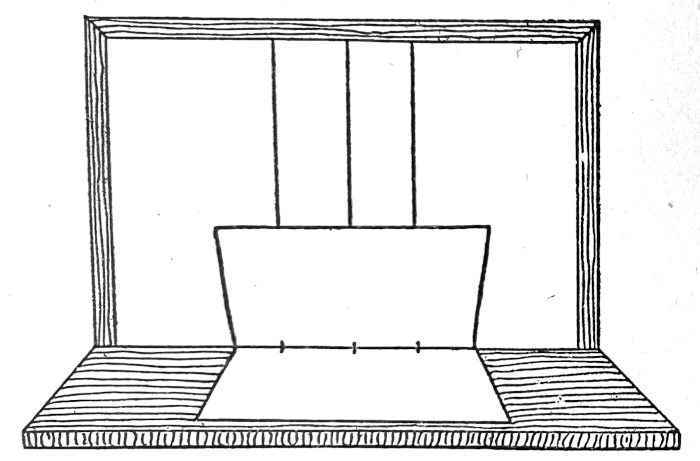
Figure 5—Showing the inside stitch of a section
[Pg 19]
Suppose the book to be bound is 8 inches long, 5 inches wide and 1 inch thick. The end-sheet can be cut 8 × 10 and folded in half. Usually, two such sheets are cut, and pasted over each other. The top sheet being re-enforced by a strip of white linen 8 × 1½, leaving ¾ of an inch on each side of the crease. The end-sheets are then pasted with a half inch margin of paste, and placed over the first and last sheet of the book.
The back of the book is now ready to be glued; it is placed between two cardboards, and then placed between two contracting boards, leaving the back of the book protruding enough to be glued freely. The glue, being properly prepared, is applied to the back of the book with a stiff brush. The headbands or trimmings are then cut 1⅛ inches and placed on each end of the back. These headbands are more of an ornament, and most books today are bound without them.
The book being 8 inches long and one inch thick, cut a piece of cheese cloth 8 inches long and 4 inches wide, and place over the glued [Pg 20]back so that 1½ inches of the cloth will lap over each side of the book. A strip of heavy paper 8 × 1 inches is cut and placed over the glued cheese cloth back. Leave the book in this position for a while to dry.
The next step is the cutting of cloth and cardboards for the cover. The book being 8 inches long and 5 inches wide, the cardboards should be cut 8¼ inches long and 4⅝ inches wide. (In making a flat back the width of the cardboards would be 5⅛.) By cutting the cardboards 8¼ inches long, you allow ⅛ inch to protrude at the top and the bottom; and by cutting the cardboards 4⅝ inches wide, you allow a space of ¼ inch adjacent to each side of the back of the book for the crease, and ⅛ of an inch margin wider than the book.
To give the book—8 inches long, 5 inches wide and 1 inch thick—a whole cloth binding it is necessary to measure the cloth as follows: length, ½ plus 8 and ¼ plus ½ (the half inches for margins at each end, and the 8¼ inches for the cardboards) making the length of your cloth 9¼ inches. In measuring the width of the book, allow space for the back, covers, creases and margins. The width, therefore, would be measured as follows: ½ plus 4⅝ plus ¼ plus 1 plus ¼ plus 4⅝ plus ½, making the [Pg 21]total width 12¼ inches (see Figure 6). We now have the following measurements for the whole cloth covering of the book: Full length of cloth 9¼ inches. Full width of cloth 12¼ inches.
[Pg 22]
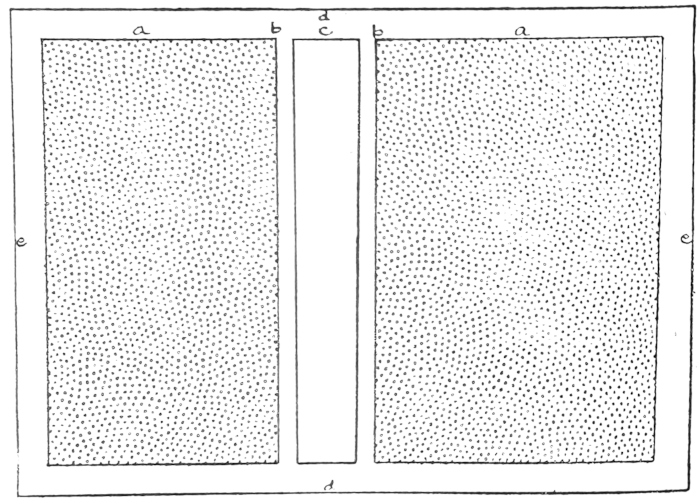
Figure 6
[Pg 23]
A piece of heavy paper 8¼ × 1 inch should be pasted over the 1-inch back to reinforce it. Paste the top margin and turn in; then the bottom margin. Now you have four corners to adjust before turning in the side margins. At each corner, you have a piece of cloth a half inch square, facing you, a part of which is unnecessary. With the aid of your thumb, manipulate the half inch square of cloth in such a way as to make two right-angle triangles; and cut the triangle facing you. Repeat the same process with the three remaining corners; and then turn in your left and right half inch margins. This completes your cover.
If you wish to put any letters, designs or title on your cover, now would be the proper time—for beginners. The subject of lettering will be taken up in another chapter.
To cover the same book with two different materials, such as cloth and paper or leather and cloth, it is customary to have the back and the corners of the book bound in the same material. Given the dimensions of any book, the rule is the same, in so far as allowing so much for the margin, ¼ inch for the crease on each side adjoining the back of the book.
In binding a book 9¼ inches long, 6¼ inches wide and 1½ inches thick with a buckram back [Pg 24]and corners and linen or paper sides, measure and cut the buckram as follows: 1½ back, ¼ plus ¼ for the creases on each side, and 1½ plus 1½ inches buckram extra on each side of the cover. The total width being 5 inches. The length would be 9¼ and ½ plus ½ or 10¼ inches. The four buckram corners should be cut in four right angle triangles.
If each corner of the cover is to have a 2½-inch right angle triangle in buckram, cut two pieces of buckram 3½ inches square; which allows for a ½-inch margin—all around—to turn in. Cut both the squares along the opposite points or the hypotenuse and you have your four right-angle triangles (see Figure 7).
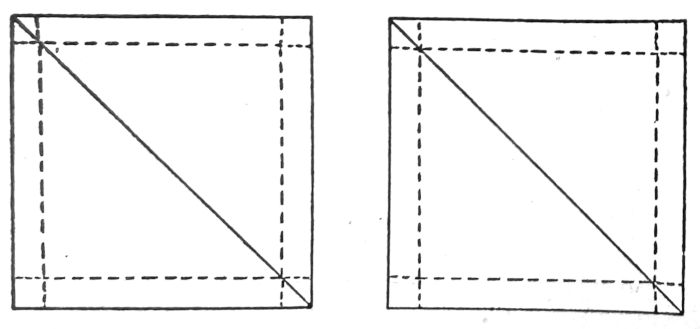
Figure 7—Pattern for the four corners. Dotted lines represent the margins.
[Pg 25]
The paper or cloth used to cover the rest of the book should be measured and cut as follows: length 9¼ inches and ½ plus ½ or 10¼ inches. The width will be 5¼ inches. About 2¾ inches will have to be cut away from the side covers to make place for the buckram corners. To do this work properly, bind your book first with the buckram back and corners; and then apply the side coverings (see Figure 8).
[Pg 26]
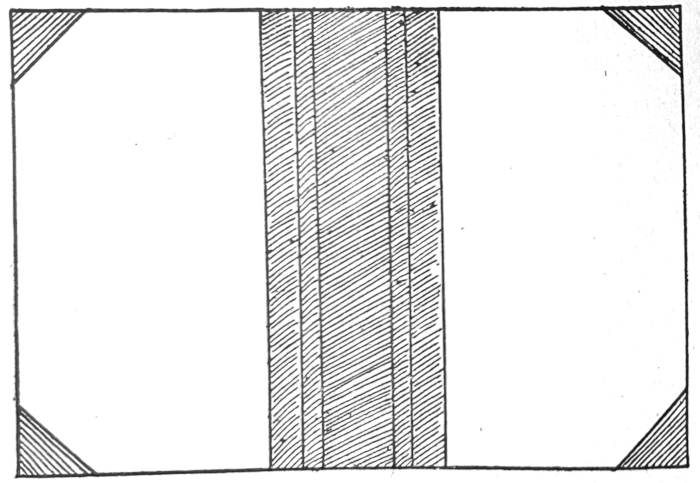
Figure 8—Outside cover of a book bound in two materials. Buckram for back and corners; cloth or paper for the sides.
[Pg 27]
Having attached the cardboards to the buckram back and corners, take the cloth or paper to be used for the side covering, and place one end (lengthwise) parallel with the buckram; allowing the cloth to lay on a ¼-inch margin of the buckram. Take a “bone” or letter opener and run the end along the cloth, so that the slant of the buckram corners will leave its impression upon the cloth or paper that you are using. Do the same with the other side. You now have four slant impressions on your cloth; and by cutting your piece of cloth ¼ inch away from the slants, but parallel to it, you will have an exact covering.
[Pg 28]
Some books only need new covers—the binding being strong. In removing the old covers, care should be taken not to cut any of the knots or stitches; otherwise the book will come apart. Also, in removing the back which usually contains the title, you may wish to repaste the title to the new covering. If the pages of the book are loose and merit restitching, remove the dry glue from the back of the book. The use of a pen knife, sand paper and a wet sponge will be necessary to remove the glue properly. The glue being properly removed from the back of the book, the sections will come apart readily. Remove the old stitchings from each section; and also examine the back of each part. If it is torn or worn out, re-enforce it with a thin slip of strong tissue paper one inch wide; so that ½ inch will rest on each side of the crease. The length of the tissue paper will depend, of course, upon the length of the page being repaired. Having taken the sections apart, you now proceed in the same manner as described in the chapter on Stitching.
[Pg 29]
The covers for a loose leaf scrap book can be made without a back. Measure and cut the cardboard ⅛ of an inch larger on all sides than the pages. Also, leave a ½-inch cloth margin on all sides. After the covers are finished, cut holes in their proper places—usually two at the back of each cover. Holes are cut in the pages to correspond with the holes in the cover. Two rings are run through the covers and pages; and your scrap or note-book is finished (see Figure 9). A hole puncher and rings can be had at a hardware store or at the “five and ten.”
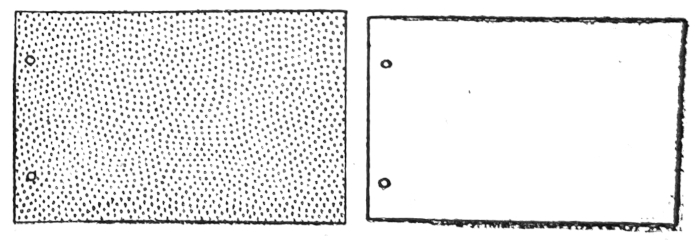
Figure 9
[Pg 30]
Bookbinders’ ink can be purchased in small tin tubes. They come in all colors; but the dark colors are best for the beginner. The light colors—especially white—do not leave a clear impression upon the cloth. To do this work properly, it is necessary to have a tool-press, a small supply of printer’s type, and a small roller. The tool-press is a metal device to hold the type fast; and is made of a brass oblong frame with two screws. The frame is movable, and the screws are used to widen or narrow it according to the title of the book.
Suppose the title to be printed upon the back of the book is PILGRIM’S PROGRESS; and the back of the book is one inch wide. You will have to print PILGRIM’S PROGRESS on two lines—each line being less than an inch. The type used would be about the same size as the capital letters of a typewriting machine.
Place the letters “PILGRIM’S” in the tool-press. Hold the tool-press with its back facing you, and set the type from left to right. Open your tube of printers’ ink and squeeze a small bit on a piece of glass. Place the small roller [Pg 31]over the ink; and keep on rolling back and forth until you have a smooth thin layer of ink on your roller. Apply the roller to the title once or twice, and, holding the handle of the tool-press tightly, press the letters upon the back of the book. Increase the pressure for a few seconds, and remove the tool-press. In order to ensure the title being placed properly, draw a light horizontal line on the back of the book, and place the type right under it.
Having printed the word “PILGRIM’S” on the back of your book, remove the type from your tool-press, and set up PROGRESS in the same way—repeating the same process. The word PROGRESS should be printed about ¾ of an inch below PILGRIM’S.
Before impressing the title upon the book, the beginner is advised to try it first on a piece of waste cloth or heavy paper. Only after you have made a clear and good impression upon the scrap of cloth, should you do the book.
After this is done, leave the printed title to dry and then attach the cover to the book in the manner described under “Binding.” Also, remove the surplus ink from the type, roller and glass. Use a little kerosene oil on a tooth brush for the cleaning of the type; and some [Pg 32]cotton waste for the roller and glass. Apply a little kerosene to the cotton waste, and apply it to the roller, until all the ink is removed. Do the same for the glass.
To use dark colors such as black, blue or brown, it is necessary to employ a light cloth; or print the title on a white cloth and paste the white over the dark cloth. White ink on a dark cloth tends to blur; and Bookbinders use instead a chemical called praeger leaf. It looks like a sheet of paper with a coating of white chalk on one side. Apply several drops from the white of an egg (size) on the cloth. Place a small strip of praeger leaf over it. Heat the type to be used for several minutes (place in oven) and then apply it on the praeger leaf. The heat of the type melts the impression upon the cloth, and the “size” (white of an egg) makes it stick. Gold lettering with the use of gold leaf is done the same way.
Here too it is advisable to experiment on pieces of scrap cloth several times, and remember, “If at first you don’t succeed, try, try again.”
One misspelled word was corrected, one extraneous hyphen was removed, and one unprinted letter was added.