Title: Canning, Freezing, Storing Garden Produce
Creator: United States. Department of Agriculture
Release date: July 24, 2019 [eBook #59977]
Language: English
Other information and formats: www.gutenberg.org/ebooks/59977
Credits: Produced by Stephen Hutcheson and the Online Distributed
Proofreading Team at http://www.pgdp.net
United States Department of Agriculture
Agriculture Information Bulletin 410
296This is a reprint of Part 4 from the 1977 Yearbook of Agriculture, Gardening for Food and Fun. The Yearbook may be purchased at government bookstores or ordered from the Superintendent of Documents, U.S. Government Printing Office, Washington, D.C. 20402. Original page numbers from the entire book are used in this reprint.
Issued in December 1977
by Edmund A. Zottola and Isabel D. Wolf[1]
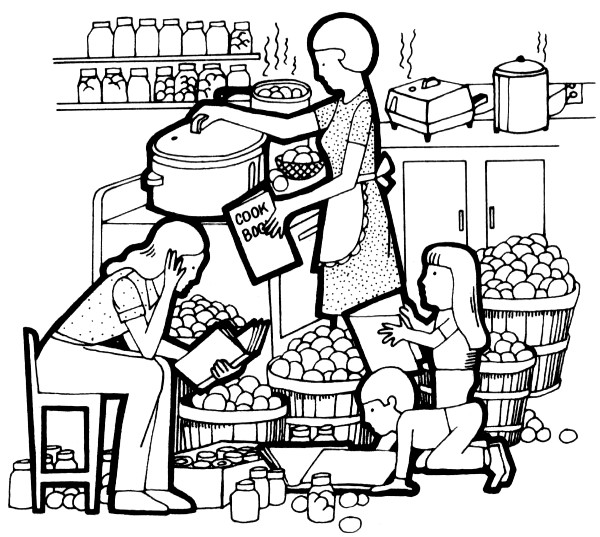
The telephone rings in a county Extension office. A harried voice says, “My garden is growing more than my family can eat, what shall I do with it? How can I keep it from spoiling?”
How many times during the gardening season is this scenario repeated in an Extension office? Too often to count! The answers to these questions are readily available in the many bulletins, folders, and leaflets on food preservation available from county, State, and Federal Extension agencies. The publications tell how to preserve food safely and wholesomely, but do little else to explain why directions must be followed precisely. Let’s take a look at the whys.
To understand food preservation, first consider the sources. Home garden food comes from plants: sources of raw food are living, biological entities, continuing to metabolize after they are harvested. Plants also provide a source of food for micro-organisms which can grow on or in them, spoiling food before it can be eaten. The primary objective of food preservation is to prevent food spoilage by preserving food until it can be used by people.
Historically, food preservation and processing assured a food supply and prevented starvation. This is probably the major reason why food is processed today in many developing countries. In the United States, however, affluence and a plentiful food supply now influence the reasons for food preservation. Today, Americans live many miles from rural areas where food is produced. Consequently, food must be preserved to assure the nonfarm population an adequate supply.
Our people want a food supply that is safe, high in quality and appearance, adequate nutritionally, and reasonably priced. Many consumers try to obtain these food attributes by returning to the “old ways” of growing and preserving food themselves.
To understand food preservation, let’s look at five causes of food spoilage or deterioration (four are biological, the fifth physical or mechanical):
(1) The primary cause of food spoilage in the United States is microbiological. Micro-organisms are small living organisms such as yeast, molds, or bacteria. They are the chief causes of microbial spoilage.
Related to microbiological spoilage of food and also a concern in food preservation is microbiological food-borne disease. There are two types. Salmonellosis is an example of a food infection where food may not support growth of the micro-organisms but merely serves to transfer it from the source to the human host. In the second type, the micro-organism grows in the food and produces a poison or toxin which when eaten, causes illness symptoms. Staphylococcal food poisoning is the most common of the second type in the US.
Severity of the major types of food-borne disease in the United States varies from the finality of botulism to the mild discomforts of Clostridium perfringens food poisoning. Food preservation techniques, followed precisely, prevent food-borne disease.
(2) The second cause of food spoilage is vermin such as rodents, rats, mice and insects that attack the food and eat or contaminate it before humans can use it. These vermin ruin millions of pounds of food each year.
WHAT ELSE CAN WE DO WITH TOMATOES?!!
(3) Have you noticed how an apple, left at room temperature, eventually gets soft, wrinkles, and dries out? This spoilage is called senescence: an aging process caused by continued respiration of the apple, eventually making it useless as food. Other foods also spoil this way.
(4) Related to senescence is chemical deterioration of food. The development of rancid flavor in high fat-containing foods is a chemical reaction which brings about an undesirable change. Loss of color or bleaching and loss of vitamins, while food is stored, are chemical deteriorations that can be controlled with proper preservation methods.
Both senescence and chemical deterioration are conveyed by organic compounds called enzymes. These enzymes are produced by all living organisms and their function is to speed up or cause the metabolic reaction necessary for the organism’s continued existence. The enzymes will continue to act after the plant is harvested, and bring about deterioration of the food unless controlled or destroyed. Preservation methods have been developed to control or destroy these organic catalysts.
(5) The last cause of food spoilage concerns food handling. Physical or mechanical damage to the food causes bruising, crushing, cutting, and wilting or water loss. These mechanical defects, besides detracting from the food’s appearance, allow easier entry of micro-organisms, insects, and other vermin to cause spoilage and aging.
Food preservation processes have been developed to slow down, prevent, or stop completely these processes of food spoilage.
An inherent part of food preservation is the package containing the food before or after processing.
Packaging provides a convenient method of handling food, prevents contamination during and after processing, bars vermin infestation, supplies a container for storage, and is a necessary part of preservation. An example would be a mason jar with proper seal for pickling.
What are the major methods available for home preservation of food? How are they carried out? Why do they prevent spoilage, food-borne disease, and give desired attributes of safety, quality, appearance, nutrition, and economy? The economics of food preservation will be developed in a subsequent chapter. Let’s explore the following available methods for home preservation of food:
The major method used for home preservation of food is temperature control. This includes canning with a pressure canner or a boiling water bath, blanching food before freezing, refrigerating food, and freezing it. Micro-organisms which cause disease and food spoilage are sensitive to environment temperature variations. By increasing the food’s temperature, micro-organisms are destroyed. When the temperature is decreased, their growth is inhibited.
Let’s look at the temperature scale 300 illustration and see how temperature affects micro-organisms. To prevent growth of micro-organisms in food and subsequent microbial spoilage, food must be kept out of the temperature range that allows growth. This is most commonly achieved by refrigerating or freezing. Refrigeration slows down or stops microbial spoilage. Freezing stops it completely.
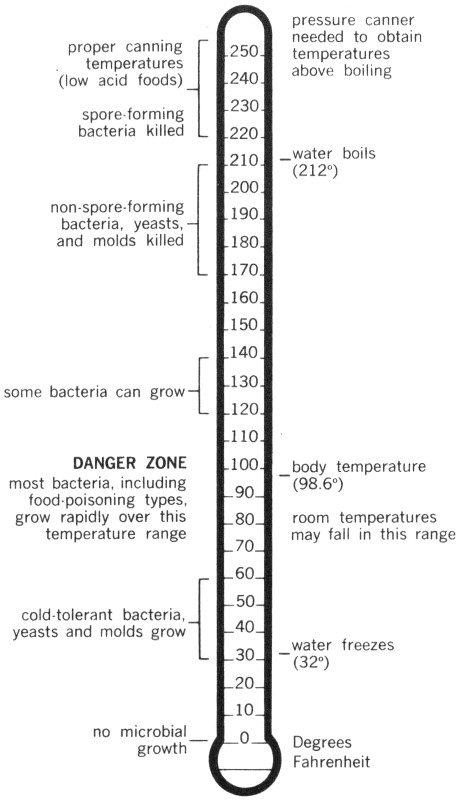
EFFECT OF TEMPERATURE ON MICRO-ORGANISMS
| Degrees Fahrenheit | |
|---|---|
| 225 | spore-forming bacteria killed |
| 220-250 | proper canning temperatures (low acid foods) |
| 212 | water boils; pressure canner needed to obtain temperatures above boiling |
| 170-210 | non-spore-forming bacteria, yeasts, and molds killed |
| 120-140 | some bacteria can grow |
| 98.6 | body temperature |
| 70-80 | room temperatures may fall in this range |
| 60-120 | DANGER ZONE most bacteria, including food-poisoning types, grow rapidly over this temperature range |
| 32 | water freezes |
| 30-60 | cold-tolerant bacteria, yeasts and molds grow |
| 0 | no microbial growth |
Enzymatic activity, while slowed down by freezing, is not stopped in many vegetables and these enzymes must be destroyed by blanching the vegetables before freezing to prevent enzymatic deterioration. Successful preservation by freezing must deactivate any enzymes that might be in the food as well as rapidly lower the food temperature to below freezing to stop microbial activity.
Freezer burn, a common problem with frozen foods, comes from improper packaging. Food moisture is lost in freezer burn, which results in undesirable flavor and texture changes. Freezer burn can be controlled by proper packaging, proper storing temperature, and avoiding long-term storage.
Refrigeration or storage above freezing, but below room temperature, preserves food for days and sometimes weeks. Refrigerated storage slows down activities of enzymes in the food and reduces metabolism of the contaminating micro-organisms.
Preservation of food by reduced temperature, refrigeration, or freezing is achieved because enzyme activity and microbial deterioration are slowed down or stopped.
Increasing the temperature of food to achieve preservation also results in destruction of the micro-organisms that produce spoilage and disease. Time and temperature regulate this preservation. Theoretically, since food will be stored at temperatures which will allow most microbes to grow, the ideal heat treatment needed to preserve the food would be one that completely sterilizes the food, that is, kills all attendant micro-organisms. To achieve complete sterilization, for example, every particle of food in a jar must reach the required temperature and be held there long enough to destroy all micro-organisms.
The time required for heat to penetrate to the center of the food in a container (the slowest heating point) is extremely important. Heat is transferred through food in containers by two mechanisms: conduction and convection. The mechanism involved depends on the consistency and amount of liquid in the food. The heat penetration rate is also influenced by size of the container, type of heating medium (wet steam vs. dry air), ratio 301 of solid to liquid, kind and size of solid material in container, amount of fat, and amount of salt and sugar.
For example, pumpkin or squash can be home canned in two forms: strained or cubed. University of Minnesota research has shown that the time required for the center of a pint jar of strained squash (which heats by conduction) to reach sterilization temperature is three to four times as long as for a pint jar of cubed squash (which heats by convection). The same is true of creamed corn (heats by conduction) and whole kernel corn (heats by convection).
Methods and recipes recommended by Extension agencies take into account all of these factors and must be followed precisely to assure a safe and wholesome product.
Why is it necessary to heat-process pint jars of string beans at 240° F for 20 minutes in a pressure canner when tomatoes can be successfully heat-processed in a boiling water bath? This brings up the second method of preserving food at home, controlling the food’s acid content. This method is most commonly used in combination with heat processing.
Most foods contain naturally occurring organic acids. Some foods contain more of these acids and are called acid or high acid foods. These organic acids have the ability to limit, inhibit, or prevent the growth of many of the micro-organisms producing spoilage and disease. The degree of inhibition is related to the amount of acid present.
A method used for measuring acid content is called pH. A measure of pH is a determination of the hydrogen ion concentration which reflects the amount of acid or alkali present in the system. A scale from 0 to 14 is used. A pH of 7 is considered neutral, above 7 alkaline, below 7 acidic. Very few foods have a pH above 7.
The classification of foods in the acid range below 7 is extremely important. Above pH 4.6 most of the spoilage type micro-organisms can grow, as well as the dreaded Clostridium botulinum (see discussion following on botulism). In foods with a pH greater than 4.6, it is necessary to heat-process the food at temperatures above boiling to obtain the desired level of sterility.
There are some types of bacteria that produce entities called endospores or spores which are extremely resistant to environmental stresses. They are a means of assuring survival in bacteria, although not themselves a reproductive mechanism. One growing or vegetative cell will produce one spore, which under proper growth conditions will germinate and produce one cell. This one cell continues to grow and can produce millions of bacterial cells. Destruction of the resistant spore necessitates the use of temperatures above that of boiling water (212° F).
BOTULISM. One of the most notorious of the spore-forming bacteria is Clostridium botulinum. When growing in food this bacteria can produce a deadly poison which causes botulism, a deadly illness. The mortality rate is 56 percent. This bacteria and its spore are present in soil throughout the world and as a result contaminates most of the food we eat. But the spore only germinates and grows where there is suitable food, no air, and a pH above 4.6. These conditions exist in canned low acid foods.
To assure botulism-free home-canned foods, it is absolutely essential that low-acid foods be canned in a pressure canner at temperatures above 212° F. The poison produced by this bacteria is one of the most potent poisons known to humans. It has been estimated that 1 cup (8 ounces) is sufficient to kill all the humans on earth. It is not something to take chances about. All home canning procedures recommended by Federal and State Extension agencies 302 are adequate to destroy this dreaded spore-forming bacteria.
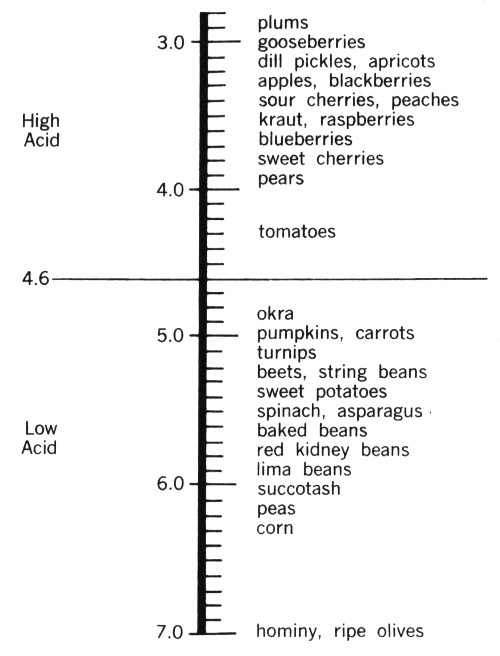
pH VALUE OF VARIOUS FOODS
| High Acid | |
|---|---|
| 2.9 | plums |
| 3.0 | gooseberries |
| 3.2 | dill pickles, apricots |
| 3.3 | apples, blackberries |
| 3.4 | sour cherries, peaches |
| 3.5 | kraut, raspberries |
| 3.7 | blueberries |
| 3.8 | sweet cherries |
| 3.9 | pears |
| 4.3 | tomatoes |
| 4.6 | ———— |
| Low Acid | |
| 4.8 | okra |
| 5.0 | pumpkins, carrots |
| 5.1 | turnips |
| 5.2 | beets, string beans |
| 5.4 | sweet potatoes |
| 5.5 | spinach, asparagus |
| 5.6 | baked beans |
| 5.7 | red kidney beans |
| 5.9 | lima beans |
| 6.0 | succotash |
| 6.2 | peas |
| 6.3 | corn |
| 7.0 | hominy, ripe olives |
Commercial canneries, which are regulated by the Food and Drug Administration, use similar processes to assure safe canned foods. In the past 50 years, 75 percent of the reported cases of botulism in the United States have been caused by home-canned food while less than 10 percent have been caused by commercially canned food. If proper home-canning procedures are followed, botulism from this source could virtually be eliminated as a cause of death in the US.
On the lower side of pH 4.6, acid content of the food will prevent growth of Clostridium botulinum and most of the other spore-forming bacteria. Thus, these foods can be preserved by using a lower heat treatment. The most common types of spoilage micro-organisms associated with acid foods are yeasts and molds. These organisms are acid-tolerant and can grow in an acid environment. They are killed at a lower temperature than spore-forming bacteria. Acid foods only need a heat treatment in a boiling water bath for a specified time to destroy the microbes present.
Preservation of food by controlling the acid content can be achieved in two ways. One is to naturally ferment the food—turning cabbage into sauerkraut. The other is to add an organic acid to the food to reduce the pH—adding vinegar to cucumbers to make pickles. Some foods such as berries and fruits naturally contain enough organic acids so their pH is below 4.6, and preservation of these foods requires only a boiling water bath heat treatment or freezing.
In a natural fermentation, lactic acid bacteria convert fermentable carbohydrates in the food to lactic acid. In this way the pH is reduced and most bacterial growth inhibited. When cabbage is fermented to sauerkraut, the cabbage’s pH is reduced from pH 6.8 during the fermentation to less than 3.5. Cucumbers can also be fermented to pickles by a similar process; however, most pickles are made by direct acidification of the cucumbers.
Direct acidification, that is, adding vinegar which contains 4 to 5 percent acetic acid, is the most common method of making cucumber pickles in the United States. It is easier, quicker, and foolproof. Often the natural fermentation will go astray. Other undesirable microbes may grow, bringing unwanted changes in the food: spoiling rather than preserving. Other foods made by fermentation include wine.
Regardless of the method used to control the pH of food, to successfully preserve food by this method it is absolutely essential to heat-process or freeze to prevent spoilage by yeasts and molds. An example of spoilage in cucumber pickles not heat-treated after acidification is the development of cloudiness and bubbling. This 303 common spoilage is caused by microbes that would be destroyed by heat processing.
Control of the moisture content of food is one of the oldest preservation methods. Removal of water from the food prevents growth of most microbes and slows down enzymatic deterioration.
Water removal from food can have several forms. The oldest and most primitive method for removing water is sun drying, which requires long hot days with low humidity to dry food evenly and quickly. Over-drying and uneven drying will result in nutrient destruction, microbial growth, and other undesirable changes. Drying of food in the home can be done and a later chapter tells how.
Water activity or availability of water in foods can also be controlled by adding compounds to the food which tie up the water chemically, making it unavailable for use in an enzymatic reaction or for use by the micro-organisms. The two most common home ingredients used in this way are sugar and salt. In making fruit preserves, the high sugar content ties up the water and helps prevent growth of many micro-organisms.
Methods used for preserving food in the home are combinations of the basic techniques discussed here. Make certain the recipe you follow is from a reliable source. Follow it precisely and be assured of a safe and wholesome food supply.
by Gerald D. Kuhn and Louise W. Hamilton[2]
All methods of preserving food will alter, if not lower, the quality of fresh fruits and vegetables, but these changes can be minimized. For practical understanding of how to minimize quality changes you need to know something about: (1) natural differences in raw food, (2) natural causes of quality deterioration, and (3) how various food handling, preparation, packaging and storage techniques and conditions affect quality retention.
Because of insufficient research information on home preserved foods, some research findings of commercially processed food have been used to foster an increased awareness of factors affecting the quality of home preserved food.
Natural differences in quality and nutrient content in raw food often exceed losses caused by preserving food. Extreme variations (tenfold or more) in vitamin A and C content have been found in some fruits and vegetables. These natural differences are known to be caused singly or collectively by differences between varieties, climate changes between seasons in the same region, and between regions in the same year. They are also influenced by some cultural practices, and maturity of crops at harvest.
Because of color, texture and especially flavor qualities, some varieties are more suited for canning; others are more suitable for freezing. Few varieties possess the all-purpose criteria needed to preserve them as either high-quality canned or frozen products.
There is no single, ideal maturity for harvesting or preserving fruits and vegetables. Obviously, the quality of canned or frozen products made from any maturity other than ideal for that specific commodity lacks the ultimate potential of satisfaction for eating.
Three natural causes account for most quality changes in freshly harvested fruits and vegetables—respiration, enzymes and oxygen. Their effects generally increase with the time between harvest and preservation, and at higher temperatures.
Freshly harvested fruits and vegetables are living organisms. They are sustained by cellular reactions known as “respiration,” in which native enzymes use oxygen and components in food and give off heat, water and carbon dioxide. The energy needed to sustain respiration is obtained from a storehouse of natural components in food. As a result, natural flavors and vitamins are diminished, sugars and sometimes acids decrease, and texture may soften. The speed of respiration and the onset of its effects differs among various fruits and vegetables, and is generally lowered by refrigerator temperatures.
Besides enzymes relating to respiration, fruits and vegetables sometimes contain other cellular enzymes associated with reducing food quality. These enzymes act with oxygen to cause rapid discoloration of bruised, peeled and sliced tissue; oxidation of flavors, and excessive softening.
The roles of oxygen in respiration and other enzyme reactions have been noted. Oxygen may react still another way to lower food quality: autoxidation, where sensitive flavor, color and vitamin components are altered by oxygen. This causes fading of colors, off-flavors and, reduced vitamin retention. 305 These reactions occur quickly during canning and drying of foods, and also account for slow changes during storage of preserved food.
Because of the effects of respiration, other enzymes, autoxidation, and desiccation (loss of water), the raw product temperature and the time between harvest and preservation are of utmost importance to preserving high-quality fruits and vegetables.
Ideal handling conditions vary with the product. Small berry and stone fruits, asparagus, green beans, beets, broccoli, corn and leafy greens, to name a few, should be preserved the same day of harvest, for highest quality. Apples, peaches, pears, plums and tomatoes, if harvested at firm maturity, should be ripened a few days before preserving them. Other fruits and vegetables may be stored from a week to months before preservation without significantly lowering their quality.
From a nutritional standpoint, if after harvest the handling and preservation of these crops are carefully planned and implemented, quality of the preserved products can be equal to food prepared from fresh market fruits and vegetables.
Fruits and vegetables are recognized as significant sources of vitamins A, the B family, C, minerals, and fiber.
Vitamin A, pro-carotene, is heat-stable and insoluble in water but is subject to a minor loss caused by autoxidation. Therefore, losses in home preserved foods are insignificant.
Of the water-soluble vitamins, ascorbic acid (C) and thiamin (B₁) are subject to serious loss upon heating foods. Riboflavin (B₂) is subject to loss when raw or preserved foods are exposed to light.
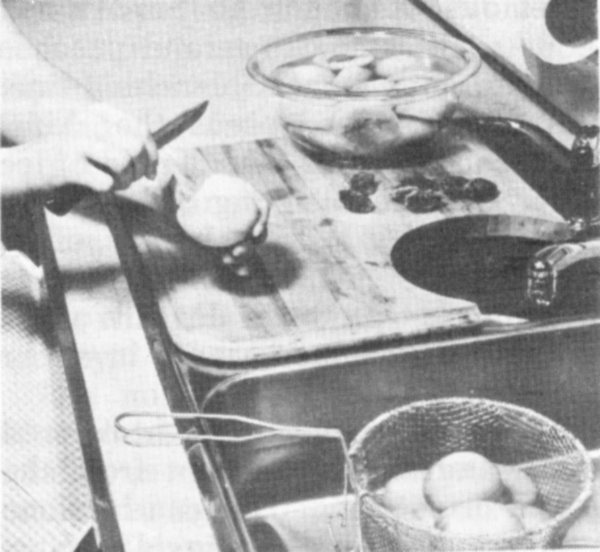
Removing the skins from peaches before canning.
Significant losses of water-soluble vitamins and minerals occur when food contacts water, such as in washing, blanching, cooking or canning foods. As would be expected, losses due to leaching of water-soluble vitamins and minerals rise with increased cut or exposed food surface areas, repeated exposures to water, and more time in water, especially when heated.
The effects on fiber in preserved food is much the same as in fresh cooked foods.
Home canned foods should have a bright color, characteristic texture, pleasant flavor and contain nutrients naturally present. When all steps of scientifically based canning directions are carefully followed, color, texture and flavor will be optimum. These observable signs of quality are also an index to nutrient retention of that canned food.
Proper pretreatment of the fruit or vegetable being canned is essential for top quality. This includes using only good, wholesome food at peak eating quality. Any trace of moldy or otherwise spoiled food should be completely removed. All food must be washed thoroughly.
Removal of skins from thin-skinned foods such as tomatoes and peaches is important. A short blanching time in boiling water loosens the skins, and a short cooling time in cold or ice water stops the cooking of the food. Because water leaches out vitamins, dilutes color and flavor, and results in a mushy product, do not allow foods to soak unnecessarily in either hot or cold water.
Air is an enemy of light-colored foods, and should be kept from the peeled or cut food. This can be done with a commercial antioxidant (ascorbic acid), lemon juice, or a simple solution of two tablespoons each of vinegar and salt per gallon of water. Peel or cut food directly into such a solution for maximum protection from air. When enough food for a canner load is prepared, drain and rinse the food for best flavor.
The packing method used is one of the most important factors in quality canned products. Foods that are heated before being put in jars have better quality than foods packed raw in jars. Heating destroys enzymes and removes much of the air from food tissues.
Enzymes must be destroyed quickly for top-quality food. Removal of air not only shrinks the food, but leads to better color, flavor and nutrient retention, and too, fruits are less likely to float. Hot packed jars also have higher vacuums, thus less oxidation can take place.
Tomatoes and tomato juice are less likely to separate if tomatoes are cut and heated at once. Cutting activates enzymes in tomatoes which then change the pectins in the tomatoes and causes separation. Heating right after cutting inactivates the enzymes and minimizes separation.
Sugar, salt and vinegar play important roles in quality canned foods. While sugar is not needed to safely can fruits, it contributes to better color, flavor and texture. Likewise, vegetables may be safely canned without salt, but when salt is used, better flavor results. Salt is essential for slow process pickles; vinegar is needed for quick process pickles. Canning or pickling salt should always be used. Iodized salt will inhibit proper fermentation and react with the starch in some foods, causing them to turn pink or blue.
Sugar concentration in sirups is important to appearance of the fruit. With a light sirup, fruits are less likely to float than with a heavier sirup. And with a light sirup, fewer calories are added. Then too, the cost is less than with a medium or heavy sirup.
Using the proper amount of headspace pays off in quality products. Adequate headspace is needed so food has enough room for expansion during heat sterilization.
Generally, more headspace is needed for foods heat-sterilized in a pressure canner than those in a boiling water canner, because of increased expansion of foods at the higher temperature.
With too little headspace, liquid is more likely to cook out of the jars during heat sterilization. This increases the danger of seal failure due to food particles that may be trapped at the interface of the sealing surface. With too much headspace, air remaining in the jar can cause darkening of the food, oxidized flavor, and lower vitamin retention, especially in food at the top of the jar.
Pressure canning low-acid foods is receiving increased emphasis today, mainly based on the greater safety of this technique. The method also offers an additional advantage that is little known to home canners—improved quality and nutrient retention.
Generally an 18° F (10° C) rise in canner temperatures increases the 307 destruction of bacteria tenfold. At the same time, chemical changes that affect color, flavor, texture and nutrients of the food are only doubled.
This means that for every 18° F (10° C) increase in canning temperature, bacteria are destroyed five times faster than are vitamins, flavor, color and texture. Accordingly, in contrast to boiling water canning, heat sterilizing in a pressure canner at 240° F (116° C) (10 p.s.i.) destroys bacteria about 17 times faster than chemical changes are effected, accounting for better nutrient and quality retention of pressure canned low-acid foods.
Be cautious about interpreting this as an advantage in pressure sterilizing acid foods. This technique can increase quality and nutrient losses because of the total time the jars of food will be near or above boiling water temperature.
For example, with tomatoes it takes about 5 minutes until steam begins to escape, 10 minutes to exhaust the air, about 5 minutes to build up pressure, 5 minutes for heat sterilizing at 240° F (116° C) and 30 to 45 minutes cooling before opening the canner. That adds up to about 55 to 80 minutes at temperatures near or above 212° F (100° C), as compared to the recommended 35 minutes for heat sterilizing in a boiling water canner. Assuming the average product temperature is elevated above 212° F (100° C) about half of this total time, the loss in quality could be at least doubled.
Properly managed heat sterilization has a great deal to do with the quality of canned food. If the temperature is too high or the time of sterilization too long, the result is a product with poor color, soft texture, and less flavor. Tomatoes canned in the pressure canner are an example.
After heat sterilization, a quality canned food will have liquid covering the solid food in the jar. The lid must allow air, but not liquid, to escape during heat sterilization. A low liquid level in the jar may indicate the lid did not function properly, pressure was allowed to fluctuate in the pressure canner, or the canner wasn’t cooled completely before opening, or raw pack was used. Foods not covered with liquid will have poorer quality.
Jars must be air-cooled naturally after heat sterilization to maintain quality as well as for safety. Delayed cooling in tightly enclosed areas, such as cardboard cartons, will decrease quality of the product.
Storage conditions are vital to quality of canned foods. If stored in a light, rather than a dark place, light-sensitive colors will darken gradually. Some colors, such as carotenoids in tomatoes and carrots will gradually fade with prolonged storage.
Storage temperatures between 40 to 50° F (4.5° to 10° C), if the spot is dry, are best for quality retention. Quality losses are increased when canned foods are stored at higher temperatures. For example, about a third of the vitamin C is lost if foods are stored a year at temperatures of 80° F (26° C) or higher.
Storage temperatures between 50° to 70° F (10° to 21° C) are acceptable.
Properly canned and stored foods should be safe to eat for more than two years. However, for top quality, it is best to can only the amount to be used in one year.
Top quality home canned foods have rich, jewel-like colors, characteristic of the food canned. Colors are those of well-prepared foods ready to be served, rather than fresh uncooked foods or over-cooked foods. Light-colored foods should retain their color with no signs of darkening at tops of jars. Fruits should look neither under-ripe and hard, nor over-ripe and mushy. Vegetables ought to look young and tender, rather than 308 old and starchy. Vegetables and fruits should be free of stems, cores, seeds, or pieces of skin, and be of uniform size, shape and color.
Freezing, like canning, does not improve food quality. Top quality fresh fruits and vegetables are essential for premium frozen products. Quality factors include a suitable variety for freezing, optimum maturity, and freshness of the product. Even with high quality, fresh produce, it is imperative to freeze foods on the day when they are at their peak of maturity or ripeness for eating fresh.
Selection, sorting and trimming of produce and the quality control steps as related to color, flavor, and nutrient retention described for canning high quality fruits and vegetables apply equally to preservation by freezing. However, most vegetables must be blanched before packaging and freezing to prevent slow but accumulating effects of enzyme activity and autoxidation. These effects, if not prevented, will cause discoloration, oxidized flavors (sometimes described as tasting grassy or hay-like), and increased loss of vitamins, especially A and C. Proper blanching recommendations are contained in the USDA Home and Garden Bulletin No. 10, Home Freezing of Fruits and Vegetables.
The quality of packaging materials used is reflected in overall quality of the frozen product. Packaging materials must be moisture-vapor-proof. This means there is no transfer of liquids or vapors from the inside to the outside, or from the outside to the inside of the frozen packages.
In addition, fruits and vegetables must be packaged in containers with as little air inside as possible. Air left inside will oxidize the food, causing deterioration of color, flavor and nutrients.
Proper sealing is essential for packaging quality frozen foods. If the seal itself is not moisture-vapor-proof, it becomes the weakest part of the package and poorer quality results.
Adequate labeling helps assure that each package of food is used while at top quality. Packages kept too long will be of poor quality. Even with the finest produce and use of the best preparation and packaging procedures, retention of quality in frozen food is affected by how quickly food is frozen, the temperature of food stored in the freezer, and how long it is frozen before eating.
For top quality, avoid freezing per day, more than two pounds of fresh packaged food per cubic foot capacity of your home freezer. Food packages to be frozen should be spread one package deep over the bottom or other areas designated by your freezer manufacturer. The freezer should be regulated to a uniform temperature between 0° F (-18° C) and minus 5° F (-21° C). A freezer temperature fluctuation of more than 5° F should be avoided if possible. Freezing too slowly, temperatures above 0° F, and temperature fluctuations in freezers increase the ice crystal size in frozen food, lower the quality and shorten the shelf life of food. Frozen foods should be used according to the guidelines in the 1974 Yearbook of Agriculture, Shoppers Guide.
Quality frozen fruits and vegetables should have the natural color, texture and flavor of the individual food. There should be a minimum of ice crystals inside the package and no sign of freezer burn.
Frozen foods should be higher in ascorbic acid and thiamin than canned foods. Vitamin C, including that leached into the juices, approaches 90 percent of the value of raw fruits.
Quality fruits and vegetables can 309 be sun-dried or dried inside using an oven or a food dehydrator. As with other methods of preservation, quality of the final product will depend greatly on quality of the fresh food being dried. Drying does not improve the quality of any food.
A top quality dried product reflects suitable pre-treatment before drying, and adequate drying under proper conditions. Also, appropriate storage after drying is vital to keep moisture from re-entering the dried product.
Fruits may be dried more easily than vegetables, because of their high sugar content and since not as much moisture must be removed to get a quality product. When properly dried, fruits should be leathery and pliable, and have a color characteristic of the fruit. Excessive darkening indicates a less desirable, poorer quality product.
Vegetables must be dried until they are brittle. The color should be characteristic of the vegetable and not excessively dark.
To sum up, nutrient content of foods depends on natural differences, control of deterioration, and handling techniques of food preparation as well as preservation. Therefore, overall nutrient content of a specific fruit or vegetable, whether fresh or preserved, may be about the same.
Top quality, garden fresh foods, served in season, provide the greatest satisfaction when served fresh as table-ready food. Individual preferences for market fresh, frozen canned, or dried food will differ. Since nutrient content is nearly the same, the choice is up to the consumer. Even more important is the choice of vegetables and fruits for a good diet.
Food editors of Farm Journal, How to Dry Fruits and Vegetables at Home, Countryside Press and Doubleday & Company (Dolphin Books), 1975. $2.95.
Hamilton, Louise W., Kuhn, Gerald D., Rugh, Karen A., with the food editors of Farm Journal, Home Canning—The Last Word, Countryside Press and Doubleday & Company (Dolphin Books), 1976. $2.95.
US. Department of Agriculture, Home Canning of Fruits and Vegetables, H&G Bul. No. 8, on sale by Superintendent of Documents, U.S. Government Printing Office, Washington, D.C. 20402. 45¢.
U.S. Department of Agriculture, Home Freezing of Fruits and Vegetables, H&G Bul. No. 10, on sale by Superintendent of Documents, U.S. Government Printing Office, Washington, D.C. 20402. 75¢.
by Ruth N. Klippstein[3]
Back-to-basics may turn out to be the theme song of the 1970’s as some of the simple activities of the past are rediscovered and practiced. Do-it-yourself is in. Nowhere is the trend more apparent than in the area of home production and preservation of the family food supply. Ten years ago no one would have dreamed the lowly canning jar lid would be the subject of Federal hearings. No one would have believed that an estimated one in four U.S. families would be raising and preserving a portion of their food supply.
What motivates people to return to home food production and preservation? Are their expectations realistic? How extensive is their gardening? Will they continue a second year? Do they preserve any of their crop? These were among the questions posed by Stuhlmiller, How and Stone of Cornell University in 1975 to a group of gardeners in five upstate New York counties.
When asked whether they gardened to save money, to have better quality food or just for a hobby or recreation, three-fourths of the 2,800 who replied hoped to save money, 54 percent considered gardening a hobby, while only 46 percent gardened for fresher food. Most said they preserved at least some of the food they grew.
If this study is indicative of the country as a whole, it is important to realistically assess whether home food production and preservation can save substantial amounts of money and whether the satisfaction gained warrants the cost of time and energy expended.
The actual costs of home food preservation, for example, should be considered. The cost of home grown food should be compared to the cost of similar food purchased for preservation in quantities at local farms or markets. The quality of the home preserved items should be realistically analyzed against readily available commercially preserved food.
There is no such thing as free food. Someone, somewhere, has to pay for it in time, energy, know-how, and at least some outlay of dollars. Home production in amounts needed for food preservation requires a longtime commitment of family resources. Beginners should realize that realistic goals and reasonable skills in the field and kitchen are essential to make home preservation pay off.
There are no general statistics citing the average dollar-cost needed to grow a given amount of fresh produce in a home garden. Conditions between individual gardens, weather, soil type, skill of operator, and geographic areas vary too much for valid comparisons.
Extension specialists at Michigan State University, however, have computed the actual cost of raising tomatoes under home gardening conditions in East Lansing, Mich. They found it costs 12¢ to grow the amount of tomatoes (2½ to 3 pounds) needed for one quart, canned. A similar cost analysis for green beans showed that beans cost 30¢ for the amount needed for a quart. Only the expendable cost—seed, fertilizer, pesticides and water—was considered.
Adding the expense for needed tools, hoses and other capital items raised the cost another 33¢ a quart if the cost were absorbed in one season or 2¢ if amortized over a 20-year 311 period. Unfortunately, the first-year gardener will find that the outlay for tools must be spent the first year so that return for the investment requires a commitment to gardening over many years.
Additional expenses are necessary if the bounty is to be preserved at home. Equipment for preserving tomatoes is minimal but equipment for canning vegetables and for freezing may be costly. Homemakers needing to invest in canners, a pressure canner, and home freezer will find that the dollar cost per package of food preserved during the first years of preservation may be higher than the cost of comparable food at the corner supermarket.
The costs of canning peaches, tomatoes and green beans in upstate New York were calculated by the author in 1975 and updated for price changes in 1976 using a number of different cost variables. She found that those who canned tomatoes could realize substantial savings, while the cost of purchasing peaches and preserving them at home approximated the cost of the commercially canned peach.
Determinations of the true cost of frozen food must consider the initial cost of the freezer plus the cost of operation and repair. Containers, plastic bags and boxes, or foil are additional costs.
Evelyn Johnson in her Outlook Talk of 1975 quoted staff at Virginia Polytechnic Institute and Cornell University as reporting a cost of 20¢ to 24¢ per pound of food frozen just for the convenience of freezing and storing food at home. Add to this the price of the food being frozen for the correct cost of home-preserved frozen food.
Freezing is probably the most satisfactory method of home food preservation, the most versatile and the easiest to do. But for all except the very best managers who use the freezer intensively, the home freezer is more a convenience than a money saver.
Needed equipment for home canning. Left, water bath canner, and right, pressure canner.
Raising a garden takes time over a significant number of months. As a hobby for table use, gardening can be a real pleasure. Skillful persons with the right tools and know-how can handle a garden of the size needed for home food preservation with a few hours of work a week, once the plants are well established. Novices can expect to spend a significantly greater amount of time per week during the four or five month growing season in northern areas and even more in areas with longer growing seasons.
The author, an experienced gardener, kept records of the hours spent cultivating and harvesting a 20 by 40-foot garden, planted primarily for fresh consumption. Only three foods—tomatoes, green beans and cucumbers—were raised in amounts sufficient for a limited amount of home preservation. Over 40 person-hours were required. The actual grocery store value of the garden food consumed by the family of three was $45. Food given as gifts and preserved raised the dollar value to $75.
Gardening often helps stretch cash income, but the dollar return is low for hours of effort. And poor weather may cause crop failures and small 312 yields, regardless of effort. Food preservation also is time-consuming.
Satisfactions. Why garden or preserve food at home? Most gardeners will cite a number of reasons:
—The best of good fresh food with no unknown additives or ingredients
—Healthy exercise
—Family pleasure working together toward a goal
—The joy of giving
—The challenge of growing a seed into edible food
—Prestige
| Energy | |||||
|---|---|---|---|---|---|
| Method | Time | Fuel | Human effort | Dollar cost from kitchen to table | Quality satisfaction |
| Freezing | Minimal low | High | Low | Very high | Very high |
| Canning | Moderate | Moderate | High | Moderate | Moderate to high |
| Drying | High | Moderate to high | Moderate | Moderate to high | High (specialty items) |
| Low, if only method available | |||||
| Pickling | High | Low | Moderate | []Depends upon type chosen | High |
| Storage (Unprocessed) | Low to moderate | Low | Moderate (Checking/culling) | Low | Moderate to high |
There is no one right answer to the question, “Does it pay to raise and preserve my own food?” It depends upon your personal goals. You may not save a significant number of dollars. You will work hard. And you probably will experience one of the most exciting activities possible—raising at least some of the food your family uses.
“We grew it” are heady words which bring people back to home food production and preservation year after year.
by Frances Reasonover[4]
Canning is probably the most economical and practical method of preserving food at home. Among other things it is a way to save food that otherwise might be wasted.
Cost of home canning depends on the kinds and sources of food canned as well as the processing methods, containers, and equipment used. Other cost factors—labor, energy, water and added ingredients—make exact cost figures impossible to apply generally, but studies are reporting averages that show canning to be economical.
The wise homemaker will can only the amount to be used within a year. Food held longer will be safe to eat if it has a good seal and no signs of spoilage, but there may be nutrient or quality loss, especially if stored at temperatures above 70° F.
As a beginner canner you need to know something about micro-organisms, including yeasts, molds and bacteria, on the food, in water, air and soil, as causes of spoilage in foods. Knowing about these minute forms of life, which are so abundant everywhere, will help make the work safer as well as more interesting.
In addition to the action of these minute organisms, the spoiling of fruits and vegetables is hastened by natural changes in color, flavor and texture of the food. These changes result from the action of enzymes or micro-organisms found in nature which break down and decompose foodstuffs.
Bacteria are the most serious foes to combat in canning because they are more difficult to kill by heat than either molds or yeasts.
Acid in canned food is expressed as pH value. Foods having a pH of 4.5 or lower are called high-acid foods and those with a value of 4.6 or higher are termed low-acid foods.
Since few bacteria thrive in acids, their destruction is less difficult in fruits than in vegetables (with the exception of tomatoes).
Botulism is a deadly poison caused by a toxin from the growth of spores (seeds) of the bacteria, Clostridium botulinum. These spores will produce a deadly toxin in low-acid foods in the absence of air (oxygen) inside a sealed jar. Therefore, the spores must be destroyed by processing under pressure at 240° F. The length of time has been determined by scientists for each individual food.
Clostridium botulinum will not grow in foods with a pH of 4.5 or lower, so high-acid foods may be processed safely in boiling water at 212° F.
Yeasts, mold and non-spore forming bacteria are readily controlled by processing at 212° F.
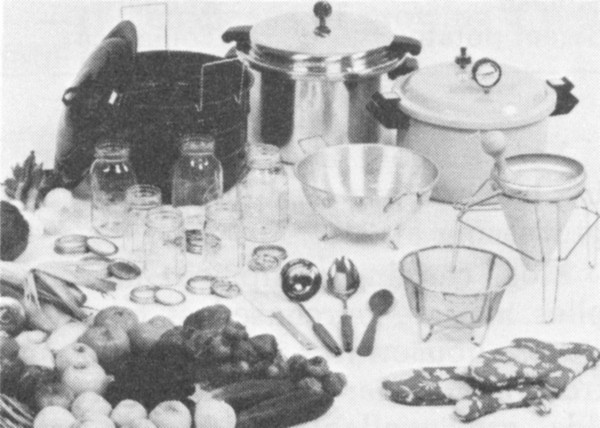
Most canning equipment and supplies may be purchased at hardware stores, housewares departments, and from mail order companies. Jars and lids are available in many retail stores.
Select standard canning jars made of tempered glass that can withstand high temperatures. The manufacturer’s name or symbol in glass will identify the product. With careful handling, jars last an average of about 10 years. Avoid using antique jars because there can be hair-line cracks not visible to the eye, causing jars to break.
Use canning jars in sizes suitable for the product canned and your family’s needs. Canning jars generally are sold in half-pint, pint and quart sizes with wide and narrow mouths. Large-mouth jars are convenient for packing such foods as whole tomatoes and peach halves. Quart jars are convenient for vegetables and fruits where your family has four or more members.
Examine the sealing edge of jars for nicks, cracks, or sharp edges that would prevent a seal. Discard any with these imperfections.
One-trip jars from purchased canned foods should not be used because they generally are not tempered to withstand the high heat required for home canning, and may break when subjected to the heat. Tops of these jars may not fit standard canning lids, thus preventing a good seal.
Home canning equipment.
Closures—jar lids and rings come with new canning jars. The sealing compound of lids recommended for one use only will not hold a seal effectively after the first use.
Select lids appropriate for the jars being used. You may find the two-piece units (flat lid with sealing composition and ring), one-piece lids, or flats with separate gaskets made of metal or plastic. Always follow the instructions for pretreatment as indicated on the box or container by the manufacturer. If no name is indicated on the lid, use a black wax marking pencil or crayon and mark the identity on each lid. If there are problems, contact the manufacturer whose name and address is on the box or container.
Screw ring bands may be reused if kept clean and dry in a protective container with a tight-fitting lid. Never use bands with rust, or pried up or bent edges.
If you have extra lids, store them protected in a dry, cool place.
One-piece zinc caps lined with white porcelain, with rubber rings, may be used. The caps may be reused if they have not cracked, spread or bent at the edges and are clean, like new. The rubber rings are effective only once because they tend to dry and deteriorate with age, often become porous, and sometimes crack.
If you have jars with bail wire clamps, sometimes called “lightning”-type jars, be sure they are not in the “antique” class. Lids for these jars are all glass, and rubber rings are used between the jar and lid for sealing. A wire clamp holds the lid in place during processing; after processing, the short spring wire of the clamp is snapped down to complete the seal.
A boiling water bath canner is needed for processing high-acid foods, such as fruits, tomatoes, tomato and fruit juice, and pickles.
Water bath canners in several sizes are available on the market. The container must be deep enough for a rack 315 to hold the jars off the bottom of the canner. The depth allows water to be over the jars of food by at least 1 to 2 inches. Keep 1 to 2 inches of space above the water to allow for boiling; this prevents water from boiling over.
The canner must have a tight-fitting lid. Or you can use a large kettle with a tight-fitting lid, and a wooden or wire rack to hold jars off the bottom. There should be free circulation of water to every part of the surface of the jar and lid.
If you are going to buy a water bath canner, check the height, and the lid to be sure it is tight-fitting. The rack preferably should have dividers so jars will not touch each other or fall against the sides of the canner or each other during processing.
A steam pressure canner is absolutely essential in canning low-acid foods, such as vegetables, and insures the destruction of spoilage micro-organisms.
Ten pounds pressure is used for processing food in standard canning jars at sea level. This pressure corresponds to 240° F.
The steam pressure canner is made of heavy metal that withstands high pressure developed by steam. It consists of a kettle with a tight-fitting lid equipped with an accurate weight or dial gage to register the pounds of pressure in the canner. The lid must lock or seal to prevent escape of steam.
The canner must have a safety valve, petcock or steam vent that can be opened or closed to permit exhausting (venting), and a pressure gage. It must have a rack to hold jars at least ½ inch from the bottom of the canner.
A dial gage indicates pressure on a numbered instrument.
A weighted gage has no dial, but automatically limits pressure with weights preset for 5, 10, and 15 pounds pressure.
Scalding tomatoes in a blancher.
The pressure is adjusted for high altitude. For information on canning at altitudes above sea level, see the later chapter by Carole Davis.
To insure the canner’s proper working condition, check the dial gage for accuracy each year—or if a canner or lid has been roughly handled or dropped, the dial gage glass broken, or any parts are rusty. The manufacturer or your county Extension office can give information on testing availability. Study and follow the manufacturer’s directions for using your pressure canner.
Run through the process of operating the pressure canner on your range in a trial run before you get into the canning season, to be sure everything is working properly. Make a note of the dial setting of the range if you use an electric range for holding pressure steady.
Trying to use a pressure canner obtained from garage, rummage, or auction sales or handed down to you from someone’s attic may prove dangerous. 316 You may not have any idea as to the care, handling, or storage of the canner. A manufacturer manual on care, use and replaceable parts usually is not available. Old-old canners did not have complete information—manufacturer’s name, address or model number—on the appliance.
General kitchen equipment is helpful in any needed washing, peeling, coring and slicing in the preparation of fruits and vegetables. Examples are, a vegetable brush for cleaning vegetables, a blancher or wire basket for scalding fruits and vegetables such as tomatoes and peaches to loosen skins for peeling, and a colander for washing delicate fruits such as berries.
A food mill is handy for making purees and straining fruits for making juices, and a strainer for straining juice. A long handled fork or plastic spatula aids in fitting and packing food and removing air bubbles. A wide-mouth funnel is very convenient for filling jars, and a jar lifter helps you avoid burns in handling hot jars. Use an automatic timer to time processing accurately.
The number of pints of preserved food you will get from a given quantity of fresh food depends on the quality, variety, and maturity of the fruit or vegetable; on the size of the pieces, and on the packing method used.
Selection of good sound fruits and vegetables is of paramount importance. The quality of canned fruits and vegetables will be no better than quality of the raw food used. For best flavor retention, preserve only those vegetables that are young, tender, and freshly gathered.
All steps, from beginning to end, of any lot of canning should be carried through as rapidly as possible. A good slogan is “two hours from harvest to container”.
Work fast with small amounts of food at a time, especially vegetables with high starch content such as corn and peas which lose quality rapidly. Any delay will result in loss of flavor and nutritive value.
Sorting and grading should be done very carefully, according to size and degree of maturity and ripeness.
Use only uniformly well-ripened products. Discard all defective products and use together those of the same size.
Dirt in seeds, bits of food, or sirup contains bacteria that is hardest to kill, and encourages yeasts and molds to grow on the outer surfaces. Wash fruits and vegetables thoroughly before canning.
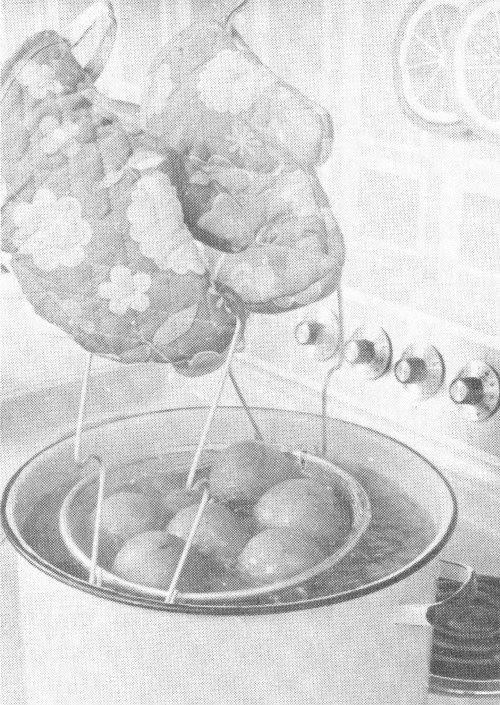
Scalding, peeling and coring—some fruits, such as peaches and tomatoes, are scalded in order to peel them smoothly.
Follow up-to-date recommendations, available in U.S. Department of Agriculture or Extension publications, for detailed procedures in preparing fruits and vegetables for canning.
You can pack food hot or raw in jars. Hot-packed food is heated thoroughly before it is packed into jars. Raw-packed food is placed raw in jars. Watery and soft foods such as tomatoes are pressed gently to make their own juice.
Air, a poor conductor of heat, should be removed from the jar. Remove air bubbles by gently moving the blade of a plastic spatula or plastic knife around the jar—being careful that the food is not broken. Add more boiling liquid if necessary to get a proper fill.
When filling jars, you will find the jar-filling funnel easy to manage. This makes it possible to avoid spills of seeds, bits of food, or sirup that could prevent sealing. But even when using a funnel you still need to wipe the jar rim.
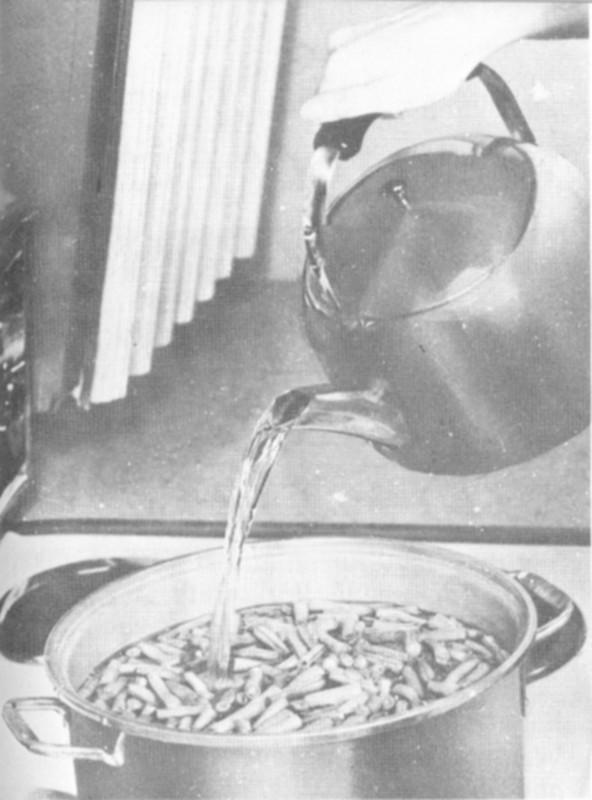
Heating beans thoroughly before placing them in jars. Here, cut beans are covered with water to be followed by five minutes of boiling.
Prepare the lids and sealing of jar according to the manufacturer’s directions. When using a flat metal lid, place the composition side on the rim of the jar. Add the ring band and screw it down until firm, but not hard enough to cut through the sealing compound. The lid will have enough “give” to let air escape during processing. This is called venting and means heating to remove air from jars.
When using porcelain-lined zinc caps, fit the wet rubber ring on the jar shoulder, but do not stretch it more than necessary. Screw the cap firmly and turn it back ¼ inch.
Use a jar lifter or tongs and place the filled jars on the rack in the canner. Fill and place jars in the canner one at a time to keep jars as hot as possible while filling the canner.
Before you begin preparing the food, fill the water bath canner half full of hot water. This permits water to heat while you prepare the food. Put a large kettle or teakettle of water on to boil. The water should be boiling when hot-pack food is put into the canner.
Place raw-pack jars in water that is hot (180° to 190° F), just below boiling. Then bring it to a boil after adding jars.
As the rack of jars is lowered into the water, the water level will rise. If more water is needed to have the jars completely covered by 2 inches of water, add boiling water.
Prepare only enough jars of food at one time to fill the canner. Work rapidly, allowing as little time as possible between filling and closing the jars and getting them into the canner.
Start counting processing time as soon as the water in the canner reaches a gently rolling boil. Put the lid on the canner. Set your timer or clock and make a written note of starting time and final time. Keep the water boiling all during the processing period. If water boils down, add boiling water sufficient to keep it at the required height. When pouring water, avoid letting it hit tops of the jars.
Process for the recommended length of time. Do not cut processing time.
Follow the manufacturer’s directions for operation of your pressure canner before, during and following processing. Supplement these directions with information in U.S. Department of Agriculture or Extension publications.
Count processing time as soon as the pressure reaches 10 pounds or the proper pressure adjusted for altitude. Be sure to hold pressure steady.
At end of the processing time, remove the canner from the heat. Allow the canner to cool until the gage registers zero to avoid breakage of jars and loss of liquid from jars. After a minute or two, open the petcock 318 gradually and remove the cover. If a weighted gage is used, nudge the weight slightly. If no steam escapes, pressure is down. Tilt the far side of the lid upward so steam escapes away from your hands and face. Because food in the jars may be boiling vigorously, leave jars in the canner about five minutes and then remove them.
When you remove hot jars from the canner, use a jar lifter, or protect your hands with cooking mits, pot holders or canvas gloves. Set the jars upright to cool on a rack, such as a cake rack, or a bread or cutting board, with double layers of dry cloth or newspapers beneath the jars. If jars are placed on a cold surface or wet cloth, the difference in temperatures may cause the glass to crack.
Avoid placing jars in a draft, but leave two or three inches between them so air can circulate freely. Avoid further tightening of lids that have sealing compound, since this usually breaks the seal—unless the lid manufacturer states it is safe to tighten.
If your processing temperature was not held steady and liquid boiled out in processing, do not open the jar to add more. Leave the sealed jar just as it is.
Do not cover jars because this slows down cooling and food continues to cook. If you have an air conditioning vent that will direct cold air on jars, cover the vent during this canning session.
After 12 hours, check the seals. The vacuum may cause a loud snap of the two-piece vacuum seal while it cools, which is an indicator of an airtight seal. If the center of the lid holds down when pressed and the lid does not move, it is sealed.
Tap the center of the lid with a spoon—a clear, ringing sound indicates a good seal; a thudding sound indicates the possibility of an imperfect seal.
If there is a sealing failure, you will need to reprocess the jars. Remove the lid, heat the food and liquid, fill a clean jar and use a new lid. Process the full length of time. If only a few jars did not seal, you may elect to refrigerate and use the food within a day or two or freeze it.
Once the jar is sealed, allow it to set until cold. Then remove the screw ring band, wash and store in a dry place for reuse. For safety make a routine check of canned foods each month.
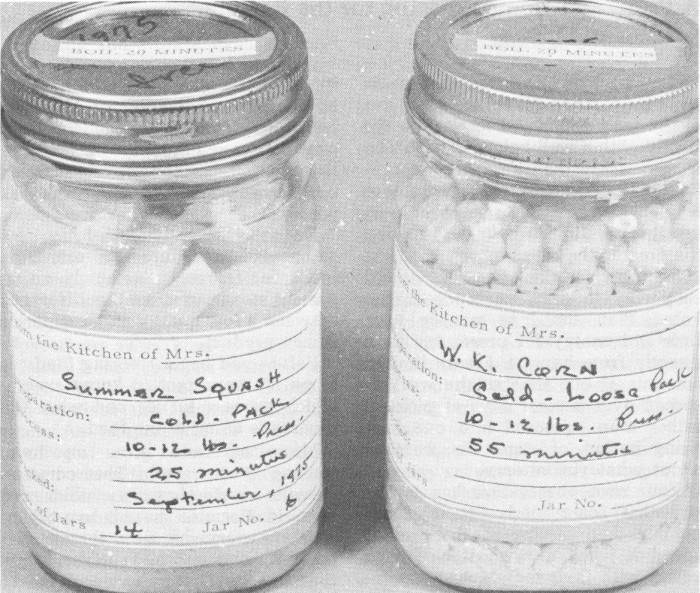
Write name of product and date canned on a gummed label or the lid of each jar with a felt tip pen. Keep a record of food canned, date, number of quarts or pints, and a place for you to check them off as you use them. This can be your guide for next year’s preservation plan. Use food preserved for the current year, readying a storage place for next season’s garden produce.
Canned foods stored in a dry, dark, cool temperature (70° F or below) will retain good eating quality for a year. Home canned foods stored in a warm place near direct sunlight, hot pipes, above a range or refrigerator, or in kitchen cabinets may lose some eating quality within a few weeks. Dampness may corrode lids and cause leakage so that the food spoils.
The main cause of spoilage in canned foods is improper processing. Bulging jar lids, or a leak, may mean gas is present and the food spoiled.
Before opening home canned foods, wash jars and lids and carefully inspect the jars. Bacteria, yeasts and molds should have been destroyed if the food was properly processed.
When you open the container, look for such danger signs as spurting, cloudy or frothy liquid, an “off” odor, deterioration, or slimy texture. A foamy or murky appearance and patches of mold are visible signs of 319 spoilage. That ordinary looking mold on home-canned food may indicate the presence of a much more deadly problem: botulism.
ALWAYS label home-canned foods.
Destroy food if any of these signs are obvious; discard out of reach of humans and animals.
The odor in good jars of food should be pleasant and characteristic of the product. Do not use food which looks or smells bad, or if there is any doubt as to its safety.
All low-acid, home-canned food should be boiled 10 to 20 minutes to insure destruction of botulism-causing toxin for added safety. Heating denatures the toxin so that it does not react with the body. Never taste home canned food before cooking it.
Successful results largely depend upon the accuracy with which up-to-date directions are followed.
Safety is best assured when you exercise special care as you prepare and pack food into canning jars, fitting jars with properly pretreated lids, and heating jars of food to a high enough temperature for a sufficient length of time to kill micro-organisms that cause spoilage.
by Charlotte M. Dunn[5]
Every homemaker knows that meals must be planned to get the most out of the food dollar and to provide the family with a well-balanced diet. The freezer, more than any other household appliance, can help secure these results. The more you learn how to use it in relation to your own family, the greater the returns.
Freezing is a quick, convenient and easy way to preserve foods in the home. Plan ahead to manage your time and energy for preserving food directly from harvest. Freeze limited amounts at one time so the work is spread over several days of picking, rather than squeezed into one long tiring period of time. Be practical about what you attempt.
Your own observation has taught you that some foods “spoil” more quickly than others, so the rate of speed at which they must be frozen varies with their individual temperaments. A good rule for home freezing is: two hours from garden or orchard to container, and the faster the better!
Most food that is highly perishable at normal temperatures can be quick frozen. Even delicate fruits and vegetables can be frozen, with only a few exceptions such as tomatoes (stewed tomatoes can be frozen) and those vegetables that lose crispness such as radishes, celery, cucumbers and salad greens.
Decide what you will freeze on the basis of availability of foods, family needs and taste, freezer space, cost of freezer storage, and availability of alternate methods of storage.
It is essential to start with high quality raw material. As garden foods mature, process without delay. Quality of the frozen food will be only as good as the quality of the food before freezing. Freeze foods at their peak of eating quality to preserve flavor, texture, and appearance as near those of the fresh product as possible.
Do not ignore details of the recommended procedures for preparing foods for freezing. Seemingly unimportant steps can make the difference between a low quality and a superior frozen product.
Before you begin freezing foods at home it’s important to know exactly which process to use and what the process is doing to the food.
Micro-organisms grow on food, causing it to spoil. The common growths are simple yeasts, molds, and bacteria. Because these micro-organisms are everywhere—in the air, water, soil and on all surfaces they contact—they naturally occur on all foods. Storing and preserving foods properly controls or inhibits the growth of micro-organisms, thus maintaining both quality and safety of the food.
Cleanliness and sanitary methods are as important in handling foods for freezing as in preparing them for immediate use.
All foods contain chemical substances called enzymes. They are essential to life, and continue their chemical activity after the fruits and vegetables mature or are harvested.
If allowed to work after a food reaches its peak of maturity, enzymes destroy the food’s physical properties, thus changing its color, flavor and texture.
When perishable food is not preserved by one of the recommended ways, enzymes within the cells of the food continue to live and cause spoilage.
Freezing and storage even at very low temperatures will not inactivate any of the common enzymes. At 0° F, the recommended temperature for storing frozen foods, enzymes are not inactivated but only slowed down. In two to three months they will produce off-odors and bad taste. This temperature only checks the growth and reproduction of destructive bacteria. The faster a food is properly prepared frozen, the sooner both enzymes and bacteria are rendered harmless.
Just about every kind of food you or I will freeze contains moisture or water, and the process of freezing food involves the freezing point of water. As temperature of the surrounding air goes below the freezing point of water, the water progressively crystallizes out in the form of pure ice. Size of the crystals which form is determined by the span of time during which freezing takes place. When the temperature is lowered slowly, the crystals expand considerably. If the freezing is sharp and sudden, the crystals retain approximately the same size as the original water molecules.
In case you have doubts about how well a food will freeze, test it before freezing large quantities. To test, freeze three or four packages and sample the food a couple of weeks later. This will show the effect of freezing but not the effect of storage. Some varieties of the same kind of food freeze well, others do not.
Much of the success you have with your home freezer will depend on how you prepare, package, wrap and seal foods. Protecting frozen food is as important as freezing food of high quality.
You will need general kitchen utensils plus a steel, aluminum or enamel kettle large enough to hold at least one gallon of boiling water, with a tight fitting cover. Use a mesh basket, a strainer, or large squares of cheesecloth to hold one pound of vegetables in the boiling water.
Steaming of cut, sliced or green leafy vegetables is recommended and will preserve more nutrients than water does.
You will need a container to hold ice water for quick chilling of vegetables to stop cooking action. Drain thoroughly in a colander and turn out on absorbent towels.
It is false economy to skimp on wrappings and containers. They should protect the food from cold air, which is dry, so as to retain the moisture in foods and prevent freeze burn and dehydration. Select them according to the use they will be put to.
Most freezer containers on the market today are easy to seal, waterproof, and give satisfactory results. Rigid plastic containers, bags, and jars with wide tops are favorites.
Moisture- and vapor-resistant wraps, which are exceptionally effective at excluding oxygen, include heavyweight aluminum foil, coated and laminated papers, polyethylene films, saran, and polyester films. They should be strong and pliable so the wrap will adhere readily to irregularly shaped objects, and eliminate as much air as possible to avoid frost accumulation inside. Careful wrapping is of no avail if the package breaks. It should be easily sealed, either by heatsealing or freezer tape.
Freezer bags are available, and freeze-and-cook bags that withstand temperatures from below 0° F. to above the boiling point. The freeze-and-cook bags are suitable for freezing and reheating food. Points to consider include the size convenient for your use and the cost.
Materials not moisture-proof and vapor-proof, and thus not suitable for packaging foods to be frozen, are ordinary waxed papers, cartons from ice cream or milk, and plastic cartons 322 from cottage cheese or gelatin products because they crack easily.
Compare price, durability, shape and reusability in selecting containers, keeping in mind their convenience and the economical use of freezer space.
Retaining the vitamins and other nutrients depends on how fruits and vegetables are handled before freezing, on storage temperature in the freezer, and on how you cook them. Always follow up-to-date recommendations available from the U.S. Department of Agriculture or county Extension office.
Select foods of top quality. A freezer is not magic—it does not improve food. Its function is to preserve quality and food values and to prevent spoilage.
Choose vegetables and fruits suitable for freezing, and the best varieties for freezing. Because growing conditions and varieties vary greatly across the country, check with your county Extension office to find out which varieties are best for freezing.
Freeze fruits and vegetables when they are at their best for table use. If possible, freeze those that are ripened on the tree, vine or bush. Fruits should be ripe but firm.
Enzymatic changes continue after harvest, lowering quality and nutritive value. If stored at too warm temperatures, fruits can lose vitamin C, turn brown, lose flavor and color, and toughen.
Don’t delay in harvesting vegetables since asparagus, corn, peas, snap beans, and lima beans all deteriorate rapidly in the garden after reaching their peak.
Observe cleanliness while you work, to avoid contaminating foods.
Prepare vegetables for freezing by blanching them in boiling water for recommended times. County Extension offices will have information on specific times for various foods.
Blanching vegetables is absolutely necessary to inactivate enzymes that cause undesirable changes in flavor and texture. This brief heat treatment reduces the number of micro-organisms on the food, enhances the green color in vegetables such as peas, broccoli and spinach, and displaces air trapped in the tissues.
Pack food in containers as solidly as possible to avoid air pockets, leaving the necessary head space for expansion. Press out as much air as possible, with your hands or by using a freezer pump. Then seal the plastic bags by twisting the open end, folding it over. Freezer rubber bands, twist-seals, or freezer tape are satisfactory for sealing bags.
Label packages clearly and carefully with name of product, date when frozen, number of servings or poundage, and any information that will help you. Special pens are made for marking frozen food products. Or you can use a wax pencil or crayon.
Speed is important in preparing food and getting it into the freezer, so as to maintain quality. Put only the amount of unfrozen foods into the freezer at one time that will sharp freeze within 24 hours.
Allow at least one inch between packages of unfrozen food in the freezer for circulation of cold air. Leave packages in freezing position for 24 hours before stacking them close together.
Uniform freezing temperature and keeping frozen products at 0° F or lower will maintain quality. Different foods have varying storage periods, so keep your frozen food inventory changing.
Use a freezer thermometer in your freezer. Check your freezer door and wall plug daily to avoid any catastrophe.
A freezer can pay wonderful dividends with considerable thought and planning by the homemaker.
by Nadine Fortna Tope[6]
Use of a pressure canner for preserving low-acid foods is not new. Pressure canners for home canning were first marketed in the early 1900’s. In 1917, the U. S. Department of Agriculture announced that use of a pressure canner at 10 pounds pressure (240° F) was the only safe method for canning vegetables. Today’s recommendations are essentially the same.
A temperature of 240° F or 10 pounds pressure at sea level is needed to kill spoilage organisms in a reasonable time, especially the spores of Clostridium botulinum. These spores, if not killed, can produce the most deadly toxin known to man.
The commercial canning industry stringently follows safe canning practices. Their safety record is excellent. A Complete Course in Canning by Lopez (1975) says that since 1925 four deaths have been reported from the consumption of more than 800 billion cans of commercially processed foods. The record for home canning is much worse—450 deaths in a fraction of the number of cans. Unsafe practices were probably used in preserving the deadly home-canned food.
Methods like open kettle, oven, and boiling water bath canning for low-acid foods are not sufficient to kill Clostridium botulinum spores. Educators talk to many people even today who still use unsafe practices because “that’s the way my mother always did it”, or because they are unfamiliar with pressure canners.
In this chapter, the need for safe pressure canning procedures will be discussed along with the rationale for using care in preparing low-acid foods for canning.
Acidity of a particular food is the most important factor in determining which canning method should be used—pressure or boiling water bath.
Acidity is measured and stated much the same way we express length or weight. Acidity (pH) refers to acid strength, not the amount of acid present.
For example, citric acid, an acid found in oranges, grapefruit, and other citrus fruits, is a weak acid compared to hydrochloric acid, a very strong acid. The measure used to express acid strength is pH. The pH scale runs from 1 to 14 with 7 as the neutral point. Substances with pH below 7 are called acidic, while those above 7 are called basic or alkaline foods. The lower the pH, the more acid the food.
Acidity or pH of a food affects the length of time it must be processed at a particular temperature to make it safe. The more acid the food (the lower the pH), the shorter the time required for processing.
Almost all foods are acid in nature. Hominy is an example of a food that is neutral or slightly alkaline.
Foods are further categorized as high acid or low acid because the C. botulinum spore will not grow at pH levels of 4.6 or below. High acid foods (pH 4.6 or below) include tomatoes and all fruits except figs. (See chart).
Those with a pH above 4.6 are the low-acid foods. All vegetables except tomatoes and those that have been pickled or fermented are low-acid.
Safe processing times have been established at 240° F for low-acid home canned products, since at this temperature the processing times are reasonably short and texture of the 324 resulting product remains good. The heat-resistant C. botulinum spore has been known to survive many hours of boiling at 212°. Once food reaches 240°, the spore is killed when held for the recommended number of minutes.
Holding of produce to be canned for long periods in warm summer temperatures gives bacteria ample time to multiply into vast numbers, thus increasing the chances of spoilage.
For example, one cell can multiply into a billion cells in just 15 hours of holding under favorable conditions.
Salt and spices added to low-acid canned products in amounts recommended do not appreciably alter processing time. Salt may slightly lower the heat resistance of some micro-organisms but not enough to present a problem if omitted for dietary reasons.
Fats and oils, if added, may reduce the rate of destruction of bacterial spores. Spores of C. botulinum have been known to survive beyond all reasonable expectation when heated in oil suspensions. Thus, adding oil or fat to a product being canned could be dangerous and is not recommended.
The type, consistency, and piece size of food and how it is packed in the jars are important factors which affect processing time. In preparing jars of food for the pressure canner, follow directions carefully. Do not use jars larger than the directions specify.
Determining the safe processing time for a food product involves two important steps.
First, the rate of heat penetration is measured by finding the spot in the jar that takes the longest time to heat. This is referred to as the “cold spot”. Times will depend on the type of food (squash vs tomato juice) as well as how it is prepared (whole kernel vs cream style corn).
The second step is done in a laboratory. A known amount of some live bacterial spores is put into the “cold spot” of the jar of food. These jars are then heated and the amount of time needed to kill the spores is determined.
Heat is a form of energy which flows from hot to cold substances. This flow occurs by convection, conduction, and radiation. In a pressure canner, convection and conduction are the primary methods of heat transfer.
Convection heating occurs in thin liquids and in gases like air and steam. As molecules are heated, they become lighter and rise to the top of the jar, displacing cooler ones toward the bottom. This movement is visible in water that is being heated in a clear glass container. Convection heating occurs best in liquids like fruit and vegetable juices or broths. These heat rapidly and thus have shorter processing times.
Small quantities of starch either added or leached from vegetables slows down the convection and increases processing time. For example, jars of liquid containing pieces of 325 green beans or peas would heat more slowly than apple juice because the pieces would interfere with convection.
A tightly packed jar takes longer to heat than a loosely packed one which allows some convection heating. Thus it is important not to over-pack jars as this will decrease the rate of heat penetration.
Some types of food heat by a combination of conduction and convection. One example is a peach half in thin sirup. The sirup heats by convection while the peach heats by conduction. Another example is cream style corn. Initially, the liquid is thin and heats by convection. As the liquid thickens, it heats by conduction.
Conduction occurs when heat is transferred from one particle or substance to another right next to it. This is the slowest type of heat transfer. Foods that mat together, like spinach, or viscous material like mashed pumpkin, heat by conduction. The larger the pieces of food or the thicker the puree, the slower the heat penetration.
A pressure canner is a kettle made from a material, usually aluminum, that is strong enough to safely withstand the pressures used in home canning. The lid is built so it can be locked to the base of the canner. On one type, metal in the sealing edge is ground smooth so little or no leakage occurs between the lid and the base. Care should be taken to avoid damage to the sealing surfaces which could ruin the canner.
Other canners have a gasket made of a rubber-like substance that prevents leakage of steam. The gasket should be washed in hot suds, rinsed, and dried thoroughly after use.
All pressure canners include a safety plug or fuse. One type has a metal fuse that melts when the temperature is too high. If the canner is used properly the fuse should never need replacing. Another type of canner has a rubber-like safety plug. Care should be taken to replace the plug when the rubber gets hard. As the rubber hardens, it takes a greater pressure for it to blow out. Some older type canners have a petcock that serves as a vent and safety valve.
In canners that have a pressure gage, vents serve to exhaust air from the canner. The air is exhausted by venting for 10 minutes after steam starts escaping. All the air must be exhausted before the canner is sealed because the steam has much more heat energy. For example, air in a 212° F oven feels just warm while 212° steam from a teakettle will burn you.
Be sure to read and follow the instructions with your canner.
All canners should have some type of rack in the bottom. A rack keeps the jars from touching the bottom of the canner and breaking. It also aids in transferring the heat more evenly within the canner by permitting water and steam circulation.
There must be enough water in the canner to provide steam throughout processing. Two quarts of water is usually recommended, although this may vary depending on size of the canner and the quantity of jars.
Pressure canners have either a dial gage, a pressure control or a combination of these. The dial pressure gage indicates the pressure and corresponding sea level temperature. The control type canner has a precision weight that sits on the vent pipe and jiggles to regulate pressure. A third type is a combination gage and control.
The dial pressure gage measures steam pressure. The tube in the pressure canner gage operates like a New Year’s Eve noisemaker, which is a flat paper tube rolled up. Blowing into the tube causes it to become more round and unroll.
The pressure gage works the same way except not as dramatically. The gage is made of a partially flattened metal tube. When pressure is applied, the tube becomes more round and straightens slightly. The needle [pointer] moves as the tube straightens. The gage is calibrated to indicate pressure. Pressure is controlled by adjusting burner heat to maintain the desired pressure. This type of gage should be checked yearly or after suspected damage, such as dropping, to be sure it functions properly.
A pressure control consists of a precision weight that rests on a specially designed vent pipe. It automatically maintains an even pressure and temperature inside the canner. Pressure builds inside the canner until the upward force (steam pressure times seat area) is greater than the downward force of the weight on the seat area. At this point, the control weight is lifted, releasing steam and reducing pressure, until the upward force equals the weight. The pressure inside again increases slightly, lifts the weight, and releases the pressure.
The repeated lifting and reseating or jiggling of the control weight indicates that the pressure is being controlled.
The burner is adjusted so the control jiggles at least several times a minute. Excessive jiggling will deplete the supply of water in the canner.
There are two types of pressure controls. One type is a single weight with 3 holes which fit on the vent pipe. The diameter at the base of the hole (seat area) is different for each of the 3 pressures—largest for 5 pounds pressure, and smallest for 15 pounds pressure.
The second type has 1 seat area and a 3-piece weight. For 5 pounds pressure, the small center weight is used. One additional ring or weight is added for 10 pounds pressure, and a second ring or weight is added for 15 pounds pressure.
With care, the pressure control remains accurate throughout the canner’s lifetime. Be sure that seat areas where the weight and the vent pipe make contact are not damaged or excessively worn; this could affect the canner’s performance.
The combination gage is not as common as the other two types. It has a sliding piston which pushes up on a spring. As pressure inside the canner increases, the piston is pushed up. Rings on the piston indicate pressure. If the heat is not regulated correctly, pressure builds up to beyond 15 pounds, at which point the weight is lifted to release the excess pressure. It will jiggle audibly, indicating to the user that the pressure is too high. This system serves as a gage as well as a safety device.
The combination gage should be kept clean and dry when not in use, to prevent corrosion. It also must be checked yearly to be sure the piston slides easily and indicates the correct pressure.
Atmospheric pressure is like the thickness of frosting on a cake. Where it is thickest it weighs more per square inch than where it is thin. At sea level, where the atmosphere is the thickest, it is heavier than atop a mountain.
As altitude increases, atmospheric pressure or its weight per square inch decreases. Altitude affects the boiling point of water. Where altitude is least, at sea level, water boils at 212° F. As altitude increases the boiling point of water decreases.
The same is true in a pressure canner. Under 10 pounds pressure at sea level, water boils at 240° F. As altitude increases, the temperature in a pressure canner at 10 pounds of pressure is less than 240°. This difference is enough to affect the safety of canned products at altitudes above 2,000 feet.
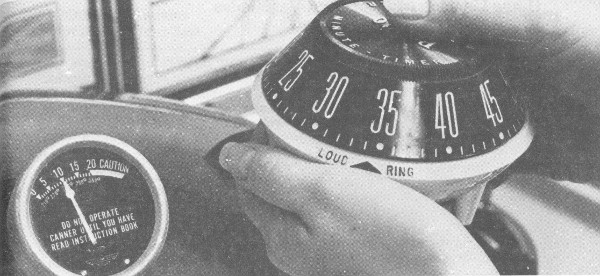
Fred Farout
Processing times and pressures should
be adjusted for altitude change.
Processing time for a particular vegetable is the time it takes to heat the coldest part of the jar to a temperature of 240° F, and maintain it long enough to kill any C. botulinum spores present. At an altitude of 2,000 feet, it takes 11 pounds of gage pressure for water to boil at 240°. For each additional 2,000 feet increase in altitude, 1 pound of pressure should be added.
For pressure canners that have the pressure control, the 15 pounds pressure weight should be used at altitudes above 2,000 feet for canning low-acid food.
At the end of processing, pressure inside the jars as well as inside the canner is 10 pounds. The pressure inside the canner should be allowed to drop slowly. If pressure inside the canner is released too rapidly, pressure inside the jars will be great enough to force the contents, especially liquid, out of the jars. This may prevent a jar from sealing if a piece of food lodges on the top of the sealing rim. It may even break the jar.
Remove the lid from the canner as soon as the pressure drops. Jars should then be taken out and allowed to cool to room temperature quickly. A type of non-toxic spoilage called flat sour can occur if the jars are allowed to stand in the canner for long periods.
When using the steam-pressure canner, the pressure given is for altitudes less than 2,000 feet above sea level. If you live in an area with a higher altitude, it is necessary to make an adjustment in pressure. See the next chapter for details.
by Carole Davis[7]
Canning in the home is increasing in popularity as a method of food preservation. Economic considerations are causing consumers to look for ways to stretch their food dollars. By having their own gardens and canning the harvested produce, they often can save money. Eating quality of home-canned products encourages some individuals to can. The activity of growing or obtaining produce and preserving it in the home sometimes gives people a sense of personal achievement and satisfaction.
In canning, food is preserved by applying heat to prepared food in containers so that micro-organisms that cause spoilage or food poisoning are destroyed and enzymes that cause undesirable quality changes in the flavor, color, and texture of food are inactivated. Preservation of food by canning also depends on sealing the food in sterile, airtight containers to prevent it from coming in contact with micro-organisms in the environment.
Canning is not a difficult technique, but it must be done properly to avoid spoilage and food poisoning, such as the often fatal botulism. It is extremely important that only tested reliable instructions are used, such as those found in U.S. Department of Agriculture publications. Based on scientific research, specific instructions have been developed for preparing, packing, and processing each food. Instructions should be followed exactly from beginning to end—without taking any shortcuts or altering any recipes.
Acidity of the food is the chief factor in influencing the time and temperatures necessary for processing. The more acid the products, the easier spoilage organisms are destroyed by heat. Acid foods—such as tomatoes, fruits, and pickled vegetables—can be safely processed at the temperature of boiling water in a boiling-water-bath canner. If spoilage organisms are not killed by adequate processing, they will continue to grow and could reduce the acid in the canned product, thus encouraging the growth of more dangerous organisms, such as Clostridium botulinum.
Low-acid foods—all vegetables, except for tomatoes—require a more severe heat treatment than acid foods to kill the organisms. The only safe way to can these foods is with a steam-pressure canner, one with a weighted or dial gage, to obtain temperatures above boiling. Clostridium botulinum is extremely dangerous in these low-acid foods because if it is present, and the heat treatment has been insufficient, it can grow and produce a deadly toxin in the sealed containers.
Processing times are based on sea level conditions where water boils at 212° F or, when under 10 pounds of pressure, at 240°. As the altitude increases, the temperature at which water boils decreases. Therefore, at altitudes above sea level you need to make adjustments in canning instructions to insure that foods are adequately processed.
When using a boiling-water-bath canner you must add more time in processing, as given in the table.
At altitudes above sea level it takes more than 10 pounds of pressure for the temperature of boiling water to reach 240° F.
When using the steam-pressure canner, the pressure must be increased 329 although the time remains the same as that recommended for sea level. At altitudes above 2,000 feet, process as follows:
| Altitude | Pounds of pressure |
|---|---|
| 2,000 feet | 11 |
| 4,000 feet | 12 |
| 6,000 feet | 13 |
| 8,000 feet | 14 |
| 10,000 feet | 15 |
| Increase processing time if the time recommended is: | ||
|---|---|---|
| Altitude (feet) | 20 minutes or less | More than 20 minutes |
| 1,000 | 1 minute | 2 minutes |
| 2,000 | 2 minutes | 4 minutes |
| 3,000 | 3 minutes | 6 minutes |
| 4,000 | 4 minutes | 8 minutes |
| 5,000 | 5 minutes | 10 minutes |
| 6,000 | 6 minutes | 12 minutes |
| 7,000 | 7 minutes | 14 minutes |
| 8,000 | 8 minutes | 16 minutes |
| 9,000 | 9 minutes | 18 minutes |
| 10,000 | 10 minutes | 20 minutes |
Use jars made especially for home canning so the jars will be the right size for the processing time and temperature used, properly heat tempered, and resistant to mechanical shock. Always check jars before using to be sure they do not have nicks or cracks. Wash jars in hot, soapy water and rinse well.
It is important to use standard jar closures. They are designed to fit home canning jars correctly, and are made from suitable materials to provide a proper seal. One of the most popular types is the two-piece lid with a metal ring or band and a flat metal disk with a sealing compound. Flat metal disks can be used only once since they may not seal properly if reused. Metal bands may be used repeatedly if they are not rusted or dented.
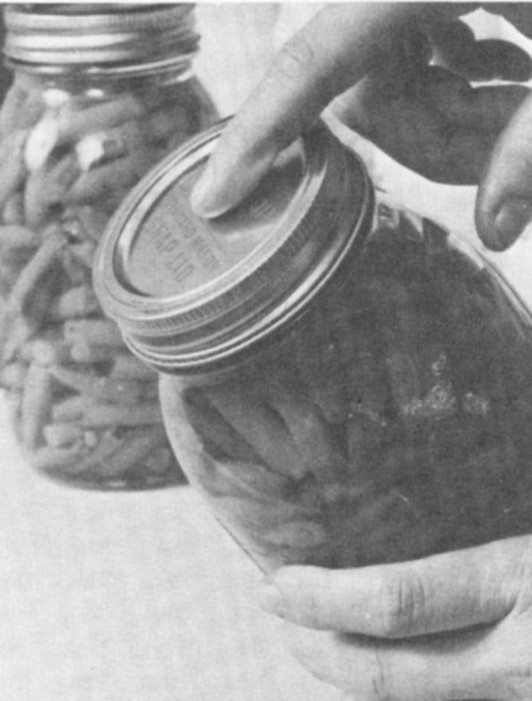
Screw ring band and disk.
Wash and rinse lids and bands. Metal lids with sealing compound may need boiling or holding in boiling water for a few minutes; follow the manufacturer’s directions. Porcelain-lined zinc caps with rubber shoulder rings can also be used to seal jars. Rubber rings should be used only once.
Water-bath canners are readily available on the market. However, any large metal container may be used for a water-bath canner if it is deep enough so the water is well over the tops of the jars and has space to boil freely. Allow 2 to 4 inches above jar tops for brisk boiling. The container or canner must have a tight fitting cover and a rack to allow water to circulate under the jars.
The steam-pressure canner is made of heavy metal and has a cover which fastens to make the pan steam-tight. The cover is fitted with a safety 330 valve, a petcock or vent, and a gage—either weighted or dial. All parts of the canner must be clean and in good working order. Check the gage before the canning season, and also during the season if canner is used often. The weighted ones need only be checked to determine if they are thoroughly clean. A dial gage can be tested for accuracy by a county Extension agent or an equipment manufacturer.
A pressure saucepan may be used for canning pint jars of food. However, 20 minutes must be added to the processing time recommended for a particular food canned with the pressure canner. This is because pressure saucepans heat and cool more rapidly than pressure canners do. Thus additional time is needed to compensate for the otherwise reduced exposure of the food to heat.
Home-canned foods will be no better than the raw products with which you begin. Fruits and vegetables should be of good quality with no bruises or soft spots. Be sure to choose fresh, firm, ripe fruits and young tender vegetables. Use them before they lose their freshness. Do not use overripe produce because some foods lose acidity as they mature, and the recommended processing time may not be adequate.
Wash all fruits and vegetables thoroughly, but gently, to remove dirt which contains bacteria. Wash small quantities at a time under running water or through several changes of water. Lift fruits and vegetables out of the water so the dirt will not resettle on the food. Do not let fruits or vegetables soak, as they may lose flavor and food value. Peel and cut or slice produce as indicated in instructions for each specific fruit or vegetable.
Fruits and vegetables may be packed raw into jars, or preheated and packed hot. Raw or cold pack means that raw, unheated food is placed in jars and covered with boiling hot sirup, juice, or water. When foods are hot packed they are heated in sirup, water or steam, or juice for a specified length of time and then packed hot into jars.
Most raw fruits and vegetables can be packed fairly tightly into containers because they cook down during processing. However, raw corn, lima beans, and peas should be packed loosely because they expand during processing.
Hot food should be packed fairly loosely. It should be at or near the boiling temperature when packed. There should be enough sirup, water, or juice to fill in around the solid food in the container and to cover the food. Food at the top of the container may darken if not covered with liquid.
Do not overpack containers as this may result in underprocessing. It is necessary to leave headspace between the lid and the top of the food or liquid in the jar because there will be some expansion of food during processing. The amount of headspace varies with the product, style of pack, and method of heat sterilization, so follow directions for each fruit or vegetable.
When using the flat metal lid with sealing compound, put the lid on a clean jar rim, with sealing compound next to the glass. Then screw the metal band down firmly. The lid will still have enough “give” to let steam escape during processing. Do not tighten the band further after removing the jar from the canner.
When using the porcelain-lined zinc cap, fit the wet rubber ring down on the jar shoulder. Fill the jar and wipe clean the rubber ring and jar rim. Screw the cap down firmly and turn back ¼ inch. When the jar is removed from the canner, tighten the cap to complete the seal.
Sugar or sugar-water sirup is often added to fruits to help them hold their shape, color, and flavor. Sugar can be added in the dry form to very juicy fruits.
To make sugar sirup—mix sugar with water or juice extracted from the fruit. Proportions for 3 types of sirup are as follows:
| Type of Sirup | Sugar (cups) | Liquid (cups) |
|---|---|---|
| Thin | 2 | 4 |
| Medium | 3 | 4 |
| Heavy | 4¾ | 4 |
Heat sugar and water or juice together until sugar is dissolved.
Fruit may be canned without sweetening—in its own juice or in water—for special diets. Processing time is the same for unsweetened fruit as for sweetened because sugar is not needed to prevent spoilage.
Process fruits by the boiling-water-bath method. Work only with the quantity of food needed for one canner load at one time.
As each jar is filled, adjust the lid, and place the jar on the rack in the water-bath canner about one-half full of hot or boiling water for raw or hot pack, respectively. Be sure the water is 1 to 2 inches over the tops of the jars, and there is an additional 1- to 2-inch space to allow the water to boil freely.
Cover the canner and when the water comes to a rolling boil, start to count the processing time. Boil gently and steadily for the recommended time for the fruit you are canning. A definite length of time is recommended for processing each kind of fruit.
When the processing time is completed, immediately remove the jars from the canner with a pair of jar tongs. Adjust the jar lids if necessary. Cool the jars on a rack or folded towel away from drafts.
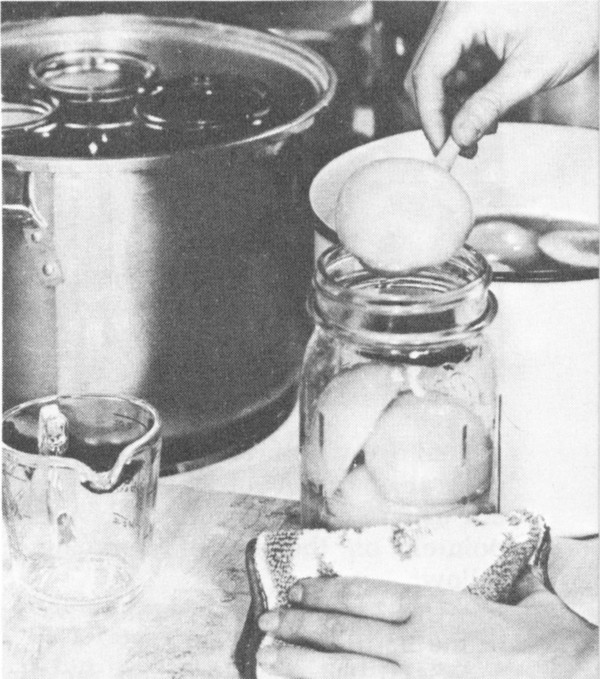
Hot packing peaches.
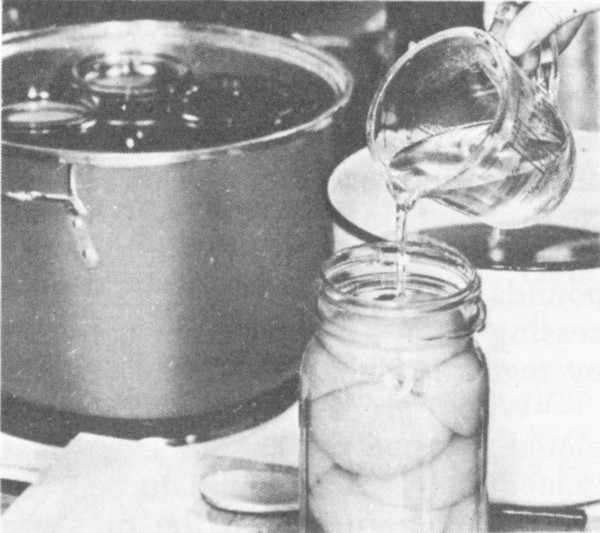
Covering peaches with a boiling sirup solution.
A steam-pressure canner must be used for processing all vegetables except tomatoes and pickled vegetables. Work only with the quantity of vegetable needed for one canner load at a time. As each jar is filled, adjust the lid, and place the jar in the pressure canner containing 2 to 3 inches of hot or boiling water for raw or hot pack, respectively, to keep food hot.
The manufacturer’s directions for general operation of the canner you are using should be followed. A few pointers on the use of any canner follow:
—Use 2 to 3 inches of boiling water in the bottom of the canner.
—Set filled containers on rack in canner.
—Fasten canner cover securely.
—Allow steam to escape from open petcock or weighted gage opening for at least 10 minutes to drive all air from canner. Then close petcock or put on weighted gage.
—When pressure reaches 10 pounds (240° F), start counting processing time. Keep pressure constant by regulating heat under the canner.
—When processing time is completed, remove the canner from heat immediately. Cool undisturbed at room temperature until the pressure registers zero. After a minute or two, slowly open the petcock or remove the weighted gage. Unfasten the cover and tilt the far side up so steam escapes away from you.
—Remove containers from canner with jar tongs.
—Adjust lids if necessary.
—Cool jars on a rack or folded towel away from drafts.
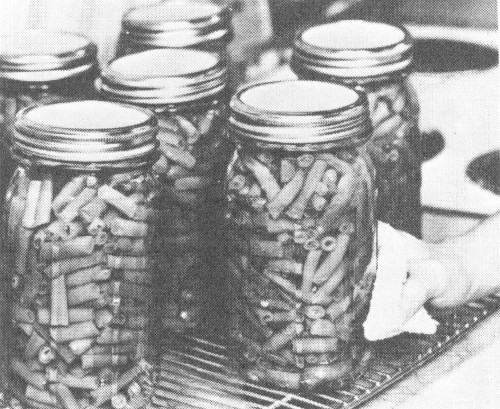
Cooling snap beans on a rack. Leave space between jars so air can circulate.
Jars should be examined after they have cooled, but within 24 hours after processing, to be sure a seal has been obtained. To test a jar that has a flat metal lid, press the center of the lid; if the lid is down and will not move, it is sealed. Turn jars with porcelain-lined zinc caps partly over in your hands; if they do not leak, they are sealed.
When jars are thoroughly cooled, metal screw bands should be carefully removed. Wipe outside of jars clean, and label jars to show date and contents. Store in cool dry place. If you find a jar that did not seal, use food right away or re-can the food immediately; empty the jar, pack and process the food as if it were fresh.
Check dates on jar labels to be sure you first use food that has the earliest processing date. Before opening any jar for use, look at it carefully for spoilage signs. If it leaks, has a bulging lid, spurts liquid when opened, or has an off-odor or mold, then do not use it. Do not even taste it. Destroy it out of the reach of children and pets.
Canned vegetables may contain the toxin that causes botulism without showing any visible signs of spoilage. Therefore, boil all home-canned vegetables covered for at least 10 minutes before tasting or serving. Heating generally makes any odor of spoilage more evident.
If the food appears to be spoiled, foams, or has an off-odor during heating, destroy it.
by Annetta Cook[10]
The growing season brings an abundance of fruits and vegetables freshly harvested from your garden. The unmatchable sweetness of peas cooked fresh from the pods, the tender-crisp texture of fresh broccoli, the delectable flavor of sweet juicy strawberries are irresistible. It is always a disappointment when the growing season is over. You may have more produce than you were able to use within a short time, so why not savor its just-picked freshness during the autumn and winter months—freeze it!
Of all the methods of home food preservation, freezing is one of the simplest and least time-consuming. The natural colors, fresh flavors, and nutritive value of most fruits and vegetables are maintained well by freezing. However, to freeze foods successfully—that is, to preserve their quality—produce must be carefully selected, prepared and packaged, and properly frozen. Be sure to use reliable home-freezing directions such as those found in U.S. Department of Agriculture publications. Unless recommended practices and procedures are observed, the food’s eating quality will be a disappointment.
The first consideration before deciding whether to freeze the garden’s harvest is whether your freezer can maintain temperatures low enough to preserve quality of the food during freezer storage. Storage temperatures must be 0° F (-18° C) or below to help prevent unfavorable changes in the food, including growth of bacteria. The temperature control of your freezer should be adjusted so the warmest spot in the freezer will always be at 0° F or lower. Freezers and most two-door refrigerator-freezer combinations are best suited for long storage of home-frozen fruits and vegetables since they can be set to maintain this temperature.
Proper preparation of produce is also important to insure high eating quality of frozen vegetables and fruits. Vegetables, except green peppers and mature onions, maintain better quality during freezer storage if blanched, or heated briefly, before freezing.
Blanching is necessary to prevent development of off-flavors, discoloration, and toughness in frozen vegetables. Besides stopping or slowing down the action of enzymes responsible for these undesirable changes, blanching also softens the vegetable, making it easier to pack into containers for freezing.
Fruit does not need to be blanched before freezing. However, most fruits require packing in sugar or sirup to prevent undesirable flavor and texture changes in the frozen product. Sugar, either alone or as part of the sirup, plus the acidity of fruit retards enzyme activity in fruit stored at 0° F or below.
Material selected for packaging fruits and vegetables for freezing must be moisture-vapor-proof or moisture-vapor-resistant to keep the food from drying out and from absorbing odors from other foods in the freezer. Loss of moisture from the food causes small white areas called “freezer burn” to develop. These areas are not harmful, but if extensive they can cause the food to become tough and lose flavor.
Suitable packaging materials include rigid plastic food containers, 335 plastic freezer bags, heavy aluminum foil, freezer paper or plastic film, glass freezer jars, and waxed freezer cartons. Collapsible, cardboard freezer boxes are frequently used as an outer covering for plastic bags to protect them against tearing.
Select packaging materials suiting the shape, size, and consistency of the food. Rigid containers are suited for freezing all foods, but are especially good for fruit packed in liquid. Non-rigid containers are best for fruits and vegetables packed without liquid. Paper, plastic, or foil wraps are ideal for freezing bulky vegetables such as broccoli, corn on the cob, and asparagus.
Rigid containers with straight sides and flat bottoms and tops stack well in the freezer. They take up less freezer space than rounded containers, containers with flared sides, and bulky, wrapped packages or plastic bags without protective outer cartons. Containers with straight sides or those that are flared, having wider tops than bottoms, are preferred for easy removal of the food before thawing. If the opening is narrower than the body of the container, the food will have to be partially thawed so you can get it out of the container.
Freezer containers and bags are available in a variety of sizes. Do not use those with more than ½-gallon capacity for freezing fruits and vegetables since the food will freeze too slowly, causing poor quality food.
Choose a container that will hold enough food for one meal for your family. You may wish to put up a few smaller packages for use when some family members are not home or to go with your family-size packages when guests are present for meals.
Pack foods tightly into containers. Since most foods expand during freezing, leave headspace between the packed food and closure.
For fruits that are in liquid, pureed, or crushed and packed in containers with wide openings, leave ½-inch headspace for pints, 1-inch headspace for quarts. If containers with narrow openings are used, leave ¾-inch headspace for pints, 1½-inch headspace for quarts.
For fruits and vegetables packed without liquid, leave ½-inch headspace for all types of containers. Vegetables that pack loosely, such as asparagus and broccoli, require no headspace.
Any container for freezer use must be capable of a tight seal. Rigid containers should have an airtight-fitting lid.
Press out all air from the unfilled parts of plastic bags. Immediately twist the top of each bag and securely tie it with a paper- or plastic-covered wire twist strip, rubber band, or string to prevent return of air to the bag.
Some bags may be heat-sealed with special equipment available on the market. Follow the manufacturer’s directions.
Edges and ends of paper, foil, or plastic wraps should be folded over several times so the wrap lies directly on top of the food and all air has been pressed out of the package. Seal the ends with freezer tape to hold them securely in place.
Grow varieties of fruits and vegetables that freeze well. Your county Extension office can provide information on suitable varieties that grow well in your locality.
Produce selected for freezing should be of optimum eating quality. Freezing only preserves the quality of produce as it is at the time of freezing. It never improves quality.
Fruits to be frozen should be firm and ripe. Underripe fruit may have a bitter or off-flavor after freezing. Pick berries when ripe and freeze them as soon after picking as you 336 can. Some fruits—apples, peaches, pears—may need to ripen further after harvesting. But take care they don’t get too ripe. Frozen fruit prepared from overripe fruit will lack flavor and have a mushy texture.
Choose young, tender vegetables for freezing. Since vegetables lose quality quickly after harvest, freeze them as soon as possible for maximum quality. The sugar in corn, peas, and lima beans is rapidly lost when held too long before freezing. If you must hold vegetables and ripe fruits for a short while, refrigeration will help retain the just-picked freshness better than leaving produce at room temperature.
Wash small quantities of fruit gently in cold water. Do not permit fruit to stand in water for any length of time since it will become water-soaked and lose flavor and food value. Drain fruit thoroughly.
Peel fruit and remove pits or seeds. Halve, slice, chop, crush, or puree fruit as indicated in the instructions for each specific fruit. Some fruit, especially berries, may be left whole, but remove stems or hulls. Work with small quantities of fruit at a time, particularly if it is fruit that darkens rapidly. Two to three quarts is an adequate amount to handle at one time.
Pack fruit by sirup pack, sugar pack, or unsweetened pack. Most fruit has better texture and flavor with a sweetened pack. Apples, avocados, berries, grapes, peaches, persimmons, and plums can all be frozen satisfactorily without sweetening, but the quality is not quite as good as freezing in sirup or sugar. An unsweetened pack will give as good a quality product for gooseberries, currants, cranberries, rhubarb, and figs as a sweetened pack.
Sirup pack. Make a sugar sirup by dissolving sugar in water. A 40% sirup (3 cups of sugar to 4 cups of water) is recommended for freezing most fruits. Sirups containing less sugar are sometimes used for mild-flavored fruits; those with more sugar for very sour fruits. The type of sirup to use is specified in the directions for freezing each fruit. Allow ½ to ⅔ cup of sirup for each pint of fruit. Cut fruit directly into the freezer container, leaving the recommended headspace. Add sirup to cover fruit.
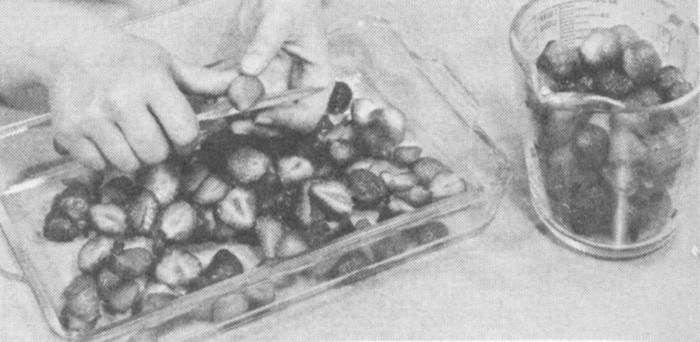
Slicing strawberries before freezing in a sugar pack.
Sugar pack. Cut fruit into a large bowl. Sprinkle with sugar. The amount of sugar to use is specified in freezing directions for each fruit. Mix gently until juice is drawn from the fruit and all the sugar is dissolved. Pack fruit and juice into freezer containers.
Unsweetened pack. Some fruit may be packed dry, without added liquid or sugar. Other fruit, particularly if it darkens rapidly, can be covered with water to which ascorbic acid has been added. Crushed fruit or sliced fruit that is very juicy can be packed in its own juice without added liquid.
For all packs except the dry, unsweetened pack, liquid—either sirup, juice, or water—should completely cover the fruit. This prevents the top pieces from changing color or losing flavor due to exposure to air in the headspace.
A small crumpled piece of waxed or parchment paper placed on top of the fruit helps keep it pressed down 337 in the liquid once the container has been sealed. The paper should loosely fill the headspace area. Do not use aluminum foil since acid in the fruit can cause the foil to pit (form holes), and tiny pieces of foil may drop into the food.
Anti-darkening. Many fruits darken during freezing, particularly if not kept under liquid. Darkening occurs when the fruit is exposed to air. Since a small amount of air is in the liquid as well as the tissues of fruit, some darkening can occur even when the fruit is submerged in liquid. To help retard darkening during freezer storage, add ascorbic acid (vitamin C) to the fruit during preparation.
Ascorbic acid is available in several forms from drug stores, some freezer locker plants, and some grocery stores that sell freezing supplies. Crystalline ascorbic acid is easier to dissolve in liquid than powder or tablet forms. The amount of ascorbic acid to use is given in the directions for those fruits where use of ascorbic acid is beneficial. Ascorbic acid mixtures containing sugar, and sometimes citric acid, also are available. Follow the manufacturer’s directions for use of these products.
In preparing vegetables, wash a small quantity of the vegetable gently in several changes of cold water. Lift the vegetable out of the water each time so all dirt will settle to the bottom of the sink or pan.
Shell, husk, or peel and trim. Some vegetables such as lima beans, corn on the cob, and asparagus require sorting for size, since blanching times depend on size of the pieces.
Blanch the vegetable (this is not necessary for green peppers and mature onions). Most vegetables are blanched by heating them in boiling water. A blancher consisting of a tall kettle, basket, and cover is convenient to use and can be purchased at most department or farm supply stores. However, any large pan which can be fitted with a wire or perforated metal basket and covered is suitable.
To insure adequate blanching, immerse a basket containing a small amount of the vegetable (1 pound) into a large amount of boiling water (at least 1 gallon). Start timing once the vegetable has been immersed and the kettle is covered. Blanching time will vary with the vegetable and the size of the pieces, so follow the recommended blanching times for each vegetable.
Cool the vegetable by immersion in a large quantity of cold or iced water. Rapid cooling is necessary to stop the food from cooking. Cool the vegetable for about the same length of time as it was heated. Once cooled, do not leave the vegetable standing in water, as loss of flavor and food value can occur. Drain the cooled vegetable thoroughly before packaging.
Other methods of blanching and cooling are recommended for some vegetables. For example, mushrooms are heated by sauteing, tomatoes by simmering in their own juice. These foods are cooled by setting the pan of food in cold or iced water to speed cooling.
After packing and sealing containers, label them with the name of the food, type of pack (for fruits), and date of freezing. Freeze food soon after packing, placing a few packages at a time in the freezer as you have them ready.
Freeze food at 0°F or below. Do not load the freezer with more food than can be frozen in 24 hours. Usually 2 to 3 pounds of food per cubic foot of freezer capacity can be frozen at a time. Place packages on freezing coils or plates or in fast-freeze section of freezer, leaving a space between each package. Loading the freezer in this manner enables the 338 food to be frozen quickly. Freezing foods too slowly can result in loss of quality.
Once food has frozen, stack containers. Keep freezer surfaces relatively free from frost to insure maximum operating efficiency of your freezer.
Fruits and vegetables stored at 0° F or below will maintain high quality for 8 to 12 months. Unsweetened fruit loses quality more rapidly than sweetened fruit.
Keeping food longer than the recommended time will not make it unsafe to eat, but some quality loss can occur.
Home-frozen fruits and vegetables are convenient and easy to use since most of their preparation is done before freezing. Thaw frozen fruit in the refrigerator, or at room temperature in a pan of cool water. Leave fruit in the unopened freezer container.
A pint package of fruit frozen in sirup will take about 6 to 8 hours to thaw in the refrigerator, or ½ to 1 hour in a pan of cool water. Fruit in sugar packs takes less time. Unsweetened packs need more time than sirup packs. For best eating quality, serve fruit with a few ice crystals remaining.
Cook most frozen vegetables without thawing first. (Corn on the cob and leafy vegetables require partial thawing to insure even cooking.) Add the vegetable to boiling salted water. Use 1 cup of water and 1 teaspoon of salt for each quart of vegetable with these exceptions: Use 2 cups of water for lima beans; water-to-cover for corn on the cob. Cover the saucepan during cooking. Cook the vegetable only until tender. Avoid overcooking.
Consult timetable in freezing directions for recommended times for cooking home-frozen vegetables.
Home Freezing of Fruits and Vegetables, U.S. Department of Agriculture H&G Bul. No. 10, on sale by Superintendent of Documents, U.S. Government Printing Office, Washington, D.C. 20402. 75¢.
by Catharine C. Sigman and Kirby Hayes[13]
Changing fruit into a variety of products such as jellies, jams, marmalades, and preserves can be most rewarding. These products serve as a good way to use fruit that is not completely suitable for canning or freezing, while adding variety and economy to the home food preservation plan.
Jams, jellies, and preserves are similar in that they are preserved using sugar, and all are jellied or partially jellied. Each differs from the other due to the fruit used, ratio of ingredients, and methods of preparation.
Jelly is made using fruit juice. It is clear and firm enough to hold its shape when removed from the jar.
Jam is made from crushed or macerated fruit. Less firm than jelly, it spreads more easily.
Conserves are jams made from a mixture of fruits including citrus. Sometimes nuts and raisins are added.
Preserves are whole fruits or large pieces of fruit in a sirup that varies in thickness.
Marmalades are usually made from pulpy fruits, with skin and pulp suspended in a clear, jellied liquid. For citrus marmalades, the peel is sliced very thin.
Butters are made by cooking fruit pulp with sugar to a thick consistency which spreads easily.
Jellied fruit products need a balanced ratio of fruit, acid, pectin, and sugar for best results.
Fruit provides the characteristic color and flavor, and furnishes at least part of the pectin and acid that combines with added sugar to give the desired gel. Full flavored fruits are needed to offset the dilution of flavor by the large proportion of sugar used.
Pectin is the actual jellifying substance and is found in many fruits in adequate quantity. If pectin is lacking, apple juice extract or commercial pectin may be used. All fruits have more pectin when underripe.
Commercial pectin is available in both liquid and powder forms. It is essential to follow the manufacturer’s instructions or tested recipes as in U.S. Department of Agriculture publications. These preparations generally bring higher yields plus the advantages of being able to use fully ripe fruit, with a shorter cook time and more uniform results.
Acid content varies among fruits and is higher in underripe fruits. Acid is needed both for gel formation and for flavor. When fruits are low in acid, lemon juice or citric acid may be used. Commercial pectins also have added acid.
Either beet or cane sugar in fruit products acts as a preserving agent, helps in forming the gel, and enhances the finished product’s flavor. In preserves, sugar aids in firming the fruit or fruit pieces.
Sweeteners such as brown sugar, sorghum and molasses are not recommended since their flavor overpowers the fruit flavor and their sweetness varies.
Other than artificial sweeteners, suitable sugar replacements are light corn sirup and light, mild honey. Neither can substitute fully for sugar on a one-to-one basis. For best results use a tested recipe, but if one is not available replace about ¼ to ½ of the sugar with corn sirup or honey. Longer boiling (for recipes without 341 pectin) may be required since additional moisture is being added.
Fruits for jellied products without added pectin must be hard ripe and full flavored, or in a proportion of ¾ fully ripe and ¼ underripe, in order to provide the needed pectin. If liquid or powdered pectin is used, fully ripe fruit is best.
After sorting to remove overripe or undesirable fruit, wash in cold running water or several changes of cold water. Prepare fruit according to the specific recipe, discarding any spoiled or bruised portions. Only the amount needed should be prepared to prevent quality loss.
In jelly making, juice is extracted either by crushing, by limited heating using small amounts of water, or by longer cooking with measured amounts of water. Heating aids in pectin extraction for those recipes not using added pectin.
The prepared fruit is put in a damp jelly bag or several thicknesses of damp cheesecloth, tied, and hung to drip. The clearest juice will be free run, but yields increase if the bag is pressed or twisted. Re-straining this juice is recommended. Do not squeeze or press.
Jams, jellies, and preserves can be made with added pectin or without it, depending on the fruit. Fruits such as raspberries, strawberries, and peaches generally need added pectin. Apples, crabapples, currants, plums, grapes, and quinces—if not overripe—contain enough pectin and acid for good gel strength.
Pectin content can be checked visually by mixing 1 tablespoon of cool cooked fruit juice and 1 tablespoon of denatured alcohol and mixing. Fruit high in pectin will form a jellylike mass while fruit low in pectin will show little clumping. Caution: Do not taste; the mixture is poisonous.
Pectin may also be tested using a jelmeter. This graduated glass tube measures the rate of fruit juice flow through the tube, giving a rough estimate of the amount of pectin present.
Jellied fruit products made without added pectin require less sugar per fruit unit and need longer boiling to reach the end point. The yield of finished product is less than that with added pectin.
Pectin added to fruit, either in powder or liquid form, must be used in recipes designating the type. Powdered pectin is mixed with the unheated fruit juice or unheated crushed fruit.
Liquid pectin is added to the boiling fruit juice or fruit and sugar mixture. The boiling time of 1 minute for both types is used and must be accurately timed. Regardless of type, or whether pectin is used, you must follow directions closely, taking accurate measurements.
One of the largest concerns when making jelly without added pectin is to know when it is done, or judging the end point. Two of the most frequently used methods for testing doneness of jelly without added pectin are the temperature test and the spoon or sheet test.
The temperature test is the most scientific method and probably the most dependable. Before cooking jelly, take the temperature of boiling water with a jelly or candy thermometer. Cook the jelly mixture to a temperature 8° F higher than the boiling point of water. If cooked to this point, the jelly mixture should form a satisfactory gel. Cook other jellied mixtures to a temperature 9° higher than the boiling point of water.
To get an accurate reading, place the thermometer in a vertical position with the bulb completely covered by the jelly mixture but not touching the bottom of the kettle. Stir jam, preserve, conserve, and marmalade mixtures before taking the temperature. Read the thermometer at eye level.
To test the jellying point by the spoon or sheet test, dip a cool metal spoon into the boiling jelly mixture and lift the spoon so the sirup runs off the side. When the sirup no longer runs off the spoon in a steady stream, but two drops form together and sheet off the spoon, the jelly should be done.
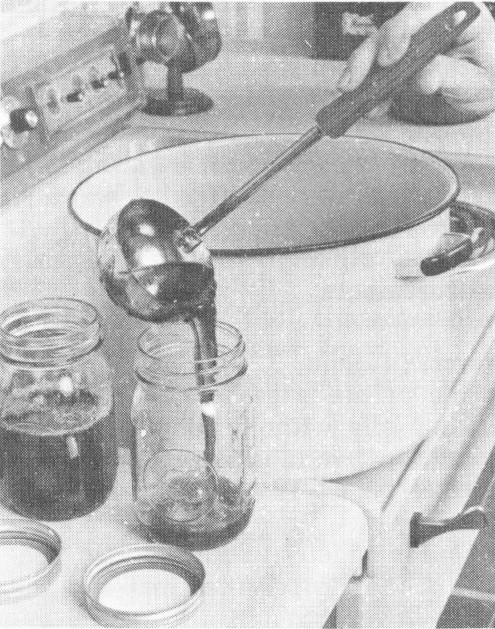
Pouring hot jelly mixture into canning jars.
Once the jellying point is reached, quickly pour jelly into sterilized containers. When sealing jelly with lids, use only standard canning jars and new lids. Pour the boiling hot jelly mixture into sterilized hot jars, leaving ⅛ inch head space. Wipe the jar rims clean, place hot metal lids on jars with the sealing compound next to the glass, screw the metal bands down firmly, and stand the jars upright to cool.
The paraffin seal is recommended only for jelly. Pour the boiling hot jelly mixture into sterilized hot containers, leaving ½ inch head space. Cover hot jelly with hot paraffin to make a single thin layer ⅛ inch thick. Paraffin should touch all sides of the container. Prick air bubbles in the paraffin.
Heat processing of jams, preserves, conserves, and marmalades is recommended, especially in warm or humid climates. Place filled jars on a rack in a water bath canner or other large container filled with hot water. The water should be an inch or two over the tops of the jars. Cover canner. Bring the water to a rolling boil and boil gently for five minutes.
Remove the products from the canner immediately when the processing time is up. Place the containers on a rack or folded cloth away from drafts to cool.
Let jellied products stand overnight to avoid breaking the gel. Remove screw bands, and label the containers with the name of the product and the date. Store in a cool, dry place. Jellied products have a much better flavor and color if stored only for a short time.
What if the jelly doesn’t gel? Try using it as a topping for pancakes or ice cream, or try recooking the mixture. To remake jelly without added pectin, heat the jelly to boiling and boil for a few minutes until the jellying point is reached. Remove the jelly from the heat, skim, pour into hot, sterilized containers and seal.
| Problem | Cause | Prevention |
|---|---|---|
| Formation of crystals | Excess sugar | Test fruit juice with jelmeter for proper proportions of sugar |
| Undissolved sugar sticking to sides of kettle | Wipe side of pan free of crystals with damp cloth before filling jars | |
| Tartrate crystals in grape juice | Make grape jelly stock, and let tartrate crystals settle out before making jelly. Then strain through two thicknesses of cheesecloth to remove crystals | |
| Mixture cooked too slowly or too long | Cook at a rapid boil. Remove from heat immediately when jellying point is reached | |
| Syneresis or “weeping” | Excess acid in juice makes pectin unstable | Maintain proper acidity of juice |
| Storage place too warm or storage temperature fluctuated | Store in a cool, dark and dry place | |
| Paraffin seal too thick | Seal jelly with a single thin layer of paraffin ⅛ inch thick. Prick air bubbles in paraffin | |
| Too soft | Overcooking fruit to extract juice | Avoid overcooking as this lowers the jellying capacity of pectin |
| Incorrect proportions of sugar and juice | Follow recommended instructions | |
| Undercooking causing insufficient concentration | Cook rapidly to jellying point | |
| Insufficient acid | Avoid using fruit that is overripe. Lemon juice is sometimes added if fruit is acid deficient | |
| Making too large a batch at one time | Use only 4 to 6 cups of juice in each batch of jelly | |
| Too stiff or tough | Overcooking | Cook jelly mixture to a temperature 8° F higher than the boiling point of water or until it “sheets” from a spoon |
| Too much pectin in fruit | Use ripe fruit | |
| Cloudy | Green fruit (starch) | Use firm, ripe fruits or slightly underripe |
| Imperfect straining | Do not squeeze juice but let it drip through jelly bag | |
| Jelly allowed to stand before it was poured into jars or poured too slowly | Pour into jars immediately upon reaching jellying point. Work quickly | |
| Bubbles | Kettle was not held close to top of jar as jelly was poured, or jelly was poured slowly and air became trapped in hot jelly | Hold kettle close to top of jar and pour jelly quickly into jar |
| May denote spoilage. | Follow recommended methods to get airtight seal | |
| If bubbles are moving, do not use | ||
| Mold (denotes spoilage; do not use) | Imperfect seal | Use recommended methods to get airtight seal |
| Lack of proper sanitation | Sterilize jelly glasses and all equipment used |
To remake with powdered pectin, measure ¼ cup sugar, ¼ cup water, and 4 teaspoons powdered pectin for each quart of jelly. Mix the pectin and water and bring to a boil, stirring constantly. Add the jelly and the sugar, stir thoroughly, and bring to a full rolling boil over high heat, stirring constantly. Boil the mixture hard for 30 seconds, remove from the heat, pour into hot containers and seal.
To remake with liquid pectin, measure ¾ cup sugar, 2 tablespoons lemon juice, and 2 tablespoons liquid pectin for each quart of jelly. Bring the jelly to a boil over high heat. Add the sugar, lemon juice and liquid pectin and bring to a rolling boil, stirring constantly. Boil the mixture hard for 1 minute. Remove the jelly from the heat, skim, pour into hot, sterilized containers and seal.
High quality jellied products depend on many factors so there may be several possible solutions to problems in making these products. Some common problems and their prevention are given in the table.
How To Make Jellies, Jams and Preserve at Home, H&G Bul No. 56, on sale by Superintendent of Documents, U.S. Government Printing Office, Washington, D.C. 20402. 55¢.
by Isabelle Downey[14]
Pickles or relishes can add zip and zest to your meals, snacks and party refreshments. They contain small amounts of nutrients, depending on ingredients used in making them. But they have little or no fat and are low in calories, except for the sweet varieties.
Sun-drying, salting, smoking and pickling were methods used in ancient times for preserving food. Pickling is still popular today.
Pickling is preserving foods in vinegar or brine or a combination of the two. Other ingredients are sometimes added to make pickles crisp and spicy.
Relishes and some pickles can be made in a few hours. Other pickles may take three to six weeks.
There are four basic classifications of pickle products, depending on ingredients used and method of preparation.
Brined pickles are sometimes called fermented pickles and take three weeks or longer to cure. Dilled cucumbers, sauerkraut and some vegetables are often prepared this way. Cucumbers change from a bright green to an olive or yellow green while the interior becomes uniformly translucent. Sauerkraut is tart and tangy in flavor, creamy-white in color, and crisp and firm.
Fresh pack pickles are also called the quick process. This method is very popular for the family with limited time. Ingredients are combined and put directly in the jar to be heat processed, or combined and heated a short time before being placed in the jar for heat processing.
Fruit pickles are usually made of whole fruits simmered in a spicy, sweet-sour sirup. Some of the favorites are peach, pear and watermelon rind.
Relishes are made from chopped fruits or vegetables (or a combination), with seasonings added and cooked to a desired consistency. They can be hot, spicy, sweet or sour, depending on the recipe used. Corn relish, chili sauce, catsup, chow-chow and chutney are popular examples.
Always use a tested recipe; one that is current and reliable. Too little of one ingredient and too much of another could cause the pickles to be unsafe to eat. Read the complete recipe before starting the preparation, and be sure you understand exactly what you are to do. Check to see you have all the ingredients. Accurate measurements and weights are most important in making pickles and relishes if a quality and safe product is to be the result.
Use only good quality fruits and vegetables. Select tender vegetables and firm ripe fruit. Pears and peaches may be slightly underripe for pickling. The pickling type cucumber is the variety you will want to use. The salad (slicing) variety does not make a crisp pickle. Contact your county Extension office for the variety grown in your area.
Wax-coated cucumbers bought from the vegetable counter are not suitable for pickling because brine cannot penetrate the wax. Besides, cucumbers for pickling should be used within 24 hours after gathering. If they are kept—even refrigerated—longer than 24 hours before the pickling process begins, you may have a poor quality product.
Always remove the blossom. This may contain fungi or yeasts which could cause enzymatic softening of the cucumber. If whole cucumbers are 346 to be brined, you may want to leave a ¼-inch stem.
Do not use vegetables or fruits that have even a slight evidence of mold or decay.
In preparing fruits and vegetables to be pickled, wash them thoroughly in cold water whether they are to be peeled or not. Lift out of the water each time, so soil that has been washed off will not drain back over them. Rinse the pan thoroughly between each washing. This is a good time to check again to see if you have fruits or vegetables that should not be used. Too, you can sort as to size, shape and color. This makes for a uniform pack and attractive product.
SALT—Pure granulated salt with no noncaking material or iodine added is best. This is sold as pickling salt, “barrel” salt, and “kosher” salt. Pickling salt is sold at the grocery store and “barrel” salt from many farm supply stores.
Table salt contains noncaking materials that may interfere with fermentation during brining. It also may make the brine cloudy. Iodized salt may darken pickles. Never use ice cream salt or rock salt—they are not food-pure.
VINEGAR—Use a 4 to 6 percent acidity (40 to 60 grain) cider or white vinegar. Read the label, for if it does not have the amount of acidity listed, it should not be used for making pickles or relishes. Some vinegar has 19 percent acidity—this must be diluted. Directions are on the label. Don’t use homemade vinegar since the acidity is not known.
Cider vinegar, used in most recipes, has a good flavor and aroma but may discolor pears, cauliflower, onions; therefore white distilled vinegar is used for these. If a less sour product is preferred, choose a recipe that has more sugar. Do not use less vinegar than the recipe specifies.
SUGAR—Granulated, white sugar is used in most pickles. However, some recipes have brown sugar as an ingredient and say so.
SPICES AND HERBS—Always use fresh spices and herbs for best flavor. They deteriorate and lose their pungency in heat and humidity. If they are not to be used immediately, store them in an airtight container in a dark, dry, cool place.
Whole spices, if left in the jar with the pickles, will darken them; therefore they can be tied in a thin cloth bag and removed just before pickles are packed into the jar. Ground spices tend to darken pickles and relishes.
WATER—It is best not to use hard water in brining. If you have hard water, boil it in a stainless steel or uncracked enamel container for 15 minutes. Remove from heat, cover, and let sit for 24 hours. Remove any scum which might have formed. Slowly pour water from the container so that sediment will not be disturbed. The water is now ready to use.
Having the right kind, size and amount of equipment and tools can save you time and energy. Check these the day before you plan to make your pickles. Otherwise you may not have what you need.
For fermenting or brining use a crock or stone jar that has never had fat or milk in it. An unchipped enamel-lined pan, glass or stainless steel are also O.K. Do not use plastic.
To cover vegetables while they are in a brine, you will need a heavy plate or large glass lid that fits inside the container. Use a filled jar of water to hold the cover down, so that vegetables are kept below the surface of the brine. Be sure the jar has a tight fitting lid.
For heating pickling liquids, use utensils of unchipped enamelware, stainless steel, aluminum or glass. Do not use copper, brass, galvanized or 347 iron utensils; these metals may react with acids or salts and cause undesirable color changes in pickles or form undesirable compounds.
Among small utensils that will help you do the job are measuring spoons, stainless steel spoons, measuring cups, household scales, sharp knives, vegetable peelers, large trays, canning tongs, ladle with a lip for pouring, slotted metal spoons, footed colander or wire basket, canning funnel, food chopper or grinder, and non-porous cutting board.
All pickles and relishes should be processed in a boiling-water bath canner. Any large metal or enamel container may be used if it:
A steam-pressure canner can be used if it is deep enough. For this purpose, set the cover in place without fastening it. Be sure the petcock is wide open so that steam escapes and pressure is not built up.
Standard home canning jars are used for pickles and relishes. Do not use jars and lids from commercially canned foods. They are designed for use on special packing machines and are not suitable for home canning.
Select jars free from nicks, chips or any defects. As you wash the jars in warm soapy water and rinse them, run your finger around the jar opening to see if there is a defect. If there is, the jar will not seal.
Look at each new metal lid to be sure the sealing compound is even and smooth. Check the metal screw band to see that it is not bent or rusty. Bands can be used over and over again. As for pretreatment of lids and bands, follow the manufacturer’s directions. Read these even if you have used that brand before; the directions may have changed.
When using rubber rings get clean, new ones that are the right size for the jars. Do not test these by stretching. Follow the manufacturer’s directions as to pretreatment needed.
It is always best to follow current, reliable procedures as in U.S. Department of Agriculture or Extension publications. This insures a quality product and one that is safe to eat. Time, energy and money may be wasted if you use outdated or careless canning procedures.
Fill the jars firmly and uniformly with the pickle product. Avoid over-packing so tightly that the brine or sirup is prevented from filling around and over the product. Slide a plastic spatula down each side of the jar to remove any air spaces. Add enough liquid to cover the pickles. Be sure to allow head space at the top of the jar as recommended in the recipe. This means there is no food or liquid in that space.
Wipe the rim, inside and top, and threads of the jar with a clean, damp cloth to remove any particles of food, spices, seeds or liquid. A small particle may prevent an airtight seal.
The two-piece metal cap (flat metal lid with sealing compound and metal screw band) is the most commonly used closure. Read the manufacturer’s directions on treatment needed to close the lid. These vary from one manufacturer to another.
When using a porcelain-lined zinc cap with shoulder rubber ring, screw the cap down firmly against the wet rubber ring, then turn it back one-fourth inch. Immediately after processing and removal of the jar from the canner, screw the cap down tight to complete the seal.
If liquid has boiled out of a jar during processing, do not open it to add more liquid, because spoilage organisms may enter. This applies to 2-piece lids also. Seal the jar as it is.
All pickle products require heat treatment to destroy organisms that cause spoilage and to inactivate enzymes that may affect flavor, color and texture. Adequate heating is best achieved by processing the filled jars in a boiling-water bath.
Spoilage organisms are in the air and there is danger of them contaminating the food as it is transferred from boiler to jar. This can happen when even the utmost care is taken. Therefore, boiling-water bath processing is needed.
After adjusting the lid, put the jar on the rack into the actively boiling water.
Now that the jar is in the water bath canner, fill the next jar. Continue until all jars are in the canner. Be sure to leave a small space around each jar. This allows the water to circulate. Water should come 2 or more inches above jar tops; add boiling water if necessary.
Cover the canner with a close-fitting lid and bring the water back to boiling as quickly as possible. Start to count the processing time when the water returns to boiling, and continue to boil gently and steadily for the recommended time according to the recipe.
When time is up, slide the canner from the hot range unit. Close windows and doors so that a draft will not be blowing on jars as they are removed. As you remove the lid, be sure to do this away from you so that you will not be burned by steam. Remove one jar at a time, using your canning tongs. Complete the seals if the manufacturer so directs. Set jars upright, away from a draft, and several inches apart, on a dry cloth or wire rack to cool. Do not cover with a cloth.
For fermented (brined) cucumbers and fresh-pack dills, start to count the processing time as soon as all the filled jars are in the actively boiling water. This prevents development of a cooked flavor and loss of crispness.
Most pickle and relish recipe processing times are given for altitudes less than 1,000 feet above sea level. If you are 1,000 feet or above, you need to increase the recommended processing time. See table in canning chapter by Carole Davis.
After 12 to 24 hours, check to make sure the jars have an airtight seal. Read the manufacturer’s directions but if these are not given, here are some general ways to tell if the seal is airtight. For the metal lid with a sealing compound and the metal screw band, if the center of the lid has a slight dip or stays down when pressed, the jar is sealed. Another test is to tap the center of the lid with a spoon. A clear, ringing sound means a good seal. A dull note, however, does not always mean a poor seal. Another way to check for an airtight seal is by turning the jar partly over. If there is no leakage, the jar may be stored.
If the porcelain-lined zinc cap with rubber ring has been used, check for airtight seal by turning the jar partly over. If there is no leakage, the seal is tight.
If the jar is not sealed, use the product right away or recan it. To recan, empty the jar, repack in another clean jar, use a new lid, and reprocess the product as before.
If metal bands are used, these can be removed from jars after 24 hours if you want to.
Wipe jars with a clean, damp cloth. Make a label for the jar. Put the name of the product and date on the label.
Store canned pickles and relishes in a dark, dry, cool place where there is no danger of freezing. Freezing may crack the jars or break the seals, and let in bacteria.
Before using, always examine each jar for signs of spoilage. A bulging lid or leakage may mean that the contents are spoiled.
When a jar is opened look for other signs of spoilage such as:
If there is ever the slightest indication of spoilage, do not eat or even taste the contents. Dispose of the contents so they cannot be eaten by humans or animals. Also dispose of the lid.
After emptying the jar of spoiled food, wash the jar in hot, soapy water and rinse. Boil in clean water for 15 minutes.
Why are pickles soft or slippery?
This generally results from microbial action which causes spoilage. Once a pickle becomes soft it cannot be made firm again. Microbial activity may be caused by
—Too little salt or acid
—Cucumbers not covered with brine during fermentation
—Scum not removed from brine during fermentation
—Insufficient heat treatment
—Seal is not airtight
—Moldy garlic or spices
Blossoms, if not removed from the cucumbers before fermentation, may contain fungi or yeasts responsible for enzymatic softening.
Why are pickles shriveled?
—Using too strong a vinegar, sugar or salt solution at the start of the pickling process. In making the very sweet or very sour pickles, it is best to start with a dilute solution and increase gradually to the desired strength
—Overcooking
—Overprocessing
Why are pickles dark?
—Use of ground spices
—Too much spice
—Whole spices left in jar
—Iodized salt
—Minerals in water, especially iron
—Overcooking
What causes garlic to turn purple or blue?
—Garlic contains anthocyanins, a water soluble pigment also found in beets. This changes color very easily and with the acid condition in pickles, turns blue or purple in color
How can you tell if sauerkraut is spoiled?
—Undesirable color
—Off odors
—Soft texture
Why does kraut get soft?
—Insufficient salt
—Too high temperatures during fermentation
—Uneven distribution of salt
—Air pockets caused by improper packing
Why does kraut get pink?
This is caused by growth of certain types of yeast on the surface of the kraut due to:
—Too much salt
—Uneven distribution of salt
—Kraut improperly covered or weighted during fermentation
Why does kraut turn dark?
—Unwashed and improperly trimmed cabbage
—Insufficient juice to cover fermenting cabbage
—Uneven distribution of salt
—Exposure to air
—Long storage period
—High temperature during fermentation, processing and storage
Making Pickles and Relishes at Home, H&G Leaflet #92, on sale by Superintendent of Documents, U.S. Government Printing Office, Washington, D.C. 20402. 45¢.
by Philip Wagner and J. R. McGrew[15]
Grapes are the world’s leading fruit crop and the eighth most important food crop in the world, exceeded only by the principal cereals and starchy tubers. Though substantial quantities are used for fresh fruit, raisins, juice and preserves, most of the world’s annual production of about 60 million metric tons is used for dry (non-sweet) wine.
Wine is of great antiquity, as every Bible reader knows, and a traditional and important element in the daily fare of millions. Used in moderation, it is wholesome and nourishing, and gives zest to the simplest diet. It is a source of a broad range of essential minerals, some vitamins, and easily assimilated calories provided by its moderate alcoholic content.
In its beginnings, winemaking was as much a domestic art as breadmaking and cheesemaking. It still is, wherever grapes are grown in substantial quantity. Though much wine is now produced industrially, many of the world’s most famous wines are still made on what amounts to a family scale, the grapegrower being the winemaker as well.
Production of good dry table wine for family use is not difficult, provided certain essential rules are observed.
The right grapes. Quality of a wine depends first of all on the grapes it is made from. As is true of other fruits, there are hundreds of grape varieties. They fall in three main groups.
First, there are the classic vinifera wine grapes of Europe. These also dominate the vineyards of California, with its essentially Mediterranean climate. But several centuries of trial have shown that they are not at home in most other parts of the United States.
Second, there are the traditional American sorts such as Concord, Catawba, Delaware, and Niagara, which are descendants of our wild grapes and much grown where the vinifera fail. They have pronounced aromas and flavors, often called foxy, which, though relished in the fresh state by many, reduce their value for wine.
Third, there are the French or French-American hybrids, introduced in recent years and now superseding the traditional American sorts for winemaking. The object in breeding these was to combine fruit resembling the European wine grapes with vines having the winter hardiness and disease resistance of the American parent. They may be grown for winemaking where the pure European wine grapes will not succeed.
What wine is. Simply described, wine is the product of the fermentation of sound, ripe grapes. If a quantity of grapes is crushed into an open half-barrel or other suitable vessel, and covered, the phenomenon of fermentation will be noticeable within a day or two, depending on the ambient temperature. It is initiated by the yeasts naturally present on the grapes, which begin to multiply prodigiously once the grapes are crushed.
Fermentation continues for three to ten days, throwing off gas and a vinous odor. In the process, the sugar of the grapes is reduced to approximately half alcohol and half carbon dioxide gas, which escapes. Fermentation subsides when all the sugar has been used up. The murky liquid 351 is then drained and pressed from the solid matter and allowed to settle and clear in a closed container.
The resulting liquid is wine—not very good wine if the constituents of the grapes were not in balance, and readily spoiled, but wine nevertheless.
Beneath the apparent simplicity, the evolution of grapes into wine is a series of complex biochemical reactions. Thus winemaking can be as simple or as complex as you wish to make it. The more you understand and control the process, the better the wine. The following instructions cover only the essentials of sound home winemaking.
Under Federal law the head of a household may make up to 200 gallons of wine a year for family use, but is first required to notify the Treasury Department’s Bureau of Alcohol, Tobacco and Firearms on Form 1541.
The grape constituents which matter most to the winemaker are (a) sugar content of the juice, and (b) tartness or “total acidity” of the juice.
Sugar content is important because the amount of sugar determines alcoholic content of the finished wine. A sound table wine contains between 10% and 12½% alcohol. The working rule is that 2% sugar yields 1% of alcohol. Example: a sugar content of 22% yields a wine of approximately 11% alcohol.
California grapes normally contain sufficient sugar. Grapes grown elsewhere are often somewhat deficient, and the difference must be made up by adding the appropriate amount of ordinary granulated sugar which promptly converts to grape sugar on contact with the juice.
| What the saccharometer shows | For wine of 10% by volume, add | For wine of 12% by volume, add |
|---|---|---|
| Ounces of sugar per gallon | ||
| 10 | 11.8 | 16.2 |
| 11 | 10.1 | 14.8 |
| 12 | 8.9 | 13.3 |
| 13 | 7.4 | 11.9 |
| 14 | 5.9 | 10.4 |
| 15 | 4.6 | 8.9 |
| 16 | 3.0 | 7.5 |
| 17 | 1.5 | 6.0 |
| 18 | 4.3 | |
| 19 | 2.9 | |
| 20 | 1.4 | |
Note: The result is not precise, yield of alcohol varying under the conditions of fermentation.—
Adapted from Grapes Into Wine by Philip M. Wagner.
In using non-California grapes, you need to test the sugar content in advance. That is done by a simple little instrument called a saccharometer, obtainable at any winemakers’ shop. This is floated in a sample of the juice, and a direct reading of sugar content is taken from the scale. The correct amount of sugar to add, in ounces per gallon of juice, is then determined by reference to the sugar table.
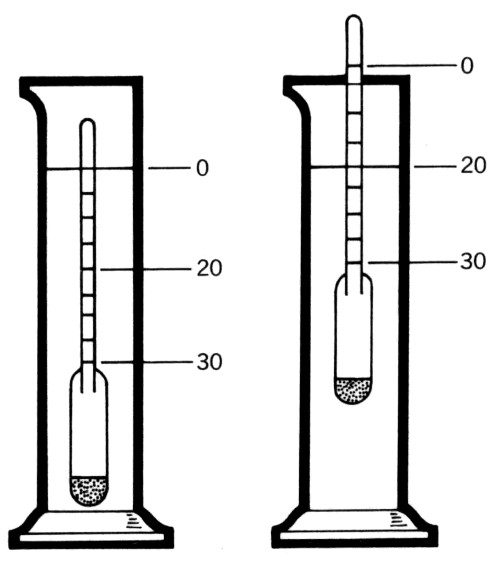
Saccharometer and hydrometer jar. Instrument floats at zero in plain water. It floats higher according to sugar content of grape juice.
If total acidity, or tartness, is too high and not corrected, the resulting 352 wine will be too tart to be agreeable. Again, California grapes are usually within a satisfactory range of total acidity. Grapes grown elsewhere are often too tart, and acidity of the juice should be reduced.
In commercial winemaking this is done with precision.
The home winemaker rarely makes the chemical test for total acidity but uses a rule of thumb. He corrects the assumed excess of acidity with a sugar solution consisting of 2 pounds of sugar to 1 gallon of water—adding 1 gallon of the sugar solution for every estimated 4 gallons of juice. This sugar solution is in addition to the sugar required to adjust sugar content of the juice itself.
In estimating the quantity of juice, another practical rule is that 1 full bushel of grapes will yield approximately 4 gallons. The winemaker therefore corrects with 1 gallon of sugar solution for each full bushel of crushed grapes.
The pigment of grapes is lodged almost entirely in the skins. It is during fermentation “on the skins” that the pigment is extracted and gives red wine its color.
How to proceed. Crush the grapes directly into your fermenter (a clean open barrel, plastic tub or large crock, never metal). Small hand crushers are available, but the grapes may be crushed as effectively by foot—wearing a clean rubber boot. Then remove a portion of the stems, which may otherwise give too much astringency to the wine.
Low-acid California grapes are quite vulnerable to bacterial spoilage during fermentation. To prevent spoilage and assure clean fermentation, dissolve a bit of potassium metabisulfite (known as “meta” and available at all winemakers’ shops) and mix it into the crushed mass. Use ¼ ounce (⅓ of a teaspoonful) per 100 pounds of grapes.
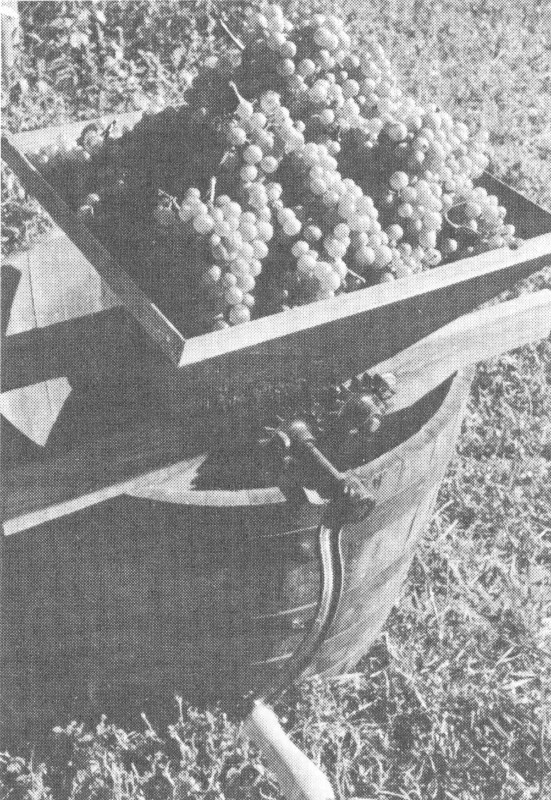
Kevin Hayes
A hand-crank grape crusher.
Also use a yeast “starter”. This comes as a 5 gram envelope of dehydrated wine yeast, also obtainable at winemakers’ shops. To prepare the starter, empty the granules of yeast into a shallow cup and add a few ounces of warm water. When all the water is taken up, bring it to the consistency of cream by adding a bit more water. Let stand for an hour, then mix it into the crushed grapes.
After the meta and yeast are added, cover the fermenter with cloth or plastic sheeting to keep out dust and fruit flies, and wait for fermentation.
If non-California grapes are used, test and make the proper correction for sugar content. Then correct the total acidity by adding sugar solution as described earlier. In using non-California grapes, it is desirable, but not necessary at this point, to add a dose of meta. A yeast starter is advisable.
As fermentation begins, the solid matter of the grapes will rise to form 353 a “cap”. Push this down and mix with the juice twice a day during fermentation, always replacing the cover.
When fermentation begins to subside and the juice has lost most of its sweetness, it is time to separate the turbid, yeasty and rough-tasting new wine from the solid matter. For this purpose a press is necessary, preferably a small basket press though substitutes can be devised.
Be ready with clean storage containers for the new wine, several plastic buckets, and a plastic funnel. The best storage containers for home winemaking are 5-gallon glass bottles or small fiberglass tanks.
Beware of small casks and barrels for several reasons. They are usually leaky. They are sources of infection and off-odors that spoil more homemade wine than any other one thing. And there is frequently not enough new wine to fill and keep them full. Wine containers must be kept full; otherwise the wine quickly spoils. Using glass containers, you can see what you are doing.
With the equipment assembled, simply bail the mixture of juice and solid matter into the press basket. The press basket serves as a drain, most of the new wine gushing into the waiting buckets and being poured from them into the containers. When the mass has yielded all its “free run”, press the remainder for what it still contains.
Fill the containers full, right into the neck. Since fermentation will continue for awhile longer, use a stopper with a fermentation “bubbler” which lets the gas out but does not let air in. When the bubbler stops bubbling and there are no further signs of fermentation, replace it with a rubber stopper or a cork wrapped in waxed paper.
Fermentation bubbler fitted to jar. Left, water is poured in to level shown. Right, position of water immediately before a gas bubble passes through.
Store the wine for several weeks at a temperature of around 60° F. Suspended matter in the wine will begin to settle, and at this temperature certain desirable reactions continue to take place in the wine itself.
At the end of this period, siphon the wine from its sediment, with a plastic or rubber tube, into clean containers. At the same time dissolve and add a bit of the meta already referred to at the rate of ¼ level teaspoon per 5 gallons of wine. This will protect against off odors and spoilage but does not otherwise affect the wine.
Next, transfer the containers to a place where the wine will be thoroughly chilled, even down to freezing. This precipitates more suspended matter and unwanted ingredients, and encourages clarification.
Assuming that the wine was made in early fall, hold it in cool storage until after the first of the year. By then it should have “fallen bright” and be stable. To test its clarity, hold a lighted match behind the bottle.
The wine is then siphoned once again from its sediment, and another 354 dose of meta added at the same rate of ¼ teaspoon per 5 gallons.
If the wine is brilliantly clear, one container of it may then be siphoned into wine bottles, corked or capped, and is ready for immediate use. Despite the common impression, most wine does not gain greatly by aging once it is stable. It continues to evolve, but not necessarily for the better.
The rest of the wine is held until after the return of warm weather to make sure there will be no resumption of fermentation, which would blow corks if the wine was bottled. By mid-May that hazard will have passed, and the wine is ready for its final siphoning, its final dose of the same quantity of meta, and bottling.
Fining. If in January the wine is not brilliantly clear, it should be “fined”. This consists of dissolving in a small amount of hot water and mixing in, at the time of siphoning, ordinary household gelatin at the rate of ¼ ounce (2 teaspoonsful) per 5 gallons. This will turn the wine milky when mixed in and will slowly settle, dragging all impurities and suspended matter with it. In two weeks to a month the process of “fining” will be complete. The wine is then ready to be siphoned from the fining sediment and treated as above.
As we have seen, red wine is fermented “on the skins” in order to extract the coloring matter and other ingredients lodged in the skins. In making white wine, the grapes are crushed and the fresh juice immediately separated by pressing so that it may ferment apart from the skins.
This fresh juice is checked for its sugar content and acidity, as in preparing to ferment red wine, and the proper corrections are made immediately after pressing. Likewise, a yeast “starter” is added.
The fermentation takes place in the same 5-gallon glass containers that are later used for storage. But as fermenters they are filled only two-thirds full as a precaution against any overflow or unmanageable formation of bubbles.
When the primary fermentation has run its course, the several partly-filled bottles are simply consolidated—filled full and equipped with bubblers. Subsequent siphoning from sediment, chilling, and dosing with meta are carried out as with red wine.
If fining is necessary, it differs in one respect: before mixing in the gelatin, mix in an equal amount of dissolved tannic acid to remove the impurities. Tannic acid is obtainable at drug stores or winemakers’ shops as a powder. This provides better settling out of suspended matter.
Dry table wine is a food beverage, to be used with meals. Sweet wines are more like cordials.
The making of sweet wines takes advantage of a characteristic of the yeast organism, namely, that its activity dies down and it usually ceases to ferment sugar into alcohol after a fermenting liquid reaches an alcoholic content of around 13%. The secret, then, is to add an excess of sugar when correcting the juice of crushed grapes before fermentation. When fermentation ceases, there is still some residual sugar in the juice. From then on the still-sweet new wine is treated much as other wine.
The three important differences are: (1) the wine is siphoned from its sediment immediately after fermentation, without the waiting period at 60° F; (2) the chilling begins as soon as possible; and (3) the dose of meta added then and at each subsequent siphoning is doubled (½ teaspoon per 5 gallons instead of ¼ teaspoon) to guard against spoilage and against any accidental resumption of fermentation.
Dry table wines made from other fruits are rarely successful, but agreeable sweet wines may be made from 355 them. The point to remember is that most fruits are lower in sugar than grapes and higher in acid. Corrections for both are almost always necessary, plus sufficient excess sugar to leave residual sweetness after fermentation.
These fruits, with the exception of apple juice, are fermented in a crushed mass in order to obtain a maximum extraction of characteristic odors and flavors. Once fermentation is concluded, they are treated like sweet grape wine. The table will serve as a rough guide to their relative sugar content and total acidity.
| Fruit | Average sugar level | Sugar needed per gallon to make a sweet wine | Average acid | Gallons of sugar water[] to add per gallon |
|---|---|---|---|---|
| ounces | ||||
| Grapes (eastern) | 12-20 | 1¼-2 | med. to high | 0-1 |
| Grapes (Calif.) | 16-20 | 1-1½ | low[] to med. | 0 |
| Apples | 13 | 2-2¼ | low[] to high | 0-½ |
| Apricots | 12 | 2-2½ | med. to high | 0-¼ |
| Blackberries | 6 | 2-3 | high to very high | 1 or more |
| Blueberries | 8 | 2¼-3 | low to med. | 0 |
| Cherries (sour) | 14 | 2-2¼ | high to very high | 1 or more |
| Cherries (sweet) | 18 | 1½-2 | medium | 0 |
| Pear | 12 | 2¼-2½ | med. to high | 0-¼ |
| Plum (Damson) | 14 | 2-2¼ | med. to high | 0-¼ |
| Plum (Prune) | 17 | 1½-2 | med. to high | 0-¼ |
| Peach | 10 | 2-2½ | med. to high | 0-¼ |
| Raspberries | 8 | 2½-3 | high to very high | 1 or more |
| Strawberries | 5 | 2-3¼ | med. to high | 0-½ |
If a cork happens to pop out unnoticed and air reaches the wine for several weeks, there is a good chance that bacterial action will begin to convert the alcohol in the wine into acetic acid. Once the presence of acetic acid can be detected (a vinegar-like odor) the wine will lose its appeal as wine. A usable vinegar can be retrieved by encouraging the process to go to completion.
Vinegar produced from an undiluted wine will be overly strong, so an equal volume of water should be added. The container should be less than three-quarters full and closed with a loose cotton plug or covered with a piece of light cloth to keep out fruit flies.
If wine vinegar is your desired goal and no wine has started to sour, use a vinegar starter. A selected strain of vinegar starter can be purchased from some winemakers’ shops, or a wild starter may be used. Frequently the water in an air-bubbler will have a vinegar-like smell. This can be used to start a batch of vinegar. The wine is diluted with an equal volume of water and the container partly filled and covered as above.
A warm, but not hot, location will speed the process. In a month or two the vinegar should be ready. The clear portion of the vinegar can be poured or siphoned off for use. If another batch is wanted, more of the wine-water mixture can be added to the old culture.
by Dale E. Kirk and Carolyn A. Raab[16]
Tasty ready-to-eat snacks and confections are some of the versatile products you can create by drying fruits and vegetables at home. After soaking in water, the rehydrated food can be used in favorite recipes for casseroles, soups, stews and salads. Rehydrated fruits and berries can also make excellent compotes or sauces.
Drying is appealing because the procedure is relatively simple and requires little equipment. Only minimal storage space is needed. Food can be dried in the sun, in the oven, or in a dehydrator.
Drying requires a method of heating the food to evaporate the moisture present, and some means of removing the water vapor formed.
Sun drying utilizes both radiant heat energy and heat transferred to the product from warm air. Natural air currents are usually adequate to carry away the water vapor.
Trays of wood slats, plastic mesh, or aluminum screen may be placed in the sun on support blocks or strips to allow air movement around and through the trays. Galvanized wire is not recommended as a tray material because high-acid foods will react with the zinc coating on the steel wire.
If insects or birds are a problem, a wooden frame can be constructed over the trays to support a plastic mesh or cheesecloth cover. Further protection can be provided by using a totally enclosed frame and a transparent panel to form a solar drying oven.
To dry in the kitchen oven, the thermostat should be set to its lowest temperature (generally about 150° F). Since oven vents provided for removing moisture from roasting and baking are adequate for drying only small quantities of food at one time, the oven door should be left partially opened. For larger loads, the air circulation rate can be increased by placing a household fan outside the oven, directed at one edge of the partially opened oven door.
Dehydrator cabinets may be purchased in many sizes and types. Or they may be built using plans available from State universities or U.S. Department of Agriculture plan services (ask your county Extension office about plans). All cabinets are provided with a heat source and vents for carrying off moist air.
Simpler units may rely on natural convection to carry moist air away, and the heating unit may be limited in output so that the cabinet never exceeds safe drying temperatures near the end of the drying period. This type will be slow in achieving drying temperature if sizable amounts of food are processed at one time.
Trays must be rotated during the processing period to insure even drying. Trays nearest the bottom, exposed to the hottest, driest air, will dry most rapidly.
If the natural convection type cabinet is equipped with a thermostat, it may be fitted with a larger heater. This will provide higher drying temperatures during the early stages but will not give even drying across all trays.
By using a fan to force air across the trays more rapidly, even drying can be obtained across each tray as well as between trays. The forced air system may be used with or without a thermostat.
Most food products release moisture rapidly during early stages of drying. This means they can absorb large amounts of heat and give off large quantities of water vapor while remaining at a temperature well below that of the drying air. Maximum drying rates can be achieved by providing a larger, thermostatically-controlled heat source and a fan for circulating air.
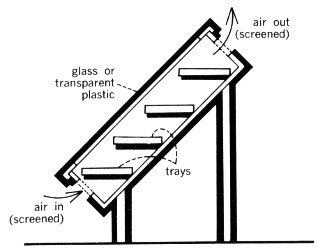
Enclosed frame solar drying oven with provision for air movement.
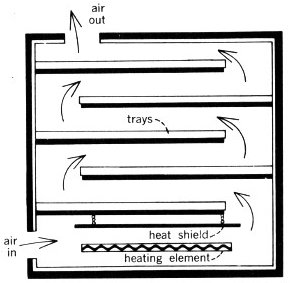
Dehydrator with built-in heater relies on air movement to carry off moist air.
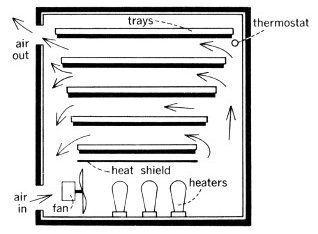
This forced draft dryer can recirculate much of the drying air to conserve energy.
To conserve energy and still obtain rapid, even drying across all trays, much of the drying air may be reheated and recirculated. This is particularly effective during the last 70% to 90% of the drying period, when relatively small amounts of water are absorbed by the air as it passes over the partially dried food.
The recirculating system requires either a thermostat or separate switch controls on part of the heating unit to adjust heat output to match the drying load. The amount of air recirculated is determined by the size of the permanent inlet and outlet openings in the box. It can be further controlled by adjusting the door to a partially opened position.
Detailed plans for constructing the recirculation-type drier can be obtained by sending 25¢ to the Western Regional Agricultural Engineering Service (WRAES), Oregon State University, Corvallis, Oreg. 97331 and requesting WRAES Fact Sheet No. 18.
Drying is a relatively simple process, but there are a number of recommended techniques. You may need to use a “trial and error” approach to find the drying procedure which works best in a particular situation.
Fruits and vegetables can be dried in pieces or pureed and dried in a thin sheet as a “leather.”
The following information summarizes major steps in drying. Detailed instructions are available at county Extension offices. Also, various books on the market give instructions for drying and recipes for using dried food.
Fruits and vegetables selected for drying should be the highest quality 358 obtainable—fresh and fully ripened. Wilted or inferior produce will not make a satisfactory dried product. Immature produce lacks flavor and color. Overmature produce may be tough and fibrous or soft and mushy.
| PREPARE | |
|---|---|
| wash, sort | |
| peel, pit/core, slice | |
| PRETREAT | |
| fruits: | dip or blanch |
| vegetables: | blanch |
| DRY | |
| oven, sun, dehydrator | |
| CONDITION AND STORE | |
| equalize, pasteurize | |
| package and store | |
Prepare produce immediately after gathering, and begin drying at once. Wash or clean all fresh food thoroughly to remove any dirt or spray. Sort and discard defective food; decay, bruises, or mold on any piece may affect an entire batch.
For greater convenience when you finally use the food, and to speed drying, it is advisable to peel, pit, or core some fruits and vegetables. Smaller pieces dry more quickly and uniformly.
Enzymes in fruits and vegetables are responsible for color and flavor changes during ripening. These changes will continue during drying and storage unless the produce is pretreated to slow down enzyme activity.
Blanching is the recommended pretreatment for vegetables. It helps save some of the vitamin content, sets color, and hastens drying by relaxing tissues. Blanching may also prevent undesirable changes in flavor during storage, and improve reconstitution during cooking.
Steam blanching is preferred because it retains more water-soluble nutrients than water blanching. Blanching times differ, depending on the type of vegetable being dried. Overblanching leads to excessive leaching of vitamins and minerals. Inadequate blanching will not destroy enzymes that cause vitamin loss during drying and storage.
Many light-colored fruits (especially apples, apricots, peaches, nectarines, and pears) tend to darken during drying and storage. To prevent this darkening, the fruit may be pretreated by blanching or by a suitable dip, but effectiveness of pretreatment methods varies.
Fruit may be dipped in one of the following:
—A solution of table salt
—A solution of ascorbic acid. Commercial antioxidant mixtures containing ascorbic acid may also be used, but often are not as effective as pure ascorbic acid.
Fruits may be steam-blanched. However, blanched fruits may turn soft and become difficult to handle.
Sirup blanching may help retain the color of apples, apricots, figs, nectarines, peaches, pears and plums. A sweetened candied product will result.
Fruits with tough skins (grapes, prunes and small dark plums, cherries, figs, and some berries) may be water-blanched to crack the skins. This will allow moisture inside to surface more readily during drying.
Before drying pretreated food, remove any excess moisture by placing the food on paper towels or clean cloths. Drying trays should be loaded with a thin layer of food as directed. If needed, clean cheesecloth can be spread on the trays to prevent food pieces from sticking or falling through.
The amount of food being dried at 359 one time should not exceed that recommended by instructions.
A temperature of 135° to 140° F is desirable for dehydrator and oven drying. Moisture must be removed from the food as fast as possible at a temperature that does not seriously affect the food’s flavor, texture, color, and nutritive value.
If the initial temperature is too low or air circulation insufficient, the food may undergo undesirable microbiological changes before it dries adequately.
If the temperature is too high and the humidity too low, as when drying small loads in the oven, the food surface may harden. This makes it difficult for moisture to escape during drying.
Oven or dehydrator drying should continue without interruption to prevent microbial growth.
To promote even drying, rotate trays occasionally and stir food if necessary.
Drying time varies according to fruit or vegetable type, size of pieces, and tray load. Dehydrator drying generally takes less time than oven drying. Sun drying takes considerably more time.
Before testing foods for desired dryness, remove a handful and cool for a few moments. Foods that are warm or hot seem softer, more moist, and more pliable than they will when cooled.
Foods should be dry enough to prevent microbial growth and subsequent spoilage. Dried vegetables should be hard and brittle. Dried fruits should be leathery and pliable. For long term storage, home dried fruits will need to be drier than commercially dried fruits sold in grocery stores.
Fruits cut into a wide range of sizes should be allowed to “sweat” or condition for a week after drying to equalize the moisture among the pieces before placing in long term storage. To condition, place fruit in a non-aluminum, non-plastic container and put in a dry, well-ventilated and protected area. Stir the food gently each day.
Dehydrated foods are free of insect infestation when removed from the dehydrator or oven. However, sun-dried foods can be contaminated and should be treated before storage. Insects or their eggs can be killed by heating dried food at 150° F for 30 minutes in the oven. An alternative is to package the food and place it in the home freezer for 48 hours.
Dried foods should be thoroughly cooled before packaging. Package in small amounts so that food can be used soon after containers have been opened.
Pack food as tightly as possible without crushing into clean, dry, insect-proof containers. Glass jars or moisture-vapor proof freezer cartons or bags (heavy gage plastic type) make good containers. Metal cans with fitted lids can be used if the dried food is first placed in a plastic bag.
Label packaged foods with the packaging date and the type of food.
Store containers of dried foods in a cool, dry, dark place. Check food occasionally to insure that it has not reabsorbed moisture. If there is any sign of spoilage (off-color or mold growth), discard the food. Food affected by moisture, but not moldly, should be used immediately or re-heated and repackaged.
All dried foods deteriorate to some extent during storage, losing vitamins, flavor, color, and aroma. However, low storage temperatures prolong storage life, and dried foods may be frozen for long term storage.
Dried foods can be reconstituted by soaking, cooking, or a combination 360 of both, and will resemble their fresh counterparts after reconstitution. However, dried foods are unique and should not be expected to resemble a fresh product in every respect.
Drying does not render the food free of bacteria, yeasts, and molds. Thus, spoilage could occur if soaking is prolonged at room temperature. Refrigerate if soaking for longer than 1 to 2 hours.
To conserve nutritive value, use the liquid remaining after soaking and cooking as part of the water needed in recipes.
One cup of dried vegetables reconstitutes to about 2 cups. To replace the moisture removed from most vegetables, barely cover them with cold water and soak 20 minutes to 2 hours. Cover greens with boiling water. To cook, bring vegetables to a boil and simmer until done.
One cup of dried fruit reconstitutes to about 1½ cups. Add water just to cover the fruit; more can be added later if needed. One to eight hours are required to reconstitute most fruits, depending on fruit type, size of pieces, and water temperature. (Hot water takes less time). Over-soaking will produce a loss of flavor. To cook reconstituted fruit, cover and simmer in the soak water.
Dried or reconstituted fruits and vegetables can be used in a variety of ways.
Use dried fruit for snacks at home, on the trail, or on the ski slopes. Use pieces in cookies or confections.
Serve reconstituted fruit as compotes or as sauces. It can also be incorporated into favorite recipes for breads, gelatin salads, omelets, pies, stuffing, milkshakes, homemade ice cream and cooked cereals.
Add dried vegetables to soups and stews or vegetable dishes. Use as dry snacks or dip chips.
Include reconstituted vegetables in favorite recipes for meat pies and other main dishes, as well as gelatin and vegetable salads.
Powdered vegetables in the dried form make a tasty addition to broths, raw soups, and dressings.
Some vitamin breakdown occurs during drying and storage of dried fruits and vegetables. Ascorbic acid (Vitamin C) is the vitamin most likely to be lost.
Nutritive losses can be kept to a minimum by:
—Blanching the correct length of time
—Packaging dried foods properly and storing containers in a cool, dry, dark place
—Checking dried foods periodically during storage to insure that moisture has not been reabsorbed
—Eating dried foods as soon as possible
—Using liquid remaining after reconstitution in recipes
by Ralph W. Johnston[17]
Proper storage of home-preserved foods, especially of home-canned products, and close scrutiny before serving are essential. If proper storage requirements are not met, home-preserved foods may lose their quality or spoil.
Homemakers should observe some simple techniques for checking home-canned foods before serving them. This will help prevent consumption of food that could cause the rare but extremely dangerous food poisoning called botulism.
Most canned foods are highly perishable yet do not require refrigeration until opened. Unlike frozen foods, they are unaffected by power interruptions or mechanical failures.
However, the hazard of botulism must always be kept in mind. Although botulism is rare, it results in a high death rate of about 65 percent among its victims. Yet it is an easy problem to avoid. Botulism results when home-canned foods are improperly processed. Under these conditions, the spore (a seed-like structure which is highly heat-resistant) of a soil bacterium called Clostridium botulinum may survive.
If the food product is low in acidity, as with peas, corn, or beans, the spore can germinate (sprout) and grow during storage at room temperatures. As Clostridium botulinum grows, it produces a powerful poison that when ingested can cause severe illness or death. Most cases of botulism in the United States stem from home-canned foods.
The home canner can avoid botulism primarily by following prescribed, reliable processing instructions such as those given in USDA Home and Garden Bulletin No. 8, Home Canning of Fruits and Vegetables. If you don’t have reliable processing instructions, don’t attempt home canning. If you have these instructions, read them before and during home canning and do not take short cuts or modify the instructions.
Do not use processing instructions of neighbors or relatives; although frequently given with the best of intentions, they may contain modifications that are inadequate and dangerous. Remember that past safe history of a relative’s processing procedure is no guarantee of future safety. Botulism doesn’t always occur even in inadequately processed home-canned foods.
After home-canned foods have cooled they are ready to be stored until needed. At this point, the home canner should make his first quality control and safety check, just as commercial canners do.
Jar lids should be examined. If the center of the lid is not depressed or is loose, refrigerate the product immediately and serve at the next meal. Before serving, boil low acid products for 10 minutes. Check all jars for cracks; if they are found, treat jars the same way as those with loose lids.
Observe cans for any evidence of leakage around seams; again if leakage is observed, refrigerate the cans immediately, serve at the next meal, and boil for 10 minutes before serving.
During this first integrity check on home-canned foods, it is unlikely that swelling of the cans or foaming in the jars will be noticeable, because of the short lapse of time since processing. But the first check can easily detect 362 loose lids, cracked jars and leaking seams on cans.
The next step is to store home-canned products. Proper storage will protect the products from loss of quality and in some cases from spoilage. Store canned foods in a clean, cool, dry area away from bright light—particularly sunlight—and in an area where the foods will not freeze or be exposed to high temperatures. Under these conditions, the products will remain at high quality for at least a year.
Excessive dampness will rust cans or metal lids. If this condition becomes severe, leakage will occur and the product will spoil. Freezing causes expansion of the product and the jar lid may loosen, the jar may crack, or can seams may be stressed. This can lead to leakage and food spoilage.
When foods are preserved by heating, as in home canning or commercial canning, the heating process is designed to destroy all normal spoilage bacteria that can grow under usual storage conditions, and all bacteria capable of causing human harm. The products are called “commercially sterile” but are not always truly sterile.
A group of bacteria produce extremely heat-resistant spores that can only germinate and grow at high storage temperatures such as those above 103° F. These bacteria often survive both the home and commercial canning process. Even though present, they normally are of little concern from the viewpoint of spoilage and no concern at all from the standpoint of human health. However, if canned foods are stored in attics or near hot water pipes or in any other area where the temperature will exceed 102° F at any time, these heat-loving bacteria (called thermophilic) can grow and spoil the product.
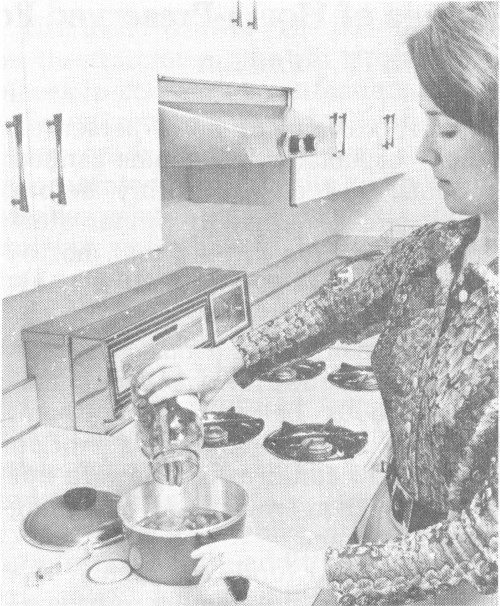
Fred Farout
Boil home-canned low-acid foods 10
minutes before tasting or serving.
As a rule of thumb, home-canned foods will remain high in quality for one year if properly stored. After a year, loss of quality may occur.
Containers for home-preserved foods are designed to resist any chemical reactions between the product and the containers. However, some products—particularly high acid ones like tomatoes—will slowly react with the metal in the can or the jar lid. Corrosion and container failure may follow during subsequent storage. This action occurs from the inside out and can take place even under good storage conditions.
Jars should be dated when stored, and used within a year from the processing date. Always rotate stock on the shelves so as to use the oldest container first, and can no more units of any single product than you can use in a year.
The last and perhaps most important quality control steps are the final inspection and serving procedures.
After removing the product from storage, carefully inspect the container, and in the case of jars the 363 visible contents. This should be done before opening.
If a can or jar lid shows any sign of swelling (bulging) or leakage of product, do not open the container. If a jar lid is loose or the contents of a jar are foamy or otherwise visibly abnormal, do not open. When any of these defects are noted, place the whole container in a heavy plastic bag and tie the top securely. Place this in doubled paper bags with heavy packing of newspapers. Tape or tie the top securely, place in a lidded garbage can, then wash your hands thoroughly.
Not all spoiled or leaking home-canned foods contain the deadly botulism toxin but some do, so extreme caution in disposal is necessary.
If a defective product is found, all of that product prepared at the same time should be removed from storage and similarly inspected.
Never taste the contents of a suspect product. Under certain circumstances, a spoonful of “off” unheated, suspect product has been known to kill.
Finally, bring all home-canned vegetables to a rolling boil after opening and before tasting. Heating makes any odor of spoilage more noticeable. Again, if an odor of spoilage is noted, destroy the product with caution. If the product is normal, cover the pan and continue to boil at least 10 minutes before serving. Only after these precautions are taken are home-canned vegetables safe to taste and serve.
A plus for home freezing is that slight variations in following directions do not result in a botulism hazard. The bacterium that causes botulism cannot grow in the freezer. Proper freezing prevents the growth of microorganisms that cause spoilage and those that can cause illness.
Besides the initial cost of the freezer itself, energy costs are significant. Utilize the freezer fully to keep the energy costs per unit as low as possible. Fill the freezer when foods are least expensive, use the products as needed, and be careful to use the oldest products first.
Take care not to overload the freezer. If you pack it too tightly with containers of warm food, the freezer will be unable to remove the heat fast enough and spoilage from bacterial growth can result.
To avoid this, freeze foods soon after they have been packed; put no more unfrozen food into a home freezer than will freeze within 24 hours. Usually, this will be about 2 or 3 pounds of food to each cubic foot of capacity.
For quickest freezing, place packages against freezing plates or coils and leave a little space between packages so air can circulate.
Small excesses of product destined for freezing can be held in the refrigerator until the first load is frozen. If a large excess of product exists, chill and carry it in an insulated box or bag as soon as possible to a locker plant.
After freezing, packages may be stored close together. Store them at 0° F or below in order to retain the highest quality for the longest time.
Prolonged storage of frozen foods results in slow loss of quality. The rate of this loss differs with various foods. To maintain high quality, obtain information on recommended storage periods for the foods you freeze. This may be obtained from your county Extension office or from USDA Home and Garden Bulletin No. 10, Home Freezing of Fruits and Vegetables.
Storage periods are recommended to guarantee food quality only. If these periods are exceeded, taste may be affected but as long as the product has been kept at 0° F or below there is no question of safety.
The homemaker’s greatest concern with a home freezer is mechanical or power failure, which can result in food losses. Some but not all of these can be avoided. Freezers are very dependable mechanical devices yet they do fail. Most failures develop after 5 or more years of use.
The homeowner should clean dust from coils of the freezer once or twice each year in strict accordance with the instruction manual for the unit. At this time watch for any changes that have occurred. Have a dealer or repairman check unusual noises or excessive running.
Air circulation around the coils should not be covered or blocked in any way. Check the plug itself for a firm fit. If the plug is loose in the receptacle, it may fall or be easily bumped out without notice. Replace loose plugs. Better yet, some hardware stores sell clips that clamp the plug in by means of the screw that holds the receptacle plate onto the outlet.
Freezer owners should know where the closest commercial freezer is, in case of an extensive failure. Check your home freezer after thunderstorms or power failures, since freezers have been known to be damaged occasionally when power falls or surges.
A well packed freezer will hold the product for many hours even if the unit is not operating. Normally, power failures are short in duration and no food thawing results. If the power is off, do not open the freezer as this will hasten thawing. Telephone or otherwise determine when the power will be turned on again.
Sometimes freezer failure is discovered only when a homemaker goes to the freezer to get something. If this occurs, condition of the food should be determined immediately. Discard all foods that are thawed and warm, since extensive bacterial growth may have taken place.
Foods may be saved if they remain frozen; or if they are thawed but very cold, about 40° F, and have been held no longer than 1 or 2 days at refrigerator temperatures after thawing. Bacteria grow only slowly in thawed but cold foods. Prompt refreezing of thawed cold foods will lower the quality but not result in spoilage or danger. If you have doubt as to whether the foods are cold or warm, throw them out as the safest course.
Once condition of the foods is determined, plan fast for the next step. If the freezer cannot be repaired quickly, make arrangements to move the food to a commercial locker plant or another freezer. To do so, package the products closely together in paper bags. Place these in cardboard cartons lined and covered with newspapers for insulation, and transfer them immediately.
Another way to save the freezer load is to use dry ice in the freezer itself. Dry ice must be handled with gloves to prevent burns. Also keep in mind that carbon dioxide gas evolves as dry ice evaporates, and can cause unconsciousness if allowed to concentrate.
When transporting dry ice, leave a car window open at least several inches. If you use dry ice in the freezing compartment, make sure a nearby window is cracked open. When packing dry ice into a freezer, figure on 25 to 50 pounds to do the job. Don’t break up the ice any more than necessary.
To summarize, frozen foods are seldom involved in food spoilage or food poisoning. Even so, mechanical devices occasionally fail, and freezer owners should have prearranged plans for such an emergency. Preventive maintenance will help reduce the likelihood of failure. If a failure results in food becoming thawed and warm, discard it for safety.
by Anton S. Horn and Esther H. Wilson[18]
Many fruits and vegetables can be stored fresh. But the home gardener must gather them at proper maturity and observe correct temperature, humidity, ventilation, and cleanliness rules.
Basements or outdoor cellars can serve as temporary storage for some produce. A cellar mostly below ground is best for root vegetables. It can be run into a bank and covered with 2½ feet or more of soil. Sometimes outdoor root cellars are made with a door at each end. Combining the outdoor storage cellar with a storm shelter in the event of tornadoes or other needs may be a satisfactory solution.
Modern basements are generally too dry and warm for cool moist storage. However, a suitable storage room may be built by insulating walls and ceiling and ventilating through a basement window. You may ventilate by extending a ventilating flue from half of the window down almost to the floor. Cover the other half of the window with wood and the outside openings of the ventilator with a wire screen for protection against animals and insects.
Keep the room cool by opening the ventilators on cool nights and closing them on warm days. If properly cooled, the room temperature can be controlled between 32° and 40° F during winter. To maintain the humidity, sprinkle water on the floor when produce begins to wilt. A slatted floor and slatted shelves will provide floor drainage and ventilation. A reliable thermometer is needed for operation of any home storage room.
A cool corner in the basement, a back room of a small house with no basement, or a trailer may be suitable. One lady we know uses part of a closet built into the outside corner of a bedroom. It is also possible to adapt storage sheds in carports by insulating and proceeding as outlined earlier.
Pits and trenches or mounds may be used for storage if a root cellar is not available or basement storage is impractical. Also, you may bury a barrel, drainage tile, or galvanized garbage can upright, with four inches of the top protruding above ground level. This will keep potatoes, beets, carrots, turnips, and apples through winter. For convenience, place the produce in sacks or perforated polyethylene bags of a size to hold enough for a few days. Then you can easily take out fruits and vegetables as needed.
Place the barrel on a well drained site, and make a ditch so surface water will be diverted and not run into the container. A garbage can has a good lid, but for a drainage tile or barrel a wooden lid may have to be built. The lid should be covered with straw, and a waterproof cover of canvas or plastic placed over the straw.
Requirements of fruits and vegetables differ. Controlled cold storage or refrigerated storage are best.
Good references are Storing Vegetables and Fruits in Basements, Cellars, Outbuildings, and Pits, USDA Home and Garden Bulletin No. 119, and bulletins on this subject prepared by your State Extension service. Your county Extension office may have the bulletins. This office may also be able to tell you how to obtain plans for a fruit and vegetable storage room, or a storm and storage cellar.
Brief notes on specific storage problems follow:
With proper care, hard-rind varieties of winter pumpkins and squash will keep for several months. Harvest before frost, and leave on a piece of stem when you cut them from the plants.
Store only well-matured fruits that are free of insect damage and mechanical injuries.
Pumpkins and squash for long-term storage keep better when cured for 10 days at 80° to 85° F. If these temperatures are impractical, put the pumpkins and squash near your furnace to cure them. Curing hardens the rinds and heals surface cuts. Bruised areas and pickleworm injuries, however, cannot be healed.
After curing pumpkins and squash, store them in a dry place at 55° to 60° F. If stored at 50° or below, pumpkins and squash are subject to damage by chilling. At temperatures above 60°, they gradually lose moisture and become stringy.
Acorn squash keep well in a dry place at 45° to 50° F for 35 to 40 days. Do not cure acorn squash before storing them. They turn orange, lose moisture, and become stringy if cured for 10 days at 80° to 85° or if stored at 55° or above for more than 6 to 8 weeks.
A dark green rind at harvest indicates succulence and good quality.
Do not store pumpkins and squash in outdoor cellars or pits.
Parsnips, Salsify, Horseradish can be left undug (stored) in the ground.
These vegetables withstand freezing, but alternate freezing and thawing damages them. If you store them in the ground, mulch lightly at the end of the growing season. Keep them covered until outdoor temperatures are consistently low. Then remove the mulch to permit thorough freezing. After they have frozen, mulch deep enough to keep them frozen.
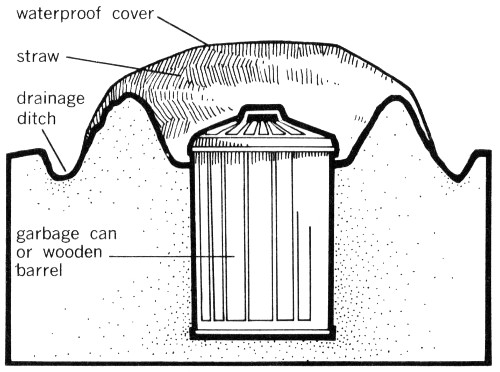
Some fruits and vegetables can be stored outdoors in a partially buried galvanized garbage can or wooden barrel.
Root crops such as beets, carrots, celeriac, kohlrabi, rutabagas, turnips, and winter radishes should not be put in storage until late fall. Root crops keep best between 32° and 40° F. They require high humidity to prevent shriveling. Continued storage at 45° causes them to sprout new tops and become woody.
Large and overmature root crops may become tough and stringy in storage. Small and immature root crops probably will shrivel.
Dig root crops when the soil is dry and the temperature consistently low. Prepare them immediately for storage. Cut the plant tops about a half inch above the crown. Beets will bleed unless 2 to 3 inches of the top is left. You may wash the roots if you let them dry again before storing. Do not expose them to drying winds, and be sure they are cool when put in storage.
Prevent bitterness in carrots by storing them away from fruits such as apples, which give off volatile gases while ripening.
Turnips and rutabagas give off odors, so don’t store them in your basement. Find a separate spot, or store them with other root crops and vegetables in an outdoor cellar or pit. 367 Turnips may be left in the garden longer than most other crops. They withstand hard frosts, but are damaged by alternate freezing and thawing. All other root crops can be stored together in your basement storage room.
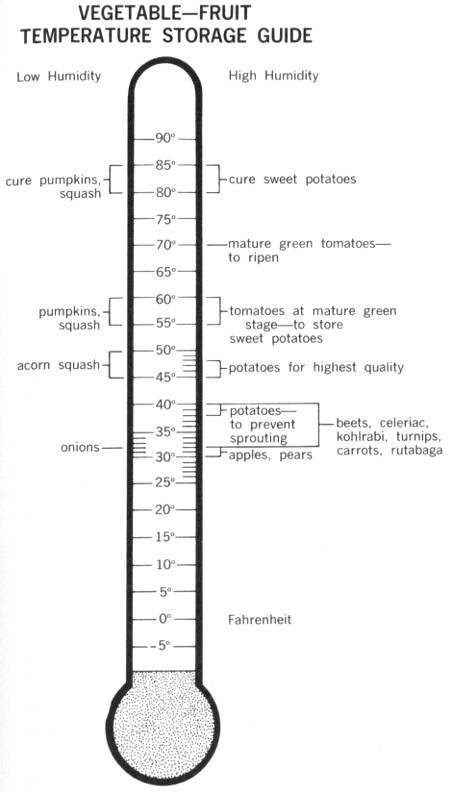
VEGETABLE-FRUIT STORAGE GUIDE
| Low Humidity | |
|---|---|
| 80-85 | cure pumpkins, squash |
| 55-60 | pumpkins, squash |
| 45-50 | acorn squash |
| 32 | onions |
| High Humidity | |
| 80-85 | cure sweet potatoes |
| 70 | mature green tomatoes—to ripen |
| 55-60 | tomatoes at mature green stage—to store sweet potatoes |
| 45-48 | potatoes for highest quality |
| 38-40 | potatoes—to prevent sprouting |
| 32-40 | beets, celeriac, kohlrabi, turnips, carrots, rutabaga |
| 30-32 | apples, pears |
Root crops keep their crispness longer when bedded in layers of moist sand, peat, or sphagnum moss. However, perforated polyethylene bags and box liners are easier to use than bedding. Root crops can be stored in crates or boxes in moist air, but they gradually lose moisture and quality unless polyethylene liners are used. Carrots and beets may be stored in 10-gallon crocks or any container that will prevent excessive shriveling.
Quick dipping of dried and trimmed turnips, rutabagas, or parsnips in wax will prevent shriveling. Float a layer of jelly-type paraffin on top of a kettleful of heated water which is deep enough to cover the vegetable. Dip room temperature vegetables quickly through the layer of wax.
For a thinner, harder wax film add a little salt and 10 to 20 percent clean beeswax.
Potatoes are the principal root crops you will probably store. Potatoes are eaten from the time they are of sufficient size for early use until storage time, and during storage when the vines have fully ripened.
If potatoes are harvested before maturity the skin may flake off easily. They are all right for immediate use, but not for storage. Immature potatoes shrink badly, bruise easily, and will not keep well very long.
For storage, potatoes should be allowed to mature and develop a thick skin. When the tops lie down the tubers should be mature enough for storage.
Dig potatoes carefully to avoid bruises, for better storage life.
Handle newly dug potatoes with care until the surface has dried or cured a few hours or more. You can keep them in baskets or slatted crates in single layers at first.
Store sound mature tubers in darkness at a minimum relative humidity of 95 percent and 45° to 48° F for highest quality. For very long storage keep at a temperature of 38° to 40° to prevent sprouting. The starch changes to sugar if potatoes are held below 45°. Potatoes may not show any external effect from exposure to these lower temperatures, but sometimes darkened tissue will be seen if the potato is cut and exposed to air.
Light causes considerable “greening” in potatoes. The green portion contains an undesirable substance that gives a bitter flavor.
Sweet potatoes that are well matured, carefully handled, properly cured, and stored at 55° to 60° F can be kept until April or May.
Sweet potatoes are easily bruised and cut. Handle them carefully and as little as possible. Put them directly in storage containers at harvest.
Cure freshly dug sweet potatoes by holding them about 10 days under moist conditions at 80° to 85° F. In the absence of better facilities, sweet potatoes can be cured near your furnace. To maintain high humidity during curing, stack storage crates and cover them with paper or heavy cloth. If the temperature near your furnace is between 65° and 75°, the curing period should last 2 to 3 weeks. After curing, move the crates to a cooler part of your basement or house where a temperature of about 55° to 60° can be maintained.
In houses without central heating, sweet potatoes can be kept behind a cookstove or around a warm chimney. If you keep sweet potatoes this way, wrap them in fireproof paper (to slow down temperature changes) and store them in boxes or barrels.
Sweet potatoes are subject to damage by chilling. Do not store them at 50° F or below.
Outdoor pits are not recommended for storing sweet potatoes, because dampness of the pits encourages decay.
Even though the home canner has canned plenty of tomatoes, it may be desirable to keep some of the fresh fruit. Keep tomatoes in the garden as long as possible. You can protect against early fall frosts by covering the plants with burlap or old carpets in the evening when frost is predicted. Polyethylene may also be used but injury will occur wherever it touches the plant.
In the summer, tomatoes should be harvested when fully vine-ripened for best quality. Pick when the color is a dark red in red varieties. During fall when frost is likely, mature green fruit can be picked and it will develop a red color when kept in a fairly warm place. The fruit is in the “mature-green” state if the tissues are gelatinous or sticky when the tomato is cut and the tomato interior is yellowish. Immature green tomatoes don’t ripen satisfactorily.
To check your judgment, cut a tomato in half that you feel is mature green. If the pulp that fills the compartments is jelly-like, it is mature green. The seeds are dragged aside easily by the knife and not cut through. In immature green tomatoes, seeds are easily cut through and the jelly-like pulp has not yet developed. Usually you can recognize the mature green ones by their glossiness, less hairiness, and more whitish green color.
You can pick mature-green fruits and bury them in deep straw or place in a room where the temperature is 60° to 70° F. The tomatoes will ripen over a period of 3 or 4 weeks. Sunlight is not needed to ripen green-ripe tomatoes, so don’t bother to put them on window sills. They ripen satisfactorily in the dark. Generally, tomatoes store best at 55° to 60° and ripen at 70° or room temperature.
You can wash the mature green fruits in a weak solution of household bleach and then wrap in paper to store and ripen.
Some people pull up the vines just before frost and hang them in the basement or garage to ripen their fruit.
Harvest onions for storage when the neck of the plant dries down, the tops have fallen over, and the roots are dry and have stopped growing from the stem plate. At that time the outer scales of the bulb are drying out and do not cling tightly (outer scales of yellow-skinned varieties change to a darker color).
Pull the onions by hand and lay in a windrow to cure with the tops 369 placed over the bulbs to prevent sun-scald. Onions may also be cured in an open shed. Remove onions with thick neck (seeders) before storage and discard all diseased bulbs.
After curing, place onions in open-slatted crates or burlap bags for further field curing or drying. Then place in storage. You may use either common storage or refrigerated storage.
Low temperatures in storage reduce shrinkage due to moisture loss and stop disease development. Keep the humidity as low as possible. Good management of ventilation is important. Ventilate storage early in the morning.
Onions held in cold storage should be placed there immediately after curing. A temperature of 32° F is ideal and will keep onions dormant and relatively free of rot. If sprouts grow it indicates too high a temperature, poor curing, or immature bulbs. If you have root growth the humidity is too high. The humidity should be 65 to 70 percent.
Do not store onions with produce that is likely to absorb the odor. Onions stand slight freezing, but do not handle or move them until they thaw. You can store onions in a dry, well ventilated attic or unheated room. Maintain as near 32° F as you can and keep as dry as possible. You can hang open-mesh bags, about half full, from overhead hooks or nails. Slatted half full crates of onions may be stacked on cross bars.
Chemical changes take place in the ripening process of apples and pears. This activity is called respiration. Starch changes to sugar, acids and insoluble pectins decrease, and volatile gases are given off. This continues until the fruit becomes overripe and mealy. During this ripening process oxygen is consumed from the air, and water and carbon dioxide are produced and heat is generated.
You may slow respiration by cooling fruit as rapidly as possible after picking. The sooner this is done the longer the fruit will keep.
Research indicates that when apples are stored at 30° F, about 25 percent more time is required for them to ripen than at 32°. Stored at 40°, the rate of ripening is about double that at 32°. At 60° the rate is close to three times that at 40°, and at 85° the softening and respiration rates have been found to be about double those at 60°. This emphasizes the importance of cooling quickly and keeping cold. The average freezing point of apples is about 28° or 29°.
Most apple varieties keep best at a temperature of 30° to 32° F and a relative humidity of 85 to 88 percent. However, McIntosh, Yellow Newton, and Rhode Island Greening apples do best at 35° to 38°. This prevents internal browning and brown core.
Pears can be stored ideally at 30° to 31° F. The highest freezing point for pears is about 29°. Since pears are likely to shrivel, keep the humidity at 90 percent. Most pears won’t ripen satisfactorily for eating at the above temperatures. They should be taken out of storage and ripened between 65° and 70°. This is ideal for Bartletts.
Bartlett pears ripen faster than apples. If you store pears too long they will not ripen properly. Don’t store Bartletts after 3 months or Anjou longer than 6 months.
Maintaining desired temperatures for home storage of apples and pears may be difficult. If you must settle for 40° F or even higher, you won’t get the good results you would if you refrigerate at the optimum temperatures. Sometimes cold storage facilities are available where you may store your fruit for a set price per container.
Don’t mix windfalls (fruits that have dropped to the ground) with 370 fruit you pick from the tree. Windfalls are overripe and give off ethylene gas which speeds ripening of picked fruit.
Desirable temperatures may be possible in refrigerator hydrator drawers for small quantities.
An extra refrigerator can be used to store fruit, but do not take the shelves out. When it is empty, for safety reasons take off the doors.
| Storage conditions | |||||
|---|---|---|---|---|---|
| Where to store | Temperature (F) | Humidity | Storage period | ||
| Vegetables: | |||||
| Beans and peas, dried | Any cool, dry place | 32-40 | Dry | Many Years | |
| Beets | Storage cellar or pit | 32-40 | Moist | Fall-winter | |
| Cabbage | Storage cellar or pit | 32-35 | Moist | Fall-winter | |
| Carrots | Storage cellar or pit | 32-40 | Moist | Fall-winter | |
| Celery | Roots in soil in storage cellar | 32-40 | Moist | Fall-winter | |
| Onions | Any cool, dry place | As near 32 as possible | Dry | Fall-winter | |
| Parsnips | Leave in ground or put in storage cellar | 32-40 | Moist | Fall-winter | |
| Potatoes | Storage cellar or pit | 45-48 | Moist | Fall-winter | |
| Pumpkin, winter squash | Unheated room or basement | 55-60 | Dry | Fall-winter | |
| Rutabagas | Storage cellar or pit | 32-40 | Moist | Fall-winter | |
| Sweet Potatoes | Unheated room or basement | 55-60 | Dry | Fall-winter | |
| Tomatoes (green or white) | Unheated room or basement | 55-60 | Dry | 1-6 weeks | |
| Turnips | Storage cellar or pit | 32-40 | Moist | Fall-winter | |
| Fruits: | |||||
| Most apples | Fruit storage cellar | 30-32 | Moist | Fall-winter | |
| McIntosh, Yellow Newton & Rhode Island Greening | Fruit storage cellar | 35-38 | Moist | Fall-winter | |
| Grapes | Fruit storage cellar | 31-32 | Moist | 4-6 weeks | |
| Pears | Fruit storage cellar | 30-31 | Moist | Fall-winter | |
| Peaches | Fruit storage cellar | 32 | Moist | 2 weeks | |
| Apricots | Fruit storage cellar | 32 | Moist | 2 weeks | |
Storing fresh cherries, peaches, and apricots very long is difficult. Refrigerate as close to 32° F as possible. Peaches ripen well at 65° to 85° and refrigerate well in hydrators for as long as 4 weeks. Peaches may be stored in walk-in refrigerators in larger quantities.
Grapes are generally not adapted to long storage. Concord grapes may be stored 4 to 6 weeks at 31° to 32° F. Catawba and Delaware varieties can be held 8 weeks. Vinifera table grapes such as Emperor and Ribier will keep 3 to 6 months at 30° to 31°.
Since apples, pears, grapes, and other fruit absorb odors from potatoes, 371 onions, and other vegetables, store them separately.
Some kitchen garden herbs, such as chives and parsley, may be potted and cared for as house plants. These plants will supply flavoring and garnishing to enhance wintertime meals.
Trying to predict exactly how long your fruits and vegetables can be stored is next to impossible. Much depends on condition of the product and how successful you are in maintaining correct temperatures and humidity. Generally, you can keep parsnips and carrots all winter, late potatoes 6 to 8 months, cabbage 3 months, onions 6 to 10 months, and pumpkins, squash, root crops, and tomatoes 3 to 6 months.
Cleanliness. One last precaution: Keep the storage areas clean and free of decaying fruit and vegetables; otherwise, molds and bacteria will spread to your sound produce.
If you store nuts (especially peanuts), soybeans, other dry beans or peas, make every effort to prevent growth of molds. Moisture, temperature, and time are necessary to promote their growth. A harmful toxin may be produced if mold growth is allowed to progress. It is important that storage areas be regularly checked so as to avoid this type of contamination.
Discard all produce that shows any sign of decay.
Insects, rats, and other pests can spread disease and are unwanted guests in any food storage area. To escape these undesirables:
—Build them out. Close all cracks and use adequate screening over all openings
—Prevent trash piles from accumulating
—Keep the storage area clean
—Control rats inside and outside. (Seek the advice of your county Extension office or a sanitarian)
—Destroy any infested food
—Remove all containers at least once a year. Wash them and air dry in the sun
—Remember that good housekeeping practices apply to all places where food is stored
U.S. Department of Agriculture, Storing Vegetables and Fruits in Basements, Cellars, Outbuildings, and Pits, H&G Bul. No. 119, on sale by Superintendent of Documents, U.S. Government Printing Office, Washington, D.C. 20402. 40¢.
by F. Aline Coffey and Roger Sternberg[19]
A community cannery is a self-help facility equipped for preparing and heat processing food. People bring in produce from their gardens and through their own efforts preserve it for future use.
Community canneries began during the late 1800’s in response to the desire of families to work together to preserve their food for the off-season. At the end of World War II there were over 3,800 community canneries in the United States. Most of these wartime canneries were subsidized, but after the war the monies ceased. Growth of the food industry, development of freezing techniques, and the lack of subsidy led to a decline of the canneries.
Today there is a resurgence of interest in establishing community canning centers. This has been influenced by the cost of food, a marked increase in the concern for nutrition, and gardening activities.
A community cannery promotes the preservation of seasonal garden surpluses for consumption during the nonproductive season. It encourages small farmers and nonfarm individuals to produce more food, thereby promoting self-sufficiency for families. It enables families who do not own recommended food preservation equipment to use safe and reliable equipment and techniques.
Availability of nonseasonal foods on a year-round basis can result in a better diet for families, especially if the center incorporates nutrition education classes as part of its program. People who grow their own food may make substantial savings in their food budget. The community cannery creates a social atmosphere of friendly, cooperative work leading to tangible results, and promotes a feeling of self-reliance.
Most of the community canneries in the country have been organized by Community Action Agencies or similar community organizing groups. Individuals, food co-ops, and other groups have successfully set up canneries, but it is recommended that people wanting to establish a canning center contact a community organizing agency. Normally, these agencies have professional people who will work on such a project. They have experience in writing proposals and are aware of potential funding sources.
Support for the canning center can be enhanced by making a special effort to include a diverse membership on a board of directors for the center.
Farmers, low-income people, business people, contractors, Extension personnel, community organizers, local officials, and members of the clergy are all potential supporters and advisors for the cannery.
Although organizing a community cannery requires a lot of work, this need not be a roadblock to initiating the project. It takes many hours to plan the canning operation, draft proposals, develop community support, locate a site, and to select, purchase and install equipment. Because this can easily be a full-time job for one person, efforts should be made to hire a coordinator. In many instances, paid community organizers, Vista volunteers, and home economists have provided valuable assistance in completing the work.
Preparation for and organization of 373 the cannery are the foundation of the project. At least six months should be set aside for organizing.
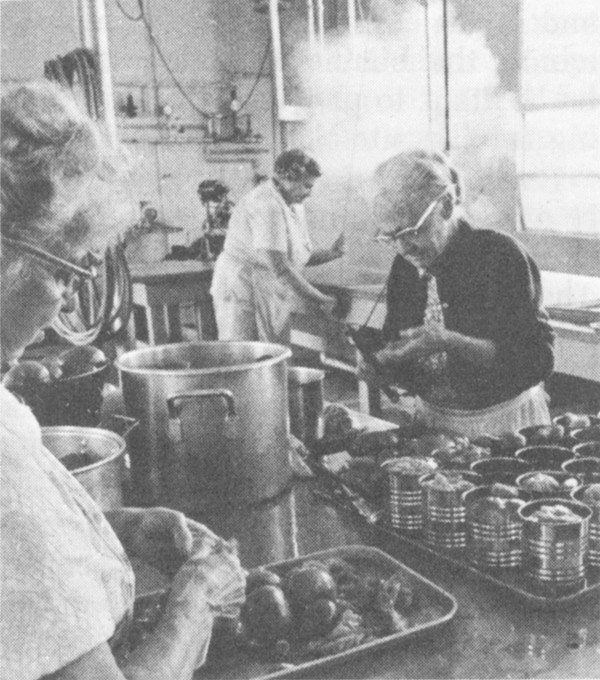
William E. Carnahan
Tomatoes in the canning process,
at a community cannery.
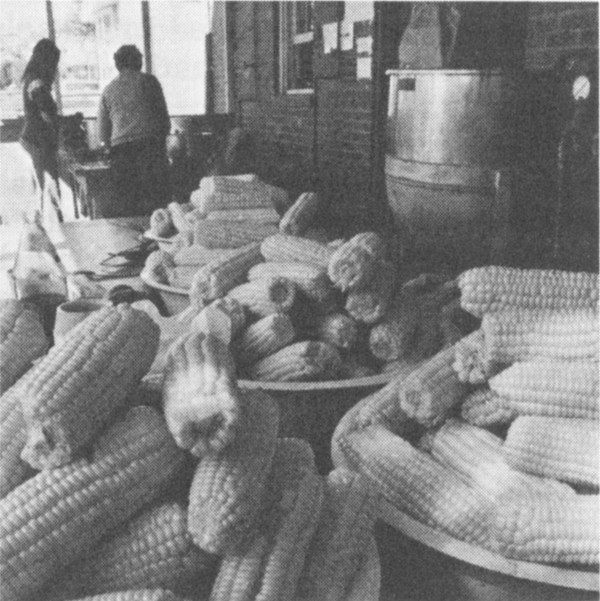
William E. Carnahan
Sweet corn ready to have kernels removed
for canning.
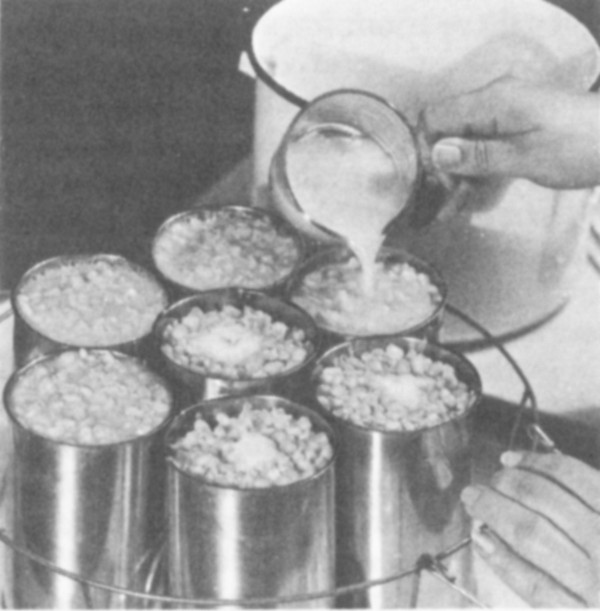
At later stage, liquid is poured over hot-packed corn. Note one advantage of a community cannery is that quantities of food can be processed in a few hours.
Here are some questions to consider before starting a community center:
How many people will commit themselves to organizing a center?
How much time will they give?
How much support can be expected from the community, town officials, local growers?
How many community and family gardens are in the area?
How near are the community gardens to the cannery site?
Is the site near a well-travelled route?
Is parking available?
Can the canning center exist merely to provide a service to the community, or will the cannery have to become involved in a commercial venture?
If some food processed at the cannery is to be sold, are local farmers willing to contract with the cannery to supply it with produce? How close are these farmers to the cannery?
Is a building available for canning purposes (for example, some old creamery)?
If so, what is the size of the building? What is its condition?
Are there cement floors and walls constructed so they can be washed down daily?
Is there room for storage, a walk-in cooler?
Is the sewage system adequate?
Does the building have existing equipment that could be put to use?
Is a dependable supply of potable water available?
What is the minimum water pressure and is it constant?
Is the water “hard?” If so, what is the analysis?
What type of electricity is available?
What is the cost of electricity per KWH and demand rate for 240 volt, 3 phase, 60 cycle?
What is the availability and cost of gas (natural or LP) or of fuel oil?
What is the number of families expected to participate? How many are low-income families?
What are the principal foods to be canned?
If it is anticipated that some products will be processed for sale, what will those products be?
Is there a market for the “for-sale” items?
Will canning supplies such as jars, lids, screw bands, tin cans be available? Can they be purchased at wholesale prices?
Is at least one person who is knowledgeable in food preservation methods available to supervise the cannery?
What will be the charge for processing a pint or a quart of food?
Will low-income people be able to pay this amount?
Are funds available to subsidize the canning of food for low-income people?
It is important to obtain a site easily accessible to the public. Selectmen, property owners, realtors should be approached for potential sites. Usually the center has limited funds, and it is difficult and takes time to locate an appropriate building with low-cost rent.
In times of a strained economy and high cost of property maintenance, the business community may be hesitant to provide low-cost housing for the site.
Establishing the facility in a publicly owned building, such as a school, is a solution in many communities. These canneries are a part of the public school’s physical plant and have traditionally been operated under supervision of the vocational agriculture and home economics teachers, using school funds.
In recent years, some schools have wanted to close canneries for several reasons: Lack of operating capital, limited use, lack of interest or know-how on the part of participants and teachers. With the resurgence of interest in canning, many new cannery ventures are located in schools but are now funded separately from school budgets.
If the cannery is the result of a community endeavor, adjoining small towns could appropriate funds sufficient to set up and man a center. Such a proposal would have to be presented to the town governing bodies. This points up the need for ample planning time. Devising means to allow the cannery to remain open year-round would favor obtaining a site other than in a public building.
Cost of organizing a community cannery is influenced by its size and scope of operation. Expenses can be broken down into these major areas:
At least two companies manufacture 375 community canning equipment (Ball Corp. and Dixie Canner Equipment Co.). Prices start at $4,300 for a single-unit operation, and go up to $20,000 for a large center. This does not include the price of a steam boiler, which costs between $3,000 and $5,000. By fabricating some of its own equipment, and by buying used equipment from canning and restaurant equipment suppliers, the cannery can reduce some of its purchase costs substantially.
Installation of the canning equipment and the steam boiler needs to be done by a licensed plumber or steam fitter, or be closely supervised by such a person.
Renovation of a building and installation of the canning equipment can cost between $4,000 and $8,000, including labor costs. Cost can be reduced by soliciting volunteer labor from local craftsmen. The organizers can handle much of the renovation, such as painting, carpentry and cement work. Teams of vocational students may be willing to take on the site renovations as part of their school training.
Salaries for employees can be paid from the cannery’s operating budget. Labor costs can be reduced if the workers are already salaried employees provided by other food-related agencies. The cannery can also be an ideal training site for participants in the Comprehensive Employment and Training Act (CETA) and can be staffed successfully in this way.
Food and Drug Administration regulations regarding food processing do not apply to community canning centers if they are not involved in interstate commerce. In June, 1976, FDA issued “Suggested Minimum Guidelines for Community Canning Operations” to protect the safety of the consumer.
Environmental regulations that apply to the centers must be carefully followed. Although these regulations are usually not hard to follow, they often mean a possibly unplanned-for expense to the cannery. It may be necessary to apply for a variance to zoning regulations. Cannery supervisory boards should have a working knowledge of all requirements of State and Federal agencies that regulate health, environment, fire, safety, plumbing, electricity, and public building codes.
Sites for the centers should have sewage and draining systems that meet demands of the centers. This would mean a septic system and leach fields, or a municipal sewage system, the latter being the easiest and least expensive method of disposal. Solid waste produced by the center is termed “clean,” and effluent from the processing could be put through a strainer, piped out of the center, and then deposited into a leach field.
To maintain high standards of cleanliness and safety, at least one supervisor should be on duty whenever the cannery is in operation. The person in charge must have a thorough knowledge of every aspect of food processing.
The Food and Drug Administration requires that a “certified registered canner” be in attendance only when low-acid foods are processed to be sold. An FDA-approved course is offered by the National Canners Association for commercial cannery personnel in various sections of the country. The cost would involve a registration fee of approximately $125 plus expenses. At present, the course content is geared chiefly toward industry. A shift to a more practical approach would be of greater help to community cannery personnel.
Cannery supervisors and attendants can participate in food preservation classes and demonstrations provided by the Extension Service. When canneries 376 are equipped with commercial food preservation centers, representatives of the manufacturing companies are available for technical information to the cannery staff. Manufacturers may also provide the cannery with a complete operations manual, processing charts, and recipes.
Cannery supervisors will benefit by employing people to work at the cannery who can provide or learn such skills as:
Bookkeeping/accounting—to keep records of input and outflow of goods and money; to pay bills.
Management—to oversee the flow of food through the center in an efficient manner for smooth operation of the plant.
Maintenance and repair—to maintain equipment and housing in operational condition.
Purchasing/supply—to ensure a supply of materials such as jars and lids.
Sales—to manage sales of surplus retail products if these are processed at the plant.
Public relations—to advertise and promote knowledge of canning centers; to handle complaints and problems of patrons.
Technical—to provide detailed information on processing techniques, food, nutrition, and gardening.
A form of recordkeeping on all foods processed at the plant is essential. This kind of information would include such data as name of person doing the processing, the date, specific food, number of jars, method of processing, time in and time out, and an identification number for foods processed for sale by the cannery.
Canning centers may be incorporated as independent nonprofit cooperatives with a board of directors as the policymaking body. By being organized in conformity with the traditional farmers’ cooperative structure, the centers receive special tax considerations. Incorporation on a nonprofit basis is a requirement of many funding sources. The cooperative structure also lends itself to a tighter knit organization, with members feeling they are part of the organization, responsible for its affairs, and willing to pitch in and help if there is some work that needs a few extra hands.
The community cannery should have general liability insurance to cover injuries sustained by the workers or persons using the canning center. Products liability insurance is unnecessary for the cannery operated solely to provide a service to the community. For the cannery that sells commercially, products liability insurance should be obtained.
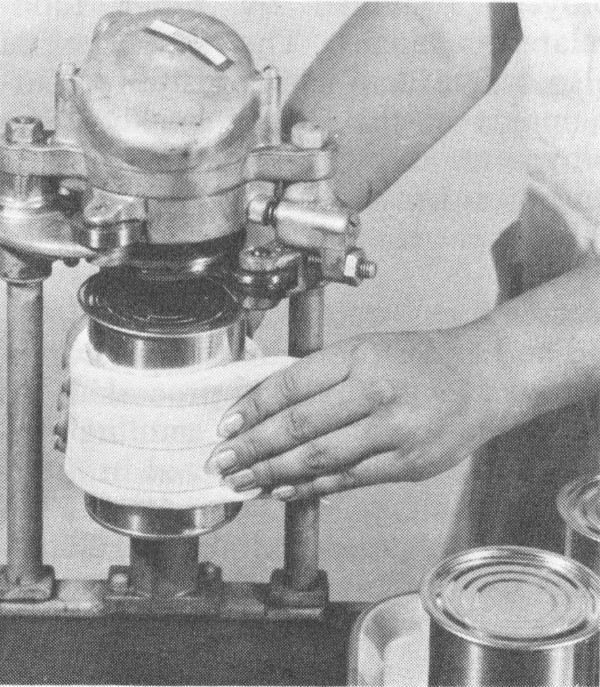
Sealer in a community cannery.
A community cannery should be available to all people interested in preserving food. Ideally, canneries are open during daytime and evening hours. Weekend hours are a possibility. When canneries are limited to processing vegetables and fruits, at 377 least 6 months of potential operation are lost in certain sections of the country. If at all possible, canneries should be operated to process a wider range of foods such as jams, jellies, pickles, preserves, meat, fish, poultry.
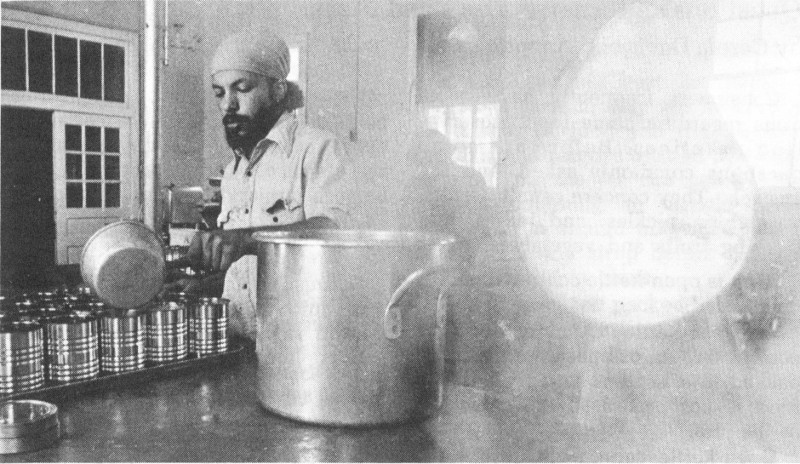
William E. Carnahan
Tomato juice being processed at a community
cannery. Since cannery is operated
by State of Virginia, only charge
is for cans used.
A processing fee is usually set for use of the canning equipment, ranging from 5¢ to 10¢ for pints to 10¢ to 15¢ for quarts. These prices do not include the cost of jar, lid, screw band, or any canning supplies such as salt, vinegar, sugar, spices that may be sold at wholesale prices at the cannery. An additional charge of 50¢ per hour is common for the use of a pulper-juicer and steam-jacketed kettle.
It may be a financial hardship for some low-income families to meet these costs, but they can be given the opportunity to exchange work time at the cannery for payment. Families of limited resources might leave off a percentage of their processed high-acid foods to be sold by the cannery. Sponsoring agencies may apply for grants, such as might be available from Title XX of the Social Security Act, in an effort to subsidize canning costs for low-income families.
To date, no community canneries are completely economically self-sufficient, so far as we know. There are centers in the South which do enough community canning to pay for all their expenses except salaries. To become self-supportive, some canneries are now developing specialty products to be sold commercially. Organic-health food distributorships and food co-ops are often a good market for community cannery processed foods.
The future of community canneries depends on continued interest in home gardening and food preservation, and concern for proper nutrition. Undoubtedly, the cost of food in the marketplace will also be a contributing factor.
by Carole Davis and Annetta Cook[20]
Consumers frequently have questions regarding home food preservation practices. Below are some questions commonly asked, and the answers. They concern canning fruits, vegetables, pickles, and jellies, and freezing fruits and vegetables.
Why is open-kettle canning not recommended?
In open-kettle canning, food is cooked in an ordinary kettle, then packed into hot jars and sealed. The food is not processed after packing in the jars.
Open-kettle canning is unsafe because temperatures reached are not high enough to destroy all the spoilage organisms that may be in low-acid foods, such as meat and vegetables, other than tomatoes.
Spoilage bacteria may also enter the food when it is transferred from kettle to jar, making it undesirable as well to can other foods such as fruits, pickles, preserves, and jams by this method.
Why is oven canning unsafe?
Jars may explode, causing personal injury or damage to the oven. Also, temperatures obtained in the oven are not high enough to insure adequate destruction of spoilage organisms in low-acid foods.
Times specified for boiling-water-bath processing of foods do not apply to oven processing since the rate of heat penetration would be different in the oven and the products could easily be underprocessed.
Should jars and lids be sterilized before canning?
No, not when the boiling-water-bath or pressure-canner method is used, because the containers and lids are sterilized during processing. But be sure jars and lids are clean.
Why is no liquid added when tomatoes are canned?
Because tomatoes provide their own juice if pressed gently when packed raw, or when heated before packing hot into jars.
Is it safe to add celery, green pepper, and onion to tomatoes when canning them?
No. Adding other vegetables lowers the acidity of tomatoes. Acidity helps protect against the growth of botulinum bacteria, which can produce a fatal toxin in canned foods. Specific recipes, times, and temperatures determined scientifically for vegetable mixtures need to be used for their safe canning.
Why is headspace important in canning?
Headspace—the distance between the surface of food and the underside of the lid—allows for expansion of solids or bubbling up of liquid during processing. If headspace is not adequate, some food in the container will be forced out, leaving food particles or sirup on the sealing surface and preventing a seal.
When too much headspace is allowed, some air may remain in the jar after processing, causing food at the top of the jar to darken.
What causes jars to break in a canner?
Breakage can occur for several reasons: (1) Using commercial food jars rather than jars manufactured for home canning, (2) Using jars that have hairline cracks, (3) Putting jars directly on bottom of canner instead 379 of on a rack, (4) Putting hot food in cold jars, or (5) Putting jars of raw or unheated food directly into boiling water in the canner, rather than into hot water (sudden change in temperature—too wide a margin between temperature of filled jars and water in canner before processing).
What causes liquid to be lost from jars during processing?
Loss of liquid may be due to packing jars too full. Headspace must be allowed between the top of the food and lid as specified in the instructions for each food. Food expands when processed, so headspace must be adequate or liquid will be forced out of the jar.
Liquid may be lost if the canner’s pressure fluctuates during processing. Lowering the pressure too suddenly after processing may also cause liquid to be lost. Pressure canner should be removed from the heat and allowed to cool normally at room temperature.
If liquid is lost from jars during processing, can more be added to fill them again?
No, because if the jar is opened and liquid added, this would allow bacteria to enter the jar and you would need to process again.
Loss of liquid does not cause food to spoil, though food not covered by the liquid may darken.
Why does fruit sometimes float in the jar after canning?
Fruit may float because it is packed too loosely, sirup is too heavy, or because some air remains in tissues of the fruit after heating and processing.
How do you test the seal on home-canned foods?
After jars have cooled, check two-piece lids by pressing the center of the flat metal lid; if lid is down and will not move, jar is sealed.
For porcelain-lined caps, check seal by turning each jar partly over in your hands. If no leakage occurs, the jar is sealed.
What causes lids not to seal?
If food has not been sufficiently heated, a vacuum may not be drawn on the jar of food and the lid will fail to seal. Presence of food particles or sirup on the jar rim could also prevent obtaining an airtight seal. Each jar rim should be wiped clean of all food and sirup before putting the sealing lid in place.
If food has been packed too tightly in the jars or if sufficient headspace has not been allowed, expansion of the food during heating could force sirup or food out of the jar, thus causing poor contact between the lid and jar.
Why should flat metal disks and rubber rings be used only once?
Depressions in the rubber compound made when the lid or ring was first used can prevent obtaining an airtight seal if used a second time.
Why should metal bands be removed after jars have cooled?
If bands are not removed soon after cooling, moisture between the ring and jar may cause the ring to rust, thus making later removal of the bands difficult. The band is no longer necessary after the jar has cooled because the seal has been provided by the flat metal lid with sealing compound and the vacuum created during cooling.
What causes canned foods to change color?
Darkening of food at the top of the jar may be caused by oxidation due to air in the jar, or by too little heating or processing so that enzymes are not destroyed. Overprocessing may cause discoloration of foods throughout the jar.
Pink and blue colors sometimes seen in canned pears, apples, and peaches are caused by chemical changes in the fruit coloring matter.
Iron and copper from cooking utensils or from water in some areas may cause brown, black, and gray colors in some foods.
Why do undersides of metal lids sometimes discolor?
Natural compounds in some foods, particularly acids, corrode metal and make a dark deposit on the underside of jar lids. This deposit on lids of sealed, properly processed canned foods is harmless.
Is it safe to use canned foods which have been frozen as the result of storing them in an unheated storage area?
Freezing does not cause the food to spoil unless the seal is damaged or the jar broken. If the jar is no longer sealed, the food may still be safe to eat if the jar is not broken and the food is still frozen and has not been subjected to thawing and refreezing.
Remove the frozen canned food from jars as carefully as possible. The food may need to thaw slightly to ease its removal from jars, but it should be left in as large blocks as can be removed through the jar opening.
Examine jars for breaks and hairline cracks. If any are found, discard food from those jars. If no cracks are found, food may be transferred from jars into freezer bags or containers and stored in the freezer, or it may be kept in the refrigerator for use within a day or two.
Home-canned foods which have been frozen may be less palatable due to texture changes than properly stored canned foods. Do not recan home-canned foods which have been frozen.
How do you protect canned foods against freezing?
Wrap the jars in paper or cover them with blankets. However, if the storage area temperature is expected to be below freezing (32° F) for more than a day or two, move the food to a warmer storage area.
What does mold on canned food indicate?
It means the jar has not sealed and the food is spoiled. Even if mold appears to be only on the surface, discard all food in the container because parts of the mold may not be visible in the food.
Is it safe to can foods without salt?
Yes. Salt is used for flavor only in canned vegetables and is not necessary for safe processing. Since the characteristic flavor and texture of pickled vegetables depend on salt, do not omit this ingredient from recipes for pickles and relishes.
What kind of salt should be used in pickling? Why?
Use pure granulated salt. Uniodized table salt can be used, but materials added to the salt to prevent caking may make the brine cloudy. Do not use iodized table salt because it may darken pickles.
What type of vinegar should be used for making pickles? Can it be diluted?
Use cider or white distilled vinegar of 4% to 6% acidity (40 to 60 grain). Do not use vinegar of unknown acidity. Do not dilute vinegar unless the recipe so specifies. If a less sour product is preferred, add sugar rather than decrease vinegar.
Why should pickles be processed in a boiling-water bath?
Pickles require heat treatment to destroy organisms that cause spoilage, and to inactivate enzymes that may affect flavor, color, and texture.
Heat processing in a boiling-water bath is recommended for all pickle products. There is always danger of spoilage organisms entering the food when it is transferred from kettle to jar. This is true even when the utmost caution is observed and is the reason 381 open-kettle canning is not recommended.
Why should plastic containers not be used when brining pickles?
Vegetables being pickled undergo physical as well as chemical changes during brining or fermentation. As a result of these changes, the plastic may be affected, causing undesirable compounds to be formed or leached from the plastic.
For fermenting or brining pickles, use a crock or stone jar, unchipped enamel-lined pan, or large glass jar, bowl, or casserole.
What causes pickles to be hollow?
Hollowness in pickles generally results from poorly developed cucumbers, holding cucumbers too long before pickling, too rapid fermentation, too strong or too weak a brine during fermentation.
What causes jelly to be too soft?
Too much juice in the mixture, too little sugar, mixture not acid enough (overripe fruit), or making too big a batch at one time.
What makes jelly tough?
Mixture was cooked too long to reach jellying stage because too little sugar was used in proportion to the pectin and acid in the juice.
What makes crystals form in jelly?
Crystals throughout the jelly may be caused by too much sugar in the jelly mixture, or cooking the mixture too little, too slowly, or too long. Crystals on top of jelly that has been opened and allowed to stand are due to evaporation of liquid.
Tartrate crystals in grape jelly may occur if juice has not been allowed to stand overnight and then strained through a double thickness of cheesecloth before preparing jelly.
Is a one-door refrigerator-freezer combination suitable for freezing and storage of frozen fruits and vegetables?
It may be difficult to obtain the recommended temperature of 0° F or below for freezing and storing foods in this style freezer without freezing food in the refrigerator part as well.
Recommended storage times are severely reduced if a freezer does not maintain 0° F or below. If freezer temperatures are above 10°, do not store frozen food for more than several weeks.
Can containers for commercial foods, such as cottage cheese, margarine, milk, yogurt, ice cream, or sour cream, be used for freezing fruits and vegetables?
Waxed cardboard cartons which previously contained dairy products are not sufficiently moisture-vapor-resistant to use for packaging foods to be frozen.
Plastic commercial-food containers are suitable if they can be tightly sealed and do not become brittle and crack at low temperatures, thus exposing the food to the air.
Can citric acid or lemon juice be used to help prevent fruit from turning dark during freezer storage?
Although these products can be used as anti-darkening agents, neither is as effective as ascorbic acid. Often the quantity of citric acid or lemon juice needed to prevent darkening is so large that natural flavors are masked or the fruit becomes too sour.
Why is it necessary to wash and blanch vegetables before they are frozen?
Washing removes dirt and some of the bacteria from vegetables. Freezing inhibits the growth of bacteria, but does not kill them. Thus it’s important that the food, as well as all surfaces it touches, be kept clean so that the number of bacteria on the food is held to a minimum. Bacteria can grow on food if the temperature rises during freezer storage, and when food is thawed.
Except for green peppers and mature onions, vegetables must be blanched to destroy enzymes which could cause undesirable changes in flavor, texture, and color during freezer storage.
Why can green peppers and mature onions be frozen without blanching?
Unlike other vegetables, green peppers and onions do not lose quality during freezer storage if their enzymes are not destroyed by blanching before freezing.
Green peppers frozen without heating are better suited for use in uncooked foods than are blanched peppers. Some of the characteristic flavor of onions is lost if this vegetable is blanched before freezing.
Why is corn which is frozen on-the-cob blanched for longer times than cut corn?
Longer blanching of corn frozen on-the-cob is necessary so that enzymes present in the cob will be destroyed. Otherwise, enzymes in the unheated cob can cause undesirable flavor changes in the corn kernels.
Corn frozen off-the-cob needs only to be blanched just enough to destroy enzymes in the kernels.
Can vegetables be blanched by steaming instead of by heating in boiling water?
The following vegetables may be heated in steam: broccoli, mushrooms, pumpkin, winter squash, and sweet-potatoes.
To steam these vegetables, put 1 to 2 inches of water in a large kettle; bring water to a boil. Add a basket containing a single layer of prepared vegetable; keep the basket at least 1 inch above the water. Cover kettle and start timing.
Steam broccoli 3 minutes; sliced mushrooms, 3 minutes; whole mushrooms (less than 1-inch diameter), 5 minutes. Steam pumpkin, winter squash, or sweet-potatoes until tender.
Is it necessary to make an adjustment in blanching times for vegetables at altitudes above sea level?
At altitudes 5,000 feet or more above sea level, heat vegetables 1 minute longer than the time given in directions for the vegetable being blanched.
What can be done to prevent food from thawing if the freezer should stop running?
Never open the freezer unnecessarily. A fully-loaded freezer will usually remain cold enough to keep food frozen for 2 days if the door is not opened; a half-loaded freezer may not stay cold enough more than a day.
If power cannot be restored or the freezer cannot be fixed before the food would start to thaw, use dry ice. If dry ice is obtained shortly after the failure has occurred and the freezer is fully loaded, 25 pounds of dry ice should keep a 10-cubic-foot freezer at temperatures below freezing for 3 to 4 days; if freezer is less than half-full, for 2 to 3 days.
Place dry ice on boards or heavy cardboard on top of the packages of food. Handle dry ice carefully—never with your bare hands. Wear gloves to prevent burns.
Another alternative is to move food to a neighbor’s freezer or to a freezer locker plant where space can be rented.
Can vegetables and fruits which have thawed be refrozen?
Frozen foods that have thawed may be safely refrozen if they still contain ice crystals or if they are still cold—about 40° F—and have been held no longer than 1 or 2 days at refrigerator temperatures (32° to 40°) after thawing.
Since thawing and refreezing reduces the quality of fruits and vegetables, use refrozen foods as soon as possible to save as much of their eating quality as you can.
compiled by Annetta Cook and Carole Davis[21]
Acid food—Food with a pH of 4.6 or below. An acid food can be safely processed in a boiling-water bath for specified times. Includes most fruits, tomatoes, and pickled vegetables.
Anaerobes—Bacteria capable of growing without air, as in a sealed container of canned food.
Blanching—Heating vegetables by immersion in boiling water, steaming, sauteing, or stewing to inactivate enzymes capable of causing quality changes in foods during freezer storage.
Boiling-water-bath Canner—A large kettle with lid, rack, and cover; must be deep enough to allow jars to be covered with 1 to 2 inches of water and still have additional height for water to boil actively. Suitable for processing acid foods.
Botulism—Food-borne illness caused from eating canned foods containing the toxin produced by Clostridium botulinum, an anaerobic bacterium. This organism can grow and produce toxin in sealed jars of canned foods that are improperly processed.
Canning—Preserving food in airtight rigid containers. Micro-organisms are destroyed by heat-processing containers of food at the temperature and time specified for each food. It is essential to follow reliable canning instructions exactly to insure a safe canned product that is free from botulism-causing bacteria and spoilage organisms.
Cold Pack—Raw, unheated food packed into canning containers and covered with boiling sirup, juice, or water.
Dehydrator—A device which removes moisture, a dryer.
Enzymes—Proteins involved in plant growth processes including maturation and ripening. Enzymes can cause loss of quality in food if they remain active during storage. They are destroyed by canning, or by blanching vegetables before freezing.
Freezer Burn—Small, white, dehydrated areas which occur on improperly wrapped frozen foods. This condition is harmless, but if extensive can cause food to become tough or lose flavor.
Freezing—Preserving food by storing at low temperatures. The recommended temperature for freezer storage is 0° F or below.
Headspace—The space between the top of food in a container and the container lid or closure.
Hot Pack—Food heated in sirup, water or steam, or juice, and packed hot into canning jars.
Hydrator (Vegetable Crisper)—A drawer-like section in refrigerators which protects fresh fruits and vegetables from drying out during refrigerator storage.
Low-acid Food—Food with pH above 4.6. A low-acid food requires processing at high temperature under pressure to destroy micro-organisms and insure a safe canned product. Includes all vegetables except tomatoes.
Micro-organism—Includes bacteria, molds, and yeasts, which when present in food can cause spoilage and even food poisoning. Therefore, they must be destroyed in canning foods or their growth prevented in freezing and drying foods.
Moisture-vapor-proof—Packing materials that prevent loss of moisture from foods during freezer storage. Examples include glass, rigid plastic, and metal freezer containers.
Moisture-vapor-resistant—Packing materials that protect foods from moisture loss during freezer storage. Examples include freezer wraps—paper, plastic, or foil—plastic bags, waxed freezer cartons.
Molds—Microscopic fungi which form air-borne spores (seeds) that may alight on food and grow into cottony mats or fuzz. Some molds or their end products may be harmful, and moldy vegetables or fruit should not be canned. Molds are destroyed by proper canning, but they may develop in leaky containers. Food from leaky containers or any canned food showing mold growth should be discarded without tasting.
Open-kettle Canning—Procedure whereby food is cooked in an ordinary kettle, then packed into hot jars and sealed. Jars of food receive no additional heat processing. This is a dangerous practice as spoilage organisms may enter the jar during the transfer of food from kettle to jar. In low-acid foods, 384 temperatures obtained are not hot enough to insure destruction of all spoilage organisms that may be present in the food.
Pack—Designates how food is packed into containers. Specifies the temperature of food when packed into jars for canning, or the method of sweetening fruits for freezer packs.
Pectin—A substance occurring naturally in many fruits which causes the juice to thicken or gel after heating if the proper proportions of sugar and acid are present. Natural pectins are more prevalent in underripe fruit than mature or overripe fruit. Some fruits have enough natural pectins to make high quality jams and jellies. Others require addition of commercial pectins which are made from either citrus peel or apples.
pH—Measure of acidity of a product. The lower the pH the higher the acidity.
Preserve—To maintain the quality of food for consumption at a later time. Accomplished by canning, freezing, pickling, drying, or making jelly, jams, or preserves.
Processing—Heating food in closed canning jars to insure destruction of micro-organisms so the canned food will remain unspoiled and safe to eat. Acid foods—such as fruits, tomatoes, and pickles—and jams and preserves are safely processed in a boiling-water-bath. Low-acid vegetables (all vegetables except tomatoes) require processing at higher temperature by use of a pressure canner or pressure saucepan. Times required to insure an adequate process are specified in canning directions for each food.
Sirup Pack—Fruit is packed for freezing in a sugar sirup made by dissolving sugar in water.
Steam-pressure Canner—A large, heavy metal pan having a tight-fitting cover which is fitted with safety valve, steam vent or petcock, and a gage—either weighted or dial. Used for processing low-acid foods under pressure at high temperatures in order to insure their safety.
Steam-pressure Saucepan—Smaller than a canner. If equipped with a gage to maintain pressure at 10 pounds, it is suitable for processing food in pint jars.
Sugar Pack—Sugar is added directly to fruit and mixed gently to draw juice from fruit before packing into freezer containers.
Unsweetened Pack—Fruit packed for freezing without any sweetening added. It may be packed dry or covered with water.
U.S. GOVERNMENT PRINTING OFFICE: 1978 O-278-050