The Project Gutenberg EBook of How to Make Sock Toys, by John M. Clapper

This eBook is for the use of anyone anywhere in the United States and most
other parts of the world at no cost and with almost no restrictions
whatsoever.  You may copy it, give it away or re-use it under the terms of
the Project Gutenberg License included with this eBook or online at
www.gutenberg.org.  If you are not located in the United States, you'll have
to check the laws of the country where you are located before using this ebook.

Title: How to Make Sock Toys
       A Pack-O-Fun Publication

Author: John M. Clapper

Release Date: October 14, 2020 [EBook #63454]

Language: English

Character set encoding: UTF-8

*** START OF THIS PROJECT GUTENBERG EBOOK HOW TO MAKE SOCK TOYS ***


Produced by Stephen Hutcheson, Lisa Corcoran and the Online
Distributed Proofreading Team at https://www.pgdp.net
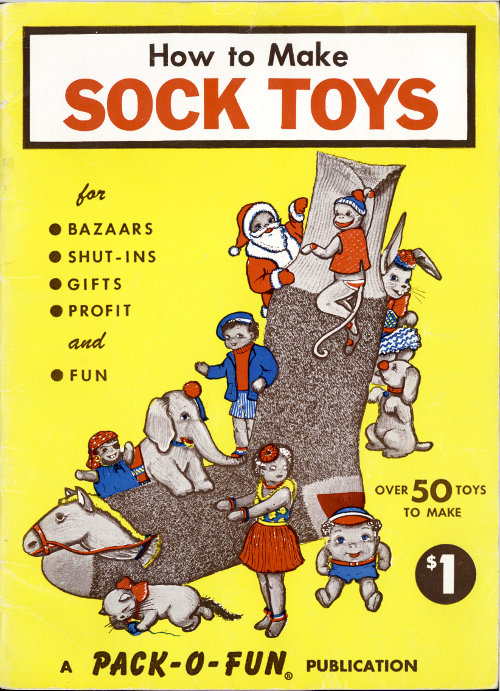
OVER 50 TOYS TO MAKE
$1
A PACK-O-FUN® PUBLICATION
All designs in this book may be used to make sock toys for gifts or for sale by individuals or organizations. It is not necessary to secure permission from the publisher.
However, no part of the text or any design illustrations may be reproduced by any printing process without the permission of the publisher, with the exception of brief quotations used for reviews in other publications.
Copyright 1958
Pack-O-Fun
741 Devon Avenue
Park Ridge, Illinois
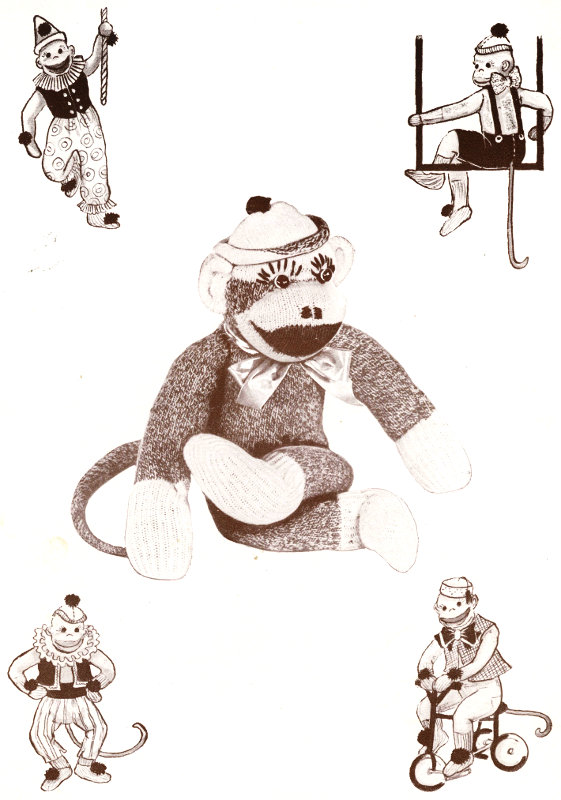
This book is dedicated to a monkey, a whimsical little fellow whose body is a sock and whose heart is hidden somewhere in cotton stuffing. During the summer and early fall of 1955 several of our friends and readers of Pack-O-Fun magazine wrote to us about him. We learned that instructions on how to make him could be had from the Nelson Knitting Company of Rockford, Illinois. We received permission to reprint the instructions and thus our new friend, the Red Heel Sock Monkey, made his appearance in the November 1955 issue of Pack-O-Fun.
We expected a mild response and were quite unprepared for the deluge of mail that poured into our office and the Nelson Knitting Company. We had no idea that so many people were interested in making a toy monkey out of a few socks. The requests kept coming in long after our supply of this issue was exhausted and we had to reprint the instructions as a separate folder to keep from disappointing readers all over the country.
We began to think in terms of other sock toys but there were so many other things to do that the idea was shelved for just a “little while.” Like so many other “little whiles” this one stretched into weeks and then months. Our little friend, the Red Heel Sock Monkey, sat in lonely splendor.
Several months ago Michelle Graff joined our staff as an artist. Much to our delight we learned that she was quite adept at creating and making all kinds of stuffed toys. Within a short time the Red Heel Sock Monkey was no longer lonely. He had several friends to play with after we had turned off the lights and left the office.
One of his most constant playmates was a roguish Sock Elephant. We decided to use this packed pachyderm in some of our ads in other magazines and once again the response was greater than we had dared expect. That settled it. We decided to change a “little while” into “now” and publish this book.
We have used the Nelson Red Heel socks for most of the animals, dolls, puppets and novelties in this book for many reasons. One very good reason is that the red heel lends itself to the creation of lovable toys. The brown body gives the feeling of warmth that a stuffed toy must have and the white ribbing and toes provide material for faces, feet, hands, etc.
Another good reason is that the Nelson Red Heel socks are quite inexpensive, selling for about 30c a pair and even less in lots of one dozen or more. These prices vary somewhat throughout the country. That brings us to our third good reason. They are nationally sold and can be found in many variety, dry goods and chain stores. They can also be ordered through many mail order houses.
All you need are some socks, scrap materials for stuffing and clothing plus a steady eye to thread a needle. The instructions have been written as simply and made as complete as possible. Pick out your toys, thread your needle and start. And, to make it even more fun, vary the features, the trimmings and clothes to bring out your own creative abilities and personal touches.

Edna N. Clapper
Printed in the U.S.A.

Step 1
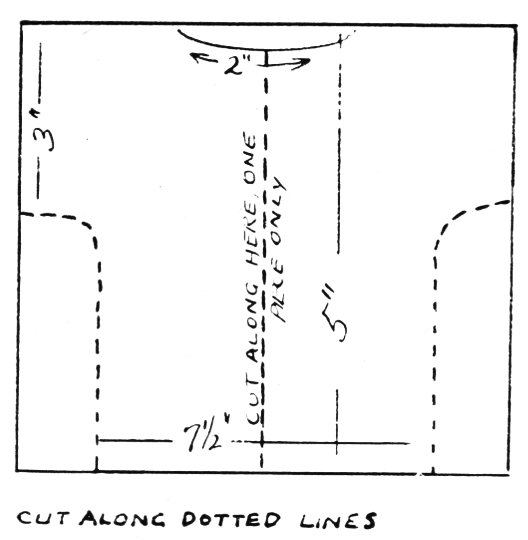
Turn sock inside out. Start 3″ from white heel and sew two seams ½″ apart and across end of the rib.

Step 2
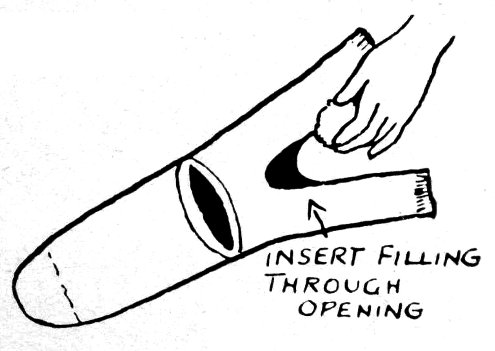
Cut sock between seams to within 1½″ of white heel. This leaves opening for stuffing.

Step 3
Turn sock right side out. Stuff with one hand and mold shape to suit with other.

Step 4
Sew up opening from top to bottom so that legs are spread apart and not pulled together.

Step 5
To shape head, tie loosely at neck with ribbon. For a more floppy head tie ribbon tighter.

Step 6
For feet, bend legs into L-shape for desired foot length and sew crease with strong white thread.
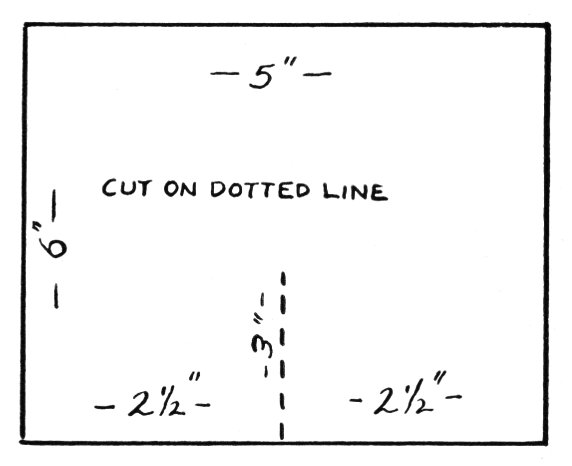
CAP: Cut off toe of the sock, leaving ½″ of brown to roll for a trim.
TAIL: Cut a 1″ strip the entire length of the front of the sock. Seam and stuff.
MOUTH: Cut the heel from the sock, leaving a brown edge around the white. Fasten on lower part of face, whipping around the bottom; stuff and finish sewing around top. The mouth can be improved by a running stitch of either black or white across the middle.
ARMS: Cut the remaining upper part of the sock into two pieces. Seam and stuff.
EARS: Cut the ears from the remaining brown part of the sole of the sock.
EYES: The eyes can be made either by sewing on buttons or by embroidering them with black thread. In this same operation a nose can be indicated by two small embroidered marks.

Fig. 1 · Fig. 2 · Fig. 3 · Fig. 4 · Fig. 5 · Fig. 6
There are many variations from this basic pattern. Decorations can be either pom poms, yarn or bells. Sometimes a fez is used for a cap. Jackets and skirts are also used for clothing the monkey.

uncaptioned

Step 1
Turn sock inside out. Cut off most of the rib, leaving about 1″ for white feet.

Step 2
Start 3″ from heel and sew two seams, ⅛″ each side of center line and across end of rib.

Step 3
Cut between seams and about 1″ into body to make opening for stuffing. Turn sock right side out.
Step 4
Insert ovals of cardboard or wood to shape feet. Stuff legs and rest of sock nice and plump.

Step 5
Sew up opening in body to bring legs together and to prevent them from bowing out.

Step 6
To shape head, tie a ribbon loosely around neck. Do not tie tightly as head will wobble.

Fig. 1 · Fig. 2 · Fig. 3 · Fig. 4
FORELEGS: Measure and cut forelegs from second sock so that body stands level—about 5″. Turn inside out, seam along one side and across foot. Turn right side out, insert stiff ovals in feet, stuff and stitch to body (Figure 1).
MOUTH: Cut off complete heel. Stuff lightly and sew to head. Stitch across center to shape mouth (Figure 2).
TRUNK: Use an 8″ strip of sock, tapering from 6″ to 1″. Seam wrong side out, turn, stuff and insert wire. (See tips on wiring, page 33.) Sew to head above mouth. Insert pipe cleaner tusks (Figure 3).
EARS: For each ear cut two pieces from sock (Figure 4). Seam and turn right side out. Sew on level with highest point of trunk.
EYES: Sew on round or oblong buttons set apart. Embroider eyes for small children.
TAIL: Make a short roll of material and sew in place.
TRIM: Sew on a fringed or tasselled “blanket” of bright material. Rick rack, little bells, ribbons or beads will give a more circusy appearance.

Fig. 1 · Fig. 2 · Fig. 3 · Fig. 4
For the body (Sock No. 1) follow the basic instructions for the monkey on page 5, but leave only 1″ of white at the ends of the legs and stuff plumper.
ARMS OR FORELEGS: See instructions for the monkey on page 5, leaving only 1″ of white and stuffing plumper.
NOSE: Cut toe from second sock. Stuff lightly and sew to the front of the head (Figure 1). Pull the head down to the chest and stitch securely (Figure 2).
FEATURES: Embroider a solid V-shaped nose in black yarn. Make three long stitches with brown yarn to form upper lip and mouth. Sew on two round brown buttons for eyes, spaced well apart (Figure 3).
EARS: Cut four ear pieces from sock. Sew two together, leaving an opening to turn. Turn and stitch to side of head, pleating the front half to incline ear forward. Repeat with the other ear (Figure 4).
TRIM: Tie a bow of 1″ wide bright ribbon around neck. Or make Mr. Teddy Bear a soldier, engineer, cowboy or any other colorful character by using the doll costumes shown in this book.

Fig. 1 · Fig. 2 · Fig. 3 · Fig. 4 · Fig. 5
For body (Sock No. 1) follow the basic instructions on page 7, but stretch the body as long as you can as you stuff and make legs 2″ long instead of 5″.
FORELEGS: See instructions for elephant on page 7, but make 2″ long.
NOSE: Cut toe from sock and sew into a point on the wrong side (Figure 1). Turn and stuff lightly. Sew to front of head with seams on the top and bottom.
TAIL: From sock cut a strip 3″ long, 1″ wide and sew into a tube. Stitch to body.
EARS: Cut four as shown (Figure 2). Seam, leaving an opening to turn. Sew unstuffed ears to sides of head, pushing the ears up a little for correct angle. Sew to hold in place.
FEATURES: Make two stitches in black yarn (Figure 3) where eyes will be. Sew a round dark button inside each. Embroider a solid V-shape nose in brown yarn (Figure 4) and add a red felt tongue below mouth (Figure 5).
TRIM: Fasten a narrow strip of red leatherette around neck. Glue sequins to this collar or paint little gold dots to resemble studs. For greater realism, an inexpensive collar may be used.

Fig. 1 · Fig. 2 · Fig. 3 · Fig. 4
Use white athletic socks. For body (Sock No. 1) follow basic instructions on page 7, but make legs about 4″ long.
FORELEGS: See instructions for elephant on page 7.
NOSE: Cut toe from sock, turn inside out and sew into a point (Figure 1). Turn and stuff. Sew to the front of the head, pulling it into shape. (Polar bears have longer snouts than other types of bears.)
TAIL: Roll a 1″ square of sock into a tiny tail and sew to body.
EARS: Cut two ears from sock, and two from pink felt, petal-shaped (Figure 2). Sew sock and felt pieces together leaving an opening for turning. Turn right side out and stitch to head, about 2″ apart. Pleat the felt side (facing front of head) as you stitch.
FEATURES: Embroider a solid V-shaped nose with black yarn, using three stitches for upper lip and mouth (Figure 3). For eyes, use small white buttons sewn over brown discs.
TRIM: Fasten a narrow strip of felt around neck, decorate with beads and attach a chain or cord. Or, use black leatherette to make a harness (Figure 4).

Fig. 1 · Fig. 2 · Fig. 3 · Fig. 4 · Fig. 5 · Fig. 6
For body (Sock No. 1) follow the basic instructions on page 7.
FORELEGS: See instructions for elephant on page 7.
NOSE: Cut toe from sock, insert a small circle of cardboard and stuff (Figure 1). This makes the snout. Sew to front of head.
TAIL: Roll a 4″ strip of sock into a tube shape and insert a length of wire (see page 33 for tips on wiring). Sew closed and pull one end into a point (Figure 2). Sew the other end to body and curl the tail round finger to get corkscrew effect.
EARS: Cut four ears from sock as shown (Figure 3). Sew two together, turn and sew to side of head. Repeat for other ear.
FEATURES: Cut a pink felt nose (Figure 4) and stitch to front of snout. Embroider two stitches for the mouth lines (Figure 5). Since Piggy’s eyes are slits, exaggerate them for more expression. Embroider wide ovals in brown yarn, adding small brown buttons in the middle. Add a few eyelashes.
FEET: Make a stitch in the middle of each foot and pull tight to form trotters (Figure 6).
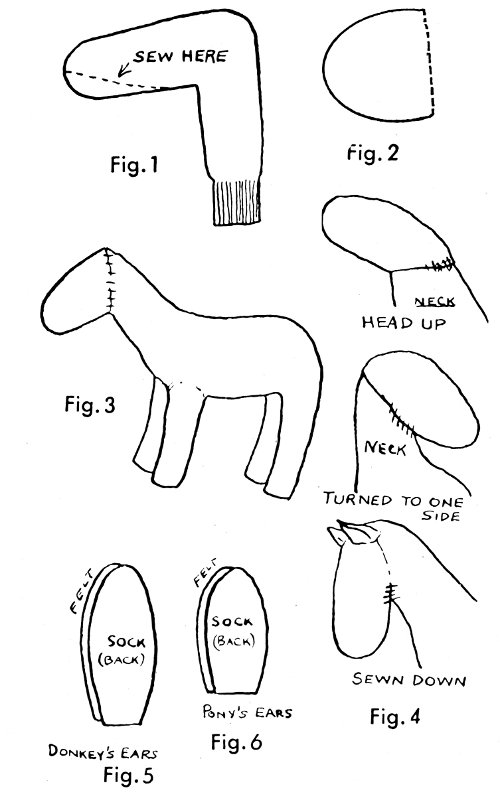
Fig. 1 · Fig. 2 · Fig. 3 · Fig. 4 · Fig. 5 · Fig. 6

Fig. 7 · Fig. 8
Follow basic instructions on page 7 for Steps 1, 2 and 3. To shape neck and head, sew a seam tapering from about the middle of the foot to about the middle of the toe. (See Figure 1, above.) Then, turn sock right side out, stuff and sew as shown in Steps 4 and 5 on page 7. This will form the neck. Do not tie, as head is made from separate piece.
FORELEGS: See instructions for Elephant on page 7. Make somewhat thinner.
HEAD: Cut toe from sock (Figure 2). Turn inside out and seam. Turn right side out and stuff. Sew to neck (Figure 3). The head can be placed at various angles (Figure 4). Shape nose, making it a little longer for the donkey.
TAIL: For the donkey braid a fairly thin tail from yarn or other material with a tuft-like tip. For the pony make the tail much fuller.
EARS: For the donkey, cut two long ears from sock (Figure 5) and two from brown felt. Sew sock and felt pieces together, leaving an opening for turning. Turn right side out and insert shaped pieces of wire (Figure 6). (See page 33 for tips on wiring.) Sew ears to head, pleating in front to curl the ears a little. For pony, cut shorter ear pieces and omit wire.
FEATURES: For nostrils, embroider two tear-shaped patches in brown yarn. For eyes, use two leaf-shaped pieces of black felt sewn to each side of the head. Over each piece, sew a flat button slightly smaller than the felt. To shape the mouth, make a long stitch with brown yarn across the lower front of the face and pinch sock around the mouth stitching to form lips (Figure 7).
MANES: A variety of materials can be used for manes. Remember that the donkey’s mane is much thinner and stringier than a pony’s mane. For the donkey, strands of black yarn can be used or a piece of black felt can be cut in a saw-tooth shape with long teeth.
TRIM: Bridles can be made from colorful leatherette. Sew pretty buttons over pieces that are stitched together to hide the joints (Figure 8). A short piece of chain will serve as a bit. For the donkey, make a colorful “blanket” with tasseled edges. Little packs, made from the toes of old colored socks can be sewn to the blanket to heighten the effect. For the pony, make a shorter “saddle blanket” and add a saddle made from an oval piece of leatherette.

Fig. 1 · Fig. 2 · Fig. 3
Use white athletic socks. For body (Sock No. 1) follow the basic instructions on page 7.
FORELEGS: See instructions for elephant on page 7.
NOSE: Cut complete toe from sock. Stuff lightly and sew to front of head, or sew to side to make kitty look to the right or left (Figure 1).
EARS: Cut two petal-shaped ears from sock and matching ears from pink felt. Sew one of each together, leaving an opening for turning. Turn and stitch to sides of head (Figure 2).
FEATURES: For eyes, cut two oblong pieces of white felt and sew to face. Sew little green buttons, highlighted with specks of white, to felt. Use tempera or white india ink for specks. Embroider nose in pink yarn, adding three little stitches to form mouth (Figure 3). A scrap of red felt sewn to the lower stitch looks like a tongue (Figure 4). For whiskers, insert broom straws or brush bristles through face near mouth.
TRIM: Use a big colorful bow with a little bell under the chin. For an extra playful look, sew a ball of yarn to front paws.

Fig. 1 · Fig. 2 · Fig. 3 · Fig. 4
For body (Sock No. 1) follow the basic instructions on page 7.
FORELEGS: See instructions for elephant on page 7.
NOSE: Cut toe from sock. Turn inside out and stitch across toe to shape a square nose (Figure 1). Turn and stuff lightly. Sew to the front of head with the seam running side to side (Figure 2).
TAIL: Cut as shown (Figure 3), seam, stuff and sew to body.
EARS: Cut as shown (Figure 4), seam and turn. Sew the 2″ side to the head, pleating in front a little to incline the ears forward. Push the ears up a bit and hold in position with a few small stitches.
FEATURES: Cut two semi-circular pieces of black felt. With curved side up, sew to face just above the nose seam. If desired, the felt may be cut into points to look like eyelashes. Add button or embroidered eyes and an embroidered nose.
TRIM: A gay felt collar or bright ribbon will do much to achieve a lively look.
START WITH INSTRUCTIONS ON PAGE 5, STEPS 2 THROUGH 6.
To shape head, pull white toe down for face and stitch to body. Tie loosely at neck with ribbon.

Step 7
Push leg against body, hold in place with one hand and stitch to body. Repeat for other leg.

Step 8
Bend legs into upside down V with white part about 1½″ longer. Stitch to hold position.

Step 9
Bend white part of leg outward to form foot. Stitch to hold and repeat for other foot.

Step 10

Fig. 1 · Fig. 2 · Fig. 3
For body (Sock No. 1) follow the basic instructions on page 7 and above.
FORELEGS: Cut about 4″ long, turn inside out, seam along one side and across the foot (Figure 1). Stuff and sew to body about ½″ apart. To keep arms from sagging, insert wires while stuffing. (See page 33 for tips on wiring.)
FEATURES: For the nose, embroider a solid “V” in pink yarn. Three stitches with black yarn makes the mouth (Figure 2). Sew on bright buttons, spaced well apart, for eyes. Add a few curved stitches in black for curly eyelashes. Insert broom straws or brush bristles for whiskers.
EARS: Cut two petal-shaped ears, 6″ long, from sock and two from pink felt (Figure 3). Sew sock and felt pieces together on the wrong side, leaving an opening for turning. Double two 12″ lengths of wire into petal shapes and insert in each ear, fastening at base of ear. Sew to sides of head with pink side forward. Pleat the felt to incline the ears forward.
TAIL: Mold a fairly large ball of cotton or use a white yarn pom pom.
TRIM: Use the prettiest bow you have and dot it with sequins and tiny spring flowers.
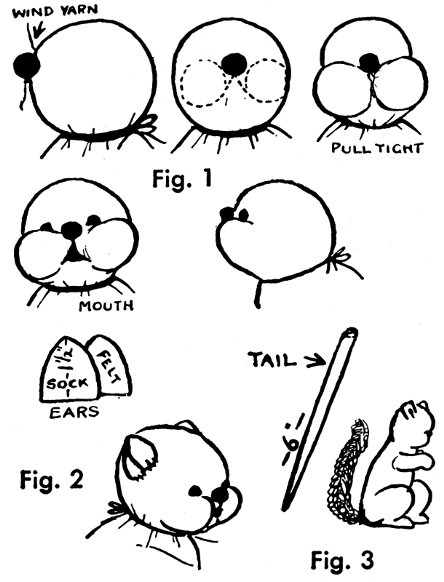
Fig. 1 · Fig. 2 · Fig. 3
For body (Sock No. 1) follow the basic instructions on pages 7 and 13.
FRONT LEGS: See Bunny’s front legs on page 13.
FEATURES: To make nose, pinch part of face into a little ball and wind yarn around it. For pouchy cheeks, use nylon thread or very strong white thread, and baste a circle on each side of the nose and ending just under the nose (Figure 1). Pluck stuffing into puffs in the middle of these circles for cheeks. Tighten stitching to hold cheeks in place. Embroider mouth with red yarn and add small brown buttons for eyes. Use broom straws or brush bristles for whiskers, pushing them through sides of face.
EARS: Cut two pointed ears from sock and two from felt (Figure 2). Sew sock and felt pieces together, leaving an opening for turning. Turn and sew to top sides of head. Pleat felt.
TAIL: Sew a thin strip of sock about 6″ long. Insert a wire and bend to shape (Figure 3). Sew to body. Use brown pom poms or jersey loopers to build up a bushy tail. Make squirrel’s tail somewhat bushier than the chipmunk’s.
STRIPES: Sew strips of black fur or felt down back of chipmunk only, spacing them about ½″ apart.

Fig. 1 · Fig. 2 · Fig. 3 · Fig. 4 · Fig. 5 · Fig. 6
For body (Sock No. 1) follow basic instructions on pages 7 and 13 with the exception of step 7. To pull face upwards stitch across back instead of front (Figure 1, above).
FRONT LEGS: See Bunny’s front legs on page 11. To achieve the down paws effect insert wires into legs and bend into L-shape (Figure 2). (See page 33 for tips on wiring.)
FACE: Cut toe from sock, stuff and sew to head (Figure 3). Add a red pom pom for a comical nose. For a doleful mouth, embroider a modified upside down V-shape and sew a lolling, long red felt tongue underneath it (Figure 4).
EARS: Cut two pieces from sock and two from pink felt (Figure 5). Sew together, leaving opening for turning. Turn and sew to side of head with ears hanging down.
EYES: Cut circles of brown felt and sew to face. Sew white buttons on circles. For a droopy look, cut crescent-shape pieces of felt and sew over so that only part of eye buttons show (Figure 6).
TAIL: Make a stubby tail from a roll of sock and sew to body.
TRIM: Add a woe-be-gone hat (see page 31 for hat designs) or a floppy ribbon bow.

Fig. 1 · Fig. 2 · Fig. 3 · Fig. 4 · Fig. 5 · Fig. 6
For body (Sock No. 1) follow the basic instructions on pages 7 and 13 but sew opening in opposite direction so that legs spread apart and there is room for the pouch. Stretch legs by pulling before stitching into sitting position.
FOREARMS: Follow directions for front legs on page 13, making them somewhat thinner and shorter.
FEATURES: Cut toe from sock, turn inside out and sew to a point (Figure 1). Turn, stuff lightly and sew to head. Mold the front of nose into a long, blunt shape, pushing in the point at the end. Embroider eye-lines with brown curved lashes (Figure 2). If possible, use crescent-shaped buttons or pieces of brown felt for eyes to avoid the “glazed” look of round buttons. Embroider mouth with brown yarn (Figure 3).
EARS: Cut four sock ears and sew into pairs (Figure 4). Turn right side out, stitch along sides of head and pleat front.
TAIL: Cut from sock and seam, leaving wide end open for stuffing (Figure 5). Turn right side out, stuff and sew to body.
POUCH: Cut a large triangle of knit to fit across the tummy with one point sewn between the legs (Figure 6). Allow the pouch to sag a little to leave room for baby kangaroo.

Fig. 1 · Fig. 2 · Fig. 3
Make the baby kangaroo from a small child’s sock in a beige or other light color. Insert a cone shaped piece of cardboard in the toe of the sock instead of the cardboard roll used in other finger puppets. Also for the baby kangaroo, there is no need to take a tuck in the heel, but rather let the heel become the top of the head (Figure 1).
FEATURES: Turn the sock inside out and sew the toe to a point. Turn right side, add padding in the very tip of the toe; then insert the cone in the toe and pad around it up to the heel. Embroider a nose and eyelines in brown, mouth in red or pink. Add tiny brown button eyes with a dot of white for highlight. Add pink felt ears similar to Mama Kangaroo’s (Figure 2).
ARMS: Cut a slit on each side of the sock just below the neck. Be sure slits are large enough to fit the fingers for manipulating the puppet. Make glove-like fingers from the second sock or the fingers from an old glove and sew them to the slits. Be sure not to sew slits closed. The best way to avoid this is to turn the puppet inside out, fit the “fingers” inside the slit and whip-switch the edges together (Figure 3).
TRIM: Add a big baby blue bow under the chin—not too tight. When not acting uppity like a puppet, baby kangaroo rests comfortably in Mama Kangaroo’s pouch (Figure 4).
... Our Fun-Loving, Mischievous Little Mascot!
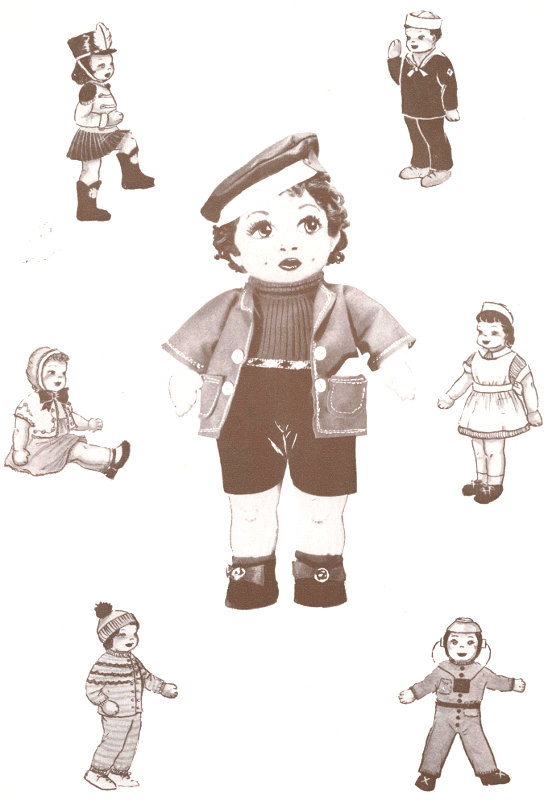
For those who want a very special doll, we have designed one with all the features of a bouncing, dimpled doll right out of a toy show window. It’s well worth the extra time and care to make Scrappy.
BASIC DOLL: Use white athletic socks and follow the basic instructions on page 19. For a more natural look, quick-dip the socks in a weak, lukewarm solution of pink dye and let dry before making the doll.
DIMPLES OR INDENTATIONS: These are quite simple to make. The trick lies in pulling a few threads back for the indentation. Use a needle long enough to go through the doll and thread it with yarn. Push the needle through from the back to the point of the indentation, catch a few of the sock threads, push the needle back through, pull both ends of the yarn and tie them (Figure 1). To make eye sockets, cheeks and lip lines see Tips and Tricks, page 33.
SHAPING BODY: Knot one end of white yarn and make three long stitches at the lower back—two that divide the legs from the body and one that divides the hips equally (Figure 2). Pull yarn tightly to make indentations. Make three dimples in the small of the back and one in the tummy.
ARMS AND LEGS: Make a dimple in each elbow and knee. Pull arms around into a natural curve, taking a small tuck along the inside of the arm if necessary (Figure 3).
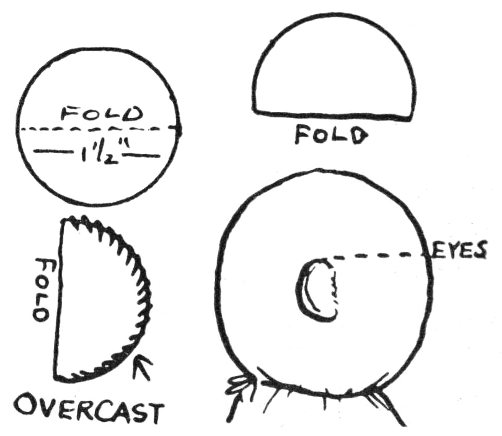
FEATURES: Mold the nose by pulling the stuffing into shape and embroider or paint tiny nostrils. For the eyes, use round buttons with shanks or salvage a pair of eyes from an old toy. Add a spot of white paint to each button eye. Embroider eyelashes and eyebrows. Cut a mouth from red felt and whip stitch to face. Then sew a white line across the middle to divide the lips. The ears are semicircles cut from a piece of sock. Roll the edges, hem and sew to the head even with the eyes (Figure 4).
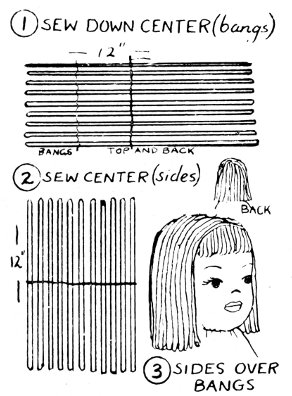
HAIR: Make colorful pom poms, using any of the hair styles on page 32. For a short hairdo, outline the hair line on the head before you arrange the pom poms.
CLOTHING: Scrappy can be dressed as a boy or a girl in a wide variety of costumes. Here’s how we dressed “him” as a little boy.
SWEATER: Use a colorful ribbed sock. Cut it off at the heel and use the cuff portion. For armholes, make a slit on each side of the sock about 1½″ down from the top. Slip sweater on and turn down the top for a turtle neck (Figure 5).
PANTS: Cut from black felt, pattern design B-2, page 29. Seam sides, turn and fit doll, tucking at the waist as necessary. Add a leatherette or plaid shoe-string belt.
JACKET: Cut from bright blue felt, pattern design A-6, page 28. Sew side seams and turn right side out. Sew two rows of white thread around all the edges for trim. Add a little square pocket and tuck in a colorful “hankie.” Sew small white buttons on the front.
TAM: Use bright blue felt, with the band in yellow felt, and follow pattern design C-17 on page 31. For a snug fit, fit the yellow band around the head, sew the ends together and use it as a guide in cutting the circles of blue felt.
SHOES: Cut from red felt, pattern design F-27, page 30. Add shiny buckles.

Fig. 1 · Fig. 2 · Fig. 3
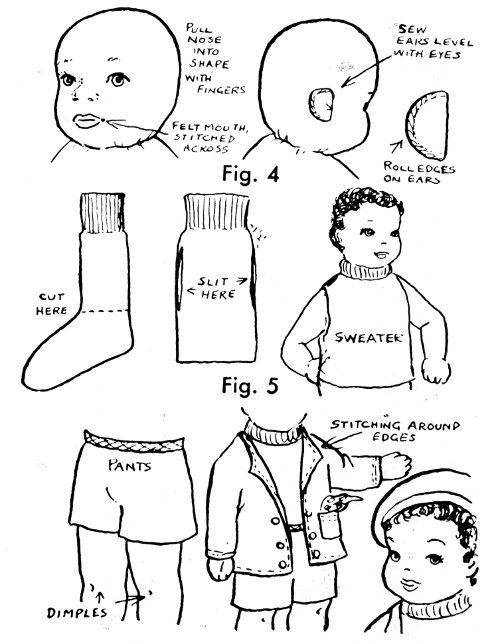
Fig. 4 · Fig. 5 · Fig. 6

Step 1
Turn Sock No. 1 inside out. Stitch across the heel to form a straight sock.

Step 2
Cut 1½″ off rib of sock so that legs are in proportion to length of body.

Step 3
Start 3″ from heel and sew two seams, ⅛″ each side of center line and across end of rib.

Step 4
Cut sock between seams and 1″ farther to make opening for the stuffing.

Step 5
Turn sock right side out. Stuff foot plumply and tie loosely with string to form head.

Step 6
Pull head forward so that white toe becomes face and stitch to chest with strong thread.

Step 7
Stuff legs and body. Sew up opening and mold figure for desired shape.

Step 8
Bend end of legs and sew a tuck to hold feet. Tie string around ankles.

Step 9
From Sock No. 2 cut arms about 5″ long. Turn inside out, seam, turn right side and stuff.

Step 10
Sew arms to sides of body and tie of each wrist with string about 1″ from end.

Step 11
Make three long stitches for finger separations and shorter ones for the thumbs.
Step 12
For the ears, cut two 1½″ circles. Fold in half and overcast along edges. Sew to head.

Fig. 1 · Fig. 2
Follow basic instructions for doll above.
FEATURES: Stitch black yarn eyelines, add long brown lashes and blue button eyes. Make three short stitches to form upturned nose. Cut a smiling mouth from red felt. Add a long stitch of white yarn to separate lips (Figure 1).
HAIR: Choose from styles on page 32 and add a big bow ribbon to top of head.
DRESS: Make a petticoat from pattern design A-13, page 29. Fit the petticoat by gathering at the waist and fastening at the back (Figure 2). Cut a skirt from the same pattern design. Use pattern design B-7, page 28, for the blouse. Gather the skirt and sew to blouse to make dress. Edge dress with rick rack or ribbon and fit to doll with opening in the back. Sew little buttons down the back to close dress. Tie a wide ribbon around waist, ending with a big bow.
SHOES: Use matching felt and cut from pattern design F-27, page 30.
PANTIES: Cut from pattern design C-3, page 29 in white cotton and trim to match dress.
FINISHING TOUCHES: Use a curtain ring for a bracelet. A string of beads around the neck will hide the seam.

Fig. 1 · Fig. 2 · Fig. 3 · Fig. 4
Follow basic instructions for doll on page 19.
FEATURES: Embroider slanted eyes, wide open, and turn the eyebrows up a little at the outer edge. With red yarn, make a smiling mouth. The nose is an arc of brown yarn (Figure 1).
HAIR: See method H-29, page 32.
EARS: Cut two petal-shaped ears from pink felt. Sew to head, folding a little as you sew (Figure 2).
JACKET: In green felt or semi-stiff material, cut from pattern design A-6, page 28. Seam and fit to doll, opening at the front. Cut a “V” in the back at the waist to form tails and sew a small button at the top of the “V”. Trim sleeves into points. Tie a tiny bow at the neck front to pull the jacket closed (Figure 3).
PANTS: Use green or yellow felt, cut from pattern B-2, page 29. Trim the leg edges to match the jacket. Fit to body and hide raw edges with a strip of ribbon or felt.
SHOES: Use brown felt and cut from pattern design C-24, page 30. Sew a little jingle bell to toes and trim edges (Figure 4).
HAT: In green or yellow felt cut eight petal shaped pieces. Stitch together by overlapping petals into a large daisy. Overlap last two petals to fit head (Figure 5). Stitch a bell or pom pom on top.

Fig. 1 · Fig. 2 · Fig. 3 · Fig. 4
Follow basic instructions on page 19.
FEATURES: Embroider eyes in brown yarn, nose in beige and mouth in red (Figure 1).
HAIR: Choose from methods on page 32.
PANTS: Cut from black or dark blue material, pattern design A-1, page 29. Sew a narrow stripe down outside of legs. Tuck waistline to fit.
COAT: Use bright red felt, or semi-stiff material, following pattern design A-6, page 28. Do not slit at middle front, rather slit to one side (Figure 2). To hide stitches, sew on a strip of felt, and add four small brass buttons down each side. Use white felt strips, ½″ by 11″ for cross piping. Cover front and back seams with a black leatherette belt. Make two epaulettes for shoulders from 1½″ long fringed ovals of yellow felt (Figure 3).
SHOES: Cut from black felt, pattern design A-22, page 30.
HAT: Cut from black felt, pattern design B-16, page 31. Loop gold or white silk cord across front and add a narrow chin strap of black felt (Figure 4).
FINISHING TOUCHES: Sew a little buckle to the front of each shoe. Cut a strip of ½″ wide white felt to fit snugly around the neck. Tuck coat into this band and fasten in front with a brass button. Use the same cord material as on hat and loop around coat buttons (Figure 5).

Fig. 1 · Fig. 2 · Fig. 3
Follow basic instructions for doll on page 19.
FEATURES: Sew on two small brown buttons for eyes. Embroider lashes and upturned nose with brown yarn (Figure 1). A quarter-size ring of red felt makes a mouth.
HAIR: See page 32 for short hair styles.
OVERALLS: Cut from blue and white striped material, pattern design A-1, page 29. Seam and turn. Sew a 2″ square of the same material to each side for pockets and a 2″ square, hemmed on three sides, for bib. For straps, use two strips of material and add tiny buckles in front (Figure 2).
SHIRT: Cut from soft blue material, pattern B-7, page 28, and fit to body, tucking in at waist.
HAT: Cut a ½″ wide strip of black felt to fit around the head. From the same overall material, cut a 7″ circle and gather to fit band (Figure 3). A visor is made from a 3″ circle of black felt folded in half and sewn around edges. Stitch to front of hat.
SHOES: Cut from black felt, pattern design A-22, page 30.
FINISHING TOUCHES: Tie a small red tri-cornered handkerchief around neck and tuck a bright scrap of material in one pocket.
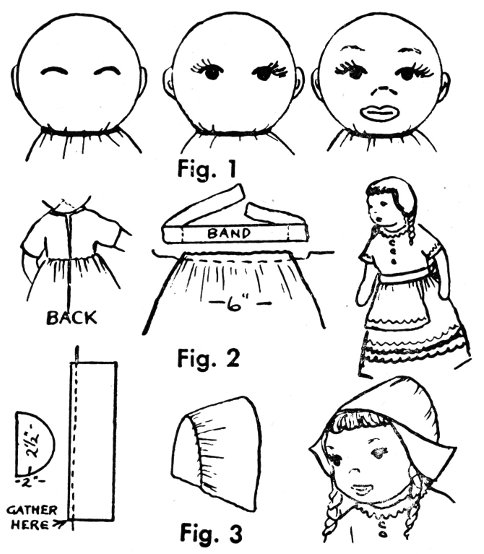
Fig. 1 · Fig. 2 · Fig. 3
See basic instruction for doll on page 19.
FEATURES: Stitch a black eyeline with yarn, add long black lashes and blue button eyes. Make three stitches to form a turned up nose. Cut a mouth from red felt and sew to face. Separate lips with a long white stitch (Figure 1).
HAIR: See method N-34, page 32 for braided hair.
DRESS: Cut blouse from soft blue material, pattern design B-7, page 28. Fit to doll with opening at back. Cut skirt from the same material, using pattern design B-14, page 29. Gather around waist with small stitches and fit over blouse. Trim both pieces with rick rack or ribbon. The apron is a 6″ square of white organdy gathered at one edge and sewn to an 18″ strip of white ribbon. Tie the apron over the waist to hide the seam (Figure 2).
PANTIES: Cut from white cotton material, pattern design C-3, page 29 and trim with narrow lace.
SHOES: Use felt to cut from pattern design B-23, page 30. Embroider a tiny flower on each toe.
HAT: Use a 3″ by 11″ piece of crisp white fabric and a smaller piece for the back (Figure 3). Gather the larger piece to fit the back and hem edges. Turn the lower corners of the hat back from the face. A tiny safety pin will hold the hat in place.

Fig. 1 · Fig. 2 · Fig. 3
Follow instructions for doll on page 19.
FEATURES: Cut one dime-size circle of white felt and cut it into two. Sew each half on for an eye, curved side up. Sew tiny flat buttons to one side. With black yarn, make six long lashes over each eye (Figure 1).
HAIR: Choose a style on page 32.
BLOUSE: Cut from soft white material, pattern design B-7, page 28, and dress doll with opening in back.
SKIRT: Use permanently pleated plaid material and cut a skirt that reaches to the knees (Figure 2). Sew to blouse with opening at back. Use a strip of brown felt or oilcloth to hide the seam. Over this, stitch a circle of fur about 4″ across. The Scotch call this a sporran (Figure 3). Drape a length of ribbon, about 1″ wide and 9″ long, over one shoulder, tucking the ends under the belt.
HAT: Cut from green or red felt (to match dress) from pattern design C-17, page 31. Add a tiny pom pom for a gay touch.
SHOES: Cut from black felt or oilcloth from pattern design A-22, page 30.
PANTIES: If desired, cut from black felt or jersey pattern C-3, page 29.

Fig. 1 · Fig. 2 · Fig. 3
Follow basic instructions for doll on page 19.
FEATURES: Embroider eyes in black yarn, nose in brown. Cut a smiling mouth from red felt, snipping out some from the middle (Figure 1).
HAIR: See page 32 for choice of styles.
JACKET: Cut from bright colored felt, pattern design A-6, page 28. Make a scarf in striped cloth or from a brightly striped sock to drape across one shoulder (Figure 2).
PANTS: Cut from brown or black material following pattern design D-4, page 29. Trim sides of legs with rick rack or ribbon. Fit to body, tucking at waist with the jacket inside the pants. To hide the seam, fasten a cummerbund of red felt or oilcloth.
SHOES: Cut in black felt from pattern design A-22, page 30. Decorate with sequins or beads.
HAT: Cut from matching felt, pattern A-15, page 31. Shape with fingers into a high Mexican hat (Figure 3).

Fig. 1 · Fig. 2 · Fig. 3
Follow basic instructions for doll on page 19.
FEATURES: Embroider slanted eyes in black yarn, nose in brown and smiling mouth in red (Figure 1).
HAIR: Follow method M-33, page 32, stitching yarn at the back of the head only to braid into a pigtail.
JACKET: Use colorful satin or shiny cotton and cut from pattern design A-6, page 28. Make sleeves wider at the wrist end. Opening will be in the front.
PANTS: In contrasting satin material, cut from pattern design E-5, page 29. Leave a 1″ opening at the ankle of each leg (Figure 2).
SHOES: Cut from red felt from pattern design A-22, page 30. Turn tops of shoes down a bit and trim with sequins or beads.
HAT: Cut a circle of felt 8″ across. Make a slit from edge to the middle. Overlap slit edges to form a coolie hat (Figure 3). Then measure around the head and make a ½″ wide band of felt. Whip stitch this to the inside of the coolie hat.
FINISHING TOUCHES: The more beads, sequins and embroidery on the clothes, the prettier the finished doll will look.

Fig. 1 · Fig. 2 · Fig. 3 · Fig. 4
Follow basic instructions for doll on page 19.
FEATURES: Embroider almond-shaped eyes in black yarn, nose in beige and smiling mouth in red (Figure 1).
HAIR: See method P-28, page 32.
JACKET: Use terry cloth, fur or similar material and cut from pattern design A-6, page 29.
PANTS: Use the same material and cut from pattern design A-1, page 29. Fit jacket over pants and add leatherette belt if desired (Figure 2).
BOOTS: Cut from same material following pattern design A-22, page 30. Use bright color thread to make a design on boots (Figure 3).
HOOD: Cut the toe from second sock and slit from raw edge to tip of toe (Figure 4). Whip stitch raw edges. Sew a band of pom poms (see method P-28, page 32) or a strip of fur along edge that fits around face. A second type of parka can be made from design E-19, page 31. Trim with pom poms or fur.

Fig. 1 · Fig. 2 · Fig. 3
Follow basic instructions for doll on page 19.
FEATURES: For eyes, sew two white oval pieces of felt to face. Embroider a line across each one, stitching a small brown button just below. Cut a mouth-shaped piece of red felt and sew into place. A small up-turned nose can be embroidered in brown yarn (Figure 1).
HAIR: Make black yarn pom poms (see P-28, page 32) and sew closely to head.
DRESS: For a halter top, cut a 3″ wide strip of gay soft material, gather a little along bottom and tie around body above waist. Make a tuck at the middle front (Figure 2). For the hulu skirt use raffia, yarn or strips of dyed nylon stocking. Wind yarn around a piece of cardboard 6″ wide about 100 times. Slip a 12″ length of ribbon under loops, leaving ends free (Figure 3). Cut opposite edge of loops, remove carefully and tie around waist (Figure 4). Over this fit a 1″ wide ribbon.
PANTIES: Cut from the same material as top piece, pattern design C-3, page 29.
FINISHING TOUCHES: Push small curtain rings over waists and ankles. Stitch to ears for earrings. Fasten a string of beads around neck to hide seam. Tuck an artificial flower into the hair. Twist several colored pipe cleaners together to make a lei.

Fig. 1 · Fig. 2 · Fig. 3 · Fig. 4
Follow basic instructions for doll on page 19.
FEATURES: Use brown yarn for eyebrows, a line of black for eyelids, nose and mouth. Sew on two flat buttons for eyes (Figure 1).
HAIR: See page 32 for short hair styles.
DRESS: Cut a shirt from checkered material, pattern design A-6, page 28. Seam and fit to body with opening at front. Sew tiny white buttons down front to hide seam. Cut pants from pattern design E-5, page 29, in brown or beige material. Seam and turn. Pleat pants at waist to fit over shirt. Cut leatherette chaparejos from pattern design A-1, page 29, cutting away top as indicated. Use a 1″ width of brown leatherette for belt and finish with a little buckle. Tie a bright three-cornered kerchief around neck (Figure 2).
HAT: Cut from beige felt, pattern A-15, page 31. Shape with fingers (Figure 3).
BOOTS: Cut in black or brown felt from pattern design E-25, page 30.
FINISHING TOUCHES: Sew loops of string or thin rope to one hand. Holsters can be cut from leatherette (Figure 4).

Fig. 1 · Fig. 2 · Fig. 3
Follow basic instructions for doll on page 19.
FEATURES: Sew round brown button eyes over dime-size circles of white felt. Embroider eyebrows in black yarn, nose in brown and mouth in red yarn (Figure 1).
HAIR: See pattern design K-31, page 32. Braid in two parts, one each side of the face.
JACKET: Use brown or beige material and cut from pattern design A-6, page 28. Sew sides, leaving a 1″ slit at waist (Figure 2). Stitch colored fringe, rick rack or beads along the front and bottom of the jacket. Paint, glue or sew colorful Indian sign on back.
PANTS: Use the same material and follow pattern design A-1, page 29. Trim outside of each leg with rick rack or fringe.
HEADDRESS: Fasten a ½″ wide strip of oilcloth or felt around head, tucking a bright feather in at the back (Figure 3). Beads or sequins can be glued to the band for a more colorful effect.
MOCCASINS: Cut from colored felt following pattern design A-22, page 30. Turn down the edges and glue on beads or sequins.
FINISHING TOUCHES: Tie a string of the brightest beads you can find around the neck to hide the seam.

Fig. 1 · Fig. 2 · Fig. 3 · Fig. 4
Follow basic instructions for doll on page 19.
FEATURES: Embroider eyebrows, lashes and nose in brown yarn. Use small blue beads or buttons for eyes, red felt for mouth (Figure 1).
HAIR: See J-30, page 32 for pony tail hair style.
DRESS: Cut blouse from any bright material, except red, pattern design C-8, page 28. Cut skirt from same material, design B-14, page 29. Gather around waist and sew to blouse, with opening at the back (Figure 2). Tie a ribbon around the waist to hide the seam.
SHOES: Cut from black felt, pattern design F-27, page 30. Sew a tiny flower to the toe of each shoe.
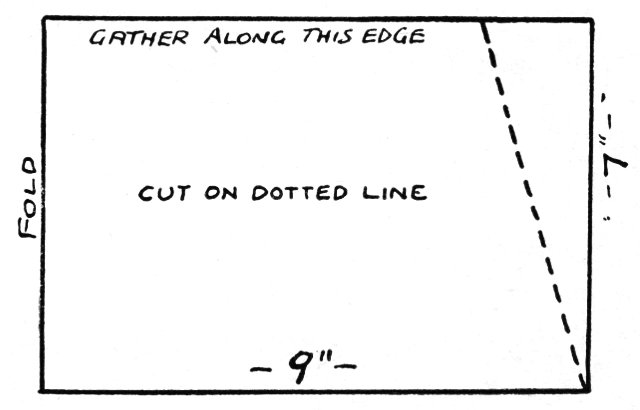
CLOAK: Use a piece of red material 8″ long by 14″ wide. Hem all sides. Gather along one 14″ side to fit around neck (Figure 3). Cut hood from pattern design P-36. Gather along neck edge and sew to cloak. Tie a strip of white ribbon around neck to hide the seam.
FINISHING TOUCHES: Wire a bunch of artificial flowers to one hand (Figure 4) or a tiny basket over one arm. Make panties and a petticoat from pattern designs if desired.

Fig. 1 · Fig. 2 · Fig. 3
Follow basic instructions for doll on page 19.
FEATURES: Use brown yarn for eyebrows and nose; red yarn for a smiling mouth. The flat brown buttons with a dot of white on each make the eyes (Figure 1).
HAIR: Use method H-29, page 32.
TUNIC: Use green felt or a semi-stiff material and cut from pattern design A-6, page 28. Cut a 7″ circle of brown felt and remove a portion from the middle 2½″ across. Slit from edge to middle to fit over the head. Scallop around outer edge. This collar fits over the jacket with opening in front. Punch three holes on each side and lace with narrow ribbon (Figure 2).
PANTS: Use soft green material and cut from pattern design B-2, page 29. If the material stretches easily, make the pants tighter than the design, since Robin Hood wears tights. Fit to body, tucking at waist. Fit tunic over pants, add belt and buckle.
SHOES: Make from green felt or similar material following pattern design A-22, page 30. Cut a “V” shaped slit at each side of shoes or roll the top down slightly (Figure 3).
CAP: Cut from green felt following pattern design D-18, page 31. After the cap is sewn on the head, turn the edge up about ½″ at the back. Attach a long red feather for color.

Fig. 1 · Fig. 2 · Fig. 3 · Fig. 4
Follow basic instructions for doll on page 19.
FEATURES: Sew a small round red bead for nose. Embroider merry blue eyes in yarn, and add heavy white yarn eyebrows. Cut and sew a crescent-shaped piece of red felt for a smiling mouth (Figure 1).
SUIT: Use red material, cut and sew coat from pattern design A-6, page 28, with opening in front. Cut pants from pattern design A-1, page 29. Sew and tuck at waist to fit body.
BOOTS: Make from black felt or oilcloth, pattern D-25, page 30. Sew a tiny jingle bell to each boot.
CAP: From the same material as suit, cut a piece 8″ × 12″. Sew the shorter sides together to form a tube. Gather one end to close.
FUR TRIM: Strips of white fur, terry cloth or rolled white cotton make effective edgings. Sew around cap, neck, front and bottom edges of coat (Figure 2).
FINISHING TOUCHES: Tie a bow of ribbon to a Christmas bell and wire to one hand (Figure 3). Sew a jingle bell to gathered end of cap. Around the waist, fasten a 1″ wide black belt with a buckle in front. Form a beard (from cap to chest) and moustache of white cotton or fur and sew to face (Figure 4).

Fig. 1 · Fig. 2 · Fig. 3 · Fig. 4
Follow basic instructions for doll on page 19.
FEATURES: For the nose, sew on a large red button. Use two small white buttons with spots of black painted on, for eyes. Embroider highly arched eyebrows in black yarn. Cut a crescent-shaped large mouth from red felt. A single white yarn stitch will divide the lips (Figure 1).
HAIR: Make orange or yellow pom poms (see P-28, page 32) and stitch to head, sideburn fashion (Figure 2).
SUIT: Use bright colored material for jacket and follow pattern design A-6, page 28. Seam and turn. Gather wrists to fit arms. Cut pants from pattern design D-4, page 29. Seam; turn and gather waist slightly. Sew to jacket to make one garment. Gather legs to fit ankles.
HAT: Make a cone from white felt and sew to head at a rakish angle. Turn edges up ½″. Stitch two red pom poms to front of hat (Figure 3).
SHOES: Cut from black felt, pattern design A-22, page 30. Make foot much longer and sew pom poms to tips of toes.
FINISHING TOUCHES: Make a ruffle of 2″ wide stiff net to fit around the neck (Figure 4). Do the same for wrists and ankles. Sew pom poms down the front. Add belt over waist seam.

A6 LONG SLEEVE (CUT TWO)

D9 SLEEVELESS (CUT TWO)

C8 TUNIC STYLE (CUT TWO)
B7 SHORT SLEEVE (CUT TWO)

A10 APRON

B11 APRON

C12 APRON

A1 LONG PANTS AND CHAPS (CUT TWO)
B2 SHORT PANTS (CUT TWO)

C3 PANTIES (CUT TWO)

D4 WIDE PANTS (CUT TWO)

E5 NARROW PANTS (CUT TWO)

A13 LONG SKIRT (CUT ONE)
B14 SHORT SKIRT (CUT ONE)

A22 LACED SHOE

B23 DUTCH SHOE

C24 POINTED SHOE

D25-E25 BOOTS

E26 LOW BOOT

F27 SLIPPER

A15 BRIM HAT

B16 TOP HAT

C17 TAM

D18 ROBIN HOOD

E19 DUTCH BONNET

P36-F20 HOODS

G21 COOLIE

CONE HAT

STOCKING CAP

H29 SHORT LOOP

P28 POM POMS

J30 PONY TAIL
K31 BANGS

L32 CREW CUT

M33 STRAIGHT

N34 BRAIDS

FACIAL EXPRESSIONS
SOCK SIZES: The animals and dolls in this book were made from size 13 socks; the puppets were made from size 9 socks. The clothing pattern designs will fit toys made from these sizes.
STUFFING: We used kapok for ease in packing and shaping. Nylon fluff, dacron filling, shredded foam rubber or lint from an automatic dryer will work as well. Old nylon hose and other cloth scraps tend to become lumpy. Use a pencil or dowel for packing stuffing in narrow places. Clean stuffed toys by dry sudsing.
WIRING: Stove pipe wire or similar types work fine. Coat hanger wire is too thick and hard to bend. Always bend wire ends up and in to prevent them from working through. Wraps wires with adhesive tape or string. Dabs of cement on the wire will hold string in place (Figure 1). Insert wires straight and bend the completed tail, ears and so forth.

Figure 1
SHAPING: Toys can be molded by pushing or pulling the stuffing with the fingers. An occasional stitch will help hold the shape. To mold chubby cheeks, make circles of small stitches, pluck the stuffing up in the circles, pull the ends of the thread together and tie off (Figure 2).

Figure 2
Indentations and dimples are made by pulling a few sock threads back into the toy. This is done by pushing a threaded needle through from the back, catching a few sock threads and pushing the needle back again. Pulling on the needle thread pulls the sock threads in. Repeat for the desired indentations and tie off. Figure 3 shows how this is done for eye sockets. For toys with side eyes (bunnies, donkeys, etc.) work from eye to eye. For more natural lip lines, catch several sock threads in shallow arcs over and under the lips and in a straight line between the lips (Figure 4). See Scrappy on page 17 for ideas on where to put dimples. Use a darning needle to push through the head or body. Lightly pencilled guide lines are helpful.

Figure 3

Figure 4
FEATURES: To give the face a flesh colored look, dip the toe of the sock in a weak solution of pink dye before the sock is cut and stuffed. Be sure the solution is lukewarm. For a more professional look, sew flesh colored stockinet over the face after the features have been molded and stitched into shape (Figure 5).

Figure 5
EYES: If you plan to make several toys, especially animals, invest in manufactured eyes. Or, use eyes from discarded toys. Shoe buttons also make very good eyes since they have shanks. Add a highlight speck of white paint to each button eye to avoid that blank look. Never use eyes that are too small unless you want an older or mean look.
HAIR: Inexpensive wigs, or ones from discarded dolls, can be substituted for pom poms and scrap fur. Pencil guide lines on the head before sewing on pom poms.
FACIAL EXPRESSIONS: Much can be done to accentuate features and to give toys individuality by embroidering or using felt eyebrows, eyelashes, wrinkles, crinkles and so forth. Felt pieces should be glued on or sewn with tiny stitches in matching thread. We used the satin stitch for embroidered features (Figure 6).

Figure 6
CLOTHING: Use freshly laundered and pressed materials—it’s well worth the extra effort. Avoid patterned materials that are out of proportion to the toys. Crayons (pressed well into the fabric) or textile paints can be used to make small pattern designs. Tempera paints tend to wash out. Choose materials that do not easily unravel.
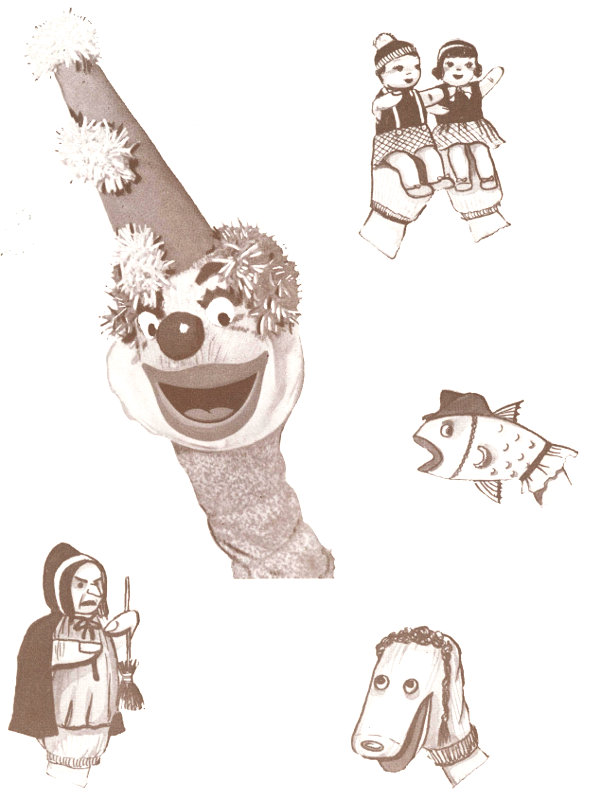

Fig. 1 · Fig. 2 · Fig. 3 · Fig. 4
MAKING AND STUFFING HEAD: Insert a short piece of paper towel roll in the toe of the sock, then push stuffing up around it until the head is plump and round (Figure 1). Tie a ribbon around the neck and stitch in place to keep it from slipping (Figure 2). Features can be added and the face pushed into various shapes. The finger puppets on pages 35-38 are just a few of the endless variations that can be made.
ARMS: Make a slit on each side of the sock below the neck—just large enough for your thumb and little finger. If desired, little glove-like fingers can be sewn over the openings, otherwise just whip stitch the edge (Figure 3). Add appropriate clothes.
TO OPERATE: Push your index finger and second finger into the cardboard roll; and thumb and little finger into the slits on the side (Figure 4). Head can be bobbed up and down or sideways by moving the fingers inside the cardboard roll while the thumb and little finger can move together and apart to grasp articles, wave, and so on.

Fig. 1 · Fig. 2 · Fig. 3 · Fig. 4
Follow basic instructions above for finger puppets.
NOSE: Use the red heel of another sock or a piece of felt. Cut in a triangular shape, sew the long sides together, turn and stuff lightly. Bend for a hooked nose and sew to face (Figure 1).
MOUTH: Sew on an upside down crescent-shaped piece of felt.
EYES: Sew on two black buttons, close together over nose. Embroider forbidding black eyebrows.
HAIR: Add scraggly black hair by sewing on loops of black yarn in various lengths and cutting the ends open (Figure 2).
CLOAK: Use a piece of dark material about 12″ × 15″. Fold in half lengthwise. Sew across one end starting at the corner of the folded edge and tapering down to a point 2″ from the top of the open edge (Figure 3). The highest point becomes the peak of the hood. Turn right side out. Gather the material about 4″ down from the front of the hood to fit around the neck of the puppet. Stitch ribbon over gathers and tie ends at front. Turn front edges of hood back about 1″ and hem rough edges (Figure 4).

Fig. 1 · Fig. 2 · Fig. 3 · Fig. 4

Fig. 5 · Fig. 6 · Fig. 7 · Fig. 8
Follow basic instructions for finger puppets on page 35.
LEGS: Cut the white ribbings from two socks to make the legs. Cut each ribbing lengthwise and sew down the long sides and across one end. Turn and stuff lightly. Sew the legs to the front of the puppet sock opposite the heel so that the puppet appears to “sit” when propped over the edge of a stage. Tie ribbon around the ankles (Figure 1). For more realistic legs with feet, follow methods used for dolls on pages 17 and 19.
HAIR: See page 32 for hair styles. Make both from the same color yarn.
FEATURES: Embroider eyelashes and eyebrows in black yarn. Mouths are red felt. Sew an upturned nose with beige yarn (Figure 2).
BLOUSE: Cut Katie’s blouse from two pieces of white material (Figure 3). Sew together at shoulders, leaving a space for neck and then down sides leaving arm holes. Pull up over bottom of puppet. Add a wide lace collar to hide shoulder seams and short lace edging around arm holes.
SKIRT: Cut a 10″ circle of felt and remove a 3″ circle from the center. Slit up the back and overlap to fit around the puppet. Fasten with a snap. Add shoulder straps of the same material to keep the skirt from slipping. Trim the skirt and straps with embroidery or sequins (Figure 4).
SHIRT: Cut Jamie’s shirt from the same white material and stitch to the body in the same way. Cut a collar-shaped piece of material and stitch around the neck. Whip stitch arm holes. Add buttons down front of shirt (Figure 5).
PANTS: Cut the pants as shown from the same felt material as the skirt—pointed piece for the front (Figure 6). Sew the point down onto the sock between the legs. Back piece will actually look like a skirt and is merely there to make short pants appear complete. Make suspenders from the same material and attach to the pants with tiny buttons.
HATS: For Katie, make a bonnet as shown and tie to the head with ribbon bow under chin (Figure 7). Jamie wears a beanie made from the toe of a sock. Roll back the brim and add a pom pom to the top (Figure 8).
SHOES: If you use more elaborate legs with feet, follow the shoe pattern designs on page 30 making about ½ size. Remember to sew the shoes to the feet rather than try to fit shoes over feet.

Fig. 1 · Fig. 2 · Fig. 3 · Fig. 4
Follow basic instructions for finger puppets on page 35.
NOSE AND EYES: Pinch a small portion of the sock together in the middle of the face and tie off—dab with red paint. Sew on one button eye and make a black patch for the other. Make evil looking black eyebrows from yarn (Figure 1).
MOUTH: From red felt, cut a wide, sly, grinning mouth. Remove a small portion from the center to give an open grin. Add a gruesome tooth or two and a villainous black mustache (Figure 2).
BEARD: Add yarn or fringed felt around the chin and sides of the face. At the top of the beard, add a few longer strands of wild looking hair (Figure 3).
DRESS: Make a bandana from bright spotted material and tie it around the top of the head, knotting the ends at one side. Hang brass curtain rings on for earrings. For the shirt, take a black colored sock and cut it off at the heel. For arm holes, make a slit on each about 1″ down from the top of the cuff. Slip over the puppet and turn down top for a turtle neck effect. Add a belt from leatherette and paint the skull and cross bones in the center (Figure 4).
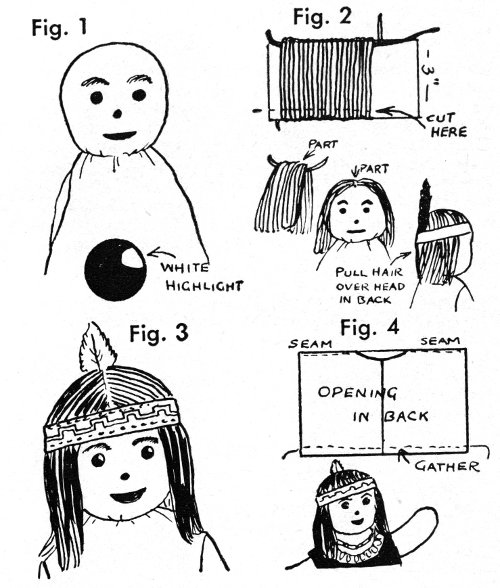
Fig. 1 · Fig. 2 · Fig. 3 · Fig. 4
Follow basic instructions for finger puppets on page 35.
FEATURES: Use two round brown buttons for eyes—paint on a spot of white for highlight. Embroider brows in black and mouth in red. Add small button nose (Figure 1).
HAIR: Wind black yarn around a card 3″ wide, about 20 times. Gather along one edge with black yarn; snip other edge open and remove carefully (Figure 2). Sew to the top of the head with the seam down the center like a part and hair hanging down each side of the head. Fit a band of tape (embroidered or plain with beadwork) around the head and add a feather at the back (Figure 3).
DRESS: Cut a shirt from a piece of material 8″ × 6″, seam and fit to puppet with opening at the back. Gather along the waist and sew to a strip of felt for the belt (Figure 4).
OPTIONAL: Add novel beads around neck and wrists (if you have added the glove-like fingers mentioned in the basic instructions). You might try a Mohawk hairdo, braids, fancy headdress, medicine man’s mask or other variations.

Fig. 1 · Fig. 2 · Fig. 3 · Fig. 4
Follow basic instructions for finger puppets on page 35.
FEATURES: Cut toe from the second sock, turn inside out and sew to a nose shape (Figure 1). Stuff lightly and stitch to the front of the head. Embroider end of the nose in black yarn and add an upside down Y-shaped mouth in red yarn. Sew on black button eyes over brown felt circles (Figure 2).
EARS: Cut two petal shaped pieces from brown felt or scrap fur and two pieces from pink felt. Sew the pink and brown pieces together, leaving an opening for turning. Turn and stitch to head. Pleat felt.
MANE: Sew bushy yarn pom poms (see page 32) or strips of scrap fur over the top of the head and down around the neck (Figure 3).
PAWS: Make two small paws from the second sock or the fingers of an old glove and sew over the slits at the sides of the puppet. Add small yarn pom poms or fur scraps near the ends (Figure 4).
FINISHING TOUCHES: If he is to be THE LION in “The Wizard of Oz” hang a little heart locket around the neck.

Fig. 1 · Fig. 2 · Fig. 3 · Fig. 4
Follow the basic instruction for the finger puppets on page 35.
FEATURES: Cut toe from second sock, turn inside out and sew to a narrower end (Figure 1). Turn, stuff and stitch to the face. Embroider two nostrils at the tip and sew on a red mouth. Cut two circles of brown felt and sew to each side of the head. Add bright buttons or beads to complete the eyes. For a sleepy look, use flat button eyes and sew crescent-shaped pieces of felt over so that only the bottom half of the eyes shows. Embroider eyelashes, or cut them from felt, if you want to give Mr. Billy Goat a coy expression.
EARS AND HORNS: Cut ears as shown and sew to the top of the head (Figure 2). Make horns from white felt, sewing them into a tube. Insert pipe cleaners into the tubes so that they can be bent to the desired shape. Sew firmly to the top of the head, pushing pipe cleaners down into the head a bit. Curve horns backwards (Figure 3).
WHISKERS: Add a pom pom (wound only 10 times) under the chin and trim to a point.
TRIM: Add a high, formal white collar with a black bow tie. Make a pair of spectacles from thin wire with the nose piece setting well towards the tip (Figure 4).

Fig. 1 · Fig. 2 · Fig. 3 · Fig. 4
The puppets shown on the following pages are basically those in which the mouth is made to move by the action of the hand. In making these puppets keep in mind that ample room must be left over and under the mouth piece for the fingers to operate freely to obtain the maximum facial expressions. Do not use staples, pins or other sharp objects to hold pieces together since they are apt to cut the hand or fingers. Make the puppets large enough so that they can be easily slipped on and off by the child or adult using them.
STEP NO. 1: Tuck the heel of the sock to make a straight tubular piece.
STEP NO. 2: Cut the foot of the sock as shown by the dotted lines.
STEP NO. 3: Turn the sock inside out and cut a piece of red material the shape of the mouth opening. Also cut a matching piece from cardboard. Sew the red material to the sock with an overhand stitch or use your sewing machine.
STEP NO. 4: Turn the sock right side out. Fold the cardboard piece in half and insert in the sock.
STEP NO. 5: Add features such as button eyes, nose, hair and so forth.
ANIMATION: Most talking puppets are operated by placing the thumb under the bottom cardboard piece and the fingers over the upper piece. Open and close the hand to make the puppet talk. Twisting the hand will give a variety of facial expressions and moving the arm about will add to the illusion.
The basic instructions above are for the crocodile which appeared in the September 1954 issue of Pack-O-Fun magazine. With modifications, literally hundreds of puppet variations can be made. By simply adding a saw-toothed strip of felt on top, Mr. Crocodile can be turned into a scaly, scary dragon. Or by shortening the mouth and building up the head, as we did for the clown and ringmaster on page 40, you can create a multitude of lovable characters from Hansel and Gretel to modern animated cartoon animals.
Whiskers and mustaches will give villainous or rube-like looks; eyes and ears can be exaggerated for comic expressions; cheeks can be padded for a chubby look and noses can be anything from a tiny button to a long duck’s beak. Hairdos can be long and feminine, short and boyish or fringed for a lion’s mane. Hats, dresses and other costume pieces will enhance the puppet character and hide the arm.
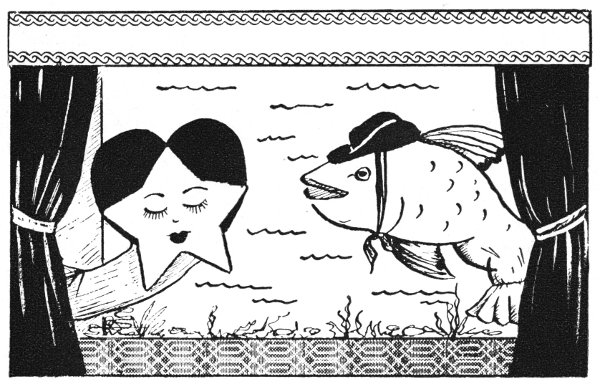
The puppets on pages 42-43 were made for the underwater western skit “Phineas Rides Again” written by our Katie Conrad. Four of the characters are talking puppets. Louie the Lobster is a finger puppet and will give you an idea how both types of puppets can be combined for maximum visual effect. Susie Starfish has no moving parts, but being the beautiful heroine really doesn’t need any! It is possible for one person to handle all six roles.

Fig. 1 · Fig. 2 · Fig. 3 · Fig. 4
For Sock No. 1 follow Steps 1, 2, 3, 4 on page 39, but make the mouth shorter.
HEAD: Cut 4″ from the toe of the second sock. Stuff lightly, but firmly, so that it doesn’t get too heavy (Figure 1). Sew to the top of the first sock, turning under the rough edges. Be careful not to sew the space above the cardboard closed in Sock No. 1. Shape nice and round (Figure 2).
FEATURES: For eyes use large round or crescent-shaped pieces of felt with bright buttons sewn on. Embroider exaggerated eyebrows. Use a big bead or button for the nose. Colorful pom poms (see page 32) are sewn on for sideburns. Cut a piece of bright red felt for an upper lip and sew it to the top sock (Figure 3).
COSTUME: Add a cone-shaped hat (see Clown Doll on page 27) perched at a rakish angle. To hide the arm, stitch a colorful ruffle around the neck—being careful not to sew it so tight that you will have difficulty getting your arm in the puppet (Figure 4).
ANIMATION: Slip the thumb into the bottom part of the mouth and the fingers into the top.

Fig. 1 · Fig. 2 · Fig. 3 · Fig. 4
Make the head the same way as the clown above.
FEATURES: The ringmaster’s features are more nearly natural than those of the clown. Embroider thick eyebrows in black, brown or red yarn and sew buttons under them for eyes. For the nose cut a triangular piece from a matching sock, sew the long edges together and turn. Stuff lightly and sew to face. Bend the nose to give it a slight hook (Figure 1). The curling mustache, hair and neat sideburns can be embroidered in yarn matching or contrasting with the eyebrows (Figure 2). Ears can be cut from felt. Sew them on so that they stick out a bit.
COSTUME: Use shiny black oilcloth to make the top hat described on page 31. Set at a jaunty angle and whip stitch to head. Stitch a white wing collar around the neck with just the suggestion of a tie (Figure 3). For greater realism add the upper part of a frock coat with wide lapels. Put a white carnation on the right lapel (Figure 4).
OTHER CIRCUS PUPPETS: By following the basic head patterns you can make other circus folk and animals. For features use the many suggestions for the Sock Animals and Sock Dolls. For example, for a talking elephant stitch a trunk right above the mouth, add tusks and big ears, a tasseled headpiece and so forth.
Reprinted from Pack-O-Fun Skit Book No. 1
The puppets are made from old socks with burlap, felt, cardboard, sponge, plastic lacing and buttons used for features, tentacles, and claws.
The operators sit on chairs on either side of a theatre made from a cardboard carton, with openings cut in each side. Stage directions for right and left are for a person ON STAGE, facing the audience. The direction from which each character enters must be considered in making the puppets.
(The ANNOUNCER appears in front of the curtain.)
Announcer: Good evening, ladies and gentlemen! For years the action-filled western has reigned supreme as a favorite with adventure story lovers. Recently, however, its popularity has been challenged by a rush of interest in underwater drama. Tonight, we combine these trends and proudly present a production that will please everyone: A-Cowboy-Story-Under-The-Sea. Its title is “Phineas Rides Again” or “The Foam Ranger.”
The following exciting characters will appear:
Phineas Fish—The Hero
Clem Clam—His Sidekick
Susie Starfish—The Heroine
Oily Oliver Octopus—The Villain
Louie the Lobster—His Accomplice
Sam Sponge—The Sheriff
Shall we join the players way down yonder in the wild western ocean?
(ANNOUNCER leaves, and the curtain opens far enough to reveal the puppet theatre. PHINEAS has entered from RIGHT and is on stage, alone, singing. Others backstage may join him to add to the volume.)
Phineas: (To the tune of “Home on the Range”)
Oh, give me a home where the mackerel roam
And the cod and the anchovies play.
Where often is seen, the cheerful sardine
And the sunfish is shining all day.
(CLEM enters from LEFT during song.)
Phineas: Hi ya Clem. Some tun-a, eh?
Clem: Frankly, Finny, it smelt.
Phineas: Ah, quit carping.
Clem: Did you hear about the commotion in town?
Phineas: What’s up?
Clem: Somebody robbed the Oyster bank early this morning.
Phineas: Great Grunion! Did they get much?
Clem: Stole all the pearls and a million dollars in gold fish.
Phineas: Phew! That’s a lot of fish! What’s the Sheriff doing?
Clem: Oh, he’s floundering around.
Phineas: Clem, go tell him we’ll help solve this case.
Clem: O.K. (CLEM leaves, PHINEAS begins singing “I’m An Old Cow Hand,” but is violently bumped as the SHERIFF enters LEFT.)
Phineas: Hey, Sam, did you do that on porpoise?
Sheriff: Sorry, Finny. I haven’t been so excited since my dogfish had guppies.
Phineas: Clem told me about the robbery. Have you found the varmints yet?
Sheriff: Nope. They left a red herring on the trail.
Phineas: Hm. Must have been some daring soles.
Sheriff: Oh, I don’t know. Only an ’eel would do a thing like that.
Phineas: I’ll go get my sea horse from the coral and join the posse.
Sheriff: Fine. See you later. (SHERIFF leaves. Before PHINEAS can leave, a girl is heard, crying, and SUSIE enters, LEFT.)
Susie: Oh, I’m so frightened! Please help me, Phineas.
Phineas: Stop your blubberin’, little gal. What’s wrong?
Susie: (weeping) I can’t find the Sheriff! I think I know who robbed the bank, and they’re after me!
Phineas: Who, gal, who?
Susie: Oily Oliver Octopus and Louie the Lobster!
Phineas: Are you sure? Why I remember them when they were just a couple of perch-snatchers.
Susie: Oh, yes. I saw them near the bank this morning, but I didn’t realize what they were going to do.
Phineas: I’ll go tell the Sheriff. He’ll throw out the fishnet.
Susie: (wailing) Oh, don’t leave me! Stur-geon-na be trouble.
Phineas: Don’t you fret, Susie, gal. Hide behind that clump of seagrass till I come back. (PHINEAS leaves, RIGHT. SUSIE also leaves, LEFT, apparently to hide. OLIVER enters RIGHT and LOUIE, LEFT.)
Oliver: Well, we made our get-away all right.
Louie: Yep, but I’m scared, boss. We’ve got to catch that little starfish before she talks.
Oliver: Well, where is she? She came this way.
Louie: ’Course I kinda hate to hurt her. Gosh, she’s purtier than Marlin Monroe!
Oliver: Forget it! Don’t be a sucker for a pretty fish.
Louie: Reckon you’re right. I’ll go look that-a-way. (leaves, LEFT.)
Oliver: (Looks about, sees SUSIE hiding and drags her on stage from left.) Aho! So there you are. Come on out.
Susie: I was right! It WAS you and Louie.
Oliver: Yes, but you’ll never tell.
Susie: Unhand me, you cod! Somebody else already knows!
Oliver: Who?
Susie: I won’t tell!
Oliver: Talk, you little sprat!
Susie: I won’t! I won’t!
Oliver: So you’re gonna clam up? Wait’ll I get Louie! (OLIVER leaves, and SUSIE is alone.)
Susie: (wailing) Land o’Ocean, what shall I do? (PHINEAS enters, RIGHT.)
Phineas: I’ll save you, Susie gal! Go hide again, quick! (SUSIE disappears quickly and LOUIE enters from the LEFT.)
Louie: Hey, Boss, where is she? (sees PHINEAS.) Out o’ my way, Buster.
Phineas: I’ll fix you, you lobster mobster! (PHINEAS rushes at LOUIE, butts him from underneath with his head and mouth and LOUIE gives a bounce in the air and collapses over the front of the stage, hanging limply. PHINEAS leaves.)
Phineas: (offstage) And you! I’ll smush you, you octopus, you! (OLIVER flies in after some loud offstage noises, bounces up in the air and collapses next to LOUIE over the front of the stage.) Clem! Sheriff! Drag these sidewinders out of here! (OLIVER and LOUIE go off limply, as if being dragged. PHINEAS enters, RIGHT.)
Susie: (offstage) Can I come out now?
Phineas: Come on. It’s all over. They’ve vamoosed to the calaboose.
Susie: (enters LEFT) My hero! You’re a dol-Phin-eas!
Phineas: Shucks, ’Twarn’t nuthin’.
Susie: But however did you do it? They’re so strong and powerful!
Phineas: For years I used to be just another poor fish. But then I started eating a better breakfast every day, and now I win all my fights.
Susie: My goodness! But tell me, what do you eat for breakfast?
Phineas: Why SEAWEEDIES, Gal, SEAWEEDIES!!
Susie: My CHAMPION! (They kiss.)
Curtain

Fig. 1 · Fig. 2
Use a pastel colored sock to hide the arm. From white or light pink felt cut a star-shaped face about 6″ from tip to tip. Round the points for a soft look. For hair, cut a heart-shaped piece of black, yellow or red felt. Sew to star face with matching thread. Add eyebrows, long inverted coy eyelashes, two stitches to suggest a nose and a red rosebud mouth (Figure 1). Sew the star-face to the sole of the sock (Figure 2).

Fig. 1 · Fig. 2
Use a white sock for our hero. Cut a 1½″ slit in the toe and turn the sock inside out. Cut a 3½″ circle of pink or red felt, fold and overstitch around mouth slit (Figure 1). Turn sock right side out and add a thin lip line. For the fan-shaped tail, cut strip of burlap or felt and sew to sock cuff, pleating slightly. Be careful not to sew cuff together. Hide the rough cut edges with a band of felt. (Figure 2). Add fins and bright colored gills. Button eyes and a few accents of paint will provide realism. Add a cowboy hat (see page 31) and tie or stitch to head (Figure 3). To animate Phineas, slip two fingers above the mouth and two fingers under the mouth. Open and close scissors-fashion.
Remember to sew a tuck in the heels to make straight tubular socks. Puppets are made for either hand and stage directions can be reversed. Dye white socks if colored socks are not available.

Fig. 1 · Fig. 2 · Fig. 3
Make Clem from a light colored sock. The head is shortened by cutting off the toe of the sock (Figure 1). For the mouth, cut a clam-shaped piece of pink felt and matching piece from stiff cardboard (Figure 2). Follow the basic instructions on page 39, stretching the sock to fit the shape of the mouth pieces. Sew on big, bright blue button eyes, add a short, colored felt beard under the chin and paint black, clam-like streaks on top of the head (Figure 3). Make a cowboy hat (see page 31) and stitch to head. Operate like the basic puppet.

Fig. 1 · Fig. 2 · Fig. 3
Use light green socks and make the same way as the clown on page 40. Substitute two thin pieces of yellow cellulose sponge in place of felt mouth. Use separate pieces for the top and bottom because dry cellulose sponge is not very pliable (Figure 1). Embroider a mustache, long hair and sideburns in dark green yarn. Sew on big yellow button eyes. Add a cowboy hat (see page 31 for hats) with a silver star and stitch a bright bandana around the neck (Figure 2). Operate like the clown puppet.

Fig. 1 · Fig. 2 · Fig. 3
A black sock is a must for this black hearted villain. Make the same way as the clown on page 40, only with a much smaller mouth. Cut two half-crescents from white felt, sew on head and add small button eyes (Figure 1). For tentacles, cut eight triangular pieces of material, about 6″ long and 2″ at the base. Sew the long sides together, stuff lightly and stitch to body with seams on the bottom (Figure 2). Make a stovepipe hat, following hat principles on page 31, and stitch to head at an angle (Figure 3). Operate like the clown puppet.

Fig. 1 · Fig. 2 · Fig. 3
A devilish red sock suits this villain. Turn it inside out. Cut off the rib and the toe. Sew two 4″ seams, about 1″ apart (Figure 1). Cut out the material between the seams. Turn sock right side out. Cut off a piece of the toe, stuff lightly and sew between the “arms” for a head. Attach two 1″ lengths of red pipe cleaner to the top of the head for “eye stalks.” Add small bright buttons or beads to the tips. Use a long plastic thong for the feelers. Push the thong through the head (Figure 2). From stiff cardboard cut out two claws and paint red. Stuff about 1″ of the “arms” and sew the claws to the stuffed ends. Add four bent red pipe cleaners to each side of the body for legs (Figure 3). To operate, use forefinger and little finger to move the “arms.”

Fig. 1 · Fig. 2 · Fig. 3 · Fig. 4
BODY: Use cut foot portion from white sock, or if you wish a larger penguin, take a tuck in the heel making a long tubular piece. Stuff toe lightly for head and heavier toward the opening which will be the base of the penguin. Sew opening closed. Tie off at the neck with a formal black bow-tie (Figure 1).
WINGS: From black material, felt or oilcloth, cut two pieces for each wing as shown. Seam, turn and insert a piece of cardboard the same size and shape. Sew on just below the neck (Figure 2).
FEET: Cut two webbed feet from black material and two from cardboard. Sew or glue one of each together and fasten to the base of the penguin (Figure 3).
FEATURES: Sew a tiny white button onto a small circle of black felt for each eye. Make a cone-shaped beak from yellow felt. Draw a line along each side to indicate the mouth and sew to the front of the head (Figure 4).
PENGUIN FAMILY: Make Mrs. Penguin slightly smaller, and Junior about two-thirds size. Mr. Penguin will, of course, wear a top hat (page 31) while Mrs. Penguin may have to be content with pattern design E-19. A colorful apron might mollify her feelings though. Junior can wear a top hat or, since he’s a bit young, a beanie.

Fig. 1 · Fig. 2 · Fig. 3 · Fig. 4
BODY: Use foot from light colored sock. Stuff plump and round. Sew up opening in the bottom. Tie off about one-third the way down for the head. Add a stiff-necked white collar with the tabs turned back around the neck (Figure 1).
WINGS: From stiff material of the same color, cut two wings as shown. Sew one to each side of the body with tip of the wings extending down and out at the bottom to form the tail (Figure 2).
FEET: Cut two webbed feet from cardboard and two from stiff material. Sew one of each together and fasten to the bottom of the duck (Figure 3).
FEATURES: Sew a round black button onto a large circle of white felt for each eye. Make the beak from two pieces of felt and sew to the front of the face (Figure 4).
OPTIONAL: If you want to make a sailor out of your duck, add a sailor hat perched at an angle on the top of his head and the regular sailor’s collar and neckerchief. To make the collar, use a rectangle of blue material, cut a deep arc from one corner to the other, then overlap corners at the front. Embroider or paint 3 white stripes along the three outside edges—add neckerchief. The hat is made from the ribbed end of a sock. Cut off the cuff, gather rough edge together tightly and turn back the other edge about 1″. If you prefer a stiff brim, insert a piece of cardboard around the inside of the turned back section.
There are any number of combinations that you might like to try for your double doll, such as Peppy and Sleepy, Suzy and Sammy or a couple of clowns. We have chosen Happy and Dumpy.
BODY: Take a tuck in the heel of the sock so that you have a straight tubular sock. Cut off the cuff. Stuff plumply and firmly and sew opening closed. Tie off the middle to divide the sock into two dolls; then tie off the head about half way down from each end (Figure 1). Do not tie tightly or doll will be too wobbly.

Fig. 1
FEATURES: The big differences in these two dolls are the features which are exactly the opposite. Both faces have the same type of nose made by pulling a piece of the face into a ball or lump and then tying off with yarn or thread. The eyebrows are embroidered in black yarn. Happy’s eyebrows are curved in a convex manner while Dumpy’s are concave. Use large bright buttons for eyes, centering them under the eyebrows. Embroider a few tears running from Dumpy’s eyes. Dumpy has a turned down mouth made of red felt while Happy’s mouth is turned up in a big grin. Cut the two mouths identically and merely reverse the points. A few frown lines can be embroidered with brown yarn on Dumpy’s forehead (Figure 2).

Fig. 2
HAIR: Make the hair from pom poms, choosing a style from page 32. Happy and Dumpy can be either boys or girls or one of each. Make Happy’s hair from yellow or red pom poms; Dumpy’s from black or brown. Set Dumpy’s hair lower on the head to accentuate the frowning look. If one or both heads are boys, add ears of semicircular felt to the sides of the head.
ARMS AND LEGS: Actually these are one and the same. The legs of one doll serve as the arms of the other and vice-versa. Make them from a second sock. Cut out four rectangles about twice the length of the head. Sew the long edges together and across one end. Turn and stuff lightly. Sew to the shoulders so that they hang freely. When the doll is flipped over, one pair should flop to the sides for arms while the other pair hangs down for the legs (Figure 3). Tie ribbon around the wrist/ankles.

Fig. 3
DRESS: Make a wide flaring skirt from a pattern design on page 29. For greater contrast sew two different colored pieces together so that when the doll is flipped over a different colored skirt will appear. Add blouses, bows, hats or any other bits that you think will make the dolls look cuter.
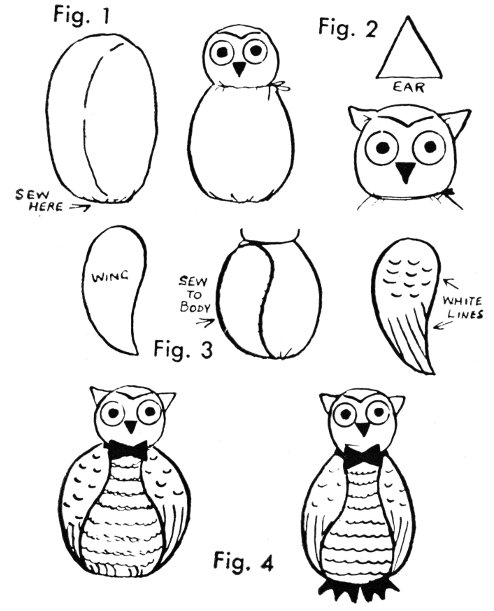
Fig. 1 · Fig. 2 · Fig. 3 · Fig. 4
BODY: Use foot of a large, dark sock. Stuff firmly, but flatten it as you do. Sew opening closed. With yarn, tie off the head about one-third of the way down.
FEATURES: Sew two white felt circles fairly close together and in the middle of each sew small yellow buttons for the eyes. Make a small cone-shaped beak from shiny oilcloth and sew on just below the eyes so that eyes and nose form a triangle. Accent this triangle by embroidering a “V” just above the eyes and nose (Figure 1).
EARS: Cut four pieces as shown from the rest of the sock. Sew two together for each ear, turn and stitch to top of head, pleating the front half slightly (Figure 2).
WINGS: Cut two wings from matching felt and sew one on each side of owl. Accent with lines of white for feathers (Figure 3). To finish the owl, embroider or paint wavy lines on the body between the two wings. Also embroider claws at the bottom, curving them as if clinging to a branch of a tree. Finally add a big red bow at the neck (Figure 4). If you prefer a stuffed doll, stuff it round and plump and then add felt feet at the bottom.

Fig. 1 · Fig. 2 · Fig. 3 · Fig. 4
BODY: Use cut foot portion from sock. Round open edges. Stuff firmly and sew opening closed. Push stuffing around until you have a nice egg shape.
FEATURES: For eyes, sew two small circles of black felt over two large half-circles of white felt. The black eye pieces can be placed in the center, to the sides or cross-eyed to get different effects. Add eyebrows of black felt or embroider them in black yarn. A few stitches in brown yarn will serve for a nose. Cut the mouth from red felt (Figure 1).
ARMS AND LEGS: Make two arms and legs from the second sock. Cut rectangular pieces, sew along the long sides and across one end. Turn and stuff. Sew the arms to the sides of the body and the legs to the bottom. The longer the arms and legs are, the cuter your doll will be. Tie yarn or ribbon around wrists and ankles.
HAIR: Make yarn pom poms (see page 32) and sew them to the top of the head.
DRESS: From the pattern designs on page 29, make a pair of pants and tack them on Humpty Dumpty. A colorful cap can be made from pattern designs on page 31. If you decide to make shoes (page 30) bend the legs for feet, stitching the tuck.

Fig. 1 · Fig. 2 · Fig. 3 · Fig. 4 · Fig. 5 · Fig. 6
Make your Weenie Doll from a dark sock so that his features really show up.
BODY: Use cut foot portion from sock. Stuff firmly and sew opening closed. Tie off one-third the length for the head (Figure 1).
FEATURES: Cut two ovals of white felt and two smaller ones of black. Sew or glue the smaller ones to the larger and sew them on the face for the eyes. Embroider eyelashes and eyebrows in black. Make a circle of red felt with a stitch across the center for the mouth. Embroider a few lines in the center of the face for the nose (Figure 2).
EARS: Cut two petal-shaped ears. Roll outer edges, hem and sew to side of head at eye level (Figure 3).
ARMS AND FEET: Cut two arms from white felt and two from cardboard. Sew one of each together, making sure you have one for the right and one for the left side of the body. Stitch to body (Figure 4). Cut two feet from black felt and two from cardboard. Sew one of each together and fasten to the bottom of the doll. Add buckles or bow to the toes (Figure 5).
CAP: Cut about 3″ from the ribbing of the sock. Gather cut edge together tightly. Place cap on head, tying a band around the cap about 1″ down from the gathers and adding a pom pom at the top (Figure 6).

Fig. 1 · Fig. 2 · Fig. 3 · Fig. 4
MOUTH: Cut an oval of cardboard 3″ × 4″ and insert it in the toe of the sock. Stitch the toe of the sock to the edges of the cardboard to give the mouth shape. Embroider brown ovals, just above the mouth for the nostrils. Stuff toe firmly down to the heel of the sock (Figure 1).
FEATURES: Make eyes from tear-drop shaped pieces of black felt with tiny brown buttons in the center. With paint add a highlight of white in the center of each eye. Cut two ears from brown felt or leatherette. Fold in half and sew to the top of the head. Add a mane made from fringe or loops of yarn. Start at the top of the head over the eyes, go between the ears and down the back of the horse (Figure 2).
RIDING STICK: Push a broomstick into the sock up to the heel. Pad well all around the broomstick down to the cuff of the sock (Figure 3). Tie off tightly. Add a halter made from leatherette or oilcloth, carrying the reins to the back of the horse’s neck. Add festive pom poms and jingle bells (Figure 4).
End of Project Gutenberg's How to Make Sock Toys, by John M. Clapper

*** END OF THIS PROJECT GUTENBERG EBOOK HOW TO MAKE SOCK TOYS ***

***** This file should be named 63454-h.htm or 63454-h.zip *****
This and all associated files of various formats will be found in:
        http://www.gutenberg.org/6/3/4/5/63454/

Produced by Stephen Hutcheson, Lisa Corcoran and the Online
Distributed Proofreading Team at https://www.pgdp.net

Updated editions will replace the previous one--the old editions will
be renamed.

Creating the works from print editions not protected by U.S. copyright
law means that no one owns a United States copyright in these works,
so the Foundation (and you!) can copy and distribute it in the United
States without permission and without paying copyright
royalties. Special rules, set forth in the General Terms of Use part
of this license, apply to copying and distributing Project
Gutenberg-tm electronic works to protect the PROJECT GUTENBERG-tm
concept and trademark. Project Gutenberg is a registered trademark,
and may not be used if you charge for the eBooks, unless you receive
specific permission. If you do not charge anything for copies of this
eBook, complying with the rules is very easy. You may use this eBook
for nearly any purpose such as creation of derivative works, reports,
performances and research. They may be modified and printed and given
away--you may do practically ANYTHING in the United States with eBooks
not protected by U.S. copyright law. Redistribution is subject to the
trademark license, especially commercial redistribution.

START: FULL LICENSE

THE FULL PROJECT GUTENBERG LICENSE
PLEASE READ THIS BEFORE YOU DISTRIBUTE OR USE THIS WORK

To protect the Project Gutenberg-tm mission of promoting the free
distribution of electronic works, by using or distributing this work
(or any other work associated in any way with the phrase "Project
Gutenberg"), you agree to comply with all the terms of the Full
Project Gutenberg-tm License available with this file or online at
www.gutenberg.org/license.

Section 1. General Terms of Use and Redistributing Project
Gutenberg-tm electronic works

1.A. By reading or using any part of this Project Gutenberg-tm
electronic work, you indicate that you have read, understand, agree to
and accept all the terms of this license and intellectual property
(trademark/copyright) agreement. If you do not agree to abide by all
the terms of this agreement, you must cease using and return or
destroy all copies of Project Gutenberg-tm electronic works in your
possession. If you paid a fee for obtaining a copy of or access to a
Project Gutenberg-tm electronic work and you do not agree to be bound
by the terms of this agreement, you may obtain a refund from the
person or entity to whom you paid the fee as set forth in paragraph
1.E.8.

1.B. "Project Gutenberg" is a registered trademark. It may only be
used on or associated in any way with an electronic work by people who
agree to be bound by the terms of this agreement. There are a few
things that you can do with most Project Gutenberg-tm electronic works
even without complying with the full terms of this agreement. See
paragraph 1.C below. There are a lot of things you can do with Project
Gutenberg-tm electronic works if you follow the terms of this
agreement and help preserve free future access to Project Gutenberg-tm
electronic works. See paragraph 1.E below.

1.C. The Project Gutenberg Literary Archive Foundation ("the
Foundation" or PGLAF), owns a compilation copyright in the collection
of Project Gutenberg-tm electronic works. Nearly all the individual
works in the collection are in the public domain in the United
States. If an individual work is unprotected by copyright law in the
United States and you are located in the United States, we do not
claim a right to prevent you from copying, distributing, performing,
displaying or creating derivative works based on the work as long as
all references to Project Gutenberg are removed. Of course, we hope
that you will support the Project Gutenberg-tm mission of promoting
free access to electronic works by freely sharing Project Gutenberg-tm
works in compliance with the terms of this agreement for keeping the
Project Gutenberg-tm name associated with the work. You can easily
comply with the terms of this agreement by keeping this work in the
same format with its attached full Project Gutenberg-tm License when
you share it without charge with others.

1.D. The copyright laws of the place where you are located also govern
what you can do with this work. Copyright laws in most countries are
in a constant state of change. If you are outside the United States,
check the laws of your country in addition to the terms of this
agreement before downloading, copying, displaying, performing,
distributing or creating derivative works based on this work or any
other Project Gutenberg-tm work. The Foundation makes no
representations concerning the copyright status of any work in any
country outside the United States.

1.E. Unless you have removed all references to Project Gutenberg:

1.E.1. The following sentence, with active links to, or other
immediate access to, the full Project Gutenberg-tm License must appear
prominently whenever any copy of a Project Gutenberg-tm work (any work
on which the phrase "Project Gutenberg" appears, or with which the
phrase "Project Gutenberg" is associated) is accessed, displayed,
performed, viewed, copied or distributed:

  This eBook is for the use of anyone anywhere in the United States and
  most other parts of the world at no cost and with almost no
  restrictions whatsoever. You may copy it, give it away or re-use it
  under the terms of the Project Gutenberg License included with this
  eBook or online at www.gutenberg.org. If you are not located in the
  United States, you'll have to check the laws of the country where you
  are located before using this ebook.

1.E.2. If an individual Project Gutenberg-tm electronic work is
derived from texts not protected by U.S. copyright law (does not
contain a notice indicating that it is posted with permission of the
copyright holder), the work can be copied and distributed to anyone in
the United States without paying any fees or charges. If you are
redistributing or providing access to a work with the phrase "Project
Gutenberg" associated with or appearing on the work, you must comply
either with the requirements of paragraphs 1.E.1 through 1.E.7 or
obtain permission for the use of the work and the Project Gutenberg-tm
trademark as set forth in paragraphs 1.E.8 or 1.E.9.

1.E.3. If an individual Project Gutenberg-tm electronic work is posted
with the permission of the copyright holder, your use and distribution
must comply with both paragraphs 1.E.1 through 1.E.7 and any
additional terms imposed by the copyright holder. Additional terms
will be linked to the Project Gutenberg-tm License for all works
posted with the permission of the copyright holder found at the
beginning of this work.

1.E.4. Do not unlink or detach or remove the full Project Gutenberg-tm
License terms from this work, or any files containing a part of this
work or any other work associated with Project Gutenberg-tm.

1.E.5. Do not copy, display, perform, distribute or redistribute this
electronic work, or any part of this electronic work, without
prominently displaying the sentence set forth in paragraph 1.E.1 with
active links or immediate access to the full terms of the Project
Gutenberg-tm License.

1.E.6. You may convert to and distribute this work in any binary,
compressed, marked up, nonproprietary or proprietary form, including
any word processing or hypertext form. However, if you provide access
to or distribute copies of a Project Gutenberg-tm work in a format
other than "Plain Vanilla ASCII" or other format used in the official
version posted on the official Project Gutenberg-tm web site
(www.gutenberg.org), you must, at no additional cost, fee or expense
to the user, provide a copy, a means of exporting a copy, or a means
of obtaining a copy upon request, of the work in its original "Plain
Vanilla ASCII" or other form. Any alternate format must include the
full Project Gutenberg-tm License as specified in paragraph 1.E.1.

1.E.7. Do not charge a fee for access to, viewing, displaying,
performing, copying or distributing any Project Gutenberg-tm works
unless you comply with paragraph 1.E.8 or 1.E.9.

1.E.8. You may charge a reasonable fee for copies of or providing
access to or distributing Project Gutenberg-tm electronic works
provided that

* You pay a royalty fee of 20% of the gross profits you derive from
  the use of Project Gutenberg-tm works calculated using the method
  you already use to calculate your applicable taxes. The fee is owed
  to the owner of the Project Gutenberg-tm trademark, but he has
  agreed to donate royalties under this paragraph to the Project
  Gutenberg Literary Archive Foundation. Royalty payments must be paid
  within 60 days following each date on which you prepare (or are
  legally required to prepare) your periodic tax returns. Royalty
  payments should be clearly marked as such and sent to the Project
  Gutenberg Literary Archive Foundation at the address specified in
  Section 4, "Information about donations to the Project Gutenberg
  Literary Archive Foundation."

* You provide a full refund of any money paid by a user who notifies
  you in writing (or by e-mail) within 30 days of receipt that s/he
  does not agree to the terms of the full Project Gutenberg-tm
  License. You must require such a user to return or destroy all
  copies of the works possessed in a physical medium and discontinue
  all use of and all access to other copies of Project Gutenberg-tm
  works.

* You provide, in accordance with paragraph 1.F.3, a full refund of
  any money paid for a work or a replacement copy, if a defect in the
  electronic work is discovered and reported to you within 90 days of
  receipt of the work.

* You comply with all other terms of this agreement for free
  distribution of Project Gutenberg-tm works.

1.E.9. If you wish to charge a fee or distribute a Project
Gutenberg-tm electronic work or group of works on different terms than
are set forth in this agreement, you must obtain permission in writing
from both the Project Gutenberg Literary Archive Foundation and The
Project Gutenberg Trademark LLC, the owner of the Project Gutenberg-tm
trademark. Contact the Foundation as set forth in Section 3 below.

1.F.

1.F.1. Project Gutenberg volunteers and employees expend considerable
effort to identify, do copyright research on, transcribe and proofread
works not protected by U.S. copyright law in creating the Project
Gutenberg-tm collection. Despite these efforts, Project Gutenberg-tm
electronic works, and the medium on which they may be stored, may
contain "Defects," such as, but not limited to, incomplete, inaccurate
or corrupt data, transcription errors, a copyright or other
intellectual property infringement, a defective or damaged disk or
other medium, a computer virus, or computer codes that damage or
cannot be read by your equipment.

1.F.2. LIMITED WARRANTY, DISCLAIMER OF DAMAGES - Except for the "Right
of Replacement or Refund" described in paragraph 1.F.3, the Project
Gutenberg Literary Archive Foundation, the owner of the Project
Gutenberg-tm trademark, and any other party distributing a Project
Gutenberg-tm electronic work under this agreement, disclaim all
liability to you for damages, costs and expenses, including legal
fees. YOU AGREE THAT YOU HAVE NO REMEDIES FOR NEGLIGENCE, STRICT
LIABILITY, BREACH OF WARRANTY OR BREACH OF CONTRACT EXCEPT THOSE
PROVIDED IN PARAGRAPH 1.F.3. YOU AGREE THAT THE FOUNDATION, THE
TRADEMARK OWNER, AND ANY DISTRIBUTOR UNDER THIS AGREEMENT WILL NOT BE
LIABLE TO YOU FOR ACTUAL, DIRECT, INDIRECT, CONSEQUENTIAL, PUNITIVE OR
INCIDENTAL DAMAGES EVEN IF YOU GIVE NOTICE OF THE POSSIBILITY OF SUCH
DAMAGE.

1.F.3. LIMITED RIGHT OF REPLACEMENT OR REFUND - If you discover a
defect in this electronic work within 90 days of receiving it, you can
receive a refund of the money (if any) you paid for it by sending a
written explanation to the person you received the work from. If you
received the work on a physical medium, you must return the medium
with your written explanation. The person or entity that provided you
with the defective work may elect to provide a replacement copy in
lieu of a refund. If you received the work electronically, the person
or entity providing it to you may choose to give you a second
opportunity to receive the work electronically in lieu of a refund. If
the second copy is also defective, you may demand a refund in writing
without further opportunities to fix the problem.

1.F.4. Except for the limited right of replacement or refund set forth
in paragraph 1.F.3, this work is provided to you 'AS-IS', WITH NO
OTHER WARRANTIES OF ANY KIND, EXPRESS OR IMPLIED, INCLUDING BUT NOT
LIMITED TO WARRANTIES OF MERCHANTABILITY OR FITNESS FOR ANY PURPOSE.

1.F.5. Some states do not allow disclaimers of certain implied
warranties or the exclusion or limitation of certain types of
damages. If any disclaimer or limitation set forth in this agreement
violates the law of the state applicable to this agreement, the
agreement shall be interpreted to make the maximum disclaimer or
limitation permitted by the applicable state law. The invalidity or
unenforceability of any provision of this agreement shall not void the
remaining provisions.

1.F.6. INDEMNITY - You agree to indemnify and hold the Foundation, the
trademark owner, any agent or employee of the Foundation, anyone
providing copies of Project Gutenberg-tm electronic works in
accordance with this agreement, and any volunteers associated with the
production, promotion and distribution of Project Gutenberg-tm
electronic works, harmless from all liability, costs and expenses,
including legal fees, that arise directly or indirectly from any of
the following which you do or cause to occur: (a) distribution of this
or any Project Gutenberg-tm work, (b) alteration, modification, or
additions or deletions to any Project Gutenberg-tm work, and (c) any
Defect you cause.

Section 2. Information about the Mission of Project Gutenberg-tm

Project Gutenberg-tm is synonymous with the free distribution of
electronic works in formats readable by the widest variety of
computers including obsolete, old, middle-aged and new computers. It
exists because of the efforts of hundreds of volunteers and donations
from people in all walks of life.

Volunteers and financial support to provide volunteers with the
assistance they need are critical to reaching Project Gutenberg-tm's
goals and ensuring that the Project Gutenberg-tm collection will
remain freely available for generations to come. In 2001, the Project
Gutenberg Literary Archive Foundation was created to provide a secure
and permanent future for Project Gutenberg-tm and future
generations. To learn more about the Project Gutenberg Literary
Archive Foundation and how your efforts and donations can help, see
Sections 3 and 4 and the Foundation information page at
www.gutenberg.org


Section 3. Information about the Project Gutenberg Literary Archive Foundation

The Project Gutenberg Literary Archive Foundation is a non profit
501(c)(3) educational corporation organized under the laws of the
state of Mississippi and granted tax exempt status by the Internal
Revenue Service. The Foundation's EIN or federal tax identification
number is 64-6221541. Contributions to the Project Gutenberg Literary
Archive Foundation are tax deductible to the full extent permitted by
U.S. federal laws and your state's laws.

The Foundation's principal office is in Fairbanks, Alaska, with the
mailing address: PO Box 750175, Fairbanks, AK 99775, but its
volunteers and employees are scattered throughout numerous
locations. Its business office is located at 809 North 1500 West, Salt
Lake City, UT 84116, (801) 596-1887. Email contact links and up to
date contact information can be found at the Foundation's web site and
official page at www.gutenberg.org/contact

For additional contact information:

    Dr. Gregory B. Newby
    Chief Executive and Director
    gbnewby@pglaf.org

Section 4. Information about Donations to the Project Gutenberg
Literary Archive Foundation

Project Gutenberg-tm depends upon and cannot survive without wide
spread public support and donations to carry out its mission of
increasing the number of public domain and licensed works that can be
freely distributed in machine readable form accessible by the widest
array of equipment including outdated equipment. Many small donations
($1 to $5,000) are particularly important to maintaining tax exempt
status with the IRS.

The Foundation is committed to complying with the laws regulating
charities and charitable donations in all 50 states of the United
States. Compliance requirements are not uniform and it takes a
considerable effort, much paperwork and many fees to meet and keep up
with these requirements. We do not solicit donations in locations
where we have not received written confirmation of compliance. To SEND
DONATIONS or determine the status of compliance for any particular
state visit www.gutenberg.org/donate

While we cannot and do not solicit contributions from states where we
have not met the solicitation requirements, we know of no prohibition
against accepting unsolicited donations from donors in such states who
approach us with offers to donate.

International donations are gratefully accepted, but we cannot make
any statements concerning tax treatment of donations received from
outside the United States. U.S. laws alone swamp our small staff.

Please check the Project Gutenberg Web pages for current donation
methods and addresses. Donations are accepted in a number of other
ways including checks, online payments and credit card donations. To
donate, please visit: www.gutenberg.org/donate

Section 5. General Information About Project Gutenberg-tm electronic works.

Professor Michael S. Hart was the originator of the Project
Gutenberg-tm concept of a library of electronic works that could be
freely shared with anyone. For forty years, he produced and
distributed Project Gutenberg-tm eBooks with only a loose network of
volunteer support.

Project Gutenberg-tm eBooks are often created from several printed
editions, all of which are confirmed as not protected by copyright in
the U.S. unless a copyright notice is included. Thus, we do not
necessarily keep eBooks in compliance with any particular paper
edition.

Most people start at our Web site which has the main PG search
facility: www.gutenberg.org

This Web site includes information about Project Gutenberg-tm,
including how to make donations to the Project Gutenberg Literary
Archive Foundation, how to help produce our new eBooks, and how to
subscribe to our email newsletter to hear about new eBooks.