The Project Gutenberg EBook of Church Needlework, by Hinda M. Hinds

This eBook is for the use of anyone anywhere in the United States and most
other parts of the world at no cost and with almost no restrictions
whatsoever.  You may copy it, give it away or re-use it under the terms of
the Project Gutenberg License included with this eBook or online at
www.gutenberg.org.  If you are not located in the United States, you'll have
to check the laws of the country where you are located before using this ebook.

Title: Church Needlework
       A manual of practical instruction

Author: Hinda M. Hinds

Release Date: July 30, 2018 [EBook #57608]

Language: English

Character set encoding: UTF-8

*** START OF THIS PROJECT GUTENBERG EBOOK CHURCH NEEDLEWORK ***


Produced by Susan Skinner and the Online Distributed
Proofreading Team at http://www.pgdp.net (This file was
produced from images generously made available by The
Internet Archive)

ST. MARGARET’S, KING’S LYNN.
From a photograph by Mr. Cyril Ellis, Victoria Road, N.
CHURCH NEEDLEWORK
A MANUAL OF PRACTICAL INSTRUCTION
BY
HINDA M. HANDS
LONDON
G. J. PALMER & SONS, 7 PORTUGAL STREET, W.C.
1907

TO OUR DEAR MOTHER, THE HOLY CHURCH
THIS LITTLE WORK IS DEDICATED
BY ONE OF HER FAITHFUL DAUGHTERS
WITH THE HOPE THAT HER HUMBLE SERVICE
MAY BE ACCEPTED
‘To the Glory of God’
Miss Hands reminds me that it was at my suggestion, as Editor of ‘The Treasury,’ that she undertook the writing of the articles which form the basis of this volume. My confidence in her fitness to write such papers was more than justified by the result. A mere man, indeed, cannot presume to offer an opinion of a book on Embroidery which will carry much weight; yet the letters received by me during the serial appearance of these papers showed unmistakably that they were supplying a real want. In their new and revised form they cannot fail to be yet more widely useful. Moreover, the beautiful work executed by Miss Hands for my own and other churches is ample proof that she is as skilled in the practice as in the theory of her art.
So with much willingness I contribute these few words of introduction. There must be many ladies to whom such a book as this—lucid, compact, and inexpensive—will be most welcome, enabling them to use their needles for the highest of purposes—the service of the Church and the beautifying of the Sanctuary. We all feel, I think, that such work, when fashioned by the hands of worshippers, has a worth and a significance, apart from its intrinsic value, which no ready-made article purchased from the ‘Church Furniture’ shop can possess. It is the concrete embodiment of love, self-denial, and reverence. It brings before our eyes an example of human talent consecrated to the highest ends. And it continues a tradition characteristic of the Christian Church throughout its history—one dating back, indeed, to those more ancient days when, in the language of the Book of Exodus, ‘All the women that were wise-hearted did spin with their hands, and brought that which they had spun, both of blue, and of purple, and of scarlet and of fine linen,’ for use and adornment in the Tabernacle of God.
Anthony Deane.
| CHAPTER | PAGE | |
| PREFACE | v | |
| I. | INTRODUCTORY | 1 |
| II. | ON MATERIALS, ETC. | 3 |
| III. | ON MOUNTING FRAMES AND TRACING DESIGNS | 6 |
| IV. | ON GOLD-WORK | 9 |
| V. | ON SILK-WORK | 15 |
| VI. | ON OUTLINE AND APPLIQUÉ | 21 |
| VII. | ON FIGURE-WORK | 29 |
| VIII. | ON LITURGICAL COLOURS, FRONTALS, ETC. | 39 |
| IX. | ON THE COPE AND MITRE | 49 |
| X. | ON EUCHARISTIC VESTMENTS, CHALICE-VEIL AND BURSE | 53 |
| XI. | ON BANNERS, ETC. | 65 |
| XII. | ON THE PRINCIPAL STITCHES USED IN LINEN-WORK | 73 |
| XIII. | ON ALTAR LINEN | 79 |
| XIV. | ON THE ALBE, SURPLICE, ETC. | 85 |
| CONCLUSION | 91 | |
| APPENDICES | 93 | |
| INDEX | 101 |
This little book (founded on a series of articles on Church Embroidery written for the ‘Treasury’) is intended for the use of those who are desirous of learning by practical experiment how to make the best use of such time and skill as they have at their command; and who, while they are unable to go through the long courses of instruction which are generally indispensable to the attainment of perfection, are yet anxious to devote their ‘labour of love’ to the service of the Church.
There are many Guilds and Associations of such workers rising up all over the country who are ready and willing to be taught, and it is with the hope of assisting these efforts that I am offering the result of many years of study and practical experience.
It is quite beyond the scope of such a manual as this to go into the History of embroidery in general, or even of this particular branch of it. On this point therefore I will say no more than that it is an undoubted fact that from the thirteenth to the fifteenth century English embroidery took a leading place throughout the whole of Christendom, and that from the fifteenth century onward embroidery began to decline as an art till it might almost be reckoned as lost to England until the middle of the nineteenth.
With these few facts in view it is not difficult to determine where to look for the best examples of Church embroidery. It must be among Museums, Picture galleries, and Collections of art treasures of the best periods that one must study to improve the taste and cultivate the intelligent perception of the best ways of doing things, not so much by actual imitation (although that might prove an education in itself!) as by absorbing the spirit of the work and seeing how and why it was done.
I cannot too strongly recommend this method of learning, and it is to this end I have used, wherever possible, such examples as are to be found in our Churches, Public Museums, and Libraries rather than those in the possession of individual collectors.
Embroidery may be defined in a general way as an ornamentation of textiles by means of the needle.
This being the case, one ought to expect from it something different from what can be attained by weaving, or something which cannot be done so well or so readily by that means.
Some of the earliest forms of embroidery were, it is evident, direct copies of woven patterns, but these were quite appropriately placed, either on material which did not lend itself happily to being woven into patterns, or where the surface so decorated was too small to be worth while weaving; or again, where the ornamental material (such as gold and silk) was too precious to be lost on the under-side of the work, as would be the case in all woven work wherever the ‘ground’ shows between the patterns.
The superiority we expect to see in needlework as compared with woven decoration consists chiefly in three points:—
1. The more harmonious gradation of colour.
2. The absence of mechanical repetition of pattern.
3. Freedom of line in the drawing.
It is this very freedom from mechanical restraint in all these three respects of colour, design, and treatment which has proved such a pit-fall to the unartistic English needlewoman.
Much of the beauty of the foreign peasant work is due to the restrictions imposed by their traditional style and limited range of colour.
There is practically no limit to the number of shades available in the present day, and without a cultivated ‘colour-sense’ an embroiderer can run riot among an embarras de richesse with most disastrous results!
A good colour-scheme is even more necessary in embroidery design than in any other (except, perhaps, stained glass) because of the brilliance of its possibilities—at once its highest merit and its greatest danger.
The colour-scheme, then, being an essential part of the design, must be decided upon in accordance with it; and the actual materials with which the work is to be carried out should be chosen all at the same time if possible.
It is necessary for the designer of Church needlework to have a very clear idea of the capabilities and the limitations both of the methods and the materials by which the design is to be completed as a work of art, and also a fair knowledge of the traditions of ecclesiastical art from early times up to the present day.
It is equally necessary for the embroiderer to be able to enter into the ideas and intentions of the designer. It adds considerably to the interest of the work when it is carried out by the person who designed it, but I must protest against the notion gaining ground largely in certain educational circles, that the embroiderer ought to design her own work. There are very many women capable of executing perfect stitchery and of entering into the highest ideals of beauty and devotion who are not fitted by nature or training to artistic design. The designer for ecclesiastical art may be compared to the composer of sacred oratorios—he needs the co-operation of many minds, hearts, and hands to perfect the realisation of his idea, and the many count it a joy to be led by him. The more entire the sympathy throughout, the more perfect will be the result. And they will consider their time and labour well-spent in practising for this. Even so the embroiderer with patient stitches will endeavour to express the ideal set before her by a master of the craft and will meet with a like reward. This is the utmost that the majority of us can hope to attain, and I cannot insist too strongly upon the statement that it is better to work from the designs of good artists, and to do again and again what has been proved excellent, than to attempt an originality which may be attractive only by its novelty.
Whether the worker be her own designer or not, too much care and attention can hardly be bestowed on the choice and arrangement of the design. The principal requirements to be fulfilled are Beauty, Fitness, and Practicability.
Beauty comes first as it is simply the raison d’être of embroidery. If decoration does not really add to the artistic value of the thing it is applied to, it is worse than useless as it destroys a certain real kind of beauty which exists in simplicity.
Fitness comes next, as it almost amounts to an axiom that without fitness a thing which is beautiful in one place may be quite ridiculous or improper in another.
And Practicability is essential because it is in vain to draw a beautiful design which cannot be carried out by the needle and thread. In embroidery the finished work ought always to be more, not less, beautiful than the coloured drawing.
Then there is the position it is to occupy—the style of architecture, method of lighting and amount of light, size of the church, &c. A large church and a dark chancel, for instance, require bolder design and brighter colour than would be suitable for a small church or one so lighted that every detail is evident at a glance.
After the design, or rather in conjunction with it, comes the choice of the materials with which to carry it out. The only point one can insist on is this—let them be the best we can offer. The best does not necessarily mean the most expensive—but the most genuine and the most suitable. Whether of gold or silk or linen, let there be no pretence about it.
If silk DAMASK is chosen for the ground of the work (and there is nothing pleasanter to work on, or more satisfactory as a background if the design of the damask be broad and flat-looking), let it be a good rich damask without any suspicion of cotton about it.
Satin is too shiny and too difficult to keep from puckering to make a really artistic background for large pieces of embroidery, although a great deal of the old work was done on it. It also has this disadvantage for the beginner, that it shows every mark of the needle if she is unfortunate enough to make a mistake which requires unpicking.
Plain corded silk is trying to the eyes to work upon, and is rather hard-looking and unsympathetic, but it makes a good appliqué on satin, velvet, or damask.
Velvet, on account of its richness and the depth of colour attainable without giving the impression of ‘blackness,’ also from its strength of contrast with every other material, has always been in great favour, whether as a ground or as an onlay.
Brocade is too assertive to make a good background, but brocade, and even tapestry (where the design is suitable) may be outlined with gold or cord, or further enriched with embroidery with a truly glorious effect, when judiciously managed.
Fine WOOLLEN CLOTH, stout serge, and diagonal cloth are respectable materials for inexpensive work.
Yarn-dyed or other good COLOURED LINEN and UNBLEACHED TWILLED LINEN are particularly suitable for use in the colonies and for poor churches at home. Both texture and colouring can be obtained in great perfection, and when worked in pure flax threads, which are also made in many degrees of thickness and almost as much variety of shade and colour as embroidery silks, they will defy the ravages of white ants abroad and the poisonous air of slums at home.
Cloths of gold and of silver are truly splendid, whether as a background for embroidery or to be used alone or for orphreys on a plainer material. Only the very best kinds should ever be employed for Church work, any thing else will look tawdry, and even the best is apt to tarnish in the air of towns or near the sea. Needless to say, it is always expensive.
In all the specimens of ancient church embroideries which have come down to us, we find a free use of gold and silver threads: some are worked entirely in gold, others with a preponderance of the precious metals used in conjunction with silk, while a third use was to touch up salient points or as an outline to glorify the whole and bring it into unity.
The principal kinds of gold and silver thread now in use are:—
Passing, which is made of flat strips of gold or silver twisted tightly over pure silk; a firm, hard thread is the result, resembling wire, which can be obtained in various thicknesses, generally sold on reels. This is sewn down, almost always two threads at a time, with fine, strong sewing-silk.
Tambour, much the same as Passing, only finer, for sewing through the material.
Bullion, of various sizes and patterns, is made of fine wire, evenly twisted in a spiral form without any silk core; usually sold by weight. It is sewn on by first cutting into the lengths required and then ‘threading,’ like the beads called ‘bugles,’ with a fine needle and silk well waxed.
Purl is somewhat similar, but coarser, and without a hollow centre. It is sewn down by passing the sewing-silk over the Purl and drawing it down between the twists of the wire. It is used more for outlines of silk-work than for filling spaces.
Plate is a flat wire, used chiefly in heraldic embroidery. It is laid over raised thread or string, with a stitch on each side of the thread, over which it is turned backwards and forwards till the thread is covered. In working Bullion, Purl, and Plate, the silk they are sewn with does not come into evidence at all. Strong fine thread is even better to sew them with than silk; both should be waxed.
Japanese gold is the one most commonly used at present. It is made something like Passing, only a very thin paper is used instead of metal to carry the gold over the silk. Its chief virtue is that it does not tarnish like most of the Passing. It is also less expensive, and made in a greater variety of sizes. Its chief drawback is that where there is much wear the gold rubs off in the course of time, leaving only the red or yellow silk it was wound on as the evidence of there having once been gold there. The Passing, on the other hand, wears any length of time, and, if made of pure gold, would be as untarnishable as the Japanese, the excessive costliness being the reason it is so seldom used. Most of the Passing is made of silver or other metal, gilded with pure gold.
Chinese gold is very similar to Japanese, the chief difference being that the paper used is thinner and cut in narrower strips. It is therefore softer, and can be made in thinner threads than any other. It is more easily damaged than the Japanese.
Passing, Japanese, and Chinese gold and silver are sewn down (generally by two threads together) with a fine twisted sewing-silk; the colour of the silk used affects considerably the colour of the gold-work, red producing a fine coppery glow; green, blue, and violet ‘cooling’ the gold; and yellow or gold-colour merely intensifying, or hardly modifying it at all.
Some of the old work was done in solid gold or silver wire. Strips of parchment were sometimes laid over with gold-leaf and twisted upon silk, like the Japanese and Chinese do with their paper. Small metal plates, spangles of various shapes and sizes, were and are still used with good effect when in moderation.
The silks employed are chiefly Floss. French floss or ‘stout’ floss, being rather thick and very smooth and bright, is useful for large, bold work; ‘Bobbin,’ ‘Church,’ or fine floss for finer work. Decca silk, which has a loose twist, may easily be split, and is useful for the brilliance of some of the dyes, different from any other to be met with in European makes.
Purse-silk is often used, couched, in place of gold or silver, being easily managed and wearing well.
Filoselle is chiefly useful for edging appliqué and for outlines.
Filofloss answers the same purpose, and is brighter in texture. It can also be used for fine embroidery by taking the threads separately; but the slight twist in each thread makes it less desirable for such work than the bobbin floss.
Scissors should be strong and sharp, cutting accurately at the points.
Thimbles, of gold, silver, or ivory, are at their best when worn smooth. They should be as plain as possible, as decoration is apt to catch and roughen the delicate silks. New thimbles may be improved by rubbing down with the finest glass-paper or a burnisher. The indentations should be large. In framework both hands are used and two thimbles required.
Needles should be procured from the best makers only, as cheap ones are apt to cut and roughen the silk by friction through the eye in the course of the work. If for any reason it may be worth while to improve a needle which has this defect, it can be done by the simple process of threading the eye with strong cotton (as coarse as it will conveniently carry), dipping it into olive oil, then into fine emery powder, and working it backwards and forwards until it ceases to roughen.
Round-eyed and ‘egg-eyed’ sewing-needles, crewel and embroidery, large-sized chenille, and occasionally a curved (so-called ‘circular’) needle, are required.
Pins should be fine and as sharp as needles. Very nice little pins may be made from fine needles by warming the eye and sticking a little sealing-wax on it for a knob; but beware of leaving steel pins in any part of the work, as they rust very quickly and make an ‘iron-mould’ stain. Indeed, it is safer to use pins for temporary fastenings only, and to put in a few stitches wherever required for more than a day or two; brass ones leave a green mark and silver-plated ones black, while even gold-plating soon wears off.
A small instrument called a piercer is sometimes used to keep gold laid in its place, but a rug-needle, or the eye of the chenille needle, will do as well.
A good stiletto, a pair of compasses, a T-square and a set-square, a ruler, measure, and tracer conclude the list of implements necessary to the Church embroiderer besides the frame.
There are several kinds of EMBROIDERY-FRAME which have been invented from time to time to save trouble or to stretch more[5] evenly than the ones in general use, but the two still most commonly to be met with are the old flat-bar and screw-bar frames. The former can be rested on trestles when large, or supported on the edge of a table and kept in place with weights when small; those with screw sides are generally mounted upon stands of their own. For work not exceeding 30 inches square I find the screw-frame the most convenient; it can be adjusted to any angle, so that the worker has no need to bend over it, being able to see her work without effort, both as a whole and in detail. To sit for many hours at a frame which lies horizontal is apt to injure the spine (whenever there is the least feeling of over-strain the work should be discontinued). It is, moreover, bad for the eyes, forcing the vision into an unnatural focus. The small screw-frame on a stand can be clamped to a table or held in the lap, and is almost equally comfortable to work at.
Tambour-frames and rigid wire-frames may be used for very small pieces of work.
The light should always fall upon the work from behind, over either shoulder of the person.
Due attention to these points (i.e. a comfortable position and proper light) would prevent much of the weariness and actual injury to the physique for which Church embroidery is often considered responsible; not always, I regretfully admit, without some foundation in fact. Still, the majority of these cases have their own carelessness to accuse, considering these restrictions to be mere details which may be safely ignored instead of taking the trouble to form a habit of doing everything in the best possible way.
A great deal of Church embroidery is done, for convenience in working, on linen, in small frames, and afterwards cut out and transferred to the richer material, silk, velvet, cloth-of-gold, or whatever it may be. Great care should be exercised in the choice of the linen, which should be unbleached and closely and evenly woven, coarse or fine, according to the nature of the work to be done on it. The inexperienced would do well to buy their linen not from drapers, but from the best embroidery shops, stating for what purpose they require it, whether for heavy gold-work, fine floss, &c.
To stretch the linen on to the frame, cut the linen, ‘by the thread,’ rather wider than the webbing which is attached to two bars of the frame. Turn down the edges evenly. Run a piece of string into the two sides that are going to be laced upon the other two bars. The linen should now be a little narrower than the length of the webbing, to which length it is now stretched by a pin at each end and one in the middle. Over-sew the linen to the webbing firmly with strong linen thread; remove the pins; roll up till the linen is a little shorter than the side bars. Insert the ends of these into the holes provided, and stretch evenly either by pegs, or, in the case of screw-frames, by screwing up the wooden screw-nuts (which ought to have been previously placed as near the central blocks as they would go). Lace up the sides of the linen tightly and evenly, with good string, fastening each end firmly. The linen is now ready to receive the design, or, if the work is to be done upon silk or velvet, that is put on now, over the linen. Loosen the frame a little, either by unscrewing a turn or two, or by moving pegs. Pin each corner of the silk on to the linen, stretching the silk a very little tighter than the linen; sew all round with fine, strong silk, or thread, and tighten up the frame again after it is on.
The design must be well within the size of the mounted linen.
Two straight lines, crossing each other at right angles in the centre, should next be run into the linen with fine silk, right across from end to end, as a guide for tracing. Similar lines should be drawn lightly on the tracing; both sets of lines and angles must be accurate; they are easily done by means of a ‘set-square.’
Transferring. There are many ways of transferring a design to the material it is to be worked upon. The easiest and least satisfactory is by means of ‘ironing off’ transfers. This limits one to the stock patterns, often of very inferior artistic value, which can be bought at the shops. The process gives a smooth even line, rather thick, which must be allowed for in choosing the design, as it must be well covered in the working. It is only suitable for fairly simple and bold designs.
The easiest method by which original designs can be transferred is by the use of carbon paper. The blue is the most satisfactory, the paper of which is thin and blue on both sides, but of course it does not show up well on a dark ground. Before using,[7] when new, it should be laid flat on a table, and rubbed all over with a piece of coarse flannel. There is also a fine green and a yellow, either of which is better for very delicately coloured ground. Black should never be used, and I have not hitherto met with a really satisfactory white carbon paper at all.
The design should be accurately traced on good tracing-cloth, especial care being taken with all geometrical forms, which should always be drawn with mathematical precision; the slightest inaccuracy generally seems to reappear at ‘compound interest.’ It is a good plan when practicable to leave any large circles that may form part of the design untraced till after the greater part of the embroidery is done, and in any case to test them with compasses. Having then a perfect drawing to start with, see that the centre fits to centre and rectangular lines correspond with the same lines on the frame, and pin it carefully in place with fine steel pins. Place a piece of carbon paper between the tracing and the material in the frame, and then go over all the lines of the tracing firmly and clearly with a well sharpened H.B. pencil or an onyx tracer. A porcupine quill or a good knitting-needle will make a very fair substitute for the onyx. The worker must bear in mind that pressure upon any part of the surface which has carbon paper underneath will leave a mark upon the material, and therefore should be careful not to rest the hand upon it or make false lines or pin-marks. A hand-rest can easily be arranged, if one be found necessary, by placing a block of wood or a few books on the table on each side of the frame and laying a board on the top. It is also important that the underneath part of the linen in the frame should be in immediate contact with some hard, smooth surface, such as plate-glass or a hard polished board, before beginning to trace the design.
Another method of transferring designs is the time-honoured one of pouncing. The drawing should be on tough paper or parchment. Pin-holes are pricked all along the lines of the drawing at pretty close intervals; a thin sheet of cork or hard felt laid under the parchment prevents creasing or cracking. The principal lines may be pricked with a larger pin than the small details. When the pattern is sufficiently pricked out it is pinned to the material, and coloured chalk in fine powder dabbed through the pinholes. The drawing must then be very carefully removed, and the dotted lines which result from the pouncing gone over with a fine sable brush with Chinese white, or any good water-colour, mixed with a little pure gum-arabic and a trace of ox-gall.
Another way is to trace the design in ink upon leno or tarlatan, and, after pinning it in place as before, go over the lines with a strong quill or ruling pen, using Chinese white or water-colours as before; this also gives only a dotted line, but is quite sufficient for coarse work, and is the best method I am acquainted with for tracing on thick woollen material.
Yet another method suitable for delicate material and not too complicated design is to take an extra tracing of the pattern on thin paper, and after tacking the edges of the paper down to the silk on the frame, stitch round the outline of the design with fine sewing silk of any colour that will show up on the ground. When all is thus marked out, tear away the paper, leaving the stitches upon the silk.
We will now proceed to describe some of the most useful stitches and how to do them.
The Sampler
Perhaps it will be best to begin with a Gold Sampler. Some of the richest and most beautiful examples, both ancient and modern, have been worked entirely in gold; and it is encouraging to the beginner not to have the complications of colours and various silks, &c., to contend with at the same time, as it leaves the mind free to concentrate itself on the attainment of a good technique, which in embroidery, like everything else worthy to be called art, cannot be accomplished without a good deal of practice. A brilliant effect with bad workmanship is not a thing impossible, but in work intended for the decoration of the Sanctuary it is even more to be deplored than in more mundane things; though embroidery of all sorts not being a necessary work, there is no excuse for doing badly in any circumstances. It is a mistake to think that time and material spent on practice are wasted. If our first attempts were looked upon as scales and exercises, as a means to an end, they would not be so grudgingly performed as they too often are.
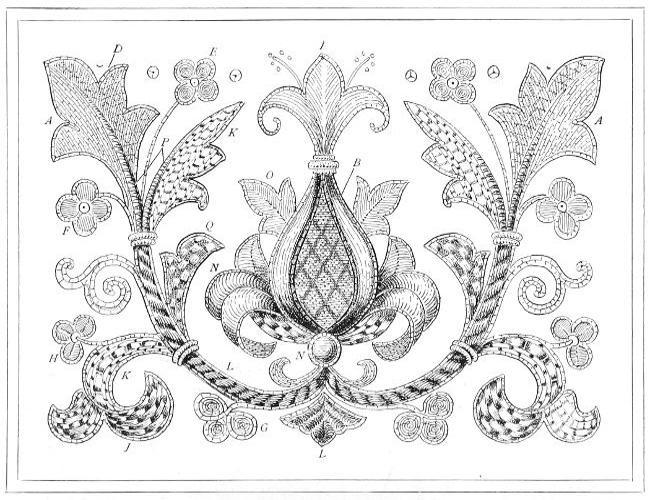
The Sampler I have prepared is intended to illustrate both the stitches themselves and also the method of applying them to the forms they are to fill. It is best to practise them first on simpler forms, and then, when more expert, to fit them into the various curves and spaces.
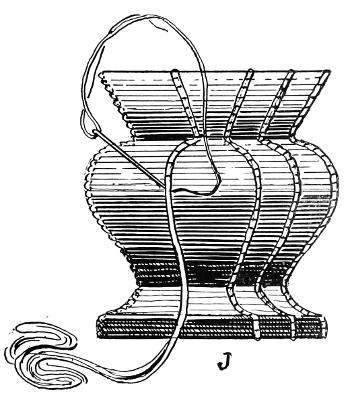
The sampler should be drawn much larger than it is here represented—say about 10 × 7½ inches—and might be placed on the linen in the frame as sketched, leaving a good space below and at the side for practice. If the frame is 20 inches long, or larger still, it will hold this sampler and the next one. It is a good thing to have a nice set of samplers to keep, as one often finds it necessary to be reminded of suitable stitches, which will not always come to mind when wanted. They can be made up into a blotter, book-cover, or work-bag, &c., when finished.
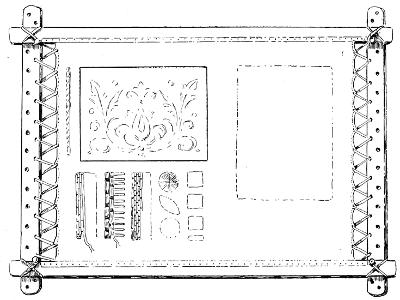
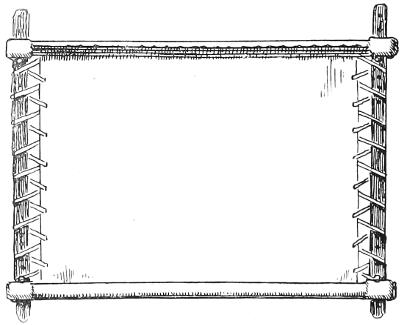
The Frame, with Sampler, &c.
Simple Couching (A in the illustration) is worked thus:
Loosen a yard or two of gold thread out of the skein and bend it in the middle. Have ready an ordinary needle, threaded with gold sewing-silk (the kind sold in large skeins by weight is the best), and with it sew the doubled end firmly down; draw the[10] needle down to the under side, and bring it up again about a quarter of an inch from the beginning; lay the two threads of gold evenly along, and put a stitch at right angles with the gold over both the threads together. This is repeated to the end of the row. At the end each thread is sewn separately in place and turned sharply back, then stitched at regular intervals as before, only each stitch must be placed between the ones formerly done. If the space to be filled is not very long, it is usual to take only one thread to start with, instead of doubling it into two, and, after drawing the end of the gold through to the ‘wrong’ side of the work, fasten it firmly, and begin at the other end of the row each time. This method has the advantage of making a less clumsy turning, and therefore a better edge to the work, as there is only one thread to double back every time instead of two. Also, the gold is more easily made to lie smoothly, as the stitches cross it constantly from the same side and in the direction in which the gold is twisted—from left to right when beginning from the right at the bottom, as in a a; from right to left when begun at the top left as in A. Gold and silver are nearly always sewn down two threads at a time (the beginning and end only being drawn through the material and sewn down at the back of the work), and unless otherwise directed it will be so understood throughout. In a great deal of modern gold work the gold thread is cut off close at the end of each row, and the cut edge afterwards covered by two threads being sewn all round it. I do not recommend this plan myself, as I have too often seen it in after-years with the ends visible in a very undesirable manner. It is true it makes a more even outline, but, if done well, the turned edges can be covered evenly and without difficulty when required; and often the slightly serrated edge itself is beautiful and characteristic, as for instance in o o and i, illustrated below. When very fine gold thread is used it may be drawn through to the back at each end of a row (without being cut off) and the turning done there. The way this is accomplished is by bringing the needle up from the back, crossing the gold thread over with the sewing-silk and sending the needle down again through the exact spot it came out at. The gold being held rather loose and the silk pulled tight, it will carry it down through the stuff just below the surface—the needle employed should be rather thicker than for sewing. In the sampler all the edges are covered with two or three threads sewn down closely over them, but in the detailed examples I have left them bare to show the working better.
The gold thread must not be allowed to get untwisted so as to show the inner core of silk; and it should lie quite smoothly, having almost the appearance of wire, the silk stitches being drawn tightly enough to keep it steady, but not so as to make indentations and destroy the smooth evenness of the surface. If it wants stroking into position, a little instrument called a piercer is used, but the large chenille needle used for drawing the ends of the gold through the linen will answer very well, or a good stiletto.
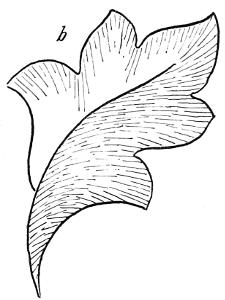
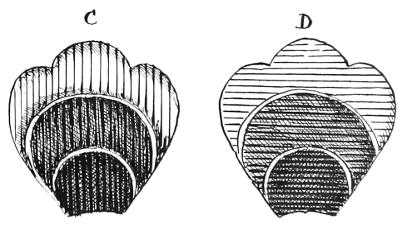
It will be seen, as soon as a few rows are done, that the silk stitches make a sort of little brick pattern on the gold. This effect is made use of by the ingenious embroidress to produce many a beautiful and fanciful diaper. The patterns may be varied to almost any extent by means of different intervals regularly left between the stitches. Here are a few examples: B, C, and D on the sampler. The middle of the pine is filled with a diaper like b, and the two upper halves of the leaves marked D can be filled with c or d.
It is desirable to work them with different coloured silks, such as red, green, yellow, &c., in rather strong shades, that the full effect of the diaper may appear, thus also will be demonstrated the very remarkable effect of the different sewing silks upon the metal already alluded to above. No. 98 (and others on the same screen) in the V. and A. Museum, South Kensington, may be referred to as specimens of the amount of colour that may be obtained in this manner. Some of the metallic threads are also twisted over with fine coloured silks to intensify this effect.
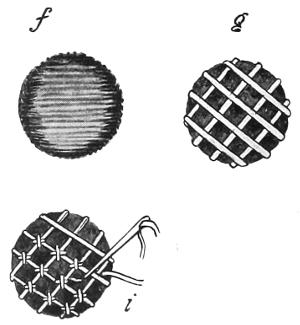
E, F, G, and O on the sampler are to show the effect of direction in the lines of the gold—an important principle, which will be further illustrated, in the case of silk work, by the direction of the stitches. Difference of tone is got by the colour of silk with which the gold is sewn down; an apparent difference of relief by the direction in which it lies.
In E a single thread is drawn through the linen (about half an inch is enough to take through and fasten at the back) in the centre of each petal (see e), and turned round to make as nearly a circle as possible, the gold thread laid round this centre twice and sewn down, two threads at a time, till the outline is reached. It will be evident, after a few rounds are done, that if the stitches are placed in exact alternation they will be getting so far apart as to fail in[11] keeping the gold in place. To obviate this, as soon as they are nearly twice as far apart as the average distance, two stitches must be put between each, instead of one.
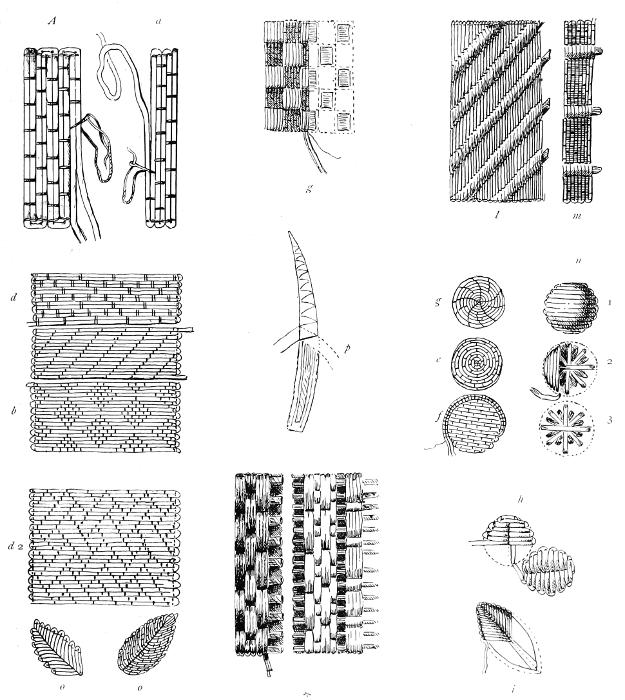
F f is just taken backwards and forwards as at A a.
The effect of G g is obtained by placing the stitches at every round a little to one side of the previous ones, instead of exactly between them.
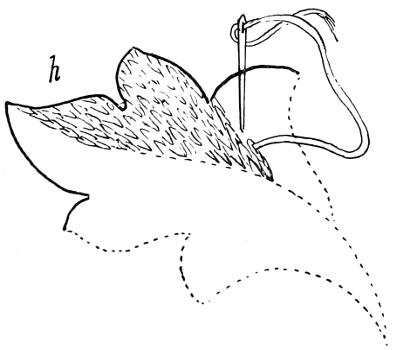
H on the sampler is shown at h above. The gold thread is begun at the base of one of the petals, and from thence taken straight up to the top and worked over, putting one stitch in the centre of each row and taking the thread backwards and forwards till the bottom of the petal is reached, when it is taken up to the top of the next petal and left to lie under the work as before. It is best to keep it to the same side of each petal, or to place the central stitch between the two threads of gold, as it raises the gold slightly, and when done with method it looks intentional. It is convenient because there is less cutting off and beginning again. At the edges of the petal the gold may be turned at the back of the work in the manner described on p. 10 above.
This slight raising of the gold, as it were by accident or for convenience, brings us to the consideration of raised work, and the question of how far high relief in embroidery is desirable. This being essentially a practical treatise, I cannot now enter into the arguments for and against its use, but may just remark that relief, however slight, accentuates the ‘value’ of the gold, as it draws extra light upon its already brilliant surface, causing at the same time extra shadows, and thus adds to the richness of the general effect, while it takes away something of its delicacy. The designer must decide how and when it is required.
The slightly raised foliation in the sampler, marked I, is done by tacking down parchment or yellow cloth, cut carefully about the sixteenth of an inch within the lines of the tracing, and then working the gold thread over it (in the same manner as at H) with one row of stitching only, to catch it down in the middle. See i.
N is raised to the highest degree permissible by sewing down bits of string (cut well within the size), first with fine silk, and then working over them, to get a smooth surface, with stuffing cotton, and lastly, covering all with yellow cloth before couching the gold. n shows the process for working the raised round; other shapes are done the same way. There are various methods of padding for high relief. Cotton-wool is used by some, and cork, &c., by others. I find the one I have described the most satisfactory, as it can be made quite firm and in high relief without being so hard and ‘unsympathetic’ as the more mechanical methods. The padding should always be smaller than the finished work is intended to be. It should be done as nicely and smoothly as though it were not going to be covered over afterwards. The last layer of stitches worked in the ‘stuffing cotton’ should be done in the opposite direction to that in which the gold is to be laid (see n2, where the cotton is shown nearly half done, n1 being the finished gold work).
J is one of the most popular of gold stitches. It is shown at j in straight lines, and should be well practised thus before attempting to apply it to curved ones. Rows of string are sewn down at regular intervals till the space is covered which is to be filled with basket-work. Note that in a curved figure the strings must be placed nearer together on the inner line than on the outer. The gold is then couched down over the string, being sewn with strong silk, which will keep it down, between every two bars of string. The next row is done the same. The two rows following have their silk stitches placed between the former ones. The next two are like the first, and so on till the space is filled.
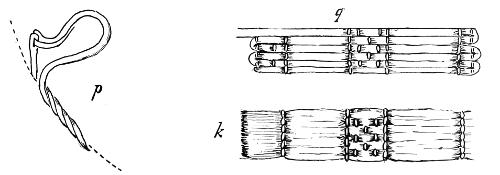
K is a little more complicated. The first two rows have three bars of string covered at a time; then two and one alternately for one row; then three again.
A great many variations of this can be made simply by covering more or fewer bars at a time, or, again, by sewing down more or fewer rows of gold at the same intervals. The principle of the basket-work is the same in all.
The stem in the sampler, marked L, and the ornament at the bottom are worked over string sewn diagonally over the space to be covered, as may be seen at l. The stitches made in sewing down the gold go in steps, not diagonally, but at right angles, as in all the others, one stitch on each side of the bar. The gold may be laid in single threads.
Q is prepared by sewing small square pieces of yellow cloth or parchment in chequers over the ground, and then covering with the gold, sewing down the latter rather closely with silk stitches in the spaces left, and putting no stitches on the raised part. Any shape may be placed under gold in this way. In much of the medieval work architectural surroundings and backgrounds to figures were very elaborately executed, with the same gold threads used in the drapery of the figures themselves, being[13] carried straight across in horizontal lines over string, &c., and sewn down very closely with different colours.
The raised veins in the leaves (P in the sampler) are done with ‘plate.’ String is laid down first, cut to a sharp point, and sewn over with stuffing cotton, worked diagonally or with several strands of it laid smoothly over the string and kept in place with a few stitches of fine silk. The plate is begun at the top, with a stitch to keep it firm, and then with one at each side it is turned backwards and forwards till it is finished.
The little bars across the stems are of bullion, sewn on with strong waxed silk or thread.
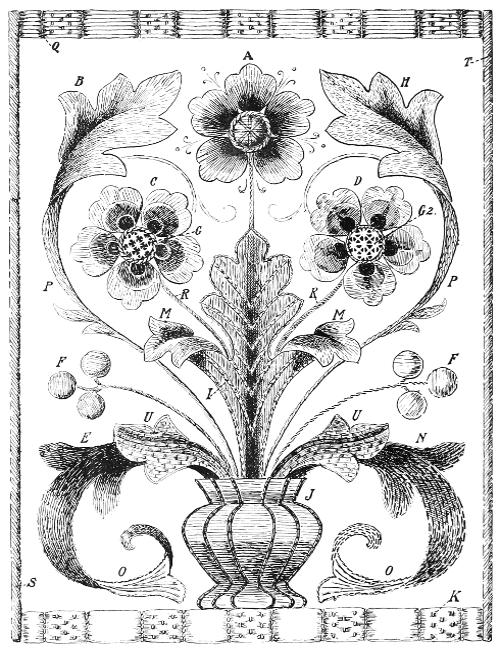
Sampler
Although the foregoing chapter was devoted exclusively to the description and illustration of the stitches most generally used in gold-work, most of them can with equal propriety be worked in silk. But the reverse does not hold good: there are many stitches useful for silk and thread, &c., which cannot well be worked with gold, because the needle and thread are taken right through the material, from the upper to the under side and up again, in and out, all the time; whereas nearly all gold-work is done on the surface, the beginning and end only of the gold being taken through the material. It is true that in some of the old embroidery, flat strips of metal were sometimes worked through the stuff, also thin solid wire, and the fine tambour is still used in the same way; but it is not practicable to any extent with Japanese gold, or passing; while purl and bullion, being in the form of a hollow coil, are obviously unsuitable for being drawn through the surface as thread. It would also involve an unnecessary waste of gold to take it through the stuff and leave it behind each stitch.
The accompanying sampler does not include any of the stitches shown in the former one, except couching. Although, in principle and in method of working, couching is the same, whether it be carried out in silk or in gold, yet, the effect being very different, it seems desirable to repeat it here. It is introduced also for the purpose of pointing out clearly the difference between it and another stitch which in some circumstances looks very similar, but is worked in quite another way and is called ‘Laid-work.’
In both couching and laid-work the principal threads lie on the surface and are sewn down with auxiliary stitches by means of a separate needle and thread. In couching, these stitches are planted at short intervals, all along the line, on each row of threads, while they are being placed; but in laid-work the whole surface is covered first, and the few stitches required to keep the mass of silk in place are added afterwards. Couching is generally worked in solid heavy threads, such as gold and silver, purse-silk, cord and filoselle, while laid-work is only suitable for floss, its chief merit being the perfection with which it shows the bright sheen of that beautiful silk. It is light and soft in effect and a very expeditious means of covering a large surface. It does not wear very well unless caught down at frequent intervals with the couching or other over-stitching, as in the example (p. 63) of a chalice-veil at South Kensington, where all the foliage is done in laid-work, the ‘laid’ stitches going across the leaves and the couching following the curves, indicating simple veining.
Both laid and couched work, when used as a filling, are best adapted to decidedly conventional designs, laid-work especially to broad and flat effects, and couching to outlines.
Although shading and even an appearance of modelling to a slight degree may be legitimately obtained by the placing of different shades of silk side by side and by the direction of the underlying and over-stitching silks, still it is not well to attempt too much in this direction, as there are many other stitches more suitable; and stitches, like other things, are much more beautiful when in their natural and proper place than when forced into a position for which they are unfit.
This sampler is intended to be worked in coloured silks. I will mention them by their numbers on Pearsall’s colour-card No. II., as it can be bought or referred to at any ordinary needlework shop, and therefore seems the most practicable means of explaining about shades, &c., to those who have never used floss silk before. While to others I would say it is certainly not necessary to use these particular colours, or this particular make of floss, so long as the silk is good, the colours harmonising with each other, and being sufficiently distinct in shade to avoid confusion.
Three shades of blue, Nos. 41, 42, and[16] 43; four shades of a bronze-green, Nos. 112, 113, 113A, 113B; three shades of a greyer green, Nos. 113A, 134, 135; a soft reddish-brown, No. 105, and one of gold-colour, No. 92, are suggested for this sampler.
Linen thread may be used instead of silk, on a coloured or a white linen ground, for practice, but it is necessary for the embroidress to get used to working in floss[1] from the first, because it is always needed for the best and richest work, and it requires a great deal of practice before it can be dexterously handled. Ornamental rings, bracelets, &c., should not be worn when working with floss silk, particular attention must be given to keep the hands in good condition, clean and smooth; it is a good plan, if they are apt to get rough, to rub in one or two drops of pure glycerine after washing in hot water before drying them. The hands should then be rubbed perfectly dry with a linen towel. If, on the other hand, they are at all inclined to be moist, they should be frequently washed in water as hot as it can be borne, then dipped into cold water, rubbed dry, and lastly dusted over with boracic powder. Carbolic, sulphur, arsenical or other ‘complexion’ soaps should never be used before working with either gold or silver or very delicate silks; indeed, it is safest to use none but pure vegetable soaps as free from chemicals as possible. A fine white-linen apron with a bib and sleeves, or an ‘overall,’ should always be worn, and the work kept covered with a soft silk or linen handkerchief. Too much care cannot be taken with floss silk, as it is apt to catch in everything it comes near and is very easily damaged. For the same reason the needlefuls should not be long, and if the silk be bought in skeins it should be carefully wound at once, on smooth reels or cards, keeping a separate one for each shade, which should be duly named and numbered.
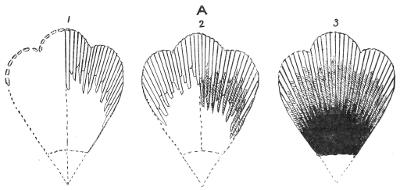
Of all the stitches which are worked with silk, I think SATIN-STITCH, with its many offshoots and variations, is the foremost both for usefulness and beauty. The smooth brightness of the surface; the clean-cut outline it makes of itself, when nicely done, requiring nothing further to finish it off; the ease with which shades and colours melt and blend in soft gradations or bold effects, make it the stitch par excellence for floss-silk work, whether coarse or fine.
The Flower marked A on the sampler is worked thus:—
Take a needleful of the palest of the three shades of blue floss and run round the traced outline of the upper portion of one of the petals. Never begin with a knot, but run a few stitches into a part that will be covered afterwards; to fasten it firmly just take a back-stitch and do not cut off the end till you have worked a few more stitches; always begin and end a needleful on the ‘right side’ of the work so as to have no loose ends at the back. Then bring the needle up from behind to the surface near the centre of the petal; set it in just over the outline at the top; draw it down with one hand and set it in with the other. (It ought to become, by practice, a matter of[17] indifference which hand is at any time above and which below.) The next stitch must be shorter, the next longer, and so on till the edge of the petal is reached. The other half of the petal is filled in the same way, beginning from the middle, and keeping the ends of the stitches even along the top and quite irregular along the bottom of the row. The stitches should be just so close together as to make a firm clear edge without either overcrowding or thin weak places.
The next row is done with the middle shade of blue; after fastening the end of the thread, take the needle through to the back, then bring it up between the two long middle stitches and about halfway from the top, set it in again to make a stitch about the same length as the others were, and continue working in the same way; the only difference between the first row and the second being that the second is worked from the upper part downwards and that both ends of the stitches are irregular in length instead of only the lower ends. Also there will be fewer stitches in each row as they get nearer the bottom.
The number of rows required will depend on the size of the petal, so will the actual length of the stitches. To give some idea of the proportion, I will suppose this petal to be an inch and a half in length and an inch and a half in width at the widest part; the stitches would then be from a half to three-quarters of an inch long at the longest; it would take four rows of stitches, and there would be about thirty of them in the top row of the petal when using the full thickness of Pearsall’s ‘Stout Floss.’ The central stitches should all be vertical, and all the others radiating—that is, slanting outwards, towards the edge of the petal; this direction of the stitches must be very carefully managed, not to be too sudden in change, and the rows of stitches should ‘dovetail,’ as it were, into each other. In this example two rows of the middle shade are used, and only one each of the lightest and darkest.
This application of satin-stitch is known by a number of other names, such as ‘Long-and-short’ stitch, ‘Plumage’ or ‘Feather’ stitch; the latter name is rather misleading, as there is a well-known stitch of that name, quite different in appearance and method of working, in common use in linen embroidery. In reading descriptions of silk embroidery one should bear in mind that when Feather-stitch is mentioned it may mean the one described above.
B is worked in the three lightest shades of the bronze-green—Nos. 112, 113, and 113A. The method is precisely the same as in A above, only the radiation is different and requires even more care in the arrangement of the stitches. Radiation of lines from a centre follows a principle of natural growth, as anyone may observe by taking the separate petals of any similar flower; all the lines and veinings, however much branched or netted, will be seen to converge towards the point where it is inserted into the calyx. In the leaf the place where they converge is the midrib—an extended centre, so to speak—and in ‘B’ the stitches are aimed in the same direction. Imagination has to be called upon to suggest where the lines should run in the part of the leaf which turns over, but it should always be done intelligently.
C is more conventional, by which I mean less regard is paid to natural growth. It is a favourite method with the Chinese and Japanese, who work this form of satin-stitch to such perfection, that the ‘right side’ and ‘wrong side’ are almost exactly alike. This may be considered a test of good workmanship. It is best to begin with the part nearest the centre, with the darkest shade of blue. Each stitch of one petal is parallel with the others and in a vertical direction; there is no radiation in[18] the working of individual petals, only in the arrangement of the petals themselves in the whole flower; and the edge of each shade is sharply defined by a voided line instead of melting or ‘shading’ into the next. A voided line is a narrow space of the ground left bare between the rows of stitches; it should be so narrow and so even as to look like a fine line or indentation in the silk. This kind of satin-stitch is equally suited to work done all in one shade or in white on white ground.
D is also worked in parallel lines, but the direction is horizontal, the shades lying side by side close together. In quite small flowers the stitches would go straight across each petal, but in larger ones, like these, half is worked at a time, a voided line being left down the middle of each. In the sampler it is also left to define each shade, but D is a simpler form for practice.
E is worked somewhat like A, only the stitches follow all along the curve equally as the veins do in lily-leaves, &c., instead of radiating. This should be begun with the darkest of the bronze-greens, No. 113B. Two rows may be worked with this, then one of the next shade, 113A, then three of the next, 113, then one of 113A to finish with.
The three berries marked F on the sampler are slightly raised. The preparation may be the same as that described in the chapter on gold-work; padding thread sewn across and across in several directions, or by layers of parchment cut to the shape. In any case the padding must be covered with stitches of silk, worked straight across, in the opposite direction to that with which it is covered eventually. The same shade, No. 105, may be used for all berries, but each should be worked in a different direction, to show the effect that such a change has on the tone of the colour.
The centres of the flowers, marked G, are begun with the brown silk, with surface satin-stitch, in which, as its name implies, nearly all the silk is on the surface of the material. It is just taken through and brought up again close to, but not exactly in, the point where it went down, leaving a very small stitch at the back, then taken across the space to be covered, and through again on the opposite side in the same manner. The stitches may lie either horizontally or vertically. Over this work a single thread of No. 92 is drawn diagonally, at regular intervals, to form a lattice. These overlying stitches, again, are sewn down by a small cross-stitch at each intersection.
This lattice-work may be used independently, without any under-stitching, showing the ground instead; it has a very pretty light effect among more solid work. Another pattern is shown at G2.
Split-stitch.—This is a stitch found much in use in the earliest specimens of ecclesiastical needlework. I believe that the faces and heads of nearly all the figure work done before the fifteenth century were in split-stitch. The effect is something like several others. When very fine and rather tightly worked it looks like satin-stitch; when looser, like fine chain-stitch; when coarse and rather loose, like crewel-stitch worked backwards and forwards. Each stitch is worked by making a small satin-stitch and bringing the needle up from the back through the middle of it, or by threading the needle with two strands of silk and bringing the point up between them. See illustrations of ancient Coptic work, where the frayed ends of silk show plainly that it was done in this way.
The silk is thus pierced through or ‘split’—hence its name.
H on the sampler is worked thus:—
With a needleful of No. 135 begin at the lower end of the inside half of the leaf and follow the inner curve as far as the point of the first lobe. Almost every alternate row of stitches is carried only halfway down, or less, to keep the radiation right. When the first lobe is filled, take the next shade (134) and work in the same manner up to the top point of the leaf. The other half of the top point and the upper part of the next lobe is worked with the lightest shade, 133A, and the last with 134; h shows the upper part of the leaf in course of being worked.
We now come to laid-work, the general character of which I have already described above.
The first process is to cover the surface with the silken threads, lying all in one[19] direction—vertical at I, horizontal at J, on the sampler.
They can be laid at any angle, provided that the stitches are kept parallel with each other, and that due consideration is given to the direction the over-stitching will take. It ought to cross the laid stitches as nearly as possible at right angles to keep it nicely in place. Of course, it is impossible to keep strictly to this, but if the principal veinings are placed thus the others will naturally approximate sufficiently.
The silk may either be carried through the material and the needle brought up a very little way further on along the outline, as in surface-satin; or the silk may be turned back on the surface, as in couching, with a stitch at each end. The middle and darkest shades of grey-green (134, 135) are used for the leaf, and the middle and darkest blues for the vase. The over-stitching of the leaf is in the lightest grey-green, done with split-stitch; the vase with the darkest blue in couching.
The band K at the bottom of the sampler may be worked in the same way, using back-stitching to keep it down. With back-stitching a pattern can be formed which is something like that made by couching, only it is softer-looking and more quickly done. If it is a border of any considerable length a number of skeins may be all begun together; then, pinning them all down with a long fine pin, the stitches are set in at regular intervals to make the pattern. The floss-silk in this case requires no needle, but, when once begun, is ‘paid off’ the reel or card by degrees as required.
Laid-work makes a beautiful background; the over-stitching may be either of split-stitch, couching, or back-stitch, and may be done either in a pattern or by simple lines, diagonal, vandyked, or at right angles with the silk laid down. Compare k, which is laid, with q, which is couched. Both may be worked with the middle shade of blue sewn down with gold-colour, No. 92.
M is worked in the same manner as B, but with the two shades of bronze-green, Nos. 113 and 113A.
N is filled with darning-stitch, the lines following the direction of the curve. Darning cannot be done in a frame in the same manner as when held loose in the hand. The needle must go in with one hand and be drawn down with the other, the same as with all work done in a frame. The stitches are about a quarter of an inch long and a very little of the ground is left between each. The rows of stitches also lie close together. The shading and proportion should be done to match E, and the different shades should ‘dovetail’ into each other as in the satin-stitch.
The parts of the leaves marked O are worked with the grey-green, No. 135, in radiating lines, not quite close together, showing about an equal quantity of the ground between. This partial filling, both in couching and in darning, is very effective for light work, but an outline is absolutely necessary, and is really the principal part of the work. The outline may be either couched or worked in crewel-stitch, like p.
Crewel-stitch, like darning, is not worked in the frame in the same way as in the hand. After fastening on the thread, bring it out at the bottom of the work and set the needle in about an eighth of an inch higher up on the traced line. Draw it down and bring it up again close to the place where it was brought out at first. Set it in again an eighth of an inch higher than the first stitch, that will make a stitch a quarter of an inch long: keep them about this length all the time. (In turning a sharp curve they should be shorter, and in a long straight line they may be a very little longer, worked in coarse silk.) Care must be taken not to pierce the stitch when bringing the needle through from the back; the method of working is the same as in split-stitch, with this exception, which makes all the difference! It may be necessary to hold back the stitch to avoid piercing it, especially on the inner side of a curved line, for the needle must always be kept on the same side of the stitch as it is begun, otherwise it will make a break in the curve. It has, moreover, a different name when worked on one side from that which it has when worked on the other—crewel when the needle comes out on the Left, outline when it comes out on the Right. There are other names given to this stitch, according to the many slight variations in the way of working it. When, for instance, instead of bringing the needle out on the line, it is taken a little way off it, so as to make a more slanting stitch, it is called stem-stitch (see stems marked R on sampler), but as this is in reality a narrow strip of satin-stitch, worked diagonally, it does not seem to require a name of its own.
U is couched with the dark grey-green silks, the shades being placed side by side.
S and T are narrow strips of slanting satin-stitch. All straight-lined Lettering looks well worked thus, outlined with an edge of couched gold or silver.
Hitherto we have considered outline merely as it is traced upon the material to be enriched by embroidery—as a boundary for the needle to work to; or when an outline has been placed round the edges of the stitching, simply to make it neat. In this chapter I propose to deal with OUTLINE as a distinct method of ornamentation, used independently of any ‘filling’; as an adjunct to appliqué; and as enclosing portions of the background to be further enriched, but not entirely covered.
Outline work is often looked down upon by the expert embroidress as a kind of needlework quite unworthy of her serious attention, because it requires very little technical skill; while, as to APPLIQUÉ, it is not to be mentioned, being almost beneath contempt!
This attitude towards the simpler kinds of decoration merely shows a want of artistic perception. Walter Crane gives outline in general its true position when he says it may be called the ‘Alpha and Omega of art,’ being the earliest mode of expression among primitive peoples and children, and also cultivated for its power of expression, character, and as an ‘ultimate test of draughtsmanship by the most accomplished artists of all time.’[2]
Outline and appliqué go naturally together because they are very often mutually dependent upon each other, appliqué nearly always requiring an outline, and outline frequently being partially filled with appliqué.
Outline may really be considered more purely artistic work than elaborate embroidery, because it depends more entirely upon the merit of the design for its beauty, being unable to hide its defects under a maze of intricate stitchery or to carry away the mind of the beholder by the glory of various colours.
In early and medieval times needlework as an adjunct to weaving and outline work by itself was used with a most perfect artistic effect, done in couched metals or silken cord, or in simple chain-stitch or back-stitch, &c.; while, as for appliqué, many gorgeous vestments may still be seen retaining much of their original beauty, worked in satin on velvet, silk upon damask, &c., Botticelli and other great masters not disdaining to draw designs for such work with their own hands.
There are several reasons for the employment of special outline in embroidery besides the elementary one of marking out the shape. In a picture such lines are not only unnecessary, but objectionable in the finished work; why, then, are they admirable here? The object of art needlework is not to make pictures (however beautiful they might be), but so to decorate certain textile articles—of furniture, clothing, &c.—that they do not lose their natural characteristics, but become themselves more truly beautiful. Figures, foliage, inflorescence, &c., should not stand out from their background like real things, but become actually part of the textile itself.
This being the case, we are debarred from the employment of naturalistic half-tones, shadows and reflected lights by which a painter makes the different objects in his picture at the same time harmonious in colour, distinct from each other, and altogether life-like in appearance.
In decorative art the use of a good, bold outline separates the colours, defines the form, harmonises the general effect, and increases the appearance of flatness.
The isolation of various colours by means of an outline is especially desirable in work which is to be seen from a distance, because masses of colour when placed in direct contact with each other become blurred and lose their true relation and value.
In the same circumstances the form is also apt to lose its proportions to some extent on account of the propensity of white and all light colours to spread themselves and increase their apparent size.
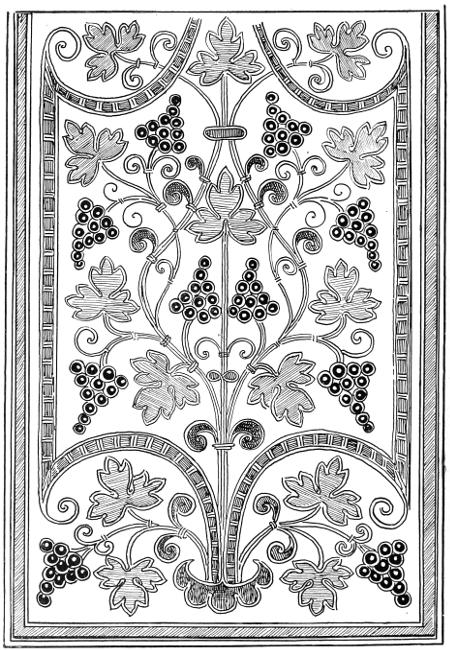
Fig. I.—Appliqué
Italian, Seventeenth Century. V. & A. Museum, S. Kensington (No. 243—1895).
Fig. II.—Outline alone
A very happy use of outline is sometimes made as a softener of general effect both for appliqué and many kinds of embroidery by the addition of a secondary outline beyond the boundary of the ornament, sometimes of the same colour, but frequently of a paler shade, or altogether different.
Or again, in conjunction with appliqué, the outline frequently breaks out into more or less fanciful and luxurious scroll-work, which entirely does away with the hardness which is the besetting fault of this kind of work.
Fig. III.—Outline with a little Appliqué
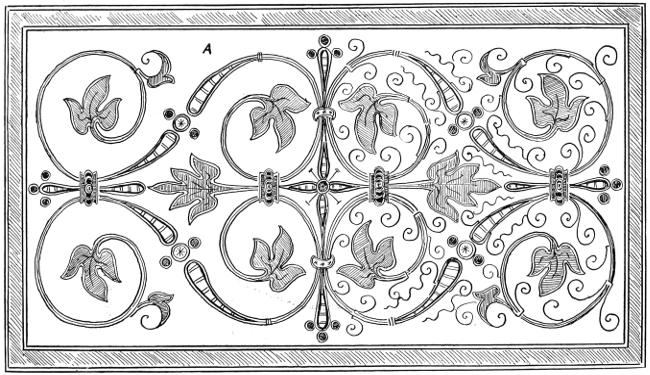
Fig. IV.—Appliqué enriched with Scroll-work
Apparel of Dalmatic, Spanish, Sixteenth Century. V. A. Museum, S. Kensington (No. 888—1897).
Illustration IV. shows a good example of this, one half of which I have drawn without scroll-work to show what a difference it makes. It is outlined throughout with four threads of fine gold, sewn down all together very closely with green silk round the leaves; the double set of four threads, meeting at the base of the leaves, form the stem, and are also sewn closely with green.[25] On the white ornament the gold is sewn with yellow, and there is an inner line of blue all round; also stitches of blue silk are placed in pairs across the white satin all the way down. All the scroll-work is done in gold twist, the same thickness as the outline of four gold threads sewn together.
It is generally desirable thus to work all small detail occurring in appliqué designs; they should be done on the ground itself after the pattern has been transferred to it. The design used for this kind of work should always be bold and broad, unmistakable in its language and graceful in its expression, and so arranged as to make the best account of the materials to be employed. Several different textures may be used to enhance the richness and interest of the composition, but it can be made very beautiful with only two—one for the ground and one for the onlay. The same may be said with regard to the colours. Any two of sufficient harmony or contrast between the ground and the pattern are sufficient, and perhaps more certain of good result in the hands of the inexperienced than a variety of colours might be.
Appliqué is particularly suitable for altar-frontals and sanctuary hangings; the finer work and smaller patterns such as Figs. III. and IV., make very effective and handsome apparels for dalmatics and albes, and orphreys for chasubles.
Appliqué can also be used for banners, where effect is really more desirable than over-much work. Quite beautiful is such a banner showing figures of saints or angels in bright raiment, well drawn, expressive, and with few details (something in the style of good stained-glass), where the full value of pure colour is obtainable and the changing light in a procession modifies or accentuates the tones alternately in a most delightful manner. Needless to say such designs must be fully coloured before the materials are chosen, and the greatest care must be exercised to see that they harmonise; nothing short of seeing the actual pieces of silk together will accomplish this; small snippings or threads of silk are useless for the purpose. And the outlines must be sufficiently thick and well marked to keep the colours distinct. A ‘cool’ dark brown or a ‘warm’ dark grey is preferable to black for this purpose.
The various fabrics used for appliqué may be prepared in the following manner.
In the first place embroidery paste has to be made, although many substitutes have been tried with more or less success. If there is a large quantity to prepare, it is better to make the paste than to try ‘cobbler’s paste’ or photograph mountant, though either will do very well for small pieces of work or to paste the back of embroidery which has been done in a frame to be mounted afterwards. In this latter case a small quantity of the paste is carefully rubbed on the back of the work with the tips of the fingers, and then thin tough paper stuck to it before cutting it out of the frame: the paper should be crumpled up and then slightly smoothed out before applying it to the work, or it is apt to contract in the course of drying, with disastrous results.
Embroidery Paste is made thus: mix 3 oz. fine wheaten flour (not ‘self-raising,’ ‘whole meal,’ or any fancy kind), 2 dr. finely powdered resin, ½ pint distilled water (cold). It must be perfectly smooth before putting on the stove to boil; it can be strained through a sieve if necessary. It must be kept well stirred, especially as it approaches boiling point, when it thickens and requires vigorous action to prevent it from burning or getting lumpy.
When once the whole mass boils, it becomes thinner and clearer, and must be kept boiling for at least five minutes.[3]
A piece of Bishop’s lawn (mounted in a frame) is next covered with as thin a layer of the paste as can be spread smoothly all over it; a large strong brush is used for this, a hog’s-hair tool such as house-painters use, round or flat. Then lay the material to be mounted upon the pasted surface, pat and stroke it down gently with a soft silk or linen rag to make sure that it is in contact with the paste evenly throughout, then pin or tack it firmly all round, and screw or peg the frame up taut. Air bubbles and creases would spoil it altogether. It is then left twenty-four hours to dry. If required sooner, it may be placed in a warm dry room, not too near the fire, but near enough to hasten the drying, or a warm flat-iron may be passed over the back; but the face of the silk or velvet must not be touched with anything; the iron must not be nearly so hot as a laundress would use; it is better, if possible, to let it dry naturally; there is less risk of damaging the material; and as it is rather a delicate process from first to last, it is advisable to experiment with something of little value to begin with.
Small pieces of stuff are much easier to mount than large ones. The whole of the pasted surface in the frame may be covered[26] with different pieces, but they must all be put on while the paste is wet, and of course it is not necessary to paste the whole of the ‘backing’ if it will not be used, though it will dry more evenly if it is at least wiped over with a damp cloth where there is no paste.
When the mounted material is thoroughly dry, it may be cut out of the frame and laid, face downwards, on a board, when the shapes required should be marked out on the linen, and cut with a sharp knife or scissors. The appliqué should be accurately traced from the same drawing as that used for the whole of the work; but it must be remembered that whatever is drawn on the linen backing will be reversed when seen on the ‘right’ side. The shapes should always be cut out a trifle larger than the drawing, rather than smaller.
The ground for the appliqué being mounted in a frame, and the design traced, nothing remains to be done but to tack each detail firmly down in its place and couch round the edges with filoselle or gold, &c. The tacking stitches may be of fine white cotton taken right across and withdrawn after the work is finished; but in any case a small stitch of the same colour as the onlay should be placed through any sharp point there may be, to prevent it catching in the silk, or getting curled out of shape while being worked round. These stitches will not be taken out afterwards. A few stitches are also desirable down the centres of leaves, flowers, &c., so that they may keep flat as well as in place.
Some method should be kept to in cutting the appliqué a certain way in the stuff; there is a distinct difference in colour when it is cut with the warp or across it, or again, diagonally. Take satin for example: cut a leaf or the petal of a flower with the ‘smooth’ of the satin going in one direction, and then cut another exactly similar, with the satin in a different direction, and place them side by side; it will be evident at once that this quality of textile fabrics (i.e. the change of colour according to direction of warp and weft) must be reckoned with and used intelligently. It is common to all in a more or less marked degree, and follows the same principle which I have pointed out when speaking of the direction of stitches. Flowers (if more than an inch in diameter) look best with the petals cut separately, all one way of the stuff, and arranged so as to radiate from the centre. Leaves can be cut with each half starting towards the midrib; but too much cutting about is not desirable.
Appliqué is intended to have a somewhat flat effect. Quite sufficient variety can generally be obtained by varying the direction of the whole leaf, and by adding veins in couched, or crewel, or split stitch. A mass of French knots or a diaper over a different-coloured silk for the centres of flowers may combine very well with appliqué, but any other additional stitches should be resorted to but rarely. It should not look like an imitation of work done entirely by the needle, and much stitchery mixed with it or worked upon it is apt to give a false impression, besides weakening the character of the work, which should be simple and dignified, with no fussiness about it. If much variety is desired, it can always be produced by the judicious selection of different materials. There is great diversity of surface effect in satin, diaper, damask and corded silks, while velvet is indeed more different than any added stitch would be.
Fig. V.—Counter-change Inlay
Inlay is something like appliqué in appearance. It is, however, worked differently, the decoration being set into the fabric to be ornamented instead of being laid upon it. It ought to be worked in cloth or some substantial kind of material not liable to fray at the edges when cut. It is eminently suitable for church hangings, dorsals or wings, &c., having a certain nobility and sincerity about it, while all it asks of the worker is accuracy in the cutting and neatness in the sewing. The hand and eye of women are so much more trained nowadays than they used to be, by means of various arts and crafts, that it ought to be a matter of course to follow a line perfectly with a sharp knife on cloth, &c.
The method of work is as follows: Two pieces of cloth of different colours and about equal thickness are tacked together and pinned down to a board with drawing-pins. The pattern is traced on the top one, and the two are then cut together with a very sharp knife (a leather-cutter’s knife is good for this purpose). The blade of the knife must be kept vertical, that ground and inlet may be of the same size. They are then taken off the board and tacked down to[27] linen already mounted in a frame, carefully fitting the two colours into each other. If the pattern be a counter-change design, there will be absolutely no waste of the stuff, as the piece which is cut out of the one material is set into the other.
When the edges have been sewn together (which is done with plain over-sewing not going through the linen—and is best worked out of the frame) the linen is removed and the outline added if required. This may be of cord or gold or narrow braid, or chain-stitching answers this purpose very well, especially as it is done loose in the hand. If a thinner material, or one more liable to fray is used, it is better to keep it in the frame throughout, and work through the linen; but it is not such a perfect method, as there is a ‘wrong side’ to it, which there should not be in the other. Neither will it hang in such soft folds, especially if it is pasted on to the linen, as some recommend.
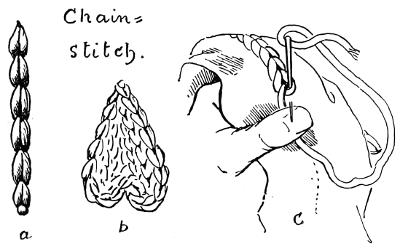
Fig. VI
Chain-stitch, which I have mentioned as a suitable stitch to cover the join when working in inlay, may be described here, as it is very useful for any work that is not done in a frame. It has been so much imitated by means of the sewing-machine in modern times as to be somewhat out of favour, but it need not look mechanical if used with discretion. It makes a beautiful even line, following any curve with great precision and ease, and will always find its place at the hands of the competent worker, either as an outline stitch or a filling.
It is done by setting the needle into the stuff at the same place it came out, the thread lying under the thumb of the left hand. A small piece of the stuff is taken up by the needle in the right hand, and the thread drawn not too tightly (beginners always make their chain-stitch too tight); the needle is then set in as before, exactly in the same place where it came out. The ‘wrong side’ of the work should look like back-stitching.

Fig. VII
French Knots, which are placed in the middle of each of the grapes in Illustration I., are extremely useful, whether in masses, singly, or in lines following an outline; they may be used as a filling, or scattered over the ground, where they will break the colour in a very pleasing manner and add to the richness of general effect. Purse-silk, or some other kind of thick, firm variety of silk, is best for knots. Floss used double and twisted together is very satisfactory; in pale shades or white it has the effect of pearls.
After fastening the end firmly to begin with, bring the needle to the surface, take the thread up on it from right to left, holding the thread with the left hand, give the needle one turn and set it vertically into the stuff near the point it came out, but not exactly on it. The thread should still be held in the left hand till it has all gone through, leaving the knot on the surface. It should not be twisted more than once round the needle. If a larger knot is wanted, thicker silk should be used; knots made with two or three twists on the needle do not lie well in their place.
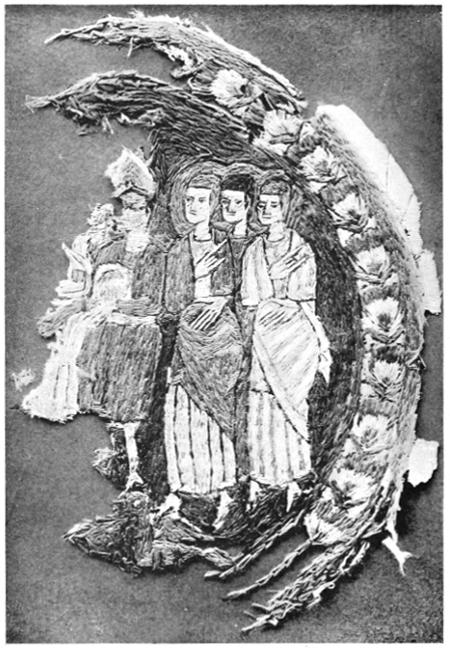
Fig. I.—Christian Coptic Embroidery
A.D. 500 or 600
Part of a Medallion of a Tunic. From Ancient Tombs in Upper Egypt.
V. & A. Museum, S. Kensington (No. 124—1891).
In the last chapter, when speaking of appliqué, I had occasion to mention how well it lends itself to representation of the human form, to be worked on a fairly large scale. I consider it eminently suitable for this because of the slight amount of stitchery required to produce the desired effect, the features being merely outlined, with the exception perhaps of the eyes and lips, which might be worked solid.
Large masses of drapery, &c., are tedious to work and may very well be represented by a piece of beautiful woven material; while the features and limbs, if well-drawn to start with, may be outlined accurately by skilful fingers without calling for a greater knowledge of anatomy or artistic expression than the average embroidress may be expected to possess.
But now we have come to figure-work as a special branch of Church embroidery. My own opinion may be briefly stated that only those who can draw correctly ought to attempt it, because, of all methods of representation, needlework is one of the least direct, and therefore one of the most difficult.
It is possible, perhaps, to get a fairly satisfactory figure worked by a person who cannot draw, if the principal lines and shading are distinctly marked out on the material to be worked, as well as a fully coloured drawing provided by the designer. But stitching is not, so to speak, a natural medium for expressing ideas, and the slightest deviation from what is intended by the artist may result in something entirely different in character—approaching, possibly, very near the grotesque on the one hand, or frivolity on the other. And as we seem in these days of general but superficial education of the masses, to have almost lost the feeling of reverence for religious effigies, looked upon as symbols only, irrespective of any æsthetic properties they may or may not possess, it is more than ever necessary to do the best things in the best way we know of. This is why I would strongly urge all who wish to enrich their embroideries with the human figure to practise drawing first. I would further suggest that the drawing should be chiefly from the antique, and the study altogether more with regard to typical than individual forms, as this training is not for the painting of ‘pictures,’ but for the sake of knowing what are the elements of human beauty and how they ought to be applied or modified. Neither am I including the study of design, which, as I have before remarked, is a study in itself. I am suggesting only such a practice of drawing as shall enable the needlewoman to know what is required of her in following out the idea and intention of her design, and to be able to carry out the same intelligently; she will not then place an eye on the cheek-bone or an ear on the jaw, or allow the fold of a garment to suggest a dislocated limb.
It is taken for granted that the embroidress is already quite dexterous and proficient in the use of the finest floss-silks and has had a good deal of practice in the usual stitches. Her mind should be unencumbered with any thought of technique, and the hand should respond without effort.
There is no new stitch to learn for this work, but there are several ways of employing the old ones.
Each method being usually associated with some distinct style or date, it is well to be conversant with the various standards, and then the worker is able to choose that which appeals to her most, or which seems the right one for any special requirement.
The decoration and vestments of a church may very well be of a later date than the building, but it seems a sort of anachronism to have it distinctively earlier, unless it actually is a treasure handed down from past generations.
Among the earliest examples to which we have access are the remains of Christian Coptic embroidery, done, it is believed, in the fifth or sixth century (see Illustration I.)
It is all worked in coarse split-stitch or (which has much the same effect) by threading the needle with two strands of silk at[30] once and bringing it up from the back between the two threads. The features are marked out with dark brown silk, and are formed in a somewhat rough-and-ready way by making almost every stitch express a feature by its direction and colour, the rest of the face being filled up as best it can. The hands in the same way; each finger is simply and crudely expressed by a single or double row of split-stitch. The garments are shaded, the rows of stitching following the direction of the folds.

Fragment of de Cantelupe Vestment in Worcester Cathedral
A.D. 1236-66
The earliest English figure work was usually done also in split-stitch, but much finer. The faces, hands, and feet were worked with the stitch all in one direction, either vertical or horizontal, and the details marked out with very fine black silk or dark brown. Sometimes the lips were put in with red. There was no shading of the flesh-tints, but they were, so far as one can tell, quite white. The Worcester fragments and the Durham stole and maniple are examples of this work; the latter, being in such good preservation, is the easiest to study. The garments and sometimes the whole figure were worked in gold or silver thread all laid one way; or again, with the face-lines vertical and the rest horizontal. The fragments from the vestment of Walter de Cantelupe (1236-1265 or 6) show a particularly beautiful scroll-work in a flowing pattern all over it. There are many small figures seated and crowned and holding a sceptre. The whole of the work is done entirely in fine gold-thread laid in one direction, and outlined with dark brown or black on what seems to have been crimson or rose-coloured Oriental silk. There is a small piece of it in the V. and A. Museum South Kensington, and some more in Worcester Cathedral Church, from which my drawing is taken.

Fig. II.—Early Thirteenth Century
(From the Syon Cope)
V. & A. Museum, S. Kensington (No. 83—1864).
But the most celebrated work, which[32] began about this time and flourished for about a century, making England famous for its embroidery, was the world-renowned ‘Opus Anglicanum,’ of which we have one of the most perfect specimens in the well-known ‘Syon Cope’ at South Kensington. One of the characteristics of this work is the way the faces are treated. Split-stitch in one shade of fine floss is still used, but, instead of lying in straight lines, it is begun in the centre of the cheek and worked round and round, in more or less circular lines, till they merge into the semicircular ones of the neck, or radiate towards the eye-socket and the straight line of the nose. The direction of the stitch gives an appearance of shading, although it is all done in one shade of very fine silk. The effect of relief is also attained by the same means, slightly accentuated by mechanical assistance—possibly the round head of a metal pin heated and pressed wherever such an effect is desired. The figure of St. Paul (Fig. II.) shows the general effect and the accompanying diagram (p. 34) the method of work. It will be observed by anyone who will make the experiment, that fine split-stitch, crewel, or chain-stitch worked solid in a circular direction in this way, if done out of a frame, will naturally cause such depressions as are to be seen in the early specimens of ‘Opus Anglicanum.’ It needed very little mechanical appliance to make these indentations regular and more effective; but by degrees this desire for effect grew beyond bounds, and the modelling became frightfully exaggerated at the same time that the natural and moderate relief of eyelids, nose, and lips, caused by a few extra stitches, developed into an actual stuffing, till figure embroidery was a thing of the past, and a debased condition of taste delighted itself with dolls dressed in silks and laces attached to needleworked ‘pictures,’ which had to be framed and glazed to keep them free from dust!
The arrangement of stitches, as in the ‘Opus Anglicanum,’ has been revived in modern times by some of the Sisterhoods, where they make a point of being ‘Early English’; but it is a style apt to become too quaint to suit modern ideas of reverence, and it is certainly much more difficult to manage successfully than the vertical or horizontal arrangement (see ‘a’ p. 34).
‘b’ shows a combination of both, and ‘c’ of the vertical method. Fig. III. is a drawing from a figure of the Blessed Virgin in a group representing the ‘Annunciation’ on an altar-frontal at St. Thomas’s, Salisbury. The whole of the frontal is closely ‘parsemé,’ with the typical Cherubim, Angels, flowers, &c., of the period (thirteenth to sixteenth centuries) and very much ornamented with free and graceful scroll-work. There is a return to the simpler method for working the face; or perhaps I should say a continuation of this method, which has never been entirely given up, in spite of prevailing fashion; probably the embroiderer instinctively feels it to be the most manageable. I mean the evenly worked surface (be it split-stitch or satin-stitch) on which the features are worked in outline. These stitches lie in the vertical direction, and there is little, if any, shading. The dress is worked in several shades of blue (also vertical split-stitch or fine satin-stitch), and there is very little attempt to give the appearance of relief in the folds. The cloak is worked entirely in gold thread, laid horizontally, with the folds marked on afterwards in rather scratchy lines of green silk. The lining of the cloak is in silver thread, flecked with black to indicate vair. The hair is pale golden-brown, in split-stitch, following the natural curves, and is very delicately drawn and worked. The whole of the group is characterised by great simplicity and sweetness. The vase containing the lilies, which stands in the centre between the Angel and the Blessed Virgin, is of richly raised gold-work; a scroll behind her shoulders with the words ‘Ecce Ancilla Dn̅i’ balances the wings of the Angel in the composition of the design.
During the fourteenth and fifteenth centuries there was a spontaneous growth of feeling for truth and beauty in all the arts; more correct drawing and richer colouring combined with strong and graceful design to produce perfection in needlework. In the most beautiful examples of this period (with few exceptions) the faces are worked in natural shades of flesh-tints, with fine floss-silks in satin-stitch, either ‘short’ or ‘long and short,’ in the vertical direction, with a fair amount of shading, but no cast shadows. The garments fall in noble lines and give the opportunity for a fine variety of colour. Precious stones, metals, and pearls were used with moderation, not that lavish profusion which afterwards degenerated into vulgar display.
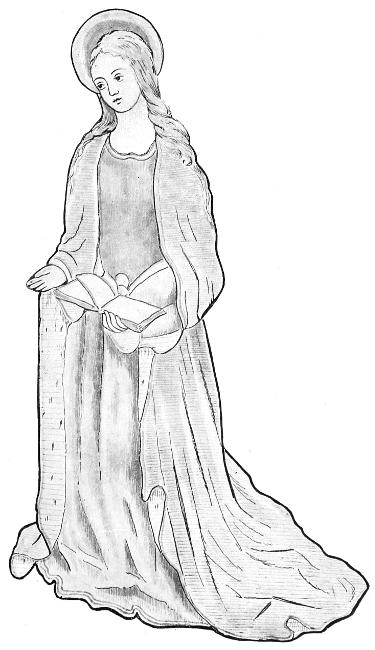
Fig. III
From an altar frontal in the Church of St. Thomas à Becket in Salisbury
Illustration IV. is taken from part of an orphrey in the Victoria and Albert Museum, designed by Rafaelino del Garbo, and represents, I think, the highest point to which ‘effect’ should go in the matter of shading and appearance of relief, perspective, &c. It is a piece of Florentine work, and shows[34] distinctly the influence of the place and the age. This reproduction of course does not do it justice; it is a perfect marvel of colour, while the drawing shows a master’s hand. The whole of the architectural background is worked in gold thread laid horizontally, the effect both of colour and shading being entirely produced by means of the silk it is couched with. In places the gold is completely veiled by the stitches, in others it gleams through, and again it is left quite bare and shining with its own lustre alone. Every line of the architecture is accentuated with gold twist of different degrees of thickness, and sometimes varied again by being twisted in the opposite direction.
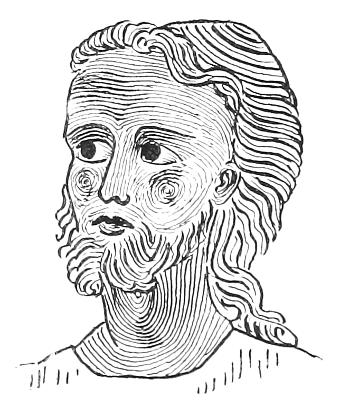
(a) English Thirteenth Century
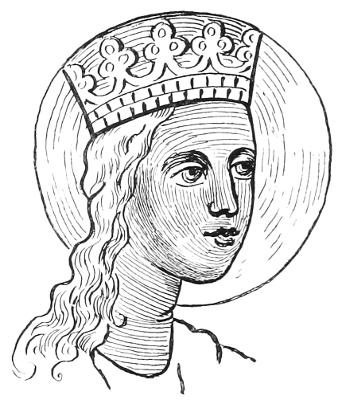
(b) Westphalian Early Fifteenth Century
V. & A. Museum, S. Kensington (No. 459—1905).

(c) Modern, Stitches Vertical
The garments consist of the same gold thread which forms the background; it is simply carried through the whole of the work,[4] with the exception of the head and nimbus, which are worked separately and appliqué to it afterwards. The hands, even, are done over the gold in short satin-stitch. The flesh-tints are coloured strongly but finely, and the shading is put in boldly. The sympathy between design and work is so marked as almost to indicate the same hand; but we have other examples, which are known to have been designed by one person and worked by another, which show the same rapport, such as the designs by Pollaiuolo embroidered by Paolo da Verona (in the church of S. Giovanni at Florence).[5]
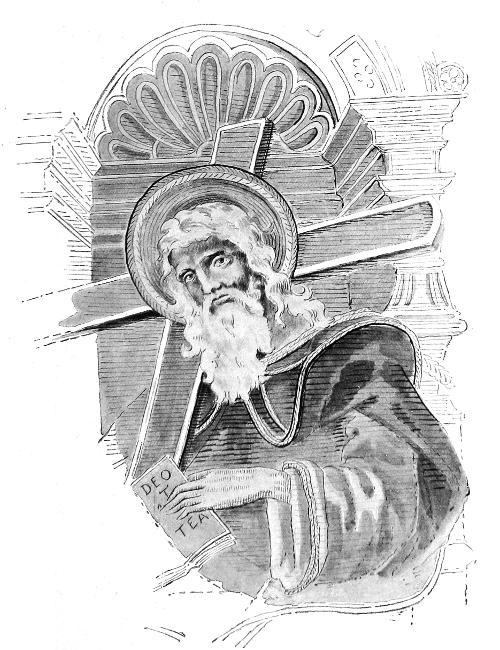
Fig. IV.—St. Andrew—Florentine work, Fifteenth or Early Sixteenth Century
V. & A. Museum, S. Kensington (No. 5787—1859).
The garments of the figures in the older embroidery were usually worked in split-stitch in much the same manner as the faces; that is to say, the stitching is done in rows, following the lines of the drawing.
In the Syon cope, for instance, the tunic of the figure illustrated in Fig. II. is worked in three shades of blue floss; the palest has faded so much as to be out of range altogether (a habit unfortunately common to pale shades of blue); the two darker ones seem to have remained almost entirely unaffected by age, light, and wear. The upper garment is worked in gold thread, with a border of green and a lining of soft yellowish-brown floss silk. The gold-work is done in the same way as the background of the cope. The threads lie in the same direction throughout—not merely in the case of the figure I am describing, but wherever gold is introduced at all—in large masses, as in the vesture, or in quite small quantities, such as the narrow border of the tunic. It is stitched so as to form the same zigzag pattern.
The lining of the upper robe is worked in a very fine split-stitch, with either very little shading or none besides that which is caused by the different directions of the stitch.
The folds in the gold-worked part are indicated by means of voided lines, which are afterwards filled up with stitches of black silk. The voiding at the folds gives a low relief, as the gold goes down and comes up again instead of all lying flat on the surface.
The hair is in fine lines of alternate blue-grey and white floss, done in split-stitch. In some of the other figures it is gold and black, or gold and white, or black and white, but always in alternate lines in the same style. In early English work the bearded faces have the upper lip shaven.
Three shades of each colour are commonly employed, not often following each other very closely, especially in the case of the green, of which the lighter shades incline towards yellow and the darker towards blue.
There were very few different colours in general use for embroidery till towards the end of the fourteenth century, after which they became much more varied, but still more harmonious, till crude and violent colours came in with the nineteenth century. The dyes formerly were mostly from Eastern sources, whence the silks also came, and where, until quite lately, very stringent rules were in force concerning the colours and dyes permitted to be used.
D’or nué seems to have been the favourite method of doing the garments about the sixteenth century. Laid-work, kept down with either self-coloured silk or gold thread, lightly couched, is also to be seen; and later, a pretty use of short-stitch in floss, worked vertically over gold threads laid horizontally—something like d’or nué, but very much coarser and more practical for the larger figures, which were then becoming more frequently worked (see diagram).
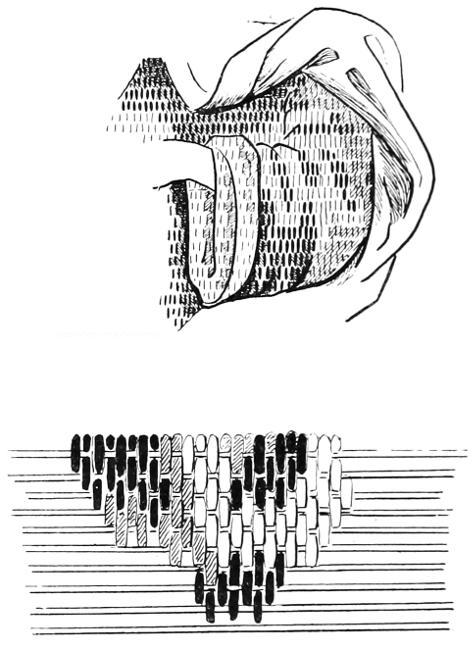
Diagram showing method of working Short-stitch over horizontal lines of Gold-thread
Another way of treating drapery is to work it solidly in long-and-short-stitch (vertical), boldly shaded, and afterwards enriching it with fine gold threads laid horizontally over the whole garment a little distance apart, and sewn down singly with fine sewing silks or split floss of the same shades as those it passes over; or sprays or diapers may be effective worked over the plain shaded silks.
The background of figure-work is not very often composed entirely of stitching in these days, when so many beautiful woven fabrics are so easily procured and time seems[37] shorter than it used to be. But still, where there is not a very large expanse to fill, a worked background is not a luxury unattainable; a very satisfactory and glorious one is gold thread laid in diaper-patterns. Laid-work and darning are quicker—the latter makes a beautifully broken colour for showing up large outline figure-work done on unbleached linen or worsted material for hangings.
I do not fancy any of my readers would undertake such a piece of work as the background of the Syon cope; but the way it was probably done has been suggested by Mr. Lewis Day thus:—
‘The stitch runs from point to point of the zigzag pattern, then it penetrates the stuff, is carried round a thread of flax laid at the back of the material, and is brought to the surface again through the hole made by the needle in passing down. That is to say, the silken thread only dips through the linen at the points in the pattern, and is then caught down by a thread of flax on the under-surface of the linen … it is a kind of work on which two persons might be employed, one on either side of the stuff.’[6]
I venture to differ from his opinion on one point only, and that is that probably the silken or gold thread was not the one worked backwards and forwards through the stuff, since the flax thread from behind would do the work just as well. The gold or silk would thus be saved from friction, and would not need to be cut into needlefuls and threaded in a needle, but could be used from continuously, as I have before suggested for long lines of couching; it is, in fact, precisely the same thing, with the exception of taking the ‘working’ needle back through the hole it made, instead of at a little distance from it. This method is so often used in fine gold-work for turning at the end of a row when one does not want it to appear on the surface that I fancy it would be suggested by this.
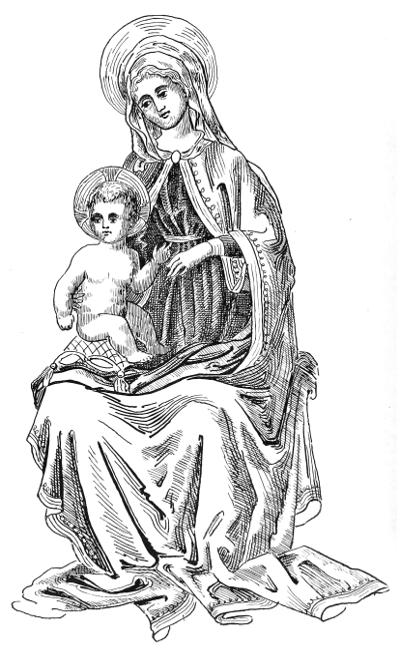
Italian Early Sixteenth Century
V. & A. Museum, South Kensington (No. 8388—1863).
(Suggested as Centre for Frontal, Fig. I.)
The question of liturgical colours need not be very fully discussed here, as this is pre-eminently a practical manual and not a treatise on ritual. Although the embroidress naturally studies the reason and uses of the things she makes, it does not properly rest with her whether the ‘Use of Sarum’ or that of any other special diocese be followed. There certainly seems to have been no very hard and fast rule observed in this matter in the early ages of the Church or even in medieval times. From the old inventories we gather that altar-frontals and vestments existed of almost every known colour and shade (and some indeed unknown ones, to us at least!). This of course may be to some extent accounted for by the votive offerings so frequently made by kings and nobles of their own magnificent vestments and of spoils taken in war.[7] These would be accepted and used in the Church quite irrespective of colour and design.
We might conclude from the old English illuminations that red, blue, purple, white, and gold were the colours most generally used, or considered most ideally correct; but on more careful investigation I think we should be driven to the conclusion that while the careful miniaturist drew the forms of what he was accustomed to see in the ordinary services of the Church, he coloured them according to his own ideas of beauty or according to the limitations of his palette. A row of clergy in one illumination, for instance, would have their albes alternately blue and red; and I remember another of an outdoor procession in which the same arrangement prevailed, with the priests’ stoles coloured blue over the red albes and red over the blue ones.
The four colours above-named being the Levitical ones, it is probable that a particular significance was attached to them; but green and black were common before the end of the fifteenth century; and the English use, which was supposed to be definitely settled by the ‘second year of Edward the Sixth,’ certainly includes them.
This gives us an authorised sequence of at least five colours—viz. white, red, violet, green, and black. Cloth of gold may be considered as glorified white. Blue, violet, indigo, and purple may be all separate colours, or they may be included in the one term ‘violet,’ as popularly understood. ‘Purple’ indeed is such a wide-embracing word that it may, in ancient documents, signify a material (velvet), while as a colour it may range anywhere between crimson and blue, but it always means something rich and gorgeous.
The altar-frontal, giving the keynote for the colour, should be arranged for first; then the vestments worn by the ministers; and, lastly, all the other textile decorations, which must harmonise with the whole. It should not be necessary to change these latter whenever the altar-frontal is changed, except for Lent. It becomes all the more desirable therefore to choose such hangings as will look equally well with white, green, or red.
For Lent they will all be mostly violet—violet and red—(red decoration on violet should be edged with black)—violet and white—by which I do not mean a bleached, cold, dead white, but a warm, brownish cream, or silver. The violet also must not be crude; blue is preferable generally, and it need not be as dark as it too often is, tending to blackness, especially in velvet. Indigo seems to me the ideal colour for Lent. When one speaks of blue for Lent, of course one does not mean bright or cerulean blue, or azure. These are the blues of our Lord’s garments, of the Blessed Virgin, and of the Seraphim, and have nothing to do with penitence.
The green should not be too blue in tone, and the red is best kept to tawny shades, or real, true red. However beautiful any one colour may be alone, its behaviour in company with others must be tested if it is to be used with them. I must plead for[40] forgiveness if I seem to press this point unduly, on the ground that I am constantly made to suffer from a disregard to this principle when I am asked to devise new decorations to ‘go with’ impossible crudities.
Wherever possible, it is best to arrange all the textile hangings, vestments, &c., to be used in a church at the same time, and to have a definite scheme of design and colour to work upon. Even when the funds necessary to carry it out are not available all at once, the general idea could be fixed upon and the accomplishment of it could follow by degrees. Too often there appears to be a sort of haphazard effect in the decoration of churches—a want of unity, as though each separate thing were an after-thought, bearing no relation to what had been done before. If there are valuable embroideries, &c., already in use, which only require to be supplemented by others, it is merely reasonable to insist upon, and not difficult to arrange, that the new ones do not clash with the old. I do not myself think it necessary to keep rigidly to one date or style so long as the work harmonises as a whole, neither is it necessary for all the shades of every colour used to be identical; but it is quite essential that they should be harmonious.
The principal hangings in use in our time are the Altar-frontal, Super-frontal, Dorsal and Wings. Curtains are also sometimes used to partition off part of the church for a vestry, a belfry, or an organ-chamber.
Besides these there are hangings simply for the purpose of covering bare walls, in the chancel or elsewhere.
As a general principle one may say that curtains which were originally intended to be drawn or looped back may hang in folds, while those used merely as a covering should hang plain.
Wings or riddells, portières, &c., should be full; altar-frontals, dorsals, and tapestries for bare walls should hang plain, and may be treated more pictorially.
The altar strikes the keynote, so to speak, for the whole church. To it, as the culminating point, all the decoration is directed; and by it we are led through the different seasons of fast and festival, marking these seasons by the change of vesture as definitely as by the changes in the ritual and service.
An altar-frontal is rather a large piece of work for one person to undertake, unless she has had considerable practice (which enables her to work quickly) and has plenty of time to devote to it, and is also possessed of sufficient patience to keep on with one thing till it is finished.
A frontal can very well be worked by several ladies, each taking a separate piece on her own frame. Almost every kind of design can be worked in this way, and that is why Church work is so often done on linen and applied to the silk or velvet afterwards. There is a popular idea that it must be done so, but this is by no means the case; it is merely a matter of convenience. It is more ideally perfect as a matter of principle to work directly on the material to be beautified.
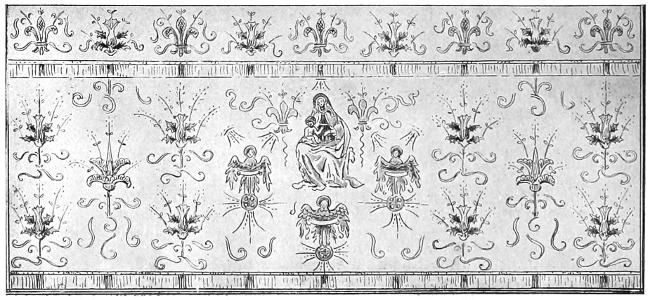
Fig. I
In describing how to make up a frontal we will take one for an 8-foot altar, 3 feet 4 inches high. We will suppose the various details of an Early English one (such as Fig. I.) to be already worked and pasted at the back with embroidery paste as described[41] in the chapter on Appliqué-work, cut out of the frames and neatly ‘trimmed’ round the edges, leaving such a line of linen as will be perfectly covered with the outline with which it is couched down to the material the frontal is to be made of. Supposing it to be damask, with a pattern that repeats every 3 feet, and that it is from 25 to 27 inches wide; 4 yards only would be required, as there would be no extra length wanted to make the patterns join exactly at the seams. There would be three seams, which must be neatly sewn, either with very fine over-sewing, or with back-stitching, in silk of the same colour, taking the greatest care to match the halves of the pattern all along the seam. When this is done there will be a continuous surface of damask 36 inches wide and 100 or more inches long.
A large strong frame must be prepared with stout linen mounted in it, rather larger than the frontal is to be—say 8 feet 6 inches × 3 feet 6 inches.
Now it makes no difference to the convenience of working how long the frame is; but no woman could work to the centre of one mounted 42 inches wide. One cannot comfortably work further in than about 13 inches; therefore, although the linen should be of the full width, not more than twice 13, viz. 26 inches, should be presented to be worked upon at one time. The easiest way to arrange this is to run a tuck along the top and bottom of the linen before it is put into the frame, or two tucks along the bottom, according to the particular requirements of the design. A chain-stitch sewing machine would do this firmly and quickly, as it is only to reduce the width temporarily, and it could be as quickly undone after it had served its purpose.
If the long bars of the frame be round instead of flat, both linen and silk may be wound upon it to reduce the width to start with. This involves the removal of the sidebars each time the work is ‘let out’; they should not be taken out altogether, neither should the lacing be quite undone, but merely loosened sufficiently for the bars to slip gently out of their sockets; there should be one person stationed at each side-bar while this is being done, to see that it is moved evenly and laced up as before, only with additional lacing where it has been let out.
A straight line should be marked down the middle of the linen; it is best run in with coloured silk or cotton to show on both the under and the upper sides, as this will be the starting-point for all measurements.
The central line of the damask is next found, and tacked down to the one on the linen. The seams will have been pressed open and flat, and the selvedges nicked pretty deeply with sharp scissors all along; if there is a hard edge, it should be cut off. The damask should then be well stretched over the linen, which should not, as yet, be made as tight as it will go; after the silk is on (fastened first by pins and then sewn all round), the whole must be stretched up as well and evenly as possible. See that the angles of the frame are right angles, whether the sides are set in with pegs or screws; all measurements should be taken quite accurately by means of a tape that will not ‘give.’ Chesterman’s metallic ones are perfect, but require care in using, as they easily break and get out of order. A large ‘straight-edge’ and ‘set-square’ are also necessary. The frontal is now ready for the embroidery. The central ornament is placed on first; then those on each side; then the others beyond.
The measure can be pinned at each end of the frame to see that the upper points are even, and again to verify the lower ones. Sometimes the design of the damask may be taken as a guide if evenly woven; and quite accurately put on the frame; but that should be tested first.
When each flower has been carefully placed and kept in position by means of numerous fine steel pins stuck vertically through the work, they must all be tacked firmly with stitches of fine strong silk or cotton straight down the centre and then into any outstanding points. These stitches should be very small on the ‘right’ side of the work so that they need not be taken out after it is finished. Then the whole of the outline is couched over the edges of the work covering the little border of linen left for this purpose on cutting it out of the frame. Two, three, or even four full thicknesses of filoselle, four or more of ‘Stout Floss,’ or of gold thread, make an excellent outline for gold and silk embroidery, according to the coarseness or fineness of the work; for appliqué different coloured cords are useful, and for most work gold thread or brown filoselle would be safe. The couching stitches should be placed fairly close together, and should be done with strong silken thread.
When the more solid ornaments are securely attached to the frontal, the scroll-work belonging to them may be added as far as can be reached without interfering with the tucks in the linen, which may then be let out.

Fig. II
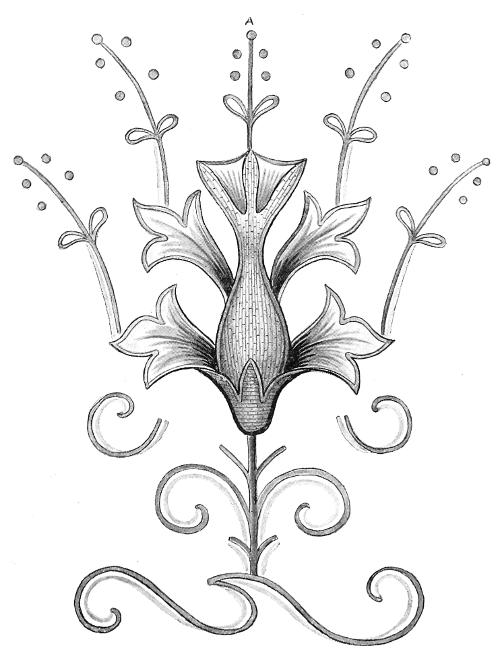
Fig. III
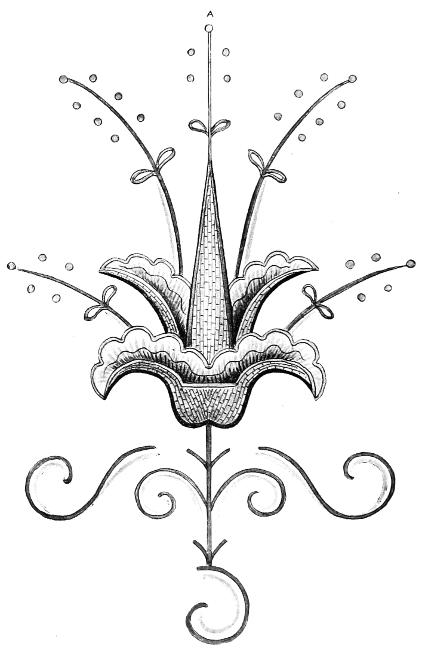
Fig. IV
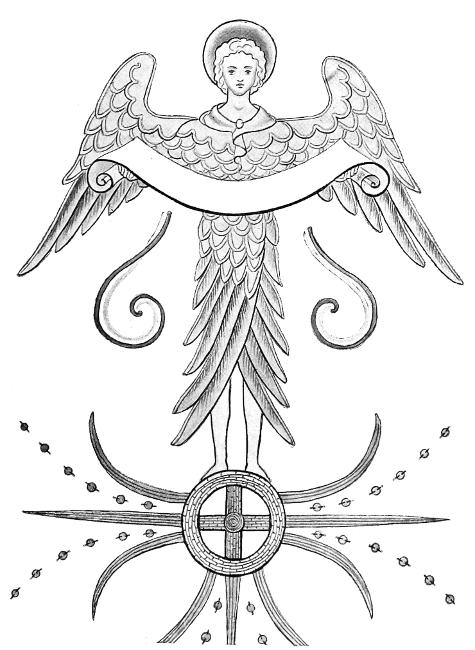
Fig. V
When the lowest row is finished and the scroll-work, the fringe is sewn on while the work is still in the frame, a line being first drawn (with tailor’s chalk on a dark ground, or coloured chalk, yellow by preference, on a white ground) straight along the bottom, where it will be just covered by the upper edge of the fringe.
Now the FRINGE is a feature of the work to which I would draw particular attention, because it has a distinct artistic value of its own, which is too often neglected or not understood and appreciated as it should be.
The use of a fringe as a decorative finish to every kind of textile is common to all countries and all ages. In early Assyrian sculpture we see it on the garments of warriors. In the Holy Scriptures we read of the fringe of golden bells on Aaron’s ephod, also of the fringes on the garments of the people of God as symbols of their consecration; while the fringes at the edges of rugs and tapestries, both ancient and modern, are so universal as to simply suggest their origin—viz. the loose threads of the warp left when cutting them off the loom.
A handsome fringe is at the same time the most beautiful and the most natural finishing touch to the lower edge of any hanging, whether plain woven or embroidered. It may also with propriety go down the sides—though this should be narrow and preferably uncut.
Generally speaking, 2½ inches is deep enough for the bottom of the frontal, 1½ inch for the super-frontal, and ¾ inch for the sides. In arranging the colours of the fringe a large proportion should be given to that of the ground-work, damask, &c., and then a fair quantity to each of the principal colours used in the embroidery. Measurements of the spacing required, and good-sized patterns of the colours, with a diagram of their order in the fringe, should always be sent to the manufacturer when ordering it. The heading of the fringe should be also specially designed, or it is nearly certain to be ugly. If gold thread is used in the embroidery, it should also appear in the fringe, if not in the ‘fall,’ at least in the ‘head.’
It should first be tacked, then stitched on, the upper edge just covering the line, starting from the centre and working towards each side. It must be stitched firmly with strong thread or silk of the same colour as one of those used in the head; the fringe must not be pulled at all tight from end to end, but rather ‘eased’ on, or it will ‘draw’ when taken out of the frame. A few extra inches should be allowed for this shrinkage when giving the measurements to the manufacturer.
When this is all done it is ready for the making up.
Some may consider this mere upholsterer’s work, and think they may very well, at this stage, hand it over to the commercial workshop; but as it is a point of religious as well as artistic sentiment, that at least the same guiding spirit, if not actually the same pair of hands, should see the work through to the end, we will proceed.
An inner lining of firm, evenly woven hemp or sail-cloth should be cut exactly true to the size which the frontal is to be, allowing 2 inches at the bottom to be turned up. In our supposed case it will be 8 feet long and 3 feet 6 inches wide. If there are any creases in it, it should be laid on a wet cloth and ironed all over with a heavy, hot flat-iron and not folded again. It is made wide enough to use without seams. It ought not to be stiffened with glue, or contain ‘dressing’ of any kind, and should be of sufficient substance without it. A large table, or a board that can rest on the trestles of the mounting frame, should be covered with a white sheet and the frontal laid on it, face downward, on taking it out of the frame. A line ruled down the centre of the hempen cloth must be placed to the central line of the frontal, and the two tacked together, taking care that the needle does not damage any delicate part of the embroidery. All knots should be on the ‘right’ side of the frontal if the tacking threads are to come out afterwards, which may or may not be necessary; the edges are then turned evenly, first along the bottom and then the two sides, beginning from the bottom when doing each side. It is then to be turned face uppermost, and the top edge sewn to the hemp.
The method of hanging the frontal must now be decided upon. It can be made with a piece of the linen to go right over the altar and hang down behind, weighted with a rod in the hem; or it can be hung by rings or buttonholes from hooks under the altar-slab. The former method is the simpler where there is no gradine with heavy ornaments to be lifted down every time the frontal is changed. The super-frontal (frontlet is perhaps the more correct term) can then be made in one with the frontal, as seen in many old examples; but the latter method seems to be the most common, possibly from the economical practice of making one frontlet serve for many frontals. If then we are making it in this way and the frontlet is already provided, we must take two careful measurements—one from the floor to the hooks on the altar, the other from the floor to the lower edge of the frontlet. If the latter is 7 inches deep it will allow 33 inches of the frontal to show beneath: the actual height of it will depend on the position of the hooks.
The linen lining is cut to allow turnings of about an inch down the sides and along the bottom, and to turn over the top hem covering the raw edge of the silk on the right side, where it has been sewn down to the interlining. The linen lining is now to be firmly stitched all along with strong back-stitching; the other edges may be hemmed round on the ‘wrong’ side after tacking them in place. A wooden lath may be slipped through the hem at the bottom, and a brass one along the top; in this case buttonholes may be worked in the upper one wherever the hooks would come, instead of rings sewn on.
The lining should be of a stout pure linen and may be of the same colour as the frontal.
I have given somewhat minute directions as to the making up of the altar-frontal, as the method is very similar for all this kind of work. Curtains do not require an interlining, neither do vestments unless the stuff is poor, which of course it ought not to be. An interlining of soft coarse muslin, or very thin unbleached calico, perhaps helps to keep it in shape and does not interfere with the grace of the folds; but anything which makes a vestment stiff or cumbersome should be avoided.
Altar-frontals are frequently stretched and nailed to a light wooden frame—a plan which is extremely convenient, and perhaps helps their preservation where they are frequently changed—but their textile grace is greatly diminished; when such a frame is used I would suggest covering it first with a light-textured linen and sewing the frontal to this, instead of nailing it on.
If the super-frontal, or frontlet, has not been already provided, we shall have to consider the question of the depth it ought to be made. Again I can only give general principles. The beauty of the whole depends on the due proportion of its parts. As altars are usually nearly of the same height, whatever their length may be, it follows that a deep frontlet reduces the proportion of the frontal to a mere ribbon if it is very long. Therefore we may say, the longer the altar the narrower the super-frontal should be.
That part of the super-frontal which lies flat on the top of the altar should always be made of pure linen. It may be of the same colour as the border which hangs down (if the fair linen cloth with a cover on it is not kept on always), but it is really more practical when made of undyed linen.
There is no vestment which has engaged the interest of artists and needlewomen more than the Cope. It is part of the state apparel of kings, nobles and bishops, and seems to be both the ecclesiastical and secular descendant of the glorious Trabea or ‘Toga picta’ of ancient Rome, where it was the custom of victorious generals to offer their magnificent robes in the temples.
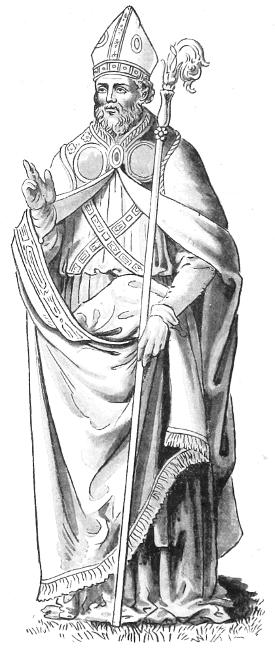
A Fifteenth-century Bishop
(Botticelli)
It seems to have maintained its pre-eminence as the most suitable vestment for priest or bishop at such high and solemn ceremonies as the Coronation of sovereigns, choral Baptisms, Marriages and Burials, also for processions at great festivals, &c.
The old examples which remain are often extremely beautiful and interesting, showing that the utmost care and thought and almost unlimited time must have been bestowed upon them. They are frequently embroidered all over, or are made of the richest velvet or brocade with hood and orphreys of woven gold.
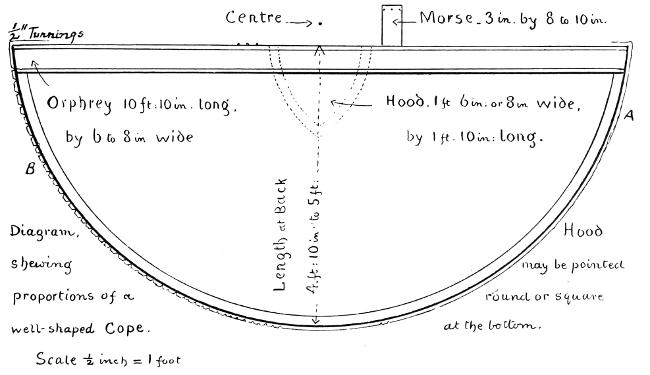
Diagram, shewing proportions of well-shaped Cope.
Scale ½ inch = 1 foot
Hood may be pointed round or square at the bottom.
The shape is theoretically semicircular, but in practice it is best, when drawing the semicircle, to place the centre a few inches above the straight line which forms the front edge of the garment (diagram). This causes the front to be a little longer from the top to the hem than the back is, and thus allows for the part which is taken up at the neck; when it is worn it rises up there from the shoulders. This becomes quite ungainly when the orphreys (which are laid on the edge of the front) are very wide and stiff, but it again may be partially compensated by fastening the morse rather low on the orphreys and having it of a good size so as to leave a fairly wide opening in front: the whole cope will then settle lower on the shoulders. There is another way of getting over the difficulty, and that is to ‘shape’ it to fit on the shoulders. I have seen one ancient and one modern specimen treated thus, and they look very well when in use, but they are quite exceptional, and this method of course destroys the typical half-circle, and would require the orphreys to be cut to fit also. It is better to keep the orphreys narrow; the only excuse for such very wide ones seems to be the magnificent embroidery of figures and tabernacle-work with which they were so often decorated in the fifteenth and sixteenth centuries, when wide orphreys became so generally used.
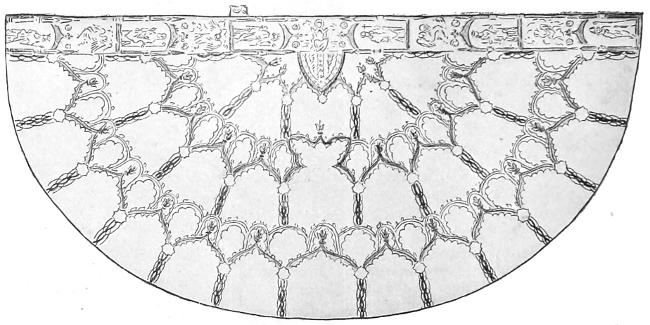
Sketch showing spacing of Canopy-work—typical English thirteenth-century Cope of St. Sylvester. Each of the larger spaces is filled with groups of figures illustrating the Life of Christ, smaller ones with Angels, the medallions with birds.
A very favourite arrangement of design in the old English work was to divide the whole surface of the cope into a series of quatrefoils, like the ‘Syon cope,’ or of canopy-work, as shown by the cope of ‘St. Sylvester,’ enclosing groups of figures illustrating the life of Christ, the intermediate spaces being filled with cherubim and angels. The lowest central space was often occupied by the Annunciation or the Nativity; the middle one usually by the Crucifixion, and the upper one by the Lord in Glory. This arrangement left very little room for a hood; indeed, at this period they are generally so small as not to require much consideration, being often merely a triangular enlargement of the orphrey at the centre. When the fashions changed (which they seemed to do definitely, if slowly), our forefathers did not exercise so much judgment as we might expect in adapting their priceless inheritance of needlework, but hacked away at one part and joined on at another, quite regardless of the mutilation it involved. Even in the Syon cope the orphreys, which are supposed to have been added only about fifty years later than the body of the cope, cut off half of the figures of the angels nearest to the edge. The ‘Daroca’ cope at Madrid, which is worked in the same style and of very similar design, has its original narrow orphrey, and the angels are designed to fit into their spaces, but the large hood seems to have been an after-thought, and a border and fringe have been ruthlessly struck through the figures of four angels enclosing the upper central group which completed the design.
In many of the later ones the hood and orphreys became the principal features of the cope, and all the decoration was concentrated upon them. Both hood and orphrey are worked separately (unless the former be a quasi-hood joined in with the orphrey, or marked out merely on the back of the cope). The orphrey is applied to the cope in a long embroidery frame, before making it up. The hood is not usually so applied, but made up by itself, lined and fringed; and fastened, by means of loops sewn on its upper edge, to buttons placed to correspond on the orphrey (either below or over it).
The cope and its lining, of silk or linen, should be cut out exactly alike, allowing at least half an inch for ‘turnings’ all round (see A on diagram). Tiny snippets should be cut out of these ‘turnings’ along the curved edge (B on diagram), then outside and lining should have their edges turned up and tacked separately, then again tacked together, first down the middle, then along the straight edge, and lastly round the curve, in each case starting from the centre. It is then ready to be slip-stitched together—again[51] beginning at the centre, both for straight and curved edges.
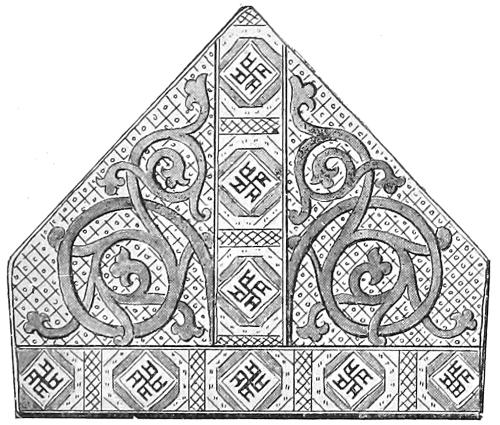
Mitre of St. Thomas of Canterbury
The cope is fastened in front with a large clasp or brooch, called the morse. This may be made of metal enriched with precious stones, in which case it is work for the artist-goldsmith. Or it may be of material richly embroidered, with or without jewels; a good size for a morse is from 6 to 8 inches long by 3 inches wide. Some of those worn by bishops at King Edward VII.’s coronation were 12 inches long.
It should be fastened firmly on the right side of the garment about 12 inches from the centre, and may have three or four large strong ‘eyes’ sewn on the other edge in which the hooks will fit, which are to be fixed securely on the corresponding spot on the left side of the cope.
Both the hood and the lower edge of the cope itself may be finished off with a border or a fringe, or both.
The Mitre—also part of the official dress of bishops and archbishops—is a linen cap of a nearly triangular form as seen from the front or back. The appearance of it is familiar to all (in a somewhat exaggerated form) in the armorial bearings of many Sees, and in pictures, &c., where towards the fifteenth century it grows taller and bigger, and more unbecoming as time goes on.
The older ones are often merely decorated with an orphrey down the middle and a band round the head; an embroidered rose or a jewel is sometimes placed on either side of the vertical band. In the more ornamental ones they are completely covered with embroidery of the finest description, often jewelled wherever possible—but the same arrangement is generally followed. The lappets (infulæ) are worked to match, and are placed in the middle of the head-band at the back, either close together or an inch or two apart. They are from 10 to 14 inches long and from 1 to 3 inches wide, finished at the ends with fringe or tassels.
The accompanying illustration of one of the mitres of St. Thomas of Canterbury shows an excellent shape, and although well covered with embroidery is not over-ornamented. The height is 10 inches and the size round the head 24 inches.
A mitre is much easier to make than would at first sight appear.
A simple one of the dimensions of St. Thomas’s requires a piece of material 12 inches wide and about 26 inches long (of course, if made for any individual bishop it must be proportionate to the size of his head).
It may be made of cloth of gold or any precious material, or of pure plain white linen.
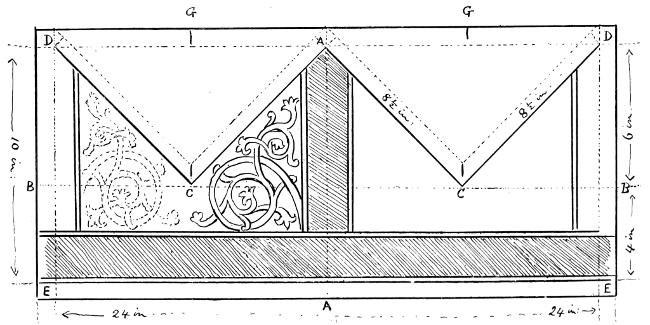
To ornament it, the material should be stretched on a frame, the centre marked, two lines drawn (tacked in with fine silk) vertically and horizontally at right angles to each other, A A and B B. Then marking off an inch along all the edges for turnings, a diagonal line is drawn from A to C and again from C to D.
The parts enclosed within these lines and D E are where the ornamentation is worked, including the orphreys. Space for these should be marked out next, or they may be worked straight on to the stuff; in any case, all except the one which covers the seam should be stitched on before it is taken out of the frame.
The making up is done simply by stitching it together in the first place so as to make a circular band; then the top edges are placed together, turning in the inch (or whatever is allowed for). A slit nearly the depth of the turnings should be cut at C and a snippet cut out at A (see diagram). It is then to be sewn neatly together along the top, G meeting G, with A at one end and D at the other.
When this is done the infulæ are sewn under the edge of the mitre at the back, and a lining (previously prepared of exactly the same shape, but a trifle smaller) slip-stitched all round the lower edge and kept in place by means of a few stitches at each point.
The mitre should then be folded quite flat, and the edge of the folds outlined with gold twist or fine cord; a little tuft of silk and gold thread, or a small gold acorn or some such small ornament, is sometimes fastened on the apex of each angle.
This is for a simple linen mitre, for the more gorgeous ones, preciosa and aurifrigiata, a band of leather is sometimes placed inside between the outside and the lining, wide enough to reach from E to B and C where the angle begins (4 inches in diagram). The triangular pieces are cut out before making it up (along the dotted line in diagram), and another piece of material (not necessarily like the rest of the mitre) is cut to fit, and sewn neatly all round, before the edging of cord is put on. The shape of this top piece will vary from a square to any lozenge, according to the angle at which the point of the mitre is made. In my diagram it is a right-angle, and so the top would be 8½ inches square. It should have an interlining of something light, yet fairly stiff. Parchment used to be considered the correct thing for this interlining, but a good collar interlining or tailor’s canvas will suffice.
The Ornaments Rubric as it stands at the beginning of our Prayer-books has been an open field for controversy for many years. So much light has been thrown by this means upon customs and observances once almost forgotten and fallen into neglect (which obviously at the time of the Rubric were before the eyes or fresh in the memories of all Church-people), that we can now once more picture to ourselves, without effort, what our forefathers strove successfully to retain as permissible for the maximum (if not absolutely commanded as the minimum) of distinctive vesture and ritual to be used in the services of the Church of England.
For the Celebrant—the Amice, the Albe, the Girdle, the Stole, the Maniple or Fanon, and the Chasuble.
For the Epistoler and Gospeller—the same vestments, except that instead of the Chasuble a Dalmatic or Tunicle is worn.
For the Altar itself—a Frontal, Fair linen cloth, two Corporals (or Corporal and Chalice-veil, or Corporal and Pall), Purificators, and Corporal-case or Burse.
The symbolism of the vestments may be considered in a two-fold aspect: both as signifying the garments worn by our Lord at His Passion (and so keeping before the eyes of the congregation the ‘continual remembrance’), and, secondly, as representing the virtues required in the ministers.
Thus we may see in the amice, first, the cloth with which our Lord was blindfolded when the Jews struck Him on the face, and, secondly (as it is first placed on the head), ‘Hope—the Helmet of Salvation.’ In the albe, first, the white garment in which He was arrayed by Herod, and secondly, Innocence of Life, or a ‘conscience void of offence toward God.’ And so, of the others, the girdle, stole, and maniple may represent the cords and bands with which He was bound and scourged, and, secondly, purity or chastity, and the yoke of Christ. While in the chasuble we see the royal robe in which He was mocked as king, and, secondly, covering and embracing all, the glorious grace of charity.
The amice, albe, &c., will be more particularly described in the chapter on Linen-work. The altar-frontal we have already spoken of. In this place we will consider the stole, maniple, chasuble, and dalmatic.
In a little book such as this, the primary intention of which is to be of practical use to the embroidress, we cannot do more than touch upon the very outside margin of history. It is, indeed, extremely interesting to trace back to their primitive uses and beginnings all the articles of vesture and ornament used by the Church in her services; but I can merely remark in passing upon the evolution of the Liturgical garments, which seem to have proceeded gradually from the most simple and elementary requirements;—begun by necessity, continued by reverence, and completed by symbolism.
Putting aside, therefore, learned research into the origin of the stole (orarium, stola) and the maniple (mapula, sudarium, mantile, or fanon), we need not go further back than the ninth or tenth centuries to find them in general use by the clergy much the same as we see them now.
The stole and maniple are usually made to match, and follow the colour of the season, as shown by the altar-frontal. About 9 feet is the full length of the former and 3 feet of the latter; 2 yards of damask will be sufficient for both, if the stole has a seam in the centre, and half the width only of 27-inch damask is required. And the best shops will supply the half-width if requested to do so; but if other vestments are being made at the same time, with the same material, it is more economical to get all the silk in one length, as it will cut to more advantage than by getting the pieces separately.
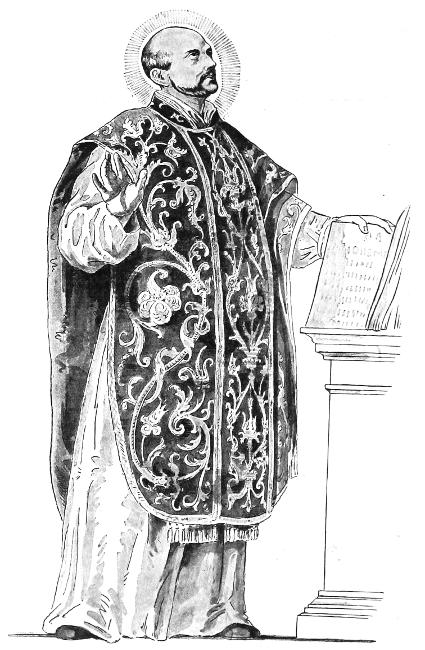
Fig. I.—Rubens’s Portrait of St. Ignatius of Loyola, (in Warwick Castle), showing elaborately worked Chasuble
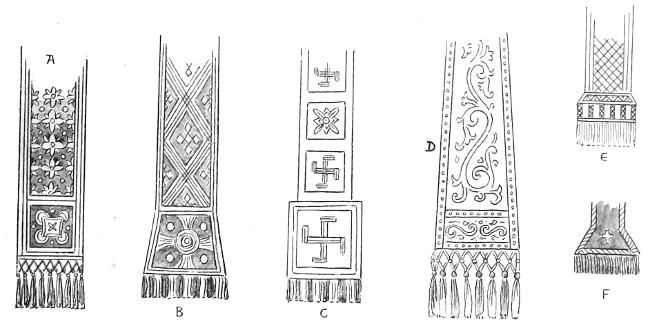
Fig. II.—Ancient forms of ends of Stole and Maniple
The width of a stole and a maniple may be from 1½ to 2½ inches in the narrowest or central part. (They are sometimes made wider, but are not so convenient to wear under a chasuble.) They may be perfectly straight from end to end, as in Illustration A, or they may widen out by degrees from the centre to the fringe, as at D. They may have a square end added on like C, or begin to widen from 8 to 10 inches above the fringe (see B), or, again, only just over the fringe, as in E and F. All these are typical ancient examples.
As to the decoration of them, as a rule they were either woven in gold thread or embroidered richly throughout the whole length in gold diaper patterns, or geometric devices, with crosses, roses, &c., at intervals; or with figures, as in the celebrated Durham relics of St. Cuthbert. The fringes were often very handsome, either knotted or plain, in various colours or of gold alone; sometimes tassels at the corners were used instead of fringe, or little golden bells.
The material of which they are made should be rich and handsome—by preference the same as the chasuble. A deacon’s stole[8] should not be so richly decorated as that of the priest.
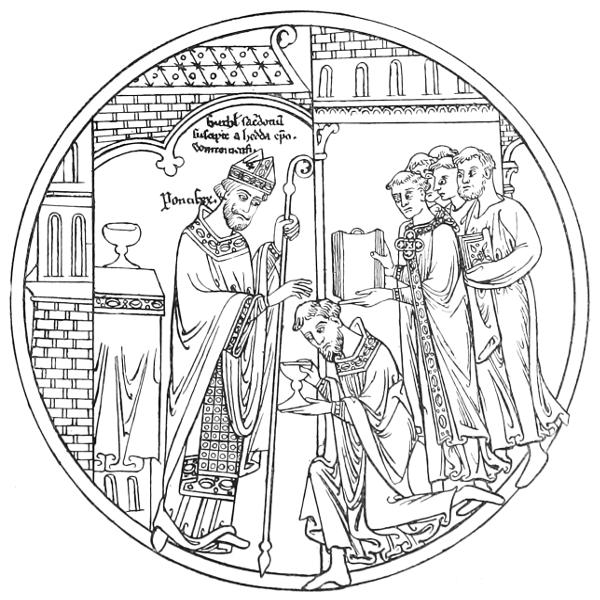
Early Twelfth Century
From MS., British Museum. V6
The chasuble (chesible, casula, planeta, amphibalus, pænula) seems in very early days to have been the ordinary outer dress of the clergy as well as the one worn at the celebration of the Eucharist; no doubt the latter would be handsomer both in material and ornamentation, so as to make a distinction. The most usual form would seem to be that of a semicircle joined up the front, leaving an aperture sufficient for the head of the wearer to pass through. It may possibly have been of a completely circular shape to begin with, with a hole in the centre like a poncho or a gaberdine. It may have been cut away at the sides for convenience, till by degrees it arrived at the two typical shapes of ‘Gothic,’ or pointed, and ‘Roman,’ or square. The former has always been more generally used in our Church, but the latter was not uncommon at the time of our Rubric. Fig. III. shows the early form of Gothic. It is from one of the tombs in Worcester Cathedral of the early thirteenth century; there are numbers of equally fine ones to be seen on the effigies of priests and bishops in our old parish and cathedral churches all over the country; the older they are, the fuller and softer-looking is the vestment as a rule. They often have one straight orphrey (or pillar) in front and a Y-shaped cross at the back (where the square-shaped ones have a Latin cross). Sometimes they have a Y-cross in front also. Occasionally there is no orphrey in front, as in Fig. III. It is not unlikely that the orphrey was added to cover the seam.

Fig. III.—A Bishop’s Tomb in Worcester Cathedral.
(Showing old form of English chasuble)
Another and very graceful way of decorating the chasuble is by embroidering it over the shoulders between the arms of the Y-cross, either on the back alone or extending over the front also. This kind of ornamentation is called the ‘Flower,’ and may be seen on the chasuble of St. Thomas of Canterbury (p. 58) and also on Fig. IV.
Almost the only difference between a modern chasuble of a good ‘make’ and the old Gothic is the seam on the shoulders, which makes it less cumbersome to wear.
Although the Gothic may be the more artistic garment, the square chasuble can also be a noble-looking vestment in its older and ampler form, as may be seen by Fig. I., taken from Rubens’s portrait of St. Ignatius of Loyola. It also gave scope for much decoration, as the broad, plain surface, unbroken by folds, lent itself to more pictorial treatment. There are many in the South Kensington and other museums with representations of the Crucifixion, surrounded by groups of saints and attendant angels.
The chasuble follows the colour of the season. A good average size is 54 inches long at the back (3 or 4 inches shorter in front) and 50 inches wide at the widest part. It takes 6 yards of 25- or 27-inch material, not counting any extra length which may be required for ‘repeat’ of pattern, which must never be forgotten when ordering any kind of figured stuff. When there are orphreys, they should be worked separately on strips of satin, velvet or damask, of a different colour or material from that of the vestment,[57] and applied to it on a frame before joining the two halves together at the shoulders. A medallion may be placed at the intersection of the Y-cross, which should not be too low down.
The material of which the orphrey is made should never be less rich than the vestment to which it is applied.
The DALMATIC worn by the Gospeller or deacon and the tunicle worn by the Epistoler or sub-deacon are very similar to each other in shape and general appearance. The latter is usually a little simpler in decoration.
Many very beautiful examples may be seen in our museums and picture galleries. It was a favourite custom with the Old Masters to represent the Angel Gabriel in the dress of a deacon in pictures of the Annunciation. There were also many well-known ones of SS. Stephen and Lawrence.
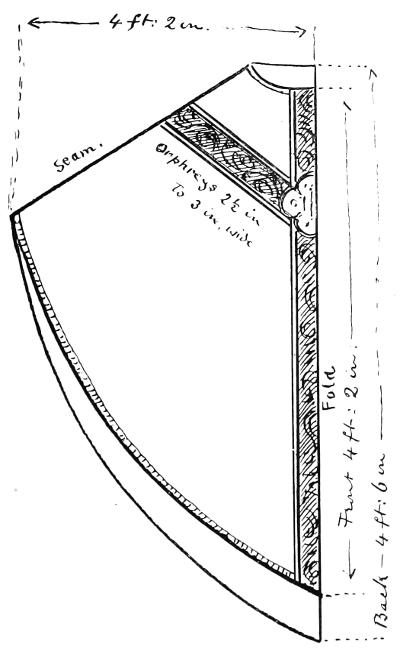
Fig. IV.—Diagram showing dimension of Chasuble
The world-renowned ‘Dalmatic of Charlemagne’[9] is still in existence in the Treasury of the Vatican, which shows the freedom with which masters of the craft could treat the decoration of the dalmatic with the happiest results. In these days we generally keep to the two stripes (clavi) and two or four apparels.
The length of the dalmatic and tunicle should be about the same as that of the chasuble or a little shorter. They also follow the colour of the season where there are complete suites of vestments, but for poorer churches it has not always been considered necessary. The lining of all vestments should be of a different colour from the vestment itself. It may be of either silk or linen; the richer ones are preferably of silk, as it is not so heavy and cumbersome as linen. The narrow orphrey is placed straight down each side of the dalmatic from the shoulder to the hem, which may be fringed all round; sometimes a rich tassel hangs over each shoulder, as in the sketch of St. Lawrence.
The apparels are rectangular pieces of silk or velvet, usually embroidered very richly in gold and colours, and made up quite separately from the vestment which they adorn.
They are attached by means of lightly worked tacking or slip-stitches.
For an amice the apparel is generally stiffened with an interlining of tailor’s canvas. It should be about 22 inches long and 3 or 4 inches deep. In use it looks something like a collar, and is sometimes called the amice collar. For a dalmatic or tunicle the apparels may be about 21 × 15 inches for the skirt and 21 × 9 for the upper one; but there is no exact rule about size, only they should not be too long (not more than 21 inches to fit in between the clavi), and for the skirt not too deep.
They are generally shorter on the albe than on the dalmatic—from 12 to 15 inches. They may be of any colour; a crimson ground with gold, blue, and white decoration has always been a favourite combination and looks well with most vestments. A bold design and plenty of gold and colour are desirable. Illustrations III. and IV. in Chapter VI. give good fifteenth or sixteenth century designs for an apparel. They are done in these colours. The earlier ones were generally of geometric design, like the stoles in Illustration I., and the interlaced circles with cross in the centre, &c. A piece of rich brocade or damask, &c., was often used instead of embroidery.
For sleeves and skirt of albe they may[58] match the amice collar. Indeed, I have seen fourteenth-century work in which the stole, fanon, orphreys of chasuble, and apparels of albe and amice are all of the same pattern, and the effect was very good.

Fig. V.—Chasuble of St. Thomas of Canterbury
(At Sens)
The corporal-case, or burse, and the silk chalice-veil are usually en suite with the altar and vestments. It is said by some that the silk chalice-veil is a foreign innovation and has no proper place in the Anglican ritual, but it is of such general use now that we must mention it here. It is usually made of the richest silk or satin, and embroidered all over, or at the corners and centre, or with a border all round and a cross or monogram in the middle of one side, lined with silk and edged with a narrow fringe or cord, or made up plain. The design is frequently, but not necessarily, made to match the burse. When this is desired, it is important to arrange it so that the design and embroidery are not spoilt when the veil is in use; for it must be remembered that the burse always presents a flat surface of at least 9 inches square, while the veil is intended to hang over the chalice, so that the centre (with a radius of probably from 2½ to 3½ inches) is the only part that will lie flat when in use. I once saw a beautifully worked chalice-veil entirely spoilt by the heads of the four Evangelists hanging upside down over the chalice. The design had apparently been copied from an alms-dish of Benvenuto Cellini, and was extremely beautiful in itself and quite suitable for a burse, but did not lend itself happily to a chalice-veil.

Fig. VI.—Ornament for Chasuble, called the Flower
The burse should be made of rich and beautiful material. In many of the old ones the back was made of leather, or something else useful and strong; but nowadays they are generally made of damask or satin, the same as the front. Nine inches square is a good size. If a chalice-veil and burse are being made to match, 1 yard of 27-inch material will usually be enough for the two. First cut a square of 25 inches for the veil; then two squares of 11 inches each from the piece that is left; this allows 1 inch all round for turnings. When the embroidery on the silk for the burse is finished it should be cut out of the frame with the linen still at the back, not cut away round the work, or it will be apt to show a ridge where it leaves off when it is stretched over the boards; besides, it is needed to protect the silk where the edge of the boards would otherwise come in contact with it. Have ready four pieces of good strong cardboard, cut exactly square, each 9 inches. This can be got at any good shop where mounts for pictures are cut.
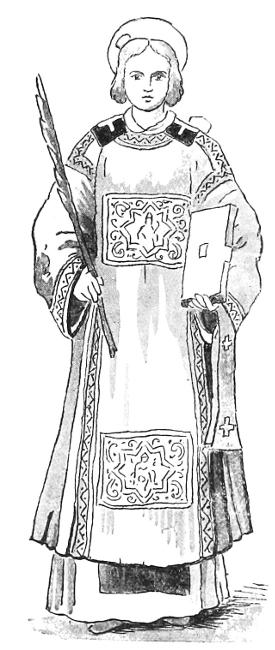
Fig. VII.—St. Stephen (after V. Carpaccio)
Two pieces of fine white linen, each 11 inches square, should be ready, nicely washed and ironed. The linen is to be stretched over two of the boards, the embroidered silk over one, and the plain silk, for the back, on the other. It can be done either by taking long stitches from one edge of the stuff to the other, right across the boards, or by means of a very small quantity of embroidery-paste on the inside of the turnings. Then each linen-covered board is placed with a silk-covered one, and the two sewn together with the finest stitches of over-sewing, in white thread or silk. After this the linen-faced sides are placed together, the silk being outside, and the two sets of board are joined at the left side by means of four or five tiny hinges, worked strongly through the silk and inner lining, in buttonhole stitch of the same colour as the cover.

Fig. VIII.—St. Lawrence (after Fra Angelico)
Some people make the back and front all in one piece of silk, but this is not so convenient either to work or to make up. There is more difficulty in getting the design exactly in the middle and straight on the boards; there is, besides, a constant strain afterwards on that edge of the silk which acts as a hinge every time it is opened and shut.
Another diversity in the way of making up a burse is the letting in of side-pieces, like a purse or pocket-book. This also is difficult to do neatly, and is inconvenient in[61] use; but where it is preferred it may be made less awkward by setting in a straight-edged piece of linen instead of a ‘gusset-shaped’ one, covering it with silk like the burse-cover, and stitching it firmly into a pleat before joining the two boards together. It will then more readily keep in place, and if it bulges when in use it will not look so slovenly as it does when the side-pieces are of linen alone. Many of the old burses were sewn up closely along three sides, with the fourth only left open, but this is obviously inconvenient.

Fig. IX.—Diagram showing dimensions of Dalmatic
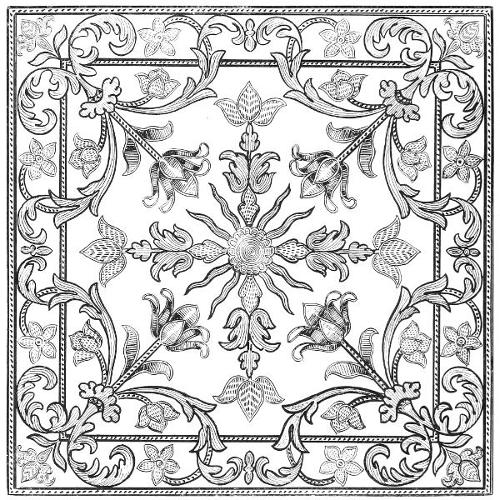
Corporal-case or Burse. (Italian, Sixteenth Century.) From a drawing, size about 10 in. square
V. & A. Museum, South Kensington (No. 1511—1388).
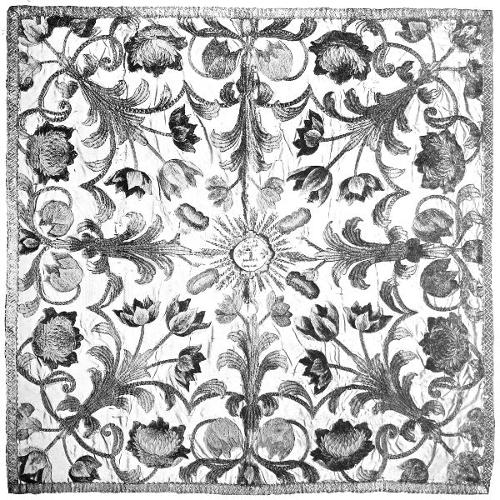
Chalice-veil. (Italian, Seventeenth Century.) From a photograph, size about 24 in. square
V. & A. Museum, South Kensington (No. 237—1895).
Ecclesiastical banners vary to almost any extent in size, shape, and material, as well as design.
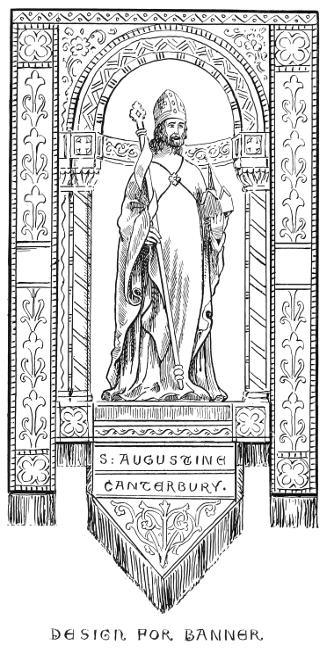
DESIGN FOR BANNER
One of the simplest, much in use in the olden times, was the Banner of St. George, the patron Saint of England. It is suitable to nearly every place and occasion, and consists of a red cross on a white ground, and is of a plain rectangular shape with a fringe or border all round.
The choir banner generally has as its chief ornament the figure of the patron saint, or the emblems of the dedication of the church, or the coat-of-arms of the parish or see, with the name of the church on the upper border. It may have orphreys down the sides, or be ‘parsemé’ with flowers, or the whole of it may be treated more or less pictorially (within a border) with an incident in the life of the saint.
The other banners in general use are those belonging to the different Church guilds and societies working in the parish, such as Temperance societies (a favourite device for this is St. George and the Dragon), Sunday schools, Missionary societies, ‘C.B.S.’ Embroiderers’ Guilds, &c. &c.
Appliqué work, as I have before observed, is admirably suitable for banners, whether the design consists of figures or emblematical devices. The material should be good of whatever kind, and strong, and the work firmly and closely done to stand wear and tear, especially if used in outdoor processions. But a painted banner is really more suited to our climate than a worked one. I do not mean an imitation of embroidery. Nothing could be in worse taste than the pretence of such a thing, but a good painting on canvas or any suitable material, in oils or tempera, which will not be greatly affected by sunshine, rain, or fog, would answer all the requirements of an outdoor processional banner far better than a more delicate embroidered one. After painting I recommend Inlay, and thirdly Appliqué in suitable materials for banners. These methods are described in Chapter VI. But of course for use in a building ordinary embroidery in gold and silks is not out of place where funds permit.
A plain rectangular banner is made up in the same manner as an altar-frontal. But a less simple shape is not quite so easy to finish off neatly. I therefore give a diagram showing how to arrange the making up of a more intricate form.
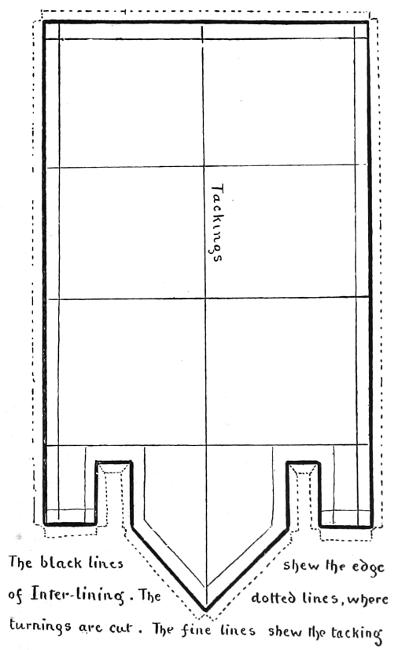
Tackings
The black lines shew the edge of Inter-lining. The dotted lines, where turnings are cut. The fine lines shew the tacking.
The banner is laid face downward on the table and the interlining (previously cut exactly to right size and shape) tacked down to it through the centre and near the edges. The dotted lines show how the material of the banner is to be cut to make the turnings lie flat. It is then to be laid face upwards and all the edges turned and tacked closely over the interlining. The outer lining may then be laid upon it, the corners cut and the edges turned, making it about one-eighth inch smaller than the other; the two are then placed together, tacked once more and then firmly sewn all round. If the fringe has an ornamental heading it should be put on last of all, but if not it should be inserted and firmly stitched in place before the outer lining is sewn down. All the edges may be evenly pressed with a warm iron after the tacking-threads are removed.
Next to the plain rectangular shape, the single point at the bottom is the easiest to make up. Proportion in size and shape is the great thing to aim at. A square and a half is a fair one for a rectangle. Variations should be rather in favour of additional length than additional width, but no exact rule can be given, as so much depends on the design.
It should be borne in mind that lines going parallel with the long side tend to lengthen, and parallel with the short side to shorten, the apparent size of any figure.
A banner should not be too large and heavy, in consideration for the person who has to carry it, neither should it be too small, or it will look poor and insignificant, however good both material and workmanship may be. If possible it should be worked on both sides, as the expanse of lining which is displayed when it is in use is not very interesting to look upon, and is in evidence for quite as long a time as the front during a procession. Vasari says that Botticelli invented the method of work I have described as Inlay for the use of church banners, considering it more effective than any other kind of work and having the advantage of being equally visible on both sides of the banner. Botticelli drew beautiful designs for needlework of this kind, but it had been actually in use for other purposes many centuries before.
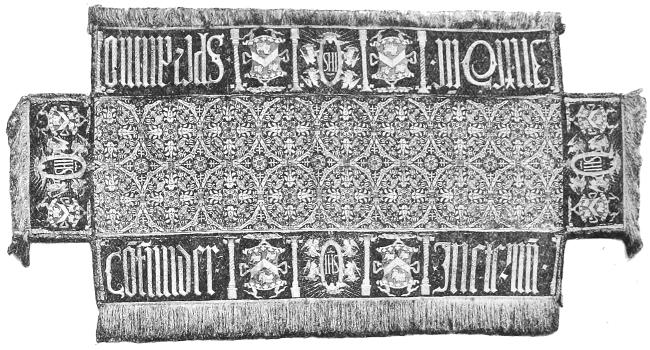
Pall, belonging to the Saddlers’ Company
Some of the finest specimens of early English Church embroidery which have survived to our time are to be seen in the funeral PALLS or herse-cloths belonging to the old guilds and companies. It seems to me that it would be a good thing if each parish church had now such a decent and seemly covering for her departed as was customary in earlier days.
The pall is still used at the burial of great persons. Those of us who were present at the funeral of Queen Victoria will not have forgotten the beautiful one worked for that occasion by the ladies of the Royal School of Art Needlework.
The terrible masses of black velvet, &c., used in the last century seem to have left a sense of recoil in the minds of many against the use of the pall altogether, but if it were once realised that black is altogether unnecessary (white or red or blue and gold being quite as often used in former times in the English Church) I think that the idea[67] would be generally approved of having one beautiful covering for the use of rich and poor alike.
Of course, it would not be possible or suitable for every simple parish church to have such magnificent embroideries as are shown, for instance, on the illustration here given of the Saddlers’ Pall, or as the Fishmongers’, Vintners’, or other rich merchants’ guilds, but a handsome cloth of red or blue brocade with a text worked on the border, or a simple symbolic design in appliqué repeated at intervals, or a plain cross (the sign which can be read and understood by all) going over it from side to side and from end to end, would not be very costly. The centre of this one is of rich red and gold velvet brocade, and the border is magnificent with coloured silks, gold, &c.
Desk-hangings, which are of use for the better preservation of the books laid upon them, and sometimes desirable as introducing a little colour and comfort among the wood and stone-work of pulpit or reading-desk, are usually, though not necessarily, of the same colour as the altar-frontal or other hangings, so far as the ground-work is concerned; the embroidery also ought to harmonise in colour and style, especially if they come into view at the same time. The same may be said of almsbags, book-markers, kneelers, and any other textile furnishings there may be.
For a desk, a piece of silk or velvet, &c., should be measured wide enough to cover the flat part of the desk (allowing a little extra on each side for ‘turnings’), and the length should be sufficient to hang down about 12 to 16 inches in front only of a pulpit desk, but both back and front of a faldstool or prayer desk: 6 to 8 inches is deep enough for these, which should be embroidered and fringed both front and back. A simple border-pattern either upright or lateral in motive looks as well as anything here, as it is not intended to attract particular attention to itself.
Altar and office-books may be covered with very beautiful embroideries, and if the materials of which they are made are good and substantial they will stand a fair amount of wear and last many years.
Almsbags should not be very elaborately worked, as they soon wear out or yet dirty when in constant use. Three-eighths of a yard of twenty-four inch material is enough to cut two if arranged in the manner shown on the diagram, thus:—
It will be noticed that the back of each bag A, is cut in one piece and the front, B, C, is cut in two pieces. The interlining, which should be of a good quality of tailor’s canvas, is cut in the same way; the silk or linen lining—the ‘business’ part of the bag—is made a very little smaller than the worked part of the front B.
To make up the almsbag, after the embroidery is worked on the silk (or whatever the material may be), the linen at the back may be cut away round the work if it makes it too clumsy. Then interlining and embroidered front are tacked together, corners cut and curves nicked before turning the edges over, the upper part of front and the whole back treated in the same way.
Then the stout silk or fine linen lining is joined along the sides and bottom with fine back-stitching, and the upper edge hemmed down to the top of embroidered front and along the dotted line of upper front (see D).
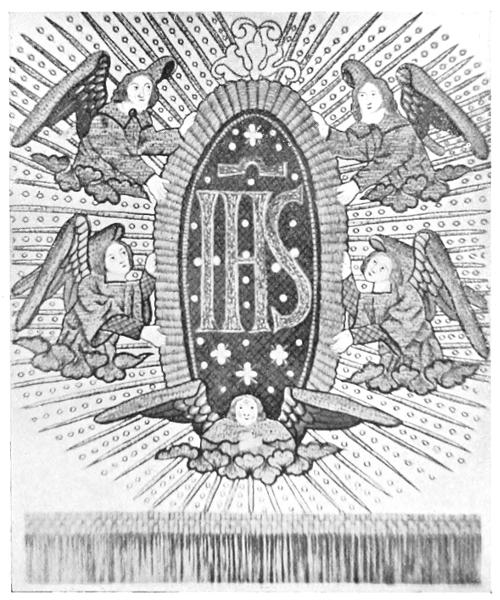
Central Ornament at Sides and Ends of Pall, belonging to Saddler’s Company
The two parts are then first tacked, then[68] sewn together with fine over-sewing, done in silk of the same colour as the material, and the bag is finished. Sometimes a fine cord is sewn all round the bag. The embroidery ought to be fine and close to wear well; it is a nice little piece of work for beginners to try their hand on.
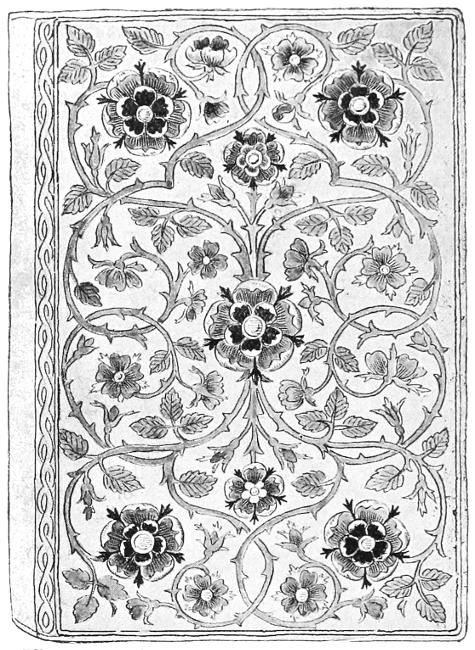
Bible, bound for Queen Elizabeth in ruby velvet, embroidered in coloured silks, gold and silver thread, and seed pearls (size, 16⅞ × 11⅜)
(In the Bodleian Library)
Kneelers frequently consist merely of mats and strips of carpet, and certainly from an artistic point of view good carpet is better than poor needlework. But if people will have the patience to do it there is no need to have bad needlework when there is an ideal stitch for the purpose which requires no technical skill in embroidery—which calls in fact for nothing in the worker but diligence, patience, and accuracy in counting. I refer to the good old cross-stitch, which unfortunately has got itself into disrepute by its devotees trying to make it do work for which it is manifestly by its nature unfit, and by the crude colouring which was common at the time the so-called Berlin-work was in vogue.
If we return to the early pattern-books of German and Venetian origin (there are many republished in the present day) it should be quite easy to choose good and suitable ones from among them, avoiding as a rule those sold in shops as ‘exclusively ecclesiastical,’ which are generally hideous, and also any that make attempts at shading naturalistic foliage and blossom: see that the design frankly acknowledges the limitations of the method and thus makes artistic use of it (see Illustration F, Chapter XII.). Good strong wool or silk and linen canvas should be selected and the work done with a ‘rug’ needle.
This work is easily made up, the edges turned over and strong flax or hempen cloth hemmed to it. An interlining of coarse felt may be added if extra thickness is desired.
The modern use of the BOOK-MARKER in the Holy Bible, Office, and Altar books seems partly to be occasioned by the absence of illuminated Initials, Versals, &c., which in former days assisted the reader in finding his place in the book. But there was often in medieval times a small handkerchief (sudariolum) attached to the altar-book by a ribbon for the use of the officiating priest, and this string would naturally sometimes be used as a ‘marker.’ In the course of time, like all other things used in the sanctuary, this would become resplendent with gold and embroidery, till the ornamental took the place of the useful and remained only as a symbol.[10]
Book-markers should not be wide or clumsy or they defeat one of the objects for which they exist—the preservation from wear and tear of the books in which they are placed. It would perhaps be more convenient if they were fastened into the binding, but as this is seldom done effectually in the first place, and they soon get worn out, the movable ones, which can easily be replaced, are now in general use. A simple device at each end and the appropriate finish of a good fringe are all that is necessary. For the sake of harmonious appearance, and not for any ritual reason, they are usually made en suite with the vestments and altar.

Diagram showing how to cut two Almsbags
When working book-markers sufficient ribbon should be left below the design to turn up and cover the back of the work. The raw edge will be turned in and it will be slip-stitched along the top and over-sewn down both sides. The fringe is then over-sewn to the extreme end of the marker. If the ‘head’ of the fringe is not suitable for this treatment, the ribbon that covers the back of the work may be cut separately and the head of the fringe inserted between the two. The back may also be embroidered.
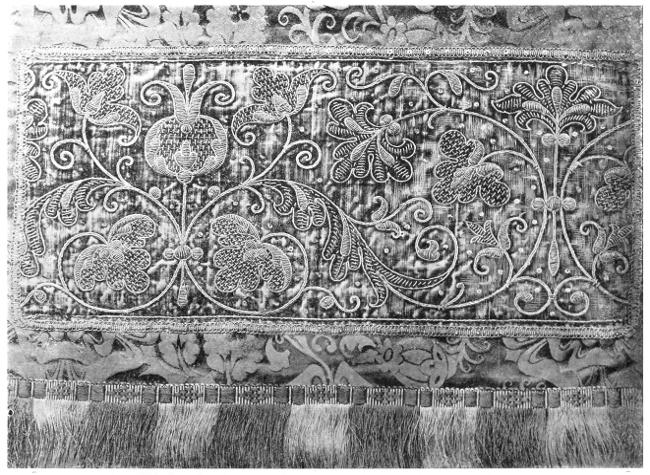
Ancient Pulpit-hanging in Stapleton Church, Shrewsbury
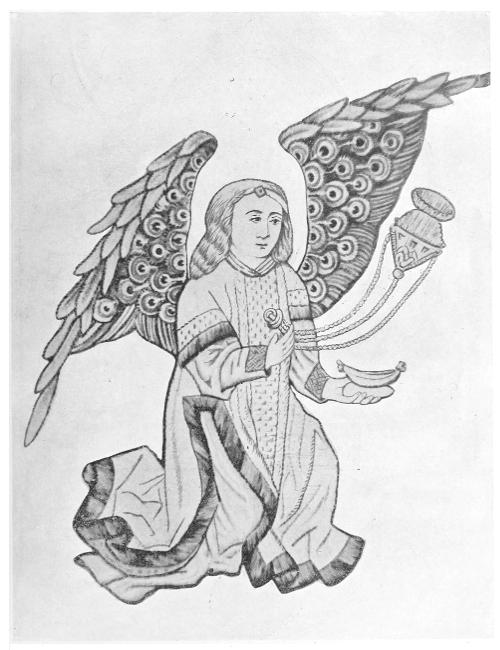
Ornament for Horse-cloth, belonging to the Fishmongers’ Company
In all the previous chapters I have assumed that the embroidress would carry out the suggestions given by means of gold and silver thread, floss silks, &c., working them either directly upon some rich fabric such as silk or velvet, or else on linen with the ultimate purpose of transferring it to the more precious material, or, thirdly, on a linen ground which is eventually covered so entirely with embroidery that no trace of the original material appears. I have mentioned coloured linens and linen thread as desirable materials where economy is a consideration, to be used for the same purposes and in the same manner as silk and gold, &c.
I now propose to treat of linen-work as a separate branch of Church needlework, different both in regard to the materials employed and in the method of using them.
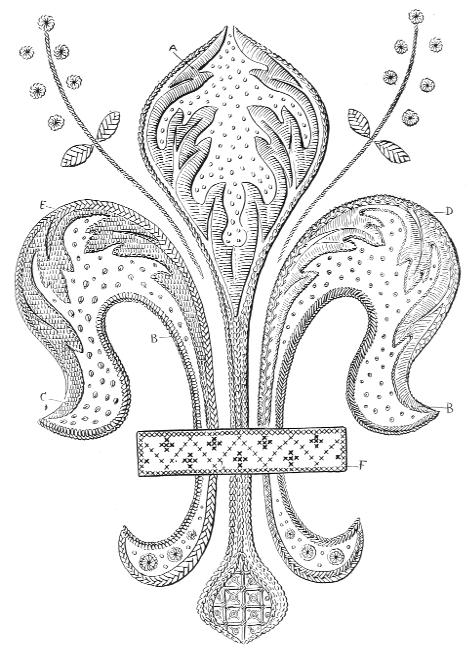
Sampler for Linen-work
To begin with, as the ground-work will be of white linen, which naturally requires frequent washing, the decoration of it must either be detachable (as in the case of ‘Apparels’), or it must be of such a nature as to withstand injury under the necessary processes of the laundry.
This limits the materials for the embroidery to linen thread, cotton, crewel wool, washing silk, and a certain make of tambour gold which can be conveniently worked through the substance of the linen.
It excludes (generally speaking) all loose surface-stitches and highly raised relief work; but on the other hand it allows of many curious and diversified stitches which can only be worked satisfactorily when done in the hand without a frame, such as chain-stitch, buttonhole, &c. &c.
In choosing the materials, whether it be the linen itself or the embroidery threads, a careful judgment is required to select only the best and most durable. If colours are to be used in the ornament, it is well to test them beforehand as to their behaviour under the ordeal of washing. The guarantee of the labels on many of them is insufficient. The linen itself ought also to be washed in boiling water before the cutting-out or embroidering is attempted. Hand-made and grass-bleached linens are much to be preferred to the more perfect-looking but less reliable products of machinery.
Linen thread for embroidery is not so easy to work with as some of the cottons prepared for this purpose; but it looks so well when carefully handled that it repays a little extra trouble in the using. It is apt to come untwisted in the friction through the stuff, and then to break rather readily; the remedy is to roll the needle between the finger and thumb from time to time during each needleful, to keep it twisted right, or to change hands, working with the left if possible, or from the opposite end of the work where it is convenient. The needlefuls also should not be too long.
‘D.M.C.’ cottons (of which there are a great number of different kinds) are very nice-looking and pleasant to work with; the colours also are good.
For white work I prefer Clark’s Anchor (à broder), the numbers from 5 to 10 being especially good and useful.
There is a great variety in the stitches which may be employed in linen embroidery, but for each separate piece of work it is best to keep to one or two only. In the accompanying sampler I have contrived to show about a dozen different ones without seriously interfering with the unity of the design; but it is to be taken merely as a sampler of stitches, and of those only the most desirable for Church linen.
All this kind of work should be solid and firm without being drawn too tight. It should never be so tightly done as embroidery which is worked in a frame, if the linen becomes puckered or drawn out of shape it will never ‘come right’ afterwards, so the stitches ought to be well practised on a waste piece of linen till the right degree of tension is ascertained. A want of due[74] regard to this is the cause of much disappointment in work done in the hand; if too loose it soon becomes shabby, and if too tight it makes a series of small holes all round the work, after repeated efforts of the laundress to make the thing lie smoothly by means of much stretching and heavy ironing.
In general method, embroidery worked loose in the hand differs from that done in a frame, in that each stitch is completed by one action of the needle instead of two, as it goes in and out of the stuff.
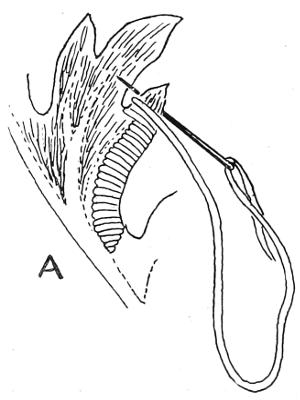
Satin-stitch, marked A on the sampler, is nearly always padded first by running a few stitches backwards and forwards in the opposite direction to that of the satin-stitch, which covers it by going ‘over and over,’ the needle going in at one edge of the outline and coming out at the other as nearly as possible at right angles. The stitches should be placed quite close together, and should never be much more than ¼ inch across: if the design shows a wider space to be filled it must be subdivided by a voided line. Some workers pad their satin-stitch very thickly, thinking to make it handsomer; but all very high relief is a mistake from an artistic point of view, as it destroys the delicacy one expects to see in linen-work, and obtrudes itself unduly even when worked entirely in white. Indeed, some authorities go so far as to say that the change of surface or texture caused by the stitchery is the only legitimate effect in white work; but I think the majority would allow a little relief, providing it is not exaggerated, especially as it causes the satin-stitch to lie much more smoothly than when done without any under layer of cotton.
Next to the satin- and chain-stitches I think BUTTONHOLE-STITCH is perhaps the most useful for linen embroidery. Simple buttonholing is worked from left to right, setting the needle in and out at right angles to the outline, holding the thread down with the left thumb at each stitch while the needle goes over it. Both chain- and feather-stitch may be considered variations of buttonhole, the principle of the method being the same in each case, viz. working from left to right (or from the top downwards), holding the thread under the thumb for the needle to pass over as it pierces the stuff and comes out again at one ‘stroke.’
In ordinary buttonholing the stitches are placed as near together as possible: at a little distance apart it becomes ‘blanket-stitch,’ of which there are as many variations as the ingenious needlewoman chooses to make, but which are not appropriate to our present purpose.
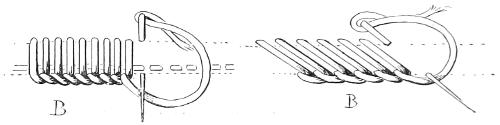
To work the foliation marked B on the sampler, it should be slightly padded, exactly as for satin-stitch, and the ridged side of the stitch kept to the outline; round the inner curves, if a sufficient number of stitches are inserted, the ridge will stand up a little and accentuate the ‘eye’ of the curve very prettily. The firmness of outline obtained by buttonholing has caused it to be applied to the most beautiful designs for cut-linen work (see Illustration, p. 82), which may be carried out with any amount of detail without the least danger of its fraying or getting out of shape, and which will last and wear as long as the linen itself. The outline should be run round before working the buttonhole for this purpose, the stitches kept close together and drawn rather tighter than when intended to lie on the surface.
The inner outlines, also marked B on the sampler, are done in the same stitch, in the one case set in straight and in the other slanting. The tiny rosettes above are worked by setting the needle in at the same place at each stitch. By drawing the thread fairly tight, a small neat hole is arrived at in the[75] centre of each; if the linen is very hard and strong, the spot should be pierced with a stiletto before working.
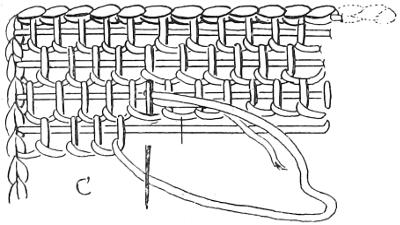
Another application of the principle is shown as a ‘filling’ stitch at C on the sampler. It is worked like one of the lace stitches, except that the needle takes up a bit of the linen beneath at each stroke (instead of ‘being in the air,’ as lace may be truly defined). An outline of chain-stitch should be worked first, as it provides a neat and convenient boundary for the rows of buttonholing to begin and end with. Bringing out the needle on the edge to the right of the worker, it is carried straight across the work to the left and set into one of the chain-stitches there; it is then brought out at the next chain, and the long thread buttonholed over till it arrives at the beginning of the thread where it was fastened on. The same process is repeated till the space is filled, the stitches in each row of buttonholing being placed between those of the previous row, and each row beginning at the left over the thread laid across from the right.
This will be seen clearly by the detail C, which is very much enlarged to show the working, but the rows of buttonholing are not usually much more than ⅟₁₆ of an inch deep. It combines admirably with chain-stitch for leaves, flowers, and even figures, the stems and small details being worked in chain, and the filling in this solid form of buttonhole, while features and the folds of garments may be clearly indicated by voided lines.
Feather-stitch, marked D on the sampler, may be considered another development of the buttonhole-stitch, the simpler forms of it being merely one, two, or three slanting buttonhole-stitches taken alternately from the one side and the other of imaginary boundary lines. In practising the stitch, until the worker gets accustomed to it, it is a good plan to trace real boundary lines, determining the width to be kept to, and two other lines at equal distances within these, as a guide for keeping the stitches all of the same size.
Feather-stitch by itself makes a very pretty border pattern, but it always seems a little frivolous unless it is subdued by an enclosing line of chain-stitch or buttonhole, with either of which it will combine most happily. The chain may be done first on each side (making, in fact, the boundary for width), and then the single feather-stitches taken from side to side into each chain in turn, being careful to pick up a tiny bit of the stuff on the needle, as well as the thread of the chain, at each stitch, otherwise it will be only a surface-stitch, which does not wear so well, though the appearance is almost exactly the same. If buttonhole be used for the edge, either it should be done slanting, to agree with the feather, or the latter should be worked in upright stitches to suit the buttonhole. In this case it does not matter which is done first, as the stitches go between and not into each other.
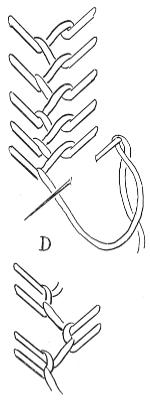
Herring-bone is somewhat similar in appearance to feather-stitch, but the method of working is quite different. It is begun from the opposite end of the border, working from the bottom upwards, and the needle[76] is set in the same direction as the line of the border, not at right angles or diagonally, but on the line itself. The stitches are taken alternately from side to side, and the threads cross each other naturally, without any intervention of the needle or thumb of the worker. It is a stitch well known to the neat-fingered housewife for keeping flat the cut edges of a seam where a hem is considered too clumsy. As a decoration it is seldom used in its simplest form; but I have seen many beautiful pieces of embroidery executed entirely in other forms of the same stitch, such as Swiss or Close herring-bone or Fish-bone. The method of work is shown here, and I think needs no further description. In the third diagram of this stitch it will be noticed that the needle goes at right angles with the outline, both in the large stitch from edge to edge, and in the little stitch in the middle. This makes the work less thick and substantial than the Swiss, which gives the same effect at a greater expenditure of silk or cotton, &c.
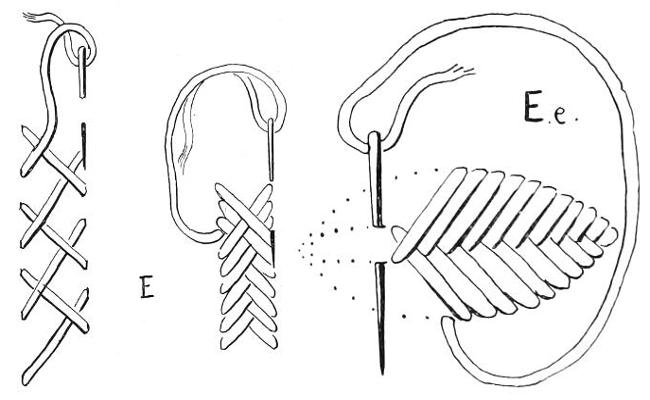
Back-stitching is very useful for making fine lines, for following outside of an outline which may seem too hard, or for breaking up a background, as in the central petal of the fleur-de-lys in the sampler, where it answers the same purpose as dots or ‘sympathetic lines’ in a drawing, by filling a flat surface quietly and unobtrusively. It is well to work it in rather coarser thread than the satin-stitch it accompanies. The stitches should not lie too close together; a very small piece of the stuff should be taken up on the needle at each stitch, and the point of the needle brought out at the spot where the next stitch is to be. If the dots do not look large enough, each stitch should be gone over twice, instead of only once, at exactly the same place. When three or four stitches are used one over the other, they make a smooth raised knot preferable to French knots for linen-work, as they do not get disarranged by ironing. When only one or two stitches are used for each dot, the needle should pierce the thread at the back as it goes through from one dot to the next place.
Cross-stitch is, I think, too well known to need much in the way of description. But the application of it to linen-work would well repay more attention than is commonly given to it. I need only point to the accompanying examples from South Kensington to show something of the beauty that may be arrived at by this simple kind of work. There are three typical ways of doing this, the first (as in Illustration F) by making a pattern on the linen by means of cross-stitch alone, in one colour. The second (F, f), by making the pattern by the linen, the background being in cross-stitch. The third, by combining cross-stitch with back-stitch for the fine lines, by means of which the smaller detail can be described without breaking up the pattern too much. (See F, f).
It can be diversified by using two or more colours, but a medley is undesirable. I myself prefer the patterns worked in one colour only; and I believe most of the old work was done in either red, green, blue, or brownish yellow, each used alone, and making by itself quite sufficient contrast with the white linen on which it was worked.

Illustration (F), Cross-stitch
Spanish, Sixteenth Century. V. & A. Museum (No. 227—1880)
If the linen used is too fine to allow the counting of the threads, in order to keep the stitches of a uniform size and to follow the pattern correctly, a fine canvas may be tacked over it, and the work done through the two thicknesses. When it is finished, the threads of the canvas can easily be drawn away, leaving the work on the linen sufficiently accurate if it has been carefully done. I would recommend the use of an embroidery frame for work done on this system, as the stitches ought to be set in quite vertically to keep them true. All canvas or ‘cushion’ work may be done on other textiles by means of this method, and for quite coarse work a frame is unnecessary.
There is yet another application of cross-stitch admirable for linen-work, which was much in favour for the bordering of corporals, &c., in the sixteenth century, and presents a lighter effect than the ordinary solid-looking cross-stitch. In appearance it is very similar to ‘Lacis’ (a darning on coarse, square-meshed net, or on small-meshed netting). This open-worked cross-stitch is accomplished by drawing the thread it is worked with quite tight at each half-stitch that is taken into the linen, the first process of the ‘cross’-stitch is worked all along one row before the second, which ‘crosses’ over it. It is either worked in two colours, one for the pattern and one for the ground, or the ground alone is worked, leaving the linen to form the pattern, in the same manner as F, f, the ground of the border becoming open-work. It may be thus worked with a beautiful lacy effect in white thread or silk for altar-linen. In each case the thread used must be fine and strong.
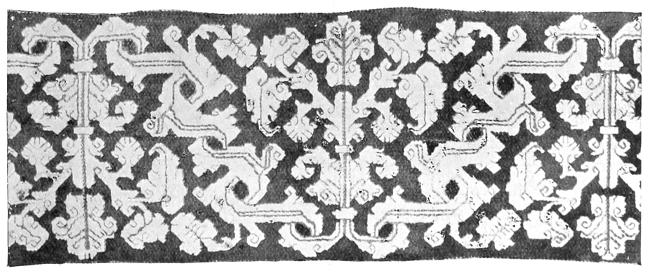
Illustration (F, f)
Spanish, Early Sixteenth Century. The same back and front. V. & A. Museum, S. Kensington (No. 224—1880)
The linen required for service at the Holy Table includes a ‘Fair Linen Cloth,’ a Corporal, Chalice-veil and Pall, or a pair of Corporals; Purificators, and a Credence Cloth.
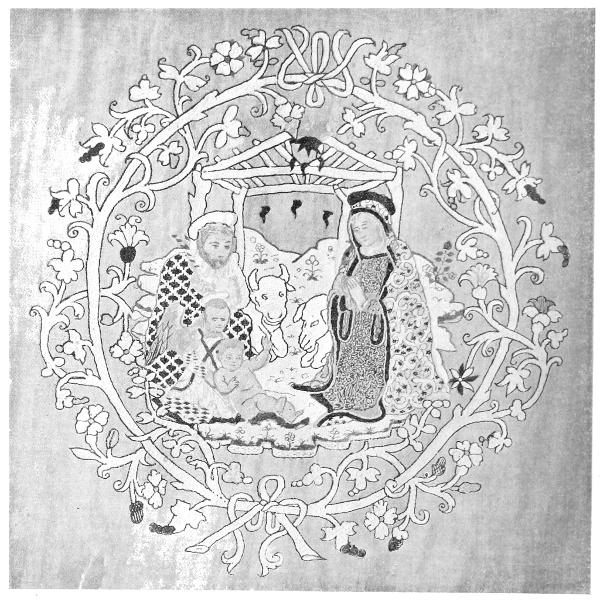
Portion of an Altar-cloth (Embroidered Cambric), Italian
The first-named should be made to fit the top of the altar exactly as to width, but may hang down at each end to within a foot or so of the floor, including the fringe.
The hem along the sides should be one inch wide and that at the ends about three inches wide. If any embroidery is worked on the part which lies flat on the top, it should not be done in high relief, and may consist of five crosses, one in the centre and one at each corner about an inch from the edges of the altar, worked in chain or close herring-bone, or very slightly padded satin-stitch.
The two ends which hang down may be enriched by any amount of embroidery, and any of the stitches described in the last chapter may be used.
Many of the clergy prefer their altar-linen worked entirely in white; linen-thread, silk, or cotton may be employed; where colour is not objected to, red, blue, green and yellow, either singly or in combination, may produce very beautiful results.
Illustration I., p. 80, taken from an altar-band at South Kensington, is worked with the names of saints, alternately red and blue, the foliage green, fruit red and yellow, flowers red, white and blue. The stitch used throughout is close herring-bone or braid-stitch, with the exception of the quaint little birds, which are done in cross-stitch.
For less elaborate work one of the cross-stitch borders F and F, f, p. 77, and worked in red silk or in gold colour, would look well, and all the rest of the altar-linen could be done to match, or with a narrower border.
For white work Illustration II. is very satisfactory. The outline of the leaves may be done in chain-stitch, the veins and grapes in satin-stitch, the quatrefoil in feather-stitch; the sacred monogram may be either solid satin-stitch, divided down the middle of each down-stroke by a voided line, or outlined with chain-stitch and filled with the buttonhole filling or with satin-stitch dots, or again, with close feather-stitch like the quatrefoil. The stems of the vine may be filled in the same manner, and the leaves with a series of back-stitches, like the illustration given for Chalice-veil.
A neatly sewn hem is better for altar-linen than hem-stitching or drawn thread; the latter especially being somewhat flimsy, and destroying to a certain extent the wearing properties of the fabric, is decidedly unsuitable for this purpose, except perhaps one kind, of which I give an illustration here (Illustration III., p. 81).
In this some of the strands of either warp or weft are withdrawn as in ordinary drawn-thread work, but instead of being merely tied together by means of the needle and thread, or the spaces between filled up with stitches, the absent strands are replaced, and one might say more than made good by the darning which builds up the pattern.
This darning might be done all in white-linen thread, or colour may be introduced as in this example, which is of blue and white alternate medallions, and the fringe is spaced with blue to correspond.
The threads withdrawn should be counted if the linen is fairly coarse, but if very fine, measurement will suffice for accuracy and is not so trying for the eyes; indeed, after a little practice, neither should be necessary in the case of the strands taken up by the needle in the course of the work. In my example—which is done on a heavy homespun linen—twenty-four threads go to the half-inch, both in warp and weft, and I would recommend that this pattern should be practised on nothing finer until it is thoroughly learnt, as it is somewhat intricate. The narrow border above and below the principal pattern is simple enough.

Fig. I.—Portion of Linen Altar-cloth Band, embroidered in various coloured silks in close herring-bone or Plait-stitch
German, Fifteenth Century. In V. & A. Museum (No. 7,025—1860).
To work it, begin by drawing three-eighths of an inch deep, then threading a needle with blue linen, silk or cotton, take[80] up five threads (or their equivalent one-eighth of an inch), and knot the blue over them with a single knot, just to keep it in place to start with; lay the end along with the strands of the linen, and work over it by taking an equal number of strands on the needle in the opposite direction to the first lot. This must be done backwards and forwards till nearly half the bar is firmly and evenly covered with blue. Then take up five and leave five, darning (over twenty altogether) backwards and forwards about four times to make the cross-bar. The first bar is to be continued up to the end, then the other stroke of the H-form is to be worked the same as the first, only, instead of doing the cross-bar, the needle is just run through the former stitches (in with the warp-strands). They are worked alternately two blue and two white, and I strongly recommend blue or green to be used with the white for practice, for the sake of the worker’s eyes, as all white work is undeniably bad to do very much of.
To fasten off the thread it is simply run through the stitches already done and cut off close.
To work the larger part of the pattern, threads are drawn to the depth of one inch (see A, on Illustration IV., which is very much enlarged to show the method of work). This will be for a row of half medallions. A very fine needle and No. 100 or 120 cotton is used to collect the strands into a series of upright bars (B), by twisting the fine cotton over each group of four (or an eighth part of the threads which each medallion takes to do). It should be twisted round and round fairly tightly, from one end to the other, and a few stitches into the linen will help to keep them apart at each end. When this is done, another inch may be[81] drawn, leaving a few threads of the linen intact between the two halves of the medallion, D.
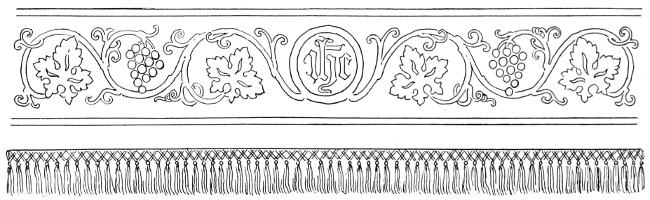
Fig. II.—Border for Fair Linen Cloth, suitable for working all in white—in the same style as No. VI

Fig. III.—Strong Drawn-thread work in blue and white thread, suitable for border of Fair Linen Cloth
The dotted lines at E show how the bars are pulled apart on the one hand and drawn together on the other by the darning forming the pattern, the bars thus connecting the whole of the medallions throughout the work. F shows one of the latter being worked from the centre. It is begun by darning eight bars regularly backwards and forwards about four times. Then the two middle bars are left and one side is darned over only three bars, to finish the first ‘step,’ and to leave the little window-like opening, H, then over two bars only to finish the ‘window,’ and begin the second step. At J it goes right across six bars[82] once, when returning to the centre it goes down the two that were left till it arrives near F again, and the other side is begun in steps like the first. At J it goes right across six again and keeps on till the second step is finished, which is where the needle has got to in the sketch. The second step is about half the depth of the first. The third is the same depth as the second, but is darned over four bars. This leaves two to be finished last, and these two are darned over till the undrawn strip of linen is reached and the half medallion is finished. The other half is exactly the same, only reversed. The thread should be worked fairly tight throughout.

Fig. IV.—Details of Fig. III, showing how to work it
The hem at the bottom should be finished off with a fringe. If colours are used in the work they should appear again in the fringe, but if it is all white a good knotted one of fine white linen thread should be sewn on by its upper edge (see Illustration II.), taking care not to stretch it at all, but rather to ease it on. It should hang quite free, not on the stuff, as it is in the case of frontals, &c.
I may here remark that it is a mistake to suppose that there is any difficulty in washing fringes. If they are not too deep in the ‘fall,’ and are well made of good linen thread, they only need to be well shaken two or three times when wet and while drying, to make them hang perfectly straight and well.
Good thread lace[11] may be used instead of fringe. Lace is also sometimes tacked along the front to hang over the super-frontal, but as it requires to be taken off every time the cloth is washed it is not practicable unless some careful lady is responsible for its welfare, or unless some such lace as Irish crochet be used, which will stand washing.
I believe the coloured embroidery described above used to be tacked on to the ends of the fair linen in this way like apparels, and removed for the more frequent washing of the cloth itself; in some modern churches where there are plenty of persons able and willing to attend to these things they are still used, and quite appropriately; but for a small village or very poor town church it seems more suitable to have good strong linen, simple embroideries (either in one colour or white), and a stout linen fringe to match.
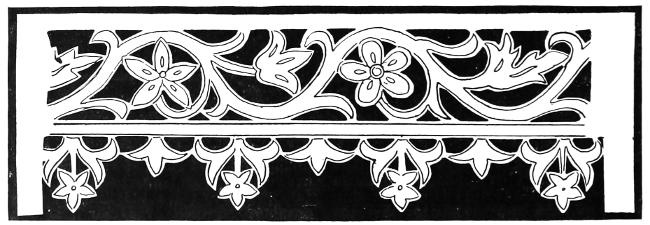
Fig. V.—Design for Cut-linen work
Cut-linen too may be used either for an open-work border or instead of lace or fringe for the edge. If evenly and firmly worked, either in buttonhole or over-sewing, it will last as long as the linen itself.
In olden times the CORPORAL or corporax-cloth was often made large enough to cover the surface of the altar, to fold over the chalice, or a ‘Pair of Corporals’ were used. It seems to be more general now to have one corporal about twenty-four inches square, and one smaller and thinner—a ‘Chalice-veil,’ used in conjunction with a stiffened square of linen called the pall; which together take the place of the second corporal.
The corporal may be worked with five crosses like the altar cloth, only smaller, or with one, just above the hem, in the centre of one of the sides; or it may have a border embroidered all round it. There are some in the Victoria and Albert Museum done in cross-stitch very similar to the designs I have suggested for Fair Linen Cloths, and one, it may be noted, with the border worked exactly the same on both sides (inside and out), so that when turned over in actual use there would be no ‘wrong side’ to show.
The more delicate ‘Chalice-veil’ may be embroidered all over, so long as the decoration does not interfere with the softness of the linen, which is its chief beauty. If it is intended to be folded when in use it should not be so soft, and the design might take up just one-ninth of the surface—one-third of the width by one-third of the length, so that when folded in three each way the ornamentation may fill the central square.

Fig. VI.—Linen Pall
Fig. VII.—Design for centre of Chalice-veil
If it is to hang over as a veil the same rule applies to it as to the silk chalice-veil,[84] namely, that as one-third of it will hang down all round when in use, the design must take account of these conditions. The corners or the sides may be the centre of decoration, which should in this case grow upward, or a border may run all round. It is frequently edged with lace of the finest and richest description.
The PALL, which is used with the soft fine chalice-veil, is a stiff square of linen from 4 to 6 inches in size, according to the chalice it is to cover. It may be embroidered all over, or with a cross, or the sacred monogram, or a symbol of the Passion in the centre. Some stiffen it with a square of cardboard covered with linen, others with a double fold of the material used for the interlining of linen collars. The upper square, which is embroidered, is often made separately; it is in this case hemmed (sometimes edged with a narrow thread lace), and a tiny strap is buttonholed across each corner to keep it in place. Otherwise it is over-sewn finely all round in the same manner as are the boards of a burse. In every case the stiffening is covered on both sides with fine white linen neatly sewn.
The origin of the PURIFICATOR is very obscure, while the use of and the necessity for it are quite obvious.
Purificators and lavabo towels now supply the place of the original maniple, &c., and in consequence are not subject to much ornamentation, the cross on the purificator being intended more to indicate its sacred use than as a decoration. There seems to be no reason why the lavabo towel should not have a neat border worked just above the hem or fringe.
Purificators should be made of the softest of linen, plain or diapered, about 12 inches square, or 9 × 12. The edges may be fringed by drawing out threads all round to the depth of about half an inch, or they may be neatly sewn with a very narrow plain hem. A small cross in the centre or at one of the corners is all that is necessary in the way of embroidery.
The CREDENCE CLOTH should be made to fit the table. It may hang down a little on each side like the altar cloth, and have a border somewhat similar only narrower, and either a fringe or lace to match in style.
In some churches the old custom is retained of hanging a ‘HOUSELING-CLOTH’[12] over the altar-rails. These rails were first required in England about the beginning of the seventeenth century, according to Canon 7 of 1640, to preserve the communion-table from Puritan profanations.
Previously to this the Houseling-cloth (a long white silken or linen towel) was held before the communicants as they knelt at the altar. It is a reverent and seemly custom, intended to prevent the fall of any particle of the Blessed Sacrament during the communion of the people.
The decoration of it may be treated in the same style as that of the altar- and credence-cloths.
Humeral veils, offertory veils, and sudaries of various kinds have been in more or less constant use to preserve the books, sacred vessels, vestments, &c., from contact with the bare hands of the assistants at the altar. It is to this reverent care and scrupulous cleanliness that we owe the conservation of so many of the precious relics of the past that have come down to our own time, which with rough and careless handling would have perished long ago. A small neat cushion of velvet or some other soft textile, about 9 by 3 inches in size, after the old fashion, would be much better for the altar-book to rest upon than the hard wooden or brass desks we so often see nowadays. Wherever these latter are used a soft cloth of some kind should at least prevent their contact with valuable books, especially if the covers are embroidered.
There are various opinions among the learned both as to the origin and line of descent (so to speak) of all the distinctive vestments worn by the ministers of the Church at the present day. The albe and surplice are not among the least interesting from an historical point of view; however, it is not our purpose to discuss it here, and whatever theory we may prefer—that which derives them from a Levitical ancestry, or from the Eastern garments of common use in the time of Our Lord, or from the Græco-Roman in the early centuries of our era, the fact remains that from the very earliest times of which we have any record of such things white linen raiment[13] was a noticeable feature in the dress of the Christian minister, whether priest, deacon, or server.
The albe and the surplice were possibly both derived from one original garment. Their chief characteristics were that they were long, full, and made with sleeves; moreover that they were usually of white linen, and either quite plain or ornamented in some simple and appropriate manner by a border that could be washed with the garment, or (in the case of the albe from the thirteenth century) by apparels which were easily removed without injuring it.
The Albe has retained its primitive character in all these respects.
The long flowing garment is confined at the waist, for convenience in ministration, by a girdle or band, which may consist simply of a plain linen cord 4 yards long, finished at the ends with tassels of the same; or it may be a band from 1 to 3 inches wide, richly embroidered in silk and gold. When this is the case it should be fastened by strings sewn to the lining, or by hooks and eyes, or a clasp, so that it may not become creased and spoiled by frequent tying. A band is perhaps better for keeping the stole in place as being less liable to roughen and damage the silk. It seems to have been an old English custom to use a band, judging by the old inventories, &c.,[14] but it is not so general in these days as the cord, and the symbolism is lost unless the band is kept quite narrow.
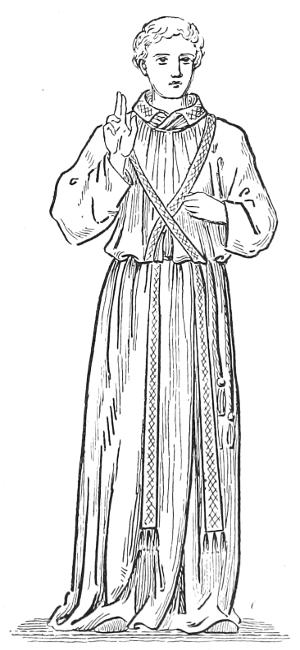
Fig. I.—Albe, with Girdle, Amice, and Stole
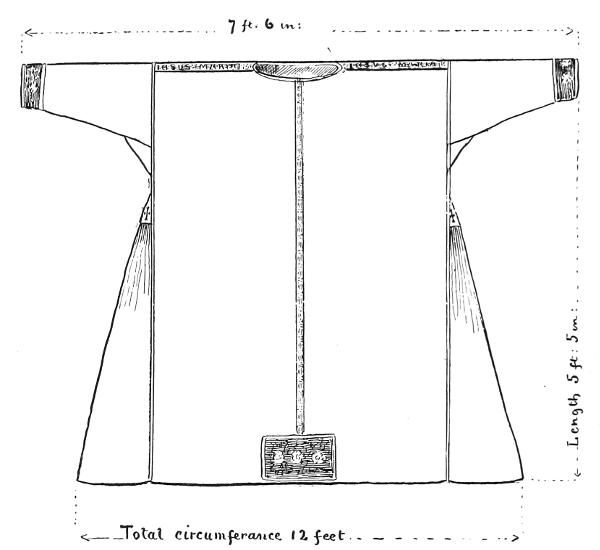
Fig. II.—Ancient Albe
(South Kensington Museum)
The diagram (Illustration II.) shows the shape and dimensions of a very old albe now in the Victoria and Albert Museum, South Kensington. The linen it is made of is 22 inches wide, and the seams are joined down the middle of the front and back by means of an insertion, worked in buttonhole-stitch with white linen thread, rather more than; ¼ inch wide. The seams at the shoulders are treated in the same way with insertion ½ inch wide, into which is worked an inscription in red thread; and there is a small red cross on each of the gussets let in at the waist to contain the gathers, which are set very close together, to provide the necessary fulness for the skirt.
The apparels are made of fourteenth century brocade.
Modern albes are usually either gathered into a neck-band somewhat like a surplice (see Illustration III.), and so are full all the way down, or they may be widened gradually from the shoulder.
The measurements are very similar in each case, and take from 7 to 9 yards of linen, a yard wide.
In the gathered pattern (which is much handsomer than the plain one) there are no cut seams except for the sleeves; the selvedges should be over-sewn together with fine cotton very closely, and then the seams will not show at all. Those on the sleeve should be finely stitched and the raw edge turned in and ‘felled’—i.e. hemmed—down on the inside. The neck and shoulder bands should be stitched with fine back-stitching on the outside. They may be decorated with any fancy stitch as well, or a narrow border may be embroidered. The hem round the bottom should be from 1 to 3 inches deep. A border of embroidery may be worked all round, above the hem.
The custom of working a lace insertion in the middle of a seam, which used to be common to the better sort of household linen as well as that for the Church, has fallen into disuse of late years, in consequence of our linen being woven so much wider than it used to be. But it might still be used in the front and back of the plain albe, and it may be well to describe the method of working it, as it is not at all difficult to do, nor so tedious as it might appear at first glance. And irrespective of the width of linen, there are occasions when the length may require addition (such, for instance, as the enlargement of a fair linen cloth for an altar). It is a recognised law of art that Beauty should be called forth by Necessity;[87] and the hiding, covering, or ornamenting a seam was perhaps the very first incentive to embroidery!
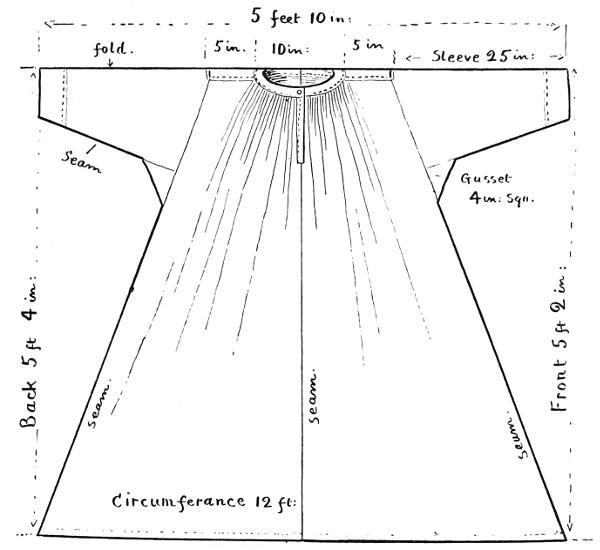
Fig. III.—Modern Albe
If it is a cut edge which is to be joined to another in this manner, each piece of stuff is hemmed separately.
The work is begun upon one hem as a foundation, and when finished is sewn closely on to the other.
For the first row * make two tiny buttonhole stitches into the edge of the hem (or of the selvedge if there is no hem). Then leave a small space, equal to the room taken up by the two buttonhole stitches; then two more stitches, then leave a space of about ⅜ inch, carrying the cotton straight along—repeat from * till the first row is done, all along the edge.
Turn the work over to the other side, or fasten off thread and begin at the same end as at first: by turning it over the same effect is attained—viz. working from left to right for each row, which keeps the work even.
For the second row the threads which stretch across the spaces of ⅜ inch are covered with fine buttonholing, and two stitches are put into each of the tiny spaces left for them in the first row.
When the end of the second row is reached the work should be turned over, as before, and the third row done exactly the same as the first, except that the pairs of stitches are worked into the little spaces caused by going from the bar to the middle of the pairs of stitches instead of into the stuff: c on Illustration IV. shows this very much enlarged; a and b are the same size as the work on the old albe. After the first row, which is worked into the linen, it is better to use a blunt needle. The button-hole-stitches should be drawn up tightly over the thread throughout the work; in the illustration of the detail they are not drawn tightly enough for the real work.
From three to five bars are enough for this pattern. A great number of different ones can be arranged with a little ingenuity, variation being brought about by differing the proportions of buttonhole ‘filling,’ bars and spaces.
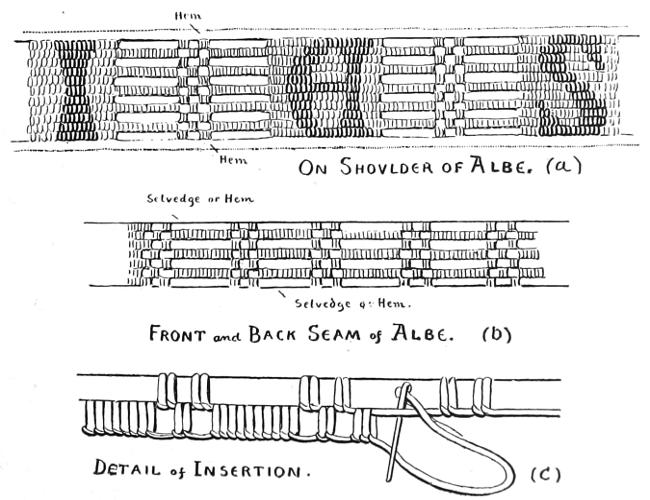
Fig. IV
The sleeve of the albe is, theoretically, tight fitting, but for convenience in wearing it over other clothing, and to get it easily over the hand, it is generally made from 12 to 14 inches in circumference at the wrist. In old pictures one often sees it fitting quite closely, in which case it is provided with buttons and buttonholes to fasten the extra opening, which has to be made at the under seam.

Fig. V.—Amice of St. Thomas of Canterbury
The Amice is either a square or rectangular piece of fine linen from 29 to 36 inches in length, worn as a neck-cloth with the albe and covering the edge of the chasuble, where it would otherwise come in contact with the neck of the wearer. It is hemmed with a narrow hem all round and has two strings 74 inches long, fastened at the upper corners to keep it in place. It sometimes has a large cross embroidered upon it, as in this example which is taken from that of St. Thomas à Becket, and has an apparel of gold embroidery attached to the upper edge. These apparels were almost universal from the thirteenth to the sixteenth century, and are retained in the English use. It is lightly tacked on to the edge of the amice, so that when it is turned back over the chasuble it lies evenly round like a collar. It may be made to match the colour of the vestment it is worn with, or one richly embroidered with gold or made of gold tissue, may be worn with any of them.
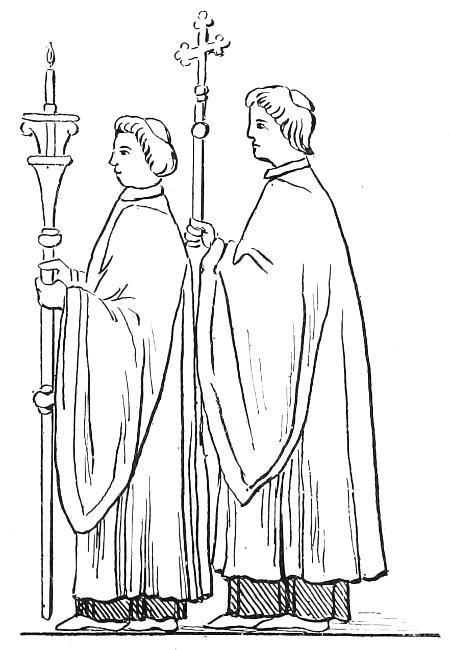
Fig. VI.—English Choir Surplice
(A.D. 1301)
The Surplice, which from very early times seems to have formed part of the choir habit of clergy and other ministers alike, is very similar to the albe, except that, being an outer instead of an under vestment, the sleeves are long and full, and also in consequence of being worn over a cassock, an albe, or a ‘pellice’[15] it has become somewhat shorter in the skirt; but there are, from the time of Edward the Confessor onward, numerous canons, laws, and directions always ordering the surplice to be long enough to reach down to the heels. The albe, surplice, and rochet are very much alike; in the old documents it is often difficult to determine which of the three is meant, there being so many names for the same thing, and both names and uses almost interchangeable. But in the present day we confine the term albe to the one with somewhat tight-fitting sleeves, surplice to the one with long flowing sleeves, and rochet to the one without any, or with full ones gathered into a band at the wrist. Albes were at one time occasionally made of silk, and sometimes were even coloured,[16] but I do not think surplices ever were, neither have they ever been much ornamented. Smocking at the gathers or an embroidered neck-band seems to have been the only decoration at all common. The rochet was and still is sometimes embroidered all round just above the hem.
The accompanying diagram (Illustration VIII.) shows how to cut a surplice like the one represented at Illustration VII.
The dimensions are very similar to those given by Dr. Rock, except that his is fuller in the skirt. If this is desired it can be done without any difficulty by merely adding another width of linen (placing the centre on the diagram 18 inches further to the right, and thus using two full widths instead of one).
It is better in this case to make the collar-band deeper, as it is difficult to get so many gathers into the 29 inches of circumference given here.
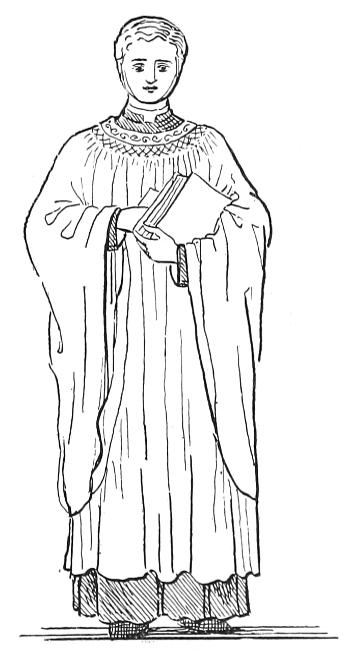
Fig. VII.—Modern Surplice
All the selvedge seams should be ‘whipped,’ ‘seamed,’ or ‘over-sewn’—three[90] names for one and the same process. The diagonal seams or any with cut edges must be ‘run and felled.’
This pattern takes 6½ yards of linen, a yard wide; Dr. Rock’s would take 2½ yards more. His is more suitable for smocking; and where a deep collar-band is used it may be embroidered, preferably in white, though some of the old ones were done in red.
A priest’s surplice should measure at least 4½ yards round the bottom; those for choir men and boys are not usually so wide.

Fig. VIII
On bringing this little book to an end the author feels sadly aware of its many deficiencies. Time does not allow for either very strict revision or much elaboration of the papers which formed the foundation of it.
There are many points of interest connected with the subject of Church needlework which have been purposely touched upon as briefly as possible, that the student may not be obliged to wade through a quantity of extraneous matter in order to find the practical information required.
There are others omitted for want of time and space (such, for instance, as illustration and explanation of the various symbols, &c., used in Church embroidery from the earliest times to the present day: special characteristics of different styles, periods, and countries, &c. &c.)
But there is one point I find I have not mentioned in its proper place (Chapter VII), which I am unwilling to pass over altogether because it involves a matter of principle. It is concerning the practice of painting the faces instead of working them in figure-embroidery.
It seems to me no more legitimate than it would be actually to embroider the robes of a painted portrait!
If figure-embroidery is beyond the ability of any individual worker, let her get someone else to do the faces while she contents herself with the robes and background, or apply her powers to other work. There is plenty of beautiful embroidery to be done without employing figure-work at all.
I have seen faces painted into embroidery so exactly simulating needlework that it is almost impossible to tell the difference. This obviates the objectionable clashing of the two distinct arts as far as appearance goes; but it seems to me morally worse, inasmuch as it is an intentional deception. One branch of art does not need to imitate another. Each should seek perfection in its own special way, and sincerity is one great essential in all.
This brings me to my parting word. Be true and your work will be beautiful. Let everything that is done for the Church be done for the Glory of God, and there will be no trickery possible, no attempt to make anything appear better than it is. The simplest work done in honest materials is more essentially lovely than the most elaborate of ‘shoddy.’
[1] It is a mistake to be over-timid in attacking floss-silk. It requires a light but firm hand, and should be pulled fairly tight to get it to lie smoothly—a sort of little secondary jerk after drawing the needle through to the back.
[2] Line and Form, by Walter Crane, i. 1.
[3] This is the smallest quantity that can be made satisfactorily, twice this quantity is easier to manage. A moderately heaped tablespoonful is about equal to 1 oz., and a small teaspoonful to 2 dr. Ordinary water filtered instead of distilled will do if it is soft.
[4] This method, called a’or nué, the Florentines seem to have got from Flanders, where it had long been in use.
[5] Vasari says: ‘The figures are no less admirably executed with the needle than drawn by Pollaiuolo with the pencil, and thus we are largely indebted to one master for his design, and to the other for his patience.’
[6] Art in Needlework, p. 130.
[7] To the present day our sovereigns offer upon the altar at their coronation a ‘Pall of Silk’ in accordance with old custom.
[8] The name orarium to denote a stole is still used in the Eastern Church for the deacon’s stole (ὠράριον), although it has passed out of use in the Western church altogether, I believe.
[9] There is a beautiful coloured reproduction of it in the ‘Art Worker’s Quarterly,’ January 1906.
[10] ‘In the famous triptych of the Seven Sacraments, by Van der Weyde, now in the Antwerp Museum, the central compartment shows a missal upon the altar at Mass with a sudariolum hanging from it. It would seem by no means impossible that the string to which this napkin was attached was used as a book-marker. The Bishop’s maniple still serves the same purpose in the book of the Gospels at the beginning of Mass.’—Rev. H. Thurston, S.J., ‘Vestments of Low Mass,’ ‘The Month,’ October 1898.
[11] Appendix C.
[12] Howsel—Husel = Saxon name for the Eucharist.
[13] ‘White shining vestment of fine linen common to all clergy.’—Council of Narbonne A.D. 580.
[14] At Sarum in 1222 there were nine girdles of silk and twelve others mentioned in the Inventory. There was one of gold tissue found upon the body of St. Cuthbert at Durham.
[15] Hence the derivation, to which some writers refer as evidence of its being at one time an under garment, points exactly the other way, the pellice being a long lambskin dress worn by the English clergy from very early times. See Matthew Paris, Vit. Abb., p. 53.
[16] Perhaps the red and blue cassocks sometimes to be seen nowadays may justify their existence by the example of these coloured albes frequently mentioned in old documents and depicted in illuminated MSS.
| Season | Westminster | Sarum | Exeter | Wells | Lichfield | Rome |
| Advent | White | Unknown (? White) | Violet | Medius (? Blue) | Black | Violet |
| Christmas | White | Mixed colours | White | White | White | White |
| The Epiphany | White | Mixed colours | White | White | Red | White |
| Epiphany (Octave) to Septuagesima | White (to Candlemas) | Red | Green | Red | At will of Sacrist | Green |
| Septuagesima to Lent | Reddish (subrubeus) | Red | Violet | Unknown | — | Violet |
| Lent, first four weeks | Black (in practice, White) | Unknown (in practice, White) | Violet | — | Black | Violet |
| Lent, last two weeks or Passion-tide | Red | Red | Violet | Red | Red | Violet |
| Easter, from First Evensong, on Easter Eve, to Low Sunday | Red | White or Mixed colours | White | Red, Low Sunday White | White | White |
| Low Sunday to Ascension Day | Red | White | White | Red | White | White |
| Ascension Day to Whit Sunday | White | White or Mixed colours | — | White | White | White |
| Whit Sunday | Red (or Saffron) Yellow (or Green) | White or Mixed colours | Red | Red | White | Red |
| Trinity Sunday | Red | Mixed colours | If handsome, Green, otherwise White | Red | White | White |
| Corpus Christi and Octave | — | — | Red and White | Red | — | White |
| Sundays after Trinity | Red | Red | Green | Red | At will of Sacrist | Green |
| Week days after Trinity, not being Saints Days | — | Unknown | — | — | — | Green |
| Saints Days | ||||||
| St. Paul (January 25) | — | Red | Red or Blue | Red | Red | White |
| Evangelists | Red | Red | Red | Red | — | Red |
| Apostles | Red | Red | Red | Red | Red | Red |
| Martyrs | Red | Red | Red | Red | Red | Red |
| Virgins | White | White | White | White | White | White |
| Confessors | Yellow (or Green and Blue) | Yellow (or Saffron) | — | Blue and Green | Varius | White |
| St. John Baptist (June 24) | White | White | — | Indius (? Blue) | Varius | White |
| All Saints | — | Unknown | White, Red and all colours | White and Red | Varius | White |
| St. Michael and All Angels | White or Blue | White | White | White and Indius (? Blue) | White | White |
| St. John Evangelist | White | White | White | — | White | White |
| Holy Innocents | Violet | Unknown | — | Red | — | Violet |
| Festivals of the Blessed Virgin Mary | White | White | White | White | White | White |
| Dedication of Churches | — | White or Mixed colours | All colours | Blue and White | — | White |
| Burial | Black | Black | Black | Black | Black | Black |
Wherever Black was ordered, Violet, Purple, Dark Blue, and Ash-colour, or Grey, seem to have been considered equivalent. So Green also replaced Yellow.
I. The Fish.—The first, in point of date, as a distinctly Christian Symbol (1) of Baptism, (2) of the Name of Our Lord, the letters In Greek forming an anagram of the Name Jesus.
II. The Cross.—The universal emblem of Christianity, showing the length, breadth, depth, and height of the Love of God in Christ.
As decoration, the Latin form ✝ should only be used for Penitential occasions, being the symbol of suffering and of the Passion. The Greek 🞣 or equilateral, the foundation of all the more decorative ones, is suitable for all times and seasons except Christmas and Epiphany.
The Gammadion, Fylfot, Swarstika, or (in heraldry) the Cross Potent rebated—a prehistoric cross found all over the world—is suitable for all seasons, and was the one most generally used in ancient Church embroidery.
III. The Glory, Nimbus and Aureole, in the East, an attribute of power; in the West, of Divinity or of consecration.
IV. The Lamb.—An early symbol of Christ as the Lamb of God, the sacrifice for sin. With the standard ‘Agnus Dei,’ signifies the Risen Lord.
As an attribute (1) of St. John the Baptist, in reference to his words ‘Behold,’ &c.; (2) of St. Agnes = Innocence and Purity, and for her name.
V. The Pelican ‘in her piety,’ a symbol (1) of Christ giving Life by His sufferings; (2) of the Blessed Sacrament.
VI. The Lion = Strength, Fortitude, Solitude, as an attribute of Martyrs, signifies the mode of their death; of St. Mark as Evangelist, because he depicts Christ as the ‘Lion of the tribe of Judah.’
VII. The Hart or Hind = Solitude, Purity, Religious Aspiration, ‘Like as the Hart desireth,’ &c.: Ps. 42.
VIII. The Crown = Symbol of Victory. Female saints generally depicted wearing the crown, male saints hold it in their hands or have it at their feet, or angels bear it above. Symbol of Martyrdom, attribute of Royalty.
IX. The Palm = Symbol also of Victory, especially that of Martyrdom. Saints and angels bear them in their hands (never on the ground or at their feet).
X. The Olive = Peace; attribute of the Angels of the Nativity—St. Gabriel, St. Agnes, &c.
XI. The Dove is the symbol of the Holy Ghost. It is shown at the Annunciation, Baptism, and over the heads of saints considered specially inspired; (2) emblem of the Soul.
XII. The Lily = Purity, especial attribute of the Blessed Virgin Mary, St. Gabriel, St. Joseph, St. Francis.
XIII. The Book signifies the Gospel or an Evangelist; or in the hands of other saints, learning and writings.
XIV. A Church in the hands of a saint indicates that he (or she) was the founder; an attribute of St. Jerome as a Primitive Father.
XV. A Ship or Ark = The Holy Catholic Church.
XVI. An Anchor = Hope.
XVII. A Lamp, Lantern or Taper = Piety or Wisdom.
XVIII. The Chalice, with Host, symbol of the Holy Eucharist; also = Faith.
The Chalice, with Serpent, attribute of St. John, in reference to tradition of poisoned Chalice.
XIX. The Four Evangelists were, in very early times, symbolised by four scrolls on the arms of an equilateral cross.
Later (from Second to Fifth Century) by four rivers, and from the Fifth Century onwards by the four Living Creatures.
St. Matthew = the winged man, in reference to his gospel showing the Humanity of Christ.
St. Mark = the Lion, his gospel being especially for the Jews.
St. Luke = the Ox, showing the sacrificial aspect.
St. John = the Eagle, ‘taking the highest flight and portraying the Divinity’ of our Lord.
XX. The Twelve Apostles.
The earliest representations are purely emblematical—twelve sheep in a row (six on each side) with the ‘Agnus Dei’ in the middle.
The next twelve men, all exactly alike, carrying a sheep, with our Lord as the Good Shepherd larger than the others.
Afterwards the attributes of the Twelve Apostles became as follows:—
St. Peter, with keys or a fish.
St. Paul, with the sword.
St. Andrew, with diagonal cross.
St. James (Major), with pilgrim’s staff.
St. John, with the chalice.
St. Thomas, with builder’s rule.
St. James (Minor), with club.
St. Philip, with staff or crozier.
St. Bartholomew, with large knife.
St. Matthew, with purse or bag.
St. Simon, with saw.
St. Thaddeus or Jude, with halberd.
St. Matthias, with lance.
XXI. A Circle signifies the World or Eternity, or perfection.
An Equilateral Triangle (or other equal three-fold form) stands for the Holy Trinity.
A Square or Quatrefoil for the World, ruled by the Cross.
XXII. The Monograms IH̅C̅ or IH̅S̅, and XP̅C̅ or XP̅S̅, are the first two and last letters of the Name Jesus and the title Christ in Greek (the C being the older form of S). They have been used from very early times, and are among the most beautiful and suggestive of the symbols. They should not be used indiscriminately, but given a due place of honour, such as on an altar-frontal or the orphrey of a chasuble or cope. They can be, and often are, extremely decorative, and the thoughtless worker is sometimes betrayed into placing them most inappropriately simply because she happens to possess a good drawing of one.
There are some in the present day who object entirely to the use of lace on any article for ecclesiastical purposes, chiefly on the ground that it is not to be found on the older ones.
It seems to me that this is not a sufficient reason for discarding it altogether (providing that it is otherwise appropriate), for it has always been the custom of the Church to welcome every new form of art as it arises and to consecrate to her use the offerings of the faithful.
Lace was not used on the older vestments, &c., not because there was anything intrinsically wicked about it, or even frivolous, but because it was not yet invented!
There is no reliable evidence to prove the existence of lace, as we understand the term, before the fifteenth century. It seems to have been evolved gradually from ‘cut linen’ through ‘drawn-thread,’ ‘reticella,’ and ‘Lacis’ to needle-point and pillow- or bobbin-lace, and was not in general use till the seventeenth century, by the middle of which it is to be seen, not merely as a decoration, but even as the entire fabric of altar-frontals and vestments.
There is no excuse, of course, for using paltry cheap lace, as there is no necessity for employing it at all. In very old churches where everything is en suite, and in simple village churches, it would not be suitable, but I think some quite modern ones may err on the side of being over-zealous for strict Medievalism. At any rate, it is well to understand the reason of things, and then decisions will be made with judgment.
N.B.—Those marked with * are mostly about embroidery, and the others on design or history, &c.
* Alford, Lady, Needlework as Art.
* Barber, Mary, Some Drawings of Ancient Embroidery.
* Bock, Dr., Geschichte der Liturgischen Gewänder.
Braun, Die Priestlichen Gewänder, &c.
Clausse, G., Les Monuments du Christianisme, &c.
Chambers, Divine Worship in England in Thirteenth Century, &c.
Crane, Walter, Line and Form (and others).
* Davenport, English Embroidered Bookbindings.
Day, Lewis, Several Handbooks on Design.
* Day, Lewis, and Mary Buckle, Art in Needlework.
* Dolby, Anastasia, Church Embroidery.
Dolby, Anastasia, Church Vestments.
* Farcy, Louis de, La Broderie du XIIIᵉ Siècle, &c.
Jameson, Mrs., Sacred and Legendary Art.
Jones, Owen, Grammar of Ornament.
Jones, Owen, Principles, an Attempt to Define, &c.
* Kendrick, A. F., English Embroidery.
* Lefébure, E., Embroidery and Lace.
Legg, J. Wickham, Notes on the History of Liturgical Colours.
Marriott, Vestiarium Christianum.
* Pugin, Glossary of Ecclesiastical Ornament.
* Rock, Dr. Daniel, Textiles, Introduction to.
Rock, Dr. Daniel, Church of our Fathers.
Semper, Der Stil.
* Townsend, W. G. P., Embroidery: or the Craft of the Needle.
Ward, Historic Ornament.
* Wilton, Countess of, The Art of Needlework.
* The Art Workers’ Quarterly.
* Burlington.
* Home Art Work.
* Studio.
Transactions of St. Paul’s Ecclesiological Society. Vols. I. and II. especially.
PRINTED BY
SPOTTISWOODE AND CO. LTD., NEW-STREET SQUARE
LONDON
End of the Project Gutenberg EBook of Church Needlework, by Hinda M. Hinds

*** END OF THIS PROJECT GUTENBERG EBOOK CHURCH NEEDLEWORK ***

***** This file should be named 57608-h.htm or 57608-h.zip *****
This and all associated files of various formats will be found in:
        http://www.gutenberg.org/5/7/6/0/57608/

Produced by Susan Skinner and the Online Distributed
Proofreading Team at http://www.pgdp.net (This file was
produced from images generously made available by The
Internet Archive)

Updated editions will replace the previous one--the old editions will
be renamed.

Creating the works from print editions not protected by U.S. copyright
law means that no one owns a United States copyright in these works,
so the Foundation (and you!) can copy and distribute it in the United
States without permission and without paying copyright
royalties. Special rules, set forth in the General Terms of Use part
of this license, apply to copying and distributing Project
Gutenberg-tm electronic works to protect the PROJECT GUTENBERG-tm
concept and trademark. Project Gutenberg is a registered trademark,
and may not be used if you charge for the eBooks, unless you receive
specific permission. If you do not charge anything for copies of this
eBook, complying with the rules is very easy. You may use this eBook
for nearly any purpose such as creation of derivative works, reports,
performances and research. They may be modified and printed and given
away--you may do practically ANYTHING in the United States with eBooks
not protected by U.S. copyright law. Redistribution is subject to the
trademark license, especially commercial redistribution.

START: FULL LICENSE

THE FULL PROJECT GUTENBERG LICENSE
PLEASE READ THIS BEFORE YOU DISTRIBUTE OR USE THIS WORK

To protect the Project Gutenberg-tm mission of promoting the free
distribution of electronic works, by using or distributing this work
(or any other work associated in any way with the phrase "Project
Gutenberg"), you agree to comply with all the terms of the Full
Project Gutenberg-tm License available with this file or online at
www.gutenberg.org/license.

Section 1. General Terms of Use and Redistributing Project
Gutenberg-tm electronic works

1.A. By reading or using any part of this Project Gutenberg-tm
electronic work, you indicate that you have read, understand, agree to
and accept all the terms of this license and intellectual property
(trademark/copyright) agreement. If you do not agree to abide by all
the terms of this agreement, you must cease using and return or
destroy all copies of Project Gutenberg-tm electronic works in your
possession. If you paid a fee for obtaining a copy of or access to a
Project Gutenberg-tm electronic work and you do not agree to be bound
by the terms of this agreement, you may obtain a refund from the
person or entity to whom you paid the fee as set forth in paragraph
1.E.8.

1.B. "Project Gutenberg" is a registered trademark. It may only be
used on or associated in any way with an electronic work by people who
agree to be bound by the terms of this agreement. There are a few
things that you can do with most Project Gutenberg-tm electronic works
even without complying with the full terms of this agreement. See
paragraph 1.C below. There are a lot of things you can do with Project
Gutenberg-tm electronic works if you follow the terms of this
agreement and help preserve free future access to Project Gutenberg-tm
electronic works. See paragraph 1.E below.

1.C. The Project Gutenberg Literary Archive Foundation ("the
Foundation" or PGLAF), owns a compilation copyright in the collection
of Project Gutenberg-tm electronic works. Nearly all the individual
works in the collection are in the public domain in the United
States. If an individual work is unprotected by copyright law in the
United States and you are located in the United States, we do not
claim a right to prevent you from copying, distributing, performing,
displaying or creating derivative works based on the work as long as
all references to Project Gutenberg are removed. Of course, we hope
that you will support the Project Gutenberg-tm mission of promoting
free access to electronic works by freely sharing Project Gutenberg-tm
works in compliance with the terms of this agreement for keeping the
Project Gutenberg-tm name associated with the work. You can easily
comply with the terms of this agreement by keeping this work in the
same format with its attached full Project Gutenberg-tm License when
you share it without charge with others.

1.D. The copyright laws of the place where you are located also govern
what you can do with this work. Copyright laws in most countries are
in a constant state of change. If you are outside the United States,
check the laws of your country in addition to the terms of this
agreement before downloading, copying, displaying, performing,
distributing or creating derivative works based on this work or any
other Project Gutenberg-tm work. The Foundation makes no
representations concerning the copyright status of any work in any
country outside the United States.

1.E. Unless you have removed all references to Project Gutenberg:

1.E.1. The following sentence, with active links to, or other
immediate access to, the full Project Gutenberg-tm License must appear
prominently whenever any copy of a Project Gutenberg-tm work (any work
on which the phrase "Project Gutenberg" appears, or with which the
phrase "Project Gutenberg" is associated) is accessed, displayed,
performed, viewed, copied or distributed:

  This eBook is for the use of anyone anywhere in the United States and
  most other parts of the world at no cost and with almost no
  restrictions whatsoever. You may copy it, give it away or re-use it
  under the terms of the Project Gutenberg License included with this
  eBook or online at www.gutenberg.org. If you are not located in the
  United States, you'll have to check the laws of the country where you
  are located before using this ebook.

1.E.2. If an individual Project Gutenberg-tm electronic work is
derived from texts not protected by U.S. copyright law (does not
contain a notice indicating that it is posted with permission of the
copyright holder), the work can be copied and distributed to anyone in
the United States without paying any fees or charges. If you are
redistributing or providing access to a work with the phrase "Project
Gutenberg" associated with or appearing on the work, you must comply
either with the requirements of paragraphs 1.E.1 through 1.E.7 or
obtain permission for the use of the work and the Project Gutenberg-tm
trademark as set forth in paragraphs 1.E.8 or 1.E.9.

1.E.3. If an individual Project Gutenberg-tm electronic work is posted
with the permission of the copyright holder, your use and distribution
must comply with both paragraphs 1.E.1 through 1.E.7 and any
additional terms imposed by the copyright holder. Additional terms
will be linked to the Project Gutenberg-tm License for all works
posted with the permission of the copyright holder found at the
beginning of this work.

1.E.4. Do not unlink or detach or remove the full Project Gutenberg-tm
License terms from this work, or any files containing a part of this
work or any other work associated with Project Gutenberg-tm.

1.E.5. Do not copy, display, perform, distribute or redistribute this
electronic work, or any part of this electronic work, without
prominently displaying the sentence set forth in paragraph 1.E.1 with
active links or immediate access to the full terms of the Project
Gutenberg-tm License.

1.E.6. You may convert to and distribute this work in any binary,
compressed, marked up, nonproprietary or proprietary form, including
any word processing or hypertext form. However, if you provide access
to or distribute copies of a Project Gutenberg-tm work in a format
other than "Plain Vanilla ASCII" or other format used in the official
version posted on the official Project Gutenberg-tm web site
(www.gutenberg.org), you must, at no additional cost, fee or expense
to the user, provide a copy, a means of exporting a copy, or a means
of obtaining a copy upon request, of the work in its original "Plain
Vanilla ASCII" or other form. Any alternate format must include the
full Project Gutenberg-tm License as specified in paragraph 1.E.1.

1.E.7. Do not charge a fee for access to, viewing, displaying,
performing, copying or distributing any Project Gutenberg-tm works
unless you comply with paragraph 1.E.8 or 1.E.9.

1.E.8. You may charge a reasonable fee for copies of or providing
access to or distributing Project Gutenberg-tm electronic works
provided that

* You pay a royalty fee of 20% of the gross profits you derive from
  the use of Project Gutenberg-tm works calculated using the method
  you already use to calculate your applicable taxes. The fee is owed
  to the owner of the Project Gutenberg-tm trademark, but he has
  agreed to donate royalties under this paragraph to the Project
  Gutenberg Literary Archive Foundation. Royalty payments must be paid
  within 60 days following each date on which you prepare (or are
  legally required to prepare) your periodic tax returns. Royalty
  payments should be clearly marked as such and sent to the Project
  Gutenberg Literary Archive Foundation at the address specified in
  Section 4, "Information about donations to the Project Gutenberg
  Literary Archive Foundation."

* You provide a full refund of any money paid by a user who notifies
  you in writing (or by e-mail) within 30 days of receipt that s/he
  does not agree to the terms of the full Project Gutenberg-tm
  License. You must require such a user to return or destroy all
  copies of the works possessed in a physical medium and discontinue
  all use of and all access to other copies of Project Gutenberg-tm
  works.

* You provide, in accordance with paragraph 1.F.3, a full refund of
  any money paid for a work or a replacement copy, if a defect in the
  electronic work is discovered and reported to you within 90 days of
  receipt of the work.

* You comply with all other terms of this agreement for free
  distribution of Project Gutenberg-tm works.

1.E.9. If you wish to charge a fee or distribute a Project
Gutenberg-tm electronic work or group of works on different terms than
are set forth in this agreement, you must obtain permission in writing
from both the Project Gutenberg Literary Archive Foundation and The
Project Gutenberg Trademark LLC, the owner of the Project Gutenberg-tm
trademark. Contact the Foundation as set forth in Section 3 below.

1.F.

1.F.1. Project Gutenberg volunteers and employees expend considerable
effort to identify, do copyright research on, transcribe and proofread
works not protected by U.S. copyright law in creating the Project
Gutenberg-tm collection. Despite these efforts, Project Gutenberg-tm
electronic works, and the medium on which they may be stored, may
contain "Defects," such as, but not limited to, incomplete, inaccurate
or corrupt data, transcription errors, a copyright or other
intellectual property infringement, a defective or damaged disk or
other medium, a computer virus, or computer codes that damage or
cannot be read by your equipment.

1.F.2. LIMITED WARRANTY, DISCLAIMER OF DAMAGES - Except for the "Right
of Replacement or Refund" described in paragraph 1.F.3, the Project
Gutenberg Literary Archive Foundation, the owner of the Project
Gutenberg-tm trademark, and any other party distributing a Project
Gutenberg-tm electronic work under this agreement, disclaim all
liability to you for damages, costs and expenses, including legal
fees. YOU AGREE THAT YOU HAVE NO REMEDIES FOR NEGLIGENCE, STRICT
LIABILITY, BREACH OF WARRANTY OR BREACH OF CONTRACT EXCEPT THOSE
PROVIDED IN PARAGRAPH 1.F.3. YOU AGREE THAT THE FOUNDATION, THE
TRADEMARK OWNER, AND ANY DISTRIBUTOR UNDER THIS AGREEMENT WILL NOT BE
LIABLE TO YOU FOR ACTUAL, DIRECT, INDIRECT, CONSEQUENTIAL, PUNITIVE OR
INCIDENTAL DAMAGES EVEN IF YOU GIVE NOTICE OF THE POSSIBILITY OF SUCH
DAMAGE.

1.F.3. LIMITED RIGHT OF REPLACEMENT OR REFUND - If you discover a
defect in this electronic work within 90 days of receiving it, you can
receive a refund of the money (if any) you paid for it by sending a
written explanation to the person you received the work from. If you
received the work on a physical medium, you must return the medium
with your written explanation. The person or entity that provided you
with the defective work may elect to provide a replacement copy in
lieu of a refund. If you received the work electronically, the person
or entity providing it to you may choose to give you a second
opportunity to receive the work electronically in lieu of a refund. If
the second copy is also defective, you may demand a refund in writing
without further opportunities to fix the problem.

1.F.4. Except for the limited right of replacement or refund set forth
in paragraph 1.F.3, this work is provided to you 'AS-IS', WITH NO
OTHER WARRANTIES OF ANY KIND, EXPRESS OR IMPLIED, INCLUDING BUT NOT
LIMITED TO WARRANTIES OF MERCHANTABILITY OR FITNESS FOR ANY PURPOSE.

1.F.5. Some states do not allow disclaimers of certain implied
warranties or the exclusion or limitation of certain types of
damages. If any disclaimer or limitation set forth in this agreement
violates the law of the state applicable to this agreement, the
agreement shall be interpreted to make the maximum disclaimer or
limitation permitted by the applicable state law. The invalidity or
unenforceability of any provision of this agreement shall not void the
remaining provisions.

1.F.6. INDEMNITY - You agree to indemnify and hold the Foundation, the
trademark owner, any agent or employee of the Foundation, anyone
providing copies of Project Gutenberg-tm electronic works in
accordance with this agreement, and any volunteers associated with the
production, promotion and distribution of Project Gutenberg-tm
electronic works, harmless from all liability, costs and expenses,
including legal fees, that arise directly or indirectly from any of
the following which you do or cause to occur: (a) distribution of this
or any Project Gutenberg-tm work, (b) alteration, modification, or
additions or deletions to any Project Gutenberg-tm work, and (c) any
Defect you cause.

Section 2. Information about the Mission of Project Gutenberg-tm

Project Gutenberg-tm is synonymous with the free distribution of
electronic works in formats readable by the widest variety of
computers including obsolete, old, middle-aged and new computers. It
exists because of the efforts of hundreds of volunteers and donations
from people in all walks of life.

Volunteers and financial support to provide volunteers with the
assistance they need are critical to reaching Project Gutenberg-tm's
goals and ensuring that the Project Gutenberg-tm collection will
remain freely available for generations to come. In 2001, the Project
Gutenberg Literary Archive Foundation was created to provide a secure
and permanent future for Project Gutenberg-tm and future
generations. To learn more about the Project Gutenberg Literary
Archive Foundation and how your efforts and donations can help, see
Sections 3 and 4 and the Foundation information page at
www.gutenberg.org


Section 3. Information about the Project Gutenberg Literary Archive Foundation

The Project Gutenberg Literary Archive Foundation is a non profit
501(c)(3) educational corporation organized under the laws of the
state of Mississippi and granted tax exempt status by the Internal
Revenue Service. The Foundation's EIN or federal tax identification
number is 64-6221541. Contributions to the Project Gutenberg Literary
Archive Foundation are tax deductible to the full extent permitted by
U.S. federal laws and your state's laws.

The Foundation's principal office is in Fairbanks, Alaska, with the
mailing address: PO Box 750175, Fairbanks, AK 99775, but its
volunteers and employees are scattered throughout numerous
locations. Its business office is located at 809 North 1500 West, Salt
Lake City, UT 84116, (801) 596-1887. Email contact links and up to
date contact information can be found at the Foundation's web site and
official page at www.gutenberg.org/contact

For additional contact information:

    Dr. Gregory B. Newby
    Chief Executive and Director
    gbnewby@pglaf.org

Section 4. Information about Donations to the Project Gutenberg
Literary Archive Foundation

Project Gutenberg-tm depends upon and cannot survive without wide
spread public support and donations to carry out its mission of
increasing the number of public domain and licensed works that can be
freely distributed in machine readable form accessible by the widest
array of equipment including outdated equipment. Many small donations
($1 to $5,000) are particularly important to maintaining tax exempt
status with the IRS.

The Foundation is committed to complying with the laws regulating
charities and charitable donations in all 50 states of the United
States. Compliance requirements are not uniform and it takes a
considerable effort, much paperwork and many fees to meet and keep up
with these requirements. We do not solicit donations in locations
where we have not received written confirmation of compliance. To SEND
DONATIONS or determine the status of compliance for any particular
state visit www.gutenberg.org/donate

While we cannot and do not solicit contributions from states where we
have not met the solicitation requirements, we know of no prohibition
against accepting unsolicited donations from donors in such states who
approach us with offers to donate.

International donations are gratefully accepted, but we cannot make
any statements concerning tax treatment of donations received from
outside the United States. U.S. laws alone swamp our small staff.

Please check the Project Gutenberg Web pages for current donation
methods and addresses. Donations are accepted in a number of other
ways including checks, online payments and credit card donations. To
donate, please visit: www.gutenberg.org/donate

Section 5. General Information About Project Gutenberg-tm electronic works.

Professor Michael S. Hart was the originator of the Project
Gutenberg-tm concept of a library of electronic works that could be
freely shared with anyone. For forty years, he produced and
distributed Project Gutenberg-tm eBooks with only a loose network of
volunteer support.

Project Gutenberg-tm eBooks are often created from several printed
editions, all of which are confirmed as not protected by copyright in
the U.S. unless a copyright notice is included. Thus, we do not
necessarily keep eBooks in compliance with any particular paper
edition.

Most people start at our Web site which has the main PG search
facility: www.gutenberg.org

This Web site includes information about Project Gutenberg-tm,
including how to make donations to the Project Gutenberg Literary
Archive Foundation, how to help produce our new eBooks, and how to
subscribe to our email newsletter to hear about new eBooks.