The Project Gutenberg EBook of The Jolly Book of Boxcraft, by Patten Beard

This eBook is for the use of anyone anywhere in the United States and most
other parts of the world at no cost and with almost no restrictions
whatsoever.  You may copy it, give it away or re-use it under the terms of
the Project Gutenberg License included with this eBook or online at
www.gutenberg.org.  If you are not located in the United States, you'll have
to check the laws of the country where you are located before using this ebook.

Title: The Jolly Book of Boxcraft

Author: Patten Beard

Illustrator: E. D. Pattee

Release Date: March 16, 2018 [EBook #56751]

Language: English

Character set encoding: UTF-8

*** START OF THIS PROJECT GUTENBERG EBOOK THE JOLLY BOOK OF BOXCRAFT ***


Produced by ellinora, Barry Abrahamsen, and the Online
Distributed Proofreading Team at http://www.pgdp.net (This
file was produced from images generously made available
by The Internet Archive)

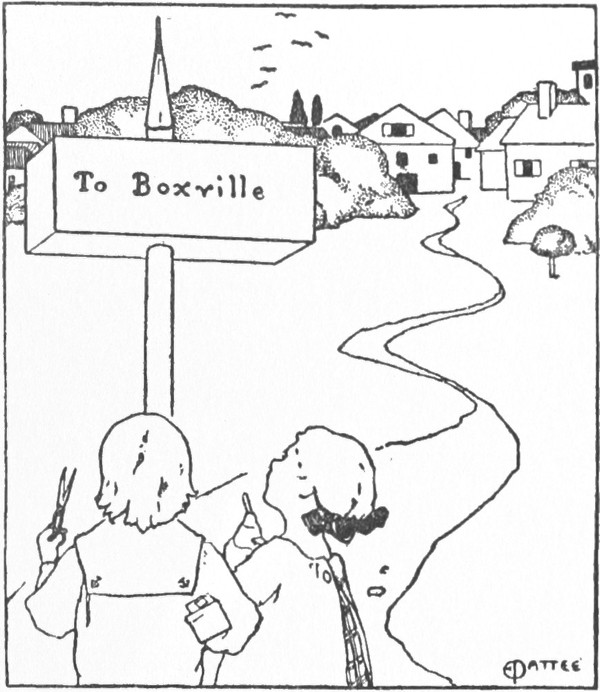
Boxville.

“The Jolly Book of Boxcraft” has been enlarged and rewritten from work started in May, 1909. This work was purchased by St. Nicholas, Little Folks, Good Housekeeping, The Congregationalist and Christian World, The Designer, Holland’s Magazine, The Housekeeper, The Ladies’ Home Journal, The New York Herald, and The New York Tribune. Thanks are due to them for the courtesy of using material which was included in their articles.
The author feels that it is only right to acknowledge her indebtedness to the children themselves who have lent their toys and helped in many little ways of their own toward the making of this book. Special thanks are due to Elizabeth Hendricks, Raymon Guthrie, Henry Jarrett, Stanley Hoyt, and Wesley Meehan, playfellows.
| PAGE | |
| Introduction (Verse) | XV |
| Boxcraft | 1 |
| The Little White Cottage of Boxville | 9 |
| The Boxville Store | 16 |
| The District School of Boxville | 19 |
| The Little Church of Boxville | 27 |
| The Boxville Railway Station | 34 |
| B. R. R. Freight Station and Shoe-box Tunnel | 40 |
| Hotel Bandbox and How to Furnish It | 43 |
| The Shoe-box Apartment House | 50 |
| A Boxville Residence | 53 |
| The Boxville Garage or Stable | 58 |
| Making a Boxville Garden | 60 |
| Boxville Boat-house or Yacht Club | 65 |
| The Houseboat “Box Craft” | 68 |
| Camp Box on Mirror Lake | 70 |
| The Gipsy Cart of Boxville Highway | 73 |
| The Shepherd’s Hut and the Sheepfold | 77 |
| Building a Box Bridge | 81 |
| Building a Toy Windmill | 83 |
| Boxville Barn and Farmyard | 86 |
| Box Brothers’ Animal Show | 89 |
| Circus Tent and Circus Grounds | 92 |
| Boxtown Zoo Garden | 96 |
| Boxtown Hose House | 98 |
| How to Make a Wigwam | 100 |
| Fort Box | 102 |
| How to Build a Toy Castle and a Fairyland House | 105 |
| Boxes Used as Blocks | 110 |
| Making a Noah’s Ark for Cracker Animals | 114 |
| Box Savings-bank for Pennies | 117 |
| How to Make a Toy Wagon and Sled or Sleigh | 119 |
| The China Doll’s Crib, Go-cart, and May Basket | 122 |
| The Toy Dog Kennel for a Toy Dog | 127 |
| How to Make a Teddy Bear’s Wheelbarrow | 129 |
| Office Furniture for Little Dolls | 131 |
| How to Make a Dolls’ Hammock | 134 |
| How to Make a Theater or Punch Show | 136 |
| How to Make a Toy Merry-go-round | 140 |
| Making a Boxcraft Automobile | 143 |
| How to Furnish a Doll-house | 147 |
| How to Make the Boxcraft Game, “Ringfling” | 154 |
| The Game of “Shoot the Chutes” | 157 |
| The Boxcraft Game “One-Two-I-Catch-You” | 159 |
| The Funny Game of “Mister Box” | 161 |
| How to Make a Magic Box | 163 |
In view of the large number of illustrations in this volume and of the necessity for grouping them, it is necessary for an occasional illustration to appear at the end of its chapter, or at the end of the preceding chapter. It is desirable therefore that the list of illustrations be consulted frequently.
| PAGE | |
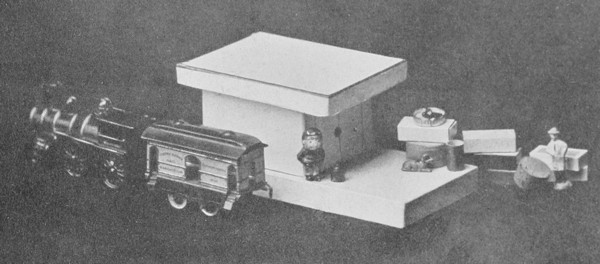
| Boxville, a Toy Town Made with Shoe-Boxes | Frontispiece |
| Boxville Cottage (Outside View)—Boxville Cottage (Inside View) | 4 |
| Boxcraft Materials—An Unfinished Boxcraft Toy | 5 |
| The Village Store (Outside View)—The Village Store (Inside View) | 18 |
| The District School (Outside View)—The District School (Inside View) | 19 |
| Boxville Church (Outside View)—Boxville Church (Inside View) | 32 |
| Boxville Railway Station (Outside View)—Boxville Railway Station (Inside View) | 33 |
| B.R.R. Freight Station—Shoe-Box Tunnel | 42 |
| Bandbox Hotel (Outside View)—Bandbox Hotel (Inside View) | 43 |
| Boxville Apartment House—Box Furniture for the Apartment House | 52 |
| A Boxville Residence:—The Garage for Boxville Residence | 53 |
| The Greenhouse for Boxville Garden—The Pergola for the Garden | 64 |
| The Boat-House or Yacht Club—The Houseboat, “Boxcraft” | 65 |
| Camp Box on Mirror Lake—The Boxville Gipsy Cart | 70 |
| Shepherd’s Hut and Sheepfold—The Box Bridge | 78 |
| The Toy Windmill—Boxville Barn and Farmyard | 84 |
| The Boxcraft Animal Show | 90 |
| Box Brothers’ Circus Tent—Circus Cages and Booth | 91 |
| Boxtown Zoo—Boxtown’s Hose House | 96 |
| Indian Wigwam—Fort Box | 100 |
| The Fairyland Castle—The Fairy House | 108 |
| Box Building with Box Blocks—A Box Animal and Box Man | 109 |
| A Toy Train Built of Boxes—Boxes as Standards for Cut-Outs | 112 |
| A Noah’s Ark with Cracker Animals—A Penny Savings-Bank | 113 |
| Wagon and Sled—Sleigh | 120 |
| Crib, Go-Cart, May Basket—Express Wagon and Doll’s Sled | 121 |
| Toy Dog Kennel—Toy Wheelbarrow | 128 |
| Office Furniture for Dolls—A Doll’s Couch Hammock | 132 |
| Dolls’ Theater—The Toy Merry-Go-Round | 138 |
| Boxcraft Toy Automobile (With Top)—Boxcraft Automobile Without Top) | 144 |
| Doll-House Furniture: Bedroom—Tables and Chairs | 148 |
| Doll-House Furniture: Mantel and Settle—Piano and Clock | 149 |
| Doll-House Furniture: Dining-room—Kitchen | 152 |
| The Game, “Ringfling”—The Game, “Shoot the Chutes” | 154 |
| The Game, “Mr. Box”—The Game, “One-Two-I-Catch-You” | 160 |
| DIAGRAM | PAGE | |
| One | How to Make Windows | 166 |
| Two | How to Make Doors | 167 |
| Three, A | How to Make Side Walls Supports for a Sloping Roof. How to Cut a Hole for a Chimney | 168 |
| Three, B | How to Make a Gable Roof out of Two Box Covers | 169 |
| Three, C, CC | How to Make a Gable Roof out of Cardboard and a Building to Fit | 170 |
| Three, D, E | How to Make an Indian Wigwam or a Round-Pointed Roof. How to Make a Tent-shaped Roof | 171 |
| Three, F, G | How to Make Ramparts for a Castle or Fort. How to Make a Roof for a Porch | 172 |
| Four | How to Make a Bridge and a R. R. Tunnel | 173 |
| Five | How to Make a Pattern for a Windmill Sail | 174 |
| Six, A, AA | How to Make a Bench Form and a Bed | 175 |
| Six, B | How to Make a High-backed Bench | 176 |
| Six, C | How to Make a Chair | 177 |
| Six, D, DD | How to Make Tables | 178 |
| Six, E, F | How to Make a School Desk and a Piano | 179 |
| Six, G | How to Make a Fireplace and a Mantel | 180 |
| Seven | How to Make a Pergola | 181 |
| Eight | How to Make a Zoo or Circus Cage | 182 |
| Nine | How to Make a Dolls’ Theater or Punch Show | 183 |
| Ten | How to Make a Sleigh or a Sled | 184 |
| Eleven | How to Make the Boxcraft Game, “Ringfling” | 185 |
| Twelve | How to Make the Boxcraft Game, “One-Two-I-Catch-You” | 186 |
| Thirteen | How to Make a Magic Box | 187 |
Material Required to Make Boxcraft: cardboard boxes, paste, scissors, crayons or water-color paints; perhaps a ruler, and pencil will help.
Do you believe in fairies? I do. I know three of them, and they are quite as wonderful as Cinderella’s fairy godmother. She could make a coach and pair out of nothing at all but a pumpkin and some mice, but the fairies that I know can do even better than that! They can make a whole toy shop full of toys from nothing at all but some cardboard boxes.
The fairies that I know are called Happy Thought, Nimblefingers, and Play. They have so much magic that they can transform even dull days and make them jolly ones. All three of them came to see me one very rainy day, and each of them sat upon a cardboard box while they all told me in chorus about the fairy art of boxcraft.
“Have you ever noticed how much an ordinary shoe-box looks like a little building with a flat roof?” Happy Thought inquired.
“All you have to do to make it a house,” Nimblefingers put in, “is to cut doors and windows in its sides.”
“And then, when you have made the house, you have all kinds of fun with it,” laughed Play.
“Boxes will make chimneys for your house,” Happy Thought pursued. “Boxes will make furniture—beds, tables, chairs, mantels, pianos, benches—everything!”
“You need only to cut the box rims to make them,” Nimblefingers interrupted.
“And when they are made—oh, think of the things you can use them for!” chuckled Play.
“A whole village can be made—cottages, school, store, church, railway station, bridges, tunnels—everything,” Happy Thought went on.
“And all that you need to do it will be a pair of scissors, a pencil, some paints, and maybe some paste. I’ll show you how,” Nimblefingers volunteered.
“When the village is made, all your toys can play in it! Haven’t you some roly-poly tumble toys, and some penny dolls, and toy animals?” Play demanded. “I know you must have.”
“And the village is not all that you can make from nothing at all but some cardboard boxes. You may make almost any kind of a toy: a theater for dolls, a merry-go-round, an Indian wigwam, and games, and games, and GAMES!”
So, the fairies, Happy Thought, Nimblefingers, and Play, told me how to make all these magic toys from nothing at all but cardboard boxes, and they asked me to tell the children about it, so that they might know how to change dull days into bright and happy ones when they had learned of the magic.
Cardboard boxes are to be found everywhere. They are in your home and in everybody’s home. Butchers, bakers, candlestick makers, milliners, druggists, jewelers, stationers, grocers, drygoods firms, shoe stores, book stores, toy stores, all keep them. Everywhere, everywhere there are cardboard boxes—big boxes, little boxes, middling-sized boxes; wide boxes, narrow boxes, deep boxes, shallow boxes; round boxes, oblong boxes, square boxes! Boxes, boxes, BOXES everywhere! All you need to do is to ask for them.
People at home are throwing them away. The butchers, the bakers, the candlestick makers, the milliners, the druggists, the jewelers, the stationers, the grocers, and the dry goods firms, as well as all the others, are constantly sending boxes to your home. The shoe stores, and the book stores, and the toy stores, and ever so many others, are throwing boxes away just because nobody seems to realize what magic there lies in them for the children.
When Happy Thought, Nimblefingers, and Play first told me about boxcraft, I did not find any trouble in securing the kind of box that I needed for the toy-making. I found that the merchants were very glad to give me boxes when I asked for them. They smiled when I asked. They did not know that a toy circus tent could be made from a round hat-box. They did not know that a whole village might be erected out of six shoe-boxes!

Boxville Cottage is made from a shoe-box.
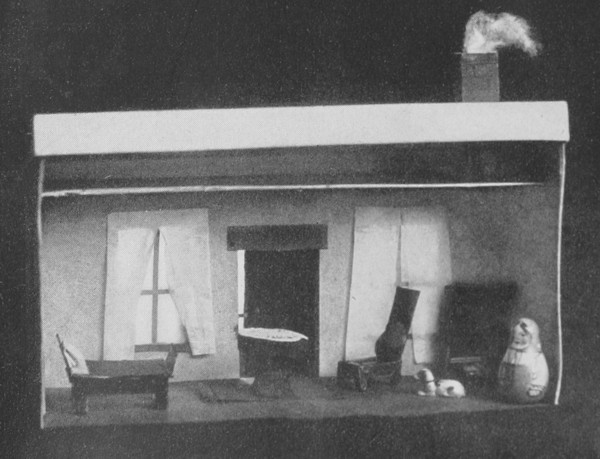
Boxville Cottage is furnished with Boxcraft Materials.
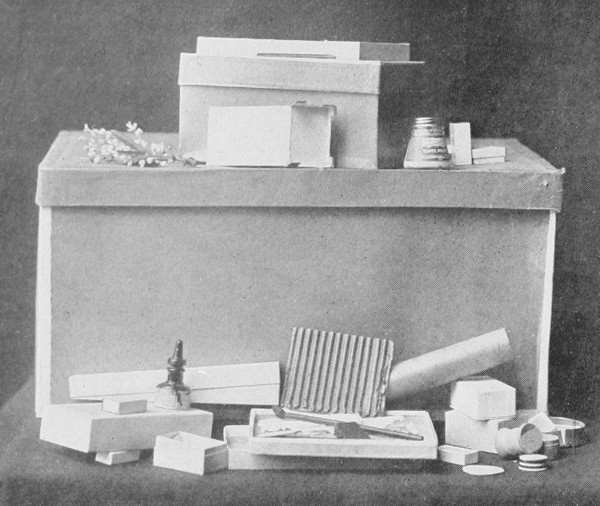
Boxcraft Materials.
An unfinished Boxcraft Toy.
Among the boxes given me were three very large ones. One was deep and wide. It came from the milliner’s. It was not a bandbox, but a box used to pack hats away in. In it I kept all the boxes that came to me. The small ones I packed inside the large ones. It was a simple matter, after that, to find what I needed when I wished to make a table, or a chair, or a punch show, or a school-house.
Another box that was given me was wide and flat. Into it I put all pretty papers that came my way—lace-paper, pinwheel paper, sheets of waxed sandwich paper and glacine book covers, crape paper, spools, cotton, pencils. Everything that could lie flat went into this wide, flat box, to be stored till needed. This box packed into the first box easily.
The third box was broad, and square, and deep. Into it I packed the playthings I had made after I had finished playing with them. It fitted into the side of the first box above the wide and flat one. All these could be put out of sight in my play-closet when night came and it was time to pick up.
These boxes I called my treasure boxes. I hope you will find three like them and keep your boxcraft materials as I kept mine, for Happy Thought, Nimblefingers, and Play told me about the plan, and I think it is a splendid one.
If you have some pretty samples of wall-paper, you can easily cover your treasure boxes with them. There might be some wall-paper like that in your play-room. If so, this would be the very thing. Then, the boxes may be placed anywhere you choose in your room.
These treasure boxes are not meant to hold large toys. It is the little toys that you will like best to use in boxcraft play. The toy figures and the animals will pack into very small space. The corrugated cardboard for roofs, the green crape paper for grass, the pretty shells, pebbles, and artificial flowers for garden building, take but small space.
The tools for your boxcraft, scissors, and paste, and paint-box, may go into the large, deep treasure box too.
Here in this book you will find the toys that the fairies have shown me how to make. There are many, many more. You can try the magic craft of the fairies for yourself in your own way. If your boxes are not always exactly like mine, make them answer by adapting the general plan of the toy to the box which you have. Learn to make much out of little. That is the motto of boxcraft play. THAT is what Cinderella’s fairy godmother did when she changed a pumpkin into a golden coach. That is what fairies always do! They find magic in little things—so suppose you try it too!
Cardboard boxes. (To make buildings and toys.)
Corrugated cardboard. (To make roofs and fences.)
Plain cardboard. (To use in cutting side walls, roofs, wheels for carriages.)
Glacine paper book-covers. (To use in making window-glass for buildings.)
Colored pinwheel papers and tissue papers. (To use in decorating houses.)
Spools. (To make standards for trees and bushes in landscape building, to make flower-stands, cannon, stools, tables, legs for dolls’ beds, men for playing boxcraft games.)
Round-headed paper-fasteners of brass. (To make door-knobs and door-latches for buildings. To fasten handles to baskets. To fasten wheels to vehicles.)
Pencils. (To use for pillars for buildings. To use for making game-boards.)
Just a pair of scissors, some paste, and a box of crayons or water-color paints.
Material Required for Making a Little Cottage: one shoe-box with its cover, a twelve-inch square of cardboard, three small boxes, and a bit of glacine paper to make window-glass.
Here is the little Cottage of Boxville. I think The Old Woman Who Lived in a Shoe might better have chosen to live in a shoe-box like this than to have made her home in an old boot! The cottage certainly seems cozy, and far more comfortable than a shoe would be. I know that her children would have preferred a dwelling like this. I am sure you like it better yourself, so I am going to tell you how you may build one just like it.
Find a shoe-box and take its cover off. Set the box upon its side with the bottom of the box facing you. This is to be the front of the cottage.
Upon the front you will need to draw two windows and a door. Take your ruler and a pencil. Measure a window space two inches from either end of the box. Make each window space two inches wide and two inches high. Half-way between these, draw a door space with its base at the base of the box. Make the door space two inches wide and three inches and a half tall.
Down the center of each window space from top to base of the square, draw a line which divides it into half. This forms the window-blinds, which you will need to cut open. (To make window with blinds, see Diagram One, B, page 166.) Cut top line. Cut down the center line and cut across the base of the square. Fold the sections of cardboard outward against the sides of your box, and you will have made a window with blinds.
Half-way between windows is the door space. (To cut door, see Diagram Two, A, page 167.) Cut across the top line of your square, down one side and across the base. Fold the cardboard outward, and you will have made a door that you can open and close at will.
If you happen to have a round-headed paper-fastener that has two pointed prongs that are meant to press through papers to keep them together, take it and press its prongs through the little door where a door-knob should be. Bend the prongs together to one side and you will have a door-latch. By turning the round knob, you may fasten the door or open it, as you like.
The roof of the cottage is supported upon two pieces of cardboard cut to fit each end of the box. (See Diagram Three, A, page 168.) To make these, take your cardboard and cut a piece the width of one end of your box and four inches higher. Make a second piece of cardboard like it to fit the other end of your box. Glue both on the box, one on each end. Then, with scissors, cut each piece off diagonally downward from the top at the rear of the box to the front of the box. This cuts off a corner and makes a sloping rest for each end of the cottage. Upon these the cover of the shoe-box is slipped to make half of a sloping roof. (See Diagram Three, AA, page 168, showing box cover placed upon side-wall pieces.)
Slip your box cover over the two points, when both are thoroughly dry. See, it makes the best kind of a roof for your cottage!
If you wish to add a chimney, any long, narrow box that is small enough to form the right proportion to the roof may be used. Measure its base upon the cottage roof near the top. Cut the cardboard of the roof so that the box end may be slipped through it and stand erect, and you have a chimney. If you use a box which has a sliding cover like a drawer, its outside will be like a real little chimney. You may mark off bricks upon it with a pencil, and color it bright red. A wad of cotton will form the smoke for a chimney.
I painted blinds and door of the cottage that you see in the picture. Blinds were green and the door was brown. You may use almost any kind of paint to do this. The colors from your water-color painting-box will answer. You may use crayons too, if you like. Other paint takes somewhat longer to dry. It is not so well adapted to the building.
In front of my cottage, I made a garden with some artificial flowers that had once been on my summer hat in a wreath. You may easily make a garden for your cottage, or you may have tubs of flowers like the one in the picture. It is the lower half of a pill-box filled with forget-me-nots.
The cottage is furnished with furniture cut from small boxes. These may be three inches long or smaller. My furniture is all painted, but you need not paint yours unless you care to do so.
The bed is made from a box and its cover. To make it, first take the lower half of your box and turn it over so that its rims are below instead of on top. At each corner cut a leg for the bed, and remove cardboard from between these cuttings, so that it leaves at each corner of the rim a two-sided leg. (To cut bench form, see Diagram Six, A, page 175.) When you have cut this lower half of the bed, take the cover of your box and turn it so that its rims come upward instead of downward. Remove the rims from each long side, and you will have left the head and footboard of the bed. Glue this piece to the lower half you first cut, and the bed will be finished. Sheets and pillow may be cut from tissue or lace-paper.
A chair is made from the lower half of any small box. Beginning at the center of one long rim of the box, cut the rim off half-way around. The part with rim removed will be the back of the chair. The other will be the seat and legs. Legs are cut to right and left of each forward corner. Cardboard is evenly removed from between them. Rear legs are cut in each rim at the side of the box in the same way, except that these rear legs have but one cut needed. They are not cornered as the front legs are. (For cutting a chair, see Diagram Six, C, page 177.)
A table for the cottage is made from a spool by standing the spool on end. Over its top is placed the half of a small round box. (A square box cover may answer quite as well.) The table may be made from an ordinary spool, or two twist spools glued end to end. (For table, see Diagram Six, DD, page 178.)
A mantel with fireplace for the cottage may be cut from a small box three inches high. Stand the box on end and cut from its rear, near the base, an opening like that of a fireplace. (For cutting a mantel with fireplace, see Diagram Six, G, page 180.) Use the back of the box, as it has no printing upon it. If your box is painted, it will not matter whether or not you make your cutting in the front, as the print will not show when cleverly painted over.
In my cottage there lived a tumble toy lady. Her name was Polly Ann. You can see her in the picture with her china dog. You may use roly-poly tumble toys or penny dolls to play with in the cottage. Figures cut from magazine pictures are fun to use, too. Color them with your paints or crayons.
Besides tumble toys, Noah’s Ark figures, and picture people cut from magazines, villagers for Boxville cottages may be found at any penny store where children trade. These are small dressed dolls, one cent apiece!
In candy shops where party favors are sold, all manner of small figures may be bought. These are odd little men or women—just the very ones to use in playing Boxville plays. At every holiday season, new ones appear! You can always find them.
Material Required for Making a Boxville Store: one shoe-box with two shoe-box covers, two long pencils, two spools, waxed paper, and small boxes.
The village store of Boxville is made from a shoe-box. One shoe-box cover makes the porch it rests upon. Another forms the roof of the store.
If you wish to make a village store, also, place a shoe-box upon its side, and then the bottom of the box will become the front of your store.
You will need to have a large shop window in front. Make this first. Two inches from the right-hand end of the box, mark with your pencil a wide oblong space five inches by three. Cut out this window space on all four sides. (For cutting a window space, see Diagram One, A, page 166.)
Cut a piece of waxed paper a little larger than the size of your window. Paste this inside the box building over the window space to make glass. Cut strips of pinwheel paper and paste them around the window on the outside of the box to make window-casings.
Now you are ready to make a door for your store. Draw a door space on your box with your pencil. Make it two inches from the left-hand end of the box. Make it four inches high and two inches wide. (To cut single door, see Diagram Two, A, page 167.) Cut across the top line, down the side line that is next the window, and across the base. When you bend the cardboard you have cut, you will have a door that will open and close. Color the door, if you like. It may be painted brown.
After this, you are ready to place the roof on your store; but first, lay one of the box covers upon its rims on your work-table and put the little store upon it, well back, so there will be a porch in front. Then, take your other shoe-box cover and fit it over the top of the box building so that it projects over the porch in front. Two long pencils, with ends run into the openings of two spools, make pillars to place at either corner of the porch.
The step up to the porch is any small box you may have.
Inside the store, a long hat-pin box makes a counter. Flowers, leaves, pretty pebbles, shells, and little toys such as you may find among your own playthings may be displayed upon the counter.
A roly-poly tumble toy will make a clerk for the store, or, if you like, you may find both clerk and customers in magazine pictures, and you can mount them on thin cardboard and cut them out. There is no end to the plays you can invent when your store is finished. Polly Ann of shoe-box cottage, Boxville, has just come to the store to buy a loaf of bread. There it is—that pretty brown pebble! Those green leaves are vegetables! The beads in that box are apples! The shells are little cakes!
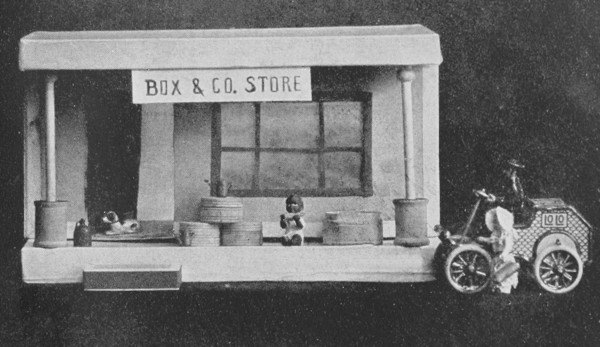
The Village Store made of a shoe-box and two shoe-box covers.
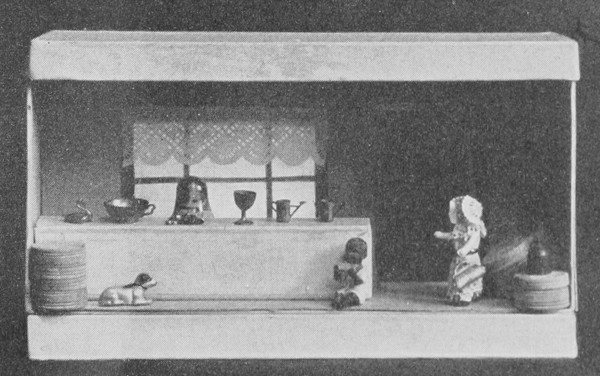
Inside view of the Village Store. The counter is a hat-pin box.

The District School of Boxville. It is made from a shoe-box.
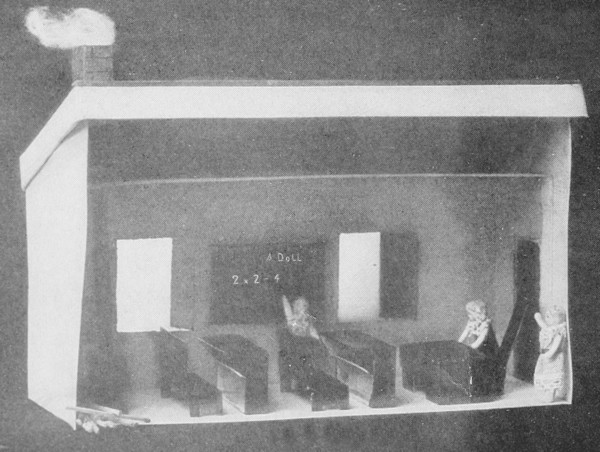
Inside view of the Boxville School. The desks are all cut from small
oblong boxes. The benches are boxes also; and the stove is a spool
with a pencil for a stovepipe.
Material Required for Building a Toy School: one shoe-box with its cover, a half-sheet of cardboard, three small boxes about three inches long, the cover of some narrow little box which has an inner drawer, a pencil, a spool, and a box two inches long.
Did you ever before see a toy school-house? I don’t believe you have ever seen anything like Boxville School, so I am going to tell you how you may build one like it.
First, you will need a shoe-box to form the house itself. Its cover is the roof. To this, at either end of the box, are glued two side walls which hold the roof in place, slanting. The cover of some tiny narrow box which is made with an inner drawer is the chimney. Inside, the desks are made from the lower parts of three boxes about three inches long. Their three covers make the benches. A teacher’s desk may be made from any small box you have. Its cover is teacher’s chair. A spool forms the stove, and a pencil is the stovepipe.
Begin by taking the cover from your shoe-box. Place the box upon the table before you so that it stands upon one long side, with its bottom part facing you, open at the back. The base of your box, which now faces you, will be the part of the school which will need to have windows made in it.
These two windows must have blinds. The window spaces must be located on the face of the box, which fronts you. From these the blinds are cut. Two inches from either end of your box, mark upon the part which faces you two oblongs, each three inches high and two inches wide. Mark a vertical line down the center of each window space. This forms the blinds, which you will need to cut. (For cutting blinds, see Diagram One, B, page 166.) Cut the top line, down the center line, and across the base line. Press the two sections of cardboard outward against the sides of the box building, and you will have made the window with blinds. Color these blinds, if you choose. Use crayons or water-color paints.
Next, you will need to make the cardboard side walls which support the box-cover roof. Take your sheet of cardboard and measure with pencil outline upon it the shape of one end of your box. Add to this four inches at the top, and cut this piece from the cardboard with its added height.
Make a second piece of cardboard identical with the first. Glue each to one end of the box upright. Cut from each the front upper corner point. (See Diagram Three, A, page 168, which shows the shape of the side walls when cut.)
Cut a door in one of these side walls, near its central part, where you see the door in the picture of Boxville School. To make this, first take pencil and ruler and make an oblong four inches high and two inches wide. (To cut door, see Diagram Two, A, page 167.) Cut top line, down one side line, and across the base line. Fold the door outward. The cardboard under the door in the side wall may be cut out the shape of the door space. If you do this, your door will bend open more easily.
If you happen to have a round-headed paper-fastener, press its pointed prongs through the little door where a door-knob should go. The round head of the paper-fastener will form a door-knob. Its prongs, bent to one side, form the latch. It will catch the door securely when the “door-knob” is turned.
Now that the lower part of the school building is finished, you may begin upon the roof. This is the box cover. Place it upon the points of the side walls so that it fits down upon them. You will readily see how this is. (For placing a roof on a shoe-box building, see Diagram Three, AA, page 168.)
When the roof is placed, you will be able to judge where the chimney-hole should be cut in the box-cover roof. It should go near the top at the end of the box that is opposite the door. The cover of some narrow box which has a sliding inner drawer will make the chimney. It will be just the right shape, square and hollow.
Mark off upon the sides of this box the bricks of the chimney. Color them red, if you like. If you use a ruler, the work is easily and quickly done. You do not need to mark the bricks unless you like. Your box may be painted merely.
To place it on the roof, you will need to cut out of the school-house roof a piece of cardboard the size of the end of your box. Decide where the chimney should go. Mark the end of it with pencil upon the roof at this point. Cut the cardboard out. (For cutting hole for chimney in a box-cover roof, see Diagram Three, AA, page 168.) Press the end of the chimney down through this hole. Press the chimney backward to make it stand straight, and glue it. Some tiny bit of cotton stuffed into the upper hole of the chimney box will form smoke.
Of course, you will be anxious to furnish your school-house inside. You may make it like a real district school such as you see in the country. It will have desks, benches, a stove, and a blackboard—to say nothing of a teacher’s desk and chair!
The lower halves of the three small boxes form desks. It is really a simple matter to make these. They are the kind that have a shelf beneath the top. They are open.
Take the lower half of one of these boxes. Place it upon one of its long rims. The upper rim will be the top of the desk. The ends of the box will need to be cut the shape of the sides of a desk. (For cutting a desk out of a small oblong cardboard box, see Diagram Six, E, page 179.)
Fit a bit of box rim beneath the top of the desk where the shelf should go, and glue its ends to the box desk. The desk may be painted black, if you choose. Make the two other desks like this one.
The benches are next cut from the box covers. To make a bench, make a cut with scissors in each box rim at the center of each end of the box. Cut each as far as the upper part of the cover. Half the box will be the back of the bench. Half will be the seat and legs.
First, cut the legs. Then bend the other half of the box upward, cut off the side piece at either end of the box, bend the long rim upward. This will make a bench with high back. (For cutting the legs of bench and its high back, see Diagram Six, B, page 176.) In following diagrams, always cut where you see the heavy black line. Bend where you see a dotted line. The bench may be painted to match the desks. Make other benches like the first one.
The teacher’s desk is made from the lower half of another box—one about two inches long. It is made like a table, except that no legs are cut in its end rims. (For cutting a bench form for the teacher’s desk, see Diagram Six, A, page 175.) The desk may be painted, if you like.
The chair for this desk is cut from the cover of the same box that made the desk. Cut the cover’s rim half off the box, beginning at the center on one long side. The part of the cover left without rim will be the back of the chair. Cut legs at the corners of the other half of the cover and at each side on the rim. Remove the surplus cardboard from between them. (To cut chair, see Diagram Six, C, page 177.) Color the chair to match desks and benches.
Your school is almost done. The stove will need to be put up—I’m quite sure that you never heard of a district school-house without a stove! It is as much a part of a district school as the dipper and the waterpail used to be. The stove of this toy school is just a spool painted black. Place it under the chimney, with the point of a long pencil run into its upper hole to represent a stovepipe. There! That is easy to do, I am sure!
The blackboard is a piece of black pinwheel paper cut oblong and pasted between the windows. If you have some old time-table in your home, perhaps you will find in it a small map that may be cut out and pasted to the walls of the school.
You can make text-books by folding pieces of paper together. These can be placed inside the desks.
Penny dolls make excellent scholars. A tumble toy figure may make a schoolmistress or a schoolmaster.
In the picture of Boxville School, you can see three penny dolls and my tumble toy schoolmistress. The dolls are at recess. Violet is trying to do a sum at the board. Pansy is pretending to be “teacher.” Lily has just finished her luncheon.
When does your school open? Now! The scholars will have to hurry or they’ll be late!
Material Required for Making a Boxville Church: one shoe-box with its cover, one narrow box about six or seven inches long, one oblong box cover three or four inches long, three small box covers of about the same size (three inches), a twelve-inch square of cardboard, and some colored tissue-paper, with a spool.
Ding! Ding! Can you hear the bell in the steeple of the Boxville Church ringing? It does not ring very loud, because it is such a small bell, but it does ring beautifully! You can try it yourself. Suppose that you make a little church like this for your village!
Take a shoe-box. Remove its cover. Lay the shoe-box upon one long side rim. The bottom of the box will become the side of the church. It will need to have three long windows cut in it.
Draw these window spaces long and narrow, about one inch wide and three inches high. Cut the two end windows equally distant from the ends of the box, and draw the outline of the center window mid-way between these two. Cut the cardboard at the top of the window spaces to a point. (For cutting windows, see Diagram One, A, page 166.)
If you have some colored tissue-paper, you may cut three pieces the same shape as the window spaces you have cut out. Let them be a little wider and longer, however. Paste each inside the box right over the open window spaces. This will make stained-glass windows. You can paint the window-casings with black ink, or paint on the outside of the box around the windows.
If you prefer, you can make the window-casings by pasting narrow strips of pinwheel paper around the windows, instead of using the paint.
The Boxville Church, as you can see, has a sloping roof. This roof is the cover of the shoe-box supported on two side walls, which are made of cardboard and glued to each end of the box. You will need to cut these side walls. (See Diagram Three, A, page 168.)
Measure the exact width and height of your box on the twelve-inch square of cardboard. Measure one end only, and place the end of the box so that it comes at the edge of your cardboard. At the top, add four inches to the height, and cut out this oblong piece you have drawn. Make another like it. Next, cut off the two front upper corners diagonally down to the mark you first made, showing the height of your box building at the front of your box.
Cut a church door in one of these sides. Make it rather high—about the height of the church windows. Let the base of the door come at the lower edge of the side wall. Cut up through the cardboard vertically for about three inches. Then cut the arch of the door and bend as if it were on a hinge. (See Diagram Two, A, page 167, for cutting door.)
Paste each side wall in place on the box building so that the points of each come at the rear of the box. When the side walls are firmly dry, cut out the cardboard that is under the door space of the side wall. The roof is not quite ready to go on yet, however. You will first need to arrange for the steeple or bell-tower.
Take the cover of your shoe-box and also the oblong box you intend to use for a steeple. This may be either a long candy box, such as chocolate peppermints are often sold in drug stores, or it may be a box such as jewelers use for hat-pins. The tower of the church should come over the door. Near the top corner of the shoe-box cover which is to be the roof of the church, mark off the shape of one end of the oblong box which is to be the tower. Cut out this square from the shoe-box roof, and cut out about a quarter of an inch more at the bottom, otherwise your steeple will not stand exactly straight.
Now, slip the roof over the points of the side walls. See! that is it! And, next, slip the tower in place down through the opening which comes in the roof over the door. (See Diagram Three, AA, page 168.)
If your tower is to have a bell, you can buy a bell at almost any toy store. It will probably cost you a penny. You will need to cut openings in the upper part of the bell-tower box. Cut one on each side, as you see it in the picture of my Boxville Church. The belfry windows will be cut like ordinary square windows, except for a point at the top. (For cutting plain windows, see Diagram One, A, page 166.)
The bell is next tied like a locket to a double cord or bit of string. One end of this string is used to fasten the bell to the top of the tower. It is sewed, with the help of a large darning-needle, to the cardboard top of the belfry. The other end of the cord will be the bell-rope, and this goes down through the cardboard at the base of your tower box and through the cardboard at the top of the shoe-box building. It can be threaded to the darning-needle and pressed through the holes made by the needle till its end hangs down into the church vestibule, as you see it in the picture. When you let the sexton pull this bell-rope, ding, ding goes the bell, and the noise that it makes is just the right size for a Boxville Church!
Now you are ready to furnish the inside of your church. Begin with the platform for the pulpit. This is the box cover you have—the one about three or four inches long. Place it where the platform should go, opposite the door. The spool will be the pulpit. Paste a little round cardboard disk over the opening at one end of the spool, and this will be the top of the pulpit. Paint the spool black.
Use a long, narrow box cover for the pulpit chair. (See Diagram Six, C, page 177.) Cut the rim from box cover, beginning near the center on one long side. Cut till you have reached the point opposite. The part of the cover from which the rim has been removed will be the back of the chair. Bend it forward.
The other half of the cover will be the seat of the chair. Legs are cut in the front rim and in the side rims that remain. To make front legs, keep the corners of the box, and cut up to the part which is the seat, the upper part of the cover. Remove the cardboard from between these two cuttings. Then, make the back legs of the chair in the box rims at side. Place the little chair back of the pulpit, and color it, if you wish, to match.
At least three pews will be needed for the church. They are to be made from the three small box covers. (See Diagram Six, B, page 176, for making high-backed benches.)
With a pencil or pin-point, mark the center of each short rim on these box covers. Then, taking one cover, cut through the rim at the two points till you have reached the top of the cover. Half of the division made will be for the back of the bench and half for the seat and the legs. Cut the legs in one half as you cut the legs for the pulpit chair. Remove from the other half of the cover the remaining end rim. Bend the rim that is left at the top upward, to make the high back of the bench, and color the bench to match the pulpit and chair.
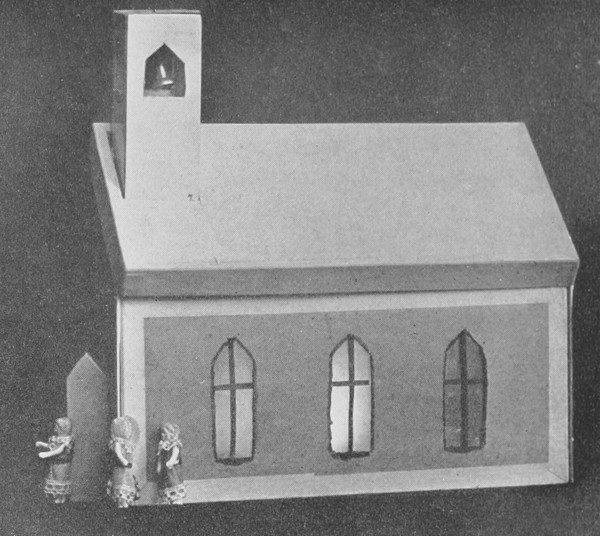
Boxville Church is made from a shoe-box. Its bell-tower is an oblong
box. It has stained-glass windows of red tissue-paper.
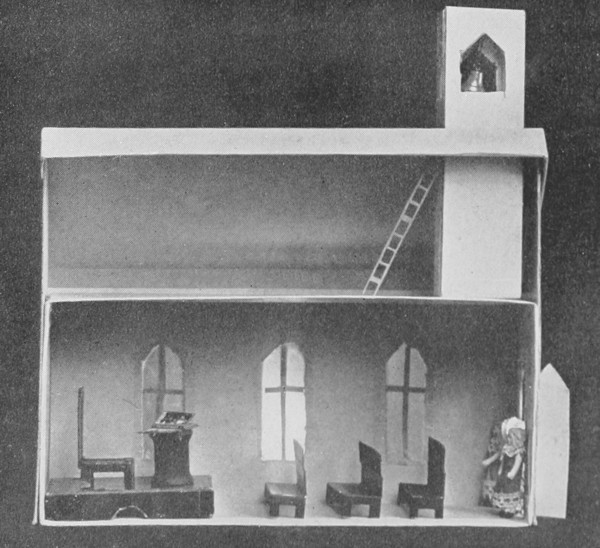
Boxville Church has a pulpit, a reading desk, and pews that are made in
boxcraft style from boxes and a spool.
Boxville Church is made from a shoe-box. Its bell-tower is an oblong
box. It has stained-glass windows of red tissue-paper.

Boxville Church has a pulpit, a reading desk, and pews that are made in
boxcraft style from boxes and a spool.
Place the benches one behind the other inside the church. Let the sexton ring the bell for Sunday-school to begin. What was the lesson you had last Sunday? Do you remember about it? Perhaps you might not so easily forget next Sunday’s lesson, if you taught it yourself to a class of penny dolls in a Boxville Church like this. Anyway, you can try!
Material Required for Making a Boxville Railway Station: one shoe-box and four shoe-box covers, one small box about four inches square and without a cover, the shallow covers of two small boxes three inches long, two long pencils, and a small square of waxed paper.
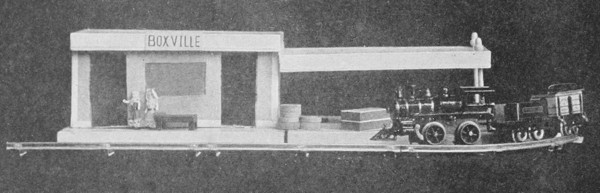
Boxville’s Railway Station is a real railway station. It is not a tin thing such as you buy ready-made in a toy shop. Boxville Station has a waiting-room with a real ticket booth and benches. You can make just the same kind of little station as you see in this picture. It is easy to make.
The building itself, you see, is the lower half of a shoe-box placed upon its side. The platform is made of two shoe-box covers placed end to end upon the floor, and the roof of the station is one shoe-box cover. The other shoe-box cover is the roof of the platform, and this is supported by two long lead-pencils.
Do you want to make a Boxville Station? To begin, you must make two doors and a window on the part of your box that is the front of the station.
About an inch and a half from either end of your box, mark a door space four inches high and two inches wide. Use a pencil and ruler for the work, so that it will be even. Half-way between the door spaces you have drawn, mark off an oblong window space two inches high and three inches wide. Now, you can take your scissors and cut the doors in the box. (To cut doors, see Diagram Two, A, page 167.) Cut the top line of each door space. Cut the bottom line also. The doors must open toward each other, so cut each door space down the side next to the window space. Push each little door inward.
Next, cut out the window space. Cut it around on all four sides, and keep to the line you have drawn with pencil. (To cut window, see Diagram One, A, page 166.) When you have finished this, take a piece of the waxed paper you have and paste it inside the station building over the window space to make window-glass. The waxed paper should be cut a bit longer and wider than the opening of the window. You can measure it by the cardboard piece you cut from the box.
If you wish, you may color the doors of your station building green or brown. Use whatever colors you have, but if you use your water-colors, keep the work as dry as you can. If you do not, the doors will not be straight. They will curl.
Place two shoe-box covers end to end upon the floor or table, for you can put the building upon them now. See, it is placed far back, so that there will be a platform in front. Place the building at the left of the platform made of the shoe-box covers.
The third shoe-box cover is the roof of the station building, and you must fit it down over the station. If you wish to have a roof over your station platform, you will need the fourth shoe-box cover to make this. To secure it in place, just cut two end corners on the box rim as far as the top of the cover. Then, turn this end rim upward and slip it under the right-hand rim of the cover which forms the roof of the station building itself. You will need two pillars at the right-hand end of your platform to keep the long roof up. These pillars are long lead-pencils. Press the point of a pencil down through each right-hand top corner of the long station platform’s top, and secure the points below by running them into standards made of spools. The pencil point will be firm when run into the upper hole of a standing spool, and when both pillars are so fixed, the roof will be quite firm. (See Diagram Three, G, page 172.)
Next, make a signboard for your station, and glue it to the roof.
You will need to have a bench or two and a ticket office in your station building. A little doll can be placed in the ticket office. If you look at the picture of my Boxville Station, you will see a lady buying her ticket of the ticket agent.
The ticket booth is the lower half of a box that is about four inches wide and an inch or so deep. You will need to stand it on its rim and cut a window in the part of the box that is the front of the ticket office. You do this just as you cut the window for your station, only you must make the ticket-booth window smaller. Draw the outline of the window first with help of pencil and ruler. Then cut it out. To cut window, see Diagram One, A, page 166.) When window is cut, paste some waxed paper over the window opening on the inside of the box. Cut a round opening in this, near the bottom. The ticket agent will need this, you see. Now, the ticket booth is finished! Place it between the doors where it should go.
You will need a bench at either end of the station waiting-room. Cut these from covers of two boxes three inches long. (For cutting benches, see Diagram Three, AA, page 176.) With pencil or pin-point mark a dot at the center of each short end rim of the covers, and cut through each rim thus marked till you have reached the top of the cover. Half of each division so made will be the high back of the bench. Half will form the seat and legs. Cut legs in the rim of one end. Leave the corners at the front of the bench and remove the cardboard that is between them, making your cutting to the right and left of each front corner. Then cut the rear legs in both side rims. Bend the other half of each box upward. This is to be the high back. Cut off the little pieces of cardboard that are left on the narrow end rims. Bend what is left of the cover’s rim upward to make the rest of the high back for each bench. Color the benches black or brown.
Toot-too! Don’t you hear the whistle of the toy train? The baggage, that is made up of boxes, is waiting on the station platform, and the little dolls are ready to start on their travels.
Miss Doll is waiting on the station platform. She has just purchased her return ticket to Boxtown.
Boxtown is the next stop. Everybody goes there on Circus Day—Mr. Doll, Mr. Mulligan, Mr. Swartzenheimer, Polly Ann, Susan Smith, all the Noahs! The station platform is crowded!
Material Required to Make a Boxville Freight Station: one shoe-box cover, one shallow cover of a box about eight or nine inches long and seven or eight inches wide, and the lower half of a deep box about six inches long and four or five inches wide.
Material Required to Make a Dark Tunnel for B. V. R. R.: the lower half of an ordinary shoe-box.
After you have built your Boxville Railway Station, I am sure you will like to build a Freight Station for your railway system. You will have so much freight to go from Boxville! There is no end to the little boxes! It will take you about five minutes, or less, to build the freight station. It is so simple that you can almost see how from looking at the picture. The shoe-box cover is the platform. The lower half of the deep box you have is turned upside-down and placed upon the left end of the shoe-box cover. A double door is outlined with pencil at one end of this box. (See Diagram Two, B, page 167, for double door.) Mark a square three inches wide on the end of the box where the door should come. Draw down the center of this from top line to lower line. This gives the two divisions of the door. Cut the top line of the door space. Cut down the center line of it and across the lower line. Bend the two doors of the doorway outward. Color them, if you like.
To make the square flat roof, take the box cover and place it down over the freight building at the top. That is an easy way to make a roof, isn’t it? And now that the freight office is made, I am sure you will agree that it is a very fine one indeed. Isn’t it fun to build your own?
Do you want to have me tell you how to make a tunnel too? It will be fine to have one for your railway system. To make one you will need a box—almost any that is deep, like a shoe-box, will answer.
How high is the smoke-stack of your train? Two inches? Well, how high is it from the ground? Five? Then, the holes made for the tunnel opening in either end of the box will need to be higher still by an inch or a half-inch. (For cutting a tunnel, see Diagram Four, B, page 173.) Turn your box over. The lower half is the only part you will need to use, so put aside the cover. In either end of the box cut out a round opening large enough for your toy train to pass through at a sixty-miles-a-minute rate. There is your tunnel!
If you have any crape paper, you can cover the sides and top of your box so that it will look like a big square hill. The ends of the box should be painted with black paint to look like stone masonry.
Let’s see how well your train goes through the tunnel—toot-too! Here it goes! Isn’t that the nicest toy you ever saw?
The B.R.R. Freight Station. It is a small oblong box with a cover
of another box for its roof. The platform is a shoe-box cover and
the freight is little boxes.

Shoe-box Tunnel may be made of almost any long box. To make it, cut
rounded openings in the end rims of the box.
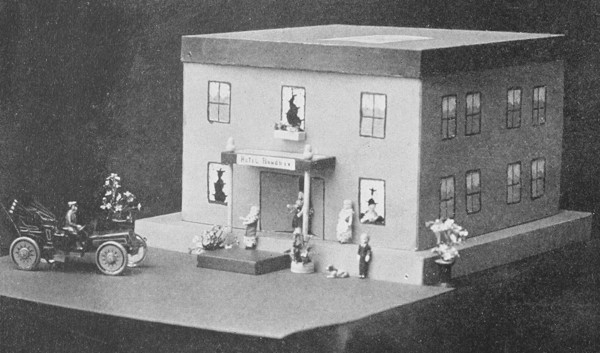
Bandbox Hotel is made of a square hat-box.
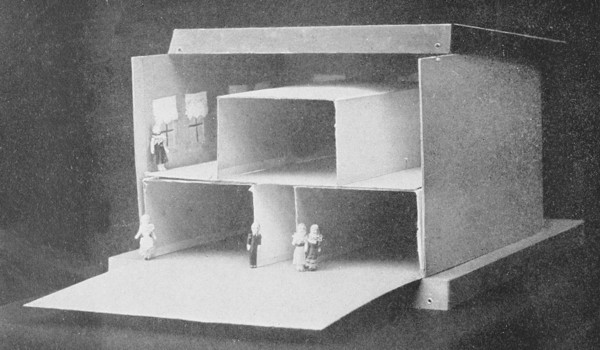
Bandbox Hotel has an opening at the back so that one may play inside
easily. Partitions of rooms are made with shoe-boxes from which
end rims have been removed.
Material Required to Make a Hotel Bandbox: one large bandbox with its cover, the cover of another square bandbox that is larger. These make the building and its roof. A shallow box cover will make the roof over the front door. Two long pencils are pillars. The hotel is furnished with furniture cut from small boxes. Spools, lace-paper, pinwheel paper, bits of wall-paper, and the glacine paper covers from books may all be used.
Did you ever before hear of a dolls’ hotel? If you look at the picture of Hotel Bandbox, you will see one that may be made from a square hat-box. Its porch is a large hat-box cover. The building is a hat-box, smaller than this cover. The roof of the hotel is the cover of the hat-box itself.
Windows and front door are cut in the rims of the bandbox.
In starting to make a hotel, begin by marking off windows. Each window must be two inches wide and three inches high. It will help you to place windows evenly if you mark a horizontal line around three sides of your bandbox about three inches from the top of the box. Use a ruler, and make all marks as light as possible. They are only intended to guide you, and must be rubbed out after you have cut out the window spaces.
Below the line you have drawn, make another, three inches farther down the sides of the box. This line forms the base of windows.
Next, make the windows that come nearest each corner of the box. Measure two inches from each corner. This gives the right spacing from the corner. Measure two inches more on your horizontal line at the top of the building, and this will give the width of a window. Make the end windows first. Then make the ones that come between. Space evenly, so that windows may come at regular intervals. Cut out each window on all four sides. (For cutting a window, see Diagram One, A, page 166.) Arrange your lower story windows as you have the upper ones.
At the center upon the front of your building outline a large double door four inches square. It should come at the very base of bandbox. (To cut double door, see Diagram Two, B, page 167.) Cut its top line. Cut its base line. Cut the cardboard between these two lines in half vertically to make the door.
When windows and door are made, then you may paste some three-inch squares of glacine paper back of each window inside the box. The window-glass is made this way. If you like, you may leave some windows open.
The building is ready, now, to stand upon the larger bandbox cover. As you see, this makes a porch.
Place the smaller bandbox cover over the upper part of your hat-box to make a flat roof.
Over the front door you may make a flat roof. (See Diagram Three, G, page 172.) Use for it a narrow box cover. Glue one long rim of this cover to the cardboard over your doorway. Press a pencil point downward through each forward corner of the cover to make a pillar. The pencil points may be secured in the holes of two spools and thus keep the roof upright. If you wish, you may glue the spools where they should go.
Cut a narrow strip of cardboard and write the name of your hotel upon it. Glue this over the doorway.
Flower-stands for the hotel veranda are simple things to make. One spool will be needed for each flower-stand. Press the stems of some artificial flowers into the hole of the spool. If you have gilt paint, you can gild the stands. I painted mine with black water-color paint.
Penny dolls make guests for the hotel. They come already dressed, but you can take one or two of yours and dress them like men dolls. I inked mine. You can see them in the picture.
How are you going to play inside the hotel? If you look at the second picture of the hotel, you will see that it is the back of the box, and that each corner at the back of the box has been cut. When this is done, the back lets down. You can cut your hotel building this way. As you see, it may be closed up again, when you are not playing inside.
Partitions for downstairs rooms are made with two shoe-boxes—just their lower half is used. Cut the ends off each box. Place each lengthwise inside the hotel so that there is a space between them. This space forms the hotel hallway.
Cut a piece of cardboard to fit into your box and put it over the top of these two shoe-boxes. It forms the floor for the second-story rooms. Another shoe-box—or two, if you prefer—makes partitions for second-story rooms.
Doors may be cut in these partitions. (For cutting a single door space, see Diagram Two, A, page 167.)
Samples of wall-paper make good carpet for the hotel. You may cut it into squares to make rugs.
Window curtains may be made from tissue-paper or lace-paper.
The furniture, itself, is cut from very small boxes. Tables are made with spools.
The lower half of a small oblong box may be cut to form a chair by removing its rim, half-way around—beginning to cut the rim at the center of one long side of the box. The part from which the rim is removed is the back of the chair. Press its cardboard upward. The part that has the rim left upon it is the seat of the chair, and legs are cut at its two front corners and in each side at the rear. (See Diagram Six, C, page 177, for making a chair.)
Place a pill-box over an upright spool to make a table. Round pill-boxes make round tables. Square boxes make square tables. (See Diagram Six, DD, page 178.)
An oblong pill-box rested on its side will form a doll’s bureau. Mark off the drawers upon its front, and glue a strip of cardboard, upright, at its rear. Paint a mirror frame on the strip of cardboard.
Beds for the hotel chambers may be made of small oblong boxes and their covers. To make the upper part of the bed, cut off the long rims on each side of the cover. This leaves headboard and footboard to be glued to the lower half of the box when this has been turned over to rest upon its rims. At each corner of the lower half of the box, cut a leg for the bed to stand upon. Remove the cardboard from between each. (To cut bed, see Diagram Six, AA, page 175.)
Little dolls touring through Hat-box County stop at the hotel overnight. Drummer dolls, on their business trips to Boxville General Store, find comfortable accommodations at Bandbox Hotel too. As soon as the toy train stops at Boxville Station, you may see them making a bee-line for the hotel.
There are splendid accommodations at Hotel Bandbox. The meals are always good. You only need to pretend what the dolls want and then give it to them. Some want their steak well done and are very particular about it, but the waiter always does right and everybody is always satisfied. After dinner the guests take a walk over to Mirror Lake and watch the man who is fishing on the bridge there. Or else, perhaps, they sit on the hotel piazza and watch the people come to the Village square to get water at the town pump.
Material Required to Make a Shoe-box Apartment House: one shoe-box with the whole of its cover, one small box about two inches long, and small boxes and spools for furnishing the apartment house.
You may make a whole row of apartment houses. They are shoe-boxes that are placed to stand on end. Windows are drawn upon the fronts of the boxes as they stand. Each apartment house must have a porch and front door as well.
Would you like to erect an apartment house? Find a shoe-box, then.
Take its cover off. Stand your box on end with the opening at back. Let the bottom of the box face you. Mark off upon it three window spaces, each With its base five inches from the top of your box. See that end windows are equally distant from the sides of your box. Make each window two inches high and one inch wide.
Arrange second-story windows evenly between top and base of your box, and place below them the first-story window. Leave a place for a door just above the base of your box at the left, as the picture of Shoe-box Apartment will show you. Make the door a little larger than your window spaces—about three inches high and two inches wide. Next to it, draw a Window space for the first-floor window.
The windows may be cut out, if you like. (For windows, see Diagram One, A, page 166.) Cut out the squares you have drawn on top, side lines, and base. Back of each window opening, paste a bit of waxed sandwich paper to form glass. Outline on the front of the box around the windows, the window-sashes. Use black ink or water-color paints to do this work. Paste tissue- or lace-paper curtains over the waxed paper inside the apartment house to make the windows trim.
Cut the door of the apartment house out. (For door, see Diagram Two, A, page 167.) Cut the top line, down the side next to the window, and across the base line.
The porch roof is half of a small box glued over the doorway. The porch itself is the half of a box glued below the doorway.
Now, put the finishing touch to the building by adding a flat roof. Take the cover of your shoe-box. Cut off all its rims except at one end, a third of the way around. This end is the roof. Cut it off with rims and fit it down over the building. Paste it in place.
The floors of the apartment are made by pasting the rest of the cover into the inside of the box, horizontally. Cut the remaining part of the cover in half. Fit each section into the box where the floors should be. Glue the edges that are fitted into the box. Let them dry thoroughly. Then, you may furnish the interior with boxcraft furniture such as is used in arranging Hotel Bandbox.
Penny dolls and Noah’s Ark ladies will surely take up light housekeeping there, if their husbands approve. In the picture, you will see the janitor, Mr. Jinks. The Noah’s Ark ladies have come to look at the rooms.
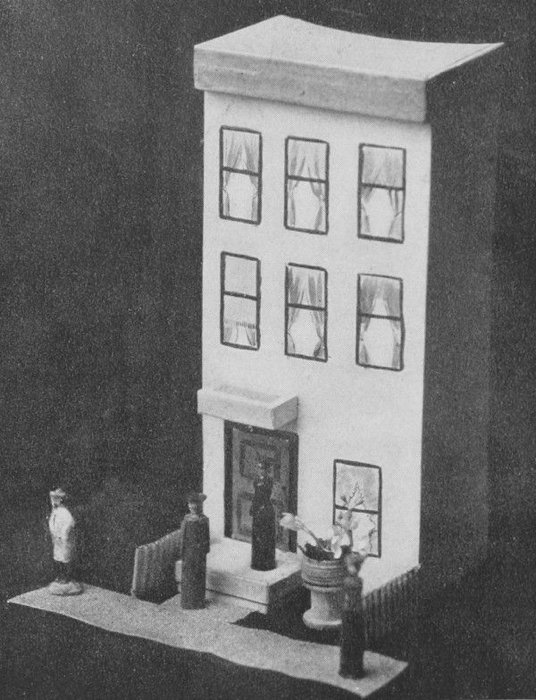
Boxville Apartment House. This is made from a large shoe-box. Its roof is the end of the cover.
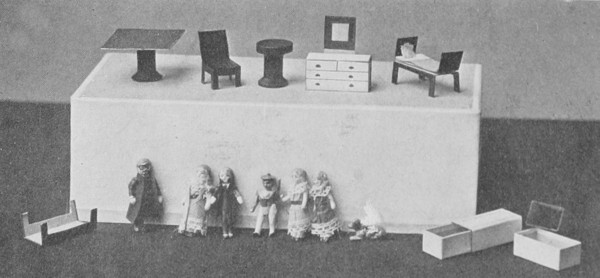
Here is furniture for the Apartment House and for Bandbox Hotel.
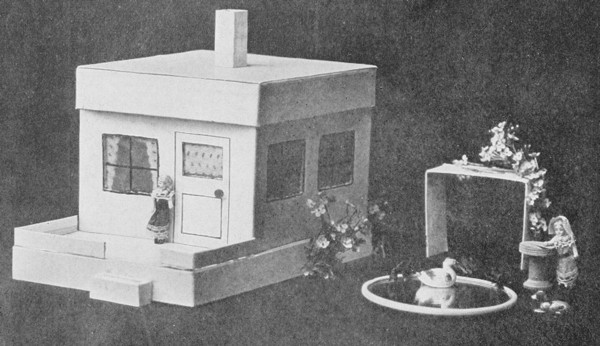
A Boxville Residence which is made from a deep letter-paper box and its cover.
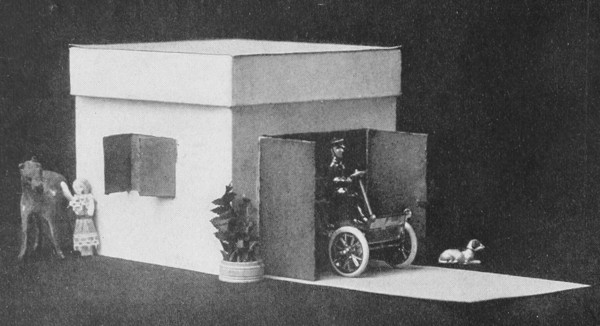
The Garage is made from a deep square letter-paper box. The cover of the box is its roof.
Material Required for Making a Boxville Residence: a deep, square letter-paper box with its cover, the cover of a flat letter-paper box about ten inches long, the cover of a drawer-like pill-box, some glacine or waxed paper, some artificial flowers, lace-paper cut from candy boxes, and some box rims.
See what a darling little house I have made for a Boxville Residence! The husband of Mrs. Doll, who owns the house, goes in his motor car to Boxville Station every morning. He commutes to Boxtown. You can see Mrs. Doll and her sister in the picture. Mr. Doll has gone to Boxtown, but in the picture of the garage that goes with the Boxville Residence you will see Mr. Doll’s motor and the chauffeur. Don’t you think it would be fun to make a Boxville Residence like mine? I will tell you how to do it.
First, of course, you will have to hunt for a deep, square letter-paper box, and the other materials that are needed to use in building. When you have found your box, turn it over so that it stands upside-down. Take off the cover. That will be the roof, but you are not ready yet to put the roof on to the building.
Upon two opposite sides of the box, mark off two window spaces. (For windows, see Diagram One AA, page 166.) Each window space measured off, with help of ruler and pencil, must be an inch and a half square. Have the bases of the windows, as well as their tops, made a uniform distance from the base of the box building. Each window should be an equal distance from the corner of the box nearest it.
When the two sides of the box are marked out with window spaces, you can begin upon the front of the house. Draw a door space about four inches high and two inches broad, and let it come an inch from the right-hand side of the box building that faces you. (For front door, see Diagram Two C, page 167.) Let the base of your door space come on the very outer rim of the front of the box. When you have outlined the door, draw a square in its upper part to indicate where the plate-glass window is to be in the door. Cut the top line of your door and down its right side. Then cut out the square you made for the window in it. There, the door will open and close, you see, when you bend it on the side where the hinge should be! Waxed paper pasted in a square under the window opening will make the glass window. Lace-paper makes curtains. A round-headed paper-fastener with its prongs pushed through the cardboard door and bent to one side will make a door-knob with a latch. By turning the knob you can open or fasten the front door tight.
After the door is finished, draw a window space half-way between the door and the corner of the building on the front of the house. Now, you can begin to cut out all the windows. Cut each one evenly, and paste a square of waxed paper or glacine paper back of each, inside the box, to make window-glass. You can outline the window-frames on the outside, using black ink or paint.
Doesn’t the box begin to look like a real house? Yes! But it has no roof yet! Where is the cover of your box? Slip it down over the building. There you are! The cover of a small drawer-like pill-box will make a fine chimney. Glue it on end to the top of the roof at the center.
Where is the flat letter-box cover? That is to be the porch. Place it on the floor or table, and then brush the rims of the box that is your Boxville Residence with paste or glue so that it will stand well back upon this veranda. Be careful not to have any paste under the door. See, there is the front porch. The veranda railing is just a box rim cut from a box and pasted to the edge of the veranda on the cover of the letter-paper box.
If you wish to have a step up to the front porch, a small box or its cover will make this.
My Boxville Residence has a garden. Mrs. Doll is very fond of gardens, and so is Mr. Doll also. I made the garden from a wreath of flowers that was on an old summer hat. I made an arbor. It was easy to make that. The arbor is cut from a candy box. It is just half the rim. I stood it up on its ends and trimmed it with the flowers. Of course, if you play out-of-doors with your Boxville Residence, you can have real flowers to play with. You can lay out walks with pebbles and gravel when you do not play in the house. I made a fountain or a pool for the garden from a hand-glass. At almost any penny store you can buy a little round mirror that will make a garden pool. You can make a sun-dial also. It is a spool with a pill-box placed over one end of it. You will have to mark off the face of the sun-dial with pencil.
Don’t you think that this makes a comfortable home for a Boxville resident? I do. I almost wish I were a little doll, so that I might open the front door and begin furnishing the inside of the house with box furniture and spools.
Material Required to Make a Boxville Garage or Stable: one deep letter-paper box with its cover.
Here is a toy garage. It belongs to the residence of Mr. Doll of Boxville. Would you like to make a garage like it?
The box you will need to use for making a garage must be deep and square. Place it upon the table standing upon its rims. Then, the bottom of the box will become the top of your building, and you may place the cover over this and glue it to make a flat roof.
Upon the front of your box, draw a large square four inches in size. Let the base of this square come upon the outer rim of the box. The square is to be the large double door of the garage. (To cut the door, see Diagram Two, B, page 167.) Cut the top line. Cut the base line. From top to base line cut another line dividing the doorway into halves to form the doors.
The doors will fold outward when you have finished cutting them. Paint them green, if you wish.
On each side of your box, you may draw a window with blinds. The window should be two inches square, and should be placed in the center of each side. Draw a line vertically from top to base of the window space to make the divisions for the blinds. This line should divide the window space evenly into halves. (To cut window with blinds, see Diagram One, C, page 166.) Cut across the top of each window you have marked out. Cut down its center line, and cut its base line. Press the cardboard outward against the sides of the little building to make blinds. Color the blinds to match the door.
There! The garage is finished. Wind up your toy automobile, and let us see how nicely it runs right through the doorway!
Material Required to Make a Greenhouse: the half of some deep box from five to seven inches long and about five inches deep (the half of a box such as is usually to be found at a hardware store), about twelve square inches of cardboard from which to cut a roof, and a sheet of waxed sandwich paper.
Material Required to Make a Pergola: half of a ordinary white shoe-box, and a strip of cardboard about thirteen inches long and seven inches wide.
Material Required to Make the Garden Itself: artificial flowers, some spools for flower-stands, sand paper for roadway and gravel walks, a penny mirror for a sunken-garden pool, boxes for benches, green crape paper for grass, a long box to make a hedge, moss, pebbles, shells, and pretty twigs from out-of-doors.
It is such fun to play in a garden that I made one for Boxville. It belongs to Mr. Penny Doll’s residence. It has a pergola and a greenhouse, a sunken pool, flower-stands, gravel walks, benches, and everything that a garden should have.
Green crape paper placed upon the floor will make the garden lawn. Sandpaper cut in strips and laid upon it forms the garden paths. A roadway may be made from sandpaper too. If you have none, ordinary brown paper will answer. A long box covered over with green crape paper looks just like a garden hedge. The paper should be pasted over the sides of the box quite flat. Garden stands are made by gilding spools and then poking into each spool, as it stands upright, some artificial flowers.
Greenhouse for the garden is made from the deep half of some box about seven inches long and five inches deep. If you like, your greenhouse may be made smaller, but this size is an easy one to handle.
The box itself forms the greenhouse building. Its roof is of bent cardboard, and the glass in it is waxed sandwich paper.
Shall I tell you how to make the greenhouse so that you may make one like it? First, take the half of the box you intend to use and place it upon its rims, open at base.
Next, one inch above the base, on each corner make a pencil dot.
Cut the top off the rims of your box.
On each end rim, at center, make a pencil dot to indicate the middle top of each box end. (Leave sides without marks.)
From the center top point on each end cut down diagonally to right and left, to form the peaked part of the building under the roof. (See Diagram Three, CC, page 170.)
Then, cut the long sides of the box to meet these, lengthwise. Remove the cardboard at the top of each long side.
Now, in the point at one end of the lower half of the greenhouse building, cut out windows. Cut them to fit your box building. (See Diagram One, A, page 166, for windows.) Back of each, paste some transparent waxed sandwich paper. If you like, cut a triangular window in the point of the building which is to be under the roof.
Between the lower two windows, cut a door to fit—one inch wide and two inches high should be a good size. (For cutting a door, see Diagram Two, A, page 167.)
You may make the roof two inches longer and four inches wider than the size of the base of your box. Cut this roof from your cardboard. Fold it through the center of its long sides to make a gable roof. (See Diagram Three, C, page 170.)
In each side of this roof, cut out windows. Paste back of their openings some waxed sandwich paper.
Glue the roof to the lower half of the building.
Any small boxes that you have will form flower-boxes when filled with small artificial flowers. They may go into the greenhouse.
To make the pergola, you will need the lower half of a white shoe-box. Take the box and stand it upon its rims, base at top, opening below.
Cut out the cardboard that was the bottom of the box, leaving a narrow rim around this between corners on the side that was this box bottom.
Then, cut off each end of the box, leaving the margin around corners and top rim like this first cutting in the box.
In the two long rims of the box cut pillars on each side. (See Diagram Seven, page 181.)
Cut two long cardboard strips from some Bristol-board—each two inches longer than the length of your box. Glue one strip each over the top of the pergola, lengthwise, over the long sides of the box.
Cut five inch-wide strips of cardboard two inches longer than the width of your box, and glue each across the opening made by cutting the top from the pergola box. Each strip should be evenly crossed between opposite pillars.
If you have any pretty artificial flowers left from your garden and greenhouse, twine them around the pillars of your finished pergola.
I have a gardener for my garden. His name is Karl Shepherd. He came to me in a box of toy lambs that I bought at the ten-cent store. I called him Karl because he looked so German. Perhaps, among your playthings, you have a little figure like him. Look and see. I am sure you will find a gardener.
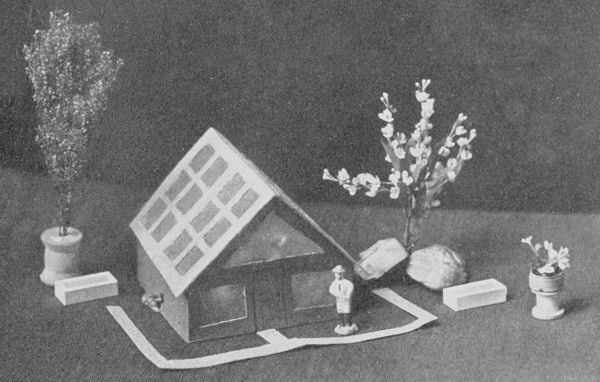
Boxville Greenhouse is cut from the half of a deep box such as hardware
merchants use on their shelves. It has a roof made from cardboard.
The glass is waxed paper.

The Pergola is made from the lower half of a white shoe-box. Strips of
white cardboard are glued across the top.
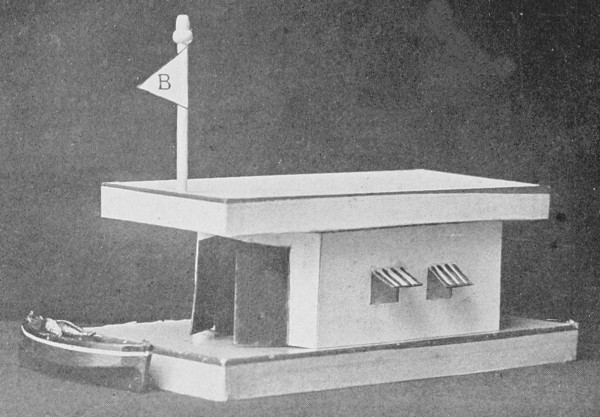
The Boat-house or Yacht Club is made from the half of a deep box
about eight inches long. Its roof and floor are shoe-box covers.
The flagstaff is a pencil.
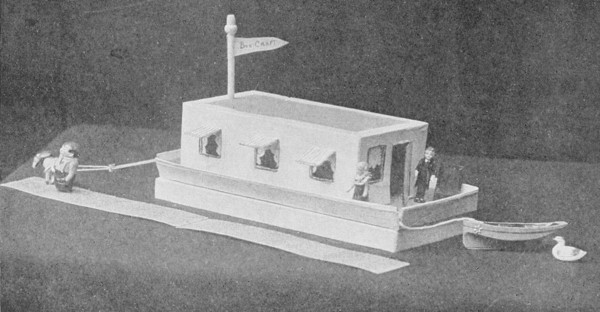
Boxcraft Houseboat is made from the lower half of a plain shoe-box.
Two shoe-box covers make the rest of the boat.
Material Required to Make a Boxville Boat-house: the lower half of a deep box about six inches long, and also two shoe-box covers.
Boxville Boat-house is made from an oblong box about two-thirds the size of a shoe-box. Its wharf is a shoe-box cover, and its roof is another shoe-box cover.
If you wish to cut a lake from a sheet of silver paper, the boat-house or yacht club is the very thing for this play. Any water toys, such as swans, ducks, fish, or frogs, may swim on Silver Paper Lake, and from your yacht club, parties of fishermen may angle for magnetized fish. The boat-house may be a part of the summer attractions of Hotel Bandbox in season.
To make a boat-house building, you will first need to turn your box over upon its rims so that its bottom becomes its top.
Draw a three-inch square on one short end of your box. Let its base come to the extreme edge of the box rim. This square is to be the door you see in the picture. Draw a vertical line down the center of this square. This gives two doors for the doorway. (To cut double door, see Diagram Two, B, page 167.) Cut across the top line and down the center to the outer rim. Bend outward the two halves of the doorway.
The boat-house is to have windows, and each window is to have an awning over it. To make windows with awnings, first draw on each long side of your box, two one-inch squares. Each square should be drawn about an inch and a half from a corner of the box. Each square should be half-way between top and bottom of the building. (For windows with awnings, see Diagram One, C, page 166.) Cut down both side lines and across the base line. Bend the cut cardboard outward and upward to form an awning. Color this awning with red stripes, using your crayons or water-color paints.
When all windows are cut, then you may place your little building at the rear of the shoe-box cover which forms the wharf.
Over the top of your building, fit another shoe-box cover to form a projecting roof over the wharf.
A long pencil will be a fine flagstaff. Run its point through the front of the boat-house roof, and glue to the top of the pencil a triangular piece of colored paper to make the pennant.
Material Required to Make a Houseboat: the covers of two large shoe-boxes, and the lower half of a child’s shoe-box.
Here is a jolly houseboat, the very thing to sail on Silver Paper Lake. Little dolls may spend their vacation upon it. Would you like to make a houseboat to play with? It is not difficult.
First, take the two shoe-box covers and glue them top to top. Place them on the floor flat. There is the lower half of the houseboat.
Upon both long sides of your small shoe-box, draw three one-inch squares, keeping the two at either end of the same side equally distant from the nearest corner of the box, and making the third window on each side half-way between them. (To cut windows with awnings, see Diagram One, C, page 166.) Cut the window squares at both sides and along their base lines. Bend the cardboard outward and upward to make the awnings. Color these with red stripes, using either chalks or water-color paints.
On the front and rear ends of the houseboat, you will need a door and window. Make an upright oblong space for the door. Mark it out with pencil about three inches high from the rim of the box. Make a window beside each door. (To cut door space, see Diagram Two, A, page 167.) Cut top line and down one side. Bend the door outward on the third side as if it were on a hinge.
A flagstaff for the houseboat is made by pressing the point of a long pencil down through the top of the houseboat in front. A paper pennant may be glued to the side of the pencil.
A piece of string will make a tow-line for the houseboat. Fasten it to any little donkey or toy horse you have, and start penny dolls on a voyage around the play-room floor. The houseboat, of course, is not meant to sail upon dangerous water. It might be safely anchored on the shore of Mirror Lake or Silver Paper Lake.
Material Required to Make Camp Box: a yard or two of green crape paper for grass and foliage of trees, two or three clothes-pins to make tree-trunks, a sheet of silver paper or a cheap ten-cent mirror to form a “lake,” the halves of shallow letter-paper boxes to make tents, and any pebbles, moss, or shells you have among your treasures.
It is great fun to make a Mirror Lake Camp—almost as much fun as being in a real camp! Mirror Lake Camp may be made on the play-room floor.
First, if you have some green crape paper, lay it flat on the floor. This is the grass.
Next, if you have some silver paper, cut out a circle of it, and paste it to the crape paper to form a lake. Instead of the silver paper, you may substitute a cheap mirror. Place this under the crape paper and cut out a circle above it.
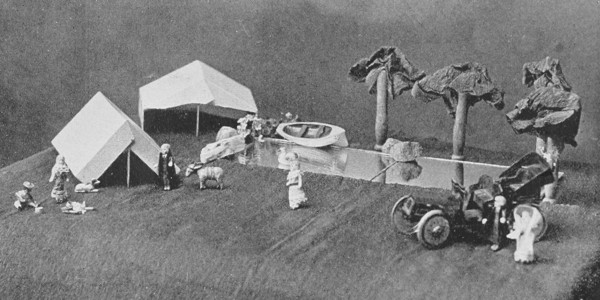
Camp Box on Mirror Lake. Its tents are made from the halves of shallow
boxes. Trees are made of clothes-pins.
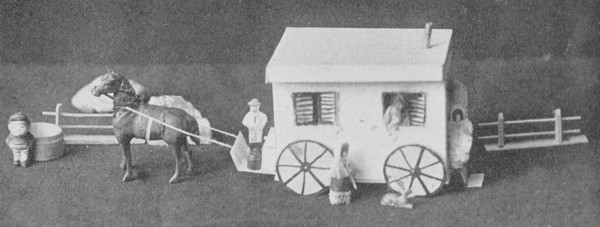
The Boxville Gipsy Cart is made from a correspondence-card box.
You will need a grove of trees near the shore of your lake. These trees are made by standing some clothes-pins on end with forks in the air. Cut some green paper and press it in between the forks. It makes the foliage of trees.
The tents are made from the half of a shallow white box like a letter-paper box. To make a tent, cut through each long side rim of your box as far as the top or bottom of the cover, as the case may be. Bend the box downward to each side of this cutting, making a tent roof, slanting to each side downward. (For cutting a tent, see Diagram Three, E, page 171.)
You may have as many tents in your camp as you like. Perhaps your tin soldiers might like an encampment on the shores of Mirror Lake. Small oblong box covers will make smaller tents for these. When it is summer, maybe it would be nice, on some warm, sunny day, to take the tents outdoors under the trees on the lawn and make a really true camp on the really true grass, with real growing things for trees in a woods. Perhaps so!
Cut bits of twigs and use these for trees. Pebbles will help to make a rocky shore for a real water lake that is a shallow pie-plate filled with water. Its sides should be covered with moss or short grass. Of course, after playing out-of-doors with the camp buildings, you will have to pick them up, when playtime is over, for the cardboard tents will be spoiled if you let them stay out over night. I know it because I tried it! I had a really darling little doll and I let her stay out in a tent after my play was finished. It rained in the night and she was all spoiled—and I had to make a new tent, too. I think you’ll like to know about this so you won’t try it. It really is better to pick up after play, I think!
Material Required to Make a Toy Gipsy Cart: a deep oblong box such as correspondence cards are packed in, also five square inches of cardboard, four round-headed paper-fasteners, and two small boxes.
Do you think it would be fun to make a gipsy wagon like the one in the picture? It is a very simple thing to make.
First, find a box such as correspondence cards come in from the stationery store. Take its high cover off, and cut from the lower part of the box almost all of the deep inner rim, leaving only about a half-inch of it all around. Put the cover back over this, and glue the two parts of the box together. The box is to be the gipsy wagon now. A door will need to be cut at one end of the box, and windows will need to be made on the sides of the box rim.
Turn the box over so that its base becomes the top of your wagon. Make the outline of a door with pencil on one end of the box. To make it, mark off an upright oblong space an inch wide and two inches and a half high. Have its base come at the very edge of box rim. (To cut door, see Diagram Two, A, page 167.) Cut one side line from the base of the box up to the top line, and cut along the top line of the upright figure you have drawn. Bend the cardboard outward to make a little door. See, it will open or close as you bend it.
Next, make the windows on the sides of the cart. You may make these with or without shutters. If you make them without shutters, you will only need to cut two one-inch squares in each side of your box. Each should be evenly distant from a corner. (To cut plain windows, see Diagram One, A, page 166.)
If, however, you wish to have shutters on the windows of your wagon, cut these squares at top and base. Then cut a line through each center, vertically, from top to base. This gives you the shutters. Press them back against the outside of the cart. (For making blinds, see Diagram One, B, page 166.)
Window-shutters and door may be painted. Dry them while you make wheels for the cart. Color them with water-color paints. Make them green or red.
The wheels are circles cut from stiff cardboard. Find your compass to help draw them round. If you have no compass, use the outline of a small round saucer about two inches and a half in diameter to guide you in drawing the four wheels in outline. Draw a hub and spokes on each, if you like.
When you have drawn them, cut each out, and press through the axle of each one a round-headed paper-fastener. Bend its prongs to either side after you have pressed the wheel into place on the cart. The wheels may be glued, if you have no paper-fasteners to use for making axles.
Your cart will need a seat for the driver. This is made from the lower half of a small, narrow box about two inches in length. Cut off the short end rims, and glue one long rim to your wagon in front, so that it makes the dashboard and floor of the front of the cart under the seat. Paste a small pill-box on this to make the seat itself.
At the rear of your cart, you may make some steps by folding a strip of box rim twice and fastening it under the door with mucilage.
Shafts for the cart are two narrow strips of cardboard pasted to the forward part of the wagon.
There! The gipsy cart is finished. Penny dolls or tumble toys will be the gipsies.
Material Required for Making the Shepherd’s Hut: a yard or two of green crape paper, some corrugated cardboard, half a small square box about four inches high, and, if you have it, silver paper to make a lake.
Here in the picture you see the shepherd’s cottage. I had a little flock of white woolly lambs given me. They came in a box, with a shepherd boy and his dog to tend them.
One day, I decided to build a cottage for the shepherd and make a sheepfold for his flock. You can make one for your toy lambs, too, and, if you like, I will tell you how to do it.
First, lay some green crape paper upon the floor to make grass. There must be grass, you know. Of course, if you have no green crape paper, you will need to pretend that the carpet of the floor is grass. Perhaps it will answer just as well. But, if you have the paper, you can make a hill or two behind the place where you intend to build. It is made by putting some blocks or books under the paper.
Next, I made a long fence by cutting some corrugated cardboard into long strips. Three rows made the width of this long fence. After you have cut your fence, stand it upon its rim. By bending the strip at one end, you can make a gate. The fence is made of very heavy corrugated cardboard, such as comes wrapped around very heavy things. There is a lighter kind that you may also use. From this kind, I made my sheep-pen. It came wrapped around a small glass jar.
To make the sheep-pen, cut a long strip of the corrugated cardboard. Cut it crosswise instead of lengthwise, and slip through each undulation in the cardboard the end of a toothpick. This gives the effect of a picket fence.
The shepherd’s but is made from the lower half of a deep box. Its roof is a piece of corrugated cardboard cut long and bent through the middle downward.
To make the house, turn your box over so that the bottom becomes the top and the box rests upon its rims.
Measure the size of its ends, and cut two triangular pieces of cardboard to fit over them and form gables. Glue each to an end of the house. (For cutting triangular roof supports, see Diagram Three, BB, page 169.)
Cut a door and a window in the front of your house. Both must first be outlined on the box in pencil. Mark the door an inch wide and two inches high, an oblong with base at the edge of the box rim. (For door, see Diagram Two, A, page 167.) Cut the top line and down one long side. Bend the door outward as if it were on a hinge. One-inch squares may be cut in the box rim to make windows. (For cutting a window, see Diagram One, A, page 166.) Cut the square on all four sides.
Place a window under the roof in the point of the gable, if you like.
The roof of the cottage is made by measuring, first, the size of the building you wish to cover. Measure this on your corrugated cardboard, and add three inches to its length and breadth. Fold the corrugated cardboard together to make a pointed roof. (See Diagram Three, C, page 170.) Glue this to the building, and the little shepherd’s hut is finished.
You may make a landscape of mountains behind it, where the sheep may go to graze. These are blocks or boxes covered with crape paper. Do not use glue or paste in doing this. The paper is merely folded over them.
A pretty stream may be made from an irregularly cut strip of silver paper. The woolly sheep love to drink at a stream, I am sure. You can see the lake I made for my landscape. It was a mirror. A rocky ledge on the mountain-side or by the lake is made with pretty pebbles such as you may find in the country.
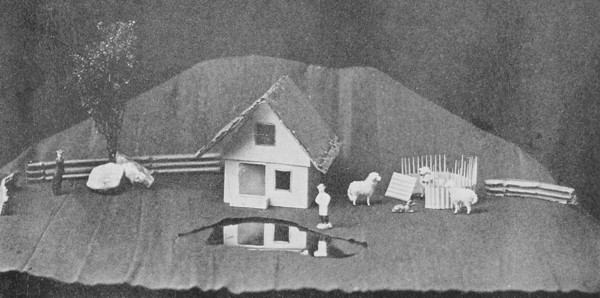
Sheepfold and Shepherd’s Cote. Corrugated cardboard is used for roof
and fences.
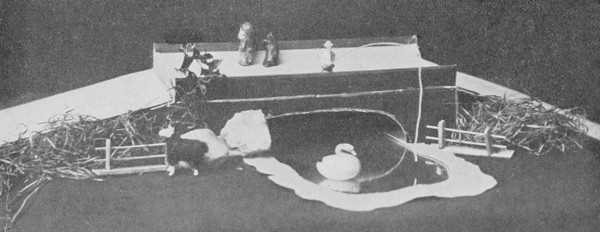
The Bridge over Mirror Lake. It is made from a
long shallow box with a cover.
Material Required to Make a Box Bridge: a long cardboard box with cover, a strip of cardboard about ten inches long.
When you look at the picture of Box Bridge, you will easily see, I think, how it is made. It may be used in many ways for play. Your toy railway system may have a bridge as well as a freight station and tunnel. A box bridge may connect opposite shores of Silver Paper Lake, and the delivery wagon from Boxville’s General Store may jog happily over the bridge to deliver goods at Boxville Cottage. Guests from Hotel Bandbox may fish from the bridge. I am sure you will find many other things to play with it, so I will tell you how to make one, even though it does seem as if you might almost make one without directions!
Take the box that you wish to use for a bridge. Remove its cover.
Turn the lower half of the box over so that the bottom of the box becomes top. Cut a semicircular piece from each long rim. This makes the long arch of the bridge. (See Diagram Four, A, page 173.)
Next, take the box cover and turn it so that its top is next to the top of the bridge. The lengthwise rims of the box will be a railing for the roadway over it. Cut each end rim at the corner, and let these end rims be pasted each to a strip of cardboard cut to fit the width of the box, and join the bridge roadway to the road along the floor where you are playing. Each strip of cardboard glued to an end of the bridge may be about five inches long.
If you wish to make more than one bridge, you may easily do so. The shape of your box, whether deep or shallow, will make a different kind of bridge. The landscape of your Boxville may be as full of silver paper streams and foot-bridges, railway bridges, covered bridges, toll-bridges, as you please!
Material Required for Making a Windmill: a box made with curved sides about five inches deep, a half-sheet of cardboard, and a long pencil.
From any deep box with round sides, you may make a windmill. You will not need the cover of the box. Remove it, and turn the lower half of the box over to stand upon its upper rim so that its top becomes its base.
Cut a small door about an inch high in the edge of the lower box rim, just as you see it in the picture of my box windmill.
On its rim, farther up, cut a narrow window. A half-inch square cut out in the box rim will make this.
The roof of the windmill is round and pointed. It is to be made from cardboard. To make it, take your compass and draw a circle twice the size of the round base of your box—or about that. Cut this circle out of the cardboard, and from it remove a quarter piece like a large slice cut from a pie. (See Diagram Three, D, page 171.)
Next, lap one edge of your three-quarter circle over its opposite side. Glue it so. This gives the round, pointed roof. Paint it, if you wish, with your paints. Color it bright red or brown.
Sails for windmill need to be cut from a paper pattern. This pattern must be made from soft paper that may be folded easily. Pad paper will answer. Cut a square of pad paper that is half the height of your windmill. Fold this square together to make halves—then again to make quarter-sections. Cut in the folded quarter-section the figure shown for shaping windmill sails. (See Diagram Five, Z, page 174.) Then unfold your paper, and, placing it upon cardboard, outline all around its edge with pencil. Then, cut the outline out. This is the sail piece for your windmill. (For shape of pattern for windmill sails, see Diagram Five, ZZ.)
Make a hole through its center. Press through it the point of a long pencil.
Make two holes in your box, near the top, below the roof—one hole exactly opposite the other. Run the pencil point through these holes. There! The sails are in place!
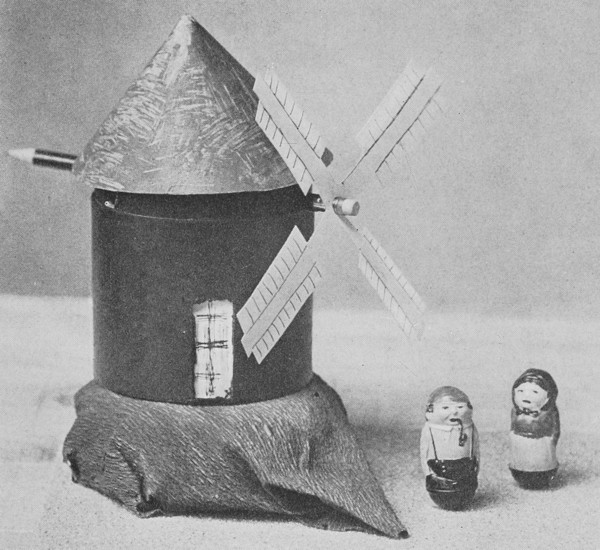
The Windmill is made from a round box. Its roof and sails are
cardboard.
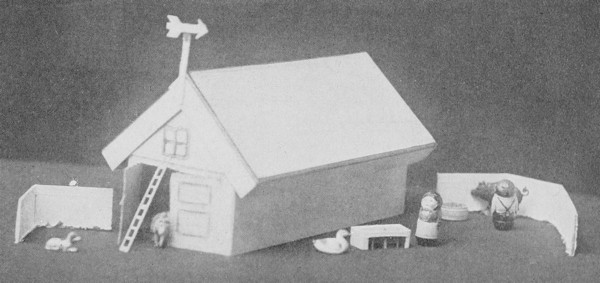
The Boxville Barn and Farmyard. The roof of the barn is made of two
shoe-box covers. The fence for the Barnyard is made of a box rim.
Where is your toy cart? Shall it go cantering over Box Bridge to the mill with some corn from Boxville Farm? What a windy day it must be when the windmill sails turn so fast!
Material Required to Make a Barn and Farmyard: the lower half of a large shoe-box and two shoe-box covers that fit it, a ten-inch square of cardboard, and the rims cut from a shallow box.
Farms are such very interesting places that I am sure you will enjoy knowing how to make one with a big barn and a farmyard where your toy animals may be kept.
You may easily make a barn like the one in the picture. You will need to have a shoe-box to make the building. Two shoe-box covers make its gabled roof. Some cardboard is needed from which to cut supports for the roof.
Begin by turning your box over upon its rim so that its top becomes the base of the barn.
In one end of the barn, cut a double door. To make this, first mark a three-inch square upon an end of your box. Draw a line down its center, vertically. (For double door, see Diagram Two, B, page 167.) Cut the top line and down the center line. The base of your door should be at the edge of the box rim. The two sections cut in the cardboard make the doors. Press each outward.
Next, you will need to make the two triangular supports for the box-cover roof. These supports must be cut from cardboard, and each must be the width of an end of your box, and be made as high as your box is wide. (For cutting these supports for a gabled roof, see Diagram Three, BB, page 169.) Glue one to each end of your box, at the upper part.
The roof is made from your two box covers lapped one rim under the other, lengthwise, to form a gabled roof shape. The upper part is glued rim under rim. (See Diagram Three, B.) Let the roof dry, and then slip it over the triangular supports pasted at each end of the box building to hold the roof in place.
Cut a little weather-vane from a strip of cardboard, if you like, and paste it to the front of the barn roof.
The farmyard is made from box rims cut from any shallow cardboard box you have. The box rims stand if you cut them with corners. They make a good enclosure.
A small box, placed on end, will make a shed. The cover of a small box will make a drinking-trough. Little boxes make chicken-coops.
Mrs. Tumble Toy lives on my farm. You see her in the picture. Her husband’s name is Bill. He is chasing the pig. You can see him, too.
Have you some toys that would like to live on your farm?
Material Required to Make an Animal Show: small boxes of all shapes and sizes, spools, and candy-box favors, a round bandbox cover to make a circus ring.
The cover of a round bandbox will make a splendid circus ring. Any small boxes and spools you may have can be the benches for your trained animals to perform upon. A really good circus may be made with Noah’s Ark animals, or with the candy-box favors that come to one at Christmas and other holiday times.
Shall I tell you how I made my circus? You can make one like it.
First of all, I collected animals. At a small candy shop, I found a polar bear, a rhinoceros, a fox, and a pig. Each came with a loose head, because the animals were supposed to be filled with candy, but I glued the heads on tight. I bought these animals because they were so cheap.
They could stand upon spools to make acts for the circus ring. I painted each spool red, and pasted over its hole a disk of colored cardboard.
From round box covers I made pyramids, and from square ones I cut benches. (To cut bench for animal show, see Diagram Six, A, page 175.) Cut a leg at each corner of the box-cover’s rim. Remove the cardboard from between cuttings.
Swartzenheimer and Mulligan were my animal trainers. Each came to me as a dinner favor. They were both little figures of toy men that stood upon a cake of sweet chocolate. You can easily see what a splendid clown Mulligan made.
The animals performed all kinds of tricks. They could stand upon each other’s backs. I had two or three tumble toys, besides. They performed splendidly.
I am sure you will have a good time making a circus. It is ever and ever so much fun, I think. You can use any animals that you happen to have among your playthings.
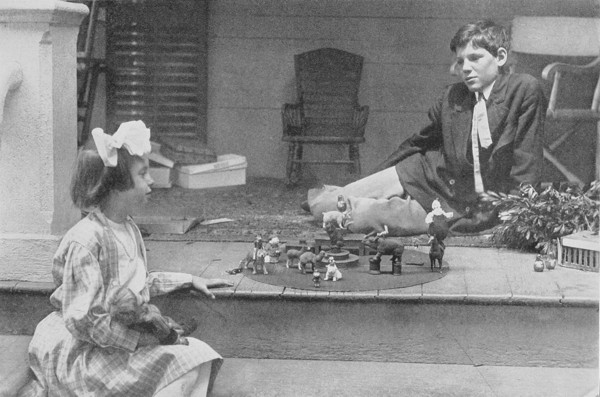
Benches for performing animals at Box Brothers’ Circus are made from an assortment of cardboard boxes and spools. The cover of a large round bandbox makes a circus ring.
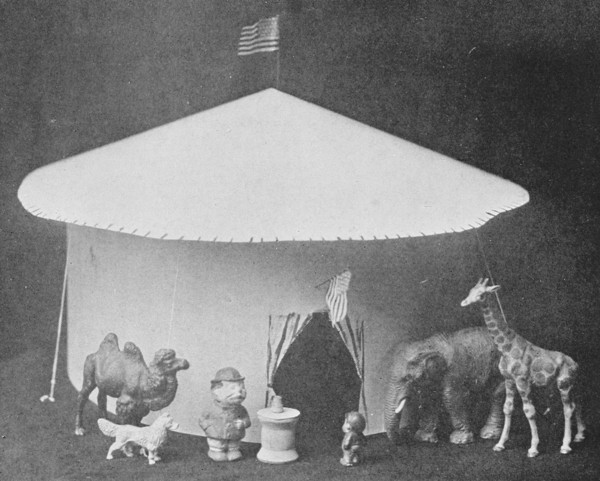
This is Box Brothers’ Circus. It is made from the lower part of a round
white bandbox.
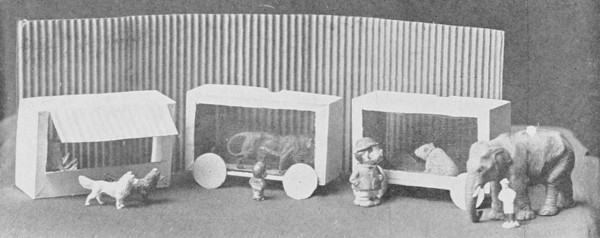
A view taken inside the Circus Grounds. The walls are corrugated cardboard. The cages are boxes with covers; and the booth is the lower half of a candy box.
At some toy shops, you will find celluloid animals. At Japanese shops, you will find cotton animals. In your own Noah’s Ark there will be wooden animals and your Boxville people—tumble toys, jointed dolls, Halloween figures, and favors will form the trainers and performers for the “Show.”
Wild animals and domestic animals may be bought at candy stores as favors. They also come in boxes at the shops where toys are found. These animals should be small—never over four or five inches in length.
Material Required to Make a Circus Tent: a round bandbox and a sheet of cardboard.
Material Required to Make Circus Cages: three or four hardware boxes from three to five inches long. A booth may be made from half of a flat letter-paper box. Some cotton mosquito-netting will be the cage bars.
A circus tent is a very easy thing to make. It needs nothing but a sheet of cardboard and the lower half of a round bandbox to make it. The lower half of the bandbox must be turned over to stand upon its rims. This forms the sides of the circus tent. The roof is cut from a large circle of cardboard.
First, arrange the box to make sides for the tent. Then, cut the roof.
In the edge of the bandbox rim, cut out a piece of cardboard the shape of tent canvas looped back to make an entrance. Draw some folds upon this with blue pencil. If you prefer, use your water-color paints instead.
When this is done, glue across the top of your bandbox some strips of string to form tent ropes. The roof of the tent, round and pointed, may next be made.
Take a large sheet of cardboard and draw upon it a circle that is half again as large around as the base of your bandbox. Cut this out. Cut from the circle a quarter piece like the slice of a pie. (See Diagram Three, D, page 171.) Lap the cut sides of this three-quarter circle, and glue together to make a pointed roof like that of a circus tent. When the roof is dry, slip it upon the top of the hat-box, and your circus tent is done.
If you find some corrugated cardboard, it may be slightly curled and pressed so that it will stand on its rim, to make a board fence for the circus enclosure. Of course, you must have a fence! Of course!
Hardware boxes that come with covers double and close telescope fashion make very good circus cages. To make these cages, you will need to cut top and bottom from the boxes, leaving rims only. You may, if you wish, keep a very narrow margin of rim around the top and bottom cutting of your box. Paste strips of coarse netting, like cotton mosquito netting, over each opening of the box. It should be glued inside the box from side to side. This makes bars for the cages. (For cutting a box to make a cage, see Diagram Eight, page 182.)
Wheels may be added to the cages, so that the animals may go out on parade. The wheels are small circles cut from cardboard. There should be four for each cage, of course. When they are cut out from the cardboard, fasten each through its center to the base of a cage by a round-headed paper-fastener. The prongs of the paper-fastener should be bent to right and left inside the covers of the box. This holds wheels firm. If you have no paper-fasteners, sew the wheels to your box with raffia, or glue them to your box.
A booth for the circus grounds may be made from a box about three or four inches in size. Stand the box on its long side. Cut in its back an awning. The awning is made first by drawing an oblong space upon the back of the box, cutting this outline down at each side line and across its base. The cardboard is then pressed outward and upward to make the awning. (See Diagram One, C, page 166, for cutting awning.) Color the awning with red stripes.
Side-show tents for circus grounds are made like the tents of Camp Box. (See Diagram Three, E, page 171, for cutting the rim of a shallow box and bending it to make a tent.)
All toy figures that you can muster—tumble toys, wooden dolls, penny dolls, Noah’s Ark ladies, shepherds and shepherdesses, should go to Box Brothers’ Circus on the play-room floor. If you look among your toys, you will find animals for the circus, I know. They may even be animals cut from old magazine pictures.
Material Required to Make a Boxtown Zoo: some shoe-boxes, their covers, strips of cardboard or toothpicks to make bars for cages.
A zoo is really a splendid thing to make. You can cage all your wild animals—Noah’s Ark animals, or whatever other ones you may happen to have. The cotton animals that are bought in Japanese stores, “three for five,” are just right for zoo animals. You can buy chenille monkeys, one for a penny, at the toy shops.
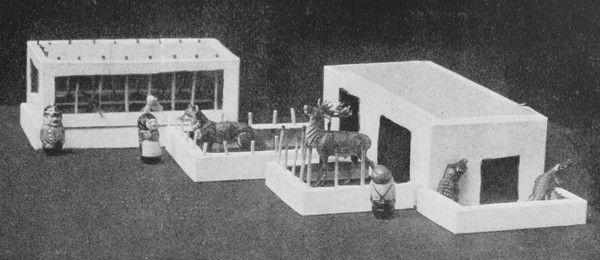
This is Boxtown Zoo. Its cages are cut from shoe-boxes. Box rims are
used to make enclosures for the animals.
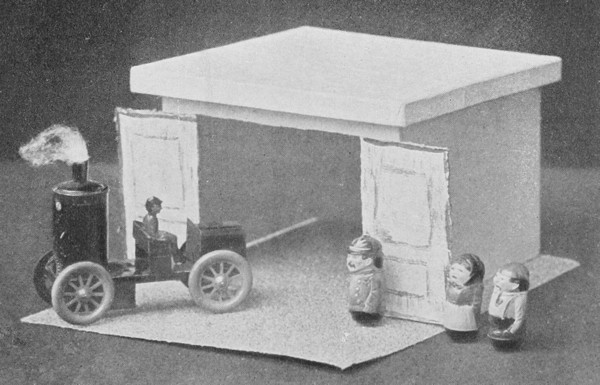
Boxtown’s Hose House. It is made from a deep square box. The roof is
the cover of another box.
When you start to build your zoo, the cages will be made from boxes. Cut out a large square from each side of the rim. Toothpicks make bars for cages. They will need to be pressed down: through the top of the box over openings you cut in the box rims. If you have no toothpicks, you may make bars for the cages by pasting very narrow strips of paper or cardboard inside the box cages over the openings in the box rims. (For cutting a zoo cage, see Diagram Eight, page 182.)
Dens for animals are boxes that have their covers taken off. These boxes must be turned over to stand on their upper rims. Doors are cut in the edge of box rims, as you see them in the picture.
Rims cut from box covers make fences for enclosures.
Little box covers make feeding-troughs.
“Do not worry the animals!” This is the rule of all zoos.
Material Required for Making a Hose House: a box deep and square, about six or seven inches long, and the shallow square cover of some larger box.
If you own a toy fire-engine or a hook and ladder, there is every reason why it should have a home. The engine-house that you see in the picture is made from a deep, square box. It is quickly made by cutting a square doorway in one side of the box rim and by adding a flat roof.
Turn your box over so that it rests inverted upon its rims. Outline a three- or four-inch square on one end of your box. Its base must come at the edge of your cardboard box rim.
Draw a line down the center of this square, vertically. Cut with scissors up this line and across the top line. This gives two doors, that should be pressed outward against the sides of your box. (See Diagram Two, B, page 167, for making the double doorway.)
Place over the top of the box the cover of a larger box, and the hose house will be finished. Why, it took you no time at all to do that, did it? Let’s see how the toy engine looks inside its new building!
Material Required to Make the Wigwam: half a round bandbox cover and a few small sticks or pencils.
Why, of course, you may make an Indian wigwam! It will take about two minutes to make one like this one in the picture. With it, you may play all kinds of Indian plays. It will be ever such fun! You will need half an old bandbox cover to help make the wigwam. The cover must be a round one.
One bandbox cover will make two wigwams. Cut the cover into halves. Take one of these and lap its edges to form a cone. Glue or sew these edges together.
Cut off the point of the cone. This makes the opening at top of the wigwam.
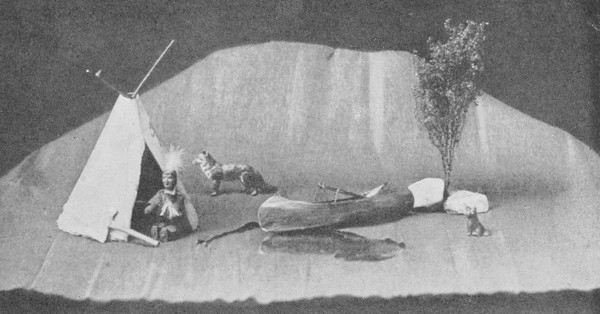
The Indian Wigwam is cut from half of a round bandbox cover.
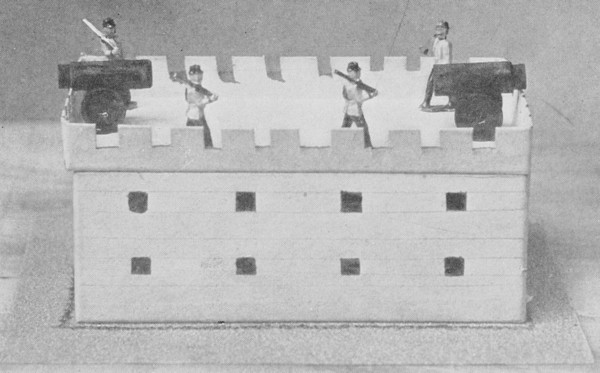
This is Fort Box. It is made from a deep box and its cover.
In the rim of the bent bandbox cone, cut a flap, and bend this back against the outer side of the tent. Stand the tent up upon its broad base, and there will be its entrance. Small sticks or thin pencils may be thrust through the top to make tent sticks. Indian symbols may be painted on the sides of the tent.
I had an Indian doll, Big Chief Ten-Cent Store. He came in a canoe made of wood. I made a green woods for him out of crape paper, and he lived near a silver paper spring upon my play-room floor in his home.
All the toy animals that I have played in the woods and Big Chief Ten-Cent Store hunted them. There was a deer that came off our Christmas tree, and a whole family of china bunnies, and—and you just ought to see him on the trail of Noah’s Ark animals! And—and you ought to see the lovely mats that are inside the Indian’s tent. I made them at Kindergarten myself.
Material Required to Make a Box Fort: a deep, square box with its cover. A round hair-pin box and a spool will make a cannon for the fort.
Would you like to make a fort for your leaden soldiers? Shall I tell you how to do it? If your soldiers are small, a box three inches deep may answer for the building. Its cover forms ramparts of the fort.
To start the building of your fort, turn your box over upon its rims so that its base becomes the top of the building. Take the box cover off and lay it aside.
Find a pencil and mark the openings for guns. They are made like windows upon the box front. Draw each about a half-inch square, and use your ruler to make each opening even. Cut these squares out, if you wish. They may also be painted black, should you prefer not to cut them out.
To add ramparts to the building, take the cover of your box and make a pencil mark upon its rim every half-inch all the way around. Cut sections from the rim, as marked, every other half-inch. Turn the box with its rim upward and glue it to the top of your box. (For making ramparts, see Diagram Three, page 172.)
At the back of the fort, you may easily devise a sallyport by cutting the cardboard door shaped. (For cutting a door, see Diagram Two, A, page 167.)
A toy cannon may be made with a small round hair-pint box by pasting it upon the side of a spool between the wheels of the spool. A thumb-tack pressed beneath one wheel of the cannon will keep it upright and prevent rolling. I painted my guns black. If you like, you may easily do this with water-color paints.
An encampment of tents may be made from small white box covers cut through each long side rim up to the top of the cover and bent, to each side of the center downward. (See Diagram Three, E, page 171, for making a tent.)
If you happen to have a penny flag, it will be just the very thing to wave over Fort Box.
You can arrange your fort upon a sheet of crape paper and make streams and woods all about it. The streams will be strips of silver paper pasted onto the green crape paper. The woods will be bits of twigs pressed into the holes of spools so that the trees stand upright. Bushes are just bits of twigs that may be laid down flat. Rocks and mountains may be made from stones.
Material Required to Make a Castle: any box, either round or square—one at least six or seven inches deep is best.
Material Required to Make a Fairyland House: an oblong box deep enough for door and windows to be cut in its sides, a few little crackers or “goodies”—possibly some gilt or silver paper in place of these.
Have you ever played in fairyland? Well, if you have not been there, you can very well make a fairyland upon the play-room floor, and in it you may gather together all the people of your Red, and Blue, and Green, and Yellow Fairy Books. These people will be Knights, and Princesses, Witches, Goblins, Fairies. All are toys, and it is an easy matter to get them together—quite as easy as it is to make a fairyland castle.
I will tell you how. First, you may like to build the castle, for that is all-important. There never yet was a fairyland without that!
Find some deep box with its cover. It really matters little whether the box is round or square-sided. A round box will make a high tower-like castle similar to the one in the picture. A square one will make one more like a fortress. It scarcely matters which you choose. Take the cover from your box. This is to form the castle ramparts later. High up in the box rim cut one or two long tower windows. Cut a door at the base of the rim. Next cut the ramparts in the box cover. (For cutting ramparts, see Diagram Three, F, page 172.) Glue these to the top of your castle box—and the castle is made!
The Princess who lives in the Castle is a penny doll dressed in a silver robe (made of tinfoil). My Princess has golden hair. It is long and beautiful. You can see it in the picture.
The Knight is a leaden soldier. His spear is a bit of wire. His shield is a brass button, polished and shining.
You can easily find the proper kind of dragon at a little Japanese shop. Mine was made of crockery and cost ten cents, but you will surely find among the cotton animals that are sold three for five cents something far better than my crockery dragon. There are the most dragon-like of cotton animals at the Japanese stores where I buy penny toys. Sometimes they are spidery and sometimes they are like crocodiles—only they aren’t crocodiles but DRAGONS. When you go to a Japanese shop and look for penny animals you will know exactly what I mean. They are all queer, and will work into any fanciful fairy tale that you wish to play with your castle.
Don’t forget to make the dragon a lair, when you have bought him. It may be just a box with a hole in it for the mouth of a den, but if you have some pretty stones and pebbles, you can build a real lair on the play-room floor with these.
Almost any fairy tale may be acted out with the Knight and the Princess. Little toys which you have among your playthings may help out. I know you will have a good time playing at fairyland. I did.
I built me a Hansel and Gretel house, too. This was to help with my fairyland play.
Hansel and Gretel were two tumble toys—a boy and a girl. Their home was in a Boxville Cottage. When they went to the woods and found the Witch’s House, I made that. It was in a forest of clothes-pins like the trees made for Camp Box.
I made the fairyland house of the Witch from a deep oblong box. I cut two windows in one rim and a door between them, as you see it in the picture of the fairyland house.
To the sides of the house, I pasted some little crackers and goodies. The roof of the house was of crackers. It was very fairy.
I used some pretzels for a fence around it.
There were some small celluloid dolls among my playthings, and I made fairies of them. You can see one that is a Daisy. Her dress is an artificial flower off my old hat. I took the center out of the daisy and made a skirt of the petals. The fairy’s wings were cut from white tissue-paper. They were glued to the back of her body.
All kinds of Halloween figures that are little favors will answer splendidly for this fairy boxcraft play. You can easily find dwarfs, gnomes, goblins, witches, elves. Oh, it will be fun, I know!
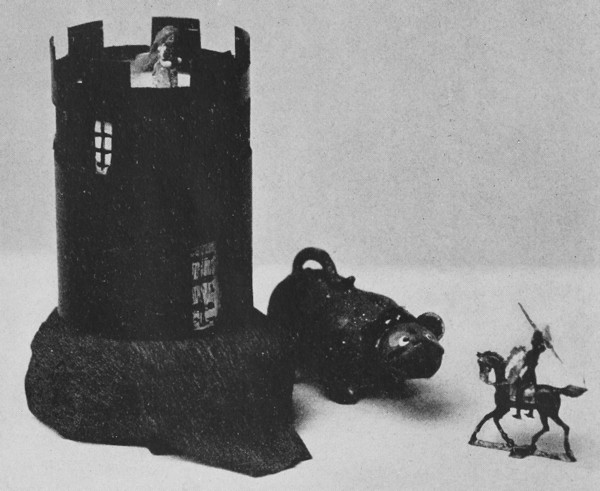
A Fairyland Castle made from a round box and its cover.
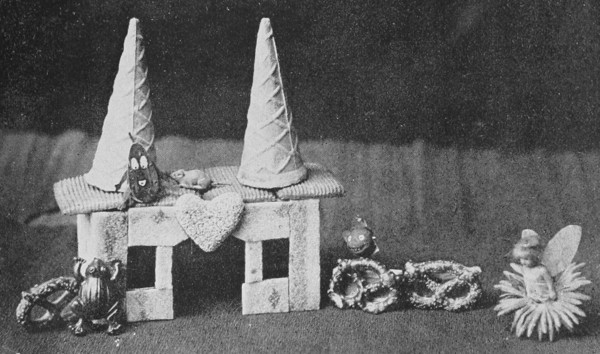
A Fairy House made of a box covered with goodies.
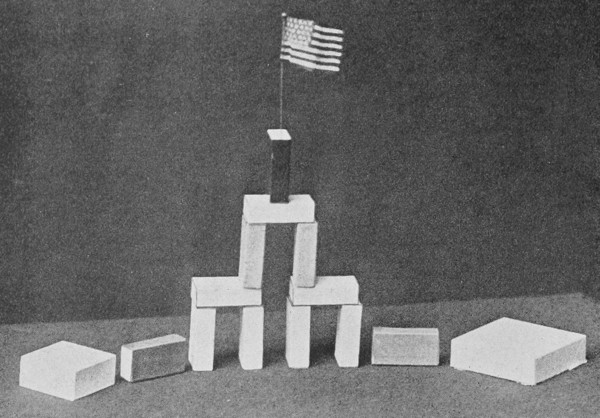
Building Blocks and Box Building with small boxes.]
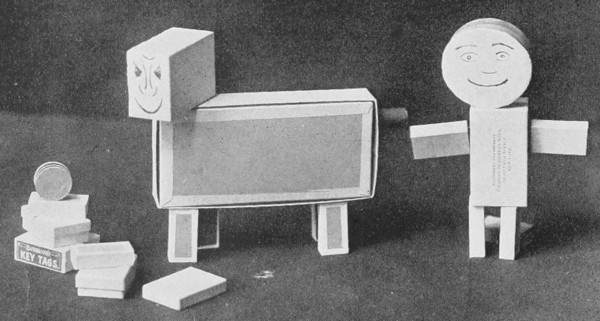
Building Animals and Box People from a collection of boxes.
In summer you can go out into the garden and gather hollyhocks. The flowers make real little flower ladies—just like fairies dressed up in red, and pink, and white dresses to go to a party. The buds of the hollyhocks make the heads for the ladies, and you just stick a pin through these and press it down at the base of the full blown flower to make the fairy lady. Acorns make fairy dishes too—did you ever happen to know that!
Material Required for Block Building: an assortment of boxes varied in size and shape.
Building with blocks is always fun, as you know. You have tried it with cubes, and with dominoes, and with cards—but did you ever try to build with boxes in the same way?
The boxes do not need to be glued. Their covers may or may not be used. Small boxes make walls, and box covers form roofs. You will see a tall block building in the picture. It was made from small drug-store boxes. There is really no end to the ways in which you may build with these.
From boxes of uneven size, men and animals may be made. Round boxes or small oblong boxes form heads. Larger boxes make bodies. Legs and arms are boxes of equal size.
The faces are drawn with pencil upon the back of boxes where there is no print. A wire hair-pin will keep the arms in place. It will need to be pressed through the box sides and bent so that the arm boxes may be slipped upon it. Men of all sorts may be made. There is great variety, as forms vary with the shape and size of boxes that you use.
If you are playing with some other child, you will find that it is amusing to divide your store of boxes, each choosing one at a time till the supply is exhausted. Then, you may each see how many different things you can build. It will be a game, and the winner will be the one who can make the most with his store.
It is entertaining to play with box animals and box men when you have to spend a day in bed. They may be placed upon a table near the bedside. They are light to handle, and they require no cutting or pasting to muss you up. If you decide to have measles or mumps, the little boxes may be disposed of easily after you have played with them. You can always find new ones to take their place when you are well again.
You may make a puzzle for yourself out of a large box and a number of smaller boxes of varied size. Try to pack as many boxes as you can into the large box. Make them come as evenly as you can in packing. There will be some space at sides, but with care and thought you will be surprised to see how small a space they may be packed into. Try them in various forms, till you are sure you have reached the best way to arrange them. Then, give the box puzzle to some friend to see if he can do with one or two attempts what you have accomplished. When you give some person this puzzle, mix your boxes well so there is no clue to their proper arrangement inside the larger box.
Toys like trains may be built with little more than a long cracker box for a coach and some oblong box for engine. The engine’s smoke-stack is a round box. Its coal-car is a cover taken from a candy box. Its wheels are buttons or button molds placed on the ends of wire hair-pins that have been pressed through the sides of the cardboard boxes. A bit of wax or plasticine will keep the wheels in place.
Paste boxes to the back of your cut-outs when you buy these sheets at the penny store. The Indians, cowboys, soldiers, and animals will then stand erect by themselves.
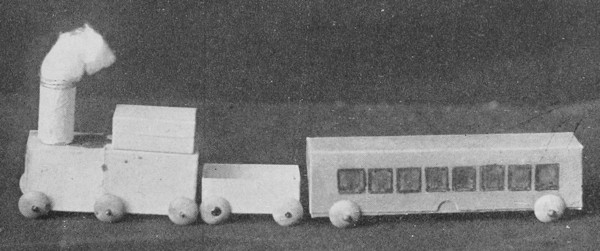
A Toy Train that is built from boxes. Its wheels are button molds.
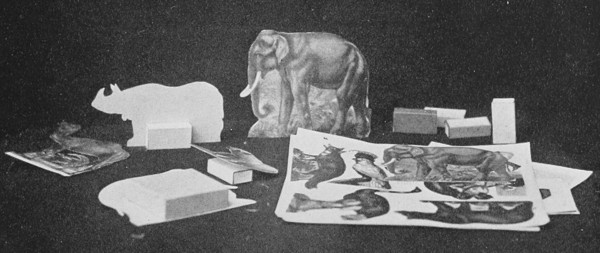
Cut-out Pictures may be made to stand when glued to small boxes.
You will have an interesting time, I am sure, in finding new ways to use your boxes in this kind of play. It is always new, for you may always find different kinds of boxes to adapt to the building. And the nice thing about it is that you can make almost anything you choose.
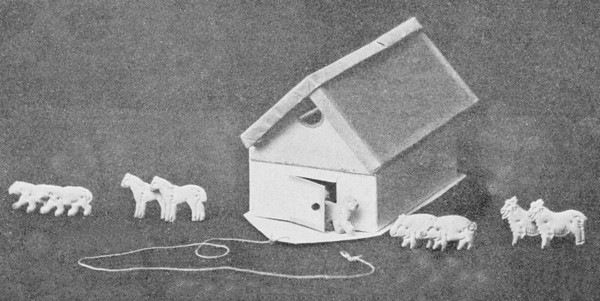
A Noah’s Ark with cracker animals.

A Savings-bank made to hold pennies. The pennies are dropped down its chimney.
Material Required for Making a Noah’s Ark: a child’s shoe-box without a cover, the cover of a large shoe-box, and some shallow box with cover about ten inches by four.
Next time that you have cracker animals to play with, build them an ark! It is splendid fun. I will tell you how to do it.
Find the materials needed to build with—a shoe-box cover, the lower half of a child’s shoe-box, and the whole of some very shallow box about ten inches long and at least four inches wide.
To make the base of the Noah’s ark, use the large shoe-box cover. Cut its rims off. Cut each end pointed. The ark building is placed on this.
The ark building is made from the small shoe-box. Place it upon its rims so that its bottom becomes top.
Cut a door in one end of the box on the edge of the box rim. To make this, cut up from the edge of the rim two inches near the center of the box end. Then cut horizontally across the box two inches more. (To cut door, see Diagram Two, A, page 167.) After cutting, bend the door as if it were on a hinge. A round-headed paper-fastener will make a door-knob and latch. Press the points of the fastener through the cardboard door and bend the prongs, or points, to one side together. In this way, animals may be securely locked into the ark.
Cut two triangular supports for the roof of the ark. They should be cut in heavy cardboard and made equal-sided. The width of one end of your box will give you the dimensions to make these. (See Diagram Three, BB, page 169.) Paste one of these cardboard pieces to each end of the ark building near the top part of the box. Let both dry well before attempting to put a roof upon them.
The roof is made of the two parts of the shallow box. Lap the long rim of one part over the long rim of the other. Glue the two rims together, one over the other. (For making a gable roof from two box covers or from the halves of a shallow box, see Diagram Three, page 169.) When the glue is dry, slip the roof over the gabled points of the ark building.
Now, when the rains descend and floods come and there is a RAINY DAY ahead of you, just summon the cracker animals from the pantry. Arrange them in pairs. Find a doll for Mr. Noah and a piece of paper to make the dove. A footstool will be Mount Ararat, and the ark may voyage all the whole day upon the play-room floor. When the sun comes out, you will have been so busy all day that you will have quite forgotten about the rain.
Material Required to Make a Savings-bank: a box in which correspondence cards have been packed, a small box with a sliding cover, and another similar to it.
When I began to make boxcraft toys, I used to save my pennies to buy pinwheel paper, cotton animals, and little figures to use in Boxville. Then, when I found that I should need crape paper or silver paper, or a mirror for a pool, I had money to buy it.
Perhaps you would like to know how to make a Savings-bank for pennies too?
You will need some small box like that in which correspondence cards come packed at stationery stores. It has a double cover.
Turn the box over so that the printing on its top is hidden. Make the top of your box the bottom by turning it over.
Draw two windows and a door on one side of the box. Paint them, if you like.
Paste over the door a porch roof made from half of one small box. The floor Of the porch is pasted under it.
Remove the drawer from the little box with sliding cover. The outside of the box, as you may have noticed, is like a tall chimney.
Take this and stand it on end at the top of your box. Draw its outline with pencil on the cardboard. Then remove the box and cut out the outline just inside the lines you made.
When this is done, you must glue the chimney over the open hole. Glue it tight and let it dry well. The pennies, dimes, and nickels may be dropped down this chimney into the bank.
There is one rule which governs this savings account in my bank—five cents must always stay in the bank to be “a nest egg.” I made this rule myself.
Material Required to Make a Toy Wagon: the half of any oblong cardboard box. A few square inches of cardboard will be required, from which to cut cardboard disks for the wheels of the cart.
Material Required to Make a Sleigh: one oblong cardboard box with its cover. A sled may be made from the cover or lower half of any long box.
If you wish to make a toy wagon, find the half of some cardboard box. Turn this upward if it is the cover. Keep the lower half, if you use that, as it is, upright, open at the top. This is the body of the wagon.
Take your compass and with it draw on some cardboard four circles of the same size. These are the four wagon wheels. Cut each out.
Find two small sticks in the garden. They must each be a trifle longer than the width of your box. Press each through the end of the box where wheels should come—press clear through both opposite rims of your box. Then press a wheel upon each end of a stick, and put a bit of wax or some glue where the linchpin should come. Let the glue dry thoroughly before you attempt to play with your toy.
A strip of cardboard cut to fit the width of the cart and glued across its upper forward rims will make the driver’s seat.
The shafts are two strips of cardboard pasted to the forward sides of the cart. Cut each about half the length of your box.
Whoa there! Back up—back! There is your toy horse in the shafts. He is waiting for you to tie his string harness. He will be ready then to go on a trot round the floor.
If you wish to make a sled, take the lower half of a box and turn it over. Its long side rims will become the runners of the sled. Cut the end rims off the box. Then, cut off each corner of the side rims of the box, slanting your corner cuttings in the same direction. There you have the runners of your sled! (See Diagram Ten, A, page 184.)
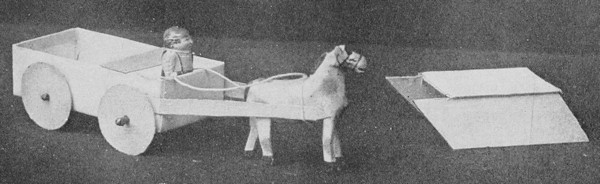
Toy Wagon made from half of an oblong box. A Sled cut from the lower
half of a box; the runners are made from the box rims.
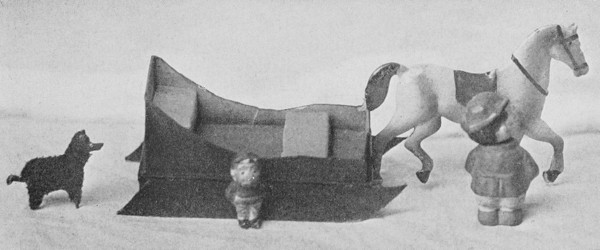
A Sleigh made from the cover and the lower half of a box. It has been
painted.
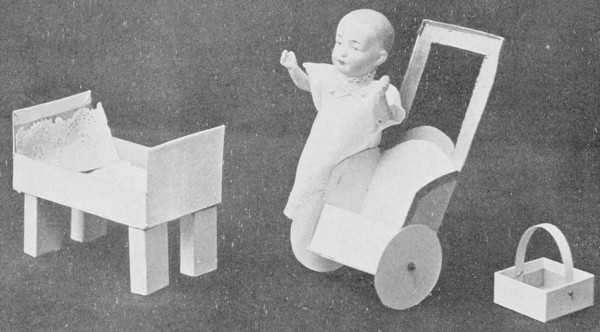
Doll’s Crib made from the lower half of a box, with pill-box legs. The
Go-cart is cut from half of an oblong box. The Basket is half a box.
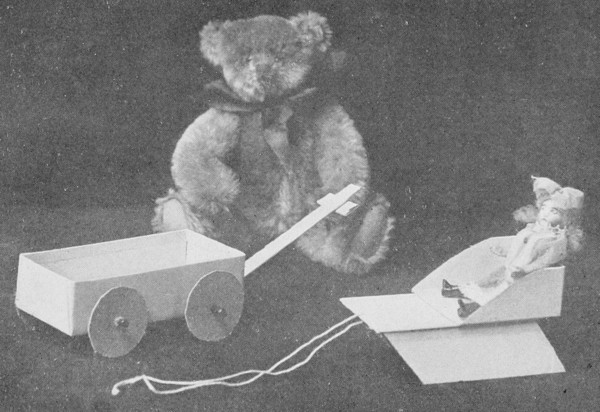
The Express Wagon is the cover of a candy box. Its handle and its
wheels are cut from cardboard. The Little Doll may have a sled
cut from a candy box.
To make the sleigh, you will need to use the cover of your box. Turn it so that it opens at top. Cut the side rims the shape of the upper portion of a sleigh, and glue the cover to the runners. A small box will make two seats for the sleigh. Fit the cover into the back of the sleigh and the lower half into the forward part. (See Diagram Ten, page 184, for making sleigh. A, runners; B, top.)
When it is winter in Boxville, cotton-batting makes snow, and my horse, harnessed to the sleigh, with a sleigh-bell on his neck, goes jingling through Main Street. The boy dolls catch their sleds to the back of the sleigh.
Material Required to Make a China Doll’s Crib: the lower half of some oblong box, and four small oblong pill-boxes of equal size to make the legs of the bed.
Material Required to Make a Doll’s Go-cart: the lower half of an oblong box about seven inches in length, and some cardboard to make wheels. Wheels may also be made from top and base of a small round box three inches in diameter.
Material Required to Make a Doll’s May Basket: the cover or top of any small box you may have; also a small strip of cardboard and two round-headed paper-fasteners.
See, here is a china doll’s crib in the picture. You can see how easy it is to make it. I hardly need to tell you. Just take the cover or the lower half of the box you wish to use, and cut off a part of each long rim—there is the top of the crib with its head and foot.
To each corner below its base glue the end of a small oblong pill-box. There! Isn’t that an easy and quick way to make a toy crib for a doll?
If you wish to make a cradle, cut the box in the same way, and cut a circle once again as wide as the width of your box. Cut this circle into half, and each half will be a rocker for the cradle. Glue one to each end of the box. That is all!
To make a doll’s go-cart like the one in the picture, take the cover or the lower half of any oblong box similar to a candy box, one-pound size. Cut the rim from it half-way around, beginning in the center of one long side. Next, cut from the part that is without rim the handle of the cart, as you see the box cut in the picture.
Next, cut two circles from cardboard to make the wheels of the go-cart. Each circle must be of equal size. Make each about three inches in diameter, unless your box is more than eight inches long. In this case out your cardboard circles to correspond, larger.
Run a stick or a long pencil through one circle, and press the point of the stick through a lower corner of the box through to the other side, where you put on the other cardboard circle for the other wheel. Your stick or pencil must be one inch longer than the width of your box. Place a blob of glue over each end of the axle and let it dry well, to keep the wheels on. When you have fitted the end of a little box into the lower half of the go-cart to make a seat, all is done. You may use a piece of folded cardboard to make the seat, if you prefer. I painted the handle of my go-cart, but it is not at all necessary to do this. The go-cart is great fun to use when you play house and go out marketing. Then you can take your doll baby with you in the go-cart. You can tie the doll baby into the cart with a piece of string.
The basket that you see in the picture is very easy to construct. You can use it for many different things, and as long as you have small boxes—or even large ones—you may make baskets out of them. You will need some round-headed paper-fasteners or glue to help make them. (The paper-fasteners are stronger and better than the glue.)
Take the lower half of a box, or the upper half, as you like, and cut a strip of cardboard twice again as long as the width of your box. This is the basket’s handle. Glue it inside the inner rim on either side of the box, or, better still, run the prongs of a paper-fastener through the side of your box and through the end of the cardboard strip on both sides of the box. There is the handle—just see what a cunning basket you have made!
In spring, May baskets can be made this way. Filled with wild flowers, they are very cunning—just the thing for a May Day gift.
If you have some pretty shells that you have picked up at the shore, they may go into a little box basket and be given to some little sick child, who will love to handle them and keep them in their basket by his bedside.
At Easter, fill box baskets with moss or green raffia cut to represent grass. Glue the raffia to the box. Then ask cook if she will give you some white beans like those that are baked with pork in a pot. Place three or four of these in the moss or raffia cuttings, and you will have made a cute little basket of eggs to give as an Easter gift. When your water-color paint-brush is moistened with blue or brown paint, make tiny specks on the beans and they will look like wee little birds’ eggs.
The box baskets make good Christmas-tree decorations, too. They may be suspended from branches by colored paper chains, or be tied on with raffia or tinsel. Each basket may be filled with candies or with pretty berries you have found out-of-doors, holly or bright wintergreen.
They may be used as place favors for a Valentine party when filled with red paper hearts.
Material Required to Construct a Toy Kennel: a small box without its cover, the cover of some larger box that is square, and cardboard.
Here is a picture of Fido, my little dog. I made him a kennel so that he could stay near the doll-house at night and be a watch-dog. Perhaps your dog would like one, if he is a play dog.
If you do want to make one, I will tell you how.
Take the lower half of your box. This is to be the building. Turn it over and stand it on end upon the piece of cardboard you have. Draw the shape of this end. Add to it about four inches in height. Cut this piece out and cut another like it. Glue one to each end of your box. Be sure your box is inverted before you begin. It should rest upon its rim.
Next, cut each end piece glued to the box to a point at the top. This makes the point of each gable side under the roof. These are the points that come under the roof to support it.
Cut an opening under one of these at one end of the box. It should be shaped like the door of a dog kennel.
Where is a large flat box cover? It is to be the roof. It ought to be about four inches wider than the width of your first box. (For making the kennel roof, see Diagram Three, E, page 171.)
Fold this cover downward in equal halves to make a slanting roof, and place it over the points of the dog kennel that come front and back of the little building. There is the kennel all finished! Whistle to Fido! Come here, Fido, to see the nice kennel made for you. Don’t you think that it would be fun some day to make a smaller one for the little china dog?
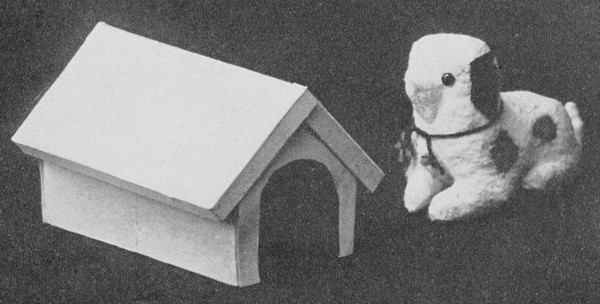
Toy Dog Kennel with cardboard end pieces glued to it to hold a bent
box-cover roof in place.

Wheelbarrow cut from the lower half of an oblong box.
Material Required for Making a Toy Wheelbarrow: the lower half of a candy box or a similar shaped box, one round pill-box for the barrow’s wheel.
The Teddy Bear’s wheelbarrow that you see in the picture was made from half of a candy box; some strips of cardboard made the legs and wheel supports, and a round pill-box made the wheel.
Do you wish to make a wheelbarrow to play with? Perhaps your Teddy would like one. I will tell you how to make it, shall I?
First, take the lower half of your box and take one end rim off. Then, from the upper part of the rim next to this side, cut out the handles of the barrow. Next, cut out the cardboard half-way around the lower part of the box between the handles. This is the frame of the wheelbarrow.
Cut two short cardboard strips each a half-inch wide and each three inches high. These are the rear legs. Glue them to the toy at either side at the back.
After this, cut two strips of cardboard a half-inch wide and five inches long. Glue these to the forward part of the wheelbarrow’s frame.
When all are well dry, press the point of a pin through one of these wheel supports, through the cover of a round pill-box, on through its other side, through the other strip of cardboard in front. Then, if you like, you may put a toothpick in place of the pin, with a small blob of glue at either end, after you have cut the hub of the wheelbarrow off to make it a correct size. Let the glue dry well, and then Teddy may have his toy to play with.
My Teddy and I play at gardening with artificial flowers on the floor. Sometimes, I make flowers from tissue-paper to use. Can’t you make them, too?
Material Required to Make the Office Furniture: the end of the lower half of a shoe-box makes the desk, a spool with a round box cover makes the desk-stool, a high round box four inches high makes a flower-stand, the cover of a box nine inches long makes a chair.
My dolls thought it would be fun to have an office. I had a little favor that was made like a tiny typewriter, and a telephone that came as a favor, too. You can buy these at any caterer’s or at a candy store.
One of my dolls was a stenographer. You can see her in the picture. Her name is Dosia—Miss Dosia. The other doll is the bell boy or errand boy.
To make a desk for the office, take the half of your shoe-box. Cut legs in its forward rim, leaving each corner. From the side rims cut the two rear legs. (To cut table or flat office desk, see Diagram Six, D, page 178.) Paint the desk with India ink and it will look like the one in the picture. If you prefer, use paint, but be careful not to use the paint too moist.
The spool makes the desk-stool. Paint it to match the desk, and stand it on end. Over the top, glue a round pill-box. Paint this also. It makes a very cunning stool for a doll eight inches in height.
The stand is easy to make. The plant on it was a favor, too. The stand is just a box about five inches high. It is put on end and painted.
The chair takes no time at all to cut. Just find the cover of a box about eight or nine inches long. Cut the rim off from it half-way around, starting at the center of one long side. Bend the part that has no rim left on it upward to make the back of the chair, and cut the legs from the lower rim of the rest of the cover as you cut legs for the desk. (To cut a chair, see Diagram Six, C, page 177.) It is fun to have a doll’s office. With it you can play at business. What is your business going to be? Are you going to be a lawyer, or the principal of a little doll’s school? Maybe yours will be a real estate office for Boxville!

Office Furniture for Dolls. This is made from boxes, box covers, a spool
and a wooden box.
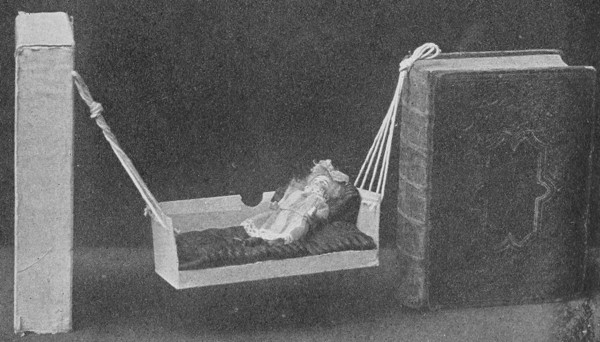
The Doll’s Couch Hammock. It is cut from the cover of a hardware box.
You can see my office boy in the picture. His hat ought to be taken off his head, but it was glued on, so he had to be impolite—though I made him say, “Excuse me!” for doing it. I hope when you engage an office boy, you will get the kind whose hat will come off! But mine is really quite a nice boy, and his name is Bobbie. (He’d rather be called Bob.) I wish that his hat would come off!
Material Required to Make a Dolls’ Couch Hammock: the lower half of any oblong box that is deep. One seven or eight inches long will make a hammock for a doll the same length. Larger boxes may also be used. Some string is needed to make ropes.
The dolls’ couch hammock in the picture is easily made. Your large dolls as well as the very small ones may have hammocks. Shall I tell you how to make one?
Take the lower half—that is usually the deeper half of a box—and turn it so that it opens at top. From the front rim, cut out a long lengthwise section of the rim.
At each end of the box, run a string through a corner. Knot the two end strings that come on the ends of the box. Knot them together or tie them, so that the hammock may be suspended wherever you wish to place it.
You may make a mattress for the couch by folding tissue-paper over brown paper cut to fit the shape of your box. Better still, you may make a real little mattress from some canvas or cloth. Cut the cloth a little larger than twice the size of your box. Fold it and sew it. Then stuff the mattress with bits of paper torn to shreds. Pillows for the hammock may be made in the same way, using smaller dimensions.
You can hang the hammock under the railing on the porch, or fasten it to the rungs of a chair when you play indoors with it. I am sure your dolls will be delighted to have you make this for them. If you are a boy, you can make one for your sister. Boys ought to know how to use needle and thread as well as girls. Soldiers and sailors know how to sew. (I know a man who can do embroidery, but, of course, that is going pretty far.) A boy ought to be able to sew a mattress, anyhow. It is as easy as making a marble-bag.
Material Required to Make a Theater or Punch Show: a deep, square letter-paper box and its cover, and some postal cards with colored views.
Would you like to make a toy theater or Punch Show to play with? Shall I tell you how to make one out of some deep, square box about eight inches square and eight inches high?
First, take the cover off your box and lay it aside.
Next, turn your box over so that it rests upon its four rims and the bottom of the box is made the top.
Upon the upper part of the box, near the top, outline an oblong about two inches from each corner of the box. Measure it with your ruler. Its top should be two inches from the top rim of the box. The whole should be about five inches wide and three inches tall. (To guide you in drawing this, refer to Diagram Nine, A, page 183.)
Cut this oblong you have drawn at both sides and along its top line. Bend the cardboard inward toward the center of the box. This will make the “stage.” (See Diagram Nine, A, page 183.)
Just over the stage, in the upper rim of the box, cut a two-inch wide opening the same length as you cut for the length of the stage below. Cut this out entirely, so that the little dolls you intend to use for actors may be dropped on black strings through the opening and made to walk and dance on the stage. (See Diagram Nine, B, page 183.)
Behind the opening over the stage, cut a slit in the rim of the box long enough to slip through a fancy postal card. Slip some pretty colored view through it, and there will be the scenery for your stage. You may have pictures of interiors as well as views of out-of-doors and houses. (See Diagram Nine, C, page 183.)
Now, cut a piece of cardboard the right size for a sign for your theater, and print its name on the cardboard. Glue the sign over the stage as you see it in the picture. It will serve to hide the little dolls’ entrance to the stage on their strings.
Last of all, place the cover of your letter-paper box, face down, on its rim on the table or floor, and put the theater or Punch Show well back upon it so that there is place for an audience of little dolls in front. (See Diagram Nine, D, page 183.)
Benches for the audience of little dolls may be cut from covers of boxes two and three inches long. (For cutting benches, see Diagram Six, A, page 175.)
Your actors may be penny dolls, or any jointed wooden dolls such as you will find in toy row-boats at the ten-cent store.
I used to collect fancy postal-card views of all kinds of interesting places and give lectures on them at my theater. It was most fun of all, I think. I had performing Noah’s Ark animals in vaudeville there, too. There is no end to the games you can play with the theater.
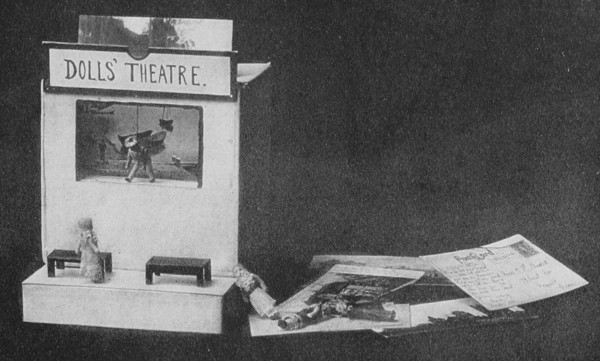
The Punch and Judy or Little Dolls’ Theater is made from a deep
letter-paper box and its cover. The scenery is a fancy postal
card and the actor is a doll.
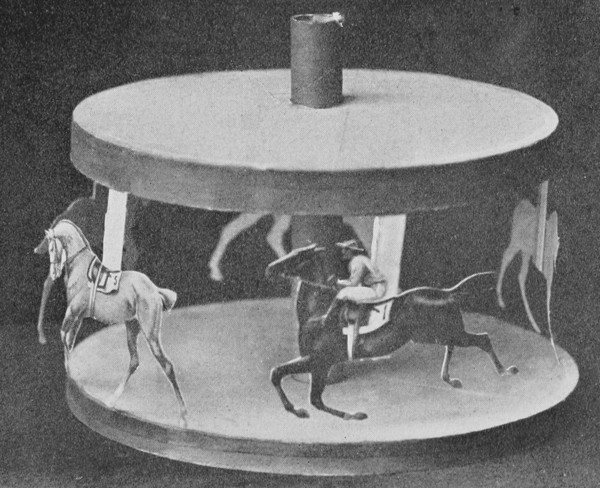
The Merry-go-Round is made from the covers of two round
bandboxes, a cardboard roll and penny cut-outs purchased at the
children’s “penny store.”
Material Required to Make a Toy Merry-go-round: two round bandbox covers, or the two halves of some large round box, a sheet of penny cut-out pictures of horses or animals, and a cardboard mailing-tube or a hoop-stick.
Everyone may own a merry-go-round. It is made from two large round bandbox covers and a mailing-tube. You will also need some pictures of animals or horses to use on the merry-go-round. Four or five animals are enough to use. A small box will require less.
Cut-out pictures of Indians or cowboys may be used on the merry-go-round. If you cannot have these, horses cut from cardboard will answer. To do this, find a clear outline of a horse in some magazine picture and trace it upon your cardboard. Then, when it is cut out, you will have a pattern to help you make the other horses by drawing around its edge.
In the picture, the horses were each a penny cut-out. They came as race-horses. They exactly fitted the bandbox merry-go-round that I made.
If your cut-outs are upon thin paper, paste them upon thin cardboard before you start the work of making the toy itself. Let them dry while you are making the merry-go-round.
To construct this, first take the cardboard mailing-tube that you have (or the hoop-stick), and run it down through the center of one bandbox cover as the bandbox cover stands on its rims like a platform.
Cut a small hole in the center of your other bandbox cover, and press this down over the cardboard mailing-tube, a third of the way down its length, just as you see it in the picture.
Now, take your animals mounted on thin cardboard and cut each out.
Cut narrow half-inch strips of cardboard for the poles of the animals. Glue them at equal intervals around the rim of the upper bandbox cover, inside. To their bases, glue the animals.
When you turn the top of the mailing-tube, the merry-go-round will twirl.
Paper figures cut from colored magazine pictures may ride on the merry-go-round. When it is made in a smaller size, china dolls may ride on it, and wooden Noah’s Ark animals may be glued to the cardboard strips to make very lifelike chargers.
Material Required to Build a Box Automobile: a one-pound candy box with cover, a sample candy box (oblong ten-cent size), one round box three inches in diameter, about ten inches of cardboard from which to cut wheels, four round-headed paper-clips for wheel-hubs, a toothpick and a round cardboard key-tag for steering gear, two metal buttons for lamps.
It is not difficult to make a box automobile, for nobody needs knowledge of mechanics to do it. Paste, scissors, boxes—and a pair of hands to do the work, these are all that you will need.
The lower half of the large oblong box forms the body of the car. Take the cover of the box off. This will be used later for the hood, if you care to put one on.
Cut off each long inner side rim of the box except for a corner at each end. Leave the inner rim of both ends on the box untouched. This forms the windguard in front and the back of the rear seat.
Paste the cover tight on your small sample candy box, and paste the box end to one end of the body of the car you are building. This completes the shape of the automobile.
Next, take your round box. Remove its cover. Cut the cover in half. This forms the wheel-guards for rear wheels. Paste each where the rear guards should go.
Cut the lower half of the box in half also. These halves are wheel-guards for front wheels. Paste them to the forward part of the automobile.
Cut four circles from your cardboard. Use your compass to outline them in pencil first. Make each with a diameter of two inches.
When these are cut, run the points of a round-headed paper-fastener through the center of each, and fasten the pointed prongs of the paper-fastener to the cardboard of the wheel-guards. This secures the wheels. If you prefer, you may glue the wheels to the guards. They should be painted with spokes and tires.
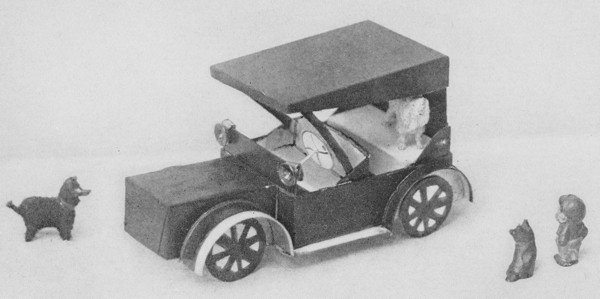
Boxcraft Automobile with hood made of a box cover.
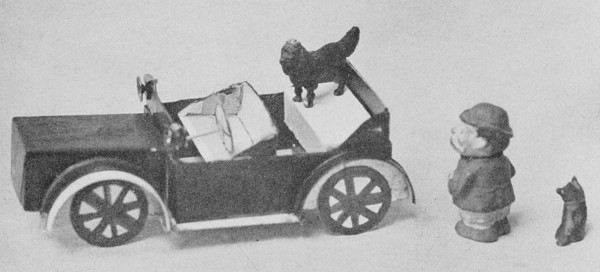
Boxcraft Automobile made without hood.
A narrow box rim is glued between the wheel-guards to make the running-board.
Two metal buttons are fastened to the front of the automobile to form the lamps.
A toothpick is pressed into the front of the box to make the rod of the wheel for steering. The wheel itself is a round cardboard key-tag fitted upon the other end of the toothpick.
The front seat of the automobile is the end corner of some small box that is fitted crosswise into the body of the car and glued in place. The rear seat is an end of a small box fitted in the same manner into the body of the car behind.
Boxcraft automobiles are the best there are. They do not cost you a single penny! Repairs are always very easy to make, too.
If you care to add a hood to the automobile, it may be made from the cover of your large box. Cut the front rim of the box cover down, and slant the long sides of the cover down to the uncut end.
Paste an upright piece of cardboard about four inches high behind your rear seat. To its top, glue the higher end of the box cover.
Two small strips of cardboard may be fitted under the hood above the front seat to hold the hood up in front.
I painted the automobile that you see in the picture with India ink. You could scarcely tell that it was made out of a box when it was finished.
Material Required to Make Furniture for a Doll-house: cardboard boxes of all kinds, especially flat letter-paper boxes, jeweler’s boxes, correspondence-card boxes. Pencils and spools may be of help in making some of the furniture.
When you look at the pictures of my boxcraft doll-house, you will see how well it was furnished. All the chairs and tables, and the bed—all the things that are in the pictures—are cut from cardboard boxes. You have just such boxes as I used, I am sure. Every home has them.
Shall I tell you how the furniture is made? First, I will tell you how I made the bedroom, shall I?
The old-fashioned canopy bedstead is made from a candy box and its cover. The four posts are long pencils. One pencil is run through each corner of the lower half of the box and glued tight. Then the cover is placed upon the upper ends of the pencils to make a canopy. Lace-paper is pasted around the rims of the cover. I made tissue-paper sheets and a lace-paper pillow. You can do that, too.
I made a tall bureau from eight empty match-boxes. The match-boxes were safety match-boxes with tiny drawers that are made to slide in and out. I saved till I had eight boxes. Then, I glued four, one on top of the other, and four others I glued in the same way. When these were dry, I pasted my two sets together. This made the upper part of the bureau. To make legs, I cut a low bench from a small box cover and pasted the boxes to its top. (For bench, see Diagram Six, A, page 175.) I sewed shoe-buttons to each drawer to make a handle. The mirror is a piece of cardboard cut oblong and pasted at the back of the bureau so that it is upright. I painted a frame around the sides of the cardboard to make it look like a mirror. The bureau cover is a strip of lace-paper. The candle and candlestick came off a birthday cake.
The wash-stand is cut from the lower half of a box about five inches long. It is cut almost as if it were a bench, only that its legs are shorter. The “splasher” is a piece of cardboard pasted upright at the back of the box.
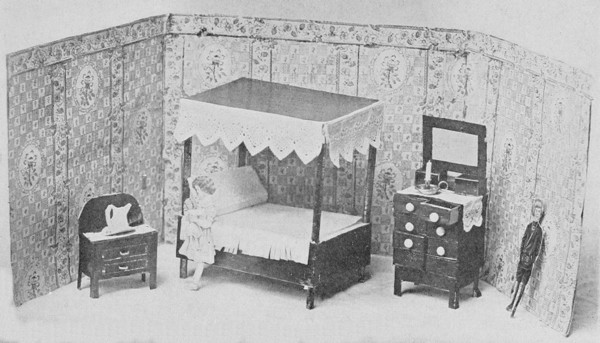
Boxcraft Bedroom furniture.
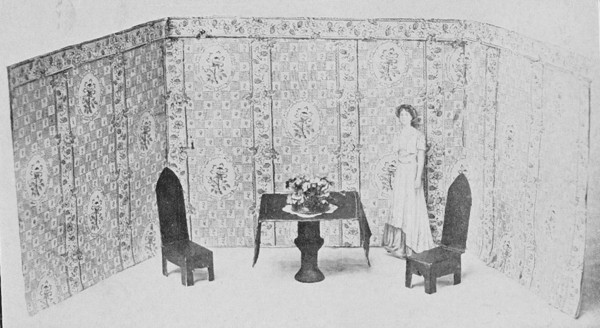
Boxcraft Table and Chairs.
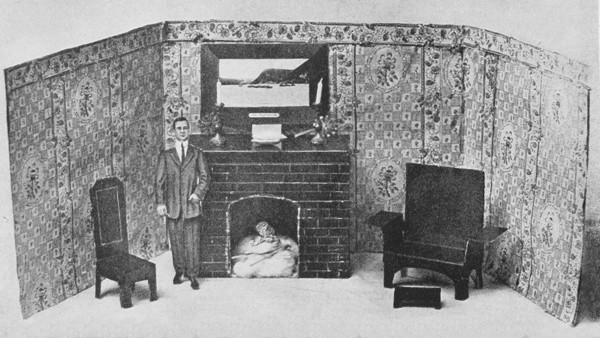
Mantel and Settle made from cardboard boxes.
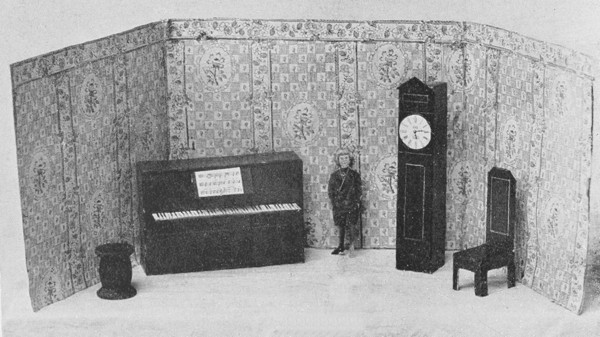
Piano and Grandfather’s Clock made from boxes.
Almost all chairs I made were cut from narrow box covers and jewelers’ hat-pin boxes. One hat-pin box will make two chairs. Each half makes one. (For chair, see Diagram Six, C, page 177.) Hat-pin boxes will make high-backed chairs. Other box covers make other kinds. When you cut an ordinary chair with a low back, begin to cut the rim from the side of your box near the center on one long side. When you make a chair from a hat-pin box, cut the rim off your box two thirds of the way around, leaving one end only with the rim on. The part without rim is the back of the chair. Press that upward, and cut the legs of the chair from the end that has a rim left upon it.
I made a grandfather’s clock by standing a hat-pin box on end. I glued to its upper front part the face of a penny watch. You do not need to spend a penny. Just mark the face of a clock in pencil and glue it to the front of your clock.
Really, I am very proud of the piano. It is not every doll-house that can have a piano—but you can make one, for it is easy. You will need a shallow letter-paper box and a narrow box such as fountain pens come in from the store where they are bought. Paste one long side of the narrow box across the front or back of the letter-paper box after you have stood the letter-paper box upright. The narrow box should be placed about where you think the keyboard belongs. (See Diagram Six, F, page 179, for making a piano from two boxes.) The music-rest is a bit of folded box rim glued to the central part of the piano above the keyboard. The keyboard is marked off with ink upon a strip of white paper and pasted upon the top of the narrow box. You can easily draw the first part of some music that you know, and place it on a tiny sheet of white paper to make a “piece” for the piano’s music-rest.
A mantel for the living-room may be made from a flat letter-paper box. Stand the box upon one long rim and place its printed side to the back. Cut from the front a mantel opening like the opening for a fireplace. (See Diagram Six, G, page 180.)
The Morris chair is made like any other chair. (See Diagram Six, C, page 177, for cutting a chair from a box.) It has two bent box rims glued to each side to make the arm rests, and the cardboard is cut rounding from the front rim of the box in cutting its legs.
I made a very cute little cupboard for my doll-house dining-room. It was easily made. You can make one out of any shallow box that is like a spool box, by cutting out all of its front rim excepting a narrow margin left all the way around its front cover. I cut some strips of cardboard and fitted them across the inside of this box and glued them to make shelves. Lace-paper made the shelf-paper. Metal corks from bottles and cold-cream tubes made mugs and silver-ware. Plates for the dining-room were circles cut from cardboard.
A sideboard may be made from half of a letter-paper box, cutting this in half lengthwise. Then cut this half the box as if you were making a high bench. Do not cut far up in the box rim to make the legs. Cut them curving at the front. Outline a drawer and cupboard doors upon the front, and paste a plate-rack at back. It is the cover of a narrow box glued behind the buffet.
Of all my doll-house furniture, I like the kitchen best. It looks so homelike. If I were a little doll, I know I should love to go into that kitchen and make candy on the stove. It would be such fun!
The stove is made from an oblong candy box cut like a bench. At two sides of its front, I cut oven doors and put round-headed paper-fasteners through them to make knobs. The prongs of each paper-fastener, bent, make latch for oven doors. At the back of each oven door, right inside the box, I pasted a small box and made a real little oven. I could put dishes in it!
The boiler in the kitchen is the kind of round tin they use to pack blue-print paper in. I stood mine on a spool after I washed the printed paper off from it. You can use an old baking-powder tin, if you have no blue-print paper box.
You can see how the kitchen sink is made—merely a box cover placed over the end of a deeper box. At the back of the box paste an upright piece of cardboard. The faucets are made from the two ends of a kid hair-curler pressed through the cardboard downward.
The kitchen table is the lower half of a correspondence-card box. It is cut as if it were a bench with long legs. (For cutting the bench, see Diagram Six, A, page 175.)
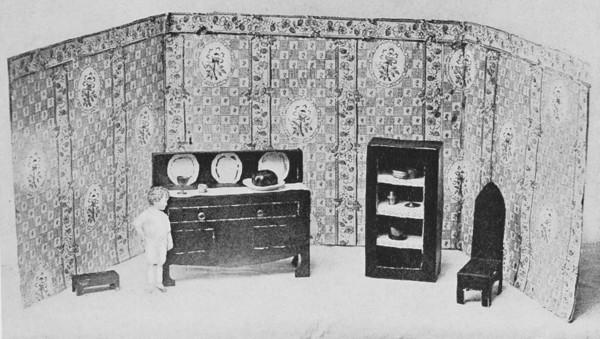
Boxcraft Doll-house Furniture. The Dining-room.
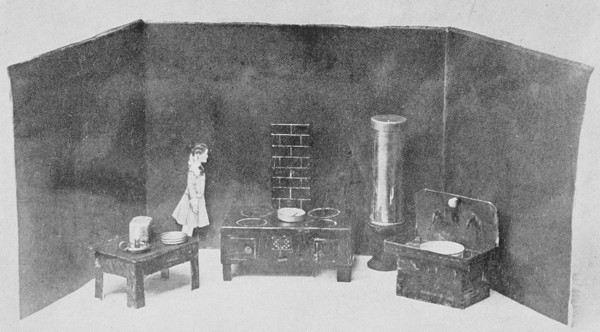
Boxcraft Kitchen Furniture for dolls. Stove, table, and sink are all boxes.
The boiler is a tin box upon a spool.
You will have a very good time playing in your doll-house, if you make one. You can make a four-roomed house from four large bandboxes placed on their sides. Put two upon the floor and glue the other two to their tops. Of course, you will not need to use the covers of the boxes. Each bandbox will make a room.
You can use strips of wall-paper for carpets and rugs. You can cut windows in the bandboxes. When you have furnished the doll-house, it will be quite like a real little home.
I painted my furniture with ink. If you paint yours, be careful to put newspapers down under your work, and be very, very careful to use your brush as dry as you can. In this way your work will be evenly colored. Let the furniture dry thoroughly before you attempt to play with it. If you like, you may paint it with water-color paints.
Material Required to Make “Ringfling”: the deep lower half of a box over seven inches square, four long pencils, and about twelve square inches of cardboard.
Ringfling is a jolly game. I am sure you will enjoy playing it. As many children as can play happily together may play the game. The first rule of the game is, “The more, the merrier!”
It takes but a moment to collect materials with which to play the game. The game itself may be made in about ten minutes—or less.
Take the deep lower half of some large square box and draw from corner to corner across its top. (See figure in Diagram Eleven, A, page 185.) Do this with heavy pencil lines.
Number each section of the board but one, using the numerals, 1, 2, 3 (one numeral each). Leave one section blank.
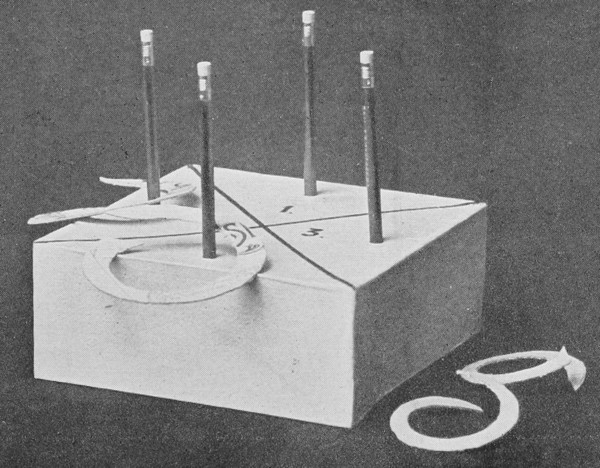
The Boxcraft Game of “Ringfling.” It is made with the help of pencils
and cardboard cut from box covers.
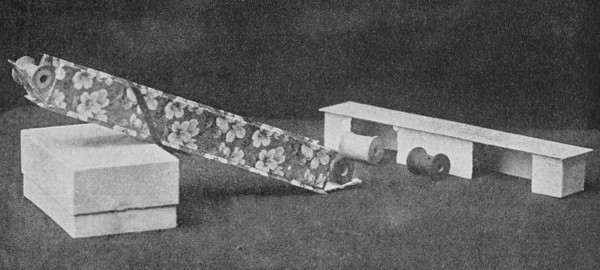
The Boxcraft Game of “Shoot the Chutes.” It is played with spools.
Cut a ring from cardboard, using a compass or saucer to guide you in drawing it first. Make it about three inches in diameter. (See Diagram Eleven, B, page 185, for cutting ring.) Make a smaller ring just like this larger one, and cut it in the very same way.
Take your pencils. Press the point of one into each section of the game-board at its center near the numeral you have drawn. Press the points of the pencils down first, and be careful to keep each hole small, so that the pencil will not slip too far down in it. The tops of all pencils should be of an even height, as you see them in the picture.
Here are the rules of the game:
Players play in turn.
Players count out to see who will begin the game and who will follow.
Each play consists of a turn to throw the large ring and the small ring.
The object of play is to have the ring tossed fall so that it circles about a pencil.
When a ring circles a pencil, it gives the player the count of the number that is upon that section. The small circle doubles the count.
Twelve counts win the game. The first to obtain this wins. You may make it eighteen—to make a longer game.
The game is played in rounds. To avoid dispute, it is best to keep the score of all players with pencil and paper.
Each player must stand five ruler lengths from the game when he flings the circles.
Material Required to Make the Game of “Shoot the Chutes”: a long box and its cover, and one high box without a cover—some spools.
This little boxcraft game may be played by two players. It is an easy game to make, as you can see by looking at the picture. It is made of two parts of one long box, with the lower half of another that is higher. It is played with spools.
To make the game, first cut the lower half of your long box as you see it cut in the picture. Make two openings in its rim, each wide enough to let a spool roll through it. Stand this part of the box upon the floor as you see it placed in the picture.
Now, you are ready to make the chutes. Cut the cover’s rim—the rim of the long box—at each corner, and press the cardboard out at each end.
Rest this part of the long box in a slanting position against your high box.
Paint four spools. Make two red and two blue. Two of the same color belong to each player.
The game is to try to get your two spools into the box. Every time you get a spool in by rolling it down the chutes, it counts you one count.
Players play in turn, one spool at a time. The game is played in rounds. The first player to reach the score of seven wins.
Material Required to Make “One-Two-I-Catch-You”: a square box cover and two buttons, one dark and one light. The counter is a round pill-box. (A square pill-box will do as well.)
This boxcraft game of “One-Two-I-Catch-You” is like a game of tag. It is a tag game on a game-board. As it is not so noisy a game, you can play it in the house.
To make the board to play on, take your pencil and your ruler. Rule a line from corner to corner across the inside of the box cover. Then, rule a line that will cross the center of the box, and another that crosses the center from the other side. This makes the triangular divisions of the board. Paint the triangles, alternating, black or blue. Leave the ones between, white. (See Diagram Twelve, page 186.)
Find your buttons now. Two players are to play this game. You will need a pill-box for a counter. Glue its cover on tight, and put a number one on its top and a number two on its base.
Play in turn, and toss the counter to see how far you can move. When the counter falls, take the number that is on its top and move as many triangles in either direction as the counter indicates.
Each player takes a different colored button to begin the game. Each button is placed in an opposite corner of the board. Each player must try to catch the other player by getting onto his triangle. The first to catch the other player three times is winner.
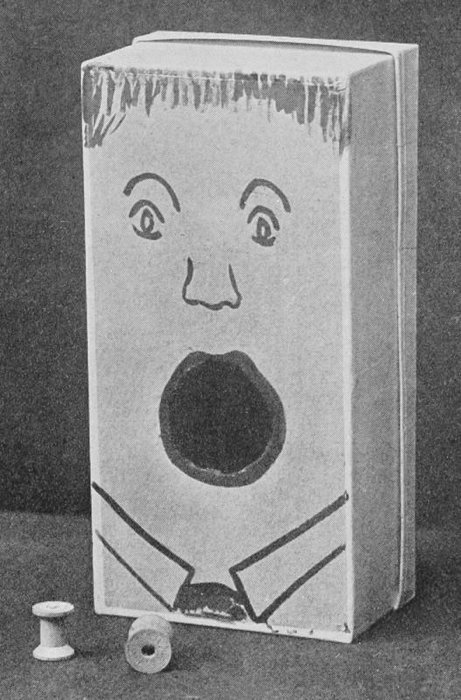
“Funny Mr. Box,” a Boxcraft Game, played with spools.
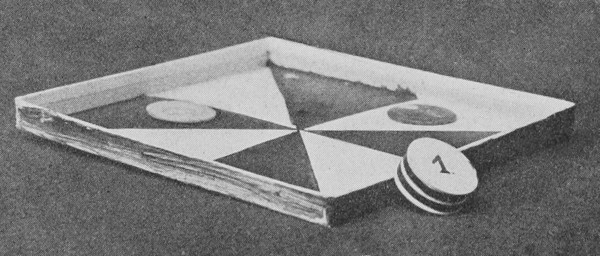
“One-Two-I-Catch-You,” a Boxcraft Game of Tag.
Material Required to Make the Funny Game of “Mister Box”: one large box with a cover—one similar to a shoe-box—two or three spools.
Allow me to introduce to you my friend Mister Box. He is funny and he is jolly. He likes to catch spools in his mouth, if you will be so kind as to throw them in.
Mister Box is a game. You can make a game like him. I will tell you how. You will need an empty box about the size of a shoe-box. It should have a cover.
Two or three players may play the game. Each will need an empty spool to play the game with. Each player may color his spool a different color. One may be blue; one may be red; and the third, if there are three players, may be green.
Now, to make Mister Box. Place your box on end and glue the cover tight. Next, take your pencil and draw a big face on the back of the box. Make the mouth large and round. Cut out the cardboard inside the mouth to make a big round hole about four inches wide. You can color Mister Box with your crayons, if you like. His hair should be brown, and his eyes too.
Now, to play the game, every player must stand, in turn, in the same place on the carpet or floor rug, four feet from the box. Measure four ruler lengths to get this. Each must try to get his spool into Mister Box. Toss the spool. No player may touch his spool till all have finished playing the round. The first one to get his spool into Mister Box six times wins.
Material Required to Make a Magic Box: two small oblong boxes with covers that slide over an inner drawer. Both boxes must be about an inch and a half long. Both must be duplicates of each other. About two yards of light twine are needed.
The magic box is truly a wonderful one. It will obey every command you give it—yes, it will! There is a secret that you will have to learn, but when you know this secret the little box will have to do just as you bid it.
The magic box is on a string. As it descends, you cry, “Halt!” The box stops at once. “Go on!” you cry. The box continues down the string. “Faster, faster!” The box fairly flies in its haste to get down to the floor! Wonderful! Wonderful!
Now, let me tell you how to do it. (It is a trick, of course!)
Find a small stick, round and smooth like a half of a toothpick.
Take the sliding cover from one of your boxes, and fit inside the drawer, across the center of it, the piece of wood so that there is space under it and above it.
Next, make a small hole at each end of the drawer of your box, and thread some string through both holes, letting the string pass under the stick of wood in the drawer. (See Diagram Thirteen, A, page 187.)
Place the sliding cover on the box and let the string pass through it at both ends. (See Diagram Thirteen, B.)
The SECRET of your magic box is the piece of wood in the drawer. Tell nobody about this. When you hold one end of the string in your right hand, place the toe of your shoe on the floor over the other end and keep the string taut. Then, loosen your hold slightly, and carefully bring the box upon the string up as far as your hand.
When you loosen the hold upon the string to make it less tight, you will notice that the box slides rapidly down the string; when you hold the string absolutely taut, the box remains firmly in one place. By practising, you will find just how much to loosen your hold on the string in order to make the box do as you wish.
Anyone who sees the box performing so wonderfully will not readily guess the secret of its magic. Here the second box, that is a duplicate of the first, comes into the play. Arrange this second box as if it were the trick box—except for the stick through the drawer. When your friends ask to examine the magic box, give them the second one. Keep both in your pocket. In putting the trick box into your pocket, slide its drawer a little, so that you can easily distinguish between the two boxes by feeling of them. When you give the duplicate, nobody will suspect that it is not the real box, if you manage cleverly.
“Wonderful! Wonderful!” they say. “What a MAGIC BOX you have!”
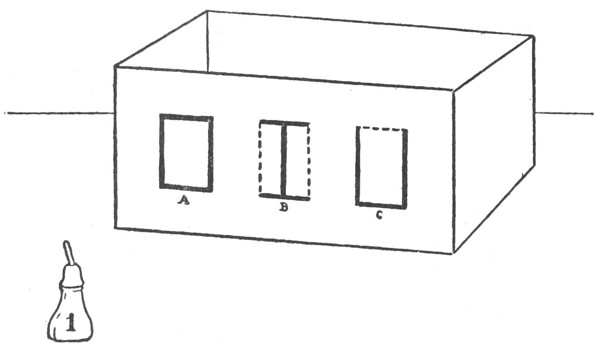
WINDOWS
Diagram One. Cut the cardboard sides of your box as the heavy black lines indicate. Fold outward upon the dotted lines.
A. A plain window without blinds or awning. Cut the cardboard out on all four sides.
B. Window with blinds. Cut the top line, the center line, and the base. Fold outward on the dotted lines.
C. Window with awning. Cut side lines and base. Bend cardboard outward and upward to make the awning over the window.
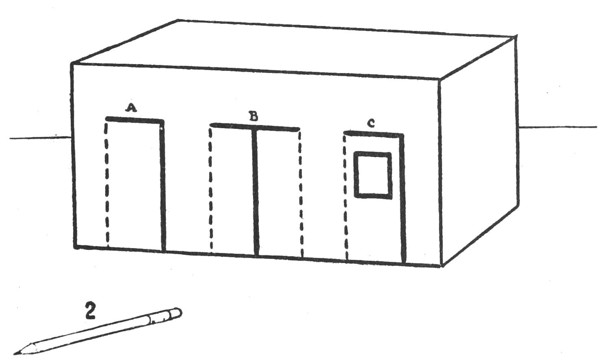
DOORS
Diagram Two. Cut the cardboard of your box sides as the heavy black lines indicate. Fold outward where there are dotted lines.
A. Single door. Cut at top and side (if need be, at the base also). Fold the cardboard outward to make a door.
B. Double door. Cut the square at top and down its center. (If need be, cut the base of the square also.) Fold both sections outward.
C. Door with window in it. Cut out a square from the single door. Cut the door at top and side. Fold it outward.
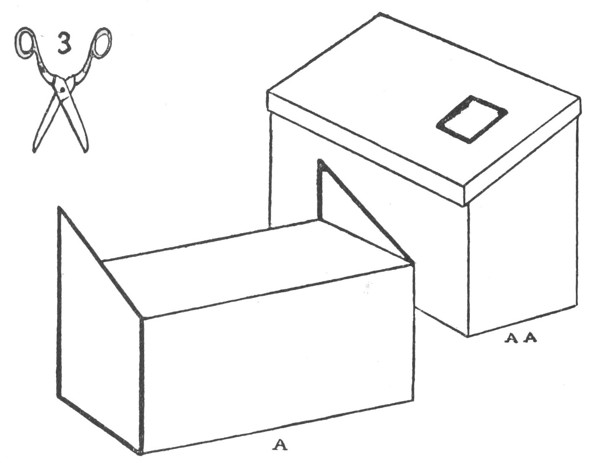
SIDE WALLS. SLOPING ROOF. PLACE FOR CHIMNEY OR TOWER
Diagram Three. This shows the shape of the cardboard pieces that are used to form side walls for a sloping roof; also the box-cover roof placed in position, and the hole for a chimney.
A. Side walls of cardboard, glued to box ends.
AA. Box cover placed on side walls. Square cut out so that a box tower or chimney may be inserted through its opening.
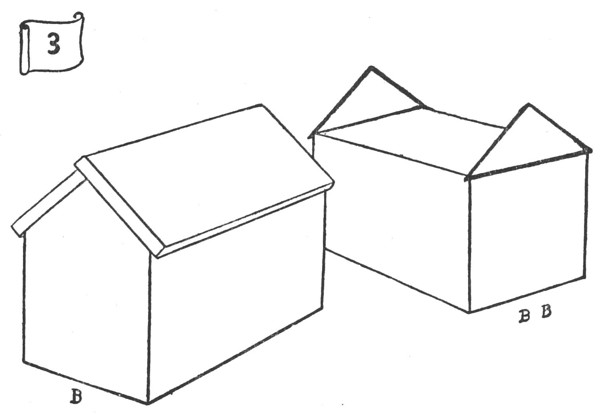
GABLE ROOF. TRIANGULAR SUPPORTS TO HOLD IT
Diagram Three. Triangular cardboard pieces are cut and pasted to the upper part of a box to hold a roof made from two interlapped box covers.
B. Gable roof made from two box covers.
BB. Triangular cardboard pieces cut to fit the ends of a box and hold a gable roof.
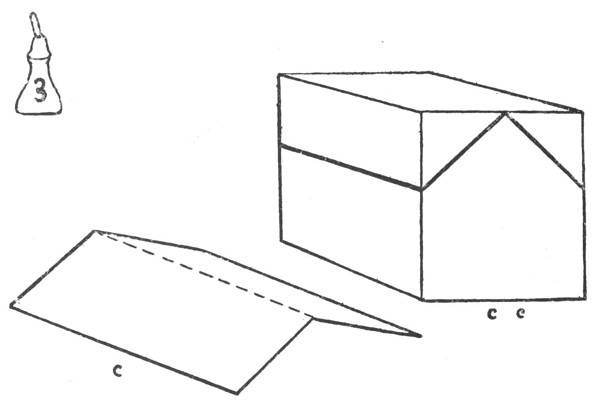
A SINGLE GABLE ROOF. BOX CUT DOWN TO HOLD GABLE ROOF
Diagram Three. Gable roof. This is a piece of cardboard cut oblong and folded through its center, lengthwise, to make a slanting roof. A deep box may be cut down to hold this roof and make a gabled building. Cut where heavy black lines indicate.
C. Roof cut from a piece of plain cardboard or corrugated cardboard.
CC. Box cut down to make the low sides and high-pointed gable ends of a small building.

ROUND-POINTED ROOF, TENT ROOF, INDIAN WIGWAM, AND CARDBOARD TENTS FOR CAMP
Diagram Three. Roofs.
D. Round-pointed roof cut from cardboard. Lap edges x to x. This makes a tent also. The Indian Wigwam is made this way.
E. This is a wide box cover folded through its center, rim cut up to the top on each long side. Bent, it makes a tent or tent-shaped roof. This is like the kennel roof.

RAMPARTS FOR A CASTLE OR FORT. A SMALL ROOF TO PLACE OVER A PORCH
Diagram Three. Cut Where the heavy black lines indicate.
F. Ramparts are cut from the rim of a box cover.
G. A porch roof may be made by taking the cover of any shallow box and pasting it over the doorway of your building. The porch pillars are long pencils run through holes cut in each forward corner of the box cover.
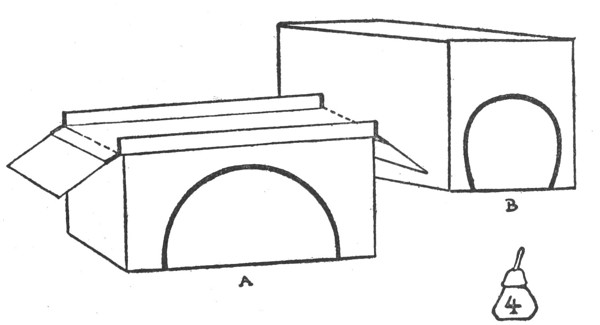
BRIDGE AND R.R. TUNNEL
Diagram Four. By cutting the ends or sides of boxes, tunnels or bridges may be made. Cut where the heavy black line indicates.
A. The bridge is made by cutting a semicircle from the long sides of an inverted box. The box cover, turned upward, forms the bridge railing. At each end, cut the corners. A cardboard strip is pasted to each end rim to complete the bridge roadway.
B. The tunnel is made by cutting a circular opening in the two ends of a deep box which has been inverted.
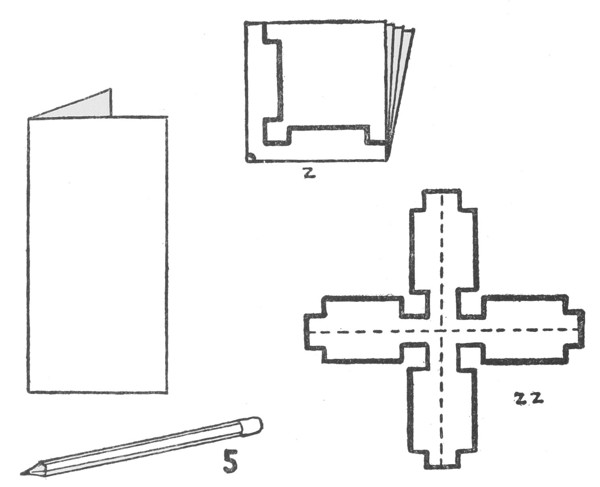
PATTERN FOR WINDMILL SAILS
Diagram Five. Take a square piece of paper. Fold it through its center once. Fold the two halves to make quarters. Draw the outline Z on the piece of paper folded into quarters, and cut this as is indicated by the heavy black line. This gives ZZ, the pattern for the windmill sails, which are cut from it in cardboard.
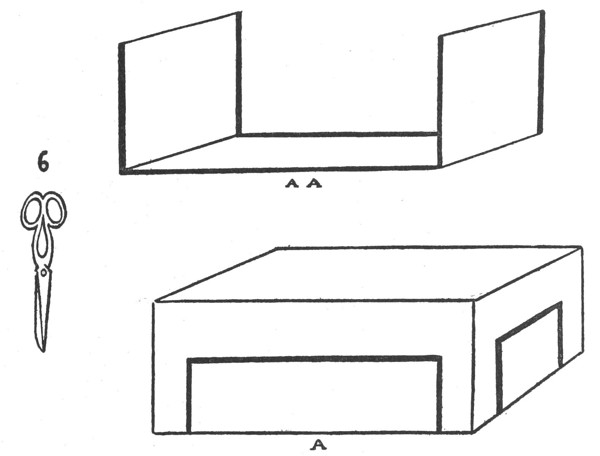
BENCH FORM AND BED
Diagram Six. Cut your box when it is inverted where the heavy black lines show.
A. A bench form is made by cutting to right and left of each corner of the lower half of an inverted box. Remove cardboard evenly from between these cuttings to make legs of the bench.
AA. This is the cover of a box from which long side rims are cut. It is glued to the bench form to make head and foot of a bed.
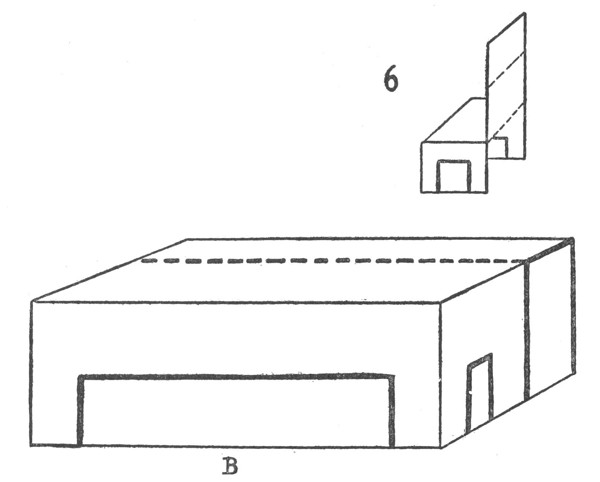
BENCH WITH HIGH BACK
Diagram Six, B. To make the bench with high back, use the lower half of a box, inverted. Cut the rim where the heavy black lines are shown. Cut front legs from the box rim on one long side. Turn up the other long rim of the box to add to the height of the back. Fold upward on the dotted line running lengthwise through the middle of the box.
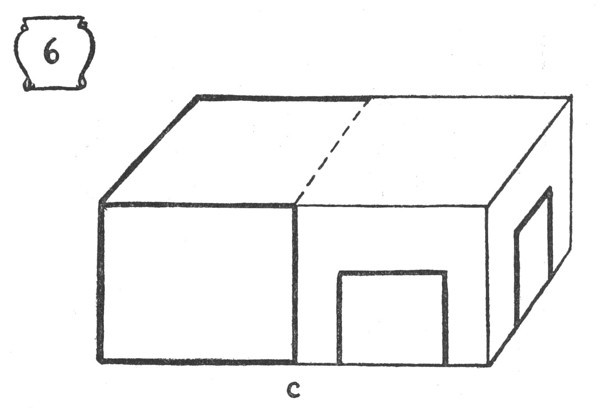
CHAIR
Diagram Six, C. To make the chair, turn the lower half or cover of your box so that it stands upon its rims. Cut where the heavy black lines are shown in the diagram. Fold the back of the chair upward where the dotted line is indicated.
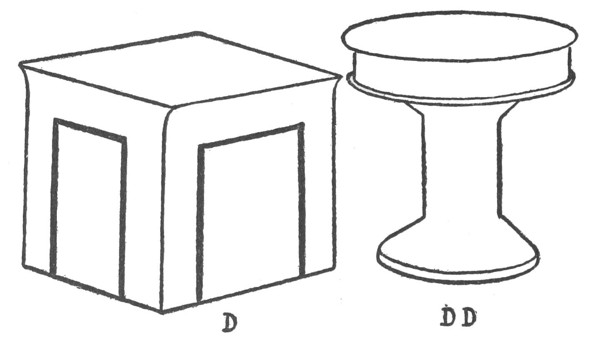
TABLES
Diagram Six. Tables are made from deep boxes by inverting the lower half of the box and cutting legs in the rim as is shown by the heavy black lines. Small boxes, square or round, placed upon upright spools will form tables, stools, stands.
D. A table cut from a correspondence-card box. Cut where the heavy black lines are shown in the diagram.
DD. A round table made with a spool and a box glued to its top.
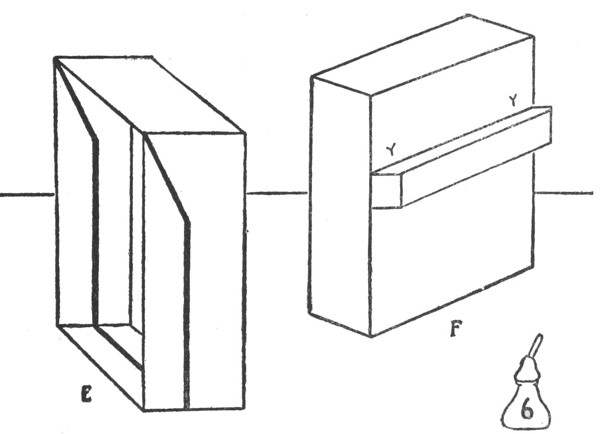
SCHOOL DESK AND PIANO
Diagram Six. Cut where the heavy black lines are indicated. Glue at y.
E. A school desk is made by standing the lower half of a small oblong box upon one of its long rims. Cut in the box rim where you see a heavy black line in the diagram. A piece of box rim is fitted below the top of the desk inside the box to make a shelf.
F. Glue a narrow box across a larger box that is placed upon one of its long sides at yy to make a piano with keyboard.
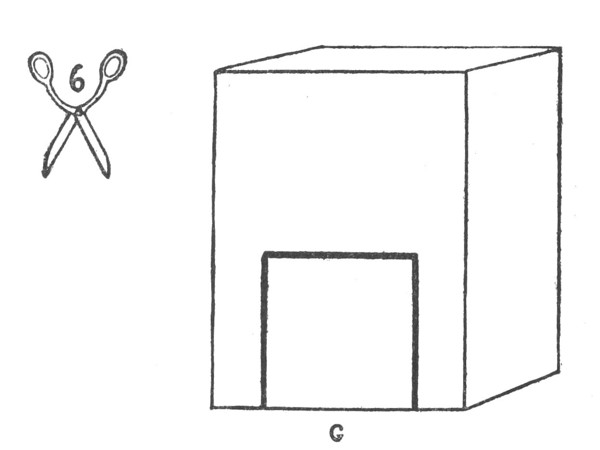
FIREPLACE AND MANTEL
Diagram Six, G. Stand any box you may have upright on one end or on one of its long rims. Cut from the front or back of the box an opening as shown by the heavy black line in the diagram.
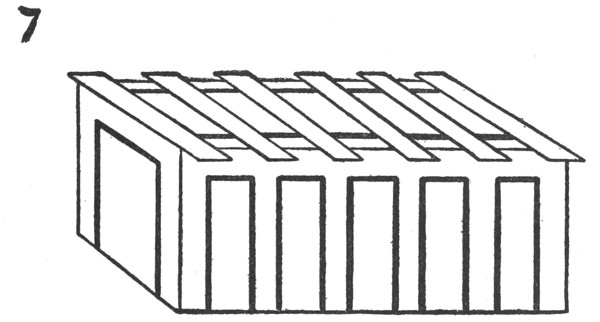
PERGOLA
Diagram Seven. The pergola is made from an inverted shoe-box. The lower half of the box is used. Cut the bottom from the box, leaving a narrow rim around the bottom. Cut the ends as shown in the diagram by the heavy black lines. Mark off pillars upon the long sides of your box with pencil, and cut these as shown by the heavy black lines of the diagram. Two cardboard strips are glued lengthwise at the top over the lengthwise edges left. Strips of cardboard are crossed over the open top which was the bottom of the box.
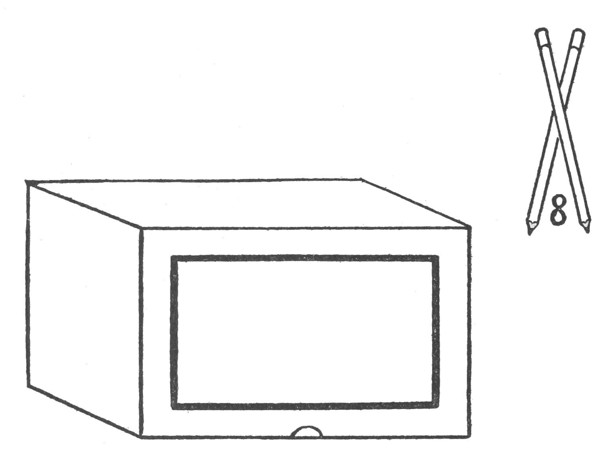
ZOO OR CIRCUS CAGE
Diagram Eight. Cut the cardboard box sides as indicated by the heavy black line in the diagram. Zoo cages are cut on each side. Circus cages are cut top and bottom of the box, and the box is then placed upon one long rim to have wheels added to it. The wheels for circus cages are cardboard disks.
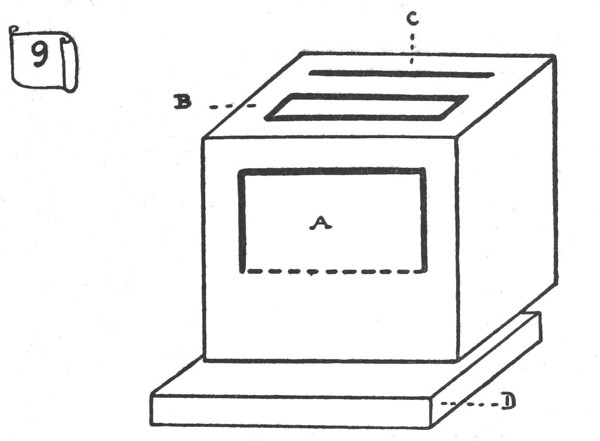
DOLLS, THEATER OR PUNCH SHOW
Diagram Nine. The theater is made from a deep square box placed to stand upon its rims, upon its cover. The opening A is cut upon one side of the box and bent inward where the dotted line is shown. This is the stage. B is the stage opening through which the dolls are let down by black cord to walk upon the stage and act. Cut an opening like this shown in the diagram by the heavy black line. C shows the slit back of the stage opening. Through this, postal-card scenery is let down upon the stage.
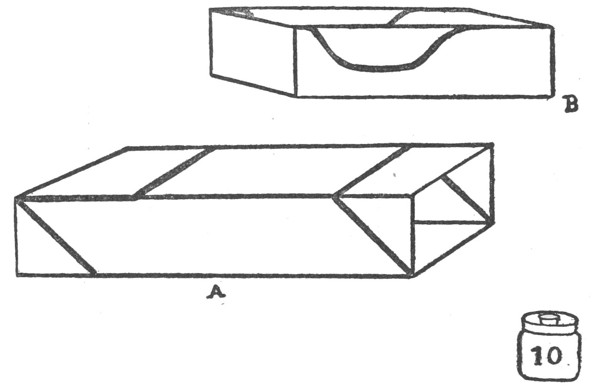
SLEIGH AND SLED
A. A sled is made by cutting the cover or lower half of a box that has been placed to stand upon its rims. Rims are cut off at each end of the box or cover. The long rims make the runners. Cut the rims Where you see heavy black lines in the diagram.
B. A sleigh top is added to a sled by cutting the cover of a box to the shape of the upper part of a sleigh. The lower half of the same box makes runners for the sleigh. Glue the cover to these. In cutting your box follow the heavy lines indicated in diagram.
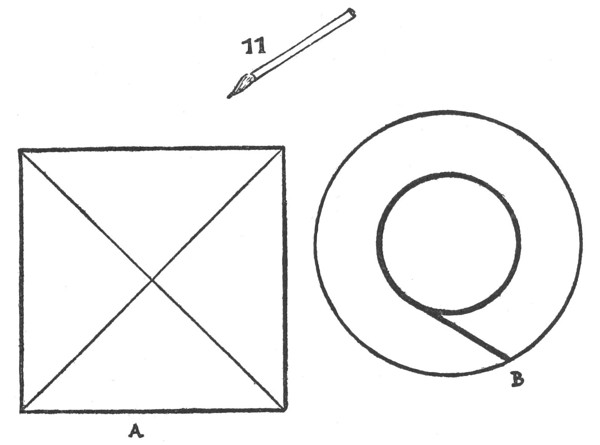
THE GAME-BOARD AND RINGS FOR “RINGFLING,” A BOXCRAFT GAME
Diagram Eleven.
A. This is the way to draw the sections for the game-board of “Ringfling.” Draw from corner to corner of the box upon its top. Number one section 1. Number another 2. Number another 3. Leave one section blank.
B. Cut two rings from cardboard like the one shown. Cut where the heavy black line is in the diagram. Make one ring smaller than the other.
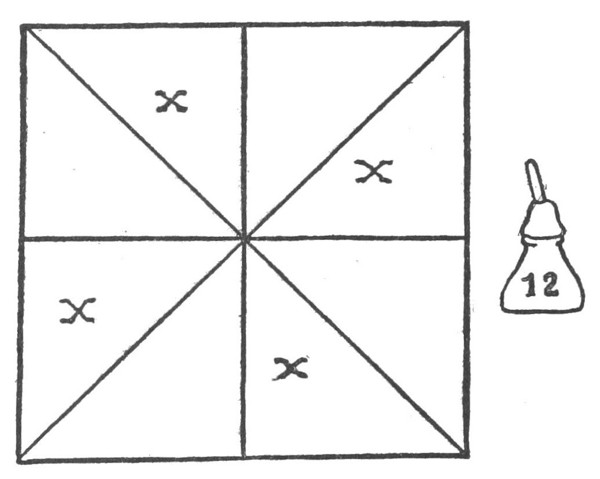
-BOARD FOR “ONE-TWO-I-CATCH-YOU”
Diagram Twelve. Draw this figure upon the top of your box. Draw from corner to corner, and from center of side to center of side, across the top of the box. Paint sections marked x.

THE MAGIC BOX
Diagram Thirteen. This shows a small box with sliding cover which draws over an inner drawer.
A is the drawer. At its center, crosswise, there is a piece of stick fitted into the box. Holes are pierced at either end of the drawer.
B is the box ready for its magic play. Its drawer is replaced within the sliding cover. The box is strung upon a yard or so of string.
End of Project Gutenberg's The Jolly Book of Boxcraft, by Patten Beard

*** END OF THIS PROJECT GUTENBERG EBOOK THE JOLLY BOOK OF BOXCRAFT ***

***** This file should be named 56751-h.htm or 56751-h.zip *****
This and all associated files of various formats will be found in:
        http://www.gutenberg.org/5/6/7/5/56751/

Produced by ellinora, Barry Abrahamsen, and the Online
Distributed Proofreading Team at http://www.pgdp.net (This
file was produced from images generously made available
by The Internet Archive)

Updated editions will replace the previous one--the old editions will
be renamed.

Creating the works from print editions not protected by U.S. copyright
law means that no one owns a United States copyright in these works,
so the Foundation (and you!) can copy and distribute it in the United
States without permission and without paying copyright
royalties. Special rules, set forth in the General Terms of Use part
of this license, apply to copying and distributing Project
Gutenberg-tm electronic works to protect the PROJECT GUTENBERG-tm
concept and trademark. Project Gutenberg is a registered trademark,
and may not be used if you charge for the eBooks, unless you receive
specific permission. If you do not charge anything for copies of this
eBook, complying with the rules is very easy. You may use this eBook
for nearly any purpose such as creation of derivative works, reports,
performances and research. They may be modified and printed and given
away--you may do practically ANYTHING in the United States with eBooks
not protected by U.S. copyright law. Redistribution is subject to the
trademark license, especially commercial redistribution.

START: FULL LICENSE

THE FULL PROJECT GUTENBERG LICENSE
PLEASE READ THIS BEFORE YOU DISTRIBUTE OR USE THIS WORK

To protect the Project Gutenberg-tm mission of promoting the free
distribution of electronic works, by using or distributing this work
(or any other work associated in any way with the phrase "Project
Gutenberg"), you agree to comply with all the terms of the Full
Project Gutenberg-tm License available with this file or online at
www.gutenberg.org/license.

Section 1. General Terms of Use and Redistributing Project
Gutenberg-tm electronic works

1.A. By reading or using any part of this Project Gutenberg-tm
electronic work, you indicate that you have read, understand, agree to
and accept all the terms of this license and intellectual property
(trademark/copyright) agreement. If you do not agree to abide by all
the terms of this agreement, you must cease using and return or
destroy all copies of Project Gutenberg-tm electronic works in your
possession. If you paid a fee for obtaining a copy of or access to a
Project Gutenberg-tm electronic work and you do not agree to be bound
by the terms of this agreement, you may obtain a refund from the
person or entity to whom you paid the fee as set forth in paragraph
1.E.8.

1.B. "Project Gutenberg" is a registered trademark. It may only be
used on or associated in any way with an electronic work by people who
agree to be bound by the terms of this agreement. There are a few
things that you can do with most Project Gutenberg-tm electronic works
even without complying with the full terms of this agreement. See
paragraph 1.C below. There are a lot of things you can do with Project
Gutenberg-tm electronic works if you follow the terms of this
agreement and help preserve free future access to Project Gutenberg-tm
electronic works. See paragraph 1.E below.

1.C. The Project Gutenberg Literary Archive Foundation ("the
Foundation" or PGLAF), owns a compilation copyright in the collection
of Project Gutenberg-tm electronic works. Nearly all the individual
works in the collection are in the public domain in the United
States. If an individual work is unprotected by copyright law in the
United States and you are located in the United States, we do not
claim a right to prevent you from copying, distributing, performing,
displaying or creating derivative works based on the work as long as
all references to Project Gutenberg are removed. Of course, we hope
that you will support the Project Gutenberg-tm mission of promoting
free access to electronic works by freely sharing Project Gutenberg-tm
works in compliance with the terms of this agreement for keeping the
Project Gutenberg-tm name associated with the work. You can easily
comply with the terms of this agreement by keeping this work in the
same format with its attached full Project Gutenberg-tm License when
you share it without charge with others.

1.D. The copyright laws of the place where you are located also govern
what you can do with this work. Copyright laws in most countries are
in a constant state of change. If you are outside the United States,
check the laws of your country in addition to the terms of this
agreement before downloading, copying, displaying, performing,
distributing or creating derivative works based on this work or any
other Project Gutenberg-tm work. The Foundation makes no
representations concerning the copyright status of any work in any
country outside the United States.

1.E. Unless you have removed all references to Project Gutenberg:

1.E.1. The following sentence, with active links to, or other
immediate access to, the full Project Gutenberg-tm License must appear
prominently whenever any copy of a Project Gutenberg-tm work (any work
on which the phrase "Project Gutenberg" appears, or with which the
phrase "Project Gutenberg" is associated) is accessed, displayed,
performed, viewed, copied or distributed:

  This eBook is for the use of anyone anywhere in the United States and
  most other parts of the world at no cost and with almost no
  restrictions whatsoever. You may copy it, give it away or re-use it
  under the terms of the Project Gutenberg License included with this
  eBook or online at www.gutenberg.org. If you are not located in the
  United States, you'll have to check the laws of the country where you
  are located before using this ebook.

1.E.2. If an individual Project Gutenberg-tm electronic work is
derived from texts not protected by U.S. copyright law (does not
contain a notice indicating that it is posted with permission of the
copyright holder), the work can be copied and distributed to anyone in
the United States without paying any fees or charges. If you are
redistributing or providing access to a work with the phrase "Project
Gutenberg" associated with or appearing on the work, you must comply
either with the requirements of paragraphs 1.E.1 through 1.E.7 or
obtain permission for the use of the work and the Project Gutenberg-tm
trademark as set forth in paragraphs 1.E.8 or 1.E.9.

1.E.3. If an individual Project Gutenberg-tm electronic work is posted
with the permission of the copyright holder, your use and distribution
must comply with both paragraphs 1.E.1 through 1.E.7 and any
additional terms imposed by the copyright holder. Additional terms
will be linked to the Project Gutenberg-tm License for all works
posted with the permission of the copyright holder found at the
beginning of this work.

1.E.4. Do not unlink or detach or remove the full Project Gutenberg-tm
License terms from this work, or any files containing a part of this
work or any other work associated with Project Gutenberg-tm.

1.E.5. Do not copy, display, perform, distribute or redistribute this
electronic work, or any part of this electronic work, without
prominently displaying the sentence set forth in paragraph 1.E.1 with
active links or immediate access to the full terms of the Project
Gutenberg-tm License.

1.E.6. You may convert to and distribute this work in any binary,
compressed, marked up, nonproprietary or proprietary form, including
any word processing or hypertext form. However, if you provide access
to or distribute copies of a Project Gutenberg-tm work in a format
other than "Plain Vanilla ASCII" or other format used in the official
version posted on the official Project Gutenberg-tm web site
(www.gutenberg.org), you must, at no additional cost, fee or expense
to the user, provide a copy, a means of exporting a copy, or a means
of obtaining a copy upon request, of the work in its original "Plain
Vanilla ASCII" or other form. Any alternate format must include the
full Project Gutenberg-tm License as specified in paragraph 1.E.1.

1.E.7. Do not charge a fee for access to, viewing, displaying,
performing, copying or distributing any Project Gutenberg-tm works
unless you comply with paragraph 1.E.8 or 1.E.9.

1.E.8. You may charge a reasonable fee for copies of or providing
access to or distributing Project Gutenberg-tm electronic works
provided that

* You pay a royalty fee of 20% of the gross profits you derive from
  the use of Project Gutenberg-tm works calculated using the method
  you already use to calculate your applicable taxes. The fee is owed
  to the owner of the Project Gutenberg-tm trademark, but he has
  agreed to donate royalties under this paragraph to the Project
  Gutenberg Literary Archive Foundation. Royalty payments must be paid
  within 60 days following each date on which you prepare (or are
  legally required to prepare) your periodic tax returns. Royalty
  payments should be clearly marked as such and sent to the Project
  Gutenberg Literary Archive Foundation at the address specified in
  Section 4, "Information about donations to the Project Gutenberg
  Literary Archive Foundation."

* You provide a full refund of any money paid by a user who notifies
  you in writing (or by e-mail) within 30 days of receipt that s/he
  does not agree to the terms of the full Project Gutenberg-tm
  License. You must require such a user to return or destroy all
  copies of the works possessed in a physical medium and discontinue
  all use of and all access to other copies of Project Gutenberg-tm
  works.

* You provide, in accordance with paragraph 1.F.3, a full refund of
  any money paid for a work or a replacement copy, if a defect in the
  electronic work is discovered and reported to you within 90 days of
  receipt of the work.

* You comply with all other terms of this agreement for free
  distribution of Project Gutenberg-tm works.

1.E.9. If you wish to charge a fee or distribute a Project
Gutenberg-tm electronic work or group of works on different terms than
are set forth in this agreement, you must obtain permission in writing
from both the Project Gutenberg Literary Archive Foundation and The
Project Gutenberg Trademark LLC, the owner of the Project Gutenberg-tm
trademark. Contact the Foundation as set forth in Section 3 below.

1.F.

1.F.1. Project Gutenberg volunteers and employees expend considerable
effort to identify, do copyright research on, transcribe and proofread
works not protected by U.S. copyright law in creating the Project
Gutenberg-tm collection. Despite these efforts, Project Gutenberg-tm
electronic works, and the medium on which they may be stored, may
contain "Defects," such as, but not limited to, incomplete, inaccurate
or corrupt data, transcription errors, a copyright or other
intellectual property infringement, a defective or damaged disk or
other medium, a computer virus, or computer codes that damage or
cannot be read by your equipment.

1.F.2. LIMITED WARRANTY, DISCLAIMER OF DAMAGES - Except for the "Right
of Replacement or Refund" described in paragraph 1.F.3, the Project
Gutenberg Literary Archive Foundation, the owner of the Project
Gutenberg-tm trademark, and any other party distributing a Project
Gutenberg-tm electronic work under this agreement, disclaim all
liability to you for damages, costs and expenses, including legal
fees. YOU AGREE THAT YOU HAVE NO REMEDIES FOR NEGLIGENCE, STRICT
LIABILITY, BREACH OF WARRANTY OR BREACH OF CONTRACT EXCEPT THOSE
PROVIDED IN PARAGRAPH 1.F.3. YOU AGREE THAT THE FOUNDATION, THE
TRADEMARK OWNER, AND ANY DISTRIBUTOR UNDER THIS AGREEMENT WILL NOT BE
LIABLE TO YOU FOR ACTUAL, DIRECT, INDIRECT, CONSEQUENTIAL, PUNITIVE OR
INCIDENTAL DAMAGES EVEN IF YOU GIVE NOTICE OF THE POSSIBILITY OF SUCH
DAMAGE.

1.F.3. LIMITED RIGHT OF REPLACEMENT OR REFUND - If you discover a
defect in this electronic work within 90 days of receiving it, you can
receive a refund of the money (if any) you paid for it by sending a
written explanation to the person you received the work from. If you
received the work on a physical medium, you must return the medium
with your written explanation. The person or entity that provided you
with the defective work may elect to provide a replacement copy in
lieu of a refund. If you received the work electronically, the person
or entity providing it to you may choose to give you a second
opportunity to receive the work electronically in lieu of a refund. If
the second copy is also defective, you may demand a refund in writing
without further opportunities to fix the problem.

1.F.4. Except for the limited right of replacement or refund set forth
in paragraph 1.F.3, this work is provided to you 'AS-IS', WITH NO
OTHER WARRANTIES OF ANY KIND, EXPRESS OR IMPLIED, INCLUDING BUT NOT
LIMITED TO WARRANTIES OF MERCHANTABILITY OR FITNESS FOR ANY PURPOSE.

1.F.5. Some states do not allow disclaimers of certain implied
warranties or the exclusion or limitation of certain types of
damages. If any disclaimer or limitation set forth in this agreement
violates the law of the state applicable to this agreement, the
agreement shall be interpreted to make the maximum disclaimer or
limitation permitted by the applicable state law. The invalidity or
unenforceability of any provision of this agreement shall not void the
remaining provisions.

1.F.6. INDEMNITY - You agree to indemnify and hold the Foundation, the
trademark owner, any agent or employee of the Foundation, anyone
providing copies of Project Gutenberg-tm electronic works in
accordance with this agreement, and any volunteers associated with the
production, promotion and distribution of Project Gutenberg-tm
electronic works, harmless from all liability, costs and expenses,
including legal fees, that arise directly or indirectly from any of
the following which you do or cause to occur: (a) distribution of this
or any Project Gutenberg-tm work, (b) alteration, modification, or
additions or deletions to any Project Gutenberg-tm work, and (c) any
Defect you cause.

Section 2. Information about the Mission of Project Gutenberg-tm

Project Gutenberg-tm is synonymous with the free distribution of
electronic works in formats readable by the widest variety of
computers including obsolete, old, middle-aged and new computers. It
exists because of the efforts of hundreds of volunteers and donations
from people in all walks of life.

Volunteers and financial support to provide volunteers with the
assistance they need are critical to reaching Project Gutenberg-tm's
goals and ensuring that the Project Gutenberg-tm collection will
remain freely available for generations to come. In 2001, the Project
Gutenberg Literary Archive Foundation was created to provide a secure
and permanent future for Project Gutenberg-tm and future
generations. To learn more about the Project Gutenberg Literary
Archive Foundation and how your efforts and donations can help, see
Sections 3 and 4 and the Foundation information page at
www.gutenberg.org


Section 3. Information about the Project Gutenberg Literary Archive Foundation

The Project Gutenberg Literary Archive Foundation is a non profit
501(c)(3) educational corporation organized under the laws of the
state of Mississippi and granted tax exempt status by the Internal
Revenue Service. The Foundation's EIN or federal tax identification
number is 64-6221541. Contributions to the Project Gutenberg Literary
Archive Foundation are tax deductible to the full extent permitted by
U.S. federal laws and your state's laws.

The Foundation's principal office is in Fairbanks, Alaska, with the
mailing address: PO Box 750175, Fairbanks, AK 99775, but its
volunteers and employees are scattered throughout numerous
locations. Its business office is located at 809 North 1500 West, Salt
Lake City, UT 84116, (801) 596-1887. Email contact links and up to
date contact information can be found at the Foundation's web site and
official page at www.gutenberg.org/contact

For additional contact information:

    Dr. Gregory B. Newby
    Chief Executive and Director
    gbnewby@pglaf.org

Section 4. Information about Donations to the Project Gutenberg
Literary Archive Foundation

Project Gutenberg-tm depends upon and cannot survive without wide
spread public support and donations to carry out its mission of
increasing the number of public domain and licensed works that can be
freely distributed in machine readable form accessible by the widest
array of equipment including outdated equipment. Many small donations
($1 to $5,000) are particularly important to maintaining tax exempt
status with the IRS.

The Foundation is committed to complying with the laws regulating
charities and charitable donations in all 50 states of the United
States. Compliance requirements are not uniform and it takes a
considerable effort, much paperwork and many fees to meet and keep up
with these requirements. We do not solicit donations in locations
where we have not received written confirmation of compliance. To SEND
DONATIONS or determine the status of compliance for any particular
state visit www.gutenberg.org/donate

While we cannot and do not solicit contributions from states where we
have not met the solicitation requirements, we know of no prohibition
against accepting unsolicited donations from donors in such states who
approach us with offers to donate.

International donations are gratefully accepted, but we cannot make
any statements concerning tax treatment of donations received from
outside the United States. U.S. laws alone swamp our small staff.

Please check the Project Gutenberg Web pages for current donation
methods and addresses. Donations are accepted in a number of other
ways including checks, online payments and credit card donations. To
donate, please visit: www.gutenberg.org/donate

Section 5. General Information About Project Gutenberg-tm electronic works.

Professor Michael S. Hart was the originator of the Project
Gutenberg-tm concept of a library of electronic works that could be
freely shared with anyone. For forty years, he produced and
distributed Project Gutenberg-tm eBooks with only a loose network of
volunteer support.

Project Gutenberg-tm eBooks are often created from several printed
editions, all of which are confirmed as not protected by copyright in
the U.S. unless a copyright notice is included. Thus, we do not
necessarily keep eBooks in compliance with any particular paper
edition.

Most people start at our Web site which has the main PG search
facility: www.gutenberg.org

This Web site includes information about Project Gutenberg-tm,
including how to make donations to the Project Gutenberg Literary
Archive Foundation, how to help produce our new eBooks, and how to
subscribe to our email newsletter to hear about new eBooks.