BY
FULLY ILLUSTRATED
LONDON
SAMPSON LOW, MARSTON & CO., LTD.
1914
The Editor hopes that this volume will be the means of inspiring boys to adopt some hobby and to follow it diligently. At any rate he has arranged that they shall be able to have a wide choice of occupations, and shall begin with expert assistance. Too many youths fall into mere aimless dawdling, and waste the golden years of their life loafing about smoking cigarettes, watching others play, chattering endlessly about games, but never engaging in them. Though this book is written for the boy’s play hour, it will not be without value in aiding him upon the sterner side of his career, if it shows him how to train hand and eye, how to strengthen his will and muscles, and if it inculcates patience, exactitude, and perseverance.
THREE HUNDRED THINGS A BRIGHT BOY CAN DO
There are few things about which so many mistaken notions exist as about training. There are several reasons for this, but most of the erroneous ideas may be traced back to the days when professional pugilists and runners were the only men who ever entered on any athletic exercise with any sort of organised preparation. For them a severe course of training was possibly a necessity. They were for the most part men well advanced in years and naturally fleshy; and to achieve the feats which they accomplished they no doubt found it necessary to reduce their weight, and for this purpose to take a great deal of exercise and to avoid all food tending to the formation of flesh; but for the average school-boy who plays football or fives, or goes paper-chasing, or, in fact, takes the ordinary amount of boy’s exercise, training, as it is generally misunderstood, is quite unnecessary, even if not harmful. He has no superfluous fat of which to rid himself, so any sweating which he may do only weakens him and renders him liable to cold. His lungs are in proper order and therefore his wind is good, and so there is no need for him to deprive himself of vegetables or his favourite pies or puddings. All he wants is to lead a healthy active life, and to do a fair amount of practice in the particular branch of athletics in which he hopes to excel.
If a boy be accustomed to walk to and from school, or even a part of the way, or to take his place regularly in the school games, he will already be in proper condition of wind and limb. He will now only require to develop Pg 2 the muscles which, in his contests, he will find it most necessary to use. These vary in nearly every branch of athletics; so his practice must be specially directed to the races or events in which he intends to take part. Now this practice is often as much overdone as in the old days the dieting and sweating used to be. I remember that when I was at school and training for a mile race, I was seldom content unless I had run two or three miles each day. Since then I have found out the error of my ways. The result of my long practice run was that when the day came for the sports I was much over-trained, and in the state usually described as “stale.” I could have pounded along for miles, but I was as slow as the proverbial cart-horse, and when it came to hard racing I was beaten by boys who had practised less persistently than I had, and whose limbs and muscles were therefore lissom and pliant.
The exact amount of practice required depends a good deal on the stamina and build of each particular boy. Big, muscular boys can undergo far more work than lightly-strung ones of less robust constitution; but it may be taken for granted as a general rule that it is better to do too little than too much. Practice should never be continued after one begins to feel tired; and if one is still feeling the effects of the previous day’s practice, it is always a good thing to rest for a day from active work, and instead to take a good sharp walk of four or five miles. When your muscles are stiff, as they are bound to be at the beginning, never force them. Get them gradually into working order, and never hesitate to rest entirely if you feel disinclined for exercise.
Rest, in moderation, is always good, and for this reason I advise boys of all ages who may be training, to make a point of going to bed early. To get up early is another aid to leading a healthy life, but I would especially warn my readers against taking any violent exercise before breakfast. Have your bath, followed by a brisk rub down with a rough towel; dress quickly, and then, if you like and can manage it, go out into the open air for a quarter of an hour or twenty minutes. Put on plenty of Pg 3 clothes, and eat either a biscuit or a piece of bread and walk quietly about, breathing freely. In the same way never do any practising immediately after a heavy meal. An interval of at least two hours should elapse to allow of the digestion of food.
Remember that your one object in training is not to force your powers, but to so increase and nurse them, that when the day for the sports comes you will be able to do your very best without fear of hurting or over-straining yourself.
Before entering for his school sports a boy must realise the important fact that it is given only to a few to excel at everything. The majority must be content to discover the branch of sport for which, by their natural abilities, they are most suited, and then to practise quietly and persistently so as to gain the best possible results.
School games and odd trials of skill will probably give the aspiring athlete some idea of the direction in which he is better than, or as good as, his fellows. In running races it is generally found that the heavily and powerfully-built boy is best suited by short-distance races, that is from a hundred yards to a quarter of a mile; but a long, loosely-knit lad usually excels at distances from half a mile to a mile. A short, sturdy boy, as a rule, develops into a long-distance runner, but as events above a mile are generally excluded, and very wisely too from the programmes of school sports, he has very little chance of distinguishing himself until later years, when his frame is set, and his heart and lungs are in a fit condition to withstand the strain caused by prolonged contests.
The prime object of the boy who desires to train for short-distance running should be to improve his speed. With this purpose in view, he should practise running from thirty to fifty yards at a time—running hard from the very beginning, and going at his fastest possible pace the whole of the way. He should do this three or four times each day, occasionally—that is, once or twice a week—running the full hundred yards. Races of two hundred yards and a quarter of a mile in length may be prepared for in just the same way, except that for the latter, a practice-run Pg 4 should seldom exceed three hundred and fifty yards. A quarter of a mile is a very fatiguing distance, and although it may be run in practice at a moderate speed, it should not be taken at racing pace, except in an actual race. In the intervals of training it is a good plan to obtain the assistance of a friend, and practise starting. In a short race so much depends on the start, that one who is able to go right away directly the signal is given possesses a great advantage.

The boy who intends to take part in the half-mile and mile races must pursue a somewhat different method, but he also must make a point of practising for speed. Most of his work must consist of running a quarter of a mile, or six hundred yards, with an occasional spin of half or three-quarters of a mile. The former distances must Pg 5 be accomplished at almost top speed, but without quite exhausting oneself; the latter must be taken at a regular, steady gait, bringing the legs out well to the front, but not carrying the knees too high. One run a day is quite sufficient, and perhaps once before the sports the full mile may be run, but this should not be done within a week of the eventful day.
Walking races are sometimes included in the sports’ programme, the distance usually being one mile. The best training for this is to walk half a mile, or sometimes three-quarters, at one’s best pace, taking great care to be perfectly fair, to keep the head erect, and to avoid all semblance of wriggle or shuffle.
For the hurdle race and steeplechase the beginner should practise persistently over obstacles similar to the ones which are to be used on the day, but never going the full distance, and occasionally running fifty yards or so on the level with a view to an improvement in speed.
Of jumping competitions there are usually two kinds—the high jump and the long jump, and much the same kind of advice applies to both. In each instance practice should be daily, with an occasional rest for a day, and taking great care to leave off always at the first symptom of fatigue, coupled with the feeling that what has already been done cannot be improved upon. In the high jump a beginning should be made at a height well within reach, the jumper going gently and lightly over so as to gradually extend the muscles. Then as he approaches the summit of his powers, he should pull himself together so as to put full force into each effort. He should jump cleanly, and start facing the bar. He should avoid all contortions and straining of the body, and above all things, refrain from the somewhat enticing-looking practice of jumping from one side—a practice which I once heard described as “putting one leg over the bar, and then going round and fetching the other.” It may pay up to a certain point, but after that point is reached it is absolutely useless.
The best and most successful jumpers have been those who have depended entirely on the spring from the hips. It is thence that all the power is obtained. Byrd Page, Pg 6 the famous American jumper, who often cleared 6 ft., and once reached 6 ft. 4¼ ins., was a thorough believer in the straightforward method. To show what persistent practice will do, I may mention that when he was very young, his legs were so weak that he was compelled to wear irons to support them. One day the doctor told him to attend a gymnasium and practise jumping in order to strengthen his limbs. He did so, with the result that his weakness was entirely cured, and that he became, as well as an expert bicyclist, the most famous jumper the world has ever seen.
To long jumping many of my previous remarks apply. In preparing for the jump, too long a run should not be taken, and in making the spring, the feet should be placed firmly together. The whole of one’s force should be put into each effort, and care should be taken to avoid making false attempts. When once he has started, the jumper should make up his mind to go right through. Both the jumper and the short-distance runner will find that a few minutes’ daily practice with a skipping rope will greatly strengthen the legs and the fore part of the feet, on which much of the strain is placed.
To all aspiring young athletes I would say: Be moderate, and take care not to overdo it; lead healthy, active lives; and avoid stuffing yourselves between meals with pastry and sweets.
Much benefit can be derived from gymnastic appliances if they are used understandingly. No advantage is to be gained by exercise that is carried on in a careless manner. Neither too much nor too violent exercise is beneficial, though constant and regular work is necessary. It is better to work for a certain length of time every other day than to devote all of one week to exercise, and not go near the gymnasium the next.
To use any apparatus carelessly is to use it dangerously. The writer has had many of his worst falls in doing some of the simplest tricks, because he was careless, and did not put his entire mind upon what he was doing. There is something besides and beyond the mere pleasure of being able to perform tricks in a gymnasium; there is a lasting benefit to be obtained in careful gymnastic exercise.
In beginning your exercises there are two points that you must bear in mind always. Stand erect, and before beginning any work draw a long deep breath. Breathe from the abdomen, so that the lower parts of the lungs are expanded. You will find by following this simple advice that anything you attempt will be much easier for you than if you go about your exercises in a careless or slouchy way. There should be no round-shouldered gymnasts. There is no one who has achieved distinction as a gymnast who is not as straight as an arrow, and across whose shoulder-blades a yardstick could not be placed without touching his back.
In your exercises avoid devoting too much time to one kind of work. Do not spend all your time, for instance, on the horizontal bar, or on the parallel bars. What all would-be gymnasts should strive for is a symmetrical development Pg 8 of their muscles. You do not want to have legs like a piano, hard and knotted with muscles, and arms like pipe stems. Nor do you want to have the arms and chest of a blacksmith, and legs like those of a crane. You want to have all your muscles developed alike, not one at the expense of another. To avoid this lop-sided kind of growth is the reason that gymnasiums have such a variety of appliances.
Now for the apparatus, and how it should be used. What boy, especially if he has lived in the country, has not tried to climb a rope, or go up a ladder hand over hand, and then, for the first time in his life, realised how heavy he is? Perhaps no form of exercise develops so quickly the upper arm and the chest as work on the rope and ladder in a gymnasium. In practising on the ladder, first try to pull yourself up until your chin is even with the rung. Keep at this exercise until you can repeat it three or four times without tiring yourself; then try to reach the rung above. Do not go up too far at first, for you may find yourself many feet from the floor without strength enough to come back as you went up. That, it is almost needless for me to remind you, means a fall—and a hard one too it may be. The same advice applies to the rope.
Almost as quick results may be obtained by practice with the dumb-bells, with which it is possible to exercise almost every muscle in the body. The dumb-bells should be light. Too heavy dumb-bells are apt to make a boy slow and sluggish in his movements. The proper weight for a beginner is half a pound, and under no circumstances should a boy use for regular exercise bells that weigh more than two pounds. Indian clubs are valuable, chiefly in strengthening the muscles of the arms and wrists.
Exercises on the rings are divided into two classes—stationary and swinging. In the former the rings are not swung. In the latter the tricks are performed while swinging. There are two ways of grasping the rings with the hands. In “single grip,” the rings are clasped as a boy grips his base-ball bat when he is ready to strike. It is used chiefly in swinging tricks. In the “double-grip,” the thumbs are kept close to the palms, and the hands rest on and over the rings.
The first trick on the rings, and the one that must be mastered before anything else is attempted, is the “breast-up.” This consists in taking a double-grip, and raising the body so that the chin is even with the hands. The hands and wrists should be over the rings, and the elbows straight out from the shoulder. Now, by leaning forward you necessarily bring your hands under your armpits, and you find yourself in such a position that you can push down on the rings and raise your body erect by simply straightening your arms. You must not expect to be able to do this the first time. It will take many efforts before you can accomplish it. The best way to learn it is to hold your weight with one hand, after you have raised your chin even with the rings, while you practise pulling the other in and under your armpit. When a boy can do this trick easily he will find that he has strength and skill enough to learn the other feats, of which this is the foundation.
In horizontal bar exercises the “breast-up” is executed in the same way, but it is seldom used in getting up on the bar. A much prettier way is the trick called the “circle.” This is done by clasping the bar with the double-grip—which, by-the-way, is the only one used on the bar—and raising your body as high as you can. If you can raise your chin above the bar, all the better. Now raise your legs in front of you as high as possible, and lift them over the bar, letting your head drop back. This will bring your legs and body down on the other side. If a boy can do this with a fortnight’s hard practice, he is doing remarkably well. In learning this trick lower the bar to the height of the shoulder and start the “circle” with a jump, which materially assists your progress during the revolution.
All boys who practise on the horizontal bar probably have in mind the “giant swing,” the hardest and most daring feat on the bar; but that is a long way in the future, and many other tricks must be mastered before it should even be attempted. Perhaps the best of these intermediate exercises is the “hook swing.” This is a very neat trick. You sit on the bar, apparently fall backward, catching the bar in the knee joints, and swing around, until you come up in your original position without touching your hands Pg 10 to the bar. It is not so hard as it looks if you go about it in the right way, and this is the proper way:
First practise by hanging head downward from the bar by the knees. Any boy can do this; but to learn the rest of the trick you need two assistants, who take hold of your hands and swing you gently at first, gradually increasing the swing as you gain confidence. When you can swing easily and safely without losing your grip and falling to the mattress as you swing backward, straighten your knees, and you will leave the bar and alight upon your feet. Your assistants will save you from falling on your head should you happen to let go with your knees too soon, which you would certainly do more times than once should you attempt the trick alone. Practise this until you can do it without help.
The next step is to sit on the bar, which should be lowered to within four feet of the ground, and fall backward. When you come to the end of the swing, let go with your knees and alight on your feet. At first you will need help in this, as in the early part of the practice.
When this is learned you can go half-way around. The object now is to come back to the position you originally had on the top of the bar. The mistake that nine boys out of ten make at this point is in thinking that all that is needed to complete the revolution is to give the body a harder swing. When you dropped from the bar in the way I have just described it was because you straightened your knees. If you bent your knees more at this point in the swing, and at the same time threw your head back, you would have found yourself on the bar instead of on the mattress. To prevent accident at first, you should have an assistant stand in front of you, so that in case you should pitch forward the moment you reach the top of the bar, you will fall into his arms. In case you should swing so hard that you cannot stop when your body becomes erect, you will simply make another half-revolution backward, when you can straighten your legs and come down on your feet in the way described already.
The most important exercises on the parallel bars are called the “dip” and the “grasshopper.” To do a “dip,” Pg 11 stand between the bars, placing your hands upon them, and raise your body to arm’s length. Then lower the body and raise it again by bending and straightening the arms. To do a “grasshopper,” begin in the same manner, but as the arms are almost straight make a little forward jump, lifting your hands from the bars, and bringing them down a few inches in advance of their original position. In this way you can travel from one end of the bar to the other, as this trick can be done equally well forward and backward. The jump may be combined with a swing in an exercise called the “pump.” These tricks are easily learned; they are very safe and make muscle fast. The chief danger in their use lies in their over-indulgence. In this, as in all other gymnastic exercises, enough is as good as a feast.
The flying trapeze is the most difficult of all the apparatus, and feats on the double trapeze are dangerous even to the trained gymnast. After you have mastered the exercises already described, it will be time enough for you to think about the trapeze.
Do not practise just before your meal hour, nor directly after it. The best time is from an hour and a half to two hours after eating. Do not practise for over an hour a day at first; that is sufficient for any boy provided he does not waste his time. It should be remembered that gymnastic feats are not necessary for health. It is quite possible to exercise all the muscles without an indulgence in dangerous displays; but many boys have the courage, the desire, and the skill to pass from exercises to gymnastics.
We may supplement our remarks by adding some observations upon how he became a gymnast by a writer who chooses to be known as “An Ex-Little Fellow.” He says: I have no doubt at least one of the readers of this book is a little fellow. He has just as much pluck as his bigger brother, his eye is as true and his mind as quick, but he does not weigh enough to be a success at athletics. His arms are too weak to knock out home-runs; his legs are not strong enough to carry a football through a rush line; and as for his back, the muscles are not hard enough, Pg 12 and the other fellow always turns him over when they are wrestling on the grass.
This little fellow doubtless thinks he is made that way, and cannot help himself. No matter how much he dislikes it, he feels that he will have to go through life watching bigger and stronger fellows playing all the games and having most of the fun. Now this is all a mistake, that is, if the little fellow has as much pluck and perseverance as little fellows generally have.
The writer of this sketch was a little fellow himself not many years ago. He remembers how he used to look with complete and absolute disgust on his bony little arms and thin pipe-stem legs. He used to look at the big muscles of one or two companions with hopeless envy. In fact, it got so bad that this particular little fellow determined to get strong, if it took years to do it.
The first thing was to get a bar. I selected a nice spot in the garden, planted deep in the ground two heavy timber uprights, and fastened firmly across the top, with mortised ends, a long heavy pitchfork handle, which was purchased at a village store, at a cost, I believe, of tenpence. When the turning-pole was finished, the next thing was to learn to do something. The first thing I learned was to hang on the pole. This may not seem like a very exciting trick, but the fact is my muscles were so weak that it took all my strength to hang there.
After hanging awhile I learned to swing a little back and forth, working up higher and higher, and it was a proud day when I was able to swing my body up over the bar, and rest my stomach on the top of it. Then I had to learn to “chin myself.” This came more slowly; but daily practice at dumb-bells and constant tugging at the bar gradually hardened the biceps and back, until on one happy day my arms bent to the strain, my head went up, and my chin projected triumphantly over the bar.
By this time the other boys became interested. They began to put bars in their own yards, and the little fellow had to superintend the operation and give instructions. The uprights should be about three by three, and planted with side braces. The post-holes should be at least three Pg 13 feet deep, and after the posts are set, filled in with stones and earth firmly stamped down. The bar must be just a couple of inches out of one’s reach standing under it flat footed. Half a dozen private bars resulted in a gymnasium in an empty stable loft, equipped with a bar, a ladder, and two trapezes. The little fellow watched his arms and legs with great concern, and could not for the life of him see that they were getting any bigger.

It did not take many months for the breeze to blow over with the other boys, but the little fellow kept on. When the weather got too cold for the out-door bar, he read Blaikie’s How to get Strong, and went through the prescribed dumb-bell exercises every night before going to bed. Then two pairs of cleats were put in the door-frame, as Mr Blaikie directs, and a short bar cut to fit them. It did Pg 14 not improve the looks of the bedroom door, but the little fellow was determined to have muscle at any cost, and swung on the high bar, and pushed on the low one every night for the whole winter. The next spring he was happy. His chest was beginning to stand out in front of his shoulders, and his biceps were swelling a little. He and his chum purchased a boat that summer, and rowed on the river every day, until they were brown as Indians, and could beat most of the light craft on the river.
The following year the little fellow went to the city, and joined a Y.M.C.A. gymnasium. There was plenty of good apparatus here, and he watched the other fellows and tried their tricks. A year or two in this gymnasium, with daily rowing in the summer, began to tell. The little fellow stripped at 123 pounds now; his arms were brown and sinewy; he could hold a good steady stroke for ten or fifteen miles in a working boat; could run several miles at a dog-trot; and had learned to “handle his body” on the bar.
Then he went to college, and in the gymnasium his arms, brown to the shoulders from rowing in the sun, won him among his classmates the sobriquet of “Athlete.” This was very agreeable to the little fellow.
Four years of work and practice in a college gymnasium could have only one result. At the end of that time the little fellow was no longer a little fellow. He weighed in his clothes 150 pounds, and every muscle in his body was hard and well trained. The friends who came down to college to see him get his diploma were greatly surprised to see him on the programme as Captain of the Gymnastic Team, and still more astonished to see him no longer a little fellow, but a stout gymnast circling the bar, swinging gaily on the trapezes, and building pyramids with his nimble confreres. That is not very long ago, and now the little fellow is surprised to find himself spoken of as about the best gymnast in one of the largest amateur athletic clubs in the country.
So much for our “Ex-Little Fellow”; and now we may recount how Mr. E. Lawrence Levy became the amateur champion weight lifter of the world. Although when a Pg 15 boy at school he was proficient in nearly every branch of athletics, and an adept at all games, it was not until later years that he turned his attention to gymnastics. It came about in this way. When twenty-five years old, Mr. Levy, having passed from school-boy to tutor, started a school of his own, and with a genuine love of athletics and a knowledge of the benefit which boys may gain from them by following them within reason, he had fitted up in his school-room a trapeze on which he was wont to practise with his pupils. Finding that it was scarcely safe to do this without skilled tuition, he sent for Professor Hubbard, the instructor of the Birmingham Athletic Club. The result was that the trapeze was removed from the school-room to the playground, where other appliances such as horizontal and parallel bars were also fixed. Here Mr. Levy again joined his pupils, and then, after three or four lessons, he, to the instructor’s surprise, accomplished several feats which are, as a rule, only achieved by practised gymnasts. Finding that he was outstripping his boys, he determined to join the Birmingham Athletic Club. Here he was able to measure himself against men of his own age and strength.
It was at the club gymnasium that he one night saw the heavy dumb-bells belonging to two professional “strong men.” He tried to lift the bells, but failed. This seems to have shaped his future course. Instead of being discouraged by failure, he determined to overcome all obstacles and go in for heavy dumb-bell exercise. He began with comparatively light bells, and with these he practised in the solitude of his school-room for hours at a time. Then he bought two new bells weighing 28 lbs. each, using them assiduously until he could do almost anything with them—holding them out at arms’ length, bringing them down to the sides of his legs and up again.
When he had thoroughly mastered the “twenty-eights,” he tried two “fifty-sixes.” These he retained for months, being determined not to attempt the heavier bells until he was quite perfect with the lighter ones. At length Mr. Levy was able to put up the 112 lb. dumb-bell. This was more than any member of the Birmingham Pg 16 Gymnasium had ever done, and it then became necessary to add two 84 lb. dumb-bells to the collection. With these Mr. Levy began quietly practising, one at a time. Then he took to using them together, and gradually overcoming the difficulties of the harder work, succeeded one evening in putting them up simultaneously.
From that point he never went back. Having done as much with the dumb-bells as at the time seemed possible, he decided to add the lifting of bar-bells to his exercises. He bought three, weighing 140 lbs., 165 lbs. and 180 lbs. He practised assiduously with these, but all the time he was yearning to do still bigger feats with dumb-bells. At last his opportunity came. One Friday evening, on visiting the Gymnasium, he found a dumb-bell weighing 150 lbs. It had been sent there for exhibition by some professionals who were visiting the city. He tried to put it up, and failed; but the dogged perseverance which marked his whole career came once again to his aid. Finding that the huge plaything was to be left at the gymnasium till the following Tuesday, he began practising indefatigably, and on the Tuesday evening, in the presence of his club fellows, he achieved his self-imposed task. The next week a dumb-bell of the same weight (150 lbs.) was added to his private collection, and he used it regularly. This private collection now consisted of two 28 lbs., two 56 lbs., two 84 lbs., two 100 lbs., one 112 lbs., and one 150 lbs. in dumb-bells, the three bar-bells already mentioned, and two iron bars, one 70 lbs. and one 120 lbs.—all these, together with two ring weights of 56 lbs. each, representing a total weight of nearly sixteen hundred pounds.
Mr. Levy appeared constantly in public. In 1891 he won the contest, held then for the first time, for the amateur weight-lifting championship, and afterwards he succeeded, at Northampton, in establishing a new record by putting up above his head no fewer than ten times a bar-bell weighing in all 170 lbs.
Of the recognised records for weight-lifting he held as many as nine; but Mr. Levy did not confine himself to one branch of gymnastics, nor made gymnastics his only athletic exercise. Each year at the grand “display” of Pg 17 the Birmingham Athletic Club he figured as a leader in exercises on the horizontal and parallel bars and on the rings. He was also an enthusiastic and expert cyclist, and took an intelligent interest in nearly every form of manly sport. He was, too, a busy brain worker.
His height was 5 feet 3½ inches; his chest measurement 41 inches; he weighed 11 st. 4 lbs., and had biceps measuring 16 inches and a forearm of 12¼ inches. At twenty-five years of age, before he took to gymnastics, his chest measurement was 34 inches, and the circumference of his biceps was twelve inches.

To my readers I commend Mr. Levy as an example of what pluck and perseverance will do when used to a rational end. For the benefit of those who may wish to follow in his footsteps, I will quote some advice from his own pen:—
“In gymnastics it is never too late to begin. There may be some who may want, like I did, to emulate the deeds of the strong men whom every age supplies; to them I would say, give yourself up to your favourite exercise as you would to music if you would excel in it. Athleticism is as jealous an accomplishment as any art you would acquire. Excel in it and you will find your reward in that rough physical vigour which the world has not ceased to admire. In order to gain it you will go through a course of training which will lay the impress of health on all you do. Instead of defying nature you will learn more readily to obey her, and your obedience will be gratefully, cheerfully accorded, for you will realise how magnificent it is to be strong yourself, and by your example and your deeds inspire others to dignify their physical powers.”
It would be difficult to say which ranks the higher in the estimation of modern boys—brain or muscle. Certain it is that in these days boys of “grit” feel a contemptuous pity for the youth who is “all head and no muscle.” Possibly most readers will admit that muscular and mental development should go together, and that modern athletics are the necessary adjunct of school life for the building up of a “sound mind in a sound body” (Mens sana in corpore sano).
Of the ancients it may be said that their faith was in “muscle.” Even old Homer, philosopher and poet, goes so far as to say, “There is no greater honour for a man during his life than that he should be accomplished in the use of his hands and feet.” It was the “man of muscle” who in ancient Greece received the highest honours and rewards; it was for him that breaches were made in the city walls that he might pass through in his triumphal march. It was he who was relieved from the payment of taxes, whose statue was erected at the public cost, and whose praise was sung by the poets.
In ancient days leaders and rulers were selected simply on account of their development of “muscle.” Hence we read of Caius Maximinus, who from the lowly position of herdsman, was raised to the dignity of a Roman Emperor on account of his physical strength. This Maximinus, Pg 19 it is said, could squeeze to powder the hardest stone with his fingers, and history tells us that on one occasion he “knocked down six men without drawing breath!” Those fingers of his must surely have been moved by muscles of iron, and his “biceps” must have appeared a veritable mountain! A consideration of the fact that Maximinus was upwards of eight feet in height renders these feats less surprising, but to most beef-eating British boys it will perhaps be a “staggerer” to learn that the mighty deeds of Maximinus were performed on a vegetable diet.

The history of another muscular leader, Milo of Crotona, may possibly have some elements of truth in it, and we can quite imagine his marching with his countrymen against an army of Sybarites, clothed in a lion’s skin and brandishing a tremendous club; but it will take more than the proverbial “grain of salt” to enable us to swallow the Pg 20 story of his running a mile with a four-year-old ox on his shoulders, killing the animal, and eating the carcase, every inch, in one day!
It is not the way of modern athletes to show their strength by killing four-year-old oxen, or knocking men down like ninepins. They let us see their development of muscle at the wrestling match, at the oar and the wicket, at swimming and cycling, at their walking, running, and leaping performances, and one great advantage of this is that the ladies, who were excluded from the ancient “gymnasia” on pain of death, can in these days, by their presence, not only secure enjoyment to themselves, but give pleasure and encouragement to many an aspirant for athletic fame, who, if for no other reason, would endure the hardest training to “win the plaudits of the fair.”
In the matter of training and developing the muscles, the old Italian proverb will, as in so many other cases, apply, “Chi va piano va sano e lontano,” or, as we should say, “He that goes gently and steadily goes safely and far.” There must be moderation in the commencement, or there will be a “breakdown” in the end. No youth who doubts the soundness of his heart and lungs should go in for muscular training—for heavy work with the dumb-bells, for instance—without medical advice. To weakly constitutions training may be injurious—even fatal. In developing the voluntary muscles, as of the arm and leg, the growth of which we can measure, we must be careful of the involuntary muscles—those regulating the heart and lungs, and which are naturally and unconsciously brought into use. Of course, those muscles most brought into play by special exercise will be most developed—of the legs and thighs, for instance, in walking, and those of the arms, legs, and loins in rowing. For the general development of muscle, it is, of course, well to “take on” those sets of muscles not used in one’s ordinary occupation. Thus a youth who is sitting the greater part of his time at study or work should walk, swim, and row; one who has a walking occupation would do well to take both to rowing and swimming; whilst a “waterman” would do best to go in for hard walking.
Every one knows that diet has a great deal to do with the development or deterioration of “muscle,” and that meat, vegetables, and drink should be very judiciously combined. Weston—whose great walk, in 1884, of 5,000 miles in 100 days, was spoken of by Dr. Andrew Blyth as “the greatest recorded labour, if its continuity be considered, that a human being has ever taken without injury”—dieted himself as follows:—
Breakfast (6.30 a.m.).—Porridge, eggs or fish, bread and butter, toast or mutton, and coffee.
Lunch (11 a.m.).—Bread and butter, and coffee.
Dinner (2 p.m.).—Mutton broth, meat, potatoes, cabbage, bread pudding, and soda water or ginger ale.
Tea (7 p.m.).—A little toast, and tea or coffee.
Supper (10.30 p.m.).—Toast, figs, sponge cake, pudding, and milk or soda water.
It will be thus seen that alcohol formed no part of Weston’s diet, and that his principal drinks were tea, coffee, and milk.
This says much for the advantage of the practice of total abstinence, especially in view of the fact of the continuity of muscular exertion. The number of steps taken in Weston’s great walk has been calculated at about 11,000,000, and the daily work of the muscles equivalent to that of raising 793 tons one foot.
Another testimony to the advantage of abstinence from stimulants in the development of “muscle” is given by Louis Cyr, the Canadian athlete, who secured the title of, “Strongest Man in the World” at a Paris Exhibition. He weighed 315 lbs., and mentioned, among his feats, that he could break with his bare fist a stone two inches thick, four inches wide, and six inches long. He took his wife (who weighed 110 lbs.) and balanced her on the top of a 12-ft. ladder, resting on his chin. Cyr said that the great secret of his strength was his total abstinence from all alcoholic drinks, and this bears out Dr. B. W. Richardson’s statement that “the idea of alcohol giving force and activity to the muscles is entirely false.”
Walking.—As a rule, the walking of long distances in a short time is a sad mistake. There is little or no pleasure in it, and the injury it may do you quite counter-balances the satisfaction you may feel in having accomplished it. I wouldn’t give a pin to be able to do my three miles in 21 min. 28 secs. like Webster, because I know perfectly well that my mind would gain nothing, or my body either from such an achievement. Every day of the year, unless specially hindered, I walk between eight and ten miles, and I am always discontented if anything stands in the way of my walk. From my own experience, I feel sure that boys, whether training for football, or school examinations, cannot do better for themselves than walk whenever they have the chance. You never know what call may suddenly be put upon the muscles of your legs. A life may depend upon your ability to sprint seven or eight miles in the hour. And if you can walk as many miles straight off and enjoy every yard of it, you may rely on being able to walk and run the distance in the time.
A few words may be said on style in walking. It is simply wonderful how people differ in this respect. Hardly two persons walk alike. They either carry their heads, or bodies, or arms differently, or there is a distinct difference in the way they use their legs or feet. However, there is nothing very sad about this. Variety is charming, even in pedestrianism, though in professional walkers this variety is apt to show itself in a walk that is almost twin brother to a trot. The following words of the once celebrated Westhall are valuable for boys and men who walk for health and pleasure, as well as professionals who walk for pots or purses:—“To be a good and fair walker the attitude should Pg 23 be upright, or nearly so, with the shoulders well back, though not stiffly so, and the arms, when in motion, held well up in a bent position, and at every stride swinging with the movement of the legs well across the chest, which should be well thrown out. The loins should be slack, to give plenty of freedom to the hips, and the leg perfectly straight, thrown out from the hip bodily and directly in front of the body, and allowed to reach the ground with the heel being decidedly the first portion of the foot to meet it.” Some people insist on the toes being turned out in a most unmistakable way when walking. It is not at all a pretty sight, and much more suggestive of a duck waddling out of a pond than a well-trained human being. Besides, it throws an undesirable and harmful amount of strain upon the smaller toes. Better to point the toes downwards and forwards, never outwards; spring sharply towards the tiptoe, straightening the knee. Learn also to hold the ground with the great toe at the beginning and at the end of each step. We cannot grasp the ground; good foothold is only to be obtained by pressure of the toes against it. This may, at first reading, seem rather strange counsel; but if we have any physical relationship with monkeys, the strangeness of it is at once removed. Mark how the monkey holds with his feet. Perhaps a million years ago we also (or rather our prototypes) held the ground with our feet in like manner.
One thing is certain, that bad walkers (bad in style, I mean) are very ugly to see, whereas there is something majestic about the carriage of a good walker.
Sprinting.—Not many athletes can excel in all kinds of running, and the champion sprinter is not generally a winner of long-distance races. Moreover, it is necessary for each runner to decide which he will be, for the training for each is different. Train gradually. At first take sharp walks of three or four miles. This will make the muscles begin to harden. Then run steadily for a quarter of a mile at a time, not troubling much about the speed. Cultivate the use of the toes and stride straight forward. Towards the end of the run the speed may be increased, for the muscles will then be in working order. Even now, Pg 24 however, the young sprinter should not tire himself. A week should be employed in this way before the more severe training is undertaken. Never begin to run violently at first, and this rule should be observed particularly in cold weather, for until the muscles have warmed to their work they are liable to strain, or even to suffer more severe injury. Practise starting. If you have a friend ask him to act as starter, and start over and over again, going to the mark and putting yourself in position time after time. In a short race like this a good start often makes all the difference, for it means sometimes a gain of a yard.
Middle Distance Races.—Speed wins short-distance races; endurance wins long-distance races, but a combination of each is needed in the medium distance contests.
Long Distances.—The training for long-distance races needs patience and endurance, for the tax upon the runner is great. Boys should not compete in long distances. No one under eighteen years of age should run a mile. The method of training is to run a quarter, or half a mile, according to the strength of the runner, and then each day to increase the distance or to run the same distance at a greater speed. Gradually by this process the lungs, the heart, and the muscles are strengthened until feats hitherto impossible become easy. In a long-distance race judgment must be exercised whether to go the distance rapidly and trust to endurance or to run warily and win by a spurt at the end, when it may be that your opponent is exhausted.
The Long Jump.—Speed is an important element in this feat, more important indeed than the spring. Experts take a run of from a hundred to two hundred feet as though they were running a sprint race and are going at their highest speed when they rise from the ground. When they are coming to the ground again they thrust their legs forward as far as they can, and so gain a foot or even more. This needs practice, however, for if the leaper loses his balance and falls backward his jump does not count. To start from the mark also needs practice, and one of the methods of mastering this feat is to run slowly to a point about nine paces short of the starting place. In training Pg 25 this point may be marked by a piece of paper. Then sprint from the paper to the starting place. Experts are able to jump twenty-four feet, and a leap of twenty-two is excellent, but not many can hope to reach these lengths.
The High Jump.—Here the athlete begins his run to the centre of the bar slowly, then he increases his speed a little, finishing with a quick run and a bound. The spring is taken in something like a crouching position with the head drawn in, but in the air the shoulders are lifted and the arms and legs jerked upwards. As the jumper crosses the bar he shoots out his legs, raises his shoulders still higher, and twists his body until he faces downwards. In fact he is then nearly horizontal, and an amateur champion of the world has likened his position at this stage to that of an arrow crossing a bow. When he comes to the ground he faces the bar. Some jumpers rise from the right foot, some from the left. The young athlete should find for himself which method suits him best. It is usual to take the leap as far in front of the bar as the bar is from the ground. Thus, if the bar is four feet high the leap would begin four feet from a point on the ground directly under the bar. The run usually begins twelve good paces from the bar, and consists of one bound after another, concluding with three short energetic ones. Then comes the spring from a crouching position. If the start is from the right foot, this foot should be almost parallel to the bar, and the heel of this foot should be the last to leave the ground. A run would carry you far, but in this feat it is the vigorous spring which carries you high. There are those who can jump more than six-feet high in this way, but they are among the champions.
Hockey.—Hockey is a game which has become very popular in England during the past few years. It is generally believed to be a southern form of the Highland game of shinty, the great game of the clansmen in years gone past, and still played in many of the northern glens, notably on the Dumbartonshire side of Loch Lomond. The hockey of the North is not played according to any scale of points, the winning team being that which secures most goals; in the South, where it is frequently played on ice as well as on terra firma, certain marks of merit are awarded, after the style of Rugby Union football.
The modern hockey stick is to some extent an artificial contrivance after the style of the driver or play club of golf. Indeed, to golf it bears some little semblance, and strangers frequently confound the two pastimes. The Scottish school-boy, when hockey comes on in its turn with other recreations of the playground, sets out for the woodlands with a strong, sharp pocket-knife. He examines carefully all the hedge-rows to see if there is any young plant which has a natural turn at the end. If he can find such with a three feet shaft and a four-inch crook at the end he sets to work there and then, and in due time his “shinty” or hockey stick is pruned and ready for the game. The full-grown Highland player will possibly provide himself with a very heavy oak sapling, and with this he will strike powerful strokes, with his right hand, or both hands if required, when in a close contested maul or fray in front of the goal. These naturally-grown clubs have more spring in them than those of artificial make, but unless they are carefully bound with cord the head is apt to give after a little hard play.


A good deal of the art of the game consists in passing or nursing, as in Association football. A novice would strike the knag or knob away from him as soon as he had obtained his opportunity. Not so the adept, who would “dribble” it forward, to use a football phrase, a few yards at a time, work it on to his partner, back up, and keep following it, then, with one swinging blow, make a shot for goal. In hockey on the ice the dribbling game is seen to most advantage, as the skilful skater can take the knag a hundred yards or more by adroit nursing or passing; were he to strike it away with the first blow the chances are that it would be immediately returned with interest, and a goal scored to the opposite side.

In the Highlands it is a grand sight to see two opposing bodies of clansmen—met as of old they met with targe and claymore—to fight out a friendly game. Everything is cast aside but shirt and kilt, and bare-headed and bare-legged the contestants seem to have walked out of the picture of some ancient Highland foray. Striking off in mid-ground the welkin soon rings with their shouts in Gaelic, their cheers and expostulations. Blows that were meant for the knag sometimes fall heavy upon an opponent’s knees, and soon legs are to be seen streaming with blood. In the heat of the play they feel it not, though next day they will possibly not have a part of their under limbs without bruises between ankles and knees. With terrific swing Donald or Duncan, who stands six-feet two in his socks, will drive it like a cannon ball through the air; and arrested by Malcolm’s head in its flight the latter drops like a stone, only to recover his senses in a minute again and go off in wild pursuit. When the sun sinks, the game is proclaimed over, and both sides shake hands, dress, and depart homeward, well pleased with their sport, no matter whether they may have won or lost. Pg 30


Indian Clubs.—Club swinging, if carried out in the correct style, brings almost every muscle into play, develops the chest and arms, imparts an easy carriage to the figure, and, if persevered in, under proper conditions to be hereafter mentioned, will ultimately enable the most round-shouldered individual to assume that lissom and perpendicular attitude which is the characteristic of the finished athlete.
First let me impress upon you the importance of avoiding heavy clubs when you commence the exercise, or even after becoming moderately proficient. Difficult feats are not easy to accomplish with very heavy clubs, besides the latter, instead of strengthening the muscles, are more likely to produce the opposite effect. Directly the club is heavy enough to sway you about on your feet, the exercise is doing you harm, and your attitude will appear ungraceful. Should you be ambitious to swing very heavy clubs, be advised to proceed cautiously, and gradually increase the weight at long intervals. Clubs recommended for ordinary use should weigh between 1½ and 2 lbs. each, as that weight affords plenty of muscular exertion to strong and comparatively weak men alike, especially in difficult exercises. Pg 32 After becoming fairly proficient with the lighter weights, heavier clubs might be used with advantage, say three or four pounds each, but a practised athlete of great muscular power may safely swing clubs of twenty pounds or more. A club, say twenty-two inches in length, made of willow which should weigh about 1½ lbs., is the most suitable for young boys or ladies. The club should be well tapered towards the top and artistically shaped: an ill-shaped club is a very awkward and unsatisfactory instrument. In nearly all exercises the feet should be some distance apart in proportion to your height: for a man of five feet nine inches, about the proper distance between heels would be seventeen inches. For many exercises the shoulders should be kept square to the front, while in others it is necessary to turn more or less to the right or left. If the shoulders are turned through half a right angle, reckoning from the position with the shoulders square, the shoulders are said to be half-right or half-left; if the shoulders are turned through a complete right angle, the shoulders are considered full right or full left as the case may be. Style is a most important item to be considered, not only for the sake of appearance, but also in order that the utmost physical benefit may be derived from the exercise. An eminent authority, in speaking of style, remarks: “If you swing clubs without regard to style, you will naturally contrive to cast almost all the labour upon your strongest muscles, so that the exercise, instead of searching out and strengthening your weak points, will merely tend to increase the muscles which are already disproportionately developed; whereas, if you attend carefully to style, you will be compelled to bring a great variety into play, so that your weakest muscles will be at first most severely taxed, and will gradually become developed in proportion to those which are naturally strong.”
It is necessary that the knees be kept straight and the muscles of the legs well braced, as there is a tendency at first, especially with heavy clubs, to let the knees bend in the course of certain movements; the head should be carried erect, and should turn with the shoulders, so that you always look in a direction at right angles to the line of the Pg 33 shoulders. The best way to keep the head steady and in its proper position is to fix the eyes on some point a trifle above their own level, in a direction at right angles to the line of the shoulders for the time being. Should you allow your eyes to wander, you will find it impossible to keep the head steady. In summing up the chief points relating to style, the following should be kept in view, viz.:—
(1) All unnecessary movement of the body should be avoided, the head should be carried erect, and the feet firmly placed at a distance apart in proportion to your height.
(2) In swings, keep the arm as nearly straight as possible; in twists, the hand should be kept almost in the same place throughout the movement.
(3) The movement of the club should be kept even, and avoid all abrupt or sudden changes of pace.
(4) The clubs should be kept in accurate turn with each other.
In order to correct your own style, a good plan is to practise before a looking-glass.
The proper position for holding the club before beginning an exercise is called “the carry.” Stand erect and grasp the club with the right hand, lift the club and hold it up vertically, with the hand just in a line, and not raised higher than the shoulder.

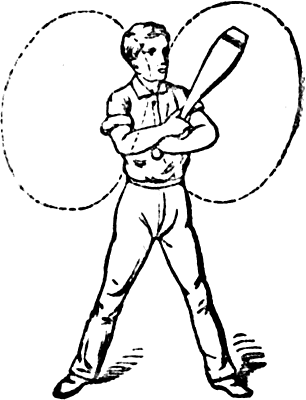
Club exercises are divided into four series. The first, called Outward, are those in which the right club moves in the same direction as the hands of a clock facing you, whilst the left club moves against the hands of the clock.
Inward exercises are those in which these conditions are entirely reversed, and parallel exercises are those in which both clubs swing with or against the clock. Windmill exercises are explained at Fig. 2, the subject is made clear in Pg 35 Fig. 1, where, for the sake of simplicity, both hands are holding the same club; the right hand, which is travelling in the same direction as a clock facing the athlete, is making an outward circle, as the left hand is working against the clock, the left hand is making an inward circle, and as both hands are swinging with the clock, a parallel exercise would be in progress, if there were two clubs instead of one as shown in the illustration.
The outward front swing follows “the carry” as a natural consequence. Straighten the arm completely till the hand is above and about three inches in front of the shoulder; the point of the club should then be allowed to move slightly forward, with the wrist turned in, then let the hand and club move to the right, the arm being kept straight, and the club being kept in a straight line with the arm throughout the movement. A circle can then be described and a return made to the initial position.
To make this description more easily understood, I have a capital illustration in front of me, and I cannot do better than quote it.
“If you were to stand with a wall about ten inches in front of you, the point of the club, would, in the preparatory position, just touch the wall at the highest point you could Pg 36 reach with the club; and as you did the swing, the point of the club would always touch the wall, and, if it were chalked, would draw a circle on the wall, of which the radius would be as nearly as possible equal to the length of your arm and the club together.”
This is one of those simple-looking movements which are by no means easy of accomplishment. The arm should be kept straight with the arm and the club in a line, and avoid stooping as the club passes in front of the legs. Beginners should practise front swings, and follow them up until they are done with before attempting anything else.
Circles, Swings, and Twists.—It should be noted that circles are divided into “swings” and “twists”. The club and forearm acting in a straight line during the movement would come under the heading of “swings,” whilst circles swung from the wrist with the hand as a centre point are reckoned as “twists.” Some of the very advanced movements, however, unite the characteristics of both swings and twists, and it is difficult to say under which heading they should be classed.

Fig. 2 illustrates the outward front swing with both clubs. The exercise shown is a cross windmill, the performer with both clubs straight above the shoulder swings the left club Pg 37 outwards; so soon as the left club points downwards he will swing the right club outwards, and it will arrive at the lowest point just as the left club has completed its circle.
The Outward Back Twist.—From “the carry,” raise the hand a little above the shoulder, passing it slightly to the rear, so that the forefinger is level with and within two inches of the lobe of the ear, the elbow being raised to the right till it is nearly as high as the shoulder, allowing the club to slope a little backwards from the hand. From this Pg 38 preparatory position, let the point of the club move to the right, and, keeping the hand close to the ear throughout the movement, a circle can be described by the point of the club.
In this twist get the point of the club sufficiently to the right and to the rear as the club descends, in order to avoid letting the point of the club pass too far to the rear as it ascends. Care should be taken to keep the hand in the same place throughout the twist, and don’t duck the head forward during the ascent of the club. This tendency is produced by the fear of a blow on the head while the club is travelling in its upward course.
Windmill Exercises.—The exercises known as windmill are very interesting. As in parallel exercises, the one club does outward circles and the other inward circles, keeping exact pace with each other, the one being always half a circle ahead of the other; therefore, when one club points straight up, the other points straight down, so that when viewed from the front, the clubs appear always to point in exactly opposite directions. A windmill exercise is difficult to learn, but when grasped, you should at once tackle the corresponding form on the other side.

Fig. 3 shows the inward back twist being cross windmilled.

The Outward Cross Front Twist.—In this twist the hand should be kept close to the left breast throughout the movement, and as the club descends, turn the wrist out and bend it over, the while turning the wrist out as the club ascends till it is horizontal on the left, again turning it sharply as the club finishes its ascent. Twists similar to the cross front twist may be performed with the hand above or below the height of the shoulder, also a cross front twist may be done with the hand at the height of and in front of either the right or left hip. Avoid letting the clubs go too far forward while they are below the horizontal, and too far back during the higher part of the movement. Each front swing should be done in good style, and endeavour not to stoop as the clubs pass each other when they begin to ascend.

Fig. 4 shows the outward cross front twist with the right Pg 39 hand at arm’s length, whilst the left club is simultaneously making an outward back twist at arm’s length, it must be noted, that although the right club is moving towards the performer, yet as it is moving in the same direction as the hand of a clock, parallel, and in front of the twist made, it is called an outward twist.

Fig. 5 shows an outward back twist at arm’s length with the right club, the left club is making an outward front twist, the only difference being, that the circle is made with the left club entirely in front of the left arm, instead of in the rear of it.

Fig. 6 shows an inward swing with the right club done simultaneously with an inward swing with the left club. This exercise can be made into a cross inside windmill in the same way that Fig. 2 can be made into a regular outside exercise, instead of being a cross outside windmill.

Fig. 7 shows an inside back twist at arm’s length above the head and an inward cross front twist at arm’s length downwards, the connecting inward front swings being also shown. This is very difficult.
Parallel Exercises.—These consist of an outward circle with one club and an inward circle with the other, in which the two circles are begun together, and in which the two clubs keep exact pace with each other throughout, consequently both clubs appear to be always parallel to each other. This is called a “parallel” combination. When the various parallel combinations have become familiar to the learner, he may continue such combinations in succession to each other and profit thereby. Parallel exercises are considered the greatest test of proficiency with clubs, as the slightest error will cause a divergence of the clubs and be at once detected.
Endeavour to master a parallel combination thoroughly, and then the combination on the other side will come easy enough.

Fig. 8 shows a parallel exercise, an inward front swing with R. being done simultaneously with an outward front swing with L.

Fig. 9 shows an outward back twist with R. and an inward cross twist with L.

Fig. 10 shows an inward back twist with R. and an outward back twist with L., followed by an inward front swing with R. and an outward front swing with L.

Fig. 11 shows an inward back twist with R. and an outward front swing with L.

Fig. 11a shows an outward front swing with R. and an inward back twist with L.


Figs. 12, 13, 14 show some of the movements of clubs as generally practised on the Continent, but we consider dumb-bells more suitable for lunging movements.

Figs. 15, 16 show some wrist exercises, which are sufficiently plain to need no explanation.
Fig. 14 shows the outward cross front twist with the R. hand near left breast, while the left club is making an outward front swing; the corresponding movement would be an outward cross front with the L. whilst the R. made the outward front swing.
Miscellaneous Circles.—Circles which may be done with the arm passed behind the neck, and the hand brought forward over the left shoulder, require extraordinary length of arm and elasticity. Circles are sometimes done in which the centre of gravity of the club is caused to remain stationary while the hand moves in a circle, which conveys the impression that the club is revolving about an axle through its centre of gravity. These are difficult movements, and very attractive.
Throwing the Clubs.—These exercises require great dexterity before satisfactory results can be obtained. To let go the club and cause it to turn twice or more in the air and catch it again, is a feat that entails endless practice. Dealing only with the right club, a few brief notes regarding some of the simpler movements must suffice. (1) Perform an outward front swing, and as the club approaches the horizontal in its ascent let it go, and after it has made one revolution in the air catch it again; this is the outward throw. (2) The inward throw is an exact counterpart of the outward throw, but done by an inward swing. (3) “The double outward throw” and “the double inward throw” are done by allowing the club to turn twice before catching it. There are endless varieties of other throws, all of which allow unlimited action, as the shoulder cannot be kept strictly in position, because the clubs have to be carefully watched while they are in the air.
Without doubt, Indian club exercise is an attractive pastime, and entails no strain on the system, unless by the foolish practice of using too heavy clubs.
Swimming.—A glance at some books of instruction conveys the impression that swimming is difficult and complicated; but many boys learn in three or four days, and we know a timid boy who had much to overcome in fear of the water who learnt in fourteen without more aid than he obtained from reading directions in books. It is easier to learn in a tepid indoor bath, because the novice is not worried by having to keep himself warm, and he has the rail, a sure bottom, and the side of the bath to help him. A friendly companion who will support his chest with one hand at first, especially if he can instruct him too, will shorten the period of learning. There is no need to go into deep water, nor to run any risks in learning to swim.
The action of the arms may be practised in or out of the water. Draw the arms to the chest with the elbows touching the sides. Close the fingers and thumb of each hand, and make the hands slightly hollow. The hands will be under the chin and the hollowed palms downwards. Push them out in front of your nose, not vigorously, but quietly and steadily, for so far the action is one that retards the swimmer rather than advances him. Once at their full extent, however, the hands should be turned almost back to back, and then each should be swept away from the other in a semi-circle, something like the action of the oars when a boat is being rowed. When the elbows touch the body the stroke ends, and the hands should go back to their position under the chin ready for another stroke.
More important than the arms in swimming are the legs, but their movements are very simple and easy to learn. Grasp the rail that runs round the bath with one hand and place the other hand flat upon the side of the bath about Pg 43 a foot below. Draw the legs up to the body, with the heels touching each other, toes of each foot turned outwards, the toes of the right foot to the right, the toes of the left foot to the left. Keep the knees wide apart and turned outwards. When the legs have been drawn up as far as possible the soles of the feet should be only just under the water. Now shoot both legs out vigorously, not only as far as they will go, but as widely asunder as you can spread them. Then bring the heels smartly together so that the legs return in a line with the body again. This last movement is very important, for it is in displacing the wedge of water between the widely opened legs that the body receives its forward impulse. Writers upon swimming have likened this action to the flight of the slippery orange pip when it is squeezed in the fingers of the school-boy.
When the use of arms and legs is practised together the legs are drawn up and the hands are placed under the chin at the same time, and the hands and legs are sent out from the body together. The head should be thrown back well, and it will help the learner to do this if he looks at the sky or at the ceiling of the bath when he is learning.
It is easier to swim upon the back than upon the chest. The movement of the legs is the same, and the movement of the hands not very different. Lie backwards upon the water and with the hands together stretch the arms behind the head, palms upwards, thumbs touching. Then sweep the hands away from each other, using them like oars, and so bringing them back with a wide curve to the hips. Upon the back it is possible to swim without the use of the arms at all.
Learning to swim makes one sadly out of breath, but with practice the art becomes easy, and we swim with almost as much ease as we walk. Having learned plain swimming it is not difficult to add gradually the numerous other methods of propelling the body through the water.
Rowing.—To watch and imitate a good rower is the best way to acquire a good style, but a few hints will help. Sit squarely upon the seat and stretch your legs straight before you, but with your toes turned out slightly. Rowers are not agreed about the knees. Some keep them together; Pg 44 others have them apart, and they will tell you that this arrangement permits the body to come further forward over the knees. Your feet should be placed firmly against the stretcher, and this must be let out or shortened, to suit the length of the rower. One foot may be placed in the strap which is often attached to the stretcher. The outside hand is placed upon the handle of the oar, with the thumb as well as the fingers above it, while the other hand grasps it firmly lower down, keeping the nut towards you. The arms are now quickly thrust forward till they are quite straight at the elbows, after which the back follows the arms by bending forward at the hips. Be careful, however, to avoid round shoulders. When your hands have reached their full stretch raise them, and the blade will drop quietly into the water. Then with the water just covering the blade, the body is brought back with a strong but not clumsy movement, till it reaches a little beyond the perpendicular of the back of the seat, when the hands are brought back to the ribs, the elbows gliding near the hips; and at the last moment, as the hand touches the ribs, the wrist of the inside hand is lowered, the knuckles being at the same time brought against the chest, and the oar is made to revolve in the rowlock. This is called “feathering” the oar, a process by which it is brought neatly out of the water. Now push the oar rapidly forward again, first, however, restoring it to its original position in the rowlock. This is done by raising the wrist, and then darting the arms forward till the elbows are quite straight. Now the rower is at his starting point. To “back water” these actions are reversed. The oar is first reversed in the rowlock, and then it is pushed through the water with as much power as is needed, and pulled through the air. When the oars on one side are pulled, and those on the other are backed, the boat is made to turn round completely in a small space. Expert rowers have arrived at the following maxims: Straighten the arms before bending the body forward; drop the oar neatly into the water; draw the oar straight through at the same depth; feather the oar cleanly, and without bringing the oar out before doing so; use the back and shoulders freely, keeping the arms Pg 45 as straight as possible; keep your eyes fixed on the rower before you. By this means the body is almost sure to swing backwards and forwards regularly in a straight line. If you look out of the boat you will probably lose this rhythmic motion.
Sculling.—This process is different from that of rowing in that the sculler has a scull for each hand, whereas the rower uses both hands for one oar. The rower sits near the side of the boat, the sculler in the centre of the seat. The sculls are lighter than oars, the action quicker. There are from thirty to forty strokes a minute in sculling, but the average is about thirty-two. The boy who goes out sculling alone is often his own steerer, and so needs to keep a sharp look-out over his shoulder. Having taken a seat in the centre, stretch out your legs to their fullest extent and adjust the stretcher. Grasp the sculls, one in each hand, by the handles, and bend your body forward until your head is well over your knees. Throw your arms well forward, and straight, so that the sculls will be thrown well backwards. Then dip the sculls, try to keep the dip uniform, and pull hard.
The stroke comes to an end when the elbows are brought to the top of the hips, and the hands to the chest, with the body well back as a result of the strong pull. The sculls are “feathered” as they leave the water by the depressing of the elbows and the bending upwards of the wrists, as the back of the hands are turned towards the forearms, an operation which offers the least resistance to the water when releasing the sculls to obtain the position known as the return, that is, the position to begin again. To turn a boat in the water the sculler must back water with one scull and pull with the other. To do this one scull is reversed, its rounded face being towards the rear as the sculler pushes it from him. At the same time pull sharply with the other scull until the boat’s head has been turned round completely. Boats without rudders are managed in the water, either by pulling both sides alike, in which case the boat moves in a straight line, or by reversing the action of the oars, equally on both sides, pushing them through the water instead of pulling them, and called backing water. Pg 46 In this case the boat recedes. By pulling one side only, the boat describes a part of a circle, which is made smaller by pulling one oar, and backing the other. By means of a rudder the boat may be made to take almost any direction without reference to the rowers.
A few experiments with a rudder will soon demonstrate what its powers are.

Water Polo.—Boys who can swim will find this excellent sport. Each player should provide himself with a sound cask. Place it upon its side and weight it with lead or other material, making this ballast fast so that it cannot move about. Now make the cask quite water-tight. Upon one end fix a horse’s head made of wood, upon the other a tail. These features may be made as extravagant Pg 47 and comic as the owner pleases. Get a paddle like a canoe paddle, and astride of this horse take to the water. Choose sides as at football and have for goals stakes driven into the bed of the river or floating objects moored into position. The ball should be a light hollow india-rubber one, or a bladder from the butcher. Some players use the inner part of a football. The paddle both strikes the ball and propels the steed. This game should never be played unless the players are accompanied by a capable person in a boat who can go to the assistance of those who may be in difficulties.
Paperchasing.—This may be practised with more or less success all the year round, but it is in the winter time that it can best be enjoyed. It is then that the air is cool and invigorating, and that the fields, being unoccupied by crops, may be run over without any very great damage being done. For boys it is a grand game; it affords a welcome change from the scrimmages and knocks of football and fives; and if the distance run be not too far, nor the pace too fast, there are few who cannot take part in it with pleasure.
An important point in its favour is that the expenses connected with it are small. The paperchaser wears jersey, knickerbockers and stockings as at football, with the addition, in very cold weather, of woollen mittens to keep the wrists warm, and the substitution of light leather or rubber and canvas shoes, for heavy boots. For each of the “hares” there must be provided a bag in which to carry the “scent.” These bags should be of stout linen or canvas and shaped like a life-buoy, so that they go round the runner—under the left shoulder and over the right—with a hole in the under-side, by means of which they are filled and emptied. Time was when the “scent” consisted of paper torn up very small, the preparation of which afforded almost as much fun as the chase itself; but nowadays we have grown luxurious, and fill the bags with the paper shavings which may be purchased for a very small sum from any bookbinder or printer.
Much of the success of a paperchase depends on the choosing of the hares. Of these there are generally two or three—more often the former—and it is necessary that one of them should have a good knowledge of the surrounding Pg 49 country. The time of their departure having been noted, they start off and lay a trail as they go. Sometimes one will lay for a while, and then the other will take a turn; occasionally one will lead and lay his trail, and the other following some little distance in the rear, will look out for gaps and fill them in. It is not necessary to lay a continuous trail, but care should be taken that it is quite easy to see from one patch of scent to the next. When the wind is high, it is always well in crossing from one field to another, to sprinkle some scent on the hedge itself.
The laying of an occasional “false” scent adds to the troubles of the hounds, and gives the hares a chance of regaining some of the advantage which they naturally lose in choosing their course. A “false” is usually managed by the hares separating, and each laying a trail in different directions; then one ceases laying, and makes his way straight across country to join his companion, and they go on again together as before. In laying a false trail, much ingenuity may be shown. One way is to make the wrong one much the more distinct of the two; but this must not always be done, or naturally it will soon cease to have any effect. In selecting a course, it is well to choose a circular one, so that in case of accidents, the distance from home is not very far; and it is a very good plan, and one which is likely to be of advantage to all, to start out against the wind and to return with it. The reason for this is that it is easier to face the wind when starting out fresh than when returning home fatigued at the end of a run.
The hounds, or pack, must be provided with a captain and a “whipper-in”—the former to set the pace and generally take command, and the latter to look after the stragglers and see that none are left behind. Both should be good runners, and if possible should have had some experience of the game. After an interval—the length of which is arranged with the hares before they start, and depends chiefly on the distance it is proposed to travel—the pack set out on their journey. The pace should be a steady jog-trot, especially at the beginning; afterwards, if all goes well, it may be increased. It is a rule that so long Pg 50 as the hares are not in sight, all must follow the trail; but if once they are seen, it becomes a case of “catch who can,” the scent is ignored, and all go off straightway in pursuit. If the hares are not seen and there appears to be no likelihood of their being caught, it is usual for the captain on getting within a mile or so of home, to give the word for a race and for the hounds to set off then to compete among themselves for the honour of being the first to reach the goal.
Carried out on these lines, paperchasing provides plenty of fun, and is as healthy a pastime as can be found. Now and again there will be a ducking caused by a failure to clear a brook, or a stumble at a fence; but if the victims of these mishaps keep moving, and immediately they reach home, change their clothes, little harm will be done. Two warnings may be given: Do not go too far; and when feeling tired, do not strain yourself by trying to race. A six or seven miles spin is quite long enough for any one; and it is better to go all through at a jog-trot, and even to walk occasionally, than to sow the seeds of future ills by striving to outdo fleeter rivals.
Hints on Football.—Football is one of the games which cannot be learned from books. Its best lessons are those taught by hard experience, and as much may be learned in an afternoon’s play and in watching a match between two good teams, as by a diligent study of all the books on the game that have ever been written; but at the same time there are a number of unwritten rules which, although they often take years to learn, are of service to every player; and I have therefore deemed it wise to collect them and put them down here in black and white in the hope that they may be of use to many who, with some experience of the game, and eager to improve their play, have no opportunity for seeing big matches, and no one whom they can ask for advice. These rules are fourteen in number, and should be learned by heart by every player. They apply specially to the Rugby game, but some of them are of use also to those who favour the Association pastime:—
1. Never play immediately after a meal. It is best to have dinner two hours before the game begins.
2. In passing a ball to a comrade send it smartly and quickly straight into his hands.
3. Never pass the ball when you are near your own goal line, and never pass straight back except when opposite your opponents’ goal, and the player to whom you pass is well placed for dropping a goal.
4. Never be too eager to pick up the ball and run with it. A neat dribble with the feet is often most effective, and it is generally very difficult to stop.
5. In collaring an opponent always keep your eyes open, and always go hard and low.
6. Never “speculate” or take flying kicks at the ball.
7. When fairly held by an opponent, do not waste your strength by useless struggling, but at once cry “held,” and put down the ball.
8. When you have the ball in your possession, and find it impossible to pass it to advantage or to proceed, always punt into touch.
9. In handing off an opponent, turn your thumb inside your hand and turn the palm outwards with the fingers held together.
10. When one of your own side is running with the ball, always follow up close behind, but a little on one side of him. When passed by an opponent who has it, try to get round again to meet him before he reaches your goal line.
11. In your spare time practise punting, drop-kicking, and place-kicking, with both feet. An otherwise good player is often left out of a team in order to make room for one who is not quite so good, but is able to kick.
12. Study the laws of the game whenever you have an opportunity.
13. Always keep your temper and do not talk. Obey your captain at once, and unhesitatingly accept the decision of the referee.
14. Change your clothes as soon as possible after playing, and in going home be careful to wrap up well.
In conclusion, I would point out that if properly played Rugby Football is not dangerous. The great majority of accidents which occur are due to the neglect of one of the Pg 52 simple rules here laid down—through useless struggling, loose collaring, wild kicking, or blind rushing. The rules for the Association and the Rugby game may be obtained for one penny each, so we have refrained from reproducing them here.

Golf.—This is another of those games well learned on the field, by observation of the best players, and by hints from friends. We have, however, compiled a series of injunctions based upon long experience.
Driving.—Lower your left shoulder. Stand still and do not see-saw with your body. Plant your feet squarely. Grasp your club lightly yet firmly in the hollow of your fingers. Slowly swing well back and complete your stroke well through, pushing to the very end with your right hand. It is a disadvantage to try to get under the ball.

The Brassy.—In using this club swing as far back as you can, slowly.
The Mashie and Iron.—Swing back very slowly and have the forefinger of your right hand well down the club, which should be held lightly. Go well through with the stroke and rise slightly off your left heel.
Putting.—Grasp the club firmly, swing back very slowly, and go well through with the stroke.


General Advice.—In all kinds of strokes swing back slowly with your left shoulder down and the forefinger of your right hand well down the club. Ever have your eye upon the ball, and finish every stroke to the very end. In all your strokes let your arms go well out from your body. Your hands should be close together on your club and the right hand well round to the left but not under the club. Press the ground with your feet and stand well back upon your heels.
Hints on Boxing.—It is true that boxing has become associated with all manner of ruffianism, but it is true also that it is one of the most effective forms of physical exercise, and that low life and brutality need no more enter into this pastime than into cricket. All the muscles are exercised, and dexterity, nimbleness, prompt decision, quickness of sight and many other admirable qualities are promoted.
The right arm is held across the body so as to protect the pit of the stomach. The elbow of the left arm is held to the side. This position enables the boxer to hit from the shoulder, an important matter in boxing. The right leg bears most of the weight of the body, an arrangement which permits rapid movement backwards and forwards as occasion demands with a minimum of exposure. The left side should be towards your antagonist, the left hand has the principal part of hitting allotted to it, the right stops, parries, and at close quarters hits too.
Study all these things carefully before a mirror, noting what parts are exposed and the manner in which the exposure may be remedied.
Throw your head well back, and watch your opponent’s eyes, for there you get the earliest indication of his intentions, and therefore you are able to make your arrangements for circumventing his plans. When you strike let it be from the shoulder and with all the weight of your body pressing the right foot upon the ground and making a kind of spring. Do not draw back your hand to make a stroke, because that gives your adversary warning. Come upon him unawares and then recover your position immediately. Generally the time to strike is when your left toe is level Pg 56 with his heel, but if his reach is longer or shorter than yours this rule may need modification. Remember that a curved blow is longer on its way than a straight one.
If your adversary strikes at your face or the upper part of the chest, do not retreat from the blow, but fling your right arm sharply outwards and upwards, catching your opponent’s arm by the wrist, and throwing it out of the direction in which it was aimed. This generally lays open your opponent’s head, and gives opportunity for a smart return blow with the left hand; it is then near his head, and has only a short distance to go. This return blow is called the “counter,” and is very effective, as it arrives when your opponent is expecting to give rather than receive a blow. This plan of campaign may be practised before a mirror.
“Stopping” comes in where this parry is impracticable. If your adversary strikes at your body you must either get away, stop, or suffer the blow in hopes of being able to hit him in return. In stopping you receive the blow on your arm, and break its force.
Figure Skating.—As soon as the skater has gained confidence and can skate in the ordinary way, he should begin to master the art of skating upon the outside edge. Put upon the ice a small stone, piece of wood, or any other object to serve for a centre. From this stand three yards with your right side towards it. Leaning a little in the direction of this centre and pressing your weight upon the outer edge of the blade of the skate, push yourself round and round the centre with your left foot. Then practise going round on the outside edge of your left skate in a similar way. Difficult as these movements will be at first, they become easy like other hard tasks by practice, and they open the way to graceful figure skating.
When the two circles have been mastered it is quite easy to cut a figure 3 upon the ice. Begin on the outside edge of the right skate as though you meant to go in a circle, but allow your left foot to hang behind your right foot. There it will act as a kind of weight, your body will tend to swing round and you will cut the second part of the 3 travelling backwards, and upon the inner edge of the skate. The impetus gained in cutting the first part of the figure will carry you to the end. Going in the other direction cut another Ɛ with your left foot, and when you can do these you are on the high road to complete success as a skater. Pg 58

Sailing on Skates.—Boys who are so fortunate as to live where there is a large sheet of ice will find much fun in sailing. If you have the money the draper will supply you with calico, or sheeting, or other similar material, two yards wide, and a journey to the joiner will be necessary, as we shall see. A B in Figure 1 is the yard made of wood, one and a half inches thick in the middle, tapering to each end to five-eighths of an inch. At C and D holes are bored for the lashings of the sail. E F is the sprit, and we get its length by measuring the boy who is going to use the sail from his neck to his ankles. This gives the length of the sprit, and the yard should be made twice as long. We have given the longest that the sprit should be. It may be shorter, and then, of course, the yard would be shortened in proportion. The sprit is tapered towards F and a hole is bored at G for lashings. The sprit is connected with the yard by what sailors call a crotch. We have given a representation of it in Fig. 2. The cord is used to lash the sprit to the yard. C D G in Fig. 1 shows the sail. It is cut to allow a broad hem, and may be sewn rapidly with a sewing machine. A strong loop of tape or cord should be sewed at each corner of the sail C D G, and at the head of the sail, that is from C to D, eyelets should be made six inches apart. At each of these the sail is tied to the yard and also at G. A reference to Figures 3, 4 and 5 will show how the sail is used, but practice will be needed and much studying of the effect of wind upon the sail before the art of sailing on skates has been mastered. A wooden rod may be attached to F, Fig. 1. This will aid in the management of the sail, as is shown in Figures 4 and 5.


Pg 60 Curling.—Like most other pastimes, curling is best learned when you are young. Your good golfer, who “swipes” clean and clever from the tee, picked up that draw and swing which the able golfer so much prides himself upon, in youth. It is quite true that laddies in Scotland first learn to skate; yet many of the best hands at “the roaring game” have learned to throw a “stane” ere fifteen. You cannot learn young enough at anything, a true sportsman will tell you. That little, bare-legged herd laddie, who sits on the banks of the Ettrick or Yarrow, will laugh at the middle-aged tyro who vainly tries to fling a fly where there is no fish lying. The young yachtsman gets his tiller hand in his first matches in an open boat; the trigger finger of the crack shot is made over his early successes at rooks or rabbits; and the good seat in the saddle on the back of the Shetland pony; but our boys are ready for their bonspeil, which means a good spell or game. Before giving a description of an actual game, the writer will endeavour to give some idea of what curling is like. In Germany it has been successfully introduced by Sir Edward Malet, the English ambassador, and there is every reason to believe that in a few years it will take as strong a hold of the English people, as already golf has done.
Pennant, in his Tour of the North (1792), writes of it as follows:—“Of all the sports of these parts, that of curling is the favourite, and one unknown in England. It is an amusement of the winter, and played on the ice, by sliding from one mark to another great stones of from forty to seventy pounds weight, of a hemispherical form, with an iron or wooden handle at the top. The object of the player is to lay his stone as near the mark as possible, to guard that of his partner, which had been well laid before, or to strike his antagonist’s.” Pg 61

“The game is played on a carefully-chosen piece of ice called the rink, which should be forty-two yards long, unless special circumstances, such as thaw, and consequently dull ice, require it to be shortened. This piece of ice should be as level, smooth, and free from cracks as possible. There is usually a trifling bias, which however to the skilled curler rather adds interest to the game, as it calls forth additional science in the play.”

“When the rink is chosen, a little mark is made at each end. This is called the ‘tee,’ and near that point stands, in his turn, each player, whose object is to hurl or slide his stones to the opposite end by a swinging motion of the arm. Each opponent also endeavours to place his stones nearer the tee than those of his opponents.”
So far for Pennant’s description of curling in the olden time. The old style, thanks to the Edinburgh men, who play on Duddingston Loch, has long gone out. Seventy pound stones would no longer be tolerated by any body of sportsmen affiliated under the Royal Caledonian Curling Club. In the olden times it seems, in some parts of Scotland, notably in the south-west, to have been a game of strength rather than of skill, and the man who threw his Pg 63 huge block the farthest, and struck his opponent’s stone from the tee, or “cock,” was considered to be the superior player. The stones are not now much more than half this weight, and so highly are the soles polished that they slip along keen ice so much faster with slight exertion on the part of the player, that they pass the tee or mark altogether, and go clean off the rink. The rinks or sides have been chosen—four players, one of whom acts as skip or director. He is generally the ablest and most experienced curler, and equal to the responsible duty of guarding the winning shot, if in his favour, or securing it if against him, with his last stone. The rink, which is also the name of the diagram of the game, is drawn off according to the rules of the Royal Caledonian Curling Club, and carefully swept clear of all snow or hoar frost. The skip takes up his station at the tee, which is the innermost of a set of circles, known as the “hoose,” no stone outside of the outer one counting in the actual score. Sweeping scores are drawn for the guidance of the players; one down the centre, which practically is a sort of hockey arrangement, as you must stick to your own side of the rink.

Sweeping commences half-down, that is, at the centre Pg 64 of the forty-two yards between tee and tee, and can be carried on by the players’ side up to the tee, when, if it still has a little impetus, the opposing skip will sweep it out of the house altogether. When this happens after a stone has been brought on when apparently lagging, it is generally greeted with what in Parliamentary phrase would be called “Opposition cheers and laughter.” In this a skip may show very superior judgment, and order his men to desist from sweeping. At his words “up hands,” brooms must be raised immediately. In front of the house or counting circle is the hog score. If stones are not thrown with sufficient force to be taken over this with the assistance of the sweepers they are shoved off the ice as dead. This is sometimes galling to a young player who, when it happens, as it does repeatedly happen on soft ice, is practically put out of the game. But the “crampits” have been adjusted. These are foot-boards, grated so that they hold firmly to the ice. On these both feet must be placed when the stone is delivered. The skip gives his directions to his first player to place him a stone on the near edge of the outer ring. Why not exactly at the tee? Because if there it would form a rest for the stone of his opponent and be forced out. Our young player, who is wielding a beautifully polished pair of Ailsa Craigs, with a sweep or two of the ice does exactly what is wanted. His opponent is asked to play to the face of this stone. This he does, hurling it out and laying his own almost in its place. The next stone of the leading player fails to catch it, and goes away to the rear, dead. The fourth stone played effectually covers or guards the winner. The next pair of players give up their brooms to the leaders, and take up their position at the crampits. A gentle draw past guard and winning stone is counselled; and this is well executed, the brooms taking the stone to the very edge of the tee or centre circle. The next player fails to remove this, and being slow guards his opponent’s stone. Pg 65

This is a piece of good fortune for the other side, who now have a second shot drawn by a very skilful player. The third pair of players cannot well get home and try to wick, and curl in (from the latter expression we have curling). This is done by putting with a turn of the wrist a certain bias or screw, by means of the handle when the stone is being delivered. The position of the game is not changed when the skips lay aside their brooms. There is a little more than half of the winning shot visible through a port or channel. Through this the skip, against whom the shot counts, threads his stone gently and easily and rubs the winner out. His opponent has no chance now, unless he rattles out the nearest guards. This he tries to do, but his opponent guards again, this time just across the hog score. A gentle draw, with an inner twist, might succeed. It is bravely attempted, but it is short a foot, and the leading skip claims one shot—victory for a well contested end. And so the game will last for twenty more heads, the winning rink being that which has the majority of shots. It is a happy, healthy game, not so well-known in England as it ought to be. In Germany some enthusiasts have introduced it, and from the military-like character in which it is carried out, guarding and storming and knocking out occupants of the fortress, it is likely there to come greatly into favour. It is to be hoped that we may Pg 66 oft see the pond where, in the language of an old Scottish curling poet—
Those who decide to include this game in their activities should put themselves into touch with the Royal Caledonian Curling Club through its honorary Secretary, A. Davidson Smith, Esq., at the headquarters of the club, York Place, Edinburgh. They will then be able to obtain the rules for the proper playing of this delightful game.
Hints by an Old Hand.—When fishing in ponds, lakes, meres, canals, or in waters where there is no stream, the depth should be carefully taken the night before, or when ground-baiting, and marked on the rod, or by measuring the distance from the plummet to the cap of the float with a piece of cotton or string. If the angler prefers the bait to be within touch of the bottom, the better plan is to use a self-cocking float, and always use the finest possible tackle in clear water; but if an ordinary float be employed, and the novice wishes the bait to lie six or eight inches on the bottom (a good plan), the lowest shot should be from 15 in. to 20 in. from the hook. This will neither interfere with the proper cocking of the float nor with the angler striking, for, from the moment the fish seizes the bait to the indication of a bite, the resistance of (at most) two or three small shots is infinitesimal. If the bottom be at all muddy, then the plummet should be as light as possible, or into the ooze it will sink, and when this is known to be the case, the depth may be obtained by the aid of a small pellet of bread and bran. Should it drop off the hook before the depth is obtained, the pellet should be made a little stiffer. A piece of “tea lead” from a tea-chest, or lead wire, similar to that used on the gut in Lea fishing (some use nothing else), may be carefully tied round the bottom of the float, to make it cock without using any shots on the tackle, and painted the same colour as the float, or, failing this, the usual self-cocking float sold at the tackle-shops may be used.
Gentles should be kept in plenty of damp sand for a few days in an earthenware pan, biscuit-tin, or tin pail, in a cellar, or any dark, cool place, when they will be ready for Pg 68 use. The sides of the pan or tin should not be allowed to get wet, or many of the gentles will make their escape. They should be kept in what is termed golden sand. This sand, which should be damp, is almost as fine to the touch as barley-meal, of a deep rich golden colour, and they will live in it for days without turning into the chrysalis state, which they do in a comparatively short time if exposed to the sun—a practice to which many anglers are addicted, and then wonder the gentles change colour. It is a great mistake to use silver sand, as it over-scours and makes them attenuated and hard. I have repeatedly seen them in this state. So much for sand. The finest gentles I ever saw were obtained from the best rump steak and a sheep’s head, and kept in coarse bran; but for taking out the black steck or “saddle-back” near the head, and scouring them until perfectly white, give me the sand mentioned above and plenty of it.
The weight floats required may be arranged and tested before they are wound on the winder for final use. This saves the beginner considerable time and trouble at the water-side. If he has a four-line winder, with lines already weighted or shotted for roach, perch, bream, tench, so much the better. A piece of cork about the size and shape of a Tonquin bean attached to the line may sometimes be used with success for fishing-swims, within easy distance from the side, in smooth clear water, near patches of weeds, flags, or candocks, the angler taking great care to keep out of sight, and to be as still as possible. When the bean-like piece of cork goes under or runs, strike gently.
Never use long-shanked hooks (the well-known crystal roach hooks, for instance) for such baits as gentles, cockspur, or small worms, small pellets of paste, wheat and malt. A considerable portion of the shank is certain to become bare in a short time, and so prevent the fish from biting. I have repeatedly seen nearly the whole shank of a crystal hook bare, and the small worm, gentles, and more especially a grain of creed wheat, dangling from the bend as a kidney might from a butcher’s hook; and I have an idea that no fish properly constituted would be stupid enough to be caught under such absurd conditions. I may just Pg 69 mention in passing, that when fishing with gentles, the last one put on the hook should have the point to come through the skin of the thick or tail end, and the twirling thin or head end to hang clear of the hook. One gentle on a No. 12 or 13 hook will often do the trick, when they won’t look at a bunch of gentles.
Use as small hooks as possible. They will hook a fish, or for the matter of that, get fast into almost anything, much quicker than large hooks: they penetrate sooner, hold very fast, and pierce the lips of such fish as trout, perch, chub, barbel, carp, when a large hook would not. For instance, the other day I hooked a 3 lb. barbel in the centre of the upper lip with a No. 10 sneck-bend, and it was quite a job to extract it. I once saw four splendid chub, all caught with similar hooks; and on several occasions I have caught good perch with roach hooks. If the novice will only remember not to allow slack line when playing a good fish on a small hook, provided the tackle is good and strong, a fish should seldom escape. Beginners often use hooks three times too big for the fish they are after, and it goes without saying, that the smaller the hook the finer the gut should be; for a small hook on thick, coarse gut is not to be thought of. On the other hand, never use a too small hook for too large a pellet of paste, with the hook embedded in the centre, instead of the point just protruding. I have seen an angler fishing under these conditions for chub with cheese paste miss five fish out of six, the damson-like pellet being pulled clean out of the mouth of the chub, without the slightest chance of hooking the fish.
We will now supplement what our “Old Hand” has told us by other hints.
Bait and Other Matters.—We shall not occupy space discussing rods, and such things. Each boy settles these questions for himself, in accordance with the money he can spare, after a talk with the dealer and a contemplation of his wares. Such accessories as landing nets he leaves generally until he is grown up, and manages very well without them. He may, however, provide himself with a clearing ring and line, because he is likely to feel the Pg 70 need for these often. This useful clearing tackle consists of a number of yards of strong cord, to the end of which is fastened a heavy ring of lead or brass. If the hook should get fast in a weed or anything else, this ring is put over the butt of the rod, and allowed to slip down the line to the hook. The rod should be held in the right hand, the top pointing downwards, the clearing-line in the left; the ring falling on the hook from its weight usually clears the hook. If not, the angler should grasp the rod firmly, and draw the line sideways, and break away. In this case, he seldom loses more than a hook; but without the use of a clearing-line he frequently loses his float as well as his hook and line, and sometimes breaks his rod. The brass clearing-rings are best, because they are jointed, and can be used when the angler has a reel on his rod.
An old angler advises that after the young fisherman has made choice of a place to fish, he should first plumb the depth truly, and with as little disturbance to the water as may be. If the water be still throw in small pieces of ground bait; if there is a strong current large pieces. Keep as far from the water as you can, and go slily to work, for even the shaking of the bank will frighten some of these fish. The bait should be dropped into the water quietly. Stand as far from the edge of the water as possible, and never let your shadow fall upon the water. When it is possible hide behind a bush or a tree.
In baiting a hook insert the point of the hook near to the top of the worm’s head, and carry it down to within a quarter of an inch of its tail. To do this you must work up the worm with your left thumb and finger, while with your right you are gradually pressing the hook downwards. If too much of the worm hangs loose the fish will seldom take the whole in their mouth, and will not be hooked. To bait a hook well with a worm is necessary to ensure catching a fish when you strike; and it consists in drawing the worm without injuring it quite over and up the shank of the hook, leaving only a small lively part of the tail below. If you bait with half a worm, choose the tail end, and insert the point of the hook into the top part, and bring it down nearly to the end of the tail, leaving only a very small Pg 71 piece of it free. If you bait with two worms on the same hook, draw the first up above the shank, and put the second on in the same manner as directed with one worm, but insert the hook near the tail of the second worm; then draw the first one down on the second over the shank of the hook.
Red Worm.—Found with the brandling but not so common. At their best in tan heaps, but are found also in the banks of ditches and sewers.
Marsh Worms.—Known also as blue heads. Found in marshes at night, especially after rain. A good bait for gudgeon, trout, perch, bream, and grayling.
Tag Tail.—Tail has a yellow tint. Found in fields in moist spring weather. Often preferred when the water is muddy, especially for trout.
Water Worms.—Found in sedges and at the bottom of dock roots. Turn up the long slimy moss on weirs for them. They are of a clear bluish white, occasionally very light purple, becoming red at the head. Fish eat them voraciously.
Ash Grub.—Look for these in the bark of trees. They are good for grayling, dace, roach, or chub.
Cow Dung Bait.—From May to the end of September these may be found under cow dung. They are eaten by roach, chub, grayling, and dace.
Gentles.—The usual term, used in angling, for maggots. Putrid meat, especially liver, will produce them. They may be obtained from butchers or fell-mongers. Good for most fish.
Lob Worm.—Sometimes called the dew worm, or the wachel. It is the ordinary large garden worm. Dig for them if they are needed at once. If wet straw is strewed upon the ground for a couple of days they will come to the surface. In the evenings they come out, and a quiet search with a lantern in gardens, or church-yards, or on lawns will discover them. They are useful for trout, eels, large perch, barbel, chub, and salmon.
Brandling.—Search for these in chaff pits, old heaps of compost, rotten tan, sweepings, manure of all kinds and tanners’ bark. Good for trout, grayling, carp, bream, and indeed for almost every fish.
Miscellaneous Baits.—Cockchafer, black or evening beetle, grasshoppers, moths, May-flies, caddis worms, bees, caterpillars, wasp-grubs, baked for half an hour, paste made of bread or cheese.
Ground Bait.—In addition to the bait upon the hook the angler usually strews what is known as ground bait, and so attracts the fish to where he is angling. It is chiefly by the judicious use of ground baits, and by fishing at a proper depth, that one angler is more successful than another, although fishing with the same baits and within a few yards of each other. If a place can be ground baited frequently fish begin to come there regularly for food. Care must be taken not to glut the fish, and the bait upon the hook ought to be more attractive than the bait flung into the stream. The ground bait most in use includes bran mixed with clay, and made into balls of about the size of a pigeon’s egg. If the current is strong a stone in the ball may be needed. Another ground bait is made by cutting the crust from a loaf. Then cut the loaf into slices each about two inches thick. Put these slices into a deep vessel of water, and when the bread has been well soaked squeeze it until it is nearly dry. Add bran and knead the whole until the mixture is as stiff as clay. This is well adapted for still waters. Another ground bait is made of barley-meal one part, mashed potatoes three parts, stiff clay two parts, worked thoroughly well together, but better even than this is one composed of stiff clay with as much bran as it will hold without destroying its stickiness. At the water side separate pieces about the size of the egg of a goose, into which stick a few worms and gentles. As these drop from the dissolving clay they are seized on by the fish, who continue to wait in the expectation of more, and are thus ready to take the angler’s bait, especially if it is more tempting than the ground bait. Boiled malt, barley, wheat, and such things, mixed with coarse sand to sink them also answer the purpose.
Trout-fishing.—In the Easter holidays boys are apt to find it difficult to decide just what to do. Football is nearly over, cricket is hardly in. It is still somewhat early for Pg 73 bird-nesting, except for rooks, and perhaps blackbirds and thrushes.
Just at this juncture the obliging trout come into season, and best of all, are ravenously hungry. Now is the time for the beginner to try his hand with the deceitful fly. Do not be discouraged, even if you have made a dismal failure of it last August. In the summer holidays it requires a practised hand to take trout with fly; but in April on a moorland stream a boy may go out and actually have some success on his first attempt. It will be wiser, certainly, to practise a little first, in your own garden, with all the tackle except the fly.
By “tackle” I don’t mean necessarily a glittering rod, fresh from the shop, with a brilliant winch and gaudy fittings. It is well to get all these things if you can afford them, though they should be toned down before using; but want of money need not prevent a boy from trying his hand at trout-fishing. A long willow wand, or even a hazel stick will throw a fly if properly managed; and running tackle is not an absolute necessity, though in every respect advantageous.
The only things that must be bought are the hooks, and these are very cheap, as most boys know.
For this time of year your flies should be March browns and blue uprights, and need not be tied on very fine gut. The outfit that is required then need cost but a few shillings, but if you can spare more get a small fishing-basket, and a fly-book, with a stock of flies. Thus equipped and with good boots you may fish for weeks without needing to visit a shop.
In order to learn how to throw a fly you should persuade a friend to show you the way he does it. This need not be at the river, nor need you tax your friend’s time to any great extent. After you have once learnt the knack practice only is required to enable you to throw a fly fairly, though it may be years before you can do so well.
This preliminary trial (during which you will have wound the line round your neck a few times) being over, you can go with some confidence to the stream. Arrived at the bank, don’t peer over to see whether there are any Pg 74 trout, because if you do there won’t be any—at least, not after you have shown yourself.
If convenient, make for a point some distance down-stream, and work upwards. By this plan you will have a chance of circumventing the trout, even if the water be clear, and not rough. In rough or coloured water these tactics are not necessary, and, in fact, it is as well, because much easier, to fish down-stream under such circumstances.
Let us take first the case of clear water, not very rough. Keep back from the edge and stoop a little, taking advantage of any cover, even the stump of a thistle. Watch for a rise, and, if possible, throw your fly lightly a little above it, and let it float down over the fish. Should the fish be extra silly he may take your fly, and then you must strike, as in bait-fishing, but with less force.
If you are fishing a northern stream, or a Devon or Cornwall brook, you will find it worth while to go on casting even if you see no rises; but on Hampshire, or other slow running rivers, the usual plan is to wait for a rise. But this style of fishing, though practised with some success by the lucky fellows who are in Winchester School, is not altogether suited for the restless nature of a boy.
To return to the fish which has taken your fly. Being a little one (for nothing large would be so silly), he will give you little trouble to land. Take care, though, to guide him down-stream; which, being below him, you can easily do. Lift him out as quietly as you can, and lose no time in getting your flies on the water once more. I say flies, because you will find it best to use two in ordinary fly-fishing.
The upper fly, or “bob,” as it is called, should be two feet or more from the tail, and should only have about three inches of gut attached to it, so that it may stick out nearly at right angles with the line. It should be fastened to a knot in the gut, so that it may not slip up and down.
There are several ways of fastening it on, but they cannot be fully explained without diagrams, and a boy of any ingenuity can easily find out for himself.
The plan most commonly adopted, that of looping it on, though it is not so neat as a knot, has the advantage of Pg 75 permitting the fly to be changed easily—a great point when the trout are fickle.

Having landed your first trout, do not try again in the same place, but work gradually upwards, trying every likely pool and eddy; but not casting more than two or three times in one place. If you succeed in getting two or three little trout on your first attempt in clear water you may think yourself lucky.
In April ’tis likely enough you may find the water coloured and high. If it is in flood, or approaching to it, of Pg 76 course the worm or minnow should be used; but of these anon.
We will suppose the stream to be but little above its usual level, and of that rich brownish colour so dear to the heart of the angler. Doubtless a worm or a minnow might still succeed; but a fly will give abundant sport, and that without requiring a high degree of skill.
Your mode of procedure need not now be so cautious as before described; and, in fact, you will find down-stream fishing often best in a coloured water. Throw, then, a long line right across the stream, near the edge of which you can safely show yourself, and work your flies across and towards you, striking smartly at any rise. You will often miss, for in down-stream fishing a strike tends to pull the fly out of the fish’s mouth, besides which the trout, on touching the surface, having his head towards you, is apt to get a sight of your rod, and to rise “short.”
If the weather and water are both favourable for down-stream fishing, you will have lots of rises, and some of the fish at least will fasten, so that you have a chance of getting a dozen or so on a good day, even before you have acquired any great skill.
The best fly for thick water I have found to be the soldier palmer, a red fly with gold twist, but it will not always succeed. A March brown, or a blue upright, or blue palmer with silver twist, may also be useful. Remember that the thicker the water the larger and more gaudy the fly may be.
We have to consider the chance of the water being too thick for fly. Then either minnow or worm will answer, the former in moderately thick water, and the latter in an absolute flood, unless the water is like pea soup. The minnow is used on a short line, with a longish rod. It requires considerable skill, and cannot be practised with safety in strange water by the beginner, or the minnow will constantly be getting lost by fouling snags. As minnows are expensive, this is a bad sort of sport for a boy with limited pocket-money.
It is a favourite, however, with the professional angler in the north, and he doesn’t lose his minnows. It is a treat to see one of these gentry spin a rough run with his minnow, Pg 77 and take two or three good trout where an amateur would do nothing but lose tackle.
The best way to learn to spin a minnow is to watch an old hand do it; but if the stream you fish is free from snags you might find it worth while to try to learn without such teaching. If so, be careful to keep the tip of the rod near the water, and, using a short line, to spin your minnow near the surface. If you get a run don’t snatch your minnow away, but keep it steadily on. Very likely the trout may bite short, but there is always a good chance that one of the revolving hooks may catch his jaw. If you do hook a fish get him out quickly, for your tackle being stout (as it must be for minnow-fishing) will bear the strain of anything short of a snatch.
To turn to worm-fishing. It is, of course, comparatively easy to get a few fish with a worm, but it takes a practised hand to take a basketful, even from thick water. A couple of shot will generally be enough, and they should be about a foot from the hook, which should be large, unless you use the Stewart tackle, which consists of two or three small hooks. A small marsh worm is considered best, but a brandling or a red worm will answer; or in a flood the tail half of a lob worm. The worm should be kept rolling along the bottom of fairly swift water, where the soil is gravelly; and a little time should be given when you feel a bite. In this way not only are large trout often taken in a flood, but sea trout, grilse, and sometimes salmon. A delicate hand is the chief requisite; but much judgment is also required in deciding which pools to fish, and when to shift your ground, according to the rising or falling of the water.
There is a sort of worm-fishing which is very different from the kind just described. The tackle used is much finer, and the method altogether different. For as it is practised in the clearest water and in the hottest weather, it is necessary to take great care not to be seen, and to avoid the slightest possible disturbance of the water. A very small red worm is used on one or two tiny hooks, and the boy who can take good trout in this way is as much a skilled angler as any fly-fisher can claim to be.
Fishing for Roach.—Most boys know what a roach is like, so it will be enough by way of description to say that it is a fish of the carp tribe, of a silvery colour, and covered with scales. Its fins are of a pale, pinkish grey, and its mouth is small and soft, suited best for vegetable food.
The roach grows sometimes to two pounds in weight, but in most rivers one pound is considered large, whilst in ponds the fish seems to deteriorate, and swarms of little roach are generally to be seen, but very few fish of over a quarter of a pound.
In rivers roach should not be killed unless they are seven or eight inches long; but in ponds, where they are very numerous, it is best to keep all that are caught. More food is thus left for the remainder.
The roach spawns in May, and is, therefore, out of condition from the end of April till June or July. It is fattest and most healthy in autumn and winter, and when caught from a clear river will be found fairly good eating. Pond roach taste muddy; but before we bring our fish to table we must learn how to catch it.
The rod should be long, light, and stiff. White cane is best, but is very dear; and the rods now to be had at many tackle-makers for three or four shillings will answer nearly as well. They are of Japanese make, and have no metal on them, which makes them light and cheap, though less durable than the expensive English rods.
For the line, if roach only are expected, nothing is better than good single horse-hair. If there are large carp about, fine gut will be better; but carp do not feed after October. In any case, it will be found convenient to have a few inches of fine plaited silk for that part of the line which is next the rod. The float should be as small as can conveniently be used, and if the fish are very shy, a little rough bit of stick is sometimes preferable. A porcupine quill is generally best, and just enough shot to sink it within a quarter of an inch, or less, of the surface should be put on the line. One of the shot should be placed within six inches of the hook, and the rest about a foot higher. The hook should be of fine wire and about No. 12.
It is important to see that the hair or gut on which this is tied is perfectly round and clear.
With regard to baits, the very best are wasp-grubs; but these are often unobtainable, and gentles (the maggots of the friendly bluebottle) answer fairly well. A cleaner and pleasanter bait to use is paste, made from bread one day old. This should be dipped in water, and then quickly squeezed dry with clean hands, or in a cloth. In some rivers—the Ouse for instance—boiled wheat is a very good bait.
In order to find the depth, use a little roll of lead, called a plummet. This should be attached to the line, close to the hook, by being partly unrolled, to admit the hook, and then fastened again; and the depth should be plumbed as soon as the tackle is ready, and before bait is prepared. The operation necessarily disturbs the fish, and time must elapse before they will feed. It is desirable to keep well away from the water while putting your rod together, and, if possible, even while fishing.
Many roach fishers carry a light square box, or basket, which serves for a seat. These anglers will sit still for hours, patiently waiting for the roach to come on; they are often very successful. When a roach is hooked, the angler retains his seat, and in order to bring the fish to the net, will remove the butt and second joint of the rod. This is also done when rebaiting. It is the great length of the rod and the shortness of the line that makes this necessary. But to return to the method of fishing: the depth being ascertained, the float should be so placed that the bait will just touch the bottom at the shallowest part of the swim, and only a foot of line should be used between the float and the top of the rod.
Calm weather is best for roach-fishing, as it is easier to see the bites; but if there is a gentle wind from south or west, sport is often good.
In summer, evening is much the best, but at this time of year roach will often feed all day. Let us suppose that you start fishing on a calm afternoon in February or March, and on reaching the river, which is free for fishing, wonder where to begin. It is lined with rushes, but here and there Pg 80 are gaps, and on the banks at some of these points you notice scraps of ground-bait on the ground, and you also see that the grass is trampled and worn. This shows that anglers have found the spot a good one. Seat yourself, or stand quietly near one of these points, and put your rod together. Then attach your line and plummet as described, and when all the rest is ready put in a little ground-bait, some yards above your swim. Chewed bread will do if you have no bran to mix with it.
If your tackle is in order, and the roach are there, you will have a nibble before many minutes; but at this stage of your education it is useless to strike at nibbles. Keep on the alert, and you will find that if you can manage to strike as the float is sinking, when a bite occurs, you will hook your fish; not otherwise. A gentle jerk is enough, as your little hook is sharp, and the roach’s mouth soft.
Violence risks breaking the line, and in any case disturbs the fish unduly.
If the roach is of good size, remember that your tackle is weak, and play your fish carefully; and don’t attempt to get it out, whether with net or otherwise, till quite exhausted. Even if you have only a small fish it is well to land him gently, or you will scare others.
When placing the line do not flop it in, but let it sink bait first, and be prepared for a bite the moment the float cocks, for the first few seconds are the best. There is also a good chance at the end of the swim. If there is a stream the top of your rod must follow the course of the float. The rule, as to only a foot of line above the float, may be relaxed if the swim is long, for to walk along is most undesirable; it scares the fish by shaking the banks. You should stand still, or better sit still while roach-fishing. Even this rule has many exceptions. If, for instance, the stream is very rapid, the saving in time effected by following your float may more than compensate for the disturbance caused by your footsteps.
In swift or flooded streams fish are less easily scared than when the water is quiet. Under these circumstances a worm is often better bait than paste, or even than gentles.
Again, in clear water which is swift and not deep it Pg 81 may be desirable to let out line by using running tackle. In this way you may reach fish which are too shy to let you get within casting distance of them.
The Nottingham anglers are particularly expert at this sort of fishing, and use rods and reels which are specially adapted for it. They are very successful on their own river, the Trent, and have introduced their style on the Thames, and even the Lea, and have sometimes taken fish when ordinary fishing was useless. They are very skilful in casting from the reel without unwinding any line first; but many different circumstances must be studied before the sort of fishing most effective can be chosen.
Rules are very necessary; but the young angler will soon find that the most important thing is to find out when the exceptions, which are so numerous and important, come in. This can best be learnt by careful study of the habits of the fish, carried on patiently, day after day, at the water-side.
The Fishing Season.—On June 16th the “close” time comes to an end, and boys may fish in free water for any kind of fish, from bleak to barbel.
If we have had a very genial spring, many fish will have finished spawning and be getting into condition, so that there will be no harm in taking advantage of legal permission, and beginning to fish as soon as opportunity occurs.
It will be found that many fish, especially chub and dace, can be caught much better at this season by flies, either natural or artificial, than by the usual float and shot system.
A common house fly, used either on the top of the water or sunk by a single shot, will be found very effective, both for these fish and for roach, rudd, and bleak. Chub will take any large insect readily, if it is presented to them in an artistic manner—that is, in such a way that they can see little of either tackle or angler.
On some parts of the Lea the wooded banks and deep holes afford capital chances for dapping for chub—a kind of fishing in which a boy with some patience and ingenuity should be very successful.
No cumbrous tackle is required, only a long, light, and stiff rod, and two or three yards of medium gut, ending in a Pg 82 foot or two of finer stuff, with a largish hook, about No. 6 or 7. Running tackle would seldom be of use, as the awkward places, overgrown by bushes, in which the best chub are usually hooked, make it very desirable to keep your line short. If the chub run large (two pounds or more), you will have to use stout tackle, or even carry a landing net.
If you have a bamboo rod, which is hollow throughout (through the knots), it is a good plan to pass the line through the middle, instead of the rings. In this way one disadvantage of using running tackle is avoided—the rod can be pushed through bushes, etc., without entangling the line.
Another and more lively plan for chub catching is to whip for them with the artificial fly; and in this case running tackle is, of course, necessary.
In the shallower parts of the rivers you will get more dace and bleak than chub in this way, and very pretty sport it is, only second to trout-fishing.
When you are trying for roach only, it is best to use a sunk fly, and to move it up and down very gently. You can feel the roach bite if you have a delicate hand, but if you find this difficult put on a small gentle with the fly. This can be seen at a considerable depth, and will disappear, of course, when the roach takes the fly.
It also forms an additional attraction, and at a pinch will do alone; but I have found the house fly generally more effective. Single hair is best for your line, unless you see large chub cruising about, which is often the case.
In this sort of fishing you can generally watch your quarry, and you have to be very careful that they do not see too much of you.
It will be found far more interesting than regular bottom-fishing, and requires more thought and more resource for its successful prosecution.
Among the insects most useful for bait, the grasshopper stands (or jumps) pre-eminent, but is not often obtainable much before July. The cow-dung fly has a brilliant yellow colour, which is very fascinating to roach; and the green caterpillar (to be obtained by tapping the boughs of oaks) is almost irresistible, especially to trout. The oak-fly, called also “the up and down fly,” from the position it always Pg 83 assumes on the oak trunk, is equally attractive, and no doubt would be appreciated also by other fish.
The hottest and calmest weather is best for this sort of fishing, as it is usually worst for the other sorts.
In case the day should be windy or otherwise unsuitable for dapping, and yet the season too early to fish the deeps, a good plan is to put on a very small quill float, and one shot; and, using a No. 10 or 11 hook and a single gentle, to fish the shallow gravelly runs from as great a distance as you can manage.
The “Nottingham” method is very useful for this purpose. This consists in using a free running wooden reel, and a light line, and throwing from the reel. It is difficult, but very useful on open rivers, where fishing fine and far off is essential.
Of course, you have to fish down-stream by this method, and will often miss your fish when striking; but that is better than getting no bites—the usual result of fishing under your nose at this time of year. Occasionally you may get hold of a barbel in this way, when using gentles for bait; and, if so, it will not be easy to land him, though he is not so strong now as he would be later on.
Bream-fishing will be coming on before long, and the early boy will get the bream. Before sunrise is the best time, and for this fish-tackle of a different sort is required. A strong rod with rings is useful, and the gut and reel line may be stout.
If the water is deep, use a long float and fairly heavy lead, and fish on the bottom with a worm (a small lob by preference) on a large hook. Put in ground-bait, over-night if possible, and lose no time when fishing. A three-pound bream can be got out in two minutes, and twenty or thirty may thus be had in an hour or two of early morning, and, perhaps, not another all day, though in the Norfolk broads I’ve known the bites continue till mid-day.
Roach-fishing proper is not in season till August, and has been described in these pages.
Jack should be let alone for a month or two yet, and perch are scarcely in order.
In conclusion, let me suggest that all fish found to be out of condition should be gently returned to the water.
To speak of canoes is to recall the name of John Macgregor, M.A., the author of those delightful books A Thousand Miles in the Rob Roy Canoe on Rivers and Lakes of Europe; The Rob Roy on the Baltic; The Voyage Alone in the Yawl Rob Roy, and other interesting works. When the first of these was issued other people built canoes, the Canoe Club was formed with the then Prince of Wales, afterwards King Edward the Seventh, as Commodore. Macgregor was enthusiastic about canoes. When he contemplated his voyage of a thousand miles he concluded that “no row-boat would serve on a land-water voyage of this sort, for in the wildest parts of the best rivers the channel is too narrow for oars, or, if wide enough, it is often too shallow; and the tortuous passages, the rocks and banks, the weeds and snags, the milldams, barriers, fallen trees, rapids, whirlpools, and waterfalls that constantly occur on a river winding among hills, make those very parts where the scenery is wildest and best to be quite unapproachable in such a boat, for it would be swamped by the sharp waves, or upset over the sunken rocks, which cannot be seen by a steersman.
“Now these very things which bother the ‘pair oar,’ become cheery excitements to the voyager in a canoe. For now, as he sits in his little bark, he looks forward, and not backward. He sees all his course, and the scenery besides. With one sweep of his paddle he can turn aside when only a foot from destruction. He can steer within an inch in a narrow place, and can easily pass through reeds and weeds or branches and grass; can work his sail without changing his seat; can shove with his paddle when aground, and can jump out in good time to prevent a bad smash. He can wade and haul his craft over shallows, or drag it on dry Pg 85 ground, through fields and hedges, over dykes, barriers, and walls; can carry it by hand up ladders and stairs, and can transport his canoe over high mountains and broad plains in a cart drawn by a man, a horse, or a cow.
“Besides all this, the covered canoe is far stronger than an open boat, and may be fearlessly dropped into a deep pool, a lock, or a millrace, and when the breakers are high in the open sea or in river rapids, they can only wash over the deck of a canoe, while it is always dry within.
“The canoe is also safer than a rowing-boat, because you sit so low in it, and never require to shift your place or lose hold of the paddle; while for comfort during long hours, for days and weeks of hard work, the canoe is evidently the best, because you lean all the time against a swinging backboard, and when the paddle rests on your lap you are at ease as in an arm-chair; so that, while drifting along with the current or the wind, you can gaze around, and eat or read, or sketch, or chat with the starers on the bank, and yet, in a moment of sudden alarm, the hands are at once on the faithful paddle ready for action.
“Finally, you can lie at full length in the canoe, with a sail as an awning for the sun, or a shelter for rain, and you can sleep at night under its cover, or inside it when made for that purpose, with at least as much room for turning in your bed as sufficed for the great Duke of Wellington; or, if you are tired of the water for a time, you can leave your boat at an inn—where it will not be ‘eating its head off,’ like a horse; or you can send it home, or sell it, and take to the road yourself, or sink back again into the lazy cushions of a first-class carriage, and dream you are seeing the world.
“But it may well be asked from one who thus praises the paddle, ‘Has he travelled in other ways, so as to know their several pleasures? Has he climbed glaciers and volcanoes, dived into caves and catacombs, trotted in the Norway carriole, ambled on an Arab, and galloped on the Russian steppes? Does he know the charms of a Nile boat, or a Trinity Eight, or a Yankee steamer, or a sail in the Ægean, or a mule in Spain? Has he swung upon a Pg 86 camel, or glided in a sleigh, or sailed a yacht, or trundled in a Rantoone?’
“Yes, he has thoroughly enjoyed these and other modes of locomotion, fast and slow. And now having used the canoe in Europe, Asia, Africa, and America, he finds the pleasure of the paddle is the best of them all.
“The Rob Roy Canoe was built of oak, with a deck of cedar. She was made just short enough to go into the German railway waggons; that is to say, fifteen feet in length, twenty-eight inches broad, nine inches wide, and weighed eighty pounds. My baggage for three months was in a black bag one foot square and six inches deep. A paddle seven feet long, with a blade at each end, and a lug-sail and jib, were the means of propulsion; and a pretty blue silk Union Jack was the only ornament.”
After the cruise the author had a better canoe constructed, shorter, and narrower (but with the same name), and in her he voyaged through Sweden, Norway and Denmark, Holstein, and some German waters. The account of this voyage is given in The Rob Roy on the Baltic, 5th Edition (Low and Marston). The later improvements of the canoe are described in that book, with woodcuts. The full description of a third canoe for sleeping in during a six months’ voyage is given in The Rob Roy on the Jordan, Nile, Red Sea, and Gennesareth, a canoe cruise in Palestine and Egypt and the waters of Damascus, 6th Edition, with eighty illustrations and maps (Murray). A fourth canoe was used in the Zuyder Zee and among the isles of Holland and the Friesland coast; and the latest Rob Roy (Number 7) ran through the Shetland Isles and the Orkneys, and Scotch lakes.
The Building Of the Rob Roy.—John Macgregor has told us that among the many who are building canoes, there may be some persons who have undue expectations as to what such boats can do. Now, the three kinds of canoes, for racing, for sailing, and for travelling, are quite distinct in their forms and capabilities.
A long, narrow, light racing-canoe, with a long, spooned paddle, will attain great speed.
A sailing-canoe with flat bearing, and some keel, will sail off the wind admirably.
The “travelling-canoe” has to sail, to paddle, and to bear portage and rough handling.
The endeavour to combine these three qualities in suitable proportions, without sacrificing more of any of them than can be well dispensed with, has led to the building of the canoe now to be described; and the new Rob Roy has been a great success.
The old Rob Roy canoe, which made a voyage through France, Germany, &c., was specially built for the purpose; and it is described in the book which gives an account of that journey. A more detailed description was given in the Transactions of the Institute of Naval Architects, but the numerous improvements suggested during that voyage, and in careful experiments afterwards, were embodied in the new Rob Roy, so that this novel, inexpensive, and healthful mode of travelling might be facilitated.
The Rob Roy was designed to sail steadily, to paddle easily, to float lightly, to turn readily, and to bear rough usage on stones and banks, and in carts, railways, and steamers; to be durable and dry, as well as comfortable and safe. To secure these objects every plank and timber was carefully considered beforehand, as to its size, shape, and material, and the result has been most successful.
In the efforts to obtain a suitable canoe for this purpose ready made, it was soon found that boat-builders might be proficient at the cabinet-makers’ work of their calling, without any knowledge of the principles required for a new design, especially when sailing, paddling, and carrying had to be provided for at once, and the requirements for each were not understood, except by those who had personally observed them, and had known how to work the paddle as well as the saw and the plane.
A canoe ought to fit a man like a coat; and to secure this the measure of the man should be taken for his canoe. The first regulating standard is the length of the man’s foot, which will determine the height of the canoe from keel to deck; next, the length of his leg, which governs the Pg 88 size of the “well;” and then the weight of the crew and luggage, which regulates the displacement to be provided for. The following description is for a canoe to be used by a man 6 feet high, 12 stone weight, and with boots 1 foot long in the sole.
The Rob Roy is built of the best oak, except the top streak of mahogany, and the deck of fine cedar. The weight, without fittings, is 60 lb., and with all complete, 71 lb. Lightness is not of so much consequence in this case as good line, for a light boat if crank, will tire the canoeist far more in a week’s cruise than would a heavier but stiff craft, which does not strain his body at every moment to keep her poised under the alternate strokes of the paddle or the sudden pressure of a squall on the sail.
The illustration on page 89 represents, on a scale a quarter of an inch to the foot, Fig. 1, a section, with masts and sails; Fig. 2 a bird’s-eye view of the deck. The woodcuts at pages 91, 93 represent, on a scale of an inch to the foot, Figs. 3 and 4, cross sections at the beam and at the stretcher; Figs 9, 10, and 11, the backboard and the apron; the rest of the drawings showing particular portions more minutely. The principal dimensions are:—Length over all, A S, 14 feet; from stem to beam, B, 7 feet 6 inches; beam, outside (6 inches abaft midships), 26 inches; depth from top of deck at C, fore end of the well, to upper surface of keel, 11 inches; keel, depth, outside, 1 inch, with an iron band along its whole length, 3/8 inch wide; camber, 1 inch; depth at gunwale, 8½ inches. The upper streak is of mahogany, and quite vertical at the beam, where its depth is 3 inches. The garboard streaks, and the next on each side are strong, while the next two on each side are light, as it is found that they are less exposed than the others, particularly in a canoe where all these lower streaks are of oak. The stem and stern posts project over deck, the canoe, if turned over, will rest on the upper edge of the combing, round the well, 1/8 inch deep, projecting ½ inch, of steamed oak, curved at the corners, and adding, by its angular position, very much to the strength of the deck about the well. The well is 32 inches from C to D, and 20 inches from E to F, so placed Pg 89 that D M is 2 feet, and thus the beam of the boat being aft of the midships the weight of the luggage G, and of the masts and sails stowed forward, brings the boat to nearly an even keel. The additional basket of cooking-things at I (Fig. 2) brings her a little by the stern. For a boat without luggage the beam should be 1 foot abaft midships to secure an even keel.

Pg 90 The deck is supported on four carlines forward and three aft, the latter portion being thus more strengthened, because, in some cases, it is required to support the weight of the canoeist sitting on the deck with his legs in the water. Each carline has a piece cut out of its end (see Fig. 6), so that the water inside may run along to the beam when the canoe is canted to sponge it out. The after edge of the carline at C is bevelled off (Fig. 5 in section), so as not to catch the shins of your legs. All the carlines are narrow and deep, to economize strength, and the deck is screwed to them with brass screws, so that it might be removed for internal repairs. A flat piece is inserted under the deck at the mast-hole H, which is also furnished with a flanged brass ring. The deck is so arched as to enable the feet to rest comfortably on the broad stretcher J (Fig. 4), the centre of it being cut down in a curve in order that the mast and sails, rolled together, may rest there when there is no luggage, and be kept under the deck, but above any wet on the floor. When there is luggage (as in this voyage) I usually put the mast and sails under the after deck. The cedar deck round the well at E F is firmly secured by knee-pieces, and the boat may thus be lifted up by any part, and may be sat upon in any position, without injury. The luggage for three months, weighing 9½ lbs., is carried in a black leather-cloth bag, 1 foot by 1 foot by 5 inches deep (G, Figs. 1 and 2).
A water-tight compartment may be made by an after bulkhead, with a lid to open, so as to allow the air to circulate when on shore.
The floor-boards, about 2 feet long, rest on the timbers until, at the part below C (Fig. 2), they end at P P (Fig. 7), in notched grooves, which fit into short oak pieces M N, ¼ inch thick, sloping forwards on each side of the keel O. Their ends rest on the garboard streaks, and so lower the heels nearly 1 inch below the level of the floor-board on the top of the timbers. The canoeist sits on the floor-boards, I prefer this to any cushion or mat whatever; but if a mat or cushion be used, it should be firmly fixed, especially Pg 91 in rough water. The canoeist’s knees touch the combing and the apron boards, while his heels touch the keel. Thus the dotted lines in Fig. 1, from the stretcher to the deck, show how the shin-bones are supported in comfort, enabling the paddler to sit for hours together without straining. But comfort is additionally secured by my new kind of backboard, shown in Figs. 8 and 9, in section and elevation. This consists of two strips of oak, 18 inches long, 2½ inches wide, and united by a cross piece at Y, and another at X, the latter being grooved (Fig. 8) so as to rest on the top of the combing, and to oscillate with the movement of the canoeist’s back, which is thus supported on both sides along the muscles, while the spine is untouched between the strips.

The dotted line U (Fig. 8) is a strong cord passed round all (through a hole in the deck or two eyes), and this serves to keep the backboard in general upright, while it is free to vibrate, or, when on shore, to be closed down flat on deck or to be removed entirely in a moment by unloosing the cord. The use of this backboard is a leading feature of the canoe, and adds very much indeed to the canoeist’s comfort, and, therefore, to his efficiency. The length and width of the oaken strips, and the width of the interval between them, ought to be carefully adjusted to the Pg 92 size and “build” of the canoeist, just as a saddle ought to fit a horse and its rider too.
The paddle is 7 feet long, flat-bladed, with a breadth of 6 inches in each palm, which is copper-banded, and made of the best spruce fir, the weight being little over 2 lbs. The spoon-shaped blade is better for speed, and a longer paddle is suitable for a racing-boat, but for a travelling canoe, where long paddling, occasional sailing, and frequent “shoving,” require the instrument to combine lightness, straight edge, handiness, and strength, it is found that a short paddle is best for the varied work of a protracted voyage. Leather cups have been usually employed on the wrists of the paddle to catch the dripping water, but round india-rubber rings look much better and answer every purpose, if placed just above the points where the paddle dips into the water in an ordinary stroke. These rings may be had for twopence, and can be slipped on over the broad blade. If necessary, two are used on each side, and they bear rough usage well, while if they strike the cedar deck, no injury is done to it.
After numerous experiments, the following very simple plan has been devised for a waterproof apron, and its application at once removes one of the chief objections to canoes in rough water, as heretofore constructed. It is necessary to have a covering for the well which shall effectually exclude the water, and yet be so attached as not to hamper the canoeist in case of an upset, or when he desires to get out of the boat in a more legitimate manner. These desiderata are completely secured by the new apron, which is not permanently attached in any manner to the boat, but is formed as follows:-A piece of light wood, of the form in Fig. 10, 2 feet long and 3 inches deep at the deepest part, is placed along each side of the deck vertically, so as just to rest against the outside of each knee of the canoeist, and then a piece of macintosh cloth (drab colour is best) is tightly nailed along and over these, so as to form an apron, supported at each side on Z (Fig. 11), and sloping from the highest part forwards down to the deck in front of the combing, over which its edge projects 1 inch, and then lies flat. The other or after end is so cut and formed as to Pg 93 fit the body neatly, and the ends may be tucked in behind, or, when the waves are very rough, they should be secured outside the backboard by a string with a knot. When this apron is so applied, and the knees are in position, their pressure keeps the whole apron steady, and the splash of small waves is not enough to move it. In rough water I place a string across the end and round two screw nails on the deck; or an india-rubber cord run through the hemmed Pg 94 end, but best of all is a strip of wood bent across the deck with its ends under two screws or chocks.

A button-hole at the highest point of the apron allows it to be supported on the waistcoat. When you have to get out on shore, or when sailing, it is usually best to stow the apron away, so that the legs may be turned into any desired position of ease. The apron I used in this tour had been perfectly fitted by myself to me and the boat. Several others, a little like it (very little!), roughly made for other canoes, have, as might be expected, failed to give satisfaction.
One important advantage of a canoe is the capacity for sailing without altering the canoeist’s seat; and we shall now describe the mast and sails found by experience to be most convenient, after three masts had been broken and eight sets of sails had more or less failed. The mast is 1¾ inches thick (tapering), and 5 feet 6 inches long, of which the part above deck is 4 feet 9 inches. The lug-sail K (Fig. 1), has a yard and a boom, each 4 feet 9 inches long, so that when furled the end of the boom and mast come together. The fore-leach is 2 feet long, and the after-leach 6 feet 6 inches, giving an area of about 15 square feet. The yard and boom are of bamboo, and the yard passes into a broad hem on the sail-head, while the halyard is rove aloft through a small boxwood block ¾ inch long, and with a brass sheave, and through another (a brass blind pulley) well fastened on the side of the mast near the deck, so that the sail can be lowered and hoisted readily. The lower joint of a fishing-rod, 4 feet 9 inches long, is a spare boom. The tack end of the boom is made fast to the mast by a flat piece of leather, lashed to its upper part and to the mast, and so as to be free to swing in every direction; after many other plans had failed this was quite successful, and lasted through the whole voyage. No hole is made in the mast, and no nail or screw driven into it, for these are causes of weakness. Two cord loops, about 6 inches apart, near the mast-head, support the flagstaff, of bamboo-cane 2 feet long, and with a silk flag 7 inches by 9 inches. When the mast is not used this flagstaff is detached and placed in the mast-hole, which it fits by a button 2 inches wide, permanently fixed Pg 95 on the staff, the lower end of which rests in the mast-step. The halyard and sheet should be of woven cord, which does not untwist, and is soft to handle in the wet. The sheet when not in hand may be belayed round a cleat on deck on either side of the apron, where it is highest, and thus these cleats are protected from the paddle.
For the sake of convenience the mast is stepped so far forward as to allow the boom to swing past the canoeist’s breast when the sail is jibbed or brought over. This also allows the luggage-bag to be between the stretcher and the mast. Thus the mast-hole H is at 3 feet 6 inches distance from the stem. The mast-step is a simple wedge-like piece of oak (see R, Fig. 14), made fast to the keel, and abutting on the garboard streak on each side, with a square hole in it for the foot of the mast. It may be thought that the mast is thus stepped too far forward, but the importance of having the sail free to swing, without lying against the canoeist’s body, or getting entangled with his paddle, which is used in steering, is so great, that some sacrifice must be made to secure this point. However, it is found that the boat sails very well on a wind with this sail, if the breeze is strong; and in light breezes it is only expedient to sail with the wind well aft, when the jib can also be used. A canoe must have a strong, light, flexible painter, suitable for constant use, because a great deal has to be done by its means in towing on dull water, guiding the boat while wading down shallows or beside falls, lowering into lochs, hauling her over hedges, walls, locks, banks, and even houses; and raising or lowering her (with luggage in) to and from steamboats. The “Alpine Club” rope, used in the new Rob Roy, was found to be hard and “kinky” when wet, and the softer rope used in the old Rob Roy was far better. Another kind of brown-tanned rope has been recommended. The painter should not be longer than twice the length of the boat. Each end is whipped with wax-end, which sort of fine twine is also invaluable for all the other fastenings, as it never slips. The painter passes through a hole in the stem, and another in the stern-post, and is drawn tight to lie on deck in the lines AY and SY, Fig. 2; the slack of about four feet is belayed round the Pg 96 windward cleat and coiled outside, so that it may be seized instantly when you go ashore, or have to jump out to save a smash or an overset in a dangerous place. This mode of fixing and belaying the painter I adopted after numerous trials of other plans, and it is found to be far the best.
The jib is a triangle of 3 feet hoist and 3 feet foot, the fore-leach fast by a loop, passing under the painter and over the stem; the head is fixed by a loop over the mast-head, and under the flagstaff button. Thus the jib can be struck while the canoeist remains in the boat, by pushing off these two loops with his paddle. To set the jib, it is best to land. This is much more generally convenient than to have jib-tackle on the mast. (I have now discarded the jib entirely.) The sails are of calico, without any seam. This lasts quite well enough, dries speedily, and sets well, too, provided that care is taken to have it cut out with the selvage along the after-leach, and not along any of the other sides. Inattention to this last direction simply ruins sails; and it cannot be too often repeated that the success of the six Rob Roy voyages could not be expected if great care had not been devoted to all these details.
A good travelling canoe costing £15 ought to last a long time, for it is not racked and pulled in pieces at every stroke, as a rowing-boat is.
The Paddle.—It has been said that the use of a canoe paddle must contract the chest, but this is certainly a mistake. If indeed, you merely dapple each blade of the paddle in the water without taking the full length of the stroke the shoulders are not thrown back, and the effect will be injurious; but exactly the same is true if you scull or row with a short jerky stroke. In a proper use of the paddle the arms ought to be in turn fully extended, and then brought well back, so that the elbow grazes the side, and the chest is then well plied in both directions. In very shallow water the paddle should be clasped lightly (turning the thumbs upwards then), so that if it strikes the bottom or a rock the hand will yield and not the blade be broken. The distance between the hands should be that of the breadth of the chest. One can tell a tyro in a moment by seeing him with his hands two feet apart, and therefore with Pg 97 a shortened stroke or too long a paddle. Great caution should be used when placing the blade in advance to meet a rock, or even a gravel bank, otherwise it gets jammed in the rock or gravel, or the boat overrides it. It is better in such a case to retard the speed rather by dragging the paddle (tenderly), and always with its flat side downwards, so that the edge does not get nipped.
For long cruises lightness is the first necessity. An ounce more or less makes a great difference when you have to carry it with outstretched arms all day. My paddle weighs two pounds. A swivel crutch on deck on the quarter is used sometimes. In my Shetland cruise I used a single paddle blade and steered by my feet acting on a light rudder by two cords. This plan has many advantages for a sailing cruise and general work, but it is not good for rapids.
Rudder.—For long sailing this is useful, and foot-lines should be used, or a rod to the yoke. I used the rod for sailing in the Dutch cruise always.
Leeboards.—These may be made of wooden triangles one foot each way, hung at each side by two corners. The lee one is thus pressed against the gunwale, and acts well.
Centre-board.—When the “Rothion” sailed across the English Channel, the late Hon. James Gordon used a centre-board at my suggestion, and his Rob Roy thus furnished held her wind admirably. The centre-board might come up through a slit one foot long in the garboard streak (not through the keel) into a closed mackintosh bag, so that when raised it would turn to one side, and lie flat on the bilge within.
The Apron.—The canoeist soon finds that this is the most difficult part of the boat to arrange with perfect satisfaction. I have had more experiments and trouble and thought about the apron than upon any other part of the canoe’s arrangements.
A full wooden hatch does well for common work, but not for rough cruising. Now and then the legs need “play,” and if the hatch is rigid at the height thus needed, it is much too high in ordinary times; and it curbs the freedom Pg 98 for the arms near the deck, being also unwieldy for instant debarking in rapids, and for stowing away.
The detached apron of the Baltic pattern is wet in use. Side pieces on deck to clutch the wooden cheeks kept out by a cane across the knees, and a permanent flap on deck, covering the fore end of the mackintosh, are great improvements. The Jordan Rob Roy had a sheet mackintosh apron, with only a cane fixed in the combing to keep the apron off the knees. For her cruise she had under this apron six inches of the after part of wood. The loose breast flap and side flaps rolled up (usually) form a curved edging near the body. By lifting this hatch, and laying it forward, the whole apron is folded forward of the knees, and in one foot of space fore and aft. This plan is a complete success; and at last my apron is all right. When a single bladed paddle is used the apron is needed only in rough water, that is, one day in four.
Stretcher.—The form described with a cut in the “Rob Roy on the Jordan,” is a very great improvement. Each foot has a light board abutting on the carline above and the timber below, so that ample room is given for the luggage bag, and much strength is combined with extreme lightness.
Sail.—Many forms have been tried, but the Club sailing matches have often been won by a lug sail. This rig is also the safest of all, and the boom can be detached from a hook on the mast to stow away.
Portable Canoes.—A wooden canoe in four pieces is easily made, although somewhat heavy. The additional expense is soon saved, if the canoe is taken often by railway as a box. Colonel Bradford’s india-rubber canoe packs up into a parcel five feet long, and one foot across. In the Eastern trip a canoe in two pieces might have been readily carried on a horse, but the Rob Roy, undivided, was thus carried easily. Berthon’s Collapsible Boat Company presented to me a charming collapsible canoe, nine feet long, and which is very cheap, safe, light, and can easily be carried in one hand. The shortest canoe in the Club was the Wharbe, 8 feet 6 inches long. But I have paddled the little “dingy” only eight feet long, which was carried aboard Pg 99 the Rob Roy yawl. I think 12 feet the best length for a cruising canoe.
I have designed a cork canoe in three pieces, five feet, four feet, and three feet long; the last to pack in the next, and both in the large middle one; weight about 30 lbs.
Sun.—When there is a brilliant glare of the sun, and it is low, and directly in front, and the eyes are dazzled by its reflection on the water, a good plan is to direct the bow to some point you are to steer for, and then observe the reflection of the sun on the cedar deck of the boat. Having done this you may lower the peak of your hat so as to cut off the direct rays of the sun, and its reflected rays on the water, while you steer simply by the light on the deck.
Caution.—When a great current moves across a river to a point where it seems very unlikely to have an exit, you may be certain that some unusual conformation of the banks or of the river bed will be found there, and caution should be used in approaching the place. This, however, is less necessary when the river is deep.
Weeds.—The ripple and bubbles among weeds are so totally different from those on free water that their appearance at a distance as a criterion of the depth, current, and direction of the channel must be learned separately. In general, where weeds are under water, and can sway or wave about, there will be water enough to pass—the requisite three inches. Backing up stream against long weeds is so troublesome, and so sure to sway the stern round athwart stream, that it is best to force the boat forward instead, even if you have to get out and pull her through. Paddling through rushes, or flags, or other plants, so as to cut off a corner, is a mistake. Much more “way” is lost then by the friction than might be supposed.
Stores on the Rob Roy.—Paddle, painter (31 feet at first, but cut down to 20 feet), sponge, waterproof cover, 5 feet by 2 feet 3 inches, silk blue union jack, 10 inches by 8 inches, on a staff two feet long. Mast, boom, and yard. Lug sail, jib, and spare jib (used as a sun shawl). Stretcher, two back boards, floor-boards, basket holding a mackintosh coat. For repairs—iron and brass screws, sheet copper and copper nails, putty and whitelead, a gimlet, cord, Pg 100 string, and thread, one spare button, needle, pins, canvas wading shoes (wooden clogs would be better); all the above should be left with the boat. Black bag for 3 months’ luggage, size, 12 inches by 12 inches, by 5 inches deep (just right), closed by three buttons, and with shoulder-strap. Flannel Norfolk jacket (flaps not too long, else they dip in the water, or the pockets are inverted in getting out and in); wide flannel trousers, gathered by a broad back buckle belt, second trousers for shore should have braces, but in the boat the back buttons are in the way. Flannel shirt on, and another for shore. Before me while writing this there are 21 various head covers used in different tours, but for boating the straw hat is best of all. Thin alpaca black Sunday coat, thick waistcoat, black leather light-soled shoes (should be strong for rocks and village pavements), cloth cap (only used as a bag), 2 collars, 3 pocket handkerchiefs, ribbon tie, 2 pairs of cotton socks (easily got off for sudden wading, and drying quickly on deck). Brush, comb, and tooth-brush. Testament, passport (scarcely needed now), leather purse, large (and full), circular notes, small change in silver and copper for frequent use, blue spectacles in strong case, book for journal and sketches, black, blue, and red chalk, and steel pen. Maps, cutting off a six inch square at a time for pocket reference. Guide-books and pleasant evening reading book. Cut off covers and useless pages, and every page as read; no needless weight should be carried hundreds of miles; even a fly settling on the boat must be refused a free passage. Medicine (rhubarb and court plaster), small knife, and pencil.
Rocks and Currents.—Even if a set of rules could be laid down for the management of a boat in the difficult parts of a river, it would not be made easier until practice has given the boatman that quick judgment as to their application which has to be patiently acquired in all athletic exercises.
But the canoeist, who passes many hours daily in the consideration of the river problems always set before him, will feel some interest in this attempt to classify those that occur most frequently.
Steering a boat in a current among rocks is like walking Pg 101 on a crowded pavement, where the other passengers are going in various directions, and at various speeds. A great deal of practice, and lessons enforced by collisions, are needed to make a pedestrian au fait in a crowd. But years of walking produce a certain power, which insensibly directs a man in his course and his speed.
After this capacity becomes, as it were, instinctive, a man can walk briskly along Fleet-street at four P.M., and, without any distinct thought about other people, or about his own progress, he can get safe to the end. Indeed, if he does begin to think of rules or how to apply them, he is almost sure to knock up against somebody. Nay, if two men meet as they walk through a crowd, and each of them “catches the eye” of the other, they will probably cease to move instinctively, and, with uncertain data to reason from, a collision is often the result.
The importance of this subject of “boating instinct” will be considered sufficient to justify these remarks when the canoeist has by much practice at last attained to that desirable proficiency which enables him to steer without thinking about it, and therefore to enjoy the conversation of other people on the bank, or the scenery, while he is rapidly speeding through rocks, eddies, and currents.
As the descent of a current among rocks resembles a walk along the pavement through a crowd, so the passage across a rapid is even more strictly in resemblance with the course of a man who has to cross a street where vehicles are passing at uncertain intervals and at various speeds, though all in the same direction. For it is plain that the thing to be done is nearly the same, whether the obstacles (as breakers) are fixed and the current carries you towards them, or the obstacles (as cabs and carts) are moving, while you have to walk through them on terra firma. To cross Park-lane in the afternoon requires the very same sort of calculation as the passage across the stream in a rapid on the Rhine.
We may divide the rocks thus encountered in fast water into two classes—(1) Those that are sunk, so that the boat may possibly float over them, and which do not deflect the direction of the surface current. (2) Those that are Pg 102 breakers, and so deflect the current, and do not allow the boat to float over them. The currents may be divided into—(1) Those that are equable in force, and in the same direction through the course to be steered. (2) Those that alter their direction in a part of that course.
In the problems before the canoeist will be found the combinations of every degree and variety of these rocks and currents, but the actual circumstances he has to deal with at any specified moment may be generally ranged under one or other of the six cases depicted in the accompanying woodcut. In each of the figures in the diagram the current is supposed to run towards the top of the page, and the general course of the canoe is supposed to be with the current. The particular direction of the current is indicated by the dotted lines. The rocks when shaded are supposed to be sunk, and when not shaded they are breakers. Thus the current is uniform in Figs. 1, 2, 3; and it is otherwise in Figs. 4, 5, 6. The rocks are all sunk in Figs. 1, 2, 3, and 5; whereas in Figs. 4 and 6 there are breakers. The black line in all the figures shows the proper course of the centre of the boat, and it is well to habituate oneself to make the course such as that this line shall never be nearer to the rock than one-half of the boat’s length.
The simplest case that can occur is when the canoe is merely floating without “way” through a current, and the current bears it near a rock. If this be a breaker, the current, being deflected, will generally carry the boat to one side. The steering in such cases is so easy, and its frequent occurrence gives so much practice, that no more need be said about it. But if the rock be a sunk rock, and if it be not quite plain from the appearance of the water that there is depth enough over the rock to float the boat, then it is necessary to pass either above the rock, as in Fig. 1, or below it, as in Fig. 2.
A few days’ practice is not thrown away if the canoeist seizes every opportunity of performing under easy circumstances feats which may at other times have to be done under necessity, and which would not be so well done then if attempted for the first time. Let him, therefore, as soon as possible, become adept in crossing above or Pg 103 below a single sunk rock with his boat’s bow pointed to any angle of the semi-circle before him.

Next we have to consider the cases in which more than one rock will have to be avoided. Now, however great the number of the rocks may be, they can be divided into sets of three, and in each of the figures 3, 4, 5, 6 it is supposed that (for reasons which may be different in each case, but Pg 104 always sufficient) the canoe has to pass between rocks A and B, and then between B and C, but must not pass otherwise between A and C.
In Fig. 3 the course is below B, and above C, being a combination of the instance in Fig. 2 with that in Fig. 1. The precise angle to the line of the course which the boat’s longer axis ought to have will depend upon what is to be done next after passing between B and C, and hence the importance of being able to effect the passages in Fig. 1 and Fig. 2, with the axis at any required angle.
We may next suppose that one of the three rocks, say B, as in Fig. 4, is a breaker which will deflect the current (as indicated by the dotted stream lines), and it will then be necessary to modify the angle of the boat’s axis, though the boat’s centre has to be kept in the same course as before. It will be seen at once that if A were a breaker the angle would be influenced in another manner, and that if C were a breaker the angle at which the boat should emerge from the group of rocks would be influenced by the stream from C also; but it is only necessary to remind the reader that all the combinations and permutations of breakers and sunk rocks need not be separately discussed,—they may be met by the experience obtained in one case of each class of circumstances.
Fig. 5 represents a circular current over the group of three rocks. This is a very deceptive case, for it looks so easy that at first it is likely to be treated carelessly. If the boat were supposed to be a substance floating, but without weight, it would have its direction of motion instantly altered by that of the current. But the boat has weight, and as it has velocity (that of the current even if the boat is not urged also by the paddle so as to have “way” through the water), therefore it will have momentum, and the tendency will be to continue the motion in a straight line, instead of a curve guided solely by the current. In all these cases, therefore, it will be found that the boat insists upon passing between A and C, where it must not be allowed to go (on the hypothesis we have started with), and if it effects a compromise by running upon C, that will be by no means satisfactory. This class of cases includes all those in which Pg 105 the river makes a quick turn round a rock or a tongue B, where the boundary formed by the rock A on the outer bend of the stream is a solid bank, or a fringe of growing trees, or of faggots artificially built as a protection against the erosion of the water. This case occurs, therefore, very frequently in some fast rivers, say, at least, a hundred times in a day’s work, and perhaps no test of a man’s experience and capacity as a canoeist is more decisive than his manner of steering round a fast, sharp bend. The tendency of the canoeist in such cases is always to bring the boat round by paddling forward with the outer hand, thereby adding to the “way,” and making the force of the current in its circular turn less powerful relatively. Whereas, the proper plan is to back with the inner hand, and so to stop all way in the direction of the boat’s length, and to give the current its full force on the boat. Repeated lessons are needed before this is learned thoroughly.
The case we have last remarked upon is made easier if either A or C is a breaker, but it is very much increased in difficulty if the rock B is a breaker or is a strong tongue of bank, and so deflects the current outwards at this critical point. The difficulty is often increased by the fact that the water inside of the curve of the stream may be shoal, and so the paddle on that side strikes the bottom or grinds along it in backing.
When the curve is all in deep water, and there is a pool after B, the boat ought not to be turned too quickly in endeavouring to avoid the rock C, else it will sometimes then enter the eddy below B, which runs up stream sometimes for fifty yards. In such a case the absurd position you are thereby thrown into naturally causes you to struggle to resist or stem this current; but I have found, after repeated trials of every plan I could think of, that if once the back current has taken the canoe it is best to let the boat swing with the eddy so as to make an entire circuit, until the bow can come back towards B (and below it), when the nose of the boat may be again thrust into the main stream, which will now turn the boat round again to its proper course. Much time and labour may be spent uselessly in a wrong and obstinate contest with an eddy.
In Fig. 6, where the three rocks are in a straight line, and the middle one is a breaker, an instance is given when the proper course must be kept by backing during the first part of it. We must suppose that the canoeist has attained the power of backing with perfect ease, for this will be quite necessary if he intends to take his boat safely through several hundred combinations of sunk rocks and breakers. Presuming this, the case in Fig. 6 will be easy enough, though a little reflection will show that it might be very difficult, or almost impossible, if the canoeist could give only a forward motion to the boat. To pass most artistically, then, through the group of rocks in Fig. 6 the stern should be turned towards A, as shown in the diagram, and the passage across the current, between A and B, is to be effected solely by backing (and chiefly in this case with the left hand) until the furthest point of the right of the curve is reached, with the boat’s length still as before in the position represented in the figure. Then the forward action of both hands will take the canoe speedily through the passage between B and C.
Cases of this sort are rendered more difficult by the distance of C from the point above A, where you are situated when the instant decision has to be made as to what to do, and it would usually be imprudent to rise in the boat in such a place to survey the rock C. If it is evident that the plan described above will not be applicable, because other and future circumstances will require the boat’s bow to emerge in the opposite direction (pointing to the right), then you must enter forwards, and must back between B and C, so as to be ready, after passing C, to drive forward, and to the right. It is plain that this is very much more difficult than the former case, for your backing now has to be done against the full stream from the breaker B.
In all these instances the action of the wind has been entirely omitted from consideration, but it must not be forgotten that a strong breeze materially complicates the problem before the canoeist. This is especially so when the wind is aft; when it is ahead you are not likely to forget its presence. A strong fair wind (that has scarcely been felt with your back to it) and the swift stream and the Pg 107 boat’s speed from paddling being all in one direction, the breeze will suddenly become a new element in the case when you try to cross above a rock as in Fig. 1, and find that the wind carries you broadside on against all your calculations.
As for sailing among rocks in a current, if the rapid is long the canoe must be directed solely by the paddle, and in short groups of rocks the course to be steered by a boat sailing is the same as if it were paddled, though the action of the wind has to be carefully taken into consideration.
In all these things free boldness and skill come best after lessons of experience, and the canoeist will find himself ready and able, at the end of his voyage, to sail down a rapid which he would have approached very timidly, at the beginning, even with the paddle.
But perhaps enough has been said for the experienced paddler, while surely more than enough has been said to show the tyro aspirant what varied work he has to do, and how interesting are the circumstances that will occupy his attention on a delightful river cruise.
The Boy as Yacht Owner.—Boys who live near a sheet of water may like to know how to make—or to have made for them by a carpenter—a homely rough-hewn yacht. They may not be able to win the American cup with it, but they may have much fun on board, and it will be difficult to wreck. Indeed, it is said to be impossible to upset a yacht of this pattern. The natives of South America use yachts of this build, and even go to sea in this kind of craft. We do not advise our readers to round Cape Horn or to cross the Bay of Biscay in a yacht like this, but on a lake or river they are not likely to come to grief. All the same, skill in swimming should precede boating of all kinds.
A, B, C, D represent six pine logs, each one fourteen feet long and eight inches in diameter. The six joined together make a deck four feet wide. Both ends of each log are roughly trimmed with an adze and underneath each log is bevelled along three feet of its length at each end. The middle eight feet of each log is thus left in its natural state, round and still bearing its bark; but three feet at each end of each log is trimmed to slope and taper Pg 108 towards its termination. E is four feet seven inches from the bow and represents a hole down to the water two inches wide and eighteen inches long. It is formed by cutting an inch away from each of the two centre logs to make two inches, and making the length of the indentation eighteen inches on each of these two logs. The purpose of the hole is to hold a centre-board, which is passed through it to act instead of a keel. It is a piece of two-inch plank eighteen inches wide. Next the bow ends of the logs are fastened together by what joiners call rabbeting and bolting. Fig. 2 represents a rabbet, and gives the dimensions. One of these rabbets is cut upon the upper side of each log, one foot six inches from the bow, so that when all the logs have been served exactly alike, and they have been placed in position side by side, these indentations form an unbroken channel across the boat. Now a piece of the toughest dry wood—the bolt—shaped like Fig. 3, should be made to fit this groove, and should then be placed therein. At H, I, in Fig. 1 bore with an auger holes three-quarters of an inch in diameter through the bolt, and right on through the log. Into these holes fit pegs of hard, very dry wood.

If these pegs and the bolt fit tightly when they are quite dry they will swell and fit very much tighter when they become wet. Two and a half feet further back at J, K, the logs are rabbeted again in precisely the same way, and Pg 109 again at L M, N O, and P Q. The mast should be as long as the boat, and at its base four and a half inches in diameter. Generally it consists of a small tree, a spruce fir, or something of that kind. The boom, seen in the completed picture, is almost as long as the mast, though more slender, and it must have a fork at its thickest end. A lighter bough, with a fork, three feet six-inches long, is needed as a rest for the boom.

The mast is fixed at R in Fig. 1, and is secured as in Fig. 4. It stands in a hole four inches in diameter and four inches deep. A and B in Fig. 4 stand a foot away from the mast in holes three inches in diameter and three inches deep. A and B are each eighteen inches long, and C is a piece of two-inch plank eighteen inches wide, and it has a hole bored in it four inches in diameter to admit the mast. At S, T, U, V, in Fig. 1 holes are bored three inches in diameter exactly upon the middle of the next to the outermost log on each side of the boat. These are fitted with forked uprights, those at S and T are eight inches long; those at U and V Pg 110 are twelve inches long. At W, X, Y and Z in Fig. 1 bore holes three inches in diameter and three inches deep, W and X being one foot away from N, O. Two feet from W and X should be Y Z. a and b are holes of the same size over the middle logs of the boat. In W, X, Y and Z should be forked uprights fourteen inches long. In a and b are uprights sixteen inches long with a cross piece upon which to rest the oar of the steersman. Fig. 5 shows what the arrangements are with regard to these uprights. A little before the mast, on each side of the boat, a pole runs through the forks of the uprights. The ends of these poles are joined aft by a piece of one-inch plank, upon which sits the man at the helm. A shelter may be made with a piece of sailcloth or other material as shown in Fig. 6.

The helm consists of a pole four feet long, which is fixed at an angle of forty-five degrees to a piece of inch plank two feet long and eight inches wide, as shown in Fig. 7. It will be found that the vessel easily answers this helm, which is used like an oar. Along the mast the sail is nine feet long. It does not run on rings, but is nailed to the Pg 111 mast. The corner is tied securely to the end of the boom, whose length is ten feet. The boom rests with its fork upon the mast and is prevented from slipping away by a forked, upright support. It is an easy matter to unfurl the sail. Take the fork of the boom from the mast, and the sail collapses instantaneously. Much navigation can be learned in a vessel of this kind, and it may be that some future admiral will have his small beginnings in a craft of this homely character.
In the last chapter we had much to say of the famous canoe traveller, the late John Macgregor, and our readers will welcome an account of his portable cooking apparatus, because even if they do not go voyages in a boat they will find it useful for picnics and camping out. This apparatus, the voyager tells us, “has been designed after numerous experiments with various portable cooking-machines which I could procure for trial, and, as it succeeds better than any of them, and has been approved by trial in five of my own voyages, and in another to Iceland, besides shorter trips, and in the Abyssinian campaign, it may be of some use to describe the contrivance here.”
The object proposed was to provide a light but strong apparatus which could speedily boil water and heat or fry other materials even in wet and windy weather, and with fuel enough carried in itself for several days’ use.
Fig. 1 is a section of the Rob Roy cuisine as it is made up for carrying. There is first a strong waterproof bag about one foot high, and closed at the top by a running cord. At the bottom is the cuisine itself, a, which occupies a space of only six inches by three inches (when of smaller size), and has the various parts packed inside, except the drinking cup b.
Provisions, such as bread and cold meat or eggs, may be stowed in the bag above the cuisine, and if the string of it be then attached to a nail fixed in the boat, the whole will be kept steady.
For use, when it is desired to boil water, the cuisine being opened, the lower part is a copper pan, c, Fig. 2, with a handle, e, which can be fixed either into a socket in the side Pg 113 of the pan, or another socket in the side of the lid, as represented in Figs. 2 and 6.
Three iron legs also fix into sockets and support the pan over the spirit-lamp, f, by which the pan, two-thirds full of liquid, will be boiled in five minutes.

The lamp is the main feature of the apparatus, and it is represented in section in Fig. 3. It consists of two cylinders, one within the other. The space between these (shaded dark) is closed at top and bottom, and a tube b, fixed through the bottom, rises with one open end inside, and another (a small nozzle) curved upwards in the open internal cylinder. Another tube, h, opens into the annular chamber between the cylinders, and it has a funnel-shaped mouth at the outer end, through which the chamber may be filled, Pg 114 while a screw in the inside allows a handle, Fig. 4 (in section), to have its end, j, screwed in. A small hole in the upper surface is closed by a little cork, which will be expelled if the pressure within is so high as to require escape by this safety-valve. The hole may be in any part of the annular cover (but is not shown in the sketch), and in such case the hole shown in the handle is omitted.
The outer cylinder of the lamp, being larger than the inner one, has a bottom, k, Fig. 3, which forms a circular tray of about two inches wide and half an inch deep.
The original form of the lamp, which was first brought to notice by the cook of the Royal Canoe Club, had a detached tray for the bottom, but now, instead of this plan for the admission of air into the lamp, two saw cuts are made, each about an inch long. One of them is shown below f, Fig. 2, and thus the lamp and tray are united in one compact piece while there still is access for air.
The late Professor J. D. Forbes, who used this lamp, says it was introduced into this country from Russia by Dr. Samuel Brown, and that “the jet of burning spirit has such force as to resist the blast of a hurricane.”
To put the lamp in operation, unscrew its handle from the position in Fig. 2, so that it will be as in Figs. 3 and 4. Then from a tin flask (which has been packed with the rest of the things in the pan) pour spirits of wine—or, if the odour is not objected to, methylated spirit, into the measure m, Fig. 5, and from that into the interior of the lamp through the opening at h. Next screw in the handle, and place the lamp level under the pan, and pour nearly another measure full into the interior tray. Set fire to this, and shelter it for a few seconds if there be much wind. I used this always with complete success on the Jordan, Nile, Danube, and many other rivers.
In a short time the flame heats the spirits in the closed chamber, and the spirituous steam is forced by pressure down the tube, and inflames at the nozzle, from which it issues with much force and some noise in a lighted column, which is about one foot in height when unimpeded.
This powerful flame operates on the whole of the bottom and lower edge of the pan, and it cannot be blown out by Pg 115 wind nor by a blast from the mouth, but may be instantly extinguished by sharply placing the flat bottom of the measure upon it.
The cover may be put on so as to rest with the flat bottom downwards, and with or without the handle. If tea is to be made with the water when it boils, the requisite quantity is to be placed in the tea vessel, n, Fig. 5, which has perforated sides, and, its lid being closed, this is placed in the water, where it will rest on the curved side, and can be agitated now and then for a minute, after which insert the handle in the socket of the pan and remove the lamp, allowing the tea to infuse for four minutes, when the tea vessel may be removed and the made tea may be poured out into the cup. The dry tea can be conveniently carried in a paper inside the tea vessel. Salt is carried in the box o, and the matches are in the box p. Coffee may be best carried in the state of essence in a bottle. An egg-spoon and a soup-spoon are supplied. A flat clasp knife and fork may be had extra.
If bacon is to be fried, or eggs to be poached or cooked sur le plat, they may be put into the lid and held by hand over the lamp-flame, so as to warm all parts equally, or the slower heat of a simple flame may be employed by lighting the measure full of spirits and then placing it on the bottom of the upturned pan as shown at Fig. 6, where it will be observed that the three legs are placed in their sockets with the convex curve of each turned outward, so that the lid, as a frying-pan, can rest upon their three points.
The spirit-flask contains enough for six separate charges of the lamp, and the cost of using methylated spirits at 4s. 6d. a gallon is not one penny a meal. The lamp-flame lasts from ten to fifteen minutes, and the weight of the cuisine, exclusive of the bag and cup, is about two pounds.
These cuisines, improved by the suggestions obtained in their use, should be carefully made with the best materials and workmanship, and the cost would be about two and a half guineas; or if with tin boiler instead of copper, and brass lamp, £1 12s. 6d. Many of much larger size (to cook for twenty men) have been used in Australia.
The lamp above described was used daily in my yawl Pg 116 but the other fittings were on a more enlarged scale, as extreme lightness was not then required.
The Norwegian Cooking Apparatus of another kind entirely will be a valuable adjunct to the yachtsman’s stores. By means of this, meat or pudding after being heated for only five minutes, and then enclosed in a box which retains the heat, will be found to be perfectly cooked after three hours, though no more heat has been applied to it.

Since John Macgegor used this stove there have been other wickless stoves invented, and sold at more moderate prices. For instance there are the Primus and the Optimus and the Wickless oil stove of the Wilson Engineering Company. Several such stoves, of which two are illustrated here, are included in the lists of Messrs. A. W. Gamage, Ltd., and they are useful indoors and in the open.
For those boys who have the good fortune to live in Britain, few hobbies are better or more enticing than collecting butterflies and moths.
The following apparatus will be enough to start with: (1) a butterfly net; (2) a few dozens of one ounce and two ounce deep willow pill-boxes, which may be strengthened by a little liquid shellac glue run round the inside edges; (3) a handbag which excludes the light; (4) a two-pound biscuit-tin with tightly-fitting lid; (5) a zinc pinning box, cork lined; (6) some entomological pins in three sizes; (7) some setting boards or blocks; and (8) a store box for keeping the specimens when dry enough to remove from the setting boards. We will now consider these items in detail.
The butterfly net can quite easily be home-made, though, where money is plentiful, it is best bought with the other things above named. To make the net-frame, obtain from a dealer what is called a Y-piece, in brass tube. Then obtain a piece of short walking-stick, not more than two feet long, which will fit into the lower section of the Y, which has a broader tube than the two upper sections. A short stick is always best, because more handy and sure in manipulation when catching the butterflies. Into the upper sections of the Y place the ends of a piece of cane about three or four feet long, being careful that each end of the cane fits tightly into the brass sockets. Then get a lady friend to make for you a green or white leno-muslin bag net, with a brown calico hem attached, into which the cane runs. This net should be made just deep enough to reach with the hand to the bottom, or an inch or so deeper only. Mind the bottom is made round, and not jelly-bag shaped with a Pg 118 point, which will ruin nearly all your captures before they are secured. Before using the net, have the muslin steeped in water for a whole night, so as to take all the stiffness out of the muslin. It will require several rinsings before the size is all removed, and it becomes quite soft. Never mind the loss of colour if green—it will only look the more workman-like. In using the net to catch the specimens, like so many other things, it requires practice to make perfect; but when once the knack is obtained, it should be a rare thing to miss a specimen. Don’t race after them, but wait until the butterfly hovers over a flower, or flies steadily past, then, with a bold, steady stroke, catch it in the centre of the net opening, at the same moment giving the wrist a sharp half-turn, which will close the mouth of the net, and so secure the novelty.
Carry the empty pill-boxes in the right-hand side pocket of the coat, transferring them to the left-hand side as filled, so that the full and empty boxes never get mixed in the pockets. Having safely netted the butterfly, place the net on the ground, and take a suitable sized pill-box in the right hand. Remove the lid, which is to be placed in the ball of the hand loosely under the bottom of the pill-box. This leaves the left hand free. Then insert the right hand into the net, and cover the butterfly with the pill-box, holding it with the left hand from the outside of the net, carefully keeping the gauze tightly over the box with the left forefinger. The right hand, which is now free, still contains the lid of the pill-box, which gently place over the butterfly, slowly drawing out the gauze remaining between the lid and the box. Quickly transfer the filled box, which should contain only one specimen, into the dark left-hand pocket. Most butterflies will at once become quiet in the dark, if it is not too hot. As opportunity occurs, it is best to transfer them to the hand-bag, which should be left near, under the shade of a bush in a cool place. By this means every specimen should be so boxed without the apparent loss of a single scale from their wings. Only take good specimens—don’t be tempted to get a quantity, but rather go in for fine quality. Especially avoid any which are chipped, rubbed, or otherwise unfit for cabinet specimens. Pg 119 It is a great mistake to take imperfect specimens, for they give just as much trouble as the finest, and are never of use either for the collection or for scientific purposes. If it is not convenient on arrival home to immediately set out our captures, they should not be killed, but placed in the biscuit-tin or left in the bag just as they are, in a cold, dark cellar, or like place, where they will be all right for a couple of days or more, remaining perfectly still.
Having brought home our captures we now produce the biscuit-tin. This is to be used for the “lethal-chamber,” where the specimens are to be sent to sleep, but not to “awake refreshed.” The processes of by-gone times for killing butterflies for collections have been many, the most primitive, perhaps, being pinching the under side of the thorax, or that part of the body to which the wings are attached. Doubtless, there are in the various collections of butterflies, large numbers of fine specimens which have been so killed; but it is an objectionable plan, because even when skilfully executed, the specimens are more or less mutilated in the structure, and are consequently difficult to set out with accuracy. We are almost certain by this method to break off a leg or two, or otherwise render the specimen imperfect. Chloroform is used by some people to kill their butterflies, but it is unsatisfactory, for it often renders them very rigid and too stiff to immediately set out, which is a great disadvantage. Much the same may be said of the fumes of cyanide of potassium, which constitute the active properties of the “killing bottles” sold by the dealers. It is, however, always wise to keep one of these bottles in the hand-bag, in case something very special is to be immediately stupefied. It must, however, be a good large bottle, with wide mouth, for it is needed generally for the big butterflies, such as the larger fritillaries, purple emperors, and the like in size and strength. There is nothing, however, so good for obtaining perfect specimens as boxing the butterflies in the nets, conveying them home in a dark hand-bag, and then killing them in a biscuit-tin with the fumes of strong liquid ammonia. It is best to buy a four-ounce tightly-stoppered squat-bottle for keeping the ammonia, which, when not in Pg 120 use, should be placed out of the light, in a drawer or cupboard, taking care the stopper is tightly fixed. In buying the ammonia ask the chemist for that with a specific gravity of .880, which is commonly kept by them. Some chemists will try to persuade the buyer that it is not safe, so as to supply a weaker article; in which case don’t trade with him again, for anything weaker will not only not kill the butterflies, but simply irritate them into knocking themselves into small pieces. Now to proceed. We place about a large teaspoonful of the liquid ammonia into a little cup, or better, in a small mustard-tin lid, taking care to keep our eyes and nose clear of the fumes. Place this as quickly as possible at the bottom of the biscuit-tin, and over it loosely a piece of paper, so as to let out the fumes, but to stop the pill-boxes from falling into the fluid, and so doing damage to box and contents. Then place the boxes containing the butterflies into the tin and tightly close the lid and leave them for not less than half an hour, or better still, a little longer. The boxes thus placed may be left overnight and opened next morning, if more convenient; but in that case it is best to put in with them a small piece of damp sponge about the size of a walnut, so as to keep the specimens from getting too dry. This damp atmosphere should also be there when the butterflies are stored away alive in the dark, for a day or two, as described already.
On opening the lid of the biscuit-tin containing the ammonia and pill-boxes, be careful to keep your face well away, or the puff of vapour may be very painful. There is no danger whatever to be feared from the use of ammonia in this manner, but still it may lead to temporary discomfort, such as pain in the eyes and loss of breath for a moment.
Having removed the lid proceed in the following manner: First place on the table before you a sheet of white paper or a blotting-pad. By your side on the table have a small tea-tray, or other flat receptacle. Take out of the tin one of the top pill-boxes, open the lid, and shake out the butterfly on the sheet of paper in front of you. Then put the lid of the pill-box with its top turned downwards, on the tea-tray, and place the remainder of the pill-box, sideways within the lid. The object is to let the air get to the inside Pg 121 of the boxes, so as to evaporate the ammonia still remaining about them, or the next butterfly to occupy the box will object to the stale fumes of “smelling salts,” and probably knock itself about in consequence. The boxes may be thus all emptied and left to air, which will not require much more than an hour, or even less, if the tray be placed in the sunshine near an open window. By placing each box sideways in its lid, the boxes and lids all fit one another, and do not get tiresomely mixed.
In shaking out the butterflies place them in rows neatly on the paper, so that you know which was the first to leave the boxes, for that row should be the first pinned, having been exposed longer to the fresh air, to permit the ammonia attached to them to evaporate. If pinned too soon, the ammonia is apt to affect the metal of the pin and make it brittle where it passes through the body of the insect. The action of this gas is most peculiar on the colours of some insects, especially on that of the small heath butterfly, marbled whites, or some of the blues. When seen for the first time one is horror-stricken, and apt to exclaim that the specimens are ruined with the nasty stuff. This, however, soon all passes away as the ammonia evaporates and the normal colours reappear in all their former beauty. Some collectors rail against ammonia, using themselves some worse killing medium. There is no other such medium which will allow of one, after pinning the insect, to move it up and down quickly in the air with the effect that the wings are as flaccid as though the specimen were alive. It leaves not the slightest trace of rigidity, which is of the highest importance for quick and successful setting out.
The next proceeding is one which requires delicate handling and touch, which can only come with practice. It is pinning the insects. To do this there is only one way which permits of the specimen being afterwards exactly set out, and that is, the “proper way.” Any deviation from it, simple as it is, leads to all sorts of trouble and vexation when we come to set the butterflies out on the blocks. Take the butterfly—with the wings closed together over the back, so that the under side only can be seen—between the left hand first finger and thumb. Touch Pg 122 it deftly, but firmly, holding no more than is necessary of the under side of the thorax, where the legs are fixed. Be very careful not to break off any of the legs, or rub off any scales from the body or legs. A small pair of curved forceps are of great use in delicately placing the butterfly in position between the fingers. The proper position allows of the wings to more than half open, when gently blown upon with one’s breath. Then choose a pin of suitable size, rather a little large than otherwise, and pass it through the centre of the upper part of the thorax, just where the two front wings meet. Mind it is exactly in the centre and so placed that the pin’s head leans somewhat forward when the pin is fully in the body. Pass the pin well through the body, so that at least one third of its length is clear of the underside of the butterfly, and all as nearly as possible the same distance through.
When we have pinned the specimens, we proceed to set or spread them out on the blocks to dry. In selecting these, say they are for butterflies, do not get the slot groove down the centre too wide, as is needed for the fat-bodied moths. Those blocks used in this country are generally somewhat rounded on each side where the wings are to rest. This is called “round-setting” in distinction to “flat-setting,” which means that the wings, when quite dry, remain set out flatly at right angles from the body; while round-setting leaves them drooping at the tips in an unnatural manner. Round-setting is considered, outside the British Islands, an insular abomination. It was the style, unfortunately, adopted in this country with the dawn of the present activity among British entomologists, and everybody knows how difficult it is to change even such a simple fashion as the round-setting of butterflies. Simple as the matter seems at first sight, it has contributed more than any other cause to the generally shameful ignorance which prevails among British entomologists of even the butterflies of the Continent of Europe outside our islands. Because they can only be obtained from abroad “flat-set,” most of our collectors would hardly look at a “foreign” butterfly; and so the study of the British species has been blocked for years, entirely from this cause, which fostered Pg 123 so largely the prejudice in favour of “British specimens.” A “British” Camberwell Beauty is now worth a sovereign, if taken in Britain, although it doubtless flew over from the opposite Continent; but the same specimen, if taken in France or Belgium, would not be worth sixpence to a British collector. Now all this is wrong and should not be. Of course, it is quite right to know what does occur in our country, but there is no need for these absurd differences in value of the specimens, whether taken in Britain or on the mainland of Europe. It leads to fraud, and it is sad to think that some professional dealers have actually made more than comfortable livings, chiefly by inducing young or inexperienced people to pay long prices for “British” specimens which were perhaps captured in Germany, where they were set on rounded blocks, sent out for the purpose to deceive English people, because they were “round-set” and pinned with Birmingham-made pins!
Another result of this insular prejudice is that some species of butterflies very closely allied to others have been overlooked for want of familiarity with another Continental species. A case of this kind was the cause of our last addition to the British list being so long overlooked. There was this butterfly, quite common, year after year, within twenty miles of London, and flying over fifty miles of country, overlooked; all because of our want of knowledge of even the commonest European species.
We therefore recommend the flat-setting, and if the new generation of students of butterflies will adopt it, the round-setting style will disappear in a very few years.
The blocks should be covered with very fine cork, or may be of soft wood, if the steel pins can be obtained. Then they would be cheaper, as the cork covering adds much to the expense, besides being always unsatisfactory, in consequence of the holes in the cork, which hold mites and such vermin.
Place the setting block on the table, with the top furthest away from you. Proceed to select the various butterflies from your damp collecting-box which will best suit the size of the block, allowing about a quarter of an Pg 124 inch clear from the outer edge on each side. Then, with the forceps, take hold of the upper part of the pin near to the body and firmly drive it in the same leaning position as it is fixed into the body, firmly into the exact centre of the groove. If the pin will not go readily into the block, make a lead for it with a sharp-pointed penknife. Do not be tempted to push down the body on the pin, or your specimens will, on removal from the blocks, be all sorts of heights on the pins, and quite unfit for cabinet purposes. Next see that the shoulders of the wings just touch the edge of the block, so as to place the wings flat, without tilting up the tips. Observe carefully that the bodies are straight and lifted by placing under them bits of paper or cotton wool so as to extend on an even plane with the thorax and wings. Continue placing your specimens until exhausted in number, or until the block is quite full, after leaving a clear space between each butterfly sufficient to lift the wing tips slightly forward of the front part of the head. Then with a sharp penknife, very neatly cut a thin nick in the under edge of the ends of the block directly below the shoulder piece of the centre groove. There should be four of these little nicks. Next get a piece of glazed cotton thread, and tie a knot at one end. Insert this knot in the top left-hand nick, the knotted end being below the block. Very gently, but firmly, bring the thread over the end of the block, close to the shoulder, down the left-hand side closely into the inner edge of the block, catching it in the bottom left-hand nick under the block. This will have had the effect of placing all the wings firmly on that side of the block. Then carry the thread underneath the block into the top right-hand nick and over the end of the block, down the right-hand upper side, over the lower end, firmly fix in that nick and cut off the thread. Great care must be taken to pull the thread over the wings not so tightly as to mark them. A good plan is to push under each upper end of the thread a thin pin which eases it, so as to avoid damaging the top and bottom specimens in the row while setting them into their respective places. These pins may afterwards be withdrawn. Next proceed with a very fine pointed needle to gently lift all the wings into Pg 125 their proper places so as to get the effect of “a well-set butterfly.”
It may be found that the thread is too slack in places to hold down the wings in proper position. That may be obviated by neatly cross-pinning down the thread on either side at intervals between the butterflies.
When all the specimens have been arranged with perfect uniformity, take two slips of tracing-paper, which have been previously cut to fit the length of the block, and each must be three-fourths the breadth of one side of the setting block. Then lay one of these strips of paper on the left-hand side, being very careful to keep just clear of the thread. All the wings will be seen plainly through the transparent paper and can be readjusted if any slip out of position. Next place with the forceps a No. 10 entomological pin firmly through the top and at the bottom of the paper, near the edge next the cotton. Place another between the first and second butterfly on the block, and so on down the row; also, as you go along, place another pin between the outer indentation where the upper and lower wings meet; also put a fourth pin by the tip of the upper wing. These pins should firmly secure the paper over the wings, which, when thus treated on both sides, will dry into the desired position for cabinet specimens. The greatest care must be taken not to allow any pin-point to enter the wing or fringe of a butterfly, or it will be quite spoiled. Next very carefully and gently undo the fastened thread, first taking out any cross pins which secure it. After its removal gently stroke from the body towards the paper on each side with a soft camel’s hair brush any disturbed scales. With practice there should not be the least damage done by the thread, which leaves no mark whatever if moved at once when the papers are firmly fixed. If they should be left on carelessly, or by any mistake, the threads will be certain to mark every butterfly, to their complete disfigurement.
Keep the blocks which contain the set-out butterflies in a dry cupboard or other safe place. When thus drying they fall an easy prey to earwigs, wasps, ants, cockroaches, and such like “small beasts,” which will strip off all the Pg 126 bodies on a block in a single night. They should not be exposed to too bright a light whilst drying on the blocks, or they often suffer in colour. When single specimens have to be set out it is easy to work the thread by putting a pin through the knot and holding down the other end with the left-hand forefinger until the paper is fixed, and then treating the other wings in like manner.
It is advisable to leave the butterflies on the blocks for about a week, though the surest test is to touch the body gently with a pin, and if quite hard, it is safe to remove the insects to a store box without fear of the wings springing. After removing the butterflies, pass over the surface of the block some hard substance, such as the back of an ivory-handled knife, to rub down any little roughness made by the pins on the surface, where the wings are placed, when setting any fresh insects on the same block.
Most of the butterflies are easily reared through all their stages,
from the eggs up to the perfect insect. This is by far the most
interesting part of the study. Until within the last few years, when
the writer of these chapters pressed some of his friends to look more
closely into the life histories of our common butterflies, it was the
custom of some naturalists to sneer at “butterfly-catchers.” Since
then a wonderful book has been published on the butterflies of the
Eastern portion of North America by Mr. Scudder, and all these scoffers
must feel very small when they see such splendid science
in the study of butterflies. Now, many people, who
never throughtthought of rearing a butterfly, are
giving careful attention to them in all their stages.
Several kinds of butterflies are readily induced to lay their eggs in captivity when carefully managed. Various species differ much in this—some may be depended upon with certainty, such as the “green-veined white” (Pieris napi), which will deposit its eggs at night upon a piece of watercress, under the influence of a warm room, and the bright light of a paraffin lamp. This species, however, is quite an exception, for, as a rule, every attention should be given to copying their natural surroundings as closely as possible. A good plan is to have ready planted in a large flower-pot a plant of the food of the particular species Pg 127 from which it is desired to have eggs, or, as they are called by the entomologists, the ova—that being, as you know, the plural of ovum, the Latin for an egg. Having got your plant nicely established in its flower-pot, buy a piece of wire-netting, about a foot wide, and bend it round so as to fit just inside the flower-pot. By cutting the wire so as to overlap a little, it is easy to twist or hook the ends, so as to make a cylinder to just fit inside the pot. Then cover this with very open muslin all round and over the top, neatly stretched, so as not to look untidy or to stop a single ray of sunshine which can get through. Having had several of these cages prepared, they may be used at the moment when you bring home the freshly-caught females.
The sooner the female butterflies are placed in the cage the better, for if they remain too long in the pill-box they are apt to get too dry, and so never recover enough to deposit their ova. After firmly tying the cage to the pot, do not disturb them when once in the cages, so long as they are alive; but leave them out of doors, where they get all the sunlight or rain. If the plant be watered, that is best done by soaking the flower-pot in water up to two-thirds the height of the soil, and not by removing the cage. Still, in dry weather it is best to sprinkle the cage with water, so that the captive may drink, which they often require to do.
Another way, especially in the case of small butterflies, is to use large glass jam-pots, with a piece of muslin tied over the top. In these pots should be a little sprig of food-plant in a small bottle of water, and also a bit of damp sponge to keep up a moist atmosphere, without which there will rarely be any eggs. The pots may be placed in the sunlight in a room near an open window, but care should be taken that the glass does not get too hot, or both parent and eggs may be killed. When the eggs hatch, never, if possible, touch, except with a camel-hair brush, the young caterpillars—or larvæ as they are scientifically called, that being the plural for larva, a single caterpillar. Pupa is the singular, and pupæ the plural, for the chrysalis; imago the singular, and imagines the plural, for the perfect insects or complete butterflies. These scientific terms are Pg 128 quite easy to learn, and are the best to use when referring to the various stages of insects generally.
In selecting females for depositing ova, take those which are a little worn, and not too recently emerged from pupæ, as they are the more likely to produce fertile eggs.
When the ova hatch, watch them very closely, at least three or four times a day. If they are on growing food, do not touch them at all, but if they require moving for any reason, a soft, sharp-pointed camel-hair pencil is the best tool to use.
Glass jam-pots are very nice for feeding young larvæ of any kind. The method is, to change the food daily, taking care to remove at the same time all dirt made by the larvæ, which is called “frass.” Cleanliness in rearing larvæ is the first consideration, and the next most important thing is to always gather their food from the same tree as that from which they began to feed when hatched. If they are fed on growing plants this does not, of course, apply. Tie over the mouth of the pot with fine unglazed calico, and over this place a piece of glass so as to stop, as far as possible, the drying of the food plant in the jar. Be very particular to supply the fresh food always quite dry, and never in a wet condition, which is apt to give the larvæ diarrhœa, to which in captivity they are very subject. Never give more food than the young larvæ are likely to eat, increasing the supply as they get older.
When changing the larvæ always count them, or some will be lost and thrown out with the withered food. The best plan is to spread out a sheet of white paper on a table, and empty the contents of the jar on it. Then examine the interior of the jar, seeing that every little one is out. Having cleaned it out with a clean, dry duster, put in the fresh food.
Then lift in with the hair-pencil any active larvæ. Those which are sulky-looking on the leaves clip off with part of the leaf, and drop into the jar. They may be changing their skin, and, if disturbed then, will probably not recover. The food should be changed at least once every day.
While growing, larvæ of butterflies generally like plenty of light, but it is unsafe to leave the sunshine too long on Pg 129 the jars, in case the living contents get baked, as will the food certainly. Some species while in the larval stage, feed only at night, hiding away in the daylight. These are matters which will soon be found out by experience.
We have never heard of any one having reared all the British species through their stages, but we know one friend who reared no less than eighteen different kinds through, from ova to imagines, in a single season.
Moth Catching.—Students of natural history in search of moths which they may identify by a reference to such works upon the subject as those by the Rev. J. G. Wood, will find an interesting method of catching them in preparing “Treacles.” The fancy “golden syrups” of the kitchen should be avoided. Ask the grocer to get common treacle—green treacle they call it in the trade. To a pound of this will be added a wineglassful of stale beer and about three-quarters of a wineglassful of the most inferior rum you can buy. A few drops of oil of aniseed will improve this dreadful concoction. Do not add the rum, beer, and aniseed to the treacle at once, but keep them in a bottle apart until you are going to use the mixture.
With a companion who carries a net, look out now for isolated trees that have a rough bark. Do not waste attention on dead trees, fences, nor chestnut trees, willows, nor flowering ivy. In warm, damp weather when there is no moon, go out with a bottle of this mixture and a house-painter’s brush, “a sash tool,” as painters call it, will serve you well, and a lantern, some pill-boxes or similar small receptacles. Having selected a tree daub it well with your mixture in a patch about a foot long and half a foot broad. So pass from tree to tree. Come back at last to the first tree again. Your companion should hold the net under the treacle patch for some of the moths that have come to enjoy the rum and treacle will fall when you turn the lantern light upon them. Those that do not may be taken from the tree by an upward scoop of a pill-box, and then secured by the lid. Try to avoid getting the sticky mixture upon the handle of the brush and upon your hands, for it will prevent your deft manipulation of your pill boxes. After the first night very little treacle will be needed to Pg 130 freshen the patches, but the mixture may be used freely on your first round. The treacling season begins about March 21 and goes on until the end of April. May does not yield many moths, nor the first week in June, but after that you may go round again with your bottle until the end of September. You may find sometimes that toads and bats poach on your preserves.

Another way to secure specimens of moths is to make a moth trap. Our diagram gives a plan of it, that is a representation of it as seen from above if we look down at it with the lid off. A, B, C, D is a box. It may be made for the purpose, or a soap box or other case may be purchased from the grocer for a few coppers. E, F, and G are panes of glass, held in grooves. H is another pane of glass which comes up to the lid, and cuts the box into two unequal parts. J is the reflector of a lighted lamp placed in front of it. There will need to be a hole in the lid over the lamp, and a flower pot upside down may be put over this hole. It is best to have three doors into the larger compartment; one in the lid and one in each of the two sides, K and L, so that two hands may be used in putting the moths that come to the light into pill boxes.
It is better to have several aquariums than one. Often the mistake is made of gathering together all kinds of savage and voracious creatures that prey upon each other. Pretty as they are, there is no need to buy the glass aquariums, and indeed better in every way for the inhabitants is a large tub put out of doors in a place where there is not too much sun. Clean sand or gravel should be strewed upon the bottom and in this water-plants may be fixed. If you have any bivalves they will love to burrow in it, and some kinds of fish love to rest upon a bottom of this kind. Large stones should be built to reach half-way up the tub, with spaces between so that the fish may dart out of the light whenever they wish. If you keep fish that need running water it will be necessary to put the tub under a tap, and to pierce a hole near the top of the tub for the superfluous water to flow away. In this case it will be as well to cover the tub with a net, or the fish may be found to have leapt over the edge. Boys may make their own net from the instructions given in Chapter XIX., or may buy cheap gauze or other similar material.
If the tub is for newts and such things as do not live wholly in the water, then the stones should be built until they come above the water and so form a little island. For these creatures the water should not be so deep, and there should be an abundance of weeds.
Freshwater shrimps and crayfish should have a shallow tub or trough, a sandy bottom, and places in which they can hide. Here, too, there must be water running in and out always. By these means we imitate the natural surroundings of the shrimps and crayfish, for they delight in the running water of shallow streams that have a bottom Pg 132 of sand and stones. The outlet for the waste water should be protected with a grating and probably with gauze, or some of the inhabitants of the tub will escape.
There are many objections to glass vessels, though some of their faults may be corrected. They trouble the fish with too much light, but if a brown paper case of the same size and shape as the aquarium be made it can be slipped over the vessel and removed occasionally when you wish to observe the movements of the fish. Glass soon becomes foul, and needs frequent cleaning. In any case the aquarium should be kept out of the sun, and for this reason a northern window is best. Whatever form of aquarium is selected there must be soil and sand at the bottom, weeds, and shelter for the fish. The bell glass is the least favourable form of aquarium, but even that may be made tolerable if the hints we have given are adopted. In the square or oblong form only one side need be glass and the remaining three sides wood, metal or slate. The sand that forms the bottom of an aquarium should be quite clean. If you have found it in the bottom of a swift stream it will not need much washing, but if from any other place it should be washed thoroughly. Put a large bucket under a tap, and as the water runs into the bucket strew the sand gradually into the moving water with one hand, and stir the water as hard as you can with the other. Keep this going until the water that runs out of the bucket is quite clean. Even now, however, the sand may not be thoroughly cleansed. Put a drop of the water upon a piece of clean glass, and when the water has been evaporated there should be no sediment. When the sand, plants, pebbles and stones have been arranged in an aquarium it is best to introduce the water gently by means of a syphon, a method explained in Chapter XIX. The aquarium may be emptied in the same way.
There are a number of ways of supplying the fish with the amount of oxygen they need. One is to change the water frequently, another already mentioned is to have running water and a pipe for the surplus water; a third means is to have a fountain, an attractive element described in Chapter XIX.
These methods, however, are mechanical and artificial. The natural way of providing the oxygen is to secure the aid of water plants. These absorb carbonic acid gas, and, having made use of the carbon in their growth, set free the oxygen, which is waste as far as they are concerned. Thus in a well-balanced aquarium the fish provide the plants with carbonic acid gas, and receive back the oxygen which they need; the plants provide the fish with oxygen which they do not want, but which is the very life of the fish, and receive back the carbon without which they would die. Water-beetles, newts and some other creatures come to the surface for their air, and take no oxygen, or very little, from the water.
For many reasons the best aquarium is a pond in the garden, for here we may have greater variety of animal and vegetable life, and beautiful surroundings of plant life too. The pond should be about three feet deep, and the banks should slope, so that there will be a little spade work at first. The bottom may be of clay, but it is better for many reasons to have cement. The points mentioned with regard to the indoor aquarium apply here also, but many of the arrangements are more easily carried out in the pond than in the tank.
Plants for the Aquarium.—The duckweeds float and need no planting. They spread rapidly. There are four kinds: the Lesser Duckweed (Lemna minor); the Ivy-leaved Duckweed (Lemna trisulca). Then there is the American Pondweed (Anacharis alsinastrum), a weed that almost blocks slow moving rivers and canals. It will grow either attached to the bottom or floating. Not only does it supply the fish with air but with food also. The Hornwort (Ceratophyllum demersum) needs no soil, and gives off much oxygen, though probably not so much as Vallisneria spiralis, a great favourite in the aquarium. Easier to obtain is the Water Crowfoot (Ranunculus aquatilis), and we may mention also the Broad-leaved Pondweed (Potamogeton natans), Close-leaved Pondweed (Potamogeton densus), the Perfoliate Pondweed (P. perfoliatus), the Curled Pondweed (P. crispus), the Starwort (Callitriche verna), the Grassy Pondweed (Potamogeton gramineus), Pg 134 and the enterprising boy will find many others for himself in ponds, streams, and canals. Foreign plants are sold by dealers. For the garden pond the beautiful water lilies may be obtained. The weeds should be prevented from occupying too much space, and if the creatures in the aquarium do not keep them in check by eating them it will be necessary to remove some of the plants occasionally.
Sanitation.—If a fish dies remove it at once, or its dead body will pollute the water. To clean a glass aquarium let the water run away through a siphon until only a few inches remain, then clean the sides with a piece of rag tied upon a stick. Now siphon the remaining water away, at the same time supplying fresh water. Do not throw a lot of food to the fishes. What they do not eat decays and poisons the water. If there are molluscs in the aquarium this danger is lessened, for many of them act as scavengers, and they are assisted by freshwater shrimps, tadpoles, and beetles. The shrimps, however, may eat the living as well as the dead, and the tadpoles, instead of being allowed to eat, may themselves be eaten.
The Food Supply.—Fish eat the buds and tender shoots of pond weeds. They may have also a moderate supply of small worms, gentles, different kinds of larvæ, and what are called ants’ eggs. Frogs and toads eat insects, little beetles, worms, grubs, caterpillars, and newts need an occasional worm.
The Fish.—Many of the fish that swarm in most ponds and streams are suitable for the aquarium. The carp is related to the goldfish, which is the golden carp. It is quiet and harmless, and will not interfere with other creatures in the aquarium. Minnows are pretty, and should have running water, and the roach is another suitable fish for life in captivity. The gudgeon, loach, and bullhead serve for bottom fish. Jack and sticklebacks are extremely interesting, but need a place for themselves, as they eat any other inhabitants of the same aquarium.
Fishes as Pets.—Perhaps, writes one of our contributors, the most interesting of freshwater fishes to watch is the stickleback, especially if a pair can be kept during the Pg 135 breeding season in a good-sized aquarium, so that they have the opportunity to collect materials and build their curious nest in the natural way.
The male fish develops during this season a most beautiful vermilion-coloured breast, and is exceedingly pugnacious, so that it is useless to attempt to keep two males in the same aquarium.
In fact, the stickleback is often so quarrelsome that it is not desirable to try to keep other fish with him, unless they are much larger than he is.
The easiest fish to keep alive are the carp (to which tribe the goldfish belongs) and the minnow.
These can be kept for years without much difficulty, and will not be likely to injure one another, or any other fish that may be placed in the same tank.
Small rudd are also very good pets, and are nearly as hardy and equally harmless.
Roach are easily obtained, and will not quarrel, but they are not quite so strong.
Perch, on the contrary, will live a long time if regularly fed, but it will not do to put any smaller fish, except sticklebacks, with them; yet they look so handsome that an aquarium containing two or three perch and a pair of sticklebacks is perhaps better worth looking at than one which can only boast of shoals of roach or other soft-mouthed fishes.
Dace and chub are pretty and harmless, but require more changes of water than is usually convenient, or they will soon die.
Tench are tenacious of life, but sluggish and fond of lying at the bottom. Small bream are fairly lively, and I have found them moderately hardy. They do not require water of special purity. Gudgeons live very well, and may be kept with minnows, being good friends together. The loach and the bullhead are fairly hardy, but have little other attraction. The grayling is very delicate, and it is not possible to keep her long, except under very favourable conditions. The ruffe or pope is hardy, like its relative the perch, and might, if obtainable (it is not a common fish), be placed in a perch tank, as a humble companion.
The bleak is almost as delicate as the grayling; and the jack is too ravenous for any fish to live in his company except another jack of his own size. This about ends the list, excepting that I’ve left till the last the noblest of fish—trout and salmon.
With regard to the latter I don’t want to encourage a boy in the notion that he can keep a ten-pound salmon in a tank.
Nevertheless, I have for many successive seasons kept salmon for weeks or months in a small tank; but these were young ones, very young, about the size of tadpoles, in fact, and not unlike them in some respects.
They are almost indistinguishable from the young trout with which I keep them. Of course, they are but babies, and they have their feeding bottles attached, and do not want feeding till these are absorbed.
To return to trout. These fish, when about a year old, are very interesting, and if a constant change of water can be secured may be kept alive for years. Even without this advantage, I have kept them many months, and have found their little ways very curious.
The trait I objected to the most was the habit of cannibalism which the larger fish developed. I found one fish of about one and a half ounces with another about half that size half way down its throat.
This makes it desirable to keep only such trout as are about the same size together. They will gradually, though very slowly, get tame, and will come out from their shelter under a weed to eat a caddis as you drop it from your hand. This was only the case with some of the fish, others remaining as shy as ever in spite of petting.
It is best to choose fish that have been taken by net, but trout taken by a fly, or roach taken by a small hook in the lip, will live very well.
I have kept trout for months that I had caught with fly and carried home for miles. Some of these were from a quarter to half-a-pound in weight; but I found smaller fish would thrive better.
For food, caddis or other water insects are best; but gentles would perhaps do, if the former are not to be had. Pg 137 I found the freshwater shrimp capital food, as it keeps alive, of course, till the trout is inclined to eat. One of the chief causes of mortality in the aquarium is the fouling of water by the decomposition of surplus food. If you are obliged to use dead matter, such as chopped liver, or meat, be careful to remove any that may be left.
Flies may be put on the surface, and will be appreciated; but the trout will seldom take them while you are watching, though they will often eat the caddis as you put them in, and even chase the shrimps.
On the whole, I think perch are the best fish to make pets of, as they can be taught even to take worms from your hand, and require much less water running in and out than do the trout. I’ve known a perch to live for years in a tin bath in my stable; whereas the trout would not be happy without a long tank, and continual change of water.
If you have only a very small aquarium it may be better to be contented with a few minnows. These, with the water weeds and little fresh-water snails, which should be in every aquarium, will be quite enough to make it look pretty.
Nickie, Nickie, Night.—Before the period when lucifer matches came into general usage and were manufactured at a moderate price, our grandparents relied on the flint, the steel, and the tinder-box to produce fire. These implements have been very completely dealt with by various writers and illustrators, who have given us some idea of the importance they were to every household.
To the student, and to the curious who desire a more tangible acquaintance, we may remark that a very fine collection of tinder-boxes, flints, and steels can be seen both at the British Museum and at the Guildhall Museum of the City of London.
A very favourite boys’ game, in the earlier part of the nineteenth century, which necessitated the possession of at least a flint and steel, the game being played in the after-dark of evening, was somewhat similar to the modern game of “Touch.” The game was called “Nickie, Nickie, Night,” and admitted any number of players. A boy was elected to the position of “Nickie,” and he could only retain this position by fleetness of foot and dexterity in avoiding his pursuers, the pursuers being formed by the remaining number of players. The game was played in any open locality, and “Nickie” being allowed a start of perhaps thirty to forty seconds, disappeared into the darkness, shouts of “Nickie! Nickie! Night! show your light! show your light!” resounding from the waiting boys, whereupon Nickie struck a few sparks from his flint and steel, indicating to the others his position; these at once tore off in his direction; while he, as quickly and silently as possible, changed his locality to elude capture. Having baffled his pursuers, Nickie Pg 139 would, if a good player, again quickly chink flint and steel, drawing off the boys in a new direction; and so the game would continue amidst the greatest excitement, fun, and laughter; Nickie, like a Will-o’-the-Wisp, darting here, there, and everywhere, greeted with shouts of “Nickie! Nickie! Night! show your light!” until, being ultimately captured, he gave way to a new Nickie, and took his place amongst the pursuers.

Our illustrations of flint and tinder-box are selected from numerous patterns; in many cases—older readers will probably remember the immense variety of these—the tinder-box was round, and the steel consisted of an old file stuck in a wooden handle, the flint being frequently picked up from among the stones in the roadway.
How to make a Kite.—Take a lath, A, B, which should be three feet long and about an inch wide. One of the ordinary laths used by builders will be quite suitable if one of the lighter ones is selected, and if care is taken to choose a straight one. Next take a cane or other piece of light flexible wood, and bind the centre of it tightly at the point Pg 140 G an inch below A. Bend the cane into a semi-circle and connect C and D with string. If this has been done properly the distance from C to D will be two feet. Now connect D B C with string and the frame will be ready.

Many years ago it was possible to cover a kite with ordinary newspaper, but the paper that is used now is not strong enough, and it is better to use calico. Place the frame upon the calico and cut round the frame with scissors, not close to the frame, but leaving a margin of calico. Turn this over string and cane and stitch it in position. This may be done with a sewing machine. At E midway between H G bore a hole with a pricker, and another at F, Pg 141 which is the same distance from H as E is. String a foot long should connect E and F, and this is kept in position by having knotted ends so that the ends cannot pass through the holes at E and F. This string will not be tight, but will hang loosely. At C and D tassels about eight inches long may be fixed.
The tail is made by folding paper. Take a number of pieces about five inches long and four broad, and fold them as though you were making spills for the lighting of candles. How long the tail should be is a matter for experiment. Try it with forty and a tassel at the end, and you will see afterwards when you try to fly the kite if that is the right length and weight. Attach your long flying line now to the string that connects E and F, about four and a half inches below E.
Choose a breezy day and ask someone to face the wind and hold the kite aloft. Keeping the line tight, run a few yards in the face of the wind to give the kite a start upon its upward journey. Now is the time to see if the tail is too heavy or too light. If the kite labours upwards and shows a tendency to come straight down, tail first, then it may be inferred that the tail is too heavy, and by reducing the number of “chickens” as they are called in some parts of the country, and by taking from the tassel the kite may be relieved of its too heavy burden. If, on the other hand, the tail is not heavy enough, the kite will plunge madly from side to side and will dive downwards head foremost, demanding more “chickens” or a heavier tassel. The kite may be flown in the dark with a Chinese lantern where the tassel is.

Rackets.—A racket ground is in the form of a parallelogram, not less than fifty yards long and twenty-five broad. Sometimes a wall of a garden may be adapted by fixing boards and net-work along the top, if there is space enough below. The wall should be painted black, and the ground be divided into four equal divisions, distinctly marked. The flooring of the court should be paved. The divisions are, two close to the wall, A and B, and two in front of them, C and D. These divisions are occupied by those who play the game. The wall should be marked by a broad line of Pg 142 white paint E at forty-two inches from the ground, and above this line each ball should strike. The ball weighs one ounce, and should be white. When it becomes dirty its whiteness is renewed by dipping it into a bag of chalk, so that it may be seen against the black wall. The game may be played by two or more players. When it is played by four, one stands in each of the compartments, A, B, C, D; those near the wall being called in-hand, and those furthest from it out-hand players. When two play, each player has two of the divisions, and the one who takes the A and B is called in-hand player, and the other out-hand player. Having decided who is to begin the game, the in-hand player nearest the wall strikes his ball against the wall; if it strikes under the line, goes over the wall, does not rebound into the out-hand spaces, or goes beyond the racket ground, the striker is out, and the out-hand player takes his place; but if the player is successful, and the ball rebounds into the out-hand spaces, and as it rises is sent back to the wall, to rebound into one of the in spaces, the game proceeds. In a close-court game the “server” who serves the ball properly above the line but not into his adversary’s court is allowed three trials before his “hand” is out. The game is, that the in-player should send the ball in such a manner against Pg 143 the wall that, on its rebound, the opposite player, or players, shall be able to pick it up or strike it. When this happens, he who struck the ball counts one point, or an ace, and the play proceeds until one player or players scores eleven, or fifteen, as the players decide.
This game may be played either in an open court, that is in a court with only one wall, against which the game is played, or in a closed court surrounded by four walls. Sometimes there is an ordinary high front wall, and a smaller back wall, omitting the side walls. The close-court game is the best, but the expense compels many to adopt the open-court game.
Fives.—This game needs a high wall, free from abutments, and under it a smooth, dry, paved ground. A line is drawn on the wall, about three feet from the ground; another line is drawn upon the ground itself about 10 feet from the wall, A; and two others are drawn on each side as boundaries, B, C. The player needs a ball of tightly-sewn leather and a fives-bat. This has a long handle, and an oval bowl of wood. The ball is hard, capable of bouncing, small and white. The game may be played by two or four people; in the last arrangement, two on each side. The game may be played either single-handed or with partners. When it is played with partners, the players toss up for first innings. The first player takes the ball, and strikes it against the wall with his bat above the line on the wall, and so that it may fall outside the line on the ground. The other then strikes it, and the players continue to hit it against the wall, either before it comes to the ground or at the first rebound, until one of them missing it, or driving it out of bounds, or beneath the wall-line, loses or goes out. The ball may fall anywhere within the side boundaries, after being once struck up by the player who is in. The game is usually fifteen, but is sometimes extended to twenty-five. This is bat-fives, and is not unlike rackets, except that it may be played in any open court, and that another kind of bat and a larger ball are used. Fives was originally played with the hand, instead of a racket.
Prisoners’ Base.—Appoint the two best players captains, and let them choose their men alternately. Next mark the homes and prisons. Two semicircles are drawn, large enough to hold the two sides, the distance between the semicircles being about twenty yards. These are the “homes,” or “bounds.” Twenty yards in front of these, two other semicircles, of a rather larger size, are drawn. These are the prisons, and the prison of each party is in a line with the enemy’s home. Having settled which side shall commence the game the captain of that side orders out one of his own side who must run at least beyond the prisons before he returns. As soon as he has started, the Captain of the other side sends out one of his men to try to touch him before he can regain his own home. If this is accomplished, the successful runner is permitted to return home while the boy who has been touched must go to the prison belonging to his enemies’ side; from which he cannot move until someone from his own side releases him, by evading the enemy and touching him. This is not easy, because in order to reach the prison, the player must cross the enemy’s headquarters. It is allowable for the prisoner to stretch his hand as far towards his rescuer as possible, but he must keep some part of his body within the prison; and if a number of prisoners are captured, it is sufficient for one to remain within the prison, while the rest, by joining hands make a line towards the boy who is trying to release them. When this is done, both the prisoner and his rescuer return home, no one being able to touch them until they have reached their home and started off again. The game, however, is not only confined to the two originally sent out. As soon as a captain sees his man in difficulty he sends out a third, who is in his turn pursued by another from the other side; each being able to touch any who have preceded, but none who have left their home after him. The captains direct, and hold themselves ready in case of an emergency, and the side wins which imprisons the whole of the boys upon the other side.
French and English.—Choose two sides in the usual way. One side takes hold of one end of a stout rope, Pg 145 and the other side of the other end. A line is made midway between the sides, each strives to pull the other over it, and those who are so pulled over, lose the game.
Two captains should be appointed, and each should have a code of signals to communicate with his own side, that he may direct them when to stop, when to slacken, or when to pull hard.
In this game sometimes a good captain may win even when he has an inferior team. For instance, if he sees all the boys are pulling their hardest, the captain of the other side sees that his opponents are leaning back too much, that is they are trusting to their weight rather than to their strength. He gives the signal to slacken, when down go the enemy, and are then dragged over the line with the greatest ease. If the enemy begins to be tired a united and sudden tug will generally bring them upright, and once moved, the victory is easily gained. No knots are to be allowed on the rope, nor is the game won, unless the whole side has been dragged over the line.
Fight for the Flag.—A game played from a mound, and any number may play. Each party chooses a captain, and having done this, divide themselves into attackers and defenders. The defending party provide themselves with a small flag, which is fixed on a staff on the top of the mound, and then arrange themselves round it so as to defend it from the attacks of their opponents, who advance towards the hillock, and try to throw down those who oppose them. Those who are so thrown on either side, are called “dead men,” and must lie quiet till the game is finished. This happens either when all the attacking party are dead, or when the flag has been carried off by one of them. The player who carries off the flag is called the knight, and is chosen captain for the next game.
Hop-Scotch.—A game played by hopping on one foot and kicking an oyster-shell or piece of tile or stone from one compartment to the other, without placing the lifted foot, except in one case, upon the ground, and without allowing the shell or tile to rest on any of the lines. A diagram is first drawn consisting of twelve compartments, each being numbered, and at its further Pg 146 end the picture of a plum pudding with knife and fork. In commencing the game, the players take their stand at the place marked by A, and throw for innings. He who can go nearest to the plum in the centre of the pudding, plays first.

The winner begins by throwing his shell into No. 1; he then hops into the space, and kicks the tile out to A; he next throws the tile into No. 2, kicks it from No. 2 to No. 1, and thence out. He then throws it into No. 3, kicks it from 3 to 2, from 2 to 1, and out. He next throws it into No. 4, kicks it from 4 to 3, from 3 to 2, from 2 to 1, and out; and so he goes on till he has passed the cross and comes to No. 7, when he is allowed to rest, by standing with one foot in No. 6 and the other in No. 7; but he must go on hopping before he kicks the tile home. He then passes through the beds 8, 9, 10 and 11, as he did those of 1, 2, 3, 4, 5, etc., and so on, till he gets to plum pudding, Pg 147 when he may rest, and placing his tile on the plum, he is required, while standing on one foot, to kick it with such force as to send it through all the other beds to A at one kick. If one player throws his tile into the wrong compartment, or when he is kicking it out, he loses his innings, as he does also if the tile or his foot at any time rests on a line, or if he kicks his tile out of the diagram.
We give also diagrams for simpler forms of the game.
Turnpike.—Although turnpike-keepers upon the roads have long since been abolished, there is no reason why the game of turnpike, played with hoops, should be played no longer. Any number of boys may play, but we will suppose there are six. One should have a hoop and the others will then be turnpike-keepers. These take two stones or two bricks and place them about two inches apart upon the ground. We may call each pair of stones or bricks the toll-bar, and each toll-bar should be some distance from the others. It is the task of the boy with the hoop to pass between the stones without touching them, and if he goes through the five then he turns and comes through them again from the other side, and so on until he fails. If he touches a toll-bar then the keeper of the bar takes that hoop, and he who had hitherto been driving the hoop becomes the keeper of that particular toll-bar at which he failed. If the hoop driver touches his hoop with his hands, or allows it to fall he must give it to the nearest toll-bar keeper and take his place while the toll-bar keeper becomes a hoop driver. Each keeper must stand upon that side of his toll-gate which is towards the right hand of the hoop driver, so that when the hoop driver returns he must cross to the other side of his toll-bar. If he is on the wrong side the hoop driver need not trouble to pass through his toll-bar at all. If the boys prefer it there may be more hoop drivers and fewer toll-bar keepers.
Posting.—Places called posting-stations are formed at regular intervals in a large circle or oval, and at each place a player takes his stand. Every player, except the hoop driver, has charge of one of these stations. Suppose there are seven players—A, B, C, D, E, F, and G, and that G holds the hoop. The other six players having taken Pg 148 their places, G starts from the station belonging to F, and drives the hoop towards A, who waits, with hoop-stick in hand, ready to relieve G of his hoop. G stops at the posting-station, while A runs the hoop to B, who takes charge of it, and delivers it to C. C trundles the hoop to D; D takes it to E; E to F, and F conveys it to the first player, G. In this way the game continues, until all the players have worked round the circle five or six times. The game is rendered more boisterous by increasing the numbers of players, and having two or three hoop drivers. Do not touch the hoop with your hands, and do not let the hoop fall.
Fox.—One player is called Fox, and he has a den where none of the players may annoy him. The other players arm themselves with knotted handkerchiefs, and wait for Reynard’s appearance. He is also armed with a knotted handkerchief, and hops out of his den. When he is out, the other players attack him with their handkerchiefs, and he endeavours to strike one of them without putting down his other foot. If he puts down his foot he has to run back as fast as he can, without the right to strike the other players, who flog him the whole way. If, however, he succeeds in striking one without losing his balance, the one so struck becomes Fox; and, as he has both feet down, is thrashed to his den.
Drop Ball.—A line must be drawn three feet from the wall at which this game of ball is to be played. The player must kneel outside this line, and never cross it; if the ball falls inside the line it is reckoned a miss. Each time the player throws up the ball and catches it it counts a point. There are many ways of playing this game.
1. Throwing the ball and catching it before it touches the ground.
2. Clapping the hands after throwing, before the ball touches the ground.
3. Putting one knee to the ground before catching the ball.
4. Putting one knee to the ground and clapping the hands before catching the ball.
5. Circling round on one heel before catching the ball.
6. Circling round on one heel and counting 1, 2, 3, or any number agreed upon, before catching the ball.
7. Strike the player nearest you before catching the ball.
There should not be too many players, for they would have to wait too long for a turn.
Jingling.—The game should be played on soft grass inside a large circle, enclosed with ropes. The players should not exceed ten. All except one of the nimblest, who is the jingler, have their eyes blindfolded with handkerchiefs. The jingler holds a bell in his hand, which he is obliged to keep ringing. The aim of the jingler is to elude the pursuit of his companions, who follow him by the sound of the bell within the boundaries of the rope, for he is forbidden to pass beyond it. If he be caught in the time allotted for the game, generally twenty minutes, the player who caught him wins the match; if they are not able to take him, he is proclaimed the victor.
The Fugleman.—The Fugleman places himself in a prominent place, and arranges the other boys before him in a line. He then begins with grotesque gestures, which all the boys are compelled to copy. Those who are seen to laugh are immediately ordered to stand out of the line, and when half the number of players are so put out, the others are allowed to ride them three times round the playground, while the Fugleman with a knotted handkerchief beats the steeds from behind.
How to Dig.—It is beyond the scope of this book to enter into all the intricacies of gardening. To do this we should need a volume larger than this devoted to that subject alone. Whatever branch of gardening a boy may pursue, however, whether he grows gooseberries, sweet peas, or cabbages, he will need to know how to dig. One of the pleasures of life is to come to a garden that has been neglected or to a plot of land that hitherto has been a field and to see it gradually become a well kept garden without a weed, under the magic of good spade work. It is like subduing an enemy. The simplest way to dig is to take a spade full of earth, turn it over, and put it back where you found it. This, however, is only for lightening the soil when the garden has been cultivated already. You would not subdue an unruly garden in that way.
Shallow Trenching.—If ABCD is a plot of land and you are beginning at the AB end, dig out the earth ABEF and convey it to the DC end and put it near but off the plot you are digging. Now dig EFGH and throw the earth from that into the trench ABEF and so on for the rest of the plot. When you have come to the end of the plot there will be a trench, but this will be filled by the earth you took there at the beginning of your digging.

Deep Trenching.—The best basis for gardening, however, is a more drastic, deeper trenching than this. Let ABCD be the plot we are going to dig deeply. Divide it into equal parts by the line EF. Make the line GH 3½ feet from FC. Dig out the earth from GHCF and carry it to X where it may be put in a heap. Make the line IJ 3 feet from GH. Dig out the earth one spade deep from GHIJ and throw it upon the heap at X. This earth at X taken from the top Pg 151 is known as top soil. Now return to GFCH and go another spade deeper, throwing the soil of this digging into a heap at Y. Still at GFCH break up the soil there with a fork, and manure and refuse may be placed there. Weeds put down here would have no chance to grow again. Go now to GIJH, dig out the subsoil there and put it into GFCH. On the top of this subsoil so removed place the top soil from KIJL. Go on like this until you come to EB, when the top soil from AEMN should go to NOQR and the subsoil of AEMN into NOQR and the top soil from MNPQ into EBON. When you get to DF you will find the subsoil at Y and the top soil at X ready for the filling of the last trench. It is important to keep the top soil on the top and the subsoil underneath. Drive the spade into the earth in Pg 152 a perpendicular direction and the full depth of the blade. Let the garden endure the winter with a rough surface so that the soil may present as many surfaces to the frost as possible. Jack Frost is one of the very best gardeners, and to see soil before he has bitten it and afterwards will be a revelation to the young gardener.

Double Digging.—The deep trenching just described, in which the top soil was kept upon the top, and the subsoil underneath, is excellent where the subsoil is unfit for plant food, but there is a problem which it does not solve. Suppose we come to a garden matted hard upon the surface with buttercups, convolvulus, grass, twitch, groundsel, thistles and other tiresome weeds, then the last thing we desire is that these should remain on top. You cannot pull up the weeds by hand because the ground is so hard that you do no more than break the weeds, leaving the roots embedded firmly in the earth. Before there is any peace in the garden these weeds must be killed, and we will now describe how to do it. Suppose ABCD is the plot of ground. From AB measure four feet and draw the line EF. From ABFE take out the soil one spade deep, that is the top soil, and put it in a heap at G outside the plot. Now from ABFE take out the soil another spade deep, the subsoil, and put it in a heap at H. Now from EF measure two feet and draw the line IJ. Take the top soil, weeds and everything, from EFJI and throw it to ABKL—KL is two feet from AB—leaving KLFE empty for the present. Now take the subsoil from EFJI and throw it into ABKL, that is upon the top of the top soil you have just thrown there. Now measure another two feet from IJ and draw the line MN. The soil from IJNM will go into KLFE, top soil first and the subsoil on the top of it. Proceed in this way, two feet at a time, and when you come to CD throw the soil at G and H into the trench that will be left, top soil first and subsoil upon the top of it. The plot ABCD will now be well dug, and all the weeds will be deep under the soil where they will speedily die and decay; and even supposing that the subsoil you had brought to the top is not good, you may double dig again next year and so recover the old top soil minus the weeds. Any weeds that grow now may be Pg 153 eradicated easily from the loose soil, and even the weeds of twitch and convolvulus may be followed down and extracted. Unless you have unlimited time and patience to look after them do not be tempted to leave grass paths, but dig the garden from side to side. Grass paths are always spreading upon the garden and making the edges weedy and untidy. If you prefer it you may do this double digging with the plot divided as we divided it for deep trenching.

Double Digging.
How to sow Seed.—It is not wise to sow old seed. Even if they grow the plants are often without vigour. Go to a seedsman who has a good character and do not buy seed because its price is low.
The soil must be fine and firm, porous and moist. It must not be sticky nor dry. The seeds will not germinate until Pg 154 they can have both warmth and moisture. Sow thinly because crowded plants do not grow well. It is best to sow small flower seeds in pans and boxes well drained, as explained in our article on window-boxes to follow. Level the surface of the earth and make it firm. Water it with a fine spray and then stand it in the shade for about five hours. Now scatter the seed thinly and cover it very lightly with sifted earth. White-washed or paper shaded glass may be placed over the box or pan until the seeds appear. The glass will keep the air warm and moist. Except in the case of the very small seeds, the depth at which they are sown should be about three times their size or thickness.
In the garden do not sow broadcast, but in drills, as the ground can then be more easily weeded and kept loose when the seeds have grown.
After sowing press the soil well down and then water gently so that the seeds are not washed out, and the water drains away quickly.
The soil must not be allowed to get quite dry, and yet excessive moisture must be avoided. Too much watering is a common cause of failure.
If the soil becomes caked before the seedlings appear or patches be lifted by them, break it up with the point of a knife, and then water gently and just sufficiently to settle the soil round the plants.
Do not water seeds or seedlings with water that is colder than the soil, and in summer do not water until the evening. If the watering of very small seeds is necessary, stand the pans or boxes in a shallow vessel of water for an hour.
For watering seedlings use a vaporiser, or dip a hair brush in water, shake off most of the fluid, and then, while holding the brush over the plants draw the hand along the bristles several times.
When the seedlings are up, loosen the soil around them very gently.
A Window Box.—There are not many forms of gardening that are so pleasant as that of having a window box. There need be no bearing of the heat and burden of the day, no laborious double digging, no tedious weeding, no back-aching Pg 155 hoeing, no hard days with the wheelbarrow. The window box, too, is not merely a fine weather friend. As you sit in your room upon a rainy day it is at the window beside you, and if your window is open the scent from the flowers comes in with every breeze. If you have a succession of window-boxes you can have a blaze of flowers upon your window sill at most seasons of the year.
The box need not be made elaborately, and though some people do give themselves much trouble yet flowers look as well or even better in such a roughly made box painted green as most boys can make out of a packing case bought for a few coppers from the grocer. You may put plants already in pots in your box, but if you desire to grow flowers in the box itself it will be necessary to fill it with earth. Before this is done holes about the size of a farthing should be bored in the bottom of the box with a brace and bit or with that more homely if unjoiner-like tool the red hot poker. These are to provide drainage. Then there should come between one and two inches of broken stones and upon this the earth. As a rule this may be the ordinary earth from the garden, but it is better to add some coarse sand if Pg 156 you have it, and if in your walks into woods and along the hedges you can secure some leaf mould to put with the earth so much the better. Well decayed manure, odds and ends of mortar and lime which the builders may have left about will all help to provide the flowers with food. There are so many flowers that look well in window-boxes that no complete list can be given. Boys should be ever on the look out to find from the boxes of other people what thrives in these boxes. Each end of the box should be left for climbers that will run up each side of the window, and no better plant for this position can be named than the delicate canary creeper with its pale green leaves and dainty yellow flowers. Nasturtiums, too, look well in this position, and no better border for the front of the box can be imagined than the blue of the beautiful lobelia. Another good climber is convolvulus major. These climbers live for one season only, but one that grows year after year is tropæolum pentaphyllum. In the winter the tubers of this plant are kept in sand and are placed in position each spring. Plants that hang over the front of the box are graceful like single petunias and rock bindweed, and for the rest each boy can make a selection of his favourites for the remaining part of the box. If he likes he may have a number of boxes so that when one has had its day another may be ready. In the spring box he would have crocuses, snowdrops, squills, daffodils and such flowers; then a box with primroses, tulips and hyacinths; and after that a box of pinks, lilies of the valley, anemones, and next the real summer flowers and blooms of autumn. Let the plants be watered regularly with water that is not too cold, and if it be possible use rain water.
It would be idle to pretend that it is possible in the chapter of a book, or indeed in a book itself, to give instruction that would make a boy an artist; but most people have the capacity to make sketches, and this is a pleasing and useful training of the eye and hand. The power to bring away a sketch of a scene that has charmed us is one well worth the cultivation, and in the making of the sketch we see many things that would otherwise escape our notice. If a boy finds he has special ability in this direction he should read the lives of artists, visit picture galleries, and join an art class, where he will be conducted through the severe discipline that leads him to drawing the living human form, amusing himself meanwhile by sketching in the lanes and woods, among the mountains, or wherever he happens to be, even if it is in the streets.
Hints on Sketching.—The drawing of a cathedral with all its complexities and innumerable details is governed by the same rules as the drawing of a barn or even of a brick, and these rules are simple, and are easily stated.
In sketching we have to draw things as they seem, not as we know them to be. The top of a bucket is a perfect circle; yet when we draw it, unless we look down upon it from a point exactly above its centre, we represent it by an oval. Similarly, when we look along a stretch of railway line we know that the lines are exactly parallel, but they seem to draw nearer to each other. The rails of a fence are of equal height, and have been put at equal distances apart, but as we look along the fence it seems as though further away the workman had used shorter posts, and had put them nearer together. If we can see Pg 158 through a railway tunnel, it looks as though the way out at the other end were smaller than the way in at this; but we know they are of the same size. The rules under which lines seem to draw together and spaces become smaller have been called the rules of perspective, and it is important that we should learn these rules. Luckily they are few and not difficult to understand, and we will learn them as we go along in drawing a few simple forms that shall include them. In Fig. 1 we have a box, its corner towards us. In the box itself the lines A B, C D, and E F would be the same distance from each other from end to end, and if they were made ever so long would never meet, but here in the drawing they meet at G. In the same way the lines A H, C E, and D F, which in the actual box are parallel or equi-distant and so draw no nearer to each other, meet in the drawing at I. In the drawing, as in reality, the lines E H, C A, and D B are parallel, and would never meet, however far we might lengthen them. The lines of the brass round the key-hole follow the same rules. Let this box illustrate another matter. We move it into a slightly different position, so that we almost lose sight of the end E C A H. This end, in the language of artists, is now said to be “fore-shortened.” The lines that draw nearer together are said to “vanish.” The point where they meet is their vanishing point.


Pg 160 We will give some further examples of the same rules of perspective applied to different forms. The young artist standing before a scene he is going to sketch should decide what point is opposite his eyes. It may be some place in a church wall or in a tree, or even in the sky. However, having fixed it, mark it also upon your paper, and then draw a horizontal line through it. (Fig. 3.)
In the scene we have selected we stand upon a hill and look at a farmhouse that stands upon another hill. The point opposite our eyes is the window A. It will be noticed that the lines above the eyes come down to the line of sight or horizontal line, B C. Those below rise to it. Lines that are parallel to each other, whether they are roof lines Pg 161 tiles, the tops or bottoms of windows, meet in the same point, so that if you get one of those lines right, it is easy to get all the others right by continuing them to the same point.

From this sketch, and the foregoing examples, we arrive at the following rules:—
Horizontal, receding lines, if they are below the level of the eyes, appear to rise.
Horizontal, receding lines, if they are above the level of the eyes, appear to descend.
Spaces, as they recede, appear to become smaller.
Objects, as they recede, appear to become smaller.
All horizontal receding lines have their vanishing point upon the line of sight.
All parallel retiring lines have the same vanishing point as each other.
All horizontal lines which are parallel with the picture plane are drawn parallel with each other, and with the line of sight.
All horizontal retiring lines forming right angles with the picture plane, or with our position, have the point of sight for their vanishing point.
We have here introduced a new term, the picture plane. The best way to understand this is to imagine you are looking at everything through a pane of glass. In this case the glass would be the picture plane, and if we could stand steadily enough in one place and trace upon the window pane the lines of the streets and houses, we should find the lines upon the pane following the rules we have given.
Many of the rules of perspective are to be seen in the sketch of Rigg’s Farm, Wensleydale, Yorkshire, Fig. 4. The receding lines of the road, the grass edges, and the walls; the front of the farmhouse is so much foreshortened that it is possible to see only a very small part of it, though the building is really a long one.

We have given also a sketch by Rembrandt, and a pen and ink landscape drawing made at Norton in North Derbyshire by Charles Ashmore.

Stencilling.—The use of stencils is familiar to most people in one form or other. Ladies frequently use stencil plates in which their names or initials are cut out to mark linen. A commoner use is that of metal plates in which the letters of the alphabet are cut out in thin metal for use in labelling trunks, boxes in commerce, with the name and destination of the owner, merchant, or goods. It is possible that a very delicate form of stencilling is familiar to many of my readers, which is used to multiply copies of letters, circulars or notices to go through the post. The machine consists of a handle to which is attached a small wheel which has projecting from its rim a series of sharp points. The letters are formed by writing with this wheel. As the wheel passes over the paper the points pierce small round holes, sufficiently close to each other to indicate the Pg 164 letters, while the paper between the holes are bridges or ties holding the inside of the loops firmly to the rest of the sheet. This writing becomes the stencil. To obtain copies, the stencil is laid over a sheet of paper, and a brush charged with colour is rubbed across. The colour passes through the holes to the paper beneath, and the copy is secured. In making the metal stencil plates of letters, ties or bridges have to be left to prevent the inner parts of the letters becoming solid like a printer’s. Such letters as I, F, J, T, and some others, can be given in their complete form, though in the case of the F, it would be better, that is, the stencil plate would be firmer, if a tie were left where the top horizontal line joins the perpendicular stem. In cutting stencils this matter of tying or supporting all the interior or enclosed parts of the composition is very important, and should never be lost sight of. It is better to err in an excess of ties, than to risk the falling to pieces of the whole by insufficient support. The reader will perceive that if the white parts of the loops in the letter B are not connected with the outer surrounding whites, they would fall out, and the letter would stencil solid, while if only one tie is given, the loops would get out of position, as the paper swells with the moisture of the paint. Instances of these ties will be found in nearly all the illustrations, particularly in the Mooresque design, Fig. 2. It is the aim of the designer to make these ties a part of the composition, and an assistance in the effect of the whole. But cases will occur where the composition must be ruthlessly cut across as in the Greek design, Fig. 1, where in one repeat the central portions are shown with ties, and in the other in its complete form. The restoration is made with the brush afterwards. The ties should be broad or narrow according to the strength of the material of which the stencil is made, and the number of repeats for which it will be used.


Stencilling is employed as an easy method of repeating the same ornament, figures, or letters, with exactness and speed. If I desired to use the simple Greek composition Fig. 1, as a frieze in the study in which I am writing, not by any means a large room, being about 14 feet by 11 feet, it would be necessary to repeat it between 90 and 100 Pg 166 times. If I had to draw this in by hand, and laboriously paint it, probably the enthusiasm for art which projected the scheme would be frittered away long before I completed it, and I should throw it up in disgust and call in the paperhanger to put on the usual wall furnishing. But if the design were cut out in stencil, it would take but little if any longer to stencil the frieze than it would for the hanger to paper it, and the scheme being carried out in the other details, I should have the satisfaction and enjoyment of a room specially decorated to suit my own taste, and unique according to the originality of the design.


In the article on the use of leaves which follows, it is suggested that the forms of leaves to be met with in the field, hedgerow or wood, are peculiarly adapted to ornamental purposes, stencilling in decoration of the home among others. But this use of natural forms in ornament requires taste and consideration. To stick a leaf here and another there, without a purpose or design in the composition, is not ornament. I propose, with the aid of the printer, to give an idea of the principles which govern the making of designs. The first one is repetition. To use a star thus * singly, is not ornament. Place a number of stars side by side at regular distances between parallel lines thus:—

and you have a design, elementary, it is true, but as far as it goes decorative. In place of the star put a clover leaf, a conventional flower such as is used in Fig. 3, or a briar leaf laid slanting to the right or left, and you have

a border which may be used for a light frieze or the top of a dado. Arrange the stars in parallel rows thus:—

so that each star falls midway between the star above and below, and you have the elements of a design such as is very commonly used in wall-papers, prints, and nearly all forms of decoration under the name of diaper patterns. Again, in place of the star put some other form, as an ivy leaf or a small spray. But in this class of design we shall not be much concerned in room decoration, as they are only used for large panels. Another principle in ornament is alternation. It may be illustrated thus:—

in which parallel lines alternate with stars. This composition is not more crude than much of what passes for decoration at the present time. For our immediate purpose let a shapely leaf take the place of the upright lines and a flower the place of the star, and you have a more advanced border, and if the masses are well balanced and drawn, one agreeable to the eye. I think the printer can illustrate another principle of design for us in symmetry thus:—

in which three exclamation marks are placed side by side at different levels, with parallel lines and a hyphen below, alternating with stars. Or a simpler form still of the same principle may be given thus:—

in which the double dagger alternates with a star. If you draw a perpendicular line up the central exclamation mark or the daggers, the right and left sides will be found to be

alike or symmetrical. In place of the daggers or the exclamation marks, draw the leaves of the wild rose, one in the centre and one inclining to the right, another to the left; put a flower in place of the parallel lines, and you will have a symmetrical composition, the stalks being prolonged below. This principle of design is clearly shown in the two designs, Figs. 1 and 1a. A perpendicular line divides the designs into two equal parts. This is two-sided symmetry, what we are more particularly concerned with. Another principle in ornament is balance of parts. This is symmetry of another order, in which the two sides of the composition, although different in all the details, yet preserve the same weight or balance. The general effect is the same. This is illustrated in Fig. 3, which is a design for a frieze. In no place could a line be drawn which would divide the composition into two similar parts, but by the disposition of the leaves of the silverweed there is an equal distribution of weight on either side of the design. This balance of parts is important to preserve when the

design departs from the symmetrical in its arrangements. It makes all the difference between a pleasing and unsatisfactory composition, and is not to be acquired without considerable practice. The chrysanthemum design, Fig. 6, is an illustration of this principle. It is designed for the panels of a door, or the sides of a grate, or to go round a door in the form of a vertical border, but in every case where it can be placed in pairs with the flowers away from the centre, to be done by reversing the stencil.
Having thus cleared the ground for practical work, we can describe the way to make stencils. For our purpose the best material for the stencil is the oiled paper used in the letter-copying press. This will be found strong, hard, and non-absorbent. It is comparatively cheap and can be purchased at most stationers. In cases in which this paper would not be large enough, which may happen in some of the running patterns, cartridge paper, or better still, hot-pressed Whatman’s, if coated on both sides with knotting varnish (to be procured at any oilman’s shop), would do very well. For smaller subjects, which are not required for more than a score repeats, ordinary note paper, the highly polished kind that crackles like sheet iron when bent is excellent, and has been largely used by the writer. The knife used is one with a blade that runs to a sharp point. This point must be kept with a keen edge, so that one cut will go through the paper, leaving a clear edge. Hold the blade of the knife at right angles to the paper, which must rest upon a clean sheet of glass. If cut upon any yielding surface, the paper will bruise. A hone should be close at hand to keep a good edge to the knife. It is important to get a clean, square cut, with no ragged margins.
To get the drawing on the paper, first make a rough sketch giving the size and general character of the design on ordinary sketching paper. If the design is symmetrical, i.e., both sides alike, rule a perpendicular line. Draw as clearly and carefully as possible one-half the composition, that is all that will appear on the left-hand side of the line. When you are satisfied with this, place a piece of looking-glass exactly on the vertical line; you will see the image of Pg 171 your drawing in the glass, but in reverse, thus completing the design. If looking-glass is not available, a coat of Brunswick black on one side of any piece of glass will give you a sufficiently good reflector. Probably you will not be altogether satisfied with the drawing as shown complete in the glass. The lines are not agreeable ones, or pretty in curve, or the balance of the parts is not quite as you would like it. Make the alterations you feel necessary, and apply the glass again. When satisfied, place tracing-paper over the drawing. This may be fastened down by drawing-pins, a touch of gum, or pieces of the free edge of postage-stamps. Indicate carefully by clear marks the position of the vertical line, and proceed to draw a firm outline of the design, with, say, an F pencil or an HB. When done, remove the tracing-paper and fold it exactly down the vertical line, with the pencil drawing outside. Double it, in fact. Then placing it on a sheet of white paper, draw the other half, thus completing the design. Put it, pencilled side downwards, on the oil paper or note-paper, and rub off with your thumb nail. Go over the design, marking all the ties very distinctly. Then cut out as before, taking care not to cut through the ties. In practice you will find it best to begin cutting at the ties; the paper will readily spin round on the glass so that you can follow the curves of the design with your knife. Should you cut through a tie, it must Pg 172 be made good. Cut off a slip of paper of the same size, put on some of the knotting, and when it is tacky, stick down the strengthening slip. The stencil may include more than one repeat of the pattern, the more repeats there are the quicker the work can be done. Some decorators in making stencils do rather more than they intend to use when stencilling, so that parts overlap, which is done to get the repeat true. I find it better, more exact, to work from two lines on the stencil, one a horizontal line and another a vertical line. By using a needle point (a needle in a wood handle), I rule a horizontal line upon the wall in the position the horizontal line on the stencil should fall. This is altogether indistinguishable when the work is finished. Then, vertically to this line, with the same point, I indicate where the repeats should fall, and then go ahead. It is a considerable help to get a friend to join in the work, as he can assist in holding the stencil on the surface to be decorated, giving you more freedom in the use of the right hand. If working alone the stencil is held with the left hand while the colour is applied with the free hand. The straight lines are not stencilled, they are run on by the help of a bevelled straight-edge. The position of these lines is indicated by ruling as above or by twanging a piece of string charged with charcoal dust in the position required.

In decorating your room, the first point to be decided is to what extent and where you will apply the work. If cost is not a great consideration, undoubtedly the best thing to do is to paint the wall over with a pleasing tone in oil colours. A frieze running round the room immediately under the moulding, the depth being according to the height of the room; a dado running round the bottom of the walls, high enough to clear the top of the chair-backs: and if the room is large enough, the division of the room into panels by ornamental columns at the corners, and appropriate divisions. A border may be run round the doors and the sides of the fireplace may receive separate attention if there are surfaces suitable for stencilling. But it is usual to apply this system of decoration to distempered walls, in which case the decoration to be applied would probably be above the dado (which would be papered in some richly Pg 173 decorated pattern), a frieze under the ceiling, and a border round the door.

In mixing the distemper (whiting and size), powder colours are used to get the tone desired. This will vary with the taste of the reader, the use the room is put to, and the aspect, whether on the shady or sunny side of the house. Do not let it be too dark, or muddy in tone: a cheerful terra-cotta, with a dash of amber in it, if on the shady side; or some tone of sage green, French grey, or peacock blue, if on the sunny side. Perhaps the best way is to keep your eyes open when passing some decorator’s establishment, or buying the paper for the dado, and fix upon the tone of colour you Pg 174 would like. Then mix some harmonizing tints which will go well with the wall colour for your stencil work. You will find that if you decide upon stencilling in dark tones upon light, that it will be more pleasing to get these richer, that is more pure, than the ground colour. The three rich or primary colours are red, blue, and yellow. In mixing your stencil colours, approach these in purity, according to the tone used. These powder colours are obtained by ounces or pounds at colourmen’s shops. The first thought to the beginner, if he wishes to darken a tone, is to put black (lamp-black) in. In practice this must be used sparingly. Rather get your strength of tint by using pure colours. With distemper colours, you will find that they are much darker wet than dry. If you wish to employ more colours than one, each colour should have a separate stencil.
Having made your stencils, fixed upon and mixed your colours, and indicated the position of the repeats, the next step is the direct application of the colour. This is usually done with flat-headed hog-hair brushes, about ¾ of an inch across, specially made for the purpose. With your palette knife spread out a thin film of the colour on the palette, which may be the back of a plate, or a glazed tile, charge the flat end of the brush with it, and bring it down perpendicularly upon the stencil. Don’t overcharge the brush. If the pattern is irregular in its details, do every other one with one side of the stencil, and then having been round, wash off the colour from the stencil, and turn it round and do the intervening repeats. The lines are put on with a smaller brush, using the bevelled side of the straight-edge to guide the hand, using more pressure for a broad line, and charging the brush heavily with colour. Brushes specially made for lining, known as Fitch hair tools, cost, according to size, from 1-1/2d. to 5d. each. Stencilling brushes cost only a few pence.
The method of producing designs, stencils, and using the stencils is employed in the production of designs for paper-hangings, carpets, floor cloths, damasks and most flat manufactured materials, except that the white used is flake-white, and the colours are mixed with gum and water. The colours Pg 175 are known in the trade as tempera colours. The ground is laid evenly upon strained cartridge paper, and absolute flatness of tint in working out the design may be gained by using stencils. In making irregular designs, that is designs which are not symmetrical, the whole composition has to be drawn and traced.
In decorating a room, there is a very considerable range of choice in the styles available, some idea of which is given in the accompanying designs, from the purely ornamental ones of Figs. 1 and 2 to the natural treatment of Figs. 4 and 6. The design suitable for the top of a dado as Fig. 1 would, with a slight modification, equally suit the frieze of a room, as both are horizontal treatments; but for perpendicular applications, the designs should be redrawn. Some idea of the fresh treatment required is given in Fig. 1a, where the parts of the composition have been re-arranged to suit a vertical position. Should it be desired to adopt two colours, the principle to be acted upon is to make the smaller masses darker tones, and more intense colours, the larger the mass, the lighter and more neutral the tone should be. Fig. 4 is equally adapted for a frieze or dado top. It is designed in squares, so that by a re-arrangement of the squares, i.e., by placing the squirrel squares under the oak-leaf squares, it can be made suitable for a vertical treatment, or for the body of the dado. In designing such patterns as Fig. 6, where again two or more colours may well be used, care should be taken that the repeats fit well in with one another, so that no ugly spaces are left unfurnished, as decorators say, and also to prevent the recurrence of horizontal or diagonal lines. This is a failure with many commercial designs and is a fault very distressing to the eye.
How a Portrait Bust is Made.—The chief work of the sculptor consists in working in clay; therein lies the main portion of his art, and there are those at the head of their profession who rarely handle a chisel, and then only to give a final touch here and there after their carver has finished his work. Moreover, there are many more busts made in bronze and in terra-cotta than in marble; but the initial procedure of building up is the same in all cases.
The first thing a sculptor does in setting about a bust is to fix a square, upright peg, or support, about twenty inches in length, into a wooden platform eighteen inches square. The platform, in order to prevent warping, should be made of two pieces of board so joined as to have the grain of the one running transverse to the other. The peg is generally furnished with a bar, like a Latin cross, and is provided at the top with what is called an armature, that is, two pieces of lead piping looped over the peg from side to side, so as to form, as it were, the outline of a head. The ends of one piece are nailed to either side of the top of the peg, and the ends of the other to the back and front of it; or the armature may consist (as some sculptors prefer that it should) of a “loop” of lead-piping, fixed to a large nail, with what is called a “butterfly” attached (see illustration). The transverse, or crosspiece, is fitted into a slot cut in the upright, and is intended to support the shoulders of the bust, the armature serving as the skeleton, so to speak, of the head. Being made of lead, the armature can be bent this way and that, and twisted about, even after it has been covered with clay. This is a very important matter, as a portrait frequently consists as much in a characteristic pose of the head as in the exact representation of features, and the peculiarity or habit of the one whose bust is to be made cannot always be perceived at the first sitting, everybody attitudinising more or less at first when about to have a likeness taken. But after a while the sitter is sure to forget himself; then the natural pose comes, and the sculptor flexes his armature this way or that, and secures the right expression, in so far as the turn or “cant” of the head is concerned.

Having thus prepared his skeleton, the sculptor is now ready to begin
with the more important matter of modelling. But first of all he has to
see that his clay is all right. The clay commonly used for this purpose
is the china clay of the potter; but at a pinch any clay will do, and I
know of more than one sculptor who, in his impecunious days, has been
obliged to turn to the common clay of the brick-field. The essential
thing is that it should not be rotten and friable, but rather elastic,
spreading easily and cohering
Pg 177
Pg 178
well. When the clay is too dry it is put in water over night. In the
morning it is in such a state that it may be passed through a coarse
sieve, and so the rough particles be got rid of. Then, when it has
dried until of the consistency of putty, it is ready for use.
The sculptor now takes four or five largish lumps and rolls them with his hands into long strips, from half to three-quarters of a foot in length, and of the thickness of a good-sized ruler. He then takes portions of these strips and applies them bit by bit to the armature and the transverse bar, thus gradually building up the general shape of the head and shoulders. Care has to be taken from the first to have an eye to the features and contour of the head that is being modelled. It is not necessary that the model should keep seated in the same attitude all the time. If required to do so, he or she, as the case may be, is apt to acquire a very stiff pose, with the result that the stiffness may be transferred to the bust. The best way is to let the sitter converse freely, and assume a natural position. By this means the habitual expression is seized, and a good likeness is more likely to be the result.
When a general rough outline of the head has been secured, it is then time to begin to work for exactitude of feature and facial expression. This the artist does by putting on a bit here, and taking off a bit there. All this is done with the fingers and thumb. Occasionally it may be necessary to use a tool, but rarely. The best sculptors work mainly with the instrument nature has provided them withal, the hands. With his fingers the artist has more freedom in handling his material, and in communicating to it that life-like expression which is the aim and object of his art. No tool yet invented by man enables him to enjoy such fineness of touch, or to give so much breadth or such delicacy of detail to his work, as that which he naturally commands in the use of his fingers.
Of course, a bust is not modelled in an hour, nor in a day. A good sculptor will finish one in four or five sittings of an hour or an hour and a half each; others will require a dozen or more. Everything depends upon the facility of the artist in seizing upon expression. This will be the Pg 179 difficult point with the beginner. He may, after a while, get the general outline of the head and face of his sitter and feel utterly helpless to go further. But then is the time to exercise patience. Michael Angelo did not become a sculptor in a day, nor yet in a year. When the tyro feels that he cannot go further, it is generally because he does not see further. Of course, he sees that his portrait is not like; but he has not yet learned to see in detail, in minutiae. That he must now begin to do by observing every little point, depression, curve, wrinkle, wart, hair, and so forth. And then, what his mind has learned to take note of, his hand will soon learn to imitate.
All the time the work is in progress the clay must be kept moist, otherwise it will crack and fall to pieces. This is commonly done by spraying it with a garden syringe, and covering it over at night with wet cloths.
When the bust is finished, if it has to be cast in bronze, or reproduced in marble, a cast of it is taken in plaster of Paris; but if it is intended to fire it, and make a terra-cotta bust of it, the operation of hollowing it is necessary. This is effected by slicing off the crown of the head with a piece of thin wire or thread, and then scooping out the inside until a uniform thickness of about an inch and a half is left. When this is done the bust will be easily freed from its peg, and the armature attached to it. The next thing is to set it aside to dry. This takes some time, and only when it is quite free from all moisture is it ready to be taken to the kiln to bake or fire. The kiln in which it is fired is the ordinary one of the potter. This having been done, the work is complete.
If the bust has to be reproduced in bronze, the plaster cast must be taken to the bronze casters, where the transformation will be effected. The process of making an exact reproduction in marble is generally done by the sculptor himself, or by his assistant, and is more or less a mere mechanical operation, the carvers working by points, as they are called, mathematically accurate, by means of which he is enabled to make an exact copy of the cast. When this is done the sculptor goes over it carefully with his chisel and gives some final touches by way of finish, Pg 180 and to add to the vividness and life-likeness, so to speak, of expression.
How to Use Leaves.—There is one desirable quality in the hobby I am about to recommend boys, and that is its inexpensive character. A quarter of a yard of nainsook muslin, a tube or two of oil paint, a good-sized handful of lint or cotton wool, two or three sheets of foolscap, and as many of cartridge paper, and you are set up for any number of wet days or vacant half-holidays. The leaves can be obtained free of cost, anywhere and at any time, winter or summer, and in any number. Ivy leaves do well, leaves of the black or red currant or gooseberry bushes are better, and the flowering currant better still. Brambles, lime, and plane trees which grow everywhere, and most trees or bushes except holly, will give you excellent subjects. Some boys know how to keep in the good graces of the housekeeper, and would “borrow” the muslin from her. (Say you would like it fine.) Probably one of your sisters paints a bit, and would lend you the burnt sienna tube (oil colour) upon the same terms; of course, the wool or lint you would get from the housekeeper with the muslin; while an application to the pater for some foolscap—you would prefer blue, it is more business-like—would be sure to be successful, for somehow fathers like to encourage boys when they mean to do something serious; and there is left only the cartridge paper to finish the outfit. Perhaps somewhere in the establishment there is even a store of this; if not, there is nothing for it but a visit to the stationer and an attack upon the pocket-money.
Now to proceed. Make the cotton wool into a nice round even ball, quite free from lumps, particularly at the bottom. Fold the muslin to get a double thickness, place the wool inside, make it into a mass about the size of a cricket-ball, tie this tightly, leaving enough muslin free to take hold of easily. (See Fig. 1.)


Next get your leaves. The front or back garden, or the greenhouse, will probably afford all you want, to begin with. Choose in preference leaves which lie flat, with no bulgings or cockles; you will get much better results. Put them in a dish or basin large enough to take them easily, and cover with a damp cloth. If you have to go farther afield for your leaves take with you, if possible, a tin box or botanist’s vasculum, and sprinkle a little water upon them. If not able to obtain such a box, then a wooden or cardboard one must do, but pack the leaves in damp moss, if able to get any. When you reach home cover up as before.
You are now ready to commence. Squeeze out some colour upon the foolscap, spread this evenly with the muslin dabber, not by smearing but by dabbing, with a slight twisting motion of the wrist, taking care that the colour is evenly distributed on the paper and the dabber. Then try it by bringing down the dabber upon a clean sheet of paper with a smart blow. If the colour comes away evenly you are ready to begin upon the leaves; if not, work away with the dabber on the foolscap till you get better results. Patience will do it.
Take one of your flattest leaves, and remove all moisture from the surface. A piece of blotting-paper is good for this purpose. Then, with a series of good hard raps with the dabber—don’t be afraid of hurting the leaf—get the colour evenly upon the face, working as near to the veins as possible. Cut a piece of cartridge paper twice the size of the leaf—and now comes the careful treatment—put the leaf down, handling it by the stalk, in the place you want it; don’t shift it about or attempt any fresh arrangement. To do so would smear the paper. Bring down the upper half of the paper upon the leaf, and hold steadily with the left hand. Then, with the forefinger of the right hand inside your handkerchief or a cloth, rest upon the outside of the paper, taking care not to let the leaf inside slip about. You may use some amount of pressure; the colour will not yield itself up too readily. If the leaf is full of sap, less force must be used, or you will crush the tissue. Now raise the paper and remove the leaf. Probably you will not be satisfied with the first attempt. Some parts will be faint, other parts loaded with colour. Possibly also the leaf has shifted a little. If this has not occurred you will have got a portrait of the leaf, showing the cutting of the edges and the ramifications of the veins. Now try again, either upon the same leaf or a fresh one. At each fresh attempt you will be getting more skilful in handling the leaf, in the use of the dabber, and the careful placing and rubbing to get the impression. And the dabber, too, will be getting into better condition. The colour will have penetrated the muslin and gone a little way into the wool. Use as little colour as possible, getting the colour on rather by smart blows than any other way. It would be well to have the cartridge paper folded ready for use, in appropriate sizes, a little too large, to permit of after-trimming.


You will find that leaves are not alike in the character of the surface. Some are covered with hairs, like the mulleins; these will take almost any quantity of colour. Perhaps you had better begin upon such leaves. Others have a few stiff hairs, and others, again, are quite free from such appendages. These require least colour of all. You will find, too, that it is better to commence with the back of the leaf. The veins are usually more prominent, and the impression obtained is more interesting. There is greater difficulty in getting the colour on all parts of the leaf, close up to the principal veins, and the rubbing for the impression is harder. But by patience and perseverance, to quote the copybook, you will soon obtain pleasing results.
I don’t think I can tell you much more that will aid you in getting good impressions. I have recommended the use of burnt sienna, because it is a cheap and easily worked colour; but any oil colour can be used, either straight from the tube, or mixed to suit your judgment or taste. Greens, olives, russets, browns, greys, yellows, or even reds, can be used. You can certainly get some startling effects with these, if removed some distance from Nature; or by using two or more colours and dabbers you may graduate the tones or colours on the same leaf. Suppose you want an autumn effect. Mix or choose your yellow, and prepare also an orange-red colour. Coat the leaf first of all with the yellow—don’t use gamboge—then with the red dabber apply that colour to the end or margin of the leaf, and take off as before
You may say, What is the use of it all when the necessary skill is obtained? You will find it a very good and useful hobby even to so obtain a series of prints of the leaves of our forest trees. There are, perhaps, more of these than you are aware of. And there is another point—the leaves of any particular plant vary very much in shape.

A collection of these variations, if at all complete, would be held even by botanists to be very valuable indeed. Then, what a number of forest trees there are! The common and wych elms, the oak and maple, the two chestnuts, the Spanish and horse—a full-grown leaf of the latter you will find a large order—the beech and hornbeam (note the difference in the margin), the wild cherry, crab, and sloe, Pg 186 the dogwood, the two buckthorns, the service tree, the wayfaring tree, the back of the leaf of which you will find good to begin with. A good instance of the variety in form in the leaves of one plant is the now common wall plant, Veitch’s Virginian creeper, which I have used to decorate a plaque in Fig. 5. The seedling leaves, too, are well worthy of collection—they vary very much from the more adult leaves. I have no need to write more upon this, as, if you make the collection of leaves a hobby, these details will come.
But the use of leaves does not stop here. More than any other part of the plant, leaves are used by the designer for sculptural details, and for decoration in all its branches. But most boys are not designers or skilful draughtsmen, neither have they the time to make drawings or paintings which would give the results so easily obtained by this process. Even excellent artists shrink from giving the amount of details which are secured in these transfers from the objects themselves. Some applications of foliage which can be done from the leaves themselves are given as hints of what is possible. These vary in difficulty, until the results are to be described only as works of art.
Figs. 3 and 4 are applications of leaves to the decoration of occasional tables, which more frequently than not are ebonised.
Fig. 4 is an arrangement of the leaves of the “Ginko,” or Adiantum tree. When the table is ready for the varnish, apply the leaves in the positions marked out beforehand. In the illustration a band of colour is supposed to be previously painted to the shape indicated, and should be some rich olive or russet tone, upon which the leaves are printed in a lighter, say a sage green. A very good scale of colours, adapted for use on black, is used by the Japanese on the trays to be found in almost any house. You may not be able to get “Ginko” leaves, but several of the adiantums have fronds the pinnæ of which could be similarly used. An arrangement of maple leaves in Fig. 3 could be copied for the centre of the table, and similarly treated. By-the-by, should you in placing the leaf make any false marks, these can be easily removed while the colour is wet by wiping Pg 187 off with a cloth, using turpentine or spirit of wine if obstinate.

Fig. 6 is an arrangement of bramble leaves. A very considerable variety of form is usually found on the same plant; this variety has been utilised. Use pale tones of colour, and make out the stalks with a brush afterwards. It will be found useful to roughly indicate the position of the leaves by pencil or chalk after having placed them, and before applying their painted surfaces. It is intended as a decoration to a photographic mount. If the mount is of a dark tea-green colour a very considerable richness of effect can be obtained. The chief difficulty will be the careful adjustment and selection of the leaves.
Fig. 5 is the application of Veitch’s Ampelopsis to a terra-cotta plaque. You will find this more difficult, as Pg 188 the surfaces to which the leaves are applied are not flat, and the material is absorbent to a high degree. First give the plaque a coating of size; this will keep the colour on the surface. Roughly sketch the position of the leaves in pencil; apply colour more copiously to the leaves, and transfer. When dry give a coating of quick-drying varnish. Copal, dissolved in methylated spirits, will prove the most satisfactory. The end of the spray is done all at once. The stems, stalks, and tendrils are put in afterwards by brush work.
Fig. 2 is the most difficult of all. It is an arrangement of hawthorn leaves in different tones of colour, and intended for a title-page or elaborate mount. The leaves can be easily obtained in considerable variety. Roughly mark out the places the leaves should occupy. Some are in front of others; do these first in a paler green. Cut out paper shapes to cover them, and stick them down temporarily after they are dry. Then, in darker and richer tones of colour, transfer the back leaves; when dry remove the covers, and touch up with a brush any deficiencies. Add the stalks, stems, and thorns, and paint in the haws.
There are many other applications to which these prints from leaves could be put. A branch of oak running across the panels of a door, a simple leaf upon the cover of a book, nicely done; in the making of stencil plates, for borders, friezes, and dados, or a conventional pattern for wall papers. Studies for wood carving can easily be obtained from the store of prints from leaves, such as the strawberry, potentilla, goose-grass, buttercup, dandelion, and many wayside plants. When the stalk or principal vein is too succulent or thick, it would be well to pare it down, to permit of easier rubbing, not attempting to get an impression from more than one surface of the leaf.
It may be useful to some readers to give the prices at which the materials may be obtained. The cheaper colours are in every respect quite as good for the purpose as the more expensive ones, and should cost about threepence a tube from an artists’ colourman. A small camel-hair brush, from a penny upwards, would do; but it might be Pg 189 sable in preference, from sixpence upwards. You can get a good-sized sheet of cartridge paper for a penny. The nainsook muslin should be new, and of a fine quality. Any holes in it would be fatal to good work. A penny or two would buy the foolscap paper.


Pyrography.—The outfit consists of a platinum point, sometimes called the burner, an alcohol lamp, and a benzine bottle with rubber tubing terminating in a bulb as shown in the illustration. The points or burners may be obtained in many sizes for fine or broad lines. The work is done upon unvarnished wood, which should be seasoned and free from resin. Sometimes designs are drawn too upon calf, cardboard, and even upon velvet, but upon these materials be careful the point is not too hot. To use the pyrography apparatus fill both the alcohol lamp and the benzine bottle half full. Upon the benzine bottle put the rubber stopper that has the metal nozzle and join the bellows and the tubing. Now light your alcohol lamp, and in its flame hold with your right hand the platinum point, and with your left hand work the bulb steadily and continuously. The platinum point will thus become red hot and it must be kept so. With this hot point draw upon the wood and you will find that all kinds of designs and effects are possible by using different points, and, indeed, by using the same in different ways and at different Pg 190 temperatures. The judicious use of sandpaper improves the general effect afterwards, and a wax finish may be obtained by the application of pure bees’-wax slowly melted in turpentine. When it is in a syrupy state apply it with a cloth, and a few days later brush away the superfluous wax and wipe tenderly with a soft cloth. The general effect may be heightened by the use of colour. The young pyrographist may practise upon some of the designs given in the other sections of this chapter, and he will be able to purchase his outfit with directions for its use. Messrs. Gamage, in Holborn, and Messrs. Benetfink, in Cheapside, have many kinds of apparatus and accessories.
Ventriloquism.—Ventriloquism is no more a gift than is the ability to talk or sing; it does not depend on any peculiar formation of the throat; it is, in fact, an art which can be acquired by almost any one possessing a voice of average compass (some twelve notes), together with an ordinarily good ear for music. If, in addition to these, the tyro show any aptitude for acting and mimicry, there is prospect of his becoming an expert performer.
Broadly speaking, ventriloquism consists in a close imitation of sound as it falls upon the ear, the ventriloquist effecting this by skilfully modifying the cavity of the mouth in such a way as to give his voice a deceptive character.
The young ventriloquist must study all sorts and conditions of sounds and voices as they fall on the ear. He must become familiar with the models he seeks to imitate. He must, for example, note that a voice from the cellar, heard in a room above, has a subdued and muffled sound, many of the consonants being strangely altered, so that the words, “I’m down here in the cellar, sir!” would sound more like, “In’e down here in a zellar, zir!” Again, in listening to the knife-grinder, he must observe, first the bur-r-r of the wheel, and then a combination of the bur-r-r with a prolonged iss when the knife touches the grindstone. These little hints will, we trust, sufficiently impress the beginner with the necessity of learning to listen with new ears whilst endeavouring to speak with a new voice.
You will observe, too, that the character of the assumed voice is determined chiefly by the shape of the mouth. This is the more important, because misguided learners are so apt to strain the larynx. There should be no pressure Pg 192 on the throat, though some pressure must necessarily be exerted on the chest and the abdominal muscles by reason of the slow rate at which the air is allowed to leave the lungs; for, be it carefully noted, the ventriloquial voice can only be spoken during a slow expiration of the breath. Consequently, the learner must exercise himself in controlling the breath, for which purpose let him practise filling the lungs with air and then reading aloud as long a passage as he can whilst the air is being slowly expelled.
With regard to modifying the natural voice, every one knows how this can be done by extraneous means. A speaking-trumpet, for example, renders it loud and harsh, whilst a hand placed lightly over the mouth makes it low and muffled.
At an evening party where we had been amusing some juvenile friends, a voice seemed to come from the chimney in obedience to one of the boys, who stood before the fireplace as a new fledged professor of ventriloquism, and we considered the imitation to be rather good until, upon lifting the table-cloth near us, we discovered a confederate on the floor, talking into an empty jug. This, of course, was mere jugglery, but genuine ventriloquism is to be attained by a careful management of the breath whilst modifying the shape of the cavity of the mouth by a proper adjustment of lips, teeth, jaws, tongue and palate.
And here let us point out that, although the best ventriloquial effects can only be produced by the mature voice, it is well to begin practising at an early age, in order to make the vocal organs strong and flexible. The present writer began experimenting at the age of twelve, only resting therefrom, as every boy should, during that beautiful period of “gruffiness” consequent on the breaking of the voice. After that we went on again, making slow headway, until one memorable night when we received undoubted assurance of our ability to deceive. It was at a party given by a bluff sea-captain in a northern town, and a young gentleman was singing a very sentimental ditty to a saddened audience, when we essayed between whiles to imitate the singer in a falsetto voice, muffled, as if coming through the closed shutters, towards which we took care to cast Pg 193 an occasional glance of annoyance. Presently the captain rose and left the room on tiptoe, at the same time indicating by vigorous pantomime that the singer was to proceed with his song. Before long a tremendous splash of water was heard on the pavement outside, and our host soon after re-entered, remarking that he had taught those young vagabonds not to mock people outside the shutters, for he’d given them “billows” from the top bed-room window.
There are in reality only three well-defined ventriloquial voices: (1) the distant voice, as from the roof, the street, etc.; (2) the resonant voice, as from a chimney, cupboard, cellar, etc.; and (3) the falsetto voice.
“But,” exclaims the intelligent reader, "how can each voice be used for various imaginary places? Will the distant voice serve equally well for roof or street?" It will; and this brings us to a very important point, viz., that we judge of the direction of sound partly by means of the sense of sight. A railway traveller, for instance, seated in a waiting-room, is often perplexed as to whether an approaching train is “up” or “down” until he notes the demeanour of those on the platform who can see the train coming in. It is always difficult to determine the direction from which distant sounds proceed, and frequently of sounds much nearer. But this uncertainty is of vital importance to the ventriloquist, as it enables him “to make the ears the fool of the other senses.” When he uses the distant voice, the audience will be unable to refer it to any particular quarter, unless the place be suggested to them by the performer. The moment he does this, however, by word or sign or mere glance even, the imagination of the audience does the rest, and the illusion is complete. It is plain, therefore, that the tyro should have some taste for acting, otherwise he can neither conceal the internal efforts he is making, nor invest his shadowy characters with any degree of naturalness.
Coming now to practical details, let the student attempt the distant voice in the following manner. Say the word “Hallo!” just in your ordinary speaking voice, in order to fix the pitch. Then open the mouth slightly, draw in the lower jaw a little, and firmly fix both jaws. Pg 194 Next, stretch or arch the soft palate as in the act of yawning take a deep breath, and utter the word “Hallo!” in the same pitch as before, but softly, and without moving the lips, endeavouring at the same time to direct the sound against the soft palate by turning the tongue well back so as to strike the roof of the mouth. At first your strange gurglings may alarm the household, and much fatigue may be felt in the jaws and tongue, but persevere and you will soon acquire a new voice of startling character.
The resonant voice is produced on the lower tones of the scale, the sound being forced into the nasal passages with a jerky explosive delivery of the breath. The parts against which the voice and the tongue should respectively strike may be felt by prolonging the sound of the letter n on a low note with the mouth nearly closed and the lower jaw drawn back a little as before. In this way utter the sentence, “Joe’s down here in the cellar!” and the words will sound deep and muffled and be accompanied by a resonant hum. Remember always to keep the lips and jaws immovable, even at the cost of mutilating your words. These will greatly improve by-and-by.
The practised ventriloquist can, of course, judge the effect he is producing, but the learner, as soon as he makes any progress, had better get a companion to criticize his efforts.
The falsetto voice is feminine and must be familiar to all. If spoken with the lower jaw drawn in and the mouth all but closed it will strike against the hard palate and produce a thin, metallic voice like that of a child. It can also be used for “distant” effects, according to the method set forth for voice No. 1. The falsetto voice is frequently used for “doll-talking”—a branch of the ventriloquial art concerning which, and polyphonism also, we shall have something to say presently. Meanwhile, devote a few minutes daily to each of the following exercises:—
(1) Singing the common musical scale to the vowel sounds, as well as to the syllables ha and coo. All good vocal exercises are an aid to ventriloquism.
(2) Practising the management of the breath as already described.
(3) Experimenting with the three ventriloquial voices.
(4) Studying all the peculiarities of voices and other sounds as they fall upon the ear.
The learner still finds it difficult, no doubt, to enunciate his words at all clearly without moving the lips and jaws, but this difficulty, though it will never quite vanish, may be greatly reduced. The vowels run smoothly enough, but the consonants give trouble, particularly the labials, b, p, m, and their first cousins, the spirants, v, f, w. As to the spirants, one may soon acquire the knack of sounding f fairly well, so this must be used for v also, unless one can hit upon that nearer substitute got by compounding g and f. To catch this sound with lips and jaws immovable, pronounce the word never as "negfer," quickly, with a light touch on the g. The sound of w is well represented by that of oo. For the labials, however, demanding as they do a positive closing of the lips, we must substitute the letters g, k, ng. Thus, the sentence, “Jim broke seven of Tom’s pens this morning,” would be rendered as “Jing groke se(g)fen of Tong’s kens this ng-orning,” and the query, “When am I to come up?” would become “Oohen ang I to cung uk?” Such sentences, though good for practice, are bad for exhibition, and must be carefully avoided in the preparation of dialogue. Nevertheless, they look much more imperfect here than they would sound in the mouth of an able ventriloquist; besides, as nobody expects to hear perfect words from a distant source, the audience readily accepts the performer’s mode of rendering them. In this connection it should be remarked that the performer may occasionally turn his face from view, and allow his lips free play, although, as a rule, either a side face, or a three-quarters face should be presented to the audience, and, pretty frequently, a front face also.
We have next to deal with ventriloquial perspective, which appertains to the gradual increase or decrease in the loudness of a sound as it approaches or recedes. Attention to this will give our assumed voices just the magic touch. For the receding voice, speak more and more gently, whilst gradually closing the mouth, until the sound is shut off. For an approaching voice, reverse the process, Pg 196 but in either case take care to maintain the original pitch. This is just where beginners stumble; they mostly alter the pitch at every step, graduating it from a growl to a squeak, or vice versa; nor do they observe how the words spoken by a receding voice grow less and less distinct until only the vowel sounds remain. The following presentment of these important matters may impress itself on the reader’s mind:—GOOD-NIGHT! Good-night! goo’-nigh’! ’oo’-nigh’! ’igh’!
We shall now give in outline a few sketches for the student to fill in with dialogue of his own. The “situations” will readily suggest some simple conversations well suited for effective treatment.
For the man in the chimney, assume a voice of low pitch, strongly resonant throughout. Express your belief that somebody is up the chimney, and stoop near the fireplace to question the intruder in a soft and rather high-pitched voice. Then draw down the corner of the mouth turned from the audience, and deliver your answers with force, so that the sound may be deflected from the stone-work supporting the mantel-piece. Your man in the chimney is a rough, cantankerous fellow, who accounts for his presence in the most absurd way, and answers with great warmth, especially when there is a fire in the grate. As soon as he begins to ascend the chimney, step back a pace, keeping your face in the same direction. To wind up, either leave him stuck in the chimney, or dismiss him by way of the roof.
In speaking to the man on the roof, begin by taking a deliberate look at the ceiling, and then shout “Hallo-o!” The answer, given in the distant voice, should sound almost like an echo. Before answering, turn your face to the audience, and, with the head in an easy, listening attitude, produce the reply softly on a note of middle pitch. The man on the roof rarely speaks more than a few sentences. The audience seem to understand how trying it is for him to converse at such a distance, so he is humanely dismissed very soon, and may then be heard faintly answering as he wanders on from roof to roof, or reaches the ground by a ladder. Pg 197

The man in the hall is a capital voice to practise. With your hand on the handle of the door, parley with the rough fellow who is trying to push it open from the other side. At this stage use the resonant voice, and explode your answers against the panel of the door. As the man is noisy, you may produce a striking effect by alternately opening and shutting the door rapidly, accompanying the action with a sudden swelling and sinking of the voice, remembering at the same time to maintain the original pitch. Much amusement will arise if your visitor happens to be a sweep who has come to the wrong house, but insists on cleaning the drawing-room chimney. You may even put your head outside the door for a moment to remonstrate with him, and then step back suddenly with the mark of a grimy hand upon your face—self-inflicted, of course, with a burnt cork. As the voice moves away, its resonant quality should be moderated, and, in case the man talks himself out into the street, it should merge into the distant voice. Sometimes, however, affairs take a novel turn, and the sweep, in seeking an exit, wanders into the cellar, where he may be heard making unkind remarks in accents faint and sooty.
The voice of the man in the cellar is a modified form of the resonant voice, delivered with less force and less of the nasal quality. A fine effect may be introduced by making your man slowly ascend and descend the cellar steps, talking or singing all the time. Moreover, this effect may be greatly heightened by using a trap-door made in the following manner. Cover a sheet of stout cardboard (about 2½ ft. square) with grained wall-paper to imitate woodwork, and let it dry thoroughly under pressure, as warping would render it useless. On it paint two large hinges with black enamel, and near the front edge fix a large black ring by means of a loop of leather or black tape. The ring may be either a wooden curtain-ring or a coil of cane bound with “wax-end.” To the under-side of the board glue two leather tabs, in line with the hinges, but projecting, so that the trap may thereby be fastened to the floor with drawing-pins. Pg 199 Before the audience arrive, fix the trap-door in position, well to the right or left of the platform or other space, and take care to indicate the thickness of the woodwork on the edge which is to face the performer. Under the trap a corresponding square of black tissue paper should be pinned to the floor, so that, when the trap is raised, a dark hole may appear beneath. During the performance, the trap must be lifted with considerable toil, else its flimsy nature will be discovered, and perhaps cause an untimely titter. If managed properly, however, it is most realistic, and may be employed in a startling way to convey the idea of a man raising it from below. This is done by fixing to the upper edge of the board a piece of strong black thread (invisible to the audience) at a few yards distance and attaching the other end to a strong finger-ring to be worn by the performer. The ring, if placed on a table or chair near the trap-door, may be slipped on the finger at the right moment, and will thus enable the performer, whenever he raises his arm with a gesture of alarm or of command, to raise the trap-door at the same time.
Doll-talking is a branch of our subject which finds great favour with boys, for it is often as funny as droll figures and smart witty dialogue can make it. The nature of the dialogue, indeed, is of much more importance here than in pure ventriloquism. The voices are easy to acquire, but not so easy to describe. Draw back the lower jaw pretty well; press the tip of the tongue against the lower teeth; raise the rest of the tongue until it nearly touches (and it will touch every now and then) the roof of the mouth, and then project the sound forcibly against the hard palate, just above the front teeth. The falsetto voice treated in this way, sometimes becomes almost perfect, enabling the ventriloquist to sound nearly every letter; whilst appearing to be absolutely mute.
Fix upon two well-contrasted characters: one speaking in a shrill falsetto, the other in a hard, metallic voice of middle pitch. Figures for this purpose can be purchased at some of the London toy bazaars and conjurers’ shops. A pair of large dolls, with practical mouths and eyes, would Pg 200 cost about two pounds, but heads may be purchased separately and fixed to home-made bodies. These heads, which represent a funny man, an old woman, a little girl and a negro, range in price from five shillings and sixpence to eighteen and sixpence, the latter kind being life-size. The pairs of dolls mostly used are styled “Tommy and Joey,” “Tommy and Granny,” etc. The performer places a doll on each knee and holds a lively conversation with them, often interrupted, however, by the crying, giggling, and singing of the dolls, whose unseasonable jokes and general naughtiness call down upon their wooden heads many a resounding blow.

There is a cheaper figure, however, called “The Talking Hand,” which may be bought at almost any large toy shop for about half-a-crown. As great fun can be got from this figure, we shall now tell our boys how to make it at the cost of a few pence. Get a quarter-yard of unbleached calico, fold it double and trace upon it an outline of the right hand and wrist. Then cut round the outline, taking care to leave a broad margin and a long thumb. Stitch round the glove, turn it inside out, and insert the hand. Now close the hand, and, with a soft blacklead, mark in roughly the eyes, nose, etc. The projecting knuckles will form the nose and the thumb the lower jaw. To give the latter a better appearance fill out the tip with wadding and sew it to that part of the glove just above it. Having withdrawn your hand, flatten the glove, Pg 201 and proceed to mark in the features more carefully with good writing-ink and a quill pen. The furrows in the face and the hair should also be marked with black ink, but the wide mouth and the tip of the nose with red ink. Colour the face with powdered chalk (yellow ochre and red) rubbed in with pellets of blotting-paper. Take care to make the eyes extra large and paint them with Chinese white. To complete the figure, sew to the glove a cap-frill, a shawl of red flannel, and a large bow under the chin, and “Betty Bouncer” becomes one of the most comical creatures you ever saw, ready to talk, laugh, or cry to order, while as to singing—well, you should just see the old lady getting her top note!
The chief subject of our next section will be polyphonism, or the imitation of various musical instruments, cries of animals, and other sounds. Meanwhile the young ventriloquist will find quite enough to do in practising: (a) Sentences containing labials and spirants; (b) voices saying “Good-night,” etc., in a monotone, whilst approaching or receding; (c) voices at the door, on the roof, up the chimney, in the cellar; (d) the “talking hand” or other figures.
Polyphony.—Polyphony is the art of imitating sounds of various kinds, usually, without attempting to deceive the hearer as to their direction. It may therefore be studied independently of ventriloquism. Already the art is much in vogue. We all know the boy who occasionally alarms the street with the yelp of an injured dog, or imitates the “cock’s shrill clarion” cleverly enough to deceive half the roosters in the neighbourhood and make quiet people mutter of canes and constables.
As in ventriloquism, so now the learner must first of all study closely the sounds he wishes to imitate. Very often they may be roughly indicated in words or syllables, and this is very helpful. Indeed, many words in our language, such as buzz, bang, tinkle, thud, crash, splash, and the like, originated in this very way. Let us begin with a few easy examples.
Knife-grinding sounds like the combination of a bur-r-r—made by fluttering the lips—with a prolonged ss. Sawing Pg 202 may be indicated by the syllables shuh-szee uttered alternately with the difference of a semitone. Planing can be effectively rendered by strongly whispering shee-yick, shee-ic-yick, ll-ll-luc, and then yu-yu-yook as a long shaving curls out of the plane. With regard to musical instruments, there is the ta-ra-ra of the trumpet, the pangka-bongka of the banjo, the zhing-sching of the cymbals, the pom-pome of the trombone, the r-rhumbu-dhumba of the drum, the explosive plim-blim of the harp, and the floo-lu-loo of the flute, whilst the notes of a clarionet may be imitated by the player’s running rapidly down the scale from a sharp nasal pli-li-li-plan-plah into a deeper glug-lu-lu-glah. Syllables like the foregoing give, as it were, an outline for the polyphonist to fill in with sound of the right colour or quality. Thus, a tune on the cornet should be sung to a ra-ra-ra forced through the tightly compressed lips, and the flu-lu-loo of the flute, with its roundness of tone and breathiness, should be vocalised in the falsetto while the cheeks are distended with air. An amusing and realistic imitation of the Jew’s-harp can be given in the following manner. Stiffen the first and second fingers of the left hand and place them firmly over the lips, but lightly, so as to allow the lips perfectly free play. Then give a strongly nasal rendering of some monotonous air whilst ringing the changes as rapidly as possible on the syllables whanga-whonga whee-whaw whoodle-ongle eedle-ongle whow-zeedle oodle-ee whay-whonga whaw, during which beat time upon the projecting fingers with the right forefinger as if twanging the tongue of the instrument. By following on the lines now laid down the apt learner may even become skilful enough to imitate an entire brass band, a feat which has been performed by at least one ventriloquist of our acquaintance. Some sounds, of course, it is almost impossible to reduce to writing, as, for example, the hollow “skaw” and murmur produced by a multitude of skaters, or the roar of an excited crowd, but in listening to these sounds, it is useful to remember that we may often obtain a key tone to work upon by partly closing the ears—just as a painter can often find the prevailing tint of a confused mass of objects by partly closing the eyes.


When the young polyphonist has acquired some degree of skill, he need not be at a loss to entertain his friends, provided he is fairly resourceful as regards acting. But acting is of the greatest importance to the polyphonist. As a knife-grinder he must work an imaginary wheel, and deftly turn the blade of a table knife upon the stone; as a waiter about to “pop” a cork with a strong click of the tongue against the palate—he should first insert a shadowy cork-screw with a chirrupy squeak; and as a cook frizzling bacon, he may do a cardboard rasher to a turn on a battledore or fire-shovel. Even the buzz of a bluebottle (made sometimes by a prolonged cornet note, sometimes by a stream of air forced through the compressed lips) will occasion much amusement if the performer acts the part of a languid mortal lolling behind his newspaper in the dog days, and murmuring,—
Then might follow a reckless chase after that fly, which should finally buzz itself crazy beneath the huntsman’s handkerchief. Again, the barking of dogs may not be much in itself, yet we have seen a performer cause roars of laughter by making his phantom poodles dance, tumble, and leap over chairs and through a hoop, to a lively tune on the piano.
As a final step in polyphony, the learner should practise the ventriloquial treatment of noises. This adds greatly to the effectiveness of a ventriloquial sketch; as when the man in the cellar takes to sawing and planing; or goes home accompanied by a dog, whose barking, mingled with the shouts of the man, grows fainter and fainter in the distance; or, it may be, the moaning of the wind is heard without, while a last-century watchman proclaims the hour in a storm-tossed voice.
To show how perfect such displays may become, we may instance the case of Thomas Ring, a conjurer who gave an entertainment before the entire English Court in the seventeenth century. From behind a screen he imitated the voices of three butchers engaged in a conversation, which was presently interrupted by a barking dog. The dog having been whipped, a bleating calf was dragged in, a knife whetted, and the calf killed amid the talk and laughter Pg 205 of the men. All this is, no doubt, within the reach of some of our living ventriloquists.


And now a few necessary hints must be given in regard to the management of an audience. Get your hearers seated in front of you, not around you, with the front row at a distance of at least ten or twelve feet. Politely impose silence upon them, and take care to repeat your opening question two or three times before replying in the ventriloquial voice, because this straining the attention stimulates the imagination of your audience, and makes the illusion more complete. Another important point—keep the assumed voice and the natural voice in contrast all the time, by means of a running fire of questions; finally, never use elaborate apparatus. Besides, ordinary windows, doors, and fireplaces, an old chest, a folding screen, a trap-door, and perhaps one or two “practical” dolls, will amply suffice.
Ventriloquists who employ a whole family of ingeniously contrived figures—we have seen some of these dance a jig—should get them to talk by machinery as well. There is very little artistic merit in such performances. Nor should the performer be suspiciously surrounded by scenery; it may cause misunderstanding, as the following instance will prove:—
A ventriloquist performing at a London theatre some years ago imitated a voice on the roof so successfully as to induce a man in the audience to ascend to the roof in search of a confederate. Unfortunately, however, two other men, filled with the self-same idea, also found their way to the roof in company, and mistaking the first man for the guilty person, gave him a sound thrashing.
In drawing our instructions to a close, let us point out that the proper end and aim of ventriloquism should be not to play the pranks of “Valentine Vox,” but to afford our friends innocent amusement. Of course, no manly boy would ever think of frightening little children; but he might be tempted to give older people a little surprise. It is therefore well he should know that persons altogether ignorant of ventriloquism may be wonderfully deceived.
One morning, just after a new servant had come to the Pg 207 house, we noticed a doll in the kitchen, sitting bolt upright and staring as hard as her glass eyes would let her. So, going up to it, in presence of the girl, we shook hands gravely, and said, “Good morning, Dolly!” To which she sweetly replied, “Good morning, sir! I have to watch Charlotte!” The effect produced on the girl was so pronounced that for days after she would hardly touch the uncanny creature.
On another occasion, at a house in Kentish Town, affairs took a more serious turn; for a young woman, upon hearing a gruff voice proceed from the chimney, astonished a company of six or eight persons by falling on her knees in broad daylight to implore the troubled spirit to unburden its mind. Upon this we at once desisted, and explained, though not without difficulty, the nature of the deception.
The ventriloquist should therefore use his strange power with caution, and mainly, as we have said, for the innocent amusement of every one concerned. At the same time he will reap from his studies certain advantages often lost sight of, viz., the training given to the ear as regards the nice discrimination of sound—musical and non-musical—and the command obtained over the vocal organs with respect to elocution.
The whole of our instructions may be summarized thus: (1) Listen to sound intently; (2) learn to analyze it; (3) experiment patiently and regularly; (4) cultivate acting. With these points in view, no reader possessing an average voice, together with some aptitude for mimicry, should fail to acquire the coveted art.
Some folks may fear that these practical lessons will produce ventriloquists by the score. To such we reply, Rest easy, good people! Ventriloquism, like every other art, requires patience and perseverance for its attainment. Consequently, many a reader, sufficiently gifted by nature, will fail in its pursuit. It is the enthusiasts who will succeed, and they, after all, are the ones who deserve the reward.
Cremated Alive.—The curtain rises and a young and beautiful girl, clothed in white, is introduced to the spectators as the victim who has been doomed to cremation, which will be instantaneously accomplished. The girl mounts upon a table placed at the back of a kind of alcove, consisting of a three-sided screen, and above her is suspended a big fire-proof sack, folded up as shown in Fig. 1.
The table upon which the victim stands ready for sacrifice appears to have four legs, and under this table burn, or appear to burn, four candles, the purpose being to indicate to the public that the space beneath the table is open, perfectly free, and beyond suspicion of any trickery. The sack, which forms a cylindrical screen under which the victim is to be burned, has been previously handed round to the spectators, so that they might assure themselves that it was entire, without any hole or split, lacing, or other artifice allowing of an escape from behind—a precaution invariably taken to allay the too ready suspicions of incredulous spectators. All these verifications being made, and the audience perfectly satisfied as to the bona fides of the case, the sack is lowered upon the victim, a pistol is fired, and the cremation commences.
Flames and smoke (see Fig. 2) soon indicate to the terrified spectators that the fire is pursuing its destructive work. When the flames have ceased, the sack, composed as we have stated, of an incombustible material, is raised, and there is seen upon the table, in the midst of the still smoking débris, only a few bones and a skull (Fig. 3.)
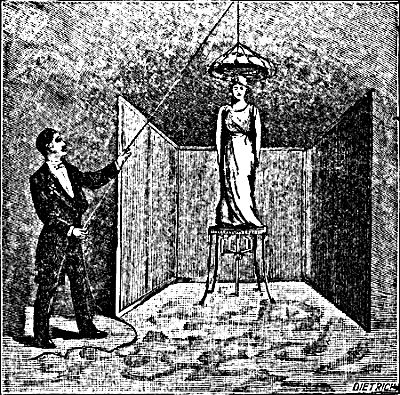
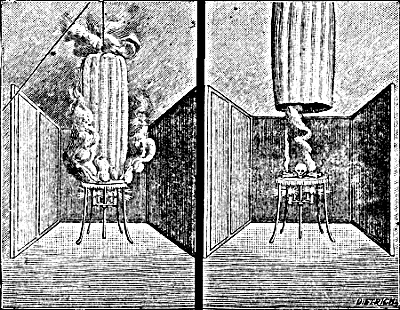
An examination of the conditions under which the disappearance has taken place does not in the least reveal the methods by which it has been so rapidly accomplished; but as it is clearly inadmissible that the sacrifice of a young and beautiful person should thus take place every evening for the simple gratification of the public, one is, of course, pushed to the conclusion that there must be some trick. And a trick there is of a most ingenious character, as will be seen by the following explanation, the comprehension of which will be aided by Fig. 4.
In this particular case the illusion is a happy combination of suitable appliances underneath the scene and of the well-known properties of plane mirrors placed on the incline. The table upon which our victim mounts for cremation has, as a matter of fact, only two legs, instead of four, and the two others are only seen by the spectators as a reflection of the two real legs in the two glasses inclined at an angle of 90 degrees with each other, and at 45 degrees with the two side panels of the three-fold screen which contains the scene of the disappearance. It is precisely the same with the two candles, which, in consequence of Pg 211 their reflection in the mirrors, appear to be four in number, whilst the central rod hides the edges of the mirrors.
Thanks to the combination of the glasses and panels, and to the adoption of a uniform surface for these panels, the reflection of the two sides in the two lower glasses appears to be but the continuation of the panel at the back. The triangular box, of which the two glasses comprise the two sides, and the floor the bottom, has its surface formed of two parts; the one made up of the top of the table itself, and the other of pieces of mirror which reflect the back panel, and pieces of material of the same colour as the panel itself.
It is easy from this to understand the whole course of the operations, more or less fantastic, which the spectator watches with such breathless interest. As soon as the victim is hidden by the sack which comes down upon her, she at once escapes by a secret trap-door in the top of the table, as is shown in Fig. 4; she then rapidly puts into position the skull and bones, as well as some inflammable material, to which she sets fire when she hears the pistol shot. She then, closing the trap, tranquilly retires, and remains hidden in the triangular space arranged between the back panel and the two glasses until the fall of the curtain.
Money Dissolved in Water.—For this trick the young magician needs a glass, which may be either the ordinary tumbler or a wine-glass, as shown in our illustration (Fig. 2). It must be of such a size that if a half-crown be dropped into the glass, it shall, lying flat, nearly or quite fill the bottom space. The conjuror must be provided also with a glass disc, of the thickness of a half-crown, and in diameter exactly corresponding with the bottom space of the glass. This, when about to perform the trick, he holds concealed in his right hand, after the manner of A in Fig. 3. Filling the glass about three-quarters full, as shown in Fig. 2, he hands it to a spectator to hold. He then asks the loan of a half-crown, and a lady’s pocket-handkerchief. Taking the coin as C in Fig. 3, he accordingly throws the handkerchief over it, or, rather, makes believe to do so, for in reality, under cover of the handkerchief, he deftly Pg 212 substitutes the glass disc, and holds this between his fingers, while the coin takes its place in his palm.
He now asks the person holding the glass to take charge of the coin also. He is instructed to hold it (the glass disc) just over the glass, the four corners of the handkerchief hanging down around it, and at the word “three,” to drop it into the glass. The conjuror counts "one, two, three?" At the word three the supposed coin falls, and is heard to tinkle upon the glass.

Touch the glass through the handkerchief with your magic wand, and state that by the time you have counted three the half-crown will have dissolved. Count three very slowly, then the handkerchief is removed, the water is seen, but the supposed coin has vanished, for the disc, being of glass, lies quite invisible at the bottom; and if it fits the water may be poured away without the disc falling out, the thin layer of water remaining underneath it holding it by atmospheric pressure to the bottom of the tumbler. It is not worth while to do this unless some one challenges Pg 213 you to pour off the water, then the challenge should be accepted readily.
The conjurer should now pay back the half-crown, but it will assist the illusion if he pays it back with two shillings and a sixpence, or in some other coins, instead of in the form in which it was borrowed.
The Vanished Half-Crown.—The trick of the dissolved half-crown may be varied. In this case the coin should be marked by the owner. Upon finding it is not in the water when the handkerchief has been removed pretend to be anxious about its loss. Say you will pay it back in instalments, and offer a shilling towards it. When the money-lender tries to take the proffered shilling it vanishes too. This is managed by boring a hole in the shilling, tying some elastic through the hole, and stitching the other end of the elastic up your sleeve. Then as soon as you leave hold of the coin it darts back up your sleeve. “Has that gone too!” you exclaim. “Well, we must try to find that half-crown; perhaps it is in this ball of worsted,” you say, as you pick one from the table. Hand the ball of worsted to someone to examine and they declare that the coin is not in it. As you walk back to the table secretly exchange this ball for another. Now this other ball of worsted has been prepared in this way. It has been wound round a tin tube about three inches long, a tube through which half-a-crown may be passed. When you have the marked coin at the beginning of the trick you should have the ball of worsted in your pocket, and putting your hand there, should put the coin through the tube into the ball of worsted. Then take the tube away and press the ball into its proper shape. It is this ball that you now place in an empty glass, and giving the end of the worsted to some lady in the audience, ask her to unwind it. As she does so the half-crown will begin to rattle upon the glass.
Magic Florins.—Take four half sheets of note-paper from any table, and then borrow four florins; these florins you place upon a table about a foot apart, and gently lay the half sheets over each. You then take up one sheet and discover the florin underneath. Placing the paper Pg 214 on one side you take up the coin, and without touching, in some extraordinary way, make it pass through the next paper. You lift it, and sure enough, there lie two florins.
You then lift the third paper, to find the florin you placed there. Again, in the same mysterious manner you pass the coin through the paper. It makes no hole going through, but when the paper is lifted up there are the three of them.
Now you lift up the last piece of paper, thereby uncovering the last florin. Repeating the same process, you then request one of the audience to lift the paper, so that he or she may see that there is no deception. This being done, there lie the four florins as cosy as little fledglings in a nest.
The extreme simplicity of the trick is the most taking part of it.
And now to explain this seeming mystery.
One great golden rule of conjuring successfully is, as it were, to take your audience into partnership with you. When you borrowed the four florins of course they thought that was all you wanted. But you began the trick with one in your left hand cunningly concealed under the four sheets, all of which you hold in that hand. Then placing the four borrowed coins on the table (which, by the by, must have a thick cloth on it to deaden the sound), twelve inches apart, with the right hand you take the three top sheets. This leaves you with the fourth sheet in the left hand, the coin below being held in position by gentle pressure from fingers below, and thumb above. Then simultaneously with each hand you place a sheet of paper over two of the four coins on the table. Doing it simultaneously distracts the audience’s attention from what you are doing with your left hand; for it is at this particular moment that the trick is being performed. As you place the paper down, with a gentle and even motion of the thumb you leave the fifth coin there, too, taking great care that it does not clash with the one there already. Now you have two coins under that sheet, though the audience only know of one. There is one under each of the other three sheets. You take one of these sheets up now and Pg 215 take the coin between the top of the thumb and fingers of the left hand, then with the fingers and thumb of the right hand you pretend to take it, but in reality you let it fall into the palm of the left hand, a feat that must be practised carefully before a mirror. You close the fingers of the right hand over the imaginary coin in them, and act as if it were there. One way of aiding the deception is to follow the right hand with your eyes as it goes away from the left, at the same time dropping the left hand in an easy unconstrained position to the side.
Now choosing the sheet which covers the two coins (though the audience only know of one), you place the right hand a few inches above it, and open the fingers, making some mysterious passes. Of course, nothing passes in reality, but when you proceed to lift up the sheet and display the second coin, the audience will either think that they could not see it, or that you are a very mysterious person, which, indeed, you are. The remainder of the trick is only a repetition of what has been already explained; but it excites more and more astonishment as it proceeds. The bewilderment of the audience culminates in the last act, when, as before, you have pretended to take the coin in the right hand (really having left it in the left), and making the passes, request one of the audience to lift up the last sheet—there lie all the four florins.
Meanwhile, your left has dropped quietly to your side, the coin in it been slipped noiselessly into the pocket, and both hands are free to return to their astonished owners the four borrowed coins.
This trick is a particularly effective one, requiring, as it does, no paraphernalia except what are always to be met with in almost every room.
Only let the beginner recollect this. He must never begin the trick without the fifth coin, or he will come to grief. Nor must he accede to requests to “do it again,” or he will be detected.
Magic Pens.—Take a small quantity of “Aniline Violet,” obtainable at any chemist’s, two pennyworth making about two dozen pens, and make it into a thick paste with water, taking care not to leave any lumps; then add a few drops Pg 216 of mucilage or good gum. Do not add too much, or the paste will not set well. Apply a small quantity of the paste thus made to the hollow part of a clean pen, within a quarter of an inch of the point, and leave it for a few hours to dry. When dry, tell your friends that you will write anything they like to tell you with the pen, but instead of using ink, you will use water. Then dip the pen into the water, taking care not to show the side with the paste on, and write whatever they ask you to, the writing appearing the same as if you were using an ordinary pen.
The Magic Bottle.—You will need two cardboard cases open at each end, and large enough to slip easily over the bottles; a specially constructed bottle, the upper part of which can contain a liquid, and the lower part containing an open space in which a glass can stand; an imitation bottle made of tin and large enough to just slide over the special bottle; and two glasses. With this apparatus before us we are ready to proceed with the performance. We introduce an empty glass and what appears to be an ordinary wine bottle, but which is really a special bottle, with its tin case over it, and containing a second wine-glass inside. By careful manipulation we pour the contents from the upper part of the bottle into the wine-glass, and then setting the bottle down in its position, pour back half the liquid, which now runs through a hole in the partition into the glass beneath. So that the audience sees one glass half full, two cardboard cases, and what appears to be the bottle (as in figure), but which really is our special bottle covered by its tin case, shaped and coloured like a bottle, and a second glass half full beneath it. Now we show the cardboard cases to prove that they are empty, and then place one case over the glass and another over the bottle. At this stage everything depends on the talk of the performer, who, by his jokes and comicalities, somewhat diverts the attention of his audience. Some excuse is now invented for changing the cases, and in doing this by nipping the one over the bottle the tin case is lifted off with it (as in Fig. 2), and placed over the glass, then on again raising the cases, the glass has disappeared, and there are now two bottles instead. Again, the cases Pg 217 are put over the bottles, and again they are raised, but by nipping both the cases, the bottles are lifted with them, and now only the two glasses appear. Again the cases are put on, and the bottle and glass restored as at first, and so a number of changes can be worked at will, the performer, of course, talking all the while and referring in the language of magicians to his power and skill in causing the bottle and the glasses to obey his will. Fig. 3 shows the construction of the special bottle with its two linings and the space for the glass to stand within it.
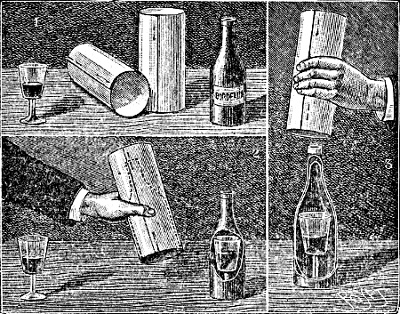
The Magic Wand.—By means of this wand (a piece of thin glass rod) we may produce fire at will. Take a teaspoonful of castor sugar, and rather less than half a teaspoonful of ground chlorate of potash, thoroughly mix without friction, and place on a saucer standing on an old tray. Secretly dip the point of the glass rod in sulphuric acid (oil of vitriol) and then touch the mass on the saucer.
Another Wand Trick.—Leave the room under some pretext and bring in with you a wand that has been made Pg 218 hot. Touch the wick of a candle, in which you have concealed previously a piece of phosphorus, and tell it to light and it will obey. It is better to use a candle that has already been lighted, because such a wick lights more readily.
The Dancing Egg.—Request someone to play the piano, and, touching an egg with your magic wand, call upon it to dance. It will do so if you observe the following directions. Let the egg be boiled hard and brought into the room piping hot. Make a small hole in the shell and through this push into the egg a quill that contains quicksilver, and has both ends firmly sealed. So long as the egg retains its heat, so long will it dance.
Mystic Thread.—Have suspended by a long thread an ordinary ring. Let someone in the audience strike a match and set fire to the thread. It burns, but the ring does not fall because the thread has been thoroughly steeped in common salt and water.
Eggs without Hens.—Have a bag made of calico or similar material. Have it made double and just inside the mouth of the part you keep towards you have six little pockets made. Into each of these put an egg that has been blown or sucked until nothing remains in it. You may now shake the bag and turn it inside out to show it is empty, and yet you are able to produce one egg after another. One may be a full one, and if you break this the trick will seem more real.
Feathers from a Handkerchief.—Obtain some long feathers—the longer the better. Take off your coat and lay the feathers in the left sleeve with the quills near the wrist. Now put on your coat with the feathers still there. Borrow a large handkerchief, and after flourishing it, to show it conceals nothing, throw it over your left arm. When you take it up again take with it one of the feathers, and when you shake the handkerchief again out drops the feather. If the feather is large and curved it will not appear as though it had been up your sleeve. Repeat the process with suitable talk until all the feathers have been produced.
Ink Changed to Water.—Fit a black silk lining into a glass vessel so that it lines the sides but not the bottom. Pg 219 Put water in the glass and gold fish, but let the audience see nothing except the black lining. Behind the glass have a spoon with ink in it. Speak to the audience with an empty spoon in your hand, and then go to the glass, secretly change the spoons and pretend to take a spoonful of ink from the glass. Now show the spoon with the ink in it to the audience, and they will believe the vessel is full of ink. Throw a cloth over the glass and call upon the ink to change to water. Remove the cloth, and with it the black lining, and there you have the water and the gold fish swimming in it.
The Mysterious Box.—Secure a little round box, into the bottom of which a half-crown will fit exactly. Line the box with dark paper and cover one side of a half-crown with the same material. Retaining this half-crown, pass the box round to be examined so that the audience may be sure it has no false bottom. Now borrow half-a-crown, and as you return to the table exchange it for your prepared one. Show this to the audience, keeping the papered side carefully towards you, and let them see you drop it into the box. In doing this keep the papered side upwards. Close the box and shake it up and down so that the coin rattles. Now touch the box with your wand and charge the coin to pass into a box, vase, or any other object in another part of the room into which you have previously placed half-a-crown. Shake the box again, this time from side to side, and there will be no rattle. Open it, the coin cannot be seen. Now ask the audience to go to the place where you have planted the other half-crown, and while they are looking for it take out your papered half-crown. When they have found the other half-crown hand round the box again for them to examine. Simple as is this trick, it is very puzzling to the audience.
How Threepence Vanished.—Place a threepenny piece upon the palm of your hand. Close your hand, but have a piece of wax upon the nail of your middle finger. Press this upon the coin, open your hand, and the coin will be out of sight.
The Hat Trick.—Borrow a hat, for a trick with a hat always has an air of importance. Now, with a deal of Pg 220 elaboration, take a glass of water and proceed deliberately to cover the glass over with the hat. You undertake to drink the water without removing the hat. Your challenge is accepted. You stoop beneath the table and commence making a loud sucking noise with the lips, as though you were drawing the water through the table. With a sharp “Now, sir!” the curiosity of your opponent will make him lift up the hat; you instantly seize the glass and swallow the contents, saying, “You perceive, sir, I have drunk the water and I have not removed the hat.”
Card Tricks.—Inseparable Kings.—Take four kings. Beneath the last place any two cards, which you take care to conceal. Then show the four kings and replace the six cards under the pack. Then take a king and place it on the top of the pack, place one of the two other cards in the middle, and the other about the same place, and then, turning up the pack, show that one king is still at the bottom. Then let the cards be cut, and as three kings were left below, all must necessarily get together somewhere about the middle of the pack. Of course in placing the two other cards you pretend to be placing two kings.
To Guess Chosen Cards.—Make a set of all the clubs and spades, and another set of hearts and diamonds. Shuffle well each set, and even let them be shuffled by the spectators. Then request a person to draw a card from one of the sets, and another person to draw one from the second set. You now take a set in each hand, presenting them to the two persons requesting them to replace the drawn cards. You must pretend to present to each person the set from which he drew his card, but in reality you present the red set to the person who drew the black card, and the black set to the person who drew the red card.
To Tell a Card Thought of.—Take twenty-one cards of a pack, and deal them out one by one in three lots, requesting someone to think of a card, and remember in which lot it is. Having dealt out the cards, ask him in which lot the card is. Take up the lots successively, and place the lot containing the card in the middle. Deal out the cards again, and ask him to state in which lot Pg 221 the card is; and proceed as before, placing the lot containing the card in the middle. Deal out the cards in like manner a third time, proceeding as before. Then deal them out as usual, and the eleventh card will be the one thought of, infallibly. This is the usual way of showing the card thought of; but, as the trick may be partly discovered by the counting, it is better to hold the cards in your hand, and take out the eleventh card, counting to yourself, of course, from the left hand, but pretending to be considering the guess.
Cheating the Maid.—For this amusing trick you arrange the cards thus: Holding the pack in your hands, find all the knaves, place one of them next to your left hand, and the other three on the table. Then find a queen, which also place on the table. Then say:—“Three scamps went into a tavern, and ordered drink. Here they are—the three knaves. ‘Who’s to pay? I can’t,’ said the first. ‘I won’t,’ said the second. ‘I wish she may get it,’ said the third. ‘I’ll manage it,’ said the first, the greatest rogue of the three. ‘I say, my pretty girl, haven’t you some very old wine in your cellar?’ Here’s the barmaid thus addressed by the rogue in question (showing the queen), and she replied:—‘Oh, yes, sir, prime old wine.’ ‘Let’s have a bottle.’ Off went the barmaid. (Put the queen in your pocket.) ‘Now for it, my lads,’ said the knave in question; ’”run" is the word. Let’s be off in opposite directions, and meet to-night; you know where.’ Hereupon they decamped, taking opposite directions, which I will indicate by placing one on the top of the pack, one at the bottom, and the other in the middle.
"When the poor barmaid returned (taking out the queen from your pocket) with the wine, great was her astonishment to find the room empty. ‘Lor!’ she exclaimed, ‘why, I do declare—did you ever!—Oh! but I’m not agoing to be sarved so. I’ll catch the rogues, all of them—that I will.’ And off she went after them, as shown by placing her on or after the first.
"Now, to catch the three seems impossible; but the ladies have always smiled at impossibilities, and wonders Pg 222 never cease; for, if you have the goodness to cut these cards, you will find that she has caught the three rogues." When the cards are cut, proceed in the usual way after cutting; and taking up the cards, you will find the queen and three knaves together, which you take out and exhibit to the astonished audience. One of these knaves is not one of the three first exhibited, but the one which you slipped on your left hand at first. There is no chance of detection, however; simply for the reason before given—nobody suspects the trick.
Another Guessing Trick.—Lay out twenty cards of any kind, two by two, and request a friend to think of two in a line; that is, one of the ten sets formed by the twenty cards. This done you take up the sets in the order in which they lie, and place them in rows according to the letters of the following words:—
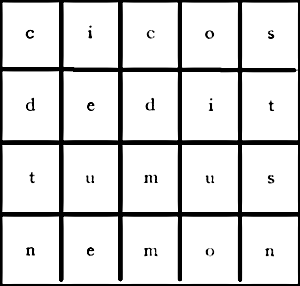
You may use a diagram like the above, but as the words are easily retained it had better be dispensed with, distributing the cards on the table just as though upon the diagram, which will make the trick more puzzling and extraordinary. Proceed as follows:—Place the cards two by two on similar letters: thus, place the two cards of the first set on the two d’s in dedit; the two cards of the second set on the two i’s of cicos and dedit; the two of the third set on the two c’s, and so on with the ten sets.
All the letters of the words being thus covered, ask the friend who has thought of the cards to tell you in which lines these cards are. If both are in the first line (cicos), they must be those on the two c’s; if they are both in the second line, they cover the d’s in dedit; both in the third line, they cover the u’s in tumus; both in the fourth, they cover the n’s in nemon.
If one be in the first line and the other in the second, they cover the i’s in cicos and dedit, and thus of the rest—the two cards thought of necessarily covering two similar letters, whilst each of the letters occurs only twice in the diagram.
To Tell a Card Thought of.—Take any number—say twenty. Pretend to shuffle them with the faces towards you and remember the first card as you close the pack—say, the ten of diamonds. Tell the friend that the only condition you require is to be told the order in which the card is dealt out by you; in other words he must tell you whether in dealing it comes out first, second, third, etc.
Remembering your first card, you may then turn your back to him, and deal out the cards one by one, and one upon the top of the other, requesting him to think of a card and its order as before said.
Then take up the cards, and shuffle them repeatedly by throwing a portion of them from the bottom to the top, taking care not to mix the cards or letting any drop, and then let the friend cut them as often as he pleases. Then take the cards in hand. Pretend to examine them mysteriously, but in reality only look for your card—the first dealt out—the ten of diamonds, for instance. Now, suppose he tells you that the card he thought of came out fifth. Then, for a certainty, it is the fourth card on the right of the ten of diamonds, in spite of all shuffling, for shuffling cannot alter the order or sequence of the cards. Always remember to count from your own card inclusive to the number of the card thought of towards your right hand. But, should your card happen to be so near the right hand or the top as not to allow sufficient counting, then count as far as it admits to the right and then continue at the left. Thus, suppose there are only two cards above Pg 224 the ten of diamonds, then count two more on the left, making the fifth. If the card you remember, or your first card, is first, then count the requisite number on the left, always beginning with your card, however.
The reason of this trick is simply that by merely cutting the
cards and shuffllingshuffling them in the way
indicated, you do not alter the sequence of the cards.
Another Method.—Form three ranks of five cards each, and request a person to think of one of these cards, and tell you in which rank it is. Take up the cards of the three ranks, taking care to place the cards of the ranks in which is the card thought of between those of the two other ranks.
Make three more ranks as before. Ask him again in which rank the card is, and take them up, placing the rank in which the card is between the two others. Operate in like manner a third time, and the card thought of will infallibly be the third of the rank named.
Observe, however, you must not form each rank with five consecutive cards; but you must place the cards one by one, placing one successively in each rank: thus, one at the top on the left of the first rank, one below that first for the second rank, one below the second for the third rank, then one in the first, one in the second, one in the third, and so on.
This trick, which is very easy, always produces a great effect. It only requires a little attention, and it can never fail unless you make a mistake in arranging the cards.
To Tell Chosen Cards.—The cards may be easily divided into two numerical parts, even and odd: by taking a king for four points, a queen for three, a knave for two, and the other cards for their especial points, we may make up two sets of sixteen cards each, the even composing one, and the odd the other. These two sets being before the performer, he takes one, shuffles it well, and lets a person take a card. He then takes the other, shuffles it, and lets another person take a card. Then, whilst each person is looking at his card, which he is requested to do, the performer dexterously changes the place of the two sets, and he requests them to replace the cards in the set whence they took them. It follows that he who took a card from the Pg 225 even set places it in the odd set, and he who took it from the odd set places it in the even set. Consequently all the shuffling and cutting in the world will be useless, for the performer has only to spread out the cards of each set to point out the cards drawn.
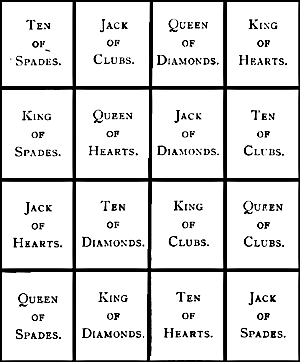
Singular Arrangement of Sixteen Cards.—Take the four kings, the four queens, the four knaves, and the four tens of a pack, and ask if there be any one in the company who can form a square with them in such a manner that, taken in any direction, from right to left, from the top to the bottom, by the diagonal—anyhow, in fact—there will always be in each line a king, queen, knave, and a ten. Everybody will think the thing easy, but it is certain that no one will succeed in doing it. When they “give it up,” take the sixteen cards and arrange them as follows, when the king, queen, knave, and ten will stand as required.
The Card That Cannot be Found.—Take any number of cards and spread them out fan-like in your hand, faces fronting the spectators.
Ask one of them to select a card. You tell him to take it, and then to place it at the bottom of the pack. You hold up the pack, so that the spectators may see that the card is really at the bottom. Suppose this card is the king of hearts.
Then, pretending to take that card, you take the card preceding it, and place it at a point corresponding to A in the following figure.
A C
B D
You then take the card drawn, namely, the king of hearts, and place it at the point corresponding to B in the above figure. Finally, you take any two other cards, and place them at C and D. Of course, the cards are placed face downwards.
After this location of the cards, you tell the person who has chosen the card that you will change the position of the cards, by pushing alternately that at the point A to B, and that at D to C, and vice versa; and you defy him to follow you in these gyrations of the card, and to find it.
Of course, seeing no difficulty in the thing, and believing with everybody that his card is placed at the point A, he will undertake to follow and find his card. Then performing what you undertake to do, you rapidly change the places of the cards, and yet slowly enough to enable the person to keep in view the card which he thinks his own, and so that you may not lose sight of the one you placed at B.
Having thus disarranged the cards for a few moments, you ask the person to perform his promise by pointing out his card. Feeling sure that he never lost sight of it, he instantly turns one of the cards and is astonished to find that it is not his own. Then you say:—“I told you you would not be able to follow your card in its ramble. But I have done what you couldn’t do: here is your card!”
The astonishment of the spectators is increased when you actually show the card; for, having made them observe, in the first instance, that you did not even look at the drawn card, they are utterly at a loss to discover the means you employed to find out and produce the card in question.
Cavies or Guinea Pigs.—In starting these little chats, suppose we commence with cavies. Some who ought to know better have said that cavies are very dull, stupid little animals, but I entirely disagree with this, as will also the lad who has kept them for ever so short a time; they are bright, intelligent little fellows, and most pleasant to make pets of, and although they belong to the rodent or rat family are not the least vicious. Cavies are extremely clean in their habits, very handsome in colour, and if their little houses are kept clean there is no disagreeable smell from them.
Now before you buy your “guineas” you should build and furnish their house, and I will proceed to tell you how to do this. The selection of a suitable place comes first. If you live in the country there is generally an outhouse or wood-shed, and if so here is the spot to commence operations; if, on the other hand, you only have a small garden or back-yard, then select a spot in it which gets a fair share of pure air and sunlight, and which is protected from the cruel east winds. The smooth-haired cavy must have a hutch not less than 2 ft. long, 18 to 20 in. from front to back, and about the same height. Let the floor of your hutch have a slight fall to the back so as to carry off the moisture; the roof must also have a slope, and should be covered with tarred felt, or brown paper well tarred and sanded, which makes a capital waterproof covering. In the front of your hutch have a closely and well-fitting wooden door, large enough for you to clean out the interior comfortably; the other portion of the front must be covered with wire netting of a very close mesh. Be sure that your doors fasten securely, as some cavies have a habit of shaking them, Pg 229 and if not properly secured, open comes the door and out drops poor guinea, who is almost sure to be killed. It is always best to have the hutch two or three feet from the ground, and resting on four legs, which is much better than nailing it to the wall. After having got so far, go carefully over your work to see that there are no cracks or crannies in your hutch, as these let in draughts, which lead to disease and death. Cover the floor of the hutch with fine sawdust, and over this some sweet chopped hay, and your house is ready for its occupants.
Without going fully into the history of the cavy, I may say that it is a native of South America, where in many parts it is very numerous. In its wild state the cavy, where the ground is suitable, burrows like a rabbit; in damp, marshy places it hides under the many plants that flourish in such neighbourhoods. They are not difficult to catch, and not being of a savage nature are easily tamed. In their native haunts they are greatly esteemed as an article of food, and although I have never had the pleasure of tasting cavy flesh, I am told by those who have, and who are well able to give an opinion, that it is delicious; and I see no reason to doubt it, as cavies are exceedingly cleanly in their habits and feeding.
There are several varieties of cavies, and as these are bred in almost every colour they afford the greatest pleasure, not only to the lad who is fond of experimenting, but also to hundreds of men and women. That the various colours can be easily bred and well fixed, has been proved beyond doubt by the many handsome little specimens that are to be seen at any of our exhibitions to-day. As we have them now, we may for our purpose divide the cavy into three classes or divisions, namely, long-haired (Peruvians), rough-haired (Abyssinian), and smooth-haired; but before going on with their description I would like to say a word as to handling them. This may seem superfluous, but it is not so, as they are easily injured; therefore, when you have occasion to lift your pet put your finger and thumb of the right hand round its neck, not tightly, but sufficiently firm to hinder it slipping, gently raise it and place it on your left hand, and so it can be safely lifted about and handled. In mating Pg 230 your cavies remember that the boar (male) controls the colour and outward characteristics of the future family, consequently he should be as typical in colour and shape as possible, and not younger than ten or twelve months; the sow (female) must not be less than about six months old, and in selecting her see that she is very tame and gentle, as she gives the inward characteristics to the young ones. Of course, in keeping cavies, as in any other variety of pets, a very great deal depends on the individual fancy, and, therefore, I shall give a short description of the three classes mentioned, and leave you boys to select which you think will give you the greatest pleasure.
The Peruvian Cavy.—The Peruvian cavy is noted for its long hair, which is its chief characteristic, and when nicely combed and brushed it would be hard to find a handsomer little fellow. The hair grows right over its head and face, so that it is sometimes difficult to see either its eyes or ears; yet its beautiful bright eyes are always on the look out, and can see you and all your movements. On the body the hair grows to such a length that it trails on the ground, some actually having it as long as seven or eight inches. The hair or fur should be as long, soft, and silky as possible, and to keep it in proper order a good deal of attention is necessary; it grows very evenly from a natural parting, from the crown of the head to the stern, falling over to each side, and to keep your pet neat and trim as well as healthy you must brush its coat regularly, using a soft brush, and if any part is matted take a wide-toothed comb and very gently comb it out. You boys know what it is to comb your hair when it is matted, and how it hurts if roughly done. Remember, therefore, that without care you will not only cause your pet pain, but, as the fur or hair on it is only, comparatively speaking, slightly attached to the skin, carelessness will result in pulling it out, thus leaving bare and unsightly patches. If, however, the brush is regularly used, there will be little or no need of the comb.
The Abyssinian Cavy.—The next variety that claims our notice is the quaint little Abyssinian or rough-haired cavy. Unlike the Peruvian, the hair of the Abyssinian is Pg 231 short and hard or rough to the touch, and instead of growing all one way it is rosetted, as it were, in bunches, each rosette or bunch being separate and distinct, and the more evenly these are distributed over the body the more charming the result.
What do my readers think of one of these little fellows—a beautiful tortoiseshell, very well rosetted, and with short, hard hair, being sold for upwards of £30? But such is a fact. It was bred by a lady who takes a very great interest in Master Cavy, and who exhibits some most beautiful specimens, and it was disposed of for the sum mentioned. The Abyssinian is a hardy little chap and must not be “coddled” up in a warm hutch. Keep him dry and sheltered from draughts and he will thrive merrily.
Smooth-Haired Cavies.—Last, but not least in any shape or form, comes the smooth-haired variety, which you boys all know, I am sure, and which is, as it fully deserves to be, the favourite. The coat of the smooth-haired cavy is soft and velvety to the touch, and the immense number of colours in which it is now bred makes it a most delightful little pet. I will not go through the many different colours further than to mention that we have them black, white, golden, brown, grey, red, and the various sub-divisions and blendings between these colours.
The cavy has a good-sized head, is Roman-nosed, has a very thick, or bull, neck, and a nicely rounded body, tapering towards the stern; eyes full and bright, and small, neatly-shaped ears; his whole make-up giving him the appearance of a cheerful, happy, and contented little fellow.
Now, as to feeding, remember that regularity and cleanliness must be observed, and that a variety or change in food is very much relished, and is necessary for the health of your cavies. For breakfast, which give early, provide some bread and milk sop, in which now and again put a piece of boiled potato; and as a change, in cold weather some barley-meal, scalded in boiling water and made into a nice crumbly mass. This latter is very warm and comforting, too, for supper, in cold frosty weather. As dry food, you must have good sound oats, wheat, a few Pg 232 crushed peas, bran, and hay. Green food must on no account be overlooked, as it is one of the most valuable things for keeping the blood cool and the stomach in proper working order; but remember that all green food must be fresh and dry. Almost any green stuff is relished, but there are a few kinds that are very good: lettuce, cabbage leaves (not too many), parsley, celery tops, carrot, turnip, beet-root, chickweed, groundsel, and chicory. Clean water must be always at hand, and a drink of milk now and then is much appreciated. As cavies are very apt to scratch their food all over the hutch, and so waste a lot of it, you should always feed in dishes or troughs. The heavy earthenware troughs, with flanged edges, which are used for rabbits, are best, as they cannot be upset, nor the food scratched out easily. I prefer earthenware to any other material, as it is so easily cleansed, and there is nothing about it that will poison or give a disagreeable taste to the food. Though water and dry food should always be at hand for your cavies, never leave soft food or greens long in the hutch, as these soon become tainted, and if eaten in that state bring on disease. Let them eat their fill of soft food and greens, and then take away any that is left. The lad who pays proper attention to his pets will soon be able to gauge to a nicety the amount of food they require.
Rabbits.—If you have sufficient pocket-money you can buy a hutch ready-made, or you can build it on similar lines to that for cavies, but of course much larger.
For ordinary-sized rabbits a hutch 3½ ft. long by 20 or 22 in. will do, but for lop-eared and Belgians it should be 4½ ft. by 2 ft.; whilst for Flemish giants 5 ft. by 2 ft. It is always preferable to have your hutch in some outhouse, where, though the inmates will have plenty of fresh air, they will be protected from very cold winds and rain. As there is a deal of moisture from rabbits, it is a good plan to have the floor of the outhouse cemented and connected with a drain, so as to carry off the wet that comes from the hutches; but as this cannot always be managed by boys who keep a few rabbits as pets, you should have a piece of guttering fixed along the back of the hutch Pg 233 and so placed that it will drain into a pail, in which put some sawdust and a little disinfectant, which will keep down any unpleasant smell. This pail you must empty every two or three days. In every hutch I like a part of it boarded off as a sleeping-room, which can be easily done by making a wooden partition and slipping it into the hutch, allowing a space of 12 inches for this purpose. This partition must have a hole cut in it large enough for the rabbits to pop in and out comfortably. Over this part of the hutch you must have a well-fitting wooden door, not only to keep them warm, but to darken the nest and so make them comfortable. In giving your rabbits their food, remember that you cannot measure the quantity exactly, any more than you can say that because you have eaten so much to-day you will want exactly so much to-morrow and every day during the week. Study and observation are the only true guides. In giving soft food and green food let them have as much as they eat up greedily and no more. Feed twice a day, as early as possible in the morning and about sundown. In the morning give soft food, such as barley-meal, pollard, sharps, middlings, and bran, which mix with scalding water into a soft, rather crumbly than sticky mess. A few tea-leaves in the soft food now and then is a nice change.
Of course, these foods must not be all mixed together, but given on different mornings, so as to provide a nice variety. As there is not much feeding in bran it should always have one of the other foods mixed in it.
When they have had breakfast put sufficient corn into their troughs to last them all day to nibble at, and for this oats are best; but as a change, once or twice a week crack up some barley for them. A feed, once a week, of grey peas, steeped till well soaked, will also be much relished. Bits of biscuit and dry, stale crusts are also good, and can be given at any meal. For the evening feed give a bit of sweet hay, dry, sweet clover, and green food of almost any description that grows, so long as it is fresh and dry. It is impossible here to mention all the greens they will eat, but amongst others I may mention parsley, chicory, dandelion, lettuce, cabbage, celery, clover in Pg 234 flower; carrots, turnips, and mangolds (a slice or two) are very good. Be very careful not to leave any soft food or greens lying about the hutch, as they soon spoil, and not only smell offensively, but injure the rabbits.
On the floors of your hutches spread sawdust (pinewood sawdust is first-rate when it can be had), and over this some nice clean straw; and always keep in the hutch a little of one of the many disinfectants that are now manufactured. Drinking vessels and feeding troughs should all be made of glazed earthenware, the latter having a flange round them to prevent the rabbit scratching out the food, and being heavy enough to prevent them being pulled about and upset. Once more, do not neglect cleanliness and regularity in feeding.
The Lop-Eared Rabbit.—One of the oldest varieties of the rabbit when these were first taken in hand and bred as fancy or domestic stock, was the Lop-ear; and so, paying reverence to his age, I will give him the first place. At the majority of rabbit shows I see lads and young men, as well as old ones, congregated in eager groups round the pens containing the Lops, or, as they are sometimes called, the King of the Fancy. I need scarcely tell our boys that the great feature in the Lop rabbit is the immense lop or hanging ears.
Well do I remember in the early days how proud the owner of a Lop was if he could show to those assembled a specimen whose ears measured from tip to tip 19 inches; yet to-day, such a rabbit (if an adult) would not be looked at by the judges in a show, for specimens 25 inches and upwards are now produced. In measuring the ears you must understand it is done as follows: Take hold of one ear, lay it flat out full length, but not stretching it to hurt the rabbit, then place a rule at the extreme tip of the ear, pass it along, across the head, and so on to the tip of the other ear, which must be held out at full length as was the other, and so you have the proper measurement of your specimen so far as length is concerned. Besides this, however, you want width of ear, and this should, roughly speaking, be one quarter the total length, measured across the widest part of one ear.
The ears of the Lop must be as long as possible and wide in proportion; not set on too closely on top of the head; thick at the root, and fall gracefully down the sides of the cheeks, nicely rounded at the tip and free from knots or lumps; the head large, with full, round, bright eyes. The body, when in repose, should be rather low at the shoulders, rising in a graceful curve to the hind quarters, which should be gradually and nicely rounded off, the head resting on the pouch or dew-lap; the tail must be straight, and carried close to the body, and the fore-legs straight and strong. Lops are bred in various colours, such as black, yellow, fawn, blue, grey, and tortoiseshell, so that there is any amount of room for experimenting. Some people, I am sorry to say, have the absurd idea that constant pulling and stretching the ears of their rabbits, whilst even in the nest, greatly helps to lengthen them, but like many cruel and ignorant ideas it is altogether wrong. All that Lop rabbits require to develop the length of ear and keep them healthy is regular feeding, cleanliness, and being kept at a temperature of from 55 to 60 degrees Fahrenheit; to secure which, during spring, autumn, and winter, artificial heat must be supplied, the best for the purpose probably being hot-water pipes.
Lops breed freely, but, as the young ones require a good deal of nourishment, the doe should, in order not to weaken her too much, only be allowed to bring up two or three, the others being given to nurse-does or foster-mothers, which can generally be had easily if a little trouble is taken to enquire for one or two amongst friends who keep rabbits. A healthy common rabbit makes a good foster-mother.
The Himalayan Rabbit.—It would be difficult to find a more handsome little rabbit than the Himalayan, and as it is one of the healthiest and hardiest of the coney family, I propose to give a few particulars of it. To commence, then, the Himalayan, or, as it has been called, the Chinese rabbit, has a perfectly white body, with dark chocolate-brown (as nearly black as can be) ears, nose, feet, and tail, and pink or rich golden eyes, the whole appearance being that of a very handsome animal. The ears must be short, close together, and stand very erect, Pg 236 so much so that if you bend them in any direction they immediately spring back into their proper position when released. The eye is round, bright, and rather full, and as I have just said, pink or rich golden in colour; the shape is very graceful, rather long than short or stumpy, giving it all the appearance of a thoroughbred animal. The coat is short, pure white, and fine and silky in texture, and the weight of a full-grown specimen should not exceed about six lbs. The fur is greatly in request for the making of imitation ermine, and good skins are always saleable to the manufacturers. Now that we have this beautiful little rabbit in our hutch, how are we to preserve its distinctive markings in all their beauty? For be it remembered that the white turns yellow, and the black or dark brown markings grey, unless proper attention is paid to them. In Chinese or Russian markets where these rabbits are on sale, we are told that the colour, especially on the feet, is not so distinct as is seen in our domestic specimens; and this I can quite understand, as, with their constant burrowing and scratching amongst damp sand, earth, lime, etc., the colour on the feet will soon be affected. A very great deal of care is bestowed by those who exhibit Himalayans in order to have their handsome markings as even as possible; for instance, the ears, from roots to tips, should be as dark as possible, and the nose the same colour, as well as all four feet and tail. This is often difficult to get; still, were it all as simple as A B C, there would be little honour in producing what any one else could produce without trouble.
As on many other questions, considerable discussion has been carried on as to how best to preserve the distinct colour. Many argued that the rabbits should be kept in entirely dark hutches, as they said the light not only destroyed the colour, but the rabbits in their wild state lived in dark burrows; just so, but these people forgot that such of the wild specimens as are to be seen in the foreign markets are not of that dark or nearly black colour, especially so far as their feet are concerned, as are those which are domesticated. Others took up the extreme opposition view, and recommended as much light as Pg 237 possible. These latter were further astray than their “dark” opponents, for there is no doubt that constant exposure to the full light does destroy the purity of both black and white. Another thing that was overlooked by the advocates of light was that too much exposure to light affected the eyes of the Himalayan, which, as I have said, are pink, for it is a well-known fact that human beings, as well as animals and birds who have pink eyes, avoid a strong light. Himalayans are best provided for in a partially darkened or shaded hutch, and this can be easily arranged, especially if the hutch stands in an outhouse or shed; if not, then partially cover the front with a bit of sacking or anything that will keep off the full glare. If your Himalayan is allowed to sleep or sit about in a wet hutch the colour of the feet will soon be destroyed; but if the hutch is built as I previously described, all water from the rabbit will soon run away. However, in the case of the rabbit under notice, it is best to make “assurance doubly sure,” so, on the bottom of your hutch put a nice layer of fine sand or sawdust, and over this straw or dried ferns, then any water will run through and be absorbed by the sand or sawdust, which should be raked over each morning, and renewed once a week. Do not give your Himalayan too much green meat, and never any that is wet or stale, as they are rather prone to scours. A few acorns are always a valuable thing to have on hand, and immediately bunny is seen to be relaxed; give one or two, and you will soon see the great good they will do.
Silver and Angora Rabbits.—Amongst the many beautiful specimens that are to be seen now-a-days at exhibitions and in the rabbitries of breeders, the silver varieties hold a deservedly high place. The various colours include silver grey (light, medium, and dark shade), silver brown, silver cream, silver fawn, and silver blue. The silvers are of medium size, and should weigh between six lbs. and seven lbs., be compactly built, having a very neat head, ears moderately short, clear bright eyes, and with that general appearance of activity that denotes a healthy constitution. The coat or fur is close-fitting Pg 238 and smooth to the touch. The skin or ground colour of the silver grey should be blue, the fur consisting of black, white, and blue hair, and, according to its distribution, so we have the three shades of light, medium, or dark, as mentioned. When the silver grey is born it is black, the colour only beginning to develop between the age of one and two months, and being fully developed at about five or six months, when their coats are very handsome. Some breeders, in order to get the silvering as quickly as possible, help nature by keeping their pets in artificially heated hutches; they succeed in thus accelerating development, but, as we have found from many years’ experience, those who so interfere, and think they know more than Mother Nature, have generally to pay the penalty for their presumption; for rabbits, too quickly developed, although their coats have a beautiful appearance, do not continue so long in that grand bloom and brightness that denotes the rabbit that has been allowed to get its coat as nature intended. All the warmth that is necessary can be obtained by having the hutches water-tight, kept clean, and protected from the extremes of heat and cold.
During the years the silver grey colour was being perfected, it is needless to say, crosses of various colours had to be resorted to, and amongst these were white rabbits, which naturally threw offspring with white or very pale ground (skin) colour in many cases, and as the fur grew, it was observed that the white hair predominated, giving the rabbit a cream or fawn colour, the lighter being designated creams, whilst the darker (or medium) were called fawns. The silver brown was another outcome of the various crosses, the Belgian, wild English, and common grey hutch rabbit, all leaving their trace in the silver variety, the under coat and top coat being, as the name denotes, a brown colour; this colour, pretty as it is, is not so “taking” to the eye as the other handsome ones are, and so it has not been kept or bred so carefully as the foregoing colours mentioned. The silver blue is still a rare colour, and has not yet reached anything like such perfection as the others; a correct blue, whilst evenly silvered, should show a beautiful blue colour all through.
Although not so frequently seen, the Angora is an exceedingly handsome rabbit, but needs a good deal of attention to keep it as it ought to be. The great feature of this breed is the immense length of its wool—not hair, mind, boys—which should be of the finest quality, soft as silk, pure white, and well distributed all over the body; the face and ears have less wool, in proportion to the other parts, but finer and more silky. The head is not very broad, and is surmounted with a pair of small and neatly-shaped ears, the eyes being pink and bright, a beautiful contrast to the snow-white wool. The weight should not exceed seven lbs. or eight lbs., although from the amount of wool they carry, they look very much heavier. Angoras must be kept in large hutches, on the bottoms of which have nice, clean, soft, oat straw. To keep their coats in proper order, they must be gently combed and brushed at least every other day, care being taken to pull as little wool out as possible. Should any part of the coat become matted, do not “tug” at it with the comb, which should be a wide-toothed one, but disentangle it with your fingers, and use a little warm water on it to help; if it is too securely matted to enable you to loosen it, there is nothing for it but to clip it off, which will, of course, spoil its appearance till the wool grows again.
A healthy, well-groomed Angora is one of the handsomest pets possible; but on the other hand, if neglected, the coat becomes foul and matted, and a more disconsolate, miserable-looking animal it would be difficult to imagine. The hutches must be cleaned out thrice a week, and a manger fixed in which to put hay or clover, of which they are very fond, and which is good for them.
Belgian Hares.—The Belgian hare is a large and very handsome variety of our domestic rabbit. Although designated “hare,” it is not a hare at all, but a rabbit pure and simple, although it has more of the hare-like form and colour than any other variety. Being a large animal, scaling from eight pounds to ten pounds in weight, it is necessary that it should be kept in a large, roomy hutch. An old and experienced breeder says the hutch should be at least 5 feet long, by 2 feet broad, and Pg 240 18 inches high, and the shaded sleeping compartment 6 inches wider than in the ordinary hutch. The Belgian in colour somewhat resembles the English hare, being of a sandy-brown or golden-foxey colour, ticked as evenly as possible with dark chocolate, thus giving the fur, which should be short, firm and glossy, a very handsome appearance; the head is of good size, broad between the eyes, and gradually tapering towards the nose; the eyes, a special feature in Belgians, are a beautiful brown colour, full, bright, and wild-looking; the ears, about five inches long, should be laced round the edges with black, and carried very neatly and closely together; the body should be long, giving it a graceful, hare-like carriage, so much esteemed, and the legs strong, long, and straight. Belgians are very apt to develop a dew-lap or pouch, or as some have called it a large double chin; this is a defect, but, owing to an undoubted cross at a remote time with the lop rabbit, is very difficult to avoid. Many specimens now-a-days do not show this point until they get old and fat. One of the best preventatives we believe is large airy hutches, and the avoidance of over-feeding. Where it can be done, Belgians should be allowed to run in a nice dry open shed, or failing this, an hour’s run three or four times a week on a nice, dry grass plot. Plenty of room, judicious feeding, and cleanliness, work wonders in the development of the Belgian hare.
Dutch Rabbits.—Unlike the Belgian, the Dutch rabbit is noted for its small size, and is generally called the dwarf or bantam representative of the domestic rabbit. There are few lads who have not been captivated by the handsome little Dutchman, and there are few large rabbitries where some of them are not kept, such great favourites are they. The breed being of small size should not exceed about five pounds in weight, and many grand ones are to be found under that weight. The pretty markings, combined with the various colours of this variety and the difficulties in getting both colour and markings exactly as they ought to be, makes the breeding of them very fascinating to those fond of experiments, and who delight in observing the various developments of the little animal.
Probably the most favourite colours are the blacks and the blues; but greys, tortoiseshells, and yellows, are all alike handsome. The head of the Dutch rabbit is shapely and not large, the ears small, neat, and carried slightly backwards; the eyes in this variety are frequently not both of the same colour owing to crossing for various colours, and the too frequent and pernicious habit of in-breeding. It is, however, necessary that both eyes should match, and be bright and sparkling; the body rises from behind the shoulders, curving nicely over the stern, and giving the rabbit a compact, well-put-together shape; legs, medium length, straight, and fine in bone.
Now to come to the markings of this little aristocrat of the rabbitry. From between the ears comes a narrow white line, gradually widening as it descends to, and encircles the smellers, and continuing round the face, this is called the “blaze,” the cheeks and ears are of the same colour as the body, whilst the chest, fore-legs, and shoulders are pure white, and the hind feet for about an inch and a half should also be white, the whole remaining part of the rabbit being a solid colour, as black, blue, grey, etc. The collar of white which runs round the shoulders should descend in a straight line, as though cut with scissors, encircling the fore-legs. The markings of a Dutch rabbit should be sharply defined, and not blur or run into each other. For instance, in a black Dutch, the cheeks, ears, and body from behind the shoulders should be a bright, solid, glossy black, and the remaining part pure white, a very beautiful contrast indeed. One great advantage in keeping and breeding Dutch rabbits is that they are small and can be more successfully brought up in cool, outdoor hutches.
If your rabbit has canker of the ear, clear out the discharge by gentle pressure with a sponge or soft rag soaked in warm water, taking great care that none of the water falls into the ear. When dry after this bathing, apply the following lotion, which any druggist will make up for you: sulphate of zinc 12 grains, water 2 ounces, wine of opium 1 drachm, mixed. Or you might try a mixture of one part Goulard’s extract of lead to five parts of pure olive oil. Pg 242 Hold the rabbit’s head on one side and pour into the ear half a teaspoonful of either of the above twice a day. Give plenty of the best food, for if the rabbit does not feed well the chances of recovery are slight.
Cage Birds.—Canaries.—Having determined to keep a bird, the first thing is to provide proper accommodation for it, and here let us suppose the lad has only accommodation for one, or at most, a pair of birds. Very well, then, procure a cage. Oh, yes, says the boy; of course, I know that. Just so, but do not forget that there are cages and cages, and that whilst some look very pretty and are quite an ornament, they are perhaps the most unsuitable and miserable of prisons for poor little Dick; avoid by all means round cages, which are the worst possible for the poor little inmates, who have no room to exercise themselves, and where it is quite impossible for them to get out of the way of draughts or shelter themselves from the scorching sun. The best and most convenient cages are those which have plain wire in front, the rest being made of wood; the larger the size the better, as a great thing is to give the inmates plenty of room for exercise. The size that I have used for years in which to keep a pair of canaries or other small birds, is as follows:—Length 24 in., depth, from back to front, 10 in., and height 15 in. In such a cage small birds will live healthily for years. Next in importance to size of cage is where to hang it, and a great deal depends upon this point. First, then, let me impress upon you never to hang Dickey (except, perhaps, for an hour or two’s change in fine, but not too sunny weather) in front of the window, for here the bird is exposed to draughts and every change of temperature, which is more injurious to the health and well-being of your pet than anything else. Select a part of the room against one of the walls as free from draught as possible, and where there is plenty of light and air; and be particular not to hang the cage higher than (but rather below) the level of the gas, as when that is lighted the air in the higher parts of the room becomes very hot, and anything but comfortable or healthy for the bird. Now that you have got your cage, which will be fitted with Pg 243 the necessary perches, drinking glasses, and seed hoppers, examine it carefully to see that it is clean and free from insects, then fill your water-glasses, and put seed in the tins or hoppers, and on the bottom of the cage a good supply of sand and small grit, which can be bought in penny bags at all corn chandlers or bird-shops, and your house is ready for Master Dick. Perches are usually too thin. They should not be like a lead pencil, but more like your thumb, and flat on top. Feed regularly each morning, on either the mixed seed, or, as we prefer it, buy some good, clean, sweet, canary seed and summer rape seed, and mix them yourself, one part of the latter to two parts of the former; clean water each day, and a wee bit of nice, dry, fresh, green food, such as groundsel, watercress, lettuce, chickweed, or plantain, as they are in season. Do not indulge your bird in luxuries, but Dickey will enjoy (and it will do it good) now and then, a morsel of sweet, ripe apple, pear, grape, or cherry. Following these directions, and keeping the cage thoroughly clean, you will find Dickey a delightful pet and one that will repay you for any little trouble.
Whenever you have occasion to go near the cage, either to look at the bird or to feed or clean it, always speak to it cheerfully but quietly, and so gain its confidence, and you will soon be surprised how earnestly it will greet you whenever you come into the room. It will greatly contribute to the health and vigour of your bird if you can now and then let it fly in the room where the cage is. Close the room door and windows, and, yourself and Dick being the only inmates, talk to him and then open the cage-door and sit down, and you will be amused at the bird’s antics; first he will hop on the ledge of the door, then, looking this way and that, he will either try his wings on a fly round the room or drop to a table or chair-back, and so investigate the whole surroundings; do not startle the bird whilst it is out or it will get frightened and dash itself about. If it seems unable to find its way back to the cage, talk to it and drive it gently in that direction, but never wave a handkerchief or paper at it or you will probably frighten it to death.
Zebra-Finches.—One of the merriest, boldest, most impudent and inquisitive little fellows is the handsome Pg 244 zebra, or chestnut-eared, finch; a prettier or more charming little pet it would be difficult to find. Zebra-finches are the hardiest and best known of the Australian finches, and are natives of Queensland and New South Wales, where they are found in great numbers; they are stoutly built, compact little birds, measuring between four and five inches from beak to end of tail, the tail itself being about an inch and a half long. The hen is soberly clad in grey with yellow beak and legs, but her mate is a handsome little fellow and somewhat difficult to describe; his beak is red; head, neck, and throat grey, the feathers on the latter being pencilled with white, which gives it a very beautiful appearance; the ears are a bright chestnut colour, and a line of black and one of white surround the beak; the breast is white, sides darker chestnut spotted with white; back and wings grey; tail black, barred and spotted with white; legs orange colour.
No description, however, can adequately convey the handsome appearance of Master Zebra-finch when in the full beauty of his plumage. He is a fearless little fellow and bold to the extent of rashness in defending his mate, for he will attack birds many times larger than himself, and generally comes off the victor; and then doesn’t he let you know it; how he struts about, blowing himself out and trumpeting to his heart’s content. They are most lovable little birds, their every action being full of grace.
Zebra-finches do not sing, but the male bird’s note is a sweet trumpeting sound, very cheerful and pleasant, and varying in tone. Watch him making love to his little mate or helping her to make a nest; how low and soothing is his little trumpet, and how much it is appreciated is easily perceived by the joyous twitterings of his soberly clad lady-love; listen to him again when he is “showing-off”; with what vigour does he blow his trumpet, and how proudly he hops about, especially if he has just thrashed a bigger fellow than himself. I kept a pair for several years in a cage, such as I described to you, and although kept in a room where more or less noise was going on all day they were as happy as the day was long, and being continually petted and talked to became very tame, Pg 245 “Master Jocky” never failing to trumpet to us when we went to the cage or spoke coaxingly to him; his little wife “Jenny” was, however, very shy and always allowed her lord and master to do all the talking, she chiming in now and again as though saying “Hear, hear,” to his remarks. As I had not, at the time, convenience for an aviary, I made a point, as soon as the birds were thoroughly tamed, of opening the cage-door every afternoon for an hour or two so that they might fly round the room; and how they did enjoy themselves! The first time I opened the cage-door they made no rush for freedom, but seemed to talk the matter over with each other, and then Jocky came to the open door, trumpeting his best to attract my attention. I spoke to him, and then, apparently reassured, he launched himself forth across to where I was and back again to his cage; then he enticed Jenny to come out, and they flew round and round, resting close together on the top of the cage now and then, when he would trumpet in his loudest and most vigorous tones; they would thus tire themselves out, and in a few minutes after would be sound asleep. Thus they lived joyously for years, but she at last succumbed to egg-binding, which, unfortunately, with this variety is more common and more fatal than with many others. They had lived together so long and so happily that poor little Jock never got over his sorrow, his delightful little trumpetings soon lost their bonny sound, and do what we could we failed to rouse him to anything like what he used to be, and so one morning when we took the cover off his cage he was dead. We all sorrowed over their deaths, for they made themselves most lovable little companions to one and all of us.
Dr. Greene, the naturalist, speaking of his first experience with these delightful little birds, says:—
"As soon as I got them home, I turned the birds loose into a greenhouse in which was nothing but a grape-vine in full foliage. I shall never forget the delight of the little couple as they rushed into the midst of the leaves, the male trumpeting loudly and his mate twittering in joyful response. They paired almost as soon as I let them out of the cage, and in a minute or two the hen bird was Pg 246 hopping about with a little bit of fibre she had picked up off the floor in her beak, looking for a place to build her nest in; this she was not long in finding, and on my supplying her with some fine hay, she very soon, or, I should say they, for the male helped in the construction, made a little domed nest among the vine branches, and in less than a week were engaged in the important duty of incubation, male and female sitting alternately on five tiny white eggs."
Zebra-finches breed freely, especially when kept in cages in a rather warm temperature. The young ones, which are hatched in about twelve days, do not leave the nest till fully fledged, when they almost immediately commence to feed themselves, when they must be removed or they will interfere with the old birds. When kept in an aviary not supplied with heat artificially, they generally content themselves with two or perhaps three broods a year, which is much better for them. It must be remembered that when kept in an aviary with other birds they are inclined to be quarrelsome and masterful, frequently either taking possession of some other nest or pulling it to pieces to construct their own, in spite of the fact that abundant nest-making material is lying about.
For food, canary seed and millet is the best, and will keep them vigorous and in good health. As a change give them a few hay-seeds, a spray of millet, or some grass in flower, which they will greatly enjoy, as also now and again a morsel of sweet apple or pear. When bringing up young, give a small piece of sponge cake and a little of the yolk of a hard-boiled egg crushed and mixed with sweet biscuit. Always see that they have plenty of grit, and keep a piece of rock-salt and cuttlefish-shell for them to peck at. They are very cleanly birds, and when the weather is not too cold, should be allowed a bath at least twice or thrice a week.
Budgerigars.—This beautiful little bird, called variously “Undulated Grass Parrakeet,” “Zebra Grass Parrakeet,” and “Shell Parrot,” is a native of South Australia, and is deservedly a very general favourite, its hardy constitution, the readiness with which it adapts itself Pg 247 to confinement, its handsome plumage, and its winning ways, all tending to make it a great pet. It can be kept in a large cage, but is much merrier and more contented in a garden aviary, where it may be kept all the year round so long as it has an inner compartment to retire to in very severe cold or wet weather. It is a miniature long-tailed parrot, measuring seven or eight inches, of which the tail is about half that length; its general colour is a brilliant grass-green, the head pale primrose, whilst the neck, shoulders, and wings are yellow-green, the feathers being edged with grey, giving it an undulating appearance, hence one of its names; the two long middle-tail feathers are blue, whilst the others are yellow with green tips; the beak is white, chin yellow, spotted with blue, which latter colour also runs down each side of the beak like a moustache; legs and feet grey or slate colour. The male bird is distinguished from the female by the blue colour of the cere round the nostrils, which in the female is of a brown shade.
Budgerigars breed well in confinement, the season lasting from about December to July, during which two or three broods will be produced. Several pairs can be kept together in one aviary, the only thing to be particular about is to provide sufficient nesting material, otherwise quarrels ensue. In the native woods these handsome little fellows generally make their nests in the hollows of gum-trees, taking very little trouble as to furnishing it; in an aviary they will select almost any hole or corner; but one of the best nests I know of is the husk of a cocoa-nut, which should have a hole cut in one end; this should be hung high up so that mice cannot reach it, and a perch should be provided close to the hole, where the male will sit and sing his love ditties, and tell his wife all the gossip of the day, whilst she is attending to her maternal duties inside. The hen lays three, four, five and sometimes six eggs, the youngsters being hatched in fourteen or fifteen days. When feeding-time comes the young ones do not open their mouths as do so many young birds, but the parents take the beak of their offspring into their own, and the youngsters feed themselves on the food which the old ones disgorge for Pg 248 them. The young birds leave the nest when five or six weeks old, as soon as they are fully fledged, and in a few days leave the parents, who soon set about nesting again; the first thing they do being to thoroughly clean out the husk for the reception of the next batch of eggs. If husks cannot be got conveniently, little wooden boxes (which should have some sawdust put in so that the eggs will not roll about) holes in the wall, or a rotten wood log will do.
When kept in small cages budgerigars, not having room to properly “show off,” are apt to become silent, but once in an aviary and the change is marvellous, as they dart about, tumbling, twisting, and climbing in all positions in the most graceful and delightful manner, and singing a pleasant little song all the while, stopping now and again as though to exchange confidences and to express delight at their surroundings. These birds do not bathe, but one of their greatest delights is to tumble and roll about in wet grass; if, therefore, the aviary has not a grass bottom, a large sod should be supplied and artificial rain produced by the aid of the watering can. When thus tumbling about, and the sun glints on their plumage it sparkles like so many gems. So far as food is concerned these charming little birds are easily satisfied, canary seed and white millet being sufficient to keep them healthy and vigorous, the only change necessary being when they are feeding young ones, when a little stale bread soaked in water and squeezed dry, and a few oats, should be added to their bill of fare; the simpler the diet the better, so do not indulge them with tit-bits. In the aviary or cage always have a supply of clean drinking water at hand, pounded oyster shells, as well as sand, fine shell grit and cuttlefish bone, which can be had at all bird shops, seed dealers, etc.
Being such hardy, sprightly little fellows, the handsome budgerigars are not liable to so many illnesses as frequently fall to the lot of our caged pets; now and again one may have a fit, due probably to improper feeding; should such occur, be careful to correct your feeding, and give grass in flower, dandelion, or a bit of groundsel. Cramp they sometimes suffer from, which is produced by cold Pg 249 or damp, the latter more especially; a simple remedy is the removal of the bird to a warm and dry atmosphere. All cage-birds (hens) are liable to egg-binding, one of the most serious complaints, and difficult to deal with, and budgerigars suffer from it like the rest; it is seldom curable, but immediately the hen is observed to be suffering she should be taken gently, very gently, in hand, and a drop or two of castor oil or sweet oil put in her mouth, whilst the egg passage should be gently oiled with a feather, and then held over the mouth of a jug of hot water, so that the steam may get to the part affected, and so relax it and assist in the delivery of the egg. A bird which has been egg-bound should not be allowed to mate and go to nest again, as sooner or later she will again suffer from the distressing complaint and die.
Any one fond of birds cannot fail to be delighted and charmed with such a handsome, good-tempered, loving, and jolly little fellow as the budgerigar.
How to treat Dogs.—Twice a day feed the dog moderately. Paunch and tripe are excellent for dogs. Boil this food, cut into small pieces, in a moderate quantity of water, and when the meat is sufficiently done throw into the gravy some good dog biscuits. When these are soft mix meat, biscuits and gravy well together. For an occasional change oatmeal or rice may be given instead of meat. During the summer boil a cabbage with the food twice a week, for unless dogs have vegetable food occasionally they are liable to have mange and scurvy. In winter put mashed potatoes in the food sometimes, for these contain the properties for which dogs sometimes eat the coarse grass in some parts called couch grass, in others twitch. Once or twice a week a dog should have boiled liver and sometimes milk in which powdered brimstone has been placed. Always he should be able to drink clean water. A dog’s kennel should be in a dry, sheltered place and lifted from the ground. It should face south or west. Let him have plenty of dry straw. Wheat straw and oat straw are best; it is said that barley straw will cause mange. Cedar or pine shavings are good if you can secure some. In cold weather a piece of canvas or carpet should be nailed Pg 250 to hang over the entrance, and great care should be taken to keep the kennel dry, or there will be mange and lameness. A kennel with an adjustable bottom which can be removed to be cleaned, is better than one with a fixed bottom. At least every two weeks the kennel should be thoroughly cleaned. Apply some good disinfectant to every crevice with a brush, then expose the inside to the sun and air to dry it. It is usual to chain the dog to the kennel, but a better plan is to place in front of the kennel a stout wire about fifteen feet long stretched between two posts that are about three feet above the ground. The ring at the end of the dog’s chain should have this wire running through it. This plan gives him a much wider range.
To destroy vermin in a dog rub soft soap well into his coat, and in about a quarter of an hour lather it well into him, and then wash it away with an abundance of tepid water.
When dogs have the “husk,” a kind of cough, they should be fed with finely chopped suet boiled in milk, with a little garlic also finely chopped added to the suet. For worms, administer a teaspoonful of salt either dry or dissolved in lukewarm water. This is also a good remedy when distemper begins, for it acts as an emetic.
The least exercise a dog should have is an hour each day. Dogs kept in the house should have exercise for half an hour before breakfast and after supper too. A run at mid-day, too, is an advantage. To lead them out soberly on a chain and back again is not sufficient for a dog. He needs more lively exercise than that. A large dog should run six miles each day. Brush your dog’s coat each day and wash him once a week.
Bad habits should be checked when the dog is young, with a whip if that is necessary, but without cruelty. A little whip goes a long way with a dog. Even the sight of it is sufficient usually. Be sure he understands for what he is being punished, and be consistent. Don’t laugh at him for one thing one day, and punish him for it another. Do not let him annoy neighbours by barking. If you do it will serve you right if the neighbours obtain an order Pg 251 from the magistrates for his destruction. They are entitled to do this, and, indeed the right ought to be exercised more often than it is.
So far we have mentioned grown dogs only, but a few hints about puppies may be given. When these are five or six weeks old they may be weaned. Feed them now for three weeks upon boiled milk, sometimes breaking into it a little stale bread. Then they may begin to have soup made of meat and vegetables occasionally. When they are between six weeks and a year old they may be fed three times a day, the most generous meal at night before they go to sleep.
The Raven.—If you keep a raven be prepared for unending mischief and destruction. He needs plenty of room, and will eat most things. Raw meat is perhaps his favourite diet, and he is pleased with rats, mice, small birds, beetles, grubs or worms, and bread. He ought to be fed once, and once only, each day, for he will find insects, worms, and other delicacies for himself. From time to time he loves to retire to a place that is sheltered, warm and dark, and where no one can see him.
White Mice.—The principal food for white mice is bread-and-milk, oatmeal grits, and any other common food, except cheese, which is bad for them. They should be kept particularly clean, and their cages overhauled each day and the bedding changed, or they will smell offensively. Cages may be adapted from boxes. Give them more room than the bought cages give them, and a dark compartment.
Jackdaws.—The jackdaw is tamed easily, and can be taught to say a few words. It is as alert as a terrier for visitors, and affectionate towards its friends. Jack loves a bath, and may be fed on bread and milk, oats, mice, small birds, insects, and meat.
The Jay.—The jay is not so impatient of captivity as the magpie, and will tolerate confinement in a large cage. It will eat meat, small birds, mice, insects, worms, and is particularly fond of eggs. It eats, too, much vegetable food.
The Magpie.—Do not keep a magpie unless you can give him generous room. He is a very clever talker and Pg 252 mimic. He is extremely fond of bathing, and a plentiful supply of water is needful to keep his beautiful plumage in good condition. The food of the magpie is the same as that of the jackdaw.
The Hedgehog.—This animal likes insects and snails, frogs and mice, and will even kill a snake, and eat it. In its wild state it sleeps all the winter, rolled up in a hole which it has filled with grass, moss, or leaves; and when tamed it will hide itself in some dark place for weeks, and never make its appearance, unless it should feel hungry. Hedgehogs destroy beetles, eating them quickly and gladly. They need no looking after, but will fend for themselves, though it is better to have a little hutch to put them into sometimes. Their feeding-time is in the night; and if there are black-beetles in the kitchen, the best plan is to leave the hedgehog there.
Silkworms.—Buy a few eggs, which should be of a lilac or grey colour. Avoid yellow ones.
The silkworm when hatched is black, and about one-fourth of an inch long. The desire for food is the first sign of life, and it is more alive then than at any other time. When about eight days have elapsed its head becomes enlarged and it turns ill, refuses food, and remains torpid for about three days. This seems to be caused by the pressure of the skin, which has become too tight. The difference in the size of the worm from the beginning to the end of the caterpillar state is such, that the worm has been provided with several skins, each of which it throws off in succession.
The silkworm feeds on the leaves of the white mulberry; or, when these cannot be obtained, upon those of the black mulberry; or even upon the leaves of the lettuce.
The eggs should be bought about the end of April and placed in trays made of pasteboard. Over the case put thin gauze. The trays may be placed in a window facing the south, where they are fully exposed to the sun, and there they should remain undisturbed till the eggs begin to hatch. As the worms appear they should be removed into other trays, and fed with the mulberry leaves. The temperature should be from sixty-six to seventy degrees, and the room ventilated, and preserved free from damp Pg 253 and from too much dryness. The trays should be kept clean, dead leaves and any other refuse cleared away. In moving the caterpillars from one tray to another they should not be touched by the fingers, but removed by threads of cotton passed under their bodies, or with a camel-hair brush.
The caterpillar has four moultings, which may be all over in four days each, if the heat of the room be increased to from ninety-five to one hundred degrees of Fahrenheit. When the heat is lower, the first moulting takes place on the fourth or fifth day after hatching, the second in four days more, the third in five or six days more, and the last in about eight days. Ten days more are required after this moulting, so that in about thirty-two days after hatching the caterpillar is fully grown.
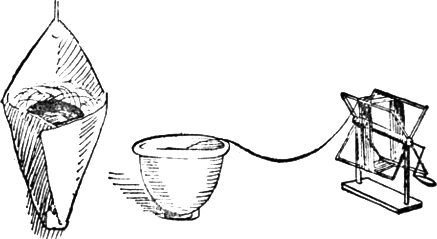
At the end of this time the silkworms change to a clear pink or flesh colour, and look semi-transparent; they refuse food, become restless, and prepare to spin their cocoon. Care should be taken to raise the walls of their tray or they will climb over and be lost. The cocoon nest should now be prepared by twisting the corners of a piece of writing-paper, and raising its edges into the form shown in the illustration. A number of these should be prepared and fixed to a piece of tape, with their pointed ends downwards; and into each one a single worm should be placed when it refuses its food, and seems inclined to spin: it will then weave its web so as to leave a space within.
The cocoon consists of three layers of silk: the first is loose and flossy, and is of no use for the silk manufacture; the second is closer, the silk crossing from side to side; and the third is still finer, and is stuck firmly together, so as to form a compact inner coating.
When the cocoon is completed, the enclosed caterpillar once more casts its skin, with its head and jaws attached to it. It is now a conical chrysalis of the ordinary shape. At first the chrysalis, when opened, contains only a yellow fluid, but by degrees the parts of the moth appear, and in a fortnight or three weeks a swelling of the chrysalis indicates the approach of another change. A rupture down its back comes next, and the moth bursts through its coating into the hollow of the cocoon, and if left to itself would soon eat its way through.
The chrysalis, however, must be stopped from eating through the cocoon; and the silk must be wound. When, by shaking the cocoon, it is found to rattle, then it is time to wind the silk. The cocoon is placed in a cup of warm water, after the loose outward silk has been removed, and then, an end being taken, the whole filament may be wound off on a piece of card. The length of the thread of a cocoon varies from 600 to 1,000 feet.
When the silk is wound off the aurelia presents itself, and being put in a separate case, it remains motionless for about twenty days, when it appears as a pale yellow moth. The male soon dies; the females lay their eggs on the slips of paper provided for that purpose. They then soon die.
A Way to Bind Magazines.—First, we must have a frame in which to stitch the sheets together. Here is mine in Fig. 1. I made it myself, and any handy lad can make one. The frame shown has an opening a foot long, so it is big enough to bind a book as long as that, or any smaller magazine. I have drawn it fitted with five strings, which would be the right number for a full-sized magazine; more or less strings are required according to the size of the book. They are, as may be seen, passed through holes bored opposite to each other above and below, and fixed tight with pegs. These strings are tapes ¼ inch wide, which mother or sister will supply.
Now for the sewing. We have stripped off the wrappers, cleaned the backs of the sheets, and laid them in order, the last sheet on the top. But to make neat work, we should have what bookbinders call “end papers”—plain pieces of paper cut and folded to the size of the magazine—to go at the beginning and end of the volume; one leaf of each will be pasted down by-and-by to the inside of the cover adjoining it.
We begin by laying an end paper on the frame with its back against the tapes. We take a needle and thread, tie a knot at the end of the latter, and pass the needle, as in Fig. 2, through the middle of tape No. 1, and through the paper, drawing the thread to the knot. How we then go on is shown by the dotted line in Fig. 2; at the nearer side of tape No. 2 we pass the needle out again, carry it behind the tape, in again at the farther side of the tape, and so on, till we finally bring it out on the near side of tape No. 5. Please to notice that we do not pass the needle through any tape except through No. 1 at firstPg 256 starting; with that exception, the thread merely goes behind the tapes.
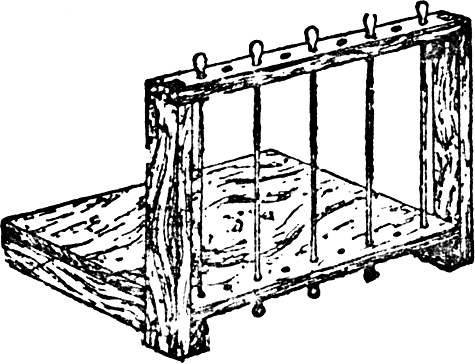
When we have reached the last tape and brought the needle out on the near side of it, we lay a sheet, in this case the last sheet, of the magazine, on the frame, and pass the needle through it inwards on the farther side of tape No. 5, and then work back to the nearest side of tape No. 1. Another sheet is now laid on, and so we proceed till the whole volume, including the front end paper, is stitched together.
If we now lay a good heavy weight on our volume, we can squeeze it into narrower compass, for as the threads merely go round the tapes, they will slip down them; and we can then glue the back. Everybody has not a glue-pot, but everybody can get a 4d. bottle of Le Page’s Liquid Glue, and nothing is better or more handy. Damp a strip of paper, or better, of thin muslin, and rub it down on the glue; it will strengthen the back. Leave the volume under pressure till the glue has set, and we may then take it out of the frame and cut off the tapes to, say, about two inches long on each side.

And now we are ready for our covers; a couple of pieces of stiff millboard, the wreckage of some old draper’s box, Pg 257 will do very well. We cut them to size, and glue down the tapes upon them, as is shown in Fig. 3; and when the volume is heavy it is well to paste a strip of thin muslin over the hinge, as indicated by the dotted lines at a, to keep all tight.
I have just spoken of paste; we shall want it for everything else that we have to do, so I will tell you how to make it. Take a couple of tablespoonfuls of flour and half a teaspoonful of powdered alum, beat them carefully with cold water to the consistency of thin cream, and boil briskly for four minutes, stirring all the time.
What we want to do now is to put a back to our volume. We want something that will look well, and be strong, and nothing that I have tried has been equal to “window-blind holland.” A dark green I prefer, but colour is a matter of taste. This material will not stretch out of place in pasting, as bookbinders’ cloth is apt to do. Fig. 4 shows how the back piece is cut. The middle part b has a strip of stiff paper pasted on it, which is not exactly the width of the back of the volume, but just a shade wider, that when pasted in place, it may have the proper curve outwards. The flap c is to be turned and pasted down on this strip of paper, but the flaps d and d will be turned and pasted down inside the covers, after the back has been pasted in its place on the volume; and when that has been done, the volume should be kept under pressure till the paste is dry.
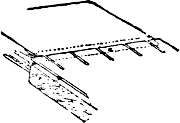

We must, of course, cover the sides of our volume; bookbinders’ cloth or marbled paper, both of which are very inexpensive, are what I commonly use. After that, we can line the insides of the covers by pasting down on them Pg 258 a leaf of the end paper. And only one more thing now remains to be done, that is to letter a label neatly, and to paste it on the back.
Scrap Book and Index.—Keep two scrap-books—one for cuttings and the other for notes. The scrap-book might be made of brown paper. Take an ordinary quarto exercise-book, with about 100 pages in it, and set apart the first fifteen pages for forming the index, for a scrap-book or a note-book without an index is as absurd as a public library without a catalogue. On the first page of your scrap-book write, in clear style, your name and address. Next, put the date on which you commenced to insert cuttings in the book. And then you might add an appropriate motto. How would this title-page do?

Having finished the all-important question of a title-page, which might be much more ornamental than the one above, begin the index on page 2 of the book.
Take a strip of paper of the same length as the pages in your book, and by doubling it in half twice and then dividing it into three equal parts, mark it off into twelve portions, as shown in Fig. B.
Now place your strip alongside of the edge of page 2, and rule a line on the page exactly where the figure 1 has been put. Only a tiny line, about three-quarters of an inch in length, is needed. On page 3, again place your strip along the edge, and rule a line where the figure 2 occurs. On page 4 rule a line where the figure 3 is; on page 5 rule a line where the figure 4 is; on page 6 rule a line where the figure 5 is; and so on, till on page 12 you rule a line where the figure 11 is. I expect you see why I have done this. Now neatly cut from the bottom of page 2 a strip, three-quarters of an inch wide, as far as the line you have ruled. This will leave at the top of the page a piece of paper jutting out. On this write the letters AB in ink. Then on page 3 cut your strip three-quarters of an inch wide, up to the ruled line, and write CD on the little square which projects underneath AB; and continue to write two letters of the alphabet on each page till you get to page 12, when you must write UVW. On page 13 you can write XYZ. Now your index is complete so far as the lettering. The edge of your book should look something like Fig. C.
If you want the index to look still better, you should write the letters alternately in red and black ink.
On the first line of page 2 in your book put A, and turning over the leaf write B on the top line. On page 3 write C, and turning overleaf write D upon the top line. Thus you will have allotted a page to each letter in the alphabet, Pg 260 with the exception of the last six letters. I think I should put on the top line of page 12 U V, and overleaf write W, as W needs more room than U V. On page 13 write X Y, and overleaf Z.
Now that the mysteries of what the bookbinders call “index cutting” have been overcome, nothing remains to be done in the way of preparing your scrap-book for the reception of the numerous newspaper cuttings which I hope will find a home therein.
We will suppose you are interested in cricket. Here comes the usefulness of your book. When the averages of the County Cricket are published you can cut out the list and paste it in your book, and enter in your index, under C, the fact thus: “Cricket, County Averages, 25,” the 25 referring to the page on which you have pasted the cutting. When Brown minor is trying to prove that his county of Kent was third on the list, you will be able to Pg 261 convince him of his error by a reference to the page in your scrap-book, whereon you have pasted a cutting headed “County Championship.” Reserve a few pages in your book for cuttings from the comic papers. You have no idea, until you commence, how interesting and engrossing your scrap-book will prove. In the newspapers there are so many curious little incidents recorded as to swimming, cycling, football, science, which you will be glad to preserve for future reference. Then, any little facts about your favourite hero may well find a place in your book. And when you have filled one book, commence another, and thus manufacture your own library of “best bits.”

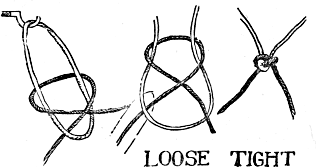
Net Making.—In Fig. 1 we have a netting needle and the way of filling it, in Fig. 2 a mesh stick. The stick may be almost any shape and about nine inches long. It regulates the mesh of the net, for the mesh is twice the circumference of the stick, so you may make a coarse net for tennis or a finer one to protect your strawberries, or a hammock net, or any kind you wish. Fix a hook into a wall or door, or in some other similar position. Take a piece of twine, a foot long will serve, tie the ends together, and hang the circle A thus made over the hook as in Fig. 3. Take the needle in your right hand and pass it through the loop. At B hold the loop and the twine that comes from the needle. Pg 262 Now cast a turn of the twine so that it rests on the upper part of your left hand and wrist, and also over loop A. Next pass the needle in an upward direction, pulling slowly and finishing with a tight knot. What makes the knot is shown at Fig. 4. In Fig. 5 the knot loose and tight is shown.
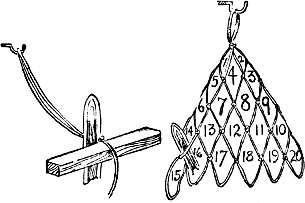
Slowly as this is done a time will come when you can do it rapidly. When you have tightened the knot, hold the mesh stick in the left hand, lay the twine over the stick with the knot resting at its edge, as in Fig. 6. Pass the needle through the loop that has thus been made, pull the twine firmly round your mesh stick, then throw a turn of the twine over your wrist and so make the same knot again. Throw the twine once more round the stick and make one more stitch through our old friend loop A. At this stage slip all you have done from your mesh stick, and you will find two half meshes attached to your loop A. In Fig. 7 these are shown as 1 and 2. Treat 1 and 2 as you treated loop A, that is first in 2 make 3 and 4 in 1. Now you have your first completed mesh, 4. Mesh 5 also is made on 1, the knots being one on the top of the other. Now go on in the same way, making the meshes in the order that you find them numbered in Fig. 7. The taking of two stitches through the last mesh of each row is the widening process, and this operation is maintained to the end of the net as far as the top edge is concerned.

On the other edge, however, as soon as you have reached the width you need you must change this policy to that of taking the stitch through the last two Pg 264 meshes of the preceding row as in Fig. 8. When the net is as long as you need it this narrowing as it is called is applied to both edges, and the fourth corner is finished off by taking the stitch through the last two meshes. Then they should be tied fast. Do not widen or narrow at the wrong edges as you work. To prevent this mistake some netters lie a piece of ribbon upon the top or narrowing edge.
Nets for fishing and for such pursuits may be made in this way. First make a square, then go along the edges of the square, narrowing at regular intervals until the net is of the size needed. Gloves may be worn if the fingers become chafed, or the knots may be drawn tight in such a way that the strain is on the needle and not on the finger. When a new needleful is commenced be sure to make the first knot very firm. Among the useful articles that may be made in this way are tennis nets, onion bags, nets for the protection of growing fruit, and hammock nets.
Photographic Enlargements.—There are so many excellent sources, easily available, from which boys may learn how to use their cameras, so many developers, toners, and fixers ready to their hands at the chemist’s, that we have not occupied space here with a general dissertation upon photography. We think, however, a chapter on enlargements will be welcome. The rapid development of bromide printing paper, and the ease by which enlargements may be produced thereon, has created quite a new era in amateur photography. No longer is it necessary to carry about an unwieldy heavy kit, which destroys half the pleasure of the amateur, when “on pictures bent,” for now he may make use of even the smallest form of camera, and enlarge his pictures when he has returned from his meanderings. Enlargements may be produced in several ways. The negative itself may be enlarged, or what is simpler still a direct enlargement may be made on bromide paper. The latter may be easily effected in two ways—(1) by means of daylight, or (2) by artificial light. It is with the former that the writer intends to deal in the present paper. A word first as to the kind of negative best adapted for enlarging Pg 265 purposes. The quarter-plate size will be found most suitable, and these may be successfully enlarged to 12 by 10. The negative must be perfectly sharp, full of crisp detail, and perfect in every way. Any small defect in a negative is fatal to its enlargement, as it is made so much more apparent by magnification.
Most amateurs find a room at the top of the house the most convenient for enlarging purposes, and one with only one window is best, and that preferably with an uninterrupted view of the sky. The light must next be excluded by pasting brown paper over the entire window, or by having a tightly-fitting wooden frame made to answer the same purpose. Provision is then made to fit into the frame a quarter-plate printing frame, in which is placed the negative. By this means no light is permitted to enter the room, save that which filters through the negative. As a general rule, it will be found necessary to fit on the outside of the window frame a reflector of some sort, and a piece of white glazed board fixed at an angle will be found as effective as anything. This will concentrate the light and produce an equal amount of illumination over the entire negative.
The arrangement of the camera calls next for consideration. If the camera possessed by the would-be enlarger is one which focuses from the front, no adaptation of any sort will be required. All that is necessary is to place an oblong table close to the window, so arranging it that the camera when placed thereon will be on the same level as the negative. The ground-glass at the back of the camera being removed, place the camera as near to the negative as possible, which must have its film side facing the room. To prevent any escape of light through the body of the camera there should be as little space as possible between the negative and the camera, a black cloth being thrown over the end of the latter to make quite certain. At the other end of the table is fixed the enlarging board, on which the bromide is affixed by means of drawing pins. The farther this board is from the lens, the greater the enlargement, of course. A few experimental trials will soon show the tyro the proper distance the Pg 266 board should be placed, and this discovered, the place should be marked for future reference.
It will be found a great convenience to have a piece of ruby glass fixed in the end of the lens cap, as this will enable the operator to see the full size of the image on the enlarging board, and thus obviate any difficulty as to the exact spot in which the bromide paper should be. The greatest difficulty experienced by the beginner in enlarging is undoubtedly the gauging of the correct exposure. Light varies so, that it will be found necessary to give the same negative longer or shorter exposures at different times. The best plan is to make a table of approximate exposures by experimenting with a few strips of bromide paper, giving each a different exposure. These strips should then be pasted in a note-book for any future reference, together with the following particulars:—(1) Time of day and year; (2) intensity of the light; (3) density of negative; (4) brand of paper; and (5) size of the enlargement. An observant worker will soon master all these little difficulties, and when once success has been achieved, enlarging pictures from small negatives will be found to be one of the most interesting branches of photographic operations.
Magic Lantern Slides.—Draw first on paper the figures you wish to paint, lay the paper on the table, and cover it over with a piece of glass of the right size and shape. Draw the outlines with a fine camel’s hair pencil or a pen, in black paint mixed with varnish, and when this is dry, add the proper colours. The transparent colours are alone to be used in this kind of painting, and these include aureolin, gamboge, Italian pink, Indian yellow, madder lake, crimson lake, Prussian blue, indigo, burnt sienna, madder brown, vandyke brown, lamp black. Ox gall will cause the colours to flow more easily on glass. Be careful that the glass is not greasy. Both water colours and oil colours are available.
An easy way to make diagrams and other outline drawings for the magic lantern is to take a piece of frosted glass of the right size and draw upon it, using Indian ink. The frost enables you to do this, but would prevent the Pg 267 maximum of light passing through the glass when it was in the lantern. Accordingly, to remove the frost now that it has served its purpose, pour Canada balsam upon it, cover with another piece of glass and bind the two pieces together as other magic lantern slides are bound.
A curious effect may be obtained by a magic lantern slide made as follows:—Tint vaseline with cochineal and place some between glasses of the magic lantern slide size, making a kind of vaseline sandwich. Put this slide in the lantern and focus it, and then insert a knife point a little way between the two pieces of glass and so let them be alternately forced asunder and drawn together. The effect upon the vaseline as seen upon the sheet is very peculiar.
Three Ways of Making a Hectograph.—It happens often that a boy, especially if he be the secretary of a cricket or football club, needs to send away many letters or notices, all alike; and few things are so wearisome as this writing of the same thing over and over again. If he will make for himself a hectograph he need write his notice no more than once and yet he may have more copies than he is likely to need. Here is the mixture that will prove so useful: gelatine, 4 ounces; glycerine, 15 fluid ounces; carbolic acid, ½ fluid ounce; water, 15 fluid ounces. First add the water to the gelatine and let it stand until the gelatine is quite soft. Now place all this in the glycerine and heat it over the fire until the gelatine has been dissolved, and then until the water has passed away in steam. The carbolic acid is to keep the mixture from turning sour, and it must be added gradually now, before cooling begins. Pour the whole into some shallow tray like the lid of one of those square tin boxes in which grocers keep biscuits. When the mixture has become firm and cold it is ready to be used.
Get a bottle of aniline ink and write or sketch whatever you desire to multiply. When the ink is dry place your letter or drawing face downwards upon the pad you have made with the gelatine. Rub the back of the paper with your hand to force the ink upon the gelatine. When the paper has been upon the hectograph for some time strip it off and you will find that your drawing or writing Pg 268 has been transferred to the gelatine. If you now press clean paper upon this drawing or writing it will be printed upon the paper, and so you may have copy after copy.
When you have as many as you need clean the surface of the hectograph for the next time you wish to use it. This may be done with a soft sponge and tepid water, but this process being rather tedious, most boys will be pleased to hear of an easier method, though it causes the hectograph in time to lose its clean appearance. Put it in the oven and let it melt, and when it is cold again it will be ready for the next letter or drawing.
The following is another way to make a hectograph: Take of pure glycerine, 9 parts; water, 6 parts; barium sulphate, 3 parts; sugar, 1½ parts; gelatine, 1½ parts. Mix well together, and allow all to stand for twenty-four hours; then heat gently over a slow fire until the whole is melted, stirring continuously until the various ingredients are thoroughly amalgamated. It may now be poured into the shallow tin or dish prepared to receive it, and allowed to stand for a day where it will be free from dust. It should not be used until absolutely cold and firm.
Here is another method we have found very successful. Take 2 ounces of fine Russian glue and 4 fluid ounces of cold water. Let the glue steep in the water until the water has been absorbed, or nearly so. Now place the glue and water in a vessel upon the fire until the glue melts. It need not boil. Add eight fluid ounces of common glycerine and six drops of carbolic acid, and also as much Paris white as will make the solution milky. Stir well and then pour the mixture into a shallow tray. In about twelve hours it will have set. For ink Judson’s purple dye will serve.
How to Make a Filter.—You should procure a common flower-pot, nine or ten inches deep. Put in a layer of animal charcoal two inches thick. Wood charcoal may be used, but animal charcoal—that is charcoal made from bones—is best. On this put a layer of well washed sand. For the way to wash sand see page 132. The layer is two inches thick. Then comes a two-inch layer of small pebbles, each about as large as a pea. At the hole at the Pg 269 bottom of the flower-pot should be a fragment of brick which fits the hole loosely. Put the filter on a stool or on a shelf. There should be a hole in the stool or shelf to correspond with the hole in the flower-pot, and under the hole a vessel to catch the filtered water. The first drops that come through the filter may not be clear, but in about a quarter of an hour clear water will commence to issue from the hole in the bottom of the flower-pot. Take out the sand and the pebbles and wash them thoroughly once in six weeks, and once in four months replace the vegetable charcoal.
The Syphon.—In aquarium work and in other occupations it is necessary sometimes to empty water from a vessel by means of a syphon. Suppose that we wish to empty a bucket. The simplest thing would be to take the bucket and turn it upside down. Suppose, however, the bucket were fast and could not be moved, or suppose there were some dregs or sediment in the bucket which we did not wish to disturb, then we should find a syphon useful. Suppose a bucket is on a table. One end of a pipe is in the water in the bucket and the other end is dangling down. Now if we can once induce the water to flow through the pipe the water will continue to run, although at first it has to run up-hill a little, a most unwaterlike proceeding. There are two ways of inducing the flow. If you take the lower end of the pipe and suck, water will be brought over the elbow. Or if before you put the pipe in position you fill it with water, it will flow, and in each case it will continue to flow until it has emptied the bucket; that is, if the pipe reaches to the bottom of the bucket.
How to Make a Fountain.—A fountain is based on the principle that water strives to find its own level. The water tries to rise as high as the reservoir which feeds it, and would succeed, but the pressure of the air prevents it. In a U tube the water keeps at the same level in each part of the tube, but if you were to cork one arm of the tube it would not come so high there, because the air would not allow it. The writer of this article when he was a boy made fountains for a fern rockery and for Pg 270 a garden aquarium in the following simple way:—Upon the garden wall he placed a bucket. At the bottom of the bucket he punched a hole and inserted one end of a length of india-rubber tube bought from a shop where they sell the appliances for the teaching of chemistry. At the same place he bought some pieces of glass tubing of such a size that it would fit inside the rubber tubing. Explain to the man in the shop, and he will know exactly what you need. Take a few inches of the tube and hold the middle of it in the gas flame, or in a Bunsen burner if you have one. When the glass is soft draw the ends asunder gently, and you will find you have two pieces of glass shaped like a fountain-pen filler. It may be that one end of each of these two pieces of tube may have been closed by this process, but all that needs to be done is to file the sharp point until you have come to where the tube is open again. This serves for the nozzle of the fountain. There were no fountain pens when the author made his fountain, and it has just occurred to him that perhaps the best thing would be to buy a fountain pen-filler at once and have your nozzle ready-made. If you make your own you may not get it right first time. It may be crooked or the opening too large or too small. However, there will be this advantage, you may make many nozzles, and so by changing them have a variety of sprays. The finer the opening the higher will be the jet. It is not difficult to apply the fountain to an aquarium. For a rockery it will be easy to arrange the pipe and nozzle, and to fix it in position with the stones.
Case for Shaving Papers.—Decide upon the size of paper you like best. Cut a piece of millboard, celluloid, or even thin wood the same size, and upon this paint an attractive design. Now cut a strip of the same material as wide as this piece, but only an inch, or less, deep. Arrange piece, paper and strip as in the sketch. A is the piece of millboard, B the sheets of paper, C the strip. At D E F bore holes and secure the whole with paper fasteners put through these. This pad may hang upon the wall with ribbon, but the design and not the strip should hang outwards. When all the pieces of paper have been used the Pg 271 paper fasteners may be unfastened, and a new set of papers introduced. The turned-down ends of the paper fasteners are ugly and are liable to scratch. Paste over them very neatly a strip of brown paper or other suitable material.
A Blotting Pad.—A very serviceable blotting-pad may be made upon the same principle as the case for shaving papers. The measurements only will be different, and a pad of writing paper may be made in the same way.

A Hygrometer.—This is a Greek word made up of hygros meaning moist, and metron a measure. It indicates how much or how little moisture there is in the air. In the diagram is a small nail A, a thread B, or better still, a long hair begged from your mother, sister, or friend. C is a weight of some kind. The author had a penny that had a hole in it. Hang this on a wall in your bedroom or in an outhouse, or even in some sheltered place out of doors. When you hang it up rule a line at D, and put the date. In damp weather the weight will rise, in dry it will descend so you may rule other lines showing where it was at different times of the year. The hair should be as free from oil as possible. You may have noticed that the clothes line slackens in dry weather, and tightens on rainy days, and this applies also to the cords of the window blinds. There is a story that when some men Pg 272 were putting a London monument in position, by a miscalculation it needed to be raised just a few inches more, and this elevation the men were unable to bring about. At last, from the crowd that had gathered to watch the proceedings, a sailor bawled, “Wet the ropes.” They wetted the ropes, and up went the heavy monument into its right place.
Chess in Twelve Easy Lessons.—There is nothing like beginning at the beginning, so I first give a diagram of the board and men as set out for play.

It will be noticed that in the above diagram the square at the bottom right hand is a white one, and it is in this way that, by custom, the chess-board is always placed. The board is divided into 64 squares, coloured alternately black and white, or some similar distinctive colours. The squares are always called “White” and “Black,” whatever their actual colour may be, and similarly the men are invariably termed “White” and “Black,” though, as a matter of fact, often coloured white and red.
Having got the board in proper position, with its white square at the bottom right-hand corner, the next thing Pg 274 is to set up the men in proper order. There are thirty-two men in all—sixteen White and sixteen Black. They consist of the following:—
Two Kings: one White, one Black. The White King stands on the fourth square, counting from the White player’s right hand, and the Black King stands on the fourth square, counting from the Black player’s left hand. This brings the two Kings opposite each other, the White King standing on a black square and the Black King on a white square.
Two Queens: one White and one Black. The White Queen stands on the white square to the left of the square occupied by the King. Similarly, the Black Queen stands on the black square next to the Black King. It is of importance in setting up the men to bear in mind that the Queens stand on squares of the same colour as themselves, the White Queen being on a white square and the Black Queen on a black square.
Four Bishops: two White and two Black. These stand on the squares adjoining their respective King and Queen. The one next the King is called the King’s Bishop, and the one next the Queen is known as the Queen’s Bishop.
Four Knights: two White and two Black. These stand on the squares adjoining the Bishops. The Knight nearest the King is called the King’s Knight; the other is called the Queen’s Knight.
Four Rooks: two White and two Black. These occupy the four corner squares, the one nearest the King being termed the King’s Rook; the one nearest the Queen the Queen’s Rook. The Rooks are sometimes called Castles.
These sixteen men are collectively called pieces.
Sixteen Pawns: eight White and eight Black. These stand on the squares immediately in front of the sixteen pieces. They are named after the pieces in front of which they stand, as the King’s Pawn, the Queen’s Pawn, the King’s Bishop’s Pawn, and so on.
As it would be very cumbrous to use the full name of each piece or
Pawn every time it may be necessary to refer to it, I shall in future
use the recognised English notation, as follows:—
Pg 275
K for King.
Q for Queen.
B for Bishop.
Kt for Knight.
P for Pawn.
Other abbreviations will be—
Sq for square.
Ch for check.
Dis ch for discovered check; and
Doub-ch for double check.
Written in this notation, King’s Rook’s Pawn becomes K R P, and Queen’s Bishop’s square Q B sq, and so on.
Now for the practical use of this lesson. Let all the readers who wish to learn the game first of all set the board before them as herein described. Then let them place the White men in their proper order on the board, beginning with the K. Similarly let them place the Black men on the board, beginning also with the K. As a second try, let them place the men on the board beginning with one of the R’s, and going across to the other R. Finally, let them familiarise themselves with the English notation, as given above. By the time they have done this they will be in a position to benefit by a further lesson.
The Board.—The chess-board is not merely something upon which the game of chess is played; it is part of the game itself, for it limits, and, to some extent, controls the action of the men. In my first lesson I gave a diagram of the board with the men set out for play, and I now give an outline diagram of the board on which the name of each square is given, both from the White and the Black side.
Now, in order to read the moves correctly, it is of the greatest importance for the student to understand the method of naming the various squares. From the diagram on page 276 it is clear that, according to our English style, each square has two names, the White player naming Pg 276 the squares from his own side, and the Black player from his. Thus, what the White player calls his King’s square the Black player calls his King’s eighth, and so on with all the other squares. All the boys who are taking an interest in these lessons should get this point fixed in their minds to avoid mistakes.

The squares running across the board are termed ranks; those running up and down, files; and those in a slanting direction, diagonals. The squares, as will be seen, are named from the pieces, which, at starting, occupy their first rank; thus the square at the lower right-hand corner is White’s King’s Rook’s Square (K R sq); the square immediately in front is White’s King’s Rook’s second (K R 2)—the word square being omitted; the next in front is White’s K R 3, and so on till you come to White’s K R 8. In a similar way you get White’s K Kt sq, or 2 or 3, etc., or White’s K or Q sq, or 2 or 3, Pg 277 and so on. Similarly, by turning the board round, you count the squares from the Black side as Black’s K R sq, or 2, etc., or Black’s K or Q sq, or 2 or 3, etc. The files are also named in a similar manner; thus the file running from White’s K sq to Black’s K sq is called the K’s file, and so with all the other files. The ranks are simply called first rank, second rank, etc. The diagonals have no special name, with the exception of the two running direct from one corner of the board to the other—that is, the diagonal from White’s K R sq to Black’s Q R sq, and that from White’s Q R sq to Black’s K R sq. These are called the long diagonals. Of course, some of the very sharp boys who read this will at once exclaim, “Why, they are the only diagonals a square can have, for a rectangular figure can only have two diagonals.” Well, that is all right in mathematics, but in chess, use or custom has brought about the practice of calling all the sloping lines of squares diagonals, and the two which, according to mathematics, are really diagonals, the long diagonals.
Having thus described the board, I next proceed to describe the moves of the various men.
The King.—The King is by far the most important man on the board, inasmuch as a successful attack upon him (as will be explained later on) involves the loss of the game. On the other hand, his moves are much more circumscribed and his powers of attack more limited than those of any other man except the Pawn. He moves only one square at a time, but that move can be made in any direction—that is, to any adjacent square, either forward, backward, sideways, or diagonally. Place the king on his own square and he can move to Q sq, Q 2, K 2, K B 2, or K B sq. Similarly, if he be placed on a centre square, he can move on to any of the eight adjacent squares. The King captures in the same direction in which he moves; that is, if any one of the enemy’s men stands on an adjacent square to his own, he can occupy that square, the other piece being removed from the board, or “taken” or “captured,” as it is termed. The King cannot move on to any square commanded by an enemy’s man, or, as it is technically called, he cannot move into check; neither Pg 278 can the two Kings occupy adjacent squares. Once during the progress of each game the King has the option of an extension of his ordinary move, but this I will describe under its proper head of castling.
The Queen.—The Queen is by far the most powerful piece on the board, as she possesses such a wide range of moves. Like the King, she can move in any direction—forward, backward, sideways, or diagonally; but these moves are not confined to the adjacent squares, for the only limits to her range of moves are the sides of the board, provided no piece or Pawn is in the way of her march. Place the Queen on her own square, and she can be moved to any one of twenty-one squares, namely, Q B sq, Q Kt sq, Q R sq, K sq, K B sq, K Kt sq, K R sq, Q 2, 3, 4, 5, 6, 7 and 8 squares, Q B 2, Q Kt 3, Q R 4, K 2, K B 3, K Kt 4, and K R 5. Similarly placed on a centre square, say Q 4 or 5, or K 4 or 5, and it will be found that she commands (that is, can be moved to) no less than twenty-seven squares on a clear board. The Queen takes in the same direction as she moves; this she does by displacing the enemy’s man, and occupying the vacated square herself.
The Rook.—Next in importance comes the Rook. This piece moves forward, backward, or sideways, as far as the open board permits, but not diagonally. Place the K R on its own square, and it can move to fourteen squares, namely, R’s 2, 3, 4, 5, 6, 7 and 8 squares, K Kt sq, K B sq, K sq, Q sq, Q B sq, Q Kt sq and Q R sq. Placed on any position on the open board, in a corner, at the side, or in the centre, it will be found that it always commands fourteen squares, neither more nor less. It captures in the same direction as it moves in a similar manner to the King or Queen; that is, by removing the enemy’s attacked man and occupying the square so vacated.
The Bishop.—The Bishop moves diagonally only (that is, in a similar manner to a man at draughts) but he can pass over any number of squares that may be open to him. Place the K B on its own square, and it can move on to any Pg 279 of the following seven squares, viz.: Kt 2, R 3, K 2, Q 3, B 4, Kt 5, or R 6. Placed on a centre square, it commands thirteen squares in all. It captures in the same direction as it moves, and in a manner similar to the K and Q. From the nature of its move the B can never leave the squares of the colour on which it originally stood. Therefore the White K B is always on a White square, and the Black K B upon a Black one.
The Knight.—Whilst the move of the Kt is one of the most beautiful upon the chess-board, it is, at the same time, the most difficult to describe, though a knowledge of its move is not by any means difficult to acquire by a little practice. It may be described as a combination of the shortest move of the R with the shortest move of the B; that is, one square in a straight direction—forward, backward, or sideways—and one square in a diagonal direction. Place the K Kt on its own square, and it can move on to the following three squares, viz.: K 2, B 3, and R 3. It will be seen that its imaginary R’s move would bring it over Kt 2, and then its imaginary B’s move places it on B 3 or R 3. Or its imaginary R’s move takes it over B sq., and then its imaginary B’s move places it on K 2. Placed on a centre square, say K’s 4, it commands eight squares—K B 2, K Kt 3, K Kt 5, B 6, Q 6, Q B 5, Q B 3, and Q 2. It will be noticed that it invariably moves on to a square differing in colour from that which it has just left; or, in other words, that it leaps from a White square to a Black one, and from a Black square to a White one. This peculiarity arises from the combination of the R and B moves. Place the Kt again on K’s 4 (a White square), and it will be seen that the imaginary R’s move brings it on to a square of a different colour (in this case a Black one), either K 3, Q 4, K 5, or B 4—and then the imaginary B’s move keeps it on the same colour. The Knight captures as it moves in the same manner as the other pieces—that is, the captured piece is removed from the board, and the capturing Kt occupies the vacated square. It has one advantage possessed by no other man, and that is the power of leaping over any intervening piece or Pawn, whether belonging to its own side or the enemy’s. For example, Pg 280 when the men are first set out in battle array, the only piece that can move without some of the Pawns first making an opening is the Kt, for it can at once spring on to B 3 or R 3, despite the intervening Pawns.
The Pawns.—The Pawn moves in one direction only, and that is one square straight forward (that is the shortest P’s move, except that on its first move it has the option of moving forward either one or two squares). Place the K P on its square, and it can move either to K 3 or K 4. Place on K 4, however, it can only move to K 5. Unlike the pieces, the Pawn does not capture in the same direction that it moves, but diagonally, one square only (the Bishop’s shortest move). Place a Pawn at K 4, and whilst it can move to K 5 it can only capture at B 5 or Q 5. The capture is effected, as it is by the pieces, by removing the enemy’s man and placing the Pawn on the square thus left vacant. The Pawn has the privilege of claiming promotion as soon as it reaches the eight square. This is done by its being exchanged for any piece of its own colour (excepting a King) which the player may desire. This is technically called “queening a pawn,” although it does not follow that a Queen is always called for. It is not necessary that the player should have lost a piece when he thus promotes a Pawn, and it therefore follows that he can have two or more Queens or three or more Rooks, etc., on the board at the same time.
This last statement may puzzle a good many boys, some of whom may say: “I am under the impression that there is only one set of chessmen used at a game of chess. If this is so I do not see that there can be two or more Queens, etc., of the same colour on the board at the same time. Will you kindly explain this?”
They would be perfectly right in stating that only one set of men is used in a game. The set constitutes thirty-two men (sixteen White and sixteen Black), and these thirty-two men form a complete set. To distinguish one piece from another different figures are used, but the shape of these figures is purely conventional, and flat counters could be used with the name or with some other distinguishing mark written on them. As a Pg 281 matter of fact, indeed, the Mohammedans do play chess with such counters, sculptured figures of any kind being prohibited by the Koran. Now, supposing a set is rendered incomplete by a man being lost, the place of the lost man can be taken by anything that will serve to denote that the piece should be on the board. I have often played a game where a thimble has done duty for a Bishop, and a small paper-weight for a Rook, and so on. So that it is quite easy to get something to do duty as a second Queen, etc.
In clubs and chess resorts, where there are many sets of men, a second Queen, if need be, is borrowed from another set. Sometimes, where only one set of men is available, a Rook (if one has been captured) is turned upside down, the promoted Pawn is placed on the top, and there you have a most excellent substitute for a Queen. Supposing, however, that no piece has been lost when the Pawn is promoted, then a piece of twisted paper can be placed on the head of the Pawn, and again we have a good substitute for a Queen.
Some boys may ask me to explain to them what is meant by “Castling” and "Taking en passant," and as it is somewhat difficult to do so without the use of diagrams, I think I cannot do better than give the required explanation.
Castling.—In describing the move of the K, I stated that once during the game the K had the option of an extension of his ordinary move, and promised to describe it later on. This extended move of the K—or rather combined moves of K and R—is termed “Castling.” There are two species of Castling, one on the K’s side, the other on the Q’s side, as shown on the diagrams upon the next page.
The operation of Castling can only be performed once on each side in a game, and that under the following conditions:—

These five points being kept in view, Castling is performed as follows:—On the King’s side by the K being moved to K Kt sq and the K R over him to K B sq. On the Queen’s side by the K being moved to Q B sq and the Q R over him to Q sq. By inspecting the diagrams this will be made clear. In Castling it will be observed that the K moves two squares (to the right or left, as the case may be), and the R leaps over him to the adjoining square. In Castling it is always best to move the K first to show clearly that Castling is the move intended. The diagrams show only White’s method of Castling, but Black castles exactly in the same way. It must be borne in mind that previous checks do not prevent the K Castling, so long as he has not been moved, Pg 283 and is not in check at the time of Castling. The young player must also remember that though the K be on his own square, and the R on its square with no intervening piece, yet Castling cannot be performed if either the K or R has moved, and then come back to his original square.
Pawn Taking en Passant.—This method of capturing can only be exercised by a P standing on its fifth square, and the captured P on the move immediately preceding the capture, have been played from the second to the fourth square. The following diagram will assist the student.

If Black in this position move the P to K 3, then the White P at B 5 can capture it in the usual course, that is by taking it off the square it occupied at K 3 and occupying the vacated square. Should, however, the Black P go to K’s 4 then the White P at B 5 could capture it en passant, or “in passing” as the term means. This is done by lifting the B P from K 4 (to which square it has gone) and placing the W P not on the square thus left vacant but on the K 6 (Black K 3) precisely as if the Black P had only moved to K 3. In the position on the diagram, should the Black P go to K 4, then the White P at Q’s fourth could capture it in the ordinary manner. It must be borne in mind that the right of capturing en passant must Pg 284 be exercised on the move immediately following the one which the adverse Pawn has made its move from the second to the fourth square, otherwise the right lapses.
I now resume the easy lessons by giving a list of Technical Terms.
Adverse Piece, Adverse Pawn.—An “adverse piece” is a piece of an opposite colour to your own, and, of course, belongs to your adversary. Similarly, an “adverse Pawn” is a Pawn of an opposite colour to your own.
Attack.—The combined action of several men against an adverse position. Attacks, of course, are generally made directly against the King, but occasionally they are directed against some weak point in the enemy’s position apart from the King.
To Attack: Attacked.—A piece or Pawn attacks an adverse man when it threatens to capture it on the move. A piece or Pawn is said to be “attacked” when it is threatened with capture on the move by an adverse man.
Castling.—This combined move of K and R I have fully described previously.
Check.—This term signifies that the King is attacked by an adverse piece or Pawn. It is one of the very fundamental principles of the game that the King cannot be captured, and therefore when a move is made by which he is attacked, notice thereof must be given by audibly saying “Check.” The King is now said to be “checked,” or “in check,” and this check must be at once parried. There are three methods by which this can be done:—
There are three descriptions of checks:—
This last is the most dangerous form of all the checks, for it cannot be parried either by interposition or capturing. The available defences of the King are therefore greatly lessened, as he must move to get out of check.
Checkmate.—When the King is in check and has no power of escape—that is, the attacking piece cannot be captured, the King moved, or a piece interposed between the King and the attacking piece—it is “checkmate,” and the game is lost for his side. To escape from a double check the King must move, and if there is no square to which he can move the game is lost, though both the attacking pieces are en prise, for it is plain that if one be taken the check from the other yet remains.
The diagram on page 286 will help the student to understand these different checks.
In the first place let White play R to Q 2, and it is a direct check. The Black K cannot move out of check, as all the squares adjoining his present position are either guarded by White pieces, or blocked by Black ones; neither can the R be taken, for no Black piece attacks it. Black, however, has one move to parry the check, and that is by playing Q to Q 5, or interposing the Q as it is termed. Similarly, White can play Q to Q sq, again giving direct check, to which Black can again only reply Q to Q 5. Once more, White can play P to R 8, becoming a Q or a B and giving direct check, to which Black’s only reply is Q, Q Kt 2.
In the second place, if White play Kt to Q 2 he gives a discovered check; that is, by so moving his Kt he uncovers Pg 286 the attack of the Q upon the K, or, in other words, the Kt moving discovers the check by the Q. In reply to this move Black has again only one move, that being P to B 5 or interposing the P. If White play B R 7, Q 3, B 2, or Kt sq. there is again a discovered check, for the R now attacks the K. In reply to this Black has three lines of play, namely, K takes Kt (at K 3) which is left unguarded by the removal of the B, or by playing the Q either to K 4, or Kt 4 interposing. If the B had gone to Kt 6 the Q could only interpose at K 4; and if it had gone to Kt 4 or R 3 the K could not then capture the Kt, but, instead, could have moved to K 5 out of check.

In the third place if the B move to K 4 there is then given double check, for whilst the B now directly checks himself, by moving he has also discovered the check from the R, and the King to get out of this double attack must move. He has two lines of escape, one by capturing the Kt at K’s third, the other by capturing the attacking B.
In the fourth place let White play P K 4, and the K is in direct check; but it is now checkmate, for the K has no possible move out of check, and the checking Pawn cannot be taken. Again, let White play Kt, Kt 6, and he gives Pg 287 double check, for the Kt checks directly, and has also discovered the check by the Q. Once more this is checkmate, for the K has no possible move. It is true that the B could capture the attacking Kt, but then the Q still checks and the danger of mate has not been averted; similarly, the P could cover at B 5, but the attack from the Kt remains all the same. This aptly illustrates what I have already said as to the extra danger of a double check.
Close Game.—See “Game” later on.
Combinations.—The concentrated action of two or more pieces and Pawns, operating in common either for attack or defence.
Command: Commanded.—To “command” a square is to have the power of moving a piece on to it, or to capture an enemy’s piece that already occupies it. To “command” the board is to have the pieces so placed that a great many of the squares are commanded.
Counter Gambit.—See “Game” later on.
Counter Attack.—See “Game” later on.
Debut.—A French word, meaning “opening,” sometimes used by English writers on chess.
Defi.—A French word meaning “challenge,” and sometimes used in English chess books.
Develop: Development.—To develop a piece is to bring it into more active play. To develop a game is to bring as many pieces as you possibly can into active co-operation.
Doubled Pawn.—Two Pawns of the same colour standing on the same file are said to be “doubled.” Generally, but not always, this is a weak position for the Pawns to occupy, as one cannot support the other.
Doubled Rooks.—When two Rooks of the same colour occupy the same file, or the same rank with no man of their own colour intervening they are said to be “doubled.” This is one of the strongest positions the Rooks can occupy.
End Game.—See “Game” later on.
En Passant.—A French term, meaning “in passing,” Pg 288 and applied to a peculiar capture of P by P, which I have fully described previously.
En Prise.—A French term signifying “exposed,” or in danger of capture. In chess a piece or Pawn is said to be en prise when it is attacked by an enemy’s piece and not sufficiently guarded. We do not say, however, that the K is en prise when attacked, but in check, as already explained.
Establish.—To establish a piece or Pawn is to place it in such a position that it cannot be dislodged by the enemy’s pieces, except at a loss. To establish a centre of Pawns is to occupy the centre squares of the board with Pawns, which mutually strengthen and support each other.
Exchange.—The winning of one piece by the losing of another.
Exchange, To Win The.—The winning of a superior piece by losing an inferior one. Especially used when a Rook is won at the expense of a B or Kt. The player on winning the R is said to have “won the exchange”; the player losing the R is said to have “lost the exchange.”
File.—Each line of squares stretching from one player’s side of the board to the other is termed a “file,” and appears perpendicular in printed diagrams. Each file is named from the piece which originally stood on its outermost square, as the King’s file, the Queen’s file, the K R’s file, and so on. The lines of squares stretching horizontally across the board are termed “ranks.”
File: Open.—An open file is one unoccupied by pieces or Pawns, and it is a great point that a Rook should be played so as to command such a file. In the diagram on page 289 the K B’s file is “open,” whilst White has doubled his Rooks on the otherwise “open” K Kt’s file.
Fork.—A term originally applied to the attack of a Pawn upon two of the opponent’s men at the same time. It is now, however, so extended as to include the minor pieces when any one of them—more especially the Kt, however—attacks two pieces at the same time.
In the diagram the Black Pawn on Q Kt 4 “forks” the Q and B. If White plays P Q 4 ch, then the P “forks” both K and Q. If the Kt goes to Q 7 ch, it also “forks” K and Q. Similarly if Kt B 3 it “forks” the Q and R, and lastly, if B takes Kt ch, it “forks” K and Q. A “fork” from a Kt on two superior pieces is always dangerous, and often fatal, whilst that from a Pawn is also dangerous.

Gambit.—See “Game.”
Game.—Besides its ordinary meaning, the word is used in a technical sense, such as “open game,” “close game,” etc. A game of chess has three phases more or less well defined. The “opening,” the “mid game,” and the “end game.”
The “Opening.”—The first or developing moves in a game, wherein the pieces are brought from their original comparatively inoperative position into active co-operation, both for attack and defence. It is here that book play comes in, and in the study of openings the young student of chess will find wide scope.
The “Mid Game.”—That portion of the game immediately following the opening; the pieces being developed on Pg 290 both sides, combinations result, and attack, defence, and counter-attack take place. It is here that the native skill of the player finds full scope for its display.
The “End Game.”—The final scene of all, after the bustle and life of the mid-game pieces have been exchanged, the board stripped of the men, and the combat reduced to narrower bounds. Here again book knowledge is of the greatest benefit to the player.
It is to be noted that some games never pass into the third stage, for the attack in the mid-game may have been so strong that surrender was imperative forthwith. Nay, in the hands of a weak player, or by some gross blunder, a game may be finished even in the “opening” stage.
The “openings” may be thus classified—
(a) Games, when neither player offers any sacrifice of material force in order to gain some strategical advantage.
(b) Gambits, when the first player offers to sacrifice some material force in order to quickly develop his game, or otherwise to gain some advantage in position. A Pawn is generally sacrificed in the gambits.
(c) Counter Gambits, when the second player makes the sacrifice.
(d) Defences, when the game gains its distinctive character from the line of play adopted by the second player. Some “defences” may properly be termed Counter Attacks.
There are many well-known openings, all of which have a distinctive name, sometimes that of their inventor, sometimes that of a well-known player who may have made them familiar, sometimes from some place or incident with which they have been connected. Thus there are the “Scotch Game,” the “Steinitz Gambit,” the “Greco Counter Gambit,” the “Philidor Defence,” and “Petroff Defence,” the latter of which should be more properly termed “Petroff Counter Attack.” Then there are many other recognised openings.
Game, Close.—A “close” game is one wherein the development both of pieces and Pawns is mainly of a conservative or non-committal nature, the Pawns being very cautiously advanced, and the pieces mainly massed behind them. The term “close” is used to designate this class of openings, because, as a rule, for many moves the board presents a crowded appearance, owing to the massing of the pieces and Pawns, and the few exchanges effected. Great nicety is required in playing the “close” game, so that when the time does come for dissolving the close position, the pieces may occupy commanding positions.
Game, Open.—An “open game” is one wherein the opening moves are of a more immediately attacking nature, and where the pieces are more quickly marched to the front. The game is termed “open” because the board, as a rule, soon presents an open appearance. Pieces and Pawns are often got rid of early, and attack and defence embarked on at an early stage. Formerly all games commencing 1 P K 4 on each side were classed as open, and all games, such as the French, etc., wherein one or both players adopted other opening moves were classed as “close.” This is, however, now given up, for as a matter of fact, many French defences develop into very “open” games indeed, whilst games commencing 1 P K 4, P K 4 often early take on a “close” character.
“Hole,” A.—This is a modern term greatly used by Mr. Steinitz, who may be considered as the “great apostle” of what is called the “modern school” of chess. As used by him, a “hole” means any square on the third rank left unguarded by a Pawn during the developing or opening moves. For example, if a player having advanced both his K P and Q P, should follow this up by advancing his K B P, or his Q B P, in each case he creates a “hole”; in one instance at K 3, in the other at Q 3. These “holes” are regarded by modern theorists as very dangerous, for an adverse piece can often be posted with great advantage on the unguarded square.
Interpose.—To move a man between an attacked man and the opponent’s piece which attacks it. Very often “checks” to the King, and attacks upon the Queen are warded off by interposing a Pawn or piece. As an illustration of “interposing” let the student refer to the diagram on page 289. If White play 1 Q R 3 ch, then Black plays 1 ... P Kt 5, thereby warding off the check. The Pawn thus moved is said to be interposed. Similarly, if it were Black’s turn to move, and he played 1 Q K 8 ch, or 1 R Q 8 ch, then White could play either 1 ... R Kt sq, or 1 ... Kt B sq, either piece then warding off the check, or “interposing.”
Isolated Pawn.—When a Pawn occupies any file, both the adjoining files of which are unoccupied by any Pawns or Pawn of the same colour, such Pawn is said to be “isolated.” In the diagram on page 286, White’s Pawns on Q B 3 and Q R 7 are both “isolated.” Isolated Pawns in an end game are often weak, whilst Pawns on adjoining files are generally strong.
J’adoube.—This is a French term, and means “I adjust,” and is used by players who may touch a man without intending to move it. Any English expression signifying that the man is touched merely with the intention of adjusting it on the board may be used. Any man that may be touched without such intimation being given, must be moved should it be the player’s turn to move, hence the importance of saying "j’adoube" (or similar words) in such cases. Young players (and indeed old ones also for that matter) should never get into a habit of touching any piece unless they intend to move it, except such piece manifestly needs to be adjusted on its square. Such a habit is likely to irritate your opponent.
Draughts in Nineteen Easy Lessons.—It is very easy to learn the moves of the men on the draught-board, but it is not quite so easy to learn to play draughts. Draughts is not a complex game like chess, but simple and straightforward, and herein lies its charm to many people who are afraid of chess with its variety of men, and their diverse powers and Pg 293 moves. In draughts there is only one description of men when the board is set for play, and the only addition is when any of these men become promoted to Kings by gaining the opposite side of the board from that whence they started. It is plain then that any boy can learn the moves of the game in a few minutes, and can at once commence to play.
English draughts is played on the 32 white squares of a 64-square board, the squares of which are alternately coloured white and black, white and red, or in some other similar distinctive manner. There are 24 men—12 White and 12 Black.

Above is a diagram of the numbered draught-board, and it is well for the beginners to number the white squares of their draught-board in a similar manner. The best way to do this is to write the numbers on small pieces of paper and stick these on the upper left-hand corner of the squares. Then when the men are placed on the squares the numbers can still be read. It will be observed that the position of the board is the reverse of that of the chess-board, for here a black, and not a white square, occupies the lower right-hand corner. This brings what is technically called “the double corner” to the right hand of the player. The Pg 294 black “double corner” is formed by the squares 1 and 5; the white “double corner” by squares 32 and 28.
At the commencement of the game the Black men occupy the 3 rows of squares numbered from 1 to 12, and the White the 3 rows numbered from 32 to 21, the intervening two rows, numbered from 13 to 20, being vacant. The row 1 to 4 is Black’s crown-head, and the row 32 to 29 White’s crown-head; the square 4 being Black’s “single corner,” the square 29 White’s “single corner.” By usage in this country Black is always given the first move, which again reverses the custom observed in chess. The first move at draughts, however, gives no advantage to the player having it, whereas in chess the advantage of the first move is of some moment.
At draughts the men move forward diagonally from square to square. That is, a black man on 11 can move to 15 or 16, and a white man on 22 can move to 17 or 18. When a man reaches the far side of the board he becomes a King, or is crowned; that is, a second man is placed on top of him. A King moves precisely in a similar way to an ordinary man, except that he can go either backwards or forwards; that is, a King (either Black or White) on 11 can go to 7 or 8, or 15 or 16.
In capturing or taking, the capturing piece jumps over the captured piece or pieces. Supposing a Black man is on 15 and a White man on 18, whilst 22 is vacant, then the Black man can capture the White man. This he does by jumping over him to square 22, and the captured man is removed from the board. If a second White man stood on 25, and 29 were vacant, the Black man could jump over both the White men, and go to 29. The King captures in a similar manner, except that he can capture as he moves either backwards or forwards.
A game at draughts is won when all the pieces of one colour have either been captured, or forced into such a position that their ultimate capture is certain, or where the Pg 295 remaining pieces of one colour are so blocked that the player thereof cannot move any of them when it is his turn to move, and the player, who thus captures or blocks all his opponent’s men, is the winner of the game.
A game at draughts is drawn when an end game results wherein the two forces are so balanced, both in number and position, that neither side can force the capture or blocking of all the pieces of the opposite side.
The following positions are illustrations of the close of games.
White to move and Black to win. (Fig. 1.)

In this position White cannot go to 27, or he would lose at once; he therefore plays 31-26, and the game goes on 32-27, 26-22, 27-23, 22-17, 23-18, 17-13, 18-14. White has now no other move than 13-9, whereupon the Black King jumps over it and the game is won. Had White had a King instead of a man he would just as surely have lost.
Black to move and win. (Fig. 2.)

In this position the pieces are perfectly equal on both sides, but Black has the advantage in position. He played 1-6, and the game goes on 5-1, 6-9, 14-5, 7-10. Now White has no other move than 1-6, whereupon the Black King jumps over it to 1, and the remaining White man is “blocked” and consequently Black has won.
Further illustrations of won and drawn games are the following positions:—
White to move and win. (Fig 3.)

Black men on 3, 8, 12, 17, 20, 21, 25, and 28.
Kings on 29, 30, 31, and 32.
White man on 15. Kings on 18 and 19.
This is a position well known to old hands at the game; though it is not likely to occur in actual play, yet it illustrates the power of the “block.” White has only three pieces against Black’s twelve, yet he wins the day. Here is the play which brings this about:—
| 19-24 | 17-26 | 10- 6 | 8-11 |
| 20-27 | 15-10 | 16-19 | 1- 5 |
| 18-22 | 12-16 | 6- 1 | 11-15 |
White now plays 5-1 and 1-5 alternately, and the Black men must go forward until they are blocked; and White therefore wins.
Now, to illustrate one form of the draw, let the student look again at the first position in third easy lesson. Had it been Black’s turn to move, no more than a draw would result, for Black must play 32-28, whereupon White plays 31-27 and runs down to 1, making a King and drawing.
In the following position White has two Kings to one, yet Black, by the strength of his position, forces the draw.
Black to move and draw. (Fig. 4.)

Black King on 22.
White Kings on 25 and 29.
The Black now plays 22-17 or 26, White replies 25-21 or 30, whereupon the Black King comes back to 25 and the draw is manifest.
When a man reaches the crown-head in capturing, and thus becomes a King, that completes the move, although there may be a piece or pieces which could have been captured if it had been a King and not a man, which made the original capture. Many of the finest stroke problems are based upon this peculiarity, for the opposing player has thereby time to make a move. The subjoined position (Fig. 5) shows another won game, the victory being brought about by White gaining a move through the Black having to stop to be crowned.
Black men on 2, 6, 15, and 22. (Fig. 5.)

White men on 27, 30, and 32.
White plays 30-26, then Black must play 22-31 and becomes a King. Then the game goes on 32-28, 31-24, 28-1. Black must now play 2-7, and White follows him up and takes him 24. If the piece on 22 had been a King this could not have been brought about, for after going to 31, thereby taking the man on 26, the move would not then have been finished, but the King would have continued by taking the man on 27, thus winning easily.
Many young players are puzzled how to force the victory when they have two Kings against one, the single King being within reach of the “double corner.” Take the following position as an example:—
Black Kings on 18 and 19. (Fig. 6.)

White King on 27.
Black wins thus:—
| 18- 1 | 15-19 | 28-32 | 15-18 |
| 27-32 | 28-32 | 27-31 | 26-31 |
| 19-24 | 24-28 | (a) 19-15 | 18-22 |
| 32-28 | 32-27 | 31-26 | B. wins. |
(a) It is here that many young players miss the point. They play 19-23 and Black moves to 31-27 and the work is all to do over again.
The last lesson showed how to win with two Kings against one, the latter being able to reach the double corner. Three Kings can also win against two, even when each of these latter can reach a separate double corner. The way to win has often puzzled young players, but yet it is comparatively easy. The following position shows how to force the victory:—
Black Kings on 14, 18, and 23. (Fig. 7.)

White Kings on 6 and 24.
Black to move and win.
The win is brought about thus:—
| 18-15 (a) | 6- 1 (c) | 27-24 | 5- 1 (f) |
| 24-28 | 14-10 | 1- 5 (e) | 24-19 |
| 23-27 (b) | 28-32 (d) | 10- 6 | B. wins. |
(a) One of the Black Kings must now go into the double corner.
(b) This is an important move, forcing as it does the remaining King into the other double corner.
(c) For if 28-32, then 15-18 wins.
(d) Compulsory, for if 1-5, then 27-24 wins.
(e) If 32-28, then 24-19 wins.
(f) If 32-28, then 6-10 wins.
It will be noticed that Black must force the exchange of a King, and then he wins with two Kings against one, as shown in fifth lesson.
Already it has been pointed out that the weaker side, though a man down, can often force a draw by correct play. Here is a position from Sturge:—
Black man on 7. King on 6. (Fig. 8.)
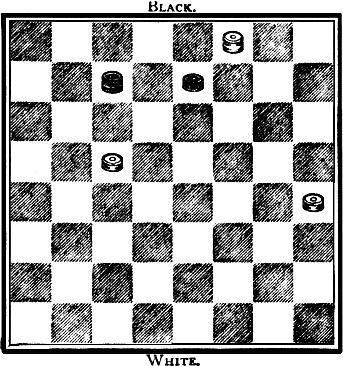
White men on 14 and 20. King on 3.
Black to play and draw.
The draw is brought about thus:—
| 7-10 | 6- 2 | 2-20 | 20-16 |
| 14- 7 | 20-16 | 3- 7 | Drawn. |
Here is another example of a draw, this time by Payne:—
Black Kings on 7 and 11. (Fig. 9.)

White man on 20. Kings on 18 and 19.
Black to move and draw.
This position is more complicated than the former, and White can vary his moves to a considerable extent, but Black, by careful play, can always force the draw. The point is that Black must hold the White man on 20. Here is a leading line of play:—
| 7-10 | 18-23 | 15-11 | (a) 12-16 |
| 19-16 | 11-15 | 23-19 | 3- 7 |
| 10- 7 | 16-12 | 7- 3 | Drawn. |
(a) If 19-16 then 11-15 draws.
This is a useful position as similar endings often occur in actual play, and all younger students should study it carefully.
Here are some examples of easy forced wins. Payne has the following:—
Black man on 1. King on 7. (Fig. 10.)

White man on 14. King on 5.
Black to move and win.
The win is brought about thus:—
| 1- 6 | 6- 9 | 7-10 | 10- 1 |
| 5- 1 | 14- 5 | 1- 6 | B. wins. |
Another very interesting position is:—
Black man on 2. Kings on 6 and 11. (Fig. 11.)
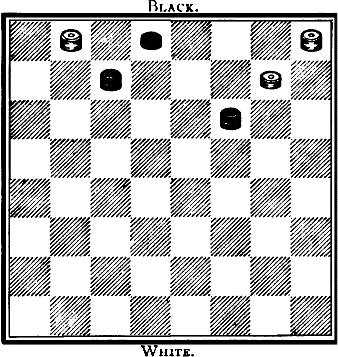
White man on 8. Kings on 1 and 4.
Black to move and win.
Black wins thus:—
| 11-16 | 2- 7 | 16-12 |
| 1-10 | 10- 3 | B. wins. |
Some of the finest play in end games occurs in positions when two Kings more or less sheltered by the double corner are opposed by three Kings or two Kings and a man. The point for the player with the strong forces to seize, is either to force the exchange of a King for a King, or to give up a King for a forced won position. It is here that great nicety of judgment is required, and the greatest attention is necessary if the game is to be won. The following position is from Payne:—
Black Kings on 1 and 2. (Fig. 12.)
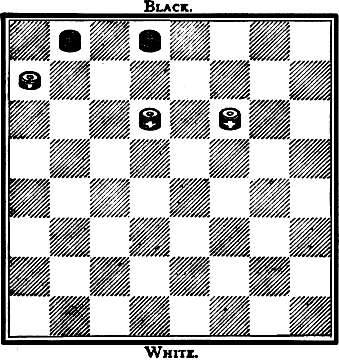
White man on 5. Kings on 10 and 11.
Either to move. White wins.
Here is the win when Black moves first:—
| 2- 6 | 6- 9 | 9- 6 | 6-13 |
| 11-15 | 14-17 | 22-18 | 18-14 |
| 6- 9 | 9-13 | 6- 2 | 2- 7 |
| 15-18 | 18-22 | 13- 9 | 1- 6 |
| 9- 6 | 13- 9 | 1- 6 | White wins (b) |
| 10-14 | 17-13 | (a) 5- 1 |
(a) Here comes White’s opportunity of sacrificing a King, thereby obtaining a position won by force.
(b) For this King must ultimately “fix” the King now on 7.
This is the victory when White moves first:—
| 10-14 | 6- 2 | 18-22 | 13- 9 |
| 2- 6 | 16-19 | 6- 2 | 14-10 |
| 14-17 | 2- 6 | (b) 13-9 | 9-13 |
| 6- 9 | 19-23 | (c) 1- 6 | 5- 1 |
| 17-13 | 6- 2 | 22-18 | (d) 13-17 |
| 9- 6 | 23-18 | 6-13 | 1- 5 |
| 11-16 | 2- 6 | 18-14 | White wins (e) |
(a) Not 11-15, for then Black wins two for one by 6-9, and this danger must be guarded against for several moves.
(b) This is the decisive moment when the sacrifice of the King must be prepared.
(c) 2-7, too, would lose, for White would then move up his King now on 22, and ultimately man off.
(d) If 2-7, 10-14, 7-2, 14-9, and White wins.
(e) Black must play 17-13 or 17-22, and then comes 10-6, 2-9, 5-14, and all is over.
The play in these “double corner” positions is always of a very delicate nature. Here is a drawn position from Payne, requiring great nicety of play:—
Black Kings on 1 and 6. (Fig. 13.)

White man on 5. Kings on 14 and 15.
Black to move and draw.
The draw is proved thus:—
| 6- 9 | 18-22 | 9-13 | 22-18 |
| 15-18 | 13- 9 | 17-14 | 9-13 (a) |
| 9-13 | 14-17 | 13- 9 | Drawn. |
(a) Black keeps command of square 13 and so forces the draw.
Here is another drawn position, from Rogers:—
Black Kings on 1 and 10. (Fig. 14.)
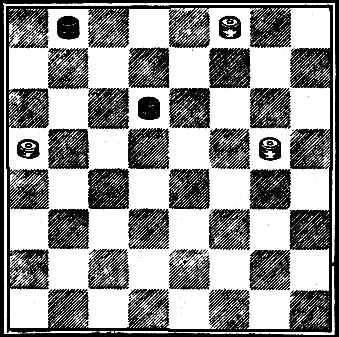
White man on 13. Kings on 3 and 16.
Black to move and draw.
The play on the position runs thus:—
| 1- 6 | 10- 6 | 2- 6 | 9-13 |
| 16-11 | 9- 5 | 7- 2 | 15-10 |
| 6- 2 | 6- 1 | 6- 9 | 13- 9(b) |
| 13- 9(a) | 3- 7 | 11-15 | Drawn. |
| (a)3- 8 | 6- 1 | 16-19 | |
| 2- 6 | 12-16 | 10-14 | |
| 8-12 | 1- 6 | Drawn. |
(b) White cannot crown the man or force an exchange, and hence the game is drawn.
When the forces on each side are reduced to two men, or a man and a King each, many positions occur which are won, lost, or drawn by well-known and long-recognised lines of play, and all who wish to become draught players should have a knowledge of them. Here is such a position:—
Black man on 22. King on 27. (Fig. 15.)
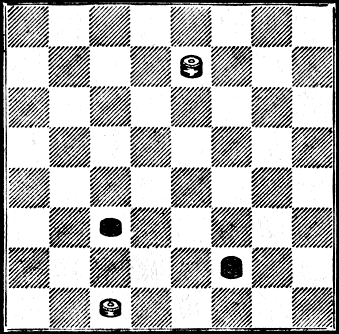
White man on 30. King on 7.
Black to move and win.
Here is the win:—
| 27-23 | 18-14 | 6- 1 | 5- 1 |
| 7-10 | 6- 1 | 5- 9 | 25-21 |
| 22-26 | 22-18 | 1- 5 | 1- 5 |
| (a) 10-36 | 1- 6 | 9-13 | 10- 6 |
| 26- 1 | 18-15 | 10-14 | 18-15 |
| 6- 9 | 6- 1 | 13- 9 | 21-17 |
| 31-26 | 15-10 | 14-18 | 5- 1 |
| 9- 6 | 1- 5 | 9- 6 | 6- 9 |
| 26-22 | 10- 6 | 18-15 | 15-18 |
| 6-10 | 5- 1 | 30-25 | Black wins |
| 23-18 | 14-10 | 15-18 | by "first |
| 10- 6 | 1- 5 | 6-10 | position." |
| (a) 30-25 | 10- 6 | 1- 6 | 1- 5 |
| 23-18 | 18-14 | 26-22 | Black win |
| 25-21 | 6- 1 | 6- 1 | by "first |
| 26-30 | 30-26 | 22-17 | position." |
Here is another position:—
Black Kings on 14 and 22. (Fig. 16.)
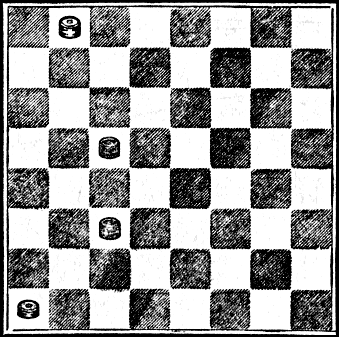
White man on 29. King on 1.
Black to move and win.
This is the play for the defeat of your opponent:—
| 22-17 | 1- 5 | 18-15 | 21-17 |
| 1- 5 | 6- 1 | 29-25 | 5- 1 |
| 17-13 | 5- 9 | 15-18 | 6- 9 |
| 5- 1 | 1- 5 | 6-10 | 15-18 |
| 13- 9 | 9-13 | 5- 1 | Black wins |
| 1- 5 | 10-14 | 25-21 | by "first |
| 9- 6 | 13- 9 | 1- 5 | position." |
| 5- 1 | 14-18 | 10-6 | |
| 14-10 | 9- 6 | 18-15 |
The student will notice that all these victories are by “first position.” This so-called “first position” will be explained in the next lesson.
We now come to the ending known amongst all draught players as
The “First Position.”
Black Kings on 14 and 17. (Fig. 17.)

White man on 21. King on 5.
Black to move and win.
If the student refers to the solution of the position on the first diagram in the eleventh lesson, he will find that the play shown in note (a) ends with the position shown above. The victory is brought about thus:—
| 17-13 | 14-10 | 15-18 | 5- 1 |
| 5- 1 | 1- 5 | 5- 9(a) | 6- 9 |
| 13- 9 | 6- 1 | 1- 5 | 15-18 |
| 1- 5 | 5- 9 | 9- 6(b) | See |
| 9- 6 | 10-15 | 18-15 | position |
| 5- 1 | 9- 5 | 21-17 | below. |
| (a) 21-17 | 1- 6 | 1- 5 | Black |
| 18-22 | 5- 1 | 22-17 | wins. |
| 17-14 | 6- 2 | ||
| (b) 9-13 | 5- 1 | 14-10 | 5- 1 |
| 18-22 | 17-14 | 22-18 | Black |
| 21-17 | 1- 5 | 10- 6 | wins. |
A More Advanced Stage of “First Position.”
Black Kings on 1 and 18. (Fig. 18.)

White man on 17. King on 9.
White to move. Black to win.
This position is formed at the end of main play of both positions given in eleventh easy lesson, as well as of main play in the position on the first diagram above.
White has two lines of play. First—
| 17-13 | 15-10 | 25-22 | 10-15 |
| 18-15 | 17-22 | 1- 6 | 22-25 |
| 9-14 | 10-14 | 22-25 | 15-18 |
| 1- 5 | 22-25 | 6-10 | Black |
| 14-17 | 1- 5 | 25-22 | wins. |
Second—
| (a) | 9- 5 | 1- 6 | 1- 5 | Black |
| 18-22 | 5- 1 | 22-17 | wins. | |
| 17-14 | 6- 2 | 14- 9 |
(a) Both 17-14 and 9-13 lose at once by 6-2.
A careful study of the principles underlying the play given in the positions in the eleventh and twelfth lessons will suffice to show the student how to secure success (if that is possible) when two Kings are opposed to man and King, the latter commanding or occupying his opponent’s double corner, where also the man can only hope to be crowned. If the single man and the King cannot be forced to take up some of the positions shown at some part of the different lines of the play, then the game will be drawn.
The next class is composed of endings in which two Kings are opposed to two Kings and a man.
The following diagram shows what is called
The “Third Position.”
Black man on 5. Kings on 13 and 21. (Fig. 19.)

White Kings on 14 and 22.
Black to move and win.
The end is brought about thus—
| 13- 9 | 25-22 | 27-23 | 24-20 |
| 22-18 | 15-10 | 22-25 | 22-26 |
| 9- 6 | 22-26 | 2- 7 | 20-16 |
| 18-22 | 14-18 | 25-22 | 26-22 |
| 6- 1 | 5- 9 | 7-11 | 16-12 |
| 22-18 | 10- 6 | 22-25 | 22-26 |
| 21-25 | 9-13 | 11-15 | 12- 8 |
| 18-15 | 6-10 | 25-22 | 26-22 |
| 1- 6 | 26-31 | 23-27 | 8- 3 |
| 14-17 | 10-14 | 22-26 | 14- 9 |
| 6- 2 | 31-27 | 27-24 | 15-10 |
| 17-14 | 18-22 | 26-22 | Black wins. |
Another class of endings is when three pieces are opposed to three pieces, generally, of course, drawn, but yet in Pg 312 some cases admitting of forced wins by delicate play. The following is a characteristic specimen of such a forced victory, and should be carefully studied by all young students of the game. It is well known to experts as
The “Second Position.”
Black men on 3 and 6. King on 1. (Fig. 20.)

White men on 12 and 13. King on 8.
Black to move and win.
The play for the victory follows:—
| 1- 5 | 32-28 | 24-27 | 28-32 |
| 8-11 | 24-27 | 28- 2 | 19-24 |
| 5- 9 | 28-32 | 27-32 | 32-28 |
| 11-15 | 27-31 | 24-28 | 11-16 |
| 9-14 | 32-28 | 32-27 | 28-19 |
| 15-11 | 31-27 | 28-32 | 16-23 |
| 14-18 | 28-32 | 27-24 | 12- 8 |
| 11-16 | 27-23 | 32-28 | 23-18 |
| 18-15 | 32-28 | 24-19 | 8- 4 |
| 16-20 | 23-18 | 28-3 | 18-14 |
| 15-11 | 28-24 | 19-15 | 4- 8 |
| 20-24 | 18-14 | 32-28 | 6- 1 |
| 3- 7 | 24-19 | 15-10 | 8-11 |
| 24-19 | 6-10 | 28-24 | 14- 9 |
| 7-10 | 19-23 | 10- 6 | 13- 6 |
| 19-23 | 10-15 | 24-19 | 1-10 |
| 10-15 | 23-27 | 14-10 | 11-16 |
| 23-27 | 15-19 | 19-24 | 10-15 |
| 15-19 | 27-32 | 10-15 | 16-20 |
| 27-32 | 19-24 | 24-28 | 15-19 |
| 19-24 | 32-28 | 15-19 | Black wins. |
The position given below is well known to experts, and the play upon it is very fine; but with the proviso, “Black to move and win,” it cannot easily occur in actual play, as the student will speedily discover if he examine the position carefully. Nevertheless, it aptly illustrates an important principle in end game play, and is well worthy of careful study. It is known as
The “Fourth Position.”
Pg 313
Black man on 21. Kings on 22, 23, and 28. (Fig. 21.)
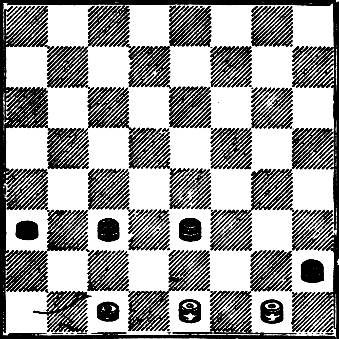
White man on 30. Kings on 31 and 32.
Black to move and win, or White to move and draw.
The Black victory is brought about as follows:—
| 28-24 | 23-19 | 18-22 | 24-27 |
| 32-28 | 27-31 | 31-27 | 31-24 |
| 24-20 | 19-24 | 22-26 | 20-18 |
| 28-32 | 32-27 | 30-23 | Black |
| 22-18 | 24-28 | 28-24 | wins. |
| 31-27 | 27-32 | 27-31 |
The draw arises thus:—
| 31-27 | 32-27 | 31-27 | 31-26 |
| 23-19 | 24-20 | 28-24 | |
| 27-31 | 27-32 | 27-31 | Drawn. |
| 19-24 | 22-18 | 18-23 |
Black can vary his play to some extent, but he can never man off to advantage, or force a winning position by any line of play, and the position is drawn.
Here is an example of a Black win brought about by very fine play, and well worthy of attentive study. It is by the celebrated James Wyllie:—
Black man on 3. Kings on 11, 19, 27. (Fig. 22.)
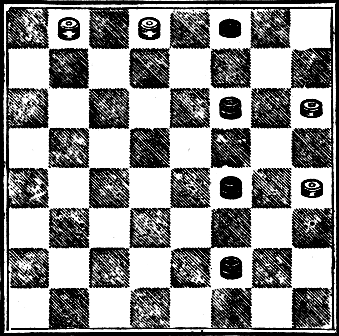
White men on 12, 20. Kings on 1, 2.
White to move, Black to win.
| 1- 6 | 18-14 | 1- 6 | 7-10 |
| 27-23 | 5- 1 | 5- 1 | 18-23 |
| 6-10 | 14- 9 | 6- 9 | 10-15 |
| 23-18 | 6- 2 | 19-15 | 23-27 |
| 10- 6 | 13-17 | (b) 9- 5 | 15-19 |
| 18-14 | 1- 5 | 11- 7 | 27-32 |
| 6- 1 | 17-14 | 14- 9 | 19-23 |
| 14-17 | 5- 1 | 7- 2 | 32-28 |
| 1- 6 | 9- 5 | 9-13 | 6-10 |
| 19-23 | 2- 6 | 15-11 | 28-24 |
| 6- 9 | 14-18 | 13-17 | 10-15 |
| 23-18 | 6-10 | 3- 7 | Black |
| 2- 6 | 18-23 | 17-14 | wins. |
| 17-13 | (a)10-14 | 2- 6 | |
| 9- 5 | 23-19 | 14-18 |
Var. (a.)
| 10- 6 | 19-15 | 6- 2 | Black |
| 23-19 | 2- 6 | 17-10 | wins. |
| 6- 2 | 3-7 |
Var. (b.)
| 9-13 | 17-21 | 17-13 | 20-16 |
| 11- 7 | 1- 6 | 10-14 | 18-15 |
| 14-17 | 13-17 | 13-17 | Black |
| 15-18 | 6-10 | 7-10 | wins. |
The position given in the last easy lesson showed a Black win when it was White’s turn to play, but it is only a draw if Black had to play first. Let the student add to the diagram the condition “Black to move, White to draw.”
The draw is brought about as follows:—
| 27-23 | 10- 6 | 7-10 | 2- 6 |
| 1- 6 | 19-15 | 5- 1 | 18-23 |
| 19-15 | 6- 2 | 14- 9 | 6-10 |
| 6- 1 | 7-11 | 20-16 | 15- 6 |
| 15-18 | 9- 6 | 10-15 | 1-10 |
| 1- 6 | 17-13 | 1- 6 | 23-19 |
| 18-22 | 6- 1 | 9- 5 | 16-11 |
| 6- 9 | 15-10 | 6- 1 | 19-16 |
| 22-17 | 2- 6 | 13-17 | 11- 7 |
| 2- 6 | 10-14 | 2- 6 | Drawn. |
| 23-19 | 1- 5 | 17-14 | |
| 6-10 | (a)11- 7 | 6- 2 | |
| 11- 7 | 6- 2 | 14-18 |
Var.(a.)
| 11-15 | 10-14 | 18-23 | 23-19 |
| 5- 1 | 5- 1 | 6-10 | 11- 7 |
| 14-10 | 9- 5 | 15- 6 | 19-16 |
| 6- 2 | 20-16 | 1-10 | 7- 2 |
| 13- 9 | 14-18 | 5- 9 | Drawn |
| 1- 5 | 2- 6 | 6-11 |
Here is a neat winning stroke from Sturges:—
Black Kings on 10, 16, 23. (Fig. 23.)

White Kings on 9, 19.
Black to move and win.
The win is forced thus:—
10-14, 9-27, 16-32. Black wins.
I give the following beautiful example of a Black win by W. G. W. Leggett:—
Black man on 1. Kings on 3 and 11. (Fig. 24.)

White men on 9, 10, 13. King on 4.
Black to move and win.
The win is thus brought about:—
| 11- 7 | (b) 1- 5 | 25-22 | 5- 1 |
| 10- 6 | 15-19 | 9- 5 | 7-10 |
| 1-10 | 5- 1 | 22-18 | 1- 5 |
| 9- 6 | 19-23 | 5- 9 | 10- 6 |
| 7- 2 | 1- 5 | 18-15 | 5- 1 |
| (a) 6- 1 | 23-26 | 9- 5 | 14-10 |
| 2- 6 | 5- 9 | 15-11 | 1- 5 |
| 1- 5 | 26-30 | 5- 9 | 6- 1 |
| 10-15 | 9- 5 | 11- 7 | 5- 9 |
| 5- 1 | 30-25 | 9- 5 | 1- 5 |
| 6-10 | 5- 9 | 10-14 | Black wins. |
Var. (a.)
| 13- 9 | 3- 7 | 8-11 | 18-22 |
| 10-15 | 4- 8 | 15-18 | Black |
| 6- 1 | 7-10 | 11-16 | wins. |
Var. (b.)
| 13- 9 | 4- 8 | 8- 3 | Black |
| 3- 7 | 15-18 | 7- 2 | wins. |
Classified List of Principal Openings.
9-13 Opening.
| Edinburgh | 9-13 |
9-14 Opening
| Double Corner | 9-14 |
| Choice | 9-14, 22-18, 11-15 |
10-14 Opening
| Denny | 10-14 |
10-15 Opening
| Kelso | 10-15 |
11-15 Opening
| Ayrshire Lassie | 11-15, 24-20, 8-11, 28-24 |
| Second Double Corner | 11-15, 24-19 |
| Virginia | 11-15, 23-19, 10-14 |
| Glasgow (Irregular) | 11-15, 23-19, 9-14, 22-17 8-11, 25-22, 11-16 |
| Wilter (Irregular) | 11-15, 23-19, 9-14, 22-17 7-11 |
| Fife | 11-15, 23-19, 9-14, 22-17 5-9 |
| Souter | 11-15, 23-19, 9-14, 22-17 6-9 |
| Sunderland | 11-15, 23-19, 9-14, 22-17 14-18 |
| Defiance | 11-15, 23-19, 9-14, 27-23 |
| Will o’ the Wisp | 11-15, 23-19, 9-13 |
| Old Fourteenth | 11-15, 23-19, 8-11, 22-17 4-8 |
| Alma | 11-15, 23-19, 8-11, 22-17 3-8 |
| Glasgow | 11-15, 23-19, 8-11, 22-17 11-16 |
| Laird and Lady | 11-15, 23-19, 8-11, 22-17 9-13 |
| Centre | 11-15, 23-19, 8-11, 22-17 15-18 |
| Doctor | 11-15, 23-19, 8-11, 22-17 9-13, 17-14, 10-17, 19-10 7-14 |
| Nailor | 11-15, 23-19, 8-11, 26-23 |
| Cuckoo | 11-15, 23-19, 8-11, 22-18 Pg 321 |
| Wilter | 11-15, 23-19, 7-11 |
| Wilter-Cross | 11-15, 23-19, 7-11, 26-23 3-7, 23-18 |
| Cross | 11-15, 23-18 |
| Cross Choice | 11-15, 23-18, 9-14 |
| Dyke (second Irregular) | 11-15, 23-18, 8-11, 26-23 4-8, 30-26, 15-19 |
| Single Corner | 11-15, 22-18, 15-22, 25-18 8-11 |
| Flora Temple | 11-15, 22-18, 15-22, 25-18 9-13 |
| Maid of the Mill | 11-15, 22-17, 15-18 |
| Maid of the Mill (Irregular) | 11-15, 22-17, 8-11, 17-13 15-18 |
| Pioneer | 11-15, 22-17, 8-11, 25-22 |
| White Dyke | 11-15, 22-17, 8-11, 17-14 |
| Albemarle | 11-15, 22-17, 8-11, 17-13 4-8, 21-17 |
| Erie | 11-15, 22-17, 8-11, 17-13 9-14 |
| Dyke | 11-15, 22-17, 15-19 |
| Dyke (Irregular) | 11-15, 22-17, 9-14, 25-22 15-19 |
| Boston | 11-15, 22-17, 9-13, 17-14 |
| Wagram | 11-15, 22-17, 9-13, 24-20 |
| Switcher | 11-15, 21-17 |
11-16 Opening.
| Bristol | 11-16, 24-20 |
| Liverpool | 11-16, 24-20, 9-13, 20-11 8-15 |
| Paisley | 11-16, 24-19 |
| Manchester | 11-16, 23-18 |
| London | 11-16, 22-18 |
| White Doctor | 11-16, 22-18, 10-14, 24-20 16-19, 23-16, 14-23 |
| Leeds | 11-16, 22-17 |
| Newcastle | 11-16, 21-17 |
12-16 Opening.
| Dundee | 12-16 |
The Losing Game.
As a matter of fact very fine scientific play is possible with this form of Draughts, but all the same the youngest beginner can play at it, and very amusing results will follow. The object in the game is for one of the players to give all his men away, or get them fixed immovably, which, of course, would be a lost game in ordinary draughts, but is a won one at the losing game. It must be borne in mind, in playing the losing game, that it is not good policy to give away men at the beginning of the game so as to be left with three men against six, or two against five, for as a matter of fact in most positions the player with the superior forces can give all his men away, leaving the other player with one or more of his men left. Here is where the laugh comes in. The hasty player keeps giving away his men until possibly he has only one left, whilst his more wary opponent has three or four. But can he give that man away and so win? Not much! He soon finds he is perfectly helpless, and the other player can force him to take all his men, whilst his solitary man or King remains still on the board, a woeful example of “vaulting ambition, overleaping itself and falling on t’other side.” In the losing game it is a case of “the more haste the least speed,” for he who is too hasty to give away his men at the beginning finds he cannot give the remainder away at the end. From the first “position” must be played for, the board opened, and men exchanged carefully, so that at the end the player who wants to win may have such advantage that he can compel his opponent to capture his remaining pieces. When the game is reduced to one man on each side he who has “the move,” as it is called, which would enable him to win, or draw, at the least, in the ordinary game must lose at the Losing Game. Here is an example of
A Losing Game.
| 11-15 | 8-11 | 5- 9 | 20-27 |
| 24-19 | 22-18 | 17-13 | 30-26 Pg 323 |
| 15-24 | 9-14 | 3- 8 | 23-14 |
| 27-20 | 18- 9 | 29-25 | White wins, |
| 8-11 | 6-13 | 12-16 | for his sole |
| 20-16 | 25-22 | 23-19 | remaining man |
| 11-20 | 1- 6 | 16-32 | is blocked. |
| 32-27 | 22-17 | 31-27 | |
| 4- 8 | 13-22 | 32-23 | |
| 28-24 | 26-17 | 21-17 |
Another form of the Losing Game is for one player to have all his twelve men against a single man of the other player. I give a position of this kind as
A Problem in the Losing Game.

The 12 Black men on their original squares.
White man on 29.
Black to move and win, that is, give all his men away.
Another funny form of draughts is for one player to give the other the odds of having once (or oftener during the progress of the game) the right of moving twice in succession, this right being exercised at such time as the odds-receiver may choose. There should be great disparity in the strength of the two players, as the odds is really very great.
The Interchanged Men.
As a final poser for those who like to puzzle their brains, I give the following as a problem. Place the men in due order on the draught-board, and then by a series of legal moves reverse the position of the men, that is, the Black men must stand where the White men came from, and vice versa.
Quaternions.—Quaternions is the name of a somewhat easy yet interesting game played on a checkered board (similar to a draughts board) with thirty-two counters or draughtsmen (sixteen white and sixteen black). The players move alternately by placing one of their men on a white square of the board, and the object of the game is to get four men of the same colour in a line, either perpendicular, horizontal, or diagonally, and the player who first succeeds in doing this wins the game. Of course, each player also does his best to stop his opponent from forming his quaternion or file of four. Should neither player be able to form a quaternion, then the game is drawn.
To show clearly what a quaternion is, I give the following diagram:—

The four men on squares 1, 2, 3, and 4, form a quaternion, and similarly do those on 5, 13, 21, and 29, and those on 10, 15, 19, and 24. The numbers here given to the squares are the same as in draughts. The point to be borne in mind in playing the game is to try to unite a perpendicular with a horizontal line of squares, or with a diagonal line. By careful play three men can be got on one of these lines, and three on a communicating line, each having a vacant square. The player of the opposite colour can fill only one of these squares, and consequently cannot prevent the formation of the quaternion on the other line.
The most careful play on both sides is required from the very first move, or the game can be forced right off. I give a diagram of an opening:—

It is now Black’s turn to play, and he must stop White from forming a line of three men with a vacant square at each end. To do this he must place a man either on 7 or 17. Supposing he plays on to 17, then White can force the game thus:—
| White. | Black. | |
|---|---|---|
| 18 | 23 | Black plays on 23 to stop White |
| 7 | 3 | getting an open three; 9 would not |
| 9 | 5 | be so good. |
| 11 | 12 | |
| 2 |
The position is now as diagrammed:—

It will be seen that White has now three on a perpendicular (beginning at 2) with a vacant square, and he also has three on a diagonal (also beginning at 2) with a vacant square. Black can now only occupy one of the vacant squares, and White thereupon occupies the other, thereby forming his quaternion and winning. Black lost the game on his second play by placing his man on 17; had he gone on to 7 his game would have been as good as White’s.
Now for a few general hints. Open the game on the middle of the board. Play to squares near those occupied by your opponent’s men. Keep your men in connection (with an eye to forming threes, as in the illustrative game given above). Keep forming threes as long as you can so as to force your opponent to stop the threatened quaternion. Keep a wary eye always on your opponent’s game, and try Pg 327 to confine him as much as possible so as to prevent him from forming threes with an adjacent vacant square. Play the cautious game rather than the risky one—that is, keep the draw always in hand, and win if you can.
Consequences.—Each player has a slip of paper. Three inches broad and eight inches long is a convenient shape and size. Each player writes upon the top an adjective which might be applied to a lady, and then folds the top of the slip so as to cover the word. All now pass their slips to their neighbours so that each one has another slip. Without looking at the adjective, which should be well covered by the fold, each writes the name of a lady who is in the room, and folds the slip again so that no writing may be seen. Once more the slips are passed along, and upon the new slip which each player has now should be written an adjective applicable to a gentleman. Fold the paper and pass it along again. This process is repeated until this adjective has been followed by the name of some gentleman of the party, then by the name of a place, next by what the gentleman said to the lady, then her reply. After that come the consequences, and finally what the world said. All the slips are now dropped into a hat, and someone is appointed to read them one by one, supplying the verbs in the right place. They will create roars of laughter, for they will run something like this: Simpering Jane Cook met Knock-kneed Peter Thompson up a tree. He said to her, “Well, I am surprised” and she replied, “Does your mother know you’re out?” The consequences were that he pawned his boots, and the world said, “I told you so.”
Concert.—The players having selected a “conductor,” seat themselves round him. The conductor now gives to each a musical instrument, and shows how it is to be played. When all are provided with their imaginary instruments, he orders them to tune, and so gives each musician a chance to make all sorts of noises. Next the conductor waves an imaginary baton, and begins to hum a lively tune, in which he is accompanied by his band, each player imitating with his hands the different movements made in performing on his supposed instrument. Pg 328 Every now and then the conductor pretends to play an instrument, and the player to whom it belongs must instantly alter his movements for those of the conductor, and continue to beat time until the conductor abandons his instrument. Should a player fail to take the conductor’s office at the proper time, he must pay a forfeit.
Shadow Buff.—A sheet or other large piece of white linen should be fastened at one end of the room, so that it hangs without wrinkles; Buff seats himself on a low stool with his face to the sheet, and a table, on which is a lighted candle, should be placed about four or five feet behind him, and the rest of the lights in the room extinguished. Buff’s playfellows next pass in succession, between him and the candle, distorting their features as much as possible—hopping, limping, and performing odd antics, so as to make their shadows very unlike themselves. Buff, who is not blindfolded, must try to guess to whom the shadows belong, and if he guesses correctly, the player whose shadow he recognises takes his place. Buff is allowed only one guess for each person, and must not turn his head either to the right or to the left to see who passes.
The Boat Race.—A most exciting game, and one that is particularly suited to parties. Any number of players may take part in it, the more the merrier, and they must be divided into two sides. The players stand in two rows, facing one another; at one end of the line there is the starter and at the other the umpire.
At the word “Go!” the starter drops a penny into the hands of each of the two men nearest him. These two men then drop it into the outstretched palms of the people next to them, and so the pennies are passed along from one to the other, and the winning side is the one which manages to get its penny into the hands of the umpire first. A great point which all the players must bear in mind is that on no account must the coin be touched by the fingers. Each player must secure the penny in the palms of his hands placed together, and must drop the penny into the hands of the man next him by simply opening his palms. This greatly adds to the fun of the game. In the hurry Pg 329 to pass on the coin the excited player will drop the money and pick it up in his fingers, and his side is then disqualified for that game.
A Musical Glass.—Take a thin cut-glass goblet, and having cut out of stiff writing-paper a cross with arms of equal length, lay it on the top of the glass, and turn down each end of the four arms, so that the cross will not slip off. Having thus fitted the cross, take it off the glass and pour water into the glass until it is nearly full. Now wipe the rim carefully, so that no particle of moisture remains on it, and replace the cross. You can make the glass vibrate and give out a sound by rubbing your damped finger over some part of the exterior. That is why it is called a musical glass; but an even more wonderful experiment may be made with it. You rub the glass with your damped finger under one of the arms of the cross; the cross will not move. Rub it between any two of the arms, and the cross will begin to turn slowly, as if by magic, and will not stop turning until one of the arms reaches a point immediately over the place you are rubbing. You can then move your finger round the glass and make the cross move as you please.

Boomerangs.—The wooden boomerang of the Australian savage has elements of danger, and attempts should not be made to throw it except away from other people and from animals. Even the thrower will do well to have a tree behind which he can retire; but meanwhile much fun can be derived from small boomerangs made of pasteboard. They should be cut in the shapes given, A and B are the best. There is no need to be very exact, but the card should not be bent and should be capable of lying flat upon a table. Other similar shapes may be invented. The curious flight of a little boomerang of this kind is induced by placing it upon a book with one of its ends projecting over the side of the book. Raise the book to a level with your eyes and then with a pencil or penholder strike sharply the edge of the boomerang near the end. Do not treat the boomerang as though you were playing at tip-cat or “peggy,” and avoid smiting it upon its upward flat surface. When you have Pg 330 learned to hit it properly it will skim through the air, then rise a little, and finally come back to some place not far from its starting-point. In any case its peculiar movements are likely to be amusing. A flip with the finger nail is another way to start the boomerang upon its course.
An Amusing Game.—In this game the ball is an empty egg-shell, and the field a covered table.
After the sides have been chosen—any number of persons taking part—the players kneel at both sides of the table, a captain at the head on one side, and another captain at the foot on the other side. In front of each captain are placed two upright articles—candlesticks, tumblers, or what not. These are the goals, across which a ribbon is stretched.
The egg-shell is placed in the centre of the table, and put in play by both captains blowing at it. All the other players then assist in the blowing, which keeps the ball moving about the table at such a rapid succession of tangents as to cause a great deal of fun. Soon most of the players will be helpless with laughter.
A touchdown, which scores four points, is made by Pg 331 blowing the ball through the opponents’ goal. The captain of the victorious side then takes the ball back to the opposite goal and blows it across the table, the object being to pass it through the same goal again. This, if successful, scores two more points.
The time limit of the game is thirty minutes, divided into two parts of fifteen minutes each. After the first half the two teams change positions, as in football.
Nine Men’s Morris.—Two persons, having each of them nine pieces, or men, different in colour from those of his opponent, lay them down alternately, one by one, upon the spots; and the aim of both players is to prevent his antagonist from placing three of his pieces so as to form a row of three without the intervention of an opposing piece. If a row be formed, he that made it is at liberty to take up one of his competitor’s pieces from any part he thinks most to his advantage; unless he has made a row, which must not be touched. When all the pieces are laid down, they are played backwards and forwards in any direction that the lines run, but can only move from one spot to another at one time. He that takes all his antagonist’s pieces, is the winner.
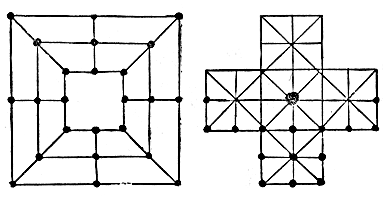
Fox and Geese.—Fifteen draughtsmen serve for the flock of geese. The fox may be two draughtsmen placed one upon another. The game is played on a board marked Pg 332 as shown in the illustration. Sometimes holes are pricked at the junction of the lines and pegs are used instead of draughtsmen. The fox is placed in the middle of the board, and the geese as shown in the illustration. The game is to confine the fox to some spot on the board, so that there shall be either the edge of the board or else two rows of men round him. When the fox cannot escape, the game is done, and the player of the geese wins; but when one of the geese is left on a point next to that occupied by the fox, and is not supported by another goose behind, or by the edge of the board, the fox can take it, and by jumping over its head to the next space, as in draughts, he may, perhaps, escape the others, as all the geese are compelled to move forwards towards the end of the board that Pg 333 was unoccupied at the commencement of the game. The fox is allowed to move either backwards or forwards. Neither the fox nor a goose must be moved more than one space at a time. If the fox neglects to take when he has a chance, he is huffed, and one of the captured geese is restored to the board. The fox should avoid getting into the lower square of the board if possible, as he will find it difficult to extricate himself from a position which can be so easily blockaded.
A Second Method.—There is another way of playing fox and geese on a chessboard, with four white men, representing the geese, and one black one, for the fox.
The geese are placed on the four white squares nearest one player, and the fox may be put where his owner pleases. The best place for him is that marked in the diagram.
The geese can move forward only, and the fox moves either way. The object of the geese is to pen the fox so that he cannot move, and the fox has to break through.
The geese have a great advantage, and a good player keeps them in a line as much as he can. This the fox tries to prevent, and if the geese make a false move he is able generally to break through the line.
Puzzles.—Dead Dogs Made Living.—The dead dogs are, by placing two lines upon them, to be suddenly aroused to life and made to run away. How and where should these lines be placed, and what should be the shapes of them?
The Springs Puzzle.—A is a wall, B C D three houses, and E F G three springs. It is required to bring the water from E to D, from G to B, and from F to C, without one pipe or channel crossing the other, and without passing outside of the wall A.
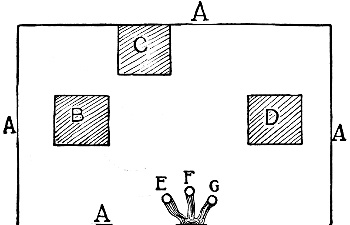

Three-Square Puzzle.—Cut seventeen slips of cardboard of equal lengths, and put them on a table to form six squares, as in the figure. Now take away five of the pieces, leaving only three perfect squares.
Six and Five Make Nine.—Draw six vertical lines, and, by adding five more lines let the whole make nine.
Cylinder Puzzle.—Cut a piece of cardboard about four inches long, of the oblong shape of the figure, and make Pg 334 three holes in it as shown. Make one piece of wood pass through, and also exactly fill, each of the three holes.
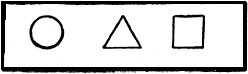
A Button Puzzle.—In the middle of a piece of leather make two parallel cuts, and below a small hole of the width of the distance between the cuts, pass a piece of string under the slit and through the hole, as in the diagram, and tie two buttons much larger than the hole to the ends of the string. The problem is to draw the string out without taking off the buttons.
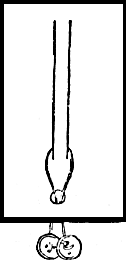

A Slit Puzzle.—Cut a round piece of wood as in A, and four others, like B. Get them all into the cross-shaped slit, as in C.
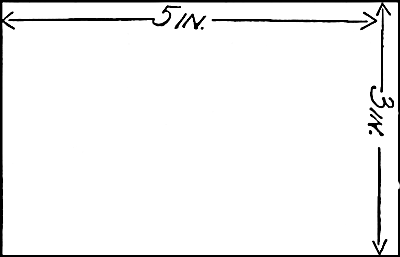
Creeping Through a Small Space.—Take a piece of cardboard or of leather, the shape and size suggested in the diagram. Cut it in such a way that you may creep through it, still keeping it in one piece.
An Ingenious Square.—Here is a way to place one to nine in three rows of three figures each, so that they will add up to fifteen in eight different ways.

The Cabinet-Maker’s Problem.—A cabinet-maker had a round piece of veneering, with which he has to cover the tops of two oval stools. It so happens that the area of the stools, without the hand-holes in the centre, and the circular piece, are the same. How must he cut his veneer so as to be exactly enough for his purpose?
Circle Puzzle.—Secure a piece of cardboard, the size and shape of the diagram, and punch in it twelve holes in the position shown in the diagram. Cut the cardboard into four pieces of equal size, each piece to be of the same shape, and to contain three holes, without cutting into any of them.
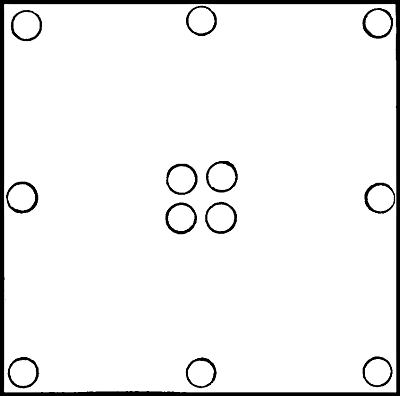
The Nuns.—Twenty-four nuns were placed in a convent by night to count nine each way, as in the figure. Four of them went for a walk; how were the remaining nuns arranged in the square so as still to count nine each way? The four who went out returned, bringing with them four friends; how were they all arranged still to count nine each way, and thus to deceive the sister in charge, as to whether there were 20, 24, 28, or 32 in the square?

Cross-Cutting.—How can you cut out of a single piece of paper, and with one cut of the scissors, a perfect cross, and all the other forms that are shown in the diagram?
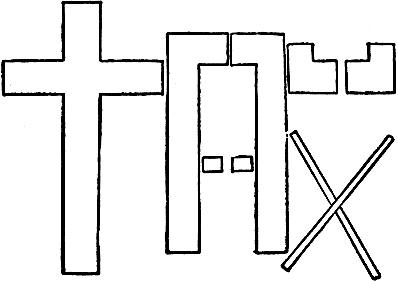
Cross Puzzle.—Cut three pieces of paper to the shape of A, one to the shape of B, and one to that of C. Let Pg 339 them be of the same relative sizes as in the diagram. Place the pieces together so as to form a cross.
More Cross Cutting.—With three pieces of cardboard of the form and size of A, and one each of B and C, to form a cross.
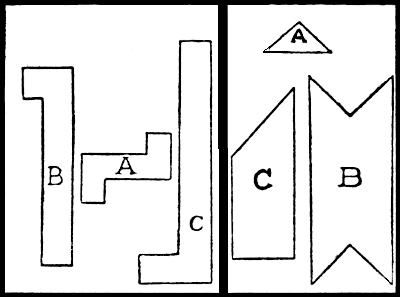
A Problem for Surveyors.—A gentleman who lived in a house on an estate decided that he would divide the estate into five building plots. There were ten fine old trees, and his instructions to the surveyor were: Don’t Pg 340 count my house in the division. I shall have that extra, but divide the remainder of the park into five equal parts with straight boundaries. I shall retain one part for my own grounds. Be careful to arrange that each plot shall have two of the trees. How did the surveyor divide the estate?

Another Problem for Surveyors.—A squire planted a number of oaks when his heir was born, and on the twenty-seventh birthday of the young man there was a tree for every year, and yet though there were only 27 trees, there were ten rows and six trees in each row, which made sixty, the age of the squire himself. How did he manage it?
Halfpence Puzzle.—Place ten halfpence in a row on the table. Take up one of them and place it on another, never in any case passing over more than two halfpence. Repeat the operation until no halfpenny remains by itself in the row.
Puzzling Advice.—Read the following:—
If your B m t put :
When your IS . putting :
The Miser’s Ruse.—A miser once asked his tenants to dinner at an inn, and asked the landlord to join the party. When the bill was presented, the miser suggested that they should cast lots who should pay the score. It was decided that they should be counted by the days of the week, and that every time he who counted called “Saturday,” the person so named should leave the room until there was only one man left, and he should pay. How did the miser manage to throw the expense on the landlord?
Two Eyes Better than One.—Put a coin on a table’s edge, with half the coin’s edge overlapping. Move three yards away and close one eye; now advance, and try to knock it off with one finger, keeping the one eye shut all the time.
Wolf, Goat, and Cabbages.—Suppose a man has a wolf, a goat, and some cabbages on the bank of a river, and he wishes to cross with them, and that his boat is only large enough to carry one out of the three besides himself. He must, therefore, take them over one by one, in such a manner that the wolf shall have no opportunity of devouring the goat, or the goat the cabbages. In which way is he to do this?

The Double Handcuffs.—Ask two friends to allow their hands to be fastened together with string, which must be looped, as shown in the illustration. Now tell them to liberate themselves without unfastening the knots, or cutting the string.
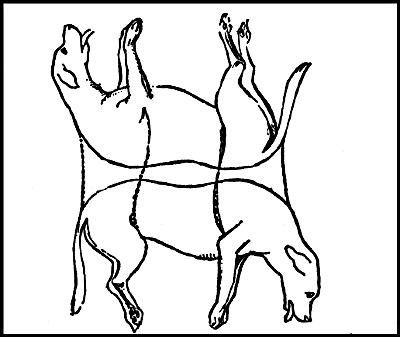
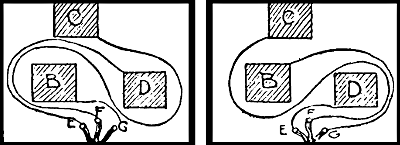
Three-Square Puzzle.—Take away the pieces numbered 8, 10, 1, 3, 13, and three squares only will remain.

A Slit Puzzle.—Arrange the pieces side by side in the short arms of the cross, draw out the centre piece, and the rest will follow easily. The same process reversed will put them back again.
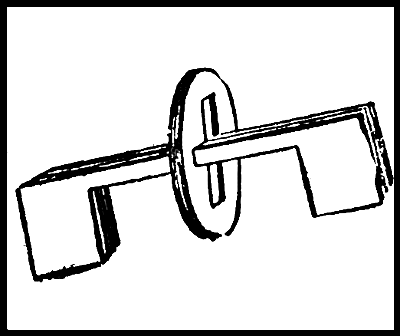
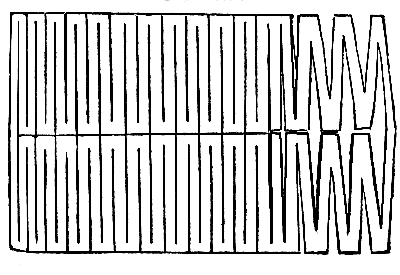
Creeping Through a Small Space.—Double the cardboard or leather lengthways down the middle, and then cut first to the right, nearly to the end, and then to the left and so on to the end of the card; then open it and cut down the middle, except the two ends. By opening the card or leather, a person may pass through it. A tough leaf may be treated in this way.
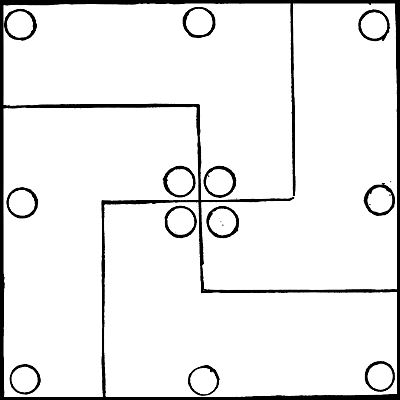
The Cabinet-Maker’s Problem.—The cabinet-maker must find the centre of the circle, and strike another circle, half the diameter of the first, and having the same centre. Then cut the whole into four parts, by means of two lines drawn at right angles to each other, then cut along the inner circle, and put the pieces together as in the following diagram.
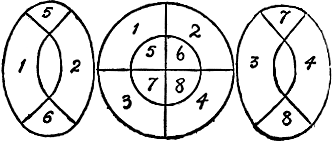
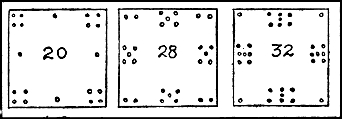
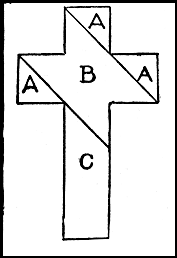
Button Puzzle.—Pull the narrow slip of the leather through the hole, and the string and buttons may be released.
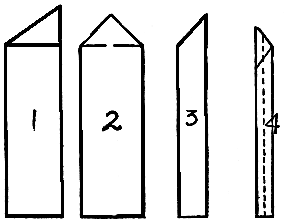

Cross Cutting.—Take a piece of writing paper about three times as long as it is broad, say six inches long and two wide. Fold the upper corner down, as shown in Fig. 1; then fold the other upper corner over the first, and it will appear as in Fig. 2; you next fold the paper in half lengthwise, and it will appear as in Fig. 3. Then the last fold is made lengthwise also, in the middle of the paper, and it will exhibit the form of Fig. 4, which, when cut through with the scissors in the direction of the dotted line, will give all the forms mentioned.
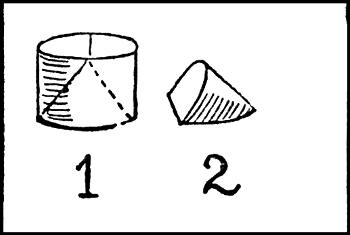
Cylinder Puzzle.—Take a round cylinder of the diameter of the circular hole, and of the height of the square hole. Having drawn a straight line across the end, dividing it into two equal parts, cut an equal section from either side to the edge of the circular base, a figure like that represented by the woodcut in the margin would then be produced, which would fulfil the required conditions.
Halfpence Puzzle.—Place the fourth on the first, seventh on the third, fifth upon the ninth, the second upon the sixth, and the eighth upon the tenth.
Puzzling Advice.—
If your grate be (great B) empty, put coal on.
When your grate is (great IS) full, stop putting coal on.
The Miser’s Ruse.—The counting, which stopped at every seventh man, was made to begin at the sixth from the landlord, who sat at the end of the table.
Wolf, Goat, and Cabbages.—First he takes over the goat; he then returns and takes the wolf; he leaves the Pg 348 wolf on the other side, and brings back the goat; he now takes over the cabbages, and comes back once more to fetch the goat. Thus the wolf will never be left with the goat, nor the goat with the cabbages.
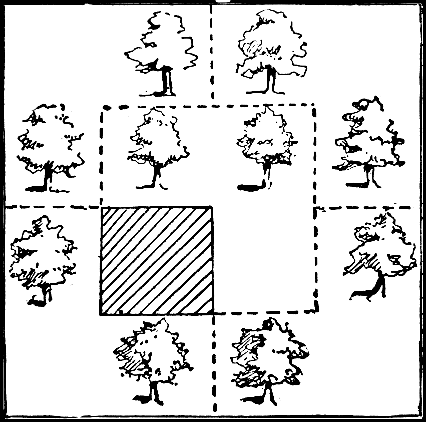
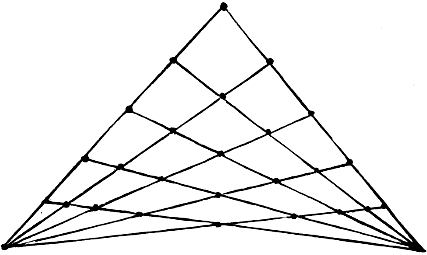
The Double Handcuffs.—This is the way to do it. C must gather up into a loop the string which binds his hands, pass it under the string fastened round either of B’s wrists, and slip it over B’s hands. This done, both will be set free. To replace the strings, reverse the process.
Wood Carving.—The best kinds of wood include white holly, walnut and sycamore, and pieces of empty cigar boxes, often Spanish cedar, are not to be despised. A pocket-knife, some bradawls, a few files, flat, round and triangular, a fine saw and some coarse sandpaper complete the tools needed for most of the work.
Draw very carefully upon paper the design with which you wish to ornament some article you may have made with wood. When you have at last drawn the design quite accurately there are many ways in which you may transfer the drawing to the wood. It may be pasted upon the wood so that paper and wood will be cut away together in those parts that are to fall below the general surface of the wood and at the end the paper that remains may be washed away. Another way is to cut out the design with scissors, lay it upon the wood and go carefully round the edges with a lead pencil; or you may without cutting it out place it upon the wood and prick through the design or at any rate the principal points with a pin. If you were to scribble with crayon, coloured chalk or pencil upon the back of the paper and were then to lay the paper upon the wood and go over the design with a hard point, using some pressure, the design would be transferred to the wood, or still another way would be to use carbon paper (see Chap. XXIV.) between the paper and the wood instead of scribbling upon the back of the paper.
However, we will suppose the design in some way or another has been placed in pencil upon the wood. Now with regard to every part in which the intention is to take out the wood completely from front to back bore a hole. Then take your fret-cutter’s saw or dentist’s saw and Pg 351 unfastening one end put this end through the hole and fasten it again. Saw perpendicularly.
At this stage the young carver will need to decide whether he will follow the pencil lines exactly. If he is a very expert sawyer he may, but it is much safer to leave a little wood to be removed by pocket-knife, chisel, or file. It is easy to do this; but if he saws out a little too much wood, if he transgresses the pencil line, he cannot put back the wood he has wrongfully cut away. After the filing a little rubbing with sandpaper will complete the work. Sometimes it is an advantage to adjust the saw in its frame with the teeth inside or sideways.
How to make a Schooner.—Take a block of wood two feet four inches long, eight inches wide, and eight inches deep. We name this as a convenient size; but a boy may if he likes make his boat twice this size, or half this size, and so long as he makes his alterations in proportion it will not matter. Try to get the wood without knots or other faults. White pine or deal with a straight grain is the best, for this wood is easy to cut into shape, and it is light.
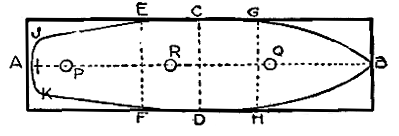
Before the schooner is shaped it should be hollowed. Draw a straight line with pencil along the centre of the upper surface of the block A B (Fig. 1). If the breadth of the block is eight inches then the centre will be four inches from each edge. Next, in a similar way divide the length of the block into two equal parts with a pencil line C D. If the length is two feet four inches then this line will be one foot two from each end of the block. Now divide the length into three equal parts by the lines E F and G H. One third of two feet four inches is nine inches and one third of an inch, so that each of the three parts will have this measurement. Draw now the line I J C B and when Pg 352 this line is of the right shape make a tracing of it, and from the tracing a cardboard model. By placing this model upon the other side of the line A B and drawing round its edge you will get the line B D K I and it will be exactly like I J C B, a very important matter. With a knife, gouge, and chisel the boat may now be hollowed with care, and we may repeat that it is easier to hollow the block before its outside has been shaped than afterwards, because it stands now more firmly upon the table or bench.
The shape of the outside is shown in Fig. 2, and it should be noticed that the line L M N is not straight but curves so that M is the lowest point and L and N the highest. Upon the counter at O a hole must be bored for the stern-post, which will come through at P in Fig. 1.

It is well from time to time to try the boat in water to see if it floats evenly, or if more has been taken from one side than the other. These little matters should be corrected, and a number of little touches will be needed here and there with tools or sandpaper before the vessel is right inside and out. Then put a deck of thin wood over the hollowed part. This should be fitted very carefully so that no water can pass into the hold of the ship. If bulwarks are desired the deck may be half an inch or an inch below the edge of the vessel, but if the deck is flush with the sides of the hull there will be no place for water to lodge.
We now come to the masts, of which there will be two. For the foremast make a hole through the deck at Q on Fig. 1. It is about an inch from the line G H. At R two inches from the line E F a similar hole should penetrate the deck for the main mast. The circumference of the lower masts should be one inch and three quarters, but an inch Pg 353 will serve for the topmasts. The bowsprit and the booms should measure one inch and a quarter round, and the gaffs an inch.
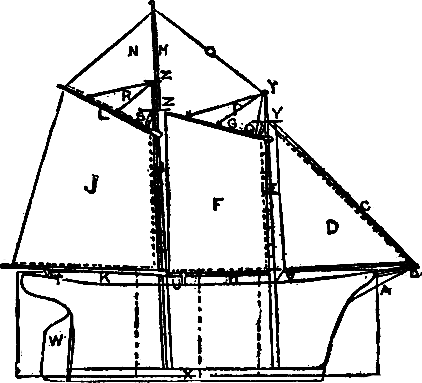
Linen will serve for the sails, and odds and ends of fishing lines for the ropes and rigging, with stouter cord like whipcord for the shrouds. The caps, deadeyes, blocks and such things may be made, but the process is wearisome and Pg 354 difficult and perhaps the better way is to buy them. The following measurements will be useful:—
| inches | |
| Bowsprit | 3½ |
| Foremast | 15 |
| Mainmast | 16 |
| Topmast | 6 |
| Fore boom | 8½ |
| Fore gaff | 8 |
| Main boom | 12 |
| Main gaff | 8 |
The sails should be made to fit these. If the schooner has been properly made she will sail well with the rudder but slightly turned to one side. If it is necessary to turn her rudder much she will lose speed and will not rank in the first class. To steady the schooner it is necessary to nail or screw along her keel, a strip of lead as ballast. Err upon the side of making this too heavy, because it is easier to cut and file away than it is to add.
The making of a Cutter.—Having made a schooner it will not be difficult to make a cutter from the appended diagrams with a few particulars regarding the measurements.

The cutter has but one mast reaching about fifteen inches above the deck. This is surmounted by a seven-inch top-mast, Pg 355 so that the complete height above the deck is twenty-two inches. Here are the other measurements.
Bowsprit, 9 inches from the stem of the vessel to the end.
Main gaff, 9 inches long.
Main boom, 15 inches.
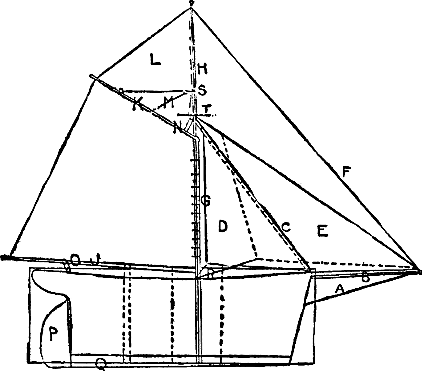

A Sleigh that can be Steered.—With the sketches we shall give, a boy unaided, or with a little assistance from a carpenter, will be able to make a sleigh that he can steer. Take a piece of board 9½ feet long, six inches wide and 7/8 of an inch thick. Ash is excellent. Avoid large knots. Let Fig. 1 represent the face of the board. From B measure three inches to C. Connect A C. From A measure two feet, four times. These measurements will give you D E F G. From C repeat this process and you will have H I J and K. Saw from A to C; from D to H; from E to I; F to J, and from G to K. You will have now four pieces of wood like the piece in Fig. 2 and some wood to spare for a purpose that will be explained soon. With regard to your four pieces of wood which are to serve for runners remember that two will be right-hand runners and two left-hand runners, because the treatment of each kind varies a little.

With regard to Fig. 2 draw the curved line A E. No rule can be given for this except that B E represents eight inches. Cut the curve from A to E, round off the angle C D B a little, and you will have a runner from which the three remaining runners may be made. This runner however is not yet finished. From C in Fig. 2 measure 2½ inches to F, then another 2½ inches to G. Make F H one inch deep and G I. Then connect H I. Measure 8 inches from G to J and then mark off J K L M making it like H G F I. Now direct your attention to the upper edge of the runner represented in Fig. 3. Pg 357 Two points will have been fixed already. M J, G F. To find the remaining points N O, P Q draw the lines M N; J O; G P and F Q making the angles N M J; O J M; P G F and Q F G the same as the angle B D C in Fig. 2. Now saw and chisel out carefully N O M J L K and P Q G F I H making what joiners call mortices. In repeating this process upon the other runners remember to have the narrower end of these dovetails inside the sledge. The arrangement will be as in Fig. 4.

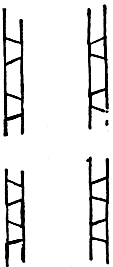
The next thing is to connect your four runners with cross bars (Fig. 5) which are each fourteen inches long, two and a half inches broad, and one inch thick. Of these cross bars there are four. The distance from A to B and from C to D is one inch in each case. These ends are shaped to form what joiners call dovetails, and they should fit exactly into the mortices upon the upper edges of the runners. The black dots represent screws. One of the cross bars does not appear in Fig. 13. The runners should be shod with iron by the blacksmith.
He will need eleven-and-a-half feet of half round 5/8 inch rolled iron, divided into four, a piece for each runner. Each piece will be 34 inches long pierced for screws as in Fig. 6. A and B are an inch from centre to centre. C is eight inches from the end, D another ten inches; E a further ten inches. F G are like A and B.
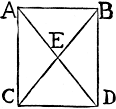
Take now a piece of board one foot wide, fifteen inches long and one inch thick (Fig. 7). Find the centre by connecting B and C and A and D by straight lines. The place where they cross, E, will be the centre. This board should be placed lengthways upon the cross bars of the front portion of your sleigh and should be fixed very securely in position with long screws. It should be at A in the completed sleigh, Fig. 13. Now for the long board upon which you sit, the board that connects the two pairs of runners, the board marked B in the completed sleigh, Fig. 13. Its width is sixteen inches, its length 7½ feet, its thickness 1½ inches. It is known as the reach board and should be of seasoned pine. This board is represented in Fig. 8. Fix your compass at A and describe a semi-circle, and then at B. A and B are each seven inches from the end of the board and seven inches from the sides. By the aid of these lines you will be able to give your board rounded ends as in Fig. 9.

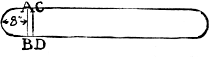

Having decided which end of this board you will have forward measure underneath 8 inches from the front extremity and at that point draw the line A B (Fig. 10). Now take the piece of wood you spared from your runners and saw it lengthwise into two equal parts. Make each part precisely as long as your reach board is wide. Screw one at C D in Fig. 10 so that its outer edge is close to the line A B. The screws go through the reach board into the cross piece. In the centre of the cross piece bore a hole with a Pg 359 half inch bit right through cross piece and reach board, this is for the bolt. Now take that other piece of runner wood and fix hinges upon it as shown in Fig. 11. The hinges should be 4×4 hinges, and should move round to their full extent each way. Leaving the reach board for a few minutes we go to the pair of runners that will be at the back of the sleigh. It will be seen that we connected these with two cross pieces. It is upon the back cross piece that we have to place our piece of wood that has the hinges upon it. Lay it upon the cross piece and when the two are even all round fasten the remaining flap of the hinges with screws upon this cross piece of the runners. These two cross pieces of wood will be separated only by the thickness of the hinges if the work has been deftly done. Place the reach board so that the outer edge of the cross piece shall come exactly to a line we may draw now upon the under-side of the reach board five inches from its backward end as in Fig. 12.

Fasten there the reach board to the cross piece with screws. The front pair of runners is fastened by passing a half inch bolt through the half inch hole we bored in the reach board and in the top of the front pair of runners. Here you will need a few washers and a nut. Each back runner should be fastened to the reach board by a loose chain as shown in the completed sleigh. Foot rests of bent iron or of wood are a great advantage. Place these where you need them. The sleigh is steered by means of two strong cords. Fig. 13 is merely general. Some of the details do not appear there.


Baby’s Sleigh.—In Fig. 1 we have the sleigh as it looks when it is finished. To upholster it would add to our difficulties, so we will depend upon an abundance of cushions for baby’s comfort. In Fig 2 we have a piece of strong board A B C D 3/8 of an inch thick, two feet long and one foot wide. From C to E is three inches, from C to G seven inches and from D to F three inches. The curve from A to G must be drawn according to the taste of the young joiner. When this side has been cut out it is easy to make the other from it.
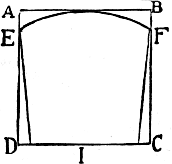
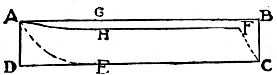
Now for the backboard. In Fig. 3 A B C D we have a piece of wood fifteen inches square. The inside lines at the bottom are one and a half inches from D and C. E and F are three inches from A and B. Put your compasses at I for a centre and draw the curve E F. If your compasses are not large enough a piece of pencil tied to a string will serve. The front board may be made like the lower half of the back board. Nail or screw the parts together and put on a bottom that fits. Inside, the seat rests on two strips, one screwed upon each side. These strips are of wood three eighths of an inch thick, an inch wide and eight inches long. The seat may be about a foot wide. The runners come next. In Fig. 4 A B C D, we have a board three quarters of an inch thick, three feet long and seven inches wide. The distance from D to E is eight inches. From A measure eight inches along the upper edge to G, then two inches to H and from H draw the line H F. Draw the curve A H. F should be three inches from the line B C. Pg 361

From F draw a straight line to C. Cut out the runner and use it as a pattern for the making of another. To connect the two runners use a couple of cross bars of hard wood each an inch and a half wide, one inch thick and a foot long. Cut the ends as shown in Fig. 5, the cuts being three quarters of an inch deep. Carpenters Pg 362 call an arrangement of this kind a tenon. The front cross bar will connect the two runners fifteen inches from the front and the back cross bar will be fifteen inches further back than that. The method of fixing them is shown in Fig. 6. The cuts A and B—mortices, joiners call them—are half an inch deep. Having placed the tenons in the mortices fasten them there with screws. Now get a board ten inches wide, half an inch thick and two feet long and screw this to the bars. If you want the runners shod with iron the blacksmith will do this for you. Place now the car in position upon the runners, and bore two quarter-inch holes in the centre of the bottom, one under the seat and the other in front. Make two corresponding holes in the board of the sleigh and so with two bolts and nuts secure the car to the runners.
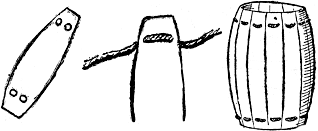
A Hammock from a Barrel.—Look round for a clean barrel. Perhaps an apple barrel will be as easy to find as any. Strip off the hoops and draw all the nails. Measure three inches from the top, and three inches from the bottom of the barrel, and draw thence a line round the top and a line round the bottom of the barrel, keeping it three inches from top or bottom all the way round. Upon these lines, and upon each stave, bore two holes with a brace and bit. Place the holes so that they are about the same distance from each other and from the edges of the staves. If some of the staves are wider than others, each will need slightly different treatment. A stout rope should be threaded through these holes in the manner shown Pg 363 in the diagram. About twenty feet of rope will be sufficient. An inch or thereabouts should be left between each stave. Cushions add to the comfort of this simple hammock.
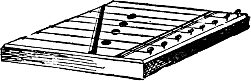
An Æolian Harp.—Make a shallow box of thin dry pine. The top piece should be free from knots and three-sixteenths of an inch thick. This is the sounding board. The sides and bottom of the box may be of wood one quarter of an inch in thickness. The harp should be two inches shorter than the width of the window in which you are going to place it. The width of the box itself may be ten inches, its depth two and a half inches. The ends should be of hard wood, for they have to bear the strain of the strings. In one end put studs or rings or eyes to which are fastened the wires or catgut strings. At the other end should be a corresponding row of violin pegs if you use catgut, or iron piano pins if you use wire. If Pg 364 you do use wire it should be of steel. In the diagram you will see the two bridges of hard wood glued diagonally across each end for the strings to rest upon. If steel wire is employed a piece of wire should run along the top of each bridge to prevent the other wires from cutting into the wood. Four holes, each an inch in diameter, in the sounding board improves the harp. The tuning may be harmonics, thirds, fifths, and octaves. Raise the sash of the window, and place the harp so that the wind blows across the strings.
A Home-Made Electrical Machine.—To make a really first-class machine of the modern type would require a good deal of mechanical skill, even supposing my readers to be the happy possessors of the necessary tools and materials; but the older type of machine—though of course not so powerful—will probably do quite well enough for most of their purposes.
I will, therefore, describe one of the simplest forms of these machines, such as any one, with a little care and patience, can make for himself.
The first thing to do is to get a general idea of what you are going to construct, which may be had from the illustration, and from the actual machines you may sometimes see in a shop window or in a scientific collection, like the Science Departments of the South Kensington Museum. It is the making of the cylinder machine we are going to work out, and, therefore, to begin with, the glass cylinder must be procured. This can be had from a dealer in chemical apparatus and costs only a few pence for the smaller size—about 3 inches by 6 inches. At the same time purchase a round glass rod, 3/8 inch diameter by 5 inches long; a sheet or two of tinfoil, and sixpennyworth of amalgam. From a carpenter or timber-merchant you will require a base-board for the machine, say 13 inches by 8 inches, by 1 inch thick, and of heavy wood; also two uprights, which are to stand on the base-board to support the cylinder. These may be 6 inches tall, by 2 inches by ¾ inch.
Having now the principal parts of the frame, the work of fitting together can be begun by making a circular hole (centre about 1¼ inches from the end) in one wooden Pg 366 upright, to take easily one of the projecting glass pieces, or pivots, at the ends of the cylinder—probably ¾ inch diameter will do. This hole may be made with a brace and suitable bit, or failing that, with a round chisel—taking care not to split the wood. In one end of the other upright cut a slot of same width as the hole, the bottoms of both being on the same level. Then rest the two glass pivots in the hole and slot, holding the uprights vertically on the base-board, when the cylinder should be quite horizontal. If it is not so, deepen the slot, or shorten either upright, as required. Drill a hole through the two sides of the slot at the top, and insert a round nail to keep the pivot from having too much play.
It will next be necessary to secure these supports to the board, which may be done by driving stout screws from below, together with the aid of some strong glue. If you have the skill it will be better to sink the supports ½ inch into the surface.
The position should be such, that the cylinder is not quite over the middle of the board. (See illustrations.) Next remove the cylinder by a little side working, and screw a piece of wood, 1½ inches by ¼ inch by about 7 inches, to the supports and base. This is to act as a brace to the supports, and also for holding tightening screws for the rubber.
We now come to the preparation of the rubber, which is an important detail. Get a wooden block 1¼ inches by ½ inch and 1 inch shorter than the cylinder. Smoothe off all the corners, and glue on one long edge, a piece of thin leather (chamois will do); fold over the flat side, and then glue it again at the other long edge; double it back loosely, and glue again in original place. This should make a sort of bag on one side of the block, which should now be stuffed with dry wool or hemp, and the two ends fastened down. A piece of black silk, about 5 inches by 9 inches, must be attached to the bottom edge.
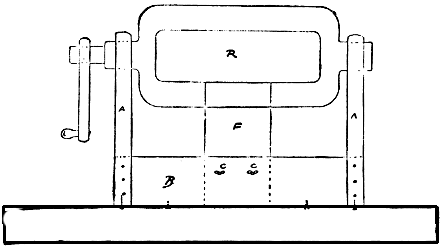
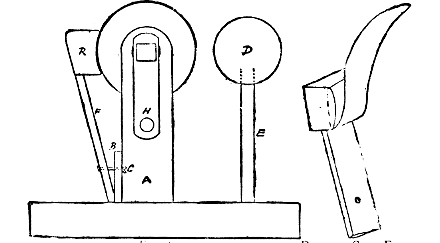
Now place the cylinder on its bearings, and press the rubber against the middle of one side, which will show what length to make the rubber stand. The thickness may be ¼ inch, and the breadth 2 inches; one end being screwed to the rubber block at the back, and the other resting on the base-board, but attached to the brace piece by two bolts with adjustable nuts. These you can get at an ironmonger’s—thumb nuts are preferable, as they can be tightened up without pliers.
As this board will be on a slope, the cushion block must be bevelled off with a chisel, so that it may rest “squarely” against the glass. The adjusting screws will enable the pressure on the glass to be regulated. Be careful to see that the silk flap (attached to the bottom edge of the rubber) comes between the leather and the cylinder, and then folds over the cylinder to about the middle of the opposite side.
We next come to the “prime conductor,” which is a piece of rounded wood, 2 inches in diameter and 1 inch less than the length of the cylinder. The end corners must be made round with a knife and sandpaper, so the whole surface may be quite smooth. Then lay on evenly with paste, a sheet of tinfoil, notching it so that it may fold nicely over the spherical ends, and take out any ridges by rubbing with the knife handle.
An insulating support must be given to the conductor, as it is to hold the accumulated electric energy, and for this the glass rod above mentioned is required. Make a suitable hole in one side of the conductor, and in it fix one end of the rod with cement. The other end can be fixed to the base-board in the same way; or a separate stand may be used; but before doing this, drive a horizontal row of strong pins along a side of the conductor, at right angles with the rod. These should be ¼ inch apart, starting and finishing ¼ inch from where the surface becomes spherical at the two ends; the heads should be cut off previously with pliers, and the external length, when driven into the wood, should not exceed ½ inch. Now erect the conductor, and see that the rod brings it level or thereabouts with the centre line of the cylinder-side. The points should not quite touch the latter; and the silk flap must not hang down far enough to come between.
There remains now but one piece of mechanism to construct—the handle. This is apt to give trouble at first, Pg 369 but with care may be successfully completed. A short piece of hard wood (say 2½ inches long), half of circular and half of square section, must be procured, and the rounded half cemented into one of the glass pivots. This must be done with good cement and both the glass and wood warmed, and cleaned first of all. Be careful not to crack the glass by too rapid heating. A thin layer of cement is best, while, of course, the wooden rod ought to fit closely. The square end now projecting must be provided with a handle, the making of which will serve to pass the time during which the cement is drying. Cut a square hole to fit the end in a piece of wood say ¼ inch by 2½ inches by 1 inch, which is the handle shaft. Pass a bolt through the lower part and secure the handle-bobbin itself by a nut. If nothing else can be got, a cotton-reel makes a fair handle when the flanges are cut off. If the nut works loose, pinch the threads at the end of the screw, or add a “lock nut”—i.e. an extra nut. Dry the cylinder and put a wooden stopper in the other glass pivot to keep out damp.
Take care to have the handle on the right-hand end of the machine when the rubber is closest to you and the conductor opposite; notice also that of the supports the slotted one should now be on the left-hand side.
All the woodwork, as well as the ends and pivots of the cylinder, and the glass rod should be painted with shellac varnish, which may generally be had ready mixed from paint merchants, or may be made at home by dissolving shellac in methylated spirits. A stick of red sealing-wax gives a more pleasing colour for the glass work if added to the shellac solution.
All through the construction of the machine must be borne in mind the fact that rough edges or points “attract” away the electricity, and, therefore, all the edges and corners must be well rounded off and smoothed with sandpaper, and everything must be kept clean and free from dust.
When the shellac is dry, let all the parts, especially the rubber, cylinder, and rod, have a good warming before the fire. Then fixing the cylinder in its place, press the rubber firmly against it by means of the adjusting screws. Pg 370 After turning for a few minutes, the handle should become stiffer, and a small spark be obtained on touching the conductor. If not, tighten up the screws a little more. It is also advisable to lay a little amalgam with tallow on the rubber, between the silk and the leather: a piece of tinfoil is also said to be of advantage when amalgam is not handy. Sometimes, too, a wire connection from the back of the cushion to a neighbouring gas or water pipe helps the success of the machine, but if proper attention be paid to warming and cleaning and the avoiding of edges and corners, success is almost certain after a short time. A delicate test is to observe whether a thread is attracted by the conductor, and if so, a spark may be soon looked for.
An iron clamp or two will be found of great assistance for holding down the base-board to the corner of a table.
The Indestructible Candles.—When a candle burns, the matter of which the candle is composed, is not lost nor destroyed. It is simply changing its form, and every part of it may be accounted for.
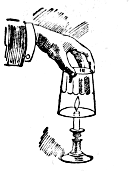
If we take a cold clean tumbler and hold it over the flame of the candle (Fig. 1) we shall see that the inside becomes moist with water, and on touching it our fingers are made wet. On the tumbler becoming warm, this moisture disappears. If we could surround the tumbler with an ice jacket, we should see the water from the flame of the candle dripping down, and if this were caught in a vessel we could obtain from an ordinary candle about a wine-glassful of water. We may therefore produce water from a burning candle. The cause of the water being formed is that there is in the fat of the candle, as one of its constituents, hydrogen, and as the candle burns, this unites with the oxygen of the air to form water. Wherever water is found it always consists of hydrogen and oxygen in combination, and of nothing else.
Presence of Hydrogen Proved.—We may prove the presence of hydrogen gas by bringing a lighted taper within two or three inches of the wick of a candle just after it has been extinguished. On holding the lighted taper in the stream of smoke coming from the wick, we shall see a tiny flame run down the smoke and re-light the candle. The hydrogen gas coming from the hot fat is being carried off in the smoke. It is very inflammable, and the flame from the taper ignites it, and in turn rekindles the candle. When the stream of smoke has ceased, it does not matter how near we hold the taper to the wick without actually touching, it will not be re-lighted. (See Fig. 2.)
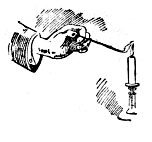
The Hydrogen Located.—A still better way of showing the presence of this gas is by bending a piece of glass tubing of small-bore, into the shape shown in Fig. 4.
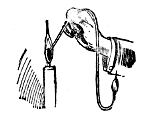
Glass tubing may be bent easily to any shape by holding it in the flame of an ordinary gas burner. The tube becomes covered with soot, and this prevents its getting hot too rapidly, and so enables the tube to bend easily and evenly. The bending must never be forced, but very gently done as the glass softens. (See Fig. 3.) A little practice will enable any boy to make a first-rate bend.
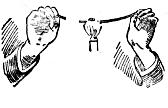
On carefully observing the flame of the candle we shall see that it really consists of three distinct parts. Round the wick it looks black, this is really a hollow chamber filled with unconsumed hydrogen. Next to this is a bright luminous cone, and outside of that is an almost invisible covering of blue flame. In the black space gas is unconsumed, in the luminous part the combustion is only partial, but outside of all, where there is most oxygen, the combustion is complete, and the flame can hardly be discovered. Now when the flame is quite steady the tube must be gently inserted at an angle into the black cone; after a few minutes, on applying a light at the end of the tube, although the candle is still burning, we shall see that this free hydrogen will burn there too with a small bluish flame.
The Candle’s Carbon.—As the candle burns, another part of its constituents is passing off into the air as soot or carbon, and this can be shown by holding a sheet of white paper or cardboard in the top of the flame, or better still, a cold saucer, on which there will be a copious deposit of black soot. This is another proof that as a candle burns it is not destroying matter, but only changing its form; from the white fat of the candle, black sooty carbon Pg 373 is liberated by the process of incomplete combustion that is going on. (See Fig. 5.)
Carbonic Acid Gas.—When substances containing carbon are burnt, one of the products is an invisible gas, commonly called carbonic acid gas. After an explosion in a mine, all the workings are filled with a deadly gas, which often kills more men than the explosion. This is called choke damp, and is the same as carbonic acid gas. Whenever a fire burns—gas, lamp, coal fire, or candle, this gas is one of the products. Let us fasten a piece of wire round our candle, and, after lighting it, lower it down into a glass bottle with a wide mouth. At first the candle burns dimly, and then, when a current of air is established, brightens. Now cover the mouth of the jar with a piece of card or the hand, and we shall see that the candle again burns dimly and quickly goes out. The jar now contains a considerable quantity of this carbonic acid gas. We may prove its presence by pouring into the jar a little clear lime-water and shaking it up. The carbonic acid gas will turn the lime-water milky. (See Fig. 6.)
Lime-water can be purchased at any chemist’s very cheaply, or it can be made by pouring water on a piece of quicklime, well shaking it, and then allowing it to settle. The clear lime-water may then be poured off. The lime may be used again and again until it is all dissolved.
Our Use of Oxygen.—We are breathing out carbonic acid gas; and on breathing through a piece of glass tubing into some of the clear lime-water we shall see that it will be turned milky in just the same way as when the candle burned. We are using up oxygen to support life, the candle uses up oxygen to support life, and in both cases the product is carbonic acid gas, as we have proved by means of the lime-water test. (See Fig. 7.)
Convincing Proof.—All that we have done up to the present supports our statement that the matter of the candle is not destroyed. In fact we have accounted for all its parts excepting that of a little mineral ash which will be left after the candle has burned away. We may, however, show in a very convincing way that our contention is true. An ordinary gas chimney is obtained, Pg 374 and at about three inches from one end a piece of wire gauze is placed, and the open end filled up with quicklime, at the lower end a cork is fixed upon which a short piece of candle is placed. There must also be a hole in the cork for the admission of air; when all is ready, carefully counterpoise the scales. Then remove the cork and light the candle and quickly replace. After burning a short time it will be found that the chimney glass bears down the beam because of increased weight. The products of the burning candle have united with the oxygen of the air, and these products, consisting chiefly of carbonic acid gas and water, have been caught by the quicklime. Because of the added oxygen they are heavier than the original candle. (See Fig. 8.)

Capillary Attraction.—There is still one interesting thing to illustrate about the burning candle, and that is the way in which the particles of fat ascend the wick to reach the flame. This is accomplished by what is known as capillary attraction. A very good illustration of this is afforded by a piece of salt standing upon a plate, on which is poured some salt water coloured blue with indigo or ink. The liquid will rise up the pillar of salt, and eventually reach the top. It rises by the force of capillary attraction. Let the pillar of salt represent the wick of the candle, and the coloured water, the fat, and the illustration is complete.
Analysis of Candle Flame.—Our candle can still give us some useful and suggestive illustrations of flame and combustion. We have seen that unconsumed gaseous vapours can be obtained from the flame by means of a bent glass tube. In the candle flame (Fig. 9) we see that this is because of the way the flame is built. The part marked o is the gaseous chamber, i is the luminous part, and e is where combustion is complete. On taking a sheet of clean white paper and pressing it down on the candle flame for a moment or two we shall get the fact of this hollow chamber demonstrated by the smoke ring upon the paper, which will appear thus—
The paper is left clean at the hollow chamber, but marked with smoke at the luminous part of the flame. (See Fig. 10.)
Now we must find the differences between the non-luminous outer flame and the luminous inner flame. To do this thoroughly we must have a Bunsen burner to afford the best illustration. This is not an expensive item. A cheap and simple form of it can be obtained for 1s. 3d. To understand the nature of the flame we must first understand the principles of the Bunsen. It is a burner in which a mixture of air and gas is consumed. A is a brass tube, mounted on a solid foot K, with a small tube C to admit the gas. There are two holes at the bottom of the brass tube to admit air in the direction of the arrows, and a movable brass collar fits over these holes, so that the air can be admitted or excluded at will. On igniting the gas, with the holes of the Bunsen open, we shall see that it burns with a non-luminous but exceedingly hot flame. On closing the holes we shall notice that the flame becomes luminous, much more languid, and does not give off nearly so much heat. (See Fig. 11.)

We must ask ourselves the question, What is the cause of this difference? The answer is a simple but very instructive one. Coal-gas, like the fat of the candle, contains carbon, and in the luminous flame, owing to the limited supply of oxygen, these particles of carbon are made white hot, and so emit light, but are not entirely consumed till they reach the outer edge of the flame, where combustion is more complete, owing to the contact of the flame with the air, and even then many of them escape; and so where gas is burnt the ceilings after a time become blackened.
In the non-luminous flame, owing to the air being admitted and mixed with the gas, the increased supply of oxygen renders combustion more complete, greatly increases the heat of the flame, but renders it incapable of giving light. Now, the reasons for the differences of the two flames are made clear.
A very clever modification of this principle has been utilised in what is known as the Argand burner, in which the gas and air are not mixed as in a Bunsen, but the burner is made circular, and the air is made to pass up the centre of the flame, so that it gets its supply of oxygen, Pg 377 burns steadily, and presents a very large surface of luminous flame. (See Fig. 12.)
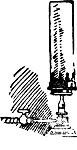
A Pretty Experiment.—Let us now go back to our candle flame. We see that it gives light, emits smoke, and does not yield a very large amount of heat. We have learnt that it gives light because the particles of carbon are heated to a white heat, but not entirely consumed. These particles in the flame are held very closely together, and so present a continuous surface. If we could get inside the flame and scatter them we should have a pretty shower of glowing sparks.
We can illustrate this by the following experiment. Take as much gunpowder as will rest on a sixpence, and a like quantity of iron filings, mix them together on a small tin dish. (See Fig. 13.)
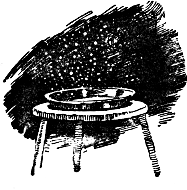
This must be done carefully and without friction. Then ignite with a taper. The gunpowder burns, makes the particles of iron red hot, and scatters them in a beautiful shower of glowing sparks. This is a fair representation of pulling a candle flame to pieces, the only difference is that the glowing particles are of iron instead of carbon.
Artificial Lightning.—This may be further illustrated by putting a flame together. We may accomplish this by passing any very fine particles of carbonaceous matter through a non-luminous flame, and we shall see that whilst these particles pass through the flame it will give light owing to their presence.
We require a little lycopodium, a piece of glass tubing one foot long, and about a quarter-inch bore, and the non-luminous flame of the Bunsen burner or a spirit lamp. Insert into one end of the tube a little of the lycopodium powder, and then, pea-shooter fashion, apply the mouth to the other end of the tube, and blow the contents into the flame. There will be a great flash of light whilst these infinitely small particles are passing through the flame, thus establishing the fact that luminosity is due to the presence of unconsumed solid matter in the flame. This experiment is sometimes called “making artificial lightning,” and in a dark room it is very effective. (See Fig. 14.)
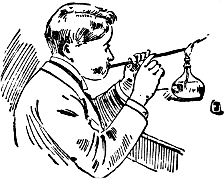
Flames that Laugh.—What makes the candle flame burn steadily is the next problem before us, and we shall see that it is very simple and at the same time most philosophical. It tells us the reason why candles are made round, and not square. The section of a candle being circular, with the wick in the centre, it can, as it burns, get its supply of oxygen from all directions at an equal distance; thus it burns regularly and steadily. If the candle were square, the four corners being at a greater distance from the wick than the sides, we should have four columns of fat standing up at the corners, and as the air rushed in to feed the flame it would come into contact with these, and so the current would be broken and the flame would become unsteady. We can show this by placing some cotton wool on tin dishes, and saturating it with methylated spirits and igniting it. This will give us what are known as laughing flames, because they burn so unsteadily. The air rushing in to feed the flame comes into contact with the wool, which impedes it, and so the flame has a dancing or laughing appearance. This experiment may be made very pretty by rendering the flames coloured. To do this add to the cotton wool, before pouring on the methylated spirit, chloride of copper; this will give a green flame; to another, chloride of strontium; this will colour the flame red; to another, common salt; this will give a yellow coloration. All these should be shown in a dark room.
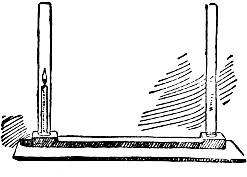
The Importance of Oxygen.—By previous experiment we have seen that oxygen is necessary to a flame, and our ingenious readers may now make a piece of apparatus to prove this. (See Fig. 15.) It consists of two pieces of glass tube standing upright near the two ends of a board, in which there is a covered channel communicating with the two. A small candle is lighted and placed in one of the tubes. The air heated by the flame rises in the tube and causes a corresponding descent of cold air down the other tube. This gives us a good illustration of ventilation produced by artificial heat. So great is the down draught, that if we hold a lighted taper over the mouth of the cold tube the smoke and the flame will be carried down, with the result that the candle is soon extinguished. The Pg 379 reason for this is that the smoke and burnt air from the taper contain insufficient oxygen to feed the candle flame, and it dies. To make this apparatus, obtain a piece of deal board about ten inches long and four inches wide, cut along the middle a groove about three quarters of an inch deep, and about the same width, leaving about half an inch at each end uncut. Cover this groove with a tightly-fitting slip. Over the two ends of the groove are fastened two small blocks of cork pierced with apertures, into which fit the vertical glass tubes; these should be about ten inches high and about three-quarters of an inch bore. Fig. 16, which is a section of one end of the apparatus, shows how a small candle like those used on Christmas trees is held erect by a wooden socket at the end of the groove so as not to impede the current of fresh air.
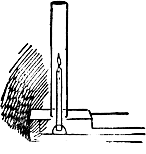
Rates of Combustion.—We must remember that all things do not burn at the same rate. Iron rust is a product of very slow combustion. In using up food to maintain the heat of the body, combustion goes on more quickly than in rusting iron, the candle burns more quickly still, gas still faster, the Bunsen burner faster still. We may get an idea of the different rates of combustion by the two following experiments. On a tin dish place half a thimbleful of gunpowder and lay on it a tiny piece of gun-cotton. Ignite the gun-cotton; it burns so fast that it has no time to set fire to the gunpowder, which may now be ignited in its turn by the taper. Another example is the laying of two long trains of gunpowder, one fine grain and the other coarse. It will be found that the two flames travel at very different rates along the same path.
The Egg and Bottle Trick.—An ordinary water-bottle, a hard-boiled egg, divested of its shell, and a piece of thin paper are all that is requisite. How can we make this egg get inside the bottle? Light the paper, quickly thrust it into the bottle, and immediately place the egg over the mouth of the bottle, gently pressing it closely down to the glass. The burning paper consumes some of the air, a partial vacuum is formed, and air pressure will force the egg into the bottle with a loud detonation. (See Fig. 17.)
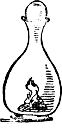
Making Water Boil by Means of Coldness.—Heat some water to boiling in a glass flask over a spirit lamp. After the water has boiled for a minute or two, quickly insert a well-fitting cork, and remove the flask from the flame. Wrap a duster or towel round the neck of the flask, and, holding it over a basin (in case of breakage), pour gently a stream of cold water on to the flask. The steam inside is condensed, a partial vacuum is formed, and as long as any heat remains in the water, it will boil, whilst the stream of cold water is continued on the outside. When ebullition no longer occurs, it will be found that the cork is held in so tightly by air pressure that it is very difficult to draw it. (See Fig. 18.)
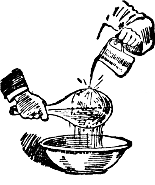
Fire Designs.—This is very simple, amusing, and effective. Make a saturated solution of nitrate of potash (common nitre or saltpetre), by dissolving the substance in warm water, until no more will dissolve; then draw with a smooth stick of wood any design or wording on sheets of white tissue paper, let it thoroughly dry, and the drawing will become invisible. By means of a spark from a smouldering match ignite the potassium nitrate at any part of the drawing, first laying the paper on a plate or tray in a darkened room. The fire will smoulder along the line of the invisible drawing until the design is complete. (See Fig. 19.)

The Magic Wine Glass.—The holding of a wine-glass to a substance mouth upwards without its falling off, may be accomplished thus. Obtain a wine-glass with a very even edge (this may be done by grinding on a flat stone), a square of blotting-paper, and a piece of glass. About half fill the glass with water, place upon its rim the blotting paper, and then the piece of glass. Whilst pressing them closely down invert the glass. The blotting-paper absorbs some of the water, a partial vacuum is formed, and on holding the sheet of glass, the wine-glass will remain suspended, being held on by atmospheric pressure. (See Fig. 20.)
The Floating Needle.—The idea of making a needle float upon water at first sight seems an impossibility but it can be done, and that with comparative ease. Take a fine needle, and rub the fingers over it gently to grease it. Now lay it very carefully on a piece of thin tissue paper on the surface of the water, as shown. Presently the paper will sink, and leave the needle floating on the water. The thin coating of grease serves to protect the needle from actual contact with the water, and thus enables it to float. (See Fig. 21.)
A Glass of Water Turned Upside Down.—A tumbler is filled with water, a piece of paper laid on, and the surface and the tumbler deftly inverted, the atmospheric pressure being unable to enter the glass, the water is kept in, so long as the paper holds. The effect of the experiment is very greatly increased, if, instead of using paper, a piece of thin mica, cut to the size of the glass, is used. The audience cannot then discover what prevents the water from running out. Any gasfitter will supply a piece of mica.
The Inexhaustible Bottle.—This wonderful bottle, from which five separate liquids can be poured, owes its marvellous qualities to the application of the simple law of atmospheric pressure. It is made of tin, and encloses five internal cylinders, each of which has a tube from the upper end running into the neck of the bottle, and another tube from the lower end opening into the side. The cylinders are filled with different liquids—water, milk, tea, coffee, lemonade. Whilst the fingers are kept over the holes the bottle may be inverted, and nothing will run out. On opening the holes one by one the liquid may be poured out, according to the wishes of the audience, and greatly to their astonishment. (See Fig. 22.)
The Magic Writing.—Fill a deep tumbler with water, and add a few crystals of iodide of potassium and a few drops of sulphuric acid. The liquid will remain perfectly clear like water. On some strips of white cardboard write various names with starch paste; when dry these will be invisible. On dipping the cardboard into the liquid the name will appear in blue writing, owing to the formation of starch iodide, which is blue. By previously preparing the names of those present at the experiment, by a little manipulation you can, to the astonishment of the audience, produce any name called for.
Producing Smoke at Will.—Two glass cylinders are the best for this, but ordinary tumblers will do. With a separate feather make the inside of each tumbler quite wet, one with hydrochloric acid, and the other with liquid ammonia. Both glasses appear to be quite empty, and nothing occurs. But on bringing the mouths of the two vessels together, a thick white smoke is at once developed. The hydrochloric acid gas and the ammonia gas unite chemically, and form the solid white powder known as sal-ammoniac. (See Fig. 23.)
A Novel Fountain.—This is a pretty experiment, and owes its action to the fact that ammonia gas is very soluble in water. In a basin place some water. Fit up a flask with a small-bore glass tube, about eighteen inches long, as shown. The end entering the flask should be drawn out so that there is only a small opening. In the flask Pg 384 place about a teaspoonful of liquid ammonia, and heat it over a spirit lamp. As soon as the liquid boils a large amount of ammonia gas is disengaged, and fills the flask and the tube. Now close the tube by means of the finger, and invert the flask over the basin of water. When the end of the tube is under the water remove your finger, and then, as the water dissolves the gas, it will rise in the tube, and will presently play into the flask like a fountain until the flask is full. (See Fig. 24.)
To Boil Water in a Paper Bag.—“Here is a sheet of note-paper; can you boil me a little water in it?” This would appear to be a thorough puzzler, yet it is exceedingly easy to do. Fold a piece of paper so that it will hold water, now suspend it above the flame of a lamp. The water will so readily take up all the heat that there is none left with which to burn the paper, and presently it will bubble and give off steam. (See Fig. 25.)
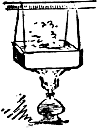
Illuminated Water.—Wet a lump of loaf sugar with phosphorized ether, and throw it into a basin of water in a dark room. The surface of the water will become luminous. Blow on the water, and you will have phosphorescent waves, and the air, too, will be illuminated. In winter the water should be warmed a little. If the phosphorized ether be applied to the hand or to other warm bodies these will become luminous. The ether will not injure the hand.
Brilliant Crystals.—Spread upon a plate of glass or upon a smooth slate, a few drops of nitrate of silver, previously diluted with double its quantity of soft water. Place at the bottom of it, flat upon the glass, and in contact with the fluid, a copper or zinc wire, bent to any figure, and let the whole remain undisturbed in a horizontal position. In a few hours a brilliant crystallization of metallic silver will make its appearance around the wire upon the glass, and this arrangement of crystals will extend gradually till the whole quantity of fluid has been acted on by the wire.
A Well of Fire.—Add gradually one ounce, by measure, of sulphuric acid, to five or six ounces of water in an earthenware basin; and add to it also, gradually, about three Pg 385 quarters of an ounce of granulated zinc. A rapid production of hydrogen gas will instantly take place. Then add, from time to time, a few pieces of phosphorus of the size of a pea. A multitude of gas bubbles will be produced, which will fire on the surface of the effervescing liquid; the whole surface of the liquid will become luminous, and fire balls, with jets of fire, will dart from the bottom through the fluid with great rapidity and a hissing noise.
The Writing on the Wall.—Take a piece of phosphorus from the bottle in which it is kept, and, while the room is lighted write upon a whitewashed wall any word or sentence, or draw any object. Now put out the light, and the writing will appear in illuminated letters. Care must be taken to dip the pencil of phosphorus in cold water frequently while you are using it. Otherwise it will burn.
To Make a Ghost.—Put one part of phosphorus into six of olive oil, and let it dissolve in a slightly warm place. Shut your eyes tightly and rub the mixture upon your face. In the dark your face will be luminous, your eyes and mouth like dark spots. Altogether you will have a very ghastly appearance. There is no danger in the experiment, and the effect might be useful in charades or home theatricals.
A Seeming Conflagration.—Take half an ounce of sal-ammoniac, one ounce of camphor, and two ounces of aqua vitae. Put them into an earthen vessel that is small at the top. Set fire to the contents, and the room will seem to be on fire.
Three Haloes.—One of the pleasing experiments of Dr. Brewster was to take a saturated solution of alum, and having spread a few drops of it over a plate of glass, it will crystallize rapidly though the crystals are so small you may scarcely see them. When this plate of glass is held between you and the sun or artificial light, with the eyes very near to the smooth side of the glass, there will be seen three beautiful haloes of light.
Beautiful Crystals.—Pour three ounces of diluted nitric acid into a glass vessel, and add gradually to it two ounces of bismuth, broken by a hammer into small pieces. The Pg 386 metal will be attacked with great energy, and nitrate of bismuth will be formed. Crystallize the solution by a gentle heat, and preserve the crystals, which possess great beauty, under a glass.
The Centre of Gravity.—A shilling may be made to balance on the point of a needle with very simple apparatus. Put a bottle on the table with a cork in its neck; into the cork stick a middle-sized needle in an upright position. In another cork cut a slit, and insert the shilling, then into this cork stick a couple of forks, one on each side, with the handles inclining outwards. Now poise the rim of the shilling upon the point of the needle, and it will rotate without falling. So long as the centre of gravity is kept within the points of support of a body it cannot fall. The balancing shilling may be transposed to the edge of a bottle, and it will still perform, even as the bottle is being tilted.
What a Vacuum Can Do.—Take a new or nearly new penny and rub it briskly upon your coat sleeve until it is warm. Then slide it up and down upon a door panel, pressing it closely to the wood. Now hold it in one place for a few seconds and you will find it will stick there, because between the penny and the surface of the door there is a layer of air which was slightly heated. As it became cool a partial vacuum was formed, and the pressure of the outer air held the penny to the door.
An Experiment in Leverage.—It would seem almost impossible that a column of iron or a plank or a spar of any kind could be so placed that one end of the spar needs support only, whilst the other end would extend from, say the edge of a precipice, horizontally into space; but that such can be done is very easily demonstrated, by very simple materials almost always at hand. By adopting the principle we may easily perform an interesting scientific parlour experiment, which always causes difficulty to the non-studious section of humanity, until the apparent mystery is explained.
In illustrating this experiment the prongs of two ordinary table forks are fastened together, one over the other—net fashion—thus causing the handles of the forks to form Pg 387 the termini of an angle of about 45 degrees. Now take an ordinary lucifer match and place one end between the network of the prongs firmly. Then place the other end of the match upon the edge of an elevation, such as a tumbler or cup, when the match, acting as a lever, with the forks giving a hundred or a thousand times additional weight to the lever, will rest (or apparently float in the air) without further support.
Ask your friends to try the experiment, after placing the materials before them, and find how many can perform it without guidance.
Coloured Fires.—It is perilous to make some coloured fires, especially those in which there is sulphur, and even if they do not explode their fumes are harmful, so that their use in the house for charades or other home purposes is objectionable and at times positively dangerous. We give, however, a number of coloured fires that are free from these drawbacks, though all the same it is wiser to reduce the ingredients to powder quite separately before they are mixed, and if a pestle and mortar are used all traces of one powder should be removed before another is introduced. Each ingredient should be reduced to a fine powder.
| Red Fire. | |
|---|---|
| Parts. | |
| Strontia | 18 |
| Shellac | 4 |
| Chlorate of Potash | 5 |
| Charcoal | 4 |
| Green Fire. | |
| Nitrate of Barytes | 18 |
| Shellac | 4 |
| Calomel (Chloride of Mercury) | 4 |
| Chlorate of Potash | 2 |
| Green Fire. | |
| Nitrate of Barytes | 9 |
| Shellac | 3 |
| Chlorate of Potash | 12 |
| Charcoal | 4 |
| Blue Fire. | |
| Chlorate of Potash | 14 |
| Salpetre | 6 |
| Ammonia Sulphate of Copper | 6 |
| Arsenite of Copper | 6 |
| Shellac | 2 |
| Blue Fire. | |
| Ammonia Sulphate of Copper | 8 |
| Chlorate of Potash | 6 |
| Shellac | 1 |
| Charcoal | 2 |
| Red Fire. | |
| Nitrate of Strontia | 9 |
| Shellac | 3 |
| Chlorate of Potash | 1½ |
| Charcoal | 4 |
It may be that some of these toys would amuse only little boys, but we have included them because our directions will enable older boys to entertain their little sisters and brothers.
How to Make Fire Balloons.—You will require for materials, tissue paper, which may be all white, or varied in colour. A balloon of white and red gores alternately is perhaps the best, as it may be used day or night; and as the balloon is constantly turning when it is in the air, the stripes add to the effect. Then again there are conditions of the clouds and atmosphere when a white balloon ascending by daylight would be scarcely visible, and for parachute purposes a daylight ascent is desirable. Tissue paper, then, paste, bonnet wire or cane, finer wire; some tow, cotton wool, or common sponge, or better than all, some round lamp-cotton, and methylated spirit or tallow, as fuel for your furnace.
The shaping of the gores which are to form your balloon must be your first consideration. You will find it advisable not to go in for overgrown balloons. They are far more troublesome to build, and to manage when they are built, and are little if any more effective than those of moderate dimensions. About four feet in height is the size which produces the best results, and in making it one is neither cramped for room, nor are the gores of unmanageable proportions.
Twelve or fourteen gores, if you use two colours, or thirteen if you confine yourself to one, will be needed; and it will be wise not to attempt to emulate the graceful pear-shape of the ordinary passenger gas balloon, but to aim at something approaching much nearer to a ball in form. Pg 390 The pear-shaped balloon would take fire to a certainty. Fig. 1 is an example of the unsafe form which is to be avoided; Fig. 2 is a perfectly safe model.

A piece of common cardboard or stout brown paper, six feet in length and a foot in width, will serve for a pattern gore. Fold it exactly in half lengthwise, and then mark off each foot, beginning at the bottom (Fig. 3). At a measure off horizontally 2 inches; at b, which is the first foot, 3½ inches; at c, 5 inches; at a point 4 inches above d, the third foot, measure off 6 inches; at e 5½ inches, marking each point. Then connect the points by as graceful a curve as may be, and cut through the line thus obtained, unfold the pattern, and you have your standard gore.
Sufficient tissue paper should have been pasted together by the narrow edges from which to cut the 12, 13, or 14 lengths of 6 feet each. The sheets should now be placed one upon the other, and the pattern being opened out and laid upon the top, the whole of the gores may be cut at one operation.
Fold a gore in half lengthwise and lay it upon your table or the floor, and upon this place a second about half an inch Pg 391 within the margin of the first (Fig. 4). With a stiff brush—sable is the best—paste the protruding edge of the lower gore, turn it over the edge of the upper and smooth it down with a duster. If you have a warm flat-iron by your side, and laying a piece of flannel or cloth over the join, you run the iron carefully along, the paste will dry at once and all fear of puckering or displacement will be obviated. Fold the upper gore lengthwise as you did the lower, and proceed in the same way with the remainder of the gores until the whole have been pasted (Fig. 5). If your balloon is a very big one it will be advisable to lay a string inside each seam as you paste it, leaving the ends long enough to tie round the hoop which is to go at the bottom or neck of your balloon.
A piece of bonnet wire or split cane 5 feet long, bent to a circle, will form this hoop, and this must now be pasted at the bottom, and the neck may be strengthened by pasting inside a strip of stouter paper, such as foolscap or cartridge, snicked with the scissors so that it may take the right shape readily.
Now a circular piece of stronger paper, “curl” paper for instance, about 9 inches or a foot across, should be pasted over the top to cover the hole where the points of the gores approach each other, and to this should be pasted a piece of yet stronger paper, writing paper for instance, to form the loop by which the balloon is to be supported during the process of inflation. The handle of a saucepan-lid should be the model to be followed.
This is the method to be adopted if you want to produce a balloon of a shape which will bear criticism, but if you are not particular in this respect, a rough and ready gore may be made by a much simpler process. You have only to take four sheets of tissue paper and paste them together by the narrow edges. Then trim off the two outside sheets as shown in Fig. 6, and from the pieces so trimmed off, add a small piece at the top A, and there is your pattern gore in a little less than no time. You can then paste several together as already directed, arranging the number as you wish your balloon to be pudgy and safe, or lanky and dangerous.
The next thing is to provide the means of ascension.


Lamp cotton is the best material for the wick, though any of the other substances already mentioned may be used if this is not come-at-able. It may be saturated with methylated spirit, or, if the material is easily accessible, melted tallow. In the latter case the wick should then be sprinkled with turpentine that it may catch fire readily. The tallow gives the best light, and lasts the longest.
Two pieces of thin wire should be attached to the hoop as shown in Fig. 7, W W, and your ball of lamp-wick is to be placed in the centre, L W. The placing of the wick is the last operation, but of course, it will have been prepared beforehand. It is simply a loosely rolled ball of lamp-cotton through which a piece of fine wire has been passed and the ends formed into hooks (Fig. 8). The size of the ball must be governed by the dimensions of the balloon and by your ambition as to the height to which it is to rise. The wick may easily be made large enough to carry the balloon out of sight altogether, especially if tallow be used.
In this case the wick should have been saturated with melted tallow beforehand, but where methylated spirit is used the proceedings must be delayed till the moment of ascension.
With a fan—a folded newspaper will do as well as anything—fan the balloon full of air to start with. Then your assistant must elevate the balloon to the right height by the aid of a smooth stick inserted in the loop, and he must stand on something to raise him to the right level.
Now the air in the inflated balloon must be warmed by holding beneath it a paper torch, care being taken that no flame touches the balloon, or it will be shrivelled up by the fire in a moment and your labour wasted.
Another assistant meanwhile should have been looking after the methylated spirit—if you use the tallow you can do without him. The spirit should be kept in a closely corked bottle and as far from your paper torch as possible. When the balloon begins to try to rise give the word to assistant No. 2, who will pour some of the spirit into the jam-pot in which the wick is lying, wait till it is saturated, and then, taking it from the jam-pot, run with it to the balloon and attach it to the cross wire by the hooks. Pg 395 Directly it is in position, give the word to assistant No. 1 to let go; touch the wick with a light, and up will sail the balloon into the air. A windy day should, naturally, be avoided, or your balloon is not likely to proceed far on its journey in safety.
But a good deal more is to be got out of a fire balloon than a mere ascension, and even the mere ascension may be improved. You may, for instance, attach a car to the balloon (Fig. 9) and a couple of figures A A—it matters little how rough they are—will, very shortly after the liberation of the balloon, look so natural that the balloon will be taken for the real thing. When it has mounted but a little distance there is nothing by which its size may be compared, and if netting is imitated by lines drawn with a pen and ink, the illusion will be yet more complete.
The car may be made of a square of writing paper with the four edges folded over equally all round. The corners should then be pinched together, folded over as in the illustration, and secured with a little paste.
A parachute may be dropped “from the clouds.” This may be simply a square of paper with a string at each corner and a figure hanging on at the ends (Fig. 11). The figure may be as rough as you like, detail would be lost. Or, two squares of paper may be used, the strings being crossed over the lower and kept in place by the upper, which should be pasted upon it (Fig. 15).
A more elaborate parachute may be made by folding a square of paper from corner to corner into a triangle. This should be folded again and once again from corner to corner when it will take the shape of Fig. 12. A cut through the dotted line and a couple of holes pierced at the dots will give, when opened out, Fig. 13; and a string passed through each hole and made to carry a car will give the complete parachute (Fig. 14).
A piece of cotton or twine should be passed through the parachute to attach it to the balloon. Then a piece of wire should be twisted and bent, as in Fig. 10, w. Fasten to this with thin wire a piece of time-fuse, t f, turned up as shown, and to the bend b attach the cotton. At the moment of ascension, light the top end of the fuse Pg 396 at a, and when it has burned to b the parachute will be liberated.
Fireworks may be lighted in the same way. You will need time-fuse, quickmatch, and such fireworks as you prefer. Blue lights, squibs, and fireworks of that description should be arranged as in Fig. 20. Here c is a cork or bung with holes bored in it for the insertion of the fireworks f f f f. Q is the quickmatch which is to light them simultaneously when the time-fuse, t f, has burnt far enough. A catherine wheel may be pinned at the bottom of the cork and connected with the quickmatch, or the pin may be dispensed with, when it will whizz through the darkness in grand style.
One of the most successful effects may be obtained with the balls or stars from Roman candles. You can, of course, pull the candles to pieces, but a better plan is to buy the balls at 6d. a dozen.
Bend a piece of wire into a circle (Fig. 16) and take two wires across at a right angle. Then place the balls, one by one, in pieces of tissue paper and cover them with meal powder and tie up the ends (Fig. 17), fastening them on the wire, as shown in Fig. 16. A piece of time-fuse, or quickmatch, q, as you want the stars to drop singly or in a shower, must next be passed through each ball packet and connected with lighted time-fuse. Of course the fireworks should hang some distance below the balloon. Crackers or maroons may be arranged as in Figs. 18 and 19, and many other devices invented.
Your balloon may also carry up a piece of magnesium wire with which the country may be lighted up, or it may take up a Chinese lantern—in fact there is no end to the fun which may be got out of it. You will find it difficult, however, to get an effect to beat the Roman candle balls.
Quickmatch costs 2d. or 3d. a six-feet length, according to the thickness required; time-fuse one penny an inch.
Bubble Balloons.—One reason for the short life of the bubble as usually blown is the excessive evaporation which takes place from the large surface presented to the air. As this evaporation of the fluid goes on, the film gets thinner, the tension gets more acute, accompanied by ever Pg 397 changing and brightening hues of colour, until the thin walls can no longer bear the strain, and the bubble bursts into fine spray. Another, perhaps, more powerful reason is the unequal strength of the walls, due to the drainage of the moisture from the upper parts of the bubble into the lower parts by its own weight. This produces a weak and thin area, denoted by the refraction of the blue rays of light in the top of the bubble, and it cannot resist the pressure from within. There are two ways of prolonging the life of a bubble. When the breath is first driven into the liquid, the force used is sufficient to send the fluid surging in all directions, and the film is fairly well nourished. Presently as the soapy water dipped out by the bowl of the pipe gets distributed over the walls of the bubble and it increases in size, this no longer acts, and drainage from the top at once sets in. If the blowing is now continued, the end so much the more quickly approaches. To enable you to continue enlarging the bubble and lengthen its life, feed it. This may be done readily and safely, by dipping a camel-hair brush in the soapy emulsion and, letting it touch the bubble at the top, when the fluid will stream down over the surface, thickening the film, and permitting you to get a bubble as big as your hat.
This is only a temporary expedient, a flank movement, and merely defers the end by a minute or two. To attack the difficulty with more success, change the mixture. Shred some Castile soap, which may be purchased by the pennyworth at the chemist’s, and beat up in the usual way with water; you will find that much more can be done with this preparation than the usual household soap. If your aim is merely to produce an overgrown, sagging, wobbling bubble, feed with a brush as above. For further experiments do not blow large unmanageable ones, but an ordinary sized bubble blown in this liquid will enable you to show its toughness, length of life, and other qualities. If your coat is made of a woollen fabric, release some bubbles on the shoulder; they will roll down the sleeve and tumble off to the floor, if they do not meet with any cotton fabric on the way; This is due to the repulsion which exists between wool and the watery film, doubtless due to the Pg 398 presence of fat in some form upon the fibres. While upon the sleeve they may be carried about the room, or passed from one person to another. This repulsion may be further utilized, too, and the bubble treated as a shuttlecock.
To do this, procure the ordinary wooden bat used by your sister for the game of bat and shuttlecock. Cover it with a piece of flannel, fine or coarse will do. Then blow a bubble not too large, so that the film shall be robust and heavy. Such is the toughness of the skin of the bubble, and the repulsion of the woollen surface to the soapy film, that it may be batted nearly two hundred times before the collapse takes place. By striking it on the side and getting some work into the bubble, it revolves slowly and the drainage from the upper part is counteracted. Two or more can play thus with the glittering ball, passing it on, or a ring of players may be formed and a stream of bubbles passed round from one member to another. Another form of the game is the keeping up a number of bubbles by the same bat. As the bubbles are very light they fall slowly, and six or eight may be kept up by the player. By having two bats, one in each hand, this becomes a game of considerable skill, and will tax the concentrated attention of the player to the utmost.
Now cut some circular discs out of note-paper about the size of a sixpence, larger rather than smaller. Get a reel of fine white cotton, and pass the end of the thread through the centre of the disc. Tie a knot in the cotton, so that it cannot readily be pulled through the hole. Then dip the disc in the mixture till the paper is wet. Blow your bubble, and before you release it from the pipe bowl, place the dripping disc of paper on the side of the bubble by dangling it from your right hand by the cotton. When it is in complete contact, a slight turn of the wrist releases the bubble from the pipe, and you will find that you have it attached to the paper disc, which in the meantime has sunk to the lowest part of the bubble. It can now be carried about by means of the disc.
There is so much carbon dioxide in the breath that bubbles blown in this way have very little power of rising, as Pg 399 the difference in the heat of the breath does not sufficiently counterbalance the heavier weight of the expired air. By attaching a piece of india-rubber tubing to the stem of the pipe and gas burner, you can get a supply of lighter gas which will make the bubble into a balloon. Having effected this arrangement, dip the pipe in the mixture and turn on the gas. Feed the top of the bubble with more fluid, and when it has reached a size which satisfies you, attach the paper disc as before. It will be an easy task to detach the bubble, which will rise towards the ceiling, until the weight of the thread counterbalances the buoyancy of the gas. It will probably rise to the ceiling, where it is quite safe, as a cushion of air will prevent the bubble striking the surface. Instead of the long thread, make out of the thinnest and lightest paper you can get, a small car, attach cotton to the corners of the car and gather the threads together and tie them so that the car hangs level. Attach this to the cotton which bears the paper disc, and connect the disc with the bubble as before, wetting only the disc. You will have a miniature gossamer balloon. Cut out two small figures of men in paper and put inside the car. Do all this before blowing the bubble. If you have a glass shade, a number of these bubbles balanced by threads may be kept for hours inside. You will find it very interesting to watch the changes of colour in the films as they get thinner through evaporation. To check this, put under the shade a wet sponge, this will moisten the air enclosed in the shade, and prolong the life of the bubbles.
No great skill is required in making the above experiments, and variations of an amusing character can be made by cutting out figures of animals and men and attaching them to the disc in place of the car. If the figures are painted so much better will the trick look. To make the mixture still stronger add nearly half as much again of pure glycerine.
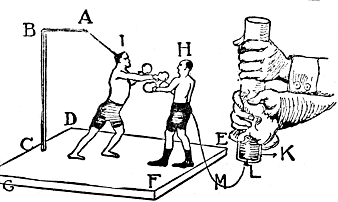
Boxing by Electricity.—A B C is a piece of iron wire inserted in the board D E F G. Cut out the boxer H in cardboard. On one side of this figure paste tinfoil bringing the tinfoil to the other side of the figure just a little at the edges. You will be able to Pg 400 get your tinfoil from the packages of tea, chocolate, tobacco or other source. Fasten the boxer to the board with sealing-wax. Now make the other boxer I in the same way and suspend him from the iron wire by means of thread. Borrow a lamp glass or the chimney from the incandescent gas burner and fit a cork K into the bottom. Through the cork pass a nail L. Connect the nail with the boxer by means of the wire M. Warm and dry the lamp chimney, and rub it with fur or silk. The boxer I will rush at boxer H, then retreat hurriedly, and this will be repeated as long as you rub the lamp chimney. Men, skilled in the science of electricity, will tell you that the reason for these strange proceedings is that the rubbing of the lamp chimney produces electricity; this passes along the wire to boxer H who becomes charged with the mysterious property. This electricity attracts boxer I who goes for boxer H. When he touches he becomes charged with the same kind of electricity and is then attracted no longer but repelled, and he continues to be repelled until his electricity has drained away by the linen thread, wire and board to the earth. Then he is ready for another “round.”
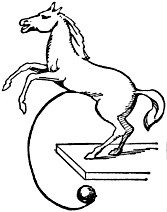
A Prancing Horse.—Carve the figure of a horse, and having fixed a bent wire to the under part of its body, place a small ball of lead upon the end of the wire. Place the hind legs of the horse upon the table, and it will prance to and fro. Sometimes the figure of a man is treated in the same way and in Yorkshire it used to be called a “Saaging Tommy,” to saag being an old word meaning to saw or see-saw.
Boats Made of Pasteboard.—Pasteboard is not a very satisfactory material of which to construct model boats, if these are wanted to sail, but it is possible to make them. The best plan for making pasteboard waterproof is to paint it with a solution of sealing wax. To make this, take sealing wax of the colour you prefer, break it into small pieces and place it in a wide-mouthed bottle. Now pour in some methylated spirits and shake occasionally until the wax is all dissolved. If too thick, add more spirit; if too thin, more wax. Apply with a brush. Owing to the evaporation of the spirit, this paint dries hard and glossy in an hour.
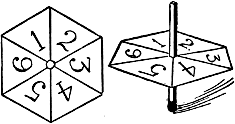
A Simple Top.—Procure a piece of white cardboard, two inches square, and cut it into a sexagon, as shown in Fig. 1. Now bore a small hole in the middle, into which push an ordinary match. You may number the sections of the sexagon and see who scores the highest number, counting the figure resting against the table as it falls. Fig. 2 shows the top complete.

The Apple or Potato Mill.—This is made by boring a hole in a nut, just large enough to pass a thin Pg 403 skewer through; the kernel should then be extracted, and another hole bored in the side of the nut, as in the diagram. A skewer should next be cut large enough at the top to form a head. A piece of string is then tied to the skewer, and passed through the hole in the side of the nut, and an apple or potato stuck on the end of the skewer. The mill should be twirled round in the same way as the humming top to wind up the string, holding the nut stationary between the forefinger and thumb of the left hand. When this is done, the string must be pulled out rapidly, and the mill will spin. Many other toys may be made upon the same principle, and some of these we will now describe.
Whirling Mac.—Our illustration shows how the apple mill may be modified for a whirling Mac. The arms Pg 404 and legs of the figure should be tied loosely to the body and the skirt should be loose too. Tie the string to the spindle inside the nut and have a button on the end of the string so that you may have a firm hold. Now twist the figure round until all the string is wound, then hold the nut firmly in your left hand and draw the string out suddenly and swiftly with your right hand. The figure will whirl round, throwing out his arms and legs. When the string comes to an end slacken it, and the impetus of the figure will cause it to wind the string again. Thus you may go on and on until you are tired.
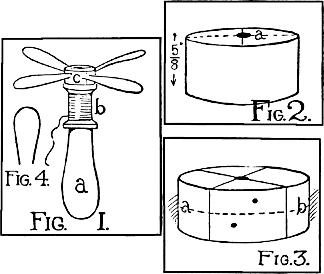
A Flying Machine.—Similar in principle is the flying machine now to be described. In Fig. 1 a is a handle cut in any hard wood four and a half inches long. Into the top of this handle bore a hole down its centre about one inch deep, and force into this a piece of wire so that the wire will be quite firm. This wire should be of iron or steel, with a diameter of one-eighth of an inch, and it should be about three and a half inches long. Pg 405 It will be easier to force the wire into the wood if it is sharpened. The hole you have bored is only an inch deep; force the wire half an inch deeper than that. Obtain now from your mother or sister an ordinary cotton spool about one and a quarter inches long. This is shown at b in Fig. 1. In the same figure c is a kind of wheel made as follows. If you cannot find something ready made take a small piece of well-seasoned wood. Cut it until it is an inch in diameter and five-eighths of an inch deep. See Fig. 2. Down the middle bore the hole a large enough that the wire you put down the handle in Fig. 1 may turn easily in it. Mark the upper surface of the wheel into four equal parts, and then you will be able to draw four perpendicular lines round this wheel at equal distances. Two of these lines are shown in Fig. 3.
Now draw the line a b in Fig. 3 half way down the wheel. Follow this line round and bore four pairs of holes as deeply as you can without piercing the centre hole. One pair is shown in Fig. 3. Each little hole is about a quarter of an inch from its neighbour. These pairs of holes must be the same distance from each other; they are for the wings you see in Fig. 1, and which we will now proceed to make. Take forty-two inches of light brass wire. Divide this into four equal parts. You will then have four pieces of ten and a half inches each. Bend each one into the shape shown in Fig. 4. These wings will be about four inches long and about two inches broad at their widest part. The ends of the wire should be about a quarter of an inch apart. Cover these wire frames with light tough paper, using as little paste as possible. The wings are inserted slanting like the sails of a windmill. Now let us go back to the spool. Upon the upper surface midway between its centre hole and the edge of the spool insert a piece of strong wire or the end of a broken knitting needle. The wire should be rigid, and should project from the spool about half an inch. When you put your wheel and wings upon the spool this wire will rest beside one of the wings and cause it to turn when the spool turns. Now take a piece of cord and wind it away from you with your right hand round the spool. Hold the handle firmly in your left hand Pg 406 and withdraw the string rapidly. The wheel and wings will mount rapidly in the air for about fifty feet and then come steadily down.
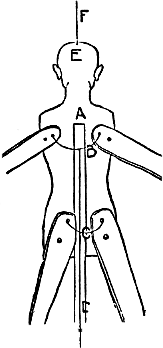
A Dancing Figure.—The illustration shows the back view of a toy easily constructed but capable of affording much amusement to the little ones. A is an ordinary lath glued to a cardboard figure of a man. The arms and legs too are of cardboard fixed loosely with short string knotted at each end. At the extremities of the arms and legs the strings B and C are tied and connected with the string D. Pull the string D and the figure will throw up his arms and legs wildly. Bears and other figures may be made upon the same principle. A string F may be put Pg 407 at E and then the lath is not necessary, for the performer can then hold string F in one hand and pull string D with the other.
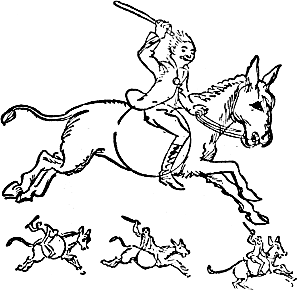
The Lively Donkey.—On stout paper or cardboard draw upon a large scale the illustration. Divide the drawing into three parts by cutting out the circle. You may now pin the parts upon the wall in such attitudes as are shown in the smaller illustration, or if you cut out many donkeys you may have all these attitudes and more.
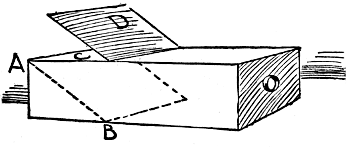
A Camera Obscura.—Obtain an oblong box, about two feet long, twelve inches wide, and eight high. In one end of this a tube must be fitted containing a lens. It must be possible to slide the tube backwards and forwards so as to obtain the focus. Inside the box should be a plain mirror reclining backwards from the tube at an angle of forty-five degrees. See A B in the Figure. At the top of the Pg 408 box at C is a square of frosted glass or a piece of tissue paper, upon which from beneath the picture will be thrown, and may be seen by raising the lid D. To use the camera place the tube with the lens in it opposite the object or scene, and having adjusted the focus, the image will be thrown upon the ground-glass or tissue paper.
Jig Saw Puzzle.—This old form of toy has been revived lately. It is easily made. Glue upon a thin piece of wood a picture, a coloured one is best. Then with a fret saw cut picture and board into all manner of wild shapes, shake them into disorder and then try to put them back again into their proper position. Jig saw is a piece of American slang for fret saw.
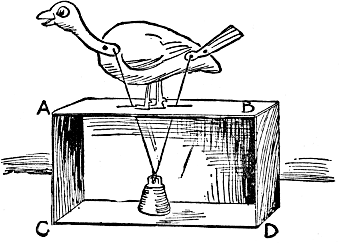
The Wonderful Chicken.—With the help of the diagram it will not be difficult to construct a chicken that will move its head and tail in a comic manner. A B C D is a box that acts as a base and conceals the pendulum. It will need to have a slit in the top for the strings which hold the pendulum. The chicken is of wood and its body has two sides. One side has been removed so that the mechanism may be seen, but when the chicken is complete the mechanism is hidden. It will be seen that the head and tail Pg 409 are attached to the body with nails, but in such a way that they are not rigid but will move up and down. E is a pendulum of lead or other heavy material, and as it swings to and fro the strings cause the head and tail to bob up and down alternately. Other moving figures may be made upon the same principle. Longer strings, and a longer box to accommodate them, give slower and more lasting movements.
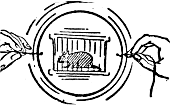
The Mouse in the Trap.—Cut a piece of cardboard of the size of a penny, and paint on one side a mouse, and on the other a trap; fasten two pieces of thread one on each side at opposite points of the card, so that the card can be made to revolve by twirling the threads with the finger and thumb. While the toy is in its revolution, the mouse will be seen inside the trap. Many others may be made upon the same principle.
Distorted Landscapes.—Take a piece of smooth white pasteboard and sketch a picture upon it. Prick the outlines in every part with a pin or needle, then put the pricked drawing in a perpendicular position, Pg 410 and place a lighted candle behind it. Stand in front of it another piece of pasteboard, and trace with a pencil the lines given by the light, and you will have a peculiar distorted landscape. Take away the candle and the pricked drawing, and put your eye where the light was, and the drawing will lose its peculiarities. To find the proper position for your eye it will be best to cut out a piece of card, adjust it, and look through a hole made to occupy the place where stood the flame of the candle.

The Working Woodman.—The wind, as well as a pendulum, may be used to make wooden figures move. In Fig. 1 we have two pieces of wood, each an inch thick, an inch and a half wide, and twelve inches long. If we place them as in Fig. 1 we have four arms five and a quarter inches long. Each one of these four arms has now to be cut into a shape to adapt it as a windmill sail; that is it has to be made into a slanting thin blade not more than an Pg 411 eighth of an inch thick, and all the blades must present a similar slope to the wind. As mistakes are likely to occur, here we will endeavour to make the point clear. Take the arm A, Fig. 2. Suppose you have slanted this from x to y. Now imagine that B comes round to A’s position, then it, too, must be sloped in precisely the same way, and not sloped from y to x. The same applies to arms C and D. Imagine them coming to this upright position, and make them all alike as they arrive there.

The method of fixing the four arms into one piece is shown in Fig. 3. A hole should now be bored exactly in the centre at the crossing of the arms. The platform upon which the figure of the woodman will stand, shown in Fig. 4, consists of a piece of wood half an inch thick, six Pg 412 inches wide and twelve inches long. At each end is screwed a block to hold the shaft which communicates the movement of the sails to the figure. This shaft is a piece of strong wire fifteen inches long, bent into a crank, as shown in the diagram, and working round and round in the two blocks. The end of the wire that comes through the centre of the windmill sails should be bent up or down to prevent it from slipping out of position. The vane, which will cause the mill to keep in the right position whichever way the wind blows, is shown twice in Fig. 4. It is of thin wood, and is fastened to the underside of the platform by means of the little catch, which should be left when the vane is made. The figures whose parts are shown should be cut out of thin wood with a fret-saw, and put together so that the joints turn easily on the pins that are put through them. Two bodies are needed. To adjust the figure take off one side of the body and place the woodman in the act of completing his stroke, with the axe touching the wood, then put a peg or small tack or nail immediately behind the projection on the top of the legs. This will keep his body from bending too far forward. Now let the axe be raised to the beginning of the stroke, and put a peg in front of the projection. The arm is connected with the crank by a piece of wire. You may not Pg 413 find the right place at first, but a few trials will put you right. Bore a hole in the arm, put the wire through, and twist it round to keep it there.

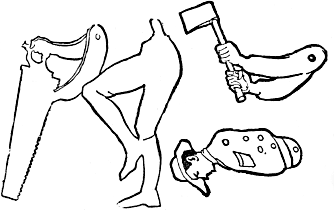

A sawyer may be made upon the same principle, as the illustrations show, or you may have a simple windmill and no figures. Fix the platform and its figures on the top of a pole with a pivot so that they may turn freely in the wind. Before you bore the hole through the platform balance the whole carefully upon the pole or you will put the hole in the wrong place.
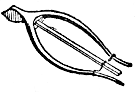
The Skip-Jack.—The skip-jack is made out of the merry-thought of a goose. A strong doubled string must be tied at the two ends of the bone, and a piece of wood about three inches long put between the strings, as shown in the illustration, and twisted round until the string has the force of a spring. A bit of shoemaker’s wax should then be put in the hollow of the bone at the place where the end of the piece of wood touches, and when the wood is pressed slightly on the wax the toy is set. The wood sticks only a very short time, and then springs forcibly up. The Pg 414 skip-jack is placed on the ground with the wax downwards. Upon this principle toy frogs are made sometimes.
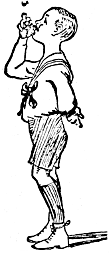
The Jolly Pea.—Stick through a pea, or small ball of pith, two pins at right angles, and put upon the points pieces of sealing-wax. The pea may be kept dancing in the air at a short distance from the end of a straight tube, by means of a current of breath from the mouth. This Pg 415 imparts a rotatory motion to the pea. A piece of broken clay tobacco pipe serves very well. Some boys prefer one pin (the vertical one) and dispense with the cross pin.
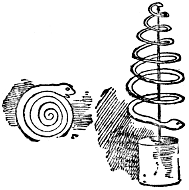
A Revolving Serpent.—Draw on a piece of cardboard a spiral serpent, as shown in the figure. Cut along the lines with a sharp knife, and mount it on a needle fixed in a cork. The serpent will now revolve on its own account. Its movements may be greatly accelerated by fixing it by means of a bent wire over the flame of a lamp or candle.

A Simple Shelter.—A very easy way to rig up a shelter from sun or rain is given in the accompanying sketch. Two poles with a deep notch in the top of each, a rope, two pegs, a sheet, and a few large stones complete the shelter. An ingenious boy could arrange an end, or two if he needs them.
A Calendar on Your Fingers.—This is the way that an old-timer manages to keep account of the days of the week that months open with. It will be found correct and interesting to people who have a memory for such things:
“What day of the week did January come in on?” asked Grandfather Martin. “If you can tell that, I can tell you the day that any month will come in on, by help of a little lingo I learned from my father when I was a boy. Friday, did you say?” and he held up his hand preparatory to counting his fingers. "Now, April is the Pg 417 fourth month; let us see—‘At Dover dwelt George Brown, Esq., good Christopher Finch, and David Frier.’ We go by the first letters of these words—1, 2, 3, 4: ‘At Dover dwelt George’—G is the letter, and it is the seventh in the alphabet. January came in on Friday you say, Friday, Saturday, Sunday, Monday, Tuesday, Wednesday, Thursday—seven; April comes in on Thursday. Take February—second month: ‘At Dover.’ D is the letter, and fourth in the alphabet. Friday, one; Saturday, two; Sunday, three; Monday, four; February comes in on Monday.
“If you make no mistake in using the rule, it will give you the answer every time.”
“But it did not give the answer for April,” said Harry, who had been referring to an almanac. “April began on Friday.”
“To be sure, boy! This is Leap Year, is it not?” Leap year requires the addition of one day for the last ten months, to allow for the 29th of February. So All Fools’ Day came on Friday this year.
“I never knew anybody outside of my father’s family,” continued the old gentleman, “who knew this little lingo and how to use it. He taught it to his children, and I have tried to teach it to mine, but they seem to forget it, and I am afraid it will get lost. When father used to go to Presbytery, fifty years ago, it often happened that a question of dates and their relation to days would come up, and no almanac at hand; in fact, the question might be as to some day of the next year; but almanac or not, my father could always find the fact wanted with just the little key of the first day of the year.”
Leap Year.—Divide the year by 4. If nothing remains it is leap year. For instance 1876 / 4 = 469 so that 1876 is leap year. If 1, 2 or 3 remain these figures give the years after leap year. Remember, leap year lapses once a century.
Spiders and the Weather.—If the weather is likely to become rainy, windy, or anything but fine, spiders fix the terminating filaments, on which the whole web is suspended, unusually short. If these filaments are made Pg 418 unusually long we may expect a spell of fine weather. In proportion to their length is the fineness of the weather. Spiders are generally indolent in rainy weather. If they are active in rain the rain will not long continue.
A Barometer.—Put two drams of pure nitre and half a dram of chloride of ammonia, reduced to powder, into two ounces of spirits of wine, or pure alcohol, and place this mixture in a glass tube, ten inches long and about an inch in diameter, the upper extremity of which must be covered with a piece of skin or bladder, pierced with small holes. If the weather is to be fine, the solid matters remain at the bottom of the tube, and the alcohol is transparent. If rain is to fall in a short time, some of the solid particles rise and fall in the alcohol, which becomes somewhat thick. When a storm or even a squall is about to come on all the solid matters rise from the bottom of the tube and form a crust on the surface of the alcohol, which appears in a state of fermentation. These appearances take place twenty-four hours before the storm comes, and the point of the horizon from which it is to blow is indicated by the particles gathering most on the side of the tube opposite to that part whence the wind is to come.
Another Simple Barometer.—Take a common phial bottle, and cut off the rim and part of the neck. This may be done by means of a piece of string, or better still, whipcord, twisted round it, and pulled strongly in a sawing position by two persons, one of whom holds the bottle firmly in his left hand. Heated in a few minutes by the friction of the string, and then dipped suddenly into cold water, the bottle will be beheaded easily. Let the bottle be filled now with water, and applying the finger to its mouth, turn it quickly upside down. When you remove your finger it will be found that only a few drops will escape. Without cork or stopper of any kind, the water will be retained within the bottle by the pressure of the external air. Now let a bit of tape be tied round the middle of the bottle to which the two ends of a string may be attached so as to form a loop to hang on a nail. Let it be thus suspended in a perpendicular manner, with the mouth downwards. When the weather is fair, and inclined to Pg 419 remain fair, the water will be level with the section of the neck, or perhaps elevated above it, and forming a concave surface. When the weather is disposed to be wet a drop will appear at the mouth, which will enlarge till it falls, and then another drop so long as the humidity of the air continues.
How to go to Sea.—Decide first whether you will go by wind or steam, as steamboat seamen and sailing-ship sailors are distinct, the former having little to do with actual seamanship, the latter everything. Consequently, most parents are well advised to send their boys on sailing ships only. Parents generally are at their wits’ end to know what to do with boys with the sea “craze.” Therefore they are, as a general rule, “rushed” into paying exorbitant sums for apprenticing fees, only to find, after a voyage, their sons refuse to go again, having had enough to tire them of it. Now, the best and safest way to get boys comfortably berthed as apprentices is to see by the daily papers, or the Shipping Gazette, the names of the largest firms advertising Australian voyages, or voyages to the East Indies, and write them particulars briefly, enclosing a stamped envelope for reply.
The large firms keep a book or register, where boys’ names are entered, so that when an apprentice is required the first on the page has the preference. This is the simplest and safest way, for there are always plenty of sharpers advertising for boys in the London and Liverpool journals, offering midship berths and other “baits” at the moderate sum of from £10 to £50. This is by no means a high estimate, for by some of the gentry larger sums are asked, and these reap golden harvests. These sharpers act as intermediates between the office people and themselves, sharing the bounty. Now, few are aware that when apprenticing boys to the sea a trial voyage is necessary. A number of lads after one voyage prefer shore. Therefore, before any binding moneys are paid, be careful to see that the indentures are made out clearly, as often they are carefully worded, or “blinded,” as it is called at sea; so that if by chance money were paid down the difficulty would be to get it refunded, for if this is not stipulated, and a wish Pg 420 is afterwards expressed to cancel agreements, the purchase-money is forfeited.
An excellent plan is to have a paper drawn up and signed by both parties, witnessed, and the indentures made up after the first trial trip; but it must be understood that the time of the first voyage, if it be a long one, makes a difference, as unless lads are apprenticed off-hand the “time” is counted as nothing.
There is a pamphlet sold by mercantile stationers at one shilling containing much information, showing parts, and describing the various builds of sea-going craft. The contents of this should be completely mastered before any boy joins a ship, as it will help him to know part of his duties in addition to the nautical language, thereby showing to his officers that he is not a “know-nothing” lad. It will also help him in a variety of ways, it being in point of fact the A B C of ship life. “Do as you are told with a will” is an expression often made use of, and in fact it must be practised by all contemplating sea life. “Ship shape” is another saying suggested by the rigid discipline exercised by mariners.
On one large vessel the following maxim was painted on the walls of the midship quarters: “There is a place for everything; put everything in its place.” One of the things a captain or the mates dislike to see is a boy clambering over the rigging in port; time and circumstance will soon teach him that part of his duties, so that while he is in port a lad should busy himself in tidying up the deck, or by doing the work allotted to him.
A boy does well to be on board his ship a day or two before departing, so as to get acquainted with the various parts, also to get himself known, and somewhat used to the deck.
Apprentices are expected to have a stout chest made for the purpose of storing clothes and sundries. Some companies provide the articles necessary for the mess-room use, but it is well to inquire of berth-mates, or the steward, and arrange accordingly.
A stout tin box, capable of holding linen is necessary, and the following articles must be procured:—
White shirt, collars, and a uniform suit for shore wear. This must be made in accordance with the rules of the company, the coat and waistcoat brass-buttoned, and the cap embellished with the house flag design and gold cordage.
For ship wear no complete list can be given, the principal articles being the following: oilskin suit, one pair of sea boots, one or two pairs of half Wellingtons; flannel shirts, and as many pairs of trousers and shoes as can be procured, the limit of these being at least three pairs. The numerous small articles may be left to discretion.
Another word of warning—do not deal with slop-shop outfitters advertising “rig outs” at low figures, but rather go to respectable tailors and traders, and purchase, or have made, the articles separately.
With strict obedience, promptitude, and a cheerful disposition a lad can hardly fail to get promoted.
To Make Your Own Toffee.—To one pound of the best Demerara sugar add about a quarter of a pint of cold water and a pinch of cream of tartar. Go on boiling it until when you drop a little into cold water it goes hard. You may look for this stage in about ten minutes. Next take it off and add three ounces of butter cut into small pieces. Boil again and test in the same way for hardness. At this stage put in lemon juice to flavour it and then pour the mixture into oiled tins. When it is nearly cold mark it into squares, and when it is quite cold divide it according to these marks.
Steam Rings.—When the kettle is boiling and sending steam from its spout gently raise the lid and then shut it down again deftly. This will force the steam rapidly from the spout in the shape of very pretty rings which will rise in the air, growing larger and larger.
Skeleton Leaves.—Leaves from which the reader intends to derive the skeleton should be gathered fresh from tree or shrub, and put in an earthen pan filled with rain water and placed in the sunshine. When the substance of the leaf becomes soft and easily detached, they should be removed to another pan, containing clean water, in Pg 422 which they must be shaken about until the soft tissue breaks away from the skeleton. Wash again in fresh water, and so continue until only the ribs and nervures remain. A soft tooth-brush, carefully used, will assist in the final part of this operation, the leaf being held in the palm of the hand during the process. Now for the bleaching. Purchase two pennyworth of purified chloride of lime, and dissolve it in a pint of water. In this solution put your skeleton leaves, and keep them under observation. As soon as one has become quite white it should be taken out and rinsed in clear water, then carefully dried. The softening process will take weeks, in some tougher species of leaf it may take months. This period may be lessened by using a small quantity of either muriatic acid or chloride of lime, but with either of these agents there is danger of rotting the skeleton. The rain-water process is the safest and most permanent.
To Imitate a Nightingale.—Many years ago a clever Frenchman analysed the song of the nightingale and made out that it consists of the following sounds:—
Temee temee temee tan
Spretu zqua
Querree pee pee
Teeo teeo teeo tix
Quteeo quteeo quteeo
Zquo zquo zquo zquo
Zee zee zee zee zee zee zee
Querrer teeu zqula peepee quee.
Pith Beads.—A little boy we know amuses himself by threading pieces of pith and then painting the pith with water colours. When his mother wears the necklace he has made in this way people are very curious to know what the beads are, and fancy they must have been made by the natives of foreign parts, probably of the South Sea Islands.
Hints on Handwriting.—Although typewriters are excellent things, they are comparatively useless just in those particular cases where distinct handwriting is of the greatest importance, and where it is so very rarely met with. By some strange process of reasoning, it has come about that almost any sort of writing is thought good Pg 423 enough for a postcard, telegram, or medical prescription. The same man who would make a very fair performance when engaged on a long communication, in which the context would be almost certain to help the reader to decipher a queer word here and there, will dash off the most puzzling penmanship when writing a short but urgent note or postcard. The very brevity of the communication adds to the difficulty of understanding it. When the present writer was at school, it was impressed upon us that, whatever else might be faulty, the addressing of the envelope should be as near perfection as we could make it. The postman of the present day will tell you that this arrangement is now reversed, and, with the exception of letters sent out by business firms, the addresses he has to grapple with are very badly and incompletely written.
Here are a few short hints, the acting upon which will vastly improve the most slovenly handwriting in a week, if persevered in. In the first place, reduce the slope of your handwriting until it is almost, if not quite vertical. Then break yourself of the habit of crowding your letters too closely together, on the one hand, and sprawling them out unduly, on the other. Instead of sprawling the letters out so, write each character compactly, but join it to the following one by a distinct link-stroke, as it were. This is the sort of writing approved of by the Civil Service Commissioners. At one time much stress was laid upon the importance of thick and thin strokes, hair strokes, and so on. Excepting in the case of professional engravers, and for artistic purposes, all these refinements are out of date. What is of vastly more importance is the making of a careful distinction between the letters m, n, and u, and again between the letters e and i. Good test-words to practice with are these: union, commence, ounce, suit, sweet, manumotive, immense, unite, untie. Characters which extend above or below the line should not do so more than is sufficient to prevent their being mistaken for other letters. All the i’s should be dotted and the t’s crossed. Finally, the last letter of every word should be written distinctly, no matter in what hurry you may be, Pg 424 for it is wonderful what an aid to legibility the observance of this simple rule will afford. Those who follow these hints may never write a pretty hand, but they can scarcely fail to write a legible one, no small accomplishment in these days, when so many of us can do almost any out-of-the-way thing, but find it difficult to sign our names distinctly.
Secret Writing.—Mix well some lard with a little Venice turpentine, and rub a small part of it equally on very thin paper by means of a piece of fine sponge, or in some other way. Lay this with the greasy side downwards upon a sheet of note-paper, and write your message upon the plain side of the greasy paper with a style or the thin end of your pen-holder, using a little pressure. Nothing will be seen on the note-paper; but what you have written may be made visible there by dusting upon it some pounded charcoal or other coloured dust. Shake or blow this dust away and there will remain as much of it as has fallen upon the parts where your style pressed the lard upon the note-paper.
Resin Bubbles.—If the end of a copper tube or of a tobacco pipe be dipped in melted resin at a temperature a little above that of boiling water, taken out and held nearly in a vertical position, and blown through, bubbles will be formed of all possible sizes, from that of a hen’s egg down to sizes which can hardly be seen. These bubbles have a very pleasing appearance and are permanent.
Etching on Glass.—Cover the glass with a thin coat of beeswax, and draw your design with a needle cutting down through the wax to the surface of the glass. Place the glass in a shallow bath, and cover it evenly with fluor-spar to the depth of an eight of an inch. Now pour sulphuric acid diluted with three times its weight of water upon the spar. Let this remain three or four hours. Pour away the acid, remove the spar, and clean the glass with turpentine, and your design will be found upon the glass.
How to make Carbon Paper.—Carbonic paper for use with order books, and for other purposes, is made as follows: Cold lard well mixed with lamp-black is well rubbed into the paper with a soft piece of cotton rag. When evenly Pg 425 and thoroughly done, wipe the surface gently with flannel until the colour ceases to come off; it is then ready for use. To obtain similar papers but of other colours, substitute ordinary paint powders for the lamp-black. The most suitable colours will be found to be Venetian red, Prussian blue, chrome green.
The Making of Paste.—There are so many occupations with which boys amuse themselves that need paste that we have included a few recipes.
A Simple Paste.—For a breakfast cup full of a simple paste, needed for use at the moment, and not required to be kept for many days, take a heaped tablespoonful of flour. Mix it thoroughly with cold water as though you were mixing mustard, then fill the cup with boiling water, pour the whole into a saucepan, and let it boil gently for a few minutes. It is then ready for use. You may use starch instead of flour.
A Large Quantity that will Last.—In a quart of water dissolve a teaspoonful of pure powdered alum. Into this stir as much flour as will make a thick cream, and keep on stirring until the mixture is smooth and until every lump has been removed. Thoroughly mix with this a teaspoonful of powdered resin, and into this mixture pour a cup of boiling water. Keep on stirring, and if the mixture does not thicken from the action of the boiling water assist it to thicken by placing it upon the fire for a minute or two. Afterwards add a few drops of oil of cloves to preserve it from going sour. Pour the paste into some vessel that has a cover, and keep it covered and in a cool place. In this form it will be thicker and stronger than is necessary for general use, but take a little as you need it and reduce it to its right consistency with warm water.
Rice Glue.—Mix rice flour well with cold water, then simmer it gently over the fire. This makes a fine kind of paste, durable and effective. Mixed thickly it may be used as a modelling clay, and when it is dry it takes a high polish.
Dressing the Skins of Small Animals.—Different dressings have been recommended, most of which contain arsenic or corrosive sublimate, which are deadly poisons; but really all that is necessary is simple alum, a pound of which can be Pg 426 bought for three-halfpence. Stretch the skin fur downwards on a board, and fasten it with tacks. Put powdered alum over it, and rub it in well. Continue to do this every two or three days for a fortnight. Then remove the alum, and with a knife scrape carefully off any bits of flesh or fat that may be left on the skin. When dried, to render it soft, rub a little yolk of egg or oil into it, and draw it backwards and forwards across the edge of a blunt knife, fixed for the purpose. Drawing through a ring, or well rubbing between the hands will also serve to soften it.
Casts of Medals and Coins.—Cut a strip of brown paper about six inches long by one inch deep. Rub a little oil or grease all over that side of the coin you wish to reproduce, cleaning off all superfluous grease with a little cotton wool, but still leaving the surface greased. Then roll the paper round the edge of the coin so that it resembles a pill-box with a metal bottom, and fix the loose end with a dab of sealing wax. Into this pour a mixture of plaster of Paris and water made to the consistence of cream, tapping the box lightly on the table to cause the plaster to settle down free from bubbles. When the plaster is set quite hard, strip off the paper, and you have your plaster mould. By soaking this with oil and fastening a strip of paper round it as round the coin, you have a complete mould into which you can pour plaster and so take a cast exactly like the original except in colour, which however may be imitated with water colours. Another plan is to make the mould of a different substance, such as isinglass; thoroughly dissolve isinglass in spirits of wine, then pour upon the coin as before, and set aside for a day or two. When quite hard it will separate easily and be found as clear as a bit of glass.
Removal of Ink Blots.—Ink-blots can be removed from paper by painting over with a camel-hair brush dipped in a solution of 2 drachms muriate of tin in 4 drachms of water. When the ink has quite disappeared, rinse the paper in clean water; then dry it.
Grease removed from Paper.—To remove grease spots from paper, gently warm the greasy part and press it, under and over, with blotting-paper. Repeatedly change the blotting-paper until most of the grease has disappeared. Pg 427 Then heat a very little oil of turpentine until nearly boiling, again warm the paper, and apply the turpentine to the grease spot by means of a camel’s hair brush, on both sides of the paper. Repeat this process until the grease has quite disappeared. Finally, with a clean brush, dipped in spirits of wine, again brush over the spot, and as the spirit evaporates the paper will be left free from grease or stain. Remember that oil of turpentine is very inflammable. It would be safer to heat it in the oven.
Invisible Ink.—Take an ounce of oil of vitriol, and mix with a pint of rain water, and when cool write with a clean pen. When it is cold it will disappear. Heat it and it will appear in black ink. Here are some other inks which appear and disappear at the writer’s will:—
Solution of nitro-muriate of cobalt, when heated turns green; solution of acetate of cobalt, with a little nitre becomes rose-colour when warm. Inks which remain visible when heated, but do not disappear when cooled include, onion-juice, yellow; equal parts of copper and sal-ammoniac in water, yellow; aquafortis, spirits of salt, oil of vitriol, and salt and water, yellow or brown. Inks which appear when exposed to light may be made with diluted solution of nitrate of silver, or with diluted solution of terchloride of gold.
How Leaves Keep Clean.—While leaf shapes have formed a subject of study ever since botanical science has existed, it is only recently that one of the most remarkable purposes which the points of leaves serve has been clearly brought out.
It has been shown, as the result of some special investigations made in Germany, that the long points quickly drain off the excess of moisture deposited upon the foliage in heavy rains.
This ready method of disposing of a surplus of moisture is important to some plants. It also serves as a means of cleaning the surface of the leaves.
Round leaves do not so easily get rid of the rain water, and it has been noticed that they remain dusty and dirty after a shower, the escape of the water by evaporation not tending to cleanse them, while long, narrow, pointed leaves are washed clean and bright.
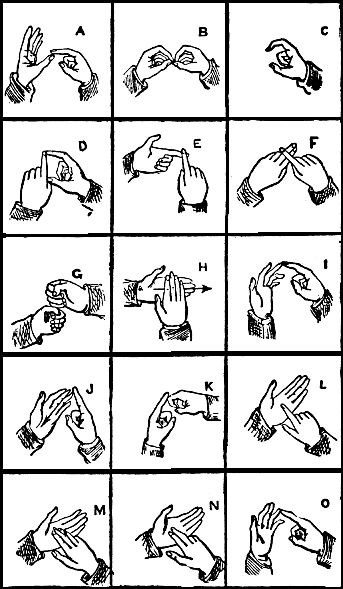
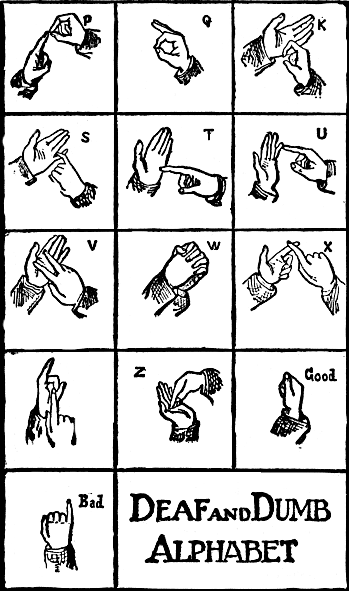
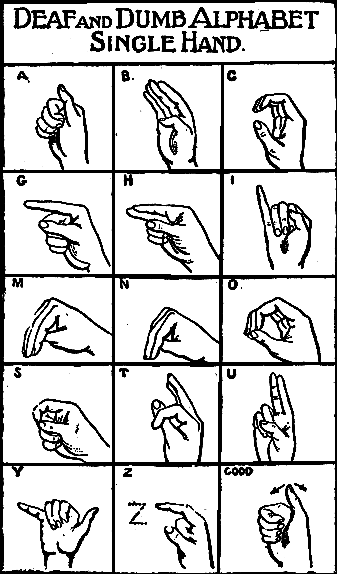

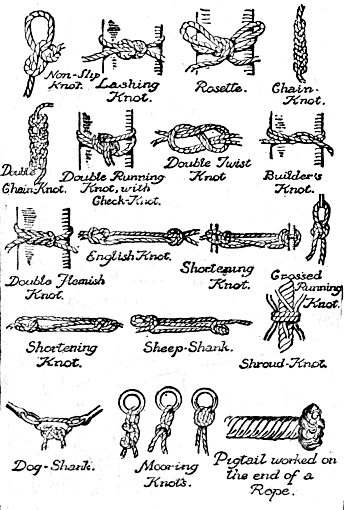
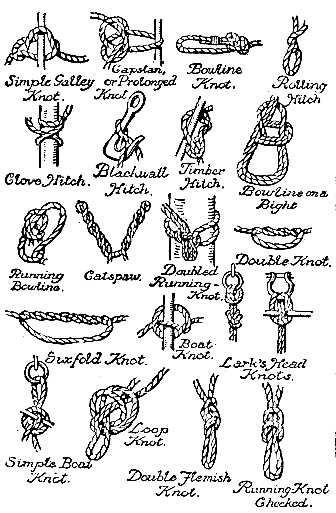
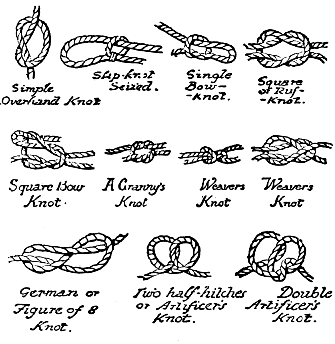
THE END
| A | B | C | D | E | F | G | H | I |
| J | K | L | M | N | O | P | Q | R |
| S | T | U | V | W | X | Y | Z |
PRINTED BY
THE LONDON AND NORWICH PRESS, LIMITED
LONDON AND NORWICH
Transcriber’s Notes:
Missing punctuation has been added in several places.
| page | as printed | changed to |
|---|---|---|
| 126 | throught | thought |
| 224 | shufflling | shuffling |
| 281 | V |