THE PLAYWORK BOOK
BY
ANN MACBETH
WITH 114 DIAGRAMS
NEW YORK
Robert M. McBride & Company
1918
Printed in the United States of America
Published October, 1918
| PAGE | |
| Introduction | 1 |
| A Woolen Ball | 25 |
| Another Woolen Ball | 27 |
| A Sprig of Flowers | 30 |
| A Skipping Rope | 33 |
| A Sucker | 37 |
| Golliwogs | 38 |
| The Meal Sack | 40 |
| An Emery Cushion | 42 |
| Rat-Tail Knitting | 44 |
| A Peep-Show Picture | 46 |
| Cup and Ball | 48 |
| Storks | 50 |
| A Cork Doll | 52 |
| A Rabbit | 52 |
| A Cork Horse | 54 |
| An Engine and Tender | 55 |
| A Chest of Drawers | 56 |
| A Cradle | 57 |
| A Doll's Table | 58 |
| A Doll's Bed | 58 |
| A Doll's Chair | 59 |
| Another Doll's Chair | 60 |
| [viii]Necklaces | 61 |
| A Hat Band | 64 |
| A Fan | 65 |
| A Pin-Wheel or Whirligig | 65 |
| A Tin Wheel or Buzzer | 67 |
| A Wooden Mill | 68 |
| A Feather Wheel | 70 |
| An Air Propeller | 72 |
| A Reversing Propeller | 73 |
| A Waterwheel and Shute | 74 |
| A Pop-Gun | 76 |
| A Whistle | 78 |
| A Long Whistle | 79 |
| A Squeaker | 80 |
| A Buzzer | 80 |
| A Clapper | 81 |
| A Telephone | 82 |
| A Drum | 83 |
| A Megaphone | 84 |
| Rush Furniture | 85 |
| Rush Whip | 86 |
| Rush Rattle | 87 |
| Paper Beads | 88 |
| Fish Bone Tea-Set | 89 |
| A Rush or Raffia Bag | 90 |
| The Harvest Plait | 91 |
| Doll's Furniture | 92 |
| A Wheelbarrow | 94 |
| A Fern Basket | 95 |
| [ix]A Doll's Stool | 96 |
| A Doll's Stool of Feathers | 97 |
| A Porter's Hand Barrow | 98 |
| A Crane | 99 |
| A Top | 101 |
| A Teetotum | 102 |
| Bow and Arrow | 103 |
| A Dart | 105 |
| A Crossbow | 106 |
| A Catapult | 108 |
| A Target | 109 |
| A Raft | 110 |
| A Canoe | 111 |
| A Ship | 114 |
| A Propeller | 118 |
| A Doll | 119 |
| A Brownie | 122 |
| Kites | 124 |
| A Monkey on a Stick | 131 |
| A Dancing Lady | 134 |
| A Model Aeroplane | 136 |
| A Farmyard | 138 |
| A Doll's House | 140 |
Far enough below the surface, in every one of us there lives, very often almost forgotten, the child, who, like Peter Pan, "never grows up." It is this everlasting child in us that keeps the keys which open for each his Kingdom of Heaven, and sad it is for those of us who have lost sight of the keeper of the keys. The sweetest and loveliest things in our lives are the simplest things. They do not abide in the excitable enjoyment of luxuries and entertainments to be bought with money; they lie in the living and eternal interest of the homeliest things of daily life, wherever people are simple, and sincere of heart, and full of loving, kindly thought and care for the concerns of others; where people do things themselves instead of paying for them to be[2] done; where wealth is counted in love, in thoughtfulness, and in interest in other people, and not in many possessions. These things are the heritage of all children, and we are happy if we can carry our heritage with us through our life; for this indeed is to be of the Kingdom of Heaven.
A child who is unspoiled by the false and ignorant estimates of others with regard to the rank and standing of those among whom he lives, is perhaps our truest socialist. He comes into the world possessing nothing, so far as he is aware, save his own identity; he knows no distinction of class; his ideas of rank are based solely on the beauty, charm, and kindness which are in due proportion the characters of those he lives with. He makes his own little kingdom if he is encouraged to work it out, or play it out, for himself; and happy is the child and happy is the parent of that child who learns to play independently, and to gather together his kingdom, without a continual cry for assistance from others. Here is one of the first great landmarks in education, and a child who is unspoiled by[3] too many possessions in the way of toys will be one well provided, for his mind should at once move to create these possessions for himself. This power to create, this moving of the spirit to make something out of chaos, is in all healthy human beings, and it is the happiest faculty we have. It is, in fact, one of the most vital sides of religion in us, and perhaps the most important to us. It brings us into direct kinship with the Great Creator of all things. This moving of the Holy Spirit over the chaos of the world, in our businesses, in our workshops, in our shipyards, in our buildings, in all craftsman's work in our factories, is probably never realized by the churchmen among us, and only vaguely apprehended by the educational authorities. Yet does not this very power of creative thought amongst even the humblest of us constitute religion of the most living vitality? This Holy Spirit moving, and living, and creating anew in every trade and craft, and in every place where men are busy, should be better realized by us, and more respected; we should[4] then be better men and women. The inventive minds among us are indeed our prophets, answering to the call of those whose labor is too long and heavy, and producing what will lessen the burden. Answering again the call for more light, more beauty, more music in the world, and producing our arts and our playgrounds, our games, our schools and colleges. Answering again the call for freedom from pain, and we have our hospitals, and our great doctors, and all who work for the betterment of the world. Here is the real and living church of God on earth. They say we are leaving the churches behind us. Say rather that the church is more with us, and all are its ministers who are working for the world's welfare.
We rebuke far too often that habit of children of asking questions. We say, "Be quiet," and "You will see some other day"! Yet it is by questions that the child shows most his interest in life, and his inclinations and desires and tendencies.
We instruct a child for years in the writings, doings, sayings, and contrivings[5] of others who have gone before us. How rarely do we realize that in these little ones there may be as great, or greater, light within, only needing care and encouragement to develop and flame up, and show its creative strength? It is sad to think how often these little lights are snuffed out in their first flickerings by the thoughtless things we say, by the foolish way we tease them at the slightest sign of independent thought, by our ignorant habit of commending and praising those who give up their independence, and conform to the commonplace habits and customs we have adopted as convenient.
Many very young children show astonishingly developed faculties in certain directions even before they can express themselves in speech. I know a little boy who, in his second year, showed such an interest in machinery that his elder relatives had to learn the parts of a locomotive engine in order not to betray their own ignorance; and over and over again we see the faculties of the creative mind so strong in young children that it is difficult to persuade[6] ourselves that they have not some previous experience to draw upon. Especially is this the case in music and the arts, for here there is perhaps less dependence on tools and previous technical training required, than in other constructive work. But it is sad to see, and very common also, that these bright beginnings too often flicker out, not because the spirit is lacking, but because these children are only too often driven to hide their lights, because they feel conspicuous, are teased, and rebuked, and chidden for their non-conformity, and are made to feel themselves outcasts if they pursue the way their spirit tends to lead them; and they lose their light, these finer little spirits, and subside into the twilight of mediocre minds.
It is indeed difficult, in these times of over-crowded schools and over-worked teachers, to foster and develop the personalities of these little ones, but we all look to a time when education may be a stronger force among us, more respected and more desired, when those who teach in our elementary schools may be the finest men and[7] women we have, those of the greatest hearts, and the widest understanding (for into their hands we place the most precious thing we have); a time, when, realizing that the laborer is worthy of his hire, we must also be brought to realize that the hire must be worthy of the laborer.
We become more and more socialistic in our community life in these days, and a child is now so little left to the charge of his mother that his life, almost from babyhood upwards, is just a passing on from one trained hand to another till he is able to support himself independently, and often long after that. His years of school grow longer and busier, and now even his playtime is to be more closely guarded and supervised. Yet it is to be hoped that here the guarding and supervising will be specially directed to preserving his independence and his choice of leisure occupation.
Games are good for all, yet playtime should emphatically not be all games: this is where our public schools have failed us; they have given too much importance to games, and almost none to private enterprise[8] in constructive play. In the little contrivances of children lie the germs of vast mechanical and artistic enterprises. The marvelous crafts passed on to us from ancient days in every land were never the result of training in schools, they partook more of the qualities of what I would call "constructive play," passed on from parent to child, each new thing a little different from any other, changing and varying in every age, yet all through a pleasure and a joy to their makers. Our trades and our crafts have all their beginnings in the immature constructions we make as children. We build houses, we furnish them, we make instruments of music (and un-music), we make ships, we fashion vessels of clay, and wood, and metal; we weave and we paint; we dimly foresaw the days when men should fly like birds, and we made kites. All this went on for countless generations, and then we laid captive the steam and the electric current, and lo! a change; all things are possible. Yet we have had a set back; we have forgotten awhile that the spirit in all of us is greater[9] than the machine. We have allowed our machines to make our toys, and instead of being toy-makers our children have to some extent become toy breakers, not because they are really trying to destroy, but because they have the right and natural desire to see how a thing is made. It is not enough, however, to know this; it is very essential that a child should make for himself, and the probability is that if the thing is easily bought he will not take the trouble to make it. He will be inclined to take it for granted that just because it is a "commercial" article, a thing to be bought in a shop, he cannot make it. Toys imported from abroad have been so plentiful and so cheap of late years that the children of to-day rarely attempt to make them for themselves, and they are immensely the poorer, intellectually speaking, for the lack of this necessity to make them. It is for this reason that I have gathered together a small collection of the contrivances of past generations, and the present generation too, not in order that they serve as mere subjects for copy, but because in making such[10] things children develop ideas for improving upon them, and for making new things.
This little collection of works and enterprises is brought together as a suggestion for what Scottish folk so aptly call "ploys," which the children may undertake without much help or instruction. Later on it may be possible to collect a more mature series of suggestions for recreative work in evening schools and continuation classes. There are people everywhere whose work during the day is so taxing that they cannot continue to strain mind and hand at the usual subjects given in evening schools, and yet they can learn to employ their leisure time very profitably by work which does not demand either mental strain, nor highly developed skill, nor any elaborate outfit, nor noisy methods of construction. It must be truly "leisure" work, and be planned to give refreshment and stimulation and "play" to weary brain and body.
Such gentle fireside crafts as the decoration of pottery, and coarse and effective needlework are delightful to practice of an evening, and need give no trouble to the[11] tidy and anxious Marthas of the household. No evenings are more pleasant than those I have spent with friends all busy at quiet crafts round the hearth, chatting a little, or listening to a reader, or singing simple songs in parts, and with no accompaniment of instruments. Constructive design for either of these two crafts is a delightful thing for either men or women of any age. We are never too old to learn to design patterns so long as our hands are able to guide a pen. For what is writing but pattern. Each of us writes his or her name to an individual design, easily recognized so soon as our hand has learned to control our instrument. Patterns for these simple crafts should therefore emanate from the minds of the workers themselves, and should never be copied if it is possible to avoid it.
This spirit of creativeness and invention should find a special period for its development in the day's time-table, and it would be immensely helpful and interesting if teachers would make collections of "outstanding" productions from the children, and if little loan collections of these might[12] travel round from place to place. The children themselves are always intensely interested in seeing such things—and sometimes the older folk who have not forgotten to be children are even more so. I have always urged that craft-work from our various educational centers should go "on tour" in this way, and I keep a large quantity of needlework which shows individuality, from all sorts of schools, going round the country. This usually is shown to teachers only, which limits its sphere, for the children themselves show a most enthusiastic interest in it, and whenever I have shown such work to children in elementary schools, the chorus of excited little voices usually repeats, "Oh, I could do that," which is exactly what is needed for a good beginning. How charming it would be if municipalities would have in every museum a section of "modern craft work," independent of the collections of antiquities we store up. For we also have beautiful things being created amongst us, no less beautiful because they result from the demands of modern needs and usages.
New habits of life produce new demands, and children quickly catch new ideas and adapt themselves to the use of hitherto unknown materials. This is especially the case in cities, and the suggested constructions for the playwork subjects in this book are almost all made out of the waste materials the children may readily find at hand, and they are put together as far as possible, without any particular need for skill, and with the fewest and simplest of tools. In the country there is always an immense wealth of superfluous material to play with, and the country child has a far greater treasury from which to supply the need of hand and mind than his neighbor of the city. Imagination can find an immensity of outlet and opportunity, even in the neighborhood of cities. I remember well my village of cave dwellings which I carefully hollowed out beneath the spreading roots of trees—very dirty trees—in a suburban wood in a Lancashire town. The caves were furnished with stones and twigs, and populated with earwigs or any creeping thing to be found and housed[14] there. Later I owned an island in a Westmorland Lake, and had a beautiful house of woven branches of the growing rowan trees, with a garden planted with ferns and wild flowers among mossy bordered paths. And again, my sisters and brothers and I made fine wigwams of the branches of young oak and hazel trees found in those lakeland woods; they were tied together at the top with the fibrous stems of honeysuckle, spread tentwise at the base, and heaped outside with a covering of dead bracken and dry leafy twigs. In town too, for wet days there was always the house under the table, walled in with table cover and blankets: delightful dwellings all, and happy little "homes" to live in, for any place is a "home" to us when we look back to it with happy memory. And the garlands we made of daisies and red clover, thick as a man's arm and plaited strongly together, with which we decked the clothes-props on the drying green, and made them into Maypoles! We remember the joy these things gave, chiefly because we made them; we remember them far better[15] than the games we played, or the entertainments we went to.
At school again, my best personal experience, and one that I have found valuable above all the other education I got, was not the lessons I learned from books; I have forgotten almost all I got from them. It was the great days when we had plays in school, and I was allowed to devise, and practically direct the whole making of the stage properties. A great time that. We made armor, and weapons, and crowns, and garments, and wings, and scenery. We had no assistance from teachers for this, and I know it taught me more than any of my teachers did. During school days I did not learn to draw because I had a drawing lesson once a week, and painfully and carefully drew perspectives of chairs and schoolrooms and other dull things. I learned to draw because I loved to scribble in my lesson books princes and princesses, and fairies, and because I had few playthings, and was always making and decorating little gifts for other people.
This practise of decorating the things[16] we make is really far the best way to teach drawing to either children or others. We make our education in drawing a far too limited affair by directing it to a pictorial issue alone, and drawing is a far wider subject than concerns picture-making solely. If we go into our museums, we see from the ancient handicrafts left to us by primitive peoples, that in the beginning all art was purely applied to useful things. The clay jar modelled in the hands alone, with its lines and curves just emphasized with a few scratches or impressions made with a stick or a bone, what is this but just play? and yet it is art also and the art adds immensely to the value of that jar. So also to-day, if any child takes a piece of clay and makes a vessel by hand, the very same thing is produced. I have seen little pots made in schools which it is difficult to distinguish from some of those of ancient Egypt or Peru in our museums. They are not one whit less artistic, and yet the art is quite unconscious, the child was only "playing" with the clay.
We would be much the richer, commercially[17] speaking, if schools would only take up this different side of art teaching—making patterns, instead of pictures. I am not condemning the drawing of pictures, but I am urging that pattern-making—constructive design in actual material, not on paper—should come first. Pattern is the mathematics of art, and it can develop the mathematical faculties far more widely than mere mental calculations can. It must be learned by wise gradations, and the learner must never be allowed to get out of hand or run riot with over-elaboration. If we can teach the children in their drawing lessons to decorate the useful articles they need for the home, we shall give a great impetus to the commercial arts. For example, if a child has one lesson at decorating a piece of pottery with a brush dipped in glaze paint and decorates it with nothing but a line of dots or strokes, he can have this fired and fixed and use it, and he also at once looks at every china shop with a sharply discriminating eye. In a very short time he will be able to choose between good decoration and bad, he will[18] understand economy in production, he will very soon demand from the trade a higher class of design, and he will be willing to pay for better design because he understands the working of it.
The fashion for amateurs to practice photography did not do harm to the professional photographer, as was feared at first; it raised the standard of professional work, and brought more custom, and not less, to the professional worker. And this holds good in all work, the more widely and thoroughly it is "understanded of the people," the more desirable do the people find it.
There is a great education before art teachers, and they must realize that they must come into touch with science and mathematics and general constructive work. They must watch the changing needs and fashions of the day, and realize that not only in classic times was the art of the people a beautiful and desirable thing. They must realize, too, that in this Twentieth Century our hands are extending their powers, and that by the use of[19] machines we are reaching a far larger public than unaided hands could do. The artist has spent two or three generations bewailing the machine; he forgot that no machine can, of its own powers, be artistic or inartistic. He left the machine alone, and therefore the machine-work has fallen into discredit. The artist craftsman is too often too conscious of his art, and does not subordinate himself sufficiently to modern ways and conditions. It is not the fault of the machine that much of our manufactured output is inartistic, it is the fault of the artist that he has not managed to control the machine. First and foremost, however, we must have some change in the training of artists, and must direct their attention to utility, rather than pictorial work. It is difficult to count the outlets possible to the decorative craftsman, provided he understands modern machinery and commercial demands. This training in handicraft begins, very rightly and naturally in the kindergarten schools, but there, unfortunately, it stops short. Now what we want to do is to plan out for our growing[20] children such crafts as will develop intelligence and skill of hand, without demanding too great physical strength or technical training, and without undue expenditure of money upon materials and outfit.
For the younger children the easiest media to work in are clay and needlework. The clay-work should be directed to the most permanent and useful things that can be produced; pottery and tiles can be very easily made, and are very permanent if they are glazed and fired and decorated, and this can be done at very little expense. Needlework must be taught so that the worker develops intelligence and independence, and is no longer made to sew the multitudes of fine stitches which were once considered necessary, and which made the girls mere unthinking machines. There are endless new ways to be followed out in the sewing and embroidery and construction of garments and household textiles. Even the rather mechanical knitting is probably only in its infancy as yet, and we may see it do great things, and play a more[21] beautiful part in our textile arts. To reform and renew the vitality of all these things we must realize that they have all their beginnings in the playwork of the little child, and that simply because the little child has no traditions to unlearn, and is therefore independent enough to think out new devices in his play, so must we all keep before us the fact that we have that light within us which is above, and independent of, traditions.
If we can see any way in which any work can be improved or altered, or beautified by some change in its treatment, we must be bold to try it, for only by courage and bravery of thought does the work of the world keep itself fresh and ever renewed and changing towards better things. Never be afraid that because you have not tried to do a thing you will be unable to do it. If the thought of doing it has come to you, it is a sign that some power is there, at any rate, and the impulse to improve and change a thing for the better is just that creative impulse stirring within, which I have pleaded for. Whose is that[22] impulse? Not our own entirely. Then surely if it is good, we do right at least to try to carry it out. It is the Mind that changes matter, but it is not your mind nor mine, though it is in our charge. And happy is he who has faith to listen and give it force and visible expression.
There are in this little book things that many of the wiser folk shake their heads over—catapults for instance. Yet I have put them in; for surely if we older folk had not enjoyed our catapults we should probably have been sadder folk, as well as wiser. All children may some day or other handle instruments of offense and destruction, and it is part of their legitimate education to learn to do no harm with them, so I have put in the catapult. I enjoyed playing with mine, and I do not think I ever broke anything with it, I do not even remember hitting anything I aimed at, and probably this is the average experience. I have not attempted to enter into any lengthy suggestions as regards making boats, or other toys requiring much patience and skill and knowledge of tools.[23] Boat-making is a most interesting thing for both boys and girls, and can be carried to great perfection by them, if they have perseverance. I see no reason why the making of model boats and mechanical toys should not be the special work of boys' manual classes, nor is there any reason why a great quantity of the craft-work and needlework in day and evening schools should not be commercialized, and disposed of by the educational authorities, both to the advantage of the teachers and the pupils. One field alone—that of providing souvenirs for sale to tourists—is a large one, and is at present open to the schools. Tourists do not come here with any desire to buy souvenirs made abroad; they would greatly prefer things with a local flavor, and preferably small and portable. I know from personal experience how immensely such a market encourages students to work at their classes in the evenings. We could keep the evening schools packed with students if they realized that their work, done in leisure hours, had some prospect of bringing in a return instead of involving[24] outlay alone. This also is playwork; and though this small book deals only with such playwork in its infancy, yet it must be emphatically urged that it develops into great things, things that the nation needs, and which can only come to their full development because the nation's children have learned to play.
My thanks are due to my grandfather, grandmother, and my father and mother, and to my nurses whose names I have forgotten, but from whom I learned to make many things. Also to Mrs. Grisedale, Mrs. Wear, Mrs. Fry, Mrs. Fellows, Miss Allright, Miss Worsdell, Miss Douglas, Miss Arthur, Mr. J. T. Ewen, H.M.I., Mr. Forrester Wilson, and to Norman Guild, for many suggestions, and for their very practical help.
Materials Required:—
A small strip of thick cardboard, a small piece of string, wool, scissors.
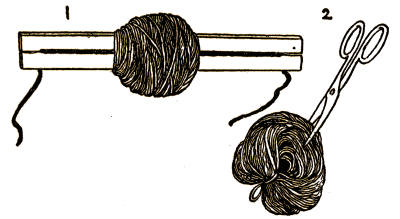
Figs. 1 and 2.
This is the easiest of all the things one can make in wool. Take a narrow piece of stiff cardboard, or a flat stick about five inches long and about one inch wide, and make a slit at each end: between these two slits stretch a piece of thin string and then, about the middle of the strip of cardboard, wind the wool over and over till it is like a ball. Do not allow the wool to spread too far along the cardboard. When the ball of wool is two, or two and a half inches in diameter, loosen the string from the slits, and slip out the cardboard carefully from the ball; you will not have a bundle of wool with a string running through all the loops. Tie the string up tightly and knot[26] it well, then take your scissors and cut the loops as in Figure 2. After all the loops are cut you will have to clip all the loose ends, till they are about even in length, and the bundle will now be a nice regular shape. This is a somewhat wasteful way of making a ball, and should only be used by very little children with waste wool or cotton yarn. It teaches them, however, a very useful thing—to wind wool evenly, and to cut and trim it.
Materials Required:—
Two used postcards or pieces of thin cardboard, a strong darning needle, odd pieces of bright-colored wools, scissors.
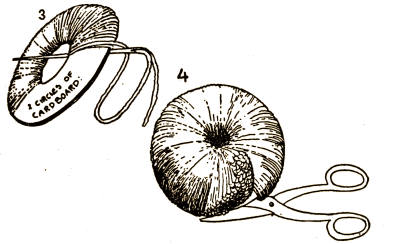
Figs. 3 and 4.
A very much better way to make a woollen ball, but more difficult, is shown in Figures 3 and 4. Here you must first have a piece of fairly stiff cardboard and on it lay a teacup or tumbler with the rim on the cardboard. Draw with a pencil, or scratch with the scissors round the rim so that you have a circle about three and a half or four inches across on it, and cut these circles out. Then take some smaller circular[28] thing, a quarter, or something about that size, and place it carefully in the center of each of your larger circles, and cut out the smaller circle like a hole in the middle of the bigger one. Now take some wool—you can have it of many bright colors, and if you have any old woollen knitted things which you do not need you can unravel them. Slip one end of your wool through the hole of both pieces of cardboard when they are laid together, tie it in a knot, and with your fingers at first, and later with a darning needle, keep winding the wool through the hole and over and over the cardboard until it is all covered. Go on winding it through the hole, until the hole is so full that even your needle will not push through. Then you must take sharp scissors and carefully cut the wool at the outer edge of this round cushion you have wound, till the scissors cut into the cardboard, so that you can slip one point between the two cards and cut right round the circle. You must be careful not to let the wool be pulled out of the hole through which you have threaded it. Now take[29] a piece of thin strong string, slip it round between the two cardboard circles, wind it two or three times, and tie it very tightly. Next, carefully tear away your two cardboard rounds and you will have a fine firm ball, which only needs cutting and trimming with the scissors into an even shape. You can make this ball look very pretty by arranging your wool as you wind it into different layers of varying color or make a quarter of your circle of one color and the next quarter of another, and so on. Small balls made like this make pretty pompoms for shoes and hats, and tassels on bags, or they can be fixed on drawstrings in underclothing, to prevent them coming out.
Materials Required:—
A little thin cardboard, wools of various bright colors, milliner's wire, a small darning needle, scissors.
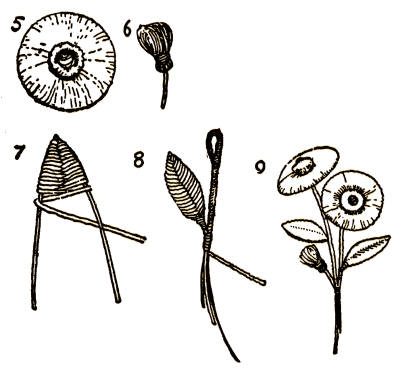
Figs. 5 to 9.
This can be made very much as the second woollen ball is made. You take a circle of cardboard again, but rather a smaller one about two inches across (a small ink bottle or an egg-cup would give about the right size); and cut in it a round hole about as big as a dime. Wind bright-colored wool through the hole and over the cardboard very evenly, using a darning needle because it is such a small hole. Wind on wool until all the cardboard is covered evenly. Then take a piece of wire about six inches long, or a hairpin will do if straightened out. You can do this by holding the ends tightly in each hand and rubbing the pin backwards and forwards against the edge of a table. At one end of the wire bend it, so that it makes a little loop, the smaller the better. Now begin with green wool to wrap round the wire, covering in the loop first, and when you[31] have covered in the whole loop wind the wool over the end of the bent piece again, and bind it tightly to the other portion, and go on down the wire for some distance. With another hairpin (not straightened out this time, but bent as much to a point as possible) or another piece of wire bent like a V, tie the green wool at the bend, and wind in and out from one side of the wire to the other, first letting the sides go wide from each other and then gradually tightening them together, till you have[32] them closed again and they become a leaf shape. Bind this leaf into the first wire stem, and add more leaves if you wish. Now wind over the first two fingers of your left hand some yellow or dark-colored wool about a dozen times, and take the end of the wool and tie it through when you withdraw your fingers, as in making the first woollen ball. Hold these loops tight from this knotted part, and wind the end of the wool round till it is like Figure 6, a little tassel; take your darning needle and sew this tassel into the hole in the circle of cardboard so that it makes a center for your flower, and sew the cardboard flower to the loop at the end of the wire. You can make two or three small tassels for this center if you like, and bind them first around the loop so that they fill up the hole in the cardboard quite tightly. More tassels can be made and tied to wires and bound into the main wire stem like little buds. These sprigs look very pretty when worn in hats, and they will not spoil with the rain: you can also put a large spray in a vase when you cannot get real flowers.
Materials Required:—
Some cheap thin string or cotton waste, some small twigs, a pencil or penholder, a strong hook fixed in a wall.
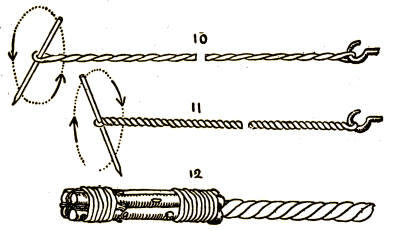
Figs. 10 to 12.
Take three or four lengths of thin string—a very cheap quality will do—about three yards long, and tie them into a knot close to each end. Be sure that every separate piece is of the same length. Then take one knotted end and slip the knot round a hook in the wall, not too high up; a curtain hook will do very well, or any other knob or projecting thing which will allow a very small loop to slip off and on, and which will hold firmly. Into the other end, at the knot, slip a pencil or penholder, and hold the strand of strings or threads with the left thumb and forefinger loosely, just beyond the place the pencil is slipped into it, as in Figure 10. With the right hand first finger hit the pencil round and round away from you, downwards, keeping it whirling so that the long strand becomes twisted. Do not hold too tight with the left hand, but be sure to keep the strands taut from the[34] hook where they are fastened. Keep on whirling until the strand is twisted so tightly that it begins to go into kinks. Then get somebody to catch the strand about the middle, and keeping it carefully taut all the time walk round until you bring the pencil end up to the hook, and slip the strand from the pencil on to the hook. Then take the pencil to where the strand is being held in the middle and slip it into the doubled end, and holding it as tightly as possible from the hook, as before, whirl the pencil in the opposite direction, towards you, upwards, as in Figure 11. This will make a beautiful cord. The pencil[35] can be slipped out now, and the ends on the hook must be knotted together so that the cord will not unravel. This is called a "twofold cord," and it can be made in two colors if you divide the length before the first twisting into two equal lengths of differently colored threads. A "threefold cord," can be made in the same way, but it must be folded into three different lengths before the second twisting, and three different colors may be introduced. A threefold cord is much fuller and firmer than a twofold one. Cords can be made of wool or silk or any kind of thread, and must be made of few or many strands according to the thickness required, and according to the thickness of the strands used. Thin woollen cords are very nice to run into woolen garments as drawstrings, or into bags; thick ones made of knitting yarn are splendid for dressing-gowns, and the ends can be finished off with tassels.
If you make a skipping rope in this way you will want a firm handle at each end, and you can make it by getting three or four small sticks or twigs, and laying them[36] close to each end round your cord. Then bind these round, at both ends of your skipping rope, with firm twine. Next take the end of the rope which projects beyond the twigs, and double the strands back along the twigs for a short distance, and bind them down again and cut away any superfluous length, and knot your binding string firmly. This will make a very pretty little handle, especially if you can get pretty greenish twigs with the bark on them and tie with colored threads or twine. Figure 12.
Materials Required:—
A small piece of thick leather, strong string, scissors or penknife.
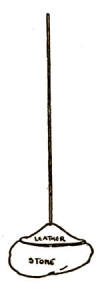
Fig. 13.
This is a very interesting toy to play with. It is very simple to make: all it needs is a round piece of fairly thick leather about four inches across. Cut this into a perfect circle with a knife, if the leather is too thick to cut with scissors, and in the very middle bore a small hole and put through this a piece of strong string, about a yard long, and tie a knot in this so that it will not slip through the hole. Now soak your leather in water till it is very soft and damp, and keep it in this condition whenever you use it. By dropping the round of damp leather quickly on to the surface of a smooth stone you will be able to lift and carry quite large stones. You must be sure[38] to drop the sucker on to the smooth surfaces, because if there are any little crevices under the sucker the air in them will prevent suction.
Materials Required:—
Colored wools, a little string, cotton, or silk, and a tiny piece of tape; a large-eyed needle, scissors.
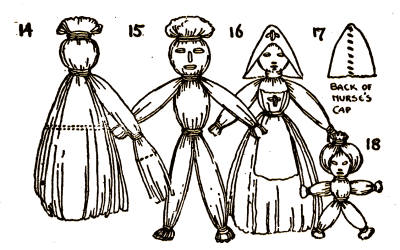
Figs. 14 to 18.
These golliwogs are made of tassels of wool. First wind your tassel over your fingers much as you wound it for the first woollen ball on the cardboard. Then cut the loops, and tie very tightly with several turns of strong cotton or silk close to the end, and again about half an inch lower. This forms the head, and the ends at the top can be trimmed into a top knot. Below the head, divide off a small portion on each side for the arms, and tie each of these again about half way down, and cut off just below the tied portion, where the dotted line is in Figure 14. Tie also for the waist at the double dotted line, and then, if legs are required, divide the remaining part of the tassel into two, and tie at the feet. Take a needle with thread or wool[39] of a different color from that you have used for the golliwog, and stitch in eyes and nose. Figure 15 makes a very good Zulu chief, if he is made in black wool. Figure 16 is a Red Cross nurse. She can be made in light blue or gray wool, and her cap and apron are made of a small piece of tape, each sewn with a red cross. Her cap must be folded and stitched up the back like Figure 17, and her neck, wrists, and belt must be wound with white thread. The little turban golliwog, Figure 18, has his headdress made of a short bundle of wool of another color pushed through the folded loop of wool which forms his head.[40] His arms also can be a separate bundle of strands pushed through the body portion.
Materials Required:—
A tiny piece of calico, white cotton, cotton wool, scent powder or lavender flowers, several apple pips, needle and thread, and scissors.
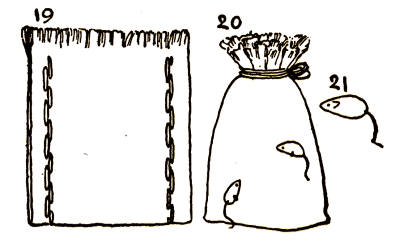
Figs. 19 to 21.
This makes a very pretty scent bag or pincushion.
Take a small piece of calico or any cotton scrap, about three inches wide and six inches long, and fold it across the middle. Take a needle and cotton and tack it up the sides, and down again, if you cannot make small stitches, keeping both rows of stitches very close together. Now fray out the threads at the ends of your strip, and turn the bag inside out. You can fill it with lavender if you like, or stuff it with cotton wool and some powdered scent; or you can stuff it quite tight with bran instead, and make a pincushion of it. Tie the opening up tightly with strong thread, Figure 20. Now take one or two pips from an apple or an orange, to make a mouse: if it is an apple pip take a penknife and scratch out[41] eyes and ears, as in Figure 21. If you use an orange pip you can ink in the eye and the ear. Now stitch your little mouse on to your meal sack, and it will be a very dainty little gift to put by for Christmas. You can also make pretty sets of scent bags out of bits of ribbon or silk patterns from the dressmaker's, or cut off any old scraps of thin materials you find. Make six little bags of different colors and stuff with cotton wool and scent, and tie round the neck of each the end of a piece of narrow baby ribbon; tie the first bag with a piece nine inches long, and each of the other bags should have a ribbon a little longer than the last. Then tie all the loose ends of the six ribbons together with a[42] bow of ribbon, and you will have a charming cluster of sachets to hang in a wardrobe.
Materials Required:—
A tiny piece of red ribbon or silk, a tiny piece of calico or cotton material, strong red cotton thread, yellow or silk thread, green wool, a little emery powder, a tiny piece of hard soap or wax candle, scissors, and crewel needle.
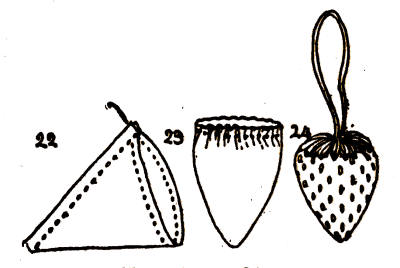
Figs. 22 to 24.
To make this you must get a little bright red material about three inches square and a little thin cotton material the same size. Lay both together and fold them diagonally across from corner to corner with the red material inside, and with fine thread and needle and very small stitches sew it from the two loose corners up to the point where it is folded, so that it forms a triangular bag. Now the bag should be folded over so that you can measure off on the diagonal fold the same length as the stitched seam, and cut away the extra material as in Figure 22. Now take some hard[43] soap, or a piece of wax candle, and rub it hard all over the cotton material in order to prevent your emery stuffing getting out, trim off any extra thickness of material at the point, and turn the bag red side out and run it very finely round the opening with strong needle and thread. Draw the thread up a little, as in Figure 23, and now take your emery powder and fill up tight with that. If you cannot get emery get some fine dry sand, or you can even pound up some cinders out of the fire, and fill your little bag very tight with the powder you make, and draw up the thread and stitch it very close. Next you must take your green wool or silk, and make long loop stitches[44] all round the top until all the opening and the gathered up portion is neatly covered with these stitches, like sepals on a flower. Stitch on a little cord or loop of ribbon, and with a yellow thread make even stitches all over your little bag, till it looks just like a strawberry—Figure 24.
Materials Required:—
A large cork, large reel, or a small piece of a narrow cardboard roller, strong pins, preferably those known as "laundry pins," a small crochet hook, colored wools.
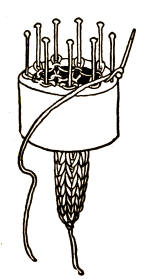
Fig. 25.
This is known as rat-tail knitting, or cork or bobbin work. It can be made either by boring a hole in a large flat cork and setting seven or eight pins in round this hole, or by setting the pins into a reel with a large hole, but I have found the best thing is to get a small tube of cardboard such as paper is rolled on (out of a toilet roll, for instance), and to stick the pins firmly into the cardboard, as in Figure 25. Five or six pins will do. Take colored wool[45] and loop it once round each pin, then wrap it very loosely once round the whole circle of pins, and, with another large pin or a small crochet hook, lift each loop up and over the last wrap of the thread, and over the head of the pin. Do this right round the circle of pins, so that you have now a second series of loops made from the thread which was wrapped round above the first ones, while the first loops have begun to descend into the tube. Work round and round till the end of your knitted rat-tail appears out of the tube at the lower end. You can knot on lengths of wool of other colors and make very pretty reins with them. You can, if you like, work with two differently colored threads, all the time using one color for the loops you lift, over a wrap thread of another color, alternating as you work round and round your circle. This is really[46] just the way a knitting-machine works, very much simplified. You can do the same on a larger scale with a wooden ring into which pegs of wood are inserted, and this will make quite a large woollen muffler.
Materials Required:—
A small piece of glass from an old photograph-frame, some firm brown or colored paper, any tiny flowers, leaves, etc., a piece of stamp paper.
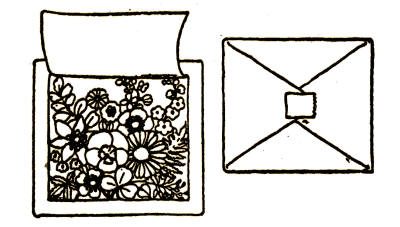
Fig. 26.
Collect a tiny bunch of the smallest flowers you can find, daisies, buttercups, violets, even little weeds like chickweed, and small grasses, clover leaves, or sprays of moss; tie them very loosely in a little bunch. Now lay your piece of glass down[47] on your paper (the paper may be any color, but the blue sugar-bag paper looks very pretty.) Take your little bunch of flowers and arrange it flat on the glass, with the faces of the flowers pressed against the glass, and the leaves and moss pressed flat on top of them. Put the prettiest side of them next the glass. When all the surface of the glass is fairly well covered fold the paper over the flowers so that it makes a neat parcel, and fasten down the corners of the parcel with stamp paper. Then turn your parcel over, and round three sides, about half an inch from the edge, cut a neat line, so that the paper will now lift like a flap and show your very pretty picture. Seaweeds can be used instead of flowers—and if so, they should be arranged on the glass in a dish of water and floated into place.
Materials Required:—
A piece of thin cardboard about eight inches square, scraps of tissue paper, string, odd scraps of veiling, net, or thin silk or muslin, paste or mucilage, scissors.
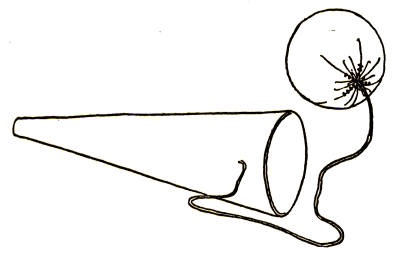
Fig. 27.
This is a very good toy to play with, and can be easily made. Get a piece of cardboard about six inches square and draw a line from corner to corner and cut it across. Then roll this triangle of cardboard into a long cone shape, about two and a half inches wide at the open end, and with a strip of thin gummed paper across the overlapping edge fix it down tight, so that it will[49] not open out again. With the scissors trim the open end to an even round. Next take a large piece of tissue or any other thin soft paper, and roll it into a neat round ball, which must loosely fit the opening of the cone. Wind a thread of wool over it in one direction, and another so that it keeps its shape. Now, if you can get a piece of a black veil, or some very thin soft net or muslin, cover over the ball so that it looks quite neat and round and even, and stitch a thin string about eighteen inches long to it. You can now cover the cup also with the veiling if you wish to, and if so, leave about three inches over at the open end, which must be drawn together, and the draw thread then pushed down inside the cone and fastened off at the closed end. It can have a little cork put in to fill it up. Put the end of the string through a hole near the opening of the cone and your cup and ball is finished.
Materials Required:—
Large flat corks, ordinary bottle corks, large and small. Hairpins, burnt matches, small feathers, penknife.
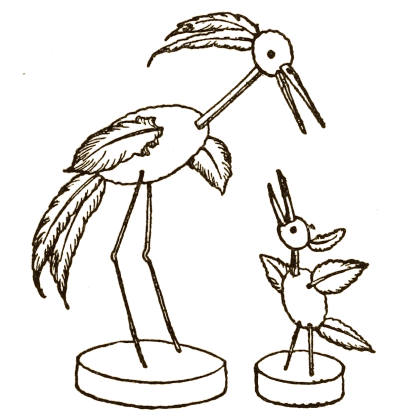
Fig. 28.
First, for the body of the big stork get a good large cork, and with a penknife cut it into a longish egg shape; then another small cork must be cut almost round for the head. For the base the stork stands on one of the large corks out of pickle jars does best, but if you cannot get one take several pieces of thick cardboard and paste them together, or take the lid of a small[51] cardboard box and make holes for the ends of the legs in it, and after pushing the ends of the hairpins through, run them into small pieces of cork, so that they will keep in place when standing. Now get a burnt match and sharpen it at either end, and push one end of it into the head, and the other into the body, and set the legs into place in the body also. Use hairpins that have no waves or angles in them, so that the bend of the pin makes the right bend for the leg. Make the beak of two matches, trimmed to a sharp point, and you can use a tiny black bead for the eyes, or draw them with ink. The feathers for the crest and wings and tail must be stuck into holes, after having a little mucilage put on the end of the quill.
Materials Required:—
Large cork, tiny piece of brown paper, a fragment of cotton wool, needle, strong thread, penknife, scissors.
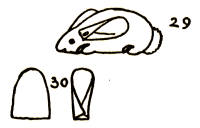
Figs. 29 and 30.
This also is of cork, shaped out to rather a point at the head and cut flat underneath. Cut little nicks on each side to define the feet. The ears are of brown paper cut like Figure 30, with corners folded over and glued or put on with a stitch of strong linen thread, small dot of ink or a small bead makes the eye.
Materials Required:—
Flat cork, two bottle corks, burnt matches, a tiny piece of thin cotton material, the same of white paper and of colored ribbon, a large; pin, a little black or brown wool, needle, mucilage.

Figs. 31 and 32.
The body is a nice smooth cork and the pinafore is a piece of white paper tied on with the piece of ribbon The arms and legs are matches sharpened and well pressed in; it is best to have their points glued.[53] The head is a small cork covered with a piece of white cotton material cut in a circle and tied tightly at the neck. Draw in the eyes, nose, and mouth with a soft black pencil, or paint them with rather dry water-color paint. Take dark wool and make large loose stitches for the hair, and then run through, from crown to neck, a large strong pin to fix the head to the body. The frill of material below the place the head is tied on makes a neat tucker when it is arranged nicely. For each foot lay a little piece of match on the base of cork, where the leg is stuck into it, and glue it down.
Materials Required:—
A flat cork, and one large and one small bottle cork, burnt matches, black wool, a little black tape, a tiny piece of colored paper, needle, scissors, penknife.
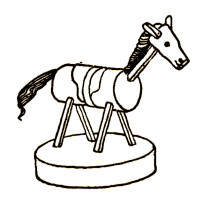
Fig. 33.
Use a nice smooth cork for the body, and cut out a little saddle in colored paper, and glue it into place, bind it round with a piece of tape or ribbon for the girth, and you can make little stirrups out of wire or silver paper and hang them on from this. The head is a small cork out of a medicine bottle, with brown paper ears, cut just like the rabbit's but much smaller and with only one fold. The mane is of loops of black wool sewed on to tape, and bound firmly down to the match that makes the neck. The tail is also of black wool, and the stand or base can be either a cork or box lid; if it is the latter the legs must be glued into holes carefully cut to fit them.
Materials Required:—
One large bottle cork and several small ones, one matchbox, large strong pins, preferably "laundry" pins.
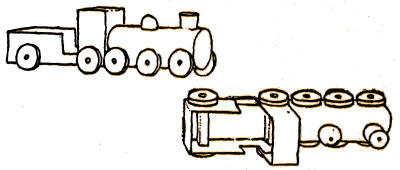
Fig. 34.
Use a large cork for the engine and a portion of a small cork for the funnel. The dome can be made of the remaining piece of the latter and must be rounded at one end. Pin both onto the boiler portion. The wheels are slices of cork set into place with pins. The tender is a matchbox with the sides cut down at one place to make the entrance, and another matchbox makes the windscreen. To make the wheels of the tender hold steady, cut long slices of cork the width of the matchbox, and run the pins into these after piercing the sides of[56] the box, as seen in the top view of the engine.
Materials Required:—
A number of empty matchboxes, a number of shoe buttons, colored or brown paper, mucilage.
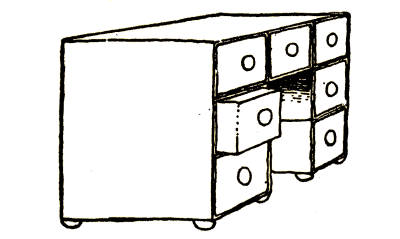
Fig. 35.
This is a very neat chest of drawers, or writing-desk, made of matchboxes; it also makes very good furniture for a toy grocer's shop. Have all your matchboxes of one size and color, and fix them all together in their outer cases with mucilage. Next get a piece of pretty colored paper (pieces of flowered wall-paper look very nice, or blue paper of a sugar bag), and glue this round the ends and top of your chest of drawers. Now in the end of each box cut[57] a small hole and push through it the shank of a shoe button, and peg this through with a tiny slip of wood or a roll of paper, so that it holds quite firm. Glue on to the bottom of your chest of drawers some buttons without shanks, or wooden button moulds, to form the feet.
Materials Required:—
An empty matchbox, a cork, needle and thread, scissors, mucilage, penknife.

Fig. 36.
Use an empty matchbox, and on the bottom glue two halves of a slice of cork for rockers. For the hood take the outer case of the matchbox and unfasten it where it is joined, and cut off a lengthwise strip about three-quarters of an inch wide, using one of the corners of this for the peak of the hood. Take a needle with strong thread, and with two large firm stitches fasten this strip to each side of the box, taking care to make the hood a nice even shape. Now you can take a little muslin[58] and lace and sew it on for little curtains and frills, to trim the cradle with, and roll some scraps of material up to make a neat mattress and pillow.
Materials Required:—
A small box lid of cardboard, large reel, mucilage.

Fig. 37.
This table is made of a round box lid fixed with mucilage on to a spool. A square lid will do equally well.
Materials Required:—
Small cardboard box and lid, needle and thread, lace or ribbon, small piece of wadding and muslin, or a piece of thin material, scissors.
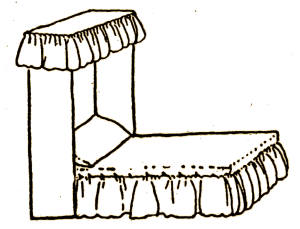
Fig. 38.
First cover the bottom of the cardboard box with a layer of soft material or wadding, with thin cotton over it, and take large tacking stitches to fasten this down. Next fix on your canopy by setting the lid upright on to the end of the box, and glue[59] or fix it into place with stationers' paper clips or large stitches. Trim the canopy round the top with a little frill of lace or muslin, and put the same, as a valance, round the bed portion. You can also add curtains at each side of the canopy, and, if you want a footboard, that also can be fixed across the bottom with big stitches or paper clips before the valance frill is sewed on. You can make quite large beds in this way, and if you have not a very pretty box you can trim it up with pieces of wall-paper pasted inside the canopy.
Materials Required:—
Slice of cork or a chestnut, large strong pins, colored wool.
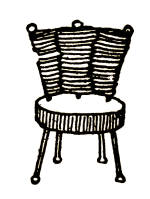
Fig. 39.
The seat is a slice of cork or a chestnut,[60] and the legs and back are made of pins, the large ones called "laundry" pins are the best. Wind pretty wool in and out between the pins to make the back look like a nice cushion. You can cover the cork seat with a piece of colored material if you wish.
Materials Required:—
Small piece of thin cardboard or post card, small piece of pretty material, a spool, needle and thread, scissors.
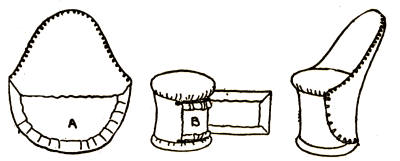
Fig. 40.
This chair is harder to make than the last one. First cut a piece of cardboard or two pieces of old post cards to the shape marked A. It must be large enough to allow it to reach halfway round the top of a reel at its widest part, where the corners are. Now tack on to this a piece of velveteen or any other pretty material, so that the edges turn over to the wrong side of the cardboard. On the second piece of card take the material only down just a little below the two corners of the cardboard,[61] and you need not turn it in on the straight edge between these corners. Tack both cards together with the material outside, and overseam or topsew them as shown in Figure 40 A. Next take your reel and bind tightly over each end of it a round piece of material, and then take a narrow strip of material or ribbon, and turn in the edges and wrap it round the reel as in 40 B, and tack the strip into place very tight. Now fix on the back as in 40 C with neat little stitches, and your chair is finished.
Materials Required:—
Needles, strong thread of linen or silk, seeds, beads, acorn cups, daisies.
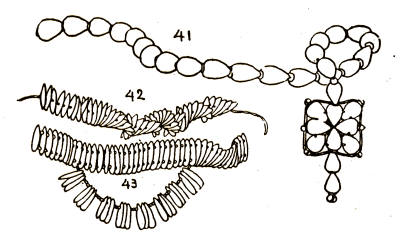
Figs. 41 to 43.
These are some of the necklaces you can make of things you find in the country, or of seeds you come across.
Figure 41 is made of rose hips threaded together. If you want to make the cross or pendant, you can use a few small beads so that your radiating hips will hold more steadily. These will hold better into place if you put a strong surrounding line of stitches into them.
Figure 42 is of melon seeds or sunflower seeds, either will do.
Figure 43, of the same, but threaded[63] twice through each seed, with a tiny bead between and a pendant loop of seeds and beads below.
Figure 44 is a snake made of acorn cups. Begin at the head (with is a large acorn with the shell cut to make eyes and mouth), and thread through the mouth, then thread on your biggest acorn cups, gradually choosing smaller and smaller ones till you get to the tail, where it should be finished with a tassel.

Fig. 44.
Figure 45 is the prettiest daisy chain. The stems are nipped off and the daisies threaded through the center. This makes a very beautiful wreath.
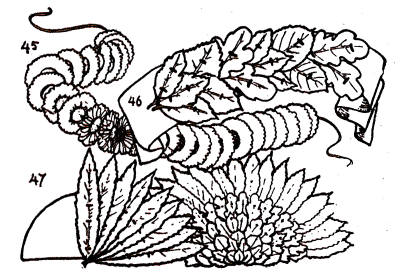
Figs. 45 to 47.
Materials Required:—
Small autumn leaves, broad tape or carpet binding, needle and thread.
Pick up the prettiest leaves which are nearly the same in size. Use a thread of brown mending yarn and carefully sew the leaves down on to a piece of broad tape or carpet binding. After you have finished the sewing press the hatband for some days under a pile of newspapers or heavy books, so that the leaves will dry flat.
Materials Required:—
Large leaves of Spanish chestnut, smaller leaves, thin cardboard, needle and brown silk or wool.
This fan is made of the large leaves of the Spanish chestnut; you can pick these up already beautifully dry and flat in the woods in autumn. Get about twenty of the same size, and cut a semicircle of firm cardboard and sew them on to it, so that the fan holds very firm, then over your stitches sew on smaller leaves of varying colors. You will find this makes a most beautiful ornament for your mantelpiece.
Figures 48 to 55 are windmills, some very easy and some more difficult, but all very interesting toys.
Materials Required:—
A square of stiff writing paper, an old penholder, skewer, or a straight twig, a strong pin or a slim upholstery nail with a large head, scissors.
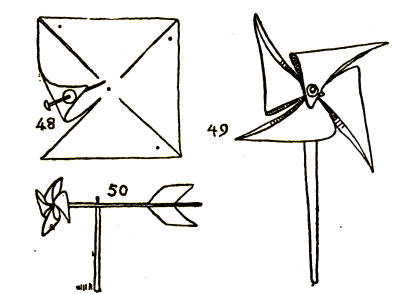
Figs. 48 to 50.
This pinwheel is made of a piece of firm writing paper. Cut the paper into a perfect square, and fold it diagonally from[66] corner to corner and smooth out again, then cut along your folds to within an inch of the center. Now cut a tiny round of strong paper or a piece of a postcard about half an inch across and take a strong short pin and put it through the middle. Then push your pin through each right-hand corner of your square of writing paper, and lastly through the center of the square, and take a piece of stick or a penholder and push the point of the pin in till it is halfway in. You will find your windmill will turn as you run, if you hold it out straight in front of you. If you can get two good[67] sticks you can use a long one as the upper part of a weather vane. Rut a nail through, rather nearer your pinwheel than the middle of the stick. At the other end make a long slit and put in a paper tail, so that the pinwheel will keep its head to the wind. Fix your nail into the end of the other stick, and set the stick upright in the ground as in Figure 50.
Materials Required:—
A circle of thin tin or a tin lid, a stick of soft wood, an upholsterer's nail, tin cutters.

Fig. 51.
This windmill is made of tin; this is rather difficult to cut unless your hands are strong, but sometimes you can get very thin tin or brass from kindergarten stores, and it is quite easy to make it of this. Draw[68] a circle about four inches across on the tin, round a jam pot or some such thing to give you a good even circle, and cut this out with the scissors. Now take a ruler and scratch lines across your circle, at right angles first, so that you have your circle divided into quarters; now divide these quarters again into three or four divisions, and draw a smaller circle on your tin about three quarters of an inch, or less, from the outer edge. Now make a clean cut with the scissors from the edge to the inner circle along each line. The tin will always bend in one way as you do this, and you must leave the little divisions bent very evenly. Make a hole in the center of your wheel and fix it strongly with a nail into a stick. You will find you can hardly hold your windmill if you stand with it facing a steady wind. This windmill is a grand one to go.
Materials Required:—
Two narrow strips of thin, soft wood, a stick for a holder, a screw, penknife, gimlet.
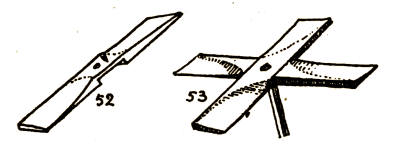
Figs. 52 and 53.
This is a wooden mill and it requires[69] some care and skill to make it. It can easily be made with a penknife out of two pieces of thin, soft wood. First you must cut a neat socket across each piece of wood in the center, halfway through its thickness. The socket must be exactly the same width as your piece of wood, so that when you set each piece socket to socket they fit exactly. Now with an awl or pricker make a neat hole in the center of the two pieces when they are fitted together. Next you must shave away with your penknife the right-hand edge of each of the "arms" or "sails" of your windmill, graduating the shaving evenly from the left-hand edge, where it is thick, to a fine blade at the right-hand edge. Now fit together the two halves and put a nail through the hole and fasten it into the end of a stick. If the nail[70] is apt to split the stick you can put a reel on to the end of it and fix the nail into the stick through the hole of the reel. It is a very good thing to put your nail through a large glass bead between the windmill and the stick.
Materials Required:—
Four large quills, a piece of firm cardboard, a cork, a box for a gas mantle, a straight stick or old penholder, paper, mucilage, needle and strong thread.
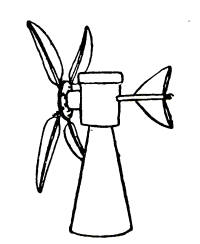
Fig. 54.
This windmill is made of goose quills, or any other large strong quill; these must be chosen with the wider webbing of the feather all on the same side, and must be the same size. Cut a circle of firm cardboard and lay each quill with its point in the middle of this circle and stitch them firmly down at right angles to each other. Glue the wrong side of the cardboard on to a reel or a piece of cork, and fix this on the end of a small stick or penholder. Now take a small cylindrical cardboard box—those used for gas mantles are excellent—and bore holes through opposite sides of[71] this, about halfway down. Push the stick through and fix into a slit at the end of it a "tail" of paper or cardboard. Take another piece of cardboard and shape it into a cone, exactly as in Figure 27 for the cup and ball. Cut a hole in the bottom of your box and fit it on to the end of the cone, which must be cut down to allow the stick to pass clear of the end of the cone.
Materials Required:—
A narrow strip of soft wood, a cork, four luggage labels or post cards, a penholder, strong glue, a penknife, an upholsterer's nail, a gimlet.
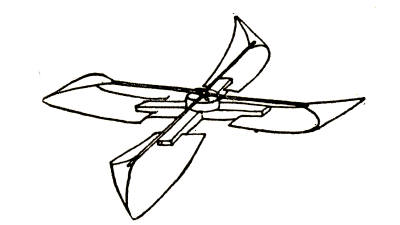
Fig. 55.
This is made of two pieces of wood socketed as in Figure 53, and with slits made in each end into which a luggage label is inserted. Use glue to hold these firm, and also to stick on to the center of the cross of wood a slice of cork, pierce a hole through the cork and the cross of wood, and through it run a nail with a fairly[72] large head. Now make a hole at each outer left-hand corner of each label and, loop through this with a needle and a firm thread. Tie the thread round the nail and run the nail into your stick.
Materials Required:—
A piece of soft wood three-quarters of an inch thick and about six or seven inches long, a gimlet, a soft wood skewer, penknife, sandpaper.

Fig. 56.
This is a little air propeller which is rapidly whirled between both hands and released: if properly done it should return to the hands. The propeller is cut out of wood on the same principle as in Figure 52, but it may be of thicker wood with a greater amount of angle to the blades. The[73] stick must be carefully fitted to the hole in the blades and must be thicker at the other end. Both blades and stick should be well smoothed with sandpaper.
Materials Required:—
Two pieces of wood as above, also two larger round sticks, such as are used to roll paper upon, a cork, two long nails, a piece of thin tin or cardboard for the tail.
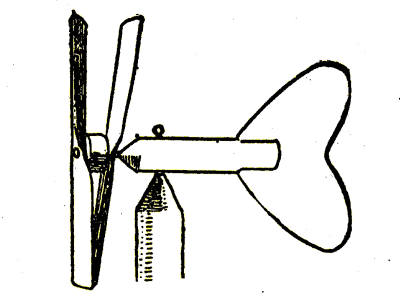
Fig. 57.
This windmill is made of two propellers cut like Figure 56, but with the bevelling of the blades of one reversed so that it will turn in the opposite direction. A piece of wood or cork or a bead may be put between[74] each propeller. The tail may be made of cardboard or tin.
Materials Required:—
Smooth straight twigs about half an inch thick, a thin wooden sweet-box or other light wooden box, two small pieces of white soft wood, about one-third of an inch thick and five inches long and one inch broad, a piece of thick wire, small tacks, pliers, a gimlet, small staples, strong thin string.
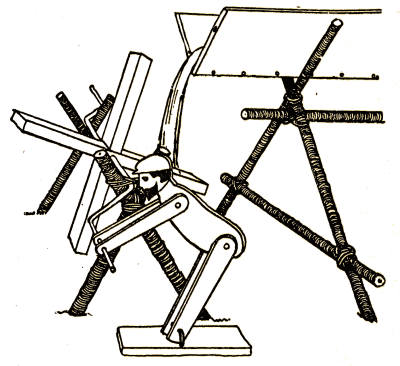
Fig. 58.
This is a waterwheel with a watershute, and it turns a crank and has a little man attached. The waterwheel has flat blades with no bevelling, and a thick wire is inserted through its axis. This wire should be bent with pliers to form the cranks. Set up crosswise into the ground some strong twigs tied firmly into position with strong[75] twine. If there is a handy little stream it should be diverted to run a channel into your watershute, which should be of two flat pieces of wood nailed together at right angles; this can also be supported on trestles. Set the shute so that the end is above the blade of the waterwheel and allows the water to fall on it with sufficient force to turn it round. The man may be cut with a fret-saw in three ply wood, and small[76] staples should be run loosely through the holes at the ankles into a thicker piece of wood which acts as a base, so that with the movement of the crank he will appear to be turning the wheel. Fasten arms and legs to the body with a thick wire which works loosely in the holes, or with a thin nail which may be bent over at the point.
Materials Required:—
A large goose quill, a small twig, a slice of raw potato, a penknife.
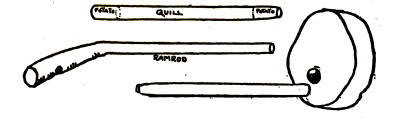
Fig. 59.
This is a most simple little toy and very easy to make. Get a large quill feather with as wide and strong a quill as you can, and cut it off where the quill is thickest. Then get a little stick or branch, preferably a little bent at the thicker end, and peel and smooth it, so that it will fit nicely into the quill with the thicker bent end projecting.[77] This makes the ramrod, but it must be fitted into the quill so that it reaches only within half an inch of the pointed or smaller end. Now take a slice of raw potato about half an inch thick or a little more, and into it push the wider end of the quill so that it takes out a neat round piece of the potato. With the ramrod gently push this first "bullet" to the smaller end of the quill and take out another slice from the potato with the wide end. Now quickly and smartly push in your ramrod and you will find your first bullet shoots off splendidly, leaving your second one at the point of the quill ready for the next shot. Large popguns can be made with a piece of tin tubing, or even cardboard rollers and corks used as bullets. The ramrod must be padded with cotton wrapping in order to fit the tube closely.
Materials Required:—
A short piece of smooth sycamore, willow, cherry, or holly branch, a pea, a penknife.

Fig. 60.
This can be made of sycamore cherry, holly, or willow branches, where there is a fairly thick coating of sappy bark outside the firm woody fiber. Choose a piece about four inches long without knots and as smooth as possible. Now by tapping patiently and wetting the wood occasionally loosen the bark from the hard wood so that it will at last slip off like a tube; this requires care and gentle handling. Now take the hard wooden core and cut into it, from the middle to within half an inch of one end, a deep curving cavity, and from this to the other end cut off a shallow horizontal slice. This core can now be slipped into the tube of bark again and a neat semicircular hole cut in the latter above the cavity in the core, and you will find this an excellent whistle. Scottish children put a small pea into the cavity before replacing[79] it into the tube of bark to make it "birl" when blown—this is a great improvement.
Materials Required:—
A piece of hollow bamboo about eight inches long, a cork, a penknife.

Fig. 61.
This is another whistle made of a short length of bamboo cane, which is hollow, cut just below one of the "knots" or divisions where the hollow tube is blocked by a solid wall of the wood. If you cannot get this, block one open end of your hollow tube of wood with a cork, and for the other cut a piece of cork or wood to fit, with a slice off to leave an opening into the tube. Now cut semicircular holes in your tube at intervals. These will each produce a different note if the others are stopped with the fingers, and with care a regular sequence of the notes of a scale can be planned. This sequence will depend on the size of the tube—its length, and the distance between the holes.
Materials Required:—
A large goose quill, a penknife.
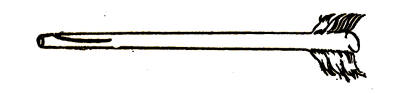
Fig. 62.
This squeaker is made from a piece of a quill. Make a neat cut close to the small end of the quill about three quarters of an inch long. When this is held well inside the mouth it will make a most alarming squeak when blown into.
Materials Required:—
A large button or small round of leather or thin tin, a piece of strong thin string, strong scissors.

Fig. 63.
This can be simply made by threading a large button on a string, so that when the ends are knotted together it makes a loop about twelve to fifteen inches long. Keeping the button in the middle of the doubled length of string insert the first and second fingers of each hand into the looped ends, and rapidly whirl the button round till the string gets a considerable twist on it. Now by alternately slacking and tightening the[81] string the button will whizz round with a slight humming noise. If a piece of tin with notched edges (as in Figure 51 of a windmill) is used, it will hum very loud. A piece of heavy lead foil, or a piece of firm leather cut into a round and notched at the edge can be used.
Materials Required:—
A fowl's merrythought or wishbone, a small slip of thin wood, a piece of strong string, penknife.
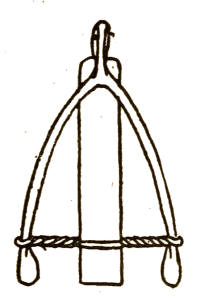
Fig. 64.
This is made of a fowl's wishbone or merrythought. Tie across from end to end of the bone a loop of string, and into this insert the end of a thin piece of wood about four inches long and three quarters of an inch wide. Slip this in till the string is about the middle, then turn it round several times till the string is twisted fairly tight without bending[82] the ends of the bone too much. Now slip the wooden strip along till the string is about an inch from the end of it and let it go. The twisting of the string will bring the wood down against the angle of the bone with a smart clap.
Materials Required:—
Two gas mantle boxes, a piece of thin bladder or greaseproof paper, many yards of thin twine.

Fig. 65.
This can be made of two of the boxes used for incandescent gas mantles; the box for the larger inverted mantles is best. Remove the lids from each end and cut off the rims carefully, so that you have two neat rings of cardboard. Slip one of these on to one end of each box and over each rim tightly tie a circle of greaseproof paper—such as is used for covering jam pots or parcelling butter. Better still, use a piece of bladder from the butcher's. Fasten this down very tight and firm, and through the middle of each paper or bladder insert and[83] knot the end of a fine piece of string which can be ten or more yards in length. If this is held taut without touching anything between the two boxes, you can whisper from end to end and the voice will be heard quite distinctly.
Materials Required:—
A gas mantle box, strong greaseproof paper or a piece of bladder, thin colored string.
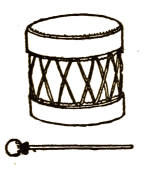
Fig. 66.
A little drum can be made of these gas mantle boxes in the same way. Stretch the bladder or paper of oiled silk tightly across each end, and lace strong threads from edge to edge of each piece of bladder or paper or silk, so that each lies evenly, then bind the edges down with twine above the stitches; the rims of the lids can now be slipped on to make it look neat. For a drumstick, wind a ball of cotton wool or tissue paper on the end of a stick and cover with a round of silk or bladder also, and bind it tightly on to the stick.
Materials Required:—
A piece of thin cardboard fifteen or eighteen inches square, gummed paper or thin tape, paste or mucilage, scissors.
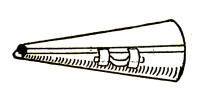
Fig. 67.
This is made of a piece of cardboard about fifteen inches square. Insert a pair of compasses at one corner, and from the one corner to that diagonally opposite describe a part of a circle and cut along the line marked. Now bend the cardboard over into a conical trumpet shape, and overlap the sides where they join, about an inch. Lay over this join a broad strip of cloth or paper pasted or glued firmly; you can put pins through the cardboard till this is set into place and dried. Now at the pointed end of the cone cut a mouthpiece wide enough to speak easily into; this will need a hole about three inches wide. When you speak into this megaphone your voice will carry a long distance—a quarter of a mile on a quiet evening—and it will give great fun[85] to watch the effect on people who are walking at some distance in the country. For convenience in holding you can paste on to the outside a loop or handle of tape, but do not push this through the cardboard as it is important that there should be nothing projecting inside the trumpet of the megaphone.
Materials Required:—
Green rushes, green wool or thick cotton thread.
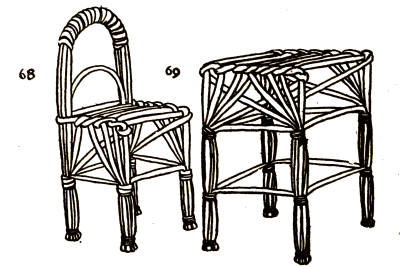
Figs. 68 and 69.
This chair and table are made of the green rushes from the marshes, and are very pretty things to make. For the little chair, first take the bundle of rushes which forms the curved back, and curve it into place and tie it round here and there with a little wool to keep it firm while the seat is being made. This will be better described by the diagram than by words. Each rush composing the seat must be added successively from the back towards the front, and when arranged, and the ends turned back or forwards to form front and back[86] legs, stays can be made of single rushes and all carefully bound in neatly with wool; wool holds much more firmly than cotton thread. The table, Figure 69, is made in the same way.
Materials Required:—
Green rushes.
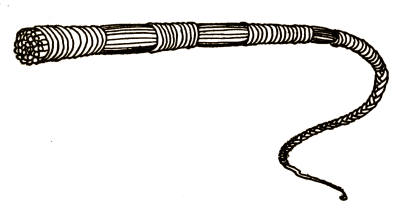
Fig. 70.
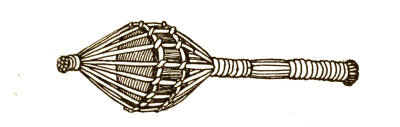
Fig. 71.
The whip is the easiest thing you can make of rushes. It is bound at intervals with wrapping of the rushes themselves.
Materials Required:—
Green rushes, small round pillbox.
This is made on the same lines as the whip, but the bundle or sheaf of rushes is opened out and made to surround a small cardboard box with a pebble or a pea in it, and another rush laced round to keep it in place. The diagram will show how to complete it; very tight firm binding is needed: it is better to do it with wool rather than with rushes.
Materials Required:—
Colored paper, wall-paper or magazine covers, a knitting needle, scissors, a ruler, mucilage.
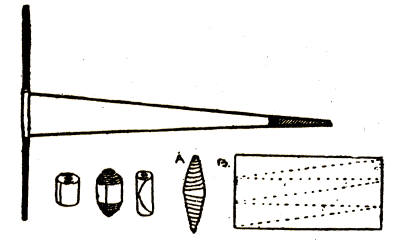
Fig. 72.
This shows how to make beads of various shapes out of paper; it can be of any color. To make the long pointed beads marked A, take a ruler and rule on your paper lines as in B, and if the paper is thin they should be strips about twelve inches long, and the wider end of the wedge can be one inch or one and a half inches. The strip must taper to a point at the other end. Now take the wide end of your strip and roll it very tightly and evenly round a steel knitting[89] needle with the colored side out, and fix down the point neatly with mucilage as in the darkened portion in the diagram. Smaller beads of various shapes can be made, but all on the same method. Leave the beads on the knitting needle till the mucilage is quite dry, and give them a coat of clear varnish. Such beads look well also with blobs of paint or gilt on them.
Materials Required:—
Large and small vertebrae of codfish, a little gilt and water color paint.
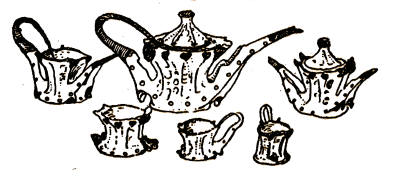
Fig. 73.
This little tea set is very dainty and is made of the separate vertebrae or backbones of large flat fish. When the bones are soft after boiling, they can be easily bent or cut into the required shapes, and[90] the different sizes of bones used for cups or tea pot can be decorated with little patterns in gilt paint or water-colors.
Materials Required:—
Green rushes or raffia, fine string, a small piece of cardboard, a tape needle.
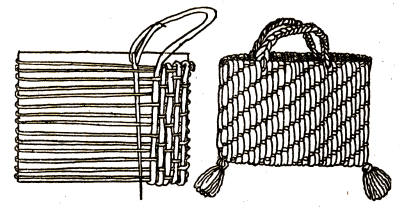
Fig. 74.
This is a little bag made of raffia or rushes, woven on to a warp of string. The string should first of all be wound very loosely on to cardboard, and if necessary slits or notches can be cut in it to hold the string firm. Now take your rush or raffia and darn up one side of the card and down the other and back again, leaving one long[91] side of the card free. You can weave one thread up and one down, or one thread up and two down as you please. When the weaving is finished draw out the cardboard and decorate your bag with little tassels, and add plaited handles.
Materials Required:—
Two long stems of straws, or stalks of oats, barley or wheat, with ears left on, a little thread.

Fig. 75.
This is made by Scottish children to wear in their hats at harvest time. Take two long firm straws with the ears on them and tie them together firmly just below the ears. Now flatten out each straw and bend[92] one across the other, and the first across that again, making each fit close and fold evenly at the bend. You will find this holds quite firmly, when tied at the end, and makes a very pretty ornament. The same plait can also be done with strips of paper an inch wide, and used as a decoration at Christmas.
Materials Required:—
Some branches of willow, freshly cut, some laundry pins, a penknife, a little broad tape or carpet binding, needle and thread.
Fig. 76.
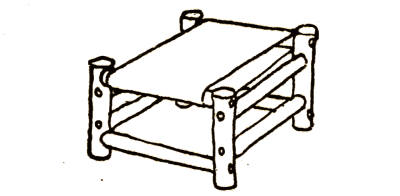
Fig. 77.
These little chairs and stools can be very neatly made of willow or privet branches, or any twigs where there is a small core of soft pith which will allow a strong pin to fit in exactly. All the lengths for the various legs and spars of each article must be measured and cut very accurately before beginning to put them together; use a very sharp penknife to do the cutting. The pins used should be fairly strong ones. In the diagrams a broad piece of tape or ribbon has been stretched tightly round the spars[93] back and front, and its end stitched together underneath, but this is not necessary. Two or more spars can be set across to form the seat, only if too many pins are pushed through one spar there is a tendency for it to split.
Materials Required:—
A piece of cork or a button mould, an empty matchbox, matches, needle and strong thread, a tiny piece of wire.
Fig. 78.
A little wheelbarrow can be nicely made out of a match or cardboard box. The legs and handles are of matches, and may be fixed on with mucilage and held steady with large strong stitches. The support for the wheel is made of a strip taken from the lid of the matchbox and narrowed at one end where it supports the wheel. The wheel may be made of a slice of cork or a button mould fixed on with a piece of wire bent into a knot at each end to prevent it being pulled through the support.
Materials Required:—
Fresh-cut willow twigs, laundry pins, four large beads.
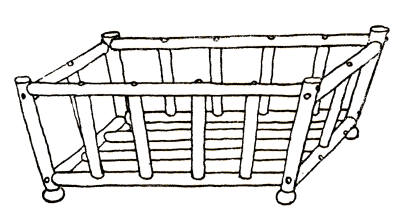
Fig. 79.
This is made of fairly thick twigs cut carefully in the same way as Figure 84, and pinned firmly together. Beads or small buttons can be fixed on for feet. The basket should be entirely lined with pretty moss, and then the earth put in and ferns planted in it. It must be kept very moist, and can be hung from the roof if preferred.
Materials Required:—
The fireproof base of a gas mantle, a tiny piece of cardboard, a little wadding and a tiny piece of silk or velvet, mucilage or needle and thread.
Fig. 80.
This is made from the earthenware support for a gas mantle. Take a piece of cardboard and draw round the circle of the mantle support on it, and cut it out. Then with a padding of tissue paper or wadding and a piece of pretty material make a neat cushion, using the cut-out circle of cardboard as a foundation; stitch or glue this neatly on the under side and fix it on to the support.
Materials Required:—
Four or five quills from a chicken's wing, some very fine pins, a little thread, scissors.
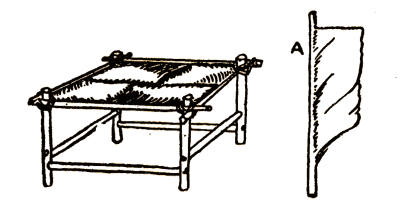
Fig. 81.
This is made of small quill feathers and is very pretty. Use feathers which are large enough to hold a pin inside their hollow tubes. Cut off a thick piece of quill for each of the four legs and entirely strip them of webbing. Cut and strip rather thinner ones for the spars to support these, and fix as in Fig. 76, using very slender pins. If the quills used for legs are strong enough, the feathers for the sea may be pinned on also, but if they are inclined to split, those for the seat must be lashed on, and therefore must be cut so that they project at the ends beyond the legs. Cut each of these like A in the diagram, so that the webbing is cut straight across at the end[98] furthest from the point of the quill. Fix each of these four quills into place with the webbing overlapping the sloping end of the quill in front of it.
Materials Required:—
A wooden sweet box, a fret saw and sharp penknife, a reel, small tacks, upholsterer's nails.
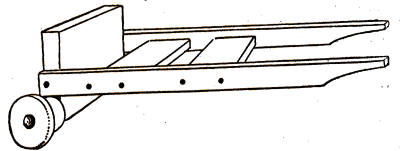
Fig. 82.
This can be made of nice pieces of soft wood such as are used for grocers' sweet-boxes or fruit boxes. Cut the two long sides with a saw and bevel them off in a curve to form the handles—they should be six to eight inches long. The crosspiece at the end should be about three inches, and also the two crossbars. Fasten the sides to the end about the middle of the latter, so that a piece projects below the sides wide[99] enough to support the wheels—these should be made of a reel cut in half and fastened on with a large-headed nail. Smooth all down with coarse sandpaper.
Materials Required:—
A wooden sweet box, three large reels, one small one, tacks, upholstery nails, string, mucilage, a fret saw, a large coat hook.
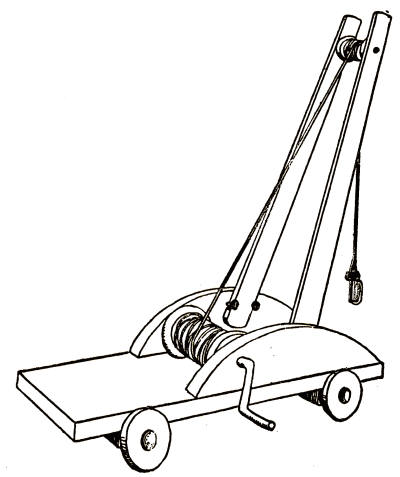
Fig. 83.
This should also be made of a box of soft wood from the grocer. The semicircular sides should be about four inches long, where they are fastened to the base; they may either be glued or nailed on to this. The base should be about seven inches long and three inches wide. Before fastening on the side-pieces bore a hole at the end of each to insert the thick wire which turns the large reel used to wind the cord, and also set in the tacks which support the crane at each side. The sides of the crane should be about three quarters of an inch wide at the lower end, and should taper to about half an inch at the other end; they should be about seven inches long. Near the lower end use another smaller reel or a[100] block of wood as a stay to hold the sides of the crane; it should be of such a size as to hold the ends of the crane firmly between the nails in the sides of the base. At the other end set in a very small reel, with a[101] long slim nail, so that it will easily turn on it. Now take a good strong dressmaker's hook, such as is used for coats or mantles, fasten it to a length of strong string, and wind one end round the large reel, setting the hook end over the end of the crane.
Materials Required:—
A large reel, a skewer or penholder, a fret saw, a penknife.
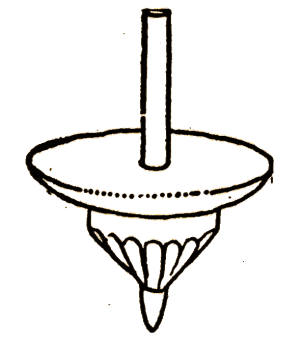
Fig. 84.
This is made of a large reel cut in half and the roller portion cut away into a point with a penknife. The pin is made of a wooden skewer or penholder with the point projecting slightly beyond the cut portion of the reel. These are very good tops and spin very steadily.
Materials Required:—
A small block of soft wood, an old penholder, a sharp penknife, a gimlet.
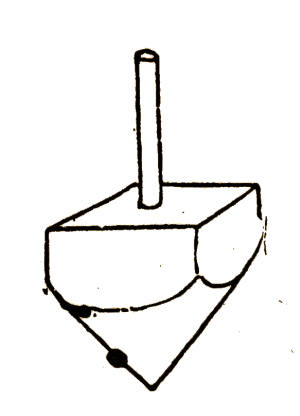
Fig. 85.
This is made from a square block of wood cut sharply to a point with a peg sunk well into a close-fitting hole. Each flat side of the top has on it a letter or a number, and the game is to spin it round, and according to which letter or number falls upward each player takes or makes so many counters to the pool. The letters generally used are—
P==pay one, N==nothing, T==take one, W==win all. Beans or counters are usually played for.
Materials Required:—
A branch of pliable smooth wood, strong twine, a penknife, two goose quills.
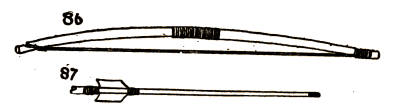
Figs. 86 and 87.
Take a smooth even branch of willow, cane, or other pliable wood about three quarters of an inch thick and about two feet or two and a half feet long, and round the smaller end cut a shallow groove about one and a half inches wide, and about half an inch from the end. About one inch from the thicker end cut a notch sloping inwards towards the middle of the stick just deep enough to hold firm a piece of strong string. Next bind round about four inches at the middle of the stick with string, laying the end of the string along the stick, so that the binding will cover it all but three inches. Bind the four inches very closely, and tie the end of the binding to the spare[104] end of the string and knot it and cut away the ends. Now bind over in the same way, round the groove at the end of the stick, and knot the free end of the string to the spare end under the binding, and stretch the free end of the string very taut, so that the stick bends a little. Make a loop in the end of the string which can be easily slipped in and out of the notch at the other end of the bow. When not in use keep the looped end loose from the notch.
The arrows must be of very straight light sticks or thin bamboo, and must be scraped or sandpapered perfectly smooth. At the point cut a long slit, and into it slip a long and very slender nail, and bind it round across the notch with strong linen thread. You can file off the head of the nail. At the other end make a similar but longer notch, and into it slip a portion of a quill feather with one side of the webbing practically cut away. Arrange both pieces of the quills so that they project the same distance at each side from the wooden shaft. Bind round the arrow with linen thread both above and below the quills, and[105] at the extreme end deepen the mouth of the notch so that it makes a groove into which you can fit the string of the bow.
Materials Required:—
A six-inch stick of soft wood, a long nail, pincers, a file, a piece of stiff writing paper, a penknife or fret saw.
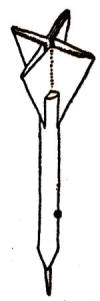
Fig. 88.
This dart is made of a piece of soft wood about six inches long, and into the sharpened end a slim long nail is driven; the head may be nipped or filed off so that the point will stick into the ground or into a target. Across the other end cut or saw two notches at right angles, for about one inch down, and fit into these a square of paper folded neatly into "diagonals and diameters"—this makes the "feathering" of the dart. Smooth the dart with sandpaper.
Materials Required:—
A bow-stick of pliable wood, strong string, a smooth lath of thin wood, a fret saw, an awl, a penknife, a long nail.

Figs. 89 and 90.
This bow is made somewhat more elaborately than in Figure 86, and shoots off pebbles or bullets. The bow itself must be tapered evenly towards either end, and in the middle it must be bevelled flat for about two and a half inches at one side, and a slight groove run right round the stick at either end of the bevelled portion. Next take a thin lath or flat thin piece of wood, a quarter of an inch thick and rather less than the length of the bow. Taper it from[107] two and a half inches wide at one end to one and a half at the other, and lay the broad end across the flattened portion of the bow with about one inch projecting. Mark on the crosspiece the width of the bow-stick and cut into each side of the crosspiece a deep sharp nick, leaving about one inch between each opposite set of nicks. Now draw your bow to the full extent of its curve without running the risk of breaking it, and mark on the crosspiece where the bowstring crosses it when the bow is drawn, and here cut a narrow slot right through the crosspiece. Into this insert a trigger as in Figure 90. The trigger must be of wood and should curve at one or both ends, and should be pinned through into its slot with a long thin nail, in such a position that the curved end will broad end across the flattened portion of full, and will lie well into the slot when the string is released. Now bind the crosspiece on to the side of the bow by strings fitting tightly into the four nicks and running round the grooves round the bow-stick. This will leave the crosspiece free[108] of any bindings which might interfere with the bullet or "quarrel" as it leaves the bow.
Materials Required:—
A forked branch, strong round elastic, a scrap of leather, fine string, penknife, scissors.
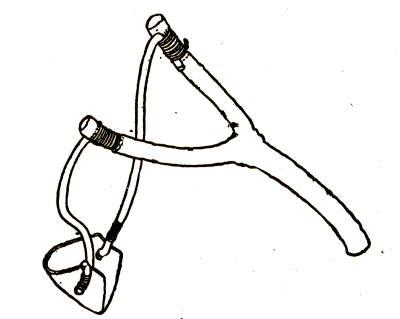
Fig. 91.
Take a firm forked branch about three quarters of an inch thick, or a little less, and trim the two forks evenly, and run a groove about three quarters of an inch wide round each, near the end. Into these bind very tightly two pieces of very strong[109] round elastic about five inches long. Next take a firm piece of leather about one inch wide and two inches long, trim it away at the corners, and make a hole at each end into which insert the free ends of the elastic, turning them back on themselves and binding firmly. It may be well to mention that there are very strict police regulations about shooting with bows and catapults, and those who use them must only do so away from houses or traffic.
Materials Required:—
A bandbox, thin paper, string, scissors, ink, and paintbrush.
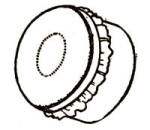
Fig. 92.
A very simple target may be made by using a round bandbox and stretching over its open mouth a piece of newspaper, which may be kept in place by slipping over it the rim taken off the lid. Mark roughly on this the "Bull's Eye" in ink, and hang up the box by means of loops of string through the side. The[110] newspaper can be renewed as often as is necessary. A square box will do just as well.
Materials Required:—
A quantity of reeds or thin straight twigs, a piece of cork, strong string.
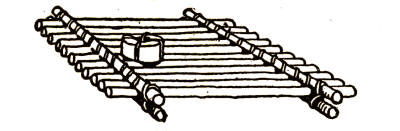
Fig. 93.
This is made of dry reeds or any other light straight sticks—bamboo is good. It may be made of any size and may even be made large enough to carry one or more persons, if the size and strength of the branches and lashings is duly proportioned, but for a toy reeds will do nicely. Lay down first the crossbar beneath the raft and then space out the raft itself to fit it, leaving a little space between each reed. Take a strong thin string and fasten it with a tight loop over the end of the first reed, turn it down and round the lower cross-spar, and then up and around the upper[111] one, and lay in the next reed, and so on. When the first row of lashings is done lay on the second pair of crossbars, and if there is any difficulty about lashing the string a large darning-needle may help you, but if the lashing is done in the right direction this is not needful. If a mast is wanted, a reel, or a cork with a hole in it, may be lashed down to the raft as in the diagram, and the mast can be set firmly into this.
Materials Required:—
Some cheap cloth or shelving, some "basketry cane," soft string or fine tape, scissors, penknife, a large strong needle.
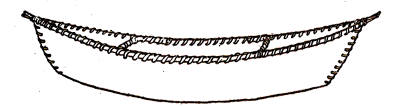
Fig. 94.
The best material for this is thin shelving cloth and it must be made at least twelve inches long. Double your shelving cloth, and outline on it the pattern of the[112] side of the canoe, which should be cut in brown paper; this must be quite straight at the upper sides, not curving as it appears in the drawing. Lay the paper pattern with the line of the bottom of the canoe at the fold of the oilcloth. Now take two long pieces of cane, such as is used for basket-work, and with a large needle, and very thick thread, lash each length of cane along the outsides of the boat from end to end, keeping the shiny side of the cloth outwards. A short thick tapestry needle is best, and the lashing must be steady and even, but if it is difficult to stitch through the cloth an awl or pricker can be used to make the holes before beginning to stitch. Now take another piece of cane and bend about one inch at one end and lash this bent portion to the side of the boat about one-third of the way along the "gunwale" where it is already lashed, and lash it over firmly to this on the inside of the boat. Bend the cane now across to the opposite side of the canoe and meantime tie tightly together the ends of the cane that is lashed from end to end of the boat, and set in this[113] crosspiece so that it keeps the two sides of the boat apart at the right angle. Fix in the second crosspiece likewise, and then lash the open ends of the boat firmly together. The canoe should be rather wide and shallow, or it will be inclined to lie on its side unless ballast is added by weighting it at the bottom. If weight is needed the best thing for this sort of boat is one or two of the heavy lead buttons to be had at a tailor's for weighting garments; they can be lashed on with strong thread through the holes. Quite large canoes can be made in this way, and if a tight "decking" of thin waterproof material be stretched across at both ends from the crosspiece it makes a vessel almost identical with the Eskimo "kayak" which used to be used round the coasts not so very long ago.
Materials Required:—
A block of soft wood ten or twelve inches long, about three inches wide and two inches deep, nine post cards, three skewers or old wooden knitting-pins, a cork, a piece of heavy wire, dressmakers' eyelets, some small staples, fine string, a gimlet, a sharp penknife, small tacks, scissors, mucilage.
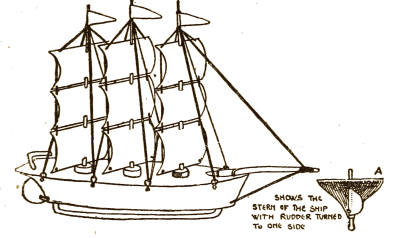
Fig. 95.
This is the simplest sort of a ship to model in wood; all wooden boats require carefulness in their modelling and balance. This can be made from six to twelve inches long, and in soft wood. Let your block of wood be about four times its width, roughly speaking. Rule a line up to center of your block to mark the keel and cut away from this with a very sharp knife to the curving outlines of the deck which must be drawn on the top side of the block. It would be impossible, in the space allowed for diagrams, to give details for modelling the body of the boat, but any boy can shape it if he is careful and observes, from pictures or actual boats or models, how to do it. When the body of the vessel is shaped and smoothed down with a file and sandpaper,[115] take a piece of heavy thick wire, and bend it at either end and sharpen the ends into points with a file and hammer it into the keel; or, if preferred, a deep groove may be cut with a gouge and a strip of lead inserted. The rudder suggested here can be made either of wood, or of a double piece of tin with a piece of thick wire hammered in at the fold and left with one end projecting, so that it fits through a hole in the stem and forms a tiller. The rudder must have a hole pierced at the lower corner, and into this fix a small staple which[116] must work loosely in its hole, and after the rudder is fixed in position this staple must be hammered into the stern of the boat. Figure 95 A shows the stern end with rudder fixed into place. Next cut a bowsprit of wood and with two staples fix it firmly on to the deck. Take three pieces of cork or three half reels, and glue or nail them to the deck—this will make a good hold for the masts. Then along each side of the boat at intervals fasten on a strong dressmaker's "eye" (for a hook) with its two small loops bent so that they overlap; the nail can be set through this. These eyelets are meant to hold the "stays" which keep the masts steady. Now take nine postcards, and about half an inch from the edge in the middle of each long side cut neatly a hole big enough to slip your masts through, with a strong needle, a piece of strong thin string or stout linen thread, knotting it with a large knot at the end. Lay the post cards flat so that they just touch and set the mast through the holes—a long wooden knitting-pin makes a capital mast—and the knob can be left on to finish it at the top.[117] About one inch or more above the top sails make a slight groove round the mast, and round this bind tightly the threads laced through the cards, tightened so that each card bends a little; carry down these threads or stays now to the eyelets and fasten them firmly. Take another stay to the bowsprit and lash it down and carry it on to meet the front of the keel, and fasten it in with a tiny tack or a pin. Gum on small paper flags to the masts. This makes quite a good little sailing ship and it is not difficult to make.
Materials Required:—
A slip of thin wood, a small strip of tin, strong round elastic, strong tin cutters, a penknife or fret saw, an awl.
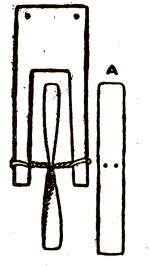
Fig. 96.
This is a little propeller which with certain alterations can be fixed to any boat.
Take a piece of tin, as in Figure A, and pierce it with two holes and file them quite smooth, and slightly bend either end left and right from the holes. Now take a piece of thin wood cut as in the diagram, with a long wide slot, so that it forms a sort of fork, and with screws or tacks hammer this on to the stern of your vessel at the two holes, so that it projects with the whole fork clear of the vessel. Now thread strong elastic through the holes in the tin blades of the propeller with the ends knotted firmly, making a double loop, each end looping over the respective forks. Twist[119] this tightly round on the same principle as in the making of the wishbone clapper, and when the twist is released it will propel your boat a considerable distance either backwards or forwards according to the direction the thread is twisted.
Materials Required:—
An old knitted stocking or pair of cotton gloves, two shoe-buttons, strong thread, some brown or black mending yarn, tissue paper, wadding, scissors, darning-needle.
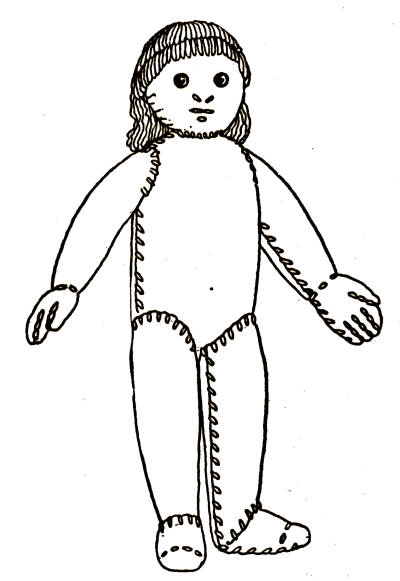
Fig. 97.
This doll is made of old stockings or old knitted or woven gloves. If only black stockings can be got it can be a nigger doll, or it can have its face alone made of light-colored glove. The stuffing must be of tissue paper roughly shaped to the right size and wrapped round with some yarn to keep it shapely, or this may be again wrapped round with a layer of cotton wadding. Shape the arms and legs separately, and fasten over the knitted covering very neatly with big, but firm, stitches. Stitch a line right through at the wrists and flatten[120] out the hands, and make lines of stitching to mark the fingers and the line of the toes: make a sort of "dart" where the leg bends at the ankle.
For the head—put an extra wad of soft padding under the face portion so that it is[121] very soft and bulgy, and stitch firmly into this two shoe-buttons for eyes. Take a large darning-needle and take your stitches right through the head to the back; use very strong doubled linen thread. The knitted covering used for the head may be all gathered into the back and simply flattened roughly into place with big stitches, as you will cover it with "hair" later on. Now take your needle through again and make the two tiny stitches for the nostrils, and pull these stitches back very tight also. Two more stitches form the mouth with a wee one below to make a hollow below the lips. Now firmly stitch the head into place, and with brown or black knitting or mending yarn carefully make large stitches radiating from the crown of the head to the forehead: do not pull these tight, and use double wool if you like. Make long loose loops of wool all round the back of the head and above them stitch as before into the crown. This makes a really very good doll if it is carefully made, and not too hurriedly done.
Materials Required:—
A pair of old kid or leather gloves, tissue paper, flat milliner's wire, strong thread of the color of the gloves, stamp-paper, ink or water color paint, scissors, strong needle.
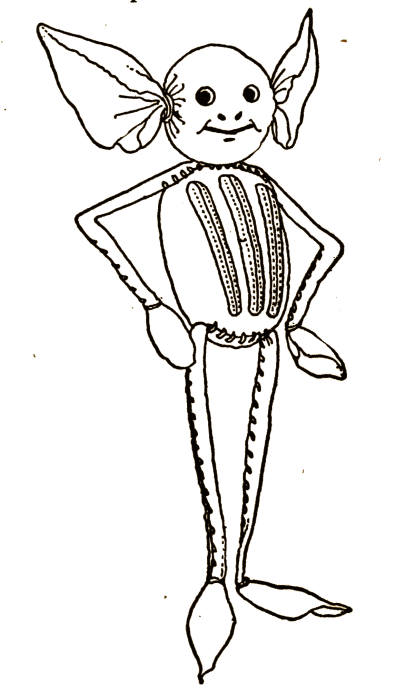
Fig. 98.
This is a very jolly little fellow, and he is made of old kid gloves. His head and body are stuffed with tissue paper. The head is just wrapped with a square piece cut from the wrist of the glove neatly gathered in at each side and tightly tied. The loose ends must then have each one corner trimmed off in a sloping line towards the neck; this forms his flappy pointed ears. Now get two tiny rounds of gummed stamp-paper and ink on each an eyeball, only partially covering the paper, and gum these on for the eyes, and with pen or paintbrush put in his mouth and nose. You can give him a very woeful expression if you make his mouth turn down. Cover his body with the back of the gloves, so that the three "points" or rows of stitching make a trimming for his jacket. The legs and arms are made of slips of the kid stitched carefully[123] over the flat wire used by milliners. The ends of the strips are left free and cut to a pointed flap to form feet and hands. Stitch limbs and head very firmly into place and bend at elbows and knees. This[124] Brownie can be made to sit down and take many different positions; he is a very lifelike little doll. You can also make him a wee nightcap out of a knitted glove and put a feather in it, and dress him with a little cloak.
Materials Required:—
Thin straight sticks of canes, strong paper or thin cotton material, strong thin string, strong paste, large-eyed needle.
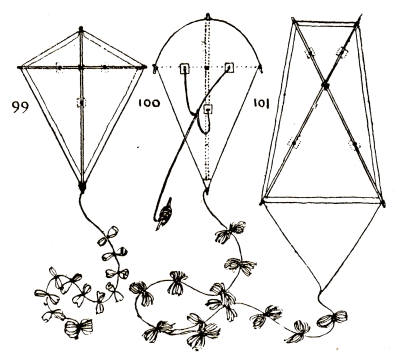
Figs. 99 to 101.
These are several of the commoner and easier kites to make. They are usually made of paper pasted over the frame, but it is in all cases better if children will take the trouble to make their kites of thin cotton material and tack or baste it into place with large neat stitches; this really takes very little more time than pasting. The frames in every case should be of the lightest and straightest sticks possible to find. You can sometimes get very good ones which are used in strengthening cardboard boxes, or if you do not mind spending a few cents the narrow slips of wood used in making picture-frames are the very thing[125] and any picture-framer can supply them.
Perhaps the most usual kite is that shown in Figure 99. The two cross-sticks are first firmly lashed in position and the ends notched and tightly fixed in place with tight "stays" of string. Now cut your paper or cloth at least two inches wider all round than the outline of your framework, cutting away the angles at the corners, so that you have a neat flap to turn over all round. Never use gum or mucilage for a kite, good strong paste is best, if it is to be made of paper. Now at the three points where your "balances" are to be attached to the kite, paste on a little square patch of cloth so that the string or "balance" as it is called does not tear the fabric or paper, and fasten the ends of your two strings through the two upper patches and knot it firmly round your wooden framework. The loose ends of your balances must now be run through the third patch and fastened to the vertical spar of the frame. The string of the kite is fastened round these balances by a slipknot. Next add the tail, which needs careful adjustment to the weight of the[126] kite; it can be weighted with rolls of paper at intervals, or little bundles of fresh grass. Scottish boys often weight it at the end with a "divot" which is a little piece of actual turf, both grass and root, all together.
Figures 100 and 104 are another form of kite most commonly used in Scotland. This needs only one straight spar of wood, and[127] the curved "bow" at the top can be made of light cane, such as is used for basket-making; or what is very good, if enough can be got, is a length of flat steel such as is used in lady's corsets. Fasten the "bow" to the spar by lashing it into a notch or groove at the top and bend it evenly and fasten it firmly by stays of string as in Figure 104, both across and to the end of the spar. Now lay on to your paper or cotton material and cut it out as before in Figure 100, with a good turnover to paste or stitch down, and add the patches where the balances are attached. These kites look very gay if a tassel of colored paper or wool is added at each end of the bow.
Figure 101 is a very good kite to make if a really large one is wanted. The two long cross-spars of wood must be notched to fit each other about one-third of their length from the top of the kite, and stays of string must be so arranged that they spread about twice as wide at the bottom as they do at the top. This kite must have four patches to insert its balances through and the slipknot of the kite-string is fixed around both.[128] Another "balance" should be fixed from the lower corners of the kite from which the tail is hung. This is a very steady kite.
Figure 102—a box kite.
This is a comparatively modern form of kite and looks very complicated. It is really less so than it looks. Take two long narrow strips of thin cotton material about eight inches wide and four and a half feet long (this is for a kite about thirty inches long). Have four straight thin spars of wood about thirty inches long, and after joining the two ends of your strips of cloth together make at intervals a narrow "casing" into which insert the ends of your spars. You can either place the casings at equal distances on your material, or you can arrange it so that the open ends of your kite form oblongs. Now have four flat spars of thin wood measured to make diagonals at each "box" end of your kite, and bore a tiny hole in the middle of each to insert a pin when the kite is stretched. At the ends of these diagonals cut a rectangular notch to hold the spars apart, tie the kite-string considerably nearer one end[129] of the kite than the other, or you can attach a balance and fix on the kite-string by a slipknot. This kite needs no tail, and can be folded and rolled away by slipping out the diagonal spars.
Figure 103—a round box kite.
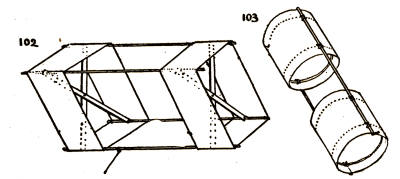
Figs. 102 and 103.
This can be made of very strong brown paper pasted so as to form a wide tube, like a large paper bag with the bottom cut out. Only two spars are needed. Inside the paper tubes arrange near each edge a circle of cane, as is used in basket-work or for stretching out the crown of a cap. Set this into place and lace through the paper a strong string and lash the cane through to the spar. This should hold quite steady if[130] it is well done, but it can, of course, have a third straight spar if necessary. Attach[131] the string as in the other box kite.
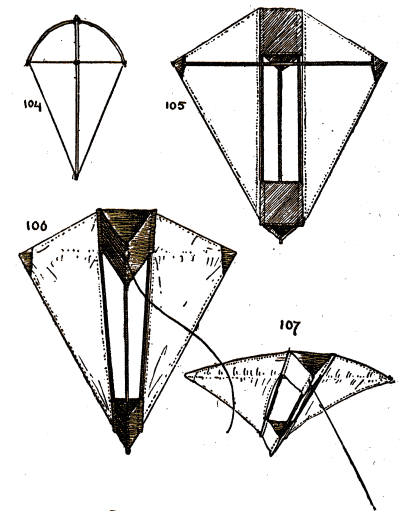
Figs. 104 to 107.
Figures 105, 106, 107—a plane kite.
This is a most beautiful and graceful kite and combines the box kite and the older varieties. The box portion is made with casings run into the cotton material at equal intervals so as to form a three-sided box. Fix in your three spars, all equal in size, and along each side fix a plane, or wing, of thin cotton material; it can be of another color and looks very gay if this is done. Make a little bag or pocket at the outer corner of each wing, and into this insert the ends of the fourth spar, so that the latter may be slipped out and the kite folded up. The string should be attached near the "nose" of the kite. It needs no tail.
Materials Required:—
Some thin three-ply wood, two long knitting-pins, two small reels, a piece of hat wire, some small staples, pliers, an awl, a fret saw, water color paints and brushes, mending wool.
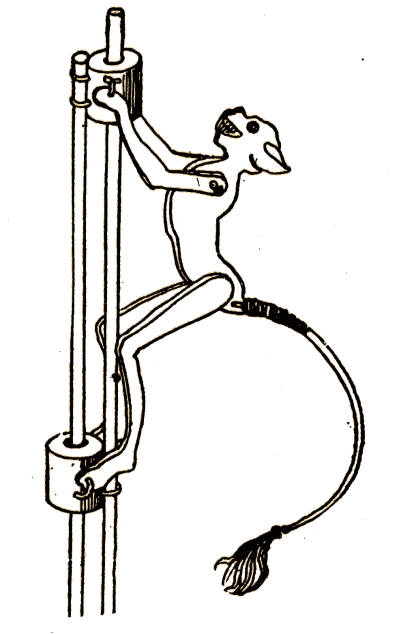
Fig. 108.
Draw your monkey carefully on the three-ply wood, the body and limbs all separate,[132] and a thin stump on to which the tail must be fastened. With the awl pierce tiny holes through arms, body, and legs, where they are attached, and insert a piece of wire, and with the pliers turn a small close knot in it on each side to prevent it coming out. Small wire paper clips will do instead if they can be got. Now saw off the rims of your two reels—they must be the same[133] size—and into one of your reels fasten two staples over the pin and into the reel, so that they hold the pin very tightly, catching the pin just at one end. With another staple through each hand fasten the arms of your monkey to this reel, and slip the other reel round the same knitting-pin and extend your monkey to its fullest length, and now fix the other knitting-pin to the second reel so that its point projects a little way through the first reel. Keeping the monkey stretched to its fullest length fasten his feet with staples to the second reel, and be sure that the limbs work quite loosely in these staples. Now with mending yarn make a tassel and fasten it to the end of your hat wire, and wrap the wire all the way up with it almost to the end. Then proceed to lash the wire to the stump of the tail and bend the tail in a nice curve; this will vibrate when your monkey is worked up and down.
Materials Required:—
Strong heavy white cardboard or thin wood, sharp knife or fret saw, crinkled paper, water color paints, a tiny portion of a quill, a tiny roll of tin or lead foil, small fine pins or wire, a small piece of narrow ribbon, a little writing paper, mucilage, string, scissors, pliers.
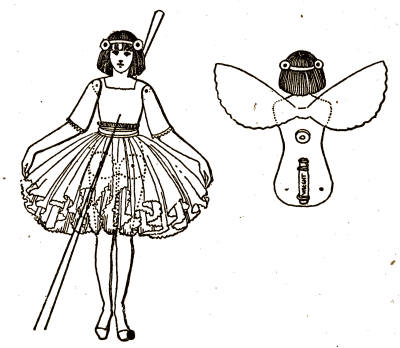
Fig. 109.
This dainty little figure can be made to dance along a double string and can be very pretty. Cut out the body and legs and arms all separately; they may be drawn[135] on white paper, or cut out and pasted on to the cardboard. If you find it difficult to make a pretty face, a suitable one may be cut from some picture post card and pasted on. The arms and legs must be fastened on to the body with a little wire which should be run through a tiny bead and twisted so that it does not come out. Roll the lead foil into a little long weight and stitch one down to the lower portion of the body both at the back and front. The crinkled paper skirt must be gathered on a draw-thread with a needle and tied evenly and tightly round the waist and fastened neatly with a little ribbon sash. Through the stomach of the little figure insert a tiny length of the quill of a feather and glue it into place; let it project towards the back more than the front. Through this quill run your string doubled so that there is a long loop both back and front and be sure that the string works easily through the quill. A portion of a tiny reel will do instead of a quill if it is glued on to the back. The object of the quill or reel is to form a tube, so that the figure will slip[136] along this when the string is slackened, but that it will hold firm whenever the string is tightened. The weights must be heavy enough to make the figure balance and run downwards as the string is sloped. A pair of butterfly wings can be cut out of writing paper and painted and fastened to the back. A little garland of everlasting flowers or moss or beads can be fastened to the hands if you wish to do so.
Materials Required:—
Soft white wood, laundry pins, thin cardboard, a tiny piece of mica, mucilage.
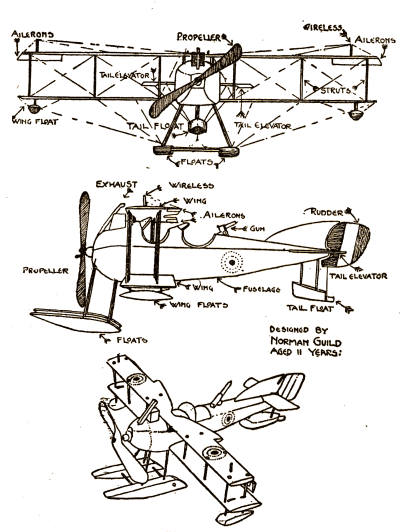
Fig. 110.
This model was made by a boy of eleven and is most beautifully proportioned and put together. The body and wings and floats and little boats are all made of the white wood, well smoothed with sandpaper; the steering-gear is of cardboard. The propeller is made of mahogany and the tiny wind-screens of semicircles of mica. All is put together with "laundry" pins. The ailerons on the upper planes are held by strips of narrow tape.
Such toys as this can only be suggested very briefly, but children with any common sense and imagination can make most elaborate and delightful collections.
Fig. 111.
The box used for the byre or stable is only one of many more elaborate buildings that can be made. The dwelling house of larger boxes, the barns, the haystacks, the pigsty, the chicken coop, troughs, and such things can all be made of larger or smaller boxes. Buildings can be thatched with straw, rushes, hay; or corrugated paper may be put on the roof. The palings here[139] are made of matches set into posts of wooden pegs, much like those used by gardeners to label plants. Trees and flowering plants can be made by getting small bushy bare twigs and wrapping their branches with moss, or fastening on everlasting flowers of gay dyed colors. Old sponges may be dyed green and cut up and fixed in the branches. A reel sawed in two makes a good plant pot for these.
The sheep illustrated here is made of a cork, with legs of matches. Its head is a tiny bean fixed to the cork with a pin, both neck and body are wrapped in cotton wool, and it is neatly fastened on with white mending yarn. The lamb is made of a large bean and a small one, with legs of pins; the beans must be soaked before setting in the pins. Noah's ark animals can be used to increase the live stock of the farm. Fields can be made of green crinkled paper, and a piece of glass or a tiny mirror can be used to make a pond. Carts, barrows, and farm implements can be made of all sorts of things, and clever children can really make wonderful farms. Windmills[140] and other simple machines can be introduced also.
These can be made of bandboxes or orange-boxes and can be either very simple or as elaborate as you please. If cardboard boxes are used, Figure 113 shows how it can most easily be arranged to give the pitch of the roof. One story may be piled on another so that the house can be enlarged at will. Doors and windows are easily cut in the cardboard boxes. The windows can also be glazed if you get a few rolls of cinematograph film and fit and paste it on, but children must be warned that this is very inflammable and it is dangerous to bring it near the fire or gas. The inside of the rooms may be papered, and on the walls little pictures may be pasted. The illustrated catalogues from furniture shops can often be cut up, and the diagrams of doors, etc., cut out and pasted on the doors of your house. Figure 112 shows a sitting-room and a little shop or kitchen. In the[141] latter the counter and dresser are made of matchboxes. The shelves are of strips of cardboard with uprights of cane, wire, or knitting-needles. The fireplace in the sitting-room can be made of a lid of a cardboard box stitched to the wall, and in it another box (a matchbox, for instance) can be set to make the grate. A good table can be made as in Figure 114, which is made by using a lid of a small box, and to the inside of its corners glueing the legs,[142] and then the larger top of thick cardboard can be fixed on with mucilage. The little shields for the corks of bottles, made of pleated lead foil, make very pretty pots and kitchen vessels in such little houses. Rugs can be woven of wool and string, and cushions, etc., to furnish the place. But there is no end to the things a child can make for a doll's house if imagination is encouraged to work the hands.
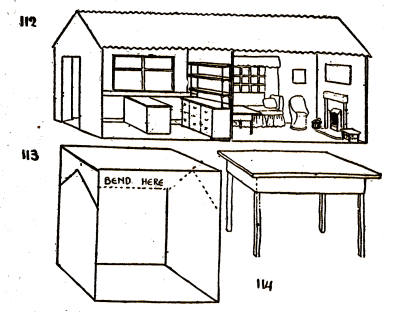
Figs. 112 to 114.
Other "Community Toys" can be made—railway stations, signals, and signal-boxes are very popular; a market place with its little tented stalls is charming. The houses we see in pictures of foreign lands give great interest, and many are so easy to make that it is quite possible to illustrate the history of home building by means of a series of toy houses. The darker side of life has even invaded our nurseries, and they too have shown the games of the trench and the guns: and it will be good to plan in our playwork now for the rebuilding of the world in the ways of peace, for it is these children of ours who must lead the world back or forward, for better or for[143] worse. All the world is in their hands, though the hands may not yet be strong for more than the making of toys. We older children do but play other games with more serious intent, yet all the same the difference between the game and the business is but a difference of degree.
THE END
TRANSCRIBER'S NOTE
—Plain print and punctuation errors fixed.