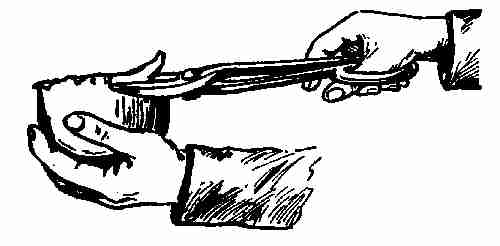
Copyright 1911, by Underwood & Underwood
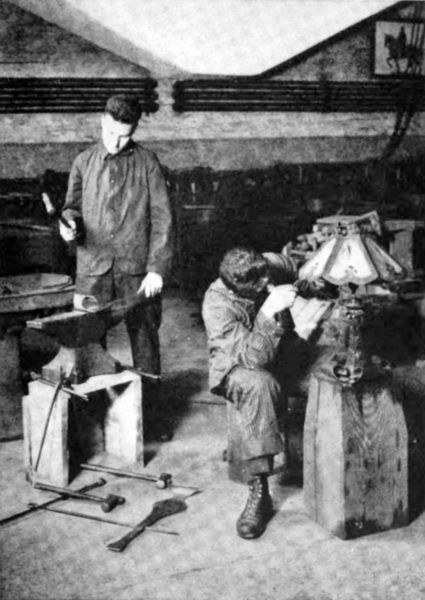
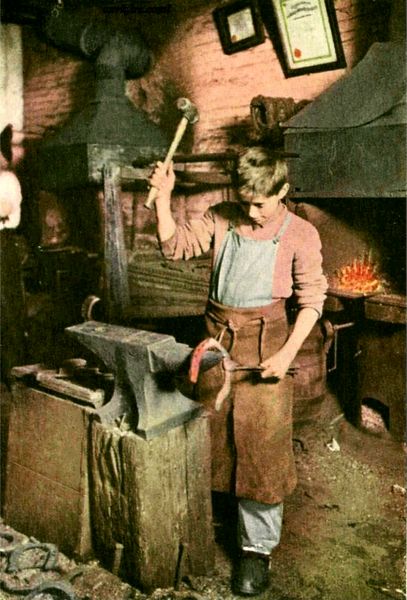
Even a Boy Can Learn How to Make a Horseshoe
| Carpentry and Woodwork |
| By Edwin W. Foster |
| Electricity and Its Everyday Uses |
| By John F. Woodhull, Ph.D. |
| Gardening and Farming |
| By Ellen Eddy Shaw |
| Home Decoration |
| By Charles Franklin Warner, Sc.D. |
| Housekeeping |
| By Elizabeth Hale Gilman |
| Mechanics, Indoors and Out |
| By Fred T. Hodgson |
| Needlecraft |
| By Effie Archer Archer |
| Outdoor Sports, and Games |
| By Claude H. Miller, Ph.B. |
| Outdoor Work |
| By Mary Rogers Miller |
| Working in Metals |
| By Charles Conrad Sleffel |
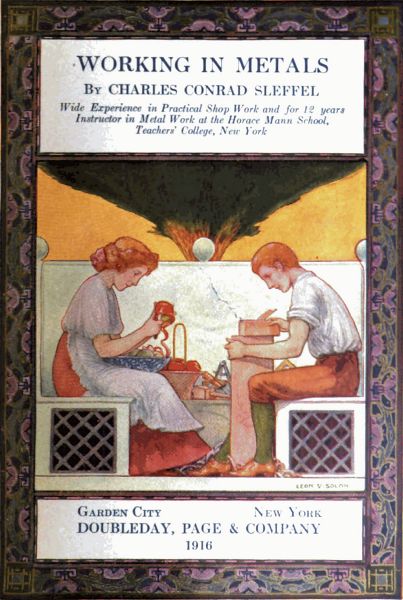
WORKING IN METALS
By CHARLES CONRAD SLEFFEL
Wide Experience in Practical Shop Work and for 12 years Instructor in Metal Work at the Horace Mann School, Teachers' College, New York
Garden City New York
DOUBLEDAY, PAGE & COMPANY
1916
ALL RIGHTS RESERVED, INCLUDING THAT OF TRANSLATION INTO FOREIGN LANGUAGES, INCLUDING THE SCANDINAVIAN
COPYRIGHT, 1911, BY DOUBLEDAY, PAGE & COMPANY
The publishers wish to acknowledge their indebtedness to the Teachers College of Columbia University for their courtesy in permitting certain of the photographs to be taken for this volume.
PART I
| CHAPTER | PAGE | |
| I. | Introductory | 3 |
| II. | Tools | 5 |
| WORK IN COPPER | ||
| III. | How to Make a Copper Bowl | 19 |
| IV. | Copper Trays | 26 |
| V. | Paper Cutter and Nut Set | 34 |
| VI. | Hard and Soft Soldering | 41 |
| VII. | Candlestick, Sconce, Rose Jar, and Chalice | 47 |
| VIII. | How to Make a Hat Pin | 64 |
| IX. | How to Rivet | 73 |
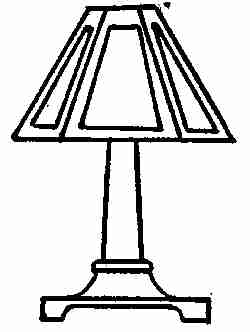
| X. | Lamp (for Electricity), with Shade | 92 |
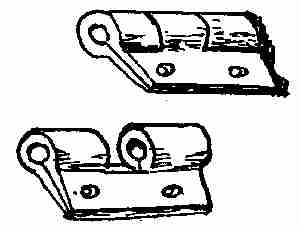
| XI. | Hinges in Copper or Silver | 100 |
| XII. | Jewel Box and Desk Set | 107 |
| BRASS WORK | ||
| XIII. | Finger Bowl, Crumb Tray, Tea Caddy, Vase, Bell and Bracket, Drawer Pulls, etc. | 133 |
| SILVER WORK | ||
| XIV. | Finger Rings and Scarf Pins | 151 |
| XV. | Necklaces, Brooches, Bracelets | 166 |
| XVI. | Spoons and Picture Frame | 178 |
| XVII. | Watch Fobs | 187 |
| XVIII. | Napkin Rings, Silver Comb, Belt Buckles | 191 |
| XIX. | Enamelling | 197 |
| THE BLACKSMITH'S SHOP | ||
| XX. | Blacksmithing and Tools | 215 |
| XXI. | First Problems in Forging | 233 |
| XXII. | Welding | 247 |
| XXIII. | Mild Steel or Soft Steel | 264 |
| XXIV. | Hardening and Tempering. Tool Making | 289 |
| XXV. | How to Harden, Soften and Stretch Steel | 307 |
| XXVI. | Forging Hand Hammers | 316 |
| XXVII. | Some General Forging Problems | 327 |
| ORNAMENTAL IRON WORK | ||
| XXVIII. | Processes, Andirons, Fire Tools | 361 |
| XXIX. | Candlesticks, Hinges, Iron Brackets | 380 |
| XXX. | Lamps, Lanterns, Iron Kettle Stand, Umbrella Stand | 396 |
| XXXI. | Door Knockers, Plates, Handles, etc. | 410 |
| Even a Boy Can Learn How to Make a Horseshoe | Frontispiece |
| FACING PAGE | |
| A Boy's Workshop | 14 |
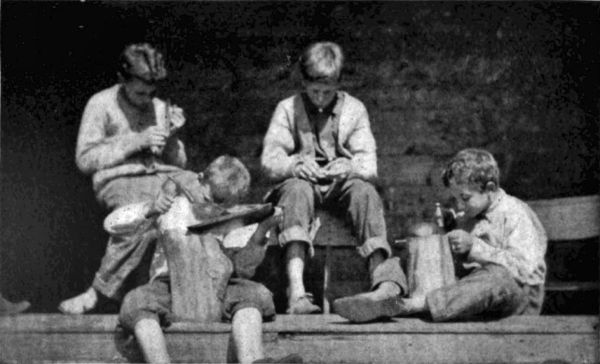
| A Group of Boys at Copper Work | 66 |
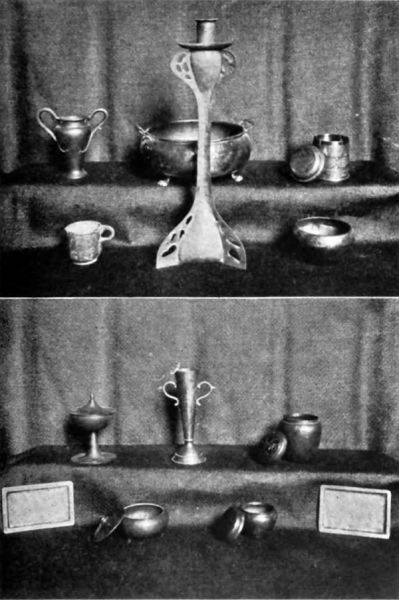
| Some Problems in Copper and Brass Work Made by Boys | 142 |
| Boys from Eleven to Fourteen Years of Age Doing Metal Work in the Country | 194 |
| Splitting and Shaping the Iron in the Making of Andirons | 362 |
| Finishing of an Ornamental Window Grill, and Levelling up of an Old Dutch Candlestick | 388 |
| Making an Iron Lamp | 396 |
| Ornamental Work and the Straightening and Finishing of an Umbrella Stand | 408 |
What a pretty copper box, John. Where did you get it?"
"I made it."
"You made it?"
"Yes, out of sheet copper in my room last night. That's the way I spend my evenings. And such fun as it is! I enjoy every minute of the time. Mother says I'd work all night if she didn't stop me.
"I'd like to do something like that. Do you think I could learn to do it?"
"I'm sure you could. Do you know the blacksmith around the corner? He taught me how to do this work, and ever so much more. He got me the tools, too. He says every boy can learn to work with metals, so I thought I'd try it. I'll take you around to see him sometime. Come up to my room and I'll show my workshop and all the tools I use."
"It would be mighty nice to know how to do something else besides running an elevator all day.[4] I get so tired of that. How long would it take me to make a box like this one?"
"Not very long if you begin in the right way. I've worked at it only since I left school. The manual training I got there helped me to know how to handle the tools. You had that training, too, and I know it will help you. Here we are, this is my workshop and bedroom. Let's work here together and I'll teach you all I know: how to use the tools and just what to do."
So began two boys to do work that one had done—metal work which any boy can do if he will but take the trouble to get the tools and have the patience to learn the way step by step.
"You don't need a large room for your workshop, you see," said John. "The table here is my work bench and all the tools can be put into a box out of the way when you are not using them.
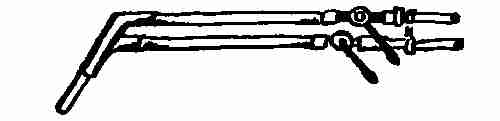
"Here are my sketches of the tools one needs to make almost anything out of copper, brass, or silver. The blacksmith made the drawings for me and taught me how to make some of the tools myself. He says every boy should learn to make his own tools and I shan't be satisfied until I can make them all. Then I can make them as I need them and only those that fit the work best. But I had to buy most of them to start with. Here they are."
These are my shears. They are sometimes called jewellers' snips. I use them for cutting copper, wire, and my designs. You can buy them at any hardware store. But be sure to get a good pair, as they are needed for so many things.
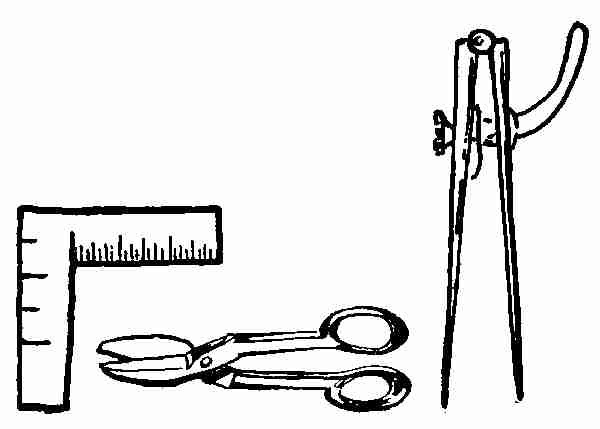
I do all my measuring with a steel square. You see it takes the place of a two-foot rule. It's useful for squaring up, too. See, it has the 1⁄16, 1⁄4, 1⁄2, 3⁄4, and 1-in. spaces.
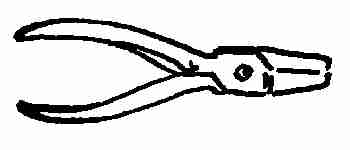
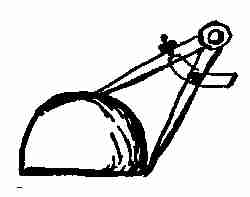
My dividers are my compasses. I draw circles, mark pieces, and find centres with them.[6] The pliers are used to twist the binding wire and to hold the metal when it is to be heated, or soldered, etc.
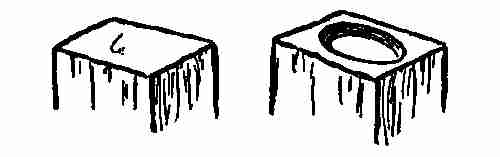
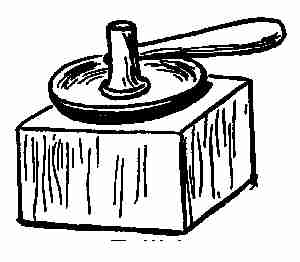
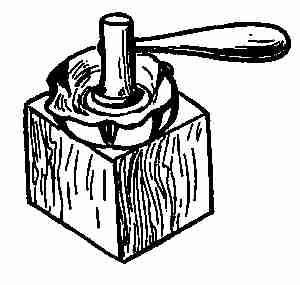
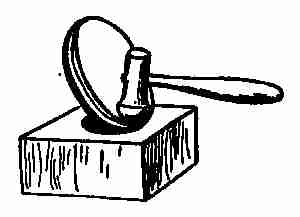
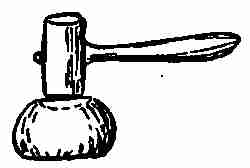
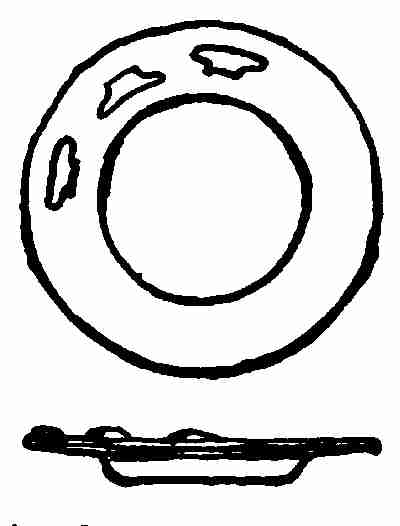
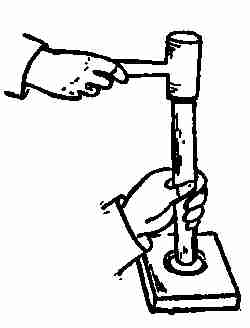
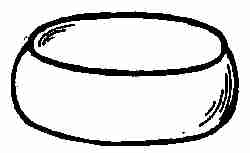
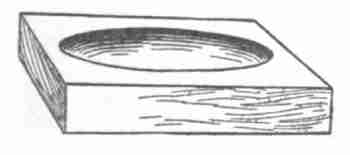
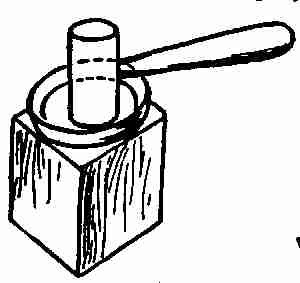
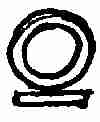
You can get a wooden block like this anywhere. Hard wood is best. This block is 6 × 4 × 4 ins. You see, I cut out a hollow bowl-shaped place in the top. When I want to work a flat piece of copper into a rough bowl shape, I hammer it into the depression. The opposite end of the block, which is flat, is useful in many ways, too.
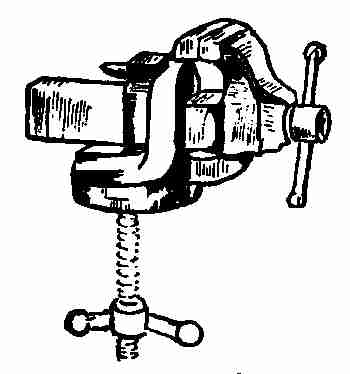
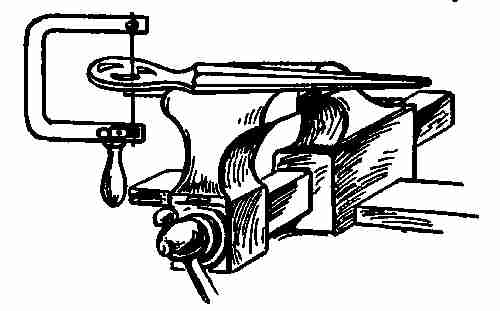
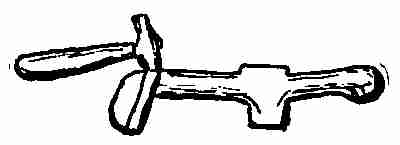
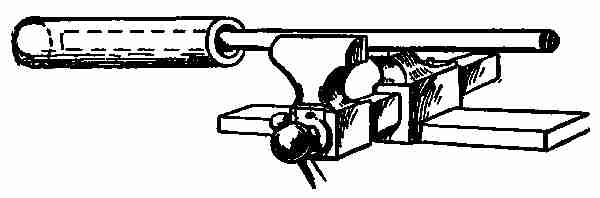
I couldn't get along without my bench vise. Here it is; made of metal. It can be fastened to a table as well as to a bench. It holds any tool used for shaping and also the metal when I wish to file it.[7]

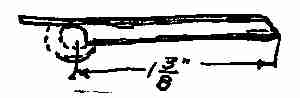
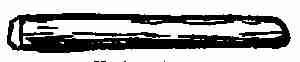
This piece of 3⁄8-in. hexagonal steel, 5 in. long, tapered at one end down to 1⁄16-in., is a punch for making or pressing holes in copper or silver. The size of the hole depends upon the length you drive the punch into the metal.

The centre-punch is made like this one, but the end is ground to a point.
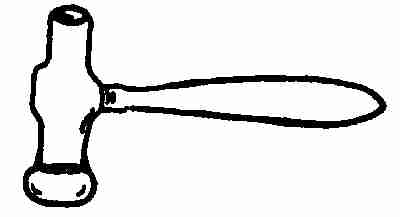
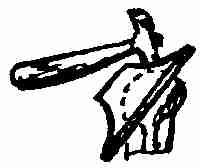
Here are my hammers. I have three and a wooden mallet. The raising hammer is used for many things which you will learn as you get on. You see one end is somewhat rounded. You can pound away on the copper with this hammer and have no fear of driving holes into the metal. It's the first hammer I use to shape up the metal bowl with.

The shaping or driving hammer is flat at one end[8] and rounded at the other. Its bent head is shaped so that you can use it in places where a straight headed hammer won't go. It's the only hammer to use when you work on the outside of boxes or bowls to shape them up.
Sometimes lumps are left on the surface of the copper after the raising hammer has been used. These are smoothed away with the planishing hammer. Its broad end flattens these rough places and makes the surface perfectly level before going on with the work.
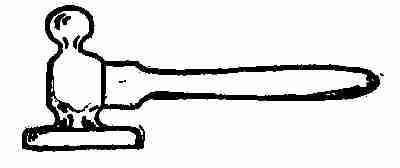

A wooden mallet is often used in place of the heavier hammer. If a light stroke is needed it can be used without danger[9] of marring the metal, as wood is so much softer than the metal itself.
You'll need some files to reduce the metal to certain sizes. I have four: a bastard, 12-in.; a mill cut, 8-in.; a half round mill cut, and one round 1⁄2-in. mill cut. Then I have one half dozen jewellers' files of different sizes. Supply houses will always tell you the best kind to buy.

The cold chisel is used in many places for cutting off material, especially for metals that are too heavy for the shears.


A carpenter's gouge chisel will be found useful for cutting impressions in wooden blocks.
The drill press is used to bore holes into the copper or silver when you wish to rivet or saw. You will need a half dozen drills for your work. The 1⁄16-in. drills are the size I like best.
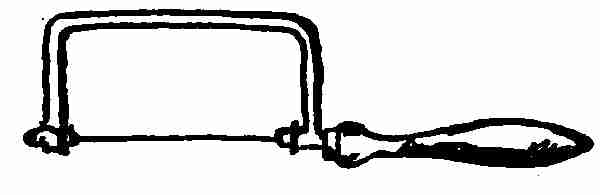
With a jewellers' saw frame like this[10] you can cut any design out of copper or silver. The fine saws are very cheap and one will last you a long time if you take care of it.
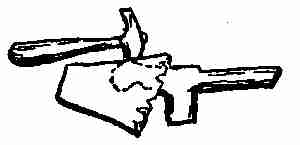
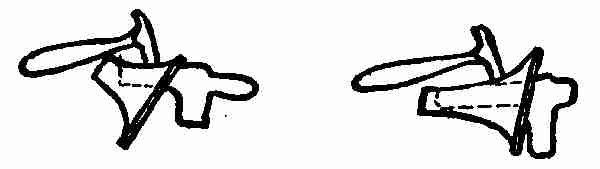
Here are the tools I use to finish shaping my bowls on. This round top stake is put into my bench vise, where it is held tight. Then I put my bowl on it after I have shaped it as much as I can on the hard wood block. I can then go on shaping it as I choose, but if the bowl is very deep you must use the anvil stake instead of the round top stake.

Here is a tool which is a combination of anvil[11] stake and riveting tool. I use it for drawing out pieces of copper into different shapes; flattening round pieces, rounding up flat ones, and for riveting pieces of metal together, as you must do when you make a piece of work like my box.
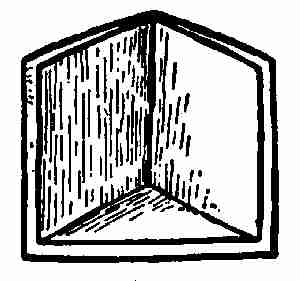
Here is a little fire screen I made myself. You need one, you know, to put your metal in, at times, for annealing and soldering. It's a safe way to prevent the blaze burning the table or setting fire to anything. I take two pieces of board, each 6 × 12 × 7⁄8 ins. (any kind of lumber will do). Nail the two 12-in. edges of the boards together, at right angles to each other. Nail this to a base and line the whole inside with asbestos. You can place any piece of metal you wish to heat in this corner and direct a flame upon it with perfect safety.
All the heat I need comes from a gas burner. Here I have a bunsen burner, and for such work as I do on rings, scarf pins, hat pins, etc., or for any work that doesn't need lots of heating in the process, the bunsen burner will do. But for annealing, which you have to do when you make bowls, or for[12] soldering, when you make boxes, you must have a stronger flame. Then I use the gas range in the kitchen or the bellows blower and blow pipe. If you happen to be where you can't get a gas flame, an alcohol lamp with a mouth blow pipe can be used.
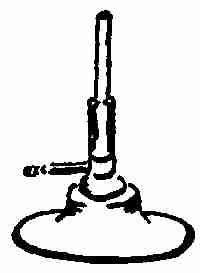

Fill the alcohol lamp with denatured alcohol (bought at any drug store). Light it. With the large end of the blow pipe in your mouth and the small end about 1⁄4 in. above and a little to the right of the flame, blow gently. This little blue flame will give you heat enough to solder small pieces. Even a small wood fire would give you heat enough to anneal any size pieces you wish.[13] "Must I learn to make all these tools before beginning?"
"Oh, no, you'd better buy your tools; they don't cost very much. Then we can start to make something right away. The first thing you must do is to design the piece of work you are going to make. I made a bowl first."
"But I can't design."
"Neither could I when I began. You won't find it hard after you have once made a start."
"Let's begin now, John, I want to make something."
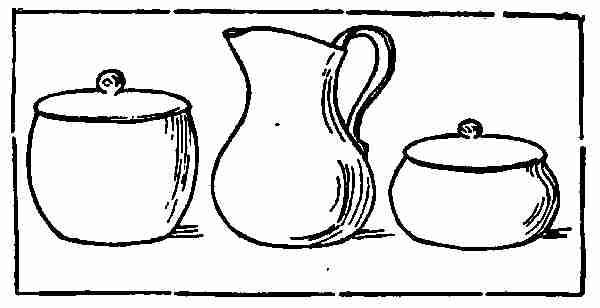
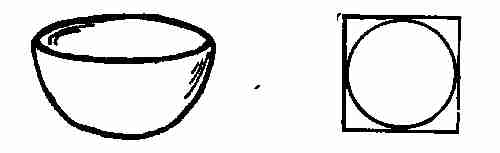
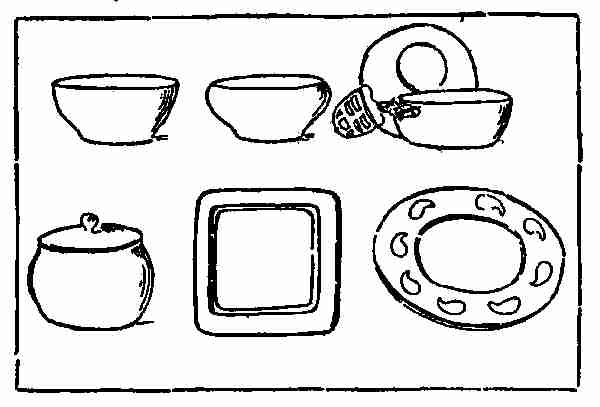
"I know you do," said John. "That's the way I felt. Now, I'm the teacher and you must do as I tell you until you can plan for yourself. Here are pictures of a lot of things we can[14] choose from: bowls, boxes, trays, etc. If a boy can make all these models he can go on and make nearly anything in copper, or even silver, he would like to make. Here are the bowl designs I have drawn. Of course there are bowls of different shapes, and some have covers to them. But we will try to get the shape that's most pleasing. Let's take this wrapping paper and draw a number of shapes on it, keeping the diameter and depth of each bowl the same. This model is 4 ins. in diameter and 11⁄2 ins. deep. Let's make all our drawings of bowls that size."

"Which do you like best?"
"I like the first one."
"Now that we've decided on the size and shape of the bowl, I must tell you something about the copper to be used. All sheet copper is sold by number, the higher the number the thinner the metal. Number 20 is a good size to use for most bowls and boxes. I use size 20 for mine. If you want a bowl to be lighter, use size 22 or 24. [15]You can buy the sheet copper at any hardware store."

"Now you know how to make your design and you know something, too, about the tools and copper in general. We are ready now to begin the bowl."
Here are the tools and the material that we need to make our first piece of work:
Material: 1 Sheet of copper, 20 gauge. Powdered pumice stone.
Tools: Hard wood block, dividers, shears, round headed hammer, planishing hammer, round top stake, mallet, files.
Directions: Take the sheet of copper, and with the dividers mark on the copper a circle having a diameter a little longer than the contour of your bowl design. Cut this circle out with your shears.
With the round headed hammer, using the rounded end, beat the metal disc into the hollow of the[20] wooden block until it takes on a fairly even bowl shape. Keep turning the metal with the left hand while you hammer it with the right.
You soon have a rough shaped bowl full of bumps and wrinkles around the outer edge.
These wrinkles must come because the circumference of the metal disc decreases as it takes on the bowl shape. So long as these wrinkles are long regular curves, they will work out all right. If they should take short, sharp shapes there is danger of the metal splitting. In order to avoid this be sure to keep the[21] wrinkles hammered out flat as you work along.

If you went on hammering too long after your bowl is shaped, the bowl would crack or perhaps break, for hammering leaves copper hard and springy. So you must soften it before you can safely hammer any more. To do this I hold the bowl over a gas range until it is red all over, then I plunge it into cold water. This heating to soften up the copper is called annealing. Repeat the hammering[22] until the bowl takes on the shape of the design.
Now take your round top stake and put it into the vise. Place the bowl over the round top stake, and with the planishing hammer, beat the surface until it is perfectly smooth, driving the metal just hard enough to flatten the bumps made by the hammering in the wooden block. If carefully done the surface will be true and bright and covered over with brilliant facets. A skillful hammer-man can really drive the metal in any direction he may wish. In this way you make a bowl out of one piece of copper. The top of the bowl will be ragged. Cut this rough edge with a pair of shears.[23] File the top with a smooth file until it is perfectly true. A good test to make sure of this is to lay the bowl down on a plate of glass, or hold it up against the window pane. If there are still any tiny openings[24] left in the edge the light will be easily seen through them. More filing must be done until no light comes through from the smallest space. This done, take a piece of emery cloth and rub the edge of the bowl until the file marks disappear. If you lap the cloth over the edge your rubbing will leave a rounded edge, which is just the finish it should have.
To flatten the bottom of a bowl: Turn the bowl upside down on a bench. With a pair of dividers find the centre of the bottom of the bowl. This is done by placing one leg of the dividers against the side of the bowl and with the other making a light scratch as near the centre as you can. Change the position of the dividers to the opposite side and do the same, but be careful that the scratch is light. Repeat this until you have done it on the four sides.
Where these lines cross is the centre. With one leg of the dividers on the centre draw a circle having a diameter of about two inches. Take a wooden mallet and strike down on the centre of the circle. This will flatten the bottom. Work from both sides of the circle and keep the rounding edge just touching[25] the circle made by the dividers. If the strokes are too heavy the bottom will bend in like the dotted lines in the sketch.
In that case, turn the bowl up and hammer from the inside. The bowl is now ready for polishing. Mix some powdered pumice stone with water. With a woollen cloth that has been wet and then dipped into the mixture, rub the bowl. This both cleans and polishes and at the same time gives a beautiful lustre to the surface of the metal.
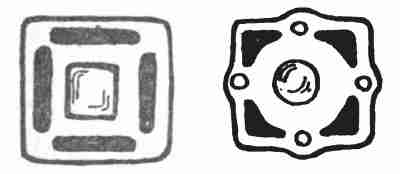
How to make copper trays (used for pins, hair pins, cards, etc.).
(1) Round. (2) Square or oblong.
Material: Piece of copper about 7 ins. square, No. 20 gauge. A hard wood block, 10 × 10 × 2 ins. thick.[27] Tools: Carpenters' gouge chisel, dividers, steel punch, shears, round peg of wood, 6 ins. long and 1 in. in diameter.
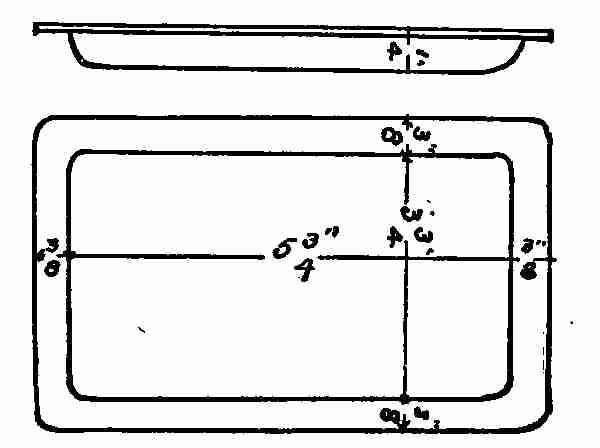
Design: Take a large sheet of plain paper. Draw on it a 3-in. circle. Using the same centre, draw a 5-in. circle. This gives you the plan or top view of the tray. Below this view on the same sheet, draw the elevation, or edge view of the tray. You can make the tray as deep in the centre as you wish. Let's make this one 1⁄2 in. deep, that's a good proportion.
This is what we call a working drawing. If you are pleased with the design, you can go right on with the work, if not, you can change it to suit. You can see by the design that the tray is made by driving the centre of this square plate of copper down into a depression. In order to do this we must make a mould the exact size and shape of the tray centre. This is what the square hard wood block is used for.[28]
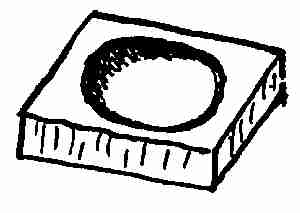
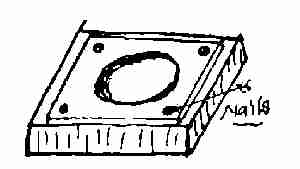
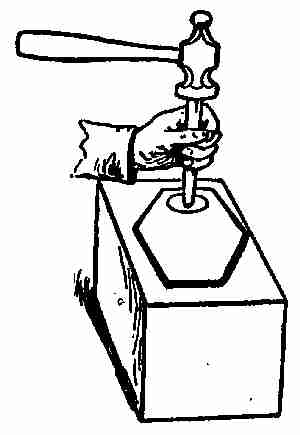
Take your hard wood block. Draw diagonal lines across one face. Where these lines intersect is the centre. With your dividers, using this centre, draw a 3-in. circle. Place the carpenters' chisel anywhere on the circle and strike with a hammer, driving the chisel down into the wood about 3⁄8 in. Do this all around the circle. Gouge out the loose wood until you have cleaned out the whole depression, being careful not to go below 1⁄2 in. in depth (the depth of your design). Smooth this up nicely with sand-paper. The mould is now ready for the metal plate. With the steel punch, make holes in each corner of the copper plate about 1⁄2 in. from the edge and just large enough to fit the wire nails. Place this plate over the mould so that the centre of the plate comes right over the centre of the mould. Fasten the four corners down with the wire nails. To drive the metal into the depression we must use something softer than a steel hammer. A hard wood peg has been found to do this best. Cut a piece about 6 in. long from the end of a broom[29] handle. Round one end up, using a file or a carpenters' chisel to do so.
Place the rounded end of the peg on the circle of the copper plate and, with a hammer, drive the copper into the depression below it. As constant hammering hardens copper so that it ceases to respond to the blows, it is necessary to soften up the metal by annealing as the work goes on. Take the sheet off the block. To do this, place the point of the chisel under the copper sheet close to the nail head and pry the nails out, lifting both copper and nail up at the same time.
After annealing, nail the copper plate in the same place as before. With the wooden peg continue driving until you fill the depression, at the same time flattening all parts of the metal that may push up. Be careful not to mar the copper at any time. When everything is perfectly flat and smooth take it off as before.
We are now ready to draw the 5-in. circle on the copper. The centre for this circle is the centre[30] of the depression; and that is found with the dividers in the same way as you found the centre for the bottom of the bowl. Make the circle on the copper. With the shears cut along a little on the outside of this line. Smooth up and round the edges of the tray with a mill file. Rub out file marks with a little piece of emery cloth. If the hammering has been uneven some parts of the copper will have stretched more than other parts and the tray will not lie flat when placed on a table. To level this up, place the tray top side down upon a bench or table and strike gently with a mallet on the surface. Holding the mallet near the head one can control the blows and be able to strike gently. But if it is held toward the end of the handle the blows will not be uniform. This applies to all hammers, whether of wood or steel. You will notice as you do your hammering the high spots will settle down and gradually flatten. The tray is now ready for cleaning and polishing. This is done in the same way as you treated the bowl.
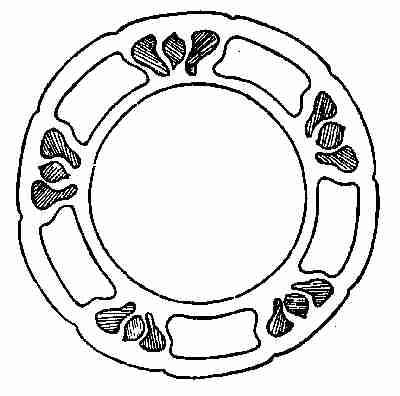
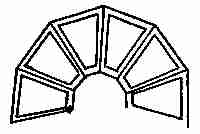
Decoration: Round trays may be decorated in many simple ways by drilling holes in the rim, and then sawing out designs to suit one's fancy, or they may be notched at intervals. Nothing is more decorative though, than the embossed or repoussé design,[31] made by beating from the back and raising the metal on the face above the level. One of the designs given here shows the embossed, and the other shows a combination of the embossed and sawed out work.
The value of the mould: It may seem to you like a lot of work to make a mould just for this round tray, but it can be used many times for making this kind of tray and also for trays of similar shape, like bowl covers, etc. Most of the jewellery nowadays is made in moulds, wood, steel, or lead. Copper, silver, and gold medals, pins, rings, tea and dinner sets are all made by the mould or die method. This mould you have just made is only a simple one; however, complex ones are made in the same way. The skill all lies in making a very good design first and then in making a very smooth mould to fit the design. After one or two trials it comes easy enough. The chapter at the end of the book will explain die and mould making in modern copper, silver, and goldsmith shops.
Material: Copper, 61⁄2 × 41⁄2 ins. No. 20 gauge.
Tools: Shears, square, bench vise, round hard wood peg; dividers, copper vise jaws.
Design: Determine first whether the tray is to[32] be oblong or square. This material makes a tray 61⁄2 × 41⁄2 in. Draw this size oblong on a sheet of paper. The rim of the tray should be 3⁄8 in. wide. Draw an inner line all around, 3⁄8 in. from the outside. Below this draw your elevation, or edge view, showing the depth of the tray. In this design it is 1⁄4 in. deep.
First see that your 6-1⁄4 × 41⁄2-in. piece of copper is squared. Now draw your inner rectangle on the metal. To do this, set the dividers 3⁄8 in., and with one leg against the edge of the copper, draw all around the four sides, marking the lines on the metal. You now have a flat sheet marked ready for[33] bending. Place the sheet of copper between the vise jaws, the inner line even and on a line with the vise.
The hard wood peg should be cut to a flat tapered end. This flat end of the peg is held at an angle of about 45° against the copper plate, just above the vise jaw and against the line of the rectangle. With the mallet drive gently. By doing this the body of the tray is pushed in, but the rim is kept straight in the vise. Repeat this all around. You'll have a tray like the sketch. If the body of the tray is not deep enough put it into the vise again and keep driving it until you get the depth you want. The inner corners will be found to be rounded, as they should be. Round off the outside corners to match. File the edges round and finish with an emery cloth, clean and polish as explained before.
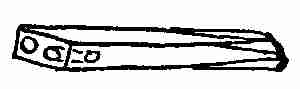
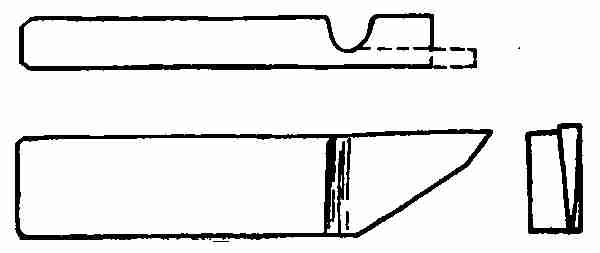
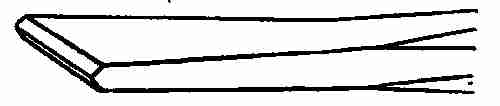
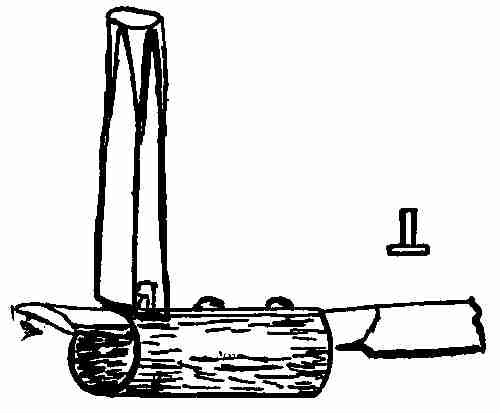
Let's make a paper cutter like this sketch. We can draw the design on paper first and then cut it out. Here is what we need to make it.

Material: Heavy copper, No. 8 gauge, 10 inches long by 11⁄4 inches wide.
Tools: Drill press and drills, jewellers' saw frame, cold chisel, files, vise, emery cloth, few wire nails (1⁄2 in.) two blocks of hard wood, one, 10 × 11⁄4 × 11⁄4 ins., and the other, 6 × 2 × 1⁄2 ins.
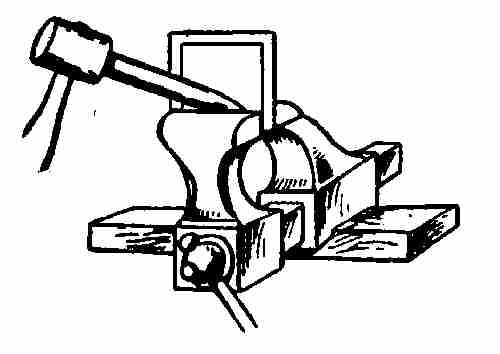
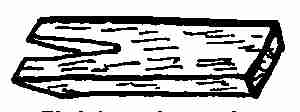
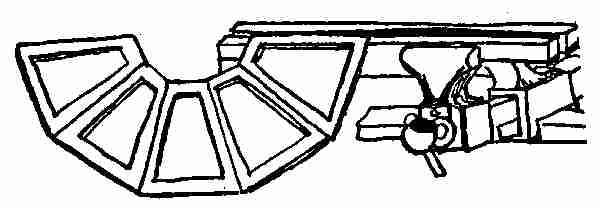
Cut out the design and paste it on the copper plate. If our shears could cut copper as heavy as this we would have little trouble to cut our design out. But the shears can't do this work, so we have to put the copper into the vise and cut the design out with a cold chisel and hammer.[35] Place the copper into the vise with the line of design to be cut flush with the top of the vise. With hammer and chisel, cut along this line. The back part of the vise will act as a shear and help in the cutting and will prevent the copper breaking away and leaving the edge rough. When this is done, place the paper knife in the vise and file all the edges smooth. Now that it's cut out and smoothed up we are ready to saw out the design in the handle. To do this drill holes in the design as a starting point for the sawing. Take the drill press and put a 1⁄16-in. drill into the chuck. Drill a hole in any part of the design. Take the jewellers' saw frame and fasten one end of the small saw into one of the legs of the frame; push the loose end through the hole made by the drill. Fasten the loose end to the other leg of the saw frame so[36] the saw is fairly tight. In order to saw properly, we must have something to support the piece while we are working on it. This is best done by taking a block of wood 6 × 2 × 1⁄2 ins. and cutting out a V-shaped notch in one end. Place this in the vise, or nail one end of it to a bench so that the V-shaped end will extend over the bench or vise to be free to work upon. Put the handle to be sawed out on this block so that it will be supported on both sides of the parts to be sawed out (see sketch of work in vise). The saw will play freely up and down in the notch. All sawed work is done in the same way.
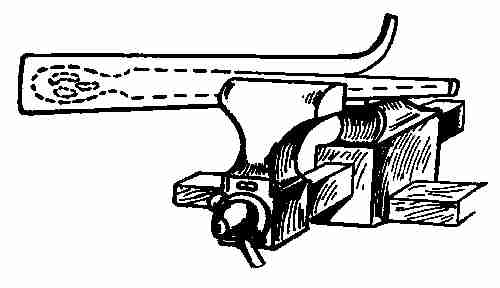
To file the edges sharp: Take your hard wood block, 10 × 11⁄4 × 11⁄2 ins.; fasten the cutter down tight by driving two short wire nails half their[37] length into the wood at each end of the cutter. Place the cutter between these nails, bend the ends over, and fasten down (see sketch). Place all into the vise jaw and tighten it up. With a rough flat file, file the edges down, working from the centre line both ways. When one side is filed about half the thickness of the copper, bend the nails, take off the cutter. Reverse it, put it back, and file as before. Do this until the edges become sharp.

To finish this piece of work as it should be done, we must do some draw filing. The draw filing is done in this way: Take hold of both ends of the flat file, the handle in one hand and the end of the file in the other. Stand lengthwise of the piece. Place the file flat down on the blade with the teeth of the file pointing in the same direction as the blade. Push it from you and pull it toward you, at the same time pressing down on the blade. This is draw filing and it is the only way to make a piece of metal true, and free from the marks of the cross filing which was done in the beginning. Repeat this on the other side until the whole paper cutter[38] including the handle is smooth. Wrap a piece of emery cloth around a block and rub all over the surface. Polish and finish as before described.
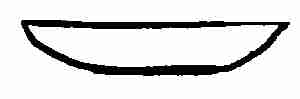
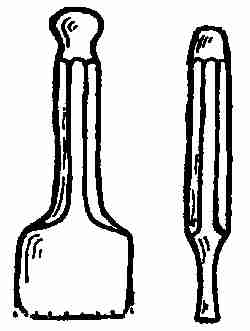
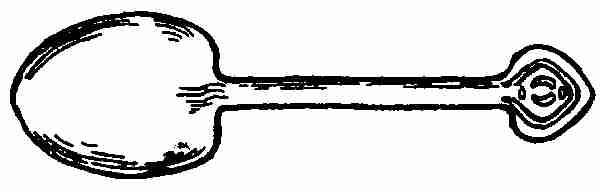
A very beautiful nut set consisting of a bowl, four plates, and a nut spoon or a shovel, can be made out of copper. One uses the same tools to make this set as were used for the copper bowl, and the work of making it is done in much the same way.
Material: 9-in. disc of No. 20 copper (bowl). Four 5-in. discs (for plates). Piece of copper 2 × 3 ins. (No. 8).

Take the 9-in. disc and hammer it into the desired bowl shape, on the hard wood block. The plate should be hammered up in the same way, keeping the depression in the centre of the plates about 1⁄2 in. deep. A very beautiful finish can be made on[39] these bowls and plates by the use of the round end of the raising hammer and a flat-iron. Place the handle of the iron between your knees, face up. Put the bowl or plate, face up on the flat-iron and go over every part with the rounded end of the hammer. This produces a surface covered with oval facets, giving a mottled effect. The edges of the bowl and plates may be left straight or they may be rounded, according to the design.
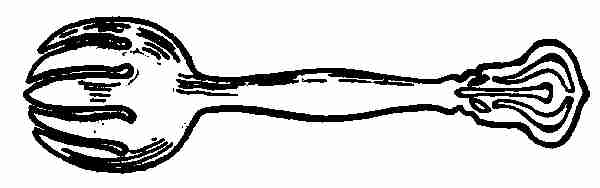
Draw the design on paper. Cut the design out and paste it on the copper. This piece of No. 8 copper is too heavy to be cut with the shears, so it must be placed in the vise. See that the outline is even with the top of the vise jaws. With the cold chisel and hammer cut along the top of the vise as you did when making the paper knife. Now you have a shovel-shaped metal of the same thickness all over. Where the handle joins the bowl the metal[40] should be left thicker than in any other place, otherwise the spoon will bend in the using. To thin out the metal of the bowl, hammer it. Begin where the handle joins the bowl and thin out to the edge. The handle is shaped by working from the bowl out toward the handle end, constantly widening and flattening it. Cut off the surplus metal, keeping to the original design. The handle may be left plain or some simple sawed out design may be put on. File up, rounding the edges off so that the spoon feels smooth and is comfortable to handle. Place the whole on a hard wood block and beat the bowl and handle into shape. Many nut spoons have designs sawed out in the bowl to lighten the weight.
Soldering is a process of joining two metals together. It is not hard to learn to do. If you are careful when you do the work to have the materials to be used perfectly clean, you may be sure of success, for, after all, it's one of the easiest and simplest of all the operations done with metals.
Material: 1. Borax: bought in lumps, wrapped in tin foil, or pulverized.
2. Borax slate: a square piece of slate with a small depression in one side. Any piece of clean slate will do. This is used to grind the lump borax, or to mix the pulverized borax to a pasty condition on.
3. Solder: silver solder, sometimes called hard solder. It can be bought by the sheet in large or small quantities. Bunsen burner, or either one of[42] the following: blowpipe and foot bellows with gas flame, a blacksmiths' fire with coke or charcoal.
Directions: The parts of the metals to be joined should, first of all, be scraped or filed bright. This prepares them best for the solder. Take a lump of borax, grind it up and mix with a little water, on the slate, until it is like a paste. Take a sheet of silver solder, cut a number of slits lengthwise down the sheet and then cut them crosswise. You will have a number of pieces about 1⁄16 in. square. These bits are dropped into the borax solution until they are completely covered with the paste. With a camels' hair brush, wash the edges of the metal to be joined, with the solution of the borax. Tie the pieces together with an iron binding wire, taking care to have the edges to be joined close together and in the proper position. If you don't, the solder will not fill up all the openings and cracks, and parts will be left unsoldered. Now, wash all around the joint with the borax solution. Place bits of solder at intervals along the joint, fairly close. Warm the work gently in the flame. This drives off the water in the borax solution. When the borax is quite dry in the joint direct a stronger flame over the whole work. Heat it gradually, but be careful that no part of the metal, except[43] that around the joint, becomes red-hot, and that both sides of the joint get red-hot at the same time. If you don't guard this, the solder will climb to the hotter side and leave the other, and the edges will not unite. Cool it off in water and file the joint perfectly smooth.
For mending teakettles, tin cans, tin cups, or anything made of tin, galvanized iron, or lead.
Material: Lead solder, comes in small bars. Flux (1.) Resin and sweet oil. (2.) Muriatic acid. (3.) Tallow candle.
Tool: Soldering iron (can be made out of a piece of half-inch round copper.)
How to solder: Soft solder is a mixture of tin and lead in even proportions. This solder melts at a very low temperature. That is why we can do the work with the soldering iron. I find I can solder many things at home with the soft solder, and I'm going to tell you how I mended a leak in the teakettle the other day. First, I took a pocket knife and cleaned all around the hole or leak, scraping the dirt off both inside and out. Then I mashed a little resin up fine and mixed a little sweet oil[44] with it. Then I washed inside and outside of this leak with the mixture. After heating my soldering iron in a stove (any kind of fire will do) I took a bar of solder, held it over the leak, and melted off a bit with the hot iron. You can make the solder flow over the leak by pressing the iron right on the hole. You see, the heat of the iron melts the solder and at the same time it heats the tin hot enough to make the solder cling to it. Before the part got cold I rubbed off the oil and resin with a woollen cloth. This left the work nicely cleaned. You can mend any leak in anything made of tin, in this way.
Galvanized iron utensils are soldered in exactly the same way, but you must use muriatic acid in place of the resin and sweet oil. But if you wish to solder anything made of lead or pewter a tallow candle is rubbed over the place to be mended, instead of resin and sweet oil or muriatic acid. In every other way the work is just the same. But lead, you know, melts at a very low temperature, so you must be careful when working on it that your soldering iron is just hot enough to melt the solder and not hot enough to melt the lead.[45] And now I am going to tell you how you can make your own soldering iron out of copper.
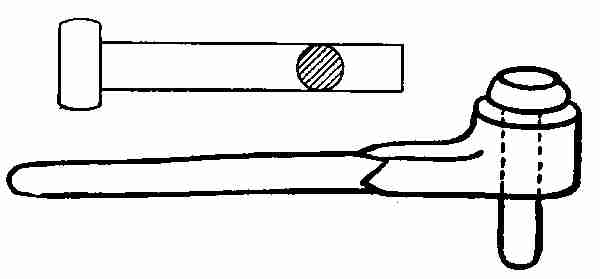
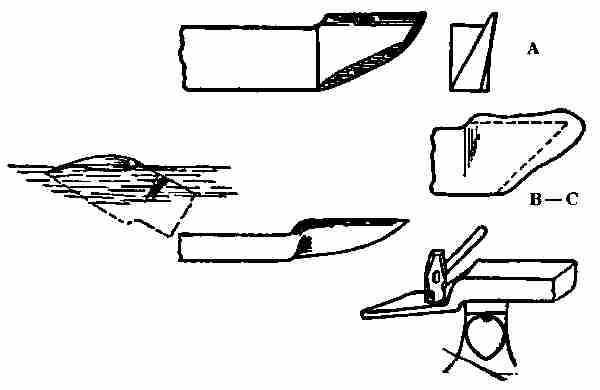
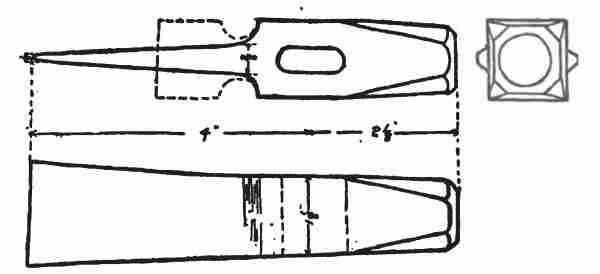
Material: A piece of 1⁄2-in. round copper, 3 ins. long, a piece of No. 8 wire, 18 ins. long, or a piece of light telephone or telegraph wire will do. Some soft solder. Resin and sweet oil. Small piece of clean tin. Manufactured fluid for soldering (used sometimes in place of muriatic acid).
Tools: Punch, vise, file, hammer.
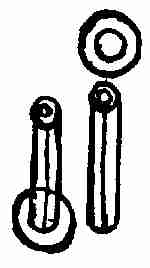
Place the end of the copper rod in the fire and heat it red-hot. Take it out of the fire and punch a hole about 1⁄2 in. from the end of the rod, large enough to allow the No. 8 wire to go through. Push the wire through this hole until half is on one side and half is on the other. Bend the wire close up to the sides to form the handle. In order to make this rigid, place the rod into the jaws of the vise and pinch the wire into the copper rod. This prevents any swinging motion. Take hold of both ends of the wire with the pincers and twist them[46] close to the copper rod. This makes a good handle. Heat the copper end of the rod red-hot, and with a hammer flatten it to a four-sided tapering end about one inch long and ending in a blunt point. (See picture.) Cool off in water and file the end of soldering iron smooth.
Now it must be tinned. On your piece of tin place some soft solder, oil, and resin. Heat the soldering iron hot enough to melt the solder, rubbing it up and down on the tin, mixing all together. Do this on all four sides, and in a little while you'll find the solder has covered the end of the soldering iron. When this is done the iron is ready to be used.
There are many forms of candle holders. Perhaps the one we are all most familiar with is the candlestick. Before the days of lamps and electricity the candle was everywhere. Many different designs of candlesticks have come down to us. Some were large, some small, some plain, while others were highly decorated. But however much the designs vary, there are many points that all have in common. There is the base, large or small, and a cylindrical shaft which rises from the centre of the base. This holds the candle. The drip pan is fastened to this shaft close to the top. It catches the wax as the candle melts. Handles are sometimes soldered on, and sometimes the candlestick is made without one. They are attached to the rim or to the shaft.
Material: Disc of copper, No. 20, 5 ins. in diameter. One piece 3 × 21⁄2 ins., No. 20, (for stem).[48] Disc, 2 ins. in diameter (drip pan). One piece, 3⁄4 × 6 ins. long, No. 16, (for handle).
Tools: Hard wood block, raising hammer, smooth file, dividers, saw, round wood peg, 3⁄4 × 6 ins.
Directions: Beat the copper disc into a saucer shape, for the base. Take the sheet of copper for the stem, fold it around the wooden peg till the edges come together. Scrape and solder the joint with silver solder.
Drip pan: Take the small disc; with the raising hammer, curve it slightly to make a drip pan. With the dividers, describe a circle 3⁄4 in. in diameter in the centre of the drip pan. Cut out this centre[49] circle and make it fit tightly on the stem. Push it down about one inch, scrape the stem, and solder the drip pan to it.
Handle: A strip of copper 3⁄4 × 6 in. long. Cut a tapering slip off each side so that one end will measure 3⁄4 in. and the other 1⁄2 in. Shape with the fingers over the round peg (place the peg in the vise to do this) until you have the shape you wish (see design). The wide end of the handle should fit down on the outside of the rounding part of the base, and the other end against the stem under the drip pan. Bore a hole in each end and rivet the handle in place. If a round handle is desired, take a strip of copper 3⁄4 in. wide and 11⁄2 ins. long, shape round with the fingers. Scrape and solder at the joints, and then solder on the edge of the base. Place and finish up each part as described. This candle design can be greatly varied. It can be[50] made taller, shorter, with various kinds of handles, or with no handle at all.
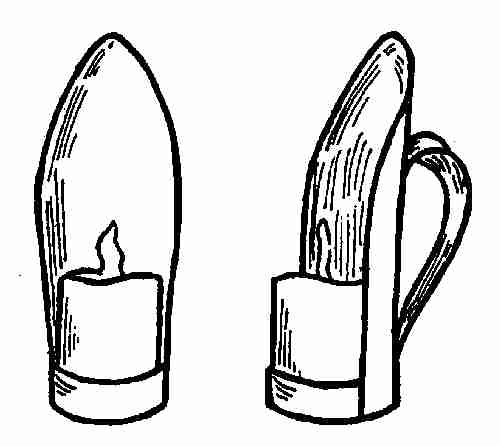
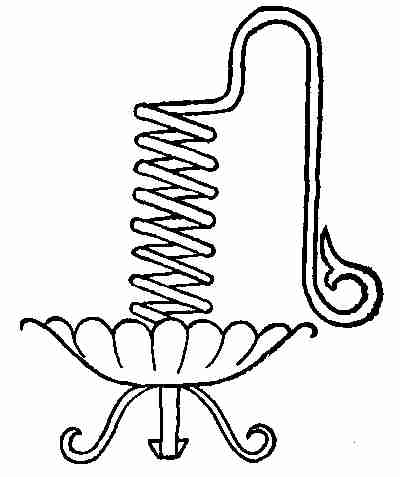
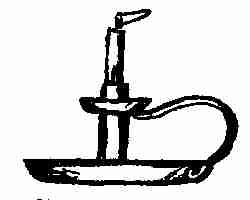
This kind of candle holder, or night light, is made to hold a short, thick candle about 2 ins. in diameter, which will burn from 6 to 10 hours. A round base supports the candle, and a shade with a handle on the back is fastened to the base. It can be adjusted so that the candle burns freely all night, while the shade protects the eyes from the light. Nothing is more convenient than one of these holders, for summer homes or for camping.
Material: Brass, No. 24, 31⁄2 × 4 ins. for reflector.[51] 61⁄4 × 7⁄8 ins. for cylinder. 2-in. disc for base. No. 20, 6 × 1⁄4 ins. for handle.
Directions: Picture shows a small night candle made of brass. Cut out a 2-in. disc. Bend the 61⁄4 × 7⁄8-in. strip to fit it. Solder the two ends of the ring and make it perfectly round. Be careful when rounding it up not to stretch it larger than the disc. Push disc into the ring flush with the bottom. Solder the bottom into the ring. Draw the outline of the reflector on the 31⁄2 × 4-in. piece and cut away the corners. Bend it to fit the holder. It should cover about one half of the circle. Solder the reflector on. Soft solder is strong enough for this work. Now bend the handle piece according to the sketch. Rivet or solder it to the back of the reflector. Polish and finish.
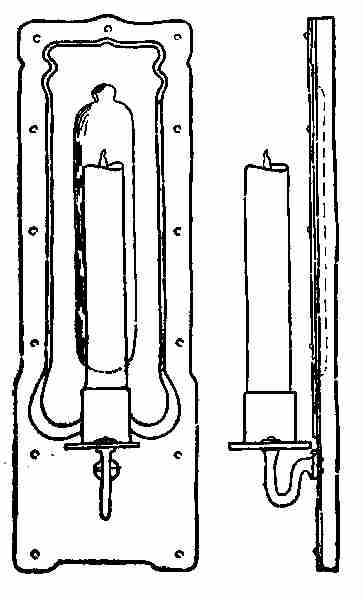
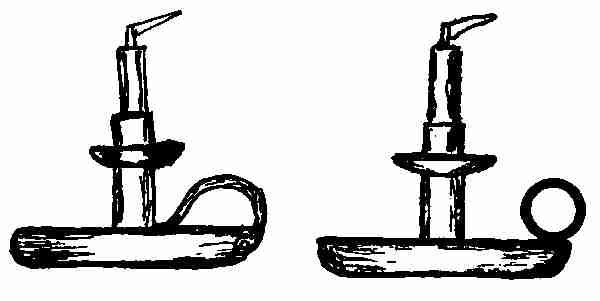
The ordinary tallow or wax candle is used in this night candle holder. You will notice from the sketch that the general style is much like that of the small holder. However, in this design, a small cup or stand to fit the candle is soldered on to the base, a little toward the front.
Material: No. 24 brass—A 4-in. disc. 12 × 1⁄2 ins., for band to go around the disc.[52] Reflector, 7 × 7 ins. Cup, 7⁄8 × 23⁄4 ins., and handle piece, 6 × 1⁄4 in.
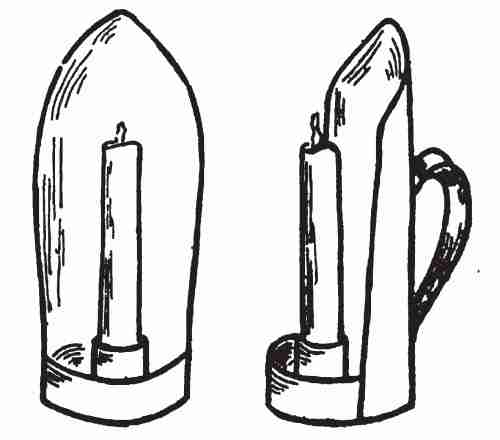
The reflectors are sometimes left plain, though the facets made by a flat placed hammer reflect the light when the candles are lighted and soften the light by day. The greater the reflecting power of the surface, the better is the effect. If each part is carefully filed and finished before they are all put together there will be nothing but the polishing needed.
The sconce is a candle holder made to fasten upon any wall. It is both useful and decorative. Some are made to hold but one candle; they can be made,[54] however, for two, three, or four candles. All sconces should have a reflector, a bowl, shaft, and drip pan. But the designs vary to suit the individual taste and surroundings. The design given here is a very simple one and one that works out well in copper or brass.
Material: One piece of No. 20 copper, 10 × 31⁄4 ins., for the reflector. One piece of No. 20, 21⁄2 × 1 in., for candle socket. One piece of No. 20 copper, 11⁄2-in. disc. One piece of 1⁄4-in. round copper 4 ins. long.
Directions: Make a drawing like sketch shown here. Place this drawing upon the 10 × 31⁄4-in. sheet of copper and cut the metal to fit the outline. Mark on this sheet of metal the embossed line shown in the sketch. Place the sheet of the copper on the hard wood block and with a chasing tool placed on the line, strike with the planishing hammer on the end of the chasing tool. This, in turn, will drive the metal into the wood. Repeat this till the outline stands out above the face of the reflector[55] about 1⁄32 in. If this is done carefully the raised part will be a true smooth line. The same tool will widen the line any width desired. Cut into a wood block a form like the impression you see back of the candle. Place the sconce over this impression and with a wooden peg drive the metal into it. The dotted line on the sketch will show how deep this should be. Drive out any buckles that may have formed during the working of the metal. This is done by placing the sconce face down on the bench and striking down on the raised parts until it lies flat.
Candle holder: Bend the stock for the holder around a 3⁄4-in. mandrel or wood peg till the two ends meet. Clean and solder these ends. Cut a 3⁄4-in. disc to fit the inside of this and solder in. Place this on the 11⁄2-in. disc and drill a hole through the centre of both.
Bracket for candle: Take the 1⁄4-in. round stock. Put it in the vise with one end projecting above, about 1⁄2 in. Drive down on this end, at the same time bend it as shown in the drawing. File the end flat. Cut a piece of No. 20 copper 1⁄2 in. × 3⁄8 in. and solder it on the end just filed. This plate is drilled with two 1⁄8-in. holes, and filed around. Bend the shape as shown in the drawing and on the other end file a shoulder and 1⁄8-in. pin. This is now placed through the hole of the disc and the candle holder, and both riveted to the bracket. The bracket now is placed on the bottom of the sconce (see drawing), and riveted on. The whole[56] sconce may now be nailed with round head nails to a flat 1⁄4-in. board to give weight, or there may be riveted to the back, angles made of No. 20 metal, 5⁄8 in. wide and bent 3⁄8 in. one way and 1⁄4 in. the other way. These angle pieces are riveted on the sides and on the two ends.
Rivets add much to the decoration of the work if they are placed at intervals and properly spaced. They make a nice finish. A hole can be drilled at the top of the reflector, to hang it upon the wall.
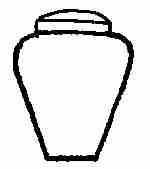
Material: One piece of copper, No. 20, 7 × 7 ins. One piece 4 × 4 ins. (for lid). One piece 3⁄8 in. wide and long enough to go around the opening of the vase or jar.
Tools: Round stake, anvil stake, driving and planishing hammers, dividers, and shears.
Design: Vase, having a base 21⁄2 ins. in diameter, height 3 ins., 31⁄2-in. opening at the top, and lid to fit. The full height of the vase is 41⁄2 ins.

Directions: Take the 7 × 7-in. piece of copper and draw a 7-in. circle. With the dividers set 11⁄4 in., using the same centre, describe a circle. This outlines the 21⁄2-in. circle for the base. Drive[57] up this disc as you did the one for the copper bowl on the wood block, making it as deep as possible. In the same way as you flattened the bottom of the copper bowl, flatten the bottom of this piece of work. Place the bowl over the round head stake. With your hammer drive on the outside. This driving with the hammer on the outside decreases the diameter and increases the length. You will remember that the copper bowl was driven up almost entirely by the use of the raising hammer on the inside and finished by work on the outside with the planishing hammer. This vase or jar calls for the shaping hammer. The vase is placed over the round stake and driven into shape by work on the outside with the shaping hammer. When the rough bowl shape is on the round head stake,[58] drive the sides straight, beginning the strokes at the line of the base circle. Repeat till the sides begin to straighten and take the shape of the design. Take it off the round stake and place it on the anvil stake.
When the sides are symmetrical, mark with lead-pencil a line 3⁄4 of an inch from the top. Work the copper above this line, over toward the centre, until the opening of the vase is about 31⁄2 ins. in diameter. Smooth the work up with a planishing hammer. If the hammer marks made by driving the bowl into shape are carefully done they leave a very beautiful mottled surface of themselves.

To make the rim for the lid to rest upon: Take the 3⁄8-in. strip of metal. Bend it into a circle small enough to fit on the opening left at the top of the vase. Be careful to have this just to fit, otherwise much filing will have to be done, and in this position filing is almost impossible. Cut it the right length, scrape both ends, and solder. Make it perfectly level so that it lies flat when placed upon the bench. Test it by placing it upon the top of the vase. File the top[59] flat, bind the rim in place. Wash, then place bits of solder all around it and heat it until the solder runs. Cool off in water, file off all rough edges left by the solder, clean and polish.
Lid: Take the 4 × 4-in. piece. Cut a 4-in. circle. Place the bowl upside down upon this disc, draw with a pencil all around the rim on this copper plate. This marks the diameter of the rim on the plate, also the line where the copper should be bent to form the lid to fit the rim.
With the anvil stake in the vise, place the disc against the sharp end of the stake, with the line on the edge. Drive with the raising hammer against the part projecting above the stake. Turn the disc, keeping the circle line on the sharp edge of the stake. Repeat this till the sides are at right angles to the top. Place the lid upside down on a wooden block, drive on the inside, shaping it like the drawing. Make it fit the rim, trim off the rough edges, file up smooth, and polish.
Do not forget constant annealing, for you know hammering always makes the metal hard.
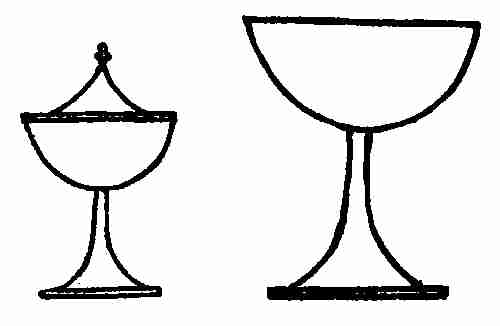
Material: 3 pieces of copper, 6 × 6 ins., No. 20. One piece of round rod copper, 1 in. long. One piece of copper, 12 × 1⁄4 ins. (for rim). Solder.
Tools: Hard wood block, round head and anvil stakes, combination stake, shears, dividers, planishing hammer, raising hammer, and shaping hammer, files, emery cloth.
Parts: Bowl, stem, base, lid, ornamental top of the lid.
Directions: Make a working drawing (full size) on drawing paper, plan and elevation.
Bowl: Take the 6 × 6-in. piece of copper. Cut out[61] a 6-in. disc. Drive the bowl up as you did the copper bowl. It should be the same shape as the copper bowl. Do not flatten the bottom. The drawing shows that the bottom should be rounding, to fit the stem.
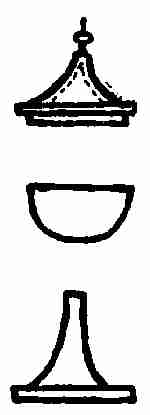
Stem and base: Take another piece of 6 × 6-in. copper. Cut 6-in. disc. With the dividers make a 1-in. circle in the centre of the disc. This inner circle must be beaten up until it becomes the stem. To do this place the disc on the round top stake, with the marked circle touching the edge of the round top. Strike with the raising hammer just above the circle line, turning the disc each time. When you have made one turn of the disc, repeat this twice, hammering just above the part driven up before. Keep repeating this until you have reached within an inch and a half of the outer edge of the disc.
The drawings numbered 1, 2, 3, 4, show the steps in the working up of the copper disc into the stem.[62]
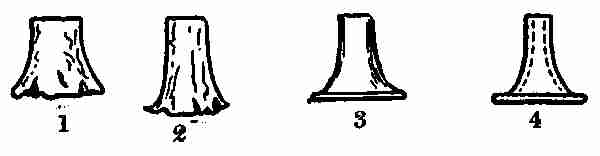
You now have a bell-shaped piece. Anneal the metal and repeat the hammering, beginning at the same place and working up to the same place as before. Anneal whenever the metal seems springy and keep working until the stem is tapered about 3⁄4 in. at the small end, gradually widening into the vase. Place the bell-like stem on the table and flatten it so that it lies perfectly smooth, with the stem perpendicular to the base. Find the centre of the bowl, describe a 3⁄4-in. circle. Scrape both the circle and the small end of the stem. Turn the bowl upside down, place the stem end of the base on the bowl, and solder in the usual way.
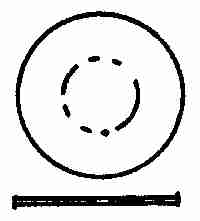
To make the lid: Take the 6 × 6-in. piece. Cut a 6-in. disc. Find the centre. Drive the centre down by using the small end of the planishing[63] hammer. This makes a cone-shaped centre, with the sides gradually widening to the edge of the lid. The highest point of the cone is one inch above the level of the lid. Place the lid on the table and tap gently on the outside until it lies flat. Take the small 3⁄8-in. piece of round rod, file a small shaped ornament (to taste) on one end of the rod and a shoulder on the other end. Drill a hole in the cone-shaped part of the lid, push the rod 1⁄8 in. through this hole and rivet it on the inside.
Rim: Strip of copper, 12 × 1⁄4 ins. Bend it into a circle just to fit the outside of the lid. Cut off the proper length and solder. Make it perfectly round and perfectly flat. Place the lid on the chalice bowl so that it overlaps a little all around, evenly. Draw a pencil line all around the edge of the bowl on the under side of the lid. This is where the rim is to go. Before soldering, test, by placing the rim on the face of the lid. Any openings seen must be closed by pressing the rim down to the lid. Bind tightly with binding wire, scrape, and solder. File and finish.
By this time you will have many pieces of scrap copper on hand. These should be kept in a small box and used whenever suitable.
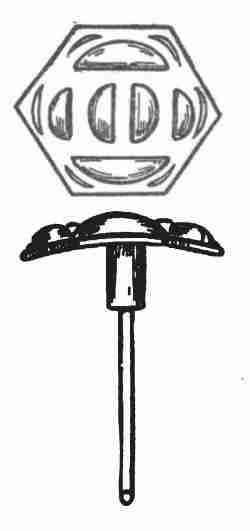
Material: A piece No. 20 gauge, 11⁄2 × 1⁄2 ins., is enough to make the head of a hat pin. The pin part must be of steel, copper is too soft. Buy any cheap hat pin in a dry goods store. (A cent apiece.) Break the glass top or black top and use the pin for the copper head.
Tools: One chasing tool, half moon; shears, dividers, planishing hammer.
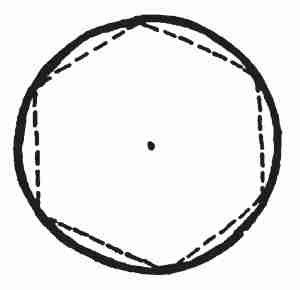
Design: Hat pin with hexagonal top (6 sides) 11⁄2 ins. across. With your dividers draw a circle on the piece of copper, having a diameter of 11⁄2 in.[65] With the radius of the circle, mark off the circumference into 6 equal parts. Draw lead-pencil lines from one point to another, just touching the circle at these points. With your shears cut along these straight lines. Now you have a 6-sided piece of copper 11⁄2 ins. across. Place this piece of copper on the flat end of the hard wood block (the grain end of the wood), and make impressions on it with the half moon tool like your designs. This tool you can make yourself. Take a piece of steel, 5⁄16 in. square or round, heat one end to a red heat and flatten it, like the flat end of a chisel. File the end just flattened blunt and rounding. This end should be hardened to prevent it from wearing rough. To do this[66] heat it to a dark red heat and plunge it into cold water. Place your tool on the upper sides of this plate and drive it with a hammer into the copper, being careful not to drive it through into the wood. If you drive the tool through you will spoil the design and have rough edges. This makes a simple raised or embossed design and is quite easily done.
When this pattern has been stamped in, curve the piece of copper any shape you wish by placing it in the depression in the hard wood block. Place the embossed side down, and with the round end of the planishing hammer, drive with light blows so as not to flatten the design. In this way, you can shape it as you wish. The top could now be soldered right on to the pin itself, but that would not make a strong hat pin. It would be weak and too easily broken from the head. In order to have a strong hat pin we make a little mushroom shaped pin holder which is fastened on the under part of [67]the head of the hat pin and in which the pin itself fits.
Material: Copper, No. 24, 3⁄8 in. square to make the flat disc. Copper No. 24, 3⁄8 in. length and about 5⁄16 in. wide to make the cylinder.
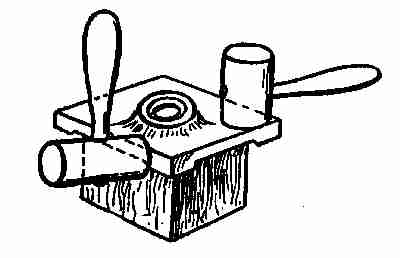
With a pair of dividers draw a circle 3⁄8 in. in diameter. Cut out the circle. Place this little disc on the flat end of the hard wood block and with a punch make a hole 1⁄8 in. in diameter in the middle of the disc. On the same end of the block, file (using round file) a groove right across the corner, about 1⁄8 in. deep. Place the small piece of copper (3⁄4 × 5⁄16 ins.), over the groove. Take the steel wire belonging to the hat pin and place it on top of the copper and over the groove. With the hammer, strike so as to drive the pin, and at the same time the copper, into the depression. The copper sinks into the groove and the two sides lap up on each side of the pin. Drive the two sides down until they lap around the wire, the edges meeting. This makes a copper cylinder which fits exactly around the wire of the pin. Take the cylinder off, fit it into the holes[68] of the small disc. Wash the two pieces with a borax solution, place a little solder on, and solder the disc to the cylinder. After cooling the piece in water, shape the disc so that it fits the under side of the hat pin top. Polish the end of the wire pin with an emery cloth, also the top of the pin holder and the inside of the hat pin top. Push the wire into the little cylinder so that it comes flush with the disc.
Now the pin is all ready to solder to the head,[69] but there is great difficulty in getting it in straight. In order to do this I make a little device out of copper, which helps me in getting things on straight. Take a piece of copper 1 in. wide and 5 ins. long. Bend each end, one 2 ins. and the other 3⁄4 in., both in the same direction at right angles. With the shears cut a V-shaped piece in the short end. This little stand is good for soldering any upright piece to a flat piece, when they should be at right angles to each other.
Place the top of the pin on the long leg of the stand and, with the pin in the slot, place in proper position and solder.
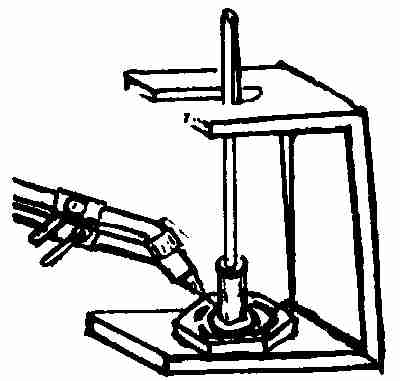
Here is a good design for a hat pin holder, a welcome addition to any dresser. The design is very simple and the holder is easily made if one follows out the directions carefully.
Material: Disc 31⁄2 ins. of No. 20 gauge, for the[70] base. One piece of 3⁄4-in. copper tubing, 4 ins. long for the body. Solder.
Tools: Iron rod, 3⁄8-in. round, 8 ins. long. Hard wood block. Planishing hammer.
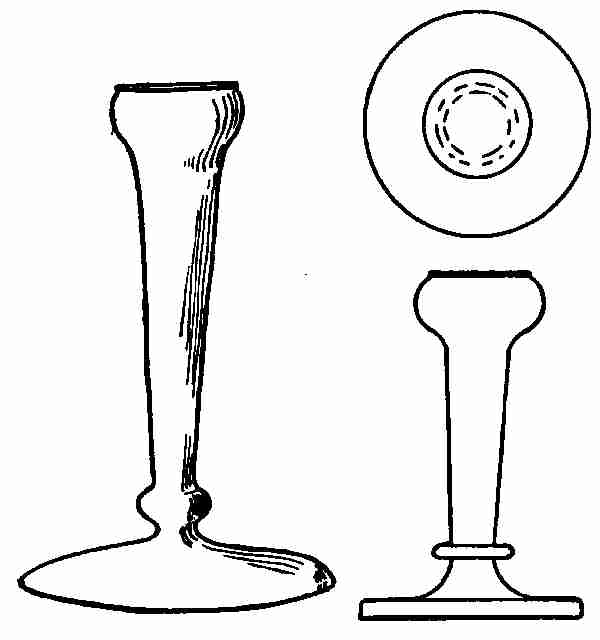
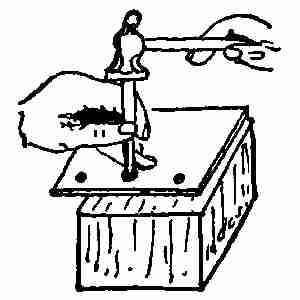
Directions: Bore a 3⁄4-in. hole one inch deep in the wooden block. Place the 31⁄2-in. disc over this hole and, with the round end of the planishing[71] hammer, drive the centre of the disc into the hole 1⁄4 in. Be careful not to drive a hole through the copper disc. Turn the piece upside down. Place the iron rod in the vise. Put the bossed end of the disc on the end of the iron rod and flatten the boss down. Shape the base by rounding the edge down all around. See that it lies flat on the table, without rocking.
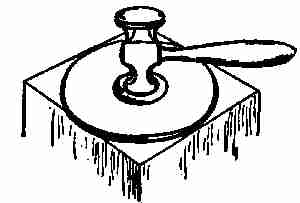
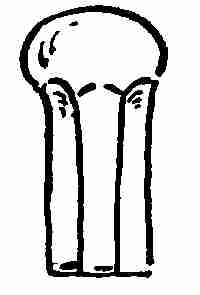
Stem: All copper tubing should be annealed before any work is done on it. After annealing, place the 3⁄8-in. rod through the hole of the tube and with the wooden mallet drive down on the tubing, beginning two inches from the end and using the hard wood block for an anvil. This constant driving and turning reduces the copper to any size required. We must make the end of this tubing fit the 3⁄8-in. rod. The tube must widen toward the other end, which is beaten out. Place it on the small end of the anvil stake. Drive with the raising hammer, turning it all the time. In this way you constantly increase the diameter, making the cup-shaped top like the design. Now the stem and base are ready for soldering. File the ends perfectly[72] smooth and level. Bind in places and solder, as before. The filing, finishing, and polishing must be done as with other copper pieces.
Hat pin holders are usually filled with some soft material. The hat pins are pushed down into this, which helps to keep them in place. Some are covered on the top with a metal disc which has five or six holes bored through, a little larger than the bar of the hat pin. These holes are drilled into the disc and then the disc is soldered on to the top of the holder. The pins cannot fall out with such an arrangement, and they are not likely to gather on one side and tip the holder over.
Riveting is one of the processes of joining two pieces of metal together without the use of solder. To rivet, you must first punch or bore holes into the metals along the edges to be joined. Place a rivet through these holes, and either with the hand hammer or rivet set, flatten down the projecting end of the rivet, forming a head similar to the head of the rivet itself. Be careful to have the rivet holes just large enough to let the rivet slip in and leave no extra space. If the holes are too large the rivet will bend instead of flattening.
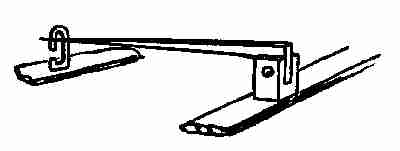
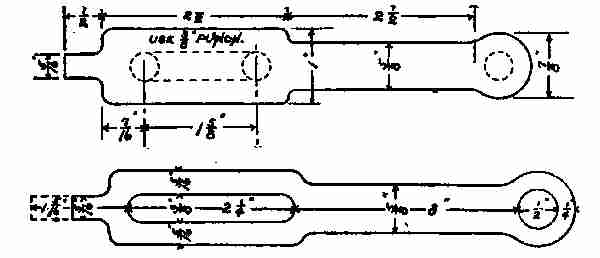
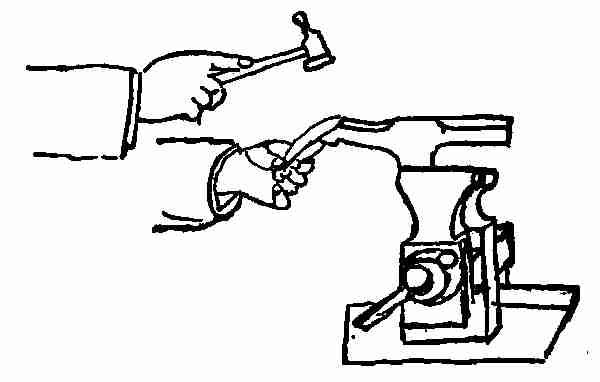
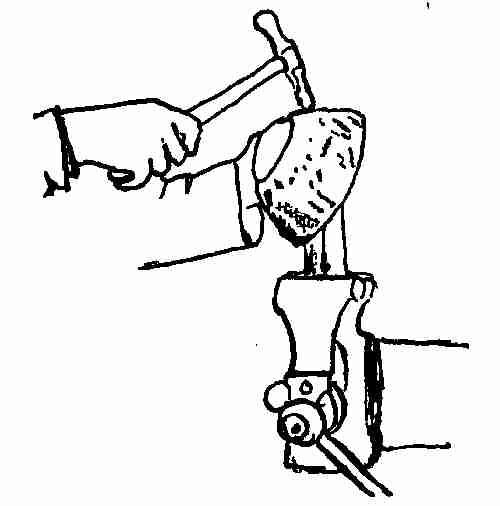
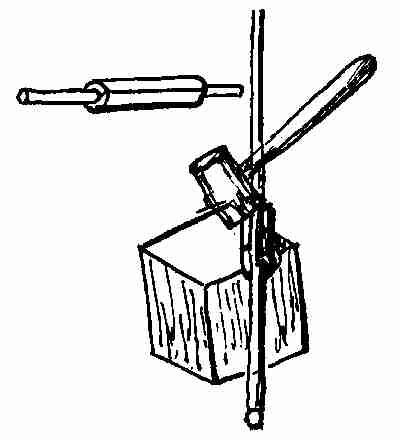
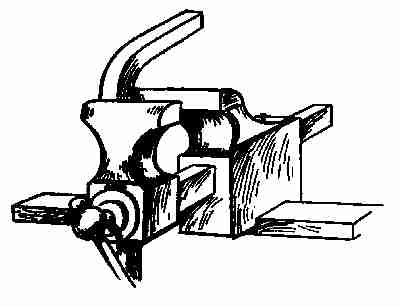
Use of the rivet set: A rivet set is a piece of steel 5 ins. long, 3⁄4 in. wide and 3⁄8 in. thick, tapering a little toward the top end. In the large end of this tool, and to one side, is a 1⁄8-in. hole drilled about 3⁄8 in. deep; on the other side is a counter-sunk[74] hole about 1⁄4 in. in diameter and 1⁄16 in. deep. This hole is used for drawing the rivet up through and closing the openings between the parts to be riveted, previous to flattening the end. (See picture of stove pipe.) The counter-sunk hole is made to shape the head after it is flattened. Tinners use it often for punching holes in thin metal, such as tin and galvanized iron, and it's one of the methods used for punching holes when making or mending stove pipes, and similar shaped pieces.
To rivet a stove pipe: Place the rivet on the stake and put the iron pipe over the rivet about where the hole should be. Tip the pipe so it will rest on the rivet. Tap lightly over the rivet. This will mark the spot where the rivet is to go. Drive down the rivet set over this mark and the rivet will be forced[75] through the pipes into the hole of the rivet set. The hole is made and the rivet placed at the same time. Flatten the projecting end, put the counter-sunk hole on the top of this flattened end, and you can shape it up like a round button.
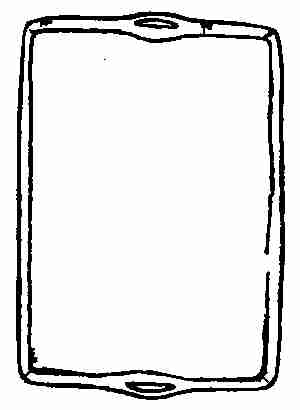
A tray as large as this one is most useful in the home for serving tea, ice cream, etc.
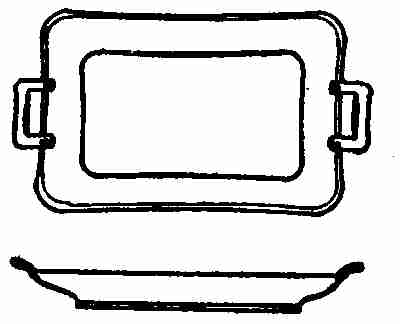
Material: No. 20 copper, 12 × 18 ins. Four pieces of copper, 31⁄2 × 2 ins. Silver wire for rivets 4 × 1⁄8 in. in diameter.
Directions: Perhaps the easiest and simplest way to make this tray is to get a large block of wood, like the end of a building joist, a little longer and wider than the 18 × 12-in. copper sheet. Out of it make a mould the shape of the body of the tray, by cutting the wood away. This mould is made similar to the one you made when making the round tray. If the mould is made carefully and according to the pattern it is a simple matter to nail the sheet[76] of copper over the depression, and drive it in with a wooden peg and mallet, making it fit every part of the mould. Before this is done it may be necessary to anneal the metal two or three times. Do so as often as you need to, it doesn't matter how often it must be done. When the surface is smooth to the touch, take the metal off the mould, and turn up the edges like the design. File off the outer edges perfectly smooth and rub them down with emery cloth. If your wooden peg has made small dents or flat places, leave them as a finish unless they seem too high or too low. The marks made by any wooden tool usually make a beautiful finish.
Handles: The handles are hollow. They are made by taking one piece of the 31⁄2 × 2-in. and drawing on this the outline of the handle. Repeat this on the four pieces. This makes four halves. With a pair of shears cut along the sides. Cut the rest out with a chisel. Snip the corners. Put four pieces together and place between the jaws of the vise. File into shape. This makes each piece a duplicate of the others. Place each piece of copper on a hard wood block and with the round end of the raising hammer drive into the block, hollowing it out. Make them in pairs so[77] that when the two parts are put together they make the handles hollow on the inside and oval on the outside. File the edges of the handle so that they meet close. Bind, solder, and file and round them up.
Fastening handles on the tray: Saw the two ends along the soldered joints about 3⁄8 in. Open these out so that they fit over the edge of the tray. Finish the ends off either rounding or square. Now drill a hole through the handle about 3⁄16 in. from the end. Place them again on the tray just where they should be and mark for the hole to be drilled through the tray.
Rivets: Take a piece of silver wire the size of the hole. Place one end of it on the vise so it will stick up about 1⁄8 in. above the surface. With the planishing hammer, hammer a small rounded head on the end of the wire. Cut it off 3⁄8 in. from the head in length. This makes a rivet. You will need four. Place these rivets with the head toward the front part of the tray and fasten the handle on. Polish and finish as you did other pieces of work.
This Dutch bowl looks well made of either silver or copper. It is worked up in the same way as[78] the other bowls described here, the little sawed out handle on the side being an addition which gives to the bowl its Dutch characteristic.

To make the handles: If the bowl is made of copper select a piece of metal thicker than the copper used for the bowl. This piece is 3 × 4 ins. long. Shape it as shown in the sketch. Mark the design and saw it out. Now bend it at right angles about 1⁄2 in. from the end. Before the corners are squared up, round the handle to fit the shape of the bowl. This is best done on a round iron stake. File into shape, drill three holes, and rivet the handles in place. A soldered handle if desired makes a neater piece of work than one riveted in place. Material used is a piece of 3 × 3 ins. The design is sawed out and shaped as before. However, in place of bending the end down we file the circle to fit the bowl. Clean the parts to be soldered, bind[79] the handle in place, wash with borax. Place bits of solder about the joint, heat, and finish. If this soldering makes the bowl very soft stiffen it by hammering it lightly all over the surface.
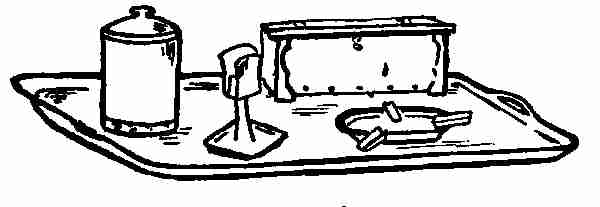
A smokers' set makes a very useful birthday gift or Christmas present and is not hard to make. All the[80] principles involved in the making have been worked out in other problems that have been given. The set consists of five pieces: a large tray, a tobacco jar, match safe, cigar box, and ash tray.

Large tray (copper or brass) oblong: This design shows a large oblong tray with handles sawed out of the sheet metal, not riveted as the handles were on the large serving tray. Draw the design for this tray on a sheet of paper. Mark out the handles like those in the picture. Place the pattern on the copper or brass sheet, and cut out the outline according to the drawing. The handles are not sawed out until the tray has been shaped up and finished. This tray is made out of a piece of No. 20 copper or brass, and is 10 × 12 ins. With the dividers make a half-inch[81] line on the four sides of the sheet as shown by the dotted lines in the sketch. Place this sheet in the vise, the dotted line even with the jaws of the vise. With the wooden peg, drive the sides up as you did the small square tray. Drill the holes in the slot and saw out for the hand-holds. File all around and finish.
This design shows a very simple arrangement of a match safe holding a match box and a tray to catch the burnt matches.
Material: Copper or brass—No. 20, 5 × 5 ins., for the tray. No. 20, 13⁄4 × 5 ins., for the holder. No. 24, 1⁄2 × 3 ins., for the centre piece. No. 20, 1⁄8 × 51⁄2 ins., for the bar. No. 24, 11⁄2 × 2 ins., for the stem.
This little holder is made up of five parts: base, stem, holder, band, and centre piece for pushing up the matches when the box is pushed down into it.
The base is made by bending all four sides up 1⁄4 in.; corners are made rounding. The stem piece is bent into a cylinder tapered by wrapping it around a 1⁄2-in. tapered stick. Solder the edges, when this is done.[82]
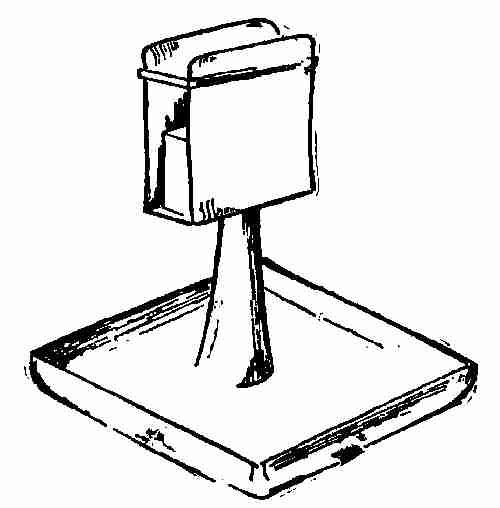
The holder itself is made by taking the 13⁄4 × 5-in. strip and bending it up like the shape of a letter U, so that it is a little longer than the match box itself. The band holds the sides in place. All is soldered together, the stem in the base first, then the holder on the stem, etc. Hard solder is used. The little centre piece is bent, placed in position, and soldered with soft solder. Polish and finish.
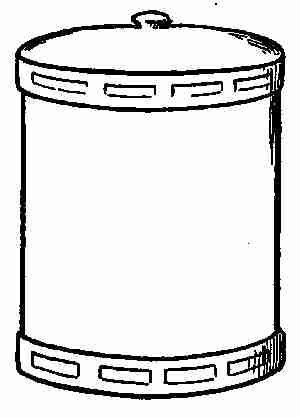
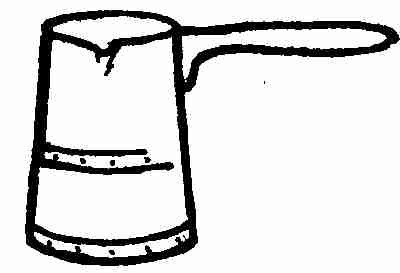
This straight-sided jar is made in three pieces. A disc 5 ins. in diameter is needed for the bottom,[83] a cylinder, 5 ins. deep, to fit the disc, and a lid made from a 5-in. disc turned over to fit the outside.
The disc for the bottom is bent up like the base of the tea caddy. Fit the cylindrical piece around this base and solder where the edges meet.
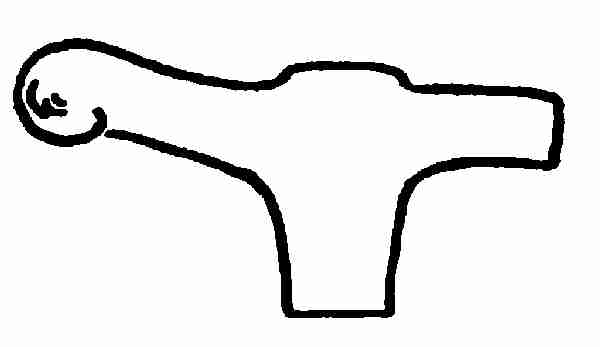
The lid: Cut a disc out of No. 20 copper, 5 ins. in diameter. Find the centre. With the small end of the planishing hammer drive a boss into a hollow wooden block, about 3⁄4 in. in diameter and 1⁄2 in. deep. Out of this boss the knob is made in the following way: Take a piece of 5⁄8-in. square iron and draw about 4 ins. of the end tapered to a 3⁄8-in. round. Bend this up about 1⁄4 in. as shown in the sketch. This is the tool that the knob must be shaped upon. Place this tool in the vise and place the hollow of the lid on this tool. With the thin[84] end of the driving hammer work the knob in shape from the outside. (See sketch.) During the working of this metal it should be annealed three or four times so that it will yield to the extreme tension required to make the knob.
The lid is rounded in the same way as the bottom piece was. There is some shaping to be done on the top of the lid. The picture here shows that[85] plainly. On the inside of the lid are two wires soldered crosswise to hold a damp sponge in place. This sponge keeps the tobacco moist. Finish and polish.
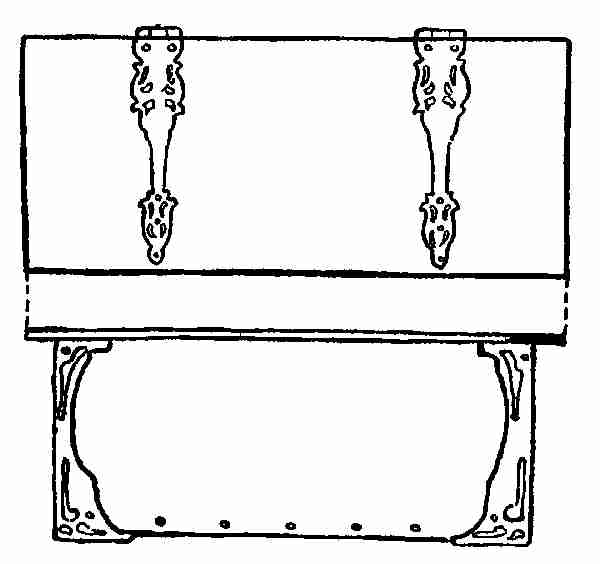
Any wooden cigar box may be decorated very effectively. This picture shows an ordinary cigar box with copper (or brass) trimmings. Corners are sawed out and riveted hinges are placed on the top. Boxes decorated in this way make splendid Christmas gifts. A heavy sheet of brass or copper can take the place of the wooden lid.
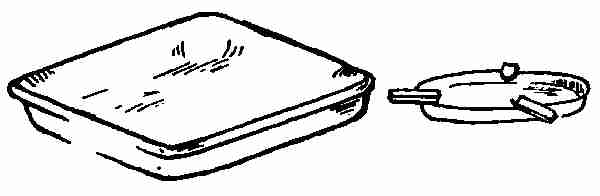
Ash trays are of various shapes and sizes. Some are merely a square tray, some are round, while others are half-bowl shaped. Sometimes two or three half-round tube-shaped pieces for holding the cigar are soldered on to the rim of the tray. All ash trays of this style are driven up in the same way[86] as you drive up a square tray or a round one, or a copper bowl. To make the cigar holders, cut a piece of thin copper or brass 1 × 2 ins. rounding on the ends. Place them on a block and round them up in a depression cut out of the wood with a gouge chisel. These are soldered on to the rim of the bowl or tray with soft solder. Polish and finish.
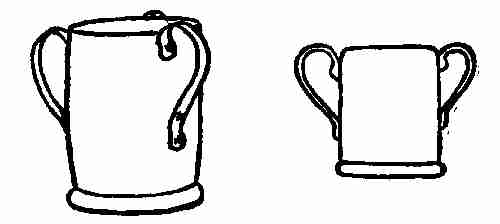
Material: For bowl, copper 123⁄4 × 6 ins., No. 20. For base, copper 41⁄2 × 41⁄2 ins., No. 20. For handles, 2 pieces or 3 pieces of copper 8 × 1 in., No. 20. Solder.
Tools: Combination stake, anvil stake, shears, drill press, drills, rivets, shaping hammer.
Directions—Bowl: Bend the 123⁄4 × 6-in. piece of copper into a cylinder over the combination stake. The two edges should just meet, and fit perfectly along the line. Scrape inside and outside[87] the joint. Wash with borax, bind with binding wire, and solder. Be careful to heat it all over the fire till the solder runs freely and fills every part of the joint. Cool off, then round it up again in the stake, filing off the surplus silver solder inside and outside. Hammer the joint down till flat and true. If carefully done this will show a thin even line of silver.
Base: 41⁄2 × 41⁄2 ins. Cut a 41⁄2-in. disc. Place the cylinder just made on the disc, allowing the surplus to extend out evenly all around. Draw with a pencil the outline of the cylinder on the disc. The rim must be turned up at right angles to the circle so that it fits exactly over the cylinder. To do this, place the edge of the disc on the sharp edge of the anvil stake, driving the edge over. Anneal and repeat until the sides are at right angles to the base. File off the top perfectly even, rounding out the edges. This makes a finish and border to the base. Push the cylinder into the bottom. Prepare, as usual, for soldering. Be careful to put bits of solder both around the edge of the turned up flange, and on the inside bottom edge. Heat and finish.
Handles: Copper pieces, 8 × 1 in. Cut a tapered slip off each side of the handle pieces, until the large[88] end is one inch wide and the small end 3⁄4 in. With dividers draw 1⁄8-in. line parallel to those sides. Bend each side back on this line. Shape the handle (see design) over the combination stake, using the fingers or mallet to do so. The top of the handles should fit up close against the top of the cylinder and should extend down about 2⁄3 of the depth of the bowl. The ends may be rounded off nicely with the shears, and filed. A 1⁄8-in. hole must now be drilled in each side. Place the handle in the proper position on the bowl. Mark the holes and drill them where the marks are made. Place rivets and rivet the handles on. A touch of soft solder will help keep these handles in place and at the same time will prevent any possible chance for leakage through rivet holes, for where you have rivets you are apt to have a leak. Clean, polish, and finish.
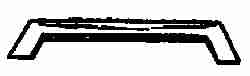
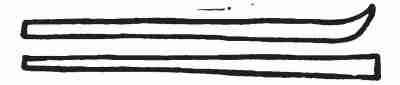
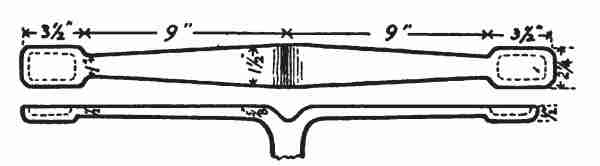
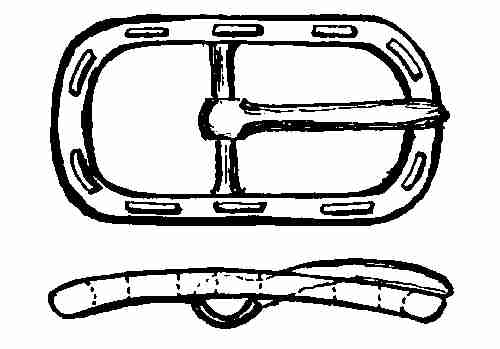
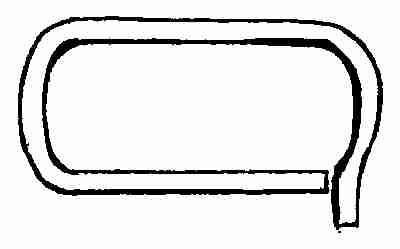
Buckles may be made of copper, silver, or brass, and the process of making them is very simple. This design shows a buckle for a man or a boy.
Material: Copper (or brass or silver) 5⁄16 in. square × 8 ins. long for the frame of the belt. One piece 1⁄8-in. round rod × 13⁄4 in. long for the cross[89] piece. One piece 3⁄16-in. square × 2 in. long (pin). Borax and solder.
Tools: Mallet, file, pliers, combination stake, and vise.
Directions: Take the 5⁄16 × 8-in. piece of copper.[90] Put it into the vise and bend it into a rectangular frame like the design. Be careful to make rounding corners and the sides parallel to each other. Cut off the surplus metal. Make the joint in one corner. Solder and file the corner the same shape as the other three.
Cross bar: Take the piece of copper, 13⁄4 × 1⁄8 in. Bend the two ends down 1⁄8 in. in the same direction. (See picture.)
Solder this piece to the under side of the frame. The projections throw the cross bar down low enough below the level of the frame to allow the leather strap to come flush with the buckle top.
Pin or tongue: Take the metal set aside for making the pin. Flatten one end of this out to 1⁄16 of an inch thick and long enough to go around the cross bar. (See design.)
Flattening the end piece hardens it so that it must be annealed. With the round pliers, bend this[91] end so it will loop over the cross bar. Shape over the whole buckle according to the design. File, finish, and polish. These buckles may be made very attractive by giving them a smooth finish, or a mottled surface, or by making a sawed out design around the frame.
Material: Piece of copper, No. 16, 8 ins. square (base). Piece of copper, No. 24, 10 × 5 ins. (post). Piece of copper, No. 20, 21⁄4 × 21⁄4 ins. (cap). 3 pieces of 1⁄4-in. round copper, 7 ins. long (for shade holder). Solder. Borax.
Tools: Raising hammer, hard wood block, anvil stake, drill press, piece of discarded broom handle, dividers.
Directions: Make a 21⁄2-in. circle in the centre of the 8-in. square plate. Drive this centre up about 1⁄2 in. above the level, tapering on the top to about 11⁄2 in. in diameter. To do this, place the centre over a hole in the wooden block 11⁄2 in. in diameter and drive the metal into the hole to the required depth. (See design.)
Draw a line with the dividers 1⁄2 in. all around the[93] edge. Be sure the line is an equal distance from the centre. Bend the sides down 1⁄2 in. all along this line at almost right angles to the surface. This bending is done in the vise. Measure off 1⁄2 in. in either direction from each corner for the feet, file out a section 1⁄4 in. deep and 7 ins. long, as was done in making the feet for the square box.

Centre post: Take the 10 × 5-in. piece and bend it around the piece of broom handle (or any other piece of round wood the size you wish). The two edges must meet. Scrape and solder, being careful that the solder runs into the joint. File it off flush[94] with the top of the metal and make the column perfectly round. Place the column on the raised part of the base and mark around the column on the base with a pencil. Saw out a hole along the marked line. Push the end of the column in so that it is perpendicular to the base and perfectly true all around. Tie it in place for soldering, with the binding wire, by fastening the wire on the extreme top of the column, and carrying it to the four corners of the base. This centres the column ready for soldering. Wash the joint well, place pieces of silver around the base and column, and heat. The base should be crowned from the centre to the outer edge. To do this, place the centre on any round top wood block. Strike on the outer edges with the wooden mallet until the desired crown is formed. See that it stands plumb and does not rock. If it does rock, tap the base gently on the outer edges with the mallet until it stands firm. File[95] and polish until the surface is perfectly smooth and free from marks of all kinds. The beautiful colours that form on the surface of copper depend much upon the finish. The body of the lamp is now ready for the cap and arms that hold the shade.

Cap: Take a 21⁄4-in. disc. Draw a circle in the centre of this disc, having a diameter equal to the diameter of the top of the column. Place this disc on the edge of an anvil stake and drive the edges of the metal over, forming a cap as described in the[96] making of the lid of the rose jar. Divide this flange equally into three parts, drilling a 1⁄8-in. hole in each one of the three divisions. Take the three pieces of 1⁄4-in. round copper. File the ends of each one, making a shoulder on the end 1⁄8 in. and 1⁄8 in. in diameter to fit the holes in the flange. Put the end of these rods into the vise with the shoulder close to the top of the vise. Put the cap on the projecting pin, and rivet. Repeat this for all three rods. Wash the rivet joints with borax, and solder. File off any projecting parts so that the inside is flush, as this cap must fit over the column. Place the cap over the column and between the projecting arms drill a small hole through both the cap and the column, and rivet as before.
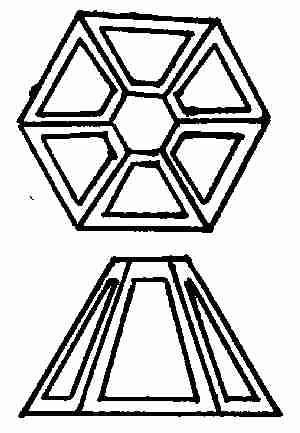
Shade, 4-sided or 6-sided: This design is for 6 sides. That gives a good proportion.
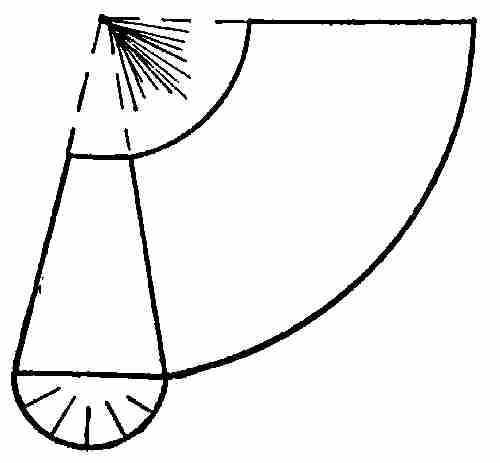
Dimensions of each side: Side (on a slant) 9 ins., top, 21⁄2 ins. Bottom, 8 ins. (See drawing.)[97] Cut out a pattern for one side. Use stiff card board. Lay this design on a piece of copper large enough to cut out the whole lamp shade. Mark around the pattern. Lay the same pattern against one side of the marked design. Make it fit exactly along the margin line. Repeat until you have done six sides. You have now a fan shaped pattern with six divisions. Cut this along the top and bottom lines.
If folded up along these division lines it would shape up into a lamp shade. All lamp shades have glass for light. We provide for the glass by cutting out a section of each of the six faces. Take your card board pattern. Mark a line all around from 3⁄4 in. and parallel to the sides, 1 in. from the top and 1 in. from the bottom. Cut out the inner[98] section made by these lines. Place the pattern on the copper and mark each section. Cut it out with the cold chisel on the wooden block. File up the rough places left, make the edges square and smooth. Bend up each section along the centre line in the following way: Get two pieces of wood, 2 × 1⁄2 × 20 ins. Place the two pieces in a vise and slip the copper between the pieces down to the line where it should be bent. Tighten up on the vise, press the copper over with the hands and tap gently along the lines with the mallet, keeping the angles about 60°. Do this on each of the six sides. If carefully done the shade will have a hexagonal shape. The open parts should come together, one side overlapping about 1⁄4 in. Hammer down the overlapping part and rivet.
Glass: Cut a piece of card board 1⁄4 in. larger all around than the opening in the sections for the glass. Take this to a glazier. Tell the dealer just what is[99] wanted and he will make suggestions as to colour, kinds of glass, etc. Cathedral or opalescent glass is very decorative.
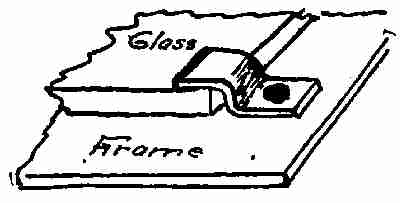
To set the glass: Place one of the panes of glass on the inside of the section, over the open space. Mark all around it. Take 4 pieces of copper (3⁄4 × 3⁄8 in.) and bend them in a double angle.
These are to be soldered or riveted on the rim. One is placed on either side, one at the top and one at the bottom. This glass rests in these brackets and keeps it in place. Repeat for the six sections. Push the brackets down against the glass after it is in place. They hold it firm against the side of the shade.
The design for this shade lends itself to many variations. It may be square, five-sided, six-sided. The edges can be escalloped both top and bottom, and a sawed out design may be made to fit over the glass.
Material: Copper or Silver.
Tools: Hardwood block, 6 × 3 × 1 in. draw plate, tongs, sharp peen hammer, saw frame and saw, round file, shears, small piece of soap.

Directions: To make a good hinge for jewel boxes or jewellery requires some knowledge of how to make wire and tubes out of sheet metal. In order to do this you must have a draw plate and that you can make yourself, in the following way: Take a piece of iron 1⁄4 × 11⁄2 × 3 ins. or 4 ins. long. Drill a number of graduated holes through the piece along the centre. The smallest hole should be about 1⁄32 in.[101] in diameter and the largest, about 1⁄8 in. Take your steel punch and file the end down, tapering so that the point will go into the smallest hole. Drive the punch into the hole until it just goes through. These holes take the shape of the tapered punch. Repeat this in each hole until the draw plate is made up of a number of graduated tapering holes. Your draw plate is used for reducing wires from a large size to any size you have holes for and for making hollow tubing for hinges.
To reduce wire: You can always buy the wire any thickness you wish, but many times a small piece of wire is needed quickly and can be made with little trouble.
If you should wish to reduce a piece of wire 1⁄8 in. thick to any size smaller than 1⁄8 in., file the end of the piece so it just goes through the hole far enough to grasp with the tongs. Rub a little soap over the surface of the wire, draw it through the hole. It is reduced to the size of the hole it goes through. After the first or second operation the wire must be annealed, as pulling it through the draw plate hardens it.
Tubing for hinges: Cut a strip of No. 28, copper (or silver) any length. Cut the width of it three times the diameter of the tube you wish to make,[102] and cut the end of this piece to a point. Place your 6 × 1 × 3-in. block in the vise. With a round file, file a groove across the block.
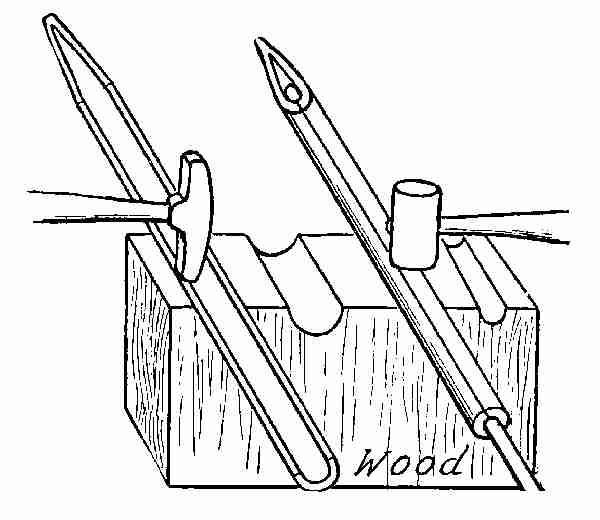
Place the strip of copper or silver over the groove and, using the hammer, drive the metal into the groove, forming a gutter.
Repeat this until you have driven the copper into a cylindrical shape. Put the pointed end through the largest hole in the draw plate. Rub well with soap. Clasp the end sticking through with the tongs[103] and pull it through. Repeat as you did when drawing wire through. Anneal when necessary. Continue to put the tube in one reducing hole after another until the tube is the size you wish. This tube with a small hole through the entire length is used for fine hinges.
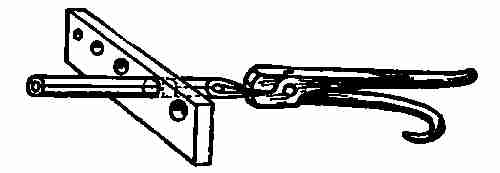
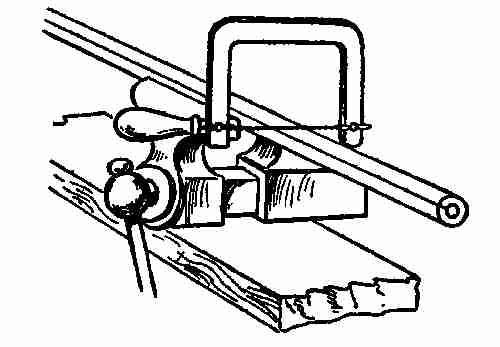
Fine hinges: To make a hinge for a box, bracelet, or any small dainty article that requires hinges, take a piece of the tube made as described. After[104] you have decided just how long the hinge must be to fit the article you are making, saw the tube into three pieces, or five pieces, of equal length by placing the tube in a vise. If it is to be a three-piece hinge, two will be soldered on the one side and one on the other, the two just far enough apart so that the one is in position to fit exactly in between them. When the three pieces are in place, a wire is pushed through the hole, and the hinge is made.
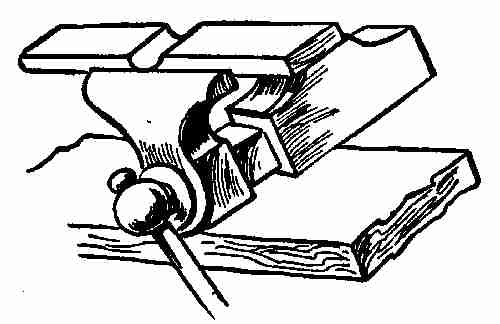
To make the wings of the hinge: Take a piece of silver or copper, No. 10, the length and width to be determined by the size of the hinge. Place this copper plate in the vise, file a groove through the centre, just large enough for the copper or silver tube to fit in about half its depth.
Saw the piece through the middle of the groove.[105]

Take two of the three short tube pieces, bind them on the groove ends of one wing. Bind the third piece of tubing in the middle of the groove end of the other wing. Place the two wings together and see that they fit closely. Do this with the greatest care, as there is no possible chance for filing after the tubes are soldered on the wings. Wash with borax, put some silver solder on the joints, and solder as before explained. When binding the tubes for soldering do not put the binding wire through the holes of the tubes. This wire makes a good conductor for the solder which is apt to fill up the small holes in the tubes.
All binding should be done on the outside.
The wings of the hinges should be filed to a taper, or any shape that will add to the appearance of the hinge. The hinge lends itself very well for decorative purposes and can always be made so that it adds to the attractiveness of the piece of work. Lock plates can be made by the same method. They, too, can be finished up to add to the ornamental side of the article.[106] Cabinet hinges: Cabinet hinges are made either of brass or copper. The hinge must be made in proportion to the design, thus adding to the decoration.
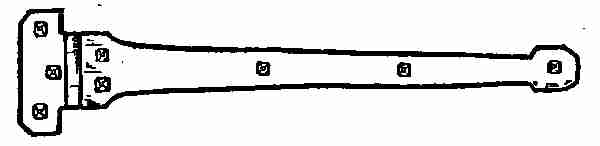
Material: Strip of copper, No. 10. Cut out according to the design.
The two ends of one are turned over a wire nail 1⁄8 in. in diameter. The one end of the other is treated in the same way. Test if they are true by placing a wire through the three tubes. Cabinet hinges may be finished by using the round head hammer and driving down a number of hammer marks, going all over the surface of the hinge. Or they may be embossed from the under side. The spacing of screws and rivets plays an important part in the design of the hinge.
Materials: A narrow piece of No. 20 copper, 20 ins. long × 11⁄4 ins. wide: this is used for the sides. One piece of No. 20 copper, 63⁄8 × 41⁄8 ins. for the lid. One piece of No. 24 copper, 63⁄8 × 43⁄8 ins. for the bottom. Two pieces of copper No. 24, 6 × 1⁄2 in., for the hinges. Copper nails 1⁄16 in. in diameter, for rivets.
Tools: Vise, shears, mallet, hard solder, borax, rivet set (steel tool), dividers, and centre punch.
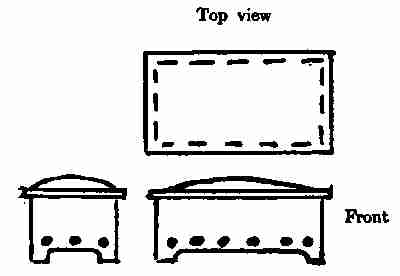
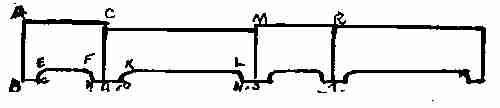
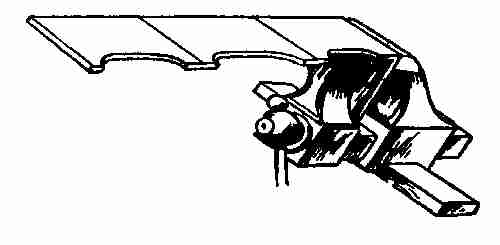
Directions: Make a working drawing of a box,[108] 6 × 4 × 1⁄4 ins., (inside measurements). The box is to have feet, and a lid with hinges is to be fastened to it. Take the strip of copper, 20 × 11⁄4 ins., measure it off into sections of 4 ins. and 6 ins. alternately. Beginning on one end mark a point 3⁄8 in. from the end. (Point G.) Draw a line (E G) 1⁄8 in. long, perpendicular to the base line. With the dividers set 1⁄8 in. apart, and one leg placed against the base line, draw a line 31⁄4 ins. long paralleled to the base. (Line E F). Draw F H. In the section D C M S, mark the point O 3⁄8 of an inch from D. Draw K O equal to 1⁄8 of an inch. With the dividers set at 1⁄8 in., draw a line 51⁄4 ins. long (K L). Join L and N. Repeat this in the other two sections. With the shears, cut along lines[109] G, G E, E F, F H, H O, O K, K L, L N, etc. The projections left form the four feet for the box to rest upon. To bend the corners, mark with lead-pencil C D, M S, R T. Place these division lines, in turn, between the jaws of the vise, and bend down at right angles. You now have a rectangular box like the picture, with one corner open.

To close the side, solder the open end. Clean thoroughly the parts to be joined. Place the parts in their proper positions and bind the corner with binding wire. Wash the joint with borax. Place some small pieces of silver solder on the inside corner. Hold it over a fire and heat until the solder runs into the joint. Cool off in water and take off the binding wire. If the solder should run through and fasten the wire to the side of the box, the wire can be peeled off and the solder filed down to the copper. But care must be taken not to let the binding wire sink into the copper. File up the corners smooth and square up the box with a steel square.[110] To make the bottom of the box: Take the piece of No. 24 copper, 63⁄8 × 43⁄8 ins. Set the dividers 3⁄16 in. wide. With one leg on the edge of this plate, draw lines on the four sides.
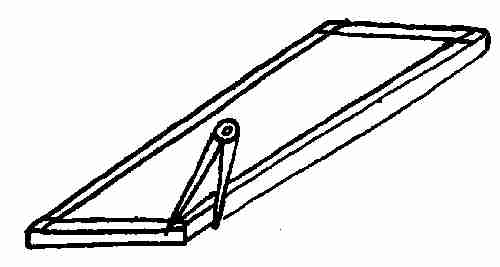
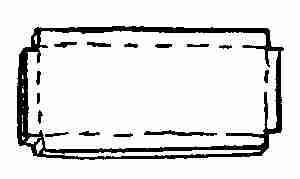
Cut out the small square made in each corner by the crossing lines. Put the plate into the vise and bend the four sides up along these lines. Try it, to see if it just fits the inside of the box. It is the bottom and must be exactly right or the box will be out of square. Now take it out for drilling and riveting. With the centre-punch prick points one inch apart and midway between the edge and the base. Holes are bored through these punch marks, with the drill press and a 1⁄16-in. drill. The bottom is now ready to slip into the box and to place for riveting. Put it in, the[111] bent edge turned down and flush with the lower edge of the box. It is necessary first to fix the bottom securely in place before all the rivets can be put in. To do this we put one rivet on each side. Take a sharp-pointed instrument, stick it into the centre hole on each of the four sides, whirl it round, and mark the place where the hole should be drilled through. Take the bottom out and prick punch these holes. Drill the four holes, place the bottom back, and push the copper nails through from the outside in, leaving the head on the outside as decoration. If the head should seem too large, reduce it by filing before riveting. Cut the nail off, leaving about 1⁄16 in. of it projecting. With the hammer strike on this projecting end, flatten it down until it covers up the holes. This is called riveting. Now the bottom is made firm so that any amount of drilling can be done without throwing it out of place. Drill all the rest of the holes and put a rivet in each one of them. The heads of these nails add to the decoration if they are put in carefully and at regular intervals.
To make the lid: If you look at your design you will see that the lid is raised a little in the centre and that the edges extend 1⁄8 in. over the four sides of the box. Take the 61⁄4 × 41⁄4 in. piece of copper.[112] With lead pencil mark the 1⁄8-in. lap over all around the lid. Place the lid on the end of the square block. With the round end of the raising hammer drive down lightly all around the inside of the lead-pencil mark, increasing the blows toward the centre. This will make an oval-topped shape. The hammering is bound to distort the edge of the copper. Turn the lid upside down on the bench; with the mallet strike down on the top of the raised part until the edges flatten down on the bench. If any kinks should come from the hammering flatten them by driving directly over them. The lid should rest on the box without rocking.
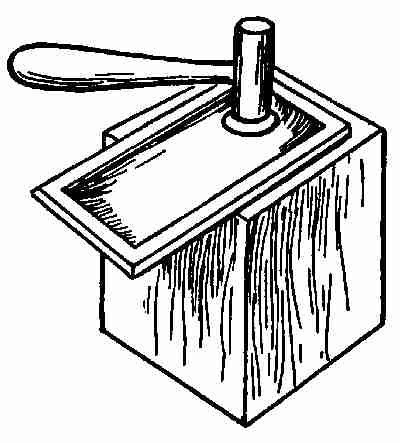
To make the hinges: Take the two pieces of copper 6 × 1⁄2 in. (No. 24). Lay a piece of No. 8 wire lengthwise in the piece of copper, and, using your fingers, bend the copper up on each side of the wire, keeping the two edges the same length.
Place this between the vise jaws, pressing the two[113] open sides together, forming a hinge right on the wire. Fix both pieces of copper this way. Draw the wire out. You have two cylindrical pieces of copper 6 ins. long with wings attached. Divide one of the pieces into six one-inch sections. Put this between the vise jaws down to the rounding part. With your jewellers' saw, saw close to the vise and along the division lines, cutting out sections 2, 4, 6.

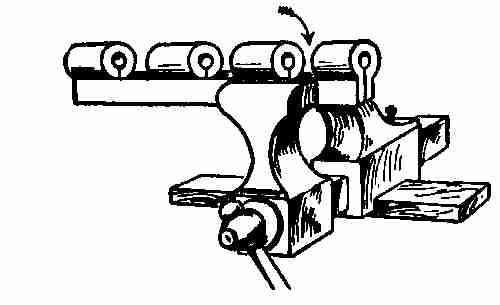

File up all open parts so that the joints will be at right angles to the hinge. Do this carefully[114] or else they will not swing true when hinged together. Use the cut hinge to measure off the sections on the other hinge. Cut out sections 1, 3, 5 on the second hinge, allowing a little on each section for filing. Fit the two parts together and fasten by pushing a wire through. Try the hinge to see that it works true and snug. Select one of the sides as the back of the box, put the lid on, with the hinge in place. You will notice that the thickness of the hinge prevents the lid from fitting down on the box. File the side of the box down so the hinge sets flush with the top, and file the wings of the hinge down to a taper. The wings are to be riveted, one flat to the under side of the lid, and the other to the back, after bending it down on the inside of the box. See section view. Hinges[115] are sometimes soldered in place. To do this, wash the joints with a little soft-solder fluid. Heat the box in the bunsen flame hot enough to make the solder run in between the joints. File any rough edges off, smooth down carefully, and polish.
A plain cedar chest is much improved by the addition of copper or brass trimmings. They add strength, too, to the box.
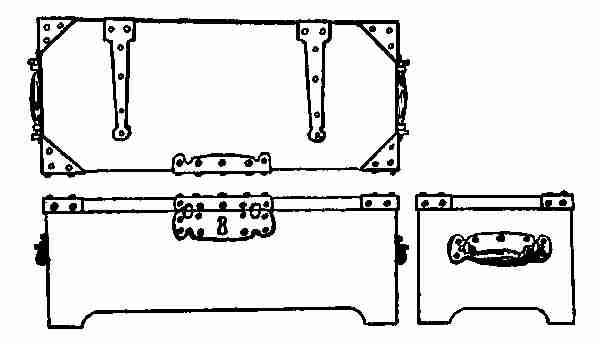
The design shows a cedar chest with hinges, corner plates, handles, and lock plate. The screws can be bought with pyramid-shaped heads, which resemble hand-made rivets. They add very much to the general effect of the whole. One must be guided[116] by the size of the box in selecting the appropriate screw decorations. This box is 12 × 20 × 36 ins. The lid is 2 ins. deep.
Hinges: The hinges should be made of No. 10 copper or brass, 3 ins. wide, and should extend two-thirds of the way across the top and half way down the back. This tends to keep the lid straight and support the back of the box.
Lock plate: The plate is made of a piece of 8 × 3 in. metal, the same thickness as the material used in the hinges. The design should correspond to the design of the hinges. The key way is in the lock plate, toward the top.
Handles and handle plate: The handles are made of 1⁄2-in. round copper or brass, large in the middle, tapering toward the ends. These ends are turned up, fitted into eye bolts and riveted into the handles. The handles should be 10 × 4 ins., with the design of the hinges and the lock plate carried out.
Corner plates: These plates go on the four corners of the chest. They are made of No. 14 metal. Perhaps the simplest way to make them is to take a piece of No. 14 metal and cut a 6-in. square. Draw the diagonals. Cut out one of the four triangles from this square. Now bend the piece along the diagonal lines and you make a corner to fit on[117] the box. Solder this open corner to the box. In making corners for the lid, make the same pattern and trim it down to suit the depth of the lid.
The trimmings on the box can be left smooth or they can be treated with the peen of the hammer and a facet surface put on, which is done quickly and is very decorative in effect.
The hinge part of the hinge is made as explained in the article on hinge making. The metal used here would be quite strong enough just to turn over in the pin without soldering it first to the body of the hinge piece.
Put the lock on the chest before the lock plate is placed. This fixes the place for the key-hole; otherwise one might get the key way too close to the opening and find no lock that would fit it. The handles are put in by means of screws, but a much stronger one is made by using bolts and screws. The bolts that hold the handle on the plate are carried through the box, and a nut and washer fasten them tight on the inside.
Ink well holder and pen tray. Book rack. Corners for desk pad. Letter file. Bill file. Stamp box. Paper cutter, letter opener, and book mark.
Material: No. 16 copper, 101⁄2 × 51⁄2 ins., for the tray. No. 16 copper, 11⁄2 × 8 ins., for the box. No. 16 copper, 3 ins. square, for lid.
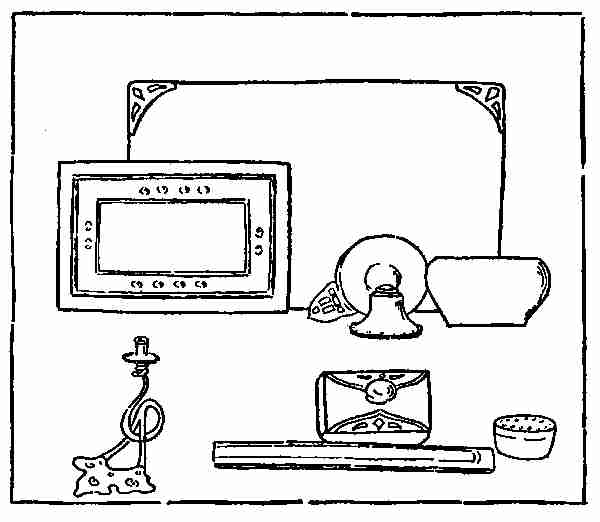
Directions: Tray: You will notice, in the design of the tray given, a 3⁄8-in. ledge all around. The inside of the tray is lowered 1⁄4 in. except a square place in the centre toward the back large enough for the box to set upon. The depression in the tray is made in the same way as described before in making[119] the small square tray. You put it into the vise and with a round wooden peg drive it in according to the design. The ledge must remain parallel to the bottom of the tray. Round it off by placing the tray on the anvil stake and driving the proper curve in it with the wooden mallet.
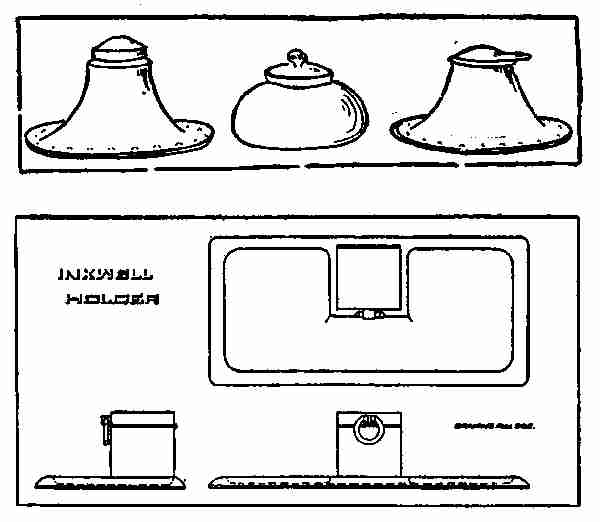
Box or holder—Sides: Take the copper piece, 8 × 11⁄2 ins. and divide it into 2-in. spaces. Bend these at right angles to form a square box, the open ends meeting at one side. Solder with hard solder.[120] Lid: Take the 3-in. square piece. Over a square block the exact size of the inside of the box drive the piece for the lid. The corners must be driven down even so that the lid will fit on the top of the box; otherwise the ink will evaporate. The hinge on the lid is made with a drawn tube in the same way as was described in the article on the making of hinges. The box is now ready to be put on the tray. File the surface of the projecting square flat, so that the box will set level. Bind it down with binding wire, and solder in the usual way.
Ring and ring post fastened to the box: The post is made of a piece of 3⁄8-in. square copper. At a distance of 5⁄16 in. from the end a shoulder is filed on it, with the stem long enough to go through the thickness of the lid. A hole, too, is drilled through one end of this post large enough for a 1⁄8-in. copper ring to be pushed through. This copper ring is made by turning a piece of copper wire around a 1⁄2-in. round rod in a spiral shape. Cut off the ring or rings as you need them. This ring is opened out, pushed into the hole, and squeezed together. It acts as a little handle to lift up the lid. A piece of blotting paper the exact size of the lid is pushed into the inside of it. This helps to keep the ink from evaporating. If the piece of work has been carefully[121] done there will be little finishing and filing to do. You can readily see that the beauty of metal work depends as much upon the finish as upon the design.
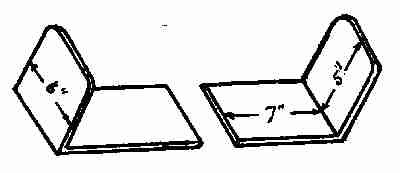
Book-racks are most useful for holding choice books on one's desk. They are made of heavy copper. This design is made so that one can place any number of books between them, by pushing the side pieces out. All book-racks are made in the same way. The design on the side pieces can be sawed out (or pierced) or embossed, or the facets left by the hammer will make a beautiful decoration. Any design work, however, must be done while the copper is in a straight piece, otherwise the bending is apt to spoil the work.
Material: Two pieces of copper, No. 14, 12 × 6 ins.
Directions: In the design shown here the edge of the upright ends are rounded. Some have just[122] the corners rounded off. Decide upon the design you wish. Cut it out, and file the copper sheet accordingly. Make the edges of the whole rack perfectly smooth and rounded. Mark off 6 ins. from one end. Bend this at the 6-in. line at right angles to the 8-in. piece. It is well to do the bending over a wooden block in the vise, using a mallet so as not to mar the metal. Polish and finish as before.

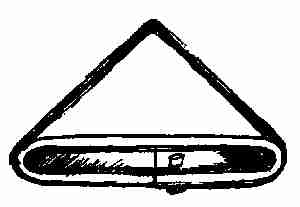
Metal corners made of brass, copper, or silver are found very useful for protecting the corners of[123] blotters upon desks. They keep the corners from curling up and add much to the general appearance of any desk. The designs are many, but for all practical purposes the plain corners seem best, as they are more sanitary.
Material: The pieces of metal 6 × 21⁄2 ins. No. 22.
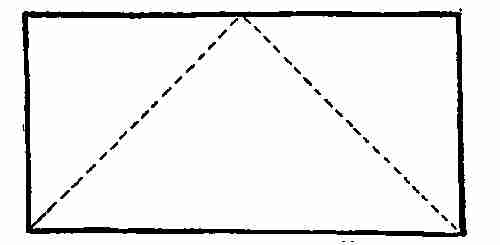
Directions: Mark your copper sheet off like this pattern. Now get a piece of wood, iron, or copper about 3⁄16 in. thick and just the shape of one of these corner designs. This 3⁄16 in. thickness will be about equal to the thickness of your blotter and the thickness of the card-board. Take your copper sheet and bend the ends along the lines marked on the[124] pattern, over the iron or wood form, driving them down to fit the shape well. You now have a triangular piece with an opening on one side. This piece would slide over the corner of a card-board pad usually cut about 24 × 18 ins. Solder the edges together. It is necessary to rivet these corners to the card-board to prevent their slipping off easily. To do this drill a small hole down through the under side close to the edge, slip these corners on the card-board, push the iron form in, and drive the rivet through the hole, through the card-board against the iron plate, thus riveting the corners to the card-board. Take out the iron plate and repeat on the four corners. If designs are to be made on metal, they must be sawed out or pierced while the metal is in the straight piece. Polish free from all roughness. A piece of soft flannel or woollen cloth is glued on the under side of these corners, so that the metal cannot scratch the desk, or any polished surface it rests upon.
This is a useful article for filing notes or memoranda of things that need immediate attention. There is very little variety in design. The base[125] can be made square, circular, six-sided, etc., and decorated in many ways. It looks well either in copper or brass. Only heavy copper should be used, in order to give weight to the base.
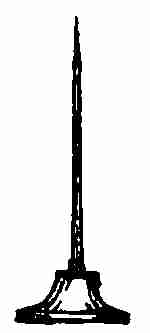
Material: A 31⁄2-in. square of No. 10 copper. Rod of sharpened steel.
Directions: Take a piece of iron 1⁄2 × 21⁄2 × 21⁄2 ins. Go to any scrap heap for this. Place the copper sheet over this block of iron, letting the surplus metal extend evenly all around. Put it into the vise with the corner vertical. Tighten it up and drive the metal over the corner till it touches the sides of the iron. Do this on all the corners. Make the outside of the metal fit tightly over this iron, acting as a shape or form. If the metal should feel springy before driving it up close, anneal it. Notice that in driving these corners down they are longer than the four sides, and they suggest feet. If filed flat and smoothed up you have a square box with a foot on each corner. Take it off the iron form and make the top rounding by driving it over the hollow block. Now drill a 1⁄8-in. hole through the middle. Place[126] the copper rod in the hole and solder with hard solder.
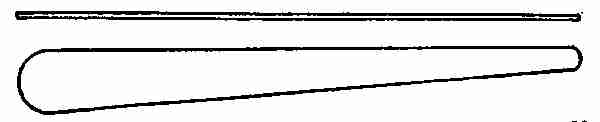
Paper cutter: No article on a desk is more useful than a good paper cutter. It may be one with a plain flat blade, no marked handle and without decoration aside from that of the metal itself with its hammer marks left upon it. Again we may have one with blade and handle, the blade either pointed (sharp edged or blunt), the handle plain or with sawed-out design. Those with pointed blades are serviceable as letter openers too. Then some designs have handles made long enough to turn the end over, forming a raised handle.
Material: Piece of No. 20 copper, 7⁄8 × 9 ins.
Directions: If the blade is to be pointed, take your strip of copper and draw a line right through the centre. Mark a point 1⁄8 in. on the end, either[127] side of the centre line. Draw lines from these points to the extreme ends of the other side. See dotted lines in the sketch.
File up the edges rounding, and polish the whole. Select a piece of copper free from scratches and marks of any kind for this work. This paper cutter can be left smooth, or it can be decorated by the marks left by the planishing hammer. These marks give a good finish and look well.
Material: Piece of No. 20 copper, 7⁄8 × 16 ins.

Directions: Mark off lines on the copper strip as you did to make the plain paper cutter. Carry the tapering lines back 7 ins. Cut off these side pieces with shears. File the edges for the whole length smooth. If any decorating is to be done, do it while the copper is in the straight piece, as it can't be done easily after the handle is turned. All filing, too, must be done before the handle is turned. When filed and smoothed up or decorated as you wish, bend half the remaining 9 inches of the[128] copper over and on to the blade, in this way forming the handle. The size of the handle will depend upon one's feeling of comfort or discomfort about it. If the edges still feel a little rough a piece of emery cloth will smooth them down.
Letter openers are really small paper cutters and are made in exactly the same way. They are shorter and narrower than the paper cutter, but almost always have a sharp pointed blade. Many scraps of copper left over after the making of large pieces can be used to make letter openers.
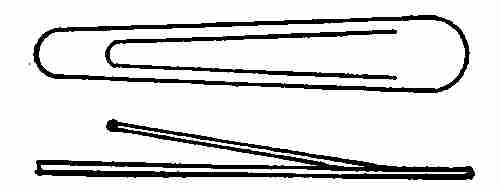
Book marks are very handy to have on one's desk. They are easily made and if very light copper is used need not be heavy or clumsy. They should be made very smooth, for they must slip easily into place in the book.
Material: No. 30 copper, 3 × 3⁄4 in.[129] Directions: This drawing can be used as the guide. Make it the required size and work just as you did when making the paper cutter. The little tongue on the inside is sawed out. It should swing easily to and fro, as it must be pushed open to catch the pages of a book and clamp them down. File and finish very smooth. If it is left the least bit rough it would tear the paper as it is pushed in.
Brass: Brass is an alloy of copper and zinc. The zinc colours the copper and gives it the yellowish or brassy look, depending upon the amount of zinc melted with it. While the operations are the same whether you are working with brass, copper, or silver, the presence of the zinc in brass makes it less pliable than the pure metals. That is why brass hardens so quickly under hammering, making it necessary to anneal the metal very often in order to work it. But zinc and copper combined melt at a lower temperature than copper or silver pure, so that great care must be taken when preparing the metal for soldering or annealing that you do not heat it over a dull red heat before plunging it into water.
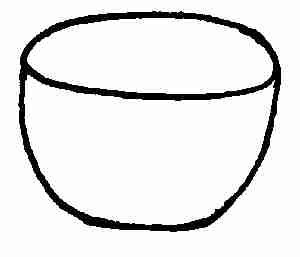
Finger bowls of brass are very ornamental and useful and can be made of the simplest designs. A[134] half dozen are a welcome addition to any table. Design the bowl and proceed exactly as you did with the copper bowl, working the sheet of brass up into a rough bowl shape on the hard wood block. Using the same tools, finish the bowl on the round stake. The surface of the bowl may be left mottled, or it can be smoothed up, as one wishes.
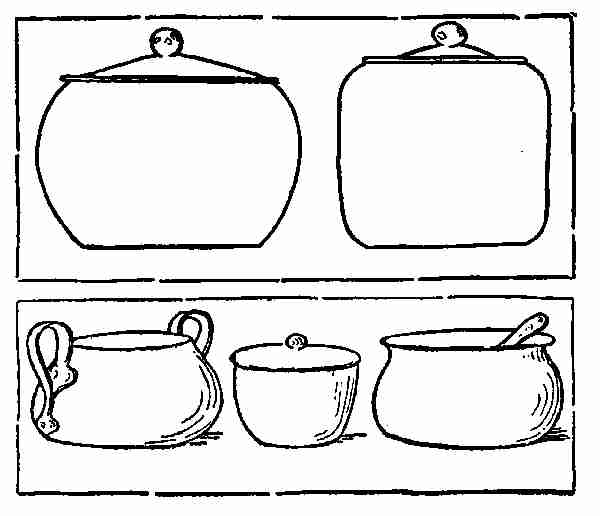
[135] These sketches suggest a number of articles that can be made out of brass.
Material: One piece of brass, 10 × 6 ins., No. 16. One piece of brass, 12 × 4 ins., No. 16.

Tools: Anvil stake, mallet, shears, dividers.
Directions: With the dividers set at 5 ins., one leg of the dividers tangent with the top of the brass plate and the other in the centre lengthwise of the piece, draw a circle. Cut around the circle with the shears. Beat over 3⁄4 in. of the centre part of the circle, tapering along the circle line toward each end. Round up this edge and curve it a little inward on wood block so that when grasped by the fingers it will be comfortable. Smooth off edge and make the flat part perfectly straight, so that when placed on the table to receive the crumbs it will lie perfectly flat.
A very simple design is given here. Mark out the dimensions on a sheet of paper and lay the[136] design on a sheet of brass. Cut the brass out to fit the design. Using the mallet, drive up the rounding part on the anvil stake to match the rounding part on the tray.
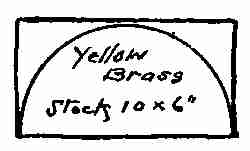
Handle of scraper: Place the handle part on a hard wood block and with the small end of the raising hammer drive down on the handle, embossing it from the outside toward the front. Give it a half hollow shape. If the edge of the handle is smoothed off with a file and made rounding, it makes a good handle for the scraper. Flatten the scraping edge so that it lies flat on the table and picks up all the crumbs on its way to the tray. Polish and finish as you did the tray.
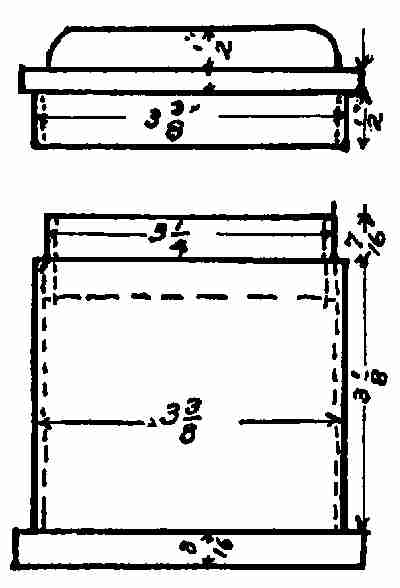
Material: One piece 24-gauge soft brass[137] (yellow), 11 × 31⁄4 ins. (for body). Disc 37⁄8 ins. in diameter (for bottom). Square: 43⁄4 ins. for lid. Two strips, 11 × 3⁄4 ins., one for rim of lid and one for rim of body.
Tools: Block used to make round tray (copper), drilling hammer, mallet, wooden peg, iron stake, silver solder, steel stippling tool.
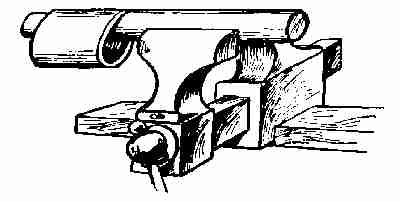
Directions: Take the piece of brass 11 × 31⁄4 ins. Bend it till the edges meet to make a cylinder. Bind it round with a piece of binding wire. See that the edges come together tight. Wash with borax. Use silver solder and proceed as before with soldering. Cool in water, clean off the joint both inside and outside till the surplus silver is filed off smooth. This leaves a fine joint line which will take on the colour of brass in time and will scarcely be noticed. Round the cylinder up by placing it on a round stake or on a round wood block. Tap gently with your mallet to do this.
Bottom: Take the 37⁄8-in. disc. Draw a circle on it equal to the bottom of the cylinder. Put the anvil stake into the vise. With the edge of the circle on the square end of the stake, drive the metal with the driving hammer, so that the upturned rim is at right angles to the disc. Test this to see that the rim stands up all round and fits the outside of the cylinder close. File the top edge of this smooth and a little rounding. Shape up and solder as you would a copper piece, keeping in mind the low melting point of brass. The heating of the bottom for soldering must heat the body of the caddy to a red heat and there is danger of unsoldering the part done. To prevent this melting, the soldered joint should be painted both inside and outside with rouge or ordinary clay wash. Mix a little clay in a saucer to a liquid and rub it over the joint. If the soldering is carefully done there will be little filing to do afterward.
Rim (for the body): Take your 11 × 3⁄4-in. piece. Bend it into a circle to fit the inside of the body. Cut it off the right length, bind and solder the two ends together. Clean off, round up on the stake, and make it just large enough to drive it into the top, pushing it down until about 3⁄8 in. extends above the cylinder. This supports the rim of[139] the lid. If it is driven down tight it will hold of itself in place. If not, use a little soft solder to make it secure.
Lid: One square piece, 43⁄4 ins. Take the mould used for your round tray. Punch holes in each corner of the brass plate, and nail it right over the depression as you did when you made the round tray. With your round peg drive the metal into the depression. When the metal is perfectly smooth and fits the impression take it out. Place the body of the caddy over the top of this lid piece and mark around it. Make a second circle 3⁄8 in. beyond the one just made. Cut out along the outer circle. Now draw a circle on the inside of the lid equal to the body of the tea caddy. Place the lid on the anvil stake and turn it up as you did the bottom piece. This should be made the same size as the bottom, as it must fit over the same diameter. Make the rim for the lid in the same way as you did the rim for the body. Round it up. Be careful that the rim of the lid fits over the rim of the body and that the diameter of the rim on the lid equals the diameter of the body of the caddy. Place the rim on the lid and soft solder it.
To decorate: With the steel stippling tool mark any little design on the surface of the lid or body,[140] or both, pricking up the design. Finish the work by polishing the same way as copper is polished. You can prevent its tarnishing by the use of lacquer. This lacquer can be bought at any paint shop. It is put on with a brush and left to dry. The lacquer being transparent does not cover up any of the design.
Material: Yellow brass, No. 20. One piece, 71⁄4 × 9 ins. (for the body). One piece, 5-in. disc (for base). Handles, 2 pieces, 51⁄2 × 5⁄16 ins. square.

Tools: Hard wood block, shears, anvil stake, files, raising hammer, carpenters' gouge, chisel.
Design: Vase, 71⁄4 ins. high, with a diameter at the top of 21⁄2 in. The body tapers toward the base. Two handles, one on each side, to be designed according to taste. The base is to be weighted in order to insure safety when in use for flowers, etc.
Directions: Make a pattern for the vase in the following way: Draw a 21⁄2-in. circle. Using the same centre, draw a 1-in. circle inside the 21⁄2-in.[141]
Through the centre of these circles draw a line 9 ins. long; 3⁄4 in. below the outer circle, over this centre line draw a line 1 in. long, 1⁄2 in. on one side and 1⁄2 in. on the other. Seven inches below this 1-in. line draw a 21⁄2-in. line, 11⁄4 in. on one side and 11⁄4 in. on the other. Connect the inside points of each line with the top line (see design), drawing lines between the two points. If the pattern is carefully developed from the drawing the metal will fold up in the right way for a vase. To do this, continue the tapering lines beyond the circle until the two lines intersect. With the point of the compass on the point of intersection, and the[142] pencil point where the sides meet the 1-in. line, draw an arc of a circle any length. Using the same centre, open the compass until the pencil reaches the base lines. Draw an arc of a circle any length. Use your 30° and 60° angle and divide the half of the circle into 6 equal parts. Take one of these 6 divisions with your compass, and step off their distance on the large circle 12 times. You now have the exact circumference for the top of the vase. Draw lines from these points to the point of intersection. This marks off the small circle or base. Connect the 12-in. point on the top and bottom with solid lines. Cut this pattern out and lay it on the metal. Cut out the metal and fold up. It should fit the drawing. The edges should meet close. Clean, bind, and solder as you did with the copper work.
Base: Use the hard wood block and drive up the 5-in. disc over the depression. Shape it as nearly as you can like the design, using the same method as you did with the copper bowl. Keep annealing this brass whenever it feels springy. Place it on the anvil stake. Use the driving hammer and shape it.
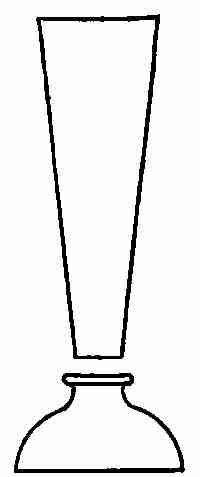
Repeat the annealing and hammering until the desired shape is gotten. Notice in the design that [143]the neck is a little smaller than the bottom of the vase. Place this small end on the point of the anvil stake and swell it out, forming a little rounding collar so that the end of the vase will slip in and fit tight. When the end of the vase is in position, wash the joint with a little soft-soldering fluid, place a little soft solder in the joint and heat until it melts. Be careful that the solder does not run over the collar. It is so hard to file off the brass.
To weigh down the base: Turn the base upside down. Melt enough soft lead to fill up the opening level with the bottom. A circular piece of brass is made to fit over the lead to hide it. Lap the edges of the base over the piece just enough to hold this and the lead in place.
Handles: Handles are a matter of individual taste. The vase can be left without handles if desired.

Take two pieces of 5 × 5⁄16 ins. square; file into shape according to the design. Bind the handles on the body of the vase. Place a little silver solder wherever[144] the handles touch. Be careful to guard the joint made by soldering the body of the vase with clay or rouge, as was done when making the tea caddy. Now you are ready to solder the body of the vase and the base together. Push it in place,[145] see that it is perfectly straight, bind and solder. If not well soldered it will not hold water. File off the surplus solder, polish and lacquer as you did the tea caddy.
This stationary bell is very useful for any purpose that a small bell serves. It has the advantage of being always in one place.
Material: No. 20 brass, used for both the bowl and bracket. The size of the design determines the amount of material used.
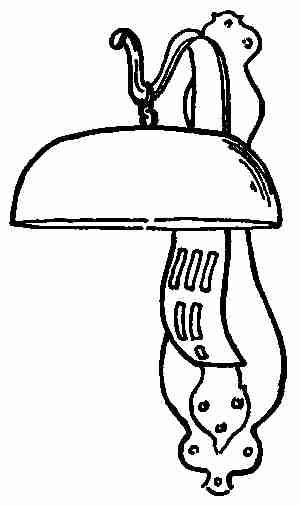
Directions: Make the bowl in the same way as you did the copper bowl, raising hammer, wood block, etc. The last work done on this bell should be of such a nature as to harden the[146] metal so that the ring is clear. This clearness of the sound depends upon the hardness of the metal. The harder you can get the metal without splitting it, the better the bell's tone.
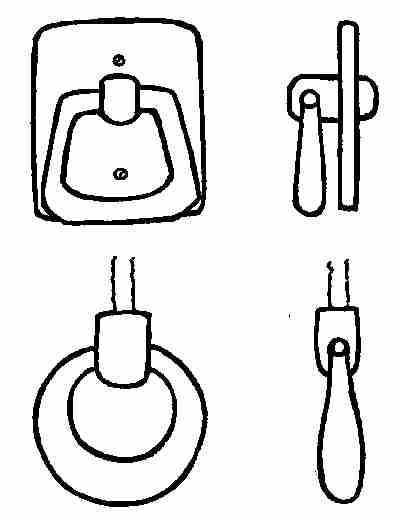
Bracket: The bracket is made of two pieces, the plate and the hanger. The plate can be made of any design or shape suitable—square, oblong, oval, or round.
Decide upon your design, mark this on the plate, and cut out. Drill small hole for the nails to fasten[147] it, either to the wall or to a small piece of hard wood 1⁄4 in. thick for a backing.
Hanger: The hanger can be made of flat, square, or round material. This picture shows a design made of No. 20 brass. It is cut tapering and shaped over a round wood block in the vise. The slots are sawed out as shown. The bell is fastened to the hanger by means of two or three links formed together in a chain, one large enough to hook over the hanger, and connected to the bell with a little eye bolt made of brass, which is pushed through the bell and riveted on the inside.
The ringing of the bell is done by a small brass rod fastened to the hanger with a small chain. The work is finished up by the use of pumice stone.
Silver: There is very little difference in the handling and working of silver from that of brass and copper. The same operations are carried out and the same tools are used. Silver is more pliable than either one of the other metals, though copper is softer. However, silver melts at a lower temperature than copper or brass, and for that reason greater care must be taken during the process of annealing, soldering, and enamelling.
Silver, of course, is the most precious metal you have worked with. So then the cost of the material limits one to the working out of comparatively small problems. When buying silver, always buy sterling. The sterling silver is made especially for silversmiths and is used in all silver work, pure silver being too soft to stand the wear that is required.
While copper is sold by the pound, silver is sold by the ounce, and rolled out to any thickness you wish. But the gauge is the same as that of copper, a No. 20 in silver being the same as No. 20 in copper.[152] If the problems given here are carefully worked out, enough practice in the handicraft of silver will be given to enable you to work out much larger problems in the metal.
Selecting stones for rings, pins, brooches, or bracelets: Choose the stones that are round or oval in shape, and pick those that have a fairly level bed and are well bevelled. This is necessary so that the bezel will hold tight when rubbed against the stone. Semi-precious and precious stones can be bought at any dealer in stones, and one has his choice out of many to pick from.
Bands for finger rings are all made, practically, in the same way. But there is a great difference in the way stones are set in these bands. Perhaps the three ways most generally used are: setting by means of a bezel, or small band; prong setting, and setting the stone down in a cavity cut in the metal, just large enough to hold the stone.
Finger ring, stone set with a bezel:
Material: One piece of silver, 23⁄8 × 1⁄2 ins., No. 20, for ring. One piece of silver, 1⁄8 × 11⁄2 ins., No. 28, for bezel. Stone. Silver solder. Borax.
Tools: Ring mandrel (you can make one yourself),[153] small wood mallet, drill press and 1⁄16 in. drill, saw frame and saw, centre-punch, small Swiss files.
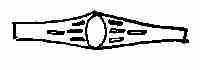
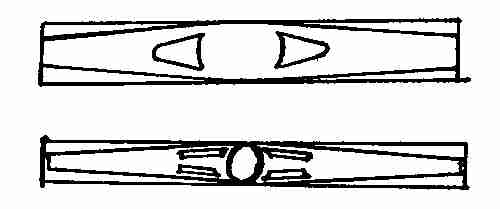
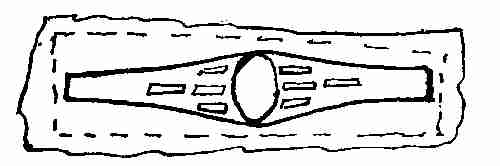
Directions—Pattern: To make a ring of this kind first cut a piece of paper 1⁄4 in. wide and long enough to go around the finger which the ring is to fit. Straighten this piece of paper out. This gives the length of the piece of silver needed for a ring. Cut another piece of paper 1⁄2 in. wide to this length. Draw with ink the pattern of the ring on this second paper.
Cut the design out and paste it on the piece of silver. With the centre-punch mark the centre of[154] each spot. Drill holes into each one. Saw out the design. With a pair of shears cut off the surplus metal. Be careful to save all the scraps. They can all be returned and exchanged for silver plate. File close to the design. You now have the band ready for bending.
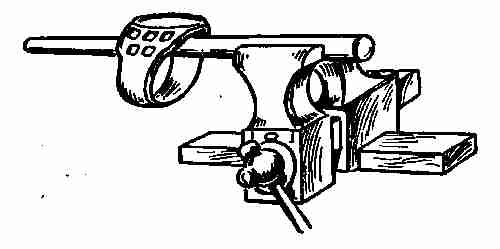
To bend the ring: A ring mandrel is needed. This is merely a tapering rod. One can buy steel mandrels which are graduated for all sizes of rings. A small tapered square punch which you can make yourself, will be found helpful. Take a piece of 3⁄16-in. round or square steel. File the end, tapering to a square point, 1 in. long. Harden it the same as you did the half moon punch used to make the hat pin. This punch is used for design work. Round holes can be squared by driving the square punch into the hole to any depth. This saves filing.
Place the ring mandrel in the vise. Using a wooden[155] mallet, bend the ring in a circular shape over this mandrel till the two ends meet. Try the ring on the finger. Snip off the ends so that the ring fits rather tightly. This will allow for stretching the ring after it is soldered.
To put on the bezel: Bend a piece of No. 28 silver, 1⁄8 × 11⁄2 ins., around the stone. This can be done with the thumb and finger. Make the silver fit around the largest part of the stone. Snip off the ends.
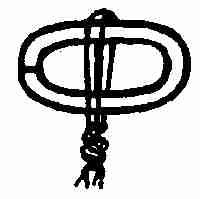
Bind the two ends with binding wire, wash with borax, put a little piece of silver on the inside and heat over the bunsen burner; which is hot enough for this kind of work. Cool off in water, remove the binding wire. Each end of this bezel must be filed to fit the circle of the ring.


When this is done bind the bezel on, and at the same time bind the lower part of the ring so that the open ends fit tightly together. Solder the bezel and the open part of the ring at the same time. Wash all the joints.[156] Place silver solder on the inside of the bezel, say one half-dozen pieces (small), round on the inside, and also one or two small pieces on the joint of the ring itself. Place the whole ring in the bunsen flame. It will all heat up about the same time. Watch the solder carefully. See that it runs all around between the bezel and the body of the ring. Cool off. Take off all the binding wire. File the inside and outside of the bottom part of the ring.
Place the ring on the mandrel and go over it gently with a steel hammer, shaping it around and making it to fit the finger. File the edges around smoothly. Go over it all with a small square file and file out all imperfections in the slots. Place a piece of fine emery cloth on a tapered round wood peg. By revolving it around this you polish and trim up the inside of the ring. Using the same emery cloth twisted around a flat stake or file, go over the outside until the ring is free from scratches.
Stone: If the bezel has been carefully made the stone should drop right into place. If by chance some of the solder should have filled up the bezel space and made it smaller, take a sharp tool like a pocket knife blade and scrape the inside of the bezel till the stone fits. Place the stone. With a[157] smooth piece of steel or very hard wood press the bezel against the stone. The bezel is thin enough to yield to this pressing process. It will cling to the sides of the stone and prevent its falling out. Polish the ring by rubbing it with pumice stone and a piece of cloth. This finishes the work.
Finger rings, silver cut away to set stone in:
Material: For this class of work we require much heavier silver than for the other rings.
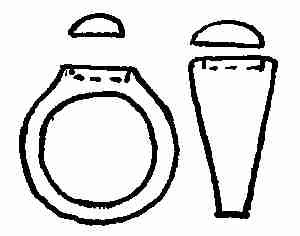
One piece of silver, No. 10, 1⁄2 × 23⁄8 ins. Solder. Borax.
Tools: Same as were used for the bezel setting. In addition we shall need one or two small chisels, which you can make yourself. Chasing tool.
Directions: Make the pattern of your ring as you did before. Paste it on the silver piece, and cut out. Bend the silver around the ring mandrel so that it will fit the finger it is intended for, and solder. Place the stone in its proper position and mark the outline of it on the silver. Now you will need a small chisel to chip away the silver and make the space for the stone.
To make chisel: Take two pieces of 3⁄16-in. round[158] steel 5 ins. long. One piece is to make a flat chisel and the other for an oval chisel. File the ends to a chisel shape.

This steel must be tempered before it can be used. To do this place the ends just filed into the fire. Heat about 1 in. of the end red hot. Cool 1⁄2 in. of this hot end in the water till quite cold. Take it out and rub the end with a piece of emery cloth till it shines.
The colour will begin to flow toward the end. When the blue colour reaches the end plunge the whole piece into water. The oval chisel is used for outlining the depression. The flat chisel is used for levelling the bed to receive the stone. With this chisel cut away the material inside the marked outline, keeping a little inside the border line. Cut away the silver to about the depth of 1⁄32 in. You will find the opening a little smaller than the stone. With your chasing tool drive around the inside of the oval, undercutting until the stone fits in. This undercutting drives up a little silver rim, which does the work of a bezel on the stone. When this rim is forced against the stone, the stone is held in place.[159] The ring is now ready for the stone, but the thickness of silver makes it large and clumsy. Before putting the stone in, the ring should be filed down to the proper dimensions. This requires a great deal of filing. Use a rough file at first and finish with a fine one. When the ring is shaped as you wish polish up the inside and outside.
To place the stone: With the ring mandrel on the vise, put the stone in place and put the ring on the mandrel. Tap gently on the silver rim, driving it against the stone. Do not drive it too hard or else you may crack the stone. Finish up and polish as explained before.
Finger ring, stone set with prongs:
Material: One piece of silver, No. 14, width and length the same as the others. Stone—in the design, square.
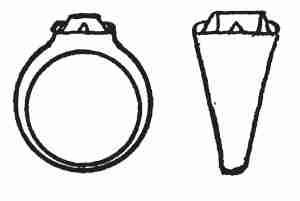
Tools: Same as used in making the other rings.
Directions: Draw design, cut pattern, place it on the silver, and cut out as before. Bend the ring to fit the finger, and solder. After the silver band has been cooled off and the wire has been removed, put the band back on the mandrel. With the planishing hammer strike down, flattening the top.[160] This reduces the thickness of the ring and gives us a flat surface, to which the prongs are soldered.
To make the prongs: Place the stone on a No. 24 piece of silver. Draw the outline of the stone on it. The square piece of silver should be 1⁄8 in. larger all round than the size of the stone. A stone may be set with 4 prongs, or 6 or 8, according to one's taste. In this setting we have the 4 prongs. Mark the outline of the prongs on the square piece of silver according to this picture.
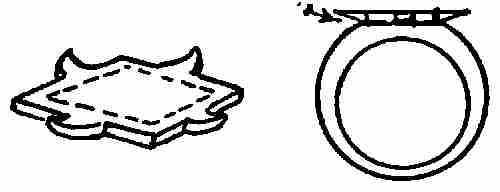
Saw out on the dotted lines. Cut a piece of copper the exact size of the stone. Place the copper on the silver and bend up the prongs at right angles to the silver plate. Take away the copper, and file the under part of the silver piece flat, and prepare the upper part of the ring in the same way. Bind the flat part of the prong piece to the flattened part of the ring, and solder. If the flattening in the first place has made the ring too large for the finger, cut a piece out along the soldered joint. Fit it to the finger and resolder. File all joints perfectly[161] smooth. The prongs should be filed carefully and made perfectly even and of the exact size and shape. Place the stone in and push the prongs against it. Rub each separate prong down until it fits close against the stone. This prevents their catching on anything like cloth, etc. Polish and finish as explained before.
Finger ring, made of twisted silver wire:
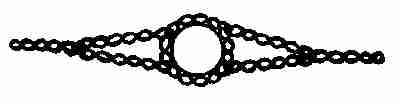
Material: No. 30 fine silver wire; length depends upon the design of the ring.
Tools: Same as those used in making the other rings described.
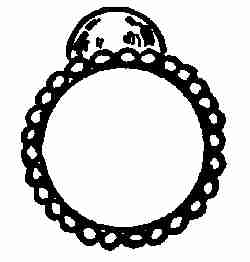
Directions: Cut off a piece of No. 30 wire about 6 ins. long. Bend it in the middle, place the two ends in the vise and, with a pair of pliers, grasp the other end. Twist the wire into an even twist. Select the stone. The round stones are best for this wire setting. In making this wire ring it is best to make the setting for the stone first. Cut a piece of wood the exact shape of the largest part of the stone. Bend a piece of No. 30 silver 1⁄8 in.[162] wide around the wood peg, till the two ends just meet. Coil around this the twisted wire, one strand upon the other, until you have about three coils. Wash with a little borax; place a little silver solder upon the under side of this coil. Heat and solder the strands together; at the same time solder the band on the inside. Place it on the ring mandrel, and curve it to fit the shape of the finger. Either press it with your fingers or use a mallet.
The setting is now ready for the ring: The ring can be made either by twisting a piece of wire to fit the finger or by using just the plain wire itself for the ring band. In either case, the piece of silver used for the band, plus the size of the setting, must equal the size of the finger. Solder the two ends of the ring band to the sides of the setting. File the inside opening of the setting to a level; place the stone in as you did the others. Clean and polish up as usual.

Material: A piece of No. 20 silver for the body of the pin; the size is determined by the size of the[163] stone to be set. A piece of No. 24 for the bezel. A piece of No. 20 silver wire for the pin. The pin piece can be bought at any jewellery store, if you do not wish to make your own. They are better, too, than those you make yourself. Solder and borax.
Tools: Shears, files, draw plate.
Directions: Cut a piece of silver, No. 20, the size of any one of the above designs. Cut a piece of No. 24, 1⁄16 in. wide and long enough to go around the stone, to make a bezel. Be sure that this bezel fits close and tight around the stone. Bind the bezel, and solder. After soldering, fit the bezel again to the stone, for the soldering is apt to change the shape. File the bottom off perfectly flat; clean the surface of that part to be used for the back of the pin. Bind the bezel on this piece, wash with borax, and solder it in place.

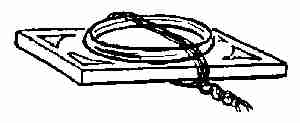
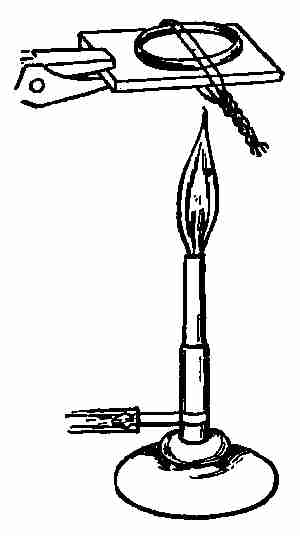
Pin: This can be bought at any jewellery store. However, if you wish to make your own, you can[164] do so in the following manner: Place a piece of No. 16 wire in the draw plate and reduce it a little. This drawing through the plate stiffens the wire, and this is just what is needed in a pin; otherwise it would bend when pushing it into the scarf. When you think it is stiff enough, file the end to a long needle point. Cut it off about 3 ins. long. Bend the blunt end down at right angles 1⁄8 in. Place this end against the back of the pin in such a way that the bent end will be against the plate and a little above the centre. Bind it in place and solder it on tight. Be careful to heat just as little of this pin as possible, for you remember that heating a piece of silver red hot softens it, and you must heat it red hot to solder. So confine the heating to as small a space as possible. Sometimes I soak a piece of cloth in water and wrap it around the pin,[165] covering up all except the part to be soldered. This prevents it from softening.

To place the stone: The stone is put in and the bezel is pushed against it and holds it in place.
This is a very plain scarf pin without any pretence at design. Scarf pins can be made in all shapes, sizes, and all sorts of cut out designs.
All silver should be polished smooth and made free from scratches. The polishing hardens the surface of the metal. This is why silver jewellery of all kinds becomes brighter and smoother the longer it is worn.
Setting of stones in scarf pins: There are many ways of setting stones for scarf pins. The setting just described is called a box setting, the bezel forming the box to receive the stone. The open or prong setting is made in the same way as that kind of setting is made for the stone in the ring.
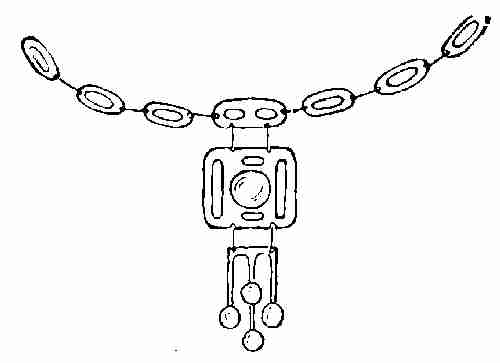
This necklace is made on the basis of a circle 7 ins. in diameter. Most necklaces having pendants are about this size. The design of this necklace is very simple. One stone is set in the pendant and this shows on both sides. The whole is connected by silver links. The stones, one either side of the pendant, between the links of the chain, are set in the same way as you set the stones in the scarf pin and rings. The only work to be done which is different from any you have done before is the making of chain links.
Material: No. 20 or 22 round silver wire, the amount depending upon the size of the chain. Stones, carefully selected.[167]
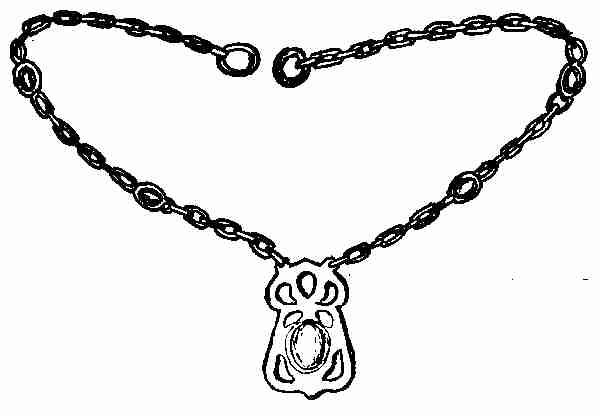
Directions: Draw the design of your necklace on a piece of paper. Place the stones at intervals. When they seem well proportioned draw the chain links between them. The length of the links will depend entirely upon your setting. When you have decided just how many links go between the stones on your design, measure off the length of one of those links. Round links do not hang as well as oval links, neither do they look so well.
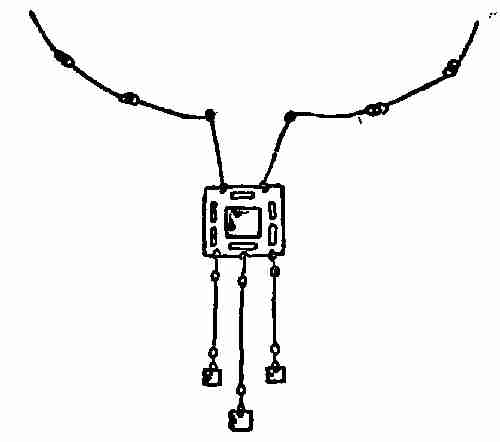
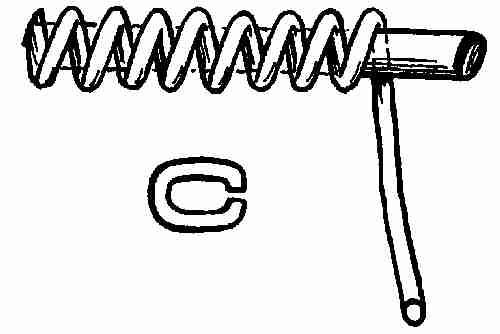
To make the links: Take a piece of iron 3⁄16 in. in diameter and file the two sides oval in shape. This is a bar on which[168] you can bend the links. One end of the silver wire is placed against this mandrel and both put into the vise and fastened. Bend the wire round and round this iron rod, making the coils as close as you can get them. Count each revolution as one link. You can easily count the number of links in your necklace. When you get the number of turns needed, unfasten it all from the vise and pull the rod out. You have a spiral-shaped coil. With a jewellers' saw, saw the length of the spiral on the end of the links. Each one will drop off in the shape of a link. This is the very best way to bend up a number of links that will be uniform in size. You will notice that the ends of the link, after it is sawed off, are not opposite each other. Push these ends together, using the fingers or a pair of pliers. If the sawing is carefully done the links will be ready to solder. Solder first one link in the usual way. Hook the other link into it. Repeat until the chain is the desired length.[169] If the proper amount of solder is placed on the joint it will run in without making lumps to be filed off later.
Pendant: The pendant is made in the same way as the watch fob, which is explained in a later chapter. The setting of the stones in the chain is done as other stone setting, except that the ends are filed into shape to receive the links for joining. Fastenings for the necklace can be bought at any jewellery store. It is much better to buy them than to attempt to make them.
Square silver wire can be used to mark out the design, or any design, instead of round wire, and great variety can be secured merely by a change in the shape of the wire used for the links. Again, you may have a necklace with or without the pendant; the so-called bar necklace, the dog collar, or the chain may be lengthened until it becomes the watch chain.
In the group picture of necklaces there is one necklace made up of long flat links joined together by small links soldered on. The design for the necklace is sawed out. It is used for a necklace and watch chain. This is only one of many[170] suggestions for sawed out design work applied in this way.
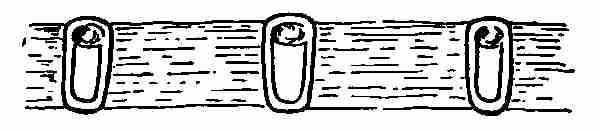
Collar slides make very pretty pieces of jewellery. Three form a set, and they are easily made. These given here are all made of silver with turquoise setting. The centre slide is usually a trifle larger than the other two. A piece of ribbon is slipped through a little wire slot put on the back of each slide for that purpose. Any colour ribbon that blends with the silver and turquoise looks well.
Material: One piece silver, 5⁄8 × 11⁄8 ins. (for centre slide). Two pieces silver, 9⁄16 × 11⁄8 ins. (for other two). Three stones well matched. Piece of No. 20 silver wire, 5 ins. long.

Directions: Cut out the shape as the picture shows and saw out the inside according to the design, leaving a flat space at the top large enough for the stones you have selected. Set the stone the same as you did stones for rings, scarf pins, etc. After the bezel is in place for soldering, cut off a piece of[171] No. 20 wire, and bend it in the shape of the sketch given here.
This is soldered on the back of the slides. Bind this on at the same time you bind on your bezel, wash with borax, and solder both. Do same on each one. File down the bezel, put the stone in place and push the bezel against the stone by rubbing. Polish and finish. This design will no doubt suggest many ways of making slides.
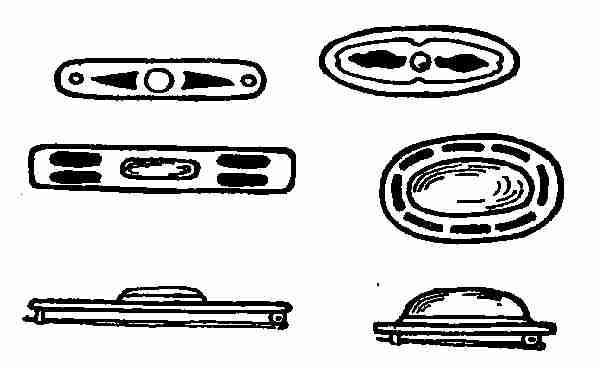
Brooches and bar pins are made in much the same way as scarf pins. The bezel is soldered as to a flat[172] bar of silver to receive the stone. But, in place of the stick pin, brooches have a bar, hinged on one end, and a little catch hook on the other. These bars and catch hooks can be bought very cheaply at almost any jewellery store, and cheaper than one can make them. However, if you wish to make that part of the brooch or bar pin yourself you can do so in the following way: Take a piece of silver 2 ins. long and 1⁄8 in. wide, No. 20. Round this piece of silver up by driving on the wide side about one inch from the end. Keep doing this till the piece of silver is about 1⁄16 in. square. Drive the four corners down, and you have an 8-sided bar. If these corners in turn are hammered down you have a 16-sided piece, etc. Continuous hammering reduces this bar to a round piece of silver about one inch long. The end should be flattened down according to the sketch (1).
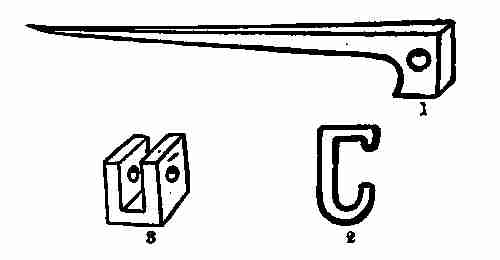
[173] To make the hinge (staple and hook): Take a piece of silver, No. 24, 1⁄8 in. wide and 3⁄8 in. long. Bend it up in the shape of a staple, square at the end (2). The piece for the hook can be made at the same time you make the piece for the pin. Use a piece of wire 1⁄16 in. × 3⁄8 in. long. After hammering, bend it like the sketch (3).
To put the staple and hook together: Drill a 1⁄16-in. hole in the staple very close to the top. Drill one in the flat shank of the pin also close to the top. (See sketch.)
Put a silver rivet in and rivet the two together, making a hinge. Place this on the bar pin or brooch and then put the hook in its proper position. Now you can get the exact length the pin should be. Cut it off long enough to let the end project through the hook about 1⁄8 in. File this to a needle point and polish very smooth. If it is rough it will not push through any kind of cloth easily. To solder, bind the pin and hook to the brooch or bar pin, and solder[174] as you would any other piece. Polish and finish up as you have done before.
Material: One piece of No. 20 silver, 8 × 3⁄8 ins. One piece of No. 24, 1⁄6 in. by any length needed for the number of bezels required. Three or five stones (turquoises blend well with silver).
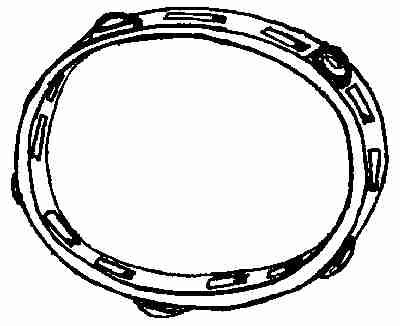
Tools: Saws, saw frame, drill press and drills, small files, borax and solder.
Directions: Secure small stones of uniform size and the same colour, or colours that blend well together. If the stones selected are too large the bracelet is apt to have a heavy or clumsy look. Bracelets should be fine, and above everything else dainty looking. Take your 8-in. piece of silver and divide it into five equal parts if there are to be five stones, and three equal parts if three stones are to[175] be used. Lay each stone in its section and mark the outline with pencil on the silver.
The sawed out design is a matter of spacing between the stones. The design shown here is a good one for this. You will see that the spaces between the stones are cut away so that the stones stand out as the design rather than the bracelet itself.
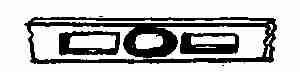
If you are working out the design given here, drill holes and saw out the spaces. Do this while the silver is in a straight piece, also file these slots or spaces true and straight, rounding the edges both ways. At the same time round the outside edges both ways, too. This makes the bracelet free from sharp edges and it will feel comfortable to the touch.
Shape the bracelet, bending it as you have bent other bands. There is danger, when bending this, of the weak places, where the open spaces come, bending in sharp angles. To avoid this put the greatest strain on the solid places and bend these first. Bring the two ends tight together, then bind and solder. When you have taken off the binding wire, file down any thickness left at this joint flush[176] with the silver band. Bracelets are both oval and round in shape. Choose one of the two shapes and round the bracelet up in that form.
Now cut the silver for the bezels long enough to go around each stone. These are all soldered in the usual way, then filed to fit and lie flat on the bracelet. Place the bezels on the solid places and bind each one separately. Place a little bit of silver solder on the inside of each. Be careful to wash the joint made in the band with a little clay to prevent its melting during the soldering of the bezels. If the bracelet during the soldering has lost its shape round it up again. File all the bezels down so that the tops are perfectly smooth. File off any rough spots in the circle or bracelet and polish it all inside and outside. Shape a soft piece of pine wood to fit the inside of the bracelet. Put this wood into the vise and put the bracelet on it. Now set the stones, one by one, and rub the bezels tight against them. Polish with rouge or pumice.
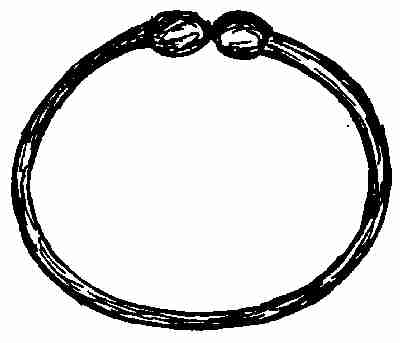
The open bracelet is really an Indian design. Take a piece of silver wire, 3⁄16 × 8 ins. long. Hardened silver is best. It can be gotten just as silver wire that has been softened can be bought. Cut[177] a piece 3⁄8 in. long from each end. Place these pieces on a piece of charcoal. With the blow pipe melt these pieces. Each will run into a little silver ball. Solder the balls to the end of the silver wire, one on each end. Bend the wire now in the shape of a bracelet. You can make the two balls just touch or you can leave them about an inch apart. Polish in the usual way. If the balls are carefully soldered on to the ends of the wire they make a very effective decoration.
Silver spoons: (1) Teaspoon, (2) Sugar tongs, (3) Mustard spoon, (4) Salt spoon and salt-cellar.
Material: No. 8 sterling silver 6 × 11⁄4 ins.
Tools: Hard wood block, drill press and 1⁄16-in. drills, jewellers' saw and frame, files, shears, and raising hammer.
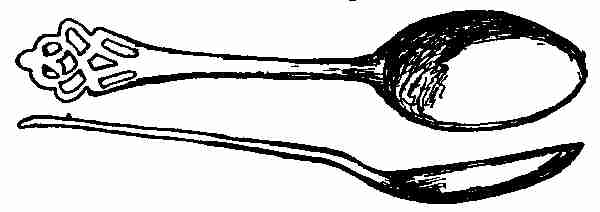
Directions: Examine carefully any teaspoons you have at home. These will suggest ideas for designs. They will give you a clearer notion of how teaspoons are made than any sketch you may see. When you have decided upon your design, draw it on paper and cut out your pattern. Paste this pattern upon the piece of silver. You cannot[179] cut this metal with a pair of shears. Put it into the vise and cut it out with a cold chisel as you did the paper knife, or you can cut it out by placing it upon the flat stake and, with the chisel held vertically, driving the chisel into the silver. You will find the vise best, however. Now you have the outline of a spoon with the same thickness all the way through. If you have examined a teaspoon carefully you will see that the bowl of the spoon itself is thinned toward the outer edge, and that the handle is tapered toward the end. The thickness of the metal is left at the short bend of the spoon where it meets the bowl. Now place the large end on the anvil stake and with the raising hammer (round end) drive down on the metal, thinning it out and at the same time shaping it into a spoon bowl. Your silver widens out and makes the bowl larger than it should be. Cut off the surplus silver. It is much better to have to cut down to the size than to be compelled to stretch the silver out, as it were, to a certain size. In one case you can stop when you have the proper thickness, but in the other you might make the metal too thin for practical purposes, in order to get it wide enough.
Handle: Handles should be tapered out from the thickest part to the end, and left large enough on[180] the end to saw out or file into shape any design you may wish to make. Don't work your problem too close so far as material is concerned. Any waste material in silver can be returned and exchanged for full value.
Hammering any metal hardens it. When this silver becomes hardened anneal it, but just enough to allow you to shape it up. However, the last annealing should be done some time before the hammering is finished so that the last work on it will harden it sufficiently to prevent its bending when in use. Hand made spoons have a beauty about them not matched by those mechanically made. If this handle is to have a sawed out design, the drilling and sawing are done as before described.
The finishing should be carefully done. Round the edges so that they feel smooth and comfortable. After polishing, the spoon is ready for use.

[181] Material: No. 16 gauge silver, 9 × 3⁄8 in.
Directions: Make your pattern and mark it off on the strip of silver. Either saw or cut off the surplus material. Drill two holes where the holes are shown, for the claws. Saw down to these holes. Do this on either end. You now have three prongs, the middle one a little wider than the other two. Take the pliers, grasp the points of the outer two and turn them outward, forming a claw. File them until they have the shape shown by the design. Do the same on both ends. File the whole piece up, rounding the edges nicely. Notice that the edge view given in the drawing shows the centre thinner than either side. This is flattened down and the flattening of the silver hardens it, so that when it is turned it acts like a spring. When you have flattened the centre part out to the thickness of the drawing, place it on a wood block and with a chisel-shaped wood peg drive in the centre, making the inside slightly concave, and rounding the top side a little. This will bend the tongs like the design. Shape the claw ends to fit the sketch on a hard wood block, using a mallet. Before bending the silver into shape take the wood peg, place the claws on the wood block, and with the wood peg drive down and slightly concave the centre of the claws. All[182] design work must be put in when the metal is in a straight piece.
These are made in the same way as the tongs with claws. In the place of claws you make the bowl spoon shaped on the wooden block, using a mallet. The spoon bowl should not be larger than 1⁄2 × 7⁄8 in. Finish and treat in the same way as the sugar tongs with claws.
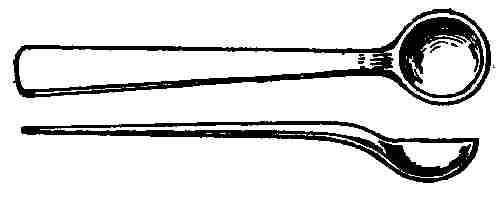
Material—Mustard spoon: No. 14 silver, 3⁄16 × 3 ins.
Directions: To make a mustard spoon like the sketch given here, measure 1⁄2 in. off the end of the silver stock. This makes the bowl of the spoon. Flatten the end down, thinning it out toward the edge. File the bowl round. Place it on a block and hammer it into a plain simple bowl shape very[183] deep. One inch from the handle end flatten it out, thinning it out toward the end. File to shape, and bend as shown in the sketch, similar to a teaspoon.
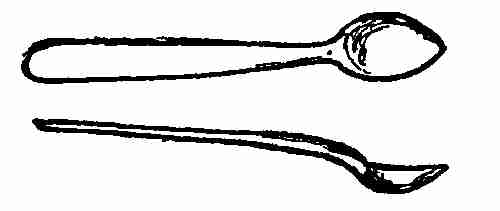
Material—Spoon: 3⁄16 × 21⁄2 ins., No. 14.
Directions: Salt spoons are made in the same way as mustard spoons. However, the handle is shorter, and the bowl is oval shaped and not quite so deep. Any little sawed out design may be placed on the handle, same as the teaspoon design. Using the same design, a set can be made to match.
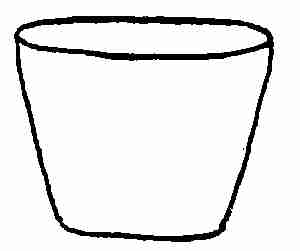
Material—Salt-cellar: Silver No. 24, disc 3 ins. in diameter.
Directions: Take the 3-in. silver disc. Draw on it a 1-in. circle in the middle. Place it on an anvil[184] stake and drive it into shape like the sketch given here. This is done in the same way as the base of the chalice was hammered up. Hammer marks should be left. They add to the design itself. When you have driven it up, see that the bottom is flat, so that it sits level on the table. Trim the top off and file the edges round.

Salt-cellars with fluted sides: There are many ways of making salt-cellars. Some have straight sides, some have tops bent over, some are saucer shaped, and some have fluted sides. Take the 3-in. disc, and divide it into 12 equal parts. File out in a hollow block a round depression and with the mallet and a wood peg to fit the depressions drive each of the divisions into the depression. Narrow the scallops toward the bottom, both in width and depth. Keep within the angle formed by the divisions. As you repeat one after the other you will notice the sides beginning to turn up and shape themselves into a cup similar to the first salt-cellar. The base of this should be one inch in diameter. Finish up and file as you did the others.
Material: One piece No. 24, 1⁄4 × 13 ins. One piece No. 24, 3-in. disc (2-in. hole sawed out of centre). One piece No. 24, 11⁄2 × 1⁄2 ins., for feet.
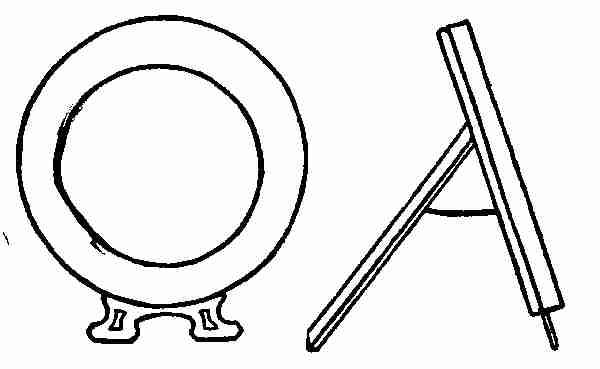
Directions: Bend the strip of silver, 1⁄4 × 13 ins., to fit the outside edge of the disc. Cut off the ends, and solder. Push the disc into the ring made and solder the ring into the disc, keeping the edges flush with the surface of the disc. File off the soldered joints smoothly.
Feet: Saw out the design for the feet according to the drawing, and solder them on to the back edge of any part of the circle. This must be done with hard solder. Before soldering the feet on, paint[186] the joints already soldered with clay, wash and paint the opening where the heat is applied for soldering on the feet. The edge of the 2-in. circle is bevelled slightly. To do this place the edge on an anvil stake and with a very light hammer drive gently down, bending inwardly. If this is carefully done it will require no finishing except the polishing.
The frame is now ready for the glass. Any kind of window glass may be cut to fit the inside. A little card board frame is made to hold the glass and picture into place. Take a strip of card board 1⁄4 in. wide, long enough to bend into a circle to fit the inside of the silver frame tightly. Cut a disc of card board to fit the card board circle. Glue the disc and circle together. Cover with velvet, so as to hide the card board. Fasten to the back a little stand for holding the picture in proper position. This, too, is made of card board and covered with the same material.
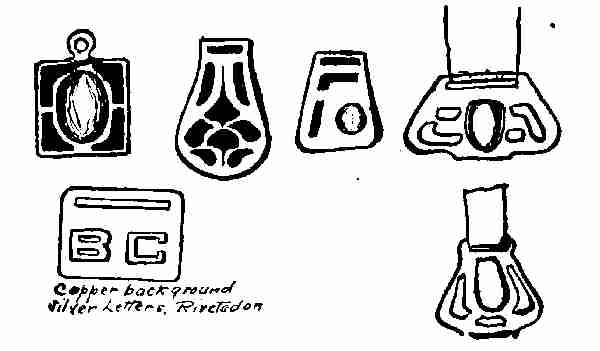
The few designs shown here are easily worked out in either metal. Many handsome watch fobs of silver alone, or copper plain, or copper and silver lettering can be made from an elaboration of these designs. College students delight in copper fobs with silver[188] lettering, symbols of their fraternities, or figures representing their class year. The white of the silver and red brown of the copper blend very well together. The fobs may be set with a single stone, or a number of stones, and, again, symbols may be sawed out of the silver sheet.
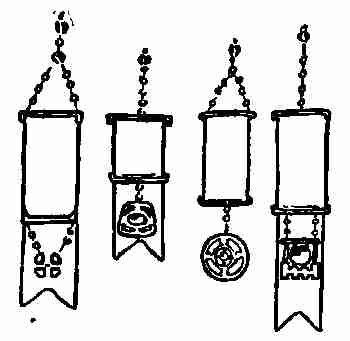
Material: Silver, No. 16 gauge. Copper, No. 14 gauge. The size of the piece of metal depends upon the size you wish to make the fob.
Tools: Solder, rivets, shears, drill press and drills, saw frame and saw.
Directions: After deciding upon the design, draw it on paper and cut it out. Paste this pattern on the silver sheet and cut out along the outline. If there is any cut out work to be done, drill the holes and saw the design out. If you are making a silver fob and you wish to enrich it by setting stones, decide upon your stone, make a bezel out of No. 24 silver, and proceed to set the stone as you did in the ring. If the background is copper with silver[189] initials riveted upon it, saw out the slot for the strap to go through, and polish the surface free from all scratches and lines. File the slot round so it will not cut the leather strap. Polish by tearing a little narrow strip of emery cloth the length of the sheet and pushing it through the slot backward and forward, pressing down on the top and bottom of the slot. This tends to round it and to polish out the file marks. Mark the initials on the silver and saw them out. Be sure that the stems of the letters are wide enough to allow holes for riveting. Put only enough rivets in to hold the letters in place. Two are usually enough, except with the letters V and W. The more carefully you follow the lines of the letters, the less filing you will have to do later. However, even with the greatest care some filing must be done and since these letters are the principal part of the decoration, they should be filed square, smooth, and a little rounding on the edges of the face side. Keep the side to be riveted against the plate flat, so it will fit snugly when fastened.
When the holes have been drilled in the letters, place them on the copper plate in the proper position and scratch through one hole with a sharp instrument. Drill a hole through this point the same size as the holes in the letters. Rivet these on with silver[190] rivets. Square the letters up on the plate, drill the remaining holes, and rivet. If the rivet is driven down good and snug the end of the rivet can be filed flush with the top of the silver. If one should wish to use rivets for decorative purposes they should be arranged in a definite way. While riveting the ends be careful to round them up instead of making them flush.
Materials: No. 20 gauge (either material), 5 × 11⁄4 ins. Individual napkin rings may be made either of silver or copper. Most rings are made of the silver, but copper lends itself very well for them. The design may be pierced, or etched out with acid. But the design work should always be done while the metal is in a straight piece. All napkin rings are made in this way.
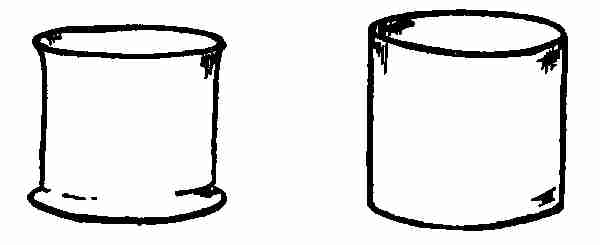
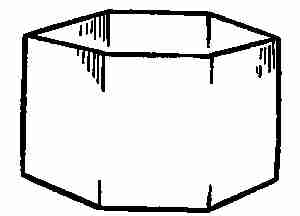
Directions: Take the silver or copper sheet and round the edges. File the two ends that are to be[192] soldered together perfectly flat so that they will meet with the least possible opening. Bend the metal in shape around a hard wood peg. Bind with binding wire, wash with borax. Then place bits of silver solder along the inside and solder. After soldering, remove the binding wire and file the joint on the inside and outside, until it is all perfectly smooth. Polish and finish. Make a copper napkin ring in the same way.
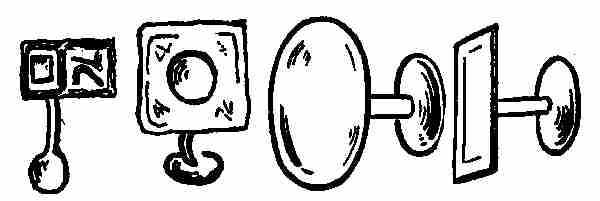
Cuff links may be made of gold, silver, copper, or brass. Often the design is worked out in the metal alone, again engraving is added, or enamel or stones. The designs given here are merely suggestions. Any one of them works out well in the metal. You will notice that some have a ball on one end of the link and a plate on the other, while some[193] have the double plates. Again, some are made with loose links joining the two heads. The link is loosened and pushed through the hole in the cuff and then hooked on to the plate. One must be careful to make the plates on a pair of cuff links small enough to go through the buttonhole of a cuff.
Material: For plain oval pair of cuff links. Two pieces of No. 20 silver, 7⁄8 × 1⁄2 in. Two pieces of silver wire, No. 14, 3⁄4 in.
Directions: Mark the design by drawing an oval on the two plates of silver. Keep length and diameter of both the same. Clip off the sides and shape to design. Save the small pieces of silver clipped off, as they will be used to make the balls at the other end of the cuff link. With the file, bevel the edge and smooth all down. Place the plates on a wooden block and curve them a little. Take the scraps of silver you cut from the plates, place them in two separate groups on a piece of charcoal, and heat it until they melt. When the pieces melt they form themselves into balls. When these silver balls are cool enough to handle with a pair of pincers, cool them off in water. File away any part of the ball a little flat and solder the silver rod to the ball. Solder the other end of the silver rod[194] to the curved side of the oval piece. Bend the connecting rod, like the picture. This forms the link. Do the same with the other link. Then file, polish, and finish. If stones are to be set, the bezels are made and put on the flat plates and soldered on at the same time the plate is soldered to the link. The stone is placed in position after it is all finished.
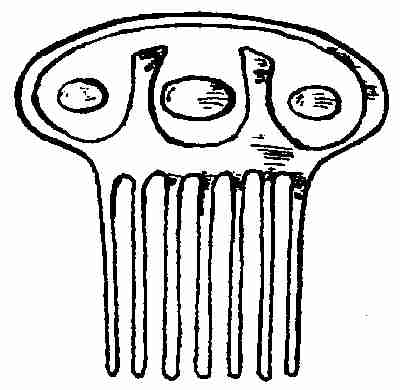
The comb described here is of medium size. It can be made larger, or smaller, as the working principle is the same.
Material: No. 20, silver, 41⁄2 × 21⁄2 ins. Three pieces of No. 24 silver for the bezels. The size of the pieces depends upon the size of the stones. Three turquoise stones.
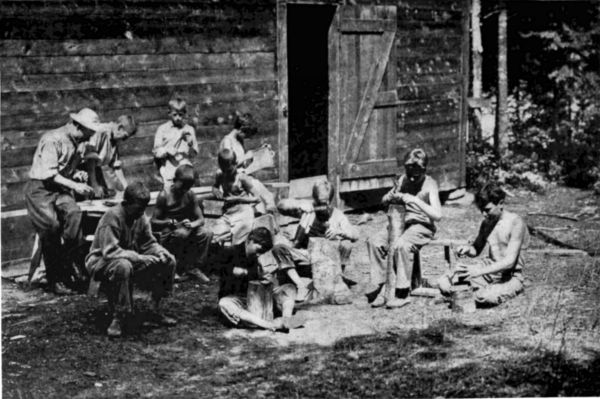
Directions: Take the silver plate, 41⁄2 × 21⁄2 ins., and divide it across the shorter dimension into [195]places corresponding to the number of teeth in the design. Be extremely careful about the spacing. Centre punch these divisions and drill holes about 1 in. from the edge through each one equal to the thickness of each tooth. Here the thickness would be about 1⁄16 in.

With a sharp tool draw lines from these holes to the outer edge. Be careful to have all the lines running parallel to each other. Place the saw through the holes and saw the divisions out, keeping as close to the line as possible. When they are all sawed out, file each tooth separately, rounding each one a little. Do this filing most carefully, for the least roughness left will pull the hair when the comb is put in place. The extreme point of each tooth should be sharp, after a gradual[196] taper from about 1⁄3 the length of the tooth to the end. This can all be done with a file. The comb is now ready to bend in shape. Place it on the round stake and with a hammer curve it until it forms an arc of a 5-in. circle. Most combs are curved to that degree.
Stones: Cut strips of silver for the bezels, long enough to fit exactly around the stone. Set the stones on the same way as you did those for rings and pins. Polish and finish.
Enamel is a glass fused to the surface of metals, for decorative purposes. It is bought in flat discs about 1⁄4 in. thick and weighing from 5 to 6 ounces. These discs are broken up so that one is able to buy enamel in small quantities. It comes in any colour and when put upon the surface correctly the colour does not change and it is not affected afterward by atmospheric influences.
Tools: One needs few tools for this work. A wooden mallet, a mortar and pestle, and a small spoon used to put the enamel on the metal when filling the design will be found sufficient. The spoon may be made by taking a 1⁄8-in. piece of silver or copper wire with about 1⁄2 in. of the end flattened down spoon shaped. File this end round and smooth so there will be no ragged edges.
Process: When you have decided upon the colour which you wish, put as much enamel as you will need into the mortar and cover it with clear water. The water washes the enamel and prevents it[198] from flying out as it is broken up. Place the pestle on the pieces of enamel and tap gently upon the end of the pestle with the wooden mallet, till the enamel is broken up into fine pieces. While doing this the water will become discoloured. Drain the water off and pour fresh water on. Repeat this so long as the water becomes discoloured. With the pestle grind the enamel to a fine paste. Press down upon the pestle, at the same time give it a twisting movement with the wrist. When the water remains clear and the enamel is pasty and free from lumps it is ready for use. While using it keep it just covered with clear water. This prevents its drying and in this dampened state it is in the best working condition.
How to place the enamel on the metal: With the small spoon pick the enamel up out of the mortar, place it on the metal and press it down into any depression. Keep it well moistened all the time. Repeat this until the whole depression is covered. If any part is left uncovered, that part will show black after firing. Then each black spot must be scraped clean, covered with enamel again and refired, which makes much unnecessary work, so be careful at the first to place the enamel just where it should be on the metal, and so avoid the extra work and firing.[199] The muffle furnace: This is a small furnace made for the purpose of melting enamels by what is called a reflected heat. The muffle is a half rounded, shaped clay form open only at one end, into which the piece to be fired is put. The flame of the furnace plays on the outside of this muffle. The temperature is raised to the required heat and the piece inside the muffle is fired without having any flame playing directly upon it. The reflected heat does the work. These furnaces can be bought in almost any general supply store. They come in all sizes. Natural or artificial gas can be used for heating; the regular hose or tube attachment is all that is necessary.
The piece in place for firing: It is usually best to light the oven before you begin to place the enamel on the work to be fired. The furnace heats up in the meantime. Place the piece on the top ledge of the furnace close to the chimney. This is a good place to dry the moisture out of the enamel. If this is not done the steam generated by the moisture and the heat causes explosions, which in turn disturb the enamel surface and dislodge small particles of the enamel. When the steam has stopped rising from the enamel—which you can tell by holding the piece between you and the light—the moisture has dried out and the work can be put into the muffle by use of a long[200] pair of muffle tongs. Extreme care must be taken when placing the piece to be fired into the furnace. The enamel is now very dry. The particles are no longer held together by the moisture and the least jar will dislodge them. The doors of the furnace are usually in two pieces, so that the upper half can be lifted away from time to time. One can look in and watch the process of melting. When the enamel is first put into the furnace and the heat begins to melt it, it rapidly changes colour. As it begins to melt it settles down and takes on a glassy, soft, smooth surface. At this point it is ready to take out. It is placed again on the top of this furnace, where it cools off slowly, otherwise the difference in expansion between the metal and the glass would cause the surface to crack. After one or two trials one easily recognizes the critical time when the enamel is well baked. These directions are only for enamelling flat surfaces. If one should wish to enamel both the inside and outside of a box lid rounded on the top and curved on the under side, a few large drops of gum arabic should be mixed with the enamel used for the under side. This prevents it from dropping off when in position for firing.
When the work has cooled off so that it can be[201] handled, it will show a surface every part of which is covered, if carefully done. If not the black spots will appear. These are copper spots oxidized by the heat, and must be thoroughly scrubbed and scraped. The enamel edges around these spots must be scraped away, covered with enamel, and refired. If there are no spots shown, the work is ready for finishing. You will find on the upper edge of the enamel line a black line caused by the impurities in the enamel which rise to the top edge. Scrape this off with a fine file until it entirely disappears.
The copper, too, usually takes on beautiful colours during the heating process. Many like to leave the colours just as they happen to come by the heat, others prefer to polish the surface to bring out the real copper colours rather than the oxide colours. To clean the oxide off one must put the piece into a pickling bath made up of one part of sulphuric acid to eight parts of water. This softens the scum on the surface of the metal so that a soft rag dipped into any cleaning material like pumice stone will easily clean it off.
Cloisonné: In this work the design is done usually in coloured enamels, which are separated one from[202] another by means of ribs of metal bent so as to follow the outlines of the design. These ribs are placed on the plaque, and a drop of solder here and there keeps them in place. The coloured enamels are filled in between these ribs and fired as before explained.
Champlevé: In this method the partitions between one colour and another are formed by ridges of the base and not by separated ribs of metal. These ridges are made by driving the metal with chasing tools from the under side up and raising it above the surface. The spaces between these walls are filled in with enamel, and it is all fired as explained before.
The lid on the rose jar as shown in the group is an example of this kind of enamelling.
The best method of obtaining a coating resembling patina is to immerse the article in a solution of nitrate of copper, and then to place it while still wet in a chamber containing an abundance of carbolic acid. In this case the development of the green incrustation may be observed from day to day. If after a week the object has not yet obtained[203] the proper colour, it must be again dipped in the above solution, and this operation is repeated till the desired shade has been acquired. As the formation of this green colour proceeds in the same way as in the open air, but more rapidly, a handsome and permanent coating of green can be produced by this means.
How to put a thin coating of colouring on the surface of metals by chemicals: A great variety of shades may be obtained simply through heat. The colours ordinarily produced on copper articles by means of heat come through the polishing. Any metal whose surface is highly polished will take on a number of different colours, beginning at a straw colour and changing to a dark straw, purple, dark blue, light blue, and steel or gray, by heating the piece to be coloured to a temperature of 630° F.
Barium sulphide and water (a very good composition for colouring metal): Immerse object until it assumes desired tint from light brown to violet to black. Heat gently over bunsen flame until a rich deep violet appears. After it is cool rub with soft cloth.[204]
Patina imitation (a very good composition for the greening of copper):
Saturate soft cloth and rub or sprinkle the solution on the copper. Let stand in the open air ten or twelve hours. Wash the colour off with clear cold water. Tone down to suit.
Another way of colouring metal.
Silver.
To oxidize silver: The following is a solution commonly used for oxidizing silver:
The variety known as liver or sulphur is generally used, and imparts a reddish brown colour to the silver, the colour being darker the darker the solution. It should be worked at 60 or 70 per cent. The stronger the solution the blacker the colour. If ammonium carbonate (20 grains) is added to the above formula and is worked hot, a black colour appears upon rubbing with a very fine wire brush. It takes on the colour of black lead.[205] Colouring of brass:
This will turn brass a very beautiful blue-black colour. Copper assumes a very beautiful tint from this solution.
Cement for engravers: Melt best pitch in an iron pot and when completely liquid stir in a mixture composed of two thirds of raw pitch and one third plaster of paris. Make a lot of ten pounds. Add one half pound mutton tallow, boil and mix thoroughly. Should this be too soft, add plaster of paris until you get the desired hardness:
To polish enamel: After rubbing it down with the corundum file, take a small rod of tin or pewter and after anointing it with fine Tripoli or rotten-stone, grind the surface of the enamel evenly with the tin or pewter rod. Next take a stick of lime wood and use that with the rotten-stone in the same way and finish with putty powder and stick covered with chamois skin.
To unsolder a piece of work: Paint those joints[206] which are not to be unsoldered with a mixture of clay water, to which add a little common salt. When dry, scrape the part to be unsoldered and paint it with borax. Now heat till solder melts, pick off with pliers or knock it off with a gentle tap. The borax adds flux, thus helping the solder to run at a melting temperature.
Most of the jewellery that we see nowadays and also much of the metal work is made under presses or drop hammers. As was shown in the making of the mould for the round copper tray, the skill lies in the making of the design and the making of a mould to fit the design.
The description of the making of a match safe by means of die sinking will explain how all die work is done: The design for the match safe is made by the artist, who turns it over to the die sinker. He, in turn, chisels out of a steel block, about 7 ins. square, a depression in which the design fits. If the match safe has an embossed design, this is all chiselled out carefully with small chisels and filed up smoothly so that when a piece of soft lead is driven into the depression it will take the shape of the match safe as designed by the artist. The[207] lead is so soft that it takes the print readily. This lead reproduction shows to the die sinker any imperfection in the die. The imperfections, if there are any, are smoothed down. The driving in of the lead into the depression is repeated from time to time, until the mould is the exact reproduction of the artist's design.
The die is now hardened by heating it red hot and cooling in water. When taken out of the water it is placed in the hammer or press. On the ram of the hammer is keyed, directly above this die, a square block of lead. When the hammer falls, the impact of the lead upon the impression produces a reproduction of the impression. This lead piece makes the top die. A piece of thin silver is placed in the steel die over the impression. If the ram is now dropped upon the silver plate it will force the plate into the impression and will stamp the design on the silver. One half of the match box is made in this way. When two of these are made, put together, and soldered, they make a whole match box. Thousands of match boxes would be made from this one die. That is the reason why this class of work can be sold so cheaply.
The principle explained here is used for the making of tea sets, dinner sets, etc.[208] The same thing is true of the round wood mould you made to make the copper tray in. It can be used to make dozens of trays, all the same size and shape.
Alloy: Base metal added to silver or gold for hardness or colour. Also any combination of different metals by fusion.
Annealing: Softening metal by making it red-hot and cooling slowly; for steel, brass, copper, silver, cooling quickly in water.
Backing: The coating of enamel on the back surface of box lids, to neutralize expanse and contraction, thus preventing top enamel from cracking.
Basse-taille: Low cutting of metal beneath the line of the surface, used in enamelling. The drawing or modelling of the subject is given by the different depths of cutting.
Beck iron: T-shaped anvil or stake used in hammer work. The arms of the T are long; one is round and slender, and tapering; the other has a flat upper surface.
Bossing up: Beating out sheet metal in the back into rough forms required.
Champlevé: A process of enamelling on metal[209] in which the ground of the pattern is cut away with a chisel into a series of shallow troughs into which the enamel is melted, the surface being afterward ground smooth and polished.
Chasing: Surface modelling of metal with hammer and punch or chasing tools.
Cloisonné: An enclosing ribbon wire, which being soldered edgewise on a metal ground makes a trough into which enamel is melted, the ribbon making the division. Thus the design is separated.
Collar: A ring made of stout leather filled with sand or some other soft material used to support the pitch block.
Draw Plate: A flat plate of steel or iron with rows of graduated holes, used for drawing or reducing wire.
Face Plate: A square thick iron plate with the surface perfectly smooth and level to test work on.
Flux: Any material used to protect the surface of metal from oxidation when exposed to heat. Borax and water mixed, etc.
Graver: A kind of small chisel used for cutting metal, or lines on surfaces.
Mandrel: A rod of wood or iron of any section used either for coiling wire for chains or the making of rings.[210] Matt tool: A punch, flat and graduated on one end, used for making groined surfaces on metal.
Pickle: Solutions of various acids in water used for removing the film of oxide and sulphide surface of metal. The acids used are nitric acid, hydrochloric acid, and sulphuric acid, about 8 to 1. This is strong enough for ordinary work.
Pin: The hard wood peg fixed in the bench to hold work against to file and fit.
Pitch block: Some iron blocks and wood blocks covered with pitch used as a support for metal in repoussé work or chasing.
Planishing: Beating a plane or level surface to a sheet of metal by the use of a broad smooth-faced hammer on a stake or anvil. Also used to give smoothed face to a bowl or cup or other object in sheet metal.
Repoussé: The method of beating out sheet metal from the back with hammer and punches.
Sand bag: A flat circular or square bag of leather filled with sand used for bossing up metal upon.
Scraper: A tool made from an old file by sharpening the point on a stone to a three-sided pyramid; used for scraping clear edges and surfaces to be soldered and for cleaning up work generally.
Snarling iron: Long Z-shaped bar of iron fixed[211] in a vise and used for bossing out the surface of vessels from the inside. They act by rebounding from the blow of the hammer near the end fixed in the vise.
Tracer: A chisel-shaped punch used for cutting for any design or work that requires deep lines.
Let's go to the blacksmith's shop and tell the blacksmith what we have done. You see I've shown you all he taught me about copper, brass, and silver. I promised to take you there when we got through. Come on. Here we are! This is his shop. Mr. Blacksmith, this is my friend. I've shown him how to do work in metal and he can do all that you taught me. We both want to learn how to make things out of steel and iron. Are you ready to take us on?
Yes, boys, you are just in time to help me out. And while you are lending a hand I can show you how to make many things that every boy can learn to do with iron and steel. Come into the shop. First I'll tell you about the blacksmith shop equipment. This is my forge and bellows, with the coal heap at the side; here is the anvil and here are my tools. You see it doesn't take a blacksmith long to name the things he needs to equip his shop. But you must know how each thing is used and what it is[216] used for. Let me draw you a picture of the forge on this board and explain to you how it is built.
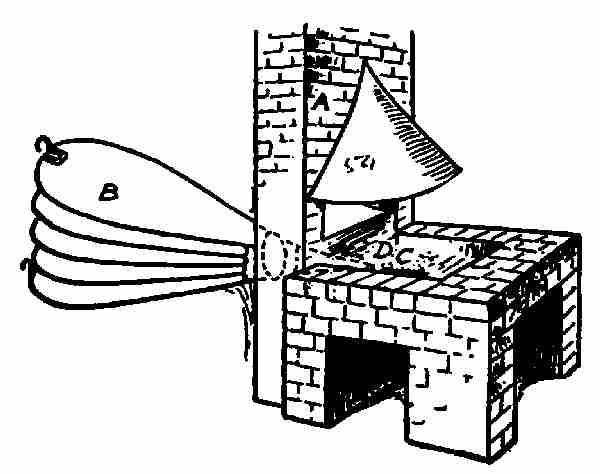
A is the chimney. You see it has an opening in the bottom to let the smoke go up. B is a leather bellows. It is placed back of the chimney out of the way of sparks from the forge fire. The nozzle of the bellows goes through a hole ending on the hearth of the forge. C is the hearth where the coal is placed. D is a nest in the centre of the hearth, called a tuyere. Through this opening the blast from the bellows enters the coal heap.
The whole forge is built of brick and mortar. Modern forges are made of iron and steel and have a sheet iron hood in place of a brick chimney. But[217] the principle of the tuyere, where the blast enters the forge, is the same as we blacksmiths have always used. Now I'll build the fire in the forge. Here in this box are some shavings. I save all my shavings and put them here to start my fire with. Place the shavings over the tuyere and light them. Let them burn for a little while, then cover the whole with this soft bituminous coal. This kind of coal is free from sulphur and phosphorus, and it cokes very nicely when the gas and tar are burnt out. Now it's time to use the bellows. You can take hold of this handle and pull down. The weights on the bottom pull the handle up again. Sometimes weights are placed on the top board. This helps to increase the air pressure. Notice that the bellows hang in a frame and the centre axis is fastened to the upright, allowing the upper and lower half to rise and fall. When the lower half falls it sucks the air in through a little trap door on the bottom, and when raised the trap door closes and the air is forced through the nozzle into the tuyere on the forge. This alternates, first taking the air in and then forcing the air out. Pump gently at first, then the coal will not smother the fire. That volume of smoke coming up is mostly from the burning shavings and it goes right up the flue.[218] This blue flame that you see now shows that the gases are burning in the coal. When they are burnt out the coals give a red glow. Now the bright fire is shown through the coal. Put your poker into the coal heap and raise it gently. The opening made on the top is a vent for the heat to escape and prevents the fire blowing into the shop. An opening like this should always be left at the top, on account of the oxygen which is being pumped in constantly. Sprinkle a little water on the coal around the outside of the fire. This helps to pack the coal down tight and keep the fire in a confined space, for it is apt to spread and use up much more coal than is needed.
You see, boys, this is an old-fashioned blacksmith shop. Most of the work done here is horseshoeing, though we have many complex things brought in for us to repair, none of which can be turned away. All these shoes hanging on the rafters are for horses and mules. The mule's shoe, you see, is a different shape from the horse's shoe. I make these in my spare moments and we call them stock shoes. Notice that the stock shoes have no heels or toes on them. These are put on when the shoe is made to fit the horse's foot.
Shoes are now made by machinery and I buy them when I haven't time to make them. But they, too,[219] must be fitted to the foot, for they come only in stock form.
Now I'm going to show you how to make a horseshoe. I'll make it out of this piece of steel tire from a wagon wheel. We use all this kind of scrap to make the stock shoes. That's why our made shoes can be sold cheaper than the manufactured shoes, if we have the time to make them. Steel is being used in place of iron in all branches of industry. A steel shoe weighing half a pound will wear as long as an iron shoe weighing one pound.
This piece of steel tire which I am using is 1 in. wide and 1⁄2 in. thick. I want to keep the thickness 1⁄2 in., but reduce the width to 3⁄4 in. To do this the end of the piece of metal is put into the forge fire. As soon as it is hot enough, I take it out and place it, edge up, on the anvil, and with the hand hammer draw it out any length I wish. You see that driving down on the edge of the hot bar thickens it. Now turn it over and drive on the flat side. You must keep driving first on the edge and then on the side until it is the right size. This is called stretching the metal out. Now the bar is long enough to bend in the shape of a letter U. Heat about 6 ins. of this bar and then place it on the largest part of the anvil horn. Strike on the projecting[220] end with a hand hammer. It bends easily into the shape.
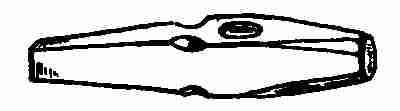
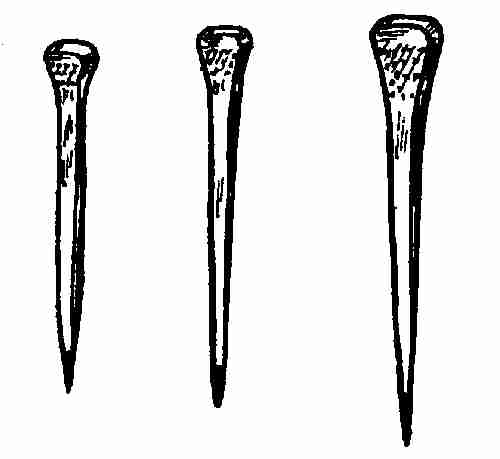
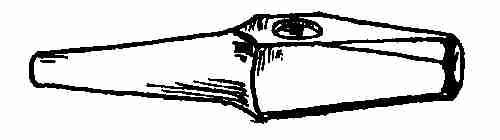
Take the chisel-shaped tool. The edge of this tool makes the groove to fit the nail heads. Every horseshoe has eight rectangular holes for nails, four on each side. These are punched through with this punch, and are made just large enough to fit the horseshoe nail heads. Now you see a stock shoe, and it is just like the dozens I have hanging on the rafters. But before the shoe is placed on the horse's foot it must[221] have the front piece, called the toe calk, welded on and the ends of the shoe turned up for heels. To make the toe calk I take a piece of iron or steel about 2 × 3⁄4 × 1⁄2 in. The end of this piece is prepared like this:
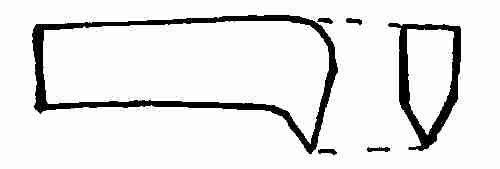
The little projection is made very sharp so that it can stick into the hot iron. In this way it is kept in place during the process of welding. When the calk is made I heat the shoe and place the calk in the proper position. The calk is cold and the little projecting point is easily driven into the hot iron. Now that it is held in place it must be welded on. Iron and steel are welded together only by the use of a flux. There are many kinds of fluxes used. For this I shall use borax. I buy it by the pound and it comes in boxes like this. Sprinkle a little on the calk, heat it in the fire, watch the fire. When the[222] metal is hot enough to weld you will notice a brown smoke coming from the fire. That tells you the borax is burning. There, see the smoke! Now I must take the shoe out quickly and place it on the anvil. A few quick, light blows upon the calk and the welding is done! The hammering must be done quickly after the shoe has been taken out of the fire, or the cold air will lower the temperature and prevent the metal from uniting. There, it's welded! Now I shape it and fit it to the horse's foot. The heels can't be bent up until I know just how long the horse's foot is. I measure by placing it on the hoof. Then the two ends of the shoe are bent and driven down so that the height of the heels equals the height of the calk. Now, boys, this is a hand made shoe. When you know how to use the fire and the tools it is an easy problem to make a horseshoe.
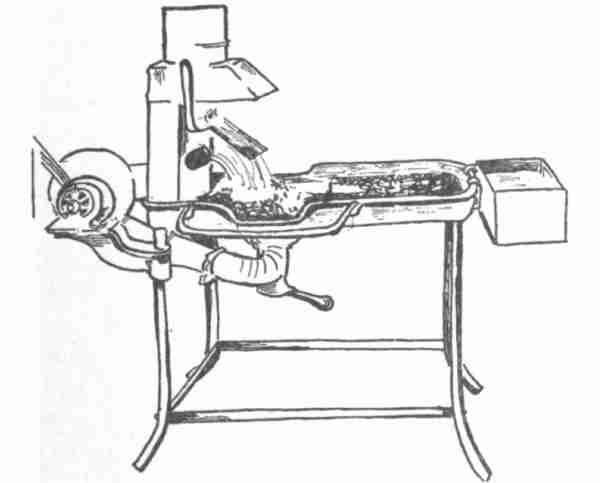
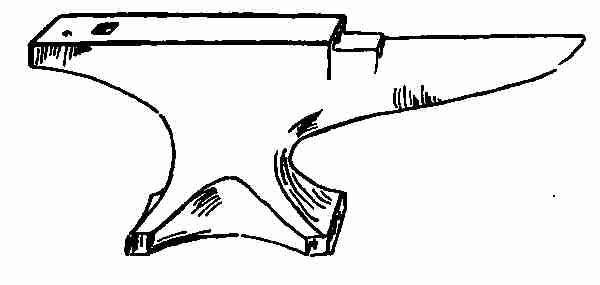
So it is with all blacksmiths' work. There is not anything about it you can't do. Any boy can build his own blacksmith shop if he has a shed or shelter large enough to keep the rain from a forge, anvil, and some tools. You needn't have the big, old-fashioned brick forge like mine. Here is a picture of a portable forge that I can recommend. It can be bought at almost any store that deals in hardware[223] supplies. It is small and handy and can be easily taken from place to place. You can buy any size anvil you wish. They come in all sizes, weighing[224] from five pounds to five hundred pounds. Here is a list of tools which will do all the work, both ornamental and plain, which you may wish to do. Get this equipment, then build your shop.
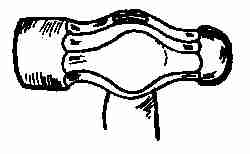
Some of these tools you have used in your copper, brass, and silver work. You will need your vise, files, your various punches, dividers, hand cold chisel, and square. In addition, you should have the following:
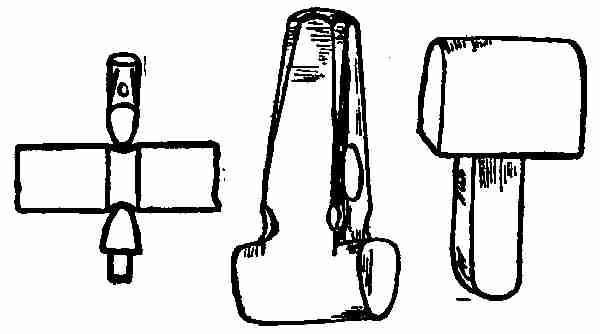
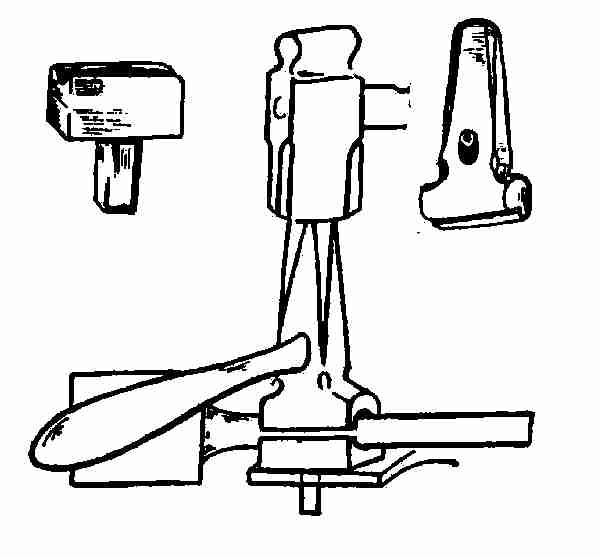
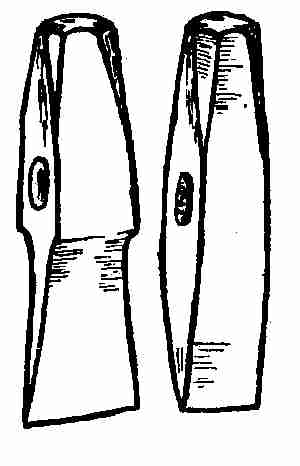
Hand hammer: A hand hammer is used more than any other tool in the shop. The flat face is used for shaping material and the round plain for riveting, etc.[225] The top and bottom fullers are used for making depressions in iron and steel. This process is called fullering. The top and bottom swages are used for rounding square iron or steel or reducing large sizes to smaller ones. Hot and cold chisels are both used for cutting iron. As the name shows, one is used for hot iron and one for cold iron. Gouges are for cutting ornamental shapes on sheet iron or steel, hot or cold. Calipers are used for measuring diameters. The broad flat surface of the flatter smoothes rough places. The set hammer is used to make square[226] shoulders. It is a small hammer and does the work in narrow places which larger tools cannot reach. This sledge weighs about eight pounds. It is used where heavy hammering or driving is needed, and in conjunction with such tools as swages, fullers, set hammers, etc. The hardie is a sharp cutting tool used to cut small pieces of iron and soft steel while hot or cold. Tongs are of all sizes. Those most called into use have the following shapes: The shovel for the fire must be small and strong so the clinker formed on the bottom can be shoveled out without carrying too much coal with it. A poker, rake, and dipper also are needed for use about the fire.
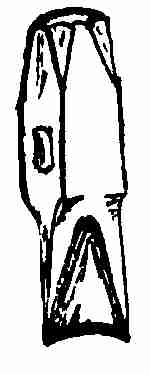
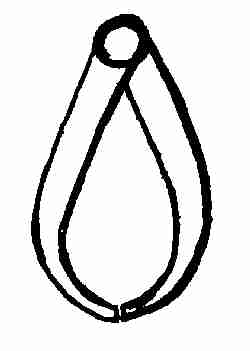
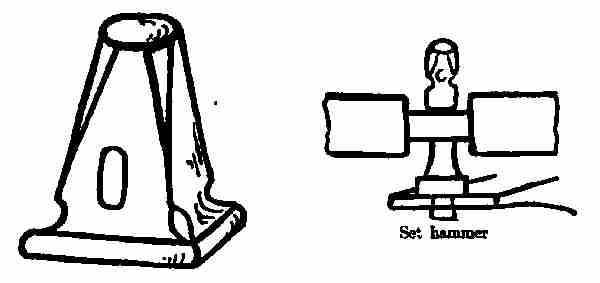
You know now all the tools needed to equip a shop. I want to tell you about the fuels, such as coal and charcoal, which you will use, and something about pig iron and wrought iron which I think you ought to know.
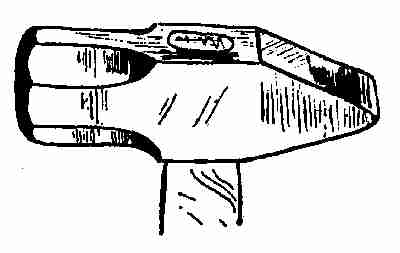


The smoke is the most troublesome thing in a blacksmith's shop. The old-fashioned forge is perhaps the best made to draw the gases and smoke[228] out, except when exhaust fans are used for that purpose. Hoods are fitted to pull down over the fire, completely covering the smoke area, and the suction made by the fan will draw all the smoke from the fire. This, of course, is possible only in modern equipped shops. The portable forges that we use have none of this drawing-out system, except through a natural draft chimney, made either of bricks or by extending an iron pipe from the hood through the side of the shed or through the roof. The down-draft system is a hood placed to one side of the fire. It falls over the fire by means of a hinge[229] placed on the hood. This is not as effective as the overhead system on account of the smallness of the hood. The pipes are all underground, otherwise the system is the same as the overhead system.
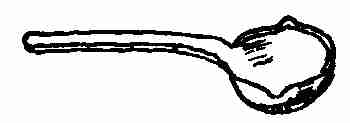
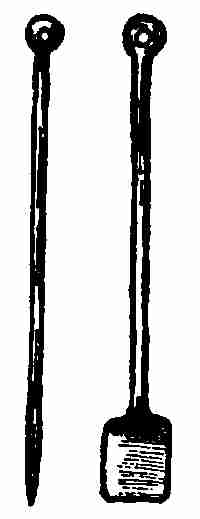
Danger of explosion: Coal gases leak into the tuyere when the blast is shut off. When the blast is put on these gases are blown up into the hot fire and they explode from the heat. They do no harm, except the noise made by the explosion.
Fuels: The coal used in a blacksmiths' shop is a soft coal called bituminous coal. It is supposed to have less phosphorus and sulphur than any other kind of coal. Coal containing either of these ingredients should not be used. Sulphur makes iron hot short and phosphorus makes the iron cold short that is, the iron is made brittle while hot by means of the sulphur, and brittle when cold through the effect of the phosphorus. When this soft[230] coal is heated the coal tar is burned out and the coal burns into a coke.
Charcoal: Charcoal is a solid fuel and the very best fuel for heating purposes. It is free from the impurities mentioned here. It is made by burning hard wood in a closed oven or kiln. This kiln in turn burns the wood into lumps of charcoal. The cost makes the only real objection to the use of charcoal as fuel.
Iron ore is an oxide of iron containing from 35 per cent. to 65 per cent. iron. The rest is oxygen, phosphorus, sulphur, silica, and other impurities. Iron ore is charged into a blast furnace, mixed with limestone as a flux, and melted down, with coke as fuel. The metal which results from this melting is known as commercial pig iron.
Wrought iron is made from pig iron. The pig iron is remelted in a so-called puddling furnace by charging about half a ton at one time into the furnace. While in a molten state it is stirred up with large iron hooks by the puddler. It is kept boiling so as to expose every part of the iron bath to the action of the flame in order to burn out the carbon.[231] The other impurities will separate from the iron and run out of the furnace as slag.
The temperature in the puddling furnace is high enough to melt pig iron but not high enough to keep wrought iron in a liquid state. So, as soon as the small particles of iron become purified the partially congealed portion forms a spongy mass, in which small globules of iron ore are in a semi-plastic state. These are gathered up by the puddler and his helper and are formed into a ball on the bottom of the furnace by means of long rabble bars used for this purpose. The ball is about 150 to 200 pounds in weight. These lumps of iron are taken to a large hammer or squeezer.
There they are shaped into long blooms to fit the rolls. They are taken right from the squeezer to the rolling mill and rolled out into bars 4 ins. or 5 ins. wide and 3⁄4 in. thick. These bars are called muck bars owing to their spongy-like appearance and the large quantity of cinders which they contain. The muck bars are now cut into lengths of 3 ft. and 4 ft. and are piled on top of each other in blocks of 200 lbs. The blocks are put into a heating furnace and heated to a welding heat. While at this heat they are put through the rolls, thus welding the whole mass together, at the same[232] time reducing the pile to sizes required by the market. When cold these are cut into lengths for use. This is the iron used in most blacksmiths' shops.
Stake pins are used for holding ropes in place, such as those on tents, etc.
Material: 1⁄2 in. round × 18 ins. long of wrought iron.
Tool: Hand hammer.

Directions: This sketch is made full size and it shows a round stake pin with a four-sided tapering end about 3 ins. long. Place one end of the bar of iron into the fire. It should be placed so that the iron will be parallel to the bottom of the hearth.
All the heating done for this kind of work must be done in a reducing fire. There are two kinds of fires, the oxidizing fire and the reducing fire. The oxidizing fire is one where the quantity of air blown[234] in is not all consumed by the fire. There is an excess of air and an oxide is formed on the iron. This prevents it from heating sufficiently. The reducing fire is one where the blast is in proportion to the consuming power of the fire—that is, just enough air is blown in to be used up by the fire.
The greater the temperature the more coal and likewise the more blast required. So that a temperature of 2500° Fahrenheit can be easily gotten on an ordinary forge fire. While the iron is heating it should be drawn out of the forge fire once in a while to be examined. When it has reached a white heat, not sparkling, place it on the anvil, and with a hand hammer begin at the end and drive it into shape according to your sketch. Hammer this until the iron begins to darken. Place it again in the fire and repeat as before until the thing is finished. A piece of iron may be heated a dozen times while working it into shape. All depends upon the skill and experience of the worker.
You will probably learn in this problem that metal will burn in this high temperature the same as a piece of wood and very much quicker. It does not smoulder like wood; it just melts away. It would be well to have the point of the iron stake melt or burn off in this particular case so that you[235] can learn all about the heating, melting, and burning of iron. The fine point on the stake is made by keeping the metal on the extreme outer edge of the anvil, so that the outer half of the hammer face will project over the anvil edge, thus reducing any metal between the two into a very small space. (See position of hand hammer in the article on tools.)
When the work is finished the temperature of the metal should be low. This prevents the metal from scaling and gives an opportunity for a smooth finished surface.

Staples are small U-shaped pieces of iron with[236] pointed ends. They are driven into wood for the purpose of holding some attachment in place. We have staples for barn doors, to catch the gate hook, to fasten chains, etc.
Material: One piece of 1⁄4-in. round iron 41⁄2 ins. long.
Directions: Heat one end of the iron piece. Draw it to a square point as was done on the staple pin. Flatten this point as shown in the drawing. Cut it off square at the extreme end so that it will be quite sharp when finished. Repeat on the other end. The piece will now be about 61⁄4 ins. long, about 1⁄4 in. round in the middle, with square, tapering points. The centre is now heated and the piece is bent over the horn of the anvil to the shape shown in the drawing.
In bending this over the horn of the anvil strike with light blows so that the two ends will be the same length. If it is warped or twisted, flatten it out again on the anvil till the flat sides lie in the same plane.
This hook is used for fastening doors as well as gates. The drawing shows a gate hook twisted in the middle.[237] Material: One piece of 5⁄16-in. square iron about 61⁄4 ins. long.
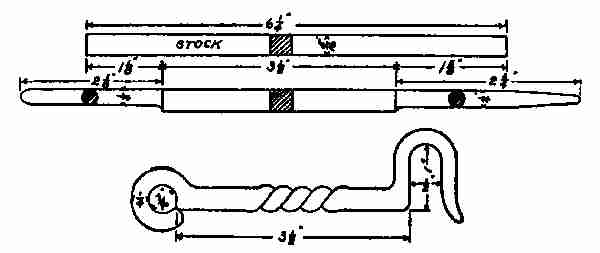
Directions: Mark off with the centre punch 11⁄8 ins. on one end and 15⁄8 ins. on the other. Put the short end into the fire and draw it out until it is 1⁄4 in. square. Hammer the corners down, thus rounding the end until it measures 1⁄4 in. in diameter and is about 21⁄8 ins. long.
Repeat on the large end and draw this out until it measures 23⁄4 ins. long. Bend the end as shown by the drawing. When both ends are bent in shape put the piece into the fire and heat it red hot between the eye and the hook. Place it in the jaws of the vise about 1 in. from the eye, and with a pair of tongs and a wrench grasp the piece about 1 in. from the hook and give it one complete turn. This twists the hook in the centre like the drawing. If[238] it has become bent while twisting it may be straightened by hammering it between two blocks of hard wood. This prevents bruising the sharp edges of the twist.
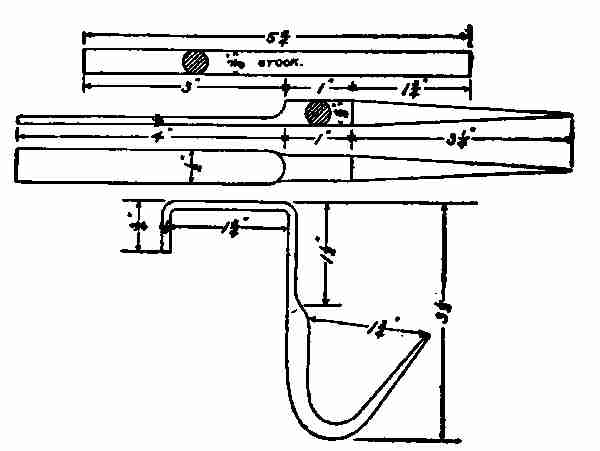
These large hooks are most useful around a stable and are used to hold harness, bags, etc.; in short, they are general utility hooks. They are simply and quickly made.
Material: Stock 3⁄8 × 6 ins. long round iron.
Directions: Flatten the iron down by heating it red hot. With the hand hammer flatten out[239] one end 4 ins. long, 1⁄2 in. wide × 1⁄8 in. thick. One inch from the shoulder made by the flattening begin to draw out the end to a round straight taper, 31⁄4 ins. long. Bend the flat part over the flat end of the anvil, to fit a joint or any wooden beam (as shown by the sketch), and hook it over the horn.
This hook may be made any size according to the purpose for which it is to be used.
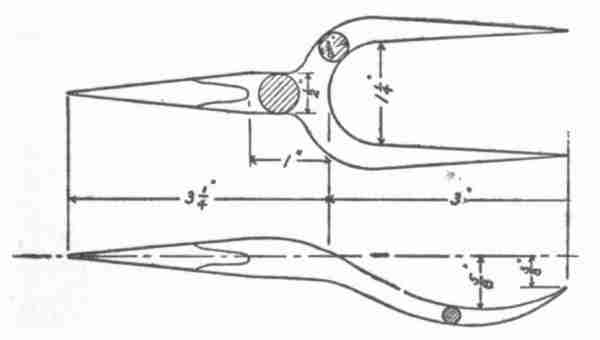
This two-pronged fork is found useful for pitching hay, fishing, etc.
Stock: 3⁄4 × 1 × 5 ins. long, soft steel.
Directions: Two inches back from the end of the bar punch a small hole in the middle of the iron. (See method of punching). Split the piece with[240] the chisel up to this hole. Open the part split and spread at right angles to the shank. Heat the piece up at the crotch. With a fuller, fuller down to 1⁄2 in. back of the spread arms. Draw the stem out 1⁄2 in. round. Now the fork is blocked out ready for finishing. This is done by following the drawings for the dimensions and size. Notice that the two ends of the fork are drawn out to a sharp round taper. The stem is drawn out to a sharp square taper, which is to be driven into a wood handle.
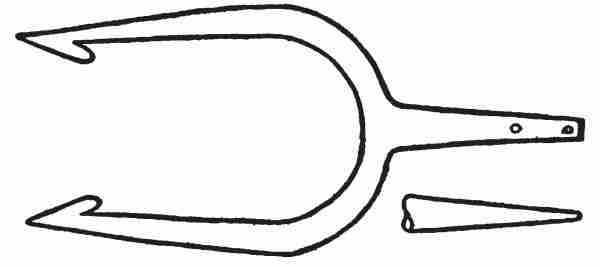
Fish spear: If this two-pronged fork is meant for a fish spear, used so often in rivers where the current is very swift, the extreme ends are flattened down to a spear point as shown in the drawing.
A bolt consists of a stem and a head. Bolt heads[241] are of all shapes—square, hexagonal, round, flat, etc.—while the stem is always round. As a rule, the thickness of the head equals the thickness of the stem, and the diameter of the head is about 11⁄2 times the thickness of the stem. This proportion is generally kept for square and hexagonal bolts.
Directions: Out of the piece of iron used enough of the end is upset to make the head. To do this, heat 21⁄2 ins. from the end of the bar to a bright red heat. Take the piece out of the fire, place the hot end on the anvil, and with the bar in a vertical position hammer upon the cold end. The cold end is driven[242] into the hot end, thus shortening or upsetting the bar. This is repeated. The end is heated again and the hammering is continued until the enlarged end has the right proportion for the head of the bolt. (See drawing.) Heat the enlarged end again and pass the cold end of the stem through the heading tool. Place the heading tool upon the anvil in such a position that the stem passes through the hole in the anvil. The upset end is hammered down against the heading tool until the head is the required thickness. Take it off the heading tool and square it up with the hand hammer. If, after squaring up, the head is found to be too small in diameter and too thick, it is again put into the heading tool and hammered down. This is repeated[243] until the head is finished according to the drawing shown.
All hand-made bolts are made on this principle, whether they are very large or very small.
If a six-sided bolt is desired the same method is used. The head is made six-sided instead of being squared as was done in the first case. The bolt is finally cut to the required length and the end is bevelled off ready for threading. Bolts may be made without going through the process of upsetting the stock. In that case the bars used are of any diameter, depending upon the size of the stem needed. Bend a piece of iron for a collar to give you the amount of stock required for the bolt head. Heat the end of the iron bar. Put this hot end into the collar. Upset it so that it fills the space in the collar. Put it into the fire, then weld and finish as you did in making the head with the end upset.
All bolts that are on the market except special bolts are made by bolt heading machines. Up[244] to 3⁄8 in. in diameter all bolts are made without the use of heat. Those above that size are all heated red hot and the principle is exactly the same as you used when you made the bolt by hand. The machine upsets the head and at the same time shapes it into any desired shape.
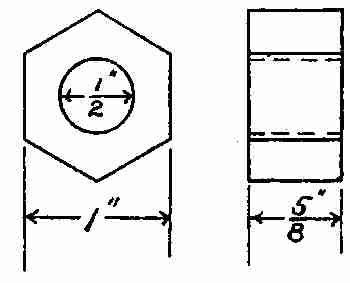
Nuts are used in conjunction with bolts for fastening things together or tightening up parts of machines. There are two ways of making nuts; one is to cut a piece of metal off the right length, punch a hole in the middle, and finish it by shaping it on the end of a mandrel or punch. The second way is to weld a collar and shape this on a mandrel. Though the second method involves welding and is the more difficult of the two, it is the better method. However, the grain of the metal in the second method runs around the nut, while in the former case it runs lengthwise. For this reason the nut is apt to split[245] when tightened up too tight on the bolt. The method explained here is the easier one of the two: it is the simple process of making the nut by punching the hole.
Material: Stock 1 × 5⁄8 in. of wrought iron, any length.
Tools: Hammer, punch, hot chisel, pair of calipers.
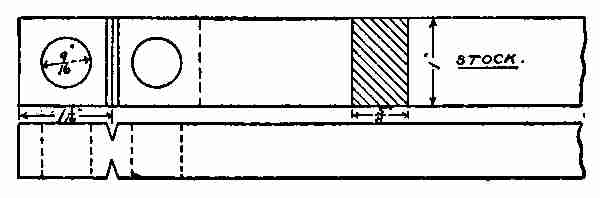
Directions: The drawing here shows each step in the process of making the square nut. Measure off 11⁄16 in. on the bar and with the hot chisel nick on each side almost through. Find the centre of the piece and, with the punch, punch a hole through it after heating it red hot. Place it on the anvil. Place the punch in the centre and drive down from one side until the impression of the punch shows through on the other side. Withdraw the punch and turn the piece upside down. Place the punch upon the impression shown through, driving down till the centre piece is loosened. It is now put over the hole of the anvil and this loosened centre piece[246] driven out. This leaves a hole in the hot iron. All holes made in hot iron are punched through in this way whether they be large or small. The size of the hole is determined by the size of the punch.

Re-heat the iron, push the punch into the hole made, and by a bending motion break the piece off where it is nicked. The piece now is sticking on to the end of the punch. Place them on the anvil and square up the nut while the punch is still in the hole. This prevents the hole from changing its shape while the nut is being driven into shape. It is now taken off the punch and flattened down to the desired thickness. Repeat this edging up and flattening down till the nut is finished.
Hexagonal nuts are made in the same way, except for the squaring up. When the piece is ready for shaping it is made round while on the punch and then made six-sided. It is flattened and edged up in the same manner until the desired size is reached.
It is often necessary to join together two pieces of iron, or the ends of the same piece, as in forming a circle, so that the joint will form one solid mass. When this is done the pieces are said to be welded together. Most of the problems treated so far have had to do with single pieces of iron. Often many pieces are welded together to make one forging, as in making the horseshoe. This is called built up work.
It is possible to weld any iron surfaces provided no oxide of iron is formed upon the surface. If such a coating occurs welding is impossible. Iron heated in the air absorbs oxygen, which results in the oxide formation. There are two ways of guarding against this difficulty: (1) Suitable fluxes, and (2) reducing fires.
The best flux is a sharp sand, usually beach sand. This is sprinkled over the ends to be welded. The sand fuses on to the ends of the iron and excludes the air.[248] The reducing fire is one that consumes all the oxygen that is forced into it by the blast. This is obtained by having a thick bed of fire for the air to pass through before coming into contact with the iron and by keeping the blast pressure low enough to enable the fire to burn all that is admitted. A thick fire, so to speak, should always be kept.
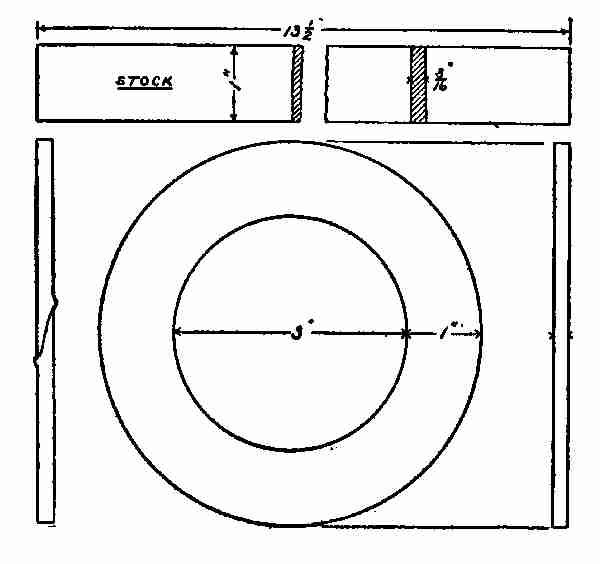
[249] The simplest problem for a first weld is a flat iron ring. This drawing shows a ring 3 ins. in diameter on the inside and 5 ins. on the outside.
Stock: Flat piece of iron 131⁄2 × 1 × 3⁄16 ins.
Directions: The making of this ring involves the processes of bending and welding. Before the bending is done the two ends are upset and made about 11⁄16 in. thicker than they were, for about 1 in. back from either end. To do the upsetting, place the hot end on the anvil vertically and strike on the cold end with the hammer until the required thickness is obtained. If the end which is being upset was not heated more than 11⁄2 in., it will probably upset without bending. If heated more than this the probabilities are that it will bend during the process. If it does so, it should be laid upon the anvil and the bend hammered out. When the desired thickness has been obtained scarf the ends as shown in the drawing, using the round end or peen of the hammer to do so. (See scarfing.)
Do the same to the other end, putting the scarf on the opposite side to the first one. Now heat the piece, about half its length, quite hot. Place it upon the thickest part of the horn of the anvil, strike upon the end that projects beyond the anvil, and bend it into a ring. The scarfs, being opposite,[250] will now fit and come together. (See drawing.) Bend over till the two edges lap. This gives plenty of material where the joint comes, to allow for the waste of the material from the high welding heat and also that needed for the hammering of the metal during the welding. The upsetting is done to allow for this waste, and to give opportunity to reduce the pieces to the required thickness. All welds should be a trifle large at the joint. The driving down edgewise on the horn of the anvil bends the material, but prevents one shaping it to its proper dimensions. That is why in flattening down the weld care must be taken not to widen the iron at that place so that it is too thin. A few trials will make this perfectly clear. A finish on the iron depends upon how skilfully one can use the hammer without unduly marking the metal.
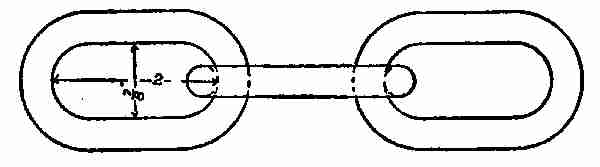
Most chains are made by hand, especially those used for the purpose of lifting heavy loads. Small[251] chains, where no special strain is called for, are welded by electricity. There are special factories for the making of chains. Most of these factories have rolling mills attached. The material is here rolled out to suit the different size chains that are made. Machinery forms the bars of iron into special shapes the size of the links. These in turn are cut by machinery. These links are all of the same size and are cut off on an angle, thus making the scarf. They are taken by the workmen, the ends lapped over slightly, then put into the fire and welded. Within the last few years the Navy Department has taken up the method of welding the large anchor chains by machinery.
Stock: 3⁄8 in. round, 6 ins. long.

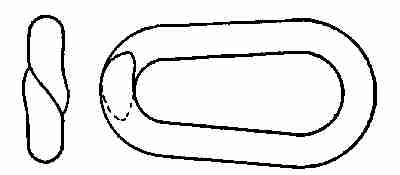
Directions: The drawing shows the size of each link in this chain. Heat the 6-in. piece in the middle. Place it on the horn of the anvil and bend it U-shaped, as you did the piece for the staple. (See articles in welding for chains.) The two ends are the same length. This is perhaps the only weld that is made without upsetting. When the scarfs are made like the drawing, bend the ends so that the[252] scarfs overlap. Now it is ready for welding. Place the link in the fire. Be careful to have the link well covered both above and below with hot coals. Let there be just enough blast to increase the heat of the fire. In a little while the sparks will flow up from the iron. At this time the link should be turned upside down in the fire without changing its position. The hottest part of the fire being underneath, the iron will heat there quickest. This turning it upside down finally brings all the parts to be welded in the hottest part of the fire. When these iron sparks begin to show, it is time to take the piece out. Place it on the anvil and[253] lightly tap upon the joint. The iron is very soft on account of the intense heat and if the blows are too heavy the iron will flatten out until it is too thin. In that case it would be impossible to finish the piece and make the weld the size it should be when done. If you examine the links of any chain you will have difficulty to find the welded end. The process of welding is not easy at first, but a few trials with the heating of the iron and handling the tools at the critical moment will prove encouraging. Chains are usually made by making first one link, then putting the stock for the next link into the first, before bending the second end.
All hooks, swivels, or shackles are put on the chain when made, in the same way that you add a link in order to lengthen the chain.
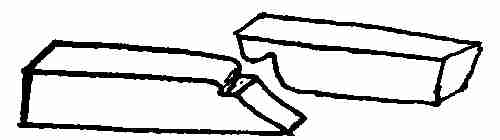
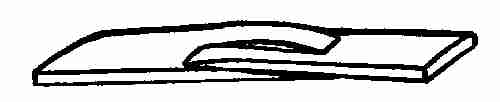
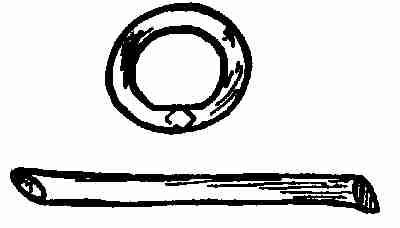
Welds are named according to the manner in which the pieces are put together. The principal welds are: (1) flat welds, (2) butt welds, (3) lap welds, (4) cleft welds, and (5) jump welds. The selection of the kind of weld to be used in any problem depends upon the form of the pieces of metal to be worked upon.
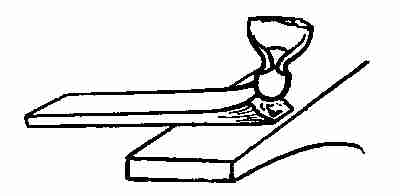
Flat welds: For flat welds the ends of the pieces of metal are first upset. Use the peen of the hammer and draw the metal out thin at the end, flatten it out and narrow it up edgewise at the extreme end. The metal is forced first forward and backward by the hammer strokes. Large scarfs are sometimes made by using a fuller.[255] This is a very much quicker way for large work than the one just explained, but one requires a helper to handle the sledge hammer in this case, to strike down on the fuller.

Most smiths use the edge of the anvil for making scarfs. Place the edge of the metal, after it has been upset, on the edge of the anvil and strike down on the top with a hammer or sledge. This moves the metal with each blow and the end of the bar is increased, making, as it were, a series of steps. It is a process[256] much the same as fullering except in place of the fuller you use the edge of the anvil. This is the quickest way to make a scarf, and the weld depends wholly upon how the scarfs are made in any one of the operations spoken of here.
If the scarf is well made it will be a little higher in the middle than at the sides, so that when the pieces are placed together the slag that forms will squeeze out. The welding is done as follows: Place the scarfs of both pieces separately in the fire, the scarfs downward. (When we speak of scarfs we refer to the bevelled edge of the roughest part of the scarf.) This prevents any impurities melting on the scarf surface. When the scarf begins to get hot enough to weld, iron sparks will blow out with the blaze. This is the sign to get things in readiness. One cannot linger for a moment when the iron is hot enough to weld. See that the anvil is clean. Have the hammer ready in hand. If one has a helper he will handle one piece while the smith handles the hammer and the other piece.
If there is no helper a hammer is placed conveniently near the anvil. The two pieces of iron are grasped by the smith, one in either hand, drawn out of the fire and given a sharp rap on the edge of the anvil or forge to remove any dirt or pieces of coal[257] clinging to the scarfs. One piece is placed on the anvil and the other piece is put on top of this. The weight of the second piece holds the first piece in place until such time as the smith can get his hammer ready to strike. As soon as the pieces stick together the ends of the scarfs are welded first. They are the thinnest and will cool the quickest. The body of the piece welds while you are welding the scarfs. Both sides are worked upon, first on one and then on the other, till the piece is hammered down to the required size. In trial work it is best for one to use pieces of iron long enough to avoid the use of tongs.
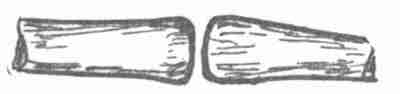
Butt welds: If the butt weld is carefully made it is perhaps the safest weld of all. This method is used mostly in welding round iron bars, 11⁄2 ins. in diameter up to 21⁄2 ins. They are made as follows: the ends of two bars are heated to a welding heat. Then they are brought out of the fire, put in a swage, end to end, and struck on the ends with a sledge hammer. While driving upon the ends the iron upsets when the contact takes place and at[258] the same time the smith is driving the weld down. Two processes are acting here, one lengthwise and one downward. This makes the best weld, from the fact that the two ends that come together have a welding heat on the whole surface of each, a condition hard to get in any other kind of weld.

Lap weld: Two flat pieces are laid face to face, as shown in picture, and are welded. One must be careful that the two pieces have the same temperature, otherwise the colder piece would cut into the hotter and make a defect.

Cleft weld: If the weld is required to stand much strain, such as in parts of a locomotive frame,[259] pieces are generally joined by the cleft weld. One piece is upset and split with a chisel. The two sides are spread apart. The other piece is scarfed on both edges to fit into this opening. If the pieces are very large much of the welding can be done while in the fire. The two pieces are placed together, in the proper position, in the fire. When the heat is hot enough to weld they are driven endwise. This drives the point of the one piece into the crotch of the other. Take them out of the fire and place upon an anvil or under a hammer. Small pieces are welded in the same way, except they may be driven with a hand hammer on the end just before driving upon the surface. The piece is reduced to the proper size and finished.
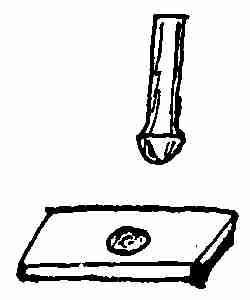
Jump weld: When one piece of metal is to be welded at right angles to another piece, a jump weld is made. Many are made by using a bob punch, making a hollow depression in a flat piece, and a rounded or button head shape on the end of the upright. Heat the end of the upright and also the flat piece[260] around the bob punch hole to a welding heat. Take them out of the fire and drive the button head down into the hole made by the bob punch.
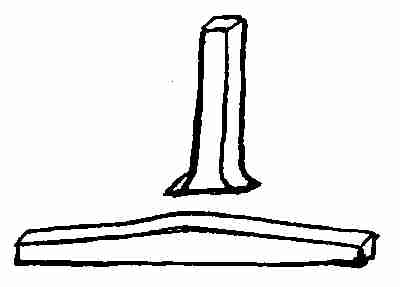

Another jump weld can be made in the following way: when square iron is to be welded to square iron, one end is upset and flattened. The other end is simply upset a little when the upright is to be welded to it. These ends are brought to a welding heat, and the work is finished as in the first jump weld. The hammer plays an important part in these[261] jump welds, for the scarf projecting at the base must be welded by the hand hammer.
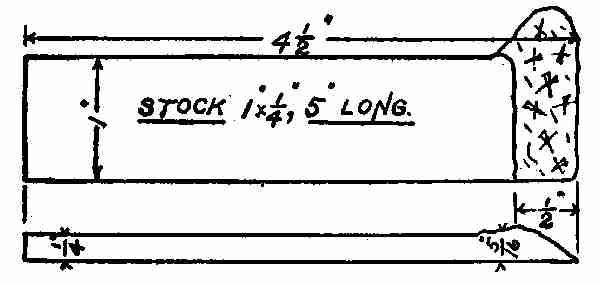
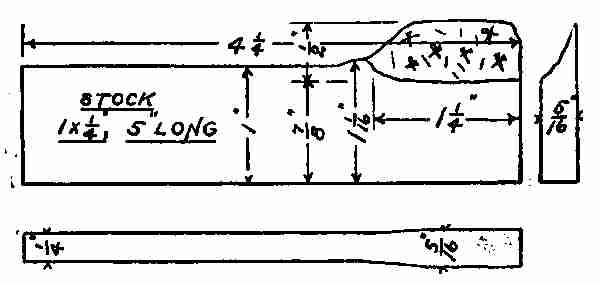
Making a corner plate: This corner plate shows two pieces of metal, 1⁄4 × 1 × 6 ins. welded in the corners, upset. The ends of the pieces to be joined are scarfed as explained in the flat weld. Both[262] pieces are heated, then one placed on the other, driven down, and welded. They are shaped upon the edge of the anvil, and the ends are cut off to the length shown by the drawing.

T weld: This is used in making a T plate. The cross piece is upset in the middle and scarfed by using the peen of the hammer as shown.
The upright piece is upset on the end and scarfed,[263] same as was done on the corner weld. Both pieces prepared are then heated and welded as described in the making of the corner plate. The sketch given here shows fairly well the different steps.
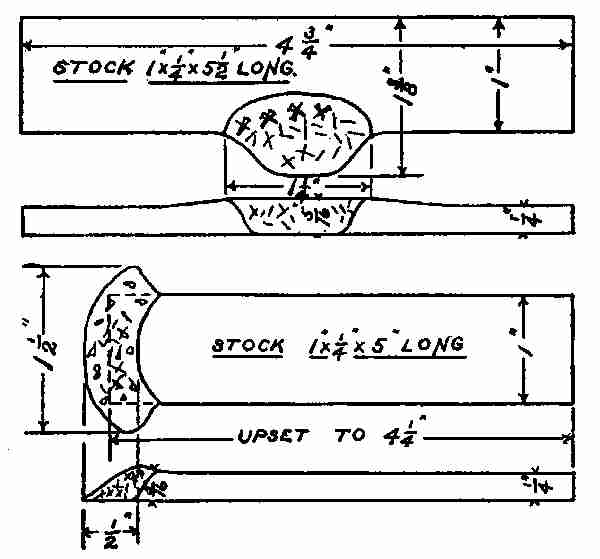
Mild steel, or soft steel, is supplanting wrought iron in many shops. Any smith who has worked with this metal will always prefer it to wrought iron. It is much stronger and can be bent, forged, and twisted in all manner of shapes, without cracking or splitting. This cannot be said of wrought iron. Therefore, when mild steel is used one is sure of finishing his problem, provided he understands the process of heating it. The matter of heating mild steel is the vital thing. It should never be worked at a welding heat or below a red heat. If worked either above or below this point it will show it by splitting or cracking before the problem is finished. Large crystals formed by working at or above the welding heat will cause the breaks, and internal fractures when working at the low heat will cause the cracks. However, this can be worked at a black red heat if the blows delivered affect only the surface and do not penetrate[265] to the centre. This metal lends itself to forging better than wrought iron does. It is very good for most kinds of forging and particularly good for making weldless rings. One of the best problems to illustrate one of the many uses to which soft steel may be put is the making of a weldless ring.
A piece of soft steel 1 in. wide, 1⁄4 in. thick, 4 ins. long, is the stock used for this ring. With a centre-punch mark off 3⁄4 in. from each end. (See sketch.) In each centre-punch mark punch a 1⁄4-in. hole through the piece. With a hot chisel cut between these holes half way through on one side. Turn it upside down and finish cutting through from the other side. Now drive the chisel through, widening the slot out. Trim up the inside of the slot. Cut away all rough edges. Upset the piece on the anvil after heating and drive down on the ends. This will increase the size of the hole by shortening the length and bulging the sides out. The piece is now put on the horn of the anvil and rounded into[266] a ring. The ends are now trimmed off or driven down into the thickness, as shown in the drawing. This is the method of making a weldless ring. It is easily made out of soft steel. It would require a very fine grade of wrought iron to do a piece of work of this kind, for wrought iron is fibrous and unless great care is exercised in forging it will split at the ends along the grain when opening it after the slot is cut in.
Steel is much cheaper than wrought iron, another good reason for its use. For the making of nuts, too, it is better than wrought iron. All one needs to do is to cut a piece off the end of a square bar, the proper thickness, punch a hole in it, and square it up. If wrought iron were used, to get the same strength one would need to bend the iron around a mandrel in the shape of a ring so that the grain of the iron would run around the hole of the nut. Then it should be welded and shaped into a square nut.
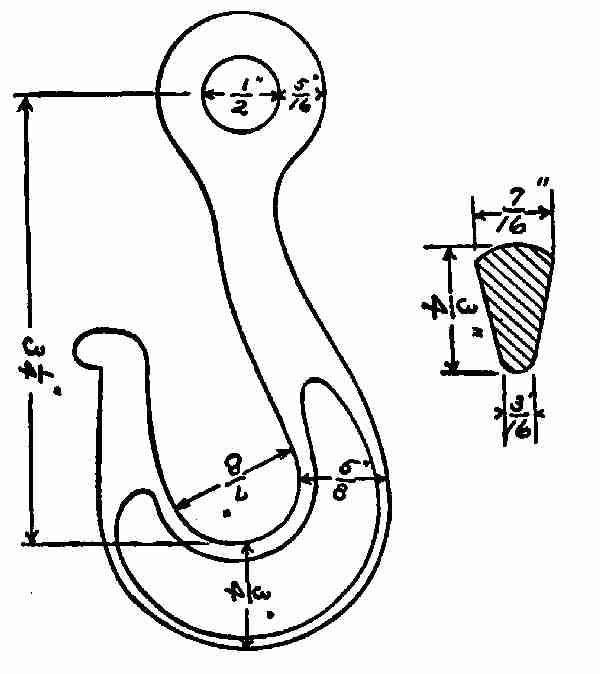
Up to the present time our work has been with wrought iron entirely. This hook is to be made out of soft Bessemer steel, which of course is very different from high carbon steel. It is the cheapest[267] of the steels. All building material, railroad rails, boiler plates, steel cars, etc., are made of this cheap soft metal. The process of manufacture is quite simple. Molten cast iron, taken from the cupola, or blast furnace, is poured directly into a so-called Bessemer converter—a pear shaped vessel. Air is blown through the mass of molten metal. The air adds oxygen to the bath, and increases the heat to a temperature high enough to burn out all the impurities from the cast iron. This converts it into steel. It requires no more than nine or ten[268] minutes to convert fifteen tons of cast iron into soft steel. The air is shut off and a sufficient amount of ferro-manganese is added so as to give the proper amount of carbon. The liquid steel is poured into ingots and these ingots while still hot are rolled into the shape used for the market. A piece of this kind of steel you are going to use to make a hook. Soft steel can be worked in the same way as you work wrought iron. It is not fibrous like wrought iron and is not apt to split unless worked at a low temperature.
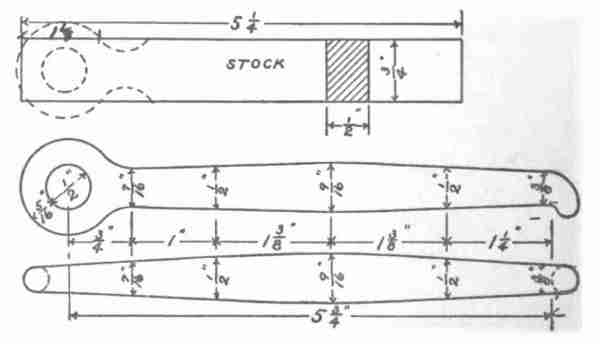
Stock: Soft steel, 51⁄4 ins. long, 3⁄4 × 1⁄2 in.
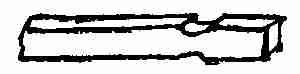
Directions: The drawing gives all the steps necessary for the making of this hook. Notice in the drawing when the stock is given it is fullered down[269] 11⁄8 ins. from one end. This is the amount needed to make the eye. After fullering the stock it is placed on the anvil and squared up.
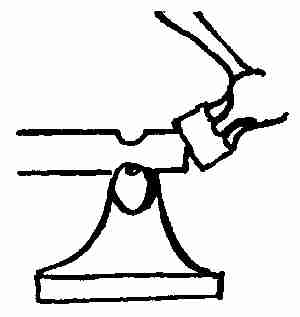
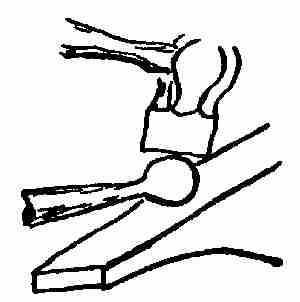
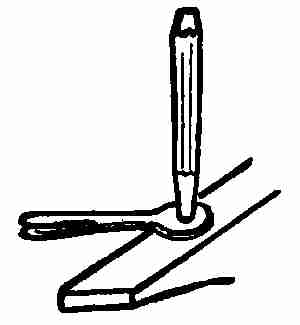
These square corners are knocked down, making it round. When the body of the hook itself is drawn out, like the drawing, a hole is punched through the eye, using the same kind of punch as you did to make the nut. While using the punch keep cooling it off in cold water to prevent its getting hot; if you do not, the end is apt to burr and rivet itself into the iron. It also prevents its sticking[270] into the hole. Place the ring of the eye on the point of the anvil and round up carefully with light blows from the hammer.

When rounded up drive the punch in again to the required size. This finishes the eye. The body of the piece is now gone over carefully with calipers and square to get the diameters and length. Bend the small point at right angles to the axis of the hook, like the drawing. Now it is ready for bending in the middle. Heat the middle very hot. Cool off the point about 1⁄2 in. Place the middle on the horn of the anvil and strike upon the small turned up cold nib to bend the hook from this point. By striking upon the cold end to bend it one can do so without destroying the shape. It will stand a lot of work upon it when cold.
When the hook is bent around as nearly like the drawing as you can, flatten it out at its widest part[271] by laying it upon the anvil and striking with the hammer. The cross section of the drawing shows the shape that this flattened part should be.
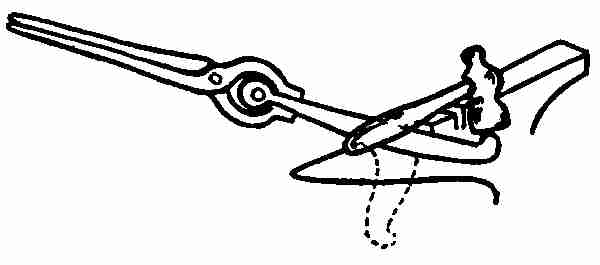
This is what we call a solid eye hook. Another way of making an eye is to take round material of sufficient length to bend an eye on the end by placing the piece over the horn of the anvil. The body of the second hook can be made out of round iron, pointed down at the end and finished up the same as the first.
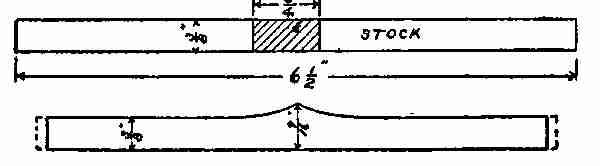
Bending a corner in iron and upsetting while bending: In this problem we bring in the making[272] and bending of iron, so that the thickness at the corner must be sharp on the top side and rounding on the inside—without flaws or cold-shut. This bending method applies to all metals, whether of square iron or wide flat iron.

Stock: Piece 61⁄2 × 3⁄8 in. square.
Directions: Heat the metal in the middle and bend it over the rounding edge of the anvil.
When the piece is bent we still have to make it square on the outside and rounding on the inside. The bend just made should be placed in the fire and re-heated. Cool the stems off in the water to within[273] one inch of the bend. Place the point of the cold stem on the anvil and strike on the hot corner. This is repeated on both outside corners until the piece assumes the shape of the drawing. This same result can be obtained by upsetting the metal in the centre before bending, as shown in the drawing.
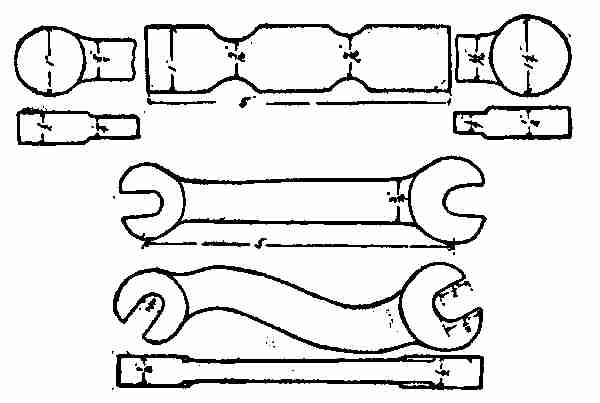
Wrenches are used for screwing nuts on bolts. They can be made in two ways: (1) One known as the solid wrench is made without welding, (2) the other, is made of wrought iron and is welded.
S wrench of soft steel: The sketch here is of a[274] wrench made from soft steel 1⁄2 × 1 × 5 ins. Fuller down the stock edgewise as shown. Draw out the centre 1⁄4 in. thick and taper it from 3⁄4 to 5⁄8 × 5 ins. long. Cut the corner off, as shown by the dotted lines, and round the two ends up to the size given. Punch a 1⁄2-in. hole in the large end and a 3⁄8-in. hole in the small end of the bar. With a sharp chisel cut a V-shaped plug out of each end, tangent to the circles.

Jaws: The jaws of the wrench are finished with a tool called a wrench hardie, placed usually on the anvil for the purpose of finishing up work of this kind. Finish up both ends in the same way. Heat the wrench at the nick and cool the jaws off in water. Place the nick on the horn of the anvil and bend it as shown. Repeat on the other end. If the wrench is carefully made it will require no filing to fit the nut. These wrenches are sometimes polished and case hardened to prevent the jaws from wearing while in use.
Large flat wrench: A quick way to make a large wrench is to make it of wrought iron. A piece of iron 1 × 1⁄2 × 4 ins. is bent at almost a right angle. The inside corner is the corner made by the natural bend the metal takes when shaping it.[275]
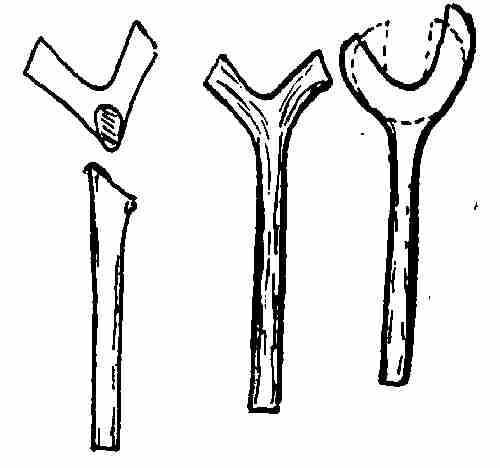
Scarf this corner by placing the peen of the hammer on the corner and striking the face of the hammer with the sledge or by using a bob punch if one is available, or it may be made by using the peen of the hammer without the use of a helper. Select a piece of round iron 7⁄8 in. in diameter. Upset the end of this and scarf it to fit the scarf made in the angle piece. Heat both pieces to a welding heat. Place them on the anvil and weld the handles to the jaws. The inside is rounded up at the same time the scarfs are being welded into place. Draw the points out to a short taper and bend them up in[276] the shape of a wrench on the heel of the anvil. This is a simple way of making a large wrench that can be used for all kinds of work.

Alligator wrench: Stock 1 × 1⁄2 × 5 ins. steel. The alligator wrench is one of the handiest tools to have in a home or shop. For general repair work it is indispensable and is easily made. Mark off 11⁄2 ins. from the end of the stock. This is the jaw part. Place the other end of the stock in the fire. Take it out and from the centre-punch mark draw the handle out 3⁄4 in. wide, 3⁄8 × 8 ins. long, and tapering to 3⁄8 × 1⁄4 in. at the extreme end. The edges of the handle should be rounding. Place the jaw ends in the fire and heat red hot. Punch 1⁄4 in. hole back 11⁄2 in. from the end. Draw out the end and shape as shown in the drawing. With a three-cornered file, file the teeth on a slant and close together. This slanting will allow the wrench to let go of the work better than those filed at right angles to the axis of the piece. The teeth should slant backward and should be put only on one side of the jaw. Both jaws should be hardened and tempered a blue colour. To do this, heat the body[277] of the steel back of the jaw to a red heat and plunge the whole into water one inch beyond the depth of the jaw. When cold take it out and polish. Draw the temper in the same way as you would for a knife blade. (See article on tempering and hardening.)
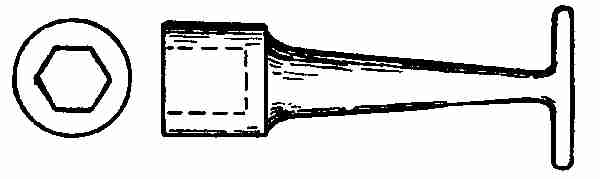
Socket wrenches are useful for tightening nuts in places that are difficult to reach. It is most convenient when many nuts of the same size are used, as bolting shaft irons for vehicles, etc. Some are made to fit an auger brace; some have solid handles with a cross bar, and some have holes punched in the shanks to place the iron bars in while twisting the nut on the bolt. This drawing shows a style of wrench in general use. It can be made in two different ways. One is called the welding method, the other is the solid method.
Welding method: Cut a piece of metal 1⁄4 × 1 in.[278] of Norway iron. The length of this bar must be determined by the size of the nut it is to be used for. Heat one end of the piece of iron and scarf it. Repeat on the other end. Bend the piece into a collar or ring, weld the two ends together, forming a cylinder about 1 in. deep—any diameter. Select a piece of round iron for the shank, the size depending upon the size of the socket. Upset one end of the round iron to fit the collar made.
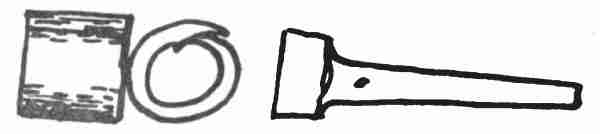
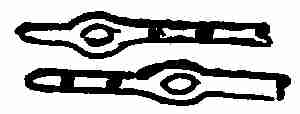
Drive the shank into the collar about one half the depth of the collar, place it in the fire, and at a welding heat weld the collar to the shank. If the wrench is to be for a hexagonal nut, make a hexagonal drift pin (a square one for a square nut), and drive the pin into the collar. Place it all on a swage and round up with a top swage. Drive the collar down until it takes the shape of the drift pin. To do this successfully requires many heatings, and it can be done only while the metal is hot enough to[279] yield always under the hammer blows. Should the drift pin stick after the collar is driven into it, place the pin on the anvil, giving it a slanting blow. This will loosen the pin and it will come out easily.
The shank should now be driven down as shown in the sketch, and two holes punched in at right angles to each other. These are holes to place iron bars for turning the wrench. These holes can be made in two ways: one, by forming lugs or bosses on the shank and punching holes in each one, or, a sharp tapered round punch, flat and sharp on the end, can be used to split the metal and force the sides out as the punch is driven in.
If the cross bar is to be used in place of the holes, a cleft scarf made in one end of the shank and a 3⁄8-in. bar of iron welded to this about 4 or 6 inches long on either side of the shank will act as a handle.
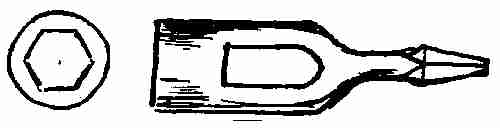
Open-sleeve or socket wrench: The wrench given here is for practically the same use as the one just described. It is lighter than the other. The opening is longer and allows the bolt to protrude through the nut without forcing the wrench off. This[280] wrench is made of machine steel, and the size must be determined by the size of the nut.
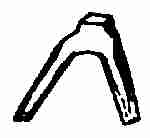
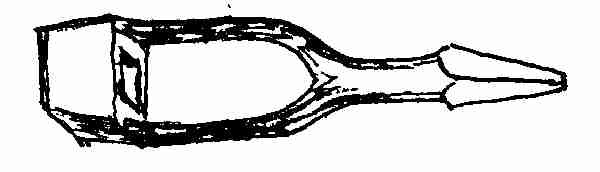
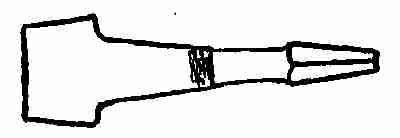
For a small wrench take a bar of 3⁄8 × 11⁄4 × 6 in. soft steel. Mark off on the bar 2 ins. from each end and on these centre-punch marks fuller down on the top and the two sides so that the bottom of the fuller will measure 1⁄2 × 1⁄4 in. Draw these ends out to 1⁄2 × 1⁄4 in. any length. Cut the four corners off and make the centre round. Bend the two arms as shown and punch 1⁄2 in. hole through the boss. Be careful to prevent cold-shuts while doing this. Drive a drift pin into the hole and forge the shape as shown. Bend the two arms as shown and weld together. These should be worked down to a 1⁄2-in. round. The ends can be made into a brace shank by squaring the end and tapering it to fit the jaws of the brace. Or weld[281] a piece of 1⁄2-in. round iron long enough to bend it into the shape of a brace, putting a round knob on the end for a hand hold. This makes a simple wrench and one that can be used in many places where flat wrenches are not convenient.
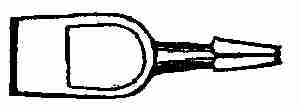
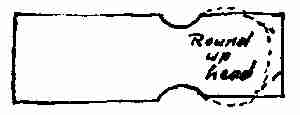
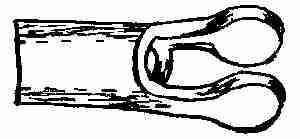
These sockets are made for wire cables, ropes, etc., and are best made of mild steel. Place the end of a 11⁄2-in. square bar in the fire and reduce it as shown in the sketch. Cut two outside corners off, as shown by the dotted lines. Round the ends up. Punch a 1⁄2-in. hole 2 ins. from the rounded end in the centre of the piece. Then cut a piece out with a sharp chisel, equal to the width of the hole. With the fuller, open the jaws out. Now cut the socket off 4 ins. from the rounded end and drill a[282] 1⁄2-in. hole through this end of the socket. A drift pin 3⁄4 in. on one end and tapered to 3⁄8 in. on the other is now driven into the 1⁄2-in. hole at the jaw side.

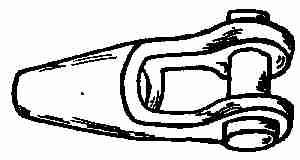
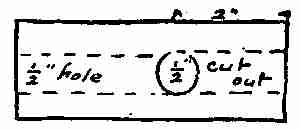
Forge the shank as shown in the drawing while the drift pin is in. While forging keep driving the drift pin into the hole. When finished the hole should measure 3⁄4 in. at the large end and 1⁄2 in. at the small end. When the socket is finished cut the ends square and smooth up. During all the time the steel should never be worked below a red heat and most of the time at a high heat, below welding heat, until it is ready for finishing. Now the jaws are ready to be closed. This is done by placing a piece of flat iron, 3⁄4 in. thick and the width of the jaw, in between the opening, and close the jaws on this either with the hand hammer or a flatter. Drill a 1⁄2-in. hole in the middle of the end. This is made[283] for the pin. Make a pin to fit this hole out of 1⁄2-in. round stock. Upset the end of the bar a little and place it in a heading tool, driving down and forming a head 1⁄8 in. thick and 3⁄4 in. in diameter. Take it out of the heading tool, cut the bolt off 1⁄2 in. longer than the width of the jaws. This allows for a 3⁄16-in. hole and pin. A small 3⁄16-in. hole is now drilled in the shank of the bolt and a split pin is put into the hole to prevent its falling out. The split pin is made by flattening down a piece of 1⁄8-in. wire in a small swage to a half round. Now double over to form an eye on one end of the two flat planes coming together. When this is put in through the hole, a chisel put in the opening will widen out the ends, thus preventing them from falling out.
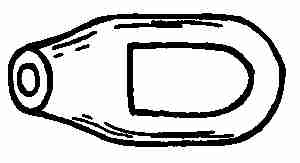
The hinge and butt are used on doors and gates. This fastening is made similar to the other hinges, except the eye is welded, instead of being a solid eye.
Stock: 1⁄4 × 1 × 71⁄2 ins. wrought iron.
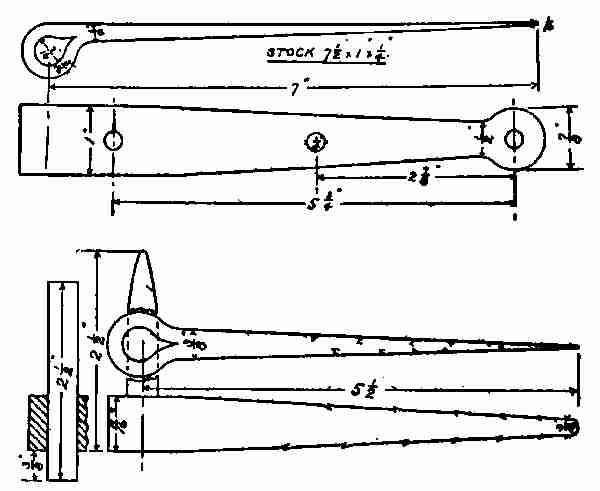
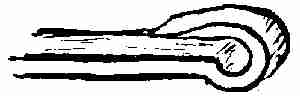
Directions: The end of this piece of stock is bent[284] around a drift pin as shown in the drawing and welded along the dotted lines. This is done by scarfing the end of the bar into a short tapered point. Bend it down at right angles about 3 in. from the end. Bend it in the opposite direction about 2⁄3 of the way around. Put in the drift pin. This now forms a hook shape. Continue the driving over until the scarf lies flat on the straight side. Take out the drift pin and weld the scarf to the body of the hinge. Drive the drift pin into the hole, shaping[285] it up. The back of the hinge is perfectly straight so that it will lie flat upon the wooden door. The other end is drawn out, tapered and the end rounded up, and 1⁄4 in. holes punched in as shown.
The butt is made in the same way as you made the ornamental butt and hinge.
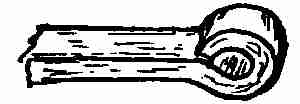
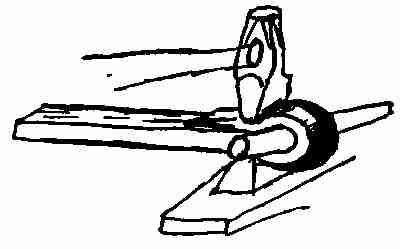
Bent hinges, such as are used on tail boards for wagons, railroad cars, etc., are simply ends of the iron piece bent around at a given diameter, with the under side flat, and the stock rolled up on one side. These hinges may be used in pairs. In that case a long rod is pushed through, connecting the two hinges.
Tongs are used by blacksmiths to hold pieces of hot metal while working upon them.[286]
Stock: Two pieces iron, 7⁄8 × 7⁄8 × 18 ins. Two pieces iron, 3⁄8 × 3⁄8 × 12 ins.
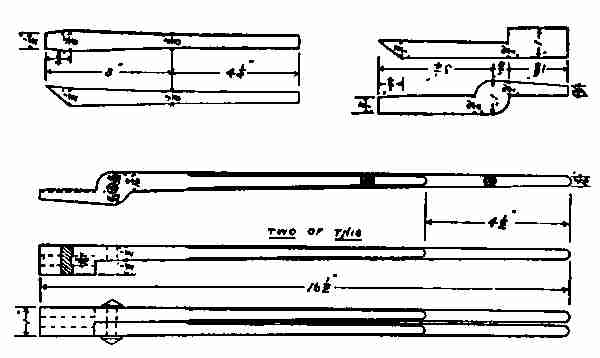
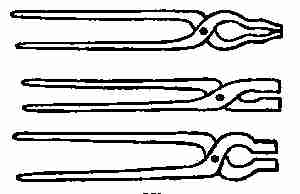
Directions: Mark off 2 ins. from one end of the 7⁄8 × 7⁄8 × 18 in. piece and heat it quite hot. This marked end is now placed on an anvil and flattened down to 1 × 2 × 7⁄16 in., leaving the shoulder as shown. (1) Heat the piece again. Place it upon the anvil, with the flattened piece extending beyond the anvil, and, with the shoulder on the outer edge of the anvil, flatten this down 1 in. wide, and 7⁄8 in. thick. (2) Then[287] the shoulders should be at right angles to each other, as shown in the sketch. Re-heat the piece 1 in. from the last shoulder made. Reduce the shoulder (2), the iron to 9⁄16 × 7⁄16 in. (3) Notice that this shoulder is directly opposite the other. This completes the jaw of the tong. Draw out the end to about 3 ins. in length. It is now cut off the bar and another piece made just like it for the pair.
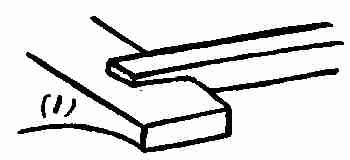
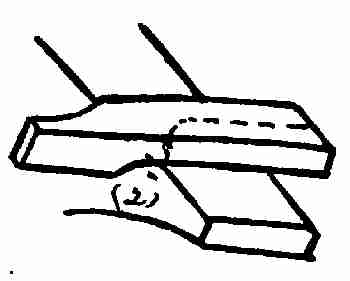
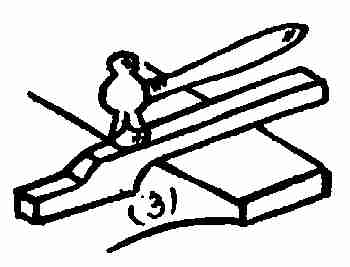
The reins or handles are welded to the small ends and tapered down as shown in the drawing, then rounded 41⁄2 ins. on the ends to 3⁄8 ins. in diameter. A hole is now punched through the eye of the jaw and a 3⁄8-in. rivet inserted. The little groove which you see in the jaw is put there with a fuller. This is done so that you can use it to hold small round iron as well as flat iron. The two parts are[288] now riveted together. This is done either by making a head on a rivet and cutting it off, allowing about 3⁄8 in. for a head on the end that goes through the tongs, then heating the tongs and completing the riveting, or, as many smiths do, by putting a piece of straight 3⁄4-in. iron in, allowing 1⁄2 in. on each end plus the thickness of the parts of the tongs for riveting. This piece of iron is made very hot, put into the hole, and both heads are riveted on at the same time. It frequently happens that the rivet bends in the holes while hammering on the ends. This prevents the tongs from opening easily. If such is the case, put the rivet and jaws into the fire and heat red hot. Hold the handle, open and close the jaws while cooling. This not only centres the rivet but prevents sticking. The tongs should work smooth and free when cooled off in water.
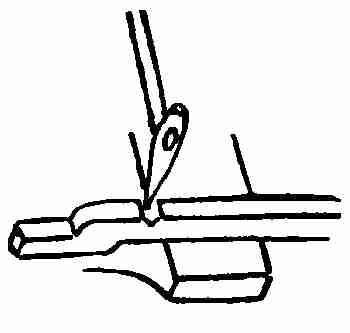
What is commonly known as carbon steel is a metal composed of iron containing varying amounts of carbon. Steels containing much carbon are called tool steels to distinguish them from the low carbon steels. Tool steel, when heated red hot and plunged into cold water, will harden, while low carbon steel treated in the same way will not do so. This is an excellent way of testing two bars of steel for carbon when one is not able to distinguish grades of steel accurately. It is carbon that gives the hardening quality. When steel is heated it becomes red at 1000° F. At 1300° F. it passes a point at which it absorbs considerable heat without any increase in the temperature, showing that some change in the structure of the metal must be taking place. If the steel is heated above this point and allowed to cool slowly, a brightening of the colour may be noticed as it passes this point, known[290] as the point of recalescence. The brightening is due to a liberation of the heat previously absorbed.
Method of heating steel in forge fires: All steel work, including tool dressing, hardening, and tempering, was formerly done in an ordinary forge fire. Now we have special furnaces for that purpose. However, in using a forge fire, care must be taken to insure good work. The fire must be very deep—that is, a large body of coke must be put between the tuyere, and the tool, so as to prevent the blast reducing the carbon on the surface of the steel. Sulphur will injure the quality of any steel tool. Hence, a fuel low in sulphur should be used. Charcoal is the best for this purpose, but the cost and the difficulty in maintaining the heat prevent its general use in blacksmith shops. If the coal does contain sulphur a great deal of it can be extracted or reduced by one making his own coke. This is done by burning the green coal to a coke and in this way driving off much of the sulphur. Gas furnaces or oil furnaces are used. This is much better than coal, for a uniform heat can be kept and an oxidation of the steel prevented. Whether natural or artificial gas is used, all that is necessary is to adjust the supply of gas in such a way that there will be a very slight excess of gas present beyond the proper[291] amount for combustion. The presence of this gas excludes all air from the steel and therefore prevents its oxidizing the surface of the metal.
Heating in lead: In order to prevent oxidation molten lead makes a most satisfactory bath. The lead is melted in a cast-iron pot and heated in the forge. The steel must be left in the bath until it has all been heated to the required temperature. As the steel will float in the molten lead it must be weighted down to keep it submerged.
Hardening solutions: In many cases clear cold water is used in hardening steel. Some use soft or rain water. The temperature of the water for general work should not fall below the temperature of the shop; otherwise it would extract the heat too quickly from the steel and cause cracks or breaks in the work.
Salt solution: Salt is often added to water which is to be used as a hardening solution. (1) It increases the rate at which the bath will extract the heat from the steel; (2) it prevents the formation of steam on the surface of the water. Put as much salt in rain water as it will dissolve. This is considered one of the best and easiest made solutions for hardening steel.
Oil solution: Linseed oil, lard, cotton seed oil,[292] whale oil, and melted tallow make good hardening solutions. They are used mostly for fine work. The oil prevents the sudden chilling of the steel and lessens the chances of cracking and breaking. Springs are mostly tempered in oil.
Metallic hardening baths: For very delicate tools mercury is sometimes used. It has a greater heat conductivity than any solution mentioned. However, the fumes given off are poisonous and for this reason it is not extensively used.
When you buy steel for tools from a merchant he will assure you that the steel he sells you will harden at a cherry-red heat. This is true provided the metal has not been spoiled either by overheating it or working it at too low a heat during the making. This causes cracks or internal fractures.
If these directions for working steel are followed out a tool should harden at a cherry-red heat when plunged into water. When the steel is heated to the proper temperature, usually a cherry red, and plunged into a hardening solution, it will be very brittle, so that a file will not cut it. One test often used is to take a fine mill cut file and try to cut the hardened part of the tool. If it slips over the surface[293] without cutting, the steel is considered hard; if the file cuts, the steel is not hard enough. Re-heat the steel hotter than before, cool it off in water, and test again. All cutting tools should possess a certain amount of hardness or toughness. When the steel has been plunged into cold water it is too hard for use. It is necessary to then reduce this hardness so that one can use the tool for the particular kind of work it is made to do. This process of reducing the hardness is commonly called drawing the temper, and the colour scheme plays a very important part in this operation. Perhaps the steps will be clearer if the process of drawing the temper on a cold chisel is explained: After the chisel is forged the proper shape, place the body of the tool in the fire, heat it red hot back of the point. Now heat the point to a uniform cherry-red heat, plunge 11⁄2 in. of this hot point into the water and hold it there until it is quite cold. This is determined by water clinging to the point when the chisel is taken out. Polish the part cooled off with a piece of emery stone, an old brickbat, or any rough polishing material. You will notice a group of temper colours starting from the point where the tool came into contact with the water. The heat in the body of the tool gives rise to these colours as it is conducted[294] through the cold point of the steel. In this group of colours the first will be (1) pale yellow, (2) a full straw colour, (3) brown, (4) purple, (5) dark blue, (6) full blue, (7) light blue, (8) gray. This colour scheme corresponds to varying temperatures in the metal. The first colour (pale yellow) accompanies a temperature of 430°, while the last colour, gray, means a temperature of 700°. The colours show, too, a varying in the hardness or toughness of the steel. A cold chisel should be tempered a blue; so when the blue reaches the cutting end of the tool the end should be plunged immediately into water and cooled off. This is the principle of hardening and tempering all common tools.
However, these colours mean nothing so far as tempering is concerned unless the cutting edge of[295] the steel has been thoroughly hardened. Then the colours have a real value. To prove that these colours are no test unless hardening precedes, take a piece of brass, or copper, or soft iron. Polish, then heat the piece in the fire to the temperature given here. You find the same set of colours, but you cannot use any of these metals for cutting tools.
The table of temper colours given in this book shows the colour required for tempering tools most commonly used.
Tempering of springs: Under the head of springs we may include every variety, from the small spring used in locks and fire-arms to the largest springs in use. They are made of spring steel of the required thickness, forged into shape, then hardened and tempered.
This hardening and tempering of springs is done in some cases by polishing and heating over a fire and drawing them to a blue colour. Then they are plunged into oil to fix the temper. Sometimes springs are heated red hot and cooled in oil, then held over the fire until the oil burns with a bright flame on the spring. It is then allowed to cool in the air. If the spring is found too hard, more oil is put on it and the operation is[296] repeated until the desired spring movement is obtained.
It is possible for you to learn to make all of the tools you may need to use, including hammers. And not only will you be able to make blacksmiths' tools, but such as are used by carpenters, bricklayers, stone-masons, machinists, etc. You must not expect to be able to do this work at first, but in a little while you will be able to replace your first working tools with those of your own make. From time to time, as the tools break or wear out, you can repair them or replace them with new ones. This gives excellent practice in forging and handling steel, and prepares you for more and more advanced work, an experience necessary for doing any work well.
Steel: There are many different grades of steel, depending upon the percentage of carbon contained in each. Steel low in carbon can be easily welded but cannot be tempered. Carbon steel is very difficult to weld and it can be done only by the use of borax or some other flux. High carbon steel or so-called tool steel, can be tempered. It is used for making cold chisels, files, drills, cutting tools, etc.[297] Crucible steel: All tools are made from crucible cast steel. The cast steel is made by placing in a graphite crucible a certain amount of wrought iron and soft steel, and carbon is added in the form of manganese. These are all melted in furnaces. When melted they are poured into ingots and drawn or shaped to sizes for the market under different kinds of power hammers. These various size bars are used for the making of all kinds of tools. The tools we are going to make are (1) centre-punch, (2) cold chisel, (3) cape chisel, and (4) lathe tools. There are five lathe tools; (1) round nose, (2) diamond point, (3) side tool, (4) cutting off or parting tool, (5) inside or boring tool.
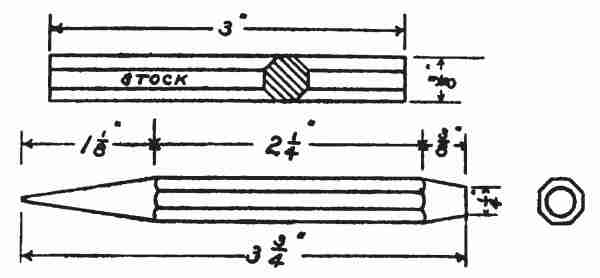
Centre-punch: You will find the centre-punch a most useful tool to have on hand. It is used[298] for marking centres before drilling holes, starting points in work, etc. A small one is made out of a piece of 3⁄8-in. hexagonal tool steel, 3 ins. long. Put one end into the fire and taper it 3⁄8 in. long to 1⁄4 in. in diameter, as shown in the sketch. Make this end flat. Put the other end into the fire and draw it into a sharp tapered round point to about 1⁄16 in. on the end. This extreme point is ground to a very sharp point. The angles of the extreme should be about 45°. This is hardened and tempered a blue colour. Then it is ready for use.

Cold chisel: Cold chisels are usually made out of 5⁄8-in. hexagonal tool steel, 6 in. long. The form and dimensions are given here.
Heat one end of the bar and place it upon the anvil. Draw it out for the short end. This is the part upon which the hammering is done when the tool is finished. The surplus stock is cut off with a hot chisel and the short end is flattened.[299] When cutting tool steel of any kind the chisel should be very sharp and the steel red hot. Put the other end of the bar into the fire, beginning back about 21⁄2 ins. from the end. Flatten it down to a chisel shape, as shown in the drawing. Cut the surplus stock off, harden and temper as explained before for the cold chisel.
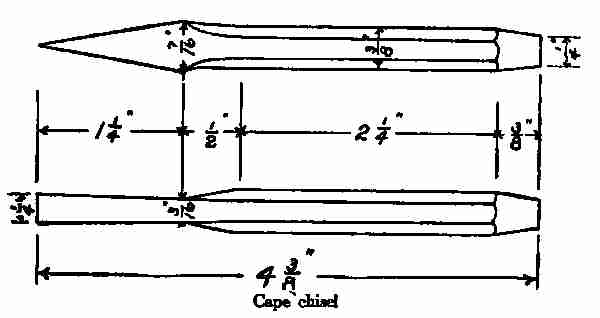
Cape chisel: The drawing gives the form and the dimensions. The small end of this tool is forged out in the same way as you forged the small end of the cold chisel. Reverse the bar and heat the other end. Two inches back from the end fuller the metal down as shown in the drawing. Draw it out tapering. This end, too, is cut off, hardened and tempered as you did the cold chisel. Cape chisels are used mostly for cutting key ways in shafting.[300] The point being wider than the rest of the blade gives clearance while cutting.
Round nose: The drawing gives the form and the dimensions.
Stock: A piece of 7⁄16 × 7⁄8 × 7 in. tool steel.
This size best fits the tool post of the lathe. You see by the sketch that one end is bevelled. This end is always made first. It is done by heating and chamfering the edges down with a hand hammer. Place the other end in the fire and draw it out to a sharp point in both directions. Throw the bevel on one side by placing the tool on the anvil and driving one side of the metal down to the other side. The point is now cut off on a bevel for clearance.
The drawing shows a cross section view of the[301] tool. Notice that it is smaller on the bottom than on the cutting edge. This is done by reducing one side more than the other. The cutting edge of the tool should extend about 1⁄32 in. above the common level.
Hardening and tempering: All lathe tools of this type are hardened and tempered in the same way as you did the cold chisel. The temper colour of this tool is a very light straw. When this colour reaches the extreme point plunge the tool into water. The slight change of temperature does not materially lessen the degree of hardness, but it does toughen the tool so that it will do more work.
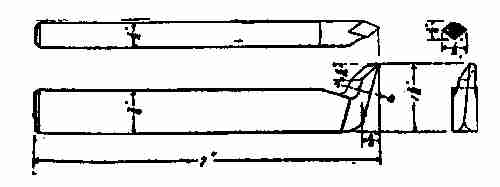
Diamond point: The form and dimensions are given.
Stock: 7 × 7⁄16 × 7⁄8 ins.
Heat one end and bevel it off as you did when making the round nose tool. Place the other end in the fire, 5⁄8 in. from the end, and fuller down to one[302] half the thickness of the bar. This fullering is done on the bottom fuller, which is placed on the anvil. Re-heat this end, place it again on the fuller in the depression made, and with the hand hammer draw this end out and at the same time square it up into a diamond point by turning the tool at an angle of 45° with the anvil. Turn again, in exactly the opposite direction. Repeat this until the point of the tool is drawn out as shown by the sketch. The clearance should not be more than that shown. It is now cut off by placing the face of the diamond on the outer edge of the anvil. Place the cold chisel above this edge, strike the chisel with the sledge hammer and cut it off. If this is carefully[303] done it will cut the proper bevel for the cutting edge. The drawing shows the slope of the cutting edge to be parallel to the top of the tool. The tool is hardened and tempered the same as the round nose tool.
Side tool (right hand): The form and dimensions are given here.
Stock: 7 × 7⁄8 × 7⁄16 in.
To make a tool of this kind bevel off the end of the stock, place the other end in the fire, and heat about two inches to a red heat. Take it out and place about one inch of this on the round edge of the anvil. With the hand hammer reduce the thickness of this steel, driving on the edge nearest you (see sketch marked A). The hammering reduces the thickness of the edge, which will be the cutting edge when finished. The part opposite to where you are working will be reduced very little. A chisel is now used for cutting the cutting edge on the tool (see B). Place the tool on a piece of soft iron, place the chisel along the line and cut through to the soft iron below. This gives not only a clear cut but prevents the chisel from driving in if it should strike the hard anvil. The clearance is cut off along the other lines. (C) The cutting edge is now offset. To do this use a set hammer.[304] Push the part made beyond the anvil 1⁄4 in. Place the set hammer in this shoulder, drive down until the offset is driven down about 1⁄8 in. (D).
The method of tempering this tool is a little different from the way you have tempered other tools, on account of the length of the cutting edge, which should be hardened its full length. Place the end just finished in the fire and heat to a red heat. Plunge the whole tool into water. Take it out and polish the cutting edge with emery stone. Now place in the fire a piece of any kind of iron; 1 in. square will do. Heat it red hot, then place it upon the anvil, and lay the part of your tool that has been hardened on the hot bar. It will draw enough heat from the hot bar to produce the temper colours. This is one way to give a piece of hardened steel the heat to temper it when the body of that piece does not contain heat enough to do so.

Boring tool: Boring tools are made for the purpose of enlarging holes in cylinders, or any hole which should be enlarged after it has been drilled. The[305] work to be done must determine the size and length of the boring tool. This is not true of any other one of the lathe tools.
Stock: 7 × 7⁄16 × 7⁄8 in.
Bevel one end. Place the other end in the fire and heat about 3 ins. of it. Draw it out to a tapering octagonal shape, as shown in the sketch. The end is pushed over the anvil about 1⁄2 in. Drive it down at right angles. The clearance for the cutting edge is cut off with a hot chisel and made ready for hardening and tempering.
Cutting-off or parting tool: This tool is made for dividing bars of metal into different lengths. The form and dimensions are here shown.
Stock: 7 × 7⁄8 × 7⁄16 in. tool steel.
Bevel one end. Place the other end in the fire and heat about 1 in. Place the fuller on the anvil.[306] Put the top fuller on this, then put the steel between the two fullers about 1⁄2 in. from the end. Using the sledge hammer, drive down so that the centre thickness will measure 1⁄8 in. Draw the lump left on the end to 1⁄8 in. thickness, the same width as the tool. The drawing shows that the clearance on this tool is one half the thickness of the cutting edge, or 1⁄16 in. This clearance must be put on as shown in the drawing, otherwise the tool will not clear while doing the cutting. Finish up as shown in the sketch. Harden and temper in the same way as you did the round nose tool. Cutting off tools are made with the shoulder all on one side. (See sketch and see article on tempering steel.)
All steels that are worked under hammers and heated to any degree of temperature, when finished should be softened by heating, so that the unequal strains caused by the working of the metal may be neutralized. When the work is entirely finished it is placed in a furnace or forge fire and heated red hot. Then the fire is either withdrawn from the furnace, or the blast is shut off from the forge, and the metal is allowed to cool off as the fire goes down. This softens the metal and saves it from the danger of unequal strains.
Hard or high carbon steels are treated in a different way. The metal is heated red hot, then it is placed in a box filled with slack lime. The lime completely covers the piece. The cold air is prevented from striking it and cooling it off too quickly. When no lime is at hand wood ash can be used.
Sometimes the steel is heated red hot, then held[308] until the red entirely disappears. Then it is plunged into cold water. This process is known as water annealing and is a process used for tool steel when quick work is required. It softens the metal so that it can be filed and worked quite easily.
We have learned that carbon gives the hardening quality to steel. Since there is little carbon in soft steel and none in wrought iron, they will not harden as carbon steel does when heated red hot and plunged into water. But there are many small articles which are best made of this soft steel and iron and which must be hardened in some way to make them useful. In order to supply the lacking carbon the metal is put through a process known as case hardening. There are two methods of case hardening. The first method is to heat a piece of soft steel or iron red hot and cover the part to be hardened with cyanide of potassium. The metal will absorb the carbon out of the cyanide and when cooled in water will have taken on a hardened surface. If this is repeated two or three times the hard surface deepens.
Any drug store will sell you some cyanide of potassium. It comes in cakes. The cakes are broken[309] up into small pieces. Be careful to keep the hands as much as possible from contact with the cyanide.
Set screws are made of soft metal, but the points must be hardened to resist the wear. This is done by heating the set screws red hot, then sticking the point into the cyanide until it cools off. Re-heat and repeat the work. During this time the iron is absorbing carbon. Heat again, plunge into cold water. The carbon forms a case on the end of the screw. Now you have a screw hard on the outside but of soft material in the inside. It is able to resist any shock that carbon steel itself could not stand.
The second method calls for the use of pulverized charcoal and bone. The principle is the same as in the first method. The iron articles to receive a case hardening are placed in a cast-iron box with a layer of charcoal above and a layer of bone dust below, alternating in this way until the box is filled to the top. The box is then placed in a heating furnace and heated to a temperature 1200° F. It is kept at this temperature from three to four hours. The articles all this time are absorbing charcoal from bone dust. The box is taken out of the furnace[310] and plunged into a bath of cold water. From this cold bath it is plunged into a bath of boiling water, then taken out and dried. The pieces are oiled over slightly to bring out the colours. They have not only a hard exterior after this process, but they have a beautiful mottled surface of grays and blues, colours one often sees in parts of small guns, wrenches, etc.
Surgical instruments, guns, small wrenches, etc., are hardened in this way. The equipment for the second method is much more expensive than that for the first; however, the principles involved are the same in both cases.
Brazing is a process of joining two pieces of metal by the use of another metal, such as brass or copper. The use of solder has been explained in the article on soldering. This article will tell about brazing of wrought iron, cast-iron, and steel in the forge fire.
One must bear in mind that when a forge fire is used for brazing, the fire should be free from green coal on account of the presence of sulphur. A reducing fire is best for that purpose. It is well to mention here that a forge fire that has been used for brazing must be thoroughly cleaned before it can[311] be used again for any welding purposes. The brass will run down and clog the tuyere. If the least bit of smelter is left on the forge it is apt to mix with the coals. In that case it would find its way into the fire, melt, and collect on any iron that may be in the fire heating. The success of any of these operations depends absolutely upon a clean fire and a clean piece of work to be done.
To prepare the pieces to be brazed: All parts to be brazed should be free from any foreign matter. They should be filed or polished with emery cloth or sand-paper. This refers not only to the parts that come into contact with each other, but both sides of the contact edge for the depth of at least 1⁄2 in. When the parts are clean, put them together. See that the joints fit. Paint the joints with a flux made of boracic acid. Mix one part boiling water with one part borax and two parts boracic acid. Keep it pasty so that it can be handled with a brush. Ordinary borax can be used if the other is not at hand. The smelter (brass) can be bought at supply stores. However, brass filings, common sheet brass, or brass wire is just as good. If brass filings are used these should be mixed with the flux. Any old tin can will do for the mixing. A spoon for dipping the flux out when wanted can[312] be made on the end of a rod 1⁄4 in. in diameter, about 20 ins. long, by flattening out an inch of the end, drawn out quite thin and fashioned spoon shaped. Place the parts to be brazed in the fire and heat till they are red hot. Dip the spoon into the brazing material and put a little of the smelter on the joints. Increase the heat. When the smelter begins to run add more. When it shows a bright streak all around the parts to be joined shut off the blast and let it cool before removing it from the fire. When it is black hot remove it from the fire and file into shape. Be very careful to see that the pieces to be brazed are so fastened together that they will not move apart when once put into place. This can be done by packing brick or clay around them or by clamping them in place. Do not put any weight that would cause any strain upon them, for when heated this would change the position and might cause a bend in the brazed parts.
Brazing of cast-iron: Cast-iron is prepared for brazing in the same way as steel or iron is prepared. The flux, however, is not the same. It is made up of boric acid, 8 oz.; pulverized chlorate of potash, 4 oz.; carbonate of iron, 3 oz. Mix these together thoroughly, breaking up all lumps that may be there. Keep this mixture in a glass jar. Place[313] the pieces to be brazed in a fire as you did the iron and steel. Heat it all red hot. Mix the flux with the smelter and put it on. Do not put this on at any time before the metal is red hot. Increase the heat and add more flux and smelter. When the brass has flowed into the joints, shut off the heat and let the metal cool off in the fire. Cast-iron requires a higher temperature for brazing than iron or steel. If a brass rod is used in place of the smelter, push the end of the rod in the joint to be brazed. It will melt off as fast as it is pushed in. When brazing some cast-iron, the break should be reinforced on the unexposed side by a plate of wrought iron or steel. If this is cleaned off thoroughly and placed against the break the smelter will not only fill up the break but it will hold this piece of metal fast.
Brazing steel band saws: Band saws break very often while in use. They can be repaired only by brazing the broken ends together. Do so by filing each end of the broken pieces, tapering to a very sharp edge 3⁄4 in. in length for lapping over. The length of this lapping depends upon the width of the teeth of the saw. When the ends are filed, place them in a vise that can be bought for this purpose. If no vise is at hand two wood clamps, or[314] iron clamps, or an ordinary shop vise will answer the purpose. Put the two ends overlapping in place, and clamp close enough to these ends to keep them in a straight line and, also, for shifting while brazing. Paint the joint with flux, using the first flux mentioned in the article. Put a piece of silver solder between the laps. Now heat the jaws of a pair of close tongs white hot, and grasp the joints between the hot jaws, and pinch them together. The heat in the tongs will melt the silver and braze the two parts. Hold the tongs steady; if not, they will bend, and the saw will be rather hard to straighten when the tongs are removed. Do not remove the tongs until they are black hot. Now place the saw in a vise and file the teeth to correspond to those on either side of the joint. Smooth the roughness from the joint.
The value of brazing: A knowledge of how to braze is most useful to any one working with the metals. Many things break that can be repaired only by this process. For instance, tubing, automobile parts, very complex parts of machinery, etc., when broken cannot be welded; they must be mended by brazing. The success of the process depends upon the care taken to make the parts perfectly clean and well fitted together. If this is well done the brazing[315] material will find its way to the closest joints and fix them.
(1) Drawing: Stretching a piece of metal in one or more directions either by hammering, or pulling, or rolling, is called drawing. In the blacksmiths' shop the term drawing always means a decrease in the size of a cross section of the piece and an increase in the length.
(2) Bending: Bending means making the metal take a shape from a straight line. It may be made into a circle or curved or bent at right angles.
(3) Twisting: In the process of twisting no change is made in the axis of the piece. The faces of the piece are changed; as for instance, when you twist a piece of paper holding one end fast and turning the other in the direction of its axis.
Upsetting: Upsetting means increasing the thickness of a piece of iron by shortening its length.
Forming: Forming is the process of giving a piece of iron shape, either by hammering or by using some forming machine; for example, the bulldog.
Welding: Welding means joining two pieces of iron together by heating them to the right temperature and hammering or pressing them together.
Cross peen hammer: The sketch shows the form and gives the dimensions of this hammer.
Stock: 7⁄8 in. square, 21⁄2 ins. long.
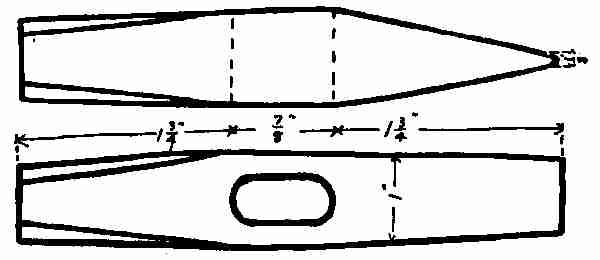
It is best to make this hammer on the end of a bar. In this way you dispense with the handling of tongs, and you are able to get the best control of your material. Mark with a centre-punch, the centre of the 21⁄2 in. piece. Through this, punch a hole with an eye punch. (See eye punch in tool list.) The hole will be a little less than the finished size. Draw the face end slightly tapering. Drive[317] the four corners down and make the face of hammer octagonal in shape. The sketch will show just where to begin this knocking down. The hammer is now cut off and the face squared up. The centre of the face should be a little higher than the outer edges. Now drive into the eye a drift pin. This pin is made of 3⁄4 × 3⁄8 × 4 in. steel. It is tapered for the whole length down to 1⁄2 × 3⁄8 in., and oval in shape. It is driven into the hole. This gives the real shape to the eye of the hammer. Take the pin out and re-heat the hammer. Draw the cross peen out to a taper as you would if you were making a cold chisel. Be careful to keep all within the dimensions given. The hammer may now be filed and polished if one wishes a bright hammer; otherwise, it needs only to be tempered: then it is ready for use.
To temper the hammer: Place the whole hammer in the fire and heat it red hot. Grasp it with a pair of pick-up tongs through the eye. Dip the face in water half way up to the eye, and hold it there until the face is chilled off. Reverse by placing the peen end into the water. While this is cooling dip up enough water with the hand to keep the face of the hammer cold. Take it out and polish both ends with a piece of emery cloth wrapped around[318] a piece of wood. The colours now are beginning to run from the middle toward the ends. When the purple colour reaches either end plunge that end into water, holding it in the water until the purple colour reaches the other end. Then plunge the whole hammer in water. This tempering darkens the hammer if it has been previously polished. Rubbing well with emery cloth again will restore the brightness. The hammer is ready for the handle. A hammer of this kind can be made without the help of a second person.
Round peen hammer: The form and dimensions for this hammer are given here.
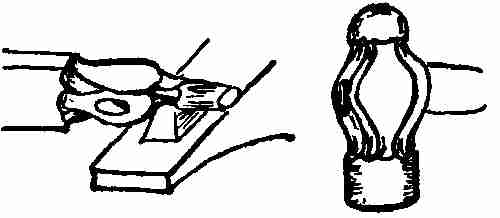
Stock: A piece of 11⁄2-in. square tool steel. This hammer, too, is best made on the end of a bar about 20 ins. in length. With a centre-punch mark off 2 ins. from the end. This spot marks the centre of the eye. Place this end in the fire. One inch from[319] the end fuller down on the four sides of the bar (1). This makes a neck one inch in diameter and having eight sides. Place it back in the fire and heat again. Now put the bar again on the fuller 2 ins. from the first fuller (1). This time fuller only two sides, the two sides opposite the centre-punch mark. Fuller so that the thickness measures 11⁄4 ins. This means only 1⁄8 in. depression on the two sides. Put again into the fire and draw the first end out so that it measures 1 in. octagonal, any length. (See sketch 2.) Heat again, this time the whole body of the piece. Punch a hole with the eye-punch where the centre-punch was made. The hole will be a little less in size than the finished hole will be (see sketch) to allow for the increase in size while working the metal into shape. Put the drift pin into the hole. Drive it through until the small end just shows through on the other side. Place a fuller over the hole and work the metal out sidewise by striking on the top of the[320] fuller with a sledge hammer. This requires a helper to do the heavy work. While the heavy work is being done the steel must be heated many times, but always without the drift pin. Keep the drift pin in water while the hammer is being heated, as the pin must always be cold when driven into the eye. Drive it in a little farther each time, so that by the time the centre is finished the hole will be the proper size (3). The thickness of the metal around the eye should be about 1⁄8 in. on the outer edges and 3⁄16 in. in the centre. This tapers a little from the centre outward, as is shown in the drawings. Put the 3⁄4-in. bottom fuller on the anvil and place the neck of the hammer on this and a top fuller above that. Strike on the fuller and reduce the neck until it measures about 3⁄4 in. in diameter, keeping the octagonal shape all the while.
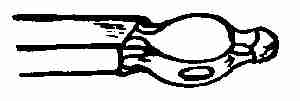
Heat the hammer again where the face should be, and fuller down between the body and the face so that this will measure about 11⁄8 in. square, using the same large fullers as before and making it octagonal. This finishes up completely the body of the hammer between the face and the peen.
With a sharp chisel cut the hammer off an inch[321] and a half from the body. You will then have enough stock for the face of the hammer.
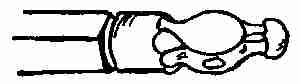
The surplus stock on the peen allows for holding with the tongs, and the face of the hammer is rounded up to about 15⁄8 in. in diameter. Bevel the edges down 1⁄16 in. back of this face and, with a sharp chisel, trim the face off flat or square with the axis of the hammer. The centre of the face should be a little higher than the outside edges.
Grasp the face with the tongs and place the peen in the fire. Take it out and cut it off 1 in. in length and make the edges rounding. To shape the peen, place the neck on a large fuller and round up as shown in the picture. Be careful each time to give it one eighth of a turn so that the octagonal shape will not be lost. If the hammer has been carefully forged it will require little finishing in the way of filing, unless one wishes to make a fancy polished hammer. If such a one is desired some draw filing and polishing must be done. This makes the hammer look better, but it doesn't increase its efficiency. The tempering is done in the same way as the tempering for the cross peen hammer was done. However, this hammer is larger and heavier than[322] the cross peen hammer and is more difficult to temper. While the same principle is involved in the tempering of both hammers, greater care must be taken in tempering this one.
The handle is placed. You will find that the driving of the drift pin into the eye, first on one side and then on the other, makes both outside openings larger than the centre. This should be so, as it helps to hold the handle firmly in place.
Here are a few problems which deal with the making of your own tools. When buying steel for this work always tell what the steel is to be used for. The merchant will probably recommend to you a grade of steel from which you can make tools that will last.
Hardie: Take a piece of 11⁄8-in. square tool steel. Make this tool on the end of a bar if the bar is long enough. It is easier handled in that way. The dotted lines on the drawing show the amount of material required to make the shank. This should be made to fit the hole in the anvil; 3⁄8 in. from the shank fuller down on the two sides of the steel, leaving 5⁄8-in. thickness between the fuller marks. Draw the end out to a 3-in. taper on one side and[323] widen it out to 13⁄4-in. taper on the other. (See drawing.)
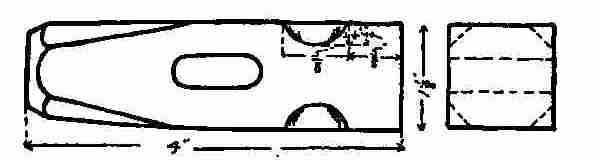
Set hammer: A set hammer is made with a piece of 11⁄8-in. square steel; 15⁄8 in. from one end mark the hole. Put one end of the bar into the fire and heat it. Take it out and punch a hole with the eye[324] punch in the piece of steel when it is marked. Knock the four corners down, bevelling them as shown in the sketch, and trim the end off rounding for the head. Cut it off 4 ins. long; fuller the four corners 11⁄4 ins. from the face as shown in the sketch. The end view of the drawing shows the depth of the fuller marks.
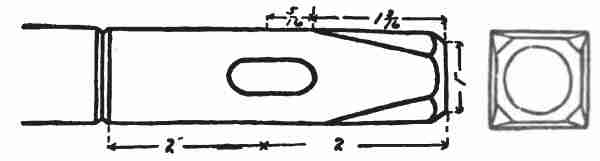

Hot chisel: This tool is made much as you make the set hammer. However, where the set hammer is fullered on the corners the hot chisel is fullered on the two sides, and the end is drawn out tapering. Used to cut hot iron. (See drawing).[325]
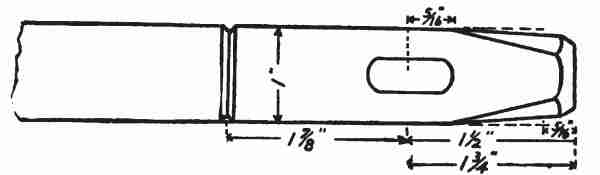
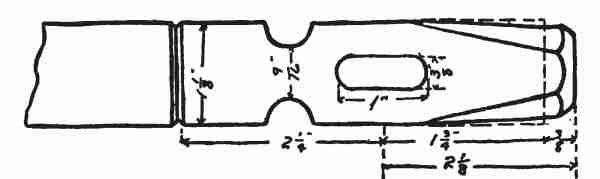
Cold chisel: This tool is made out of 1-in. square stock. The punching of the eye and head part of this chisel is made in the same way as the other tools described here. A blade is tempered from the[326] centre to 23⁄4 ins. in length, and the cutting edge is finished a little rounding. This tool is made to cut cold iron, hence its name.
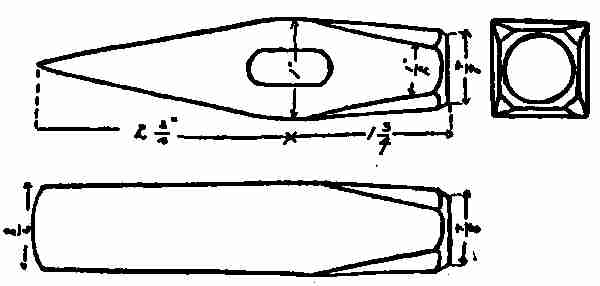
Ice shaver: Ice shavers are useful as shavers, breakers and choppers of ice. They are made out of a piece of low carbon steel for the blade and a piece of 5⁄8-in. round iron for the handle.
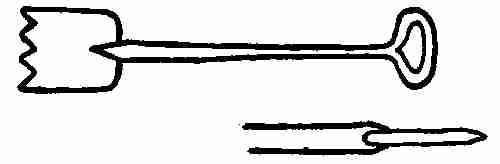
Directions: Take a piece of 1⁄2 × 6 × 4 ins., and cut along as shown by the lines. When these two corners are cut out, point the centre piece for a cleft weld. Slit the end of the rod, scarfing its points thin, and slip this point into the crotch of the scarf, and weld with borax. This now gives you a piece that looks like a shovel. On the other end of the handle bend a ring about 4 ins. in diameter. Place the flat end in the fire, heat it up, and taper this flat end down very thin, about 1 in. long. With[328] a file, file four teeth in the end, the same shape as shown here. It is now ready for tempering. This is done by heating all the teeth well back toward the handle red hot. Plunge the whole thing into water to cool it off. Take it out and polish. Heat a piece of large iron in the fire red hot. On this piece of metal place the teeth of the pick. When the blue colour appears on the point and cutting edges of the teeth, cool in water. It is now ready for use.
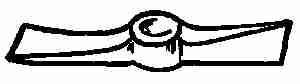
Grub hoe: The form and dimensions of this tool are given, also the different steps in the process of forging.
Stock: 11⁄4 × 3⁄4 × 5 in. steel.
Directions: Mark off with a centre-punch the middle of the piece of stock, and then mark off 1 in. from the middle in either direction. Fuller, as shown in the sketch, on the first end, to a depth of 1 in. Heat the piece and fuller the other end to a depth of 1⁄2 in. (A). The centre lug is now 2 ins. long. To make this 2 ins. long it is necessary that the fuller be placed on the piece on the outside of the centre-punch marks. Draw out the two ends, as shown by the sketch, one being directly opposite the other. Punch a hole with the eye punch in the middle of this lug almost through on one side.[329] Take the punch out, turn the piece upside down, and finish punching the hole. The punch used for doing this part of the work should be straight and tapered and quite thin on the end. The problem is not to cut out a large piece but rather to split the metal. It's only 3⁄4 in. wide and will not allow for the cutting away of any material. A punch of this kind will heat up on the end while driving, when it is apt to bend. To avoid this keep it cold by dipping it into water from time to time. Place a little green coal in the hole after you have started the punch in. This prevents its sticking in the hole and it also prevents the end of the punch from getting hot. A very deep, narrow slot can be punched successfully in this way.

The drift pin used to shape the eye upon should be made the size of the finished hole—that is, 11⁄2 × 3⁄4 in. and 6 ins. long—oval-shaped, and tapered on the small end to 3⁄8 × 1⁄4 in. This taper should be the whole length of the drift pin. Drive the pin into the hole about half way down. This widens the hole so that it can now be placed on the horn of the anvil and fullered to the required thickness, which[330] should be 1⁄8 in. on the extreme edge of the eye. Drive the drift pin again about 4 ins. or 5 ins. At the same time work the metal down on the outside. Repeat this till the hole fits the drift pin. The pin is now driven in through from the other side, thus making both outside openings of the eye the same size. The hoe is now finished up as shown in the sketch and ready for hardening and tempering.
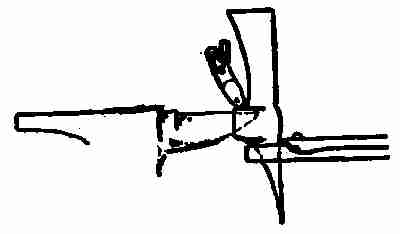
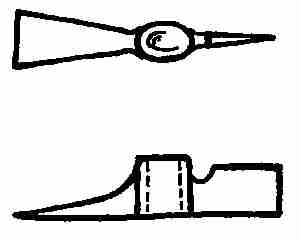
This is done in the same way as you did the chisel and the same temper colour is used for both. Five pounds is considered about the right weight for a hoe of this kind. The problem of working out the eye for this is the same as for making the eyes of picks, hatchets, and tools of similar design.
Turnbuckles, made either of steel or iron, are used for truss rods. There are many ways of making[331] turnbuckles. Out of all, three methods are here given: (1) Solid forged buckle, (2) welding up, (3) pipe method.
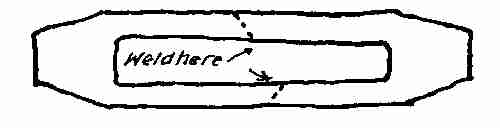
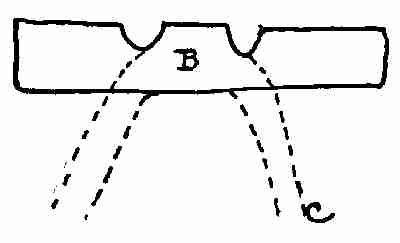
Solid forged buckle: This is made of soft steel. Select a piece of 11⁄2-in. square stock 6 ins. long. Mark off 2 ins. with a centre-punch on each end. Draw the ends out 1 in. round. Bend the ends down as shown at B. Forge the buckle part to 11⁄4 in. round at the end, as shown at C. Make the other end just like this one and weld the two ends together so that the total length will be 10 ins. Now drill holes in each end for a 3⁄4-in. tap. Tap a right-hand thread in one end and a left-hand thread in the other end, or you can put a swivel hook in one end in place of the thread. To do this the hole should be drilled 7⁄8 in. without a thread. Select a piece of 7⁄8-in. round soft steel 10 ins. long. Upset[332] the end and work a tapered round head on as shown at D. The head should be 1 in. long and large enough to work loosely in the slot. Put this into the hole with the head between the wings and point the end forming it into a hook.
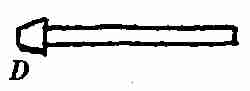
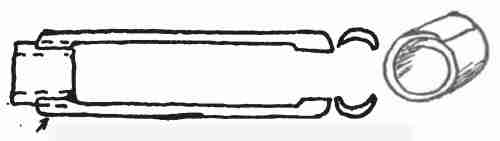
Second method: This is done by welding the two rods to collars. Make two collars out of wrought iron, the size depending upon the size of the turnbuckle. Scrape the ends of this flat iron, bend each into a circle, and weld on the horn of the anvil, thus making two collars. The arm should be drawn out of a piece of flat iron and made half round by a swage on the anvil. This leaves the original thickness of the bar on each end of the piece drawn out. These ends are now flattened and scraped as shown at A and should be wrenched to lap on the inside of the collars. Place one collar on one end and the wings opposite each other. Push a bar of iron into the opening within an inch of the collar. This bar prevents the tongs from squeezing the two wings[333] out of shape and loosening up the collar while welding. Grasp the turnbuckle with a pair of tongs and place the end in the fire. Take a welding heat and weld this down on the horn of the anvil. At the same time shape it as shown at B. Draw out the piece of iron, place the other collar in the open end, and weld it as you did the first. This is finished up in the holes made. Threads can be cut or swivel hooks can be placed in.
Third method: Take a piece of pipe, length and size desired. Heat one end and upset it, enlarging and thickening it slightly. Cut a round iron plug to fit this end tightly. Heat the plug and drive it into the pipe. Place it on the fire and weld the pipe to the plug. At the same time forge the end square or hexagonal. Drill a hole in this end, pin the swivel hook same as explained in the second method. Select the iron, make the head on the rod, and put it through the pipe into the hole, head inside, before the plug is welded in the other end. Be sure that this rod will turn freely. Shape the hook before the plug is welded in the 2-in. end. This gives one an opportunity to push a rod into the pipe and hold the head of the hook while shaping it in the form of a hook or eye as required.
Now weld a plug in the other end the same as[334] you did in the first. Drill a hole in this end and cut a thread to receive the truss rod end. This last method is much simpler than the other two. It has this advantage, that the thread will not rust so quickly, since it is always enclosed in the pipe. However, there is danger of a very weak spot right back of the plug, because you know when two pieces of metal are welded together the temperature should be the same. If not, the cold one will cut into the hot one and form cold shuts. In this case it is impossible to get the plug the same temperature as the outside. As a consequence there is a defect in the forging.

Eccentric strap: The principles applied in the working out of this problem are used in making many articles of wrought iron. Eccentric straps are[335] much used in foundries, machine shops, and general shop work.
Stock: Bar of wrought iron or soft steel 11⁄8 ins. square, 16 ins. or 20 ins. long.
Round the bar down on one end to 1 in. in diameter. Split the other end up the length of the bar 8 ins. to within 1 in. of the shoulder made by the rounding down of the stock. These two arms are now thrown at right angles to the stem, forged down to 1⁄2 × 1 in. the entire length. The arc of the circle made by the arms is determined by the size of the thing the eccentric strap is meant to fit when it is finished. The ends are now turned up at right angles and are bent to fit the circle. A gouge chisel will cut the end off rounding. All ladle handles can be made in this way.
Garden hoe: The drawing shows the form and dimensions of the hoe, a garden tool very simple in construction and very useful.
Stock: 6 × 4 × 1⁄2 in. steel.
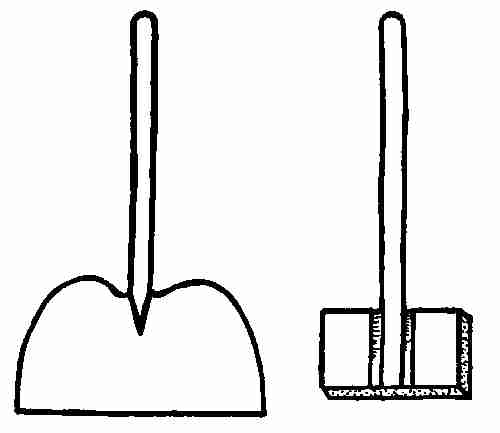
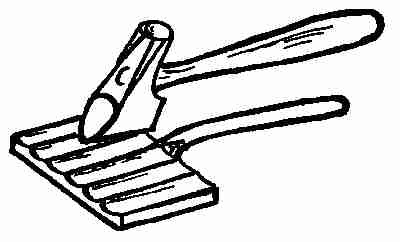
Directions: Mark off 2 ins. at one end and cut down 1 in. deep on both edges. Cut out a wedge-shaped piece as shown in the sketch. Draw out the piece 1⁄2 in. in diameter and 6 ins. long. This forms the handle. Fuller down on each side of the handle where it joins the body as shown by the full[336] lines. With the fuller spread out the metal on either side of the handle until it forms a blade 8 × 5 ins. This blade should be 3⁄16 in. thick at the top and 1⁄8 in. at the cutting edge. Bend the handle into shape. File or grind the edges of the blade to make it smooth. This should be tempered by heating it red hot. Plunge into oil. Take it out when cold and hold it over the fire[337] until the oil flashes off. Then allow it to cool in the air. Grind it and polish if a bright finish is required. If not it is now ready for the wood handle.
Wood chisel: Chisels for cutting wood can be made from a piece of gas pipe and a piece of steel, or from old cold chisels too short for use. If no piece of old tool steel is at hand take a new piece, 5⁄8 × 4 ins., hexagonal.
If a piece of gas pipe is used, 1⁄2 in., heat one end and place it on the point of the horn of the anvil. With the peen hammer thin the point down around the end. This thinning stretches the metal and gives you a funnel-shaped opening, and a scarf to use for welding. The short chisel end should be pushed into this for about 1 in. and the scarf should be tapped down gently on this chisel. Sometimes it is necessary to upset the end of the chisel in order to make it fit the scarf. If required to do this, put it into the fire and heat it red hot, and upset it on the end where the weld is to be. Now put it into the pipe, put borax on the scarf, and heat it hot enough to weld. Take it out and weld it up in a bottom swage and reduce the weld to 1⁄2 in. in diameter. Cut the shank off about 31⁄2 ins. from the weld and heat this end again. Stretch it on this end so as to enlarge it to fit the wood handle which[338] will be placed in later. Heat the steel end. Flatten it down to the shape of a wood chisel, the width to be according to the size needed. Out of this piece of steel a chisel 1⁄2 in., 3⁄4 in., or 1 in. can be made. It should be tapered down 3⁄4 in. on the cutting edge. File the cutting edge on the chisel. It gives a much better finish. The chisel is hardened and tempered almost the length of the whole blade, a blue colour, by heating it red hot, plunging it into water, polishing, and drawing the temper on a hot piece of iron. The handle is made by using what is known as a hollow auger. This shapes the wood to fit the pipe. A piece of the same pipe can be sawed off with a hack saw about 3⁄8 in. wide. This makes an iron ring, which should be driven in the end of the wood handle to prevent it from splitting. These chisels make the best kind of tools for rough, heavy work.
Door hasp: Door hasps are found most commonly on barn doors and gates, and in conjunction with a staple and lock form a complete fastening. The drawings make clear the different steps in the work.
Stock: 1⁄4 × 1 × 6 ins.
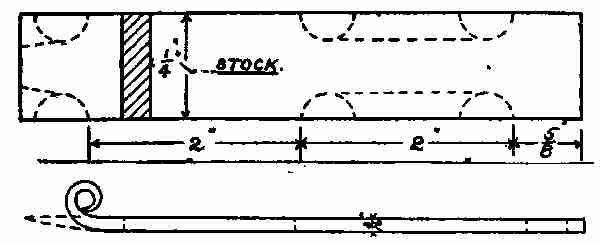
Directions: The eye is made first. Heat the piece red hot. Fuller down the stick 5⁄8 in. from one end, and 2 ins. from the fullered mark put in another. The distance between the fullered marks should be[339] 2 ins. Draw out the space between the fullered marks to 5⁄8 in. in width, 21⁄2 ins. long. Cut the corners off the piece left on the end, as shown by the drawing. Round this up with the hammer on the anvil. Punch a hole in the middle of the eye, but keep the thickness the same during all the work. To make the body of the piece, where the slot is, 2 ins. from the shoulder fuller the end down to 5⁄16 in. from the end. Draw out this end to 15⁄16 in. in length. This forms the loop, and at the same time it tapers[340] to a sharp end. (See drawing.) The piece is now ready for punching. Mark places for the punch holes, then cut between the holes with a hot chisel. In this way the centre piece is cut out, forming the slot. If this is carefully done little work will be required to finish it. The slot is filed out if any rough places are left. The end is bent up. Sometimes a ring is put in it, as a door pull, and sometimes the latch itself is used for the pull.

Pair of dividers: Perhaps the simplest way to make a pair of dividers is to get a pair of buggy top joint butts, 1⁄2 in. size. Weld to each of the legs a piece of steel to form the two legs for the dividers. Begin about 1 in. back of the weld and draw the legs out tapering, octagonal in shape and rounding toward extreme sharp points. Place a washer on each side of the joint, and rivet the ends together with a steel rivet. If carefully done the dividers will require no wings. If wings are required they can be made by punching a slot 1⁄2 × 1⁄8 in. in each of the legs, 2 ins. from the joint. In each of these slots drill holes, in one a 1⁄8-in. hole and in the[341] other a hole for a 3⁄16-in. tap. Drill both sets of holes through the legs. Tap out the one and make a thumb screw to fit. This is done by drawing out a 3⁄8-in. stem on the end of a 3⁄8-in. rod and cutting off 3⁄8 in. of this to form the head of the thumb screw. Heat this end and flatten down. Finish up with a few strokes of the file. Cut a 3⁄16-in. thread on the end. Screw it into the dividers. Draw out a wing 3⁄8 in. wide, 1⁄8 in. thick, to fit the slot. Bend it into a semicircle and place it into the slot. Open the dividers. See that it swings round on this circle. Drill a small hole in the end of the wing to fit the 1⁄8-in. hole drilled into the leg and rivet it into the slot. This makes a pair of dividers that can be used for all classes of work.
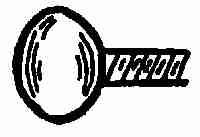
1. Stone chisels:
Stock: 1⁄4, 1⁄2, 5⁄8, 3⁄4-in. octagonal steel, 5 ins. long. Stone chisels are made out of the above sizes of steel, in sets, for the cutting of marble, sandstone, granite, etc.
Directions: Put one end of the stock in fire. Heat about 1 in. Draw this hot end to a taper[342] 1⁄4 in. at the small end and 11⁄2 in. long. Place the extreme end again in the fire, take it out and strike it on the end by placing it upright on the anvil. Upset this end and form the round top shown in the drawing. If this top is not completed in one heating, heat it again and repeat the hammering on the end. All stone chisels are made with this rounding end so that wood mallets can be used for driving purposes. The ones shown here are the shapes used on most stone chisels.

The size of the teeth depends upon the hardness or softness of the material to be cut. The large teeth are used for hard stone cutting and the small teeth for soft stone cutting. Place the other end of the tool in the fire and flatten it down as[343] shown in the sketch given here. Notice the dotted lines show that the extreme cutting edge of this tool is narrower than the body. This is an allowance made for the spreading out of the tool while cutting the teeth. Space off the teeth with a 3-cornered file as shown in the same sketch, and cut the teeth with a chisel made in the following way: Take a piece of 1⁄2-in. octagonal steel. Draw it out in the shape of a cape chisel. (See sketch.) Heat the end of the steel tool, then place it in the vise. With the end projecting up place the chisel on the mark made by the file, strike down sharply on the chisel, and drive it down to the required depth. This is repeated until the teeth are all cut. Flatten the cutting edge carefully on the anvil, and all teeth that may have been driven out of a straight line by the cutting. Heat the tool to soften it. File between the teeth the roughness made by the forging of the tool. A small flat jewellers' file will be found best for this purpose. Harden the tool as you did[344] the cold chisel, and temper it at the purple colour sign.
2. Pick:
Stock: 1⁄2-in. square tool steel, 8 ins.
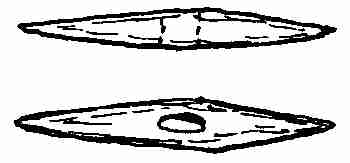
Directions: Mark the middle of the bar with a centre-punch. Punch the hole through with the eye punch. Put in a drift pin and flatten down the bulged sides of the bar made by punching the hole. Draw the two ends out to a sharp square point. This should make the pick not more than 10 ins. long. The drawing should show the shape it will be when finished. These picks are hardened the same as cold chisels, and tempered at the purple colour.
As the name indicates, these drills are used for making holes in rocks when blasting is to be done. The form and shapes most in use are shown here.
The double drill, used so much in power drilling machines, is made in the following way: Take a 1-in. octagonal bar of steel, any length. Heat one end, and upset it to 11⁄4 in. in diameter. Put a[345] small 1⁄2-in. fuller on the anvil and place the end of the bar lengthwise on the fuller. Put the top fuller directly above this and strike with a sledge hammer. The result is two fuller marks driven down within 1⁄2 in. of meeting. Reverse this and do the same on the other two sides. This marks a cross.

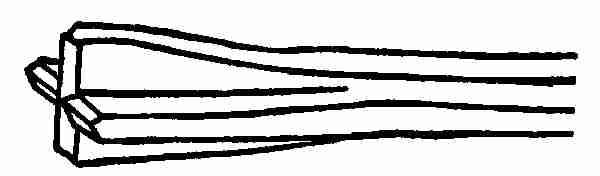
Place the forming tool in the anvil, and with a set hammer forge out the wings as shown in the sketch. The diameter of the drill depends upon the[346] size of the hole to be drilled and is made accordingly. Use a sharp chisel for cutting the cutting edges of the drill. It is now ready for tempering. Drills are made in this way from the raw material. When once made they are kept in shape by what is known as the drill dressing tool shown here. These rock drills wear out on the sides, thus reducing the diameter. When re-dressing they are always upset to the required diameter. The re-dressing is done in the following way: Heat the end of the drill in the fire and place the dressing tool so that the cross impression fits the end of the drill. Drive on the end lengthwise of the bar, upsetting the drill to the required diameter, at the same time retaining the original shape of the cutting edge of the drill.
To temper rock drills: Take two small tubs of cold water, one clear and the other made soapy by cutting up a bar of cheap soap into bits. Heat the end of the drill to be tempered to a dull red and put it into the tub of clear water, the cutting edge only under water until it is cooled off. Take it out to polish. When the straw colour appears plunge it into the tub of soapy water. This does away with any red heat that might be in the bar when the temper colours appear. Soapy water is a poor[347] conductor of heat and it allows the steel to cool off without suddenly chilling it.
These drills are used for drilling holes in rocks where it is impossible to place machines or where machines are not available, such as on farms, where great rocks and nigger heads are to be removed by drilling and blasting out.
They are made as you would make a cold chisel. The taper, however, is much shorter and the ends are usually either rounded or diamond shape. (See sketch.) The cutting edges are ground, but in many cases they are forged and filed to shape. They are tempered in the same way as cold chisels are treated.
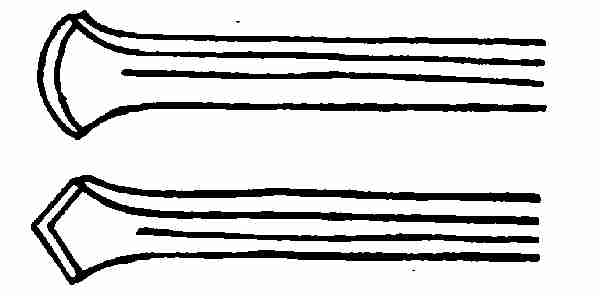
Round and flat hand drill: Take a piece of octagonal steel, the size and length depending upon the size and depth of the hole to be drilled. These should not be over 20 ins. in length, for the blow would have little effect upon the cutting edge of the drill. Put one end into the fire, take it out and finish it up as you would the short end of a cold[348] chisel. Reverse the piece of steel, and heat this end, for about two inches, red hot. Place it on the side of the anvil face and flatten it down tapering. Make it very short and just wide enough for the size hole to be drilled. With a hot chisel cut the end into the proper shape, either round or diamond shape. With the hand hammer work the cutting edge on the end. This end should be from 1⁄8 in. to 3⁄16 in. in thickness. Either file or grind the bevel which forms the cutting edge sharp. Harden and temper it the same as you would a cold chisel. If it is found, on trial, to be too soft, re-heat, harden, and temper at a higher colour. One of the best hand drills for drilling holes in soft material like bricks or sandstones is a piece of gas pipe any length. File teeth in the end, like a saw tooth. Case[349] harden the end. This drill will go through a wall almost as quickly as a twist drill and with much less labour.
Shackles are used for connecting chains, wire, ropes, etc.
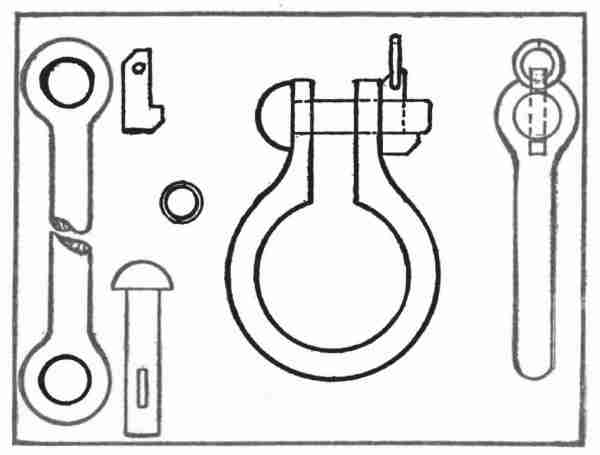
Stock: One piece of 3⁄4-in. round iron, 121⁄2 ins. (for shackle). One piece of 1⁄2-in. round iron, 4 ins. (for pin). One piece 1 × 1⁄8-in. flat iron, 13⁄4 ins. (for key). One piece 3⁄16-in. round iron, 21⁄4 ins. (for ring).
Directions: Heat the 3⁄4-in. round iron bar two[350] inches, then bend this end on the anvil at right angles to the rest of the bar. Place the heel on the anvil, with the end sticking up. Strike on the end with the hand hammer and drive it down into the heel of the piece. Repeat on the other end of the bar. As one can always force the metal into any shape one desires by first driving it one way or the other, skill in making the two ends of the bar depends upon one's way of using the hammer. This method of making the eye on the end of the bar does away with welding and upsetting of the metal. A round finished eye is the result of the natural bending of the metal. This holds good not only for the shackles like this one but for many other tools, such as hand holds for cars, wagons, etc.
Bending: The shackle should be bent as shown in the sketch. First bend it right back of the eye, each one at about 45°. Heat the body of the piece and shape it around the horn of the anvil until the opening measures 1 in. wide. The sledge and swage are best used for this purpose. Place the swage on the metal and have the helper strike the swage. The shape is not apt to be changed or the metal marred if these tools are used.
Pin: Take the 1⁄2 × 4 in. piece of stock. The[351] end is heated and upset about 1⁄2 in. Place this end in a heading tool and work a button head on the end with either the cupping tool or a hand hammer. The pin should have a slot cut through it 2 ins. from the head. To do this make a punch to cut the slot the shape required. After the piece is marked punch the slot by driving the punch half way through on one side. Turn the piece over and drive the hole through on the other side. This enlarges the metal a little. Reduce it to the 1⁄2-in. size to fit the hole in the shackle. Cut a little piece of iron the thickness and width of the key, 1⁄2 in. long. Heat the end with the hole in and drive this drift into the slot. With 1⁄2 in. top and bottom swage and the drift in the slot, reduce the pin to fit the hole. Drive the drift out. You now have a nice rounded pin with a hole in, 3⁄8 × 1⁄8 in.
Key: Take a piece of 1 × 1⁄8 in. flat iron or steel. Mark the shape of the key. Cut it out and file to fit the slot. Drill holes in the small end of this to prevent it falling out of the pin.
Ring: Bend the piece of 3⁄16-in. wire around a 5⁄8-in. rod in the shape of a spiral and saw off each ring as required. The ring should fit the hole in the key. This method of making a shackle is the[352] same whether the material is 1⁄4 in. in diameter or any size up to 2 ins. in diameter.
Crow-bars are made by welding a piece of round No. 2 flat steel into the end of a wrought iron bar any length or any size, depending upon the use to which the bar is to be put when made. This drawing shows a bar for shifting rails for railroads. When the size is determined, select the wrought iron to be used. Upset the end and split it with a chisel 3⁄4 in. for a cleft weld. Re-heat the end to a white heat. Place it upon the edge of the anvil nearest you and with the peen of the hammer work the scarf out to a sharp point. Repeat on the other side. (See picture.) Place the piece of steel selected for welding, in the fire; shape this end down to a sharp point at an angle of 45°. With the edge of the chisel placed on this scarf, strike on the top of the chisel with a sledge hammer. This will cut a nick and at the same time it raises up a sliver which will help hold the piece of steel in the iron[353] between the cleft. Cool this scarf off in water until it is black hot. Heat the piece of iron (scarf end). Place the end of the steel scarf between the cleft and close the scarf on to the steel by striking gently. The steel will now stay in the end of the piece until it is welded. Place the scarf in the fire and when it is red hot cover it with borax. Get a welding heat on the wrought iron close to the joint first. Gradually work this heat toward the steel till the borax begins to burn, emitting a dark brown smoke. Take it out of the fire and place it on the anvil. One or two sharp blows on the end of the steel will drive it up into the crotch of the scarf. Now strike gently on the top of the scarf. Increase the force of the blows when you are sure the two pieces are welding together. If the pieces are not welding, which will be readily seen by the points of the scarf opening while working them down, place them again in the fire, put on borax and re-heat. A few trials will teach you how hot to get it for welding. Flatten down the end and shape it as shown in the drawing. Harden and temper the crow-bar as you would a cold chisel. If the point is not quite sharp enough grind it on the stone.
This tool is made in much the same way as you make a crow bar. However, before bending the[354] end up into a crow-bar shape, cut a slot in the end, as shown in the picture. Now bend it into shape. The handle should not be over 20 ins. in length and tapered usually from 3⁄4 in. at the large end to about 3⁄8 in. at the smaller end. The end is now flattened and a hole punched in it to hang it up when not in use. This is one of the handiest tools to have around any shop, not only as a nail and a bolt puller, but it may be used in place of the crow-bar. The drawing explains the various steps in the making of the tool.
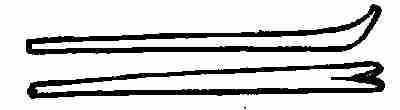
Stock: Spring steel, 7⁄8 × 1⁄16 in. × 9 ins. long.
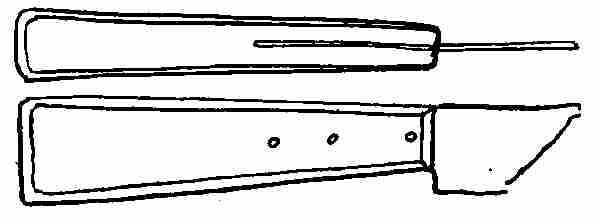
The spring steel used for carving knives or any[355] steel used for that purpose should be a grade that will harden in oil just hard enough to feel a mill-cut file cut the steel. Cut the stock off 9 ins. and forge the shank first. On this size steel this forging of the shank consists in reducing the thickness of the material and widening it about 1⁄16 in. to 2 ins. in length. This tends to toughen the steel, and it makes a better knife by this extra work.
To forge the blade, heat 7 ins. and bend it a little edgewise before reducing the one side for cutting edge. Allow the stretching and thinning out of this edge to straighten the blade, and the curve on the back will form itself, naturally, by the extra length of the cutting edge. Do not try to forge the exact shape of the knife. It is much better to reduce it to the required thickness, outline the shape, and[356] cut it with a hot or cold chisel. At this thickness the knife can be worked either hot or cold when doing this particular kind of work. Cut along the outline, thus giving it shape. A fine file will finish the roughness on the outline and trim up any uneven spots caused by the shaping. When the knife is finished, so far as the forging is concerned, anneal it by heating the whole blade and allowing it to cool in slaked lime. This relieves any strain due to forging. Handles are made of bone, birch, or beech, and can be shaped to suit one's taste. They should measure about 1 × 5⁄8 × 5 ins. Rivets hold them in place. (See cut.) These are of brass wire, easily made by cutting off the length required to go through the wood to hold the blade in place. Place the blade in the slot of the wood handle and drill four holes through the wood and through the blade. Do not make the holes more than 1⁄16 in. in diameter. Take the blade out, harden, and temper. All drilling of holes and fitting should be done before the blade is tempered, while it is in the soft state. It is difficult to drill the holes after the tempering has been done.
To temper the blade: The blade is tempered by heating it on a coke fire. Place the back of the blade down, on a piece of flat iron. The iron will[357] heat red hot. The iron under the knife prevents the flame striking the blade and heating it unevenly, in spots, as it were. When the blade is red hot plunge it into a bath made of linseed oil. Take it out of the oil and polish it. Use the piece of iron the blade was heated on to draw the temper. This hot iron is put on the anvil, the back of the knife edgewise is placed on the iron and moved forward and backward to insure a uniform heat. As soon as the straw colour appears take out any buckle or bend caused by the hardening. Place the other side of the blade on the anvil. A few quick, sharp blows with the peen of the hammer will straighten the blade. Continue the tempering until the purple colour shows. The blade should be tempered so that a very smooth, sharp file will just cut it when rubbed over the surface. Place the blade in the handle and rivet it in place, polish it, and then grind.

The handling of wrought iron when making ornamental work often brings in, besides the usual smithing operations, the processes of embossing, impressing, engraving, etching, inlaying of copper or brass, grinding, and polishing. Embossing is done by heating the piece and raising the metal from the back into an iron above the surface.
Impressing is done by cutting an impression in an iron block and driving the metal into it.
Engraving consists of putting the design upon the[362] iron with a diamond point chisel or any sharp tool, with the aid of a hammer. When the design is cut out by means of acid the process is called etching. It is done in this way: The surface to be etched is first covered with a layer of wax. The design to be left is scratched through the wax into the metal by using a very sharp tool. This lays bare the surface of the metal to be etched. The acid or etching fluid is then applied. When sufficiently etched the acid is removed from the surface of the metal by means of turpentine. This stops the action of the acid immediately.
Inlaying is hammering one metal into the surface of another. It is done by cutting a groove in the surface of one metal and hammering the other metal into this groove.
Impressing, engraving, etching, inlaying, etc., are used on fine pieces of ornamental work, such as door knockers, drawer pulls, door handles, sword blades, ornamental hinges, fire sets, etc., or on small pieces of work such as initials or coats of arms, etc.
Splitting of iron or soft steel: Splitting iron or soft steel is done for many pieces of work. All solid rings, rings without welds, handles for carrying ladles in foundries of all kinds are made in this way. [363]Most of our ornamental work, where we require two pieces of iron running from a stem in opposite directions, calls for this process.
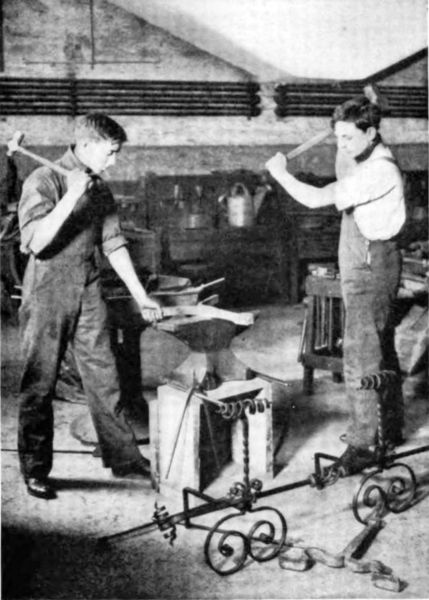
We are now going to make a pair of andirons. The process of splitting iron comes in with this problem.
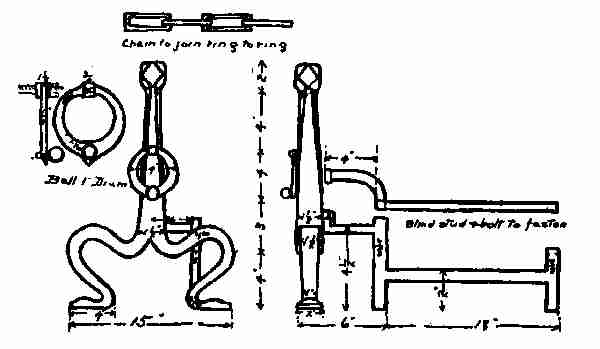
Pair of andirons: It is always best to make a sketch of the large pieces of ornamental work to be made, in order that they may have the proper proportion to their setting and bear the right relation to their surroundings. For instance, a grill made from either wrought iron or soft steel must fit the opening when finished, iron gates must fit space for which they are intended, yet not be too tall or too short to be in good proportion to their setting, etc.[364] Andirons must fit into the fireplace and occupy the space so as to give the eye a sense of fitness and proportion to the whole hearth. This sketch shows a pair of andirons that can be made suitable for any size hearth. No inlaying, etching, etc., is used upon this work, the only decoration being the hammer marks left by the peen of the hammer. Andirons are much used in country homes where log fires are in use. They can be made of iron or brass, and coal or wood may be used on a hearth fitted out with a pair.
Stock: One piece soft steel, 11⁄2 × 11⁄2 × 20 ins. Two pieces, 7⁄8 in. square, 9 ins. long. Two pieces, 7⁄8 in. square, 14 ins. long. Two pieces, 7⁄8 in. square, 20 ins. long. One piece 3⁄4-in. square iron. One piece 1 × 1⁄4 × 6 ins. flat iron.
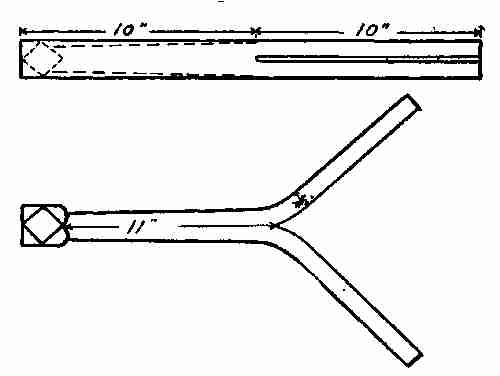
Directions: Take the 20-in. bar and split it 10 ins. To do this rub a piece of chalk on the two faces of the bar. This makes clear any marking put on the surface. With the square mark off 10 ins. from one end. Now with a pair of dividers set at 3⁄4 in. run along the bar with one leg of the dividers on the outer edge to the 10-in. mark. Do this on both faces. Now mark on this centre line with a cold chisel. Put the bar into the fire and heat the end of it. Take it out when red hot and[365] put it on the anvil. The marks made by the cold chisel will show plainly. With the hot chisel cut along the lines made by the cold chisel, cutting from both sides of the piece until the bar is divided into two equal parts. This will require a number of heatings to do. The last inch should be cut from the top down. To cut this, up-end the bar on the anvil or any solid base, placing the hot chisel in the crotch of the piece and striking it with the sledge hammer. This cuts the last inch down square with the axis of the bar. The sledge hammer work is heavy and one requires a helper here. The bar is now divided into two wings. Before[366] shaping these two wings into the base for feet the upper part of the bar should be drawn out according to the drawing and the end rounded or squared as suits the taste. The wings are now shaped up and form the two feet on the bar. (See drawing.)
To shape the feet of the andiron: The drawing shows the shape and length the legs should be. To do this heat the bar at the crotch, and flatten both sides out almost straight. This prepares for shaping according to the drawing. Measure off 3 ins. from the extreme end of each leg and mark off with a centre-punch. The 3-in. lengths form the feet. Taper the iron between the centre-punch mark and the crotch so that when finished the leg should measure 11⁄2 × 5⁄8 in. close to the crotch, and 1 × 1⁄2 in. at the centre-punch mark. Repeat this on the other leg. Flatten out the feet so that they will measure 31⁄2 × 21⁄4 ins. These feet are slightly impressed. To do this place the feet over a hollow iron block and force the metal down so[367] that the under side is raised up about 1⁄2 in. above the level of the foot. (See dotted lines on the drawing of the feet.) Repeat on the other side.
The leg is now ready to be bent into shape. Heat up at the crotch and then bend both legs back toward the top end at an angle of 60°. Heat again and bend the legs forward, shaping them like the drawing.
Back part of the andiron: The drawing shows a short upright piece placed so as to prevent the logs rolling out in front. The 14-in. piece is welded on to the upright, as shown in the drawing, and fastened on to the andiron. The 20-in. piece is welded on to the andiron and forms the leg on which the wood is placed. These pieces are welded upon short uprights by what is called jump welds. (See description of jump welds.) The end of the iron is bent on the anvil as square bends are always made. (See description of square bends.) The end that fastens to the andiron proper is also bent square, but tapered slightly to make a nice fit. Fastening the frame to the andiron is done with a stud and bolt. The stud is screwed into the andiron and into the frame as shown by the dotted lines. A square headed bolt fastens the upper part, thus preventing any twisting out of place. The only finish given[368] to the andirons is that left by the marking of this peen hammer. This leaves a mottled surface, which gives an old look to the finished piece.
Chain ring bolt: Ring bolt is made from a 3⁄4-in. square iron piece. This is drawn down at one end until it is 1 in. long and 1⁄2 in. round. A thread is cut on this end. Drill a hole through the centre of the square head 3⁄8 in. in diameter.


Ring: Take the 1 × 1⁄4 × 6 in. piece of flat iron. Draw it out so that it tapers toward each end. (See drawing.) On the extreme end of each is a 1⁄4-in. pin 3⁄8 in. long. Bend ring into shape. The lower centre of the ring has a knob. This knob is made out of a piece of 3⁄4-in. square iron pulled down 1⁄4 in. in diameter and 1⁄4 in. back from the end. The fullered end makes the pin and should be cut long[369] enough to project through the ring 1⁄8 in. to allow for riveting. You have sufficient stock to round up on the edge of the anvil into a ball shape. Drill a hole in the centre of the ring and fit the pin on the end of the knob into the hole in the ring. Rivet tight. The design you see on the ring may be put on with a diamond pointed chisel. The ring is now heated, opened out, and pushed into the hole made in the ring bolt so that it swings easily into place. Two rings of course should be made. The chain fastened from one ring to another is used as a guard against fire. The chain rings are made out of 1⁄4-in. square iron which is cut 10 ins. long. Then they are bent square and welded as chain links are usually welded. Notice that the last two links show an opening just wide enough to allow them[370] to be slipped into the rings of the andiron. This completes the set. The finish is made by the indentations left by the peen of the hammer.
On page 369 is shown another pair of andirons. They are made in the same way as the pair just described, splitting it down to form the legs. The wood rests are riveted through the body of the piece, forming a large rivet head in front to hold it in place and at the same time adding to the decoration.

Fire tools form part of the andiron set and are used for grate fires or open hearth fires of either coal or wood. They are always in evidence in country homes where open fireplaces are still in use. They can be made of brass, iron, or soft steel. If an andiron is in place the fire tools are usually[371] made of the same metal and finished in the same way so as to match.
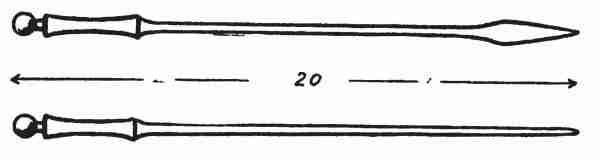
Poker:
Stock: One piece of 7⁄8-in. round iron or soft steel 8 ins. long (for handle). One piece 1⁄2 in. round. One piece 20 ins. long (for rod).
These drawings show a simple design in fire tools. All have handles after the same design, slightly curved, with a ball as an end decoration. The making of the handle is described below, and this method, of course, applies to the making of all the handles of this set.
Handle:
Stock: One piece 7⁄8 in. of round stock fullered down 7⁄8 in. from the end to a thickness of 5⁄8 in. Knock the four corners down and round up into a ball. Five inches from this, fuller the piece to 5⁄8 in. thickness. Draw the piece out any length, keeping the thickness 5⁄8 in. Weld the 1⁄2-in. rod to the small end. The extreme end of the poker[372] may be finished in various ways. It is sometimes turned at right angles to the rod. It may be pointed, flattened, etc. The centre of the handle is slightly curved. To do this heat the rod and reduce it, then place it upon the largest part of the horn of the anvil. With the hand hammer, hammer until the thinnest part in the centre measures about 3⁄4 in. in diameter. In this way the handle is reduced 1⁄8 in. at that point, and curved in slightly.
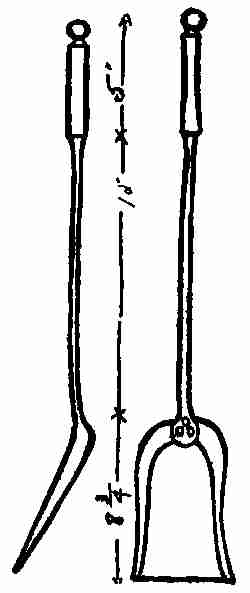
Shovel:
Stock: Handle, 7⁄8 × 8 in. round iron or soft steel. Rod, 1⁄2 × 10 ins. long, iron or soft steel. Shovel blades, rectangular piece of No. 20, soft steel, 6 × 9 ins.
Directions: Handle is made in same way as you made the handle of the poker.
Rod: The rod is welded at one end to the handle. The other end is flattened out to be riveted on to[373] the shovel blade. To do this, upset the extreme end of the rod back about 1 in. and about 3⁄4 in. in diameter. Flatten this out and shape it up as shown by the sketch. Holes are drilled in for 1⁄8 in. rivets.
Shovel blade: Cut a paper pattern just the shape of the blade. Mark on the inside of the pattern the width of the edges to be turned up. Place the paper pattern on the metal and cut out the outline with a cold chisel. Now mark off the inside line for the turned up edges. Heat the metal in the forge fire, a little at a time, beginning at the centre part of the round. Bend it upon a round stake, tapping gently with the hammer until the blade is well shaped, according to your design. This size metal will buckle up the same as the copper did. Give as much care in rounding up the iron as you did to the copper. (See copper bowl.) When the piece has taken on the shovel shape place the end of the handle to be riveted on the blade, and mark the holes. Drill and rivet the handle and the blade with 1⁄8-in. round head iron rivets. Notice that the shovel blade is not in an exact line with the handle and rod. It forms an angle with them. This bend is made after the riveting is done. Heat the piece where the blade joins the rod and bend it[374] back gently either with the hand or by tapping it with a hammer, keeping the hot part of the shovel, all the time, on the horn of the anvil.
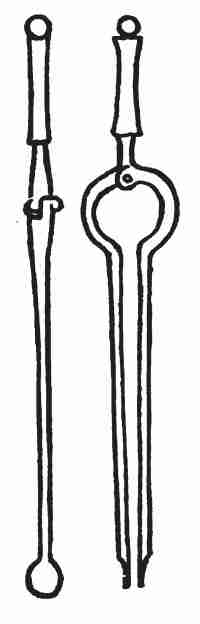
Tongs:
Stock: 7⁄8 × 12 in. round, for handle. Two pieces 1⁄2 × 16 in. round rod.

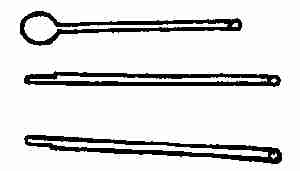
Directions: Make handle as for poker and shovel. Look at the detail drawing and you will see by the dotted lines that 2 ins. from the lower end of the handle the stock is bent out at right angles to the axis of the handle. Take one of the 1⁄2 × 16 in. round rods, place it in the swage, using the top swage on this. Shape the piece between the two swages. Form it to an oval shape by striking with a sledge hammer on the top swage. This makes one half of the rounded part of the tong. If this is done without turning the piece while working it, the cross section will be oval. Bend it rounding, as shown by the drawing. It is now ready to weld to the rod, but before doing this it is best to finish the[375] hinge. Draw out the stock between the shoulder and the bend, 2 × 5⁄8 ins. in diameter. Leave the stock heavy near the handle on account of the weight of the tongs. To form the hinge: Place a round 3⁄4-in. punch, flattened on the end, on the corner and drive down half way. This makes a circular depression, just large enough to accommodate the 1⁄2-in. hinge. Two of these wings of the tongs are to be made to complete the tongs. The second piece is far simpler than the first to make, and it is really the only part of the tong that moves. Draw out the stock and make the same size oval as you made with the other piece under the swages. Bend it the same shape. Repeat the work with the punch on the end, thus making the other half of the tong hinge. File these halves to fit perfectly. When that is satisfactory, drill a hole through the middle. Put a round-head rivet through, and see whether[376] the hinge now works perfectly free. Remove rivets. The parts are now ready to be welded to the rods. Upset the ends of the small rods, scarf both for a regular lap weld (see Lap Weld), and finish by welding. The end of the tongs are flattened down. Flatten out the material and at the same time round it up. If the material is not thick enough to give enough for this rounding part, upset the end a little, or double the end over and weld. (See Welding.)
Tongs are now ready for riveting together. Place the hinge in position. Push the round-head rivet through the hole made. Let it push through far enough to allow material for a rivet head of exactly the size of the round head. The head may be rounded up if not too large, while it is cold. Since only a 1⁄4-in. rivet is called for here, this work can be done without any heating.
Tongs are made, as you know, for the purpose of picking up pieces of wood or coal to place them in a stove or open fire. One must keep their use in mind when making the ends of the tongs fitted to do this work, so the ends may be flat, round, claw shaped, concaved, etc. The finish will be the same as the finish on the andiron, without any attempt at ornament. The surface should[377] show the hammer marks, but be quite free from lumps.
Stand: Sometimes hooks are fastened in the fireplace for holding the fire tools. A tool stand, however, is most convenient and may be made easily. The drawing shows a plain design, with base, feet, upright, arms for receiving the tools, and handle.
Stock: Base, No. 20 sheet iron, 18 × 14 ins., oblong piece. Feet: 3 pieces, 1 in. square, 2 ins. long. Upright, 3⁄4 in. round, 26 ins. long. Arms, 2 pieces, 1 × 1⁄4 × 15 ins. Handle, 1 × 1⁄2 × 20 ins.
Directions: The drawing shows the stand as it should look when finished. Base is made first. Cut out a pattern of an ellipse, long diameter 18 ins., short diameter 14 ins. Place this pattern on the oblong piece and cut it out with shears or a cold chisel. On the inside mark off 11⁄4 ins. parallel to the outside edge. On that line turn the metal up as you turned up the rim of the copper bowl. This can be done while the metal is either hot or cold. Perhaps it is a little easier to work up most of the bend while the metal is hot and finish up while it is cold. Do not cool the metal off in water, though. This tends to harden it a little. Let it cool off gradually, and when necessary anneal or soften it.[378] Feet: The 1-in. square iron is fullered down 1 in. from the end. The ball is rounded out of this end piece same as was done in making the balls for the door knocker. This leaves part of the metal with which to make a pin for riveting. Cut off this rivet pin the length required. Rivet holes are made in the base large enough to receive the rivet pins on the iron feet. Divide the base into three equal parts. Drill rivet holes the right size, put the iron balls in place, and rivet.
Arms: The two pieces of 1⁄4 × 1 × 15 ins. are bent and scarfed. The two scarfed edges are welded together. Then the end is welded to one end of the upright post.
Handle: The handle is made separate and is then welded on to the arms. Take the 1⁄2 × 20 in. piece and bend it at right angles 5 ins. from each end. Heat it in the middle and bend so the two ends come together. This forms a loop. Make this loop the same shape as is shown by the handle. Weld the two 5-in. ends together, shape, and then weld this to the crotch of the arms. This forms the handle. The arms are now bent wide enough to receive the fire tools.
The upright: Cut it off 30 ins. from the top of the arms. Upset one end large enough to make a[379] foot 4 ins. long and about 2 ins. wide. This is flattened down and shaped as shown, for three 1⁄4-in. rivets. Push the rivets in and rivet the upright to the base. If the base should not be strong enough to hold the upright firm it can be strengthened by placing a brace from the long ends and fastening it to the centre of the upright. This adds to the decoration as well as the strength. Use a 1⁄2 × 1⁄8 in. flat bar of iron or steel. Place it in a vise and twist it about two thirds of its length. Bend the ends to fit the curved sides of the base and also to fit the post. A small 1⁄8-in. rivet on each side and one through the post will hold it sufficiently. The stand is finished to correspond with the andiron and fire tools. In this design the hammer marks seem more suitable than any special decoration. A little machine oil spread over the surface, the whole thing heated in the forge fire until the oil flashes off, gives a natural iron finish, which is most pleasing.
This wrought iron candlestick is made up of three pieces welded together.
Stock: Three pieces of 3⁄8-in. round iron 4 ins. long.
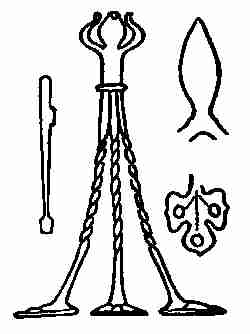
Directions: The detail drawings show the steps in the making of this piece of work. Notice that the rod used to make the leg and foot also forms part of the holder or socket. Take one of the 3⁄8 × 4 in. rods. Mark off 3⁄4 in. from one end. Draw this out as shown by the sketch. Mark off 1⁄2 in. from that point. From this 1⁄2-in. mark draw the material out 41⁄2 ins. long. This should be made square and tapered slightly toward the foot. You will then have 3⁄4 in. for the foot.
Foot: The drawing shows a conventional flower[381] shaped foot. Spread the 3⁄4 in. wide enough to shape a foot as shown in the sketch. Shape it by cutting it out with a chisel and then filing. The embossing is done in the same way, as has been explained. (See Embossing.)
Socket: The socket is tulip or cup shaped. Flatten out the opposite end of the 4-in. bar and shape up as shown in sketch. Make the other two legs to match this one. Weld the three pieces together at A in the following way: Put the three parts together and bind in place with a piece of binding wire. Place it in the fire and heat it to a welding heat. Weld the three pieces close to the socket and for about 1 in. below. Shape a round neck (see sketch) and at the same time reduce it to 3⁄8 in. in diameter. The small iron collar is put on and welded about 1 in. below the socket. This addition is for ornamental purposes entirely.
Shape socket for the candle: Heat the top at a low heat and with a pair of round-nosed pincers shape up as shown.
The legs are now twisted. This can be done the last thing and while the metal is cold.
Wrought iron candlestick: Take a piece of soft steel or wrought iron 1⁄4 × 4 × 4 ins. Heat the bar. Emboss the centre by driving it in a hole in a swage[382] block. The centre should be about 11⁄2 ins. above the surface of the feet. Cut out the four pieces as shown in the sketch. File up and finish the base.
Post: Select a piece of 5⁄8-in. square iron. Taper the ends to 3⁄8 in. square by 71⁄2 ins. long. The small end swells out 1⁄2 in. as shown in the sketch. Forge a small pin, 1⁄4 × 1⁄4 in., on the end of this post. Now swell the base of the post so that it will measure 7⁄8 in. square. The length from end to end minus the length of the pin should measure 8 ins. Forge a 3⁄8-in. pin 1⁄2 in. long at the base end. Heat the centre of the post; place it in the vise and give it a complete twist to the right. Drill in the centre of the base a hole to fit the pin on the end of the post. Heat the pin red hot and rivet the base to the post.
Candle socket: This socket is made in a conventional design. Take a piece of No. 20 soft sheet[383] steel or iron and cut a disc 21⁄2 ins. in diameter. Divide this piece equally into six parts and cut out as shown on the drawing. Bend these leaves up to form a socket. Now cut a piece of sheet metal 21⁄2 ins. square, and cut out as shown for the little ornament fastened on the top. Bend the four wings down as shown here. Drill a small hole through the centre of each to fit to the piece on the end of the post. Place these pieces in position and rivet in place. This work is to be done cold. A candlestick of this design is easily made and very attractive when finished.
Next to the scroll, the twist is perhaps the most characteristic detail of decorative treatment in iron. Twists relieve the plain effect of the straight lines made by the hard edges of the metal, by introducing short curves into the design. The twists are easily made and lend themselves largely for decoration on such things as fire escapes, brackets, grills, gates, fences, and smaller articles, such as umbrella stands, door knockers, fire tools, etc.
The twisting is done best while the iron is cold. If done while the iron is hot great care must be taken to check up when the lines begin to run too close[384] together. Take a bar of square iron, fasten one end in the vise, and with a monkey wrench on the other end give the metal a twist. Only square bars show a change in the shape after twisting. Round stock when placed in the vise and twisted shows no change in shape. However, two pieces of round stock twisted give a very pleasing effect. A braided strand is made (1) by welding the ends of two pieces of round iron together side by side and twisting them, (2) welding ends of two more pieces of the same size and length together and twisting them, (3) by welding these two twisted bars together on both ends and twisting them in the opposite direction. This gives a braided effect which is most decorative. However, the square stock gives the most satisfactory result in all of this twisted work.
Handles can be made by reducing square stock, leaving the centre larger and drawing the ends out to a taper and twisting this tapered part. Begin the twist in the middle and let it rise gradually toward each end. Great care must be taken with this work, as the smallest sizes are also the weakest and naturally bend first. To do this work successfully the metal must be heated and driven a little each time until the whole taper is twisted.[385] Spirals: Spirals are made by drawing a long taper on the end of a round or square bar of small iron. Turn the end of the bar up 1⁄2 in. at right angles. Grasp the turned up end in the vise; coil the end up as you would a coil of rope. Slip one end under the other when they come together. When the first coil reaches the centre of the piece repeat on the other end until the two coils meet in the middle. Heat it all evenly. Grasp both ends in the tongs and pull the spiral out. Stop when the openings equal the size of the iron of which the coil is made.
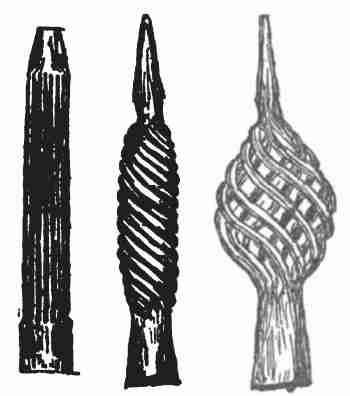
Ornamental bulbs: Bulbs are used in the same way as spirals and twists, for decorative purposes, on andirons, grills, fences, etc.
The form shown here in the sketch is a very simple one. The principle, however, is the same as that applied to the forging of more complex bulbs. Select a rod of iron for a core. Reduce the thickness to about 1⁄2 in. for about 6 ins. long, leaving the[386] required thickness at the ends; 1⁄2 in. from the shoulder nick the bar around, cutting it almost through. Leave about 1⁄16 in. to hold it to the body of the piece. Cut the core off 1 in. from the 3-in. cut. The picture shows the method of making the core in order to work out the problem. Select a number of pieces of 3⁄16-in. round soft steel the length of the reduced piece and place these around the core, each one fitting close to the next one. If the space is too small or too large when the last piece is put in make the core larger or smaller. These rods should just touch when they lie around the core. Now with a pair of tongs bind all the rods tightly around the core and with the same tongs put one end in the fire and heat red hot. Cover with borax. Take on a welding heat and weld it in a swage, confining the length of the welding to as short a space as possible.
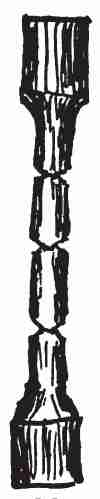
The core prevents the rods from sinking while[387] welding and it also keeps them in place. Reverse the piece. Put the other end in the fire and weld as before. Weld the neck as short as possible. Heat the body of the piece uniformly. Grasp one end of the bar in the vise and with a pair of tongs twist the other end toward the right slowly. While doing so tap lightly on the end with a hammer. This tends to loosen up the rods and help the twisting. Be careful not to twist so much that the rods will break away from the welds. Heat all again. Place it again in the vise and twist in the opposite direction, at the same time driving on the ends. This forces the centre out and gives it a bulb shape. The core should bend up where the cutting is done. Now the core should be driven out. A punch driven in against the core should break it easily where the cut marks are made. These short ends are forced out through the openings between the rods, and any uneven buckles or bends in the rods should be bent or straightened as the case requires. The bulb can be trued up while cold. A punch driven through from the opposite side will help straighten any of the rods bent from the outside in.

The rods can be plied apart with a pair of pliers[388] or a pair of tongs. The surplus metal on the top end is now cut off and trued up.
This old Dutch candlestick is made of 3⁄16-in. round wire in spiral form. The spiral stem is made so that, as the candle burns down, an inner socket is moved around the spiral. This travels up and down and keeps the point of the candle above the holder.
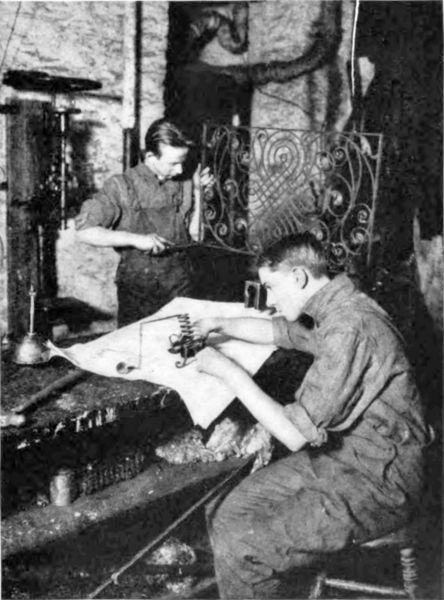
[389]Stock: Base, 5-in. disc of sheet steel or iron. Legs, 1⁄8 × 1 × 5 ins. (makes the 3). Spiral, 3⁄16-in. round wire, 40 ins.
Directions (base or pan): Divide the disc into sixteen equal parts. Flute these parts by cutting out a little hollow in a hard wood block and driving the flutes in by the use of a round cross peen hammer. Fluting reduces the diameter of the disc and forms it into a pan shape.
Legs: The three legs are in one piece. The 1⁄8 × 1 × 5 in. piece is split down half way; 1 in. from where the split ends the piece is fullered down. (See sketch.) Draw out this end 3⁄8 in. wide. Draw out the split ends to this width, and all pieces to 1⁄8 in. thickness. This forms a tripod, the three legs at an equal distance apart. The ends of the feet are made very thin by flattening down. Turn these up as shown by the sketch and shape the three feet.
Spiral stem: This candle stem is 3⁄4 in. in diameter. If you wind up a piece of 3⁄16-in. wire on a 3⁄4-in. iron rod while the metal is cold you will have a spiral stem like the one shown here. To do this make a mandrel out of a 3⁄4-in. bar not less than 20 ins. in length. Drill a 1⁄4-in. hole in the end. Into this hole drive a 1⁄4-in. iron plug. Place this[390] mandrel in the vise. Bend a small loop on the end of this wire to fit the 1⁄4-in. pin. Bend the wire and begin to wind around the bar. Make as many turns as are shown in the drawing. Take the wire off. The small loop end will stick out below the spiral and prevent it standing on a base level. This end must be driven back. To do this place it upon the other end of the rod, strike it with the hammer, and flatten it out so that the base will stand flat. Insert a sharp-pointed chisel between the coils; open them out so that the distance between them will be 1⁄4 in. Do this while the metal is cold. The handle may be made any design. It can be bent over, extended at right angles to the top, etc. Rivet the legs to the base with a 1⁄4-in. bolt. With a nut on the end rivet tightly to prevent the nut loosening up.
Socket to fit the spiral stem, for raising and lowering the candle: Stock: One piece of 1⁄8 × 1 × 3 in. One piece of 1 × 21⁄2 in. flat iron or soft steel, No. 20.
Directions: The No. 20 piece is bent around a 3⁄4-in. mandrel to give it a cylindrical shape. The two edges just come together. The handle of this socket is made by fullering down 1⁄8 × 1 × 3 ins., 1 in. back from the end, and drawing this out 3⁄16 in. round, 2 ins. long. The end is turned over as shown[391] in the sketch; the other end is filed round to fit the inside of the socket cylinder. The two pieces are now brazed together. File the parts that come into contact with each other perfectly clean, and cover with borax. Heat it red hot and touch the parts to be brazed with the end of a piece of brass wire. At a certain temperature the brass wire will melt and fill up the spaces between the bottom and the cylinder. (See Brazing.) This makes a tight joint: it is like soldering wrought iron together. This method of joining is used where welding would be impossible, as it would be in this case. File the base off smooth. The candle can now be slipped between the coils of wire. It should travel in its socket up and down the spiral. (See drawing.)
Ornamental hinges are used on doors, wall cabinets, chests, gates, etc., or wherever suitable. There are three methods of making hinges: (1) Solid eye, (2) welded, (3) turned or bent eye. (See article on Plain Hinges.)
Solid eye: The first drawing shows the solid eye split ornamental hinge.

Stock: One piece of soft steel or wrought iron, 7⁄8 × 7⁄8 × 6 ins. long. Take a bar of iron 18 ins.[392] long with the above dimensions as to width and thickness; 5 ins. from the end of the bar fuller down to 3⁄8 in. thick. These 5 ins. are flattened down to 1⁄4 in. thick and 2 ins. wide, any length. Split the flattened part to within 21⁄2 ins. of the shoulder. The two ends are now thrown out, tapered, and bent into shape. Cut the piece from the bar 1 in. back of the fullered part. Round the piece up, thus forming the eye. The body of the piece between the split and the eye is now widened out to 21⁄2 ins. To do this use the peen of the hammer on the under side of the metal, thus thinning out the metal in the centre in order to increase the width. Shape it up and curve it about 1⁄4 in. This, in turn, gives a nice rounded finished surface similar to the drawer pull. The chased design on the hinge is made in the same manner and with the same tools as are[393] used in work in chasing. (See chapter on Chasing.)
The butt for the hinge is made of 1 × 1⁄2 in. flat wrought iron. Fuller down the end of the piece, round it up to fit the diameter of the eye of the hinge. A hole is punched in the middle of the piece. A 21⁄2 × 1⁄2 in. piece of iron is drawn and is pushed into the hole, riveted down on the short end, and welded. The other end is drawn out to a square tapered point. Nick the four edges at intervals with a sharp chisel, thus throwing up little projections to prevent it from slipping out of the wood when driven in to hold the hinge. This kind of hinge is used mostly for doors. The upper part of the pin that sticks through the eye of the hinge is ornamented by a fuller mark and a round top.
This bracket is made of three pieces: back piece, hanger, and support:
Stock: Back plate, 3⁄8 × 1 in. of soft steel or Norway iron. Hanger and support, 1⁄4 in. square.
Back plate: The drawing shows the back plate as a conventional leaf design and is made as follows: Take the 3⁄8 × 1 in. of soft steel and shape it according to the drawing. With the peen of the hammer widen out the top enough to cut out the design[394] shown here. When cut out as shown, boss up the centre of the leaves by using the peen hammer on a round hole. This bossing is a matter of taste. The lower part is now flattened out, trimmed, and shaped as shown. The thickness is of no importance. On the end of the top bar forge a pin about 3⁄16 in. in diameter to fasten into the back by riveting.
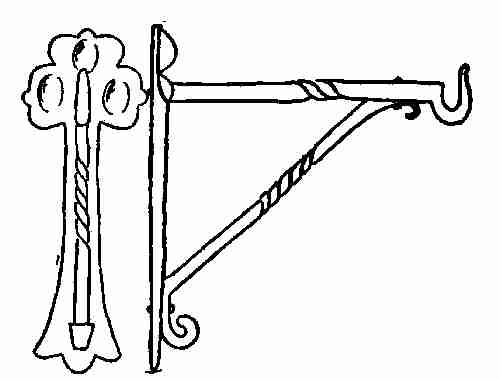
Hook: The hook is made in the same way as you made the gate hook. The bar is twisted in the middle.
Support: Select a bar the right length and twist it in the middle. Flatten the ends down and bend the little curves as shown. This is drilled for a[395] 1⁄8-in. rivet, then placed in position. Holes are marked in the hanger and in the back. Rivet the support in place. Be careful to have the hanger at right angles to the back. If you do not, the effect is spoiled, no matter how good the rest of the workmanship may be.
The sketch shows a wrought iron lamp with square base, four feet, round hollow post, shade holder and shade.
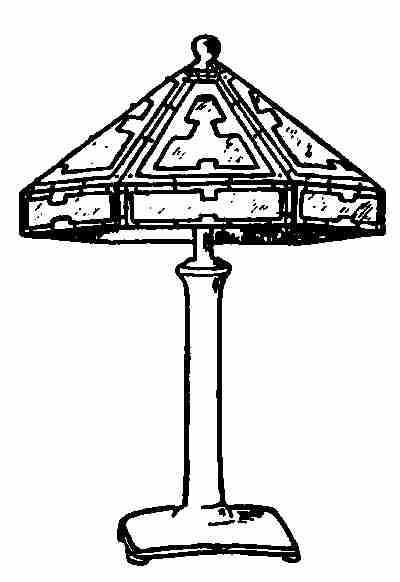
Base: No. 16 soft sheet steel, 10 ins. square.
Make a 21⁄2-in. circle in the centre of the 10-in. square piece. Drive this up 1⁄2 in. above the level by placing it over a 21⁄2-in. hole in a wooden block [397]or a swage block. If this piece of iron is placed over a hole any diameter and struck on the opposite side with the peen of the hammer it will sink into the hole and take the rounding shape. This can be done while the metal is cold. With a pair of dividers find the centre of boss and describe a faint circle 1 in. less than the diameter of the base. Tangent to those lines draw lines along the edge of the base. The dotted lines on the sketch show how the base should be cut out. The stock left on the corners forms the feet when the sides of the base are bent into shape. Cut out the piece of metal as described and bend the sides over 1⁄2 in. The corners must be heated red hot and formed separately. This is best done over the heel of the anvil. After placing the heated corners on the heel of the anvil drive quickly with a light hammer first on one side and then on the other, forming and upsetting the metal into shape at the same time. The flare on the bottom of the feet is worked in after the corners and shaped as shown in the sketch. Repeat this on the four corners. Now flare out the feet on the horn of the anvil. Out of the centre of the boss cut a circle a little less than the base of the post, to receive the post.
Post: Take a 10 × 5 in. piece and bend it around[398] a piece of round iron so that the two edges will fit close together. The inside and outside of these are filed for brazing. (See Brazing.) This post is now bound with good strong wire to keep the joint close. Cover with flux, place in the fire and add the smelter to the joint on the inside of the pipe. When the smelter runs into the joint take it out of the fire and allow it to cool in the air. The joint is now filed up on the outside and if properly brazed should show only a very fine line made by the smelter. The upper part of the post is now swelled out as shown in the sketch, by heating at a low heat and spreading the metal out all around the end.
A cap is placed on top of the post to hold the arms that support the shade and to hold, too, the electric light bulb, or gas pipe, or oil well, according to the light to be used. The cap is made by rounding the end of a 1-in. bar to 1⁄2 in. in diameter, 2 ins. long. The other end is cut off about 1⁄2 in. to allow for the flattening down to make the cap.
Place the 1⁄2-in. stem into a heading tool and flatten this bar down quite thin. Spread it out so that the edges can be turned over at right angles to form a cap to fit the top of the post. This cap can be either brazed or riveted on to the post. Either will look well. If used for gas or electric light a hole[399] should be drilled through the centre of the cap and through the post to receive the wire. If used for gas the lower side can be tapered out so that 1⁄8-in. gas pipe can be screwed in. Now cut a thread on the top of the post to fit an electric light socket. The same thread acts as a holder for the bracket of the shade holder. Place the cap on the post, rivet and braze. File the lower part of the post and the inside of the hole on the base perfectly clean. The bottom of the post should be filed a little tapering so it will fit into the base of the hole tight. Wire it in for brazing so that the post will stand perpendicular to the base. Carry your binding wires from the top of the post to the four corners of the base, using heavy wire for this work of binding. Cover the joint with flux. Place the centre on the fire and put the brazing material on the joint around the post. With a slow heat, heat till the smelter runs into the joint. Close off the blast, let it remain in the fire until cold, then remove it.
Shade holder: This is made of a piece of 1 × 1⁄8 × 10 in. soft steel. Fuller down 3 ins. from the end to 3⁄8 × 1⁄8 in. Draw this out any length. Split the other end to within 11⁄8 ins. of this fuller mark. Throw these arms out and draw each down the same size as the other, 1⁄8 × 3⁄8 in. Place[400] the crotch on a small bottom fuller and with the top fuller spread each arm out so that it will measure an equal distance from the other arms. At the same time this will shape the centre. Drive the end out tapering 3⁄8 in. wide at the base, tapering to 1⁄8 in. square at the ends. The length of the arms depends upon the size of the shade. Tip ends of the arms should be bent up 1⁄8 in. to hold the shade in place. Drill a hole in the centre of the tripod and tap a thread in the hole to fit the thread on the end of the cap, so that this will screw on. These arms can be bent down or up to suit the height of the shade.
Shade: The shade pattern is developed in the same way as the shade described in the copper article on lamp shades. In this case, however, each unit is cut out separately and riveted to the next; all put together and filed; 1⁄8-in. soft iron rivets are used for riveting the parts.
Glass: The glass can be bought at any glazier's. Cathedral opalescent glass is best. Place a piece of card-board on one of the units and mark the outline of the opening. Cut about 3⁄8 in. larger than this outline. This pattern taken to the glazier can be cut out from any kind of glass, according to the size wanted.[401]
This lamp may be used for gas, oil, or electricity. The difference between this and the preceding lamps lies in the construction of the base. The full page illustration shows lamp described here.
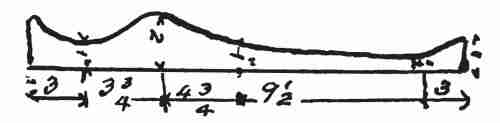
Base: Soft steel 1⁄8 × 5 × 24 ins.
Mark off the design shown by the full lines on the 1⁄8 × 5 × 24 in. piece. This is for one leg of the lamp. Cut with a sharp cold chisel along the outline about two thirds of the way through the thickness. Place the cut line in the jaws of the vise. With a pair of tongs grasp the waste material, then with a prying motion break off these pieces. File up the rough edge left by the cutting. With this piece as a pattern cut in like manner three more pieces, making four in all. This makes the stock for the four legs. Place the foot end of one piece into the fire and bend about 1 in. of this end into a small circle having a radius of not more than 3⁄4 in. About 5 ins. back from this heat the metal to a length of 5 ins.[402] Place it on the anvil as shown and with the hand hammer drive it into a circle.
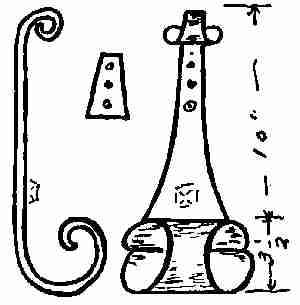
While bending this into shape keep the circle a little larger than the drawing calls for. The circle is very easily reduced, while if it was made too small in the beginning one would have to straighten the whole piece out to increase the size. Therefore, it is best to work it large until finished. Wide stock like this is easily twisted out of shape, so that it is very difficult to bend it up in a circle of this kind. It is hard, too, to change any twist that may be worked in.
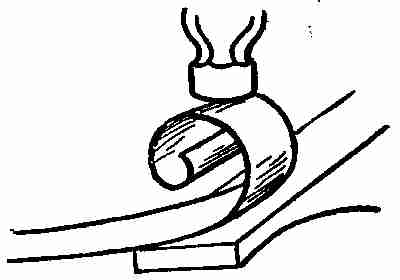
Bend the other three legs in the same way, as nearly like the first one as you can. Be sure to make the four legs the same height when finished. Drill[403] three holes for 3⁄8-in. bolts, as shown in the sketch. Seven inches below the top drill one hole in each leg for a rosette or some form of decorative treatment. These four legs are held in place by means of a tapered square plug 4 ins. long. The small end should fit the smallest width on the lamp legs and the taper 4 ins. below this width. Drill a hole through the centre of this plug for a 1⁄8-in. gas pipe, if to be used for gas. The same opening can be made for electric wires, etc., and a lamp well, placed at the end for a lamp.
To put the lamp together: Place one leg on the square plug and mark through the holes on the plug. Centre-punch these holes and drill for a 3⁄8-in. top. The hole should be drilled through the plug. Tap out the holes and bolt the two legs, one on either side. While drilling these holes be sure they are at right angles to the centre axis of the plug. This means a little blocking up on the tapered end. Bolt the two legs to the plug by using any short 3⁄8-in. bolts for this purpose. If all work so far has been carefully done these two legs will stand vertically to the plane of the table. If not they can be made to do so by taking out a little of the curve in the legs, thereby lengthening the side that might be a little short. Place one leg up on the third[404] side and with a scratch awl mark the holes through on to the plug and drill these three holes through the plug. Tap out as you did before and put the other two feet on. Square up all the work done. Bolts are used for this purpose. Take 3⁄8-in. square bolts, 1⁄2 in. long. Reduce the thickness of the head to 1⁄8 in., flattening and rounding the top slightly. Put these in place of the temporary bolts. They will hold the sides of the lamp in place.
A decorative piece can be made out of a bolt head by placing it in the heading tool and forming a pyramid shaped head. This is pushed through the hole and riveted on the other side. Cut off a piece of gas pipe short enough to extend about 1 in. above the top of the lamp and to come within 2 ins. from the base. This is now forced through the hole in the plug. If any of the bolts should have screwed into this hole, preventing this pipe from going through, they should be filed off. To fill up the interval caused by the four scrolls bending outward on the top of the lamp, forge a round ball on the end of a square bar to fit this opening. Cut off the ball and drill a hole in through the ball to slip over the pipe. The thread on the end of the pipe should fall below the top of the ball. Make a tripod as explained in the description of the preceding lamp. Screw it in[405] the end of this pipe tight against the ball. The end of the pipe is used for the fixtures needed.
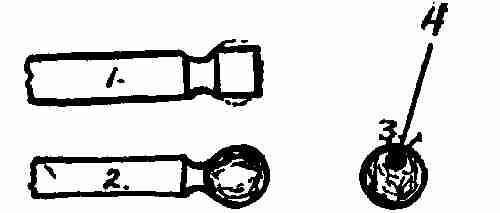
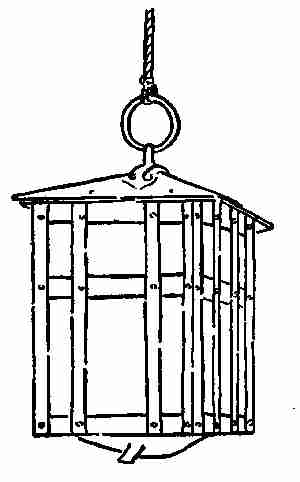
The lantern shown here is of a simple design and can be made out of material without putting in any bends or twists. The material for the making of the uprights is 1⁄2 × 1⁄8 in. steel.
The top and bottom should be made of No. 16 soft steel. The design shows that all pieces are riveted together on a framework.
The top can be of one piece and shaped as shown in the sketch. Bottom is of one piece and is made for electric light, candle, or oil lamp. Fixtures for any one of the above ways of lighting must be placed in the bottom of the lantern. For the candle, a small socket can be riveted to the bottom. A cup to receive the oil lamp may be put in place. If candle or oil is used the bottom of the lantern must be fastened with a hinge, so that it will open to receive the lamp or candle. If it is adjusted for using electric light the cluster sockets can be fastened to the bottom, or they can hang from the top. These lanterns can be made in all sizes, from one small enough for a cozy corner to one large enough for a lodge keeper's gate.
They may be hung on ornamental brackets, as shown in the sketch here, or they may hang directly from the ceiling, with ring or chain fastenings. They are made square, round, hexagonal, and so forth.
The sketch here shows a simple design of a kettle stand. The parts are (1) upright stand, (2) alcohol lamp holder, (3) hook.

Material: One piece 5⁄16-in. square iron, 20 ins. Two pieces 5⁄16-in. square iron, 9 ins. One piece 5⁄16 in.[407] square iron, 7 ins. One piece 3⁄16-in. round iron, 8 ins. One sheet No. 20 iron, 6 in. in diameter.
Directions: Flatten one end of each piece of the three pieces, 5⁄16 × 20 in., 2 pieces of 5⁄16 × 9 in. Weld these three together. Weld the 5⁄16 × 7 in. piece to the three pieces as shown by the sketch. Bend the two 9-in. legs out equal distances from the front leg. This forms the tripod. Bend the ends of the three short pieces into a scroll to form the feet. Now, bend the centre rod up as shown in the sketch. When this is done catch it in the vise close to the bend. With the monkey wrench grasp it about two thirds of the way up and twist the centre piece to the right a sufficient number of turns to give it a regular bend between the two points. Reduce the end of this upright post to 3⁄16 in. round and 6 ins. in length, leaving on the end a small boss about 3⁄8 in. This boss is to be rounded up by flattening[408] and rounding on the edge of the anvil. Through the centre of this boss punch a 3⁄16-in. hole and drive into it a piece of 8 × 3⁄16 in. round wire. When half of the wire is pushed through the hole bend the ends forward and at the same time drive them into the boss. This prevents the bent piece of iron from working up and down. It is now opened out as shown by the sketch and bent into a hook shape. The end of the post is turned so that the centre of this hook will hang over the centre of the tripod.
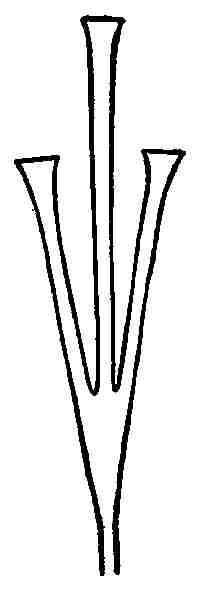
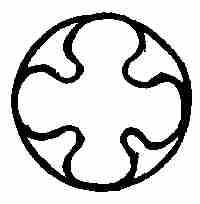
Lamp holder: Mark on the 6-in. disc a flower form similar to the one shown in the sketch. Cut out the design with a sharp chisel. File all rough edges and bend the shape up so that it will fit around the outside of the alcohol lamp, to hold it in place. Punch a hole through the centre for a 1⁄8-in. rivet and drill a 1⁄8-in. hole directly under the centre of [409]the hook. Place the lamp holder on and rivet in place. When the kettle is placed on the hook it should hang directly over the lamp. If it does not do so the post may be changed and the position of the kettle made to correspond.

The umbrella stand in the accompanying illustration shows a splendidly shaped design. You will notice that the four uprights are curved and twisted, fastened to two rings 10 ins. in diameter. The pan in the bottom of the stand, placed there to catch the drippings from the umbrellas, is made of copper and is beaten into shape in the same way as you would drive any pan into form. This is made to fit in the base of the stand.
To make this stand, take four pieces 1 × 1⁄8 in. flat soft steel, 40 ins. long. Two pieces 1 × 1⁄8 in., 31 ins. long, are needed for the rings; four pieces 1 × 3⁄8 × 12 ins. for legs. The copper pan should be 12 ins. in diameter.
Sketches given here show two different designs of door knockers. In the first design the knocker itself is made of round iron and twisted to form part of the design. It is made of very heavy stock.
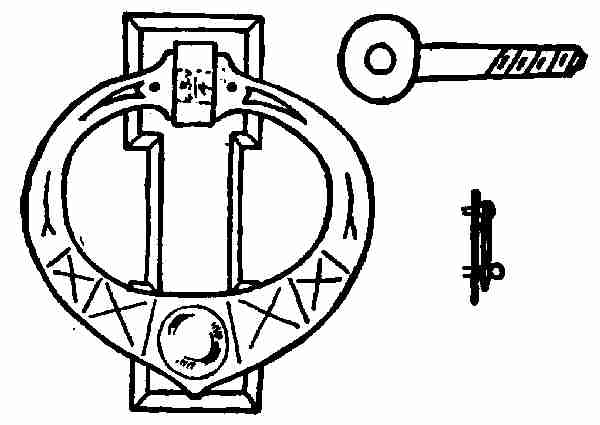
Stock: Escutcheon plate: 1 × 1⁄4 in. flat iron. Bolt: 3⁄4 × 1⁄2 in. iron. Knocker: 1⁄4 × 1 × 4 ins. long.[411] Directions: Take the piece of metal intended for the escutcheon plate and thin the ends out according to the dimensions of the drawing. Draw out the end of the 3⁄8 × 1⁄2 in. piece until it is 3⁄8 in. in diameter and 2 ins. long. The thickness of the door must determine the length of this bolt. Since the door knocker fastens on to the door, the bolt should go through and fasten on the inside with a washer and nut. The other end of the bolt is rounded to the dimensions given and a 1⁄4-in. hole is drilled through the centre.
Knocker: Taper the 1⁄4 × 1 × 4 in. piece of iron down as shown in sketch, retaining the thickness, 1⁄4 in., throughout the whole length. The two small pins on the end of the knocker are now made 1⁄4 in. in diameter and 1⁄4 in. long. This whole piece is bent into shape, the pins touching and the sides filed parallel to fit the bolt. When it is fastened into the bolt it should fit up snug and close.
Ball for end of knocker: Take a piece of 5⁄8-in. round iron any length. Fuller in as shown by the sketch. Rivet this to the centre of the knocker, the pin on the end of the ball projecting far enough through to make a rather large rivet head on the other side. The rivet head acts as a knocker. The bolt is pushed through the escutcheon plate, then the[412] knocker is ready to be placed on the door. Sometimes these balls are made long enough to go through the door and fasten in the same way as the bolt.
Second door knocker: The design and dimensions given here show the general scheme of this knocker. The escutcheon plate is made with a piece of 1⁄8 × 51⁄2 × 7 in. soft steel. The corners of this piece are clipped off and filed rounding or square.
Knocker: The knocker is made in the same way as the knocker was made in the first design. You use a piece of very heavy material about 13⁄4 in. in diameter. The ends are drawn down to 1⁄2 in. in diameter. If the stock is 1 in. in diameter, the piece may be upset large enough in the middle for the centre. This lessens the work of drawing out and is perhaps a much quicker way of making a knocker. The length of the knocker ring before it is bent is about 15 ins. This is pushed into the eye bolt. This knocker is placed on the door with wrought iron nails, one in each corner. The bolts that hold the knocker are riveted flush to the back of the plate. This finishing work should be done by the peen end of the hammer while the metal is cold.
Escutcheon plates: Escutcheon plates are used for lock plates and fancy key ways. Some are[413] plain, while others lend themselves to elaborate decorations. They are forged out while hot. Two designs are here given. The simpler one explains itself.
Decorated Plate:
Stock: 1⁄8 × 1 × 6 in. soft steel.
Directions: Mark off 11⁄2 in. each way from the centre of the plate and centre-punch. This allows about 11⁄2 in. on each end for drawing-out purposes. Draw ends out. (See sketch). Split the metal down to the centre-punch mark as shown in the sketch. These small ends are now bent out, and the long ends are bent in a circle, thus forming the design. The key way is made by drilling two 1⁄4 in. holes 1⁄2 in. apart about the middle of the piece. Chisel out a piece between the two holes according to the design. Drill four holes as shown. These are for screws or wrought iron nails, used to fasten[414] plates to doors. Many escutcheon plates are used for wall cabinets, cedar chests, doors, etc.
Stock: Piece of soft steel 1⁄8 in. thick, 3 × 7 ins., for the escutcheon. Knocker, 3⁄4 × 1⁄4 × 51⁄2 ins. Eye bolt 3⁄4 × 1⁄2 bar any length. Strike pin, 3⁄8 in. round, 3⁄4 in. long (on bar).
Directions: Mark off on a thin sheet of metal the outline of the drawing. Cut the escutcheon plate same shape as the drawing (using cold chisel). File it up so that the edges are perfectly smooth. With a 1⁄8-in. drill, drill holes for the screws.
Knocker: Split the 51⁄2-in. piece of stock, leaving 1 in. square for the eye bolt and eye untouched. Round up the wings to 1⁄4 in. in diameter. Twist the two wings according to the design. Bring the two loose ends together and weld up 11⁄2 in. from the end. The same heat will enable you to draw and shape the loop. Spread out the parts between the weld and the twist, forming in this way the loop.[415] Eye bolt: This is best made by working the end of a bar any length of the size stock given. The drawing shows a jaw-shaped holder to receive the eye of the knocker.
Punch a hole about 3⁄4 in. from the end of the bar about 1⁄4 in. in diameter. Cut out the piece between the hole and the end of the bar with a chisel. This forms the jaw. The small pin end is fullered down and drawn out the same as you did on the boss of the ring for the andiron, then it is riveted on to the escutcheon plate (see drawing) in place to receive the knocker. A 1⁄8-in. hole is drilled through this and through the eye of the knocker for the rivet to fasten the two together. The strike pin is made in the same way as the eye bolt, except that there is no jaw, just the plain piece of iron. The sketch shows a simple projection for the knocker to strike on.
Door knockers were used formerly in place of door bells, but to-day they are merely used for ornamental purposes.
Door pulls are used as knockers, too. In general they take the place of door knobs, and are used in[416] conjunction with a door plate. They are made of soft steel or iron.
Stock: Soft steel or wrought iron, 1⁄8 × 3 × 61⁄2 ins., made same way as the door knockers.
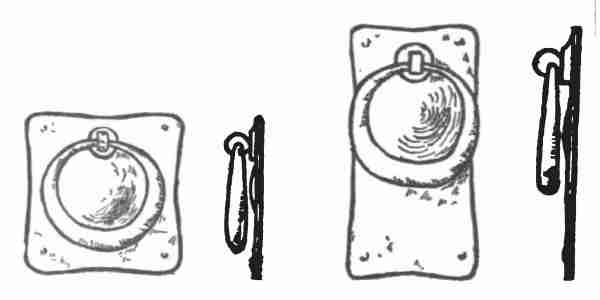
Stock: 5⁄8 in. round, 6 ins. long, of soft steel or wrought iron.
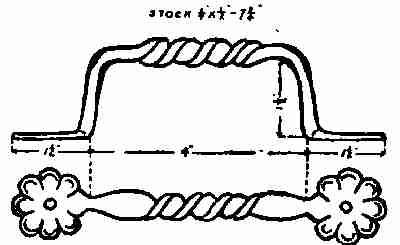
Directions: The piece of stock is drawn from the centre 23⁄4 ins. both ways to 5⁄16 in. in diameter. This will leave a piece of the full size material on each end of the rod. Flatten this out from the wide ends. Heat the iron very hot and flatten it down so that the width will be not less than 11⁄2 in. to 2 ins., to 1⁄8 in. thick.[417] Cut the design out. Any one of the designs shown can be used. The bosses are drawn up from the under part by using the peen of the hammer and driving it into a hard wood block, or on an iron stake, as explained in the article on embossing. A very blunt chisel, like a fuller, will give the centre effect. The handles are now bent into shape. Some handles are twisted out of flat stock.
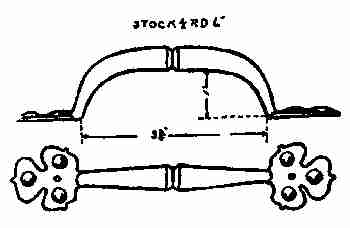
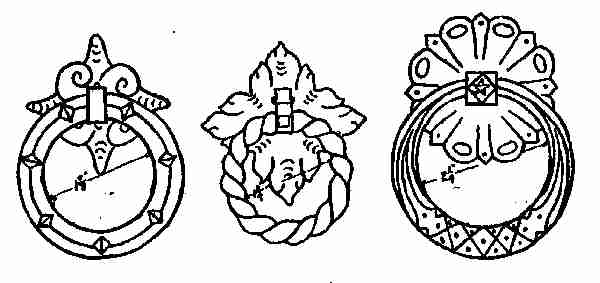
Drawer pulls are made in much the same way as door knockers. There are the escutcheon plate, bolt, and ring. They may be made to push through[418] a drawer of any kind. The design depends much upon the use the drawer pull is put to. They can be made out of round iron, flat iron, twisted iron.
Stock: Escutcheon plate, 1⁄8 in. soft steel, 21⁄4 ins. round. Bolt, 1⁄2 in. square on the bar. Ring, 1⁄4 × 61⁄2 ins., all of soft steel.
Directions: With a cold chisel cut a piece of flat soft steel 21⁄4 ins. round and make a disc. Divide the disc as shown by the drawing. File out the escalloped edges and with a small hand chisel chase the lines so as to form the design. The small half-round chisel will form the ovals and a centre-punch will form the dots. The ring is made by drawing each end of the 61⁄2-in. piece to a taper, leaving about one third of it for a centre. The ends should be tapered to 1⁄4 in. round. These ends fit into the bolt. Bend the ring into a circle. Engrave the design as you did on the escutcheon plate, using the same tools. The eye bolt is made from the 1⁄2-in. square bar by drawing out the end of the bar 2 ins. or less in length, 1⁄4 round, the length depending upon the thickness of the drawer. This bolt is to go through the drawer and be screwed tight in place with a nut. The large part is now cut off 1⁄2 in. in length and the four corners knocked down. A 1⁄4-in. hole should be[419] drilled through the bolt to receive the ring. Heat the ring red hot at the heavy part and with a pair of tongs open it out just wide enough to receive the eye bolt. Then the ring is pushed into place.
Bossing up: Place the disc while cold on the hollow wood block and drive down from the under side with the hammer, bending in the inside. This makes the outside slightly oval, so that the bearing will be on the outer surface. The depth of this concave should not exceed 1⁄4 in. A few designs are here given.
THE COUNTRY LIFE PRESS, GARDEN CITY, N. Y.
Spelling appears to be evolving between US/UK e.g. ACKNOWLEDGMENT, galvanized, practice, calipers, wagon, mold. Both color and colour are used in the text.
Obvious punctuation errors repaired.
Obvious typos repaired:
The text contains some inaccuracies which have been left but are noted here: