| Carpentry and Woodwork |
| By Edwin W. Foster |
| Electricity and Its Everyday Uses |
| By John F. Woodhull, Ph.D. |
| Gardening and Farming |
| By Ellen Eddy Shaw |
| Home Decoration |
| By Charles Franklin Warner, Sc.D. |
| Housekeeping |
| By Elizabeth Hale Gilman |
| Mechanics, Indoors and Out |
| By Fred T. Hodgson |
| Needlecraft |
| By Effie Archer Archer |
| Outdoor Sports, and Games |
| By Claude H. Miller, Ph.B. |
| Outdoor Work |
| By Mary Rogers Miller |
| Working in Metals |
| By Charles Conrad Sleffel |
NEEDLECRAFT
NEEDLECRAFT
BY EFFIE ARCHER ARCHER
Needlework Editor of well-known magazines. Connected with
New York Public Schools, Y. W. C. A.,
and Arts and Crafts Club
Garden City New York
DOUBLEDAY, PAGE & COMPANY
1916
ALL RIGHTS RESERVED, INCLUDING THAT OF TRANSLATION INTO FOREIGN LANGUAGES, INCLUDING THE SCANDINAVIAN
COPYRIGHT, 1911, BY DOUBLEDAY, PAGE & COMPANY
| CHAPTER | PAGE | |
| I. | What You Should Have in Your Work Box— Sewing on Buttons—Basting—Darning | 3 |
| II. | Back-stitching—Over-casting— Creasing a Hem and Hemming—Rolling a Hem—French Hemming—Sewing on Tapes and Hooks and Eyes | 12 |
| III. | Gathering—Sewing on Bands—A Practical Sewing Apron—Hemmed Patches—Gussets and Tucks | 26 |
| IV. | A Doll's Skirt—Sewing Case—Bindings—Doll's Bed Linen—Pin Case | 41 |
| V. | Making Buttonholes—Cutting from a Pattern—A Doll's Dress | 58 |
| VI. | A Lesson in Stencilling | 74 |
| VII. | What Can Be Done with One Skin—Cut Leather Bags, Belts, Book Covers, etc. | 83 |
| VIII. | Tooled Leather and Tools Necessary | 91 |
| IX. | The Simplest Stitches in Embroidery—Chain-stitching, Outlining, Herring-boning, Cross-stitching, Soutache, Coronation Braiding | 98 |
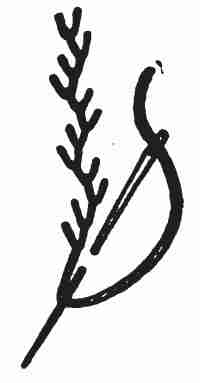
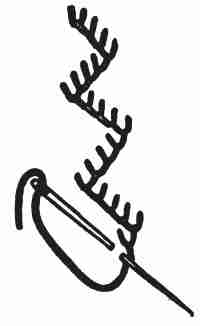
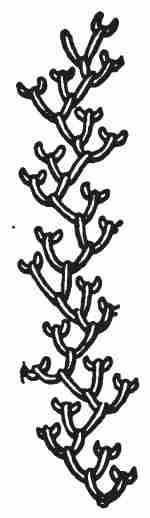
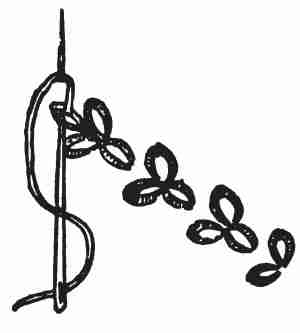
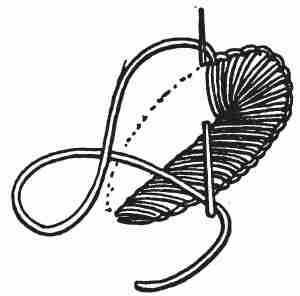
| X. | Smocking—Feather-stitching—Lazy-daisy Stitch | 112 |
| XI. | Couching—Shadow-work—Turkish Stitch—How to Stamp Designs | 121 |
| XII. | Buttonholing and Wallachian Embroidery | 130 |
| XIII. | Roman Cut-Work—Fancy Buttonholing for Borders—Bermuda Fagotting | 138 |
| XIV. | Satin-Stitch and Marking | 147 |
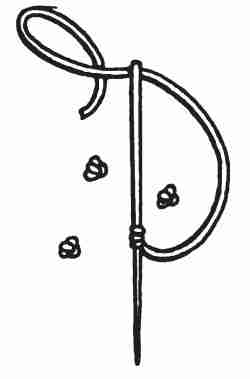
| XV. | Eyelets and French Knots—Bullion Stitch, and Other Fancy Stitches | 160 |
| XVI. | Long and Short—Kensington Embroidery—Ribbon Work for Simple Flowers | 176 |
| XVII. | Hardanger Embroidery for Squares, Pin Cushions, and Spreads | 190 |
| XVIII. | Appliqué on Linen and Other Materials—Hedebo Embroidery | 198 |
| XIX. | Hemstitching for Handkerchiefs and Collar and Cuff Sets—Simple Drawn Work Stitches | 207 |
| XX. | Easy Lace Stitches—Fagotting, Single Mesh, Double Mesh, Spiders, Fan, Maltese Cross, Twisted and Buttonhole Bars, Picots for Simple Edge | 227 |
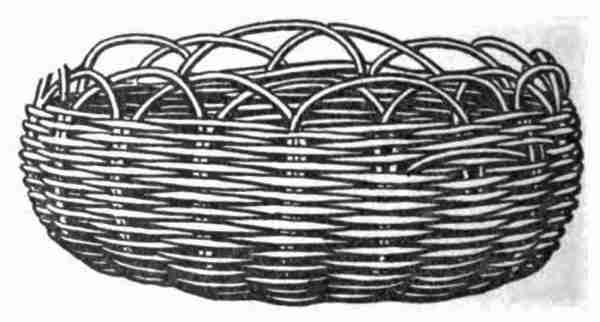
| XXI. | Simple Baskets | 242 |
| XXII. | Raffia Baskets and Napkin Rings | 250 |
| XXIII. | Raffia Hats | 262 |
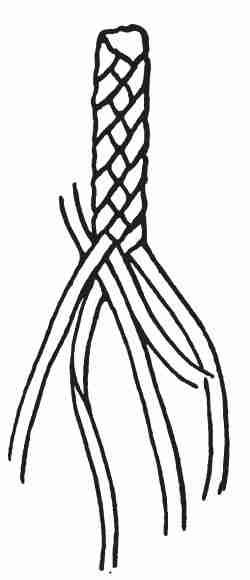
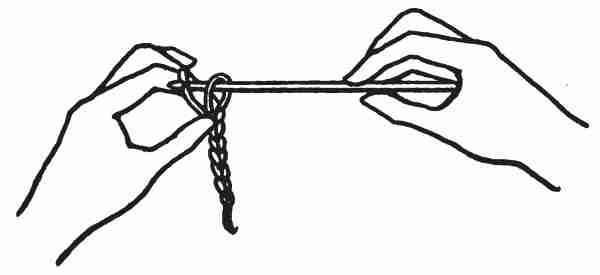
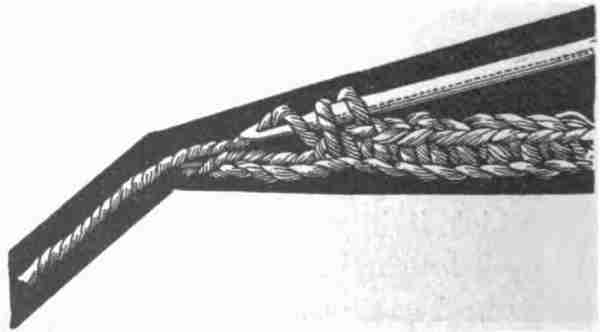
| XXIV. | Knotting for Dolls' Hammocks, Shopping Bags and Other Purposes | 271 |
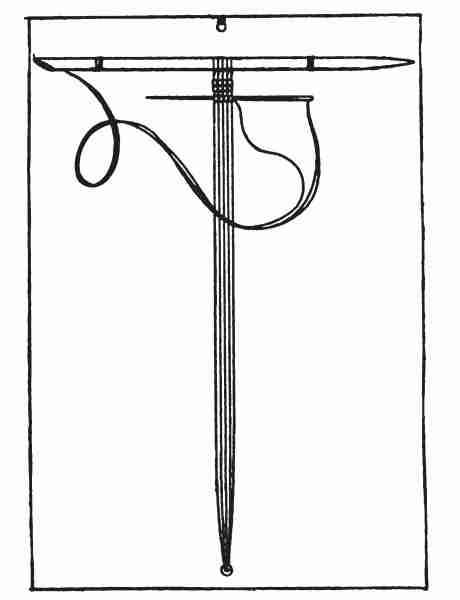
| XXV. | Simple Bead Chains on Single Strings—A Homemade Loom—Woven Chains—Belts and Purses | 278 |
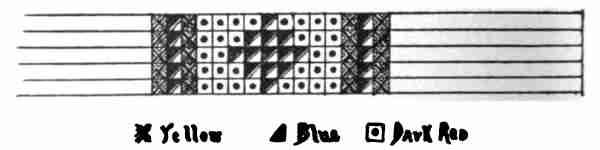
| XXVI. | Braiding and Weaving Four and Six Strands—Weaving on Looms | 295 |
| XXVII. | Simple Crocheting—Stitchery for Edges and Shawls | 306 |
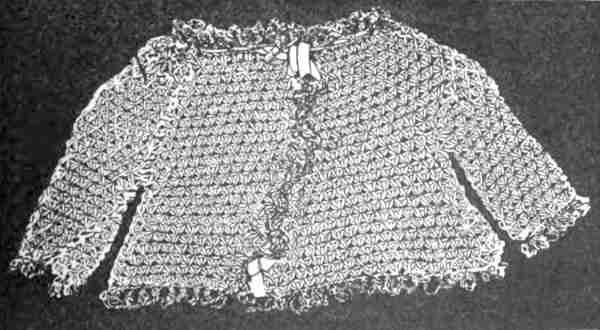
| XXVIII. | Pattern Directions for Making Doll Caps and Capes, Jackets, and Child's Bedroom Slippers | 320 |
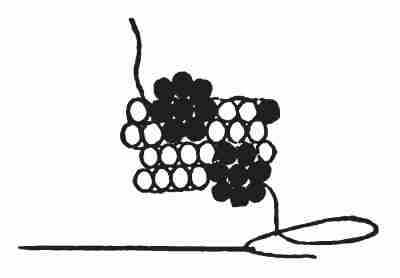
| XXIX. | Irish Crochet Lace | 333 |
| XXX. | Knitting, Plain and Purling—Wash Rags—Fancy Stitches for Shawls | 351 |
| XXXI. | Doll's Cap, Hood, Leggings, and Jackets | 360 |
| XXXII. | Embroidery Suggestions for Boarding School Girl | 372 |
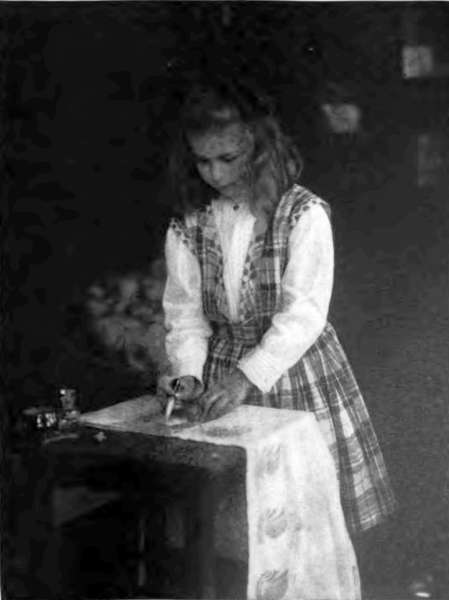
| The Last Step is Making the Buttonholes | Frontispiece |
| FACING PAGE | |
| The Right Way to Darn | 10 |
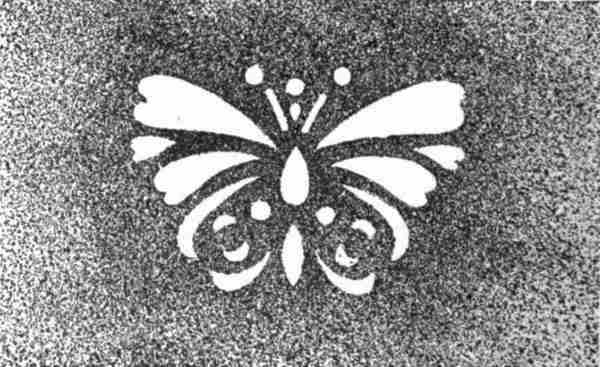
| A Single Motif Being Used on a Stencilled Scarf | 76 |
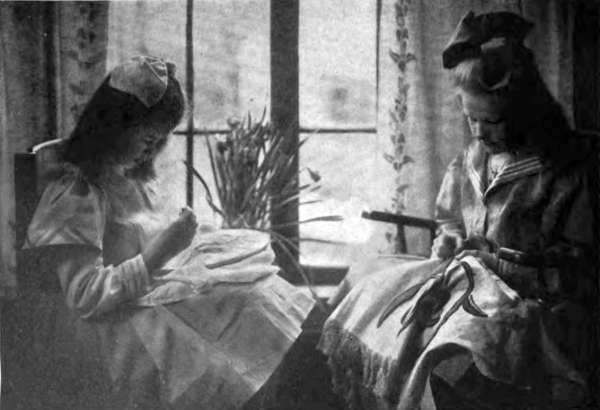
| Many a Happy Hour is Spent Embroidering | 164 |
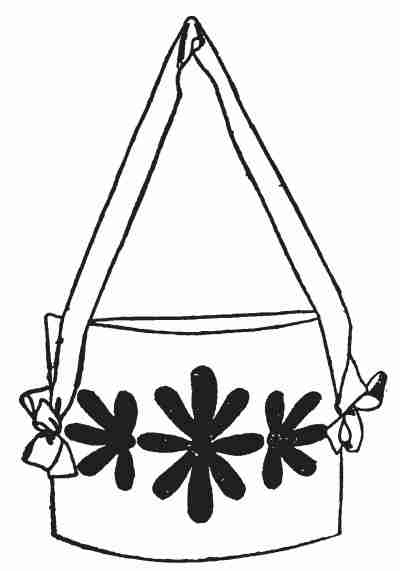
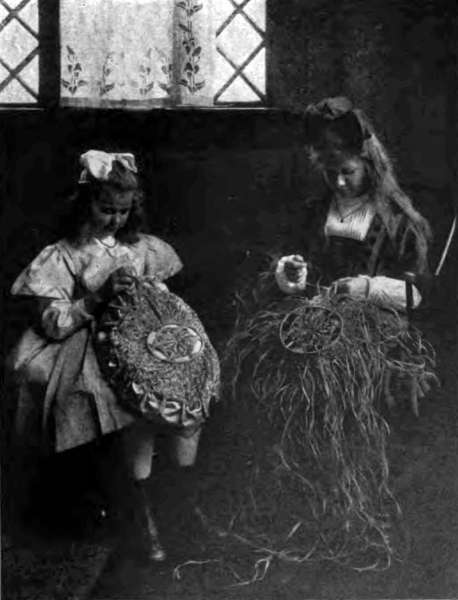
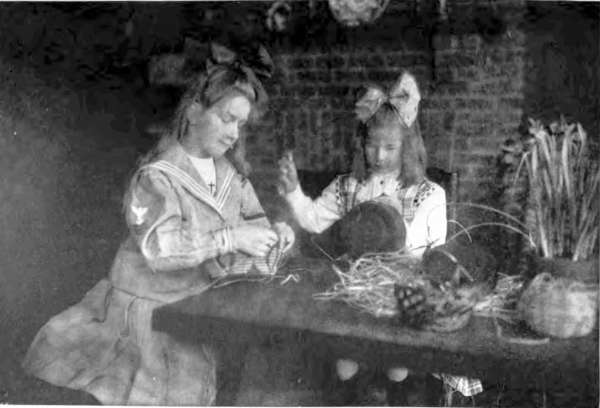
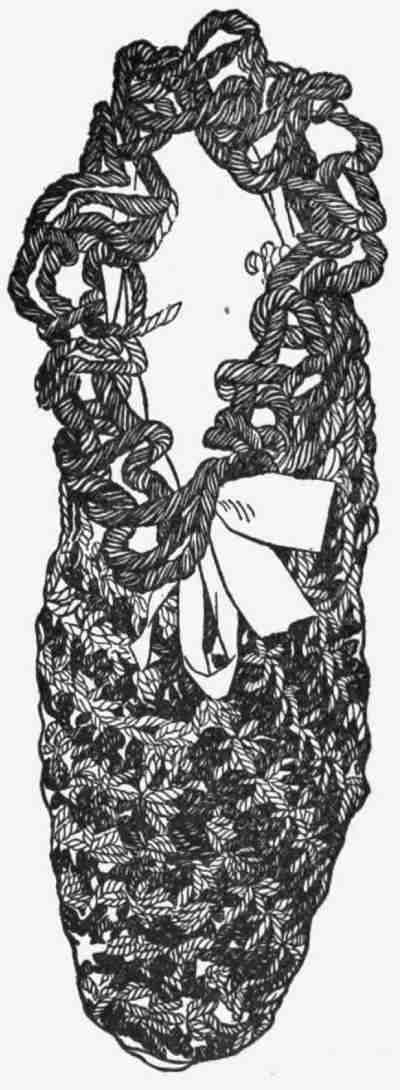
| It is Jolly to Make a Raffia Work Bag | 250 |
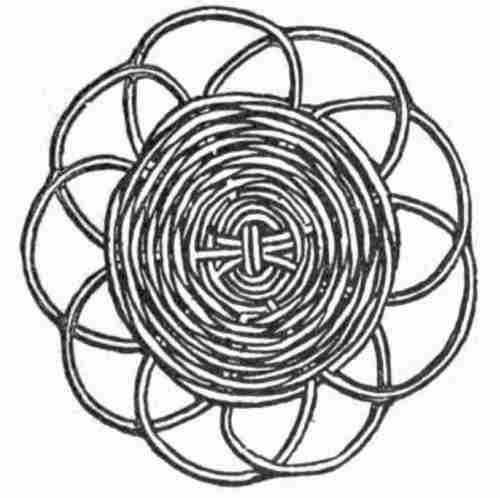
| Sewed Raffia Baskets Make Attractive Gifts | 258 |
| The Fascinating Task of Making Bead Chains | 284 |
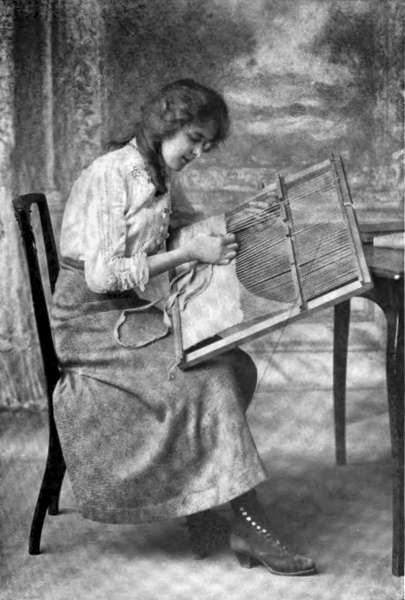
| A Cushion Top Can be Woven on a Simple Hand Loom | 296 |
| Her First Knitted Shawl | 356 |
NEEDLECRAFT
You will find that you are happiest when doing things for those you love; and what greater help can you give than by learning to do things for yourself that now those who love you best do for you? The little everyday things that appear to be so simple, yet take so much of the mother's time should be the things first to learn. There are so many things that one could do if one only knew how, that it seems a shame to waste time. Dolly needs new clothes, mother always needs help with her sewing; and then, too, the numerous birthdays and Christmases follow so quickly one on top of another, that there is hardly a chance to save up for one before the next is here. Many a hard problem for the little mother will be solved in this book.
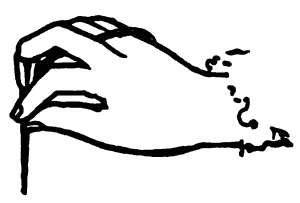
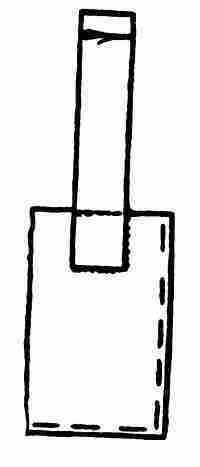
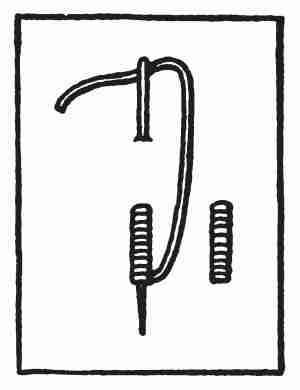
It is lovely to have a little work-box fixed up with thread, needles, and scissors, all of your own, and if you ask mother, I am sure she will give some of[4] her threads to help you start one. If you take a card and shape it like a Maltese cross you will have space for four colours of threads. You will need a card for the white alone because you will find you use so much more of it. You must have a little thimble and always use it or your finger will look cramped when working. Have you noticed how pretty ladies look when sewing? Well, you must do as they do, tap your needle with the thimble to send it through the material (Figure 1).
Have you ever wondered and wondered why it is that buttons have the horrid habit of dropping off just when you wanted to dress quickly or take Sally Ann walking? Well, I will whisper the reasons for this: the first is, that the thread might have been worn out from active service; or the thread used might have been weak; or lastly, which is probably the true cause, the button might have been sewn too close to the material and came off the first time it was used. Mother may not be around to help you when the accident happens, and would you not feel proud to sew it on for yourself?
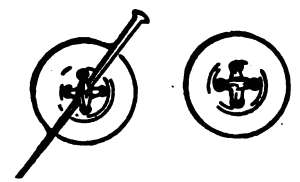
To sew a button on securely you should make a[5] pin-hole where the button is to be placed. A four-hole white button is the easiest to work on. Thread a No. 7 needle with a length of No. 40 white sewing cotton, bring the ends together and make a knot. The right length thread is measured from the tip of the thimble finger to the elbow. When a thread is used double it should be twice the length of this. A neat knot is made by holding the threaded needle in the right hand and by taking the end or ends, as the case may be, between the thumb and first finger of the left hand. Keep the thread tightly stretched, wind it around the top of the first finger, then move the finger down the thumb, carrying the thread with it about half an inch. Now with the nail of the second finger bring the knot thus formed to the end of the thread.
A large ungainly knot is a disfigurement to a piece of sewing. You are now ready to adjust the button; place the knot on the upper or right side so that it will be concealed; after adjusting the button put a pin across the top and sew securely through the holes, crossing the threads. Sew not less than three times through each hole. Remove the pin. Insert the needle from underneath, then bring it out between the button and cloth close to the centre of the button. Wind the thread tightly[6] around the neck of the button three or four times. (The neck is the threads between the button and material.) Wrapping the threads around protects the stitches and allows room for the buttonhole to lie under the button. Take the thread through to the wrong side and take up three stitches, make a short stitch on the material and cut the thread close (Figures 2 and 3).
When a three-hole button is used the stitches form a triangle on the top of the button. A shoe-button should be sewed with a No. 2 needle and coarse black thread. The stitches are taken through the shank of the button. Fasten off the thread after sewing on two buttons, for if they are all on one continuous string or thread and that breaks, all the buttons are apt to come off. If each button is securely fastened the thread may be passed, however, from one to the other.
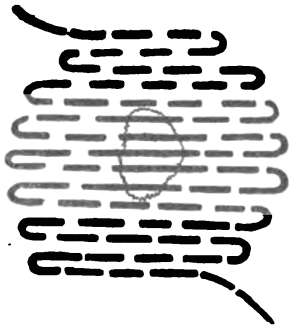
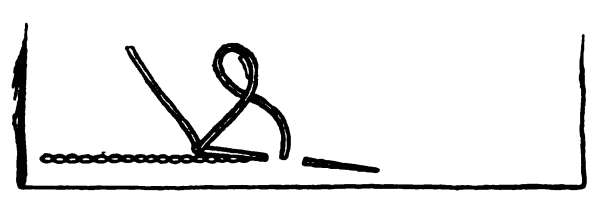
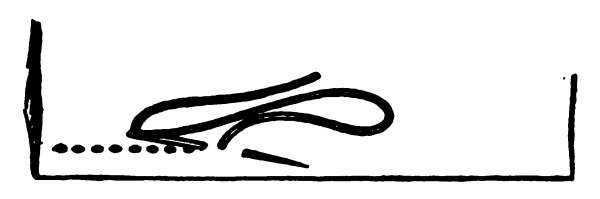
Now I know you want to do some real sewing; it must not be big or you will get very tired and think sewing is not as pleasant as you fancied. The simplest stitch in sewing is basting. This is used to hold materials together until you are ready to make[7] firmer stitches. In the following illustration the even and uneven basting stitches are shown (Figures 4 and 5). They must be straight. Even basting stitches should be taken about a quarter of an inch apart and in the running stitch which is fine basting about an eighth or a sixteenth of an inch. Pretty huck pillows can be made of even and uneven basting or running stitches. A leaf, star or a figure cut out and traced on a piece of muslin[8] will make a nice design for running stitches (Figure 6).
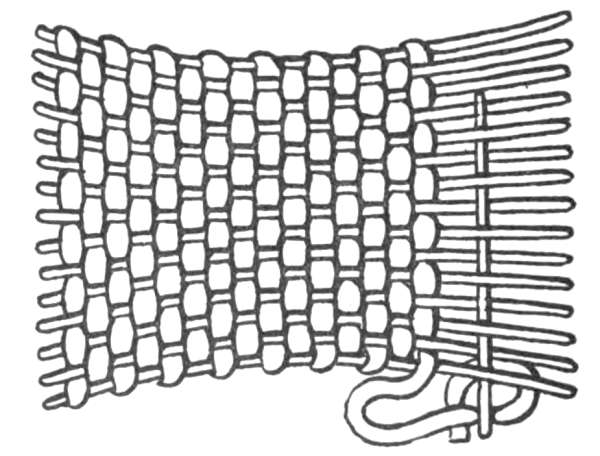
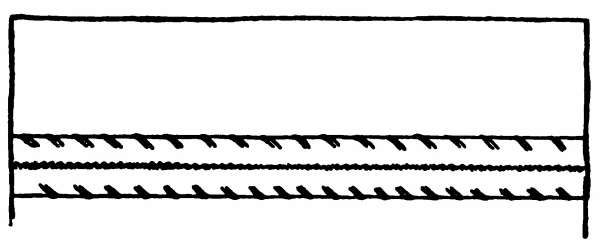
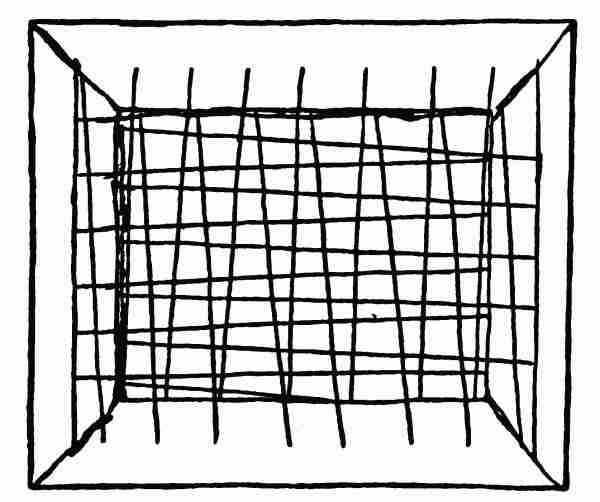
If you will examine different kinds of materials before they are cut, you will note that the threads run in two directions. The threads running lengthwise must be the stronger, as they have more strain on them. They are called the warp. The warp is set up first before the weaving begins. The threads running crosswise are called the woof. It is the weaker thread and forms the edge or selvage.
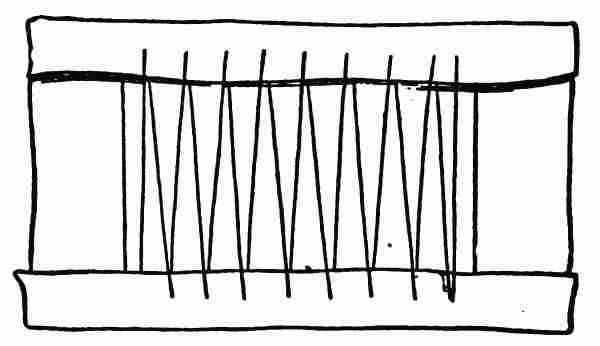
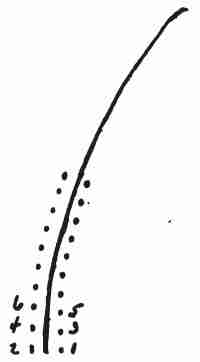
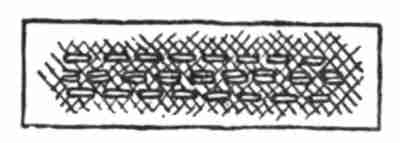
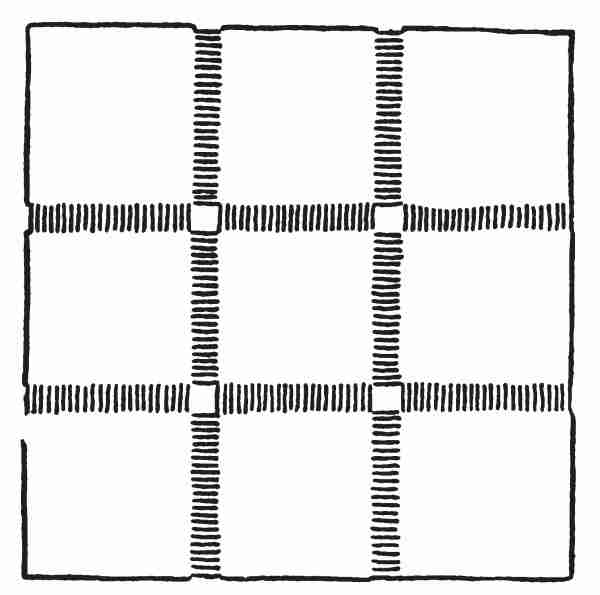
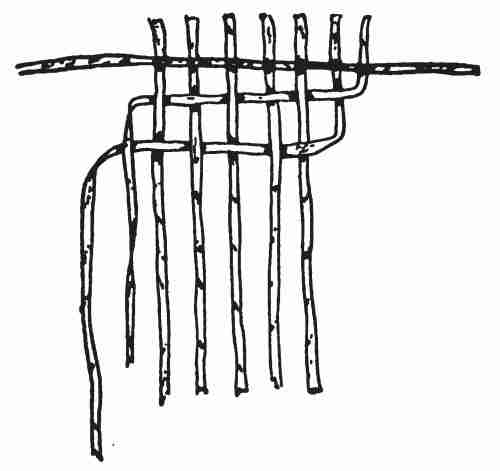
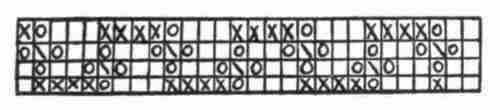
If you will take a card three inches square and[9] prick a line of dots half an inch from the top and bottom edges and prick a line a quarter of an inch apart you will have a little loom. The dots must be directly under each other. A piece of coloured worsted and a large-eyed crewel needle No. 2 will be required. Make a knot at the end of your thread and start from the upper right hand hole on the wrong side. Bring your thread up through the hole and down through the lower right-hand dot. The needle must now come up through the next hole at the bottom and the thread be again stretched across the card.
When every hole has been filled and you have several rows of straight lines, fasten off the worsted in the back. Another shade of wool should be selected so that you can distinguish the warp from the woof. The thread you are now going to use is the woof; commence at the top and go straight across to the left line, up over and down under each thread and so on till the row is completed. In weaving the next row, pick up the threads of the warp that you went over last time. Alternate rows agree (Figure 7). When finished, the little piece can be used as a doll's mat.
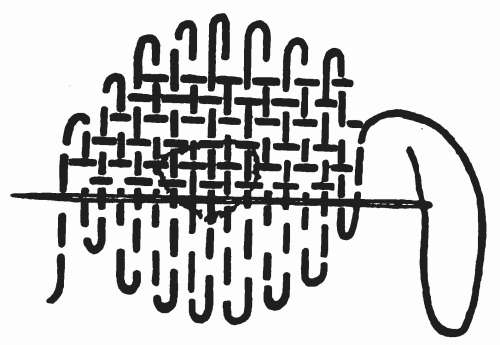
To darn your stockings is almost as simple a matter as this weaving. Instead, however, of starting[10] the thread of the warp on an even line, as on the card, start some higher than the others. The reason for this is that an even line will be apt to make an uncomfortable seam in your stocking. The woof threads are always connected to the stocking. A darning ball should be used under the hole. In darning cashmere or woollen stockings it is best to allow the warp to be very slack as wool shrinks considerably in washing. Wool should be used for darning woollen stockings.
Have you ever belonged to a sewing club? If[11] not, try to start one and see how much fun there is in it. The club should meet either on Friday or Saturday afternoon, after the school work is finished. Every girl should bring her stockings to darn and another piece of work, so that when the darning is over she will have something to work on. If there are more than four in the club it is a very hard thing to keep up. Three is the ideal number for it. It is better to have a small number—three, for instance. A large club is apt to be distracting, but three or four little girls, with the right helpful spirit, will find such meetings very instructive and entertaining.
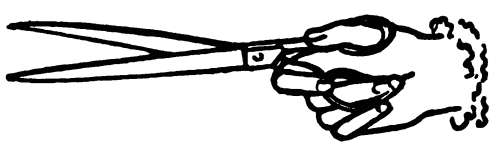
Stitching is witching," the song book says, and it is true, for after we know that stitch there are a hundred and one things we can do. Some people call it back-stitching and we must try to remember that, so that we shall understand of what they are talking. Get mother to give you a piece of material to practise on that has a stripe in it. Now take your scissors (Figure 9) and cut out two three-inch squares. Baste the two squares together a quarter of an inch from the edge. Hold the square over the first finger of the left hand ready for the back-stitching. Let the basting run up and down over your finger. Start from the[Pg 13] top and make a small stitch backward, on the right side of the material, instead of forward as you did in running (Figure 10). Pass the needle under until you have a stitch twice as long on the wrong side as that on the right. Take the next stitch backward close to the end of the last one on the right.
Remember that the stitch you take backward is only half as long as the one you take forward. Stitching always looks very different on the wrong side, but on the right side it ought to look like machine stitching. This stitch might be called the lion stitch, because it is so strong. It is used to join two edges together, as for the seams in bean-bags or cushion covers.
In places where there will not be much strain we use a quicker stitch, which is called the half-back stitch (Figure 11). This is very much like the stitching of which I have been telling you. The wrong side will look about the same, but on the right side[14] instead of the stitches touching there will be a space, then a stitch of equal length.
The next stitch to learn is the combination-stitch, which is made up of both the running and the back-stitch (Figure 12). It is a stitch that is greatly used for sewing long seams, as on underwear. By this stitch we can cover the distance in about half the time that back-stitching would take.

Whenever you can avoid making a knot, do so, because it spoils the look of your work on the wrong side. You can start your work, if it is a seam, for example, by making two or three stitches on top of each other. Follow the thread of the warp or woof[15] of the material as much as possible. After fastening your thread, make two fine running stitches forward and one back. Keep the stitches the same length.
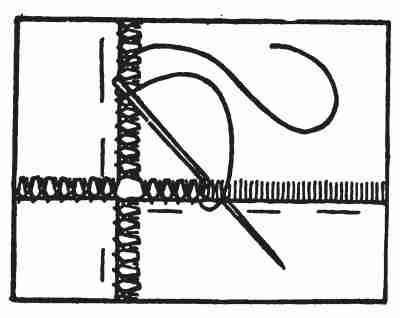
Over-casting is used on unfinished or cut edges to keep them from fraying (Figure 13). The stitches all slant from right to left. Take the stitches one eighth of an inch deep and one quarter of an inch apart.
Over-handing is fine over-casting and used to connect two finished edges together (Figure 14), as when sewing lace on ruffles, or joining selvages. What is the selvage? It is the edge of the warp.[16] The next time mother goes shopping ask her to take you with her. When she tells the salesman she wants so many yards of goods, whether it is for kitchen towels or a dress for herself or for you, notice how the goods is measured. The salesman will measure along one of the finished sides of the goods. These finished edges are called selvages.
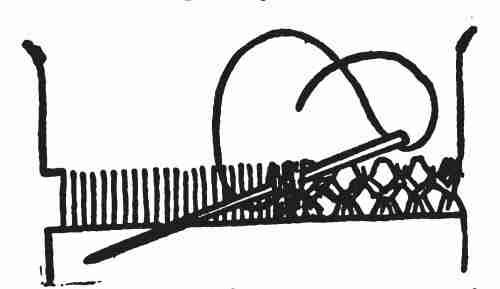
Make the stitches in over-handing as small as possible, keeping the stitches even. Sew through both pieces of the material. Hold your work between your thumb and first finger. Here again it is not necessary to make a knot. Let a half-inch of the end of your thread lie on top of the material toward the left side; the over-handing stitches will cover this end. When the over-handing is finished run your thumb-nail along the stitches on the right side. If your stitches are too deep there will be a seam on the wrong side, whereas if the instructions[17] have been followed carefully the material will lie perfectly flat (Figure 15).
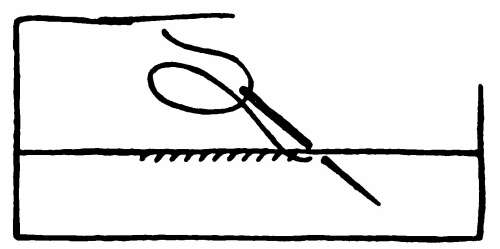
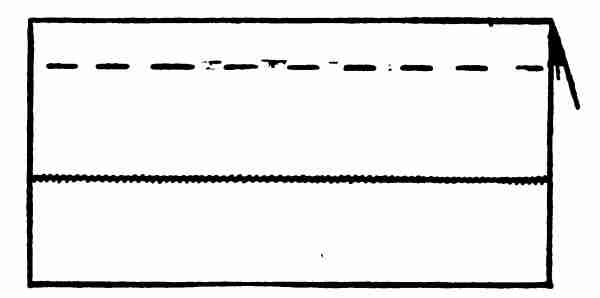
Now we are ready to help mother hem the new kitchen towels. First see that the edge you are to hem is straight. If it is not, pull out a thread so as to mark a line to cut by. You must take a thread that runs the entire way across the end of the towel. Cut carefully along the space out of which the thread came. Get a piece of card that has two smooth or straight edges and make a notch one-half inch from the corner (Figure 16). A half-inch hem is the one commonly used on a towel.
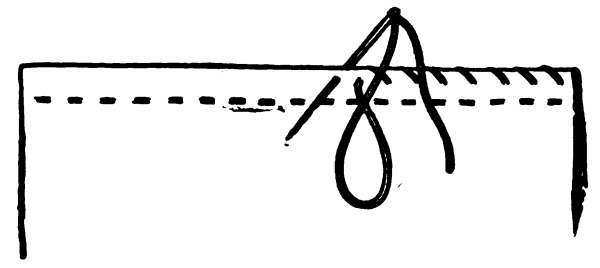
If mother likes to have her towels with a wider or narrower hem, notch the card the size she wishes. Turn the material back one-quarter inch and crease it down with your thumb-nail. A second fold is made the width of the hem. Take your measuring card and, placing the end of it on the double edge, see if your hem is exactly the width desired. Baste along the first folded edge to hold the material together for hemming (Figures 17 and 18). Hold the edge to be hemmed toward you. Do not knot your thread. Insert the needle at the extreme right of the hem. Pull the needle through, leaving a[18] little end, as in over-handing, to be fastened down with the hemming itself.
Your needle should slant as shown in the diagram (Figure 19). Take a stitch right through all the thicknesses of the material. Be sure that it goes[19] through to the other side. The fewer the threads taken on the needle at the same time, the neater the result will be. The stitches should slant from right to left. The stitches must be close together if we want fine hemming. Let each stitch be the same size as the other and slant in the same direction. The right side of the hem looks like a row of short dashes.
If your needle gets "sticky" when you are sewing, you should pass it through your emery-bag till it is shiny and sharp again. The needle is apt to get that way if your hands perspire. Ladies who like to keep their sewing looking fresh and white, as if hands had never touched it, find it a good plan to wash their hands in a little vinegar, or lemon and water.
It is very necessary to sit so that the light falls over your left shoulder. A little straight-back chair is another good help in sewing. Do you know[20] that many of our English great-grandmothers had very straight backs? When they were little girls they had to sit on a very straight, tall chair, an hour or two every day. A foot-stool was placed under their feet, and their shoulders strapped against the chair. Of course they did not sit there idle, but a piece of fine sewing was given them to work. You see they did not have the opportunity to run around and play as you have. Their chief recreation was their dancing lesson.
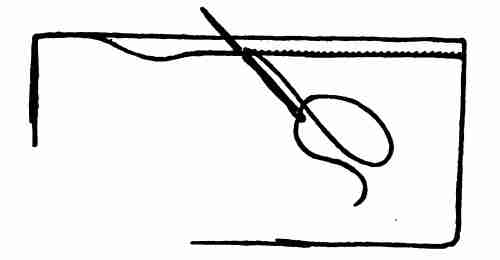
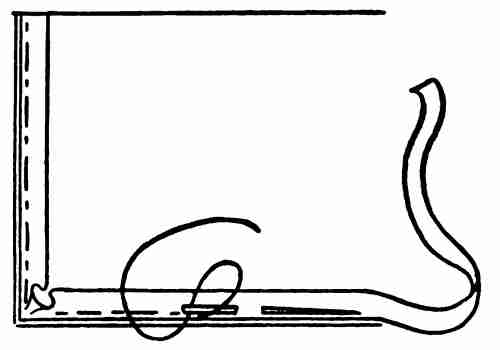
The towel finished, the next thing to learn is how to turn a corner and hem it. Shall we make a cover for Sally Ann's bed or a dust-cloth for mother? In either case cut a piece of material eighteen inches square and turn a hem and baste it as you did for the towel. The next side is folded the same as the first. The corner should form a perfect square (Figure 20). Sometimes the material is very thick and the hem wide; in that case it is wise to cut a little oblong piece out of the corner as shown in the illustration (Figure 21).
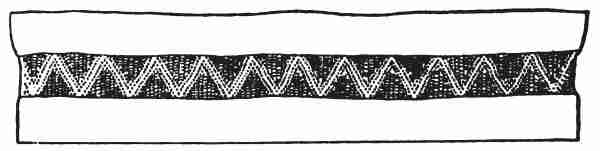
Napkins and table-covers should be sewed with a French hem. Make a turn about a sixteenth of an inch deep. The second turn should be about three sixteenths of an inch wide. Fold the hem back so that it touches the right side of the material. The hem is connected to the material with tiny over-hand stitches. Open the hem, when finished crease with the thumb-nail till it lies perfectly flat.
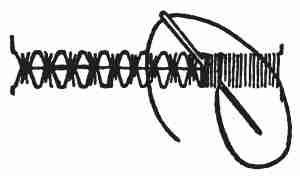
A pretty new way of finishing a handkerchief is to roll the material for the edge instead of folding it. Over-cast or, as we sometimes say, whip it with delicate-coloured cotton, (Figure 22). The nicest material for handkerchiefs is fine linen, but lawn[22] is cheaper for practice work. Hold the wrong side of the material to you. Then roll about one eighth of an inch between the thumb and first finger of your left hand. Do not roll more than an inch of the hem at a time. Take a needle and thread it with a piece of coloured cotton. In this case it is permissible to make a knot. Insert the needle at the beginning of the roll. Over-cast or whip the rolled edge. The stitches should encircle the roll and not go through it. When the rolled inch is over-casted, roll another inch and repeat in this manner till the whole handkerchief is worked. If you desire, when you have finished one side, you can whip in an opposite direction toward the point at which you started, thus forming a cross with each return stitch (Figure 23).
Lace is sewed to raw edges by rolling and whipping the material and connecting the lace at the same time.
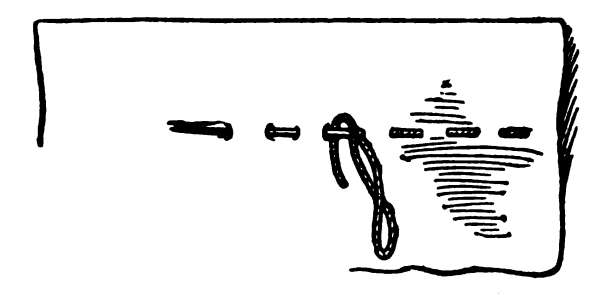
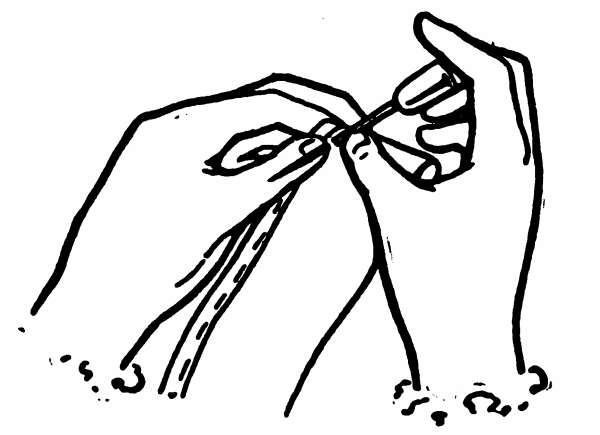
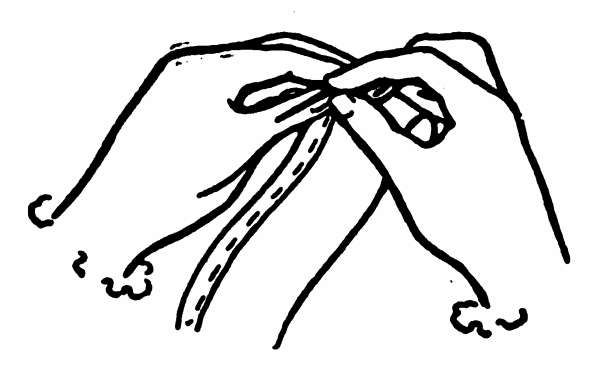
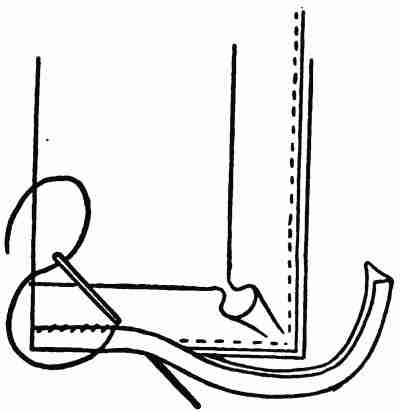
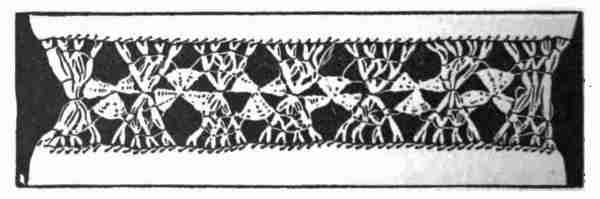
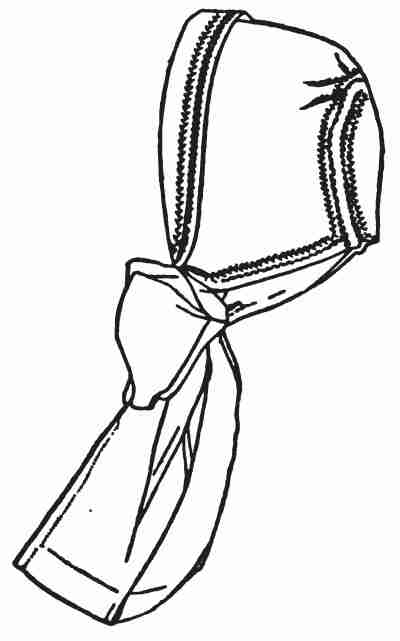
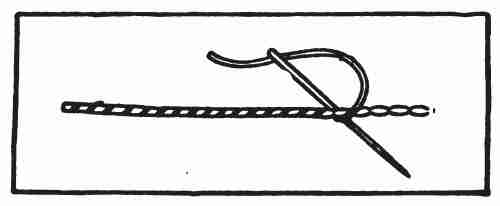
Tapes should be on all towels and on all your skirts and dresses that are to hang on nails or pegs. Take a piece of fine tape about five inches long. Crease one end down one quarter of an inch (Figure 25). If the tape-loop is to be sewed on a towel find the direct centre of the top edge of the towel. Lay the tape with the creased end open flat on the towel (Figure 26). Sew along the creased line with back-stitching. Fold the other end of the tape over, baste it down so that it entirely covers the stitches already made and with small hemming stitches connect the tape to the material (Figure 27). There should be two tape-loops on your dress or separate[24] skirt. There is usually too much weight for only one loop. Place a loop in each armhole of the waist or dress. For the skirt, measure the waist-band and place the loops so that the band is divided in thirds.
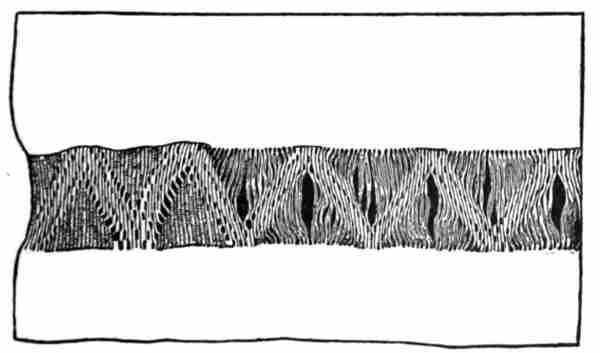
Do you know that very few people sew on hooks and eyes properly? Yet there is no difficulty in sewing them correctly and they look much nicer. Take the eye, connect it to the material with two stitches that make a cross. With the same thread pass the needle to the left-hand loop. Insert the needle in the material so that the eye of the needle is within the loop and the point of the needle comes just outside. See that the thread passes from left to right under the point of the needle. Draw the needle through and repeat in this manner until the two loops of the eye are firmly connected to the material. Sometimes it is necessary to cover the upper part of the eye. In that case cover the metal with fine over-and-over stitches as shown in (Figure 28B).
The loop of the hook is sewed on in a very similar manner at the base, while the top of the hook is caught with eight or nine over-and-over-stitches (Figure 29). These stitches are taken under the hook portion and connect the under side only. Measure accurately just where every eye goes and place the hook so that when it meets the eye it will be straight. A sixteenth of an inch out of the way spoils the appearance and is apt to pull the material crooked. Another point to remember is that it is not a good plan to place the eyes on the extreme edge. A margin of some size is most necessary to extend beyond the eyes. Sometimes it is necessary to sew a piece of material so that it extends one inch beyond the eyes if the eyes are sewed on the extreme edge of the finished garment. This piece is called the fly piece.
Though I know you don't like making samples, I am going to ask you to make a little apron for a doll, as a model, before we make a real big one.
Get a piece of muslin five by nine inches and a No. 9 sewing needle. Thread it with a piece of No. 70 cotton. Baste an eighth of an inch hem on both of the five-inch sides, and a three-quarter of an inch hem on one of the nine-inch sides.
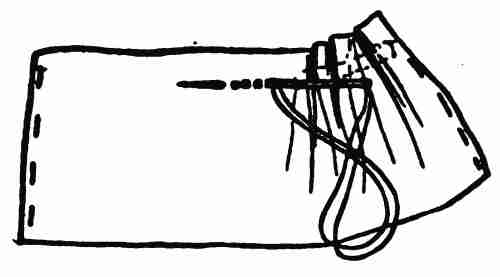
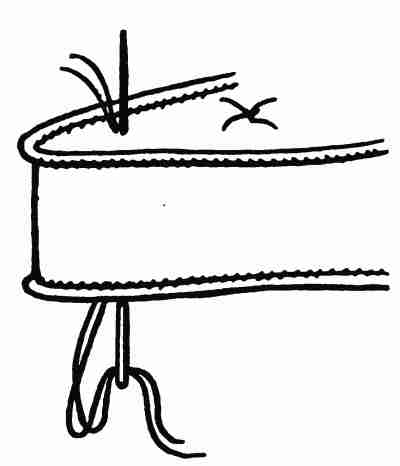
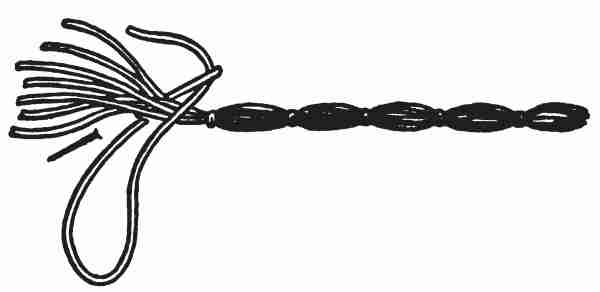
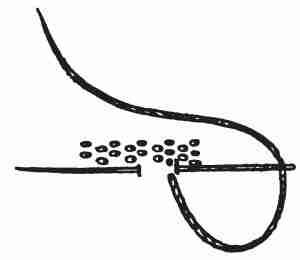
The basting of the three sides being finished we will now start to gather the fourth side. Thread a No. 8 needle with No. 50 thread. Use a thread a trifle longer than nine inches. Make a good-sized knot in the thread so that the end cannot slip through the material. Start from the right-hand side of the piece and insert the needle on the under side. Let the knot come on top of the narrow hem about one quarter of an inch from the raw edge.
The needle is now in position on the right side of the material. Take up several stitches on the needle before pulling it through (Figure 30). The stitches are nothing more than running stitches. When the running has been worked across the nine inches of the material, take the needle out and make a knot in the thread.
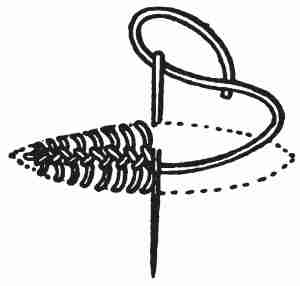
Put a pin, vertically, close to the last stitch. Take up only a few threads of the material on the pin. Draw up the running thread so that you have about three and a half inches of gathering. Wind the thread that extends beyond the gathering over the top and under the point of the pin a number of times, crossing the thread at the middle of the pin so that it forms an eight (Figure 31).
To allow the gathering to fall evenly, it will be necessary to stroke it. Use a No. 2 needle for this purpose. With the right side of the work toward[28] you begin at the left-hand edge. Hold the work between the left thumb and forefinger, keeping the thumb below the gathering thread. Put the point of the No. 2 needle under the gathering thread, holding it obliquely. Press the needle toward the thumb, bringing the little plait under the thumb and drawing the needle downward. Pinch the little plait down lightly with your thumb. Continue in this way, putting the needle under each stitch (Figure 32).
Let us now put a band and strings on our apron. Cut two strips of material ten inches long by two inches wide. These are for the strings. Baste an eighth of an inch hem on the two long sides of each strip. Make a three-quarter of an inch hem on each string.
Over-hand the ends of the broad hem. All the hems that are basted on the strings and the material itself should be hemmed with fine stitches.
Cut another strip two and a half inches wide by five inches long. This is the band. Turn down one eighth of an inch of the material all around the band. Crease the band in half, lengthwise, so that the edges, just folded, are inside.
Find the centre of the gathered material and the centre of the opened band. Holding the wrong side of the apron toward you, pin the middle of the apron to the middle of the band. Pin the gathered side of the apron to the band, three quarters of an inch from each end of it.
Wind the gathering thread around the left-hand pin, drawing the thread up to fit the band. With the point of the needle adjust the gathers so that the fullness is evenly distributed along the band. Holding[30] the gathers toward you, baste with small stitches a little above the gathering thread.
Turn up the band and on the right side of the apron hem the band in it, catching up a gather with each stitch. Some people prefer to stitch along the basting line instead of hemming (Figure 33).
Baste the other side of the band down, and hem as on the right side. Insert the strings in the band. Hem in the same way as on the band, first the right side and then the left side, and now your little apron is completed (Figure 34).
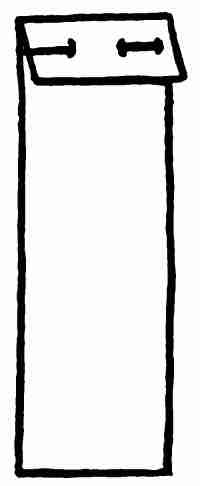
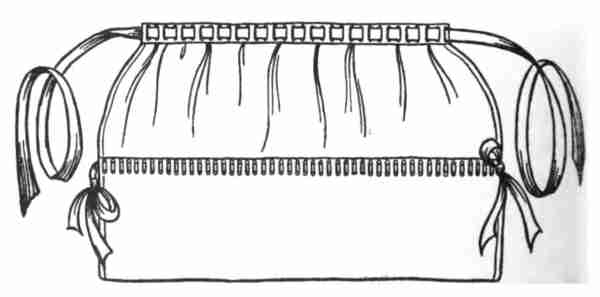
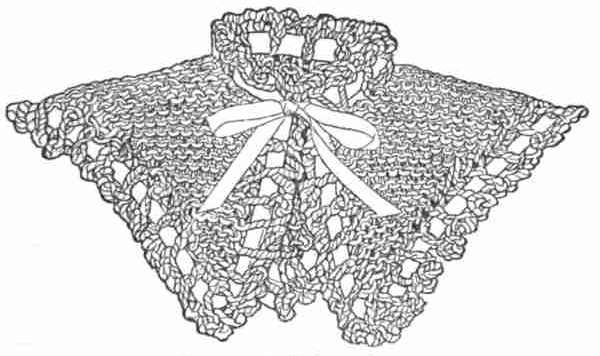
Would you not like to have a sewing apron that[31] you can use as a bag when you are not wearing it? It is such an easy thing to make that after you have one for yourself you will be making them for your friends for Christmas.
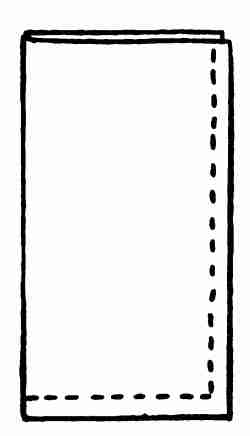
Get mother to measure you from the waist to the knees. The material for the apron should be one and a half this measurement. Turn one third of the material back. Baste the double edges together and sew with fine combination stitches.
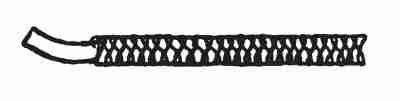
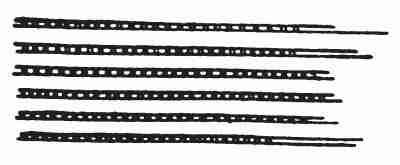
Turn this piece inside out. Crease back one eighth of an inch edge of this pocket, as it were. Baste a piece of beading over this raw edge right around the back of the apron. Be careful not to sew up the pocket.
The beading on the back must be the same distance from the bottom as the beading in front; that is, we must keep a straight line. Sew on the extreme edges of the beading with fine running stitches, to connect it to the material. Now as[32] the ribbon we are to run in the beading must serve as a draw string, as well as for decoration, it will be necessary to put two pieces in. So get a narrow ribbon about one half the width of the openings in the beading. Each piece of ribbon must be long enough to go once around the apron and enough of the ends left to tie double bows—one for each side. Start one piece of the ribbon at the right-hand side of the apron and the other at the left.
The top of the apron or single piece is finished with a piece of beading which is sewed on, as on the pocket. A ribbon long enough to go around your waist and to tie a bow in the back is run through the beading (Figure 35).
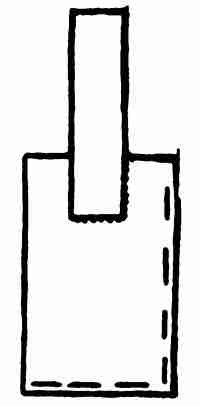
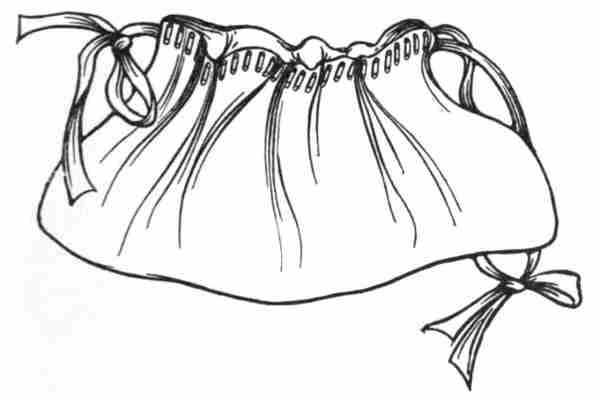
When the apron is not being worn your work can be placed in the large pocket and the single section[33] folded within the pocket. The ribbons are then drawn up tight and "bravo!" you have a work bag fit for a queen (Figure 36).
There are so many kinds of rents or holes that may happen to your clothes that it is worth the while to know how to mend the various kinds. There is an old adage that says, "Waste makes want," and we would spend a small fortune in clothes if every time a wee hole made its appearance we discarded the garment.
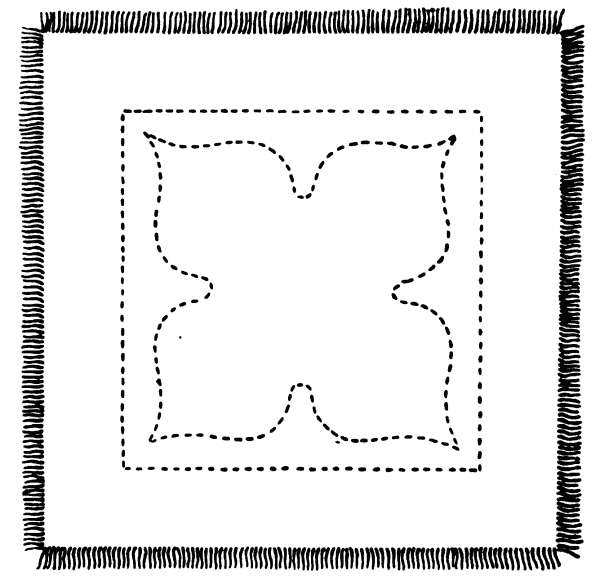
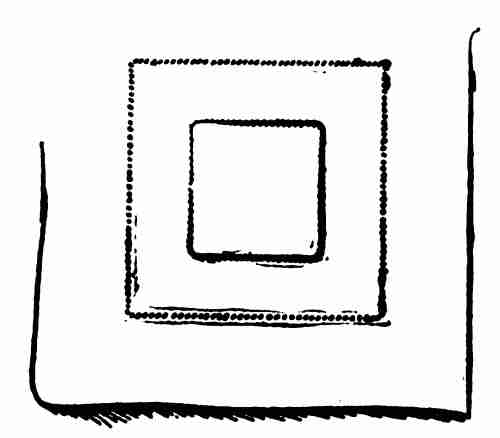
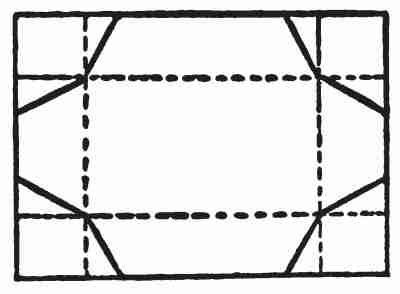
If it is a circular hole in a dress or underbody, as often happens, under the arms, we will use the square patch. Cut a piece of the same kind of[34] material, three inches square, or larger if necessary. Turn a fold of one eighth of an inch on the four edges of this square. Crease it lengthwise and crosswise.
Crease the material on which the patch is to be laid lengthwise and crosswise through the tear. Pin the small piece or patch on the wrong side of the large piece, or garment, so that the creases run in the same direction. The warp must run the same way in both pieces. One sixteenth of an inch from the edges run a basting thread. Hem the four sides on the patch to the material (Figure 37).
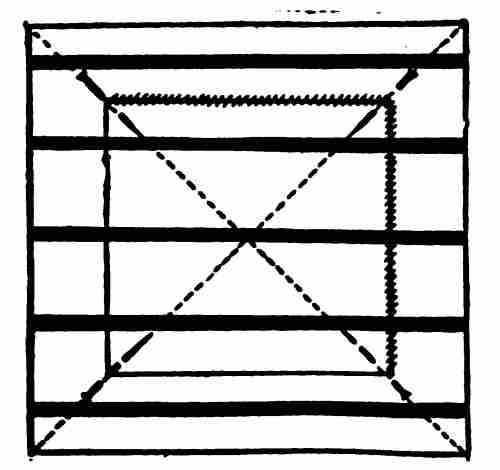
On the garment side make a crease half an inch wide, from the hemming, on the four sides. Four little squares will be formed in the corners. Crease along the diagonal of each square. Place a pin one eighth of an inch from[35] each corner, within the patch (Figure 38). Cut the garment from the centre of the tear to the pins. Repeat this on each side, cutting along the crease which you made, one half inch from the hemming.
Turn in one eighth of an inch and baste. Hem all around (Figure 39).
In patching material such as checked or striped ginghams, percales, or other materials, the stripes or the checks must match so that the patch is not too apparent (Figure 40).
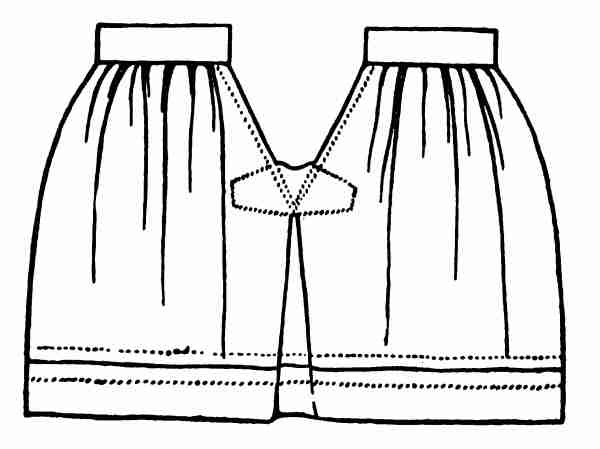
Have you ever noticed how the slit or placket of a petticoat or side opening of drawers is finished? A piece of material is put in[36] of an odd shape to strengthen the openings. This is called a gusset. Suppose that you were making a petticoat. Join the skirt up the back from the bottom, but leave eight inches open at the top. This top opening is the placket. But let us take a small piece of material and practise making the back of a skirt. We will put a hem and a few tucks at the bottom of the material first.
Make a measuring card of a straight strip with an eighth, three eighths, and three quarters of an inch notches.
Crease and fold a wide hem (three quarters of an inch), using the measuring card as a guide.
Over-hand each end of the hem. Now baste along the hem. The over-handing must be done before the basting. Now hem this wide hem.
Again, using the cardboard measure, on the right side of the model fold a crease three quarters of an[37] inch above the hem. Begin at the right-hand side to crease and baste (Figure 41).
With a fine, even, running stitch, an eighth of an inch below the crease, make the tuck (Figure 42). Measure every few stitches to keep the seam straight.
If a second tuck is desired, measure from the tuck instead of the hem.
Now we are ready for the slit which is in the centre top. On the wrong side start at the top with an eighth of an inch hem, but decrease it to almost nothing right to the bottom (Figure 43). Fold the other side in the same manner. In hemming the two sides, start at the top.
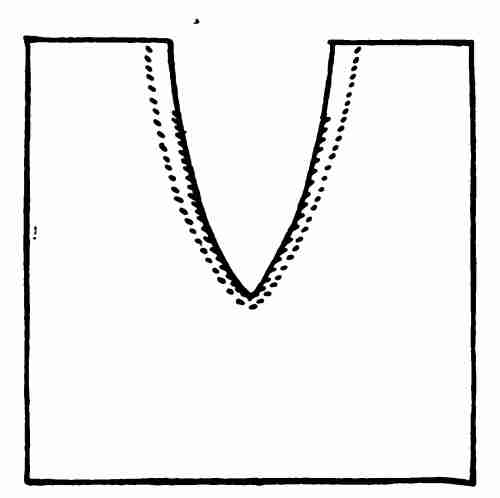
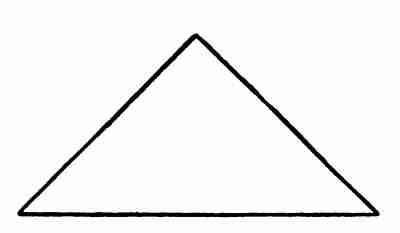
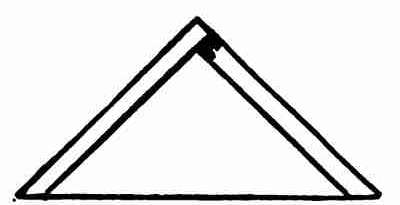
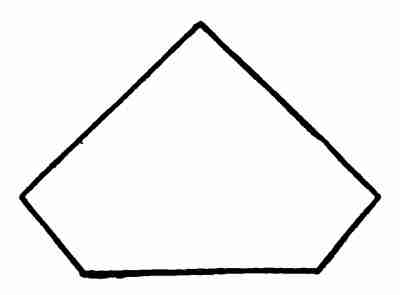
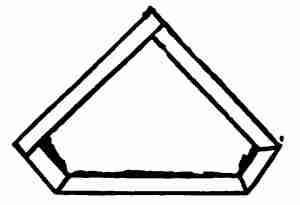
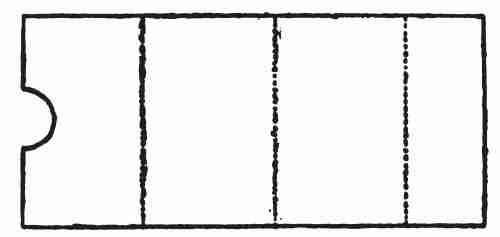
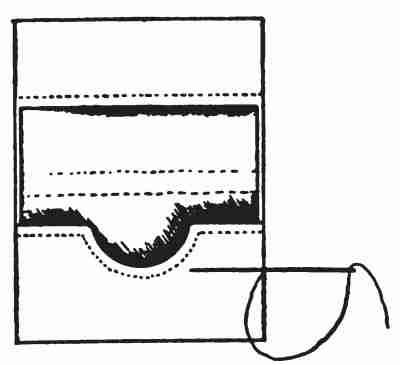
Now let us practise making gussets[38] on a piece of paper. Cut a piece of paper three inches square. Fold it from corner to corner and cut (Figure 44). Turn the straight or short edges of the paper one eighth of an inch and fold along the two shorter edges (Figure 45).
Hold the paper with the straight edge down, measure it from the two points one quarter of an inch. Now cut a piece of material the size of the paper and fold like model.
Cut off the two points one quarter inch from each corner on the thread of the goods (Figure 46). Turn these two straight ends and the bias edge of paper one eighth of an inch (Figure 47). Turn point of paper down one eighth of an inch from bias hem and crease (Figure 48).
Now cut the muslin gusset and fold just like the paper one.
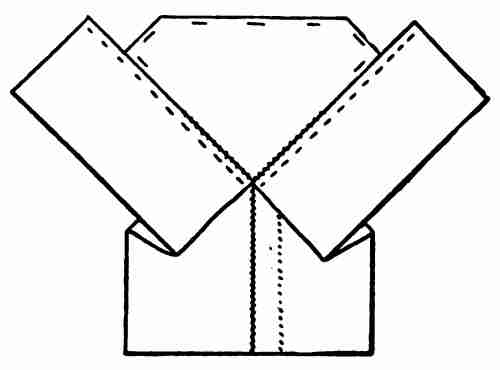
Hold the model or skirt with right side toward you, and turn up point of gusset. Holding the wrong side of the skirt toward you, twist left side of gusset to left side of placket and over-hand to creased line, half way up the gusset (Figure 49).
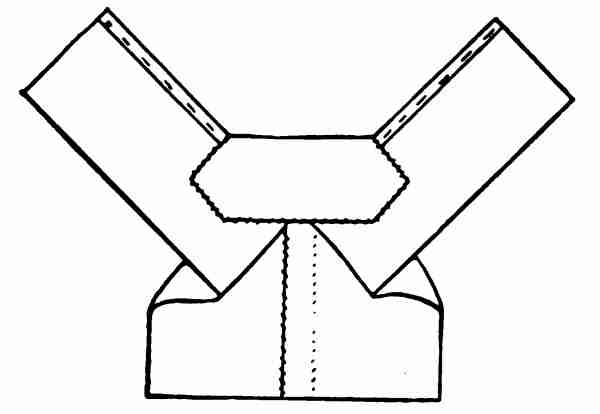
Over-hand right side. Turn bias edge of gusset over to right side, pin, having straight edges parallel to warp and woof threads and then hem (Figure 50).
Gather the top of the skirt and put on a band[40] on each side of opening about the same width as the one used on the apron (Figure 51).
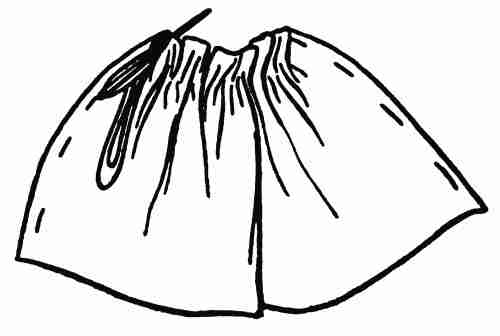
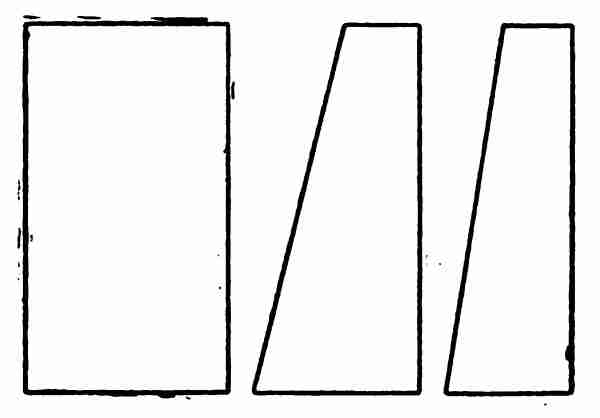
Let us suppose that Sally Ann measures twelve inches from the crown of her head to the soles of her feet and that you would like to make her a gored skirt like mother's. Would you not feel happier if you made the pattern and then cut the skirt yourself?
Take a piece of paper twelve by nine inches wide, mark every inch on both the long sides of the paper. Lay a ruler so that it touches the centre of the space between the first and second dots on the upper edge, and between the second and third dots on the lower edge. This will form the half of the front gore of the skirt. Mark it, "half of front."
Now draw a line from the second dot on the upper edge to the centre of the space between the fourth and fifth dots of the lower edge. Connect the sixth dot on the upper and lower edges, mark this section "side gore." Connect the eleventh dot on[42] lower and upper edges and mark this section "back." The remaining inch mark "belt." (Figure 52).
Cut the pattern apart along the lines drawn.
Take a piece of muslin twenty-four by nine inches. Tear off two inches of the muslin on the length for the band and then ten inches for the back of the skirt.
Fold the remaining piece of muslin with the two short edges together so that the doubled piece measures six inches by nine. Place the straight edge of front of skirt pattern on the fold of the material and the edge of the side gore on the other edge. Pin the pattern down securely and cut through both thicknesses of the material (Figure 53).
Pin the skirt together, placing a straight edge of[43] a gore to a bias. Baste a quarter-inch seam along the finished edges of each gore, holding the bias edge toward you. Sew the seams up with combination stitches. Press open the seams and over-cast each one to keep it from fraying.
Fold a hem at the bottom of the skirt an inch and a quarter wide. Baste the hem so that seam comes to seam. On the front gore there will be a fullness. Gather this fullness in with fine running stitches and baste. Use a separate thread for the gathering. Now hem around the whole skirt.
Cut the placket two inches down through the centre back. Turn a hem on the right side one half inch wide and on the left one eighth inch. Sew the hem.
Lap the wide hem over the narrow at the bottom[44] of the placket and stitch across the wide hem two rows of stitching one eighth of an inch apart.
Turn in the strip you cut off at first for the band one quarter of an inch on the two short sides and on one of the long sides.
Fold lengthwise, find centre of band and crease; one inch from this, crease again.
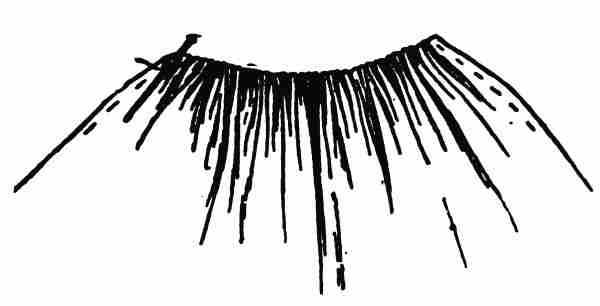
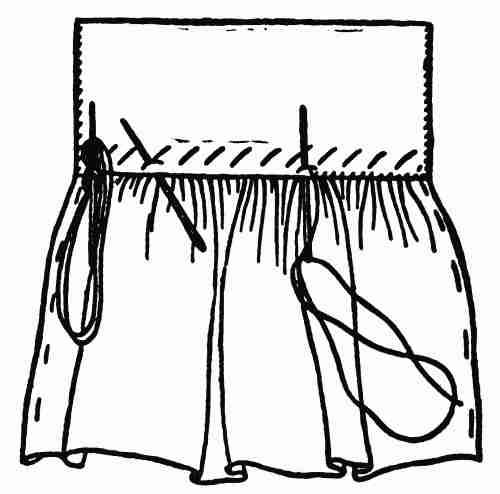
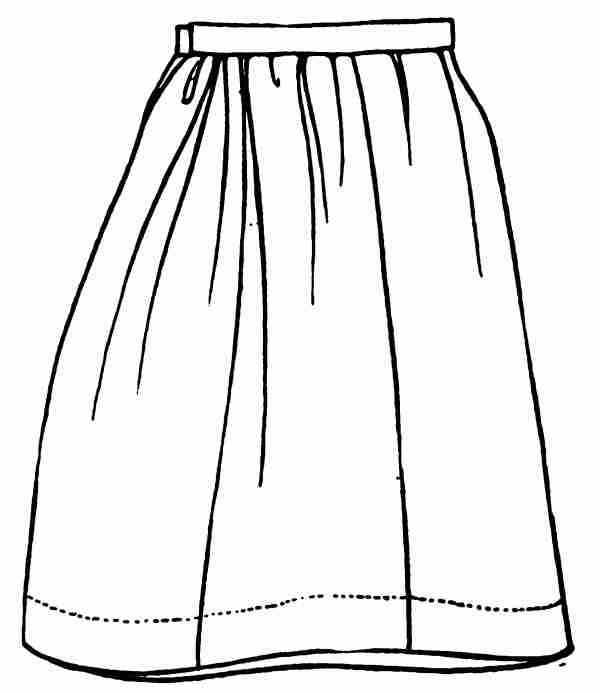
Place and pin band in the same way as for the gusset described in the last chapter, placing the[45] middle crease at the middle of front of skirt. Then pin the band also at the creases on either side of centre. Gather each side of the skirt that is left. Draw in the thread to fit belt. Spread the gathers so that most of the fullness is in the back.
Over-hand the ends and hem second side of the placket. This finishes the skirt (Figure 54).
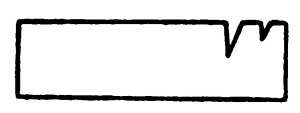
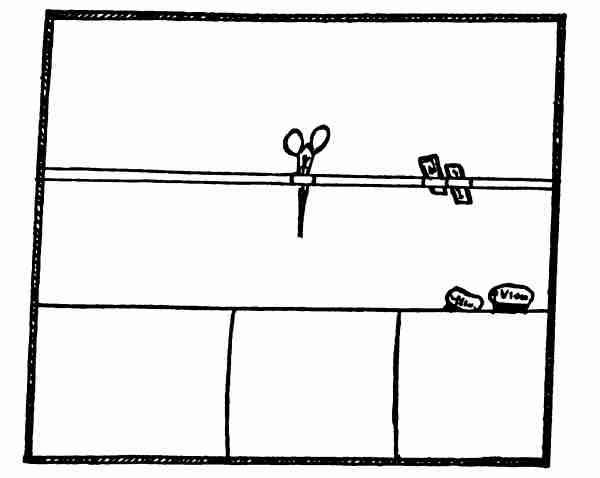
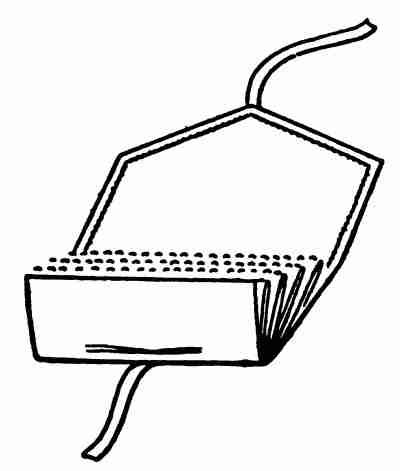
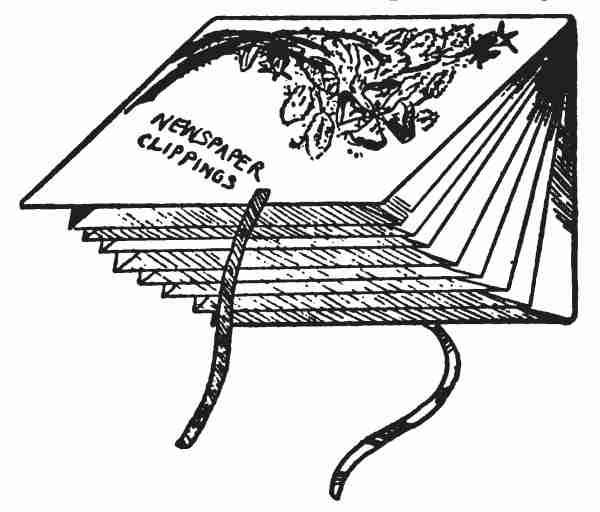
A basket or box of some sort is very nice to have, as we have said above, for your sewing, but suppose you were going to sew with another friend and you wanted a handy case in which to carry your sewing implements? A cloth case that can be folded or rolled is very much more convenient and may be carried in the large pocket of your apron. One made of denim is inexpensive, wears well, and is highly practicable. One yard will make you a case.
Cut a piece of green denim sixteen by fifteen inches long. Turn up four inches of the material, baste down both sides. Baste a four-inch pocket on the left-hand corner of your case. The rest of the case divide in two. This will hold your darning cotton that comes on cards.
We have a pretty way of finishing this case, which is not only ornamental but strong, and that is to bind it. Get a piece of tape long enough to go around the whole case. Crease it lengthwise so[46] that one edge comes slightly below the other. Open it and lay it on denim and then neatly back-stitch the right side and hem the wrong. The hemming should be just below the back-stitching, and must not be seen on the right side. Allow enough tape at the corners to make a good angle. Both sides of the corner must be treated alike.
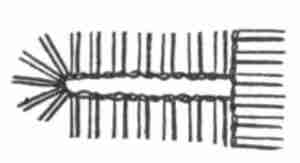
It will be well to have a needle case to match the sewing case. Cut a strip of material thirteen inches long by three and a half inches wide. Cut this strip in four parts. Get a piece of cardboard that is not too thick or of such kind that will break easily, as some of the cheaper grades of brown cardboard are apt to do. Cut four pieces, three inches wide by three and a half inches long. Thread your needle with a piece of No. 40 cotton and put a big knot at the end. Take one of the pieces of denim and a[47] piece of the cardboard. Catch the material from side to side with stitches about one quarter of an inch apart (Figure 55). After sewing these two sides sew the third and fourth in the same manner. Cover each piece of the cardboard in this way (Figure 56). Take two of the covered pieces and over-cast them carefully together.
You should have leaves of flannel to stick your needles in. Pink the edges of the flannel. Pinking is snipping out the edge in little points and can be done with scissors. Connect the two pieces of the needle case with two tiny bows, or a heavy thread can be made to answer the purpose. The flannel sheets are tacked through the centre like the pages in a book (Figure 57).
The third or middle compartment between the spool case and darning thread can be used for a miscellaneous pocket to hold the tape-measure, emery-bag, small scissors and other necessary articles.
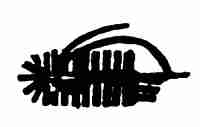
A piece of tape stretched down on the denim with just enough spring for the package of needles to pass through is a handy way to carry them (Figure 58).
It is rather dangerous to travel with a pair of scissors with the points unprotected. In Canada[49] and the states that border it the Indians sell the little sweet grass protectors. A cork, however, that comes in small bottles such as you get from drug stores will protect the points of the scissors as well as the sweet grass protectors, if not as elegantly. If the scissors are too large to put in the pocket a piece of tape could be stitched down to slip them in lengthwise. The case should be folded in three parts when it is not in use and a piece of tape the same colour as the binding tied around it (Figure 59).
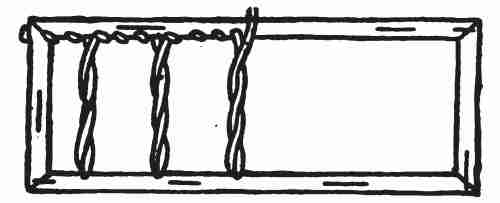
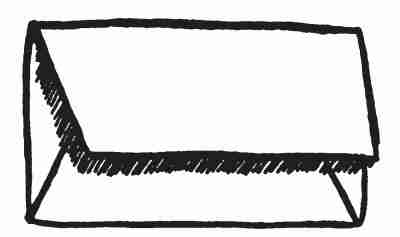
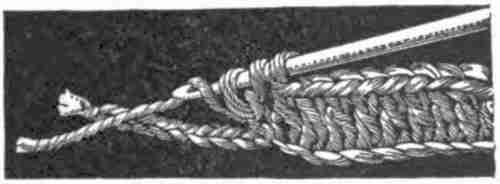
Now that you have your sewing apron and a work box, you will love to be sewing every chance you get. Suppose we plan a set of bed things for Sally Ann.[50] First let us make a mattress. The mattress on your bed is covered, probably, with ticking, but this is too harsh for your fingers to sew, so let us select percale or zephyr, and half-inch tape for the binding; the filling can be cotton, hair, or feathers. If it is impossible to get any of these three, newspapers chipped up very fine will make an excellent padding. Many people use newspaper chippings to fill pillows for summer use.
Measure the bedstead and cut two pieces of percale or zephyr exactly the same size. Now cut a stripe of the material, one inch wide, long enough to go around the four sides of one of the pieces of the material that you have just cut.
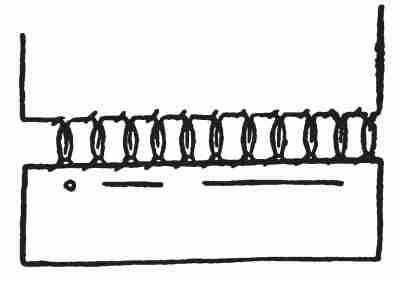
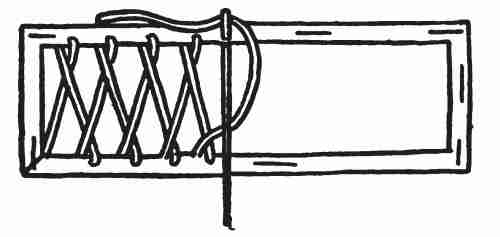
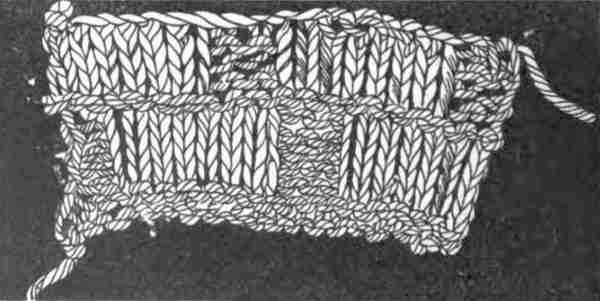
Baste the long narrow strip around one large piece. Lay the wrong side of the strip to the wrong side of the material (Figure 60). The edges must be even. Use the combination stitch of one running stitch and one back-stitch just below the basting. When the strip has been securely sewed to the four sides of the material, join the two ends together on the wrong side.
Now take your tape, which may be white or the colour of the figure in your material, and bind the edges by first running one side down and then the other (Figure 61).
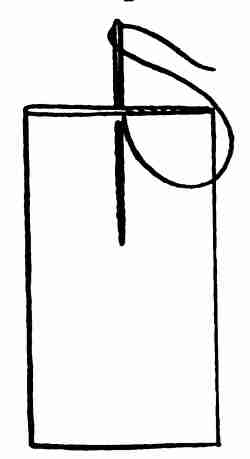
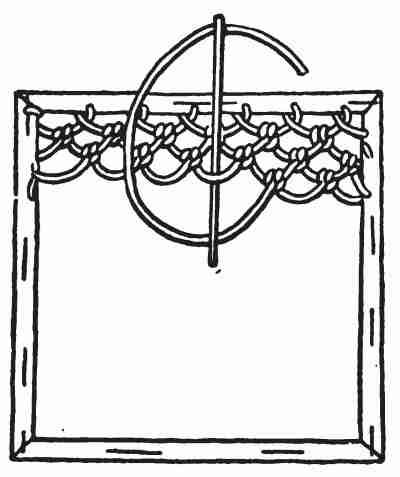
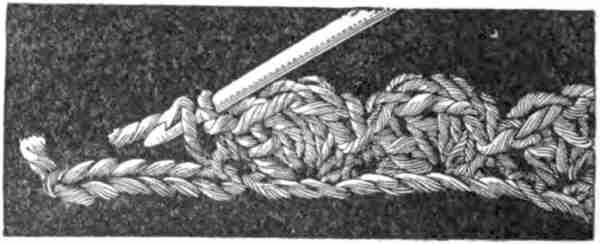
The other piece of material is sewed in the same manner—the wrong side of the strip to the wrong side of the material. Do not sew, however, around the entire four sides but leave about six inches open through which the filling may be passed. After basting the strip with combination stitching fill with cotton or whatever material you have on hand. Do not fill the mattress so that it will be bumpy. Put a little stick in and flatten the filling at the top.[52] Now sew the opening up and we are ready to quilt the mattress.
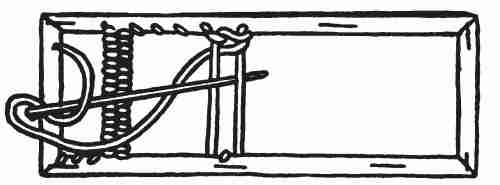
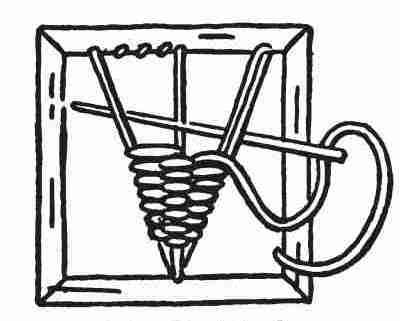
Thread a large needle with two pieces of heavy cotton floss or wool. Push your needle through to the other side, letting a short end extend above the mattress. Bring your needle back again close to where it came out (Figure 62). Unthread the needle and tie the ends tightly. Cut off what is left and repeat again two and a half inches over. It is best to quilt in rows; that is, to start two inches in from the long side and make a row parallel with the tape. The next row is made two and a half inches farther over and the next row of knots should come in between the first row of dots.
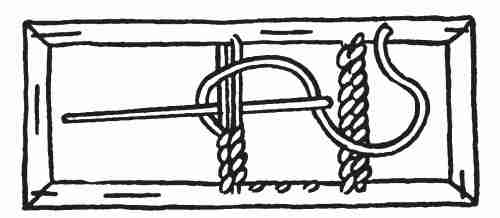
This mattress is made just like yours and the pillow is the next article we will make. The pillow should be half the width of your mattress, as we will use two on the bed. Take a piece of material twice the length desired for the pillow. Use the same kind of material as that used for the mattress. Fold the piece[53] in two with the wrong side out. Join the two long edges and one of the short sides with the combination stitch (Figure 63). Make the stitches one quarter inch from the edge. Now turn the case inside out and fill with cotton. Turn in the edges of the open end and over-cast them together (Figure 64). As I have said before, it will be necessary to make two pillows.
The pillowcases can be made of lawn, cambric or muslin. Cut the material a little larger both in length and width than the pieces used for the pillow. The seams of the pillowcases will have to be felled. Along the one short side and the long side make fine running stitches, one quarter of an inch from the edge. Cut the raw edge from one side so that the other is about an eighth of an inch wider. Now fold the wider edge over like a hem so that it completely covers the cut edge and hem neatly to the material. The open[54] end has a wide hem of say three quarters of an inch. When the hem is finished turn the case with the work inside.
For the sheets cut two pieces of muslin or lawn large enough to cover the mattress and to turn under. The selvage edge of the material should run the length of the sheet. Turn in a quarter-inch hem on the two long sides of each sheet and hem. Now turn a one-inch hem at the top and bottom of each sheet. This completes the sheet (Figure 65).
A blanket is of course very necessary to have and it can be made of a piece of an old blanket or of canton flannel, cashmere, or plain flannel. If a piece of blanket is used, finish the edges with the blanket stitch which is described in Chapter twelve of the book.
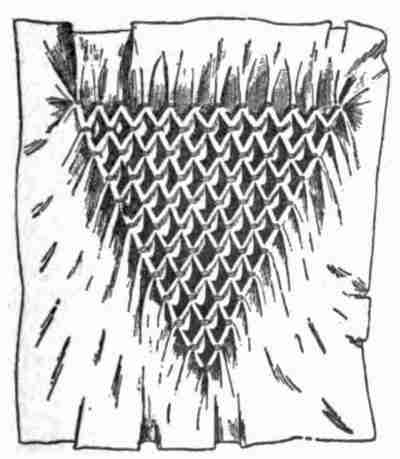
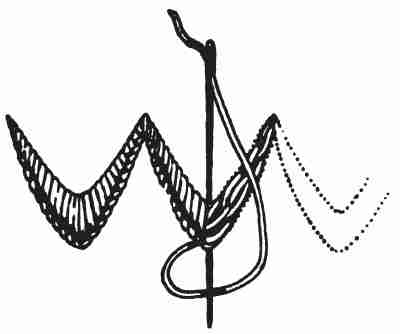
The flannel, cashmere, or canton flannel is finished by turning the edges over a quarter of an inch and herring boning or cat-stitching them to the material (Figure 66). For cat-stitching see diagram in Chapter nine.
No bed is complete without a counterpane of some sort and this can be made as fancy as you desire. A pretty one is made of strips of insertion joined together by fine over-casting or fagotting. Fagotting is explained in Chapter twenty. A row of edging will have to be sewed like a ruffle around the two long and one short sides to complete the counterpane.
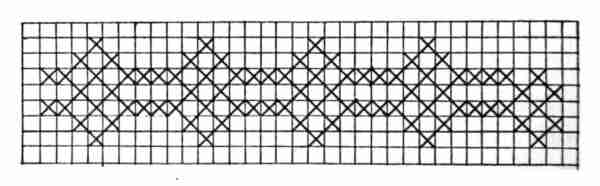
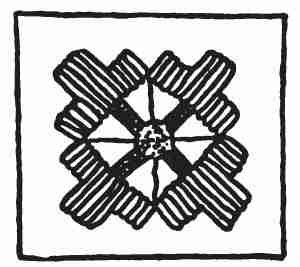
If a very fancy counterpane is desired get a piece of checked gingham of some light colour. The check should be a quarter of an inch square. With your needle threaded with white or a shade deeper than the[56] darkest check make spiders on the dark squares and crow's feet on the light. Directions for making a spider are given in the chapter on "Lace Stitches."
A crow's foot is made by taking one stitch on the diagonal of the square and two on each side of it, the stitches on each side of the first one being a trifle shorter than the previous ones (Figure 67). A counterpane like this is very attractive and does not require a great deal of time to make.
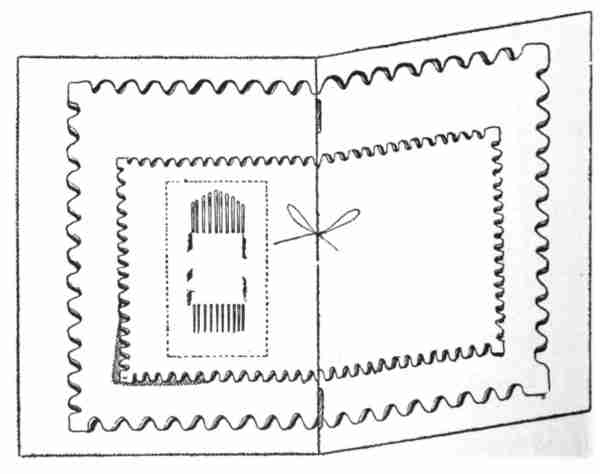
A dainty little pin case that will make an acceptable little gift for a friend that is going to travel is the envelope pin case. Take a piece of material such as linen, cretonne, or silk and another piece of[57] different coloured material for lining and shape one end as shown like the flap of an envelope (Figure 68). A good size is nine inches long by four inches wide.
Cut a piece of stiff paper a half inch smaller than the pieces of material. Baste the material which will be outside over the paper so that the edges are folded back one quarter on the paper. Turn a similar fold on the lining and hem it to the material as shown on the flap of the envelope opened.
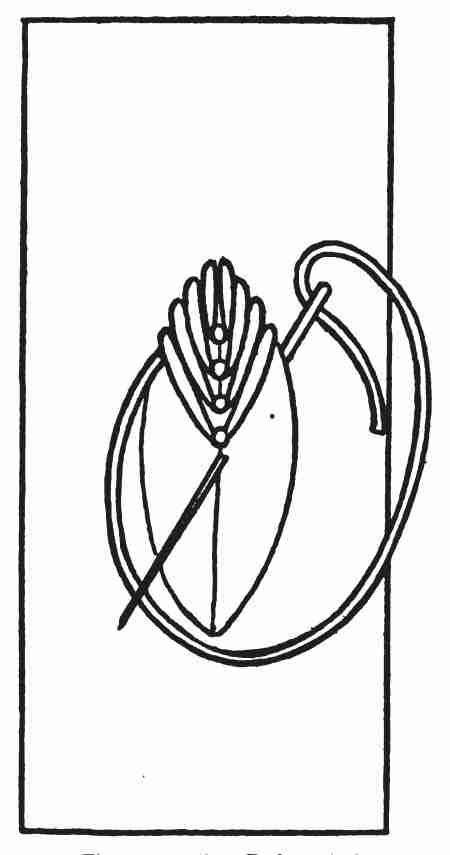
Now take two papers of pins and place them in the case so that they look like leaves of a book. Be careful to see that the heads of the pins are on top. Now catch the pins to the case with several long stitches which are taken below the points of the pins. Stitch a ribbon to flap of envelope and one at the bottom. Close the case and tie the ribbons and you have a handy pin case (Figure 69).
To make a good buttonhole is an accomplishment that any girl can be proud of, as it is the hardest thing in sewing. The thread should be almost double in length to that you usually take, as a joining is very clumsy in a buttonhole.
A buttonhole is a worked opening in a piece of material or garment through which a button is to be slipped. The friction caused by buttoning and unbuttoning necessitates that the worked edges should be firmly and well sewed.
Before we make a real buttonhole, let us see how the stitch is worked. Draw a line one inch in length with the straight of the material. Take two stitches[59] one inch long over this line. At the extreme right of the stitches insert your needle, threaded with No. 40 cotton. Take a stitch about a sixteenth of an inch below the line. While the needle is still in the material—you are working from left to right—(Figure 70), carry the thread under its point from the left, to the right side of the needle. The enlarged cut showing this stitch is very plain. The needle is then drawn through the material toward the chest and then straight from it. The next stitch and every other stitch must be identical with the first, the difference being that each stitch is then a little farther to the left. Every stitch must be the same length.
Now let us prepare to make the stitch on a fold. Fold a band in three equal parts. Pass the needle between the folds and bring it out on the edge. Hold the end of the thread with the left thumb. Carry the needle to the back of the fold and insert the point through the fifth thread of the material from the edge. The double thread at the edge of the needle is brought around the point of the needle from left to right and drawn out. (Figure 71).
A tailor's buttonhole is made slightly different. The needle is placed in the same position as in the ordinary buttonhole. The thread is brought from[60] the top of the stitch and the doubled thread is brought around under the point of the needle from right to left (Figure 72).
The corners of the buttonhole are worked in two ways, either barred or rounded. The round corners are worked in the same buttonhole stitch, only it[61] is twice the depth of the buttonholing along the two edges. Five or seven stitches will be sufficient for a corner or the ridge of the buttonholing will be too crowded.
The bar or braced end of the buttonhole is a little more difficult. It is necessary to bar a buttonhole for heavy woollen materials such as men's coats, or your own cloak, or outer wraps (Figure 72). Generally the first end of the buttonhole is rounded and the last end barred (Figure 73).
Work around the buttonhole end when the last stitch has been made, turn the material so that the work lies across your forefinger. Pass the needle over the extreme left of the stitch, (Figure 74). Work four stitches the same length as those of the two sides of the buttonhole, and then insert the needle through the ridge of the first buttonhole stitch. The ridge of the bar faces the buttonhole. This bar should be just the width of the buttonhole. Nine stitches are usually sufficient for it.
Tailors run two or three strands at the base of the buttonhole before working the nine stitches.[62] The stitches are not taken through the material but only over the threads.
A buttonhole is fastened off on the wrong side at the base of the stitch.
The most important step is to cut the buttonhole straight. The buttonhole should be a trifle longer than the button. It should be cut in the opposite direction to which the strain will be. For instance on the back of the waist the buttonholes should run crosswise, for the movement of the shoulders spreads the buttonhole lengthwise. On the bands around the waist buttonholes are made lengthwise.
A sharp pair of scissors or a penknife should be used for cutting the holes. Insert the point of the scissors or knife through the centre of the buttonhole. Cut one side, then the other, along a thread of the material.
The thread is fastened securely on the wrong side of the left-hand corner. Use No. 40 sewing cotton for buttonholes, unless on very fine material, when No. 60 should be used. Sometimes it is well to over-cast the raw edges before working the buttonhole. A thread should always start at the extreme lower left-hand corner.
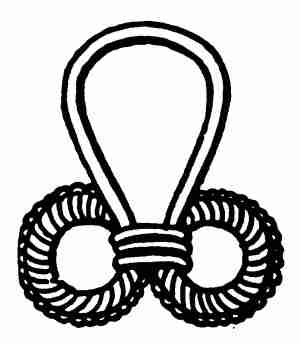
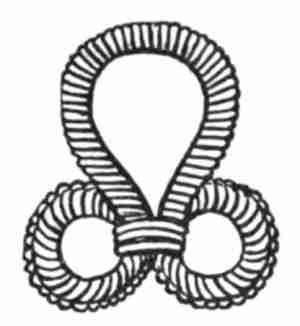
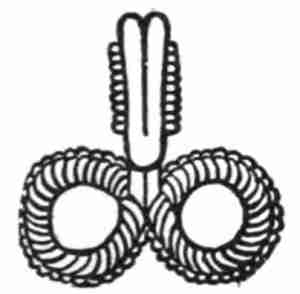
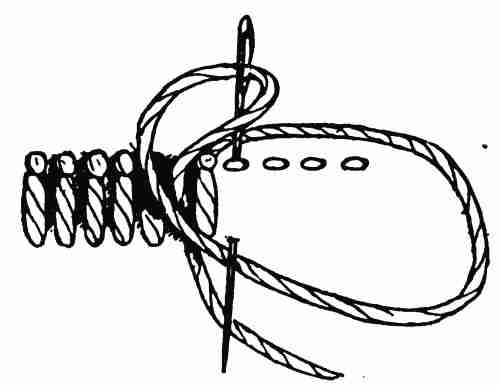
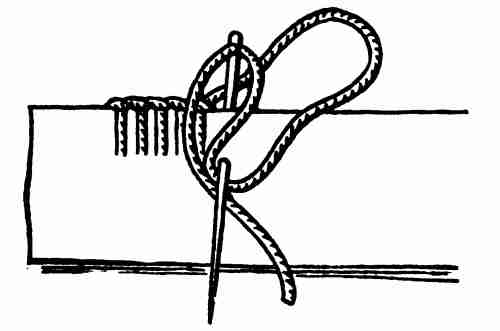
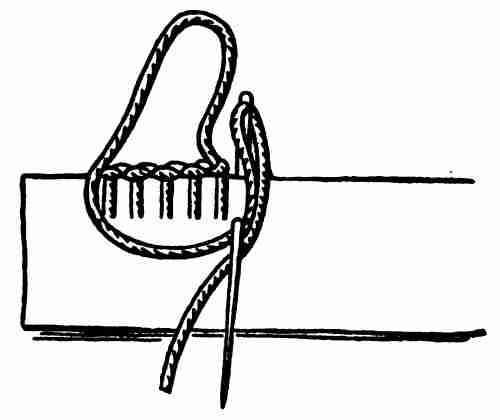
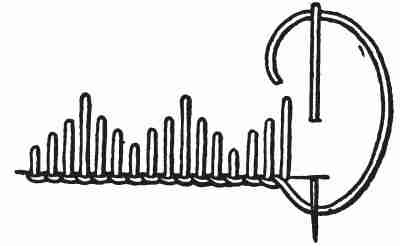
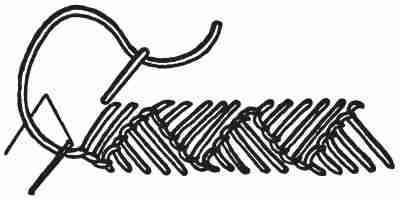
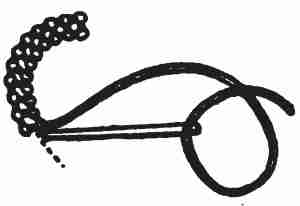
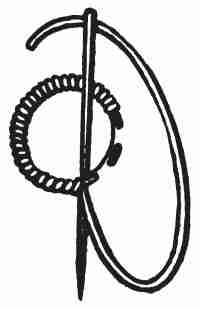
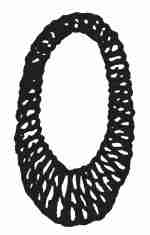
The backs of yokes should be fastened with loops and fine buttons. To make a loop, span the thread[63] across the edge of the material in a loop large enough to slip the button through. Let the last stitch be on the right-hand side. Now place the threaded needle under the strands of thread letting the thread fall under the point of the needle. Repeat in this manner till the strands are entirely covered. The ridge or purled edge of this stitch will be on the outside of the loop.
Hooks are sometimes caught into loops, but they are made directly on the material instead of sewed on the edge. The strands of thread, however, are not as loose as the buttonloops. The diagram (Figure 75) of the two loops will convey a clear idea of how the threads are spanned and covered.
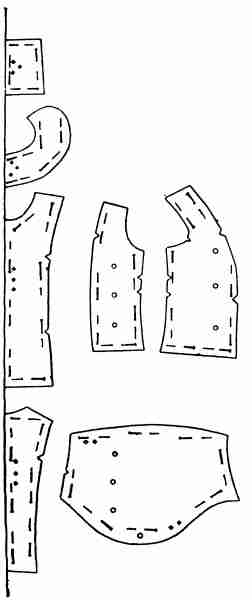
The last step in sewing is cutting from a given pattern. An old garment that fits well, ripped apart makes an excellent pattern and requires very little fitting. Press the pieces before using them as a pattern. Lay the material so that the selvage runs lengthwise, that is, from head to foot. Only[64] one half of the garment is necessary for a pattern, as the material is doubled or folded lengthwise (Figure 76). The centre front of the skirt or waist is always placed on the fold of the material and either basted or pinned down before cutting.
Collars, cuffs, bands, and sleeves are cut with the selvage running their length. Cut any part of a garment such as sleeves, waist, or skirt through two thicknesses of material so that both sides will be exactly alike. This does not refer to the front gore of a skirt. When the material has a right and wrong side the right sides should face each other before cutting the pattern.
Handkerchiefs or frills should be cut along a thread so that the edges may be perfectly straight.
Be sure that the material lies perfectly flat under the pattern. Pin the centre first to keep it from slipping before pinning the edges. Pin the entire garment before cutting anything, so that you can be sure that your material will be sufficient. This also gives you an opportunity to see where to put the smaller pieces and economize with the material.
A large pair of scissors should be used in cutting. The blunt-pointed blade is next to the board or table. It is well to practise on paper and plan the pattern before using the pattern on the cloth.
Bias bands should be cut on the bias of the material. Cut a square piece of material and fold it cat-a-corner. Cut along the fold and you will get a true bias.
Bands to finish the necks of undergarments or around armholes should be cut on the bias. In fact, any curved edge that has to be faced should be faced with a bias instead of a straight band.
Now suppose we make a real dress for Sally Ann that will be put together and finished just like one of your own dresses. The style we will select will be on the order of a French dress, that is, a long waist and short skirt. The pattern for the waist is in seven parts: they are the front, side front, back, side back, sleeve, collar, and cuff. The skirt is only one piece.
Three quarters of a yard of material will be sufficient to make a dress for a doll from eighteen to twenty inches in height.
In all patterns that are bought only one half is given; sometimes all the seams—which are a very important part of a dress—are given and sometimes[66] they are omitted. Any pattern that is published by a reliable firm tells on the envelope whether you should allow for the seams or not.
The pattern is usually of tissue paper and each piece has perforations or holes of different shapes. One shape means this side must be placed on the fold of the material, another shape or perforation the same shape only grouped differently, means that the pattern should be placed on a straight thread of the material. Still another means "gather here." If there are tucks in the pattern they are usually indicated. Where the seams join each other, little notches are made and corresponding notches are placed together and pinned after the pattern is cut.
Let us suppose the material is forty-five inches wide. Place the centre of the skirt on the fold of the material and pin in place. Your pattern should be planned and pinned on a flat surface such as a sewing table. Place the pins through the tissue pattern and both thicknesses of the material, letting the head and the point of the pin be visible to the eye. Do not cut any piece of your pattern until you have planned and pinned every piece, as that is the only way you can economize on your material (Figure 77). Often a pattern cut before each piece is[67] planned comes to grief if an over-supply of material has not been provided.
The centre front is also placed on the fold of the material as well as the centre, back and collar. The sleeves are now fitted in, so that the perforations rest on the straight thread of the material. The side front and back and cuffs are also pinned to the material. The pattern now pinned, take a large pair of cutting scissors and holding the blunt part toward the table, cut close to the tissue pattern, or if no seams are allowed, the width stated in directions should be allowed for the seams.
Let us make the[68] sleeve first. Take one sleeve and holding with the right side join notches together (Figure 78). Baste the sleeves up on the seams one eighth of an inch from the edge. When the basting is finished make a row of fine running stitches. Turn the sleeves on the wrong side and baste them before working the combination stitches. The sleeves are now ready to be banded. The band is taken and sewed on the short side. The seaming is taken on the wrong side of the material. A little seam is taken on each of the long sides of the cuff. Fold the cuff in half. The turns or folds are opened out and now turn the cuff inside out. Run a gathering thread at the lower edge of the main part of the sleeves starting the thread one half inch from each side of the seam. Place the cuff around the sleeve so that cuff seam rests on the seam of the sleeve. Pin into position. It will probably be necessary to pull or adjust the gathering thread so that the lower part of the sleeve be just the size of the cuff. Baste the band on after it has been pinned satisfactorily before working the combination stitch.
Turn the sleeve inside out and fold the cuff in the creases. Hem the inner side of the cuff to the[69] wrong side of the sleeve. On the upper side of the sleeves run another gathering thread about one inch and a half from the seam (Figure 79). We have now finished with the sleeve until the waist proper is ready.
Now take the centre back and side back and baste them together. Join the pieces so that the notches correspond. Work the combination stitch three eighths of an inch from the edge. The side fronts are joined to the backs under the arm and on the shoulders. The front is then sewed to the right side of the waist only. It will be necessary to face the centre front piece and the left side front. Take a bias strip of material not more than three quarters of an inch wide and fold an eighth of an inch on each side of this strip. Join the shoulder seams together, one side of the back to the right side of the front and the other side to back. Sew with combination stitches, then make a felled seam as explained for the sleeve. Baste the turned fold to the right-hand side of the waist by opening out creased side and[70] placing the two right sides together and stitching one eighth of an inch from the edge. Turn the bias over to the wrong side of the waist and slip stitch. Slip stitching, as I have explained before, is somewhat like hemming; only the stitches are taken back of the folded edge and catch one thread only of the material.
The other bias band is basted in like manner to the left-hand side of the waist.
The sleeves are ready to be put in. Measure one and one quarter inches from the under arm seam on the waist, which is the short seam near the front of the waist. Pin the seam of the sleeve to this point. Pin the rest of the sleeve so that the gathers are evenly distributed. Pin the right side of the sleeve to the right side of the waist. Baste securely. Remember that the gathers should be thickest on the upper part of the sleeve (Figure 80). Stitch with fine back-stitching and then overcast. The neck may be bound or may have the collar attached.
Turn and hem the outer edge of the collar; a[71] ruffle of lace may be added if desired. Baste the collar to the waist, and try the waist on Sally Ann. If it is a satisfactory fit, stitch in place. It is well to cover the raw edges with a little bias fold. Hem the fold down on both sides.
The long strip is not joined, but a half-inch hem folded on one side and then stitched. The skirt is plaited or kilted, as it is often called. A hem is made on each of the short sides of the strips. Now crease the material as if you were going to make a tuck three quarters of an inch deep. A box plait will next have to be planned; again crease your material as if you were going to make a tuck three quarters of an inch deep. These creases must be exactly three quarters of an inch from the double fold of each piece. Measure an inch and a half, then turn the material under so that a three-quarter inch piece is under the left side of the waist line. This completes the box plait.
The plaits from there on are folded toward the left, while the first two were toward the right. Baste each plait down securely. When working on cotton materials that have a lot of dressing, the creases are likely to stay in without basting, but while working on it the edges are apt to get turned up. Basting (Figure 81) is therefore the surer and safer way[72] to keep the plaits in position, while for woollen or soft, sleazy materials it is the only way.
When every plait has been basted lengthwise, take another thread and baste them crosswise three or four times.
Join the waist to the skirt, taking care that the centre of the box-plait is under the direct centre of the front of the waist.
A sash will be needed to finish this dress. It can be tacked in place or little straps of ribbon may be stitched at intervals and the ribbon run through the straps (Figure No. 81A).
If this dress had been stitched on the machine it would have been better to make tailored seams on the waist; that is, a narrow seam is taken on the wrong side. The material is then turned back so[73] that on one side of the seam it slightly overlaps the other. Baste in place and stitch on the edge. Tailored seams do not require any extra allowance of material. They should slant toward the right on the right side of the garment and toward the left on the left side. If the seams were stitched to run in one direction the garment would have a very one-sided appearance.
Press all the wrinkles caused by handling the dress in sewing. It is best to lay a damp cloth over the material rather than place the iron directly on the material. You will need a small iron for this dress. Press each plait down carefully. Take out the basting threads before trying on the dress.
There are good, bad and indifferent dressmakers, and I know you wish to be one of the former. Sew a row of buttons on the left front of the dress and make little buttonholes to correspond on the right side.
What is stencilling? Let us see. Stencilling is a branch of painting. Have you heard the story of the Baltimore belle in the time of the Revolution who was most anxious to go to the first big ball that was to be given after the war? The town had been divested of all the beautiful silks and satins that the great ladies were accustomed to wear. Our country had stopped importing these costly materials because there was no occasion to use them and no money to pay for them.
An invitation had been sent to one of Baltimore's fairest daughters who was intending to go with her cousin. What were they to wear? Both needed the festive garments. At last, after a careful canvass of the town, the young man managed to borrow a pair of satin breeches and a flowered coat and all the other articles necessary to make a fine dandy of those days, except the silk stockings.
The girl succeeded in finding a piece of white lawn of the coarsest kind that was sufficient to make a[75] frock. In no way discouraged this clever young lady, who luckily could paint beautifully, started and painted little sprays of rose buds on the fifteen or twenty yards required for the gown. This made a very dainty and pretty frock.
Poor George, her cousin, was in despair in not being able to borrow or buy a pair of silk stockings, but clever Miss Betty hit on the plan of painting his legs with a thick coat of white and then decorating them with clocks on each side, so that no one at the dance even suspected that he didn't have on silk stockings.
Miss Betty's dress was voted to be the most charming dress of the evening.
Ever since I have heard this story I have wished that Miss Betty had known how to stencil. What a lot of time she would have saved! I am sure you will agree with me when you know how to stencil.
Have you noticed the flat gay decorations above the moulding in some houses? Well those are stencilled. A painter will cut out a design from a thin steel background; he lays this on the wall and paints over the open spaces in the design. It is the only true way in which he can keep his pattern. All free-hand designs are bound to show a difference in outline.
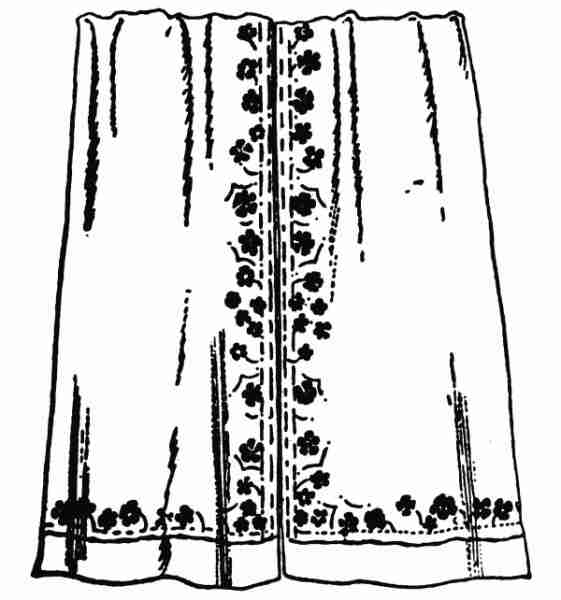
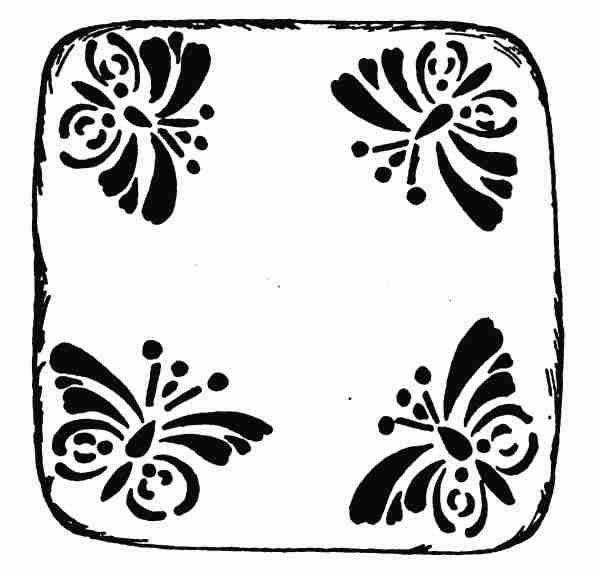
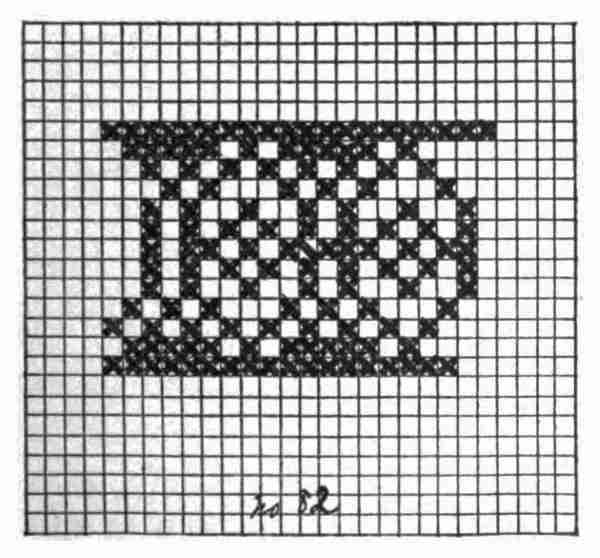
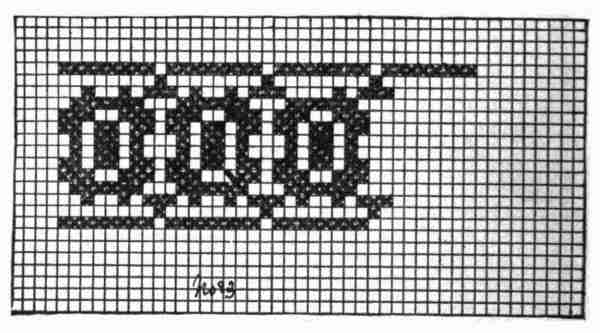
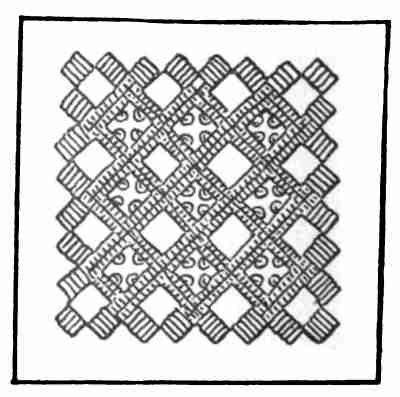
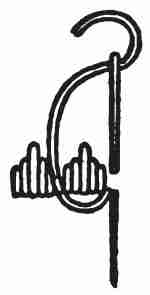
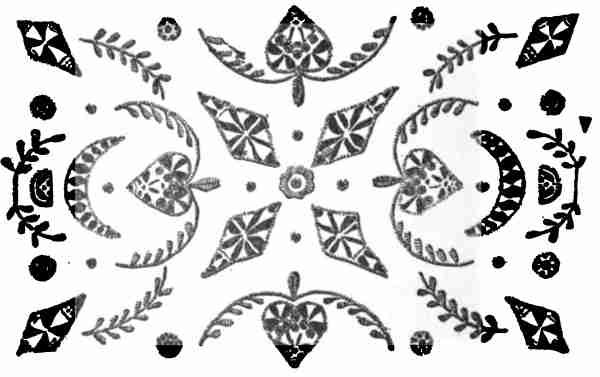
Stencilling for home decoration is used on curtains (Figure 82), portières, rugs, couch covers, table covers, lunch sets, pillow tops, (Figure 83), bags, counterpanes, as well as for dresses, parasols, wraps, scarfs, and in fact almost every conceivable object that allows the use of decoration.
You can get a stencil board from any artist supply shop, but the one you can make at home is cheaper even if it is not quite as durable.
In many of the schools, stencilling in its simplest form is taught in the kindergarten. The children are taught to fold a heavy piece of drawing paper[77] lengthwise and draw half a design so that the centre of it is on the fold of the paper. The design is then cut away, leaving the background intact. This method is good for very simple motives. Sometimes when we do not wish our design to be so set, we will draw it without creasing the paper.
The stencil board that you can buy is very hard for little fingers to cut, besides being expensive.
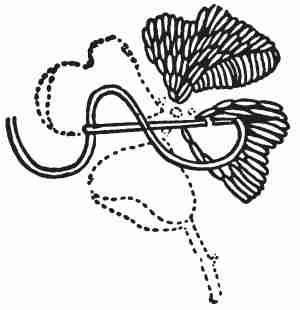
To make a stencil pattern, draw a design such as a bunch of violets. Let every petal be separated from the other and where the stems should intersect[78] leave a little space between. These little spaces or bridges are what keep the background together. Of course, as a usual thing, if you buy a stencil outfit, one pattern or more already cut comes with it. In many of the large shops stencil patterns can be bought separately, but if one has any idea of drawing it is an easy matter to make a pattern.
The design can be traced and cut on a piece of heavy manilla paper: a coat or two of shellac makes the paper stiffer and somewhat waterproof. The advantage of using drawing paper is this, that it may be cut with a pair of scissors, while a stencil board requires a sharp penknife and lots of finger[79] strength to cut the pattern. White shellac is the best to use, as it dries quickly. It can be bought from any paint store.
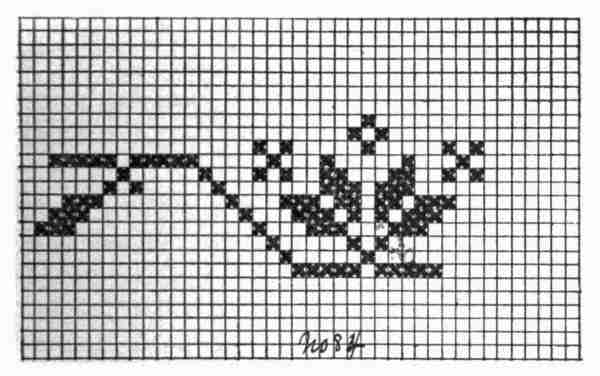
The pattern now cut (Figure 84), you are ready to do a piece of real stencilling. Let us choose the cheapest thing we can get for our first attempt. A piece of cheese cloth for a sash-curtain appeals to me. Put in the hem so that the stencil will be sure to be straight. Lay a large piece of blotting paper over the board or table on which you are going to work. Place the cheese cloth on top of that. Try your stencil pattern and measure how many times you can repeat it. It is better to plan a pattern with a small space between each motif so that you will not have half or part of the design left over. Stick a pin where the centre of each motif should be.
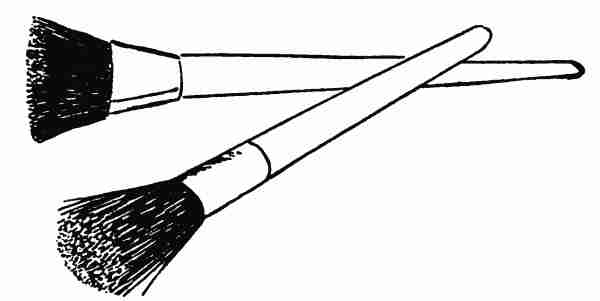
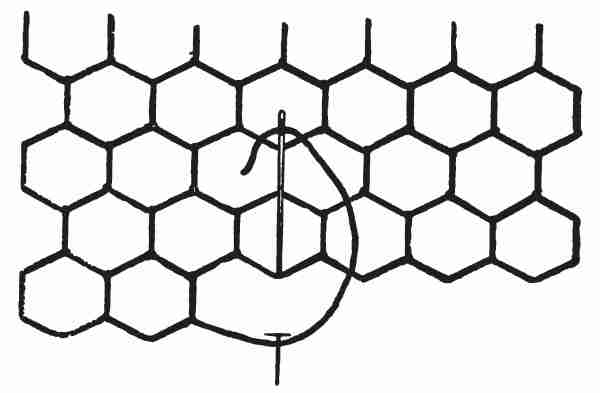
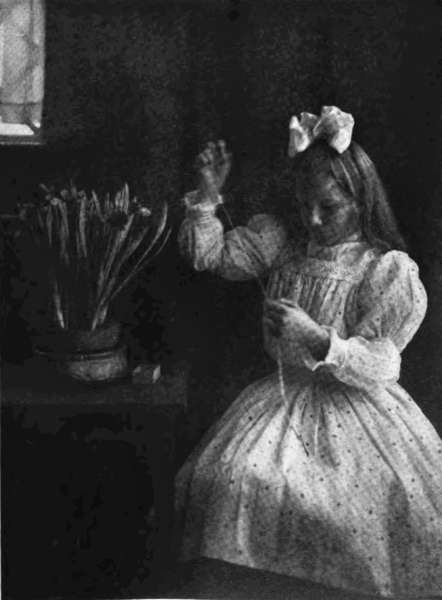
Lay the stencil pattern in position and thumbtack it down to the cheese cloth and blotting paper. Turpentine and oil are the most satisfactory for stencilling, though there are several patent mixtures sold that are good. The paint can be mixed with the turpentine till it is the consistency of a thick cream or the brush can be dipped into the turpentine and then into the paint. In either case the brush must be wiped quite dry, as the process is more of[80] a rubbing in one than painting. Bristle brushes of four different sizes should be in your stencil outfit. They come round and flat, (Figure 85). The frontispiece shows a child stencilling with the round brush.
Dip the brush into the mixture and be sure you wipe it off on a soft rag before painting in the design. If the brush is too wet the result is a blurred stencil.
Use a different brush for every colour. When the first motif is stencilled, move the pattern and place it over the next pin. If you want to reverse the pattern, clean it thoroughly with naptha on both sides and let it dry for a couple of minutes before using again.
To make a stencilled piece washable it has to be steamed like printed dress goods. This can be accomplished in two ways: that is, by holding it over a steaming kettle, or by laying a wet cloth over the stencilling and pressing with a hot iron.
Needless to say, a piece stencilled in water colours should not be treated like this.
Water colours or crayons can be used when a piece is not desired to be washed. The latter works in as smoothly as paints.
Scrim, cheese cloth, linen, crash, burlap, monk's cloth, and Arras cloth can be used for curtains or portières. The cost of them varies from seven cents to one dollar a yard.
Sometimes a small motif is taken and stencilled all over the material. This gives the effect of a printed pattern.
Five tubes of paint will produce almost any shade[82] under the sun. They should be blue, yellow, red, black, and white. Blue and yellow make green; blue and red, purple; lavender, yellow and red make orange. A little black will soften the colours while white lightens the shade. Other combinations can be made by mixing three colours together. Enough of the paint should be mixed at one time to stencil the entire piece, as it is extremely difficult to mix a new batch of colour that will be the exact shade as the first. Ultramarine blue is the shade of the deep sea. Crimson lake is a bright red. Venetian red is a terra cotta. Emerald green is a blue green. Sap green is yellow green. Ivory or lamp black are the two blacks to be had in oil paints; the former is shiny while the latter is dull. Flake white is the term for white in oil paints.
Of course, you can buy ready mixed in tubes almost any shade you desire, but it is lots more fun to make your own colour combinations, as well as very much cheaper. Diamond dyes can be used for stencilling by letting one package of dye serve for one pint. The dyes will have to be boiled in the manner stated in their directions.
You will find that stencilling is the most delightful of the home crafts. Those who are not fond of needlework will find this a real wholesome pleasure.
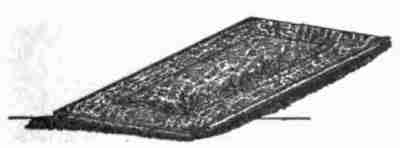
There is nothing so handsome for a library table or cushion in a room of dark rich colouring as leather work. These articles are very expensive to buy and are sold in arts and crafts shops or women's exchanges and some of the department stores. You have doubtless seen the dyed whole skin used on a library table, but have you ever seen leather appliqué? That is the design cut out of a leather background and lined, or pieces of leather applied to a background.
Different kinds of leather may be used for this work. The cheapest and thinnest kind is sheepskin. Leather is usually sold by the square foot and one has to buy the entire skin. Sheepskin costs about sixteen cents a square foot; some stores charge more for it, while it is possible at a wholesale and retail shop to get it for less. The skins come dyed in all shades. Golden brown, dull gray or moss green are the most artistic for general use. Many tailors[84] like to trim ladies' suits with leather and for this purpose many beautiful odd shades are dyed. Goatskin ranks next to sheepskin and is a trifle dearer. Chamois is good for belts or dainty opera bags. It comes in white or cream only. Calf is a beautiful substantial skin, as is also Russia calf. Pebble calf is what its name implies, very rough with a glazed finish. The other side presents an undyed appearance.
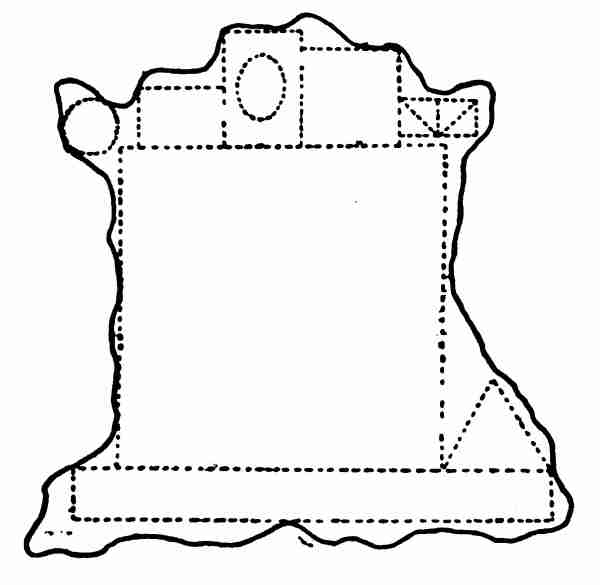
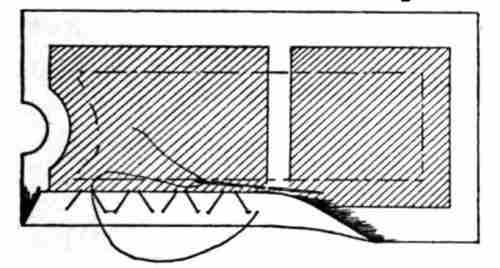
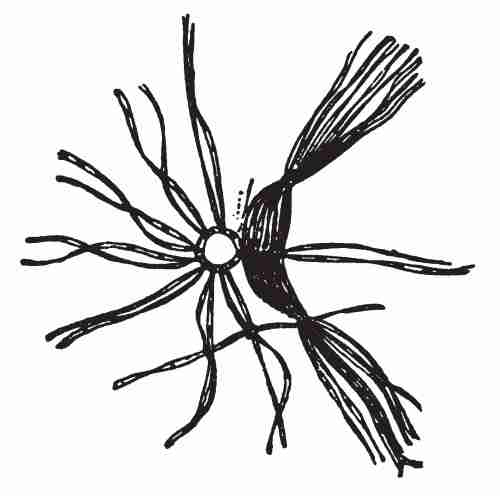
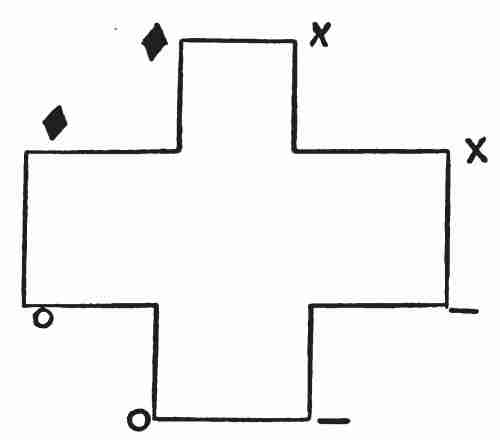
If you get a skin you should not expect to get a sofa cushion as well as a large table mat out of it. A skin carefully cut will give you one large piece[85] and the rest of it can be planned for smaller objects, such as card cases, pen wipers, blotter corners, belts, picture frames, possibly a magazine cover or a bag. The diagram of the skin shows how carefully to cut out and plan every part of it (Figure 87).
Let us take the sofa cushion first. A bold conventional design can be used in each corner. One that has each part separate like a stencil design is one that I have in mind.
Cut each part out carefully so as not to impair the background. A cheaper grade of leather of a tone deeper or lighter can be laid under the design, though velvet is also in excellent taste for this work. Broadcloth, satin, and sometimes taffeta are also used. If a shaded effect is wanted a different coloured background can be pasted under each different section of the design. It is a better plan, however, for the amateur to restrict herself to one colour for the background as the finishing of different pieces is no easy problem (Figure 88). Library paste is the best means of making the leather and background adhere, also it does not spot as mucilage does. The majority of leather workers consider that the pasting completes the piece, while others feel that it is necessary to machine stitch along the extreme edge of the cutting. Yet again[86] others prefer to work embroidery stitches such as open buttonhole or couching stitches. Both of these are explained at length in later chapters. A pen wiper can be made from a piece cut in circular, diamond, or triangular shapes. Cut two pieces of chamois leather the same shape. A plain piece of the leather also is needed to back the pen wiper. The chamois pieces serve as leaves on which the pen is wiped.
A card punch will be needed to make a hole through the four pieces for the ribbon or cord which holds them together.
It is most necessary to plan the design so that it[87] will be appropriate to the object it is to be applied to. The leather should also harmonize with the colour of the room or gown with which it is used or worn.
For those who are anxious to learn how to design, books on this subject can be obtained from the public libraries. You should bear in mind, however, that practice makes all things perfect.
The different methods of applying the design had better be gone into before we proceed any further. Thick manilla paper or artist linen may be used on which to draw the design. The pattern is then thumb-tacked or pinned on a flat wooden surface, on the upper edge only, as it will be necessary to raise the paper off and on during the tracing.
An orange stick such as used for manicuring or hard pencil will be needed for the tracing. Trace along the pencilled design with a very heavy pressure so that there will be an indented line on the leather. A line once impressed is almost impossible to remove, so great care must be taken to keep the design true.
Every time you stop tracing there will be a deeper indentation; for that reason in tracing a curved line try to draw a full sweep without stopping. A ruler will be an aid in tracing straight lines.
It may be found necessary to dampen the leather[88] so that the tracing will be distinct. In that case dampen the entire piece of leather with a wet cloth. Dampening in sections only causes water rings. Once the whole leather is dampened, however, it can be redampened in sections without fear of marking.
Designs for leather may also be applied by means of a perforated pattern and a stamping powder or paste or a transfer pattern may be also used.
The leather for cut-work may be cut with sharp scissors and manicuring scissors for round or curved places or two sharp knives of different sizes. A board of soft wood is the best on which to work.
The best kind of paste is one that has been recommended by a successful leather teacher and proves satisfactory to all who have tried it. "Bring to a slow boil a half-pound of flour in two quarts of water. Add to this mixture when cool, an ounce of nitric acid and a dram of boric acid and a few drops of clove oil." The nitric and boric acid, as well as the clove oil, can be obtained from the drug store.
If knives are used to cut out the design, thumbtack the leather before commencing.
The paste is applied lightly on the wrong side of the leather, then the lining placed over it. Lay the article with the right side up and put it under weights until it dries. Any surplus paste that may happen to ooze through can readily be scraped off.
A wide range of articles can be made from leather appliqué, whether underlaid or overlaid, such as table covers, bags, belts (Figure 89), medicine cases, card cases, mirror frames, book or magazine covers, portfolios, memorandum pads, waste baskets, pocket books, bill folders, chair covers, besides numerous other articles.
Sometimes it will be necessary to have two tracings of the design, one on the leather and one on the other background. Leather is often applied to heavy crashes for portières, or pillow tops. A bold conventionalized poppy is an excellent design for portières.
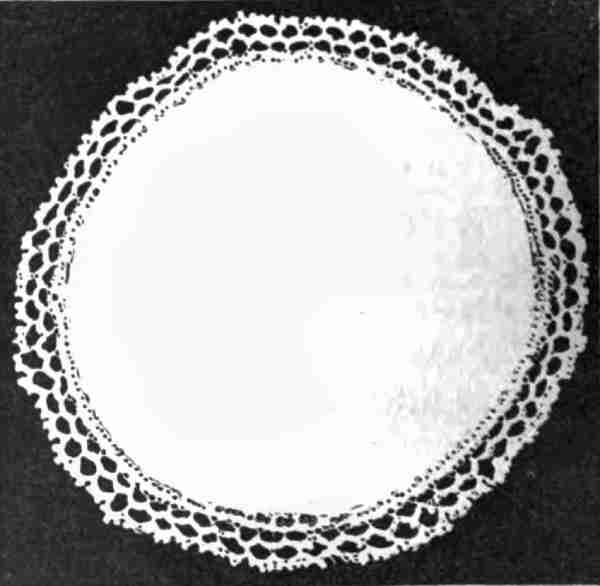
Paper is often used to line centerpieces or mats.
Rough tinted cartridge paper can be treated the same as cut leather and the daintiest of candle or lamp shades can be made of them. The design is cut out as in leather and a thin China silk lines the whole. Each section of the design may then be[90] coloured the right shade of the silk. For instance, a design of cherries can be painted with orange and red for the cherries and the leaves green, while the paper is of tobacco brown; a narrow gold braid finishes the shade at the top and bottom, while the shade is held together with four tiny gold rivets.
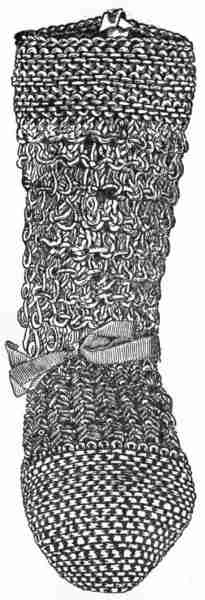
Tooled leather is one of the oldest and most beautiful of crafts. Instead of weakening the leather it simply makes it more beautiful. A handsome box is made of soft wood or cardboard and covered with tooled or embossed leather and is a possession that a queen might envy.
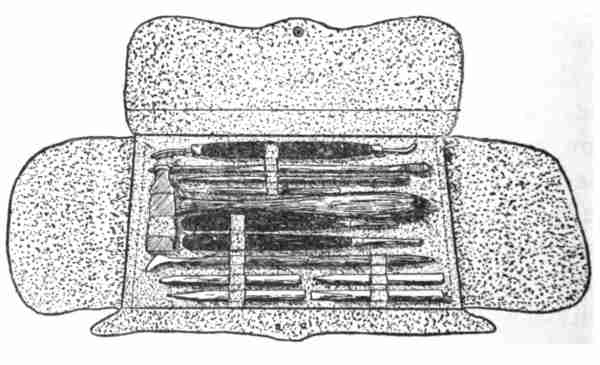
Boxes containing tools for leather work can be had for from five to twenty-two dollars for the outfit. Twelve tools are in the box. Two modelling tools, a steel hammer, two embossing tools, a punch, an embossing ball tool, one cutting or trimming knife, and four chasing and pearling knives (Figure 90). Now I know that there are not many of you who would care to buy an outfit for five dollars, but for home use there is a simple little article that can be substituted and yet you can obtain very satisfactory results. A steel nut pick will work wonders and then, when you feel that you can do very much better work with other tools, invest in a case of them.
All leathers are not satisfactory for tooling. The best and most used is Russia calf in a heavy quality. One skin is usually the least a dealer will sell.
Let us suppose we are working on a card case. The design is traced in the manner described in the last chapter, that is, by tracing over the dampened leather.
After the design has been traced remove the paper and holding the nut pick firmly in your right hand as you would a pencil, proceed to deepen the lines. The leather must be kept moist or the tool is apt to scratch and break the outer skin. It is a work over which you may become fatigued, but you can[93] just lay it aside till the next day and then proceed again. The deeper the tooled line the handsomer the piece. It will take several hours to tool a card case.
Another form of decorating leather is with the little geometrical die that was used so much in past winters for decorating the background of etched copper articles (Figure 91). The little die is placed on the leather with its raised or embossed side downward and one knock from a steel hammer is sufficient to make an imprint on the leather. The entire background is filled out in this manner. Hammer with an even pressure otherwise the background will be bumpy.
Sometimes you may prefer to have your background pressed or modelled and the design to stand out in relief. In that case take the bowl or thick part of the nut pick or modeller and press the background in flat. If the leather wrinkles when rubbing it change the direction of working. When the work is completed it will be noticed that the modelled part of the leather is darker and quite shiny.
Designs such as cherries, cat-tails, and most floral forms give a greater opportunity for elaborate[94] working. They can be carried out in relief. This relief is a much more difficult work. In the first place the design is drawn on the finished surface of the leather and then, after another sponging with water, hold the leather up from the table. Holding the section to be modelled between the first finger and thumb, work the tool backward and forward under the section.
Some workers prefer to hold the working side toward them, contending that a greater pressure can be brought to bear on a downward stroke than an upward one. In that case the design is stamped or traced on the wrong side of the leather.
The oftener the rubbing is done and the leather is dampened the higher the design will stand forth. The parts to be worked in relief may be done before the background (Figure 92).
To keep the leather from falling back to its natural shape some workers paste the relief parts. My teacher used a paste that we found quite stiff enough except for large heavy objects.
To make this paste an ounce of dextrin is left soaking in water for about sixteen hours. Dextrin, by the way, is the only paste which will not stain silk. It is a white powder, and when used as a paste can be dissolved in boiling water till it is the consistency of a thick cream. When used as a modelling wax, however, it requires to be thicker than a cream. After the dextrin is dissolved mix in a pint of scrap leather that has been grated to shreds, and a few drops of turpentine. The scrap leather thickens the paste while water thins it.
Before applying the paste to the leather the raised side is placed face downward upon the marble. Take some of the paste and press it into the hollow places until they are entirely filled. After every space has been filled lay a piece of paper over them and then a cardboard or a piece of board large enough to cover all the design.
Turn the leather, paper, and board right side up on the working table. While the places are being filled in the design is apt to be pushed a little out of shape. With the finer modelling tool or your[96] nut pick go over the flattened places again. Let the work remain on the table for four days without touching it so that it may be thoroughly dried.
Sometimes you will see a beautiful tinted leather. This is usually done by the means of dyes, or chemicals. For the amateur the former is recommended. The dye is applied to the leather with soft cotton or a sponge. To deepen the shade wet the places desired to be darker two or three times with the dye.
To obtain the brightly polished appearance so often seen in a handsome piece of leather rub the piece with your bare palms. A little wax rubbed on your hand greatly aids the work.
In all leather work it is necessary to leave a margin about a half inch at least.
Another paste which may be substituted for the formula given in this chapter is one made of equal parts of sawdust and rye flour with water.
The cutting or shaving knife that comes with the outfit is good for cutting the leather. If a deeper indentation is desired than is obtained by tracing the pattern, a slight slit may be made with the shaving knife. Of course cutting the leather weakens it and it should only be done on a very heavy piece of skin.
The hammer is indispensable for stamping in the little dies. These dies are not usually included in the outfit.
The difference between the modelling (Figures 93 and 94) and embossing tools is that the embossing tools are a greater aid in achieving fine bas-relief work. The embossing ball tool is used to make the deep indentations.
The punch is to make holes for rivets or through which cords or ribbons may be passed to connect two or more pieces of leather together as on a pad or book. The punch and pearling knives are used in fine carved leather. As one becomes proficient in the art of simple leather work she is tempted to branch out and try more elaborate work. A great many books have been written on this subject which, though perhaps puzzling to a beginner, will be interesting and invaluable if the work is taken up as a serious occupation. The best specimens of this work can be seen at the different arts and crafts exhibitions.
It would be hard indeed to say just how many stitches there are in embroidery, as so many are combinations of the others. The ones you will hear about are the simplest ones.
Some years ago I had a large class in embroidery in a mission school. Every seat was taken and many applicants were refused admittance. The supervisor came in one day and said that there was a little girl who was very anxious to join the class and that she knew how to sew. I did not have the heart to refuse her, so in marched little Nellie. She was just seven years old and said that she attended sewing school every Saturday at her church and that her teacher had taught her all about embroidery. I gave her a little stamped design and told her to chain-stitch it and let me see how well she could do it. About five minutes later I happened to turn around and there was little Nellie frantically waving[99] her hand. "Teacher, teacher," she said, "that is the only stitch the Lady didn't show me."
Now, as I am most anxious that nothing like that will happen to you, I will start with chain-stitching as the simplest stitch (Figure 95). It is also one of the oldest stitches in embroidery. Every museum that exhibits embroidered articles will have some elaborate designs carried out in fine chain-stitching. If the stitches are worked in filo silk or spool silk the effect is like machine work.
Draw a straight line on a piece of muslin and thread your needle with a piece of red cotton. No knots should be used in embroidery. Fasten the thread by taking three fine running stitches and one back stitch to insure firmness at the end of the line. Now with the needle in position at the beginning of the line, start by taking a straight stitch on the line. Bring the thread under and pull the needle through the material. You have made the first loop. Put your needle back into the last hole or as near as[100] possible to it, take another stitch on the line, repeat until you come to the end of the design.
Take the same length stitch every time or you will not have a good-looking chain. If you will look at the links in your chain bracelet, you will see that every link is the same size as the others. Suppose you wanted to chain-stitch a square or a triangle: when you come to the corner do not try to make one continuous line, but carry the needle down through the material at the end of the loop to fasten the link and start the next row at right angles to it. Chain-stitching can be put to many uses. It is a pretty stitch to cover a single line in a conventional design. It is also the quickest kind of padding for large designs. When it is used as a padding, the rows are worked close to each other. If the work is to be raised very high, the chain-stitching may be placed in rows one on top of the other. You will, however, hear more about padding in a later chapter.
The next stitch we will talk about is the outlining, (Figure 96). Some people think it is[101] simpler than chain-stitching. It was the first stitch I learned in embroidery, but it is not as pretty as chain-stitching. The first thing I did in fancy work when I was nine years old was a wonderful face cloth with a wild rose on the top, and under it my name and the motto, "Cleanliness is Next to Godliness," worked in red cotton. After that I made face cloths for every member of the family.
Outlining makes one think of plain sewing. There are two kinds of outlining, rough (Figure 97) and smooth, the difference being in how the thread is thrown. To make the rough outline, fasten the thread as directed in chain-stitching and on the line take a stitch about an eighth of an inch. Then work from left to right. Let the thread fall under the needle and be sure to keep it this way. A smooth outline is made by throwing the thread over the needle instead of under it; this outline can be used as stems for flowers unless a more elaborate kind is desired.
Either chain-stitching or outlining is an excellent way to decorate bureau scarfs, pillow tops, or table covers.
Herring-boning is used for finishing seams on a flannel skirt, or it may be used above hems. The[102] little flannel skirt you intend to make for Sally Ann this winter should be finished in this way. Here is a stitch for which we do not need guide lines, though while you are learning, the lines might be helpful. Draw two parallel lines a quarter of an inch apart. Take a stitch on the upper line, about an eighth of an inch long. Then make one on the lower line, letting the thread fall always to the right. When you have made a row between with the lines, try to work one without lines and see if you can keep the herring-boning straight (Figure 98).
A plain quilt or cover for the baby can be made very attractive, by working herring-boning around the edge. If the cover is woollen, use worsted or heavy silk for the stitchery, but if it is cotton material, a heavy lustre is recommended. The needle to use depends on the thread. A sewing needle will carry a round cotton thread such as D. M. C.,[103] Madonna, Utopia, Royal Society, or Peri lustre. A crewel needle, which is a needle with a long eye, will be required for silk or worsted. An easy way to thread a No. 2 or No. 4 crewel needle with worsted is to hold the needle in the left hand and double the thread at one end and run the needle through it. Hold the thread between the thumb and first finger of the right hand so that the thread is just visible. Gently pull the needle out with the left hand and run the doubled thread through the eye. It sounds a great deal harder than it actually is, but it will require very little practice.
When you went to kindergarten did you have little pierced cards on which you made designs in coloured silks or cottons? Well they had these at my school[104] and we made book-marks, needle-books and all sorts of funny little things. If you remember the cross-stitching of the kindergarten days, regular cross-stitching will be a simple matter. The nicest material for this work is Java canvas, which is very coarse and stiff. It is ideal for book covers or napkin rings. The holes in the canvas are so large that working on it is almost like play. As Java canvas is rather expensive you will find a coarse scrim a good substitute. A lot of boys that I once knew took up this work very enthusiastically, so simple is it.
Do you know that you can make a gingham apron for mother and decorate it with cross-stitching that will last ever so long? Get a piece of gingham with squares about an eighth of an inch. Cross-stitch it in a shade darker than the gingham or in white or[105] red. The stitches are taken on the diagonal as shown in the diagram (Figures 99 and 100). If there is a great deal of cross-stitching to be done, the quickest way is to make all the stitches that run in one direction first, and then come back and cross them. Perhaps mother has a small piece of cross-stitching that you can use as a model. Simple triangles are easy to make. Begin the lower row with an uneven number, such as seven, nine, eleven, or thirteen. The next row make two stitches less, dropping one from each end, and so on till you have one at the top.
Now suppose that you had a little linen or silk[106] bag on which you would like to have a cross-stitch design, yet this material is not coarse enough for you to use as a guide for the cross-stitching. Do not think you cannot do it, for I will show you a way. Get a piece of scrim just as coarse as you can find, and baste it over the place you would like to cross-stitch. Work the design on it and when the cross-stitching is all finished pull out the scrim thread by thread. Sometimes you will have to snip the thread of the scrim if your needle accidentally gets caught in them. (Figures 101, 102, and 103.)
A very simple thing to do is to braid a dress for yourself. Now that all the large pattern houses are carrying transfer patterns you can get a design[107] for braiding very cheap. A little girl I know braided a dress for herself and one for her mother last summer. She used light blue chambray and braided it with white. There are several kinds of braid, but the easiest to use is soutache, whether it is cotton or silk. It is a flat braid and varies in width from one to three eighths of an inch. First stamp your design on the material, or if you have not a transfer pattern you can draw a design on tissue paper, making it as long as required and then baste the paper in right position on your dress. Take a stiletto, which is a little tool somewhat like a nail that is used in embroidery for piercing holes, and punch a hole on the line. Push one end of your braid[108] through this and fasten the end of it on the wrong side of your material. Thread your needle with sewing cotton or silk the colour of the braid and sew it down with little running stitches and an occasional back-stitch to fasten it firmly. When you come to the end of the line or of the braid, carry the end through as at the beginning and fasten.
Coronation braid is beautiful, but oh, so very much harder to sew on than flat braid. There are two ways that coronation braid may be sewed on. The one that I give preference to is stamping the design on the wrong side of the material and holding the braid on the right. A stiletto hole is made on the line and the end of the braid brought through to the back and fastened securely so there will be no likelihood of its slipping. Then, holding the braid with the left hand, connect it to the material from the wrong side with fine running stitches. The stamped line on the wrong side will serve as a guide[109] for the stitches. You can feel every time the needle touches the braid. Now perhaps many of you are wondering what coronation braid is. It is a braid that looks like fat grains of rice all strung together. There are different sizes of the braid, varying from the quarter inch to the three quarters of an inch size.
The second way to sew it on is from the right side with little slip stitches. At the small end it would be wise to take a stitch over the braid to hold it firmly. Centre pieces, bureau-scarfs or even towel ends are handsome when decorated with coronation braid, and do you know it is a very easy matter to make designs for yourself, as there is nothing prettier than daisies or wild roses for coronation braid. If the petals are too fine to allow you to use the coronation braid, then you must use one grain for each petal, cutting off the grains as you require them.
Coronation braid comes in white, Delft blue, bright green, or red. The braid is supple enough to turn sharp corners.
The daisy, as I have stated before, is one of the principal designs used for coronation braid. Braid[110] the flower with one piece of the braid. It is not necessary to cut the braid but at the beginning and the ending of the daisy. The very largest width of coronation braid will be required for the daisy. Two grains will be sufficient for a petal. Bring the narrow ends to the centre and connect them to the material. In the centre make a cluster of French knots. The effect produced is a daisy embroidered heavily and yet quite different from satin stitch. (Figure 105.)
A belt decoration with five or six coronation daisies is very attractive when used on a light summer dress. Sometimes the owner prefers to couch the braid down with blue cotton and to work the centre of the daisy in the same colour.
A row of daisies is improved by working a fagotting stitch which is explained in "Simple Lace[111] Stitches," between the petals. See that the braid is sewed on far enough apart that the lace stitches will not be crowded.
Coronation braid is also used with crochet stitches for the borders of centre pieces and towels.
Smocking is such a fashionable trimming this year that I am sure you will not be contented till Sally Ann has a smocked dress. Why, one cannot take a walk in the park without seeing several little children and some grown-ups, too, wearing smocked dresses. Sometimes they are made of fine lawn or pique and then again they are China silk, crêpe de chine, or cashmere.
Stamped patterns can be had for smocking but they are not at all necessary. Nearly every little English girl knows how to smock without buying a pattern and why should not you?
The simplest form of smocking is the honeycomb or diamond (Figure 106). It can be any size you wish. A good size for Sally Ann's dress is the half-inch diamond smocking. The beauty of the work lies in its regularity. To keep it so, the dots must be spaced evenly. A good way is to have a marking card. Take a piece of heavy paper or[113] thin cardboard about six inches long by an inch and a half wide. With a ruler draw a faint line one half inch down parallel with the long edge of the card. Draw four other lines below this at quarter-inch intervals. Be sure that the space between each two lines is a quarter inch, no more or no less. Along the top line measure in one half inch. From this point make dots at quarter-inch intervals all the way across. Each line is dotted in like manner, letting each dot come directly under the upper one in straight rows. If mother has a card punch ask her to lend it to you and where the dots are make holes. A stiletto will answer the same purpose as the punch; or an orange stick may be pressed into service. Your marking card is now ready.
Measure the length you wish to make Sally Ann's[114] skirt. Select a piece of material that will show pencil marks, such as lawn, pique, China silk, or crêpe de chine. It will not be necessary to gore the skirt, as the smocking will form a sort of yoke for the dress. A little frock smocked in blue or red will be nice enough for all occasions. Take the material and smooth all the creases out after it is cut the right length. You must allow about the same amount of material for the width of the hem as you do for ordinary skirts. Place the smocking card so that the edge of it is on a line with the top edge of the goods. The smocking must be done before the belt is put on. Through each of the perforated holes make a dot in lead pencil. After every hole has been dotted, move the card so that there is only one quarter of an inch space before commencing to dot again. In other words, place the card so the dots have the appearance of being one continuous design.
Thread a No. 6 sewing needle with a piece of red or blue cotton. Make a tiny knot at the end. Start from the topmost left-hand dot from the under side of the material. Draw the first and second dots together. Three stitches on the right side will suffice to hold them together. Between the second and third dots let the thread span the material on the wrong side without pulling it. The third and fourth[115] dots are drawn together and then the thread spans the space between the fourth and fifth. Do you see how we are working? First a dot, then a space, a dot, then a space, until the entire line is finished.
The second row is worked exactly the same only instead of starting on the first dot of the second row, start with the second. The third row corresponds with the first and now at last we have formed a diamond.
If a little more colour is wanted than just the dot alone, pass a thread along the edge of each diamond under the dots. A suggestion which may prove helpful to you if the material has starch in it is that it is easy to crease each line of dots before starting to smock. If the material is soft the smocking should be stroked or gauged. There is a new term to learn, "gauge." It is the same as stroking in sewing. The English women have all sorts of complicated patterns in smocking, but the one that is most popular is the diamond[116] smocking I have told you about. After you know the principle you can make the smocking as deep as you wish and then try and smock in points. (See Figure 107.)
Feather-stitching is almost as simple as smocking. It has various other names. Perhaps you know it by the name of "brier-stitch." The first and simplest form is the single feather-stitching. A thread as fine as No. 60 sewing cotton or a heavy Germantown wool can be used for it. Baby blankets or a blanket for yourself are pretty feather-stitched in wool.
Like smocking, patterns can be had for feather-stitching. But the best embroiderers never use them, as their mechanical correctness makes the work too much like machine work. I do recommend, however, a faint line drawn so as to have something on which to guide your line and gauge your stitches.
Let us thread our needle with a piece of coarse blue thread. On a little piece of muslin draw a faint pencil line across it. Commence from the upper right-hand side of the line.[117] Take a short stitch about three sixteenths of an inch on the right of the line, slanting to the line. Let the thread come under the point of the needle in each stitch. The second stitch is taken on the left side of the line the same distance over and the same in slant (Figure 108).
Double feather-stitching is two stitches to the right, two to the left and so on till the line is finished (Figure 109). In fact you can make three, four (Figures 110 and 111), or five stitches or even more if you wish on each side. The prettiest little border can be made of feather-stitching in circles. Take a quarter or a fifty-cent piece and draw a faint line around it on the material about one inch from the edge. Move the piece till it overlaps the pencilled circle and draw another circle. Repeat as many times as necessary to go around the skirt, sleeve, or section you are decorating. A row such as this makes a pretty decoration around the sleeves and neck of a night dress or the ruffles of drawers.[118] Marking cotton No. 20 or No. 25 should be used for feather-stitching underwear.
Infants' dresses, bibs, or petticoats of lawn or any very sheer material of cotton or linen should be worked in fine marking cotton, either Nos. 25, 30, 40, or 50.
Just a word about threads. There are several different kinds. The most popular and best known are D. M. C., Madonna, Royal Society, and Utopia. The numbers run about the same. Some teachers recommend one certain kind, but the result obtained from using any of them is almost identical.
There is a pretty little stitch that can be made with a foundation of double feather-stitching. We used to call it "seaweed-stitch" when we were youngsters. I remember I made a white cashmere coat for my doll and used the seaweed-stitch along the hem and above the opening, and on the cuffs and collar of the coat. It was embroidered in rose coloured filo silk. A row of double feather-stitching was worked in the usual way. At the end of each stitch a little Van Dyke point or V was worked. Try it yourself and see how dainty it is (Figure 112).
A good way and something new for decoration is the feather-stitchery used like festoons on the hems. The way this is done is to take a compass and make a circle about two and a half inches in diameter. Cut it out in heavy paper or thin cardboard. Baste the hem in place and then trace one-third of the circle. Repeat in like manner till the hem has the appearance of large scallops. Along the lines work the single or double feather-stitching in No. 20 marking cotton through the two thicknesses of the material. Pull out the basting threads from the hem and then carefully cut away the material within each scallop on the wrong side of the hem. In other words, the upper part of the under hem is cut close to the stitching. Cut right down to the feather-stitching.
Only thin materials are pretty worked like this, as the doubled material gives a milk-white appearance, while the upper or single parts are transparent. A lazy-daisy stitch worked in the centre of each scallop adds further beauty to a feather-stitched hem such as has been just described. The lazy-daisy has been aptly called because it requires a stitch to connect each petal to the material.
Another name for this lazy-daisy stitch is the "bird's-eye" stitch (Figure 113). It is used to represent[120] clovers, daisies, or leaves. The stitch is made, if for a daisy, from a common centre. Bring your needle up from the centre of the daisy and take a stitch the length of the petal. Let the thread come from the left under the point of the needle. Pull the needle through the material on the right side. A short stitch at the end of the petal catches it down to the material. The needle is now brought back to the centre and the next petal made in the same manner. Any size daisy can be made like this from the quarter to a two-inch size. Remember that the larger your daisy is the more petals it should have. As fine thread should be used for the little flowers and the heaviest silk or lustre for the big ones, it is a wise plan to faintly mark in pencil the daisy. One line will be sufficient for each petal. If you do this, you can then be sure that each petal will be the same length as the last.
A charming little yoke can be made of groups of fine tucks and rows of the daisies.
The more one does of fancy work the more fascinating it becomes. Every new piece presents an opportunity for new stitches and colours.
We have talked a lot in the first chapters of this book as to the different implements necessary for sewing and by now I am sure you have a well-equipped sewing box or basket. Now it will be necessary to add considerably to your work box for embroidery.
The crewel needle which I mentioned in the ninth chapter is the most important implement. Get a pack of assorted Nos. from 5 to 10. They will answer every purpose unless you need a large tapestry needle for couching. The most unfortunate thing about a crewel needle is that the eye has the bad habit of breaking. This is caused from the steel being so fine at the top that vigorous working snaps it off very quickly.
A tapestry needle is like a large crewel needle, only it is much stronger and the eye is very large.
A stiletto of ivory, bone, or steel should also be in your box. An orange stick can be substituted for a stiletto in case of emergency.
A small pair of scissors, too, should be included to cut the ends of silks or pare away the material after buttonholing or making an eyelet.
I have kept the most important till the last. That is the embroidery hoop or rings. Really you would be surprised to see how many different kinds there are in this world. First there are the black celluloid ones that have their good points, but they do not stretch over the material. Then there are the common wooden ones that have sharp edges that catch and fray the silk on every turn. There are some wooden ones that have a felt lining and whose edges are an improvement on the cheaper kind, but they also do not stretch over thick fabrics. The kinds that have a spring and may be adjusted to any size desired have their advantage, but the spring catches the silk also and of course that will never do for fine work. The simplest, best, and cheapest kind is the pair that is made at home. Get two pairs of the cheapest rings, even if their edges are rough. One pair should be small enough[123] to set inside of the other. They vary from the smallest to the largest circular kind, each one setting inside of the other. Select two pairs that come next in size to each other. The most convenient size and ones that can be used for all kinds of work are the six inch. Take the larger hoop of each pair for your work. Now cut a piece of canton flannel in half-inch strips, or if mother has the coloured selvage left from a piece of flannelette, get that. The largest hoops should be wound over and over like the hoops they use in schools for fancy drills. The other hoop should be padded before winding it. To pad, lay strips two or three thicknesses deep around the hoop and then wind thickly like the other hoop. Hoops like these never leave marks on the material, as often happens with the celluloid or wooden hoops. Another point is that the sheerest material, such as chiffon, can be used in them, while if a heavy burlap or crash is embroidered over them a little of the winding strips can be removed for the time being.
There are other things you might find handy for your box, but it is no use getting them till you have occasion to use them.
Now we are ready to make use of some of the things just described. The tapestry needle will be brought[124] into use for our next stitch, which will be couching.
It is a beautiful old stitch that is often used as an outline. It can be made as a heavy thick cord, or yet again it need only be the size of a fine string. The expression is often used, "Couch a cord on." Cord is used instead of threads and lustre on pieces where only the effect is wanted.
To couch with a number of silk or lustre threads select a No. 2 tapestry needle. Cut the skein of silk so that you will have the longest length of thread possible. Thread your needle with all the strands in the skein, if the eye will carry them. Make a stiletto hole in the cloth on the line of the design. Bring the tapestry needle through to the back (Figure 114).
A crewel needle is threaded with a single strand of silk, the same shade or lighter or darker if you[125] desire. Fasten the silk ends down neatly on the back of the material with the single thread and bring it up one quarter of an inch from the hole and span the cluster of silk threads. The threads are caught down in this manner at quarter-inch intervals. When the end of the line is reached, the cluster of threads is again taken through to the back of the material.
Couching is a stitch that you will hear more about in later chapters.
The Turkish or Ismet stitch is another name for cat-stitching or herring-boning. See Figure 98. The stitch is taken vertically instead of horizontally, as in cat-stitch. Turkish stitch gets its name from the embroideries from Turkey (Figure 115). It seems to be the favourite stitch of the Turkish ladies.
Have you ever noticed how many pieces of Turkish embroidery are worked on coarse unbleached muslin or tan linen? The colours are generally bright green, blue, coral pink, chestnut brown, purple and then outlined in black or gold thread.
Shadow work, is not that a funny name for embroidery? But you can understand why it is called[126] that when you see a piece worked. It gives the appearance of a design under the cloth, as all the stitches are taken from the wrong side of the material. The design is drawn or stamped on the wrong side. Lawn is usually selected for the background of shadow work because of its transparency. A heavy cotton such as No. 16 or No. 20 marking cotton or D. fine lustre is necessary.
Daisies or chrysanthemums are most popular for shadow work on account of the smoothness on their edges. Not that it is impossible to work an indented edge, but it is more difficult.
To work the shadow stitch, place your work over your embroidery hoop with the design side up. Start to work a petal from the heart of the flower. Do not use a knot. The stitch is like cat-stitching (see Figure 98). First you take a stitch on one side of the petal, then you pass over to the other side. Be sure you take the same length stitch every time. The stems are worked in outline stitch. Shadow work from the right side looks like back-stitching[127] (Figure 116). It is used on aprons, shirtwaists, or bureau scarfs where a good effect is wanted with very little work.
There are two ways of working the leaves of daisies or chrysanthemums in shadow work: First, and the best in my opinion, is to start and work from the top of the leaf to where the midrib commences in the design. Now work from the midrib to the outer edge on the right side of the leaf. The left-hand side is yet to be filled in. Start from the base of the leaf and instead, however, of putting the needle through the material by the midrib catch one thread upon the midrib and then take a stitch on the left-side edge of the leaf, up to where the midrib ends.
The other way of working a leaf is to outline the midrib first. Then start from the base of the leaf and work across the entire leaf. The former way is the better, because there is not such a wide stretch of thread on the wrong side as in the latter method.
Batiste, organdy, and lawn are the usual materials used in America for shadow work, but in England, where more substantial materials are generally liked, tea cloths of linen in shadow stitch are often seen. Tiger lilies are good for any large piece.
The effect of shadow work on linen is as if a padded design was placed on the material.
White is the nicest for working shadow stitch on waists, especially as colour is apt to cheapen the effect.
Remember that a design drawn out in pencil soils the cottons or silks and necessitates the article being washed before it is used. You can buy patterns for embroidery so cheap and in such excellent taste that it pays one in the end to use them instead of drawing on the material. There is the perforated design that can be had from five cents up. It is the oldest and in some ways the most expensive pattern. The perforated paper is laid, with the rough side up, over the material on the ironing table or any other flat surface. An especially prepared powder that embroidery shops sell for stamping designs is the best to use. A pouncet is several layers of felt rolled together, or a piece of wood covered with felt. Rub the pouncet in the powder. See that the pattern is weighted down so that it will not slip while you are working on it. Rub the powder in with a circular movement. Lift the weights from the lower edge of the paper, and gently raising the pattern see that the design is well on before removing the pattern. A hot iron will be necessary now to set the powder. Every time you use the iron just[129] clamp it down on the design. Wipe it off on an old piece of cloth before you press it again on another section of the design. Each time the iron touches the powder, part of it adheres to the iron and the design would be spoiled if the iron was used again before wiping it. After the design has been set, the iron can be used freely over the whole work.
There is another method of stamping with a perforated pattern, and that is placing the smooth side of the design face upward and using a blue paste that comes in cake form. The pouncet is dipped in kerosene or naptha and then rubbed on the paste. Apply to the paper as directed for the powder. This method requires no iron, but care must be taken not to get the pouncet too wet or the design will run.
A third method for stamping is one that requires to be rubbed with the back of a spoon. The fourth and newest method of stamping is by the transfer designs. The patterns are in different colours. Place the transfers with the bright or raised surface next to your material and press with a heated iron. Some patterns require a very hot iron, while for others a moderately heated iron suffices.
You can make a perforated pattern yourself by drawing a design on a piece of paper and using a sewing machine to perforate along the lines.
Embroidery buttonholing is a little different from the buttonhole stitch used in sewing. It is a stitch that is most used to finish the edges of centre pieces, scarfs, and, in fact, any article where embroidery is wanted to finish the work. You know that it is possible to use a fancy stitch, such as the Turkish stitch described in the last chapter, but in that case the material will have to be turned back and hemmed. The twill or purl of buttonholing, as the little ridge on the edge is called, serves as a resistance for the material from fraying out.
The buttonhole stitch is the most popular in embroidery. It is the foundation for many other stitches. Feather-stitching is really an open form of this stitch.
As a usual thing it is necessary to pad before working buttonholing. It raises the work and makes it much more durable as an edge. The padding can be done in either running-stitch or chain-stitching.
Let us take for our first example the straight buttonholing. It is the simplest form. Cover the space between the lines with coarse, running stitches. Let the background be medium weight linen. The padding thread should be No. 16 or No. 20 marking cotton, or two strands of white darning cotton makes an excellent padding. The stitches can be fully one quarter of an inch in length. Take up a single thread of the background so that the padding will be all on the top of the material. This keeps the work well raised on the right side and perfectly flat on the wrong side. An extra row or two toward the outer edge of buttonholing raises the edge prettily. Chain-stitching is a more rapid way of padding, but should only be used for coarse work. Remember that the wider the buttonholing the more padding will be necessary.
The padding should be worked over your embroidery hoops, keeping the work as near to your fingers as possible. The actual buttonholing gets a rounder effect if done over the finger, though it is possible, of course, to do it over the hoops.
Again, no knots in buttonholing. Thread your needle with No. 25 marking cotton. Make three little running stitches and one back-stitch to insure firmness in the starting. Let your thread come up[132] slightly under the lower line of the buttonholing. With your left thumb holding the thread down to the material draw your thread to the right, take a stitch over the padding, bringing the needle out slightly below the lower line. The thread should fall under the point of the needle in each stitch.
The next thing we learn in buttonholing is a scallop. The deeper the scallop the more difficult it is to make a good corner and to keep the slant of the stitches right. When you buy a stamped piece of embroidery, select a pattern that has a shallow scallop and one where the points are not too sharp. In working a scallop the stitches should slant vertically in the direct centre, slanting the other stitches toward this point (Figure 117).
The object in carrying the needle slightly beyond the stamped line is that all the stamping may be[133] well covered. A stitch that is taken directly through the line shows the stamping.
The diagrams (Figures 117 and 118) show how to work a simple scallop and one with a sharp scallop. A good deal has been written about the cutting of scallops, but the safest and wisest is to wash the piece before cutting out the scallops. A pair of small embroidery scissors should be used to cut the material away close to the twill of the buttonholing. If a scallop is cut before it is washed it frays so much that the edge has an untidy look.
Some women work a row of machine stitching close to the lower edge before padding it, as a preventive from fraying, while others insist on cutting the material to allow a hem on the wrong side only. Try the first way and see if you are not successful. Another point to bear in mind in buttonholing is that the stitches should be taken very close to each other. If a piece of buttonholing is well done it is hard to distinguish one stitch from[134] the other, and yet they must not be made one on top of the other or the buttonholing will be rough.
Wallachian work gets its name from a little community in Pennsylvania. It is a German word and is nothing more than coarse buttonholing. It is especially appropriate on heavy waists, centre pieces, pillow tops or work bags. A finer form of it looks well on sheer waists. The rings or circles are worked from a centre like the spokes in a cart wheel (Figure 119).
The leaves or petals of a Wallachian figure are worked on the slant, and here is the difference from ordinary buttonholing and the distinctive feature of Wallachian embroidery. Usually the petals have an indented top and a line running through the centre. Begin at the lower right-hand section and take a short stitch on the line as for outlining. The next stitch is taken close to this from the midrib to the outer right-hand edge. The[135] stitches need not be quite as close as in buttonholing and no padding is required. Continue in the same slant to where the centre line stops. The stitches from this point radiate till they are in a good slant to continue down the left side. Note the stitches in the diagram (Figure 120).
Some people do not slant their stitches and the result is that the work is not as pretty and loses its chief charm.
Placing your thimble on a piece of material, make a little circle around it and in the centre make a little dot to practise the Wallachian ring on.
You will find that your thimble or spool is a great help to you also in making scallops. Draw a line with the ruler just below where you want your scallop to be. Inscribe half a circle with the aid of your thimble or spool on the straight line. Just within this half-circle draw another half-circle that will touch the upper line of the scallop. A ten-cent piece or in fact any coin can be[136] used like this. Embroidered pieces should be washed by themselves, especially if they are worked in colours.
A little girl I was teaching some years ago was very slow in working a centre piece. She finished the piece one day just before her term was over. Thinking that she would surprise me, little Daisy decided to launder the piece herself. Her mother knew nothing about embroidery, so was not able to tell her how to proceed. So Daisy washed the piece and having seen how mother bleached the linens, Daisy desired to give her piece a sun bath. She spread it out in the sun and when she went for it the colour was half out. Poor little Daisy was heart-broken. She would not have had this trouble had she observed the following directions:
Put the piece to launder in warm water and rub it with a pure soap, such as castile. Ordinary laundry soaps are too strong of lye to be used. If the piece is very soiled let it soak a long time, several hours. Usually washing the piece out in water is sufficient. Rub with the hand only. Rinse in clean water and lay the piece on a thick cloth or a Turkish towel. Roll the towel up and leave until the piece is almost dry.
Lay the embroidery, with the worked side down,[137] over a heavy padded surface. Press with a hot iron quickly. If the centre of the piece puckers, dampen it again till you have pressed it out thoroughly.
If you fear to put the iron directly on the piece lay a thin white cloth over it and then press. Many a really beautiful piece is spoiled in the laundering.
Roman cut-work or Colbert embroidery is one of the prettiest forms of buttonholing. The right way to work it is to make the stitches so that each one is distinct from the other. Some people insist on crowding the stitches as in regular fine buttonholing, which is quite a mistake, as its distinctness lies in dissimilarity to the ordinary buttonholing (Figure 122).
The work is used for centre pieces, corners of lunch napkins, coat sets, as well as on heavy linen dresses. In Scotland the little girls make the entire yokes of their night gowns in cut-work as well as the top of their night gown case. These cases are placed on top of the bed pillows during the day and are marvels of fine handwork. This custom is not restricted to Scotland, but Italian, French, and German women are also proud of their night dress cases.
The design for Roman cut-work should be bold[139] and not too close together. It should be stamped directly on the material. The American way of working it is to run a line of fine stitches on the outline and then work a row of buttonholing. The stitches are a little less than an eighth of an inch deep. The background spaces between the design are then cut away close to the buttonhole edge. Do not neglect to wet and press the linen before cutting the buttonholing. Keep the twill of the buttonholing on the outer edge of the design so that the background will be bordered with the twilled edges (Figure 123).
The European method of Roman cut-work is to run the thread first and then cut the material so[140] that there is an eighth of an inch extending beyond the running stitches. This is turned under till the running thread forms the edge and then the buttonholing is worked through both thicknesses of the material. This way prevents the linen from fraying. The design is basted over a piece of coloured paper, letting the basting stitches follow closely the buttonholing. The wide spaces are then filled in with a simple lace stitch such as the twisted bar, woven bar, or spiders. Sometimes the spider is used in conjunction with one of the former stitches, and it is an excellent stitch for filling in the corners. Marking cotton No. 20 or No. 25 should be used for Roman cut-work, as well as the lace stitches.
To make the twisted bar, plan the open spaces so that they will be well filled and yet not too crowded. Span from one side of the space to the other with the thread, then return and whip the thread or stitch three or four times. The stitches may be connected and have the appearance of a series of points (Figure 124).
The woven bars are made by working two threads across the space about one eighth of an inch apart. Start from one end and weave. Take up one thread on the upward and the other thread on the downward pass. Continue in this manner till the whole bar is woven. The bars are placed at equal distances apart (Figure 125).
The spider is a little more complicated. It is made on an uneven number of threads, usually seven. They may be double or single. To make the whipped or double-thread spider, span the space with the thread and then whip back to the centre and connect the thread to the buttonholing again at some little distance from the first stitch. Whip back to the centre again and take a stitch directly opposite. Continue in this manner till there are five, seven, or nine threads around the centre, then proceed to weave under one and over the next thread until a good-sized spider is made. Do not make too large a spider, as it detracts from the work. An illustration for the single spider is given in the chapter on lace stitches.
The blanket stitch is a favourite for working the edge of flannel skirts or quilted covers. Worsted or coarse silk can be used for it. It is made on the raw or folded edge of the material. Two stitches are long and two are short. Sometimes they are worked like a pyramid. Beginning at the base we increase each stitch till we reach the point and then decrease each stitch[143] in length as we work back to the base on the other side (Figure 126).
The triangular buttonhole is a pretty stitch for a conventional design that has long narrow sections. It may also be used for working a very large simple scallop (Figure 127). The way we were taught in school was to mark the section to be worked in deep points. The twill of the buttonholing must come on the lines. The stitches are not very close to each other. The stitches are taken on the line across to the next line. Begin at the longest opening and make every stitch shorter. When the line is covered, turn the work so that the twill of the buttonholing touches the top of the stitches just made. If this stitch is used on the outer scallop it will be necessary to hem the material, letting the triangular buttonholing form the edge.
Then there are fancy forms of buttonholing that are used especially in Mount Mellick work. The double buttonhole stitch is effective to fill in the large leaves. The stitches are taken in groups of two, then a little space and two more stitches. Continue[144] in straight rows. Sometimes one will see a leaf worked one half in double buttonholing and the other half in a close stitch.
The honeycomb or mesh is a fancy name for another form of buttonholing. Work a row of buttonholing about a quarter of an inch apart. The distance may be changed to suit the design you are working on. In the second and all other rows, the needle is over the buttonhole loop directly above and a short stitch taken a quarter of an inch, or the distance you have decided on, below the loop. In starting each row bring the needle up a quarter of an inch, or more or less as you desire, below the previous row. The distance must be kept even to achieve satisfactory results. It is not necessary[145] to start from one side always. The first row is worked from left to right, the second from right to left and so on, back and forth, till the space is filled (Figure 128).
Bermuda fagotting is the name of a stitch that gives the effect of drawn work, when no threads have been drawn. It is used on scroll designs as well as to outline a simple floral pattern. Lawn, dimity, China silk, handkerchief linen, or nainsook are the prettiest materials for this stitch, as it demands a fine, transparent background to give the right effect.
Sewing cotton No. 100 or 150 and a special needle are the only requirements for this work. The needles can be bought from any art needlework shop for five cents each. It is like a large-sized carpet needle with a small eye. A carpet needle can be substituted if it is not possible to obtain the regular needle in your locality. Tie one end of the thread to the eye of the needle. While practising this stitch it will be necessary to make guide lines. On each side of the design line make a row of dots an eighth of an inch apart.[146] The dots above the line must be directly over the lower dots. Note the diagram (Figure 129) of this stitch. I have numbered the first six dots.
Take a stitch from one to three and tie the end of the thread under this point. Make the stitch a second time from these points, pulling the material between them closely. Pass the needle underneath and connect one and two with two stitches. Then pass to point four and connect two. Three and four are connected in the same manner. It is only necessary to tie the thread when commencing the work or a new thread. The needle is so large that it makes quite a hole in the material and the thread is so fine that the manner of working is not clear to the average eye unless a detailed explanation is given (Figure 130).
When working on a curved line or a corner it will be necessary to make an extra stitch on the outer or longer side only.
The scroll lines or stems of a conventional shirtwaist design are more dainty when made in Bermuda fagotting. The corners of handkerchiefs or a design on underwear or yokes and collars lend themselves to this style of adornment.
The more interested we become in embroidery the more we find how much more there still is to be learned about it.
There may be embroiderers who are experts in one branch of the subject and yet who will do very unsatisfactory work in another. For instance, one girl may be very proficient in fancy stitches and yet may not do the simple stitches or vice versa. Few American girls excel in the satin-stitch, not because it is hard, but it must be perfectly accurate. The average German, Swiss or French child can do better satin-stitch at the age of twelve than the average American woman does. From the time the children in those countries can hold a needle in their hand they are taught to sew and embroider.
Satin-stitch is a stitch that is taken over and over across a space. Sometimes it is quite heavily padded and at a first glance gives the appearance[148] of a piece of material heavily raised. Fine designs should, however, be slightly padded. There are three ways in which padding may be done. There is the running or uneven darning, the chain, or the filling-stitch. A great deal depends on the smoothness of the padding. The chain-stitch should only be used for coarse work. The padding should not cover the stamped outlines, for they are needed as a guide for the satin-stitch. The padding is usually worked in a heavier thread than the outer stitches. Darning cotton that comes in four strands is often used. One or two strands is sufficient.
The prettiest satin-stitch is taken straight across. The stitches should not be crowded, but should be worked so that when the embroidery is finished the stitches are hard to distinguish one from the other.
The Old English letter "E" (Figure 131) shows a good example of satin-stitch and outlining. The latter was used on the single lines. The entire letter may be carried out in satin-stitch by first running the single lines with uneven darning stitches[149] and then covering these with fine satin-stitches. Make the padding stitches as close together as possible, or the satin-stitches will be uneven.
The letter "C" (Figure 132) offers an opportunity of combining two colours. After the satin-stitch has been done, a little back-stitch is worked through the centre of the heavily padded sections. This combination of stitches is pleasing when colour is used, as the satin-stitch is in one colour and the centre stitches in another. A great many of the regular sewing stitches can be used instead of the embroidery ones. For the very fine lines, back-stitching can be used, making the stitches finer than those used in ordinary sewing.
The letter "A" of Figure 133 shows a good combination of satin-stitch and back-stitching.
Satin-stitch can be worked straight across or on the slant. Most of the modern work is straight, though a great many Germans still prefer to slant their stitches. The work should be held toward[150] you and the needle straight. The padding should be worked lengthwise on the design and the satin-stitch in the opposite direction.
The Chinese do beautiful embroidery, usually in satin-stitch which is not padded and the finest of silks are employed for the work.
Another way of marking is to make a row of French knots along the outline design. A single line script letter lends itself best to this kind of work.
For bath towels an outlined letter is better than a padded one. The letter on a school bag or a heavy Turkish towel should be very simple as the wear they get does not warrant the spending of too much time on them. If there is a monogram to be made it is prettier if the initials of the Christian name be light and the surname heavy.
We learned about outlining in the first chapter of embroidery stitches, but outlining in combination with outer stitches is a little surprise for you. We have the German to thank for most of the good combinations of stitches or letters. After the letter has been outlined in white, we will say, a thread of colour is taken. Starting from the upper left-hand[151] side the needle is passed under the first stitch of the outlining, up through the second stitch and down again through the third, till every stitch has been taken up on the needle (Figure 135). The threaded needle should not pass through the material except at the beginning and end of each line (Figure 136).
Another manner in which a letter may be embroidered, especially an old English letter, is to work it solid in white and outline it in colour. The Van Dyke point is good also where a broad space is to be filled. It is sometimes called the bird's-eye stitch.
Start at the top and on the left side of the letter or space it is to fill. Insert the needle on the right side and take a stitch to the centre on a slant like a buttonhole stitch. Fasten to the material with a little short stitch. Bring needle out at the extreme left and repeat directions until the space is filled. Each stitch forms a V (note Figure 138).
Sometimes you will find a very elaborate letter, the outline of which has been worked in satin-stitch or French stemming. Little eyelets or satin-stitch dots are worked between the lines.
When two or more letters intertwine they are called a monogram. It is not every set of letters that will make good monograms. Letters that have a good swing should be selected so that though they intertwine each letter should stand forth clearly. It is permissible to use the surname initial a trifle larger than the Christian initial. When monograms are composed of three letters and one of the smaller letters is placed on either side of the larger one the effect is very pleasing. The smaller the letters, the finer[153] the thread should be. No. 50 or 60 marking cotton can be used for letters one half-inch in size. A three-quarter inch letter should be carried out in No. 45 marking cotton. A one-inch letter requires No. 35 cotton, while the two-inch letters take No. 30 and so on. The larger the letter the coarser the cotton.
The beauty of a monogram is to have something original. Perhaps you want to work your bag. Take a tea cup and place on the material in the position you desire the monogram. Run a faint pencil line around the cup. Draw a block letter in the centre so that it touches the upper and lower edges of the circle. Your two Christian initials are then placed one on each side of the centre letter. Try to fit the letters so as to keep the circle perfect. It may be you will not really draw block letters, but so much the better, as the monogram will be more original. If it is impossible to make a complete circle with the letters, embroider the sections of the circle between[154] the letters in stem-stitch. Stem-stitch, you will remember, is an outline-stitch covered with the over-and-over or small satin-stitch.
A monogram of this sort is especially appropriate for a man's handkerchief. A twenty-five-cent piece, or a fifty-cent piece if it is a very large handkerchief, should be used for the circle. Seeding (Figure 139A) may be combined with satin-stitch in working monograms. Seeding is nothing more than a series of little back-stitches. A good effect is obtained by working one letter in satin-stitch and the other in seeding. It will be necessary to outline the outer edges of the seeded letter.
You have probably noticed the gold emblems and lettering on the sleeves of army officers' regimentals. They are generally worked in bullion, though sometimes gold thread is used. Bullion comes in gold and silver and at the first glance looks like the Oriental gold or silver threads. The difference is, however, that bullion is tubular, while the threads are usually composed of two or three strands twisted together or over and over a thread of red cotton. The red cotton makes a strong foundation for the gold threads and, by the way, do you know that all silk that comes on spools has a fine thread of cotton running through the centre? The purer the silk the less cotton is[155] used, but the latter is very necessary, as the threads will not stand very much strain if they are all silk.
Now let us get back to emblems in bullion. It is necessary in bullion work to have a fine cardboard foundation which is called "the cartoon." Trace your design on the cardboard and then cut the design out. Baste the cartoon to the background, which may be of any material you desire. Broadcloths, silks, satins, and velvets are the materials usually selected for the work. Thread a fine needle with a piece of silk. Fasten the thread on the wrong side of the material and bring the needle up through the right side. Let us suppose that you are working the block letter A. Start from the apex of the letter. Cut a piece of the bullion just the size of a very small bead. Slip the needle through the cut piece of bullion and span the point of the letter. Continue in this manner till the cardboard is closely covered with the bullion. Each piece of bullion is cut to fit the space it is to cover.
In working a five pointed star, start and pad each section lengthwise, if it is to be embroidered in silk or cotton. For bullion work the cartoon is always necessary.
Work each section of the star from the point to[156] the centre. Work from left to right, so that each section that is worked is to the left.
Papier-maché letters can be bought that may be used as a padding. They are very satisfactory for anything that is not to be laundered, but continual washings flatten the papier-maché, while if the padding is made of cotton it lasts as long as the background.
Handkerchiefs for yourself can be daintily marked in very fine feather-stitching in D. M. C. marking cotton No. 80. Remember to keep the stitches in a pretty slant.
There are numerous places that a letter or monogram can be used. A girl I know who is at a boarding school has marked all her bed linen and towels. For each pair of sheets and two pillow cases she uses a different style letter or monogram so that her linen is in sets.
Cross-stitching is appropriate for bath towels, although face towels are often very attractive worked in this stitch.
The question often arises as to which is the right place to put a letter or monogram on a table cloth, napkin, pillow case, or sheet, and though you may not be interested in any of these articles at present, it is well to know these[157] little points when helping to mark the household linens.
Napkins are usually marked with the letter in the direct centre when folded. Of course, like many other things, there are fads for changing the position. One extreme style is to mark the letter in the direct centre of the napkin. This style necessitates folding the napkin in a fancy shape so that the embroidery will be seen at its best advantage.
There are two good ways to mark a table cloth. One is to place the lettering midway between one corner of the table and the hem. When the cloth is on the table the letter is below the top. The second and newer way is to have the letter on the top of the table on a line with the plates. If two sets of letters or monograms are used place them at diagonal corners.
On sheets the letters should be placed two and a half inches above the hem. The letter is worked so that when the sheet is folded back the base of the letter is toward the foot of the bed.
Pillow cases or towels are marked in the centre of one side, two inches above the hem.
Again let me impress upon you not to embroider white washable material in silk, thinking that because[158] silks are more expensive they are better. Silks are apt to discolour in laundering. Cottons are now manufactured that have a high gloss like silk and yet they never discolour.
Another pretty and new way to mark letters on lawn or fine linen handkerchiefs is one that gives the effect of Bermuda fagotting and yet it is only hemming with a large needle (Figure 140). Draw the letter in pencil on the handkerchief. Thread a large tapestry or chenille needle with a piece of No. 200 linen thread. Cotton thread may be used but it is very apt to break. Tie one end of the thread[159] to the eye of the needle so that it does not slip out. Thread another needle with a strand of No. 8 marking cotton and pass it to the back at the beginning of the letter. Unthread the needle, allowing a half inch to extend out of the back. Let the No. 8 cotton follow the lines of the letter and take a stitch into the material with the large needle. Work from right to left, holding the No. 8 cotton from you. Pull the fine thread tight around the stitch you have taken. Now pass your needle around the same group of threads of the material, holding the stitch over the heavy cotton. Work around the entire outside of the letter, then turn and work the inner line. Stitch again through the hole already made, taking up the same group of threads. Sometimes this style is called ladder-stitch, as the heavy cotton gives the effect of the side of the ladder and the groups of threads represent the rungs. Any design that is uniformly narrow can be carried out in ladder-stitch.
The most beautiful of the embroidery stitches is the eyelet, and it is also one of the hardest. A piece of embroidery that is thickly covered with eyelet-work and possibly a little satin-stitch and buttonholing is commonly termed Madeira embroidery. One will often see a piece of the Madeira embroidery so closely covered that it is almost impossible to put another stitch in between the embroidered spots. About fifty years ago it was a matter of impossibility to buy machine embroidery, and eyelet-work was one of the last things made by machine. It was an easy matter to distinguish the hand-work from the machine-work up to about five years ago. A certain regularity of the stitches and the kind of thread used proclaimed it machine to even the amateur. Now-a-days the crafty manufacturers stamp the material to imitate the hand-made embroideries and use a thread of the same quality so that sometimes the[161] professional embroiderers find it hard to distinguish it from the real.
If you should ask a boy who has watched his mother working one, what an eyelet is he will probably tell you that it is cutting holes in the material and sewing them up again. To his mind this is a great waste of time.
Besides being ornamental, the eyelets often play an important part. They are used to run ribbon through in corset covers, night-gowns and other pieces of underwear, as well as on bags, baby bootees, (Figure 142), caps and carriage covers. No machine beading can impart the elegance that a well-made eyelet does to a personal garment. Eyelets can be either round or oval. For a small round one run a tracing thread on the outline. Let each stitch take up but one or two threads of the material. Use No. 35 or finer marking cotton for small eyelets. With your stiletto pierce a hole in the outlined edge till it is just the size of the[162] stamped eyelet. Now with the same thread sew around the opening with close over-and-over stitches. The stitches should only be the width of the stamped line (Figure 143). They must be even, else you will have a "Pig's-eye."
For the large round eyelet, as well as the oval, in all sizes it will be necessary to cut the material within the outline which has first been traced with the running thread. The cuts should be made lengthwise and crosswise, right to the tracing thread. The cut material is turned under to the wrong side and the eyelet worked as just described. After the embroidery is finished turn the material over and any part of the cut cloth that extends beyond the stitches trim off. Your fine embroidery scissors should be used for the cutting.
Sometimes you might like to make an eyelet to represent a grape. Some embroiderers call it a shaded or padded eyelet. After the eyelet has been traced make another row of tracing or padding below the lower half of the eyelet. Start from the centre side of the eyelet and make the second[163] tracing deeper on the lower portion of the eyelet. If any space is left between these two rows of tracings fill in with other rows of uneven darning (Figure 144A).
When eyelets are used on the outer edge of a design, they should be buttonholed.
The next stitch to claim our attention is French knots. In France they are known as the English knot. They are used to fill in the centres of flowers. When working a piece of golden rod the natural effect is best produced by using French knots very close to each other. A[164] row worked on each side of a row of feather stitching makes a pretty decoration on babies' dresses, caps or even on yokes of dresses for yourself.
A heavy thread is good to practise making the knot. The actual size or kind of thread to use should depend partly on the kind of material and partly upon the other style of work or stitches that you intend combining with it.
To work the knot, fasten the thread securely on the wrong side and bring the needle through to the right side. Now hold the thread down with your left thumb. With the right hand put the needle over and under the thread until there[165] are three or four coils of the thread around the point of the needle. Now hold these coils down with the left thumb. Turn the needle so that its point will go down through the material as close as possible to the place through which it came (Figure 147).
A pretty idea for making knots for dress trimmings is to thread the needle with two strands of silk, each of a different colour.
Bullion stitch is an elongated French knot. It is used considerably in Mountmellick embroidery, to represent grains of wheat. Small leaves and daisies are oftentimes carried out in bullion stitch.
To make the stitch we will say that we are working on the conventional daisy. Bring the thread up to the base of the petal. Insert the needle so that the length of the petal lies on top of it. (See Figure 148.) Twine the thread around the needle point until there are as many coils as the length of the petal. The left thumb should hold the coils in place while you are twisting them. The needle is now drawn through the material. It is put through the same hole, or as near as possible[166] to the one from which it came. Keep the left thumb holding down the coils until the stitch has been fastened.
Another way to accomplish bullion stitch, which has the same appearance, but which really is a very much slower method, is to lay a heavy thread the length of the stitch desired and then neatly wind the cotton over it. It requires a heavy cotton to work this successfully.
An embroidery needle should not be used for either French knots or bullion stitch, as the eye is apt to stick when pulling it through the coils. A large sewing needle should be substituted.
Any girl can make dainty and original designs for eyelet work if she will invest in compasses. As[167] has been stated before, eyelets vary in size. The size that is most effective for decorating heavy linen or cotton is an eyelet a little less than half an inch in diameter. A larger eyelet is often used, but it requires a good deal of patience and experience to keep it in shape.
With the compass hundreds of designs may be used. The most popular as well as being the most attractive is the simple daisy. A circle is drawn to represent the centre. A quarter of an inch over from the centre circle, or less if you wish to, draw six other circles so that they form a ring around the centre dot.
A design such as this can be used on a ruffle of a petticoat or between tucks on dresses while for a whole linen piece there is nothing handsomer for a scalloped or hemstitched centre piece, doily, bureau cover and many other articles on which a bold, open effect is appropriate.
The Wall-of-Troy design is a good one for compass work, only it is suggested to faintly rule the design then inscribe the circles so that their centres are on the line. For instance, suppose you want to make a border design about an inch and a half deep. Take your rule and keeping on a straight thread of your material draw a two-inch line, then leave a[168] space, then draw another line, so on to the end. An inch and a half above these lines draw another row of lines just over the spaces of the first row. Connect the ends of the lines together. Plan so that there is a circle at the points or corners of each line. Between these dots on the horizontal lines make two more circles, while on the vertical lines make only one. These instructions are for a circle the size described; for a smaller eyelet it will be necessary to add more circles to the lines.
A still simpler design is one that is made on a square, that is, with a dot at each corner and one in the direct centre. The dots must be kept the same distance apart.
The Italian girls will make the most elaborate designs of compass work on strips of firm, heavy muslin for ruffles for underwear. They are not like the American and French girls, who will only wear the sheerest kind of light material. The advantage the Italian girl has over her French and American sisters is that when she embroiders a garment it lasts for years, even if it is constantly used, while delicate embroidery is apt to have a very short life on account of the background. To the American girl this is no drawback, as she is always craving for new things.
Sometimes a thimble, spool, or even a twenty-five cent piece is used instead of the compass when a large eyelet is required.
An edge of eyelets is very handsome on a collar and cuff set or handkerchief. They should be placed so that after they are worked they touch each other. The entire eyelet may be carried out in buttonholing or the lower half may be buttonholed and the top worked in the regular way. After the work has been completed dampen the edge and press before cutting out the material from underneath the lower edge of the eyelet.
It is possible to work the eyelet without any buttonhole stitches and yet use it for an edge. In that case a little padding is required and the stitches should be close together.
A linen hat that has a simple scallop edge and a simple design on the brim and crown is a treasure that usually only the wealthy enjoy. It is nice to know how to embroider, but unless we put to use the things we know our knowledge is like a white elephant on our hands. After a careful study of the diagram of the stitches you desire to make and reading the description as to how to make it, a little child could almost work a hat, but the mounting of a hat is not so simple. Yet, what is the use of[170] taking time to embroider one if you do not intend to make it up?
Eyelet work is particularly dainty on a hat as it gives a lacy effect. The material should be a medium weight linen so as not to be too stiff. At one time butcher's linen was thought to be the only kind to be used, but of later years a softer linen is preferred. Lingerie hats have been used for years, probably long before you were born. Every year the shape varies a little. One year it is a narrow brim sailor, next year it is a wide brim, then again a high, next a Tam-o'-shanter crown. The last four years it has been the mushroom shape. For most faces there is nothing more becoming and girlish than the latter (Figure 150).
Sometimes the mushroom shape is covered with hand-embroidered ruffles, while again a circular piece having the crown cut out is used. The size of hat varies by what fashion dictates, so it is hard to say just how large your linen should be cut. A twenty-two or twenty-four inch circle makes a neat little shape.
After the embroidery has been worked as described in the first part of this chapter, the frame is prepared for mounting it. A wire frame is lighter and more satisfactory than a buckram frame.
The first thing to decide is, how are we going to face the hat? Tucked ruffling, net, dotted swiss, or fine ruffles of Valenciennes lace may be used. Most people prefer to cover the entire frame with cheap, fine lawn before facing or covering the hat.
This is done by placing the hat on the lawn, the brim touching the material, and cutting a circle a trifle larger than the brim. Cut a circle out for the crown and slip the lawn over the frame. If the crown is too large to allow the lawn to be slipped over it a wide bias band of the lawn can be used to cover the brim. The bias strip should be just the depth of the brim. For the crown, cut a circle large enough to cover the top and use a bias band around its sides.
Tack the muslin to the frame by long basting stitches. It will be necessary to pass under the wire when taking a stitch to keep the material in place. The tucked ruffling can be bought by the yard, trimmed with a row of narrow lace. The entire thing is banded. To adjust a ruffling of this sort place the band around the edge of the crown and[172] tack the ruffle in position at short intervals and at the extreme edge of the brim.
Net or dotted Swiss is pretty shirred or corded or even put on plain. A strip three times the length that it would take to go around the brim plain is cut the depth of the brim. This band is cut on the straight of the goods. A shirring string is run on both sides. The strip is placed in position and pinned taking care to distribute the gathers evenly. The shirring string under the crown is pulled up first and the material over-handed to the frame. The gathering thread on the outer edge of the brim is also adjusted like this, only instead of over-hand stitches, fine running stitches are preferable. Then a small heading is made on one side of the strip that is to be shirred. The heading makes a pretty, soft finish at the edge and does not require any great length of time to do. Allow three quarters of an inch, or more, in the depth of your ruffle if it is to have a heading. Turn one edge of the material to the wrong side. The turn should be a little more than a quarter of an inch deep. The gathering thread is run a quarter of an inch from the folded edge of the material. When the thread is pulled up the heading is formed.
If the material is to be corded, baste a narrow[173] round cord like a corset lace inside the material. The cord is placed where it is desired and the material is folded over it as for a tuck. A running thread is worked close to the cord to keep the two pieces of material together. The threads are afterwards drawn up to bring the fulness of the ruffles to fit the outer edge of the hat.
Three rows of cording are quite sufficient on the edge and the other two rows at equal intervals from the outer brim to the crown.
The ruffles of Valenciennes lace are adjusted by pulling the drawing string on the edge of the lace, and basting the first row of lace on the extreme edge. The second row just touches the first, and so on, filling as many rows of lace in as required.
The embroidered piece is then washed and the brim placed. The edge is tacked at intervals while around the crown the stitches are taken very close together.
The Tam-o'-shanter crown is pulled in shape by a gathering thread, if it is cut in a circular shape and the gathering is all on the edge. Cut the circle large enough to make a pretty Tam-o'-shanter.
The embroidery decoration may be in the direct centre of the crown. If the design is a small one it can be scattered over the crown to give an all over effect.
There are many ways that a lingerie hat may be trimmed and it is hard to say which is the prettiest. A black ribbon band and a bow is simple but severe. White taffeta ribbon may be used the same way if an all white hat is wanted. In fact any shade of ribbon is attractive used like this. The illustration shows a pretty way of trimming a lingerie hat for a girl of about fourteen. A narrow coloured ribbon is used around the crown and a rosette of leaves with rose buds and forget-me-nots is attractively placed on one side.
Sometimes coloured linen is used for the hat and in that case the embroidery may be worked in the same shade as the linen; or white. The hat is then trimmed with white or black. A coloured hat is not as practicable as a white one, as the former is apt to fade and may not be as becoming as the white.
A baby's buttoned hat is made of two circular pieces scalloped out at the edges, one piece being four or five inches smaller than the other. The large one is used for the brim. The head size is cut out of the direct centre and then bound in tape. Three inches from the crown opening sew a circular row of buttons, a half inch apart. Use a washable linen, lace, or crochet button for this purpose.
One inch from the edge of the crown make as[175] many buttonholes as you have buttons. A pair of daintily hemstitched strings that are attached, one on each side of the crown opening, completes this charming little hat. It can be easily unbuttoned and laundered flat. These hats are made of duck, pique or heavy linen. They are the nicest thing you can make for your little sister for the summer when she wants to play in the sun.
It is the ambition of every one who starts to embroider to make a piece of flower work and though the floral designs are most fascinating to embroider they are by no means as artistic as the conventional.
The way to embroider a piece of flower work and obtain an original colouring is to get a natural flower and place it in a vase in a position that you can clearly see the light and shadow. The best flower to start with is a daisy. Note that the petals are not a dead white, but there is a suggestion of green toward the centre of the flower. Get mercerized cotton to work with at first until you become accustomed to the stitch.
There is no cut and dried rule in regard to the colouring, but the art of shading a piece naturally is a lesson that is very essential for the embroiderer.
To many people the term embroidery means flower work and only after a course of instruction they[177] discover for themselves how much more artistic and in keeping with most rooms is a conventional design.
Flower work, however, is not to be despised as you will learn more about colour combination and Kensington stitch in one piece of this style than any kind of embroidery.
All flower work has long and short stitch on the edge of the petals or leaves that do not turn over. Daisies do not have turn over leaves as often as a double rose or chrysanthemum. Suppose we draw a very large daisy on a piece of white muslin. With your needle threaded with white lustre start from the right-hand side. Take one stitch on the line.[178] Place your needle back near the same point from which you started. Take a short stitch that goes a wee bit outside of the stamped line past the first stitch. The object of going beyond the line, is that the stitch completely covers the stamping.
The third stitch is taken at the same slant, only longer. The fourth is a short one and so on, first one short and then one long until the top of the petal is reached. Remember, though, these stitches are only on the edge. The left half is worked the same, but the stitches slant a little differently. A good rule to mention right here is, that all stitches should slant to the heart of the flower. In leaves they slant toward the base. The inside of the petal, when the long and short stitches are completed, should be irregular (Figure 151).
The Kensington stitch gets its name from an English school of embroidery. It is more like outlining than any other stitch.
After the edge of the flower has been worked in long and short stitch, the Kensington stitch is used to give the solid effect.
The piece must be held all the while in a tight fitting pair of hoops so that it can not sag in the least.
If the petal is long, two or three rows of Kensington[179] stitch will have to be worked to fill it in. If silk is desired, two strands are used for the edge and one strand for the Kensington stitch. The stitches are dovetailed into each other. Each row must have an irregular lower edge, else they will look like bricks laid one on top of the other. The stitches should be so worked that it is difficult to tell where one ends and the other begins (Figure 152).
Three shades of green are sufficient for the leaves until you are quite expert. In working them embroider on the edge of the lower half of each leaf with the second shade and the upper part with the lightest. Work one side first using the second shade under the lightest and the third under the second. Work to the midrib only. It is not necessary to work in the veins, but if they are desired they are put in after the leaf has been worked. Do not hesitate to cover the stamped veining on the leaf you are working, as the next leaf will be a guide to where to place the veins. They may be in the lightest[180] or deepest shade of green, while sometimes a reddish-brown is substituted.
The centre of the daisy may be satin-stitch or a cluster of French knots. If the dot is worked from the centre to left and from the centre to right you are more apt to get a perfect outline than when starting from one side and working to the other.
As a usual thing the lightest shade is on the outer edge of most flowers, but there are a few exceptions, like wild roses and some species of pansies in which the deepest shade is on the edge and toward the centre it is lightest.
The stems may be worked in satin-stitch or Kensington in wood shades or deep greens, whichever give the more realistic effect to the flower.
It is a great mistake to use white for the background of flower work. Cream or pale gray make a very much softer and more pleasing effect.
Sometimes a little of the stem brown can be worked into the leaves.
Have you ever seen a lace spread or centre piece with flowers embroidered on it? You might think that the worker was more than ordinarily clever, but really any one who can embroider flowers can do this. Baste a piece of fine lawn on the section you desire to embroider and stamp it with a spray.[181] Embroider in the usual way and when the spray is finished neatly cut away any of the lawn that extends beyond the flower without cutting the lace. The result is that the piece has the effect of a natural flower resting upon it.
The finer the silk used the more delicate shading can be accomplished.
There is another way to represent flowers that is particularly beautiful. It is known as ribbon work or rococo embroidery. The ribbons especially made for this work vary from slightly less than one quarter of an inch to a little more than a half inch in width. The colours do not range in such long lines as the silks. In fact it is rare to find a shop that carries more than ten colours. Sometimes the ribbons are shaded. They are soft and do not crease quite as readily as an ordinary ribbon.
A No. 6 crewel needle is about the right size for the narrow ribbon, while the half inch ribbons need a No. 3.
Forget-me-nots, conventionalized small asters, and little roses are suitable for the narrow ribbons. Satin, moire, broadcloth, or heavy silk are used for the background and the daintiest of needle cases, jewel[182] cases, handkerchief bags, belts, and other little accessories may be evolved from a small piece of silk and a few yards of ribbon. The design is stamped on the background and all the single lines or stems outlined with filo silk. Let us imagine we are working on a spray of forget-me-nots. The needle is threaded with six inches of the narrow green ribbon. Slip your needle from the under side of the material drawing all the ribbon through but a quarter of an inch. One stitch is generally sufficient for a leaf, though sometimes the leaves are wider and require two or possibly three stitches. The ribbon serves the same purpose as silk. The one point to remember is that the ribbon should not be twisted. Naturally in pulling it through the material several times it becomes so wrinkled that a short piece works to better advantage than a long one. The flower is made in the same way, one stitch for each petal and when completed a French knot is made in the centre of the flower (Figure 153).
The ends caused from starting and finishing off are fastened or caught down with a piece of fine thread on the wrong side.
Do not pull your stitches. The work is very much prettier when it lies soft and full on the background.
It is well to make use of every piece of fancy work you do and yet sometimes a new thing may strike your fancy and you would like to make a small piece.
A card case is acceptable to every girl and it is a good plan to make them to match your visiting dresses.
Take a piece of material five by ten inches long. Three inches from one of the short edges stamp a design that will not occupy a space larger than three inches long and two inches deep. The length of the design must run parallel with the short edge of the material. The bottom of the stamping must be five and a half inches from the short edge of the material.
A little spray of lilies of the valley on a green silk background makes a dainty case (Figure 154).
Get a piece of stiff tailor's canvas and cut it to measure eight and three quarters inches by four inches wide. A piece of china silk the same size as the satin will be needed for the lining. It is[184] best to select the shade of silk that harmonizes with the outside material. With a green cover a lining lighter or darker is suggested. The latter is preferred as the constant fingering of a light colour is apt to soil it.
Cut all three pieces so that they are true oblongs; two and a quarter inches from the short edge make a crease. Two and a half inches from the first crease or four and three quarters inches from the outer edge make another crease and cut along it, thus separating the stiffening in two.
Two and a half inches on both sides of the now short edges of the piece that is not creased draw a line from side to side and crease.
On the extreme right-hand side measure down one and a half inches from the corner and make a dot; measure up from the lower corner and make another dot. The space between the dots should measure one inch. Take a twenty-five cent piece and place[185] on the space between the dots so that the edge of the material is under the direct centre of the quarter. Make a semicircular curve on the canvas around the quarter. Cut along the pencil lines (Figure 155).
The stiffening now ready, baste it to the lining. See that all creases have been smoothed out of the China silk lining before basting. Place the two pieces of canvas so that there is an equal margin on all four sides. The cut edges of the canvas must be placed one eighth of an inch apart as shown in the diagram (Figure 156). On one side is the four and three-quarter inch piece and the other is the four inch. Pin or baste the canvas through the centre to keep it in position. With a threaded needle cat-stitch the silk to the canvas, care being taken to see that the stitches do not appear on the silk side. Cat or catch-stitching is another name for herring-boning, which is explained in the chapter on feather-stitching.
Before turning a corner, cut off a small piece of material to prevent the corner from being bulky. Treat each corner in like manner: when you come to the little curved part, slash the material so that when it is folded over the canvas it will fit perfectly smooth.
Fold the canvas and lining along the creases originally made in the canvas. An iron pressed over them will help to make them stay in position. The embroidered piece is then placed over the wrong side of the canvas. A half-inch turn is made on all sides. Turn this half inch toward the wrong side of the canvas. Sometimes a layer of cotton batting is laid under the embroidery between the canvas and satin. The satin piece is basted to the canvas. The folded edge of the satin and the folded edge of the silk are overcast with tiny stitches. Fold back the two sections of the case and over-cast each side (Figure 157). Your card case is now completed.
A bill folder is made in the same way, only that the ends are not stitched together to form pockets as in the card case.
It is always well to know how to make pretty, attractive pieces of needlework that will make acceptable gifts for Christmas or a birthday.
Nearly everybody has a hobby. Sometimes it is saving receipts, sometimes keeping newspaper clippings, and then again it may be keeping theatre programmes. It is well to consider what gift is most suitable for the one that is to receive it; to make for the faddist an envelope to keep her clippings will be just the thing.
Take a piece of brown linen ten and a half inches by nine and a half inches. Fold it in half so that it measures five and a quarter inches by nine and a half inches. Stamp a spray of daisies or wild roses on one side and mark what the envelope is supposed to hold, such as receipts or clippings. Brown linen does not soil as easily as white. Embroider the flowers and the lettering, then dampen the linen thoroughly and press on the wrong side. Now take two pieces of cardboard that measure eight and a half inches by four and three quarters. Cover the cardboard with the linen, use long stitches[188] as described in the needle case, except that two pieces of the cardboard are placed side by side on the brown linen. Now take two pieces of brown paper the same size as the cardboard and cover the stitches. Paste should be used to make the paper stick to the linen.
Make six envelopes by taking six pieces of paper nine by thirteen inches and cut a two and a half inch square from each corner (Figure 158). One inch over from where the squares are cut make a star. There are eight such points as you note.[189] Connect the dot to the corner by a line. Cut the paper along the lines. Fold the ends in, then fold the bottom flap over these and paste. Fold the top flap over without pasting (Figure 159).
Now, holding these six envelopes in the case with bottom edges touching the space between the two cardboards, punch three holes through linen, cardboard, and envelopes.
Take a half a yard of ribbon and run through the holes and tie the ends in a bow on the corner.
Take another half a yard of ribbon and cut in two. Fasten a piece on each side of the cover (Figure 160). These two pieces are tied in a bow and keep the base of the case closed.
We have to go back to the foreign embroideries to find those that are beautiful and yet substantial enough to last beyond the usual life of a piece of fancy work. There is nothing we have originated in embroidery on this side of the world as rich as Hardanger work, and yet it is comparatively little known. The background for this work is a loosely woven material like scrim or basket weave materials such as Java canvas or the regular Hardanger canvas which is imported.
It is lots of fun working Hardanger in wool on Java canvas as it goes so quickly, and after we have learned the stitches we can work it on as fine a canvas as we desire.
The simplest stitch is the block. Thread a large tapestry needle with a piece of heavy wool. On your piece of Java canvas work a little block. The worsted is on the right side of the canvas, and then taking a stitch over four threads of the canvas bring[191] the needle up on the next opening to the right on the same line as the first. Five stitches constitute a block; a space of four threads is then left and the next block started, (Figure 161). A great deal of Hardanger has these blocks running at right angles to each other with no space between the blocks. Mistakes cause a great deal of trouble and sometimes it is necessary to rip out quite a lot of stitches before they can be rectified and for that reason you must be very accurate in your counting.
The star is another favourite figure in Hardanger work (Figure 162). Four stitches are taken over four threads of the material, side by side, then five stitches over eight threads of the material and then four again. This forms one side of the star. The second side is made exactly the same only that at the base of the thirteenth stitch the first stitch of the second side starts forming a right angle. The star has four sides as you will note in the diagram of this stitch. Now count and see if there are twelve threads on each of the inner sides of the star. If[192] you find any mistake go over it and straighten it out. There must be twelve threads on each side. Cut four from each corner. This will leave four threads directly in the centre of each side. With a piece of embroidery cotton about the weight of a thread of your canvas weave the bars. The weaving is very simple, over one and under the next till the bars are woven. Some of these bars have little knots on the outer centre edge of each. They are called picots (pronounced pe-co) and they are made somewhat like a French knot. The bar is woven half way across and laying the needle on the bar the thread is wound around the needle point. Hold each twist down with the left thumb (Figure 163). The needle is drawn through and the result is a little knot on the thread near the stitches. A little stitch is taken into the woven part of the bar and the thread carried over to the other side of the bar and another picot made.
For an ornamental stitch to be used on the material[193] between the stars or blocks make a diagonal stitch like the first stitch in cross stitching (Figure 164).
Pin cushion tops are easy to make and the following instructions are given for cushions about four or five inches square. Take a square of scrim or Hardanger canvas eight inches large. It will be necessary to pull a thread so that the material will be quite straight on the edges. Pull out four threads about one and a quarter inches from the edge on each side of the material. Turn a quarter-inch fold on one side and crease the material again so as to make a half-inch hem. Baste it down so that it just touches the drawn threads. Repeat on the four sides. Be sure that at the corner the double thickness of drawn threads are exactly over each other. We are now ready to hemstitch the hem. Thread the needle with No. 90 sewing cotton. Run the thread under the hem and holding the double part of the hem toward you take up four threads of the material. Pass the needle again around this group and now into the hem. Continue in this manner around the four sides. At the corners it will be necessary to take up both thicknesses of the material.
Crease the finished square in four. Count sixteen[194] threads upon the crease from the hemstitching and with lustre No. C or heavy linen thread "aa" make a little block of four strands of floss over four threads of the material. Make a flight of eight blocks each at right angles to the other. Now instead of continuing in the same direction turn and work seven more groups down and to the left. Turn again to the left and work seven blocks for the third side of the square. Six groups to the right of the third row completes the square.
Now with your fine embroidery scissors cut close to the stitches of the three blocks at each corner. The cut threads are drawn out. Four more cuttings will be necessary on each side. They should be made against the stitches only; that is, the threads that are running in the same direction as the stitches should be cut. Figure 165[195] shows where the cuts were made and the threads drawn out. The remaining threads are woven. A mercerized or dull finished marking cotton is used for the weaving. It may be either the plain weaving or may have picots on each side of the bar. Another pretty arrangement of picots is to place them on one side of the bars so that they appear in groups of four each facing the other (Figure 165).
Sometimes a lace stitch is used such as the spider or simple loop stitch. Directions for making a spider will be found in the chapter on lace stitches. The loop stitch is made by taking a stitch in the centre edge of each bar. Take a stitch just as if you were buttonholing.
Buttonholing the edge is preferred by many to hemstitching.
A pretty stitch often seen bordering a row of drawn work is made in pyramid form. It can be as deep as desired. First take a stitch over two strands of the material then three, then four, then five and down again to two (Figure 166). This stitch must be worked of course before any of the threads are drawn.
If a little larger and more elaborate square is wanted, take a piece of material nine or ten inches square. Make a star, skip four threads and work the open squares described for the smaller pin cushion.
On the opposite side of the square, directly across from the first star, skip four threads and make another square. At the other two corners of the square make a star (Figure 167).
The German peasant girls are proud of their aprons with a border of Hardanger embroidery.[197] It is a common thing for them to have a border fifteen or eighteen inches deep. Often they will make yards and yards of a pattern, say four inches wide, and they will insert it above the hems on sheets and towels and cut out the background material.
There is no nation on earth as thrifty as the Germans. A German girl I know who is only nineteen years old has her entire bedroom fitted up with Hardanger articles that she has made herself. First there is the bedspread and bolster, each most elaborately embroidered with an all-over design. Then there is a round pillow (the edge buttonholed) and a square pillow as well as the bureau scarf and pin cushion. If she bought the articles already worked she would have paid hundreds of dollars for the outfit, while the actual cost was only a few dollars. Nearly all the best of fancy-work shops sell small pamphlets on Hardanger work that are not expensive and after one is familiar with the foundation stitches it is an easy matter to follow the designs they give.
Appliqué, or laying one material on another and stitching or embroidering them together is one of the simplest forms of embroidery that even the Indians years ago knew how to do. How many of you have not seen on an Indian woman queer shapes cut out of leather and ornamented with beads used for a border on her skirt?
There are two kinds of appliqué, underlaid and overlaid. Most of the work is the latter kind. The underlaid is a little more difficult to do. It will be explained at greater length later in this chapter.
Appliqué is such easy work that you will almost think it a mistake not to have heard about it before, but after all it is really necessary that we should know the simpler embroidery stitches before we attempt an appliqué piece, so that we can decorate it in the manner to suit ourselves.
The European peasants work some of the crudest specimens of appliqué, yet their colour schemes and[199] choice of material are good. For instance, Russian crash, which is sold at the towel department of many of our large department stores, from twelve to twenty cents a yard, and which is very narrow, usually about sixteen inches wide, is often employed as the background of their portières.
Before the Russo-Japanese War it was possible to get Russian crash as wide as forty inches. It is made by the peasants in their homes from the waste ends left from weaving linens. You have no doubt read of how poor Russian peasants live in hovels in the same room with the cow, if they are fortunate enough to possess one, and their pigs. Necessarily the work they do is not very clean but the artistic qualities of the crash overcomes the fact of the dirt.
The better class of peasants will take three strips of crash and connect them together with coarse sewing or lace stitches and then apply circles of broadcloth, or coloured linens on them. Other geometrical figures are often applied.
I heard of a Southern family the other day who are so thrifty that they allow nothing to go to waste, not even the old coats and trousers that have played the double rôle of clothing the father and then have been cut down for Johnny. After Johnny has had all the wear possible out of them Grandma again[200] cuts them, this time in the shape of leaves, and sews them on a large muslin circle, one overlapping the other. This forms a mat for the dining room. I am telling you this story not that you may imitate it, but rather to let you know that after all we have women here that are as clever and thrifty with their needles as the European women.
For appliqué work the design is cut out and the wrong side covered almost to the edge with a paste made of starch and water.
When a complicated piece of appliqué is to be worked, stamp your design on the background. Then on the right side of the material to be appliquéd, or on the wrong side of velvet, lay a piece of transfer[201] paper. Place the design on them. With a blunt pointed instrument go over the line firmly till you have a tracing of the design. If the lines are not quite clear go over them with a pencil.
Cut out each piece and paste it to the background. The edges may be machine stitched or satin-stitched or outlined. A cord, also the couching stitch, makes a good finish.
Very clever representations of animals can be made by appliqué. Take a duck, for instance. The breast can be white felt, the head dark green velvet. The wings dark brown and the back and tail a lighter brown broadcloth. The legs and the bill should be canary-coloured taffeta silk. Cut each section so that it slightly laps over the other.
Appliqué underlaid is accomplished by stamping the design on the wrong side of the material and then cutting it out. The background is left intact like a stencil. A piece of material of a different colour is laid under the cut piece of material. The raw or cut edges may be treated in many ways. The material may be turned back and stitched by machine or the edges may be finished with buttonholing stitches, couching, fine satin-stitch or chain stitch. The turning back of the cut edges requires[202] that they be neatly done or the embroidery will not show to its best advantage.
Hedebo embroidery is in no way connected with appliqué work, but like the latter it is a branch of needlework that few people in America understand. Without exception it is the most elaborate form of white work. The stitches give the effect of being very difficult, but this is not so. The work requires a lot of time and careful planning of the stitches for which buttonhole stitch is usually the foundation.
Hedebo is worked on a finely woven linen. The design is stamped directly on the material. A thread of D.M.C. No. 25 or spool linen thread outlines the figures. Within the design, the linen is cut[203] one eighth of an inch from the running thread. This eighth-inch extension is then turned under the stitches and basted down. A small piece of dark green oilcloth is then laid under the figure to be worked and basting stitches hold the material and oilcloth together. The oilcloth protects the fingers and it is often used by foreigners in making eyelets. A small piece is used and it is moved as many times as necessary. A large piece is too clumsy to hold. On the extreme double edge of the opening of the design fine buttonholing stitches are taken. The stitches are about one thirty-second of an inch apart.
A section of a design suitable for a collar is shown here and the stitches will now be explained that have been used on it (Figure 170).
A bar is formed by laying two or three threads so that they span the opening from side to side. Over these threads fine buttonholing is worked.
The little triangles are worked by making seven or nine stitches into as many of the buttonhole stitches. The second row is worked into the first, one stitch from each end is omitted. Continue in this way to the point (Figure 171).
The three large loops that separate the pyramids or triangles from each other in the two outer circles are worked by making two loops that will each take up half the space between the triangles. These loops are whipped two or three times to make them heavier and then they are covered with buttonholing. Work the first and half of the second and then make the loop for the third or last and work it also in buttonholing, then finish the second (Figure 172). The centre of the circle is made by connecting the opposite triangles and loops together. Gently distribute the threads from the centre to allow a small opening. Put a thread around this opening and neatly buttonhole the threads.
The middle figure is made by working a row of[205] open buttonholing then running a drawing thread into the loops and buttoning this band with tiny stitches.
The stitches of the middle circle are somewhat simpler than the ones just described. A circle of open stitches is made directly under the buttonhole stitches on the material. Divide this circle in eight parts and make a large loop at alternate eighths. A connecting thread at the centre base of each loop connects each opposite pair of loops. The triangles are worked from the centre to the outer edge.
The open triangles are made by working a row of open loops around the three sides. The loops are drawn slightly together with another thread.
There are many pretty edges that can be used as finishes for work. The linen pieces, however, have to be hemmed first and then the fancy edge put on.[206] An edge of pyramids is attractive. An edge of buttonholed loops with a picot in the centre of each bar as described on Hardanger is also good. Sometimes the loop or pyramid may need stretching in shape. Take a pin in the lower centre and pull the edges out the desired size.
In turning curves an extra little loop may have to be worked so as not to crowd the large points.
Drawn work is another of the fascinating branches of fancy work and when used in combination with embroidery it greatly enriches the piece. Suppose now that you wanted to make a handkerchief and yet did not want to take the time to buttonhole the four edges. Well there is nothing more appropriate than hemstitching. The very expensive handkerchiefs only have two threads drawn before hemstitching them but it will be easiest to hemstitch when more threads are pulled.
Handkerchief linen that can be bought from one dollar up per yard is of course the[208] correct thing to use, but lawn or fine china silk is often substituted.
A third of a yard of linen thirty-six inches wide will make three handkerchiefs. A thread will have to be drawn so that the squares will be perfectly straight. A twelve-inch square of linen will make a nice little handkerchief. Narrow hems not more than one-quarter inch wide are more generally used at present so we will plan our handkerchief for that.
Measure up from the edge of one side five eighths of an inch and draw out four threads one at a time. The other three sides must also be treated in like manner. After measuring the first side with the tape measure the other sides are more accurately measured by turning up one corner of the side that has the thread drawn so that it forms a right angle. The upper edge of the angle must just touch the drawn threads. Crease firmly along the diagonal as shown in the diagram. Now with the piece still folded over pull the first thread of the second side of the handkerchief so[209] that the corner when turned back forms a perfect square (Figure 173).
When the threads of the four sides have been drawn fold back one eighth of an inch, then make a double fold so that the hem is just one-quarter inch wide. Baste it down so that the folded edge lies right under the drawn threads. With your needle threaded with a piece of No. 100 sewing cotton, start from one corner. Let the end of your threaded needle fall between the two thicknesses of the material. Bring the needle through the edge of the hem. Work from right to left; pass the needle under four of the upright threads. Now pass again under the same group of four threads, but this time carry the needle through the edge. Hem directly on a line with the fourth thread of the group (Figure 174).
Another way is to hold the material with the hem toward you and work from left to right. Pass the needle under four threads letting the thread in the needle fall under the point of the needle. Pull the needle through, thus forming a loop and taking a stitch into the hem in the usual way (Figure 175).
If your thread gives out or breaks, start the next thread by working over two or three of the stitches.
In hemstitching the corners take up four of the double threads.
When hemstitching on coarser material more threads can be drawn and also a greater number of threads can be taken up when working.
Dainty little collar and cuffs sets can be made by hemstitching the hems: and a quarter of an inch above this work make a row of French knots or feather-stitching.
Sometimes when a very open effect is desired it is necessary to double hemstitch the threads. This is very simple. Hemstitch in the usual way, then turn the work and take up each group on the other side of the drawn threads (Figure 176).
Drawn work is worked to perfection in Mexico. There they have large classes for the mountain children who do most elaborate pieces on frames.
Hemstitching is not always necessary in doing drawn work. Many beautiful borders can be made with simple stitches.
The sheaf stitch (Figure 177) is made by pulling the threads for a space of a quarter of an inch or more. Decide the width that you desire and then cut the threads perpendicularly. Draw the first and last thread to the distance desired, and then cut opposite end to match the first slash. After the threads have been drawn out neatly buttonhole the cut edges with narrow buttonhole stitches. Now place your work in your embroidery hoops, or, better still, if it is possible, buy a pair of oval ones that are especially made for drawn work. Fasten thread in the centre of one of the buttonholed sides.
The number of threads to take up will depend on the coarseness of the weave of the material. For medium weight linen take up either six or eight threads using a stitch like that shown in the first step of the second method of hemstitching. Pass[212] on to the next stitch and when the row is finished fasten in the second buttonholed side. The thread that passes from sheaf to sheaf should lie straight enough so as not to sag between each group or pucker the material.
Another pretty stitch that reminds one of a fish bone is worked somewhat like feather-stitching.
Prepare the space as for the sheaf stitch. Connect the thread in the same way. Take up six threads on the left hand side placing the thread under the point of the needle as it comes through. Now on the right hand side divide the group made by the first stitch in half and take the last three threads and the three next to it that are not worked (Figure 178).
A simple stitch is the twist stitch (Figure 179). Prepare the material in the same way as for the last two stitches and securely fasten your needle in the centre of the bar, skip the first three threads. Take up the next three on your needle; pass the needle back under the first three. Continue like this till the end of the row is reached.
A dainty all-over effect suitable for yokes or corners of handkerchiefs, cloths, etc., is made by drawing the threads out so that the material left forms squares. Pull a quarter inch of threads then leave a half inch of material. Repeat in this manner until the space is covered. Cross the lines, forming squares of the material (Figure 180).
The double hemstitching, sheaf-stitch, fishbone, or twist stitch can be worked on the drawn threads. You will note that you will have at each corner of the solid squares an open quarter-inch square. They will require an extra stitch such as the spider described in the lace stitches or the loop stitch described in the Hardanger chapter.
Sometimes it is hard pulling the threads of linen. If the threads are soaped they come out very easily. Do not wet the soap but just rub it dry on the material.
Some of the finest examples of hand embroidery or drawn work are found in the convents. Perhaps you are under the impression that drawn work must be done right with the hem, but that is not so[214]. I want to describe a beautiful handkerchief to you that I once saw in a convent. It was made of the sheerest handkerchief linen and one thread only had been pulled for the hemstitching. A quarter of an inch above the hem another thread was drawn, but this time, instead of letting it extend to the hem, a thread was cut one quarter of an inch from the hem at the beginning and ending. Six threads were drawn like this at eighth of an inch spaces. The four sides were treated in like manner.
Where the threads intersected at the corner, the squares were hemstitched all around, two stitches being allowed to each side of the square. The[215] stitches were taken through to the centre of each square. Beyond where the lines intersected the six long lines were treated quite differently. A piece of fine braid not more than an eighth of an inch wide was taken on the space between the first two rows of drawn threads. A regular cat-stitch was worked over this. First a stitch was taken on the drawn threads above the braid, then, one below it (Figure 181). When the braid was entirely covered with stitches on the first row, a second piece of tape or braid was placed over the space between the second and third rows of drawn threads. This time instead of catching the thread of both rows, the stitches are taken into those of the previous row on one side of the tape and into the third row of drawn threads on the other side of the tape. Five rows of tape complete the band between the stitches. Of course all this work is on the wrong side of the handkerchief. On the right side, a totally different effect is produced. At first glance you would think that there are five rows[216] of tiny tucks with hemstitching on each side, until you look again closely and see that it is padded hemstitching (Figure 182).
A section of a drawn work handkerchief for some ambitious little girl to own is shown in the illustration on this page (Figure 183). It is like a cobweb.[217] A piece of handkerchief linen twelve inches square is selected. Starting from the outer edge of the four sides an eighth of an inch wide space is left, then the threads drawn for an eighth of an inch. Repeat this seventeen times. At the corners the space and drawn threads form squares.
Now the rest of the space should be divided up in like manner, so starting from one corner of the solid square in the centre, draw the threads for an eighth of an inch, then leave a space the same length and then draw again. Continue in this manner on the four sides of the centre square. Pull out all the cut threads and you find that you have a deep border of little squares. Buttonhole around the four sides of the centre square with tiny stitches, thus keeping the linen from fraying.
To get the pointed edge as shown in the handkerchief, buttonhole over the line of horizontal threads and four of the vertical. The little filling stitch I am going to suggest to you is so simple that really after you have buttonholed the handkerchief your task is almost completed.
Start in the first point under the solid square and work diagonally across the open space. Pass your thread around the centre of the little square also on the diagonal. Continue across till you reach[218] the buttonholed edge around the linen square in the centre.
Skip the next point and work the same stitch in every other point. This stitch and in fact all the rest of the handkerchief should be carried out in No. 200 sewing cotton.
In between the worked points make another stitch which is very similar to the one just described.
It is started from the edge and a stitch is taken on the diagonal across four of the squares and half way across the solid squares at the corner of each group.
Having reached the buttonholing next the linen you turn your work and repeat the stitch over the same square. The stitches now form the figure 8.
The design of drawn work in the centre of the square is simple as well as being particularly pleasing. Draw the threads for a half-inch space, one quarter of an inch above the buttonholing. This must be done on the four sides of the square. The corners must be buttonholed before beginning the drawn work. Start the first thread for the drawn work in the centre of one of the buttonholed corners. Work the sheaf stitch all the way across. Now start a second thread, knotting the first sheaf in three, the next in two; so on to the end. These[219] stitches are taken quite close to the linen. Both sides of the sheaf stitch are treated the same.
The daisy in the corner completes the pattern. The daisy is made on the foundation of cross-stitches caused by the sheaf stitch. A Maltese cross is made thus forming twelve stitches catching all these together in the centre. Now weave a thread around in a circle, one eighth of an inch from the centre. To form the petals of the daisy start a thread from one of the threads that connect with the buttonholing and catch on the woven circle as you would if you were doing fagotting.
Wherever threads are drawn so that they intersect at right angles, as in the case of this handkerchief, a space is left vacant which is very unsightly if not filled in with some figure. Here it was with the daisy which is extremely easy but in the majority of cases it is with the Maltese cross.
The wide strip of drawn work shows a pretty pattern for linen scarfs. It is nothing but right that every girl should take an interest in her bedroom. She may not be fortunate enough to have one entirely by herself but that does not excuse her from trying to make it as attractive as possible. The key-note to beauty and elegance is simplicity. Better have a dainty bureau scarf hand made and[220] a few necessary toilet articles than a bureau beribboned and with a lace scarf, crowded with old visiting cards, dance orders, and dainty nothings that only catch the dust and give one a bewildered feeling when one looks at them. The scarf should be worth displaying if it is hand work, for remember what is worth doing is worth doing well.
The butterfly pattern of drawn work (Figure 184) is simple and pretty enough to please the most exacting and as has been said before is most appropriate for bureau scarfs. The material of the scarf may be linen, lawn, or scrim. It is quite unnecessary that the drawn work extend around the whole scarf—three sides, one long and the two short, being quite sufficient.
Draw the threads out for an inch, then hemstitch the cloth on both sides of the space; be sure to take up the group of threads already hemstitched when working on the second side. Fasten the[221] thread in the direct centre of one end of the drawn work and catch eight groups of threads to form the sheaf stitch. An eighth of an inch above the centre thread start another thread. Divide the sheaf in thirds and knot each section of the first sheaf. Pass the thread to the second sheaf and repeat the same thing, this time under the centre instead of above it. Alternate sheaves are divided above the centre line and the remaining sheaves under.
A third thread is started beginning an eighth of an inch below the centre and the other side of the sheaf is divided in three.
A fourth thread is started one eighth of an inch from the solid material. This time the sheaf is divided in four, in groups of two. First the top of one sheaf is woven like this, then the bottom of the next. Continue in this manner till the end of the strip is reached.
The fifth thread knots the groups on the side of each sheaf that was omitted by the fourth thread.
You will notice now that the four threads cross each other in the centre of the space between each sheaf. Knot the threads in the centre and weave across the lower four threads until you have made as large a fan as the space will allow. The remaining[222] threads are divided in two, three on each side, and two other fans are woven on them.
In the next space the fan of four is reversed and is made in the opposite direction to the first group. This pattern is commonly termed the butterfly pattern.
Drawn work should be worked on frames, though it is not necessary to use the large square one of the Mexicans. The nicest kind of frame and one easy to handle is the oval form, which comes in different sizes. They are particularly convenient to hold a long, narrow piece, which can be worked to better advantage than on the round rings.
Every once in awhile one sees specimens of a new kind of drawn work. There is the Mexican of which we have had a few of the simplest stitches, there is the Hardanger or Swedish drawn work, which is described in another chapter, the Porto Rico drawn work which is very intricate and also very trying to the eyes, but after all none compares in simplicity to the Bulgarian drawn work. It is so substantial that often after the material of the article on which the work is done has worn out, the drawn work is as good as new and can be transferred to another piece of material.
Bulgarian drawn work instead of weakening the[223] material as Mexican work usually does strengthens it considerably.
The work is done in spaces varying from a half inch to three inches in width. It can be done on linen, huck or lawn backgrounds, though sometimes scrim is used. Personally I do not think it pays to work elaborate patterns on scrim as the background is not substantial enough.
We will take for example the first towel end shown in this work.
Draw threads out of an inch and a half space. It is not necessary that the cloth should be hemstitched, though till you are quite familiar with the work it may be easier for counting. The hem is then turned over and hemstitched. Make the double hemstitch on the other side as described in the first part of this chapter.
I have found that though there are many threads that may be used for weaving there is nothing quite[224] as satisfactory as Electro in its finest number. Start from the extreme lower left hand corner. Weave back and forth over three of the groups with a blunt pointed crewel needle for one quarter of the distance from the hem. Now omitting the first group weave across three. You will see that you dropped the first group and took up the fourth. Weave to the middle of the space. Now drop the second group and weave across to the fifth group until you are three quarters across the space. Now drop the third group and weave across to the sixth. Weave until the space is filled. Without breaking your thread weave the seventh, eighth and ninth, then the eighth, ninth and tenth, next the ninth, tenth and eleventh, then the tenth, eleventh and twelfth. Weaving the eleventh, twelfth and thirteenth brings you back again to the hem.
The woven threads will look somewhat like an arch of blocks. Between the arch there are six groups of threads. Let us weave that in pyramid effect. Start at the hem and weave across the six for a little more than a quarter of an inch. Then dropping the first and last groups of threads of the proposed pyramid weave over four threads for another quarter of an inch. Again dropping the first and last threads of the four you were weaving,[225] work across two. Fasten your thread by bringing it through the woven stitches into the hem. A new thread is started in like manner. You are now ready to start another arch, close to one just made.
A little more elaborate design is shown in the second towel end, a detail of which is also given (Figures 186 and 187.)
After the threads have been prepared as has been just described for the first towel start from the lower left hand side and weave across the threads eight times. The weaving is very simple. First you take two groups with needle pointing to the left and then you take the one group that you didn't[226] take up the first time. You work back and forth as it were.
Now drop the first thread and weave across to the fourth group as in the first towel. Each set of three groups will only have eight lines however. Continue in this manner till you are one space from the solid material, then weave across four instead of three. Start to weave down on the right side over the three groups under the block of four. Now continue weaving over groups of three until the hem is almost reached then weave the last block over four (See detail of Figure 187).
On each side of these blocks weave a row working over two groups.
The groups of thread within the woven rows are woven into a triangle.
Bulgarian drawn work is used on pillow cases, handkerchiefs, towels, dresses, scarfs, or small square cloths.
Sometimes coloured threads are used and the result is very effective. Use cottons and if they are coloured boil them in salt and water before working with them.
One of our best authorities on lace has said that there are over one hundred different stitches used in lace. Now there are various kinds of laces; there are crochetted, bobbin, as well as needle point laces. It is about two branches of needlework laces—Renaissance and point—that we will talk about in this chapter.
Renaissance lace is made by basting a flat braid on a given pattern and filling the spaces between with simple lace stitches. Point lace is made of very fine plain braid with much finer thread and more elaborate stitches.
The basting of the braid is extremely important. Sometimes only a single line is given to indicate where the braid will be, while again a double line is shown. The braid must not be wider than the double lines. It may be basted so that the side[228] held toward you will be the right side of the lace or vice versa. Start from one corner of the design, turn over one end of the braid an eighth of an inch. For coarse work one row of basting stitches through the centre of the braid is sufficient but for fine work baste along both edges of the braid.
In basting around a loop the inner edge of the braid will have to be gathered. This may be done in two ways: the first by pulling a thread or by running a thread on the edge. At a sharp point the braid will have to be turned.
The preferred method of working the lace is to have the right side facing you. In starting to braid turn up one eighth inch of braid and start from a point so that the end may be covered later.
The braids vary from one cent to fifteen cents per yard.
A simple stitch in lace that greatly resembles the Turkish stitch in embroidery is fagotting. It is a stitch that is often used by dressmakers to connect bias bands together for yokes and sleeves. For this as well as other lace stitches the beginning of the thread should be fastened so as to be unobserved by the average eye. If the braid is neatly over-casted the end will be quite secure. Starting from the extreme left of the section to be fagotted take a stitch through the braid on the opposite side of[230] the opening, letting the thread fall to the right. The stitches are taken from side to side. This stitch is best suited to long narrow spaces (Figure 188).
The foundation stitch of lace is the single mesh or net stitch. It is a stitch that may be used in almost any shape opening. It is a good thing when working a piece of lace to pick out one stitch for filling in the background; then the design proper can be as fancy as desired.
The mesh or net stitch is good for a filling stitch. A blunt pointed needle is the best for working lace as you are not so apt to stick yourself. Make a row of open buttonholing, not however through the background. The second row is worked slightly below the first row. Each stitch is taken into a loop of the upper row. If the spaces decrease in size drop one stitch from each end for as many rows as[231] necessary. To finish the stitches overcast them to the braid. To many lace makers this stitch is known as single Brussels (Figure 189).
Double Brussels or the knot is worked like the single only that there is a second stitch taken in the same position as the first. The last must be short and drawn tightly (Figure 191).
Another pretty filling-in stitch is the spider. It can be as large as desired allowing the space it is to be used in to determine the size. A thread is spanned across the space and the braid whipped for a short distance, say a quarter of an inch. The space is spanned again so that the threads cross. Pick up all the threads on the needle through the centre and make a little stitch to bind them. Now begin to weave over one leg or strand and under another, so on till a good-sized body is formed to the spider. In weaving be careful not to skip one of these little legs (Figure 192).
Another way to work a spider, to make it a little stronger is to whip each leg as it is spanned.
A third and more elaborate spider is one made with the foundation thread as described for the first spider and then instead of weaving straight around make a stitch back over one leg and forward under two until the body is the desired size. This is called the spider in its web (Figure 193).
It is easier to weave on an uneven number of threads, and the number of these should depend on the space. A large space requires a large spider with lots of legs.
A fan (Figure 194) is made by spanning three or five threads so that they come to a common centre on one side and on the other they are arranged in ray effect. The weaving is started from the base under one thread and over the other on the first row if[233] there are only three. The second row is like the first, only the threads skipped in the first row are taken up. Alternate rows agree.
A Maltese cross looks like four fans caught together. The threads are crossed lengthwise and crosswise and the stitches taken to gather the threads in the centre. The weaving is the same as the fans. In weaving the fans or crosses do not work much more than half way up (Figure 195). A twisted bar is nothing more than a thread overcasted (see illustration, Figure 124).
A buttonholed bar is made by laying two or three threads and buttonholing over them (Figure 196).
In this age of machine work there are all sorts of braids that may be procured for lace work. Little edges that[234] were impossible to buy are now made by machinery.
A little edging makes a dainty finish to a straight braid and also enhances the beauty of the fancy braids.
To make a simple edging, work a row of picots on the edge of the braid which forms the edge of the design.
Dainty yokes, collars, baby caps, and tie ends can be made of a few yards of braid and two or three different kinds of stitches.
Another decoration I would like to tell you a little about is Limerick darning. It is often used with fine lace work on a background of fine net.
The lace thread is used for the darning. The most common of the stitches is the plain darning taken up over one hole and under the next of the net. The next row is worked close to the first.
Darning on net is a decoration that is often used by itself. Smart little turn-over collars and cuffs are most attractive darned in heavy white floss or colour if preferred. Pin cushion covers and other[235] dainty articles that every girl loves to have in her bedroom may be darned to good effect.
One of the most simple forms of lace work is Connemara lace. It gets its name from the Irish county of that name.
The materials required are Brussels net of any size desired, lace braid of a width to correspond with the net, heavy lace rings, a ball of Renaissance thread No. 60 or linen spool thread No. 25, as well as a spool of coloured cotton.
Connemara lace is used extensively for curtains, bed spreads and in fact, on any large piece, when the effect is desired and yet not much work. A good design for Connemara lace is shown in Figure 197.
The net can be white, ecru, or black.
Draw a simple yet bold design on a piece of stiff paper or better still a piece of pink or blue paper muslin.
The rings can be bought all ready for applying, for a couple of cents per dozen but they can also[236] be made at home. Take a pencil and wind around one end of a thread about as many times as you would judge from the illustration of the button or ring half worked (Figure 198). Slip the threads from the pencil and carefully and closely go over them with buttonhole stitches till all the loose threads are completely covered.
Baste your net over the design, then baste the braid along the design. With a fine thread secure the braid on the extreme edge to the net only with fine running stitches. Sew one side of the braid entirely around the design then sew the other side down.
The rings are buttonholed to the net.
If a very elaborate piece is wanted, lace stitches may be inserted in spaces that are bound on all sides with braid. The stitches, however, should be of the simplest, such as the twisted bar or spider.
Honiton braid which is an egg-shaped braid is much more beautiful than the plain Renaissance braid employed in Connemara.
The dearest of baby caps, handkerchief tie ends, and other dainty little articles on which a fine decoration is desired can be made from fine net and Honiton braid. Each section of braid can be cut[237] and made to form petals for a flower or to represent a leaf. Honiton is of course more expensive than Renaissance braid but a yard of Honiton goes a good way.
There is a thread that can be bought by the yard, called picot or purling thread. It has a loop at short intervals each side of it. The needle can be threaded with it and can be used for stems, tendrils, or other parts of a design where a fine single line is desired.
The centre of a flower in Honiton appliqué may be in worked various ways. A small ring or button may be used or spiders may be woven in the centre. Again the single Brussels or mesh stitch is worked in a little circle in the centre. Use a very small ring, if you decide on rings for centre, as a large ring spoils the effect of a flower. Any child can make designs for Honiton appliqué.
The background for Honiton is the fine Brussels net. Sometimes a double thickness of net is basted over the pattern and the Honiton sewed on or appliquéd to the net. The double thickness of net gives a moire effect. Each section of the braid is sewed to the net only. Sometimes two widths of braid are used, one size for the flowers and another for the leaves.
The braids at most art shops can be had in black, cream, or white. If, however, you are not fortunate enough to get cream, the white can be dyed at home to be as light or deep as you desire. I use cold tea diluted in water for a light cream, and coffee for the deeper cream. Put the lace to soak in the tea or coffee for a couple of hours. Rinse in cold water and let dry. If it is not a deep enough shade put more tea or coffee in the water and soak the lace again. Another way to dye lace, chiffon or any delicate fabric is to get a tube of oil paint the colour you desire and dilute it in gasolene. Of course the gasolene makes the paint light, so test the solution by dipping a small piece of cloth in and see if it is the right shade. A quart of gasolene is sufficient unless the article is very large.
I know a girl who dipped her white hat all trimmed with flowers and tulle that was quite soiled into a mixture of gray paint and gasolene and the result was a pretty dove gray that everybody thought was new.
Teneriffe or Brazilian point lace is such a simple form of lace making that I am going to stop and tell you a few words about it before we proceed to the next chapter.
Little forms which look like a large spool with[239] pins stuck in them can be bought in many art shops, but you can easily make a foundation yourself for Teneriffe lace.
Draw a circle two inches in diameter on a stiff piece of cardboard. Sometimes the circle is drawn on white muslin and fastened securely to an embroidery hoop or frame. Divide the circle into halves, then quarters, then eighths and each eighth divide into six equal parts. Make a dot at each division. Thread a needle with a piece of coarse thread. Insert the needle one quarter inch beyond the circle and bring it up on a dot. Continue in this manner all around the circle. Fasten securely.
Now thread a needle with a long thread of No. 80 linen thread. Let it be extra length. Pass the needle under each loop from side to side until each little stitch has a thread passing through it. (Figure 199). Knot the threads in the centre and weave four or five rows, over and under the strands close to the centre. Skip a quarter inch[240] then carry a thread around and knot each thread as you pass it. Count the threads and divide the number by six; on this number weave a little pyramid. Repeat the little pyramid five times, each time letting it be woven on the same number of threads as the first. Take a thread and catch every two threads above the centre figure. An eighth of an inch above this work another row, this time dividing the two threads previously caught and taking one of them and one of the next row together. An eighth of an inch above the row make another row, catching the same threads as were taken in the first row from the central figure (Figure 200).
Sometimes a pin cushion is used to make Brazilian lace. The pins are stuck in and the threads wound over them.
Brazilian or Teneriffe lace can be used for borders on handkerchiefs or other fine articles, while again they may be used as medallions on waists or other thin clothes. The material from under them is cut out so that a lacy effect may be produced.
Other patterns may be readily made. Remember that the stitches are very similar to those used in the corners of drawn work borders.
Basketry is so easily done and at such a small cost that almost any one, even a very little child, can master it without very much difficulty. With very few tools some beautiful gifts and other useful articles may be made.
In this chapter it is my intention to tell little children just how to make some pretty things with materials that they can obtain from nature's storehouse and otherwise.
In making baskets a great deal of rattan is used. I suppose that some of my little readers will wonder what rattan is. Well, I will tell you. It is a kind of grass or leaf which grows in forests of foreign countries, twining about the tress, hanging from branch to branch sometimes hundreds of feet in length but hardly ever over an inch thick. The people over there in those countries send this material to us so that we can make many pretty things. For little boys and girls living in the country there are materials which they can get from the fields[243] and river banks that may be substituted for rattan.
For instance the water willow when peeled proves a very good material. Reed, which is a sort of grass that grows on the banks of rivers, may also be used after it is dried and peeled. Raffia is another material which is commonly used for this work. It is a sort of soft substance generally pale yellow and can be bought by the pound at any large store.
Dried grass is sometimes substituted for raffia and the results are often just as pretty as those obtained by the original material.
Grass twine is used. It is something like rope, and rope is often substituted for it. Raffia is generally used to cover it in making baskets.
A few tools will be necessary for our work such as a strong pair of shears, a tape measure or ruler, a vessel for water, and some very coarse, blunt-edged needles.
Simple baskets of rattan are very interesting to make and I will tell you how to make a small round basket without a cover.
For this basket you will need four fourteen-inch pieces of rattan or spokes as we are going to call them, one eight-inch piece and two or three longer pieces for weavers.
Before starting the work, the rattan should be soaked in water until it becomes soft enough to bend easily. Then two of the pieces are placed side by side in a vertical position and the other two in a horizontal position crossing the vertical pieces at the centre. Between the two horizontal pieces and to the right of the centre the half spoke is placed.
These are held in position by the left hand, while the right hand does the work.
One end of the long piece called the weaver is placed at the centre, back of the horizontal spokes, with the end toward the right. The first finger of the right hand presses the weaver across the vertical[245] spokes, under the horizontal on the left, over the vertical, and behind the horizontal again. Repeat twice so as to fasten well.
Separate the spokes evenly, and it is now ready for the weaving (Figure 201).
If there is any of the winding piece left, it may be used as a weaver.
The weaving is done by pressing the weaver under one spoke and over the other until the bottom of the basket is about two and one half inches across.
Soak it in water for a few minutes and then bend the spokes upward to form the sides of the basket.
In order to make the weaving of the sides of the basket easier, rest the work on the knee, holding the spokes with the left hand and press the weaver under and over the spokes with the first finger of the right hand. If the weaver comes to an end join a new piece by crossing them behind a spoke about an inch from the end of each.
When the sides of the basket have been woven, leaving about an inch and a half of the spokes extending, it is ready for the border.
Cut the spokes to an even length with a slanting cut, so that the points may be easily pushed down between the weaves. Hold the spokes in water for a few minutes and then push one of the spokes[246] down beside the next spoke at least three quarters of an inch below the edge. Do this with every spoke until the border has been completed. Now our little basket is finished and ready for use.
Sometimes little girls like to have their baskets brightened up. A pretty lining of silk or other material would do this very nicely.
Perhaps some children would like to know how to make a basket with a cover. It only requires a little more time but it will prove very interesting.
The material for this basket consists of six sixteen-inch spokes, one spoke nine inches long and three or four weavers.
The bottom of this basket is made in the same way as the one previously described. After this much has been done, wet the spokes and proceed to turn them up and weave the sides of[247] the basket. The weaving is done rather loosely until you have used three of the weavers. The last weaver is drawn more tightly so that the basket will assume the shape of an apple with the top cut off. The edge is finished off with a flat border which may be made by soaking the spokes in water until they become quite soft. Each spoke is brought behind the next one to the right of it, and out over the front of the basket. Then the end of each spoke which is lying over the front of the basket is brought up over the next spoke to the right and is pressed down inside of the basket. When it is dry the ends of the spokes may be cut off.
The cover is made like the bottom of the basket, only the spokes are bent gradually upward from the centre. The material for this cover consists of six fourteen-inch spokes, one spoke seven or eight inches long and two long pieces for weavers.
When the cover is nearly as large around as the[248] top of the basket it is finished off with a border like the one described for the top of this basket. The cover has to be fastened to the basket and the easiest way of doing this is by making rings of rattan.
A piece of rattan about twelve inches long is tied into a ring, the ends being twisted in and out of the ring. Three rings are necessary, none of them measuring more than a half or three quarters of an inch across. One ring is attached to the cover on the front between the border and the last row of weaving, the ends being sewed under a spoke. Another ring is attached in the same way at the back of the cover and the third is fastened across a spoke in the front of the basket between the fourth and fifth rows of weaving. The cover is placed on the basket so that the ring at the back will be just over a spoke of the basket. A small piece of weaver is then placed between the third and fourth rows of weaving, below the border and to the left of the spoke mentioned. It is brought through the ring on the cover and drawn just tightly enough to allow the cover to close easily. The ends are crossed and brought through to the inside and sewed down, as the rings were. When this is done the basket is complete.
There are many other pretty articles that can be[249] made easily, such as a mat for a teapot or lamp and trays for other purposes (Figure No. 203).
A very simple way to make a mat would be to cut four fourteen-inch spokes of rattan, one eight-inch spoke, and two weavers. The mat is started in the same way as the first basket in this chapter. When the end of the first weaver is reached, a second is joined to it. By the time the second weaver has been used, the mat is large enough for a border. The mat has to be bound. The binding may be done by passing the weaver under the last row of weaving just before it reached the next spoke. It then goes behind that spoke, in front of the next and under the last row of weaving. The spokes should then be soaked in water, and when soft take spoke No. 1 and cross No. 2 and push it down beside No. 3 and so on around the mat. A number of these mats may be made and joined together for various purposes. Two mats joined by ribbon make a very pretty whisk-broom holder.
In nearly all this work weaving is the principal thing. By changing the weave we can obtain very interesting and pretty results. The simple over and under weave may be changed by using two weavers and twisting once, twice or three times between the spokes according to the size of the article.
Raffia is so soft and strong that it is very well fitted for the work of children's fingers.
So many different things can be made with raffia that it is just as precious to the little ones as the same amount of gold.
Little baskets made of raffia are dainty and easily made. For example a work basket, a candy basket, or a basket for handkerchiefs, collar buttons, and many things are interesting.
For one of these baskets we need one long piece of rattan, a bunch of raffia and a blunt-pointed needle. Soak the piece of rattan in water until it is soft enough to work with. Wind the end into the smallest possible ring and with the needle full of raffia start in the middle of the ring and sew over and over from left to right until the end is firmly fastened. The next row is brought around at a little distance from the first and the raffia is brought down through the centre, up and once around the coil, thus holding the first coil to the second.
Wind the raffia around the rattan until the coil has been brought half way around the second time, when it is again sewed through the centre. At quarter distance all the way through the basket these joinings are made and they must be made to the right of the one below and joined to the previous row. The joinings form a pattern.
As the basket grows larger the number of joinings increase. New needlefuls of raffia are always started at a joining, the old strand being brought from left to right through the upper part of the joining. The new strands being brought from right to left through two twists of raffia and drawn through so as to leave the short end lying next to the rattan.
Begin to wind again and soon both ends are covered. When you have made about ten rows, which will form the bottom of the basket, bring the rattan above the last row and proceed as before. Each new row is brought above the previous one so as to form the sides of the basket. When the basket is about eight rows high, the ninth row is brought just a little inside of the eighth so as to have something for the cover to rest upon. When about three inches from the point where the rattan was brought up to make the sides of the basket, it should be cut long enough to finish the row and then shaved off to a flat point[252] which is sewed closely to the last row. For this basket we will have to make a cover.
The cover is made in the same manner as the bottom of the basket. When you have nine rows complete, a border is made to finish off the cover. The tenth row is sewed to the ninth by a fancy stitch which is made by winding once around the ninth from left to right and once around the tenth from right to left and so on alternately until the row is completed.
The end of the rattan is shaved off and sewed to the last row. A pretty lining would beautify this article very much.
One of the very simple things which a very small child could easily make is a napkin ring (Figure 204).
Cut a piece of cardboard or stiff paper about an inch and a half wide and eight or nine inches long. Paste the ends together forming the ring. Take two strands of raffia and knot them. Place the knot inside the ring holding it with the first two fingers of the left hand. The strand on the right is brought up and across the ring on the top, the end hanging over the left side. The strand on the left is brought around the right strand under again through the ring and out on the right through the[253] loop made by the right strand in turning and crossing the ring. Pull both ends. The strand on the left is brought across the ring, the right strand placed over it through the ring and out through the loop on the opposite side. Pull both ends. The little knot formed on the edge is called "Solomon's Knot" and it makes a very desirable edge.
Different colours may be used in raffia which brighten the ring very much and make the work more interesting.
When the strands of raffia come to an end, a new one is joined by placing the end over the old one about an inch or an inch and a half, and working with them as one. The ends may be cut off after the ring is finished. Sometimes a small bunch of raffia about an inch long is tied to the outside of the ring. The ends are frayed out to add to the effect.
There is one article which proves to be most delightful and interesting to make (that is, to the girls) a doll's hat (Figure 205).
I think that nearly every little girl knows how to[254] braid raffia and after you have learned how to sew this braid together you can make any size or shape in hats.
Braid some raffia, say about two or three yards. Have several loose strands and a needle and scissors.
Just as in making large hats we begin with the centre of the crown. A needle is threaded with a fine strand of raffia and the work is begun by winding the end several times with the end of the strand threading the needle.
A coil is then started with the edge of the braid up, not the face, and it is sewed through at least two braids at a time, in stitches which run in the direction of the braid. The needle is put in slanting down from right to left and up in the opposite direction. The crown is coiled round and round[255] until it is about two or two and a half inches large. The coil is then brought round with the upper edge just below the centre of the last row. The following rows are sewed in the same way until the crown is completed or high enough to suit you. Have care in sewing the braid so as to show as little of the stitches as possible. The brim is made by flattening out the braid and sewing it so that it overlaps the centre of the braid of each preceding row.
When the brim is wide enough one or two rows are sewed more tightly than the others and the end of the braid is sewed under the brim very flatly. Now the hat is ready to be trimmed.
I would like to tell a little about the handles of baskets in this chapter. In most of the baskets already described a cover has been made. Some people would rather have a handle to the basket, so let us see if we cannot learn how to make some handles. The twisted handle of rattan is made by using one spoke of rattan of suitable length, and a weaver. A knitting needle or something similar will be necessary for the work.
The needle is pushed down beside a spoke of the basket and then drawn out again to make room for the end of the rattan to be pushed in, about three inches below the top of the basket. The other[256] end is inserted in the same way on the opposite side. This makes the foundation handle. The end of the weaver is inserted under the third row of weaving to the left of the spoke and pushed up between the weaving. It is twisted around the foundation about an inch apart. When the opposite side is reached, the weaver is pushed in under the third row of weaving on one side of the handle spoke and brought out on the other side. The weaver is then laid across the first twist and each of the following ones, to the other side where it goes under the third row as on the opposite side. About five or six times across will cover the handle. The weaver is fastened off by bringing it inside the basket across a spoke, in again, and then cut off.
The braided handle is made by using six pieces of rattan braiding using two pieces in each strand.
While weaving the basket, three pieces are pushed in on each side of a spoke and the weaving is continued over the spokes.
The double ring handle is made by twisting rattan into rings and sewing the rings to the weaving of the basket on opposite sides.
In sewing baskets or other articles, different kinds of stitches are used. To put a hat together the braids are sewed together with a plain stitch,[257] whereas in putting a basket together a fancy stitch is employed.
The Indians are famous for the various kinds of fancy stitches, which they have used in making basketry articles.
The skip stitch which is used in sewed baskets is made by enclosing two spokes at a time or enclosing one spoke between every two.
Another useful and decorative stitch which is often used is the split stitch. The spokes are twined with raffia for a certain distance and then are split in two and the right spoke of one is joined to the left spoke of the other and twined with raffia as one.
Sometimes in making a cover for a hanging jar the spokes radiating from the centre are brought diagonally across each other and joined together by the winding stitch.
Many of the simple lace stitches described in a preceding chapter prove very useful in basketry work.
To make the melon-shaped basket shown in Figure 206 a six-inch pair of embroidery hoops will be needed. One hoop is placed inside of the other. The inside hoop is perpendicular while the other one is horizontal. Tie the two rings together at the point of intersection.
From basket splint one sixteenth of an inch thick, cut six strips which are ten inches in length. They should be one inch and three quarters in the centre and taper to points at both ends.
Select raffia in two shades. The natural and brown were used for this basket. With a strand of the brown start to weave at the point of intersection.
Wind around the four pieces of hoop until a square about one and a half inches is made. Repeat on the opposite side of the hoops.
Take two of these pieces of prepared basket splints and insert them in the centre of both squares.[259] First one side of the pieces is inserted in the square and then the other end of the ribs is inserted in the other square. The natural colour raffia is now used to weave over the hoops and ribs. The weaving is done over and under and back and forth from side to side until there are a dozen rows of weaving. The other side of the basket is treated in like manner.
The other four ribs are inserted two on each side of those previously placed. Now begin and weave all the way across. Weave several rows of brown then the natural raffia. You will put in more or less of the brown raffia as you desire, only the pattern on each side of the centre must agree.
Instead of weaving from one side and then across to the other, it is a better plan to weave a little first on one side of the basket and then on the other. In this way you are sure of your pattern.
If the raffia is threaded in a large needle it is easier to weave.
Another strand or more is wound around the handle. A basket such as this makes an attractive fruit basket and is just the thing to give to sick friends or to use when going berrying.
Raffia can be used in many ways as you have already seen. A pretty box for jewellery is one that is almost as easy to make as the napkin ring. Get a sheet of thin white cardboard. The brown cardboard is a very weak material and easily bends and breaks. Cut two circles of cardboard five inches in diameter. Use compasses to inscribe the circle, so that it may be perfect. Then cut a strip seventeen inches long by two inches wide. From the centre of one of the circles cut a two-inch circle. This piece will be the top of the box. Now thread your needle with a strand of the raffia which has been soaked in water and buttonhole in raffia over the cardboard. When the cardboard has been entirely covered with the raffia stitches (Figure 207) take the other circle of cardboard and[261] cut a half-inch circle from the centre. Cover this piece of cardboard like the top. (Figure 208). The raffia should be wiped before using it; if not the water will spoil the cardboard.
The centre opening on the cover will be filled with a spider-in-its-web. Make four strands of raffia across the space. We now have eight spokes. Take the threaded needle back to the centre and having passed under a spoke go back and pick it up. The idea is to go back over one and forward under two. Continue in this manner till the spider is the size you desire.
The long strip of cardboard is sewed together and is worked like the napkin ring. With a strand of raffia, cast or bind the bottom of the box to the side. The top is fastened on one side with two strands of raffia which are tied in a bow. The extra ends are cut off.
Many of our little girls have made any number of dolls' hats by just braiding raffia and sewing the braids together.
If you were to make a large hat (by this I mean a hat large enough to wear yourself) by sewing braids of raffia together, it would be entirely too heavy and also would fall into any shape, perhaps not a very desirable one.
The only thing to do would be to procure a wire frame and to make the raffia hat on it.
In order to do this we will have to braid enough raffia for the whole hat before doing anything else.
For this kind of braiding the raffia will have to be soaked in water and then rolled out so that the strands will look like pieces of ribbon about three quarters of an inch wide.
You may use a five, seven, or nine strand braid for this hat. Take one long strand of raffia and place it horizontally on a flat surface. Tie seven long pieces to the horizontal piece as shown in Figure 210.
Begin with the last strand on the right-hand side and weave it over the next, under the following one, etc., toward the left side letting it hang out to the left. Take the next strand on the right and weave it in the same manner as the preceding one.
When the left-hand side is reached, drop the first left-hand one with the rest and let the new weaver hang out till the next is brought over. The first one, when it reaches the left side, is always turned over the last weaver just brought over before dropping it (the first one) into place with the others.
When the first set of strands are used, replace them one at a time by using the new and old together about two inches from the end of each.
It will take about eighteen or twenty yards of braiding to cover the frame. When the braiding is ready to sew on the hat, begin with the centre of the crown. When the crown is entirely covered, start with the brim and begin sewing the coils together to the frame at the base of the crown. The under side of the brim may be covered with silk or material of a similar kind, or if you prefer to have it, covered with braid sewed on in the same manner as the outside, beginning at the base of the crown.
When the whole hat frame has been covered with the braiding, you may roll it in the front or on the side, or in fact any place to suit yourself. A nice large bow of ribbon placed on the hat in a becoming fashion would make it very attractive, or for those who prefer flowers and ribbon the hat trimmed in this manner would be equally charming.
A woven raffia hat made on a wire frame is a very charming and neat creation.
It takes time and patience and skill to make the hat, but when it is finished you are doubly repaid for your work and the time spent on it.
The crown is woven first and then fitted to the crown of the wire frame. Take a small strand of raffia to make a ring of very small dimensions, say about one quarter of an inch in diameter. To this[265] ring, knot eight strands of raffia as shown in Figure 211. Eight more strands are tied around each of the eight strands, using the very pretty and effective "Solomon's Knot."
This knot is a very simple twist and may be tied either with a double or single strand. The strand which is tied on is laid first under the main double strand and then both ends are crossed over each other. The right one goes first under the end of the left-hand one and over the double middle strand and then again under the loop of the left-hand one.
It would be well to practise with strands of raffia other than those used in making the hat so as to become quite familiar with the knot before using it on the hat. Counting the eight strands tied to the[266] ring and the sixty-four strands that are Solomon-knotted to the original eight we have seventy-two strands in all. They start from a common centre and are brought down and outward through the pattern and are knotted one by one onto the main strands as they cross.
If you were to trace any one of the seventy-two strands you will find that it comes to the outside edge of the square through a very simple course. The last or eighth strand, knotted to the main strands, is used to tie up the bunch of strands coming from the sides of the diamond. It falls into place with the other strands and is tied up in turn as the others are. The larger knot tying up the bunch of raffia in the centre of the diamond is the same kind of knot as the smaller ones. It may look slightly different in composition, but that is due to the fact that it is being tied around a larger bulk.
After the knots have been all tied at the edges of the diamonds, the ends are woven under and over making a sort of a square design as shown in the illustration.
The finishing of the crown is done by taking four strands, two from each of the squares at the centre, and knotting them together with a simple knot. Two from each side are knotted together.
If you find that the strands do not come out in sets of four, make an extra strand by splitting in two one of the other strands.
The brim of the hat is not so tedious to make as the crown and having a larger surface on which to work you will find that the progress is more rapid and requires less time and energy.
Knot on the outer wire of the frame as many strands of raffia as will fit very closely but easily side by side and then tie them into loops such as were used on the edge of the crown of the hat. This loop is the same as that used in making the shopping bags and hammocks described in the next chapter.
You may use your own judgment in designing the brim. The outer edge may be made of the same loops that we have just spoken of. On the next row the strands of raffia are drawn down tightly and tied around the wire with a simple knot.
Alternate these two designs and you will have a very pretty brim.
To finish off the edge on the brim, cut the ends off to about three quarters of an inch in length and sew them in under the wire with a needle threaded with fine raffia. A tapestry needle or a darning needle would do for this purpose.
The trimming for this hat could be easily made of raffia. I will leave it to the maker to decide what would be most suitable to the taste. I might suggest such articles as buckles made of raffia or rattan or perhaps quills made of raffia.
If you do not care to have the hat trimmed with its own material, velvet ribbon, satin, flowers, quills, etc., would make a desirable trimming.
A very bewitching hat of a plain, three-strand braid of raffia can be easily made with very little trouble.
The raffia has to be soaked in water until it is soft. Unroll each strip and it will probably be about three quarters of an inch wide. In order to make the braid thick enough it will be necessary to use three or four pieces in one strand of the braid. Braid about nineteen or twenty yards before beginning to make the hat.
Choose a wire frame of a low rounded crown and a broad flat brim. If you wish to change the shape of the frame after the braid is sewed on, it will be a very trifling matter.
The end at which the braid is begun forms the centre of the crown. It is bent over at about five eighths of an inch from the tip and the long end is coiled around in a second row, the edge of which[269] comes an eighth of an inch under the edge of the centre. It is generally sewed on with a darning needle, threaded with a very fine strand of raffia. Use the back-stitch bringing the strand all the way through on the right side and then all the way through underneath.
The crown is made entirely by sewing the plaits together, separately from the wire frame, but it will be well to try it on the frame occasionally so that it will securely fit. When about six or seven rows have been sewed together and the crown is four or five inches high, the brim is begun. The coil of braiding is brought around more loosely and flattened out as it is sewed.
When six or seven rows have been completed, the brim at the back will be large enough. Each succeeding row will have to be cut as it gets near the back and the end fitted in under the previous row until the sides near the back are about nine or ten rows wide and the front twelve rows. It would be well to pull the coil slightly tighter as it draws nearer the outer edge so that the last rows may roll a little.
If you care to have the under brim of braided raffia it can be made in the same way, except that it is one row wider at the front and sides, to allow it to roll over the edges of the brim. It is pressed on the[270] wrong side and attached to the under brim of the wire frame, with very small stitches of raffia. The outer edge of the under brim should not be fastened until the crown and the top brim are on the wire frame, as the top brim should come over the edge of the under brim.
The crown and the upper brim are now pressed on the inside and put on the frame to which they are caught with a stitch of raffia here and there.
The centre of the crown particularly should be firmly attached with stitching to the centre of the wire frame. A row of braiding is brought around to cover where the upper and under brims join inside the rolled brim and is sewed on either edge with small stitches of raffia.
A hat like this would be very pretty trimmed with a satin ribbon or silk bow. A large bow at the side or the back would make it very attractive if the bow is of a contrasting colour.
Some people prefer leaves and flowers, with a little touch of silk; others quills or feathery materials. In fact it may be trimmed with material of any kind.
Knotting of raffia for dolls' hammocks, shopping bags, belts, coverings for hanging jars, and many other things proves to be a very interesting part of the basketry work.
Little girls could easily make some very pretty belts to be worn with some of their dainty frocks, and I don't know what could be more delightful than a hammock for dolly to sleep in.
First let us see how we can make dolly's hammock. We will have to have two small brass rings about three quarters of an inch in diameter, twelve pieces of raffia, and a pair of scissors.
Place one of the rings on a table or other flat surface and tie each of the twelve pieces of raffia on the ring, leaving an end about an inch long. Begin and tie simple knots three inches from the ring and one inch apart, knotting the strands two and two until nine or ten rows have been completed. Finish the hammock by fastening the ends three[272] inches from the last row of knots, to the other ring. The hammock is ready for Sally Ann to have a nap.
The next thing to do is to make a shopping bag, to carry all the small bundles when you go down town to buy dolls' clothes.
This little bag is made with the same kind of knotting, only the number of strands and the arrangement of them differ (Figure 213).
Twenty-two strands of raffia and a pair of scissors are necessary. Arrange twenty of the strands in pairs, and tie each pair in the centre. Place them on a table with the knots side by side, leaving a little less than ten inches on each side of the knots. Begin on one side of the centre knots, and tie one strand from one knot to the next strand from the next knot. They must be an inch from the first knots. Tie the same two strands an inch from the centre on the opposite side. In the same way tie the outside strands of this group to form the corners. Tie them one inch from the first centre knot. Make ten rows of knots an inch apart. When these have been completed, the bag is ready for the handles.
Separate the strands on one side of the bag from those on the other. Divide the group on one side in half. Fasten each group one and a half inches beyond the last row of knots. Braid the strands[273] about six inches. Do the same with each group, making four braids in all. Hold the two braids from one end of the bag together so that the loose ends of one braid overlap the other. Beginning at the middle point make a binding one and a half inches to the right and a similar one to the left. Cover the binding with "Solomon's Knots." Keep the lines of knotting straight. Finish the opposite handle in the same way.
Some day when you have shopping to do for your mother, take your bag along and see how handy it will be.
In the beginning of the chapter I spoke of a belt to wear with a pretty frock. A belt made of a six strand braid proves to be very serviceable to some little girls. You may use plain white raffia or a plain colour but oftentimes two colours add to the attractiveness of the belt.
Take three long pieces of raffia, that is, if the raffia is very thick; if not, six or twelve pieces using two or four pieces as one strand. Hold the strands at the centre in the left hand. Put the strand on the extreme right over and under the next two strands. The strand on the extreme left is put under, over and under the other strands. This forms a braid. Continue doing this braiding until the belt is long enough to suit you. To finish the ends tie the remaining loose strands close to the braid and cut off the ends. Turn the knots under and sew over the ends with the loop-stitch described in a preceding chapter.
In working with raffia many times an article will need something to put a finishing touch to it, I would suggest using a fringe or tassel according to the kind of work in question. In my experience they have proved to be just the thing for such purposes. For example, in knotting raffia for a work bag, the ends of the raffia may be left hanging and when cut to an even length provide a very plain finish for the bottom of the bag. Fringing or tassels would, I think, add considerably to the appearance of the article. To make fringe on the bottom of such a bag it is necessary to cut the ends an even length after the last knot has been made, and with a pin or needle fray out the ends very finely.
The way to make tassels for a finish is to wind a strand of raffia over a cardboard about two or three times, or if the tassel is to be quite thick, wind five or six times. Slip it off and bind it several times near the top with the end strand of the bag. Sew it fast with a tapestry needle. Cut through the centre of the loops. A row of these across the bottom of a bag are very effective.
A very dainty little article for a very small child to make is a little clothes brush or whisk broom. Secure a brass ring about one inch in diameter and cover the ring with the loop stitch. Fold twelve strands of raffia twice and slip the bunch through the ring bending it in the middle. Make a binding one inch below the ring and one inch long; cover the binding with "Solomon's Knots." Fringe the ends well and trim off evenly (Figure 214).
Knotting in silks, cotton or linen strands should be mentioned in this chapter. It is a difficult thing[276] to find a piece of fringe that will just match the colour of silk you have but it is an easy matter to make the fringe yourself. The simplest kind is the knot fringe. It can be made of filo, rope, twisted, or heavy floss when used in connection with a silk, satin, or velvet background. For cotton or linen background, cotton floss or fine cord can be used.
Let us suppose that you wish to make the fringe into a hem. Take a cluster of six or eight strands of rope silk, ten inches in length, and draw them through the extreme edge of the hem. If the other kind of silks are used, more strands will be necessary. Knot the cluster close to the hem. At a little less than a half inch distance over make another cluster and repeat in this manner across the space on which you want the fringe.
Now take the first cluster and divide it in half. Hold the half nearest the next group in your left hand and divide the second group. Taking the half close to first group, knot the strands together one half inch from the hem. Continue like this all the way across. Do not pucker the material when knotting.
A third row of knots is now made below the second. This takes up the first half of the knot previously[277] used and half of the next group. In this way you form a diamond. If a deeper fringe with more knots is desired cut the strands of silk three inches longer. For every inch of fringe allow three inches of strands.
Have you ever taken pop corn and made a chain of it for Christmas trees, or perhaps you have strung cranberries? Maybe it was the first time that you ever held a needle. I remember when we were youngsters living in the South, our nurse used to take us out under trees and we would string "Job's Tears" for hours. Many drug stores sell these seeds on strings for infants to cut their teeth on.
The simplest form of bead work is just as easy as stringing pop corn or berries. Beads come in all sizes from the tiny ones that are no bigger than a top of a pin to the large ones the size of a marble. Sometimes you can get odd-shaped beads, flat on one side and curved on the other. A string that is pretty enough to wear on state occasions can be made of heart-shaped and round beads.
The regular bead needle is very fine and long.[279] It is better when stringing a single strand to double the thread. Use linen thread No. 100 or 150. Thread the needle with a piece of thread eight inches longer than double the length of the necklace. Bring the two ends together and make a knot three and a half inches from the ends of the thread. The thread will be very much stronger if you wax it. Now thread seven small round beads then an odd shaped one. Repeat in this manner till you have the length of chain desired. Cut off the needle and tie the remaining thread in a tight knot close to the beads. Ribbons are sometimes used to fasten the chain or necklace together but the little clasps that you can buy for a few cents are neater and do not get soiled as ribbon does. Fasten on the clasp with the thread that extends beyond the knots.
A sweet little daisy chain can be made on two threads. Thread two bead needles with two long threads. Bring one end of each thread together and make a knot as described above. Fasten the knot to a table with a pin so that one needle is on the right and the other one on the left. Thread two white beads on your right hand needle. Put your left hand needle down through the white bead so that you have a thread coming from each side of the beads. Your needles will have changed position.[280] Thread the right hand needle with one yellow bead. Pass the left hand needle down through this and again the needles are reversed. Thread two more white beads like the first two and do the same thing. Now take the right hand needle and thread two more white beads and carry the needle through the first two white beads from right to left. Thread two more white beads on the same needle and carry it through the second or top group of white beads from left to right. Thread ten green beads on each of the needles and now we are ready to make another daisy (Figure 215). Continue in this manner till the necklace is complete.
Another and more elaborate daisy chain is made on one needle. Make a knot in the thread and string four green beads. Hold this down between the thumb and forefinger of the left hand. Thread one green bead and pass through the third of the four beads. Thread another green bead and pass through the first bead. Thread one white bead and pass through the green one on the left. Thread another green bead and pass through the green one to the left (Figure 216).
Third row—Thread a green, pass into a green to the left. Now thread a white bead and pass in through the first white bead.
Fourth row—Thread a yellow bead and pass through last white, and a green bead through the green.
Fifth row—A green bead through the last green, a white through the yellow.
Sixth row—A white bead through the last white, a green through the last green.
Seventh row—A white through the last green, a green through the last white of the sixth row.
Then three white beads on the needle and pass through the first white on the second row. Carry the thread through the daisy thus formed till you have it again in same position as it was before you threaded the three beads.
Eighth row—One green into the last green, one white into the last white. (Note that you are now starting another daisy on the left-hand side).
Ninth row—One yellow into last white, one green into last green.
Tenth row—One green into last green, one white into yellow.
Eleventh row—One white into last white, one green into green.
Twelfth row—One white into last green, one green into white.
Repeat the directions from the second row. Note that though the chain is four beads wide there are only two beads that you work on in each row.
If the thread breaks, start the new one, two or three rows back and go through the different beads.
The above directions are for a chain that is worked without a loom. Now-a-days it is quite possible to buy a little loom for about fifty cents, but you can make one at home that will not cost you a penny. The size of the loom will depend on what you are working but we presume that it is a chain. Should you ever make a purse it would pay you to buy a loom.
To make the home-made loom get a piece of card and a wooden meat skewer such as butchers use. Fasten the skewer down on both ends to the cardboard about two inches from the upper edge. One inch above the skewer in the direct centre make a hole and one inch from the bottom edge of the cardboard make another hole. Cut six pieces of No. 90 linen[283] thread, thirty-six inches long. This measurement is sufficient for a chain twenty-seven inches or under. Tie one end of each thread to the skewer. Now holding the six threads together, carry them down through the bottom hole across the back of the cardboard and tie in a loose knot to the top hole.
Thread a bead needle with a thread of No. 100[284] linen thread that has been well waxed. Tie the thread to the extreme right hand thread of the warp. Now we are ready to make the chain (Figure 217).
First row—Thread the needle with five yellow beads. Pass the needle toward the left under the warp threads, letting one bead slip in every space. On the left hand side bring the needle up to the right side and slip it through the five beads.
Second row—Thread five blue beads and fasten them in the same way.
Third row—Thread five yellow beads.
Fourth row—Five red beads.
Fifth row—Five red beads.
Sixth row—Two red, one blue and two red.
Seventh row—One red, three blue, one red.
Eighth row—Five blue.
Ninth row—One red, three blue, one red.
Tenth row—Two red, one blue, two red.
Eleventh row—Five red.
Twelfth row—Five red.
Continue in this manner for as many inches as needed (Figure 218). When you have used up all the warp threads on the upper side of the cardboard roll the finished chain over the skewer and fasten the remaining threads in the lower hole.
To make a belt or purse the larger loom will be necessary. Designs used for cross stitch are suitable for bead work.
Before I tell you how to make any more bead chains and the other articles that may be made with beads, I want to tell you how to make a dainty purse that is illustrated in this chapter. It is made of gold and rose-coloured glass beads and it belongs to a bright little girl I know who has been using it for the past three years. A spool of heavy buttonhole twist of a colour to correspond to one of the coloured beads is needed (Figure 221).
Take eighteen strands of silk, each a yard long. See that the ends are all even. Tie a tight knot through the centre of the threads. Thread a bead needle with one of the strands of silk. Put on two pink beads then three yellow, five pink, three yellow, five pink, three yellow, five pink, three yellow, five pink, five yellow, one pink, seven yellow, one pink, seven yellow, one pink, seven yellow, one pink, five yellow, five pink, three yellow, five pink, three yellow, five pink, three yellow, five pink, three yellow, seven pink. This completes the first string. Do not allow any beads to drop, which they are very apt to do while you are working on another row. It is suggested that the strand of silk on the left of the beads should be knotted closely to the beads to prevent them from slipping.
Unthread your needle and take the next strand; thread two pink, one yellow, then slip your needle through the second yellow bead of the first row, thread one yellow, five pink, one yellow, now slip your needle through the middle yellow bead of the first row or in other words[287] slip your needle through every eighth bead on the first row. The colouring remains the same. I will start the instructions again for the second row which is to be threaded, two pink, one yellow, slip needle through bead on first row, one yellow, five pink, one yellow, slip needle through bead, one yellow, five pink, one yellow, slip needle through, one yellow, five pink, one yellow, slip needle through bead, one yellow, five pink, one yellow, slip needle through bead, three yellow, one pink, three yellow, slip needle through, three yellow, one pink, three yellow, now slip needle through bead, three yellow, one pink, three yellow, slip needle, three yellow, one pink, three yellow, slip needle, one yellow, five pink, one yellow, slip needle, one yellow, five pink, one yellow, slip needle, one yellow, five pink, one yellow, slip needle, one yellow, five pink, one yellow, slip needle, one yellow, six pink, slip needle into last bead of first row and knot the two threads close to the bead. Be sure that the knot is large enough not to slip through the hole of the bead.
Thread your needle with the third strand. Put on two pink, three yellow, two pink, slip needle through third bead of first group of five pink of the second row. (For the rest of the row "slip needle" means slip the needle through the fourth[288] bead below the one slipped through on the second row) two pink, three yellow, two pink, slip needle, two pink, three yellow, two pink, slip needle, two pink, three yellow, two pink, slip needle, two pink, five yellow, slip needle, seven yellow, slip needle, seven yellow, slip needle, seven yellow, slip needle, five yellow, two pink, slip needle, two pink, three yellow, two pink, slip needle, two pink, three yellow, two pink, slip needle, two pink, three yellow, two pink, slip needle, four pink.
The fourth row is the same as the second. Every other row from the third is also worked like the third.
The last row which joins the bag—Two pink, slip needle into fourth bead of next to last row, thread three more beads, slip into centre bead of the group of sevens of the first row. The pattern is diamond-shaped as you will note, therefore after threading your needle with three beads of the shade to correspond with the previous row slip your needle in the centre bead of the groups of seven of the preceding row and the first row. Work first to the right and then to the left.
Every two strands of silk must be knotted together to keep the beads from slipping off. Braid the threads extending beyond the bead work in groups of three. A large bead or slide will be[289] necessary to make the purse a practical money bag. Get two big beads that have openings large enough to pass all the silk threads through. Take a knot on the silk thread after the first large bead is in position. This knot should be two inches at least from the beads. The silk threads may now be cut quite close to the knot or they may be cut one inch from the knot to form a tassel.
If the little purse was left without any further work it would look quite top heavy and unfinished, for that reason a bead tassel is suggested as shown in the illustration of the bead purse.
Thread your needle with a long strand of the buttonhole twist. String about two and a half inches of pink beads. Before commencing to string the beads fasten the thread in the heavy knot at the bottom of the purse. Catch the thread with the beads also in the knot. Make two pink strings this length and two yellow. Then make four strings, two pink and two yellow, that are not more than an inch and a half long. Fasten off the threads securely and the bag is complete.
Three bunches of pink beads and two bunches of yellow will make two purses as have just been described. The beads vary in price from six cents a bunch to twenty-five cents. Sometimes the more[290] expensive kind have only half the number of beads that the cheaper bunches have. Do not get too small a bead or the work will become very tedious. The large beads for the slides are more expensive. They cost four cents apiece or more.
Of course other colour combinations can be made, also other patterns. Silver and blue is another pretty combination for a bead purse.
Now while we are on the topic of beads, I would like to tell you about some sensible portières and cushion tops that I recently saw at an Arts and Crafts exhibition made of an inexpensive background and beads. Monk's cloth was used for one of the portières. Monk's cloth is somewhat like burlap but the weave is coarser and more even. A hem was turned on one short side and one of the long sides and the thread drawn out for a space of about two inches. The threads were hemstitched and then a design of beads worked between the groups of threads. To accomplish this the design was well planned out before commencing the work. The number of beads needed to fill out the space can be judged by placing the beads in the opening and testing that for yourself. After the design has been selected make a pencil copy of it. It is better to restrict yourself at first to just two colours.[291] Fasten your sewing thread securely to the threads of the material. Use carpet thread for the weaving. Let us suppose that you have selected a pattern that is seven rows of beads deep and you have chosen tan as the background and red and chalk white beads for the decoration:
First row—Thread one red bead, six white, one red, six white. As we will only work a section at a time, let us secure the beads. Slip your thread under the hemstitching. Now let each bead come between two consecutive groups of hemstitching. Bring your thread to the right side. Be careful not to disturb your beads. Now carry the thread through the beads again. The thread should be drawn tight but not so as to pucker the hem.
Second row—Work this by stringing one white, one red, four white, one red, one white, one red, four white, one red. Fasten as described in the first row.
Third row—One red, one white, four red, one white, one red, one white, four red, one white. Fasten.
Fourth row—One red, one white, one red, four white, one red, one white, one red, four white. Fasten.
Fifth row—One red, one white, four red, one[292] white, one red, one white, four red, one white. Fasten.
Sixth row—One white, one red, four white, one red, one white, one red, four white, one red. Fasten.
Seventh and final row—One red, six white, one red, six white. Fasten.
After this section is worked slip your needle through the beads to the last one on the first row and continue to weave.
The beads to use for portières or large pillows are round ones that are three eighths of an inch in diameter.
For curtains, table covers or any article where the weight of the large bead is not desirable use a smaller bead that is not more than a quarter-inch in size.
Scrim curtains with a single row of the smaller beads add a pretty touch of colour to the otherwise plain window. Almost any shade can be had in the beads, but the trouble is that they can not be bought at every store. A bead supply house is the one from which to get them. They cost only one-quarter as much as when bought in a department store.
Ecru scrim with a row of turquoise blue, canary yellow and sage green beads and the simple twist stitch such as described in the chapter on "Simple Stitches in Drawn Work," makes a curtain[293] suitable for a simple room. The way to accomplish this work, is to take a stitch on the drawn thread, in the regular way for the twist stitch, then slip a bead on, then take another stitch, then a bead, so on to the end.
If a skeleton square of beads is desired on a sofa cushion it is advisable not to draw it out in the same manner as for a curtain.
For a two-inch border to be set in four inches from the edge, crease the cushion through the direct centre. Measure four inches from the edge and cut the material on the crease for two inches. Treat each side like this. Draw the threads out on each side of the cut, stop when you get four inches from the edge. Of course the material must be in a perfect square and just the size you want for the pillow before you begin any of the work. Place the beads as explained for the portière. Do not cut the threads you drew out but, threading a needle with two or three at a time, carry them through the beads. In this way there is no necessity for cutting and buttonholing the corners where the border intersects, as in drawn work. Loose woven materials such as monk's or arris cloth are extremely hard to buttonhole and even after very careful work they are apt to fray.
If a fancy edge is desired for the pillow one made of beads is far more appropriate than anything else. After the pillow is complete and made up, put on the bead edge by catching a bead to the material at a short distance from each other.
For a canoe or porch pillow there is nothing more durable than bead pillows of a dark colour worked with gay coloured beads.
Braiding or plaiting can be done in any materials and may be used for shopping bags or circular rugs. Raffia, corset laces, heavy silk floss or rags can be utilized for the braiding.
It is extremely difficult to conceal the ends when three strands are used so for that reason I have selected four strands to commence with.
When working with cords or very long strands of material, knot the four ends together. Pin the knot to your knee and proceed to weave. Take the extreme left-hand strand and weave under the next strand. At the same time weave the extreme right-hand strand over the next. Cross the two strands in the centre. (See Figure 222.) If a knot is not desired at the start the cords may be commenced as shown in the Figure 223.
To braid with six strands take the extreme left-hand strand and weave under and over to centre and with the right-hand strand weave over and under to centre and cross the left-hand strand (see Figure 224).
After the braid has been made it can be sewed together for a mat. In joining a strand insert the new piece so that it extends a little beyond the braid. If a long braid is desired it is best to have the strands of different lengths so that the joinings will not be all in one place (Figure 225).
When braiding or weaving with rags cut the strips about three quarters of an inch wide. Old rags can be used for this, cutting out the weak parts. Cheap cotton fabrics when new make excellent mats.
Weaving on frames is very interesting and not such a difficult task as you imagine. There are hand and treadle looms. The following instructions will be for the former. A stretcher such as artists use for painting can be used or four pieces of board twenty-four inches long by four inches wide and one inch thick. Take the four pieces to form a frame.
Buy three half-inch dowels or long round sticks; which may be bought from a hardware shop; and sand-paper till they are quite smooth. Screw in four large picture rings two on each side of the frame, one at each end. Slip one dowel through the rings at each end and tie to picture ring.
The warp may be cord which is sold by the pound or a heavy soft twine. A wholesale cord or rope house will be the best from which to buy the warp.
A thin board such as you have in your window shades and to which the string is attached makes a good shuttle. Cut it so that it is twenty-two inches long and wind the warp on it lengthwise.
Tie one end of the warp thread to the lower left-hand picture ring.
Lay the warp threads over the lower dowel, up through the frame and over the upper dowel. Remember always to lay the thread outside and over each dowel. The first six threads are placed very[298] close to each other. After that the threads are laid half an inch or a little more than a quarter of an inch apart. The finer the weaving the more warp threads will be needed. The usual allowance is from four to eight threads to an inch.
Two plain boards that are as long as the dowels and three inches wide by a quarter of an inch deep will be required now. Slip into one of these boards at each end between the warp threads and bring the boards to the centre and tie together to keep them from slipping.
Take a piece of cord nine inches longer than a dowel and tie to the throat of the lower left-hand screw. Make a knot at first warp string and slip it over dowel. Twist the double thread two, three or four times. Repeat slipping over dowel and twisting between every two warp strings until you reach the right hand screw. Tie the threads to the screw. This is called pairing the threads. Repeat the pairing at the other dowel. When the pairing is finished slip the[299] lower dowel out of the rings and tie the dowel again to the screws.
To space the warp threads an upholsterer's needle and carpet thread will be needed.
If the weaving occupies the full size of the frame, hitch or tie the carpet thread to the lower left-hand screw, while if the warp threads do not extend very far over place an extra screw on the outside of the frame where the warp threads begin.
Buttonhole stitch over the dowel keeping the lower thread down and the upper thread on top.
Hold the warp threads apart with finger of the left hand while buttonholing. Pull your stitches tight. Two or three stitches should be made between each two warp threads. The stitches must be an eighth of an inch apart.
Now we are ready for the bridge.
Two feet, as they are called, will be necessary to support the bridge. A carpenter will make them for a small amount. They should be seven inches high by three inches wide at the base (Figure 226). One foot is placed in the centre of opposite sides of the frame and the third dowel run through the holes.
Loosen the two boards at the centre and place them close to the dowel. Place the bridge over the set of threads nearest you. Take a six-inch piece[300] of cord and catch up first warp thread. Tie thread to bridge. All knots should be made like a weaver's knot. The loop should not extend lower than two inches below the bridge.
This completes the setting up of the loom. To weave, the material may be cut as stated before or raffia or Indian fibre may be used. If the weaving is to be in one colour only, it is well to join the pieces together and wind on a long shuttle. If short pieces are used a hook will be required. It can be made of a strip of wood taken from the hem of window shades. Notch one end of it.
A selvage will be necessary at the beginning and the end of the weaving and is done in a fine cord.
Start at left-hand corner and tie the thread to warp. Pass the shuttle to right-hand side between the threads. Lower the bridge and pass the shuttle back again between the threads to left-hand side. Raise the bridge again and repeat as just explained. It will be best to comb down the woof to keep it straight and regular. A regular weavers' comb can be bought, but a coarse hair comb may be substituted. Six rows will be sufficient for the selvage. The[301] regular weaving is worked the same only in coarse warp. Remember the bridge must be lowered every other time.
In weaving a new thread or strand commence a little way back from where the last strand stopped.
Learn to weave and you get much more artistic effects in rugs than ordinary rug or portière weavers obtain.
Beautiful cushions and other useful articles can be made by weaving.
It is a great mistake to think that all cast off clothing can be woven into handsome rugs or portières. True it is possible to weave them, but it is almost a hopeless task to get artistic effects from old coats or a lot of dark articles.
The modern rug weavers get a few yards of cheap muslin in two or three shades and make a rug that can be sold for two or three dollars. Silk is not like old woollen materials, it can be utilized to the last thread because it is soft and works to good advantage.
Two old silk petticoats will make two pillow tops that are artistic as well as useful. One of the most beautiful examples of silk weaving was a cushion I saw made from two old silk petticoats; one was sage green and the other Delft blue. The strips were[302] about one inch wide. All the worn parts were cut out. No piece was considered too small to use.
Every pattern of rug has a name given it by the weaver. The most common pattern is the hit-and-miss. The name aptly describes it. There are never two hit-and-miss patterns that are exactly alike. To look at a collection of hit-and-miss rugs one is reminded of the Croton shrub which has no two leaves alike. As children, we used to call them Match-me-if-you-can trees.
A hit-and-miss pattern is a good one to learn on.
Do not weave first one green strip then one blue and so on, because you will get a jumble of blue that is neither interesting nor pleasing. Decide on which colour you would like for the background, then use most of that shade.
I have heard an old weaver say that when she works the hit-and-miss pattern she will carry first one stripe of the background the entire way across and probably start the second row. A little strip of the second colour is then used and then the background again. The good worker never cuts her strips all the same length but strives to get the effect of little slashes of colour against a solid background. A rug made of medium blue and white rags suggests the sea with white caps on it.
When an Indian weaves a rug, he sits on the floor and weaves, till he has to stand to work.
Tapestry is woven almost the same as described for rugs; instead of the loom having a bridge that has to be moved by hand to regulate the threads, a treadle is used.
The wrong side of weaving is always facing you on the loom and all ends are fastened afterward with a needle and thread. Perhaps you would be interested to know how a weaver makes a set design in tapestry. Usually an artist designs a piece, say a design for the back of a chair. Often the artist is the weaver himself. He will make two sketches in colour one to put under the warp threads and the other to keep in sight. He then starts to weave the design in as many colours as desired, then the background is worked.
A piece of hand-made tapestry is a possession that only the very wealthy can buy for it is indeed exceptional to find an ordinary weaver who can make tapestry. To the French is given the honour of being the most clever weavers in the world. As a general thing in France weaving is an inherited trade. You will find, if you ask the weaver what his mother, his father and his grandfathers were, he will tell you—weavers. The hands of the men are almost as small and soft as the women's.
I have seen a beautiful screen that represented a pansy field, if you can imagine such a thing worked in over two hundred shades of silk. Every conceivable kind of pansy was worked in it. It was made for a man who loved pansies. It took four weavers three months in which to make it, working eight hours each day.
Too much thought can not be given to the right colour for your rugs or whatever you intend to weave on your simple loom. Study to get harmonizing effects rather than contrasting ones. Gray is probably the most pleasing of backgrounds and can be combined to advantage with almost any other shade. Remember that a dark room needs a cheerful colouring while a bright airy room can stand subdued shades.
Red excites the nerves. Lavender is depressing. Blue is a cold colour and should be combined with other colours to be effective. Green is restful to the eyes in any shade, while yellow seems to reflect light and for that reason is to be highly recommended for use in a dark room. One of the prettiest rooms I know, which is ordinarily a very dark one, is one that has bright yellow and chestnut brown for its decoration. The minute you enter that room you are impressed with its cheerfulness and warmth.
No matter how pretty and beautiful are the hangings and other dainty touches of a room, a rug remains the chief attraction. It is to a room what a vase is to a flower. A rug is not absolutely necessary, but unless it is the right kind your room looks patchy.
As in everything else practice makes perfect and as soon as you become accustomed to weaving you will plan regular designs that will make the work more fascinating. If you have a large quantity of undefinable shades of silk or wool or cotton rags I would recommend that you dye them all one shade.
One ten-cent package of a dye will colour a couple of pounds of rags. Get a dye that is good for all three kinds of material as sometimes a dye that changes the colour of silk may not affect cotton at all.
CROCHETING ABBREVIATIONS.
| 1. | Slip stitch (sl st) | ||
| 2. | Chain stitch (ch) | (Figure | No. 227) |
| 3. | Single crochet (s c) | " | No. 228) |
| 4. | Double crochet (d c) | " | No. 229) |
| 5. | Treble crochet (tr c) | " | No. 230) |
| 6. | Shell (sh) | " | No. 231) |
| 7. | Stitches (sts) |
The beginner in crochet will have very little trouble in learning the work as the stitches used are comparatively few in number although the various combinations in which they may be used are almost unlimited. It is wise to become accustomed to the stitches and especially with the abbreviations, which are used so extensively throughout all crochet work. No doubt the beauty and variety of the patterns one can execute, also the durability of the work are the chief causes for its popularity at the present time.
The implement used is a crochet hook which varies in size according with the quality of the[307] thread used. The steel hook with the bone handle is to be preferred.
Too much emphasis cannot be placed upon the importance of the position of the hands when working, and the firmness of the stitches, as the work is, at once, better and more even when the proper position is maintained. The crochet needle should be held lightly between the first finger and the thumb of the right hand; the hook horizontal and parallel with the first finger of the right hand, that part of the work which is in course of construction being held closely between the thumb and third finger of the left hand. The thread is wound once around the first finger, passes under the second and third fingers of the left hand, and is wound around the small finger. It is now held in position by bending the fourth and small fingers toward the palm of the hand.
The foundation stitch of all crocheting is the chain stitch (ch) (see Figure 227) which is begun by making a slip knot around the needle. Draw the thread through this loop, and you have a chain. Again draw the thread through this second loop, continue until the chain is of desired length.
Another stitch is the slip stitch (sl st). Insert the hook in the foundation work. Draw loop through the work and another through the loop on the needle.
Single crochet (s c). See Figure 228.
Insert hook in work, make a loop on the hook and draw through, making two loops on the needle. Throw thread again over hook. Draw thread through both loops.
Double crochet (d c). See Figure 229.
Before inserting the hook in the stitch to be[309] worked, put the thread around it. Throw thread around hook and draw the thread through the stitch and you will have three loops on hook. Throw thread again around hook and draw thread through two loops. Throw thread again around hook and draw through the remaining two loops.
Treble crochet (tr c). See Figure 230.
Put the thread around the hook twice, insert in the work. Draw a loop through work, making four loops upon needle. Draw the thread or loop through two loops on needle, then again through[310] two loops and the third time through the remaining two loops.
Shells (sh). See Figure 231.
Shells are formed by making groups of either single, double or treble stitches worked into the same space or stitch.
Edging and insertions are very much in use and are often applied to blouses, collars and cuffs, towels, centre pieces, handkerchiefs, belts and various other articles.
Tiny Insertion (Figure 232).
Ch 7 catch into a ring and into one side of ring work 5 s c *ch. 7 catch in next to last s c, 5 s c in[311] new ring. Repeat from * for length desired and fasten off.
Tiny Edging (Figure 233).
1st row—Ch. 9 turn.
2nd row—1 s c in each 9 ch, turn.
3rd row—ch 9 work 1 d c in first s c made, turn.
4th row—* Over ch work 9 s c Work ch of 9 turn.
5th row—1 d c over the d c of preceding row. Turn.
Repeat from * until you have length desired.
For the edging made:
1st row—Over each d c on one side and each empty ch on the other work 4 s c.
2nd row—Work 1 d c into first s c then * 2 ch, miss 2 s c and work 1 d c into next. Repeat from * along both sides of insertion.
Loop Edging (Figure 234).
Work 29 s c over a padding cord, then catch in 7th stitch made to form a ring. Again work 29 s c and catch in the 7th stitch to form another[312] ring. Continue until the edging is the required length.
For the edge, begin at the first end for the picots and work as follows: make 1 s c into 8th stitch of first ring, ch 5, skip 1 s c—1 s c in next stitch. Repeat for three picots. Ch 2, begin in 8th stitch of next ring and make 3 picots there and so continue to the end of edging.
Loop Insertion (Figure 235).
Ch 10 and catch in a ring into one side of ring work 6 s c, ch 10, catch in the last s c forming a ring, and into new ring work 6 s c. Continue in this way for length desired. Then work down the other side of rings 6 d c in each.
Now work down each side of insertion 1 s c in[313] the centre point of each side of the ring and 5 ch between. In these ch loops work 6 s c each and fasten off.
Narrow Crochet Edging (Figure 236).
Ch 14.
1st row—1 d c in 10th ch from needle, ch 3, 1 d c in same st. Ch 3, 1 d c in next st, ch 3, 1 d c in same st. 3 stitches on foundation will stand beyond the row.
2nd row—Ch 6 turn * 1 d c in centre loop of cluster of three, ch 3 repeat from * 2 times. 1 d c in same space, ch 2-1 d c in third ch of turning loop.
3d row—Turn ch 5 * 1 d c in centre of loop of clusters, ch 3 repeat twice from * 1 d c in same space * ch 1-1 d c in 6 ch loop, repeat from * 7 times ch 1-1 s c in end of foundation.
4th row—Turn ch 6-1 sl st in fourth ch from needle ch 1-1 d c in next space between d c, ch 5-1 sl st in fourth ch from needle, ch 1-1 d c in next space. Repeat from * 5 times. Ch 3-1 d c[314] in centre loop of 7 ch clusters, repeat from * three times more ch 2, 1 d c in third ch on turning loop.
5th row—Turn ch 5, make clusters in centre loop as with other row. Repeat from 2nd row. On each repetition of 3 row the final s c is taken up in the loop of 3 ch of the former scallop.
Cone Insertion (Figure 237).
1st row—Ch 15 turn 1 d c in ninth ch from needle, ch 3 skip 2-1 d c in next, ch 3 skip 2-1 d c in last stitch.
2nd row—4 s c in first space, ch 1 in second space work 2 d c—1 tr c, ch 3, 1 tr c, 2 d c, ch 1, in third space work 4 s c.
3d row—Ch 10, one sl st over 3 ch—ch 5, 1 tr c in last s c of preceding row.
4th row—4 s c in first space, 1 s c in same space with sl st, 4 s c in next space.
5th row—Ch 6, skip 2 s c of preceding row, 1 d c in next stitch. Ch 3, skip 2-1 d c in next stitch. 3 ch, skip 2-1 d c in final st. Repeat from beginning of second row.
Crochet Insertion with Ribbon (Figure 238).
Make a ch of 35 stitches: 1 d c in 7 st from end of ch, 3 ch, 1 d c in next 3 rd st of ch, 3 ch, 1 d c in next 3d stitch of ch, 3 ch, 3 d c in 5th of ch, 3 ch, 3 d c in same st as last 3 d c to join shell, 4 ch, 3 d c in next 5th st of ch, 3 ch, 3 d c in same stitch as last three, 3 ch, 1 d c in next 5th of ch, 3 ch, 1 d c in next 3d of ch, 3 ch, 1 d c in last stitch of ch, 8 ch; turn. Work the next and every succeeding row the[316] same. Run narrow ribbon under and over 3 ch. in centre. This trimming is very pretty when used on a blouse waist.
Rainbow Shawl (Figure 239).
Either Saxony or floss may be used, about six[317] skeins of white and half a skein of each of the colours used being necessary.
To form main part of Shawl.
Ch 68 sts of white.
1st row—Turn and work back thus: Draw out st on hook about three-fourths of an inch, pass hook under the single thread of wool, draw through st, pass it under wool, work a sl st, 1 ch (in the way you work first st of every row). To make second st* pass hook through second, draw up to three fourths of an inch, catch the wool and make 2 close ch: repeat from * to end of chain. Turn and repeat from first row till you have worked 76 rows in the white wool.
To make the Rainbow Stripe on either end of white.
Fasten in the pink wool and work two rows, then in the order named—yellow, orange, light green, dark green, indigo, light blue, violet. Finish the end with two or more rows of white.
To make Fringe.
*Chain 35, fasten down in next st with a sl st, repeat from * to end of row. Finish both edges of scarf with a row of knot stitches.
Crochet Scarf (Figure 241).
Material, 8 skeins Shetland Floss.
Directions for Cross Stitch (see Figure 240).
Make a chain the desired length: work 1 tr c in the fourth stitch of ch. Now stitch back into the first and second of ch and make a tr c in each. (This forms a cross stitch.) Repeat to end of chain.
To make Scarf.
Ch 139 stitches.
Work 34 cross stitch on ch; continue working back and forth with cross stitch until scarf measures 1½ yards in length. Finish ends with a fringe. Each strand is 6 inches and 8 strands of wool are knotted to each cross stitch to form fringe.
Having become well acquainted with the stitches and patterns described in the previous chapter, you are competent to go on with the more intricate ones described in this chapter.
A pretty doll's cap is made of silk. Without a silk padded lining the cap will be just the thing for the warmer months.
Doll's Cap.
Begin by winding silk around a lead pencil 12 times: make 24 s c over this.
2nd row—Make 2 s c in every s c on first row.
3rd row—S c in every s c on 2nd row.
Continue widening often enough to keep the work nearly flat (to do this two s c instead of one are worked upon the one of the preceding row). This completes the solid work of the crown.
4th row—Ch 3, make 3 d c in same stitch, skip 4 d c in next st. Continue around entire crown.
5th row—Make a shell of 6 d c in centre of each shell of 4 d c, leaving off within 7 shells of last row.
6th row—Make a ch of 5 st and s c in middle of next shell. Ch 5, s c in middle of next shell. Continue around entire crown.
7th row—* 5 s c on each ch of 5 of previous row. Turn s c for entire row around to where the shells of 4 were left. This begins the front of cap. Turn and repeat from * 2 more rows. Next make a row of shells of 4 st in every 5th st.
8th row—Make shell of 5 d c in middle of each shell of 4 d c. Repeat these 2 groups of 4 rows of s c and 2 rows of shells twice more.
9th row—A row of 5 ch in middle of each shell, then a row of s c. Finish the cap with a row of shells of 7 d c around the entire cap. Finish shells with a row of picots made by a ch of 3 caught in every st with a s c. This completes the cap.
Doll's Hug-Me-Tight (Figure 242).
1 skein of Saxony white.
1 skein of Shetland floss, blue.
1⅓ yards of narrow white ribbon.
Make a ch of 20 st., take up each ch with a s c.
Turn 19 s c in slipper stitch (slipper stitch is s c taken up on the back thread of the row below).[322] Crochet back and forth in this manner until you have 8 ribs or 16 rows which form the back. Then take up 5 s c and crochet back and forth until you have 9 ribs or 18 rows, which forms the one front. Then count nine stitches for the neck, taking up the remaining 5 sts for the other front and make 9 ribs or 18 rows for the other front. Finish with a border all around of s c taking up the whole stitch,[323] alternating the colours, 1 row blue and 1 white until you have four blue and four white, finish the whole with a blue picot.
Cut the ribbon into six pieces, sew one piece in each of the outer edges to form the armhole and front as illustrated. This jacket can be made for a child by commencing with 45 ch, 25 ribs for back and 25 ribs for fronts.
Jacket (Figure 243).
Pompadour wool through which a thread of silk runs, was used for making this pretty jacket. Three skeins of the wool are required.
The body of the sacque is of star stitch (Figure 244).
Ch 95 on which work 11 stars, widen with 2 ch.
For sleeve make 11 stars, and back, 25 stars.
One front 11 stars. For the first 4 rows of front work 11 stars, widen with 2 ch work across sleeve, widen 2, work across back, widen 1 star every other row; at sleeve widen 2, across sleeve widen 2, then 11 stars from the front. After the 4th row continue as before, only widening 1 star at the four sleeve points for 10 rows. In 15th row work 11 stars for the sleeve, now drop out the entire sleeve, including the widening points, work across back alone, leave out sleeve as before then 11 stars for the second front; work 12 rows across sacque widening under arms as in centre back. Tie wool at point under arm and work 13 rows around sleeve joining each row as made. For border, work 4 rows of knot stitch.
Slippers in single crochet (Figure 245).
One skein of each of two contrasting colours of Germantown wool, one pair of soles. For making these slippers in mercerized Perle cotton, which is[325] very cool for warmer days, two balls will be required.
In making slippers it is very essential for the work to be as tight as possible to prevent it from stretching.
The following directions are for slipper size 3. Ch 11 sts. Make 11 s c in slipper stitch, described in doll's hug-me-tight (Figure 246) widen in the centre by making 3 s c in 1 ch. Make two rows like last widening in centre, then a row without widening. When the work reaches from the toe to the hollow part of the sole (about 12 ribs) the front is long enough.[326] (Alternate two rows one colour and two in the other.) Turn and work 15 s c. Continue in the slipper stitch until the work will reach around the sole by stretching. Join the end to the front by overcasting on the wrong side. Beginning at the corner where the end is joined make a row of crazy stitch around to the other side. Make 3 more rows of crazy stitch. Finish with a row of shells.
Directions for crazy stitch—Make a ch of 4 sts; then throw the thread once over the needle, take up the third nearest stitch to the needle, and pull it through the loop; throw the thread over again and pull it through the nearest two loops on needle and crochet the remaining two loops off in the same manner. This completes the d c described in chapter 27. Make two more d c in the same loop, skip 3 stitches, fasten with a sl st in next st 3 ch. 4 shells in next st. and continue for length desired.
Slippers in Star Stitch (Figure 247).
4 balls of mercerized crochet cotton.
Star stitch is made by a ch of the required length. Insert hook in 2nd ch from it, draw wool through, keeping both sts on hook, insert hook in 3rd ch and draw wool through keeping this st also on the hook, skip the next ch and take up the 4th and 5th in same manner, making 5 sts on hook; now drop the strands of wool from which these sts were made, and take up wool of contrasting colour, double end into a loop with short end about one inch in length, draw this through all the sts on hook, being careful not to let this short end slip through, ch 1 to hold sts in place. Now with this new strand work a star by drawing it through the eye of star, it being the tightest stitch near the ch on hook keeping both sts on hook as before.
Draw wool also through long st down the side of star, then through next 2 ch which gives 5 sts on hook, then dropping the strand from which this star was made pick up the wool of 1st star and loop it through these 5 sts and ch 1 to hold the star in place. This ch should be worked tight so it will draw the sts together and form the star, which should be almost square. In the second row place the contrasting colour over the star underneath, tying in the wool, ch 3 on which take up 2 sts; this gives you 3 sts on hook, the next 2 loops are drawn through[328] the long and short stitches of star underneath, taking up back stitch of the long and both strands of the short or eye of star.
For the slipper proper.
Ch 9, on which make 3 stars, 2 ch at end then work 3 stars down the other side of ch, taking up the other thread.
2nd row—4 stars, 2 ch, 4 stars.
3d row—without widening.
Widen 2 stars every other row until you have 10 rows 2 rows without widening, then widen in the next.
There will be 13 rows in all, and 20 stars in this last row, now divide front and work 20 stars on either half[329] for the sides; fit around sole by stretching and sew up the back on the wrong side. The wool or thread should be broken at the end of each row. (Crochet should not be worked backward and forward unless directions are given to that effect.)
For a frill around the slippers work groups of 6 ch st two more rows of the same. I always sew my slippers onto the soles after being finished, by overcasting with wool of the same shade on the right side, which saves stretching the slippers all out of shape when turning them.
Jacket in Shell Stitch (Figure 248).
Material: 5 skeins of white Germantown and 1 skein of colour for edge. No. 7 bone needle.
Ch 127, with 3 extra sts for turning.
1st row—Skip 2 ch and make 4 d c in the next. * Skip 3 ch, 1 s c in next, ch 3, 4 d c in same st with s c and repeat from * ending with a final s c.
2nd row—Turn 1 s c in s c below * 2 d c in same st, 1 s c in next s c below and repeat from * ending with a s c in top of turning ch.
3rd row—Turn ch 3, 4 d c in s c below * 1 s c in next s c, ch 3, 4 d c in same st repeat from * to end of row.
Repeat 2nd and 3rd rows 9 times, then repeat the 2nd row once more. This gives a depth of work[330] sufficient for the back part of sleeves. At the end of the last row fasten off.
The lower part of the back is now to be made. Count 8 shells (sh) along from the end of the last row and begin to crochet there, working as with 3rd row until within 8 sh of each other end of last long row.
Crochet in pattern upon this row until 11 rows in all have been worked. Upon the 12th row increase 1 sh in the 2 s c from each end by making 2 sh in those st instead of one.
Work without increasing for 13 rows more, then fasten off.
Go back to the foundation and upon the other side of it, beginning where the first row ended, crochet 13 sh as in 1st row. This is the commencement of the left shoulder and front.
Upon this row work 3 rows more in the usual way. At the end of the last row drop the loop temporarily from the needle, tie in an extra ball of wool at the top of the very beginning of the last row, ch 12 and fasten off. With this ch the extra width for the centre of the front is secured.
5th row—Again take the dropped loop upon the needle and crochet as usual making 3 sh upon the extra ch. The row is now 16 sh wide. Work in pattern for 17 rows more, the last row ending at the wrist. Fasten off.
On the 1st short row of lower front count 8 sh along from end of last row, begin there, work as usual to the other end, then crochet back and forth until the front is as long as the back, increasing 1 sh on the 13th row in the 2 s c from the underarm seam. The second front is made exactly like the first. The 3rd pattern row now is worked up the fronts around the neck, across the lower edge of jacket and sleeves, then finished with a scalloped[332] edge worked as follows: Make 1 s c in space preceding st where s c was made on row below, ch 5, 1 s c on top of 1st d c below, ch 4, 1 s c in same space, ch 5 and repeat from beginning around all the edges, fasten off.
Shape the jacket by crocheting the sleeves and underarm seams together.
Crochet should be carefully washed and should not be put in the general laundry. Make suds of warm water and a little borax. Put the article, if of cotton or linen thread in and let it soak for a little while, then squeeze the water out of the article between the hands. Rinse in several waters in this manner always using warm water.
Put the piece in a white bag and hang on the line.
This way keeps the piece from stretching out of shape. Keep it on the line till the article is perfectly dry.
Knitted articles should also be treated in like manner when washing for if a knitted piece was pinned on a line to dry the article would be stretched out of shape.
Irish Crochet lace is one of the most durable of laces and is suitable to be worn for all occasions. It especially recommends itself for pick-up or porch work. It looks well and does not take an endless while to make, as almost every motif is made separately thus giving a variety. And although one may not have more than a few minutes to devote each day to the work, it is surprising how many articles can be completed with little effort and little time.
The materials necessary are a steel crochet hook, considerably finer than for ordinary crochet work, as the work must be very firm, even and close. Irish Crochet Thread, numbers 36 to 50 or D. M. C. cotton numbers 70 to 100 inclusive and number 10 for the padding cotton will be needed. All laces look better if pressed before making up, this is especially true of Irish Crochet. And when slightly soiled it can be washed in soap suds, made from any good laundry soap; rinse thoroughly in several[334] waters, starch slightly and iron on the wrong side on a heavy blanket. These simple directions help to make the lace look like new. In Irish Crochet the motifs are made separately mostly worked over a padding cotton.
Then these motifs are basted on a pattern of cambric, or paper muslin which has been cut to the desired shape. A row of chainstitching is worked and basted to the edge of the pattern, then the filling in background is worked, joining the different motifs together with rows of chainstitching and picots or any other background stitch desired.
Doily with Irish Crochet Edge (Figure 249).
This can also be used for a bread plate.
1st row—around a 24 inch circle of linen work a row of single crochet.
2nd row—5 chain, miss 3 single crochet and fasten with a single crochet in the 4th stitch; continue around mat.
3rd row—Into each group of chains work 3 single crochet, 1 picot, 3 single crochet.
4th row—6 ch fasten in the picot loop.
5th row—3 single crochet, picot, 3 single crochet, 1 picot, 3 single crochet, 1 picot; continue all around. This completes the mat.
Belt of Irish Crochet (Figure 250).
This belt is very useful, especially as it is mounted[336] upon a foundation, which is the ordinary cotton waist belting, one inch wide sold at all notion counters for a few cents. The crochet belt is basted upon this belting after being stretched and starched.
To make the belt:
1st row—Chain 26, turn.
2nd row—1 double crochet in 6th stitch of chain, chain 2, miss 2 stitches and work 1 double crochet in 9th stitch of chain, chain 2, miss 2, chain and work 1 double crochet in 12th stitch of chain, chain 5, skip 5, chain, 1 double crochet into 17th stitch of chain, chain 2, 1 double in 20th stitch of chain, chain 2, miss 2 chain, 1 double crochet into 23rd stitch of chain, chain 2, miss 2 and work 1 double crochet in 26th stitch.
3rd row—Chain 5, 1 double crochet in top of double crochet of preceding row, chain 2, 1 double crochet in top of double crochet, chain 2, 1 double crochet in top of double crochet, chain 2, 1 double crochet in top of double crochet, 5 double crochet over chain of 5, 1 double crochet in top of double crochet, 2 chain, 1 double crochet in top of double crochet, 2 chain, 1 double crochet in top of double crochet, chain 2, 1 double crochet in 2nd stitch of chain of 5 at the end; turn and repeat from 2nd row for length required. For the edge, work on both sides of the[337] belt into every chain loop 3 single crochet, 1 picot 3 single crochet.
Rose Tie with lawn facing (Figure 251).
This bow has an under facing of lawn with a simple crochet edging of double crochet and chain stitch with picots, worked at even intervals. For the crochet tie:
1st row—Work rose the same way as the one in the wheel tie. Now crochet around the rose in this manner * chain 3, 1 single crochet caught in the 1st double crochet of the rose petal, 5 chain, 1 double crochet in 5th stitch of petal, chain 5, 1 double in 8th stitch of petal, 5 chain; repeat from * five times more.
2nd row—5 chain, 1 single crochet in each previous group of 5 chain, continue around entire rose.
3rd row—6 chain 1 single crochet in each preceding loop of chain.
4th row—* 6 chain, 9 double crochet in first space, 6 chain, 1 single crochet for next 4 spaces, 6 chain, then 9 double crochet in 5th space; repeat from * twice more.
5th row—* 6 chain, 1 single crochet in 1st double crochet of group, 6 chain, 1 single crochet in 5th double, 6 chain, 1 single crochet in 9th double; repeat from * all around.
For the next two rows work 6 chain, 1 single crochet in each previous group of chain. Finish the edge with a row of chain and picot.
Work two sections like the one described and fasten together in the centre. Sew this upon the lawn facing and the tie is complete.
If the tie shows any tendency to cap in the course of construction add an extra chain in the group of chain stitches every now and then.
Wheel Tie with Rose and Straps with Shamrock (Figure 252.)
Wind padding cotton 6 times around the crochet needle. Over this ring work:
1st row—50 double crochet.
2nd row—Chain 5, miss 2 double crochet, * in the third stitch, work 1 double crochet, 2 chain, miss[339] 2 double crochet repeat from * 24 times. Work a spider in the centre of the ring, with a needle and thread.
Make 8 of these wheels for the tie. Join together with filling stitch (3 chain and a single crochet). After working 3 chains and a single crochet around the edge of the tie, work 1 single crochet in first space, 3 chain, 1 single crochet in second space, 3 chain * 1 double crochet, 7 chain in third space (catch back into second chain from needle to form a picot chain) repeat from * 4 times more, chain 3, 1 single crochet in next space, chain 3, 1 single crochet in second space. Continue in this manner all around tie.
For rose in centre of tie.
1st row—Chain 6, join in a ring.
2nd row—Chain 6 * 1 double crochet into ring, 4 ch 1 double crochet, 4 chain repeat from * twice more and join.
3rd row—Over first 4 chain work * 1 single crochet, 5 double crochet, 1 single crochet; repeat from * 5 times.
4th row—Work a row of 7 chain loops fastening at back of first row of single crochet (this is what helps to form the rose petals and makes them stand one above the other).
5th row—Over these loops work * 1 single crochet, 7 double crochet, 1 single crochet, repeat from * all around.
6th row—A row of 9 chain loops.
7th row—Into these loops work 1 single crochet, 9 double crochet, 1 single crochet; this completes the rose.
Let me mention here that roses can be substituted for the shamrocks worn on the ends of the straps.
For straps.
Work 27 single crochet over a padding cord, join in a ring. Work 9 single crochet over padding cord, 1 chain, 9 single crochet, 1 single crochet, over padding cord into the chain stitch. Continue working 9 single crochet, 1 chain, 9 single crochet over padding cotton and fastening each time in the[341] chain stitch with a single crochet. One strap is 6 inches long and the other is 7 inches long.
For the edge of straps work 2 chain, 1 double crochet, in first single crochet of previous row, 2 chain, 1 double crochet in 3rd stitch, 7 chain count back 5 chains and slip stitch (to form a picot) 1 double crochet in 5th stitch, 2 chain, 1 double crochet in 7th stitch, 2 chain, 1 double crochet in 9th stitch. Continue on both sides of straps.
For the shamrocks.
Wind padding cotton over the end of crochet hook 6 times. Over this ring work 30 single crochet. * Over 3 strands of padding cotton work 11 single crochet. Twist padding cotton in a downward loop and work 1 single crochet over crossing of padding cotton, continue 15 single crochet over the loop, draw padding cotton to pull loop up close and then work 11 single crochet over padding cotton alone. Miss 2 single crochet on ring and work 2 single crochet over padding cotton into next 2 stitches of ring.
Turn, leave padding cotton, 12 chain, 1 single crochet into top of crossing loop, 12 chain, 1 single crochet into ring just before beginning of arch. Turn, over 12 chain work 4 single crochet, 1 double crochet, 1 treble crochet. Work 1 treble crochet[342] into single crochet over crossing of loop. Continue over next 12 chain, 14 treble, 1 double and 4 single crochet. Work 4 single crochet over padding cotton into next 4 single crochet on ring, repeat from * twice more leaving out the 4 single crochet over padding cotton into the ring the last time. Turn, work a row of single crochet over padding cotton. Between petals take the needle out, insert in stitch half way between the petals, and pull loop through, this will give a better shape to the petals. Then continue with single crochet.
For stem work 3 single crochet over padding cotton into ring. Then 40 single crochet over padding cotton alone, turn and work 40 single crochet over padding cotton into the previous row of single crochet to the ring. To shape the stem to the right pull the padding cotton before working the second row of single crochet.
Long Jabot (Figure 253).
Over a padding cotton work 50 single crochet, turn, and work down other side, 41 single crochet over padding cotton into previous row of single crochet (leaving one-half of stem still to be worked).
1st arm—Now twist the padding cotton under the stem, fasten with a slip stitch, over the loose padding cotton work 18 double crochet, turn and[343] work over padding cotton into each double crochet, 18 trebles, fasten with a single crochet in the 5th single crochet of centre stem.
2nd arm—Turn work over padding cotton, 10 double crochet into double crochet of previous row. Now work 8 double crochet over padding cotton alone, turn and work 18 treble crochet over padding cotton into the double crochet of previous row. Fasten in 10th stitch, this completes the second arm.
Now work 8 arms more in the same way, then finish the stem with 9 single crochet over padding cotton into the other single crochet of stem.
For the centre work over 2 strand padding cotton 6 double crochet and fasten into the single crochet which connects the arms to the stem, continue all around centre and fasten off.
Work 36 chain, into these work 36 double crochet with 6 double on each end. Continue working until there are 4 rows of doubles. Connect the leaf to this with slip stitch, baste on paper and work 3 rows of the filling stitch all around.
1st row—For the edge, work 6 chain loops into every loop of previous row.
2nd row—Over 6 chain loops work 7 single crochet.
3rd row—6 chain loops caught into every 4th single crochet.
4th row—Into 6 chain loops work 4 single crochet, picot, 4 single crochet, then into 2nd or next loop work 4 single crochet, picot, 4 single crochet, into 3 loop work 4 single crochet. 5 chain turn and fasten in the 4th double crochet over 2nd loop, turn and over chain work 4 double crochet, picot, 4 double crochet, then into the 3rd loop finish with the other 4 single crochet; repeat from * all around jabot.
Baby Irish Lace, with Rose Leaf and Grapes (Figure 254).
For roses.
Chain 12. Into chain work * 1 double crochet, 3 chain repeat from * for 6 times more. Into each group of 3 chain work 1 single crochet, 6 double crochet, 1 single crochet making seven petals to a rose.
For the leaves.
Chain 8, join in a ring. Over this ring work 32 single crochet without breaking the thread, chain 8 and form another to the right and a little above the other ring, work 32 single crochet into this one also, again chain 8 and form a ring to the left of the first ring, fill this ring with 32 single crochet.
For grapes.
Chain 3, join. Fill chain with single crochet, continue working around, widening as needed for 3 rows. Decrease by missing a stitch occasionally to shape grapes. Just before finishing stuff with cotton, make 3 grapes for each cluster and fasten into centre of leaf. Baste all motifs on muslin and fill with background stitch. For edge of scallop work groups of 6 chain caught down with a single crochet then * 4 single crochet into first space, 2 single crochet into next space, 6 chain, turn, fasten[346] into single crochet, turn, 3 single crochet over chain, picot, 5 single crochet, 2 single crochet into same space, 4 single crochet into next space, 6 chain, turn, and catch down beside first loop, turn, 4 single crochet over chain, 6 chain turn, catch down in centre of first loop, turn, 4 single crochet, picot, 4 single crochet, into chain, 1 single crochet into next loop, picot, 3 single crochet, 4 single crochet into next space and repeat from * all around edge of lace.
Dutch Collar (Figure 255).
Begin the rose with a small thick ring made by winding the padding cotton ten times around the end of the crochet needle. Cover this ring with single crochet, cutting off the end of the padding cotton when the ring is three quarters covered. *Chain 6, catch down into the ring; repeat from * 5 more times, dividing the spaces as evenly as possible so the last chain is caught down beside the first one.
Over the chain loop work * 1 single crochet 7 double crochet, 1 single crochet, repeat from * all around.
*Chain 7, catch down at back in the same stitch as that in which the chain loops of the preceding row was caught, repeat from * all around.
Over chain loop * 1 single crochet, 9 double[347] crochet, 1 double crochet. Repeat from * all around.
*Chain 8 catch down in back same place as before. Repeat from * all around.
*Over chain loops work repeat from * 1 single crochet, 11 doubles, 1 single crochet, this finishes the rose centre.
*Now begin the first row around the rose * 7 chain 3 picot, (catch back into third stitch) chain 7, picot, 3 chains, catch down in first petal in outer row, repeat from * 12 times more, spacing these picot loops evenly all around, catching the last one into the centre of the first.
*Next work one picot loop catching in into centre of loop of row below, then a loop of 6 chains, repeat from * caught into centre of next picot loop.
Turn and over this loop work 9 single crochet, turn, work 9 double crochet over the single crochet 3 chain, catch down into same stitch as the 6 chain loop was caught. Work 2 rows of picot loops, then repeat from * all around finishing the row in the corner of the first 9 double crochet ornament.
9th row—Work a row of plain picot loops.
10th row—Work a row of plain picot loops.
11th row—Another row of plain picot loops.
Five roses are required for the collar.
For the wheels.
Over a padding cotton ring, work single crochet. Over a single strand of the padding cotton crochet into every single crochet, a single crochet, work 4[349] rows the same way only add a picot in every 4th single crochet in the last row. Now begin the first row around the wheel * chain 7, catch into the last single crochet of the wheel, chain 7, picot, chain 7, chain 3, skip 2 stitches of the wheel and catch down into the 3rd with a single crochet, repeat from * all around.
Next work 1 picot loop, catching it into the centre of loop in row below, then a * loop of 6 chain caught into centre of next picot loop. Turn, and over this loop work 9 single crochet, turn and work 9 double crochet over the single crochet, 3 chain stitch down into same stitch as the 6 chain loop was caught. Work 2 more picot loops, then repeat from * all around finishing the row in the centre of the first ornament.
Work a row of plain picot loop. Another row of plain picot loops. Make four wheels for the collar.
Sew the roses and wheels firmly on the cambric pattern (the size and style having been cut out of the cambric).
Placing them so as to leave room for a single row of picot loops to be worked between to join them, crochet a chain of chain stitches and baste them upon the edge of the cambric pattern. Fill the[350] work out to the desired shape with the picot loops, which should contain the same number of chain stitches as the loops in the roses and wheels, 3 chain, 1 double crochet, 3 chain, work a row all around collar, then begin the border or edge. Work around the inner edge and fronts of collar 4 single crochet into each loop, then around the lower edge * 4 single crochet in the first space, 4 single crochet in the second space, 2 single crochet in the third space; chain 6 down at the beginning of second space. Over the loops thus formed make 3 single crochet, picot, 7 single crochet, 2 single crochet into same (third) space, 4 single crochet into next space. Turn, 6 chain catch down into next to the last loop, turn, 5 single crochet over the loop, chain 6, turn, and catch down into centre of first loop. Turn, 5 single crochet, picot, 5 single crochet over this last loop, 2 single crochet into the next loop, picot, 3 single crochet, repeat from * all around edge. Take the collar up from the cambric and press upon the wrong side over a blanket or heavy flannel.
There are certain terms used in knitting that are peculiar to the work. Until these terms are studied and practised, the instructions are as bad as trying to read a foreign language that you know nothing about.
Knitting is usually done on two needles though there are times when more needles are used, for instance, in knitting stockings.
Thread, silk or worsted can be used for the work. The latter is best for practising the first stitches or pieces.
The first term we learn in knitting is "to cast on stitches" (Figure 256). Select a pair of medium-sized wooden needles. Your worsted should be wound into a ball. "Casting on" is the foundation for the work. Take a knitting needle in each hand between the thumb and first finger. Make a loop of the worsted over the left-hand needle near the end. Put your right-hand needle through this loop[352] under the left needle. Holding the needles in this position, throw the worsted around the point of the right-hand needle and draw the right-hand needle through the first loop. There is now a loop on each needle. Slip the last loop made over the left needle. * Both needles are in the one loop, the left on top of the right. Again throw the worsted over the point of the right-hand needle and draw the needle through with the loop on it. Slip this loop over the left-hand needle and repeat from *, till the number of stitches desired are cast on.
The * indicates from which point the directions are to be repeated.
The German method of knitting is to hold the work in the left hand and the worsted over the first finger, under the second and third and then over the little finger.
To knit, the right-hand needle is in the first loop from the point of the other needle. * Throw the worsted over point of the right-hand needle and[353] draw it through the loop. Slip the first stitch off the left needle and insert the right needle into the next stitch and repeat from *, till all the stitches have been transferred to the right-hand needle (Figure 257).
Remember to hold the work in the left hand when starting to knit each needle or row.
To purl (Figure 258). The work is held in the left hand. The worsted is brought in front of the work. The right-hand needle is inserted through the stitch from right to left in front of the left needle. Pass the point of the right needle over the worsted and draw the loop through. Slip[354] off the stitch on the left needle as in knitting. Repeat in this manner until all the stitches are transferred.
Sometimes it is necessary to get rid of some of the stitches. In that case the needle is slipped through two stitches instead of one and the new stitch formed in the usual way. There are two abbreviations for purling two together. They are p. 2 tog. or p-n. The latter means purl narrow.
When knitting, two stitches can also be taken together. The abbreviation for this is n. K. 3 tog. means knit three stitches (sts) together as one stitch.
To slip-stitch means to take a stitch from the left-hand to the right-hand needle without knitting it, and its abbreviation is sl.
To bind or cast off means to slip the stitches from the needle so that you have a chain edge. Slip the first stitch and knit the second. You now have two loops on the right-hand needle. * Put the point of the left needle (from left to right) through the first stitch on the other needle. Hold the worsted tight. Slip the right-hand needle through the loop formed as described above and then slip the loop from the left needle. There is only one loop on the right-hand needle. Knit the next stitch and repeat from *.
Casting off must be done loosely or the work will have a puckered appearance.
It may be that you desire to widen the row of stitches. Both widening and decreasing is done at the end of needle or row. Knit as usual till there remains but one loop on the left-hand needle. Insert the left-hand needle through the loop at the base of the last stitch. Bring worsted around the point[356] and make a stitch as usual. The last stitch is knitted in the usual way.
After you have practised the stitches with wool, it is well to buy a ball of coarse knitting cotton and a pair of steel needles. The cotton makes excellent wash cloths. Cast on 50 stitches then knit or purl the same amount of rows as stitches. To make a fancy cloth knit three rows then purl three rows until you have the fifty rows.
The long straight shawls are the most popular at present.
A little one for yourself that would be quite pretty is made in pop corn stitch (Figure 260). It requires five skeins of worsted and a pair of wooden needles.
Cast on 59 stitches on your needle.
1st row—K 1st, then knit two stitches together (2 K tog) the rest of the way. You now have 30 stitches on your needle (Figure 260).
2nd row—K first stitch, then knit the loop which is formed between the double stitches of the first row. Continue in this manner till you have again on the needle the same number you cast on—59.
3rd row—K plain all the way across.
4th row—P plain all the way across.
5th row—K 2 together all the way across to the last stitch, then k that by itself.
6th row—Same as second row.
7th row—K plain.
8th row—P plain.
Continue in this manner till you make a scarf about one yard long.
The popcorn pattern affords good practice for the different stitches explained before.
If a longer shawl is desired continue in the same manner. To make it broader it will be necessary to cast on more stitches at the beginning.
A shawl may be finished in many ways. Sometimes a little crochet edge is worked around it, or[358] a chain stitch fringe can be made. The plain fringe is the one most used however. This is made by cutting the wool about ten inches long. Take four lengths and slip them through and knot them into the border edge at each end of the shawl. This makes a fringe about five inches deep.
The basket stitch makes a thick shawl (Figure 261.)
To make a wide shawl in this stitch 10 skeins of Germantown wool will be required.
Cast on 120 stitches.
1st row—Knit plain.
2nd row—* K 3, p 7, k 3, p 7, repeat from * to end of needle.
3rd row—* K 7, p 3, k 7, p 3, repeat from * to end of needle.
4th row—* K 3, p 7, k 3, p 7 repeat from * to end of needle.
5th row—P the entire row.
6th row—* P 7, k 3, p 7, k 3, repeat from * to end of needle.
7th row—* P 3, k 7, p 3, k 7 repeat from * to end of needle.
8th row—Like 6th row.
9th row—P entire row.
Nine rows form the pattern, repeat from second row until you have a shawl two yards long.
DOLL'S CAPE.
Commence with 1 stitch. Knit plain, increasing 1 stitch beginning of each needle until there are 30 stitches on needle. Increase 1, knit 12 stitches, bind off 6 stitches, knit 12 stitches. Increase 1 stitch beginning of needle, knit to end of row; turn, knit 1 row plain. Repeat until there are 15 stitches on needle. Now increase 1 stitch at the neck and decrease 1 stitch at end of row, 1 row plain. Repeat 3 times more. Knit plain without increasing at front and 2 together at end of needle, until 1 stitch is left on needle, fasten off. Finish the right side same as left. Crochet a row of holes for ribbon, 1 chain, 1 double all around. With blue yarn crochet 1 row, 3 chain, 1 single.
Doll's Jacket (Figure 263).
Cast on steel needles No. 13, 64 stitches, 1 plain 1 purl for 26 rows, Knit 16 stitches; turn. Take another needle, knit the 16 stitches for 5 rows with No. 16 needles knit plain for yoke, decreasing 1 stitch[362] at the neck until there are 12 stitches on needle, knit plain until there are 7 ridges, bind off. From the 48 stitches left on needle, knit 32 stitches for 14 rows; bind off. Finish left front same as right.
Sleeves—Cast on steel needles No. 16, 26 stitches. Knit plain for 6 ridges. With steel needles No. 13 knit 1 plain, 1 purl for 20 rows. Bind off 3 stitches beginning of each needle until 8 stitches are left on needle; bind off. Sew up seam and shoulder seams. Crochet a row of holes around neck for ribbon, 1 chain, 1 double. With blue yarn crochet one row, 3 chain, 1 single all around.
Doll's Cap (Figure 264).
With blue yarn cast on No. 16 steel needles 45 stitches. Knit plain for 6 ridges. With white yarn and No. 13 needles, 1 plain, 1 purl for 17 rows.
Crown—Knit 29 stitches, knit 2 together; turn, knit 14 stitches, knit 2 together. Repeat until all side stitches have been worked up and the crown is complete. Then pick up stitches on both[363] ends, first on one side; turn, knit them plain, also the crown stitches, then pick up the stitches on that side and knit them. Make a row of holes for ribbon, yarn over needle twice, then knit 2 together to end of row. 1 row plain, knitting only 1 of the stitches cast on. With blue yarn crochet 1 row, 3 chain, 1 single.
Doll's Leggings (Figure 265).
Cast on 32 stitches. 1 plain, 1 purl for 21 rows. Decrease beginning and end of needle. Knit for five rows. Decrease continuously 1 stitch beginning and end of needle every 6th row, until there are 22 stitches on needle. Knit for 15 rows. Bind off 6 stitches, knit 10, take another thread, bind off the remaining stitches. Knit the 10 stitches for 4 rows. Decrease beginning and end of each needle, until there are 4 stitches on needle. Bind off and sew up seam. With blue yarn crochet 3 chain, 1 single around top of legging.
Infant's Knitted Bootees (Figure 266).
Material—2 Skeins White Wool, 1 Skein Pink or Blue, 1 Pair Knitting Needles No. 16.
1st row—Cast on 53 stitches in coloured wool.
2nd row—Knit plain to the end of row.
3rd row—Slip 1, make 1, knit 25, make 1, knit 1, make 1, knit 25, make 1, knit 1.
4th row—Knit plain to the end of row.
5th row—Slip 1, make 1, knit 27, make 1, knit 1, make 1, knit 1, knit 27, make 1, knit 1.
6th row—Knit plain to end of row.
7th row—Slip 4, make 1, knit 29, make 1, knit 1, make 1, knit 29, make 1, knit 1.
8th row—Knit plain to the end of row.
9th row—Slip 1, make 1, knit 31, make 1, knit 1, make 1, knit 31, make 1, knit 1.
10th row—Knit plain to end of row.
11th row—Slip 1, knit 33, make 1, knit 1, make 1, knit 34.
12th row—Knit plain to end of row.
13th row—Slip 1, knit 34, make 1, knit 1, make 1, knit 35.
14th row—Knit plain to end of row.
15th row—Slip 1, knit 35, make 1, knit 1, make 1, knit 36.
16th row—Knit plain to end of row.
You must now have 75 stitches on your needle. Knit now 8 plain rows then knit 43 stitches, now knit 2 together. Turn your needles and continue this until you have 25 stitches on each side of needle. You must now tie on the white wool then knit 12 plain, then knit 2 together as above, you are beginning now to make the part that forms the little sock. Knit 2 together 7 times, turn your needle, knit 1, pick up the stitch that you will see between the two stitches that you have knitted, two together, next row knit plain. Next row purl 1, then you have four rows complete. Commence 2 together again 7 times continue this until you have 5 pattern rows.
Always remember to take 2 stitches together after you have knitted the 12 stitches. There should be 14 stitches on each side needle. Tie on the[366] coloured wool again and knit plain to end. Knit 1 row plain then make 1, knit 2 together to the end of row. Then make 1, pick up the stitch already explained. Tie on white wool, knit 1 row plain. Begin the pattern again by knitting 2 together. Remember you must always begin a row on the right side of the bootee. Do 7 rows of the pattern, then 12 rows ribbed. Rib is to knit 2 plain rows and purl 2 rows. After knitting 12 rows cast off on the right side and sew the bootee up neatly at the back and run some ribbon in to finish it off.
A warm hood for the baby (Figure 267).
This hood requires an ounce and a half of Shetland wool and one pair of fine bone needles No. 7.
Cast on 21 stitches, knit 6 rows or three ridges plain.
Second row—Knit one * wool over needle twice, knit 2 together, repeat from *.
Knit 3 more rows plain. Cast on 21 stitches at one end and knit back and cast on 20 more at the other. Knit on these 62 stitches that are on the needle for 30 more rows. Now start a new pattern by knitting 1 for the edge * wool over, slip the next stitch on the right-hand needle, knit the next two, pass the slipped stitches over these two. Note the two loops remain on the right-hand needle and the[367] wool cast over. There knit from * to the end of row, knitting last stitch plain, purl back. Repeat these 2 rows 20 times. Cast off the 20 and 21 stitches at the end. Knit on the original 21 stitches for 30 rows.
Next row—Knit 1 * wool across the needle twice, knit 2 together, repeat from *.
Knit 6 rows.
Cast off.
Your knitting is now finished and somewhat[368] in the shape of a cross. Join the X's to the X's on the wrong side. Sew right up to the corner.
Join the dashes to the dashes, the O's to the O's, the diamonds to the diamonds in like manner (Figure 268).
You will have a piece of knitting that looks like a box cover. Turn it so the wrong side is in the right position. Fold the backs over the other so that the 2 rows of holes correspond. Sew along the bottom edge.
Turn back a little corner from the plain knitting and sew it down.
Run a ribbon through the holes and tie in a bow in front.
Knitted Vest for Baby.
Materials required, 10 oz. of Shetland Wool, a pair of Bone Knitting Needles No. 12 and 2 yds. of Ribbon.
Cast on 140 stitches.
1st row—Knit plain.
2nd row—Knit 2 purl 2 all the way across. Continue knitting 2 and 2 ribs for 5 inches.
To form the armholes work backward and forward[369] on the 1st 40 stitches for two and three quarter inches. Cast off all but 12 stitches for the shoulder strap. Work 12 rows on these 12 stitches and cast off.
For back—Continue from where you divide it for the armhole for 60 stitches leaving 40 for the second front.
Work two and a quarter inches on the 60 stitches. Cast off. Make second front the same as first. Sew up on shoulders.
A pretty little crochet edge around the neck and armhole will complete this comfortable little vest.
A simple crochet edge is made by working one double crochet, * 4 chain, 1 double crochet in first chain, miss 2 stitches, 1 double crochet, repeat from * sew the two small pieces of ribbon that have been cut in half to the vest. Tie in a bow. The bows hold the little garment together.
Pine Pattern Lace.
Cast on 28 stitches and knit across plain.
1st row—Slip 1, knit 2 together, make 2, knit 2 together, knit 10, knit 2 together, make 2, knit 2 together, knit 1, make 2, knit 2 together, make 4 (thread four times round needle) knit 2 together, knit 2 together, make 2, knit 2 together.
2nd row—Knit plain, but work twice (knit 1 and purl 1) in each of these make 2 loops. In the[370] 2nd row work 6 times (knit 1, purl 1, knit 1, purl 1, knit 1, purl 1,) all in the 4 made stitches.
3rd row—Slip 1, knit 2 together, * make 2, knit 2 together, knit 2, knit 2 together, make 2, knit 2 together; repeat from * once, knit 2, make 2, decrease 2 (by working slip 1, knit 2 together, draw the slipped stitch over), knit 5, decrease 2, make 2, knit 2 together.
4th row—The same as second row.
5th row—Slip 1, * knit 2 together, make 2, knit 2 together, knit 1, repeat from * three times, knit 2, make 2, decrease 2, knit 3, decrease 2, make 2, knit 2 together.
6th row—The same as second row.
7th row—Slip 1, knit 2 together, make 2, knit 2 together, knit 2, knit 2 together, make 2, decrease 2, make 2, knit 2 together, knit 2, knit 2 together, make 2, knit 2 together, knit 4, make 2, knit 2 together, knit 2 together, draw the first two together; stitch over the second thus decreasing again, decrease 2, make 2, knit 2 together.
8th row—The same as second row.
9th row—Slip 1, knit 2 together, make 2, knit 2 together, knit 4, knit 2 together, knit 5, knit 2 together, make 2, knit 2 together, knit 6, make 2, decrease 2, make 2, knit 2 together.
10th row—Knit 2 together, drop the second loop of the "make 2," knit 1, draw the first stitch on the right-hand needle over the knitted one, thus decreasing again; knit 1, purl 1, knit 8, purl 1, knit 13, purl 1, knit 2. Repeat from first row.
A girl who has to make a home of her boarding school should try and make her room and little personal articles as attractive as possible. Her room is her citadel where only her bosom friends and cronies meet. One likes to feel when they enter their room that it is a place where everything is hers and every object in sight means something to her.
A girl might not like to embroider, yet there are hundreds of things that can be done without any needlework decoration, such as stencilling, cut leather or simple appliqué. It always amused me to hear a girl say, "I don't like to embroider." I always feel like asking her, if we are acquainted, if she knows how to embroider. You will find that in nine cases out of ten she does not. Embroidery is like anything else, you have got to know it to like it. It may be you prefer one branch to others. Some branches of this work may be tedious[373] to you but when you stop and think what simple things are classed under embroidery you will find that you have a wide field from which to select.
It is not my object to go into details in regard to stitchery in this chapter but rather to give you some helpful suggestions in regard to knowing what to make and what colours to use. The stitches to be used are fully described in the previous chapters.
The first thing to consider is, are you going to have a bedstead or a couch in your room? Make it the latter unless you have a broad window seat that you can heap up with pillows. No room at a boarding school or college is complete without a half a dozen pretty pillows. When the chairs give out you can use the cushions, Japanese fashion, on the floor. Some girls like to carry their whole room out in cretonne, which is very pretty and dainty if you can afford it. Cretonne covers last about a year and then they get faded and dusty, while a linen background embroidered will last for many years. It may need laundering but it will stand any amount of that. If the embroidery fades a little that also is no drawback as it takes the effect of newness from the room. A room ought to look as if people lived in it and enjoyed it and not as if it were an exhibition room[374] in some department store. Don't think I am trying to encourage untidiness but let the things be used and enjoyed.
When I was about your age for several weeks I spent my spare time embroidering a centre piece for my auntie's dining room table taking care to get just the right colours that would look well with her every day china. It nearly broke my heart when it was finished to have her use it only for state occasions. If my cousins do not use it any more than auntie did it will last for hundreds of years, or be thrown into the rag bag by the next generations if they don't like it. Enjoy all the pretty things that you possess if they are appropriate for the use you intend them for.
Have you ever heard the story of the little dirty boy of the slums who was given a new white tie by his teacher? He had first to wash his hands before he touched it and then he washed himself to wear it and asked his mother for a clean shirt so that everything would go with the tie? Do you know that if you have one beautiful thing in your room of which you are very proud you too will see that all the things around it set off its beauty?
For the girl who has a window seat in a room and wants to keep her room dainty and bright there is[375] nothing as pretty as the lingerie pillow. It may be made of heavy white linen or lawn as you desire and can be oblong, round or square. The cushion is covered in any colour that you prefer and the white top embroidered with large eyelets, Roman cut work, Hardanger or drawn work so that the colour will appear through the openings. Some of the handsomest imported pillows have motifs of real Filet, Irish Crochet or Cluny lace. These motifs are very expensive and not really necessary. The back and front of the linen cover are scalloped on the edges and half an inch above this scalloping a row of large eyelets is worked at intervals. The back and front are laced together with ribbons the same shade as the coloured covering. For a pink and blue room the cushion can be covered with pink and the lingerie slip laced with blue. For a square pillow plan the design on a square and arrange one in each corner and one in the direct centre.
These slips will require frequent laundering.
The lithographed pillow is a thing to be avoided by a girl of refined taste. You would not hang lithograph posters in your bedroom so why feel that it is all right to buy a lithograph pillow?
The chief point to remember in getting little accessories for your room is to keep the colouring[376] as harmonious as possible. Avoid getting the popular things of to-day which are apt to be an eyesore to you to-morrow.
Do not decide quickly to carry out your room in school colours, there will probably be a dozen of the girls who will do this very thing and you will be tired of it before your course is through. A fraternity pillow is to be expected as there are dozens of ways that it may be treated and look quite different from the other girls' pillows.
The general way in which a school or fraternity pillow is made is to cut out of felt the letters, figures and any design that is to be placed on it. The background may be broadcloth, ladies' cloth or felt. Use one of the school or fraternity colours for the appliqué and the other for the background.
One of the handsomest fraternity pillows I ever saw, was one belonging to a Hamilton College man. Hamilton's colours are buff and bright deep blue. The fraternity's colours were black and gold. A handsome piece of Hamilton blue broadcloth was selected for the background. The fraternity pin was reproduced in colour in fine filo silk. The gold silk was a perfect match to the gold in the pin. Even the background of the pin, which was black enamel, was represented by very fine Kensington[377] stitches. The rope-like edge of the pin was reproduced on the pillow by little rope-like sections heavily padded and worked in gold silk. On the back of the pillow were his initial and his class year below. No beruffled ribbons or gaudy cord detracted from its richness. It was a square cushion and its only finish was a large button in each corner where the end was gathered and tucked in to give a round effect.
The school girl of to-day is learning to eliminate the unnecessary trumpery things that cheapen the room and serve as dust gatherers. Outside of the pillow, bed or table covers and an occasional bag for fancy work, laundry or gloves there is no ornate display of handwork. Even the walls are left bare with the exception of a framed print or a few family photographs.
Try if possible and see if you can get a plain paper for your wall. More than one really charming room is spoiled by having an atrocious paper on it. It is really impossible to try to be artistic with an ugly wall paper.
Since stencilling has become so popular, it is not an uncommon thing to have the entire room stencilled.
Suppose you had planned to have your room in[378] lilac, green and light gray. White can be substituted for the gray but it soils more readily than the latter. The floor should be polished and a couple of small rugs or one larger one be used on the floor. The lilac shade should predominate in the rug. The covers should be of the gray or white with a stencilled design in green and lilac. A pretty way to treat the pillow is to get inexpensive lilac material of a coarse texture. Cut a square about fourteen or fifteen inches. Cut four strips of white or gray five inches wide by twenty-five inches long. These strips should be finer than the lilac or of a different weave. Baste one strip on each side of the lilac square. Mitre the strips at the corners. A design is then stencilled on the four strips in lilac and green. The backing of the pillow should be in plain lilac.
If preferred a striped lilac and white piece of material can be used for the centre and back.
For the girl who is fond of initials or monograms I would suggest that the cover be hemstitched and a wreath selected in different sizes appropriate to the article on which it is to be used. These wreaths can be carried out in colour or the background may be coloured and the wreaths white. Inside of the wreath work your monogram or initial. If you[379] desire a Dutch room, carry out this scheme in Delft blue material and have a dark set of Mission furniture.
Nile green linen with wreaths of conventionalized rosebuds or daisies, worked in shades of pink, or white and yellow, suggests a French room, with a brass bedstead. As I have stated in the chapter on initials, the stem stitch is pretty for working single lines of a design that is carried out in satin-stitch.
Stem stitch is too slow a method however to embroider school linens, and I would suggest using a substitute that has the effect and yet does not require the time. A row of outlining is made, and then turn the work back in the same manner, this time instead of working through the material, catch the places where the two successive stitches of the first row overlap (Figure 269.)
Another wrinkle you might be glad to hear of and possibly want to put in practice is how to clean a daintily embroidered piece without washing it, such as a pincushion or pillow top. School is not like home where you can be sure a piece sent to the laundry will have proper attention. Another drawback is that all extras have to be well paid for. If the piece is thickly covered with white[380] talcum powder and allowed to stand without disturbing it for forty-eight hours, the embroidery will emerge almost as clean as if it had been laundered.
Now then there are the curtains for your room. You may be fortunate enough to have a room with dainty dotted swiss or dimity curtains that will go very nicely with the things you are planning and then again you may be inflicted with a pair of cheap imitation lace curtains. If you can possibly afford it change them as soon as possible. Personally I would rather have no curtains than the wrong ones. Dimity, dotted swiss, scrim, plain net or grass linen are materials that are inexpensive as well as artistic. Of course you can make them as fancy as you wish. Any of the above mentioned materials can be stencilled. Rick-rack braid, which is a wavy braid, can be used to edge the net curtains or a Connemara lace design is also appropriate.
A narrow crochet edge can be used on the edge of the scrim curtains or a narrow border of drawn work can be used.
Shadow work is effective on dimity or dotted swiss curtains. Another pretty stitch very similar to the shadow stitch is the skeleton stitch. Instead of the work being on the wrong side it all appears on the right. Work a row of very fine running stitches on the right side. Fagot stitch from side to side catching the thread into the running stitches. The work is done from the centre of the flower to the tip of the petal. Do not end your thread but weave over and under the fagotting stitch to the end of the petal, leaf or space on which you are working.
The curtains may be sash lengths or may be the full length of the window but do not make them longer than to reach the sill.

Obvious punctuation errors repaired.
Obvious typos and errors repaired:
Hyphenation is inconsistent and has been left in that state where there was a balance of with and without spellings e.g. chain-stitching and chainstitching, handwork and hand-work and over-cast and overcast.