
Front Endpaper A
Front Endpaper B
| Carpentry and Woodwork By Edwin W. Foster |
| Electricity and Its Everyday Uses By John F. Woodhull, Ph.D. |
| Gardening and Farming By Ellen Eddy Shaw |
| Home Decoration By Charles Franklin Warner, Sc.D. |
| Housekeeping By Elizabeth Hale Gilman |
| Mechanics, Indoors and Out By Fred T. Hodgson |
| Needlecraft By Effie Archer Archer |
| Outdoor Sports, and Games By Claude H. Miller, Ph.B. |
| Outdoor Work By Mary Rogers Miller |
| Working in Metals By Charles Conrad Sleffel |
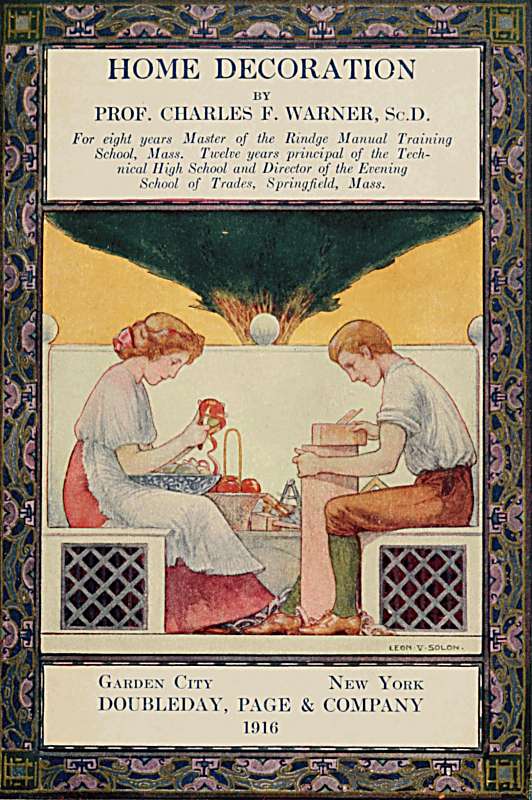
HOME DECORATION
BY PROF. CHARLES F. WARNER, Sc.D.
For eight years Master of the Rindge Manual Training School, Mass. Twelve years principal of the Technical High School and Director of the Evening School of Trades, Springfield, Mass.
Garden City New York
DOUBLEDAY, PAGE & COMPANY
1916
ALL RIGHTS RESERVED, INCLUDING THAT OF TRANSLATION INTO FOREIGN LANGUAGES, INCLUDING THE SCANDINAVIAN
COPYRIGHT, 1911, BY DOUBLEDAY, PAGE & COMPANY
TO THE BOYS AND GIRLS OF AMERICA
THIS BOOK
WHICH RECORDS WHAT SOME OF THEM HAVE DONE
IS HOPEFULLY DEDICATED
Some pure lovers of art discard the formula, Art for Progress, the Beautiful Useful, fearing lest the useful should deform the beautiful. They tremble to see the drudge's hand attached to the muse's arm. They are solicitous for the sublime if it descends as far as to humanity. Ah! they are in error. The useful, far from circumscribing the sublime, enlarges it.... Is Aurora less splendid, clad less in purple and emerald—suffers she any diminution of majesty and of radiant grace, because, foreseeing an insect's thirst, she carefully secretes in the flower the dewdrop needed by the bee?
This volume is the result of an effort to bring together in close relation with fundamental principles of design a variety of practical problems which are more or less closely connected with the general problem of home decoration and suited to the constructive ability of boys and girls from twelve to eighteen years of age. While the book is mainly a record of the author's experience and observation in this department of educational work, he has received many suggestions from co-workers in the same field. It will be impossible to give credit to all who have directly or indirectly assisted in the preparation of this book: but special acknowledgments are due to Mr. Fred M. Watts, who furnished the material for the chapter on Pottery and several drawings for other parts of the book; to Miss Grace L. Bell for the illustrations and descriptions embodied in the chapter on Block Printing; to Mr. Burton A. Adams for the problems in metal work; to Mr. Edwin A. Finch and Mr. Lewis O. Richardson who contributed many of the specifications for the problems in furniture-making; to Miss Elizabeth M. Morton for specific suggestions pertaining to the subject of dress as related to the principles of decoration; and to Mrs. Ruth B. S. Flower, of Florence, Mass., who supplied several of the photographs and much of the descriptive matter for the chapter on Weaving.
| CHAPTER | PAGE | |
| I. | Introductory—The Story of a House | 3 |
| II. | Decorations and Furniture | 34 |
| III. | Pictures | 64 |
| IV. | The Arrangement of Flowers | 81 |
| V. | Decorative Fabrics | 95 |
| VI. | Dress and the Principles of Decoration | 121 |
| VII. | Furniture Making | 129 |
| VIII. | Finishing and Re-finishing | 212 |
| IX. | Hand Weaving | 244 |
| X. | Pottery | 280 |
| XI. | Decorative Work in Leather, Copper, and Other Materials | 321 |
| XII. | Concluding Suggestions—Country Homes | 366 |
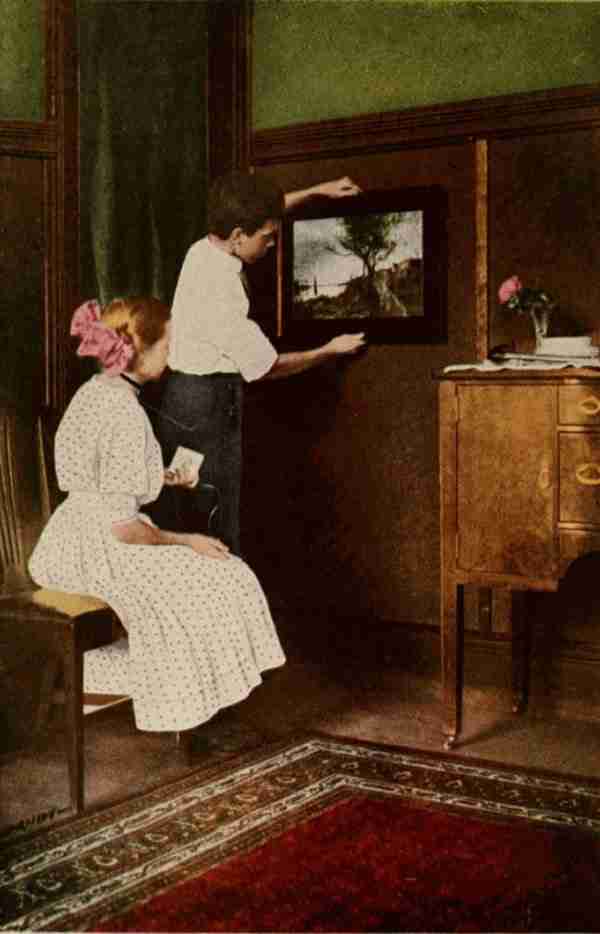
| Hanging a Picture | Frontispiece |
| FACING PAGE | |
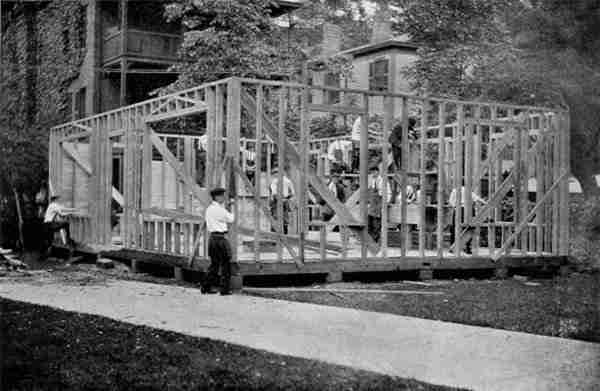
| All the Rough Carpentry was Assigned to the Boys of the Woodworking Sections of the Vocational School | 22 |
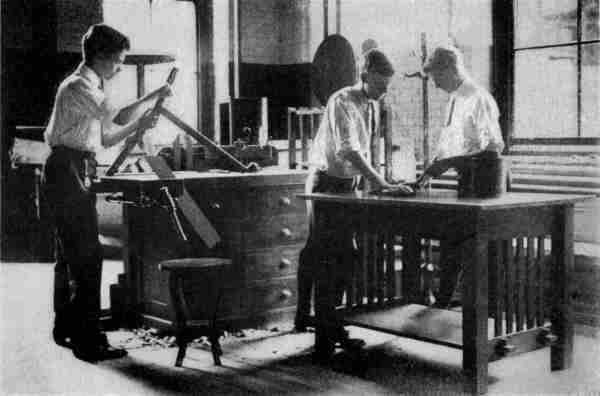
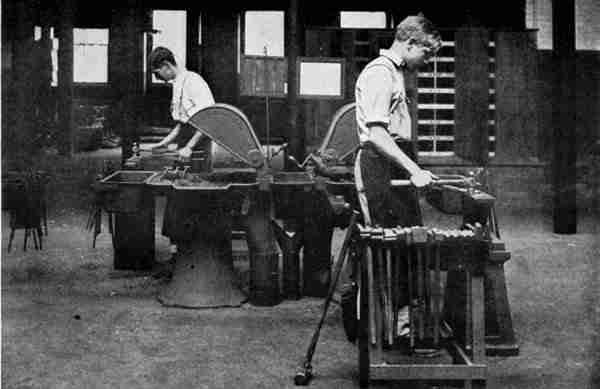
| The Boys of the Forging Classes of the Technical High School were not Overlooked in the Distribution of the Work on the House | 24 |
| A Table Runner of Russian Crash and Pillow Cover with Geometrical Design | 96 |
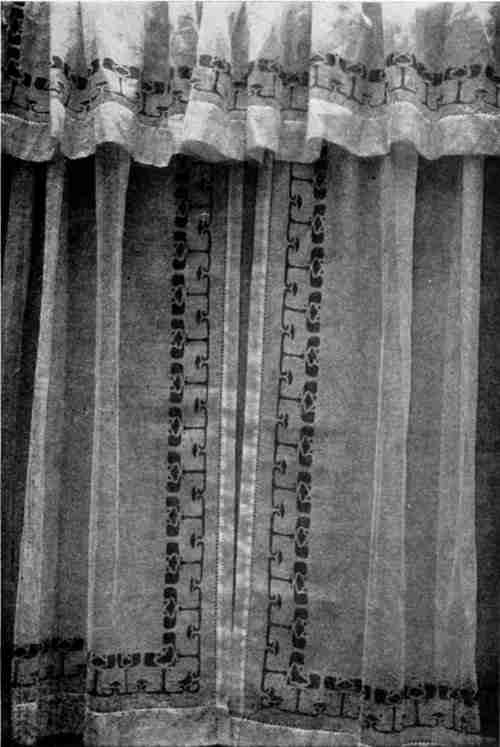
| Window Draperies with Stencilled Border | 108 |
| Crocheted Panels, a Linen Work Bag with Conventional Landscape in Darning Stitch, a Crash Table Mat Embroidered in Darning and Couching Stitch | 118 |
| Finishing a Library Table | 212 |
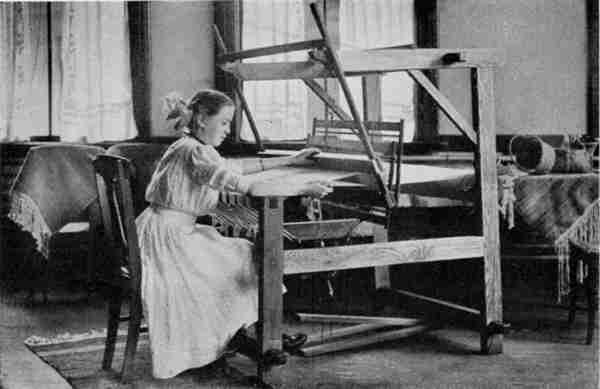
| Weaving a Rug | 244 |
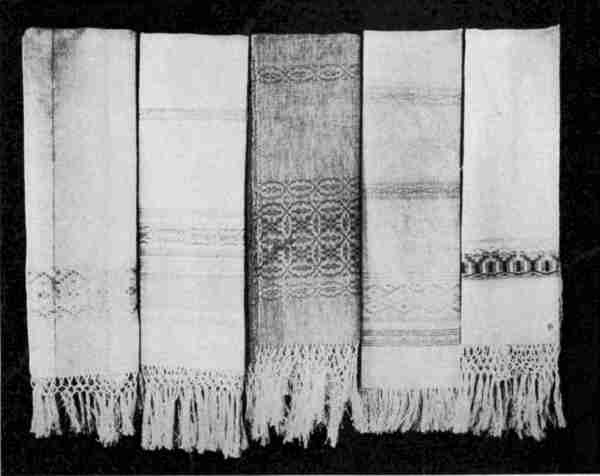
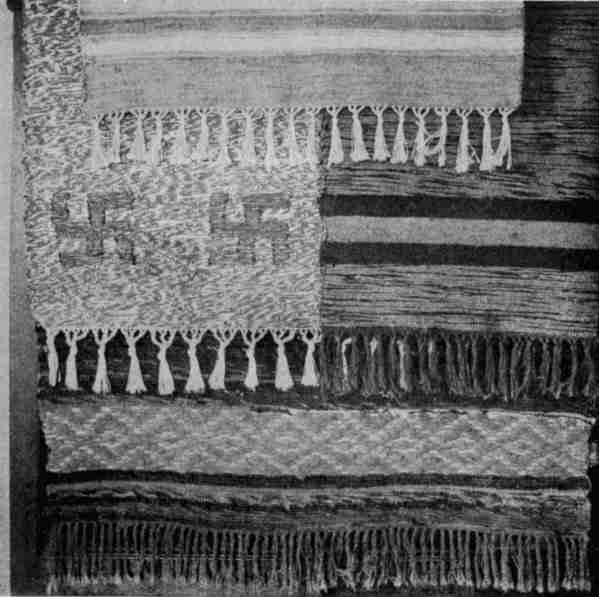
| Hand Made Rugs, Hand Made Towels | 252 |
| An Alcove with Window Draperies, Pillow Covers, Window Seat and Moss Green Rug, All Hand Woven | 262 |
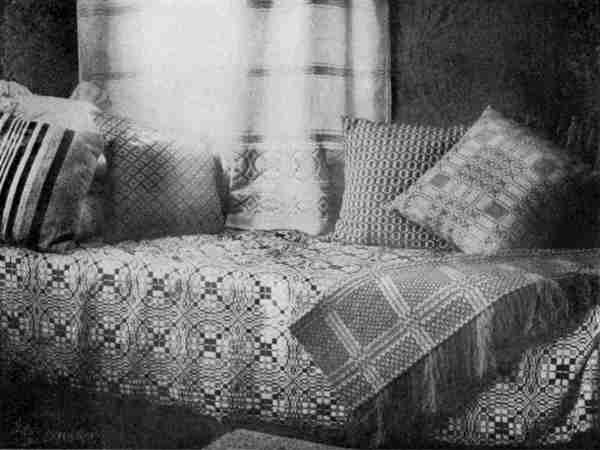
| Hand Woven Window Draperies, Couch Cover, Slumber Rug, and Pillow Covers | 266 |
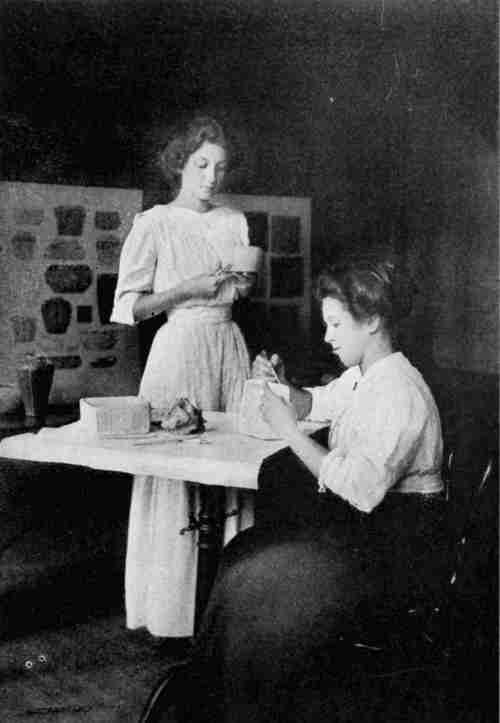
| Girls at Work on Pottery | 280 |
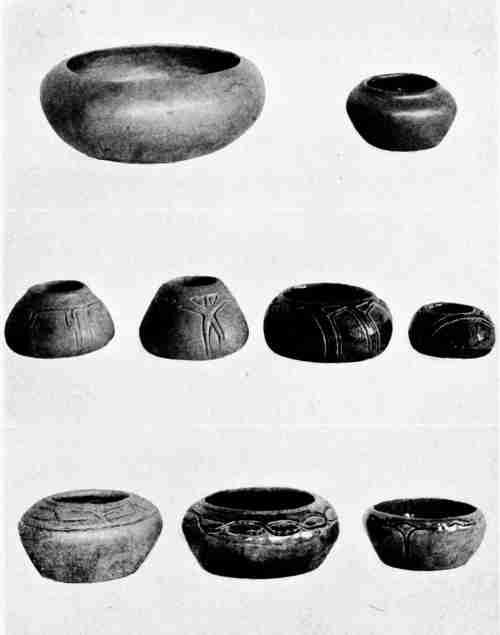
| Bowls | 294 |
| Vases and Fern Dishes | 312 |
| Tiles | 316 |
| Pottery: Designed and Made by Schoolgirls | 318 |
| Decorative Forgings | 364 |

To design, plan, and build a house is a task that rarely falls to the lot of boys and girls. In fact, it is not the common experience of men and women to build houses without the aid of architects, masons, and carpenters. Such a task, however, was recently offered to certain classes in one of the public schools of a well-known New England city. It was, indeed, a school problem, and yet there was something about it that seemed to suggest larger and more interesting things than are ordinarily dealt with in the school-room. It did not seem at all like some school work. It was more like real life; for all boys and girls must some day have homes of their own, and here was a chance to learn how the house, which is an important part of every home, is planned and built. It is hardly necessary to say that this work—or play, if you like that word better—was undertaken with[4] genuine enthusiasm. It was a task crammed full of the pleasure of interest and of accomplishment—full of the joy of doing something worth while—from the beginning to the end.
The House a Work of Art.—One of the first lessons learned by these young builders—perhaps the most important one of all—was that a great many things have to be thought of in planning a house, if the thing is to be well done. It is not simply a question of deciding how many rooms one will have, arranging them in some conventional order, and building the house around them with whatever external features style or fancy may dictate. Too many houses, it is true, are planned, or at least put up, in this thoughtless fashion; and whatever goes into them in decoration or furniture is generally chosen either for necessary use or for display—not with any thought of the real comfort and satisfaction that come from artistic surroundings. People who are satisfied with such dwellings seem to show less appreciation of art, the highest product of civilization, than those uncivilized tribes who decorated their caves or huts with beautiful rugs of their own weaving and who ornamented their pottery and their utensils and implements with wonderfully conceived and elaborately wrought[5] designs. Modern cave dwellers in apartment houses with all the conveniences of their ready-made surroundings, are in danger of missing that self-expression in their home belongings that encouraged and delighted even the savage. The most extreme example of this form of degeneracy is found in the suggestion of a certain great inventor, that the age of concrete construction, now at hand, means that we are to have concrete houses poured into a standard mould, hardened in twenty-four hours, and finished for occupancy in a day or two.
The boys and girls of this story would not have accepted a machine-made, standardized house if one had been offered them, ready for use. There was a special purpose for which their house was to be planned and built, as there generally is in the case of any real house. No style A, B, or C, chosen from any series of pattern-built or moulded houses, could fulfil such a purpose; and even if it could, would they willingly give up all the fun of planning and building and furnishing? Would they forego the lessons of experience to be learned from all this work? This is always a large part of the satisfaction which comes to any one who builds his own house. In the present instance it was the chief motive, since the boys and girls who were[6] planning this house were not expecting to make their home there.
Why the House Was Built.—What, then, was the purpose for which this house was to be built; and what were the specific problems involved in realizing this purpose? It was to be a practice house for the girls of the household technology course. This meant that it should be, so far as possible, a model house; but it must of necessity be a simple one. Economy, always a safe guide, was a most important factor in determining the character of the design. A limited appropriation—about $1000—for building material was available. Economy of space as well as of expense was also important. The only available land was a triangular lot in the corner of the school yard, 665 square feet in area. This limited the dimensions of the floor plan to 24 by 35 feet. It was decided to develop the design within these dimensions, on a rectangular plan, with one story and a hip roof, because such a design would present comparatively easy problems in framing and insure a building of pleasing external proportions.
In attacking the problem of design the method of approach was determined by the fact that school-[7] girls and school-boys were to be the architects and builders. House planning, home decoration, and household management were important subjects of study on the part of the girls and various forms of drawing and constructive work were required of all the boys of this school; so they all felt that they had a right to contribute something out of their study and experience that might be of value in working out this problem. The design must therefore be a composite of the best features of many studies.
A Composite Design.—The rooms required for a house of this character were thought to be a hall, a living room, a dining-room, a kitchen, a pantry, a bedroom with a closet, a bath room, and a linen closet. Nothing short of this outfit of rooms would satisfy the demands of a house to be used to give practical training in all the essentials of plain housekeeping and in the entertainment of guests. With these requirements in mind and with full knowledge of all the limitations of the problem, the girls of the junior and senior classes, who were taking the course in household technology, entered into a lively but friendly competition with each other to produce the most acceptable design and draw the best plan. So many excellent plans resulted from this competition that it was difficult[8] to select the best. It was therefore decided to combine in a new and final plan the best features of several studies that seemed to meet the conditions of the problem with equal success. Two of these were selected as having the greatest number of good points. From these the final floor plan was developed and the necessary modifications made in the original drawings to make the general design of the building fit the plan.
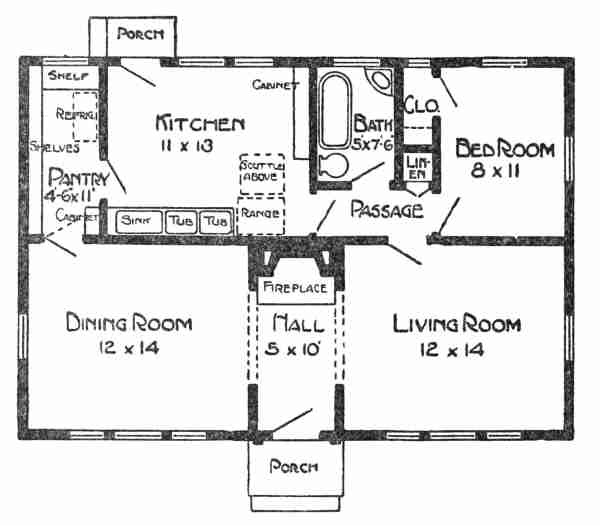
[9] The Hall.—It may be of interest to note how some of the details of the problem of design were worked out for the final plan. Beginning with the hall, it was easily seen that economy of space required that the room should have small dimensions. In fact, it did not need to be a separate room at all. It could easily be a space between the living room and the dining-room, separated from both by means of portières and joined upon occasion with either room or with both, thus making possible a reception room or a dining-room of good size, or one large room. Of course, the central idea of a hall must not be lost sight of in providing for a desirable extension of other rooms. It should suggest a warm welcome to the guest; and here is where the fireplace may fulfil the double function of giving the cheer of the hearth-stone at all times and the comfort of fire when warmth is needed. The absence of a stairway, since none was needed, was a favourable circumstance. Appropriate decoration and furnishing in due time were to add a few distinguishing marks so that the house could retain, without any appreciable sacrifice of space, the dignity of an entrance hall.
The Living Room and the Dining-room.—The relative positions of the living room and the dining-room,[10] as already stated, were determined by the location of the hall. The purpose of each was distinct and self-evident, and determined the features of design that lent themselves most readily to appropriate decoration. In the living room the floor, the wall spaces, and the ceiling needed consideration with regard to their final treatment, to give pleasing proportions and harmonious colouring. The same was true of the dining-room, though its different purpose suggested a different design. An abundance of light was important for both rooms, hence the large, multiple windows. Such windows would also offer a good chance for pleasing drapery effects.
The Kitchen and Its Appointments.—No room demanded so much study as the kitchen. In the first place it was necessary to make provision for a relatively larger kitchen than would ordinarily be needed in a house of this size, because in this case it was designed to be used as a practice kitchen and must therefore be large enough to accommodate a considerable number of girls—at least eight—at one time. This point assumed so much importance in the minds of the young designers that they were constantly tempted to rob other rooms of the space that was due them in order to[Pg 11] get a "nice, big kitchen." But by clever adjustments and combinations the necessary floor dimensions were secured without unduly cramping other features of the plan. The range, laundry tubs, and sink were conveniently located near each other with the tubs at such a height that when not in use the cover was flush with the top of the range, forming a shelf on which kettles and other kitchen utensils could be easily placed as they were moved back and forth from the range. It was thought that it would be very desirable, if not necessary, to have this shelf covered with zinc or some kind of sheet metal.
It will be noted as a possible fault in the plan that the range is very near the door into the passageway leading to the bedroom, the living room, and the hall. This point received due consideration; but in view of the compensating advantages the arrangement was thought allowable, inasmuch as the door into the passageway would be used only occasionally. There seemed to be no more convenient location for the passageway, which was designed to give privacy to bedroom and bath room and, in cases of sickness or any emergency requiring it, easy communication between the kitchen and the bedroom.[12] Special Features.—The pantry was located between the kitchen and the dining-room for obvious reasons—to give easy communication in serving and to confine kitchen odours to their proper place. In place of a kitchen closet a cabinet was provided for as being on the whole the more serviceable of the two. It is always desirable to have an entry or lobby, with a convenient part of it reserved for the refrigerator; but the need of providing as much room as possible in the kitchen itself seemed to justify the omission of the lobby. Another unusual feature—this time not an omission—is to be found in the window of the bedroom closet. Such a window, although not common, was thought to be very desirable on sanitary grounds and as a possible protection against moths.
Early Plans for Decorating and Furnishing.—These were by no means all the features of design that had to be considered. As already suggested, there was much study given to the question of interior decoration and furnishing, even at this early stage. This was simply necessary forethought; for much of the attractiveness, restfulness, and homelike atmosphere of any house is created by the architect, who, in his arrangement of rooms, door-ways, and windows, disposes his wall areas so that they[13] may be divided symmetrically and lend themselves naturally to colour toning, offering tempting spaces for a few choice pictures and opening up beautiful vistas. Such house-planning, begun with clear vision and followed with taste and delicacy in every detail, may often lead to a harmony of effects as pleasing to people of artistic temperament as a symphony is to those who enjoy a fine musical composition. In fact, the parallel between sympathetic gradations of form and colour and harmony of musical tones is a very close one, and the appreciation of it is by no means rare. Any intelligent person, on seeing a suite of rooms designed and arranged by a real artist, though he may not understand why, will be impressed by the rhythm of space divisions, the harmony of colours, the lack of any jarring or discordant notes in the decoration, the simplicity, fitness, and real beauty, not of any particular part, perhaps, but of the whole combination. We often find ourselves using the same language whether we are describing the work of an artist-architect or the work of a musical composer.
Adaptation to Purpose.—Our young architects discovered that there are certain fundamental principles or laws that must be observed at the[14] very beginning, if a really good and true design is to be made. The first of these laws is the law of adaptation to purpose. The application of this law was illustrated in the location of the various rooms in the plan of the house, in the dimensions agreed upon for each, and in the details of arrangement, especially in the kitchen and other rooms connecting with it. But this law is universal in its application. It determines not only the broad features of the plan but the details as well. It does not permit anything useless or superfluous to exist, for that would mean weakness. It aims at efficiency and strength. It dictates the details of construction all along the line, from the framing of the building to its finish and its decoration. It even determines the character of the furniture and the amount of it. Adaptation to purpose is a ruling principle.
Simplicity.—Another great principle that revealed itself as the plans of the house developed may be called the law of simplicity. This is one of the elementary laws of nature transferred to the realm of craftsmanship. It is an axiom of geometry that the straight line is the shortest distance between two points. Not less evident is the fact that when Nature undertakes to do anything she goes[15] about it in the simplest and most direct way. The natural tendency of all motion is along a straight line—so reads the first law of motion. Analyze the most complex forms and processes of nature and we shall find them due to the harmonious combination of the simplest elementary lines and movements. But the same law of simplicity which invariably marks the works of nature gives strength and beauty also to the works of man. Thus, in discussing the various problems that developed as the designing of the house progressed, it was found—as of course it should have been—that the solution which met the test of simplicity, while satisfying the law of adaptation to purpose, was the true one.
Correlation.—A third great fundamental principle that found expression in these studies of the house plans was the principle of correlation. Not only must each part of the design be adapted to its use in the simplest possible manner, but it must support all other parts and receive support in return. It is like cooperation or team-work in play or in the practical affairs of life. Every room in a house bears some natural relation to every other room, and even the objects in the same room or in adjoining rooms must assist each other,[16] whether their purpose be utility or decoration or a combination of both. Only by due attention to the mutual relations of the various elements that must enter into the composition, can the designer produce those pleasing space effects, those blendings of colour tones, those manifest relations between the various objects, useful or decorative, that give order, unity, and sympathetic feeling to a complete design.
The Floor the Foundation.—Almost unconsciously our young architects found themselves under the guidance of these three great fundamental principles of design. When they came to the problem of specifying the finish for the floors and other wood work of the hall, living room, and dining-room, they found that this problem was intimately associated with the larger question of the colour scheme as a whole. The mutual dependence of all the elements concerned could not be overlooked. It was evident that the floor, which is the foundation of the room, should be darker than the walls and ceiling and the general tone of the furnishings, in order to give the suggestion of sufficient weight and firmness for the support of the entire room and all it might contain. The effect of solidity could[17] be produced by staining the floor boards or by providing a liberal supply of dark, rich-toned rugs, large ones as well as small ones. There was no question of carpets. These, of course, are not allowable in a model house. A few rugs were already available, and others could be procured by buying them or by making them. A properly toned floor, however, is desirable, even with a most generous covering of rugs. It was therefore decided to give the floor a coat of stain when it was ready to be finished.
Importance of Colour Schemes.—But what was the colour to be? The designers were thus brought face to face with that difficult but important problem which all who plan houses have to solve before they can hope to bring their work into harmonious adjustment with the various natural and human conditions that must be satisfied in the final product, if it be made a good example of the designer's art. The problem of the colour scheme is fundamental. Upon this depends not only the tone of the floors, the walls, and the ceilings, but also, to a certain extent, as has already been suggested, the kind of woods to be used in the interior finishing, and whether they are to be painted, stained, or left in their natural colours. It will determine the material and the colours of the portières, curtains,[18] cushions, lamp shades, picture frames, vases; in fact, it will largely settle the decorative character of every article placed in the rooms. The consideration of movable objects, however, may be deferred till the more substantial and fixed elements are decided upon.
Southern Exposures and Cool Colours.—In settling the all-important question of the colour scheme the first point to be considered was the location of the rooms with reference to light and to external surroundings. Rooms that have a southern exposure and nothing to interfere with their being flooded with sunlight need to be protected against the glare of too much light. For such rooms dull tones of colour are the best—dull browns, soft gray-greens, certain blue tones, and the medium grays—light, cool colours that counteract the overbrilliancy of direct sunlight and give a positively tempered feeling to the atmosphere of a room. Incidentally, too, perhaps because they are the tints associated with distant views, the cool colours make a room seem larger than it really is.
Northern Exposures and Warm Colours.—Northern rooms, on the other hand, do not generally suffer from excess of sunlight and heat. Warm colours are needed in such rooms. Deep reds, rich yellows,[19] and golden browns will seem to bring sunlight into a sunless room. Our designers noted the fact that many of the rooms in the house they were planning must be comparatively dark. The house was to face the high brick walls of the neighbouring school building, not more than twenty-five feet distant, and its principal rooms had a northern exposure. A warm colour treatment, therefore, was unquestionably needed. Should red, brown, or yellow be the prevailing tone? The deciding point was the location of the hall and its relations to the other rooms. It was, first of all, the hall, the place of welcome for the guest; but it was dark. Its walls must have the sunniest of all colours—a rich golden yellow. The same would serve the needs of the living room, or perhaps a brown with yellow enough in it to be well in tune. The dining-room could safely be darker and more luminous, in pleasing contrast with the golden yellow of the hall; but it must not be decidedly red. The ceilings of these three rooms, whether beamed or not, since they must be lighter than the walls, could have the same or nearly the same tint. This might well be a light corn yellow.
The colouring of the walls of the bedroom, bath room, and kitchen was not so important a question[20] as the decoration of the three front rooms. Utility and sanitary conditions were important things to be considered. Light tints were decided upon, which in the bedroom might be relieved, in the finishing touches, by delicate stenciled figures in some warm tone.
Interior Woodwork.—With the colour scheme settled it was a comparatively easy matter to decide what should be the general tone and character of the interior woodwork. The floors of the three front rooms, since they were to be closely associated, required the same solid colour, which could well be a walnut brown, darker than any of the walls. Fumed oak trimmings were thought desirable for the dining-room and gum wood for the living room, either of which could be extended to the hall; but ivory white for the living room and the hall, leaving the oak for the dining-room, found much favour. It was finally decided, however, to adopt for the three front rooms the combination of natural woods first suggested. The bedroom and bath room, where suggestions of cleanliness are peculiarly appropriate, were specified to be finished in white. Yellow southern pine was decided upon for the kitchen and its accessory rooms.
As soon as the chief features of design were decided upon, preparations were made for carrying them out in the actual work of building; for the house was not to be a "castle in air." The first step was to put these ideas on paper and work out the details of construction in clearly executed and accurately dimensioned drawings. These included, as the first to be used, the working drawings for the framing and other rough woodwork, blue print copies of which were to be put into the hands of the boys of the elementary vocational school, who were to carry out this part of the building plans.

The Working Drawings.—A considerable number of detailed drawings had to be made before the[22] work of construction could be wisely begun. This furnished an interesting set of problems for the mechanical drawing groups of the technical high school. The material for this work consisted of rough sketches in pencil, but with the correct dimensions as determined in the plan accepted as the result of the competition in design. These preliminary sketches required much study on the part of both boys and girls, under proper guidance, in order to find out what the elements of construction should be, what dimensions were required, and how the various parts should be put together. It was an experience of great value to all, but especially to those boys who were looking forward to architectural draughting as a possible vocation. They got an inside view of the importance, on the one hand, of accurate working drawings as a basis for good construction and, on the other hand, a practical illustration of the necessity of a thorough knowledge of constructive principles, in order to make correct working drawings. They saw that the efficient architect must be a builder, acquainted with all the detailed processes employed by the carpenter or mason, informed upon all the conditions to be met, and knowing the best ways of meeting them. They gained impressions which should [23] help them, in studying the work of great architects, to look beyond the exterior, however pleasing it may be, for those elements of strength and beauty that characterize all good workmanship.
How the Work Was Distributed.—It will be recalled that boys and girls were to be coworkers in the designing, planning, and building of the house. The boys were to be held responsible for the drawings, the decorating after designs made by the girls, and the higher grades of woodwork, including the finishing of the rooms and the making of the furniture. They were to do the wiring for the electric lights, the bells, and the interior telephones; and they were to install all the fixtures in connection with this wiring. Boys from the metal-working sections were to do the necessary piping for gas and water and some of the work of plumbing; but, since the laws regulating plumbing are strict and well enforced, as they should be, it was necessary to keep this most essential feature of the work under charge of licensed plumbers. But this requirement did not remove even the plumbing of the building from the field of public school work; for, fortunately, this city has a well-equipped plumbing school in the trades school department, under the direction of[24] licensed plumbers of high standing, who were glad to have given them, as an exercise for their classes, a practical problem in house plumbing. The boys in the forging classes were not overlooked in the distribution of the work on the house. Many of the fixtures needed for use or ornament were designed to be made in the school forge shop. The girls designed and made rugs, curtains, portières, and cushions as a part of their school work in weaving and stencilling; and they contributed many decorative articles in clay, copper, leather, and other materials. Thus every technical department of the school was brought into service; for in the building of a house there is to be found something to enlist the interest of every boy and girl.
Boy Foremen in Charge.—To bring about the right distribution of the work and to marshal the working forces effectually required the oversight and management of an experienced instructor. But much of the work of direction was delegated to competent boys. The preliminary tool work in the school shops had revealed those who were especially observant and capable as leaders, and those who worked best under specific directions. Thus the twenty boys of the vocational school who set the posts and framed the house worked sometimes [25] in pairs—one being the chief foreman and the other the helper—sometimes in gangs of three or four under a foreman. The plan was varied according to the nature of the work in hand. When leaders of more technical knowledge and skill were needed, as was the case in setting the window frames and directing the shingling, capable boys from the technical high school were placed in charge of groups of younger boys from the vocational school. In this way the work was advanced in several directions at the same time; and the advantage was not all in the advancement of the house construction. It was a delightful and profitable experience for all the boys, not unlike that which some of them will doubtless repeat when school days are over and they take their place in the more serious affairs of life. In after years they may look back upon the first house that they helped to build and recall the part they took, their companions in the work, and the good time they had withal.
Setting Batter Boards, Posts, and Sills.—The first step in actual construction was to mark off the lot and set the batter boards. These were made by driving three stakes to form a right angle about four feet from the point where each of the four main[26] corners of the house was to be located. Two rough boards, one for each side of each angle, were nailed horizontally to each of the four sets of stakes, with their upper edges all brought to the same level. It is very important to set these batter boards with accuracy, since their function is to carry the lines which mark the dimensions and level of the ground floor. In the present instance their first use was to locate the concrete posts on which the sills of the house were to rest. Twenty-two of these posts, which were 4 feet long and 8 inches square, were put in position by first setting moulds or boxes, the interior dimensions of which were those of the posts, 3 feet deep in the light soil and filling them with a mixture of concrete and crushed rock. It was not thought necessary to remove the moulds after the hardening of the concrete. In fact, the sills were framed and placed in position resting on these boxes before sufficient time had been given for the concrete to harden. The sides of the boxes, however, were scored with a saw cut so that they could be easily broken off just below the ground, exposing the projecting ends of the concrete posts for about one foot. The sills were of 6 by 8-inch first quality spruce. They were set on the 6-inch face, the two long sills being spliced over posts,[27] using a long halved joint. Mortise and tenon joints, draw-bored and pinned, were used at the corners. The floor timbers of 2 by 8-inch spruce were gained into the sills with the top faces flush with the top of the sill and crowning (i. e., bending) upward if at all. The spacing of the floor timbers was taken off at the sill on a strip of furring—spruce, 7⁄8 of an inch thick by 2 inches wide—which was moved out to the centre near the line of bridging and lightly nailed, bringing crooked timbers into line. The bridging was then nailed in, the outside last to prevent springing the sills.

Referring to the accompanying sketch (Plan A) it will be noticed that the corner posts and centres were not mortised into the sills, but were simply butted on and heavily nailed or spiked. There was a time when carpenters would have regarded such a method as altogether wrong; but those were the days of great corner posts and heavy studding, placed two or three times as far apart as is the practice now. It was thought that placing the studs 16 inches on centres, which is the common practice in modern house framing, removed the necessity of mortising into the sill. Mortising is still recognized, however, as a good thing to do and is sometimes practised by first-rate carpenters.[29] Plan A also shows how the outside walls were trussed over openings; and Plan B shows how the corners of the building were tied by the lapping of the double plate, and how the ceiling timbers and rafters were placed on the top of the plate.

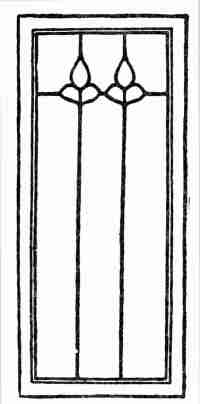
The window frame details are shown in a series of cuts (Plan C) which for the sake of completeness are drawn to show also the interior finish, not usually represented in the framing drawings. A detailed description of these features of construction is unnecessary, since the dimensions and relations of the various elements and the technical terms by which they are known are all clearly indicated in the illustrations.
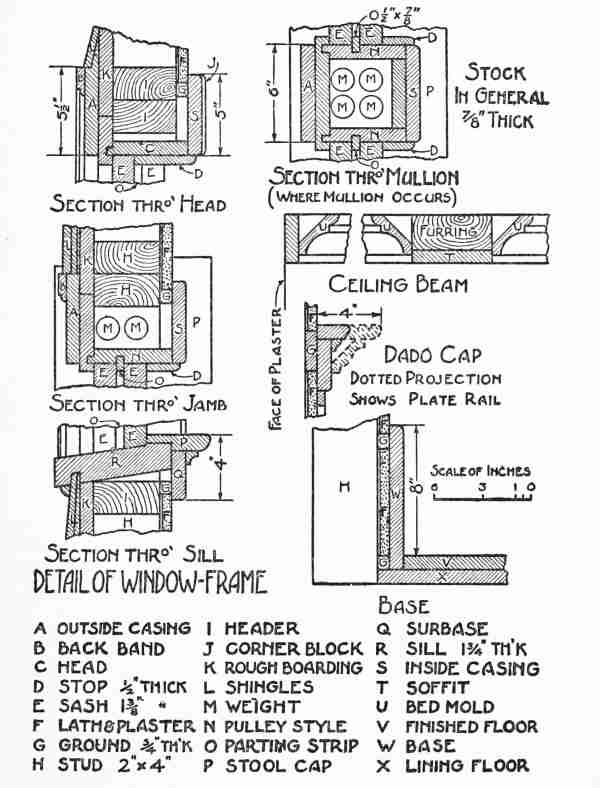
In the same series of cuts a detail of the base is shown which includes the framing, the base board, and the lath and plaster. It should be stated, however, that a substitute for lath and plaster was recommended to the student architects—a new product in paper board especially designed for walls and ceilings, which it was decided to use. The use of this material removed the necessity of the "grounds" shown in the drawings and always needed as a nailing base for the wood trim when the walls and ceilings are lathed and plastered. In the detail of the dado cap, which will be found[31] on the page of construction drawings, the dotted lines show how the cap was to be expanded into a plate rail, requiring the addition of brackets with a bed moulding between, in the finishing of the walls of the dining-room. Among these drawings will also be found a detail showing a section of the beamed ceiling finish.
It will be readily understood that none of the finishing work called for in the detailed drawings was begun until the rough carpentry on the house was practically completed. All the rough work, which included framing, boarding, shingling, laying of the lining floors, and putting up partitions, was assigned to boys of the woodworking sections of the vocational school. This is an elementary industrial or trade school, admitting from the grades below the high school boys who have attained the age of fourteen years and wish to learn some mechanical trade. It represents a new and promising experiment in American education. The building of this house furnished an excellent opportunity for the boys of this school to show the honesty of their purpose in enrolling themselves to learn the fundamentals of a trade and thus prove their right to have the chance.
So the house was built by the combined efforts[33] of the boys and girls of the public schools of this New England city, unassisted by professional architects or paid labourers. How they carried out with their own hands the designs for decorating and furnishing the house is told in the succeeding chapters of this book, which also suggests wider applications of the principles of household decoration as possible to be made in the homes of clever boys and girls throughout the country. To carry out these suggestions will mean work—but work of a kind that gives pleasure to the worker and to many others. It was work for the young designers and builders of whom this story tells, but they said it was "great fun," and there really is no pleasure quite equal to that found in doing with one's own hands an exceptionally good thing. The true craftsmen of all time have found it so. One of these master workmen, Stradivarius, the violin maker, so George Eliot tells us, made his confession thus:
Have nothing in your houses that you do not know to be useful, or believe to be beautiful—William Morris
The decorating and furnishing of a house have their true beginning in good architectural design. It is a mistake to proceed upon the theory that decoration necessarily implies something added for its own sake—something beautiful in itself but selected and applied without regard to the lines, spaces, and colours of the room in which it is to be placed and without considering the relation of this room to neighbouring rooms and to more remote surroundings. The truth is, a decorative object may or may not be intrinsically beautiful; but however beautiful it may be in itself, it finds its truest beauty in an appropriate setting. And the decorator who is actuated by the true spirit looks to the architect for inspiration and finds his greatest successes in acknowledging that leadership. To attempt to[35] lead when one should follow is neither good art nor good sense.
There is danger, perhaps, that this truth may be taken too seriously. It would also be a mistake to run to the other extreme and adopt at the outset a rigid plan of decoration and furnishing, specified like contract work to be carried out and completed on a certain date soon after the house is built. The problem is one of growing interest, especially as regards furniture, pictures, and the smaller objects of use or beauty, and for its best and happiest solution requires time and study. Only the broad and fundamental features can be settled in advance. The important thing is to have the main lines, dimensions, space relations, and colour schemes settled with due regard to utility and appropriateness and, as the work of construction proceeds, to keep all details in harmony with this general plan.
Colour Harmony in the Model House.—It will be remembered that the colour scheme of the hall, living room, and dining-room of our model house was settled quite early in the development of the design. Standing near the centre of the living room and looking through the hall into the dining-room,[36] one may see at a glance how some of the details of decoration were worked out in keeping with the general treatment. The walnut brown stain of the floors gives a good foundation of colour. It flows easily into the lighter browns and yellows of all the lower wall spaces. The suggestion of olive green in the frieze of the living room offers a pleasing contrast with the prevailing browns and harmonizes well with the woodwork of this room, which, it will be remembered, was designed to be finished in gum wood. This beautiful wood, when properly treated, presents a surface of satin-like texture and soft colour tone. In the dining-room a corner of which is shown in the frontispiece, the frieze lends a warmth of colour where it is needed and is in keeping with the fumed oak trim. The wide openings into the hall from the rooms on each side of it, together with the long, unbroken lines of the beamed ceilings, give the impression of generous width. The plain wall spaces, though varied in tone and relieved of monotonous spacings by the location of the necessary doors and windows, are of great assistance in increasing the apparent size of the room. Plain walls are also the best of backgrounds for pictures.[37] Redecorating Old Houses.—It is, of course, true that the decorating and furnishing of a house or an apartment cannot always have a new and original architectural design as the basis for the solution of the problems involved. As a matter of fact, in the great majority of cases, the houses in which homes are made are already built and have been previously occupied. Often they are very old houses, presenting difficult and even impossible tasks for the decorator. Sometimes, however, such houses are all the more desirable if they bear the marks of age that suggest a past of dignity and charm. But the spirit which inspires the artist in decorating and furnishing a house already built is the same as that which controls his thought when he can begin with the foundation of a new and original design. His first thought is to discover how beauty may be enhanced and at the same time unity of purpose and harmony of treatment be preserved. His constant care is to avoid incongruous elements, however beautiful they may be in themselves or however appropriate in other houses. His general aim is to use his art to develop the design as it is, if there be any design at all, and make the most of it.
Decoration as a Corrective.—But this does not[38] prevent him from attempting to counteract the blunders of faulty design and bad architecture. Such correction, indeed, forms a large part of the work of decorators and furnishers, both professional and amateur. If the lines and space divisions of a room be not good, the decoration must be planned with a view to giving the needed harmony of proportions, or at least the appearance of it. If the ceiling be too high, it may be made to "look" lower by carrying the ceiling paper or tinting one or two feet down the walls of the room to meet the picture moulding. The effect of reduced height is accentuated by a high base board or by wainscoting. If the ceiling be too low, the depressing effect may be largely overcome by extending the picture moulding along the top of the wall spaces close to the ceiling. This is a desirable thing to do in the living rooms of most modern houses. Striped wall papers of proper tones may be used in low rooms with good effect in increasing their apparent height. Bad wall spacing may also be corrected by enlarging door-ways, substituting portières for the doors, and by arranging the drapery over windows to give the effect either of increasing or of diminishing their height, as the conditions may require.[39] Wall Papers.—Probably no element of decoration furnishes so many pitfalls to ensnare the unwary as wall papers do. It is easy to fall a victim to a captivating design as it appears in the few square feet of wall paper displayed on the dealer's rack. The same interesting figure, spread out in endless repetition on the four walls of the living room, may create an atmosphere of unrest and positive discomfort keenly felt by sensitive persons. A wise choice cannot be made in the absence of all the conditions that should really determine it. After all, it is not the paper which is beautiful in the roll that should be selected, but only that which will become beautiful when hung upon the walls of a certain room. Papers with large figures should be avoided unless there is a special reason for using them. They always have the effect of reducing the apparent size of everything associated with them. They make a small room appear dwarfish and a large one over decorated unless well relieved by plain spaces harmonizing in colour with the large-figured patterns. Strong contrasts in colour values should also be avoided, not only between the designs and the ground colour of the wall paper itself, but also between the paper and other objects of[40] importance in the room. The principle of gradation in colour values, which does not as a general thing allow the placing together of light and dark shades or tints, is almost as important as harmony of colour tones.
Nature of Decorative Design.—The one fact never to be lost sight of by the decorator is the real nature of true decorative design. It is never a picture. While it may suggest the natural forms of plants or animals, it does not aim to represent them in a naturalistic way. Some of the best decorative designs do not even suggest natural forms; but, whether they do or not, the central idea is the repetition of good combinations of line and form in closely related colours and values on a flat surface. If natural forms are used, they should be more or less highly conventionalized. Anything that destroys the idea of flat surfaces in the same plane is a false note in wall decoration. In the nature of the case, a wall can have but one plane. Clusters of flowers or patterns of any kind that seem to hang in front of this plane, or back of it, are out of place and therefore offend the sense of fitness. Such incongruities are sometimes so pronounced that they positively shock the sensibilities of refined people. Extreme examples[41] have been known to give such pain to sensitive persons as to drive them from the room.
Advantage of Plain Walls.—Decorative designs, however, are not essential in wall papers. The main point in the treatment of walls is to secure and preserve a good background. If one is in doubt as to the kind of figure or pattern to be used, which is often a perplexing question, it is well to leave them out altogether. Plain walls are always good if the colour tone is right; for colour is the main thing in wall decoration. The decorative effects of form may be brought out in the portières and window draperies, which may easily carry more elaborate patterns when associated with plain walls than is desirable with figured wall decorations. In fact, with figured walls plain portières and curtains are much to be preferred. In our model house, as has been explained, the wall decorations were designed to offer a plain background of colour. The figured borders of the portières and curtains, combined with the careful gradation in the colouring of the floors, wall spaces, and ceiling, gave such a variety of tone to this background that nothing further was needed to avoid monotony.
Trial Needed in Doubtful Cases.—It is, indeed,[42] a good rule to omit whatever is unnecessary. To observe this rule wisely is to escape much that is positively bad in decoration. Overwrought designs, too great variety in decorative material, too many decorative objects, however great their individual beauty, too many odd pieces of furniture, too many interesting things in whatever direction one may turn, create an oppressive and disquieting atmosphere and a feeling of unrest which it should always be the aim of home decoration to dispel. And yet it may not always be best to set aside our treasures because they do not seem perfectly suited to the general scheme of decoration or are not apparently needed to complete it. It is, in fact, often very difficult to determine where the line should be drawn between what is needed and what is not needed. The fact that nothing seems to be lacking is not a final test if one has at hand useful or beautiful things that may be introduced into a scheme of decoration already well thought out and be given a trial. Such experimenting will often reveal unsuspected needs or add a new charm that at once proves its right to be retained.
To take a step like this, somewhat out of line with accepted rules as strictly interpreted, is entirely[43] safe if this step is dictated by good taste and does not lead the young decorator too far afield. Exceptional treatment of any kind should show proper restraint, and such restraint, when it is plainly indicated in any work of art, is in itself an attractive feature.
Precise Rules not Always Practicable.—The truth is, the rules of decoration, though founded upon fundamental principles of art, are not rules of precision like those founded upon mathematical principles. In the nature of the case they must in their application yield more or less to circumstances. It is, for example, a good general rule to determine the colour scheme and background first and accommodate other decorative features to these as a foundation; and yet it is possible for a situation to be so exceptional as to justify a complete reversal of this rule. Here is a concrete case. A young artist was the fortunate possessor of a considerable number of Japanese and Chinese embroideries and other Oriental ornaments. He wished to make these the main decorative materials for one of his rooms. The embroidered figures were in yellow and white on a deep, strong blue, the general effect being quite dark. There were in the collection several[44] prints, showing the typical dull reds, dark blues, and yellows of Japanese art. Now the room itself happened to be one that, under the general principle of colour schemes as determined by exposure and other fixed conditions, would demand warm colours on its walls. It would easily support a rich red frieze with appropriate combinations in floor, dado, and ceiling. This would set off well the dark oak trim and the mahogany furniture, but it would rule out the Oriental decorations. One or the other must give way; and, since the value of these decorative materials was beyond question, it was decided to try them, even at the cost of setting aside the general rule. The whole matter resolved itself into selecting a proper background for these beautiful pictures and embroideries; and for these the best colour was a gray blue—the coldest of colours. But when the whole decorative scheme was carried out to completion and the cold background was fully employed in setting off the rich colours and exquisite workmanship of the Oriental prints and draperies, all the circumstances that ordinarily determine the choice of backgrounds were forgotten in the charm of originality. No one thought of the exposure as requiring warm colours, the dark[45] oak trim was not noticed, and the mahogany furniture was still in keeping. The result was so absolutely satisfying that no one who saw it could question the good taste displayed in this very original plan of decoration.
But such exceptional cases should not shake our confidence in the fundamental principles of decoration. It is true that these principles cannot be reduced to formulas to be applied invariably in all cases, and it is unreasonable to assume that any form of treatment is the only one possible in any given case. Modifications in the application of these principles are always possible, but the principles themselves are as unalterable as the Mosaic law. One is, indeed, tempted to summarize them thus as the
Thou shalt have no household gods except those that be beautiful or those that be useful.
Thou shalt not make unto thyself any likeness that is in the heaven above or in the earth beneath, or in the waters under the earth, that does not find an appropriate setting in thine house.
Thou shalt not look in vain upon the creations of the great masters of decorative art.
Remember the colour scheme and keep a good background.
Honour the original design, however old it may be, and make the most of it.[46] Thou shalt not hesitate to correct the blunders of faulty design and bad architecture.
Thou shalt not kill thy neighbours or thy friends with over-decorated wall papers or oppressive decorations of any kind.
Thou shalt not bring together incongruous articles nor permit insane arrangements of anything that is thine.
Thou shalt not permit any false note to mar the harmony of thy decorations.
Thou shalt not imitate thy neighbour's house or anything that is thy neighbour's, for it is the glory of the good decorator to show originality but at the same time to acknowledge his dependence upon those who have preceded him.
Relation of Furniture to Decoration.—So much for the treatment of floors, walls, and ceilings. We may now turn to the more special consideration of those objects of use or beauty that are to be associated with these backgrounds—furniture, pictures, lamp shades, and small ornaments. That these are closely related to decoration has been implied in all that has been said. They are, in fact, in themselves elements in the decorative scheme and as such must obey the same laws. Their value, however, depends more or less upon their utility, and for this reason they seem to require consideration somewhat apart from their merely decorative functions. This is especially true of furniture, which would have[47] very little reason for being if it were not for its usefulness.
In designing the furniture for the model house the questions that constantly suggested themselves were: What is this piece of furniture under consideration to be used for? What form, construction, and finish will enable it to give the best service? What features of design are needed to render it suited to its surroundings? In considering the furniture for the model house it was most natural to apply these tests to the various rooms in order.
Hall of the Model House.—First, there is the hall. This is the room into which a visitor is first admitted, and from its atmosphere he gets his first impressions. But in this house it is a very small room and designed to serve not merely[48] as a place for the formalities of welcome but also as an expansion of the rooms on either side. Its furniture must consist largely of the fireplace. There is no room for a hall settle nor even for a chair. A mirror, simply but richly framed, might hang on the wall near the front door, balanced by a picture on the opposite wall behind the door. An umbrella rack should stand outside on the porch.
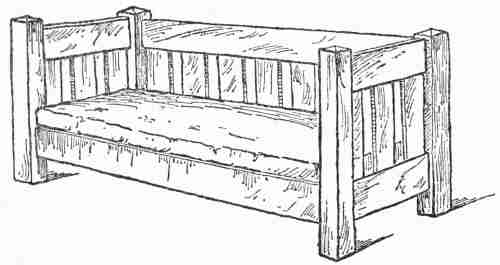
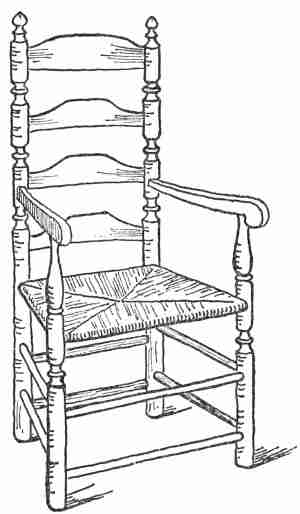
Hall Furniture in General.—The halls of modern houses vary greatly in their relative importance. In some the traditions of the old English manor houses seem partially to survive. In mediæval England the hall was the principal room, if not the only one comfortably furnished. When modern houses combine the living room and[49] library or reception room with the hall, there is need of something more than hall furniture of the formal kind. The requirements of comfort must be met. But, generally speaking, hall furniture is of little real use. Odd chairs, attractive by reason of their oddity, the richness of the materials used in their construction, or some other assertive quality, but not fit to sit in, are suitable or at least excusable in the hall. The hat and coat rack of our fathers has been declared insane and no longer appears in well-regulated houses. In place of it is found the hall settle, which is of real use. It should be designed on simple lines and give the impression of strength and dignity. If the hall is to be used as a waiting room for guests, a few good chairs, conveniently placed, will be needed for[50] their comfort and a choice picture or two on the walls will add greatly to their pleasure.
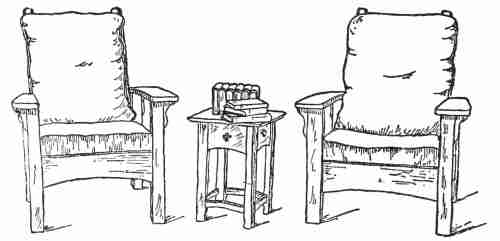
Living Room Furniture.—In furnishing living rooms there is bound to be a wide range for the exercise of good taste because of the variety of needs to be met and the large facilities afforded in the markets for meeting these needs with due regard to artistic requirements. It will be quite impossible to go into detail in discussing so large a topic. The important thing is to keep in mind the central idea of a living room—the place of all places where[51] the freedom, comfort, and protection of home life are to be enjoyed. The very atmosphere of the room should suggest simplicity, sincerity, and good cheer. Every article of furniture should be there to serve a genuine need, and it should be strong enough to do its full duty. Spider-legged, top-heavy tables; light, weak chairs; chairs on casters or rockers; sofas with carved backs or couches with none at all,—these have no place in the living room. The long, straight lines of the craftsman or mission style of furniture are in the right direction; but if these be used at all they must be made quite general, since few other styles harmonize with them. Wicker or reed furniture[52] is a notable exception. When well designed it will fit in almost anywhere.
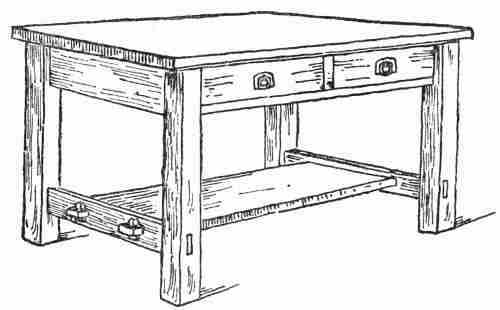
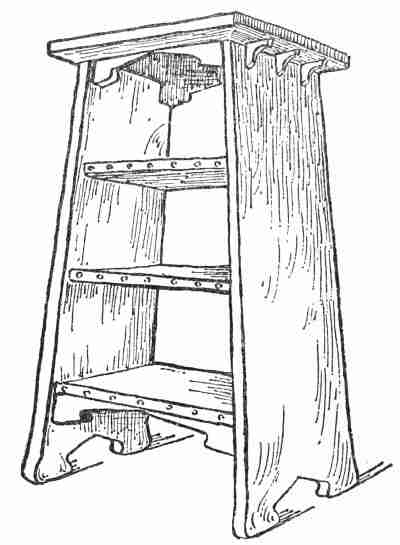
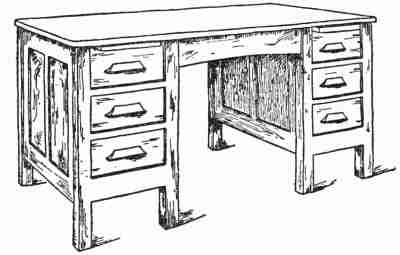
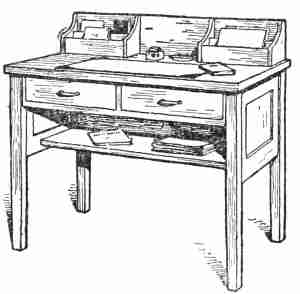
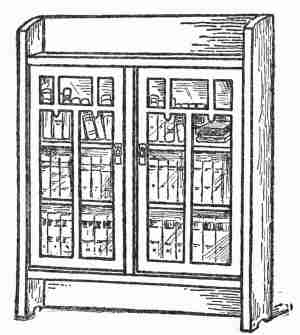
The frequent combination of the library with the living room requires a suitable adjustment of the furniture to this use. A plain, serviceable magazine rack, which may be easily made, will relieve the tables of an accumulation of weeklies and monthlies. Moderately low bookcases, with[53] or without doors, are to be preferred to the more ordinary high ones because this form harmonizes better with the lines of a room, which are generally longer horizontally than vertically. If doors are used, it is well to break up the glare of the glass by heavy sash, the spacing of which may be arranged in a very pleasing manner. Good design in library tables calls for ample size. Firmness and convenience as well as satisfactory proportions should control the choice of a writing desk.
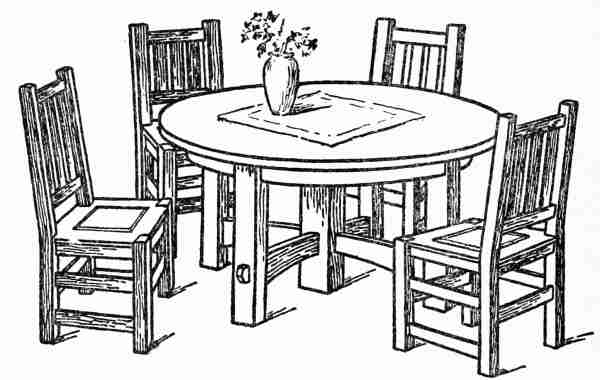
Dining-room Furniture. Only a few elements[54] enter into the design for the furnishing of a dining-room; but they are evident and should have a controlling influence. The table and chairs are for a definite purpose and this should show itself in good design. Heavy construction is permissible since the chairs are to be moved but little and the table is practically stationary. Moreover, weight and generous dimensions are suggestive of bounty and good service. The rectangular extension table is most readily adjusted to varied demands, but the round table is preferable for the family circle; and for a company of twelve or fifteen a large, round, temporary table top, placed on an ordinary extension table, has been found very attractive.
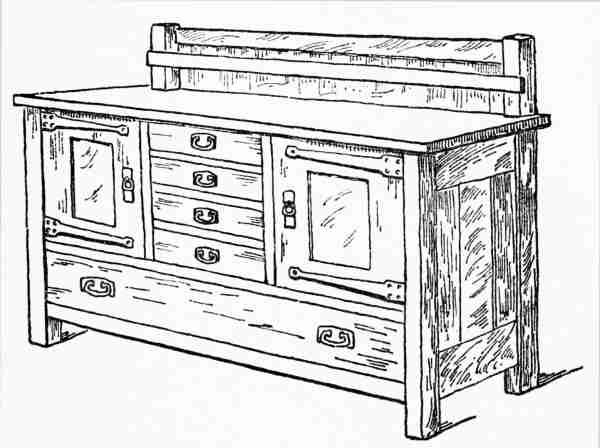
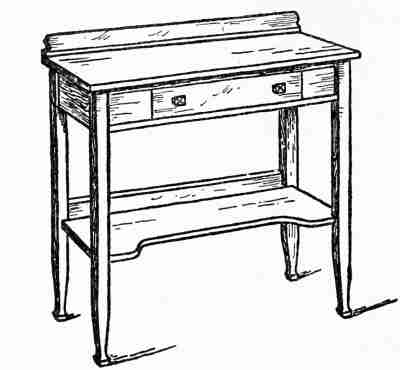
As comfort is the chief result to be obtained in furnishing a living room, so richness, within one's means, is an appropriate aim in furnishing a dining-room. The history of sideboard design might be cited in proof of this statement, if proof were needed. Probably no single article of furniture has been subjected to greater elaboration; but the desirable suggestion of plenty with convenience may be secured without overdoing it. The unique purpose of the sideboard makes it an interesting study for one who wishes to design and[56] construct his own in conformity with the architecture of his dining-room. The buffet or serving table furnishes an equally interesting, though simpler, problem.
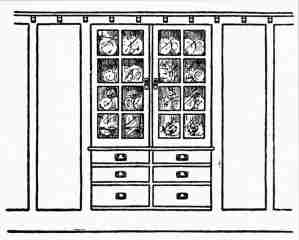
For the care of the china, the built-in cabinet as a feature of the architecture of the room is to be preferred to the movable cabinet designed for this purpose, because of its richer decorative possibilities. Large, glazed doors are desirable in either case, not for the full display of china and glassware but to give a suggestive glimpse of it. As this cabinet is for decoration and not for show, it is well to avoid plain glass doors unbroken by sash. Leaded panes[57] are frequently employed with good effect. The decorative effect of old and odd pieces of china—not too many of them—is most appropriately employed by the use of the plate rail; but it is better to leave the plate rail bare than to load it with commonplace crockery and inappropriate ornaments.
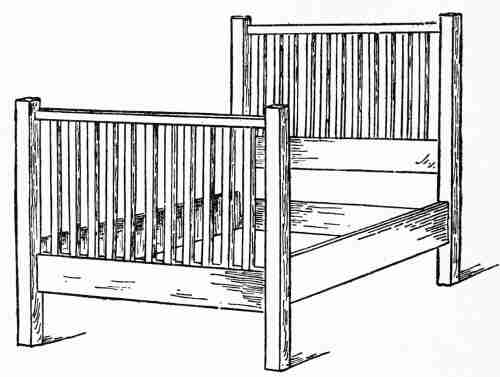
Chamber Furniture.—The bedroom speaks for itself. A dainty freshness in all its appointments is conducive to sleep and rest, which it is the distinctive purpose of this room to provide. The necessary articles of furniture are a bed, a dressing table, a bureau or chiffonier, a few chairs, and, if there be no bath room attached, a commode or wash stand. A couch is an appropriate addition;[58] and here, if anywhere, rocking chairs are allowable. When the bedroom must be used more or less as a living room or sewing room, as it too often unfortunately is, furniture to serve such uses must be provided. In selecting or designing all this furniture, lightness, and simplicity of design, combined with strength, should be allowed a controlling influence. The recognition of this idea has given great popularity to the brass or iron beds; but it is possible to design and construct beds of oak, maple, or other woods that harmonize with the rest of the furniture, carry out the idea of daintiness, and have sufficient strength for service.
Many of these suggestions on furniture design are being carried out in fitting up the model house described in our introductory chapter. A small house like this, limited to one story, does not permit great variety in its furnishings. Certain standard conditions, however, were to be met here, as everywhere else, and the young designers found[59] much pleasure and great profit in working out the furniture problems. Some of the construction details will be given in the later chapters.

Arrangement Follows Selection.—The problem of furnishing a home is not fully settled when the questions of design have been answered and the right selections made. After selection comes arrangement, or, to speak more accurately, after a certain amount of selection a certain amount of arrangement; for, as has already been suggested, there is considerable dependence of one upon the other. It is not wise to drop the arrangement till the selection is complete, for the simple reason that the happiest choices are often the late ones, determined by the disposition of the earlier ones. And yet in the main the order as stated is the true one. It should be noted, too, that in arrangement[60] there is a larger field for the exercise of individuality and taste. While artistic principles still hold sway, they yield more readily to exceptional interpretation by the ruling spirit of the household, to the demands of style, and to the larger number of possibilities for pleasing effects when the question is one of the arrangement of things already well chosen for their usefulness and for their artistic value.
Utility the Controlling Principle.—The problems of arrangement, however, are by no means vague and uncertain. The natural law of adaptation[61] to purpose is not difficult to follow. In some rooms obedience to it has become a settled custom. No one, for example, would think of placing the dining table in any other place than the centre of the dining-room or, if the room be a long one, in the centre of one end. The sideboard, serving table, and china closet likewise fall into their natural places. So also the bedroom and the hall, though perhaps to a less degree, present comparatively easy problems in furniture arrangement when due regard is paid to the purposes for which such rooms are designed.
Importance of Appropriateness.—But it is in the library and the living room that we find the most difficult and at the same time the most interesting problems. And this is due to the operation of the same law of adaptation to purpose. It is the variety of uses and the diversity of useful objects that make the problem somewhat complex. However refined and beautiful the different units may be, there must be some arrangement of them into working groups. The important elements should dominate and those of lesser importance should fall naturally into related but subordinate places. The easy corner with its couch, pillows, and its low seats, has a definite function to perform. So[62] also have the piano and the music rack, the bookcases and library table, the Morris chairs and tabourettes, the window seats and screens, the writing desk and its proper lighting by window or lamp, the fireplace and all the accessories of comfort that may belong to it. The various centres of interest should be accentuated by grouping around them the most appropriate furnishings and the most suggestive decorative features. It may be well to add one word of caution, and that is that a proper balance should be maintained between the various centres of arrangement in order that no part of the room may seem neglected and bare.
The Danger of Overcrowding.—Finally, the one great danger to be avoided in meeting the requirements of good arrangement is the temptation to overcrowding. Many otherwise excellently appointed living rooms suffer from an embarrassment of riches. Such overcrowded rooms are worse than an overloaded ship because they cannot topple over and sink as one might well wish them to. To secure the right things and just enough of them, arranged with a proper balance between utility and beauty, is the true aim. It is as true to-day as it ever was in the arrangement and beautifying of the home, and, for that matter, in[63] everything that concerns every-day life—just as true as it was in ancient times when men wrote those famous inscriptions over the doors of the temple at Delphi: over one, know thyself, and over the other, the golden mean of not too much.
I now require this of all pictures, that they domesticate me, not that they dazzle me. Pictures must not be too picturesque. Nothing astonishes men so much as common sense and plain dealing. All great actions have been simple, and all great pictures are.—Ralph Waldo Emerson
The decoration of a room is generally not complete without pictures. There is, of course, great value in good pictures entirely aside from their decorative effect; and too great care cannot be exercised in their selection. But our present purpose is to consider them as decorative features; for, though a decoration is not a picture, pictures themselves are properly regarded as important elements in the general scheme of decoration. And this is especially true as regards matting and framing, the distribution of pictures upon the wall spaces, and the method of hanging them.
Importance of Space Relations.—A picture mat and frame are simply elements of finish, and their function is to give the picture a certain individuality[65] and yet connect it harmoniously with the space in which it hangs. In fact, the wall space is a part of the framing of the picture. The importance of giving some study to the relations of all the spaces involved is evident. The mat and the frame should not be of equal width. Here is a fine opportunity to secure variety in spacing. No definite rules can be given; sometimes the one, sometimes the other should give way. Generally speaking, tall wall spaces require vertical pictures, and spaces longer horizontally demand horizontal pictures. But variation from this rule is possible and even necessary through the grouping of several pictures. In grouping, however, there is danger of being tempted to allow too many pictures. In the houses of the well-to-do, and even in the homes of those of moderate means, too many pictures, rather than too few, are often found. The example of one New England home, known to the author, may be mentioned. The house is new, of generous proportions, and it is the home of an artist. There are few pictures on the walls, but they are distributed with rare artistic effect. There are many good pictures stored in the attic because there is no suitable space in which to hang them.
The Japanese Way.—The Japanese have taught[66] us many valuable lessons in art, and in the matter of the number of pictures to be displayed they have a very interesting lesson to teach. It is their practice to hang a single choice picture for a season in a space where it may be best enjoyed, and then after a time to replace it with another picture, and this, perhaps, by another if circumstances permit. There are many conditions that determine the selection of the picture to be displayed. It may be the preference of a guest, or it may be the season of the year, or, in fact, any occasion that may give a certain picture special significance. There is, in this singular custom, a very definite service which the picture is made to perform, and it is given an individuality which perhaps has no parallel in our own practice.
Grouping of Small, Simple Pictures.—If a considerable number of pictures are grouped together, it is quite essential that all the pictures of the group should be of similar character and tone and similarly framed. It is hardly possible for them to be all of the same size, nor, indeed, is such agreement desirable except in so far as is required to give proper balance to the group. Small pictures in light frames are, of course, the most desirable for such grouping, and if possible there should be[67] an evident reason for the grouping. A series of photographs of a certain locality, for example, might form a group of four or five or even more pictures so that they could be easily seen together and so more thoroughly enjoyed. A collection of photographs in passe-partout bindings, especially if they deal with subjects in any way related, may form an attractive group. But pictures of any considerable size or those having decided individuality are generally not suited to any plan of grouping. They should appear by themselves, in frames and other surroundings which accentuate their peculiar merits.
The Kind of Frame.—The material of the frame, its colour, and the colour of the mat are determined by the tone of the picture. Oil paintings easily support gilt frames and should be hung in good light. Pictures of light values with white mats are well finished in narrow gilt frames. Carbon photographs and other pictures of dull tones, are appropriately framed in wood of dark or medium colour, and appear best when hung against a dark wall. The truth of these statements will hardly be questioned by any one who has a good sense of colour harmony. But there are many other elements that enter into a concrete problem of picture[68] framing that cannot be brought under general rules or formulas. It is generally best to depend largely upon the tests of trial. In framing and hanging pictures, as in many other things, observation and experience are the best teachers. Some suggestions may be found in the following record of two actual framing problems that were satisfactorily solved.
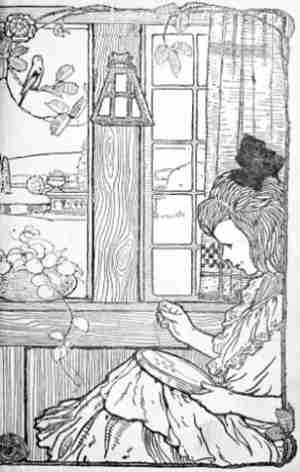
The conditions which had to be met in this problem are plainly shown in the framed picture as it hangs on the wall. The picture itself is a small one, 8 inches wide and 13 inches long. It is interesting because of its representation of a sewing room in one of the high-class homes of the colonial period. The mistress and her two young daughters are engaged in sewing and embroidery. Patterns are displayed upon the wall; the furniture is appropriate and evidently an example of the best of the period. All these details are suggestive of the delightful home life of our grandmothers.
Such a picture needs a mat to give it depth and to properly emphasize its details; and it requires a simple, narrow frame. The mat was accordingly made 21⁄2 inches wide and the frame 1 inch wide. The tone of the mat selected was a light bluish[69] gray, forming a good connecting link between the bright colours of the picture and the gray of the wall against which it was to be placed. Since it was to hang directly over a fine old mahogany table, it was thought fitting to give the frame a mahogany finish, connecting the furniture shown in the picture with that of the room.
The frame was made with mitred corners of perfectly plain, square-edged birch, which readily takes a mahogany finish. The stain was first applied with a brush, rubbed in, and allowed to dry. A surfacing coat of shellac, coloured to match the stain, was next put on, allowed to dry, and then carefully sand-papered, special care being taken to guard against rounding the edges and corners. A coat of varnish was next applied, which, after hardening for one week, was rubbed first with pumice stone and oil and finally with rotten stone and oil. A final coat of thin finishing varnish was then put on, which was lightly rubbed with rotten stone and water to give the half dull effect required to match the antique mahogany table.
The picture is a copy in sepia tones of Murillo's Saint Anthony, 16 inches in height by 20 inches[70] horizontally. The frame is made of quartered oak 3 inches wide, slightly convex but smooth; and it is well joined with mitred corners. A picture of this character needs no mat. Indeed, it would have been the height of presumption to strive to accentuate a masterpiece of such highly idealistic meaning and treatment. It must be left to itself as much as possible. The dimensions of the frame are therefore determined by the size of the picture itself.
The picture hangs against a light gray wall in good light, somewhat apart from other pictures. It was a happy thought thus to recognize its dignity. It was given further distinction by finishing the oak frame so that it should not associate itself with the other woodwork in the room. Since the room in which the picture was to hang has a light ash trim and most of the furniture a mahogany finish, this requirement was easily met.
But there are many ways of finishing a frame to avoid too close association with the commonplace that would have been anything but appropriate to such a picture as this. A gilt surface, a silver-gray tone, or a highly polished golden oak are possible blunders. Nothing should be done to call attention to the frame of any picture, least[71] of all to one of such spiritual feeling as this one. The frame should seem to be a part of the picture, repeating its prevailing tones with a richness in keeping with the composition of the picture itself. The colour should be a rich, dark brown, but not so dark as to obscure the figure of the wood. The finish should be dull, but soft and smooth.
There are several brown stains which, properly applied, would give the desired effect. For the colour it was thought best to rely upon Van Dyke brown, which may be used either with alcohol or turpentine. It is not desirable to use a water stain in a case like this because it would raise the grain, necessitating sand-papering, which should be avoided as much as possible on picture frames in order to keep the edges and corners intact. Ammonia fuming preserves the figure of the wood better than any other form of staining, but it was thought that the oak might not take on a tone dark enough to meet the requirements. It was decided, however, to try the fuming method and to tone up with a thin coat of stain if the effect proved to be not sufficiently dark. The ammonia process resulted in a rich, soft surface, but in a colour too light. A thin Van Dyke brown alcohol stain was therefore[72] applied and when dry this was followed by a very thin coat of shellac—mostly alcohol—coloured to match the stain. This was to fill partially the grain of the wood. Finally, it was thoroughly coated with wax finish and well rubbed to restore the soft, satin-like surface.
Framing pictures in passe-partout binding is one of the little arts of home decoration, though it is by no means an unimportant one. It is easy to learn and it involves small expense in time and money, but it furnishes a means of preserving many pictures of real worth in themselves or of value to their owners because of pleasant associations; and it is in itself a delightful occupation. It offers the same chances for artistic effects in[73] colour harmony and contrasts, in spacing, and in the arrangements for hanging that the more difficult methods of framing do, with the added advantage that one need not be deterred by the question of expense from discarding an unsuccessful result and trying again.
Varieties of Binding.—Passe-partout binding is made in a great variety of colours. It costs from ten to twenty cents per roll of twelve yards, according to colour and quality, and it may be purchased of dealers in artists' supplies. For general use the ordinary width of binding—7⁄8 of an inch—is required; but extra narrow widths are supplied when it is desired to add a margin of a contrasting colour. For these margins the gold and silver narrow bindings are, with certain pictures, very effective; but white and other light colours are often used for this purpose.
Artistic Colour Effects.—The choice of the colour for the principal binding should be controlled mainly by the tone of the picture, with which, as a general thing, it should blend. If no mat be used, more or less of a contrast in colour between the picture and the binding is permissible; but the most artistic effects are obtained when mats are used. These should, of course, be in harmony with the[74] colour tones and general character of the picture. It may be a harmony of agreement if there is a border of light tone between the picture and the mat, as illustrated in the accompanying drawing. Without such a border it will be necessary to show a pleasing contrast of tone. But in almost all cases when a mat is used the outer binding should repeat the predominant colour or some other prominent characteristic of the picture. For example, if it be a picture of an English hunting scene with mounted sportsmen in red coats, the mat may be of a light greenish hue and the binding red. If it be a landscape photograph in sepia tones, a white or light coffee-coloured mat with a dark brown binding is a good combination. A Scotch scene is appropriately framed in a plaid binding. In this case it is the subject of the picture rather than the colour that suggests the binding. But in all cases opportunity is offered for carefully selecting the colour combinations, planning the spacing, and arranging the grouping of pictures of like character. Thus one of the simplest of decorative processes presents large artistic possibilities.
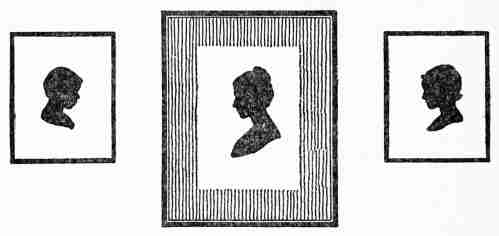
An Actual Problem.—The various steps in the process of framing a picture in passe-partout binding may perhaps be best understood by giving[75] an example of it. The actual problem is to frame a silhouette—an original drawing in black India ink on light gray paper, 8 by 10 inches in size, with the longer dimension vertical.
Materials and Tools.—The materials and tools required are as follows: A piece of glass the size of the picture (8 by 10 inches), since no border is needed; two pieces of thin pasteboard, which may be cut from an old box cover, the same size as the glass; a generous yard of black passe-partout binding; two passe-partout rings, which cost five cents per dozen; a little photographers' paste; a sharp knife or a pair of scissors; and an awl or a pointed nail.
The Process.—With these materials in hand it will require scarcely more than twenty minutes to complete the work. The first step is the setting of the rings. This is accomplished by punching two small holes in one of the pieces of pasteboard two inches from the edge chosen for the top and about one inch from each side. Through these holes the points of the rings are pushed until the ring is close to the pasteboard. Bending the points over in opposite directions fastens the ring firmly. This is a comparatively large picture. Had it been small—say 4 by 5 inches or smaller—only one ring in[76] the centre, fastened about 11⁄2 inches from the edge, would have been needed.
The picture is now mounted on the second piece of pasteboard by fastening it at the upper corners with a little paste. It is desirable to use as little paste as possible. The two pieces of pasteboard are then brought together, care being taken that the rings are on the outside, and the glass laid over the picture. These parts are now ready to be bound together. The sides are bound first. This is done by cutting two pieces of the binding 1⁄4 of an inch longer than the short edges of the picture, wetting the gummed side and laying it along the edge of the glass so that it will lap 1⁄4 of an inch over the face of the glass. Each end of this binding will extend 1⁄8 of an inch beyond the glass. The rest of the binding is now folded over upon the pasteboard back, taking pains to draw it down close to the edge of the glass and pasteboard before it is permanently fastened. The 1⁄8 of an inch that projects at each end is then folded over the corner and pressed down as close as possible to the edge of the glass and pasteboard. The upper and lower edges are bound in the same way, excepting that the pieces of binding are first cut the same length as the edges over which they are to be pasted, and,[77] before they are pasted on, the two corners on the side to be pasted to the glass are cut off 1⁄4 of an inch back at an angle of 45 degrees, and the other corners are also trimmed back to about 1⁄8 of an inch. The accompanying drawing shows more clearly how these binding strips are trimmed. The purpose of it is evident; for when the strips are pasted over the top and bottom edges of the glass, it is seen that they have been cut to give the appearance of mitred corners, and that when folded over the edges upon the back of the pasteboard no rough edges of binding are left exposed at the corners.

One of the lessons of experience in this work is that it is well to take great pains in centring the binding strips accurately before pasting them on, as they do not stick well if the attempt is made to correct a mistake by removing the binding and pasting it on again.[78] The more elaborate passe-partouts, requiring mats, borders, and double bindings, are scarcely more difficult than the simple example just described, though they will require more time. It is well to begin with the easier problems. When borders and double bindings are used the narrow passe-partout strips are pasted on first, with proper care to cut the mitres correctly and to centre the strips accurately before pasting them down upon the glass. The edges are bound last. This partly covers the brighter-coloured strips previously pasted along the edge of the glass, and leaves a narrow line of colour exposed as a border just inside the binding.
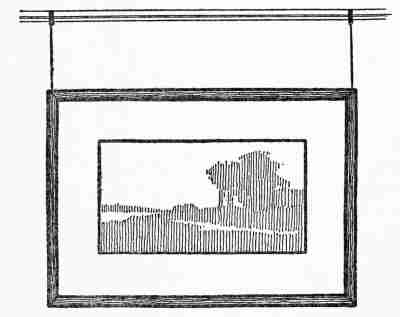
How to Hang Pictures.—If wire be used for hanging pictures, it should be as small and inconspicuous as possible. In place of the braided steel wire, which may be needed for large pictures, a single brass or copper wire is much to be preferred for those of lighter weight. In all cases where the wire shows it should appear as two vertical lines against the wall and not as a single wire bent over a single hook in the form of an inverted V, so commonly seen and so manifestly failing to conform with any[79] lines of a room. Levelling the picture may be easily managed by using only one wire, making it continuous through the screw eyes on the back of the picture. These screw eyes should be placed near the top of the frame—about one sixth the whole vertical width of the picture from the top—so that the picture may hang nearly flat against the wall. Whenever possible, however, pictures should be hung without showing the wire at all. This may be easily managed without seriously marring the finish of some rooms by driving two fine finishing nails in the part of the lower wall which is to come directly behind the top of the picture, allowing them to project about 1⁄2 of an[80] inch and bending them up a little with a pair of pliers so that the wires will not slip off. Choice, small pictures may be hung in this way on fine upholstery tacks. It is often possible, when the wire must be exposed, to stop it just below the dado cap and thus avoid showing the wire over the frieze. Whenever it is necessary, as it often is, to suspend wires by means of the so-called picture hooks from a picture moulding or cornice strip placed above the frieze, some attention should be paid to the colour of these hooks. Bright metal hooks showing over a delicately coloured moulding are in bad taste. Some people prefer to use the inverted V suspension in order to reduce the number of these picture hooks. But it is far better to retain the straight, fine, and nearly invisible wires and colour the hooks to make them less conspicuous.
In determining the height of pictures it is only necessary to remember that they are placed upon the walls to be enjoyed. While monotony in height is to be avoided, the average eye level should not be disregarded. The frontispiece illustrates an effective placing of a picture in the dining-room of the model house.
Formerly when the furniture, pictures, and draperies had been arranged in our rooms, with perhaps a few pieces of bric-à-brac, we considered their decoration quite complete. But we have learned how much cheerfulness a few simple flowers, properly arranged, impart to the same rooms; and so flowers have come to be considered as almost essential to the complete decoration of the home.
A Lesson From the Japanese.—If we have learned much from the Japanese in regard to the arrangement and hanging of pictures, from them we have learned more about the artistic arrangement of flowers. They have taught us to value the stem[82] and leaves of the flower as essential to an artistic arrangement, that flowers of the same kind should be grouped together, and that harmony and blending of colour are necessary to secure the most artistic effects.
Flowers of a Kind Grouped Together.—We may have been in the habit of putting several different kinds of flowers together and of being satisfied with such a composition; but the Japanese would tell us that when several different kinds of flowers are combined in one grouping the full beauty of each is lost; and after a few experiments we shall come to see the truth of this. Here is an illustration: At a summer camp with which I am familiar it was the daily duty of one of the younger boys to go for the wild flowers we used for keeping the camp gay. He often brought home snug little bunches of the flower of the wild convolvulus and the wild rose, to be used together. No pleasing arrangement could be made from such a handful, so he was asked to bring long pieces of the vine of the convolvulus and gather branches of the rose, especially those with the buds. The convolvulus we arranged in a flat dish at one end of a gray stone mantel, letting the vine hang over the mantel, and he quickly saw that it "looked prettier—more as though it were growing."[83] When a few of the stalks of the wild rose were arranged by themselves in a green glass vase he pronounced them much "prettier than when mixed up with other flowers."
The Way of the Garden.—In our gardens we plant the sunshiny daffodils by themselves, the sweet peas grow in a mass together, and we have beds of roses. If we follow the same plan in the arrangement of our flowers indoors we shall realize their decorative qualities to the utmost. So we may consider it a safe rule to follow in arranging flowers,—to use only one kind of flower, with its stems and leaves, arranging them loosely, rather than to have many in a compact grouping. One single, long-stemmed rose, with its beautiful foliage, in a tall, slender glass is more decorative and gives us more pleasure than a dozen roses stripped of their foliage and crowded into a small vase.
Exceptions.—While the above rule should be generally followed, there are exceptional instances of the perfectly harmonious arrangement of flowers of two or more kinds together. Among these we may mention the combining of field daisies and buttercups, or buttercups with the grasses among which they grow. So, too, the lacy flower of the wild carrot may sometimes be effectively combined[84] with some other flower. The spikes of the cardinal flower, for example, are gorgeous in colour, but very stiff and difficult to arrange; so the addition of a few sprays of the wild carrot softens the effect and makes it more pleasing.
We have just considered the grouping of flowers by themselves. There is another element to be considered before we can have artistic results, and that is arrangement as to colour.
Colour Grouping.—We may not all be sensitive to colour ourselves, but in arranging flowers we should always keep in mind the pleasure that is to be given others, and so we wish nothing in our colour grouping that will offend those whose colour sense is keen. There are three colour schemes that can be followed with success and satisfaction to all. In one we group together only flowers of the same colour, as red roses, pink sweet peas, yellow iris, not red, pink, and white roses, nor all of the various colours of sweet pea.
Another arrangement calls for shades and tints of the same colour. With many flowers it is possible to get exquisite effects by following this scheme. For instance, pansies ranging from a pale lavender[85] to deep purple are lovely arranged in a low basket of damp moss. Sweet peas have beautiful shades of pink that can be combined, as well as shades of red and of lavender. Nasturtiums are never so effective as when the various shades of yellow, orange and brown are used together. The garden aster of to-day is another flower that affords much pleasure in colour arrangement; for it has lavenders and purples, a variety of pink tones, beautiful reds, and perfect white ones.
And the white ones! What shall we do with these? Three or four pure white asters of the same variety may be used together; or two or three white ones may be grouped with a few lavender ones, or pink ones. White may be combined with any colour with good results. Nature is a good teacher here for she gives us both the coloured and the white in almost every variety of flower. For example there are crimson cosmos and white cosmos, scarlet geraniums and white geraniums, blue violets and white violets, and so on through a great many varieties.
Combination of Complementary Colours.—Another colour grouping that is sometimes desirable makes use of the complementary colours. The salpiglossis, a garden flower that ought to be better known than it is, gives us examples of these, with its blue and[86] orange-yellow flowers that are so effective together. The iris also has flowers of complementary colours, yellow and violet blue being common among them.
A Flower Composition as a Picture.—Having learned something about the artistic use of colour, we come to the consideration of the arrangement of the flowers, and this includes the vase or other receptacle used for holding them. An artistic flower composition is a picture; and as the mat and frame give finish to a picture hanging on the wall, so the vessel holding flowers should give the required finish to the flower picture. Like the frame, it should be simple in design, have graceful lines, and serve only as a medium to set off the flowers to the best advantage. There should be as little decoration as possible, and when jars or vases of colour are used they must blend or harmonize with the colour schemes of the flowers placed in them.
Receptacles for Flowers.—It often is a problem to find the most fitting thing for holding flowers; but in the reliable Japanese shops one can always find some simple holders, and there are very good designs in the clear and in the green glass that are inexpensive and appropriate. As a rule the less expensive[87] the article the better adapted it is as a suitable holder for flowers. One need never mourn that she cannot afford cut glass vases for flowers, as they and their cheap imitations are among the most unsuitable of holders.
Four Typical Flower Holders.—Let us suppose our equipment includes four simple receptacles,—a small, clear glass fish globe such as may be had for twenty-five cents; a clear glass vase, about twelve inches in height, cylindrical in shape though flaring a little at the top, costing twenty-five cents; a large cylindrical Japanese jar of a pale green tint, eighteen inches in height and costing about one dollar and a quarter; and a deep green one, about eight inches in height, which may be bought for sixty or seventy cents.
The fish globe is very effective when nasturtiums and their leaves are loosely arranged in it. The stems show through the water and glass and form a part of the composition. Short stemmed roses may be most artistically grouped in it. I have seen a very charming combination of mignonette and bachelor's buttons in the same bowl, as well as a harmonious picture in yellow, composed of the various shades of California poppies and their foliage.
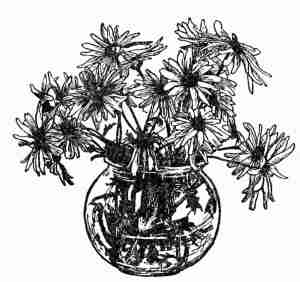
The tall glass sets off two or three long stemmed roses: and a few yellow daffodils or the narcissus with their leaves look equally well in it. Poppies for a day, in the same vase, have given pleasure to the beholder. At Easter it has joyously borne a stalk of two perfect lilies, and in the autumn tall spikes of salvia have been equally at home in it.
Our tall Japanese jar is suited to larger arrangements, for we need to remember that in tall or vertical compositions the vase should be about one third the height of the whole combination; so this is adapted to holding branches of apple blossoms or mountain laurel; or, if one is fortunate enough to find tall lilac bushes, about three branches from these are effective in it. Tall-growing golden-rod looks equally well placed here. It furnishes a modest setting for dahlias and chrysanthemums, and one of its most decorative compositions has been two or three branches of pine bearing their brown cones.
The possibilities of the smaller green jar are[89] numerous, and only a few are given as suggestions. A loose arrangement of jonquils and their leaves, or of white narcissus, is effective. The shorter stemmed lilacs, either the purple ones or the white ones, may be placed in it. An arrangement of white field daisies, and one of yellow roses, have been found equally successful. One soon discovers the harmony and balance that exist between the flower and holder.
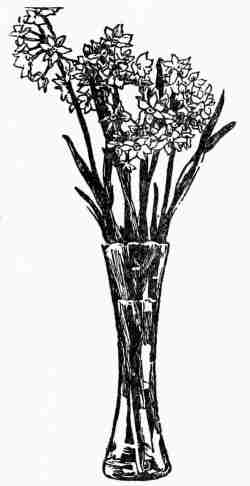
Space and Harmonious Surroundings.—To obtain the largest decorative effect we must have not only artistic grouping and harmonious setting of flowers, but space and background, just as are needed for the hanging of pictures. Many a floral composition has lost all decorative effect from being placed in too small a space and surrounded by distracting objects. A few days ago I stepped into a room on an errand and forgot my errand in the pleasure I[90] derived from seeing some beautiful yellow chrysanthemums, three or four, I think, in a yellowish brown jar on a large mahogany table, having for a background the upturned leaf of the table. It stood some little distance from anything else, a shaft of sunlight lay across the whole, and as I looked at it I thought: Here is all that constitutes a decorative arrangement of flowers. It was the feature of the room that held one's attention.
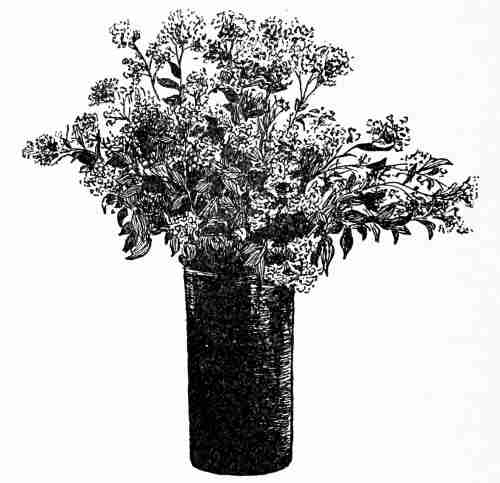
Flowers for the Dining Table.—If we can have flowers in but one room in the house, it may be difficult to decide which one it shall be. Since it often happens that the dining-room is the only room where a busy family comes together for any length of time, flowers should certainly be introduced here that all may share their beauty and cheer. Any arrangement for the home table should be moderately low; and there are many simple flowers that can be used in this way to advantage. For instance, one can gather a quantity of the innocence or common bluet (root and all), to be found in any field in the spring, and put them in a shallow glass dish. Simple and effective decoration for the table is the result. Flowers with any degree of fragrance should never be used in the dining-room. The fragrance of some flowers is offensive to many people, and when combined with the odour of food doubly so.
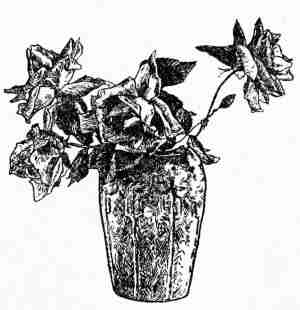
At a luncheon served by the girls in the model[92] house the floral decoration for the table was a half dozen single, yellow jonquils with their foliage, placed in a creamy brown vase made by one of the girls. Their dishes being in white with a gold edge and the walls and furniture in browns, nothing could have been more harmonious than these few simple flowers.
Expensive Flowers not Necessary.—It is evident that for floral decoration neither expensive nor lavish displays are necessary, that simplicity is the thing to strive for, and that a few sprays of wild flowers in their season are more truly artistic than many expensive hot-house flowers. In this country we do not, as the Japanese do, make a festival in honour of certain flowers; but if we rightly appreciate and utilize the flowers of each season, we may give a touch of festivity to the life of every day.
In the early spring nothing can be more appropriate than an arrangement of pussy willows or branches of the alder with its tassels, while the red maple when in flower gives a touch of colour that will brighten any room. A clump of blood root in a small jardiniere is as decorative as the expensive plants one may see in the home of some friend. The flowers of the field and the garden offer so many[93] possibilities for decorative results that no one's home need lack the cheery touch which they can give.
There is a personal element in flowers such as is not found in any other means of decoration, not even in pictures, with the single exception of good portraits. They seem to speak to us. We can almost believe that they feel an interest in all that we have said about them. If they really could know, would they not approve the principles that we have laid down? We may fancy that they would approve and that, if they could really speak and we would listen, they would tell us so in some such language as the following:
Don't mix us; we are exclusive and prefer our own kind.
Don't make a confusion of colour with us.
Don't arrange us in snug, solid masses.
Don't neglect to use our stems and foliage as a part of the decoration.
Don't tie us with ribbons, nor put paper-lace frills around us.
Don't crowd us in with an assortment of household goods; we need space and a background.
Don't arrange us in tall, stiff forms for the dining table.
Do love us and use us in the home as much as possible. This is well for you. By so doing not only will your love of us increase, but your artistic perception of the fitness of things will constantly enlarge. For truly has it been said, "The poorest woman in the world, if she has faith in beauty, will always be able to fill her home with light; she can always place there some flowers."
The very need of ornament arises out of a certain innate discontent with plain, smooth surface—Lewis F. Day
No kind of decorative art offers greater possibilities for touching the right—or the wrong—chord than that which makes use of fabrics. Portières, curtains, cushion covers, table runners and mats, lamp shades, and many other furnishings, in which fabrics are involved, present problems that quickly engage the interest of the amateur decorator who wishes to avoid the commonplace and, when well worked out, add greatly to the attractiveness of artistic surroundings. And every house becomes a studio for problems peculiar to itself, when the possibilities of development in this direction are realized. Here, as everywhere else, decorative art is secondary to architectural design and must never fail to acknowledge its dependence. Its glory is to follow. To attempt to lead means miserable failure.
Example of the Model House.—The wide doorways connecting the hall, the living room, and dining-room of our model house made doors undesirable and portieres necessary to assist in marking the division between the rooms and to soften the lines of the wood finish. They were made to harmonize with the colour scheme but were darker and richer in tone. The multiple windows, with the absence of direct sunshine, suggested the light style of drapery; and the preference given to straight-lined, substantial furniture, made in the school shops, led as a natural consequence to cushions and coverings of leather or coarse fabric, in order to bear out the idea of simplicity, directness, and durability in craftsmanship. Velvets and satins would have been out of place.
Utility to be Regarded.—The highly decorative function of such accessories makes it doubly necessary to exercise care in selecting materials, designing the ornamental features, and properly placing the completed article, in order that the requirements of use be not subordinated to the demands of art. It must never be forgotten that utility is the basis of all true decoration. Portieres were originally a substitute for doors—a means of closing an opening between rooms. It must be possible always [97] for them easily to serve this purpose. Hence loops or rings, which slide easily over a pole, should be used. Portières may properly be made of heavy cloth and they may have a lining harmonizing or in pleasing contrast with the tone of the principal fabric. They should always be at least opaque. Window draperies, on the other hand, are not a substitute for shades or curtains. They should not shut out the light but soften it. They should, therefore, be made of light, washable, and durable material, and be hung so that they can be easily taken down for cleaning. The simplest style of hanging, by means of a brass rod and plain brackets, is the best. Since there is no need of frequently sliding them over the rod, it is well to hang them by means of a hem, stitched two or three inches from the top of the drapery, through which the rod may be easily pushed. Cushion covers and table runners, made of durable material and decorated with colours that are washable, are manifestly more serviceable than those that look fresh only when new, and hence are more in keeping with the idea of sincerity in household decoration. There is necessity for honesty in decoration as well as in plumbing if it is to meet the tests with equal success.
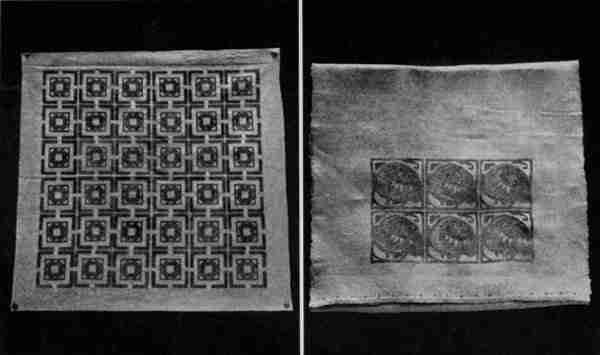
Pillow Cover With Geometrical Designs Printed on Dyed
Cotton Cloth. |
Table Runner of Russian Crash with Block Printed
and Embroidered End Panels |
How such decorative features are worked out[98] from beginning to end, is told in the following directions for a few practical problems which are known to be practical, because they have been actually carried through from the design to the completed article. This detailed and complete explanation, with the accompanying illustrations, will suggest many similar problems which every home offers.
Problem: Decorating a Table Runner.—This problem is easily separated into four distinct parts—making the design, cutting the block, printing, and finishing. The materials needed are as follows:
| (1) Making the design | (2) Cutting the block |
| Ordinary drawing paper | Gum wood |
| Rice paper | Small penknife |
| Charcoal | Vise |
| Pencil | Sand-paper, fine |
| Japanese or sable brush, medium size | |
| Water-proof India ink | |
| (3) Printing the design | (4) Finishing the runner |
| Printing board | Embroidery silk or mercerized cotton |
| Sheet of glass | |
| Oil paints | |
| Turpentine | |
| Palette knife | |
| Cotton batting | |
| Cheese cloth | |
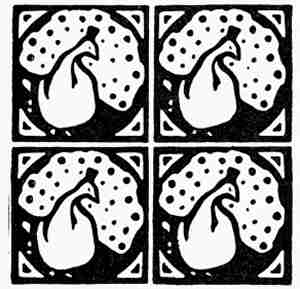
The Design.—To carry out the problem as illustrated, it is necessary, first of all, to make the design. Geometry, nature, and the imagination are satisfactory sources upon which to draw for the motif. If the inventive faculty is quite undeveloped, one should study for suggestions the figures in Oriental rugs, photographs of early Eastern art, and the fine old tapestries in museum collections. Some good geometrical designs, like that used on the pillow cover illustrated on page 104, were made by school-girls after drawing many figures found in rugs; and interesting bird patterns, after studying numerous reproductions of Coptic designs. In no case was the block pattern in the least like the[100] designs studied. They served only as ideas to start with and led to the production of truly original work. It is essential to keep a few simple principles in mind in working out the design: (1) Both the dark and light shades in the patterns should be varied in size and form to avoid a monotonous result and should be as beautiful in proportion as possible. (2) There should be a centre of interest, one part of the design dominant—more attractive than any other. (3) The design must be a unit—i. e., the parts must hold together. All feeling of unity is lost if the parts of the design call attention to themselves to the exclusion of the whole.
Preliminary Sketches and the Drawing.—It will be found desirable to make many preliminary sketches in charcoal or soft pencil, rubbing in a part of each sketch with a tone in order to secure immediately the dark and light effect. These should be compared, keeping clearly in mind the principles stated above. When one possessing the right qualifications has been found, the next step is to draw on a fresh piece of paper an accurate 3-inch square and[101] copy upon it the satisfactory design in pencil outline. This should be done very carefully, that the spirit of the original charcoal sketch may not be lost. When the drawing is completed it must be put into shape to be transferred to the block. To do this we fasten a piece of rice-paper over the drawing and trace with very light pencil lines, filling in the dark spaces with black ink, using a brush. This brush work may be done directly without the pencil line if the drawing underneath shows very plainly through the paper. When the ink has thoroughly dried, the design may be cut out on the edge of the 3-inch square.

Laying the Pattern and Cutting the Block.—A block[102] 3 × 3 × 7⁄8 inches will now be required. This should be procured and sand-papered. One face of it should then be covered with a coating of library paste, the pattern laid upon it, and rubbed down smooth. If the design is symmetrical it should be pasted on the block, ink side up, but otherwise with the ink side down, or the design will be reversed upon the cloth. When the paste gets quite dry one may then fasten the block in the vise and, holding the blade of the knife at a slight angle and always away from the dark spots, proceed to cut the design along the outlines. These must be kept very smooth and sharp. All of the white shapes should be cut[103] out, leaving the black ones in relief. Usually an eighth of an inch will be deep enough for the background, but it will be found after practise in printing that the larger spaces should be cut deeper and that, when the edges or corners of the block form a part of the background instead of the dark pattern, they also need a deeper cut. The paper that still adheres to the face of the block may now be removed by rubbing it upon a sheet of sand-paper laid upon something hard and smooth like glass in order that the block may have an absolutely level surface.

The Padded Board.—All block printing should be done upon a padded board. A very convenient one can be made by laying upon a bread board three or four sheets of blotting paper, and tacking over these several thicknesses of cheese cloth. In place of these an ironing board may be used.
Material Required.—It is essential to select for the runner a piece of crash of fine texture and even weave. This is sold under the name of Russian crash and is from 15 to 16 inches wide but varies considerably in quality. It is very difficult to print well upon the coarser grades.
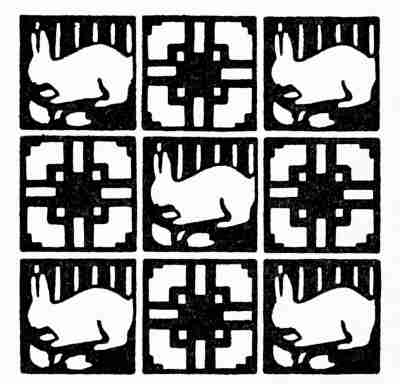
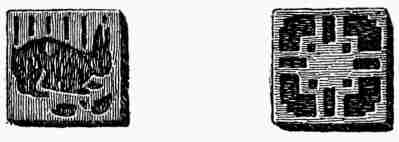
Trying the Colours.—After deciding upon a colour which will harmonize with the general colour scheme of the room in which the table runner is to be used, it is in order to mix the paint and try the block upon a small piece of crash. To prepare the paint, squeeze a small quantity of the true colours chosen upon a sheet of glass and blend thoroughly with the palette knife, thinning with turpentine to the consistency of cream. It is seldom that a colour right from the tube will prove a pleasing one to use. Other colours mixed with it will change its hue and intensity; black or white will alter the value. Tie a little cotton batting up in a small square of cheese cloth[105] or old handkerchief linen, being careful to remove from the raw edges all ravellings that might drop into the paint. Spread out quite thin upon the glass a small portion of the prepared paint and press the pad into it a number of times until it has absorbed all it will. Now charge the block by lightly pounding its surface with the pad. Press the block upon the cloth evenly. Only by repeated experiment will it be possible to determine just the right quantity of paint to mix, its brilliancy of tone, its consistency, how heavily to charge the block, etc. A good print shows the texture of the cloth through it, is even in tone, and has clear-cut edges. If the print looks like a painted spot, or if, when quite dry, you find it has stiffened the cloth, the paint used was too thick or else the block was too heavily charged. Different materials require different treatment. For a thin silk the block should be very lightly charged and lightly though evenly pressed upon the material. In printing upon crash[106] it is necessary to press the block very firmly upon the material; and frequently, to insure getting a sufficiently strong impression, it is advisable to tap the block lightly with a hammer or wooden mallet. If one has a steady hand, the block can easily be lifted at one side to determine just where the extra pressure is needed. The block should be thoroughly rubbed with old cloth after each impression is made and occasionally sand-papered to remove any paint that may adhere to it. The first print made after sand-papering the block is liable to be a little less distinct than the others and should therefore be made upon an extra piece of the material.
Centring the Work.—A good way to plan the placing of the panel design is to run a basting thread across the crash between two of the woven threads. Mark the centre of the runner upon this thread, and, using these guides, print the design, beginning with one of the central units.
Additional Features.—Considerable charm can be added to the pattern by filling some of the spaces with a simple darning or running stitch in some bright colour. The embroidery thread used should be rather fine. It is well to finish the ends of the runner by button-holing with ravellings of the crash.[107] Tiny dots of some colour used in the panel may be embroidered at intervals just above the button-holed edge.
Colours.—The following list of oil colours will be found practical: ivory black, flake white, burnt sienna, light red, crimson lake, chrome yellow, chrome green, permanent blue.
Materials.—Linen, cotton, soisette, all or part silk pongee, crêpe de chine, cheese cloth, and unbleached muslin are excellent materials for block printing. Beautiful background tones can be obtained by dyeing the two latter with easy dyes.
In place of the gum wood for the block, basswood, maple, or holly may be used. It is possible to get along without a vise by fastening the block between two cleats nailed to an old table or heavy board. Success is sometimes achieved in cutting blocks while simply held in the hand.
Laundering.—If the material used for the foundation is washable, block printed articles can be satisfactorily and easily laundered in soapy, lukewarm water. The colours are not injured in the least. A liquid called stencil mordant is sometimes used in place of turpentine, insuring still greater permanency of colour.
Other Applications of Block Printing.—Other articles[108] suitable for decoration by block printing are curtains, pillow covers, table covers, cushion covers, bureau scarfs, Portieres, table mats, bags of many sorts, etc. Printing may also be used to ornament articles for personal use, such as aprons and scarfs.
Problem: Window Draperies.—Making the design, cutting the stencil, printing, and finishing form the divisions of the problem to be worked out. A list of necessary materials follows:
| (1) Making the design | (2) Cutting the stencil | (3) Printing |
| Charcoal | Sheet of glass | Large board |
| Pencil | Sharp penknife | Blotting paper |
| Reflector | Turpentine | |
| Ordinary drawing paper | Oil paints | |
| Tracing paper | Bristle brushes | |
| Carbon paper | Pins | |
| Stencil paper |
The Design.—Suggestions as to the method of procedure in making a design have been already given in the section on block printing. The principles of design to be considered are outlined there also. In working out this problem, however, several new things come up for explanation: (1) The difference between a design to be stenciled and one [109] to be printed by means of a wood block; (2) the method of joining units to form a border; (3) the method of turning a corner in a border design.
The Stencil Bands.—By studying the illustrations accompanying this section and by experimenting with the charcoal or soft pencil, it will be seen that in a stencil design the dark spots which stand for the color in the finished work are completely separated from one another by bands of varying widths.
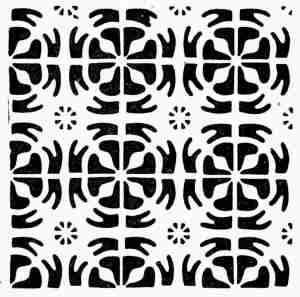
These bands, or bridges, as they are called, serve to hold the stencil together and are connected throughout the design. Though they may be as wide as one desires, it is seldom wise to make them[110] much narrower than one eighth of an inch, as they are easily broken; and, unless carefully pinned down when stencilling, the paint is liable to run under them and ruin the work. In a block print design no connection of the light or separation of the dark parts has to be considered. In the illustration of the stencil observe that the dark and light are reversed as compared with the stencilled pattern—i. e., the dark represents the stencil paper, the light the openings through which the paint is applied.

The Complete Unit.—It will be readily understood that a border may be made up by repetition of one unit which is a complete thing in itself. The[111] unit in such a case may be made very long and narrow, so that in repeating it along the vertical edge of a curtain it produces a narrow band, while along the horizontal edge the band is broad. A border worked out in this way, with perfectly straight and practically continuous margins, is very structural in character, emphasizing, as it does, the vertical and horizontal edges of the drapery. The effect is strong and dignified. The corner in this kind of border presents no difficulty.
The Subordinate Unit.—By studying the illustration in Plate IV it will be seen that the unit of the border in this case is not complete in itself, but that the very conventional flower and stem composing it are joined to the next unit by what might be called a subordinate unit, composed, in this case, of a leaf form. The units are so closely spaced that a structural effect is fairly well obtained—i. e., the upper and lower edges of the border are nearly straight, giving a feeling of restfulness to the design that never accompanies one with broken or wavy edges.
Designing the Corner.—Having planned a design for the straight running border of the curtains, take a reflector and experiment with the corner. The reflector can easily be made by cutting from an old[112] discarded looking-glass a small rectangular piece, 31⁄2 by 6 inches being a convenient size. The edges should be very straight and the corners square. Hold the reflector at various points along the border and always at an angle of 45 degrees. Study these possible corners which will be reflected in the glass, and when one sufficiently strong and interesting is found draw a light line along the edge of the reflector. This line, of course, exactly bisects the corner of the border to be made. Avoid making a border of this kind too deep or, when turned for the vertical edges, it will form a very broad and heavy band.
The Outline Drawing.—The dark and light design having thus been worked out in charcoal, the next thing to do is to make a very careful pencil-outline drawing of the same. It is well to draw the corner and one unit free-hand and trace the rest. To do the tracing, pin a piece of very thin paper over the finished part, and trace with a well sharpened and fairly soft pencil. Turn the tracing paper upside down, fitting a part of the tracing to the drawing underneath. After tacking it down, trace the remainder, using a firm, even pressure and being careful exactly to follow the line. Strengthen the part of the pattern thus transferred by going over it with[113] a sharp, hard point, and continue as before until you have a border of which both the vertical and horizontal sections are from 9 to 12 inches long.
Transfer to Stencil Paper.—Now, take a piece of stencil paper and square up one corner. Fasten the pencil drawing securely to the stencil paper along one edge, slip a piece of carbon paper between the two, and trace the design.
Cutting the Stencil.—Before cutting the stencil for the curtain a beginner should do a little practising upon an extra piece of the paper. Trace a portion of the design upon this piece, lay it upon a sheet of glass or very hard wood, and with a sharp penknife cut along the outline of the pattern. The knife should be held at a slight angle and the cut made completely through the paper. The pieces of stencil paper should never be pulled out but will fall out without aid when the cutting is completed. After a little practice it will be found a simple matter to cut the design with perfectly smooth edges.
Suitable Materials for Stencilling.—For the curtains fine cheese cloth or batiste will be found excellent. Even unbleached muslin will make attractive curtains where expense must be carefully considered. Unless the woodwork of the room is white, the pure white materials will be found less pleasing than those[114] that are quite creamy in tone. Scrim in a charming, grayish tan colour is obtainable, and, if of good, soft quality, makes most satisfactory curtains. It is not advisable to hemstitch this material before stencilling as in case of accident or failure so much work is lost; but the hems should be carefully planned and basted, those along the inner edges of the curtains being narrower than the bottom hems.
The Colours.—The color scheme of the room should be carefully considered in deciding upon the colour or colours to be used in stencilling. If two colours are chosen, they should be of the same value—i. e., the two colours should form equally dark spots in order that the pattern of the border may appear in the same dark and light as the original charcoal sketch.
Pinning the Stencil.—When ready for the actual process of stencilling, lay a large sheet of blotting paper upon a board and over this place the corner of the curtain. Pin the stencil securely to the curtain so that the edge of the border when printed shall be about half an inch from the hem and the edges of both shall be absolutely parallel. Use as few pins as possible but enough to keep the stencil close to the cloth.
Testing the Paint.—Having mixed the oil paint[115] with turpentine or stencil mordant, using an old cup or glass for each colour, practise stencilling upon a small piece of cloth. Put blotting-paper under the cloth and pin the stencil down with great care. Use short, stiff bristle brushes for the stencilling, one for each colour. Remove almost all the paint from the brush by pressing it upon blotting-paper. When it leaves scarcely a mark, proceed to stencil the pattern by pounding the brush upon the exposed portions of the cloth, working close to the edge of each spot. If, upon removing the stencil, the edges are blurred, the paint was too thin or the stencil not carefully pinned down. If, on the other hand, the coloured spots look thick and painty, so that upon drying, the cloth is found stiffened in these places, you may be sure that the paint used was too thick or that the brush was too wet. The secret of good stencilling is to use the paint as thin and the brush as dry as possible. Hold the stencilled sample up to the window and see whether, when the light shines through it, the colour appears right.
The Real Process.—When confident that the process is understood and that the colour is satisfactory, proceed to stencil the corner of the curtain. Always have at hand a bottle of turpentine and a[116] clean piece of cloth to use in case of accident. When removing the pins from the stencil wipe each one carefully. Clean the stencil, too, handling it with care that none of the slender bridges may be broken. Replace the stencil, fitting a section of it to the finished work. Put the pins in the holes already made, otherwise the paint will get into them and disfigure the work. Continue the stencilling, a section at a time, until the border is completed. Do not fold the curtains until the stencilling is thoroughly dry. If the threads of the material can be easily pulled, a hemstitched edge will make the best finish; but careful hand hemming will look well upon material like fine batiste.
The Valance.—The curtains should hang in vertical folds from the top of the window to a point slightly below the window sill. They should be drawn back at each side of the window and the space between at the top filled by a valance about a foot deep, perhaps deeper if the window is very high. This valance should have the border stencilled upon it and should be tacked just underneath the edge of the curtains. Sometimes, as in the illustration in Plate IV, a valance running across the entire width of the window is used. In this case it is run upon an extra rod in front of the one from which the curtain[117] hangs. Double rods for this purpose can be bought.
Other Possible Problems.—As stencilling can be employed in practically the same place and upon the same materials as block printing, it is only necessary to refer to the lists given at the end of that section of this chapter for suggestions as to further possibilities in the way of home decoration by stencilling.
Problem: Table Mat.—As in the preceding problems, the first thing to do is to plan the design roughly in charcoal or soft pencil in order to get the dark and light relations and the best proportions possible. If convenient, the mat should be made for use with some special lamp or vase. By measuring the base of this object it is easy to determine the size of the plain central space, which may be either circular or square in shape. The forms in the decorated part may be made of various shapes, but it is well to keep them very simple in outline. Straight lines alone may be employed, as in the mats illustrated in Plate V, or a combination of straight and curved lines, as in the one shown in Plate III. After working out the design very accurately with a hard pencil, the next thing in order is to transfer it to a piece of[118] coarse Russian crash or heavy linen by means of carbon paper, taking great care to get the straight edges of the design even with the threads of the crash.
Desirable Combinations of Colour and Stitches.—The simple running or darning stitch should be employed in embroidering the pattern. Two or more colours may be used. Darning in dull green and outlining with black in the same stitch makes a very attractive mat. Other good combinations are green and white, blue and white, blue and green, soft dull blue, and pinkish orange. This by no means exhausts the pleasing contrasts that may be found. The brighter colour should always be employed in the smaller quantities. The mat illustrated in Plate V was embroidered in dull green and red mercerized cotton. After the darning was completed it was found that the red used in the small circles alone was too conspicuous, although it was very dull in tone. This defect was completely remedied and a perfect unity given to the design by outlining the forms in a couching stitch, using both colours. This was done by laying a green thread along the edge of each spot and taking a stitch of red over it at equal intervals.
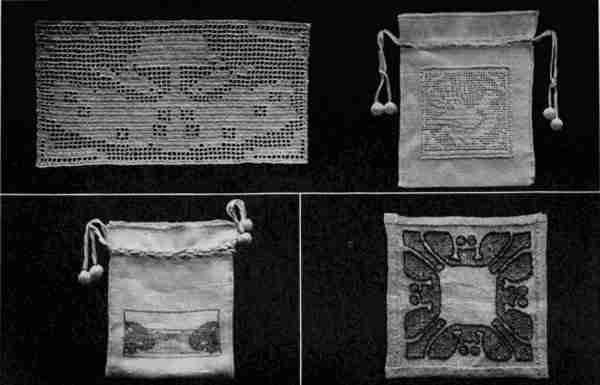
| A Linen Workbag With Conventional Landscape in Darning Stitch | A Crash Table Mat Embroidered in Darning and Couching Stitch |
| Designed and Executed by School Girls | |
After the embroidered pattern is done one may finish the mat with fine, close hemstitching or by button-holing the edge with ravellings of the crash. The latter method is usually more pleasing. The simple darning stitch can also be used to make very attractive borders for table runners, sofa pillows, decorations for work bags, as illustrated in Plate V, besides being used to enrich a great variety of block printed or stencilled articles.
The Satin Stitch.—Another effective and easy embroidery stitch to be used in decorating articles for the home is the over-and-over or satin stitch. When planning to use this stitch upon coarse linen in which the threads can be easily counted, transfer the design, after having carefully drawn it in pencil outline, to paper marked off into little squares. This can be bought where kindergarten supplies are sold. Redraw the outline of the design, following exactly the lines on the paper, and at the same time keep as close as possible to the original form. Let a certain number of threads of linen represent a square of the design and copy the pattern in the satin stitch or even the cross stitch if preferred. No transferring of the pattern to the cloth is necessary.
A pattern worked out on cross section paper in[120] this way can also be crocheted, as illustrated in Plate V, and set into linen or some of its many imitations to decorate numberless articles for home or personal adornment. This crocheted work, if evenly done in fine thread, is quite suggestive of the Italian filet lace.
In considering the dress of the person as related to home decoration one is not so far afield as one may seem to be at first thought. It is true that dress has a variety of functions to perform that have no connection with the subject of decoration; and yet there is much that is common to both. Well-dressed people of whatever age or sex, in the design and general make-up of their costumes, must observe the same laws that govern design wherever it is applied, as an expression of the artistic sense in the affairs of every-day life. Beauty of line and proportion, harmony of colour, adaptation to use and to a great variety of special conditions, simplicity, symmetry, restraint, are all involved in[122] personal attire, as they are in the decoration of a room; and in most cases success or failure in one field has its counterpart in the other. Have we not often remarked of a house or of a room that it looks "just like her" or perhaps "just like him"; and do not attractive costumes give pleasure to others than those who wear them for the same reasons that properly decorated and well-arranged rooms afford similar enjoyment to those who live in them?
Art and the Fashions.—In discussing the parallel between art in clothing and the more stable art of home decoration it must be admitted, of course, that style in dress introduces some embarrassing questions; for the styles, especially for women, suffer wonderful changes with every season. And yet people of artistic feeling and good taste, succeed in maintaining a fair degree of harmony between the changing demands of fashion and the established principles of art as applied in dress.
How to Be Well Dressed.—The well-dressed woman knows how to select her clothes and how to wear them. She must study her own figure and know her defects as well as her good points. With this knowledge she can learn to subdue the one and bring out the other. She should have a clear conception[123] of the ideal figure and strive to adapt herself to it. To acquire this training the principles of the art of decoration must be understood and applied. She should never wear a garment of a certain style simply because it is the fashion, but strive to make it conform to her individual type.
Good Lines.—Decorative design in dress must follow the construction lines of the figure and not destroy them. These are the much discussed good lines of which we hear and read so much. Horizontal lines break the figure and increase the breadth, while vertical lines give the appearance of height. It is the simple lines, conforming to and following the lines of the ideal figure, which are the best. The taste of most women leads them to desire simple clothes; but through ignorance or inexperience many of these women fail to achieve that aim. A stout woman with a round back is sometimes seen wearing a dress with lapels or ruffles over the shoulders. This only serves to accentuate her defect.
Unity and Harmony.—In all forms of decoration harmony is essential—i. e., all the parts that are to be combined must agree with one another and with their surroundings. To secure this in dress is to give unity to the entire costume. A dress hat with plumes should not be worn with a tailored[124] suit in the morning; and yet we often see such a combination. Here the lack of harmony is between the parts of the costume; but the entire costume must be suited to the peculiarities of figure. There are women who never look well in the straight lines of a tailored suit: the severity is not becoming to them. They must tone down the effects of the lines by ruchings, ruffles, a soft stock, or some such softening elements of dress. Others do not look well in fluffy things. Each must know what is becoming and dress accordingly.
Importance of Colours.—Every season we hear that certain colours are to be worn. Many women will choose a colour because they like it without considering whether it is suitable for them to wear. A little attention to a few well-known facts will help them to avoid failures of this kind. It is generally recognized that light colours seem to increase the size. Striped materials should not be worn by the stout women unless the stripes are very indistinct. Dots are also very dangerous for her; but she may choose a pattern with pin-point dots scattered over the surface at some distance from each other. She is always safe in a plain, dark colour.
Colour and Complexion.—In deciding on a becoming colour one must take into account the colour of[125] the hair and eyes and the tone of the complexion. It has been thought that young girls can wear clear, light shades and that older women should keep to dark, quiet colours; yet there are older women who wear pale gray, mauve, and lavender charmingly and many young girls who cannot wear blue or pink. It is quite impossible to make accurate colour rules, because it would be hard to find two complexions that require exactly the same colour setting. It is well, however, to study combinations of different colours with the idea of finding the right colour, to use in any costume, the amount of each, and the best arrangement to give a proper balance.
Proportion.—The importance of the principle of proportion is often overlooked, but beauty of dress is never possible if it be neglected. A well-dressed woman, in selecting her hat, must have given consideration to the relation of the size and shape of the head to the lines of the entire figure. Strictly speaking, a hat is a covering for the head, and it should seem to belong to the head, to protect it, and, through harmony of colour and proportion of line and mass, to improve the appearance of the whole costume. The artist, when drawing a figure, uses the head as the unit of measure. Therefore[126] in choosing a hat one should select a style that is in good proportion to the size of the head and to the height of the figure. If the mass of the head is increased disproportionately by too large a hat, the entire figure is apparently shortened and the natural proportions destroyed. One often wonders why photographs of people with hats on look so old-fashioned and sometimes so ridiculous. It is because the hat is not in good proportion. The Gainsborough and Reynolds ladies with hats never look queer. Their hats bear the right relation to the head and the figure.
Appropriateness.—The general proportions of a hat or a gown may be good, but the addition of the decoration may destroy all the good effect obtained by securing the right relation of line and mass. The aim of all decoration should be to harmonize and strengthen the whole. Beauty of dress, therefore, depends upon simplicity and appropriateness of the material used as well as upon the form and arrangement of the material. Wherever ornament is used it must fulfil the condition of fitness to place; otherwise it is not really decorative. In trimming a hat, the one who is to wear it should take her seat before a mirror, and place the hat comfortably upon her head; then with the aid of a hand glass she[127] should try the trimming in different positions until the best effect is obtained.
The designs in trimming should be appropriate to the garment. The size of the design and the kind of form used should be considered. Simple forms are the best for all decorative art work. In fact, there is great advantage in plain materials. They always work to greater economy than stripes or plaids.
Influence of Occupation.—The well-dressed woman should realize how great is the influence of occasion and occupation. Some gowns were intended only for afternoon wear in the house; but we often see them worn on the street cars or for shopping. I have always approved of the rule in many shops which requires the clerks to wear plain black gowns. Formerly it was the old finery which was used for every-day wear. Now the business woman to be successful has to exercise more thought upon her clothes than the woman at home. Her clothes have harder wear and must be appropriate for her work.
The dress of school-girls and children must not be overlooked. It should be as simple as possible and above all else it should be comfortable. It should never bind or pinch; indeed, the clothing should not interfere with any function of the body. But we often see children dressed with much lace,[128] with many ruffles, and even with jewellery; and we have seen school girls wearing net waists, plumed hats, and high-heeled shoes. What an infraction is this of the principle of appropriateness in dress!
It is only by labour that thought can be made healthy, and only by thought that labour can be made happy—John Ruskin
The chief purpose of this chapter is to outline the most important general facts upon which good furniture making is based and to give specific directions for working out a number of typical problems, following designs which have been proved in completed articles made, for the most part, by school-boys and tested by use. No attempt is made to give this great subject complete and systematic treatment; for this would involve many problems in constructive design and a corresponding number of working drawings, with specifications for the selection and preparation of materials and for the work of construction—a subject so extensive that it would easily overrun the limits of a single chapter. The aim is rather to select a few of the most suggestive lessons of experience in constructive work with special reference to our main subject of household decoration.
It is taken for granted that the interested reader is familiar with the use of the common hand tools for woodworking or that he can, with some assistance, perhaps, easily command their use. It is not thought necessary, therefore, to describe in detail the proper method of using tools, but rather to offer practical suggestions on the selection, preparation and constructive use of woodworking materials and, in the series of problems which follow, to give some helpful hints on the way woodworking tools should be used. It is also assumed that in most cases the very great advantage of woodworking machinery may be utilized, especially in preparing the materials and bringing them within easy reach of the hand-tool processes. The true art-craft spirit, which always honours handwork as the supreme method, may not hesitate to command the services of machines so long as it does not become slavishly dependent upon them.
The first thing that should claim the attention of the artistic woodworker is the selection and preparation of his materials, commonly known as the stock. The sculptor selects his marbles with the greatest care. So should the cabinet-maker make sure that his woods are taken from the right parts[131] of selected timber and that they are properly sawed and well seasoned. The importance of this cannot be overestimated. Hard wood boards, cut from the sides of a tree, will in drying, invariably curve across their grain. It is only those that are cut from the centre to the outside of the tree that may be depended upon to remain approximately true; for, after this cutting, the grain runs directly through the thickness of the board, or nearly so. Boards taken from timber in this way are said to be "quarter sawed"; those cut by sawing through the logs from side to side, as is always done with soft woods and often with hard woods, are said to be "plain sawed." This is illustrated in the accompanying drawings.
Quartered Oak.—In the case of oak, the quarter sawing not only maintains a flat surface but greatly improves the appearance of the stock when finished. The popularity of quartered oak for furniture may therefore be said to be well founded, for it is the sincerest of woods. It is as good as it looks.
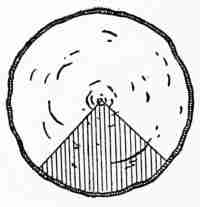
Quarter sawing, however, is very largely confined[132] to oak because the appearance of the grain and the strength of most woods is far from being improved by this method of cutting. Thus ash and gum wood and all the softer woods sometimes used in furniture making are plain sawed. We shall, therefore, generally find stock from these woods curved and twisted badly so that it will be necessary, in selecting material for large surfaces such as table tops, to pick out the straight parts for these surfaces and save the remainder to be cut into the smaller pieces which will always be needed. These pieces can be easily planed without much loss of thickness.

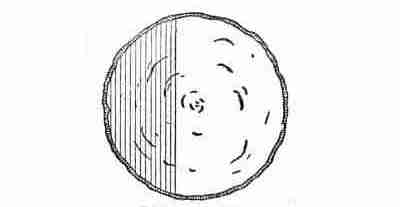

Kiln-dried Lumber.—This bending and twisting of the boards does not take place as soon as they are sawed out of the log, but gradually during the process of seasoning; and, unless the lumber is[133] kiln-dried, the more gradual the seasoning the less the bending. Lumber is kiln-dried by stacking it, with air spaces left between the boards, in steam-heated closets or kilns, where the process of drying is carried on evenly though rapidly. Kiln-dried lumber, therefore, retains its shape quite as well as that which is dried slowly in the lumber pile. But whether kiln-dried or not, it should be allowed to remain in a dry place as long as possible before using it so that it will have a chance to change all that it is likely to and so lessen the subsequent shrinking and warping. A good cabinet-maker never undertakes to make furniture from stock that he does not know to be perfectly dry and well seasoned, not only because unseasoned lumber is more likely to shrink, warp, and crack, but also because it cannot be depended upon to hold the glue, take varnish well, or respond readily to other methods of finishing.
Planing Down to a Flat Surface.—Since boards are seldom perfectly flat, even if one has taken the greatest pains to select well-seasoned stock, it will almost invariably be necessary to work them down to a plane surface when they are glued up or joined together in any way. To accomplish this result it is necessary to plan the arrangement of the pieces[134] in such a way that the concave of the bend shall fall on the same side, as shown in the illustration, and thus provide for the final working down with the least possible removal of stock. They can be arranged on a level bench top or floor with the convex side down so that they will lie as flat as possible. The boards should then be taken out one by one and their edges should be carefully planed so that they will match together in the position in which they are laid. It will be necessary to take each board from its place and return it several times in order that this matching may be made as perfect as possible. The object of all this is to prevent the entire arrangement from springing—i. e., from acquiring any new bend or twist when the parts are glued up. In joining boards to form large pieces of glued-up work, like table tops, it is customary to strengthen the joints by means of dowel pins. Small table tops and similar work may be safely glued up without dowelling.

Fastening Glued-up Work. It will be readily understood upon a little reflection that all plain glued-up work should be allowed to move slightly[135] upon the framework to which it is attached; for even after it is well seasoned and well finished all woods will swell slightly in a damp atmosphere and shrink slightly when the air is dry, the greatest movement being across the grain. Solid table tops, therefore, should never be fastened down firmly upon the framework with glue or with screws, but should be secured by means of buttons screwed to the under side of the top which travel in grooves cut in the framework and thus allow for expansion and contraction. A drawing is shown to illustrate the method of attaching the table-top buttons. Much of the warping and splitting of furniture is due to the failure of the designer or maker to observe this precaution.
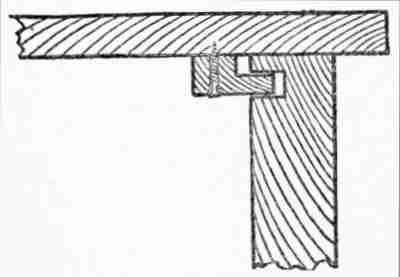
In planing up stock, whether it be a single piece or several glued together as just described, the cabinet-maker planes off one side first and then, using this side as the working face, gauges to the required thickness and planes off the other side if necessary. If the work be upon glued-up stock, it is well to plane off the projecting edges of the concave sides first, as that is generally somewhat easier and may be all the planing that will be necessary. If it be single pieces of stock that need to be planed up, the natural twist or "wind" is first planed out to a flat working face on one side before putting the plane to the opposite side.
The Surface Plate.—Planing to a flat surface requires some device to guide the eye. If the surface be very uneven at first, a beginning may be made in the planing without much assistance; but a point will finally be reached when neither the unaided eye nor the hand can determine whether or not a surface is flat. To determine this a surface plate, as it is called, is needed. This consists of a block of cast-iron, thick enough to prevent it from being bent—i. e., an inch or more—and with a somewhat rough but perfectly flat surface on one side. This surface is well chalked over. When the wood surface which is being planed down is[137] laid upon this chalked surface and slightly moved it is readily seen that the highest places on the wood will become marked with the chalk and so indicate to the cabinet-maker what parts are to be removed. By making several tests of this kind he is able to plane to a good flat surface.
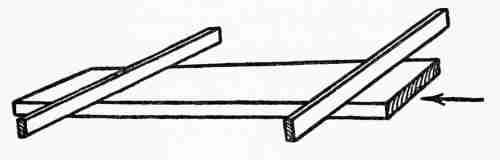
Winding Sticks.—If the amateur's workshop is not provided with a surface plate, a simple means of testing for a flat surface is by means of two narrow straight edges or "winding" sticks, placing them on their narrow edges across each end of the piece, as shown in the illustration, and sighting across their upper edges. The slight projections in the surfaces of the board can be determined in this way and planed off until the two top edges of the sticks are found to be level. These winding sticks are simply wooden strips, accurately made, with opposite faces parallel. Their dimensions may be 1 × 21⁄2 × 30 inches.
Importance of True Surfaces.—It may be well to add that all this care to produce flat and parallel surfaces is not merely for the purpose of giving a good appearance to these surfaces. True surfaces are necessary for the good of the work as a whole, for they form the basis from which other surfaces are gauged and other parts "trued up"—i. e., made square or otherwise geometrically correct. When the main surfaces of a piece of cabinet work are properly shaped, all the framework and other parts may be brought into line without bending or twisting. All such strains should be religiously avoided in good cabinet work. The natural curves, twists, or projections of the stock used should be removed by the use of the proper tools and never be strained to force any of the parts into their proper places or shapes. Such efforts produce strains which are transmitted to other parts, displacing them, causing new defects or a general failure of the parts to support each other.
A Systematic Plan of Work.—When the cabinet-maker undertakes to make either a single piece of furniture or several pieces, he goes about it in a very systematic way. Consulting his working drawing he makes an accurate list of the different pieces[139] that will be required. For example, if he is to make a Morris chair he notes the fact that he will need four legs or posts 21⁄2 inches square by 223⁄4 inches long, a front rail and a back rail each 7⁄8 × 21⁄4 × 22 inches, two side rails 7⁄8 × 21⁄4 × 24 inches, and so on until the list of necessary parts is completed. With this list in hand he makes a careful selection of the lumber and prepares the pieces in the rough, allowing economically for the necessary working waste. Economy of time and labour is also secured by keeping together all parts on which similar work is to be done. Thus, if several parts are to be sawed to the same width or fashioned to the same curves, it is generally the best plan to work these parts out together while the machines and tools are set for this purpose. Such a plan not only saves time but, partially at least, it obviates the danger of mistakes. It is important also to follow a systematic order of work. All sawing to rough dimensions should be done before the pieces are dressed to drawing dimensions, and the latter operations should generally all be completed before laying out and cutting the joints. As the work progresses toward completion great saving of time and much comfort will result from keeping the completed parts in good[140] condition and so arranged that they can be easily assembled.
Necessity of Good Joints.—After the selection and preparation of the material for the stock, the next important general process that demands attention is gluing; for good cabinet work implies good glue and a knowledge of how to use it. Prepared glue, such as is sold in bottles, is unsatisfactory for work of any consequence. A good woodworker always has his own glue pot and sees to it that it may be made ready for use on short notice. The glue should be fresh, thin, and hot. It should be applied quickly in a warm room and the parts to which it is applied clamped up quickly before the glue chills. It is the glue which penetrates the wood that holds the parts together and not a layer of glue between the joined edges or surfaces. It is therefore evident not only that joints and surfaces should be well smeared with glue, hot and thin enough to be quickly absorbed, but also that the parts should be clamped up quickly while the glue is still hot so as to prevent any surplus from remaining in the joint. This is an additional reason for making close fits in all joints—in those which are to be glued up as well as in those which are not. It[141] is a common fault of beginners to be satisfied with loose mortise and tenon joints, counting upon the glue to fill up the spaces. Much of the furniture found in the markets falls to pieces for the same reason. Such work should never be allowed to pass. It is based upon an entirely mistaken notion of the true office of glue and is nothing more nor less than a falsehood in wood.
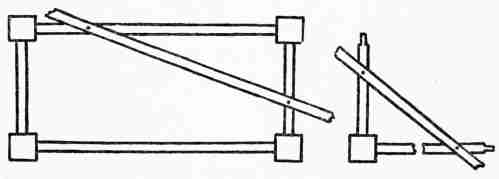
Systematic Methods Required.—As in the preparation of stock and working it up, so in gluing, system is all important. The hand screws or clamps should be made ready and adjusted to the required width so that they may be quickly placed in position as soon as the glue is applied. The whole process must be managed as quickly as possible because the joints must be tested before the glue has had time to set. A carpenter's large square should be used for testing the right angles, since it is more reliable[142] than the small try squares. It will frequently be found necessary to hold framing pieces square while the glue is hardening. This can easily be done by nailing small strips of waste stock across the parts, as shown in the drawing. A beginner should be cautioned not to attempt to glue up too many joints at one time. Two opposite corners of a framing piece should be glued up separately and left to set before the attempt is made to glue the whole rectangle together. The two remaining joints, however, should be glued and clamped together at the same time.
Inexpensive Framing Stock.—Picture-frame stock can be easily obtained of dealers in artists' supplies and in furniture stores in a great variety of styles. Much of it is so well prepared and so nicely finished that it leaves little to be desired. It is, therefore, often best to secure the stock for frames in this way. It is, however, somewhat expensive, so that, when economy is important, it behooves the young woodworker to prepare his own framing stock.
Very satisfactory frames 2 inches in width or less may be made from matched oak flooring, a section of which is here illustrated, by planing off the tongue and cutting away one side of the groove[143] to furnish the inset for the glass. Wider flat frames of any thickness can, of course, be cut out from the ordinary stock. A special tool for cutting the inset is desirable but not necessary. A 1⁄4-inch saw cut may be made with a circular saw or even with a hand saw and the necessary removal of the wood accomplished by means of careful chiselling.
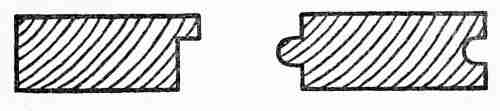
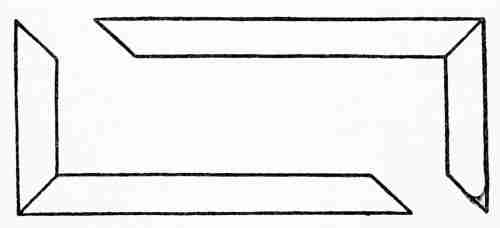
Mitres.—Frames may be joined at the corners in various ways. A common way is by the mitre joint illustrated in the drawing. To secure good joints of this kind it is necessary that the mitres be cut on an angle of exactly 45 degrees and that[144] the pieces for the corresponding sides of the frame be precisely of the same length. Hand sawing is generally not exact enough to produce angles of sufficient accuracy even when an ordinary mitre box is used. Hand-sawed mitres, therefore, will require a little truing with a small plane. Great care must be exercised also in fitting the corners together. The common bench square is not large enough to prove the work. A better way is to lay a carpenter's framing square on the bench and fit the two pieces of the frame against the sides of the square, testing each corner in that way.
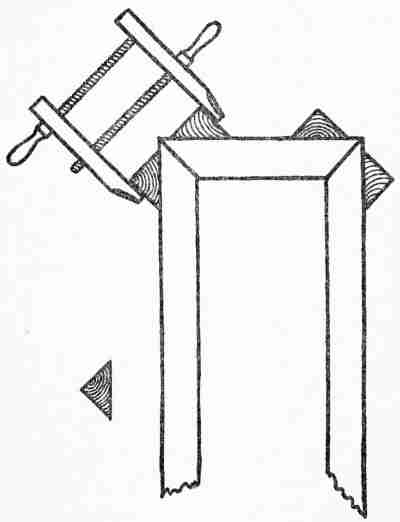
Gluing the Joints.—If the corners are unusually well fitted, a good joint can be made by first sizing the ends with glue and then firmly pressing the pieces together upon a true surface, leaving them undisturbed for four or five hours until the glue is hard. By sizing the ends of the joints is meant thoroughly filling the end pores with glue, rubbing it into the pores with another block. Generally speaking, however, it is necessary to make use of a mitre-clamping device. If a special clamping device is not available, one can be easily made by gluing small soft wood blocks to the parts of the frame near the corners, as shown in the accompanying drawing. In a half hour or so these blocks will become firmly[145] set so that the mitre joints may be glued together, clamping them up with a hand screw. As already explained under the general directions on gluing, it is good practice for a beginner to glue up opposite corners and not attempt to glue up the two remaining corners until the first two are well set. When the first two corners are well set they should be nailed; and before the two remaining corners[146] are glued it is well to try the parts together to see if they do not require a little correcting before gluing. These joints also should have light nailing after the glue has been set. In nailing, small holes should be made with a brad awl or drill in order to avoid splitting the corners, and long finishing nails should be used.
The Defect of Shrinking.—With proper tools the mitre joint is the easiest one to make, but it has one unavoidable defect, especially in wide frames. It is very difficult to get stock well seasoned and almost impossible to get it perfectly seasoned, so that wide frames, however well finished, must be expected to shrink a little after they are joined together. As most of this shrinking is across the width of the stock it is evident that it will tend to open the mitre joints on the inside of the corners. This is what happens almost invariably with joints made in this way from wide stock in picture framing. The same defect is also frequently observed in the interior finishing around windows and doors.

There are three other methods of joining the corners of picture frames—viz., the halved lap joint, the mortise and tenon joint, and the dowelled joint. A drawing is shown to illustrate these three kinds of corner joints, and it is hardly necessary to say[147] that no one of them is open to the same objection that attaches to the mitre joint. All these joints require accurate cutting and rather more of it than the mitre joint requires, but they are more easily glued up. The halved lap joint is easily clamped up with a common hand screw, even when the frame is a very large one. But the other two require long clamps in order to pull the joints up well.
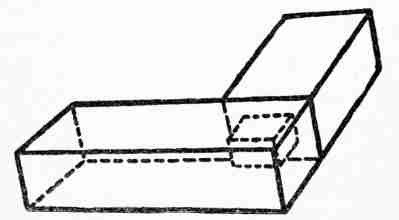
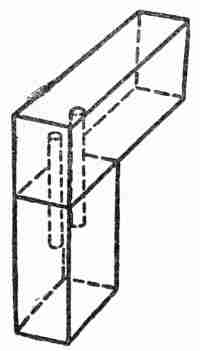
Character of the Frame.—The kind of joint required depends upon the general character of the frame—whether it is to be heavy or light, wide or narrow, and whether made of picture frame moulding or of the plain framing stock with round or flat face; and the character of the frame is a matter of[148] design, determined by the kind of picture, by its setting, and by other considerations discussed in Chapter III. How the plan for the construction of the frame for any given picture is influenced by such considerations may be seen in the example which follows:
This photograph is 60 inches long by 16 inches wide. It is a copy in brown tones of a classic painting by Otto Kneille—The Education of Athenian Youth, the original of which hangs in the Royal Gymnasium in Berlin. It represents a spacious hall or court showing three of the large marble columns and a massive seat in which an old man reclines while another old man is expounding some doctrine to him and to a group of younger men gathered around. In the centre of the scene a boy lies flat upon the pavement reading a manuscript. Near him several youths under the direction of a master, are contending in feats of strength. The composition is one that suggests weight and[149] power. It may appropriately hang in the hall or in the library over a wide, low bookcase.
A picture of this character needs no mat and must have a wide, heavy frame. The stock chosen was oak, 4 inches wide, 11⁄2 inches thick, and flat faced. The size and weight of such a frame, including the glass, demand firmness of construction as the first consideration. The stock is too wide for successful mitring because shrinking would naturally open and weaken such joints. It was therefore framed together with mortise and tenon joints, well glued. A dowelled joint might have sufficed, but it would not have the same strength. The mortises were cut in the vertical ends and the tenons were left on the long horizontal pieces. This was in conformity with the usual method of joining framework—for example, door frames, window frames, panel frames, and other interior woodwork; for the greatest possible length is invariably given to the vertical parts.
The frame was given a dark brown finish, repeating the darkest tones of the picture. Long screw eyes were fastened to the back 2 inches from the top, so that the picture might hang nearly flat against the wall. A strong braided wire about 75 inches long was run through the eyes and securely looped[150] at each end, so that a little more than an inch of wire on each side passed through the eyes. Since the picture was to have a prominent place on a certain wall, two nails 66 inches apart allowing for the two widths of the frame as well as for the length of the picture were driven into this wall, and the heavy photograph was easily hung and balanced without exposing the wire to view.
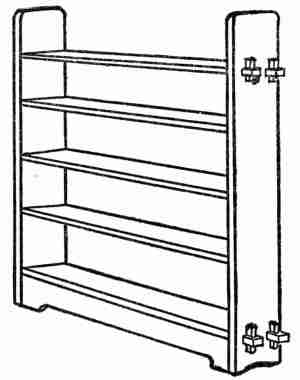
The Design.—The problem of design was to plan a simple, inexpensive bookcase which could be easily transported and set up in a student's room and which would hold approximately two hundred books. The drawings show how these requirements were met in the design. When in use it is held together by keyed shelves at the top and bottom. The necessary stiffness is given to it by the base pieces which are fastened both to the sides[151] and to the bottom shelf by screws. Additional stiffness is given by drawing up the three middle shelves to the sides by means of screws. Upon removing the screws and the keys the bookcase is easily taken apart so that it may be crated in compact form for transportation. It is equally easy to set it up again. It has no back and may therefore stand away from the wall as well as against it. Its contour is plain, with few curves, giving a simplicity which will harmonize with modest surroundings and yet not bar it from keeping company with more pretentious furnishings.
The original of this design was actually made up in white wood, stained and finished to harmonize with black walnut furniture; but it may be made up in oak, ash, cherry, or any of the common woods used for furniture. For one bookcase the stock required is as follows, the sizes allowing for finishing to the dimensions as given in the drawing: For the ends, two pieces 7⁄8 inch × 101⁄4 inches × 4 feet 21⁄2 inches; for the short shelves, three pieces 7⁄8 inch × 101⁄4 inches × 3 feet 1 inch; for the long shelves, two pieces, 7⁄8 inch × 101⁄4 inches × 3 feet 5 inches; for the base pieces, two pieces 7⁄8 inch × 63⁄4 × inches × 3 feet; for the keys, one piece 7⁄8 inch × 7⁄8 inch × 1 foot. In addition to this there should be two dozen No. 10[152] round-headed blued screws, and one half dozen 11⁄2 inch No. 10 flat headed blued screws.
The tools needed are as follows: Rip saw, cross cut saw, back saw, compass, jack-plane, smoothing plane, block plane, spokeshave, try square, steel square, rule, knife, hammer, mallet, screw-driver, 3⁄4, 1⁄2, and 3⁄16 inch bits and bitstock, and 1⁄2 and 3⁄4 inch chisels, gauges, and sand-paper.

Construction.—All the stock should be jointed, planed to width, and smoothed with sand-paper. The two end pieces should be squared to length, the top corners rounded, and the curve at the bottom cut as shown in the drawing. Care should[153] be exercised in sand-papering not to round the edges. The correct spacing for the shelves should then be marked off on the end pieces and squared across, care being taken to have both ends spaced alike. To do this plane the ends together, with their edges flush; and, beginning at the bottom, measure off each of the spaces with correct allowance for the thickness of the shelf and mark these spaces across the edge. Then, separate the end pieces and with the marks on the edges as a guide, square across each of the end pieces on the inside and mark with a knife. In allowing for the thickness of the shelves it should be remembered that the stock, though originally 7⁄8 of an inch in thickness, has been planed and sand-papered, some of the shelves perhaps having been finished down more than others. It will therefore be necessary to measure and allow for the thickness of each shelf separately.
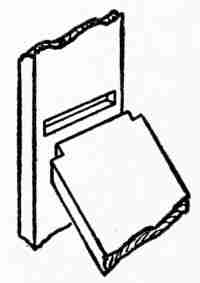
The three middle shelves are "gained" in—i. e., set into grooves in the upright ends—1⁄4 of an inch deep, as shown in the sketch. It will be better craftsmanship if the grooves are not carried across the full width of the end pieces but stopped, say,[154] one inch from the edge, the shelves being cut to fit, as shown in the drawing. If this be done, the grooves should be cut out carefully with a chisel. If the grooves be carried across the full width of the end, they may be cut down with a back saw and then chiselled out. To insure a good fit in either case care should be exercised not to cut outside the knife lines. Chisel the bottom of the grooves carefully so that they will be uniformly 1⁄4 of an inch deep.
The next step is to cut the mortises for the top and bottom shelves. The dimensions for these should first be laid off on the stock by means of a gauge. They should then be bored well inside the marks and carefully chiselled out. Before this chiselling is done, however, knife lines should be marked on the outside of the end pieces exactly opposite the gauge lines. In mortising, as in cutting the grooves, the greatest care will need to be exercised that the chisel does not cut outside the knife lines. In working for a close fit it is better to err on the side of removing too little stock at first, if one must err at all, since it is quite easy to remove a little more in the final fitting. It is quite impossible to replace stock once removed.
In measuring for the length of the shelves it should not be overlooked that the top and bottom shelves are to carry the tenons to be keyed through the end pieces. These tenons should be cut out accurately with a rip saw, and the stock between them removed with a chisel after a deep knife line has been made. After fitting these tenons to the mortises and finishing them, the mortises for the keys should be cut, using a small chisel. It should not be overlooked that the outside face of each key mortise is cut on an angle, as illustrated. The three middle shelves are then cut to length, the ends squared by means of a block plane, and corners cut out to fit the grooves.
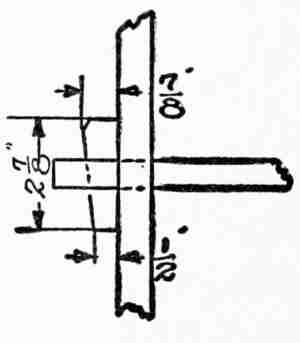
The parts are now ready to be put together temporarily and squared up in order to fit in the base pieces more perfectly than could be done by mere measurement. It will add a pleasing detail to set back these base pieces 1⁄4 of an inch from the front and back faces.
After all the parts are carefully fitted they should be assembled and the key and screw fastenings inserted. When this is accomplished the bookcase[156] is ready for finishing. As this is a distinct part of furniture making it is reserved for treatment in a later chapter.
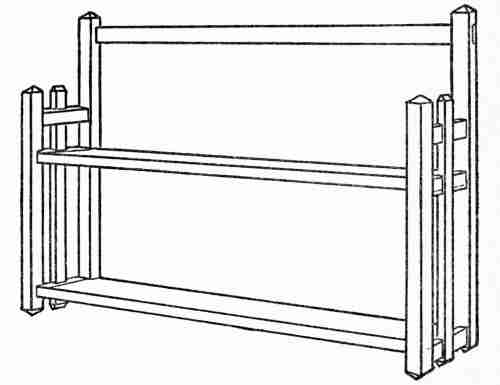
The Design.—It is designed to plan a light but strong book rack, to be fastened to the wall of a chamber. Since it is intended to occupy the space that might be given to pictures it is properly as simple in construction as a picture frame, depending upon good proportions and symmetry to give a pleasing effect. The straight lines of the design, which is illustrated above, meet these requirements[157] and also harmonize with the general form and outline of books. Both shelves may be used for books, if desired, but the design permits them to be confined to the lower shelf, reserving the upper one as a suitable place for a bit of pottery or two, or some other choice bit of bric-à-brac. The mortise and tenon joints give the essential stiffness and strength without requiring the use of heavy stock.
Materials and Tools.—Since strength with lightness is an essential feature to realize in the working out of this design, soft woods should be avoided. Ash is probably the strongest of the light woods in common use. Oak is much stronger but heavy and hard to work. White wood is comparatively light and very strong. Gum wood is classified with ash excepting that it is closer grained. Since this book rack is to be used in a chamber in which the wood trim is in enamelled white and most of the furniture of a mahogany finish, it will be equally appropriate to make it of white wood, to be finished in enamelled white, or of bay wood as a basis for mahogany finish. It was decided to adopt the latter course.
The stock requirements for carrying out this design are as follows: 2 back posts, 11⁄4 inch ×[158] 11⁄4 inch × 24 inches; 2 front posts, 11⁄4 inch × 11⁄4 × 18 inches; 2 centre uprights, 5⁄8 × 1 × 18 inches; 1 back rail, 5⁄8 × 11⁄4 × 37 inches; 1 end rail, 1 × 11⁄4 × 44 inches; and 2 shelves, 7⁄8 × 7 by 37 inches.
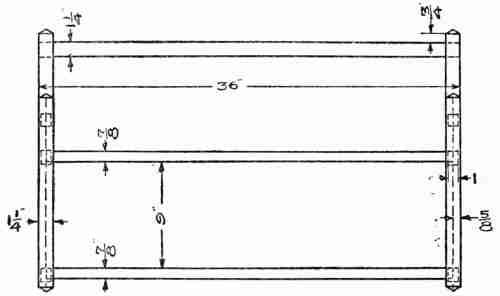
The tools needed are much like those required in the previous problem—i. e., the same planes, saws, bitstock, squares, and the gauge; but there will be needed a 3⁄8-inch bit, 3⁄8-inch and 3⁄4-inch chisels, a knife rule, a rabbet plane, a mitre box, and a mallet.
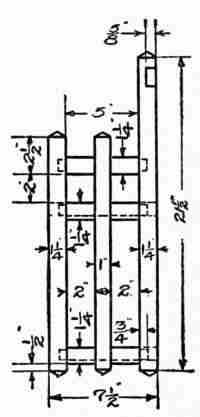
Construction.—The details of construction required are as follows: Dressing the stock pieces, cutting the posts to length, cutting the points on the posts, rabbeting the cross rails and cutting them[159] to length, cutting the mortise and tenons, halving on the end rails, cutting and fitting the shelves, cutting, fitting, and fastening the back rail, arranging the clamps and other appliances for gluing up, and cleaning off the glue after hardening.
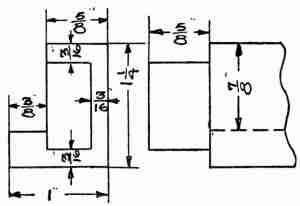
The stock pieces should be first "dressed" down to the drawing dimensions. This means that they should be planed and sand-papered preparatory to laying out the cutting dimensions. The front and back posts should be cut to length in the mitre box, care being taken to allow an extra 1⁄2 inch for the pointed ends at the top and bottom. These pointed ends are cut in the mitre box by raising one end of the post and sawing to lines squared around the post 1⁄4 inch from the other end. The angle of the cut is made uniform by resting the raised end of the post on a block lightly nailed on the inside of the mitre box, thus giving the same elevation for all the posts. The 1-inch by 11⁄4-inch piece for rails is rabbeted out, using the plane designed for that purpose, and afterward cut to[160] length as called for. The blind mortises should be made not more than 7⁄8 of an inch deep, and the tenons 1⁄16 of an inch shorter in order not to strike the bottom of the mortise. One of these rails should be accurately laid out with knife lines and the rest marked from this as a pattern. The drawing shows the location of the tenon with reference to the part of the rail on which the shelf rests. This is the most convenient position for cutting the tenon and it also gives greater strength. The centre uprights should be halved on after the end rails are in position, being cut for this purpose as illustrated in the drawing. They may be allowed to stand out 1⁄8 of an inch beyond the face of the end rail, and in making the joint an equal amount of stock is to be taken from the rail and from the upright. The shelves are then easily cut to length and the ends fitted with the block plane and dropped into place, being lightly glued and nailed with brads from the under side of the rabbet. Finally[161] the top back rail should be halved in, being left to the last in order that the more important fitting of the shelves may be more easily accomplished.

In gluing up the mortise and tenon joints care must be exercised to set clamps out ready for use before the glue is applied so that the parts may be promptly drawn up in position. After gluing they should be allowed to remain about ten hours in order that the glue may properly harden before the clamps are taken off. All the extra glue squeezed out of the joints in clamping must be scraped off with a chisel, after the glue has hardened a little; and any remaining spots of glue must be carefully removed with fine sand-paper so as not to leave anything to interfere with the filling and finishing.
The Design.—So far as the question of use is concerned, no problem of design could be more definite than this one, since an umbrella rack can have but one use. The only elements of beauty possible are found in simplicity, proportion, and the general effectiveness of the construction for meeting the demands of use. The drawing shows[162] four square, straight posts, squared at the ends, which are allowed to project a little above the top to avoid a box-like effect. All the joints are mortised except the division bars at the top. The cross pieces at the base are made wider not only to conceal the drip pan but to give a more stable appearance to the whole rack.
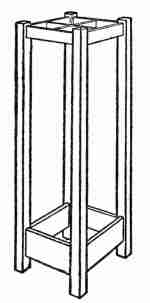
Materials and Tools.—Oak is selected as perhaps the most appropriate wood; but other woods, if the surroundings require it, may be used to good advantage. Oak is one of the strongest and most durable of the woods used for furniture and takes well a great variety of finish. It is also quite easily obtained.
The stock requirements are as follows: Four corner posts 11⁄4 × 11⁄4 × 271⁄2 inches; four top rails 1⁄2 × 11⁄4 × 9 inches; four base rails 7⁄8 × 3 × 9 inches; two division bars 1⁄4 × 11⁄4 × 91⁄4 inches; four cleats 1⁄2 × 1⁄2 × 9 inches; and one board 1⁄2 × 71⁄2 × 71⁄2 inches to support the pan.
The same tools in general will be required as in the previous exercises, but it will be necessary to add a 1⁄4-inch bit, a 1⁄4 inch chisel, a steel scraper, and two short clamps.
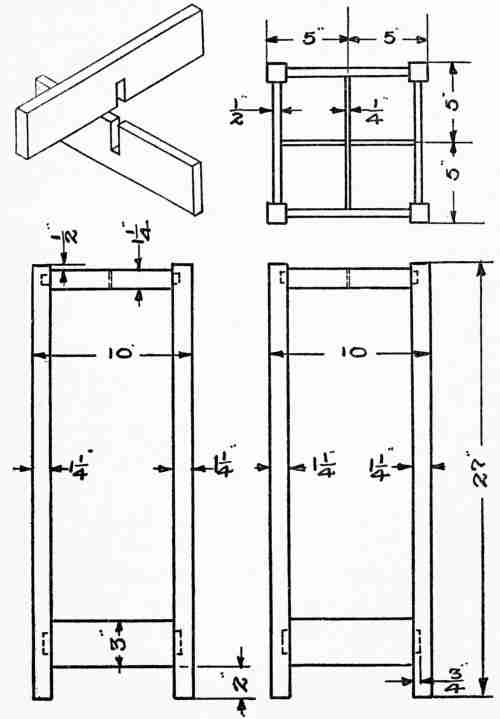
Construction.—All the stock should be planed to size, scraped, and sand-papered with the exception of the base board for the pan, since that is hidden from view. The scraper corrects all slight unevenness of surface and removes scratches and other blemishes. Care should be taken in sand-papering to rub always with the grain of the wood and to avoid rounding the corners. The corner posts should first be cut to proper length and the tops and bottoms slightly chamfered. Mortises are then to be located, bored, and chiselled up. The top and bottom rails should be laid off and the tenons gauged and cut, care being taken not to have them too long. The inside edges of the tenons have to be pared off slightly, as illustrated in the drawing, to allow room for each when they come together.
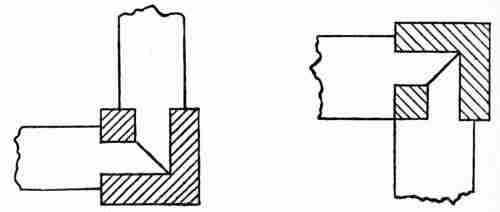
The next step is to assemble the parts, clamp[165] them up, and test them for accuracy. While these parts are in the clamps, measurements should be taken for the cross pieces, which may then be made, allowing extra length of 1⁄4 of an inch in each end for the tenons to enter the top rails. These cross pieces are to be halved together at the centre, as shown in the drawing. The base rails are designed to be thick enough to take up all the space on the inside of the posts so as to hide the corner, as illustrated in the sketch showing the bottom construction.
The next step is to assemble the parts for gluing. It is not necessary to explain this process in detail, since it has already been thoroughly explained in the general section on gluing. It is not necessary to glue on the cleats on which the pan rests; they may be nailed in. When the base is glued together measurements may be taken for the pan.
The Design.—This problem calls for an attractive article of furniture which should also be useful as a receptacle for magazines and current newspapers. An enclosed portion between two of the shelves is desired to conceal from view and preserve for a time the more valuable papers, parts of magazines, or clippings, as may be found convenient. The[166] perspective sketch on this same page shows how these simple requirements are met. The overhanging top adds character and strength to what might otherwise seem too light for the load it is intended to carry.
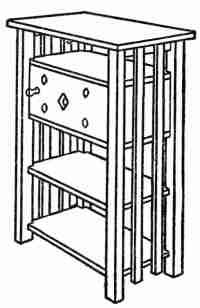
Materials and Tools.—Oak is selected as a suitable wood because of its strength and durability; for this stand is likely to be in almost constant use. A light wood, delicately finished, would soon show wear.
The stock list, according to the drawing, may be itemized as follows: 4 corner posts 13⁄4 × 13⁄4 × 36 inches; 4 upright slats 5⁄8 × 1 × 34 inches; four shelves 7⁄8 × 101⁄2 × 17 inches; one piece for the top 7⁄8 × 14 × 21 inches; 2 top rails 1 × 13⁄4 × 12 inches; 1 piece for the door 7⁄8 × 8 × 151⁄2 inches for the ends and the back of the closet 1 piece 5⁄8 × 8 × 36 inches; 1 pair 11⁄4-inch brass butts with screws for the hinges, and one brass knob or catch.
The tools needed are a jointer, a block plane, a smoothing plane, steel square, try square, knife gauge, fine cross cut saw, 1⁄2-inch bit and bit stock,[167] key-hole saw, 1⁄2-inch chisel, mallet, nail set, hammer, screw-driver, and steel scraper.
The principal operations are as follows: Planing to size; scraping and sand-papering stock; squaring ends and smoothing them to the required length; laying out gains at corner posts; making mortises for top rails; making the rails; assembling the main parts; fitting ends and sides of the closets; hanging the door and putting on the fixtures.
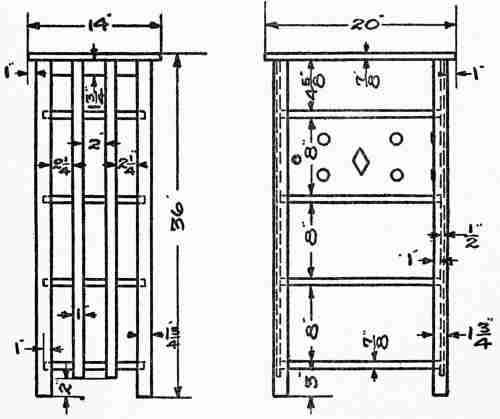
The Construction.—Smoothing with the plane[168] and scraping are very important and they should be completed before any sand-papering is done because particles of sand (silica), adhering to the wood, will dull the steel tools. All three operations are needed to remove the marks of the machine tools of the factory, in order to give a good finish in the end. The scraper follows the plane, removing the unevenness which the latter leaves on board surfaces. Sand-papering gives the finishing touches.

After the stock is well smoothed, the top and the shelves should be squared off, cut to length, and block planed. The posts should then be cut and accurately trimmed to dimensions. They may be marked with a knife line for the gains into which the corners of the shelves are to be fastened. Since the posts are perfectly square, no attention will have to be given to their exact location in marking or cutting the gains; but when the mortising for the rails is laid out, care must be exercised to mark them so that the mortises will come on the proper faces for assembling. In mortising for the top rail it is well not to work up to the end of the post but to cut back, say 3⁄4 of an inch, as shown in one of the[169] details. The rails may now be laid off and the tenons cut and fitted. It is exactly 81⁄2 inches between the shoulders of the rails. Since the shelves are 101⁄2 inches wide, one inch is thus left on each side to be gained into the posts.
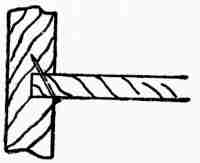
The parts are now ready for the first assembling. To do this it is convenient to have a clear bench top on which the posts may be laid on one side, face down. The rails and shelves may then be slipped into place, the other two posts placed on top, and the whole clamped firmly together. This is the preliminary assembling for the purpose of testing the accuracy of the work. If it be found all right, it should be taken apart again, and, after glue has been applied to the tenons and to the ends of the shelves, the parts should be quickly re-assembled and clamped up as before, with the angles kept true. Before the glue hardens the shelves should be nailed into the posts, as indicated in the drawing. In this case it is the nail that is the main stay. The glue is accessory, adding much to the stiffness of the construction.
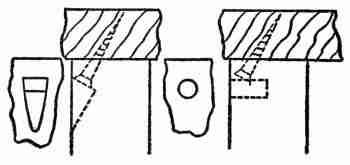
The top may now be set on and fastened by screws or by brads driven through into the posts and well set[170] so that they may be concealed by putty, coloured to match the stain used. The end slats should be fastened on in the same way. The back and ends of the closet are next cut to size and bradded in. The door is then fitted and, to break the surface a little, an ornamental design is cut in the centre. Still further relief is given by setting in the door 1⁄4 of an inch from the edge of the shelf and ends of the closet. The door is now hung on brass hinges, the stop and catch added, and the stand is ready for staining and finishing.
The Design.—This is to be a table designed on simple lines and of good proportions. It is to have no drawer but as much shelf room as conveniently possible. The under shelf is designed to be cut out to allow a chair to be drawn up on either side. The end shelves may be regarded as designed to combine a bookcase with the table, thus adding much to its usefulness.
Materials and Tools.—For a table of this kind[171] oak is very appropriate. The following list gives the stock required for one table. The widths and the thickness are as called for in the drawing, but the lengths are given a little long to allow for cutting. A board not less than 9 inches wide and 10 feet long will be needed as stock for the top, the dimensions of which are 7⁄8 × 26 × 39 inches. A 10-inch board, 41⁄2 feet in length, will also be required for the shelves. There will also be needed four legs 13⁄4 × 13⁄4 × 30 inches; eight slats 1⁄2 × 11⁄2 × 18 inches; two back pieces 1⁄2 × 2 × 201⁄2 inches; two rails 7⁄8 × 3 × 32 inches; and two rails 7⁄8 × 3 × 20 inches.

The same tools will be required as in the foregoing problems excepting that a 1⁄2-inch bit and a 1⁄2-inch chisel will be required for mortising, and two 3-foot clamps.
Construction.—The first step in the construction is to dress the stock, smoothing, scraping, and sand-papering it, and working the various parts to size. The lengths, however, of all parts excepting the[172] legs are not cut accurately until, in the process of construction, these parts are needed. The legs are at once cut to length and the mortises laid out, bored, and cut. A gain should also be cut in each leg, into which the bottom shelf is to be fitted, glued, and bradded from the under side. The end and side rails may then be laid off for shoulders and tenons, and cut. In this case the tenons should be made 1⁄2 of an inch wide.
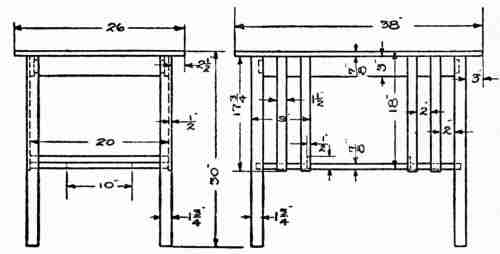
In gluing up, the top should receive attention first, in order to allow the longest possible time for testing the work under the inevitable changes due to continued seasoning. Great care must always be exercised in making the glued joints. It is often necessary to make them over on account of the development of cracks. Proper care, however,[173] will prevent this. The general directions for gluing, given at the beginning of this chapter, will be of service.
As soon as the top has been glued the four short side pieces may be glued to the shelf, taking pains to make good joints before applying the glue. It should be noted that the inside ends of these short pieces are to be 15 inches apart, and it is important that the ends on opposite sides should be exactly squared across, as indicated in the drawings. This may be accomplished by first locating the centre of the shelf, at the intersection of lines, marked c in the drawing, and measuring 71⁄2 inches each way to the line of the back pieces, which are to run across the whole bottom shelf. As soon as the glue is hardened the ends should be squared and made true to set into the gains when the table is assembled. Finally, the legs, the rails, and the shelf may be assembled, glued, squared up, clamped, and set aside to harden before the clamps are removed.
It is a good plan to brad the shelf in from the under side before the glue hardens. After standing a few hours the table will be ready for the 1⁄2-inch strip which forms the back of the shelf. This is to be fitted and bradded in. Then the slats may be cut to length. They project slightly below the[174] shelf, and are fastened in position by screws. The top may be cut to length and its ends smoothed, after which it may be fastened on the frame by means of screws and buttons, as already described in the early part of this chapter.
The Design.—This table, as the illustration shows, is designed to be of simple style, without a drawer or side shelves, and with the bottom shelf keyed into the base rail. Heavy, square legs, and mortise and tenon joints are called for.
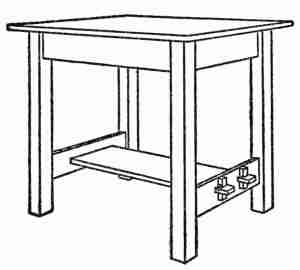
Materials and Tools.—The mission type of furniture, to which this design belongs, suggests oak as the fitting wood. The stock for the top, the dimensions of which are to be 7⁄8 × 28 × 44 inches, may be cut in three pieces from a 10-inch board, 12 feet long. For the shelf a board 7⁄8 × 12 × 43 inches is required. There are needed also four legs 23⁄4 × 23⁄4 × 30 inches; two side rails 7⁄8 × 4 × 36 inches; two end top-rails 7⁄8 × 4 × 22 inches; two[175] end bottom rails 11⁄2 × 4 × 22 inches; and for keys a strip 1 × 2 × 28 inches.
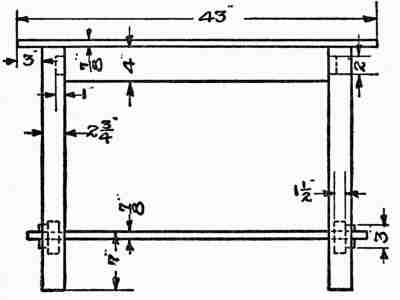
The same tools are required as were needed in the foregoing problem.
Construction.—Since this table has a larger top than the light library table, even greater pains must be taken than in the case of the smaller table to join the boards for gluing up. All like parts should be laid off together and the necessary mortises and tenons cut and fitted, as in the previous case. The two end rails may be glued into the legs first and clamped, leaving the side rails to be put in place last, when the bottom shelf may also be fastened in without gluing by means of the tenons[176] and keys. The latter should be cut somewhat longer than is really needed so that they may appear to be as effective as they really are; and they should be tapered at least 1⁄2 of an inch in order to drive up well. A small brad may be driven in to keep them from getting loose when the work shrinks.
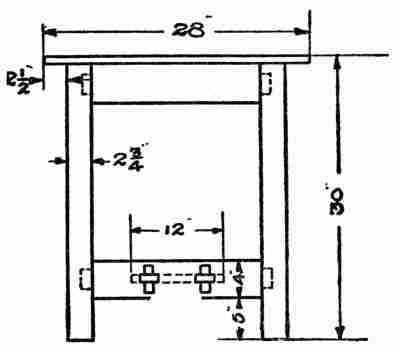
The Design.—This is to be an upright bookcase, with five shelves and an overhanging top. Some variety of surface is afforded by the arrangement of the sash, as indicated in the drawing. The shelves are made to be adjustable, and not fixed as in other problems.
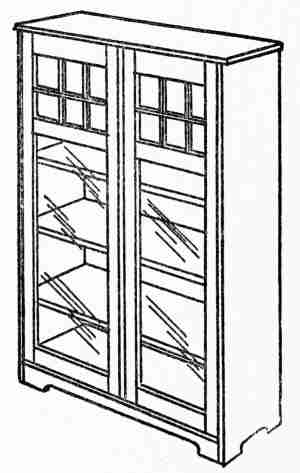
Materials and Tools.—The stock required for one bookcase of this pattern is as follows: two end pieces 7⁄8 × 111⁄2 × 481⁄2 inches; for the top and bottom, two pieces 7⁄8 × 12 × 40 inches; four shelves 7⁄8 × 11 × 40 inches; for the sides of the doors, four pieces 7⁄8 × 2 × 45 inches; for the top and bottom rails of the doors, four pieces 7⁄8 × 21⁄2 × 18 inches; for the middle rail, one piece 7⁄8 × 2 × 18 inches; for the sash, one piece 7⁄8 × 1⁄2 inch × 6 feet; for the back, enough 1⁄2 inch stock to cover the space 38 × 46 inches. In addition to this there will be required four hinges, two catches, a lock, and glass for the sash as dimensioned in the drawing. It is not necessary, however, to cut the small lights. One large pane of glass may be set in the full width of the door so that the small sash divisions may be apparent rather than real.
The tools for this problem are the same as those used in previous problems with the addition of a 1⁄4-inch bit and 1⁄4-inch chisel, and a rabbet plane, or a universal plane for cutting out the rabbet for the glass.
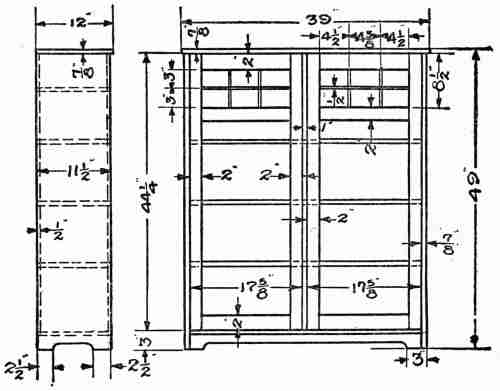
It is not necessary to give directions for the treatment of the stock, since it is practically the same as that employed in preceding problems. The details for cutting dimensions are given in the accompanying drawings. It would be well for the young woodworker to study these carefully and[179] make out a working plan of procedure similar to that which has been outlined in other problems.
Construction.—The first thing to do is to erect the bookcase—i. e., to cut the sides, the top, the bottom, and the back pieces to proper form and dimensions, bring them into position, and fasten them. It will be noticed that the sides and top are rabbeted out, as indicated in one of the small drawings, so that the edge of the back will not show when it is nailed in position. The bottom shelf is also made narrow enough to allow the back boards to be brought down over it and nailed to the edge.
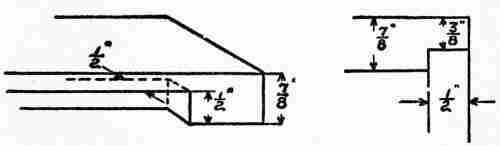
After the case is erected the doors should be laid out according to the drawing for mortises and tenons, and the inside edges rabbeted to give an inset for the glass. If it is decided to use one large light at the top of the door instead of six small ones, the sash effect for this light will have to be made of pieces thin enough to allow this arrangement.[180] When the doors are ready for setting the glass it may be held in place by small 1⁄4 round strips, bradded in behind it. Great care should, of course, be exercised in gluing up the doors to avoid strains which might give them such a twist that they could not be fitted to the case. Careful fitting of all the mortises and tenons and the usual assembling of the parts of each door before gluing is attempted is a wise precaution. It will also be wise to allow a little stock for trimming off, both on the sides and on the ends, when the doors are finally fitted in.
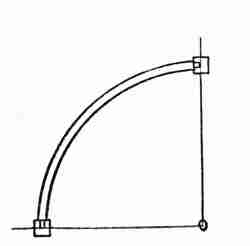
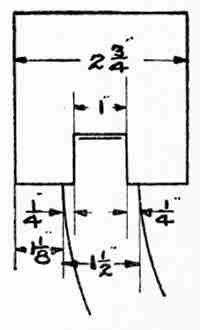
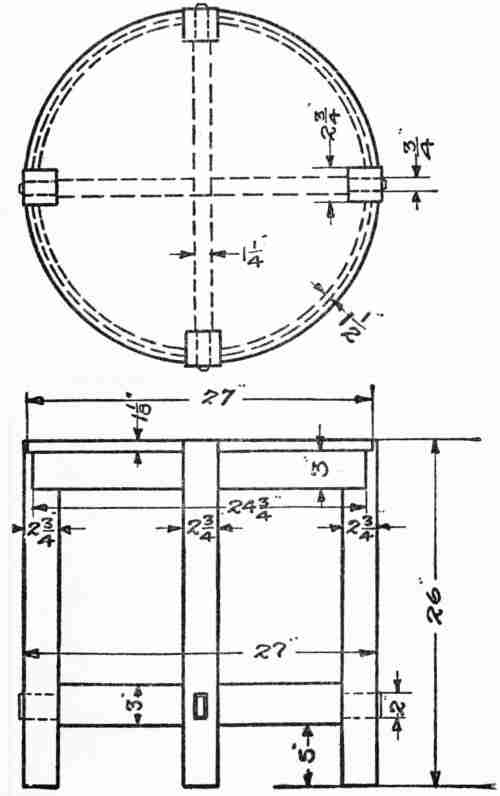
The Design.—This problem calls for a table of mission style with square legs set into the circumference[181] of the table flush with the top and having tenons exposed on the face of the legs. Simplicity of form combined with strength characterizes the design.
Materials and Tools.—Quartered oak is recommended for a table of this design. The stock required for one table is as follows: four legs 23⁄4 × 23⁄4 × 27 inches; two cross rails 11⁄4 × 3 × 29 inches; one piece of 3 × 12 × 20 inches for the curved rails; and stock enough to make a round top 11⁄8 inches thick and 27 inches in diameter.
The only tools desirable to provide, in addition to those previously used, are a trammel and spokeshave or a circle plane.
Construction.—The first step is to join up and glue the top so that it may have ample time to harden and dry while the other work is being accomplished. The stock for the legs may then be dressed and the bottom mortises marked and cut through the posts. Care must be taken to transfer the marks to the opposite side so that the mortises may be accurately outlined on the face. Care must also be taken in cutting the mortises, in order to make good, clean joints. A dimensioned detail of the top mortises, which are to receive the tenons of the curved rail, shown on page 180, should be[183] consulted before laying out this work. It should be noticed that the legs project 11⁄4 inches above the top rail. After the top mortises are cut the cross bottom rails should be halved together and the tenons laid off and cut. It will be noticed that the projecting end of the tenons is to be bevelled off, but this should not be done until the fitting is completed.
In laying out the plan of work for the construction of the curved rails the trammel comes into use. With this, mark off carefully the inside and outside curves on a thin piece of board and, with a large steel square, draw straight lines from the centre or pivot point, making an exact quarter circle. This is shown in one of the drawings on page 180. Then, parallel with each straight line and on the inside, mark off other lines one half the thickness of the leg. This locates the shoulder of the tenon. The pattern should then be carefully cut out of the thin board and used as a template for marking out on the stock the form of the curved rails. After these rails are band sawed and smoothed, the tenons may be cut.
When the framing parts of the table have all been cut and fitted they may be assembled and glued. Finally the top is placed face down on a bench top[184] or on horses, and the inverted frame laid over it and centred to give the correct position of the insets for the legs. These should be laid off with great care, the outline reproduced exactly on the opposite side, and the stock cut out. The top and frame should then be fastened together from the under side. After a few finishing touches have been given to the projecting ends and exposed surfaces, the table will be ready for the filling and varnishing.
This is the most ambitious of the special problems in furniture making here suggested. Details are given in the drawings on the opposite page. If the young woodworker can give sufficient time to it and can command the services of a few machine tools it will not be an unreasonable task to undertake. Most of the operations required in its construction have already been carefully explained and need not be repeated as detailed directions. There are, however, one or two principles of cabinet-making called for in this problem which were not required in the others. They will therefore need explanation.
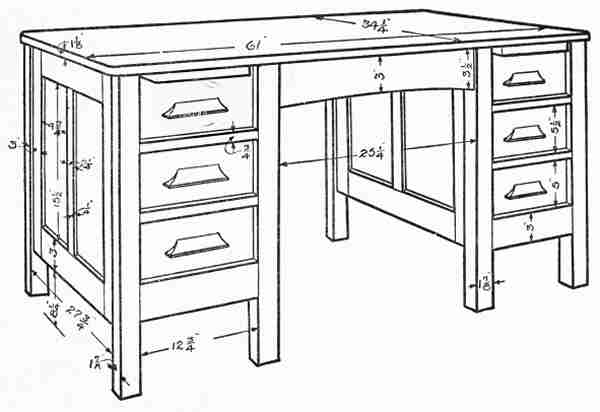
Panelling.—To avoid the difficulties which would result from the swelling, shrinking, and warping[185] of wide surfaces in furniture it is common practice to make use of the panel. The design of the panel is easily understood. It consists of a framework of ordinary thickness, put together usually with mortise and tenon joints. The inside edges of this framework are grooved, and into the groove is fitted a piece of stock generally thinner than the frame which fills the space between the sides of the frame. The panel board may be in one piece of wide stock or it may be glued up. It may be of very thin stock inset on both sides of the panel, or it may be of thicker stock inset only on one side, and perhaps not inset on either side, in which case only the edges of the board are made thin enough to run in the groove of the panel frame. In this problem the panel board is to be made of 1⁄2-inch stock, flat on the outside, and inset 1⁄4 of an inch. The back of the panel board is flush with the frame and is chamfered off to give the necessary tongue all around to run in the groove. The narrow stock of the framework is not likely to swell or shrink appreciably and, if well constructed, cannot become warped or twisted. The panel, on account of its greater width, may and generally does swell and shrink considerably; but it should be fitted to move easily in the grooves so that its changes may[187] not be noticeable. Should it be desired to finish the panels with a moulding this should be nailed to the rails, not to the panel board.
Danger in the Power Saw.—The panel frame may be constructed by hand, but if a circular saw be available it will be found of great service. Beginners, however, should employ the services of an expert sawyer and not assume the great risk involved in the use of a circular saw or even a band saw, especially if these saws are without guards. The necessary operations should be carefully laid out on the partially finished stock, with a good square and gauge. A combination plane is quite essential for cutting the grooves; and this carries its own gauge. Care should be taken to make all measurements from the centre of the piece, and gauge and square always from the face sides and from the face edges of the joints. The cuts that it is necessary to make for the joints are indicated in the drawing. In gluing up, the directions already given in the section on gluing should be followed.
Sand-papering.—There is a legitimate use for sand-paper in the finishing stages of the work on this desk, as there is, in fact, in almost every kind of fine woodwork. Its use has already been advised in the directions for furniture making. In furniture[188] manufactories sand-papering machines are among the most expensive machines to be found in the shops; and their high cost is of course justified by their productive value. It is quite impossible to work down large pieces to a good surface by the process of planing. If a sand-papering machine is within easy reach of the amateur cabinet-maker, it will be very desirable for him to send all large pieces like the tops of tables and panel boards to the factory in order to have them run through the machine. The expense is very slight. In sand-papering by hand considerable pressure should be applied as evenly as possible and always along the grain. Any movements directly across the grain or at an angle are sure to show through the finish. The process is facilitated by wrapping the sand-paper around a block of wood about 2 × 4 inches in diameter or, better still, a block of cork of the same dimensions.
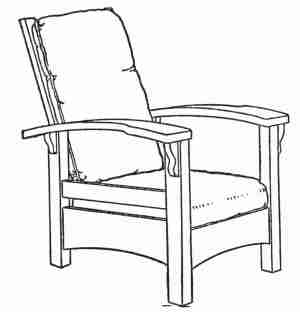
History of the Design.—Among furniture designs the Morris chair has become a classic. It takes its name for its originator, William Morris, the great English designer and reformer, to whom, perhaps more than to any other person, we are indebted for sane and honest work in furniture design and in[189] all forms of household decoration, not only in England but in other European countries and in America. And probably no one of his creations has done more to teach the lesson of simplicity, comfort, and utility in furniture than the Morris chair.
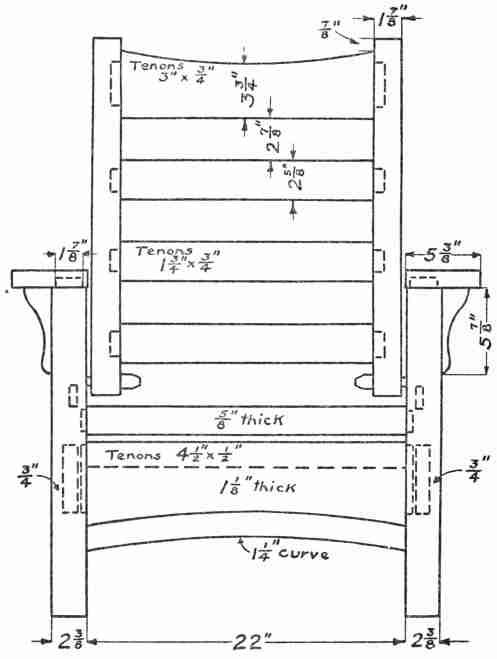
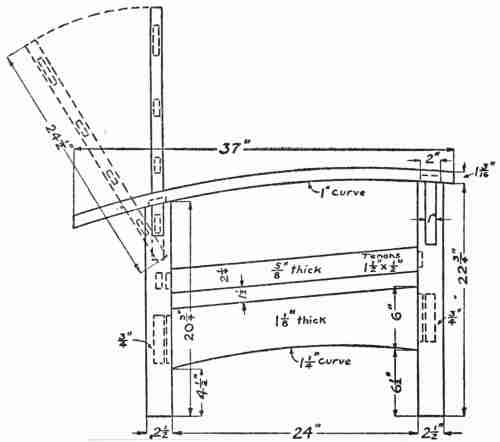
It may be well to add, however, that like many other famous works of art, the original design of William Morris has suffered much in countless imitations. The furniture shops display carved and otherwise embellished monstrosities under the name of Morris chairs which are nothing less than an insult to the great name they bear. But the life of all imitations of original and really great ideas is bound to be short. Only the good and true, which are the original, survive. The really valuable features of the original Morris chair design, combining beauty of material with simplicity of form and construction, have taken a lasting hold[190] upon the hearts of all people who have found solid comfort in these chairs. The chairs contemplated in[191] this problem are illustrated on page 50, chapter II. Both are in quartered oak. The one on the right is stained in dark brown and has a box cushion for the seat and a pillow cushion for the back, in medium brown leather. The one on the left is in light fumed oak with cushions of mahogany velour. On account of its smaller dimensions it is somewhat lighter in weight than the one on the right, and the dimensions of the smaller one will be followed in this problem. This chair is an exact copy of one in[192] ash which, with a centre table and stool, were designed and made for a college girl's room; and a large part of the work of constructing the three pieces of furniture was done by the girl herself.
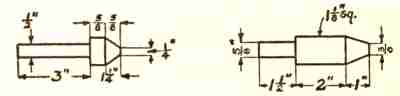
By careful examination of the dimensioned drawing shown on the preceding page the young woodworker who undertakes this problem should select his stock according to the following list: 4 legs 21⁄2 × 21⁄2 × 24 inches; two arms 3 × 51⁄2 × 38 inches; two bottom side rails 11⁄8 × 6 × 26 inches; two top side rails 5⁄8 × 21⁄4 × 26 inches; two bottom rails (front and back) 11⁄8 × 6 × 24 inches; one top rail (back) 5⁄8 × 21⁄4 × 24 inches; two back uprights 11⁄8 × 17⁄8 × 25 inches; three cross pieces for back (lower) 3⁄4 × 25⁄8 × 20 inches; one cross piece for back (top) 3⁄4 × 6 × 20 inches; one bracket 1 × 3 × 18 inches; four pins 41⁄2 × 41⁄4 inches square.
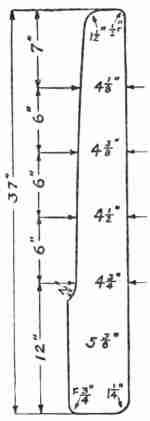
In sawing up the stock, allowance should be made of course, for necessary[193] waste in working down to the drawing dimensions. The arms are drawn with a curve and may be fashioned by band sawing them out of 3-inch stock. There will be a considerable saving in material and labour, of course, if the arms are made flat; but the effect of the curve is very pleasing. The back slats may be sawed to a slight curve, which is another attractive feature; but flat slats are easier to make and just as serviceable.
The process of construction does not differ in general from that already described in some of the foregoing problems, and need not be repeated here in detail. The method of finishing this and all other furniture referred to in the problems will be explained in the following chapter.
Since the Morris chair is a heavy piece of furniture, it will be necessary to provide casters for it. The Acme Pin caster, so-called, was used in the chair referred to in this problem. It makes use of a steel ball turning upon ball bearings, and is set up into the legs so as to leave only about 1⁄4 of an inch of the ball exposed.
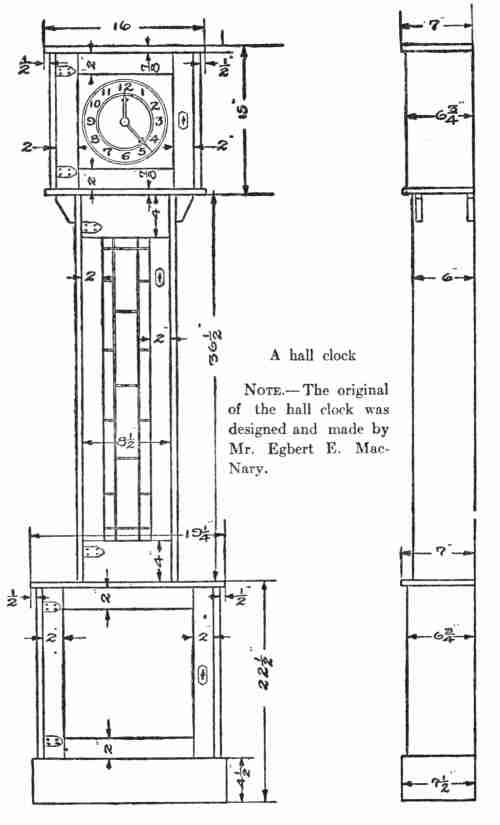
Note.—The original of the hall clock was designed and made by Mr. Egbert E. MacNary.
Design.—This clock was designed and built to conform to the requirements of the space allotted to it. [194][195] The lines of the case are all straight; there are no spires or gables or fantastic curves on the top. A hall clock is indoors, and the top should be horizontal; for all the other lines such as tops of window casings, picture moulding, etc., are horizontal. If the clock stood out of doors under the stars, then the top might be spired or pointed.
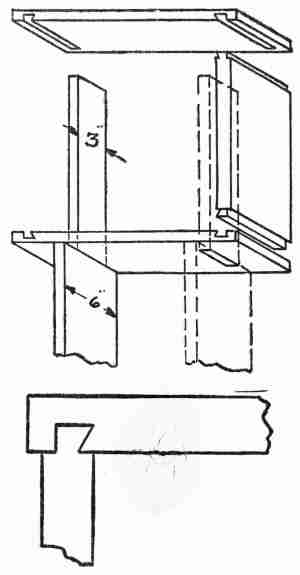
The construction, as indicated in the sketches, is simple and substantial. The long sides extend the entire height of the clock, being firmly joined into the base and head. The works are supported between these sides. The wood is 3⁄4-inch[196] quartered oak, hand dressed, and stained a warm brown. The dial, hinges, catches, pendulum, and weight are of brass.
Cutting Glass with a Wheel Cutter.—The long door has a panel of transparent leaded glass. This leaded glass work is a most fascinating process. The lead strips required for it were purchased of a dealer in lead specialties. Stained glass window concerns are usually willing to sell this lead. A full-size drawing was made of the design for the glass panel and the glass cut in pieces to match the pattern. A ten-cent wheel glass cutter was used. One caution, kept in mind, will enable one to use a wheel cutter of this kind without injuring it. It should never be used twice in the same cut. One stroke of a few inches over a cut previously made will ruin the wheel; but if the wheel is not abused by tracing over a cut, it will last a long time. The glass should be laid on a level table and the cutter used with a firm hand, making a continuous cut against a straight edge.
Soldering.—The long lines of the design are in one piece; and there is a strip around the entire outside edge. To solder the pieces together, the glass and lead strips are laid in position on a board, and brads (about 1 inch long) are driven part way into the[197] board close against the outside strips, so as to hold the pieces in position. A small bead of soldering paste is placed on each joint. A small soldering "iron" (which is really copper) and wire solder are used. The copper may be "tinned" by filing the point bright, heating it, dipping it in the soldering paste, and then quickly touching it to the solder wire. The point will become coated with the solder, or, as we say, "tinned." The iron will need frequent heating. A quick, light touch of the iron and solder wire to the joints will give the best result.
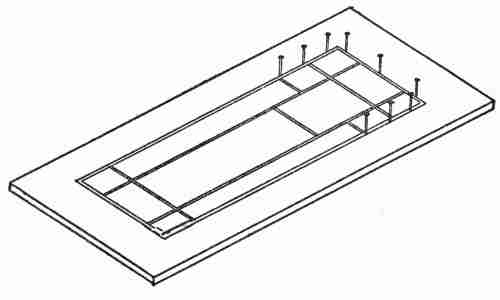
The two rings in the brass dial were "raised" by driving the brass into a groove in a piece of oak with[198] a hard wood wedge. The piece of oak was revolved around the dial by means of a nail driven through the centre of the dial into the oak piece. When a short arc of the ring had been raised, the grooved piece was swung around about 1 inch and the groove continued.
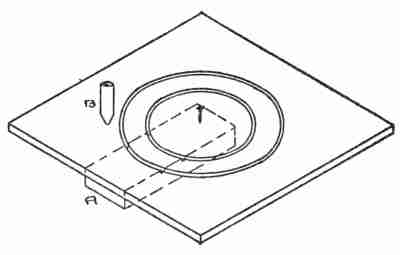

The length of the pendulum depends upon the number of teeth in the escape wheel. It was necessary in the case of this clock to take out the escape wheel, which had 32 teeth, and substitute one of 22 teeth to accommodate the length of pendulum desired.
The greatest charm of home life in the summer season is rarely found within the house. This is especially true in the village or in the country, where nature is at her best; but even in city homes[199] that are fortunate enough to include in their surroundings a small yard, a bit of garden, or any means of connecting the home with "God's great out-of-doors," though it be but a sheltered balcony or a window garden, the touch of nature is not lost. It is possible, however, for art to assist nature; and in many cases her assistance is very much needed. It is certainly true that nature cannot be left wholly to herself in the neighbourhood of the village or city home. If there be a garden, as much forethought must be exercised in planning it and as much pains taken in developing and caring for it as is called for in working out any form of interior decoration. There are problems of design and construction suggested by the need of suitable chairs and settles for the piazza, comfortable hammocks and couches for the balcony, awnings for the windows on the sunny side, and the right furniture, perhaps, for an out-door dining-room. The more decorative features are found in the rose arbours, the trellises, the garden screens, the lawn tent, the pergola, and the garden gate; and all these offer[200] problems that easily come within the reach of enterprising and capable young craftsmen.
General Types.—In the designing of out-door furniture there are two suggestions from nature that may appropriately find expression. On the one hand large masses, as seen in the hills and rocks, suggest solidity, weight, and permanence. This idea is embodied in walls of masonry, stone posts, iron gates, stone or concrete pedestals, or in some other kind of heavy construction. On the other hand, there are the suggestions of lightness, delicacy, and growth, seen in the growing vines, shrubbery, and small trees, which are carried out in the so-called rustic furniture, trellises, arbours, and garden screens.
An Example of Heavy Furniture in Wood.—A settle designed for comparatively permanent use in some cool or retired corner of the garden may be made of native pine, white wood, or spruce, well protected by several coats of paint. A suggestion is here given for such a design, laid out on substantial lines. Ordinary 4 × 4 spruce, planed, may be used for the posts, pine or white wood for the rest of the construction, 2-inch stock being used for the back pieces and arms, and 7⁄8-inch boards for the rails and seat. Mortise and tenon joints should be[201] used in the framing. The illustration shows also a simple design cut in the back pieces and repeated in the two front posts. It is a decorative feature which seems to counteract, somewhat successfully, the general severity of the lines on which the settle is designed to be built.
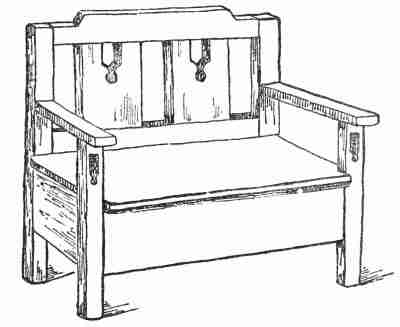
Concrete Furniture.—Still more substantial out-door furniture may be made of concrete cement. This material has come into use for sidewalks and pavements and as a substitute for brick and stone masonry in retaining walls, bridge abutments, and in a great variety of heavy building construction. Concrete is, in fact, an artificial stone, made by mixing[202] Portland cement with sand or pulverized rock in the right proportions, thoroughly wetting the mixture with water, and allowing it to harden. It is so commonly associated with heavy, crude work that it is not easy to believe that it may be also fashioned into anything of an artistic or decorative character; and yet it is capable of a wide range of out-door decorative uses. Gate posts, pedestals, fountains, window boxes, urns, and other forms of garden pottery in great variety, tables, and garden seats, have been successfully moulded in this material. Its natural stone gray colour and surface are well suited to many of these uses; but it may be given a variety of colour effects in bold design if occasion requires it. In weight and durability it leaves nothing to be desired.
The Wire Form.—Concrete cement cannot be modelled like clay. In its formative state it is too soft for such manipulation. It must be supported in some way while it is being worked into the desired shape and until it has hardened. In general there are two methods of giving the necessary support: viz., by employing an interior framework or skeleton, generally of wire lath, which is permanently encased in the cement; or by using a plaster or wooden mould into which the material[203] in a soft and plastic state is poured and from which it is removed when hardened. The latter method has been elaborated quite extensively for commercial purposes, because it readily yields an indefinite number of marketable results from the same moulds. The simpler wooden moulds may be easily made by a clever boy; and after a little experience he can soon learn how to mix the cement properly and mould a form successfully. For single pieces of concrete work, however, the wire forms are to be preferred. A suggestive illustration of this method is found in the following problem:
The dimensions called for in this design are a diameter of 10 inches and a height of 8 inches. The wire form must therefore be made to approximate quite closely to these dimensions. A good material for the form is galvanized wire lath of 1⁄2-inch mesh. This problem will require a piece about 8 inches wide and 34 inches long for the convex side, and a piece about 10 inches square for the base. From the square piece a circle 10 inches in diameter should be cut out. A strong pair of tinners' shears will be needed for this purpose. In bending the long piece into the cylindrical form it is well to proceed slowly in order to produce an evenly curved[204] surface—i. e., one free from angular bends. A good way to accomplish this result is to lay the piece down on a bench top and bend it up over a cylindrical wooden block. If nothing better is available a rolling pin will serve this purpose. When the bending is nearly complete, the two ends of the piece should be brought together, lapped over about an inch, and bound together with free ends of the strands of wire. A pair of pliers will be of great assistance. If this part of the process has been carefully done, there will result a cylindrical form 10 inches in diameter. The circular piece should now be attached to one end of this form by means of the free ends of the strands found there, bending the projecting wires over and clinching them at convenient points on the circumference of the circular piece where there are uncut meshes of the wire. The form is now ready for covering with the cement.
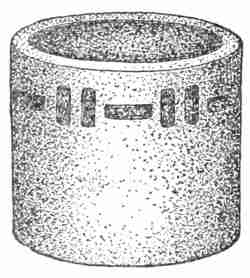
The first step is the mixing of the cement for what is known as the scratch coat. This is made by mixing Portland cement with fine, clean sand in[205] the proportion of one part cement to two of sand. These ingredients should be thoroughly mixed together in the dry state, and then there should be added a small quantity of goats' hair, well picked apart. For the problem at hand about five pounds of cement will be needed and as much goats' hair as can be held in the hand. The whole should be thoroughly wet down with just the right amount of water. It is important that the mixture should not be made too soft. A scratch coat should be given a consistency that will enable it to be easily spread over the wire form and, at the same time, to hang well together.
When a sufficient amount of the right mixture has been obtained, it should be spread upon the wire form by means of a small mason's trowel or a large knife. It is well to begin at the bottom of the convex side of the cylinder, working upward, taking no pains to make this first coat smooth, since roughness is desirable, and paying no attention whatever to the inside of the cylinder, excepting to see that the cement is forced well through the meshes so that the whole mass will be held together firmly when dry. The inside is given a smooth coat as a part of the later finishing process. When the convex surface has been well covered, the form[206] should be turned bottom up and the cement spread upon the base of the cylinder in the same way. After the wire has been completely covered, the form, which is likely to be somewhat distorted, should be corrected by careful manipulation till a true cylinder has been obtained. This is allowed to stand for about five hours until the cement has thoroughly hardened. It is then ready for the finishing coat.
The next step in the process is to make the cement for the finishing coat. Considerable variety is possible here, depending upon the colour and other surface effects that are desired. In this design a light, sparkling surface when finished is required. To produce this effect a mixture of one part Portland cement and two parts marble dust will be needed. This should be mixed without hair to a consistency like that used for the scratch coat.
Before applying the finishing coat the surfaces should be thoroughly moistened by means of a brush well filled with water. There are various methods of applying this coat. The simplest is carefully spreading it on with a trowel and smoothing it with the moistened hand. When the surface has hardened sufficiently it is sometimes possible to improve the finish by the judicious use of sand-paper or a coarse file. It is not possible to produce[207] perfectly even surfaces in this way; and yet the method has the characteristic freedom of handwork in general, and yields very satisfactory results.
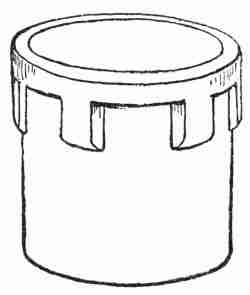
The Decoration.—A great variety of decorative effects may be obtained in concrete pottery and in other articles made of this material for out-door use. In pottery these decorations may take the form of raised figures or ornaments, of borders or designs cut in the surface, and of inlays in colour. Whatever the form of design, the necessary cutting for it is best made when the cement has become well set but not very hard—i. e., from 6 to 10 hours after the finishing coat is applied. A stout, sharp, pointed knife blade is all the tool that will be required. A narrow chisel, however, may be found desirable for deepening the cuts. The knife should be guided by means of a ruler, which should be flexible if used on curved surfaces; and the depth of the cut will depend somewhat upon the size of the piece. In work similar to that described in the problem just given, a depth of 3⁄16 or 1⁄4 of an inch is sufficient.[208] This cutting, of course can be made after the cement has hardened, by the use of hammer and chisel; but it will be much more difficult.
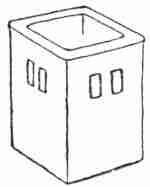
The Colours.—Colour cement for inlaid designs is made by using the best quality of white Portland cement as a base, colouring it with dry mineral pigments which are sold by dealers under the name of lime or cement-proof colours. Among the pigments suitable for this purpose are red oxide of iron, which produces a red; oxide of cobalt, which gives a good blue; chromate of lead, which produces yellow; carbonate of copper, which gives a good dark green; and burnt umber, which yields a good brown. These come as dry powders and should be mixed with the dry cement and marble dust, making a mixture of uniform colour, before the water is applied. In order to determine the right colour it is well to experiment with a small quantity of the various ingredients until a satisfactory shade has been found. Then with this as a guide a sufficiently large quantity should be mixed, in the same proportions, to the consistency of a thick paste, and applied to the design, which has been previously cut in the surface to be decorated. To[209] insure thorough adhesion of the paste to the concrete, the cutting should be well moistened with a wet brush. A number of suggestive designs are shown in the accompanying drawings.
Rustic Furniture.—The lighter out-door furniture can be easily made up in a great variety of designs. The form of rustic settles and chairs is determined largely by the material which is available. Very useful and ornamental effects are produced by using sticks cut from the tops or from branches of small trees. Birch saplings, easily found in the second growth of some wood lots, afford a good supply of material. It is not necessary that the sticks be straight; the natural crooks and notches are often very useful in bracing the framework. Chairs, settles, tables, standards for flower boxes, and other articles of furniture may be made out of this rough and unfinished material.
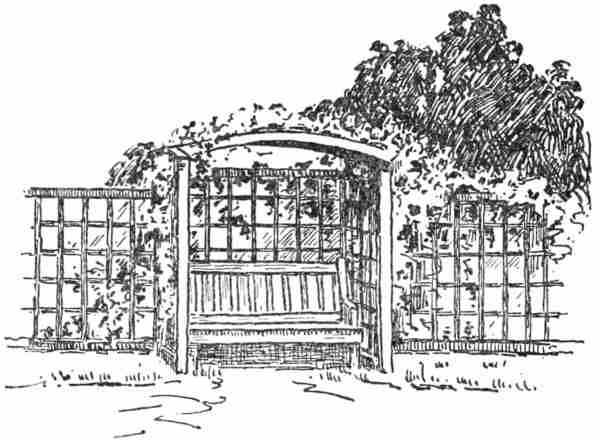
Lattice Work.—Trellises and garden screens have been made in an almost endless variety of forms. Among the most satisfactory is the plain lattice work in squares and rectangles. Its simplicity and evident durability are points in its favour. Experience proves also that vines and other plants needing support are readily adjusted to this form of trellis. The size of the stock required in making[210] the right-angled lattice work depends upon the uses to be made of it. For a garden screen the uprights need to be of 2 × 2 inch stock and of any convenient length. End posts of 3 × 3 inch stock will be required, to give necessary stiffness; and, if the screen be a long one, intermediate posts of the same size should be placed at intervals of ten or twelve feet. The horizontal pieces may be strips of 7⁄8-inch stock, 2 inches wide, set their full thickness into the uprights. Spruce furring, which lumber dealers supply in 2-inch widths, is suitable for the small rails; but if chestnut be used for the[211] uprights it is well to use the same wood for the rest of the construction. The top and bottom rails should be of heavier stock, not less than 2 by 3 inches. The best foundation is a line of concrete posts, firmly set into the ground at intervals of 6 feet, to which the bottom rail or the uprights are fastened by means of irons set into the cement when the posts are formed. Two coats of dull green paint will protect the wood and properly subordinate the lattice work to the trailing branches which it supports.
'Tis toil's reward that sweetens industry—Ebenezer Elliot
In the commercial production of furniture the cabinet-maker has nothing to do with the finishing of his work. This essential part of furniture making is turned over to artisans who are finishers by trade. In a separate part of the factory they attend to the cleaning and filling of the wood and to whatever finish is applied to the work of the joiner. It is hardly necessary to add that the finishing of all kinds of woodwork is quite as important as any other feature in its production; for, however good the lines of design may be and however thoroughly the design may be carried out in the construction of any piece of furniture or other woodwork, it may be and often is spoiled as a work of art in the finishing.
But the amateur cabinet-maker should be his own finisher. He should familiarize himself with the various kinds of finish that may be applied to[213] the different woods. He should know the object of filling wood and how it is done. He should understand the processes of fuming, staining, and varnishing so well that he can produce with certainty the results desired.
First Steps in Finishing.—The first step in finishing woodwork is to clean it up and prepare it for the filler. Too great care cannot be taken in examining all surfaces for slight oversights that have occurred in the joinery work or for blemishes that have been acquired in any part of the process of construction. Light planing, chiselling, or scraping, and perhaps a little sand-papering, always with the grain, may be needed to remove these faults and blemishes. The most serious of these generally result from gluing. All surplus glue should be carefully removed, even to the film that soaks into the surface of the wood. The slightest spot of glue remaining will keep the filler out of the wood and show through any kind of finish.
Importance of Filling.—As soon as the furniture is thoroughly cleaned, if it is to be finished in the natural color, the grain of the wood must be filled with a light, transparent, semi-liquid substance, known as the filler, which, after standing from five[214] to seven minutes, should be thoroughly rubbed off with a piece of coarse cloth or a handful of shavings. This process, as its name indicates, fills the pores of the wood and protects them against the absorption of moisture and the consequent swelling. But this is by no means its chief purpose. Strictly speaking, filling is the ground-work of all subsequent finishing processes and, for that reason, it may be said to be the most important operation connected with wood finishing. If improperly done, no amount of good work with the varnish brush will remove the fault. In fact, good work is impossible after a bad beginning. Good varnishing or good finishing of any kind requires that, before the final finishing processes begin, the surface should be made perfectly level and smooth, free from all unevenness or roughness or minute openings of any kind that might allow the varnish or other finishing material to penetrate the wood. If the filling has not been so thorough that no part of the subsequent finishing material can be absorbed by the wood, a rough surface will be sure to follow. This may, of course, be rubbed down and re-finished, but never with that perfection of result which is assured by laying a good foundation in correct filling. It may be set down as a fundamental principle of wood finishing[215] that the best result is obtained when the filling or surfacing has been so thoroughly done that the thinnest of finishing coats, few in number, are required to produce the desired result.
Liquid Fillers or Surfaces.—There are many kinds of fillers in common use, but they may all be considered as belonging to one or the other of two classes. They are either liquid fillers or paste fillers. Woods differ greatly in the coarseness or fineness of their grain. The coarse or open-grained woods require a filler with body enough to close up the pores of the wood and give that perfectly even surface necessary as a foundation for good finishing. The close-grained woods, on the other hand, do not present the same filling problem. They could not absorb a paste filler. In fact, it is hardly too much to say that the fine, close-grained woods, like maple, gum wood, and birch, do not need a filler at all; and there are some coarse-grained woods, like southern or hard pine and cypress, the pores of which are naturally filled with gummy or resinous substances and will not absorb an artificial filler. But all such woods do need to be given a finishing surface which will prevent the finishing coats from soaking into the fibre of the wood. This is the office of the so-called liquid fillers, which[216] are very properly called "first coaters" or "surfacers."
How to Make a Liquid Filler.—A standard formula for the preparation of a liquid filler is as follows: Mix four parts by weight of carbonate of soda with six parts of china clay, and grind this mixture in about eight parts of japan, thinning the product with turpentine or benzine to the consistency of linseed oil. Laundry starch may be used in place of china clay, giving a filler which is somewhat easier of application than the clay filler because it does not settle. It lacks in durability, however, especially if it is not well covered. The finest grained woods do not require the addition of any material to the filler to give body. A great variety of liquids may be easily obtained which, without being mixed with anything, will give the necessary surface.
Glue size, water glass, and the cheaper grades of varnish, thinned if necessary with benzine or turpentine, are often used for this purpose. But these are all inferior to the standard surfacers and never should be used on the best grades of woodwork. Shellac is always preferred as a first coater for hard pine, as it keeps the resinous sap in the pores of the wood and preserves the natural colour of the grain.[217] If oil is applied to hard pine without first applying this protecting coat of shellac, the wood blackens with age. Shellac is an excellent first coater for other woods also. It is commonly used in house finishing as the surfacer for the interior trims. But it dries rapidly, and generally with a rough surface. The first coating of shellac, therefore, requires careful sand-papering before the varnish is put on.
Time Needed for a Shellac Coat to Dry.—It may be well to caution the amateur finisher as to the time required for the thorough drying of shellac. While it may be truly said to dry very rapidly, the first drying is necessarily upon the outer surface, forming a hard coating which delays somewhat the drying throughout, so that a shellac filling is not really dry enough to sand-paper a half hour or so after it has been applied, though it may appear to be. It is a good rule to allow at least twenty-four hours for thorough drying; and it may be well to add that all methods of filling, rubbing off, etc., require for the best results more time than energetic workers sometimes allow.
Cost of Surfacing.—A practical question that the amateur finisher will ask is, how can one know in advance how much filler is needed for given pieces of work, and what will be its cost? For a good[218] quality of liquid filler it is safe to say that one pint will cover eight square yards with one coat. The cost varies greatly, depending upon the quality of the filler and whether it is home-made or obtained of a dealer. A good commercial filler or surfacer can be bought for $1.50 per gallon, making the cost per square yard of one-coat surfacing about 21⁄2 cents. A small can costs 15 cents. Good work cannot be done with the cheaper grades of filler. Shellac, which is, all in all, the best of surfacers, can be bought for $1.85 a gallon, which would make the cost of surfacing somewhat under 3 cents a square yard.
How to Make a Paste Filler.—A good paste filler, such as is required for the open-grained woods like oak, ash, baywood, and poplar or white wood, may be made from pulverized and floated silica as a base, thoroughly mixed with raw linseed oil, turpentine, and japan in equal parts, with enough silica added to the liquid mixture to form a good paste of a consistency somewhat thicker than paper-hangers' paste. If the mixture should prove to be a little too thick, it may easily be thinned with turpentine. The final mixing of this filler requires grinding in a hand mill. Unless a considerable quantity of it is needed it is quite as well to purchase a can of the paste filler of a dealer in painters' or finishers' supplies,[219] though commercial fillers are not generally quite so good as a one made on this formula. They often contain wax and whiting and other materials as a base which are not so satisfactory in the long run as the floated silica.
How a Paste Filler is Applied.—Paste fillers should be spread on the surface to be filled very liberally with a wide, stiff brush, allowed to stand from five to seven minutes, and then rubbed off with a piece of burlap or a handful of fine shavings or excelsior. But it must not all be rubbed off or drawn out of the grain. This is an easy mistake for an inexperienced worker to make. The thing to do is to rub it in and at the same time leave the surfaces smooth. The surfaces should then be allowed to dry for about twenty-four hours before receiving the final finishing coats.
The importance of a good foundation surface—even, smooth, and free from unsealed pores that would absorb and thus undermine the first coat of varnish—has been explained in the section on filling and surfacing. If this foundation has been well laid, the amateur finisher may enter upon the varnishing stage of his work with confidence; but he will soon learn that there is much call for skill[220] in order to produce the desired results in this part of the finishing process. The selection, preparation, and application of varnish is a special calling, and great skill comes only as the result of experience; but certain main facts and principles are easily learned.
How a Good Varnish is Recognized.—It is hardly necessary to say that a superior varnish must be clear, transparent, and brilliant. These qualities are always associated with this kind of finish. But durability is also a necessary quality. An expert will, with his eyes shut, recognize a high-grade varnish by its peculiar odour, which is to him an agreeable one. He will at once detect inferior grades by the rank, sharp odour of resin and benzine used in their manufacture. The range of quality and cost in varnishes is probably greater and more varied than in any other finishing material. For fine, artistic work only the best varnish is allowable; and this may be bought for $3.00 a gallon.
"Sag" and How Corrected.—A good varnish flows easily from the brush, spreads evenly, and dries slowly, thus allowing plenty of time for its proper distribution over the surface. And time enough should be taken to apply an even coat which will not dry unequally and lead to cracking due to[221] irregular contraction in the process of hardening. It is of the utmost importance that each coat be spread evenly over the surface when first applied. Great care should be taken not to brush long in one place. Re-brushing after a brief interval leaves brush marks which are objectionable. Unequal spreading on broad surfaces often causes the varnish to run or "sag." A tendency to sag may be brushed out if attended to promptly. But, if it is not noticed until the varnish has begun to set, the only way to prevent a bad blemish is to absorb the thickening parts of the coat by means of a partly dried brush; and this must not be attempted three or four minutes after the varnish has been put on. By that time it will have become quite well set and a sag will be beyond repairing by any simple means.
Time Required Between Varnish Coats.—The best varnishes, as has been stated, dry quite slowly, and they seem to dry and harden not, as shellac does, on the top first, but from the under surface outward. This peculiarity emphasizes the need of allowing sufficient time between coats. And it should be added that mere drying is not all that is required. Each coat must harden; and during the process of hardening slight movements take place throughout the mass of the coat until it becomes[222] permanently set or hardened. The time required for this permanent setting or seasoning, as it may be called, varies with the character of the under coat, with the temperature of the room in which the finishing is done, and with the thickness of the varnish coat itself. Five days is usually thought to be a short seasoning period. As many weeks would not be too long for the best results. It is folly to attempt to hurry up a job of varnishing. In the nature of the case it cannot be hurried without yielding disastrous results. There is no other kind of work in which "haste makes waste" with the certainty that it does in varnishing. Great pains must be taken with each coat. Least of all should the under coats be slighted, for solidity and depth in the appearance of the finished surfaces depend upon there being plenty of evenly laid and well hardened varnish before the final or finish coat is applied. All this work should be done in a well-lighted room, free from dust, and with a good supply of fresh air, kept at an even temperature, of about 70 degrees—certainly not colder than this, since a lower temperature prevents varnish from spreading evenly.
Number of Coats Needed.—The number of coats of varnish required vary with the character of the[223] work. What is known as piano finish requires from three to seven under coats of good elastic rubbing varnish, each well hardened and rubbed down to give under surfaces more even than the best brushing can give. In addition to these under coats a final finish coat is needed to give brilliancy and lustre.
How to Rub Down Varnish.—Rubbing down varnish is a unique and important part in the process of finishing. The beginning of the operation consists of long and persistent rubbing with pulverized pumice stone mixed with oil or with water, if the work is such that water would have no chance to soak into the pores of the wood. Whichever liquid is used, a rubbing pad will be found necessary. This is a block about 4 inches square, made of thick, loose cloth like felt or hair cloth. In use it is first moistened in the oil or water and then dipped into a box containing a quantity of powdered pumice. With this the varnished surface is rubbed vigorously, giving a circular movement to the pad in rubbing down the broad surfaces. As the smoothing progresses, less and less of the pumice powder is used. Near the end of the process enough will be found on the surface or adhering to the rubbing pad. What remains on the surface is finally all wiped off carefully with chamois skin, when it will be found[224] that the surface has been levelled down but that it is covered with fine scratches due to the grains of the pumice. These are removed by a second rubbing in rotten stone and oil or water.
Dull Finish and Flat Varnish.—For many purposes good finishing requires but one under coat rubbed down and covered with a finish coat; and this finish coat is often not allowed to retain its natural lustre. For furniture a dull finish is much to be preferred. It is more durable, it harmonizes better with its surroundings, and it is more in keeping with the idea of simplicity and usefulness. In working for a dull finish it is not so essential to secure depth and evenness of surface as it is when a high lustre is required, and therefore fewer coats are necessary. In fact, a dull finish may be given to furniture without any varnish at all. Two or three coats of shellac, each well rubbed down, give a very satisfactory result. Wax finish, to be described later, gives beautiful effects. There are varnishes known as flat varnishes which give a dull finish without rubbing. They are made by dissolving beeswax in turpentine in the proportion of two ounces of the solid to a pint of the liquid, using moderate heat and mixing the wax solution while warm with four times the quantity of warm varnish. What is known[225] as the old Dutch finish is obtained by using over the proper stain one coat of wax varnish. But there is no kind of dull finish so durable as that given by several coats of high-grade varnish, each well rubbed down.
How to Prepare and Apply Finishing Wax.—The simplest and at the same time one of the most attractive methods of finishing woodwork is rubbing it with finishing wax. This is one of the old processes which has of late years been revived by the arts and crafts societies and is becoming deservedly popular. Finishing wax may be purchased ready for use or it may be made by dissolving yellow beeswax in turpentine in the proportion of two parts wax and one of turpentine. To do this the wax should be cut into small pieces or shavings, placed in a dish, and covered with the liquid. The solution may be hastened by heating in a water bath; but, if a gas flame be used for heating the water, care should be exercised to extinguish the flame before bringing the turpentine near, on account of the inflammable character of turpentine vapor. This mixture, which is too thick to spread with a brush, may be applied either hot or cold by means of a piece of soft cloth. Soft cloths, like clean[226] cheese cloth, should be used also in rubbing. The rubbing should be continued for a considerable time, but it is by no means so tedious a process as the rubbing down of the several coats of varnish. Less rubbing is required if the wax is applied hot. One of the greatest advantages of the wax finish is that it may be quickly applied and immediately rubbed down, after which the furniture is ready for use. Filling and finishing are accomplished together. It is also easy to apply a fresh coat of wax at any time. In fact, it is desirable to re-finish new pieces of furniture in this way several times during the first few months of their use, and after that about once a year.
Object of Staining.—Up to this point the processes of finishing considered have assumed that the wood treated is to retain its natural colour, excepting that it may darken with age. But it is often desirable to give artificial colours to woodwork—i. e., to dye or stain it. This is done for a variety of purposes—to reduce to one tone the different shades of the natural colour often found in the same kind of wood, to bring out the natural beauty of the grain and texture, to give an entirely new colour to the cheaper kinds of wood in imitation of the[227] more expensive kinds, and to produce tones that will harmonize with various colour schemes. To accomplish this great variety of results, scores of different kind of wood dyes or stains have been put upon the market in almost countless shades and tints, but they are all easily classified under three heads. They are oil stains, water stains, or alcohol stains.
A Perfect Stain.—A perfect stain, if it could be obtained, would be a clear, limpid liquid, free from all solid particles or specks of colouring matter that might clog the pores of the wood and interfere with the absorption of the filler—so clear and transparent that it would in no way obscure the grain of the wood, which in many varieties is the chief element of beauty—so limpid that it would easily soak deep into the pores of the wood, carrying to a considerable depth below the surface an artificial colour which will not fade on exposure.
Water, Alcohol, and Oil Stains Compared.—The water and alcohol stains on the whole meet these requirements better than the oil stains do. They are clear, and without body, and they have great penetration. But they are not free from faults. Many of the water stains are made from aniline dyes which are not durable. The alcohol stains,[228] however, are generally permanent. Both the water stains and the alcohol stains raise the grain of the wood and are liable to show darker in corners and on end grains and to show laps from re-brushing. The oil stains, on the other hand, are free from these faults. They spread easily and evenly, they do not raise the grain, they do not double up or show laps or streaks, and they do not fade; but they have a few defects which overbalance these good qualities. They have considerable body which prevents them from penetrating equally all parts of the surface, so that they do not carry in the colouring as either the water or the alcohol stains do. Their oily nature causes them partly to close up the filaments of the wood and thus interfere with the subsequent process of filling. This is so bad a defect that oil stains are not to be recommended for open-grained woods, the fine finish of which depends so much on correct filling. They are more successful with the close-grained woods, which need only to be surfaced with shellac or the ordinary liquid filler.
How Stain is Applied.—If furniture or any kind of woodwork is to be artificially coloured, staining is the first of the finishing operations to be attended to. The stain should be spread upon well-cleaned[229] surfaces by means of a brush, a cloth, or a sponge, and allowed to stand for a few minutes so that it may penetrate well into the wood. The surfaces should then be carefully wiped off with clean, soft cloths or cotton waste to remove any stain that may not have soaked into the wood, and thus prevent a streaked or painted effect. After the stained surface is thoroughly dry, a filler, coloured to match the stain, should be applied and rubbed well into the pores, as already explained in the section on natural finish. The beginner will need to be cautioned again and again not to rub the filler all off or draw it out of the grain, but to rub it in as much as possible. He will also need to be on his guard against the presence of moisture or grease, which will interfere with good results.
Excellent prepared stains in great variety may be easily obtained of dealers in painters' supplies. They will not always produce the effects claimed for them, but with a little experimenting it is possible to find prepared stains that will give almost any desired result. They are somewhat expensive, however, and the amateur finisher may prefer to develop his own stain. Following are some suggestions along this line:
Asphaltum and Golden Oak Stain.—A good chocolate[230] brown stain may be produced on almost any light-coloured wood by a very thin varnish made by colouring turpentine with asphaltum and applying with a brush. A considerable quantity of asphaltum should be used, but not enough to make a sticky liquid. This will need to be finished with shellac or finishing varnish. When applied to quartered oak it produces the beautiful effect known as golden oak. It may also be used on white wood to give an imitation of black walnut; and Georgia pine under this stain takes on a very attractive tone without obscuring the natural figure of the wood.
Mahogany.—A clever imitation of mahogany may be made by staining birch of the right grain with logwood stain. The stain is made by boiling together equal parts of logwood chips and water for about three hours. While the mixture is hot, chloride of tin is added gradually until the right shade of colour is produced. The stain should be allowed to cool before it is applied, and then several coats may be needed to secure the right depth of shade. The filler used should be coloured with burnt umber and sienna. The finish may be a brilliant or a flat varnish, or wax.
Baywood as Mahogany.—Mahogany stain is also applied to baywood, resulting in what commonly[231] passes for real mahogany. The genuine article, however, is an imported wood coming from South America, Mexico, and Africa in several varieties; and it is a much harder wood than the American baywood imitation. Both the birch and the baywood imitations of mahogany may be so well stained and finished that it is difficult to distinguish them from the imported varieties.
Flemish Oak.—The various oak stains are worthy of special mention. Flemish oak finish is very dark, almost black. It is prepared by first applying a stain made of bichromate of potash dissolved in water in the proportion of one half pound of bichromate to a gallon of water. The solution should be strained and applied with a stiff brush. After drying, the surface is well sand-papered and a coat of thin black stain is applied, made by dissolving japan drop-black in turpentine. This is allowed to stand a few minutes, then wiped off, and when the surface is thoroughly dry a coat of thin shellac is applied. After a thorough drying and hardening the surface is smoothed down with fine sand-paper and finished with wax.
Mission Oak.—The so-called mission oak finish may be in several colours, but as a rule it is of a dull gray with the flakes slightly reddish. The stain[232] is made from drop-black in oil, tinged with a little rose pink, and thinned with japan and turpentine. The mixture should be strained through cheese cloth and applied with a staining brush. Wax finish is invariably used for mission oak.
Forest Green Oak.—Forest green oak is among the best of the green effects in this wood. The stain is made by mixing two parts of chrome green with one part of chrome yellow for the colouring material. This is added to a mixture of three parts turpentine and one of raw linseed oil, with a little white japan. The resulting stain should be somewhat thinner than linseed oil. After this has been applied to the oak surface, rubbed in and dried, it is given a coat of thin shellac coloured with tumeric and a very little green aniline. This should have a wax finish.
Gray Oak.—A gray stain may be given to oak by a solution of iron sulphate, made by dissolving a small quantity of chemically pure crystals in water, and giving the solution a strongly acid quality by adding a little sulphuric acid. This solution is most conveniently used by placing it in a box tank large enough to contain the pieces of wood to be stained, as they must soak in the solution until they are thoroughly saturated. The pieces may be kept[233] separate by stout cords tied around them, and they may be held under the solution by means of weights. When taken out they should be allowed to dry before they are rubbed down.
Weathered Oak.—Weathered oak stain is made by taking two ounces of copperas and the same quantity of dry tannin, dissolving them separately in about a quart of water, and when thoroughly dissolved mixing them together. When applied to oak it gives it the natural weathered tone with a slight bluish cast. It may then be oiled, shellaced and finished with a flat varnish or wax.
Fumed Oak and Chestnut.—But the most satisfactory method of giving a brown tone to furniture or other woodwork, is without question, by fuming with ammonia, though this process is limited to two woods, viz., white oak and chestnut. All other woods, including red oak, are deficient in tannic acid, the essential element to combine with the ammonia gas in the production of the stain. This method requires a fuming box of sufficient dimensions to contain the article of furniture to be fumed. It must be carefully constructed with all its joints made vapour proof by pasting over them strips of paper and covering them with shellac.[234] The top or one side of the box should be fastened with screws, so that it may be vapour proof when the box is in use and yet easily removed. The operation of fuming consists simply in placing the furniture in the box with one or more shallow pans filled with the strongest ammonia—not the household ammonia, which is too weak—screwing the top or cover on, and allowing the apparatus to stand from 12 to 24 hours, according to the shade desired. If the fuming box be provided with small glass windows in its adjacent corners, a good light will be thrown across the furniture so that the development of colour may be observed without opening the box. When the desired shade has been obtained and the furniture removed, it is best to give it a good wax finish which will develop a beautiful velvety texture.
Peculiarities of Fumed Finish.—It will be observed that the toning of quartered oak by the fuming process develops the beauty of the grain far better than any other process of staining; and there should also be noted the still more remarkable fact that the contrasts of tone are the reverse of those given by staining; i. e., the parts that appear lighter in the one case are the darker parts in the other. This gives a certain distinction to the fumed finish and[235] furnishes a means of detecting that which is not genuine.
A vivid and very effective finish for furniture as well as for the trim of some rooms is white enamel. It is used on new work and also in re-finishing old furniture and other woodwork. In the latter case the old finish, whatever it may be, must be removed and the surfaces thoroughly sand-papered. But whether the wood be old or not, a satisfactory enamel finish cannot be produced by using the white varnish alone, since, like all other varnishes, it is somewhat transparent. It is necessary, first, to coat the wood with flat white—a paint made of white lead with some zinc oxide for hardening and thinned with turpentine. Oil should not be used in any part of the process. Three coats of this paint will generally be needed to produce the right surface for the final finish. Each of these coats should be allowed to dry and become well hardened. Two or three days, better still a week, should be allowed for hardening between coats, since insufficient hardening leads to cracks in the subsequent coats and develops a tendency to chip off. When a surface is ready for the enamel, only one coat of it should be applied, and that should be given not less[236] than one week to harden before it is exposed to wear. Enamel is simply a good varnish coloured with zinc oxide ground in varnish. It may be thinned, if necessary, with turpentine, and it is applied with a brush like any other varnish.
Problems in filling and finishing were developed in the series of furniture making problems in Chapter VII. It is only necessary to bring forward the unfinished work there described and apply to it the finishing methods outlined in this chapter. Our problems are, therefore, the following:
The Knock-down Bookcase.—If made up in white wood it may, like its original, be stained in imitation of black walnut and waxed. It may, however, be of oak, ash, or cherry, and finished to harmonize with the furniture with which it is to be used.
The Hanging Book Rack.—In the design for this rack it was suggested that it might be made of white wood and given a white enamel finish, or of baywood with a mahogany stain and varnish.
The Umbrella Stand.—Oak was advised for this piece of furniture. It needs to be treated with a paste filler and given two coats of varnish, well rubbed down.
The Magazine Stand.—Oak was suggested for this stand. The color will depend upon the surroundings. Filling and varnishing will be required if it be given a liquid stain, and wax finish if it be fumed.
The Light Library Table.—Oak was mentioned as a very appropriate wood for this table, but some lighter wood like ash may be used. It will be remembered that all open-grained woods require treatment with a paste filler before they are finished.
The Heavy Library Table.—As this was designed in the mission style, oak was chosen as the most suitable wood. It may be given the so-called mission oak stain and a wax finish.
The Round Centre Table.—This may be made in any of the woods commonly used for furniture, but quartered oak was mentioned. A golden oak finish will be found very satisfactory.
The Bookcase with Glazed Doors.—This may be made up in ash, in quartered oak, or in gum wood. The finish will depend upon the kind of wood used and the furniture with which it is to be associated.
The Library Desk and the Morris Chair.—The originals were made in quartered oak, fumed, and waxed.
The Hall Clock.—This may be made in quartered[238] oak and given a weathered oak stain and wax finish.
There is nothing that affords more satisfaction to one looking for pleasing effects in household fittings than the occasional piece of genuine old furniture repaired and re-finished. Some of the rare old colonial designs are of exceptional merit. This is proved by the high prices which they often command. These designs originated in the days of the genuine hand crafts, before the invention of machine-made, cheap furniture. The work of the older designers was characterized by a certain individuality which gave it artistic value; and the craftsmen who worked out these designs did their work with such care and thoroughness that what they produced has had a lasting quality. It is for these reasons that we find it still in existence and so much desired.
Caution as to Repairs.—In the work of renovating old furniture, problems are met which are very different from those which have to be considered in the production of new work. All questions of design are settled. There is generally enough of the original article to show what the design was. The problem is one of restoration; we must supply[239] the missing parts and re-finish the whole. The first thing to do, therefore, with any piece of genuine antique furniture is to look it over carefully from the point of view of the cabinet-maker, note its defects, supply the missing or loosened parts, and mend the breaks. It will be found that the wood is generally exceedingly dry and brittle on account of its age, and that it will therefore need to be handled more carefully than new wood; and, in matching up, it will often be found desirable to make use of parts of other old pieces rather than to add new wood to the old. This is especially true of veneering, which cannot be well matched in any other way. Old bits of veneer, on the other hand, may be so deftly fitted into the spaces where they are needed that the grafting is entirely obscured by subsequent finishing.
Scraping.—After the necessary repairs have been made, the next thing to be done is to remove the old finish. If the varnish is dry and brittle and somewhat cracked, it may be removed by means of a well-sharpened scraper, great care being taken, however, not to injure the wood surface, especially at the corners and edges. If the scraper does not take off the varnish well at certain points, fine sand-papering may be resorted to. It is generally wise,[240] also, to give the entire surface a light sand-papering before it is cleaned up for finishing.
The Varnish Remover.—It often happens, however, that the scraper will not accomplish the desired result. In that case the liquid varnish remover is necessary. This may be found at the paint stores. The best formulas for producing these varnish and paint removers are known only to the manufacturers. It is therefore not wise for the young finisher to attempt to make his own remover. He should provide himself with a can of it and a bristle brush with which to apply it to the furniture. After putting on a good coat he should let it remain a few minutes and then try to scrape off the softened finish with a putty knife. If it doesn't come off readily, it should stand a little longer. The amount of time required depends entirely upon the hardness of the old finish. But in due time it will become soft and can be very quickly and effectually removed. A putty knife, however, will not remove it all. After scraping off as much as possible from the plain surfaces and from the corners, a careful washing with turpentine or benzine will clean off what remains. It is of the greatest importance that none of the old varnish nor any of the varnish remover should be permitted to remain. Either of them will[241] show through the finish as stains on the broad surfaces and collect in the corners when the new finish is put on.
Re-finishing.—The re-finishing process is much like that described for new work, the chief exception being that there is generally no need of filling unless it has been found necessary to add new wood in making the repairs. Generally speaking, the re-finishing begins with the surfacing, which may be done with thin shellac coloured to match the stain of the furniture. This is sand-papered lightly before receiving the one or more coats of finishing varnish necessary to produce the desired effect. Very often all that is needed is a well rubbed down wax finish.
The table with which this problem deals was found in an old furniture shop among a large number of pieces probably of equal antiquity but of poor design; for all old furniture was not conceived on beautiful lines. Much of it was quite as ugly as some of the modern furniture. This table, however, when separated from the rubbish which almost concealed it, was found to have good proportions,[242] with simple but graceful elements designed to make it useful as well as attractive. It was a drop-leaf table, the leaves being cut in with a double curve at each of the four corners. The legs were of turned stock and fluted, terminating in brass thimbles with casters. One leg was broken off, one of the leaves had broken away entirely from its hinges and the other was partly broken, the table top had received some hard knocks, and the entire surface was so begrimed with dust and dirt that it was with difficulty that one could tell the kind of wood of which the table was made. It took some imagination to conceive the possibilities which lay in this much abused and dilapidated old relic.
The first thing to do was to wipe off the dust and dirt as well as possible with a damp sponge. The part of the top that remained on the frame was then removed so that the repairs could be easily made. The broken leg was replaced by boring each of the broken parts and setting them together with a 3⁄4-inch dowel, glued in. The brass tips and casters were removed and set aside to be burnished. The missing parts of the top were replaced by new pieces of baywood, fitted in, glued, and stained to match the original wood. After the necessary repairs had been made the entire table was treated with[243] varnish remover and the old finish scraped off with a putty knife. This part of the process was completed by washing all the surfaces thoroughly with turpentine, carefully picking out with a pointed knife from corners, cracks, and openings of any kind, all remnants of the old finish and of the varnish remover. After carefully wiping off the results of this treatment with clean cheese cloth all the broad surfaces were then smoothed off with fine sand-paper. It was found that the wood was well filled, so that all it now needed was a final finishing with wax. The transformation from the begrimed old table found in the shop to a graceful and beautiful article of antique furniture was complete.
The "Daughters of Pandarus" (from the "Odyssey," Lib. XX). Translation by Mrs. Browning.
Among the home industries which the arts and crafts societies have lately revived, perhaps none invite more interest or deserve greater honour than weaving with the hand loom. Weaving is an ancient art. If we were to seek its origin we should have to go back to the time when men adopted homespun clothing in place of rude coverings made from the skins of animals. That was a great change, for it meant the beginning not only of the textile industries but of civilization itself. It is no wonder that the distaff and the loom were highly honoured in ancient mythologies. Not less honour is due the spinning wheels and looms of our grandmothers, [245] which played an important part in the early beginnings of our own history. The New England colonists spoke with pride of communities which showed progress in the weaving of cloth; and this was then largely a home industry in the hands of honourable women. It was a work of necessity, but not without love and devotion. Many evidences remain in beautiful coverlets or bedspreads, in towels of homespun flax, in durable linen sheets and table-cloths—examples of unfailing patience, great ingenuity, and marvellous skill—handed down from generation to generation to their present fortunate and proud possessors.
The Primitive Loom.—In the Orient, where our choicest rugs are made, two trees growing near each other, some strings and pieces of bamboo, and a few simple accessories, are all the worker requires. This is a primitive loom. The modern hand loom is the same in principle; and the looms of our factories do not differ from it essentially. While it is true that their productive power has been enormously multiplied, this great improvement, which was actually one of the chief causes of a great industrial revolution, was due mainly to the inventive genius of two men who harnessed the motive powers of nature to the English hand looms.
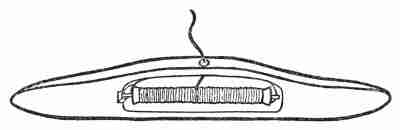
Warp and Woof.—The fundamental process in all weaving is essentially the same; and it is exceedingly simple. It consists in passing one set of threads between two other sets of threads which cross each other alternately and are moved first up and then down to allow the passage of the shuttle with its bobbin and thread. The set of threads which cross each other and which, by being moved up and down, interlock the thread which is passed between them, is known as the warp. The thread which the shuttle carries across and between the warp threads is called the woof. By careful selection of materials, by skilful design in the dyeing and arrangement of these materials, and by proper management of the warp and woof to express the design, the most beautiful Oriental rugs are fashioned; and, though we may not be able to reproduce these in our homes, very beautiful and very useful things may be made upon the hand loom by those who have the necessary enthusiasm and patience.
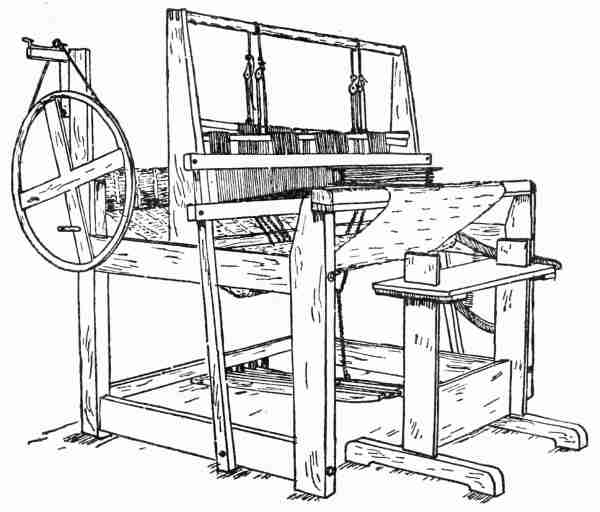

What the Hand Loom is.—The hand loom consists of four uprights or posts, joined on two sides at the top and bottom by cross pieces. Attached to the lower cross piece are two other uprights, one on each side of the loom, bolted in such a manner as to give free play back and forth. This is the beater. These cross pieces are grooved on their inner edges, and into this groove is slipped the reed, which is a frame divided into sections by short, stiff wires, making from 10 to 25 or more sections to the inch.[248] It is called a reed because it was formerly made from reeds. The sections of the reed are called dents, and through each one is to be threaded a single strand of the warp. From the upper cross pieces extend two other uprights, one on each side, to a height of about two feet above the general framework. They are united at the top by a round piece called the roll, over which, near each end, are passed cords attached to pulleys which in turn carry other cords fastened by means of screw eyes to inch-wide sticks extending across the width of the loom. These sticks are in pairs and carry cords or wires of uniform length through the centre of each of which a thread of the warp is passed by means of an eye in each wire, as through the dent of the reed. This is called the harness. There must be at least two of them, and there may be more. Two are necessary for the simplest weaving of a plain surface, and more than two if the work is to be more complex, as is required for scarfs with fancy borders, cushions, or any figured products of the loom. Near each end of the loom are two[249] rollers to which the two ends of the warp threads are attached when the loom is set up for weaving. These rollers are called beams. Over one of them the woven product passes as the loom is operated, while the other holds the unwoven warp. At the back of the loom is still another cross piece, underneath which pedals are fastened. These pedals connect by chains with the harnesses in such a manner that when the foot is placed on one of them the cords attached to it play over the pulleys, throwing the harness and the warp threads which it carries below the level of the other set or sets of warp threads. An ingenious device of cogs at the side of the loom holds the work taut and enables the worker to let out fresh warp and also to roll up completed work.
Preparing the Warp.—When the essential parts of the hand loom and their uses are understood, the amateur weaver is prepared to make ready the warp and attach it to the machine. The thread or warp is taken from spools or cones, four threads at one time, which constitute what is called a bout. After determining how many threads will be required, allowing so many threads to form one inch of the woven cloth, the operator must decide how wide[250] her warp is to be and how long. With the width, the length, and the number of threads to the inch in mind, she proceeds to wind upon her warping bars or frame the requisite amount until she has it all in one great skein. In putting this upon the bars or frames she should be very careful to cross each bout—i. e., each four threads—so that one bout shall go above and one below, in order to allow the introduction of a pair of sticks, called lease-sticks or leash-sticks. These attachments keep the order of the threads so that they may be drawn into the harness in the same order in which they are wound on the beam.
Warping the Loom.—To warp the loom the operator loosens one end of the skein and, passing it from the warping bars to the loom, attaches it to the roller or beam at the back of the loom, after carefully dividing it so that it may be evenly distributed. At this point an attachment called a rake is firmly fastened to the loom by cords and a certain number of threads placed in each division. By the aid of the lease-sticks, which are inserted, and with the assistance of a second person to hold the skein firm, the threads are wound upon the beam. The rake is now removed and the worker proceeds to set up the piece.
Drawing in the Warp.—As has already been explained, two harnesses only will need to be used for simple weaving. Taking the first bout of four threads, the weaver draws the first thread through the centre of the first loop in the first harness, or the one to which the right-hand pedal is attached. The next thread is put through the centre of the first loop of the second harness, or the one attached to the left-hand pedal. The third is drawn through the second loop of the harness connected with the right-hand pedal, and the fourth, in turn, through the second loop of the harness attached to the left-hand pedal. Great care must be exercised that no mistakes are made; for a single misplaced thread means that the work of drawing in must be all done over again. A special kind of hook is used to assist in drawing in the warp. When the drawing in is completed properly, the operator begins at the right-hand side of the loom and, measuring the reed, allows one half the width of web from the centre of the reed and draws each thread through each dent in regular order. When this is done it is only necessary to connect[252] the warp threads to the canvas of the beam by means of heavier threads which hold the warp out in the loom, test the work, and proceed joyously with the weaving.
Beating Up the Woof.—The weaver presses the right-hand pedal, and every alternate thread separates from the other, leaving a space between the two sets of warp threads for the shuttle to be thrown from right to left, carrying the woof threads through. The operator then draws this thread up at the side to make a good selvedge and brings home the beater, thus pressing the woof into the warp. A sheer fabric requires a light stroke of the beater, while firm cloth requires more force. Releasing the right pedal, the operator presses the left, which causes the warp threads to cross, holding more firmly the woof threads just thrown. The shuttle now passes from left to right, carrying through another woof thread which, in turn, is beaten up as before. So the work goes merrily on with the throws of the shuttle alternating from right to left and from left to right, interspersed with the strokes of the beater.
The Design.—This problem, like all others in house decoration, involves in its initial stages [253] questions of design. Before planning the rug it is necessary to know what use the rug is to have—whether it is to be for a hall, a living room, a dining-room, or a chamber, and whether it is to be used upon hard wood floors or with a carpet. This is a question of colours, and of materials; for the designer must avoid too sharp contrasts in colour, not only in the rug itself but in its relation to the other colours with which it should harmonize, and the materials used must not display glaring inconsistencies of texture. Unless the beginner has special talent as a colourist it is not wise to attempt the introduction of too many colours in one piece of work. If the warp is dark it is usually better to use light or medium woof. If several shades are used in the body of the rug, better results are obtained by using for the border or end decoration one or more plain colours which match or readily blend with the principal colours of the body of the rug.
Materials: Denim.—There are many materials suitable for rug making. Denim in moss or forest green makes a rug fit for a queen. This should be woven on a blue or green warp thread of carpet size. In preparing the woof it will be necessary to cut the denim on a true bias into strips from 1⁄2 to 3⁄4 of an inch wide. The latter width is better.[254] In cutting, the best method is to fold back one corner of a square cut end along the selvedge, forming a fold across the cloth at an angle of 45 degrees. Crease this fold carefully and make the first cut along the fold. With a yardstick or a straight edge of some kind rule off lightly with a piece of chalk or soft pencil strips of the proper width for the succeeding cuts, taking great pains to maintain a true bias. When a sufficient amount has been cut, the pieces should be ravelled or fringed on each edge by drawing them quickly through a button hook. There is a certain knack in this, but it is soon acquired. The fringed strips should then be fastened together at the ends by means of overhand stitching, trimming off neatly all projecting corners. The moss-like effect when woven is improved if the woof, as soon as it is prepared, is not rolled into balls but left in suitable lengths for filling the shuttle. A special form of shuttle without a bobbin or spool is used for carrying the woof cloth for rug weaving. Its simple construction[255] is shown in the illustration. The woof is wound endwise and unwound in weaving by turning the shuttle.
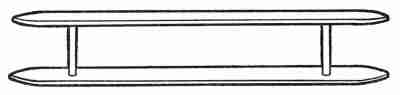
Another good material for rug making is found in various kinds of woollen cloth. Warm, durable, and handsome effects may be obtained by using a gray wool with catawba or some other warm shade of red as the end decoration, with set figures for the body of the rug. Geometric designs, arrows, swastika, the pine tree, and many other forms are possible. Very dainty colours also may be combined in rugs for chamber use. Materials for these may be obtained from worn lawn dresses, discarded silkaleen and mull, which work up beautifully with one or two plain colours reserved for use in the borders.
Combination of Blue and White.—Blue and white is always a happy combination; and exceedingly dainty creations may be woven, to be placed perhaps in the guest chamber, by using a woof of old blue with a white warp, combined with white borders and a white knotted fringe. A vine-like effect may be obtained in the border by twisting blue and white together in opposite ways and weaving in a plain thread of white or blue between the two. Another happy combination of blue and[256] white results from weaving on a blue warp a woof of white outing flannel, cut and fringed as described for the moss rug of denim, with a border of old blue and figures of the same colour. For a chamber or for a bath room in white such a rug as this will leave nothing to be desired.
A Weaving Design.—It has just been said that design in rug making is a question of colours and of materials. It is already apparent that it is more than that. It is largely a question of procedure in the process of weaving. That this is so may be shown in the following account of the making of a blue and white rug. The thought was to produce a rug with five stripes of blue running lengthwise, with white figures at regular intervals through the middle of the rug. To accomplish this result two threads of white warp were removed from the reed and harness every two inches for a space of ten inches on each side, thus making what may be called a weaving design; for the blue stripes, it will be easily seen, had to appear to the number of five on each side when the rug was woven. The white figures were formed by first throwing the blue cloth or woof through the warp by the usual throw of the shuttle and, before beating it up, threading into the warp white cloth in the desired pattern, after[257] which the woof and pattern were beaten up together. For the pattern five threads or pieces of white cloth were used, two of which were 6 inches in length and three 2 inches, the two longer ones being placed between the shorter ones as illustrated. A space of 7 inches was left between the white figures, the location of which was carefully determined by counting the threads, both of warp and of woof, so that in weaving the figures should appear at the right place. The result of this weaving design was a very beautiful rug.
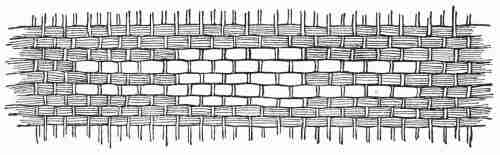
Another Example of Weaving Design.—This feature of rug designing is capable of indefinite expansion. Perhaps one more example may be given. The object was to produce a rug of medium dark centre with an 8-inch border all around of a darker colour. This effect was produced by first weaving 8 inches of the dark end border, which was of mixed goods showing several dark colours contrasting[258] happily. Having reached the place where the medium centre was to begin, a woof thread of this medium colour and of the right length was joined each time to short pieces of woof of the border colour so that, as the weaving progressed along the length of the centre, not only the centre colour appeared in its proper place but 8 inches of border on each side. When the proper length of the centre had been woven, the rug was finished by weaving another 8 inches of the border colour. The result was a rug of individuality and charm.
Great Variety of Material.—Endless combinations will occur to any one who becomes interested in this captivating art. The field for colour design is almost without limit. No material is so old and useless as to be despised by the clever rug maker. Old bed ticking with its blue and white stripes cut on the bias makes a very desirable combination when woven on a blue warp with a plain blue border. A charming mottled effect in one instance was produced by a yarn which was ravelled from an old raw silk portière of a mahogany shade and wound into balls with finely cut strips of tan cloth, the balls being rewound several times. This was used as the woof for the centre of the rug. The border was made of a weaving thread of the unravelled[259] mahogany yarn, doubled several times to give thread of a size equal to that of the tan cloth. Discarded clothing in which the prevailing colours are red, when made up into woof threads and woven on a white warp, gives a charming effect which may be strengthened or toned down by a border combination as desired. Dyes may, of course, be used if the colours of the weaving threads made up from old cloths and discarded clothing are not suited to the design that is to be worked out.
Weaving the Rug.—When the design for the rug has been thoroughly worked out, determining the colours, materials to be used, and the method of procedure, the warp and the woof threads should be prepared and the warp attached to the loom, as already explained in the discussion of the general process of weaving. Further details of procedure are not needed here. The thing to do is to weave a rug as designed. The next thing to do is to design and weave another rug, and then another and so on. As in most crafts so in weaving, experience is the great teacher—a teacher who demands faithful work, who finds lessons of value in every failure and abundant satisfaction in every success. Some of these successes were found in the rugs illustrated opposite page 252.
Rug weaving is probably the simplest of all weaving and therefore a good problem with which to begin. After serving a satisfactory apprenticeship in this field the amateur will have acquired sufficient knowledge of design and sufficient skill in the art to pass to more difficult problems. This will take her out into a large field of opportunity. Portières, window draperies, table scarfs, bedspreads, and covers for pillows and cushions in endless variety will suggest themselves to the ambitious worker. In all these, as has been seen in the case of rug making, design is all important. The management of the loom is much the same in all plain weaving. What differences there are will be found, for the most part, in the weaving designs. In the following problems are described some of the special features involved in the other forms of weaving.
Suggestions for the Design.—If the loom is wide enough these may be woven in one piece; but usually it is necessary to weave them in sections or breadths. In this case, of course, they must be afterward neatly joined. The possibilities in colour design are naturally varied. They may be woven with a woof of plain colour contrasting with the colour[261] of the warp, in stripes, or with plain centres with striped ends. Harmony of colour effects is always to be sought. Depth and richness may sometimes be obtained to a highly satisfactory degree by a generous use of black. Materials may be yarns, bits of silk or velvet, or pieces of fine, soft woollen goods. The warp may be silk or linen or mercerized cotton. Beautiful portières have been woven by leaving out two threads of warp at regular intervals, giving a loose and fluffy effect. Silk and wool pieces may be used in the woof, alternating with one or more threads of wool yarn of any desired shade; and, if of the same colour as the warp used, they will impart a very decided tone to the whole product. In portières, the general appearance is much improved if the woof is not beaten up hard into the warp. The soft beating gives a resulting texture that is more pliable and more suitable for hanging in easy folds such as is demanded in portières. Couch covers, however, which will have to resist more wear and tear, should be beaten up harder. In preparing the silk and wool pieces the cloth should be cut into very fine strips, joined by carefully lapping the ends, and, by cutting away a part of the cloth, making the joint uniform in size. If the material is cloth of ordinary thickness[262] 1⁄2 an inch is quite wide enough for strips. The length of the pieces used may vary greatly, though they may be somewhat different in colour. They may vary all the way from a few inches to a length long enough to weave an inch in the portière or cover. This makes it very easy to secure a source of supply for the material in saving old garments and short pieces of cloth for the specific purpose of making up the woof threads for these products of the loom. Almost any household will be able to save enough in a short time to furnish the material for a beautiful pair of portières or a couch cover which will be durable in quality, easy to clean, attractive in colour, and satisfactory from every point of view.
The Design.—Curtains of one colour or of several are woven on the simple loom with two harnesses. They may be of the soft cream tint, the material for which is easily obtained and the effect of which, in softening the light passing through them, leaves little to be desired. But if a little colour be required, the weaving design may be easily changed to secure this result. One may, for example, weave at first 7 inches of the plain cream. This will give woven material enough for a 2-inch hem at the [263] bottom of the curtain and 5 inches before the beginning of a coloured border. The border may consist of two threads of colour alternating with two threads of the cream, thus making a stripe of about 7 inches in width. Following this may come 8 to 10 inches of the plain cream, followed in turn by a narrow stripe of the same colour as the border, 3 inches wide, in turn followed by another 10 inches of the plain cream and another narrow stripe, and so on, alternately, until the required length of the curtain has been woven. If desired, a top border may be woven in, though it is well to make it somewhat narrower than the one at the bottom—say about 5 inches—and it must be added so that it will show below the hem. In any case the top of the curtain should be woven plain, allowing for hemming, and also for shirring if a rod is to be inserted for hanging the curtain. Vertical stripes are often desirable in curtains, especially if the room is so low studded as to invite the employment of every possible means for making it seem higher. Such stripes may be made by using two colours for the warp—as, for example, blue and white or green and white—with one of these colours as woof.
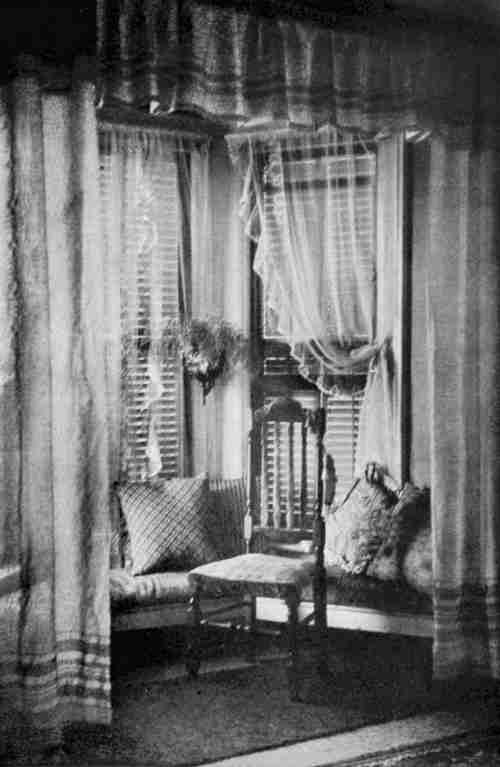
Importance of Selecting Good Warp.—The successful working out of this problem depends very[264] largely upon the proper selection of materials. While many things may be used for warp with a certain degree of success, there are fine points to be observed in weaving as in all the art-crafts, and the real beauty of the result depends upon giving due attention to these points. It is always well to remember that in all weaving the warp plays a most important part. Mercerized cotton warp works out effectively with silk or linen woof or with a combination of both, and retains its beauty after being laundered many times. In the soft cream shade it has almost the appearance of silk, at a much less cost. But silk may often be obtained at a low price if the weaver lives in the neighbourhood of a silk mill. Bargains in small lots of unsalable colours may be secured with which the weaver may do wonders; and if the colours are not good the silk may be dyed at small expense. Our grandmothers saved their tea grounds for a week or more, boiled them, and made a dye which gave a beautiful gray warp. They were, in fact, very particular about their warping threads. Not everything would suit them. They learned from experience that the wearing quality of goods is improved by having the warp stronger and harder twisted than the filling. It was common for them to spin a certain thread for this purpose.[265] Exquisite results follow the use of a fine linen warp in white or natural colour with linen or silk for filling. Striking and beautiful also, in its way, is the very coarse linen warp.
Variety in Woof Threads.—A very pleasing effect in sash curtains or in full length window draperies is produced by weaving heavy threads alternately with fine threads, using two shuttles or bobbins, one holding the heavy thread and the other the fine one. Two or more threads may be alternated in this way as the fancy of the designer prompts; and this style of weaving may be confined to borders, leaving the body of the fabric plain, or the borders may be woven of the solid, heavy threads and the body of the curtains or draperies ribbed with the alternate coarse and fine threads. Such curtains are very beautiful in cream white; but colour may be used if the colours are fast so that the curtains may be successfully laundered.
Before undertaking more difficult problems in weaving it will be necessary to explain in general two important processes. The first one is the process of pattern weaving; the second, dyeing. Among the heirlooms treasured by many families[266] are the beautiful blue and white coverlets or bedspreads and the hand-woven table-cloths and towels. No one with strong domestic tastes who has been fortunate enough to see these products of home industry can have failed to be charmed with the wonderfully wrought designs and with the quaint names by which they were once well known; for our grandmothers designated these designs by such names as Spring Flowers, Governor's Garden, the Path of the Roses, Flowers of Lebanon, Ladies' Delight, Fairies Ring, and doubtless by many more names which have been lost. This work in pattern design is wrought by the use not of two pedals and harnesses, right and left, as used in the first three problems, but by the use of several additional harnesses.
To Be Learned by Experimenting.—If the beginner in weaving has mastered the use of the simple loom with two harnesses it is possible to extend her knowledge and skill to the successful operation of a pattern weaving loom. But the procedure is too technical and too varied to be described in detail as directions for a practical problem for amateurs. It is far better to experiment with a loom of this kind under the guidance of some person competent to point out the way step by step. Nor will it be [267] possible, in a brief description of this somewhat intricate subject, to suggest ideas for original weaving designs to ambitious beginners who wish to take up pattern weaving. Copies of the traditional designs may be obtained as material for study and practice. After a little it will be possible to make variations and so lead to the delight of originating simple and perhaps more elaborate new patterns.
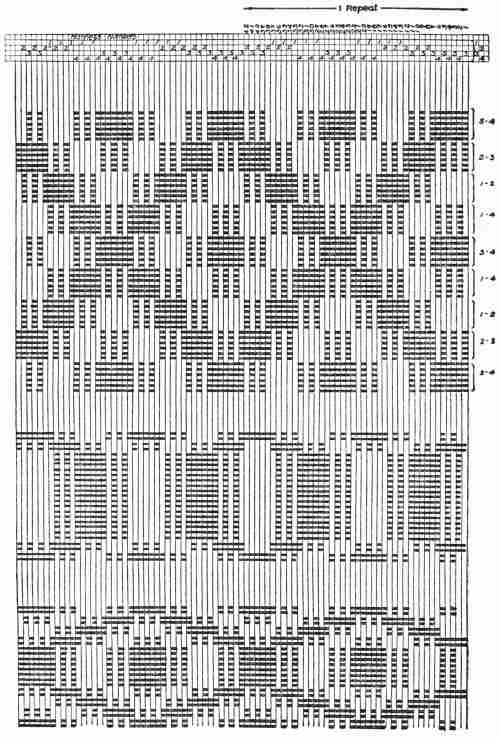
How Patterns Are Written.—Complete working directions for pattern weaving will therefore not be attempted in this chapter; but it may be possible to point out a few leading facts and principles which will be of assistance to the experimenter who ventures to take up by herself this interesting application of the art of weaving. Patterns for this work are plainly written out from right to left on cross section paper, as shown in the upper part of the accompanying illustration, each horizontal section of which corresponds to one of the harnesses of the loom and the pedal attached to it. If we have a four-harness loom, as would be required for working the pattern and weaving the figures illustrated, the right-hand pedal and the harness connected with it, which is the one farthest from the operator, are designated by the number 1, and correspond to that harness number in the pattern. Following in order, the [268] next three pedals and connected harnesses are numbered 2, 3, and 4 to correspond with the same numbers in the pattern. Turning now to the vertical sections of the pattern, we shall find that each one corresponds to a certain warp thread, so that when the pattern is "drawn in"—i. e., when the warp for weaving the pattern is attached to the loom—we shall find the thread of the warp which is to be drawn through the first loop or wire indicated by a mark on the section of the pattern corresponding to that warp thread and to the number of the harness through which it is drawn. Thus, according to the pattern shown in the illustration, the first thread is to be drawn into the 3d harness, the 2d thread into the 4th harness, and 3d thread into the 3d harness, and so on alternately until we reach the 8th thread, which is drawn into the 2d harness; the 8th, 9th, 10th, 11th, and 12th threads are drawn alternately into the 2d and 3d harnesses, and the 13th, 14th, 15th, 16th, and 17th are drawn alternately into the 1st and 2d harnesses. This process is now continued, as will be clearly understood by reference to the pattern, up to and including the 42d thread, when one drawing in of the pattern will have been completed. A further study of the pattern shows that the marks on lines 3 and 4 form[270] a continuously alternating series; and similarly that those on 2 and 3, 1 and 2, and 1 and 4 form also a continuously alternating series. But these numbers, however paired, correspond to the harnesses into which the warp threads, indicated by the numbers 1 to 42, are drawn. It thus appears that after we have drawn in as many warp threads as the pattern calls for once around in the order indicated in the pattern, we have prepared the loom for weaving one of these patterns. We must therefore draw in the rest of the warp threads in the same order as those already drawn in, thus repeating the drawing in of the pattern as many times as required for the width of the piece to be woven. The illustration shows two "repeats" of the pattern.
Operation of the Harnesses.—Having explained the method of drawing in the pattern, we may now study the movement of the harnesses necessary to guide the warp properly for the weaving of the pattern. It has been noted that, with the pattern under consideration, harnesses 1 and 3 hold a continuous line of alternating warp threads, leaving harnesses 2 and 4 to take up all the intervening warp threads. If then the operator should throw down pedals 1 and 3 together, and alternately 2[271] and 4 also together, the warp threads would be crossed exactly as in plain weaving. Bringing out a pattern in weaving must, of course, require a variation of the pedal movement from that used in plain weaving. Now, upon reference to the illustration it will also be noted that in writing the pattern, or in drawing it in, no two threads have ever come together on the same harness. If the 1st thread has been drawn into the 3d harness, and the 2d thread into the 4th harness, as shown in the pattern illustrated, the operator begins the weaving of the pattern by throwing down the 3d and 4th pedals together and throwing the shuttle which carries the pattern thread. This operation is what weavers call a "pick." Each pick of the pattern thread is represented in the diagram (page 268) by a broken black line running across the pattern. Thus the diagram of the first design shown indicates that there are 6 throws of the shuttle alternately over and back, or 6 picks of the pattern thread, for each corresponding section of this design. But between every two picks of the pattern thread there must be a pick of the plain weave, requiring, as has already been explained, the pressing down of either the 1st and 3d pair of pedals together when the shuttle is thrown from the right side, or of[272] the 2d and 4th if thrown from the left side. It is evident, then, that there must be two shuttles prepared for carrying the woof threads. One of these is to be used for the plain weave and the other for the pattern weave. The shuttle used for the plain weave is usually threaded with a fine thread of linen, though this, of course, is subject to variation according to the design of the weaver. The pattern weaving shuttle should carry a coarser thread, which may be of silk, linen, wool, or mercerized cotton.
Variations in Pattern.—From the fact that a carefully written pattern is necessary in preparing a four-harness loom for pattern weaving, one would naturally infer that the pattern must be closely followed in the weaving process. And so it must if the pattern be woven as written; but, after the drawing in, it is by no means necessary to follow the written pattern. As the weaving progresses it is easy to see many variations in pattern which may be woven upon one drawing in—patterns so varied as to seem to hold very little relation to each other. In fact, one of the delights of weaving with a pattern loom is to devise ways of modifying simple patterns, elaborating them into new weaving designs, producing unique and sometimes very[273] interesting original figures. We have only to remember that patterns are made by the order and number of the overshots—i. e., the throws of the shuttle carrying the pattern threads—and that the overshots in the same horizontal and vertical lines are produced by the same pair. In the pattern illustrated the overshots are made by 2 and 3, by 1 and 2, by 1 and 4, or by 3 and 4, not counting 1 and 3 and 2 and 4, which are the pairs for plain weaves. We should also remember that the last end in one overshot is usually the first one in the next. Examples of two variations in design that may be woven from the original written pattern, to which we have already referred, are illustrated in the diagram and probably at least a dozen more variations are possible.
This problem will require the use of the four-harness loom. The first thing to do is to procure the written pattern for the border and draw it in. When the drawing in is completed and the weaving is begun, the first step in the process is to weave a few inches of the plain cloth. In doing this, however, we shall, of course, find that the pressing of the right-hand and left-hand pedals as in simple weaving will not accomplish the desired result;[274] for it has already been explained that the pedals of a four-harness loom must be worked in certain pairs to produce a plain weave. It will be remembered that to do plain weaving with the warp drawn in as required by the pattern illustrated on page 268, it is necessary to press pedals 1 and 3 together alternately with 2 and 4—i. e., both pedals of each pair must be pressed at the same time to produce the same effect as that produced by the alternate movements of the right and left pedals in simple weaving.
When a sufficient length of plain cloth has been woven, the written pattern for the weaving of the border design must be faithfully consulted and the right pairs of pedals pressed down in proper order for the weaving of the pattern. The second or weaving shuttle carries the bobbin, which is filled with the colour required in the pattern. Any changes of colour required by the design are easily produced by inserting a new bobbin filled with the desired colour.
The Design.—A great variety of design is possible in table scarfs. It is common to weave in a narrow beading of whatever colour may have been chosen, following this by a few threads of white, and this in turn by a narrow band of the colour of the border with some slight suggestion of the pattern, then more[275] of the plain white and finally the full pattern of the border. The centre of the table scarf is simply a matter of plain weaving in white or possibly in some solid colour, while the other end of the scarf must be woven with the same border and bands as were woven at first, but in the reverse order.
Variations in Design.—One pleasing style of decoration is found in repeating the border several times with inch-wide spaces between. Another variety requires a heavy border at the ends, with narrow ones at short intervals throughout the length. Shadow borders, so-called, are also common, and may alternate with borders of colour or may constitute the entire decoration. Shadow borders are heavy borders woven in the cream or body colour of the scarf instead of being in a contrasting shade. In order to make them stand out well it is necessary to use a coarser thread than is required for the colour borders. A gray linen plain weave is often embellished in white with delicate effect. There is also a heavy linen thread which is good for scarf borders. It is obtainable in dainty colours, and the heavy thread seems to bring out the patterns in greater perfection. Darning silks in fast colours are also employed, but these should be woven double in order to obtain the best effect. They[276] are found in the market in short lengths and in such attractive colours as Delft blue, reseda green, pink, and catawba. The last two colours, used with linen in the natural shade, make a happy combination.
Scarfs should be woven from 20 to 24 inches wide and about 11⁄2 yards long, unless some special use requires that they should be of different length. Not only do they make pleasing table covers, but they are useful as tray cloths, and from them charming sewing or embroidery aprons may be fashioned by folding one end over, tying it with ribbons, and arranging pockets to hold the work. One scarf will make two aprons. Fancy bags are also woven on the same general lines as scarfs, but the width needs to be only 8 or 10 inches. These may be woven of the pattern throughout, or they may be striped with bands or borders. Lined with silk and finished with ribbons or cords, they are very much admired for embroidery and other fancy work.
In the discussion of the problem of hand weaving, frequent reference has been made to the use of coloured materials. While it is possible to obtain many good colours in the market, it is much more satisfactory to make these colours at home by the[277] use of the dye pot. In former times, when hand weaving was general, there was no other way; and, in fact, dyeing and weaving may well be considered now, as they were then, sister arts. When the wool was washed, carded into rolls, spun into yarn, and again doubled and twisted, it was, generally speaking, still necessary to treat the yarn with some permanent dye before weaving it into cloth. One notable exception was found in the natural gray homespun, which was of yarn spun from the wool of both the black and the white sheep carded together. The modern worker with the hand loom will find almost the same necessity as our grandmothers did for a knowledge of the art of dyeing. Seldom will she find at hand just the shade or colour required by the design of the piece to be woven. Much of the material that is worked up for the woof of rugs, for example, will be found to be so faded or spotted that it would poorly repay one for the labour of weaving it up in that condition. And even the new material, which it is often necessary to procure for plain weaving, for pattern weaving, and for use in borders, will often need a bath in the dye pot in order to furnish the tone of colour needed.
Some Good Points in Dyeing.—Good results in dyeing are obtained by using the prepared dyes of[278] the markets, mixing together more than one colour often, after some experimenting, in order to produce the desired shade. Instead of mixing the dye one may, if she chooses, dye first in one colour and top off with another. A fine permanent green is obtained by dyeing thread or cloth a good yellow and topping with a blue bath. Green and blue dye used together give neither green nor blue but a blending of both colours, which is exceedingly pleasing. In all cases it is better to make the dye bath weak, leaving the article to be dyed in the bath a long time rather than to keep it a shorter time in a stronger dye. The advantage is not only greater permanency of colour but also greater certainty in the result; for one can watch the process of dyeing more easily and guard against the colours becoming too dark. The material which remains in the dye bath until it takes practically all the colour from it may generally be depended upon neither to fade nor crock.
Some Common Dyes.—The dull, soft colours, made generations ago from barks and teas with alum as a mordant, had artistic qualities and were generally permanent. It is well worth while to experiment in this direction. Straw colour may be made from the old-fashioned herb saffron; orange comes from[279] madder and fustic; yellow is obtained from powdered dock root; rusty nails boiled in vinegar with a bit of copperas give a good black dye, useful also in freshening black yarns that have acquired a dull or faded colour. White maple bark boiled in water makes a fine medium brown which may be made fast by first treating the cloth or yarn to be dyed in it with a solution of alum. A permanent and fine nankeen colour may be made from a pail of lye with a piece of copperas half the size of an egg boiled in it. In fact, nearly everything which possesses colour may be considered a dye. Vegetable substances are generally in themselves more permanent, but most dyes need to be fixed or "set" by the use of some mordant. All this will mean much experimenting, of course, unless one is fortunate enough to possess an old receipt book with its quaint allusions to mordants, kettles of brass, and vessels of pewter. The use of the prepared dyes, which may be easily obtained with explicit directions, is generally satisfactory and of course somewhat easier; and yet the interest which inspires one to cultivate the art of hand weaving leads to a desire to master all of the arts intimately associated with this ancient and fascinating home industry.
To watch a potter thumping his wet clay—Rubaiyat of Omar Khayyam
The boy who makes his mud pie, baking it in the sun, and the Indian who, ages ago, coiled clay in a basket which he burned away, are but two widely separated links in a continuous chain; for men of all time have found a fascination in the wet clay that is so easily moulded and fashioned into all manner of things of beauty and of use. And, beside the joy of exercising the creative faculty, there has also been the spur of a common need to inspire men of different races, independently of each other, to develop the primitive household arts, like pottery and rug making, by the use of methods no less remarkable for their similarity than for their cleverness. The impressions that the primitive man received from his natural surroundings were easily expressed in the plastic mud, and it was probably not long before he discovered that fire made them permanent and practically indestructible. [281] Improvement was bound to come in due time. By washing the grosser impurities from the clay mud through a process in which the heavier particles settled, leaving the silt or finer clay to be poured off, some artist of a very early time found a material that became one of his most valuable helps in adding to the furnishings of his tribal household. First it was simply burned clay; but in due time enamel or glazed work found its use in tiles for building purposes, in grain jars, in wine jugs, in many kinds of table ware; for the uses of ancient terra cotta and porcelain were numerous.
The primitive arts, however, were not confined to objects of necessary use. We find, buried with the ruins of ancient cities, many evidences of the potter's craft, and among them articles for decorating the home, for personal adornment, and for religious use, like the rings and scarabs of Egypt. And in modern decorative art, as applied in the household, the one final touch which gives that indescribable charm, which it is the aim of all art to give, is perhaps to be found in a few—a very few—choice bits of pottery.
All of this use of clay, from the rude art of prehistoric times to the finest product of modern skill, is based on a plain scientific fact, viz., that a small[282] quantity of water in the clay, not removable by any ordinary means of drying, can be driven out by intense heat so as to cause a permanent change in the character of the clay. This water is called the water of combination. If the clay is not heated more than enough to dry it, a later mixing with water restores it to its former plastic state; but clay once burned has lost its water of combination and never can return to its original condition.
Most beginners in clay modelling will expect, perhaps in the early stages of their work, to be made acquainted with the potter's wheel; for who has not heard of this interesting device? It is of interest chiefly because of its practical utility in the manufacture of pottery; and yet no one can forget the potter's song with which Longfellow begins his beautiful poem Keramos, making it a text for a sermon on the philosophy of life:
Potter's Wheel Unnecessary.—The potter's wheel was used in comparatively early times and has[283] been intimately associated with the art ever since. But it requires much physical strength and considerable skill to use it effectively; and its use has been by no means universal. We find the Indians of our own time and people of other races, expert in building pottery by hand, using the method of coiling. It seems best, therefore, to advise beginners to adopt the simpler method and to forego the use of the potter's wheel. The comparative inexpensiveness of the hand method of building is another point in its favour. The tools required are few and simple. Inexpensive and easy methods are favourable to the experimental stage; and it is well for the amateur to have every encouragement to experiment freely both with methods for building and with designs for his ware, keeping in mind always that the beautiful is generally the simple and strong, not the fantastic and complicated.
The Method of Coiling.—It will be understood, therefore, that in general the process to be followed consists in building up the bowl or jar or whatever the design may be by using coils of clay of the right consistency, welding and shaping them together, and scraping them down, if necessary, until they are ready to receive the first firing. After this they[284] may receive a coating of glaze and be fired again. At first the beginner will find his chief interest simply in experimenting with the building up process.
The materials and tools needed are as follows: Clay; oil-cloth, 18 inches square; cotton cloth or flannelette, 18 inches square; a few simple modelling tools; a soft pencil; drawing paper; card-board, 6 ply; a plaster of paris "bat," or a piece of slate.
Clays.—It will be necessary to add a word of explanation in order that these materials and tools may be well selected. There is a great variety in clays, ranging from a very coarse red clay used for flower pots to the finest white clay used for porcelain. The latter is called kaolin and is very pure. A good modelling clay may be obtained from dealers in school supplies or from potteries. In some localities, especially in the neighbourhood of brick-yards or other clay industries, a satisfactory clay may be easily found. But, however obtained, some experimenting will be necessary to test its suitability. The modelling clay is probably the least liable to yield disappointing results.
The cotton cloth or flannelette is to be moistened and used to wrap up the clay in order to keep it[285] from drying too rapidly during the intervals when it is set aside. This will not be necessary during the early part of the process, for then it is desirable for the clay to stiffen as rapidly as possible by natural means.
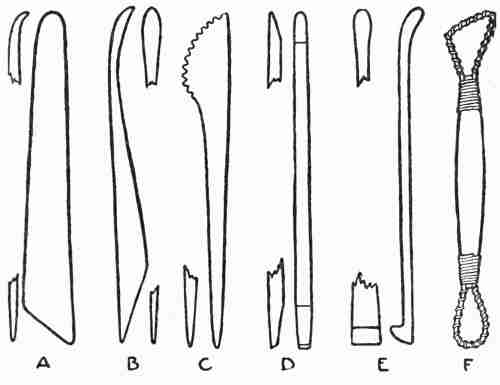
Of the modelling tools needed some can be whittled from hard wood. They are not expensive, however, and the beginner will perhaps find it well to obtain most of them from a dealer in artists' materials. The accompanying illustration shows some of these, among them a very useful tool (F) with brass wire[286] loops which are in turn wound with finer wire. F and C are especially useful for scraping clay too soft to be easily managed with smooth edges. The thumb-like tool A is perhaps the most generally useful of those shown here.
In this connection it is well to emphasize the fact that the greatest of all tools is the human thumb. Cultivate its use. Most modelling and building can be managed with the thumb, assisted by the fingers.
The Bat and How Made.—A plaster of paris bat will be found exceedingly useful. A sheet of thin, unsized paper serves well, however, for a surface on which to build; but the dry plaster of the bat absorbs the moisture of the clay at the bottom and hastens the stiffening process. This bat can be easily made. Take a small quantity of water (a half pint or more according to the size of the bat required), sift into this from the hand an equal amount of plaster of paris, and stir it in until a little dry plaster appears at the surface. After a little more vigorous stirring let it rest a few minutes and then pour it into tin pans which are 4 or 5 inches in diameter by 1 inch deep. The pans should be previously coated on the inside with a thick soap solution, made by dissolving soap in hot water to the consistency of a thick cream. The bats will[287] harden in 10 or 15 minutes and may be easily removed from the pan, ready for use.
This problem naturally divides itself into six important steps, as follows: The design or profile; building and shaping; decoration, if any; firing (bisque); glazing; and firing the glaze.
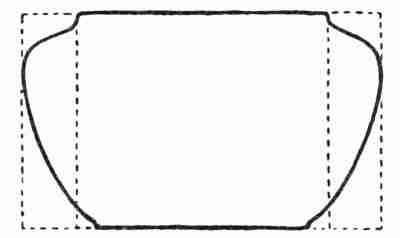
The Design or Profile.—As in all problems of decoration the first step is found in design. For present purposes we may consider a bowl as having a diameter as great as or greater than the height. The bowl will be more interesting from the standpoint of variety if there is a difference between its height and its greatest diameter, and also between its diameters at the top and at the bottom. The accompanying drawing shows such differences.
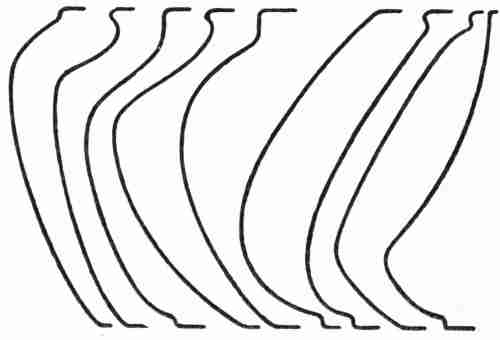
Another example of the value of variety is to be found in the curve of the profile. A line that is simple but constantly changing in its degree of curvature—as, for example, an elliptical curve—is more pleasing than an arc of a circle, which is sometimes called the curve of limitation. It should be noted that a curved form, in order to be forceful, should have some dominant curve in combination with others which are subordinate. The profiles illustrated in the following drawings have this dominant element and are in no case composed of arcs of circles. These varied, interesting, yet simple lines—live lines as they are sometimes called—consisting[289] in each case of only two or three elements, are given here merely as suggestive material. A little experimenting will show unsuspected possibilities in strong, forceful curves, and the young student is advised to make many experiments in the effort to discover such possibilities. An example of profiles to be avoided is given in Problem II, on page 309. That these are vase forms and not bowl contours is immaterial. A is commonplace because the two parts of the curve are too much alike. B is unrestful in its three curves of nearly equal size. If the suggestive profiles illustrated in the foregoing drawing be turned upside down it will be noted that very few of them seem as pleasing as before. It will be found also that a different ratio of height to diameter will give very different effects with the same profile. A bowl having top and bottom alike may, so far as design is concerned, be classed with the pill box. We don't know which is the top until we have spilled the pills. If attractive pieces of pottery are found with the top and bottom of equal diameter and with curves in themselves objectionable, it will invariably be found that the attractiveness consists in some beauty of glaze, colour, or decoration which is prominent enough to conceal the defects of form.
Natural Forms.—It may be well to add a word here in regard to the imitation of natural forms in designing the general shape of any piece of pottery; and that word is a very brief one. Avoid them. Nature is a great teacher in all branches of art; but in pottery her suggestions are to be used as decorative elements rather than for fundamental shapes. A fish with a flower in its mouth does not seem appropriate; but a bowl for water-lilies, while it may not take the form of a fish, might reasonably have a fish as an element of its decoration.
Testing Profiles.—A good way to study the effect of the profile of both sides of the bowl is to fold the paper on which the profile is drawn vertically through the centre and transfer the line reversed by rubbing the back of the paper, thus giving the other half of the drawing in exact symmetry. When the general shape of the profile has been tested in this way one side should be redrawn carefully; then, with the paper folded along the centre line, so that the pencil line falls outside, the whole form may be cut out; and then it may be unfolded. The next step is to begin to build up the design in clay.
The Building.—Roll out a coil of clay a little thicker than the bottom of the bowl is to be; perhaps[291] 3⁄8 or 1⁄2 of an inch will serve, since the bottom is to be hollowed slightly by scraping. The roll should be uniform in diameter and rolled as little as possible, in order that it may not become too dry. Upon the piece of paper or the plaster bat start to coil the roll from the centre until the desired size is reached, then smear the rolls together, working toward the centre. Turn the coil over and work the other side together, truing up the circle and making the bottom of uniform thickness. Avoid the use of water in smoothing the coils together. It may seem to make the work easier, but it softens the clay and invites careless work.
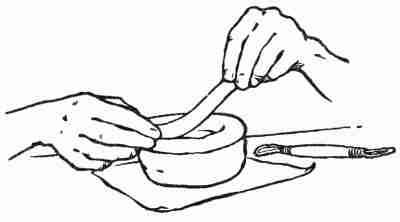
With another coil begin to build up the sides, making a complete circle, and, having pinched off the ends where they meet, join them carefully. Lay two or three coils in this fashion, pressing each[292] coil firmly into place as it is laid, and smooth them together as in the base. The process is illustrated in the drawing. If the clay is very soft, the work may be set aside to harden a little, while a beginning is made upon other pieces. It is well to have two or three pieces in the process of construction at the same time.
Testing the Work.—A template or gauge will be needed to test the work as it progresses from the first rough stages to the finish. This is made of card-board by cutting out an exact copy of the profile, leaving at the bottom sufficient width to insure rigidity when the template is held upright on the table or bat.
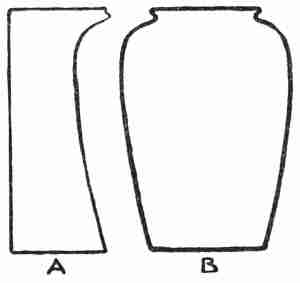
As the work goes on, if the design requires that the form should be "brought in" toward the top, the coil must be laid a little inside of the profile desired, as the smoothing tends to increase the diameter slightly. In all the building, allowance[293] should be made for this enlargement. When the coil is high enough and of the shape desired, it should be allowed to stiffen until it is rigid enough to handle. With the various modelling tools the surface should then be scraped wherever it is necessary to remove the hardened clay in order to give a symmetrical shape to the desired profile.

A drawing is shown to illustrate the process of scraping. The surface should be left smooth and even; and this may be accomplished without water or sponge. The flat sides of the scraping tool may be used to polish the clay as soon as it becomes leather hard—i. e., hard and stiff, but before it begins to whiten and dry.
The lip or top of the bowl will require special attention. It will probably need to be thinned down and have all sharp edges removed. Then the bowl should be turned upside down and the bottom[294] hollowed out to a depth of 1⁄16 to 1⁄8 of an inch, leaving a "foot" or rim around the outside of the circle to give it steadiness.
The Decoration.—After the bowl is complete as to its general form, the problem of its decoration, if there is to be any, must be solved. This may be studied during the intervals when it is necessary to set the bowl aside to harden. If the form and colour are good, the bowl may possess a charm that will not be improved by decoration. On the whole, less decoration, rather than more, should be the aim. The three vases illustrated at the top of a following page are examples of pottery without decoration. (See page 308.)
Generally speaking, bowls like the one we are building may be decorated by one of three methods: By sinking lines or channels in its surface by means of a sharpened, chisel-like stick (D, page 285); by modelling or carving the surface; or by painting the surface with coloured "slip" or with coloured glaze. It should be explained that "slip" is a mixture of clay and water of the consistency of cream; it may be coloured or uncoloured. A combination of two or more of these methods is, of course, possible. Examples of the first two methods are shown in the illustrations of bowls, vases, and [295] tiles. A combination of the first and third methods was used in decorating the tiles of the middle row shown in Plate XIV opposite page 316.

Classes of Decoration.—The form of the decoration is simply a matter of space division, as illustrated by two examples shown below. It is evident, too, that decoration, so far as form is concerned, divides itself naturally into three general classes: (a) The horizontal band; (b) the vertical division; (c) a combination of these two. The last will prove to be the most common of the three. It should be noted that an all-over pattern, which has been left out of consideration as tending to monotony, would commonly be a combination of both horizontal and vertical methods of division. It should be noted also that the presence of other than vertical and horizontal lines in pottery decoration does not affect the main classification. Typical[296] examples of these divisions are illustrated in both bowls and vases, as well as in the cuts A and B. It will be seen in each case that one scheme or the other predominates and that there are possibilities for great variation in treatment.
Analyzing the patterns shown in all these illustrations, we find that the band or horizontal scheme offers a succession of large and small spaces, giving variety and rhythm. In many of those patterns showing the combination type there is a concentration or "knotting" of the line at regular intervals, frequently at the intersection of both horizontal and vertical elements. This is well illustrated by the left-hand bowl of the middle row shown in this plate opposite page 294. When the method of painted decoration is employed the concentration point is composed of mass instead of line. All this serves to give emphasis and rhythm.
For subject matter in decoration natural forms may be used as shown in the vase at the left of the top row illustrated in Plate XIII, opposite page 312. Or an abstract arrangement of lines may be employed, as shown in its nearest neighbour, which may or may not have had its origin in a very much conventionalized natural motif. The essential thing to remember is that the divisions[297] of spaces must be varied and rhythmic and the decoration suited to the method of application.
How the Design is Applied to the Clay.—After the design has been studied as much as possible on paper it should be planned out on the bowl with a soft pencil, allowing sufficient space for the incised line or channel to be made. The clay should be leather-hard—i. e., stiff but not dry. The spacing around the circumference should be made exact, deviating somewhat, if necessary, from the spacing of the paper drawing. A good way to manage this important step in the process is to measure the circumference at the point of greatest width with a narrow strip of paper and then to divide this circumference by folding the paper evenly into the number of units desired. By wrapping the paper around the bowl again the points of division may be transferred to the clay and then projected upward or downward vertically to the belt that it is desired to meet. It is necessary to make sure that the vertical lines are true "meridians" and do not swerve to the right or the left. In order to test the horizontal lines, measurements may be made from top or bottom. All of this work is best done free-hand; for, aside from the value of the eye training derived, hand-built pottery is seldom exact[298] enough to permit of a more mechanical method of planning its decoration.
The drawing on the clay having been completed, the next point is to choose the tool best fitted for the work and carefully make the cuts, deepening them from time to time as the work progresses. If the design is to be worked out in line, a chisel, like that illustrated in D (page 285), may be whittled from a pine stick. It is held nearly upright and used as a scraper to cut out at first a shallow channel. Reserve should be exercised in cutting, because, generally speaking, there is danger of making the design too insistent. Some of the best designs are very subtle and quiet. Care should be taken, however, to allow for a slight filling in of the hollow by the glaze when it is applied.
Modelling a Decoration.—If the decoration is to be modelled it would seem wise to do it, in whole or in part, as the work is built up; but in this case great care will be needed to keep a firm hold on the relief and unity of the decoration. It will be easy to over-model the work.
How Under-glaze is Applied.—For decoration with under glaze the colours given under the head of glazing (page 304) are mixed in different proportions with dry powdered clay and water to form a[299] colour paste. This is painted on the "green" or moist clay, forming a smooth and even surface. Experience will teach the proportions of colour to be mixed with the clay. These proportions vary greatly with different colours. A very strong colour like cobalt will give a deep blue if mixed in the ratio of one part by weight of cobalt to ten parts of clay. Colours like the oxides of iron and copper are of medium strength, and antimony is quite weak.
Before the work is left to dry it would be well to make sure that all corners and rough edges are smoothed off as they will show light and rough through the glaze. The use of sand-paper, however, is not advised, though it may occasionally be used in the emergency of an accidental roughness remaining after the piece is dry. The aim should be to have all clay work show something of the plastic nature of the material out of which it is made.
Firing.—Pottery must be "bone" dry before it is fired. A very satisfactory portable kiln for firing may be purchased for from $34 to $175, according to the size. The smallest size, which is illustrated in the next drawing, will be ample for the needs of one or two persons. If, however, the amateur does not care to go to the expense of purchasing[300] a kiln, it is generally possible to find a pottery factory in the vicinity that will undertake the firing and perhaps the glazing.
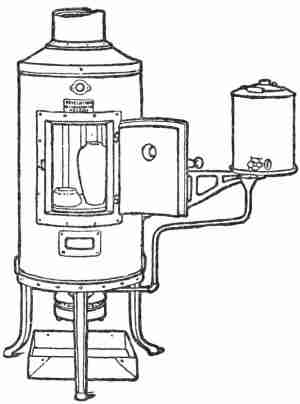
Temperature Required.—Pottery is fired at a temperature varying, according to the clay and the glaze used, from approximately 1800 to 2000 degrees Fahrenheit. Modelling clay fires at 1958 degrees Fahrenheit, or what is called "cone 04." This term comes from the fact that the heat is gauged by pyrometric cones, which can be seen through a spy hole attached to the kiln. These cones are graded compositions of various materials and possess different degrees of resistance to heat. They are usually set up in clay in groups of three or more. When one of them melts it bends over, as illustrated in the accompanying drawing, which shows cone 05—the most[301] fusible one—completely "down," and 04 at a point indicating that it is time to shut off the heat from the kiln. This must be done gradually and the kiln must be allowed to cool completely before it is opened. This is especially necessary when firing the glazes described in the following section, which require the same temperature as modelling clay. Further details about firing and caring for the kiln may, of course, be learned from descriptions accompanying the apparatus. Pottery comes out of the first firing in the kiln a dull porous ware and in colour either cream, buff, or red, according to the amount of iron in the clay. In this state it is called "bisque" or "biscuit."
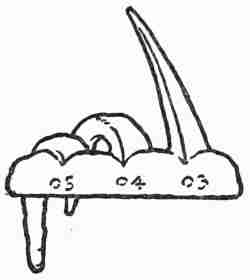
Glazing.—It is necessary to bring the pottery up to the condition of bisque before it can be glazed; or, to speak more accurately, before it can be over-glazed; for it has already been shown how the so-called under-glaze is put on before the first firing. The subject is somewhat technical, and it will not[302] be possible in a single chapter to take up the details extensively. Briefly speaking, the glazes most used for this class of work are the lead glazes—combinations of "white lead" or carbonate of lead as a flux with kaolin, flint, whiting, feldspar, and other ingredients. These are supplied in powdered form and are ground together in water by means of a mill or a large mortar and pestle; a mortar 8 inches in diameter will serve.
Grinding the Glaze.—The grinding should continue about an hour. It should be said, however, that there is such a thing as grinding too fine. After the glaze has been properly ground a small quantity of gum tragacanth, dissolved in water, is to be added as a binder to prevent flaking and rubbing off in handling. It is also a good plan, though not always necessary, to strain the glaze, as soon as it is ground, through fine muslin. The tools and materials needed for this work may be itemized as follows: Lead carbonate, whiting, Canadian feldspar, Florida kaolin, French flint, white oxide of zinc, and various other oxides and colours noted in the text; earthenware bowls, 10 or 12 inches in diameter, for holding the glaze; large spoons, preferably aluminum; agate mortar and pestle, 8 inches in diameter.
Example of Matt Glaze and Bright Glaze Mixes.—Two mixes are given below calculated to fuse at cone 04. One has a "matt" or dull velvety surface, and the other has a "bright" or shiny surface. The matt will be found more desirable for general work because it harmonizes better with flowers and foliage. The figures given below refer to units of weight. Metric weights (grams) are most convenient to use, but any units will serve so long as the same one is used throughout. The matt glaze should be of the consistency of thick cream, the bright glaze somewhat thinner.
MATT BASE | BRIGHT BASE | ||
| Lead carbonate | 154 | Lead carbonate | 142 |
| Whiting | 25 | Whiting | 20 |
| Canadian feldspar | 83 | Canadian feldspar | 84 |
| Florida kaolin | 51 | Florida kaolin | 8 |
| White oxide of zinc | 8 | ||
| French flint | 44 |
The bases itemized above are colourless and there must be added to them from 3 to 6 per cent. of colouring material that will stand heat. A list of materials with their colours when fired is given on page 304, together with a few typical combinations of colours in quantity suitable to be added to the glaze bases given above. The following lists are by no means complete, and it is expected that the young[304] decorator will make use of these colour mixtures simply as an introduction to quite extensive experimenting:
COLOUR MATERIALS | |
| Black oxide of cobalt | Blue |
| Black oxide of copper | Blue green |
| Green oxide of chromium | Yellow green |
| White oxide of antimony | Lemon yellow |
| Red oxide of iron | Yellowish brown |
| Green oxide of nickel | Dirty gray (for neutralizing) |
| White oxide of tin | Makes glaze opaque |
| Black oxide of manganese | Purplish brown |
| Yellow ochre | Yellow |
| Burnt umber | Brown |
COLOUR COMBINATIONS | |||
| Olive green | Blue-green | ||
| Iron oxide | 5 | Cobalt oxide | 1 |
| Cobalt oxide | .5 | Copper oxide | 7 |
| Yellow ochre | 4 | ||
| Dark brown | Dark gray-blue | ||
| Iron oxide | 3 | Nickel oxide | 5 |
| Nickel oxide | 2 | Yellow ochre | 3 |
| Manganese oxide | 5 | Cobalt oxide | 2 |
| Copper oxide | 1 | ||
| Light gray-blue | |||
| Tin oxide | 5 | ||
| Cobalt oxide | .5 | ||
| Copper oxide | 1.7 | ||
Applying the Glaze.—Before applying the glaze to the piece of pottery or bisque, the latter should[305] be soaked in clear water for about five minutes or until the air is expelled from the pores. When this has been accomplished it should be removed from the water and all moisture should be wiped from its surface. The piece is then ready to be dipped into the glaze, or to have the glaze poured over it, if the size and shape of the piece make it more convenient to apply the glaze in this way. It is usually best to glaze the inside first, shaking out all the superfluous glaze before applying the glaze to the outside. During this process the piece must be held firmly but by as few points of contact as possible. These points of contact will generally need to be touched up before it is ready for firing.
It is sometimes necessary to glaze large pieces with a brush, putting on several coats in order to cover the surface with an even thickness. The matt glaze requires a greater thickness than the bright glaze in order to develop its characteristic velvety texture. The greater thickness may be easily secured, because it flows more slowly than the thinner bright glaze and is less likely to drip from the sides of the piece to which it is being applied; but, on the other hand, it is at a disadvantage in that it does not, in flowing slowly, correct inequalities[306] of thickness so readily as the more mobile bright glaze does. A certain thickness, however, is essential; and if, after firing, it is found that the glaze was put on too thin, a second coat may be applied and the article again fired.
Firing the Glaze.—Before the glazed piece is fired the glaze should be dried and what runs down and collects about the bottom or foot should be scraped off. It should then be set in the kiln on a kind of pointed tripod of hard burned clay, called the "stilt," which prevents the glaze from sticking to the floor or shelves of the kiln. All glazed ware should be placed in the kiln with at least 1⁄2 an inch of space between the pieces to prevent them from sticking together during the fusing state of the glaze, when it is apt to bubble or "boil."
The firing of glaze is a process very similar to that employed in the production of bisque, already described. Greater care, however, must be taken in controlling the increase in temperature so that it shall be even and steady—free from all sudden flashes of heat. The cooling also should be very gradual and, as in bisque firing, the kiln should be allowed to get cool before it is opened. With this second firing the pottery is finished unless it should happen that a second coat of glaze is found to be[307] necessary. If only a few spots need attention, this second coat is best applied with a brush.
The tools required for making this vase are the same as those used for the bowl, and the process of building is much the same. The chief difference is that it is more difficult to preserve the profile in building because the added height and the greater weight tend to bulge the lower part. To meet this difficulty it will be necessary to set the work aside quite often in order to let the lower part harden sufficiently to support the upper part.
The Profile.—In preparing the profile the same rules hold as were applied in working up the problem of the bowl. It will be well to remember, however, that the curves of a vase must be treated with greater reserve as to their lateral projection than was necessary in the case of the bowl—i. e., the curve of a vase should be enclosed within a rectangle narrower in comparison with its height than is the case with the curve of a bowl. The reason for this, of course, is found in the greater height of a vase in comparison with its diameter. The following figure shows three typical vase forms. If these curves be compared with those shown on page 288, illustrating bowl contours, it will be observed how the[308] height of the vase is emphasised in the greater restraint and subtlety of its curves. In the next illustration we have two "horrible" examples to which attention has already been called in the suggestions for the design of bowls. The dotted lines in the illustration show how these curves may be improved if, in either A or B, one element of the compound curve be made dominant at the expense of the other. If at the same time the diameter be made smaller in comparison with its height the attractiveness of the contours will be still more improved. Indeed, it will be a transformation from a profile that is positively bad to one that is very good.

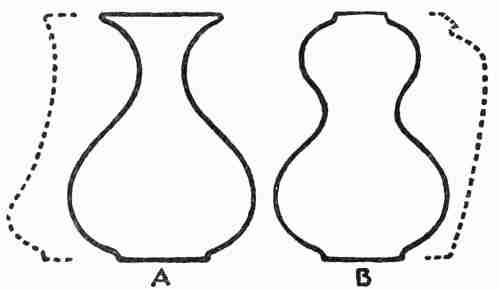
Decoration.—The problem of decoration is not very different from that of the bowl. Here again, however, the added height seems to call for greater accent by means of vertical or panel divisions. Unless this be understood there is some danger that the larger vertical spaces will seem to offer simply more room for horizontal bands, resulting in a barber pole effect.
Handles.—If handles or buttresses are desired, care should be taken that they are designed as an integral part of the vase—i. e., that they continue or reinforce its lines. Two suggestions for the treatment of the problem of handles are given in the accompanying drawing. It will be noted how sympathetically these handles conform to the lines[310] of the vases to which they are attached. Handles that give the impression of being made for another vase should be avoided.
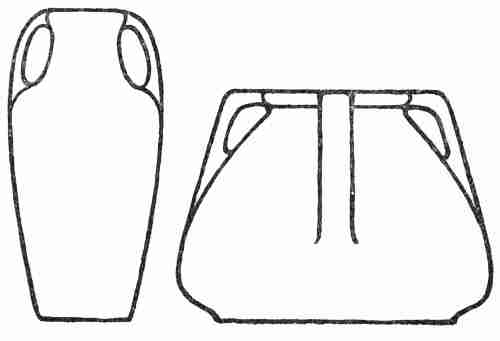
The process of building the fern dish is not essentially different from that employed in making the bowl described in the first problem. If the fern dish is to be round, the coiling method may be used; but if the dish is to be square or rectangular it is not necessary to use this method. In place of it the process of "piecing on" may be employed—i. e., one piece of soft clay may be added to another and[311] the different pieces welded together as the work proceeds.
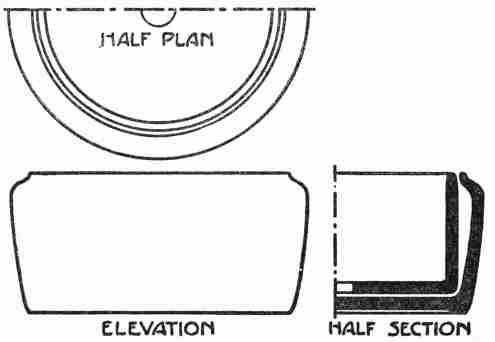
The Lining.—The fern dish requires a separate inner dish or lining with a hole in the bottom of it like that in the ordinary flower pot. This feature forms the unique part of the problem. Generally speaking, the presence of this lining seems to call for a little closer approach to the vertical in the sides of the outer bowl; and yet some latitude is allowable, as is shown in the right hand dish illustrated in Plate XIII following, which is somewhat similar in profile to that illustrated in the accompanying drawing. This drawing shows the development[312] of the problem as applied to a round fern dish. Much freedom, however, may be used in the plan as either the round or the rectangular fern dish seems to give satisfaction. The half section in the drawing shows a very narrow space between the inner and outer bowls at the top edges. This adds greatly to the good appearance of the completed fern dish. The sides of the inner dish are made vertical, since it is necessary for it to be easily removed.
Decoration.—The problem of decoration differs very little from that discussed under the problem of the bowl. Either the fern itself or its woodland neighbours may easily furnish the motif. Sometimes there is occasion for designing similar dishes not for ferns but for other plants. Thus the smaller square dish, illustrated in Plate XIII opposite, was designed and made for the familiar "bluets," and the subject matter for its design was found in that flower.
Glazing.—The rules already given for glazing apply in this case, but it will be necessary to glaze the outside fern dish only. It is well, however, to glaze a narrow strip along the upper edge of the inner dish; but the rest of it should be left unglazed. It hardly needs to be added that in firing [313] it is necessary to keep the inner and outer dishes separate.
The Design.—This problem introduces several points in design that need to be especially emphasized. The candlestick should be of such size that it will easily support the average candle without putting the user to great inconvenience in fitting it by paring it off or melting it down. It is necessary to provide a lip to catch the stray drops of wax that will run down the sides of the candle; and it will be a convenience to have this supplemented by a slight dishing of the base if the candlestick is to be carried about. If a handle is to be added it should seem to be a natural outgrowth of the candlestick itself, as was explained in the discussion of handles for vases; and it should, at the same time, offer a place for a firm and comfortable grasp. The accompanying drawing shows how handles may be designed really to form a part of the candlestick and at the same time, by means of a sharp bend or elbow at the top, to provide a natural place for the thumb to assist in grasping the handle.
Whether the candlestick is to be high or low depends entirely upon the use intended for it or upon the preference of the user. Generally speaking,[314] a low candlestick is better for carrying about and a high one more desirable for standing in a cabinet or on shelf or table. It is well for some definite idea of utility to manifest itself in the form chosen. Merely planning a tube and a handle upon a base, without carefully relating these three different elements according to the requirements of use, can hardly be called designing a candlestick.

The building of the candlestick is started, like the bowl in the first problem, by coiling from the centre, and the rim may be added in the same way. Care should be taken, however, to attach the central tube firmly. This may be coiled or simply modelled from a single lump of clay. If there is to be a[315] handle it is well to build it at the time the central tube is built, as it is then easier to make a firm attachment.
The varied and extensive uses of tiles make it difficult to limit the scope of this problem. Tiles are used for paving, wall facings, ceilings, coverings for stoves, linings and facings for fireplaces, rests for flower pots and teapots, and for various other purposes. Tiles figure very prominently in the history of art. They are objects of interest and study in many public buildings and museums throughout the civilized world. But this problem will confine itself to two of the many varieties of tiles, viz., tiles designed for bowls or teapots and tiles used for the facing of fireplaces.
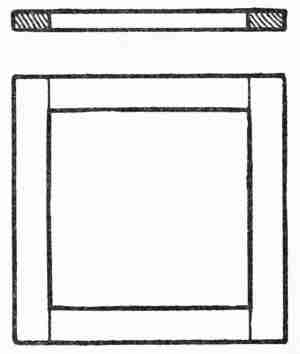
The Tile Frame.—In building tiles a frame is used measuring about 6 inches square by 5⁄8 of an inch[316] thick. The strips forming the frame may be 1 inch wide, lightly nailed together at the corners so that, if necessary, the frame can be easily taken apart while the clay is moist. This frame is placed on a plaster bat or piece of paper and the clay forced firmly into its corners and sides, working toward the centre, until the frame is completely filled. It is then turned over in order to make sure that the under side of the clay is thoroughly welded together. Care should be taken to use sufficient clay to bring both surfaces well up to the surface of the frame, scraping off the surplus clay with a straight edge. While the clay is moist, one side is chosen for the back, and this is hollowed out to prevent warping. The hollowing may take the form shown in the right-hand tile at the top of Plate XIV, or it may be in the shape of channels 3⁄4 of an inch or more in width, separated by ridges 1⁄2 of an inch wide running across the back of the tile. Whichever method is used, the depth should be about 3⁄16 of an inch and not over 1⁄4 of an inch. Even when the utmost precaution is taken, the tile is very liable to warp. It should therefore be dried slowly and with the greatest possible evenness of exposure on both sides. The greatest help of all is found in the use of the so-called "grog." This is made [317] by grinding to a powder clay that has been fired once and shrunk, but not glazed. It is used by mixing it with the clay before it is moulded, in the proportion of one part grog to three of the clay. It may be added here that grog will be found of great assistance not only in making tiles but in making other ware. It will not be necessary, however, to burn clay for the express purpose of making grog. The occasional failures which develop at the first firing of every batch of pottery will furnish an adequate supply.
Decoration.—When the tile is dried and shrunk a little it may be easily taken from the frame, but it should be allowed to get quite stiff before decoration is applied. While the hardening process is going on the decoration may be studied. The three general methods of decoration considered under the flower bowl—viz., the sunken line, the modelled surface, and the painting with under-glaze or over-glaze—are all available for use with the tile. If it is to be a tea tile the modelled surface must be treated with considerable caution, otherwise there may result an uneven surface for the teapot to rest upon.
Firing.—In giving the tile its first firing it is safer to stand it on one edge in the kiln, but not on the floor of the kiln, as the intense heat of the floor[318] would be liable to shrink that side more than the others. It may be supported on two stilts or it may be placed on one of the shelves. For the glaze firing the tile should be placed flat on the stilt.
Tea Tiles.—The tiles illustrated at the top and bottom of Plate XIV were designed and made to serve as rests for a teapot, a bowl, or a vase. It will be noticed that the centre is left free with one exception, which is given as an interesting variation from the general rule. The free space is an advantage in giving relief to the design and in furnishing an even surface for the teapot or bowl to rest upon. In the decoration of rectangular tile forms the general principles as to variety of measure or shape in space divisions hold true. Emphasis should be concentrated at the corners in order to strengthen the design.
Fireplace Tiles.—Some of the tiles illustrated in Plate XIV would be entirely appropriate for facing a border around the opening of a fireplace. This is especially true of the middle design shown at the top of the plate, on account of the lines which project through the corner design nearly to the edges of the tile. This makes it especially adapted to repetition in a facing or border.
Decoration of Tiles.—It is in the field of painted [319] decoration, however, that the most attractive possibilities in fireplace tile designs are found. The framed tile illustrated in Plate XV opposite—an example of over-glaze painting—is intended for use as a colour accent for the wall. This tile is painted in matt glaze between raised outlines. Three similar tiles are illustrated in the middle row in Plate XIV. The right-hand one, like the framed tile of Plate XV, is a matt over-glaze, but the outline instead of being raised was slightly depressed. The other two are examples of under-glaze painting. They were painted on moist clay, as described in the problem of the bowl, and afterwards covered with a bright glaze. In this case the glaze was itself coloured, thus adding richness to the colour scheme. The repetition in a tile facing of landscapes, designed to be complete or nearly so, would be tiresome. It is better so to design the entire facing that it will be made up of a series of very simple landscape motifs, each fairly complete in itself, but all so related to each other as to form, when joined, a larger, somewhat conventionalized, landscape. A treatment of this kind lends itself to many other decorative schemes.
The fireplace offers a great opportunity for design, not only in itself, but as related to the decorative scheme of the room in which it is placed. It[320] should not be forgotten that it is, in a sense, the focal centre of the room. This fact, together with its comparatively small size, makes it possible to give it a strong and rich note of colour, accenting the prevailing colour scheme of the room. Tiles, properly designed and applied, offer a rich and varied field for charming effects in colour and texture.
To become an artist in dealing with tools and materials is not a matter of choice or privilege; it is a moral necessity; for a man's heart must be in his skill and a man's soul in his craftsmanship—Hamilton Wright Mabie
Leather work, like weaving and pottery, is of very ancient origin. The New Testament text concerning "new wine in old bottles" referred to bottles of leather, or wine skins. We read of leather as having been used in still earlier times for shields, saddles, harnesses, parts of chariots, and as an accessory to clothing. In the middle ages the "gentle craft of leather" was not confined to the shoemakers' useful productions but included much ornamental work. There were wall coverings of leather with designs carved, or modelled, or stamped with hot tools; seats were upholstered and books were covered with tooled leather. Some of this work was richly adorned with painted and gilt figures like the celebrated Spanish leather.
Why Leather is Suited to Decoration.—Leather seems, therefore, to have won the right to a high place among the materials suited to decoration. Its beautiful texture, the rich brown tones of its natural colour, the ease with which it takes dyes, and the readiness with which under proper treatment, it receives and retains the marks of the modelling tool, qualify it to minister to the artistic sense no less than its durability enables it to serve the more common uses.
Limited Decoration Desirable.—The tooling of leather is based upon the fact that, when wet, the fibre yields readily to compression and receives impressions that are retained after the leather is dry. But the beauty of design depends upon the colour and texture of the surface quite as much as upon the figured impressions upon it. It is therefore a good point in design not to cover the surface so completely that the peculiar beauty of the material itself be lost. The decorations should be bold and rich, but the tooling should be confined to a small part of the surface. Calf skin and cowhide are well suited to tooling. They are supplied in two general forms, viz., the smooth, generally as Russia calf, and the rough or split cowhides, known as ooze. Leather may be stained[323] a variety of colours by aniline dyes; but since the natural colour of leather is brown, brownish tones are more satisfactory than the blues, greens, violets, grays, etc., because they seem more sincere.
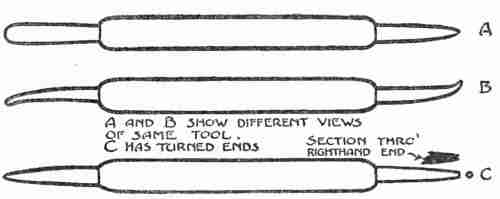
Tools.—The simple tools required for tooling leather may be purchased at small cost, or they may be made from cheap nut picks by filing these to shape, polishing them, and buffing them. The illustrations show two different tools, each double pointed. A and B are different views of the first tool; C is the second tool. The narrow pointed end of the first tool is for outlining and working into corners. The broad, flat end is for smoothing down and for general use; the broad tool should be used whenever possible. The round point on the left end of C is used for outlining and transfering[324] the design to leather. The right hand end of C is known as the background tool. It is cupped out like a nail set, as indicated by the lengthwise section just above and by the end view at the extreme right; in fact, a nail set may be used for the same purpose. The background tool, however, is to be used sparingly. If used to excess, especially on large surfaces, the result is likely to have a mechanical and "shoppy" appearance.
The sizes given in the illustration on page 325 are typical, but it is expected that in this and other problems, dimensions will be varied to suit conditions. When the size has been determined the leather should be cut a little longer and wider than the final dimensions are to be, to allow for attaching the belt pin or buckle. The strip of leather should be thoroughly soaked in cold water and then rolled in dry cloth until the leather is dry enough for tooling. It is essential that there should be absolute uniformity of moisture. If on applying the tool, water follows pressure, the leather is still too wet. If it should get too dry to retain the mark of the tool it may be sponged on the back.[325] There is danger of water stains, however, if the entire back is not wet.

The Design.—The illustration shows two treatments. An interlaced pattern is shown in A which concentrates the interest at the ends and in the middle of the back. The pattern shown is tooled solid and the background is left untooled. If the pattern be tooled in outline it is well to shade these outlines out into the background in order to give relief to the interlaced bands.
Modelled natural forms are shown in B. In this the background is tooled down, but is heaviest at the ends or in the spaces against the raised forms. This gives the background a richer appearance than it has when tooled absolutely flat. Both patterns here shown are straight with parallel sides. Other shapes are possible—for example,[326] those wider in the middle and tapering toward the ends.
When a satisfactory design has been worked out and drawn it is transferred to thin bond paper. The greatest care should be taken not to have any pencil marks on the back of this paper, for they leave a dirty gray stain on the leather which is difficult to remove. It may be added here that whenever it is desired to mark the leather for any purpose a tool should be used, not a pencil.
The Process.—As soon as the leather has dried just enough to retain the marks, the pattern should be placed upon it, pencilled side up, allowance being made for trimming to the desired width. The paper may be held in position by thumb tacks, which must not, however, pass through the leather inside the part that is to be cut off. The pattern may now be traced through the paper, over the lines of the drawing, with the round pointed tool. Care will have to be exercised to make sure that the pattern is completely transferred to the leather. When this is accomplished the pattern should be removed and the lines, which will be found somewhat dimly traced on the leather, should be immediately deepened by going over them with the same tool.
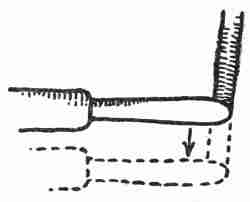
The next step is to tool down the design; and in doing this the work should be turned under the tool rather than the tool itself on the work, in order that the pressure of the tool may be applied at the edge of the pattern farthest from the hand. This not only insures a correct and convenient position of the tool, but allows a perfect view of the work. In this part of the process the broad tool should be used, moved sidewise, as shown by the direction of the arrow in the accompanying cut. In working up into corners the narrow tool may be used if necessary. The movement may be described as "ironing the leather down." The surface should not be roughed up or cut up into "shoulders." It is a process requiring time. One should not try to get the full depth with the first pressure of the tool. One should coax the surface and add pressure with each succeeding stroke, taking care that the tool does not scrape. It should glide; and yet, on the other hand, beginners will perhaps need to be cautioned not to wear out the surface by feeble scratching and[328] patting. A firm, even gliding pressure does the work. As the leather dries it will be seen that the tooling has given it a dark, glossy surface. When the process is completed the belt may be trimmed down with a firm, sure cut of the knife, using a straight edge wherever straight lines are desired.
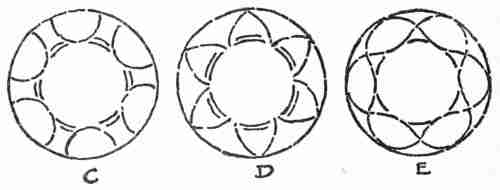
The Design and the Process.—The purpose for which a mat is used requires as one condition of design that there should be a plain surface in the middle. If the general form be square the design at the corners should be strengthened. If circular, the design should be so arranged that it will lend support to the perfect curves of the circle rather than weaken them. In the three outlines given below, C shows a form supporting the circle; D and E show forms tending to weaken the circle. Conditions determining size are more variable[329] in this problem than in others, because of the great variety of uses which a mat may serve. In a design like that shown in A of the accompanying illustration, the portions left untooled—i. e., the leaves and fruit—may be raised still more by pressing out the leather from the back by means of a tool. To do this the leather should be placed face down in the palm of the hand or on modelling wax, which has been covered with a piece of chamois or sheepskin. Then by gently forcing the leather down with a round, blunt tool such as the blunt end of a nut pick the desired relief in the figure may be obtained. After this is done it will probably be necessary to turn the mat over and correct the modelling. In order to preserve the higher[330] relief it is well to back it up with cotton batting, soaked in paste, and finally to cover the entire back with a lining of silk or leather.

A pen wiper consists of a cover, which in this case must be made of leather suitable for tooling, and several leaves of soft material like sheepskin or chamois, which should match the cover in colour. The process of tooling the pen wiper does not differ essentially from that already employed in the foregoing problems. It should, of course, be carried through to completion before the book is made up. These parts are to be tied together with knots of sheepskin thongs of the same colour.
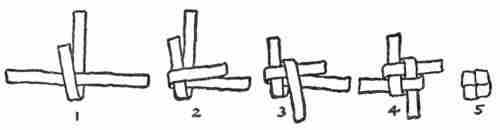
The series of cuts given below show the progressive steps in forming the knot, which should finally take the shape of Figure 5. After it has been formed the thongs are passed through holes punched in the cover and leaves of the pen wiper, and secured by a second knot formed on the back, resembling[331] Figure 4 with the ends cut as close as will leave them securely tied.

Another illustration gives two suggestions for the design: A, a rectangular pen wiper tied with two knots at the end; B, a circular pen wiper tied with one knot in the middle. In these designs, and indeed in all others, decoration should recognize (not antagonize!) the outer form of the article to which it is applied. This point is made in the illustration.
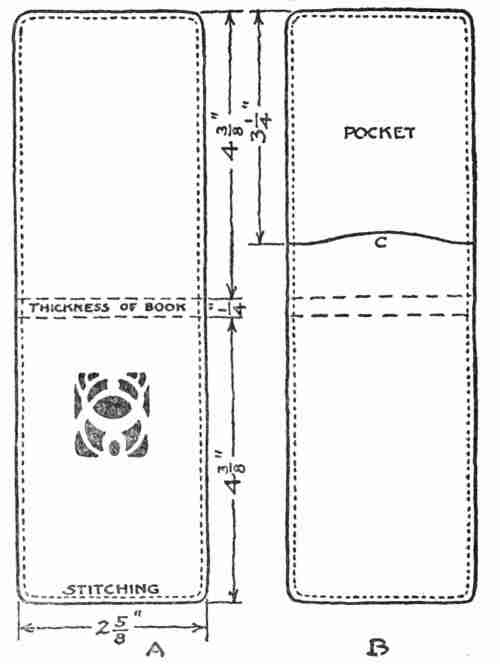
Planning the Cover.—The object in this problem is to make a permanent protection for fillers. It is well known that the fillers themselves may be purchased for a trifling sum and that they are provided with a backing of stiff paper which is designed[332] to be slipped into a pocket in the back of a leather cover and thus form a neat pocket note-book. It is evident that the dimensions of the filler determine the size of the cover; but, in planning the[333] cover, care should be exercised to allow sufficient play for width, length, and thickness after all the cutting and sewing are done. This means that the stock for the cover and lining should be cut a little larger than called for in the final size. The design illustrated shows both the outside (A) and the inside (B) of the cover. As it is planned the cover is to be lined with sheepskin of harmonizing colour; but this may be left out if desired, though it, of course, gives a much better finish to put it in.
Assembling the Parts.—The first step after cutting out the leather for the cover is to prepare the leather and tool it, if it is to have any decoration. A piece of leather should be cut for the pocket, and the edge (C) shaped. The edges of the lining and the pocket should next be lightly pasted and pressed on the cover. A line is then to be ruled with a leather tool (not with pencil) on the outside to serve as a guide for stitching. A machine stitch may be employed or it may be done by hand. If by the latter method it will be necessary to pierce the leather at equal distances along the tooled line. Hand stitches may safely be a little longer than the machine stitches.
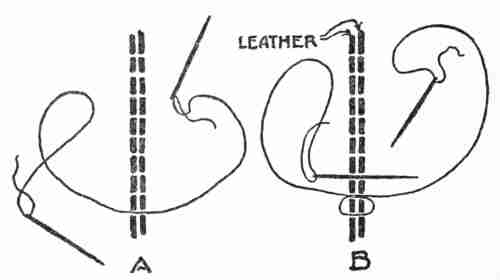
Stitching.—A good way to secure equally spaced[334] stitches by hand sewing is to make use of bow springs or spacing dividers set to the required distance. A more rapid way to accomplish the same thing is possible by making use of a tracing wheel, if one is available of suitable size and of the right spacing between the teeth. The hand stitching may be done either with one needle or with two. If with one it is best to sew a running stitch once around the seam and then return, covering the alternate spaces left on the first round. It is better, however, to use two needles, one on each end of one thread, selected long enough to finish the sewing without piecing it, and to proceed as illustrated in A and B, i. e., to draw one needle with its thread through to the middle of the thread,[335] as shown in A, and then the other through the next hole, and so on alternately from opposite directions, producing a stitch like that illustrated in B. It will, of course, be understood that, in the illustration, the length of the stitch is exaggerated in order to show the process plainly.
Trimming and Finishing.—When the sewing is finished the thread is fastened by doubling over one or two of the stitches and drawing the ends inside between the cover and lining. Then a line should be tooled on the cover about 1⁄16 of an inch outside of the stitching, and on this line the cover, lining and pocket are trimmed together. The raw edges may be treated with water colour to give them a finish. Finally the cover is moistened a little and folded back with firm pressure in order to establish an even and permanent bend in the leather.
The Design.—The problem of design in this case is, first of all, to determine the dimensions of the pad, which depend, of course, upon the use to be made of it. Then a dimensioned sketch should be drawn in outline, including the spacing for the corners as illustrated in the drawing (A). The only detail that will need elaboration is the corner. The shape[336] and decoration of one of the corners should be carefully laid out on thin paper, from which in due time it may be transferred to the leather and tooled as in other problems.
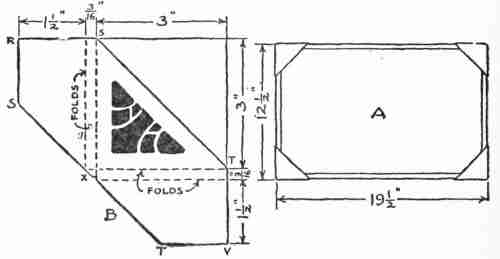
Material and the Process.—For making the pad it will be necessary to secure a piece of binders' board—i. e., heavy pulp or straw board—of the required size. The medium weight is the best, and it may generally be obtained at the bookbinder's. If this cannot be obtained, two sheets of 10-ply card-board may be used instead. The size given in the drawing will carry a half sheet of commercial blotting paper. The edges of the paper board should be bound with passe-partout binding of a colour to harmonize with the leather that is to be used; the strips of binding should[337] be long enough to extend under the leather corners but they need not reach up to the corners of the board. After the binding has been put on, the top of the board should be covered with paper also harmonizing in colour with the leather, and the paper should be cut of such size as to lap over the edge of the binding and yet leave a suitable width of the binding. The so-called "cover papers" will be found satisfactory.
Making the Corners.—The next step in the process is to lay out and cut the leather corners according to the original design. The form in which the leather is to be cut and the dimensions are shown in the illustration B. The little flap at x should be noted. It is designed to tuck under and close the corner. The edges of leather at x should be "skived" or thinned down so as to add to the neat appearance of the work. Further improvement will result from skiving down the edges S R S and T V T of the large flaps, which are to be folded over underneath and pasted down to the back of the board. The ordinary photographers' paste is satisfactory for this work. When the leather corners are placed in position for pasting, two or three thicknesses of blotting paper should be used at each corner,[338] in order to secure the necessary space for the reception of the blotters when the board is in use. After the corners are pasted on, the back of the board should be covered with paper in the same way as the front, care being taken to leave a portion of the binding and leather exposed. Finally a number of blotters of full size should be inserted in position under the corners to keep them in shape and the whole placed under light pressure until dry.
The Design.—In the illustration (A), showing a card-case unfolded, the dimensions give the finished size. The same card-case is illustrated in B somewhat reduced in scale and with the flaps turned in. The design on A is a rectangle broken at the corners. In this case, as it may be with all similar forms, the design is treated as a sort of binding, extending across the middle fold. C shows an alternative design which is treated as a panel and may be placed on one or on both sides of the card-case. The question of which is the top and bottom in such a design as that in C can be determined only by the owner's habit of holding a case. Sometimes a monogram is placed in one of the inner flaps, as illustrated in A, or on one of the outer surfaces.
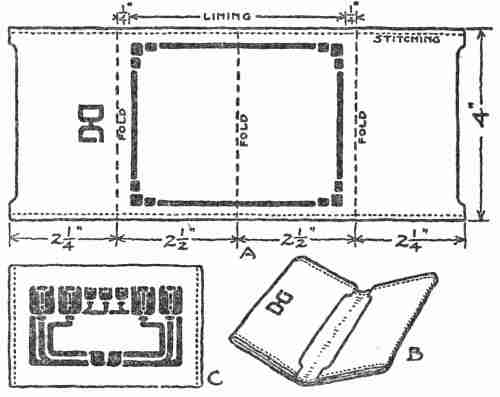
The Process.—In cutting the leather for a card-case it is necessary to provide a piece a little larger than the finished dimensions in order to allow for trimming. The design should be transferred, the line of stitching determined, and the tooling done, according to the description already given for the other problems.
The Lining.—A card-case may be lined either with silk or with sheepskin, in a colour to harmonize with the outside. If lined with silk it must be trimmed down to size accurately after tooling,[340] great care being exercised to have the sides parallel and the corners true and square. Then the silk is to be turned in at the edges and lightly pasted along the edges to a width of 1⁄8 of an inch, care being taken, however, not to paste those portions of the edges that will be visible when the flaps of the cover are turned in, i. e., the middle of the fold B. This precaution should be taken because the paste may strike through and spot the lining. The flaps should then be moistened a little and folded down with firm pressure; but before stitching they should be fastened down with a little paste to form pockets. This takes the place of basting and is followed by stitching as described in the problem of the note-book. If lined with sheepskin, the ooze side showing, the cover need not be trimmed down until after the stitching; then both may be trimmed at once.
The Design.—The details of design and construction are shown in the accompanying illustrations. In A the outer flap is shown tooled. It will be noticed that the cap of the snap fastener is taken as the central point in design. The tooling is done as directed in the other examples of this class of work.
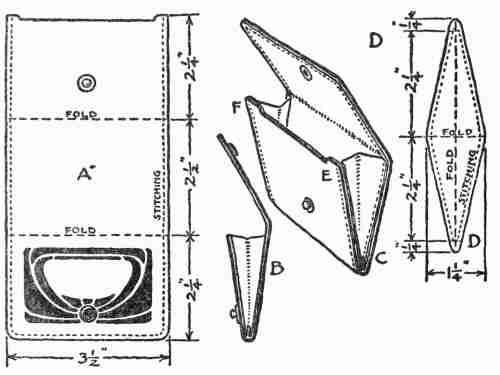
The purse is lined throughout with leather. It has bellows ends, as shown in the perspective at C and in the end view at B. The pattern of the bellows end shown in D is intended to fold in the middle, bringing both ends of the leather together and thus giving an end of double thickness. With thin leather, such as is used in the present instance, this pattern is practicable. If thicker leather be used the bellows must be made of single thickness. In this case the pattern would simply be like that shown in the lower half of D.
The Process.—After the lining is pasted to the[342] cover a snap fastener should be attached. Proper care, of course, should be taken to see that the fastener comes in the right place so that the purse will fold properly. The cover and lining should then be trimmed and the leather surface ruled for stitching. It is well to fold the inner flap of the purse while it is moist from pasting. Finally a little paste is applied along the edges of the bellows ends and they are placed in position.
Stitching is started at the point E shown in the perspective. Hand stitching is the most practicable. The direction is down one side, up the other, and around the outside flap to the other bellows end, stopping at the point F. When the stitching is completed the inside flap should be folded down.
The Design.—The first step is to choose the book to be bound. For the sake of simplicity, as perhaps the first piece of bookbinding undertaken, it should be a folio or "section." And it should be worth binding in leather. The subject, the paper, and the typography should be worthy of the distinction.
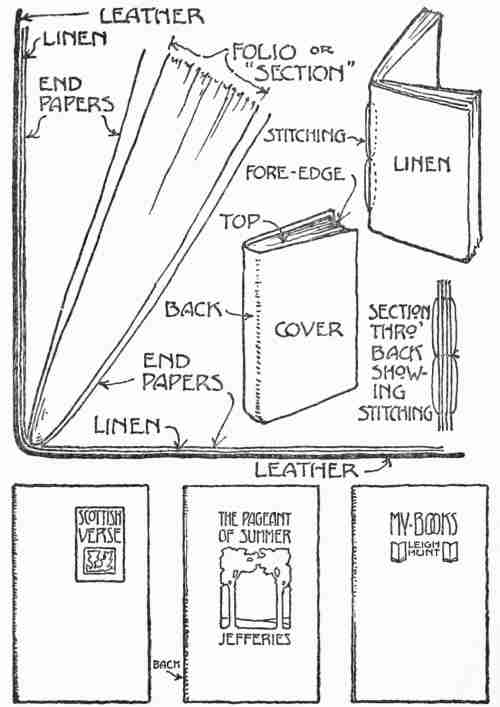
The Process.—If the book selected is already bound or "cased" it is necessary first to remove[343] the binding or casing. Then at least three fly leaves should be added, made up to match the other leaves of the folio. A piece of bookbinders' linen or buckram is now cut to the size of the open folio, placed upon it like a cover, and, with the fly leaves and the folio itself, stitched through the back with silk of a colour to harmonize with the leather.
The next step is to prepare the leather cover. To do this, first place the leather in position on the closed folio and, allowing 1⁄4 of an inch at the top and bottom and 3⁄8 of an inch at the fore edge, mark and cut out the stock for the cover. The decoration, if there is to be any, may now be tooled on. If the design is heavy enough in relief to need a backing, it may be at once filled with cotton batting, pasted in as directed in the problem of the mat, and covered with thin paper.
Stock for the end papers is now selected. They may be of cover paper, or of silk, and they should harmonize in colour with the leather. They are formed of two thicknesses of the material chosen, by folding it over to fit into the part between the linen and the first fly leaf. If of paper they are to be cut to the length of the folio leaves, but the width is to be left with an allowance for adjustment[345] after the linen is pasted in. If the end leaves are to be of silk, an allowance of 1⁄4 of an inch must be left for turning in at the top, the bottom and the fore edge.
We are now ready to paste the linen to the leather. Strong paste, with perhaps a little thin glue added, is needed for this part of the process. Now paste the outside end leaves to the linen on the inside of the cover; and, if silk has been used for these leaves, paste the other two to the outer fly leaves. Finally, the book should be placed under very gentle pressure and kept in this condition until dry. Care should be exercised to adjust this pressure to the character of the tooling, if there is any, so as not to crush it.
There is a limited field for metal work in home decoration; but there are some things of metal that combine beauty and utility to a remarkable degree and, in their making, introduce us to most interesting operations. Beginning with the gate, which may be of wrought iron, or with the door knocker, which may be of antique brass, we may find in every home problems of design involving work in metals. Ornamental hinges, key[346] escutcheons, fastenings of various kinds, andirons, and other accessories of the hearth, lamp holders, card trays, crumb trays, bon bon dishes, and many other useful things that may be made in attractive forms readily suggest themselves. How some of these may be made is suggested in the following simple problems:
This is an easy problem. Only four constructive operations are required, viz., cutting out the stock, sawing the design, bending, and finishing. The illustration shows the form and the dimensions and suggests a simple design. The material required is 18-gauge soft copper.
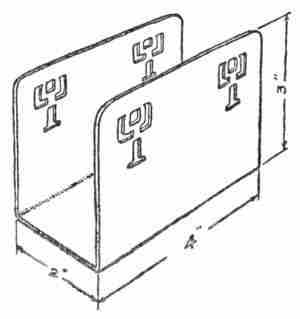
The first step in the process is to cut out a strip of copper 8 inches long and 4 inches wide. If necessary the edges may be trimmed even and then the round corners should be cut. The design is traced on strong, thin paper and securely pasted[347] on the copper in the proper position by using cold liquid glue. A hole is drilled through each unit of the design by means of a hand drill, a jewellers' saw inserted, and the design cut. Time and patience will be required for this operation. Saws are easily broken, and new ones must be attached to the saw frame and again applied to the work. After sawing the design it is necessary to give the edges a smooth finish. This is done with a file. The surface which is to form the inside of the rack is then thoroughly cleaned and polished with water and pumice.
The copper is now ready to be bent to the required shape. To do this prepare a block of hard wood 8 inches long and 2 inches wide, grip it in a bench vise, and clamp the strip of copper squarely across the block in such a position that the sides may be bent over the edges of the block. When this has been done it only remains to clean the outside surface and finish it on the felt buffing wheel. If a fine polish is desired, the buffing should be preceded by careful grinding with a Scotch water stone and water.
This requires the same kind of material as the letter rack and the same operations, with the addition[348] of riveting. After the stock is cut out, trimmed and trued up at the edges, an outline of the design is pasted on, as in the previous problem, and the design cut out. The top is then bent over and riveted with a copper tack, having shaped the head of the tack in the vise before inserting it. While the tack is being riveted the finished head should be protected by placing it on a lead block. Finally the edge should be filed to the shape shown in the cross section, and the whole cleaned and polished.
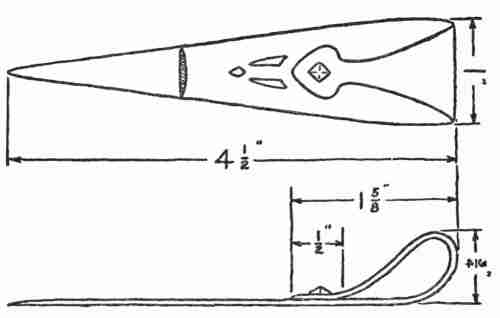
For this problem 12-gauge copper will be needed. The operations required are cutting out, sawing, and[349] soft soldering. After the necessary stock has been cut to the required shape and the edges filed, the design is outlined, pasted on, sawed, and finished as before. It is desirable to grind with the Scotch stone and water to a good polish. The head will then be ready to be attached to the pin.
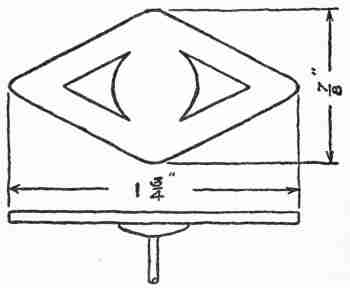
Carefully scrape with a knife the portions of the surface where the pin is to be attached (shown in the drawing), select a steel pin of desired length, scrape the surface of the little disk attached to one end of it, apply to this disk a little soldering paste by means of a small stick, and then, with a gas (or alcohol) blowpipe, melt on a bit of soft solder, which should cover the whole disk. Now place the copper, outside face down, on an asbestos pad, applying the soldering paste to the central portion, place the disk with its bit of solder on this portion of the copper, and fuse as before.
When the copper has cooled, clean off the oxide,[350] which will have formed, by dipping in diluted sulphuric acid, and polish on the buffing wheel.
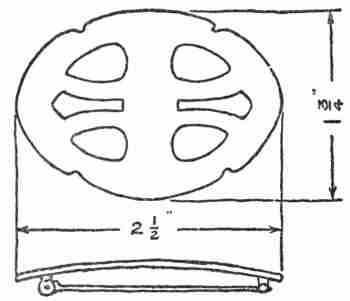
Eighteen-gauge copper is required for this problem. The operations are like those for the hat pin except that hard soldering is necessary. The slight bending of the copper, required in this case, is done by means of a horn mallet and a sand pad. For hard soldering, the surface must be scraped as before and covered with a little borax ground in water and applied with a small brush. The belt plate should then be placed on the asbestos pad, with its convex face down, and blocked up so that the end where the soldering is to be done is horizontal. The catch[351] should then be placed in position with a small piece of silver solder at the base. The solder should be melted as before by means of a mouth blowpipe and gas or alcohol flame. The hinge is soldered on in the same way, and finally the pin is cleaned and polished for use.
This problem is much like the first one described under metal work. Sixteen-gauge copper is required. It may be bent by placing it between two hard wood blocks in a vise and hammering it with a rawhide mallet.
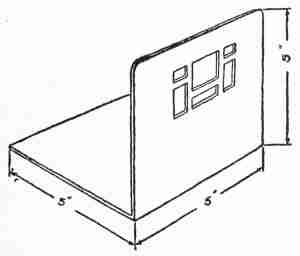
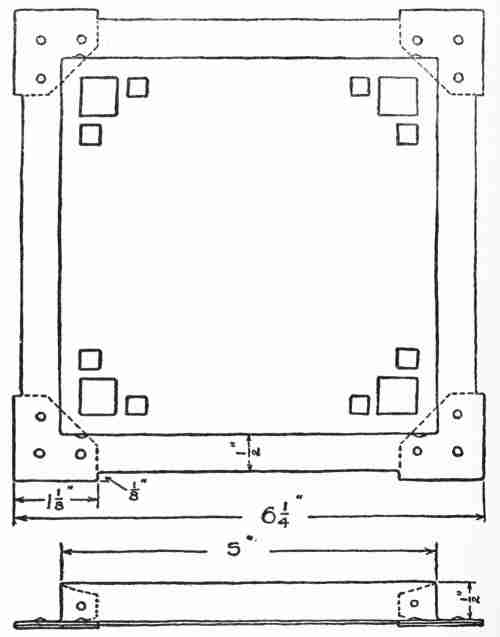
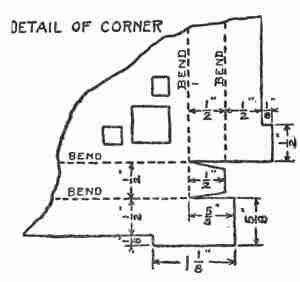
Twenty-gauge copper is required for this problem. The operations are similar to those already described;[352] but the cutting and bending are much more difficult. After determining the design it will be necessary to[353] make a drawing showing fully developed surfaces, as illustrated in the detail of the corner. The four corners must be marked and cut exactly as shown in the drawing. A piece of hard wood is then cut to the size of the top, 5 inches square in this case, to be used as a form on which to bend down the sides and turn the flanges. If the corners are correctly cut the parts will fall naturally into place, to be bored and riveted, as the drawing plainly shows. In order to protect the tablecloth, the under side of the rivet holes should be countersunk so that the ends of the rivets may be finished smooth and flush with the under surface. As an additional protection, a felt mat may be glued on the bottom.
This problem introduces engraving and enamelling, two interesting but somewhat difficult operations. The process to be carried out is as follows: Using 12-gauge copper, saw the outline, and apply the design[354] for the part to be enamelled to the copper by sketching it with a pencil or transferring it by means of carbon paper. Then strengthen the pencil or carbon lines by scratching lightly with a scratch awl. Imbed this fob in pitch, either in a pitch bowl or in a small quantity of pitch placed on a piece of board clamped to the bench or table. Using an engraving tool, remove the copper from the spot to be enamelled to the depth of 1⁄32 of an inch. It is well to have the bottom of the spot reasonably level but not necessarily smooth and the sides slightly undercut. Before applying the flux, clean, by pouring a small quantity of concentrated nitric acid over the cut and immediately rinsing it off under the water tap. Flux should be kept in a closed jar under water after grinding, and taken out as needed on the tip of a small strip of copper previously cleaned with acid. Enough flux should be applied to cover the bottom of the spot to be enamelled; but the depth of the spot must not be filled up.
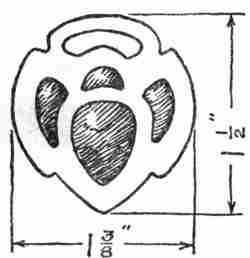
Now place the fob on a piece of wire gauze on an iron tripod, and apply the flame of the blowpipe to the under side. Heat very slowly until all the water is driven off, then force the heat until the flux is fused. Allow it to cool slowly, then remove any flux that may have adhered to the surface of the fob by grinding with Scotch stone. Clean with acid as before, fill the spot with enamel in the same manner as the flux was applied, and fuse again. After fusing, the surface should be stoned again to remove inequalities and again fused, cleaned with water and buffed on the wheel.
If it is desired to apply enamel to sterling silver the flux may be omitted and the enamel applied directly, but the silver should be cleaned with sulphuric acid instead of nitric acid, and great care should be used in heating as the fusing point of silver is but little above that of enamel. The depth of the engraving on the silver need not be as great as on the copper.
Eighteen-gauge copper should be used for this problem, and two new operations, viz., raising and chasing, are introduced. After cutting out a circular piece of copper to the diameter indicated, allowing one half[356] an inch extra for raising, it is annealed by heating it to red heat under the blowpipe flame and cooling by dipping in a sulphuric acid pickle bath. A circle indicating the inner edge of the rim is lightly scratched, and a hard wood block is cut on the end grain to the shape indicated in the sketch, and placed in a vise. Now holding the copper on the block, it is raised to shape with the round end of the roughing hammer. It is well to anneal frequently.
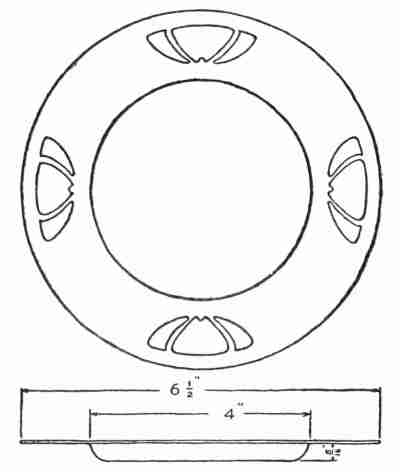
After shaping, the design may be applied by means of transfer paper and the lines lightly scratched on the surface. Then imbed the tray in pitch and outline the design by following the lines with a narrow chasing tool. Reverse the tray on the pitch and, with a chasing tool of suitable shape, raise the body of the design to the height desired. Reverse on the pitch again and with a flat tool true the outlines and smooth the background. Remove from the pitch, trim the edge of the tray if it is forced out of line, clean with pumice stone and buff.
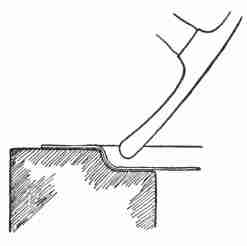
All the foregoing articles may be agreeably coloured by painting them with, or immersing them in, a weak solution (boiling) of liver of sulphur. If soft solder has not been used, another pleasing[358] finish may be secured by applying a thin coat of lubricating oil and heating gently until the oil is volatilized. An antique green or verdigris finish may be obtained by painting with a mixture of acetic acid and copper carbonate. Several coats may be necessary; and it is desirable to lacquer the surface to ensure permanency.
The materials and tools for this problem are six ply card-board in dull shades of gray, brown or green, and with mat surface; Japanese paper of average thickness; passe-partout binding a little darker than the card-board and of harmonizing colour; paste; a penknife with a thin blade; and a water colour outfit.
Of the drawings included in the group on the opposite page one shows a development of the surface of the candle shade which is the subject of this problem. Referring to the elevation it will be seen that if the edges AE and DH be continued until they meet at O, OE and OH are really equal to the radii of the outer arc of the development shown in the upper part of the group, and OA and OD, to the radii of the inner arc. This upper[359] developed surface really forms the pattern of the candle shade.
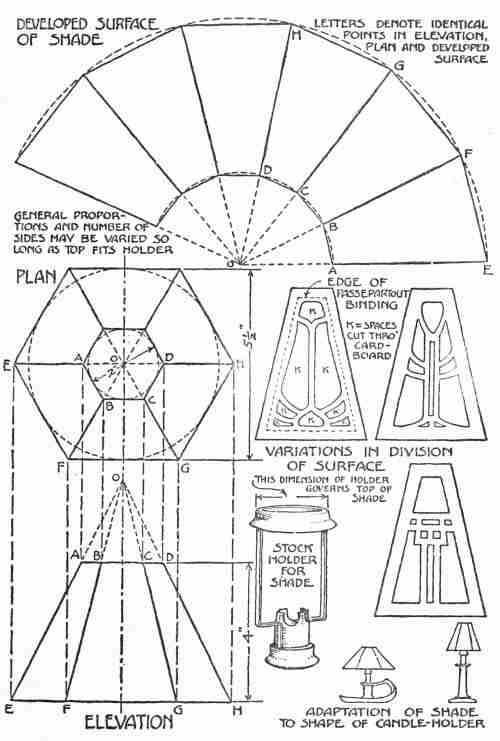
The decoration consists of openings cut through the card-board segments. These are covered with Japanese paper, thus allowing light to pass through, but adding the effect of colour. A margin of 3⁄8 of an inch is allowed along the openings, the remaining spaces being divided by partitions of card-board, as shown in the different typical designs at the right of the illustration. It will be noticed that the group of openings forming the decoration of one side conforms in the main to the shape of that side. It will also be noticed that there is a variety of size and shape in the openings, but that they all show a certain unity and harmony of space division.
The openings are cut with a penknife, care being taken to make as clean a cut as possible. Japanese paper, of pale green, orange, or some suitable light colour, is pasted under the openings. The process of pasting is one that requires some care. It is well to paste only a portion of the pasteboard at a time taking care not to use more paste than necessary and not to let any get over the edges of the openings. The paper should be pressed on while the paste is still moist, and the paper[361] itself should, of course, not be pasted at all. It should be placed with colour side next to the openings.
When the paste is dry the card-board should be lightly scored on the lines AE, BF, etc., and bent on these lines, bringing the sectors together into the form of the shade and fastening them at the top and bottom temporarily with a bit of passe-partout binding. If the binding is of the ordinary width (7⁄8 of an inch), it should be cut lengthwise into two strips of equal width, to be used for mounting the edges. No attempt should be made to run the binding along more than one edge. The separated strips should then be cut the exact length for each top and bottom edge and applied one at a time. Then the side edges are bound, with the apex of the angle at the middle of the binding. When the binding is firmly fastened it is carefully trimmed off at the top and bottom.

Two designs for such pendants are illustrated in the accompanying drawings. They were derived from suggestions in the Craftsman, and were successfully worked out in remodelling a house. The seven-light fixture consists of a circular[362] pendant-board about 30 inches in diameter, made from 2-inch plain oak stock, cut into 60-degree segments and, with splined joints, glued up to form a circular piece which was turned up on a large lathe. An open space 7 inches in diameter was left in the larger circle, which was covered by a cup-shaped cap turned from plain oak stock and attached to the larger circle by screws. The considerable opening covered by this cap contained the cut out and the wiring necessary for connecting with each of the seven lights. Seven medium-sized hooks of composition metal were procured which had large, coarse threaded screws. A 3⁄16-inch hole was drilled lengthwise through the shanks of these hooks. Holes were bored near the centre of the arc of each segment in the board circle to receive these hooks. When the fixture was assembled the wires for each light were carried from the cut out across a channel made for that purpose on the upper surface of the board, passed down through[363] the hole in the shank of the hook, woven into the links of the chain pendant and connected with the corresponding bulb socket after passing through another hook, like those described above, which linked the socket to the chain. As a finish around the hooks shallow cups of beaten copper were fashioned over a wooden form, turned for the purpose, and oxidized to a tone somewhat darker than the brown of the oak board. Copper cups in a conventional petal design were made to place over each of the bulbs. The chains were also oxidized to conform with the other metal work. The entire combination was satisfactory.
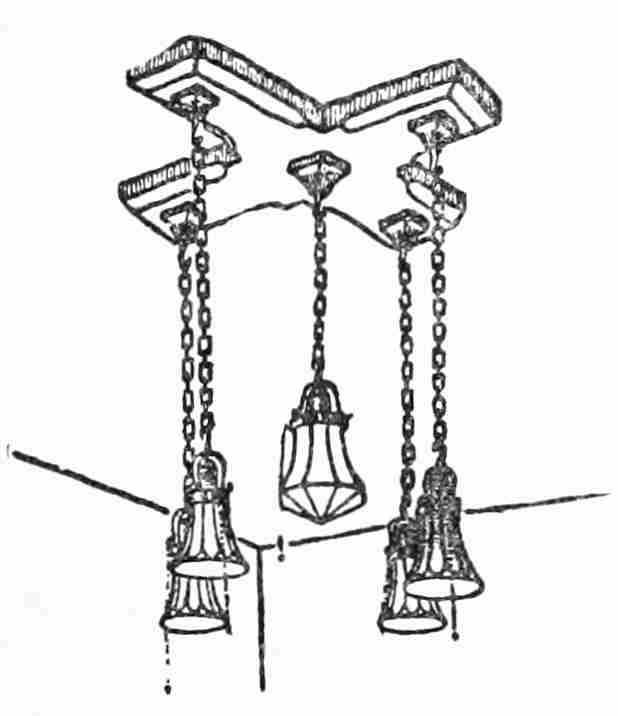
Another design for the dining-room of the same house and much easier to construct is also illustrated. It will be observed that the square form instead of the circle is carried out consistently in the woodwork and metal caps. These caps and the chains are in natural brass of a dull finish. The shades are of ground glass, decorated with a flower design in heavy black lines. The central light has a larger shade than the others, wholly enclosed. In this one is placed a red incandescent[364] bulb for use whenever such decorative effect is desired.
In the story of the designing and building of the model house reference was made to contributions from the forge shop. Among these were the andirons, door knocker, lantern bracket, and other articles shown in the accompanying illustrations.
It should be understood that all wrought iron work that has any reality in it requires an equipment especially adapted to its production. There must be a good forge and fire, an anvil, and proper tools, all in the hands of a workman of some experience and skill. Successful forge work can hardly be considered among the handicrafts easily adapted to the needs of the amateur working without instruction and with poor equipment. But with good tools, proper equipment, and a little experience any clever boy will be able to design and fashion many useful articles for the home which have real artistic merit.
For the fireplace, in addition to andirons, there may be made the shovel, poker, and tongs, and possibly the old-fashioned crane and pot hooks. Other fixtures that may be made are ceiling hooks, [365] lantern brackets for the wall or for lantern posts, standards for the newel post, the hall lantern or the porch lantern, the latch and the knocker for the door, and, if the architectural design permits, hinges, plates, and bolts for the door. This list by no means exhausts the uses of wrought iron in house decoration. It may be extended to include draw pulls, key escutcheons, furniture handles and hinges of great variety, nails with ornamental heads for use with heavy construction, and many small articles such as trivets for steam kettles, toasting forks, candle holders, and many other useful articles which have also decorative value.
To know what you prefer, instead of humbly saying amen to what the world tells you you ought to prefer, is to have kept your soul alive.—Robert Louis Stevenson
Keen observers of American customs, who have studied the development of our taste in house designing and furnishing, tell us that the best expression of our art in architecture and home decoration is to be found in our country homes. They do not overlook, of course, a beautiful public building in this city or that, perhaps ten altogether, or an occasional private residence on Millionaire Avenue, which are monuments to the genius of the men who created them and of which any country may be proud. What they mean is that as a people we seek and secure the right combination of utility and beauty in our homes more frequently in the country than in the city.
At first thought such a criticism may seem to[367] be an exaggeration. Is it reasonable, we ask, that people of good sense, such as most Americans are, really succeed better in planning, building, and decorating the houses which they are to occupy but a few weeks in the summer than they do in developing their city homes? We are told that it is true and that there are good reasons for it.
Simplicity of Country Life.—It is the life in the country and at the seashore that is the simple life, the natural life, the life that sets us free from the accumulated burden of mere "things." Here we come to forget for a time the many and find pleasure in the few. Here we are to feel the joy of living. Nature is all about us, and she gives of her bounty freely. Our wants are few because we are so well satisfied with the free gifts. What wants we have keep step with our needs here as they do nowhere else. We care less for what others have; we are more individual, more rational. Here we generally demand what we really need and we more frequently obtain it. And this is true whether it be something that appeals to the æsthetic side of our natures or whether it be that which ministers to our material needs. In seeking the beautiful for the simple home in the country we do not so often forget the useful; for here, away from the[368] world of museums and studios and collections, we learn that art is possible without paintings and statuary. In the exterior form and colouring of the shingled cottage, set like a gem on the hillside or by the sea, in the harmonious arrangement of its interiors, with every article of furniture chosen only for use and comfort and placed where needed, and with decorations, cheerful but restrained and subordinate, suggestive of more glorious colours and more interesting things in the world without—in such surroundings we have beauty and utility combined. Here we have the time and the opportunity to realize the truth that all art is one and that it may find in the problems of decoration in the country home, if not its highest mission, its most open field for giving to appreciative people the pleasure of seeing and enjoying the beautiful.
Opportunities for Constructive Art.—If it be true that there is a more universal recognition of the true principles of art in the better class of our country homes than in our city homes, it is proof, if proof be needed, that the elements of art expression are found in the simple, natural materials of every-day life. It may be that in the development of art amid simple surroundings "necessity is the mother of invention," and that, more or less[369] naturally, simplicity is thrust upon us. The general habit of our time is to extend the vacation period in the country or at the seashore to the point of making a home there for every summer season. But only a few can carry wealth and elegance with them. A great majority must be satisfied with simple and inexpensive homes. At first we accept them as the only thing possible, and then we discover that in their very simplicity they offer the best of opportunities for true æsthetic expression. And this opportunity is largely for the younger members of the family—for the boys and girls whose vacation period is more extended, whose interest in the summer home is perhaps the more vital and whose imagination is the more susceptible to the art suggestions of nature. We have seen that it is possible for boys and girls to build and furnish a house under the exacting requirements of city life. How much easier it must be to build a cottage for the summer season, decorating and furnishing it in harmony with the simple needs of a vacation home.
If such a suggestion meet with acceptance, those who undertake the work will find much practical help in the problems outlined in the foregoing chapters. It is not expected, of course, that the[370] directions there given will always be exactly followed. In the furniture problems, for example, soft woods like pine and spruce may be substituted for the harder woods specified. Very attractive as well as very useful simple furniture has been made in this way at a merely nominal expense. Staining and finishing may easily bring it into harmony with colour schemes; but the bright, fresh colour of new pine and spruce is in itself by no means unattractive. The smooth, exposed beams of the ceilings and walls, if of well chosen stock, may be stained a beautiful gray green or a soft brown. A good colour suggestion may be found in the weathered gray of the hewn timbers of very old buildings. The effect of a ceiled-up wall or of a dado may be easily obtained by stretching burlap or denim over the studding or over a backing of inexpensive sheathing. These materials are very durable and inexpensive, and they may be found in a great variety of beautiful shades. They make excellent portières. A lighter, thinner material like scrim is better for window draperies. All these fabrics afford good surfaces for decoration by stencilling. Stained or painted soft wood floors, covered with grass cloth rugs or the more dainty hand woven rugs like those described in the chapter[371] on weaving, with simple, useful furniture, a picture or two, and a few choice pieces of pottery, complete the equipment for a charming living room. If it all be the product of home industry, the cash outlay for the material need not be over forty dollars, though an outlay of ten times that amount for better materials would not in the least interfere[372] with such a room being decorated and furnished by the unaided labours of the amateur artists and craftsmen of the family.
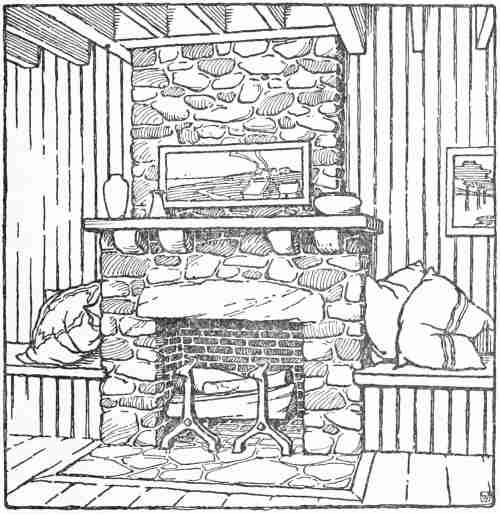
The chief expense would naturally be for the living room, dining-room, and kitchen. The dining-room, however, may well be simply a corner or alcove of a large living room. Such an arrangement greatly increases the value of a single fireplace, which will be required to give the summer home the sense of perfect comfort. This may be of rough field rock and should be large enough to take one-cut fireplace wood. The chamber furnishings may be very simple indeed. Furniture dealers make a point of supplying beds, bureaus, chairs, and cabinets of simple design, unfinished, so that the purchaser may stain them to harmonize with any desired colour scheme. But such furniture, or good substitutes for it, can be made very inexpensively. For example, the stock for a good bed will not cost over seventy-five cents. Cases provided with shelves and curtains in place of drawers, made at a cash outlay possibly of one dollar, will serve for bureaus. The cost of materials for building an eight-room cottage in every way satisfactory need not exceed five hundred dollars; and such a cottage could be beautifully furnished[373] by clever boys and girls at an expense for materials of one hundred and fifty or perhaps two hundred dollars.
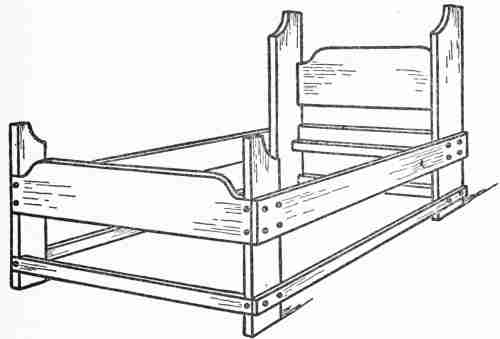
In the exterior finishing of summer cottages nature generally needs very little assistance. No colours harmonize so well with the gray rocks, sere fields and marshes, and the evergreen trees by the seashore, as the weathered grays of the shingled cottage. The window frames, door frames and facings, painted to preserve them, may be of the same colour or in dull green or brown, plainly marking the outlines of the house but without unpleasant contrasts. A stained roof in slate gray[374] or creosote brown is also in keeping. The underpinning and outside chimneys in the field rock of the locality are eminently fitting. The house among the hills will stand more colour because the colours of nature are richer, especially in the autumn season. But wherever the house may be, it should repeat in its larger surfaces the prevailing colour tones of its natural setting. It should seem to fit into its surroundings as if it belonged there and would always remain there, a part of the simple, natural beauty all around it.
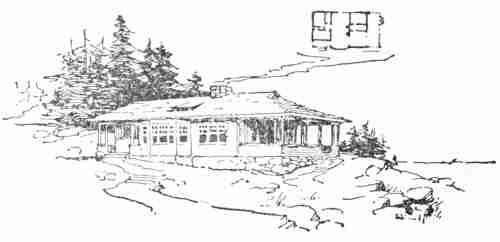
THE COUNTRY LIFE PRESS, GARDEN CITY, N. Y.

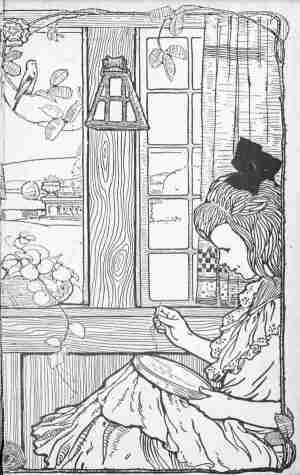
Spelling is the same mix of US/UK as others in series (eg color/colour)
Corrected obvious typos:
tell -> tells
arrrangement -> arrangement
CROHETED -> CROCHETED
STENCILING -> STENCILLING
on account -> on account of
will be be -> will be
retain -> and retains
expecially -> especially
Portières/Portieres found with and w/o accent in equal parts (left as in text in each case)
Hyphenation made consistent:
wood-work -> woodwork
outdoor -> out-door