
| Note: | Images of the original pages are available through the Digital Library of the Falvey Memorial Library, Villanova University. See http://digital.library.villanova.edu/Item/vudl:267659 |
CHAPTER I. HISTORICAL.
CHAPTER II. DESCRIPTION OF THE LOCOMOTIVE.
CHAPTER III. HOW TO BECOME AN ENGINEER.
CHAPTER IV. DUTIES OF AN ENGINEER.
CHAPTER V. HOW TO RUN A TRAIN.
CHAPTER VI. HOW TO BUILD A MODEL LOCOMOTIVE.
CHAPTER VII. CONCLUSION.
Containing Full Instructions How to Proceed in
Order to Become a Locomotive Engineer;
Also Directions for Building a Model
Locomotive; together with a Full
Description of Everything an
Engineer Should Know.
PROFUSELY ILLUSTRATED.
BY AN OLD ENGINEER ON THE NEW YORK CENTRAL RAILROAD.
New York:
FRANK TOUSEY, Publisher
29 West 26th Street.
Entered according to Act of Congress, in the year 1898, by
FRANK TOUSEY,
in the Office of the Librarian of Congress at Washington, D.C.
HISTORICAL.
To begin a subject properly you must begin at the beginning.
Boys who don't like history need not read this chapter, for in it we tell how the steam engine began, and if it never had begun, you know, there would never have been any engineers, nor any necessity for writing this book.
For two or three generations we have had the story of James Watt told us; how when a boy and watching his mother's tea-kettle one day he saw the steam lift the lid, and that suggested the idea that if a little steam could lift the lid of a kettle, a great deal would lift still heavier weights and revolutionize the world.
Now they tell us that Watt was not the first one to have this idea by several, that it was first suggested by the Marquis of Worcester, in his book called the "Century of Inventions," as "a way to drive up water by fire," A. D. 1663.
This was about a hundred years before Watt came on deck, but the marquis never put his idea into practice, and Watt did, so to the latter the credit belongs.
Here are a few dates:
Watt's invention of the separate condenser, 1765; Watt's first patent, 1769; Watt's first working engine introduced into a manufactory, 1775; first steam engine erected in Ireland, 1791; first steamboat run on the Hudson, 1797; first steamboat abroad, 1801.
First regular steamboat ever run was from Albany to New York. The name of the boat was the North River, her builder was Robert Fulton, and she made the passage in 33 hours.
The first railroad was built in England, in 1811.
The first ocean steamer was the Savannah, an American craft of 350 tons, which sailed from New York for Liverpool, July 15, 1819, making the voyage in 26 days.
Such were the early beginnings of steam.
There are three principal kinds of engineers, locomotive, steamboat and stationary.
In this little book we propose to deal mainly with the duties of a locomotive engineer.
If one is a good locomotive engineer he can easily learn to manage the engine of a steamboat; and if he is skilled in either of these particulars he will have no difficulty with the biggest stationary engine ever built.
The work of the different engineers differs only in detail, not in kind.
Let us now glance at the history of the steam horse, which[Pg 5] has done more than any other one thing to revolutionize the world.
Be very sure that the locomotive, with its pistons, its spinning drive wheels, its polished steel and shining brass, did not come into existence all at once.
By no means. Like everything else in the way of mechanical invention that attains greatness, the locomotive had an insignificant beginning to reach which we shall be obliged to get back somewhere about the middle of the last century, for then it was that the desire for faster traveling than horses can furnish seems to have had its birth.
The first attempt at a railway seems to have been at Colebrook Dale, England, a spot celebrated for having the first iron bridge in the world—where a small iron road was constructed in connection with some mines; a horse furnished the motive power here.
The first railroad then was without a locomotive, and, strangely enough the first locomotive was without a railroad on which to run.
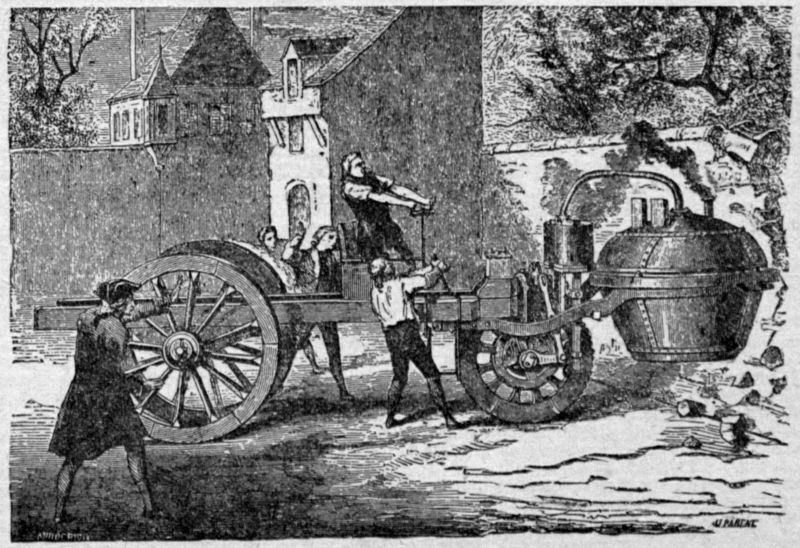
The first locomotive made its appearance in France. It was simply a huge tea kettle on wheels, and was built by Joseph Cugnot at Paris in the year 1769.
It is the custom of English writers to ignore Cugnot's invention, and claim for themselves the origin of the locomotive; but that is only a pleasant way the English usually have.
Cugnot's locomotive actually existed though, and was undoubtedly the first. It was operated by means of two bronze cylinders, into which the steam passed through a tube from the boiler—escaping through another tube.
The boiler was fastened on the front of the car, which moved on three wheels—the steam acted only on the foremost wheel.
The speed of Cugnot's locomotive was about three miles an hour. On the first trial it ran into a building and was broken to pieces.
In 1784 the famous Watt patented a steam locomotive engine in England, which, however, never was put to use.
In 1802, Trevethick and Vivian patented a locomotive, which, in 1804, traveled at the rate of five miles an hour, drawing behind it a load of ten tons of coal.
Several other "traveling engines," as they were then styled, were invented by other mechanical engineers with only moderate success, it being reserved for Stephenson, in 1811, to build the first locomotive that should prove of practical use.
About this time a man named Thomas Gray, of Nottingham, England, brought upon himself the contempt and ridicule[Pg 6] of the whole English nation by pushing forward the idea of the locomotive in connection with coal mines.

"It is all very well to spend money on these railway schemes," said a member of parliament about that time referring to Gray's projects, "it will do some good to the poor, but I will eat all the coals your railways will ever carry."
127,000,000 tons were carried recently in one year, on English railroads alone. What a tough time this parliamentary slow coach would have had to swallow all that!
The first practical locomotive in the world—Stephenson's invention, was Old No. 1, which pulled the first regular train on the Stockton and Darlington R. R. on Tuesday, September 27, 1825.
Old No. 1 cost $2,500 to build. It was a very clumsy affair; nothing better, in fact, than a big boiler on four wheels, which were moved by great levers worked by pistons from the top of the machine.
Old No. 1 has been preserved, and was, in the year 1859, placed upon a pedestal in that English town of Darlington as a public memorial of the beginning of the railway.
No sooner had the Stockton and Darlington R. R. proved itself a success than all England was in arms against it. Here are some of the absurd objections urged against railroads, taken from the newspapers of the day.
Steam horses were "contrary to nature;" they were "damaging to good morals and religion;" the smoke of the locomotive would "obscure the sun, and thereby ruin the crops." Farmyards and farmhouses would be burned by their sparks; the clanking, puffing locomotive would have such an effect on the mind as to drive people crazy (this was backed up by certificates from a dozen doctors); locomotives would cause springs to dry up and fields to become sterile; they would create great chasms by constantly running over the same ground.
What twaddle!
Yet all their objections were made in good faith, and we have by no means selected the most absurd.
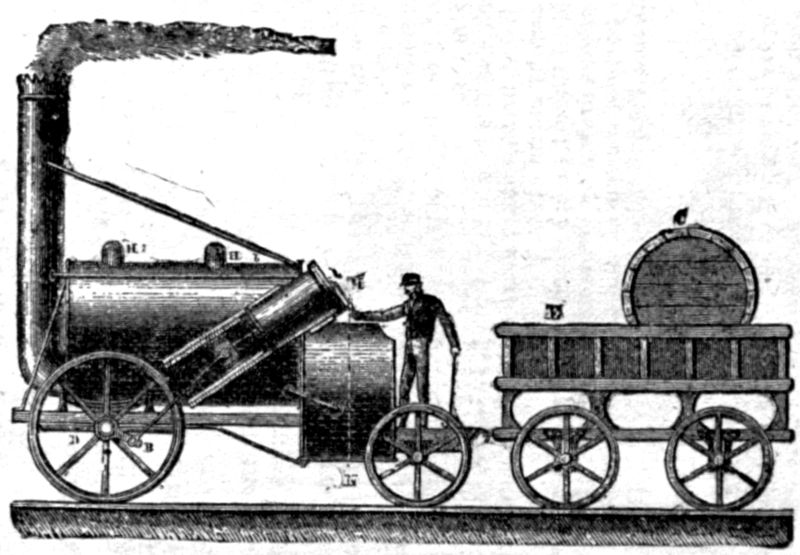
Old No. 1. proving too clumsy, a lighter locomotive was soon after built by Stephenson, called the "Rocket," which we illustrate. It won a prize of $1,500 in 1829, and is still preserved in the great locomotive works at Newcastle-on-Tyne, England.
The first railroad in America was built from the granite quarries of Quincy, Mass., to the Neponset river, a few miles distant.
Peter Cooper built one of the first American locomotives. It ran on the Baltimore and Ohio R. R., and was called the Tom Thumb.
The boiler of the Tom Thumb was built of gun barrels and shaped like a huge bottle standing upright upon a simple platform car.
Such was the beginning of the locomotive.
In Great Britain alone over 600,000,000 people are annually drawn by locomotives.
Add to these figures, which represent only a small island, the persons drawn by locomotives in America, Europe, and other parts of the world, and the number becomes stupendous almost beyond belief.
DESCRIPTION OF THE LOCOMOTIVE.
In order to become an engineer, the first thing necessary is to gain a thorough understanding of the peculiarly complicated machine which it is the duty of engineers to control.
This is of the highest importance, and a careful study of this chapter and the diagrams accompanying it will be of great assistance to anybody who contemplates becoming an engineer.
There are locomotives and locomotives, all built on the same general plan, but varying in details according to the[Pg 9] ideas of their builders, and the class of work which they are expected to perform.
Thus for elevated roads and short surface lines, devoted principally to passenger travel, locomotives of light capacity[Pg 10] are employed; costing less at the start, and being less expensive to run.
The "dummy" is even a grade below these, being practically a stationary engine set on a car with driving wheels attached.

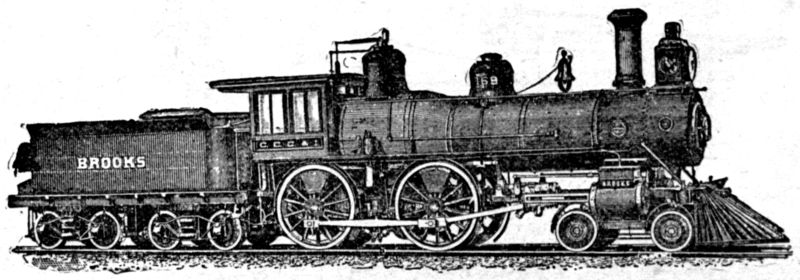
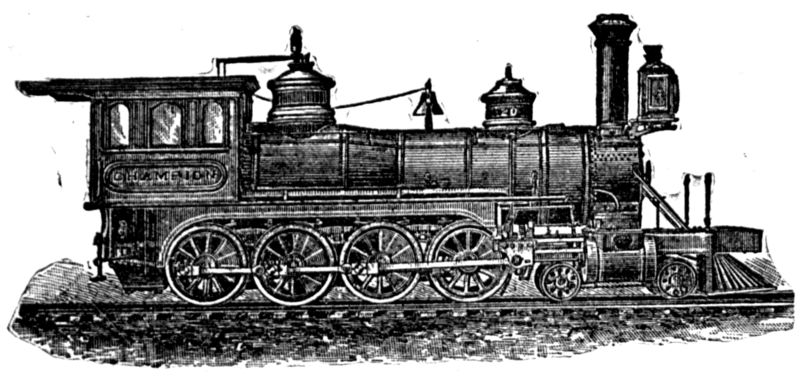
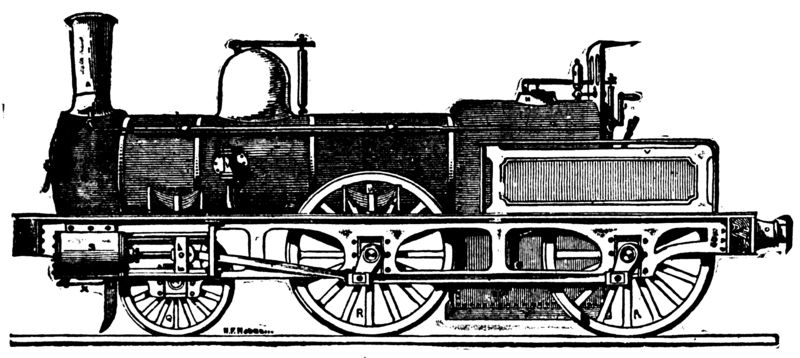
In America our locomotives are built with long boilers and have a general trim appearance.
Some have two driving wheels, others, still longer, have four. We illustrate both of them.
English locomotives present a clumsy appearance alongside the American.
For us to attempt to decide which is the best, would be the height of presumption.
Certain it is, however, that English locomotives do run at a greater average speed than those in the United States.
We will now proceed to describe by tabular arrangement, an English locomotive.
This description will practically describe the American locomotive as well.
We cannot enter into a detailed description of both for want of space, and select therefore the machine which has attained to the highest speed.
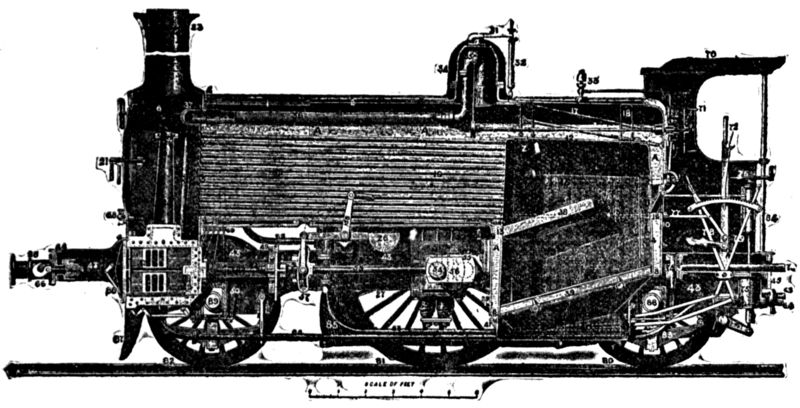
We will first look at the outside of the locomotive.
1, 2, 3, Barrel of Boiler. 6, Smoke-box. 22, Smoke Stack. 32, Spring balance.
33, Whistle. 34, Dome. 64, Exhaust pipe. 70, Cab. 85, Brake blocks. 87, Life guards. 88, Trailing axle and wheel. 59, Heading axle and wheel. 54, Driving axle. O, Speed indicator. P, Splasher. S, Sand-box. T, Tool-box. V, Safety valve. W, Balance-wheel.
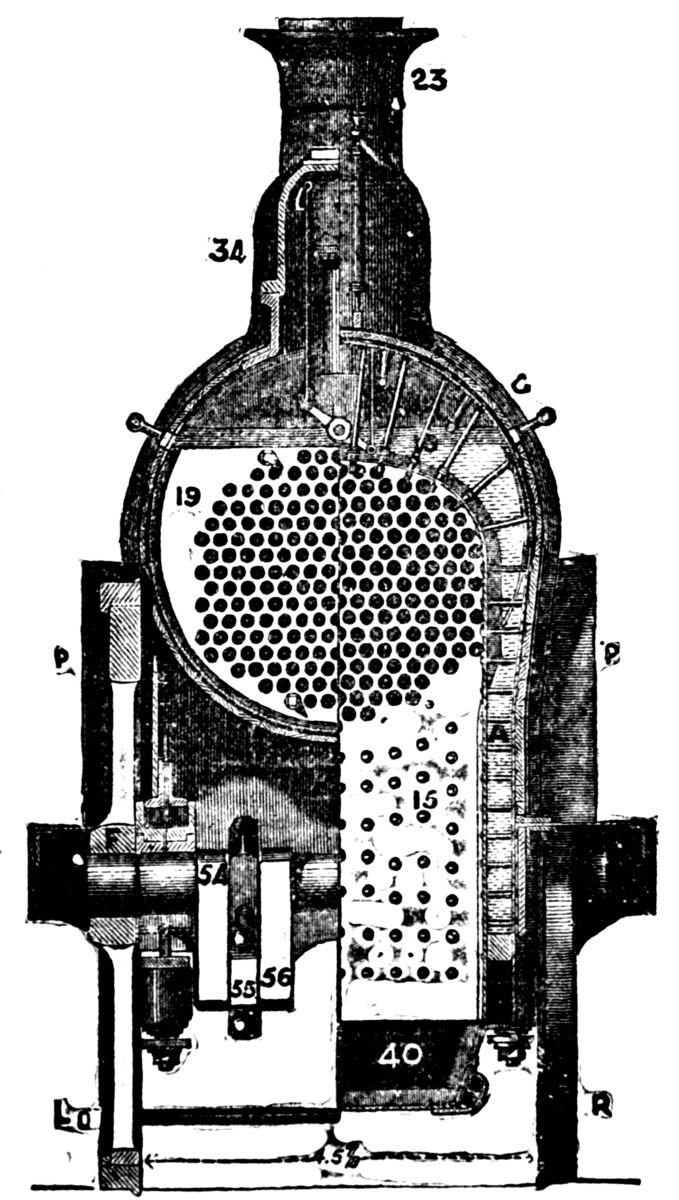
Let us now take an inside view of the locomotive. Compare the numbers carefully with the cut, and take time to think what you are doing, otherwise don't read this part at all.
1, 2, 3, Rings arranged telescopically, forming barrel of boiler. 4, Solid angle-iron ring. 5, Tube plate. 6, Smoke box. 7, Shell, or covering plate. 8, Foundation ring. 9, Throat plate. 10, Back plate. 11, Fire door. 12, Covering plate of inside fire-box. 13, Tube plate. 14, Back plate. 15, Stays. 16, Mouth-piece. 17, Stays from inside fire-box to shell plate. 18, Palm stays. 19, Tubes. 20, Smoke-box door. 21, Pinching screw. 22, Chimney. 23, Chimney cap. 24, Blast pipe. 25, Top of blast pipe. 26, Balance weight. 27, Wheel spokes. 28, Front buffer. 29, Mud plug. 30, Safety valve. 31, Safety lever. 32, Spring balance. 33, Whistle. 34, Dome. 35, Regulator. 36, Steam pipes. 37, Elbow pipe. 38, Brick arch. 39, Fire bars. 40, Ash pan. 41, Front damper. 42, Back damper. 43, Frame plate. 44, Iron buffer beam (front). 45, Iron buffer beam (back). 46, (See half width plan) cylinder. 47, Cylinder posts, valve. 48, Valve chest. 49, Steel motion plate. 50, Horn blocks. 51, Axle boxes. 52, Slide bars. 53, Connecting rod. 54, Crank shaft. 55, Crank shaft, big[Pg 14] end of. 56, Crank shaft, arm of. 57, Expansion link. 58, Weigh-bar shaft. 59, Valve spindle. 60, Valve rod guide. (See half width plan). 61, Pump. 62, Delivery pipe. 63, Field pipe. 64, Exhaust pipe. 65, Volute spring. 66, Draw-bar hook. 67, Lamp iron. 68, Oil cup. 69, Oil pipes. 70, Cab. 71, Regulator handle. 72, Reversing lever. 73, Draw-bar. 74, Draw-pin. 75, Steam-brake cylinder. 76, Hand-brake. 77, Sand-rod. 78, Front damper. 79, Back damper. 80, Trailing wheel. 81, Driving wheel. 82, Leading wheel. 83, Spring. 84, Hand rail. 85, Brake blocks. 86, Waste water-cocks. 87, Life guard. 88, Railing axle. 89, Leading axle. Z, Lead plug.
43, Frame plate from end to end of engine. 44, Iron buffer-beam. 46, Cylinders. 50, Horn block, to carry axle-box and brass. 51, Axle-box and brass. 52, Slide bars. 53, Connecting-rod. 54, Driving axle. 55, Big end of driving axle. 56, Arm of driving axle. 59, Valve-spindle. 60, Valve-rod guide. 61, Pump. 76, Hand brake. 85, Brake blocks. 88, Trailing axle. 89, Leading axle. 90, Piston rod. 91, Piston head, held on the rod by a brass nut. 92, Backway eccentric rod. 93, Frontway eccentric rod. 94, Eccentric Straps. 95, Eccentric sheaves. 96, Tire. 97, Lip on tire. 98, Brake irons. 99, Foot plating. 100, Transverse stay. A, Water space between inside and outside fire boxes. B, Slide-block with end of pump-ram screwed into the end. C, Link motion (see 57, inside view). D, Slide valve rod, working guide. H, Inside journal, showing how the axle is supported inside of frame plates. I, Cross-head, solid, with piston rod.

15, stays in walls of fire-boxes. 18, stays from crown plate to covering plate. 19, tubes. 23, smoke-stack. 40, ash-pan. 54, crank shaft. 55, big end of crank-shaft. 56, arm of big end. 34, dome.
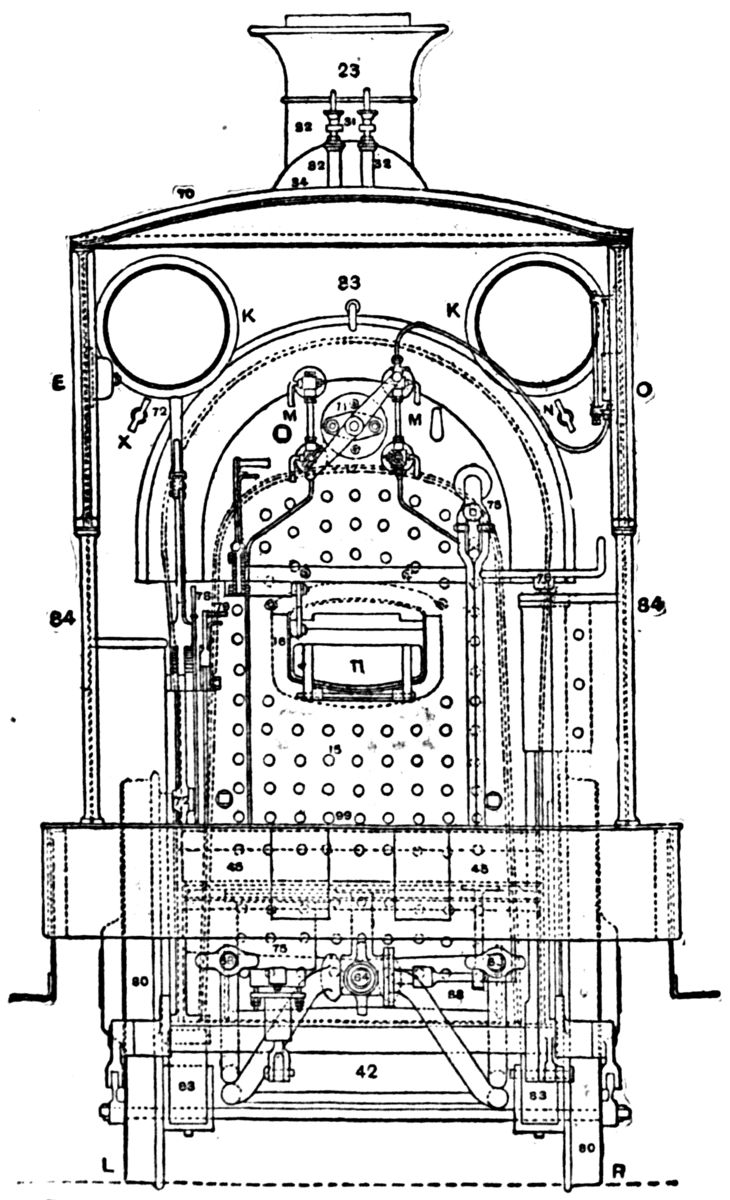
A, water space. F, nave of wheel. P, P, splashers over driving wheels. R, right side of engine. L, left side of engine.
75, steam brake handle. 33, whistle handle. 23, smoke stack. K, K, weather glasses. O, speed indicator. E, conductor's bell. N, oil for cylinder. X, blower handle. R, right side of engine. L, left side of engine. M, M, gauge glasses.
Some Points About the Locomotive.
Here are a few interesting points about this particular locomotive which we have just been describing.
It is a single engine on six wheels—which are well distributed, with a large boiler of abundant steam generating power with cylinders of great capacity, and driving wheels of moderate diameter.
It is accompanied by a tender on six wheels, capable of holding a supply of 2,520 gallons of water, and 40 cwt. of coal.
Notwithstanding its great capacity, this tender is so low that a tall man may stand on top of the coal without fear of being knocked down by bridges.
There are over 47 tons of metal in the locomotive and tender.
When they are in full working order the gross weight with water and fuel amounts to 59 tons.
This locomotive drew its first train 87 miles in 1 hour and 50 minutes.
Differences in Locomotives.
It is an old saying and a true one that no two locomotives are ever alike, any more than two men are ever alike.
The difference is due not so much to the materials of which the locomotive is built as to the method in which they are put together, for no two engines were ever put together geometrically alike.
They may differ in some simple matter. It may be in the casting of the cylinders, in the quality of the copper of the fire box, in the valves or in the smoke stack. Whatever the difference may be there is still always a difference which is bound to affect the running qualities either for better or for worse.
HOW TO BECOME AN ENGINEER.
The boy who aims to become an engineer, if he desires success, must make up his mind to two things.
First, that he will, all his life, have plenty of hard work.
Second, that he will, in spite of all obstacles become a good engineer.
A boy who looks forward to the honorable calling should be of robust health and perfect physically. If these conditions do not exist, he should abandon the thought at once, and turn his attention to something else.
There is no royal road to engineering any more than there is to any other honorable calling.
A position must first be obtained in the round house as general helper.
For a time the candidate must content himself with doing chores, cleaning up and any odd jobs which are given him to do.
At this stage of the game he must cultivate habits of observation, be an attentive listener and try to understand and remember the "engine talk," that is going on about him.
Everything he learns in this way is going to be of service later on.
For the first few months, unless he is fortunate enough to gain favor in the eyes of some obliging engineer, no one is going to stop to explain matters and he need not expect it. Nevertheless there are a thousand and one little things that he can pick up if he is shrewd, all of which will come in play later on.
When the locomotive is taken out watch how they do it. When it comes in keep your eyes open for points, and you will be sure to get them. When it breaks down and comes in for repairs then is the very time of all others to be on hand if you can and watch how they fix it.
Every day will bring its own information—the boy's work is to watch and remember, but he must not ask too many questions, and never any at improper times, unless he desires the ill-will of everybody in the yard.
By and bye he will be made an oiler, put to cleaning the big iron horse and other work of similar sort.
After a time he will slip into a fireman's job, and then he must understand that his chance has come. Now all depends upon himself.
Make friends with your engineer while you are acting as fireman, and learn from him all you can.
The way to make friends is to be industrious, obliging and always courteous, no matter how tired you are or how badly things seem to go.
The troubles and disappointments of one day should not be brought down to the next.
Let every day be a new beginning in itself.
Don't drink.
Don't swear.
Don't lose your temper and flare out under reproof.
Don't shirk your work and try to do as little us you can.
Don't say to yourself so and so ain't my work and I ain't going to do it. Do whatever your hands find to do and do it with all your might.
A model engineer is distinguished by the fullness of his knowledge of the engine, and this must be learned while you are a fireman—not after you become an engineer.
He should love his work—the locomotive should be his hobby—and whatever contributes to enlarge his stock of information concerning it should contribute to his happiness. Unless he can feel that way, he should promptly step out of the cab and turn his attention to some other business, for he can never hope to make a good engineer.
On the engine is the only place where one can learn to be an engineer.
During the time the engine is under steam with a train, everything seen, heard, felt and smelt is capable of affording a lesson.
On the engine the eye is trained to distinguish different colors at considerable distances. If one is color-blind he cannot be a good engineer.
On the engine the ear learns to detect the slightest variation in the beats and knocks about the machinery—to distinguish the difference between the knock of an axle box and the knock of a journal.
On the engine the body learns to distinguish the shocks, oscillations, etc., which are due to a defective road from those which arise from a defective engine. The olfactory nerves became very sensitive so as to detect the generation of heat from friction before any mischief is done.
It is only while an engine is in steam and going at good speed that the rocks, coral-reefs and sand-banks on railways can be seen and learned, and the value of and the rank acquired by an engineer are in exact proportion to the pains he takes to find them out, and to remark their dangerous position on his chart.
A model engineer can tell you all about any particular engine he happens to see merely by glancing at it.
He will be able to say this was built by so and so. I know it by this crank, that piston. "Look here," he says, "that rod was built when I was a boy, it's all out of date now, consequently the engine must have been built in such a year."
In short the model engineer should be familiar with the history of locomotive engines from Old No. 1 down to date.
The model engineer is always a good fireman.
A man may be a first-rate mechanic, he may have worked at the best class of machinery, he may have built engines and have read all the published books on the locomotive,[Pg 20] and yet, if he is not a good hand at the coal shovel, he will never be a first-class engineer.
A good fireman knows when to put on coal, how and where and just how much. A man may be the best mechanic the world ever saw and know nothing of these things which are the very all essentials of a good engineer.
A model engineer is clean himself, and his engine is cleaner.
Cleanliness is said to be next to godliness. Upon a railroad it may with truth be said that cleanliness is next below the highest talent and next above the length of service.
A clean engineer frequently scales the ladder of progress much faster than a dirty one, although the latter may have everything else in his favor.
A model engineer runs the most important trains, and he is never the man who wore the greasy, dirty cap or the coat and trousers all smeared with oil.
What is the secret of constant successful engine driving?
Not length of service, not because a man has served so many years on freight trains and so many more on passenger trains, for the best engineers are ever those who have been promoted over the heads of others for their smartness.
Promotion according to merit should be the invariable rule on railroads. Seniority should have nothing to do with it. The position is too important, there are too many lives at stake, too much money involved to make it right or proper to push one man forward beyond another simply because of the length of his service. That sort of thing is all right for ordinary business, but for engine driving it won't do.
Merit tells.
To the best engineer belong the best trains.
Chance never built an engine, and it should have nothing to do with running it.
Yet the opposite way of doing things is the general rule.
Engineer A retires, dies or is killed, and Engineer B is promoted because he happens to be next on the list. He may be a dull, stupid fellow, and Engineer C as bright as a dollar, but in the chance death of A, B gets the prize, and everybody that has any interest in the successful running of his train becomes the loser thereby.
Engine driving, to be good, must be based upon rules and principles.
He who strictly observes them wins; he who don't, loses. With the latter all is uncertainty; the hand trembles upon the regulator, the eye watches with painful anxiety the needle of the pressure gauge, and gazes into the fire to find[Pg 21] out its deficiencies, but gains nothing but blindness by the attempt.
With the engineer who has a reason for every act performed, either by himself or his fireman, all is different. He works by rules and principles that have proved themselves a thousand times over to be safe, practical and certain in their results.
Sound rules and principles are absolutely sure in the effects of their application—not right to-day and wrong to-morrow; not right in a short trip and all astray on a long one; not right on one particular engine and wrong on another; not right on the first part of the run and wrong at the end; not right with one kind of coal and wrong with another, but always right, every time.
Under the guidance of sound rules and principles, the mind of the driver is full, and he is enabled, under all circumstances, to handle the regulator with confidence, to travel with a boiler full of steam, and to finish with success.
In a word, these are rules and principles which lead up to and make the success of an engineer.
DUTIES OF AN ENGINEER.
Let us now consider in detail some of the more important duties of an engineer.
The Notice Board.
Before going to his engine an engineer should, for his own safety, as well as that of the public, visit the special and general notice boards and post himself fully upon the running of the trains for the day. By neglecting this more than one engineer has lost his life.
An anecdote bearing on this is related on good authority, as follows:
"By incessant rain a river had become so swollen that, owing to the rush of water, the spiles of a wooden railway bridge became shifted.
"The bridge was inspected, and one side of it pronounced to be dangerous. Arrangements were made to use only one track until repairs could be made, and notice of such arrangements posted in the round-house.
"The engineer neglected to visit the notice board, ran his train past the man appointed to pilot him over the break, got his train off the track, and was killed."
After the engineer has read the notices and made himself thoroughly acquainted with them, he may proceed to his engine—not before.
Inspection of the Engine.
When on the foot plate the first thing an engineer wants to do is to inspect his engine in every part.
Begin with the water in the gauge glass and ascertain its level and find out whether it correctly indicates the height of the water in the boiler by opening the lower cock in the usual manner.
Satisfied that the boiler is safe, the engineer must assume the responsibility of looking after it, for should anything prove wrong afterward, he alone can be called to account.
He should also observe what pressure of steam there is in the boiler, what is the condition of the fire, how much coal there is in the tender and its quality, and lastly that the water supply is all right.
If the inspection is made properly all will go well; if in a half-hearted, slip-shod fashion trouble is sure to follow.
Inspection of an Engine over a Pit.
It is a good and a safe rule to examine an engine over a pit before starting out. When this is done properly and regularly, the habit is unmistakably the mark of a good engineer.
That an engine may be properly examined over a pit, it is necessary that it should be placed in such a position that every part of it may be seen and inspected without having the machinery moved.
The examination, to be complete, should be commenced at one specified point, and continued all around the engine, until the engineer returns to the place where he began.
In general, the only tools needed are wrenches.
The inspection should begin at the trailing engine axle, on the engineer's side, and the best rule is to examine everything, not forgetting the fact that more engines break down in consequence of bolts and split pins working out than from any other cause.
After the engineer's side has been properly examined, the under side of the engine next claims attention. The engineer should begin at the crank shaft, taking his stand, where it is possible to do so, between the shaft and the fire box, while he is testing the bolts and rivets connected with it.
Big Ends.
Big Ends require to be fitted brass and brass, to work well, and to be well-cottered or bolted up, but with sufficient slackness on the crank bearing to allow of their being easily moved sideways by hand, so that a little room may be left for the expansion of the journal by heat.
Big End brasses do best, wear longest, and knock least,[Pg 23] when tightened up a little at a time and often, instead of being allowed to run until they thump alarmingly. With proper attention they seldom run hot.
Little Ends.
Little Ends need scarcely any supervision excepting what is required from the oiler, provided they are fitted with steel bushes. Those fitted with brasses require the same attention as Big Ends.
Eccentrics.
When the eccentrics are being examined particular attention should be paid to the bolts, nuts, safety-cotters and set-pins. The bolts which hold the two halves of each eccentric strap together should always nip tightly, as any slackness always affects the engine's speed.
Inspect carefully also the inside springs and axle boxes, specially the latter. See that the fireman oils them; if he does not, you are to blame.
The ash-pan, piston rod, smoke box, etc., all need to be looked at with care, for to run right the engine must start right, and this brings us to the most important thing of all—the condition of the fire before leaving the round house, for there is no other one thing on which an engineer's good name, success and future prospects depend so much as on the condition of the fire at the beginning of the day's work.
If the fire is not properly lighted at the start, no matter how good the engine or how smart the engineer, constant trouble during the trip, to say nothing of an increased consumption of coal which is bound to tell against him, will be the result.
Don't get to your work late, and don't allow your fireman to be late. If the fire is to be properly built he has got to take time to it. Fires thrown together in a hurry always turn out bad.
Duties of a Fireman.
As the model engineer must first have served as fireman, let us say a word on that score.
Before a fireman can serve on a passenger train, he should have served awhile as freight brakeman, or in the yard shifting cars. Before going on an express train, he must have run on slow trains as fireman. All this is necessary that he may acquire a knowledge of the petty details of his work.
A superintendent who puts a green hand at firing certainly exhibits a great want of good judgment, to say the least, and just this has often been the cause of serious accidents and loss of life.
Here are a few things that a man must know before he can become an engineer:
1. How to make up a proper fire in a locomotive fire-box.
2. How to handle the shovel when the engine is running.
3. How to learn roads and signals.
4. How to calculate the effect of the weather on the rails.
5. How to manage an engine and train on varying grades.
6. How to have full control of an engine and train at full speed.
7. How to work the steam expansively and yet keep time.
8. How to regulate the water supply.
9. How to read the gauges at a glance and understand just what they mean.
Now all these things have got to be learned while a fireman, for unless you know them you can never become an engineer.
Some engineers will give no instructions. They demand certain results, and if the fireman don't do just what they expect because he does not understand what is wanted, they call him a fool, snatch the shovel out of his hand and do the work themselves.
It is the engineer who is the fool in this case, and doubly so if he loses his temper and swears.
Certainly it is very hard for a sensitive young man to learn of such a master, but after all it is good discipline.
Never mind if you are sworn at and dubbed an idiot. No matter if you do choke a few fires and stop a few trains. Persevere! Keep your temper, watch how the engineer does it and try to do the same yourself next time. Show him that you are not the idiot he has called you, prove that you are no fool by your patience and perseverance—qualities, like enough, which he himself does not possess.
A first class engineer, however, will show a new fireman just what he wants done and how to do it.
Here are a few lines from an excellent manual on engineering, describing the conduct of a good engineer to his fireman. Read them with care:
"With good engineers an awkward fireman soon changes his habits and appearance—he gets the knots dressed off of him, as it were. Has he been taught to come on duty dirty and late? He is sharply reproved, and very properly too. Does he throw the fire irons down anywhere after using them? He is told there is a place for everything in that engine. Is he dirty about his work? He is shown how to handle the shovel, oil feeder and everything else without[Pg 25] blackening himself to such a degree that a boy in the street mistakes him for a chimney sweep. Thanks to such engineers, who deserve much praise for keeping their firemen in proper training, for, just as they are trained so will they turn out engineers, good or bad."
HOW TO RUN A TRAIN.
A good engineer works his engine with direct reference to the number of cars he has to pull.
It would seem as though any fool might know this, yet instances are on record where careless engineers have actually pulled out of a station without their trains, and never discovered that they were missing until they had occasion to whistle for brakes.
Starting.
In starting the regulator should be opened gently, especially with a full boiler.
Care is necessary when starting to keep the cylinders and valves clear of water. Half a pint of water will wash the faces of the cylinders and valves. Slip or no slip, it is better to use a little sand than to incur the risk of slipping when the rails are inclined to be slippery.
When the engine begins to feel its load the regulator can be opened more. A few clear, sonorous puffs at the start do good; they rouse the fire into action at once—there is no hesitation in the matter. They also clear the tubes of loose cinders and soot left in them after being swept out.
When you are well under way pull the lever up a notch or two at a time until you get it just where you want it. Don't jerk it too far, then let it out too much and have to pull it back. Feel your way as you go, and time and trouble will be saved.
Nothing looks so bad as to see an engineer suddenly close the regulator, pull the lever very nearly out of gear and "smack" the steam on again. The force with which the steam may strike the piston under such circumstances is very great and often may do damage.
To an attentive engineer the start is full of interest; for, although he may have made a careful and thorough examination of his engine before joining his train, he cannot feel satisfied that all is right until the full pressure of the steam is on the piston and the engine feels its load.
Steam Blowing.
Now the engineer must begin to use his ears and eyes.
As the train moves on he listens.
Is the steam blowing?
It is.
Which side?
This is the way to find out.
Suppose a blow is heard at each turn and only when the outside crank is nearly in a straight line with the piston rod looking from the left-hand side of the foot-plate and with the outside cranks on the same center line and on the same side of the axle as the inside crank.
Then it would be discovered that a piston is blowing because the sound is intermittent, for the blowing through of a valve would be a continuous leaking.
Further it would be certain that the defect was not in the left hand cylinder, there being no steam in it when the cranks were in the position above described, and therefore we must look to the right hand cylinder where the full pressure of steam must be on the piston.
Beats of the Engine.
There are four beats for one revolution of the driving wheel or the crank axle.
These beats tell you in emphatic language whether the engine is running right, or whether there is something out of gear.
Learn what they mean and never let your attention be drawn from them.
If the beats weaken—any one of them—it means trouble. Taken in time the difficulty may be easily remedied, allowed to pass unnoticed, death and disaster may result.
Keeping up Steam.
It is scarcely necessary to state that to properly run your engine steam must be kept up.
When the engine has got the train up to speed, steam should begin to issue from the safety valves. When it does not do so there has not been a full boiler, as there always should be at the start and the fireman must be made to understand how to make a starting fire in proper shape.
On short runs this does not matter so much, but on express trains it is of the highest importance.
On long runs if the engine is not instantly up to the mark at the start, and if the feeds must be held off to allow the fire and the engine a chance of recovery, the consequences are that the water in the boiler gets lower and less, and the uncertainty of ever getting the water up again becomes greater every minute, especially with a heavy train and against a strong side wind.
Management of Fires.
Of course the state of the steam depends altogether upon the way the fires are managed, but for us to give directions how to manage a locomotive fire-box to the best advantage would require pages of description which could scarcely be understood unless one had had previous practical experience.
Remember one thing, the engineer is responsible for the fire, even if he does not make it. He must therefore know when a fire is good and when it is bad, why and what to do.
We shall, however, describe two styles of fire, the thoroughly bad and the thoroughly good. All intermediate grades every man must learn for himself.
How To Build a Bad Fire.
Pile your coal up in the shape of a cone, by shoveling all the coal into the middle of the fire box, and putting as little on the sides as you possibly can.
Such a fire possesses the following characteristics: Uncertainty as regards steam making, positive certainty as regards the destruction of fire boxes and tubes. It generally draws air at the walls of the fire-box, and in consequence, the fire-irons are always in the fire, knocking it about and wasting the fuel.
As such fires are found in the center of the grate, they weigh down the bars and burn them out in the middle in short order. Lastly, the cold air being admitted into the fire-box up the sides instead of in the middle, comes in direct contact with the heated plates and stays, doing them a great deal of damage by causing contraction and expansion.
Take the best engine ever built and let an engineer run it awhile with these "haycock" fires, as they are called—and many do it—you will be sure to find the boiler subject to sudden leakage, either in the joints of the plates or in the stays, the tubes, or the foundation ring. Such engines are always in the repair shop, and because of bad firing and nothing else.
How to Build a Good Fire.
The good locomotive fire should maintain steam under all circumstances of load or weather, should consume its own smoke, should burn up every particle of good matter in the coal, or, in other words, capable of being worked to the highest point of economy.
Such a fire requires to be made at the beginning, and maintained in a form almost resembling the inside of a saucer, shallow and concave, with its thinnest part in the center.
A fire like this will make steam when other fires will make none.
It is the only style of fire that should be permitted by a good engineer.
Firing.
To fire properly the fireman should stand in such a position as to be able to reach the coals in the tender easily, and to work the shovel without shifting his feet, except when he turns slightly on his heels, first, toward the coal, and then toward the fire hole.
If a fireman, in the act of firing, lifts his feet off the foot plate, he will roll about, and the firing will be improperly done, in consequence of the coal being knocked off the shovel by the latter catching against the fire hole ring or depletion plate.
Don't jam the shovel into the fire-box—stop it dead at the fire-hole ring. Give the coals a fling, discharging them like shot right into their intended destination.
Don't jam your shovel into the coal and load it down as much as possible. A few lumps of coal lying nicely on the body of the shovel can be handled better. The shovel should not be pushed into the coal by the knees, but should be worked only by the muscles of the arm.
Throw the first shovelful of coal into the left hand front corner, the second shovelful in the right hand front corner, the third shovelful in the right hand back corner, the fourth shovelful in the left hand back corner, the fifth shovelful under the brick arch, close to the tube plate; the sixth and last shovelful under the door. To land this one properly the shovel must enter the fire-box and should be turned over sharp to prevent the coals falling in the center of the grate or the fire.
Now comes the question when to fire.
To fire properly, with the greatest effect in saving fuel, it should be done as soon as the steam begins to lift the valves, when by opening the fire-door and putting on a small quantity of coal the steam is checked sufficiently to prevent its being wasted by blowing off.
Some engineers have an idea that unless the steam blows off furiously they have not done their duty by the engine.
A big mistake this.
When steam, water and fuel are being thrown away through the safety valves, it is a positive proof of the existence of either one or the other of the following evils:
Either the engine is too small for its work or too great for its man, and both the engine and the man would do better on short runs; the former until it could be doctored, or the latter until he had learned to bottle his noise.
The intervals between the rounds of firing, which should[Pg 29] consist of six shovelfuls only each time the door is opened, is in every case regulated by the weight of the train or load, the state of the weather and the time allowed for running the trip, together with the quality of coal.
The greatest possible mistake on an engine is putting on too much coal. The fire is choked, clinkers are formed, the temperature of the boiler is reduced, contraction and expansion sets in and leaks are formed—in a word everything goes wrong.
The secret of good firing is to fire frequently, a little at a time.
Feeding.
Having discussed fire, let us now consider the other element upon which the locomotive lives—water.
The maintainance of steam in proper shape requires a knowledge of how and when to feed.
The aim in feeding should be to regulate, as nearly as possible, the supply to the demand—just sufficient to keep the water at a proper level in the glass.
This keeps up an even temperature in the boiler plates, tubes and fire-box, and this has much to do with the service of an engine. Many engineers always work their feed in the precise way to get the worst results.
As soon as the boiler is full of steam and blowing off they turn on the pump full and keep it on until the steam is from 30 to 50 pounds below the maximum pressure before turning it off.
This method is the very worst possible. What is wanted is a constant moderate supply of water, keeping the pressure as nearly even as possible. Nothing can beat this.
When injectors are used one of them should be screwed down so that it will act moderately like a pump. This will save the water which is usually lost in turning injector on and off.
On the Foot-plate.
When the train is under full headway the engineer should stand in his proper place on the foot-plate so as to be able to command the regulator and reversing valve at an instant's notice.
Especially is this necessary at night, when the engineer's attention should always be on his engine, listening constantly to its beats to detect any irregularity which may arise from some defect in the machinery, frequently casting his eyes on the pressure gauge, and on the level of the water in the gauge glass.
When the fireman puts on coal, the engineer should look round occasionally, to be sure that he is doing it right, placing[Pg 30] the coal next to the walls of the fire-box, and not piling them in a heap in the middle.
When the rails are slippery, great care is required to prevent the engine from slipping, by closing the regulator in time.
When about to enter a tunnel, the sand valves should be opened, and the sand allowed to flow freely until the train emerges from the tunnel—sand is cheaper than steam.
Never forget that lives and property depend upon the faithful performance of your work.
HOW TO BUILD A MODEL LOCOMOTIVE.
As a preparatory step toward becoming an engineer, it is highly desirable for the boy who looks forward to that honorable calling to familiarize himself with the different parts of the locomotive engine. This we have stated before.
There is no better way to accomplish it than to build a model locomotive.
At first glance this may seem to be among the things impossible, but it is not so, providing the boy has a mechanical turn, and any boy who has not better not think of becoming an engineer.
We now propose to give simple and accurate directions for building a model locomotive, accompanying the same with a series of illustrations, which we trust will be sufficient for the purpose intended.
Before beginning we have one word of caution to offer.
Don't do your work in a hurry. Don't calculate on the length of time it is going to take you to do it. Make up your mind to understand each detail before you begin, and to work slowly and carefully.
If you remember this you will probably be able to build your locomotive. If you forget it you certainly will fail.
How to Begin.
First of all in building a model locomotive, as in every other class of engineering work, it is necessary to get the measurements correct in spacing out the different parts to be joined together; and do not think that because it is only a model you are making that any off-hand way will do, because you will find before the engine is half finished that great accuracy is necessary if you wish your model to work.
A slight mistake in the measurements of a large engine will cause so much friction as to take half its power to overcome. The same mistake with your model will stop it entirely.
In soldering be careful to get the metal thoroughly heated. You will then get a firm joint—otherwise not.
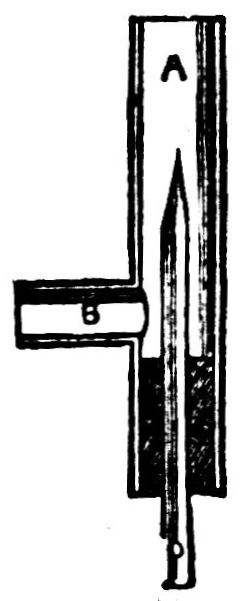
Fig. 1.
|
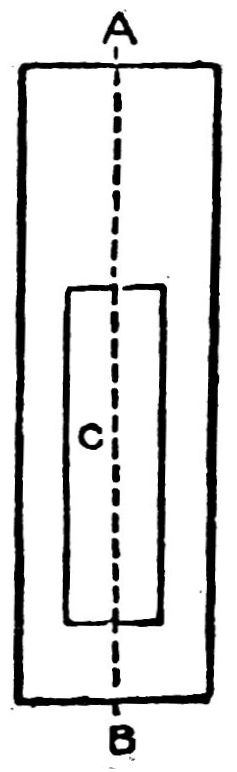
Fig. 3.
|
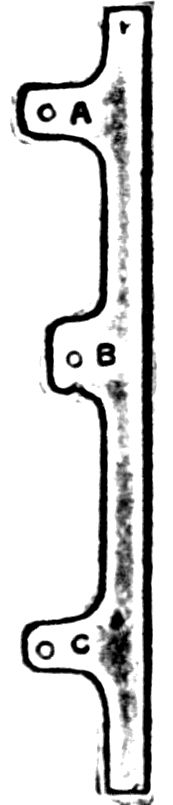
Fig. 4.
|
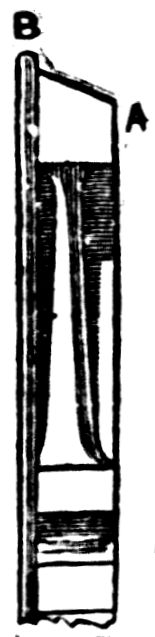
Fig. 6.
|
In giving these directions we assume that the boy who will undertake to follow them is accustomed to the use of tools to some extent. If not, he will have to learn as he advances by repeated experiments.
Try your experiments on something else. In soldering, for instance, solder pieces of brass together until you learn to make a joint.
Don't try your experiments on your model, or you will grow discouraged before you are half through.
A word more about soldering.
Do not touch the metal with the soldering-iron and then take it away. You might be able to solder in that way but the joint would not hold, but fall apart at the first pressure or slight blow.
Soldering on the best work should be used very seldom, and all the fastenings should be either done by riveting, screwing or brazing, and it is hardly necessary to remark that no part of a boiler should be soldered which comes in contact with the flame of the lamp or furnace.
Brazing had better not be attempted by any boy who has not been practically taught the art, unless it be on small joints.
To braze the seams of a model boiler would require a forge fire, or a very powerful gas blast—too expensive for the amateur. Small things such as a broken slide valve, rod, etc., can be brazed by using a gas blowpipe.
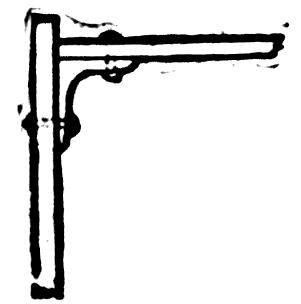
This will cost but little to make, and as it will be useful, we explain. See Fig. 1.
To make a blowpipe such as is pictured in Fig. 1, first get a small piece of brass tube, A, of about half an inch diameter, and 5 inches long. Drill a hole at 2 inches from one end, and insert a piece of gas pipe, B, soldering it in place.
Now take a glass tube a quarter of an inch in diameter and 7 inches long, hold one end in a gas flame, and when red-hot draw it out to a fine point, then file round and break off the tip, leaving a small hole.
Now take a sound cork and squeeze it into the tube A as at C, drill a quarter inch hole through its center, insert the glass tube D, and the blow pipe is finished.
To use it you connect the pipe B with a gas bracket by means of a rubber tube, and attach the glass tube D to a pair of bellows by means of another piece of rubber tubing. The bellows should have an air-bag attached. Otherwise you will have a jerky, uncertain flame.
When you want to braze any article, bind the parts together with some very fine brass wire and cover with a little powdered borax and water; then lay the article on a piece of charcoal, and if it is necessary to preserve the temper of the steel you are about brazing, cut a potato in half and push each end of the steel rod into the halves, which will keep the temperature from getting too high.
Then turn on the gas and start your blow pipe, at the same[Pg 33] time working the bellows with your foot, and by either pushing in the glass tube D, or drawing it slightly out, you can regulate the shape of the flame as required.

Now bring the flame to bear on the joint you wish to braze, having first supplied plenty of borax. Soon you will[Pg 34] find the brass wire melting and running into the joint like water. It must then be neatly filled up and the joint will be scarcely visible.
Here are a few tools which will be useful to you in this work.
A center punch, or steel spike for mashing metal for drilling, etc., and a small riveting hammer. Three or four files of different degrees of fineness, a screw plate and taps, a small hand-drill with a set of drills to fit and a good firm vise.
A lathe is of course desirable. Curves for bending metal you can easily make from pieces of bar-iron, holding them in the vise while working on them.
When you have your tools ready get the material for your model.
Several sheets of brass and copper, the castings and various sized screws and bolts are what will be required.
All being thus prepared the time has arrived to take the
First Step.
The first step toward building a model locomotive is to be posted on the action of steam in the cylinder.
Go to encyclopedia and read up on that point.
If you have no encyclopedia go and look one up in some library. You can't build your engine until you understand this.
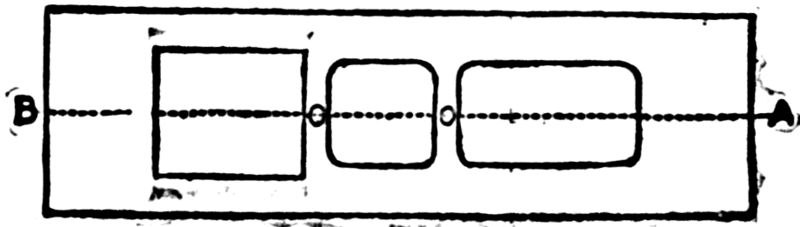
Next draw an accurate plan of your model.
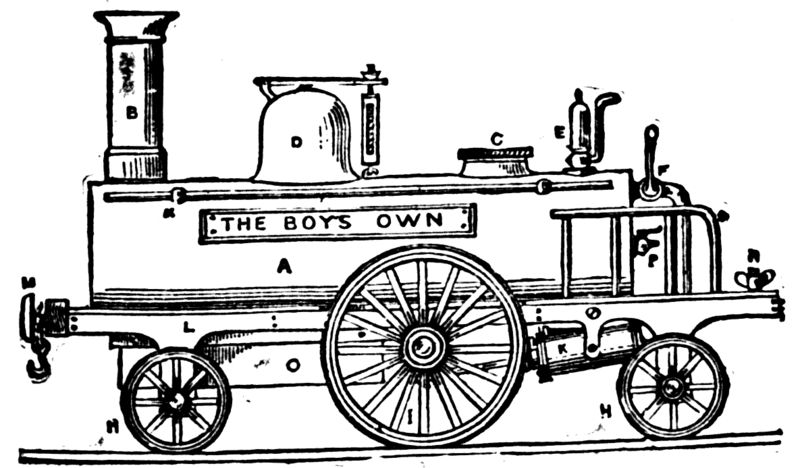
Figure 2 is the idea. It is a side view of our locomotive. Let us describe.
A. Boiler.
B. Smoke-stack.
C. Screwhead, to fill boiler with water.
D. Steam chest with safety valve attached on top.
E. Whistle.
F. Steam tap to start the engine with.
H. H. Leading and trailing wheels.
I. Driving wheel.
K. Cylinders.
L. Frame.
M. Buffers.
N. Set thumbscrew to fasten on the tender.
O. The lamp.
P. Tap, used to ascertain the quantity of water in the boiler.
R. S. Hand rail.
To all locomotives there are three principal parts, the frame work, or carriage, the engine, or cylinders, and parts connected with them, and the boiler.
Our model shall be a fifteen inch one.
Laying out Materials
is the next thing in order. First we want a sheet of brass for the bed plate, 1/16th of an inch thick, cut 4×14 inches, and be sure to cut the corners square. (See Figure 3.)
Hammer this out flat, file it smooth and dress up, with emery cloth fastened upon a flat piece of wood.
Next cut a square hole in it as at C, beginning half an inch from B, and making the opening 11 × 1-1/2 inches. Be careful to center this hole on the line A B, or your engine will be lopsided, and you must take the same care in setting the smoke stack, dome, etc.
Now take Fig. 4. This represents one of the side frames. Cut these out now, thus:
Drill holes at A B C for the axles to work in. Finish both sides the same way. Turn the bed plate upside down, fasten the frames on at a quarter of an inch from either side by small angle pieces (Fig. 5), or by soldering, which is easier done. Then solder a piece across each end, about half an inch deep, and the frame is ready for the wheels.
These you can make if you have a lathe, but it would be better to buy your wheels ready made if you can, but if you can't do that, and have the lathe, turn your tires up to the form shown in Fig. 6.
The small wheels should be about 2-1/2 inches in diameter, and the driving wheels, 4 inches. The rim, B, should project a little over 1/16th of an inch, and the rest of the edge should be beveled off rightly, as at A.
The spokes should then be filed up smooth, drilling out the center hole for the axle before removing it from the lathe.
Great care must be taken to turn both the driving wheels to exactly the same diameter, or one wheel would travel further in a revolution than the other, and as they ought both to be fixed rigidly on the crank shaft, the engine would never travel in a straight line, but would go round and round in a circle.
Get some steel wire for the axles and fasten them to the wheels by soldering or by cutting a slot with a fine file in the center of the wheel, as at A, Fig. 7. Then file a small portion of the ends of the axle flat and drive in a brass wedge made by a piece of wire which will hold them together firmly.
The crank shaft, or axle, must be hammered up to shape, making it hot occasionally in the gas flame while working it.
The cranks should be at right angles to each other, and[Pg 36] the throw of the crank half the distance of the cylinder stroke.
For instance, say the cylinder being a 1-1/2 inch stroke, the distance between A B (Fig. 8) will be three-quarters of an inch, you must then ease the size of the crank at A to prevent the piston knocking the cylinder ends.

The cylinders you had better buy ready made or have them made for you. Get a pair of oscillating cylinders of three-quarter inch bore and inch and a half stroke. These will drive your engines several miles an hour.
Fig. 9 gives an underneath view of the frame work and the place to put the cylinders in. They must be supported by two lugs, A A, screwed to the bed plate B, which must have a piece cut out on either side to allow the driving wheels C, to work in, as at D; because, being larger than the others, they project beyond the top of the bed plate, as shown in Fig. 2.
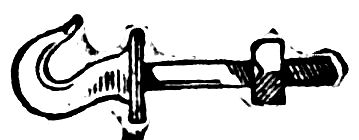
Next screw on by means of the hook F, the buffer beam, previously cut from a piece of mahogany, 5 inches long, half an inch thick and one inch deep, nicely squared and sand papered. Drill a hole at G, and pass the shank of the hook through the beam and piece of brass in front of the frame, screwing up tight with nut H.
For buffers you may take two brass, flat-headed screws, and attach them to the beam half an inch from either end, allowing half an inch projection.
Now polish everything smooth and bright. Next warm the model over the gas—don't let it get hot—and carefully lacquer it with a small brush taking care not to go over any part more than once. The spokes of the wheels must be painted, the buffer beams varnished and the cylinders painted, leaving the covers and flanges bright. Now put away your work to dry, covering carefully from dust.
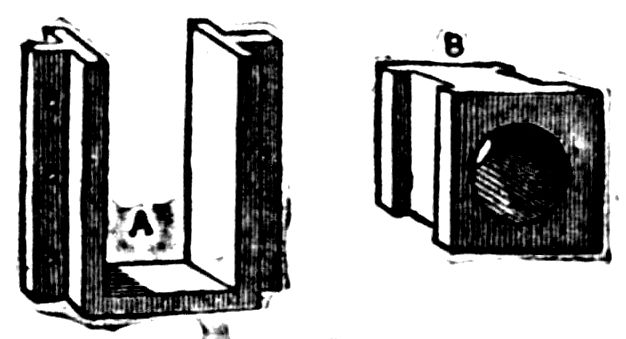
How to Make the Boiler.
In making the boiler you can't be too careful. This is the part where the greatest chance for failure comes in.
Buy a piece of copper tubing 11 inches long, 3 inches wide and half an inch in diameter.
If you want to make it yourself bend your copper round a wooden roller and rivet or solder together—riveting is the best if you can get it tight. You must then turn two circles of brass about an eighth of an inch thick for the ends and polish all. Fig 10 gives you the idea.
Now push the ends into either end of the tube about an eighth of an inch from the edge, as at A, Fig. 11, and solder in place. The projecting flange must be hammered down all around as at B, soldered and finished with a half round file. When filing solder use only an old worn file as a good one soon fills up.
Smokestack, Tubes, etc.
Now drill a hole at A (Fig. 10) for the smokestack, which should be three-quarters of an inch in diameter. Then cut a slot in the bottom of the boiler 6 inches long by 1-1/2 inches wide, commencing one-quarter of an inch from the forward end of the boiler.

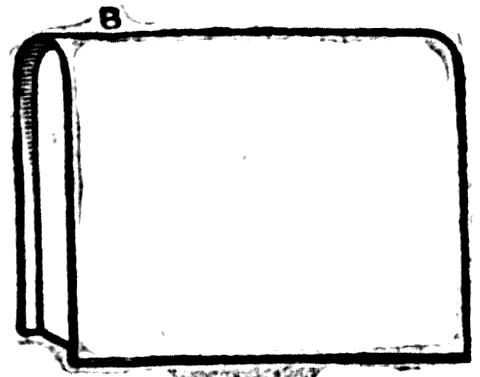
Fig. 13.
|
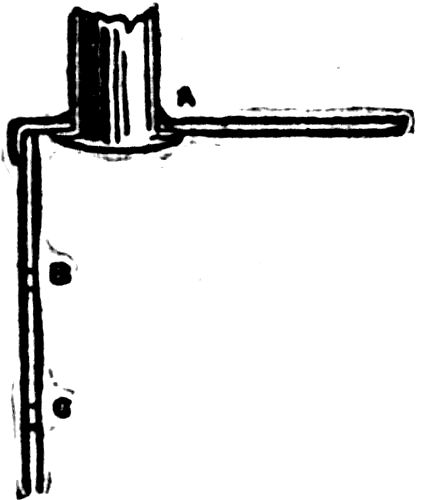
Fig. 14.
|
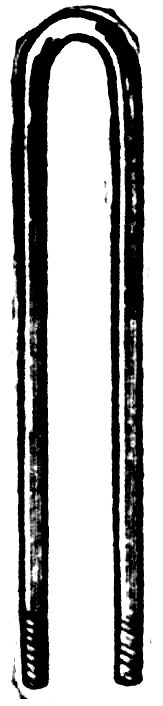
Fig. 15.
|
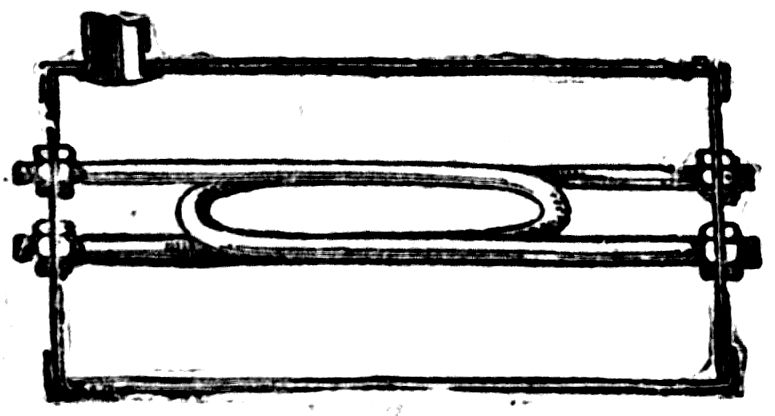
Fig. 16.
|
Next take a sheet of copper and cut a piece about 6-1/4[Pg 38]
[Pg 39]
inches long by 6 inches wide and bend it over a wooden
roller to the shape shown in Fig. 12, keeping it 1-1/2 inches
apart between A and B. Cut also two other pieces of copper
to the shape of your bent sheet (Fig. 12), and make it long
enough to reach to the dotted line. These form the two ends,
and may be placed an eighth of an inch from the edges, as in
Fig. 13, and soldered in place, and the projecting rims turned
over and sweated with solder from the outside, in the same
manner that you did the boiler ends in Fig. 11. Then drill
a three-quarter inch hole at B (Fig. 13) for the bottom of the
smokestack to go into, and cut a piece of three-quarter inch
brass tubing of sufficient length to pass out at top of boiler
about half an inch, as shown at A, Fig. 10. You can then
hammer out a rim or flange on the bottom end of the smokestack
and push it up through the hole in the copper box,
soldering it in place from the top as at A, Fig. 14. Then
drill two small holes at each end of the box, B C, Fig. 14.
These should be a little more than an eighth of an inch in
diameter, to allow an eighth of an inch tube to pass through.
Now get two 12-inch lengths of hard drawn steam pipe, an eighth of an inch in diameter, and with your screw plate put a thread on each end, about half an inch in length. Then make eight nuts to fit the threads on the piping, filing them up into proper shape.
Now take the piping and bend it very gently, to prevent it cracking, around a bar of iron or handle of some tool held in the vise, until it is in the form shown in Fig. 15. Do each one the same, then mix a little turpentine with white lead, and smear each end, where you have formed the screws, taking care not to get any into the tubes, which can be temporarily plugged up.
Next put a nut at either end, as far as the thread will take it, then smear a little white lead around the holes drilled in the ends of the box, B C, Fig. 14.
Push the tubes in from the inside, and screw up firmly with the remaining nuts, in the position shown at Fig. 16. The inside nuts can then be tightened up with a wrench, and if you do all this carefully, you will never be troubled with any leakage, no matter what pressure you may get in your boiler.
These tubes are immensely strong, and owing to their small size, the water in them is raised quickly to a higher temperature than that contained in the rest of the boiler, causing a continual circulation to take place, and a constant supply of steam to be found.
The box can now be placed in the boiler, through the slot cut in the bottom, taking care that the top of the box is not more than half way up the boiler, as at B, Fig. 10. This[Pg 40] will leave a portion projecting below the lower edge of boiler like C. This part protects the flame of the lamp from being blown away by the draught caused by traveling along, and which would cause you to lose steam. Solder it firmly in position from the outside to prevent the flame from touching any soldered portion. Also solder neatly round A, Fig. 10.
The smoke stack can be made from another piece of three-quarter inch brass; turn it up in your lathe bright and put a collar on it at A Fig. 17, to allow it to push on to the piece of tube left projecting at A Fig. 10.
The top of the smoke stack, B Fig. 17, will also require turning in the lathe and must be fitted on neatly.
Get advice from some mechanic about the steam chest, which is a brass casting and will have to be turned up in the lathe, and after cutting a circular hole in the top of the boiler of about an inch in diameter it can be either screwed or soldered on, previously putting the steam pipe E in position by drilling a hole at F and after bending it as shown, pass it through at F and solder in place. The top of pipe E should be about a quarter of an inch from the top of inside of steam chest.
Before soldering on the steam chest drill two holes as at G H Fig. 10, one for the small lug G to be screwed into, which holds one end of the lever of the safety valve, and that at H should be drilled conical with a rimer, and the valve H can be turned in the lathe and afterwards ground to fit the hole with a little emery and water, by means of a slot cut across the top and worked round with a screw driver.
The spring case of the safety valve I, Figure 10, is easily made from a piece of one-eighth inch brass tubing, using some small, hard, brass wire to form the spring. When finished it should be hooked to the eye and screwed into the boiler at V.
The manhole or screwhead, K, is used to refill the boiler when it has steamed low and will have to be turned up to shape, and the bed, L, which it screws into can be firmly soldered on the boiler, having first drilled a hole slightly larger than the diameter of the screw itself, which should be sufficiently large to allow an ordinary tin funnel to be used to refill by, and the screw ought to be long enough to hold a leather washer under the head to keep it steam-tight.
The whistle, M, will require a hole drilled for it to be screwed into, and that, as also the steam-tap, N, and water-tap, O, can be bought cheap, ready to put on.
The tap O should be screwed in at a slightly higher level than the top of box B, and when working the engine should steam issue from it when turned on instead of water, you[Pg 41] ought to immediately blow off steam by safety valve H. Then unscrew K, and refill the boiler with water.

Fig. 17.
|

Fig. 18.

Fig. 19.
|

By this time the framework will be quite dry, no doubt, so you can, after cleaning and polishing the boiler, attach it to the frame by a screw or solder at the forward end, and the steam-pipe N can be screwed on to the projecting piece of[Pg 42] tube left at F, while you also screw a short length of pipe into the steam box of engine through a hole in the bed plate. Then bend it up to the steam tap, and solder them carefully in position; this will hold the after end of the boiler firm.
Go over every soldered joint to see if any small hole is left, and resolder where necessary, as a hole in the boiler not larger than a pin's point would prevent you from getting any pressure of steam in the boiler, as the water would all blow out.
Now lacquer or paint your boiler, and while it is drying turn your attention to the lamp, which we picture in Fig. 18.
The Lamp.
The lamp is simply an oblong tin box, about 5 inches long by 1-1/4 inches wide and three-quarters of an inch deep.
To make it cut a piece of tin 4-1/2 by 5 inches and bend it to shape. Then solder the two edges together and cut two ends to fit; push them in and solder in place.
Now cut three pieces of brass quarter-inch tubing into three-quarter inch lengths; drilling holes in top of lamp, insert them, allowing a quarter of an inch to project, as at A, Fig. 17. Then solder them on four pieces of bent wire—C, C, C, C, Fig. 18—by which to hang the lamp by means of two wire pins run through them and small holes drilled in the sides of projecting piece C, Fig. 10.
The screw filler B, Fig. 18, will have to be soldered in, also, and when complete the tubes A may be filled with cotton wick and the lamp about three-parts full of a methylated alcohol, which will give a clear, smokeless flame.
Now you can start your locomotive by filling the boiler about three parts full of hot water, and then hooking the lamp underneath; you will soon get up a good pressure of steam.
See that the taps are all turned off, and if there is no leakage from careless workmanship, you will find on turning the steam tap on, that the locomotive will run beautifully and will travel at great speed either on a smooth oil-cloth or a board floor.
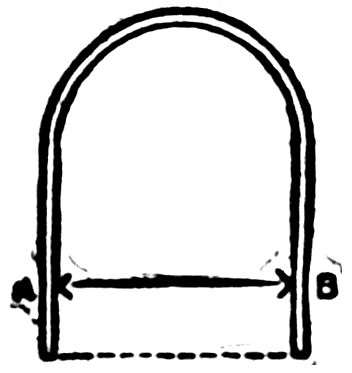
On rails it would run quicker still, but for this engine, if you make a small tender of the shape shown in Fig. 19, and fasten it at any angle by the set-screw on the foot-plate of the engine shown at N, Fig. 2, the model will run in any sized circle you may wish without rails, according to the angle you fix the tender to the engine.
Wooden cars you can make if you wish, but each one added will reduce the speed of the engine, of course.
Tin is the best material to use for the tender, as no great strength is required—indeed it should be made as light as[Pg 43] possible. The wheels and axles you must finish in the same manner as those on the engine, and it can be made into a tank to hold an extra supply of alcohol by soldering a piece of tin round the inside and covering it in with another piece cut to shape and fitted with a screw nut to fill by as shown in Fig. 18.
Such is the method of constructing a model locomotive which will run without complicated machinery.
The boy who has succeeded in following these directions will no doubt be ambitious to try his hand on a more complete model on a larger scale, something like Fig. 20 for instance, which is a side view of a large model locomotive in a finished state.
How to Build a Large Model Locomotive.
In building a large model the first thing to be done is to decide how large you want it. Sketch your model carefully, or, if not able to draw plans, get some one who is to help you. Make your plan the exact size of the model you intend to build, then you can take all the measurements from it and save yourself a lot of trouble and time.
Remember, however, that the larger you make the engine the more expensive the castings and materials will be.
Should you persevere, however, and by good fortune succeed, you will have a model locomotive that would cost you two or three hundred dollars to buy ready made. If you have a lathe and can turn the wooden models for the castings yourself, use sheet iron for the frame-work, etc., where possible; the total expense will not be so very great.
Begin your work in the same way you did on the other model. If you want a bigger engine than the one shown in Fig. 20, there would be no trouble in increasing the measurements, which we are about to give, proportionately, remembering that Fig. 20 is drawn to an eighth-inch scale.
Dimensions.
Make your dimensions as follows: Length over all, 3 ft. 2 in. Length of bed-plate, 3.5 in. Width of bed-plate, 9 in. Diameter of driving wheels, 8-1/4 in. Diameter of leading wheels, 5-1/4 in. Gauge—that is width of track on which model can run—6-1/2 in. Cylinders, 1-3/4 in. bore by 2-1/2 in. stroke. Length of boiler, including smoke box, 28 in. Diameter of boiler, 5 in.
Cylinders of the above dimensions will drive the engine at a high rate of speed, with from 30 to 50 lbs. of steam.
Description of Large Model Locomotives.
In Fig. 20, the different parts of the engine are lettered,
and it will be well for the boy who desires to make a locomotive[Pg 44]
[Pg 45]
like it to compare the following description with the
cut, before he does anything else.
A is the smoke stack and B the steam blast used to increase the intensity of the fire worked by rod C running through the hollow hand-rail D and ending in handle F. G is the steam-dome, which with the safety valve is the same pattern previously used. H is the extra safety valve, worked from the foot-plate. I is the steam whistle, K wind guard, L starting lever, M smoke-box with door, N O spring buffers; P is the line-clearer or wheel guard. Q are the leading wheels, R R the driving wheels, S is one of the cylinders with piston rods and guides bolted to frame and showing double connecting rod at T T. U U are the springs which support the weight of the boiler, etc., on the axle bearings. The spring or rear wheel does not show, being inside the safety guard and hand-rail V. W is the back pressure valve, through which the water is thrown by the force-pump into the boiler, and X is the blow-off tap to clear the engine from all water after having used it. Y shows the side of the ash-pan.
How to do the Work on the Large Model Locomotive.
First of all comes the frame work. It wants to be of eighth inch sheet iron squared up perfectly true and flat and cut as is shown in Fig. 21, beginning 4-1/2 inches from A, and leaving 6 inches at B, and cutting it 6 inches wide there by 8 inches long, and continuing it 4 inches wide for the rest of the distance. Be careful to keep it quite central on the line A B, and leave two connecting strips 1 inch wide as at C C.
The side frames come next. These must be much stronger and quite different from those used in the previous model. They may be cut from the same eighth inch iron to the shape shown in Fig. 22.
The center of slot B is 17 inches from one end, the center of A 10 inches from B, and the center of C 13 inches from B.
In measuring, always start from a given center if you want to be accurate. That is, from B to A and from B to C; not from B to A and from C to B.
The slots are each 1-1/4 inches wide by 2 inches deep, leaving 1 inch of iron at the top, as shown. The four large boles shown in Fig. 23 are only ornamental, and can be now cut out. They also serve to lighten the frame.
The frames, after being smoothed up can be fastened to the bed plate in the manner described before, by angle-irons, or knees, riveted on.
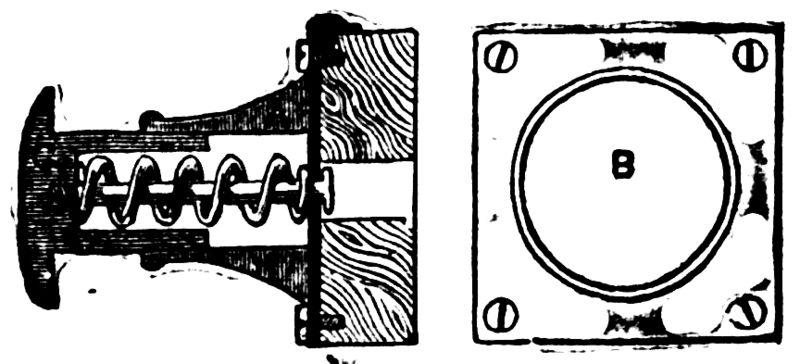
Two end pieces must also be prepared. Let them be 1 inch deep, with the ends hammered square, at right angles,[Pg 46] and then riveted to the bed plate and side frames, as shown in Fig. 20. Then drill three holes in them, about an inch and a half from either end, and one in the center, by which to bolt on the buffer beams by means of a couple of screws put in at the back. The buffer beams should be mahogany, 1 inch wide by 2 deep by 10 long, squared nicely and sandpapered. A hook can then be made—Fig. 23—and a hole being drilled in the center of the beam, you can pass the hook stem through and into the central hole of framework, and screw up tight with nut at back, which will hold all firmly in place. The buffers for this model must be properly made, with springs to take the pressure in case you should run into anything.
Fig. 24 shows this buffer. You will have to get it cast. Turn out in your lathe a wooden mold and get four castings in brass made from it. A Fig. 24 is cast with a square base plate 2 inches square, as in front view B, and is secured to the buffer beam by four flat-headed screws. The piece C must be turned true and just the size to slide in and out of A easily. Each part must be finished up in the lathe. A should be an inch and a half long. Drill a hole in the buffer beam to allow the head of the pin to work freely, and another hole in base plate of buffer the size of the pin, whose head prevents the spring from forcing C entirely away from A.
The spring should be made of thick steel wire; the buffers can then be screwed in as just mentioned. The wheel-guard or line-clearer P (Fig. 20) can next be cut out to shape and bolted on to frame, and should just clear the line by a quarter of an inch.
We will now proceed to the axle bearings and springs, U, Fig. 20.
Make a wooden model like Fig. 25, and get 6 castings in brass made from it. They must then be filed up square and smooth and fitted into the slots cut at A, B, C, Fig 22, and either screwed or riveted on by the side holes. Before finally fixing them prepare 6 brass bearings, B, Fig 25, which must fit exactly and slide easily in the inner surface of A, then drilling a hole through each five-eighths of an inch in diameter. These take the axles, which in this model are all straight, and three-quarters of an inch in diameter, shouldered off to five-eighths for the bearings.
Next for the springs. Take 4 pieces of either sheet iron or brass for the supports, 1-1/2 inches long by 1/4 inch wide. Drill a hole in either end as shown at C, Fig. 26. A should be three-eighths of an inch wide, drilled through, a pin put in and all riveted together loosely.
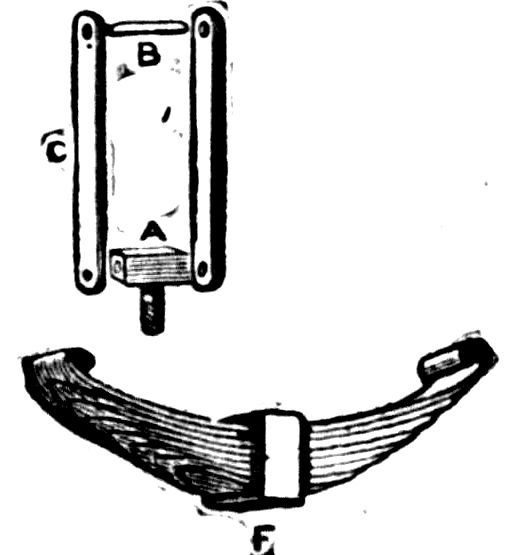
Now take a clock spring and cut it into shape, as at D, Fig. 26. The top piece requires to be made hot with your[Pg 47] blow-pipe, then the ends turned over to hold the pin B. Each piece of spring must be a little shorter than the one above it, and the ends neatly tapered, all to be inclosed in the brass band F, which has a small hole drilled at F to hold the[Pg 48] end of the pin by which the pressure is directed on to the axle boxes, as shown in Fig. 20. A hole is also to be drilled in the bed plate over the center of each axle box to allow the pin to pass through, and also a smaller one an inch and a half on each side for the support A, Fig. 26, to screw into. Now all can be fitted into position.
Next come the cylinders. These are to be an inch thick and three-quarters bore by two and a half inch stroke. They should be of the fixed slide-valve pattern, with double eccentrics fitted on the middle axle shaft, and reversing lever brought to quadrant on foot plate. They had better be bought ready made.
Fig. 27 shows their working. A A are the eccentrics, B the slide-valve rod with guide G attached. C C is the bed plate and D the balance weight, F the rod leading to quadrant and lever on foot plate. The cranks are put on outside the wheels and fastened by keys as in Fig. 20. The connecting rod T should be cut to the form shown in Fig. 28, and the ends squared out and a brass band fitted in with a hole drilled from top A to oil by and a set screw B to adjust the bearings perfectly.
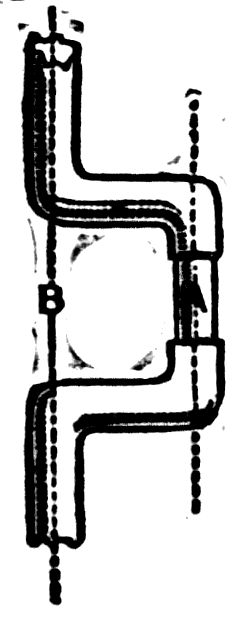
If you wish to fit a force pump it should be placed centrally between the cylinders and be worked by an eccentric on the main shaft, but a pump on a model locomotive is next to useless unless it is also made to work by hand.
In Fig. 29, we have one which can be worked either way. A is the pump; B the eccentric on main-shaft to work it by steam power. To work by hand you have only to push up hook connection C, which disconnects it from the eccentric; and then by working the handle D, which is screwed into the bottom of the plunger C, the water is forced into the boiler. An extra stuffing-box at F will be required. G is the exhaust water pipe bent up to the back-pressure valve on boiler, and H the supply pipe carried on to rear of engine.
Two small blow-off cocks will be necessary on each cylinder to get rid of the condensed steam when starting. They can be connected with a tye-rod, and both worked from the foot-plate with a single handle. Now paint to suit your taste and put away to dry.
Next comes the boiler, which will need extreme care. For this you will require sheet copper an eighth of an inch thick.
First cut a piece 19 inches long by 16 wide and bend it round, forming a cylinder 5 inches in diameter. The cap must be closely riveted and the two ends hammered out into a flange outward, leaving the body of the boiler 17 inches long, as in Fig. 30. B is the shape of the piece to be next riveted on at after end. Now take another sheet 9 inches wide and hammer a half inch flange round it, so as to fit over[Pg 49] the dotted line at A. Rivet them firmly together and also another piece in after end. It will then have the appearance of Fig. 31, and should be 4-1/2 inches deep from A to B, and forming a copper box 6 inches wide from B to C and 8 inches from C to D. Then rivet together another box to form the inner casing 4-1/2 inches wide by 6-1/2 inches long and 9 inches deep, the bottom to be hammered outward to the dimensions of B C C D, as shown in section Fig. 32 at A A. A hole is next to be cut out in the center of rear plate and also the rear part of inner casing which comes opposite to it, and 1-3/4 inches by 2-1/2 forming the furnace door.
A casting of that shape and 3/4 of an inch thick, which is the distance between the inner and outer casing B C, must be procured and drilled with holes every 3/8 of an inch and firmly riveted in position, as shown in Fig. 32 at D. Two pins should project on either side of the inner surface to support the fire-bars and ash pan, and the bars should be made of cast iron and small enough to get out easily by tilting up one side; they should run lengthwise of the engine.
For the boiler tubes some hard drawn brass tubing three-quarters of an inch in diameter will be required. Cut the pieces slightly over 17 inches long, then drill 10 holes in the inner plate as at E, Fig. 32, and in the position and arrangement shown in Fig. 33. These tubes should have a wire ring brazed on about a quarter of an inch from either end, and then being placed in their respective holes in the tube plate, the projecting portion is to be headed back with a flange, or you can fit them in as already shown in Fig. 16 by each being double screwed and nutted. These tubes allow the smoke and flame to pass through from the furnace to the smoke box, M, Fig. 20, and so away up the smoke stack, and by the large surface they expose to the fire, help to raise steam very quickly. In some engines as many as 300 tubes are fitted.
The steam supply pipe and regulating lever handle should now be made and placed in position, and Fig. 34 shows the shape to make it. A B are the front and rear plates of the boiler, C is the supply pipe bent with a screw end downward, after passing plate A, and then upward into the steam dome, where it should be securely fastened into a cross-piece. D is the tap or valve which can be turned on or off from the foot-plate by means of the long rod, F, ending in the lever handle, G.
The rod must be fitted with a stuffing-box, the same as those used on the cylinders, and packed with cotton wick to prevent loss of steam by leakage. When all this is complete, the forward end of the boiler can be furnished with a tube-plate riveted on and the tubes flanged over.
Now the boiler must go to a practical brazier, and be properly brazed. Cut the hole for the steam dome, and let him braze it on at the same time. If the job is practically done, your boiler can be heated red-hot without fear.
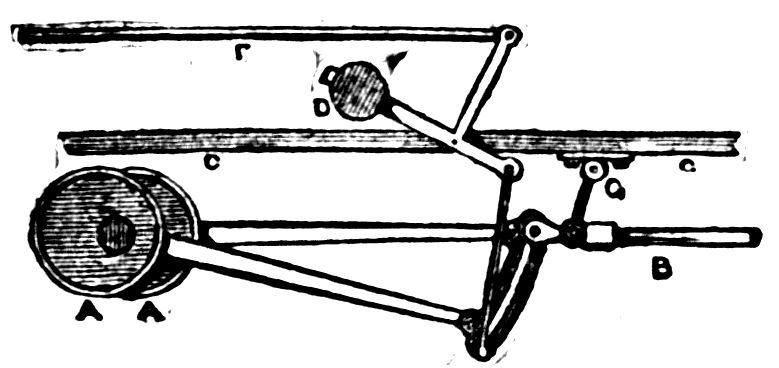
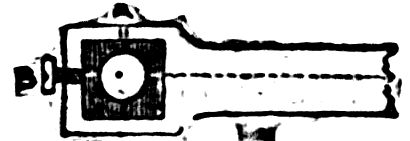
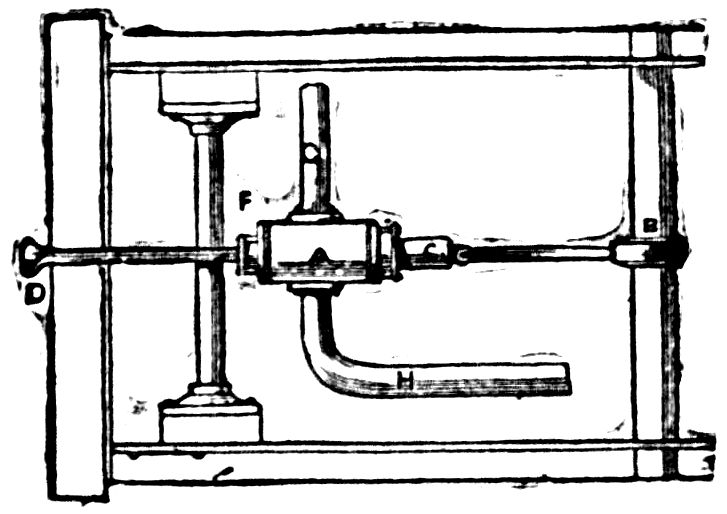
Meanwhile buy your pressure gauge—it wants to be one and a half inches in diameter—and let the brazier test your boiler to 100 pounds steam to the square inch capacity.
Should it burst you will have to make another. If not you need thereafter have no fears.
Now make the smoke box, which should be three inches deep and of the shape and dimensions shown in Fig. 35. This and the smoke-stack can be made of iron, hammered up to shape and finished with a brass ring. The smoke-box can be screwed on the forward flange or boiler.
The door is drawn open to show the amount of bulge it should be hammered to. In the center a hole should be drilled through which to pass the screw used to close it, which is attached to the loose bar, A. The handle, B, is then screwed up tight.
The door is circular and must be large enough to overlap the opening about half an inch and have a couple of bright iron or brass eyes, C, riveted on to form the hinge.
Next comes the back-pressure valve, Fig 36. A is a front view with plate by which it is bolted to the boiler, as at W, Fig. 20.
It is very simple to make, and consists of the casting A with top and bottom covers and the ball-valve B, which ought to be ground with a little emery and oil to fit perfectly. It acts in this manner.
The water being forced up C from the pump, raises B and passes into the boiler. On the up stroke of pump, the pressure is removed from under B and the pressure of steam in the boiler causes it to fall back and close the opening entirely, preventing any water from passing away from the boiler. A small flange can be put on each outer side of the boiler near the furnace to support it on bed-plate level with smoke box.
The boiler should now be covered with flannel, cut to shape and wrapped round the body part and a casing of sheet tin put over it and secured by brass bands and small nuts underneath—as shown in Fig. 20.
The steam supply pipe can now be connected with the cylinders and it should be made forked as in Fig. 37. A leads from steam pipe and branches off to each cylinder, where it must be screwed up with white lead.
The exhaust pipes B B should be of larger tubing and bent round up the sides of the smoke box so as to be out of the way when you have to clean the tubes. A small brass pipe, C, must also be passed through the chimney, bent upwards and fitted with a tap which should take the steam from the top of the boiler and be used as shown at D F Fig. 20. This helps to raise steam very quickly.
Fig. 38 is a rear view of the foot plate and shows the necessary fittings which you must either make or buy to complete the model.
The cocks you might make but the water gauge you must buy. A is the furnace door, B two gauge taps, C starting-lever[Pg 52] handle, D spring balance safety valve, F wind-guard with two look-out holes, G steam whistle handle, H pressure gauge, N the quadrant and lever for reversing the engine, O the rear buffer beam with buffers, P the wheels showing axle, R R the springs for same and V the safety-guard rail on either side.
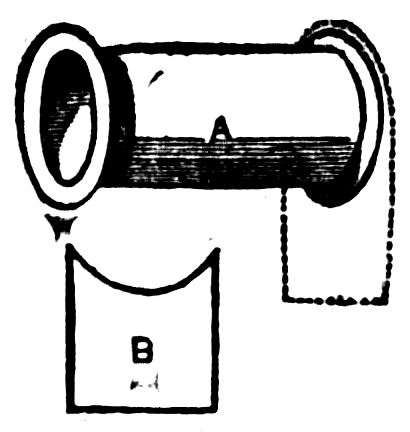
Fig. 30.
|
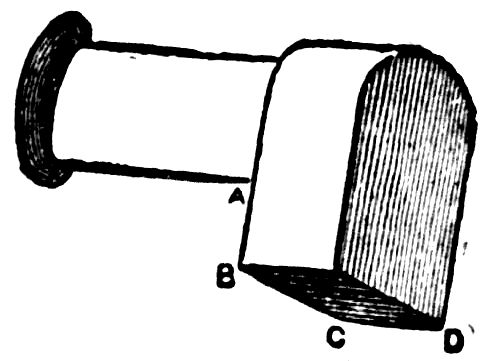
Fig. 31.
|
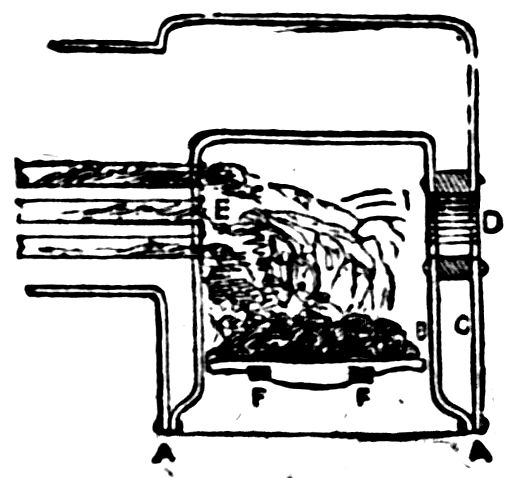
Fig. 32.
|
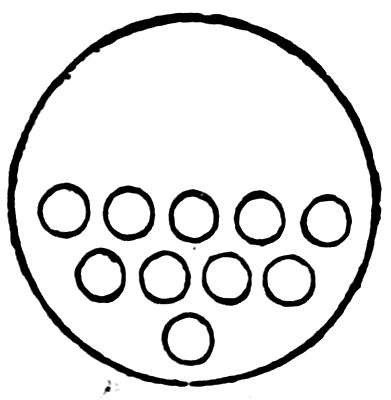
Fig. 33.
|
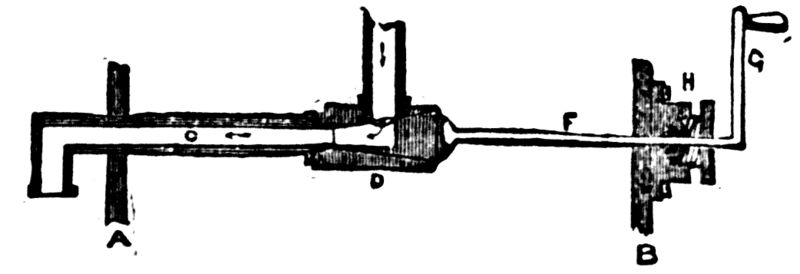
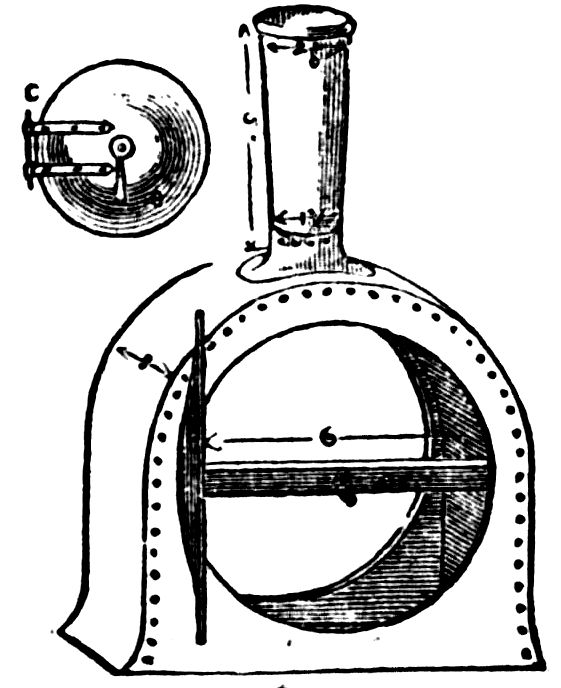

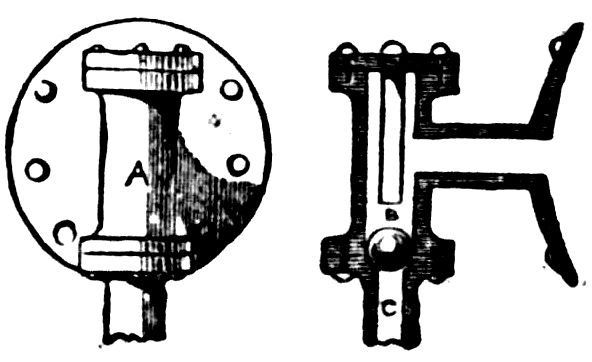
When these fittings are all complete holes must be drilled in rear plate for each piece; they must be firmly screwed in place with white lead. The glass tube of the water gauge, the stuffing-box, and the gland of the starting lever should be closely packed with tallow and cotton wick.
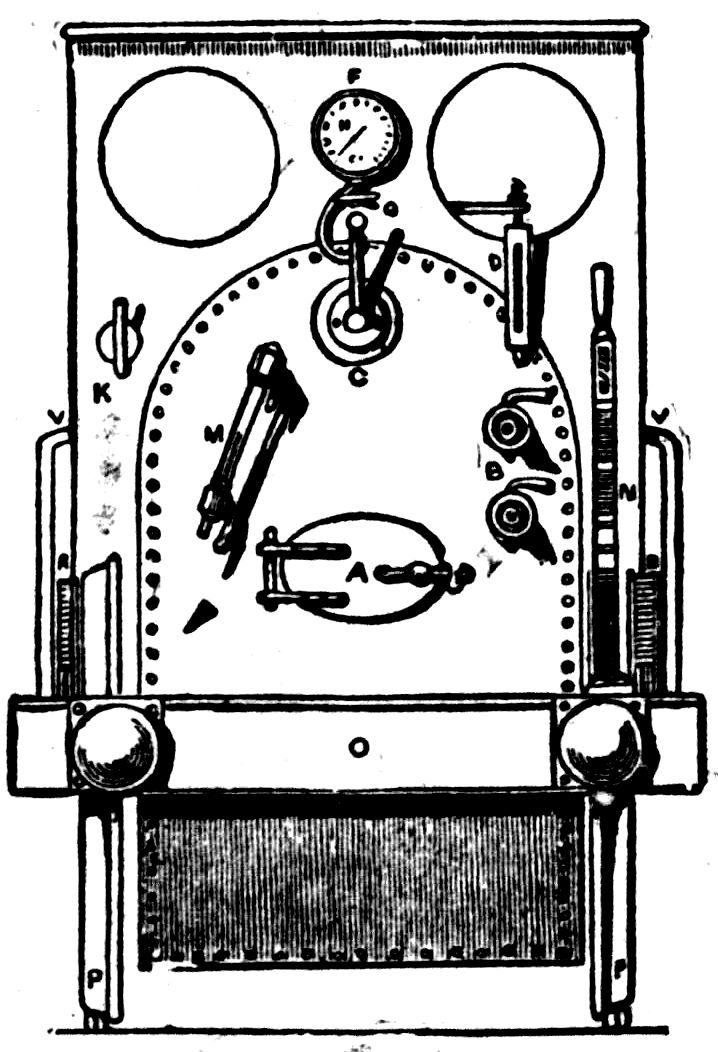
Next paint the entire model over again and let it dry. We give no directions as to colors; use your own taste. After the paint is thoroughly dry varnish with the best clear, hard varnish and let it dry again.
While it is drying you can be making the rails.
Get some square bar iron, cut it into six-foot lengths, if you wish the rails to be portable, and drill a hole in each end half an inch deep.
The rails can be joined together at each end by means of a piece of wire and kept at a proper distance apart by being fastened to pieces of wood placed like sleepers, fastened by screws passing through holes drilled in the rails every six inches. These sections can be laid end to end, and your line be made as long as you wish. If you want a circular line, each section must be bent to a portion of a circle; one about 30 feet in diameter is suitable for this model.
When finished place your locomotive on the track and get up steam. Fill the boiler with water by means of a funnel until you see it rise up three parts of the way in the glass water-gauge. Then see that all taps are turned off and start the fire. Charcoal is the best fuel, as it gives a clear, hot fire without much smoke once you start it right.
Try the safety-valve occasionally to see how your steam is getting on, and when it begins to form turn on the blast-tap, which will soon draw up the fire, and you will presently see the pressure rise and show itself in the pressure-gauge.
When the gauge shows 30 lbs. of steam you might start the model by turning on the cocks on cylinders until no more condensed steam issues from them.
Then shut them off and turn on steam full power and watch the engine travel, gradually increasing its speed.
CONCLUSION.
Let us now bear the conclusion of the whole matter, which takes us straight back to where we started, and we again repeat if you want to become an engineer make up your mind that you will be a good one or none at all.
We have examined the locomotive inside and out, underneath and on top, even peering down the smoke-stack, crawling into the fire-box, and learning the true science of shoveling coal.
What then remains to be told?
Nothing that can be remembered long enough to be of any practical use.
There are matters—dozens of them—connected with locomotive engineering which we have not even alluded to, but they are for the most part such as must be learned by actual every day experience to be of any use.
We might, perhaps, under three heads speak a few closing words. First let us take up
SIGNALS,
and post ourselves a bit on that most important subject.
The greater part of an engineer's time while on his engine must be spent in the lookout for signals.
Upon this depends not only the safety of every soul on the train but his own as well.
Never jump at conclusions in the matter of signals.
Never assume that because a "distant" signal and all the other signals are off the line is clear.
Every engineer should, as far as possible, not only see that each signal is off, but he should also cast his eye over the[Pg 56] road in front of him to see whether it should be off. At night caution in the matter of signals is even more necessary than in daylight. Then the only safety lies in keeping a constant lookout.
You must know your road. It is not enough to know where the up grades lie and where the downs. You must know just how steep the grades are and their length.
Often signals are badly placed and cannot be seen until the engine is close upon them.
With this you have nothing to do. Engineers do not place signals. Doubtless if they did they would alter the position of many of them. All you have to do is to heed the signals, no matter how well or how badly they are placed.
To enter into a detailed description of signals until some universal system of signaling is adopted, would be but a waste of time.
You will have to learn all these things during your apprenticeship; they are matters upon which books can give you little help.
Presence of mind you must always have if you expect to become a good engineer, and courage, too—plenty of it. This brings us to our second head, which we will write
"Broke Down."
What to do when the engine has broken down?
There comes the tug of war, the time when it will be definitely decided whether the engineer is good, bad or indifferent.
Hundreds of lives may depend upon prompt action, thousands of dollars' worth of property are in the engineer's hands, either to waste or save when the moment of the break down comes.
In Mr. S. A. Alexander's excellent treatise entitled "Broke Down" is placed in red letters over every page, "Protect Yourself from Approaching Trains."
When a break-down occurs, this is the first thought which should enter the engineer's mind, and the first act should be to carry it out.
There are many causes of a break-down, too many to enumerate. In the roundhouse is the place to study break-downs, for here, daily, every variety is open to inspection—broken crank-shafts, broken eccentric-rods, eccentric-straps and sheaves, broken motion and broken springs.
Of course an engine may be broken, and yet able to run its train through. This is an important consideration. Some engineers hardly know when they are beaten.
It is a matter of record that a certain engineer, known as "Hell-fire Jack," ran his train over a bridge after one side[Pg 57] had been washed away by a raging flood. Thousands of such daring deeds have been accomplished by engineers, but "Cautious Jacks" will be better appreciated by the company than "Hell-fire Jacks" every time.
Real heroism lies in good judgment and a cool head. Suppose that the right hand back gear eccentric-rod breaks. "Can I get along in forward gear, after having disconnected the rod and the strap?" is the question. The answer is yes, and it should be prompt, as all such answers should be when the engine breaks down.
It is such readiness as this that makes break-downs but a matter of a few moments.
It is also highly necessary that the engineer should ask himself "What tools have I upon the engine? What can I do with them? Can I find them in the dark? If I run off the track in what condition is my screw jack? Will it work properly? Have I a ratchet or bar to work it with?"
These are things which should be continually kept in mind.
Air Brakes.
The air-brake has changed engine driving materially in the last few years, and a word or two concerning it should be said.
The air-brake consists briefly of an air cylinder placed beneath each car, which can be operated by the engineer from the foot plate, the pressure of the air controlling the action of the brakes.
There are two valves to an air-brake, one for ordinary stops and the other for sudden stops in case of emergency.
In the first only partial pressure of the confined air is used, in the latter the full pressure is employed and the brakes brought against the wheels with all force at once.
One of the most important duties of an engineer is to be well assured that the air-brakes are in proper working order.
After the call for hand brakes has been given, the air brakes must not be applied until the hand brakes are released. Air and hand brakes should never be used at the same time on a car.
When cars having different air pressures are coupled together the brakes will work first on that having the highest pressure.
Special instruction is needed to fully comprehend the working of air brakes.
Here is a speed table which may be useful. We have taken the liberty of extracting it from Alexander's "Ready-reference for Locomotive Engineers," an excellent hand-book with which all candidates for the foot-plate should provide[Pg 58] themselves. Published by the author, S. A. Alexander, York, Pa.
Time and Speed Tables.
Key: M = Minutes.
S = Seconds.
T = 10th of a Second.
| M | S | T | ||||||||
| 10 | miles | per | hour | is | 6. | 00 | to | 1 | mile | |
| 11 | " | " | " | " | 5. | 27 | " | 1 | " | |
| 12 | " | " | " | " | 5. | 90 | " | 1 | " | |
| 13 | " | " | " | " | 4. | 37 | " | 1 | " | |
| 14 | " | " | " | " | 4. | 17 | " | 1 | " | |
| 15 | " | " | " | " | 4. | 00 | " | 1 | " | |
| 16 | " | " | " | " | 3. | 45 | " | 1 | " | |
| 17 | " | " | " | " | 3. | 32 | " | 1 | " | |
| 18 | " | " | " | " | 3. | 20 | " | 1 | " | |
| 19 | " | " | " | " | 3. | 09. | 5 | " | 1 | " |
| 20 | " | " | " | " | 3. | 00 | " | 1 | " | |
| 21 | " | " | " | " | 2. | 51. | 5 | " | 1 | " |
| 22 | " | " | " | " | 2. | 43. | 5 | " | 1 | " |
| 23 | " | " | " | " | 2. | 36. | 5 | " | 1 | " |
| 24 | " | " | " | " | 2. | 30 | " | 1 | " | |
| 25 | " | " | " | " | 2. | 24 | " | 1 | " | |
| 26 | " | " | " | " | 2. | 18. | 6 | " | 1 | " |
| 27 | " | " | " | " | 2. | 13. | 3 | " | 1 | " |
| 28 | " | " | " | " | 2. | 08. | 5 | " | 1 | " |
| 29 | " | " | " | " | 2. | 04 | " | 1 | " | |
| 30 | " | " | " | " | 2. | 00 | " | 1 | " | |
| 31 | " | " | " | " | 1. | 56 | " | 1 | " | |
| 32 | " | " | " | " | 1. | 52. | 5 | " | 1 | " |
| 33 | " | " | " | " | 1. | 49 | " | 1 | " | |
| 34 | " | " | " | " | 1. | 45. | 6 | " | 1 | " |
| 35 | " | " | " | " | 1. | 42. | 6 | " | 1 | " |
| 36 | " | " | " | " | 1. | 40 | " | 1 | " | |
| 37 | " | " | " | " | 1. | 37. | 3 | " | 1 | " |
| 38 | " | " | " | " | 1. | 34. | 7 | " | 1 | " |
| 39 | " | " | " | " | 1. | 32. | 3 | " | 1 | " |
| 40 | " | " | " | " | 1. | 30. | 0 | " | 1 | " |
| 41 | " | " | " | " | 1. | 27. | 7 | " | 1 | " |
| 42 | " | " | " | " | 1. | 25. | 7 | " | 1 | " |
| 43 | " | " | " | " | 1. | 23. | 5 | " | 1 | " |
| 44 | " | " | " | " | 1. | 21. | 7 | " | 1 | " |
| 45 | " | " | " | " | 1. | 20. | 0 | " | 1 | " |
| 46 | " | " | " | " | 1. | 18. | 2 | " | 1 | " |
| 47 | " | " | " | " | 1. | 16. | 6 | " | 1 | " |
| 48 | " | " | " | " | 1. | 15. | 0 | " | 1 | " |
| 49 | " | " | " | " | 1. | 13. | 5 | " | 1 | " |
| 50 | " | " | " | " | 1. | 12. | 0 | " | 1 | " |
| 51 | " | " | " | " | 1. | 10. | 6 | " | 1 | " |
| 52 | " | " | " | " | 1. | 09. | 4 | " | 1 | " |
| 53 | " | " | " | " | 1. | 07. | 9 | " | 1 | " |
| 54 | " | " | " | " | 1. | 06. | 6 | " | 1 | " |
| 55 | " | " | " | " | 1. | 05. | 4 | " | 1 | " |
| 56 | " | " | " | " | 1. | 04. | 3 | " | 1 | " |
| 57 | " | " | " | " | 1. | 03. | 2 | " | 1 | " |
| 58 | " | " | " | " | 1. | 02. | 2 | " | 1 | " |
| 60 | " | " | " | " | 1. | 00. | 0 | " | 1 | " |
| 65 | " | " | " | " | 0. | 55. | 3 | " | 1 | " |
| 70 | " | " | " | " | 0. | 51. | 4 | " | 1 | " |
| 75 | " | " | " | " | 0. | 48. | 0 | " | 1 | " |
| 80 | " | " | " | " | 0. | 45. | 0 | " | 1 | " |
| 85 | " | " | " | " | 0. | 42. | 3 | " | 1 | " |
| 90 | " | " | " | " | 0. | 40. | 0 | " | 1 | " |
| 95 | " | " | " | " | 0. | 37. | 9 | " | 1 | " |
| 100 | " | " | " | " | 0. | 36. | 0 | " | 1 | " |
[Pg 59] The boy who aims to become an engineer should not waste his school hours in idle dreaming or in too much sport.
Improve every moment you can spare from other duties or needed exercise in studying arithmetic, geometry, algebra and mechanical engineering. A little knowledge as a draughtsman will also be a great help.
Above all, get some larger manual on locomotive engineering and read and re-read it until you know its contents by heart.
Remember that there is no limit to knowledge in any direction.
The time can never come to any engineer when he can truthfully say to himself, "I know it all," and to his life-long study write
Colored Covers. 32 Pages. All Kinds of Good Stories. Price 5 Cents. Issued Weekly. Read List Below.
| No. | ||
|---|---|---|
| 1 | Dick Decker, the Brave Young Fireman | by Ex Fire Chief Warden |
| 2 | The Two Boy Brokers; or, From Messenger Boys to Millionaires | by a Retired Banker |
| 3 | Little Lou, the Pride of the Continental Army. A Story of the American Revolution | by General Jas. A. Gordon |
| 4 | Railroad Ralph, the Boy Engineer | by Jas. C. Merritt |
| 5 | The Boy Pilot of Lake Michigan | by Capt. Thos. H. Wilson |
| 6 | Joe Wiley, the Young Temperance Lecturer | by Jno. B. Dowd |
| 7 | The Little Swamp Fox. A Tale of General Marion and His Men | by General Jas. A. Gordon |
| 8 | Young Grizzly Adams, the Wild Beast Tamer. A True Story of Circus Life | by Hal Standish |
| 9 | North Pole Nat; or, The Secret of the Frozen Deep | by Capt. Thos. H. Wilson |
| 10 | Little Deadshot, the Pride of the Trappers | by An Old Scout |
| 11 | Liberty Hose; or, The Pride of Plattsville | by Ex Fire Chief Warden |
| 12 | Engineer Steve, the Prince of the Rail | by Jas. C. Merritt |
| 13 | Whistling Walt, the Champion Spy. A Story of the American Revolution | by General Jas. A. Gordon |
| 14 | Lost in the Air; or, Over Land and Sea | by Allyn Draper |
| 15 | The Little Demon; or, Plotting Against the Czar | by Howard Austin |
| 16 | Fred Farrell, the Barkeeper's Son | by Jno. B. Dowd |
| 17 | Slippery Steve, the Cunning Spy of the Revolution | by General Jas. A. Gordon |
| 18 | Fred Flame, the Hero of Greystone No. 1 | by Ex Fire Chief Warden |
| 19 | Harry Dare; or, A New York Boy in the Navy | by Col. Ralph Fenton |
| 20 | Jack Quick, the Boy Engineer | by Jas. C. Merritt |
| 21 | Doublequick, the King Harpooner; or, The Wonder of the Whalers | by Capt. Thos. H. Wilson |
| 22 | Rattling Rube, the Jolly Scout and Spy. A Story of the Revolution | by General Jas. A. Gordon |
| 23 | In the Czar's Service; or, Dick Sherman in Russia | by Howard Austin |
| 24 | Ben o' the Bowl; or, The Road to Ruin | by Jno. B. Dowd |
| 25 | Kit Carson, the King of Scouts | by an Old Scout |
| 26 | The School Boy Explorers; or, Among the Ruins of Yucatan | by Howard Austin |
| 27 | The Wide Awakes; or, Burke Halliday, the Pride of the Volunteers | by Ex Fire Chief Warden |
| 28 | The Frozen Deep; or, Two Years in the Ice | by Capt. Thos. H. Wilson |
| 29 | The Swamp Rats; or, The Boys Who Fought for Washington | by Gen. Jas. A. Gordon |
| 30 | Around the World on Cheek | by Howard Austin |
| 31 | Bushwhacker Ben; or, The Union Boys of Tennessee | by Col. Ralph Fenton |
For sale by all newsdealers, or sent to any address on receipt of price, 5 cents per copy—6 copies for 25 cents. Address
FRANK TOUSEY, Publisher, 29 West 26th St. N. Y.
Containing Stories of a Gold Seeker.
PRICE 5 CENTS.
Colored Covers.
| No. | |
|---|---|
| 1 | Young Klondike; or, Off For the Land of Gold. |
| 2 | Young Klondike's Claim; or, Nine Golden Nuggets. |
| 3 | Young Klondike's First Million; or, His Great Strike on El Dorado Creek. |
| 4 | Young Klondike and the Claim Agents; or, Fighting the Land Sharks of Dawson City. |
| 5 | Young Klondike's New Diggings; or, The Great Gold Find on Owl Creek. |
| 6 | Young Klondike's Chase; or, The Gold Pirates of the Yukon. |
| 7 | Young Klondike's Golden Island; or, Half a Million in Dust. |
| 8 | Young Klondike's Seven Strikes; or, The Gold Hunters of High Rock. |
| 9 | Young Klondike's Journey to Juneau; or, Guarding a Million in Gold. |
| 10 | Young Klondike's Lucky Camp; or, Working the Unknown's Claim. |
| 11 | Young Klondike's Lost Million; or, The Mine Wreckers of Gold Creek. |
| 12 | Young Klondike's Gold Syndicate; or, Breaking the Brokers of Dawson City. |
| 13 | Young Klondike's Golden Eagle; or, Working a Hidden Mine. |
| 14 | Young Klondike's Trump Card; or, The Rush to Rocky River. |
| 15 | Young Klondike's Arctic Trail; or, Lost in a Sea of Ice. |
| 16 | Young Klondike's New Bonanza; or, The Gold Diggers of French Gulch. |
| 17 | Young Klondike's Death Trap; or, Lost Underground. |
| 18 | Young Klondike's Fight for a Claim; or, The Boomers of Raccoon Creek. |
| 19 | Young Klondike's Deep Sea Diggings; or, Working at the Mouth of the Yukon. |
| 20 | Young Klondike's Winter Camp; or, Mining Under the Snow. |
For sale by all newsdealers, or sent to any address on receipt of price, 5 cents per copy—6 copies for 25 cents. Address
FRANK TOUSEY, Publisher,
28 West 26th St., New York.
An Interesting Weekly for Young America.
BRIGHT, CATCHY STORIES.
Beautiful Colored Covers.
32 Pages. Price 5 Cents.
Don't fail to read about Fred Fearnot's Wonderful Adventures in School, at College, on the Stage, Out West and as a Detective. They are Bright, Interesting and Fascinating.
COMPLETE LIST.
| 1 | Fred Fearnot; or, School Days at Avon. |
| 2 | Fred Fearnot, Detective; or, Balking a Desperate Game. |
| 3 | Fred Fearnot's Daring Rescue; or, A Hero in Spite of Himself. |
| 4 | Fred Fearnot's Narrow Escape; or, The Plot That Failed. |
| 5 | Fred Fearnot at Avon Again; or, His Second Term at School. |
| 6 | Fred Fearnot's Pluck; or, His Race to Save a Life. |
| 7 | Fred Fearnot as an Actor; or, His Fame Before the Footlights. |
| 8 | Fred Fearnot at Sea; or, A Chase Across the Ocean. |
| 9 | Fred Fearnot Out West; or, Adventures With the Cowboys. |
| 10 | Fred Fearnot's Great Peril; or, Running Down the Counterfeiters. |
| 11 | Fred Fearnot's Double Victory; or, Killing Two Birds With One Stone. |
| 12 | Fred Fearnot's Game Finish; or, His Bicycle Race to Save a Million. |
| 13 | Fred Fearnot's Great Run; or, An Engineer For a Week. |
| 14 | Fred Fearnot's Twenty Rounds; or, His Fight to Save His Honor. |
| 15 | Fred Fearnot's Engine Company; or, Brave Work as a Fireman. |
| 16 | Fred Fearnot's Good Work; or, Helping a Friend in Need. |
For sale by all newsdealers or sent to any address on receipt of price, 5 cents per copy, or 6 copies for 25 cents.
FRANK TOUSEY, Publisher,
29 West 26th St., New York.
32 Pages of Great Detective Stories.
Handsomely Decorated Covers.
Issued Weekly. Price 5 Cents.
Containing Stories of Old King Brady, the Great Detective, assisted by Young King Brady, his faithful young pupil.
Embracing the most daring adventures, startling scenes and hairbreadth escapes ever published.
READ THE FOLLOWING LIST.
| 1. | The Black Band; or, The Two King Bradys Against a Hard Gang. |
| 2. | Told by the Ticker; or, The Two King Bradys on a Wall Street Case. |
| 3. | The Bradys After a Million; or, Their Chase to Save an Heiress. |
| 4. | The Bradys' Great Bluff; or, A Bunco Game that Failed to Work. |
| 5. | In and Out; or, The Two King Bradys on a Lively Chase. |
For sale by all newsdealers or sent postpaid on receipt of price, 5 cents per copy, by
FRANK TOUSEY, Publisher,
29 West 26th St., New York.
Stories of Land and Sea.
Issued Weekly. - 32 pages.
HANDSOMELY EMBELLISHED COVER.
THE MOST ENTERTAINING AND EXCITING LIBRARY PUBLISHED
Read about HANDSOME HARRY, the Brave Commander.
Read about CHING-CHING, the Tricky Chinee.
Read about SAMSON, the Gigantic Negro.
Price 5 Cents. Price 5 Cents.
LIST OF NUMBERS:
| 1. | Handsome Harry of the Fighting Belvedere. |
| 2. | Handsome Harry's Peril; or, Saved by His Trusty Crew. |
| 3. | Handsome Harry's Chase; or, On the Track of the "Vulture." |
| 4. | Handsome Harry in Africa; or, A Land Hunt for His Foe. |
| 5. | Handsome Harry and the Slaver; or, Adventures With Friends and Foes. |
If you cannot procure any numbers of Handsome Harry from your newsdealer, send the price, 5 cents per copy, to us and we will send any copies ordered by return mail. Address
FRANK TOUSEY, Publisher,
29 West 26th St., New York.
USEFUL, INSTRUCTIVE AND AMUSING.
Containing valuable information on almost every subject such as Writing, Speaking, Dancing, Cooking; also, Rules of Etiquette, The Art of Ventriloquism, Gymnastic Exercises, and The Science of Self-Defense, etc., etc.
| 1 | NAPOLEON'S ORACULUM AND DREAM BOOK. |
| 2 | HOW TO DO TRICKS. |
| 3 | HOW TO FLIRT. |
| 4 | HOW TO DANCE. |
| 5 | HOW TO MAKE LOVE. |
| 6 | HOW TO BECOME AN ATHLETE. |
| 7 | HOW TO KEEP BIRDS. |
| 8 | HOW TO BECOME A SCIENTIST. |
| 9 | HOW TO BECOME A VENTRILOQUIST. |
| 10 | HOW TO BOX. |
| 11 | HOW TO WRITE LOVE LETTERS. |
| 12 | HOW TO WRITE LETTERS TO LADIES. |
| 13 | HOW TO DO IT; OR, BOOK OF ETIQUETTE. |
| 14 | HOW TO MAKE CANDY. |
| 15 | HOW TO BECOME RICH. |
| 16 | HOW TO KEEP A WINDOW GARDEN. |
| 17 | HOW TO DRESS. |
| 18 | HOW TO BECOME BEAUTIFUL. |
| 19 | FRANK TOUSEY'S U. S. DISTANCE TABLES, POCKET COMPANION AND GUIDE. |
| 20 | HOW TO ENTERTAIN AN EVENING PARTY. |
| 21 | HOW TO HUNT AND FISH. |
| 22 | HOW TO DO SECOND SIGHT. |
| 23 | HOW TO EXPLAIN DREAMS. |
| 24 | HOW TO WRITE LETTERS TO GENTLEMEN. |
| 25 | HOW TO BECOME A GYMNAST. |
| 26 | HOW TO ROW, SAIL AND BUILD A BOAT. |
| 27 | HOW TO RECITE AND BOOK OF RECITATIONS. |
| 28 | HOW TO TELL FORTUNES. |
| 29 | HOW TO BECOME AN INVENTOR. |
| 30 | HOW TO COOK. |
| 31 | HOW TO BECOME A SPEAKER. |
| 32 | HOW TO RIDE A BICYCLE. |
| 33 | HOW TO BEHAVE. |
| 34 | HOW TO FENCE. |
| 35 | HOW TO PLAY GAMES. |
| 36 | HOW TO SOLVE CONUNDRUMS. |
| 37 | HOW TO KEEP HOUSE. |
| 38 | HOW TO BECOME YOUR OWN DOCTOR. |
| 39 | HOW TO RAISE DOGS, POULTRY, PIGEONS AND RABBITS. |
| 40 | HOW TO MAKE AND SET TRAPS. |
| 41 | THE BOYS OF NEW YORK END MEN'S JOKE BOOK. |
| 42 | THE BOYS OF NEW YORK STUMP SPEAKER. |
| 43 | HOW TO BECOME A MAGICIAN. |
| 44 | HOW TO WRITE IN AN ALBUM. |
| 45 | THE BOYS OF NEW YORK MINSTREL GUIDE AND JOKE BOOK. |
| 46 | HOW TO MAKE AND USE ELECTRICITY. |
| 47 | HOW TO BREAK, RIDE AND DRIVE A HORSE. |
| 48 | HOW TO BUILD AND SAIL CANOES. |
| 49 | HOW TO DEBATE. |
| 50 | HOW TO STUFF BIRDS AND ANIMALS. |
| 51 | HOW TO DO TRICKS WITH CARDS. |
| 52 | HOW TO PLAY CARDS. |
| 53 | HOW TO WRITE LETTERS. |
| 54 | HOW TO KEEP AND MANAGE PETS. |
| 55 | HOW TO COLLECT STAMPS AND COINS. |
| 56 | HOW TO BECOME AN ENGINEER. |
| 57 | HOW TO MAKE MUSICAL INSTRUMENTS. |
| 58 | HOW TO BECOME A DETECTIVE. |
| 59 | HOW TO MAKE A MAGIC LANTERN. |
| 60 | HOW TO BECOME A PHOTOGRAPHER. |
| 61 | HOW TO BECOME A BOWLER. |
| 62 | HOW TO BECOME A WEST POINT MILITARY CADET. |
| 63 | HOW TO BECOME A NAVAL CADET. |
| 64 | HOW TO MAKE ELECTRICAL MACHINES. |
| 65 | MULDOON'S JOKES. |
| 66 | HOW TO DO PUZZLES. |
| 67 | HOW TO DO ELECTRICAL TRICKS. |
| 68 | HOW TO DO CHEMICAL TRICKS. |
| 69 | HOW TO DO SLEIGHT OF HAND. |
| 70 | HOW TO MAKE MAGIC TOYS. |
| 71 | HOW TO DO MECHANICAL TRICKS. |
| 72 | HOW TO DO SIXTY TRICKS WITH CARDS. |
| 73 | HOW TO DO TRICKS WITH NUMBERS. |
| 74 | HOW TO WRITE LETTERS CORRECTLY. |
| 75 | HOW TO BECOME A CONJURER. |
| 76 | HOW TO TELL FORTUNES BY THE HAND. |
| 77 | HOW TO DO FORTY TRICKS WITH CARDS. |
| 78 | HOW TO DO THE BLACK ART. |
| 79 | HOW TO BECOME AN ACTOR. |
All the above books are for sale by newsdealers throughout the United States and Canada, or they will be sent, post-paid, to your address, on receipt of 10c. each.
Send Your Name and Address for Our Latest Illustrated Catalogue.
FRANK TOUSEY, Publisher,
29 WEST 26th STREET, NEW YORK.
The Table of Contents was added by the transcriber.
Images may be clicked to view larger versions.
Some inconsistent punctuation has been normalized throughout the book.
Some inconsistent hyphenation (e.g. smokestack vs. smoke-stack) has been retained.
Some illustrations in this book appear to have been lifted from Locomotive Engine Driving: A Practical Manual for Engineers in Charge of Locomotive Engines by Michael Reynolds (London: Crosby Lockwood, 1888).
Fractions have been normalized to the form X-Y/Z.
Page 5, changed "locomotiive" to "locomotive."
Page 7, changed "Engilsh" to "English."
Page 8, changed "clumsey" to "clumsy" and "prise" to "prize."
Page 16, changed "guage" to "gauge."
Page 17, changed "will came" to "will come."
Page 19, changed "where on can" to "where one can."
Page 21, changed "gain" to "gains."
Page 22, changed "reponsibility" to "responsibility."
Page 24, changed "read then" to "read them."
Page 27, changed "thinest" to "thinnest."
Page 29, changed "guage" to "gauge" (twice) and "at at" to "at."
Page 34, changed "undestand" to "understand."
Page 51, changed "shown it Fig. 35" to "shown in Fig. 35" and "llittle" to "little."
Page 56, changed "definately" to "definitely."
Page 57, changed "air-brakes consists" to "air-brake consists."