Mother Nature's
Toy-Shop

Mother Nature is every bit as fond of the little folks in her human family as of the grown-ups, and while she prepares untold joys for lovers of the outdoors among men and women and larger boys and girls, she never forgets the little ones.
For their benefit she keeps an open toy-shop full of marvellous playthings, all free to any child who wants them, and instead of the children paying her for what they take she pays them for coming to her by giving them rosier cheeks, brighter eyes, and stronger bodies. She puts more glee into their laughter and greater happiness into their trustful little hearts.
As in the large department stores in big cities, the goods in Mother Nature's shop are changed for each season of the year; so the little shoppers have constant variety and hail every new season with fresh delight. This book is written to call attention to the beautiful and wonderful things to be found in Mother Nature's toy-shop and to tell what to do with them, for one must know how to use the amusing material that is furnished.
After really getting into this most enchanting of all toy-shops with eyes open to see its wonders, we found that the difficulty to be met was not how to write about them, but how to stop writing. The display was so varied and so inviting, it seemed that we must tell the children about everything we saw, but if we had gone on seeing more and telling more there is no saying what size this book would have been.
| PART I—WILD FLOWERS | ||
| CHAPTER | PAGE | |
| I. | Daisies | 1 |
| II. | Jack-in-the-Pulpit | 5 |
| III. | Red and White Clovers | 8 |
| IV. | Clover Designs | 12 |
| V. | Other Wild-Flower Designs | 19 |
| VI. | Pussy-Willows | 24 |
| VII. | Arrangement of Flowers | 33 |
PART II—GRASSES | ||
| VIII. | Fairy-Trees Made of Grasses | 40 |
| IX. | A House Made of Grass | 45 |
| X. | Grass Dress and Grass Head-Dress | 56 |
PART III—GREEN LEAVES | ||
| XI. | Oak-Leaves | 61 |
| XII. | Grape-Leaf Drinking-Cup | 68 |
| XIII. | Green-Leaf Designs | 71 |
| [viii] | ||
PART IV—CULTIVATED FLOWERS | ||
| XIV. | Phlox | 76 |
| XV. | Cultivated Foxglove | 81 |
| XVI. | Miss Hollyhock's Garden-Party | 88 |
| XVII. | Daffodils | 92 |
PART V—SEED-VESSELS | ||
| XVIII. | Seed-Vessel Playthings | 96 |
| XIX. | Buckeye Horse and Buckeye Rider | 103 |
| XX. | Burdock-Burrs | 108 |
| XXI. | Things to Make of English-Walnut Shells | 117 |
PART VI—VEGETABLES | ||
| XXII. | Things You can Make of Lima Beans | 123 |
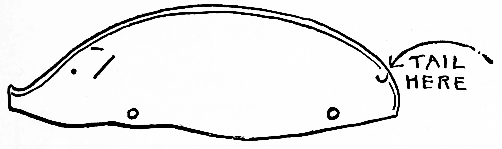
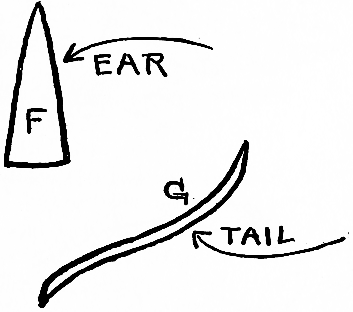
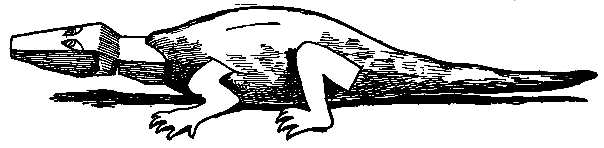
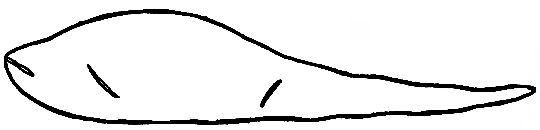
| XXIII. | Sweet-Potato Alligator and What to Make of a Radish | 130 |
| XXIV. | Green-Pea Toys and a Green-Pea Design | 136 |
| XXV. | Corn-Husks and Corn-Cobs | 148 |
PART VII—FRUIT | ||
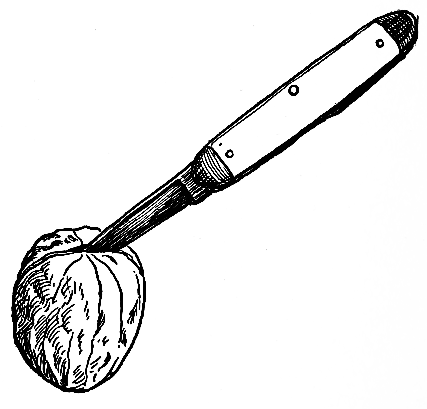
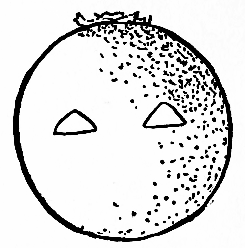
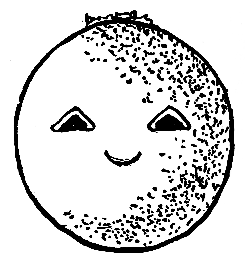
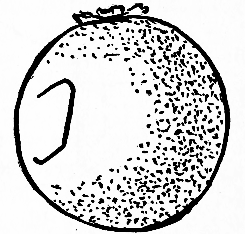
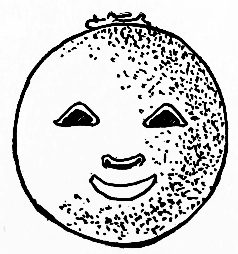
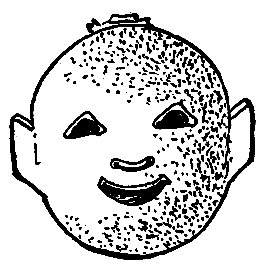
| XXVI. | The Funny Orange-Head | 163 |
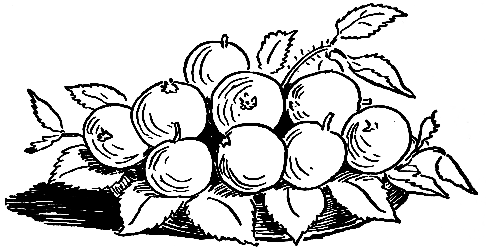
| XXVII. | Apples and Apple Fun | 171 |
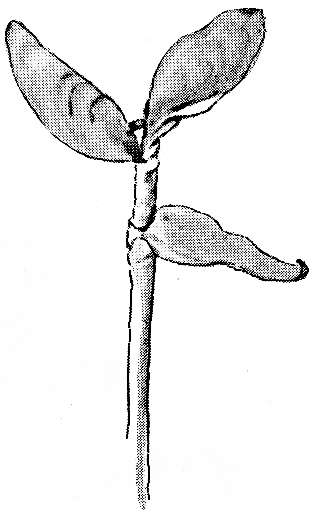
Wild flowers, like children, are up early. They don't want to lie abed after their long winter's sleep; they want to be awake and see what is going on in the world. While you think it is still winter there is a stirring going on under the blankets of brown earth, and sometimes before the snow is off the ground you may find the little things working up through the stiff soil and opening their eyes to the gentle spring sunshine.
It is remarkable the way the soft, tender sprouts force their way through hard ground that we would have to take a knife or trowel to dig into. But they do it. Not all at once with a great, blustering rush, but gently, steadily, and quietly they push and keep on pushing until their heads are above ground; then they begin to grow in good earnest, and pretty soon they laugh right out into blossom.
The pleasure these earliest wild flowers give us is in going out to look for them and in gathering handfuls to carry home and put into little glass bowls to be "Oh'd" over and wondered at, to be admired and loved because they are lovely, and because they bring some of the sweet outdoors of spring into the furnace-heated house.
They are too delicate and fragile, these anemones,[2] hepaticas, and bloodroots, to be handled and played with, but later come the stronger, sturdier flowers and with many of these you can do all sorts of entertaining things. You don't have to look very far for them either. They are in the fields, by the roadsides, and even along the edges of the streets of a village or small town. You won't find them in the city.
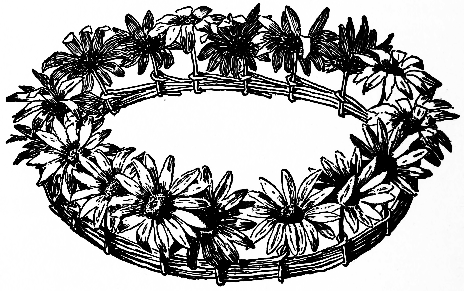
To begin with, there are the daisies. How white the fields are with them! If they are fine, large daisies on tall, strong stems they will reach up to your waist—that is, if you are a little girl. If you are bigger they will come well above your knees. There are a number of things that you can do with them. First, you can make a really beautiful
Gather a whole lot of daisies with rather long stems. They will stay fresh longer if you put them into a pail of cool water and let them drink a little before using them;[3] and if they have wilted while you carried them, the water will bring them up again as fresh as—why, as fresh as a daisy to be sure. This is the way to make the crown. It is a new way and a good way.
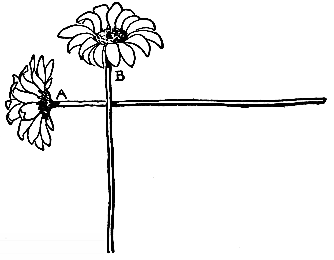
Take one daisy in your left hand and hold it, not upright but in what is called a horizontal position like the one marked A in Fig. 1, then with your right hand hold another daisy upright and place its stem in front of and across the stem of the first, as you see it in Fig. 1.
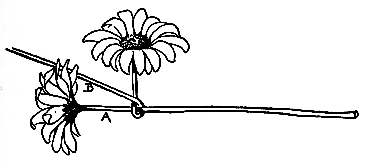
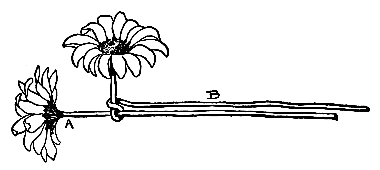
This second daisy we will call B. Now turn the stem of B under the stem of A and up at the back as it is in Fig. 2. Bring this same stem, B, around and in front of its own upright part like Fig. 3. Turn it all the way around the upright part and let the stem of B rest on top of the stem of A. Fig. 4 shows this, but in the drawing the stems are separated a little so that you may see each one plainly. It is something like weaving, you see. And it is weaving of a sort.
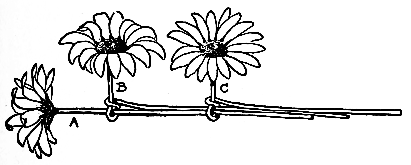
Across the stems of the daisies A and B, two stems this time, place the stem of another daisy that we will call C, and weave it on the first two stems exactly as you wove B onto A (Fig. 5). The stem of the fourth daisy will have to cross three stems, A, B, and C. The fifth daisy-stem will cross four stems, but after that the end of the daisy-stem A will probably have been passed and you will be weaving on the others. It depends upon the length of the stems how many are woven over; sometimes there may be five. It is not well to have more than that number. You can cut a stem off when it seems to be going too far around the crown.
Place the daisies close enough together to have their petals touch, or even crowd a trifle, because when the crown is curved and the ends brought together the flowers will separate and leave wider spaces. When you have woven enough daisies to make your crown the proper size to fit your head, cut the last stems off about two inches from the last flower and, with a strong blade of grass or piece of string, tie them to the stem of the daisy A, just back of the flower. Fig. 6 shows what the daisy crown looks like when finished.
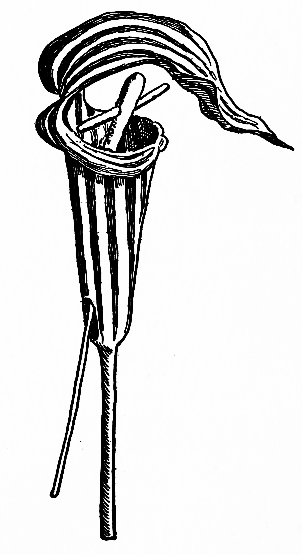
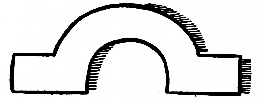
One of the earliest wild flowers to show its head above ground is Jack-in-the-pulpit. It is an odd plant and what we call the flower is not the blossom at all, but a protecting leaf called a spathe which surrounds the tiny flowers growing on the club-shaped spike (or spadix) standing upright inside.
That is a good thing to know and remember, but what concerns us now is that there is a pulpit with its curved sounding-board—or perhaps it is a striped awning—overhead, and that in the pulpit is Jack.
He is a cheerful little preacher and his pulpit is somewhat gayer than we usually see, but no one ever told Jack that to be good he must be solemn and that to preach he must have a pulpit rich and sombre. The good God who made him gave him his pretty, striped pulpit with its striped awning to shelter it, and Jack goes on preaching his cheerful sermons from this as long as he lives. Hear what some one has said of him:
Some people who love the woods and the wild flowers can understand Jack's wild-wood language. They will tell you that over and over again he is saying: "Come into the clean, shady woods and learn to love all the wonderful living, growing things to be found here. Come into the green woods and hear what we can tell you of beauty and love and kindness; of courage and perseverance and strength, for plants must have courage and perseverance as well as strength in order to live."
All the time these plants are working in the ground and above it to make their flowers perfect and their seeds fruitful. Sometimes it is difficult work, too, if the soil does not give them enough food, or a dry summer chokes them with thirst. Sometimes they must struggle hard to gain a footing between the rocks where they were told to grow, or to keep from being crowded out by stronger, coarser plants that are called weeds.
But they keep on trying to do their part and to do it well; they work and love, and their children, the blossoms, laugh, laugh, laugh with the happiness of it all.
Now if Jack seems to you to stand too still in his pulpit while he preaches all this, why you can make him move around. He can turn first to one side then to the other, and he can lean forward over the front with extended[7] arms as some preachers do when they are very much in earnest.
For this you will first have to cut a hole at the back of the pulpit near the bottom, as is shown in Fig. 7, then, slipping your knife inside, cut Jack loose from the flower and drop him out from the top by turning the pulpit upside down.
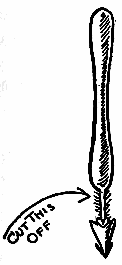
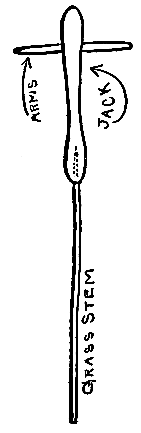
Cut off the lower, thin part of the spike to which the arrow points in Fig. 8 and, after puncturing a deep hole in the end, push in a very slender twig or grass-stem. Fig. 9 shows how this is done. For arms that will make Jack seem more like a little man, push a short piece of grass-stem through the spike near the top where you see it in Fig. 9. Make a hole all the way through the spike with a pin so that the arms will slip in easily.
When you are ready for Jack to preach put him in his pulpit, sliding the grass-stem through the hole at the back. While you hold the stem of the pulpit in one hand take the grass-stem in the other and, by moving it up and down, twisting it one way, then the other, and tipping it up, you can make him rise up tall and straight, then sink down; you can make him turn to the right and to the left and lean forward. That is being active enough in such a small pulpit, isn't it?
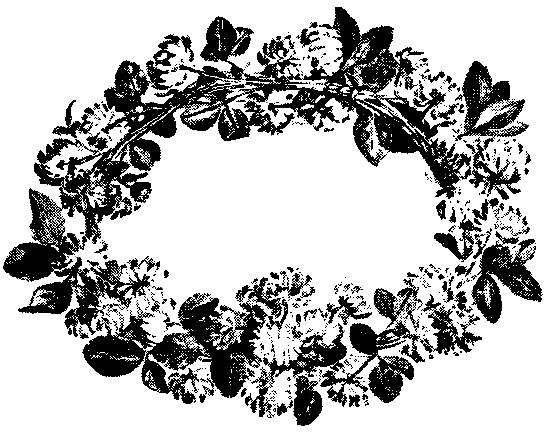
By the roadside, through the meadows, on the farm, at the cottage door, and in your own yard those dear, familiar little friends, the clover-blossoms, come to greet you. Even in city parks you may find them, and always they are ready and glad to help you have a good time. Gather a lot of these flowers and sit in the shade under a tree with your lap filled with them while I tell you how to make a
Select some long-stemmed blossoms and leaves, bunch them and bind their stems together their full length with strong grass or string. Wind the grass around and around the stems, tucking the ends securely in under the last wind. You may need several long blades of grass for binding one bunch.
In the same way make a second bunch and fit the flowers up close against the first bunch of blossoms, with their stems lying along the side of the first stems. Do not lap the flowers of one bunch over the flowers of another. Fasten the second bunch in place by binding the stems to those of the first bunch; then make a third bunch and bind it on next to the second bunch. Continue making these clover bunches and binding their stems to the stems of those already a part of the wreath until the strip is long enough to fit around your head. Try it on and, if it is the proper length, join the two ends by binding the last[9] stems to the stems of the first bunches. Fig. 10 shows the clover wreath complete.
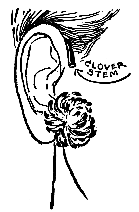
You should also have a
Take one of these clovers and fit it in tight between your cheek and the lobe of your ear (Fig. 12). Be careful not to break the long stem, for you must bring it up snugly just back of your ear along the line where the ear joins your head, and when this is done, bend the end of the stem down gently over the top of your ear. The stem will hold your earring in place. Make the other earring in the same way. The two clover-blossoms used for the earrings should be as much alike as possible both in size and shape. They[11] should be matched carefully, as pearls and diamonds are matched in a pair of real earrings.
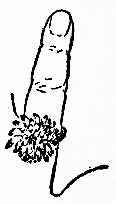
Now for a "solitaire"
Now you are ready, with the addition of a long, straight twig, at the top of which you have fastened a bouquet of clover, to play that you are queen of all the clover fairies, and that your clover-tipped twig is your magic wand.
The running, vinelike clovers are fine to use for climbing-roses on outdoor doll-houses. They can also be trained over the doll garden-frames and arches.
Have you ever admired the pretty patterns on wallpaper of flowers and green leaves? Have you ever embroidered dainty designs in colors on white linen, and do you love it all? If you do, you will like to make some designs yourself in a new way, and with real flowers and real leaves.
You don't have to know how to draw or to paint in this designing, for the flowers are there ready for you to use, more exquisitely drawn and colored than the greatest artist could do them. Your part is to group and arrange them on a sheet of paper so that they will form beautiful designs; designs that will not only delight you, but that may be copied in embroidery or in other ways.
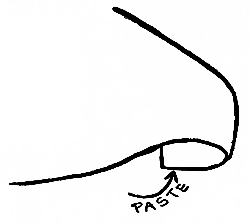
Merely to place the flowers on the paper in some sort of a pattern is interesting, but the design won't last because the flowers won't stay in place. Your sleeve may wipe them all off, or a puff of air blow them away, so a method has been invented especially for you that will keep them where you want them to stay, and that method is simply to paste them there.
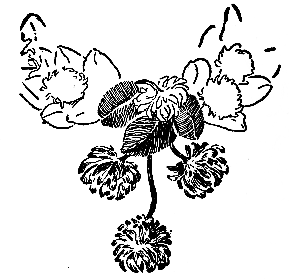
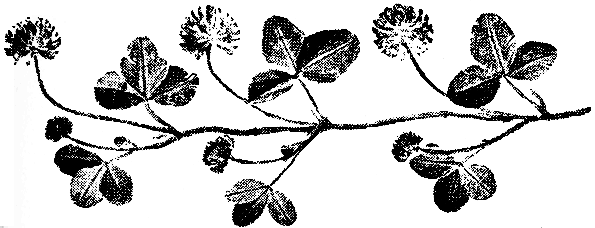
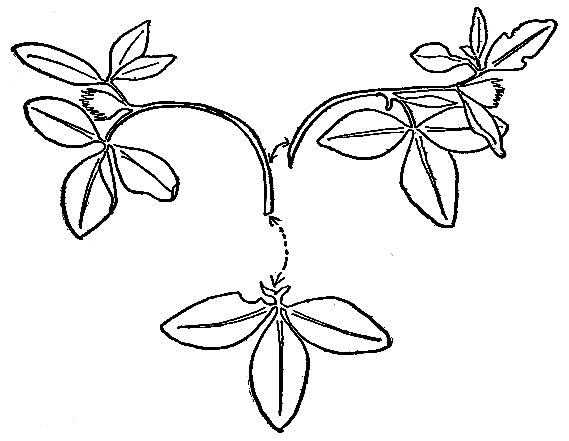
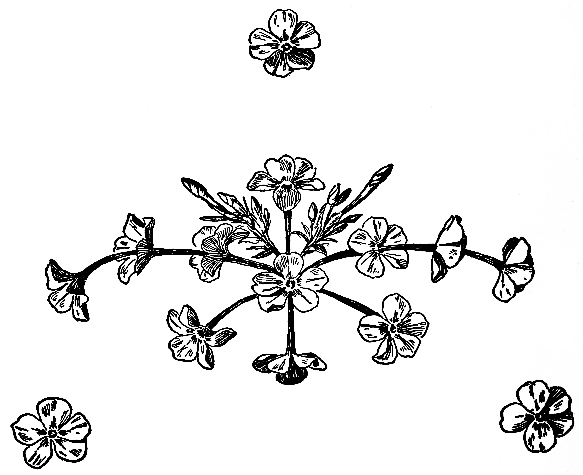
You can make designs of almost any kind of flowers, the common pink-and-white clover that grows underfoot nearly everywhere makes a particularly pretty one. This is the long-stemmed, viny kind, and its name is alsike clover. Fig. 15 shows what the alsike clover looks like, and you will see that its leaves are rather pointed at the tip, and shaped more like the leaves of the large red clover than like the almost round ones of the little white clover.
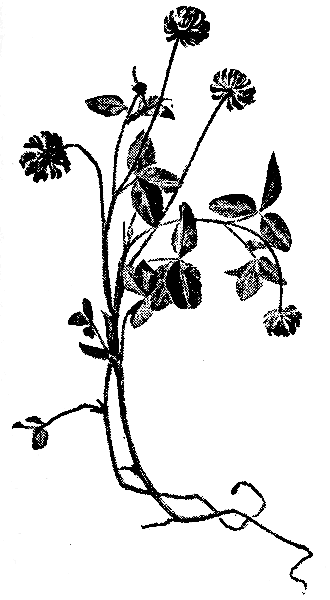
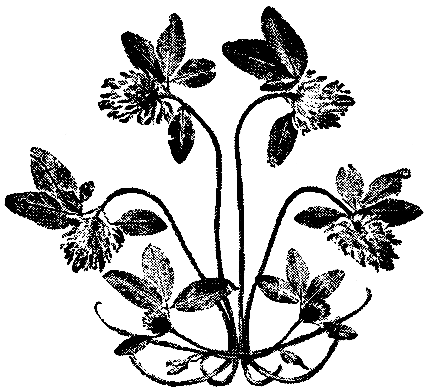
The graceful, upright design (Fig. 16) was made of the alsike clover, the blossom of which was a deep-rose color, and the original design when finished looked like a piece of embroidery done in silks. It was so lovely I wish that it could be given in its natural colors here.
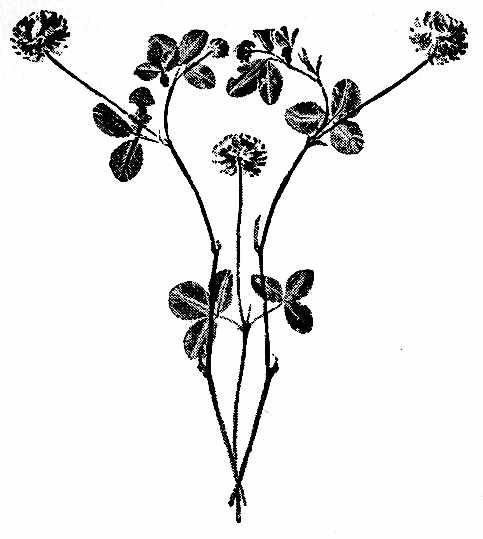
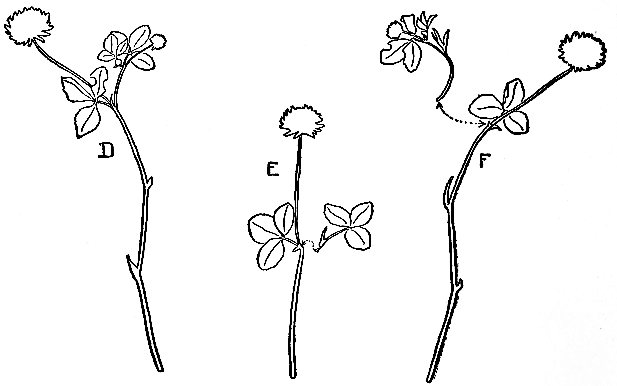
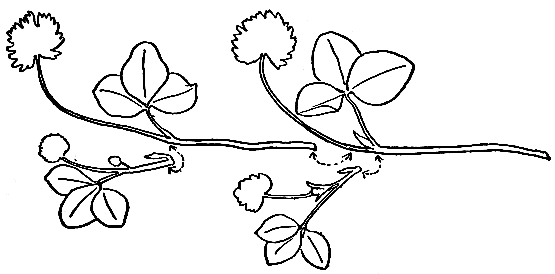
Look at Fig. 16 carefully and see that while the sprays of clover at the right and left appear to be exactly alike, though turned in opposite directions, they are not really so, and the little differences help to make the design interesting. They keep it from being what we call monotonous. Now look at D, E, and F, Fig. 17. These are tracings of the sprays of clover before they were grouped together to form the design Fig. 16. The spray on the left, marked D, is just as it grew and as it was used in the finished design; but F, on the right, had to have the little budded spray added at the place on the stem shown by[15] the arrows to make it resemble and balance the other. This bud with its leaves was clipped from another clover-vine.
The spray in the centre of the design was like E, Fig. 17, and it was necessary to give it the extra leaves shown at its right because, without them, it was not symmetrical, which means evenly balanced, and it would not have looked well in the design.
When all of the material was collected and ready to be[16] put together, the central spray, E, was laid in the middle of a sheet of unruled, white paper with the lower end of the stem near the bottom edge, then the sprays D and F were placed on the right and left of the centre one and tried first in one position, then in another, until it was decided that they looked best arranged as in Fig. 16. After that the extra leaves for the middle spray, and the bud and its leaves for the right-hand spray, were put in place.
It all seemed charmingly satisfactory, so the design was
taken apart that it might be fastened permanently in place.
The middle spray had to be adjusted first, and a drop of
good library paste was put on the under-side of the clover-blossom,
a drop on the under part of each leaf, and on the
under part of the stem at the lower end. Then the spray
was laid in the middle of the paper just where it was at
first, and pressed down to make it stick. Paste was put[17]
[18]
on the under part of each of the three leaves to be added
and on the under part of their stem at the end, and they
were pasted down to look as if growing on the main stem,
opposite the other leaves.
Next the left-hand spray was pasted in place in the same way, then the right-hand spray, to which was given its bud that curves in to almost touch the bud on the other spray. Paste was also put half-way down on the under part of the long stems of each of the side sprays.
This completed the clover design and it was exceedingly pretty, but after it had been sufficiently admired it was placed between papers under several heavy books to press, that it might be more durable. It was after it had been pressed that it looked like a piece of silk embroidery.
Pasted designs can be made without pressing; but while they are more beautiful they will not last as long as the others. You can enjoy your fresh designs for a while and then press them. Do not make the mistake of covering the entire under part of a flower or leaf with paste as if it were made of paper; a drop is all that is needed, more will spoil it.
Flowers do not always grow exactly as you want them for your designs, but a too straight stem can be coaxed to curve by drawing it between your fingers, and leaves and sprays can be cut away or added as has been shown. All this changing about only makes it more fun to work out the design.
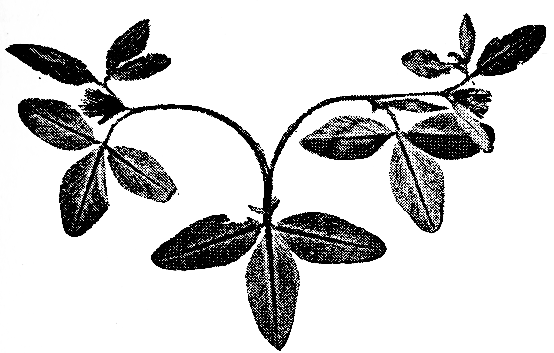
Fig. 18 is a running design of clovers which can be used for a border. The little arrows on Fig. 19 show where the different parts are joined.
The large red clover was used for the design Fig. 20 and the leaves and buds of the red clover for Fig. 21. Fig. 22 shows how the parts of Fig. 21 are put together. These drawings are all original from designs actually made of fresh clover-blossoms and their foliage.
Isn't the design Fig. 23 what grown-ups call Japanesque? Doesn't it look as if it had been copied from a printed pattern on a piece of Japanese cotton cloth?
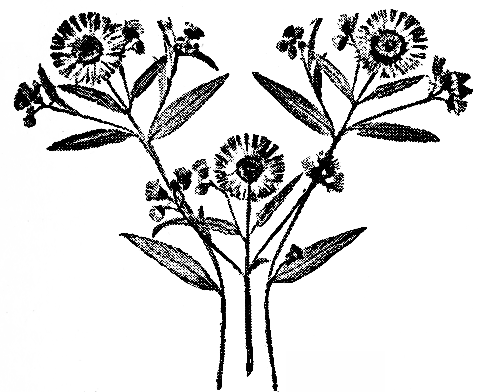
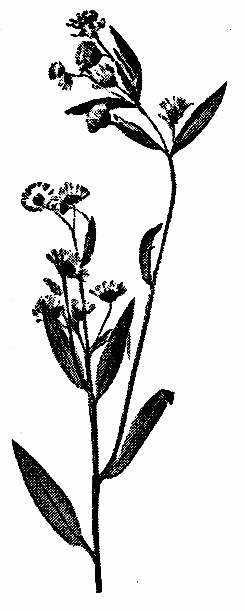
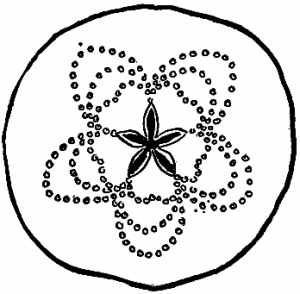
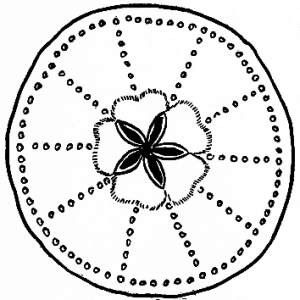
Well, it was not. It is from a design made especially for you of real wild flowers, freshly gathered. The name of the flower is the daisy fleabane which grows in almost all open grassy fields where daisies and buttercups and clovers are found.
The illustration Fig. 24 shows how the daisy fleabane[20] looks when first gathered. Sometimes the blossom is entirely white, sometimes it is tinged with purple, and it has a bright-yellow centre. Its petals are as fine as a fringe, like those of the asters that blossom in the fall.
In making the design the full-blown flowers were pressed down flat, which makes them round like a sunflower, while the buds and partly open flowers were left as they naturally grew. The composition, or arrangement, of this design is like that used for the upright clover design (Fig. 16), that is, it has two tall side sprays and a shorter middle spray; but see how very different the two designs are in appearance. The clover is all graceful curves, the daisy fleabane is stiff and formal with straight lines and angles.
If you use the white flower, make the design on a sheet of tinted paper, else the flower will not show. All white flowers should have tinted paper for a background.
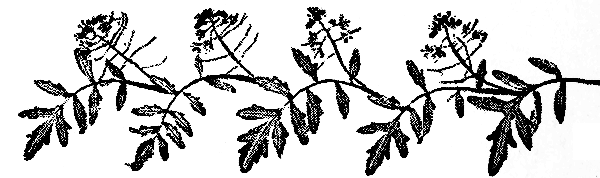
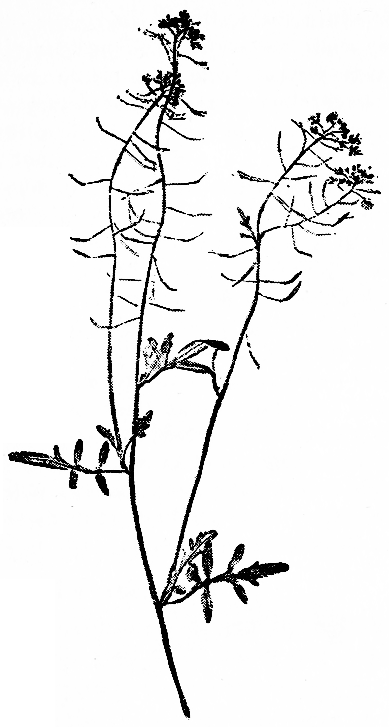
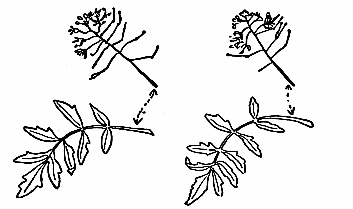
The small, yellow blossoms of the wild mustard and its compound leaves make very dainty designs. Fig. 25 is one of them.
From the drawing of the wild mustard (Fig. 26) you will
see that the flowers do not grow close to the leaves as they
are placed in this design, but on tall stems which lift them[21]
[22]
far above the scattered leaf-sprays. The design Fig. 25
was made by cutting off a number of flower-clusters and
leaves, and grouping first one flower-cluster and one leaf-spray
together, with the ends of their stems touching, then
another flower-cluster
and another leaf-spray.
The arrows in Fig. 27
show where the stems
are brought together,
and the design Fig. 25
shows how the joining
of the first two is covered
with one of the
small leaves of the second
leaf-spray, and how
the joining of the second two is hidden under a leaf of the
third leaf-spray, and so on.
There are four flower-clusters and five leaf-sprays in the design. You can have as many as you wish but must end them with a leaf-spray.
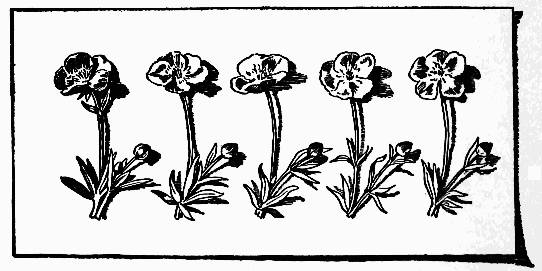
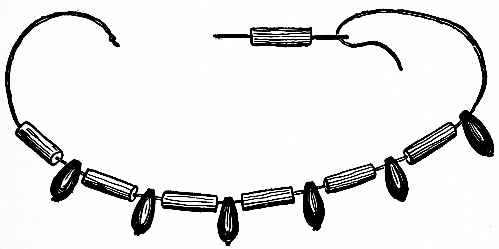
Buttercups are so beautifully golden, so glossy and bright, you would think they could be made into many[23] nice things, a gold necklace for instance. And so they could if they only would not wilt almost as soon as they are gathered. To be sure, they will revive and freshen up when put in water if they are not too much wilted, but we cannot make them into jewelry while their stems are in water.
Still there is something buttercups can be used for, and that is designs. Fig. 28 is a drawing from the simplest kind of a buttercup design but a pretty one. It shows five wide-open blossoms placed in a row at equal distances apart with a little spray of leaves and bud at the lower end of each stem. These sprays do not grow as they are in the design but are added after the flowers are placed in a row.
As in all other designs, each flower, bud, and stem is touched with paste on the under-side to hold it in place on the paper. A design like Fig. 28 should be pressed after it is arranged, and it will last a long while and keep its bright color. A number of other and very beautiful designs can be made of the common wild buttercup.
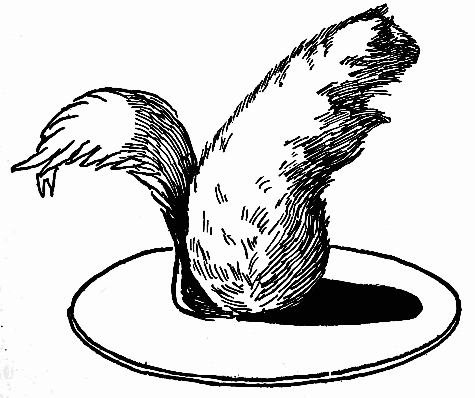
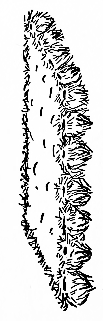
We all welcome and love the dear little pussy-willows (Fig. 29) whose fur is so soft and silvery. How pretty they look sitting along the slender, bare branches of the small American willow-tree which is their home. The pussies like to come early to assure us that spring is here. They are very tame little kitties, and will allow you to carry them away to your school or to your home.
Sometimes pussy-willows turn into little rabbits, squirrels, bumblebees, and mice, but they need your help, they cannot make the magic change alone. It will be lots of fun helping them if you do it this way.
Take a small branch of the very
largest pussies you can find, have
ready some scraps of smooth, fresh
writing-paper, a piece of cardboard,
pair of scissors, and some good paste.
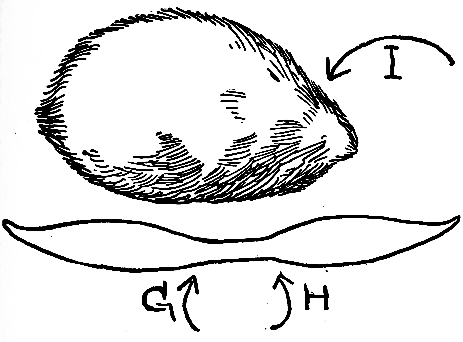
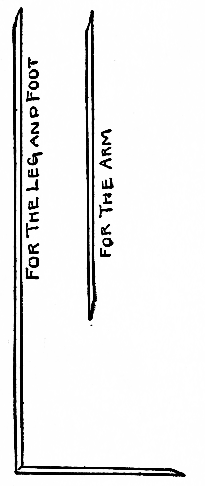
It only requires long ears to change
the pussy-willows into bunnies. Cut
the ears from your writing-paper like
the pattern Fig. 30. Put paste on[25]
[26]
the strip between the letters G and H, then take a pussy
from the branch and stick the paste-covered strip just
above the small end of the pussy, which will be the bunny's
head. The arrow I, Fig. 30, points to the place for
the ears. When the paste has dried bend the ears up
like the ears of the rabbits in Fig. 31. Make three or
four rabbits to keep each other company and paste them
in a row on your piece of cardboard.
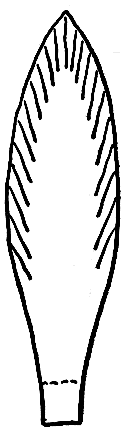
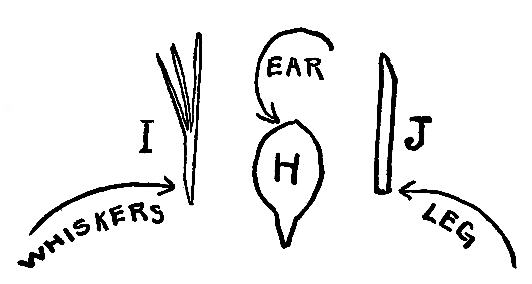
This little gray squirrel (Fig. 32), sitting up in such a lifelike pose, must be made of a slightly bent, rather long,[27] slender pussy. Pull forward some of the fur near the small end so that it will look like the front legs of the squirrel when he holds a nut in his hand-like front paws, and push up two tufts on the head for ears. The pussy from which Fig. 32 was made already had these tufts for legs and ears, and it looked so much like a squirrel one simply had to add the tail and let it be a squirrel.
Cut the paper tail like the pattern Fig. 33, fringe it along the edge and bend forward the little lap at the bottom which is separated from the tail by the dotted line. Curve the tail backward, put paste on top of the lap, and stick the lap to the under part of the large end of the pussy; then paste the finished squirrel to a piece of pasteboard cut round or square as you like best.
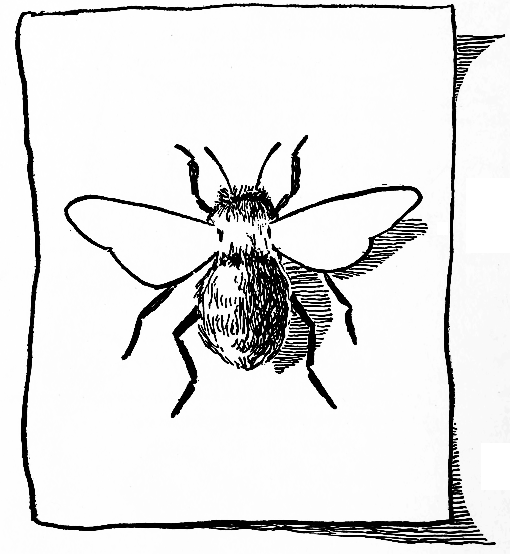
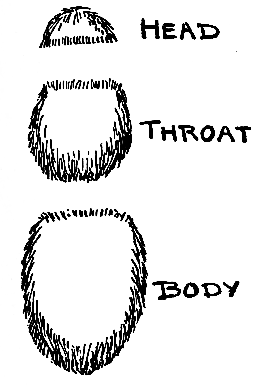
Mr. Bumblebee (Fig. 34) needs one whole pussy for his body, one-half of a pussy for his big, round throat, and[28] a small piece of the pussy for his head (Fig. 35). On the piece of cardboard which is to hold the bee, draw his legs like Fig. 36, then paste the three parts—body, throat, and head—on top of the legs. Fig. 37 shows how it would look underneath if you could see through the paper, so you will know exactly where to paste first the throat, then the head, and lastly the body. The edges of these parts where they join must be pushed close together.
A bumblebee has slightly curved spikes extending from his head which are called antennæ. Fig. 38 shows you where to draw them. You will also see on the same diagram how to widen the six legs, making them thicker and more lifelike. Cut paper wings the shape of Fig. 39, making them the proper size to fit your bee. Remember that a bumblebee has small, short wings compared to the size of its body. Bend the lap at the bottom of the wing along the dotted line, and paste the lap of each wing onto the sides of[29] Mr. Bumblebee's chest. The wings turn back over the laps and hide them. (See Fig. 40). The finished bee is shown in Fig. 34.
If you cut a leaf out of green paper and put your bumble-bee on that instead of on the cardboard, he will look, with his extended wings, as if just ready to fly, and will make a fine addition to your collection of things made of outdoor material.
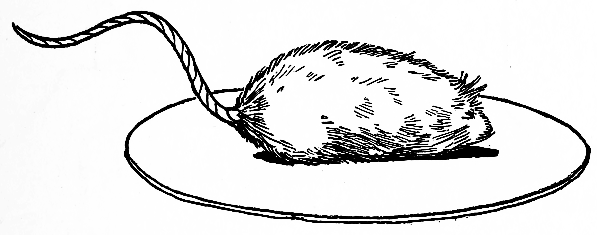
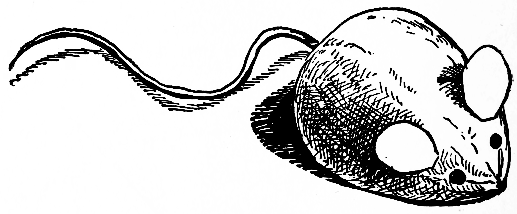
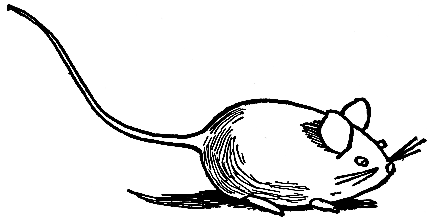
Then there is the pussy-willow mouse (Fig. 41). He is a nice little gray mouse with a long tail.
Choose a large pussy-willow for this mouse, ruffle the fur up on top of the head and it will look like ears. The head is at the small end of the pussy. Paste one end of a piece of cotton string under the large end of the mouse, and that will be his tail. The string should be white.
Finish by pasting the mouse to a round or square piece of pasteboard.
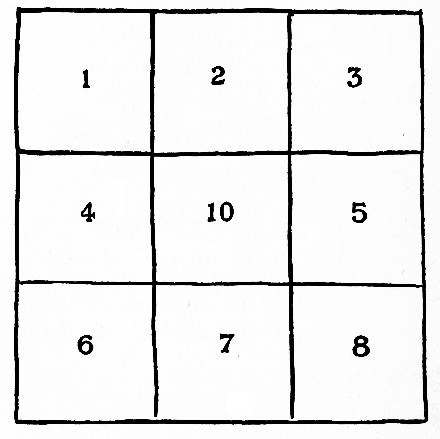
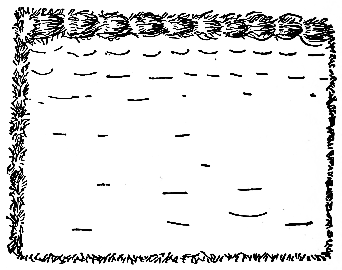
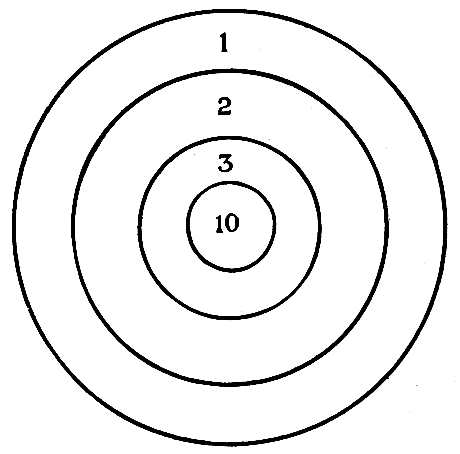
This is a good game and it will make you laugh to see the pussies leap up in the air, sail along a short distance, and land on a numbered square of the game-board.
The board (Fig. 42) should be ten or twelve inches square. Cut it from a flat, even box lid or any other pasteboard you happen to have. Draw straight lines from[31] top to bottom about one inch apart, then more straight lines from side to side one inch apart. This will divide the board into squares like a checker-board. Each of these squares must be numbered and you can draw or paste them in. Fig. 42 shows how the game-board should look.
To play the game, lay the board down on a flat surface, a stone will do if you are out-of-doors, or even the ground; and a table, if in the house. In front of the board draw a short line for the starting-post. The line should be ten or more inches from the board according to the distance you can make the pussies jump. Any number of players may join in the game and each player should have his own jumping pussy.
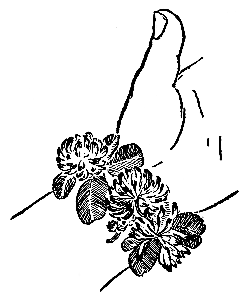
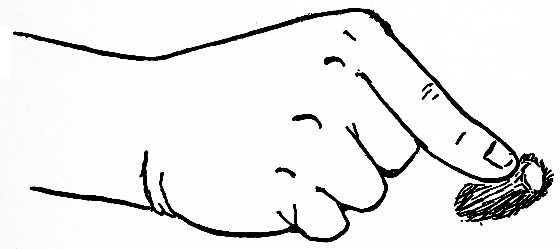
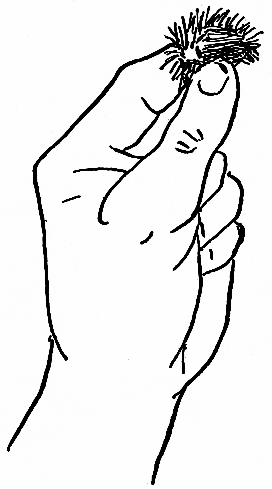
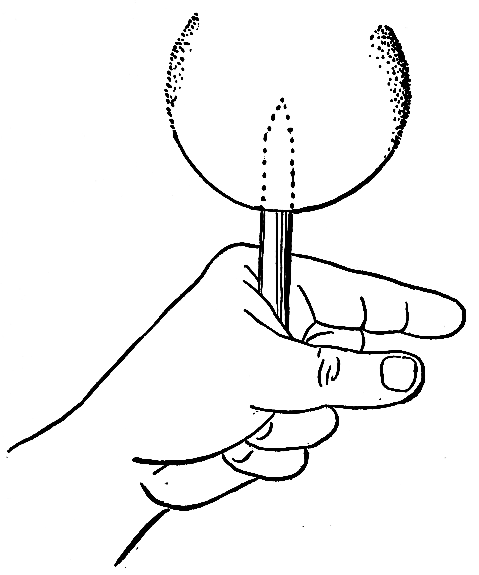
Fig. 43 shows how to place the pussy under the tip of your right forefinger, with the large, blunt end standing a little out beyond the finger-tip. When ready to shoot, press down suddenly on the pussy and, as your finger slides off the small end, away jumps pussy and lands on a square of the game-board. Each player plays in turn, always, of course, placing the pussy on the starting-line when shooting. The player whose pussy lands on the highest number wins the game. Jumping pussy-willow can also be played[32] by dividing the players into two even sides; then the side which has the highest score, after the numbers won by them have been added up, is the winner.
A nice, big bunch of pussy-willows makes an attractive bouquet, and a very welcome one early in the spring. "The pussies are out!" we hear some one say, and then the boys and girls vie with one another in their effort to be the first to find and bring home branches of the little catkins as proof that spring has come and they were the first to see her.
The arrangement of flowers is interesting and means a great deal. It means that this chapter will tell you what wild flowers look prettiest on the dinner-table and in bowls and vases in other parts of the house; what flowers and vines will keep fresh longest, and the kind that do not need water but are beautiful when dry. It means that you can learn not to force a tightly packed handful of all sorts of flowers into a small vase and expect them to look well. Flowers don't like crowding and are quite particular about their associates.
If you come in hot and tired after your walk, put the flowers you have gathered into a pail of fresh water and let them stay there until you have rested and are ready to sort them out and make each kind look its very best. All flowers do not appear well in stiff, straight vases; all do not look well in bowls. That is the first thing to learn, and the next is that while some flowers seem to smile upon and nestle lovingly up to some others, there are kinds that they seem to draw away from and frown upon. Only a few examples can be given here. If you love the flowers you will find out more for yourself.
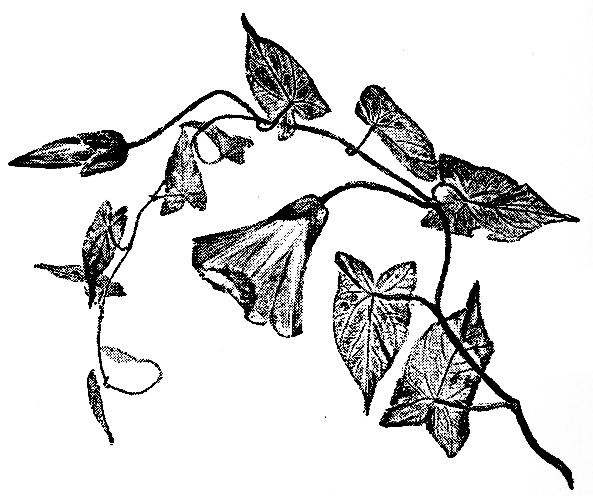
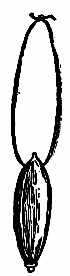
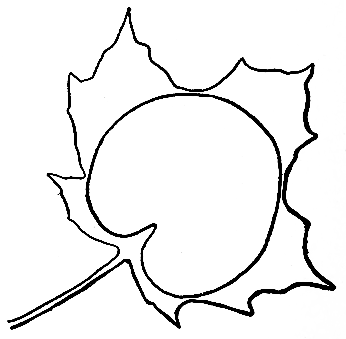
In your walks through the fields and along the country roadsides have you ever noticed the wild morning-glory? Of course, you have seen it and, perhaps, gathered some blossoms, only to find them in a short time wilted in your[34] hand or turned into little, long bags, puckered at the top as if drawn up with a string.
When I say noticed, I mean have you thought about the flowers while you looked at them? Have you noticed their shape and beautiful color, and have you seen the great difference between the green leaf of the wild morning-glory and that of the cultivated one?
The wild morning-glory leaf (Fig. 44) is more beautiful in shape, the vine is more graceful, and the blossom just as lovely as the cultivated morning-glory, and all this beauty need not be left behind when you gather the wild flowers which are to make the rooms of your home charming.
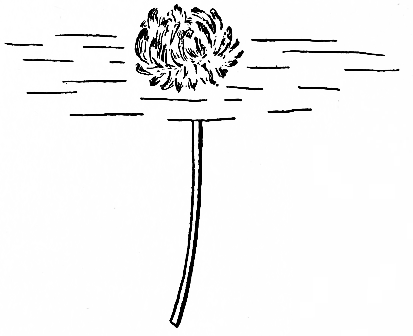
While I write this, July 7, there stands on a table in our living-room a tall glass vase, wide at the top and holding plenty of water. It is filled with a mass of wild morning-glory-vines, and there are four new, entirely open, pink and white blossoms while others are just twisting open.
Four days ago, when out for a walk in the country, I gathered the vine by the roadside where it grew in the company of daisies, buttercups, and wild mustard. Lifting themselves up into the light, where the warmth of the[36] morning sun could open the buds and where the leaves could breathe in the fresh air, some of these trailing vines had wound themselves in masses around tall, strong weed-stalks.
I gathered the vines, weed-stalks and all, breaking them off close to the ground; and now these stalks hold most of the vines upright in the vase, while other sprays droop gracefully over the edge and hang down almost to the table-top. Only one or two flowers were in bloom when I found the vines, but there were quantities of green buds which I hoped would open later, and that is just what they are doing. It is like having wild flowers growing in one's window. And as for decoration, nothing can be more beautiful (Fig. 45).
Trailing vines always make pretty decorations, and many wild ones keep fresh a long while when given plenty of water. Some have flowers, some have not, but in any case they are worth gathering when you have large vases to fill.
The wild clematis is another beautiful vine, and you will find it clambering over fences and bushes along the country road. Its masses of white flowers fill the air with a sweet, spicy perfume that delights you.
You can gather the clematis when it is in blossom, and keep it fresh in water for some time if you put it in root ends down. This vine does not wilt as you carry it. Later in the season, when the white flowers have turned into balls of silvery fringe, the vine is lovely in a different way. Then you can gather great armfuls and take it home to hang over mirrors or picture-frames, letting it become quite dry. It is best to strip the leaves off the sprays at first because they are not beautiful when dry. In a day or two after hanging up your clematis the balls of fringe will become a mass of soft down which will cling to the vine for many weeks. Later, when it becomes dusty, take it down.
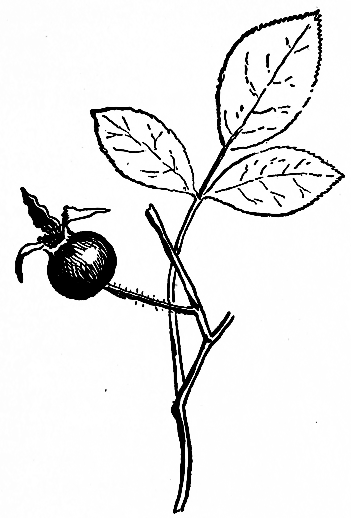
Then there is bittersweet, another wild vine that we gather in the fall. It covers fences and bushes as the clematis does, but instead of turning into fringe balls its small, creamy white flowers become bunches of berries.
The berries are yellow at first; when ripe they split open and curl back to show the brilliant red seeds inside that look like coral beads.
Gather the bittersweet while the berries are yellow, strip off the green leaves, and hang the vine up dry or put it in a large vase without water. Then the berries will open and last all winter.
Both of these are pretty flowers and worth gathering. The snapdragon (perhaps you call it butter-and-eggs) does not mind at all where it grows. Field, roadside, or even[38] the village streets may be its home, but wherever it lives, it makes the spot shine joyously with its stalks of yellow blossoms. Snapdragons combine well with the wild carrot, whose other name is Queen Anne's lace, and together they make a delicate and beautiful bouquet.
If you have a large glass fish-globe fill it with fresh water, and put in the snapdragon and wild carrot in a loose bouquet. Nothing could be prettier for the August lunch-table than this.
Do not put any other kind of flowers in the bowl; the roses won't like it; neither will you when you see how much better they look by themselves.
There is the yellow iris, the white and the purple, and they are very beautiful when combined but not crowded. Always put some of the long-spiked leaves in with the flowers.
Clover bouquets make delightful centrepieces for the table. Arranged loosely with its own green foliage, the rose-colored clover is especially beautiful in a clear, green glass bowl of water. The sprays should be brought over the edges of the bowl, and allowed to droop down, resting partly on the table.
Yellow clover and its foliage mingled with white clover makes a charming combination as a bouquet for almost any occasion. The name of the yellow clover is hop-clover. It is not as common as the other kinds.
When there are no flowers to be had you can have bouquets and centrepieces of green leaves, ferns, and vines, and you will be surprised to find what pretty ones can be arranged and how much they will be admired.
Ferns will wither soon unless taken up with the roots and the soil surrounding them; but if they have the roots and soil they will last a long while, provided you put them in a bowl or jar and keep them always wet. That does not mean to water them as you would any other growing plant, but to keep them standing in water all the time. Maidenhair-fern kept in this way makes a delicate and beautiful centrepiece for the table.
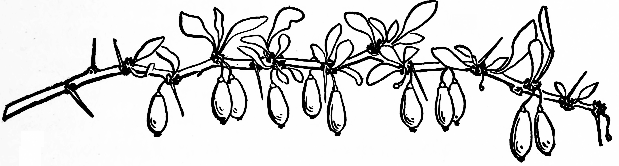
Sometimes you will find varieties of foliage that are full of color. In early summer the young leaves of the scrub-oak are very brilliant in reds and yellows, and I have made bouquets of nothing but leaves from the rose-bushes. These are often tinged with red and purple. Sprays of the barberry-bush with its rows of dangling red berries are pretty in a green bowl. Be careful of the thorns when you gather this. Cut the stems; do not try to break them.
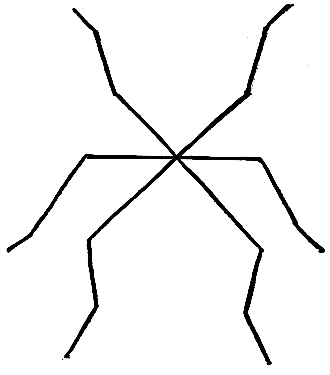
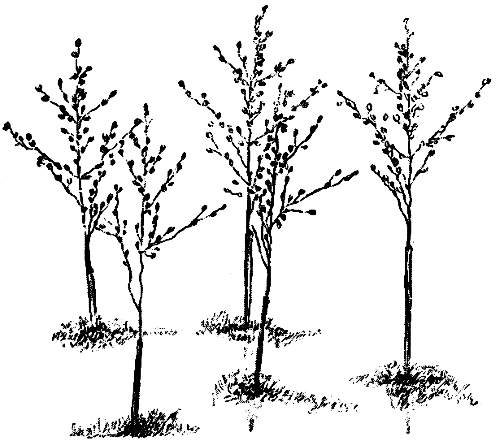
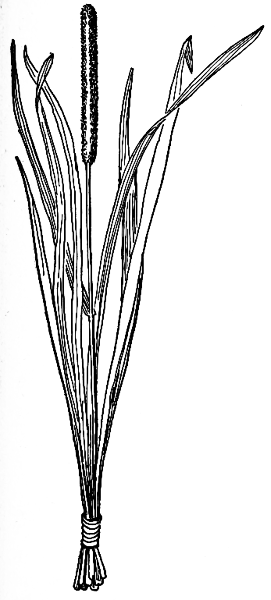
Some of our grasses appear like very large trees to the little grass fairies who, we like to pretend, hide in their midst; while other grasses, with their jointed, bamboo-like stems, seem to these tiny people to be tall forests of real bamboo.
Why not play that you are a little fairy and live among the grasses? But to see the grasses as the fairies see them you must lie down and bring your eyes very near the ground; so stretch yourself out flat, face down, with your head lower than the grass tops; then look steadily ahead through the tall grass stems. What do you see?
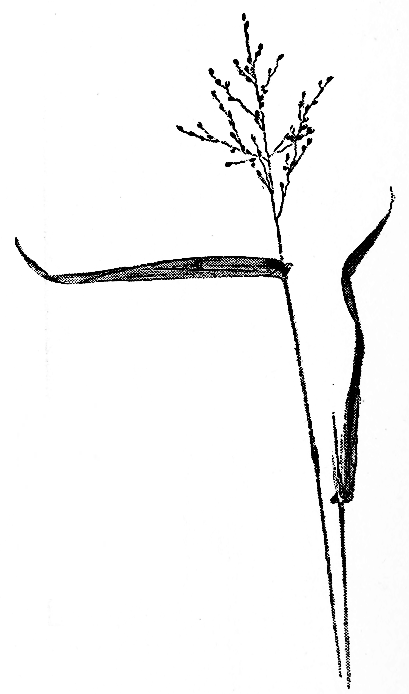
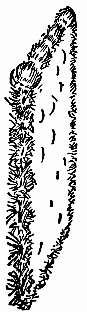
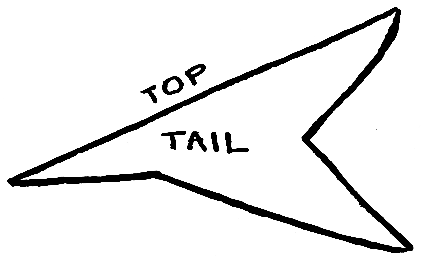
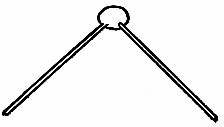
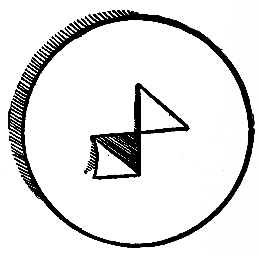
The five fairy-trees standing by themselves in Fig. 46 are four short-stemmed tops of the Scribner's panic-grass. Fig. 47 shows exactly how the grass looks before you pick it, and Fig. 48 gives a simple design that you can make by placing the tips of the four grass tops together, allowing the stems of two heads to lie in a straight horizontal line (that means a line running from left to right), and the stems of the other two heads to lie in a straight line vertically (that means up and down).
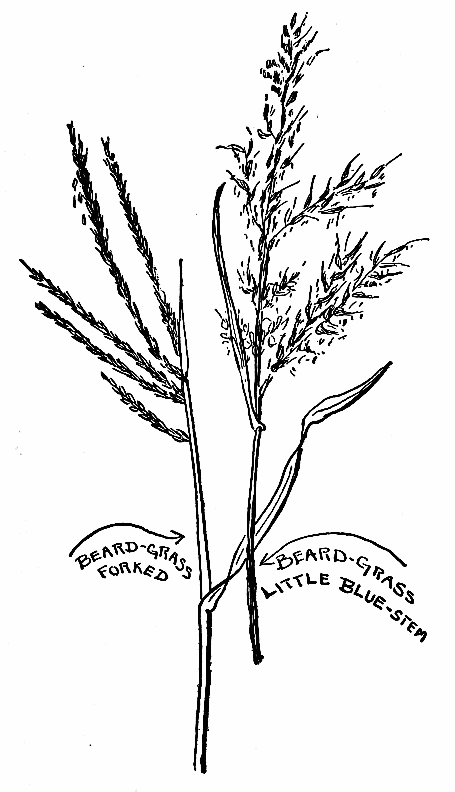
While you are playing with the grasses you can begin to learn something about them. The beard-grass, which[41] some people call the little blue-stem (Fig. 49), has near relatives named forked beard-grass and bushy beard-grass. These are stiff and angular, with bamboo-like stems, just the thing for trees in a little Japanese garden which some time you will want to make. You may run across them anywhere, for they are common in all parts of our country.
Make friends with these and with other grasses. As you find them learn their names just as you would learn the names of new playmates. Take the grasses home, show them to your father and to your mother; if they[42] do not know their names, carry them to school and ask your teacher about them. In case she cannot tell you, go to the public library with your grasses and persuade the librarian at the desk to help you find their pictures and names in some of her books. All grasses have names, so[43] [44] keep asking and hunting until you know what to call them. When you know their names you will be glad to see your friends, the pretty green grasses, whenever you find them.
In Chapter XVIII, which tells how to make a burdock-burr house, you will find more about grasses.
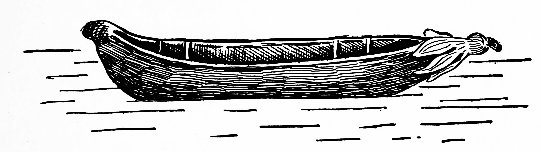
Real people live in grass houses way off in the Philippine Islands. That is, their houses are made of bamboo, which is a kind of giant grass. It must be a pretty airy, comfortable house in summer, and it is always summer in the Philippines, but we never see that kind of houses here. One reason is because in most of our country a grass house would be very cold in winter, and another reason for not building them is because the bamboo grows only in the extreme south, and even down there people want more substantial homes.
A prettier playhouse, though, could not be devised, and if you could see a Filipino house you would want it immediately, but since you cannot have a real one you can have the fun of making a little doll Filipino house, and of making it exactly as the little brown Filipino men make theirs. Suppose you gather some grass and twigs now, and build the little house for your doll.
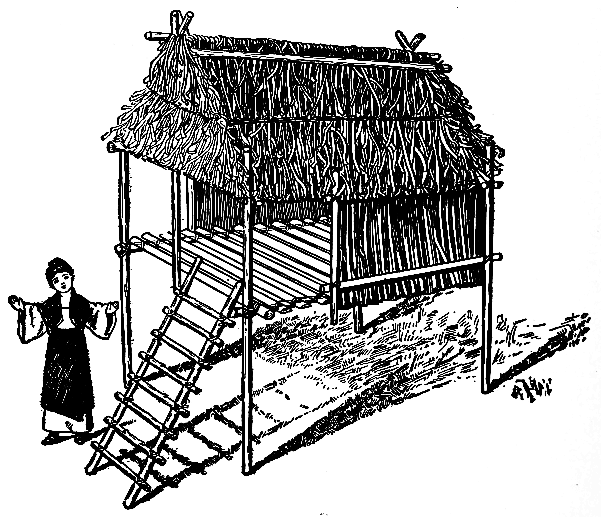
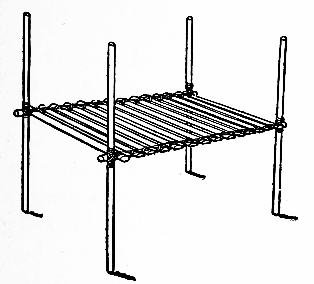
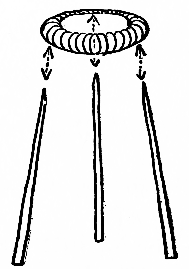
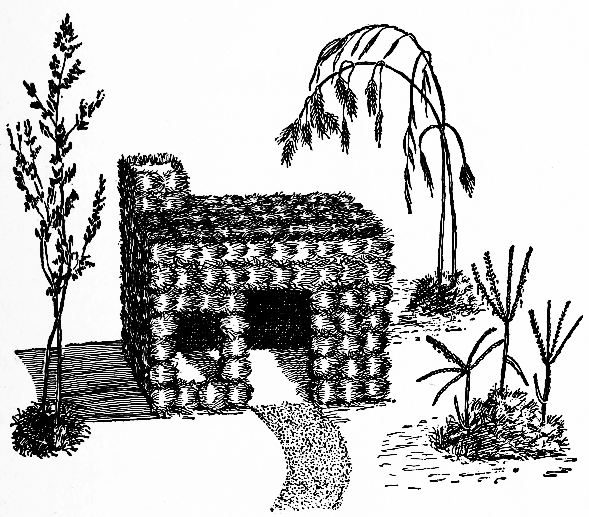
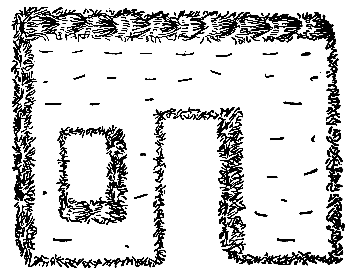
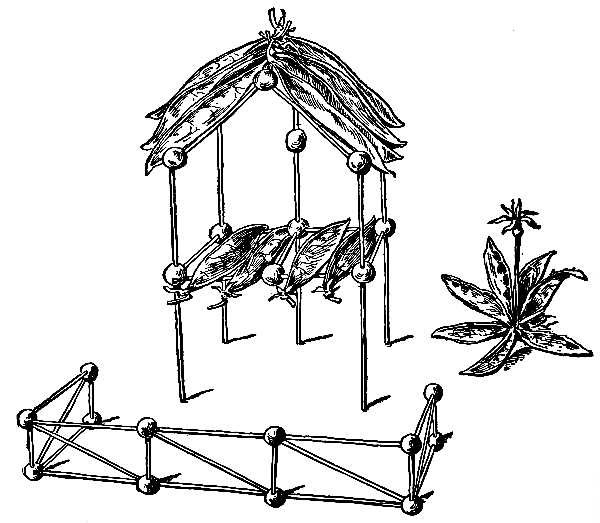
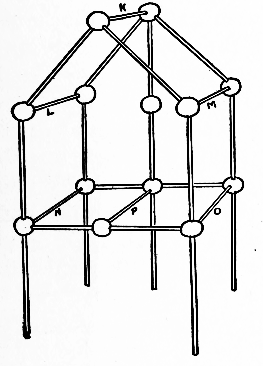
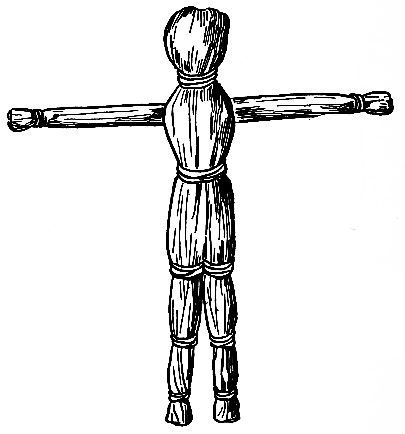
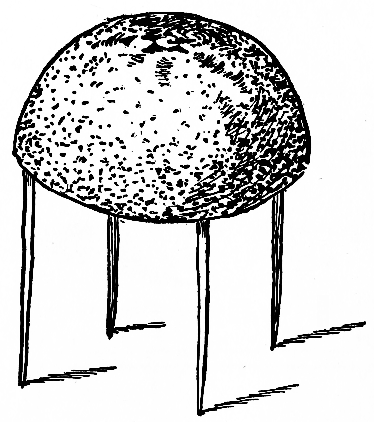
Some of the queer little people whose home is in the Philippine Islands perch their houses like birds' nests up in the trees, but often they are built on stilts to lift them high from the ground. Our little house (Fig. 50) shall be on stilts. We will make the floor first. If you do not understand how to measure by inches, ask an older person to help you.
Find two straight, round sticks, not quite as large round as a lead-pencil. The sticks must be cut six and a half[46] inches long, then two sticks of the same kind five inches long; after that there must be six more sticks five inches long. Split these last six sticks in half lengthwise.
The Philippine people do not use nails, or screws, or glue, and not even wooden pegs, in building their houses; they bind and tie the parts together with rattan, and as we are going to build just as they do we, too, will tie the parts of our house together, but will use raffia in place of the rattan.
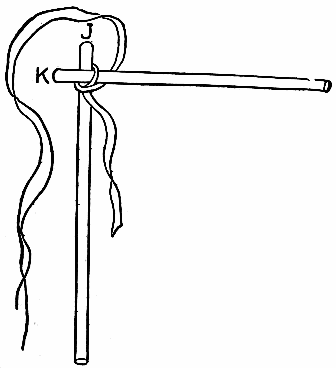
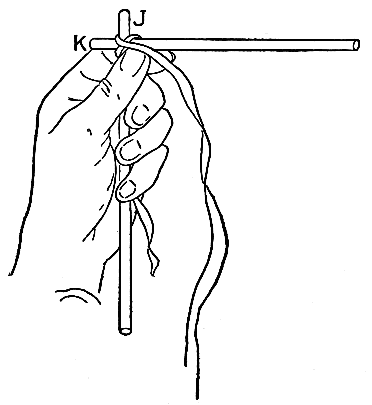
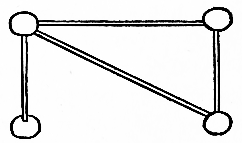
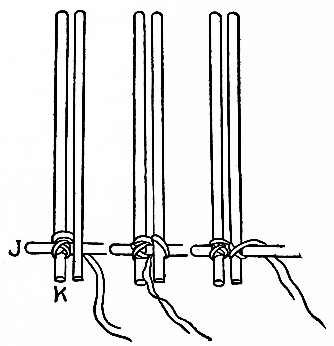
Hold one of the six-and-a-half-inch sticks (letter J, Fig. 51) upright in your hand while you cross it a short distance below the top with a five-inch-round stick (letter[47] K, Fig. 51). The distance from the top of the upright stick to the crossing and the distance from the short end of the other stick to the crossing must be the same.
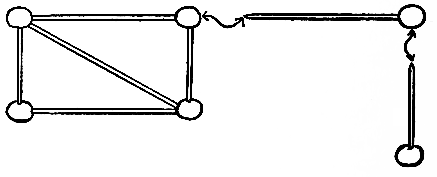
Begin binding them together as shown in Fig. 51. Then carry the raffia (string will do if you cannot get raffia) over and between the two ends of the sticks (Fig. 52), and wind it opposite ways several times around the sticks, bringing the raffia between as well as over them. This will lash them firmly together. Now turn this beginning of your floor around so that the short stick will be upright and the long one extend from side to side. Do not let the binding loosen; hold it tight and cross the long stick with one of the split five-inch sticks (Fig. 53). Be sure that the flat side of the split stick is next to the long stick, and that you leave a slight opening between it and[48] the first crosspiece. Pull the raffia tight and bind it over this second crosspiece (Fig. 54), then back, crossing it as in Fig. 55.
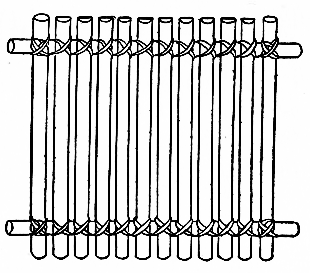
Bind on the next split crosspiece in the same way, and go on adding crosspieces until they reach almost to the end of the long stick, then let the last crosspiece be the second unsplit five-inch stick. When all the short crosspieces are properly bound onto the long stick, bind the other six-and-a-half-inch long stick under the opposite ends of the crosspieces in the same way, and just as carefully (Fig. 56). This makes the floor and we must lash it to the stilts, which are four upright sticks, each seven and one half inches long. Fit the stilts in the outside corners made by the crossing of the end and side sticks of the floor, and, holding the floor about four and a half inches above the lower ends of the stilts, bind floor and stilts together (Fig. 57). Of course you can put the stilts on only one at a time.
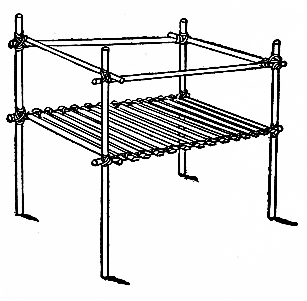
Make the framework for the walls by binding and tying onto the stilts near the top two sticks, each six and a half[49] inches long, one stick on each side. Across these sticks, from stilt to stilt, at each end, bind a five-inch-length stick (Fig. 58).
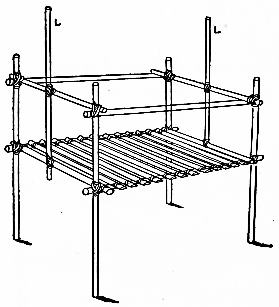
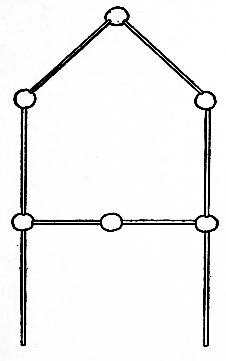
To support the roof there must be two upright sticks, each seven inches long, and these sticks must be bound and tied to the middle of the end sticks of the floor and the end sticks of the wall. They are lettered L and L in Fig. 59
Fig. 60 shows the framework of the house without the bindings, so that you may see exactly how the sticks are put together. There is a ridge-pole which forms the top ridge of the roof. This must be a stick about seven inches long, and it is to be tied to the uprights lettered L and L[50] that you have just fastened on the two ends of the house. (See Fig. 59, L and L.) Four other sticks, M and M and N and N, long enough to reach from the ridge-pole, crossing above it, to the side crosspieces of the wall, you must tie to the ridge-pole and the side-wall sticks, placing them slanting, as you see them in Fig. 60, at each end.
Like many other people, the Filipino wants a porch to his house. Perhaps he sits there to smoke his curious little pipe, which is not much larger than the one you make of an acorn. I have never seen him on his porch, but I have seen him smoke and afterward tuck his pipe away in his long, fuzzy hair, where it remained in safety even while he leaped and pranced about in the wild dance he loves so much.
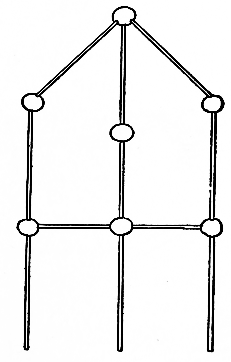
But we must not forget the porch. If the Filipino[51] has one to his house, we must have a porch to ours. We won't make it separately and add it to the part already built, but, as the Filipino does, we will use part of the house-floor for the floor of the porch, and let the roof cover that as well as the house. To do this we must separate the house part from the porch part by putting up two more uprights, one on each side, a little way back from the front of the house, and these uprights will form the boundary-line. Letters O and P in Fig. 60 are these last uprights, the sticks which form them being long enough to reach from the wall side-piece to the floor, and extend a little above and below where they cross the upper and lower sticks.
Now we come to the real grass part of the house, for we have had to use small sticks for the framework instead of bamboo, and where the Filipino uses palm-leaves we will use grass.
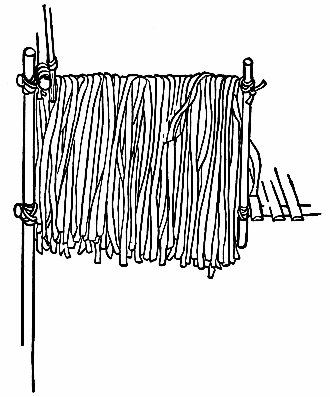
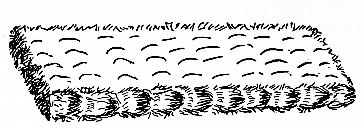
Gather some long, coarse, fresh blades of grass for[52] thatching both the roof and walls, and begin with the walls. Bunch the grass evenly, the stem ends all together, bend the bunch at the centre, then spread it out at its centre, and hang it thickly over one side-wall beam, which is the upper stick (Fig. 61). Have the stem ends inside the house hang down as long as the tip ends on the outside, and let the outside ends hang down below the edge of the floor; then take a flat strip of wood and place it near the top of the grass-covered wall, bend the ends a little and slide them back of the uprights (Fig. 62). Smooth the grass down evenly and put in another flat stick, this time at the bottom (Fig. 62). If you want the inside of the house as perfect as the outside, slide in two other strips on the inside of each wall to hold the grass down. Fig. 62 shows the grass partially trimmed off to make it even at the bottom.
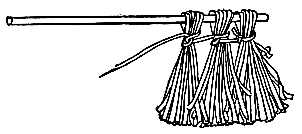
To thatch the roof you will need two more sticks for rafters. Over one stick, near the end, tie a bunch of grass into a tassel, using a piece of raffia to bind it; hang more grass over the stick or rafter, and tie it into another tassel, and with the same piece of raffia tie a third tassel (Fig. 63). Fig. 64 shows exactly how the raffia is tied. Make the tassels rather[53] thick and put them close together so that there will be no space between.
When this rafter (the stick) is covered with thatch lay it across the side of the roof half-way between the ridge-pole (top stick on the roof) and the stick forming the side wall of the house, and tie the ends securely to the slanting sticks of the roof. Thatch another rafter and fasten it on the opposite side of the roof, then cover two shorter sticks with thatch and tie one across the front, the other across the back peak of the roof on a line with the thatched rafters on the sides.
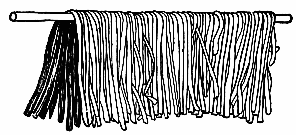
Fasten more thatch at the front and back peak of the roof, tying it to the ridge-pole, also to the two slanting sticks. Allow the grass to hang down far enough to cover the top of the thatch below it (Fig. 50). This thatch must entirely fill up the ends of the roof made by the peak. Now hang grass over the ridge-pole at the top of the roof as you would hang your doll's little sheets on your toy clothes-line (Fig. 65), and bring the ends down over the thatched rafters on each side of the roof. Hold this top thatch in place by laying sticks across the grass just below the ridge-pole on each side of the roof. Bind and tie these sticks at each end to the framework of the house (Fig. 50).
If grass cannot be had for thatching, soak hay in water to make it soften and take the stiffness out, then use that. Raffia dyed green might do, or should all else fail, take fine broom-straws softened in hot water for the thatch, and use loosely twisted string for binding and tying. Of course the string should not be white, but you can dip it in coffee and dry it; the color will then be like the color of rattan.
The spry little Filipinos use ladders instead of stairs to reach their living-room, so we must make a rustic ladder for our house.
Cut two slender sticks about six and one-half inches long for the sides; then cut seven or eight short sticks for the crosspieces or rungs. The rungs should be one and three-quarter inches long. Bind and tie the ends of the rungs to the side sticks (Fig. 66), placing them about three-quarters of an inch apart. The ends of the rungs must cross the side sticks and extend out about one-quarter of an inch. If properly tied, your little ladder will be firm and strong.
Place the ladder one end resting on the ground, the other end on the front edge of the porch, then stand off and admire your work. It is certainly worth admiring, for the house will be a perfect miniature Filipino home, and you may imagine you can see tall cocoanut-palms and many other strange and beautiful trees and plants that grow in the hot Philippine Islands. You might copy some of these with grasses and small flowering wild plants.
If you have a Noah's ark it will be a good idea to select some of the animals that live in the Philippines and put them in the little rattan and bamboo jungles which you have made of grasses. A piece of looking-glass or plain window-glass can represent water not far from the house, and here you should have a crocodile sunning himself on the bank. Let a wild boar be plunging out of the jungle, and deep in the bamboo grove you might hide the tremendously large[55] snake called a boa. I don't think there will be a boa in your Noah's ark, but you can make one of bread dough, or of clay. With all these dangerous creatures prowling round, do you think it strange that the Filipino people put their houses on stilts?
If this were a real house in the real Philippines you might see a number of natives, wearing little or no clothes, coming toward you bringing small snakes which they had caught to sell in the towns for rat-catchers. And near the house there would be most wonderful flowers, some of them orchids, the flowers that live on air; while all around would be strange and rare birds.
At one side of the house, some distance away, there would, perhaps, be a wet rice-field where the queer water-buffalo, called a carabao, would be drawing a strange-looking plough, the driver, a little brown man, wearing an immense umbrella-like hat woven of palm-leaves.
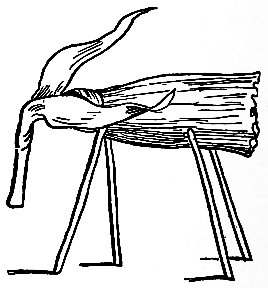
Listen! Do you hear that deep, booming sound? It comes from the peculiar tree which a native is striking with his big club in slow, heavy blows on one of its immense, wall-like roots. The sound goes rolling far over the land, telephoning to other natives that white people are coming.
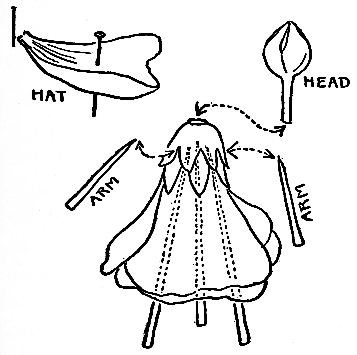
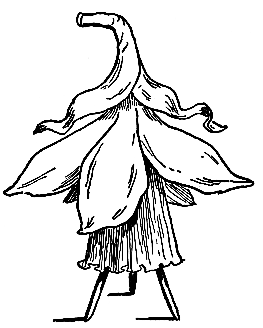
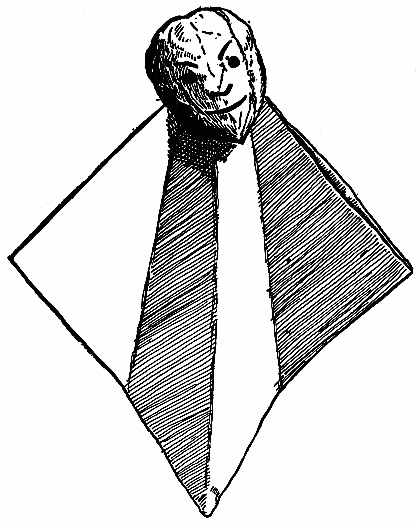
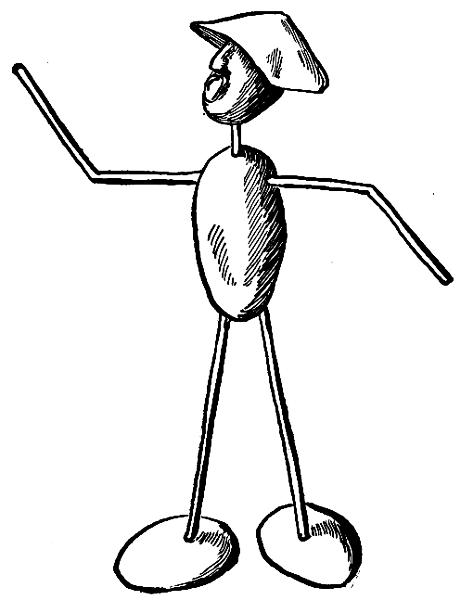
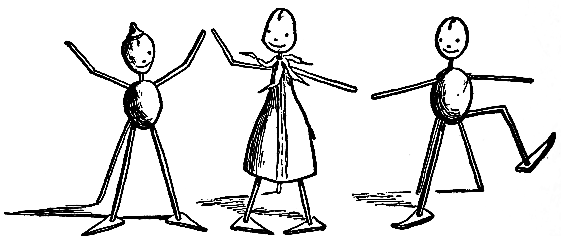
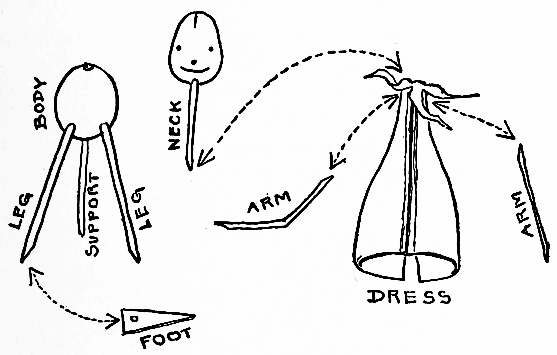
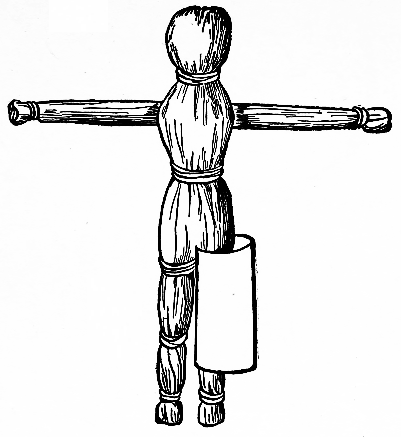
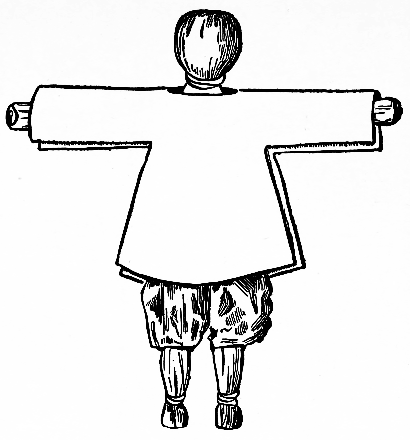
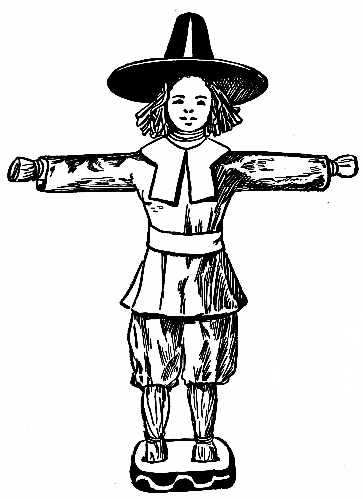
To make the little house seem more real, dress a doll in genuine Philippine costume and stand her near the ladder with arms extended as if in welcome. The dress must be a white waist with flowing sleeves, a light-colored skirt, a large gay handkerchief, called a pañuelo, folded around the doll's neck, and an overskirt made of a square of dark cloth drawn tightly around her body from waist to knees. No stockings are needed, but you can give her heelless slippers with only a narrow strip over the toes to keep them on.
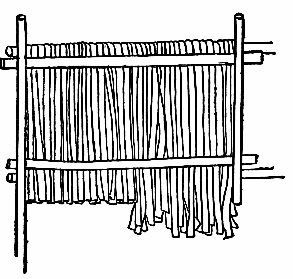
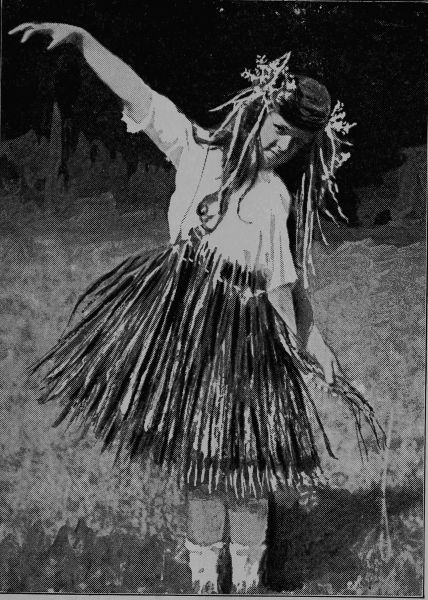
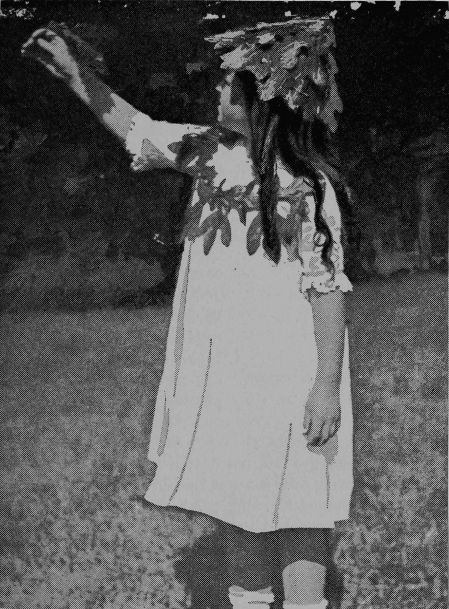
Look at the little girl in the photograph who is wearing her new grass dress made of the wavy hair-grass and playing that she is a wood-nymph. She feels very proud and is greatly pleased with her pretty costume.
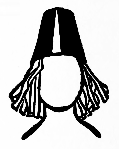
Almost any kind of long, slender grasses can be used for a dress of this kind, but you must gather an armful or more. It takes a good deal of material, for the fringe must be close and thick.[57]
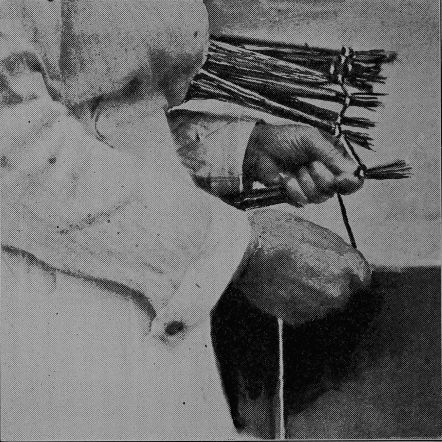
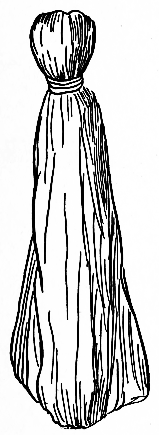
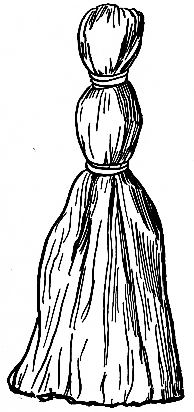
Divide the grass into bunches, each bunch about as thick as your thumb, and have the heads of all the grasses together at one end of the bunch, and the stem ends together at the other end.
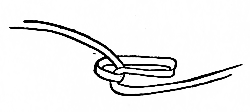
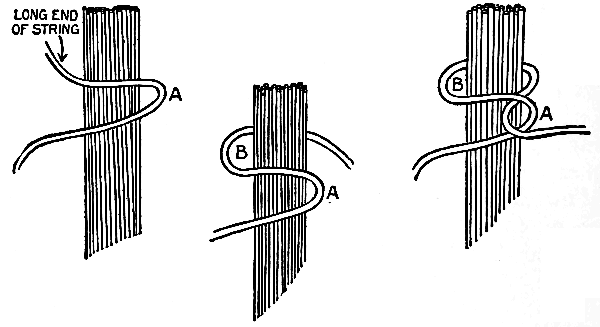
Tie a strong string around the stem ends of one bunch. Hold this tied bunch under your left arm, stem ends to the front, and take up another bunch (Fig. 70). Bring the long end of the string across the front of the second[59] bunch and form a loop (A, Fig. 67). Hold the loop while you pass the string around the back of the bunch (Fig. 68), then slide the end through the loop A, Fig. 69. Draw this loop-fastening very tight and it will hold. Now place the second bunch under your arm with the first bunch, and make a loop-fastening around the third bunch. Keep on adding bunches of grass in this way, always drawing the last bunch close to the one before it, and holding them all together under your arm as in the photograph (Fig. 70). In this picture the grass bunches are purposely left far apart that you may see exactly how to make the fringe.
The grass dress will be finished when you have made[60] a strip of fringe long enough to reach around your waist, for the skirt—it needs no waist—is really only a fringe of grasses to be worn over a light summer dress.
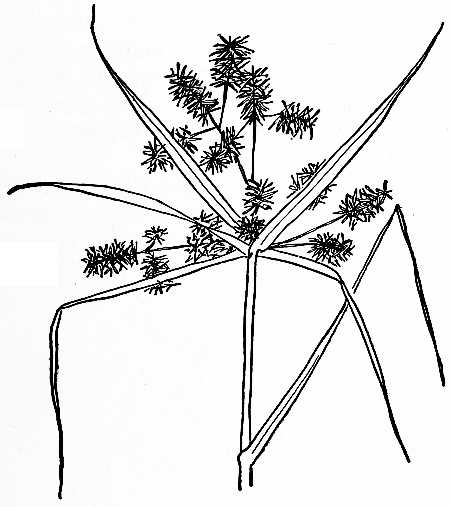
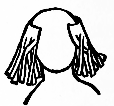
The grass head-dress to be worn with the wood-nymph skirt is quite as wild-looking, but is simply a band of grasses, with bunches of the bristle-spiked cyperus grass (Fig. 71) hanging downward on each end. The band goes across over the top of the head, and the grass side ornaments fall over the ears.
Wear the grass costume and carry a light branch of green leaves in each hand when you give your next outdoor fancy dance, or take part in outdoor tableaux where you could represent either a wood-nymph or the spirit of the grasses.
To dress up and pretend is something every little girl, and boy too, for that matter, likes to do, and there is no better place for having this kind of fun and no greater storehouse for dress-up material than the wide, sunny fields and green, shady forest on a summer's day.
If you want to be a wood-nymph, a fairy, or a pioneer; if you would be a fashionable lady decked in jewels rare,[62] or a rollicking cowboy, or Robinson Crusoe, it is all the same to Mother Nature's department store. Fields, Woods & Co. can furnish all you need. If the goods are not always ready to wear, they are at least ready to be made up into what you want.
Why, you can even be a little savage and wear a skirt made of a fringe of long grasses, like the wood-nymph's dress, and bracelets of slender, golden-brown rootlets, if that pleases you; all the materials are ready to your hand. And you can make a
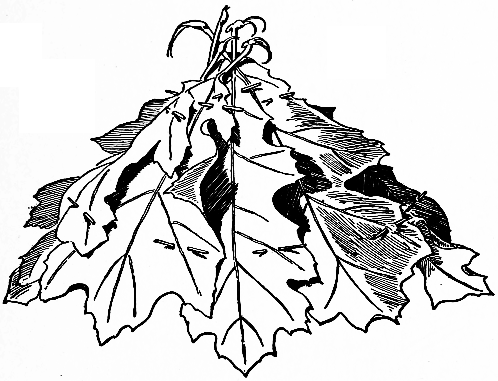
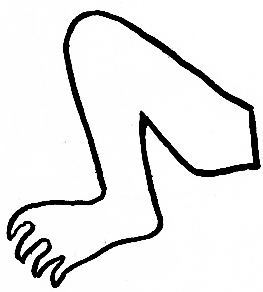
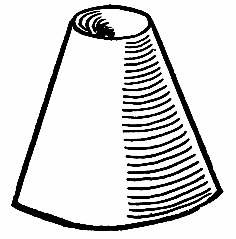
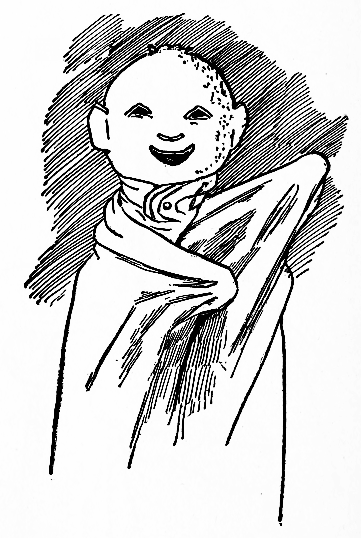
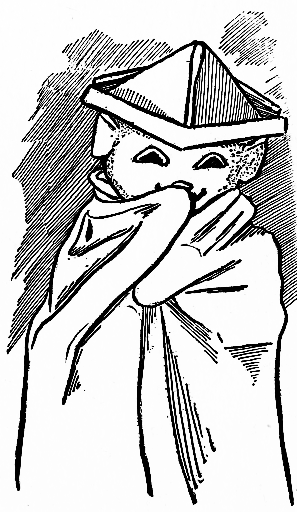
The photograph given here shows one little girl who likes immensely to wear her Crusoe hat, and Fig. 72 shows just how the hat looks when not on her head.
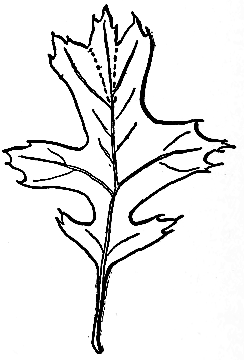
It won't take more than five minutes to make the hat, but first you must gather the leaves. Ordinary oak-leaves are too small to use; it is on the scrub-oak that you will find them large enough. The scrub-oak grows low, like a bush, and the leaves will be quite within your reach. Like a good shopkeeper, this kind of oak shows his customers leaves of various sizes, but it is the very largest that you must take, and only the ones that are dark-green in color. The pretty new light-green or brownish leaves will soon wilt and curl on the edges, while a hat made of the older, tougher ones will last in good condition several days if left out in the dew at night or kept damp in the house.
The number of leaves needed depends upon the size of
the leaves and the size of your head. It is well to have
at least a dozen and a half; then you can select the best.
The largest leaves are not always perfect, but unless very[63]
[64]
much torn or eaten away by insects they will answer. To
gather all you need you will probably have to visit several
of the little scrub-oaks.
If you are at home when you make your hat, use broom-straws to pin the leaves together; if you are in the woods find some smooth, slender twigs, break them in short pieces, and they will take the place of the straws.
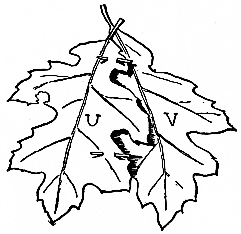
Begin by pinning two leaves together as they are in Fig. 73. These leaves are lettered U and V. You see that U is lapped over V and then pinned to it in two places, first near the stem and then through the lower side lobe. The next leaf would be letter W, and W would be pinned to U just as U is pinned to V. Make the stems meet at the top and keep adding leaves, pinning one to another, until the hat is large enough to fit your head comfortably, then pin the last leaf to the first.
Do not make the hat too flat; if you find it flattening out, lap the leaves over more at the bottom. When finished it should be shaped like Fig. 72.
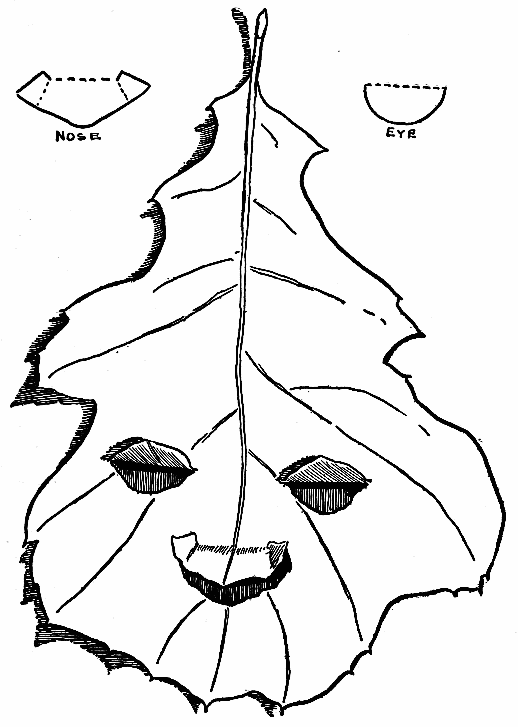
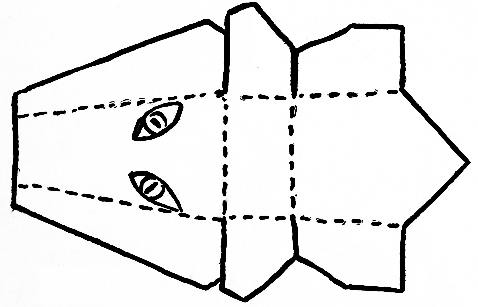
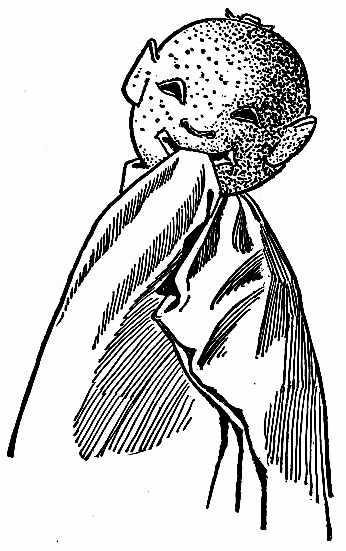
Among other frolics in the woods you can have a masquerade—a real one, where you wear a mask, and that mask made of one of the largest leaves of the scrub-oak. Not even a pair of scissors will be needed to make this mask, and it is a funny one too (Fig. 74). See the turned-up eyelids and the wide nose tilted at the end.
When you have found a leaf large enough (the one in[65] the drawing was nine inches long and seven inches wide) use your thumb-nail to cut out the eyes and nose. The outlines at the top of Fig. 74 show how to shape them, and the dotted lines show where they are bent up.
There is no mouth, none is needed, for the leaf, below the nose, drops down loosely over your mouth like the curtain on a mask one buys at a shop. The oak-leaf mask will stay on your face if you wet the under parts of each side and stick them to your cheeks.
Another way to make the mask is to turn the leaf around, stem down, and then cut the eyes and nose in the wide part, leaving the narrower stem end for a long chin. This kind you can hold in front of your face by taking the stem in your hand. It requires so short a time to make a mask that when one wears out or is lost you can have another to replace it in a minute or two.
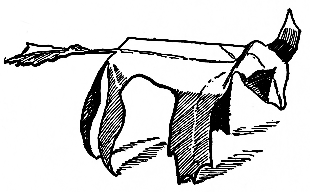
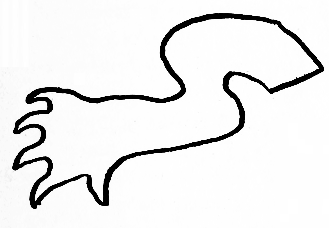
He has the funny expression of a real dog when he is making up his mind what to do next, even if he is only an oak-leaf. It was an ordinary leaf four inches long which was, by tearing a little here and bending a little there, transformed into his absurd dogship (Fig. 75).
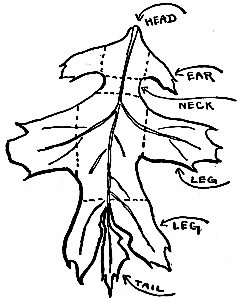
Fig. 76 is the tracing of the leaf actually used for the dog. Fig. 77 shows the same leaf with its stem nipped off and the other end torn up, not very evenly, where the dotted lines are in Fig. 76. This makes the little dog's tail. The tear on either side reaches to the mid-rib of the leaf, but does not cross it, and the mid-rib being unbroken holds the tail out stiff and straight.
The two hind legs are bent down just where the tear ends in making the tail. The dotted line in Fig. 77 shows this. The other two legs, formed by the side lobes of the leaf, are bent down as the dotted lines indicate. The tip of the lobe on the left side had to be torn off because that leg was longer than the opposite one.
In making the neck the narrow part of the leaf was bent up and then down, the two dotted lines show where. Then the ears were bent up and the little oak-leaf dog was placed standing as you see him in Fig. 75, to have his picture drawn.
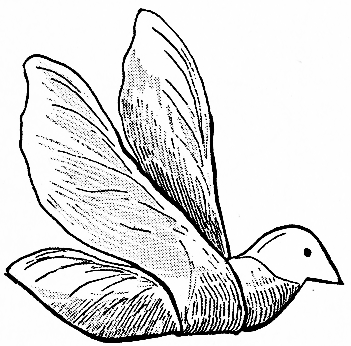
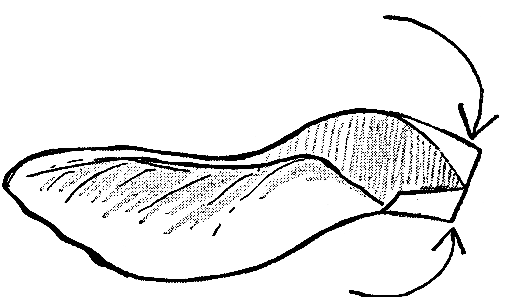
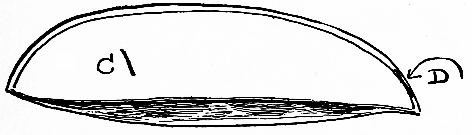
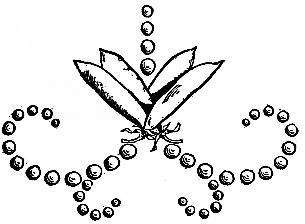
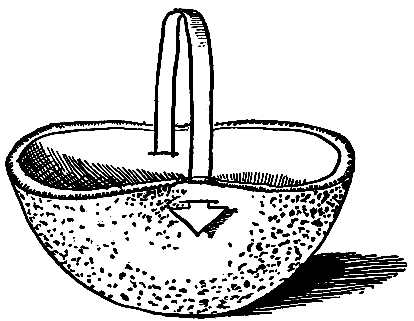
A wild-grape leaf will do quite as well as a cultivated one for a drinking-cup if it is large enough. You want a large leaf, because a small one will hold only a sip of water, and when one is really thirsty that is certainly not enough.
Whether wild or cultivated, the grape-leaf should be washed in clean water to take off dust and any possible insects that may be on it. Where there is water to drink there is water for washing the leaf, so there can be no difficulty about that, and the large green leaf, freshened by the water, looks very cool and inviting.
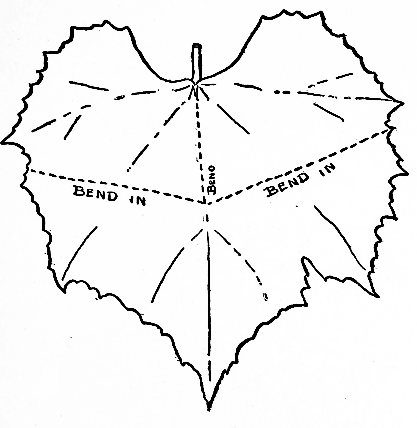
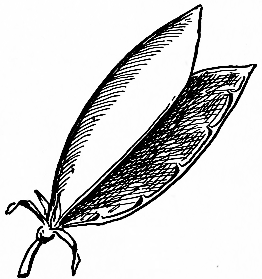
It is simply a matter of folding, first one way, then the other, that turns the grape-leaf into a cup. Fig. 78 is a tracing of the leaf from which the cup (Fig. 79) was made. It measured eight inches at its widest part, almost seven inches from tip to stem, and the cup held a good supply of water.
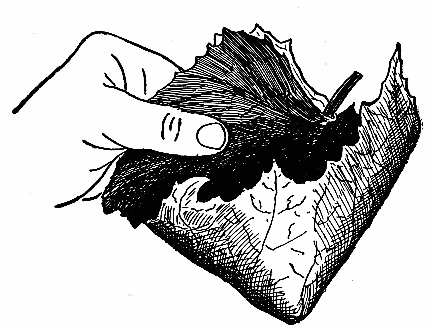
Begin to fold by bringing the two lower lobes of the leaf together in the way shown in Fig. 80. This makes the middle bend that is indicated by the dotted line in Fig. 78. Then bring the two lobes around to the left, or to the right if that comes easier, hold them close together and lap them over the upper lobe on that side. That makes the two side bends which join at the middle bend (Fig. 78), and rounds the cup into shape.
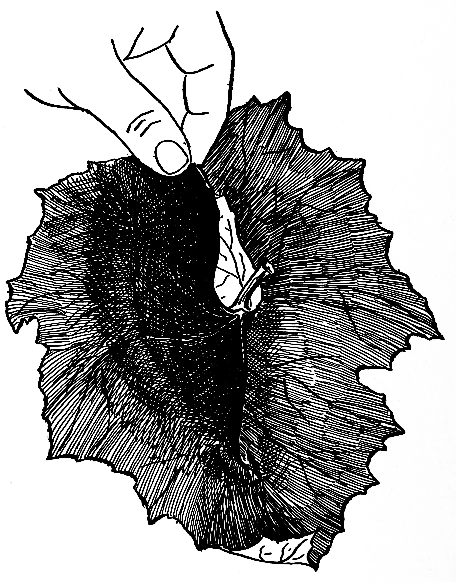
The bottom of the cup is pointed, as you see, and,
of course, will not stand; then, too, the cup falls apart
when you loosen your hold, but neither of these things
are of any consequence, for you can let your cup lie flat[69]
[70]
and fold it again very quickly when it is needed. As long
as the folds are held tight in your fingers, the cup will keep
its shape and hold water without leaking a particle. Use
the upper, or green, side of the leaf for the inside of
the cup; the under, or light, side is fuzzy and may harbor
small insects even after it is washed. Be sure you look
into the water before drinking it. This should be done
no matter what you drink from or where you get the
water.
Remarkably pretty designs can be made entirely of green leaves; also with leaves and their seed-pods, their nuts and berries. You can press a design of leaves alone, but one having seed-pods, berries, or nuts cannot be pressed. It is fun to make it, even if it cannot be preserved by pressing, and you will like to do it.
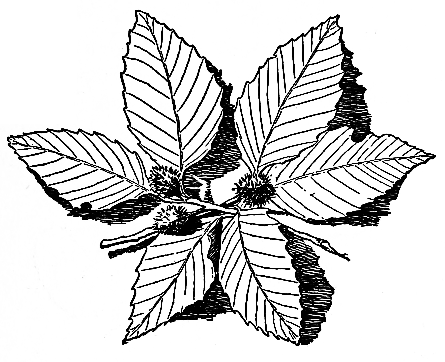
Fig. 81 is the drawing of a charming design made of two twigs broken off a beech-tree. On one twig were two beechnuts in their pretty green, spiky outer shells; on[72] the other was just one nut. Each twig had three leaves. Nothing was cut off and nothing was added for this design; the twigs were used exactly as they came from the tree. The stems were simply crossed, with the lower leaf of one twig falling over the stem of the other twig, and that finished it. The easiest thing in the world to do if you happen to think of it.
There is one thing about the green leaves of the violet which makes it a joy to use them in a design, and that is, the stems are so pliable, so easily bent and curved, you can do almost anything with them.
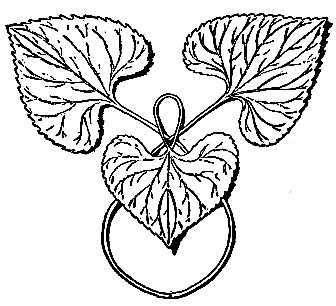
See how the stems add to the beauty of the violet-leaf design Fig. 82.
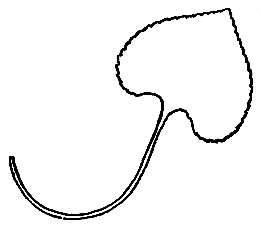
The curve of the stem of Fig. 83 is a natural one for it to take, and you can probably find a leaf with its stem[73] curved very much like it, but it is another thing to come across one of the same size which has a stem curved in the opposite direction, and such a stem is necessary for a design like Fig. 82.
Very well! Since the stem does not naturally curve the way we want it, we will make it do so. All we have to do is to draw it through our fingers several times and, by pressure, gently persuade it to turn as we wish.
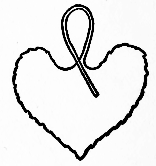
Fig. 84 is the under-side of the small leaf at the bottom of the design (Fig. 82), and shows how the stem loop above the leaf was made.
First a violet-leaf with stem curved like the one in Fig. 83 was laid down on a sheet of paper, then another leaf of the same size, with stem made to curve in the opposite direction, was placed beside but not touching the first leaf, and with its stem crossing the other stem. The two stems meeting at the bottom formed a pear-shaped loop. The small leaf, after its stem had been formed into a loop and the end tucked in at the back, was fitted on top of the stems of the large leaves, as you see it in Fig. 82.
Violet-leaves are seldom flat; they are apt to curl at the edges; some are so curled as to form little cornucopias. Choose the flattest you can find for a design like Fig. 82, and paste them to the paper with a touch of paste on the under-part of the tip and of the two lobes at the bottom[75] of each leaf. Paste the stems down also with a touch of paste here and there.
The violet-leaf design can be pressed.
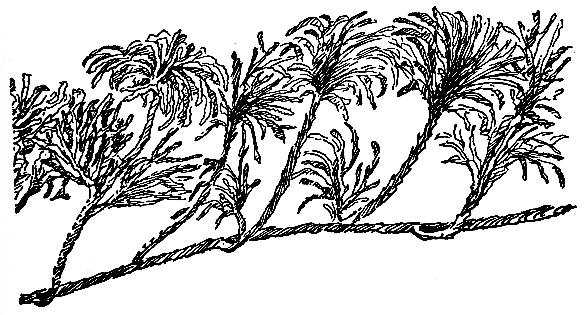
Deep in the shadowy woods, often where pine-trees are growing, you will find the ground-pine. Clinging close to the ground, curling in feathery, green clusters on its vine-like root, it runs for yards over the surface, while its root, lying along the top, sends down slender rootlets into the earth. Push away the dry leaves or pine-needles that usually cover the root, and you can pull up long strips and soon gather enough to make the prettiest kind of festive decorations.
Festoons of the ground-pine are very pretty on walls, stair-banisters, porch-railings, over picture-frames, and hanging from chandeliers, and this ready-made evergreen rope is as suitable for outdoor as for indoor decoration, as beautiful in summer as in winter.
When you want to "dress-up" in the woods use the ground-pine for trimmings. Loop it over your skirt and make a wreath for your hair. Last summer at camp we used the ground-pine in this way and the little girls, arrayed for a dance, never looked prettier. For table decorations at camp and for decorating the tent doorways the ground-pine is charming.
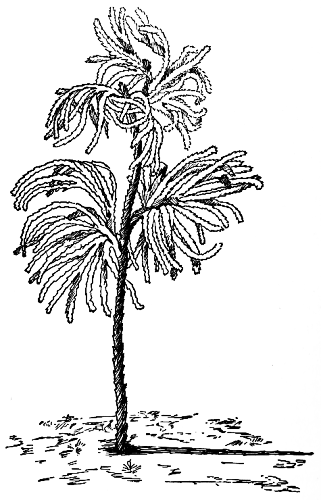
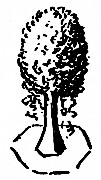
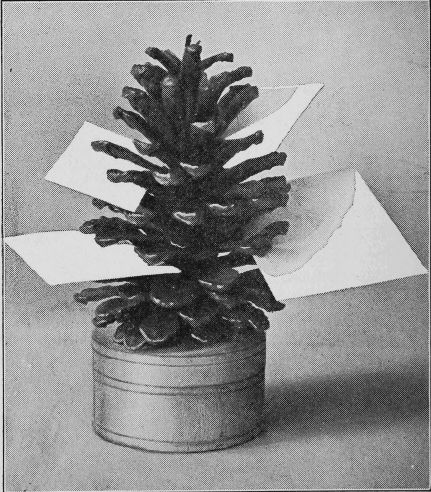
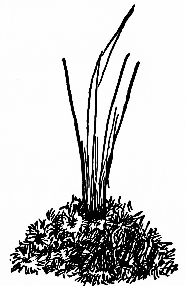
Fig. 85 shows how the short, curled clusters grow on the long root, and Fig. 86 gives a wee pine-tree made of one cluster picked off the root and planted in an outdoor doll's garden.
This is what our American writer and poet, Ralph Waldo Emerson, said of the ground-pine:
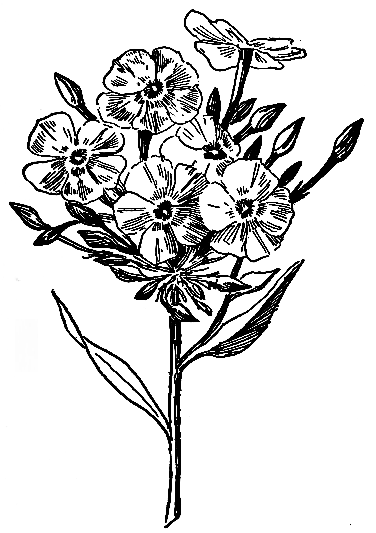
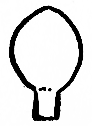
In a great bunch of garden-flowers given me by a friend I found some pink-and-white phlox (Fig. 87), and from it I made first a
As you know, the blossom is trumpet-shaped and flares at the open end into five petals. The tube part is long and narrows to a point, so it is easy to push one flower into another. That is what you do in building the phlox tower. You pull the blossom off its stem and out of the little green calyx which holds it, then you push the end of the tube part into the round red eye in the centre of another flower as far down as it will go. Then you push another blossom into that one and build up until your tower is as high as you want it, or as high as it will stand without toppling over. A bud stuck in the top flower makes a good finish (Fig. 88).
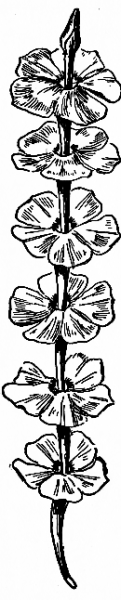
The design Fig. 89 was made by first putting three blossoms together, sticking one inside the other as for the tower, to form the long side sprays, and afterward arranging three blossoms below the side sprays and one above[77] with their stems meeting at the middle, as they are in Fig. 89. On each side of the upper flower was placed a sprig of buds; then the tube part of a blossom was cut off and the petal part fitted in the centre of the design to cover the ends of the other flowers where they met.
The tube parts of three more flowers were cut away, and the petal parts arranged in the position shown in Fig. 89. This formed a scattered design quite different from any of the others made of flowers.
Touches of paste on the under part held all the flowers[78] in place. The phlox design is a good one to preserve by pressing.
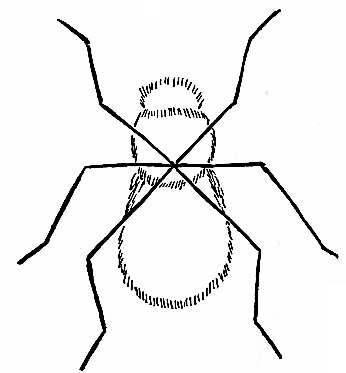
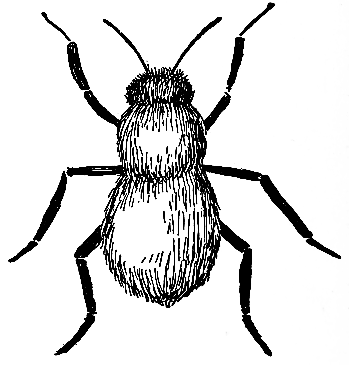
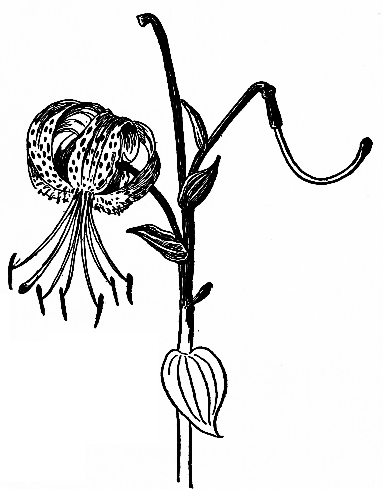
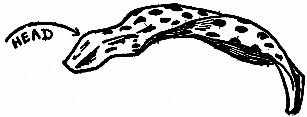
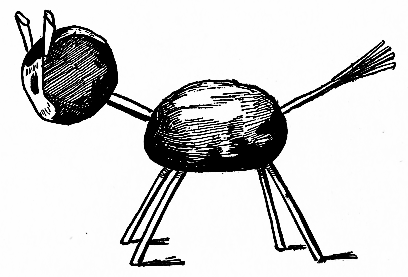
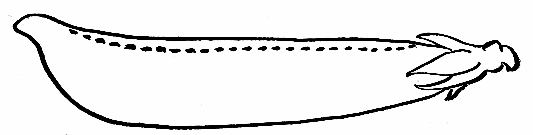
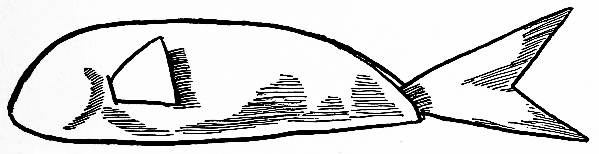
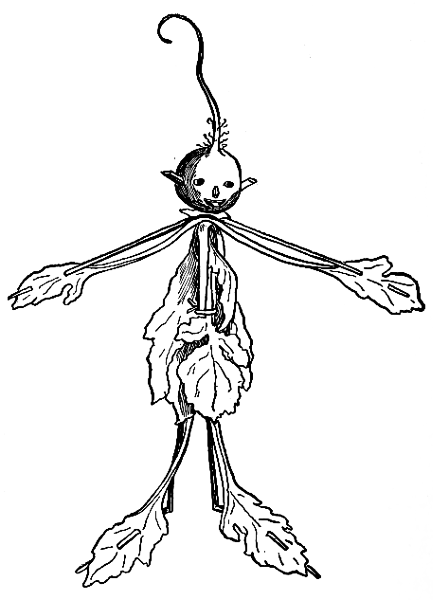
From the brilliant-orange tiger-lily, with its dark-brown or black spots, we are going to make a—tiger? No, a leopard. Tiger-lilies may have spots, but tigers, you know, are striped.
It is really wonderful how much this little animal, made of parts of a beautiful flower and broom-straws, looks like the stealthy, prowling, wild creature which lives in Africa and Asia. The yellow coat of the live leopard is covered with black spots, and so is that of our flower leopard. The fierce living animal has a long tail that it moves slowly[79] back and forth in anger or when it threatens to attack another animal or a man. Our little leopard also has a long tail which, if it does not really move, looks as if it were just going to. But while the live animal is ferocious and will kill, we can only pretend that of the tiger-lily leopard. Though he looks dangerous, he cannot even nibble a green leaf.
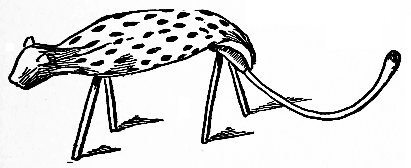
The illustration of the tiger-lily given here is a drawing of the one from which the lily leopard (Fig. 90) was made. You will notice that at the right of the flower (Fig. 91) there is the stem and pistil of a blossom that has fallen apart.
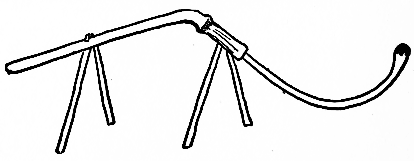
When we make the leopard we cut off this lily-stem close to the stalk, leaving the pistil attached, to use for the back-bone and tail. Four broom-straws, about an inch and a half long and sharpened at one end, we use for legs. The pointed ends of two of the legs are pushed[80] into the stem at the front, and the other two in part of the pistil at the back, as shown in Fig. 92. That makes the skeleton.
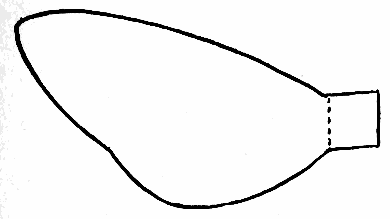
Now we have to fit on the skeleton the leopard's spotted coat. After pulling the perfect flower apart we select the petal best suited for this purpose (Fig. 93), and then take the curl partially out of it by pressing it down on the table with our fingers. The tip of the petal will have to be cut off because it comes down too far over the tail.
The blunt end of the petal will be the leopard's head, and it can be rounded up and moulded with your fingers until it looks like the head of the leopard in Fig. 90. Small ears of bits of broom-straw, pointed at one end, we must stick in the head where they belong and then, in order to make the coat stay in place, we will pin it to the skeleton at the neck, in the middle of the back, and again at the tail, with fine broom-straws. So we have the little leopard complete.
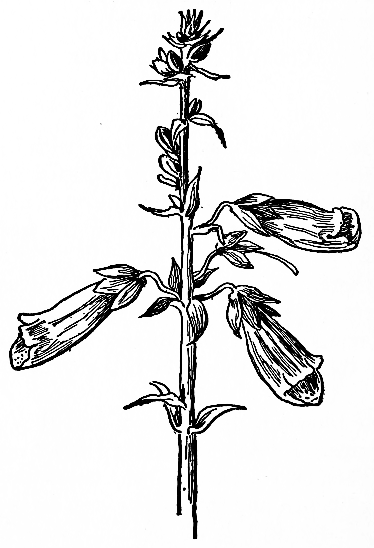
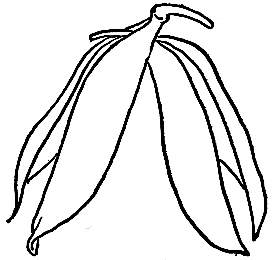
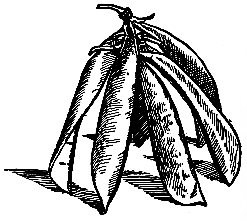
Do you know the cultivated foxglove with its tall spikes of thimble-shaped flowers, prettily spotted inside? (Fig. 94.) And do you know that these flowers will fit on the ends of your fingers like tall caps on the heads of little fairies?
Perhaps there are foxgloves growing in your garden now. If there are, pick five blossoms off the stalk, selecting a large one for your thumb and a small one for your little finger; the others should be of a size in between these two.
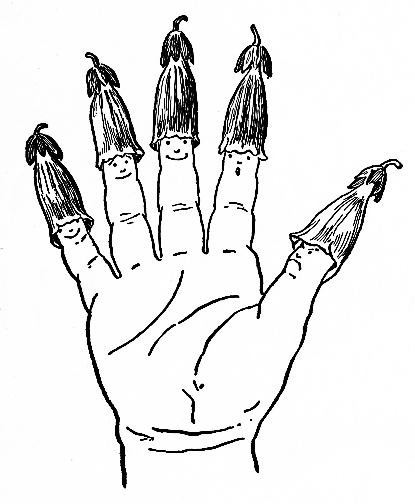
Turn these blossoms upside down and they at once become fairy-caps. Fit the caps on all five fingers of your left hand. Then on your fingers, just below the caps, draw little faces with pen and ink. Now you have five living, moving fairies who will do all sorts of things and be very spry about it (Fig. 95). They will nod at you joyously, they will bend low in solemn salute, and they will put their little heads together to plan some piece of mischief.
They can be fairy children at school, if you like, with the short, fat thumb fairy for the teacher; and you can make the fairy pupils stand close together, shoulder to shoulder, then at a word from the teacher, separate and stand alone again.
It will be fun to name the fairies, such names as Pepper-grass, Mustard-seed, and Catnip, and with the teacher standing before his class, have him call the roll and have each fairy bob his head as he answers to his name.
Perhaps you will want the teacher to require each pupil to sing a little song or recite a short verse. When a fairy does that, he moves forward in front of the others, and stays in that place until he has finished. Here is a pretty verse for a flower-capped fairy to recite:
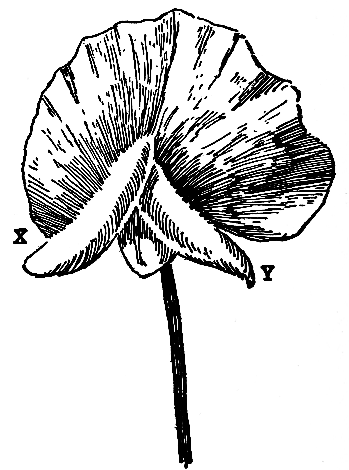
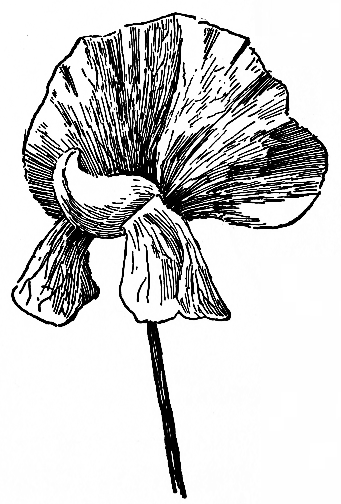
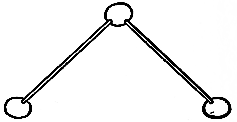
You use a little pretended magic when you turn a sweet-pea blossom into a peacock, and that makes it seem more mysterious and more interesting. It doesn't take a second but while you are doing it you must repeat this transformation rhyme:
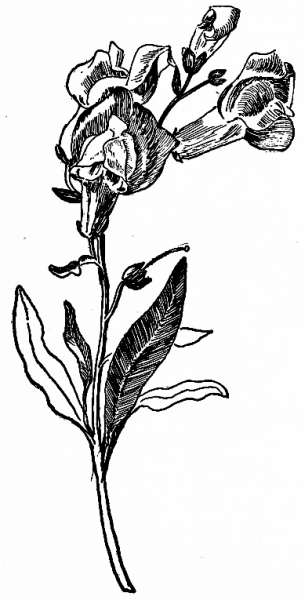
The magic that turns a blossom of the large, cultivated snapdragon into a little lady's head, upon which rests a dainty, ruffled sunbonnet, or into a ferocious-looking lion's head, is the magic of pen and ink, not of rhyme.
The blossoms of the cultivated snapdragon are very much larger than those of its wild cousin, called by some people butter-and-eggs, but the cultivated flowers grow on a stalk in the same way as the wild ones. You would hardly recognize the cultivated flowers as snapdragons because of their size and wonderful colors. A sure test is to pinch one; if it opens its mouth it is a real snapdragon; if[87] it doesn't it is not; but you must know how to pinch it, else it may refuse to snap.
The illustration (Fig. 98) shows a stalk of the cultivated flower, and looking at the blossoms in that position you can see neither the lady's head nor the lion's, yet they are there.
Pick a blossom off its stalk, leaving the little stem attached, and turn it around until you discover the sunbonnet and see that it looks like Fig. 99, then with pen and ink draw eyes, nose, and mouth on the part under the bonnet that is the face. This part is white, while the sunbonnet is sometimes a dainty pink and sometimes a gorgeous scarlet or orange, with deeper color on the edges.
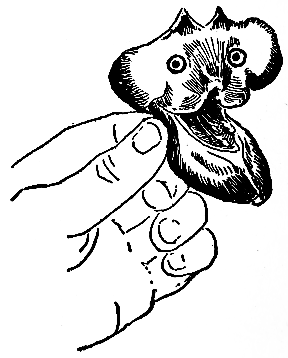
Turn another blossom upside down and the crown of the bonnet becomes the lower jaw and beard of the lion, while the other part is the lion's face. On the face you must make two fierce eyes like those in Fig. 100. When you take hold of the lion's jaws at the back and pinch them he will open his great, wide mouth as if to send out a tremendous roar, only to snap it shut again without a sound as you stop pinching. Fig. 100 shows how to hold the flower to open the lion's mouth.
The pink snapdragon is best to use for the lady's head and the orange-colored one for the lion's. If you would rather call it a dragon's head, you can, you know, but it looks more like a lion.
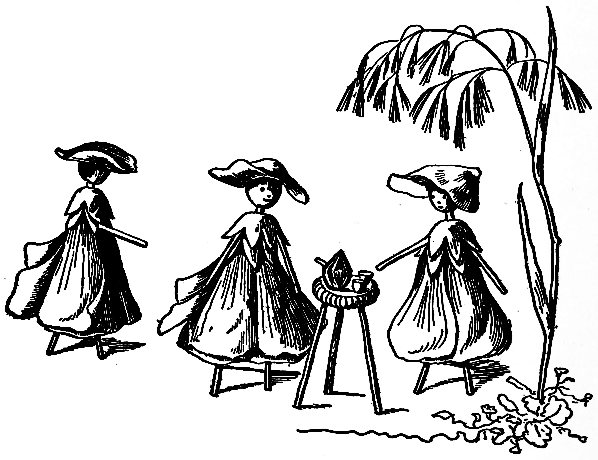
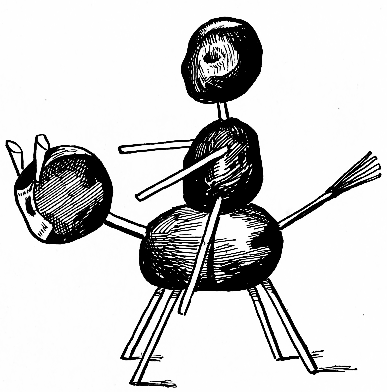
When Miss Hollyhock gives a garden-party the scene is a gay one. All the ladies, and you can have as many as you want, are in their freshest, crispest summer gowns. There are dainty pink ones, white, rose-colored, and deep red; there are light yellow and orange; there are gowns almost brown and others almost black, but whatever the color of the skirt the waist is always green. Green waists[89] are the style where Miss Hollyhock lives, and she and all her friends follow the style very closely.
The hats these little ladies wear to the party are of the same silky material as their skirts and are usually of the same color, though sometimes a lady in white will appear in a pink or yellow hat, or a pink lady can be seen wearing a white hat, and the lady in rose knows how well she looks in a hat that is almost black. When there are two or more gowns of the same color the hollyhock ladies prefer to have different colored hats so that they will not all look alike.
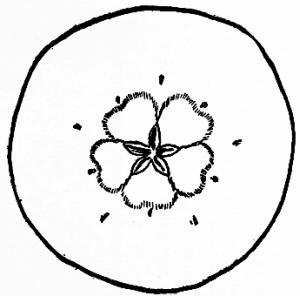
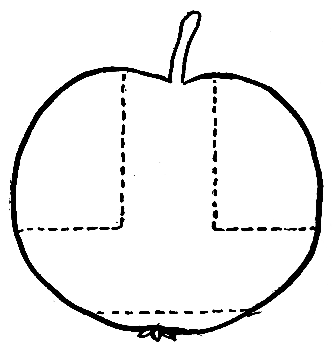
Fig. 101 shows how Miss Hollyhock and her friends are made from the flowers of that name. When you have gathered the flowers you must cut off the stem of each close to the green calyx which is Miss Hollyhock's waist, and then cut out the pistil which grows inside the blossom. This pistil is shaped something like a little club, and is covered with the yellow grains of pollen (ask some one what pollen is). It looks like Fig. 102. The pollen will make the flower wilt quickly. That is why it is best to take the pistil out.
Now select a nice, round, hard, green bud for a head and leave its stem on for the neck. Turn the sharp point of your scissors around in the top of the hollyhock calyx to make a little round hole, then push the stem of the bud into the hole, screwing it round and round until the bud almost, but not quite, touches the calyx. If you push it all the way down your lady will have no neck; her head will grow directly out of her shoulders.
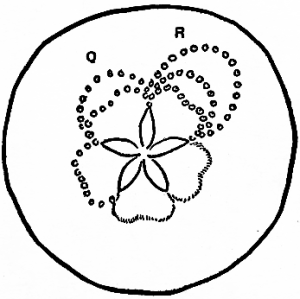
Wooden toothpicks are used for legs, arms, and support, but strong broom-straws will answer as well, or straight, slender twigs. Push three toothpicks, twigs, or broom-straws up into the centre of the flower, two in front and one at the back as you see them in Fig. 103. The dotted lines show where they go inside the blossom. Be sure to have all three the same length so that the little lady will stand firmly. The arrows on Fig. 103 show where to insert the arms. Cut sharp points on the broom-straws to make them slide in easily. Blunt ends will tear the flower.
With pen and ink make the eyes, nose, and mouth on[91] the head, and use a petal of another hollyhock for a hat. Pin the hat to the top of the lady's head with a pin or short broom-straw.
A garden-party would not be complete without
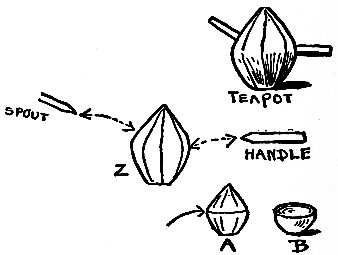
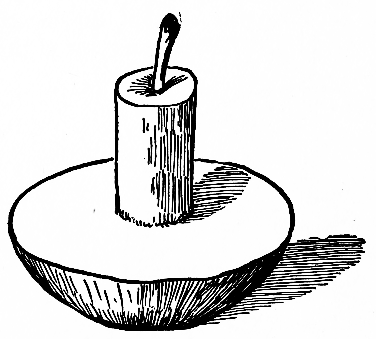
Make the tea-table of the hollyhock's round cake of unripe seeds which most children call a cheese. This is covered with a green case which is easily taken off and then you have a round, white disk like a little table-top turned up at the edge. Select the largest one you can find and push the ends of three toothpicks or broom-straws into the under-side for the table legs (Fig. 104). Now the tea-table must have a
Find a green bud for a teapot shaped like Z (Fig. 105). Push two short straws into the bud in the places shown by the arrows in Z (Fig. 105), one for the spout and one for the handle. Cut the tops off smaller buds to make them into teacups (A and B, Fig. 105). A drop of paste at the bottom of the teapot and the cups will keep them in place on the table.
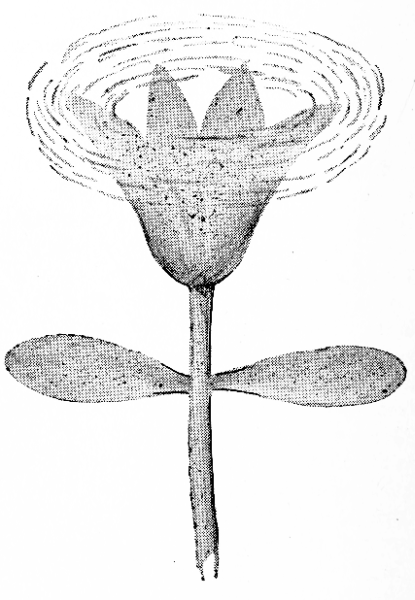
Daffodils, yellow as sunshine, always come with the beautiful springtime. The blossoms of the single daffodils, with their tall, golden cups resting in the saucers of lighter-colored petals, are the daintiest, though both single and double are so like a song of cheerfulness it is a joy to have them near. They look as if they wanted to dance for sheer happiness and, wonder of wonders, you can actually make them dance.
Gather a few of the single daffies, leaving on them the very short stems which hold them to the main stalk. These little green stems will be the stiff ornaments at the top of the dancers' green caps when you turn the flowers upside down, which is right side up for the dancers.
To make a flower stand alone and give it feet to dance on, push three wooden toothpicks firmly up under the little yellow skirt into the centre of the blossom. It doesn't matter if a flower has three feet; like an insect, it may have more than two and it won't stand on two. Spread the bottom ends of the toothpicks out a trifle like a tripod to make the flower stand steady (Fig. 106).
When you have made several dancers, stand them on a tin tray, and they will be a group of "daffy-down-dillies just come to town," arrayed in their best gowns and ready to take part in the dance. Tap the tray gently from underneath and the dancers will begin to move. Tap a little harder and they will begin to dance. Tip the tray slightly forward and they will dance toward you; tip it backward and they will dance away again.
Queer little animals that come only from Daffy land can be made of the single daffodil-blossoms. Take one of[94] the flowers and carefully cut away the outstanding petals, leaving the perfect, long cup. Hold the cup in your left hand with the short, green stem hanging down; the stem is the animal's head; then break off about half an inch from the blunt ends of four wooden toothpicks and use the longest parts for legs. Push the pointed ends of the tooth pick legs up into the under-side of the long, slender cup as it is held in your left hand. Keep the legs of an even length and the animal will stand firmly. This little[95] fellow, with his green head and long green nose, is very comical (Fig. 107). He can dance on the tin tray too, and run about when you tip it.
The daffodil toys will keep their color a long while even after the blossoms are dry. Do not take off the brown calyx which is lightly wrapped around the bottom of each flower. It represents the hair of the dancers and the ears of the animal.
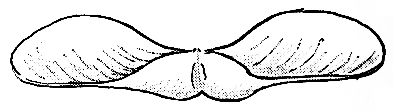
You can have some fun with the daffodil stalk, too, after taking off the flowers.
Fig. 108 is a daffodil stalk; look at it closely, then look at Fig. 109. They are really the very same though they appear to be so different. One seems to have a blossom at the top, and you know that the other has not.
If you want to do the trick and make a stalk blossom, select a stalk like Fig. 108, hold the stem closely between your open hands and roll it rapidly by first sliding your right hand forward while the left slides backward, then the left forward and the right hand back. This makes a whirligig of your stalk, and the flower will appear at the top as you see it in Fig. 109.
Try making whirligigs of other kinds of stems; of grasses, twigs, and leaves.
When the flowers have gone then come the seed-vessels, equally as good for playthings but very different.
Of course, you know the rose-haws, the little red and yellow and green apples that you find on the rose-bushes in the fall. They are the seed-vessels of the rose, and every rose which is allowed to remain on the bush until it fades and falls apart leaves a seed-vessel to take its place.
The rose-haws look very much like little apples. Rosy-cheeked
Baldwins, yellow harvest-apples, and greenings,[97]
[98]
and they will make a fine fruit-piece for the centre of your
doll's table. Pile them up on one of the toy dishes and
put the smallest of green rose-leaves
around the edge (Fig. 110).
But the rose-haws can be used for something besides toy apples; you can pretend they are jewels and string them for a real necklace.
One necklace can be entirely of the haws and another like Fig. 111, which is made of bronze-green haws (Fig. 112), and the long, green seed-pods of the plantain (Fig. 113). The blossoms of the plantain are pale purple or lavender, and hang from the stalk as the seed-pods do. They are bell-shaped and about an inch long. The leaf is like a lily-leaf.
As you see, the haws and seed-pods are strung alternately;[99] first a haw, then a seed-pod, again a haw and so on. Thread your needle with strong thread and be sure the thread is long enough for the necklace. Measure it around your neck, letting it droop as much as you wish; then allow several inches at each end for tying. If you cannot find the large, brownish-green haws use yellow or red ones, but the green haws, when strung with the green seed-pods, are more beautiful.
To match the necklace, make long, green earrings of the plantain seed-pods. Fig. 114 shows a seed-pod earring. You see it is strung on a thread and the ends of the thread are then tied to form a loop. The loop must be just large enough to fit comfortably over your ear, and[100] when you wear the earring, the green jewel will hang down and dangle delightfully. The upper end of the seed-pod should almost touch your ear.
Plantain is very useful in making jewelry because you can use the stalk as well as the seed-pods.
Fig. 115 is a necklace made of the plantain-stalk cut in short pieces, all the same length, and the coral-red berries of the barberry-bush. The crooked branches of the barberry-bush grow very close together and are covered with thorns which stand out straight and sharp like pins. That is why it is so often used for hedges; nothing can get through it without being terribly scratched. From the branches the red berries hang down like coral drops. Fig. 116 shows the way they grow. To make this necklace, string first a piece of the plantain-stalk, pushing the needle through lengthwise, then string a barberry and again a piece of the green stalk; after that a barberry. Keep on in this way until the necklace is as long as you want it.
The berries are exceedingly pretty strung as you see them, hanging down in their natural way, and really, you cannot string them any other way. The upper part of[101] the berry is the only part through which you can pass your needle because of the large, hard seed which fills the space below.
How to make the earrings to complete this set of jewelry is shown in Fig. 117. First you string a piece of the plantain-stalk, then a barberry; then you put your needle back through the stalk and tie the thread at the top. After that you make the loop to put over your ear as you did in making the seed-pod earring.
You see it is not only the seed-vessels of flowers that can be turned into playthings. The trees also furnish abundant material for toys.
Gather the winged seed-vessels that fall from the maple-trees, Fig. 118 is a maple seed-vessel, and let us sit on the dry, sun-warmed grass and turn them into odd little birds like Fig. 119. These birds are very near the size of our ruby-throated humming-birds, a trifle larger perhaps, but they do not in the least resemble the beautiful, jewel-colored, long-beaked wild bird, either in looks or habits. However, they are nice, tame, quiet little birds and never object to being handled, played with, and placed on any bush or low tree where you may happen to want to put them. You cannot say that of the humming-bird, can you?
You will need two seed-vessels for each bird. Divide[102] one through the centre, separating the two wings, and use one of these wings for the body of the bird, as you see in the diagram Fig. 120. Clip off the two corners of the square end where the arrows point to shape it like a bird's head, then carefully bend up the seed-vessel pair of wings, and fit the body down in between them, resting it on the centre part that holds the wings together. One or two stitches with needle and thread, passed through wings and body, will keep them close and secure.
When your bird is finished (Fig. 119), thread a needle with black thread, tie a good-sized knot in the end of the thread, and push the needle from underneath up through the back of the bird where it will come out between the wings. Draw the knot up close to the body and tie the other end of the thread to a low branch of a tree. When you stand off a little distance you cannot see the thread and your bird will seem to be hovering in mid-air. A gentle breeze will stir the bird and make it look as if flying. If there is no breeze, you can blow on it, or fan it until the little thing flutters about almost as if alive.
Be careful to string the thread through the bird at a place that will make it evenly balanced.
All children love the clean, glossy, brown horse-chestnuts or buckeyes. There are so many buckeye-trees in Ohio that it is called the Buckeye State, and many villages of Long Island are full of them. They are used for shade-trees and often line the streets, where they send down showers of their nuts, pretty but not good to eat. Everywhere the children gather basketfuls and take them home to play with, and in other Beard books we have told of some things that can be made of buckeyes, but the buckeye horse and rider which you see here have just arrived.
He is a very remarkable-looking horse with his funny round head and stiff legs and tail, though not more remarkable than the little man who rides him. Both are made simply of buckeyes and slender twigs. The head and body of the horse and of the man are buckeyes. The neck, ears, tail, and legs of the horse are smooth, straight twigs; the neck, arms, and legs of the man are also twigs.
When you make a horse let the light-colored part of the buckeye be his face. This part usually has a dark spot on it which looks like an eye. You will see it in Fig. 121. He will have only one eye unless you put in another with lead-pencil or pen and ink, but very frequently horses are blind in one eye, so it will not matter whether he has two eyes or one.
Stick two short pieces of twigs in the head for ears and a longer twig for the neck. You will have to sharpen the[104] ends of the twigs to a point so that they will go in easily. The neck twig will need sharpening at both ends.
Before putting the head on the body of the horse, which should be as large a buckeye as you can find, push in four twigs for the legs. The front legs must slant forward, the hind legs slant backward. This will make him stand firmly. Then choose a slender twig for the tail, and split it several times at one end to show that it has hair on it, as in Fig. 121. Fasten the tail on and then push in the neck twig. This finishes the horse.
For the body of the man who sits astride the horse, choose a buckeye which is rather flat on one side. A round buckeye will roll off. Find a small buckeye for the man's head and give him a twig neck (Fig. 122). Do not make his twig arms stand out straight at his sides; push them in slantingly so that he will hold them out in front. Put his twig legs in far apart and slant them a little forward.
Now place the man on the horse, and if he does not fit, change the position of his legs until he sits securely. Your buckeye man and buckeye horse will then look like Fig. 122.
Of course you like to gather the rich-brown pine-cones that lie scattered on the ground under the pine-trees; we[105] all do. Collect a number of those which have loosened and opened out their little leaf-like scales, then stand them up like trees in an open space on the ground. They look so much like toy trees we immediately want to play we are foresters, way off in the wild western lands, planting forest-trees for Uncle Sam.
We can make our forest as large as we want it and plant trees every day if we like, or we can gather up our nice, clean, dry cones and take them into the house to use in some other way. They make nice playthings.
If you find small, short cones, not fully opened out, notice how much they look like little pineapples; you must save these for our fruit-and-vegetable market, where we sell fat, short acorns as hazelnuts, the long acorns as pecans, and the buckeyes, or horse-chestnuts, all shiny, dark, and smooth, as eggplants, and rose-haws as apples.
There are other things in our store, too. String-beans, which are really locust-pods, and heads of white cauliflower made of bunches of the wild carrot or Queen Anne's Lace blossoms, tied together so that the pretty white flowers of the wide-spreading clusters lie evenly with edges touching. A number of these clusters are used for one head[106] of cauliflower, and around each head are arranged green leaves with their tops cut off just as you see them around the real vegetable.
Save one of your fine, large-sized, wide-open cones and make a card-rack of it like the one shown in the photograph Fig. 123.
You must have a small, round or square wooden box for the base and glue the flat bottom of the cone on the lid. The box can be filled with small brass clips for holding sheets of paper together, or with pins, and it will then make a fine birthday or Christmas present for some one. The cone card-rack is very useful on a writing-desk.
If you make a number of these cone-racks they will be something new for your next fair. Remember to stick some pretty cards in each rack.
Perhaps you would like to keep some of your cones for Christmas-tree ornaments; they make very pretty ones.
Gild several until they shine like gold, then silver others, and they will look as if covered with white frost. If you have collected any of the prickly sweet-gum balls that look as if they were carved in little starry patterns, gild and silver these, too, and let them dangle from the tree on long gilt or silver cords.
These natural, outdoor ornaments are not easily broken, and may be kept from year to year for your Christmas tree.
Now let us build a little woodsy house of burrs (Fig. 124) and put it in a little garden. Gather two heaping handfuls of large-sized burdock-burrs, small ones are not strong enough, and begin building. These burrs grow on a bush; they are about the size of a marble, are almost round, are prickly, and are pinkish at the top.
Make the roof first (Fig. 125). Stick ten or twelve burrs together in a row with pink heads all pointing in the same direction. Place this row on a flat, smooth surface, a board, flat stone, table, or, perhaps, the hard earth, and attach another row of burrs along the side edge of the first row. Continue to add more burrs until you have six or seven rows fastened into one flat piece.
Be sure that this piece does not bulge out or sink down in places, for the roof must be perfectly flat. Make the two side walls (Figs. 126 and 127) and the back wall of the house as you made the roof; the back wall must be the length of the roof and the height of the side walls (Fig. 128). The side walls must each fit on the ends of the roof and be high enough to look well.
The front wall of the house must have a doorway and a window (Fig. 129). But first make it solid, exactly like the back wall and exactly the same size, then lay it down on the flat surface that you are using for a table, and open a hole for the doorway by taking out five or six burrs, counting from the bottom up, and two or three burrs, counting from side to side. That will make about ten or[109] twelve burrs to be removed. Take out the burrs for the window and make the opening three or four burrs high and two burrs wide. (See Fig. 129).
Use four burrs for each side of the hollow square chimney (Fig. 130), which is open at top and bottom.
To put the different parts of the house together lay the roof down flat and stick the edge of the back wall on top of the outer row of burrs which forms one of the long edges of the roof. Fasten one side wall on one short edge of the roof in the same way and press the edge of the back wall and the edge of the side wall together, making the corner firm and square. Next attach the second side wall, and lastly fit in the front wall.
Now lift the house carefully, place it right side up on the ground, and adjust the chimney to the roof. As you work keep the picture of the house in front of you so that you may see at a glance whether you are building it correctly or not. If you cannot find large burrs, let the sides and the roof of the house be two layers of burrs stuck firmly together. Make a path leading up to the door of very small shells, sand, or fresh earth.
Would you like to have a little pond near the house, with white water-lilies floating on its surface and wee cattails growing here and there in and near the water's edge?
You can easily make such a pond. Sink a shallow pan in the ground, a hole must be dug to fit it, you know, and fill the pan with water. Cover the edges with moss or earth and plant short-stemmed heads of timothy-grass (Fig. 131) and slender, stiff grass-blades in scattered groups near the water. It is timothy-grass that looks so much like cattails, and also the grass called foxtail.
Some of the cattails can be made to look as if they were growing in the pond if you make a flat-bottomed ball of burrs around the ends of the stems to hold them upright (Fig. 132), and put some small stones on top of the ball to weight it down in the water.
For the little water-lilies select perfect white clover-blossoms (Fig. 133), and for the leaves, or lily-pads, use[113] any rather small, smooth, round leaves. The marsh-marigold leaf will answer, or you can cut out water-lily leaves from oak or maple. Make them the shape of the pattern Fig. 134. The pattern here is laid on a maple-leaf ready to cut out a leaf for the water-lily. Make a number of lilies and float them and the leaves on top of the water.
You might add a pea-pod canoe (Fig. 135), with a tiny American flag standing proudly erect at the bow.
When you make the canoe, open the pod where you see the dotted line in Fig. 136. To keep the pod open make little braces of broom-straws, and put them in crosswise with one end against each side of the canoe. There are four braces in the canoe (Fig. 135), but you may not need that many.
In the picture given here the tree on the left of the little house of burrs is just two stalks of the common grass called meadow muhlenbergia, which are held up as if really growing, by several green burrs left from building the house. The burrs are squeezed up tight to the grass-stems and then pressed down tight to the ground. You can find the grass for these trees almost any place; it is very social and loves to make its home with other grasses.
The graceful, drooping tree on the right of the house is made of the grass called brome-grass. Keep your eyes open and you will find it some time while playing out-of-doors. As soon as you see it, run to the brome-grass and whisper its name. You will be glad to discover it and[115] will remember its name afterward whenever you see the grass.
Look at the picture again and notice the odd plants near the brome-grass tree. Their name is Bermuda-grass. See how they spread out their long, slender fingers. They look very much like a grass named the small crab-grass, and another the large crab-grass, and like another still called the wire-grass; but if you put all these side by side and examine them closely you will see how they differ.
Besides making things of burdock-burrs, you can play a game with them. The game is something like archery, only, instead of shooting arrows at a target, you throw burrs at it.
Get a good-sized piece of woollen cloth or some kind of material with a rough surface to which the burrs will cling. Tack this up on the fence or on a board; then, with a large piece of chalk that will make a wide mark, draw four circles, one inside the other like Fig. 137. It doesn't matter if your circles are not perfect. Do the best you can and finish your target. Number the spaces between the circles 1, 2, 3, 10. The outer space is 1, the next, 2, next to the centre 3, and the centre 10. The centre, being the bull's-eye, counts most.
Have ready a lot of burrs for each player; mark a boundary-line on the ground, beyond which no one must step in throwing the burrs, and, standing at the boundary-line, let each player in turn throw three burrs at the target. The burrs that stick to the target make the score if they are in the numbered spaces. Fig. 138 shows how to hold the burr. Suppose one burr sticks to the space numbered 2, and the two others are in number 1, the player would then have two ones and one two which, added together, make four; her score then would be four.
Always pull the burrs of one player off the target before the next player takes her turn, and there will be no question as to who should claim them. After each player has had three turns, let every one add up her scores. The player who has the highest wins the game. If divided into sides, the players on the side having the highest score are the winners and they should be given a hearty cheer by the losing side. Even very little girls and boys should learn to be good losers and to help celebrate the victory of others.
Nuts are the seed-vessels of the nut-trees; did you ever think of that? They do not grow only that we may have something delicious to eat. They ripen and fall on the ground, where some of them take root and grow up into trees themselves. If you plant a hickory-nut a little hickory-tree should come up, and it will if the conditions are all right. If you plant a walnut it will be a walnut-tree that will appear; so you see a nutshell is the seed-vessel of the nut-tree.
English walnuts do not grow wild in this country, but are cultivated here and you all know what the English walnut is like. Our American walnut is very hard to crack; its shell is rough and deeply grooved, but the English-walnut shell is smooth and without sharp edges, though its surface is uneven. There is a shallow groove running round the shell, like a seam, and the shell cracks open along this seam evenly and easily.
The easiest way to open an English walnut so that the shell will be in two perfect halves is to push the tip of a penknife-blade into the groove at the large end of the nut, and then slowly and carefully turn the knife to pry the halves apart. When opened this way the shell is never broken (Fig. 139).
After you have opened several nuts and taken out the[118] kernels, use the knife to cut away the thin, papery divisions inside the shells. You will then be ready to make
As a rule professors wear black robes when they wear any, but our nutshell professor wears white because it is more becoming to his dark complexion, and because it is more effective and draws attention to him.
To make the robe, fold an oblong piece of white paper into a square, which makes the square double. The edges should measure about four inches. If you have a large white envelope cut off one end to make it square and use that. Fold the square diagonally across from point to point, as is shown by the dotted line in Fig. 141. Now turn back first one side point, then the other side point, and make them meet over the first fold to form a fanlike pleat, wider at the bottom than at the top. The dotted lines on either side of the middle one in Fig. 141 show where the folds should come. The middle fold is bent out, or toward you; the side folds are bent in, or away from you. The side points now extending toward you are the wide, flowing sleeves of the professor's gown.
Take the robe in your hand at the bottom point, holding it from the back, and on the top point hang the professor's nutshell head (Fig. 140).
While the head balances quite securely on the point, you can make it wag from side to side, make it shake and tremble when the professor grows very earnest in his discourse, and make the chin thrust itself forward when he[121] is emphatic. You do all this merely by shaking and tipping the paper robe. He is an amusing little lecturer, this English-walnut shell professor, and seems very much alive.
It is a far cry from a lecturer to a little mouse, yet one English-walnut shell will make both, half a shell for each.
This is a nice, cosey-looking little mouse who crouches down comfortably and does not show his legs (Fig. 142).
The point of the shell is the nose of the mouse; above it make two round, black eyes and then paste on two brown-paper ears. Cut the ears like Fig. 143, bend back the little stems at the bottom, put a touch of paste on each stem and stick the ears to the mouse's head in the position shown in Fig. 142. Cut a piece of string about three inches long for the tail and paste one end of it on the inside edge of the shell at the large end.
If you make three of these mice and glue them to a piece of cardboard they will look very cunning. Or you can glue one mouse to a small card and use it for the top of a Christmas pen-wiper.
A pretty way to give a small present at Christmas or on a birthday is to put it into an English-walnut shell box. A thimble fits in the box beautifully (see Fig. 144).
Open the shell of an English walnut in the way described (Fig. 139). Cut away the inside partitions and, with jeweller's cotton, make a soft little bed in one-half of the shell. Press down the cotton in the middle to make a hollow, and in this hollow fit the new thimble. Put a layer of cotton over the top of the thimble and tuck in the edges. The way to close the box is to cover the edges of the other half-shell with glue and then fit it on the half that holds the thimble, just as it was before you opened it.
Now you have a whole nut again, but the meat inside is very different from that which you took out. You can gild the nutshell after the glue has hardened or leave it as it is. Its own brown color is pretty enough. In either case you must have a piece of narrow ribbon to tie around the box and form a loop by which to hang it (Fig. 145).
Pass the ribbon under the small end of the nutshell, then bring it up and tie it securely at the top of the large end. The ribbon should not be over the seam but should pass across the middle of each half-shell. It will then hold the two parts together and keep the glue from loosening. After the ribbon is tied at the top of the nut, make a long loop above it and tie again in a bow-knot.
Vegetables are good to eat, certainly, and you know what they are like when cooked and on the dinner-table; but many are also good to play with. You can make fine toys of them, toys that are entirely different from any you have ever seen. Here is the
A fish that really swims, not on top of the water but in it, is the little fish (Fig. 146). You won't find that in a[124] shop or anywhere else, for I have only just discovered how to make it myself.
A paper tail and two paper fins must be added, but that won't take five minutes when you know how to do it. The tail and fins make it wonderfully lifelike, for when the fish swims around in a big basin or dish-pan, the tail sways this way and that, the fins move back and forth exactly as they do on a living fish in a real lake or in the great ocean.
Choose a good, firm bean-pod, one as flat and even as you can find, open it carefully along the straight edge and take out the beans. Save the beans, for you can make something of them too. Do not let the pod close again after the beans are out. It must be open about half an inch, or maybe a little more, at the middle. You can widen the opening by pushing your finger in. Be careful not to split it along the upper edge. It should be like Fig. 147, which shows the opening at the bottom.
With the small blade of a pocket-knife make a slit on[125] each side of the pod at the large end where it is marked C in Fig. 147.
These slits are to hold the fins. Directly on the curved edge of the small end of the pod, at the place marked D, cut another short slit. Don't let it reach the lower edge. This is to hold the tail.
From writing-paper, not the very heavy kind, cut two fins like Fig. 148. Double the paper and cut out both at[126] once so that they may be exactly alike. From the same kind of paper cut the tail like Fig. 149. All you have to do now is to push the sharp point of one paper fin into the slit on one side of the pod, the other fin into the slit on the other side of the pod, and the sharp point of the tail into the slit in the edge of the pod, and there is your fish. You see the fins and tail are not pasted on and they really seem a living part of the fish. Notice that the top of fins and tail are different from the bottom, and be sure to have the top edge up when you put them in the slits.
The way to make the lima-bean fish swim is to place it, open edge down, in a large basin of water; then with a stick or spoon begin at the centre to stir the water gently and gradually round and round until it all moves faster and faster, and keeps on moving after you stop stirring. Then your little green fish will swim. Round and round[127] the basin he will go, his tail waving and his fins moving so naturally you will shout with delight.
If at first the fish insists upon turning over on his side and floating about like a dead fish, don't give him up. He is only playing 'possum. He can swim and he will if you are patient and keep setting him upright until he gains his balance and becomes used to the water. Remember to put the fish in the water, not on top.
Don't let the beans, that you have taken out of the pod when making the fish, get dry and hard. They can be turned into a
Three beans and several strong, straight broom-straws you will need for making this comical little fellow, who, upright and independent, stands squarely on his own feet. That is a good thing for any one to do, let alone a little bean man (Fig. 150).
The beans should be of different sizes. A large one for the body, next in size for the feet and a smaller one for the head. Some beans have a little point that stands out on one edge and looks like a tiny nose, while below it there is a round hollow that looks like a little open mouth. That is the kind of bean to choose for the little man's head.
The broom-straw for Mr. Bean's arms should be quite four inches long, if he is to be four inches tall. Cut one end of this broom-straw slanting to a point like E in Fig. 151, and push the point through the upper part of the body bean and out far enough on the other side to make the arms of equal length; then bend one arm up at the middle where the elbow should be, and the other arm down as you see them in the drawing of the man (Fig. 150).
The broom-straws for the legs must be two and a half inches long and cut pointed at both ends, for one end of the leg is pushed into the lower part of the body bean and[128] the other end into the half bean which is the foot. Split the foot bean in half to make two feet and push the leg straw into the rounded side. The flat side is the bottom of the foot.
A short piece of broom-straw, hardly an inch long, is the neck. Cut this straw pointed at each end, push one end into the top of the body bean and the other end into the lower part of the head bean. Use one-half of the outer skin, that comes off the foot bean when you split it, for a hat. Being curved like a rose-petal, it fits the head very nicely, but a drop of paste on the little man's head will make it more secure.
Your lima-bean man may be a farmer and own
Look over all your bean-pods that still have beans in them, and select the one shaped most like Fig. 153. Do not take the beans out of the pod; they make the pig fat and solid. The stem end forms the snout and the head.
Cut four broom-straws about one and a half inches long for the legs. Sharpen each of these straws at one end and push the pointed end into the lower part of the body, two on each side, in the places shown by small rings on Fig. 153.
From part of another bean-pod cut two ears like F, Fig. 154, and pin them on the pig's head with a short straw as they are shown in the picture of the pig. Run the straw through one ear near the bottom, through the head and then through the other ear on the other side of the head.
Pull a narrow strip from the edge of a bean-pod for the tail (G, Fig. 154). Curl it by drawing it lightly over the blade of the scissors. Punch a small hole with the point of the scissors in the upper edge of the pig's back at the place marked by the arrow on Fig. 153, and push one end of the tail into the hole. Make small round dots with a pencil, or pen and ink, for the eyes. The ears and tail may be made of paper if you find that easier to use.
If you have ever seen an alligator, a long-tailed sweet potato will make you think of one immediately.
Fig. 155 is a baby alligator with a sweet-potato body and paper head and legs. It is just the size of the little alligators they sell for pets down in Florida. That is, the alligator from which the drawing was made is the size of the live ones; the drawing is, of course, smaller.
Find a potato shaped like Fig. 156. Cut a slit in the large end and two slits on each side where you see them in Fig. 156. When you make the side slits push your knife in with the blade slanting upward and backward for the[131] front legs, and slanting downward and backward for the back legs. This will allow the paper legs to slide in without bending.
Use brown paper, as near the color of the potato as you can get, for the alligator's head and legs. Make the head like Fig. 157, cutting along the heavy lines and bending along the dotted ones. Bend down the sides of the head[132] and of the neck, then bend the head first up, then down, to lift it above the neck (Fig. 155.)
The eyes of a baby alligator are large and prominent. Draw them on the head as you see them in Fig. 157. That is as near as we can come to the real eyes.
Cut out of the same paper used for the head two fore legs like Fig. 158, and two hind legs like Fig. 159. Slide the fore legs into the slits nearest the large end of the potato[133] and the hind legs into the slits near the tail. Push the point of the paper neck into the slit at the large end of the potato. That finishes the baby alligator, which is wonderfully true to life.
A crisp, fresh, clean radish is very tempting, but don't eat it this time; turn it into something else by the magic your ten fingers can work.
Fig. 160 shows a round white radish which, with its long, slender root and leaves still on it, has been changed into a queer little radish imp by using strong broom-straws to stiffen his leaf arms, his leaf legs, and his leaf body. His eyes are bits of broom-straw, his mouth is a slit with a broom-straw tongue, and his absurd, stand-out ears are also pieces of stout broom-straw.
The root growing out of the top of his head is like a Chinaman's queue standing on end with little, crinkly separate hairs at its base.
When you make your radish imp cut two broom-straws about four inches long for his arms; point these at the ends. Cut two more strong broom-straws a little longer than the distance between the radish and the tips of the two longest leaves. Point these at both ends (Fig. 161). Now choose two leaves of even length, nearest the radish, for the arms. Don't take them off but push a broom-straw[134] through each leaf, first in, then out, then push the other end of the straw into the thick part of the stems just under the radish. Look at Fig. 160 and see how this is done.
The leaves with the longest stems must be used for the legs. If there are more than two long-stemmed leaves, cut off all except those wanted for the legs. Bend the long, stout broom-straws at one end, as in Fig. 161, and push the other end up through the thick part of the stems and into the radish; then with a piece of string or strong blade of grass tie the stems of the leaves to the straws, as shown in Fig. 160. This forms a little belt at the waist-line. Leave[135] a large leaf with short stem loose at the back for a cape and run the bent ends of the long straws in and out of the leaves intended for the feet.
Cut a curved slit in the radish for a mouth and push in a small piece of broom-straw for a tongue, then put in bits of straw for eyes, nose, and uplifted ears.
You can make a most amusing little white mouse of a white radish; not a round one like that used for the imp, but egg-shaped, like Fig. 162. The long root is the tail of the mouse and the other end of the radish is his head. Cut two paper ears like H, Fig. 163. Make two slits in the head and slip the pointed ends of the ears into the slits.
For whiskers (all mice have whiskers) find two sprays of fine branching broom-straws (I, Fig. 163), cut them the proper length, and push a spray into the head on each side of the nose. Put bits of broom-straw in for eyes and then cut four thick straws like J, Fig. 163, and push the pointed ends slantingly in the lower part of the radish for the feet of the mouse. His legs are not seen because he is crouching. The drawing of the mouse shows where to put the feet.
Press your thumb on the rounded edge of a fresh, fat green pea-pod, and, pop! it goes splitting open at the top. Then push your thumb into the opening, run it down the pod and the two halves separate, showing a row of fine, large peas that look like great green pearls in a soft, silk-lined case made expressly for them.
You have done this ever so many times when helping mother, haven't you? And you know that the next thing to do when the pod is open is to run that same little thumb down again and scoop out all those round green peas, letting them fall with a patter into the pan in your lap.
Now as a reward for such helpfulness suppose you ask mother or the cook to give you a good big handful of peas which have not been shelled, and ask also for some wooden toothpicks such as are used in the kitchen for fastening meat together; or a number of nice, straight, strong[137] broom-straws if there are no wooden toothpicks. Take all these out on the porch if the day is fine and sit down comfortably to make the remarkable things which I am going to tell you how to make. It is a good plan to have a box and its cover to hold the shelled peas and their pods, but it does not really matter except that the round peas are apt to roll away and get lost if you put them in your lap.
The little green-pea greenies, cousins of the brownies, shown in the illustration are funny, aren't they? But the drawing is not as funny as the real greenies, and you can make them in all sorts of absurd positions.
Two little men and a widely smiling greeny girl are given here (Fig. 164). The large green peas that come late in the season are used to make these little people. In fact, it is only the large peas that can be used for any of the[138] things described. Fig. 165 shows how the greeny girl is put together. Her arms, legs, and neck are made of broom-straws. Her body and head are green peas. Her dress is one end of a pea-pod and her feet are bits of a pea-pod cut the shape you see in Fig. 165.
First cut short pieces of broom-straws for the legs and point them at both ends so that they will be easy to push into the peas and pods. Cut another piece the same length, pointed at the top end for the support. Push the legs and support into the large pea used for the body as you see them in Fig. 165. Now cut another piece of broom-straw pointed at both ends for the neck and push one end into the pea you have selected for the head.
Cut off the stem of a large pea-pod, leaving the little leaves at the top, which were the calyx of the pea-blossom, for a collar, and then cut the pea-pod dress the proper length to fit the little woman. When that is done put the dress on over the headless body and push the lower end of the broom-straw neck in at the top, down through the collar, and into the pea which forms the body. With a pin make a hole on each side just under the collar and push a broom-straw[139] arm in each of the armholes you have made. Bend one straw in the middle, as in Fig. 165, to give the bent elbow.
Last of all cut two three-cornered feet like the one in Fig. 165 from a pea-pod and push a foot on the end of each leg. Turn the toes in and the little figure will look very comical. To give her a face, dip a pen in black ink and make two round eyes in the head, a round nose, and a wide mouth turned up at the corners. The pen must be pushed through the skin of the pea to do this. When the greeny girl stands up, her dress hides the support at the back so that it cannot always be seen, and she looks as if she stood on her two feet just as you stand on yours.
The illustration (Fig. 164) shows how the greeny men are put together. The little dancing fellow must have two supports because one foot is lifted. The tiny ridiculous cap on the head of the other man is the little cap that holds the pea to the pod and sometimes clings to the pea after it is shelled.
The greenies' little tents are made of pea-pods and it takes three pods for each tent. After you have taken out the peas split the pods up along the back edge, but leave the two halves fastened together at the stem. Stand up two pods by pushing the stem end of one pod between the two halves at the top of the other, as they are shown in Fig. 166. Then separate the halves of the third and longest pod and place it astride the first two (Fig. 167). This will make quite a strong tent, and, if you like, you can have a whole camp of them.
The greenies need not always live in tents. Like other people, they can have houses as well.
It is best to use the wooden toothpicks in making the house. They are stronger than broom-straws and all the same length. Begin by putting the front of the house together. Make the peak first. Choose a large pea, push the end of a toothpick into it, then not far from that push in the end of another toothpick slantingly so that the lower ends will be separated as you see them in Fig. 168. On each of these lower ends stick a pea like Fig. 169. That is the peak for the roof. Now make a long upright for each side by using a pea to join two sticks (Fig. 170), and push the upper end of each upright into the peas at the lower ends of the peak (Fig. 171).
Shorten two toothpicks by breaking half an inch off each of them, then join them as you did the uprights by pushing one end of each stick into a large pea (Fig. 172). This is the front joist or crosspiece of the upper floor of the house, and you must fit it in between the two uprights of the front by pushing the ends of the crosspiece into the peas at the middle of the uprights (Fig. 173).
The back of the house is made in the same way with a
third upright added which runs down through the middle[141]
[142]
from the point of the peak to the bottom of the house.
This third upright is made by shortening two toothpicks
and joining them with a pea, then fitting them in between
the pea at the top of the peak and the pea at the middle
of the crosspiece. A whole toothpick with the upper end
pushed into the lower part of the pea at the middle of the
crosspiece finishes the long upright (Fig. 174).
When the front and back are made all there is to do to finish the frame of the house is to put in the crosspieces to hold them together. Fig. 175 shows all these crosspieces or joists. One crosspiece between the two peas at the top of the front and back peaks for the ridge-pole (K,[143] Fig. 175), one on each side between the peas at the bottom of the peaks (L and M), one at each side between the peas at the ends of the front and back crosspieces (N, O), and one between the two peas at the middle of the front and back crosspieces (P).
Now you have the frame of a two-storied house or a house with only an upper story, but it needs a roof and a floor. Split some of your pea-pods in half and lay one at a time across the ridge-pole at the top and the crosspiece at the bottom of the peak. Put half of a pod on one side of the peak, half a pod on the other side of the peak, then another half pod on the first side, and the next one on the second side, and so on until the space is covered and the house is roofed in. The stem ends of the pods must be up. The stems lock together and hold the roof in place.
Make the loosely laid floor also of the split pea-pods, putting them across from front to back.
Your little house (Fig. 176) now looks like those which strange people in far-away, hot countries build for themselves. They have no lower story or what we call a first floor, but are lifted on posts far above the sometimes very damp ground,[144] and out of reach of any wild animals that may be prowling around.
You can make a fence to put around the house in this way: Push a large pea on each end of a whole toothpick like Fig. 177, then break a toothpick exactly in half, stick one end of each half into the lower parts of the peas to form uprights, and push the lower end of each of these uprights into another pea as shown in Fig. 178. For the slanting crosspiece stick one end of another toothpick into the upper pea at the left-hand side, and the other end into the lower pea at the right-hand side (Fig. 179). Add a toothpick between the two lower peas, and one section of the fence is finished (Fig. 180).
Begin another section by sticking one end of a toothpick into a new pea and the other end into the upper pea at the left side of the section you have just finished (Fig. 180), then put in half a toothpick for the upright, a pea on the bottom of that, a whole toothpick for the slanting crosspiece, and another whole toothpick for the bottom.
In this way you can keep on adding section after section and make your fence any length. To turn a corner all[145] you have to do is to push the toothpicks which form the upper and lower crosspieces of a new section in at the back of the top and bottom peas of an end section of the fence.
You will notice that in the illustration there is a plant growing at the side of the house which looks something like a cactus and adds to the tropical, or hot-country look of the little greeny people's home.
Seven half pea-pods are used to make this plant, four to stand up and three to lie down flat. Wrap and tie the stem ends of the four half pods together with a bit of string. Push a toothpick for a flower-stem through the middle of the bunch. Cut away the stem of a pea-pod, then cut off the calyx, or circle of little leaves, with the knob below attached. This is to be the blossom of the strange plant. Stick the flower on its toothpick stem, knob down, as you see it in the picture.
To make the plant stand firmly lay the three extra half pods down flat with the stem ends one on top of the other and the outer ends at equal distances apart, and force the toothpick flower-stem through the pods where they[146] cross. These three flat pods make a base which holds the rest of the plant upright, while they look as if they were a part of it.
This is not a toy, but you will like to make it just the same, and afterward, perhaps, you will want to try another design all by yourself. If you can draw at all, with a soft pencil make some curves on a piece of white paper like Fig. 181, only ever so much larger, then a straight line up from the centre. The distance between the two largest curves at their widest part should be about eight inches. If you cannot draw these curves, ask some older person to do it for you.
Lay your paper with the pattern drawn on it flat on the table before you, shell some peas and carefully place them on the pencil lines of the curves. Begin with the largest peas at the centre of the design and finish with the smallest at the ends of the curves. Fig. 182 shows how this is done. Put the first pea on the curve at the place shown by the arrow in Fig. 181.
You won't be able to keep the peas in place unless you stick them to the paper with paste. Hold the tube of paste in your left hand, squeeze out a very little, take it off the tube with one of the peas and push the pea, paste side down, onto the paper where it belongs.
When the peas are all placed on the curves open two[147] pea-pods as you did for the greenies' tent, slide one pod between the two halves of the other, and with a little paste on the stem ends and the tips, fasten them in the middle above the curves of peas as they are shown in Fig. 182. The two halves of each pod are not opened wide but are like Fig. 183. Above the pods, on the straight, upright line, place four more peas, beginning at the bottom with a large pea and ending with one much smaller.
The success of this design will depend upon making one side just like the other and in keeping it equally balanced. That is, one side must not sag down below the other and the pods at the top must fit exactly on the line, half on one side, half on the other.
The peas, you see, do not touch each other, but are separated by little spaces, and the spaces are all of the same length.
Let us play that we are really celebrating America's first Thanksgiving!
You can see one of our long, rude puncheon tables spread out in the mild, sweet air of Indian summer, laden with delectable dishes of clam chowder, oysters, fish, turkey, duck, goose, venison pasties, turnips, dumplings of barley flour, corn bread, wheat cakes, pumpkin pies, grapes, plums, great flagons of cider, and "all manner of tasty eats."
William Bradford, our good governor, with his old flintlock in hand, is just returning from a successful hunt for additional wild turkey. We shall need these, as ninety friendly Indians are to be our guests for three days and nights. Later they, too, will hunt and bring us wild deer.
Elder Brewster, in his festive doublet and hose, has stopped a moment to speak to Master Bradford. Sitting at table, you can see Captain Miles Standish with arms outstretched in glad welcome as he calls more Indians to join the feast, while Massasoit, the mighty chief, stands at the table signalling with his arrow for the braves to approach.
Already Quadquina and Hobomok are at the festive board, seated between Captain Miles Standish and John Alden. Squanto, who tells the boys how to trap game and teaches settlers how to plant corn, is resting on the ground with his feather-bedecked shield in one hand, and the calumet, or pipe of peace, in the other.
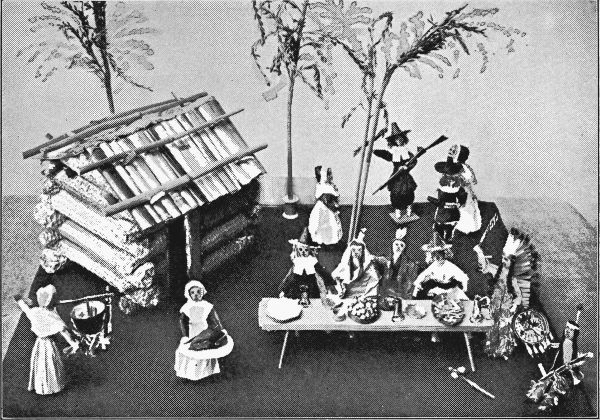
Now winsome Priscilla Alden comes, bearing on a pewter platter one of her savory hot baked turkeys, and her friend, Mary Chilton, is watching the delicious stew which simmers in the big iron pot over the outdoor fire.
Mistress Brewster, on her way to cut pumpkin pie, must needs stay her steps a moment to give ear to Governor Bradford's remarks, and Desire Minter is hurrying forward, ahead of the other young women, to serve the men at the feast.
All this would be told you by one of the little corn-husk pioneers shown in the photograph if only they could speak.
At all events, they can stand alone. They can be made to sit down, too, and their arms can be bent in any position. You may lift and place them in various parts of the grounds at pleasure. You might even imagine them to be the real characters they represent, and so live over again that Thanksgiving of 1621.
The making of these little people is most interesting. Use the rather soft between-layers of corn-husks; about two husks for each pioneer. If the husks seem brittle, soak them in[151] water and make them pliable. Lay one husk partially over the top of the other (Fig. 184), bend them across the centre (Fig. 185), and let the smoothest side be the front of the doll. Fold each side of the front to the back until the front somewhat resembles Fig. 186; then wind slender, soft string around to form the neck and head of the doll. Wind another soft string around lower down for the belt-line (Fig. 187).
Make the arms of soft corn-husk (Fig. 188) by turning the lengthwise edges of the husk inward again and again, until the roll is of the desired size. Cut off the ends evenly[152] and wind the arms with string at the centre and near each end.
Run the small blade of a penknife through the shoulders of the doll from side to side. Turn the blade flat side uppermost and allow it to remain in this position while you slide in the arms and screw them through the opening, pushing them along on top of the flat side of the blade. When in place, withdraw the knife and your little woman will be ready for her costume.
To make the man, cut Fig. 187 up from the bottom to within a short distance of the belt, thus dividing the husk skirts into two equal parts. Wind each half with string at the top, middle, and near the end to form the legs (Fig. 189).
Use black tissue-paper for the loose knee-trousers. Cut
[154] two strips of the paper, fit one strip over a leg (Fig. 190), push the paper up on the inside until it resembles Fig. 191, then fasten in place with strong paste. Make the other trouser leg in the same way (Fig. 191).
Cut the coat from a folded piece of dull-green tissue-paper, and just at the neck make a hole large enough for the man's head to slip through (Fig. 191). Paste the front edges of the sleeves over the back edges and lay the front edges of the coat over those of the back. Fit the coat in at the belt-line with your fingers. Cut a black belt of tissue-paper, fold it lengthwise, and belt in the fulness of the coat, then paste the belt ends together. Be careful to make[155] the belt loose, for men's waists are large. Make the collar (Fig. 192) of white paper and fasten it around the man's neck with a drop of paste in front.
From black, brown, or drab-yellow tissue-paper cut a strip of fine fringe and paste it on the man's head for hair (Fig. 193). Then make his hat. To do this, roll a small square of stiff black paper into a cornucopia to fit the man's head, paste the edges together, and trim off the corner which hangs down at the bottom (Fig. 194). Glue the hat-crown on the man's head, cut off the sharp top peak, and tilt the crown back a little (Fig. 195).
Now cut a disk of the black paper for the hat-brim, slash it across the centre into four points (Fig. 196), but only just far enough to make the opening fit over the hat-crown. Slide the brim on the crown, allowing the slashed central points to lie up against it, and fasten them there with paste (Fig. 197). Glue the pioneer's feet into holes cut part-way through a small piece of the corrugated flat pasteboard used for packing purposes. In this way the little man becomes independent and able to stand alone (Fig. 197).
The corn-husk women also wear tissue-paper clothes. The waists are made in the same manner as the men's coats, only shorter and confined at the belt-line with paste. Straight dress skirts are slipped over the waists, and held in place at the belt by winding string around the pinched-up gathers. Long, severely plain white aprons, minus strings, are pasted to the waist-line, and white-bordered black caps and large white three-cornered neckerchiefs complete the costume.
The cap is a straight piece of black tissue-paper with a narrow strip of white folded over the front edge. When ready, the white-bordered black strip is laid over the head, smoothly brought down on the sides, puckered together at the back and tied around the neck with a string. You have only to clip loose the outside layer of white close to the string at the neck-line to give the flare to the cap's white border.
The crisp dress skirt forms sufficient support to enable the little women to stand alone.
With the exception of Squanto, whose manly chest, back, and arms have no covering, the Indians wear suits of tan tissue-paper made on the same principle as the white men's costume, only the trouser-legs are narrow, long, and have the seam cut in fringe and run up on the outside. The bottom edge of the coat and the sleeve seams are also fringed. The coat is not wide and no belt is worn.
Pieces of colored tissue-paper adjusted blanket fashion over the Indians, and fastened here and there with bits of paste to hold them in place, form the Indian blankets.
The Indians' hair is merely a strip of black tissue-paper pasted over the top, back, and sides of the head with the ends loosely twisted and allowed to hang down in front on either side.
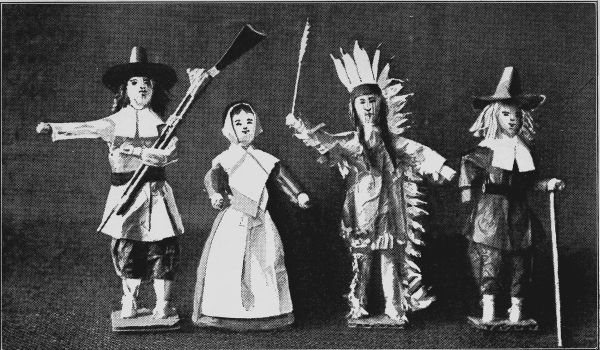
The war-bonnet is cut from a strip of white writing-paper,
the tips of the feathers are inked, and one end of[157]
[158]
the strip is then pasted around Massasoit's head, as shown
in the picture.
It is best to make a number of corn-husk people at one time. Put the two husks together for each pioneer and Indian, then wind a string around the neck of each to form the head (Fig. 186). Again tie a string around each at the belt-line (Fig. 187). Continue making the people in this way, step by step, until all are finished at the same time. Have ready as many arms as you have people, and run the arms through each, one after another.
When bending the arms or legs of the little people do it slowly and gently. If they are inclined to spring back, tie them in position overnight and they will stay bent.
When dressing the dolls, cut out all the men's collars at one time. You can do this by cutting through as many layers of paper as there are men. Adopt the same plan with the other parts of clothing for the men, women, and Indians, and your work will be rapid.
With ink draw features on all. The women must have ink hair, parted in the middle.
Remember when making Miles Standish to cut his hair of red paper, for he had auburn hair.
The "sad" colors worn by the pioneers were really the cheerful autumn hues, rich, dull reds, greens, browns, and yellows. These will give you quite a variety of colors for the costumes of both men and women.
Make the puncheon table of a flat, narrow piece of wood. With a gimlet bore holes through the board, slanting them toward the centre, one hole near each corner. Any kind of round sticks will do for the legs. Cut them all of the same length and glue one in each hole.
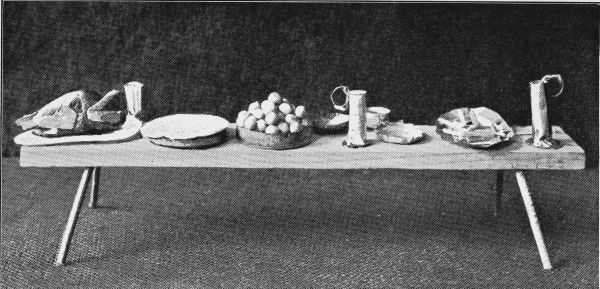
The pewter dishes are made from one of the collapsible
lead tubes used for oil-paints and various other things.
Cut open the empty tube and smooth it out flat, then cut
out round pieces for plates, mould the plates over the tops[159]
[160]
of wooden spools, and the flagons over a pen-handle or
other round stick. Make the flagon-handles of slender
strips of the tube bent into rings, and slip one end of the
strip over the edge of the flagon.
A piece of yellow paper pasted over the cover of a very small baking-powder can makes a pumpkin pie. The turkey is merely pinched-up paper with brown tissue-paper laid smoothly over the breast. Its wings and legs are of bits of lighter-colored paper rolled and bent into shape, then pasted on the turkey.
Fresh, green, uncooked corn-cobs from which the corn has been cut and scraped make delightful pioneer log-houses. Cooked cobs are too hard to cut. Choose slender cobs, long ones for the front and back of the house, shorter ones for the sides. Cut a notch, or saw it, if the cobs are dry and hard, on the tops of the ends of each of the two foundation logs (Fig. 198). Cut a notch on both top and bottom of each remaining log as indicated by the black lines in Fig. 198.
Always make a larger notch in the small end of the cob than in the large end, so that the large end of another cob may fit in it; for, when building, it is necessary to place small ends and large ends together, and never two large ends or two small ends, or the house will be unevenly balanced.
Lay the two foundation cobs down parallel to each other and a short distance apart; then bridge across the ends[161] with shorter cobs, fitting the notches into each other. Continue building in this log-cabin fashion until the house is of sufficient height.
On the front of the house draw two straight lines down across the cobs, one for each side of the doorway. Then take your house apart and cut the doorway out from the marked cobs. Rebuild the house, gluing layer upon layer. Make the doorway jambs of straight pieces of corn-stalk, and glue them on each side of the open doorway.
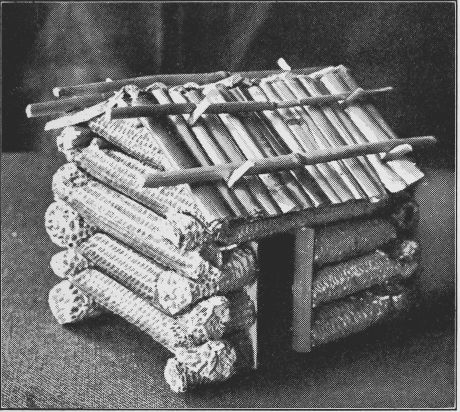
Before the roof can be added, corn-cobs, graduated in[162] length and without notches, must be laid at each end of the house to support the roof and give it its gable ends. These graduated cobs are the "trap-logs." They rest upon long strips of corn-stalk, called "ribs," which are placed across from one end of the house to the other. Build the roof log-cabin fashion as you built the body of the house, laying a rib between the ends of each layer of graduated cobs, and as you build, fasten the parts together with glue.
Cut enough clapboards of corn-stalk to cover both sides of the roof. Make them all of the same length and long enough to reach from the top of the roof to a trifle beyond its lower edge.
The clapboards must be held down by means of "weight-poles" laid across, and to keep the weight-poles from rolling off use pegs called "knees."
Make the knee-pegs of corn-stalk. Cut a hole near both ends of four of the clapboards and glue in pegs, slanting them upward. You will then have two pegged clapboards for the front of the roof and two for the back. Place them near the ends of the roof and glue all the clapboards in place. Cut four slender lengths of corn-stalk for weight-poles, and lay them across the roof, resting against the knee-pegs. Glue them to the roof only where they buck the knee-pegs. When finished, set the house aside until the glue is entirely dry. It may then be moved.
Corn-tassels standing in empty spools make fine trees.
It is fitting that the story of our country's first Thanksgiving should be retold this year by means of corn. You remember, of course, that friendly Indians showed the pioneers how to plant and cultivate corn, which, to them, was a new grain. Later, when a wonderful harvest had been gathered, our forefathers decided to set aside a day to thank God for His goodness. That was the first Thanksgiving.
You will hardly believe it is only an ordinary, everyday orange when you have made it into the head that I am going to tell you about.
Select a small, firm, perfect orange and with a pencil mark features on it, first the eyes like Fig. 199. Carefully cut out the little spaces of skin between the lines, then mark the nose (Fig. 200); cut this and mark the mouth (Fig. 201); cut this and at each side of the head draw the ears like Fig. 202. You will see that the line of the ear does not continue all the way around; that means that you are simply to run your knife along the line, cutting through the skin so that the ears may be lifted up and peeled forward to stand out from the head; the front part remains attached (Fig. 203).
Make the neck of a slender, strong, round stick sharpened to a point at one end. Push the point up into the under part of the orange, where the neck should be, by twisting the stick around as it goes in (Fig. 204).
The orange is the head, but your hand and fingers are to be the body and arms to go with it. Look at Fig. 204. That will show you how to hold the stick firmly and at the same time leave your first finger and thumb free to use as arms.
Pin a handkerchief, or other soft cloth, around Mr. Orange's neck, bring it around to cover your hand and then pretend he is talking while you move his arms and say as many funny things as you can think of. By moving the stick while you hold it in your hand, you can make the orange head turn in various ways (Figs. 205 and 206), and a little paper hat fitted on it will make it still funnier (Fig. 207).
The orange need not always be a man. You can play it is a little girl and make a cunning little wreath of flowers[166] for her small head; or pretend it is a baby and have it wear a baby's cap made of paper. If you want to turn it into a young lady, pierce the ears and fit in earrings made of violets. You do this simply by threading the flower-stems through the holes you have pierced, and drawing the blossoms up close to them. Then, you can make believe the orange is an old man and put a pipe in his mouth. Make the pipe of an acorn with a twig for the stem. If you want the baby to cry, squeeze the orange a little and tears of orange-juice will roll from its eyes and stream down its face. Little holes must first be punctured in the eyes to let the tears run out.
The soft, golden orange-skin, lined with silvery white, is fine material for moulding and making into different kinds of things to play with. Bring your orange and we will begin by making a toy stool for your doll-house (Fig. 208). It will look very much like the real stools which the Japanese make for real people to sit on, though nothing is used for it but the orange-skin.
First cut the orange across from side to side, making two halves, and after you have taken out the pieces of juicy fruit and enjoyed eating them, examine the two pretty yellow orange-skin bowls that are left. See how soft and pliable they are. Now take one of the bowls and pinch the edges of two opposite sides toward each other; hold them steady while, with your other hand, you pinch the other two sides toward each other. Hold all four sides bent inward for a moment, then let go of them and the sides will stay bent while you wind string across, first one way then the other, between the curved stool legs you have just made by bending the sides of the bowl inward.
Set the stool away to dry and stiffen into shape; then, when it has become hard, take off the string and you will have a little Japanese stool quite as strong as if made of wood.
A candy-box can be made in the same way of the other half of the orange-skin, but you must curve the sides in only a little for this; not nearly as much as for the stool. Stand the candy-box, with open part up, ready to be filled with candy.
An orange-skin basket is a substantial little affair when finished, and will hold almost anything you want to put in it. It looks like Fig. 209. For this you will again need half of an orange-skin. Bend in two opposite sides after first cutting a short slit in each side near the edge. Make the handle of strong paper, cutting it like Fig. 210, with a tongue at each end. Bend over the two side points of each tongue, and slide one tongue through the slit in one side of the basket, the other tongue through the slit in the other side, then open out the points again and they will make secure fastenings for the handle. You will see from the illustration that the tongues are put through the basket from the inside and show on the outside.
Before setting away to dry, tie a string around the bent-in sides of the basket, and stuff the open part with crushed paper to keep it in shape.
When you have another orange save the two halves of the skin, pack each full of crumpled, clean, blank paper, flatten the bottom of the bowls so that they will stand firmly, then set them away to dry.
If you do all this carefully the bowls will harden in good shape and you can use them to eat and to drink from.
Cunning little toy summer-houses may be made from an orange-skin in a moment's time (Fig. 211). Take half of an orange-skin and stick the sharp ends of four wooden toothpicks into the edge of its rim. Place the toothpicks upright, at equal distances apart, and they will form the pillars to support the golden, dome-shaped roof. Stand the little summer-house on the table, and you will think it charming.
By slicing an orange you can have a number of little, yellow hoops for your dolls, made of the rind around each slice. When the hoops are carefully dried in perfect circles, you can roll them on top of a table or on the floor, and play the dolls are having great fun racing with their orange-skin hoops.
When the apple-trees are in bloom, stand under one and look up through the wonderful tent of flowers at the little bits of blue sky peeping down at you between the blossoms. Isn't it delightful to see so many, many apple-blossoms all at once? How beautiful they are and how sweet they smell!
Now, pick one little blossom and examine it carefully. Count the pretty pink-and-white petals. Five petals? Yes. Look again, see how they grow from the centre and notice their shape. Be very particular, so that you will remember exactly how the blossom looks; make sure you know, for I am going to tell you about the flower you can find inside the big, ripe apple after all the other apple-blossoms are gone.
Cut the apple into thin slices from side to side through the core. Take one of the slices from near the middle of the apple and hold it up to the light, so that the light will shine through it, then look carefully and you will see in the centre a perfect pattern of the apple-blossom you gathered from the tree (Fig. 212). Apple-seeds form the centre of the flower. The petals, five in number, are of the flesh of the fruit. They are of the same shape and size as the real blossom. Isn't it wonderful?
Now, take the seeds from their hard, glossy cases, again
hold the slice up to the light and lo, in the centre of the[172]
[173]
slice, you will find a five-pointed star which twinkles as the
light shines through.
You can add to this and make a pretty, shining pattern in this way: Take a wooden toothpick, and with its pointed end pierce little holes all along the edge of the flower pattern; then make a loop of little holes above one of the petals (Q, Fig. 213), and still another above that one (R, Fig. 213). Pierce the edges of all the petals and make the same kind of double loops above them also, then the design will be like Fig. 214. Hold it up to the light, turn it this way and that and your slice of apple will look as if spangled with glittering diamonds. Fig. 215 shows a wheel design which you can make of another slice.
When I was a little girl I used to make apple candles that stood up in their own candlesticks. I always ate the[174] fresh, juicy slices as I cut them off. Fig. 216 shows how the candles look when finished. The stem is the wick, and as it is usually dark at the end, it is a very good imitation of a candlewick that is partially burnt. The dotted lines on Fig. 217 show how to cut away the apple to leave the candle and its holder.
First cut off a slice at the blossom end, so that the candle-stick will stand without tipping. The dotted line at the bottom of Fig. 217 indicates where this cut is to be made. Then run your knife around the apple without cutting all the way through to the core, where you see the middle dotted line on Fig. 217. After that, begin at the sides and gradually shave down the upper part little by little, being careful not to cut below the slit you have made around the apple. When the middle part standing up around the[175] core is the size of a real candle it is time to stop cutting. Because of the core inside you cannot make your candle very slender, but you can cut off the sharp edges and make it round.
Another thing I used to love to do with my apple when I was a little girl was to tie a long string to the stem and hang it before an open fire to roast. I think you will enjoy it too.
Tie one end of the string securely to the stem of your apple, and don't break the stem off in doing it (Fig. 218); then tie the other end to something heavy on the mantel-shelf that will hold it securely. The apple should hang in front of a grate of glowing coals, or near the red-hot coals of a wood-fire.
As soon as cooking begins, twist the string and make the apple spin round and round so that it may be roasted evenly on all sides; it is fun to do that. When the juice begins to run and drop from the apple, set a saucer under to catch the hot, sweet syrup. It is good poured over the apple when that is thoroughly cooked. Add sugar to the juice while it is hot if it is not sweet enough.
In New England, many years ago, there was always to be found in every household at least one spice apple. It sounds good to eat, doesn't it? But they were not made for eating, they were used for sweet-smelling ornaments, and for keeping away moths and other troublesome insects. Perhaps you will like to make a spice apple to give away; it will be a pretty and very sweet gift and will last for years.
Choose a small, perfectly sound apple and have ready a lot of cloves. Stick the cloves into the apple as you would stick pins into a cushion, only the cloves must be put in very close together, touching each other and making the apple look like a large, prickly, brown nut. That is all, unless you want to hang the apple up. In that case run a wooden toothpick through one raised side at the top, across the little hollow where the stem grows, and out through the raised side opposite, after first breaking off the stem. Cross this toothpick with another pushed through the apple and also bridging the hollow. This will make a low handle in the form of a cross. At the middle, where the toothpicks touch, tie a bright ribbon, leaving a loop by which to hang it.
When an apple is cut across into round slices, you can make a doll's table of the largest slice by using four wooden toothpicks for legs, pushing them into the apple at equal distances apart. Half of a slice, with halves of toothpicks for legs, makes a very suitable seat for this remarkable table.
If you cut a thick flat slice from a small apple you can make it into a top that will spin by pushing a toothpick[177] through the centre, leaving a long end on one side and a shorter end on the other. The short end is the peg upon which the top spins. Take the long, upper end of the toothpick between your thumb and first finger, give it a hard, quick twist and drop the top on a table having a hard, smooth finish, where it will spin merrily. The little fruit-top will not spin on a carpet or any rough, uneven surface.
An elaborate book for girls, by Lina and Adelia Beard whose former books on girls' sports have become classic, which contains a mass of practical instruction on handicrafts and recreations. So many and so various are the things it tells how to do and make that it will give occupation to any sort of girl in all seasons and all weathers.
"The girl who gets this book will not lack for occupation and pleasure."—Chicago Evening Post.
This book is the result of the authors' earnest desire to encourage in their young friends the wish to do things for themselves. Its aim is to give suggestions that will help them to satisfy this wish. Within its covers are described a great variety of things useful, instructive, and entertaining, suited for both indoors and out.
"It would be a dull girl who could not make herself busy and happy following its precepts."—Chicago Record-Herald.
The authors tell everything that girls want to know about sports, games, winter afternoon and evening amusements and work, in a clear, simple, entertaining way.
This book comprises an infinite variety of amusing things that are worth doing; for instance: "A Wonderful Circus at Home," "How to Weave without a Loom," "How to Make Friends with the Stars," "A Living Christmas Tree," etc.
This book furnishes the means of gratifying the impulse toward self-expression that, properly directed, is a great factor in a child's development. It opens a large field of simple handicrafts for little folk by showing how toys can be made from such ordinary things as empty spools, clothes-pins, old envelopes, etc.
He gives easily workable directions, accompanied by very full illustration, for over fifty shelters, shacks, and shanties, ranging from the most primitive shelter to a fully equipped log cabin. Boys will find it an invaluable guide in constructing temporary or permanent shelters in their hikes or encampments.
The directions for making boats are practical and illustrated by simple diagrams, and the work is full of new and suggestive ideas for all kinds of craft.
"A book that is truly fine and will probably have a wider influence on the lives of boys into whose hands it falls than almost any other book that comes their way."—The Interior.
"Instructions as to ways to build boats and fire-engines, make aquariums, rafts and sleds, to camp in a back-yard, etc. No better book of the kind exists."—Chicago Record-Herald.
"Every boy who is handy with tools of any sort will enjoy this book."—Youth's Companion.
"Full of new ideas for active boys who like to use tools and see interesting things growing under their hands."—New York Tribune.
"A perfect treasure-house of things that delight the soul of a boy."—The Interior.
"It tells how to play all sorts of games with marbles, how to make and spin more kinds of tops than most boys ever heard of, how to make the latest things in plain and fancy kites, where to dig bait and how to fish, all about boats and sailing, and a host of other things which can be done out of doors. The volume is profusely illustrated and will be an unmixed delight to any boy."—New York Tribune.
"It tells boys how to make all kinds of things—boats, traps, toys, puzzles, aquariums, fishing tackle; how to tie knots, splice ropes, make bird calls, sleds, blow guns, balloons; how to rear wild birds, to train dogs, and do a thousand and one things that boys take delight in. The book is illustrated in such a way that no mistake can be made; and the boy who gets a copy of this book will consider himself set up in business."—The Indianapolis Journal.
Obvious punctuation errors repaired.
Page 109, caption Fig.124, "Burdock-burs" changed to "Burdock-burrs" (house of Burdock-burrs)
Page 111, caption Fig.132, "Burdock-burs" changed to "Burdock-burrs" (by Burdock-burrs)
Page 114, caption Fig.137, same as above (Burdock-burr target.)
Page 114, caption Fig.138, "bur" changed to "burr" (Hold the burr)
Page 143, caption Fig.177, "ig" changed to "Fig" (Fig.177)
Page 164, caption Fig.203, "pealed" changed to "peeled" (peeled forward)