The Project Gutenberg EBook of Educational Toys, by Louis C. Petersen

This eBook is for the use of anyone anywhere at no cost and with
almost no restrictions whatsoever.  You may copy it, give it away or
re-use it under the terms of the Project Gutenberg License included
with this eBook or online at www.gutenberg.org


Title: Educational Toys
       Consisting Chiefly of Coping-Saw Problems for Children in
              School and the Home

Author: Louis C. Petersen

Release Date: September 3, 2013 [EBook #43635]

Language: English

Character set encoding: ISO-8859-1

*** START OF THIS PROJECT GUTENBERG EBOOK EDUCATIONAL TOYS ***


Produced by David Edwards, Diane Monico, and the Online
Distributed Proofreading Team at http://www.pgdp.net (This
file was produced from images generously made available
by The Internet Archive)
[Transcriber's Note:
LEAD-PAINT WARNING!
DO NOT USE THE GROUND-LEAD
PAINT INGREDIENTS
mentioned in the "Coloring the Toys" chapter.
See Transcriber's Notes at end of document for more details.]
by
LOUIS C. PETERSEN, B. Sc.
Director of Manual Arts, State Normal University,
Carbondale, Illinois
PUBLISHED BY
THE MANUAL ARTS PRESS
PEORIA, ILLINOIS
COPYRIGHT
LOUIS C. PETERSEN
1920
| Page | |
|---|---|
| Introduction | 5 |
| Tools and Supplies | 7 |
| Bow Drill | 8 |
| Transferring Designs | 9 |
| Woods | 9 |
| Laying Out Work | 10 |
| Sawing | 10 |
| Fastening Bases | 11 |
| Fastenings | 11 |
| Coloring Toys | 12 |
| Working Drawings and Directions | 15 |
| The Buzzer | 16 |
| The Shark Puzzle | 16 |
| Duck | 18 |
| Goose | 18 |
| Wild Duck | 20 |
| Hen | 20 |
| Deer | 22 |
| Cow | 22 |
| Weasel | 26 |
| Tiger | 26 |
| Rocking Rhino | 28 |
| Minstrels | 30 |
| Squirrel | 32 |
| Pig | 32 |
| Kangaroo | 32 |
| Camel | 36 |
| Giraffe | 38 |
| Swan Rocker | 40 |
| Balancing Peacock | 42 |
| Toy Dog | 44 |
| Teddy Bear | 46 |
| Parrot | 48 |
| Doll's Hobby Horse | 50 |
| Stern Wheeler | 50 |
| The Weather-cock | 50 |
| Arm-chair and Rocking-chair | 54 |
| Doll's Cradle | 54 |
| Doll's Bed | 56 |
| Doll's Table | 56 |
| Kites | 58 |
| Wood Choppers | 60 |
| The Bucking Goats | 60 |
| Pecking Hens | 60 |
| Acrobat | 64 |
| Climbing Sailor | 64 |
| The Jumping Jack | 68 |
| Balancing Barrister | 68 |
| The Dancing Rastus | 70 |
| The Spanking Esquimaux | 72 |
| Wabbler | 74 |
| Falling Teeter-Totter | 76 |
| Tumbling Tommie | 78 |
| The Busy Pup | 80 |
| The Dinkey Bird | 82 |
| Pelican Sewing Stand | 84 |
| Whirligig | 86 |
| The Cart | 86 |
| The Wagon | 88 |
| Flying Goose | 90 |
| The Dodo Bird | 92 |
| Rocking-horse and Rider | 94 |
| Animated Elephant | 97 |
| The Bucking Mule | 100 |
| Fox-and-Goose Game | 104 |
| Nine Men's Mill | 106 |
| Disc Puzzle | 108 |
| Ball Puzzle | 108 |
| Appendix | |
| Knots and Braids | 111 |
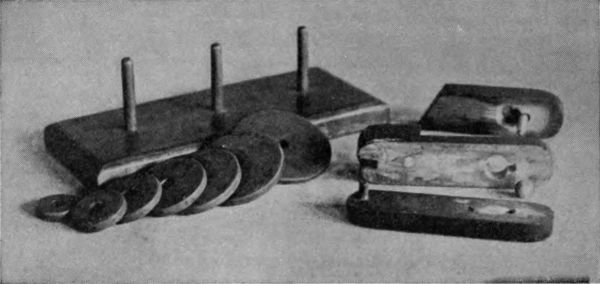
The purpose in sending out this collection of toys is to promote among children a love for educational occupation. This book is intended to be of real service to parents and teachers who are intrusted with the arduous responsibility of child-training. It is with this object in view that the directions, drawings and photographs have been prepared.
The experience of almost twenty years as a teacher has convinced the author that only when the child approaches subject-matter with interest and enthusiasm can the best results be obtained. Giving a child an opportunity to make things, arouses his interest; therefore, learning by doing is a most effective method in gaining educational ends.
Toy-making incorporates this method, with several vital elements added. It takes into account the child's view-point, his proclivities and his emotions. It is a form of activity that appeals strongly to his fancy, has a direct relation to his environments, and is within the range of his mental grasp and constructive ability. His wonderful imagination endows the creatures of his handiwork with life, individuality and cunning. The toy problem is in harmony with the child's resourcefulness, his powers and his interests.
The problems contained in this book have been selected from those worked out in the Normal Model School. They have been tested under ordinary class-room conditions. To survive the weeding-out process, a toy has had to meet the following requirements:
In his early years, the child begins tinkering with what materials and tools he can find, making something. The wise parent and teacher will turn that healthful, happy, creative instinct into good, useful channels. He will encourage and guide the child, in these early attempts, by surrounding him with congenial conditions, by furnishing him suggestions, pictures, drawings and such other aids as will direct him to occupational[Pg 6] problems of educational value, and by providing him with a place to work, the tools, wood, nails, wire and other necessary equipment.
One advantage in connection with the kind of educational hand work presented in this book is that it can be carried on with a very small and inexpensive equipment. Moreover, it is light, clean and agreeable in every respect. The tools are safe for a child to handle. The material is substantial and durable. The articles made are firm, strong and of lasting quality. They become an excellent means for providing an abundance of entertainment, and constitute most acceptable gifts, promoting as much genuine happiness for the industrious donor as for the fortunate receiver.
Toy-making may readily be adapted to class-room conditions and a period be devoted to it each day. Members of the class may be appointed to distribute the tools and material at the beginning of the period, and collect them at the end. While at work, each pupil should stay at his desk and keep it neat and orderly. When not in use, the equipment should be locked up in a box having suitable compartments for the tools and materials.
The teacher who is to conduct the class should be thoroly familiar with the work and should have made each model before taking it up as a class problem. The work as a whole should be conducted in a systematic and quiet manner; concise planning, prompt action, and accuracy in details should be insisted upon. The cheerful spirit, the formation of correct habits, and the proper regard for everything and everybody should be cultivated along with skill in constructing and good taste in coloring the toys.
If for any valid reason this work can not be carried on in the school, the teacher should encourage the pupils to do it as home work. The child can buy his own scroll saw and colors, and furnish his own wood. The work can be done outside of school, but still be under the supervision and guidance of the teacher. The training that comes thru reading and interpreting directions and drawings, and carrying out the instruction in every detail, is of value to every child, no matter what his future career may be.
The child should, therefore, have a book of his own, giving directions and drawings. Furthermore, the teacher should give the proper amount of credit for the home work.
The equipment listed below is suggestive for ordinary class-room conditions. The number of pupils should not exceed twenty-four.
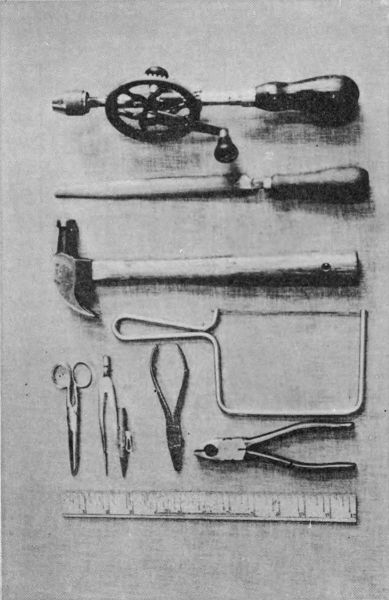
Tools for each pupil:
Tools for every four pupils:
General class equipment and supplies:
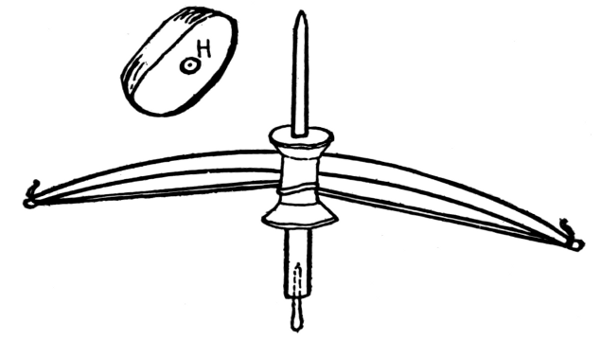
The bow drill is useful for drilling small holes in wood, and may easily be made by a child. First, procure an ordinary thread spool. Push a round stick six inches long thru the hole with a tight fit. Shape the top of the stick to a point (Fig. 3). Drive a nail into the other end of the stick. Cut the head off the nail, hammer it flat at the end, and sharpen it with a file. In this way a drill of any size needed for the work can be made. The bow is made from a slender, flexible stick, about twenty inches long. A notch[Pg 9] is cut at each end where the ends of a strong string are securely tied. Slip the bow string once around the spool and spin it. The top end of the spindle is guided in a shallow hole in a piece of wood as shown at H in Fig. 3. This block of wood is held in the left hand while the right moves the bow back and forth, spinning the spindle and drilling the hole.
The shapes of people, animals and birds on the plates that follow are drawn full size. They are intended to be made of wood, and may be transferred by any one of the following methods:
(a) Place a piece of transparent paper, known as tracing paper, over the drawing in the book, and with a soft, sharp lead pencil, trace all the lines on the drawing. Cut out the traced shape with a pair of scissors. Place it on the wood, and with pencil trace along the edge of the paper pattern.
(b) Make a tracing and paste it on the wood.
(c) Place a piece of carbon paper on the wood, carbon side down. On this, place the tracing in position and fasten it down with two thumb tacks. With a hard pencil, or a stylus, go over all the lines of tracing. Pressure should be applied as the lines are being traced so that they may show plainly on the wood.
(d) Rub the back of the tracing with graphite (the lead of the pencil). Place it on the wood, and with a hard pencil, or a stylus, trace the lines.
(e) When a permanent pattern is desired for class use, place the tracing on a piece of cardboard, and transfer the outline by method c or d, indicated above. With a sharp, pointed knife or shears cut the cardboard accurately to line. Place this template on the wood, and with a sharp pencil, held vertically, draw lines around the edge of the template. This method serves well for class work.
Save the thin-wood boxes found at home. Ask the store-keeper to save boxes instead of burning them. A rich supply of wood for toy-making may be secured in this way. For class work, it will be necessary to buy wood prepared and surfaced to dimensions. The thicknesses most convenient for school work are 3/16", 1/4", 3/8", 1/2", 7/8".
While three-ply wood is best for the thin stock, the single-ply answers the purpose when due care is given to the direction of the wood fibers—the grain. Such woods as maple, elm, birch, cherry and bay wood are very durable, but rather hard to work. Bass wood, poplar and sugar pine are easy to work, are preferable in school, and give satisfactory results.
It is important to have the patterns placed correctly on the wood so that the desired result may be reached. One of the things sought is the greatest possible strength in the parts sawed out. The grain of the wood should, therefore, run lengthwise of the wood where the parts are narrow. Another thing desired is the economical use of material. The patterns should, therefore, be so arranged on the wood that the outlines will match closely together and thus use up as nearly as possible all surface space on the board. Generally, it is advisable to place the larger patterns first, beginning near a corner of the board, and then fit in the smaller patterns on the intermediate spaces.
Where the drawings are not full size, the dimensions are shown in inches or fractions of an inch. Guided by the figures, the outlines of the object may be laid out directly on the wood by ruler, pencil and compasses. In laying out the different shapes on the wood, attention should be given to the direction of the grain of the wood, to have it run lengthwise the object, not crosswise.
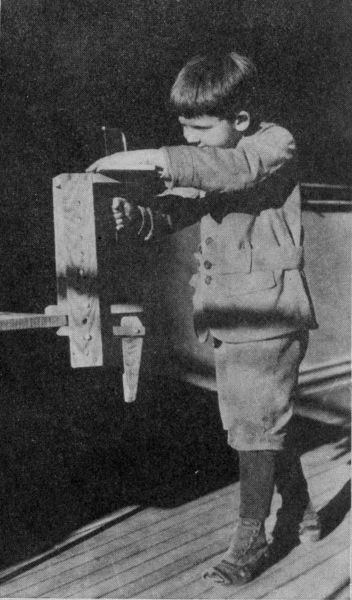
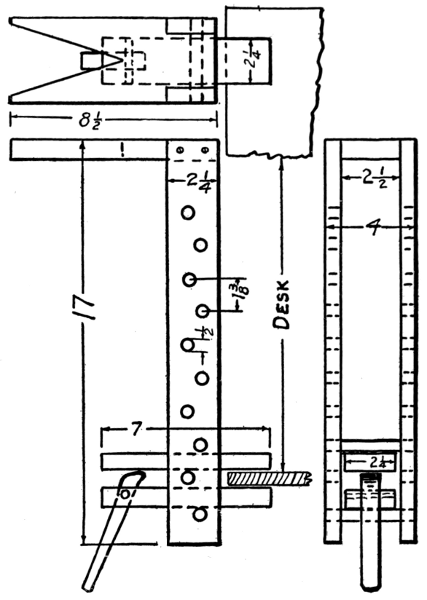
After the different shapes have been properly laid out on the wood, the next thing to do is to saw them out with a coping-saw. The wood is placed flat on a saw-bracket, pattern side up. This saw-bracket is fastened to the edge of a desk or a table top and should be adjusted in height so the top of it is about 6" below the child's chin. The child may stand or sit, when at work, whichever is most comfortable, but a standing position gives more freedom of movement.
The wood is held and guided on the saw-bracket with the left hand, while the right hand operates the coping-saw with an up-and-down motion in the V-shaped opening in the bracket.
The coping-saw is the principal tool needed for this work, and may be purchased with extra blades for about 25 cents. The frame is made of spring steel and holds the blade in tension. By pressing the frame against the edge of a table, it may readily be sprung enough to allow the blade to be put into the slots in the ends of the frame. There is a pair of end slots and a pair of side slots in the frame. The blade may be inserted into these slots with either the teeth edge or the smooth edge of the blade towards the frame. The points of the teeth should always point towards the handle of the frame. The frame is held with the handle down. The saw does the cutting as it is pulled downward. In working the saw, the blade must be kept perpendicular to the face of the wood. The blade should never be forced against the wood, as that will cause the wood to tear, and leave a ragged edge. Saw[Pg 11] right to the line. Keep the saw going up and down to insure freedom and plenty of room for the blade, especially in turning corners. When removing it from the work, do not attempt to twist the blade or let the frame hang on it, as the blades are brittle and break easily.
When an opening is to be sawed out, bore a hole in the middle of the part to be cut out, remove the blade from the upper part of the frame, while holding it in place in the lower part with the thumb of the right hand. Slip the blade thru the hole from below, and replace it in the slot while pressing the upper part of the frame against the edge of the desk. When the opening has been cut, the saw may be removed by reversing the operation. In all cases, saw the edge of the wood to a finish as far as possible. Rough or fuzzy edges should be removed by filing and sand-papering.
Where toys have bases, they should be made of two or more thicknesses, one overlapping the other. The lower piece should be thicker than the upper, extending a distance equal to the thickness of the upper part. When both the toy and the base parts are ready to fasten together, hold the toy in a vise, with its feet up, and drive nails thru the upper part of the base into the feet. Then fasten the top to the lower part with escutcheon pins. Space the pins accurately.
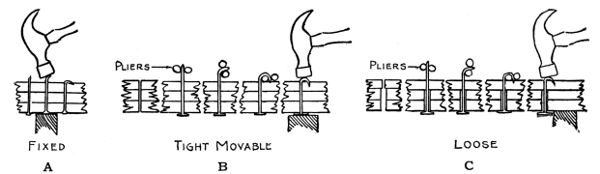
Several methods are employed in fastening parts together in toy-making. Where parts are joined together permanently, a thin coat of liquid glue should be rubbed on the joining surfaces with a small paddle, and then fastened with several brads. Where possible, these brads should reach thru the parts just enough to be clenched on the other side (A, Fig. 5).
A movable joint is secured by one flat-headed nail which acts as a pivot, on which one or more of the parts turn. The nail must reach thru the wood far enough to allow the end to be bent back like a staple and be driven into the wood.
A loose joint is required in some toys so that the parts may swing without friction. A flat-headed nail is used as a pivot, and holes, a little bigger than the nail, are bored thru all but one of the parts to be joined together. The part that will be nearest to the point of the nail has no hole bored in it, for it should fit tight. The nail must reach thru the joint far enough so that it may be bent back, staple-like, and when the point is driven back into the wood, the joint should swing freely. The nail may be bent with round-nose pliers (B, Fig. 5).
The possibilities that may be achieved in beautifying these wooden toys are almost limitless. They may be treated as design problems, thereby serving as a means of training the taste and imagination as well as developing an appreciation of space relations and color harmonies. The work is fascinating to children and presents an excellent opportunity for acquiring knowledge and skill in mixing and applying colors. Several methods are given here. The choice of method should be guided by the child's ability and experience in doing work of this kind. The employment of striking and brilliant colors will enhance the charm and increase the artistic effect.
The methods of coloring are arranged in the order of their difficulty in manipulation:
Method No. 1. Water colors may be used to color the wood, but only a little water should be used so as to prevent the tendency to spread. When the toy is dry, a coat of shellac may be applied over the water color. This protects the wood and gives the toy a crisp and bright appearance.
Method No. 2. Of the calcimine paints, the one known as "Calcimo" may be used successfully by children. It is procured in powder form and costs from 15 to 50 cents a pound according to color. It is mixed with water that contains a binder to prevent the colors from rubbing off in handling the toys. The binder may be either glue or mucilage mixed with the water. The proportion is about a tablespoonful of glue to a quart of water. In preparing the colors, put a teaspoonful of powder in a water-color pan and add water, while stirring and rubbing out the lumps, till the mixture comes to a consistency of thick cream. It may then be applied with a No. 6 water-color brush.
LEAD WARNING!
DO NOT USE THE WHITE LEAD OR GROUND LEAD INGREDIENTS MENTIONED IN
METHODS 3 AND 4.
Method No. 3. When handled correctly, oil paint and enamel paint give excellent results, producing a smooth, brilliant gloss. First, give the toy a coat of white lead or flat white tone. Apply it with a flat sash brush about an inch wide. Allow the toy to dry four or five days and then sand-paper it smoothly with No. 1/2 sand-paper. Finally, give it a coat of enamel paint of the colors desired.
If colored enamel is not at hand, use white enamel and add colors ground in oil. The enamel paint is put on a surface with a large camel-hair brush. Use No. 10 artist's flat brush for features. Natural details and life-like effects should be avoided.
The features should be conventionalized. Eyes, ears, nose and mouth may be dotted in with a tooth-pick.
Method No. 4. For a second coat, instead of using enamel for coloring, white lead ground in oil may be used, mixed with colors ground in oil. This produces a mat or dull finish that is quite pleasing. However, if a gloss finish is desired, a coat of varnish may be applied over the dull color. Dry colors may be mixed with shellac varnish until it is heavy enough to cover the wood. If this mixture becomes too thick to spread smoothly, it may be thinned with alcohol. The brush that has been used in varnish may be cleaned by washing in borax water. When the joints are movable, it is advisable to paint each part separately before putting them together. Where glue has been used to form joints, it should be thoroly dry before the toy is painted.
In beginning the construction of these toys, read the directions carefully so as to understand the process of construction. Study how you can best arrive at the desired results. By thinking ahead, as you proceed, many mistakes may be prevented.
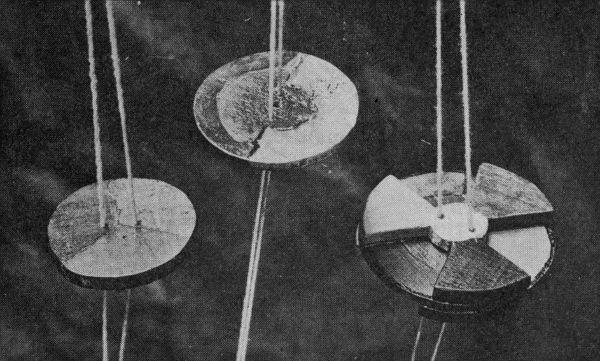
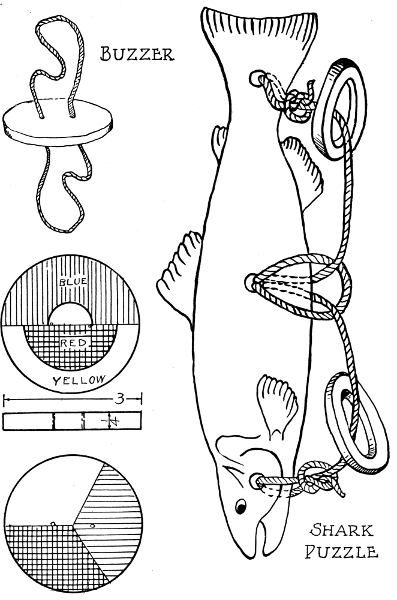
This toy is made from 1/4" stock. Two 1/8" holes are located on a straight line passing thru the center, one on each side of the center and 1/4" from it. The circle is drawn with compass, and then sawed to the line.
The circumference is stepped off into lengths equal to the radius, and every second point connected by line with the center. This divides the surface into three equal spaces called sectors. Color each sector with one of the primary colors—red, blue and yellow.
A strong cord is slipped thru the two holes, and the ends tied together in a square knot, leaving a loop on each side of the wheel.
To operate the buzzer, insert a finger of each hand in the loops and swing the disk around in a circular motion till the strands of the cord are twisted together. Then pull hard on the cord so that the disk will be set into a spinning motion as the cord is being unwound. At this instant slacken the cord so that the disk may continue turning, and rewind the string. Then pull on the cord again, and the disk will spin in the opposite direction. By whirling the disks rapidly in this way, the colors will blend and show a new color produced by the three primary colors. The other side of the wheel may have half of it colored yellow and half colored blue. This will blend into green when spun. By pasting paper sectors of different colors on the wheel, an infinite number of tests in color-blending may be made.
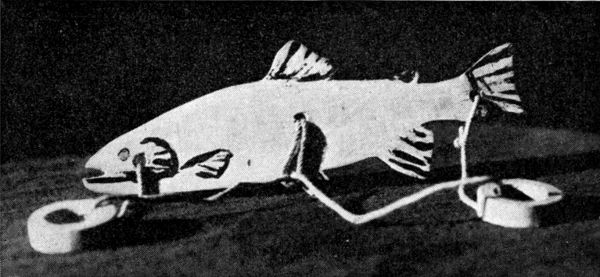
The shark is sawed out as shown in the drawing and three holes bored.
To make one of the rings, draw two concentric circles—one 1/2" radius and the other 3/4" radius. First, saw out the inner circle and then the outer.
Take a piece of cord a foot long, double it and slip the loop thru the middle hole in the shark. Next, put the two ends of the cord thru the loop. Slip a ring on each end of the cord, and tie with a slip knot into the end hole in the shark.
Puzzle: Transfer a ring from one end to the other.
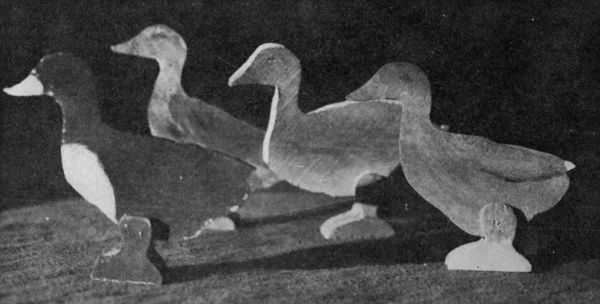
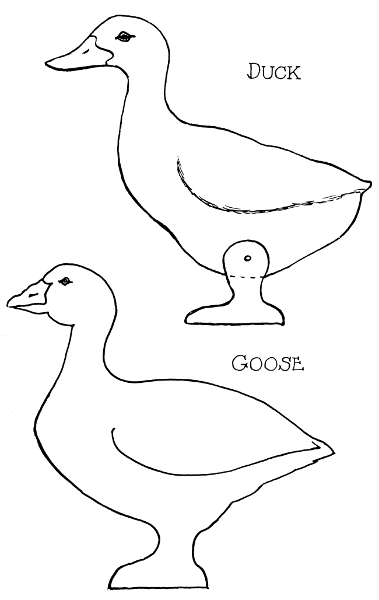
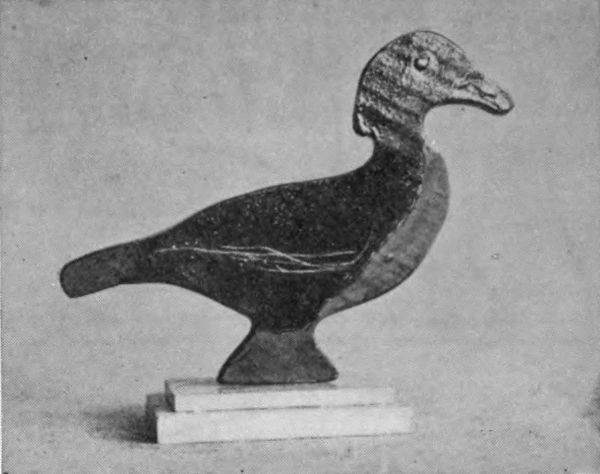
The parts for this fowl are sawed out of 1/4" stock. The edges should be sawed square and to line, and may be made smooth and slightly rounded by filing and sand-papering.
The two feet should be made alike and held together when the hole for the nail is drilled thru them. The bottom of the feet will then be on the same level, and the duck will stand upright. Put a fine 1" nail thru one foot, drive it thru the body, at the proper place, and press it thru the other foot.
With round-nose pliers, bend the end of the nail around so the end will point toward the wood (Fig. 5). Place the head of the nail against a block of iron, and with the hammer drive the point of the nail into the foot. The joint should be firm and movable so the duck will stand at different postures.
Color the body brown, with black outlines and streaks on the wings, the bill yellow, the head green, and the feet red.
This project may be made of 3/8" stock and fastened to a platform base (Fig. 6).
The platform is made of two rectangular pieces one on top of the other. The upper is 1-1/2" by 2-1/4"; the lower, 2-1/4" by 3". The grain in the two pieces should cross to prevent warping.
To fasten the goose to the platform, outline on the upper piece of the platform the position for the foot. Hold the goose with foot up. Drive 1-1/2" brads thru the upper piece of the platform into the foot.
On the upper side of this upper piece of the platform, locate points at each corner, 1/4" from the outer edges, and drive 5/8" escutcheon pins thru it into the lower piece of the platform.
Smooth all parts, and color the body white with black trimmings. Make the bill yellow, the feet red and the platform green.
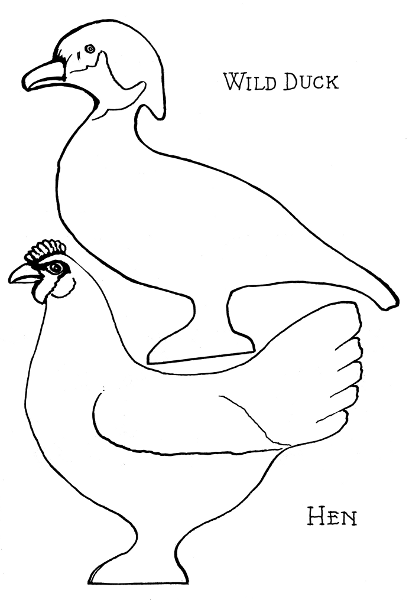
The body may be cut from 3/8" stock, or from heavier material if so desired. It may be whittled to natural shape with a pocket knife before fastening it onto the platform.
The bill, eye and feet are colored yellow, throat, breast and tail red, head and wings dark green, and platform blue.
The construction of this problem is similar to that of the goose. Her feet and comb are colored red, body white with black trimming, beak and platform yellow.
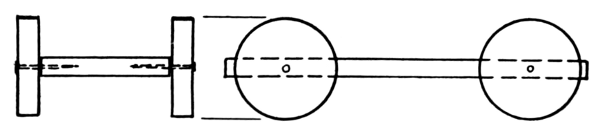
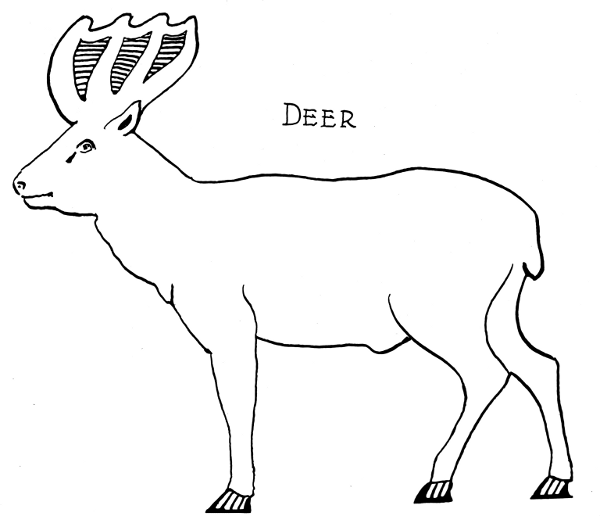
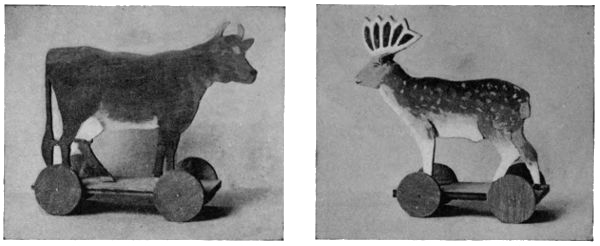
The stock is 3/8" thick, the grain running vertical. It should be mounted on a wheel base 3/8" by 2" by 5-1/2" (Fig. 7). The deer is colored reddish brown, but nearly white under the body and on the lower parts of the legs. Color the base black and the wheels red.
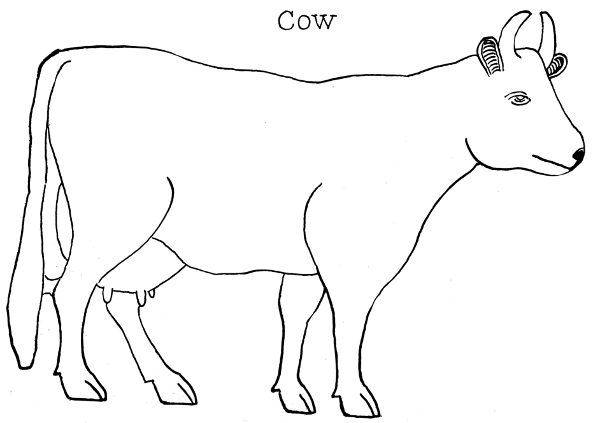
The stock is 3/8" thick. The grain of the wood should run vertical. The cow should be mounted on a wheel base 3/8" by 2" by 5-1/2". Wheels are 3/8" thick, 1-1/2" diameter. This is a Jersey cow, and should be colored accordingly. The base may be colored green, and the wheels red.
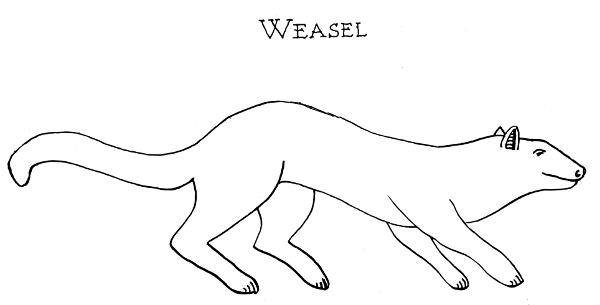
This little creature is wary and swift as lightning in its movements.
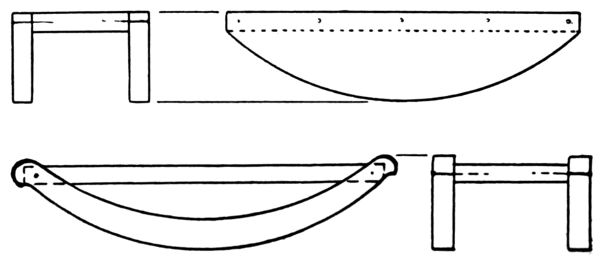
The stock should be 1/4" thick, the grain running lengthwise of the body. It may be mounted on rocker base 1/4" by 1-1/2" by 5" (Fig. 8. See text on "Minstrels," page 30). It is reddish brown with under part of body light.
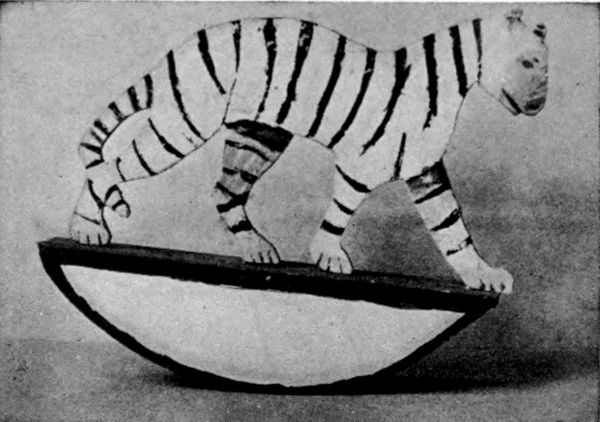
This may be treated in the same way as the weasel except the coloring. Examine a tiger in the zoo, or look up some colored pictures of tigers so you will know just how to draw his stripes and just what color to make them.

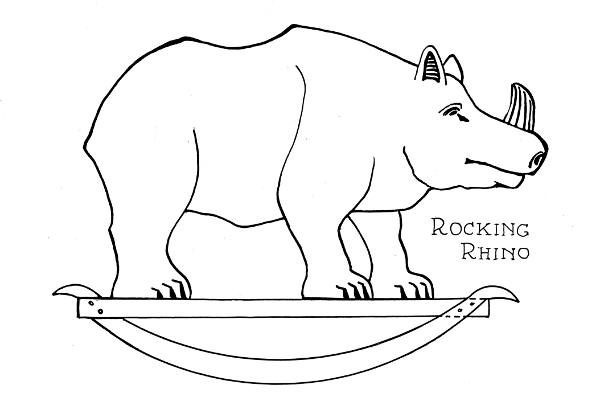
The rhinoceros should be cut out and colored and mounted on a platform which has rockers fastened to its edges (Fig. 8).
Hold the animal in the vise, head down, and nail thru the platform into the feet.

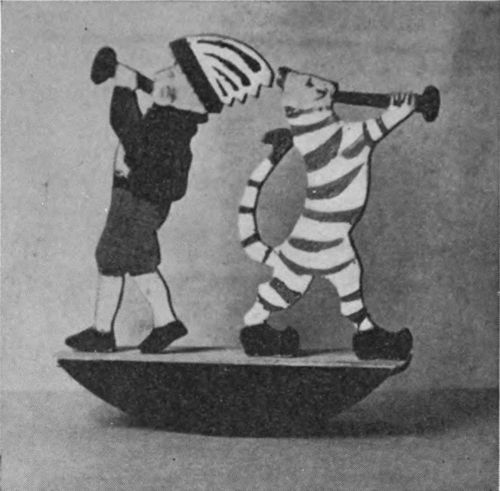
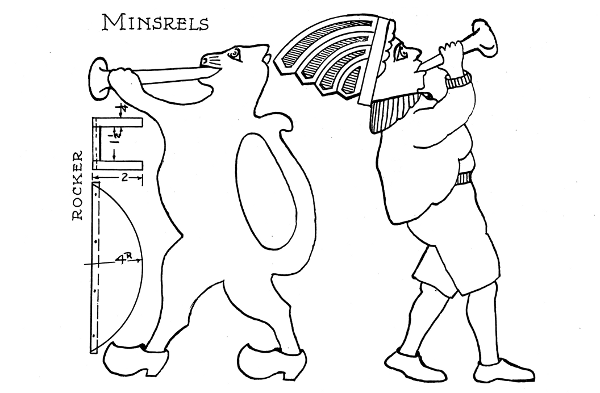
The stock for the two minstrels, the platform and the rockers is 1/4" thick, with the grain of the wood running lengthwise in each object.
The bottom of the feet of the figures should fit squarely onto the platform. The rockers are laid off with the compass. The center of the arc is on a separate piece of wood of the same thickness as the rocker.
When the rockers are accurately finished and nailed to the platform, a center line is drawn along the under side of the platform, and points located to match the position of the feet of the figures. Use 3/4" brads and drive them thru the platform. Hold the figures, heads down, in the vise, or in clamps, and, in turn, drive the brads thru the feet and into the legs so that the figures will stand in an upright position. They are then colored in such brilliant attire as is becoming two gay minstrels.
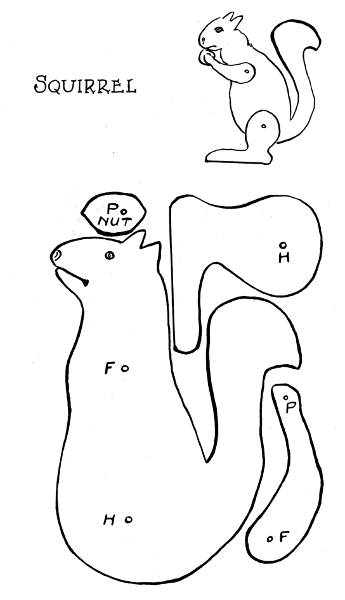
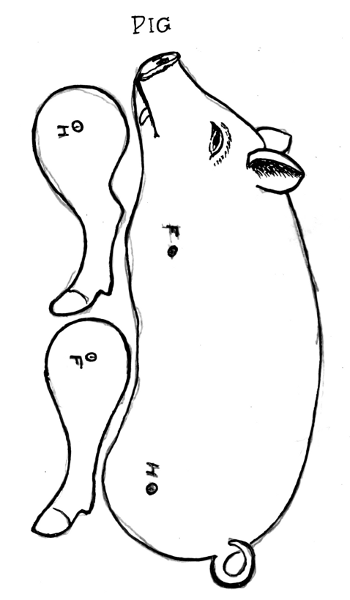
The squirrel is generally regarded as being wary and wild. Still, by wise and kind treatment, its timidity can be overcome, and it may become quite tame. All parts of the squirrel may be made from 1/4" stock. Saw out the body, two fore, two hind legs and a nut.
Hold each pair of legs together in boring holes thru them. Smooth the parts and assemble them by firm movable joints.
Color throat and breast light gray, and the remainder brown.
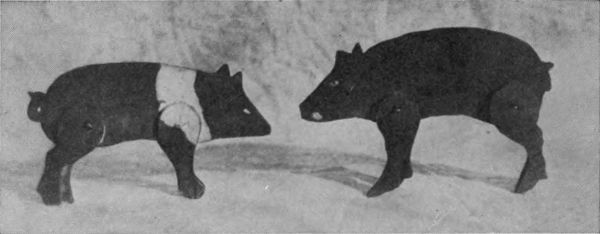
This problem is worked out similar to the squirrel. It may be colored red, black or white, with large spots.
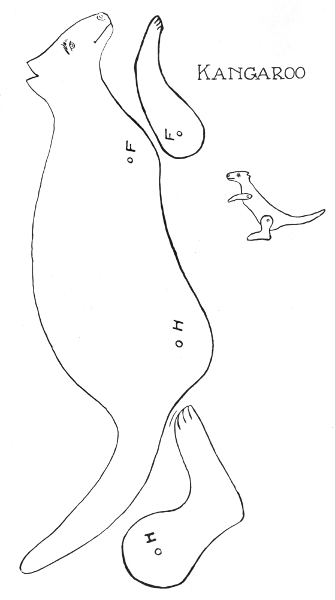
This animal has its home in Australia, where the birds are songless and the trees give no shade.
It has a very powerful tail which serves with the two long hind legs as its support and for making enormous bounds. The fore legs, much like arms, are used with surprising dexterity by this strange animal. The nose, throat and breast are very light, the rest of the body is reddish brown.
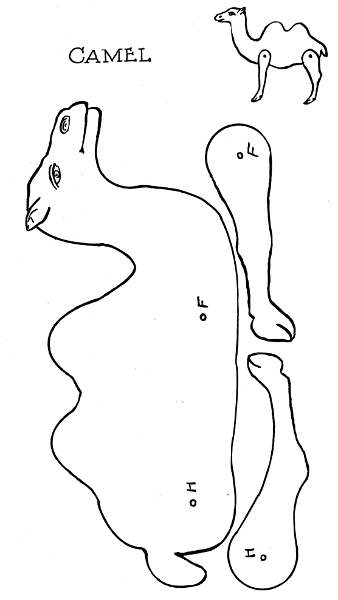
It is with significance that this beast is called the ship of the desert. Like a ship crossing a wide ocean of water, the camel travels across a great expanse of sand carrying heavy loads of freight.
It has a wonderful endurance and can go for a week without drinking, subsisting on the coarse grass of that waste region, and the water stored up in its humps. Its dreamy eyes, sullen nature, angular figure and neutral grey-brown color—all seem to resemble the rocky desert itself.

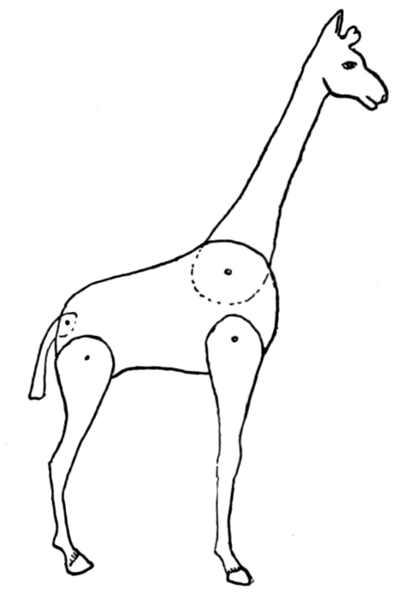
This creature (Fig. 9) is, unquestionably, the tallest of all the beasts of the forests of Africa. It does not stoop to obtain its living from the ground, but browses on the tops of trees.
It is also called the camelopard, suggesting a resemblance in shape to the camel and in color to the leopard.
It is cream-colored with a shower of dark-brown spots on its back and sides.
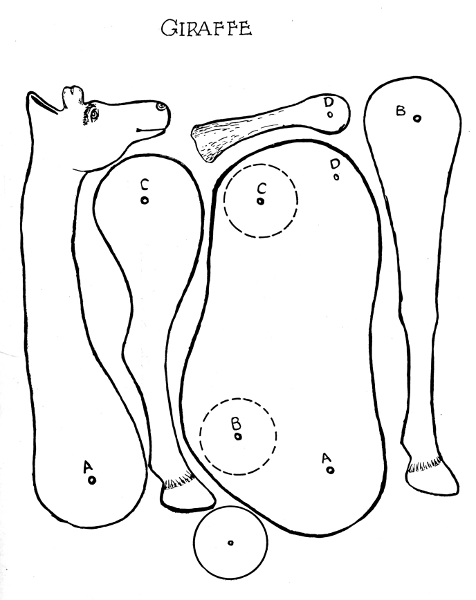
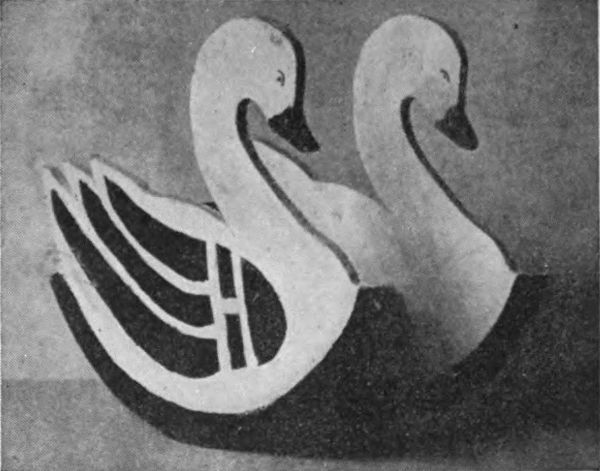
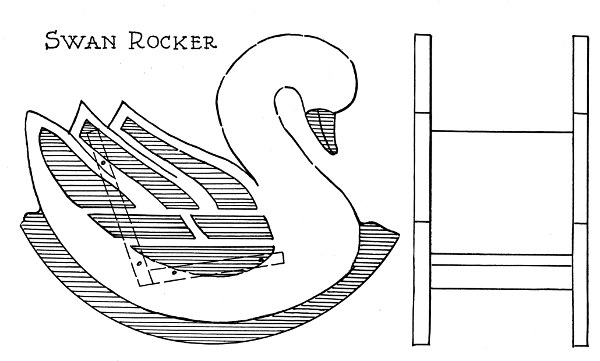
All the parts may be made from 1/4" stock. The two sides are made like the pattern. The seat is 2-1/4" wide, the back 2-1/2". Both are 3" long, and serve to unite the two sides.
When the parts are finished and ready for assembling, mark on the sides the exact location of seat and back; also the position of each nail on all parts. Hold the two sides together and make small holes thru them where the nails are to be driven. Nail, in turn, the seat and back to the first side, and then to the second side.
Color white and decorate appropriately.
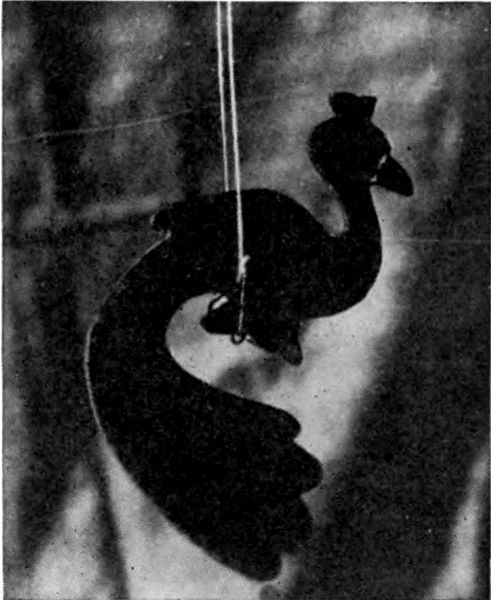
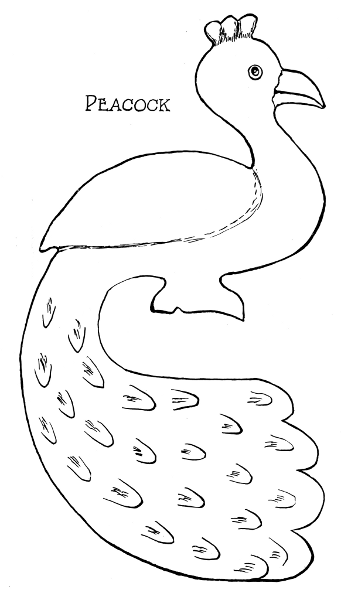
Saw out the shape of the fowl as outlined in the drawing.
There is good chance for display of fine color in dark-green and blue. The breast should be colored brown.
Make a small stick about 2" long for a perch. Drive a small nail into each end of the stick, and tie the ends of a fine cord to each nail. Press a brad thru the middle of the stick up into the foot of the peacock. It may then be hung up by the long loop of the string and swung freely.
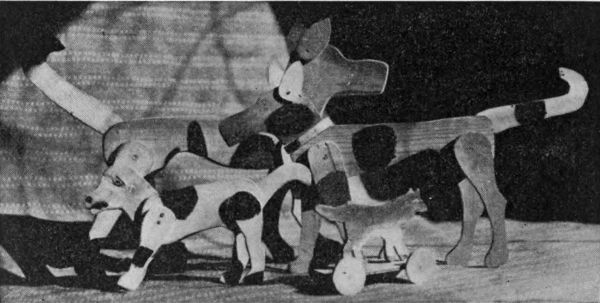
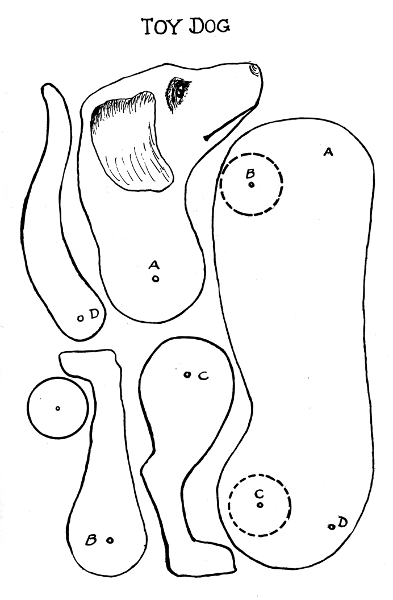
This dog may be made of 3/16" or 1/4" stock. When put together, the two pieces for the body are separated by the head, tail and two circular pieces. The legs are fastened to the outside of the body by two long nails that reach thru the five thicknesses. The ends of the nails are bent back.
Smooth the parts and color white, with large black spots on head, back, tail and legs.
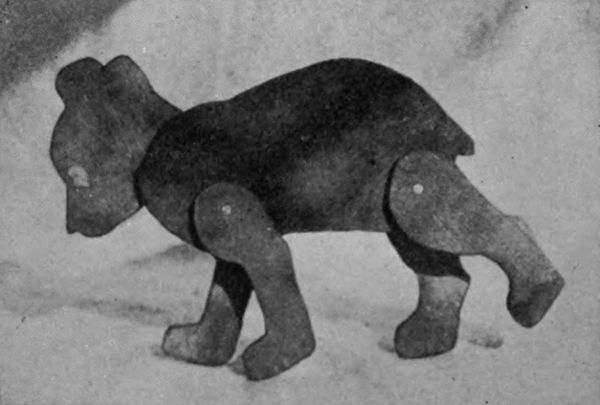
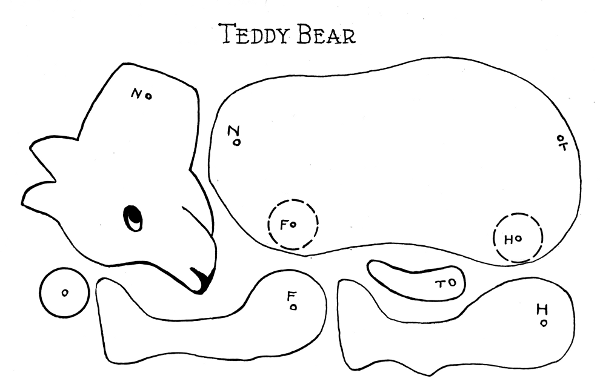
This animal has two pieces for the body. The head and two circular pieces hold these two pieces apart. The head and legs move on tight joints so that the bear will stay in the desired position.
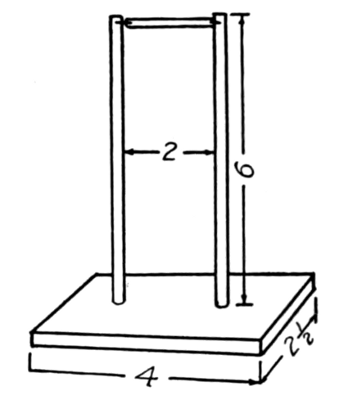
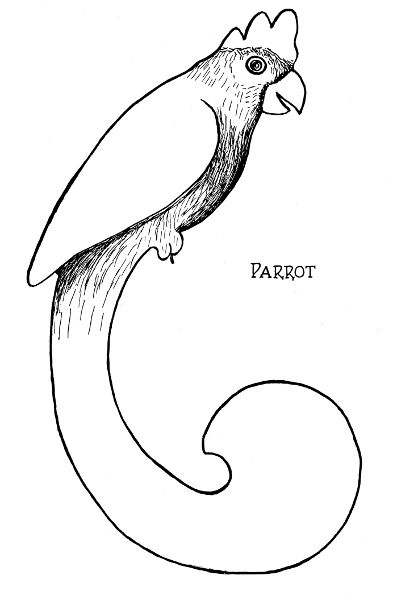
This may be made of 1/4" stock. The base has two holes bored thru it for the uprights with fit tight into the holes (Fig. 10). The perch is 2" long and has a brad in each end to swing on. These brads fit loose thru the uprights near the top ends.
The parrot is sawed out, and a 3/4" brad driven up thru the foot which also fits into the hole in the middle of the perch.
The parrot may be colored white with black trimmings, yellow beak and eyes, red crest, tail and foot. The wings are green.
The stand should have a green base, red uprights, and yellow perch. The bird should balance well and swing freely.
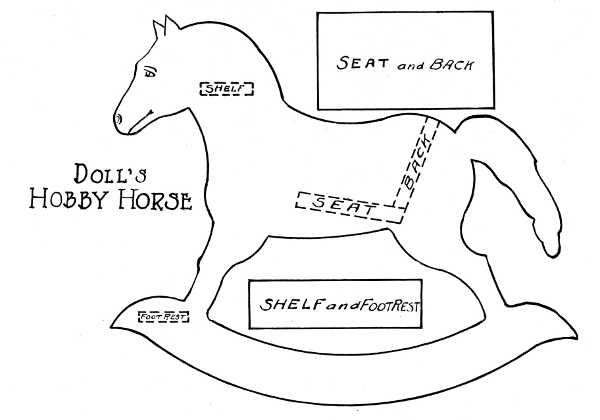
The two body pieces of the horse with rocker are sawed from 1/4" wood. The seat and back are made alike, as are also the shelf and foot-rest. The ends of these four pieces should be at right angles to the sides, and the edges should be slightly rounded.
Mark carefully on both side pieces where the cross-pieces are to be fastened. Hold the two together and make fine holes thru the two thicknesses where the nails are to go thru. By driving the brads thru these holes, fasten all the cross pieces to one side, and watch that the brads go straight. Then fasten the other side in a similar way.
Color the horses white, rockers red, and seat blue.
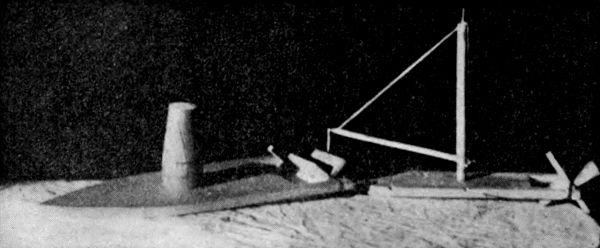
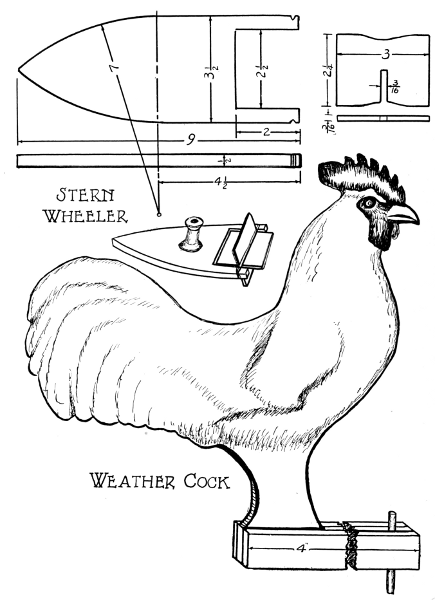
This boat is sawed out according to the drawing, and notches cut on the arms at the stern as a place for the rubber band which serves both as axle and motive power. The paddles are sawed out to fit together to form a stern wheel with four paddles.
The elastic is made in a double loop of four thicknesses, one of which is placed in each of the four angles of the paddle. By twisting the elastic band, power is stored up sufficient for the boat to attain a fair rate of speed. A spool serves as smoke-stack.
Paint the boat white and smoke-stack red.
This fowl may be made of 3/8" stock; a shingle will do. Let the grain run vertically. The perch may be made of similar stock, triple thickness, with the middle piece short to allow room for the foot of the rooster. The pieces[Pg 54] are securely fastened together with nails, and a hole bored in the other end of the perch for a metal pivot, on which it should swing to tell the way the wind blows. Give it two coats of paint, using brilliant colors.
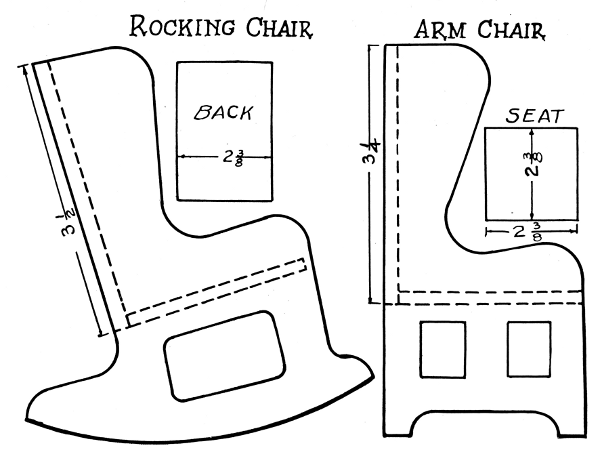
These two doll's chairs are similar in construction. Make them from 1/4" wood. Saw out two sides, a back and a seat for each chair. Have edges finished accurately. The seats are alike for the two chairs. The backs, also, are alike, except that the one for the rocker is 1/4" longer than the other. Assemble as shown in dotted lines, and fasten with 1" brads.
The chairs may be colored white or mahogany. With due care and skill, this furniture may be made very attractive and valuable.
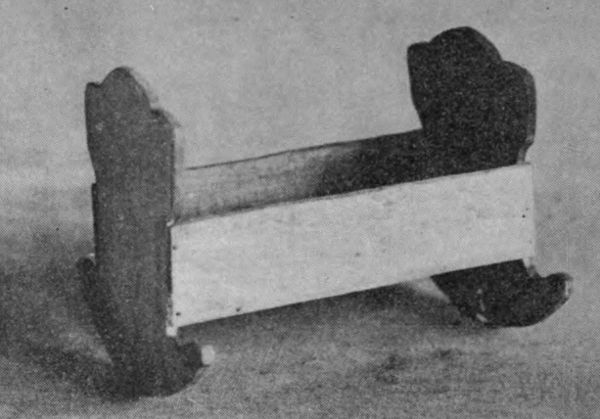
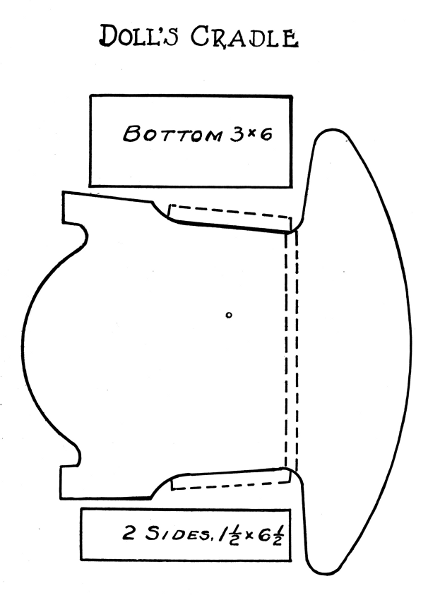
Every little girl loves to own a cradle for her doll. Here is one that is strong and pretty, and can easily be made from thin wood about 1/4" thick. Saw out the two ends after tracing the outline from the full-sized drawing. The two sides and bottom have their dimensions given. When properly shaped and smooth, the bottom is fastened with 1" brads between the ends. One-inch brads are driven thru the sides into the edges of the ends. Be careful when driving the brads that the sides do not split and that the brads go straight.
Paint the cradle white on the outside and violet or pink inside.
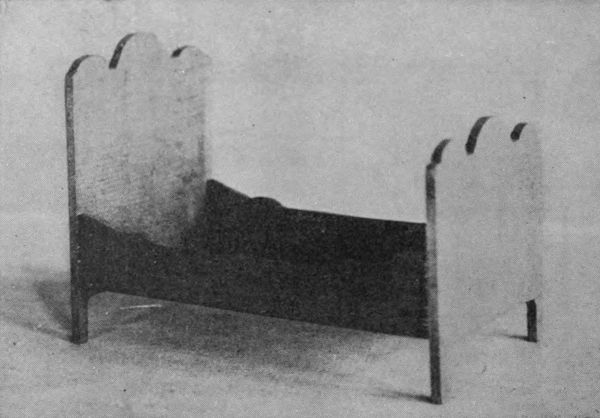
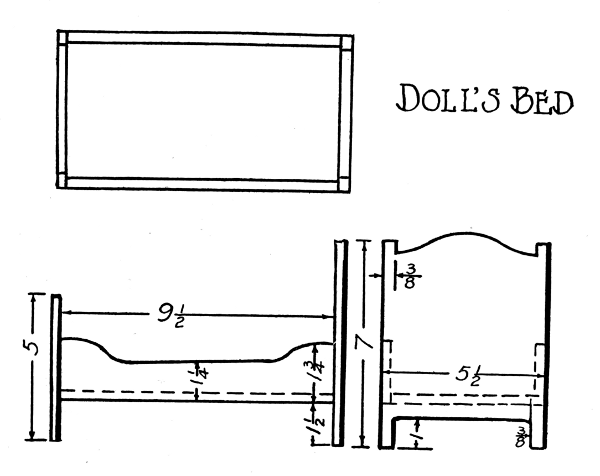
This is a problem that will appeal to the little girl. It is also needed to complete the set of doll's house furniture. It is made of 1/4" wood and fastened with 1" brads. The grain should be run from top to bottom in the ends of the bed and lengthwise in sides and bottom.
The parts should be cut out of paper full size and placed on the wood as patterns. In cutting out the ends, fold the paper on the vertical center line so as to cut the two halves at the same time. When all parts are sawed out, fasten the bottom to the two ends, and then put the sides in place. The bed is colored like the rest of the furniture.
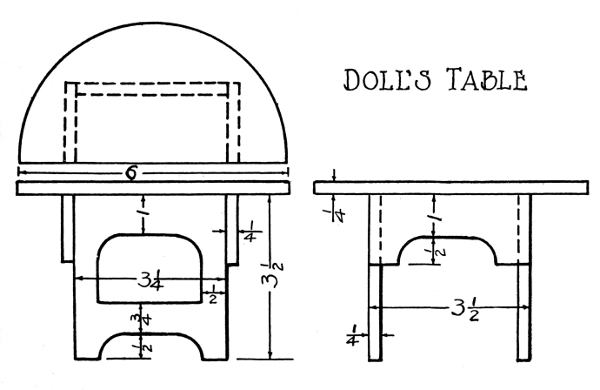
This table, being part of the furniture set, may be made from 1/4" stock. The four pieces comprising the legs are made from two paper patterns that are laid out to measure, folded on the vertical center line, cut out symmetrically, then traced on the wood, sawed out, smoothed and fastened together with 3/4" brads. The top is drawn directly on the wood with compass and fastened with 3/4" brads, centrally on the legs.
It is colored white, brown, mahogany or some other shade to harmonize with the general color scheme of the Doll's House and its furnishings.
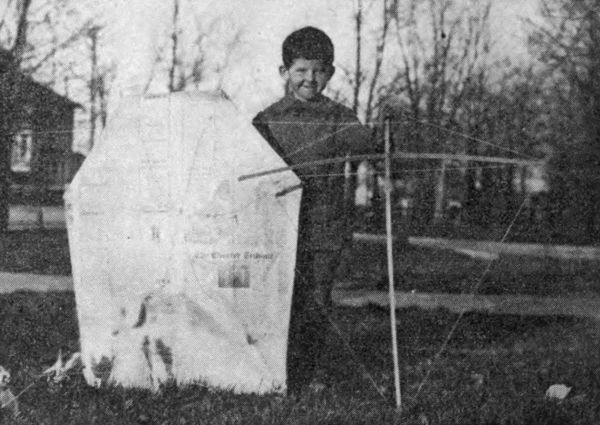
Kite-flying is known the world over. Every boy wants to make and fly a kite. It is a sport that is almost limitless in its possibilities.
Kites may be made any size, of almost any shape and with all sorts of decorations. The two models here presented are types of practical fliers and are easily made.
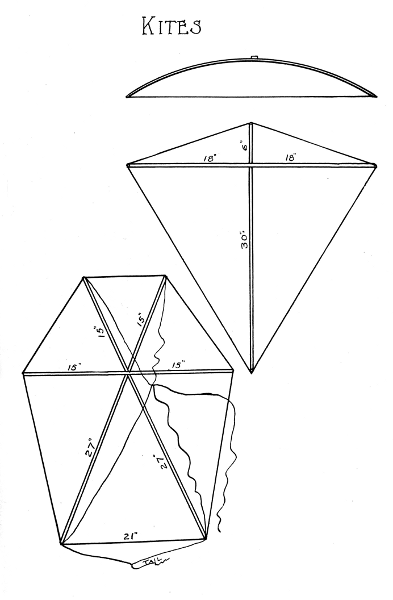
One needs a tail to steady it in its flight, the other is tailless, but has the cross rod sprung by means of a string into the shape of a bow. The wind is caught against the convex surface and renders it steady. In the making of kites, it is essential that a few things be observed:
If the size be changed, the same proportions should be maintained. Make the wooden stays as light as possible consistent with strength.
Be sure to preserve balance both in distance and weight of the various parts. Make the cross-lap joint secure by driving a light nail thru the several thicknesses and bending down the end; then tie them together with strong twine. Cut a notch in the outer ends of the stays and in stringing the twine taut prevent it from slipping by tying a knot around the stick and thru the notch. The paper should be very light and strong. It is doubled over the string and pasted together.
The guy-strings are fastened to the ends of the wooden stays and the anchor line securely tied to them with several knots directly opposite where the stays cross. A few adjustments in point of balance and of the weight of the tail may be necessary in starting to fly the kite, but after they are made, it should rise to a great height and maintain a steady flight.
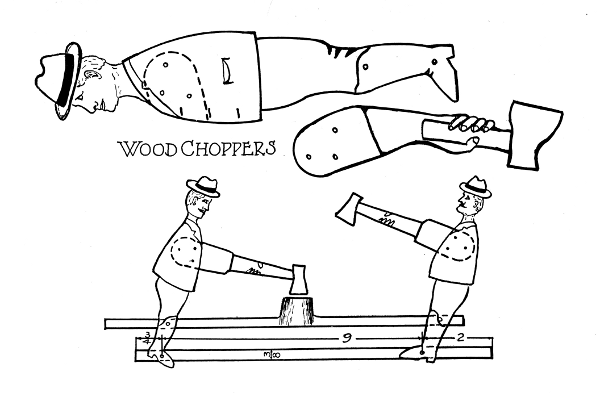
The stock required is 1/4" thick. Two bodies, two arms with axes, and two bars are needed for this toy. The upper bar has a place 5/8" from its center which is widened to resemble a tree stump an inch high. The pairs of parts are held together while holes are being bored thru them. The shoulders of the men and arms should have small holes to make a fixed joint while the men's legs and the bars should have holes closely fitting 1" nails.
Both bars are located on the side of the men on which the arms are fastened.
Color the coats, hats and sleeves blue, boots and axes black, arms, fingers, faces pink, and trousers red, bars green, and stump brown.
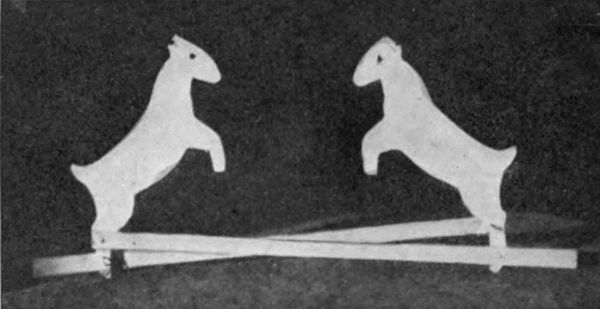
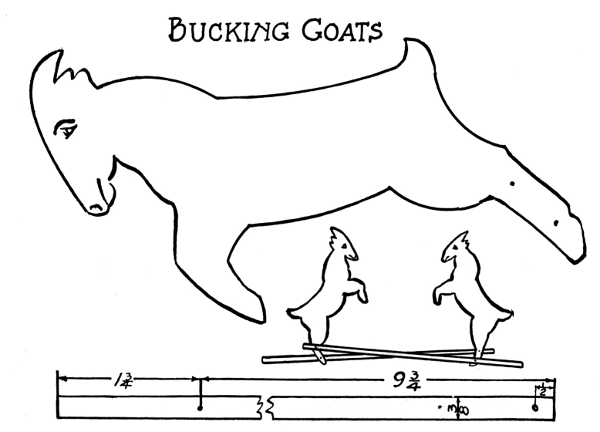
From 1/4" stock, saw out two bodies, as shown in the full-size drawing, and two bars shown in the dimensioned drawing. Place the two bodies together and bore holes in the hind legs, as shown, for 1" nails. Do likewise with the two bars. Color the goats white, with large brown spots on their backs, necks and legs. Color the horns and hoofs black, and the bars gray or brown. Fasten with movable joints, one bar on each side of the goats, having them cross as indicated in the assembled drawing.
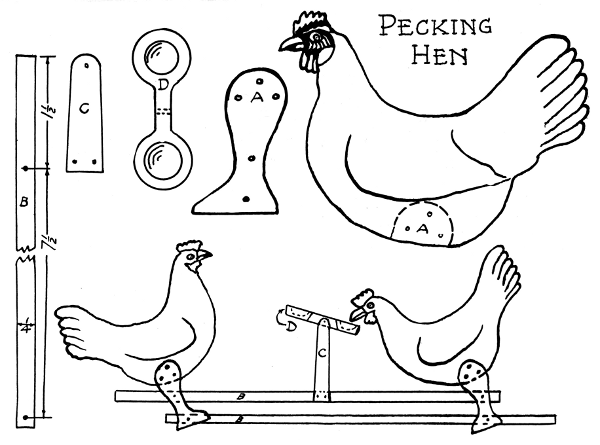
Saw out two bodies and four legs for the two hens. Hold two legs together and bore five fine holes thru them as shown in the drawing. Then place one of these with each of the unbored legs and bore these, using the first pair as template for boring the second. Also bore holes in the two bodies together, saw out the two bars and bore the holes thru the two together. Saw out the upright and the tilting pans; bore holes, and fasten together with a loose joint. Enlarge the two lower holes in legs of the hens to the[Pg 64] size of a 1" nail. Fasten two legs to each hen with three 3/4" brads, and clench. Finish the parts in appropriate contrasting colors. Place the two bars between the legs of the hens and insert thru the holes 1" nails, bending their ends back to form a loose joint. Take the upright and the pans, and fasten the lower end of the upright to the middle of the upper bar so that each pan will tilt when the hens peck.
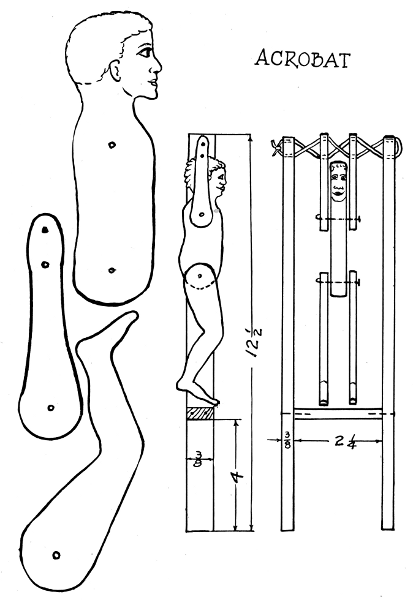
The body, arms and legs are made of 3/16" wood. After the acrobat is sawed out and holes are bored, paint the parts in gay colors. Assemble with loose joints. The two upright sticks are fastened to the cross piece by two 1" brads at each end, after the two holes are bored in the upper ends for the cord. It is colored green or black. Insert a strong double cord thru the frame and the hands of the acrobat. There is a twist in the cord when the legs are down, but it is straight when the arms point down.
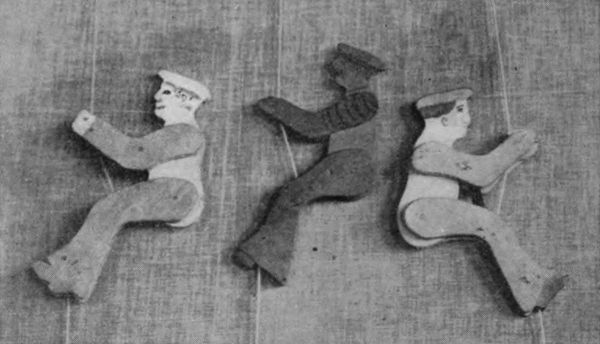
This nimble tar climbs a rope according to a style that is all his own. Pull on the string, and the friction on the two nails between his legs being greater than that between his hands, his hands glide upward. Let go, and the elastic band between his legs and arms pulls his legs up, and he thus gets a fresh grip.
Saw out of 3/16" stock one body, two arms and two legs. The arms are fastened to the body with three 3/4" brads and clenched. The legs have a loose hip joint on a 1" nail with the end bent back. The rubber band is held between arms and legs by two nails. The string is held between two thicknesses of felt or cardboard that are fastened between the hands with two brads to produce the required friction. Bore holes to avoid splitting. The string passes down between the two legs around two nails that pass thru both legs but do not pull them together. Color the cap white and suit blue.

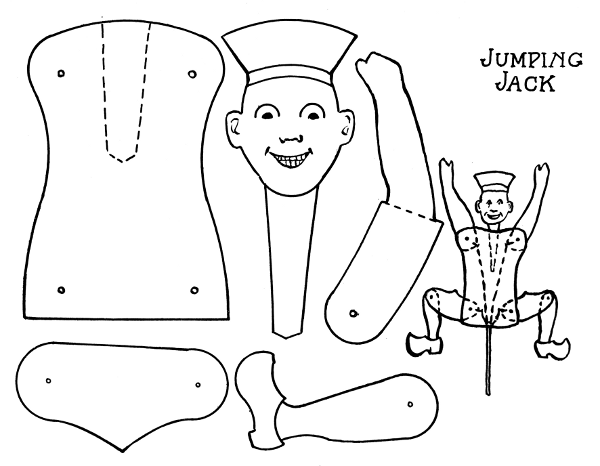
The wood should be 3/16" thick. Two of each pattern is required, except the head, which may be made of slightly thicker stock.
Bore the holes as shown to form loose joints.
Color the cap and body blue, thighs and upper arms yellow, calves and fore arms pink, and shoes brown.
Insert small nails into edge of arms and thighs at the points where the strings are to be attached. Take two pieces of string, two feet long; tie the ends of one to nails in the arms, the ends of the other to the nails in the thighs. Insert 1" nails thru one of the body pieces; drive 3/4" brads thru it and the neck; place arms and legs in position; adjust the strings to proper lengths, and tie a knot on them. Place the other body piece in position. Bend back the ends of the nails, making loose joints, and drive the brads thru the neck into the second body piece, and clench. Fasten the legs together with loose joints, and all should work freely.
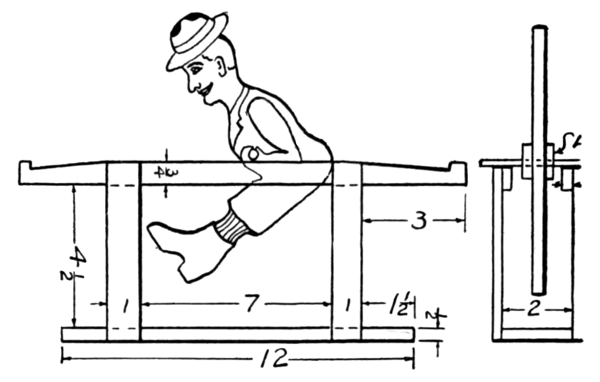
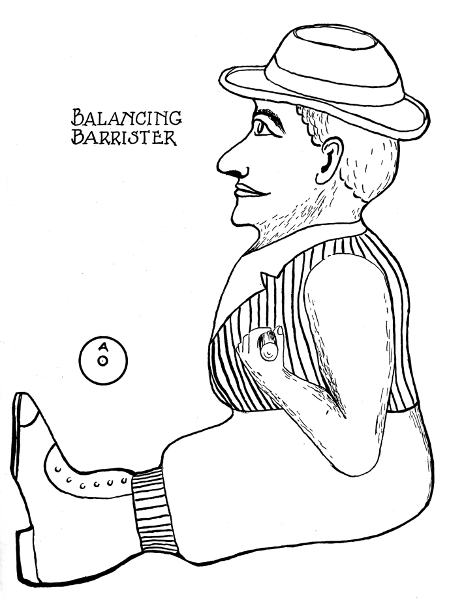
The body may be sawed from 3/8" stock as outlined in the drawing. Find its center of gravity by balancing it on a knife edge, crosswise, and then lengthwise. Draw lines along the knife edge where it balances. Where these intersect is the center of gravity. Bore a hole at this point of intersection perpendicular to the body, and so as to fit tight on a 1/4" dowel rod. Make two discs 1" diameter, 1/4" thick, with a hole to fit tight on the dowel on each side of the man.
Color his shirt red, hat and trousers blue, arms and stockings white, and dowel, shoes and parallel bars black.
The frame on which the man should balance (Fig. 11), with his head just a little the lighter, is made of seven pieces. The base, 1/2" x 2" x 12"; the four[Pg 70] uprights, 1/4" x 1" x 5-3/4", and the two bars, 3/8" x 3/4" x 15", are firmly fastened together so that the two bars will be parallel and horizontal.
When the man is properly balanced, which may be accomplished by whittling off a little stock where needed, he should roll from end to end of the bars by giving the dowel a twist between two fingers.
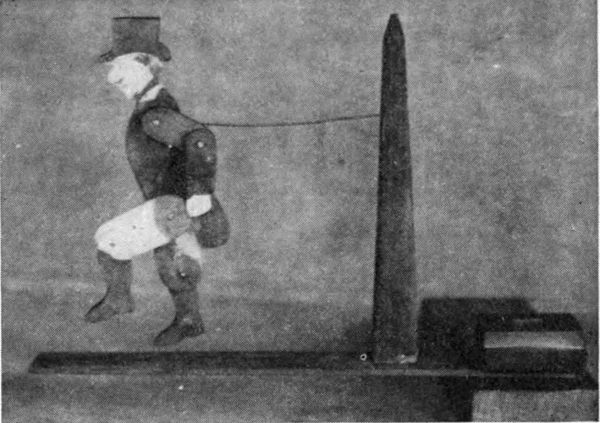
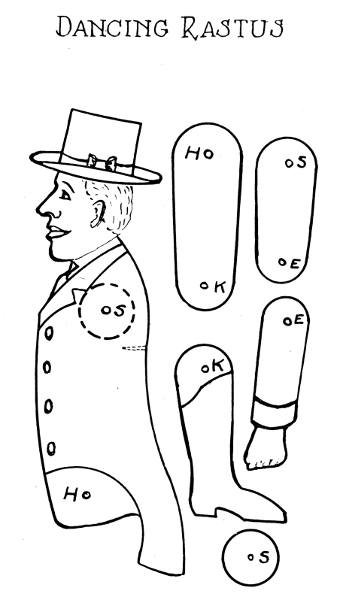
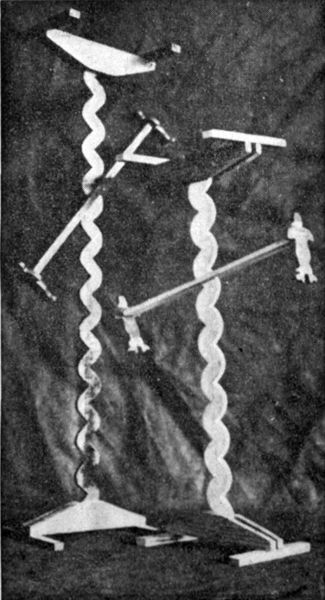
All parts of the body are of 3/16" stock. When sawed out, the parts are colored separately and assembled. All joints should swing without friction. Therefore, bore all holes larger than the nail, thru all thicknesses, except the one nearest to the point of the nail. At elbows and knees have the heads of the nails on the inside. At the shoulders place a small wheel between the arms and body, and use a 1-1/2" nail for pivot, with plenty of play. The platform (Fig. 12) is of thin, springy wood, 1-1/2" wide and 9" long. The upright post is of 1/2" stock about 6" long and securely nailed to the platform and braced with a small block. Holes are bored into Rastus' back and the post so as to fit tight on No. 16 spring brass wire, 5" long. Put a weight on the rear end of the platform, let the front end project out over the edge of a table and set it vibrating. This should cause Rastus to swing legs and arms in a merry fashion.
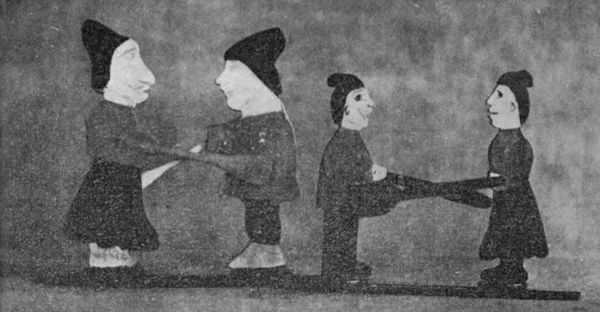
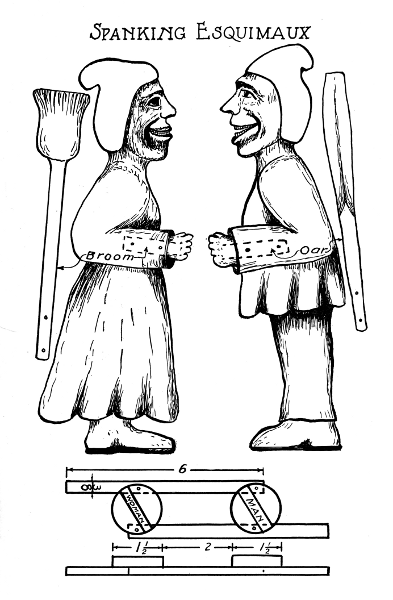
The stock for all parts is 1/4" thick except for the oar and broom which should be 1/8" thick. Saw out the two figures, wheels and bars. Hold the two wheels together and bore two holes for the pivot nails. Do similarly to the bars. Assemble wheels and bars temporarily to mark places on the wheels where the feet of the figures will be fastened. Saw out the oar and broom. Color all the parts separately in bright contrasting values to bring out the outlines of the arms and other parts of the figures. Fasten the wheels to the feet, the bars to the wheels in loose joint, and the oar and broom to the man and woman in positions indicated by the dotted lines.
When properly put together, the figures should swing when the bars are moved back and forth, and the oar and broom go flying and strike with a rattling bang.
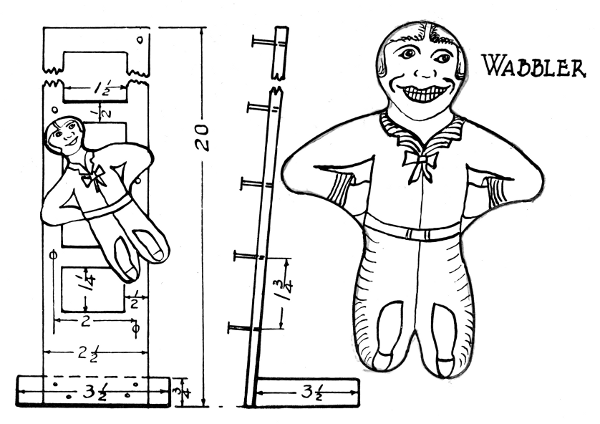
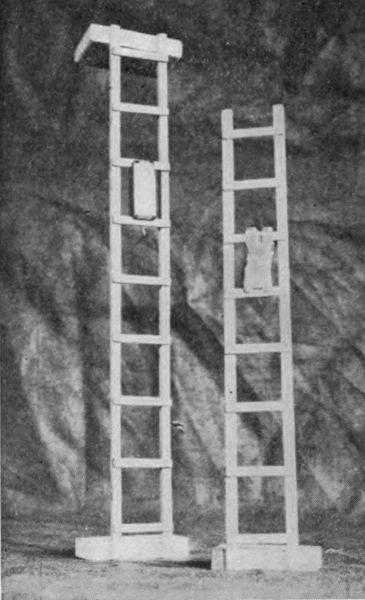
This toy is made so that the wabbler can go or glide down the ladder on his elbows. The ladder is made from soft wood 3/8" to 1/2" thick, 2-1/2" wide, and 20" long. The openings are cut as shown, and nails located and driven in exactly as indicated in the drawing. The ladder is then securely fastened to the base which is made of 3/4" wood, 3-1/2" square. The wabbler is sawed out of 1/4" wood. A full-sized drawing is shown. This is all one piece without openings. Features and parts of the body are to be worked out by using paints of different colors.

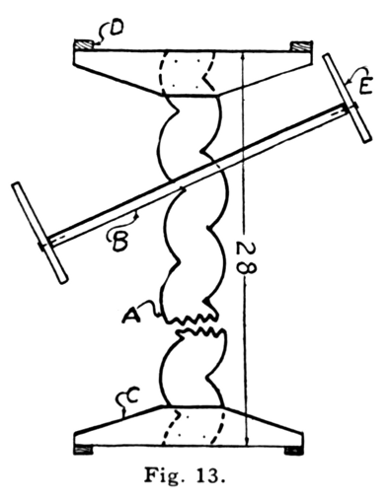
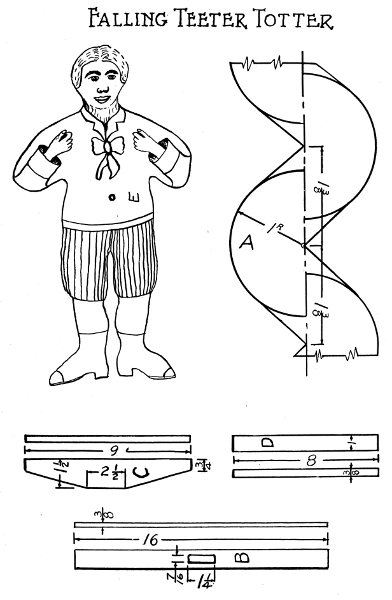
The stock for the upright piece and end supports is 3/8" thick; that for the two boys and teeter-totter is 1/4" thick. The upright is made 2" wide and 28" long. On the center line lay off points 1-3/8" apart. With these as centers, draw semi-circles of 1" radius alternately on both sides of center line. From each center draw lines tangent to the circles, as shown in the drawing.
Saw to these lines and curves, and finish the edges so that they are smooth. Saw out two boys and the teeter-totter board (B, Fig. 13), cutting out the center opening accurately. Slip this board onto the upright, and watch it fall from top to bottom in a see-saw motion. If it fails to travel smoothly, see where the rub is and remove the obstacle. Fasten the two pairs of cross pieces to each end of the upright so that it will stand vertically on either end.
Give it a thin coat of paint. Color the boys and fasten them with a nail thru the body of each boy, fitting loosely, and driven into the ends of the board. When the see-saw is turned up-end down, the boys will swing on the nails and keep heads up.
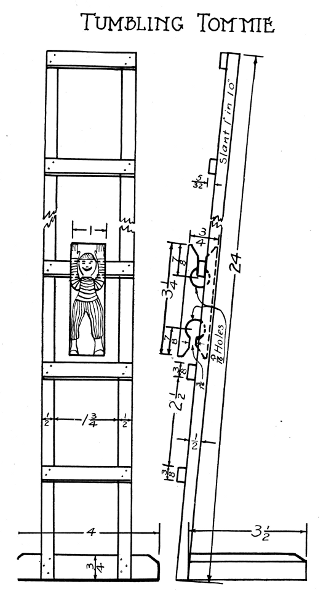
This problem is rather unique in its principle of operation and offers at once material for study and investigation. Like that of a circus performer, the combinations must be exactly right or the little fellow may fall on his head. In making the man, first bore the holes thru the block and take care to make them parallel. The openings into the holes from the ends must be in the same plane and made to slide over the rounds of the ladder without friction. The tumbler may be shaped and colored to look like a man. A base may be attached to each end, but on opposite sides of the ladder, so that Tommie may tumble in both directions.
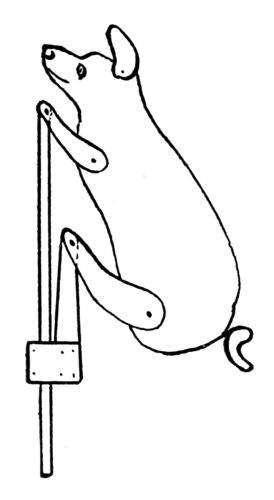
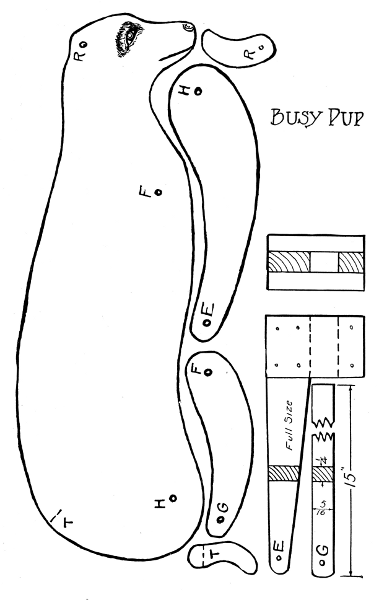
All parts of this article are made of 1/4" wood except the ears which should be 1/8" thick. Saw out one body, a pair each of fore legs, hind legs, ears and tail, and the push-rod and guide. The guide is made of four pieces and fastened together with glue and brads, as shown in the drawing. The two pairs of legs are fastened to the body by loose joints. Holes are bored thru one end of the push-rod and the forefeet; also thru the projecting end of the guide and hind feet. Fasten that end of the guide between the hind feet with loose joint (Fig. 14). Insert the push-rod thru the hole in the guide, which should slide easily, and fasten between the fore feet. By holding the guide in the left hand and working the push-rod back and forth, the dog should work freely and without a hitch in all the varied positions that it is possible for it to assume. With fine brad fasten the tail. Bore holes thru head and ears, and pivot them on a loose joint so that they will swing when the pup is busy scratching.
The pup may be colored white with black spots on neck, body and legs. The push-rod and guide may be finished in a dark color or black.
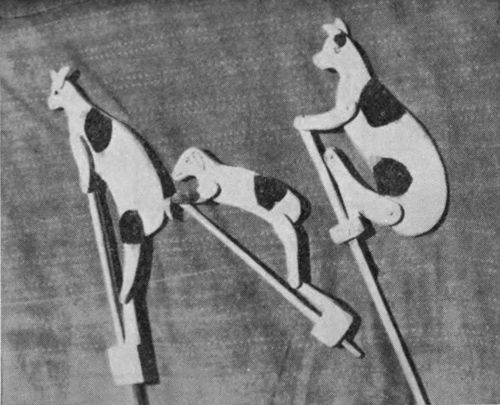
The stunts that this pup can perform are greater in number than one would suspect. Furthermore, they increase also in variety as the child acquires skill in manipulation.
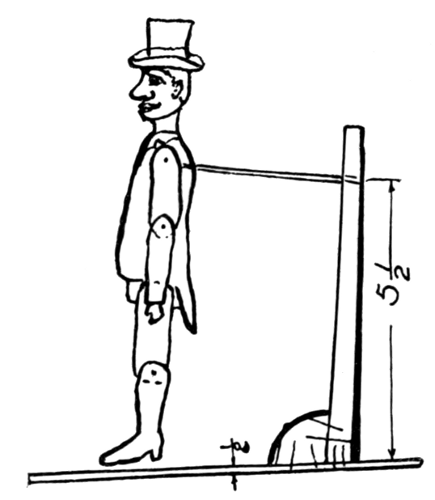
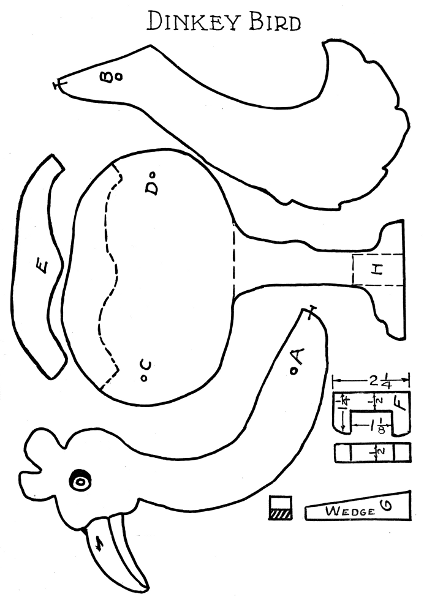
When properly made up, this bird can bob its head and tail up and down. A swinging pendulum supplies the motive power. The parts are shown in the drawing full size, except the clamp that holds the Dinkey in upright position (Fig. 15).
The head, tail and body pieces, one with and one without the leg, are sawed from 1/4", the back (E) from 5/16", the wedge from 3/8", and the clamp from 1/2" stock. Finish all edges. Drill 1/16" holes at A and B. Put the two body pieces together so they coincide, and drive fine 1" nails thru both of them at C and D. Then separate them enough to let the back (E) into place between them. Fasten the three pieces together with five 1" brads, and clench. Fasten clamp (F) securely to the foot at H.
Color the different parts in gay tints, and let dry.
Take 4 ft. of strong twine and with small nails fasten one end to the head and the other to the tail. Pull out the nails at C and D enough to let the head and the tail slip into their places between the body pieces. Then reinsert the nails. The head and tail should swing freely, and the back (E) act as a stop in their up-and-down motion.
Put the clamp onto the edge of a table top and fix with the wedge. Pull down on the loop of the string, grasp it about 6" from the top, and there tie a simple knot. Fasten a stone or a piece of metal to the loop. Set it swinging and watch the bobbing performance according to Dinkey fashion.
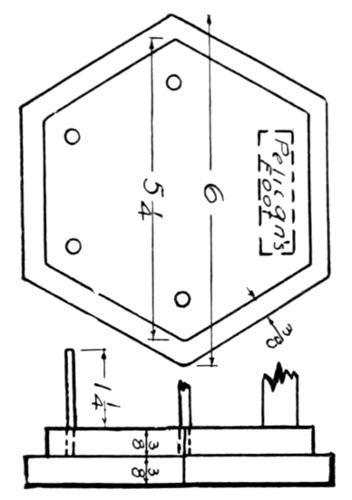
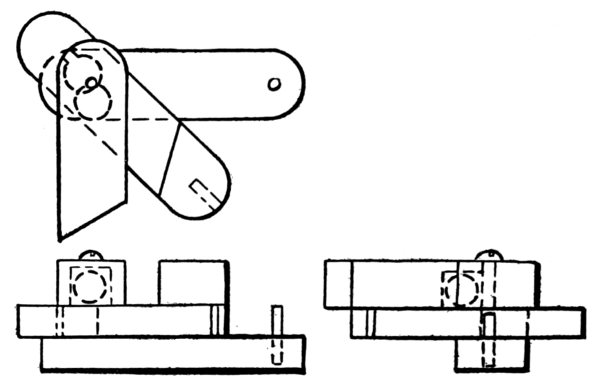
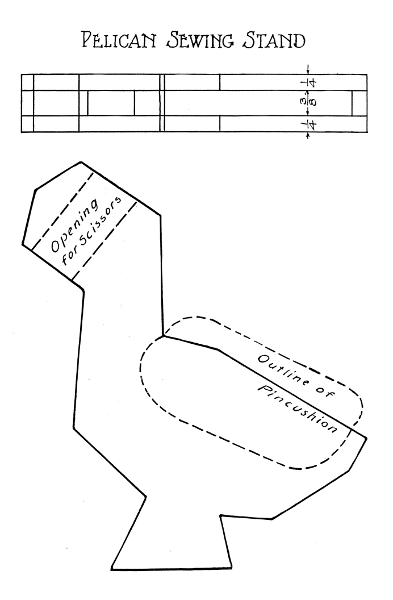
Whether or not this article may be within the toy class, one thing is certain: It is useful as well as ornamental. The pelican is made of three thicknesses. The middle piece is 3/8" and the two outside ones 1/4" thick. The middle piece has parts cut away to give room for the pin-cushion, and in the head, an opening is left to give place for scissors, which, in turn, serve as the bird's beak. The cushion is stuffed with cotton or some other suitable material, and covered with a double thickness of thin cloth, and fastened in place securely by nails piercing from one side to the other.
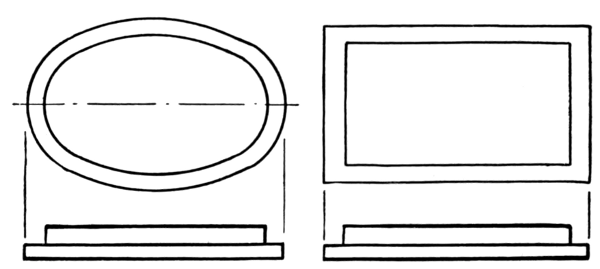
The platform is six-sided in shape (Fig. 16), of double 3/8" thickness, with grain at right angles in the two pieces, and has four pins extending 1-1/4" above the surface for holding spools. The pelican is fastened to the platform by placing the upper thickness against the foot, and driving 1-1/2" brads thru and up into the foot. Bore holes and drive the pins for the spools thru the upper thickness. Lastly, the bottom board of the platform, which extends 3/8" beyond the upper, is fastened by driving 3/4" brads thru the bottom piece into the upper. The pelican may be colored with white enamel and black trimmings, while the platform may be light green or blue.
Besides the places for scissors and spools, other attachments may be arranged to suit the convenience of the happy possessor.

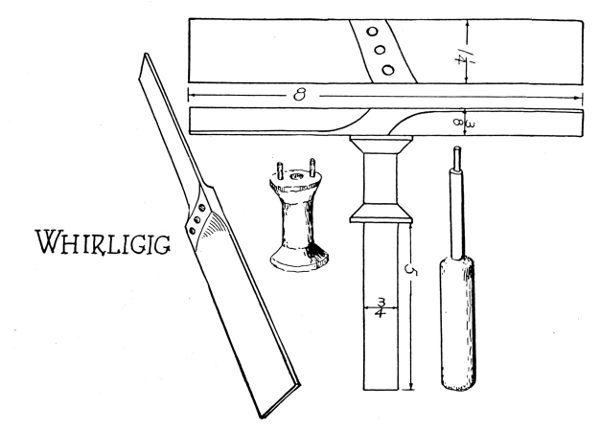
This little device might also be called a child's aeroplane, for it soars up into the air over houses and trees, and makes everybody around crane his neck in wonder. The parts consist of the flyer, a spool and the handle. First, get an ordinary thread spool, bore two holes in one end and drive in two six-penny nails. Cut off the heads 3/8" from the end of the spool and file the ends round and smooth. Take a piece of strong wood (yellow pine will do) about 7" long and 3/4" square. Whittle down one end for a distance 3/8" longer than the length of the spool and so it will make a running fit.
For a flyer, get a piece of soft wood 3/8" x 1-1/4" x 8". Bore three holes at the center to fit onto the two pins on the spool and the top end of the handle. Whittle both faces down to a slant like a windmill so the blades will be less than 1/8" thick. Put the parts together. Wind about a yard of string around the spool in the proper direction, and then set the flyer spinning by pulling the string quickly off the spool. If all parts are properly balanced and adjusted, the flyer should go "way up high."
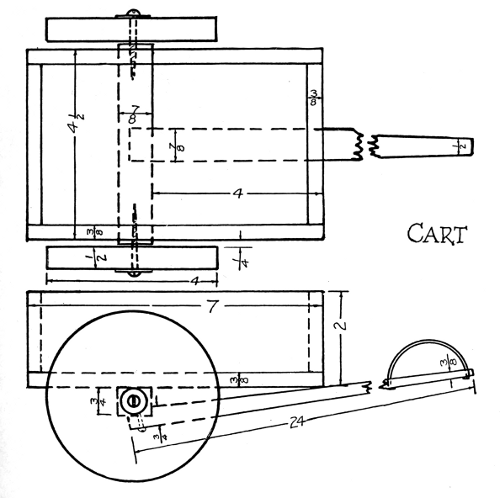
This practical project is of heavier stock than most toys. However, dimensions and sizes of stock may be modified to suit the convenience and wishes of the maker. The box may be of 3/8" stock, the axle and tongue of 3/4", and the wheels of 1/2" or 3/4".
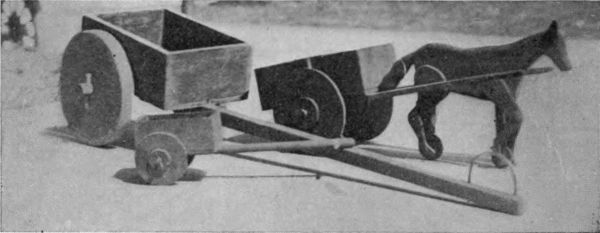
Heavy round-headed screws with washers under the heads, fitting thru holes bored in the wheels and screwed securely into the ends of the axle, form the bearings.
Take care to bore the holes thru the wheels and into the ends of the axle the proper size, and central and true.
The box is fastened by driving 1-1/4" nails thru the bottom into the axle. The tongue is shaped to fit on the axle, and is securely fastened by nails to the axle and wagon bottom.
A handle of a loop of brass wire may be inserted thru the tongue near the small end, and the ends bent.
The box is painted green and wheels and tongue red.
The stock required for the box of the wagon is 1/4" thick, for the wheels 3/8", for the tongue 1/2", and for the axles 3/4". The axles are 5-1/2" long; the rear one is 1" wide; the front one is 7/8" wide, as shown in the drawing. The holes for the screws in the ends of the axles are bored 3/8" from the lower side. The screws are heavy, 1-1/2" round-headed, with metal washers under the heads. The holes in the wheels are bored true, and so that they will just slip over the screws.
The tongue is connected with the front axle by a piece of tin, cut from a tin can after the pattern shown on the drawing.
The cross piece between the wagon box and the front axle, called the bolster, is 1-1/8" wide, 5" long and 3/4" thick. It tapers from 5" in length at the top to 2-1/2" at the bottom, where it rests on and turns on the tin that is nailed to the top side of the axle.
Always bore holes of the proper sizes before inserting screws.
The front axle is connected to the bolster by a 2" round-headed screw on which it turns. In making the wagon box, the sides are nailed to the bottom, the ends fastened in position, and the back nailed onto the edge of the seat.
The box is painted green outside and red inside. The two wings of the tin plate are bent down to fit tight onto the sides of the tongue, and nails are driven thru the tin into the tongue. The whole running gear is painted red. The box is nailed to the bolster and to the rear axle. The seat is nailed into position, the wheels fitted on, and the front axle screwed onto the bolster. This wagon is strong and should last a long time and afford much wholesome pleasure.
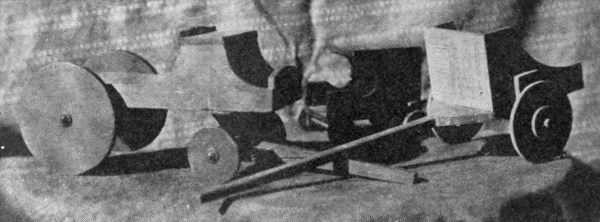

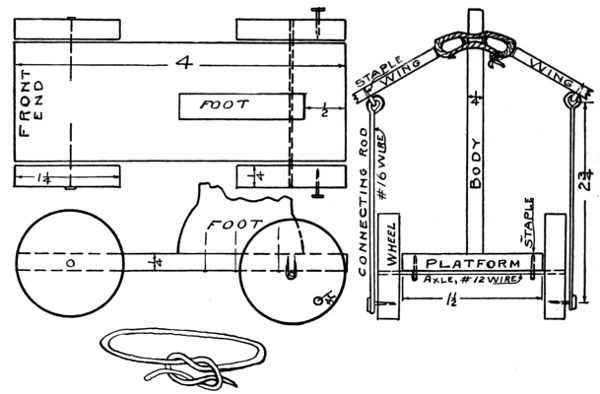
The body, platform and wheels (Fig. 17) are of 1/4" stock. The wings are a little thinner. Saw out one body and two wings and bore holes for cords, as shown in the drawing. Saw out the platform and four wheels, and finish them carefully. The front wheels turn on 1" flat-headed nails that are driven into the edge of the platform 3/4" from the end. The rear wheels are driven onto a wire axle which turns in two wire staples that are driven into the bottom of the platform, 3/4" from the end and 1/4" from each edge. In driving these staples, take thought to avoid splitting the platform. Also, when boring holes thru the center of the four wheels, take care to secure proper direction and sizes of holes for a running fit in the front wheels and a press fit onto the axle in the rear wheels. Hold the body with foot up, and nail the platform onto it. With round-nose pliers make the connecting rods from No. 12 wire with the eyes neatly shaped and at right angles to each other. Attach the rods to the wings by staples so the joints will work freely without too much play. Attach the other ends of the rods to the outer faces of the rear wheels by means of short flat-headed nails. The nails pass thru the eyes of the rods and are driven into the wheels 1/4" from the outer rims. The nails in the two wheels must be in line with each other, as they act as cranks to actuate the wings. After the rear axle is assembled and fastened in place, the wings are fastened to the body.
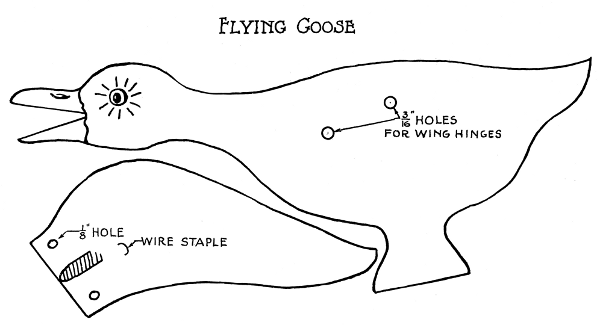
The parts of the wings that touch the body must have been rounded off, as shown in section on the drawing. The edges are removed from the holes so as not to wear the cord.
A heavy strong twine may be used for hinging the wings to the body. Each of the two hinges is formed by slipping the end of the cord up thru the wing, then thru the body, then down thru the second wing, and back thru the body; then tie the ends in a square knot under the first wing. Adjust all parts accurately so they are not too loose and yet work without friction.
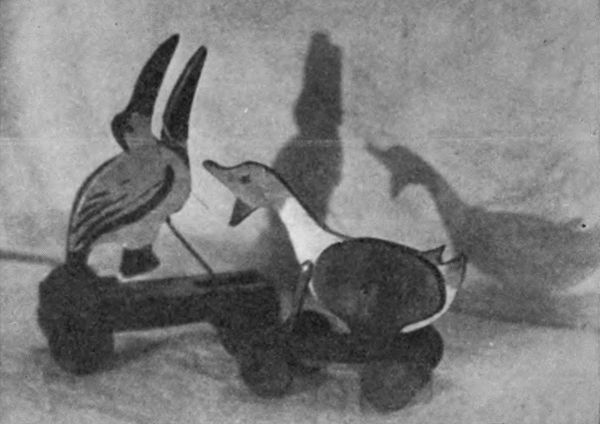
This goose may be painted white with gray stripes on the wings, red beak, foot and wheels, and green platform.
Attach a string or slender stick to the end of the platform to roll it on the floor.
Watch the flying goose and see if she can rise by flapping her wings.
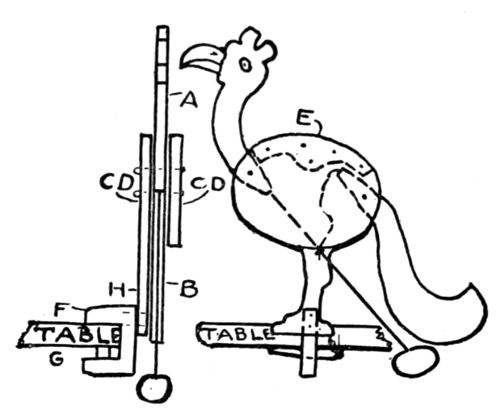
Until recently this bird has been considered extinct, but is here revived to show what it may have appeared like. In this case it has chosen to perambulate on four wheels and maintain a bobbing motion of the head and body by means of a connecting rod between the breast and a crank on the front axle.
The body swings on a pivot between two uprights which we will call the wings. These wings are held apart by a piece between the feet, which is slightly thicker than the body to give the body freedom of motion.
The two base pieces are fastened onto the outside of the feet by three 1-1/2" brads driven in from each side. The front end of the base is held together by a piece 3/4" square and 3/8" thick, which is also the thickness of the base pieces and wheels. The body and wings are of 1/4" stock.
Make saw cuts 1/8" deep across the bottom of the base pieces to form bearings for the two wire axles, one 1/2" from the rear, and the other 1-1/4" from the front end of the base. The axles should turn freely in these cuts,[Pg 94] and nails bent over them will secure them in their places. The parts are colored in gay contrasting colors before assembling. The body is pivoted between the wings and the piece between the feet is fastened. Then the base is assembled and fastened to the outside of the feet of the dodo.
Before inserting the axles into the wheels, the ends should be hammered a little flat to prevent them from turning in the wheels. It should be a tight fit. Next, put the axles into the cuts, and fasten. Slip a fine nail thru the hole in the upper end of the connecting rod, and drive it thru the breast of the bird, and bend the end. Then put the lower, or forked, end of the connecting rod over the crank on the front axle and secure it by a brad.
When rolling along on the floor, the dodo should bob its head in a most polite manner in recognition of being well put together.

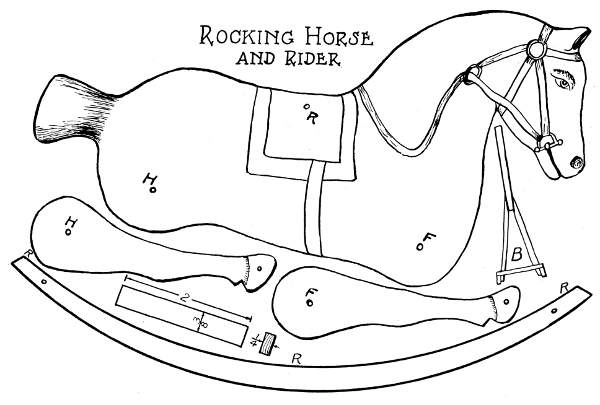
The body of the horse is shown full size and may be sawed from 3/8" wood. All the other parts should be made of 1/4" wood and have the grain run lengthwise.

Two fore and two hind legs are required. The upper end of each leg is tapered off on the side that fits against the body so that the feet will be far enough apart to be fastened on the inside of the rockers (see end view B). Each pair of legs should be fastened to the body with a nail thru the three thicknesses at the place marked. Saw out two rockers and finish to true and smooth curves. With fine brad fasten the feet on the inside of the rocker at the places marked, but take care that the wood does not split. Saw out three rails 2" long and 3/8" wide to be fastened onto the top of the rockers with two fine brads, one at each end of the rocker and one in the middle, as indicated on the drawing by the letter R. The upper ends of the legs may now be secured to the body by two or three brads.
Give the whole a general touching up to assure strength and smoothness. Give it a priming coat of paint. Let dry four days. Paint saddle, bridle, cross rails and rocker red, and the body and legs white. Outline eyes, nose, hoofs and other features in black, and the rocking horse is complete.
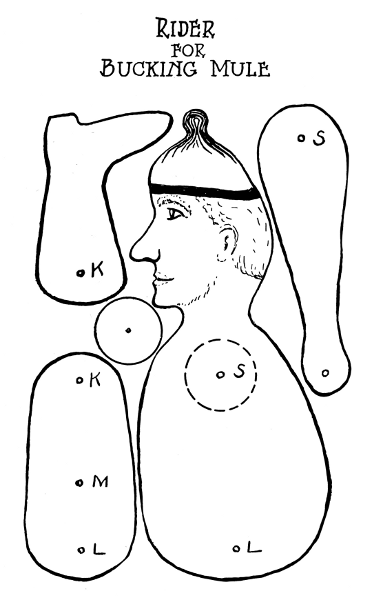
The body of the rider is 3/8", arms and legs 3/16" stock.
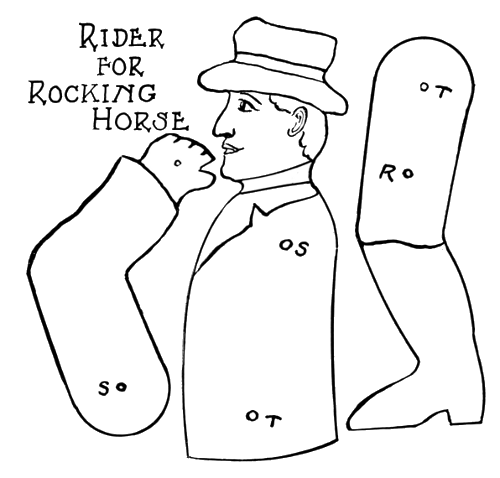
The body is composed of three thicknesses. The two on the outside are 1/4" thick, the one in between is 3/8" thick, and reaches only to the dotted line (Fig. 18), to allow room for the head which is 3/8" thick and moves between the two outside pieces with 1-1/4" nail as pivot. This is a loose joint.
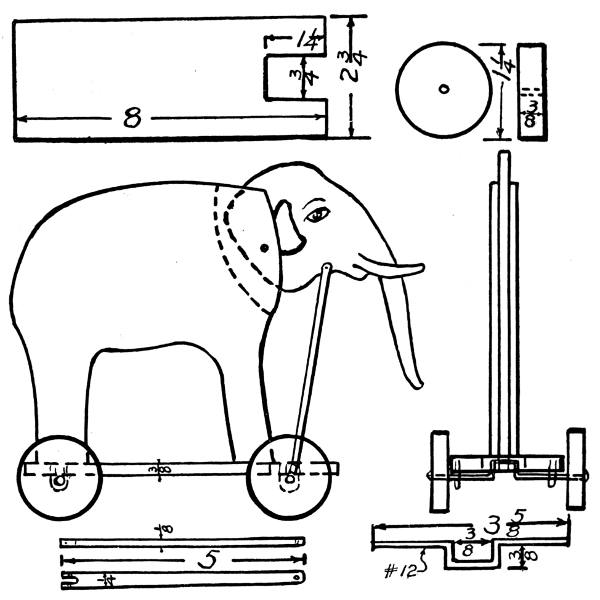
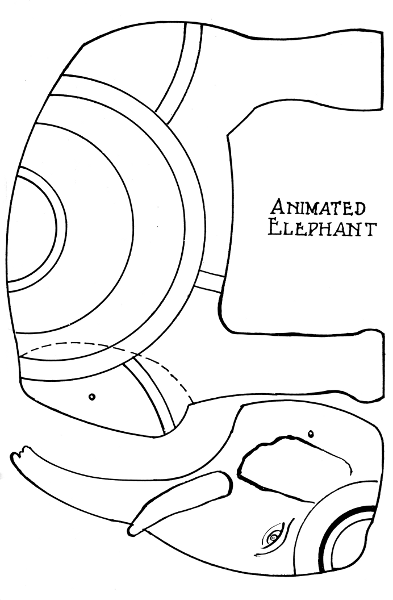
Saw out the platform and wheels to dimensions. The connecting rod should be of wood 1/8" thick and 1/4" wide. A hole is bored near the end that is pivoted to the throat of the elephant; in the other end is a fork to fit over the axle crank with a fine hole bored at right angle thru the connecting rod for a brad to prevent the crank from slipping out. The two axles are made from No. 12 steel wire. One is straight, the other has a crank in the middle. Flat places are hammered near each end of the axles so that they may be pressed into holes in the wheels and not turn. Each axle is held to the platform by two staples which may be made from long brads by cutting off the heads.
Color the elephant gray, the blanket red and yellow, the platform and connecting rod red, and the wheels yellow. Fasten the platform to the[Pg 98] elephant by driving nails thru it into the feet. Press the wheels onto the axles and fasten the axles under the platform so they move freely. Fit head and rod in places so all connections are strong and move without friction. Attach a string to the front end of the platform, and when pulled on the floor, the elephant will swing his trunk up and down in a vicious manner.
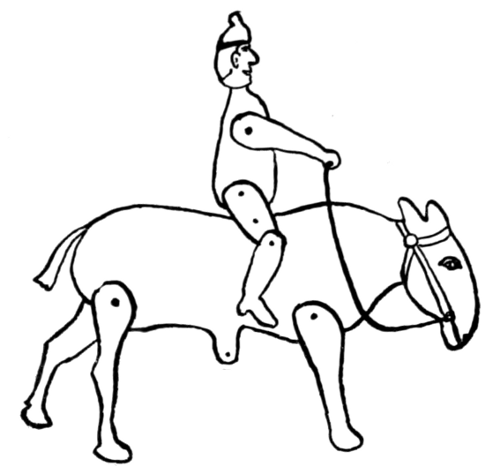
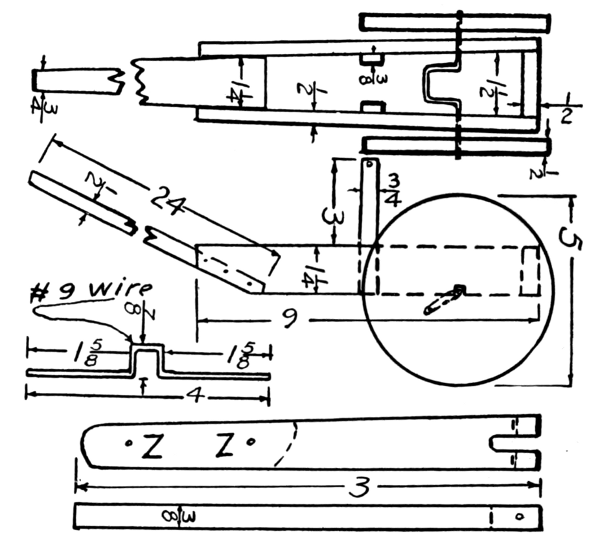
Saw out of 3/8" stock the bodies of the mule and rider (Fig. 19). All legs and arms are of 3/16" stock. Two circles to be placed between the man's arms and shoulders are of 1/4" wood. The connecting rod, marked Z, Z (Fig. 20), shown full size and of 3/8" stock, is to connect the fore legs of the mule and the crank on the axle. Fasten the legs to the mule and arms and legs to the rider with loose joints. Then take rod Z, Z, and make the fork-like cut in the wide end and drill a small hole thru it at right angles to that cut. This is for the nail that holds the crank in place. Fasten the rod securely between the fore legs of the mule at the position indicated. The tail is then fastened with two 1/2" brads. Paint the mule and rider in contrasting colors.

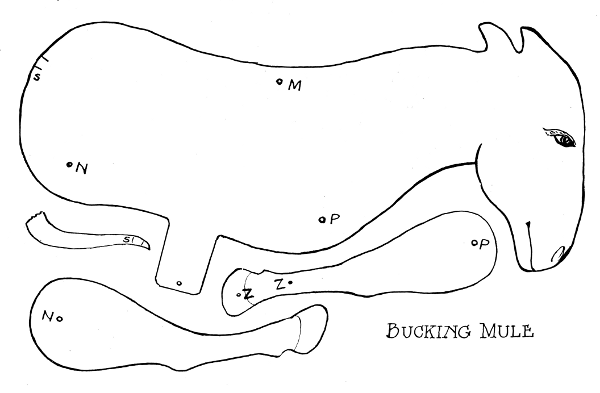
Next, make the frame and wheels as follows: Saw out two 5" wheels and bore the center holes to fit tight on the wire axle and to run true. The frame, the handle, the sides and end are shaped from 1/2" stock. The two upright pieces are made of 3/8" stock and securely fastened on the inner faces of the sides. Then the sides are nailed to the end piece and the handle. Cuts are sawed into the lower edge of the sides, 2" from the end to form a bearing for the axle. Paint wheels red and frame green. The axle is best made by holding the wire in a vise. First, make bends 3/8" on each side of the middle point. Then make the second pair of bends 1-1/4" from the middle. Near each end of the axle, flattened places are hammered so that, when driven into the wheels, they will not turn. Drive the wheels onto the axle. Put the axle in place, drive nails into the sides, and bend them over the axle to hold it in place. Take the mule, put the projection from the body between the two uprights on the frame, insert a 1-1/2" nail thru the three holes, and bend the end back. Join the connecting rod to the crank. Stride the rider on the mule and insert a nail thru his thighs and the back of the mule. With a neat cord connect the hands to the mouth of the mule, for a bridle. Take hold of the handle and watch the mule gallop when you push him along.
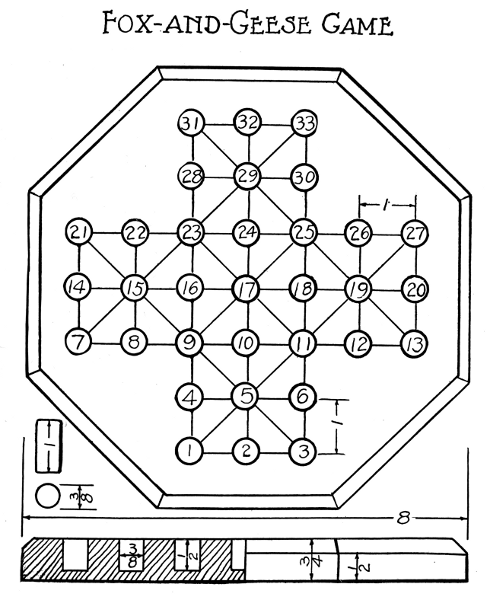
This game is played by two people on a board with 33 holes, as shown in the drawing. The board may be made either square or octagonal. The octagon is made from a square by placing one point of the compass at a corner and the other point at the center of the board. With each corner in turn as a center, draw arcs intersecting the edges of the board. Connect these points of intersection across the corners of the board; saw off the four triangles. Smooth the edges and chamfer. Lay out and bore the holes. Make 26 pegs to fit loose. Leave 24 white for the geese and color 2 red for the foxes.
In playing the game, all the pegs are put in their places. The foxes at Nos. 9 and 11; the geese at 7, 8, 12, 13, and consecutively up to 33. The foxes and geese can move on the lines only, in any direction from one hole to the next. A fox can also jump over a goose and take it, provided the hole just beyond it is vacant. In fact, the fox can jump and take several geese in various directions if conditions permit. The geese can not jump, but they can move so as to hem in the foxes and make it impossible for them to move. This means that the foxes have lost the game. In starting the game, the player having the foxes gets the first move. His aim is to jump and capture all the geese and win the game. Each player takes turn in moving. When crowding a goose in on a fox, the player always has another goose behind it so that the fox can not jump it. This game is one of the kind that requires foresight and study. It is highly interesting and entertaining, and by experience, players may become quite expert at the game.
Solitaire—This same board may also be used for the solitaire game. However, that requires 32 pegs. They are put in all the holes except No. 17. The object is to jump and take all the pegs but one, and it must land in hole 17. Unaided, this is difficult to do, and it would take a long time for a person to discover a solution. For this reason, the reader is presented with the following "Key": 5 jumps to 17 and takes 10, 12 to 10 and takes 11, etc.; 3 to 11, 1-3, 18-6, 3-11, 30-18, 27-25, 13-27, 24-26, 27-25, 22-24, 31-23, 33-31, 16-28, 31-23, 4-16, 7-9, 21-7, 10-8, 7-9, 24-22, 22-8, 8-10, 10-12, 12-26, 26-24, 17-15, 29-17, 18-16, 15-17.
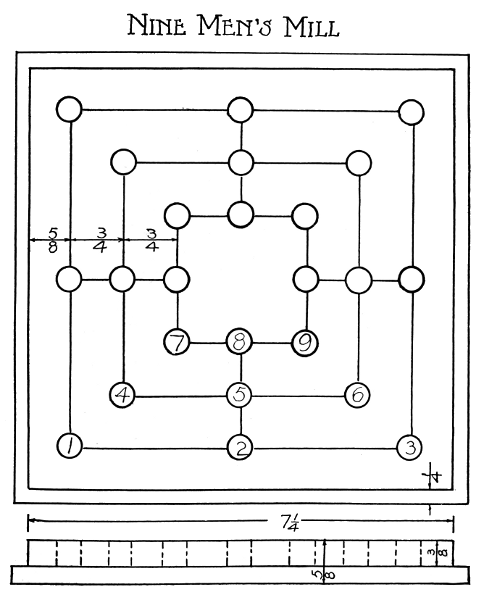
This is a game that is played by two persons and is as fascinating as it is old. The upper part of the board is 3/8" thick and has 24 holes bored thru it, as shown in the drawing. The lower board is 7-1/2" square and 1/4" thick, and extends 1/4" beyond the top board on all sides. The grain in the two boards should run at right angles when fastened together. The 18 pegs are 3/8" in diameter and 1" long. Each player has a set of 9 pegs, the sets being differently colored. In starting a game, each player takes his turn in putting a peg into a hole till all the pegs are put down. Then they take turns in moving the pegs. A peg may be moved from one hole to the next and only along rows parallel with the edges of the board, not along the rows that run from corners of the board to its center. That is, along rows 1, 2, 3 or 2, 5, 8, but not along rows 1, 4, 7. The object of a player in putting down pegs and in moving is to get a Mill; that is, get 3 pegs in a row parallel with the edges of the board. For example: Pegs in holes 4, 5, 6 or 2, 5, 8 makes a Mill, but not 3, 6, 9. When a player gets a Mill, he can take one of his opponent's pegs that is not in a Mill. Another aim of a player is to place his pegs so that he prevents his opponent from getting a Mill. When the pegs of one of the players have all been taken except 3, then he is allowed to jump anywhere on the board. When the pegs are all gone but two, then the game is lost. When a player can get 5 pegs into holes situated as 7, 8, 9 and 4, 6, then he has a double Mill by moving from 8 to 5 and from 5 to 8, etc., and pick one of his opponent's pegs for each move.
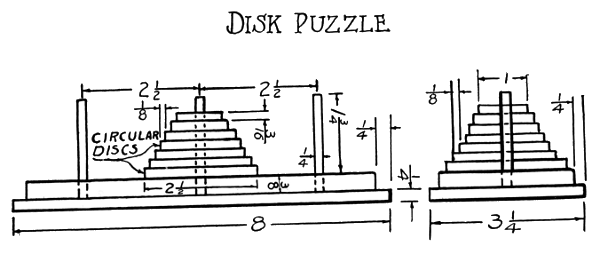
This problem consists of a base, three spindles and seven disks of different diameters. The spindles are fitted tight into holes in the base and rounded at the top so the disks will slide over freely. The seven disks are laid out on the wood with compass, and to prevent splitting the holes are all bored before the sawing is done.
The parts may receive a finish of stain and two or three coats of shellac. Polish with No. 1/2 sand-paper between each coat.
Puzzle—Place all disks on one spindle, decreasing in sizes upward. The object is to transfer the disks to one of the other spindles and to be in the same order. In doing this, never have more than one disk at a time removed from the spindles, and never place a larger disk on top of a smaller one.
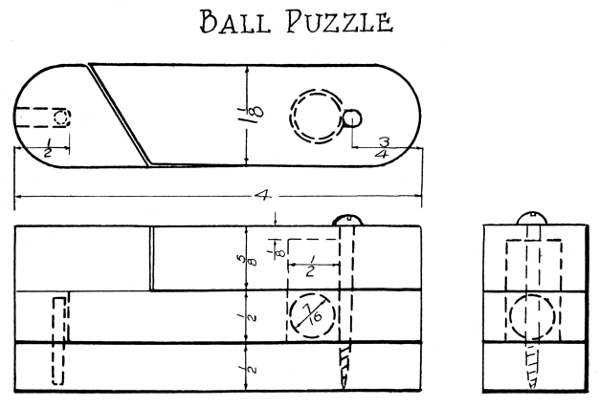
At first it is not evident why this is called a ball puzzle, but, when let into the secret, most people see at once a good reason for naming it so. The wooden ball or marble is hidden from sight inside of the wood and may be shifted in position from the middle to the upper piece of the puzzle and vice versa (Fig. 21).
The problem is to slide the middle piece off of the pin that projects up from the lower piece and swing it around its pivot. This pivot is a 1-1/2" round-headed screw, fitting loosely in the upper two and fixed in the lower piece. A 1/2" hole is bored thru the middle and 1/2" deep in the upper piece to hold the 7/16" ball. This hole is bored so it touches the hole for the screw. In the middle piece, the screw can slide into it. In order to make the ball leave[Pg 110] its position in the middle piece, the puzzle must be held upside down. The drawings show the puzzle both closed and open, and supply directions for constructing this interesting problem.
Finish with stain and two coats of shellac. This puzzle may be a source of much genuine amusement when a circle of friends come together and all want a hand at opening it, each having his advice to give how to solve this mysterious problem.
Most of us are called upon, in the course of our daily duties, whether afloat or ashore, in camp or at home, to hitch up pack animals, do up packages, equipments and outfits, and make fastenings on sails, tents, scaffolding and play apparatus. This involves the tying of a great number of knots and in many cases life and limb depend upon the correct tying of those knots. The seamen, textile workers and civil engineers are pastmasters of the art. Our scouts, sailors and soldiers are taught knot-tying as an essential factor in their training. Would it not seem a part of wisdom, for the sake of safety and economy in time and good nature, for everybody to master these knot problems? It would, at least, be a very practical part of the training for children in the schools.
They should be taught knot-tying and its application in an intelligent and thoro manner, and have frequent practice-drill therein, till it becomes second nature to them.
When a knot is tied, it must be pulled together tight, so as to stay. Otherwise, especially if the cord is stiff, the loops will slide apart or flop out of position, and the knot will come loose. A knot derives its strength and reliability from the friction between its different parts. When tension is applied on a knot, the two parts which lie alongside of each other should move in the reverse directions and produce a maximum amount of friction, as the ropes tend to slip.
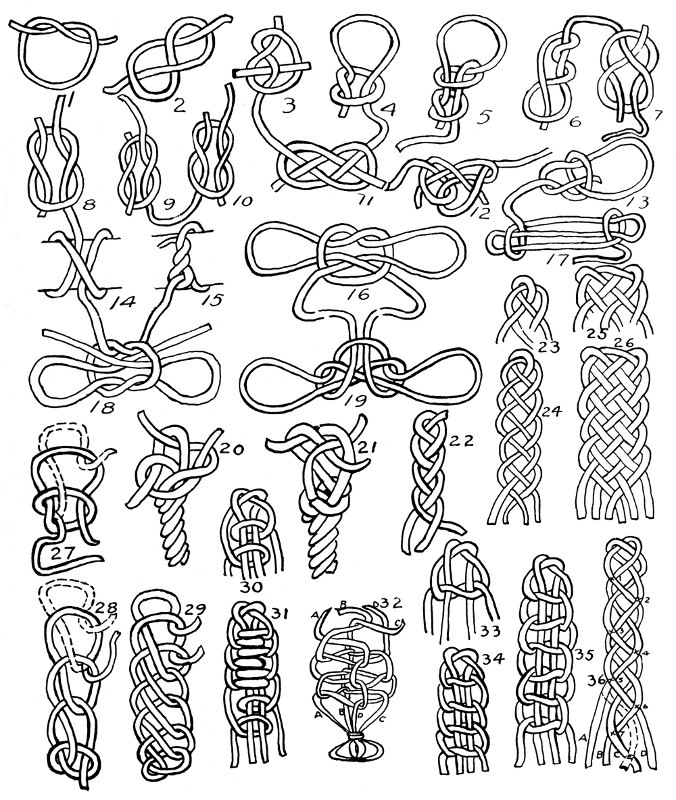
One may readily learn to tie the different knots by carefully following the accompanying drawings. Procure a slender, flexible rope, bend it into the shape shown in the drawing, and go over and under, as indicated, so that the parts will be in the correct relative positions. Begin by making the simple knots, and, later, tackle the more complex ones. Also learn their names.
NAMES OF KNOTS AND BRAIDS
1. Overhand knot—to prevent unraveling of rope, starting of a square knot; also a stop knot.
2. Figure-eight knot—used for a stop knot.
3. Boat knot—used on sails and rigging.
4. Slip knot—used to fasten rope end to a post.
5. Flemish loop—stays tight, will jam.
6. Stevedore knot—will not jam.
7. Sheet bend or weaver's knot—for joining two ends.
8. Square or reef knot—for joining two cords—very useful, is non-slipping.
9. Granny knot—most people confuse it with the square knot. It will slip.
10. Thief knot—will slip.
11. Carrick bend—used on top of gin pole or mast to hold it erect; the four ends are fastened to the ground.
12. Carrick bend—used to join two ropes.
13. Bowline—a very useful non-slipping loop.
14. Clove hitch—an effective means for fastening rope to a post or ring.
15. Timber hitch—used for pulling logs.
16. Handcuff hitch—used to convey prisoners.
17. Sheepshank—to decrease the length of a rope.
18. Bowknot—is tied like the square knot, but with ends doubled back in tying the latter half—used on neckties and ribbons.
19. Spanish bowline—used as boatswain's chair.
20. Wall knot—used by electricians as a stop on drop-cord.
21. Wall knot crowned—a neat rope-end finish, to prevent unraveling.
22. Three-strand flat braid.
23. Four-strand flat braid, begun.
24. Four-strand flat braid, continued—the right strand goes over, the left one goes under, and then is passed to the right, in front of the middle strand.
25. Six-strand flat braid, begun.
26. Six-strand flat braid, continued—note that each strand goes from one side clear to the other, before turning around and goes over and under, alternately, in crossing the other strands.
27. Chain knot—is begun like a slip knot.
28. Chain knotting, continued—each loop is pulled taut.
29. Double chain knotting—is started like the single chain knot, but the second loop is formed from the free end, and slipped thru from the same side as the first. Both ends are used, alternately, and the loops are pulled taut. It makes a beautiful cord, triangular in shape.
30. Genoese braid, begun—two cords are used, one end of each is used as a core, tho a thicker core may be used, and with the other two ends, in turn, loops are drawn around the core.
31. Genoese braid, continued—makes a handsome flat braid.
32. Watch fob—may be made of three or more strings or ribbons. Four strings are used in this case. Take two shoe strings and double them. Tie thread around them, about two inches from the loops. Hold the loops in the left hand, with the ends up. Name them A, B, C, D, as is shown in the drawing. First, bend A to the right; bend D over A, and away from you; bend C over D, and to the left; bend B over C, and toward you, and slip the end under the loop of A. Second, take string A and double it back to the left; bend B over A, and away from you; bend C over B, and to the right; bend D over C, and toward you, and slip the end under loop at A. The third step is like the first, and the fourth like the second. When finished, slip the loops thru your watch-ring, open the two loops and slip the watch fob thru them. The charm is neatly fastened to the finishing ends.
33. Banister bar—is made by tying the overhand knot over a core of any desired thickness.
34. Banister bar, continued—the process of tying this knot is as follows: Hold the left strand horizontally behind the core; reach under it at the right of the core and take the right strand, bring it forward and to the left across the front of the core, and then back at the left of the core, thru the loop formed by the left strand. Continue by repeating this process.
35. Solomon's knot—this is started like the banister bar, but, instead of tying all the knots alike, the tying is done, in turn, first with the right-hand strand, then with the left. Each strand will thus remain on the same side of the core as at the start. The strand in front of the core is used continually for tying the knot by the left and right hand, alternately, as the strand moves from side to side. It is a series of left and right overhand knots over a core.
36. Four-strand round braid—is very pretty, and well repays any difficulty in mastering it. It is not as easy to illustrate, by drawing, the process of making a round braid as a flat one; however, by carefully following the movement of each strand in the illustration, while manipulating the four strings, one will soon gain success and also much satisfaction.
First, hold the four strands in the left hand, as in the beginning of the flat braid, but, instead of taking the right strand, reach in, just in the left of the right strand, and, from behind, take the left strand, bring it forward and across in front from right to left. Second, exchange the places of the words, right and left, and repeat the above-described process.
Referring to the drawing, reach in at B, and from behind at the right, below x4, take C; bring it forward and across B, at x7. Next, hold the braid in the left hand and, with the right, reach in at D and take A from behind, and bring it forward and across C, at E, as is shown by dotted lines.
Braiding with three strands, or as many more as desired, may be done with ropes, strings of beads, rich-colored cords and ribbons, or basketry materials, for making many useful and beautiful articles, such as chains, belts, hangings, bags, portieres and wicker work for baskets, lamp shades and chairs.
By MICHAEL C. DANK
A collection of full-size toy patterns. Toys which make a strong appeal to the child. Each pattern sheet presents a particular class of toys including Jointed Animals, Animal Rocker Toys, Wheeled Platform Toys, Lever Toys, String Toys, Freak Toys, Novelties, etc. While intended to be worked out in wood many are equally well adapted for cardboard. Toy-making at home from these patterns is a fine hobby for the boy from six to twelve years of age, and in the school is a fascinating manual training activity. These patterns are based upon the author's long experience in the teaching of toy-making in public and private schools and summer camps. They are well presented on sheets size 10-1/2 x 14 inches and are enclosed in a portfolio with an attractive design in color. Price, 80 cents.
MANUAL TRAINING TOYS for the BOYS WORKSHOP
By HARRIS W. MOORE.—A popular boys' book illustrating 42 projects overflowing with "boy" interest. The drawings are full-page and show each project complete and in detail. A descriptive text accompanies giving full information as to materials needed and how to proceed with the simple tools required. Price, $1.50.
COPING SAW WORK
By BEN W. JOHNSON.—Presents drawings and suggestions for a course of work in thin wood that is full of fun for the children, and affording ample means for training in form study, construction, invention and careful work. A helpful guide for the teacher of the fourth grade. Price, 30 cents.
KITECRAFT and KITE TOURNAMENTS
By CHARLES M. MILLER.—An authoritative and comprehensive treatment of kitecraft. The book deals with the construction and flying of all kinds of kites, and the making and using of kite accessories. Also aeroplanes, gliders, propellers, motors, etc. Four chapters are devoted to presenting a detailed description of kite flying tournaments. Abundantly illustrated and attractively bound. Price, $1.75.
BIRD HOUSES BOYS CAN BUILD
By ALBERT F. SIEPERT.—A book of rare interest to boys. It is written in the boy spirit and combines the charm of nature with the allurements of continuation work in wood. It illustrates hundreds of bird houses and shows working drawings of various designs, also feeders, shelters, sparrow traps, and other bird accessories. The common house nesting birds are pictured and described with information regarding houses, foods, etc., suitable for each. A pleasing and practical book for wide-awake boys. Price, 65 cents.
Send for Descriptive Catalog.
THE MANUAL ARTS PRESS
PEORIA, ILLINOIS
Transcriber's Notes
REMINDER: LEAD-PAINT WARNING! DO NOT USE THE GROUND-LEAD PAINT
INGREDIENTS mentioned in the "Coloring the Toys" chapter. This book
was published before the harmful effects of lead paint to children
were known. Also, when working with enamel paint that contains a high
quantity of solvents, make sure the area is as well-ventilated as
possible. If still in doubt, wear a respirator mask to prevent the
toxic effects of solvent inhalation. Paper masks do not block solvent
fumes.
Some of the diagrams have been moved from their original positions to
the sections describing their constructions.
Pages 6, 13: Retained original spelling of "thoroly."
Page 15: Changed "craftmanship" to "craftsmanship."
Page 31: Changed "Minsrels" to "Minstrels."
End of the Project Gutenberg EBook of Educational Toys, by Louis C. Petersen

*** END OF THIS PROJECT GUTENBERG EBOOK EDUCATIONAL TOYS ***

***** This file should be named 43635-h.htm or 43635-h.zip *****
This and all associated files of various formats will be found in:
        http://www.gutenberg.org/4/3/6/3/43635/

Produced by David Edwards, Diane Monico, and the Online
Distributed Proofreading Team at http://www.pgdp.net (This
file was produced from images generously made available
by The Internet Archive)


Updated editions will replace the previous one--the old editions
will be renamed.

Creating the works from public domain print editions means that no
one owns a United States copyright in these works, so the Foundation
(and you!) can copy and distribute it in the United States without
permission and without paying copyright royalties.  Special rules,
set forth in the General Terms of Use part of this license, apply to
copying and distributing Project Gutenberg-tm electronic works to
protect the PROJECT GUTENBERG-tm concept and trademark.  Project
Gutenberg is a registered trademark, and may not be used if you
charge for the eBooks, unless you receive specific permission.  If you
do not charge anything for copies of this eBook, complying with the
rules is very easy.  You may use this eBook for nearly any purpose
such as creation of derivative works, reports, performances and
research.  They may be modified and printed and given away--you may do
practically ANYTHING with public domain eBooks.  Redistribution is
subject to the trademark license, especially commercial
redistribution.


*** START: FULL LICENSE ***

THE FULL PROJECT GUTENBERG LICENSE
PLEASE READ THIS BEFORE YOU DISTRIBUTE OR USE THIS WORK

To protect the Project Gutenberg-tm mission of promoting the free
distribution of electronic works, by using or distributing this work
(or any other work associated in any way with the phrase "Project
Gutenberg"), you agree to comply with all the terms of the Full Project
Gutenberg-tm License available with this file or online at
  www.gutenberg.org/license.


Section 1.  General Terms of Use and Redistributing Project Gutenberg-tm
electronic works

1.A.  By reading or using any part of this Project Gutenberg-tm
electronic work, you indicate that you have read, understand, agree to
and accept all the terms of this license and intellectual property
(trademark/copyright) agreement.  If you do not agree to abide by all
the terms of this agreement, you must cease using and return or destroy
all copies of Project Gutenberg-tm electronic works in your possession.
If you paid a fee for obtaining a copy of or access to a Project
Gutenberg-tm electronic work and you do not agree to be bound by the
terms of this agreement, you may obtain a refund from the person or
entity to whom you paid the fee as set forth in paragraph 1.E.8.

1.B.  "Project Gutenberg" is a registered trademark.  It may only be
used on or associated in any way with an electronic work by people who
agree to be bound by the terms of this agreement.  There are a few
things that you can do with most Project Gutenberg-tm electronic works
even without complying with the full terms of this agreement.  See
paragraph 1.C below.  There are a lot of things you can do with Project
Gutenberg-tm electronic works if you follow the terms of this agreement
and help preserve free future access to Project Gutenberg-tm electronic
works.  See paragraph 1.E below.

1.C.  The Project Gutenberg Literary Archive Foundation ("the Foundation"
or PGLAF), owns a compilation copyright in the collection of Project
Gutenberg-tm electronic works.  Nearly all the individual works in the
collection are in the public domain in the United States.  If an
individual work is in the public domain in the United States and you are
located in the United States, we do not claim a right to prevent you from
copying, distributing, performing, displaying or creating derivative
works based on the work as long as all references to Project Gutenberg
are removed.  Of course, we hope that you will support the Project
Gutenberg-tm mission of promoting free access to electronic works by
freely sharing Project Gutenberg-tm works in compliance with the terms of
this agreement for keeping the Project Gutenberg-tm name associated with
the work.  You can easily comply with the terms of this agreement by
keeping this work in the same format with its attached full Project
Gutenberg-tm License when you share it without charge with others.

1.D.  The copyright laws of the place where you are located also govern
what you can do with this work.  Copyright laws in most countries are in
a constant state of change.  If you are outside the United States, check
the laws of your country in addition to the terms of this agreement
before downloading, copying, displaying, performing, distributing or
creating derivative works based on this work or any other Project
Gutenberg-tm work.  The Foundation makes no representations concerning
the copyright status of any work in any country outside the United
States.

1.E.  Unless you have removed all references to Project Gutenberg:

1.E.1.  The following sentence, with active links to, or other immediate
access to, the full Project Gutenberg-tm License must appear prominently
whenever any copy of a Project Gutenberg-tm work (any work on which the
phrase "Project Gutenberg" appears, or with which the phrase "Project
Gutenberg" is associated) is accessed, displayed, performed, viewed,
copied or distributed:

This eBook is for the use of anyone anywhere at no cost and with
almost no restrictions whatsoever.  You may copy it, give it away or
re-use it under the terms of the Project Gutenberg License included
with this eBook or online at www.gutenberg.org

1.E.2.  If an individual Project Gutenberg-tm electronic work is derived
from the public domain (does not contain a notice indicating that it is
posted with permission of the copyright holder), the work can be copied
and distributed to anyone in the United States without paying any fees
or charges.  If you are redistributing or providing access to a work
with the phrase "Project Gutenberg" associated with or appearing on the
work, you must comply either with the requirements of paragraphs 1.E.1
through 1.E.7 or obtain permission for the use of the work and the
Project Gutenberg-tm trademark as set forth in paragraphs 1.E.8 or
1.E.9.

1.E.3.  If an individual Project Gutenberg-tm electronic work is posted
with the permission of the copyright holder, your use and distribution
must comply with both paragraphs 1.E.1 through 1.E.7 and any additional
terms imposed by the copyright holder.  Additional terms will be linked
to the Project Gutenberg-tm License for all works posted with the
permission of the copyright holder found at the beginning of this work.

1.E.4.  Do not unlink or detach or remove the full Project Gutenberg-tm
License terms from this work, or any files containing a part of this
work or any other work associated with Project Gutenberg-tm.

1.E.5.  Do not copy, display, perform, distribute or redistribute this
electronic work, or any part of this electronic work, without
prominently displaying the sentence set forth in paragraph 1.E.1 with
active links or immediate access to the full terms of the Project
Gutenberg-tm License.

1.E.6.  You may convert to and distribute this work in any binary,
compressed, marked up, nonproprietary or proprietary form, including any
word processing or hypertext form.  However, if you provide access to or
distribute copies of a Project Gutenberg-tm work in a format other than
"Plain Vanilla ASCII" or other format used in the official version
posted on the official Project Gutenberg-tm web site (www.gutenberg.org),
you must, at no additional cost, fee or expense to the user, provide a
copy, a means of exporting a copy, or a means of obtaining a copy upon
request, of the work in its original "Plain Vanilla ASCII" or other
form.  Any alternate format must include the full Project Gutenberg-tm
License as specified in paragraph 1.E.1.

1.E.7.  Do not charge a fee for access to, viewing, displaying,
performing, copying or distributing any Project Gutenberg-tm works
unless you comply with paragraph 1.E.8 or 1.E.9.

1.E.8.  You may charge a reasonable fee for copies of or providing
access to or distributing Project Gutenberg-tm electronic works provided
that

- You pay a royalty fee of 20% of the gross profits you derive from
     the use of Project Gutenberg-tm works calculated using the method
     you already use to calculate your applicable taxes.  The fee is
     owed to the owner of the Project Gutenberg-tm trademark, but he
     has agreed to donate royalties under this paragraph to the
     Project Gutenberg Literary Archive Foundation.  Royalty payments
     must be paid within 60 days following each date on which you
     prepare (or are legally required to prepare) your periodic tax
     returns.  Royalty payments should be clearly marked as such and
     sent to the Project Gutenberg Literary Archive Foundation at the
     address specified in Section 4, "Information about donations to
     the Project Gutenberg Literary Archive Foundation."

- You provide a full refund of any money paid by a user who notifies
     you in writing (or by e-mail) within 30 days of receipt that s/he
     does not agree to the terms of the full Project Gutenberg-tm
     License.  You must require such a user to return or
     destroy all copies of the works possessed in a physical medium
     and discontinue all use of and all access to other copies of
     Project Gutenberg-tm works.

- You provide, in accordance with paragraph 1.F.3, a full refund of any
     money paid for a work or a replacement copy, if a defect in the
     electronic work is discovered and reported to you within 90 days
     of receipt of the work.

- You comply with all other terms of this agreement for free
     distribution of Project Gutenberg-tm works.

1.E.9.  If you wish to charge a fee or distribute a Project Gutenberg-tm
electronic work or group of works on different terms than are set
forth in this agreement, you must obtain permission in writing from
both the Project Gutenberg Literary Archive Foundation and Michael
Hart, the owner of the Project Gutenberg-tm trademark.  Contact the
Foundation as set forth in Section 3 below.

1.F.

1.F.1.  Project Gutenberg volunteers and employees expend considerable
effort to identify, do copyright research on, transcribe and proofread
public domain works in creating the Project Gutenberg-tm
collection.  Despite these efforts, Project Gutenberg-tm electronic
works, and the medium on which they may be stored, may contain
"Defects," such as, but not limited to, incomplete, inaccurate or
corrupt data, transcription errors, a copyright or other intellectual
property infringement, a defective or damaged disk or other medium, a
computer virus, or computer codes that damage or cannot be read by
your equipment.

1.F.2.  LIMITED WARRANTY, DISCLAIMER OF DAMAGES - Except for the "Right
of Replacement or Refund" described in paragraph 1.F.3, the Project
Gutenberg Literary Archive Foundation, the owner of the Project
Gutenberg-tm trademark, and any other party distributing a Project
Gutenberg-tm electronic work under this agreement, disclaim all
liability to you for damages, costs and expenses, including legal
fees.  YOU AGREE THAT YOU HAVE NO REMEDIES FOR NEGLIGENCE, STRICT
LIABILITY, BREACH OF WARRANTY OR BREACH OF CONTRACT EXCEPT THOSE
PROVIDED IN PARAGRAPH 1.F.3.  YOU AGREE THAT THE FOUNDATION, THE
TRADEMARK OWNER, AND ANY DISTRIBUTOR UNDER THIS AGREEMENT WILL NOT BE
LIABLE TO YOU FOR ACTUAL, DIRECT, INDIRECT, CONSEQUENTIAL, PUNITIVE OR
INCIDENTAL DAMAGES EVEN IF YOU GIVE NOTICE OF THE POSSIBILITY OF SUCH
DAMAGE.

1.F.3.  LIMITED RIGHT OF REPLACEMENT OR REFUND - If you discover a
defect in this electronic work within 90 days of receiving it, you can
receive a refund of the money (if any) you paid for it by sending a
written explanation to the person you received the work from.  If you
received the work on a physical medium, you must return the medium with
your written explanation.  The person or entity that provided you with
the defective work may elect to provide a replacement copy in lieu of a
refund.  If you received the work electronically, the person or entity
providing it to you may choose to give you a second opportunity to
receive the work electronically in lieu of a refund.  If the second copy
is also defective, you may demand a refund in writing without further
opportunities to fix the problem.

1.F.4.  Except for the limited right of replacement or refund set forth
in paragraph 1.F.3, this work is provided to you 'AS-IS', WITH NO OTHER
WARRANTIES OF ANY KIND, EXPRESS OR IMPLIED, INCLUDING BUT NOT LIMITED TO
WARRANTIES OF MERCHANTABILITY OR FITNESS FOR ANY PURPOSE.

1.F.5.  Some states do not allow disclaimers of certain implied
warranties or the exclusion or limitation of certain types of damages.
If any disclaimer or limitation set forth in this agreement violates the
law of the state applicable to this agreement, the agreement shall be
interpreted to make the maximum disclaimer or limitation permitted by
the applicable state law.  The invalidity or unenforceability of any
provision of this agreement shall not void the remaining provisions.

1.F.6.  INDEMNITY - You agree to indemnify and hold the Foundation, the
trademark owner, any agent or employee of the Foundation, anyone
providing copies of Project Gutenberg-tm electronic works in accordance
with this agreement, and any volunteers associated with the production,
promotion and distribution of Project Gutenberg-tm electronic works,
harmless from all liability, costs and expenses, including legal fees,
that arise directly or indirectly from any of the following which you do
or cause to occur: (a) distribution of this or any Project Gutenberg-tm
work, (b) alteration, modification, or additions or deletions to any
Project Gutenberg-tm work, and (c) any Defect you cause.


Section  2.  Information about the Mission of Project Gutenberg-tm

Project Gutenberg-tm is synonymous with the free distribution of
electronic works in formats readable by the widest variety of computers
including obsolete, old, middle-aged and new computers.  It exists
because of the efforts of hundreds of volunteers and donations from
people in all walks of life.

Volunteers and financial support to provide volunteers with the
assistance they need are critical to reaching Project Gutenberg-tm's
goals and ensuring that the Project Gutenberg-tm collection will
remain freely available for generations to come.  In 2001, the Project
Gutenberg Literary Archive Foundation was created to provide a secure
and permanent future for Project Gutenberg-tm and future generations.
To learn more about the Project Gutenberg Literary Archive Foundation
and how your efforts and donations can help, see Sections 3 and 4
and the Foundation information page at www.gutenberg.org


Section 3.  Information about the Project Gutenberg Literary Archive
Foundation

The Project Gutenberg Literary Archive Foundation is a non profit
501(c)(3) educational corporation organized under the laws of the
state of Mississippi and granted tax exempt status by the Internal
Revenue Service.  The Foundation's EIN or federal tax identification
number is 64-6221541.  Contributions to the Project Gutenberg
Literary Archive Foundation are tax deductible to the full extent
permitted by U.S. federal laws and your state's laws.

The Foundation's principal office is located at 4557 Melan Dr. S.
Fairbanks, AK, 99712., but its volunteers and employees are scattered
throughout numerous locations.  Its business office is located at 809
North 1500 West, Salt Lake City, UT 84116, (801) 596-1887.  Email
contact links and up to date contact information can be found at the
Foundation's web site and official page at www.gutenberg.org/contact

For additional contact information:
     Dr. Gregory B. Newby
     Chief Executive and Director
     gbnewby@pglaf.org

Section 4.  Information about Donations to the Project Gutenberg
Literary Archive Foundation

Project Gutenberg-tm depends upon and cannot survive without wide
spread public support and donations to carry out its mission of
increasing the number of public domain and licensed works that can be
freely distributed in machine readable form accessible by the widest
array of equipment including outdated equipment.  Many small donations
($1 to $5,000) are particularly important to maintaining tax exempt
status with the IRS.

The Foundation is committed to complying with the laws regulating
charities and charitable donations in all 50 states of the United
States.  Compliance requirements are not uniform and it takes a
considerable effort, much paperwork and many fees to meet and keep up
with these requirements.  We do not solicit donations in locations
where we have not received written confirmation of compliance.  To
SEND DONATIONS or determine the status of compliance for any
particular state visit www.gutenberg.org/donate

While we cannot and do not solicit contributions from states where we
have not met the solicitation requirements, we know of no prohibition
against accepting unsolicited donations from donors in such states who
approach us with offers to donate.

International donations are gratefully accepted, but we cannot make
any statements concerning tax treatment of donations received from
outside the United States.  U.S. laws alone swamp our small staff.

Please check the Project Gutenberg Web pages for current donation
methods and addresses.  Donations are accepted in a number of other
ways including checks, online payments and credit card donations.
To donate, please visit:  www.gutenberg.org/donate


Section 5.  General Information About Project Gutenberg-tm electronic
works.

Professor Michael S. Hart was the originator of the Project Gutenberg-tm
concept of a library of electronic works that could be freely shared
with anyone.  For forty years, he produced and distributed Project
Gutenberg-tm eBooks with only a loose network of volunteer support.

Project Gutenberg-tm eBooks are often created from several printed
editions, all of which are confirmed as Public Domain in the U.S.
unless a copyright notice is included.  Thus, we do not necessarily
keep eBooks in compliance with any particular paper edition.

Most people start at our Web site which has the main PG search facility:

     www.gutenberg.org

This Web site includes information about Project Gutenberg-tm,
including how to make donations to the Project Gutenberg Literary
Archive Foundation, how to help produce our new eBooks, and how to
subscribe to our email newsletter to hear about new eBooks.