This book does not pretend to be an exhaustive treatise on the subject of horsewomanship. It is offered merely as a collection of the most important points gleaned in my career as a horse-lover and professional horsewoman. While from experience alone a rider may evolve good form if she is a natural born horsewoman, yet this is so rare that, with most of us, a knowledge at the start of the general fundamental principles which are the basis of form in riding and driving, is essential. It was my good fortune to have my mother, Mrs. Emily S. Beach, lay the foundation for me and, similarly, these chapters may aid some of my readers.
Nothing in this book is hearsay. That which takes but a moment to tell has taken me years to learn; learned as a pupil; learned as a teacher; learned by observation; learned by exhibition, by many a triumph, by many a heart-break; much of it a pleasure, much a hard task, but repaid always by my comrades through it all—the horses.
I desire to express my thanks to Messrs. Brewster & Co., Mr. Herman Haas, Messrs. Martin & Martin, Messrs. Whippey, Steggall & Co., The Durland Co., and Mr. P. Nardī for the many illustrations and suggestions which they have kindly given me. Many of the illustrations are from photographs which my friends have been kind enough to send me.
| PART I—RIDING | ||
|---|---|---|
| CHAPTER | PAGE | |
| I. | Form in Riding | 3 |
| II. | Hands | 14 |
| III. | Mounting—Side-Saddle | 31 |
| IV. | Riding Astride | 37 |
| V. | Hunting | 58 |
| VI. | Show Ring | 77 |
| VII. | Hints on Riding | 91 |
| VIII. | Correct Dress for the Saddle | 108 |
| IX. | Saddles and Bridles | 133 |
| X. | The Saddle Horse | 157 |
| XI. | The Selection of a Saddle Horse | 180 |
| PART II—DRIVING | ||
| XII. | Form | 193 |
| XIII. | Four-in-Hand and Tandem Driving | 217 |
| XIV. | Show Ring Appointments | 245 |
| XV. | Hints on Driving | 250 |
| XVI. | Dress | 259 |
| XVII. | Bits and Bearing Reins | 264 |
| XVIII. | Harness | 273 |
| XIX. | Gymkhana Games and Suggestions for Private Horse Shows | 282 |
| Index | 291 | |
With all the changes in fashion and fads, riding still holds its own, and the field which it occupies can never be invaded. For women, quite as much as and even more than for men, it is of all exercises the one best adapted to keep them in condition, to restore the glow of health, and to key up the whole system to respond to all the delights of life. No less for a woman than for a man is the old saying true, “There is something about the outside of a horse that is good for the inside of a man.”
Self-made riders are apt to scoff at what is termed “form,” but “form” is neither fad nor fashion. It is that way of doing any particular thing that is recognized as the best. This is why a self-taught person is at a disadvantage. She may, possibly from her experience, have worked out the correct theory of riding, but she has not had the advantage of learning all that has been worked out by others, and it is the assimilation of the results of others’ experience that constitutes form.
Riding should, I think, be as much a part of a child’s education as any of the subjects taught at school; in fact, I would paraphrase and say that “Reading, Riding, and ’Rithmetic” were the essential elements of every child’s education. All children find in it the keenest pleasure, and to the delicate child it offers salvation. Once the first difficulties are overcome, the benefits are soon realized. Benefits not only to the general health, with restored circulation and appetite, but to the character which acquires patience and self-control—qualities quite as essential as the proper use of hands and legs for the making of a horsewoman.
I do not, however, approve of very young children taking riding lessons. The age of seven is quite young enough, for when younger than that a child’s legs are so short that it is difficult for her to keep her balance at any gait faster than a walk. But I do approve of very young children becoming accustomed to the motion and acquiring balance by being held on the back of a very quiet pony, which, of course, should not go beyond a walk. The great danger in beginning too young is that the child may have a fall, and, if she does, may receive a shock to her nervous system, the effects of which will make her timid about horses for years to come.
I like to have a child come to me for her lesson without fear, not timid from any past experience, yet enough awed at assuming control of so big an object as a pony to have respect for, and be dependent on, her teacher. Later on, confidence will come with increasing knowledge, and so her education as a horsewoman will be properly begun.
Although learning to ride in childhood is certainly an advantage, yet age is not necessarily an impediment to a woman’s learning the art. I have known many women who have never been on a horse’s back until they were forty years of age, or even older, who, after a few courses of lessons, have derived much pleasure from their riding, and, with application, have even become proficient. However, the best riders, like the best singers or pianists, are born, not made, and there is a grace about the natural rider that cannot be attained even by the most thorough training.
Form in riding depends chiefly upon a correct seat, and that in turn depends upon balance and correct position. Balance can only be attained by keeping the muscles relaxed and being ready to respond at any moment to every movement of the horse. It is impossible to acquire balance if all the muscles are stiff all the time. The body should sway in rhythm with the horse’s gait. This not only looks well, but saves both rider and horse from all unnecessary exertion and fatigue.

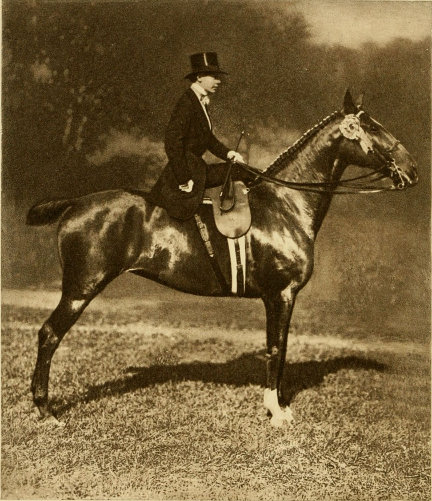
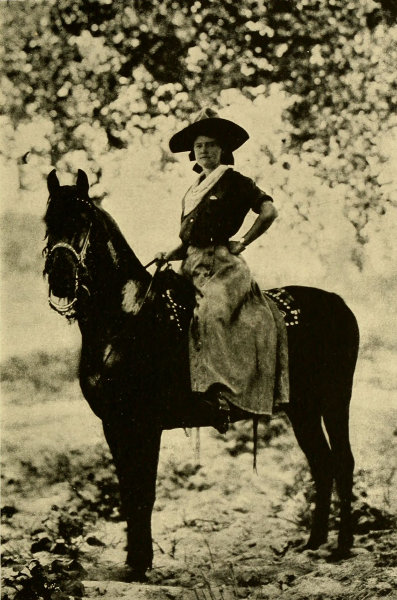
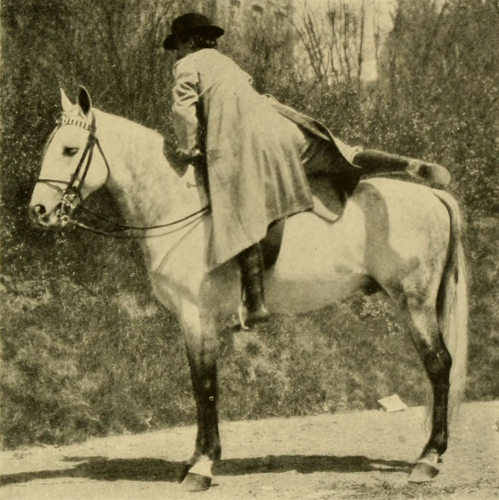
Quite as important as balance is the proper position in the saddle. The first point, remember, is that the body must be squarely in the saddle, neither to the right nor to the left, and the right thigh must be kept pointed almost directly to the front. The body is kept in this position by having both legs at all times in their correct position. The right thigh should be well down on the saddle and the right knee should both press down and pull back on the upper pommel. The right leg from the knee down should be kept close, but not rigid, against the saddle-flap and should be nearly vertical, neither thrust forward nor sideways nor twisted back, and the right leg should not touch the left leg. If the right leg is kept in proper place, the right shoulder—the bane of so many women riders—will be neither forward nor down, but squarely in line.
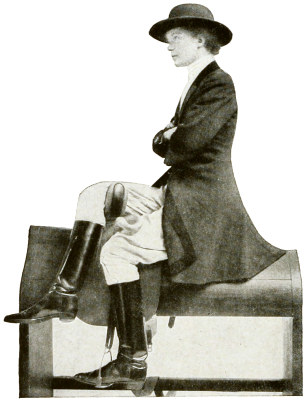
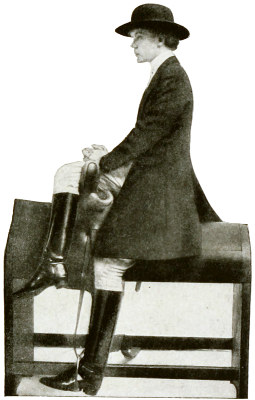


The left leg should be kept in the same position as a man’s leg, that is, held in firmly against the saddle. The left knee should be slightly bent and the leaping horn and the stirrup-leather should be so adjusted that the former will press down and over the left thigh about five inches above the knee. Side-saddles have two holes, in either of which the leaping horn may be screwed, and for most women it is more comfortable to have the horn in the lower hole. The left leg below the knee should be vertical, neither thrust forward with the heel down nor back with the toe below the level of the heel, nor, on the other hand, thrust out at an angle of forty-five degrees or so from the horse’s side. All but experienced riders should ride with the ball of the foot resting lightly on the stirrup-iron, with the heel a trifle down and the foot parallel to the horse, or, if possible, pointed in, and this should be done by turning the leg at the thigh joint, just as is later described in the cross seat. When a rider has become expert she may ride with her foot “home,” that is, with the instep resting on the iron. It is always advisable to ride with the foot “home” when the horse shies or takes a fast gallop.
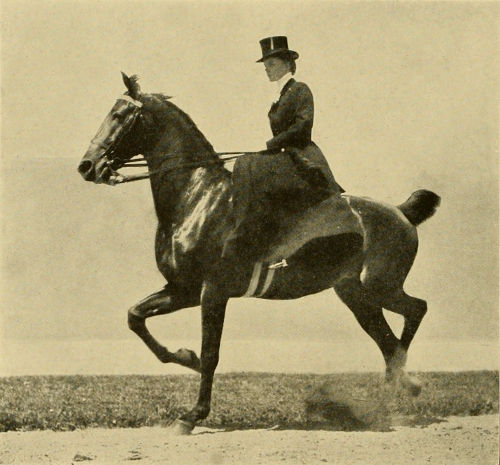
On this correct position of the left leg depends the evenness of the hips, and on the correct position of both legs depend the level of the shoulders, the level of the hips, the squareness and firmness of the seat, and the proper control of balance.

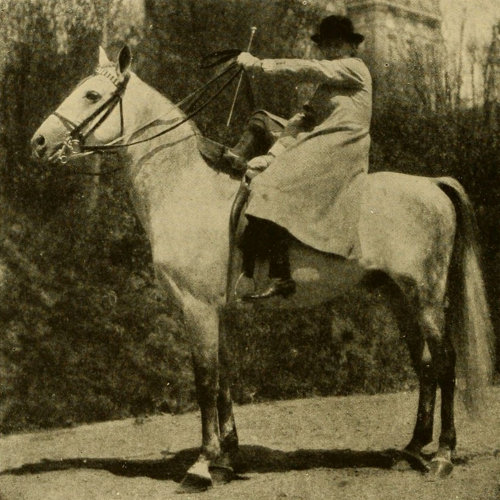
The hands should be held on a level about six inches in front of the waist; the forearms horizontal, the upper arms hanging naturally from the shoulders, so as to keep the elbows level, and in a vertical plane with the shoulders. Bowing the elbows out, or, on the other hand, clapping them too close to the sides, are common faults, and are equally bad not only for the sake of appearances, but because, in either of these positions, the strength of the arms is lessened. Similarly, the elbows should not be carried back when the hands are in position, for, if they are, you cannot pull the horse up should he stumble, or, on occasion, stop him suddenly; nor should they be carried forward over the knee, for that position is stiff and tiring and gives the body a tendency to bend forward.
In jumping a horse trained to jump in the American fashion, when approaching the jump, the hands are carried well forward and, at the same time, the body is also carried forward. The reason for this is partly to help the horse over the jump, and partly because the horse, before he rises, throws his head far to the front, and the rider’s hands and body move with him. On landing, the horse’s head and with it the rider’s body and hands resume their normal position.
Both hands should be kept in position, and neither arm should ever be allowed to hang at the side in military fashion. Nothing looks worse in park riding for either a woman or a man. In riding a horse that is bridlewise and perfectly broken so that he will obey the slightest movement of the reins and can make all the changes of action and of gait by a mere suggestion from one hand, the other hand should still be kept in almost the same position as if it held the reins, and remember that if it is necessary to rearrange the hair or the hat, or if you wish to make any gesture with the right hand, to be sure to transfer the whip to the left hand. By neglecting this precaution and carrying the whip in the right hand, when it is moved about, your horse, or your companion’s, may see the whip and think he is about to be struck, and a serious accident may result.
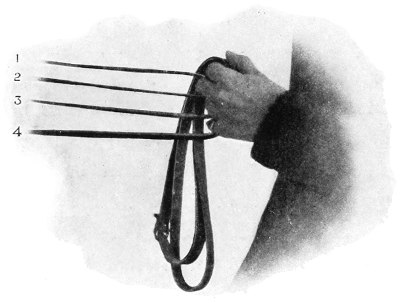
The left hand is the bridle-hand and the one in which the reins should habitually be carried. After mounting, and in first taking up the reins, remember that the snaffle rein is a trifle longer and wider than the curb rein and that the ends of the snaffle reins are joined with a buckle while the ends of the curb are stitched together.
There are different ways of first taking up the reins. One of the best is to grasp them together in the right hand, the curb reins in the middle and the snaffle reins on the outside, drawing them sufficiently tight to feel the horse’s mouth very lightly, with the ends passing through the hand and out under the little finger; then, holding them all horizontal, to pass the left hand down on them vertically, the near snaffle rein outside the little finger, the near curb between the little finger and the third finger, the off curb between the second and third fingers, and the off snaffle between the first and second fingers. Then let go with the right hand and turn the left hand into its position with the ends of the reins coming out between the thumb and forefinger.
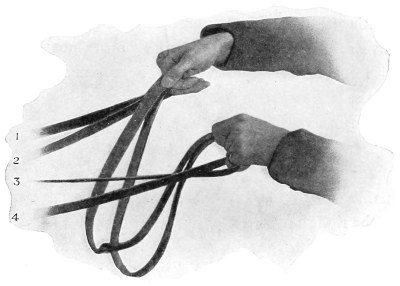
Another way is first to take up the snaffle reins with the right hand, the off rein outside the little finger, the near between the first and second fingers, feel the horse’s mouth lightly, and then pass them into their correct position in the left hand, the near snaffle outside the little finger, the off snaffle between the first and second fingers; then pick up the curb reins with the right hand and pass them to the left hand separated by the third finger.
A third way is first to pick them up in the right hand in the same position in which they should finally be in the left hand, except that the off and near reins are reversed; that is, the off snaffle rein comes outside the little finger, and the near snaffle rein between the first and second fingers, and similarly with the curb. Then drop the left hand over them, in front of the right, as above described, with the fingers in their correct final position. This position has been already described, but I will state it again: The near snaffle rein comes outside of the little finger, the near curb rein between the little and third fingers, the off curb rein between the third and second fingers, the off snaffle rein between the first and second fingers; the ends of the reins come up through the hand and fall to the right between the thumb and forefinger.
The reins should be adjusted to their proper length with the right hand so as to feel the horse’s mouth lightly before the fingers of the left hand are closed on them. With regard to the ends of the reins, it is equally correct to have all four reins one upon the other, and then put the thumb on top of them all, or to put the thumb on top of the snaffle reins and have the curb reins pass to the right of the thumb, if one is riding on the snaffle; or, if one is riding on the curb, to have the thumb resting on the curb reins and the snaffle reins passing to the right of the thumb.
The reins should be properly arranged in the left hand, as I have described, at the start, when the body and the elbow are in their correct positions, and they should be held at this same length at all times and not allowed to slip through the fingers. They should be held by pressing the edges of the reins, with the fingers, against the cushion of the hand, and not by squeezing the flat surfaces of the reins between the fingers. The principal reason why beginners let the reins slip through their fingers is that they do not hold the reins by the edges.
The whip, crop, or stick, whichever may be carried, belongs in the right hand, but the whip and stick are both carried with the handle up and the small end pointing downward whereas the crop should always be carried with the handle downward and the loop end upward. The reason for this is, probably, because in England crops which have handles are used for opening the latches of gates, and, when held in this position, the handle can be quickly used for this purpose without the crop being shifted. Another reason is because, when used in the hunting field with the lash, the lash can be got out quickly, and the crop will be in position for use at a moment’s notice. Whichever of the three, whip, stick, or crop, may be carried, hold it lightly in the palm between the thumb and first finger of the right hand.
I have already described the position of the reins in the left hand. The next thing to be considered is the position of the left hand itself when holding the reins.
As I have said, the forearm must be horizontal. The hand must be held with the knuckles nearly vertical, and not horizontal, as many hold it. The hand must be bent in toward the body at the wrist, and the wrist must be flexible so as to give slightly with the movement of the horse’s head. Nearly all beginners have great difficulty in remembering to keep the wrist bent, as they are apt to straighten it out so as to give a direct tug on the horse’s mouth with their arm, and so lose the spring which the supple wrist would give them.
The right hand should be held symmetrically with the left, bent in at the wrist in the same way, and with the knuckles at about the same angle. For beginners, it is better, until they have acquired fairly good “hands,” to hold the bight of all four reins in the right hand between the thumb and forefinger, about an inch from the left hand and just below the whip, the bight of all four reins passing through the right hand and out under the little finger. This keeps the right hand in position ready for an emergency, but it does not allow it to interfere with the even pressure and “feel” which the left hand has on the horse’s mouth, with both the near and off reins. Remember that, under normal circumstances, all four reins must be held firmly in the left hand, and that there must be an exactly even pressure on the horse’s mouth on both sides, and that, in order to keep the reins so and prevent them from slipping, they must be held by the edges between the second joints of the fingers and the cushion of the hand, and must also be firmly pressed down between the thumb and forefinger.
The right hand should, as it were, be kept in reserve and used as circumstances may require. For instance, if the horse is thoroughly bridlewise, he will have been trained to turn to the left by passing the left hand to the left, at the same time slightly turning it on the upper arm as a pivot, thus touching the off side of the horse’s neck with the off reins; similarly, to turn to the right by carrying the left hand to the right, and turning it to the right on the upper arm as a pivot, thus bearing the near reins against the near side of the horse’s neck. Many saddle-horses, however, have not been trained to this, so they have to be turned in riding very much as in driving; that is, by pulling the rein of the side toward which they are to turn.
Now, with a horse which has an exceptionally sensitive mouth, and a rider with exceptionally good hands, this can be done by a mere turn of the left wrist; but if the horse has not a sensitive mouth, or the rider has not very good hands, the right hand must be called into assistance. In such a case turning the horse to the right is very simply accomplished by taking the off reins in the right hand a few inches in front of the left (which, however, must retain its grasp of all the reins without shifting), separated by the little finger, the two reins passing out between the thumb and forefinger. Then, by a slight pressure of the right hand, bring the horse’s head around to the right.
Turning to the left, however, is not done by taking up the near reins in the right hand, as in driving, but by taking the off reins in the right hand just as if one were going to turn to the right, but without any pull on the off reins. Then letting the off reins slip slightly through the fingers of the left hand, and pulling the near reins with the left hand enough to make the horse turn, and as soon as the turn is accomplished, restoring the reins to the former position in the left hand.
Another purpose for which the right hand must be always available is for shortening the reins. This should be done by grasping the bight or ends of all four reins together in the right hand, behind the left, between the thumb and forefinger, passing through the hand and out by the little finger, and slipping the left hand up on the reins as much as may be needed.
If, however, more strength is required than can be had from the left arm only, the right hand should be placed on all four reins in front of the left hand, which, of course, will have to be turned so as to bring the knuckles horizontal, the reins occupying the same position in the right hand as in the left, only reversed; that is, the off snaffle coming outside the little finger, and the near snaffle between the first and second fingers, etc. The fingers of the right hand are then closed upon the reins and the horse pulled in with all the strength of both arms.
I do not mean to imply for a moment that any horse can be pulled up or stopped by a steady pull on the reins, for no woman is strong enough to stop a horse who is determined to run, by pitting her strength against his. There must be a “give and take,” and even in stopping a runaway, alternately giving him his head and then pulling him in, is far more effective than a steady pull; nor should a horse ever be stopped or pulled up with a jerk unless to avoid running over a child or in some other emergency. To stop a horse or make him slow down, he should first be given his head slightly by carrying the hand forward, and then pulled up gradually. If you start to pull a horse with a violent jerk you will immediately excite his resentment and make him pull against you with all his strength, and you will end in giving him a hard mouth and developing a “puller.”
Another purpose for which the right hand should be in readiness is to tighten the curb reins. If the horse is being ridden, as he usually will be, either with the pressure on all four reins about even or with the curb reins somewhat looser than the snaffle, and he starts to pull, or there is some other occasion for using the curb, the right hand may be brought over in front of the left and the curb reins taken in the right from two to six inches in front of the left hand, separated by the third finger, passing out between the thumb and forefinger. The curb can then be tightened with the right hand without affecting the snaffle, and the horse made to slow down or stop, as may be required. Great care, however, should be taken by beginners not to attempt to do this, as they would be almost certain to put far too great pressure on the curb, might cause the horse to rear, and would be very apt to make him start to run, through obstinacy. I would, therefore, never advise a beginner to attempt to take up the curb reins in this way unless some emergency made it imperative.
Some riders with very light hands, when riding very powerful horses with rather hard mouths, may find it desirable to ride on the curb instead of on the snaffle. In such case there are two positions which may be taken. One is to put the curb reins in the position of the snaffle reins and vice versa, and then leave the snaffle reins somewhat looser than the curb. This is a method much used with the Kentucky type of saddle-horse and with horses which have been broken to the use of the curb only, as are nearly all army horses.
Another way of holding the reins when riding on the curb is to separate the two curb reins with the little finger of the left hand and the two snaffle reins with the middle finger. The reins are then held in the army fashion. Some horses have been broken to be ridden in this way, and the rider may find it easier with them.
Neither of these last two ways of holding the reins of which I have spoken should be attempted by beginners as they will only confuse them.
Another point which is very often neglected is that the reins must not be twisted between the bridle and their ends. Be sure that they are kept straight at all times, as it looks very badly to see them twisted either on the neck or in the bight of the reins, and if the bight is twisted, one is very apt to mix the reins when changing them.
With regard to holding the reins in both hands, this should only be done by beginners, and in the hunting field, and with absolutely green horses who have to have their heads pulled around in order to turn them.
I shall discuss the position of the hands in the hunting field in the chapter on hunting, and what I have said about turning horses who are not bridlewise covers all that needs to be said about green horses.
Beginners should not use the curb reins at all, and should hold one snaffle rein in each hand, the snaffle reins being held in the position of the near snaffle rein in the left hand, and the off snaffle rein in the right hand; that is, passing outside of the little finger up through the hand and held between the thumb and forefinger. A beginner, particularly if she has ever driven, will naturally start to take a rein in each hand in the driving position, that is, separated by the thumb and forefinger and coming out under the little finger. This position is never taken in riding. The object of taking a rein in each hand is to accustom the fingers to the reins, and the rider to holding the right hand parallel with the left. Keeping the right hand in a corresponding position to that of the left not only looks smart and neat, but it helps to keep the right shoulder in place. Of course, in the side-saddle, the tendency of all beginners is to carry the right shoulder forward and higher than the left. If the right forearm is held symmetrically with the left forearm, the right shoulder cannot be out of place.


In riding astride beginners should also hold a rein in each hand, as holding the reins in the left hand only tends to pull the left shoulder forward and out of place. So when riding astride, the symmetrical position of the right hand and arm with the left brings the right shoulder forward and keeps the shoulders square.
I have mentioned above the reasons for sometimes reversing the positions of the curb and snaffle. Another case where this may properly be done is where a running martingale is used.
Next to balance, light hands are the most important attribute of a good rider. They really are a gift, like an ear for music, or a delicate sense of touch, or acute vision, and go with a certain nervous and sensitive temperament. Some riders have naturally light hands and scarcely need any instruction with regard to them. With them the feeling of the horse’s mouth is instinctive. Light hands, however, can, to a great extent, be cultivated, and there is no excuse for any experienced rider having heavy hands. Women are more apt to have light hands than men, and while men may rely on strength to control a horse, and can control many horses by sheer brute force, women very seldom have sufficient physical strength to do this. Women should seek “the strength of effect and not the effect of strength.”
It is hard to define the term “light hands.” If I might attempt a definition, I would say that the hands serve as a means of communication between the horse’s and the rider’s mind, so that the rider, through the touch of the horse’s mouth, communicated through the reins and hands, knows what is in the horse’s mind and so can make the horse’s mind instantly respond to the rider’s will, and thus the rider and horse are at all times in sympathy, and the horse acting with, and not against, his rider, and the rider with, and not against, her horse.
Lightness does not in any way denote weakness, for, behind the light touch, there must always be firmness, decision, and strength. Nor does lightness mean a touch so vague that it produces upon the horse’s mind an impression of vacillation. In riding it is most important for the rider, once she has made up her mind what to make the horse do, to make the horse do that thing and not allow him to do anything else. One might, indeed, say that lightness of hands is very closely akin to tact and that it is a means of inducing a horse to adopt as his own the will of his rider.
I spoke a moment ago of strength. By this I mean firmness and not brute force. If a rider is fortunate enough to be gifted with lightness, she will be able to control her horse by a spirit of love instead of adopting the brutal method of controlling him by fear and having him prepared at every moment to obtain his revenge upon his rider, as a horse that has been treated brutally is almost certain to do when he has the opportunity.
Coupled with the lightness of hands should be fearlessness in the mind of the rider, and the horse must know both that the rider is fearless and that she trusts him. If the rider shows a lack of confidence in the horse and acts as if she were suspicious of him, the horse will soon know it, and will do exactly what the rider fears that he will. A horse has a mind which very readily receives impressions from the rider’s mind. For instance, a rider expects a horse to shy at some object; she will unconsciously impart that thought into the horse’s mind and the horse is almost certain to shy; but if she will say to herself, “there is nothing to shy at, we will simply go quietly by this”; if she does not interfere with the reins and gives the horse absolutely no sign that she has any thought of shying in her mind, the horse will, nine times out of ten, if not ten times, pass by the object without showing the slightest alarm. It is usually the rider that shies and not the horse. Some riders make the great mistake of first thinking that a horse is going to shy at some object, then forcing him, by whip and spur, to go up to that object and pass it. They will thus bring the horse to a state of the most pitiable excitement and panic, and, while they may succeed, they may be quite sure that the next time he sees that object, or goes by the same place, he will be far more afraid, for he will dread not only the object itself, but a repetition of the whipping and spurring.
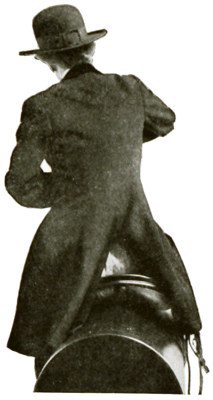
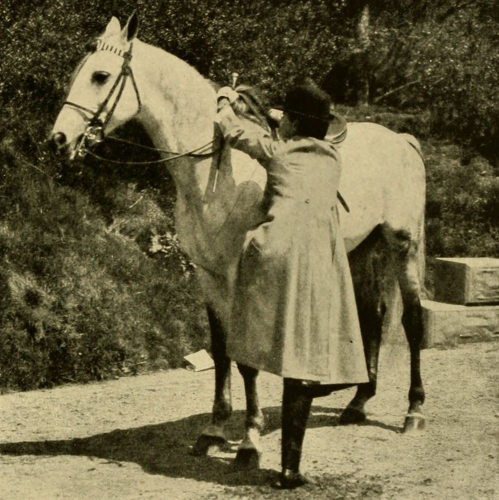
There are two ways of mounting with the side-saddle—from the ground and from the block. The former method is preferable, as a block is seldom available, and a woman should always be able to mount from the ground with or without assistance. To mount from the ground without assistance, stand at the horse’s near side, facing the saddle. Lengthen the leather to the last hole, take up the reins in the left hand and then place it on the upper pommel. Place the left foot in the stirrup, assisting with the right hand if necessary, then grasp the cantle with the right hand and spring from the right foot, pulling yourself up with both arms, and throw the body into the saddle, letting go with the right hand just as you reach the saddle. Then raise the right knee and place it over the pommel, shorten the leather to its proper length, adjust the skirt, and place the loops over the feet. While this is easy for a tall woman with a pony, it is very difficult for a short woman with a large horse, so in that case the best thing to do is to stand your horse downhill or in a ditch, or to stand yourself on a stone or a fence—if one is available.
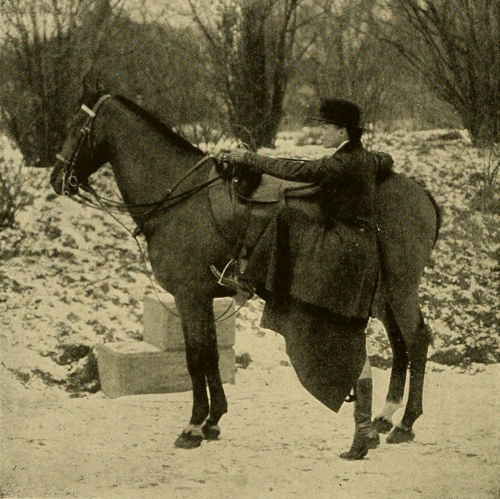
To mount with assistance, the leather being left at its proper length, stand opposite the cantle, facing to the front, place your left foot in the man’s right hand or in both his hands clasped, then at an agreed signal spring from the right foot and have him throw you, but not too high, into the saddle, then place the right knee over the pommel and the left foot in the stirrup.

If your horse is nervous or does not stand well, it is better for the man who is assisting you to hold the horse’s reins in his left hand and lift you with his right hand only, or you can take the reins in your left hand and place it on the pommel and your right hand on the cantle, and then let the man lift you with both hands.

In mounting from the block, the groom stands by the horse’s head and holds him; you then sit on the saddle, place your right knee over the pommel and your left foot in the stirrup. The groom should adjust the straps, or you may adjust them yourself, and you should then take the reins in the left hand. Never, under any circumstances, when mounting from the block, put your foot in the stirrup before you are in the saddle, as, if the horse should start, you would lose your balance and have a fall.

In dismounting, with or without assistance, the first thing to do is to take the straps off and clear the left foot from the stirrup, then throw the right leg clear of the pommel; gather the reins in the right hand and place it on the pommel, then spring lightly to the ground. If any one is assisting you, you should place your left hand on his shoulder. It is most important to clear the stirrup first, as otherwise, with your right knee clear of the pommel, you might lose your balance and be dragged.

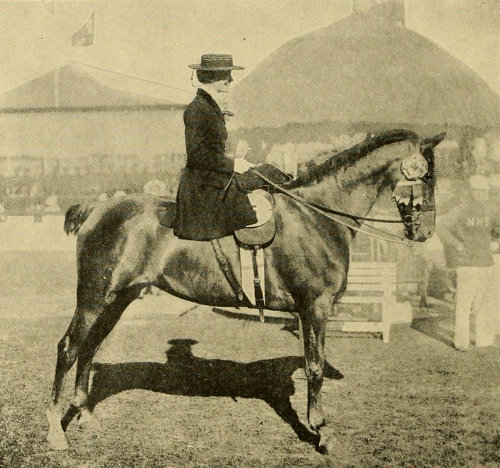
In these days of “advanced” ideas the advisability of women aping men in yet another way, by riding astride, is the subject of general discussion. Many “authorities” upon riding—“mere men,” it is needless to say—speak with enthusiasm of the day when all women will ride in this, for most of them, ungainly and unbecoming fashion. Personally, I deplore this tendency and believe that it is a mere passing fad and that, except under peculiar conditions which I shall mention, most women ride best and look best in the side-saddle.
The average woman is not built for cross-saddle riding; her legs from the knee up are too short; her thighs too thick; her hips too big, and she is cushioned too high to enable her to keep close down with the required firmness on the saddle. The side-saddle certainly insures a stronger seat, especially in all cases of pitching forward, as, for instance, with a stumbling horse or a kicking one, or on landing after a jump. With safety skirts and safety stirrups the danger from dragging is obviated and this, the only serious danger in the use of the side-saddle, is more than offset in my judgment by the great danger of a woman being thrown because of her insecure seat in a man’s saddle. Many claim that the cross-saddle is safer than the side-saddle in case of a rearing horse falling over backward. I do not agree with this, for, in the first place, many good men riders have suffered shocking accidents in this way and, when riding in the cross-saddle, unless the rider succeeds in throwing himself clear from the horse, he is almost sure to have one leg broken. On the other hand, with a side-saddle, if the horse comes down on his off side, there is no danger of a broken leg, and when the horse starts to rear a woman can usually make him fall on the off side by pulling his head to that side with all her strength, so that on this point the ease of clearing oneself from a cross-saddle is more than offset by the ability to throw the horse with safety and make him fall on the off side.
Up to the age of eleven or twelve it is a good plan for a young girl to learn to ride astride and so acquire balance and confidence, but if she is to use the side-saddle eventually she should certainly begin to use it at the age of twelve, and I would advise beginning as early as eleven. If she begins on the cross-saddle and acquires the knack at this early age, it will be easier for her to take it up again on occasion later in life, and, of course, the advantages which come from learning to ride without a saddle can best be acquired astride, though they may be acquired with a pommel and leaping horn on a surcingle.

In riding, women are very generally accompanied by men, and there are few occasions when a woman has it in her power to look better—or worse—than when in the saddle. It is only those women who are built like men and very young girls who look at all well astride. A woman with merely a normally developed figure looks both ridiculous and immodest in this position, and in an English saddle thoroughly ill at ease.

Much as I disapprove of most women using the cross-saddle, yet, as this book is intended to be a somewhat complete treatise on riding for women, and as many women insist on using the cross-saddle, and as in some parts of the West, and in roughing it, riding must be astride if at all, I shall make a few suggestions about the way in which a woman can best attempt to do this, though it is something in which she can rarely, if ever, attain perfection.
The saddle for cross riding generally used by women in the East is the same as a man’s, although some makers are offering a cross-saddle especially adapted for women (see illustration, page 155). These saddles are built more on the lines of an army saddle, having more dip and a straighter flap than those for men.
Many men, and nearly all hunting men and polo players, use plain flap saddles; that is, without rolls and cut well forward so as to give plenty of room for the knees (see illustration, page 155). This type of saddle enables the rider to have his knees well up and forward and gives him a very firm seat for jumping. Few women, however, are long enough in the legs from the knee up to take this seat, so most women will find a roll flap saddle more comfortable.
In the West the Mexican type of saddle is generally used. This saddle has a high pommel, or even a high horn in front and a very high cantle serving as a back rest, making what is practically a “dished out” seat, far better suited to a woman’s conformation than the English saddle. The Mexican type of saddle, however, is not adapted to a horse with a square trot, but only to the loping or fox trotting horses of the West. The reason for this is that in posting or rising to the trot, the knees should be quite well up and forward, and the Mexican saddle is so built that in it one cannot take this position.
There are two distinct types of seats recognized in this country which may be called, for distinction, the military and park seats; the former is the correct seat for the saddle of the Mexican type. In this seat the rider sits upright with the legs almost straight, the knees scarcely bent, and the ball of the foot resting on the iron, with the leather very long. In fact, many military riders have their legs perfectly straight and their toes down. This seat is comfortable only on the “five-gaited” horses; that is, horses whose gaits are the single foot, the lope, the canter, the pace, but whose trot, instead of being the smart square trot of the Eastern park hack, is more of a running walk and is known as the “fox trot.” With a horse that has a true, square trot, it will be found, as I have said, that posting is both difficult and tiring with this military seat and it is ill adapted for jumping anything over two feet in height. In the military seat the trot is taken up from the ankles, so that the knees are slipping up and down, while in the park seat posting or rising is done from the knees, which should remain in the same position at all times.
The park seat looks much smarter than the other, and suits the gaits of the types of horses used in the East far better and is the proper seat for the English or hunting saddle. In this seat the stirrups are considerably shorter and the knees are well bent and carried in front of the leathers. The feet may be carried “home” in the irons or resting on the ball of the foot, as preferred. For hunting, the former is the position used by almost all men and equally advisable for women. Many of the best riders ride with their feet “home” at all times because, with most saddles, particularly if the rider has long legs, with the feet “home” the lower leg is advanced about six inches and, as it should be, carried vertically. This brings the knee well in front of the leathers. This position gives the correct hunting seat and that seat is entirely correct for park riding. Personally, I prefer riding with the feet “home” at all times.
To acquire a firm and balanced seat in riding astride, by far the best method for a child is to take the first lessons on a blanket and surcingle without stirrups, or on a felt pad with detachable wooden stirrups. The seat must be close and the rider should rely on balance and not on the grip of the knees, except in jumping or in emergencies, such as shying or bucking. The principle, whether with or without a saddle, is to balance at all times, with an intuition when to grip.
While women cannot be expected to go through this preliminary course without saddle or stirrups, it is unquestionably the best way to teach boys, and I see no reason why girls should not go through it as well. The great advantage of beginning without stirrups is that it teaches a close seat at the start. Many riders who have not learned by riding at first without saddle and stirrups acquire the habit of relying altogether too much on the stirrups to keep their seats. In doing this their muscles are kept rigid, they become stiff and awkward, and they rely upon grip and strength, when they should rely on ease and balance. This fault is especially common with women, probably because they have been used to the support of the pommel and leaping horn of the side-saddle.
In riding bareback, or on a blanket, the rider, if she is to retain her seat at all, must do so by acquiring a close seat, while in the saddle she can rely more on the stirrups.

There are two recognized methods of mounting—the “army” and the “English.” The latter is generally adopted in the East, but there is much to be said in favor of the former, even with the English saddle, while it is far the better method with the Mexican or army saddle. The English method is this: The rider stands on the near side, facing the saddle. The reins are gathered in the left hand in their proper position, as described in the chapter on “Seats and Hands,” and are drawn tight enough to feel the horse’s mouth lightly. The pommel is then grasped in the left hand. The left foot is placed in the iron, assisted by the right hand, if needed. The cantle is then grasped in the right hand and the rider springs from the right foot assisted by the pull of the arms. The right leg is swung over the cantle and into position on the off side of the saddle, while at the same time the right hand is swung forward and out of the way of the leg.

The army method is this: The rider stands at the horse’s near shoulder, facing toward the pommel. The snaffle reins only are gathered in the right hand so as to feel the horse’s mouth lightly. The off rein outside the little finger, the near rein between the first and the second fingers, and the bight of the reins passing between the thumb and the forefinger and falling on the near side of the horse so as not to be caught in the right leg. The pommel is then grasped with the right hand. The left foot is placed in the iron assisted by the left hand, if needed. A lock of the mane from six to twelve inches above the withers is then grasped in the left hand and the rider springs from the right foot assisted by the pull of both arms. The right leg is swung over the cantle and into position on the off side, the foot placed in the stirrup, and then the snaffle reins are passed into the left hand in their proper position and the curb reins are taken up in the right hand and placed in their proper position in the left.
This army method of mounting is claimed to be, and I am inclined to think it is, safer than the other, especially with a restive or kicking horse. It appears to give the rider a firmer hold while in the act of mounting. The rider’s weight is so far forward that it is very difficult for the horse to rear, and the rider, before placing his foot in the stirrup, stands so far to the front that he is out of the reach of the horse’s kick. When mounting in the English fashion, if the horse rears before the rider has swung his leg over, there is quite serious danger of an accident, and a minor point is that, unless the saddle is tightly girthed, it is very much less liable to slip when mounting in the army fashion, as a large part of the weight of the rider is supported by the horse’s mane.
This army method of mounting is in general use in the West, and of course in the American army, and many men with army training habitually use it with the English saddle.
In order to adjust the leathers to the proper length before mounting, most women will find, as most men do, that the stirrup from the tread of the iron to the extremity of the leather should be the length of the whole arm extended, and this may readily be measured by placing the tips of the fingers on the stirrup bar, so that the base of the iron rests against the armpit.
After mounting, to adjust the length of the stirrups, clear the feet from the irons and straighten the legs so that they fall naturally. The tread of the iron should then be made to come just at the ankle joint, and the stirrups will then be the right length when the feet are carried “home.”
In dismounting, whichever method you adopt, be sure to clear the left foot from the stirrup as well as the right foot before you start. There are two methods in vogue: the first is to clear both feet from the stirrups and then throw the right leg over the horse’s head, turning the body on the saddle to the left and dropping the reins for a moment as the right leg goes over, and gathering them again in the right hand as soon as it has cleared the horse’s neck; then spring off the horse to the ground, steadying the body with the right hand on the horse’s shoulder and throwing the body well clear of the horse. This is a very good way, unless your horse is nervous or apt to rear. The other way is to throw both feet clear of the stirrups, then gather the reins in the right hand and place it on the pommel. Place the left hand on the horse’s neck and throw the body entirely clear of the horse, the right leg passing over the horse’s quarters.

Many riders step off the horse; that is, they keep the left foot in the stirrup, disengage the right foot, throw the right leg around the horse’s quarters, then step down in the reverse of the way in which they mount. This, however, is rather dangerous, for, if the horse should start when you are in the act of dismounting, you are in a position where there is almost no control and you are likely to have an accident through being dragged with the left foot in the stirrup.
It goes without saying that no reliance whatever must be placed on the reins for keeping the seat. Many beginners, and even some experienced riders who should know better, whenever they feel themselves losing their balance, hang on by their reins. This invariably results in giving the horse a hard mouth, and is very dangerous with a spirited horse or one whose mouth has not been spoiled by this practice, as it is almost sure to make him rear, which causes the inexperienced rider to lose her seat completely. It is the principal cause of the hard mouth of the typical “riding-school horse.” No rider with good hands will ever hang on by the reins, and in nearly every case in my experience it has been the pulling rider and not the pulling horse.
The secret of the close seat in the position astride is to turn the legs inward from the thigh joints so as to open the legs to their utmost capacity. This brings the rider’s body in the closest possible contact with the horse’s back and brings the feet parallel, or nearly so, to the horse’s body, and puts the knees and thighs in the best position for gripping when necessary. There is a great deal of knack about this. It is not difficult to put one’s legs in this position at a walk, but it is difficult to keep them so while the horse is trotting or cantering, without having the muscles rigid, whereas the leg should be kept in this position with all the thigh muscles completely relaxed, especially those underneath the seat. While in gripping it is necessary to contract the muscles on the upper inner sides of the thighs, these are the only thigh muscles which should be contracted. The contracting of the other thigh muscles tends to throw the rider out of her seat. This seat can certainly be acquired by practice and, once acquired, it becomes second nature. The majority of riders and nearly all women, instead of turning the legs inward from the thigh joints, turn their knees out and grip with the calves of their legs, with all their thigh muscles rigid. Obviously, as the only joint in the leg on which the leg can rotate is the thigh joint, turning the knee out twists the whole leg the wrong way. This results in the large muscles of the thigh being contracted and in the rider sitting on them, instead of sitting down close to the saddle. The difficulty is that, with a beginner, it seems natural to turn the knees out and grip the horse with the calves, but it is impossible to acquire a firm seat in this way, and the position is not only awkward and insecure but very tiring.
I cannot say too often that the seat must be acquired by balance and all the muscles of the legs and of the body and arms must be relaxed. If the leg muscles are rigid and the legs are not turned inward from the thigh joints, the rider will be lifted off the saddle by the contraction of the muscles of the thigh and will not be in balance. Dependence will then be placed on gripping, and this gripping will be done with the calves instead of the knees. A sure indication that the legs are thus held is when the feet are turned outward, for they cannot be unless the whole leg from the thigh joints is so turned.
The legs should be kept well forward, with the knees in front of the leathers, and the legs from the knees down vertical and hanging naturally. At the canter the legs from the knees down should be carried forward rather than back. The body should be well back in the saddle about two inches in front of the cantle and resting comfortably.
Most beginners, although they may take this seat while the horse is standing or at a walk, lose it the moment he takes up a trot. They then begin to lose their seats by leaning too far forward, contracting the leg muscles and bringing their legs back. This is chiefly the result of fear, of self-consciousness, and of “trying too hard.” It is one of the results of the worst fault of nearly every beginner, that of keeping the muscles rigid all the time and trying to hold on by legs, pommel, reins, and mane instead of merely sitting on in a comfortable position and relying on balance.
With regard to playing polo, many women have the idea that they can only play polo in a man’s saddle. My opinion, based on my own experience and the experience of many of my friends, is directly to the contrary. Many women play polo, and play it very well, in a side-saddle, and I do not know any reason why a woman cannot play at least as well riding in a side-saddle as riding astride. She certainly has a more secure seat in the side-saddle, and the first awkwardness of the back-hand stroke in this position being overcome, all the other strokes are quite as easy, and it is so much easier to ride another player off when one is in the side-saddle that all the women on both teams should ride either in the side-saddle or in the man’s saddle in order to make the game fair.
So many books have been written on “Hunting” and the subject so exhaustively treated, that I shall only attempt to discuss under this head a few points of particular interest to women.
When a woman hunts she enters a masculine field of sport, and in the hunting-field she is meeting men on their own ground and on even terms. In the hunting-field, therefore, a woman must expect to take her chances with the men, and she is not entitled to that courtesy and deference which she may expect on other occasions.
For example, if a woman loses her hat or stirrup, she should not expect any man to pick it up for her or to pay her the slightest attention. Again, if a woman and a man are both going at the same fence, she should not expect him to pull up and allow her to go over first or to treat her otherwise than as he would another man. It is not field etiquette. So, if a woman has a tumble and is not disabled, she need not expect the men to give up the hunt to help her into the saddle. They are not supposed to do anything of the kind. It follows, therefore, that if, for example, a woman and a man are going at the same panel and the man has the right of way, the woman should yield to him and follow him over.

The following are points of hunting etiquette which must always be borne in mind; indeed, I may almost say that they are rules which must be strictly observed:
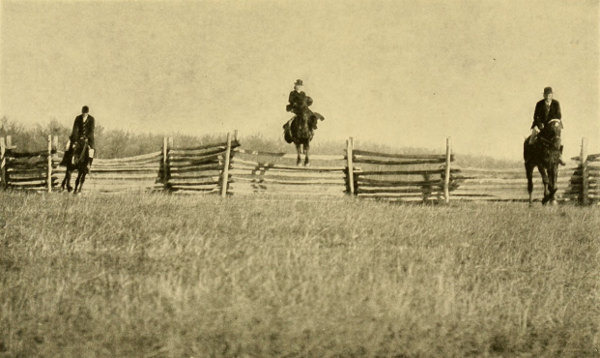
Two riders should never go at the same panel at the same time. While it is quite right for two or more riders to go at the same fence at the same time, it is not only against etiquette, but quite dangerous, for two to go at the same panel. So in going at a single panel—where, for example, there are trees or wire on both sides, or for any other reason there is only one panel in the fence which can be jumped, or where it is what is termed in hunting a “trappy place,” so that the field have to go over it one after the other—if your horse refuses you should not put him at it again, but turn him away from the panel and then take your turn as soon as you have a chance to swing in; otherwise you not only violate hunting etiquette, but you are in great danger of causing an accident to the rider who is immediately behind you. Moreover, the whole field should not be held up while your horse is trying it again.
At a check all the field should, if near the hounds, stand still and keep quiet, for noise and motion disturb the hounds when they are in the act of picking up the scent.
The type of hunter suitable for a woman is described in Chapter X—“The Saddle Horse.” No woman should go into the hunting-field at all unless she is a thoroughly experienced rider and has complete confidence in herself. Even then she should not attempt to ride a green hunter until she has had years of hunting experience. She should ride a qualified hunter and, however experienced she may be, she should bear in mind that, in all probability, the horse knows how to take the jumps better than she does. The maxim, “Let your mount have his head while you keep your own,” will carry a woman safely and surely to the finish.
As a general rule, unless a woman knows her mount thoroughly and has ridden him many times, she should not attempt to help him over his jumps. Every horse has an individual style of jumping, and it is nearly always best to develop his own natural style and not to attempt to make him jump in a way that is unnatural to him.
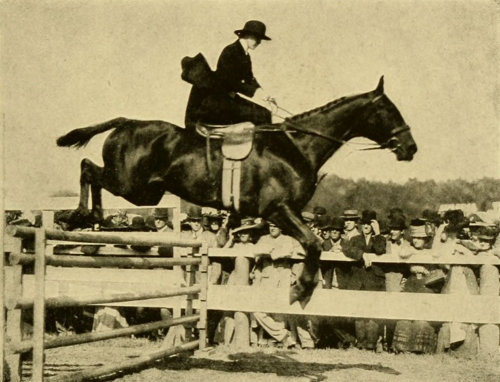
There are three quite different ways in which horses jump: one by rushing, one by taking the jump in the stride, and the other by popping over. One cannot say that any one of these styles is best, for it all depends on the individual horse. Some horses do best in one way, others in another; and a horse who naturally rushes his jumps can hardly ever be trained to pop over them quietly, and the horse who has jumped in his own natural style for years can jump far more safely in that style, even if it be rushing, than if his rider attempts to make him jump in any other style.
For a woman the best style of jumping is that of the hunter who swings along and takes his jumps in a steady stride, and who is neither too fast nor too slow; who is up with the hounds, yet not on them.
What I am about to say with regard to the seat and hands in jumping applies to hunting in this country, not in England, for there the horses are very differently trained; but in any case a woman should always find out how a horse has been trained before attempting to jump him.


When in the field the best position in which to hold the reins is to take them in both hands, the near snaffle and the near curb in the left hand in their usual position, and the off curb and off snaffle in the right hand in their usual position, the snaffle and curb in each hand being separated by the little finger. The ends of the reins come through the right hand between the thumb and forefinger and the ends are gathered in a loop which passes between the second and third fingers of each hand. While it is not necessary to hold the reins in this position all the time in the field, it is the best position to hold them in when jumping. When the reins are held in this position the elbows should be in their usual place, unless you are riding a horse who needs to be given his head a little more, in which case they must be a little to the front. Before coming to a jump the arms should not be stiff and the hands should not be held as far apart as the loop in the reins will allow.

The position of the body and legs is the same as I have described in chapter I, but, if anything, the stirrups should be one or two holes shorter than for ordinary riding, so as to have the left knee well bent and the leaping horn touching the left leg about five inches above the knee.

When approaching a jump the horse should be kept well in hand and should be gathered about two strides before the take-off. The moment he takes off he should be given his head by dropping the hands and carrying them well forward with the elbows nearly straight. This will carry the body well forward, and both body and hands should be kept in this position until the horse has cleared the jump, when the body should be thrown back, so that, when the horse lands, the rider’s body will be well back in the position that it was before he took off.
In jumping, the reins should never be long and must always be held at such length that if the horse touches or stumbles he can be pulled up, and this can only be done by carrying the hands well forward in the way I have described. They must be carried forward in order to give him his head, for, when a horse comes to a jump, he throws his head very far forward so as to get his balance and exert his greatest strength.
What I have said above applies equally to a horse that rushes his jumps, to one that takes them in his stride, and to one that pops over. It is particularly important to keep a rusher well in hand and not allow him to get such speed before the take-off that he cannot rise, for, in that case, he is almost sure to crash into the fence and have a very bad fall. While most horses need a good deal of speed to carry them over the jumps, they should not be at their top speed, for if they are they will not rise.
What I have said above applies to an American-trained hunter.
If you are riding an English-trained hunter, the manner of approaching a jump is entirely different. With them, if you give them their head too much they stop, so that in order to make them jump you have to lean back and pull on the reins. If you attempt to jump an English-trained horse in the American way or an American-trained horse in the English way, you are very apt to come to grief.

What has been said above with regard to the manner of jumping a fence applies equally to jumping a ditch or anything else.
The higher or the broader a jump, the more important it is to take it correctly. The difference between the various jumps is well expressed in the old maxim, “Fast at water and ditches and slow at timber”; but there is so much timber and so few ditches and water jumps in this country, and the pace is so fast, that this advice is hard to follow. When I say fast I refer to drag hunting.
In hunting, a woman should be at either the front or back. It is better for her not to be in with the field, and she should regulate her pace according to the horse she is on. If in a strange country, the best thing for her to do is to follow some good rider who knows the country well rather than attempt to pick her way as she would in a country which she knew.
In hunting it is most important to save your horse, to keep him fresh for the jumps, and not tire him out at the start. Don’t ride to the “gallery,” and if you have the choice between a sensational jump and a gap, take the gap and save your hunter. Remember that you are not giving an exhibition of high jumping, nor are you in a horse-race.
Bear in mind that the master or huntsman sets the pace and that, ordinarily, particularly at the start, he should be in the lead. One should not pass the huntsman and, above all things, one should never ride up on the hounds. If you come to a ploughed field, go around it if you can, and, if you have to cross it, spare your horse as much as possible.

Somehow hunters go better for a woman than for a man. Perhaps it is because a woman’s hands are lighter, either from ignorance or knowledge, or perhaps it is because a woman is not so insistent and is less domineering. It is always better to let the hunter jump than to jump the hunter.
Ordinarily a good hunter may be hunted at least twice in a week, but so much depends on the country, on the rider herself—to say nothing of the horse—that one cannot lay down any rule in regard to this. Between the hunts, unless after an unusually stiff run, a hunter may be larked a bit, or driven to a light trap, or walked for an hour or two. This will ordinarily keep him in better condition than letting him stand in the stable. In fact, in my own experience, I have known hunters that were hunted one day and driven to market the next, and the market I have in mind was not at all near home. Many heavy-weight hunters are driven from time to time in the wheel, and light-weight hunters in the lead, both of a four and tandem. Indeed, the leader of a tandem was originally a hunter. So that a hunter may be a useful horse in the stable.
If one has a thoroughly reliable and seasoned hunter well up to one’s weight, he ought to be able, barring accidents, to carry one through the season, unless one is attempting to hunt more than twice a week, and there are few women in this country who are strong enough to do that.
In chapter VIII I have indicated the costume for the hunting-field, but for convenience I will restate it here. The correct appointments for the side-saddle are:
Breeches of either dog-skin or buckskin or white cloth or of the same material as the habit.
The habit should be very dark gray, almost black, hunting cloth. The collar should be of the colors of one’s hunt.
The buttons should be black, with the name, design, or monogram of the hunt in white or gold. The correct coat is made without a seam in the middle of the back and with two vents at the side instead of one in the middle, and is somewhat shorter than the habit coat that many women wear. It may be made with five or three buttons, according to the wearer’s fancy, but preferably with five.
An apron or half-apron skirt should be worn, for safety’s sake.
The boots must be of black calf. Patent-leather or russet boots are not correct in the field.
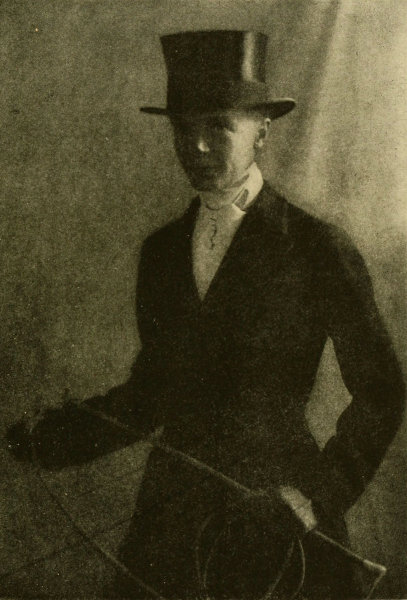
A silk hat is correct, but a derby or a hunting hat, such as I have described in chapter VIII, may be worn, and a hat guard, such as I have there described, is necessary.
Either tan dog-skin or white buckskin gloves are correct.
An Ascot stock should be worn with a plain bar gold pin.
Attached to the two D’s on the off-side of the saddle should be a sandwich case with a flask in it, a sandwich in the case, and a drink in the flask.

A pair of white woollen gloves must be carried on the off-side under the flap.
In England a crop is always carried in the field. In this country it is correct, but a cutting whip may be carried instead. If a crop is carried it may have a thong, although, personally, I think it a great nuisance.
The saddle and bridle are the same as I have described in chapter IX, except that, in the field side-saddle, a woman should always use a breastplate, and if she has a horse that cannot carry a breastplate she had better not hunt him.
As I state in chapter IX, a standing martingale should never be used in the field, but a running martingale may be used if the horse requires it, as is often the case. For many horses the best bit to use in the field is a plain snaffle, with very large rings, so that the bit cannot be pulled through the horse’s mouth. The bridle should have a cavesson, instead of the usual noseband. Other horses go better with what is known as a four-ring snaffle; that is, a snaffle which, instead of having the cheek pieces attached to the snaffle rings, has them attached to separate rings, the rings to which the cheek pieces are attached and the snaffle rings being of the same size and both much larger than the rings of an ordinary snaffle-bit. The reins only are attached to the snaffle rings in this form of bit. This bit is more severe than a plain snaffle, but much less severe than a curb.
Generally speaking, only riders with very light hands should use the curb bit in the hunting-field, unless with horses having unusually hard mouths, or “pullers.” In going over the jumps it is very difficult to keep an even pressure on the curb, and there is great danger of bringing up the horse too short on landing.
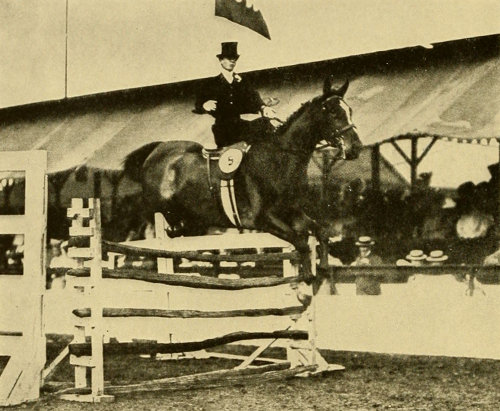
In showing horses under saddle, the mental and physical attributes of the rider have a greater scope than when riding under any other circumstances. Very frequently it is the rider who wins blue ribbons quite as much as the horse, and at every horse show one sees horses lose the ribbons which they should win because of the crude way in which they are shown. A woman, in justice to herself as well as to her mount, should not enter the show ring until she has become a thoroughly experienced and accomplished rider, and however well a woman may ride in the park or in the field, it by no means follows that she will be able to bring out the best points of a horse in the ring.
Just as there are horses which win countless blue ribbons in shows, but do not compare with other horses in the field or for general use, so, on the other hand, there are women whose only delight is the show ring. They hunt not, neither do they hack.
The experience which has been gained in ordinary riding will not be of very great assistance in showing “horse show horses”; that is, horses which are kept only for show purposes. These animals require most careful handling and a thorough comprehension of their individual characteristics.
The most important thing for a woman to bear in mind when showing horses is to be a cheerful loser. A feeling of good-fellowship should pervade and the spirit of rivalry should not be carried to extremes. Do not think that you have been unfairly treated when you have not won, or that the losing of the blue necessarily means that your horse is not good. Perhaps on this occasion he was not in his best form and perhaps at some other time, before some other judge, you will have better success.
One should always remember this: that the names of the judges are published in advance, and if one does not care to submit one’s horse to their judgment, one need not compete. If, by any unfortunate chance, the judges should be changed after one’s horses are entered, there are two courses open—either to stay in and abide by their decision or withdraw one’s horses and state the reason. Certainly, after having voluntarily submitted the horses to their judgment, it is most unsportsmanlike and contrary to the spirit of fair play to criticise the judges for their decision, and it has been my experience, after many years of showing horses, that the judges are fair and impartial and do their best to render their decisions upon the merits of the horses. One should also remember that the judges are usually men of very wide experience and thorough knowledge of the points of a horse, and that they see many faults and blemishes which would escape the eye of the spectator.
A horse presents an altogether different appearance when seen from within the ring to that which he presents from without. A horse that steps very high and has a flashy, all-round way of going and looks from without like a winner, may be seen from within the ring to have serious faults, such as dishing, paddling, crossing forward, or spreading too wide behind. Outsiders, of course, do not have the opportunity which the judges have to examine the horses critically, and all they can base their judgment on is the general effect which a horse produces at a distance. A horse which may appear to an outsider strong and bold may, on closer inspection, be seen to be coarse-necked and heavy in the shoulder or too big-boned for his class, and a horse with truer action and better quality, conforming to the standard of his class, may easily be overlooked by the outsider.
To prepare a horse for the show ring requires weeks and even months of work. He must be in perfect condition; his coat must be fine, his eye bright, and he must be neither too fat nor too lean, and his preparation must be so timed that, on the day of the show, he will be at the top of his condition. All this involves good feed, plenty of water, and quiet, systematic exercise.
It is most desirable that the person who is to show the horse should have ridden him several times before the show—the oftener the better—so that the horse and rider may know each other thoroughly, and the rider may understand all there is to be known about that individual horse’s training, and how best to bring out his good points.
I consider it a bad plan for a horse to come into the ring too fresh. Some people seem to think that horses must be saved up for the show. I think, on the contrary, that horses should be worked quietly and regularly for weeks before and during the show as well. In the first place, the music, the noise of the crowd, the strangeness of the scene, and of such a gathering of people, all tend to excite a horse and make him more difficult to control, so that this excitement will give a horse all the appearance of spirit that is needed. Besides this, a very fresh horse rarely shows good manners, and in all ladies’ classes manners count fifty per cent. By manners I mean that on entering the show ring a horse must not look as though he were about to make even a small, unharmful buck; he must not be inclined to kick at the horse back of him nor to bite the horse in front of him; he must not stop at the gate as he passes it, nor must he try to edge in toward the centre of the ring while going around or when changing; he must not hold his head either too high or too low; he must not seem to be taking too much hold on the bit, nor must it require three or four times around the ring to settle him down. In other words, he should not look as if he were being exercised rather than shown.

In England they have a very good method of showing horses in the ring; that is, they start them at the canter, then bring them down to the trot, and lastly down to the walk. In this way a horse is well settled down, has lost most of his freshness and excitement, and will usually walk quietly, as he should.
Here we start at the walk, then take the trot, and then the canter. Consequently many horses under the influence of the excitement of the music and noise will not walk or stop, but jigjog and side step, which condemns a lady’s horse at once. Were these same horses ridden in the English way, they would be quiet by the time they came to the walk and would win the blue ribbon which they deserve.

It is particularly desirable that this English method of showing horses should be adopted, now that the English type of riding horse—that is, a thorough or three-quarter bred—is becoming so popular in this country. This is just the kind of horse which will not start quietly at a walk in the show ring. Probably our way of showing came into vogue at a time when the ladies’ saddle horse was a much quieter animal, with less of the hot thoroughbred blood in him than he has now.
A horse should enter the ring at a quiet, easy walk, not inclined, as I have said, to jigjog. He must keep in line—that is, follow the horse in front of him—unless his natural gait is faster, in which case you have the right to pass and can swing into line when you see a space.
He must take both the trot and the canter from the walk at command. The latter is particularly important in the ring, as it is not permitted to take the canter from the trot. He must canter easily, right or left, according to the way he is going around the ring. That is to say, when going around to the right he must canter on the right foot, and when going around to the left on the left foot. Parenthetically I may remark that the reason for this is that, at the canter, a horse’s body is held diagonally to the line of the direction in which he is going and pointed in the opposite direction to the foot on which he is cantering; that is to say, when he is cantering right his body is pointed diagonally to the left and vice versa. From this it follows that the foot on which he is cantering must be on the inside of the circle or turn which he is making. Otherwise he is almost sure to cross his legs and very apt to fall.
It is very important, therefore, that a horse should be able to change his foot at command. It is always a strong point in a horse’s favor if he changes readily from the right to the left in cantering, and while a horse under the side-saddle should canter normally right, he must canter left when circling or turning to the left.
For the ring a horse must stand quietly, back and start readily, and, when the horses are lined up, he must be willing to leave the line and to show perfect manners up and down the ring.
Fortunately for the exhibitors, the old-fashioned way of putting horses through figure eights and small circles has been done away with. Now, all that is required in the ring is, first, walk your horse; then, at the command of the ring master, change his gait to a trot, and then, at command, walk again and then pass from the walk to the canter and continue cantering until the ring master tells you to stop, and, of course, make such changes of direction as he indicates.
Then the horses which are selected to stay in the ring are lined up and the others are given the gate. Next, if the judges so desire, each of the horses lined up is put through his paces. Then the judges, after a detailed examination of each of the selected horses, award the ribbons—blue for first, red second, yellow third, and white fourth.
There are many important things to remember while riding in the show ring. The most important is to keep yourself and your horse under quiet control. Then, no matter what the decision may be, at least you have the satisfaction of having shown your horse at his best. It is important to have a place in line and try to keep it whatever it happens to be. It is not at all necessary to pass the rider ahead. Passing the rider ahead while in front of the judge, at least, looks premeditated. It makes it much harder for him to get a proper view of the horse you are passing and does not help him to view your horse, nor is it courteous to the other riders. If your horse naturally walks, trots, or canters a bit faster than the horse in front of you, so that, to show your horse to his best, it is necessary to pass, it is quite as easy to find an opportunity to pass somewhere else than just in front of the judge. So, when the ring master asks all the riders to line up, it is not necessary that they should all attempt to do so next to the judges’ stand. The judges do not remain there, and the fact that your horse is nearer the stand does not bring him nearer the blue ribbon.
In backing a horse, remember that his head must not be too low on his chest. His neck should be well arched up and his head drawn in on the neck and high on the chest.
If you find that your horse does not back readily, it is probably because his forefeet are too far forward. In this attitude he is in the best position to resist you whatever you may do, and you may find it impossible to back him in the usual way. In such a case, first give him his head and a touch with the heel, starting him forward a step or two; then gather him and, by pulling gently, you will find that he backs readily.
In the ring always remember to do implicitly what the judge asks. Even if the judge should demand a circle, circle you must, and if a figure eight, that too must be done.
After you have lined up and when your horse is being put through his paces, remember, in turning, always to turn your horse’s head toward the fence and not toward the centre. If you turn toward the centre, the horse is very apt to try to join the other horses as they stand lined up, however good may be his manners.
Of course, before you ride a horse in the ring, you must be sure on what signal he is trained to take the canter. I have explained on page 84 that some horses are trained to take the canter when the rider turns their head to the side on which they are to canter and touches lightly the curb rein on that side. Other horses are trained to take the canter on merely touching the curb rein on the side on which they are to canter. Thus they are trained to canter right by touching the right curb. Other horses, again, are trained to take the canter on a signal given by raising the curb rein on the side on which they are to canter and at the same time carrying the hand to the other side. Thus, to make such a horse canter to the right, carry the left hand to the left and at the same time raise the off curb rein with the right hand. It is, therefore, most important to know the signal to which your horse is accustomed; otherwise he may either not take the canter or canter on the wrong foot.
A most important point which should never be overlooked is to be sure that your own saddle, which you should use, if possible, in the show ring, fits the horse you are to ride. Otherwise the horse may appear to have lost his manners when the real trouble is that the saddle is hurting him and making him fretful and nervous.

In walking, while a horse should appear to have his head, one must be careful not to let his head nod, for this often gives an appearance of lameness. I believe it is sometimes called bridle lameness. I once had such an experience myself. The horse was perfectly sound but thought to be lame because I had given him his head too much; that is, ridden him with too loose a rein. A horse, while walking, should have his head well placed, not too low or too high, and a horse whose head is up and neck well arched is much more becoming to a woman than a horse that carries his head down.
In general, in the ring, a horse had better be ridden on whatever rein he has been trained to go by, whether it be curb or snaffle, and so much depends on the individual peculiarities of the horse and rider that no definite rule can be laid down. The important thing is to have light hands and not to do anything to excite or annoy the horse.
Just a few more words of advice gleaned from the experience of many years. Never, if you can prevent it, display the slightest particle of nervousness when mounting or on entering the ring. Horses—especially the high-spirited ones—are very sensitive to touch and to the mental attitude of the rider, and they know at once from the rider’s hands whether her head is steady and cool or nervous and excited.
If you have occasion to ride for any considerable distance, and particularly if the weather is hot, bear in mind that the weight of the rider and saddle on his back for a long period of time tires the horse quite as much as forcing him beyond his gait. It is better, therefore, to keep a horse at a sharp walk or, if you are trotting, at a sharp trot, so as to cover the ground and then to rest him at intervals for ten or fifteen minutes, than it is to keep going for the whole time at a slow walk or trot. When you rest your horse be sure to loosen the girths, and, if you have far to go, it is better to take the saddle off entirely and let the horse roll if he wants to, as few things refresh him as much.
It is equally important not to force a horse under saddle beyond his gait; find out his natural fast gait and keep him at it and neither force him beyond it nor let him lag.
If you have a nervous or high-spirited horse who wants to go, it is far better to let him go in moderation than to be constantly holding him back, as that worries and fatigues him and, in the meantime, you are not covering the distance. So, if you are riding in company and your horse is the more spirited of the two, you will find it easier for your horse to let him keep about one-half a head in advance of the other, for, if you keep him level or hold him back, he will be fretting all the time and tire both himself and his rider.
In riding, even for a short distance, it is most advisable to start and finish your ride at a walk, following the old maxim, “Walk the first mile out and the last mile in.” At the beginning of a ride a horse needs to get going a bit in order to be limbered up and catch his wind. So, if you start off, as many do, at a fast trot or a canter, the horse will soon be winded and the rest of your ride will be spoiled. If you start him slowly, he will warm up to his work and you will have the best part of the ride where it should be—toward the end and not at the beginning. When you bring your horse home he should be well cooled off before he arrives, that he may not take a chill. By bringing your horse home in this condition, you save your groom a vast amount of work, and work which only the most conscientious grooms can be depended upon to do; that is, to cool the horse off properly before he is stabled or fed.
With regard to the gait at which you should ride, it is, of course, impossible to lay down any rule, so much depends upon the rider, the horse, the length of the ride, the season of year, etc., but one point should be constantly kept in mind, and that is, unless you are riding a trained hunter, to go down all hills that amount to anything at a walk. If you have to go down faster than a walk, a horse is much less likely to stumble going downhill at the canter than at the trot. It is also easier both for the rider and horse to go uphill at the canter than at the trot; though, of course, if the hill is a long one, it is better to walk it. In going uphill, always give a horse his head, and, in going downhill, keep him well in hand and ride him on the snaffle so that you may be able to pick him up the moment he stumbles.
In riding at night, when it is too dark for you to see the road, let your horse pick his own way, as a horse sees very much better in the dark than a person.
If you are riding through a strange country and lose your way, give him his head and he will find the way home. Horses have an exceptionally well developed sense of locality and can nearly always be trusted to find their way home by instinct.
In these days of automobiles, it is important to follow the rule of the road and always keep to the right.
If you have occasion to dismount and lead your horse, by far the best way to hold him is, standing on the near side, to take the two curb reins in the right hand, separated by the forefinger and passing through the body of the hand where they are firmly held, keeping the hand about two or three inches from the bit. In this position you have the horse under perfect control, and, when you are leading him with your hand in this position, do not look at him or pay any attention to him and you will find that he will follow. Whereas, if, as many do, you take only one rein in hand along the horse’s neck and then speak to him, he will either pull back or he may get away from you and you cannot stop him. Approach your horse’s head from the side and not the front, and be sure not to raise your hand or whip or do anything which might frighten him or give him the idea that you were about to hit him on the head. Horses, especially Western-bred horses, are very sensitive about their heads and, if an attempt is made to grab the reins suddenly or violently, they are almost sure to back away and very apt to rear.
If your horse limps and you are alone, or the person whom you are with does not know what to do, you should immediately dismount and look at the foot on which he is limping, to see if he has picked up a stone or run a nail into his foot. In picking up a horse’s foot it is most important to put yourself in a position where he cannot kick you. To do this, approach the foot which is to be taken up from the front, face to the rear, and grasp the horse’s fetlock with the hand nearest to him. If he refuses to lift his foot, push his foot forward and, if necessary, put your weight against his shoulder or stifle, so as to throw his weight on the other leg. If you have not a hoof-pick about you, the best way to dislodge a stone is to hammer it with another stone and, if you are quiet and gentle with your horse, you probably will be able to dislodge it without much trouble. If, however, you cannot dislodge it, do not attempt to ride your horse while he has the stone in his foot, but lead him until you get assistance. If your horse has run a nail in his foot, you must immediately have it drawn out by some one who knows his business, as it is not only very painful, but there is great danger of lockjaw.
In regard to park hacks and long-tailed saddle horses, the only way to solve the problem in this country of the two types, in horse shows, is to divide the classes having long tails and short tails. At present in horse shows in the saddle classes long-tailed and docked horses are frequently entered in the same class, which makes it doubly difficult for the judge, at times causing his decision to depend largely upon his personal preference for long-tailed or docked horses. I would suggest, therefore, that in all shows where the long-tailed and docked horses are not divided into separate classes in advance, there should be an informal division made before the judging, very much as is done with respect to the championship classes, where the judges often are permitted to divide the classes into horses above and below 15.2.
Every horsewoman should have at least a general knowledge of when and with what to feed her horse. In general a horse should be fed three times a day, and the allowance for the average horse is four quarts of oats, at six in the morning, and as much hay as he will eat about an hour later. At noon two quarts of oats and hay about an hour later, and at night a bran mash composed of about two quarts of oats and an equal mash of bran, well salted. A horse should never be watered after eating. He should be watered about twenty minutes before his first morning meal and may be watered about twenty minutes before each of his other meals. There is no objection to watering him at other times, not after feeding, and in hot weather it is advisable to water him frequently. When watering a horse in the stable, he should be allowed to have as much as he wants to drink, but the water should never be very cold. In winter the chill should always be taken off the water before it is given to the horse.
The above hours for feeding, except the hour for his breakfast, must, however, be modified by the time when he comes in from work, as a horse should always have a good rest and be thoroughly cooled off before he is fed oats. He can eat hay when he is hot but never oats.
Many horses will require more than the above allowance and many others less, and some horses require as much humoring about their food as a nervous child.
If a horse is very thin and not working hard, one of the best ways to fatten him is to give him light, steady work and mix molasses with his feed. If, however, a horse is becoming poor in spite of taking all his food, it is probably because his teeth are too long and need filing down, as a horse with long teeth will never masticate or digest his food properly.
With most horses, any food remaining in the manger after a meal should be taken out and thrown away, as the sight of it is apt to disgust them and put them off their feed.
A sweating horse should not be watered unless while on the road, in which case it does him no harm to give him, from time to time, a drink of not too cold water, but after each drink he should be walked for five or ten minutes before taking up the trot or canter.
While on the road it is much safer not to let your horse eat any grass, and if he does eat any, be sure not to trot him until he has had ample time to digest it. On the other hand, when a horse is brought home and is being cooled off by the groom, it refreshes him very much to be allowed to nibble the grass.
It is very advisable, if you have land enough, to have a portion fenced off as a paddock, even if you keep only one or two horses. When a horse comes in tired, after a hard day, nothing refreshes him so much as to be turned out without even a bridle, and allowed to roll as much as he wants; and if horses are not being used it is better for them to be turned out for a few hours in the paddock rather than to remain all day in the stall. If you have a paddock, however, be sure that the fence is high enough to prevent your horses jumping it, and be particularly careful that the inside of the fence is smooth and that there are no nails or barbed wire or anything that might injure the horse. There are portable paddock fences to be had, which are easily put up and moved, and they are very useful when you move your stable about from place to place.
If you are fortunate enough to buy a thoroughly trained horse, the difficult thing is to keep him so without spoiling him by over indulgence on the one hand, or, on the other, by arousing his obstinacy by fighting instead of controlling him. Quite as much tact and forbearance are needed in the handling of horses as in handling children. They should not be punished for trifling faults, nor should grave faults be allowed to become habits.
Much can be done by caresses and the use of the voice. But in the caressing be sure that the horse does not think that you are slapping him. Most horses resent being slapped on the back quite as much as most of your friends. In fact, all horses worth riding dislike anything that will startle them, or any sudden shock.
It is easy to establish a sort of a private signal code with your horse, which he will always understand. It is only necessary always to do the same thing to bring about the same result. If you wish your horse to move the part of the body in front of the saddle, the signal should be by stroking him on the neck or shoulders, and if he is to move any part of his body behind the saddle, he should be stroked or touched on the quarters. If he obeys, continue stroking, but if he disobeys or misunderstands, cease the caress. In time he will come to regard the caress as a signal. For example, if you wish your horse to back, do not stroke him on the neck, nor if you wish him to turn from one side to the other should you stroke his quarters. Much more can be done with a horse through kindness than through fear. Unbounded patience is needed, and the individual peculiarities of each horse must be made the subject of careful study. Some horses are intelligent while others are stupid, and it is with the latter that good horsewomanship comes to the fore. A stupid horse has to be led on step by step, and should only be taught one lesson at a time and should master that before proceeding with the next. When you are training your horse and he shows obstinacy, or appears to be stupid, before starting to punish him or compelling him to obey your will, be sure first that the cause of his obstinacy is not some petty discomfort—such as an ill-fitting bit or a sore back, too tight a girth, or indigestion. Nine times out of ten the reason for a horse’s obstinacy is that he is uncomfortable or that his mind is distracted by some petty annoyance. Furthermore, a horse when he is fresh can seldom be taught anything. The best thing to do is to give him thirty or forty minutes good straightaway work until he is calmed down, and then you can command his attention. He will then go along without gazing around or being distracted by every passing trifle, and all his faculties will be at the command of his rider.
When riding in company remember there is a “riding courtesy.” You have your comrade and your comrade’s horse to consider as well as yourself and your own horse. The two horses should be kept going together, and on the same gait as much as possible, so if your horse begins to urge ahead, keep him back a trifle. There is nothing more annoying than the “galloping friend” who will not take the trouble to control her mount, and so makes the other horse nervous and unmanageable.
Never “cluck” to your horse, even when you are riding alone. It is a very bad habit to acquire, and, when you are riding in company, the other horse or horses are sure to hear you and to increase their gait quite as much as you want your horse to increase his. You are supposed to ride a trained horse, who will obey the signals from the reins, heel, or whip, and if your horse does not know these signals he must be taught them before you ride in company. Do not, however, under any circumstances, flourish your whip or use it with such force that another horse can hear it, for the effect will be quite as bad as clucking.
If your horse lays his ears back and bites at the other horse, do not pull his head away, especially if you are up with the other horse, for that will put him in a position where he can kick to great advantage. Instead of pulling his head away, rein him back and keep his head straight.
If you have occasion to raise your right hand to adjust your hat or hair, be sure first to place the whip in the left hand, as otherwise your horse or your comrade’s horse is very apt to be frightened by seeing the whip flourished in the air.
A most important point to be remembered is that your horse should be girthed before you mount him, and never after mounting—first, because it is very dangerous to mount with the girths loose, for if the horse should break away from the groom, or whoever is holding him, or even swerve or buck suddenly, the saddle is almost sure to twist and there may be a very bad accident; and, secondly, because girthing a horse after the rider is mounted generally results in the girths being drawn too tight, and too tight girths not only cause the horse great pain but make him apt to stumble or lag in his gait and become unduly exhausted. Tight girthing has very much the same effect on the horse as tight lacing has on the rider.
If you have occasion to look to the rear, always turn your body toward the right; not only is it much easier to look around in this way, but you cannot turn to the left without raising your right knee more or less, and you are apt to raise it so high that if the horse should start suddenly you would lose your hold of the pommel.


With the side-saddle, safety skirts and stirrups should always be used, as with them a fall is very unlikely to injure the rider. With the plain skirt a bad accident may be caused through the skirt catching on the pommels, and with a plain stirrup there is great danger of being dragged by the foot.
If the horse shies to the right, always remember to throw the weight to the left; this keeps the legs tight in position which enables the rider to maintain her balance; whereas, if you throw your weight to the right, you lose the grip from the right knee and have no means of recovering your balance, so that a fall is inevitable. Of course, if the horse shies to the left you should throw your weight to the left for the same reason. Owing to the very strong grip of the right knee over the pommel, it is almost impossible for a woman to be thrown to the near or left side of the horse; the only real danger is of being thrown to the right, and, as there is nothing to stop a woman from falling on the off or right side of the saddle, as there is on the left, it follows that, toward whichever side the horse may shy, the only thing to do is, as I have said, to throw the weight to the left.
When you feel yourself being thrown, especially if you have on a plain skirt or have a plain stirrup, or both, be sure not to let go of the reins, for in case you do not fall clear of the saddle, your one chance for self-preservation is that in some measure you still have control of the horse. If you keep hold of the reins you have a good chance of being able to pull him in and keep him from running away, and you will save yourself from being dragged and probably escape a very serious accident.
If a horse in the act of shying or balking succeeds in turning half-way round with you, do not try to turn him back against the direction in which he has shied, but, instead, pull him quickly and completely around in the direction which he has taken. He will not attempt to resist you and you will at once have him back in his original position and going in the original direction.
If your horse rears, give him his head immediately and throw your weight as far forward as possible. This will usually bring him down. If, however, you feel that he is going over, remember that a horse when he rears always falls to one side or the other. Therefore, as soon as you find that he is bound to fall, pull his head with all your strength to the right so as to make him lose his balance and fall on that side. The chances are that you will not be hurt, whereas, if he falls to the left, you are almost sure to have your legs caught beneath him and so be seriously injured.
If your horse backs, give him his head and particularly be sure not to have any pressure on the curb, as that keeps his head in. Sit close and urge him forward with the left leg and touch him on his off quarter with your whip. If you are wearing a spur, touch him lightly at first and then as hard as may be necessary.
If your horse kicks or bucks, keep his head up by loosening the curb and using the snaffle only. Sit close and put him in motion, but be careful not to let the left leg go back, as this is apt to terrify him and make him kick or buck all the harder. Very few horses will either kick or buck when they are in motion, and, unless the horse is vicious and is an habitual kicker or bucker, his kicking or bucking is usually caused by freshness, and the best thing to do is to make him canter until he has calmed down.
If your horse balks, by far the best thing to do is to distract his attention or else let him stand quietly without offering him any resistance. A horse has only one idea in his mind at a time, but that idea is very fixed, so that if you strike a balking horse or resist him, you will simply arouse all his obstinacy and he will balk all the worse. The best way to distract his attention is to pet him and speak to him. In the course of a short time he will tire of the balking and attempt to start forward. If at this moment you keep him standing a bit longer he will become possessed of the idea that he wants to go, and you will have no more difficulty with him for the time being. Indeed, I have found that this is by far the best way to break a horse of the habit of balking.
When you are riding in company, an important thing for both your companion and yourself to remember is that if your companion, whether man or woman, is mounted on a slower horse than yours, and your horse starts to run, the very worst thing that he can do is to try to catch you. The noise and excitement which his horse produces will make your horse run all the faster; his horse being slower, he will not be able to catch you, and you will be almost sure to have a runaway. I have known of many very serious accidents being caused through a man trying to catch a girl’s horse when her horse was merely galloping a little too fast. Unless your companion is a thoroughly experienced rider and has a horse that he knows is faster than yours, he had much better rein his horse in and give you a chance to control your own horse. It may also be remarked that it is a very difficult thing to catch a runaway horse, and any one who attempts it is taking a great risk, not so much for himself as for the girl whose horse he is attempting to catch, while another woman, if mounted on a side-saddle, would have the greatest difficulty in bringing herself into position to catch your horse at all. If a woman using the side-saddle has occasion to catch another’s horse, she should be sure to keep the other horse on her near or left side. If the runaway horse is on her right side, it is very difficult for her to catch him without losing her balance. If you do have occasion to stop a runaway horse, you should, if possible, have your horse at least a neck ahead of him, so that you may be sure to catch his reins close by the bit when you grab for them. If you attempt to catch the reins back of his neck, it is very unlikely that you will be able to stop him, and you are much more apt to cause a fall.
To look well in the saddle a woman must be correctly and smartly turned out. The picturesqueness of the old-fashioned skirt, the plumed hat, and the ambling palfrey has passed away, and a woman’s riding clothes of to-day are designed, first, for comfort, and second, for neatness. Absolute plainness and everything in keeping are the principles to be followed.
For the side-saddle the habit must be well cut, well made, and of good material. The length and style of the coat should be adapted to the wearer’s height and figure.
The skirt should always be of the “safety” type. There are several different designs of safety skirts, but they may be divided into three classes—the apron skirt, the half apron, and the skirt with patent fasteners.

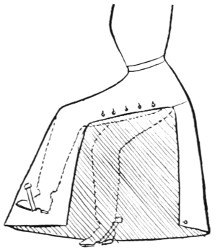


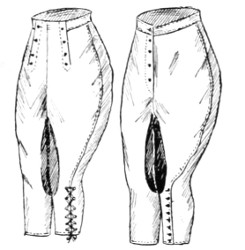

The apron skirt is very generally used in England, and in this country is used by many for hunting and, to some extent, for general riding. With this pattern of skirt the rider must, of course, wear boots and breeches. The skirt is entirely cut away on the side next to the horse so that, when the rider is mounted, her legs are in direct contact with the saddle. The skirt is fastened along the right leg above the knee with buttons and has a strap which passes under the right knee. There is also a strap which passes under the right foot and another strap which passes under the left heel and holds the skirt in place.
The half apron skirt is similar to this but, instead of being fastened to the right leg by buttons, it goes under the thigh and the rider sits on it.
The skirt with patent fasteners is cut just like a plain skirt, but on the right side and following the leg from the knee down there is an open seam extending around the pommels. This seam is fastened with patent fasteners when the rider is off the horse, but should be left open when she is mounted.
I consider the apron skirt the safest for use in the hunting field, for, while in my own experience I have not known of a woman being “hung up” with a skirt with patent fasteners, I have heard of this occurring. The awkwardness, however, of the apron or half apron skirt, when one is out of the saddle, makes it embarrassing for the wearer, so it is scarcely to be recommended for ordinary riding.
The half apron pattern of skirt is quite as safe as the apron and it is really more a matter of individual fancy as to which of the two one should select.
There are also skirts of the type with patent fasteners which are fastened in the same way at the waist, so that if the rider should be thrown and the skirt should be caught in the saddle, the waistband will give way and the rider will be entirely released from the skirt.
Habit skirts should be kept from blowing and “riding” by the use of two elastic loops, both on the inside of the skirt, one in such a position as to pass over the right toe, the other under the left heel. These loops should be slipped into position as soon as the rider is in place in the saddle. It is a mistake to think that there is any danger from these loops, for they are sure either to slip off the foot or to give way in case of an accident.
In the saddle a woman should produce a broad-shouldered and long-waisted effect, and the coat should be cut with this principle in mind. Unless a woman’s shoulders look wider than her hips, she will never present a smart appearance on a horse. I do not admire a small-waisted effect in the saddle. Somehow it is inappropriate and looks uncomfortable. The effect should be of broad shoulders, slimness, neatness, and ease; of long lines rather than curves.
The coat should be single-breasted, fastened with five or three buttons, according to the wearer’s figure, and also with regard to the use for which the coat is intended.

Thus in the hunting-field, whatever the rider’s figure, it is better to have five buttons, in order to protect the rider as much as possible against rain, etc. For hunting, and especially for use in cold weather and for country wear, the collar of the coat should be made to turn up and button over with a tab, and there should be a button under the left lapel, so that the coat may be buttoned closely to the neck for further protection.

With regard to length, the fashion of the time must, of course, be followed. At present it is the fashion to have coats long, so as to come about five inches above the knee when the rider is standing. Some will find it becoming to their figure to have coats even longer and some shorter, and we may hope that the days of the tight-fitting postilion coats, which make the rider look all hips, have passed forever. The collar may be of velvet of the same shade as the habit, of the material itself, or of gray, black, or tan leather, according to the color of the habit, but not of silk or satin. Personally, I do not care for leather collars and think they are too showy to be really smart. A left side breast pocket and two side pockets are permissible. It is a good plan to line the tails of the coat with rubber, so that the sweat from the horse’s back will not soak through the cloth.
The sleeves should be plain and finished at the cuffs like a man’s, or the cuffs may be turned back from two to three inches, according to the length of arm, but should never be of velvet or any material other than that of the coat itself.
Waistcoats are very smart, but not absolutely necessary. For use in the hunting field and in cold weather they are advisable, and should then be made of a rather heavy material, and, in particular, the back should be of flannel so as to protect the rider against a chill. Waistcoats may be made of various fancy or plaid materials, in heavy or light weights, which are manufactured especially for the purpose. Single-breasted waistcoats are smarter than double-breasted.
The pockets may be made with or without lapels. If the former, they should be real lapels or flaps coming over the pockets, as they are meant to wear in the hunting-field so as to prevent things in the pockets from escaping. These pockets in the waistcoat are very convenient for the watch, change, etc.
For the woman who does not ride much or is just taking it up and is not sure whether she will enjoy it, for summer use in the country and for beginners and growing children, ready-made habits of good style are to be found in the department stores.
For the woman who rides, however, it is most advisable to have a habit built by a smart tailor and made of the best materials. The cheaper materials do not give good service and lose their shape.
For winter use, some heavy material which does not stretch should be selected, such as melton, broadcloth, heavy cheviot, or heavy whip-cord, and for most women the best colors are black, black and gray, brown, dark blue, dark green, and any dark, quiet color which is becoming to the wearer. For park riding in the winter, checks, plaids, and other pronounced patterns are not suitable.
For medium weight habits for spring and fall use, there is more freedom of choice. The rider can always select something becoming in checks, medium weight gray and brown cloths, light whip-cords, and invisible stripes. The great point is to be sure that the material selected is “tailor’s cloth,” for no other cloth will stand the hard wear of riding.
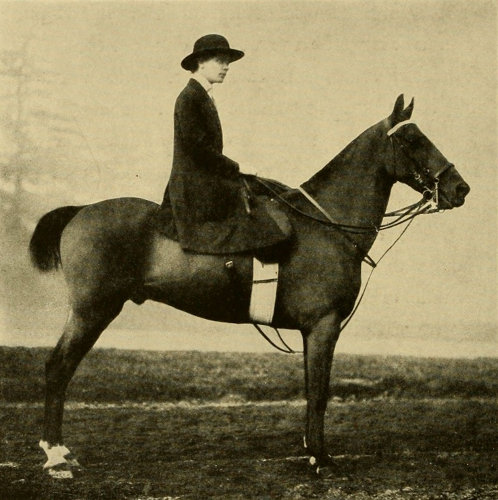
For summer there is a much wider range of choice. For very warm weather, khaki, duck, crash, and linen habits are all suitable. They are all smart and cool and stand tubbing, or else can be regularly scrubbed with a stiff hand brush and bath soap. This saves the risk of their being shrunk or starched out of shape by a careless laundress. It is essential that habits for use in warm weather should be of material that can be washed, and one should be sure to have the material shrunk before it is made up, else, when the rider puts it on after its first wetting, she will probably present a “grown-up-in-the-night” appearance.
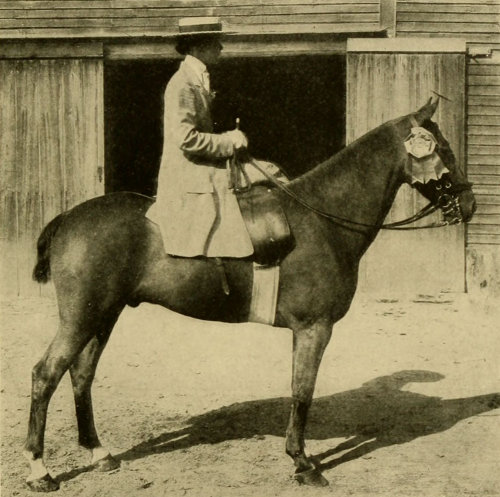
It is a very good plan with summer habits to have two skirts made for each coat, as skirts become soiled much more quickly. If one rides much in the hot weather it is necessary to have at least three summer habits, and the more one has the smarter one’s appearance.
In London in the season, and throughout England in the summer, many women wear a white linen skirt with a dark coat or a dark cloth skirt with a white linen coat. The former of these combinations is very well suited to our climate, with its constant changes, and also to the roads which have been oiled for automobiles, as the oil ruins cloth skirts, while it can be readily washed out of the linens. The combination of a dark cloth skirt and a white linen coat looks cooler than it is and is better suited to the English climate than to ours.
For rainy or cold weather a rain coat or covert coat is very serviceable. The former may be either of the material of which the English rain coats are made or of cravenetted cloth. Very few of the tailors in this country make these rain coats, so it is usually necessary to buy an imported one.
The English coats are so made as to shed the water in front of the pommels, and do not allow it to collect. They have an inner lining which fastens about the wrist with an elastic band and the collar buttons over with a tab. They, therefore, are a complete protection against the wet but, except for use in very cold storms or in snow, are too hot for general purposes in our climate.
A coat of cravenetted cloth will therefore be found, perhaps, more serviceable. If intended as a protection against the rain, it should be nearly as long as the habit on the near side, and the back should, of course, have a vent long enough to clear the cantle.
For riding in cold weather many women find it necessary to wear a top-coat, which may be made of heavy covert cloth or of rough tweed or of any suitable plain material such as a man would use.
Such a coat need not be as long as a rain coat, but may be, if the rider desires additional protection. The top-coat, of course, should be longer than the habit coat, as nothing looks worse than to see the skirts of a habit coat coming out under those of the top-coat. The top-coat may be finished just like a man’s, with patch pockets, etc., and should, of course, have a collar that will turn up and button over with a tab.
A serviceable coat for summer use in rainy weather may be made of light weight check rubber cloth, which is very smart and cooler than the imported English rain coats.
The underclothes for riding should be as carefully considered as the outer garments. Silk shirts and full silk tights are best for riding, but, if full tights are not worn, socks should be worn in place of stockings, as the latter wrinkle under the right knee and chafe. Garters, if tight, as they need to be, stop the circulation, and supporters come directly under the leaping horn. If silk tights are deemed too extravagant, silk lisle or lisle tights, or boys’ long balbriggan, lisle, or gauze merino drawers are a good substitute.
Corsets or corset waists, if worn, should be loose enough for absolute comfort and freedom, but women who are accustomed to the support of heavy stays should, when riding, wear equestrian corsets. To present a mannish appearance in the saddle, short corsets should be worn and, as I have said before, the appearance of being laced should be entirely avoided.
Either equestrian tights or riding breeches are worn, and nowadays most women prefer the latter.
A woman’s riding breeches are made on the style of a man’s and of similar material, the chief difference being that if buttons are used to fasten them below the knee, they should be placed either directly in front, which is smart but may be uncomfortable, or on the inside of the right leg, so as to avoid rubbing against the saddle. Instead of buttons, lacing may be used and, if it is, both knees can be finished alike, the same as a man’s. Two of the patterns are illustrated on page 109.
Breeches may be made of the same material as the habit or of any suitable material such as a man would wear. With a heavy winter habit it is, of course, unnecessary to use as heavy material for the breeches as would be the case if no skirt were worn. For summer use, breeches may be made of white linen, duck, or khaki.
For hunting and for rough country wear and for cold weather, doeskin breeches are most serviceable and very comfortable, and white breeches, such as men wear in the hunting field, are correct and suitable for almost any occasion.
Women who are inclined to fatness may prefer equestrian tights, made of silk or wool, to breeches.
Riding boots for women are made either stiff legged, like a man’s, or soft legged, and with or without tops. My preference is for a boot made throughout of one material, and, for some occasions, stiff legs are almost a necessity, while for others the soft legs are more comfortable.
For winter use, and for wear with black, blue, green, or very dark gray habits, black boots look much better than tan.
For the show ring and for park riding, patent-leather stiff-legged boots are correct, and are better suited to very formal occasions than plain calf boots. Patent-leather boots should always be made with stiff legs, as otherwise the varnish will crack. Plain calf boots are more serviceable and more comfortable than patent-leather for country riding, and are correct for the hunting-field. Patent-leather boots are not correct in the hunting-field, and, like most other matters of correct form, this rule is founded on common sense, for patent-leather boots tire the feet and legs, and with them the feet are apt to become very cold in bad weather. They are also easily scratched and damaged in riding over rough country.
For hunting and for polo, stiff-legged boots are correct, as they are a great protection for the legs.
Tan boots are not correct in the show ring, except for out-door shows in the summer, nor are they correct at any time in the hunting-field. They look better with summer habits, and with any light colored habit, particularly with light grays, browns, and khaki. Black patent-leather boots, hot as they are, look very smart with white linen habits.
The loose-legged boots, which resemble a jockey’s boot, are being worn now by both men and women for park and country riding, especially in summer. They are cooler than stiff-legged boots, but give scarcely any protection.

A very good type of serviceable boot for rough country wear, is one which laces over the instep and ankle, and, in its general cut, resembles the field boot or shooting boot. As these can be loosened over the instep, they do not bind the foot or bring discomfort after a long day’s wear, and they are much more comfortable for walking. They have the same objection, however, as the loose-legged boots; that is, they do not protect the leg in rough work.
Many women wear, in the country, tan laced boots or leather leggings, either of the straight kind or what are known as leather puttees. These are the same as a man’s except that the legging of the right leg should buckle on the inside, for the same reason as I have mentioned in respect to the buttons on the breeches. It is, however, much more important in the case of the leggings, as the buckles, if placed on the right side, would come directly in contact with the saddle and cause the rider great discomfort.
Whether boots or leggings are worn, they should be of a length sufficient to come well up over the breeches, but should be about two inches shorter than a man’s boot or leggings would be, because the right knee in the side-saddle is bent at much more of an angle than it is when riding astride, and if the boot is too long it is very apt to pinch the flesh between the pommel and the top of the boot.
The boots should be fastened with catgut or cord loops in the back, engaging with buttons sewed in the breeches, and one may also have straps or “garters” passing through loops in the back of the boots and attached in front by cord loops to the second button on the breeches. These loops and straps prevent the boots from slipping down and the breeches from slipping up, and from twisting.
Boots, if not made by one’s own boot maker, should be a size larger than those ordinarily worn, as boots tight in the foot, particularly of the stiff-legged kind, are, at the end of a long day, instruments of torture, and I have known of many cases where they have had to be cut off because of the feet having swollen. Whatever kind of boot is worn, it should fit very closely about the calf and should be smaller at the top so as to conform to the shape of the leg. Many women consider the fit of the boots as unimportant, not realizing to what an extent they may be seen, and how uncomfortable, too, loose boots are for walking.
Under the coat should be worn a plain or plaited shirt of any pattern or material which may suit the wearer’s fancy, provided only that it is in keeping with the general mannish style of the whole costume. Silk shirts are very suitable and quite correct at all times. The cuffs should be fastened with sleeve-links.
For neckwear I prefer white Ascot stocks. These stocks should be made of very thin material which is hard to find. The ready-made ones are usually much too thick and clumsy and cannot be tied neatly. They should never be laundered stiff, and in the front a piece of celluloid is inserted on the inside, or the stock may be worn over a stiff standing collar of the same height. The stock should be fastened with an appropriate pin. The bar pins look particularly neat.
Instead of white Ascot stocks, stocks in colors, tying in a bow, are very smart, particularly for summer, and they are not so warm as the Ascots. They come in plain colors and polka dots and are much worn in England. Of course, they look best when worn over a high standing collar.
Instead of a stock, it is equally correct to wear a high turnover or standing white linen collar with an Ascot or a four-in-hand tie, or a bow tie which is quite smart for almost any occasion. One should never wear a “ready tied” stock or tie. They are essentially bad form.
If a belt is worn it should be of plain calf leather or pigskin with a plain buckle.
While for city riding, whatever the weather, a coat must be worn; in summer in the country many women ride without one for coolness’ sake. When riding without a coat, it looks much better to wear a belt, which should pass through loops sewed on the band of the skirt.
The hair should be done plainly and low on the head, either braided or securely coiled. For young girls only, a hair ribbon, which should be black, is permissible. Be sure that the hair is arranged securely, for nothing looks worse or is more uncomfortable when riding than untidy hair.
The correct hat for use in winter is a black derby, except on very formal occasions, such as the show ring or formal park riding, when a silk hat should be worn, if becoming. If not, however, a derby is equally correct, but these are the only two hats which are correct for formal riding. A silk hat is also worn in the hunting field, where it is strictly correct. Many women wear in the hunting field a specially constructed stiff derby intended as a protection to the head in the case of a fall, or of coming in contact with branches.
Many women find the “Continental” hat more becoming than the derby, and it is perfectly permissible for all but very formal occasions. It is never, however, correct in the show ring or in the hunting field.
For all occasions when a habit of a color other than black, dark blue, or dark green is permissible, a derby hat may be worn of a shade to match the habit. Thus, a light or dark brown derby, if becoming, looks very smart with a light or dark brown habit, and a gray hat with checks.
For summer wear the plain straw or black sailor or Panama is correct for all occasions, but the Panama, if worn, should be perfectly plain and, particularly, should have a plain ribbon. These styles of hats are much better suited for wear with linen or crash habits than derbys or Continentals. For wear in the summer the sombrero is comfortable, but I do not consider it very fit.
All riding hats should be large enough to set well down on the head, like a man’s, and should be kept in place by a rather broad elastic. If this is sewn a trifle nearer the front of the hat than usual, it will hold the hat better than if sewn exactly in the middle.
Hat pins should never be used in riding. They look out of keeping, and in case of an accident are very dangerous. It is quite correct to wear a hat guard, but it should be of the kind that fastens to the back brim of the hat, with the hanger inside of the coat collar, and the hanger should be short enough to keep the hat, if blown off the head, from striking the horse. This precaution is very important, as I have often known of horses starting to run from being struck by the hat.
Riding gloves should either be tan, dog-skin, white buckskin, or white chamois. They should be heavy, hand sewn, have either one or two buttons, and should be a size or two larger than those usually worn.
White gloves are correct for all occasions, and I think look smarter than tan. They should always be worn with white habits.
For the hunting field and the show ring, heavy white buckskin gloves are strictly correct, but they do not wash well and, as they have to be pipe-clayed to look white, the pipe-clay comes off on one’s habit and proves very annoying. I have found white chamois gloves the best for use as they can be washed while on the hands in tepid water with a scrubbing brush and bath soap. When dry they should be put on, rubbed softly together, and they will then be practically as good as new. Buckskin gloves should be kept on trees to dry after washing or they will lose their shape and shrink.
Driving gloves which are reinforced over the fingers where the reins are held in driving, are not suitable for riding. They are too stiff and clumsy and one loses the “feel” of the horse’s mouth.
It is always correct to carry either a whip, stock, or crop, and it is advisable to do so, both because the horse may need punishment and in order to give the right hand something to do.
Light cutting whips are best when riding a green horse or one that is apt to require punishment. Crops, of course, should always be carried in the hunting field, and for other occasions plain sticks are equally correct.
It is not safe for a woman, unless she is an experienced rider, to wear a sharp spur, and one should never be worn except with an open skirt, as it is almost certain to catch in a plain skirt. The spur, if worn, should be plain and of the same pattern as a man’s.
No jewelry should be worn in riding except the pin in the tie and the cuff links.
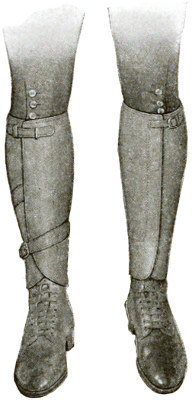
The under dress for cross-saddle riding should be the same as for the side-saddle. For the outer dress the only style that I consider correct is loose riding breeches, polo legged boots, and a long coat. The divided skirt always looks to me out of place, and any woman who wants to wear a skirt had better ride in the side-saddle. For a long riding trip in the mountains or for roughing it or for any occasion when a woman is apt to have to walk as well as to ride, a short divided skirt, coming only to the knees, such as Western women wear, is appropriate, but I should not consider it appropriate for ordinary riding in the East.
Stiff boots are preferable to leggings because they do not show the shape of the leg and are more of a protection than soft legged boots. The boots should be as long as a man’s for cross-saddle riding and should show three buttons on the breeches. They should be tight in the leg and fastened in the way I have described on page 121.
The breeches should be cut exactly like a man’s except that they should be more baggy above the knees. They must fit very closely at the seat and about the waist and should fit very tightly below the knee. They should always be reinforced with buckskin on the inside of the knees. Appropriate breeches are shown in the illustration on page 109.
The coat should be single-breasted, with three or five buttons, according to the wearer’s figure and personal fancy, and rather loose fitting, quite long, with very full skirts coming below the knee when mounted. The skirts of the coat are kept in place by a tab which engages with the third button from the top on the breeches, just above the boots. The coat should be opened enough in the back to clear the cantle, so that the skirts will fall on either side of the horse. With the skirts so fastened at the knees, the thighs and upper legs are concealed and nothing is visible but a smart boot.
I consider this far the smartest, the most comfortable, the most modest, and the safest costume for cross-saddle riding.
In the following list will be found the average price for all riding clothes, etc., each good of its kind:
| Cloth riding habit | $75.00 | to | $100.00 |
| Linen and flannel habit | 45.00 | to | 60.00 |
| Waistcoat | 10.00 | to | 15.00 |
| Covert coat | 45.00 | to | 55.00 |
| Rain coat | 40.00 | to | 45.00 |
| Tights | 1.00 | to | 20.00 |
| Socks, ½ doz. pairs | 1.50 | to | 6.00 |
| Equestrian tights | 1.50 | to | 2.50 |
| Riding breeches | 10.00 | to | 18.00 |
| Boots (ready-made) | 12.00 | to | 15.00 |
| Boots (made to order) | 20.00 | to | 35.00 |
| Boots, laced and strapped | 25.00 | ||
| Leggings | 10.00 | to | 15.00 |
| Riding stocks, ½ doz. | 3.00 | to | 6.00 |
| Shirt waists, ½ doz. | 12.00 | to | 30.00 |
| Linen collars, ½ doz. | .75 | to | 3.00 |
| Neckties (each) | .50 | to | 2.00 |
| Belt | .50 | to | 2.00 |
| Silk hat | 8.00 | to | 10.00 |
| Derby hat | 4.00 | to | 5.00 |
| Sailor hat | 3.00 | to | 5.00 |
| Panama hat | 10.00 | to | 30.00 |
| Sombrero | 5.00 | to | 15.00 |
| Hat guards | .50 | to | 1.00 |
| Gloves | 1.00 | to | 2.50 |
| Riding crops | 2.00 | to | 10.00 |
| Whips | 3.00 | to | 5.00 |
| Sticks | 1.00 | to | 5.00 |
Much discrimination is required in the selection of a side-saddle. In order to be comfortable it must fit both the rider and the horse, a condition harder to find than one would imagine.
The best makers carry different lengths of saddles in stock. The shortest measure eighteen inches from the front to the cantle, and the longest twenty-four inches. With each of these different lengths there are standard widths, and I cannot overstate the importance of a woman choosing a saddle that is suited to her conformation. On page 140 of this book will be found a diagram, with instructions for measurement, so that if a good maker is not available the saddle may be ordered by mail, but I would advise any woman who wishes to select a saddle to take some experienced woman rider with her to the saddler’s and rely on her advice, as I have known many women to choose the wrong size of saddle and thus be rendered very uncomfortable. Trying a saddle in the shop is very different from riding in it on a horse, and it takes a great deal of experience to pick out what you require.
A side-saddle, in this country at least, costs quite a bit of money, but a good one, with proper care, will last for a lifetime, and, with a little adjustment, can be made to fit almost any horse. While there are hundreds of different makes of side-saddles on the market, the really good ones are very few.
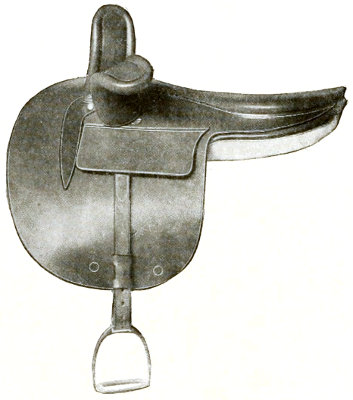
The best English side-saddles are really in a class by themselves, and no such saddles are made in this country except by the English saddlers, and they use only imported English pigskin. The English, whether imported or made here of English material, cost only a little more than the American saddles, and they are so far superior that there is no question in my mind but that they should be one’s choice.
In its construction a woman’s saddle differs from a man’s. As it is made to sit on instead of to bestride, the seat is made as level as possible, and the best saddles have, if any, only a slight dip of, say, from one to one and a half inches. I find a saddle with this slight dip more secure for hunting and for riding very green horses, but the saddle should not have a greater dip than this, and many women find a level seat without any dip perfectly comfortable. I prefer a level saddle for all ordinary use, and the dip, if any, must come from the elevation of the cantle, and not from the hollowing out of the seat or from the elevation of the front. The old style side-saddle, with a “dished out” seat covered with doeskin, has been entirely abandoned, for the safety of the rider and the comfort of the horse.
The best makers use pigskin for covering the seats of nearly all their saddles. In France, however, many women use buckskin and some of these saddles are used in this country. In France these saddles are pipe-clayed and look very smart with a light habit, and if one is able to have two or more saddles in one’s stable, I know of no objection to using this French type of saddle on occasion.
The saddle-flaps should also be made of genuine pigskin. Most makers use pigskin to cover the leaping iron and pommel. Some of the best saddles, however, have these covered with buckskin, which gives them a safer and more clinging feeling.

The greatest improvement in the modern side-saddle is the cutting far back of the gullet plate, which leaves the withers covered only by the continuation of the near flap. This form of construction not only keeps the seat of the saddle level, but makes the rider much more comfortable, as it enables her to have her thigh horizontal instead of the knee being raised as it was in the old style of “dished out” saddles with a high front. Moreover, it has the great advantage of freeing the horse’s withers from pressure, and helps a bit toward keeping his back cool. The cooler the back is kept the freer it will be from soreness and chafing.

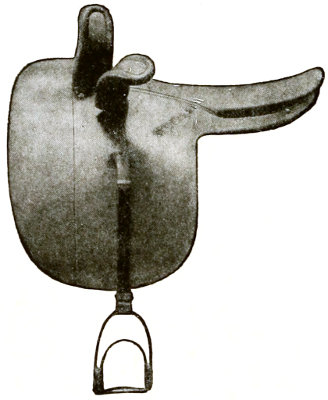
The frame of the saddle is called the “tree.” The tree of the standard saddles is of a standard width, and the fitting of the saddle to the horse’s back is secured not from using different sized trees but by padding. Horses’ backs differ greatly both in width and sharpness, so that the saddle should always be fitted to the particular horse on which it is to be most used. This should be done by an experienced and competent saddler, and a proper fit secured before the saddle is bought or accepted. With a properly fitted saddle, saddle pads and cloths should never be necessary. They look clumsy, they are liable to slip out of place, they collect sand and dirt, and even the best of them heat the horse’s back. If some kind of saddle pad is required on account of a sore back, or an ill-fitting saddle, or if, for instance, one is using one’s own saddle on a strange horse that it does not fit, by far the best pad to use is a sheepskin, cut the same size as the saddle and worn with the woolly side next to the horse’s back. Sheepskins are readily washed and do not heat the horse’s back nearly as much as the ordinary felt saddle pad.
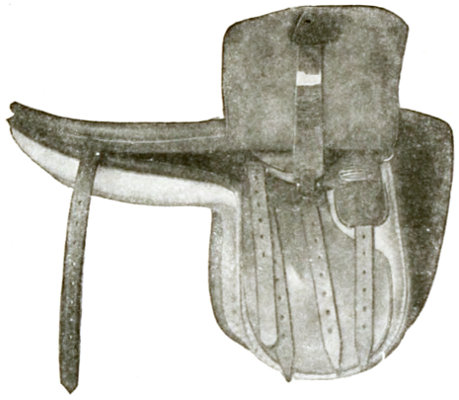
Saddles are lined either with leather, with plain Holland linen, or with heavy white serge. Of the three I greatly prefer the leather because it is cooler for the horse’s back, is more easily cleaned, looks far smarter, and is more durable. If the saddle fits the horse properly the leather lining will never rub him, but it must be kept soft by frequent oiling.

In my opinion, linen is next best, but it does not wear as well as leather, and serge, which is in general use and is found in most saddles, is not as good a material for lining as either leather or linen. It is not durable, it becomes very dirty, it is hard to dry, and, unless it is kept clean and dry, it rubs the horse’s back badly.
As a substitute for a leather lining and in order to prevent the serge lining from chafing a tender back, many riders adopt the expedient in vogue in India and use a leather saddle cloth called “numnah.” These are good for use in hot weather and keep the horse’s back much cooler than would the serge lining, and save chafing. They are cut the exact size of the saddle and fastened to it by straps which pass under the flap. They must be kept soft by constant oiling, otherwise they fail in their purpose.


The girths are made either of webbing or of leather. The Fitz-William girth is the safest and neatest for a woman. This consists of one very broad girth, some five inches wide, with two buckles at each end which engage the two outside billets on either side of the saddle. This girth goes next to the horse’s body, and another girth, about half as wide and a trifle shorter, passes over the first girth—on which it is held in position by a leather loop just below the buckles—and terminates in a single buckle which engages the middle of the three billets on either side of the saddle.
The advantages of this type of girth are that it is very strong and safe, and it is much easier with it to girth the horse as tight as is necessary for the side-saddle than it is with two or three separate narrow girths, each independent of the other, such as are commonly used in livery stables and riding schools.
In girthing with the Fitz-William, first the wide girth is drawn tight, and then the narrow girth, and it will be found that the narrow girth can be tightened on the wide one so that, after it has been drawn, the wide one can be taken up two or three holes, and then the narrow one can be taken up again, and so the horse cannot, by inflating himself, prevent tight girthing.
For the show ring, for hunting, and for park riding the girths must be either of leather or of white webbing.
For country use brown webbing girths are permissible, but they never look well and are liked chiefly by lazy grooms.
Needless to say, white girths must be kept scrupulously clean and pipe-clayed.
I do not approve of braided horse-hide girths, nor of the Western “cinch” for use with the conventional English side-saddle. The “cinch,” of course, is a very useful device for use with a cowboy’s saddle, but there is no justification for its use with the side-saddle.

The balance strap, which is the strap running from the girth billets on the near side to a ring fastened on the off side of the cantle, serves to hold the saddle in position. It must not, however, be strapped too tight or it will pull the saddle too far over to the right and fatigue the horse unnecessarily. Some of the best English side-saddles now are so made that, when ridden by a very good rider, a balance strap is not necessary. This is a great advantage, as many horses are ticklish and the balance strap annoys them, and, besides, the side-saddle without a balance strap is smarter, on the general principle that the less unnecessary harness there is on a saddle-horse the better.
It is most important that the bridle and reins should be made of the very best quality of leather throughout, and of course, when they are, they are not cheap, but, on the other hand, they last so much longer that it is economy to buy the best at the outset. Cheap leather may give way at a critical moment, and, in any case, the low grade of leather will become hard and stiff, will crack, and will not take the proper polish. The leather, both of bridle and reins, should be thin and pliable, but this should be the result of pressing and working by the strapper. The reins especially must always be pliable, as thick reins tire and hurt both the hands of the rider and the mouth of the horse, and with them one cannot have that lightness and firmness of touch by means of which alone a horse should be controlled by a woman. I cannot insist upon this too strongly, as many fine mouths have been ruined through the use of thick and heavy reins.
The reins for a woman’s use should be a little narrower than for a man’s, and should be in proportion to the relative size of her hands. Women with very small hands may find it necessary to have reins especially made for them. The width of the reins should be such that, when held in the position described, the fingers can be fully bent and the edges of the reins held between the second joint of the fingers and the cushions of the hands. If they are too wide, the fingers cannot be fully closed, which presents a very awkward appearance. If a rider has very long fingers the reins should not be too narrow, for, if they are, they cannot be grasped on the edges, and they slip through the fingers. Therefore, women with exceptionally long fingers usually find it better to use a man’s bridle.
With the Weymouth curb and bridoon a double bridle is, of course, used. This is illustrated in the cut and the names of the various parts given. The buckles should be leather covered and should be square rather than round. The cheek pieces and bridoon head may be buckled with the curb and snaffle bits, respectively, or be stitched. The latter looks much neater, but it makes the bits hard to clean and they cannot be changed.
The latest method is to have an invisible hook on the inside of the cheek pieces, which is similar to the hook used on certain types of the best side-saddles, in place of the buckle for shortening the stirrup leather. The cheek piece, where it passes through the ring, has stitching on it, and, without a close inspection, one would not notice whether the cheek pieces were stitched or hooked. I recommend this appliance very highly, as it wears better than buckles and looks just as well as stitching.

The reins should be fastened to the rings in the same way as the cheek pieces, whether by buckles, by stitching, or by the invisible hook which I have described.
When the standing martingale is used it is fastened to the noseband or to the cavesson, which many use in its place.
With horses that rear or are inclined to “star gaze” a woman should always, except in the hunting field, use a standing martingale. It keeps their heads down, gives the rider better control, and prevents rearing.
The standing martingale looks better if hung from a breastplate in the same manner as a running martingale. Standing martingales cannot be used in hunting, as they prevent a horse from jumping freely. So in hunting with a horse that needs a martingale a running martingale should be used. This is attached to the front of the breastplate and has two branches ending in rings, through which the snaffle reins are passed. In front of these rings there should be leather stops on the reins to prevent their buckles from catching in the rings.

Running martingales are chiefly used in the hunting field and in jumping, for in jumping a horse must have his head free, and a tight standing martingale would prevent him from throwing his head forward at the take off, and so not only prevent him from using his strength to the best advantage, but would tend to throw him off his balance. Running martingales, however, are not nearly as effectual in preventing a horse from rearing, and when they are used it requires a very considerable amount of strength on the part of the rider to keep the horse’s head down, while, of course, the standing martingale keeps the horse’s head down without any exertion on the part of the rider.
If a standing martingale is used, be sure that it is not fastened too tight; it should be loose enough to allow the horse quite a little play with his head in its natural position. If it is tighter than this the horse, when the reins are loose, will put his head in its natural position, then feel the pressure of the martingale and think that he is being backed. He will thereupon back, and the more you give him his head by loosening the reins, the more, through attempting to raise his head, he will feel the pressure of the martingale and will keep on backing. Under these circumstances, the only thing you can do is to gather him lightly with the curb, which will bring his head in and relieve the pressure of the martingale, then urge him forward, or, if you want him to stand, keep a light pressure on the curb so as to prevent the martingale from being tight.
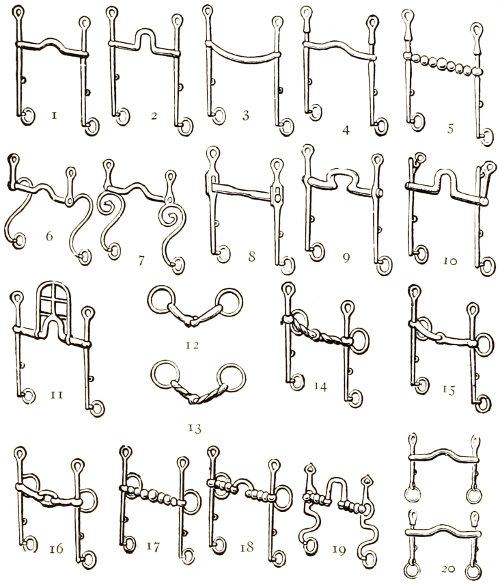
The breastplate, used with nearly all horses by women in the hunting-field, should be used at all times with a horse that is “tucked up” like a greyhound. In fact, many riders use breastplates at all times with nearly all horses, and, except in the show ring or in park riding where they are not considered good form, I think they should be generally used with women’s saddles. They hold the saddle in place, and, with them, the girths need not be drawn so tight.
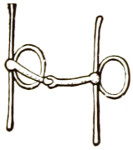

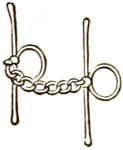

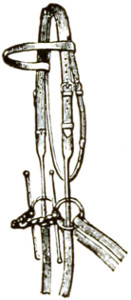
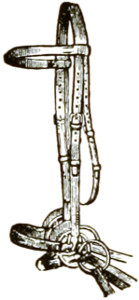
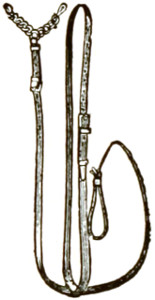
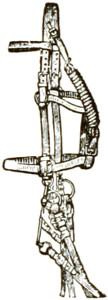
The breastplate not only holds the saddle firmly in place, but it also keeps it from turning, prevents the girths from slipping back on the horse’s belly, distributes part of the weight of the saddle on the horse’s shoulders instead of having it all on the girths, and gives the rider a feeling of security and confidence.
A few horses have such wide chests and some such tender skins that a breastplate is apt to gall them.
The best bits for a woman to use are the curb and snaffle. The curb bit in general use is of the Weymouth pattern, as illustrated above (see cut No. 1, page 150). The snaffle is jointed (see cut No. 12, page 150). Most horses go better with a curb bit with a slight port, such as No. 2, page 150, though personally I like the pattern illustrated in No. 1, same page, above, quite as well, if not better. For horses with very tender mouths or with sore mouths, the curb bit may be covered with rubber. Other horses, again, go better with a jointed curb, and old horses, whose mouths are so hard that they cannot be brought back to their original condition, may require the use of a heavy port or other device which will cause them pain when the curb rein is tightened.
These various devices are illustrated above. For hunters, for pullers, for polo ponies, and for Southern gaited horses, various kinds of bits are used, but I shall not attempt to describe them here. They are fully treated in many of the standard books on riding and do not belong in a book devoted to riding and driving for women.
I shall add a few hints, gleaned largely from my own experience, which may not be found in other books on the general subject.
The normal position of the bit, whether curb or snaffle, or both, is in the space between the teeth called the “bars,” about two inches below the eyeteeth in the mare and the tushes in the gelding. This brings the curb chain to bear on the sensitive flesh of the lower jaw where the pressure is most effective. If the curb is too high, the chain bears on the jawbone which, at that point, is only covered by skin. This skin readily becomes calloused, so that the curb chain has almost no effect. If the curb is too low, the horse will be able to get his tongue over the bit and keep it there, so that control will be lost and the cheek straps will be too loose, and the snaffle, unless it has very large rings, may be pulled through the horse’s mouth.
Many horses have a bad habit of getting their tongues over the bit. A horse with his tongue in this position is quite uncontrollable, and he must be broken of the habit at any cost. Most horses will be cured by taking up the cheek straps and thus raising the bits in the mouth. This, however, may bring the curb chain too high, as above stated. If it does, or if this method is not successful, it may be necessary to resort to one of the patterns of curb bits designed to prevent the horse from getting his tongue over, such as the gridiron, No. 12, page 150, which has a ring which is passed over the horse’s tongue.
A temporary device which may be used, except in the show ring, is to put a rubber band over the port in the curb and around the horse’s tongue. It must, of course, not be tight or it will stop the circulation, but it diverts the horse’s attention and, of course, prevents him from bringing his tongue over the bit.
If a horse is inclined to lag, or go up against the bit, raise the snaffle in his mouth and lower the curb.
In the ordinary adjustment of the bits, the curb chain should be fastened so that, when hanging naturally, you can slip two fingers under the chain without disturbing the position of the bit, but if the animal has a hard mouth the chain may be tightened enough to give good control. No definite rule can, of course, be laid down. Beginners, however, are particularly cautioned to have their curb chains looser than I have indicated, as, until they have acquired “hands” and have entirely given up the habit of holding on by the reins, they cannot with safety either to themselves or their horses ride with the chain at all tight.
If a horse has been spoiled and his mouth is so calloused or “hard” that he cannot be controlled even with a tight curb, and you still want to ride him, the chain may be twisted, or one of the punishing types of bit may be used, such as those above illustrated (Nos. 19 and 20, page 150). Twisting the chain or using such a bit will make his mouth all the harder, but will enable the rider to control him.

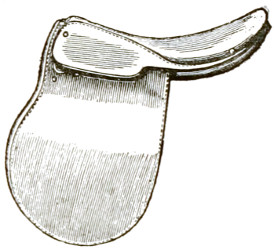
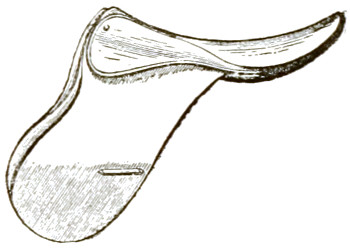
While the Mexicans and Indians use very cruel bits and ride only on the curb, they necessarily ride with light hands; otherwise they would break the horses’ mouths.
If a horse pulls more on one side of his mouth than on the other, drop the bits on the side opposite to that on which he pulls. If horses have had the advantage of proper training and intelligent riding, they should have no “mouth tricks,” such as sticking their tongues out on one side. If they are continually fretting with their tongues and lips and heads, it is probable that there is something the matter with their teeth or that they have some soreness or irritation inside of their mouths. Horses do not do things of this kind without cause, and as soon as anything of this kind is observed the mouth should be thoroughly inspected and steps taken to remedy the trouble immediately. Horses often have trouble with their teeth very much as we do. Usually a “vet.” will be able to remedy any condition of that kind, but if not, it may be necessary to call in a horse dentist. If trouble of this kind is not attended to, the symptom may become a habit or a trick very hard to break and result in spoiling a horse’s appearance and manners.
In writing my description of the lady’s saddle horse I find that, of all the horses I have ever seen, I have not yet found one that eclipses, or even equals, “Lady Bonnie.” I have described her before, and all the change that is needed is in the tense, which, alas! must now be in the past. When asked for a perfect type of lady’s saddle horse, I close my eyes and think of her. She may have had her faults, but who has not? To my mind she came as near perfection as any horse in the world. Her beautiful walk, perfectly balanced trot, and straight and delightful canter, made her a joy to ride. Her well-crested, lengthy neck, giving room for plenty of rein; her sloping shoulders and beautifully defined withers meant for keeping the saddle in place; her back of just the right length to make the saddle look in proportion; her smoothly turned quarters, with tail set high, carrying out the perfection of her top line; her small head, wide between the eyes; her tiny well-set and well-carried ears, combined with the fineness and beauty of her coat, like black panne velvet, completed her magnificent effect of breeding. Her intelligence, her eagerness to do her part, her great though perfectly tractable spirit, and her wonderful manners made it a pleasure to know her and a privilege to be her friend.


A lady’s saddle horse should be of solid color, black, chestnut, bay, or brown. White pasterns, or a star or snip of white on the face, make a very attractive “trimming up.” Personally, I do not consider white-legged or bald-faced horses so suitable for women, because they look “flashy.” While of course color has nothing to do with conformation or the other qualities most to be considered in a lady’s saddle horse, it has everything to do with the points of a horse for the show ring, where no piebald or flashily marked horse would stand a chance in a ladies’ class.
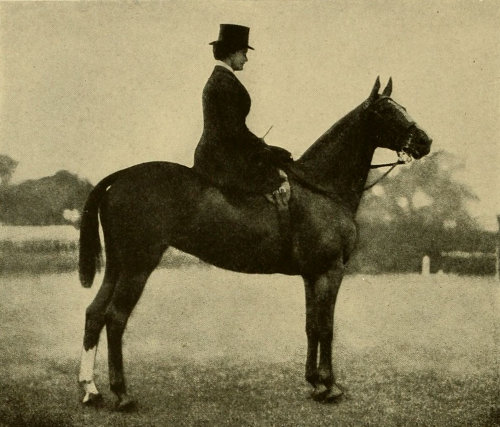
The only gaits used in the show ring, and generally for park riding in the East, are the walk, trot, and canter. The walk should be quick, yet without tendency to jigjog; the trot square, well balanced, and with no hint of mixed gaits. There should be plenty of “all-round action,” of the hocks quite as much as of the knees, but of course not the “high action” of the carriage horse. The canter should be free and easy, but not too high, and should always be a canter—not a shuffling go-between, nor should it be so fast as to border on a run.
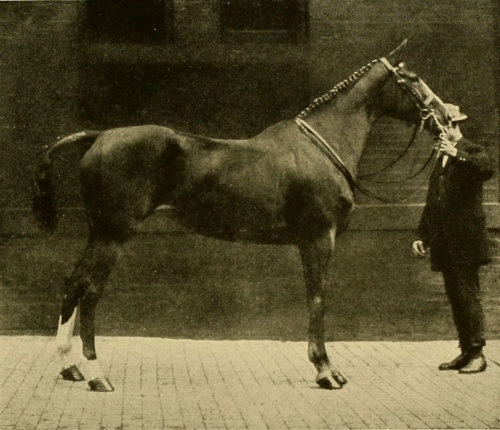
The thoroughbred should be the ideal saddle horse, as he is fashioned by nature for that purpose alone. In England this is the type of “riding horse” most in vogue, and in this country he may, in a few years, as he already has there, supplant the park hack type. However delightful he may be in the country or in the hunting-field, he is not really suitable for park riding, where a collected trot is essential and where his excitability gives the rider more than she wants. It must be borne in mind that the conditions of riding in England are entirely different from what they are in this country. Here we ride for exercise; there they hunt for exercise and ride for rest. Therefore, what they want for riding is a horse with very easy gaits who does not give the rider any exertion. In England there is very little riding on hard roads, as there is here. They almost always ride over turf and they have bridle paths on nearly all the roads. The English “riding horse” I have referred to is a thoroughbred or three-quarter bred, and the trot is not one of his gaits. His canter is very easy and he gives the Englishwoman just what she wants in the way of rest and fresh air. With us, however, but few women hunt, and when they ride they want exercise and want, therefore, a horse that will give them more to do. They find this in a horse with a good swinging trot, but they would not find it in the thoroughbred.
A very strong strain of thoroughbred blood is needed to produce the best type of saddle horse and, aside from their suitableness for park riding, many thoroughbreds, properly trained and judiciously selected as to conformation, make horse show winners.
Riding a thoroughbred is altogether different from riding any other kind of a horse. It is then that all the niceties of the art of riding are called into play, not so much as regards the seat, for his gaits are easy, but the hands must be more than usually light, more than usually firm, and more than usually quick in their communication between the mind of the rider and the mouth of the horse. In fact, I am going to say the mind of the horse too, for of good gray matter the thoroughbred possesses an ample share. Thoroughbreds are so excitable and so hot-blooded that only experienced riders with good hands can manage them, and they are very unsafe for those who have not mastered the art. They are hard to manage when ridden in company with other horses, and they are so fussy and unreliable that they afford but little pleasure except to an accomplished horsewoman.
Next in order to the thoroughbred comes the hunter. Were I limited to one horse I would, of all others, select the hunter because of his general all-round usefulness. He is thoroughly suitable for park riding, he can be driven, he can be hacked, and his jumping qualities put him in a class by himself. There are so many different types of hunters that one cannot fairly say that any particular type is the best. All depends on the country to be hunted and whether the horse is wanted for hunting only or for general utility as well.
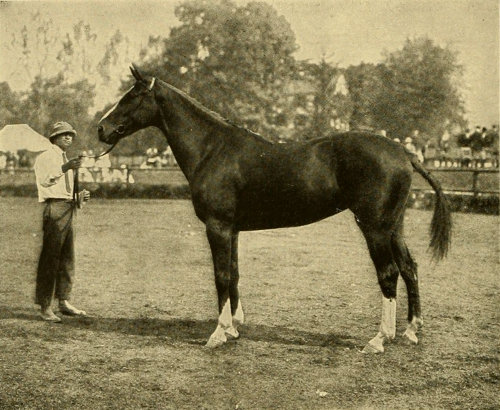
Probably the best hunters are the Irish. They are up to more weight, they have more substance, greater endurance, and, for their own country, are the safest jumpers in the world. These Irish hunters have been bred and hunted in Ireland for generations and are natural born jumpers for banks, but in Ireland they do not have fences, such as we know them, nor do they have such high jumps in the hunting-field as we have. So Irish hunters are not suited for hunting in this country until they have been thoroughly trained over our fences. The English and the Canadian hunters are more accustomed to timber and jump higher than the Irish.

Hunting in the vicinity of the great cities of the East has changed entirely in this country in the last fifteen years, and the types of horses that were suited to former conditions are not fast enough and do not jump high enough for the pace we have now. The present tendency in the East, since there are no longer wild foxes to be hunted, is to turn hunting into steeple-chasing, and the only horses that will carry their riders fast enough and safely over the courses as they are laid out are thoroughbreds or three-quarter breds.
In other parts of the country, of course, the country is not so stiff and the thoroughbred type is not essential.
In the South, particularly in Virginia, the best traditions of the hunting field have been upheld since the earliest times, and there is the home of the best hunting to be had in this country. There has been as yet no invasion by barbed wire. The country has not been exploited or commercialized, and the farmers are of an entirely different class from those to be found in the neighborhood of the great cities or in the North. As a general rule they are heartily in sympathy with hunting; many of them follow the hounds and breed hunters, and even use them on their farms. In fact, the hunter is the general type of horse to be found throughout that section of the country.

The hunter is the one kind of mount for a woman in which beauty, though desirable, is not a requisite. Rather does one seek in hunters breeding, courage, and intelligence, and the greatest of these is intelligence. The good hunter will show a long neck, withers standing well back, and forelegs well forward of the girth. He should have sloping shoulders and great depth of chest. In fact, his chest should be so deep that when you look at him his legs should not appear as long as they are. He should have strong quarters, and there is no valid objection to their being “ragged,” for he needs great power in his quarters to carry him over the jumps. Of course, one may recall many instances of light-weight thoroughbreds of beautiful conformation who are admirable hunters, but they cannot be hunted every day over a heavy country. That a hunter is to be ridden by a woman, is no reason why his appearance should be ladylike. The extra weight of a side-saddle and the unevenness of the distribution of the rider’s weight on his back, make it necessary that a woman’s hunter should be quite as large and powerful as a man’s. The recognized type of hunter is close to the thoroughbred and quite distinct from the harness horse. Without exception, all hunters have more or less thoroughbred blood, though sometimes we have to go unexpectedly far back to find it. Many of them are three-quarter bred, and some have as little as one-quarter, or even an eighth or a sixteenth. As for their blood, there is no recognized standard of breeding. Some of the best jumpers have come from trotting stock, some from hackney stock, and some even have appeared, as it were, by accident in stock of no recognized breeding at all, and the qualities that go to make a hunter cannot be found with any certainty through breeding. The principal qualification of a hunter is that he should jump, and jumping is something that seems to be born in individual horses, and to depend not so much on their breeding as upon the union of courage with a certain conformation.
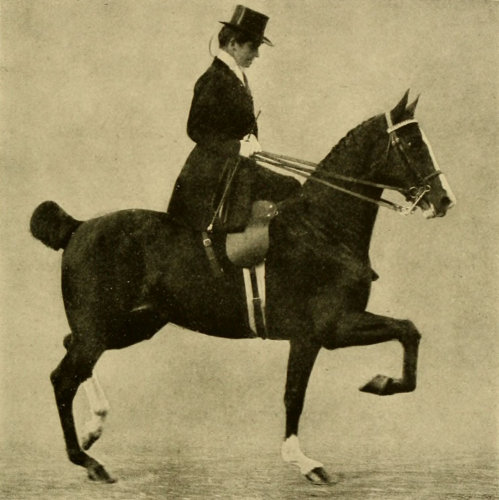
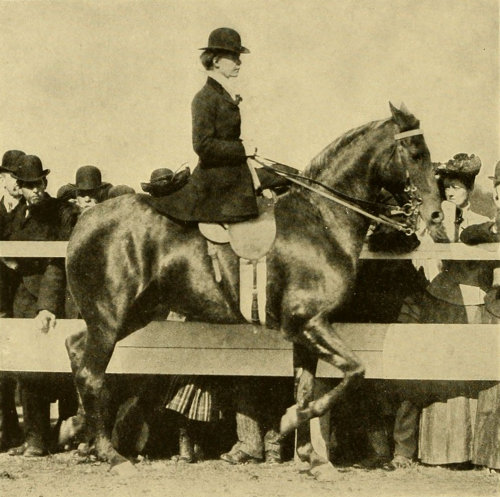
The correct type for a park hack is the subject of much diversity of opinion in the show ring as well as in park riding. Some judges favor the thoroughbred type, while some go to the other extreme and favor the harness type. My choice for a park hack is a sort of a “betwixt-and-between”; a riding horse “smarter” and more “peacocky” than either the thoroughbred or the Southern bred saddle horse; not necessarily bristling with quality, yet showing plenty of breeding, and with substance, style, and a snappy all-round way of going. In other words, a horse that fills the eye of the layman by his general showiness, and yet satisfies his rider by the niceness of his gaits and manners and the feeling of pride on being mounted on something that compels universal admiration.

Of late the term “road hack” has come into use. This title does not yet denote a definite type. If I were attempting to define it I should say a horse more like the English cob, low in stature, not over 15.1, but great in substance, and with beauty somewhat sacrificed to utility. He must be well mannered, be as willing to stand as he is willing to go, and should have a fast, well-balanced trot, as the hardness of the roads often makes cantering impossible on the highway. He should resemble the park hack, but should be of a more useful and heavier type, and if he can jump a bit, so much the better.
In all horse shows there is now a class for what is called the “combination horse,” a type, as I have heard some people say, that cannot exist without detriment to either the riding or driving qualities of the animal. With this I personally do not agree. I think all saddle horses should be broken to drive, for there are many occasions when they will be more useful to their owners in harness than under saddle, and it is far better when one cannot ride to exercise one’s saddle horse by driving it to a light trap than to have it ridden by a groom or a stranger. In this country it is almost impossible to find a groom with “hands,” and one’s own saddle horse should be kept for one’s own riding exclusively. Moreover, if one has “hands,” one has them quite as much in driving as in riding, and the horse will always feel that he is under his mistress’s own control. Of course one would never think of taking a schooled and beautifully gaited saddle horse and making him into a harness drudge, but occasional light work in the shafts will do one’s horse far more good than harm. While every saddle horse should go well in harness, it does not follow that every harness horse should go well under saddle, for the recognized type of harness horse is utterly unsuited to the saddle. It is not a question of training; no amount of training could make the stiff-necked, flat-withered, heavy-shouldered harness type into a saddle horse. He has been bred for generations for dragging and not for carrying, and he is an entirely distinct type from the saddle horse.
So we find that the combination horse ought to be rather a saddle horse that can be driven than a harness horse that can be ridden, and, for the show ring, the ideal combination horse is really a park hack well broken to harness.
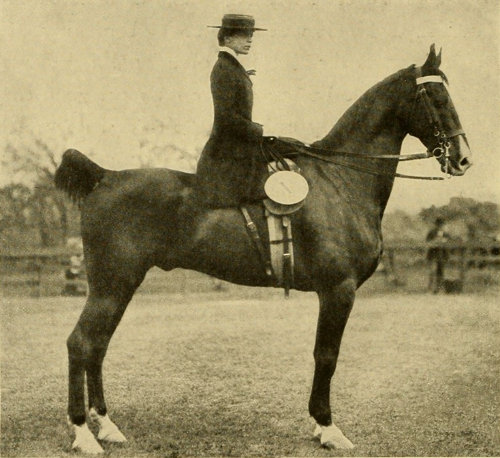
A good polo pony is a treasure in any stable. For a country hack he is excellent, giving a good ride, never tiring you, and never being tired himself. His early training makes him unusually quick to rein and very bridle-wise. Once get used to his quickness and you are sure to enjoy him.
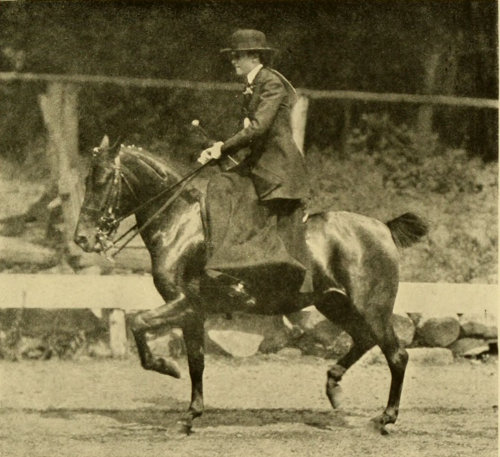
The type of polo pony has changed in the last ten years, as the game is so much faster than it was. Formerly the limit of height was fourteen hands. Now it is 14.3. The type used to be a stocky, rather heavily built pony, more of the type of an English cob with a docked tail, such as we see in the early polo prints. Now they have a great deal of thoroughbred blood and many of them are three-quarter bred, and have, of course, the characteristics of that type. Many ponies which are too hot-blooded for use in the polo field, or who are “mallet shy,” make ideal riding hacks and are easily broken to harness. Such ponies can often be picked up at great bargains and made as useful a pony as one can well have at any price. In these days women are beginning to play polo, and it goes without saying that there is no difference in the type of polo pony for a woman’s use from that for a man’s.
There is an exceptionally good type of pony which has not appeared to any extent in this country, commonly known as the Irish pony. This is a cross between a thoroughbred and a half-bred hackney, the small size being gained, of course, through the hackney cross with the pony. They have much of the fineness of the thoroughbred and a great deal of the substance of the hackney. They have tremendous endurance, are remarkably good combination horses, can often jump a bit, and can be ridden and driven all day long by any lady, and very often are so gentle that a child can ride them. As a combination pony they cannot be excelled, and they are particularly useful to help out in a small stable, as they can be used for station work and for taking the children to the beach, and all that sort of thing. They are, however, very high-priced and hard to pick up at a bargain.

The safest and most reliable pony, from my experience, for a child to begin on is an old polo pony which has been ridden for some time by a woman and has not had the excitement of the polo field for many a year. If one wants, however, a smaller pony than this for a child, the best type to my mind is the Welsh pony. They are far more gentle and better for children’s use than the Shetland pony, and are much more reliable. I consider the kind of Shetland pony that one finds in this country a treacherous and stubborn little beast. Of course a pure-bred Shetland pony which has been properly broken is ideal for a child both to ride and to drive, but the pure-bred ones are kept on the other side. It is almost impossible to find them in this country and very few of them are bred here. My experience with them is that they are not safe for children to ride or drive. Of course, they are so small that if they have a good load behind them and a reliable man to drive them, they cannot do much harm, and they certainly have great capacity for work. They live to a great age and require but little care.
Having decided on the type of horse that one wants, the next thing is where to find him. One of the most important points to bear in mind, and one often overlooked in selecting a saddle horse, is not only that he can be but that he should be becoming to the rider, and this becomingness depends largely upon the horse and rider being in proper proportion to each other. It is better that the horse should be too large and too heavy rather than too small and too light. For instance, while a tall woman looks out of proportion on a small horse and a stout woman ridiculous, a small woman can look smart on a large horse and a woman who weighs little may look well on a weight carrier. Still, other things being equal, I would advise that the choice be given to a horse proportioned to the rider’s size and weight.

Not only the horses themselves but the horse buyers may be divided into classes. There is the green purchaser with plenty of money and the green one with only a hundred or two to spend; the clever buyer who “has an eye” and the buyer who thinks she “has an eye.” The first mentioned should go to a high-class dealer, rely on his advice, and thus be sure of getting what she wants as long as she is willing to pay the price. The second ought to find something in the “practically sound ones” or among the discarded polo ponies. The clever buyer will fill her wants anywhere, in the auction marts, on the stock farms, at the race track, or through a casual meeting on the road, while the one who thinks she “has an eye” is a source of profit to others if not to herself.
The attitude of the public at large toward the horse dealer is to my thinking most unfair, for reputable business methods are to be found among them quite as much as in any other business or profession. If the buyer’s experience is limited, there is nothing in which she can be so easily deceived as in a horse. Therefore, I strongly advise the novice to go always to a dealer of good standing, state frankly what she is looking for, how much she is willing to pay, and put herself in his hands without affecting knowledge which she lacks. When you go to a dealer of standing you may be confident that having acquired a high reputation he will maintain it, and will not sell you a horse other than he represents it. If you go to a “gyp” dealer you must keep your eyes open and rely on a veterinary of your own selection, coupled with the advice of some friend who has real knowledge of horses; otherwise you are putting yourself at the mercy of the kind of man who has given horse-dealers at large the unfair reputation in which they are held by the public.
Certainly the novice should not expect to get “something for nothing,” and I would strongly advise the buyer to make up her mind that it is better economy in the long run to pay a good price for what she wants than to buy something cheap and in a short time have to sell it for even less than she may have paid.

With regard to the prices charged by reputable dealers, one must bear in mind the value of a horse’s education, all the chances of sickness and of the development of unsoundness which the dealer has had to take, the great expense of a dealer’s establishment in a large city, and the many hands through which a horse has probably passed before he has come into the dealer’s possession. There is not only the first cost of the horse but also the expense of shipping him from the country—where he was raised—into the city; the cost of keeping him there until he is conditioned and has passed through the dangers of acclimatization—that is, sickness caused by change of climate, of water, etc.—the risk of breaking him to unaccustomed sights, and the long period of training and developing into a schooled and mannered saddle horse.
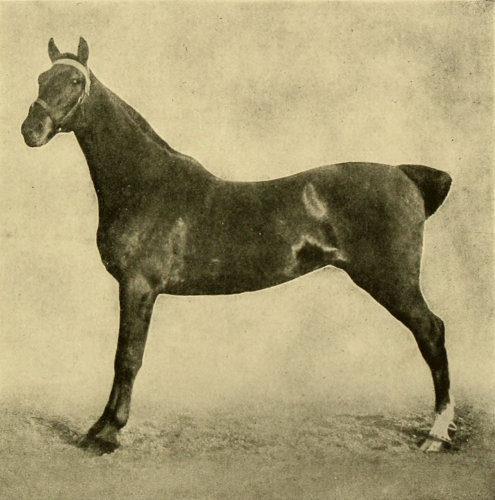
Once the type has been decided on, whether it is a riding horse, a driving horse, or a combination horse, the buyer must next determine whether she knows enough to be able to trust to her own judgment, and, if not, whether she knows some one who has sufficient knowledge to be able to advise her or whether she must rely entirely upon the dealer. She must, of course, be sure that any one on whose advice she relies not only has sufficient knowledge but is entirely disinterested. If you decide to rely on a dealer, it is far the best way to pick out your dealer, go to him, and then, if he has not just what you want, ask him to get it for you instead of going yourself to other dealers. This not only saves time, but the dealer has a very much wider choice than you could possibly have yourself, and it is my experience that by this method you will not have to pay any more than you would if you went straight to the dealer who has the animal that you want.
In buying a high-priced horse I would be sure that he carried out all the conditions demanded by his type: that he possessed beauty and good conformation, that he was free from blemish, that his manners were perfect, his disposition good, and his age not less than five nor more than eight. A horse younger than five is little more than a colt and more liable to injury and blemish than an aged horse, and eight years is a good boundary age, not only from a point of usefulness, but as a matter of investment as well. There is a popular prejudice against paying a big price for an aged horse (“aged” being the term applied to a horse after his eighth year); that is, unless he is a show animal with a list of winnings to his credit and bought to be shown.
A horse to have good conformation should show a niceness of proportion in all his parts. Conformation in a saddle horse calls for a nice head, and a long, flexible, and crested neck—never a ewe-neck. Looking from the withers downward he should present a narrow appearance, for sharp, well-defined withers are most necessary for the proper carrying of a side-saddle, while gradually sloping shoulders hold the saddle in place and go with good gaits and general handiness and quickness. The back should be in proportion to the rest of the horse, and short rather than long. A very long back is usually a sign of weakness and mars the general appearance, but nearly as bad is the back that is too short. This is generally accompanied by a very round barrel, flat withers, thick shoulders, and a general undesirable chunkiness. The sway-back and the roach-back must also be rejected. The former makes the proper adjustment of the saddle difficult and gives an awkward “dipping back feeling” to the rider, especially when posting. The roach-back is the other extreme and makes her feel as if she were dipping forward. The barrel should be well ribbed and the quarters must not slope nor the tail be set too low or the top line will be destroyed.
“Manners” in a horse mean perfection of training, fearlessness, and a will subservient to that of the rider, but do not mean a broken spirit. The spirit should be there, but it should be under control.
When you have found a horse that “pleases your eye,” have him shown to you at a walk, trot, and canter, which will give you an opportunity of studying his appearance in motion and his manners generally. While at his gaits look at him from in front and from behind as well as from the side; that is, have him ridden toward you and away from you as well as past you at all his gaits. Have him change from the walk to the canter and see how quickly and readily he changes. Have him stand for a few minutes and have him backed for at least six steps, and then have him ridden a short distance at a fast canter and see how easily he reins down. Mount him yourself two or three times. A horse that will not stand quietly and that fusses while you mount and dismount is a nuisance; backing is a good test for rearing, and reining in quickly is usually a sign of a light mouth.
Never buy a puller; they are ruination to hands, pleasure, and temper; so see that the horse you are looking at is bitted lightly, that he wears the ordinary double bridle with curb bit and bridoon, and that the curb chain is not fastened too tight. Beware of animals that are shown to you with tight nosebands and tight curb chains, spoon bits, gag snaffles, etc.,—these are signs of “pullers.” Equally bad is the horse with no mouth at all, for he is often a rearer or a jibber. I like to see a horse trained to be ridden with an even pressure on both curb and snaffle, as described in the chapter on hands.
While the horse is being ridden for you to look at, watch closely how he handles himself; see that his walk is free, his trot bold and well balanced, and his action true all-round. By this I mean that his hock action must be in keeping with his front action. A high-stepping horse will give you a good ride if he uses his hocks equally well, but a horse that is high-going in front and stiff and draggy in the hocks is impossible.
See that he neither “dishes out” nor “paddles,” and that he does not travel so closely that there is danger of his crossing his legs. Avoid the horse that stretches too far in front and “points” or “dwells,” for, except to a very good rider, these variations of the gait are uncomfortable. They also count against a horse in the show ring.
His training and the trueness of his way of going having been proved, he must next be tried for courage. If in the city, have him ridden past automobiles, trolley cars, steam drills, and elevated roads; if in the country, past automobiles, railroad trains, mowing machines, steam rollers, or any unusual or noisy object, and in both city and country see that he minds strange sounds, such as automobile horns, steam whistles, etc., no more than strange sights.
The trial having gone satisfactorily thus far, have him saddled with your own saddle and before mounting, ask the owner for points on the best way of riding him.
Different horses have different little peculiarities, and may have been taught by various signals. The person who has had experience with that particular animal can give you valuable hints as to his training and the signals for changing gaits, etc., to which he is accustomed.
The horse being now ready for you, mount him and start him off quietly; first walk him, then try his trot and his canter, and if the gaits prove pleasant the next step is the “vetting.”
Stallions, even the most tractable of them, are not suitable for women either to ride or drive. The choice of a horse should therefore be confined to mares and geldings. There are many who consider the gelding preferable to the mare, but with this I do not quite agree. The mare has a peculiar lightness of foot, vivacity, and élan which are seldom if ever found in the gelding.
Before stepping into the trap, the horsewoman should make it a habit to inspect the horse, harness, and trap, and see that everything is as it should be: that the horse is properly put to, that the bit is right, that the girths are neither too tight nor too loose, that the traces are neither too long nor too short, and if there is a stop on the shaft that it is just back of the tug. Be sure also that the trap is properly turned out, that the rubbers are in, that there is no accumulation of dust, that the nuts on the wheels are tight, and that every detail has been properly attended to. Not only is this a wise precaution to use with hired traps, but it shows your own coachman that you know what you are about, and it keeps him up to his work. Having made this inspection, which ought really to be done at a glance,—except that a careful examination should always be made of the horse’s head to be sure that the curb chain is neither too loose nor too tight, the bit not too far up nor too far down, and the mouthpiece the width of the horse’s mouth—neither too wide nor too narrow—and that the check or bearing rein, if one is used, is not too tight,—the next thing is to step into the trap. If you are driving a lady’s trap, such as a George IV, a Peters’, or a basket phaeton, the groom who has driven the trap up from the stable should, before getting out, have left the reins across the middle of the dash with the end of the reins on the seat, and the whip to the left of the reins, leaning against the seat and pointing to the rear. The groom should then stand at the horse’s head. You should step into the trap with the left foot, putting the right foot on the step, then sit down, and at the same time gather the reins in the left hand and the whip in the right.
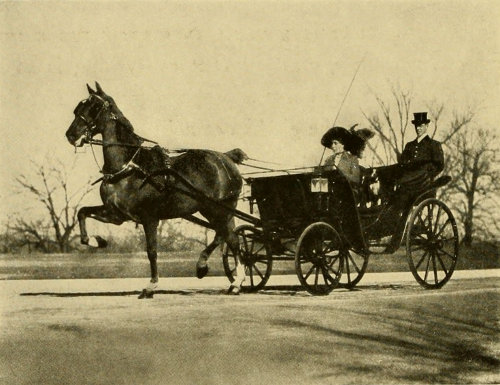
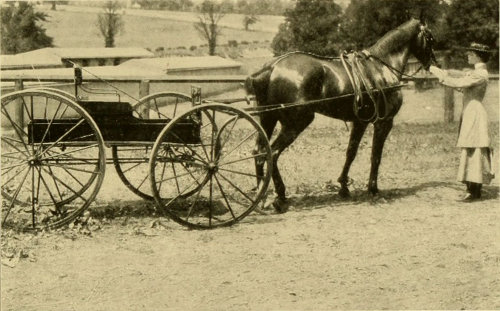
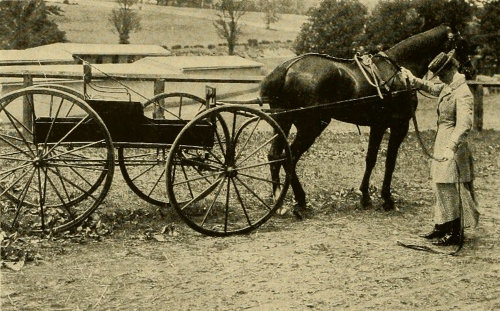
If you are driving a runabout or a cart, or any other than a distinctly lady’s trap, the groom should leave the whip in the socket and should pass the reins doubled through the off terret of the pad from rear to front in such a way that the buckle end of the reins will hang even with the loop. You should go to the off-side of the horse and draw the reins through the terret with the left hand; then take the reins in the right hand, the near rein under the forefinger and the off rein under the third finger, with the ends coming out between the thumb and forefinger. Then you take the reins just beyond the right hand in the left, the near rein between the thumb and forefinger and the off rein between the second and third fingers, the ends passing down the palm of the hand and out by the little finger. Then step back until you are opposite the dash, letting the reins slip through both hands, and then, with the right hand, pull them through the left a little more until they are at the length which they will be when you are in the seat, and very lightly feel the horse’s mouth. Then take the whip out of the socket with the right hand and transfer the reins to the right hand in the same position as I have described above, and step into the trap. Take hold of the dash with the right hand, and put the right foot on the step and step into the trap with the left foot, and if necessary assist yourself by placing the left hand on the seat when you are in the act of stepping in. Sit down on the driving seat and take the reins in the left hand in the position described above, keeping the whip in the right hand. So far, exactly the same things are done whether you are driving a pair or a single horse. With a pair you should not have the whip laid across the horses’ backs, as you would in driving four.
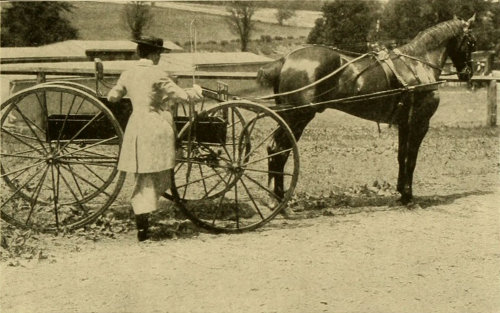
For ladies’ traps I prefer the square, almost level driving cushion to the slanting one, as it is more comfortable and gives a woman a more distinctive appearance. For country traps, and particularly for high carts, a slanting cushion may be more suitable.

When driving, it is most important that a woman should sit correctly. She should hold herself erect, without stiffness; her feet should be together and her knees slightly bent. She should neither sit with her knees straight nor, what is worse, be perched on the edge of the seat with her feet back; she should never while driving loll against the back of the seat, and she should look as though she were driving and not as if she were being driven.
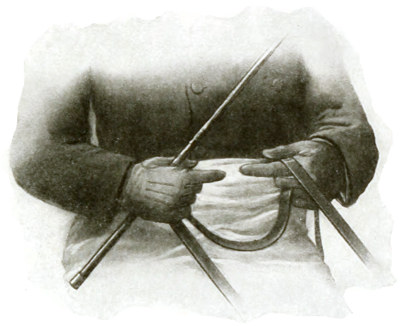
There are only two correct ways to hold the reins when driving, and so many people hold them incorrectly that I will describe them in detail. The two reins should always be held in the left hand, the near rein between the thumb and forefinger, the off rein between the second and third fingers, and the ends passing down and out by the little finger. The reins should be gripped by the fingers holding the edges of the reins against the cushion of the hand, and should not be held by squeezing the flat surfaces of the reins between the fingers, and they should be held tightly enough so that they will not slip, but not so tightly as to cramp and tire the fingers. Holding the reins in this way, well down into the fingers and as close to the knuckles as possible, insures a firm grip and makes it easy to guide to the right or the left by merely turning the back of the hand down or up. The left upper arm should be vertical, the left forearm horizontal, the hand turned in at the wrist, and held about six or eight inches in front of the body. The right hand should be held in a corresponding position about four or five inches from the left hand.
The whip should be balanced in the palm of the right hand, passing between the thumb and forefinger so as to leave all the fingers free to grasp the reins if need be. It should be carried at an angle of forty-five degrees, and point toward the left and front. The lash of the whip, for single and pair horse driving, should always be free.
The theory of correct driving is that the left hand is to hold the reins, the right hand to hold the whip and to assist the left hand in shortening the reins and in turning and stopping. The method of holding the reins in the left hand, and keeping the right hand only to assist the left, as I have described, is that laid down by nearly all the recognized authorities on driving,[1] and for convenience I will call it the orthodox method.
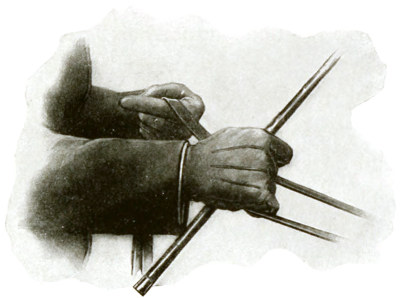
A variation on this method has, however, been introduced recently, and is now generally adopted by many of the best whips, both in England and this country, and is almost universally used in the show ring, where it is considered the correct form. For convenience I shall refer to this as the modern method. In this method, while the reins are held in the left hand as I have described, the off rein is allowed to slip through the second and third fingers about five or six inches, and is held in the right hand, passing under the little finger and coming out between the first and second fingers. The right hand is held about three or four inches from the left and symmetrically to it; the portion of the reins between the right and left hand is slightly loose. The whip is held in the right hand exactly as I have described, so that the forefinger of the right hand is extended and the other three fingers closed on the rein, the third finger and little finger holding it tightly and the second finger loosely. The reins are habitually held in this way, and the horse is guided to the right by pulling with the right hand on the off rein, and is guided to the left by turning the back of the left hand up and, if necessary, moving the right hand slightly forward and the left hand slightly back, so as to loosen the off rein and tighten the near rein. If, however, when driving in this way any occasion arises for using the whip, the off rein must be first shortened in the left hand by pushing it through the second and third fingers from the front with the right hand. The right hand then lets go of the off rein and the whip is used as I have described. This method of driving is now taught by the best professionals. It looks smarter than the other method, and when the reins are held in this way the horse is under better control, and can be turned more quickly and at a proper angle, and with less apparent movement of the hand, and with well-trained and properly bitted horses it is probably the best method to adopt. But with green or ill-trained horses it is not an advisable method, because it takes a little longer to shorten the reins than the orthodox method, where the right hand is free and can immediately be placed in front of the left. Whether both hands are on the reins or not, the reins should always measure the same length and should never be allowed to slip through the fingers. The horse’s head should always be kept straight, and to do this the hands must be held level.
The whip must always be held in the right hand; the horse must never be touched with the whip while the right hand is on the reins. The whip should be used sparingly, and it is much more likely to be too much used than too little. It is used more in driving a pair than in driving a single horse, as one horse often lags behind the other and it may be necessary to use it on him to keep him up, though this should be done rather by proper bitting than by the use of the whip. Before using a whip, however, for punishment, be sure you hold the reins firmly in the left hand and that the horse is well gathered, otherwise he will start forward when you whip him and may get away from you. In fact, it is most important always to gather the reins well in the left hand before even touching your horse with the whip, as otherwise you will have the horse going in a series of jumps, which is not only very bad form but uncomfortable for every one in the trap.
I cannot insist too strongly on the necessity of having both reins securely held in the left hand and the horse well gathered before using the whip, for if you touch the horse with the whip with the off rein in the right hand, you are sure to slacken that rein and thus cause the horse to turn to the left. Moreover, if the horse starts, you are not in a position to control him.
To pull horses up and to stop them, you must first see that the reins are held evenly in the left hand; then place the right hand as far in front of the left as may be necessary. If you know that the horse has a hard mouth and does not stop readily, the right hand must be a foot or even more in front of the left, while with a horse that is light mouthed and stops quickly it should be only a few inches. The right hand is placed over both reins—some separate the reins by the third and little fingers, others put the little finger on top of both reins—and the left hand is raised and carried forward, at the same time the right hand is brought back so as to bring the left hand above and directly over the right. The horse should not, of course, be reined in with any sudden jerk, but only by a gentle and gradually increasing pressure, which is accomplished much more easily by this method of laying the right hand on the reins than it could be by pulling the reins with the arms or body.
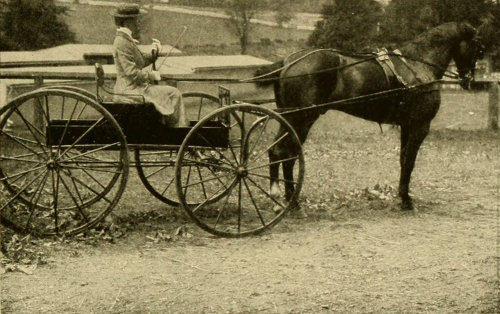
Nothing looks worse or is such bad form, in stopping horses, as to pull the reins in toward the body, as is so often done by those who do not understand driving. Not only does this look badly, but it is dangerous, for it leaves the driver with no control whatever over the horses as soon as her hands come up to her body. There is no way by which she can take up any more slack except by leaning so far back that she looks as if she were falling over backward. In the correct method of stopping, which I have described, if not enough slack has been taken up at first, more can be taken by simply slipping the right hand further along the reins and carrying the left hand higher and more to the front, and throughout the whole operation the two hands should not be carried further to the rear than they were when you began. While this is, and always has been, the correct method of pulling up, it is astonishing how few remember to use it, even in classes in the show ring, where driving counts. Another great advantage of this method is that it is very similar to that used in pulling up a tandem or a four, and it is best to acquire the habit of correct driving for a single horse and for a pair, which will not have to be altered when you take up driving four-in-hand and tandem.
If you wish to turn to the left, when driving with what I have called the orthodox method, you should take the near rein in the right hand between the second and third fingers a few inches in front of the left hand and pull gently with the right hand, keeping the left hand as it was or advancing it slightly so as to loosen the off rein; then, as the horse is completing the turn, gradually relax the hold with the right hand, and when the turn is finished let go with the right hand.
In turning to the right the off rein should be gathered in the right hand under the little finger, a few inches in front of the left, and the horse pulled to the right by the right hand similarly to the way I have described for turning to the left.
In both the “orthodox” and “modern” methods, to shorten the reins in order to keep horses under better control or to slow them down, the reins must first be evenly held in the left hand; then the right hand is placed in front of the left, the off rein under the little finger, the near rein between the first and second fingers, and the reins are then grasped firmly in the right hand and drawn back and pushed through the left hand. It is bad form, in shortening the reins, to take the reins behind the left hand and pull them through with the right, though through carelessness many do it. If there is occasion to shorten the reins more than a few inches, instead of pushing through, let go with the left hand and again grasp the reins with the left hand in front of the right, and then, if necessary, continue to pull in hand over hand.
If in the act of turning a corner, or making any turn, there should be occasion to use the whip, as sometimes happens, particularly in pair driving, a “point” may be taken on the rein on the side toward which the turn is being made: thus, if turning to the left, take the near rein in the right hand between the first and second fingers and loosen the hold of the left thumb on the near rein for a moment, carry the right hand up to the left hand, and then place the thumb on the rein so as to form a loop, then let go with the right hand. This leaves the right hand free to use the whip, and holds the near rein sufficiently to keep the horse turning. If there is too much pressure, relax the left thumb and let the loop slip a little. Similarly, in turning to the right, grasp the off rein under the little finger of the right hand and push it back, letting it slip between the second and third fingers of the left hand until a loop is formed to the rear of the fingers, then close the left thumb on this loop and let go with the right hand, which is then free as before. This loop, if too much rein has been taken up, can be allowed to slip through the fingers of the left hand as much as may be necessary. In making a turn it is not under any circumstances advisable to use the whip while either rein is in the right hand; it is much better not to use the whip until the turn is completed.
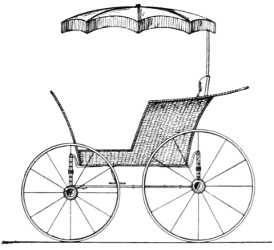

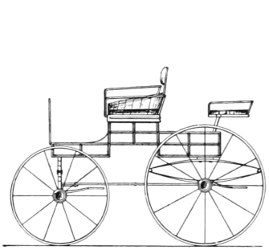


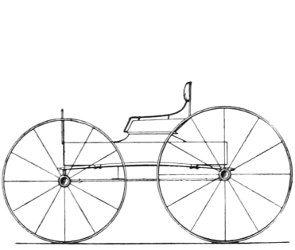
To lengthen the reins, do not let them slip through the left hand, but take them in the right hand, the off rein under the little finger, and the near rein between the second and third fingers immediately in front of the left hand; then close the fingers of the right hand on the reins, relax the fingers of the left hand, and pull the reins through the left hand with the right as far as may be necessary. Letting the reins slip through the left hand without the assistance of the right, as I described, is bad form, and is unsafe, because they may not slip evenly and they might well slip too much. Besides that, in driving spirited horses it is most important to have an even pressure on the bits and to feel their mouths all the time. If the reins are allowed to go, even for a moment, as they would be in letting them slip through the left hand without the assistance of the right, the horses would know it and be very apt to start and even to run.
All that I have said above with regard to the management of the reins, applies equally to the driving of a pair or of a single horse. It does not apply to the driving of roadsters or trotting horses, as they are differently trained and driven in an entirely different method.
In learning to drive, unless one is being taught by a professional or other experienced whip, I would rather advise beginning with the “orthodox” method, and thus learning thoroughly the correct fundamental principles of driving, which are the same in both methods. The “modern” is simply a variation on the “orthodox,” and the danger of beginning with the “modern” method is that with the off rein held in the right hand, as I have described on page 199, the beginner may fall into the very incorrect, though common, method of holding a rein in each hand, and so not have the right hand constantly in readiness to assist the left in shortening the reins, in pulling up, in turning, and in the use of the whip.
The reins should never under any circumstances be held separately, one in each hand, for, obviously, if they are, the right hand cannot assist the left, the whip cannot be used, the horses can only be pulled up to the extent of the distance of the two hands in front of the body, and it is impossible to keep an even pressure on both reins; one hand will always pull more than the other. Holding a rein in each hand violates the first and fundamental principle of correct driving—that the two reins must at all times be held firmly in the left hand.
It is needless to add that the horse must never, under any circumstances, be struck with the reins.
When starting, the horses should first be gathered well in hand, and then, at the moment of starting, given their heads by carrying the hands forward. Many drivers make the mistake of trying to start the horses by pulling them back instead of giving them their heads.

If you are driving in the afternoon, and there is any chance of your being out after dark, you should always be sure that the lamps are on the trap and that they have new candles; also, in country driving, be sure at all times that there are tools under the seat, including a wrench, a hoof pick, and matches.
In using the whip never strike a horse in front of the pad, or on his belly or legs, but always on his quarters, and do not use the whip unnecessarily or keep up a constant tapping on the horse. “Tapping” is a very bad habit, into which many people fall, and it completely spoils a horse, as he becomes so accustomed to the whip that it produces no effect on him unless used with violence, which should seldom, if ever, be necessary. If your horse is lazy, instead of constantly tapping him, give him one vigorous lash, and accompany it by a decisive tone of the voice. A few repetitions of this will, almost always, cure his laziness, and presently the voice alone will be sufficient. “Tapping” will only make the horse more confirmed in his laziness.
In driving, if your horse shies, you should never whip him; you must keep control of him by a firm hold of the reins, and if possible drive him quietly up to the object that he is afraid of and make him pass it, and if practicable make him pass it two or three times until he has forgotten his fear. You must have the right hand in readiness to pull hard on the rein opposite to the side toward which he is shying, so as to avoid his overturning the trap, which, incidentally, is another demonstration of the importance of using the correct method.
If your horse rears, give him his head immediately by loosening the reins, and urge him forward with voice or whip, or both if necessary. If he becomes uncontrollable and rears over backward, spring out of the trap on the side opposite to that on which his legs are, keeping a firm hold of the reins, and, as quickly as you can, sit on his head. Do not let him attempt to get up until he is clear of the trap.
In driving, particularly with a single horse, the greatest danger is from kicking, for once your horse begins to kick you are in great danger in any kind of a trap, except a breaking cart, where the distance between the driver and the horse is so great that he can kick freely without touching the body of the cart. Of course no woman should knowingly drive a kicking horse, and if there is any question about it she should always take the precaution to use a kicking strap. A kicking strap cannot, however, be used in the show ring, but generally its use on other occasions is advisable. A kicking strap, fitting tightly when the horse is standing, of course effectually prevents a horse from kicking, as he cannot kick without first raising his quarters. The kicking strap, to be of real service, must be very strong. Bad accidents have happened through the kicking strap breaking, and a horse in the act of raising his quarters to kick has great power.
In driving green horses single, it is much safer to use a high cart than any kind of a four-wheel trap. With a cart, the horse cannot, of course, cramp the wheel, and in a high cart there is much less danger from his kicking.

To get out of a trap when you have no groom, first lay the whip on the seat pointing toward the back of the trap, then place the reins in the right hand, taking them up enough to feel the horse’s mouth. Grasp the dash with the right hand and step out of the trap backward, with the right foot on the step, the left foot coming first to the ground; then step forward until opposite the pad and put the reins through the off terret in the position described on page 197.
When, however, a servant is in attendance, he should, as soon as you pull up, stand at the horse’s head; you then simply drop the reins with the left hand so that they lie over the dash; either lay the whip, as above described, to the left of the reins pointing to the rear, or else place it in the socket; then step out of the trap, facing forward, the left foot on the step. The servant then steps into the trap on the same side on which you have stepped out.
If the horse will not stand, it is quite correct to step out forward, keeping the reins in the left hand, and then to hand them to the servant when you have reached the ground, having first laid the whip on the seat pointing to the rear.
If you are driving a phaeton with a servant on the rumble, he should jump out as you begin to pull up and run to the horse’s head. If, however, your horse is very nervous and will not stand, it is quite correct to have the servant stay on the rumble, and then, after you have pulled up, to pass the reins back to him on your left side. Then place the whip in the socket and step out, facing forward.
1. “Driving As I Have Found It,” by Frank Swales, pp. 94–100; “How To Drive,” by Captain Morley-Knight, pp. 24–28.
As this book is limited in its scope to riding and driving for women, I shall not attempt to discuss four-in-hand and tandem driving in detail, and for a very exhaustive work on four-in-hand driving, would refer the reader to “A Manual of Coaching,” by Fairman Rogers (Philadelphia, J. B. Lippincott Co., 1900), and to “Driving for Pleasure,” by Frank Underhill (D. Appleton, 1897).
One of the best short books on the technique of driving is “Hints on Driving,” by Captain C. Morley-Knight, R.A. (George Bell & Sons, London, 1895). Chapter VI of that book describes in detail the method of holding and shortening the reins in four-in-hand driving, and chapter X the same problem in tandem driving. Like other English authorities, he, however, gives quite a different position for the right hand in tandem driving from that in four-in-hand driving, while the chief American writers, and nearly all the best whips of my acquaintance, advocate and use substantially the same position of the right hand in both.

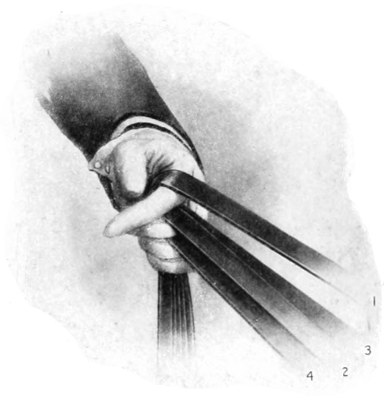
Before beginning to drive either tandem or four-in-hand, it is absolutely essential that you become proficient in handling the whip, and I would strongly advise learning to “catch a thong,” by daily practice, either outside on the ground, or, better still, on the box of the coach or driving seat of the cart, of course without the horses. By so doing one can concentrate one’s mind upon the thong without being distracted with the management of the reins and the movement of the horses. The best and clearest description which I have found in any work is in chapter XX of “The Private Stable,” by James A. Garland (Little, Brown & Co., Boston, 1903), and in describing how to catch a double thong I cannot do better than to quote what he says on pages 546 and 547:
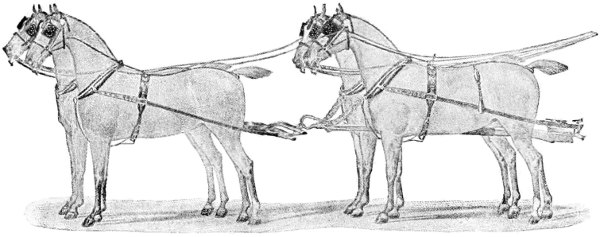
“Hold the whip horizontally in front of you with the end of the thong held between the handle of the whip and your fingers. Face a wall or the side of a building and with the quill end of the whip describe a letter “S” backward. Begin with the lower tail of the letter, following its form to the upper end. Don’t move the arm, keep the elbow easily by the side, and direct the movement of the whip by turning the wrist. Continue to increase the speed until the thong falls in place. At first a short downward movement at the end will facilitate the accomplishment of this somewhat difficult feat.
“Another method is to catch the thong over the head instead of in front or to the side. This is done virtually by the same movement, the imaginary letter “S” being horizontally overhead instead of vertically in front or to one side.
“Still another method involves a new movement. Hold the whip with the right hand against the waist and the quill end well around to the left and on a line with the top of the head. Carry the stick at this angle around to the right until in a line with the right shoulder. In so doing raise the right hand gradually. Now drop the quill end of the whip until it is on a line with the handle. This last movement should be executed quickly so that the end of the stick strikes the thong on the right-hand side of the stick.
“When the thong is caught, it is wound around the stick in opposite directions. The lower end should be unwound with the right hand, the whip being held between the thumb and forefinger of the left hand. The end of the thong should be rewound in the same direction as the upper part and held in place by the right hand. The loop should be about two feet and a half long and caught on the quill part of the stick.”
Not until you are proficient enough to catch the thong with certainty should you attempt to drive either four-in-hand or tandem, and you will find, the moment that you take the reins in your hands and start to drive, that it will be far more difficult to catch the thong than when you could give it your undivided attention. Moreover, it is vastly more difficult to catch the thong in a wind, or under trees or other obstacles, than when learning in the stable, and constant practice is required to keep one’s hand in.

I shall not attempt to describe how the horses should be put to a coach or a tandem, for to do so would be to go far beyond the scope of this book, so I shall assume that the coach or cart, as the case may be, is correctly appointed and the horses properly put to.

To quote further from Mr. Garland’s work:
“In taking up the reins stand about two feet from the pad of the off wheeler. Remove the reins from the pad terret or trace tug and allow them to fall to the ground.
“First take up the near lead rein with the left hand, placing the little, second, and middle fingers under the rein. Drop the left hand to the side, allowing the reins to slip through the fingers. Tighten the fingers over the rein at this point. Now raise the left hand and place the little and second fingers under the off lead rein. Drop the hand to the side as before. The parts where the reins are joined should hang evenly in front of the left hand. The reins may be adjusted by taking the rein that is to be drawn out between the middle and index fingers of the right hand. The reins should now be transferred into the right hand, separated by the middle finger.
“Take up the wheel reins in the left hand, separating them with the middle finger, the near wheel rein on top. Drop the left hand to the side as described in the preceding paragraph. Now raise the hand and adjust the reins, with the thumb and forefinger of the right hand, so that the buckles on the wheel reins hang evenly.
“Pass the lead reins into the left hand, the near rein over the index finger and the off lead rein under the index finger and on top of the near wheel rein.
“When taking up the reins, draw each in turn gently through the terrets, tight enough merely to ‘feel’ the bit without causing the horse to flex his neck or make any backward movement.
“Step back to the wheelers’ hocks, and, keeping the left hand against the body, take the reins with the right hand in the same order as they are in the left hand. With the right hand close in front of the left one, draw the reins through the fingers of the left hand as far as the right arm can be extended, and then remove the right hand.
“As soon as this is done, take the whip in the right hand from the foot-board (if a tandem), or from the backs of the wheelers (if a four-in-hand), and transfer the reins into the right hand in the same order as they were held in the left hand. The reins are now to one side and out of your way in mounting.
“Place your left foot on the hub, your right on the roller-bolt, then the left foot on the body step, and the right one on the foot-board. Take your seat as soon as possible and transfer the reins back into the left hand in the original order.”
A reference to the accompanying sketches on pages 219 and 222 will show the positions of the hands and reins quite clearly.
The correct position of the feet, legs, body, arms, and hands are the same as already described on page 198 in the notes on driving a single horse or a pair.

To start a four-in-hand, the horses should, before starting, be well up in their collars, so that the traces are taut. The leaders’ reins should be shortened by grasping them in the right hand, separated by the middle finger, about a foot in front of the left hand and replacing them in the left by carrying the right hand behind the left. Take off the brake as quietly as possible, then advance the right hand, put the little and second fingers over the two off reins with the middle and index fingers so placed over the two near reins that the latter may be grasped. When you are sure that the four horses are feeling the bit and they are well together, drop and advance the hands, and at the same time give the horses a signal; at the same moment the grooms let go their heads, and the horses should all start together. Once the horses are in motion together, bring the left hand up into its position near the centre of the waist, and, removing the right hand from the reins, hold it slightly in advance of the left. To quote again from Mr. Garland:
“To shorten or lengthen the lead reins, place the middle finger of the right hand between the lead reins directly or at some little distance in front of the left hand, depending upon how much the lead reins are to be taken up or lengthened. If you wish to lengthen them, tighten the fingers of the right hand and draw the reins out to the desired distance. Should you wish to shorten the lead reins, take them out of the left hand, and in putting them back bring the left hand behind the right one. Do not advance the left hand.
“To lengthen or shorten the wheel reins, place the right hand under the lead reins and grasp the wheel reins in the same manner as described for taking up the lead reins. The wheel reins can now be either pushed back or drawn through the fingers of the left hand.
“TO STRAIGHTEN THE TEAM“Should the leaders work over to the right of the wheelers, grasp the two reins, which are between the second and middle fingers of the left hand, between the middle and index fingers of the right hand. Draw these reins (the off lead and the near wheel) out a little, and it will be seen that it has the effect of bringing the team into line. Should the leaders work over to the left of the wheelers, instead of drawing the centre reins out, work them a little further back through the fingers of the left hand.
“STOPPING“When it is desired to stop the team, raise the left hand, and, placing the right hand over the reins, twelve inches in front of the left hand, as described in a preceding paragraph, press the reins in toward the body with the right hand.
“TURNING“To turn to the right, shorten the leaders’ reins so that the lead bars hang slack, and place the little, second, and middle fingers over the off lead rein about five inches in front of the left hand (depending upon how sharp a turn you desire to make). Draw the off lead rein back over the forefinger of the left hand, first raising the left thumb. Whenever you think you have shortened the rein sufficiently, drop the thumb on the loop thus made.
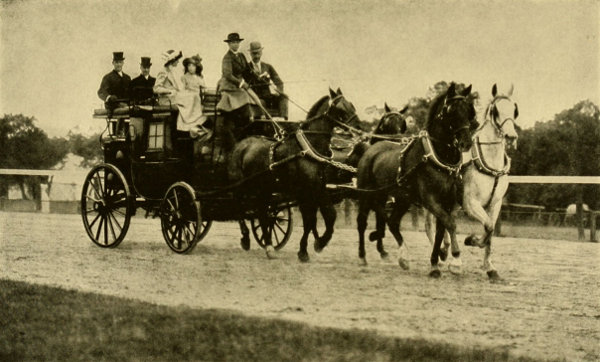
“Place the right hand over the off reins and be ready to grasp the off wheel rein from the inside with the little and second fingers, should the off wheeler fail to follow the off leader in making the turn. At the same time place the middle finger of the right hand between the near wheel and the near lead rein with the forefinger over the latter, and thus be ready to exert opposition should the horses on the near side turn too quickly. By placing the middle finger between the lead reins they may be operated separately or together.
“It will be seen that the wheelers may be drawn back together at any time in making the turn. As soon as the turn has been completed, lift the left thumb and let out the loop of the off lead rein; then, after giving the leaders more rein, let the hands resume the position shown on page 238.
“To turn to the left, shorten the leaders’ rein so that the lead bars hang slack, and place the little, second, and middle fingers over the near lead rein about five inches in front of the left hand (depending upon how sharp a turn you wish to make). Draw the near lead rein back over the forefinger of the left hand, first raising the thumb. Whenever you think you have shortened the rein sufficiently, drop the thumb on the loop thus made. Grasp the off lead rein with the little and second fingers of the right hand and insert the middle finger between the off and near wheel reins. The near wheeler may be made to follow the near leader by tightening the near wheel rein with the middle and forefingers. Opposition may be exerted on each or both off reins, or the wheelers may be drawn back together. When the turn has been made, drop the loop and, after giving the leaders more rein, allow the hands to resume the position shown on page 238.
“TURNING ACUTE ANGLES“In turning an acute angle to the right, take up the leaders as has been previously described. Then with the right hand reach over the lead reins, and, grasping the near wheel rein with the little, second, and middle fingers, bring it up to the left of the lead rein and back over the index finger of the left hand, dropping the rein down in front of and around the thumb, in such a manner that the rein will be held in place by the fleshy part of the thumb near the wrist. Now make a ten-inch loop with the off lead rein, holding the loop in place with the thumb, and, reaching under the lead reins, make, in a similar manner, a point with the off wheel rein. After the turn is made, first drop the points, then the opposition over the thumb, and finally let out your leaders.
“In turning an acute angle to the left, first take up the leaders, then place the right hand under the off lead rein, and push back toward the body the off wheel rein through the fingers of the left hand, and make the two points with the near lead and wheel reins. After the turn has been made, draw out the off wheel rein with the right hand until the buckles on the hand pieces are even. Then let out the off wheel rein and the two points as described in preceding paragraph.
“In turning a right angle, as from an avenue into a street, make the point, i.e., loop, over the forefinger when the leaders’ forefeet have reached the corner.
“In going downhill, take up your leaders so that the lead bars hang slack, and then shorten all four reins.
“If your reins become misplaced, keep your team going, unless approaching or on a sharp decline. Under the latter conditions, have the servants run to the horses’ heads and bring them to a stop as quickly as possible. It is much easier to readjust the reins when the horses are going than to try to stop them. Find the lead reins and take them in the right hand with the middle finger between them, then with the thumb and forefinger of the right hand place the wheel reins in their proper position, and when this is accomplished return the lead reins to the left hand. Remember the off rein belongs on top of the near ones.”

What has been said and quoted above relates more particularly to four-in-hand driving, but the principles of tandem driving are the same, except that it must be borne in mind that to drive tandem requires far lighter hands and more quickness and skill on the part of the driver than it does to drive a four. There is, of course, nothing to steady the tandem leader and, in cases where in driving a four-in-hand it would be necessary to make and hold a point—as, for instance, in turning a corner—with a tandem it will often only be necessary to touch the leader’s rein. Remember, also, that the wheeler is only too apt to turn the moment he sees the leader turn, and it is often necessary to steady the wheeler by a pressure on the opposition rein, and, if he has a hard mouth or a sluggish one, it may even be necessary to make an opposition point to prevent him from making too sharp a turn. Except for the fact that a four-in-hand requires far more strength, tandem is the more difficult of the two. It is, however, peculiarly well suited for a woman because of her light hands and quickness, and there is no reason why women should not excel in this form of driving. Indeed, in the show ring, there have been far fewer accidents with women driving tandem than with men.
As most of the current works on four-in-hand and tandem driving were written before the days of automobiles, added caution is now needed, particularly with respect to the tandem. No woman should, under any circumstances, attempt to drive horses tandem unless they are thoroughly accustomed to automobiles, and it is necessary nowadays to be very much more on the alert than it was before the evil days of gasolene.

While with a well-trained tandem there will seldom be occasion for much whip work, at the same time, even with the best-trained horses, there will be occasions when the leader can only be controlled by the prompt and skilful use of the whip. With green horses it is quite impossible to control the leader without being prepared to use the whip at any moment. The ability to catch the thong comes into play far more frequently with a tandem than with a four-in-hand, and it is even more essential with a tandem, for the thong is more easily caught in the wheels of a cart, and particularly of a gig, than a coach.
With regard to the kind of cart to which the tandem should be driven, it is to be noted that, for several years past in the show ring, tandems have been generally shown to gigs, and very few tandems have been shown to carts even in country shows. This may result in giving the general impression that the gig is the correct vehicle to which to drive a tandem, which is far from being the case. No recognized authority holds that it is the correct vehicle, and, for road driving, a gig is thoroughly unsuited to a tandem. While a gig is more comfortable and balances better than a wrongly adjusted tandem cart, yet a gig is much too low for the driver either to have proper control of his leader or to be able to see obstacles in front of the leader. Moreover, a gig, having a much smaller body than a tandem cart and also short shafts, gives an appearance of wrong proportion to the tandem, and, especially from a distance, an effect of something lacking. This is particularly the case with horses over fifteen hands two. If a gig is used, it is important that the lead traces should be as short as possible, so as to make the whole appearance more compact.

For road work, and particularly for country driving, a tandem cart is not only correct, but is a more practical and suitable vehicle than a gig, particularly with large horses. The driver is well up above the horses, which gives far better control; she is able to see well ahead of the leader, and there is also the advantage of being out of the dust and in a position where one can better see other vehicles, both in meeting and passing them. Whatever kind of vehicle is used, the tugs should be so adjusted that the vehicle is in balance when the shafts are in position. While this is not so important with a gig or a cart whose body is hung on springs independent of the shafts, it is absolutely essential with a tandem cart, or any other cart, where the body is not balanced independently. I wish to lay great emphasis on this point because very few grooms know anything about it, and it is the most common thing in the world to find a horse put to a cart with the girth strapped so tightly that there is no play to the shafts. This is entirely wrong. If English tugs are used, as they should be with a tandem cart, the girth should be so loose that the shafts not only play in the tug, but the tug plays in the girth, and this will usually be done by letting out the girth from four to five holes beyond where it would be if it were tight.
With regard to balance, the body of a tandem cart is made to slide on runners, and the position of the body is regulated by a screw with a handle which comes up under the driving cushion. This handle may be turned so as to throw the body backward or forward, according to the number of persons who are to sit in the cart; thus, if a groom is to sit on the back seat, the body of the cart should naturally be much farther forward than if the back seat were empty, and, for the same reason, if there is the additional weight in front of another person besides the driver, the body of the cart should be moved farther back than if the driver were alone. The proper position of the body of the cart—so that it will be in balance—can only be learned by experiment, for it varies, of course, with the angle of the shafts and the weight of the load to be carried.
While the tandem cart is correct for tandem driving under all circumstances, for country use there are several forms of light high carts which are quite correct and much easier for the horses in hilly country or on heavy roads. While the bodies of these carts are not adjustable, balance can be secured by raising or lowering the tugs in the girths so as to raise or lower the shafts, and by adjusting the position of the people in the cart. In all high carts the weight should be thrown forward in going uphill and back in going downhill. It is an interesting fact that a horse can pull a heavier load uphill the more weight, within reasonable limits, he has on his back.

In tandem driving, when going downhill, the leader’s reins should be shortened; if the hill is long, they should be grasped in the right hand a few inches in front of the left, separated by the middle finger, released from the left hand for a moment, then carried back with the right hand behind the left and grasped again in the left, and held there until the bottom of the hill is reached. If, however, the hill is only a short one, they may be simply taken up in the right hand and held there for a moment. The leader should, of course, not be pulling at all when going downhill; on the other hand, his traces should not be so loose as to give him any chance of getting his feet over. In travelling on the level, the leader’s traces should be only moderately taut. The tendency with beginners is to let the leader do too much work; this not only tires the leader, but it gets the wheeler in the bad habit of letting the leader pull not only the cart but the wheeler as well, and, in general, the leader should rather be reserved for uphill work. On the level most of the work, and downhill all of it, should be done by the wheeler.
While tandem driving originated in driving one’s hunter in the lead to the meet so that there was no attempt at having the horses match, nowadays matched pairs are commonly shown in the ring tandem, so that it may be said that there are three different classes of tandem horses: First, matched pairs; second, a large wheeler with a small, showy leader; and third, two horses of the hunter type, not necessarily matched, for a sporting tandem and for country work. It is a mistake to suppose that tandems are merely ornamental; on the contrary, it is one of the most practical ways of harnessing two horses, and the only really practical way of harnessing two horses to a cart. Horses generally enjoy being driven tandem because it means freedom for them both, and they can exert their strength to great advantage. Indeed, on the Continent nearly all the heavy trucking is done with very high two-wheeled vehicles drawn by two, three, or even four horses tandem.
Those who are in favor of putting a harness on their hunter will find that one of the best ways of exercising a hunter is by driving him in the lead of a tandem, as there he may be given much less pulling than if he is driven single. If you have a long-tailed hunter, do not, however, drive him in the lead. No long-tailed horse should ever be driven in the lead of a tandem, save in the exceptional case of showing a sporting tandem in the ring. The sporting tandem, as shown in the ring, is made up of any kind of a wheeler and the hunter in the lead with his saddle on. The riding bridle is carried in the cart.
Of late years there has been a great outcry against the practice of docking which, in my opinion, has arisen through ignorance and prejudice, and has been raised by people who do not at all realize the dangers of driving long-tailed horses, especially in a four or tandem.
The arguments used against docking are first that it is cruel and second that it prevents a horse from brushing off the flies. Neither of these objections is well founded. The operation, when properly done by a competent man, causes almost no pain to the horse, is done very quickly, and has no after ill effects. With regard to brushing off flies, this argument would be quite good if horses were left out in the fields without anything on them, but to use it with regard to the driving horses of persons of means is perfectly ridiculous. When a horse is harnessed he cannot possibly use his tail to brush off the flies. When he is standing in a properly appointed stable, he is always covered in summer with a sheet and in winter with a blanket, and there are no flies in winter. When he is turned out in summer he is always covered with a sheet.
Docking is not, as its opponents assert, a senseless fashion, but is founded on reason. A long-tailed horse, particularly if driven in a low four-wheeled trap, is almost sure, however careful the driver may be, to get his tail over at least one of the reins. If he does, it is a matter of great difficulty to release the rein, and if the horse is high-spirited or in any way vicious, as long as his tail is over the rein the driver has absolutely no control over him. He is in a position to kick, which he is almost sure to do, or to run, or to do anything he pleases, and he nearly always does something which he should not do. The opponents of docking are not persons who have driven high-spirited horses or who know anything about either tandem or four-in-hand driving. The danger, when a horse gets his tail over the rein, is multiplied a hundred-fold when he is the leader of a tandem, for in that case the driver is absolutely helpless; there is nothing that he can do but either jump out of the trap and run to the leader’s head or wait until such time as the leader may see fit to let the rein go. In the meantime the leader may be kicking, turning, pulling to one side, running away, upsetting the cart, or doing any one of a thousand things which the driver cannot in any way prevent. In pair driving it is also a very serious thing if either horse puts his tail over a rein. The result is that immediately control is lost not only over him but over the other horse as well, for half of the control over the other is had through the coupling rein which is buckled to the rein caught in the tail. Many most serious accidents have been caused by long-tailed horses catching the reins. I do not therefore consider it safe for a woman to drive a long-tailed horse of any spirit.
Of course roadsters or trotting horses never should have their tails docked, nor should thoroughbreds or polo ponies, and many hunters do not. But when a woman drives any of these long-tailed horses, she is taking risks which she had better avoid.
With regard to the looks of a horse, to my mind no driving horse with any kind of a formal trap looks smart with a long tail any more than he does with a long mane, or forelock, or with the hair about his fetlocks untrimmed. I am not talking about a horse in the state of nature, but of a horse harnessed to a properly appointed trap.
With regard to saddle horses, I think also that a horse of the park, hack, or combination type looks far better with his tail docked.
It might be said that a trotting horse is quite as apt to get his tail over the rein as any other driving horse, but this assertion loses sight of the very different way in which a trotting horse is driven, and of the fact that in a trotting wagon the driver sits so near that he can reach down and lift the horse’s tail over, and that trotting horses are carefully trained not to start under these circumstances.
Trotting horses are in a class by themselves, and it is more reasonable to say that the tails of trotting horses should be docked than that the tails of other driving horses should be long.
With regard to the mane, every driving horse should have his mane thinned out by pulling, so that it may not look shaggy. Most ponies look best with their manes closely hogged. If this gives a ewe-necked effect the mane may be cut in a curve, short at the head and withers and longer in the middle. The forelock on all driving horses should be cut entirely away.
The harness should be of black patent-leather with square wire buckles. Crests, monograms, or initials should be small and inconspicuous: for a single horse, placed on the standing martingale; for a pair, on the breast plates.
Loin straps, which are part of the appointments of a victoria or other trap driven by a servant, should not be used for ladies’ traps driven by a lady. Pole chains with oval links are permissible or pole pieces, when the owner drives; chains are never permissible on any trap driven by a servant. The chains should fasten at the pole and no extra links should be allowed to hang.
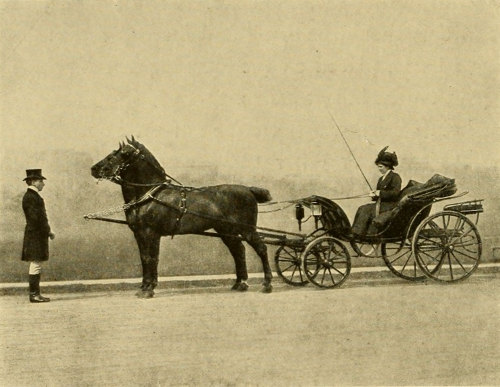
Phaetons for use in the country have been shown of late, built on the lines of the George IV and finished in natural wood, and with them russet harness instead of black patent-leather is very smart, and, if the trap is a light one, Dutch collars may be used instead of Kay collars. All formal ladies’ traps finished in dark colors should also be lined with the owner’s colors, either black, dark blue, dark green, or maroon, and the servants’ liveries should match the lining. Country traps of a light color should be lined in light colors, and it looks smarter for the lining to match the country livery, although gray liveries may be worn with any light lining. Ladies’ traps may also be lined in leather instead of cloth and in the same colors, and it is most important that the trimming of the lining should be strictly in keeping and very plain. The driving cushion should always be covered with the same material as the lining. The mat in the bottom of the trap should, of course, match the lining.
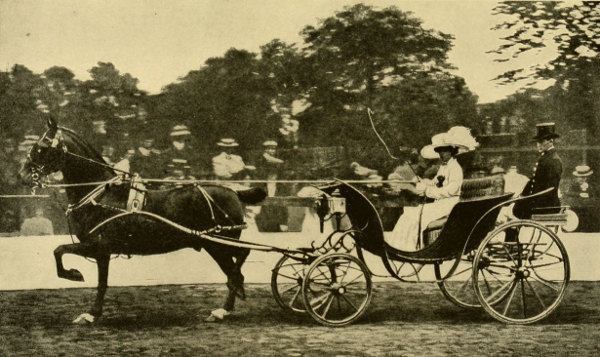
The running gear of all ladies’ traps should be finished in dark colors with inconspicuous striping, and the striping should be in keeping with the lining; that is, if the lining is other than black, the striping should be of the same color. All light colors for the striping, such as primrose, light red, and light green, should be confined to sporting traps and runabouts; light hues do not seem appropriate to formal ladies’ traps.
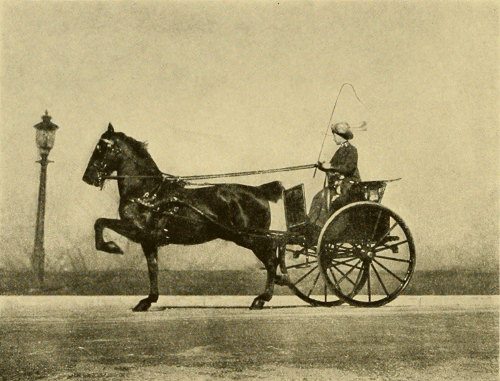
With all formal ladies’ traps, plain square lamps are more appropriate, and round lamps belong rather with sporting vehicles. Illustrations of a number of smartly appointed ladies’ traps will be found on page 209.
The owner’s rain coat and storm gloves should be carried folded in the hood. The rubbers, comprising the rubber apron and groom’s rain coat and cover for his hat, should be folded and placed under the seat of the rumble.
Regulate the pace by the distance that you have to go, and, whatever the distance, keep going at a steady pace—from seven to nine miles an hour is a good average—and it is a great mistake in long driving to go sometimes very fast and then try to balance it by going very slowly. In the old coaching days, when long distances were covered and the horses had to be kept in good condition, the general principle was to keep the horses going at about the same gait uphill and down, and this applies quite as much with a pair or a single horse. It is easier for a horse, and tires him less, to keep a steady gait than to walk up and down hill and then go very fast on the flat.
The most important thing about driving horses, especially for distance driving, is to find by experience their natural fast gait and then to keep them to it, and never to urge your horses beyond their natural gait, as nothing tires them so quickly. On the other hand, it tires a high-spirited horse almost as much to keep holding him back from his natural gait. Horses, after they have been driven a bit, know better than their drivers how to cover the ground, and they generally had much better be left to pick out their own gait than be forced to what the driver thinks is the gait they should take. So, in going up or down hill, if a horse shows a natural inclination to trot up even a steep hill, let him trot if he wants to; it will tire him less than holding him back.

It is also a great mistake, which many drivers make, to walk horses down every hill they come to. Unless a hill is very steep, it is far easier to keep up a steady even trot, and if you have a heavy trap and find it straining your horse, drive him in the soft part of the road, which will hold back the trap. In going up or down very steep hills, it is easier for the horses to zigzag from side to side, though of course at a walk, as a hill as steep as that cannot be undertaken at a trot.
Start your horses slowly and let them gradually warm up to the work before them, and drive them slowly, or even walk them, for the last mile or two, so as to cool them before they go to the stable. As in riding, follow the old adage, “Walk the first mile out and the last mile in.”
When you are bringing your trap up to the house or to the curb, so as to get out yourself, or to let some one else out, you should rein in your horses gradually; keep them going at a gradually diminishing trot, until just before you are at the point at which you are to stop, and then stop them quietly but firmly. Do not attempt to dash up to the stopping place and then throw the horses back on their haunches, but do not bring your horses down to a walk twenty feet sooner than you need to and then creep up to the stopping place. Follow the same general principle when you are coming to a corner or entering a gate. That is, keep your horses well in hand and slow them down before you make the turn, but it it is very bad style to bring your horses down to a walk, or anything approaching a walk, before turning a corner and to make the turn at the walk. When going at a trot you should not make a turn at the walk unless you wish to turn the trap entirely around and go in the opposite direction, or unless you have to make a turn of more than a right angle.
In going up driveways, as in approaching a country house, be sure to keep your trap in the middle of the road, and to keep your horses up to their gait, always with your horses well in hand. Needless to say, it looks very badly to cut in on the grass on either side or to look as if you were cutting W’s.
It must be borne in mind when you are driving into a country place, that many of them have their drives so arranged that there is a turn to the stable near the entrance gate. Be sure that your horses are well in hand, and that you are prepared to turn them to the other side, as they are sure to see the stable turn and very apt to try to take it.
When you come to a hill, remember that your horses in going up need to stretch their heads out in order to exert their full strength. You should, therefore, give them their heads as much as they want, provided always that you keep them in hand. In going downhill, on the other hand, the horses should always be reined in, though, as I have said, not enough to bring them down to a walk unless the hill is very steep; they should, however, be kept well in hand in going down as there is then the greatest danger of stumbling.

If you are driving a trap with a brake, with which some basket phaetons are equipped, as are all traps for use in hilly countries except runabouts, do not use the brake too freely. It is much better for the horses to accustom themselves to hold the trap back than it is to have them pulling it downhill. If your horses become accustomed to having the brake on at every hill you go down, you will find great difficulty in holding them when you drive them without a brake. The brake should be reserved for use in going down very steep hills and for emergencies, such as having the horses get away from you when going down a moderate hill; but the brake should never be used, in single or pair horse driving, in pulling up.
The rule of the road in this country is “keep to the right,” but why this rule has ever been adopted, instead of the English rule of keeping to the left, I have never heard explained. A little reflection will show one that the English rule of keeping to the left is the naturally correct and sensible rule, and that the whole theory of correct driving is based upon it. Thus, the driver sits on the right side of the trap in order to be able to avoid hitting a trap passing in the opposite direction, as he is on the side where he can best watch his own trap and the trap that might strike him. So the whip is held in the right hand, pointing toward the left in order not to engage with the whip of a passing vehicle, and the reins are held in the left hand that the whip may be held in the right.
Similarly, I may add, in riding, a man rides on the woman’s right, in order that he may have the point of danger, the middle of the road, when, if the riders are going to collide with persons or vehicles coming in the opposite direction, he will be the one to suffer the collision. That keeping to the left would be the common-sense way is quite clearly shown by the fact that many automobiles are now made with the chauffeur’s seat on the left, so that, keeping to the right, he may see and not collide with vehicles coming in the opposite direction. However, this rule of keeping to the right is established in this country, as it is in many of the Continental countries, and probably will never be changed. All vehicles, riders, etc., coming in the opposite direction, therefore, must be passed on the right, and on crowded roads, particularly in parks and on the streets or avenues of the city, the driver should habitually keep to the right of the middle of the road. If you are driving slowly, wherever you may be, you should keep to the extreme right in order that vehicles going faster may be able to pass you on the left. In passing any other vehicle or rider going in the same direction you should keep him on your right.
For driving in the show ring, the park, or any crowded thoroughfare, the whip should be used to indicate to those behind you what you are going to do. It is held up straight to show that you are slackening speed or that you intend to stop. It is carried to the right of the trap and twirled from left to right to indicate that you are turning to the right, and it is kept to the left and twirled from right to left if you are turning to the left. You should not only give these signals yourself, but you should always observe the driver ahead of you to see what signals he may give, and be sure when you are driving in any crowded place to keep your horses absolutely under control so that they may be stopped in a moment if need be. This is particularly important in driving in the city, where conformity with traffic regulations makes sudden stops necessary.
For all formal occasions, when you are driving any kind of a phaeton with a rumble, you should always have a servant on the rumble. For any formal occasion, where it is correct to drive a trap with a rumble, it is incorrect not to have the servant. It is better form, even for country driving, if you take a servant, to have him on the rumble, where he should always be if there is a rumble. It is not correct, where you have a rumble, to have the servant at your side. If the horses are pulling too hard, it is quite permissible to pass the reins back to the servant, or he may even drive them from the rumble, where he can control them quite as well as he could if he were sitting beside you.
For this reason the reins are made longer for a woman than for a man.
While, except for four-in-hand, there is no prescribed formal costume required for driving, at the same time there are certain general principles which women should always observe, not only for formal occasions, such as the show ring or park, but whenever they take the ribbons.
For formal ladies’ traps, such as phaetons, it is perfectly permissible to wear a large hat of the prevailing fashion and an afternoon or calling gown. Where the owner is driving a trap of this kind on a formal occasion, the costume should not be tailor-made, and her costume should produce the effect that she is out for a pleasure drive. With sporting traps and carts of all kinds, on the other hand, the costume should be strictly tailor-made and the hat small and not inclined to blow off. This is particularly so for tandem driving, and in that case the general effect should be mannish, and particular care should be taken to have everything securely fastened so that undivided attention may be given to the horses and reins. For driving tandem, or for any kind of a sporting vehicle or cart in the country, a plain sailor is the most appropriate as well as one of the easiest to keep on, and veils, as well as other feminine adornments, look quite out of place. The hair, of course, should be neatly and securely done, and boots or low shoes are much more appropriate than high-heeled slippers with open-work stockings.
It is always correct, under any circumstances, to carry a lap robe, and while in the show ring it may remain on the seat on the left side of the driver. For other occasions it is better to spread it over the knees to keep off the dust. If it is spread, be sure that it is neatly tucked in about the feet, but to do this requires some knack, and the best way to arrange the robe is to have it come over the feet so that the heels will rest upon it, and then to have the right end placed under you so as to entirely cover the lower part of your knee. If you are driving alone both sides should be adjusted in the same way, but, of course, if you have a companion the robe should cover you both.
For tandem a driving apron is permissible, but is not required, instead of a robe, and for four-in-hand driving it is required.
The costume for four-in-hand driving, as worn by the members of the New York Ladies’ Coaching Club, is a rough gray beaver top hat with a double-breasted dark-blue melton driving coat. Under the coat is worn a plain tailor-made cloth suit of any smart material, such as a check or a stripe. Some members wear spats, which are very smart. Heavy tan driving gloves are worn, and the driving apron is laid across the knees and strapped around the waist over the driving coat.
For the show ring heavy white driving gloves or tan driving gloves are equally correct, as they are for other occasions. When driving ladies’ traps, if you are wearing a gown with short sleeves and therefore are wearing long gloves, they should be slipped off the hands and folded back so that only the arms are covered and then driving gloves should be slipped on the hands. When driving a George IV, where a card-case is part of the appointments, it is a good idea to fold a fresh pair of gloves in the card-case.
For all formal occasions, such as the show ring and park and town driving, the servant should wear a groom’s dress livery, consisting of a single-breasted long coat with six buttons in front and two rows of three buttons in the back. The coat should come to five inches above the knee and should always be kept buttoned. It should be of the color which the family may have adopted—black, dark blue, dark green, maroon, or gray, etc. The coat collar should be of the same material as the coat and the cuffs should be plain without buttons. Under the coat a waistcoat should always be worn, of some striped material, a small strip showing inside the collar. A plain white Ascot tie and standing collar should be worn, but no cuffs, and the coat sleeves should be very long, coming well down to the hand. The breeches must be white—of buckskin or breeches cloth. Stiff-legged top boots should be worn, with tops of tan or buff, or of some color which matches or goes well with the color of the coat. The boots must always be of calf and never of patent or varnished leather. A silk top hat should be worn, with a narrow silk band. In this country it is improper to use cockades except for officers of the army and navy and other officials. The gloves should be tan, but white buckskin gloves are correct for park or town driving.
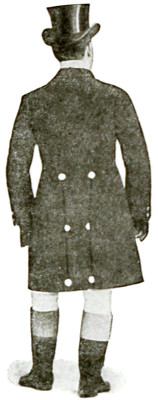

For country wear, particularly in summer, this full-dress livery is too hot and looks out of place, so that an undress livery should be worn. The best style of undress livery is a morning or cutaway coat with three buttons in front and two in the back, cut like any morning coat, but a little higher in the neck, and breeches and leggings of the same material, or perhaps leather puttee leggings. This livery is made of covert cloth or whip-cord, and the color may be any shade of gray or any shade of tan. If the livery is gray, it is smarter to wear black leggings rather than tan, and when the leggings are black, black shoes should always be worn, and russet shoes with tan leggings. The hat to wear with this livery should be the same shape as a top hat, of black felt for a gray livery, or of brown felt to match the tan livery, or a straw hat of the same shape may be worn, black to go with the dark livery or straw color with any livery. Tan gloves are correct with undress livery. A sack coat is sometimes used instead of a cutaway, but I think the latter very much smarter, and if a sack coat is worn a top hat should not be worn, but rather a square derby.
In the illustration on the opposite page are shown the various types of driving bits, and I shall not attempt to describe them in detail any more than I did with respect to the riding bits. They are fully treated in many of the standard works on the subject and a detailed description of them would not belong in this book.
For single horse driving either the Liverpool or Ashleigh is correct for all occasions, except for the show ring and park driving with ladies’ traps, such as the George IV or Peters’ phaeton, where the Buxton is the correct bit for single horses as well as pairs, and except also for gigs where a gig bit is correct. Gig bits, however, should not be used with other traps than gigs. For pair horse driving the Buxton is correct for the show ring and park driving and may be used for informal occasions, though personally I think it rather poor form for country driving with any kind of trap. The Buxton, however, not having a hole to correspond with the “half cheek” of the Liverpool or Ashleigh, is, unless you use the “full cheek,” rather a severe bit for any but a skilled driver with light hands. For pair driving a pivoted bit should always be used. The Liverpool is not so suitable for pair driving as the Ashleigh or other elbow bits, because even when the bars are pivoted they do not turn freely, so that the two inside bars are usually pulling at an angle on the bit, and do not give an even pull on the horses’ mouths.


If your horse has a very light mouth, and you have not acquired very light hands, it may be better to drive with the reins in the full cheek. If, however, you have acquired light hands, the reins had better be in the half cheek of the Liverpool or Ashleigh, or in the middle bar of the Buxton, as this gives much more control and “feel” of the horse’s mouth. In fact, no competent whip with light hands, particularly no woman, will want to drive a horse, however light his mouth, in the full cheek. If your horse’s mouth is rather hard and there is danger of his running away, it is better to have the reins in the first hole of the bar of the Liverpool or Ashleigh, but if you drive him this way you must keep a very light hand, as it makes the pressure of the curb chain too severe, and you may make his mouth hard by a constant pressure of chain. If you are unfortunate enough to have to drive a puller, it will probably be necessary to put the reins in the second hole of the bar, and even to twist the curb chain, and to use a special form of bit with a long port or other device intended to stop a pulling horse. No woman, however, should have a pulling horse in her stable.
In pair driving the bitting is most important. It is the rarest thing in the world to find two horses who are not only well matched in appearance but have the same dispositions and require the same bitting. In fact, there is an old saying, “There is always one to a pair.” By correct bitting and a proper adjustment of the coupling reins the differences in the dispositions of the two horses can be equalized, and they can be made to go well together. This is a point which is very frequently neglected by inexperienced drivers, and few coachmen really understand it, so that you must learn it yourself and see that your coachman has your horses properly bitted and coupled.
The general principle, of course, is that the slow horse of the pair should have the reins in the cheek or half cheek, while the fast horse should have them in the half cheek, or the first, or even the second, hole in the bar, and it may be found necessary to put a severe bit on the fast horse and a plain bit on the slow one. Similarly, if one horse has a light mouth and the other a hard one, the bits and the coupling reins must be regulated and the curb chains adjusted accordingly. It is impossible to lay down any fixed rules to follow. It is all a matter of experiment with the particular pair of horses that you are driving.
Of equal importance with the proper adjustment of the bits and of the reins in the cheek or bar is the adjustment of the coupling reins. These are the two shorter inside reins by which the near horse is coupled with the off rein and the off horse with the near rein. The coupling reins should be so adjusted that the pressure on the reins of each horse will be the same; that is, the off horse should have the same pressure from the off rein as he has from the near coupling rein, and the near horse should have the same pressure from the near rein as from the off coupling rein.
If it happens that the two horses go absolutely together and have the same mouths and the same dispositions, which, as I have said, is almost never the case, then the coupling reins will be buckled in the same hole on each rein. If the two horses have different mouths or different dispositions, the buckles will have to be shifted accordingly. That is, for instance, if the near horse has more life or a harder mouth, the off coupling rein must be taken up so that there will be more pressure on him than on the off horse. The coupling reins are also adjusted for the purpose of bringing the two horses nearer together, and for keeping their heads together or apart as may be necessary.
The two horses of a pair should have their bodies and heads straight and parallel to the pole, but it will be found that some horses are inclined to carry their heads to one side or the other, and the coupling reins should be taken up or loosened accordingly. For example, if the near horse carries his head to the near side, the off coupling rein must be taken up, which compels him to straighten his head.
If you have two horses that seem to be perfectly matched, but the off horse carries his head a little out to the front and has a light mouth, and the near horse carries his head close to his chest and has a hard mouth, to get them to pull together and keep them well in the traces the coupling rein of the off horse should be two or three holes shorter than that of the near, and consequently the off coupling rein will be let out and the near coupling rein taken in, and in such case the off horse, if he has a light mouth, should be driven in the cheek and the hard-mouthed near horse down in the bar.
A common fault of coachmen and grooms lies in buckling both coupling reins too tightly, which makes the horses carry their heads in toward the pole instead of going away straight. This looks very badly, makes the horses’ mouths hard, and either keeps the horses going diagonally or causes them to carry their heads crooked.
If horses have acquired, through wrong coupling, the habit of turning their heads in toward the pole, or their quarters out from it, it is sometimes a good plan to change their positions instead of always driving them on the same side. Then, on the other hand, horses sometimes get into the habit of leaning in against the pole. This is a difficult habit to break, but by changing their positions or by adjusting the bits and the coupling reins, and steady and careful driving, this habit can be broken.
Bearing reins are required in the appointments for ladies’ traps except for runabouts and pony carts, and I believe generally in their use with nearly every kind of trap, and with single horses as well as with pairs. It is only the abuse of bearing reins, and not the use, which has led to the outcry so generally made against them by persons ignorant of the principles and practice of driving.

Bearing reins should be just tight enough to keep the horse’s head up in its natural position. When so adjusted they prevent a horse from putting his head down and getting the bit in his teeth; they prevent him from putting his tongue over the bit and do a great deal toward preventing him from kicking.
Bearing reins are particularly necessary in pair driving, for however well matched two horses may be in general appearance, they seldom carry their heads naturally at just the same height. In that case the horse who naturally carries his head high should have his bearing rein quite loose and the other quite tight, so that their heads may be at the same height. Nothing looks worse than to see two horses in a pair carrying their heads one low and one high. Most of the best authorities on driving also say, and I have no doubt that it is true, that bearing reins keep a tired horse up and make his going easy; they also keep him from nodding.
Of course, many thoughtless grooms draw the bearing reins altogether too tight, so as to force the horse’s head up and make him almost ewe-necked. This naturally frets a horse, especially when he is standing still. The bearing reins should be fastened to a bridoon and not to the bit, as, if fastened to the bit, they raise it too high and are apt to spoil the “feel” of the horse’s mouth.
For runabouts, at all times, bearing reins should be dispensed with, and they may be dispensed with for informal country driving in any kind of carriage, especially with a single horse. When bearing reins are used they should generally be loosened if the horses are to stand for any length of time.
The overhead check-rein should never be used, except with roadsters or trotting horses.
The use of silver-plated instead of brass-plated harness for formal occasions, such as the show ring and park, is optional, but brass-plated harness is more suitable than silver-plated for informal occasions and for country driving.
The correct appointments for a woman’s trap in the show ring are given in a separate chapter, page 245. For other occasions the buckles, etc., may be either square or round, according to the owner’s fancy. Square buckles are more appropriate for formal occasions and perhaps for four-wheel traps; round buckles are rather for carts and sporting vehicles. There should be as little metal about the harness as practicable, and the ornaments should be confined to crests, engravings, or initials, which should be small and inconspicuous and placed only on the winkers, rosettes, face pieces, standing martingale, and pad. Breechings may be used for heavy traps, but are not suitable for light traps such as runabouts or for carts. They sometimes make a nervous horse kick, and in such cases they should, of course, be dispensed with. Kicking straps, as I have said elsewhere, should generally be used for a kicking horse both with four-wheel traps and with carts.
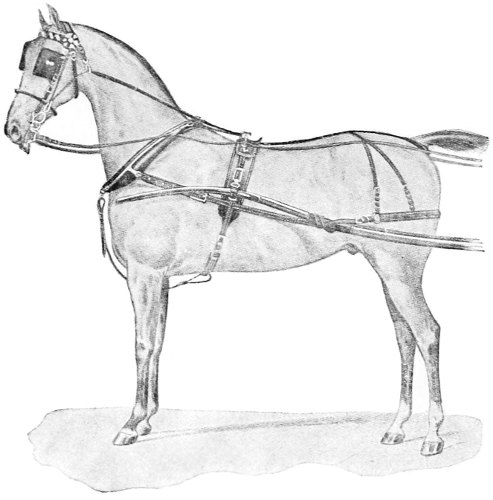
The harness should be made of the best quality of leather and hand sewn, and should always be kept soft and pliable, and never allowed to become hard or mildewed.
Russet harness is perfectly correct for informal country driving and with runabouts or any kind of light country trap, whether two or four wheeled, particularly with traps finished in natural wood.
For all heavy traps, whether four or two wheeled, collars and harness should be used, and it is essential that the collar should fit the horse. In fact, it is most important that each horse in the stable should have his own collar, which should be carefully fitted to him by a competent harness-maker. Collars come in standard sizes, varying from 19 to 22 inches, and are made to fit by altering the stuffing. The Kay collar is the type generally used.
The weight of the harness is in proportion to the weight of the trap; for heavy traps, such as phaetons or dog-carts, the heaviest harness should be used, while with runabouts, basket phaetons, and light carts, lighter harness is correct.
For country use, and especially in summer with all kinds of light country traps, such as runabouts, Hempstead carts, and breaking carts, a Dutch collar is quite correct and is much more comfortable and cooler for the horse than a collar and hames. The Dutch collar, however, should not be used with any kind of a heavy or formal trap, as it is not so well adapted for pulling, nor does it look well with them.
The lining of the collar should be black for all except sporting carts, where russet lining looks very smart, though almost too sporty for a woman.

Driving reins for a woman should be thinner and lighter than for a man, and should be very pliable for the same reasons, as I have explained on page 145, that apply to riding reins.
The general principle to be observed in driving, as well as in riding, is to have as little harness on the horse as practicable, and, above all things, not to have the harness overloaded with ornaments.
For country use, and for all informal occasions, it is not necessary to use patent-leather harness, as it scratches and becomes shabby very quickly. Plain black pigskin is therefore more appropriate and perfectly correct for such occasions. For rainy weather special harness should be used, as the rain injures the leather and tarnishes the metal of the regular harness, and entails a great deal of unnecessary work on the grooms. Rainy weather harness has all the buckles covered and is made of oiled leather.
When the owner is in deep mourning, everything about the harness should be black, all of the bright metal should be covered with black leather. It looks quite inappropriate to see the servants with wide crape bands but the harness with all the bright metal showing and colored rosettes and saddle cloths; or, what is even worse, colored saddle cloths and black rosettes. While it is not necessary to use black harness when the owner is in mourning, all colors should certainly be avoided in the rosettes and saddle cloths, and the servants should be put in mourning also.
What I have just said in the chapter on harness for single horses applies generally to harness for a pair.
Kay collars should be used for pairs with all traps, except that Dutch collars may be used for a pair with runabouts or any other light country trap. There is a very light station trap, finished in natural wood, with which russet harness with Dutch collars, for a pair, looks very smart and may be used in the country.

The horses may be coupled to the pole with either pole chains or pole pieces; the former with oval links are correct when the owner drives, but are never permissible in any trap driven by a servant. The chains should fasten at the pole and no extra links should be allowed to hang. The pole chains, if used, should be of burnished steel and not of brass. Oddly enough, for some reason which has never been explained, pole chains and pole pieces are regarded as belonging to the trap and not to the harness.

Loin straps should be used with a lady’s trap only when a servant drives.
The winkers should be square when square buckles are used, but round winkers may be used, as well as round buckles with sporting traps, for which they are quite appropriate.
Metal rosettes should be used with a single harness and may be used with pair harness, or for ladies’ traps. Silk rosettes may be used of any color the owner may fancy, and should match the liveries. In the show ring and park flower rosettes are worn, but with pairs fancy rosettes are worn on the near side of the near horse and the off side of the off horse; that is, one on each horse on the outside, while on the inside the rosettes should be plain metal.
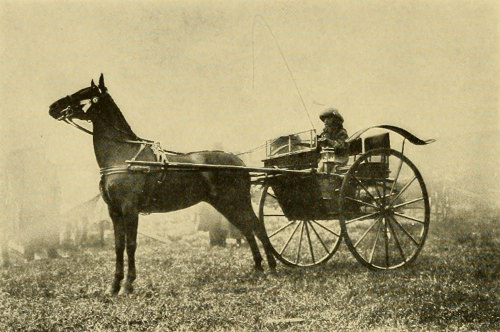
Double harness should fit the horses just as single harness does, except that the belly-bands should be looser, so as to admit two or three fingers between them and the girths.
A whip with a lash should always be used, except with roadsters or trotting horses, when a straight whip is correct. The whip should be of a length proportionate to the trap and the distance of the horse from the driver. The same kind of whip should be used for driving a single horse as for a pair. The shaft should be straight and may be of any color the owner fancies, and may be mounted in gold, silver, or brass. The best whips in general use are made of holly. For a woman’s use a whip should be lighter and more slender than for a man’s. A heavy whip is very tiring to the hand, and quite unnecessary for the kind of horse that a woman drives. The handle of the whip may be covered with leather or plain, and, if leather covered, may be of any color which goes well with the shaft. While colored snappers are used, plain white is always correct, and I consider it much smarter.
The lash of the whip should always be kept white and very pliable, and, of course, should be pipe-clayed when necessary.
For a phaeton or breaking cart, where the horse is quite a long distance from the driver, a much longer whip should be used than for a runabout or a Hempstead cart.
Gymkhana games may be held either independently or in connection with private or country club shows, and I would suggest as a programme for such a combination the following events:
Classes 3 and 5: Hunters to be shown over jumps, which may be merely post and rail, brush, in and out, or any combination of these, performance over jumps only to count.
Event No. 8: Starters will be handed a large wooden spoon and an egg. The spoon must be carried in one hand, with the egg in the bowl, twice around the course. Any one dropping the egg must return to the starting point for another, and whoever first completes the two rounds of the course with an unbroken egg held throughout in the spoon wins the race.
Event No. 9: There must be a fence or wall down the middle of the course. The stalls are made with poles, which are attached at one end to the fence and at the other end to stakes driven in the ground. At the start there should be one less stall than there are contestants, and the length of the fence should be such that at the start there will be no fence lapping over. The stalls should be between three and four feet wide and all stalls on the same side of the fence.
The contestants start mounted; when the music plays they ride in single file around the fence in a ring until the music stops; the riders then dash for the stalls and the rider who is left over is out of the contest. Before the music starts again one stall is removed, and the performance is repeated until there are only two contestants left for one stall, and then whoever of these gets it wins the event. The horses may be ridden into the stalls backward, forward, or any way in which they can get in. In other words, it is the old game of “Going to Jerusalem.”
Event No. 10: The contestants are in pairs, a man and a woman, each with his pony. All the contestants start dismounted. At the starting signal the man first puts the woman up, then mounts himself; they join hands and dash madly down the field and race twice around the course, holding hands. The pair to reach the finish first win the race. If desired, jumps may be introduced.
Event No. 11: The contestants may be all men, all women, or both. The contestants start mounted at one end of the course, each of them having a spear; at the other end of the course are six or eight potatoes for each contestant, those of each contestant being placed together in a row and opposite his place in line at the start. The contestants must pick up the potatoes, one at a time, with the spear, ride back to the starting point, and drop each potato in a basket. The one who first picks up all his potatoes, carries them on his spear, and drops them all in the basket, wins the race. If a contestant drops a potato on the way back to the starting point he must pick up that potato with his spear without dismounting.

Event No. 12: This event, if my memory serves me right, was originated by Mr. F. M. Lowry, M.F.H., of the Harkaway Hunt, McDonald, Pennsylvania, and it can take place only in a hunting country or where one or more packs of hounds are available; it can, of course, only be tried where the grounds are large. A drag is laid over the country, taking as many fences as may be desired, but without flags or other indications of the course. The finish should be at the grand stand. Each hound wears a ribbon of a distinctive color and each rider draws by lot a card with the corresponding color of that worn by a hound. The riders all follow the hounds, and the holder of the color of the hound which first arrives at the finish is awarded the cup, provided that the hound has followed the full course. There need be no contest between the riders as to who shall be first at the finish.

Of course the above programme is for an open-air or summer show, but all the classes and many of the events may be used in-doors in a ring. To take the place of the events which must necessarily be omitted for an in-door show, I would suggest a costume ride. The style of costume may be left to the choice of the riders, or some particular period or type may be adopted. The riders go through the evolutions of a drill to music.
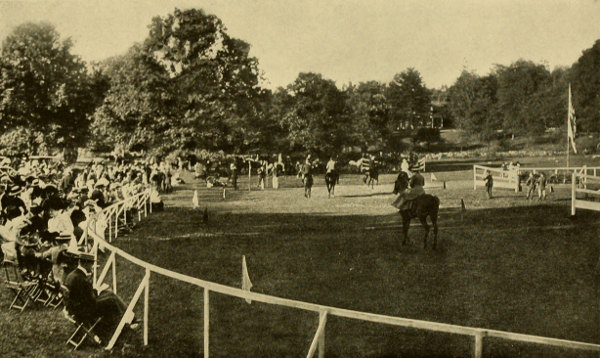
Another suitable event for an in-door show is tandem riding which has become deservedly popular. The horse one rides is saddled and the reins and all appointments are the same as for ordinary riding, with the exception that the bridle has the usual D’s similar to those of the wheeler of the tandem, through which the reins of the leader pass. The leader has a harness which consists of a pad with terrets and a driving bridle without winkers and whatever form of bit may best suit the individual horse. The reins are of white buckskin, the size of light driving tandem lead reins. There should be about a half a horse’s length between the two horses. The best and most practical way of holding the reins I have found to be as follows: Treat the curb and snaffle reins of the horse you are riding as if they were one rein and separate them both by the middle and third fingers; that is to say, the near curb is laid on top of the near snaffle rein and they both pass between the middle and third fingers. The off snaffle is laid on top of the off curb rein and they pass between the first and middle fingers. The ends come up between the thumb and forefinger. The near lead rein passes under the middle finger and up through the hand, coming out between the third and fourth fingers. The off lead rein passes down between the third and fourth fingers and passes out under the middle finger. An ordinary light driving whip is held in the usual way for driving in the right hand, and the right hand is held in readiness to assist the left and particularly to turn the leader. Horses, with a little training, are easily ridden or driven in this way and can be taught to jump and go through complicated evolutions. This tandem riding is a suitable event for winter entertainments in clubs and riding-schools.
Punctuation has been standardised, and simple typographical errors have been repaired. Inconsistencies in hyphenation, and obsolete or variant spelling have been preserved.
The main caption has been moved from the bottom to the top of the image in the following illustrations:
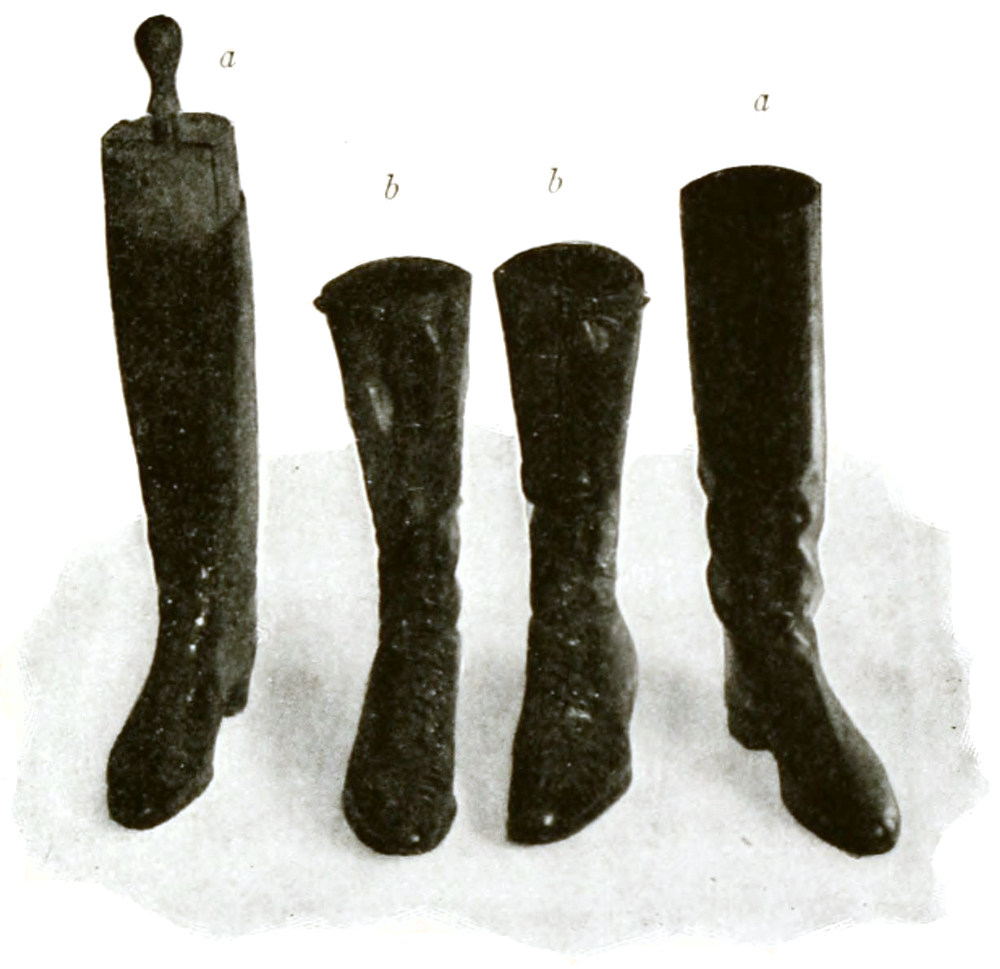
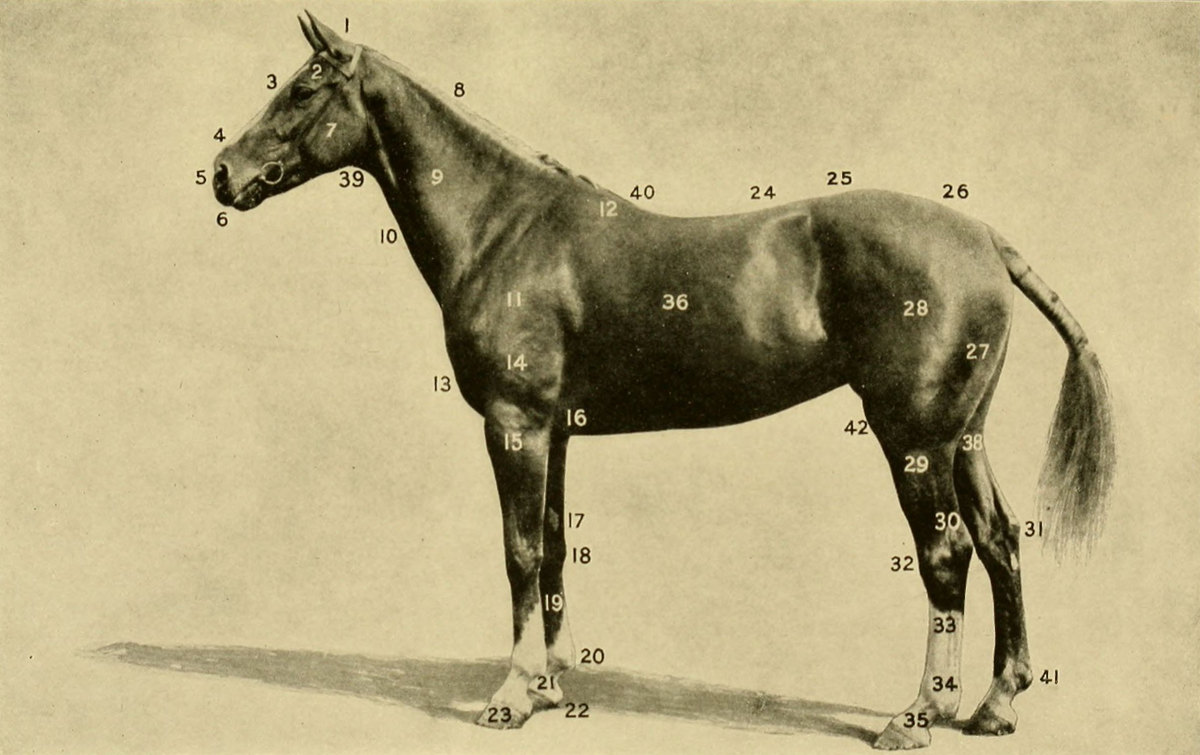