In a preface which is omitted from this translation, the author claims for his work a place between the books dealing solely with the history and development of the art of working in leather and those of which the object is to impart a knowledge of the technique of its various processes to amateurs who may be unable or unwilling to undertake a regular course of instruction. He points out that leather, in its adaptability to many different kinds of treatment, is a material eminently suited to the interpretation of the style of decoration known as “modern art.”
In the French edition there are numerous reproductions of examples of leather decoration and of ornament intended for adaptation to leather-work. In the following translation these illustrations and also a short chapter referring to them are omitted, and some examples of leather-work derived from various English sources are substituted. The text of the work has been generally somewhat abridged. The fact that there are many technical and other terms in French that have no exact equivalent in our own language, has rendered a free translation desirable, but the meaning of the original text has been carefully preserved.
7
| PAGE | |
| TRANSLATOR’S NOTE | 5 |
| INTRODUCTION | |
| The Decoration of Leather in the Past | 13 |
| CHAPTER I | |
| Tools and Leather | 15 |
| CHAPTER II | |
| Methods of Working in Leather | 19 |
| CHAPTER III | |
| Leather Mosaic | 42 |
| CHAPTER IV | |
| Dyes, Patines and Gilding | 64 |
| CHAPTER V | |
| The Choice of Design and Colour | 76 |
| APPENDIX | |
| Leather Hangings and Furniture | 80 |
| NOTE | |
| Some Extracts from the Report of the Committee on Leather for Bookbinding, appointed by the Council of the Society of Arts, February, 1900 | 90 |
| Index | 96 |
9
| Fig. | PAGE | |
| 1. | Tracing-point | 20 |
| 2, 3. | Incising knife used downwards like a pencil | 21 |
| 4, 5. | Incising knife used upwards | 22 |
| 6, 7. | Incising knife held like a graver and pushed forward | 23 |
| 8. | Executing a slanting cut when the edge of the leather is to be subsequently turned up | 24 |
| 9. | Opener | 25 |
| 10. | Enlarging the outline with the opener | 25 |
| 11. | Slanting cut | 26 |
| 11a. | Showing the difficulty of raising the inner edge A | 26 |
| 12. | Lowering the outer edge with a modeller | 29 |
| 13. | Ball-shaped steel tool with handle | 32 |
| 14. | Position of hands in embossing leather | 32 |
| 15. | Tool for working reed decoration | 34 |
| 16. | Using a hand punch | 36 |
| 17. | Cutting-out knife | 40 |
| 18. | Paring knife | 43 |
| 19. | Paring knife | 43 |
| 20. | Paring leather | 44 |
| 21. | Cutting-out knife | 46 |
| 22. | Cutting-out knife | 46 |
| 23. | Cutting-out knife | 46 |
| 24. | Cutting out inlay | 4810 |
| 25. | Using roller to secure adhesion of inlay | 51 |
| 26. | First position of outlining tool | 53 |
| 27. | Second position of outlining tool | 53 |
| 28. | Gouge outliner | 56 |
| 29. | Outlining wheel | 56 |
| 30. | Gouge outliner | 56 |
| 31. | Straight outliner | 56 |
| 32. | Polishing mosaic | 57 |
| 33, 34. | Sticking inlay on morocco ground with tool (Fig. 33) instead of roller, to avoid crushing the grain | 60 |
11
| PLATE | Page | |
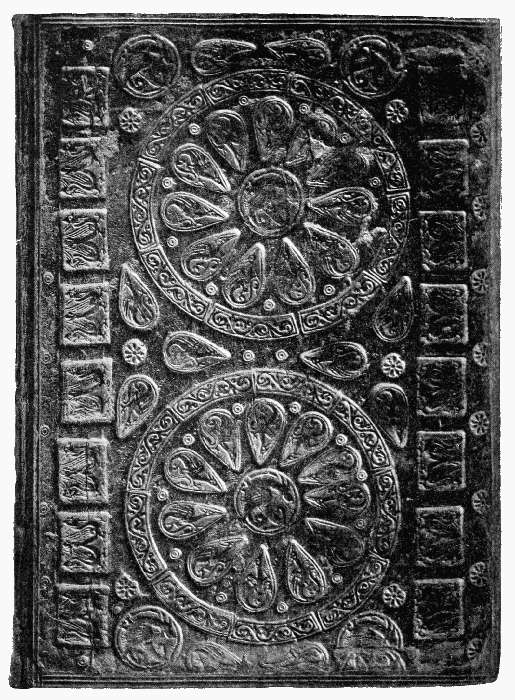
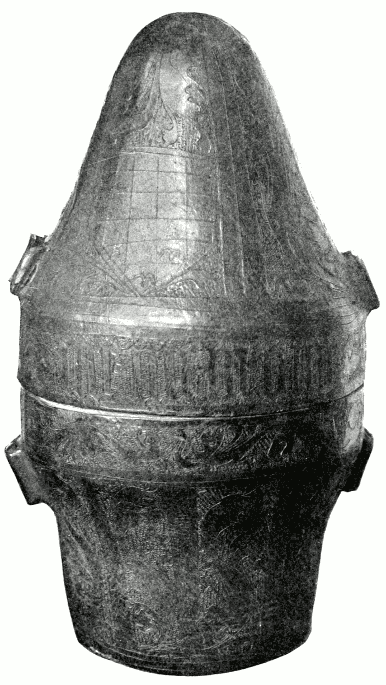
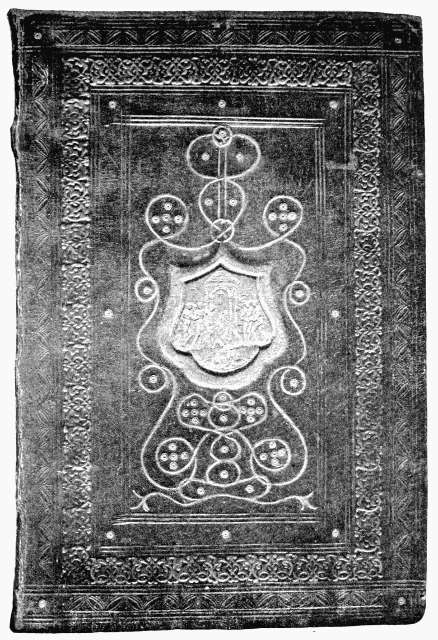
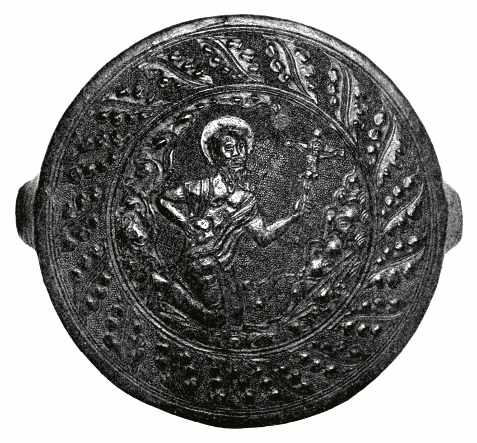
| 1. | Blind-stamped leather binding of the Winchester Domesday Book. English, 12th century. | (Frontispiece) |
| Society of Antiquaries, London. | ||
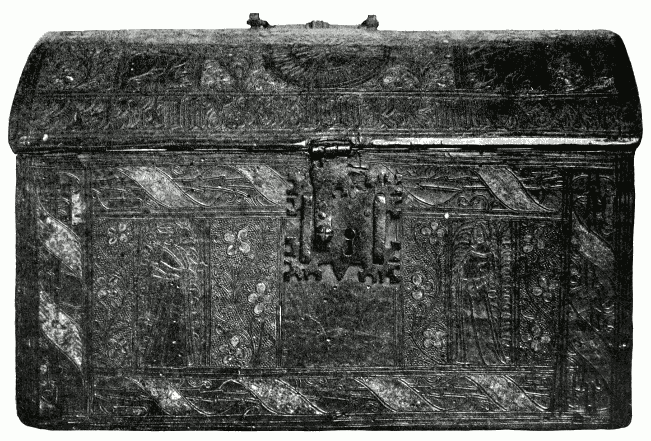
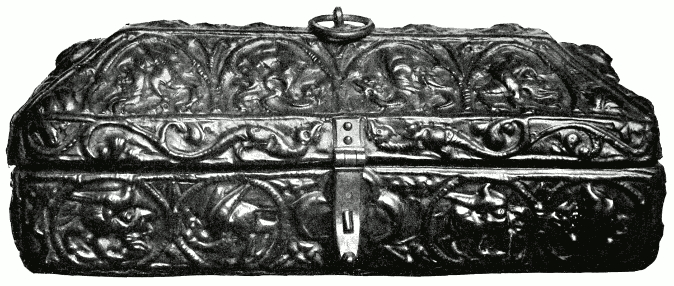
| 2. | Casket covered with stamped leather, cuir bouilli. German, 14th century. | 22 |
| South Kensington Museum. | ||
| 3. | Coffret covered with leather, incised, coloured and gilt. French, 14th century. | 24 |
| South Kensington Museum. | ||
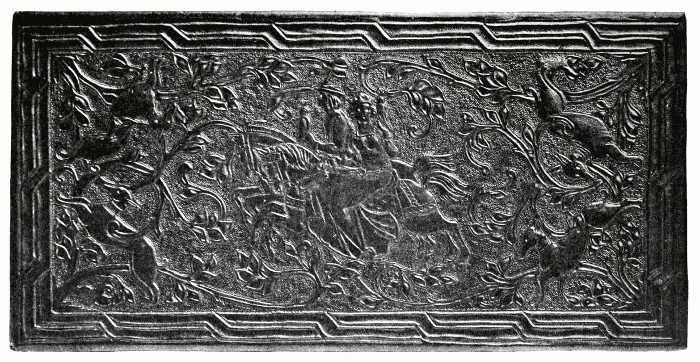
| 4. | Casket covered with embossed leather, cuir bouilli. French, early 15th century. | 28 |
| South Kensington Museum. | ||
| 5. | Case of cut and embossed leather, cuir bouilli. Italian, 15th century. | 32 |
| South Kensington Museum. | ||
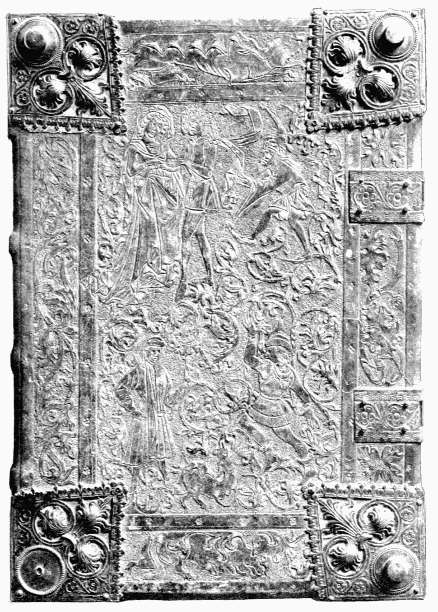
| 6. | Blind-stamped morocco binding with gilt roundels and coloured cameo design. Celsus. De Medicina. Venice, 1477. Italian, 15th century. | 37 |
| British Museum. | ||
| 7. | Case of cut and punched leather. German, 15th century. | 40 |
| South Kensington Museum. | ||
| 8. | Brown leather binding, cut and engraved, with punched background. German MS. Chronicle of Events. German, 15th century. | 44 |
| Bodleian Library, Oxford.12 | ||
| 9. | Cover of case for a cup in wood covered with leather, cuir bouilli, cut, embossed, painted and gilt. Italian, about 1500. | 49 |
| South Kensington Museum. | ||
| 10. | Cover of work-box of wood covered with embossed leather, cuir bouilli. German, 16th century. | 56 |
| South Kensington Museum. | ||
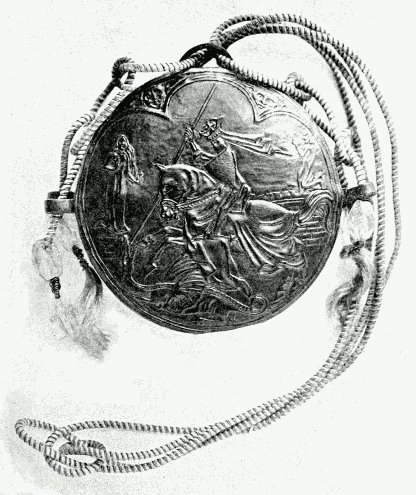
| 11. | Powder-flask of wood covered with leather, cuir bouilli, cut and embossed. Italian, 16th century. | 56 |
| South Kensington Museum. | ||
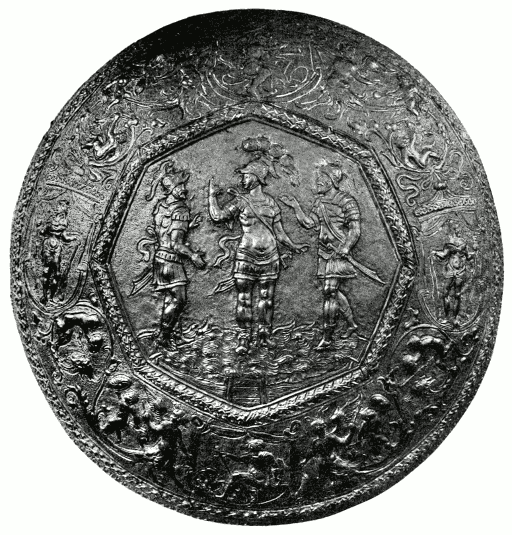
| 12. | Shield of cut and embossed leather, cuir bouilli. Italian, 16th century. | 60 |
| South Kensington Museum. | ||
| 13. | Top of casket covered with brown calf, cut and slightly embossed. By Florence Hornblower. Modern English. | 65 |
| South Kensington Museum. | ||
| 14. | Embossed and punched brown calf binding. Rubáiyát of Omar Khayyám. Designed by Mary G. Houston. Modern English. | 66 |
| South Kensington Museum. | ||
| 15. | Mirror case of punched black leather, cuir bouilli. Executed by Miss Casella. Modern English. | 71 |
| South Kensington Museum. | ||
| 16. | Black morocco binding with applied panels of tooled, cut, painted and gilt calf. Le Roman de Tristan et Iseut. Designed by Robert Engels. Modern French. | 74 |
| South Kensington Museum. | ||
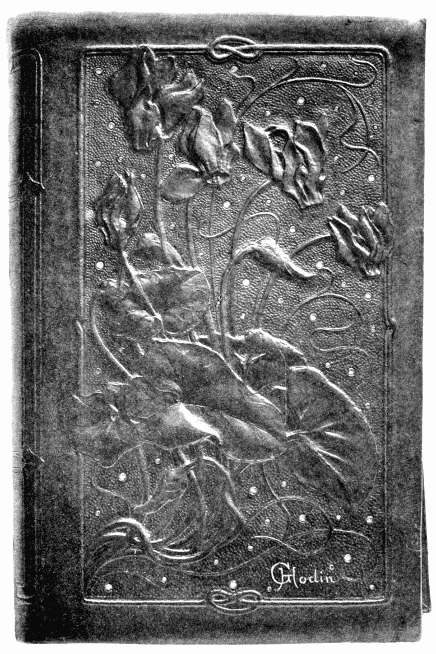
| 17. | Binding of stained calf, cut, embossed, tooled and patinated. By Henri Godin. Modern French. | 78 |
| South Kensington Museum. | ||
| 18. | Gold-tooled and inlaid morocco binding. The Letters of Princess Lieven. By S. T. Prideaux. Modern English. | 82 |
| 19. | Back and seat of chair in cut, embossed and gilt cowhide with punched background. Executed by Rosalie Vigers from a design by Frederick Vigers. Modern English. | 84 |
| 20. | Embossed calf binding. Book of Common Prayer. Executed by Rosalie Vigers from a design by Frederick Vigers. Modern English. | 86 |
The following remarks, without attempting a description in detail of the different phases through which the art of decorating leather has passed since its origin in primitive times, deal with the treatment of leather solely from the decorative point of view, the present volume being limited to the consideration of this aspect of the subject.
In all ages man has sought to develop to their fullest extent the possibilities of splendour in the materials of his dress, and an important place in the wardrobes of our early ancestors was filled by skins shorn of hair, thus lending themselves easily to decoration in many different ways.
The nomadic races, described to us as at first riding their horses barebacked to the conquest of the West, soon adopted ornamental trappings more suited to their position as conquerors, as shown by the marvellous mosaics of piqué leather which from an early date constituted the foundation of the war-like equipment of the Tartars and Moguls.
In addition to magnificently woven materials and damascened arms, the Crusaders brought back with them to Europe, leather ornamented with wool, silk and precious metals. Europe set itself to imitate this art of working in leather, and found a source of faultless taste and purest models in Spain, then occupied by the Moors.
For several centuries the art of decorating leather14 remained the speciality of Spain. The word “cordwainer,” derived from Cordova, is a witness of this monopoly by the Peninsula of everything connected with leather-work, apart from the modelled and stamped leathers, introduced into Venice from the East.
Other countries, however, were doing better work than that of imitating the celebrated manufactures of Cordova. In Germany especially, leather was discovered to be an ideal material for rendering the mantles and plumed helmets of heraldry, while the marvels of carved and embossed leather preserved in the Dijon Museum are a proof of the interest taken in leather-work by the great decorative school of the court of Burgundy.
In the Middle Ages precious stuffs adorned with enamels, ivory and gold were discarded as covering for the beautiful manuscripts executed by the monks, and in their place heraldic subjects in carved and modelled leather were introduced and lent a new character to books which were no longer the exclusive property of crowned heads. The invention of printing afforded the Renaissance movement the means of attaining its full development, and soon called for a less archaic binding for its incunabula. Leather either decorated in mosaic or tooled in gold formed a perfect covering for these marvels of typography, and from the end of the fifteenth century to the present revival of decorated leather both styles have been much in use.
There are various standard works on this subject, which may be consulted by those desirous of studying its development further.
The few tools essential in leather-work are illustrated in the text, where their use is described. They comprise:
1. A Lithographic Stone or a Slab of Marble (preferably the former).
2. A Tracing-point and some 6H Graphite Pencils.
3. An Incising Knife.
4. Modellers of different sizes.
5. An Opener.
Special tools, Punches, Wheels etc., are treated of at greater length in dealing with the different processes in which they are used.
The art of working in leather is now so general that it is not difficult to obtain skins specially prepared for the purpose. It is an essential qualification that nothing of a fatty nature be used in their preparation. The tanning process of the best skins, whether with a glossy surface artificially obtained by rolling or with a dull surface, should be a very simple one. Oak and sumach tannins (used especially for morocco leather) are those which best preserve the suppleness and capillarity of leather. The susceptibility of its colour to alteration from exposure16 to light is greatly influenced by the materials used in tanning. Oak wood and chestnut are the tannins least influenced by light. Skins tanned with cassaigre and mimosa, light at first, become darkened in a marked degree by exposure.[1]
[1] See the observations on the importance of the tanning process in the preservation of leather, in the Note at the end of this volume.
So many varieties of leather are on the market that some guide will be found useful in selecting the most suitable for the different methods of decoration. These methods may be classified as follows:
The leathers which may be used in these various styles of decoration are
Sheepskin does not lend itself either to incising or to carving and is only useful for cheap work; it is very malleable and models easily, but for that reason lacks the firmness of calf when modelled. It is also not possible to get such good colour results with sheep-skin as with17 calf, cow-hide, or ox-hide. It can be used for large work, such as wall-hangings, screens, etc., but is not recommended. Beginners, however, will find it useful on account of its low price.
Cow and calf are the most suitable leathers for really artistic work. Cow-hide may be obtained with either a glossy or a dull surface; the dull skins are sold specially prepared for decorating and give good results, the smoothness of their surface making them particularly suitable for modelling and pyrogravure.
Calf varies greatly in thickness and colour. It should be noted that in carved and modelled work the advantages of great malleability in the material are more than counterbalanced by the disadvantages; durable results cannot be obtained with very malleable leather which yields easily to the tool, and since high relief can be worked without difficulty in comparatively thick leather by damping it, its use is much to be preferred.
Ox-hide is frequently as thick as strong cardboard and is the ideal leather for carving, hammering and pyrogravure. In cut decoration a better effect can be obtained with this leather than with thinner skins, and being very firm, it is equally suitable for modelling.
Morocco leather, which is mostly of the kind called “Cape morocco,” is goat-skin with a grained surface produced by pressing hard seeds upon the skin while it is still damp from the tanning. For bookbinding and similar purposes this grain is crushed by pressing hot plates heavily on the surface. The only way of decorating leather so treated is by an inlay (or literally onlay) of skins of other colours, and is known as Leather Mosaic.[2]
The so-called Russia leather is generally very light and soft and well adapted to modelling on wax. It should not be cut.
Pig-skin is very firm and was formerly much used for18 the fine stamped bindings of the fifteenth, sixteenth, and seventeenth centuries. It does not lend itself well to carving, but is very suitable for pyrogravure because of the contrast between its light tint and the dark brown mark produced by the hot tool.
Chamois leather, which is not always prepared from the skins of deer or chamois, is only suitable for flat ornament. It may be decorated by pyrogravure or with stencilled ornament, or used in its natural colour as background to an open-work pattern of leather of another colour.
Vellum, a very thin and stiff white skin, can be decorated with brush or pen-work. It is principally used for bookbinding. Those who wish to paint on vellum can draw their inspiration from the marvellous miniatures of the Middle Ages: a description of this style of decoration, however, does not come within the scope of the present work.
In this chapter the different processes which may be used in the decoration of leather will each be described in turn.
The preliminary operation of tracing the design on the leather is however common to them all.
The design should in the first instance be drawn on fairly thick tracing-paper or architect’s linen. This should then be fixed on the leather in such a way that it does not move during the transfer of the design, but so that it is possible to lift it to ascertain the progress of the work. It will be found convenient to fold the edge of the tracing-paper over the top edge of the leather and fix it with seccotine.
The leather must be wet in order to take the impression of the tracing. A soft, slightly damp sponge is passed several times evenly over the whole surface; if only a part of the leather were wetted an aureole would form round that part and would leave a permanent mark. When the leather has once been wetted all over there is no further fear of this, and it may then be damped again in parts when necessary. Practice alone will make it possible to judge accurately the degree of saturation that each skin requires to bring it into a fit condition for working on; speaking generally, the water should have penetrated the leather so that the pressure of the tool will not bring it back to the20 surface. Neglect of this rule might result in staining the leather.
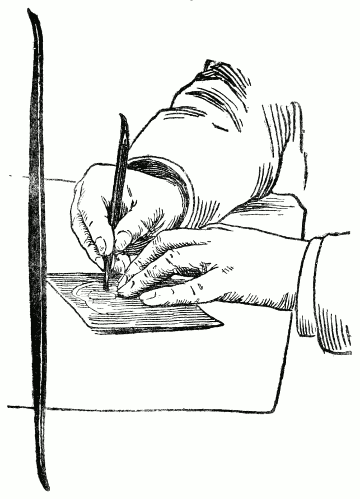
The design is transferred to the leather by means of a metal tracing-point (Fig. 1). An agate or ebony point, or an exceedingly hard 6H graphite pencil, may also be used for the purpose. The pencil possesses the additional advantage that it can be given a very fine point where an extra thin and sharp outline is required. Doubling the outline by going over it twice should be avoided. From time to time the tracing-paper or linen should be raised to see that the design is being well marked on the leather. The outline should be dark; when it comes light it is a proof that the leather is too dry and requires damping again.
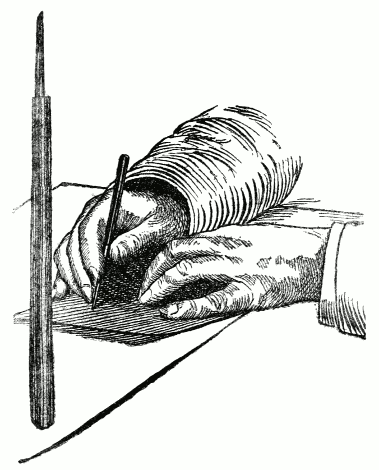
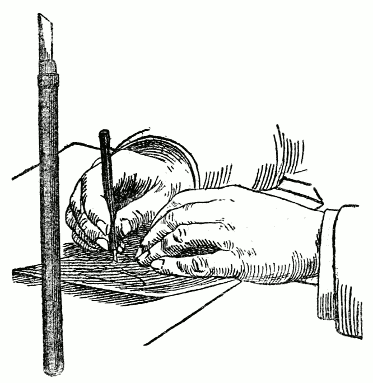
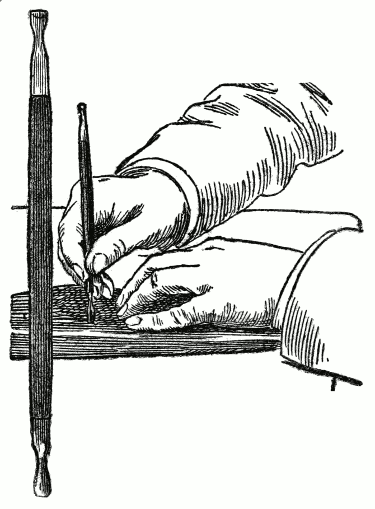
This being the first operation in working thick leather by carving, engraving and modelling, it will be dealt with before passing to the different processes peculiar to these methods of decoration. The incising is done after the design has been traced. There are numerous incising knives for the purpose which vary in shape and are manipulated in different ways; no one of them can be specially recommended as notably superior to the rest, and the artist should choose the one with which he feels most likely to succeed. The knife illustrated in Fig. 2 is used with a downward movement and is held—as shown in Fig. 3—very short, so as to obtain a sufficient purchase over the blade which is guided by the middle finger. The knife illustrated in Fig. 4 is used upwards. Fig. 5 shows the manner in which it should be held to produce a vertical cut. It will be found of great assistance in making a good firm cut to guide the right hand21 with the left hand as in Fig. 5. When curved lines are to be cut, the left hand must be used to turn the leather so as to present it in the most favourable position for the operation of the blade. The third knife (Fig. 6) is held like a graver with the handle supported against the palm of the hand and is pushed forward (Fig. 7). It is useful in cutting curved lines over a large surface. The depth of the incision should vary according to the effect22 to be produced by the subsequent operation, but it should never exceed a third of the thickness of the skin.
Thin skins should rarely be cut, and, if they are cut, the incision should barely penetrate the surface. On ox-hide the depth of the cut may be considerable without danger of impairing the strength of the leather.
When the leather is to be modelled in high relief, the design should be well separated from the background in the cutting process. The incision should also be deep when the outline is to be accentuated afterwards with a23 tool called an “opener” (Fig. 9) to produce an effect like the leading in stained glass.
Should it be desired to raise and turn up the edge of the leather to simulate a leaf, petal, or piece of ribbon detached from the background, the knife must be held slanting, as in Fig. 8, so as to make an almost horizontal cut.
However thick the leather may be, it is important that two lines should never be cut quite up to the point of intersection. For example, in cutting the outline of a leaf, the points of the indentations should be left uncut to avoid the tendency of the part within the angle to project and turn back. Sufficient impression can be24 obtained with the modelling tool to give a finished effect to these points.
The incision must be clean and sharp, and absolutely vertical, except where it is made slanting for the purpose described above.
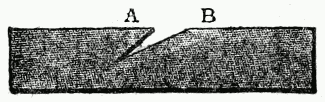
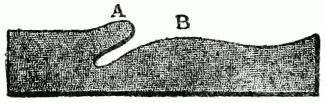
Leather with flat decoration in outline of even thickness is called cut, or engraved leather. The tool used to enlarge and accentuate the outline is called an opener. It is like a straight modeller broadened in the centre and with a blunt point (Fig. 9), or a small blade with the point26 cut off square and the angles rounded. When the leather has been well wetted and the water has thoroughly soaked in, the end of the opener is inserted in the incision and pushed along it with a very slight and gentle gliding movement. The broader part of the opener will act as a wedge and widen the cut evenly. Openers can be had in various sizes to produce lines of different width. When the design is to be modelled afterwards, an opener should be used which broadens on the right side only; held slightly slanting, it will press down the outside edge of the incision which is to be sunk into the ground. Fig. 10 shows the manner of holding the tool; it should be worked backwards and forwards to make sure that the edges are evenly parted. The left hand may help to guide the point to prevent it from slipping off the line.
To be able to accomplish satisfactorily this operation of opening the outline, it will be found that the incision must be absolutely vertical. Supposing it to have been made slanting as in Fig. 11, it will be easy to sink the outer edge (B) into the ground, but when it comes to raising the inner edge (A) an excess of material will be encountered which will offer stubborn resistance to being raised in a direction contrary to that of the incision (Fig. 11a). The opener should not be moved at too great an angle in the incision as the point, though blunt, may yet be sharp enough to cut and spoil the modelling by raising the surface of the leather.
After it has been outlined, the leather may be further27 decorated by variously tinting the parts within the lines, if the style of the design will admit of such treatment; an effect similar to leather mosaic is thus produced. (See Chapter III.)
Pyrogravure, or engraving with a hot tool (see p. 36), gives a very similar effect to that of cut or engraved leather, the only difference in the appearance of the work thus decorated being due to the slight burr of the edges and the darkening of the line caused by the hot tool. This effect of dark colour can, however, be added to cut leather by colouring the lines with a dye applied with a fine brush. In order to prevent the colour penetrating and spreading beyond the lines, the latter should be lightly coated with paste before the dye is applied.
Great expertness is required in carving leather, that is to say, in producing lines so deep that the design stands out sufficiently from the background to allow of its being ornamented by independent lines less deeply worked.
Some leather cases from the Dijon Museum, which were exhibited at the Petit Palais in Paris in the year 1900, are good examples of carving, and the manner in which they are finished with touches of gold is very characteristic. The style and method of production of these examples may well be imitated. Decoration on ogee-shaped lines is to be avoided, as, however artistically treated, it is apt to bring to mind the stamped leather of the so-called “Cathedral Style,” specimens of which filled the libraries of the romantic period of about 1830.
Besides the tools enumerated above, some artists use the gravers and gouges employed in chasing metal and wood-carving, but a great deal of practice is necessary for their proper handling, and they cannot be recommended to the inexperienced worker.
Pyrogravure is an alternative method of producing strongly accentuated lines, and by the judicious use of punches an infinite variety of interesting background effects can be obtained.
Before leaving the subject of carved leather, mention must be made of cuir bouilli, which was used in conjunction with it during the Middle Ages, chiefly for sheaths and cases, and is now unfortunately a lost art.[3] Mons. de Saint André de Lignereux, in Le Cuir d’Art français, tells us that the leather was boiled with gums and resins obtained from the East, and moulded and cut while still soft from this treatment.[4]
[3] An example of modern English work in leather treated in a somewhat similar manner is given in Plate 15.
[4] Le Cuir d’Art français, par Saint André de Lignereux, Etampes, 1900.
Punches are steel or brass tools, having at the point a design cut in relief or in intàglio, which are impressed on the leather either by the hand alone or with a hammer The design is thus reproduced on the leather with the impression contrary to that on the tool. For hand pressure only, they should be fixed in wooden handles to afford greater grip and power. They may be used hot; the design will then appear darkened on the leather.
Punches are also employed in tooling with gold leaf, or in burnishing the impression of their surface on groundwork gilded with shell gold.
Leather decorated entirely by means of punches is called hammered leather. It is used in the style of decoration described later under the name of modelled leather with punched background, and can also be employed with great advantage in conjunction with carved leather.
Leather may be modelled in two ways; with a cut29 outline or with the traced outline merely accentuated with the tracing-point or opener. In the former case the leather must be fairly thick, in the latter it may be thin calf or Russia, which is very soft and delicate.
Leather modelled after being cut should, when finished, have the appearance, with regard to the relief, of a metal or modelled wax plaque. The leather takes the desired30 shape easily, and should therefore be delicately handled.
The great charm of modelled leather lies in the softness of its forms, and care must be taken to avoid irregularly cut outlines which disagreeably arrest the eye by failing to merge into the ground.
Faulty incisions, or those too deeply cut, are liable to leave a light line between the modelled subject and the background, due to the cut having exposed not only the surface, but the inner substance of the leather. This light line will also have a tendency to appear if the modelling is not done directly after the opening of the lines, or if they are too widely opened, or if the opener is too sharp and unduly deepens the cut. The fault can be remedied by staining the line to match the surface of the leather.
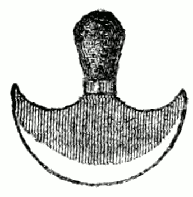
The tools used for modelling are not numerous; two or three modellers, more or less fine and of different curves, (Fig. 12) are sufficient. A special tool, called Pied de Biche (hind’s foot) in allusion to its shape, is also useful in depressing the ground at right angles to the modelling. Modellers may be either of nickelled steel or of brass, provided that the convex side with which the leather is modelled be perfectly smooth. It is better not to use ordinary steel which, when the leather is wet, might cause it to become stained through the rusting of the tool occasioned by the materials used in tanning. It may also be mentioned here that when using acids for patine,[5] steel tools should be kept away from the work. Hydrochloric acid in particular will rust them so badly in a single night as to make them unusable unless they are repolished.
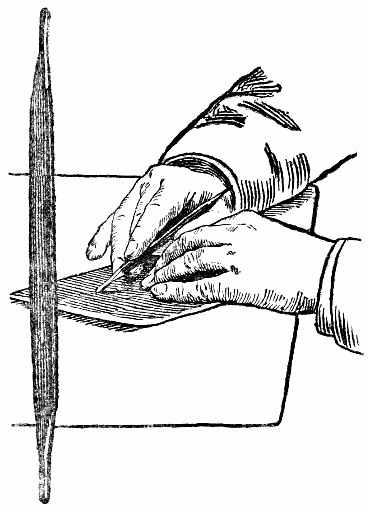
When the leather is thick it must be thoroughly wetted on both sides; it is then taken in the left hand, the portion31 to be embossed being between the forefinger and thumb, which are laid flat on the surface of the leather, while the other three fingers form the under part of this species of clamp, and ensure the leather remaining steady (Fig. 14). Steel clamps are made for fixing the end of the leather to the table, but the system of holding it in the32 hand is preferable, except for very large work, as it can be more readily moved about.
A modeller or a tool consisting of a small steel ball with a handle (Fig. 13) is then worked backwards and forwards with more or less pressure on the back of the leather until the desired degree of relief is obtained. It is possible to work very high relief by this method.
Another way of embossing in high relief, which we believe to be here described for the first time, is as follows: The outline of the design must first be traced on the flesh side of the leather. This is done by placing blue transfer paper under the leather, with the blue side uppermost, while the design is being transferred to the surface of the leather with the tracing-point in the manner described on p. 20. A chamois leather bag, about 16 × 12 inches in size, is filled with very fine, carefully sifted sand, and then sewn up as tightly as possible, so that the surface is quite taut. The bag is placed on the table, and the leather face downwards upon it. The steel ball is then rubbed to and fro, on the flesh side of the leather, at the point to be embossed, and the relief is produced as the sand yields under the pressure of the tool. The sand gives enough support to the leather, however, to prevent it stretching too much, as it would be liable to do if merely extended over a frame.
The next process is to open the incisions. This is not done till after the leather has been embossed in order not to further impair the strength of the leather at the outline, already diminished to some extent by cutting. The object of opening the incision is to facilitate the flattening of the outer edge so that it merges into the ground and the graduated modelling of the inner edge to form the softened outline of the ornament in relief.
To obtain this soft effect, the modeller is gently passed from left to right over the angle formed by the inner edge of the incision and the surface of the modelling. The33 tool may be lifted and the leather turned about to place it in the right position for this movement. The leather is frequently wetted (but not to such a degree, however, that the water oozes out of the surface when the modeller is used), and assumes the substance of wax. Should it show a tendency to rise after it has been depressed, it must be gone over again with the tool; if the leather is of good quality, it will keep the modelling permanently when it is once dry.
Care must be taken to avoid making a false impression; the least contact of the tool with the leather will leave a mark on the damp surface, which it is not always possible to efface from beneath.
Having dealt with cut and modelled leather, we now turn to modelling without cutting, the outline of the design being first simply marked out with the tracing-point, or with the opener held very slanting to avoid wrinkling the surface of the skin. This process should be adopted in preference to the preceding one, for comparatively thin skins which would not bear cutting. The relief may be obtained in the manner described above by working it up from the back of the leather, or the leather may be laid surface upwards on a cake of wax and the design brought out in low relief by depressing the background with the tool. Better results are obtained with the latter method. The wax is applied under the parts to be modelled, which must be accurately marked out for this purpose on the under side of the leather, and thin paper is pasted underneath it to keep it in place and prevent it sticking to the table; or a very smooth, thin tablet of wax is placed on stout cardboard under the entire piece of leather; when in position, the edges of the leather should be turned over and firmly fixed underneath the cardboard in such a manner as to prevent the wax forcing itself out under the pressure of the tool. The wax must be prepared with spirit to expel the grease or contact with it would stain the leather.
After thoroughly wetting the leather, the outline34 should be well accentuated with the opener and the design brought out by lowering the ground all round it with a fine modeller. The modelling is then done by working the tool with varying pressure and is held in place by the wax.
Beginners are advised to start by copying a plaster cast, in order to get a full understanding of the values of relief.
The subject of wax supports brings us to that of padding the relief to preserve its form, which may be done in many different materials. The padding may be made of a special wax treated like cement, or of absorbent cotton-wool soaked in a paste made of flour and water, or of cuttings of glove skins shredded very fine[6] and mixed dry with talc, flour, dextrine, etc., forming a liquid paste when water is added which can easily be run into the hollows of the relief. This paste solidifies rapidly, and is not affected by damp. Cardboard or cork scraped very fine and mixed with paste or flour and water will also form a durable padding. A special padding made with a round cotton cord dipped in flour mixed with cold water is employed for flower stems and the so-called reed decoration—a decoration consisting of a round line in relief of uniform width, which lends itself to many combinations, and is worked with the tool illustrated in Fig. 15. It may also be used in modelling the relief by pasting it first on the back of the leather and, when dry, moulding the leather with a modeller over the projection on the surface caused by its thickness.
[6] Dollage de gants.
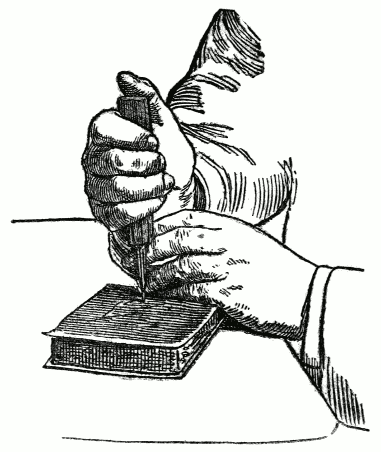
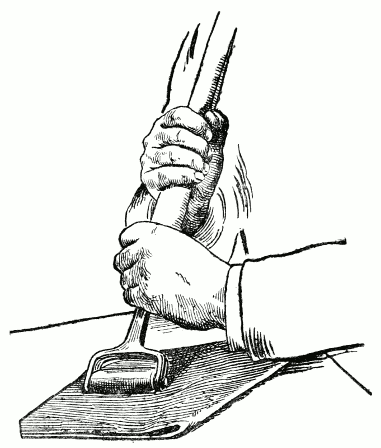
When the leather has been cut before35 being modelled, the punch completes the work of the modeller in sinking the outer edge of the incision into the background. To do this perfectly, the edge of the punch must be placed very exactly against the outline of the raised design; the handle should be held slanting slightly to the left in working; extra pressure will thus fall towards the right on that part which, in spite of having been sunk by the modeller, will always show a tendency to rise if the punch be used too flat upon the surface.
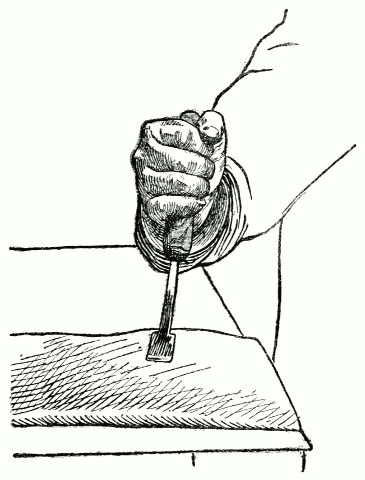
A hammer, though useful in working certain punches which depend upon being deeply impressed to produce a good effect, requires great sureness of hand when used as described above, to prevent overstepping the limits of the outline, and punches in wooden handles are much to be preferred for this work. Too deep an impression is avoided by their use, and, by guiding the end of the punch with the left hand, it can be placed more surely in the right position and worked by the steady pressure of the wrist. (Fig. 16.)
The most useful punches are those producing a powdered or a very small check pattern. With these there is no need for the impressions to be arranged in any regular order; it is indeed better that they should slightly overlap so that no part of the ground is left out. The effect of some punches is dependent on their arrangement in combination; others can be arranged independently to form a semis—a pattern made up by the repetition of some given figure at intervals.
Wheels, either plain or having a more or less broad surface engraved with any kind of pattern (such as a check diaper, pearling or arabesques), are used for outlining or for continuous patterns, or for producing imitations of shagreened leather.
An excellent effect can be obtained by varnishing the parts depressed by the punch to make the colour adhere, and then painting them with gouache or bronzes. By36 rubbing the leather afterwards with a woollen cloth, the colour or bronze is easily removed from the unvarnished modelling.
The tools employed in pyrogravure are based on the same principle as the instrument for thermo-cautery in surgery. The apparatus in most general use consists of a platinum point mounted in a hollow metal handle connected by a rubber tube with a pear-shaped rubber37 blower. This blower serves to inject through a tube the carburetted air from a small benzine reservoir attached to it. The incandescence of the point is maintained by this constant injection, and the lines are burnt more or less deeply according to the degree of incandescence, and the pressure applied. The great difficulty is to keep the line of even thickness throughout. The points are to be had of different shapes according to the effect desired. Some are pierced at the end, so that the carburetted air escaping leaves a mark on the leather similar to that which would be produced by a hot iron grazing its surface. In this way a brown tint is obtained varying in darkness in proportion to the proximity of the point to the leather.
 6. Blind-stamped Morocco binding with gilt
roundels and coloured cameo design. Celsus. De Medicina. Venice,
1477. Italian, 15th Century.
6. Blind-stamped Morocco binding with gilt
roundels and coloured cameo design. Celsus. De Medicina. Venice,
1477. Italian, 15th Century.
There are also rather large blowers which are worked automatically by compressed air, while others have a pedal action like a sewing machine.
It would be difficult to explain the many ways of handling the point so as to obtain different effects; it should, however, always be held slightly inclined to the right. It is shaped like an eagle’s beak, so that by using the point alone, fine lines of more or less depth are obtained, and by inclining it more to the right the rounded part will burn a larger surface of the leather. Very deep hollows can be made with the point highly heated. Pyrogravure is also an efficient way of depressing the ground work of thick leather when the point is worked with repeated touches over the surface. With a light hand and an accurate knowledge of the degree of heat required to produce fine lines, a skilful artist is able to draw with the point as if it were a pen.
The left hand plays a very important part in the process by controlling the injection of carburetted air through the blower, and thereby regulating the heat of the point. When the incandescence is automatically produced, equal facility in varying the degree of heat according to the requirements of the work is not possible.
The following description is borrowed from Mons. E. Aumaître, the inventor of another process for the decoration of leather to which he has given the name of pointogravure.
The implements required are two graving-points, one large and one small, a modeller and a spirit-lamp.
The design having been traced on the leather, the whole of it is wetted with a sponge as described on page 19. The point is then heated in the spirit-lamp and passed lightly over the line. It should be held like a pencil and heated sufficiently to produce a light brown mark on the leather, and it should run smoothly without sticking. The fine lines are drawn lightly and the point pressed more heavily for the deeper ones. Deep hollows can be made by sloping the tool, and using its widest side. The point being very small, it requires frequent heating to keep it in a condition to produce satisfactory results. It is not hot enough unless it runs smoothly on the leather and darkens the impression. On the other hand, overheating is to be avoided to prevent burning the surface of the leather. This process skilfully carried out will produce shading, hatching, and lines of great delicacy, also much softer effects than pyrogravure. It lends itself equally well to the broad treatment of a design.
It is beyond the scope of this work to describe the process of stamping leather with a steel die and a balance-press;[7] we will therefore explain a method in which the steel die is replaced by thick cardboard or leather cut out in open-work, and the balance-press by a small one worked by hand. The cardboard or leather stencil, laid on damp leather and placed in the press, will sink in, causing39 those parts of the leather which are against the open parts of the stencil to stand out in relief.
[7] Balancier.
There is another method which has been found particularly satisfactory in working a deep design on the board of a book-binding. The design is drawn sharply in outline with a pen upon very white paper. By a photographic process a metal block is produced from the drawing, on which the outline appears in relief. This block, mounted on pasteboard or wood, will form a die with which the design can be hollowed out of the leather by pressure in a copying-press, and the result subsequently perfected by cutting or modelling.
Another interesting process consists in etching a design deeply upon a copper-plate; the lines are then filled in with printing ink, the surplus removed with the palm of the hand, and the plate wiped over with a soft rag, preferably of flannel. A piece of leather is then wetted and placed under the plate and the whole heavily pressed. Since a copying-press is not sufficiently heavy to produce the relief, a bookbinder’s press should be used and tightly screwed up. When the leather has taken the impression sufficiently, the whole is removed from the press, and the copper-plate carefully raised, avoiding tearing the leather if it should have stuck to the plate. The design will then stand out in relief, coloured black or red according to the ink used. The ink must be thick enough not to spread over the leather under pressure.
There is also a method of stamping leather by means of two plaster casts prepared with stearine, both bearing the same design, one in relief and the other hollowed. A thoroughly wetted piece of thin leather is placed between these two casts and well pressed, the amalgam enabling the plaster to bear the pressure. The leather should be allowed to dry between the casts, or, if preferred, the hollow one may be removed.
The same principle can be applied without the hollow40 cast, by modelling the leather with the modelling tool, so that it takes the form of the cast in relief beneath it. In some cases the plaster is left permanently under the leather to form the padding.
The leather should be neatly and sharply cut out for open-work decoration, and placed over a groundwork of leather, stuff or metal: the last material is well adapted by its contrast of colour to show up the ornament laid over it. Open-work leather is a good material for hangings, and when destined for this purpose the design is sewn on the groundwork of leather or stuff with a sewing-machine, or stuck with gutta-percha. In the latter case the back of the leather is made quite smooth, and a layer of gutta-percha is placed on it and made to stick by means of steam produced by heating a wet pad. Well pressed down with this pad the gutta-percha will stick to the leather, and also cause it to keep in place on the groundwork, to which it is made to adhere permanently by passing a hot iron over the surface. A sheet of white blotting-paper is laid over the leather to protect it. When the leather is worked in relief, this proceeding must be reversed, that is to say, the leather is placed face downwards on a sheet of wadding with the material forming the groundwork uppermost, and the hot iron is passed over the back of the material. The relief can easily be worked on the leather before it is cut out.
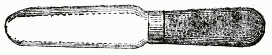
The cutting out is done on a piece of strong cardboard with the knife illustrated in Fig. 17.
The borders of open-work leather can be ornamented41 by a sort of plaiting formed by lacing thin strips of soft leather through holes made with a punch.
A very effective decoration for furniture can be made with open-work leather over a panel of wood, or a metal background.
Until recently it seemed as if this pleasing art would have to remain the monopoly of a limited number of professional craftsmen working with numerous tools, and reckoning a ten years’ apprenticeship necessary to the attainment of proficiency in their craft. But although there is small likelihood of amateurs entering the domain of the followers and emulators of artists such as John Reynes, Florimond Badier, Monnier, Padeloup and Jubert, Mons. Eugène Aumaître has invented a simpler process of leather mosaic, for which fewer tools are required and which is within the reach of artist and amateur alike. The following pages contain the result of the study of his method, with the addition of some observations based on the practical experience of the author.
Any skin may be used for the groundwork of leather mosaic, but morocco, and especially the kind called Cape morocco, is generally preferred, because of the grained surface which shows up the inlaid decoration to the best advantage.
Other skins, however, with either dull or glossy surfaces make good backgrounds for mosaic decoration, and as they are generally fawn coloured, they may first be stained to produce shaded groundwork very attractive in effect.
The old masters of leather mosaic made great use of fawn-coloured calf, occasionally adding a touch of coloured lacquer to bring out the light parts of the design.
The first necessity in working leather mosaic is to have a flat and rigid surface to work upon; it is indispensable therefore, when the leather is not in itself sufficiently thick and firm, to stretch it on cardboard. This rather troublesome preparatory process is best confided to an expert; we will, however, describe it for the benefit of those preferring to execute it themselves. A strong, smooth piece of cardboard called millboard is taken, and the edges rubbed down with glass paper. A thin coat of paste is applied on one side of the board and allowed to dry.
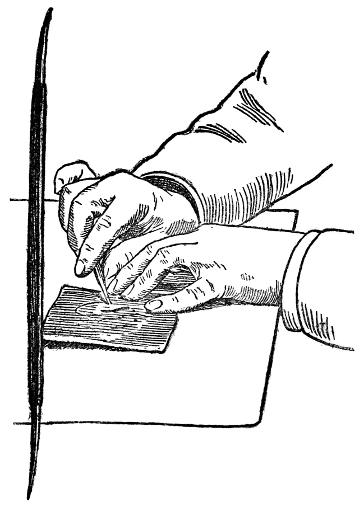
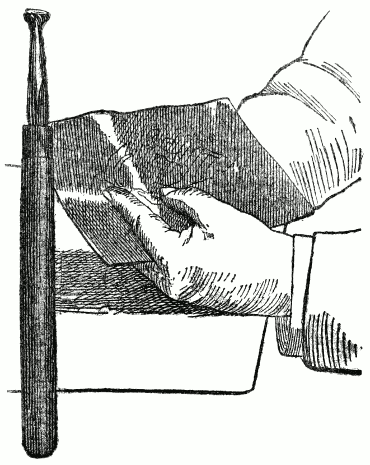
The edges of the leather must now be thinned so that they will more readily stick when turned over and pasted under the board, and also to avoid the unevenness which the normal thickness of the leather would produce underneath. A paring-knife with a broad, flat, very sharp blade (Figs. 18 and 19) is used for this purpose; its manipulation is difficult and requires long practice. The handle is held against the palm of the hand, and the fingers extending over the blade cause it to penetrate the leather superficially by a more or less strong pressure, the object being to take off shavings from the back of the skin, increasing towards the edge until the edge itself is reduced to the thickness of a cigarette paper.
The leather is placed surface downwards on a lithographic stone or a slab of marble. It is held stretched with the left hand, the fingers being extended over it on the face of the stone, and the thumb pressed against the side leaving the part just in front of the fingers free to be pared (Fig. 20). It is of the first importance for the success of this operation that the leather should be kept well stretched. The knife is held almost horizontally to avoid cutting into the leather at too sharp an angle, and is worked from left to right towards the edge.
The leather is then fastened to the cardboard by pasting either the whole of it or only the edges, which are turned underneath. In any case ordinary paste should be used; seccotine or glue would sink into and harden the leather, making the subsequent outlining process difficult.
When the piece of leather is so large that it would cause the board to warp when it dries, some paper should be pasted on the other side of the board, which will keep it flat by drawing it in the opposite direction.
 8. Brown leather binding, cut and engraved, with
punched background. German MS. Chronicle of Events. German, 15th
Century.
8. Brown leather binding, cut and engraved, with
punched background. German MS. Chronicle of Events. German, 15th
Century.
The work is then put into the press or under heavy boards. It is important that this should always be done after paste has been used. When it is too large to put into a copying-press, it should be laid upon a flat table and a sheet of nickelled or very smooth zinc placed against the part to be decorated. The cardboard known as Carton Jacquart may be substituted for the zinc, but there is a risk that the moisture of the paste penetrating the leather may cause it to swell, notwithstanding its glaze. The zinc plate or the board should not be smaller than the leather, for in that case the pressure would produce a ridge round its edge.
The groundwork is ready to receive the ornament as soon as it is dry. The different methods of working mosaic will now be explained in turn.
In this style of decoration the leather used for the inlaid design is white or very light in tone, and may be dyed subsequently to present the appearance of a mosaic made of variously coloured leathers.
The skins sold for this purpose are split sheepskins. Their extreme thinness renders them liable to stretch a great deal, and therefore they are most difficult to cut out in any desired shape. To obviate this difficulty, the back of the leather is pasted over, and it is then stretched on a board and fastened with drawing-pins to prevent it from shrinking as it dries. But there is another and a better method—that of mounting the leather on paper.
Some paste is made of very light and smooth flour, diluted with half the quantity of water and beaten to a cream. The water is added in small quantities while the mixture is being stirred. Canson paper, or some other strong46 drawing paper, is pasted over the whole surface of the leather, so that it adheres lightly, and can be removed afterwards without difficulty; it is then placed under boards and allowed to dry thoroughly.
The design is traced by means of carbon paper on the paper lining of the inlay leather. A hard pencil should be used in order to produce very sharp lines.
Cutting-out knives should possess a keen edge and a small blade, and should be so shaped that they can be turned freely in any direction. The knife illustrated in Fig. 21 combines all these qualities. It consists of a very fine double-edged blade, set loosely into a slit in a hard wood handle and secured with a few turns of thread; a piece of leather over the whole (A) keeps the blade in its place. The handle being loose, it is possible to give any minute movement to the blade, which can also be taken out for sharpening when necessary. It must be kept as sharp as a razor. The extreme fineness of this blade facilitates cutting out the delicate parts of a design, but if handled too vigorously it is apt to get out of shape. The second tool (Fig. 22) is a stencil-cutter’s knife, and is very similar to the one described above except in size. It is usually sold mounted in an ebony slide bound round with copper wire, but can with advantage be mounted as in Fig. 21, in a split hard-wood handle.
One little known tool deserves mention for its flexibility and lightness. This is a small scraper shaped like an unslit pen, the blade widening from the point in two very fine edges like the head of a pike. It is used by photographers and miniature painters, and is sold by the dozen in small boxes. When in use it is firmly fixed in a small pen-holder so that it does not turn when pressed upon (Fig. 23).
The special knife illustrated in Fig. 17 is sometimes recommended, but it is better adapted to cutting out thick skins for open-work decoration, as the point of the blade is not sufficiently fine for use on thin leather.
The leather to be cut out is placed on a sheet of the cardboard used in mounting drawings, which is firm, but at the same time easily penetrated by the point of the tool. The nature of the board on which the leather is laid is important, for to ensure a clean cut, the tool, as it pierces the leather, must not encounter a veined surface such as that of wood, which might deflect the point. The three middle fingers of the left hand hold the leather mounted on the paper upon the board, the thumb and little finger supporting the whole underneath (Fig. 24). The part49 which is to be cut is turned towards the knife by the left hand, the right hand being held in a fixed position with the knife, slightly inclined to the right, cutting the leather as it is presented by the other hand. The lines must be cleanly cut in order that the subsequent operation of outlining may be successfully accomplished. With every care in cutting out, it may sometimes be found in detaching the cut portion that a small thread of the leather remains unsevered. In this case it should be neatly cut through, and on no account may it be pulled to make it give way, which would result in spoiling the design by either tearing or stretching the leather. When cutting out a design on a large scale it is not possible to hold the work in the manner just described; a part of the design to be cut out is therefore placed flat on a large sheet of cardboard on a smooth table and can then be turned about as required under the point of the knife.
 9. Cover of Case for a cup in wood covered with
leather, cuir bouilli, embossed, painted and gilt. Italian, about 1500.
9. Cover of Case for a cup in wood covered with
leather, cuir bouilli, embossed, painted and gilt. Italian, about 1500.
When the inlay is of white or very light leather, it is extremely difficult to conceal any joins occurring in the middle of lines; care must therefore be taken that there are as few joins as possible, and that they are arranged at points where they will easily disappear in lines of the design going in an opposite direction.
The centre of the design should be cut out first, and then the outer lines, reserving the more delicate parts, such as flower stems, for the last.
When the inlay is of a nature that does not require placing in any very exact position, as for instance a spray of flowers, it will be sufficient to lay it on the groundwork and mark the principal points. When it is to occupy a definite position, forming the framework of a design, for instance, it is laid upon the groundwork exactly in the right place and then given a sharp turn in a copying-press,50 great care being taken that it does not get displaced during the operation. Owing to the thickness of the supporting paper, this will be sufficient to mark the outline of the design on the groundwork. Some very smooth starch paste is then applied with a flat brush on the exposed side of the cut out leather, care being taken that every part, however small, is thoroughly pasted. To facilitate this and to prevent the leather curling up when pasted, it should first be fixed to a board with drawing-pins.
The portion of the ground which is to receive the inlay is damped with a soft sponge; the inlay is then placed in position and pressed down with the palm of the hand, a modeller being used for the finer parts. If it should become displaced, the greatest care must be used in correcting it. With the small pincers used by artificial flower-makers, the minutest pieces of leather can be taken up and replaced after being repasted, if necessary.
The next process is that of setting the inlay into the groundwork, so that no relief remains. This is done with the help of a roller with a long wooden handle held in both hands and pressed against the shoulder, as illustrated in Fig. 25. The paper on which the inlay is pasted plays an important part in this operation; the greater its thickness, the greater will be the pressure attainable, and the deeper the penetration of the inlay into the damp background.
At first the roller is worked lightly with one hand only to ensure the uniform adherence of the inlay, the movements being short, and repeated several times over the same spot. When afterwards pressing heavily over the whole surface, a piece of thin, tough paper between the roller and the work will prevent the inlay from curling up, and the paper may be lifted from time to time to see that nothing is out of place.
When the work is not too large, it is easier and more effectual to use a copying-press instead of a roller for this operation, which is then carried out in the following manner: A piece of felt is laid in the press, and over it a sheet of very smooth or nickelled zinc, or, failing this, of Carton Jacquart. The work is then laid on it and covered with a second sheet of nickelled zinc and some pasteboards. The press is screwed up as tightly as possible.
The work must not remain in the press, as if allowed52 to dry completely, the subsequent removal of the paper pasted to the inlay would become extremely difficult. To effect this removal, the paper is dabbed with a damp sponge until it is ready to come off. A point of the pincers is inserted underneath the paper which, if sufficiently soaked, should easily come away when the tool is slid gently along. The paper, as it becomes freed, should frequently be cut off with scissors to facilitate the handling of the tool. The leather, being damp, may possibly become unstuck and stretched during this process. It must then immediately be repasted and replaced, and the stretched part reduced to its original size by gently pushing it together with the modeller. Should it be found impossible to reduce it thus, the part that is out of shape must be cut off and joined on again. When the paper has been removed, the whole surface is carefully washed over, wetting it as little as possible, so as not to cause the mosaic to become unstuck. The work is then placed in the press, or under boards, until it is perfectly dry.
Outlining is the most delicate process in leather mosaic. When well carried out it should be impossible to distinguish the line where the inlay joins the groundwork. The extreme edge of the inlaid leather is pressed into the groundwork by means of a tool invented by Mons. Aumaître, producing a fine line the breadth of the edge of the tool selected. This tool, called an outliner (Fig. 27), has two blunt ends, one rounded and the other square, and is flat on one side and rounded on the other. The rounded side of the tool affords extra pressure, and should therefore be placed on the inner side of the line so that it serves to increase the depression of the edge of the inlay. It is best to work the outline with the cold tool first, and then to go over it again with the tool heated. The inlay53 is lightly damped round the edges, and the round end of the tool is placed half on the inlay and half on the groundwork. The tool is held first inclined backwards (as in Fig. 26) and then brought with pressure to a perpendicular position (Fig. 27). This will make a groove into which the edge of the inlay will disappear. The square end of the tool is used for straight lines. Great care must be taken in placing the tool correctly; no portion of the inlay may protrude beyond the flat side of the tool, as any particle of the edge, however minute, which is not sunk in the groove would have to be cut off. If the edge of the inlay does not extend up to the tool, the error is still more troublesome to correct, more particularly when the leather is of a delicate colour, on account of the difficulty of matching the exact shade for joining it.
After this operation the edge of the outlining tool (Fig. 28) is inserted in the groove thus formed, and worked with a short up and down movement. A ruler will serve as a guide in working straight lines. The round side of the tool is54 held slightly inclined towards the edge of the inlay. The wheel illustrated in Fig. 29 may also be used, but requires great sureness of hand for its successful manipulation. Gouge-shaped outlining tools with curves of different degrees (Fig. 30) are useful for little curved lines which are otherwise difficult to work; also the tool represented in Fig. 31, for the lettering on bookbindings, etc., where the56 lines require to be sharply finished. It must, however, rest with the artist to select the tools he considers most suitable for his work.
 FIG. 28.—GOUGE OUTLINER.
When the outline has been worked with the cold tool, a hot one is used to go over it again to ensure perfect adhesion, and to give an attractive brown tint to the lines. The end of the outliner is heated over a spirit-lamp to a degree at which it can still be comfortably held in the hand, and used as before. If the tool does not run smoothly, owing to the elasticity of the edge of the inlaid leather, the latter may be lightly damped with a brush. It will at first be found difficult to keep the tool at the right heat. As a groundwork, calf with a smooth surface is more sensitive to damage from an over-heated tool than split sheepskin. It is useful to paste some of the inlay leather upon a spare piece of the leather of the groundwork, with which to test the heat of the tool. If the tool be too hot, it will burn and penetrate the leather without pressure. It can be cooled to the desired temperature on a wet sponge.
The next process in leather mosaic is that of colouring, which is dealt with in Chapter IV. It then only remains to give the finishing touch to the work by passing a polishing iron (Fig. 32) over the surface, to polish it and make it perfectly even. The tool is heated by holding the part which does not come in contact with the leather over the flame of a spirit-lamp. The polished side should frequently be well rubbed on flannel, and should any portion of its surface become dull, the polish can be restored with fine emery paper. The polishing iron, when heated, is held in the right hand and worked with little stroking movements, bringing first the end and then, by lowering the handle, the back of its polished surface in contact with the leather. The various positions of the tool during this operation closely resemble those of a vessel when it is pitching.
 11. Powder-flask of wood covered with leather,
cuir bouilli, cut and embossed. Italian, 16th Century.
11. Powder-flask of wood covered with leather,
cuir bouilli, cut and embossed. Italian, 16th Century.
This style of decoration consists of different coloured leathers arranged upon a ground, and is the only one that can properly be called leather mosaic. The work of marking it out is a lengthy one and demands scrupulous exactitude. A finished design is first painted in water-colours and marked with letters which are repeated on58 the pieces of coloured leather, so that the exact place is indicated which they are to occupy in the design. It is important in this style of mosaic to obtain a very correct tracing of the design on the groundwork. On a smooth and light ground the tracing-point lightly worked will be sufficient; when the ground is dark or has a grained surface, red or white transfer paper should be used. The most satisfactory method of marking the design is by impressing a stencil of thick paper, but it cannot be employed with morocco leather for fear of crushing the grain too much. A thick stencil, however, carefully used without exerting great pressure, may give a sufficient result without spoiling the grain.
For polychrome mosaic on a smooth ground with an inlay of split sheepskin pasted on Canson paper, the method already described for working mosaic of one colour is the best, but at the same time the directions which are given below for placing the differently coloured skins side by side in position should be followed.
Morocco leather for inlaying is thinned with the paring-knife, but it cannot be reduced to the excessive thinness of split sheepskin. It possesses, however, the advantage that the extreme edges may be made thinner in proportion for laying one over the other at the point where they meet.
After it is pared, the back of the leather is pasted over and it is pinned out on a board to dry. The different parts of the design to be inlaid are then traced on the various coloured leathers, and cut out in the manner already explained. The difficulty of placing the pieces exactly edge to edge is so great that it is better to allow them to overlap very slightly, but in order that this should not produce undue thickness at the point where they join, the substance of the extreme edges must be further59 reduced with the paring-knife. A small margin is left for this purpose in cutting out. Paring the edges to their thinnest possible substance will give a slightly jagged outline, and the extra piece will thus more easily merge into the join than if sharply cut. Outlining with the hot tool will perfect the join.
To avoid crushing the grain of rough morocco, the tool illustrated in Fig. 33 is used instead of the roller to secure the adhesion of the inlay to the groundwork, in order that the pressure may be applied only upon the inlay. Damping the groundwork, except where the ornament is placed, should be avoided. The tool is held pressed down with both hands as in Fig. 34, and rubbed backwards and forwards. The work is then placed under boards.
The remarks on paring leather for polychrome mosaic apply also to paring the leather for covering a design in relief. An extra margin is left round the edges, which are “slashed” with the tool, so that they may better embrace the form of the modelling, the finer details of which are not worked until afterwards. The leather is first placed dry in position over the modelling, and smoothed over with a modeller, so that it takes the form of the relief. It will then be seen how much should be cut from the edges, so that it may exactly fit into the outline when it is pasted on.
This method of mosaic invented by Mons. Aumaître possesses the advantage of being very durable, owing to the edges of the inlay being secured between the two edges of the incision made in the groundwork. The outline is60 deeply cut in the groundwork, the incision well opened with the opener and then filled with paste. The inlay is also pasted and the edges inserted in the incision. A wheel or a large modeller is used to press down the edges, and the outline is then gone over with a hot tool.
 FIG. 33, FIG. 34.—STICKING INLAY ON MOROCCO
GROUND WITH TOOL (FIG. 33) INSTEAD OF ROLLER, TO AVOID CRUSHING THE GRAIN
FIG. 33, FIG. 34.—STICKING INLAY ON MOROCCO
GROUND WITH TOOL (FIG. 33) INSTEAD OF ROLLER, TO AVOID CRUSHING THE GRAIN
The term mosaic is perhaps not very correctly applied to this style of decoration, in which the shape of the design is indented, by pressure, on the damp surface of the groundwork, and filled in with an inlay of leathers thick enough to stand out in relief, and be subsequently carved. A thin kind of cowhide[8] specially prepared for embossed work is used. The design is traced upon it in the manner described for carved leather, and a preliminary modelling is executed indicating the outlines and veinings as strongly as possible. The high reliefs may be embossed and lightly stuffed. This done, it is placed upon Bristol board, not less than half the thickness of the leather itself, with a piece of red transfer paper face downwards in between. The whole is firmly fixed upon a drawing board so that nothing can get displaced, and the design is cut out with a stencil-cutter’s knife (Fig. 22). If possible, both leather and Bristol board should be cut through at the same time, but should the knife not penetrate the latter sufficiently to cut it through, the outline will have been marked on it by the transfer paper and it may be cut out separately. The leather and the board must, however, be absolutely identical in shape and very sharply cut. With the die thus formed by the Bristol board, the morocco groundwork is depressed to receive the inlay. It is thoroughly wetted and the water allowed to sink in. The board is then placed in the exact position which the leather inlay is to occupy, and covered with a very thick sheet of blotting-paper to protect the grain of the groundwork from being crushed too much. The whole is well pressed in the copying-press until the die has sufficiently entered into the leather. The leather inlay should then be tried in the hollow thus produced, and trimmed where necessary if it be too large. After pasting it thoroughly, taking62 care not to omit any small points, it is placed in position on the groundwork and worked into the hollow with a modeller. The work is then placed under boards to dry; a press would flatten the relief too much.
[8] Kip-skins.
When the paste is quite dry and the leather well stuck, the carving may be proceeded with as described in Chapter II.
Very characteristic effects are obtained by colouring leather worked in this manner.
The following description of a style of decoration, called by Mons. Belleville “incrusted mosaic,”[9] is derived from the valuable work of that author, entitled Le Cuir dans la Décoration Moderne.
[9] Mosaïque par Incrustation.
In incrusted mosaic the design is not cut out and applied on the background, but the different pieces of coloured leather forming the design and the leather of the background are placed side by side on the same plane. When the ornament is simple and the background plain, the design is traced on the groundwork, carefully cut out, and used as a pattern for cutting out the piece destined to replace it; when the ornament is to embrace the whole surface, the following method is recommended: The design, drawn on paper and coloured, is fixed on a drawing-board and over it is placed a sheet of transparent paper, or some thin muslin carefully sized and stretched. An exact tracing of the design is made on rather stiff paper, which is coloured or numbered to correspond with the pieces of the different leathers which are to compose the mosaic. The tracing is then cut out, separated, and the pieces pasted on the corresponding leather, either with the face on the flesh side of the leather, or the back on its surface. In the latter case it is very lightly done, but if pasted on the63 flesh side it should be done securely, as it will remain permanently. When all these pieces are cut out of the leather they are pasted in their respective places on the design, and the whole put in the press for about ten hours. If the work has been well executed, the lines where the pieces of leather come together will be hardly visible; the next step is to accentuate them and make them regular. This may be done either with a heated wheel giving a smooth even line, which may, if desired, be subsequently gilded, or by pyrogravure. Vigour and character can be imparted to the outline by the use of the latter process, and the darkened colour of the burnt line is made more brilliant by polishing it with an agate burnisher. In either case the tool must be worked accurately with its edge half on each side of the line. The main advantage of the process of incrusted mosaic is that the grain of the leather employed is better displayed than in inlaid mosaic. It is only suitable for work on a large scale.
[10] Patine represents a veneer, or wash of colour, applied on the surface, or in the hollows of leather, to intensify its tone, or to give artificial effects, such as those of verdigris, rust, or antiquity.
Partly owing to its nature, and partly owing to the tanning process, leather is susceptible to the action of the dyes used to colour it in degrees varying according to their composition and penetration. We will not attempt to enumerate all the dyes that may be employed or to describe their composition. Excellent results can be obtained with ready made preparations, and some brief remarks on the subject are all that is necessary for the purpose of this work.
Practical experience alone is a reliable guide in the selection of dyes, as, whatever their base may be, they all vary greatly in use. It may be remarked that there are many aniline dyes which are more durable than vegetable ones, although there are others which merit their reputation for instability. The colour of dyed leather cannot be expected to remain unaffected by constant exposure to direct sunlight, but it should not alter with ordinary use.[11]
[11] See the remarks on Leather for Bookbinding in the Note at the end of this volume.
It is obvious that, in proportion as the colours sink into the leather, they will lose in brilliancy, but on the other hand, this very absorption, which allows colours to be65 superposed and appear translucent, gives a depth rarely obtainable in materials of less capillarity.
 13. Top of Casket covered with brown calf, cut and
slightly embossed. By Florence Hornblower. Modern English.
13. Top of Casket covered with brown calf, cut and
slightly embossed. By Florence Hornblower. Modern English.
The following notes are intended merely as a general indication of the manner of treating the various substances used in colouring leather.
The substance sold by druggists under the name of potassium is very violent in its action and would burn the leather as well as the brushes used to apply it. It should only be employed, and that very sparingly, for such purposes as black lettering. Pearl-ash should be used in preference, but also with great caution, or it will not only destroy the surface, but rot the substance of the leather.
Potash is soluble in water to saturation point, that is to say, a given quantity of water will not dissolve more than a given quantity of potash.
It is very difficult to measure the exact strength to use; that which is barely sufficient to penetrate and colour a surface artificially made smooth by rolling, will sink in where the leather has been cut or punched and immediately darken it considerably. It is a good plan therefore to experiment on a spare piece of the leather. Potash lye is more easily used in the right proportion, and may be employed for staining very light coloured leather.
Soda has the same effect as potash, except that it is a little less strong; both substances have always been much employed in dyeing skins. Permanganate of potash is supposed to dye a mouse-grey colour, but it is most uncertain in its action, as it depends entirely on the porosity of the leather. Xanthin and catechol browns are pleasing in appearance, but their effect is less rich than that obtained with potash. They become improved by hard rubbing with encaustic.
Sulphate of iron has a strong and persistent odour and is also somewhat injurious. It is useful, however, and produces a colour varying from a light shade to an intense66 violet black. When used over potash, a dead black is obtained.
Alizarin, the colouring principle of madder, which can also be obtained from coal-tar, is employed in many colour combinations and gives a fine durable red. Hydrochloric acid changes it to violet. Carthamine and cochineal also produce good reds; the latter is turned orange by the action of hydrochloric acid.
Hydrochloric acid turns ammoniacal cochineal pink, but merely discolours the red made from archil. Direct extracts of red wood are unaffected by it.
The colouring matter of logwood, extracted by treating the powder obtained from an aqueous decoction of the wood with spirit, is sold as hematoxylin. Metallic salts convert it to a violet black, salts of tin change it to pink, alkalis to blue, and acids to yellow. Durable pinks are obtained directly from carthamine, the colouring matter of Carthamus Tinctorius.
The base of most fine yellows is picric acid. The chromates of zinc and baryta give very permanent yellows, which are particularly useful in mixing greens.
The vegetable yellows are less durable. They include turmeric, which is especially fugitive, and quercitron; the former is turned red, and the latter brown, by the action of hydrochloric acid.
Orange tints are easily obtained by using red over yellow, first allowing the yellow to dry completely; or they can be bought ready prepared with alizarin. Mandarine and nasturtium tints can also be bought ready prepared, or may be made by a mixture of vegetable colour, such as saffron and arnotto.
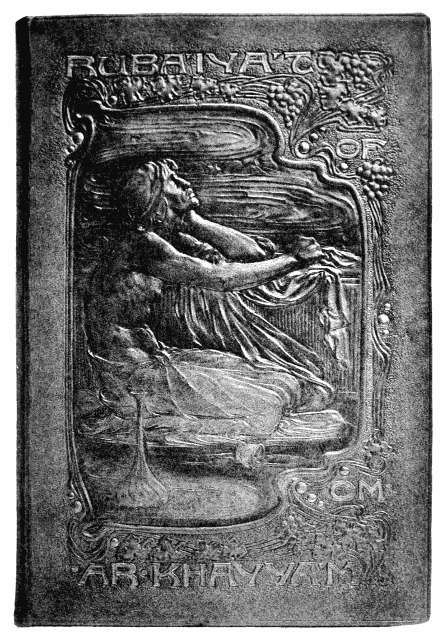 14. Embossed and punched brown calf binding.
Rubáiyát of Omar Khayyám. Designed by Mary G. Houston. Modern English.
14. Embossed and punched brown calf binding.
Rubáiyát of Omar Khayyám. Designed by Mary G. Houston. Modern English.
Good and durable blues are obtained from indigo and alizarin.
Greens of every composition are fugitive, especially those sold ready mixed. Better results are obtained by applying yellow and blue one over the other than by the direct application of the colour, but when the range of tints thus afforded is too restricted, recourse must be had to some of the numerous dyes varying in tint from greenish yellow to deep olive. Successive applications of sulphate of iron and picric yellow will produce the latter colour, and a vegetable green, which, however, is not very durable, is made from buckthorn berries.
All the dyes which have been just enumerated, which form, however, but a very small proportion of those in existence, are employed in dyeing textiles. These materials have first to be treated with mordants such as tannin, chrome or sumach, in order that they may take the dye, whereas leather is already prepared to receive it by the tanning process.
Ordinary water-colours based on glycerine or albumen can be used in the decoration of leather, but are recommended only for colouring small parts of a design, partly because liquid colour is more easily applied over large surfaces, and partly because, being less transparent, they do not lend themselves to the process of rubbing which plays so important a part in patine. Oil or spirit colours, on the other hand, possess a transparency which allows of their being used over a ground coloured with a different medium. When the leather on which they are painted is undyed it should first receive a coat of paste.
Colours sold under the name of patines grasses will produce a groundwork of great brilliancy, if well rubbed before they are quite dry.
The use of gouache should be limited to the hollow parts of incised or punched leather.
Gold and bronzes are also used with good effect.
Colours obtained from potash and sulphate of iron—dark green, dull red, etc.—are much used for groundwork. Potash produces a warm brownish-red, and tints, varying in colour from a pale to a dark slate grey, are obtained with sulphate of iron. As already stated, a coating of picric yellow over the latter will give a dull green.
In colouring large surfaces, it is best to use soft sponges, or small pads of cotton-wool covered with soft linen. The pads can be held by the edges of the linen and the sponges may be mounted on handles, but the best protection for the hands against staining is a pair of very soft rubber gloves like those used by surgeons.
The leather is first damped all over and the colour then applied in a succession of even washes. Care must be taken not to unduly darken any part of the leather by using too much colour, bearing in mind that different parts of the skin will vary greatly in porosity. In colouring groundwork with various superposed tints, the actual results are often entirely different from those one has had reason to expect. So far as is possible, in order to prevent this from happening, it is advisable not to mix the colours of different makers on the same piece of work without knowing their composition, or first experimenting with them on a spare piece of the leather.
A second colour should never be added until the underneath one is dry, or a muddy effect will result. If the colour becomes too dark, or if the second stain predominates unduly instead of merging into the underneath one, the whole work, fixed firmly on a board, should be dipped in water and scrubbed with a very soft brush and some69 soft soap. It should then be allowed to dry in the sun. This method of making the colour lighter can only be used when the ornament is not in relief; it has been found particularly successful in treating potash and sulphate dyes.
Ox-hide, light or fawn-coloured calf, pigskin and white morocco are leathers suitable for colouring. They are, however, very absorbent, and will require an application of paste before staining. This will also be found indispensable in colouring the white split sheepskins used in mosaic.
In staining leather for mosaic, several successive applications of colour will be required, especially in the case of greens which sink in quickly.
In addition to plain dyeing, there are various methods of producing shaded groundwork, marbling, sprinkling, etc.
For shaded groundwork diluted colour is applied with a sponge or pad worked over the leather with a circular movement, and the uniform tint thus obtained is darkened as required by further applications with stronger colour. In shading a ground from one colour to another, as for example from dark olive to malachite green, orange red and pale yellow, the edge of each colour, as it is put on, is covered with a piece of thick paper, which must be firmly held in place, in order to prevent the colours mixing where they come together.
A sponge with large holes is dipped in potash, sulphate of iron, or some other deep coloured dye, and lightly applied over the surface of the leather so that parts of it corresponding to the holes in the sponge are left untouched; or the first application of colour may be made evenly over the leather and the marbling worked, as described, in a second application.70 Many varieties of pattern can be obtained by moving the sponge in different ways. Leather may be bought ready marbled by a gelatine process.
The leather is first lightly pasted over, and drops of water, more or less large, are scattered upon it by jerking the handle of a small couch-grass whisk full of water against the left wrist held a few inches from the surface of the leather. A very little colour is then taken in the brush and jerked in the same manner over the drops of water, with which it will partially mix and give the effect of roots branching out in all directions. Variety can be obtained by applying the water with a sponge instead of the brush, and the colour in large drops over the whole or certain parts only of the field, or by using dyes of different colours which give curious effects in combining. After applying the dye, the surplus moisture is absorbed with blotting-paper.
The leather may be bleached to a light tint by means of an oil-paint brush dipped in decolorant[12]; the bristles of the brush are pushed back with the finger and when released jerk the acid in fine drops over the surface. The leather must be freshly and thoroughly damped so that the outline of the bleaching shades off into the ground.
Sprinkling is done with a rather close iron grating and a long narrow brush like a plate-brush. The dye is prepared on a flat plate and the brush dipped in it, the superfluous liquid being removed against the edge of the plate. The brush is rubbed backwards and forwards on the grating held horizontally a few inches above the leather over which it scatters a fine shower of the dye. Should the colour froth on the grating, the brush must at once be rubbed upon71 oiled paper. Sprinkling may also be done with a vaporiser for fixing drawings, but it is difficult to get a sufficiently fine shower so that the drops do not merge into each other.
The above process is a useful one when parts of the leather are to be “reserved,” i.e., to remain untouched by the dye. For this purpose a piece of strong paper is cut to the shape of the part to be reserved and pasted lightly to the leather during the process of sprinkling, after which it is damped and removed. Another method is to paint the reserved parts with one of the two preparations given by Mons. Belleville in Le Cuir dans la Décoration Moderne, afterwards removing it with benzine or petroleum spirit:—“Eighty parts of colophony, 4 of yellow wax, 6 of spermaceti, 4 of tallow, 60 of spirit of turpentine and 10 of alcohol.”
Or, “One hundred parts of virgin wax, and the same of castor oil, with 25 of borax and 25 of copal varnish.”
Instead of reserving the parts of the leather, the dye may be removed subsequently by means of reagents called decolorants. Sulphuric, hydrochloric, oxalic, nitric, or muriatic acid diluted with water in the proportion of one in five, can be used for this purpose, but their effect should first be tried on a spare piece of the leather, as it will vary according to the nature of the dye on which they are used. It should be noticed that, in mixing the acid, the right quantity of water must be measured out and the acid carefully added drop by drop. If water is poured into acid it causes an explosion.
The outline is traced rather deeply on the leather, so that it is still visible after the groundwork has been dyed. When the dye has sunk in, the decolorant can be easily applied with a paint-brush. On modelled leather dyed bronze green, a rag or piece of cotton-wool dipped in decolorant and quickly passed over the relief, will lighten the colour and produce the effect of bronze with the exposed72 parts rubbed lighter by use. Should the effect of the acid be too strong, the colour may be again deepened by washing the leather over with a yellowish gold stain, which will only take effect on the relief, since it will merge into the darker colour of the rest of the work. The same process may be employed on white calf with a light olive dye to obtain the effect of old ivory. Even when much diluted, however, the action of these acids must in the end be injurious to the leather. They should be used with great care and never undiluted. Where possible, washing the leather over afterwards with water will, to some extent, diminish their harmful effect.
Stencilling is another process by which portions of the leather forming the ornament are reserved from the dye used in colouring the ground. The design is cut out of a very thin sheet of copper or tin. A large short-haired brush[13] is used to take the dye from a plate, or pad, and is then rubbed very lightly over the stencil firmly fixed on the leather. Only the parts unprotected by the stencil will take the colour. The brush must not be too full or the dye would have a tendency to run under the stencil. The most suitable dyes are glycerine inks and marking inks containing nitrate of silver. A variety of colours may be mixed with glycerine for this purpose. The ink thus obtained is transferred to a cloth pad, such as is used by printers, from which the brush will only take the required quantity.
[13] Pompon.
When the leather is dry a lighter tint, transparent enough to allow the stencilled design to be visible through it, may be washed over the whole. Excellent effects of considerable richness can thus be produced. The depth of colour is further increased by the process of rubbing, which is necessary to the proper patine of leather. If done with wax, encaustic or varnish, it is an effective protection for the surface of the leather against deterioration from outside73 causes. With certain soft leathers, if the colour has not sunk in deeply, rubbing with the finger alone will give it great brilliancy; with other leathers the rubbing will produce an effect in proportion to the degree of porosity of the skin. It should always be done before the colour is dry, but not until it has penetrated sufficiently into the leather not to return to the surface with the pressure. The middle finger is used. A certain amount of polish can be given to the leather by rubbing it only with the finger (moistened with a little oil to allow it to slide easily), or, for a large surface, with the side of the hand instead of the finger. When a medium is used, it is applied with a circular movement by means of flannel or rag; a flannel brush consisting of a series of little flannel rolls, which can be bought at a surgical instrument-maker’s, is very useful for a large surface requiring much rubbing. Pure wax, which must be softened in the hand to make it spread evenly, encaustic and spirit varnish are all efficacious in preserving the colour and increasing its transparency.
Another method giving excellent results consists in applying opaque colour, gouache or bronzes in the hollows of a design and removing the surplus of the colour by rubbing. In this way an incised design can be boldly outlined in light on a dark ground, and may afterwards be bleached within the outlines if desired. After cutting the design on the leather, the whole surface is washed over with potash or any other dark stain, a coat of paste is then applied and immediately wiped off, so that some of it only remains in the hollows. When the paste is dry, some rather liquid gouache is washed over and run into the lines, any remaining on the surface being removed by vigorous rubbing with a damp rag. The same process may be applied to the hollows of punched leather. In using bronzes or gold in powder, some spirit varnish or specially prepared varnish is necessary to make them adhere. After applying the varnish, the surface is wiped over to remove all74 except that which is deposited in the interstices, and when this is sufficiently dry to hold the powder, the latter is put on with a very soft, short-haired brush and adheres to the varnish. The surface is then rubbed in the manner already described. All powder colours do not mix equally well with varnish; green and blue bronzes often change colour when brought in contact with it. Gold and silver powder give good results, used either dry or mixed with gum on shells. Chinese vermilion may also be employed with varnish, but other colours are more suitable for this purpose when prepared in the form of gouache.
Special manipulation is required for gold leaf applied to the decoration of leather. For gilding over a whole surface, as for instance an aureole round the head of a saint, the following is the best method. Several layers of starch paste are painted with a brush over the part of the leather to be gilded, and followed when dry by a little gelatine paste. A coating of some special preparation is then applied and allowed to dry to the right condition to retain the gold leaf, which varies according to the nature of the preparation; the degree of moisture can be tested with the finger. Gold leaf is sold in small books and is exceedingly thin. A flexible knife, like a palette knife, is used to manipulate it, and a single leaf is laid on a cushion of deerskin stuffed with wadding, and cut to the required size. It is then placed over the preparation on the leather and lightly pressed down with a very soft, round, short-haired brush.
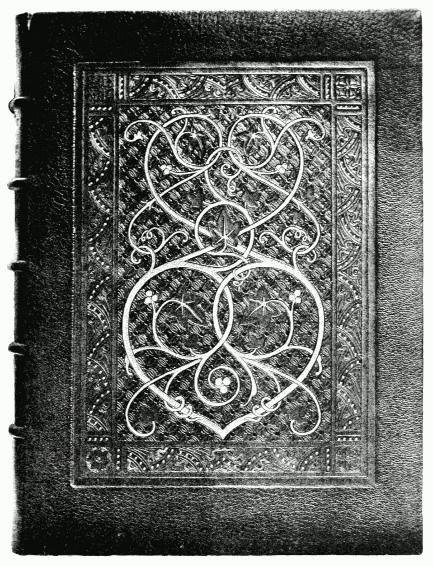 16. Black Morocco binding with applied panels of
tooled, cut, painted and gilt calf. Le Roman de Tristan et Iseut.
Designed by Robert Engels. Modern French.
16. Black Morocco binding with applied panels of
tooled, cut, painted and gilt calf. Le Roman de Tristan et Iseut.
Designed by Robert Engels. Modern French.
For gilding with hot tools a specially prepared powder made of resin or gum is used. This powder melts with the heat of the tool and causes the gold leaf to adhere to the leather only where it comes in contact with the parts of the tool cut in relief. The process is as follows: Some powder is lightly spread over the part of the leather to75 be gilded and a piece of gold leaf laid over it, the tool is heated sufficiently to melt the powder without burning the leather and is carefully applied on the right spot, the surplus gold being afterwards removed with the short brush. The tools used by bookbinders are slightly convex, so that firm and even pressure of the whole tool can be exerted by first inclining the handle towards the gilder, and then raising it while still maintaining the pressure and inclining it at the opposite angle.
Gold can also be applied with a brush in the form of powder suspended in liquid gum or spirit varnish. If it does not spread evenly, owing to there being too much liquid in proportion to the powder, dry powder may be added where necessary with a short brush when the liquid is almost dry.
Shell gold is applied with a slightly damped brush and, when dry, may be burnished with an agate or punch; the design of the punch will stand out in bright gold on a ground of dull gold. The pressure of the wrist is sufficient to work the punch and a hammer should not be used.
There is an interesting field for the artist’s enterprise in the discovery of new processes for the decoration of leather by means of colours and bronzes. It is not possible within the limits of a single chapter to give a complete list of the many methods that may be employed.[14]
[14] As a conclusion to this chapter, the French edition quotes from the Bulletin de la Société de l’Encouragement pour l’Industrie Nationale some extracts from the Report of the Committee on Leather for Bookbinding, published by the Society of Arts in London (1901), which will be found in the Note at the end of this volume.
The present chapter is devoted to some remarks on colour combination and the composition of ornament, based on the personal experience of the author.
Three colours, for the groundwork, ornament and high lights respectively, will, in many cases, be found sufficient for a scheme of decoration. A multitude of colours, worked in great detail on a relatively small surface, confuse the eye and hinder it from grasping the effect of the decoration as a whole. Only special styles of decoration, such as Moorish geometrical patterns, allow of the use of a great variety of colours. The circumstance already explained, that in leather decoration dyes may be used one over the other, enables interesting effects to be produced.
A design of sea, with seaweed and fish, can be effectively rendered entirely with sulphate of iron of varying strength. A weak solution is washed evenly over the whole; the waves are then drawn in with a flat brush dipped in a stronger solution, and the dark outlines afterwards bleached with acid where they border the first tint. The fish and seaweed in relief are similarly treated with decolorant, and a light wash of yellow over the whole completes an effective decoration.
The foliage of the chestnut tree in autumn lends itself exceptionally well to decorative treatment, both as regards form and colour. The large variety of greens and yellows are most effective on a ground of brickdust red.
A groundwork of soft grey, brightened by an underwash of very pale yellow, is suitable for reserved or bleached designs. Deep carmine constitutes a rich colour for groundwork, and is produced by using bright red over potash and deepening the effect by rubbing.
In planning a decoration, the artist has generally some special effect in his mind which he wishes to reproduce. It is not unusual, however, for the result to be totally different from what is anticipated, since uncertainty constitutes one of the charms of the art of colouring leather. These failures, as they may be considered from one point of view, often produce interesting effects and sometimes lead to valuable discoveries.
Marbled leather should be decorated with flat ornament only.
Figures in high relief belong properly to the domain of the sculptor and should be avoided in leather work, much of its individuality lying in the value of the outline in producing an effect of relief.
Some skilful artists produce in leather not only the relief, but the turned over edges of petals, etc., and treat twisted ribbons in open-work; the result, though pleasing, is essentially evanescent, owing to the extreme fragility of the detached portions of the leather.
Of all the uses to which leather work may be applied, none offer greater scope to the inspiration of the artist than bookbinding. It has become the fashion not only to provide a more or less rich covering for a beautiful edition, but to suggest in its design the nature of the contents of the volume, should these lend themselves to such treatment. The artist, however, will do well to practise this principle with due restraint, avoiding, on the one hand, what may be called anecdotal design, and, on the other, an over subtle symbolism.
Leather coffers, when well executed, constitute veritable works of art. They present considerable difficulties in78 the mounting of the leather over the wooden coffer so that the lines of the ornament come exactly in the right place. It is necessary that the lines forming the framework of the design should accurately correspond with the dimensions of the coffer to be covered. A coffer usually consists of a box with a hinged lid; the measure is taken by laying the leather round the whole; the leather is then cut, leaving a small surplus at the edges to be pared and folded over at the sides. The join should be arranged for at the lower border and not at the intersection of the lid and the box. The leather at this point is better left to be cut after it has been stuck on the wood in mounting.
When the leather is decorated in mosaic and consists of panels each enclosed within a patterned border, the probability of its stretching when it is fixed on the wood, must be taken into consideration; Cape morocco, however, if fairly thick will hardly stretch perceptibly.
During the process of outlining the design, which is done before mounting the leather on the wood, it should be stretched to its full extent on a flat board.
When the decoration is in relief, the padding should be very firm, so as to counteract the tendency to stretch during the process of mounting.
Generally speaking, designs based on naturalistic flowers do not give the most satisfactory effects in the decoration of coffers, since the style is not suited to the restricted size of the panels, even when the design ignores them and extends beyond. Designs in the modern style, or Gothic designs in the style of the fifteenth century, or those based on the Arabic decoration of the best period, are much to be preferred; in the last two styles punches used with a hammer will greatly assist in lowering the groundwork, so that the design stands out in relief without the necessity of stuffing it, as in embossed work. By introducing gouache or bronzes into the impressions made with the punches, rich effects of colour can be produced.
There are numerous other styles appropriate to the decoration of leather coffers.
In the decoration of large surfaces, such as the panels of wall-hangings, the artist is cautioned against the abuse of detail, frequently the stumbling-block of the beginner. He is recommended to exercise a wise restraint in his composition, and to avail himself of the numerous resources of the conventional art of the modern school more particularly in their application to the ornamentation of large surfaces. Technical efficiency in the use of the tools is essential and must be gained by practice, but may be said to be second in importance to a thorough knowledge of decorative design, which can be attained only by the intelligent study of the best models. The education of the eye is a considerable factor in the conventional interpretation of natural forms. The artist cannot do better than to study the ancient Japanese school, which has found such favour with the initiators of the so-called “Modern Art,” and which affords the best examples of balance in design in its rejection of unnecessary detail in the interpretation of natural forms. He may also find inspiration in the fields of Egyptian and Assyrian art, in the interlaced patterns of the disciples of St. Dunstan, and in the quaint renderings of leaves and flowers in the hangings and brocades of the Middle Ages.
The origin of the use of decorated leather for hangings and furniture has been the subject of much controversy. After consulting various books on the subject, we believe, as already stated, that its introduction into Spain may be attributed to the Moorish conquerors about the eighth century. In an Arabian manuscript of the sixth century of the Mohammedan era, mention is made of the industry as flourishing in the town of Ghadames in the Sahara. Jehan de Garlande, author of a Latin dictionary composed in 1080, mentions Cordouans first manufactured at Cordova in the eleventh century. About the same time, the Monk Theophilus, in his curious encyclopædia of the arts which unfortunately has not come down to us in its complete form, gives the following description of the processes of gilding leather:—
“For laying on gold or silver, take the clear liquid of white of egg beaten up without water, paint some with a brush over the part which is to receive the gold or silver. Damping the end of the same brush in your mouth, bring it in contact with a corner of the cut leaf (of gold or silver). Then lifting it with extreme rapidity, you lay it on the prepared place and spread it with a dry brush. At this point you must take precautions against a draught, you must hold your breath, for if you breathe you will lose the leaf and find difficulty in recovering it. When in position and dry you may, if you wish, put a second over it in the same way, and then a81 third, if it is wanted, so as to be able to give a more brilliant polish with a burnisher.
“You can, if you wish, apply the leaf on a ceiling or a wall; in the same manner, over a lining of tinfoil. If you have neither gold nor silver, you will use tinfoil, which you will apply thus....”[15]
[15] Theophili Presbyteri et Monachi, Libri 3 seu Diversarum artium schedula. Chapter 24.
Until the middle of the seventeenth century, hangings, and even carpets, of decorated leather formed an important item in those inventories of princely possessions which are such a reliable and inexhaustible source of information for the historian of the sumptuary arts.[16] Princes and other great personages depended largely on decorated leather and tapestries, when moving from place to place, to supplement the often hastily improvised decoration of their temporary apartments.
[16] Dictionnaire de l’Ameublement et de la Décoration depuis le 13me Siècle jusqu’à nos Jours, by Henry Havard.
The enumeration of all the different processes by which the leather was ornamented would carry us beyond the limits of this appendix, and we will confine ourselves to tracing in outline the development of the art of working in leather as applied to hangings and furniture during the last few centuries.
First in order of time we find skins covered with hair, sewn together for carpets or hangings; different kinds being placed side by side, either irregularly, or alternately to form a pattern. We are not, however, here concerned with anything but leather proper, that is to say, skins with the hair removed, and this was first decorated by means of a hot tool. The addition of colour speedily followed. Dark coloured leathers were also sewn as borders on lighter ones, and polished metal ornaments were added to brighten the leather groundwork, a fashion borrowed from the method of joining and strengthening the accoutrements of war.
Little by little, as the custom spread of reproducing the human figure and animals, attempts were made to carry out whole pictures on panels made of leather sewn together with the seams hammered flat. But painted leather was still generally of comparatively small dimensions, and it would seem that these pictures were designed chiefly for the ornamentation of chests. The leather was first stretched over wooden panels, several panels being sometimes placed side by side. A special paste was used, the object of which was to cause the leather to shrink when dry, so as to make the panels adhere more closely together. The following description by the Monk Theophilus of the paste used in his time for this sort of work may interest the reader:—
“Panels for altars or doors are made thus:—First join some boards carefully one by one with the help of the joining tool used by coopers or joiners. They must be fastened together with cheese paste made in the following manner:—Some soft cow’s-milk cheese is cut very thin and washed with hot water in a mortar with a pestle, changing the water until it comes out clear. The cheese after being pressed in the hand is put into cold water until it hardens. It is then well crushed with a piece of wood on a smooth wooden table. In this condition it is put back into the mortar to be carefully pounded with the pestle, after having added water mixed with quicklime till it becomes thick like a sediment. Panels put together with this paste when dry, stick so fast that neither damp nor heat can separate them. They must then be made even with a special tool for this purpose. This tool, curved and sharp on the inside, has two handles, so that it may be used with both hands. It is used to level panels, doors and shields until they are perfectly smooth. They are then covered with untanned mule-skin or ox-hide, after it has been wetted and the hairs scraped off. The water is partly squeezed out, and while still damp it is stuck on with the cheese paste.”[17]
[17] Theophili Presbyteri et Monachi, Libri 3 seu Diversarum artium schedula. Chapter 17.
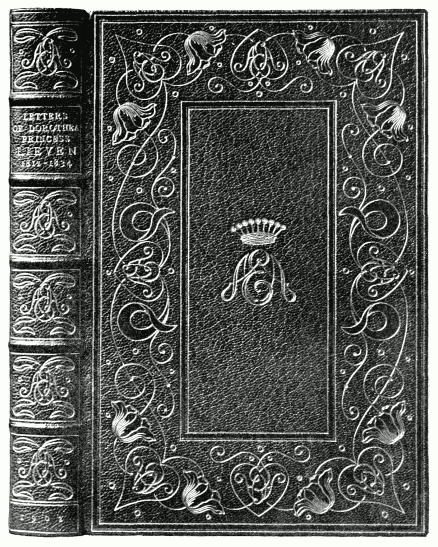 18. Gold-tooled and inlaid Morocco binding. The
Letters of Princess Lieven. By S. T. Prideaux. Modern English.
18. Gold-tooled and inlaid Morocco binding. The
Letters of Princess Lieven. By S. T. Prideaux. Modern English.
In the eleventh century we come to the first employment of gold leaf on decorated leather, whence is derived the name, “or basané,” which it afterwards received. The passage describing the process of gilding has been quoted already (page 80), but each master of the art no doubt introduced his own modifications.
With the introduction of gold, leather decoration assumed a magnificence and importance hitherto unknown. The heads of the saints were surrounded with golden haloes, and the gold and silver embroideries of the sacerdotal ornaments were carried out in those metals on the leather. A little later the knights are represented clad in brilliant armour with plumed helmets. The correct rendering of the heraldic colouring of the coats of arms figuring on shield and target then necessitated the use of a more extended range of oil colours, until, little by little, decorated leather grew to resemble the paintings of Van Orley.
Meanwhile, punches, cut in relief or in intaglio and used with a hammer, were adopted to break the monotony of the groundwork and throw up the relief of the ornament, and the fashion also arose of embossing leather with a modelling tool or by means of stamps, the latter method necessarily resulting in the substitution of repeating ornament for figures and landscapes.
Leather manufactured in Spain, Portugal, Flanders, and later in England is almost always decorated in high relief with touches of gold, the design being principally flowers, foliage, cupids, pomegranates, etc. Venice alone remained faithful to flat decoration with hollowed or merely darkened outline in the cameo-like medallions of classical scenes painted on groundwork whose design was borrowed from the gorgeous stuffs of the East.
The fashion imported from Italy in the reign of Francis I of breaking up surfaces with pilasters, cornices, medallions and ornaments in relief, was instrumental in adding84 importance to small painted designs on leather rather than to hangings properly so called. Some of these leather paintings were like pictures and were used not only for wall decoration, but as hangings for beds and even as bedspreads of state. The custom of thus decorating beds lasted a long time. Pierre Bénard, an upholsterer by trade, established in Paris, and author of a collection of songs dedicated to the “Vertueuse Royne Marguerite,” first wife of Henri IV, refers to the use of “or basané” in this manner as an evidence of wealth.
Already under Catherine de Médicis, decorated leather had become extremely popular, and was preferred to all other hangings for the embellishment of apartments; its popularity lost nothing under the second wife of Henry IV, in whose native country this style of decoration was also held in great favour. In the reign of Louis XIII the influence of Anne of Austria brought Spanish leather again into fashion. From that time also, leather gilt or stamped in its natural colour and ornamented with copper nails (probably inspired by the marriage chests with their curious studded ornament) was found in the mansions of the great and became the principal material for covering chairs.
The grandiose style of architecture of the time of Louis XIV called for the decoration of spaces framed in gorgeous pilasters and was favourable to the application of decorated leather in the style of Bérain. But this did not long remain popular, and leather was replaced by Gobelin and other tapestries made in France, whose introduction gave the deathblow to the manufacture of leather hangings.
From this period till the present day the art of gilding leather has been on the decline. Of this no further proof is needed than the following preface written in 1762 by Fougeroux de Boudaroy, who had been commissioned by the Academy to take over the work of research, previously conducted by Réaumur, on the subject of leather hangings:—
 19. Back and Seat of Chair in cut, embossed and
gilt cowhide with punched background. Executed by Rosalie Vigers from a
design by Frederick Vigers. Modern English.
19. Back and Seat of Chair in cut, embossed and
gilt cowhide with punched background. Executed by Rosalie Vigers from a
design by Frederick Vigers. Modern English.
“Flanders, Holland and England are reputed to have furnished the first gilt or silvered leather hangings seen in Paris. Some attribute their invention to Spain, but without apparent reason, since to-day there are in France no such hangings of Spanish manufacture, nor are they much known in that country. The gilt leather hangings which come to us from Flanders are nearly all made at Lille, Brussels, Antwerp and Mechlin; those derived from the last-named place are the most prized of all. Some very fine ones which we have attempted to imitate are made in Venice; manufactures were also started at Lyons and met with success.
“It was only about two centuries ago that this trade was established in Paris. We owe it to some Flemish workmen who settled in the capital and left successors there. But on account of the nation’s prejudice in favour of all that comes from abroad, the hangings from Holland and Flanders were always preferred to those of our own manufacture, although they did not surpass the latter in quality or in beauty.
“Though equalling those of Holland and Flanders, it was not possible to find a sale for our hangings unless they were passed off as having been made in one or other of those provinces, and this was frequently done by our manufacturers. It must, however, be admitted that certain gilt leather hangings from England and Venice have never been equalled here. We are forced to allow their superiority in brilliancy, beauty of design and durability. Perhaps all that our workmen needed to be able to imitate them perfectly was to feel the assurance of greater constancy in our tastes, and to witness the cessation of that affection and preference for everything foreign, which might lead to the more favourable treatment of the native industry.
“Gilt leather hangings were at one time much sought after. Their qualities of being, unlike woollen and other materials, unaffected by damp and insects, of retaining their brilliancy unimpaired by time, of not attracting dust, and of allowing it to be easily removed by washing with a sponge, and finally, of not lending themselves to the multiplication of the insects which in summer infest the capital and which find in other tapestries convenient nests for depositing their eggs, were all advantages, forming so many reasons for their being in demand and gaining for them a place in the apartments of the great,86 of which they frequently constituted the ornament. But to-day, a change of taste and the dictates of fashion which outweighs even the advantages and conveniences of life, have caused them to be almost forgotten and relegated them to the ante-rooms of a few county houses where some of the earliest are to be found, nearly as beautiful as when they were first made in Paris.
“Now that the art is less in vogue, we think it a suitable time to describe it to the public, thus following the intention of the Academy of allowing nothing to be lost that may now or hereafter be useful to the cause of art. We may at any time be desirous of returning to these older fashions, no longer being able to vary them, and this may be among those destined to return to favour. At any rate, it will be agreed that some of its processes merit description, and might find their application in other arts and help in bringing them to perfection.”
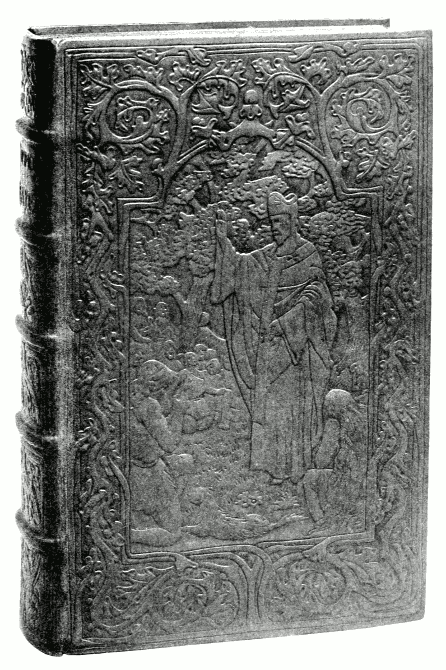 20. Embossed calf binding. Book of Common
Prayer. Executed by Rosalie Vigers from a design by Frederick Vigers.
Modern English.
20. Embossed calf binding. Book of Common
Prayer. Executed by Rosalie Vigers from a design by Frederick Vigers.
Modern English.
The same author describes minutely and very clearly the various processes in use at the time for gilding or silvering leather. Instead of silver-gilt, which is necessarily very costly, he recommends silver leaf burnished and covered with a varnish, for which he gives the following recipe, found by him, as he modestly acknowledges, among the papers of Mons. de Réaumur:—
“Take four and a half pounds of colophony, the same quantity of ordinary resin, two and a half pounds of sandarach and two of aloes; mix these four drugs together, after having broken up those which are in large pieces, and put them in an earthen pot on a good charcoal fire. It is better for the fire to be of charcoal, because it makes but little flame, which would be dangerous if it should enter the vessel, as the ingredients are very inflammable. To guard against this accident and others of which we will speak later on, the vessel must be chosen large enough not to be more than half-filled by the drugs already mentioned and the others yet to be added, as will presently be explained. It is well also for it to widen out at the top, or to have a rim that will project the flame outwards. These are small precautions which it is always better to take; some, however, neglect them, and87 make their varnish on a wood fire, and then double attention must be given to prevent the drugs igniting.
“Melt all these drugs in the pot and stir them with a spatula so that they mix together and do not stick to the bottom. When they are well melted, pour in seven pints of linseed oil and mix it with the drugs, using the spatula. Cook the whole, stirring it from time to time to prevent as much as possible a kind of sediment which forms and does not mix with the oil from sticking to the bottom of the vessel. When the varnish is cooked, pass it through a cloth or strainer.
“This quantity of varnish should, according to workmen, remain seven to eight hours on the fire to cook, but this cannot be regarded as an invariable rule. It will not take so long to cook on a large fire. A better test used by workmen in manufacturing varnish is to take a few drops of the liquid with the spatula and lay it over silver leaf on some leather; or else they take some of the varnish in a silver spoon and, by trying it with the finger tip as if it were syrup, find out if it is cooked enough. If it ropes in cooling, or if the finger has a tendency to stick when it is gently withdrawn, it is a sign that it is sufficiently cooked, that is to say that it has arrived at the consistency of a thickish syrup. The varnish is then brown in colour, and curiously enough when laid over silver it becomes transparent and gives the effect of brilliant gold.”
While on the subject of gold groundwork made with gold or silver leaf or tin-foil covered with varnish to imitate the colour of gold, it is curious to note how far back in the history of art its origin can be traced; after the Greeks, the Byzantines made use of and, it may also be said, abused it. This want of moderation in the use of gold is to be met with long afterwards, for it is mentioned in his book on painting by L. Benedetto Alberti who died in Rome in 1472.[18]
[18] Sunt qui auro immodice utantur, quam aurum putent historiæ affere majestatem. L. B. Alberti, De Pictura, Book 2, page 25, ad finem Vitruv. Elzevir. f.
Van Orley, Raphael’s pupil, when painting his “Last88 Judgment” at Antwerp, had his panel gilt in order to obtain “a beautiful transparency.”[19]
[19] Decamps. Vie des peintres flamands. Paris, 1753, 4 vols. Vol. 1, page 39.
We have quoted above the formula for golden varnish given by Fougeroux de Boudaroy which he ascribes to Réaumur. It may be found interesting to compare with it that given by the Monk Theophilus in his Diversarum Artium Schedula:—
“Put some linseed oil in a small new pot; add some gum arabic called fornis pounded very fine; this gum is like very light incense, but is more brilliant when broken up. Place it on a charcoal fire and cook it carefully without allowing it to boil, until it is reduced by one third. Be very careful of flames, for they are very dangerous, and the preparation is difficult to extinguish if it once catches fire. Any painting coated with this varnish becomes brilliant, beautiful and perfectly lasting....
“Another method. Arrange three or four stones which will stand the fire without breaking, or bricks may be used instead. On these place a new pot, pour into it some fornis mentioned above, called by the Romans “glossa,” otherwise gum arabic. Over the opening of the pot, put a smaller one having a little hole at the bottom; fill in with clay so that no space remains between them. Carefully light a fire underneath the apparatus until the gum liquefies. You will also have a thin tool with a handle which will serve to stir the gum and to find out the exact moment when it becomes perfectly liquid. Have a third pot on charcoal by you in which there is hot linseed oil; when the gum is quite liquid, so that a thread of it hangs from the tool when it is withdrawn, pour in the hot oil, stir with the tool, and, when in this condition, cook all together without letting it boil, take out the tool from time to time and spread a little of the mixture on wood or stone to try its density. With regard to the proportion, be careful that there are two thirds of oil to one of gum. When it is cooked according to your judgment, take it off the fire and, covering it with care, let it cool.
“Of the Method of Colouring Tinfoil to give it the Appearance of being Gilt, so that it may be used when Gold cannot be had.
“Place the pieces (of tinfoil) side by side on the board, fasten them one by one to the wood with wax, so that they cannot get displaced, spread over them with the hand a coating of the varnish described above, and let them dry in the sun. After that take some sticks of rotten wood cut in April, slit in half and smoke dried. Peel off the outer bark and the second, which is the colour of saffron; scrape it into a clean vessel, adding to it a fifth part of saffron, macerate it well in old wine or ale; after letting it stand during the night, make it lukewarm the next morning. When in this condition, dip in the sheets of tinfoil one by one, frequently taking them out until you find them assume a golden shade, when you will again fix them on the wooden board and apply a coat of varnish as before; when dry you will have sheets of tinfoil that you can use as you wish in your work....”[20]
[20] Diversarum artium schedula, Book 1. Chapters 21 and 36.
Although it may not be possible for an amateur, incompletely equipped with the necessary implements, to reproduce the marvellous work of a byegone age, there are still many methods of decoration for him to attempt which will be equally attractive in modern surroundings.
“This Committee met for the first time on May 3, 1900.... Its first step was to appoint two Sub-Committees from amongst its members. The first of these was to visit a selected number of libraries, and to ascertain the comparative durability of the various bookbinding leathers used at different periods and preserved under different conditions.... The second ... was appointed to deal with the scientific side of the matter, to ascertain the cause of any deterioration noticed, and, if possible, to suggest methods for its prevention in the future....
“The first step taken by the (first) Sub-Committee was to visit a number of libraries, including that of the British Museum, the Bodleian Library, Oxford, the University Library, Cambridge, the libraries of the Athenæum Club, of the Patent Office and of the Chemical Society, also the valuable private library of Mr. Huth....
“As regards the common belief that modern binding leather does decay prematurely, the Sub-Committee satisfied themselves that books bound during the last eighty or hundred years showed far greater evidence of deterioration than those of an earlier date. Many recent bindings showed evidence of decay after so short a period as ten, or even five years. The Sub-Committee came to the conclusion that there is ample justification for the general complaint that modern leather is not so durable as that formerly used. To fix the date of the commencement of this deterioration was a difficult matter; but they came to the conclusion that while leather91 of all periods showed some signs of decay, the deterioration becomes more general on books bound after 1830, while some leathers seem to be generally good until about 1860, after which date nearly all leathers seem to get worse. The deterioration of calf bindings at the latter end of the nineteenth century may be attributed as much to the excessive thinness as to the poor quality of the material.
“With regard to the conditions under which books are kept, ventilation, lighting, heating, etc., the Committee were satisfied that in libraries where there was no artificial light used, and where the ventilation was good, the bindings were generally in a better state than elsewhere. Where gas is used the bindings are in the worst state noticed, especially on the higher shelves.... Daylight and still more direct sunlight, has a disintegrating effect on leather....
“As to the suitability of various leathers, the Sub-Committee came to the conclusion that of the old leathers (fifteenth and sixteenth century), white pigskin, probably alum tanned, is the most durable, but its excessive hardness and want of flexibility renders this leather unsuitable for most modern work. Old brown calf has lasted fairly well, but loses its flexibility, and becomes stiff and brittle when exposed to light and air. Some of the white tawed skins of the fifteenth and sixteenth century, other than white pigskin, and probably deerskin, have lasted very well. Some fifteenth and sixteenth century sheepskin bindings have remained soft and flexible, but the surface is soft and usually much damaged by friction. Vellum seems to have lasted fairly well, but is easily influenced by atmospheric changes, and is much affected by light. Early specimens of red morocco from the sixteenth to the end of the eighteenth century were found in good condition, and of all the leathers noticed, this seems to be the least affected by the various conditions to which it had been subjected. In the opinion of the Committee, most of this leather has been tanned with sumach or some closely allied tanning material. Morocco bindings earlier than 1860 were generally found to be in fairly good condition, but morocco after that date seems to be much less reliable, and in many cases has become utterly rotten. During the latter part of the eighteenth century it became customary to pare down calf until it was as thin as paper. Since about 1830 hardly any really sound calf seems92 to have been used, as, whether thick or thin, it appears generally to have perished. Sheepskin bindings of the early part of the century are many of them still in good condition. Since about 1860 sheepskin as sheepskin is hardly to be found. Sheepskins are grained in imitation of other leathers and these imitation-grained leathers are generally found to be in a worse condition than any of the other bindings, except, perhaps, some of the very thin calf skin. Undyed modern pigskin seems to last well, but some coloured pigskin bindings had entirely perished. Modern leathers dyed with the aid of sulphuric acid are all to be condemned. In nearly every case Russia leather was found to have become rotten, at least in bindings of the last fifty years....
“The work of the second Sub-Committee, which was composed of chemists specially conversant with the treatment of leather, was directed specially to the elucidation of the following points; an investigation of the nature of the decay of leather used for bookbinding; an examination of the causes which produced this decay; a research into the best methods of preparing leather for bookbinding; and a consideration of the points required to be dealt with in the preservation of books....
“The Sub-Committee made a number of tests and analyses of samples of decayed leather bookbindings, as well as of leathers used for binding. The Committee found that the most prevalent decay was what they termed a red decay, and this they think may be differentiated into old and new, the old red decay being noticeable up to about 1830, and the new decay since that date. In the old decay the leather becomes hard and brittle, the surface not being easily abraded by friction. The older form is specially noticed in calf-bound books, tanned presumably with oak bark. The new form affects nearly all leathers, and, in extreme cases, seems absolutely to destroy the fibres. Another form of deterioration, more noticeable in the newer books, renders the grain of the leather liable to peel off when exposed to the slightest friction. This is the most common form of decay noted in the most recent leathers. In nearly all samples of Russia leather, a very violent form of red decay was noticed. In many cases the leather was found to be absolutely rotten in all parts exposed to light and air....
“An extensive series of experiments was carried out with a93 view of determining the causes of the decay of bindings. The Sub-Committee find that this is caused by both mechanical and by chemical influences. Of the latter some are due to the mistakes of the leather manufacturer and the bookbinder, others to the want of ventilation, and to improper heating and lighting of libraries. In some cases inferior leathers are finished (by methods in themselves injurious) so as to imitate the better class leathers, and of course, where these are used, durability cannot be expected. But in the main, the injury for which the manufacturer and the bookbinder are responsible must be attributed rather to ignorance of the effect of the means employed to give the leather the outward qualities required for binding, than to the intentional production of an inferior article....
“We are of opinion that no special skin can be condemned in its original condition, although goat, seal, pig, and calf are probably superior in strength of texture to sheep. Sheepskins are, however, equally resistant to chemical agencies, and being naturally soft and flexible, are extremely suitable for use for purposes where they are not much exposed to mechanical wear.
“Fresh market skins, dry skins, or wet salted skins are much to be preferred to those known as ‘drysalted,’ since the crystallization of the salt which takes place in the drysalting process, tends to weaken the structural fibre of the pelt. No tainted or putrefied skins, even if only slightly affected, are suitable for the manufacture of bookbinding leather, both for the same reason, and because the weakness of grain so produced leads to uneven dyeing.
“In the soaking of skins we would strongly condemn the use of old putrid soaks, or the addition of salt to the soaks to assist in the softening, as both methods weaken the skin. ... Violent mechanical treatment such as ‘stocking’ is injurious....
“The liming should be done in mellow, weak limes. Old limes smelling strongly of ammonia, and containing large quantities of bacteriological products, must be avoided....
“Special care should be taken with regard to the beamhouse work after unhairing and fleshing, as, by excessive or unsound puering and drenching of the skins, their whole94 natural strength is frequently destroyed.... Great damage is frequently caused by the use of foul puers or foul bates, in which putrefaction has taken place.
“Pure sumach is the tannage we would most strongly recommend for high class bookbinding....
“The tannage of bookbinding leathers must be a mellow one, and must not be carried too far, as we have found in many cases the cause of decay in tanned leather has been the fact that the leather was overloaded with tannin. Tanning has throughout a hardening effect on the leather fibre, which, if pushed too far, ends in brittleness and loss of tenacity....
“We must absolutely condemn the use of any but mild vegetable acids in souring or scouring the leather, or in the dye bath, and as far as possible would avoid the use of acids and alkalis on tanned leather, both being equally injurious.
“It has been shown by careful experiment, that even a minute quantity of sulphuric acid used in the dye bath to liberate the colour, is at once absorbed by the leather, and that no amount of subsequent washing will remove it. In a very large proportion of cases, the decay of modern sumach-tanned leather has been due to the sulphuric acid used in the dye bath, and retained in the skin....
“We ... advise that the glazing of skins by friction in a damp ‘seasoned’ condition should be avoided.
“The use of nitric acid as a preparation for glazing is absolutely destructive....
“The use of oxalic acid for washing backs of books, or of leather for bookbinding, is fatal to their durability....
“The sprinkling of leather with ferrous sulphate (green vitriol), either for the production of ‘sprinkled’ calf or ‘tree’ calf, must be most strongly condemned, as the iron combines with and destroys the tan in the leather, and free sulphuric acid is liberated which is still more destructive....
“The stretching of leather tightly over books in a wet condition ... should be strongly condemned....
“It is shown conclusively that the catechol tannins, which include turwar, quebracho, hemlock and larch barks, and gambier, are unsuitable for bookbinding leathers where durability is expected, and that sumach yields a much more permanent leather, while myrobalans occupy an intermediate place, but nearly approaching sumach. It is unfortunate95 that cassia bark, which is the tanning material employed for East Indian sheep and goat skins, should have proved so unreliable, since these leathers have been largely used in bookbinding without suspicion, and are in other respects a cheap and good article. With regard to sumach leathers themselves, it is possible that some of the darkening noticed may be due to the presence of adulterants, such as pistacia leaves, in the sumach used, as it is almost impracticable to obtain absolutely pure sumach, and the pistacia tannin is allied to that of the cassia.
“Of all the influences to which books are exposed in libraries, gas fumes—no doubt because of the sulphuric and sulphurous acid which they contain—are shown to be the most injurious, but light and especially direct sunlight and hot air, are shown to possess deleterious influences which had scarcely been suspected previously, and the importance of moderate temperature and thorough ventilation of libraries cannot be too much insisted on.”
Transcriber’s Note: Blank pages have been deleted. Some illustrations have been moved and the corresponding entries in the lists of illustrations updated. Three illustrations have been rotated 90°. Footnotes have been moved to follow the referencing paragraph. The publisher’s inadvertent omissions of important punctuation have been corrected. Duplicative front matter has been removed.
The following list indicates any additional changes made. The page number represents that of the original publication and applies in this etext except for footnotes and illustrations since they may have been moved.
Key: {<from>}[<to>]:
  Page          Change

    -  {_To face Page_}[_Page_]
   12  painted and gilt calf. Le Roman de Tristan et {Iseul}[Iseut].
   56  of wood covered with embossed leather, cuir {bouill}[bouilli].
   83  of repeating ornament for figures and {landscopes}[landscapes].