This eBook is for the use of anyone anywhere at no cost and with almost no restrictions whatsoever. You may copy it, give it away or re-use it under the terms of the Project Gutenberg License included with this eBook or online at www.gutenberg.org
Title: Photographic Amusements, Ninth Edition
Including A Description of a Number of Novel Effects Obtainable with the Camera
Author: Walter E. Woodbury and Frank R. Fraprie
Release Date: May 14, 2012 [eBook #39691]
Language: English
Character set encoding: ISO-8859-1
***START OF THE PROJECT GUTENBERG EBOOK PHOTOGRAPHIC AMUSEMENTS, NINTH EDITION***
| Note: | Images of the original pages are available through Internet Archive/American Libraries. See http://archive.org/details/photographicamus00wood |
INCLUDING A DESCRIPTION OF A NUMBER OF NOVEL EFFECTS OBTAINABLE WITH THE CAMERA
BY
WALTER E. WOODBURY
FORMERLY EDITOR OF "THE PHOTOGRAPHIC TIMES," AUTHOR
OF "THE ENCYCLOPEDIC DICTIONARY OF PHOTOGRAPHY,"
"ARISTOTYPES AND HOW TO MAKE THEM," ETC., ETC.
REVISED AND ENLARGED BY
FRANK R. FRAPRIE, S. M., F. R. P. S.
EDITOR OF "AMERICAN PHOTOGRAPHY"
Ninth Edition
AMERICAN PHOTOGRAPHIC PUBLISHING CO.
BOSTON 17, MASS.
1922
Copyright 1896
By The Scovill & Adams Co., of New York.
Copyright 1905, 1909, 1914
By The Photographic Times Publishing Association, New York.
Copyright 1922
By American Photographic Publishing Co.
Printed in the U. S. A.
THE PLIMPTON PRESS · NORWOOD · MASS ·
AS Mr. Woodbury stated in his introduction to the original edition of this book, in order to avoid misunderstanding, it would be well to explain at the outset that it is not intended as an instruction book in the art of photography in any sense of the word. It is assumed that the reader has already mastered the technical difficulties of photographic practice and is able to make a good negative or print.
It was the purpose of the author to describe a number of novel and curious effects that can be obtained by the aid of the camera, together with some instructive and interesting photographic experiments.
The contents of the work were compiled from various sources, chiefly from "The Photographic Times," "The Scientific American," "The American Annual of Photography," "La Nature," "Photographischer Zeitvertreib," by Herman Schnauss, and "Les Recreations Photographiques," by A. Bergeret et F. Drewin; and the illustrations were likewise taken from various sources.
In conclusion the author or compiler modestly lays claim to very little himself, quoting the words of Montaigne, who said:—
"I have gathered me a posie of other men's flowers, of which nothing but the thread that binds them is mine own."
And yet so popular did the book prove that in the course of its first ten years of life, it ran through edition after edition.
The publishers of "The Photographic Times" later acquired the copyright of the popular volume and published three editions.
The publishers of American Photography acquired the book during the Great War through their purchase of "The Photographic Times," but in spite of a steady demand for the book after the limited stock had been sold out, did not find it advisable to reprint it until now.
In putting the book to press at this time, most of the original plates have been used. A number of the old pictures have been replaced by more modern examples and 14 pages have been added to the book, including several new topics.
The publishers would be glad to receive manuscripts and pictures describing and illustrating novel and interesting photographic effects not mentioned in this volume, to be published in American Photography and incorporated in the next edition of Photographic Amusements. They also request that photographers who make photographs illustrating any of the topics treated in the book, and especially those illustrated by wood cuts, may submit them for consideration, as they are prepared to purchase such as may seem available for the next edition.
Boston, January, 1922.
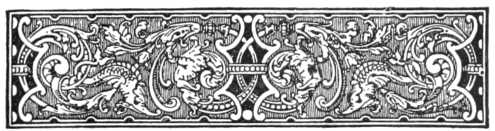
Quite a number of novel effects can be obtained by the aid of one or more mirrors. If two mirrors are taken and placed parallel to one another, and a person placed between, the effect obtained is as shown in Fig. 1, where one soldier appears as a whole regiment drawn up into line. To make this experiment we require two large-sized mirrors, and they must be so8 arranged that they do not reflect the camera and the photographer, but give only multiple images of the sitter. This will be found quite possible; all that is necessary is to make a few preliminary experiments, adjusting the mirrors at different angles until the desired effect is obtained.
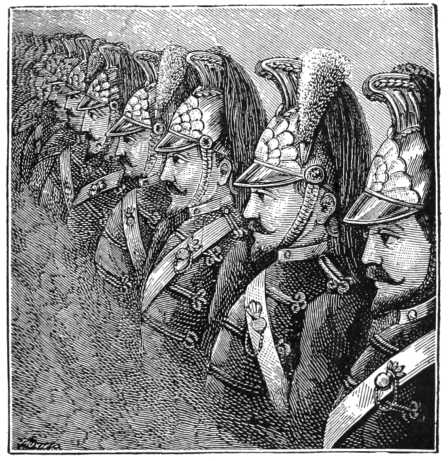
FIG. 1.—EFFECT OBTAINED WITH PARALLEL MIRRORS.
A process of multiphotography which was at one time quite popular consisted in posing the sitter with his back to the camera as shown in Figs. 2 and 3. In front of him are arranged two mirrors, set at the desired angle to each other, their inner edges touching. In the illustrations here given the mirrors are inclined at an angle of 75 deg., and five reflected images are produced. When an exposure is made and the negative developed, we not only have the back view of the sitter but the full reflected images in profile and three-quarter positions as well.
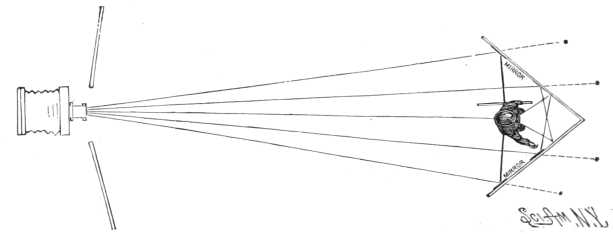
FIG. 2.—DIAGRAM OF THE PRODUCTION OF FIVE VIEWS OF ONE SUBJECT BY MULTIPHOTOGRAPHY.
In the diagram, Fig. 2, reproduced from "The Scientific American" the course taken by the rays of light, determined by the law that the angle of incidence is equal to the angle of reflection, is plainly marked out. We see here their passage from the sitter to the mirror and back to the camera. Provided the mirror be large enough, images of the full length figure can be made as shown in Fig. 4.
For photographing articles where it is of advantage to secure a number of different views of the same object this method of photographing with mirrors opens up quite a wide field of9 possibilities. In France it is used for photographing criminals, and thus obtaining a number of different portraits with one exposure.
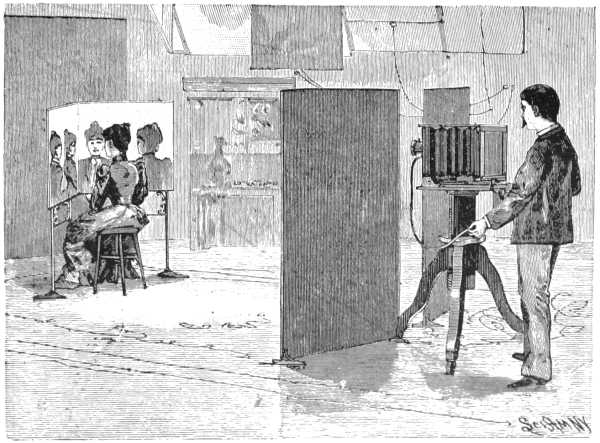
FIG. 3.—GALLERY ARRANGED FOR MULTIPHOTOGRAPHY.
The use of an ordinary mirror in portrait work has enabled photographers to produce very pleasing results. There is often a very striking difference between the full and side views of a person's face, and by means of such a combination as this, one is enabled to secure a perfect representation of both10 at the same time. In making reflection portraits it has often been noted that the reflection has a more pleasing effect than the direct portrait. The reason of this is that it is softer and the facial blemishes are not so distinctly brought out. There is naturally a slight loss of detail, but this is by no means a drawback. The worst fault of the camera in portrait photography is the tendency to include every little detail which the artist would suppress. It not only includes all the detail, but often exaggerates it to a painful extent. By making a portrait by reflection this defect is avoided. Of course the image is reversed, but this is in most cases of little consequence; in fact, the sitter himself would be more likely to consider it a far more truthful likeness, for when we look into a mirror we do not see ourselves as others see us, but a reversed image. With some faces the difference is quite striking.
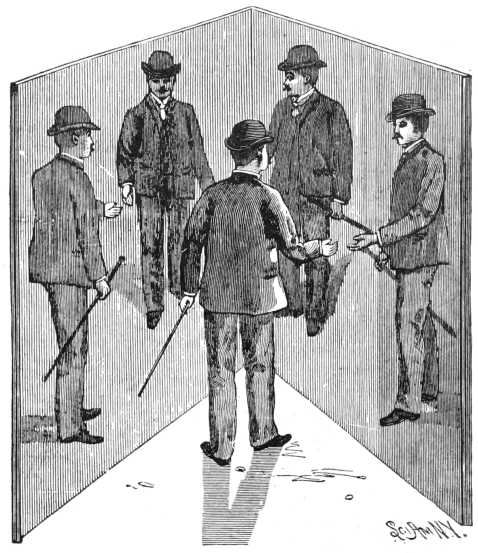
FIG. 4.—MULTIPHOTOGRAPH OF A FULL-LENGTH FIGURE.

By H. L. Bostwick. FIG. 5.—MULTIPHOTOGRAPH OF CISSY FITZGERALD

FIG. 6.—ELONGATED REFLECTION IN A SPOON.
Very many amusing effects can be obtained by the use of a convex mirror. Even an ordinary, well-polished spoon may be made to give some curious results. (See Fig. 6.) The thin man becomes an elongated mass of humanity to whom Barnum would have given a big salary, while the fat man may be reduced to the proportions of a walking-stick.
Convex mirrors for producing these ludicrous effects can be purchased at any mirror manufacturer's store. The advantage of the camera lies in the ability to secure permanently the curious images produced.
Even more ridiculous-looking images can be secured by the use of a piece of uneven glass silvered. For a method of silvering glass we are indebted to the kindness of Dr. James H. Stebbins, Jr., the well-known analytical chemist. Dissolve pure nitrate of silver in distilled water in the proportion of 10 grains to 1 ounce, and add carefully, drop by drop, sufficient strong ammonia solution to just dissolve the brown precipitate at first formed, stirring constantly during the addition.
Make a solution of Rochelle salt, 1 grain to the ounce of distilled water. Clean the plate of glass thoroughly with a little wet rouge and polish dry with a piece of chamois leather. Warm it before the fire or in the sun to about 70 to 80 deg. Fahr., and lay it on a perfectly level surface. Then mix 1 ounce of the silver solution with half an ounce of the Rochelle13 salt solution and pour the mixture on the glass so that every part of the surface will be evenly covered with it.
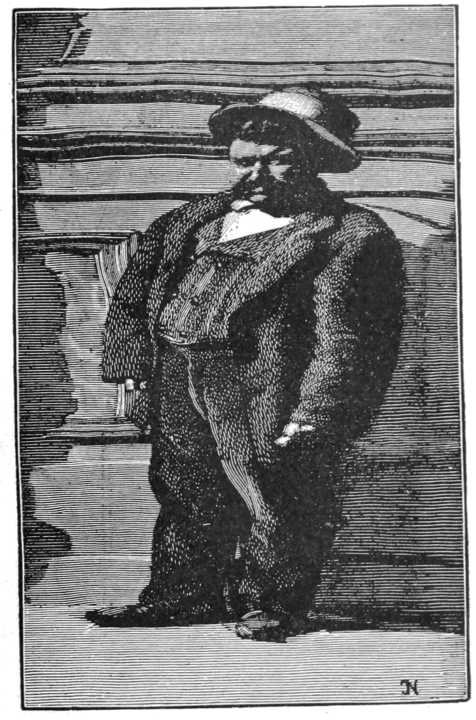
FIG. 7.—CURIOUS EFFECT OBTAINED WITH A CONVEX MIRROR.
Allow this to stand in the warm sunshine from half to one hour, when the reduced silver will be deposited as a fine film over the surface of the glass. When this is done wash off the glass with distilled water and wipe the entire surface very gently with a little wet wadding, which will take off the roughness and render it easier to polish. When perfectly dry the14 silver should be polished by rubbing with some smooth, hard surface. The plate is then varnished by pouring over it a suitable varnish and is ready for use.
The name anamorphosis has been given to two kinds of pictures distorted according to a certain law, and which are of such a grotesque appearance that it is often impossible to recognize the subject of them; while viewed with proper apparatus they appear as perfectly correct images. One kind is designed to be viewed by reflection and the other is reconstituted by means of a special rotary apparatus.
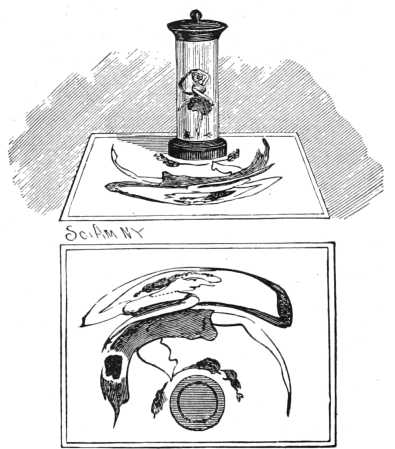
FIG. 8.—ANAMORPHOSIS VIEWED IN CONVEX CYLINDRICAL MIRROR.[1]
[1] From "Experimental Science." Published by Munn & Co., New York.
Until quite recently, these pictures were drawn approximately from the reflection of the object as seen in a convex 15mirror, the position of which was indicated on the drawing and which restored it to its real form. M. Fenant conceived the idea of employing photography for obtaining these pictures. Fig. 9 reproduces a photo-anamorphosis from a negative by M. Fenant. If a cylindrical mirror be placed on the black circle shown in the reproduction the photograph will appear in its original form. Our illustration represents a portrait, although the features are barely recognizable. Similar pictures may be obtained by photographing the drawing or subject reflected in a cylindrical concave mirror placed perpendicularly.

FIG. 9.—A PHOTO-ANAMORPHOSIS.
The second kind of anamorphosis is produced by the distortion of the picture in the sense of one of its dimensions. To reconstruct it, it is caused to rotate rapidly, at the same time that a disc, perforated with a slit through which the picture is viewed, is rotated in front of it at a slightly different speed.
The apparatus invented by M. Linde for producing the anamorphosis is shown in Figs. 10 and 11. G is a camera16 provided with a revolving plate-holder, T H are revolving discs the movement of which is made to bear a certain relation to that of the plate-holder by means of the band F and the pulleys D D. The whole is set in operation by a piece of clockwork and the cord F. A is the axis of the camera, B that of the plate-holder, and C that of the revolving disc. On this disc is fixed the picture from which it is desired to make an anamorphosis. The relative motions are so regulated that when the plate-holder has made a complete revolution the disc has turned through an angle of 60 to 80 degrees in the opposite direction. Between the plate-holder and the lens is a diaphragm pierced with a slit about 10 millimetres wide. The action of the light on the plate takes place through this slit. The negative obtained, prints are made upon plain salted paper and rendered transparent with wax or vaseline. These pictures can be viewed in the ordinary apparatus used for showing anamorphoses of this kind. The print is fastened to a revolving apparatus and in front of it is another disc painted black and provided with a number of slits. The latter revolves at one-fourth the speed of the picture, and the image when viewed through the slit resumes its normal proportions.
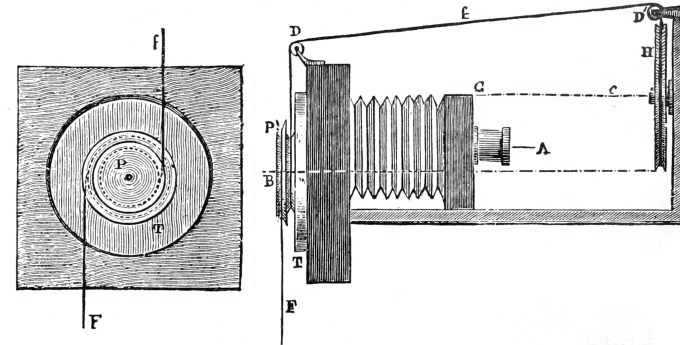
FIGS. 10 AND 11.—LINDE'S APPARATUS FOR PHOTO-ANAMORPHOSIS.
These were at one time quite popular, and if properly managed can be rendered very effective. There are several methods of making this kind of picture. If the photographer possesses a pedestal large enough, all that is necessary is to place this on a stand and the person to be photographed is arranged behind.
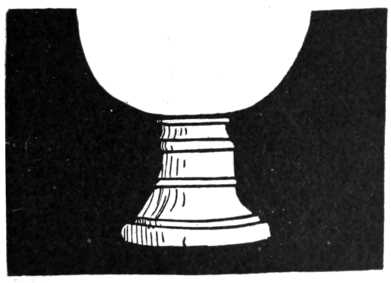
FIG. 12.
The breast is uncovered and some white soft material artistically arranged in folds over the shoulders and in such a way as to appear connected with the pedestal. A black background is placed behind and the exposure made. To give a more realistic effect the hair, face, and all other parts showing should be liberally powdered over with a white powder or rice flour. The negative produced will have a clear glass background, but the body of the figure will still be visible. This is removed by cutting away the film round the pedestal and to the arms on each side, leaving only those parts remaining that are required to produce the statuette. In printing we get a white statuette portrait on a dark background.
If the photographer does not possess a pedestal, the next best means to produce these pictures is to get a large sheet of cardboard and cut it out to the shape shown in the figure beneath, and with white paint make the picture of a pedestal, shading with a little gray to give rotundity. The figure is stationed behind it, and a black background used.
A third method involves still less trouble. This is to purchase a ready made pedestal negative. These are film negatives of a pedestal that can be adjusted18 to the negative of the subject desired to be produced as a statue. After the negative is taken and varnished the film is scraped off round the figure, cutting off the body as shown in the first illustration, after which the pedestal negative is adjusted, fastened, and then printed. The negative is reversible and can also be used for different subjects. The picture shown in Fig. 13 was made by Mr. G. B. Bradshaw, of Beach House, Altrincham, England, by means of one of his pedestal negatives.
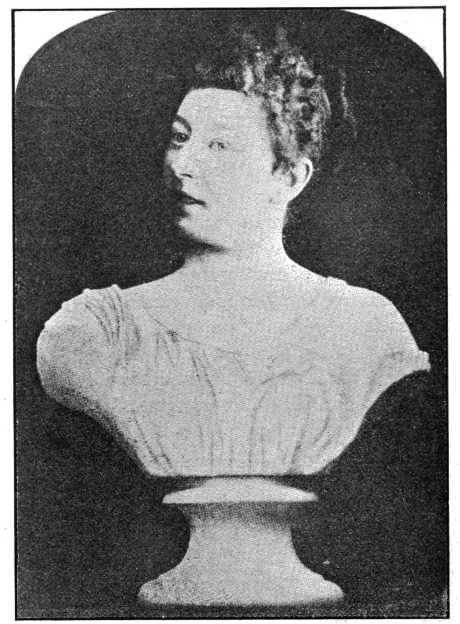
By G. B. Bradshaw.
FIG. 13.—STATUETTE PORTRAIT.
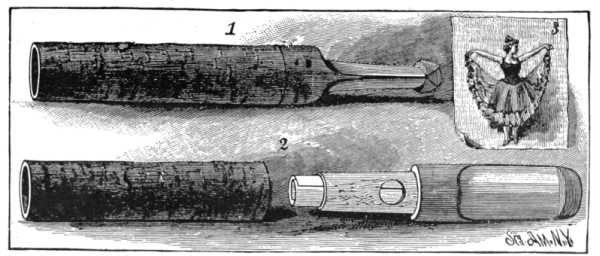
FIG. 14.—CIGARETTE TUBE FOR MAGIC PHOTOGRAPHS.
Take an ordinary silver print and fix it without toning. Thoroughly well wash it to remove all traces of the fixing solution and then immerse it in a saturated solution of bichloride of mercury, when the image will disappear. The bichloride of mercury changes the photograph into white20 chloride of silver and chloride of mercury which is also white. The image when on white paper is thus rendered invisible.
Next soak some strong bibulous paper in a saturated solution of sodium hyposulphite, and, when dry, paste a piece of the paper to the back of the invisible print with a little starch paste, attaching it by the edges only. Of course the image can also be made to appear by soaking the invisible print, without the bibulous paper attached, in a solution of sodium sulphite, hypo, or water with a little ammonia added.
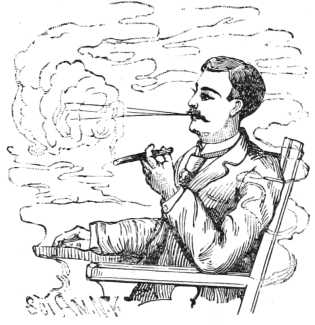
FIG. 15.—DEVELOPING THE IMAGE.
Magic photographs made in the manner above described can also be developed by smoke. A novelty, introduced in Paris some time ago, consisted of a cigarette or cigar holder, shown in Fig. 14, containing in its stem a little chamber for the insertion of a small piece of apparently plain paper, but in reality an invisible photograph produced in the manner already described. The ammonia vapor in the smoke passing through the chamber attacked the print and developed the image. By blowing the smoke on the latent image it may be made to appear, but the operation is rather tedious, and anyone with a little ingenuity can easily construct a cigarette holder with an arrangement to hold small pictures and allow the smoke to pass through.
The chamber of the cigarette or cigar holder must of course be sufficiently large to allow of the print being inserted in such a manner that the smoke can readily attack its surface, otherwise uneven development of the image will take place.
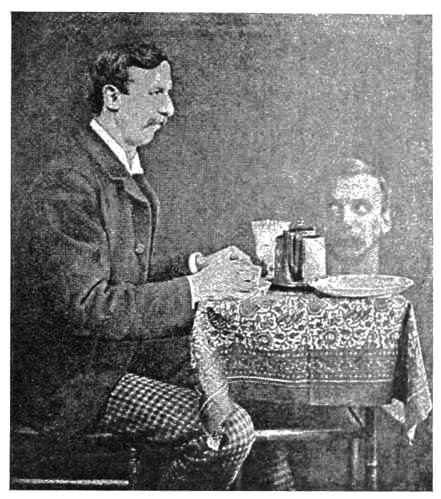
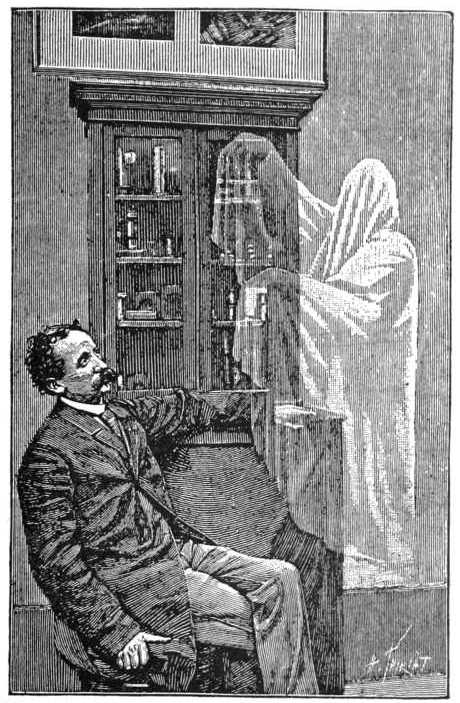
FIG. 16.—A "SPIRIT" PHOTOGRAPH.
Many years ago, in the old wet-collodion days, a well-known photographer was one day surprised by the visitation of a spirit. The apparition did not make its appearance during the nocturnal hours, as is, we have been given to understand, the custom of these ladies and gentlemen from the other world, but, strangely enough, in broad daylight; and not by his bedside to disturb his peaceful slumber, but upon the photograph he was in the act of producing. Had this gentleman been of that soft-brained kind, so easily gulled by the professional spiritualist, it is possible that he would not have done what he did, which was to make a thorough and scientific examination as to the probable cause of the phenomenon. The case was this: A gentleman sitter had been taken in the usual manner upon a collodion plate. Upon taking a positive print from22 the negative, he was surprised to find a dim white figure of a lady apparently hovering over the unconscious sitter. Upon examination of the negative, the image of the figure was also visible, but not so plainly as in the positive. The explanation of the whole matter was soon discovered. In those days glass was not so cheap as at present, and all old or spoilt negatives were cleaned off and freshly prepared with collodion for further use. In this case the glass had previously supported the23 negative image of a lady dressed in white. Some chemical action had evidently taken place between the image and the glass itself, turning the latter slightly yellow in some parts. This faint yellow image, although hardly visible in the negative, had, being of a non-actinic color, given quite a distinct image in the positive. The case was not an isolated one, as these spirit photographs, as they were called, often made their appearance when old negatives were cleaned and the glass24 used again. The precise action producing the image has never, we think, been satisfactorily explained. It could often be made more distinct by breathing on the glass. We do not know if any enterprising humbug ever took advantage of this method of producing spirit photographs to extort money from the unwary, but about ten years ago a work was published, entitled "Chronicles of the Photographs of Spiritual Beings and Phenomena Invisible to the Material Eye," by a Miss Houghton. In this a number of reproductions of photographs of "spirits" were given with a detailed explanation of how they were obtained and the difficulties attending their production, the "spirits" being apparently of very independent natures, only making their appearance when they felt so inclined. It is quite possible that a person entirely ignorant of photographic methods might be led into the belief that they were actually photographic images of the dead, but we fear that the book is hardly well enough written to deceive the experienced photographer. At certain and most unfortunate periods in the process employed, some of the plates had a convenient habit of slipping into the washing tank and there, according to the author, becoming utterly ruined; also we learn that many were ruined by being accidentally smudged by the photographer's finger. We should not, we fear, have a very high opinion of an operator who was in the constant habit of "smudging" negatives with his fingers so as to entirely spoil them, nor can we quite understand what brand of plates was used that "got spoiled by falling into the water."
From La Nature.
FIG. 17.—SPIRIT PICTURE.
From La Nature.
FIG. 18.—SPIRIT PICTURE.
It is not difficult to explain how these pictures were produced. There are quite a number of methods. With a weak-minded sitter, over whom the operator had complete control, the matter would be in no wise a difficult one. It would then only be necessary for the spirit, suitably attired for the occasion, to appear for a few seconds behind the sitter during the exposure and be taken slightly out of focus, so as not to appear too corporeal.
If, however, the sitter be of another kind, anxious to discover how it was done and on the alert for any deceptive practices,25 the method described would be rather a risky one, as he might turn round suddenly at an inconvenient moment and detect the modus operandi. In such a case it becomes necessary to find some other method where it would not be requisite for the "spirit" to make its appearance during the presence of the sitter.
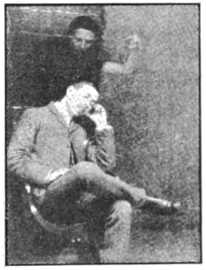
FIG. 19.—SPIRIT PICTURE
DISTURBED SLUMBER
The ghostly image can be prepared upon the plate, either before or after the exposure of the sitter. The method is this: In a darkened room the draped figure to represent the spirit is posed in a spirit-like attitude (whatever that may be) in front of a dark background with a suitable magnesium or other artificial light thrown upon the figure, which is then focused in the "fuzzy-type" style; or, better still, a fine piece of muslin gauze is placed close to the lens which gives a hazy, indistinct appearance to the image. The exposure is made and the latent image remains upon the sensitive plate, which is again used to photograph the sitter. Upon developing we get the two images, the "spirit" mixed up with the figure. The spirit should be as indistinct as possible, as it will then be less easy for the subject to dispute the statement that it is the spirit-form of his dead and gone relative. Some amount of discretion in this part of the performance must be used, we fancy, otherwise the same disaster might happen as did to a spiritualist some little time ago. An elderly gentleman had come for a seance, and, after some mysterious maneuvers, the gentleman was informed that the spirit of his mother was there. "Indeed!" replied the old gentleman, somewhat astonished. "What does she say?" "She says she will see you soon," informed the medium. "You are getting old now and must soon join her." "Quite right," replied the old gentleman; "I am going round to her house to tea to-night."—Total collapse of spiritualist.
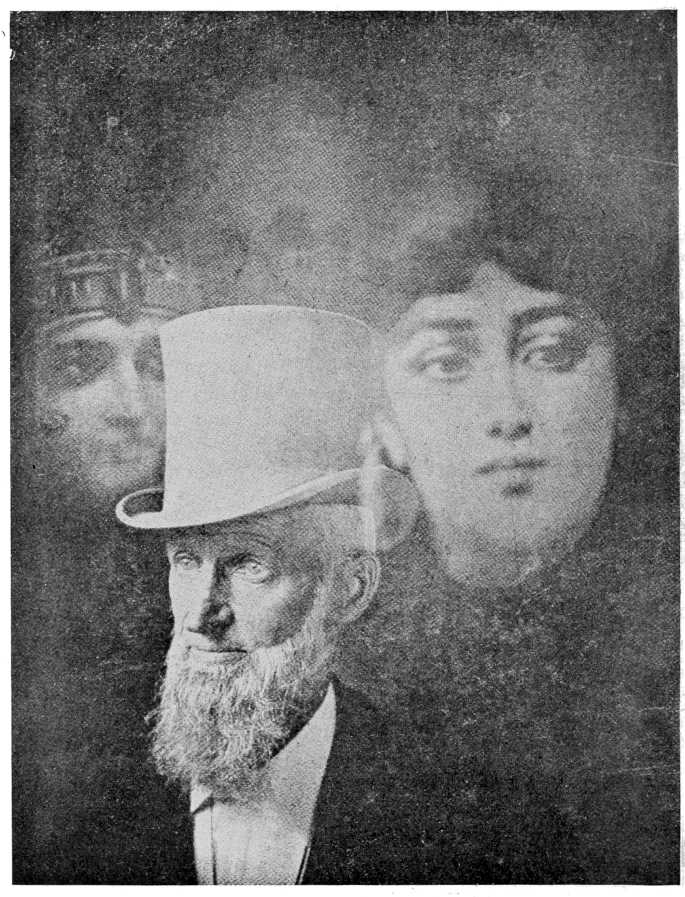
FIG. 20.—PHOTOGRAPH OF "SPIRITS."
Fluorescent substances, such as bisulphate of quinine, can also be employed. This compound, although almost invisible to the eye, photographs nearly black. If a white piece of paper be painted with the substance, except on certain parts, the latter only will appear white in the picture.
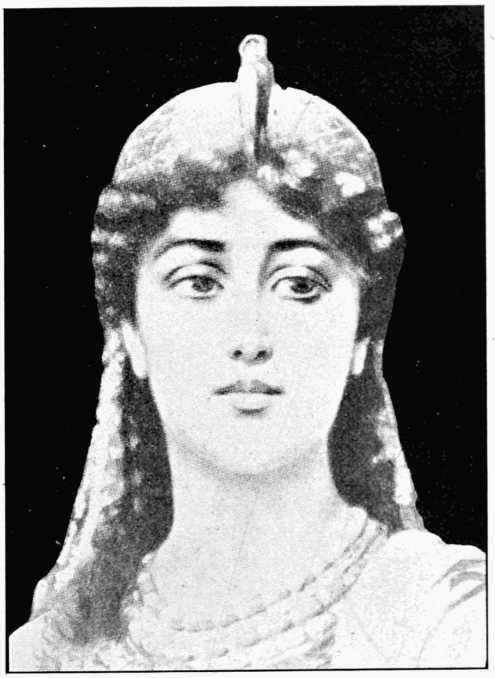
FIG. 21.-PAINTING BY N. SICHEL.
From which the "Spirit" Photograph opposite was made.
We hope that it will not be inferred that we desire to explain how to deceive persons with regard to photographs of spirits, for this is not so; we only hope that they will be made28 merely for amusement, and if possible to expose persons who practice on the gullibility of inexperienced persons.
Fig. 20 is a reproduction of a "spirit" photograph made by a photographer, claiming to be a "spirit photographer," and to have the power to call these ladies and gentlemen from the "vasty deep" and make them impress their image upon the sensitive plate by the side of the portraits of their living relatives.
Fortunately, however, we were in this case able to expose this fraud. Mr. W. M. Murray, a prominent member of the Society of Amateur Photographers of New York, called our attention to the similarity between one of the "spirit" images and a portrait painting by Sichel, the artist.
A reproduction of the picture is given herewith, Fig. 21, and it will be seen at once that the spirit image is copied from it.
In a recent number of The Australian Photographic Journal we read of the following novel method of making so-called spirit photographs: "Take a negative of any supposed spirit that is to be represented, put it in the printing frame with the film side out; lay on the glass side a piece of platinotype paper with the sensitive side up; clamp in place the back of the printing frame and expose to the sun for half a minute. Now place in the printing frame the negative of another person to whom the spirit is to appear, and over it put the previously exposed sheet film side down; expose to the sun for two minutes until the image is faintly seen, then develop in the usual way and the blurred spirit photograph will appear faintly to one side or directly behind the distinct image. Sheets of paper with different ghost exposures can be prepared beforehand."
Spirit photographs might easily be made by means of Prof. Roentgen's well-known X-ray process of impressing an image upon a photographic dry-plate without uncovering the shutter. The process would however entail considerable expense and would necessitate the use of so much costly apparatus that we will content ourselves with the simple mention of the possibility.
How few amateur photographers there are who thoroughly enter into the enjoyment of the art-science as a pastime. Many of these, perhaps, must be excused for the reason that they are ignorant of its capabilities. Indeed, how many there are who imagine that the art of photography consists in making negatives and, from these, prints—good, bad and indifferent. All the friends and relations are called into requisition "to be taken." At first they do not mind, thinking it a fine thing to have a portrait made for nothing; but when they see the result they very naturally object to be caricatured, and the amateur loses many a friend, and the maiden aunt leaves all her money to the home for stray cats. If he is a married man and delights in a happy, cosy home, neatly and artistically decorated, photography can be of very great assistance to him—how much, few realize. There are a thousand different ways in which it can be of use, and the photographer has always before him some permanent record of his travels and skill.
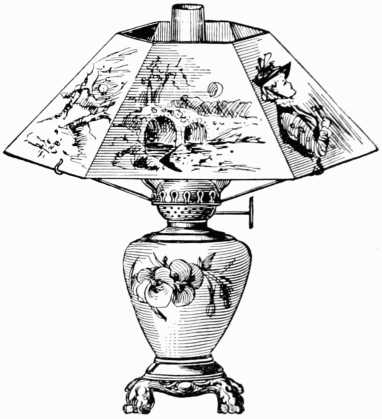
FIG. 22.
Let us take, for instance, the making of transparencies. These are very simply made. Any moderately rapid dry plate can be used for the purpose. Every amateur becomes possessed after a time of a large number of negatives, good, bad, and indifferent. Let him carefully go through these, selecting all the printable ones and the pictures that he most30 admires. From these, transparencies can be made, either by contact, or enlarged or reduced in the camera. Persons residing in cities often have a nicely furnished room utterly marred by an unsightly outlook. Perhaps a view of chimney pots and dirty back yards. In such a case all that is necessary is to fit in place of the lower panes some neat photographs on glass, backed with thin ground-glass. These can be puttied in or they can be fitted in neat brass frames and hung up against the windows.
The craze of the present day appears to be in the direction of bright and gaudy colors, except with the more highly cultivated, who recognize the artistic value of unobtrusive colors and delicate tints. A photograph, provided it is a good one, is always to be preferred to colored pictures unless the latter are by good artists. We once constructed with a half dozen of transparencies a very neat lamp shade. Some idea of it can be obtained from Fig. 23.

FIG. 23.
A brass frame is first constructed, and any wire worker will execute this so as to hold the six or eight pictures. The transparencies are made, cut down to the size and shape required and fitted in; then ground glass of the same size and shape is fitted, small brass tabs at the back being used to keep them in their places behind the transparency. The glasses should not fit too tightly in the brass frames or, on expanding by the heat, they will crack.
A hall lamp can be treated in the same way, the colored glass removed and photographic transparencies substituted. Photos on glass can in the same way be used for a variety of other purposes, such as fire screens, candle shades, etc.
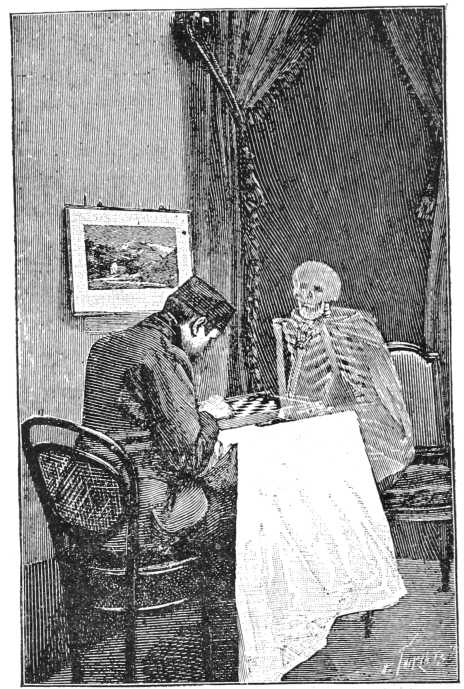
Next look up your stock of prints, scraps, waste prints, etc.
Often from a large, spoilt picture you can get a neat little bit about a couple of inches square or less; look up all these and from them a photographic chess-board can be made. Our illustration in Fig. 24 is intended to show what is meant, although our artist has not been happy in the selection of his material to represent photographic views and portraits. First mark out a square the size you wish the chess-board to be. Divide it into sixty-four squares and draw a neat border round it. Thirty-two of the squares are then neatly pasted over with selected photographs as varied as possible in subjects. Sixteen are fitted one way and sixteen the other. Our illustration is incorrect in this respect. The sixteen pictures should be placed the right way on the sixteen squares nearest to each player. When the photographs have all been pasted on and dried the whole is sized and varnished. If, however, it is desired to preserve this photographic chess-board, and at the same time to use it frequently, a better plan is to cover over with a glass plate and bind all round the edges to prevent dust from entering.
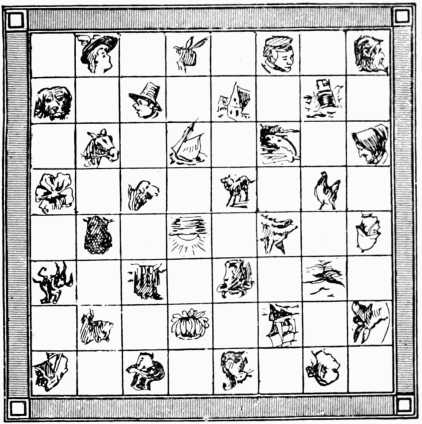
FIG. 24.
In a similar way a neat card table can be manufactured. Fig. 25 is intended to illustrate the top of the table covered with photographs and protected by a glass plate.
A little consideration will no doubt give various other similar ideas to the reader.
Those who can work the carbon process successfully have it in their power to transfer photographs in various colors to all kinds of supports, to wood for instance. The panels of a door can be very considerably improved by the insertion of photographs on fine grain wood, varnished.

FIG. 25.
Pictures can in this manner be transferred to plates, china and ornaments of every description.
Various methods of printing on silk and various fabrics have from time to time been given. Perhaps the best for our purpose is the primuline process, as various colored images can be produced, with but little trouble, on all kinds of material. A description of the process will be found in another part of this work. (See Page 39.)
These the amateur can hand over to his better half or female relations, who with the natural feminine abilities will produce all sorts of pretty artistic articles for decorating the room.
We are well aware that we have by no means enumerated one half of the various means in which photography can be employed for decorating the house, but hope at least to have given the reader some idea of what its capabilities are.

FIG. 26.—LEAF PRINT. BY T. GAFFIELD.
Nothing can exceed the beauty of form and structure of the leaves of different plants. Ruskin observes: "Leaves take all kinds of strange shapes, as if to invite us to examine them. Star-shaped, heart-shaped, spear-shaped, fretted, fringed, cleft, furrowed, serrated, sinuated; in whirls, in tufts, in spires, in wreaths; endlessly expressive, deceptive, fantastic, never the same, from footstalk to blossom, they seem perpetually to tempt our watchfulness and take delight in outstripping our wonder." Photography has placed in our hands a simple method of preserving facsimiles of their ever varying shapes that will last long after the leaf has died and crumbled to dust. Although the discovery of the darkening action of silver chloride when exposed to light was discovered by Scheele as far back as 1777, little was apparently known of the possibilities attending the discovery until 1839, when Fox34 Talbot read a paper on "A Method of Photogenic Drawing," in which he described various experiments that could be made with paper coated with this substance, and showed many pictures of leaves, ferns, and pieces of lace which he had obtained.

FIG. 27.—LEAF PRINT. BY T. GAFFIELD.
The illustrations which we reproduce herewith are reproductions from leaf prints made by Mr. Thomas Gaffield, who has made quite a study of this fascinating pastime. In a little work entitled "Photographic Leaf Prints," published in 1869, he describes his method. The leaves and ferns are first35 selected and pressed between the leaves of a book. They must not be dried, as in that state they do not so readily permit the light to pass through and the delicate structure of the leaf would not be reproduced. They should therefore only be pressed sufficiently to allow the excess of moisture to be extracted. A sheet of glass is put into the printing frame and the leaves artistically arranged. When the arrangement is satisfactory the leaves are attached to the glass with a little mucilage to prevent them from slipping out of their places. A sheet of sensitive paper, albumen, gaslight, or platinum is then inserted, the frame closed up and exposed to the light until a very dark print is obtained. The time required in printing must be found by practice; it will, of course, differ according to the intensity of the light. It is a good plan to employ an actinometer to judge the correct exposure. It is not possible to open the frame, as a double or blurred picture would result. The halves should be exposed sufficiently long to enable the light to penetrate through them and give a distinct image of the veins and structure.
When the printing is completed the paper is removed and toned and fixed in the usual manner. If platinotype or gaslight paper is used, this, of course, requires development. The resulting picture gives us a light impression of the leaves on a dark background, but if so desired, the print thus obtained can be used as a negative. It can be made transparent with wax or vaseline, and prints obtained from it giving a dark image on a white ground. It is difficult to say which picture is the more beautiful. We give illustrations of pictures of both kinds. (Figs. 26 and 27.)
Naturally enough, the beauty of these pictures lies in the careful selection and arrangement of the leaves. Those which are too thick should not be used. Delicate ones, showing all the veins by transmitted light, are the most suitable. They can be arranged artistically, in any shape or form. We prefer, however, a life-like arrangement to the construction of various shapes and designs.
By the following method anyone can, without any knowledge of drawing, produce from a photograph a pen and ink sketch suitable for reproduction as an illustration. From the negative a silver print is made on albumen or gelatine or collodion paper. This is fixed without toning in a solution of hyposulphite of soda. It must then be thoroughly washed to remove all traces of hypo, and when dry, the outlines of the photograph are traced over with a fine pen and a waterproof ink, obtainable at any artist's material store. If the photographer possesses a little knowledge of drawing, some of the shading can also be attempted. When the ink is dry the picture is immersed in a saturated solution of bichloride of mercury (poison) when the photograph will disappear, leaving the outline sketch intact. The picture is again well washed and dried. Newspaper sketches are often made from photographs in this manner, a zincotype being quickly produced from the drawing. Gaslight paper can also be used.
Photographs can be very effectively printed upon silk, satin, or other fabrics. There are several methods of accomplishing this. A simple one is the following:[2] The silk best suited for the purpose is that known as Chinese silk, and this is first washed in warm water with plentiful lather of soap, then rinse in hot water, and gradually cool until the final washing water is quite cold. Next prepare the following solutions: Tannin, 4 parts; distilled water, 100 parts. Sodium chloride, 4 parts; arrowroot, 4 parts; acetic acid, 12 parts; distilled water, 100 parts.
[2] From the "Encyclopaedic Dictionary of Photography," by the author.
The arrowroot is mixed up into a paste with a little of the distilled water, and the remainder added boiling hot, with the acid and the salt previously dissolved in it. When the solution 37is quite clear the tannin solution is added, and the whole allowed to get fairly cool. The silk is then immersed for about three minutes, being kept under without air in the folds, and then hung up to dry, or stretched out with pins on a flat board. The material is then sensitized by brushing over with the following solution: Silver nitrate, 12 parts; distilled water, 100 parts; nitric acid, 2 drops to every 3 ounces. Other methods of sensitizing are by immersing in or floating on the silver solution. After sensitizing, the material is dried by pinning on to a board to keep flat. It is then cut up as required, and printed behind the negative. Every care must be taken in printing to keep the material flat, and without wrinkles or folds. It must also be kept quite straight; otherwise, the image will be distorted. Printing is carried on in the same manner as with printing-out paper. It is then washed and toned in any toning bath. The sulphocyanide gives the best action. Fix in a 10 per cent. solution of hyposulphite of soda for ten minutes; wash and dry spontaneously. When just damp, it is ironed out flat with a not over-heated iron. Black tones can be obtained with a platinum toning bath, or with the uranium and gold toning bath, made up as follows: Gold chloride, 1 part; uranium nitrate, 1 part. Dissolved and neutralized with sodium carbonate, and then added to sodium chloride, 16 parts; sodium acetate, 16 parts; sodium phosphate, 16 parts; distilled water, 4,000 parts.
Very effective results may be made by printing with wide white margins, obtained by exposing with a non-actinic mask.
Another method is the following: Ammonium chloride, 100 grains; Iceland moss, 60 grains; water (boiling), 20 ounces.
When nearly cold this is filtered, and the silk immersed in it for about fifteen minutes. To sensitize, immerse the silk in a 20 grain solution of silver nitrate for about sixteen minutes. The silver solution should be rather acid.
Or immerse the silk in water, 1 ounce; sodium chloride, 5 grains; gelatine, 5 grains. When dry, float for thirty seconds on a 50 grain solution of silver nitrate. Dry, slightly overprint and tone in the following bath: Gold chloride, 4 grains; sodium38 acetate, 2 drachms; water, 29 ounces. Keep twenty-four hours before using. Fix for twenty minutes in hypo, 4 ounces to the pint of water.
On this page we reproduce a curious photograph by M. Bracq, which appeared some time ago in the Photo Gazette.
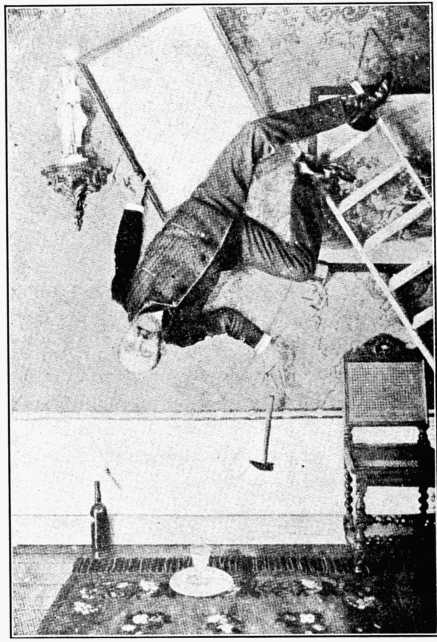
By M. Bracq. From Photo Gazette.
FIG. 28.—A CATASTROPHE.
Despite all the terrible catastrophe which it represents, carrying pictures along with him in his fall, the subject has not experienced39 the least uneasiness, not even so much as will certainly be felt by our readers at the sight of the tumble represented.
The mode of operating in this case is very simple and we are indebted to La Nature for the description of the method employed by M. Bracq. The photographic apparatus being suspended at a few yards from the floor of the room, in such a way as to render the ground-glass horizontal (say between the two sides of a double ladder—a combination that permits of easy focusing and putting the plates in place), there is spread upon the floor a piece of wall paper, about 6 feet in length by 5 feet in width, at the bottom of which a wainscot has been drawn. A ladder, a few pictures, a statuette, and a bottle are so arranged as to give an observer the illusion of the wall of a room, that of a dining room for instance. A hammer, some nails, etc., are placed at the proper points. Finally, a 5 feet by 2-1/2 feet board, to which a piece of carpet, a cardboard plate, etc., have been attached, is placed under the foot of a chair, which then seems to rest upon this false floor at right angles with that of the room.

FIG. 29.
Everything being ready, the operator lies down quietly in the midst of these objects, assumes a frightened expression, and waits until the shutter announces to him that he can leave his not very painful position. This evidently is merely an example that our readers will be able to modify and vary at their will.
By means of a dye process known as the "Primuline Process," very pretty images in various colored dyes can be made upon silks, satins, cotton goods, etc. The material is first40 dyed in a hot solution of primuline, made by adding about 15 to 30 grains of the dye to a gallon of hot water; a little common salt should also be added. On immersing the fabric, and stirring it about in the solution, it becomes of a primrose yellow color, when it is removed and washed under a cold-water tap. The next process is to diazotize it by immersion for half a minute or so in a cold solution of sodium nitrate, one-quarter per cent., which has been sharply acidified with hydrochloric or other acid. The material is again washed in cold water, but it must be kept in a weak light. It can be hung up to dry, in the dark, or exposed while wet beneath the object of which it is required to produce a positive reproduction. This process gives a positive from a positive, so that any ordinary picture on a sufficiently translucent material—flowers, ferns, etc.—can be reproduced. Printing requires about half a minute in the direct sunlight to half an hour or more in dull weather, or if the material to be printed through is not very transparent. The high lights become of a pale yellow, so that a faint image is perceptible; but this is made visible in almost any color by development in a weak solution (about one-fourth per cent.) of a suitable phenol or amine. The following have been found suitable:
For Red.—An alkaline solution of β-napthol.
For Maroon.—An alkaline solution of β-napthol-disulphonic acid.
For Yellow.—An alkaline solution of phenol.
For Orange.—An alkaline solution of resorcin.
Brown.—A slightly alkaline solution of pyrogallol, or a solution of phenylene-diamine-hydrochloride.
For Purple.—A solution of α-napthylamine hydrochloride.
For Blue.—A slightly acid solution of amido-β-napthol-sulphonate of sodium, now better known as "eikonogen."
If the design is to be made in several colors, this can be done by painting on the different developers, suitably thickened with starch. After developing, the material is well washed and dried. With the purple and blue developers it is necessary to wash the material finally in a weak solution of tartaric41 acid. Wool and silk require a longer exposure to light than other fabrics, and cannot be successfully developed with the maroon or blue developer.

AA. The sky and side light.
BB. Two dark backgrounds.
C. The white screen in oblique position.
D. The subject.
E. The camera.
FIG. 30.
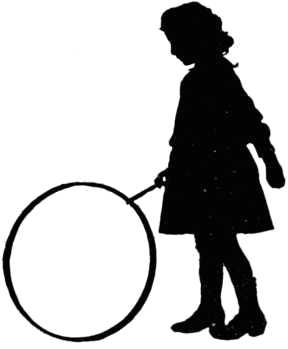
FIG. 31.
Silhouette portraits were at one time very popular. They are simply made, and if the effect is well carried out will afford considerable amusement. The best description of their manufacture was given some time ago by Herr E. Sturmann, in Die Photographische Korrespondenz. His method is as follows:
Place two dark backgrounds in parallel position about 4 feet from the sky and side light of the studio and distant from each other about six feet. Improvise a dark tunnel by drawing a black cloth, of non-reflecting material, over the two dark grounds, and arrange a white screen, somewhat larger than the distance between the two dark grounds, in an oblique position so as to be fully illuminated.
The subject to be silhouetted must be placed in the centre of the tunnel, one side of the face turned towards one ground, but comparatively nearer to the white screen so that the side of the face turned towards the camera is as much as possible in the shade.
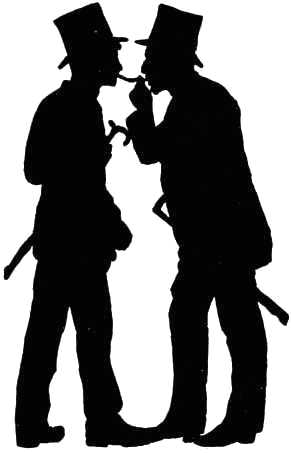
FIG. 32.
Focus must be taken accurately, so that the outlines of the figure are perfectly sharp.
As it is the object to obtain a perfectly transparent, glass-clear silhouette upon an absolutely opaque ground, but a very short time of exposure is required.
Develop as usual and to secure perfect opacity intensify43 more than usual. Plates of lower sensitiveness invariably give the best results. A slow plate or one made particularly for reproduction is well adapted for this kind of work. With ferrous oxalate or hydrochinon developer there is scarcely any need of intensifying.

FIG. 33.
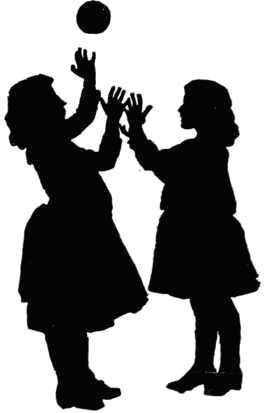
FIG. 34.
To obviate the shadows cast upon the floor by the lower parts of the figure, place it upon a thick, large plate-glass, supported by props of five or six inches in height, and spread upon the floor under the glass a piece of white muslin. The muslin must be free of folds or wrinkles, and be so connected with the white screen, that the division line between is not reproduced upon the plate.
The very feeble shadows of the feet can be easily touched away with pencil.
Single persons or groups of two or three figures can be photographed in this peculiar style with very good effect.
For heads and busts expose in the usual manner, but to obtain silhouettes similar to those our grandmothers had cut in black paper, and long before photography was thought of, cut an appropriate mask of black paper to cover the part not wanted during printing.

FIG. 35.
It should be borne in mind that in this class of work the white background only is the object to be photographed, hence the necessity of but very short exposures. With longer exposures absolute blacks and whites are impossible.
The following is a curious and interesting experiment, based upon the peculiar property possessed by fluorescent substances of altering the refrangibility of the chemical light rays. Take a colorless solution of bisulphate of quinine, and write or draw with it on a piece of white paper. When dry the writing or design will be invisible, but a photograph made of it will show them very nearly black.
Get a glass-blower to make an ordinary shaped wine-bottle of very thin and clear glass, and clean it well. Next take the white of two eggs and add to it 29 grains of ammonium45 chloride dissolved in 1 drachm of spirits of wine, and one-half ounce of water. Beat this mixture into a thick froth and then allow it to stand and settle. Filter through a tuft of cotton-wool, and pour into the specially made bottle. By twisting the bottle round, an even layer of the solution will deposit itself on the sides. Pour off the remaining solution, allow the film in the bottle to dry, and again repeat the operation.
The next operation is to sensitize the film with a solution of nitrate of silver, 40 grains to 1 ounce of water. Pour this in and turn the bottle round for a few minutes, then pour off the superfluous solution and again dry. Hold the neck of the bottle for a few seconds over another bottle containing ammonia, so as to allow the fumes to enter it. Printing is the next operation; this is accomplished by tying a film negative round the bottle, and covering up all the other parts from the light. Print very deeply, keeping the bottle turning round all the time. Toning, fixing, and washing can be done in the ordinary way by filling the bottle up with the different solutions. The effect is very curious, and can be improved by coating the inside of the bottle with white enamel.
These can be produced by what is known as the powder or dusting-on process. The principle of the process is this: An organic, tacky substance is sensitized with potassium bichromate, and exposed under a reversed positive to the action of light. All the parts acted upon become hard, the stickiness disappearing according to the strength of the light action, while those parts protected by the darker parts of the positive retain their adhesiveness. If a colored powder be dusted over, it will be understood that it will adhere to the sticky parts only, forming a complete reproduction of the positive printed form. Prepare—Dextrine, one-half ounce; grape sugar, one-half ounce; bichromate of potash, one-half ounce; water, one-half pint: or saturated solution bichromate of ammonia, 546 drachms; honey, 3 drachms; albumen, 3 drachms; distilled water, 20 to 30 drachms.
Filter, and coat clean glass plates with this solution, and dry with a gentle heat over a spirit lamp. While still warm the plate is exposed under a positive transparency for from two to five minutes in sunlight, or from ten to twenty minutes in diffused light. On removing from the printing frame, the plate is laid for a few minutes in the dark in a damp place to absorb a little moisture. The next process is the dusting on. For a black image Siberian graphite is used, spread over with a soft flat brush. Any colored powder can be used, giving images in different colors. When fully developed the excess of powder is dusted off and the film coated with collodion. It is then well washed to remove the bichromate salt. The film can, if desired, be detached and transferred to ivory, wood, or any other support.
If a black support be used, a ferrotype plate on Japanned wood, for instance, pictures can be made from a negative, but in this case a light colored powder must be used. The Japanese have lately succeeded in making some very beautiful pictures in this manner. Wood is coated over with that black enamel for which they are so famous, and pictures made upon it in this manner. They use a gold or silver powder.
With this process an almost endless variety of effects can be obtained. For instance, luminous powder can be employed and an image produced which is visible in the dark.
Some time ago we suggested a plan of making what might be termed "post-mortem" photographs of cremated friends and relations. A plate is prepared from a negative of the dead person in the manner described, and the ashes dusted over. They will adhere to the parts unexposed to light, and a portrait is obtained composed entirely of the person it represents, or rather what is left of him. The idea is not particularly a brilliant one, nor do we desire to claim any credit for it, but we give it here for the benefit of those morbid individuals who delight in sensationalism, and who purchase and treasure up pieces of the rope used by the hangman.
A method of making a photograph which can be made to appear at will is thus described in Les Recreations Photographiques.
Take a convex watch crystal, V, or any similar larger glass if desired—for instance, those used for colored photographs; clean the glass well, place it perfectly level, convex side down, and fill it even full with a mixture of white wax and hog's lard. When it has solidified, apply to the back a flat glass plate, P, cut exactly to the largest dimensions of the convex glass, secure the glasses together with a strip, B, of gold-beater's skin, fastened by strong glue as shown in the figure. Now mount a portrait, with the front towards the convex glass, on the plate P. The combination is now ready; by heating it the wax between the two glasses melts and becomes transparent, allowing the portrait to be seen; on cooling it will lose its transparence and the portrait will disappear.
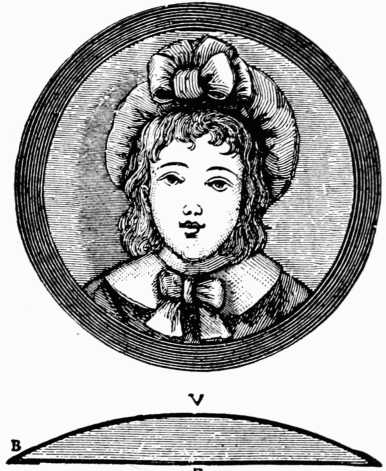
FIG. 36.
If an object be placed against a non-actinic background and an exposure made, the black parts surrounding it will not have any effect upon the plate, and the object can be shifted to another part and another exposure made. In a recent article published in La Nature, and translated in the Scientific American, a number of curious effects obtained by photography by M. R. Riccart, of Sainte-Foix-les-Lyons, are described and illustrated.

FIG. 37.—A DECAPITATION.
The system employed by the author of these photographs is that of the natural black background obtained through the open door of a dark room, combined with diaphragms skillfully49 arranged in the interior of the apparatus, between the objective and sensitized plate. This is the surest method of obtaining the desired effect with the greatest precision, without the junctions being visible, and with perfect sharpness in the cutting of the parts removed. For this effect, it is necessary to place the diaphragm at three or four centimeters from the ground glass, in the last folds of the bellows of the camera.

FIG. 38.—ANOTHER DECAPITATION.
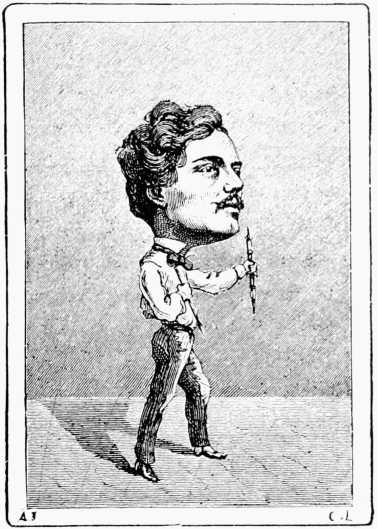
The following are a few data as to the manner in which the scenes that we reproduce were obtained. The first, representing a decapitation by means of a saber (Fig. 37), was taken by means of an exposure in which the head was placed upon the block, the subject inclining forward upon his knees, and a50 diaphragm, occupying about two-thirds of the plate, completely masking the body up to the neck. Then, without changing the position of the apparatus, the diaphragm was placed on the other side in order to conceal the head, and the body was photographed in the second position along with the person representing the executioner. It would have been possible, by a third exposure, to so arrange things as to make the executioner the decapitated person. It was by the same process that the three following scenes were obtained: A person with his head placed before him in a plate (Fig. 38); a man carrying his head in a wheelbarrow (Fig. 39); and a person to whom his own head is served in a plate (Fig. 40). Such scenes may be varied to any extent. Fig. 41 is a photograph of a decapitation, while Fig. 42 is made by two exposures of an individual at different distances but so combined as to give the appearance of one exposure. Fig. 43 is that of a person in a bottle. The individual represented was51 first photographed on a sufficiently reduced scale to allow him to enter the bottle. This exposure was by using a screen containing an aperture, as for the Russian background. But this precaution was taken merely to conceal the floor, and yet it would perhaps be preferable in such a case to have the subject stand upon a stool covered with a very black fabric. However this may be, when once the first impression has been made, there is nothing more to be done than to photograph the bottle on a larger scale and the result is obtained.
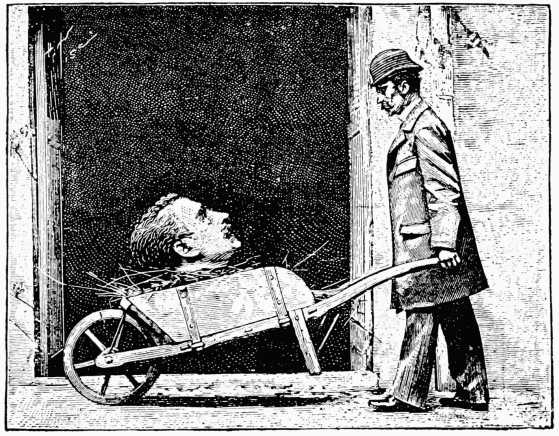
FIG. 39.—THE HEAD IN THE WHEELBARROW

FIG. 40.—THE HEAD UPON A PLATE.
There are three principal methods of copying mechanical drawings, tracings, sketches, etc. These are: (1) A process to obtain white lines upon a blue ground; (2) a process by which blue lines upon a white ground are obtained; and (3) a process giving black or violet-black lines upon a white ground.
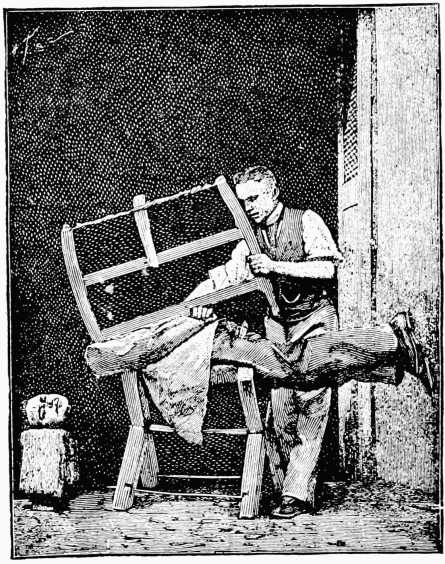
FIG. 41.—THE SAWED-OFF HEAD.
The first process is undoubtedly the simplest, as after printing upon the paper it is developed and fixed by simple immersion in cold water; but, at the same time, the white lines on the blue ground are not so clear and effective as the other processes. The cyanotype paper, as it is called, can be53 obtained ready for use at any draughtsman's stores, but if you prefer to make it yourself, here is the recipe: Two solutions are made—20 parts of red prussiate of potash are dissolved in 100 parts of water, and 10 parts of ammonio-citrate of iron in 60 parts of water. These two solutions should be mixed together immediately before using, and the operation must be performed in the dark. Paper is floated on this solution, or applied with a broad camels-hair brush, and hung up to dry. If it is well dried and carefully preserved from light, moisture and air, this paper will keep for some time. After printing—which, when sufficient, should show the lines copied of a yellow color upon a blue ground—the prints should be washed in several waters, and if a few drops of chlorine54 water or dilute hydrochloric acid be added to the washing water, the blue ground will appear much darker and the lines rendered clearer and whiter. The commercial paper sold is generally prepared by this method.

FIG. 42.—THE REDUCTION.
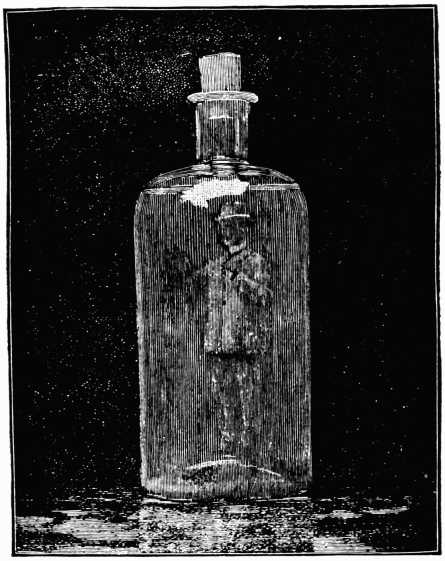
FIG. 43.—MAN IN A BOTTLE.
Blue prints may be given a black tone by plunging them into a solution of 4 parts of caustic potash in 100 parts of water; then, when the blue color has entirely disappeared under the action of the potash, and a yellowish color has taken its place, they are immersed in a solution of 4 parts of tannin in 100 parts of water; then washing them again, we obtain prints whose tone may be assimilated to that of pale writing ink.
In the process giving blue lines upon a white ground, it is necessary that the action of the light shall be to convert the55 iron compound into one that can be discharged from instead of being fixed on the paper, so that we obtain a positive from a positive. Abney describes the process as follows: Thirty volumes of gum solution (water 5 parts, gum 1 part) are mixed with 8 volumes of a citrate of iron and ammonia solution (water 2 parts, double citrate 1 part), and to this is added 5 volumes of a solution of ferric chloride (water 2 parts, ferric chloride 1 part). This solution thus formed is limpid at first, but will gradually become thicker, and should be used soon after mixing. It is then applied with a brush to the paper (which should be well sized) and dried in the dark. Exposure is accomplished in a few minutes, the paper being placed under the drawing in the printing frame. It is then developed with potassium ferrocyanide, 50 grains, water 1 ounce, applied with a brush until all the details appear of a dark-blue color. The print is then rapidly rinsed, and placed in a dish containing the clearing solution, made of 1 ounce of hydrochloric acid and 10 ounces of water.
The third process, which gives violet-black lines on a white ground, is the following: Make up the sensitive solution with water, 16 ounces; gelatine, 4 drachms; perchloride of iron (in a syrup condition), 1 ounce; tartaric acid, 1 ounce; sulphate of iron, 4 drachms. The paper is floated on or brushed over with this and dried. The exposure is about the same as with the last process. When sufficient, the greenish-yellow color will turn white, except the lines, which should be somewhat dark. The developing solution is composed of 1 part of gallic acid in 10 parts of alcohol and 50 of water. When immersed in this solution the lines will turn blacker. The finish is then made by thoroughly washing in water.

These are obtained as follows: A sheet of paper is coated with a ten per cent solution of gelatine, and when dry this is floated on a ten per cent solution of bichromate of potash. Again dry and expose beneath a positive transparency. The print thus obtained is then immersed in a ten per cent solution of chloride of cobalt. The parts unacted upon by light will absorb the solution. Wash and dry. We then have a faint image which will alter its color according to the state of the atmosphere. In damp weather it will be almost if not entirely invisible, but when the weather is fine and dry, or if the image be heated before a fire it will turn to a bright blue color.
Some time ago dry-plates were placed on the market which would develop, apparently, with water and a little ammonia only. The secret of the method was that the backs of the plates were coated with a soluble gum, containing the developing agents, and, of course, when the plate was immersed in the water, they instantly dissolved and formed the developer. Plates thus prepared are useful in traveling where it is not always possible to get the necessary developing solutions. To prepare them the backs are coated with the following mixture:
| Pyrogallic acid | 154 | grains |
| Salicylic acid | 15 | grains |
| Gum or dextrine | 154 | grains |
| Alcohol | 1 | fluid dr. |
| Water | 5 | fluid dr. |
This is allowed to dry at an ordinary temperature. After exposure, all that is necessary to develop is to immerse the plates in water containing a small quantity of ammonia.
There are quite a number of different methods of making caricature portraits. A simple one is to make two photographs of an individual, one of the head alone and another of the entire body on a much smaller scale. From these two negatives prints are made, and the larger head is cut out and pasted on the shoulders of the full length figure. Any signs of the cutting out are removed by the use of a brush and a little coloring matter. From this combined print another negative is made so that any number of these caricature prints can be made without extra trouble. The effect is shown in Fig. 44.
From Tissandier's Handbook. FIG. 44.—CARICATURE PORTRAIT.
Foregrounds for making caricature portraits are sold in this country. The method of using them is shown in Fig. 45.58 The card containing the grotesque drawing is held by the sitter on his knees and arranged by the photographer in such a way that his head rests just above the neck of the painted body. A white background is arranged behind and when the negative is made all traces of the edges of the foreground are removed by careful re-touching.
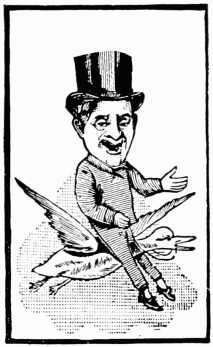
FIG. 45.—CARICATURE
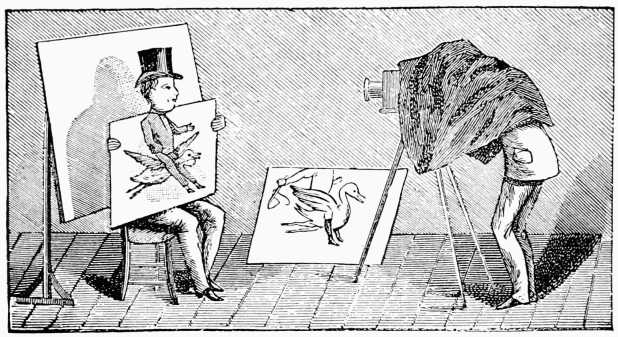
FIG. 46.—MAKING THE CARICATURE PORTRAIT.
Another method of obtaining grotesque caricature portraits has been devised by M. Ducos du Hauron. His apparatus, which he calls "La Photographie Transformiste," is thus described by Schnauss in his "Photographic Pastimes." A, Fig. 47, is the front of the box, which is furnished with an exposing shutter formed of a simple sliding piece fitting into the grooves R R, R R. B P are two screens pierced with slits a a, c c. C is the rear end of the box where the dark slide is placed. D is the lid of the box, which is lifted either for placing the slotted screens or for putting in the sensitive plate.59 When not working direct from nature, the transparency is placed in the grooves R R, R R, at A.

FIG. 47.—THE HAURON "TRANSFORMISTE."
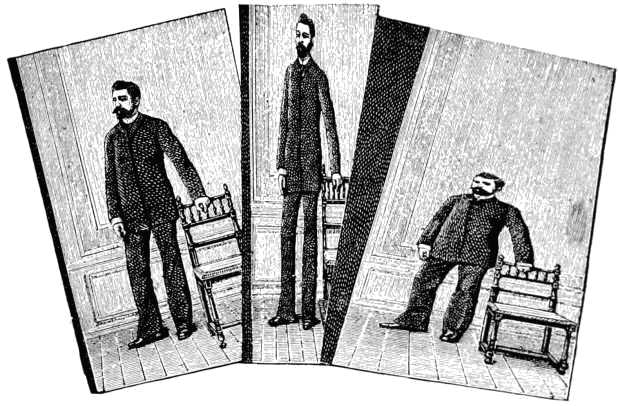
FIG. 48.—PHOTOGRAPH AND DISTORTIONS WITH THE "TRANSFORMISTE."
According to the arrangement of the slits, the caricatures obtained will be different. If, for instance, the first slit be a vertical one, and the other, i.e., the one nearest the picture, a horizontal one, the picture, in comparison with the original, will60 be distorted lengthwise. If, however, one of the slits forms no straight line, but a curved one, the transformed picture will show either lengthwise or sideways curved lines, according to the slit being a vertical or a horizontal one. The form of the resulting picture will also be different according to which one of the slotted plates is placed more or less obliquely in the box.
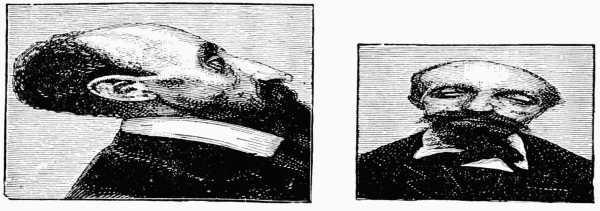
FIG. 49. and FIG. 50.

FIG. 51. and FIG. 52.
The slits must be made very exactly; above all, their edges61 must be absolutely sharp, every incorrectness being transferred to the picture. They may be made about one-third of a millimeter wide; if they are too narrow the picture will not turn out sharp. In making the slits it is a good plan to cut them in thin black paper, and to mount the latter on glass plates.
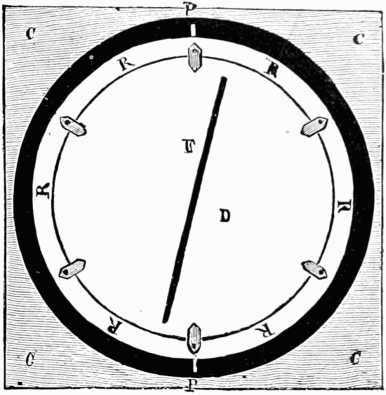
FIG. 53.
In a later description of the apparatus we learn that the discs containing the slits are often made circular in shape and so arranged that they can be revolved as shown in Fig. 53. This, of course, allows of a still greater variety of positions of the two apertures in relation to each other and an increasing number of grotesque effects. Reproductions of some of the pictures obtained are given.[3] See Figs. 48 to 52.
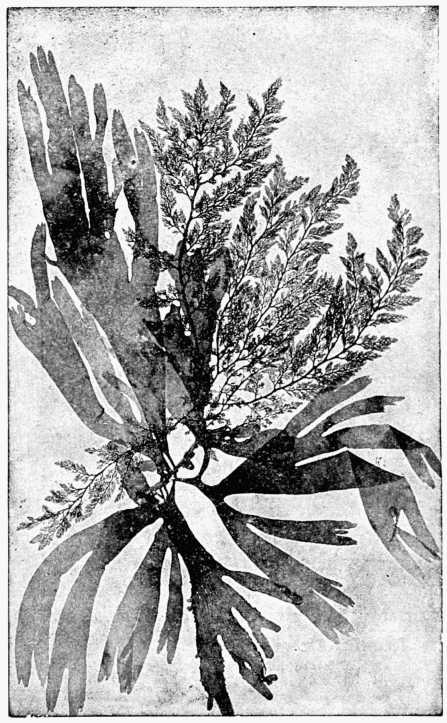
FIG. 54.—SEAWEED PHOTOGRAPH.
Of all the glorious creations of nature few are more beautiful than the delicate sea mosses to be found by the sea shore. Many delight in preserving them in a dry state, mounted on cards, but unfortunately they are usually so fragile that after a little while they fall to pieces. The photographer, however, is able to reproduce these beautiful formations and preserve them in a more permanent form by63 means of his camera. It is true that he cannot reproduce their delicate colorings, but the photographs can, if so desired, be lightly printed on platinum paper and colored as well as possible by hand.
A special camera is sold for making these little pictures.

FIG. 55.—STAMP CAMERA.
FIG. 56.
STAMP PHOTO.
It contains a number of lenses all of the same focus. In front is an easel where the portrait is attached, surrounded by a suitable border. The images given are about the size of postage stamps (see Fig. 56), and when the negative is printed on a printing out or developing paper, toned or developed, they can be perforated and gummed at the back. They are very useful for sticking to letters, envelopes, and for business purposes.
There are several different ways of making these. Obtain some Balmain's luminous paint, and coat a piece of cardboard with it. Place this in the dark until it is no longer luminous; place this behind a glass transparency and expose to light, either daylight or, if at night-time, burn a small piece of magnesium wire. Return to the dark, remove the transparency, and a64 luminous photograph is obtained on the prepared card. A simple plan is to merely expose a piece of the prepared cardboard to the light and place it behind a transparency; then retire to a darkened room. The luminous paint, showing through it, will have a very pretty effect. If no glass transparency is at hand, a silver print can be used, if previously oiled and rendered translucent by vaseline or any other means.
Perhaps the beauties of nature are nowhere better exemplified than in flowers, and nothing can be prettier than photographs of them carefully arranged. When we say carefully arranged we mean, of course, artistically. The secret of arranging flowers—an art in itself—is to hide the fact that they have been arranged.
Among the best pictures of flowers which have appeared in print, are those by John Carpenter, an English gentleman, who has made this particular branch of photography his chief study, and has been awarded many prizes and medals for flower studies.
Some time ago we wrote to him asking for a few particulars of his method adopted, and he has been so very kind as to send the following valuable notes:
Suitable Flowers.—I find that the best colors to photograph are pale pink, yellow, white or variegated colors. Reds, browns, and dark colors generally, do not answer well.
Flowers of irregular form are most suitable, such, for example, as chrysanthemums, lilies, poppies, etc. These give beautiful gradations of light and shade.
Grouping.—There is great scope here for artistic feeling. All appearance of formal arrangement must be avoided and a natural grouping should be aimed at. This becomes more difficult as the flowers must be somewhat on one plane to get them in proper focus. A round bunch of flowers which may appear very pretty to the eye would probably be utterly wrong to make a picture of.
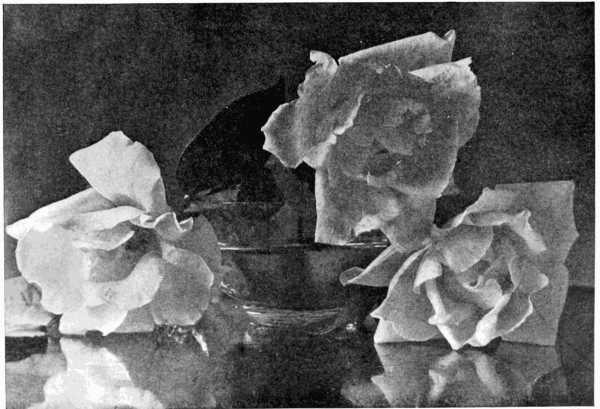
Fannie Cassidy.
FIG. 57.—A BOWL OF ROSES.
Lighting.—I have never worked in a studio, but have a small lean-to glass house in which I work. The top light is softened down by light shades so that the strongest light comes from the side. This gives solidity to the subject and is more pleasing than a flat lighting. Of course, the sun should never shine on the subject.
Plates and Exposure.—If colored flowers are being photographed, orthochromatic plates are a necessity, but for white flowers and light-green foliage ordinary plates may be employed. I generally use a medium isochromatic, stop the lens to f:22 and give exposure of from thirty to sixty seconds in summer and vary according to the season; sometimes twenty minutes is not too much.
Development.—My usual and favorite developer is pyro-ammonia, and in careful hands it cannot be beaten. I commence development with a minimum of pyro and work tentatively.
Using such a solution, for 2 ounces of developer I should commence with 1-1/2 grains pyro, 1 grain bromide, and 2 grains ammonia. If the image does not gain sufficient density add more pyro and bromide, but unless very fully exposed it is difficult to avoid too much density, especially if white flowers are being photographed.
I find a plain gray or dark background most useful, and to avoid flatness it may be set at an angle and not too near the subject.
Flowers should be photographed as soon as gathered, and if possible be placed in water. I have often found a plate spoiled by movement of the leaves or flowers, even with short exposures, although the movement was not perceptible to the eye. This is more especially the case in hot weather.

Take a portrait negative that is no longer of any use, and immerse it in a weak solution of hydrofluoric acid. The film will leave the glass. It is then washed and returned to the glass support. By stretching the film one way or the other, and allowing it to dry in this position, the most amusing prints can be made. Keep your fingers out of the acid!
A curious experiment showing that a photographic dry-plate can be otherwise affected than by light, so as to form an image upon it, is the following:
An image of copper in relief is necessary—a penny will do for this purpose. Place an unexposed dry-plate in a normal pyro developer, and on it lay the copper coin. After about five minutes or so, remove the penny, fix and wash the plate, when a perfect image of the penny will be found on it.
Similar experiments to that described above have been carried out by Prof. Fernando Sanford. He placed a coin on a dry-plate and connected it with the terminal of a small induction coil, capable of giving a spark of three or four millimeters, while a piece of tin foil upon the opposite side of the plate was connected with the other terminal of the coil.
Several negatives were made in this way, the accompanying photograph, Fig. 58, being from one of them. With one exception, they all show a fringe around them, due to the escape of the charge from the edge of the coin, which accounts for the formation of the dark ring observed around the breath figures made upon glass.
Later on he undertook to photograph in the same way objects insulated from the photographic plate, and has since68 made negatives of coins separated from the plate by paraffine, shellac, mica, and gutta percha. The accompanying photograph, Fig. 59, was made with the coin insulated from the photographic plate by a sheet of mica about 0.04 mm. thick. The mica was laid directly upon the film side of the plate, and the coin was placed upon it and connected to one terminal of the small induction coil already mentioned. A circular piece of tin foil of the circumference of the coin was placed upon the glass side of the plate directly opposite the coin, and was connected to the other terminal of the induction coil. The little condenser thus made was clamped between two boards, and was covered up in a dark room. Two small discharging knobs were also attached to the terminals of the induction coil, and were separated by a space of less than a millimeter, so that, when a single cell was connected with the primary coil, the spark between the knobs seemed continuous.
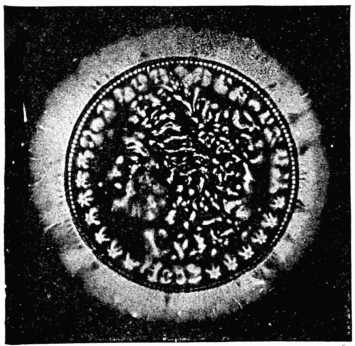
FIG. 58.
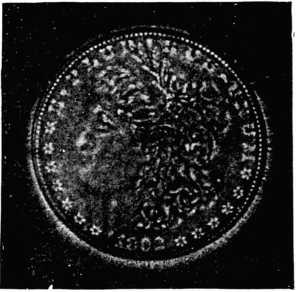
FIG. 59.
The plate was exposed to the action of the waves set up in this condenser for one hour, when it was taken out and the negative image developed upon it by the usual process.
These are reversed vignettes, that is to say, the margins round the portrait instead of being white as in the ordinary vignette are black. A method of making them was recently described by "Teinte" in The Photogram. This was as follows:
Two methods can be adopted. The first of these about to be detailed, though entailing, perhaps, in the first place a trifle more trouble, produces the best results. We require a black background, preferably of black velveteen, large enough for a head and shoulders. As the material is not usually obtainable of a width greater than twenty inches or so, there will have to be a seam, and this must be very neatly done. The seamed velveteen is then stretched taut on a frame, which should preferably be covered first with calico, to prevent "sagging." Always, before use, dust the velveteen with a soft brush—say, a hat brush—to remove any adhering dust or fluff. Instead of velveteen, a good paper background can be used, only it must be seen that the surface is smooth and free from cracks or creases, and is dead black.
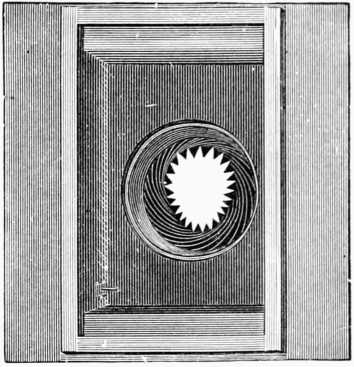
FIG. 60.—MAGIC VIGNETTER.
We require also a vignetting mask suitable to the subject, with a serrated edge. This has to be fixed inside the camera between the lens and plate.[4] The proper position can be found by trial; the further the card is away from the plate the softer and more gradual the vignetting. No special arrangement for holding this is required beyond what can be prepared by any one who can use his fingers. We take a piece of stout card, 70the outside of which will just fit into the folds of the camera's bellows, and by a little twisting it can be sprung in between the folds which will hold it. There is an opening in the center, square in shape, about quarter plate size. This acts as a frame to hold the vignetting mask, which has the opening of proper size and shape. By using a frame as described the vignetter can be moved about up and down and from side to side, and when the correct position is found fixed by drawing pins. The frame and vignetter should be blacked all over. For this purpose take some lampblack ground in turps, and mix with it a little gold size sufficient (found by trial) to prevent the lampblack from rubbing off when dry, but not enough to cause the paint to dry shiny.
[4] A vignetter for the purpose, as shown in Fig. 60, has been placed on the market.
A good distance to fix the vignetter is about one-third the extension of the camera when the object is in focus, measuring from the lens.
We adjust the camera so that the image of the figure falls in the correct position on the screen, and the vignette is made of such a size and shape as to give the amount required.
The shadow of the mask protects the edges of the plate surrounding the image, and in development we obtain a negative in which the image is vignetted into clear glass, and on printing from such the margins print dark. The printing of such a negative should be prolonged until the margins of the picture are quite lost, or they are apt to show after toning.
The sketch shows the arrangement of vignetter inside camera.
The other plan consists in making an ordinary negative, using preferably a dark background. From this is made a vignette in the ordinary manner. When this comes from the frame it is placed on a piece of clean glass—face up—and another piece of glass free from flaws placed over it. Now cut a piece of card to the size and shape of the vignetted portion of the print, and fix this with glue to a piece of cork. This piece of cork must vary in thickness with various pictures. Now place the cork on the glass so that the mask covers the picture and fix with glue to prevent slipping. Place the71 whole out in diffused light, and allow the darkening of the margins to go on until sufficiently deep. The print is then toned.
The height of the card from the print must be such that no abrupt line is produced between the first printing and the darkened margin, but that one will shade into the other without break.
If we have an ordinary gelatine negative, say, of half-plate size, and require to enlarge it to a whole plate, the simplest plan is to thoroughly wash it and immerse in a solution composed of citric acid, 2 ounces; hydrofluoric acid, 1 ounce; acetic acid (glacial), 1 ounce; glycerine, 1/2 ounce; water, 20 ounces. The action of the hydrofluoric acid will be to detach the film from the glass, while the other acids will cause the film to spread out considerably; the action being even all over, the image is completely enlarged. It is then carefully removed and washed in plenty of clean water, after which it can be transferred to a larger piece of glass. The action is sometimes to weaken the negative in density; it is therefore occasionally necessary to intensify it.
Curious as it sounds, very good moonlight effects can be procured on a
bright sunshiny day. A photograph is made of a landscape in dazzling
sunlight, a small stop and rapid exposure being given. The plate
should, if possible, be backed with any of the substances recommended
to prevent halation. Choose a landscape, with the reflection of the
sun's rays in water, and include this and the sun itself on the plate.
It is best to wait, however, until the sun just disappears behind a
cloud. Shade the lens so that the rays do not shine on it direct, and
expose rapidly. Use an old or weak devel72
73oper. The sun and its
reflection will, of course, make their appearance first. Continue the
development until the detail in the under-exposed parts is just
visible, and fix. Print very darkly, and slightly over tone. If
printing is done upon green developing paper, and a little re-touching
with Chinese white, the effect is very good.

Photographed from Nature by Fred. Graf.
FIG. 61.—MOONLIGHT PHOTOGRAPH.
There are few photographers who appear to be aware of the many beautiful phenomena of nature that can be studied by the aid of photography. Under the title of "Schnee Crystalle," Dr. G. Hellmann has published[5] a book on this subject profusely illustrated with engravings and photo-micrographic collotypes from direct photographs by Dr. R. Neuhaus.
[5] Rudolph Muckenberger, Berlin.
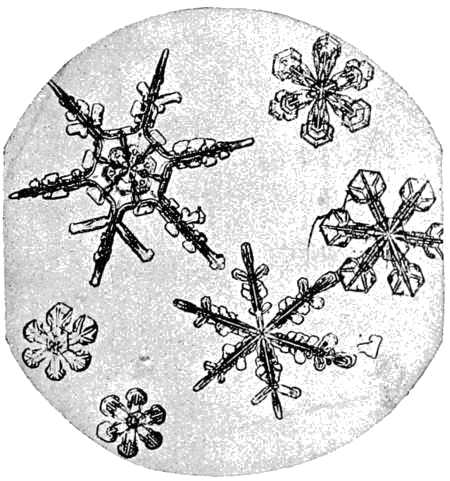
FIG. 62.—SNOW CRYSTALS. PHOTO BY DR. NEUHAUS.
Dr. Neuhaus describes his method of photographing snowflakes in Dr. Eder's Jarbuch, from which article we extract the most important and interesting paragraphs: Were we to attempt to photograph snow crystals in a perfectly cold room, the temperature is still higher than that out of doors; moisture at once precipitates upon the carrier of the object; the crystals would melt and evaporate after a short time. The work must be done in the open, and perfect success can be expected only when the temperature is near zero.
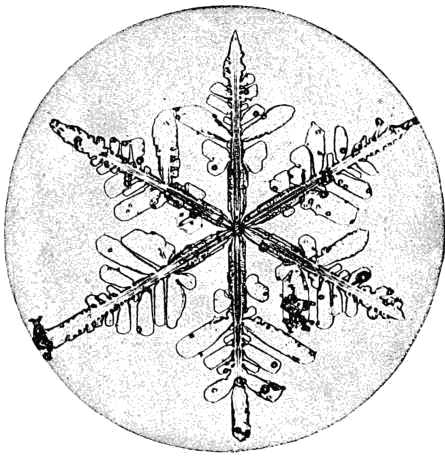
FIG. 63.—SNOW CRYSTALS. PHOTO BY DR. NEUHAUS.
Snow crystals evaporate rapidly even in low temperature, and the work requires to be done rapidly and with caution. Freshly fallen snow only will give a good photograph, and as we are compelled to work in the midst of the snow storm, the task becomes still more complicated and difficult. Snow crystals but a short time after falling break, the broken pieces freeze together and crystallization is destroyed. For the illumination of snow crystals, transmitted light only can be used; reflected light destroys the shadows, and injures the high75 lights, and the result is necessarily but a very imperfect picture of the object.
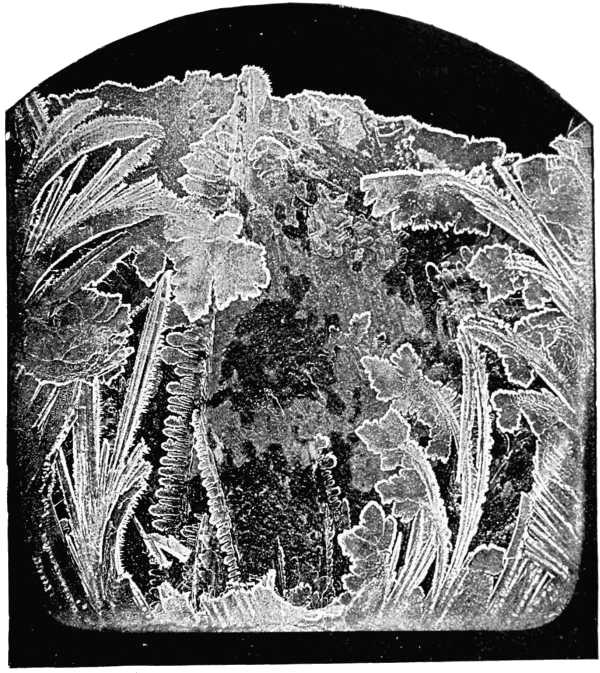
Photo by Martin.
FIG. 64.—A NATURAL PHENOMENON IN ICE.
Diffused light, especially that of a dark winter's day, and during a snow storm, is not fit for this kind of photo-micrographic work, and we must resort to artificial light, preferably to that of a petroleum lamp. To prevent heat action emanating from the illuminating ray cone, an absorptive cell of alum76 solution should be interposed. As alum solution freezes at about 20° Fahr., chloride of sodium is added. With Hartnark's projection system, at 31 mm. focus distance, from 5 to 7 seconds upon an erythrosine plate is ample.
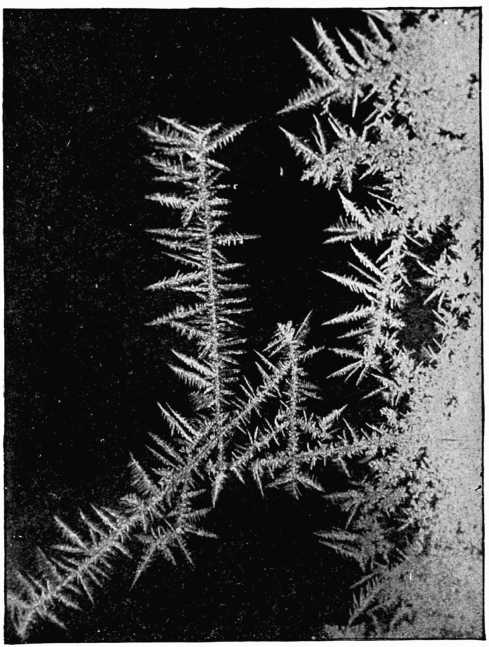
FIG. 65.—PHOTOGRAPH OF FROST CRYSTALS.
BY JAS. LEADBEATER.
Dr. Neuhaus has made photographs of more than 60 different ice and snow specimens. The pictures of ice crystals much resemble those of hoar frost, deposited after a cold winter's night. Of snow crystals, the doublets are highly interesting, two crystals merged into one, and those having passed through77 a moist stratum of air, when microscopic drops of water will freeze into the hexagonal form, giving the picture an appearance very much resembling cauliflower.
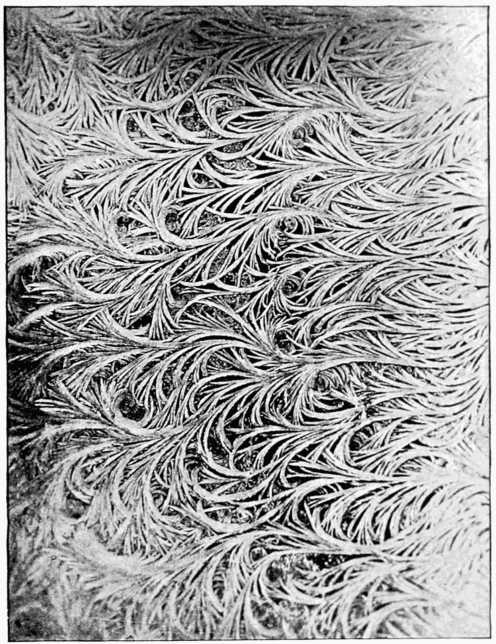
FIG. 66.—PHOTOGRAPH OF FROST.
BY JAS. LEADBEATER.
The most difficult question of all remains, the cause of the various forms of the hexagonal crystals, which frequently change in the same snowfall. Instead of advancing a new hypothesis, says Hellmann, it is better to acknowledge that we know nothing positively in regard to this. In our knowledge of the form and structure of the snow we have made great advance since the time of Kepler, but after nearly78 four hundred years, we cannot give a satisfactory answer to his question, "Cur autem sexangula? Why six-sided?"
We do not know the special conditions which determine the formation of one or the other form of snow crystals. We have found that a low temperature favors the formation of tabular crystals; a higher temperature the star shaped crystals; these groups show such multifarious forms that it is necessary to seek for other causes which influence the formation of snow figures. There is offered here a broad field for new investigation and study.
We give a reproduction (Fig. 64) of a photograph of a curious group of crystals. Some water had been left in a 10×8 dish on a winter day, and a film of ice was seen floating on the surface. The formation of the crystals and the floral design were so beautiful that it was taken out and photographed. The delicate lace-like edging of the glacial tracery is the result of the deposition of hoar frost while draining off the water from the ice leaves and flowers and fixing the image in the camera.
Quite recently Mr. Jas. Leadbeater has favored us with some account of his beautiful work in this fascinating branch of photography, some samples of which are here given. He first makes his windows perfectly clear and waits for a keen frost. The camera is inside the room and a dark cloth-covered board is placed on the outside, leaning against a low balcony of wood. The exposure varies with the thickness of the crystals, from two to ten seconds, principally with a very small stop. Two reproductions of his pictures will be found on pp. 76-77.
The study of crystallization is undoubtedly an interesting and fascinating one, and photography may be made to play an important part in securing permanent records of these curious formations. If a drop of water containing a salt be allowed to drop upon a glass plate, it will, upon evaporation, deposite crystals of various kinds. In a recent article in La Nature, by Dr. E. Trouessart, a description is given of the79 beautiful crystallic forms deposited by a drop of ink on evaporation. The article is translated in the Literary Digest, from which we make extracts:
"Take a sheet of glass, deposit on it a drop of ink and spread the drop a little, uniformly; let it dry for a few minutes; then examine with a microscope, magnifying from 50 to 200 diameters, and you will be able to see the flowers of ink in process of formation under your eyes; that is to say, regular white crystal particles which detach themselves from the black or violet medium, and arrange themselves so as to form regular figures.
"If you are pressed for time, this beautiful result will easily be obtained by passing the sheet of glass over a spirit lamp or a candle to evaporate the moisture. The crystals will then be smaller and more numerous, presenting the appearance of a dark firmament densely sprinkled with bright silvery stars. But if you have patience to wait for evaporation without heat, you will obtain larger crystals of more varied forms, arranging themselves as crosses, flowers, etc.
"These crystals may be varied indefinitely by modifying the compositions of evaporation, adding more ink, etc. But it is quite possible that different inks will give different results. The inks I use, like all the other inks in use, have a basis of sulphate of iron and gallic acid.

From "The Literary Digest."
FIG. 67.—INK-CRYSTALS, AS SEEN THROUGH A MICROSCOPE.
"By allowing the evaporation to proceed slowly, it is quite easy to watch the formation of the crystals. The geometrical figures are more or less perfect cubes, pyramids, lozenges, crosses, needles, etc., the pyramids being formed by cubes superposed one on the other, as in the pyramids of Egypt. The flowers in our illustration are formed by the union of crystals, each of which represents the petals or sepals of a flower. The Maltese cross—the crucifer or four-leafed flower—is the normal regular form, but multiples of four frequently occur, by the formation of new crystals in the intervals; and also by the accidents of crystallization, we get flowers of three and five petals, resembling Rubiaceae, lilies, orchids, violets, etc."
Although a lens is the most important part of the photographer's apparatus, it is not absolutely necessary for the production of photographs. Very good pictures can be made by means of a pinhole. Remove the lens from the camera, and insert in its place a sheet of thin, hard cardboard. In the centre make a tiny hole with a fine-pointed needle made red-hot. Another method is to make a large hole in the cardboard, and paste over it a piece of tinfoil and make the pinhole in this. The essential point is that the hole be perfectly round without any burring at the edges. The most perfect arrangement can be obtained by getting a watchmaker to drill a fine hole through a piece of sheet metal. The diameter of the hole should not be greater than one-fiftieth of an inch. Whatever is used, cardboard or metal, it should be blackened all over to prevent the reflection of light in the camera. The focusing glass should be brought within about 6 inches of the hole. Owing to the small amount of light admitted, focusing is very difficult. It can be done by pointing the camera towards the sun and focusing its image. For the same reason the exposure is very long, ranging from ten minutes to half an hour; it is, in fact, difficult to overexpose.
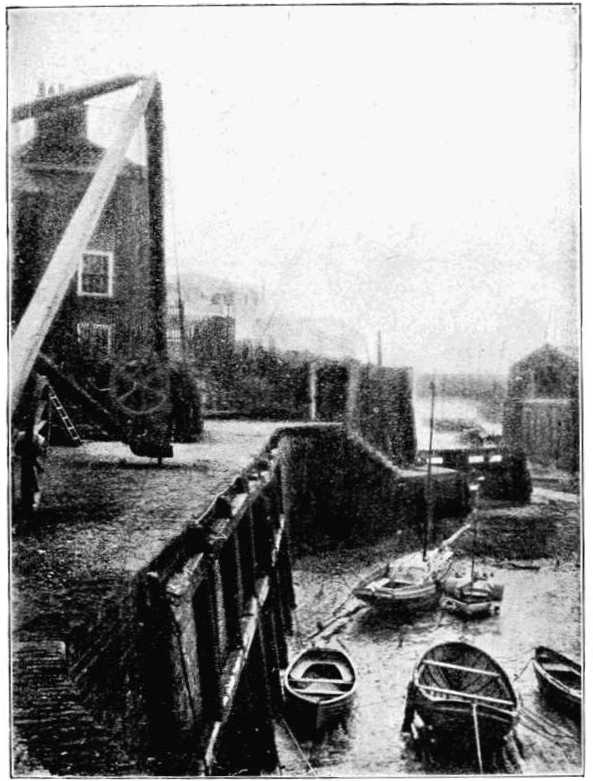
Negative by F. C. Lambert. From Anthony's International Annual, 1894.
FIG. 68.—PINHOLE PHOTOGRAPHY.
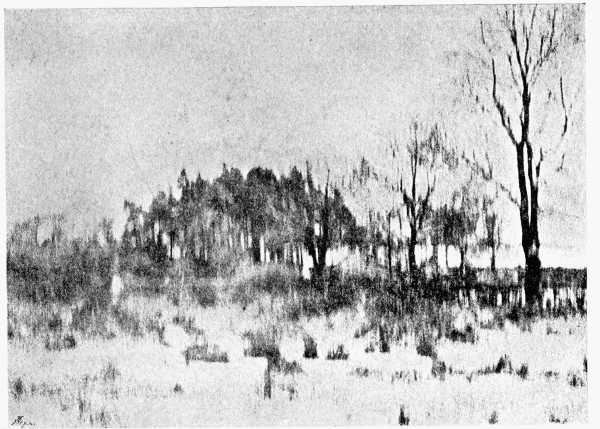
(Photograph made through a slit without a lens.)
By Roland Briant. FIG. 69.—THE WHITE ROBE OF NATURE.
It is usually stated that no focusing is required, the larger the plate the wider the angle, but according to Prof. Pickering, 12 inches is the maximum distance for sharp work.
Peculiar diffused effects can be obtained by using a fine slit in place of the pinhole. The picture shown on page 82 is an example.
We have already described the various remarkable photographic pictures which may be taken by successive exposures with the same individual in different positions against a perfectly black and non-actinic background. This, however, is not easily obtained, and a French photographer, M. Bracq, has invented an ingenious attachment to a camera by which the same effects may be obtained with any background and under the ordinary conditions of amateur photography. The following description is from La Nature translated in the Popular Science News.
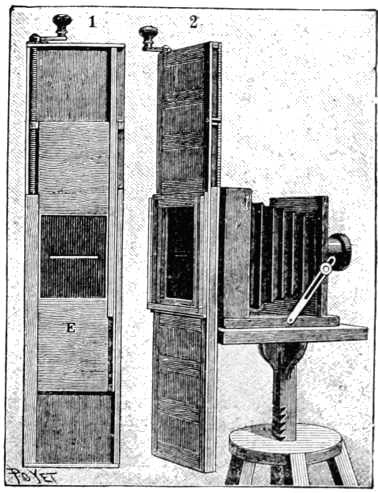
FIG. 70.
The apparatus, Fig. 70, is attached to the back of the camera, and consists of a frame suitable for holding the usual ground glass, or plate holder. Directly in front of the plate holder is placed an opaque screen perforated with a horizontal slit the width of the photographic plate used. By means of a screw84 and a crank the screen with its opening may be made to move up and down before the plate, thus allowing all parts of it to be successively exposed. A pointer connected with the screen shows the position of the slit at any time when it is covered by the plate holder.
The operation of the apparatus is evident from the above description. To take the picture illustrated in Fig. 71, for instance, the table with the boy upon it is placed in the proper position and supported by planks, another table, or in any convenient way. After properly focusing it on the ground glass, the screen is screwed down till the opening is at the bottom of the camera, and the plate holder being placed in position, the slide is drawn and the handle turned till the indicator shows that the opening has reached a point corresponding to the image of the bottom of the table on the plate. The slide is then replaced in the plate holder, the table and its support removed, and the boy placed in the second position, and the exposure continued by screwing up the screen until the entire plate has been impressed with the double image, which, upon development, appears as shown in the illustration.
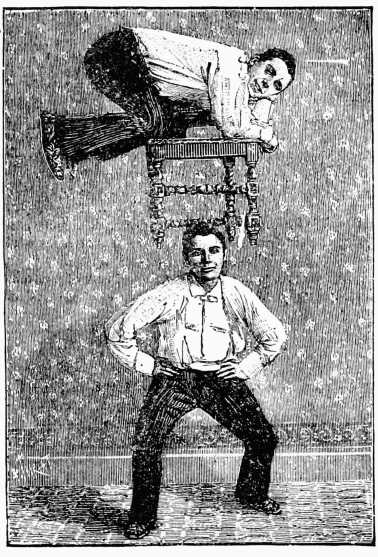
FIG. 71.
The perforated screen may also be made to move horizontally as well as vertically across the plate, and by a combination85 of the two directions the same individual may be taken four or more times in different positions in the same photograph. Many amusing and astonishing effects may be obtained by the simple means which will readily suggest themselves to any practical photographer.
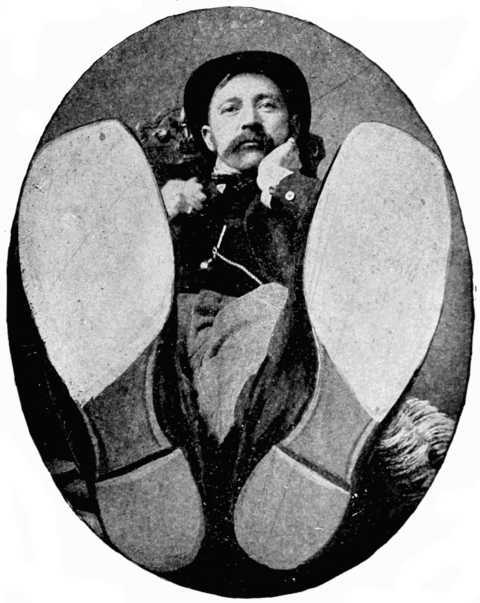
Copyright, 1894, by W. J. Demorest.
FIG. 72.—A PHOTOGRAPHIC FEAT.
By the use, or rather the abuse, of a lens having a very wide angle, say, 100 degrees, some very amusing effects can be obtained by apparent exaggeration of perspective. We say apparent advisedly, for if a view made with one of these86 lenses, say of 5 inches focus, be viewed by the observer at a distance of 5 inches from the eye, the perspective will appear correct; but, of course, this is never done under ordinary circumstances. Every person, unless extremely short-sighted, will hold a photograph at a distance from the eye of about 12 or 14 inches.

FIG. 73.—A WIDE-ANGLE STUDY.
The effect of using a wide-angle lens under ordinary conditions is to make objects in the foreground appear ridiculously large, while those in the background have a diminished appearance. Fig. 72 is an example of this; it is hardly necessary to observe that the gentleman's pedal extremities were not so gigantic as represented in the photograph. Fig. 73 is another and scarcely less painful example of this exaggeration.
In the Practical Photographer, some time ago, it was humorously suggested that sportsmen could, by means of the camera, bring home apparently indisputable evidence as to their skill or prowess. Thus, for instance, you and your friend Jones have been out fishing together, and realized the truth of the old saying about anglers—i.e., "a worm at one end of a rod and a fool at the other." You have, however, managed to catch a fish (any sort will do) about the dimensions of a good-sized sprat. It is the usual custom of anglers, I believe, to view their captures through magnifying-glasses before discoursing upon them. A better plan, however, is to photograph your fish, and then there can be no dispute whatever, because it is the popular belief that photography cannot lie. However, all that is necessary is to hang the fish in front of the camera to the bough of a tree, we will say, with a piece of black thread. You then retire several paces behind it, holding up your arm as if you were holding up the fish. Your friend will then adjust the camera so that the fish just comes under your hand, focuses, places a very small stop on, so as to get everything sharply defined, and makes the necessary exposure. Thus it is possible, with a little trouble, to obtain everlasting records of your marvelous day's sport, for you can easily make yourself appear to be holding a fish of gigantic proportions—say, 5 ft. long, or so. Fig. 74, 75.
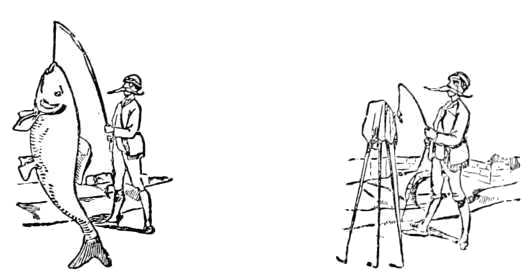
FIG. 74. and FIG. 75.
Our illustrations are from "Photographic Pastimes" by Herman Schauss.
With a very wide-angle lens it is also possible to make a photograph of a little suburban garden, and it will appear to resemble a park or palace grounds. This is a trick often adopted by auctioneers and estate agents, so that in viewing photographs of property, it is really impossible to form any safe idea regarding the place itself.
Amusing caricatures may be obtained by deforming the sensitive surface of the negative. The accompanying conical portrait is one.[6]
[6] From "Les Recreations Photographiques."
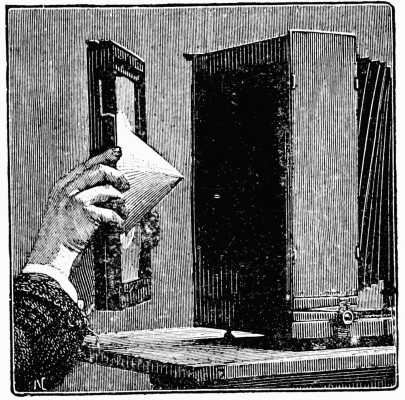
FIG. 76.
To depict the features of a person on a paper cone is not an easy matter; whilst to obtain them by photography is a tolerably simple operation.
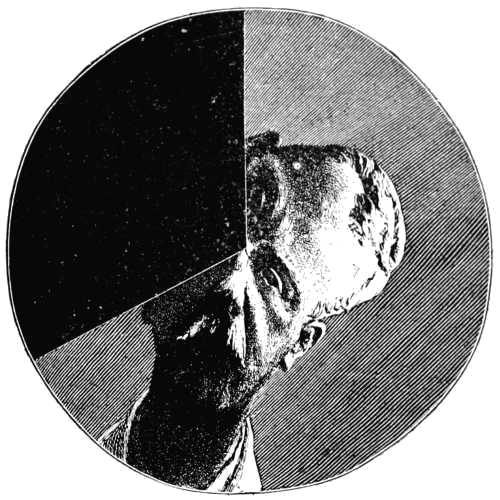
FIG. 77.

FIG. 78.
Having glued on the interior face of a plate-holder (the slide being drawn), in the place of a sensitive plate, a cone made of strong cardboard, superpose on it an unexposed film which has been cut to the form of the development of the cone (as shown in Fig. 77). The film is secured by means of two or three pins. Having focused on a point of the subject in a middle plane, the ground glass is afterwards drawn back a distance equal to half the height of the cone, taking care not to derange either the subject or the objective. To obtain a sharp image a very small diaphragm must necessarily be used, but with a rapid plate and good light that is of little moment. The camera should be placed in the dark room, the lens being inserted in a hole in the partition just its size, and the subject in the adjoining apartment opposite the lens—this because the cone will not allow the plate-holder to be closed by the slide.
Fig. 76 shows the arrangement of the camera and holder. The exposure made, the film is developed, as usual. The negative gives a print deformed as shown in Fig. 76. The original, if not grotesque appearance of the head disappears when the print is rolled into a conical form and the observer places his eye in the prolongation of the axis of the cone. Fig. 78 shows the head as seen under these conditions.
Prepare a saturated solution in water of the crystals of thiosinamine, and add from two to eight minims of it to an ordinary pyro or eikonogen developer. Expose rather less than usual. The effect of this addition to the developing agent is an entire reversal of the image, a positive instead of a negative being obtained. Ammonia will assist the reversal. Colonel Waterhouse, the discoverer of this process, recommends in some cases the plates being subjected to a bath of 5 per cent nitric acid and 3 per cent potassium bichromate before exposure, followed by a thorough washing.
In the very earliest days of photography this term was applied to what would now be considered very slow work indeed. We now usually apply this term when the exposure does not exceed one second. In some cases this only amounts to the one-thousandth part of a second. This exceedingly brief exposure is usually given to the plate by means of a suitably constructed shutter.
The immense strides that have recently been made in instantaneous photography, owing chiefly to the advent of the dry-plate process, have caused photography to become useful to almost every branch of science.
To Muybridge and Anschutz we are greatly indebted for the strides made in instantaneous photography. These gentlemen have succeeded in photographing moving objects hitherto considered impossible to be photographed. Galloping horses, swift-flying birds, and even bullets and cannon balls projected from guns have been successfully photographed, showing even the little head of air driven along in front of the bullet.
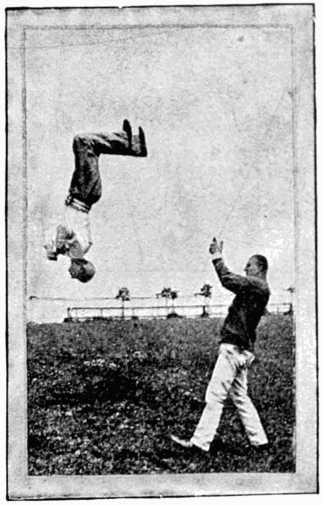
FIG. 79.
Both Muybridge and Anschutz also succeeded in making series of twenty-four or more photographs of a horse during the time it makes a single leap, and thus illustrated its every movement. The value of these and other possibilities with the camera for artists cannot be overestimated. Its aid92 to meteorologists in photographing the lightning, to astronomers in stellar, lunar and solar photography, and to all other sciences would require a work as large as this to describe.

By Lt. Joachim Steiner.
FIG. 80.—INSTANTANEOUS STUDIES.
For the making of instantaneous pictures a large number of suitable cameras have been devised. In most of these the lens is a very rapid one, and in some cases so arranged that all objects beyond a certain distance are in focus. With an instantaneous camera a secondary image is necessary, so that the right second can be judged for making the exposure. This is usually produced by a finder. In making instantaneous exposures the following tables may be useful:
Approximate distance
| A man walking 3 miles per hour moves | 4-1/2 | Feet per second |
| A man walking 4 miles per hour moves | 6 | Feet per second |
| A vessel traveling at 9 knots per hour moves | 15 | Feet per second |
| A vessel traveling at 12 knots per hour moves | 19 | Feet per second |
| A vessel traveling at 17 knots per hour moves | 28 | Feet per second |
| A torpedo boat traveling at 20 knots per hour moves | 35 | Feet per second |
| A trotting horse | 36 | Feet per second |
| A galloping horse (1,000 yards per minute) | 50 | Feet per second |
| An express train traveling at 38 miles an hour | 59 | Feet per second |
| Flight of a pigeon or falcon 94 | 61 | Feet per second |
| Waves during a storm | 65 | Feet per second |
| Express train (60 miles an hour) | 88 | Feet per second |
| Flight of the swiftest birds | 294 | Feet per second |
| A cannon ball | 1,625 | Feet per second |
| An object moving— | ||
| 1 mile per hour | 1-1/2 | Feet per second |
| 2 miles per hour | 3 | Feet per second |
| 5 miles per hour | 7-1/2 | Feet per second |
| 6 miles per hour | 9 | Feet per second |
| 7 miles per hour | 10-1/2 | Feet per second |
| 8 miles per hour | 12 | Feet per second |
| 9 miles per hour | 13 | Feet per second |
| 10 miles per hour | 14-1/2 | Feet per second |
| 11 miles per hour | 15 | Feet per second |
| 12 miles per hour | 17-1/2 | Feet per second |
| 15 miles per hour | 22 | Feet per second |
| 20 miles per hour | 29 | Feet per second |
| 25 miles per hour | 37 | Feet per second |
| 30 miles per hour | 44 | Feet per second |
| 35 miles per hour | 51 | Feet per second |
| 40 miles per hour | 59 | Feet per second |
| 45 miles per hour | 66 | Feet per second |
| 50 miles per hour | 73 | Feet per second |
| 55 miles per hour | 80 | Feet per second |
| 60 miles per hour | 88 | Feet per second |
| 75 miles per hour | 110 | Feet per second |
| 100 miles per hour | 147 | Feet per second |
| 125 miles per hour | 183 | Feet per second |
| 150 miles per hour | 220 | Feet per second |
| 200 miles per hour | 257 | Feet per second |
With these tables it will be very easy to find the distance that the image of the object will move on the ground-glass screen of the camera. To do this, multiply the focus of the lens in inches by the distance moved by the object in the second, and divide the result by the distance of the object in inches.
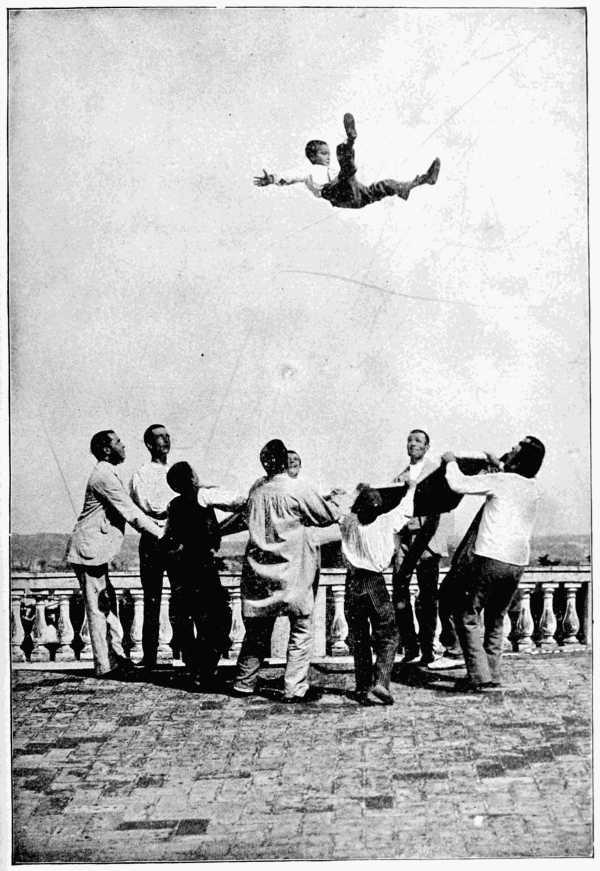
FIG. 81.—"A RISE IN THE WORLD."
BY THE MARQUIS DE ALFARRAS.
Example, find the movement of the image of an object95 moving 50 miles per hour at a distance of 100 yards with a lens of 9-inch focus.
9 × 876 = 7,884 ÷ 3,600 = 2-1/5 inches per second.
We must also find out the speed of the shutter required to take the object in motion, so that it will appear as sharply defined as possible under the circumstances. To do this the circle of confusion must not exceed 1/100th of an inch in diameter. We therefore divide the distance of the object by the focus of the lens multiplied by 100, and then divide the rapidity of the object in inches per second by the result obtained. This will give the longest exposure permissible in the fraction of a second. For example, we require to know the speed of a shutter required to photograph an express train travelling at the rate of 50 miles per hour at a distance of 50 yards with an 8-1/2-inch focus lens.
The train moves 876 inches per second.
1,800 distance in inches ÷ (8-1/2 × 100) = 1,800 ÷ 850 = 36/17.
876 speed of object per second ÷ 36/17
= (876 × 17)/36 = 413
= 1/413 second.
Given the rapidity of the shutter, and the speed of the moving object, we require to find the distance from the object the camera should be placed to give a circle of confusion less than 1/100th of an inch. Multiply 100 times the focus of the lens by the space through which the object would pass during the exposure, and the result obtained will be the nearest possible distance between the object and the camera. For example, we have a shutter working at one-fiftieth of a second, and the object to be photographed moves at the rate of 50 miles per hour. How near can a camera fitted with a lens of 8-1/2-inch focus be placed to the moving object?
Object moving 50 miles per hour moves per second 876 inches, and in the one-fiftieth part of a second it moves 17.52 inches, so that—
8-1/2 × 17.52 = 8.5 × 100 × 17.52 = 14,892 inches = 413 yards.
Instantaneous photography can only be successfully performed in very bright and actinic light, and should never be96 attempted on dull days, as underexposure will be the inevitable result. In developing it is necessary to employ a strong developer to bring up the detail. Some operators make use of an accelerator for this purpose, but it is not to be recommended; the simplest is a few drops of hyposulphite solution added to about 10 ounces of water. In this the plate is bathed for a few seconds previous to development.
The following is a table by H. E. Tolman showing displacement on ground glass of objects in motion:
| Miles per Hour. | Feet per Second. |
Distance on Ground Glass in Inches with Object 30 Feet Away. |
Same with Object 60 Feet Away. |
Same with Object 120 Feet Away. |
| 1 | 1-1/2 | .29 | .15 | .073 |
| 2 | 3 | .59 | .29 | .147 |
| 3 | 4-1/2 | .88 | .44 | .220 |
| 4 | 6 | 1.17 | .59 | .293 |
| 5 | 7-1/2 | 1.47 | .73 | .367 |
| 6 | 9 | 1.76 | .88 | .440 |
| 7 | 10-1/2 | 2.05 | 1.03 | .513 |
| 8 | 12 | 2.35 | 1.17 | .587 |
| 9 | 13 | 2.64 | 1.32 | .660 |
| 10 | 14-1/2 | 2.93 | 1.47 | .733 |
| 11 | 16 | 3.23 | 1.61 | .807 |
| 12 | 17-1/2 | 3.52 | 1.76 | .880 |
| 13 | 19 | 3.81 | 1.91 | .953 |
| 14 | 20-1/2 | 4.11 | 2.05 | 1.027 |
| 15 | 22 | 4.40 | 2.20 | 1.100 |
| 20 | 29 | 5.87 | 2.93 | 1.467 |
| 25 | 37 | 7.33 | 3.67 | 1.833 |
| 30 | 44 | 8.80 | 4.40 | 2.200 |
| 35 | 51 | 10.27 | 5.13 | 2.567 |
| 40 | 59 | 11.73 | 5.97 | 2.933 |
| 45 | 66 | 13.20 | 6.60 | 3.300 |
| 50 | 73 | 14.67 | 7.33 | 3.667 |
| 55 | 80 | 16.13 | 8.06 | 4.033 |
| 60 | 88 | 17.60 | 8.80 | 4.400 |
| 75 | 110 | 22.00 | 11.00 | 5.500 |
| 100 | 117 | 29.33 | 14.67 | 7.333 |
| 125 | 183 | 36.67 | 18.33 | 9.167 |
| 150 | 220 | 44.00 | 22.00 | 11.000 |
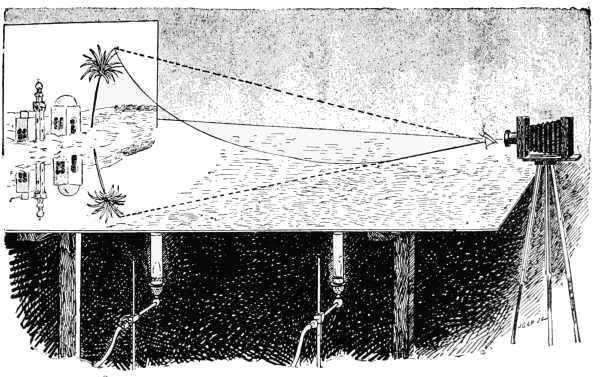
FIG. 82.—ARTIFICIAL REPRODUCTION AND PHOTOGRAPHING OF A MIRAGE
Some time ago a photographer made quite a sensation by the publication of a fine photograph of a mirage, a phenomenon frequently observed on the plains of Egypt. The wily photographer had, however, never traveled away from this country. He had simply produced the effect by artificial means. A method of making these pictures was given some time ago in the Scientific American. A very even plate of sheet iron is taken and placed horizontally on two supports. The plate is heated uniformly and sprinkled with sand. Then a small Egyptian landscape is arranged at one end of the plate, and the photographic instrument is so placed that the visual ray shall properly graze the plate. A sketch of the arrangement is shown in Fig. 82.
This instrument was devised by M. Paul Nadar, the celebrated French photographer, but anyone can construct a similar apparatus. The arrangement is shown in Fig. 83.
The slides A and B B are adjustable so that any sized picture can be inserted and the sides closed round it to shut out the light from behind. A silver print unmounted is made transparent with vaseline and placed on the glass. Pieces of paper of various colors are placed in the reflector, C, and by this means all kinds of effects can be obtained. A landscape can be viewed as though under the pale reflected light of the rising sun behind the mountains, which may be changed gradually to the full light of day.
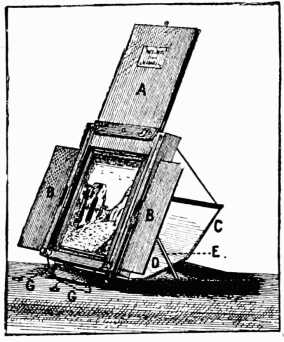
FIG. 83.—NADAR'S PHOTO-CHROMOSCOPE.
This is a process of combining a number of images in such a way that the result obtained is an aggregate of its components. Francis Galton was one of the first to employ this system. In the appendix to his "Inquiries into Human Faculty," Galton has described the very elaborate and perfect form of apparatus which he has used in his studies; but entirely satisfactory results may be obtained with much more simple contrivances. The instrument used by Prof. Bowditch[7] is merely an old-fashioned box camera, with a hole cut in the top for the reception of the ground-glass plate upon which the image is to be reflected for purposes of adjustment. The reflection is effected by a mirror set at an angle of 45 degrees in the axis of the camera, and pivoted on its upper border so that, after the adjustment of the image, the mirror can be turned against the upper side of the box, and the image allowed to fall on the sensitive plate at the back of the camera. The original negatives are used as components, and are placed in succession in a small wooden frame which is pressed by elliptical springs against a sheet of glass fastened vertically in front of the camera. By means of this arrangement it is possible to place each negative in succession in any desired position in a plane perpendicular to the axis of the camera, and thus to adjust it so that the eyes and the mouth of its optical image shall fall upon the fiducial lines drawn upon the ground-glass plate at the top of the camera. An Argand gas burner with a condensing lens furnishes the necessary illumination.
[7] From McClure's Magazine, September, 1894.
"For our amateur photographers," writes Prof. Bowditch, "who are
constantly seeking new worlds to conquer, the opportunity of doing
useful work in developing the possibilities of composite photography
ought to be very welcome. Not only will the science of ethnology
profit by their labors, but by making composites of persons nearly
related to each other, a new and very interesting kind of family
portrait may be produced. The effect of occupation on the physiognomy
may 100
101also be studied in this way. By comparing, for instance, the
composite of a group of doctors with that of a group of lawyers, we
may hope to ascertain whether there is such a thing as a distinct
legal or medical physiognomy."
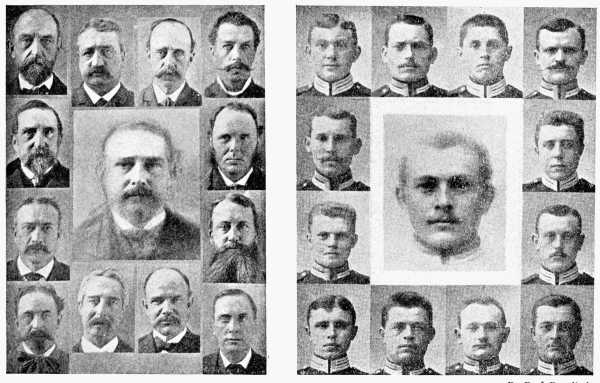
By Prof. Bowditch.
FIG. 84.—COMPOSITE PORTRAITS OF BOSTON PHYSICIANS AND SAXON SOLDIERS.

FIG. 85.—CAMERA WITH OPERA GLASS ATTACHED.
During the last few years many so-called telephotographic lenses have been placed upon the market. These instruments enable one to photograph objects in the distance and obtain images very much larger than those given by the ordinary photographic lens. These lenses are, however, very costly. In an article by Mr. O. G. Mason, published in The Photographic Times for June, 1895, that gentleman described a simple method of obtaining telephoto pictures by replacing the ordinary lens with an opera glass. He says: "Several devices have been brought forward with a view of decreasing the expense of telephoto lenses, but I have seen no others so satisfactory, cheap and simple, as the utilization of the ordinary opera glass for the camera objective, which was described, figured and finally constructed for me about a year ago by Mr.102 Alvin Lawrence, the horologist of Lowell, Mass. An opera or field glass is a convenient and useful instrument in the kit of any touring photographer; and when he can easily and quickly attach it to his camera-box as an objective its great value is at once made apparent. Mr. Lawrence's method of doing this at little cost is a good illustration of Yankee ingenuity. It is not claimed that such a device will do all or as well as a telephotographic lens costing ten times as much; but it will do far more than most people could or would expect. Of course the field is quite limited, which, in fact, is the case with the most expensive telephotographic objective, and the sharpness of the image depends much upon the quality of the opera or field glass used. The accompanying views show the relative size and character of image by a forty-five dollar rapid recti103linear view lens and a four-dollar opera glass attached to the same camera and used at the same point. The other illustrations show the camera as used and the method of opera glass attachment to the lens-board. It will be seen that the eye end of the opera glass is placed against the lens-board, one eye-piece in a slight depression around the hole through the centre, and by a quarter turn the brace between the two barrels passes behind a projecting arm on the board, the focusing104 barrel resting in a slot in this arm, where it is firmly held in position by friction alone.

FIG. 86.—CAMERA SHOWING ARRANGEMENT FOR OPERA GLASS.
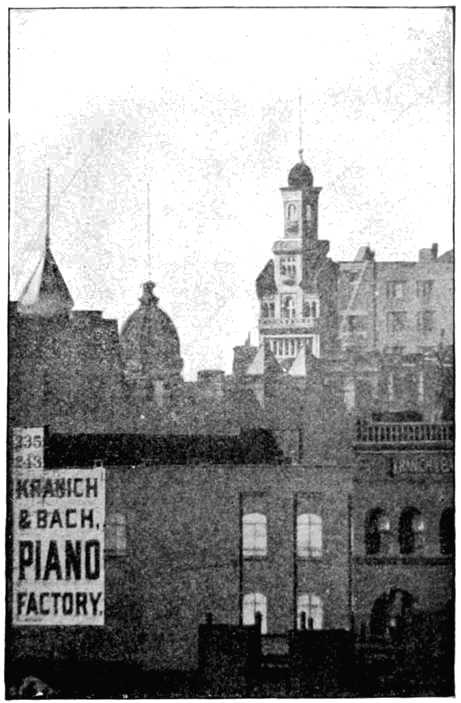
FIG. 87.—VIEW TAKEN WITH OPERA GLASS.
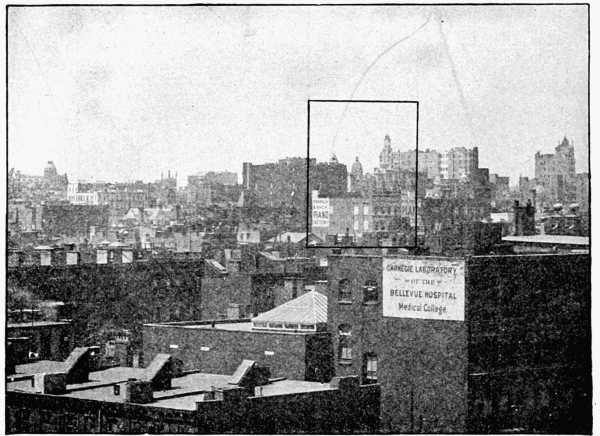
FIG. 88.—VIEW TAKEN FROM SAME SPOT WITH AN ORDINARY VIEW LENS.
As opera glasses are usually constructed for vision only, no attempt is made by the optician to make correction for securing coincidence of foci of the visual and chemical rays of light as in the well-made photographic objective. Hence, it is often found that the actinic focus falls within, or is shorter than, the visual. When this is the case, the proper allowance is easily made after a few trials.
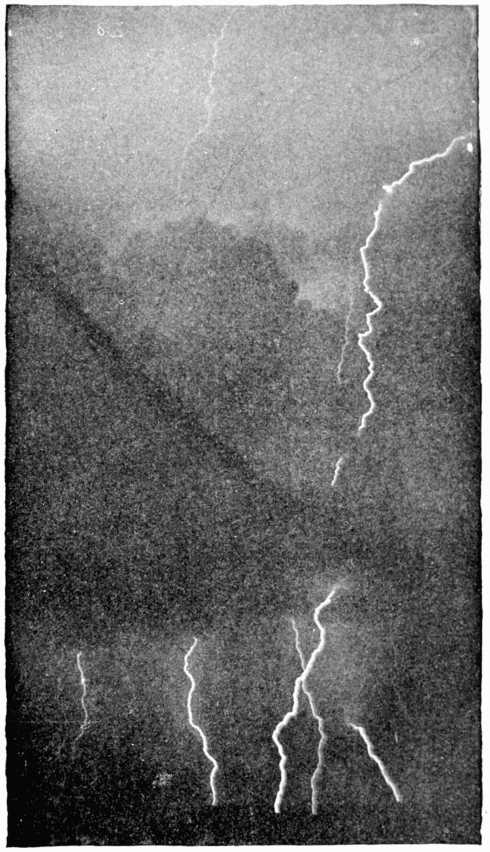
FIG. 89.—PHOTOGRAPH OF LIGHTNING MADE AT BLUE HILL.
The method of making photographs of lightning flashes is very simple. The camera is focused for distant objects.106 During a thunderstorm the camera is pointed in the direction of the flashes, a plate is inserted, the cap is removed from the lens, and as soon as a flash takes place the lens is covered up and the plate is ready for development. To avoid halation a backed or non-halation plate should be used.
Photographs of pyrotechnical displays can also be made at night. The method of procedure is the same as described for photographs of lightning. The camera is focused for distant objects and the lens pointed towards the place where the discharge takes place. Fig. 90.

FIG. 91.—A DOUBLE. BY H. G. READING.
Some very amusing pictures can be made by double exposure. For instance, Fig. 91 represents a man playing cards with himself. A method of making these is thus described by W. J. Hickmott in "The American Annual of Photography for 1894":
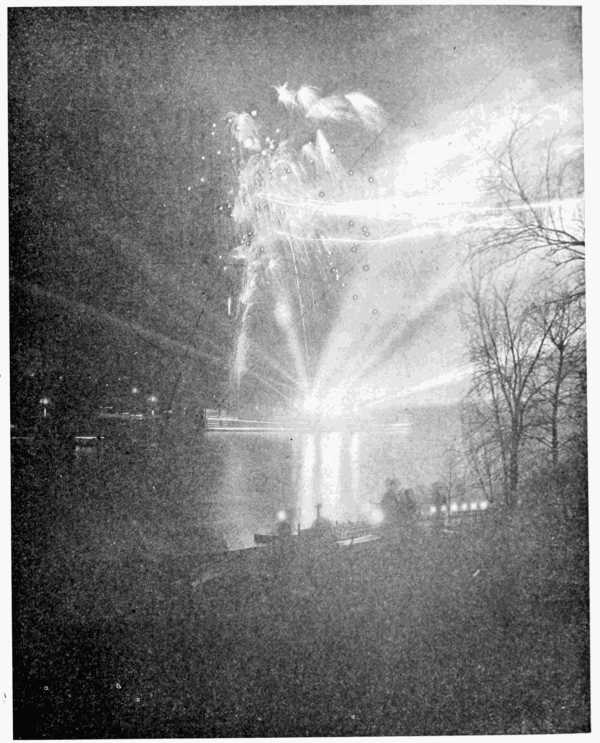
By Leonard M. Davis.
FIG. 90.—FAREWELL RECEPTION TO THE PRINCE OF WALES.
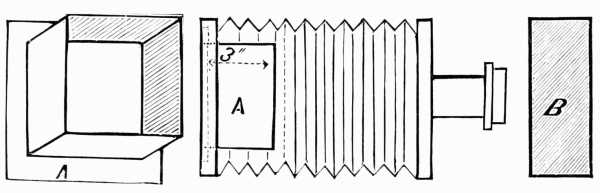
FIG. 91, FIG 92, and FIG 93.
Fit an open square box into the back of the camera, having it fully as large as, or a little larger than, the negatives you wish to make. My attachment is made for 8 × 10 plates and under, and fits into the back of a 10 × 12 camera. In shape it is like Fig. 91, and I will designate it as A. The box is about 3 inches deep. When put into the camera it appears as in Fig. 92. Now have a plain strip of wood just one-half the size of the opening in A like B, Fig. 93. Have B fit very nicely in A, at the opening toward the lens, and so that it can be moved freely from one side to the other. It is very convenient to have a rabbet on the top and bottom of A so that B can be moved from side to side and maintained in any position.

FIG. 94.
To make a "Double," attach A to the camera as shown, put B into its place in the opening in A, say on the right-hand side as you stand back of your camera, thus covering up the right-hand side of the plate when exposure is made. Pose your subject on the left hand side, which will give you an image on the right-hand side of your ground glass and plate, draw the slide and expose, immediately returning the slide. This finishes one half of the operation. Shift B over to the left-hand side of A, which will cover up that portion of the plate just exposed, pose your subject again,109 but on the left-hand side, which will give you the image on the right-hand side of the ground glass and plate, draw the slide and expose out for the exact length of time as at first. On development, if the exposure on both sides has been correct, and of equal length, a perfect negative will be the result.
The camera must on no account be moved between the exposures, nor the focus changed. After making the first exposure the correct focus for the second is obtained by moving the subject backward or forward until an exact focus is secured, and not by moving the camera or ground glass. The whole apparatus should be painted a dead black.
When the attachment is in place it will be noted on the ground glass that while the strip B is just one-half the size of the opening in A, it does not cut off just one-half of the ground glass, a line drawn through the center of which shows that a space in the center of the plate about one-half an inch in width receives a double exposure, but this is not apparent in the finished negative. The figure should be posed as near the center of the plate as possible in each instance. This apparatus, as described, is only available for making two figures. By making B narrower, or one-third of the width of the opening in A, three figures may be made, using each time a separate piece to cover up that portion of the plate exposed, and by changing the form of B to that shown in Fig. 95, four positions can be secured.
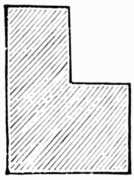
FIG. 95.
Val Starnes describes[8] another and still simpler method. He says: Take a light card, mount and carefully cut from it a disc that will fit snugly inside the rim of the hood of your lens, resting against the circular interior shoulder (Fig. 96). Cut from this, in a straight, true line, a small segment (Fig. 97). The exact amount to cut off you can determine by slowly thrusting with one hand a card with a straight edge across the lens hood, looking the while at the ground glass; when the shadow has crept almost to the center of the 110focusing screen, hold the card firmly in place and notice how much of the circle of the hood is covered by it: cut from your disc a segment corresponding to the amount left uncovered. Don't let the shadow creep quite to the center of the ground glass, for you might go the least bit beyond, and an unexposed strip would result. Now paint your disc a dull black; loosen the hood of your lens on its threads, so that it will revolve easily and freely, and you are ready for business.
[8] "American Annual for 1895."

FIG. 96. and FIG 97.
Get your focus and then place disc in hood of lens, straight edge perpendicular (Fig. 98). Cover lens with cap or shutter; insert plate-holder and draw slide; pose your figure directly in front of uncovered portion of lens; expose. Next, without touching disc, slide, or anything but the hood, gently revolve the hood on its threads one-half turn (Fig. 99), and pose your figure on opposite side; expose. The trick's accomplished.
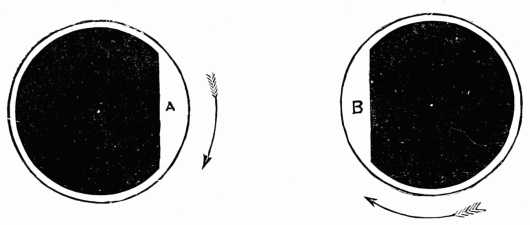
FIG. 98. and FIG 99.
Another arrangement devised by Mr. Frank A. Gilmore, of Auburn, R. I., is shown in Fig. 100.
A black-lined box is fitted to the front of a camera. The front of the box is closed by two doors. On opening one door a picture may be taken on one side of the plate; on closing this door and opening the other, the other half of the plate is ready for exposure.
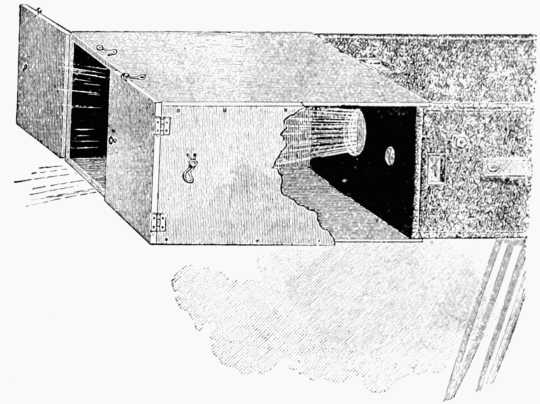
FIG. 100.—CAMERA FITTED WITH ARRANGEMENT FOR DUPLEX PHOTOGRAPHY.
The subject poses in one position and is photographed with one door open, care being taken to bring the figure within the proper area of the negative. The finder enables this detail to be attended to. Then the door is closed, the other is opened and the second exposure for the other half of the plate is made with the subject in the other position. It is not necessary to touch the plate-holder between the exposures. The cover is withdrawn, the one door is opened and the shutter is sprung. The doors are then changed and the shutter is sprung a second time. Time exposures are rather risky, as involving danger of shaking. A picture made by Mr. Gilmore will be found on the next page.

By F. A. Gilmore. From Scientific American.
FIG. 101.—SPARRING WITH HIMSELF

By C. A. Bates.
FIG. 102.—RESULTS OF A DOUBLE EXPOSURE.
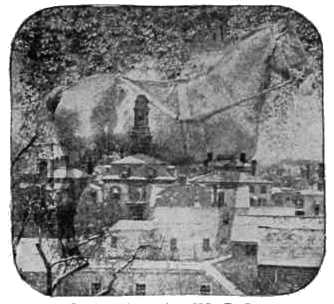
Copyright, 1894, by W. J. Demorest.
FIG. 103.—RESULT OF A DOUBLE EXPOSURE.
Amateurs often obtain unexpected results from carelessness in exposing their plates. Some very amusing pictures can, however, be obtained by making two different exposures114 on one plate. The subject should, of course, be of a very different nature. Our illustrations, Figs. 102-3, are examples. In making these it is necessary to give a very short exposure in each case, about one-half the amount that would be ordinarily required. The negative must be carefully developed, using plenty of restrainer. Similar effects can, of course, be obtained by printing from two different negatives, but the results are, as a rule, inferior.
If the photographer be skilled in drawing he can make some laughable pictures that will amuse his friends by drawing a sketch of a comical body without a head, as shown in Fig. 104; a photograph of anyone is then cut out and the head pasted on.
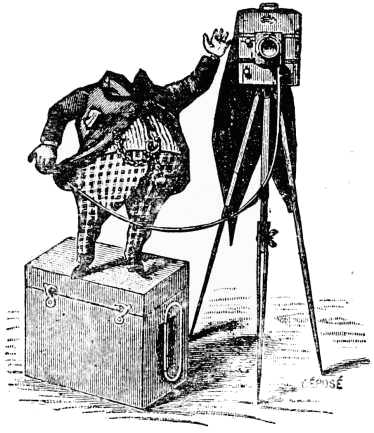
FIG. 104.

FIG. 105.—THE TWO-HEADED MAN. BY IVAN SOKOLOFF.
This picture shows a variation of the theme illustrated in Fig. 94, and is a type of doublet usually avoided by amateurs, who prefer to have one figure complete and shown in two positions. The monster is an amusing variation and will be new to most people. The subject sits in the same spot for both exposures, except that he bends his head and shoulders first to one side and then to the other. It is advisable to keep the background very simple, otherwise objects on the wall may show through the head, as in some of the spirit photography methods given on previous pages.
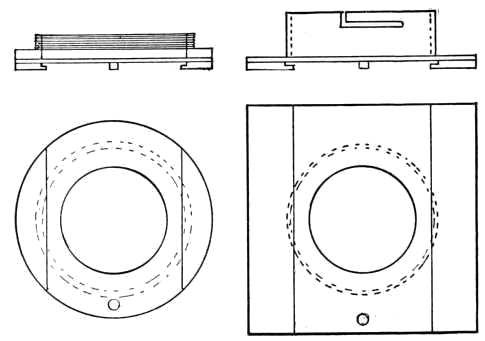
FIG. 106.—MOUNTINGS FOR TRIPLICATORS.
While doubles are well known to many amateurs, the making of three exposures of one subject on a single plate is not so common. Mr. Chas. A. Barnard has furnished particulars of his method of making the pictures shown in Figs. 107 and 108. Fig. 106 shows two methods of mounting the attachment in front of the camera lens, one being designed to slip over, while the other screws into the lens barrel, the front of which is often fitted117 with a screw thread. Fig. 109 shows the stops which slide in this mounting; in making them, first mark on each the position of the center of the lens by measuring up from the stud which holds118 the stop in place. Draw your circles for stops with this as a centre, and as large as diameter of lens. Leaf A is used for the sides of the triplicator, reversing between the exposures. With an inch circle, the width of this is 0.2 inch. The edges should be filed down as thin as possible without nicking. Leaf B is for the centre exposure of the triplicator, and the slot is 0.012 inch wide and 1 inch long. Leaf C is the duplicator stop, its width being 0.3 inch. Leaves D1 and D2 are for top and bottom exposures of a vertical double, and are the same size as C. The proportions might have to be slightly varied for some other lens, in all these cases. A triplicate exposure is made as follows. First focus, using the whole lens, at any stop, and determine the limits of your picture spaces. As the leeway is small, do not get the figures too large. Pose the model in the centre, stop down till properly lighted, and note the stop and mark edges of view on119 ground glass. Focus on model at one side, stop down till edge blends into edge of previous view, and note stop. Do the same in third position. This may take some time, and a chair may be used instead of a model. Finally, put in the plate and make the three exposures, giving four times the exposures ordinarily required for the same stops. The order is immaterial. Stops recommended for a 3-1/4 × 5-1/2 camera are as follows: For a horizontal doublet, leaf C, U. S. 16; for a vertical doublet, leaf D1, U. S. 54, leaf D2, U. S. 40; for a horizontal triplet, leaf A, U. S. 16, leaf B, U. S. 90; for a vertical triplet (leaves not shown in drawing), leaf A for top, U. S. 32; for bottom, U. S. 20, leaf B, U. S. 90. Vertical pictures are extremely difficult to figure.

FIG. 107.—TRIPLICATE EXPOSURE. BY CHARLES A. BARNARD.

FIG. 108.—FARM WORK (TRIPLICATE EXPOSURE). BY CHARLES A. BARNARD.
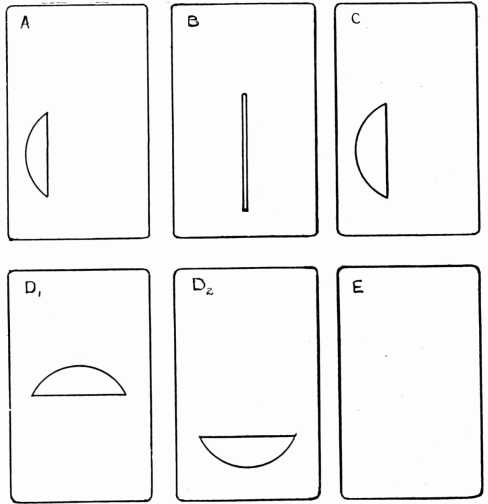
FIG. 109.—STOPS FOR DUPLICATORS AND TRIPLICATOR.
To make a photograph with this peculiarity, it is necessary to make two exposures of a head in exactly the same position, one with the eyes closed and the other with them open. Two positives are made from the two negatives and bound in contact by means of lantern slide binders, so that the outlines coincide. If they are now held in front of a flickering lamp or match flame, the combined portrait will be seen to rapidly open and close its eyes, giving a very weird effect. This effect depends upon the fact that the human eye receives impressions slowly and has a tendency to judge that a motion is uniform, when rapidly varying phases of it are seen. The flickering flame, moving sideways, shows first one and then the other of the two images, which are separated by the thickness of the glass. The same effect can be produced by sliding the pictures slightly sideways on each other, but the perfection of the illusion will depend somewhat on the regularity of the movement, and the flame method is better. If the two pictures are printed on one piece of paper, the combined image may show the same illusion.
We have all of us seen and many of us have made collections of those attractive little bits of paper so frequently stuck on the front cover of a book to designate its ownership. Invented almost contemporaneously with the first printed books, they have been designed and engraved by artists of the highest standing and used by the world's greatest men and women. Who would not be proud to own a book containing a bookplate made by Albrecht Durer or Paul Revere, or one whose bookplate proved it had belonged to George Washington or Theodore Roosevelt, irrespective of the great money value of such items?
The bookplate is an intensely personal possession. The first were heraldic, identifying the possessors by their coats of arms. Modern bookplates usually reflect some personal taste of the owner, his hobby, his house, his portrait, or the type of books he collects. Nothing could be more fitting than one made from a photograph taken by its possessor, and yet in the writer's collection of many thousand bookplates covering several centuries and many countries, there are less than a dozen photographic examples.
They are easily made. The most usual method is to choose a suitable photograph, a view of the home or library interior, a loved landscape or view, a symbolical figure with a book, a genre which may be a pun on the owner's name, or a picture relating to his chief hobby, and draw a more or less ornamental frame containing the words "Ex Libris" or "His Book," together with the name, about it. There are other wordings, but the above are the commonest. The whole is then photographed down to the proper size, usually three or four inches high, and prints made either by photography or from a halftone block.
The nude female figure is a frequent motive in bookplates, whether photographic, or etched or engraved. The example we show is the work of two artists, one of whom made the photograph while the other designed the framework.
By A. E. Goetting and Will Ransom.
FIG. 110.—A PHOTOGRAPHIC BOOKPLATE.
Did you ever try building landscapes on the dining-room table? If not, learn how easy it is and try it out some evening or rainy Sunday, when you don't feel like tramping across country with muddy roads and flat lightings.
The easiest kind of pictures to make in this way is an imitation of snow scenes. Any white material may be used, as snow, i.e., fine salt, powdered sugar, flour, or whatever the kitchen closet or the chemical shelf may produce. A range of mountains may easily be made by merely heaping up the material and then modeling ravines and broken slopes with a sharp pencil. A brilliant side lighting should be used to give the effect of sunrise or sunset, and clouds may be printed in from a cloud negative or obtained by means of a roughly painted background.
Perhaps mountains are more naturally represented by the use of a few sharp-angled pieces of coal from the cellar, or fragments of broken stone from the nearest quarry or monument maker. On these, after arranging, the white powder may be sifted, lodging in a close imitation of nature. If a highly polished table is used, reflections may be obtained as in a lake, or a sheet of glass with a dark cloth under it may be used for the same purpose.
More complicated landscapes may be made by using twigs as leafless trees, fence posts, etc., and children's toy houses may be introduced, particularly if well screened by brush and half buried in snow. Only the merest hint of the possibilities can be given, for they are endless.
The introduction of figures, in the shape of dolls, china and metal animals, carts, autos, railroad trains, etc., greatly widens the scope of such landscape work, but of recent years these figures have been more frequently used for tableaux, such as the one shown opposite. Extremely comical pictures have been made with kewpies, billikens and other queer creatures and their animal friends, and with grotesque figures made of vegetables, fruit and eggs.
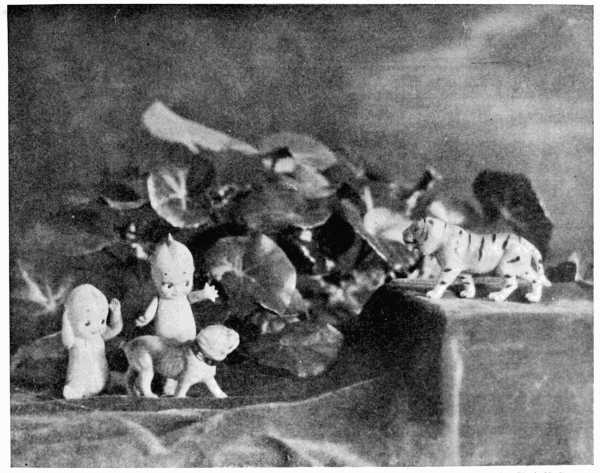
By Clark H. Rutter. FIG. 111.—FRIEND OR FOE.
The night photographer has to be more or less immune to criticism, and willing to endure all kinds of conversational interruptions, from friendly questions to unmannerly jeers and imputations of insanity. The general public knows from personal experience with hand cameras provided with slow lenses and small stops that picture taking can be done only by sunlight and in the middle of the day, and does not understand the setting up of a camera in a poorly-lighted place at night for the taking of a picture. Nevertheless, this branch of photography is very interesting and results are possible even in villages and the open fields, wherever the least artificial illumination or glimpse of moonlight is present.
Naturally, much light means shorter exposures than are possible with very sparing illumination, but too many light sources do not tend to artistic results. One of the finest night pictures we ever saw was that of an old farmhouse, nearly buried in snow, with one or two windows showing the light of a kerosene lamp. The snow was illuminated by the light of the full moon, and only two or three minutes' exposure was given.
As a matter of fact, 15 to 30 minutes' exposure on any landscape at f: 8 by the light of the full moon high in the sky will give a picture hardly to be distinguished from one made in daylight except by the softness of the shadows, and such pictures sometimes have a softness and wealth of detail in ordinarily shadowed parts which cannot be obtained by exposures in daylight.
The best night pictures are perhaps those taken in city streets brilliantly illuminated by arc lights, especially when the pavements are wet. Care must be taken not to have brilliant lights shining directly into the lens, for even double-coated plates will not prevent halation and reversal of the image under such circumstances. Ghosts, or wheel-shaped images of the lights, in other parts of the plate, are sure to occur with all double lenses in such cases. The night picture shown opposite shows how interesting a simple subject, poorly illuminated, may turn125 126out in the print. This shows typical star radiation about the single visible light, caused by the blades of the iris diaphragm, and also a slight ghost from this light on the face of the tower, caused by a double reflection within the lens.

By F. A. Northrup.
FIG. 112.—A GLIMPSE OF THE EXPOSITION.
Other forms of night photographs, treated elsewhere in this book, are photographs of fireworks and lightning. Very interesting and scientifically valuable pictures of the latter phenomenon have been made by swinging the camera during the exposure, thus getting a dozen or more paths of the same flash parallel to each other.
To make a photograph in green on the red skin of an apple is a wonderful but simple feat. Tie up the selected fruit on a sunny bough in a thick yellow or black paper bag for about three weeks before harvest time. Immediately after taking off the bag, paste a black paper stencil or a very contrasty negative to the apple with white of egg. It should be small, to fit the curved surface quite closely. Clear away leaves, so the sun gets clear access to the fruit, and leave on the tree till it becomes red. If not then ripe, put it back into the opaque bag for a day or two till ready to pick. The negative may then be soaked off. Don't use a valuable negative, but make a duplicate for this experiment. A paper stencil is better, anyway.
To put a photograph on an egg, take one which is perfectly clean, sponge it over several times with 1 to 50 solution of table salt, dry, then sponge over with 1 to 12 solution of silver nitrate. Keep your fingers out of this, or they will turn fast black. Then take a black paper stencil or a small contrasty film negative, cut a hole in a piece of black flannel somewhat smaller than the negative, and tie around the egg to hold the negative. Then bring into light, print out, wash and tone and fix like any printing-out paper. And don't eat the egg, for chemicals will go through the shell.
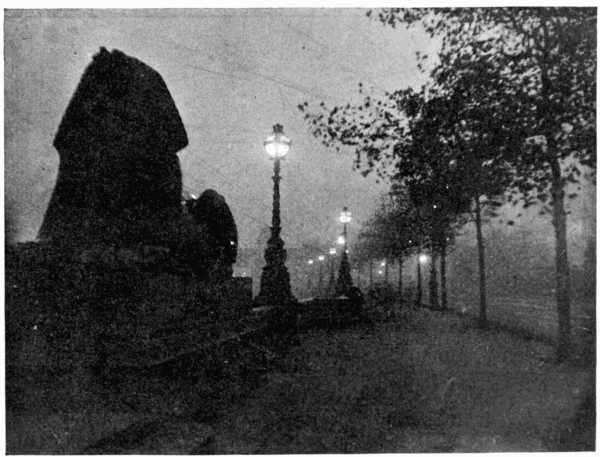
By A. H. Blake. FIG. 113.—THE EMBANKMENT, LONDON.

Transcriber's note:
1. Figure 83.—COMPOSITE PORTRAITS OF BOSTON PHYSICIANS AND SAXON SOLDIERS was corrected to Figure 84.
2. Figure 91.—A DOUBLE. BY H. G. READING. is out of sequence. Another Figure 91 comes later in the text.
3. Mismatched quotation marks are as they were in the original book.
***END OF THE PROJECT GUTENBERG EBOOK PHOTOGRAPHIC AMUSEMENTS, NINTH EDITION***
******* This file should be named 39691-h.txt or 39691-h.zip *******
This and all associated files of various formats will be found in:
http://www.gutenberg.org/3/9/6/9/39691
Updated editions will replace the previous one--the old editions will be renamed.
Creating the works from public domain print editions means that no one owns a United States copyright in these works, so the Foundation (and you!) can copy and distribute it in the United States without permission and without paying copyright royalties. Special rules, set forth in the General Terms of Use part of this license, apply to copying and distributing Project Gutenberg-tm electronic works to protect the PROJECT GUTENBERG-tm concept and trademark. Project Gutenberg is a registered trademark, and may not be used if you charge for the eBooks, unless you receive specific permission. If you do not charge anything for copies of this eBook, complying with the rules is very easy. You may use this eBook for nearly any purpose such as creation of derivative works, reports, performances and research. They may be modified and printed and given away--you may do practically ANYTHING with public domain eBooks. Redistribution is subject to the trademark license, especially commercial redistribution.
To protect the Project Gutenberg-tm mission of promoting the free distribution of electronic works, by using or distributing this work (or any other work associated in any way with the phrase "Project Gutenberg"), you agree to comply with all the terms of the Full Project Gutenberg-tm License available with this file or online at www.gutenberg.org/license.
1.A. By reading or using any part of this Project Gutenberg-tm electronic work, you indicate that you have read, understand, agree to and accept all the terms of this license and intellectual property (trademark/copyright) agreement. If you do not agree to abide by all the terms of this agreement, you must cease using and return or destroy all copies of Project Gutenberg-tm electronic works in your possession. If you paid a fee for obtaining a copy of or access to a Project Gutenberg-tm electronic work and you do not agree to be bound by the terms of this agreement, you may obtain a refund from the person or entity to whom you paid the fee as set forth in paragraph 1.E.8.
1.B. "Project Gutenberg" is a registered trademark. It may only be used on or associated in any way with an electronic work by people who agree to be bound by the terms of this agreement. There are a few things that you can do with most Project Gutenberg-tm electronic works even without complying with the full terms of this agreement. See paragraph 1.C below. There are a lot of things you can do with Project Gutenberg-tm electronic works if you follow the terms of this agreement and help preserve free future access to Project Gutenberg-tm electronic works. See paragraph 1.E below.
1.C. The Project Gutenberg Literary Archive Foundation ("the Foundation" or PGLAF), owns a compilation copyright in the collection of Project Gutenberg-tm electronic works. Nearly all the individual works in the collection are in the public domain in the United States. If an individual work is in the public domain in the United States and you are located in the United States, we do not claim a right to prevent you from copying, distributing, performing, displaying or creating derivative works based on the work as long as all references to Project Gutenberg are removed. Of course, we hope that you will support the Project Gutenberg-tm mission of promoting free access to electronic works by freely sharing Project Gutenberg-tm works in compliance with the terms of this agreement for keeping the Project Gutenberg-tm name associated with the work. You can easily comply with the terms of this agreement by keeping this work in the same format with its attached full Project Gutenberg-tm License when you share it without charge with others.
1.D. The copyright laws of the place where you are located also govern what you can do with this work. Copyright laws in most countries are in a constant state of change. If you are outside the United States, check the laws of your country in addition to the terms of this agreement before downloading, copying, displaying, performing, distributing or creating derivative works based on this work or any other Project Gutenberg-tm work. The Foundation makes no representations concerning the copyright status of any work in any country outside the United States.
1.E. Unless you have removed all references to Project Gutenberg:
1.E.1. The following sentence, with active links to, or other immediate access to, the full Project Gutenberg-tm License must appear prominently whenever any copy of a Project Gutenberg-tm work (any work on which the phrase "Project Gutenberg" appears, or with which the phrase "Project Gutenberg" is associated) is accessed, displayed, performed, viewed, copied or distributed:
This eBook is for the use of anyone anywhere at no cost and with almost no restrictions whatsoever. You may copy it, give it away or re-use it under the terms of the Project Gutenberg License included with this eBook or online at www.gutenberg.org
1.E.2. If an individual Project Gutenberg-tm electronic work is derived from the public domain (does not contain a notice indicating that it is posted with permission of the copyright holder), the work can be copied and distributed to anyone in the United States without paying any fees or charges. If you are redistributing or providing access to a work with the phrase "Project Gutenberg" associated with or appearing on the work, you must comply either with the requirements of paragraphs 1.E.1 through 1.E.7 or obtain permission for the use of the work and the Project Gutenberg-tm trademark as set forth in paragraphs 1.E.8 or 1.E.9.
1.E.3. If an individual Project Gutenberg-tm electronic work is posted with the permission of the copyright holder, your use and distribution must comply with both paragraphs 1.E.1 through 1.E.7 and any additional terms imposed by the copyright holder. Additional terms will be linked to the Project Gutenberg-tm License for all works posted with the permission of the copyright holder found at the beginning of this work.
1.E.4. Do not unlink or detach or remove the full Project Gutenberg-tm License terms from this work, or any files containing a part of this work or any other work associated with Project Gutenberg-tm.
1.E.5. Do not copy, display, perform, distribute or redistribute this electronic work, or any part of this electronic work, without prominently displaying the sentence set forth in paragraph 1.E.1 with active links or immediate access to the full terms of the Project Gutenberg-tm License.
1.E.6. You may convert to and distribute this work in any binary, compressed, marked up, nonproprietary or proprietary form, including any word processing or hypertext form. However, if you provide access to or distribute copies of a Project Gutenberg-tm work in a format other than "Plain Vanilla ASCII" or other format used in the official version posted on the official Project Gutenberg-tm web site (www.gutenberg.org), you must, at no additional cost, fee or expense to the user, provide a copy, a means of exporting a copy, or a means of obtaining a copy upon request, of the work in its original "Plain Vanilla ASCII" or other form. Any alternate format must include the full Project Gutenberg-tm License as specified in paragraph 1.E.1.
1.E.7. Do not charge a fee for access to, viewing, displaying, performing, copying or distributing any Project Gutenberg-tm works unless you comply with paragraph 1.E.8 or 1.E.9.
1.E.8. You may charge a reasonable fee for copies of or providing access to or distributing Project Gutenberg-tm electronic works provided that
1.E.9. If you wish to charge a fee or distribute a Project Gutenberg-tm electronic work or group of works on different terms than are set forth in this agreement, you must obtain permission in writing from both the Project Gutenberg Literary Archive Foundation and Michael Hart, the owner of the Project Gutenberg-tm trademark. Contact the Foundation as set forth in Section 3 below.
1.F.
1.F.1. Project Gutenberg volunteers and employees expend considerable effort to identify, do copyright research on, transcribe and proofread public domain works in creating the Project Gutenberg-tm collection. Despite these efforts, Project Gutenberg-tm electronic works, and the medium on which they may be stored, may contain "Defects," such as, but not limited to, incomplete, inaccurate or corrupt data, transcription errors, a copyright or other intellectual property infringement, a defective or damaged disk or other medium, a computer virus, or computer codes that damage or cannot be read by your equipment.
1.F.2. LIMITED WARRANTY, DISCLAIMER OF DAMAGES - Except for the "Right of Replacement or Refund" described in paragraph 1.F.3, the Project Gutenberg Literary Archive Foundation, the owner of the Project Gutenberg-tm trademark, and any other party distributing a Project Gutenberg-tm electronic work under this agreement, disclaim all liability to you for damages, costs and expenses, including legal fees. YOU AGREE THAT YOU HAVE NO REMEDIES FOR NEGLIGENCE, STRICT LIABILITY, BREACH OF WARRANTY OR BREACH OF CONTRACT EXCEPT THOSE PROVIDED IN PARAGRAPH 1.F.3. YOU AGREE THAT THE FOUNDATION, THE TRADEMARK OWNER, AND ANY DISTRIBUTOR UNDER THIS AGREEMENT WILL NOT BE LIABLE TO YOU FOR ACTUAL, DIRECT, INDIRECT, CONSEQUENTIAL, PUNITIVE OR INCIDENTAL DAMAGES EVEN IF YOU GIVE NOTICE OF THE POSSIBILITY OF SUCH DAMAGE.
1.F.3. LIMITED RIGHT OF REPLACEMENT OR REFUND - If you discover a defect in this electronic work within 90 days of receiving it, you can receive a refund of the money (if any) you paid for it by sending a written explanation to the person you received the work from. If you received the work on a physical medium, you must return the medium with your written explanation. The person or entity that provided you with the defective work may elect to provide a replacement copy in lieu of a refund. If you received the work electronically, the person or entity providing it to you may choose to give you a second opportunity to receive the work electronically in lieu of a refund. If the second copy is also defective, you may demand a refund in writing without further opportunities to fix the problem.
1.F.4. Except for the limited right of replacement or refund set forth in paragraph 1.F.3, this work is provided to you 'AS-IS', WITH NO OTHER WARRANTIES OF ANY KIND, EXPRESS OR IMPLIED, INCLUDING BUT NOT LIMITED TO WARRANTIES OF MERCHANTABILITY OR FITNESS FOR ANY PURPOSE.
1.F.5. Some states do not allow disclaimers of certain implied warranties or the exclusion or limitation of certain types of damages. If any disclaimer or limitation set forth in this agreement violates the law of the state applicable to this agreement, the agreement shall be interpreted to make the maximum disclaimer or limitation permitted by the applicable state law. The invalidity or unenforceability of any provision of this agreement shall not void the remaining provisions.
1.F.6. INDEMNITY - You agree to indemnify and hold the Foundation, the trademark owner, any agent or employee of the Foundation, anyone providing copies of Project Gutenberg-tm electronic works in accordance with this agreement, and any volunteers associated with the production, promotion and distribution of Project Gutenberg-tm electronic works, harmless from all liability, costs and expenses, including legal fees, that arise directly or indirectly from any of the following which you do or cause to occur: (a) distribution of this or any Project Gutenberg-tm work, (b) alteration, modification, or additions or deletions to any Project Gutenberg-tm work, and (c) any Defect you cause.
Project Gutenberg-tm is synonymous with the free distribution of electronic works in formats readable by the widest variety of computers including obsolete, old, middle-aged and new computers. It exists because of the efforts of hundreds of volunteers and donations from people in all walks of life.
Volunteers and financial support to provide volunteers with the assistance they need are critical to reaching Project Gutenberg-tm's goals and ensuring that the Project Gutenberg-tm collection will remain freely available for generations to come. In 2001, the Project Gutenberg Literary Archive Foundation was created to provide a secure and permanent future for Project Gutenberg-tm and future generations. To learn more about the Project Gutenberg Literary Archive Foundation and how your efforts and donations can help, see Sections 3 and 4 and the Foundation information page at www.gutenberg.org
The Project Gutenberg Literary Archive Foundation is a non profit 501(c)(3) educational corporation organized under the laws of the state of Mississippi and granted tax exempt status by the Internal Revenue Service. The Foundation's EIN or federal tax identification number is 64-6221541. Contributions to the Project Gutenberg Literary Archive Foundation are tax deductible to the full extent permitted by U.S. federal laws and your state's laws.
The Foundation's principal office is located at 4557 Melan Dr. S. Fairbanks, AK, 99712., but its volunteers and employees are scattered throughout numerous locations. Its business office is located at 809 North 1500 West, Salt Lake City, UT 84116, (801) 596-1887. Email contact links and up to date contact information can be found at the Foundation's web site and official page at www.gutenberg.org/contact
For additional contact information:
Dr. Gregory B. Newby
Chief Executive and Director
gbnewby@pglaf.org
Project Gutenberg-tm depends upon and cannot survive without wide spread public support and donations to carry out its mission of increasing the number of public domain and licensed works that can be freely distributed in machine readable form accessible by the widest array of equipment including outdated equipment. Many small donations ($1 to $5,000) are particularly important to maintaining tax exempt status with the IRS.
The Foundation is committed to complying with the laws regulating charities and charitable donations in all 50 states of the United States. Compliance requirements are not uniform and it takes a considerable effort, much paperwork and many fees to meet and keep up with these requirements. We do not solicit donations in locations where we have not received written confirmation of compliance. To SEND DONATIONS or determine the status of compliance for any particular state visit www.gutenberg.org/donate
While we cannot and do not solicit contributions from states where we have not met the solicitation requirements, we know of no prohibition against accepting unsolicited donations from donors in such states who approach us with offers to donate.
International donations are gratefully accepted, but we cannot make any statements concerning tax treatment of donations received from outside the United States. U.S. laws alone swamp our small staff.
Please check the Project Gutenberg Web pages for current donation methods and addresses. Donations are accepted in a number of other ways including checks, online payments and credit card donations. To donate, please visit: www.gutenberg.org/donate
Professor Michael S. Hart was the originator of the Project Gutenberg-tm concept of a library of electronic works that could be freely shared with anyone. For forty years, he produced and distributed Project Gutenberg-tm eBooks with only a loose network of volunteer support.
Project Gutenberg-tm eBooks are often created from several printed editions, all of which are confirmed as Public Domain in the U.S. unless a copyright notice is included. Thus, we do not necessarily keep eBooks in compliance with any particular paper edition.
Most people start at our Web site which has the main PG search facility: www.gutenberg.org
This Web site includes information about Project Gutenberg-tm, including how to make donations to the Project Gutenberg Literary Archive Foundation, how to help produce our new eBooks, and how to subscribe to our email newsletter to hear about new eBooks.