The Project Gutenberg EBook of Practical Bookbinding, by Paul Adam

This eBook is for the use of anyone anywhere at no cost and with
almost no restrictions whatsoever.  You may copy it, give it away or
re-use it under the terms of the Project Gutenberg License included
with this eBook or online at www.gutenberg.org/license


Title: Practical Bookbinding

Author: Paul Adam

Translator: Thos. E. Maw

Release Date: March 31, 2012 [EBook #39318]

Language: English

Character set encoding: ISO-8859-1

*** START OF THIS PROJECT GUTENBERG EBOOK PRACTICAL BOOKBINDING ***


Produced by Chris Curnow, Hazel Batey and the Online
Distributed Proofreading Team at http://www.pgdp.net (This
file was produced from images generously made available
by The Internet Archive)

PRACTICAL BOOKBINDING
BY
PAUL ADAM,
Director of the Düsseldorf Technical School of Artistic and Practical Bookbinding.
TRANSLATED FROM THE GERMAN BY
THOS. E. MAW,
LIBRARIAN KING'S LYNN PUBLIC LIBRARY.
WITH 127 ILLUSTRATIONS.
LONDON
SCOTT, GREENWOOD & CO.
19 LUDGATE HILL, E.C.
NEW YORK
D. VAN NOSTRAND CO.
23 MURRAY STREET
1903
(The sole right of translation into English rests with Scott, Greenwood & Co.)
[Pg iv]
| Page. | |
| Metric and British Systems Compared | vi. |
| Preface | vii. |
| Introductory Remarks on Working Methods and Materials | 1 |
| A.—Materials for Sewing and Pasting | 1 |
| B.—Materials for Covering the Book | 4 |
| C.—Materials for Decorating and Finishing | 7 |
| D.—Tools | 9 |
| PART I. | |
| Forwarding. | |
| Chapter I.—General Preparatory Work | 13 |
| Chapter II.—Sewing | 40 |
| Chapter III.—Forwarding: Cutting, Rounding, and Backing | 54 |
| Chapter IV.—Forwarding: Decoration, of Edges and Headbanding | 62 |
| Chapter V.—Boarding | 85 |
| PART II. | |
| Finishing. | |
| The Book Cover | 93 |
| Chapter VI.—Making the Cover | 95 |
| Chapter VII.—Work with the Blocking Press | 103 |
| ChapterVIII.—Treatment of Sewn Books, Fastening in Covers, and Finishing Off | 119 |
| Chapter IX.—Hand Finishing | 129 |
| Chapter X.—Account Books | 157 |
| Chapter XI.—School Books, Mounting Maps, Drawings, &c. | 169 |
| Conclusion | 177 |
| Index | 180 |
| Page. | |||
| Fig. 1 | Glue-pot for heating by petroleum. | 3 | |
| Figs. 2 & 3 | Holding whilst folding. | 15 | |
| Fig. 4 | Lifting into the Press. | 19 | |
| Fig. 5 | Open sheets laid out for gathering. | 20 | |
| Fig. 6 | Sections fanned out for drawing out. | 22 | |
| Fig. 7 | Sections fanned out for pasting. | 23 | |
| Fig. 8 | Suggestions for mounting on guards. | 25 | |
| Figs. 9-13 | Suggestions for folding plates and maps. | 26 | |
| Fig. 14 | Collating. | 28 | |
| Fig. 15 | Rolling machine. | 31 | |
| Fig. 16 | Sewing frame. | 33 | |
| Fig. 17 | Arrangement on the sewing frame. | 33 | |
| Fig. 18 | Arrangement of threads in holländering. | 35 | |
| Fig. 19 | Small stapling machine for single sheets. | 35 | |
| Fig. 20 | Arrangement of staples in brochures. | 35 | |
| Fig. 21 | Arrangement of threads in old style of sewing. | 41 | |
| Fig. 22 | Arrangement of threads with double cords. | 41 | |
| Fig. 23 | Divisions for sawing-in. | 42 | |
| Fig. 24 | Machine for sawing-in. | 43 | |
| Fig. 25 | Suggestions for single and double end papers. | 45 | |
| Fig. 26 | Suggestion for double end paper with tear-off. | 45 | |
| Fig. 27 | Overcast end paper. | 46 | |
| Fig. 28 | Loops for attaching to frame hooks. | 47 | |
| Fig. 29 | Loops for taking frame keys. | 47 | |
| Fig. 30 | Suggestion for sewing on four cords. | 48 | |
| Fig. 31 | Suggestion for sewing on six cords. | 48 | |
| Fig. 32 | Suggestion for sewing two-sheets-on. | 50 | |
| Fig. 33 | Thread-sewing machine. | 53 | |
| Fig. 34 | Wire-sewing machine. | 53 | |
| Fig. 35 | Rotary guillotine. | 54 | |
| Fig. 36 | Lever guillotine. | 55 | |
| Fig. 37 | Top edge arranged for when trimming three edges. | 56 | |
| Fig. 38 | Rounding the book. | 57 | |
| Fig. 39 | Rounding machine. | 58 | |
| Fig. 40 | Backing machine for small shops. | 59 | |
| Fig. 41 | Backing machine for large shops. | 59 | |
| Fig. 42 | Backed book arranged for trimming. | 60 | |
| Fig. 43 | Marbling outfit. | 66 | |
| Fig. 44 | Suggestion for sprinkling colour. | 68 | |
| Fig. 45 | Comb marbling. | 69 | |
| Fig. 46 | Suggestion for curl marbling. | 69 | |
| Fig. 47 | Bouquet or peacock marbling. | 70 | |
| Fig. 48 | Eye marbling. | 70 | |
| Figs. 49 & 50 | Arrangement of flat and rounded edges. | 74 | |
| Fig. 51 | Top edge arranged for gilding. | 80 | |
| Fig. 52 | Headband shears. | 82 | |
| Fig. 53 | Headband working. | 83 | |
| Fig. 54 | Board-cutting machine. | 86 | |
| Fig. 55 | Spring back. | 87 | |
| Fig. 56 | Boarded book. | 88 | |
| Fig. 57 | Section of edge rule. | 89 | |
| Fig. 58 | English style of lacing boards. | 90 | |
| Fig. 59 | View of the most general styles of binding, showing the divisions of the work. (Table) | 94 | |
| Fig. 60 | Corners cut for turning in. | 96 | |
| Fig. 61 | Corners: Right and wrong. | 96 | |
| Fig. 62 | Paring with Offenbach or Berlin knife. | 97 | |
| Fig. 63 | Paring with French knife. | 99 | |
| Fig. 64 | Blocking press. | 105 | |
| Fig. 65 | Appliances used in blocking backs. | 107 | |
| Fig. 66 | Colour roller. | 115 | |
| Fig. 67 | Stuck-on gauges. | 118 | |
| Fig. 68 | Turning in the head. | 121 | |
| Figs. 69 & 70 | The head: good and bad. | 122 | |
| Fig. 71 | The pasted-down book. | 125 | |
| Fig. 72 | Treatment of tear-off. | 128 | |
| Figs. 73 & 74 | Simple line designs. | 131 | |
| Fig. 75 | Half-calf extra tooled in blind. | 133 | |
| Fig. 76 | Leather binding with simple design in blind. | 134 | |
| Fig. 77 | Simple gold tooling on sides. | 135 | |
| Fig. 78 | Tooled cover. | 136 | |
| Fig. 79 | Specimen of tooling done in the Düsseldorf Technical School. | 137 | |
| Fig. 80 | Leather binding by Oswald Kob, Bozen. | 138 | |
| Fig. 81 | Cover with laurel motive done in the Düsseldorf Technical School. | 139 | |
| Fig. 82 | Leather binding with fern motive done in the Düsseldorf Technical School. | 143 | |
| Fig. 83 | Simple gold tooling on squares. | 144 | |
| Fig. 84 | Design in gold for squares. Tools by F. Clement, Leipzig. | 145 | |
| Figs. 85 & 86 | Two designs in gold for squares. | 145 | |
| Figs. 87, 88, & 89 | Three simple backs. T, d, B = Title; N, T = Sub Title. | 147 | |
| Fig. 90 | Type-holder with centre position. | 148 | |
| Figs. 91, 92, 93, & 94 | Four backs tooled in the Düsseldorf Technical School. | 149 | |
| Fig. 95 | Group of backs tooled in Carlsruhe Technical school. | 150 | |
| Figs. 96 & 97 | Two richly decorated insides done in the Düsseldorf Technical School. | 150 | |
| Figs. 98, 99, 100 & 101 | Four richly tooled backs | 151 | |
| Fig. 102 | Rich half-calf extra binding. | 152 | |
| Figs. 103 & 104 | Tooling on heads. | 153 | |
| Figs. 105, 106, & 107 | Tooling on the edges of the boards. | 154 | |
| Fig. 108 | Motive executed in the Düsseldorf TechnicalSchool. | 154 | |
| Fig. 109 | Case to protect book. | 155 | |
| Fig. 110 | Cut-out case. | 155 | |
| Fig. 111 | Book cover. | 155 | |
| Fig. 112 | Cover in case form. | 155 | |
| Figs. 113 & 114 | End papers for account books. | 158 | |
| Fig. 115 | Boards cut out at head. | 160 | |
| Fig. 116 | Suggestion for account book back. _K_Pared edge; _T_Part to be pasted. | 161 | |
| Fig. 117 | Suggestion for account book back. | 162 | |
| Fig. 118 | Boarded account book. | 163 | |
| Fig. 119 | To show where turn-in is to be cut. | 164 | |
| Fig. 120 | Hand numbering machine. | 165 | |
| Fig. 121 | Suggestion for back of guard book. | 166 | |
| Fig. 122 | Pattern for dust flaps. (Leinwand = Linen hinge.) | 167 | |
| Fig. 123 | Eyeleting machine. | 172 | |
| Figs. 124 to 127 | Showing stages of pinning down for stretching. | 173 |
| Metres. | Decimetres. | Centimetres | Millimeters. | Inches. |
| ·001 | ·01 | ·1 | 1 | ·039 |
| ·002 | ·02 | ·2 | 2 | ·079 |
| ·003 | ·03 | ·3 | 3 | ·118 |
| ·004 | ·04 | ·4 | 4 | ·157 |
| ·005 | ·05 | ·5 | 5 | ·197 |
| ·006 | ·06 | ·6 | 6 | ·236 |
| ·007 | ·07 | ·7 | 7 | ·276 |
| ·008 | ·08 | ·8 | 8 | ·315 |
| ·009 | ·09 | ·9 | 9 | ·354 |
| ·01 | ·1 | 1 | 10 | ·394 |
| ·02 | ·2 | 2 | 20 | ·787 |
| ·03 | ·3 | 3 | 30 | 1·181 |
| ·04 | ·4 | 4 | 40 | 1·575 |
| ·05 | ·5 | 5 | 50 | 1·968 |
| ·06 | ·6 | 6 | 60 | 2·362 |
| ·07 | ·7 | 7 | 70 | 2·756 |
| ·08 | ·8 | 8 | 80 | 3·150 |
| ·09 | ·9 | 9 | 90 | 3·543 |
| ·1 | 1 | 10 | 100 | 3·94 |
| ·2 | 2 | 20 | 200 | 7·87 |
| ·3 | 3 | 30 | 300 | 11·81 |
| ·4 | 4 | 40 | 400 | 15·75 |
| ·5 | 5 | 50 | 500 | 19·69 |
| ·6 | 6 | 60 | 600 | 23·62 |
| ·7 | 7 | 70 | 700 | 27·56 |
| ·8 | 8 | 80 | 800 | 31·50 |
| ·9 | 9 | 90 | 900 | 35·43 |
| 1 | 10 | 100 | 1000 | 39·37 |
1 gramme = 15·44 grains.
28-1/3 grammes = 1 oz. avoird.
1 kilogramme = 1000 grammes = 2·20 lb. avoird.
1 metre = 100 centimetres = 39·37 inches. Roughly speaking, 1 metre = a yard and a tenth. 1 centimetre = two-fifths of an inch. 1 kilometre = 1000 metres = five-eighths of a mile.
1 cubic metre = 1000 litres = 35·32 cubic feet.
1 litre = 1000 cubic centimetres = ·2202 gall.
1 calorie = 3·96 British thermal units.
| C. | F. | C. | F. | C. | F. | C. | F. | C. | F. | ||||
| -25 | -13 | 5 | 41 | 25 | 77 | 65 | 149 | 105 | 221 | ||||
| -20 | -4 | 8 | 46·4 | 30 | 86 | 70 | 158 | 110 | 230 | ||||
| -17 | 1·4 | 10 | 50 | 35 | 95 | 75 | 167 | 115 | 239 | ||||
| -15 | 5 | 12 | 53·6 | 40 | 104 | 80 | 176 | 120 | 248 | ||||
| -10 | 14 | 15 | 59 | 45 | 113 | 85 | 185 | 125 | 257 | ||||
| -5 | 23 | 17 | 62·6 | 50 | 122 | 90 | 194 | 130 | 266 | ||||
| 0 | 32 | 18 | 64·4 | 55 | 131 | 95 | 203 | 135 | 275 | ||||
| 1 | 33·8 | 20 | 68 | 60 | 140 | 100 | 212 | 140 | 284 |
To Convert:—
Degrees C. to Degrees F., multiply by 9, divide by 5, then add 32.[Pg vii]
Degrees F. to Degrees C., first subtract 32, then multiply by 5 and divide by 9.
Nowadays the bookbinder does not bind only those books given to him for this purpose as was the case in former years, for present conditions necessitate his undertaking many kinds of work which have little or nothing to do with the binding of books, particularly such as are connected with the making or finishing of printed matter and paper goods, or where pasting, gumming, and glueing are required, which, in their turn, are connected with paper and cardboard.
On the other hand, some branches of the bookbinder's craft have now become quite distinct, and have developed into special industries, and have so enlarged and extended that even their particular methods of working and technical terms have quite changed. Cardboard goods, leather goods, photo albums, maps, and even account-books are treated by particular firms as specialities.
As we must now keep within clearly defined limits, we shall treat here only the work of bookbinding proper as far as it is concerned with the making of the book for publisher, bookseller, and buyer, and also the making of account-books, whilst the other work given to the binder, commonly called "fancy goods," must be excluded. Editions de luxe,[Pg viii] charters, illuminated addresses, &c., are likewise excluded, as they are quite apart from the ordinary work of the bookbinder, belonging solely to artistic bookbinding. When any such work is required the intelligent worker will not be at a loss; besides, he will derive ample assistance from the illustrations for this class of work.
The parts of this little book have been so arranged as to correspond to our present-day division of work: preparatory work, forwarding, covering, and finishing. In England and France the various processes have for a long time been similarly termed, and although in Germany we could not follow their lead without any deviation, because our method of work and division of labour are so different, yet the basis of this arrangement has been used in this book.
Every text-book has some drawback, the greatest of these being that a practical demonstration on the subject is more helpful than the most detailed written description, and yet even in the latter a text-book is limited. For the rest, I have tried to be as brief and clear as ever possible and to avoid faults which I have discovered in my former writings of a similar kind.
Paul Adam.
Düsseldorf, Germany, 1898.
[Pg 1]
The bookbinder works with quite a large variety of materials which are mostly what we might call "half-made," that is to say, such materials as have already undergone some hand or machine process in order to make them fit for the work of the bookbinder. This is not the place to go into details as to the source of all these materials or the manner of their production: that may be seen in special treatises.
We separate into various groups the materials we use.
The bookbinder himself prepares his paste from wheaten flour and boiling water. Put in a shallow vessel, by preference a stone or enamelled metal wash-basin, the quantity of flour required for about eight days, pour in as much water as will make a mixture by soaking and stirring of the consistency of honey. Add to it boiling water, first slowly, then quicker, stirring all the time. It does not do to add the water too quickly, as that is likely to make the paste knotty or lumpy, because it cannot be stirred quickly enough and the gluten develops unequally. If added too slowly, the starch is not heated quickly enough and does not thicken[Pg 2] sufficiently or not quickly enough, and the paste turns out too thin.
Good paste, when cold, should not be stiff like pudding, but should be easily worked with a brush. In order to prevent a skin forming on the top whilst cooling, pour over the paste as much cold water as will cover the surface immediately after the mixing with the boiling water; this water is afterwards poured off.
In summer when the paste is made, and whilst still hot, add a few drops of turpentine and mix well; this preserves the paste and keeps off insects. The addition of alum to the paste tends to make it watery, besides having no preservative properties.
If required, paste may be thinned by adding a little warm water. Potato flour is often used fraudulently for making paste, but this should only be taken when it is possible to use it up quickly, and not for books, but only for fancy goods, as this flour does not possess great adhesive power and is unsuitable for leather.
Glue is made from the well-known cake glue. The best English glue, although the dearest, is the cheapest to use. Good glue whilst soaking in water should still retain a certain degree of stickiness, must not be greasy, and should have no disagreeable smell. Glue if weighed before soaking and afterwards dried and again weighed should give no perceptible loss in weight. Good glue should not have a disagreeable taste, and above all should not betray the presence of salt.
To obtain the proper consistency in glue for bookbinding, a quantity of the cakes is taken and sufficient water poured over it to cover well. The next day the gelatinous mass is taken out of the water and dissolved in the glue-pot by placing the softened glue in a pot standing in an outer vessel containing boiling water. Glue should never be boiled[Pg 3] nor placed directly on the fire, as that causes the loss of the best part of its adhesive property.
Glue and paste are generally worked with a brush. For paste a large hollow brush is used; this holds a large quantity of paste and covers a large surface. For glue a closer brush with a metal fastening is used, because here the hairs cannot be secured with pitch owing to the brush being constantly exposed to heat. On the paste brush there must be neither ring nor anything else of iron, as this used in paste would cause rust, and rust would give iron stains to light-coloured leathers. For the same reason no enamelled vessel should be used for paste after the enamel has once been chipped or worn.
Laying the glue or paste on a material is called glueing or pasting. A zinc-plate is the most serviceable pasting-board, as the paste is easily washed off. Glue can be scraped or soaked off and used again. Pasting-boards of mill-board or paper are hardly to be recommended, as their use entails a considerable loss of material.
Of other adhesive substances, dextrine, gum, gelatine, and isinglass are used for certain purposes. The two former are always used cold, the two latter warm. The former are dissolved in cold water; gelatine and isinglass are soaked exactly like glue, the water poured off, and then melted in the glue-pot.
Dextrine and gum are used by the bookbinder almost exclusively for pasting larger surfaces, and for laying on these substances a broad thin brush fastened with a metal strip is used.
 Fig. 1.—Glue-pot for heating by petroleum.
To heat the glue and to maintain the heat a glue-heating apparatus is used. The upper part always consists of the glue-pot. The better kinds are made of copper or brass wrought or moulded in one piece. For the sake of convenience a partition is let into this pot so that thick and thin[Pg 4] glue may be ready for use at the same time. The glue is not heated directly over the flame, but by hot water; to do this the glue-pot is placed within a larger vessel containing water, the glue-pot at the same time closely fitting to the outer rim of the larger vessel. This contrivance is placed over a petroleum, gas, or spirit lamp, which gives the required heat. In some districts where brown coal is found, it is heated on a specially made contrivance with the brown coal waste.
The latest method of heating is by electricity. The apparatus necessary for this has been put on the market by the firm W. Leo, Stuttgart.
The majority of bookbinderies, large and small, use a strong linen hemp-spun thread for sewing, the strength of which depends upon the weight and size of the sheets to be sewn. As it is inconvenient to be obliged to be continually beginning a new thread or knotting, most bookbinders use a reel of thread. The so-called Marschall thread is the best.
The book is held together by cords, for which the so-called sewing cord is used. There are now special kinds made for the purposes of the bookbinder; these are lightly twisted out of a long fibrous material so that afterwards they can be easily undone for the subsequent necessary scraping out. Certain kinds of bindings are sewn upon tapes; strong raw linen tape of 1-1-1/2 cm. being the material most generally used.
For machine sewing, thread is generally used. Tinned iron wire, ready wound on spools, is also used. It is made in various sizes and used according to the weight of the sheets.
The real protection against outward injury to the book lies[Pg 5] in the cover, the inside of which consists of boards more or less strong. Of the kinds on the market the bookbinder uses grey-board, which is made from waste paper and rags. It is grey, very tough, and flexible, but dearer than other raw materials.
Straw-boards made from straw and waste paper are cheaper, but less flexible, and are easily broken. They take a very high polish under the calendering machine and become very hard, and are therefore very suitable for some work if flexibility is not essential. They are generally used in all cloth binding.
So-called leather-boards are unsuitable, for, in spite of great toughness and pliancy, they are certain to cockle and always remain spongy. Wooden-boards are unsuitable for bookbinding on account of their small resistance, but are indispensable for fancy goods and portfolios, as they can be so nicely cut and are less liable to subsequent cockling than any other kind.
Besides these, yellow and blue boards are made. These are coloured to suit and serve quite special purposes, mostly fancy goods; but they also are not used in bookbinding, on account of their high price.
The thinnest boards are known as middles. This is a strong whitish material made entirely from waste-paper. It is used for lining backs, limp bindings, and in all cases where flexibility, together with durability, is required.
In finished work—books, fancy goods, maps—the boards are never left exposed to view, but are covered with paper, cloth, or leather. For the inner side of the cover of the book white or coloured paper is frequently used, note-paper of the smallest size being more rarely used.
All marbled or pressed papers are made in one standard size. Besides the end papers for inside of books, a figured paper has of late been made known as "litho printed" for[Pg 6] fancy goods. This has been put on the market in the most varied kinds, and also with cloth-like impressions, under the names damask, brocade, and Leipzig end papers. The use of this paper has of late been almost discontinued. The dearest are those printed with designs in gold.
Cloth is more durable than paper, calico being mostly used. This is made in all colours and designs, and was formerly imported from England; but to-day German manufacturers produce a really good article. Plain linen cloth, black, green, or grey, sail cloth, buckram, mole-skin, and beaver are used in the making of account-books.
Silk is used in the bookbindery as end papers in extra work, and also for fancy goods and for lining boxes. The lower grades are seldom used, the better qualities being mostly taken.
To-day velvet is still used in the bindery, chiefly as a covering for portfolios, albums, and addresses, and except for metal clasps remains without ornamentation.
The bookbinder's best material, to which is given the choicest, most expensive, and most painstaking decoration, is leather in its various kinds. Sheep-skin, undyed or split and dyed, serves for school books and other cheap work. Goat-skin and morocco are better kinds, the latter being preferable both as regards price and quality.
Morocco is made from the skin of the goat. Morocco, Levant morocco, and maroquin all denote the same kind. It is a strong, coarse-grained leather imported from the Levant, very tough and durable.
Cape morocco, also called maroquin écrasé, is similar to this. This has a very large, artificially smooth-pressed grain, and hitherto has been higher in price than all other leathers.
Calf (matt or polished) is quite smooth and is only used for fine work. Cowhide is similar to this, but of coarser[Pg 7] texture, and is only used for leather goods, portfolios, and albums; for other work in the bindery it is not easily enough worked.
Celluloid is one of the latest materials used for covers. There is evidently a good opening for this in the wholesale manufacturies, stamped goods, and small fancy goods; whilst on the other hand it is of little value to the smaller shops, as it requires machinery for gilding.
For the decoration of our work, either during or after production, there will be a large variety of materials used. Colours are used for the decoration of the cut edges and the cut heads of books. The smooth, uniformly coloured edges are made by a body colour—carmine, scarlet, chrome yellow, silk green, indigo blue. All these colours must be very finely ground before using; the addition of a little paste or dissolved gelatine makes the colour adhere.
For marbling the edges Halfer's marbling colours are now exclusively used; these are to be had ready for use.
Amongst the binders' materials gold takes quite an important place. Leaf-gold in various colours is supplied either by the gold-beater or the wholesale dealer. The colour most used at the present time is orange gold, which is about the same in tint as our current gold coinage. Red gold is somewhat deeper in tone. Green gold and lemon gold are considerably altered by an alloy of silver, and are sold cheaper. Besides gold there are still other leaf-metals used, principally aluminium as a substitute for silver. The latter is still being used, but its unfortunate property of turning black will by-and-by drive it from our workshops. Bronze-leaf is also used for very small jobs in large quantities—makers' names on hat linings, ties, &c. Like[Pg 8] silver, it is also liable to rapid oxidization, which takes place with especial rapidity upon leather.
Gold leaf is made in various sizes. The larger size, about 85 mm., is the best to use, whilst the very small sizes are better suited for some work.
As a ground-work for gilt edges, the so-called poliment (Armenian bole) is now generally used. This is cleaned bole, made into a paste, and applied in a solution not too thin.
To make the gold stick to the surface, glair or white of egg is used in all cases. It must be properly diluted according to whether it is to be used for gilt edges or hand-tooling.
Finished work, especially smooth surfaces, is improved by the application of varnish, and is at the same time rendered damp-proof. The so-called bookbinder's or leather varnish is used for leather, cloth, or pressed dark papers. Map varnish, also sold as photographer's varnish, is suitable for light articles, maps, placards, &c. At present, spirit varnish with its quick drying and high surface is almost exclusively used for this purpose. Turpentine varnishes are no longer generally used in bookbinderies; in colour printing copal and amber varnishes are used.
The ready-made headband is an article specially manufactured for the bookbinder. It is fastened on the book in suitable lengths to cover the place where the body and back of books join at head and tail. These headbands are to be had in the most varied styles, according to price and requirement. For ordinary work a cheap cotton is good enough, for fine half-calf bindings a silk headband is used if it is not intended to weave by hand a headband of silk thread for decoration known as a worked headband.
Besides the headband, the book-marker is required, generally a silk braid in bright colours.
It is often necessary to fix clasps to heavy books and also to the smaller hymn-books and prayer-books. These are[Pg 9] made to suit all requirements and in various styles by firms making a speciality of this work. The stronger the metal used, the better the clasp and the easier for the worker to handle, as clasps of poorer quality are sometimes spoilt even whilst being fixed to the books.
Imitation metal fastenings are necessary for certain purposes, although their use is now considerably limited. These are the stamped metal rims and corner pieces, which are indispensable in the manufacture of sample cases, &c. The fancy goods with their decorated borders which were so popular at one time have disappeared from the trade; on the other hand, there has been a demand for fancy coloured cords made by twisting cords together.
The bookbinder's workshop of to-day presents quite a different aspect from that of our forefathers, even if we go back only 50 years.
The work benches as now found in small leather or jobbing shops stand near wide and lofty windows, each bench having a large drawer at each worker's place. Underneath, between the legs of the bench, there is a board fixed on supports upon which boxes containing colours or any other materials in use are placed within easy reach; and so that the board may not inconvenience the worker sitting in front of it, a semi-circular opening is cut at each worker's place. At each place there is a stool, somewhat higher than an ordinary chair, with three legs and a round flat seat. The legs are connected by strong bars for the worker to rest his feet upon. Shelves for the larger tools are conveniently arranged on the walls, so as not to be a hindrance, but still within easy reach. A few smaller chests with drawers are required for the storing of smaller tools and pieces of metal ornament, [Pg 10] &c.
A sufficient number of wooden presses, pressing boards in folio, quarto, and octavo, with the screw key, as well as the press jack belonging thereto, must be conveniently placed. The screw key is used when applying heavy pressure; the press jack serves as a support during certain work which necessitates laying the press on the edge of the bench. If we add a few larger and smaller cutting boards and a few sewing frames, we have completed the list of the large wooden tools.
The bookbinder requires very many small tools, even if we take into account only those necessary for ordinary shop-work. Iron rules and squares in various sizes, shears, knives, compasses and spring dividers, folders, files, pincers and hammers of different sizes, chisels, gouges, and punches.
The finisher's tools are: Gold cushion, gold knife, scraper, steel; and furthermore, for hand-tooling, letter-box, fillets, rolls, ornaments, and letters, all very fine and very dear tools, which must be kept in special cupboards and boxes so as to protect from possible injury. The higher the class of work done in the shop, the larger must be the stock of these tools.
These are the tools for general work and which no shop could be without; but what makes our modern workshop so different in character from what it was in former times are the many mechanical contrivances without the aid of which practical and profitable work is now inconceivable.
The most necessary iron ally of the bookbinder is the cutting machine, either with lever or wheel action, the former for light, the latter for heavy work. Machine manufacturers vie with one another in their efforts to introduce inventions and improvements; but to-day it would seem impossible to make a discovery likely to be of any importance.
The second most necessary machine is for cutting boards. Those with a wooden pedestal and table are not so much to be recommended as those made entirely of iron.[Pg 11]
When gilding in large quantities has to be done, a blocking press is necessary; lever action is always to be preferred to the balance or rotary action, the latter being of advantage for blocking or relief work, and also for fancy paper work. Even the best blocking press has some drawback; to be of any value, it necessitates quite an arsenal of plates and dies for blocking, and also calls for the constant replenishing and renewing of the same.
The standing press is used for heavy pressure applied to large batches of books. An iron press with two uprights will be found sufficient even for heavy use in most bookbinderies.
The rounding machine is now out of use. The binder rounds the back of the book with a hammer, and then it is backed in a backing machine, which puts the ridges on both sides of the book. The latest machine now being used in some of our large binding shops for this purpose is called the rounding and backing machine, which completely rounds and backs the book.
The rolling machine of to-day is lighter than were the first models of this machine; besides, the work is in many cases unnecessary, as modern printed books are generally carefully rolled before they leave the printer.
The wire-stitching machine came into use in England about 20 years ago, but is now abandoned. The wire-stapling machine is used for pamphlets, school-books, &c. Eyeleting and round-cornering machines are smaller appliances, whilst the backing machine mentioned above is a very useful ally. Machines for scraping and paring leather are used least of all, as there is little for them to do in a small bookbindery.
The foregoing is not an exhaustive list of our tools and machines, but we will bring to a close these introductory remarks on the usual appliances, as mention will be made of the others in their proper place.[Pg 13]
Books reach the bookbinder either in the sheets just as they left the printing press or folded and stitched. This folding and stitching is, of course, part of the binder's work, so we will begin with the sheet as it left the press; this sheet must in the first place be folded ready for further manipulations.
By folding we mean the arranging of the parts of a sheet in the order of succession required for reading. To facilitate this work the printer marks not only the page numbers on each sheet but also gives each sheet a number, these numbers being known as signatures. Every sheet is printed on both sides; the front side is called the first side, the other side the perfecting impression. Both sides are marked by a number or (more rarely) a letter. This mark stands at the right-hand side at foot of first page and is called the first signature; the second signature takes the same position on the second side of the sheet, that is, on page 3. Take any book haphazard and you will find the true signature on the first and the second[Pg 14] signature on the perfecting impression, always in the same position. In order to show at a glance whether the signature is the first or the second, the compositor adds an asterisk, thus—
| 1 | 1* | or | A | A* | |
| first | second | first | second | signature. |
We will see later that there is still another reason for the signature in the place mentioned.
When the sheets are to be folded, all the sheets of an impression are laid one on top of the other and all lying the same way. The modern quick-printing presses gather the sheets automatically, so that a sheet is rarely laid the wrong way, excepting through want of care in looking over them, or in the knocking-up in the printing office a few sheets or a whole batch are thrown out of order. According as we are dealing with folio, 4to, or 8vo format we must order the gathering of the sheets and, of course, the position of the signature. The commonest format is 8vo, that is to say, the size which gives eight printed leaves (or 16 pages) to the sheet. At the same time, the method of folding this format is the most economical and includes the others as well.
When folding 8vo sheets the pile lies in front of the worker in such a way that all the second signatures lie uppermost at the foot of the outside right page and all the first signatures at the left on the under side of the sheet; or, in other words, all first-side leaves are turned face downward and perfecting impressions face upward.
Printed sheets are never folded according to the edges of the paper, but always registered by the printed columns or the page numbers. The novice finds this by holding the sheet against the light, but the experienced worker is able to fold the sheet without so much as lifting it from the table.[Pg 15]
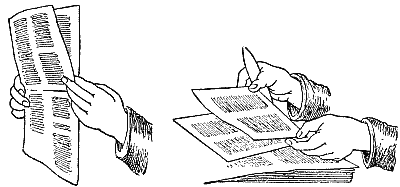 Figs. 2 and 3—Holding whilst folding.
The manipulations for the folding of an 8vo sheet are as follows: The right hand holds the paper-folder and creases down the folds, the left gathers the sheets and moves them about aided by the right.
1.—The right hand takes hold of the sheet at the right a little below the middle, brings it over to the left, when it is taken by the left hand and properly adjusted according to page numbers or corner of printed page (Fig. 2).
2.—Crease with folder from bottom to top (the folder is held slanting to the crease, but the edge is used).
3.—With the right hand the right and the left hand the left of the folded sheet are taken hold of at about the middle of the longer sides, nip together, make a short turn so that the left hand brings the sheet with its fore-edge to the folder's body, the left hand lets go, takes hold of the sheet between both ends at the middle fold, and adjusts pages and edge of fold alike (Fig. 3).
4.—The right hand creases from top to bottom.
5.—Left hand turns sheet over to other side, both hands take hold as before, nip together last fold, and adjust pages and fold.
6.—Crease from top to bottom, laying aside sheet to left, fold lying to right.[Pg 16]
The whole process, which demands considerable dexterity, is only to be thoroughly learned by example and imitation; but study the illustrations, which are correctly drawn from life.
This is the way sheets are folded when they come direct from the press; but if they had already been folded in quires, as is usually the case with school and hymn books, the sheets would simply be folded in the middle for convenience of storage and despatch.
In this case the quires must first be opened, the crease taken out, and the sheets laid open. This work is called "breaking the backs." The unfolded sheets are folded in exactly the same manner, but before the last crease the sheet is turned, creased from bottom to top, and put aside in such a way that the sheet is turned over, that is face downwards. If this precaution is not observed, the folded sheets would afterwards be found in wrong order.
At this point we might remark that the top, both of the book and the single page, is called the head, the bottom the tail. These commonly used terms will very frequently crop up.
The folding of a 4to sheet is exactly the same, excepting that the last fold is omitted; the second signature lies face upwards at top on the right, the first signature lies downwards at top left hand.
Folios are made up but rarely nowadays, except in artistic éditions de luxe, Bibles, and missals; they are simply folded in the middle; the signatures appear as in 8vo format.
Duodecimo format, that is, a sheet printed to make 12 pages on each side, is so printed that the third part of the sheet has to be cut off with a knife or machine. This work is done in various ways: the sheet may be folded without regard to the one-sided elongation; after folding the part is cut off with a knife or machine at the proper place and the[Pg 17] detached portion inserted in the middle of the main section; the small section is therefore called "the inset." On the other hand, the inset may be cut off before folding and then separately folded and inserted. This is the more usual method.
The cutting off of the inset prior to folding can be done in such a way with the modern quick-printing presses that the sheets are adjusted and cut off in the machine, or they may be folded in sections of six—eight sheets and cut open in the fold. For cutting open such sections a very sharp knife is required, either the usual bookbinder's knife or, better still, a somewhat longer two-edged paper-knife rounded at the end.
Formerly, when printing was not done with such accuracy as now, the sheets were folded into sections by means of points. The compositor made a point on both sides between main sheet and inset in the furniture where the division had to be made; if pins were stuck into the table through these points each of the sheets following could be placed on the pins.
Thus all sheets are brought to perfect register and may be cut with knife and rule or machine exactly through the points. This work is called "working to points."
The detached portion appears as a long printed slip upon which are four pages or columns side by side. They are folded in a very simple manner.
The page on the right is brought over to lie on the page to the left, registered, and creased in the middle, and the double sheet is now folded once more in exactly the same way.
Inserting is done as follows: The sheets for insertion are placed to the right, the main sheets at the left side of them; the right hand takes a sheet to be inserted at about the middle of the fore-edge, the left hand at the same time taking a main sheet in such a way that thumb, middle, and index finger open the sheet about the middle of the upper fold, and raise it so that the right hand can easily slip in the[Pg 18] insertion. Whilst doing this, the left hand slips to the back, where the forefinger manages the adjustment of the sheet inserted. The insertion is nicely fitted into the back and must lie close to it. This work is also very easy, but it also is much easier to learn it from example and imitation than by written instruction.
If the insets were already arranged before folding, that is to say, had the sheets been arranged according to page numbers immediately after printing as before mentioned, strict attention must be given to see that each main sheet has its insertion, otherwise the page sequence would be thrown into confusion in binding.
In folding, every fold must be sharply creased down; but a firmness of body in the sheets, a smoothness of the single sheet, and a proper sharpness in each separate fold can only be obtained by pressing the sheets. For this purpose the sheets must first be "knocked up," that is, they must first be adjusted at head and back by knocking them together on the table. Sheets are never pressed without being counted at the same time; this is done both for convenience in pressing and for checking the work.
Knocking-up can only be done upon a firm level surface; the beginner had better not take too many sheets at one time, say from 20 to 25: these are moved to and fro between the palms of the hands so that the back fold and upper fold are worked in turn, and at these sides the sheets are brought into line.
Knocking-up proceeds quickly if the sheets are handled lightly and freely. The single batches thus levelled are brought together and they in turn knocked up in the same way. Care must be taken that single sheets do not hang back, i.e., that all sheets come up to the levelled edge.
The knocked-up sheets are counted off—thin paper in hundreds, thick paper in fifties. To do this any big lot is taken[Pg 19] hold of with the right hand—one soon learns to judge the quantity to be taken by the fingers—by the fore-edge, giving the hand a turn so as to bring the backs uppermost, when the sheets will fan out at the back and thus make the counting an easy matter. The left hand counts—pardon, the head counts, but the left hand tells off the sheets in such a way that the middle and index fingers are alternately inserted in 4, 8, 12, 16, &c., whilst counting 1, 2, 3, 4, &c., and at the same time throwing over the sheets held. Every 25th lot of four sheets gives 100, and, of course, any other number you please can be counted in the same manner. Each lot is once more knocked up, placed in piles crosswise, and afterwards pressed.
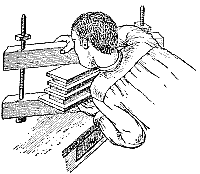 Fig. 4—Lifting into the Press.
The contrivance for pressing most generally used nowadays is still the bookbinder's little wooden hand-press, with wooden, or perhaps iron, screws; the former are lighter and handier, the latter heavier but more durable and therefore of advantage where heavy pressure is demanded. Each lot is placed between pressing-boards; these are about 1-1/2 cm. thick and vary in length and width according to the sheets or books to be pressed. According to the grain of the wood we speak of long and cross boards. On top of the upper and underneath the lower batch we[Pg 20] place a cross board; it does not matter which way the grain runs in the other boards used. This precaution is taken to obviate the probable breakage when the cheeks of the press run parallel with the grain of the two outer pressing-boards.
The pile of sheets between the pressing-boards is so placed that the nuts of the press are at first raised as high as the pile about to be pressed requires, then the press is put on the table to the right in front of the worker so that the head of one screw at the front touches the table edge. The pile is drawn on to the front edge of the table, the left hand slips underneath, and the chin presses on top. Whilst raising the upper cheek of the press with the right hand, the pile is inserted between the opened cheeks, is adjusted, and the press screwed up, first by the hand screws and then by the screw key used for this purpose. To do this the press with its high cheeks is held firmly between the legs and the nuts screwed up with the screw key as tightly as ever possible.
At this stage we might mention a work which is very frequently done in the printery, but seldom in the bindery: this is the so-called gathering before folding. This work, as we have already mentioned, is done so that printed matter for publication can be properly stored or prepared for sending away.
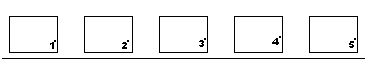 Fig. 5—Open sheets laid out for gathering.
The sheets are taken just as they left the press and piled up side by side in a row in order of number on a long table, each pile of sheets in exactly the same position as the others and just as they would be placed for folding; that is to say, for 8vos the first signature at the bottom left-hand side underneath, the second signature being at the bottom right-hand side on the top.[Pg 21]
Generally the work is gathered in batches of 5-6 sheets. The sheets in question are then laid out (see Fig. 5).
The worker takes a board the required size, upon which he places the sheets when gathered; he begins at No. 1 pile, takes off the top sheet, being very careful not to take two, lays it upon the board, and so he goes the length of the table, taking the top sheet from each pile. He lays the pile of gathered sheets on the end of the table or another table standing behind. They are there received by another worker, knocked up, and folded in the middle. If only one worker can be spared for the job, the gathered sections are placed to one side, but each is laid crosswise over the other so that they are easily picked up afterwards for knocking up and folding. If the work has more than five or six sections, the separately gathered sections must be afterwards again gathered in the same manner. Perhaps there may be placed in the last section parts of a sheet—the title, addenda, corrigenda, frontispiece, diagrams, &c. The treatment of these will be dealt with presently (pp. 22-24).
Sheets so gathered must be afterwards opened out for folding in the bindery. The section is opened, the crease well pressed out, and the whole smoothed down quite flat, care being taken that all sheets lie the same way, the opened sections lying side by side according to the signatures.
Before the folded sheets are arranged or gathered, there is frequently still some pasting to be done. The title, for instance, is seldom printed with the first sheet, but is usually made up with the preface, contents, &c., after printing the last page, often as part of the last sheet.
On this account the last sheet must be examined before folding to see how it is composed. If it happens that the sheet is to be exactly halved, it is best to cut the sheet in the middle and fold each half separately. It is even worth[Pg 22] while cutting the sheet into quarters if the sheets can be pinned on, because it is then possible to fold the cut sheets in lots of five or six and to draw out each one singly, as it is commonly called "pulling out."
This pulling out is very easy work; each folded batch is separately opened in the middle, fanned out with a paper folder so that each sheet stands back about 1/2-1 cm. behind the other, and the batch folded together again; it would then appear as in Fig. 6.
Fig. 6—Sections fanned out for drawing out.
Take the batch lightly between the finger and the thumb of the left hand, and with the right draw off the sheets from the top one by one, knock them up, and firmly press down the back fold.
Every part of a sheet which after folding makes less than four pages (equal to two leaves) must be pasted on. To do this the parts to be pasted are fanned out from the back with the pasting side uppermost, that is to say, the sheets are fanned out with the folder in the same way as described for "pulling out," until they lie like steps or stairs, each sheet displaying an edge of about 3 mm. In this manner all sheets so lie upon each other that each is about 3 mm. behind the one under it.
The narrow margin is pasted; to avoid pasting more than the proper margin of the top sheet, a piece of waste paper should be laid on top at the right distance from the edge. Each leaf has thus a narrow pasted edge by which it is secured to the main sheet. So that the pasted edges do not stick together whilst each sheet is being fixed in its place, which,[Pg 23] of course, takes time, the batch is taken between the fingers immediately after pasting, and by a few light movements the sheets are worked a little further apart.
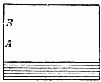
Fig. 7—Sections fanned out for pasting.
Take the batch at A between the finger and thumb of the right hand, at B in the same way with the left; the upper leaves slip gently backwards if the right hand bends the batch lightly upwards so that the sheets are pushed to B, the left first allows the sheets to slip back and then holds them firmly so that the right may repeat this movement several times.
The batch is then so placed across the table that it lies to the right of the worker with the pasted edge away from him, whilst the pile of sheets to which the parts are to be pasted lies to the left, also with the back edge away from him. Leaf after leaf is taken up, carefully adjusted to back and upper fold, and pasted on to the main section and lightly rubbed down to right and left with the finger-tips, putting aside to the left each sheet as finished.
Under certain conditions, the pasting on of a so-called correction may be a very disagreeable task. If errors have been made in composing or printing a page which escaped notice and correction at the proper time, a revised page is printed, and this must be inserted by the binder in the place of the faulty one. This inserting is done after the folding; the faulty leaf is so cut off that a narrow margin is left in the back to which the rectified leaf is pasted.
If maps or plans accompany the work these also must be[Pg 24] inserted; thin sheets need simply be pasted on the back edge like other sheets and fixed in their right place; but thick paper is not easily pasted on and, besides, would always pull away the next leaf. It is therefore joined to a narrow strip of paper about 1 cm. in width and this is pasted and fixed in the back. If several plates have to be inserted at the same place, or to be fixed at the end of the book, they are joined together in sections of suitable thickness. For this, thin paper is hinged in the back of the book, that is, the two plates are pasted over each other after pasting a narrow margin of about 3 mm. When dry, the double leaf so obtained is folded together in the middle of the pasted little guard. As this process lessens the leaf which has the back-fold by as much as is pasted to the other, the latter is cut down by 3 mm. beforehand.
If there are many such plates to be joined together, they are made up in sections of 4 or 6 according to the thickness of the paper, and every 2 or 3 cut down according to circumstances, and the same number left the full size. When all have been properly cut, the edges are fanned out and pasted. Then as many as make up a section are taken up and fanned out a little further, the pasted edge of No. 1 is laid on 6, 2 on 5, 3 on 4, and the batch set aside on the left and the same process gone through with the next lot. When dry, the plates thus guarded together are creased together at the back.
Plates on thick paper must likewise be mounted on strips of paper. These are cut from thin, strong note-paper and are so arranged that their thickness in the back is the same as the thickness of the plates. It is well to select a paper which when double is as thick as the plates. In case the plates are extra thick, the guard is made four-fold. The width of the guard must be measured to correspond. If a guard of double thickness only is required for filling up, it is cut twice[Pg 25] the width of the guard and 3 mm. added for pasting on the plate. This gives 2 × 1 cm. + 3 mm. = 23 mm. If a guard of four-fold thickness is necessary, the result is 4 × 1 cm. + 3 mm. = 43 mm. The plates are fanned out narrowly with the back edge uppermost, pasted, and each plate affixed to one of the made guards. This work is called "mounting on guards."
When the pasted plates are dry they are folded in the back on the following plan according to whether the guard must be two-fold or three-fold.
Thus the folded guard completely fills out the space in the back of the book. Besides, two, three, or more plates can easily be made into a section if the little guards are made up within each other.
Despite this levelling work, the pasted part will still be noticeable; the thoroughly dried sections are therefore taken in batches of four or five, knocked up at the back edge, and the thick part carefully hammered on a stone or iron bed.
Just as paper strips have been used in this work, linen can be used for guarding atlases and mounting large maps which are intended for long and constant use. To fill out the back, cardboard or thick drawing-paper the thickness of the plates (or, if anything, a little less) is used. Of this material strips are cut 1 cm. in width and same length as the height of the work, cutting a strip for each plate of course. Besides these strips, cut some soft white calico into strips 3 cm. in width. These are pasted, laid quite straight upon a clean board, two strips of paper are placed in the centre side by side on top of the pasted strip, and at right and left of each a map is hinged on, the first face downwards, the second face upwards. When dry, the section so made is creased in the middle,[Pg 26] knocked down with the hammer, and pressed for a time. By this method two plates are hinged on each guard; by the other each plate had its own guard.
Many books are issued with plates larger than the format of the book itself; they must be brought to the right size by folding, but in such a way that the folded plate is secure from injury during any subsequent trimming.
Before making a single fold in the plate, the worker should clearly see his way through his scheme for folding, so as to bring the plate to the size required with the smallest possible number of creases. Plates which are slightly wider and longer than the size of the book are easily made to fit if they are folded once or, if necessary, twice across the middle, pasting the edge of one fold on a guard and then fixing in its place in the book.
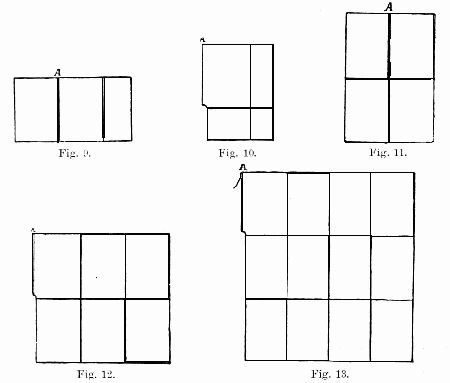 Figs. 9-13—Suggestions for folding plates and maps.
If this will not do, the plate must first be folded up from the bottom edge far enough to escape damage in trimming, and then the long side must be similarly folded. Larger plates must take more folds, always working on the principle that the length of the book should first be obtained in the best possible way, and afterwards the width is taken as the guide in making the folds.
In doing this the plate must be folded now to the front, then to the back, so that on drawing it out it opens in a zigzag fashion. For the sake of clearness we give illustrations showing the most general methods of folding. The part marked A is secured in its place in the book by mounting on a paper guard; but one may, by cutting out the map properly, leave a small margin which will serve as a guard as shown in Figs. 10, 12, and 13.
In all cases, however, it is essential that the thickness of the folded plates should be equalised by inserting guards in the back of the book.
Formerly, when several plates were inserted one after the other, it was customary to place them in such a way that they were trimmed at top and bottom alternately; now they are placed so that they are all trimmed at the top edge: this is much better, because it keeps the top edge smooth and close, thereby keeping out dust and insects. The accompanying sketches are based upon this principle.
The so-called two-page illustrations in periodicals must be treated in the same way. These are only possible in the middle of a section, where they would be caught into the back and injured if the following precaution were not observed. Such illustrations are taken out, the back edge pasted, and then placed in the back so as to adhere to the following sheets, projecting about 1/2 cm.
The printed sheets thus treated must now be collected by[Pg 28] the same process—that is if they have not been gathered in open sheets in the printery—into volumes; this work is generally known as gathering after folding.
As in gathering open sheets, the piles of folded sheets are placed side by side; but as these take up so much less room than the open sheets, in most cases the whole work may be laid out at one time.
Clear the longest table procurable, which if not long enough must be extended by the addition of small tables, trestles, &c., upon which are laid the batches of sheets in fifties, and, beginning with the last sheet, work up the row until the title page is reached and the gathering ended. Starting from the left, the gathered sheets are placed to the right; after the last sheet, i.e., the title page, there should be sufficient room for placing the gathered sheets and also, if possible, for knocking up and collating, that is, checking the sequence of the sheets. The gatherer begins with the last sheet on the left, draws the top sheet with the right hand on to the left hand held flat to receive it, and so goes along the row, drawing from each pile one sheet, which drops into its place on top of the preceding one in the left hand. This work can be carried on simultaneously by several persons following each other, but there must be a sufficient number of persons stationed at the end ready to knock up and collate the gathered sheets. In order to simplify this work and to enable one to take up the completed gathering at the title page, the pile containing the title page sheet is plainly marked across the back with a blue or red pencil, so that one sees on the back of each single sheet a coloured mark easily seen in the gathered and knocked-up sheets.
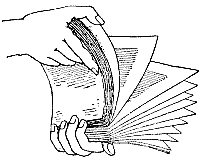 Fig. 14—Collating.
To collate a book it is taken in both hands. Taking a good hold of it by the right hand at the top edge, it is lightly held by the left at the bottom towards the back. Now make a turn downwards with the right so that the whole[Pg 29] pack of sheets springs upwards and spreads out at the back like a fan, and the controlling left hand lets them go one at a time, whilst checking the sequence of the signatures, that is to say, the sheets must be checked to see whether instead of the right signatures following in due order there is not a second signature or perhaps none at all. In such a case the sheet must be taken out and re-folded.
It may be well to refer now to another more detailed branch of this work which is necessary for certain purposes. If books which have already been used or bound are sent for re-binding it would be very unsafe to rely upon the pages being in proper order, especially if they have been much torn and have to be mended. Very frequently the leaves of a section have been misplaced. In such cases the book is laid flat upon the table, the head lying to the top, and, beginning at the title, leaf by leaf is lifted with the point of a knife after the way some ignorant persons have of using a moistened finger. The knife point is not inserted under the leaf lying uppermost but is lightly placed at the top of the leaf near the page number and the leaf pushed up from the side so that the left index finger takes it as it separates from the succeeding leaf whilst the eye scans the page numbers 1, 3, 5, 7, 9, &c. Also with other things that do not admit of any other method of collating, e.g., ledgers, documents, &c., this is the only possible way of doing it.
Nowadays, paper received in the printery has been so well calendered beforehand—that is to say, polished between rollers—and after printing the sheets are once more so well[Pg 30] rolled that the gathered sheets may at once be prepared for sewing. Old paper, however, must be beaten or rolled to make it firm and solid. The former work will be completely forgotten at no very distant date, as the younger generation of masters and men show less and less inclination to learn it. For beating, a stone about the height of a low table, and a surface about the size of a sheet may be used, or a cast-iron plate about 6 cm. in thickness embedded in a block of wood the same height as the stone. Upon this firm base—which, of course, must stand on the ground floor or in the cellar—the book, or section of it if too thick, is beaten with a short-handled iron hammer, the face of which measures about 100 sq. cm. All corners and edges are well rounded off, and the face is slightly convex. The handle must be short, not above 12 cm. long, cut oval, and just thick enough to be well grasped. The hole in the hammer is made so that the handle drops a little at the (outer) end.
In beating, the sections should be held by the left hand after being knocked up. In order to prevent injury to the paper, the sections are placed between pieces of waste paper of same size, also a mill-board or piece of waste paper to size is laid upon the beating stone. The right hand wields the hammer, which must strike the sections (or book) fairly and squarely with the full face. The beating is begun at the edge, and blow after blow is given in gradually lessening circles until the centre is reached, the left hand, of course, keeping up the necessary motion of the sections. It requires considerable practice to do this without shifting the sections, but if this happens they must again be knocked up.
The experienced workman knows by the touch where the book has been beaten much or little and works accordingly. The main thing in this, as in all other work, is that the book should be again pressed for some time—for a night at the least. The beaten volumes are divided into several lots or[Pg 31] sections about a finger thick, and pressing-boards placed between them. If any sections show folds or creases even after pressing, they must be once more beaten and pressed.
 Fig. 15—Rolling machine.
The work of beating, as already said, has been almost entirely superseded by the rolling machine. In treatises by theorists, one finds over and over again that books are not so well bound nowadays owing to the "practice of hand-beating being discontinued." This opinion is absurd, and arises from a very superficial technical knowledge and wholly imperfect acquaintance with the requirements of our craft. A machine-rolled or unbeaten book is always much better than one imperfectly beaten, for here nothing is demanded but sheer force, and that is always exercised with better results by a machine. As already pointed out, our modern printed books do not require any such work; besides, the so-called surface papers and printed illustrations prohibit both beating and rolling, as such work would destroy the high surface of the paper. Old books, on the contrary, where the paper is unsized, spongy, and swollen, require some such work, as pressing alone, even for days, has not the required effect.
In beating, the work should be divided into sections or lots of 15 to 20 sheets; they need not be counted, they are measured by the eye. For rolling, however, the sheets must be counted off exactly, from 8 to 12; they are knocked up and placed between zinc plates of same size and passed[Pg 32] through the rollers obliquely, the upper back corner being first inserted. It is well to introduce the second lot before the first has quite passed through the rollers; this not only saves the rollers but avoids the extra pressure on the lower corner when a section leaves the rollers. For this reason it is advisable to insert the lots right and left alternately. The first lot rolled should be examined to test the amount of pressure, and at first a lighter pressure should be applied to avoid risk of injury.
We have now come to the end of the processes through which a book has to pass before it is actually made up into book form. Before we take up this work there is incidental work to be mentioned which comes before the work of binding proper. This is the stitching and treatment of stitched or bound books for binding and the necessary repairs thereto.
The stitched or brochured book is no true book form; it is nothing more than the gathered sheets of a work in a temporary form, handier and more convenient, and therefore more saleable.
To prevent leaves from falling out in the event of their being cut open, they are lightly stitched together—holländert.
How did the name originate? It is difficult to say. Perhaps books stitched in this manner were first brought out in Holland.
With this method of sewing, the sheet only gets one short thread in the middle; but as the sewing of each sheet separately would entail a considerable loss of time, that old contrivance of the bookbinder for most kinds of sewing work, the sewing frame, is here made use of. A base or bed has on each front corner a perpendicular screw, upon which is placed a movable cross-bar with a slit. This bar is regulated by two screws; lay cords are fastened to hooks which are slipped through the slits, the other ends being knotted to[Pg 33] metal keys fixed under the base. A narrow movable bar, bevelled to the front of the bed, holds these keys when the lay cords are tightened.
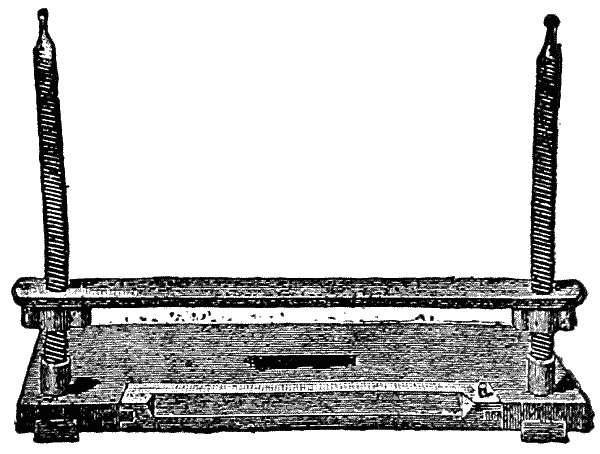 Fig. 16—Sewing frame.
There are no lay cords on the sewing frame for the work of Holländering as in other kinds of sewing, but two strips of zinc plate about 1 to 1-1/2 cm. in width are fastened so that at the top they are attached to the hooks and at the bottom are held with a pin. The lot to be sewn is placed rather slant-wise on the bed of the frame to the left, the back turned outwards, the head to the sewer, all sheets, therefore, facing away from the worker.
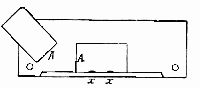
Fig. 17—Arrangement on the sewing frame.
The left hand takes the upper sheet with thumb and middle finger, so that the forefinger at once falls in the middle of the sheet, turning the sheet so that the head A lies to the left and face upwards as shown in the illustration; zinc strips are stretched at the points x. The left hand is introduced into the opened sheets from behind to take the needle when pushed in and then to draw it out again; the right hand inserts the needle from outside, and also draws out the needle inserted from inside by the left hand.
All kinds of sewing on the sewing frame are divided between both hands in the same way.
The threaded needle is now introduced into the sheets to[Pg 34] the right of the right strip at the back fold and again brought out to the right of the left strip, the sheets being meanwhile held open by the left hand. The thread is drawn out, except for a short end, the second sheet taken and laid open, and the needle is now introduced to the left of the left strip and brought out to the left of the right strip; and so on, each time introducing the needle from the right side to the right of the strip and from the left side to the left of the strip, drawing out accordingly. The thread is only to be seen on the outside of the strips.
The so-called English darning-needle—a long needle with a long eye—is used by the bookbinder. A special thread is made on purpose, the highest number being used for holländering.
When the sewing frame is packed so full that the sheets can no longer be kept properly squared, a sharp knife is taken and the threads cut off along the metal strips, and the sheets are then removed from the sewing frame. Every sheet is now independent of the other, and has a thread in the middle, of which a little may be seen at each needle-hole. These ends are afterwards pasted up in the work to follow. It is clear from this method of sewing that it is not necessary to tie a second thread on to the first when finished, but simply to begin with a new thread, letting the ends always project a little.
This method is the more recent and practical. It admits of one kind of sheet being sewn immediately after folding: nay, more: whilst one folder is still busy folding, another may begin to holländer. It is not till afterwards that the sheets are gathered. Gathered sheets are sewn in the same way, and are more easily knocked up than when sewn on cords and the threads left uncut after the old style instead of on metal bands. In holländert sheets the threads lie as shown in Fig. 18.[Pg 35]
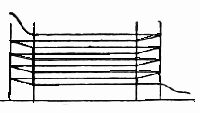 Fig. 18—Arrangement of threads in holländering.
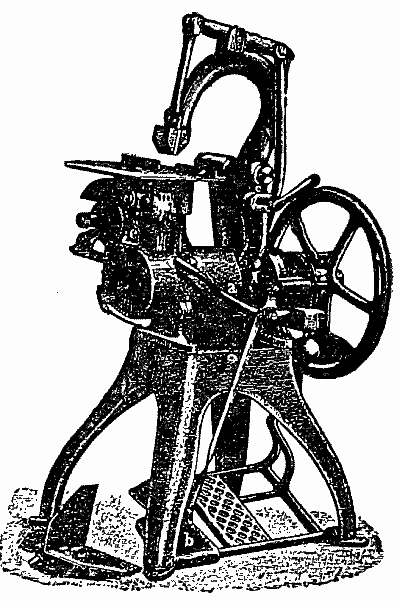 Fig. 19—Small stapling machine for single sheets.
Lately, in brochuring, the sheets are not holländert, but sewn with wire on the machine. This is a very good method when the finest possible staple closing from the outside is used. For this work a small machine is used, similar to those used for wiring documents, copy-books, and single sheets, which have an automatic wire-drawing action.
The batch of sheets is here arranged face upwards to the right of the worker. The right hand takes the sheet by the head, opening it at the same time with the forefinger, and inserts it in the groove of the machine, which is at the same moment set in motion. With each different sheet the position of the staple must be changed so that all do not stand the same height, as it would cause the paper to be cut through in pressing.
The accompanying sketch shows the arrangement of the collected brochures.
Fig. 20—Arrangement of staples in brochures.
It is barbarous to sew more tightly with wire, for in the necessary pulling to pieces to bring them to their former[Pg 36] state for binding they are sure to be more or less damaged. Sewing with a large machine using strips of gauze cannot be recommended.
The further treatment of holländert or wire-sewn sheets is dealt with towards the end of the chapter.
Most of the books given to the small binder do not come to him fresh from the printer, but sewn, used or unused, cut open, or as published. The sheets for binding must, as far as possible, be restored to the condition they were in before they were sewn. It is absolutely necessary that they should be made into loose single sheets. This work is called "pulling to pieces." The outer cover is torn off, the thread or wire inside the sheet removed, and the sheets very carefully separated one by one. When they are all pulled to pieces they are pushed open a little at the back, first to one side, then to the other, and scraped with a knife from top to bottom so as to remove all dirt, glue, &c., adhering.
Where the sheets had been cut open and the inner leaves worked out of place, they must be well pushed into the back again. The sheet is lightly held half-open in the left hand, and the leaves are knocked into the back with a long folder or knife.
If sheets are found badly folded they must now be properly re-folded. Any torn places must be repaired. A special chapter ought really to be devoted to this, for repairing and restoring is an art in itself. Here, only the most necessary work can be mentioned.
There are three different kinds of tears: tears in the print, in the margin, and in the back. The first may be torn with slanting edges; in such a case, both edges must be carefully pasted, fitted to each other, a piece of paper laid over and under, and then well rubbed down. If the tear has not slanting edges, but is clean cut, it is always best to paste the[Pg 37] edges likewise and to join the pieces by overlapping very slightly. It always looks better than the patching with strips of paper—a method adopted even by good workmen. The pasting on of pieces of tissue paper is to be condemned.
In cases of repairs like the foregoing, a piece of unpasted tissue paper may be laid on the repaired place and rubbed down, so that any paste exuding cannot do harm, and besides, it will serve to strengthen a weak place. It may be used, however, only on condition that the tint is exactly the same as that of the other paper.
Tears at the margin are repaired by pasting on strips of the same paper or of a kind as near as possible in texture and tint. To make the mend less noticeable, the paper should be torn beforehand, that is to say, by tearing one side of the paper the edge is less sharply defined and appears more like part of the sheet and is hardly perceptible.
Tears in the back (if outside) leaves are mended by pasting them down on to the following inner leaf; afterwards the glue makes this place still stronger. If the middle leaf is likewise torn, a narrow strip is pasted into the back. This may be cut true by the straight-edge if a very narrow strip suffices, but if the tear is here also sideways a piece of torn paper must be pasted on. If there are backs, torn off corners, or the like to be put in, a suitable paper is selected, a piece a little larger than the missing piece cut off the edge of the damaged leaf neatly pasted, the patch laid on slightly overlapping, and well rubbed down under a piece of waste paper. When thoroughly dry, the loose edges of the patch should be carefully torn off so as to slope and taper off nicely.
When all parts are repaired and the sheets again in proper order, the book is pressed for a while between boards.
It is thus that good books are treated, and although it would be better to return books of no special value as not[Pg 38] worth the labour, still it does happen that cheap books—mostly school books and periodicals—have to be repaired. A quick way of getting through such work is as follows:—
A larger piece of similar paper is well pasted and laid upon a clean cutting-board, and from this piece strips of the required width are cut, laid down in their place, and cut to length with the shears, and well rubbed down under waste paper. If the pasted piece becomes dry before it is used it must be coated again.
All repaired sheets must be laid between mill-boards to dry.
Worn and damaged periodicals are repaired in the same way. Generally the numbers are curled towards the fore-edge. Before commencing to pull to pieces they should be rolled towards the back, especially close to the back, to straighten them. The leaves must all be well pushed into the back, turned down corners (so-called dogs' ears) must be turned up, and two-page illustrations must be pasted away from the back. There are generally single or double leaves at the end of each copy or sheet—these must be pasted on. This work is not done singly, but the whole volume is at once laid open from back to front for pasting. All parts of the sheets to be pasted are placed at the front edge of the table, the edges fanned out, the other sheets wherein they are to be placed being meanwhile pushed further back so that they are not touched during pasting. The fanned-out sheets are pasted and each is rubbed down on to the sheet following.
It has already been said that in pulling to pieces the wire or thread sewing must be removed; this is not always easy. To begin with, the wires must be first bent upwards; if they are firmly glued to the outside of the back, the latter has first to be softened by smearing it very thickly with paste, and after leaving it some little time the glue may be scraped off and[Pg 39] the wires loosened. Not until then can the wires inside the sheets be removed and the sheets separated. The backs of books that have been bound are softened in the same way.
Even to-day—Heaven help us!—well-got-up books, even illustrated works, are sewn through sideways with coarse wire staples. Great care must be used in removing these and in separating the sheets, so that the bookbinder may at least try to undo the harm caused by barbarous methods practised either in thoughtlessness or ignorance.
It sometimes happens that the back of a book is so bad that it is necessary to cut it clean off. The leaves are then made up into sections of 6 to 8, levelled at the back, and overcast with a fine needle and fine thread. This work can be done quicker with an ordinary sewing-machine, adjusting it for the longest stitch.
New works consisting of thin single sheets are done in the same way.[Pg 40]
Modern books are fastened together by sewing; as a rule thread is used, and always in sewing good books. Thread sewing is very much better than wire stitching. In the first place, thread has not the disadvantage of rusting, to which wire is always subject; secondly, thread does not break the paper in the back, as so frequently happens when cheap paper containing much wood fibre is wire-stitched. The greatest advantage of thread sewing over wire lies in the flexibility of the spun thread; with sharp pressure it lies flat in the sheet, whilst wire does not give at all. Besides, it is flexible the whole length, and this adds greatly to the life of the book.
All thread sewing is now done by machinery and is really satisfactory. Only the very smallest job shops sew their books by hand.
The principle of sewing is to fasten each sheet to several cords or bands by means of a long thread running right along the inside of the sheet. These cords give the book its hold to the cover; therefore the more cords used, the more firmly is the book secured to its cover. There are now two methods of fastening the sheets on the cords; first, there is the older method of passing the thread along and out of the sheet, around the cord, and again into the sheet, and repeating the same movement at the next band.[Pg 41]
Fig. 21—Arrangement of threads in old style of sewing.
Nowadays, this method is almost entirely discarded. When for special reasons, or on account of its greater strength, it is desired to imitate the old method, the sewing is done on double cords; that is to say, for every cord two cords are stretched alongside each other and regarded as one. This sewing is more tedious, as the thread must take up each cord as shown in Fig. 22.
Fig. 22—Arrangement of threads with double cords.
These somewhat elaborate modes of sewing have been simplified in recent years by making saw-cuts in the back, in which the cords are laid. By this means the sewing thread never actually passes out of the sheet, but is drawn behind the cord lying in the saw-cut and thus holds it.
That is why we "saw-in" our books. The sawing-in is done with a broad saw; the so-called "tenon saw" being the one most generally used. The saw-cut must correspond exactly to the thickness of the cord to be used, should be less deep than wide, and should not take up too much glue when glueing up, as this might easily turn brittle. By inclining the saw to right and left alternately during sawing, the resulting cut will be something like this ¯¯¯¯¯/__\¯¯¯¯¯; this is the best and most usual form. The common practice of widening the cut by means of a coarse file gives a triangular cut like this ¯¯¯¯¯\/¯¯¯¯¯ which is objectionable, as the groove gets filled with glue, thus rendering the thread liable to break. As many cuts must be made in the book as there are cords to be used, besides the so-called kettle stitch at[Pg 42] head and tail by which the thread is passed from one sheet to the other. Dividing the back for sawing-in is done by marking off 1 cm. from the head and twice as much from the tail and dividing the rest into equal portions with the dividers. An octavo should never be sewn on less than four cords, and a folio on six. If obliged to use less through low prices, then three must be taken as the minimum number, and that only in exceptional cases. If the books are very small—as, for instance, prayer-books and hymn-books less than 7 cm. in height—it may then be permissible to sew on two cords. The division for the different sizes for sawing-in is made as shown in Fig. 23.
| 6 cords = 9 divisions. |
|
| 4 cords = 7 divisions. |
|
| 3 cords = 6 divisions. |
|
| 2 cords = 5 divisions. |
|
Fig. 23—Divisions for sawing-in.
The saw-cuts at the kettle stitch are less deep and quite narrow; they only mark the place where the thread is to pass in and out.
It may be wondered why the distances between the cords, when using four or six, are unequal; the reason for this will be explained when we come to the sewing of such sizes.
In sawing-in, the batch to be sawn is knocked up head and back and put between two boards—if the volumes are thin, several may be laid together—so that the back projects about 1/2 cm. beyond the edges of the boards. The first and last sheet of each volume have previously been laid aside, as these, with one exception, are not sawn-in.[Pg 43]
Books and boards are now clamped in a small hand-press, which is screwed up by hand only. For convenience of working, the press with the screws is laid flat upon the table, so that the nuts are against the table edge. The press is propped up at the back by the press-jack. The divisions for the cords are marked on the back with a lead pencil after measuring with the dividers, and the cuts made according to the markings. If several volumes of the same size are to be sawn-in, the top sheet of the first batch sawn is used as a guide for marking the others, thus saving the work of measuring each one with the dividers. Where much sawing-in is done, a sawing-in machine is employed. The sheets are placed, backs downwards, in a moveable box, which is led over a system of circular saws.
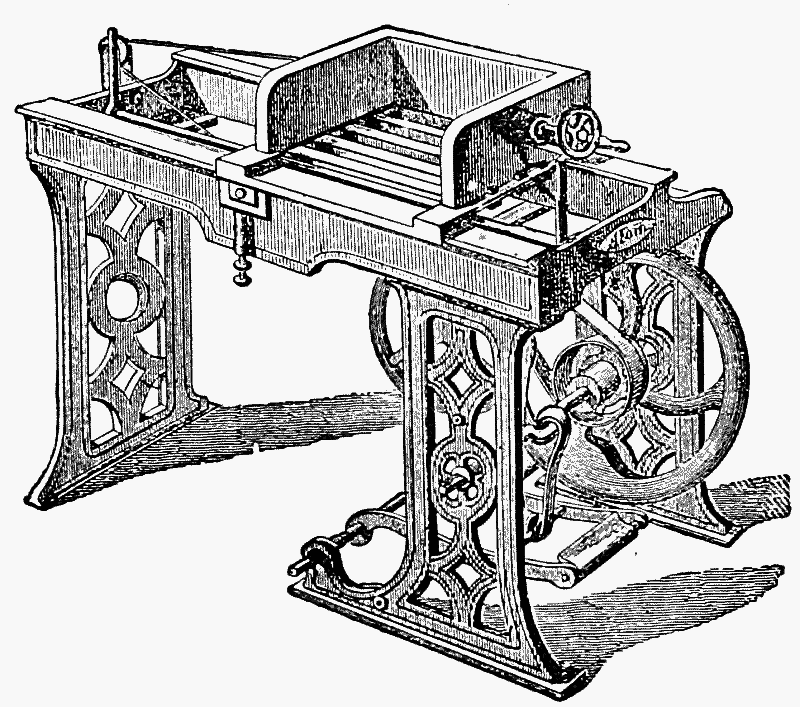 Fig. 24—Machine for sawing-in.
After the work of sawing-in, the first and last sheets are replaced, the volumes again collated, and the end papers put in place; the sheets are now ready for sewing.
End papers are the blank leaves which the binder places at the beginning and end of a book. They vary according to[Pg 44] the style of the book. Every end paper consists of a "fly leaf" (this lies over the title page in the book), the "paste-down," and in most cases of a "tear-off." For the stronger end papers and in half-leather bindings a cloth joint is used. Whilst dealing with these end papers, we must not forget the narrow guard; it is worked on the prepared end paper (as will be shown later) by folding over, and serves to enclose the title or end page with which it is sewn. The words joint, guard, and swell may here be more clearly explained, as they are used very frequently in the bindery. In the first place, we call the part where back and cover are joined by a sort of hinge "the joint," also strips of leather, cloth, &c., used for making this part are called "joints"; secondly, the slightly raised part of the back, caused by pressing or sewing, is shortly called "the swell"; and any strips of linen or paper fastened into the back of the book for hingeing maps, plates, &c., are called "guards."
For use as end papers, a paper must be selected which suits in quality and tone the printed paper. Nothing shows lack of taste more than the use of a blue end paper with a paper of yellow tone. For both back and front a double sheet is necessary and is cut the required size. A paper guard, about the width of three fingers, is made from a piece of stout waste paper and pasted on a narrow margin at the back of the double leaf, in order to protect it in the joint and also for fastening on the cover. If there are single leaves to be used up, two of these might be pasted to each other narrowly on the back and upon this the guard; this is the so-called double end paper.
If instead of these only a single leaf is taken, then we have a single end paper; this is used for cheap school books and generally at the back only.
The accompanying sketch shows both these end papers with the small guard already folded. This folding of the[Pg 45] guard is not very easy for the beginner. The leaf is placed face upwards, square in front of the worker, and a very narrow margin at the back edge bent upwards about 3 mm. in width, the forefinger and thumb of both hands shaping and bending the guard, working from the centre to the ends.
Fig. 25—Suggestions for single and double end papers.
Should the sheet from which the end papers are made be a little wider than required for the end papers, the tear-off may be folded at the same time; with double end papers, the leaf which is to be pasted down later is inserted between fly leaf and tear-off, and therefore is called "insertion."
Fig. 26—Suggestion for double end paper with tear-off.
If the end papers are to have a cloth joint it must be placed within the two leaves or, better, pasted in face inwards. Double cloth joints are no longer used in printed books, as they make the end papers too thick, and in the subsequent rounding the first sheet is apt to break. The joint is here also folded on as before.
Formerly, when linen joints were used, the end paper was simply made by inserting the strip of cloth and hingeing on the outside leaf about 1 cm. from the fold. This, however, has many disadvantages, therefore the end papers are made as explained, then carefully tearing off the outside leaf in the back in pasting down and cutting it as required it is pasted on to the board, as will be more fully explained under "pasting down."
The French paste a double leaf before the first and last sheets after having pasted a covering leaf around these.[Pg 46]
For extra work, the following style of end paper is the best; it is used in England for all high-class work, and in Germany also it has been adopted by all the first-class firms.
The end papers consist merely of single leaves the size of the sheet. These are fanned out at the back to make a small margin and pasted. The first leaf is then pasted down on the end-paper sheet so as to leave a margin of about 2 mm.; the second leaf is pasted level with the back. All end papers are proceeded with in the same way.
If these are to have a cloth joint it must be pasted on the outside also only 2 mm. wide. When the end papers are dry, they must be stitched down along the back, 2 mm. from the edge, with the sewing-machine adjusted to its longest stitch. It is unnecessary to knot the ends of the thread—they are cut clean off. When there is no sewing-machine, the volumes must be overcast by hand. This overcasting is done by inserting a fine needle near the back of the knocked-up sheets from above and drawing the thread almost quite through, the second and following stitches all being made from above. The thread would then appear as in Fig. 27.
Fig. 27—Overcast end paper.
These end papers are made up before sawing-in and sawn in with the book, and when it is not possible to stitch them with the machine they must be sawn in before overcasting, or the sawing would cut the threads.
Now for the sewing. We stretch the requisite number of cords, which are secured to the hooks at the top by a simple loop which is easily undone as soon as it is taken off the hook. At the bottom a double loop is made, through which a key is passed so as to hold the stretched cord underneath the moveable board.[Pg 47]
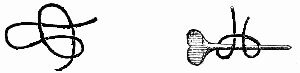
| Fig. 28—Loops for attaching to frame hooks. | Fig. 29—Loops for taking frame keys. |
The length of the cords is regulated by the thickness of each book, and as it is possible to sew a number of books at the same time when they are all sewn the same way, the length of the cords is regulated accordingly; it also depends upon the kind of books to be sewn. Cheap books get 3 cm. for every cord on each side more than the thickness of the book, that is 6 cm. plus the thickness of the book. School books get still shorter cords. For extra work, where the ends of the cords are laced through the boards, one should allow double. It is easy to calculate the length required for a single volume, but rather difficult for a batch of books varying in thickness; it is then better to measure. For example, suppose we have to sew a batch of six books, all differing in thickness but measuring in all 25 cm. high; we would allow for cheap work: 6 vols., each taking 6 cm. extra lengths = 36 cm. + total height, 25 cm., making 61 cm.; for extra work: 6 vols., each taking 12 cm. extra lengths = 72 cm. + 25 total height = 97 cm. length of cord.
The collated batch of books is laid on the bed of the sewing frame as in holländering (Fig. 17), the sheets taken hold of in the same way, and laid open for sewing. Of course the cords are adjusted to the saw-cuts, and it is better to push them more to the right than to the left, so as to give the left arm full play. Here also, as in holländering, the left hand does the work behind the cords inside the sheet, whilst the right inserts the needle from the front and again brings it out.[Pg 48]
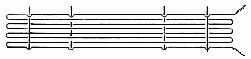
Fig. 30—Suggestion for sewing on four cords.
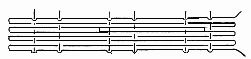
Fig. 31—Suggestion for sewing on six cords.
The first and last sheets—called end sheets—are sewn a little differently from the others, as the needle is here not inserted and drawn out exactly at the cord but at a little distance from it so as to allow them to be adjusted afterwards. Sewing[1] with us is invariably begun with the last sheet at the right, working on to the left, and reversing the process with the following sheet, and so to the end, so that the thread one way passes from and the other to the worker. With all other sheets, excepting the end sections, the thread is inserted at the kettle stitch and brought out at the next cord, round the cord, and inserted at the same hole, to be brought out again at the next cord, and so on till the thread comes out at the other kettle stitch and is inserted in the next sheet to go through the same process. With books sewn on four cords, it is allowable to skip one of the two middle cords alternately, so that each time the thread passes on to the right the right middle cord is skipped, and the left is skipped when the thread passes in the opposite direction. This facilitates and shortens the work without taking away from durability or quality. Books on 6 cords may be treated[Pg 49] in the same way; the right and left of each pair of cords may be skipped alternately. It was for this reason that we paid attention to the distribution of the cords on the back when sawing-in (see Fig. 23).
[1] In England, France, and part of Holland, sewing is begun with the title page.
This method of sewing is known as "end to end," in contradistinction to "two sheets on." The former is the better method and is essential for valuable books, unless the sections are exceptionally thin. The latter is "good enough" (i.e., not worth much) for the trade and cheap work. As far as strength is concerned it would do, but a book sewn in this way does not swell sufficiently in the back to make a proper backing groove.
It is an old rule in bookbinding that each sheet after it has been sewn should be pressed down with the needle so that the backs of the sheets lie close and firm together; this is called "pressing down." Should this, however, not be sufficient, the back must be knocked firm from time to time with the dividers or a rule.
The first and last sheets must be fastened to the one following and preceding respectively; but in the course of the sewing this enchaining to the preceding sheets—the so-called kettle stitch—is only necessary in the case of very thick sections. It is done by passing the needle through and bringing it out between the two preceding sheets at each end and thus chaining on the then top sheet to the one lying underneath.
The two-sheets-on sewing is done by laying open the second sheet on top of the first after making the first stitch in the first sheet and then passing the needle through the second sheet, then the third stitch is made in the first sheet and the fourth in the second sheet. One length of thread is used for the two sheets. Where the sheets have not been cut open, the left hand lightly takes the sheets in turn where they have been cut, a folder is placed in the middle and is[Pg 50] shifted from one to the other as required. The process is the same whether there are only three cords or even six.
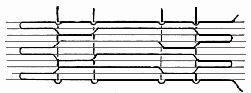
Fig. 32—Suggestion for sewing two-sheets-on.
It has already been said that several volumes of the same kind can be sewn on top of each other on the sewing frame; in this case the volumes must be separated from each other after the sewing is completed.
The free ends of the cords are untwisted so that they may be scraped open more easily afterwards, and then one volume after another is drawn along the cords to the ends until they are twice the length of the free cords away from each other, which, of course, will vary according to the subsequent style of binding.
So then we allow 6 and 12 cm. according to circumstances; but this length is curtailed to 3 cm. in the cheap school books, because the shorter the cords the quicker they are scraped open. Every cord is cut in the middle between the books with the shears, thus separating each volume from the other. The strands of the loose ends of the cords are now completely untwisted by inserting the cord in the groove of the scraper and repeatedly rubbing it up or down with the back of a knife.
After scraping the cords, the end-paper guards are always pasted down; the book is laid with the back to the front edge of the table, the first sheet with the end paper is turned downwards, the end-paper guard is bent up a little so that it stands away from the sheet, paste it neatly and carefully, close the section and adjust it so that the sheet in the end paper is level with the others, but not the end paper itself—this[Pg 51] must project a little at the back. When only one finger is required for pasting it must be the middle finger, so that the forefinger is free from paste and ready to take hold of anything.
If stitched end papers are used for extra work, a sheet of paper is laid on the second sheet so as to leave 3 mm. free, paste this strip and bring down upon it the once-more closed first sheet, taking care to square it at the outside with the body of the book.
The folder should be brought down firmly over the outer sheets after pasting down so as to ensure the paste sticking.
If the pasting-on of the joints is not properly carried out, the result will be that in most cases the book opens badly when finished.
In half-cloth or other simple bindings, the scraped cords may be pasted on at once. Bring a little paste (about the size of a pea) upon the point of a folder under the slightly raised cord, pasting the latter evenly and neatly upon the paste-down of the end paper so that the pasted-down strands of the cord lie like a feather. To prevent the pasted cords sticking to each other, the books are piled up back and front until dry. In extra work, the cords—which are also longer—must by no means be pasted on; a piece of waste paper or a cover the size of the sheet is pasted outside the sections under the cords, level with the backs. This serves partly as a protection for the end papers and partly to make a good joint when covering.
The volumes so prepared are now glued up. They must be knocked up at head and back; they are then placed with the backs outwards on a board specially kept for this work—the glueing board—with the fore-edge of which they must be exactly level. On top must be placed a smaller board or a heavy piece of iron, likewise level with the book. The book backs are thus held firmly between the glueing boards,[Pg 52] the left hand holding them firmly by pressing on the top, the right hand glueing the backs with very hot but not thick glue; rub this well in with the point of a hammer, and after having firmly squeezed the glue out of the brush, use it for taking off the surplus glue from the backs. An old trick of the bookbinder is to heat the hammer for this work. It is a bad plan to give the back a thick coating of glue and then allow it to dry, because it at once becomes brittle. Some experienced workers place the books between the glueing boards so as to leave about 1 cm. projecting, as it is thought that the glue thereby gets better between the sheets; but this method is out of date and is of no special value. It is, however, of great importance that the glued book should be laid so that it is truly square at the head as well as the back, for if this is neglected no amount of trouble will save the book from being cut out of shape.
Before passing on to the next chapter we have still to mention the mechanical contrivances for sewing. For small as well as large binderies, machines have been invented both for wire stitching and thread sewing; the former are more generally used, the latter not being sufficiently perfect in construction to meet all demands for speed and accuracy. Then also the method of fastening the book in the cover differs so much from the traditional method that we must still hope for improvement. When this comes to pass, this machine will then supersede the wire-stitching machine, with all its unavoidable disadvantages. The working of the machines is so simple that they are attended to almost entirely by girls. We refrain from giving descriptions of mechanical appliances within the limits of a short treatise, as any day may bring forth new inventions which are certain to effect great changes in this department. Besides these costly appliances there are also simpler sewing-machines for small shops, by which books are sewn in very[Pg 53] simple fashion over steel needles, by means of which the cords may afterwards be drawn along.
 Fig. 33—Thread-sewing machine.
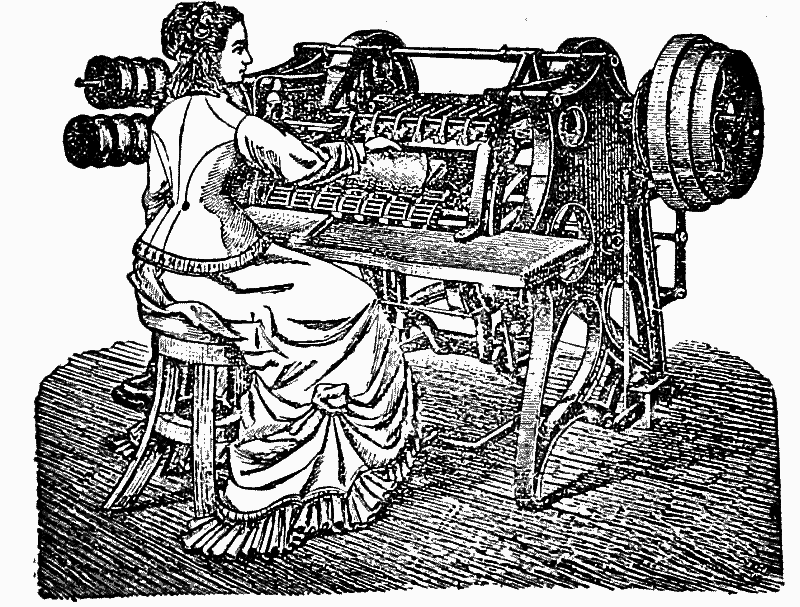 Fig. 34—Wire-sewing machine.
As these machines demand very large saw-cuts, they can only be used for trade work and any cheap lines. We only mention them to draw attention to their existence. Unprinted paper and music are sewn on tapes as well as cords. This method of sewing is described in Chapter IX.[Pg 54]
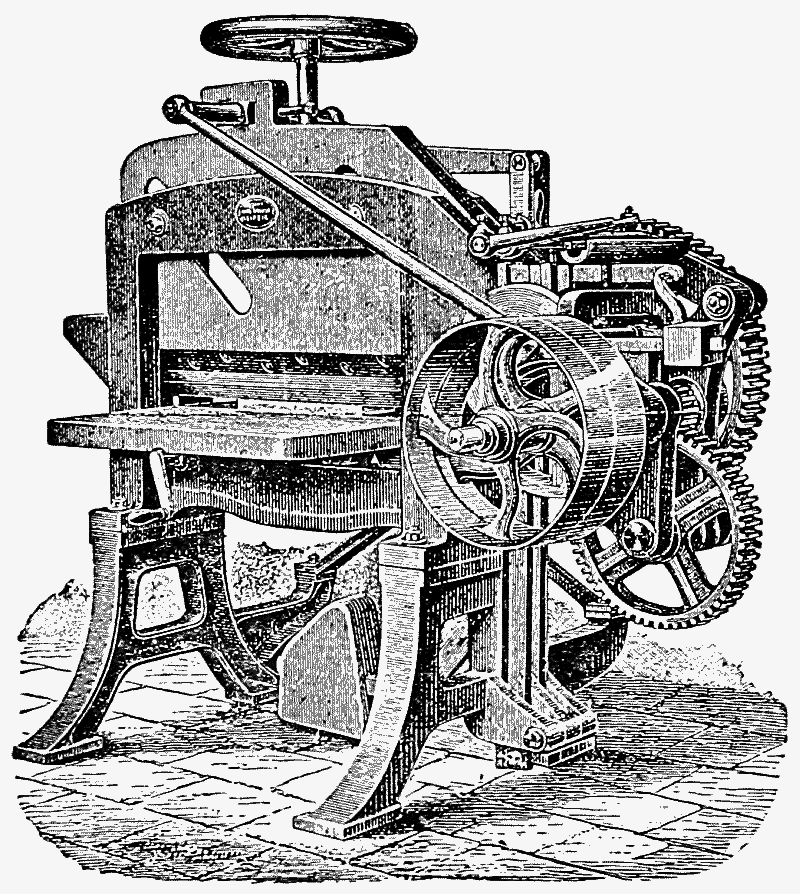 Fig. 35—Rotary guillotine.
In nearly all cases the book is trimmed after glueing, and it is best to do this before the glue is quite set. Even in extra work books are nowadays trimmed on three sides, that is, before the book is rounded each side is cut one after the other. This method has the advantage that it is quicker, that the top and bottom corners of the round fore-edge[Pg 55] cannot break, and that it is easy to treat every side during the process of marbling.
Of course, in the best work the book is first cut at the front, rounded, pressed, and then cut top and bottom.
Under present conditions we might completely abandon the old method of trimming with the plough, for, although this is a most valuable tool, it would not pay to use it now, and the shops where it is still in use are few and far between; besides, our German machines now do the work so thoroughly and accurately that we are able to execute the highest class of work by their aid.
 Fig. 36—Lever guillotine.
The machines worked by a lever are very suitable for small shops and small books. Rotary action is for heavier work and is more suitable where both heavy and light work have to be done.
The fore-edge is generally trimmed first; the back of the book is carefully adjusted to the "back gauge," the back gauge is so adjusted by moving backwards and forwards that the knife comes exactly upon the point marked beforehand. The first principle to be observed in trimming is that as little as ever possible should be taken off the book. Measuring and marking for trimming are done with the dividers; the latter is called "marking for cutting." When the back gauge has been adjusted so that the points lie directly under the knife, the clamp which holds the book in[Pg 56] position is screwed down and the machine set in motion. The book must be cut smooth and quite free from any jaggedness, and if this has not been accomplished the knife must be ground or, at least, well sharpened.
Something must be done in trimming top and bottom to prevent the groove at the back from receiving too much pressure. The simplest means is to glue a thick board on the under side of the clamp. If a piece of stout cloth has been pasted to this board, it will afterwards be easily removed from the clamp if it is lightly glued on at two places only. If cloth is not used, pieces of the board will adhere to the clamp and cause no little inconvenience.
Instead of this, there are metal plates sold which are fastened to the clamp in a simple way, either by screws or springs, and they are just as simply removed.
The bottom edge has to be cut first, as one is thus able to adjust the head—which, of course, must be rectangular—against the back gauge and then to make the bottom edge parallel. After cutting this edge, the book is turned round and the bottom edge adjusted on the back gauge so as to get the top edge ready for cutting. Whilst doing this, care must always be taken that the book is placed under the clamp so that the arrangement made for saving the groove from pressure is effective.
Fig. 37—Top edge arranged for trimming when trimming three edges.
As our machines are made to cut from left to right, the book back must be on the left.
Very often a book contains so many folded plates that it is considerably thinner in some places than at others. These thin places must be properly packed with paper or strips of board, otherwise the knife is sure to tear or jag, no matter[Pg 57] how sharp it may be. This packing may be left in the book until the book is quite finished and then taken out.
If any fibrous matter has stuck to the bottom sheets through cutting on a much-used bed, it must be removed with a very sharp knife.
The trimmed volumes are "rounded," i.e., they are rounded and the groove made at the back to which the boards have to be fitted. For this reason the grooves must be made to suit the thickness of the boards to be used.
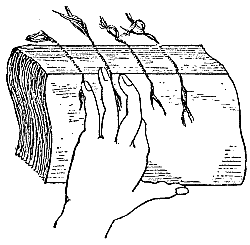 Fig. 38—Rounding the book.
To round a book, slightly damp its glued back, place it on a firm stone or metal bed, and knock it round with a hammer. Properly speaking the process is as follows: The left hand takes hold of the back of the book lying flat before the worker and works it into a round form, the right hand helping all the time by beating it along the back from one end to the other.
In this way each side is treated alternately until the back is evenly rounded. The rounding of the fore-edge should be equal to one-third of a circle.
Books that have been hammered so much that they fall straight from the centre towards both sides are called "over rounded"; if, on the contrary, the book is round at the sides and almost straight in the middle the book is called "flat rounded." The latter occurs when the thread used in sewing has been too thin or held down too much (see page 37). Great care must be taken to avoid what is called springing a section—this is generally caused by a break in the glued[Pg 58] back; but it is almost impossible to round a book perfectly if the sections are very thick or if it contains many pasted-in plates.
There are now very useful machines for rounding books, also hand machines. The work connected with these consists simply in turning the book a few times, pushing the back up to the rollers each time.
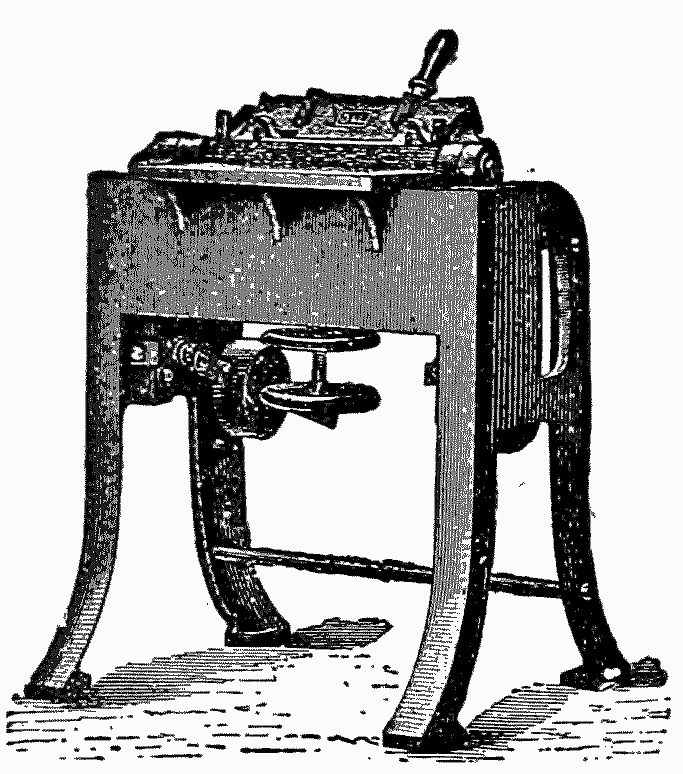 Fig. 39—Rounding machine.
When the book is properly rounded, it is "backed," that is, it is so placed between backing boards that they are away from the back just as much as is required for the groove, the width of the latter depending upon the thickness of the boards; a small thin volume gets thin boards and therefore a small groove; a thicker volume requires thick boards, and, of course, a deeper groove. The made groove should be a little deeper than the board set in it. The book and backing boards are placed in a wooden press, screwing up by hand and once more carefully adjusting. To do this, the press is first placed lengthwise on the table so that one end projects a little over the front edge of the table; the evenness of the rounding is then perfected—one hand at the back and the other at the front edge pushing and adjusting. The better and truer the book has been rounded before laying in the boards the less there will be to do when placed in the press. If the rounding is correct, the head and tail must be examined to see that they are exactly rectangular, for the book may have been knocked untrue, and the evenness of the grooves—which are easily disturbed—is also examined.[Pg 59]
Backing and rounding is the most important work as far as regards the appearance of the book when finished; it must be done with the greatest exactitude and requires much practice. Although it is hardly perceptible, yet the great difficulty lies in the book itself being so very easily shifted.
When the book is placed in the press without a fault it is screwed up as tightly as possible with the screw key, and through this the grooves already project over the edges of the backing boards; but a sharp groove can only be obtained by the help of the hammer.
The hammer, however, must not be used blindly on the back, but by lightly knocking, blow by blow, the first and last 4-6 sheets must be brought over the edges of the boards. This done, the whole of the back is well pasted, and after remaining thus a short time it is then rubbed with the point of the hammer along the sheets until all superfluous glue is soaked and scraped off. With a handful of paper cuttings the back is rubbed smooth and clean. The use of a toothed cachir iron is strictly forbidden, but the round side of this tool may be used instead of the hammer.
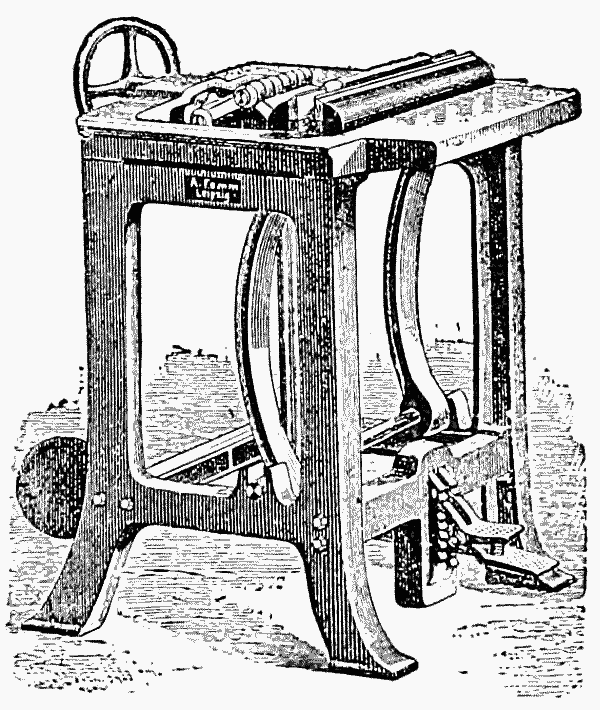 Fig. 40—Backing machine for small shops.
For backing, we have also a useful machine—the backing machine. For small shops it is made for clamping only, and the making of the groove is done with the ordinary hammer. For large shops this machine has a roller going right across the back which forms the groove down each side.
 Fig. 41—Backing machine for large shops.
Valuable books are either trimmed at the front and at once backed or they may be backed before trimming. This is generally done with bulky[Pg 60] books, as they are liable to throw out a section, and this danger is lessened by backing first. The work of backing remains the same. If the fore-edge has already been trimmed, care must be taken that the grooves do not suffer during trimming after backing. One way of effecting this is to lay the book on a special cutting board with the edge up to the groove, or by making use of the arrangement on the clamp already described, and adjusting the groove of the book to the blocks fixed on the clamp.
Should the fore-edge not have been cut, the book must again be knocked straight after backing; to do this a strong cord is tied round the book about 1-1/2 cm. from the back, the book is then laid upon a firm bed, and the back again knocked straight; this work is called "tying up."

Fig. 42—Backed book arranged for trimming.
It facilitates the work if the book is taken up and lightly held in the left hand whilst the right holds the hammer and knocks the round inwards until the book is once more square.[Pg 61]
The squared book is now trimmed, and it is not until the trimming is finished that the cord is loosened.
In pressing, several volumes of the same size can be done in the hand press at one and the same time.[Pg 62]
The edges of a book are nearly always finished off in some way or another, as the plain white edges would quickly become soiled. As a matter of fact, the binder always uses a covering of gold or colour for this purpose, and care should be taken that this way of treating the edges is decorative and not the reverse.
In small binderies the edge is most usually sprinkled. A small brush with a handle (such as is used for blacking shoes) is dipped into a very thin coloured liquid and rubbed over a fine sieve which is fixed in a frame. The sieve is kept at sufficient distance from the edges of the book to allow the little drops of colour to fall like a fine rain. For this work the book is screwed up in the press (which is laid flat) by means of the press-jack. As a sprinkling colour, nut-wood stain thinned with water is used, or indigo, carmine, Prussian blue, mahogany brown, green cinnabar, all well diluted with water, with the addition of a little paste and borax or a few drops of dilute carbolic to prevent the paste turning sour; aniline dyes have a common appearance. The sprinkle must fall very finely upon the edges, therefore the first large drops should be taken out of the brush by giving it a few preliminary rubs over the sieve.
A few variations are made in sprinkled edges by scattering damp sawdust, sand, or bran on the edges before sprinkling,[Pg 63] thus producing a coarser kind of sprinkling. Similarly rice, barley, even starch or drops of wax are used. All these edges are out of date and in really good workshops are every day falling more and more into disuse, preference being given to marbling upon a sized ground.
For the production of even marbling an edge-marbling roller has recently been brought out.
Rubber rollers—one or two—together with the automatic colouring rollers bearing aniline dyes mixed with glycerine, are made up into a handy contrivance by means of which smooth coloured edges can be rolled over. These edges are passable only when carefully and skilfully executed; as a rule they look coarse and common and are taken up only by badly equipped shops. Marbling rollers can be used for comb marbling as well as for small veined marbling.
We may say that the coloured edge is the oldest style.
Earth colours which cover well—cinnabar[2] (red or green), carmine, chrome yellow, graphite, bismuth, and also other colours that cover well, indigo, carmine, and Prussian blue—are ground to a fine powder and thoroughly mixed with water and a little paste or gelatine so that the edges may be evenly covered.
[2] Cinnabar if not red must be a preparation with other colour.—Trans.
Only printed books are put in the press, and in this case they must first be rubbed down with alum water. After about five minutes the colour may be laid on. Hog's-hair brushes are used for this. Recently, eosin has been used to colour red and picric acid for yellow, both well diluted with water.
The paste edge is a variety of the coloured edge; it is produced by loading paste with a very strong colour so that it covers well when laid on. With the blunt point of a stick, a bluntly pointed cork, or even the finger-tip, figures may be[Pg 64] traced in the colour when laid on, and then the figures may be brought out better by going over the lines with a pointed stick. The work demands a skilled draughtsman if a good effect or something more than the very simplest design is desired.
The book must be pressed for pasting the edges, and the paste colour must not be laid on too thickly or it will spring off when dry.
Coloured as well as paste edges will take gold tooling and afford considerable scope to the skilful and thoughtful workman.
The finest way of finishing edges and the one allowing greatest variety of treatment is known as marbling; this is a special process.
Formerly regarded as a secret art, it is now an easily acquired branch of our work, thanks to the careful experiments and excellent demonstrations of the master bookbinder, Herr Joseph Halfer, of Buda Pesth.
The whole process of marbling depends upon the peculiarity possessed by colours of floating upon a sized surface when they are mixed with oxgall, and a colour containing more gall forcing off the one first applied. Besides, the colours may be drawn about with a pencil or stick without their mixing. If the smooth edges of a book are brought into contact with such a floating surface-colour they will take up the colours completely.
Ground and colour must each have certain fixed degrees of consistency, and the atmosphere both in and out of doors has also a great influence upon the work.
The prepared body, shortly known as "the body," is at present always composed of boiled Carrageen moss. To every litre[3] of water exactly 12 g. are added and the liquid[Pg 65] is put in a saucepan, which is never used for any other purpose, and placed on the fire, great care being taken to catch it just at boiling point or it will all boil over. At the right moment take the saucepan from the fire and strain the contents through a hair sieve, what remains being thrown away as useless. The body may be used the next day, but for figured edges it is better after having been kept three days, and for veined marbling five days. The vessel containing the body must be kept covered so as to exclude all dust.
[3] Not quite a quart.
Gum tragacanth (known as "gum dragon") can also be used as a body, but Halfer's colours are not intended to be used with this.
A marbling trough to contain the body is used whilst working; it is made of zinc plate, is about 15 cm. in width, 50 cm. in length, and 3 cm. in depth, and has a sloping partition soldered near one end, and the colour not taken up is drawn into the division thus made.
A bowl, about 6 cm. across the top, is kept for each colour, and also a hog's-hair brush and a birch-twig brush.
A small bundle of birch twigs is tied round with thread, leaving about 4 cm. of the twigs free, the thickness of the lowest part tied not exceeding 1 cm. The bristles of the brush are tied back so as to form loops and held awhile in boiling water so that they retain their shape after drying and untying. With a brush made up in this way, drops may be laid on anywhere.
For all drawn-out edges only bristle brushes are used, whilst for all other edges a brush is used only for laying on the first colour. For some edges a wide brush is used, so that the whole trough can be filled at one blow; a carpet brush with a short handle is most convenient to use.[Pg 66]
A little stick for tracing the colours is also necessary—a butcher's skewer is as good as anything. Besides this, the colours are drawn by combs of various widths; these are easily made by glueing pins with their heads at fixed distances between two strips of mill-board: the result is a tool resembling a comb. All requisites can be conveniently kept in a little wooden box together with the colours. Nowadays only Halfer's ready-made colours are used.
 Fig. 43—Marbling outfit.
Any one wishing to learn the process of marbling edges would be wise not to attempt all the styles at once, but should be content to learn one before proceeding to another. We will commence with "comb" marbling, also known as "feather" marbling.
When marbling is to be done, the colours must always be tested first. A little colour is shaken into each bowl and its brush placed with it, and one or two drops of prepared oxgall added to each colour so as to make the colour float on the surface.
One prepares one's own oxgall. An ox gall in the gallbladder is procured from a butcher, a glass funnel is placed in a bottle which has been weighed beforehand, and the bottom of the gall bladder is pierced so that the bladder empties its contents into the bottle. After finding the weight of the gall, add to the weight of the gall alone one-sixth and pour into it spirit of wine until the weight is equalized;[Pg 67] shake thoroughly and strain the mixture, which will now be quite clear and ready for use.
The colours, with their brushes, are placed in the order in which they are to be used, beginning with the darkest and finishing with the lightest.
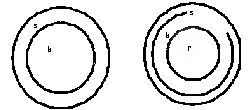 s—black; b—blue; r—red; yellow in centre.
A drop of colour is let fall from the black brush upon the body, the surface of which had previously been drawn off with a strip of paper; the surface of this drop must be about the size of a crown piece. If part of the colour sinks to the bottom, the body is too thin or the colour too thick, or the drop was too large and could not spread quickly enough; in the latter case the surplus colour will be seen lying at the bottom and will have no connection whatever with the colour on the surface; but if a cloudy connection can be traced from the surface to the bottom then the body has already become sour and in most cases unfit for use. If the colour does not retain its smooth outlines and becomes jagged, it also shows that the body is too old. If, however, the drop extends as desired and shows none of the faults above mentioned, a drop of blue colour is let fall in the centre of the first, which drives out the first drop in the form of a ring; when it has not this effect, but strongly contracts again, a drop of gall must be added, the colours wiped off to the sloping partition, and the whole process repeated. If the action of the colour was too strong, a little undiluted colour must be added. If the result is satisfactory, a drop of red is added to the blue. The colour scheme is seen in the accompanying drawing. Lastly, yellow is dropped into red, and black is thereby reduced to a very thin ring.
Before each new sprinkling, the old layer of colour must be wiped off. To do this, cut strips of stout waste paper[Pg 68] about two fingers in width and a little longer than the trough is wide. The edge of the strip is placed slantingly at the end of the tank in the surface of the body and the surface colour drawn off, at the same time lightly pressing the ends of the strip against the sides of the trough.
When the colours are satisfactory, the little stick is traced in and out amongst them. If too much colour follows the stick, the body is too thick; only a narrow line of colour must follow the stick.
If the colours are thus correctly prepared, the whole trough is sprinkled in the following manner: Along the middle of the trough the darkest colour is sprinkled in what we might call links, that is, each drop is linked to the one preceding.
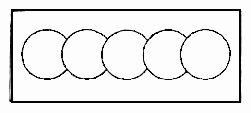
Fig. 44—Suggestion for sprinkling colour.
The second colour is sprinkled on in the same way; one circle, however, is on the right and the other on the left of the centre colour. Into each drop of the second colour let a drop of the third and then of the fourth colour fall.
The colours must then be traced crosswise with the stick in this form and then likewise with the comb. Neither stick nor comb should be dipped more than about 2 mm. below the surface, otherwise the body is set in motion and the colours disarranged.
The combs should not be made too fine, 30 to 35 teeth for every 10 cm. is the best width and sufficient for most cases. If the comb is drawn back again from the other end it produces drawn-back marbling; this is rarely applied.[Pg 69]
The finished comb marbling can be still further varied if figures are traced in it with the stick as shown in Fig. 46.
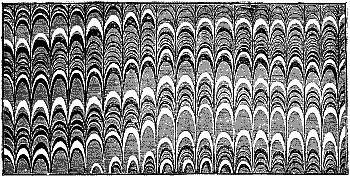 Fig. 45—Comb marbling.
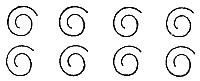
Fig. 46—Suggestion for curl marbling.
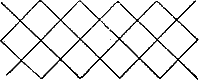
If a double comb is made—one that allows two combs to pass each other, their teeth being 2 cm. apart—bouquet or peacock and eye marbling can be produced. The double comb is drawn over the length of the trough, at the same time moving the two combs up and down evenly. This motion causes the colours to assume the form shown in the accompanying illustration.
Bouquet or peacock marbling is produced by drawing the double comb through the finished comb marble design, and if the double comb is used immediately after the cross tracing with the stick, eye marbling is the result.[Pg 70]
With a little thought it would be easy to invent other fancy designs, but these are better applied to paper, as trimmed edges are more beautiful and effective when the marbling is of simpler design.
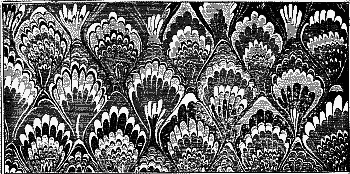 Fig. 47—Bouquet or peacock marbling.
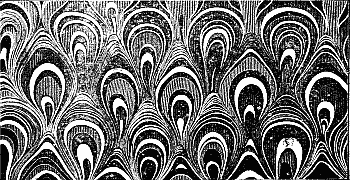
Fig. 48—Eye marbling.
Large marble, called also Turkish marble, is produced as follows, using the same arrangement of colours. Only the[Pg 71] first colour is laid on ringwise; all other colours are scattered in smaller drops from brushes. A darker colour is chosen for the last—brown, blue, olive, grey—to which is added a few more drops of gall and as much spirit of soap (spiritus saponatus), as sold by the druggists. This last colour is prepared in a larger and shallow basin. The largest brush is taken with the hand and dipped, shaken out a little, and then lightly knocked on the left hand so as to sprinkle the colour. The drops will fall in a dense shower, and, owing to their extra impetus, will drive together the preceding ones, and yet they will form the principal colour in the design. If it is desired to have veins of white in the design, a few drops of gall should be added to a little water in a bowl and used as any other colour; the same applies when using white in comb marbling. In a similar manner the so-called Kremser style of marbling is produced, but fewer colours are then used, generally only black and red, red and blue, brown and blue, green and red, at the end sprinkling a little of the strong principal colour to which, besides the spirit of soap, a drop of pure stone oil—not petroleum—from the chemist has been added. As last colour, blue grey (black with a little blue), brown, or grey is used.
Recently, a sort of paper termed Trichinal marble has been very prominent on the market. Black and light brown or red and light brown or black, red, and light brown, or white, are all sprinkled on with a brush, length (not cross) wise drawn through, and then grey with a few drops of turpentine (but very driving) is sprinkled on with a small brush. The single drops have ragged edges and produce a peculiar effect.
Thin-veined or French marbling is done upon the same ground, though it can also be done on a somewhat thinner body. The colours, however, are diluted by 50% water, and, consequently, more gall is added. As a rule, only two[Pg 72] colours are used; blue, red; brown, blue; brown, green; black, red; black, blue. The first colour is laid on in rings with a brush and must be strong enough to spread over two-thirds the width of the trough; the second colour is sprinkled over with a little birch broom in drops that spread out to the size of a half-crown. Lastly, the so-called sprinkling-water is sprinkled over with one dash from the large brush as already explained. Sprinkling-water consists of two parts water and one part spirit of soap. The small veins must be driven quite close together and the eyes made by the sprinkling-water must not be larger than a small pea.
It should be observed that for this kind of marbling only the darker shade of red is to be taken, as the light carmine lake colour sinks and does not give a fine effect. India red is best of all.
The sprinkled colours are first tested with strips of paper; cuttings of clean note-paper are saved for this purpose. The edges of a book can be marbled only when the book is level or straight, therefore they must be marbled either before rounding or the book already rounded must be levelled by knocking it on a stone or metal slab. In all cases the marbling is done—both with papers and books—by dipping from one corner to the other diagonally opposite, but never deeper than just sufficient to take off the layer of colour. To prevent the colour from getting between the leaves, the edges are held between zinc plates, which must be dried each time after using. To make the paper or edges take the colours more readily and to prevent any subsequent running off, the edges are lightly washed down with alum water. This wash is made by boiling 100 g. of alum in 1/2 litre of water and using it solely for this work.
The alum solution is laid on with a sponge, with which the[Pg 73] edges are washed over. The moisture must have thoroughly soaked in, therefore it is necessary to do it 10 minutes before marbling.
If, however, the edges have become thoroughly dry they will take the colours badly. This occurs in from 20 to 30 minutes, according to the temperature. Marbling can only be done in a warm room where the temperature is equable and where there is no dust.
The marbling bath must be of the same temperature as the room. The body must be skimmed each time before sprinkling the colours, but the colours must be sprinkled on immediately afterwards.
An excellent treatise on the work of marbling edges has appeared under the title: [4]Fortschritte der Marmorirkunst. Von Joseph Halfer. William Leo, Stuttgart.
[4] The Development of the Art of Marbling.
Gilding edges takes up most time when only occasional books are to be done. The fore-edge can be treated either flat or round. In every case the book must be placed in the press within boards. These boards are narrow strips, about 1/2 cm. thick and up to 5 cm. in width; they must be of equal thickness and bevelled only on long side, the edge itself must be rounded.
Many makers send out boards bevelled right from one side to the other. This kind is very unsuitable and has many disadvantages. The boards must not be made from wood of very open grain, and firs and oaks must not be used. The boards are to be somewhat longer than the edge about to be treated, so that the edge may be as firm and tight as possible and at the same time easy to work upon; two outer boards are added to those regularly used, as shown in Figs. 49 and 50.
The inner boards are quite flush with the book: the latter must on no account stand back. The outer boards are[Pg 74] about 3 mm. behind the others; the book is so placed in the press, and here again the book and boards must be exactly level with the press cheeks. The press is then screwed up as tight as possible. If the inner boards have not perfectly straight edges they must be planed down.
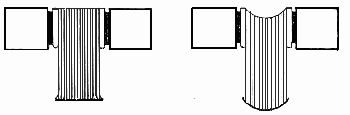
Figs. 49 and 50—Arrangement of flat and rounded edges.
The edges are to be scraped down quite smooth with a scraper or, if necessary, with a knife; the scraper must not be sharpened for this purpose as the carpenter sharpens his tools, that is, not to a cutting edge but as though it were for carving, until a bevel (or turned edge) of about 3 mm. has been ground. The edge thus gets a turned edge, with which the book is scraped. If it should cease to "take," the old edge is rubbed down with a steel and a new one made by a few firm strong rubbings. The edge should be wetted a little to prevent its heating. Flat edges are scraped with a flat scraper, rounded edges with one suitably rounded. In this case the round of the blade must be more decided than that of the edges, as it would otherwise be impossible to get into all parts of the edges. Scraping with pieces of glass is an antiquated, clumsy method.
When scraping, the press should lie flat on the table edge, the other end being supported by the press-jack. In scraping, the blade is held in both hands, scraping away from the worker, the scraper sloping forwards. The press must be made immovable. Scraping is continued until all places have been gone over and the whole is perfectly smooth[Pg 75] and even. When this is accomplished, the edges are thinly coated with paste, which is well rubbed in along the sheets with a bundle of waste paper until the edges look as if burnished. It is advisable to damp the edges before scraping, as the blade then takes hold more uniformly.
Then bolus is mixed with glair as a body colour, laid on sparingly, very evenly, and free from streakiness, using a thick hair brush for the purpose. Bolus is sold to the trade ready prepared under the name "Poliment." Some time before using, it should be scraped into a suitable vessel and mixed with glair. The latter is prepared by adding the white of an egg to 1/4 litre of water and beating to a froth. It is then strained through a piece of linen or, better, through a filtering paper.
After the bolus ground has dried (which takes a few minutes) the gold is laid on. There are various methods of doing this. The surest and quickest way is to lay it on with the gilder's tip.
A row of long badger hairs is glued between two pieces of cardboard; this is drawn a few times over the hair of the head, which makes it take the gold easily. Gilders' tips are to be had at any colour dealer's. Gold is taken from the gold book, laid upon the gold cushion, and cut into suitable strips with the gold knife. The gold cushion consists of a piece of calf stretched raw side out on a board. Between the leather and the board there is placed a pad of cotton wool, and over the wool a pad of blotting-paper. The gold knife is a thin, pliant, two-edged knife without a sharp edge, in fact it is better to blunt the fore-edge from time to time by rubbing it on a polished steel. If the knife is too sharp it will cut the leather cushion. Taking the gold from the book will not be found a very easy task. The top leaf covering the gold is turned back, the book with the uncovered leaf of gold laid on the cushion, and the book slowly lifted up. The[Pg 76] gold-leaf remains flat upon the cushion and may be cut with the knife as required. If a draught has turned the gold-leaf over or made it lie unevenly, it may be righted by lightly tapping with the knife on the cushion near the gold; careful breathing on the centre of the leaf will help in more awkward cases—the rest must be learned by practice. Never attempt to take hold of gold-leaf with the fingers; only the experienced workman knows how to carry gold-leaf with a finger.
For gilding the edges the deep red gold is always used, or else the so-called orange gold, which is somewhat lighter in tone, but never the lemon or green gold.
For flat gilt edges the gold is cut about 3 mm. wider than the book and into as many strips as would make up the length of the edge if joined together.
Before laying on the gold, the bolused edge is brushed down with a hard clothes-brush to remove all hair, dust, &c. Glair is now liberally applied with a thick hair brush, laying it on separately for each strip. The gold is now lifted from the cushion with the gilder's tip so that it very slightly projects over the end of the brush and is transferred to the wet edges. The tip is brought to within 1 cm. of the surface of the edges and with a quick motion the whole surface of the gold is at once brought into contact with the glaired edges, which will instantly take it up quite greedily. The gold slightly overlaps on to the inner boards. In this one continues, preparing the edge for each fresh strip and laying on each strip so that it slightly overlaps the other until the whole length is covered with gold. If the gold should be injured in any way, the press must be tilted so as to allow a little glair to run under the gold to the spot and then a larger piece is laid over the faulty place. When it is seen that all parts are completely covered, the press-jack is put aside, the press is taken by the screws between the beams and raised[Pg 77] high overhead so that the gilded part is turned downwards. One end is carefully lowered until the glair has run to one side and dripped off. As soon as the greater part of the moisture has been removed, the press is either placed upright with the edge to the wall and head downwards or it is laid across the table where it will not be disturbed, with the head of one screw on the table edge. In this way the moisture runs off quicker, as the whole length of the edge drains together. When dry, the edges are burnished, and it is in seizing the right moment to do this that the clever finisher shows his skill. The first test is made on the boards. If the gold comes off on scratching the portion on the inner board with the finger-nail, the edge is still too damp; if the scratching makes it shine, it will be all right. The experienced worker can trace the progress of drying with more certainty by breathing on the edges; the slowness or rapidity with which the breath disappears points to the dry or moist state of the edges.
When it is believed that the proper degree of dryness has been obtained, the edge is polished with a burnisher. A piece of tracing paper which has been waxed on the upper side—that is, the side next the burnisher—is laid on the fresh edge to protect it from injury. The burnisher is then worked crosswise, stroke by stroke, over the paper (through which the edge can be observed) the length of the edge; if it is noticed that gold and moisture adhere to the paper near to the boards, the work must be laid aside to wait a little longer. If, however, the whole process has gone on satisfactorily, the edge is gone over with a linen rag and a little beeswax. It is not at all better to use a silk rag instead of linen, for it happens too easily that tiny threads stick to the gold unnoticed and are afterwards rubbed into the edge. After going over the edge with the waxed rag, the bare edges may take a greater pressure in burnishing, and if no flaws are[Pg 78] now perceptible there need be no hesitation in burnishing with very strong pressure. The burnisher must be held quite level, the long handle fixed against the shoulder and the lower end firmly gripped with both hands just above the metal fastening. The fore-edge of the burnisher is not to be held parallel to the sheets, but must be at a slight angle; it thus slips better over the paper and there is less danger of making rills and furrows, and the polish is obtained more rapidly. Flat edges are always burnished crosswise, but at the end a broad burnisher may be used for going over the edges lengthwise with a few slow, firm strokes, so as to ensure a very level surface.
Quick burnishing must always be avoided; it heats the gold, which rubs off under the burnisher, and causes holes which can never be remedied.
As soon as one length has been burnished, the waxed cloth must be applied before proceeding further.
Slight flaws in the gold itself, or due to bubbles in the glair, may be put right by touching the faulty places with a small brush dipped in rectified spirit and immediately laying on a piece of gold; if the edges had not yet been gone over with the waxed rag, it would be sufficient to breathe on the place, lay on the gold, and burnish under paper. This need only stand a few minutes, as it quickly evaporates, and may then be burnished again at once, first with, then without, the tracing paper. It must be observed that such faulty places must be burnished in the direction of the sheets, never crosswise.
Rounded edges are more difficult to work; the scraping alone being more troublesome. Each piece of gold is halved, laying on each time a little beyond the deepest part of the round. The press is so lowered as to give a decided slope to the half of the edge to be operated upon. The gold is cut to a little more than half width, and only the under[Pg 79] side to a little beyond the middle is glaired, which in this case must be done very freely. The strips of gold-leaf are laid on as before. When one side has been covered with gold, the press is turned and the other half of the round similarly treated. Care must be taken that there is always a liberal supply of glair in the depth of the round. To drain off the superfluous glair the press is placed so that the glair runs off on the long side; the gold is in consequence better taken up in the round.
Burnishing is here also done under a piece of paper, and it is better to work crosswise, first one half to the centre of the round and then the other. Only thin books are burnished along the edges with a round burnisher. After the round edges have been burnished crosswise they are burnished with the round burnisher.
Burnishers are made of agate or of bloodstone; the latter is said to produce a higher polish, but this may be due to our being more accustomed to its use. In selecting burnishers the flat ones should not be too wide and the strongest of the curved ones should be taken.
Top and bottom edges undergo the same treatment in gilding as the flat fore-edge, except for a few slight necessary differences in the method of fixing the book. In the first instance, long boards are used instead of the outer boards—these protect the book from injury. The boards (the short sides of cross-boards are often used instead) are laid exactly in the groove at the back, but the outer boards are set back so that they are exactly in a line with the depth of the round edge. If this precaution is neglected, the chances are that little ridges will appear in the fore-edge where pressure has been applied. Fig. 51 shows the arrangement in the press.
Scraping is done from the back to the fore-edge. As the back is not pressed so solid as the rest of the edge, it frequently happens that it does not get scraped so smooth. In[Pg 80] this case recourse may be had to a fine file and fine sand-paper. The rest undergoes the familiar process. Take care that no glair runs on to the fore-edge when applying it or when draining it off. It is convenient to place the press crosswise on the table so that the fore-edge stands at its lower side; the glair then drains off the whole length of the edge more evenly and drains more towards the fore-edge. Many finishers elevate the press, letting it drain towards the fore-edge; there is no danger to the latter if the press is tipped forward from the top. On no account must the glair be allowed to drain towards the back, as this part is very open and all the moisture would gather there.
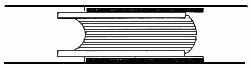
Fig. 51—Top edge arranged for gilding.
Besides the method of laying on the gold-leaf with the gilder's tip there is another which is specially used in gilding hymn-books; a piece of gauze is stretched across a frame, passed over the hair, and then the gold for the entire length of the edge is at once picked up and laid on. Round edges may be similarly covered by means of a couple of threads or horse-hairs stretched on a frame. The threads can be shifted to the short sides of the frame; they are adjusted to the width of the edge, allowing for the rounding, and are slightly greased by passing over the hair, and thus pick up the strip of gold at the edges. Just before laying on the gold, the threads are adjusted so that the gold fits the shape of the edge. Then plenty of glair is applied and the gold quickly and truly laid on.
This method is not exactly difficult, but it is not quite so safe as laying on with a gilder's tip, especially for very large edges.[Pg 81]
The simplest way of laying on for flat edges is by means of strips of paper. This has the advantage of allowing a larger number of gold strips being made ready for laying on at one time. Select a piece of stiff and not too thin paper, cut into strips about the width of the strips of the gold-leaf, draw one side of the paper across the hair, and then take up the leaf so as to allow it to project a little over the edge of the paper strip. After glairing, strip by strip is laid on.
For very cheap work it is often necessary to gild edges with alloyed gold. Such edges are not so carefully and thoroughly prepared; in particular, they are not scraped, but rubbed down with sand-paper. Blood serum is used instead of white of egg; this is prepared by allowing ox-blood to stand a few days and then filtering off the clear liquid.
Aluminium is laid on a gelatine solution: one tablet of gelatine to 1/4 litre of water.
Gilt edges are also frequently tooled or scraped and painted. This work comes within the sphere of the art binder and cannot be dealt with in this book.
All other coloured and marbled edges can be burnished in the same way as gilt edges. In good work this must always be done.
In small shops headbands are made to this day of striped calico, which is cut into strips of 2 cm. wide right across the pattern, and one edge is pasted round a thin cord. After drying, pieces the exact size of the back of the book are cut off. The back of the book at the head is glued with a not too thin glue and the headband glued on so that the pad made by the cord lies on top of the edges and thus covers the place where book and cover join.
 Fig. 52—Headband shears.
Woven headbands are now to be had so cheap that it is no longer necessary for the binder to make his own. The[Pg 82] cheaper kinds are woven of cotton, and of these there are bands made which have two pads, each edge having a different colour. This band is cut along the middle for use; for the rest, it is cut into pieces according to the width of the book and then glued on to the back. Better kinds in silk are only woven on one side, therefore the cutting asunder is not necessary. For work in quantities, the headbands are cut the size of the back with the adjustable headband shears.
For extra work the headband is hand-worked in silk. This work can only be learned by practice, although its execution is not difficult; such books are only headbanded after boarding.
To make the filling for the headband, cut into strips pieces of vellum which have been pasted together, between which a piece of tough, thin pasteboard may be pasted to further strengthen. These strips are cut a little less than the height of the squares and a little longer than the width of the back. So as to facilitate the work, the strip is at once curved to the rounding of the back.
Take two silk threads of the kind sold as "Cordonnet" silk, each thread of a different colour. Both threads are threaded in a sewing needle, the threads taken double, the ends of both double threads knotted together. The book is clamped in the ends of a press and stands slanting a little outwards. The needle is inserted in the back groove of the first sheet at the left hand underneath the kettle stitch and the thread drawn out to the knots. Thus one thread is always above and another below. The strip of vellum is now placed upright on the outside edge of the head, the thread is brought over from below, and is stitched from above to below close to the head, with the hanging needle through the first sheet[Pg 83] under the kettle stitch outwards. Bring the same thread once more up over the strip, let the needle hang in the hollow of the fore-edge, taking in its stead the other thread which takes up the first, bringing it out underneath the vellum strip. By this, the first thread is firmly drawn as a chain stitch into the headband now beginning. The second thread is now brought upwards but need not again be taken through the sheet; it is taken back under the vellum strip once, and at the second time the needles are changed in the hollow as the first thread one more takes up the second thread and draws it into a chain. Thus the work goes on; after several journeys the thread is once again drawn out through a sheet until both threads are brought out at the other end of the back and pasted down. The first knots must also be undone and the ends pasted so that they do not show on the back. It is essential that the vellum strips should be always firmly and evenly sewn upon the edge, and also that every winding of the thread and the chain lies quite regular.
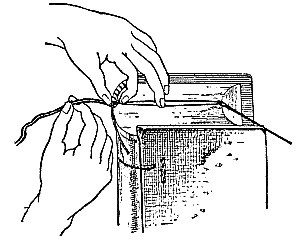
Fig. 53—Headband working.
[Pg 84]It is possible to make a variation by making a few stitches with a third thread of another colour in the centre of the headband. Any vellum projecting at the ends must be cut off flush with the book.
Some books are given a marker; this is made of silk ribbon or of a cheaper kind specially woven for the purpose. It is cut long enough to allow of its projecting a little at the head and pasted there, and at the same time comfortably held by the finger at the corner diagonally opposite. The marker is glued on before headbanding.[Pg 85]
The boards may be fastened to the covers in various ways, apart from casing, i.e., fixing books in publishers' ready-made cases.
1. Fastening upon bands (ordinary fastening).
2. Fastening below bands (fastening on a deep groove).
3. Drawing the bands through the boards (fastening with laced bands).
The boards for the books are nowadays manufactured from pulp, excepting in a few districts in Pomerania and East Prussia where wood boards are still occasionally made. Of these pulp boards the better kinds are called mill-boards; the cheaper are called straw-boards. Leather boards are not suitable for books as they invariably wrinkle or cockle. The boards may be cut to size before fastening on, or this may be done even after the fastening on has been completed. The former is generally practised where there is a board-cutting machine, but even then further attention is usually given to the shaping of the boards in the case of "extra" work.
The board-cutting machine is a very useful ally, for by the aid of quickly adjusted rectangles and parallels a board may be cut perfectly true.
The boards are selected according to the size and thickness of the book, marked out, and cut perfectly rectangular. The[Pg 86] boards must slightly project at top and bottom as well as fore-edge so as to afford sufficient protection to the book. The margins so projecting are called the squares. Small books are allowed a small square, as a matter of course, and large books a square correspondingly larger.
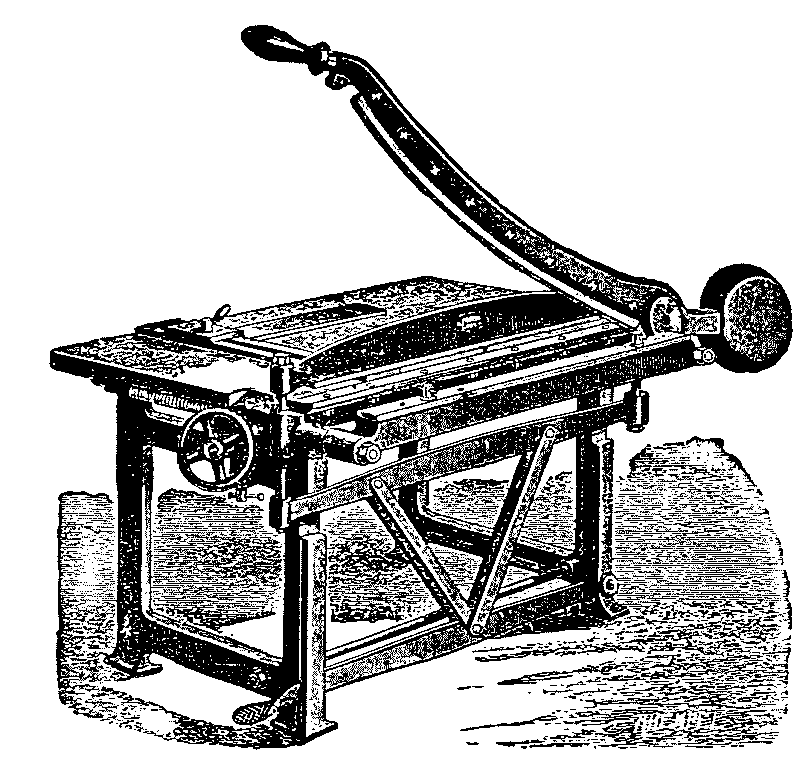
Fig. 54—Board-cutting machine.
Where there is no board-cutting machine, the boards must be cut to size with the knife upon a cutting-board, using a straight edge for the line.
The knife used is the well-known bookbinder's knife—Henckel Bros.' Solingen make is the best. These knives—both in fixed and removable wooden handles—are made of "glass hard" steel. If the point is worn away, a piece about 1/2 cm. long is knocked off with a hammer on an iron edge, thus making a fresh edge. The cutting-boards must be of maple, beech, or pear tree.[Pg 87]
If it is intended to shape the edges of the board on the book, it must be cut about 1 cm. larger each way so as to allow for further trimming.
Fastening the boards to the book is called "boarding." This can generally be done as well with paste as with glue; the former is preferable but necessitates longer pressing and drying. Glueing is quicker, but the bands cannot then be pressed so evenly into the boards.
For ordinary fixing on the bands, the insides of the boards are pasted to about 3 cm. in width, the bands also pasted, and the board laid on, bringing it well up to the groove. If it is intended to glue up, the bands are also glued, provided they have not already been glued on—a method preferred by many experienced hands. The bands must be pasted so that they radiate from the back without any tangle; a morsel of paste the size of a pea is laid on the band from underneath with the folder or point of a knife, the band smoothed down, and the thing is done. After glueing-up, the book is pressed between boards. If zinc plates are placed under the boards whilst pressing, the pasted parts will be pressed quite smooth and shiny.
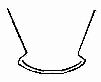 Fig. 55—Spring back.
For cloth or half-cloth binding a hollow back is frequently glued on. To make the covering material of the back more lasting, a back is made up of strong wrappers or some other tough material, which extends over the back underneath the cover. This backing material must be cut 4 to 5 cm. wider than the width of the back and about 1 cm. longer each way than the book. This strip is pared very narrowly along both sides with a sharp knife on the so-called paring stone. A second strip—the backing—of the same material is cut the same length but exactly the width of the back of the book and is glued on to the middle of the wider strip. The overlapping parts at the sides are broken in towards the middle, close by the inner packing, and the[Pg 88] crease well pressed down with the folder. These overlapping edges are then turned back again and a rule is laid on the packing parallel with the edge but drawn back to the middle about 2 to 3 mm. according to the thickness of the cover. If the moveable flaps are now again laid over towards the centre and narrowly creased near the first fold over the rule, a second parallel fold is obtained which allows the book to open much better. The back in section appears as illustrated in Fig. 55 after the middle part of the packing has undergone the necessary rounding.
Rounding can be done either by rubbing the middle part round with a proper wooden tool in a rounding board having several hollows of various degrees of convexity, or by drawing the back with a rocking motion under a broad folder. Such a made-up back must fit perfectly true to the groove and on the back. This is the hollow back. Before fastening it to the book, the latter must have a piece of stout paper pasted over the back; good packing-paper is the best. Newspapers and loose advertisements out of magazines are not at all satisfactory and must not be used. The book is glued and the paper laid on and glued. In doing a large batch the books may be pasted in the press and the paper pasted on.
Many experts glue the hollow backs on and use paste for the board. Very frequently the glue comes through and spoils the end papers. It is better to raise the flaps of the back, paste the tear off of the end paper, paste the bands on to it, and the loose flaps as well, and then paste this on the outside and set the board on it. The latter must be set back a little further in this case so that the book moves freely in the joint. The back, therefore, is a hollow arch[Pg 89] stretching over the book from groove to groove, the loose flaps of the packing adhering between book and board. The book is pressed until thoroughly dry—best between zinc plates.
For shaping boarded books an edge rule is used. This is a thin iron rule not much longer than the width of the book. On the long edge an iron pin about the width of the edge is soldered. This tool is inserted between book and board so that the iron pin lies close to the edge of the book; if the board is trimmed along this it will leave the board exactly as much larger than the book as is the width of the rule.
Knives or points must be well grasped in cutting boards. The edge must be clean and square.
If the boarded book has a hollow back, first one end is shaped and the projecting back is neatly cut clean and straight to the other board with the shears, and then the other end is shaped.
Boards are fixed on a deep groove by pasting them on the outside to a width of about 3 cm., placing them direct on the book, backing them firmly into the groove, and then pasting the bands very smoothly upon the boards. A folded piece of waste paper is placed on the pasted part, a piece of zinc plate over it, and the book then pressed. The double leaf is used to prevent any sticking to the zinc plate, which bands are particularly liable to do if the plates had not been properly cleaned after previous use.
Boards to be fastened into a deep groove must be lined with waste paper; this is done with paste. When packing, a narrow strip of paper must be brought over the inner edge of the board in the groove to the outside, so that the cut edge of the board is covered and does not strain or swell.
This is also done when boarding, as follows:—
At the present time, all good half or whole leather bindings[Pg 90] have the boards laced through in good shops. At the outset the bands must be left with longer ends for this—5 cm. at least on each side. A parallel line is marked on the board along the back about 6 to 8 mm. from the groove. The board is fitted on the book just as was done when fixing in the groove, and exactly opposite each band a point is made on the marked lines. The board is then removed and at the points marked is pierced slanting inwards—about half right angle—with a pointed awl. The board is turned, and sideways, near every first hole, a second hole is made which likewise takes a slanting direction to the board. The bands are drawn through these holes, and to be able to do this the bands must be well pasted and twisted to a point; cutting off the extreme ends of the bands will facilitate the drawing through. To draw the bands quite firm and tight the boards are stood upright in the groove, the bands drawn through as tight as possible, and in this position—that is, with the boards half open—they are knocked down with a hammer upon a firm bed. The principal thing to be observed is that the bands are pasted fast in the holes, but where they are seen they are knocked down quite flat. The boards are now slowly closed, the ends of the bands projecting at the outside are cut off short, and the book pressed, using zinc plates inside and out.
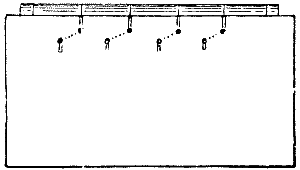
Fig. 58—English style of lacing boards.
The French method of lacing is not much practised in other countries; it is somewhat more roundabout, and is done[Pg 91] before cutting—immediately after glueing up. The boards are each shifted to right or left for cutting and cut together. By so doing, the edges always correspond exactly to the back groove.

For every band there are three holes bored forming a triangle. The awl holes are directed towards the middle of this triangle. The band must describe this course. The end is pushed under the piece of the band seen on the inside of the board, the bands drawn tight, with board standing upright as before described, also well knocked down in the same way, and the end cut off just beyond the piece under which it is drawn. The book is then pressed between zinc plates.[Pg 93] [Pg 92]
Formerly only one way of making the cover was known, and that was the gradual making of it on the book itself. This has been considerably changed of late owing to the production of immense quantities for publishers' requirements. Book and cover are now in many cases made separately, the former being afterwards glued into its cover or "cased."
The publisher's case is nowadays a necessary evil, without which we cannot get along and which we have got to take into account. In spite of it, bindings are still being produced in the old approved way, particularly in small establishments and in high-class shops. Before we proceed with the preparation of the cover after the trimming, we must know how it is intended to treat the book. In the preceding chapter we have learned the methods of boarding, and this now leads to the methods of covering. Previous to that, however, we would like to give a plan showing the various ways of treating the volumes under consideration, and then the chapter on the covers may be given (see plan on page 94).[Pg 94]
Table of Headings:
Col. A: Folding. Pulling to pieces.
Col. B: Sewing.
Col. C: Holländering.
Col. D: Gluing. Pasting.
Col. E: Pressing. Cutting.
Col. F: Marbling and gilding edges.
Col. G: Rounding. Backing.
Col. H: Boarding.
| Work on the book. | ||||||||||
|---|---|---|---|---|---|---|---|---|---|---|
| First stage. | Second stage. |
|||||||||
| Style of Binding. | A | B | C | D | E | F | G | H | ||
| Brochure | — | — | ||||||||
| Brochure Paper boards | — | — | — | — | — | |||||
| School books | — | — | — | — | ||||||
| Half cloth (bound) | — | — | — | — | — | — | — | |||
| Half cloth (cased) | — | — | — | — | — | — | ||||
| Whole cloth (bound) | — | — | — | — | — | — | — | |||
| Whole cloth (cased) | — | — | — | — | — | — | ||||
| Half leather | — | — | — | — | — | — | — | |||
| Half calf, extra | — | — | — | — | — | — | — | |||
| Whole leather | — | — | — | — | — | — | — | |||
| Publishers' cases | — | — | — | — | — | — | ||||
Table of Headings:
Col. I: Making the case.
Col. J: Covering.
Col. K: Pressing.
Col. L: Preparing the leather.
Col. M: Covering.
Col. N: Fastening the book in the cover.
Col. O: Pasting down.
Col. P: Jointing.
Col. Q: Pasting down end papers.
Col. R: Hand tooling and decorating.
| Work on the Cover. | |||||||||||||
|---|---|---|---|---|---|---|---|---|---|---|---|---|---|
| Casing. | Covering. | Finishing. | |||||||||||
| Style of Binding. | I | J | K | L | M | N | O | P | Q | R | |||
| Brochure | — | ||||||||||||
| Brochure Paper boards | — | ||||||||||||
| School books | — | — | — | ||||||||||
| Half cloth (bound) | — | — | |||||||||||
| Half cloth (cased) | — | — | — | — | |||||||||
| Whole cloth (bound) | — | — | — | ||||||||||
| Whole cloth (cased) | — | — | — | — | — | ||||||||
| Half leather | — | — | — | — | |||||||||
| Half calf, extra | — | — | — | — | — | ||||||||
| Whole leather | — | — | — | — | |||||||||
| Publishers' cases | — | — | — | — | — | — | |||||||
The boards for making the covers are cut the required size exactly as when cutting for glueing; a packing of thin cardboard or thin wrappers is cut for the back. The width of the back from first to last sheet is carefully measured by laying across it a strip of paper, the dividers are adjusted to the measure, and this is transferred to the wrapping paper. The packing is cut to suit the boards in height. When cloth only is used for the cover, the cloth is cut 2 to 2-1/2 cm. longer and about 4 cm. wider than the packing. The width of the back depends upon the question of cost or other consideration. In whole-cloth bindings the cloth is, of course, cut in one piece and 1 to 1-1/2 cm. larger all round than the boards and back taken together. Glue is always used for cloth. As piles of pieces of cloth shift about in glueing, a touch of glue is given to two corners of the pile and left to dry a little. These corners hold the pieces of cloth in position whilst being glued and prevent the edges from being smeared. In glueing cloth it must be seen that the glue is well rubbed into the grain or artificial indentations.
For covers which have only the back made, the packing is laid upon the middle of the glued cloth and the boards hinged on right and left at side of it, leaving, however, as much space between as is required by the joint and the thickness of the boards. As a rule, the space required will be as much as the thickness of the board. In making leather backs one allows a little more.[Pg 96]
The cloth back is at once turned in at head and tail after the boards have been laid on, and the cover rubbed down in the groove with the folder.
Turning-in is done by pushing the side to be operated on a little over the edge of the table, and with the thumbs the cover is pressed over the edges of the boards with a sliding motion, whilst the forefingers hold the cover underneath.
Whole-cloth bindings are turned in in the same way, but in this case the corners must be first cut off obliquely as shown in the illustration.
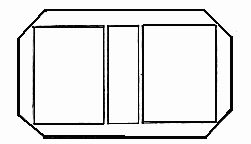
Fig. 60—Corners cut for turning in.
The cloth is cut off at the corners so close that only as much as the thickness of the board remains. Thick boards have therefore more cloth left at the corners than thin ones.

Fig. 61—Corners: Right and wrong.
The top and bottom edges must be turned in before the fore-edge. At the corners, the cloth is nipped a little with the folder, without, however, making an oblique fold; there should rather be a hollow round turn-over remaining which is only drawn on with the fore-edge, then from the corner slanting to the board.[Pg 97]
The edges must always be turned in quite sharp; there must never be a hollow place on the edge of the board. On the other hand, it looks bad if the edges have been much rubbed down with the folder, at least with cloth; it is different with leather.
The turned-in cover is turned and the front side well rubbed down under paper with the folder. When cloth has once been glued it must not be allowed to lie long as it rolls up and sticks together, which renders it practically unworkable.
The finished covers are laid between pasteboards to dry; only when the drying has to be done in a hurry may they be hung on stretched cords. The latest in this work is a case machine which turns out 550 cases per hour.
When leather is used, it must first be pared, that is to say, the parts to be turned in where it is too thick in the joint must be gradually thinned.
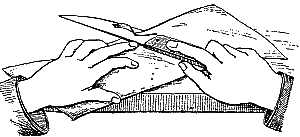
Fig. 62—Paring with Offenbach or Berlin knife.
The paring knife, of which there are various kinds, is used for this work. The best known and the most generally used are the Offenbach and the Berlin, both very much alike except for a slight difference in the edge. The quickest paring knife is made after the French pattern.[Pg 98]
This knife is called a "thrusting" knife because of the manner of using it, in contradistinction to those generally used with a cutting motion; but even these a skilful worker will be able to use with a thrusting motion. The under side of the paring knife is covered with leather.
A lithographic stone or piece of marble will serve as a bed upon which to pare the leather. The stone is set in a frame under which there is a bar to hold it against the edge of the table so that it does not work backwards whilst in use. All edges are rounded off and the surface is ground and polished.
Ability in paring does not entirely depend upon the skilful use of the knife but also upon the way the left hand manipulates the leather and upon a thorough knowledge of the nature of the leather. It should not be forgotten that the latter has a grain, though very few bookbinders pay any heed to this. With many leathers it is a very difficult matter to pare against the grain, especially pig-skin and cow-hide. One may generally take it that a leather pares best in the direction in which it stretches least. The grain runs from the back to the sides. The Offenbach knife is narrower and ground more to a square point than the Berlin knife, the edge of which forms a sort of half right-angle to the blade. See manner of holding the knife in Fig. 62.
Quick working is an advantage of the Offenbach knife, which is due to the fact that less attention need be given to holding the leather on the stone, and paring proceeds from left to right, the left hand at the same time helping to push the knife. The Berlin make pares from right to left; here the blade is held almost parallel to the edge of the leather, the point of the knife inclining to the leather; with the other the edge is cut over slantingly with the point outwards.
To use the French knife requires more practice; the cutting edge is almost at right angles to the knife, and, besides, the method of holding it is somewhat unusual. For[Pg 99] paring all thick leathers or large surfaces it surpasses all other makes in execution. To make the leather more workable for paring it is previously manipulated, that is to say, it is turned flesh side outwards and rolled to and fro, whilst firm pressure is applied with the second and third fingers of the right hand, thus making it pliable.

Fig. 63—Paring with French knife.
In an ordinary bindery thin or split leathers are mostly used; these do not require very much paring, which is only necessary for pig-skin and the finest moroccos. The latter leather is narrowly pared about 2 to 3 mm. wide along the edge for half as well as for whole bindings. Only the back is pared the whole width, therefore 1 to 1-1/2 cm. has to be nicely gradated. Broken places, inequalities of the edge, or even holes to be filled in, greatly add to the difficulty of the work.
In the thicker skins also—thick places often occur in the otherwise thin skins—the joint must be thinned down. The packing is laid upon the wrong side of the leather and its[Pg 100] position marked out with the folder. The leather is pared about 1 cm. in width along this line, that is to say, it is pared so that 1/2 cm. right and left along the mark the thickness of the leather is reduced.
As a rule, first-class books are not provided with a cover made in advance, and even those described by publishers as "super extra" do not rise above morocco goat.
We have to do with the following leathers which are mostly used for the publishers' bindings: Goat-skin (of oriental hybrid sheep), morocco goat, sheep-skin (unsplit sheep-skin), and split sheep-skin [or so-called skivers]. There is another goat-skin, not Levanted, sold and used under the name "bastard" leather. "Levanting" means to imitate by pressing the grain natural to the skins from the Levant. Most kinds of our leather receive their grain by such process.
For whole-leather bindings a narrow margin is pared down all round the edges, the turn-in at the back is pared just as much as is necessary, and also at the corners. The leather corners are cut slant-wise at the outset, and the paring is done so that the thinning begins exactly at the edge of the board.
In leather bindings the board, as well as the back packing, is glued on, rubbed down, and the edges then pasted and turned in, the leather is rubbed down sharply in the joint, the back, and on the edges; but a folder must never be used on the leather covering the board itself.
It frequently happens that the board is finished off with round corners; in this case, the method of turning in cloth as well as leather is slightly different. The two neighbouring edges are turned in. The leather or other material is cut off not quite so close as for square corners, and the material is drawn very smoothly and neatly over the edges in little folds, using a pointed folder for the work.
Books not wholly covered with cloth or leather get corners[Pg 101] of the same material as is used for the back. Cloth corners are not cut singly, but a strip of material long enough for the required number of corners is glued and then cut with the shears into pieces of this shape(a) or, better(b), placing them on the boards in such a way that the material projects a little over the corner of the board. First of all, the lappets of the top and bottom edges are turned in, the corners nipped in the manner shown, and then the lappets of the fore-edge are also turned in. Leather corners are treated in the same way, but these are cut from waste pieces according to the zinc stencil plate kept for the purpose, and then pared down.
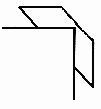
Glue is used for fixing on cloth corners, but strong paste is always used for leather. All edges and corners are well rubbed down with the folder and left smooth and sharp, but, on the other hand, the grain on the board side must be left uninjured. Insufficient paring of the corners or using only the fingers for turning-in causes very thick edges; such work is out of date and would not be done by any thoughtful workman.
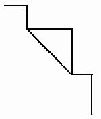
Books bound in half-cloth or half-leather have the sides covered with paper; the latter often with cloth. When cloth sides are used, the material must always harmonize with the back both in regard to colour and texture. On each side to be turned in the paper is cut 1 to 1-1/2 cm. larger than the surface of the board to be covered. The paper is cut along the back with the knife and rule. The corners are turned down in half right-angles according to the size of the cloth or leather corners and somewhat smaller than these, and cut off with the shears as shown in the illustration, using the fold as a guide.[Pg 102]
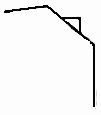
In ordinary work with very small corners, especially in large quantities, the corners may simply be cut off diagonally, and if there are many covers they are knocked up and the cutting is done with knife and rule or with the machine.
As a trade article for the publishers, the finished cover is lined with paper on the inside, both for the sake of improved appearance and to prevent the drawing outwards. For every board a sheet of paper is cut about 1/2 cm. smaller than the board and pasted on. The covers are placed between boards to dry.
Covers are generally decorated in some way; as a rule by means of the blocking press. Where they get any hand tooling, it is always done on the book when bound, for which no case is made in advance. Simple gold lines along the back and corners of the cover are excepted; such work is known as "filleting."[Pg 103]
We make a distinction between gold tooling and blind tooling. The latter is simply an impression on the leather or other material without the use of gold, whilst the other is an impression upon a specially prepared leather or other surface, using gold leaf.
Skill in blocking depends first of all upon a tasteful and suitable selection and arrangement of the engraved blocks and letters necessary for the decoration and inscription.
The blocks, &c., are to be had ready made from the engravers in properly arranged sets; but still it is essential that the finisher should possess certain artistic taste and feeling, especially in making up the lettering. It must be borne in mind that in an inscription or title the principal part (word or line) must be distinguished by larger or heavier type; furthermore, two lines of equal length must never appear in an inscription. Short words (the, and, for, &c.) worked into an inscription as separate lines add considerably to its appearance. See pp. 148 to 153 for what is said on the arrangement of the title in hand lettering. The same applies to the arrangement of all lettering.
The blocks and letters are always fixed to the upper part of the press—the platen.
To enable alterations to be made quickly or to secure pieces which may have slipped, there is a draw-out plate[Pg 104] made in all modern blocking presses. The engraved blocks are not affixed to this plate with glue but with cobblers' wax. The following is a practical way of managing the ornamental blocks: On a thin but very strong board about the size of the article to be blocked, the blocks are arranged with the backs uppermost, the engraved face being next to the board. This board is fixed with wax exactly in the centre of the lower part of the press—the table. By "exactly in the centre" it is to be understood that the centre of the various blocks brought together lies on or near the centre of the draw-out plate. If there are more and heavier blocks fixed to the upper than to the lower side of the plate, the latter must be lowered a little—in a word, the plate must be so adjusted that all parts receive equal pressure. It is only by making a few trials that one can learn exactly what is right.
The press should be warmed by this time, and it is well to slide in the table with the blocks adjusted upon it, and to let it remain under light pressure until plate and table are warmed throughout and no trace of moisture may be seen on either. Now put a little wax on each block, lay over them a piece of stout wrapping paper, cardboard, or similar stuff, push in and press gently; the wrapper also may be waxed. After about five minutes, open the press to see whether all parts have stuck. Until this takes place the press must remain closed. If, however, all pieces are sticking fast, draw out the table and examine the imprint of each particular part to see whether the pressure is equal; if this is not so, it remains to be seen whether such inequality is due to a faulty fixing of the plate and, if necessary, to rectify it; otherwise, pieces of paper must be made up into a suitable packing and laid upon the back of the blocks until all inequalities are removed and an even impression is obtained.
This done, the back of the set-up blocks, or the wrappers affixed thereto, is waxed at as many places as required, or[Pg 105] rather as far as the set-up blocks extend, the plate pushed in, and the press closed until the set-up blocks adhere to the upper plate. The lighter this first impression is made, the easier it will be to detect any inequality on the table (or matrix) and to set it right by backing up with paper.
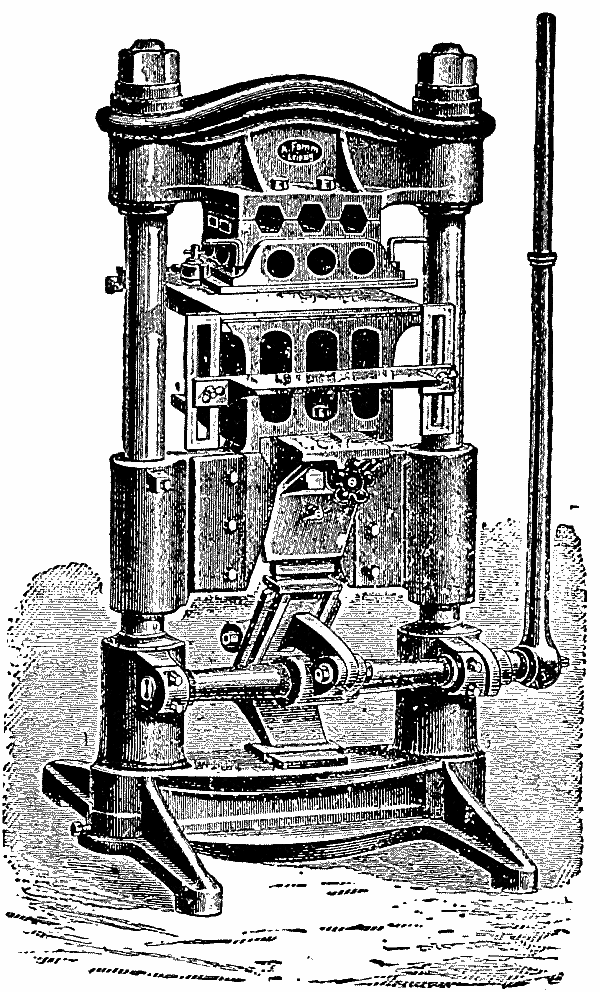 Fig. 64—Blocking press.
Before proceeding further, a few words must be said about the construction of our modern blocking presses. For modern blocking we use knee-lever presses, whilst balances are now no longer used.
On the upper part there is a sliding plate—the so-called platen—which draws out on prismatic rails.[Pg 106]
A second plate works on hinges at the side of the sliding (or draw-out) plate and can be pulled out to the left. This plate is used principally for colour blocking—the other plate for gold.
Blocking can be done in gold and colour immediately after each other, and if the plate is in duplicate, four impressions can be made in succession without having to take off and change the plate.
In the upper plate there are round borings for the gas burners or hot irons used for heating the press; the latter are out of date and do not produce a steady temperature.
It now remains to insert the article to be blocked in the press so that it will be blocked exactly on the spot required.
There are several ways of attaining this object, which are adopted according to the kind of work in hand. The surest way is to mark the place by pins.
Two large drawing pins are pasted upon pieces of cardboard, a second piece of board is placed over each one so that the head is embedded between the two pieces but leaving the points free. The gauges thus made are fixed with wax at convenient places, best on the middle line above and below the table but in such a way that they themselves are not touched by the plate. To prevent their falling off, a larger piece of cloth is pasted over them, always leaving the points visible. The surest preventive against falling off is to have screw-on gauges. A strip of metal having a slit in the middle can be screwed tightly to the table by means of a screw passed through the slit. At the end a steel point about 1/2 cm. long is riveted on. With this gauge the points can be adjusted to any position on the table as required.
All work not turned-in which requires repeat blocking, and all such as requires blocking in more than one colour, is "pinned on." On the other hand, covers which are finished after being once blocked on back or side which require no second[Pg 107] impression may be adjusted with the angle gauge or blocks. Many make use of both at the same time. Such covers then have been turned in all round when being worked, whilst "pinning on" requires that the covers should not have been turned in.
The practical bookbinder who has to deal with turned-in covers frequently gets over the difficulty by making two incisions about 2 cm. apart with the knife upon the turned-in edge at the place where it should be pinned on, and opening out the material at the incisions, thus making a loose margin for pinning on.
For pinning on covers as well as backs, a template is cut from wrappers or thin board, which is adjusted on the cover and the register holes made with an awl. When pinning-on has to be done for blocking which has to be repeated very many times, the register points are strengthened behind with stiff paper to prevent them from breaking or tearing away and thus becoming inaccurate.
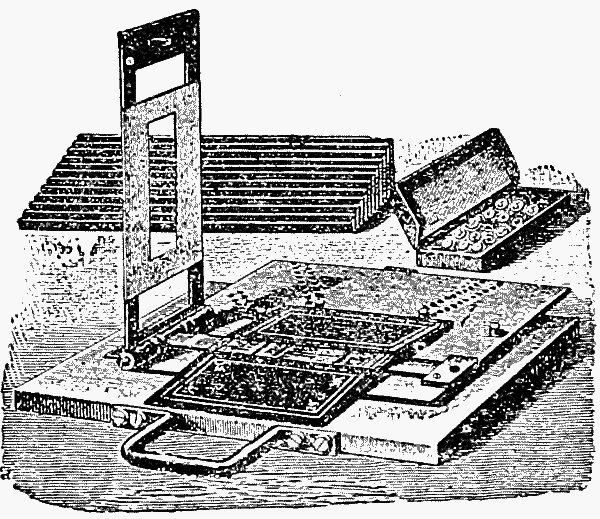 Fig. 65—Appliances used in blocking backs.
To enable the most various widths of backs to be quickly inserted and to supply a substitute for the thick layers of cardboard packing which make a fine impression impossible, a special contrivance with metal pads has been made. This is shown in the sketch herewith.
Mention has already been made of the table (or matrix). This is a bed of stout boards which is intended to serve the double purpose of saving the blocks when blocking thin articles (backs of covers, &c.) and also for strengthening and equalising the resistance from below when working on [Pg 108] heavier articles. Faults arising during working, such as insufficient adhesion of the gold (and an increased pressure) may be set right by pasting on pieces of paper to the matrix or table.
The matrices consist of strong but thin material; the best is wrappers or the thinnest board. After use they are kept for subsequent repetitions of the same or for other work.
The lettering must always be set up fresh for each job, whilst the ornamental pieces may be arranged on the tables or matrices at hand after the existing original impression.
Setting the type is a special art and calls for considerable taste and skill; the letters very easily slip out of the type-holder, especially where very small type is used, unless special precautions are taken to prevent this. Here we will pass over the most important point in the arrangement of the types and refer to the paragraph dealing with "Lettering" under "Hand-tooling"; what holds good there always holds good here.
Lettering is always set upon special pieces of board and afterwards encased in a type-holder, as it demands much more attention and subsequent correction. These boards should likewise be wrappers of the same thickness as those used at the same time for the ornaments. For fixing, cobblers' wax is likewise used. The favourite method frequently adopted of using glue coated with paste is not to be recommended, because the letters do not admit of proper setting upon this gelatinous mass. Not only do the lines of letters require to be kept right by means of a strip of metal or metal line, they must be carefully adjusted after taking a light impression, especially when using a very small type. The first pull must be under so light a pressure that on a soft paper everything is distinctly visible. The lines are arranged from this proof, whilst each single letter is carefully checked. Where letters do not show up properly they must be backed up with paper of[Pg 109] suitable thickness on the board until all unevenness disappears. The lighter the pressure applied the easier it will be to make corrections. Letters heavily pressed at the outset can seldom be properly rectified afterwards.
In large editions it does happen, in spite of all precautions, that single letters work loose and fall out; this may damage parts of the plate as well as valuable covers, and one therefore tries to guard against it. Some take narrow strips of cloth and paste one round each line of type, others pour liquid glue between the lines which, when thoroughly dry and hard, is a very sure means of preventing the falling out of any piece of type.
When everything is in order, the type is likewise inserted; various parts of the back of the board are well waxed and the table is then pushed in and the press closed tight. It remains closed until all parts are thoroughly dry, for it is only then that we may feel assured that no parts can fall out. The drying may be hastened by opening the press about a quarter of an hour later and drawing out the plate, likewise the table, and now allowing plate and table to dry by exposure. If any parts of the plate should lift, wax must again be applied and once more pressed.
When the plates and press are got into working order, and the backs or covers have received their register marks by means of the template, the blocking may be commenced. The table is drawn out, a piece of work pushed in to the register, and the press closed. It is necessary that the press should have been previously regulated to the thickness of the article being blocked, and to begin with a light pressure at first, as heavier pressure can be applied afterwards if required. Cloth requires sharper pressure than leather. Large heavy covers are always blocked with the press quite closed, whilst small things like single titles, hat linings, ties, &c., are finished with only a short pull of the lever. The correct regulation of the pressure rests with the worker. [Pg 110]
We distinguish between blocking in blind, gold, colour, and relief. Blocking in blind, both on leather and cloth, should not be attempted upon articles which have become very dry. A good plan is to store them in a cellar the night before and to bring out only as many as can be finished in the next half-hour's work. Blocking in blind can only be done on matt or grained material, as its effect is nil upon a smooth polished surface.
The finish can be considerably heightened in special cases by going over the impression with a brush and white of egg after the first blocking and then again pressing under less heat. Calf leather, and undressed calf in particular, receives its splendid brown colour by being previously damped with boiled or distilled water to which a little spirit has been added. The impression on a damped ground is first made somewhat warmer and afterwards repeated when the press has cooled a little, occasionally wiping the blocks with a waxed cloth. The impression must in all cases be even in colour and have a high finish; if this is not so, the lighter places must be once more damped with a small brush and again impressed.
Articles to be blocked in gold must be prepared with some substance to which the gold will adhere. The finisher uses a fluid or dry adhesive according to the material he is working upon. Of liquid sizes, diluted white of egg or, in some cases, dissolved gelatine or blood serum is used almost exclusively. These liquids, which are applied with a sponge or, for fine work, with a brush, are called the "ground" or "sizing." Of dry adhesives, we know only the gilding powder, which consists of resin with now and then an addition of dried white of egg. The other powders used by the finisher are rice flour or potato flour; these are not used as adhesives but to prevent the gold sticking at places where it is not wanted. [Pg 111]
Leather and cloth are sized with white of egg; silk and other woven materials are finished without special sizing, and also surfaced papers and cardboard goods, as they are treated with finishers' powder, a wet preparation being unsuitable.
Size for blocking is thinner than for hand finishing, and when it has to be washed over the whole of a cloth cover it is still further diluted. Glair for brushing over an impression consists of one part white of egg and one part vinegar; to every 1/2 litre 1 g. of powdered borax is added, the whole beaten to a froth and filtered. For coating-over, take one part white of egg, two parts water, and to every 1/2 litre add 10 drops of glycerine and 1 g. borax. If a larger quantity of glair is required for coating over, it may be thinned with water or vinegar; but size made with vinegar must not be applied to fancy coloured cloths.
Gilding powder may be yellow or white, the latter kind is rougher and is suitable for silk stuffs and also where blocking has to be done over colour on cloth. Yellow powder is softer and is apt to clog the finer cut tools; it is more suitable for the preparation of paper de luxe, for blocking surface and chromo papers, and for photo cases.
Gilding powder is sprinkled by means of a box which has a double layer of fine gauze instead of a bottom. By tapping upon the box a fine shower of powder is dusted on to the surface to be gilded.
Glair is made in the workshop; the powder is bought ready prepared—to make it would take too much time.
For blocking in alloyed metals, gelatine size is used, as it is a powerful adhesive. A tablet of gelatine is soaked in 1/4 litre of water overnight and next morning is dissolved in the bath. Gelatine is used to cover the whole surfaces and is laid on when lukewarm. Blood serum serves the same purpose. Ox blood is allowed to coagulate, and the hardened mass[Pg 112] thus produced is placed over a cloth strainer, or hair sieve, and the liquid albumen allowed to drain from it; the process is hastened by cutting the caked blood into small pieces. Only the clear liquid which is strained off is to be used—a pinch of borax will make it keep longer.
For finishing bindings, real gold-leaf—orange tint—is used almost exclusively, the cheaper green gold being used only for sample cases and school books. Alloyed metal and aluminium (this is now commonly used instead of the quickly oxydizing silver) are used almost solely in the manufacture of papers de luxe and for placards.
Pure gold-leaf is always laid on the sized cover after the surface to be blocked has been lightly gone over with a ball of oiled cotton wool, or a slightly greased rag. This must never be done to such a degree as to cause grease spots. Calf must not be thus treated with grease, but if the gold is not likely to stick at certain places, the first impression may be picked out with a brush slightly oiled so as to make the leaf adhere. Dark polished calf will, however, stand a little oil.
Fine leathers are first stamped and the impression is gone over with a brush, then the gold is laid on and again impressed. The gold is lifted from the cushion with a gilder's tip or a pad of cotton wool and transferred to the cover. The gilder's tips consist of square pieces of cardboard a little smaller than the piece of gold to be used, to the under side of which is pasted a piece of cloth. A handle of cardboard or a button is pasted on top for convenience of holding.
Draw this tip lightly over the hair, press it on the gold, which will lightly adhere to it, and then transfer the gold to the surface to be stamped, where it is pressed down with cotton wool, which should be surgical wool, as that kind is free from knots. Many prefer a tuft of cotton wool rolled into a[Pg 113] handy size, this is likewise drawn over the hair, and the rest done as before.
When gilding powder is used, the gold must not be laid on with the pad. The gold must be placed on the powder by hand only, a task calling for considerable adroitness. The gold is taken up with the gold-knife, aided by a moistened finger-tip taking a corner, passed over the surface with the knife, brought to the required position with the hanging corner, and now the knife is taken away flat sideways. The gold must lie quite even on the powdered surface. Any subsequent shifting of the gold is entirely out of the question, because the layer of powder would be disturbed and might not hold in places.
To know exactly what degree of heat should be applied requires special study, and the pity is that fixed rules cannot be given—one day a black morocco goat-skin may stand a great heat, whilst on another day the same heat applied to similar stuff might burn it up. Cloth is always the same, calf leather papers, skytogen, &c., are much more difficult. On the whole, the following rules may be observed:—
| Cloth | white of egg (or glair) | medium heat |
| Sheep-skin | white of egg (or glair) | slight heat |
| Goat-skin | white of egg (or glair) | medium heat |
| Morocco | white of egg (or glair) | medium heat |
| Silk | white gilding powder | short hot pressure |
| Surface papers and cardboards | yellow | short medium pressure |
| Calf | glair | hot (light leathers somewhat less heat) |
| Varnished paper | white gilding powder | little heat |
The latter contains sufficient adhesive matter in the colour without[Pg 114] using any other size, even for alloyed gold, but the covers must, however, be slightly moist. For this purpose they are left overnight in a damp cellar or placed between slightly damped boards.
We have already spoken of the matrix. Where silk or other thin woven materials are to be blocked, a firm hard board must be laid on the table and frequently changed, otherwise the impression will be defective. For ribbons for wreaths, &c., a suitable piece of paper which had been damped some time before should be laid underneath.
Although relief blocking upon bindings seems to be out of favour, there are numerous styles of imitation relief practised nowadays, especially in imitation of cut leather or wrought metal. This work necessitates the matrix or table being prepared with great care, as it must be the counterpart of the plate. For this purpose an impression is first made upon a stout cardboard, which is fixed firmly enough on the bed to prevent its shifting, the block being affixed to the platen. Upon this first cardboard are laid the raised parts according to the height required, likewise cut out of stout cardboard, continuing to place a layer upon the other until a true negative of the block is obtained. Small and slightly raised ornamentation is not specially underlaid, using instead a piece of stout board well smeared with cobblers' wax, which, after standing awhile under the plate in the closed press, will make a very exact and firm base. Matrices made up of several layers of cardboard pasted on top of each other are also, when finished, covered with a piece of pasted packing paper and then pressed. This leaf prevents single pieces from working loose and sticking to the block.
For relief stamping, leather or cloth is stretched upon thin wrappers. The guide points must be made a little further apart on account of the material shrinking slightly under relief stamping. [Pg 115]
Colour blocking, which has gained such unexpected popularity, gives the finisher no little trouble. As blind blocking is done by the press, so also may colour blocking be done if the blocks are coloured with the brilliant colours specially prepared for printing. A colour roller, made by moulding English roller composition on a wooden pin, is used for colouring the blocks. The worker himself may cast these rollers in a well-greased mould. The roller composition is dissolved in water, and after being poured into the mould is allowed to stand a few hours to cool. The colour blocker keeps about three rollers ready, of which one is used for light colours, another for middle tones, and the third solely for black. The rollers are either fixed in a fork with two handles or an axle goes through the wooden pin which is bound in leather at each end wherein the axle revolves in the hollow of the hand.
 Fig. 66—Colour roller.
The rollers spread the colour upon a stone of suitable size. The colour should be laid on the rollers—not on the stone—not too thickly, and then evenly distributed on the stone by bringing the roller over it backwards and forwards. Both stone and roller must always be cleaned after use; perfect cleanliness must be carefully observed throughout. The stone is cleaned with petroleum, the remaining colour is removed from the roller by passing it several times over a sheet of glass, rubbing it down with petroleum before again using it so as to remove any particle of dust adhering.
In order that the colours may appear as bright as possible, a little varnish is added to them, which in every case must be of a kind to suit the particular colour. Dammar varnish is suitable for light colours, and for darker colours amber varnish. Where great brilliancy is required, Venetian turpentine is added; but this lengthens the time required for drying if a little too much is added. [Pg 116]
In every case, however, a little siccative must be added to every colour; a few drops materially quicken the drying.
Colour blocking can only be done when the blocks have been secured to the plate, as this must be opened each time it is coloured.
The simplest colour-printing is where one colour appears between the impression in gold, and in this case it is generally done by first making the impression in gold and then in colour.
In more complex work several colours are to be used; at the present time the work is frequently produced requiring colours side by side and superimposed, together with gold, bronze, and aluminium.
The process is in each case as follows: From the block supplied by the engraver an impression is made which forms a matrix. It is best to select a piece of board exactly the size of the covers to be printed and at the two places to be taken by the guide points pieces of vellum are firmly pasted, being already pierced for the guide points, these vellum additions being further secured by pasting over them a strip of paper or cloth. For every block to be used a similar board with its vellum additions is prepared. Upon the ground of this first matrix the other auxiliary matrices are likewise first impressed with the block—all of them black, of course, so that it would be possible at any time to fit in the blocks.
Every new block for colour printing is pressed into the ground of the auxiliary matrix belonging to it; also for the so-called first-impression block.
It must be understood that colour printing can be done well only upon a perfectly even and smooth surface, therefore it is wise with first-impression blocks, as well as larger colour plates, to repeat the impression, only slightly warm after having given a very hot impression the first time. [Pg 117]
Surface papers are an exception as they generally stand very little heat.
It helps here either to let the newly made covers get half dry or, better, to let them lie longer in a damp room.
When different colours are to be superimposed, the order in which they are printed is a matter of some importance. As a rule, the so-called warm tones (yellow, brown, red, or colours containing much of these) are printed first; the cold tones (blue or others containing much blue) being afterwards laid on. White is also classed as a cold tone, but for technical reasons it must nearly always be printed first. If these rules are observed, serious mistakes will seldom be made.
Moreover, proof impressions of the different colours must be taken upon white cardboard, which should be marked for reference, in the same way noting the proportion of the colours used in mixed colours. If the outline block is to be printed in colour, it comes last; gold stamping being done first.
The process of printing in bronze is similar to colour printing, as the bronze is dusted over a preliminary impression in colour (gold upon red or yellow ochre, aluminium upon white, coloured bronze upon a suitable similar colour). Bronze is not printed upon colour, because the bronze sticks too easily to such surfaces in places where it is not wanted; it is then much better to use gold-leaf.
Should it be necessary on the score of economy to make a double working in bronze, the cover must be previously washed with glair.
Leaf metals, pure or alloyed, are printed upon colours after they have been slightly dusted with gilding powder, and with moderate heat. The colours, however, must previously be allowed to dry thoroughly. Larger surfaces are wholly prepared with glair to prevent the gold from adhering where not required. [Pg 118]
Most of the colours must cover well where it is not intended that they should have a translucent effect. A good covering is not secured by laying the colour on thickly but by properly mixing the colours, and often also by giving a second coat after the first surface has dried. Above all, one must avoid too thick and greasy colours. Black must always be printed with a strong good covering colour, as must also the outline block.
For colour printing, the press must be of the same temperature as the room. In winter it is slightly warmed an hour before use, and when necessary this must be repeated later.
There are quite a number of little dodges not easily communicated but which are quickly picked up in practice.
 Fig. 67—Stuck-on gauges.
Simple work is not adjusted by pins, but is pushed up to three guides; moreover, the gauge of the press is not generally used, but three little pieces of board are firmly glued to the table instead. The illustration (Fig. 67) will clearly show the arrangement. At the letters A the pieces of board are glued, to which the cover to be blocked is pushed up.
To prevent these gauges from being pushed off, or to facilitate refixing in the event of their becoming loose, the gauge generally supplied with the press is brought close up behind them. [Pg 119]
For better-class bindings and where hand tooling is to be done the covers are not made in advance as the books are formed and then case and covering made on the book itself. This results in a better appearance and a stronger connection between the book and its cover.
It has already been explained (Chap. V., pp. 87-88) how the so-called hollow back is made in boarding.
This kind of back, however, is only used in ordinary binding in half or whole cloth. For leather or half-leather bindings a strip of wrapping paper or thin cardboard is cut. The exact size is taken with a piece of paper across the back from the first to the last section. This strip must be exactly the same length as the cut boards to be used. The strips—afterwards representing raised bands—are laid upon this packing; these strips are best cut from waste pieces of cow-hide, but if this is not to hand, paste pieces of waste goat-skin three ply thick, press lightly, and, when dry, cut out of this material strips not exceeding 2 mm. in width. The position of the bands is carefully measured with the dividers and marked with pencil and straight-edge and the strips are then glued on in their places. The bands are left projecting over the edge until quite dry and at 3 mm. from the edge, and are then pared down to it. [Pg 120]
For extra half-leather work the backs are previously glued round on the book itself. A strong—not too thick—packing paper is selected, the back is thinly coated with rather thick glue, and the paper, a little wider than four times the width of the back, is so laid on the back as to leave, say, the first two sheets free. As far as it sticks, the paper is rubbed down, then folded back to the other joint exactly at the last section, brought back tight over the back, and now firmly rubbed down on the strip left free at the first sheet. Exactly at the first sheet the paper is again folded over and pasted over the back, afterwards repeating the preceding glueing process. In this way the paper is folded from the joint and glued three times. The overlapping parts are cut off. The back now consists of four layers, the first of which is glued on to the book, the other three, of course, forming an arch over it, although they themselves are glued together. What is overlapping at top and bottom is cut off with the shears close by the headband, care being taken that the back is truly squared. The headband should be nearly but not quite as high as the squares. By so doing, the back will be 1/2 mm. shorter at each end after cutting than the boards. For this work the book is placed in the press so that the back stands out free.
Bands that are to be fixed on are likewise placed in position and are then glued on with a round.
The backs are covered with cloth or leather. The former is cut the required size, that is, allowing 2 to 3 cm. in width to overlap at each side, glued, the rounded backing strip laid exactly in the middle, and then placed in the hollow of the left hand. The right hand takes the book and both are brought together so that the backing fits exactly in each joint but corresponding to the height of the boards. When this adjustment has been obtained, the parts overlapping on the boards are pressed down for a time, and after again seeing[Pg 121] that the position is right, they are drawn over firmly. It is best to stand the volume on its fore-edge and, using the palms of both hands together, rub the covering material firmly down on the boards. When the back is properly drawn on, the head and tail are turned in. With hollow backs the joints must be well rubbed down. It is necessary to cut off a small piece of the corner of the board at the joints at top and bottom; this may be done either with a sharp knife or shears, and, of course, before the book is covered.
To make the turn-in (on the book), the book is placed with its back on the table, letting both boards fall back so that they lie open on the table. Take hold of the book at the edge between index and middle finger of the left hand and lift it out of the boards at the head; the right hand, with the help of the folder, turns the pasted lap inwards and rubs it well down without creases or wrinkles. After both pieces have been thus turned in, the back is further worked at the head to give it a good shape.
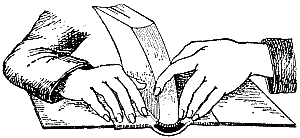 Fig. 68—Turning in the head.
The same process is gone through with books bound in whole cloth or half leather. In the latter case the leather must, of course, be pared down, as also in half calf or whole leather, the work with these being somewhat more elaborate.
It is here of the utmost importance that the greatest attention should be given to careful paring of the leather, especially[Pg 122] seeing that the leather is not too thick in the joint; if so, it must be reduced to the required thickness. It must be pared at the head so that the turn-over does not appear any thicker than the rest of the back. Leather used for covering books must be worked with paste, and paste only.
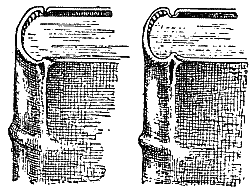 Figs. 69 and 70—The head: good and bad.
It must be drawn tight over the bands, and these should be well rubbed down with the folder. The turning-in is done in the same way, but the overlap—as far as the actual width of the book is concerned—is again drawn out so that it projects about 2 mm. over the headband.
This projecting leather is pressed quite flat—not slant-wise—over the headband, so that seen from above it almost covers the latter.
All half and full leather bound books have the corners of the boards next to the head pared down. This is done before covering—it not only makes the turning-in easier but the book has a better appearance and opens better.
When the turning-in is finished, the book is opened wide and the boards adjusted so that both turnings-in are uniform and sharp and also that it has already, to a certain extent, a deep groove, and then closed. If no layer of waste paper has previously been sewn in, it may now be placed in the joint, so that after drying the boards may open quite freely and nicely. [Pg 123]
The closed book is now "tied up," that is to say, a cord is looped and tied right round the back at the joint. The turn-in is thus drawn in at the pared-down parts. Behind the cord the head and tail are pressed down with the folder to right and left, slightly outwards; whatever may have been drawn in by the cord is put right on the inside edge and the edges are rubbed sharp and square with the folder. The book is lying throughout on the paring stone, not upon the press-board.
The foregoing applies to made cases as well as to those backs which are pasted on the books. With the former it is necessary to round the backs. This is done by drawing the back underneath a folder with a wave-like motion. It can easily be done after being once seen. To give the back a good hold on the book from the very outset, the inserted part is pasted narrowly at the joint before being laid on the pasted leather so that at this place it firmly adheres to the back.
Backs that are stuck to the book itself are cut open about 2 cm. long at the joints with a small knife in order to take the "turn-in"; for the rest the work is the same.
Corner making and covering are here exactly the same as already explained for the ready-made cover.
Books bound in half or full cloth with hollow backs are treated in the following way: The glued cloth is laid flat upon the table, the back of the book placed in the centre of it, the book lifted up, lightly pressing the cloth to the back with the flat hand only, and then sharply rubbing down the overlapping sides at the joint with the point of the folder, rubbing the sides as well. For this, lay the book on the edge of the table so that the back stands clear. If the sides were brought over the boards at once, neither a sharp groove could be obtained nor would it be possible to draw over the cloth without creases. [Pg 124]
We now come to the finishing of the books, but we must first deal with the fastening of the book into the cover. By covers is understood either a cover made to fit a book to hand or a cover to which a book is to be made to fit. The latter is the more difficult.
The book, when pulled to pieces, without end papers and sewing, should be about one-sixth thinner than with the paddings of the cover, thin books, of course, a little more. Thickness of thread and compressing or allowing to swell in sewing should equalize what difference there may be.
If the book is ready trimmed, edges finished, pressed—it should always be cloth jointed—it is cased in. A packing is pasted on the back, that is to say, similar to glueing the back, the back is pasted on to the book itself, a strip of paper the proper width is laid on so that the two first sheets remain free, rubbed down, folded back from the other joint, pasted on the free margin, and the surplus cut off.
In this way, not only is the back pasted over but it gets another covering of paper. The padding of the cover is now rounded, either by drawing it under the folder in the way mentioned or by drawing it to and fro over a chock fixed in the press. The book must suit the cover so that it fits tight into the joints. The padding of the back is glued, the book laid in, the boards at both sides well drawn over, a covering of paper laid over the back, and then well rubbed down with the flat folder. The pressing that finds so much favour is altogether superfluous, as it takes absolutely no effect upon the glued back. It is only when the covers are somewhat too narrow that the joints are improved by pressing. After the glue has set a little, the end papers are pasted on, i.e., they are pasted over and lie open until thoroughly dry. It is done as follows:—
Insert a piece of waste paper under the cloth joint, the joint itself getting a thin coat of rather weak glue. The bands,[Pg 125] which must remain free although cut off to leave only 2 cm. in length, are laid over the joint and likewise glued. Now lay the book square before you, the open board next the table edge, and with the point of a knife first lift the bands from the cloth joint, lay them taut over the smooth board and smooth them down with the knife so that everything lies smooth and even, taking special care that the bands are not noticeable in the joint through any evenness. The cloth joint is now drawn over and well rubbed down on the board, the latter being at the same time well pressed on the joint so that it has quite a straight sharp edge.
The book lies open in this way to dry, but it may be turned, placed on a board, pushed up to the joint, and the other side similarly pasted on.
 Fig. 71—The pasted-down book.
Plainer bindings, especially school books and publishers' cheap cases, are often pasted down with only the outer leaf or white end paper and without a cloth joint, whilst here the coloured end paper has still to be pasted down; in the former case proceed as follows:—
The back—without packing—is simply glued over, the packing rounded. The book is properly placed in the cover, and the outside fly leaf—afterwards an end paper—and bands are pasted, the latter at the same time being smoothed out with a knife or folder; the boards are then closed, pressing them over very sharply. The book is turned and the other side done in the same way, and at once pressed.
Where a cloth joint has to be pasted on, a paste-down must be pasted on to the board. [Pg 126]
The practice of doing the coloured end papers at the same time as the book is not so good as subsequent pasting down, as they are then less likely to be injured during trimming and colouring the edges, &c.
The paste-down is first cut to size a little less than the book itself and fastened in with thin glue so that the paper is close to the joint but not so close as to cause it to swell. The counterpart of the fly leaf is pasted on to it, both leaves are cut with a knife close along the joint, for back and front, about 1/2 cm. wide, are pushed up, thinly pasted, and pasted into the book up to the pressed joint. The leaves so hinged in are now raised, the under leaf thinly coated with thin glue, the leaf closed and rubbed down under paper with a folder. Immediate pressing is to be avoided, as the thin glue is very easily squeezed out. After a while the pressing is done, of course, when zinc plates—if necessary, polished boards—should be inserted between the end papers, and not too great pressure applied.
If the boards have been fastened on with paste and without a back, zinc plates are also used, but between the first and last sheets of the book, so as to press these very smooth and to prevent the plates from sticking to the damp end papers.
Half or whole cloth, half leather, or, generally speaking, all bindings which are not pasted down open, are laid upon a board, pasting thinly with thin paste first one side, then turning the book and pasting the other, and then pressing. In doing quantities, ten may be done before pressing.
Cheap work is often pressed by laying the volumes crosswise upon each other and pressing in batches between boards. Books with a deep joint where the bands are either laid on the board or laced in are always pasted down open. Where cloth or leather jointed, this is done in a similar way to boarding in covers, except that the bands need not be considered [Pg 127] here, as they have already been seen to. Working the leather well in the joint and firmly pressing back the board after turning in the head lighten this work and improve the appearance of the joint. Leather joints are always pasted down open with paste, but must, of course, be left lying longer.
The so-called double end papers, that is, without cloth or leather joint, are very effective. Only the best and strongest paper can be used for these. The double sheet, folded in the middle, is narrowly pasted at the back and fixed in the joint of the book—not in the fold of the joint but in the joint made by pressing. This prevents the bend coming on the place where the paper has already become weakened by sharp creasing, but near it. The half for the fly leaf is at once pasted down; that to be pasted on the board must first be cut to size. The end paper is cut off at head and tail of the book, the book opened, the end paper laid over the board, and with the dividers is marked out on the paste-down parallel with the edges, somewhat less than the book. At the fold marked by the edge of the board at the joint, nick in with the scissors up to the mark made, slip under this a zinc plate, and on this cut the end paper by the mark up to the nicks. It is understood that the end papers should not be cut off right round the book, otherwise they would become too scant at the fore-edge.
A piece of waste paper is now laid under the paste down, thinly coated with glue, the leaf drawn tightly over the board and rubbed down; at the same time a piece of paper is laid over the joint as above. When pasting in the cover, the book is placed square and the joint strongly and briskly rubbed down with finger and thumb of both hands.
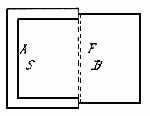 Fig. 72—Treatment of tear-off.
A paper having a design must, of course, be laid in the same direction as the book. Where paste-down and fly leaf are to be pasted on separately, it must be so arranged that, after[Pg 128] the pasting, one leaf forms the counterpart of the other, that is to say, the design must run through and be broken only by the joint. To effect this it is necessary that the paste-down should be first pasted on; when pasting on the fly leaf the work can be made right.
Silk paste-down and fly leaves are frequently used for extra work, the silk here being stretched over a piece of stout paper and pasted narrowly at the edges. [Pg 129]
When the books have been bound they are generally ornamented in gold or in some other way. Although the more elaborate finishing in gold is not done in the ordinary bindery, but is confined to the art binderies, sufficient instruction will be given here for the simpler finishing on back and side.
Gold finishing is only learned at the cost of much patience and long, painstaking practice. Although the technical schools teach finishing in a comparatively short time—usually in a few months—only the ground-work can thus be acquired, for it takes years of practice to teach all the technicalities and to make an expert finisher, equal to any calls made upon him.
It may also be mentioned here that in most technical schools the work is executed with the very best and most suitable tools and, furthermore, the whole interior arrangement of the workshop is as favourable to the work as can be conceived, and thus all conditions for good work prevail. When young workers come from such an institution to work under strange conditions, where they have to struggle along with unfamiliar and perhaps unsuitable and antiquated tools, bad light, and other drawbacks, it is not to be wondered at if they—at the outset, at least—do not answer all expectations. Similar inconveniences have less effect upon old and experienced workers, as they have the steadiness[Pg 130] and assurance which come to them as the result of long years of work, and they, therefore, never become nervous and fidgety. A cool head and a steady hand are the first essentials in a finisher, and after these the feeling for neatness and exactness.
Gold tooling has evolved from the blind tooling of the 15th century, which up to that time had been the only method of decoration for the exterior of books, excepting where gold or jewels were used. The first application of this method was in drawn lines made by running the heated fillet alongside the rule, and even to-day the fillet, although improved in make, still retains its place as a suitable tool for the decoration of leather backs and sides. Speaking generally, blind tooling is not sufficiently appreciated by finishers, especially in shops doing much hand tooling; to many it is almost unknown, and they would be at a loss if there were any demand for it, and yet it is eminently suitable for simple finishing with slender resources, to obtain a result at once chaste and striking without excessive ornament, and this without a costly assortment of tools and other special appliances.
Before proceeding to the details in the work of finishing, a few preliminary observations may be made.
Blind tooling is the ornamenting of leather with tools without the application of gold. It might also be correctly described as matt tooling. Its peculiarity and beauty consist in its rendering the tooling on the leather in a darker tone. Blind tooling may be executed upon leathers of any colour, but its full decorative effect is seen only upon light colours, especially upon undyed calf and pig-skin and also upon coloured unpolished calf.
To produce the deepest and most uniform tone it is necessary to damp the leather previous to tooling. As it is well that the whole surface to be tooled should retain some moisture[Pg 131] it is advisable to damp it evenly with a sponge on beginning the work.
The simplest tools are, as already mentioned, the fillets, which may be single, double, or triple, with lines of equal or different thickness.
The design is carefully traced with dividers, folder, and rule, and the heated tools run along the rule. Before applying the tool, which should be only moderately heated, the line previously marked out should be damped with a suitable brush. The instant the moisture has been absorbed by the leather, the tool should be applied. There should be no hissing, as the tool should be only lukewarm for the first application. The roll must touch the leather at the beginning without any uncertainty and the line made at once and without stopping, as otherwise a darker shade would appear in places.
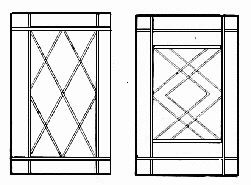 Figs. 73 and 74—Simple line designs.
Each time before using the roll it is passed over a well-greased piece of leather.
The impression should appear uniformly brown; if it is lighter at any part, it has not been sufficiently damped; if darker at another place from the beginning, then that part was too damp. Success depends before everything else upon uniform damping of the leather and correct heating of the tool.
With ordinary cleanliness and care, complete success is assured in this method of finishing. [Pg 132]
After the surface of the leather has again become dry in all places, the whole design is again gone over, but this time with the roll a little hotter, at the same time rubbing the roll well with the greased cloth. If there had been unevenness in the depth of colour before, it will hardly be possible to remedy it now, for the light places remain so and the dark ones become even darker.
Where blind filleting is done it is usual to do die tooling at the same time. It is advisable—especially for novices—to apply the die without heat to the damp leather, then to damp specially and apply the die lukewarm as in filleting. Tooling with dies is essentially different from filleting in the method of execution. The fillet polishes whilst running on, the die remains on the one place, and yet every part must receive an equally good impression. In order to secure a good impression from a die it is necessary to apply it promptly, and press without hesitating as to where to begin. To ensure all parts of the tool being well impressed, its surface is slightly curved lengthwise, and according to this curve the die must be rocked to and fro whilst impressing. If too much time is wasted before the die is applied the impression will turn out lighter. By allowing the heated die to remain long on the surface of the leather, the latter loses its moisture at that place and the die could not produce any further deepening of the colour. Such places must be again damped and tooled until a uniform tone is attained. Care must be taken that this repetition does not produce "doubling," that is, a blurred appearance of the design, and also that it does not lead to indistinctness of outline.
Blind tooling upon light leathers is to-day called upon to satisfy the needs of the less wealthy just as it was 300 years ago, for in such a style of decoration the utmost durability and moderate cost are combined, and its very simplicity enhances its beauty. [Pg 133]
 Fig. 75—Half-calf extra tooled in blind.
[Pg 134]
 Fig. 76—Leather binding with simple design in blind.
Now for the hand finishing. It is first of all necessary that we should be able to letter straight, at first upon a board. For the tooling of long straight lines, dotted lines, or other style of lines upon the sides, rolls are required, upon the circumference of which the design is engraved, whilst for tooling upon the back the so-called fillets are generally used, which likewise are used only for lines or patterns. Besides, certain kinds of ornaments are here printed with dies—the rows of letters with the type-holder in which these are set.[Pg 135] All these tools are heated over a flame—best over gas—to the temperature suited to the material operated upon. To make the gold adhere, the material to be tooled is sized or "glaired" with one part vinegar to three parts white of egg well whisked or beaten and filtered, as is done in blocking. Other materials for sizing will be dealt with later.
 Fig. 77—Simple gold tooling on sides.
Lines are made along the sides and at corners of the boards, especially on paper-covered boards; this is called "running a line up" or "filleting."
The line to be gilded is clearly marked with a sharp folder, picked out with glair, and the gold, which is taken up on the roll, is printed in.
 Fig. 78—Tooled cover.
The gold leaf is cut on the cushion into narrow strips about 1 cm. wide, and the warm (each time wiped clean) and slightly greased roll is lightly passed over it so that the strip of gold adheres to the circumference of the roll, and then rolled[Pg 137] off with a firm and even pressure on to the place intended.
This is now gone over with a wool rag (or gold rag), and only the printed line is left; the surplus gold remains in the rag.
 Fig. 79—Specimen of tooling done in the Düsseldorf
Technical School.
Fig. 79—Specimen of tooling done in the Düsseldorf
Technical School.
Near the finishing stove should stand—as also for blind tooling—a shallow saucer containing water and also a common brush similar to those sold with bottles of gum. A drop of water is thrown from this brush on to the hot tool in order to test its heat. Cloth is printed with fairly hot tools; they should hiss a little when tested. Goat-skin requires a heat almost sufficient to produce hissing, whilst hissing[Pg 138] would indicate too hot a tool for use on morocco, and all sheep-skins will bear only moderate heat. If the roll was too hot, the gold would have no brilliance, and if too cold, would appear broken. Calf requires the same heat as cloth, but quick working, especially on first applying the tool. The roll has a long handle which rests against the shoulder whilst held in the right hand. When getting into position for an impression the thumb-nail of the left hand is used as a guide and support.
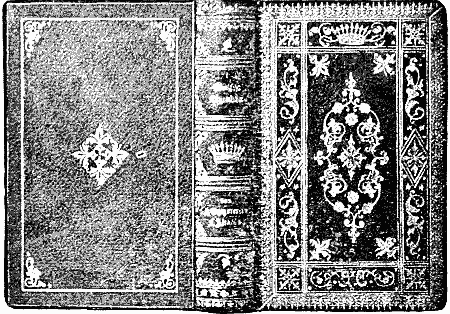 Fig. 80—Leather binding by Oswald Kob, Bozen.
A line around a cover is marked out correctly with dividers and folder, picked out with size, and printed in gold in the same way. The rolls have a notch, which is for starting and ending at the corners; these must always be joined exactly. Rolls for two or more lines must print the corners perfectly diagonal, and for this purpose such rolls are cut so as to print a true diagonal corner; one corner being made for the beginning and the other for the end. Of course it is impossible to print long lines with only one revolution of the roll. The roll is run along the line from starting point until[Pg 139] near the end, lifted off, and again placed on the spot just quitted, a little behind the starting point of the roll, so that this part does not show. This is repeated as often as the length of the line necessitates. In order to secure good corners, the roll is lifted just before reaching the corner and a corner tool is used for the corner itself. At no point should one be able to see where the roll was set on or taken off, and the result should be a straight, even line, showing no trace of inequality.
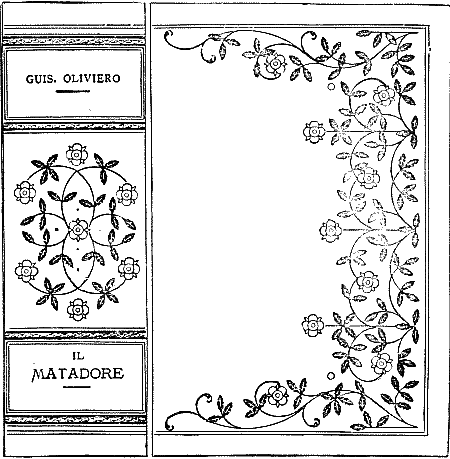 Fig. 81—Cover with laurel motive done in the Düsseldorf
Technical School.
Fig. 81—Cover with laurel motive done in the Düsseldorf
Technical School.
For single lines, the gold is generally taken up on the previously[Pg 140] heated roll; but in using wider rolls it is better to lay the gold on with the tip and press it well down with surgical cotton wool.
Places where the gold did not stick or which look gritty must be sized afresh and once more tooled. The beginner generally finds that the gold does not stick at the point where he begins, a sure sign that he hesitated too long on commencing.
It has already been said that white of egg is used for making the gold adhere, and there are, indeed, very few materials requiring any other treatment, yet we know of a number of cases where white of egg alone is insufficient to fulfil this purpose—not, indeed, because it is unsuitable, but because the quality of the leather is such that the white of egg would be absorbed too quickly (calf, tanned sheep) or that it would take badly and unequally.
Just as certain kinds of leather are difficult to treat, so also are old, long-stocked skins. If the finisher knows that such a piece of leather lies before him, he ought to rub it down on the raw side with best olive oil; it will thus receive a substitute for the lost natural fatty matter and become more supple. This oiling, of course, is only practicable with dark leathers, as light leathers nearly always become darker. A skin so treated should be rolled up and laid aside for a few days.
At any rate, such a defective leather is improved by a previous washing with size, no matter whether it be made from vellum, gelatine, or glue. It must not, however, be made from the commonest kinds of glue, as these make the leather dull.
Vellum cuttings, or gelatine, are soaked overnight in water sufficient to cover, and next day dissolved in a sort of glue-pot. This sizing must be used very thin and should not be quite cold. In using ordinary glue, two drops of medium[Pg 141] strength to about three table-spoonfuls of warm water will suffice.
Many finishers prefer thin paste water as a size, with which they coat the whole surface; personally, however, I would only recommend it for unpolished calf—but here there is a real necessity for it. In this case it is liberally laid on in large sweeps with a sponge—not new, and free from grit—and then well rubbed into the pores of the leather with the ball of the hand. The surplus is quickly washed off with clean water.
Large surfaces left plain are also washed with gum tragacanth, because this sizing leaves no lines behind. About 10 grammes of tragacanth to 1/4 litre water are soaked in a vessel, and after swelling it is well stirred. This solution is also laid on with a sponge, but is not rubbed in, neither is it subsequently washed off.
These two methods of sizing will be found sufficient to meet all cases.
There are certain materials that do not allow the use of a liquid sizing, particularly silk and velvet. The latter is no longer finished by hand, and even blocking velvet is now considered bad style.
For gold tooling on such materials gilding powder is used; it is to be had either white or yellow, but for hand tooling the white only is required.
Although no exact rules can be given for determining the temperature of the tools used upon the various materials, yet we must try to give a general rule for each kind.
We will use the following terms to distinguish the different degrees of heat: Lukewarm, i.e., not the slightest hissing when tested; medium, i.e., just on the border of hissing; hot, slightly hissing. In the following group the method of sizing is repeated, and a scheme for the approximately exact temperature of the tools is given. [Pg 142]
Cloth, goat-skin, and marbled leather (without previous sizing, white of egg): medium heat.
Sheep-skin and lamb-skin (glue size, white of egg): medium heat. Calf (white of egg): hot.
Morocco goat (without sizing, white of egg): medium heat.
Morocco, Levant morocco, crushed morocco (glue size—painted in, white of egg): lukewarm.
Pig-skin, Russia, seal (without sizing, white of egg): lukewarm.
Mention has already been made of a wash of paste water for matt calf. As a rule, the whole surface is washed with this preparation, as it is thereby rendered less liable to finger marks. In the very best shops there is still another method. The leather is washed down with tragacanth and the previously impressed design picked out with white of egg and quickly tooled with tools medium to hot.
Vellum requires a special treatment. On the day before it is to be finished in gold it is washed with alum solution and, for gold tooling, sized with undiluted white of egg and tooled lukewarm.
When tooling is done with powder it is dusted on by means of a powder-box, over which is stretched some thin material, and tooled lukewarm.
The great convenience in the use of powder induces many binders to adopt it for leather and cloth also. This practice is objectionable, and the conscientious finisher will always avoid it. It may be excused when a name has to be printed on a Prayer-book or similar article in a hurry, or when an article is already varnished, as powder in such a case is very convenient and satisfactory, but under any other conditions it is a sign of incompetence.
Tooling upon powder on leather looks very gritty and unsightly after having undergone many changes of temperature, as the latter greatly affects this material. Its brightness vanishes[Pg 143] entirely—a thing that never happens when white of egg has been used.
It must still be observed that tooling with lukewarm tools must be done slowly, and with hot tools quickly. Nearly all inexperienced finishers use too hot tools.
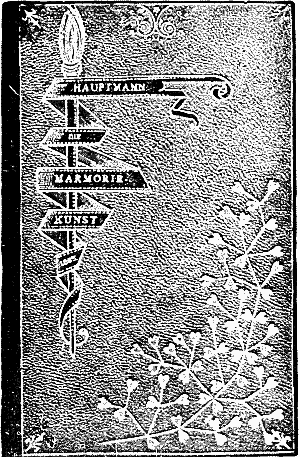 Fig. 82—Leather binding with fern motive done in the
Düsseldorf Technical School.
Fig. 82—Leather binding with fern motive done in the
Düsseldorf Technical School.
So far, we have dealt with the preparation for finishing and tooling with a roll. Besides this tool there are fillets, gouges, and dies, all nearly the same, being dies, and only differing in shape. Nearly all beginners are unreasonably afraid to use the gouge. Any one able to use the roll properly will have little difficulty with the gouges. A genuine technical difficulty does arise when only a small portion of a curve may be worked (which frequently happens) on account of its having to be joined to another. Moreover, the joining of one curve to another must not be seen. [Pg 144]
Every single gouge of the complete set (it should contain at least 20 pieces) forms the quarter of a circle. The gouges are chosen according to the design, so that the tools placed thereon cover the outlined design exactly, and the tool numbers are noted on the designs so that they may be quickly and surely picked up when required for use.
The tyro is apt to select sizes too large and to print the curve sloping instead of perpendicular; this must be guarded against.
Double gouges are not easily used in the same way, as the joinings cannot be concealed; they may be used for making first outlines, which must be finished with single curves.
 Fig. 83—Simple gold tooling on squares.
Faulty places must be done over and over again until the whole is perfect and brilliant and all the gold adhering.
Fillets are nothing more than long narrow dies of either simple or ornamental lines. It is the practice of the old school to widen the impression of narrow fillets by continuous rocking of the hand to right and left, as they are fond of doing when lettering with a type-holder. This practice is fundamentally wrong. Work finished in this way will never show the quiet and uniform brilliance in the gold to be seen in work where the movement was only in the direction of the dies and fillets.
Besides tooling the front sides, the inside edges or squares are generally ornamented in extra work. A simple but very effective decoration for the edge consists of a line close to the edge[Pg 145] of the board and also one close to the end paper and a connecting line at the corner; such an edge is previously polished with a burnisher. To do this the leather is slightly damped, the tool moderately heated—not hissing—and then polished with long even strokes.
 Fig. 84—Design in gold for squares. Tools by F. Clement,
Leipzig.
Fig. 84—Design in gold for squares. Tools by F. Clement,
Leipzig.
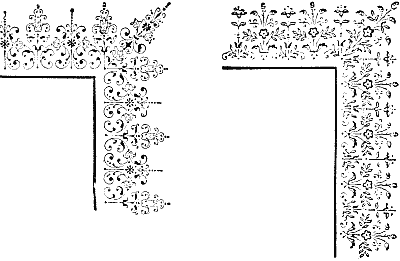 Figs. 85 and 86—Two designs in gold for squares.
With the help of rolls and dies, even richer decoration may be produced, and really artistic ornament designed and executed on the inside as well as on the outside cover. Such work, however, does not come within the limits of this treatise. We must be satisfied with giving a few illustrations of the less elaborate designs. Rolls are very often used in finishing the edges, so as to fill up at once the whole width of the space, and about this we must say a few words. Rolls with a[Pg 146] pattern have, as is known, no notch, and therefore may be used for a run on of any length without a break. For smaller margins and cheap work the rolls are frequently run over each other. This saves time but it does not produce a nice effect, as the design is blurred at the point of crossing. It is better to lay the gold leaf on one side and to remove it exactly at the corner and then tool; the side next to it is now treated in exactly the same way, giving special attention to the removal of the leaf at the corner. The design is thus made to join together at the corners without crossing, because the roll will only leave its impression as far as the gold goes. For extra work, however, a die suiting the roll in width and design should be chosen, and leaving as much of the corners as the die will cover free from gold, the remainder of the surface is covered with the leaf and tooled. With a little skill, the roll can be taken up exactly where the gold leaf ceases. The edge is then cleaned with the[Pg 147] gold rag and fresh gold laid on for the corner die and then tooled. By this method the design at the corner is correctly finished.
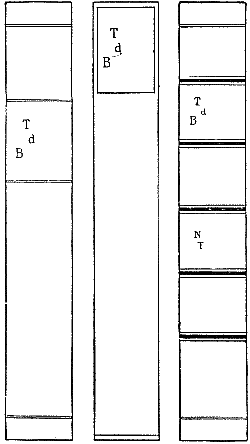 Figs. 87, 88, and 89—Three simple backs. T, d, B =
Title; N, T = Sub Title.
Figs. 87, 88, and 89—Three simple backs. T, d, B =
Title; N, T = Sub Title.
Gold tooling on the back is more difficult on account of its convexity. For this work the volume is placed in a little wooden press which finds a place upon the bench, or in a special contrivance which can be screwed to the bench. [Pg 148]
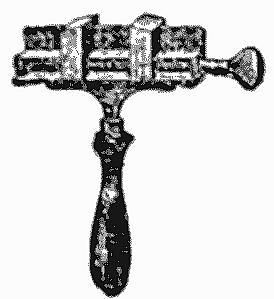 Fig. 90—Type-holder with centre position.
To ensure good results in tooling the back, it is necessary that the work to be done should be accurately marked out beforehand. The bands are measured out by means of the dividers if they do not already show as raised bands. With a pointed folder draw this traced design accurately upon a strip of cardboard. Blind lines are made upon cloth before the latter has become quite dry; in other cases tool the first impression hot and vigorously, pick out the impression with white of egg, and then tool with lukewarm fillets. In making lines, the fillets may be drawn to and fro, whereby a great brilliancy will be produced. Gold lines or ornamental fillets are picked out with white of egg and then tooled in gold. For simple lines the gold is taken up from the cushion; for ornamental fillets the gold is carried to the back.
Lettering the back is an art in itself as regards the arrangement of the lines, but besides this it requires considerable practical experience. The letters are composed and screwed up in the type-holder for printing. The type-holder, with the letters, must never be placed over the heating stove, for in Germany letters made of lead are still most generally used, and these would melt very quickly if placed over the stove. Moreover, the letters should be screwed up just tight enough to prevent their falling out. The heat expands them and they are then locked quite firmly enough in the type-holder.
In arranging the letters the following general rules should be observed:—
1.—Always use types from the same fount in a title.
2.—For books printed in Gothic (black letter) type use Gothic letters; for books printed in Latin types use the same for lettering.
3.—All lines in a title should be set either in lower case only or in caps. only. [Pg 149]
4.—Gothic and Latin in a title are inconceivable.
5.—Except for abbreviations, points are no longer used in the titles of books, not even at the end; neither is a comma placed after the author's name.
6.—Nowadays, a short line is always made under the author's name.
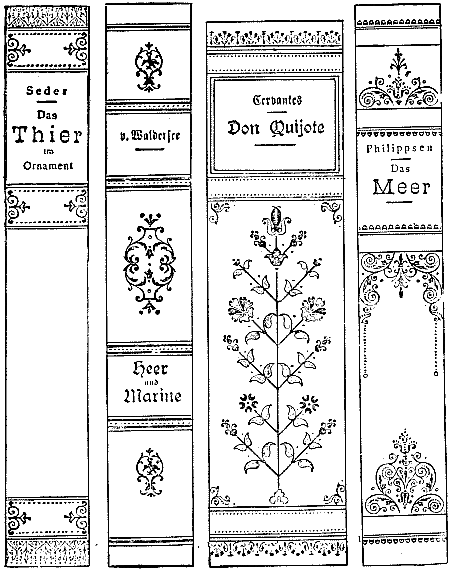 Figs. 91, 92, 93, and 94—Four backs tooled in the
Düsseldorf Technical School.
Figs. 91, 92, 93, and 94—Four backs tooled in the
Düsseldorf Technical School.
As regards the length of line and choice of types, the following should be observed:—[Pg 150]
1.—The most important word (catch-words) should be made prominent by larger type or spacing.
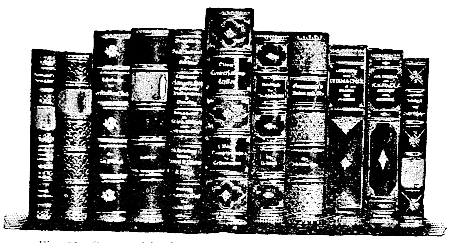 Fig. 95—Group of backs tooled in Carlsruhe Technical
School.
Fig. 95—Group of backs tooled in Carlsruhe Technical
School.
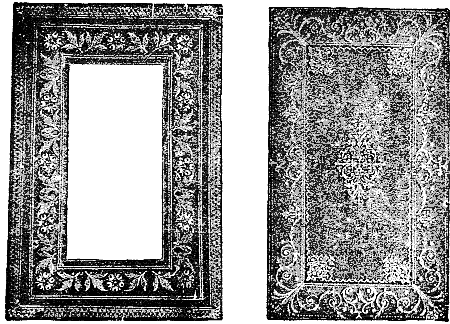 Figs. 96 and 97—Two richly decorated insides done in the
Düsseldorf Technical School.
Figs. 96 and 97—Two richly decorated insides done in the
Düsseldorf Technical School.
2.—The oftener a short conjunction or article (for, the, and, or, &c.) is placed between the lines, the more effective will the title be; such words must be set in smaller type. [Pg 151]
3.—Two lines of equal length should not come together; long and short alternating as much as possible.
4.—The author's name is set in type a little smaller than the principal catch-word.
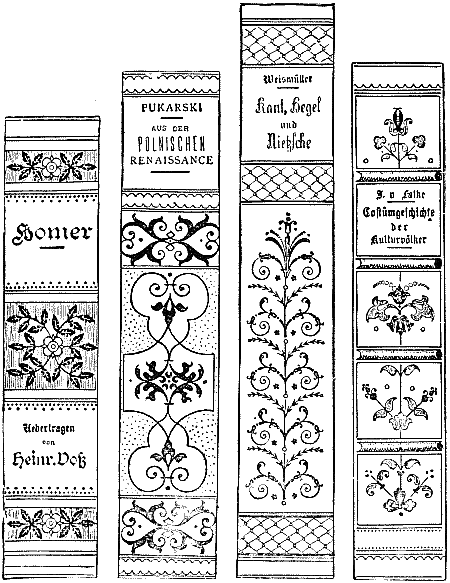 Figs. 98, 99, 100, and 101—Four richly tooled backs.
5.—The lettering is most effective when the type is selected and arranged so that it rises in size towards the middle line and then decreases. [Pg 152]
6.—Unnecessary length tends to indistinctness; the best title tells what the book is in very few words, and should be easily read at a little distance.
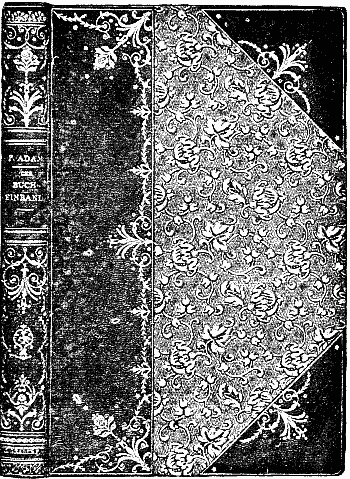 Fig. 102—Rich half-calf extra binding.
It is impossible to mark out the whole of the title with the dividers unless a specimen copy is at hand from which the spaces can be measured. The best guide is the eye. The distance between the lines should be equal; a plain line is reckoned as a line of type and must not be placed at half the distance between the lines. [Pg 153]
If a line with letters having long upstrokes (literature, hostile, latter, &c.) follows one without long downstrokes (never, miner, memoir, &c.) the lines must come a little closer than when a line having long downstrokes (poppy, Ganges, &c.) comes over one having long upstrokes. In this respect the binder is in a more difficult position than the printer, as the latter need give no attention to this, his title never being so cramped into little space.
The effectiveness of a leather back can be considerably heightened by evenly smoothing and polishing the title panel with a burnisher. Such a back with the title panel enclosed within a square with only a fine double line at the head and tail and also a fine line close to the head is perhaps the best that an ordinary bookbindery can produce. It is essential, however, that every detail should be faultlessly executed, especially the title.
Tooling a square is frequently done. The beginner should always use the roll for this, although tool makers produce line pieces for the work. It is easier to print straight with the roll than with the line pieces, which require skill to use. Special attention should be given to joinings at corners, so that neither gaps nor overlapping are seen.
For the rest we have given a number of different designs of backs (pp. 149, 150, 151) as well as a few richly tooled half-calf bindings, and also two specimens of highly ornamented insides (p. 150).
 Figs. 103 and 104—Tooling on heads.
The head and tail and edges are often decorated in higher class work. Of course the style of finishing is very limited on account of the smallness of the surface. Fillets and rolls are generally used for this work, being worked on [Pg 154] the cap as seen in the illustrations, and always directed towards a central point. The gold for the head and tail and edges is cut to size on the cushion, the edges slightly greased, and the gold taken up by the book itself.
The accompanying illustrations give suggestions for the gilding of edges.
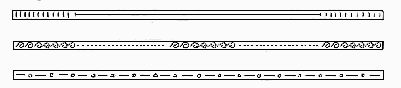 Figs. 105, 106, and 107—Tooling on the edges of the
boards.
Figs. 105, 106, and 107—Tooling on the edges of the
boards.
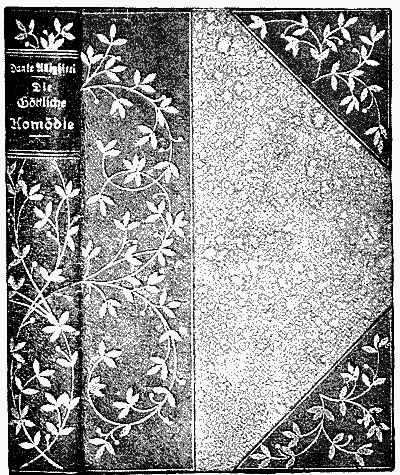 Fig. 108—Motive executed in the Düsseldorf Technical
School.
Fig. 108—Motive executed in the Düsseldorf Technical
School.
Lining is done on almost all books. For this the "jigger" is used. It is heated so that it hisses slightly, and with one quick and sure movement is drawn along the straight edge. [Pg 155] The line is drawn away from the worker, that is, contrary to the way one would draw a line with a lead pencil. Lines are drawn along paper, past back and corners, often also right round the edge, over leather or cloth and cover; the closer to the edge the more effective the line.
Many of the more costly books take a case to protect them from injury. For trade purposes this is simply cut from plain boards and remains uncovered.
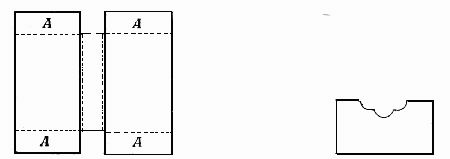
| Fig. 109—Case to protect book. | Fig. 110—Cut-out case. |
The parts A overlap and are either pasted together or wired with the machine.
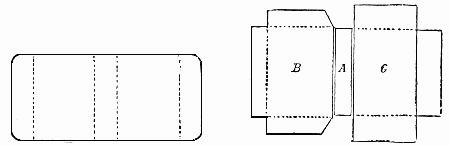
| Fig. 111—Book cover. | Fig. 112—Cover in case form. |
Similar cases of thinner boards—but covered—are made for hymn and prayer books. They are always pasted, covered with a dark pressed paper; and the edge at the centre is cut with a gouge as seen in the adjoining illustration (Fig. 110).
Hymn and prayer books may at times have a cover; this [Pg 156] would be cut from stout paper, generally calf-leather paper, the colour of the case covering (See Fig. 111).
Covers made in case form entail more work (Fig. 112). The centre piece has a joint at each side; this part is, therefore, covered with cloth, which extends over the parts B and C, all the rest being covered with dark pressed paper. [Pg 157]
Account books are nowadays almost always made by wholesale firms, but there are still, now and then, considerable orders given to medium and small firms for special work; yet it is just in these small shops that antiquated methods of work are still followed to a certain extent, to deal fully with which would require a volume in itself.
To-day, the methods generally followed are based upon the principle that the spring back, reaching a finger's width over the side, must work strongest on the book itself, and that such a one opens best. Upon this principle is based the untanned leather spring back, which, being a patent, has become a somewhat expensive style.
It is cheaper to make up the backs with wrappers, for which machines are also to be had; but, nevertheless, the principle is the same, and both answer the same purpose, although the former is lighter and more durable; it cannot be denied, however, that after long use the cover works loose.
For account books, only the best and strongest paper—ruled or printed—is used, always according to sample. Of course, the work of ruling can hardly be considered as coming within the scope of this book.
The paper is folded together in sections of three to five sheets, according to the thickness and quality of the paper. For heavy books a strip of jaconet is folded in the middle [Pg 158] of the inner sheet of each section before sewing, and, in any case, this should be done with every first and last three sheets. The end paper makes a section in itself, which, like all others, is taken up in the sewing—it has previously been attached to the third section by means of strips of jaconet. In the end paper a coloured fly leaf and linen joint are pasted.
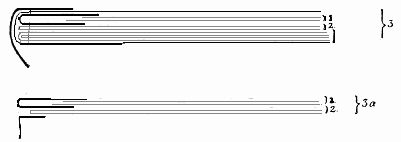 Figs. 113 and 114—End papers for account books.
The following is a practical way of making the end paper:—
1.—Take a strip of linen (not cloth) three fingers wide, and glue on narrowly two sheets of plain paper or paper of another colour, and fold in the middle.
2.—One sheet of a double sheet of white paper is coated with thin glue, and the hinged leaf No. 1 is pasted to it.
3.—The end section is pasted in behind the first sheet of the first section, the white sheet is pasted upon the second sheet of the ruled paper; around the whole section a strip of jaconet is sewn, or
3a.—A piece of jaconet 1 cm. wide is so hinged to the white double sheet of this section that half of it remains free; in this fold the second section is sewn.
Better-class work intended to serve for years of office use is again being sewn with thread on tapes; the cheaper work is machine wire-stitched. [Pg 159]
In hand sewing, double bands—a wide, strong linen tape—are used, end to end, of course, and with strong thread.
The bands are also stretched upon the sewing frame; for folio, at least six are used, and for quarto not less than four.
It has already been said that the sections are sewn throughout, and, further, that the end section is likewise similarly sewn with them through the linen joint—in high class work with coloured cordonnet silk. All sheets, without exception, are kettle-stitched at the end. Large books are not usually glued up the whole of the back, but only at head and tail, with perhaps a little in the middle; they are only completely glued up after having been rounded in the press, as this makes them retain their shape longer.
If it is decided to do any marbling, the fore-edge is marbled immediately after trimming it. Rounding is more pronounced in this than in ordinary work, otherwise the spring back would have no effect with such bulk, and the book would easily go out of shape.
The account book is also pressed, but not in the same way as printed books, as the former has its groove pressed quite out. After careful adjustment between boards, they are squared to the edge of the first and last sheet, the whole lifted into the press, and the back glued with very hot glue. The bands are generally left outside the boards, as they would leave marks too pronounced on the book if pressed inside. After the book has thoroughly dried in the press, it is cut at top and bottom, marbled, or some other suitable treatment given to the edges, and then pasted up. The "clothing up" of the account book is done either with soft leather and paste or with mole-skin specially prepared for the purpose; in the former case the bands are omitted, that is, only the parts between the bands are pasted. In [Pg 160] pasting up with mole-skin, only the back may be glued—never the covering material. The covering material has a loose overlap of 4 cm. at each side.
Account books take a stronger headband than other books; it must reach on to the board, which it binds to the book. For this purpose the board must first have been affixed.
In the first place, a thin but very strong board is laid—about 1-1/2 mm. from the joint—upon the first sheet, which has been completely coated with glue; the bands are pasted out upon this board, as also are the leather or beaver clothing overlaps.
It is obvious that this thin board is not stout enough for this heavy book, therefore a second heavier board—or, if necessary, even a third—is pasted to it; but as the back now goes over on to the board, the heavier board must be set back sufficiently to prevent it from pushing into the back when opening the book.
As the pasting together of these boards makes them very thick, and such thick boards not being easily cut, they are generally cut the required size beforehand. Before pasting the thicker board upon the first board, the back is prepared.
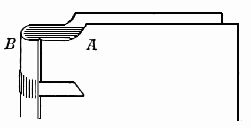 Fig. 115—Boards cut out at head.
First of all, the headband. It is carried on to each board 3 cm. deep, and the boards must therefore be cut out the same distance up to the edge; at A the board is bevelled off on the inside. Now cut a piece of coloured chamois leather—dark red or green—5 cm. wide and as long as the distance from one notch across the back to the other. The back at B is [Pg 161] now glued, the strip of leather laid on so that it projects 1-1/2 cm. beyond the edge, and the ends at each side brought equally to the bevelled part A. At both sides these are pushed in under the thin board and well pasted down, whilst the piece projecting over the edge is glued and turned backwards; but in order to strengthen the piece on the back of the book, a piece of card as long as the width of the back is laid in.
The back is selected either from ready-made undressed leather backs of suitable length and width, or is made on the machine. The practice of pasting the backs at the edges only does not seem satisfactory, because on the one hand it does not give sufficient spring, and on the other the single sections easily work loose. For pasted backs, stout wrappers are taken, and the strips are cut so that each one slightly overlaps in width the one preceding. The glued and fitted strips are either pressed hot in the rounding press or put through a rolling machine built for the same purpose. The finished backs should be allowed to dry for a short time. Where there is no machine suitable for this work, the backs must be pasted into each other, beginning at the outside, and well rubbed down upon a board made with grooves of various dimensions. The older method of pasting the backing upon the book itself is still followed, although it does not produce the firm arch nor give such a good shape as the former method. When it must be done, the following is the way to proceed: The size is taken by laying a piece of paper across the back (taking in 1/2 cm. of the board on each side), and with the dividers this measure is marked out on a strip of wrapping paper, which must be the exact length of the board, but wide enough to project about a hand's width over each board. So that this should not have an unsightly appearance in the book, it is bevelled along each side.
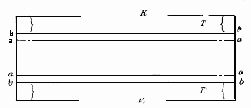 Fig. 116—Suggestion for account book back. K—Pared
edge; T—Part to be pasted.
Fig. 116—Suggestion for account book back. K—Pared
edge; T—Part to be pasted.
According to the measurement marked by the dividers at [Pg 162] top and bottom, a rule is laid from a to a, and along this a sharp line is drawn with the folder, and the lappets projecting underneath the rule are bent upwards. At this line thus marked, the wrapper is folded over and creased with the folder. A second parallel line is made in the same way, about 6 to 7 mm. farther out, from b to b. The back thus prepared is rounded in the middle part; a strip the size a to a might still be pasted in the centre. To fasten this to the book, both strips are glued with strong glue from b to the edge, the back brought into position, glued, and pressed down. From this it will be seen that the back stretched across the book is not glued on from a to b. A few more pieces of wrapping paper are still glued on to this first back to increase the strength of the arch; each one is measured separately after the one preceding it has been glued into its place, always measuring from a to a.
Such backs do not adhere quite firmly, and it is advisable to insert another narrower glued strip, opening the book in the middle, of course, to do this. After inserting the back, the book is closed, and the back will now lie close and tight [Pg 163] to the book. It is trimmed at top and bottom with a sharp knife and finished off with a rasp if necessary.
The heavy boards are hinged on to this back. They are cut to fit, and, beginning at the fold b, are placed so that the edge of the board stands a little away from the joint.
 Fig. 118—Boarded account book.
Where it is possible to glue up hot, the back should be made in advance. It is, however, essential that the spring back should be slightly over-rounded, that is to say, that its ends should first be pressed out so that they can be pushed on to the back; only thus can it be really effective, and must, moreover, be shaped to three-quarters of a circle.
An apparatus recently put on the market for glueing without heat, solely by wrapping up in drilling, is little better than a toy, which saves neither time nor material. The inventor can hardly be in the trade—certainly not a practical worker.
The prepared backs are fastened to the books as follows: Cut a strip of stout linen so that it projects a little at each end and 3 to 4 cm. at each side; glue the inside of the rounded back evenly, and then fasten in the linen strip so that it projects equally at ends and sides. At head and tail the ends are brought over on the outside, and the back thus made is forced on the book. Before doing so, a line should be drawn on the thin boards about 1-1/2 to 2 cm. from the joint, glue up to this line; the strip with the back would be drawn up at both sides and then pressed down. To make these backs lie closer, a strip of packing may similarly be inserted. [Pg 164]
So then the same work is done here with the glued-up backs as in the old style with the packed spring backs; here the back is just hinged on cloth, there it is made from a piece of wrapper. The thick board is set on in the same way as in the other style of work, set off from the glued back about 1 to 1-1/2 cm. To fill up this space, lay in each groove a piece of cord of suitable thickness which has been well pasted, rubbing in the paste quite smooth, and, after drying, paste over with stout paper.
Very thick books have a rather clumsy appearance with their many superimposed boards; this is improved by bevelling on all four sides the upper thick board.
To protect the book, leather bands are pasted on the back, also something to add strength is generally put on at head and tail, which is then covered with specially strong leather. For covering, linen, mole-skin; for heavy and extra work, pig-skin and cow-hide are used. Leather is, of course, always pared down, thoroughly coated with paste, well stretched over, and well rubbed down in all hollows at the joints, bands, &c.—side panels are also let in—and turned in. Where the back disappears under the thick board, the turn-in is cut in almost up to the edge at b with sharp scissors; if it were cut right to the edge it would be visible, which must be avoided. For turning-in at the head, it is obvious that the book must lie open as in the illustration.
 Fig. 119—To show where turn-in is to be cut.
The corners of account books must always be rounded. Metal corners on account books are clumsy, damage the writing desks and other books coming into contact with them, and even when using the best mill-boards it is impossible to fix [Pg 165] them so firmly that they will not work loose in the course of time. In their stead, leather corners and guards may be fixed, which are frequently tastefully finished in blind or gold.
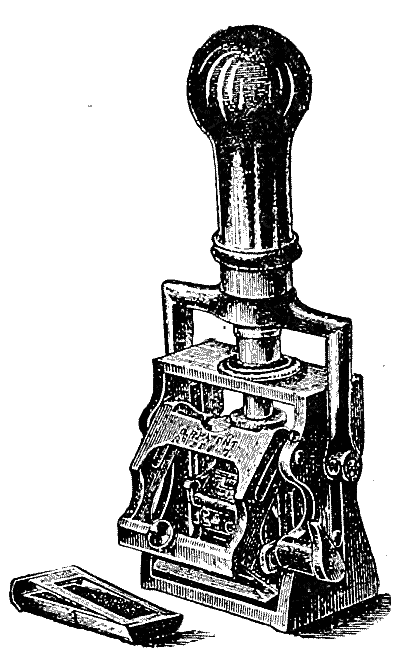 Fig. 120—Hand numbering machine.
All books for office use are either folioed or paged, i.e., either each page or each sheet gets a consecutive number in order to facilitate reference from the index. This may be done either by the hand numbering machine or by the larger machine worked with a treadle. In both cases the figures succeed each other automatically whilst printing.
It is always advisable to do this work before binding, as it is then easier and, besides, there is less chance of the fresh ink smudging when each single sheet of the sections is pushed up.
The manipulation of this apparatus is so simple that further explanation seems superfluous.
Where bound books have to be paged, small pieces of blotting-paper must be laid between the sheets to prevent smudging.
The manufacture of guard books for bills, letters, &c., comes into the same department as the making of account books. Guards are cut 4 cm. wide and folded in sixes along the middle, and sewn with strong thread, end to end, upon a strip of linen stretched upon a piece of wrapper to which bands have been pasted to further strengthen. The sections are sewn together at intervals of about 2 cm., so as to allow room for the papers that are to be pasted in. [Pg 166]
The stiff back with the sewn-on guards is now pasted into a cover, which is made with a back measurement as seen in the illustration. An insertion for the back is not cut for this purpose, but the two boards are hinged together with a strip of stiff paper somewhat wider than the back. The book is then provided with a linen or mole-skin back and corners, covered with paper, and, after the guarded back has been pasted in, is lined with paper. If it is intended to gum the guards, the gumming should be attended to before the sewing. The guards are fanned up slightly and brushed with gum-dextrine, to which a little sugar and a few drops of glycerine have been added, so that when dry the gum should not be too brittle.
 Fig. 121—Suggestion for back of guard book.
For all such work a thumb index is generally required; each page takes one or more letters, or a specification is given, according to which the binder counts off the number of pages required for each letter—X and Y being here excluded. Nowadays, the indices are cut with index shears, which not only regulates the depth of the index but also avoids the acute angles which are so easily torn in.
Commence cutting from the back, that is, with the Z; this, being the last letter, is not cut out. Then count off W, cut with the shears, and cut off what remains below to the bottom edge with a sharp knife, to do which a narrow thin board is slipped underneath. The further you proceed towards A, the longer is the strip which has to be cut out with the knife. [Pg 167]
When the excisions for the whole alphabet have been made, the letters are pasted on. These are sold ready printed, and nowadays are almost always in one piece for back and front.
The printed sheet with the alphabet is glued or gummed on the back, and, after drying, the alphabet is creased lengthwise and either cut so or punched out with a suitable tool. The single letters are damped and stuck in position.
One might also insert a strip of zinc after the cutting in of the letters and cut the length at once.
Cheaper kinds of account books for temporary use are often made with fixed backs; the packing is simply omitted, but the head and tail are pasted a little to make the turn-over hold better. No matter whether the cover be of leather or cloth, paste must be used, as this ensures the back adhering strongly to the book. Such a method of binding can be recommended for music.
Portfolios for drawings, &c., are often required; the boards are hinged together with paper as previously described for guard books, the inside of the back lined with cloth, and the outside covered with leather or cloth. The turn-in is pasted over the lined back.
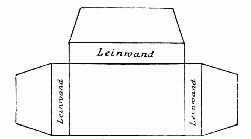 Fig. 122—Pattern for dust flaps. (Leinwand = Linen
hinge.)
Fig. 122—Pattern for dust flaps. (Leinwand = Linen
hinge.)
If books are to be made so that they can be fastened, slits must either be made with a chisel, through which the tape ends[Pg 168] are drawn from the outside to the inside and there pasted down, or else small round eyelet holes are made, and then proceed as before.
Dust-proof flaps are hinged on to three sides of a thin board with strips of linen in the following style, and lined and covered separately. The body itself is likewise made of thin board. (See Fig. 122.)
The whole arrangement is pasted on to the back board of the portfolio. [Pg 169]
The school book, perhaps the most despised branch of work in the bindery, has unjustly come to be treated as a sort of step-child by bookbinder and bookseller. Although everything has been cut down as finely as possible as regards paper and printing, yet the cost of binding must also be cut down, and a profit on the whole is still looked for. Thus it is that school books can only be produced by machinery. Folding, sewing, board cutting, trimming, and lettering are all done exclusively by machinery. All finishing work, pressing, headbanding, decorating the paper covers, have fallen off. The cover is always made in advance and the book fixed into it. A good goat-skin is seldom used for the back, almost always split sheep-skin, thereby also saving paring, or the so-called split horse-hide. These latter are put on the market in various colours and grains and are well suited for the work. A third-rate marbled paper is used for covering, as prices are not given for better kinds. A stout smooth paper is strongly recommended for end papers.
Frequently, in the smaller towns, there are still produced Bible histories, catechisms, and the like in half-leather bindings, tanned sheep-skin, the sale of which is likely to be large and assured for many years. The whole skin must be damped and well stretched previous to cutting out, in order that it may be cut into backs to the best advantage. [Pg 170]
The backs are laid on top of each other and pressed out in the wooden press between two old boards to remove all superfluous moisture. The edges are then pared with a sharp knife, the backs pasted, laying every two with pasted sides together to prevent their drying, and the books fixed in the leather backs. For this purpose the books are set in boards previously cut to size. In this case the books take tight backs; the joints are well rubbed down with the folder.
Thinner volumes in cloth have likewise tight backs. The cloth for the backs is cut into strips of handy length as wide as the length of the backs must be, is glued and cut a suitable width with a knife upon the cutting board, measuring with the eye. Recently, the so-called "taking off," as practised in fancy goods work, has been adopted for the sake of its cleaner and neater results in pasting and glueing covers. A large zinc plate is coated with glue, neither too thick nor too thin, the cover is laid face downwards and taken up, so that it is evenly coated all over with the glue or paste. The work requires some practice, but it is very quick and, above all, is neat and clean. The boards are laid upon these strips by a worker (allowing for the thickness of the back), turned in at top and bottom by a second worker, and the books at once fixed in. The backs, still damp, fit very well to the books, the joints are well rubbed in; covering and pasting on are done afterwards.
Where hand sewing must be done, the end papers should be first attached to each first and last section, double in front, single at the end. Sewing should never be upon two bands only but on three at least, better upon four, so that the two middle ones can be changed each time. In order to expedite the scraping of the bands, the threads are untwisted before pulling out from each other, the loose end need not exceed 1-1/2 cm., as a long band holds no better than a short [Pg 171] one, care being taken that it is always firmly pasted down. The drawn-out volumes are placed in batches on top of each other, all bands lying outwards. The projecting ends are well brushed with a hard brush, which renders them easy to scrape down. If it is intended to paste down the bands, the whole of the ends might now be pasted, the books lifted off one by one, and the bands pasted over on to the end paper. It is better to leave the ends free and to paste down when glueing up. They then become more thoroughly saturated with the paste and are pressed at once, and thus join the boards so much better.
It may be mentioned that school books with tight backs are more lasting than with hollow backs, no matter whether leather or cloth be used.
Mounted articles, i.e., placards, maps, drawings, &c., to be mounted on boards or linen, are frequently sent to the ordinary bindery. Things to be mounted on boards must be mounted whole, those that are to be rolled up or folded are mounted on linen. Placards are generally printed on very stout paper, and these should be well damped upon the back with sponge and water before pasting, and only when the paper is perfectly limp and stretched should the pasting be done, otherwise creases are sure to be caused by the stretching of the paper after mounting. A piece of packing paper the size of the placard to be mounted must also be pasted upon the back of the mounting board to prevent the board from "drawing." Only when the mounting is completed may the mount be cut to size and, if necessary, bound.
This binding is done by marking with the dividers a border about 1-1/2 cm. wide along the trimmed edge and laying a pasted strip of coloured paper and, turning it over, drawing it on to the back with a piece of clean waste paper, and well rubbing down. At the corners the strip is cut obliquely, as [Pg 172] in the case of a book, nipped, and turned in. This is done at the first two sides lying opposite to each other. At the other side the strip is laid not quite up to the ends and cut with the shears slightly obliquely, so that the finished corner appears as in the accompanying illustration. Of course, when such work is done in large quantities, another method is followed. For this the board would be cut to size, back and front—1 cm. narrower and shorter—likewise, and the boards bound beforehand. The strips are not turned in at the corners of the first two sides, but the whole side is rubbed down and the ends cut flush. The strips for the other two sides are cut to size, at the same time cutting off the corners obliquely at both sides, then pasted and drawn over the edges. When mounting on large surfaces, one person alone is not able to do the work—there must be some one to render assistance.
Such large pieces are always rubbed down under a piece of stout paper. As the hand cannot pass over the whole surface evenly and easily, a large piece of waste paper rolled into a ball and held firmly in the hand is used for rubbing down.
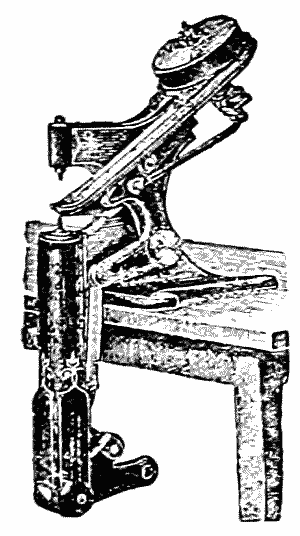 Fig. 123—Eyeleting machine.
The finished placard is placed between boards to dry. For hanging them, either eyelets with rings as sold are used or two holes, about 5 cm. apart, are punched with the eyelet pliers in the middle of the top edge and eyelets clamped in with the punch pliers. For doing large quantities it is advisable to procure a machine, the small eyeleting machine, which pierces and clamps the eyelet at the same time.
Mounting plates, plans, drawings, or maps on cloth is done in the following way: Paper can only be properly mounted upon a very tightly stretched [Pg 173] linen or cotton material; linen being generally used in England. Where such work is frequently to be done, so-called drawing boards ought to be at hand. These are wooden boards, best when made to fit into each other so that they can be enlarged to suit the work in hand.
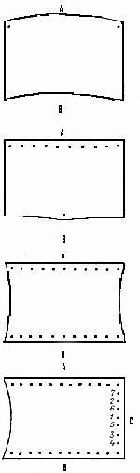 Figs. 124 to 127—Showing stages of pinning down for
stretching.
Figs. 124 to 127—Showing stages of pinning down for
stretching.
The board must, of course, be perfectly clean on the stretching side, otherwise the back of the mounted article would be soiled. If necessary, the surface may be covered with waste paper before stretching. The material should be left about 5 cm. larger all round for convenience of stretching and working. The stretching is best done with drawing pins, which may be used again and again for the same work. The method of stretching is as follows: Woven fabrics stretch less in direction of the warp than the woof, therefore stretching is begun in the former direction. The material is fixed with pins at two corners of one side, stretching it firmly at the same time. The material will be drawn outwards a little on the stretched side (Fig. 124). To counteract this, a pin is fixed in the middle of the opposite side, after having pulled the material over so that the side A forms a straight line. The whole side A is then pinned down, the pins not being more than 5 cm. apart (Fig. 125).
Now draw out the pin on the B side and pin down the whole side, firmly stretching the material all the while, beginning at the middle and working towards the sides (Fig. 126). [Pg 174]
The third side is pinned down by first fixing a pin in the centre, then in the centre of the halves to right and left, then proceeding with the smaller divisions in the same fashion. The material is pulled far enough to form a straight line (Fig. 127). The last side is well stretched and pinned down as just described. In this way a surface not only entirely free from wrinkles and creases is produced, but the texture of the material will run straight.
In mounting upon cloth, special care must be taken that the paper is perfectly limp and flexible; but this must not be due to its having been too thickly coated with paste.
Large wall maps made up of many pieces must be very carefully damped and must be allowed to lie damp a long time. Attention must be given to the colours, which are apt to run, and also to the proper fitting of the various pieces, as these have often been stretched in various ways in the lithographic press, or through irregular drying have taken unequal sizes. Damping and pasting must be repeated to help to remedy this until the whole fits together perfectly.
Maps to be folded must be cut into sections of suitable size. In order that they may fold together well, the various pieces are set slightly apart, the horizontal lines slightly less (1-1/2 mm.), the longitudinal somewhat more, where there are many parts up to 3 mm.
Perfect fitting is here essential, and to insure this it is advisable to mark out the divisions with the folder and rule. This is not necessary for small maps, the eye will then be sufficient guide. Thorough rubbing down is absolutely necessary to make every part adhere.
When perfectly dry, the material is taken from the stretcher, the edges accurately trimmed, and the map folded upon the cross lines into one long strip, and then this strip is folded over in zigzag fashion to the given size.
The appearance of such a map is greatly improved by [Pg 175] sharply pressing awhile, for which a zinc plate should be inserted between each fold.
Such maps are often placed in a small light case of cardboard covered with cloth, or a light cover is made, into which the map is so pasted at the back board that it lies ready for use when opened.
Paintings, drawings in colour, or wash drawings cause exceptional difficulties, as the moisture of the pasting medium tends to dissolve or make the colours run. In such cases smaller sheets are placed between sheets of damp blotting paper, and it is stuck upon the pasted underside. When the object permits it, it is glued on without previous damping. Large tracings present the greatest difficulties as the paper stretches very much and, on account of its delicacy, is not easily manipulated and is liable to crease. Such work requires several hands. It is necessary to have clear paste, quite free from knots, which has been thinned to the consistency of thick pea-soup. When at all practicable, the tracing itself is pasted twice, the first pasting will make the paper stretch and the second ensures a proper coating of paste. Two persons lift the tracing and turn it over (for very large pieces four persons are required); the sheet is laid down at one corner, the other three being held up, and the whole gently lowered little by little. One person rubs it down slowly, proceeding from the first corner and carefully avoiding creases and bubbles.
With such big jobs it is often impossible to avoid tears near where it is held by the fingers of the workers unless timely precautions against this are taken. The simplest way is to paste strips of paper and to stick these on the four corners of the pasted side of the tracing and to take hold of these. These strips are removed as the rubbing down progresses, making sure, however, that there is still enough paste left on these places. [Pg 176]
Tracings are always mounted upon white paper, even though it has afterwards to be cut or mounted on cloth.
Maps that have to be prepared for hanging on walls are always provided with a roller at top and bottom; these may be stained and varnished or covered with coloured paper. The mounted maps are glued and tacked to the half-round rollers. Where all round rollers are used they should be ordered in halves. The edges of the map are glued between and the two halves then nailed together. Rings are screwed into the top roller for hanging, and also a few tapes to tie up the rolled map if required.
Plates and maps, as also placards, are also varnished. Varnishing is nowadays always done with spirit varnish, which is convenient for working. All papers cannot be simply varnished and done with—the nature of the paper must be taken into consideration. All sized and chromo papers may be varnished without preparation. Many note-papers, especially unsized and copperplate papers, must first be sized, which prevents the resinous parts from penetrating and thus avoids grease spots.
The best of all means is glue or gelatine; the former turns the paper somewhat yellow. A thin solution is made, which is laid on warm with a large sponge in long quick strokes. Where colour or ink is to be dealt with, no parts should be touched twice or the colours will be effaced. A second coating, however, may be given after the first has dried. The spirit varnish to be used—called map or photo varnish—is still too thick as sold. It is thinned with 90% spirit of wine to the required consistency until it runs easily from the brush.
Wide varnish brushes with lead fastenings are used. Two coats of thin varnish are better than one coat of thick. [Pg 177]
Our work is now finished. The author has endeavoured to deal only with what comes within the sphere of practical bookbinding.
At the present time there is a sharp dividing line drawn between what we may call the practical and artistic bookbinding. To whatever height of perfection the latter may still reach, it only begins where the practical bookbinder has completed his work faultless in every detail. A bad binding does not become a work of art when it has had its exterior artistically decorated, it rather calls forth condemnation on its bad forwarding and wasted skill in finishing.
Yet in spite of the separation of the practical from the artistic in binding, it could hardly be possible—where the two are so closely connected—that the latter should not now and then be touched upon. Should the intention of issuing a book on artistic binding in form similar to this be carried out, it would also be necessary to refer occasionally to the practical side of binding.
To-day we look in vain in the ordinary bindery for the many little extra jobs which, formerly, were the largest portion of the work in artistic binding. All the little jewel cases, card cases, cigar cases, &c., which made the winter months of the binder—as late as the sixties and seventies—the busiest and most profitable months of the year, have [Pg 178] vanished from our workshops, as also have the mounting, &c., of embroideries and women's work. As a result, the number of those able to execute these minor works of the art binder has grown smaller. This branch of work, which at one time seemed inseparable from our trade, has partly become a separate industry in itself and has partly been drawn into other special trades where the work can be done better and cheaper by other means.
Therefore the lettering of portable articles—spectacle cases, cigar cases, purses, pocket-books—is no longer done; such things—where they are not made to stock—are made by the leather worker, this also having passed away from the binder. This continual loss of work originally ours—not marked by decades now but by still shorter intervals—should make all bookbinders reflect. The question no longer is "How to prevent it?" but the more far-reaching one: "How to face the fact?" The only possible way is for every master bookbinder—having regard to prevailing conditions—to immediately put all his skill and energy into some special branch of the trade. With this good counsel we would like to send forth this little book.
At the present time there are few small towns indeed where one day 50 cloth cases have to be turned out, to-morrow half a dozen books to be bound in half-calf extra, next day 50 fancy boxes, and then, perhaps, a few fine velvet-covered cases.
Should there really be found such conditions still existing, no workman would be found—owing to our modern system of training—able and willing to work under such conditions.
Those possessing the essentials in an art craftsman—infinite pains, neatness and exactness—are sure to make rapid progress. What is still required—an eye for colour and good taste—are easily acquired, for much of the bookbinder's work is based on experience and example. [Pg 179]
He who sees much, especially new things, will soon be able to reproduce the things seen, and will, moreover, soon learn to distinguish between good and bad. About taste, so-called, it is not worth while arguing, as taste is mostly dictated by fashion and is often fashionable folly. The thoughtful craftsman, however, should be quite clear as to the principles determining what is to be permitted and what rejected in his own work; for the rest he may follow the lead of fashion—he must, in fact, if his work lies much in that way.
Our conclusion may, therefore, be summed up in these words:—
Let the most painstaking neatness and thoroughness be the masters of each one.
No man can do everything; he who can do something well, does most.
ENGRAVING FOR ILLUSTRATION.
HISTORICAL AND PRACTICAL NOTES.
By JOSEPH KIRKBRIDE.
Crown 8vo. 72 pp. 2 Plates. 6 Illustrations. 1903.
Price 2s.6d.; Abroad 3s. Strictly Net.
GLUE AND GLUE-TESTING.
By SAMUEL RIDEAL, D.Sc. Lond.
14 Illustrations. 144 Pages. Demy 8vo. 1900.
Price 10s.6d.; India and British Colonies, 11s.;
Other Countries, 12s. Strictly Net.
SEALING-WAXES, WAFERS, AND OTHER ADHESIVES
For the Household, Office, Workshop, and Factory.
By H. C. STANDAGE.
Crown 8vo. 96 Pages. 1902.
Price 5s.; India and British Colonies, 5s.6d.;
Other Countries, 6s. Strictly Net.
THROUGH ALL BOOKSELLERS, OR POST FREE OF
SCOTT, GREENWOOD & CO.,
19 Ludgate Hill, London, E.C.
End of the Project Gutenberg EBook of Practical Bookbinding, by Paul Adam

*** END OF THIS PROJECT GUTENBERG EBOOK PRACTICAL BOOKBINDING ***

***** This file should be named 39318-h.htm or 39318-h.zip *****
This and all associated files of various formats will be found in:
        http://www.gutenberg.org/3/9/3/1/39318/

Produced by Chris Curnow, Hazel Batey and the Online
Distributed Proofreading Team at http://www.pgdp.net (This
file was produced from images generously made available
by The Internet Archive)


Updated editions will replace the previous one--the old editions
will be renamed.

Creating the works from public domain print editions means that no
one owns a United States copyright in these works, so the Foundation
(and you!) can copy and distribute it in the United States without
permission and without paying copyright royalties.  Special rules,
set forth in the General Terms of Use part of this license, apply to
copying and distributing Project Gutenberg-tm electronic works to
protect the PROJECT GUTENBERG-tm concept and trademark.  Project
Gutenberg is a registered trademark, and may not be used if you
charge for the eBooks, unless you receive specific permission.  If you
do not charge anything for copies of this eBook, complying with the
rules is very easy.  You may use this eBook for nearly any purpose
such as creation of derivative works, reports, performances and
research.  They may be modified and printed and given away--you may do
practically ANYTHING with public domain eBooks.  Redistribution is
subject to the trademark license, especially commercial
redistribution.


*** START: FULL LICENSE ***

THE FULL PROJECT GUTENBERG LICENSE
PLEASE READ THIS BEFORE YOU DISTRIBUTE OR USE THIS WORK

To protect the Project Gutenberg-tm mission of promoting the free
distribution of electronic works, by using or distributing this work
(or any other work associated in any way with the phrase "Project
Gutenberg"), you agree to comply with all the terms of the Full Project
Gutenberg-tm License (available with this file or online at
http://gutenberg.org/license).


Section 1.  General Terms of Use and Redistributing Project Gutenberg-tm
electronic works

1.A.  By reading or using any part of this Project Gutenberg-tm
electronic work, you indicate that you have read, understand, agree to
and accept all the terms of this license and intellectual property
(trademark/copyright) agreement.  If you do not agree to abide by all
the terms of this agreement, you must cease using and return or destroy
all copies of Project Gutenberg-tm electronic works in your possession.
If you paid a fee for obtaining a copy of or access to a Project
Gutenberg-tm electronic work and you do not agree to be bound by the
terms of this agreement, you may obtain a refund from the person or
entity to whom you paid the fee as set forth in paragraph 1.E.8.

1.B.  "Project Gutenberg" is a registered trademark.  It may only be
used on or associated in any way with an electronic work by people who
agree to be bound by the terms of this agreement.  There are a few
things that you can do with most Project Gutenberg-tm electronic works
even without complying with the full terms of this agreement.  See
paragraph 1.C below.  There are a lot of things you can do with Project
Gutenberg-tm electronic works if you follow the terms of this agreement
and help preserve free future access to Project Gutenberg-tm electronic
works.  See paragraph 1.E below.

1.C.  The Project Gutenberg Literary Archive Foundation ("the Foundation"
or PGLAF), owns a compilation copyright in the collection of Project
Gutenberg-tm electronic works.  Nearly all the individual works in the
collection are in the public domain in the United States.  If an
individual work is in the public domain in the United States and you are
located in the United States, we do not claim a right to prevent you from
copying, distributing, performing, displaying or creating derivative
works based on the work as long as all references to Project Gutenberg
are removed.  Of course, we hope that you will support the Project
Gutenberg-tm mission of promoting free access to electronic works by
freely sharing Project Gutenberg-tm works in compliance with the terms of
this agreement for keeping the Project Gutenberg-tm name associated with
the work.  You can easily comply with the terms of this agreement by
keeping this work in the same format with its attached full Project
Gutenberg-tm License when you share it without charge with others.

1.D.  The copyright laws of the place where you are located also govern
what you can do with this work.  Copyright laws in most countries are in
a constant state of change.  If you are outside the United States, check
the laws of your country in addition to the terms of this agreement
before downloading, copying, displaying, performing, distributing or
creating derivative works based on this work or any other Project
Gutenberg-tm work.  The Foundation makes no representations concerning
the copyright status of any work in any country outside the United
States.

1.E.  Unless you have removed all references to Project Gutenberg:

1.E.1.  The following sentence, with active links to, or other immediate
access to, the full Project Gutenberg-tm License must appear prominently
whenever any copy of a Project Gutenberg-tm work (any work on which the
phrase "Project Gutenberg" appears, or with which the phrase "Project
Gutenberg" is associated) is accessed, displayed, performed, viewed,
copied or distributed:

This eBook is for the use of anyone anywhere at no cost and with
almost no restrictions whatsoever.  You may copy it, give it away or
re-use it under the terms of the Project Gutenberg License included
with this eBook or online at www.gutenberg.org/license

1.E.2.  If an individual Project Gutenberg-tm electronic work is derived
from the public domain (does not contain a notice indicating that it is
posted with permission of the copyright holder), the work can be copied
and distributed to anyone in the United States without paying any fees
or charges.  If you are redistributing or providing access to a work
with the phrase "Project Gutenberg" associated with or appearing on the
work, you must comply either with the requirements of paragraphs 1.E.1
through 1.E.7 or obtain permission for the use of the work and the
Project Gutenberg-tm trademark as set forth in paragraphs 1.E.8 or
1.E.9.

1.E.3.  If an individual Project Gutenberg-tm electronic work is posted
with the permission of the copyright holder, your use and distribution
must comply with both paragraphs 1.E.1 through 1.E.7 and any additional
terms imposed by the copyright holder.  Additional terms will be linked
to the Project Gutenberg-tm License for all works posted with the
permission of the copyright holder found at the beginning of this work.

1.E.4.  Do not unlink or detach or remove the full Project Gutenberg-tm
License terms from this work, or any files containing a part of this
work or any other work associated with Project Gutenberg-tm.

1.E.5.  Do not copy, display, perform, distribute or redistribute this
electronic work, or any part of this electronic work, without
prominently displaying the sentence set forth in paragraph 1.E.1 with
active links or immediate access to the full terms of the Project
Gutenberg-tm License.

1.E.6.  You may convert to and distribute this work in any binary,
compressed, marked up, nonproprietary or proprietary form, including any
word processing or hypertext form.  However, if you provide access to or
distribute copies of a Project Gutenberg-tm work in a format other than
"Plain Vanilla ASCII" or other format used in the official version
posted on the official Project Gutenberg-tm web site (www.gutenberg.org),
you must, at no additional cost, fee or expense to the user, provide a
copy, a means of exporting a copy, or a means of obtaining a copy upon
request, of the work in its original "Plain Vanilla ASCII" or other
form.  Any alternate format must include the full Project Gutenberg-tm
License as specified in paragraph 1.E.1.

1.E.7.  Do not charge a fee for access to, viewing, displaying,
performing, copying or distributing any Project Gutenberg-tm works
unless you comply with paragraph 1.E.8 or 1.E.9.

1.E.8.  You may charge a reasonable fee for copies of or providing
access to or distributing Project Gutenberg-tm electronic works provided
that

- You pay a royalty fee of 20% of the gross profits you derive from
     the use of Project Gutenberg-tm works calculated using the method
     you already use to calculate your applicable taxes.  The fee is
     owed to the owner of the Project Gutenberg-tm trademark, but he
     has agreed to donate royalties under this paragraph to the
     Project Gutenberg Literary Archive Foundation.  Royalty payments
     must be paid within 60 days following each date on which you
     prepare (or are legally required to prepare) your periodic tax
     returns.  Royalty payments should be clearly marked as such and
     sent to the Project Gutenberg Literary Archive Foundation at the
     address specified in Section 4, "Information about donations to
     the Project Gutenberg Literary Archive Foundation."

- You provide a full refund of any money paid by a user who notifies
     you in writing (or by e-mail) within 30 days of receipt that s/he
     does not agree to the terms of the full Project Gutenberg-tm
     License.  You must require such a user to return or
     destroy all copies of the works possessed in a physical medium
     and discontinue all use of and all access to other copies of
     Project Gutenberg-tm works.

- You provide, in accordance with paragraph 1.F.3, a full refund of any
     money paid for a work or a replacement copy, if a defect in the
     electronic work is discovered and reported to you within 90 days
     of receipt of the work.

- You comply with all other terms of this agreement for free
     distribution of Project Gutenberg-tm works.

1.E.9.  If you wish to charge a fee or distribute a Project Gutenberg-tm
electronic work or group of works on different terms than are set
forth in this agreement, you must obtain permission in writing from
both the Project Gutenberg Literary Archive Foundation and Michael
Hart, the owner of the Project Gutenberg-tm trademark.  Contact the
Foundation as set forth in Section 3 below.

1.F.

1.F.1.  Project Gutenberg volunteers and employees expend considerable
effort to identify, do copyright research on, transcribe and proofread
public domain works in creating the Project Gutenberg-tm
collection.  Despite these efforts, Project Gutenberg-tm electronic
works, and the medium on which they may be stored, may contain
"Defects," such as, but not limited to, incomplete, inaccurate or
corrupt data, transcription errors, a copyright or other intellectual
property infringement, a defective or damaged disk or other medium, a
computer virus, or computer codes that damage or cannot be read by
your equipment.

1.F.2.  LIMITED WARRANTY, DISCLAIMER OF DAMAGES - Except for the "Right
of Replacement or Refund" described in paragraph 1.F.3, the Project
Gutenberg Literary Archive Foundation, the owner of the Project
Gutenberg-tm trademark, and any other party distributing a Project
Gutenberg-tm electronic work under this agreement, disclaim all
liability to you for damages, costs and expenses, including legal
fees.  YOU AGREE THAT YOU HAVE NO REMEDIES FOR NEGLIGENCE, STRICT
LIABILITY, BREACH OF WARRANTY OR BREACH OF CONTRACT EXCEPT THOSE
PROVIDED IN PARAGRAPH 1.F.3.  YOU AGREE THAT THE FOUNDATION, THE
TRADEMARK OWNER, AND ANY DISTRIBUTOR UNDER THIS AGREEMENT WILL NOT BE
LIABLE TO YOU FOR ACTUAL, DIRECT, INDIRECT, CONSEQUENTIAL, PUNITIVE OR
INCIDENTAL DAMAGES EVEN IF YOU GIVE NOTICE OF THE POSSIBILITY OF SUCH
DAMAGE.

1.F.3.  LIMITED RIGHT OF REPLACEMENT OR REFUND - If you discover a
defect in this electronic work within 90 days of receiving it, you can
receive a refund of the money (if any) you paid for it by sending a
written explanation to the person you received the work from.  If you
received the work on a physical medium, you must return the medium with
your written explanation.  The person or entity that provided you with
the defective work may elect to provide a replacement copy in lieu of a
refund.  If you received the work electronically, the person or entity
providing it to you may choose to give you a second opportunity to
receive the work electronically in lieu of a refund.  If the second copy
is also defective, you may demand a refund in writing without further
opportunities to fix the problem.

1.F.4.  Except for the limited right of replacement or refund set forth
in paragraph 1.F.3, this work is provided to you 'AS-IS' WITH NO OTHER
WARRANTIES OF ANY KIND, EXPRESS OR IMPLIED, INCLUDING BUT NOT LIMITED TO
WARRANTIES OF MERCHANTIBILITY OR FITNESS FOR ANY PURPOSE.

1.F.5.  Some states do not allow disclaimers of certain implied
warranties or the exclusion or limitation of certain types of damages.
If any disclaimer or limitation set forth in this agreement violates the
law of the state applicable to this agreement, the agreement shall be
interpreted to make the maximum disclaimer or limitation permitted by
the applicable state law.  The invalidity or unenforceability of any
provision of this agreement shall not void the remaining provisions.

1.F.6.  INDEMNITY - You agree to indemnify and hold the Foundation, the
trademark owner, any agent or employee of the Foundation, anyone
providing copies of Project Gutenberg-tm electronic works in accordance
with this agreement, and any volunteers associated with the production,
promotion and distribution of Project Gutenberg-tm electronic works,
harmless from all liability, costs and expenses, including legal fees,
that arise directly or indirectly from any of the following which you do
or cause to occur: (a) distribution of this or any Project Gutenberg-tm
work, (b) alteration, modification, or additions or deletions to any
Project Gutenberg-tm work, and (c) any Defect you cause.


Section  2.  Information about the Mission of Project Gutenberg-tm

Project Gutenberg-tm is synonymous with the free distribution of
electronic works in formats readable by the widest variety of computers
including obsolete, old, middle-aged and new computers.  It exists
because of the efforts of hundreds of volunteers and donations from
people in all walks of life.

Volunteers and financial support to provide volunteers with the
assistance they need, are critical to reaching Project Gutenberg-tm's
goals and ensuring that the Project Gutenberg-tm collection will
remain freely available for generations to come.  In 2001, the Project
Gutenberg Literary Archive Foundation was created to provide a secure
and permanent future for Project Gutenberg-tm and future generations.
To learn more about the Project Gutenberg Literary Archive Foundation
and how your efforts and donations can help, see Sections 3 and 4
and the Foundation web page at http://www.pglaf.org.


Section 3.  Information about the Project Gutenberg Literary Archive
Foundation

The Project Gutenberg Literary Archive Foundation is a non profit
501(c)(3) educational corporation organized under the laws of the
state of Mississippi and granted tax exempt status by the Internal
Revenue Service.  The Foundation's EIN or federal tax identification
number is 64-6221541.  Its 501(c)(3) letter is posted at
http://pglaf.org/fundraising.  Contributions to the Project Gutenberg
Literary Archive Foundation are tax deductible to the full extent
permitted by U.S. federal laws and your state's laws.

The Foundation's principal office is located at 4557 Melan Dr. S.
Fairbanks, AK, 99712., but its volunteers and employees are scattered
throughout numerous locations.  Its business office is located at
809 North 1500 West, Salt Lake City, UT 84116, (801) 596-1887, email
business@pglaf.org.  Email contact links and up to date contact
information can be found at the Foundation's web site and official
page at http://pglaf.org

For additional contact information:
     Dr. Gregory B. Newby
     Chief Executive and Director
     gbnewby@pglaf.org


Section 4.  Information about Donations to the Project Gutenberg
Literary Archive Foundation

Project Gutenberg-tm depends upon and cannot survive without wide
spread public support and donations to carry out its mission of
increasing the number of public domain and licensed works that can be
freely distributed in machine readable form accessible by the widest
array of equipment including outdated equipment.  Many small donations
($1 to $5,000) are particularly important to maintaining tax exempt
status with the IRS.

The Foundation is committed to complying with the laws regulating
charities and charitable donations in all 50 states of the United
States.  Compliance requirements are not uniform and it takes a
considerable effort, much paperwork and many fees to meet and keep up
with these requirements.  We do not solicit donations in locations
where we have not received written confirmation of compliance.  To
SEND DONATIONS or determine the status of compliance for any
particular state visit http://pglaf.org

While we cannot and do not solicit contributions from states where we
have not met the solicitation requirements, we know of no prohibition
against accepting unsolicited donations from donors in such states who
approach us with offers to donate.

International donations are gratefully accepted, but we cannot make
any statements concerning tax treatment of donations received from
outside the United States.  U.S. laws alone swamp our small staff.

Please check the Project Gutenberg Web pages for current donation
methods and addresses.  Donations are accepted in a number of other
ways including checks, online payments and credit card donations.
To donate, please visit: http://pglaf.org/donate


Section 5.  General Information About Project Gutenberg-tm electronic
works.

Professor Michael S. Hart is the originator of the Project Gutenberg-tm
concept of a library of electronic works that could be freely shared
with anyone.  For thirty years, he produced and distributed Project
Gutenberg-tm eBooks with only a loose network of volunteer support.


Project Gutenberg-tm eBooks are often created from several printed
editions, all of which are confirmed as Public Domain in the U.S.
unless a copyright notice is included.  Thus, we do not necessarily
keep eBooks in compliance with any particular paper edition.


Most people start at our Web site which has the main PG search facility:

     http://www.gutenberg.org

This Web site includes information about Project Gutenberg-tm,
including how to make donations to the Project Gutenberg Literary
Archive Foundation, how to help produce our new eBooks, and how to
subscribe to our email newsletter to hear about new eBooks.