The Project Gutenberg EBook of The Essentials of Illustration, by
T. G. (Thomas George) Hill

This eBook is for the use of anyone anywhere at no cost and with
almost no restrictions whatsoever.  You may copy it, give it away or
re-use it under the terms of the Project Gutenberg License included
with this eBook or online at www.gutenberg.org


Title: The Essentials of Illustration
       A Practical Guide to the Reproduction of Drawings &
              Photographs for the Use of Scientists & Others

Author: T. G. (Thomas George) Hill

Release Date: January 7, 2011 [EBook #34869]

Language: English

Character set encoding: ISO-8859-1

*** START OF THIS PROJECT GUTENBERG EBOOK THE ESSENTIALS OF ILLUSTRATION ***


Produced by Lesley Halamek, Chris Curnow and the Online
Distributed Proofreading Team at https://www.pgdp.net (This
file was produced from images generously made available
by The Internet Archive)
| PAGE | |
| Intaglio Printing | 1 |
| Intaglio plates | 2 |
| Line engraving | 2 |
| Etching | 5 |
| Soft-ground etching | 6 |
| Mezzotint | 7 |
| Photogravure | 8 |
| Plane Surface Printing | 15 |
| Lithography | 15 |
| Chromolithography | 20 |
| Photolithographic processes | 23 |
| Collotype | 23 |
| The preparation of illustrated pages | 26 |
| Relief Printing | 33 |
| Woodcuts and engravings | 33 |
| The Half-tone process | 37 |
| The Half-tone three-colour process | 46 |
| Photomechanical line blocks | 49 |
| The drawing of microscopic details | 67 |
| The drawing of diagrams and apparatus | 72 |
| The drawing of maps | 76 |
| The drawing of graphs or curves | 79 |
| The swelled gelatine process | 84 |
| The Relative Cost of blocks and plates by various processes | 89 |
| Literature | 91 |
| PLATE | |||
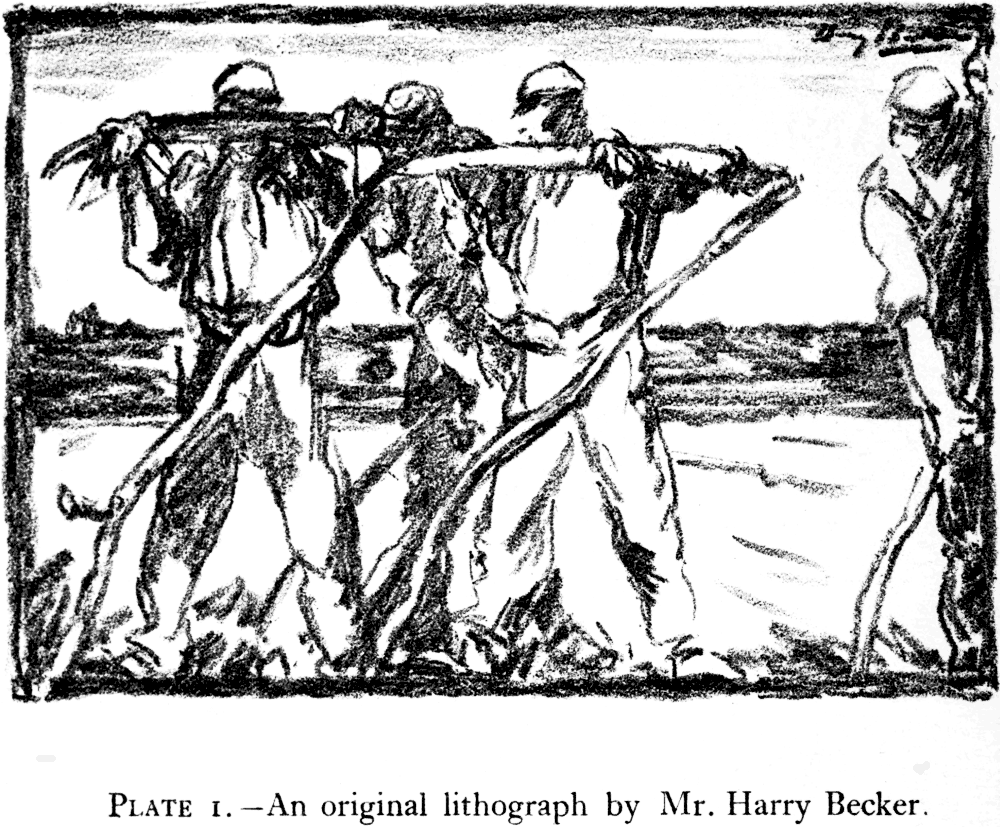
| 1 | An original lithograph by Mr. Harry Becker. | ||
| 2 | Chromolithograph. | Messrs. Gerrards, Ltd. | |
| 3 | Collotype. | Messrs. André, Sleigh & Anglo, Ltd. | |
| 4-5 | Collotype. | Messrs. André, Sleigh & Anglo, Ltd. | |
| 6 | Half tone. | Swan Electric Engraving Co., Ltd. | |
| 7 | Half tone. | ||
| 8 | Photogravure. | ||
| 9 | Collotype. | Messrs. André, Sleigh & | |
| 10 | Half tone. | Anglo, Ltd. | |
| 11 | Half tone. | ||
| 12 | Half tone three colour. | ||
| Tailpiece, p. 11. | Electrotype from the original wood engraving by Bewick. |
| Tailpiece, p. 30. | Line block. Messrs. Bourne & Co. |
| Fig. 1. | Wood engraving. Messrs. Edmund Evans, Ltd. |
| Fig. 2. | Wood cut. Mr. G. N. Oliver |
| Figs. 3-6. | Line blocks. Messrs. André, Sleigh & Anglo, Ltd. |
| Figs. 7 and 8. | Line blocks, reproductions of a wood engraving. Mr. C. Butterworth. |
| Fig. 9. | Line block. |
| Figs. 10-13. | Line blocks, reproductions of wood engravings. |
| Fig. 14. | Line block. |
| Fig. 15. | Line block. Messrs. André, Sleigh & Anglo, Ltd. |
| Fig. 16.page vii | Line block. Swan Electric Engraving Co., Ltd. |
| Fig. 17. | Line block. Messrs. André, Sleigh & Anglo, Ltd. |
| Figs. 18-20. | Line blocks. |
| Figs. 21-23. | Line blocks. Messrs. Bourne & Co. |
| Figs. 24 and 25. | Line blocks. |
| Fig. 26. | Line block. Messrs. Bourne & Co. |
| Fig. 27. | Line block. |
| Figs. 28 and 29. | Line blocks. Messrs. André, Sleigh & Anglo, Ltd. |
| Fig. 30. | Line block. Mr. C. Butterworth. |
| Fig. 31. | Line block. Messrs. André, Sleigh & Anglo, Ltd. |
| Fig. 32. | Line block. Mr. C. Butterworth. |
| Figs. 33 and 34. | Line blocks. |
| Figs. 35 and 36. | Line blocks. Messrs. André, Sleigh & Anglo, Ltd. |
| Fig. 37. | Line block. Messrs. Bourne & Co. |
| Fig. 38. | Lithograph reproduced by the Swelled Gelatine Process. Artists Illustrators, Ltd. |
| Tailpiece, p. 86. | Line block. Messrs. André, Sleigh & Anglo, Ltd. |
M ODERN scientific publications, although they may in some or even many cases equal in their scientific quality the memoirs of earlier workers, do not, on the average, reach a high standard as regards illustration. For instance, in Great Britain botany is pre-eminent in its morphological aspects; it should therefore follow that the illustrations, which form so important a part of such papers, should be beyond reproach. This is not always so, a fact which must be patent to anyone with the slightest critical knowledge who looks through a typical journal. This is a fact much to be regretted, since many of the earlier scientists were accomplished draughtsmen and, indeed, often artists; in this connection the Hookers and Professor Daniel Oliver may be mentioned. The implication is not intended that there are no good amateur draughtsmen nowadays; there are, and in some cases possessed of great ability. The beautiful work of Church in his Floral Mechanisms may be cited as an example.
It may, of course, be argued that any picture which serves to illustrate the particular feature is good enough; this is the contention of one who takes an insufficient pride in his work. A feature worthy of an illustration deserves the best the author can produce, more especially as a literary form is still, fortunately, preserved or, at any rate, aimed at.
The reason for indifferent illustrations is primarily due to bad or mediocre drawings, or to their unsuitability for the kind of reproduction in view.
With regard to the first point: this lack of draughtsmanship often obtains; when education entirely replaces mere instruction, it is to be hoped that all students of page x science will be trained in the rudiments of drawing. Meanwhile the difficulty can be partly overcome, as will be seen later on, by the simple means of drawing on an enlarged scale, in order that in reproduction reduction can be made.
The second reason, the onus of which also falls on the authors, is a lack of knowledge regarding the kind of drawing suitable for the different modes of reproduction; this is a very important point, for "technical conditions govern even genius itself."
Authors, however, are not always to blame; it would appear that even editors sometimes are wanting in the requisite knowledge, for we have known straightforward line drawings reproduced by half-tone; in other cases the paper used is unsuitable for the reproduction and, at other times, the printers are at fault.
With a view to remedying, at any rate in part, these deficiencies, a course of lectures, arranged by the Board of Studies in Botany of the University of London, was delivered in the Lent term of 1913 in the Department of Botany of University College, London.
In gratifying the wish expressed by some that these lectures should be given a more permanent dress, the author feels that some apology is necessary, for he can lay no claim to authoritative knowledge of much of the subject-matter; questions relating to the graphic arts and to illustrations, however, have always been of interest to him, so that he has tried various experiments, often with disastrous results, and thus has gained some experience.
In these matters the author has benefited much through his association with Professor F. W. Oliver, who, characteristically, has been ever ready to discuss these problems with, and to place his knowledge and experience at the disposal of the author.
The outline of the ways and means of illustration page xi contained in the following pages is primarily intended for ordinary working scientists, not for artists, professional draughtsmen or skilled amateurs.
The point of view is mainly botanical, primarily because the present writer is a botanist and also because the requirements of modern botany in the way of illustrations are more extensive than those of any other science; the requirements of other sciences, however, have not been overlooked. With regard to other branches of knowledge, the principles considered will, it is hoped, prove of some value to the workers therein.
The details of technique have been kept as brief as possible; in fact, sufficient only has been said to indicate the main principles involved. In the literature cited, to which the author is indebted particularly for matters relating to technique, will be found full, and sometimes exhaustive, accounts.
With regard to the illustrations, these have been selected to illustrate the various methods of reproduction described or to demonstrate the points raised. In those instances where the source has not been acknowledged or the draughtsman or photographer mentioned by name, the figure is by the author: and since the actual making of plates and blocks is of considerable importance, the firms, when known, responsible for their making are mentioned in the Table of Illustrations. In this connexion the author desires to express his appreciation of the skill shewn and care taken by Messrs. André, Sleigh and Anglo, Limited, who prepared the majority of the new illustrations which appear in the following pages.
The author is indebted to many who have helped in various ways in the production of his work; particularly is he desirous of expressing his warmest thanks to Miss O. Johnston for the charming drawing of Geranium columbinum (Plate 2) and to Mr. Harry Becker for his beautiful lithograph (Plate 1). To Miss S. M. Baker, page xii Dr. W. G. Ridewood, and Miss Winifred Smith thanks are due for the loan of original drawings; also to Mr. Edward Hunter and Mr. Hugh Hunter for information regarding matters of technique and cost.
The number of illustrations would have been less but for the generosity of Messrs. Chapman and Hall, the Editors of the "Annals of Botany," "The Imprint," and the "New Phytologist," Professor F. W. Oliver and Mr. G. N. Oliver in lending blocks. Recognition also must be made of the kindness of Mr. Richard G. Hatton in consenting to the use of certain blocks from his admirable "Craftsman's Handbook," of the Delegates of the Clarendon Press for permission to reproduce figure 14, and of Messrs. Frederick Warne and Co. for permission to make use of the wood engraving by Messrs. Edmund Evans, Ltd., of Kate Greenaway's charming Milkmaid. Finally, the author desires to express his sincerest thanks to Mr. Gerard T. Meynell, of The Westminster Press, for the keen interest he has taken in the work, for his help with the illustrations, and for the great care he has taken in the production of the book.
University College, London
January, 1915.
I N the biological sciences the massing of illustrations into plates is still the favourite method of illustration, although text-figures have recently become more numerous.
This is partly due to innate conservatism, for most of the earlier memoirs were so illustrated, doubtless because it saved time, since if wood engravings were used with a view to text-figures, the compositor had to wait for the blocks, whereas in the case of plates the compositor and the engraver worked independently. Also the possibilities of plates are enormous; they may be very beautiful indeed besides being biologically satisfactory, for much finer results can be obtained by engraving metal than by engraving wood. Then again there are many different processes available for the making of plates, so that if one proves unsuitable for a subject an excellent reproduction may be obtained by another.
Before passing on it is desirable to point out the essential differences in the three ways of printing.
Intaglio printing. If the finger-tips be examined, many ridges and furrows will be seen on their under surfaces; if now a thick ink be well rubbed into these so as to fill well the furrows, and the superfluous ink be wiped off from the general surface, an impression will be obtained of the furrows on pressing the fingers on to a piece of smooth white paper. Better still, if the copper plate of a visiting card be examined, the name will be found cut into the surface. If an intimate mixture of tallow and lamp-black be well rubbed into these depressions and the excess of ink wiped off the surface of the plate, an impression can be obtained by placing a piece of damp page 2 paper on the plate and passing both through the domestic mangle—the kind with rubber-covered rollers. In each case the principle is the same, the pressure forces the paper into the depressions of the plate so that it takes up the ink.
Plane surface printing. This is characteristic of lithography and allied processes. Writing or a design well chalked on a blackboard can be transferred on to a smooth piece of paper merely by a little vigorous rubbing on the back of the paper placed in position over the drawing. The transfers of childhood provide a further simple illustration, so also does the hectograph (jellygraph).
Relief printing. In this case, the design is raised above the general surface of the substance. A rubber stamp is an obvious example.
It will be noticed that intaglio and relief are the reverse one of the other, whilst plane-surface printing is intermediate between these extremes. In intaglio, the ink is taken from a depression; in relief from an elevation; and in flat printing from a plane surface.
INTAGLIO PLATES. There are several methods of making intaglio plates, but only a few are used in the illustration of scientific papers; attention however may be drawn to the others, not only for their own sake, but also on account of their influence on some modern photo-mechanical processes.
LINE-ENGRAVING. Line engraving, by which is meant cutting lines into copper, steel, or other suitable material with a burin or graver, is a very ancient art. Its employment for illustrative purposes is an outcome of the art of the metal workers—particularly the Florentine goldsmiths of the fifteenth century—who filled up the lines cut in the metal with a black enamel of silver and lead sulphides (niello) which was made by heating page 3 together a mixture of these metals with sulphur. This enamel when once in was very hard to remove, so that in order to see how their lines were progressing, the artists rubbed well into the metal, in order to fill up the lines, a sticky ink. The superfluous ink was then wiped off the general surface of the metal and a piece of paper was placed in position and pressed sufficiently hard to make it enter the depressions, which alone contained the pigment, and take up the ink. A print was thus obtained of the work and so its state was ascertained.
Metal engraving is carried out in the same fashion at the present time. A flat plate of copper or steel is well polished and is worked upon with a graver or burin, so that the picture is represented by lines cut into the metal. Any line, however fine, will give an impression on printing, hence it is hardly surprising that engraving has long been a popular means of expression by artists, since force, depth and delicacy are possible of attainment.
The printing is carried out in exactly the same way as by the early metal workers: the plate is covered with a thick ink which is forced well into the lines and then the superfluous ink is removed. The plate is now ready for printing; to do this, the plate is placed in the bed of a copper-plate press and over it is laid a sheet of damped paper which is covered with two or three layers of blanket. The whole is then passed under the roller which forces the paper into the incised lines, so that not only is the ink picked out, but a mould of them is taken on the paper, hence the very finest lines will give an impression. Having passed through the press the paper is carefully peeled off, and thus the print is obtained.
With regard to the metal employed, copper is commonly used, since it is soft and easy to work; its softness however is, in a sense, a disadvantage, since the plate will soon wear, the finest lines being the first to go, so that a limited edition of good impressions only is possible. page 4 To overcome this difficulty, the plate may be faced with steel, by which means it is rendered very durable.
Steel, although once popular, is not much used nowadays owing to its hardness and the rapidity with which it rusts. As compared with copper engravings, steel gives a somewhat harder line, whilst copper gives a soft line, but this, of course, does not mean that steel engravings are harsh; the finest work can be done on steel and of remarkable delicacy.
At the present day line engraving is seldom or never used as a means of illustrating scientific work. It is obvious that the average scientist has not the time and he certainly does not possess the skill to make his own plates; the engraver must translate the originals into lines, so that much consultation would be necessary. Further, a line engraving takes a long time to make, and most publishers would certainly look at the expense.
In the past, however, the line engraving was much used, and very beautiful work was often accomplished. The following works contain outstanding examples.
Bojanus: Anatome Testudinis Europaeæ, Vilnae, 1819-1821. The plates are beautiful engravings by Lehmann after the drawings by the author.
Chatin: Anatomie Comparée des Végétaux. Good steel engravings illustrating the structure of various plants.
Curtis: Flora Londinensis, London, 1777. The illustrations are hand-coloured copper engravings by Sowerby and others, many of which, particularly the earlier ones, are of outstanding excellence. The engraving is often nothing more than the mere outline of the plant, whilst in cases where the structures are more massive, a certain amount of shading is used. The colouring is very good indeed, and it is obvious that much care was taken not only in the actual painting but also in the choice of page 5 pigments which, as far as can be judged, are as fresh now as when first used.
Curtis's Botanical Magazine and Edwards's Botanical Register contain some excellent examples of hand-coloured copper engravings.
Levaillant: Histoire Naturelle des Oiseaux d'Afrique. Paris, 1805-8. This work contains beautifully coloured engravings by Feesard. The original drawings were by Reinold.
Lyonet: Traite Anatomique de la Chenille. La Haye, 1762. The plates are amongst the best illustrative of zoological science.
Martius: Flora Brasiliensis. The earlier volumes, e.g., Vol. 13, Part I, contain excellent engravings.
Passæus: Hortus Floridus. Arnheim, 1614-17.
Sowerby and Smith: English Botany. London, 1790-1866. The illustrations are hand-coloured copper engravings.
Thuret et Bornet: Etudes Phycologiques. Paris, 1878. This work contains the finest plates ever published in a botanical work. Riocreux drew from the preparations, and his drawings were engraved on steel by Picart, Thomas and others.
ETCHING. Etching is a term very loosely used; strictly speaking it consists in corroding a metal plate or a flat stone with acid, or other substance possessed of a kindred action, so that depressions are formed. A pen and ink drawing, although usually so termed, is not an etching. Briefly the method is this: a well polished copper, steel or zinc plate is covered with a substance, known as the etching ground, consisting commonly of a mixture of asphaltum, white wax and pitch, which resists the action of the acid. The ground may be laid in more than one way; the simplest, perhaps, is to dissolve the etching ground in some solvent such as chloroform, which readily volatilises, page 6 and to pour the solution on to the plate, which is tilted this way and that until the liquid is evenly distributed; the excess is poured off and what remains is allowed to dry, the plate being kept level during the process.
The plate is then warmed until the ground is softened, when it is held over a smoking candle and is rapidly moved here and there so that if properly done the fine soot is evenly incorporated in the ground. When the plate is cold, the drawing may be made by cutting through the etching ground, so as to expose the underlying copper, with needles of various sizes. The work is then etched by means of dilute nitric acid.
When this is satisfactorily accomplished, the ground is cleaned off, the plate well inked with copperplate ink, and the surface ink removed by coarse muslin. The plate is then gone over with fine muslin, but the ink must not be removed from the depressions; finally the damped paper is placed in position and impressions obtained by the use of the copper-plate press.
Etching, although suitable, especially when natural-printed,* for the illustration of many scientific subjects, is but seldom employed at the present time for this purpose; the preliminary announcement of Warburg's Die Pflanzenwelt, however, states that some of the illustrations are etchings.
*A plate is said to be natural-printed when all the ink is removed except from the depressions; in artificial printing some ink is allowed to remain on the flat parts. Artists frequently, after removing the superfluous ink, lightly dab the plate in order to make the pigment spread slightly beyond the actual limits of the depressions; this is known as retroussage.
SOFT-GROUND ETCHING. This is a somewhat rare method of reproduction nowadays; it may, however, be described briefly, for it would appear to be suitable for scientific purposes, since it should not prove a matter of great difficulty for an author who is a sufficiently skilled draughtsman to make his own plates. The polished copper plate is laid with ordinary page 7 ground to which is added lard in a quantity according to the warmth of the weather.
Over the plate is then placed a sheet, larger than the plate by an inch or two, of damp, thin, grained paper, the edges of which are folded over and pasted to the back of the plate. When the paper is dry it will be well stretched and in close contact with the plate. With the hand resting on a bridge, in order to avoid inadvertent touching of the plate, the drawing is made on the paper with a pencil of a hardness suited to the softness or otherwise of the etching ground. When the drawing is finished the paper is carefully removed; wherever the pencil has been used, the etching ground will adhere to the paper, so that in such places the metal will be exposed. The plate is then etched and printed as in the normal process.
No reproductions of drawings of scientific subjects apparently have been reproduced by this method. Examples can conveniently be examined in The Seven Lamps of Architecture by Ruskin.
MEZZOTINT. The characteristic feature of mezzotint is that the subject is translated into tones rather than lines as in the preceding intaglio methods.
The surface of a smooth metal plate—usually copper—is raised into innumerable and minute projections by going over it in all directions with a curved steel tool, known as a rocker, the edge of which is finely toothed. An impression taken of the plate in this condition will give a deep rich tone. The high lights are obtained by scraping and burnishing away the elevations so that there are no pits left to hold the ink, and, similarly, intermediate tones are produced by partly removing the pile so that the pits are made of varying degrees of shallowness and consequently will print in tones according to their depth.
Impressions are taken in the same way as in the case of etchings.
page 8Mezzotint apparently has never been used for the reproduction of scientific subjects. Indeed, in a sense, this process is much too artistic for the purpose. At their best, illustrations reproduced by this method have mystery and depth and give the imagination much employ; in a word, they are subjective rather than objective, qualities unsuited for our purpose.
PHOTOGRAVURE. Photogravure may next be considered, for although it is a photo-mechanical process, it corresponds to mezzotint. Excellent results may be obtained by its use provided the drawings—usually executed in monochrome such as sepia—be really good, otherwise they are hardly worth reproducing by this relatively expensive method.*
*This account refers only to plates made and printed entirely by hand, not to photogravure for printing on a rotary machine.
Photogravure is particularly suitable for the reproduction of drawings showing a large amount of detail and made up of a variety of tones rather than lines or stipple.
The photographic part of the process is essentially the same as making a carbon print from a photographic negative. This consists in exposing under the negative the carbon tissue, which is a mixture of gelatine, in which is dissolved bichromate of potash, and a suitable pigment. Such a film of bichromate gelatine is, when dry, sensitive to light. If no light gains access to it, the gelatine is readily soluble in warm water; if light acts upon it, the gelatine becomes insoluble in proportion to the degree of its exposure. Obviously, the pigment will be retained in varying degrees according to the relative insolubility of the different parts of the gelatine.
The carbon tissue having been exposed, is rolled down on a wet sheet of paper covered with some adhesive and is dried under pressure. The paper is then soaked in warm water when the basis of the carbon tissue easily page 9 peels off; the picture is developed by laving in warm water, which will dissolve the gelatine in proportion to its exposure to the light. The print when dry is remarkably permanent and, from the picturesque point of view, is infinitely superior to the ordinary silver print.
The method of making the photogravure plate is, in outline, as follows:
The original drawing is photographed, and it is very important that the negative should be as perfect as possible.
From the negative, a positive is made upon transparency carbon tissue which is mounted upon a sheet of plate glass. The procedure is, in essentials, exactly the same as described above for the making of a carbon print. This positive when dry may be touched up; after which a negative, which also may be touched up, is made from it upon an ordinary sheet of carbon tissue.
The negative so obtained is transferred to a prepared plate of copper, developed with warm water and dried.
The copper plate is prepared as follows: after being well polished until quite free from all scratches, the surface is dusted over with finely powdered resin or, more usually, bitumen. The plate is then heated until the dust adheres.
After the carbon negative has been stuck on to the plate, developed and dried, the margins and back of the copper are protected with an acid-resisting varnish. When dry, the plate is placed in the etching bath of nitric acid or, more generally, of ferric chloride. The etching fluid will pass through the thinnest parts of the negative first, so that the surface of the copper will be etched to a degree corresponding to the thickness of the gelatine. The high lights on the negative obviously will be represented by thick coatings of gelatine, consequently such parts will be but slightly etched and vice versâ.
page 10If the plate had not been laid with resin, the surface after etching would show more or less extensive depressions and elevations; but the grains of resin protect the copper immediately beneath them from the action of the acid, which consequently can only dissolve the exposed parts of the metal between the resinous particles. The result is, therefore, that the plate is covered over with numberless fine pits of varying depths. The deepest ones will, on printing, give the darkest tones, since they will hold more ink, the shallower ones will give the lighter tones, whilst the shallowest and those parts unetched will give the high lights.
The plate is usually etched three or four times successively in varying strengths of fluid, after which the etching ground and gelatine is cleaned off.
A strong copper-plate ink is then well rubbed in by means of a dabber, after which the ink from the surface is removed, first with a coarse piece of muslin and finally, with fine muslin. The ink must not be removed from the pits.
The first pull is then taken as in a line engraving with a copper-plate press, and its appearance shows what corrections are necessary. The plate nearly always requires a certain amount of engraving; the high lights may be improved by means of a burnisher, the shadows by means of a rocker or a roulette—a small steel wheel the rim of which is beset with fine teeth—and so on. Finally, if a large edition is required, the plate is steel faced.
Although much used for the reproduction of pictures, photogravure is too rarely employed for scientific purposes; this is to be regretted, for the process is admirably suited to the reproduction of photographs and drawings with delicate tones. As compared with the usual half-tone, the cost is high, and this no doubt militates against its use.
page 11Examples of outstanding excellence will be found in the New Phytologist, Vol. xi, 1912, plates 5 and 6. These are absolute facsimiles of the original drawings by Mr. McLean, both as regards colour and reproduction of tones. Plate 8 may also be examined and compared with plates 9 and 10 which are reproductions of the same subject in collotype and half-tone respectively.
L ITHOGRAPHY. Of these methods of printing, lithography is the outstanding example: it is a method of reproduction possessed of great possibilities, for by its employment a facsimile of any drawing can be obtained.
As a means of artistic expression it ranks high amongst the graphic arts, and, for the reproduction of drawings of a scientific nature, it is very popular, since it meets most requirements and is comparatively inexpensive.
The art, which was discovered by Senefelder towards the end of the eighteenth century, depends on the fact that grease and water are immiscible: a drawing made with a greasy pigment upon a suitable surface adheres very strongly, whilst those parts free from it retain water, so that when damped and rolled up (i.e., inked), the ink used will stick only to the lines, etc., of the drawing, but not to the other parts.
Clearly the surface is all important, and this is provided by lithographic stone, a limestone occurring in Germany, France, England and Canada. The best stones occur at Solenhofen near Munich, those from other localities being inferior in quality. Incidentally it may be mentioned that zinc and aluminium plates are not infrequently used in place of stone.
Lithographic stones vary in hardness, colour and grain. For the best work the stone should be homogeneous and of a hardness suitable for the subject; the colour affords an indication of the hardness, the lighter-coloured stones, which are much the commoner, being softer than the darker.
There are two modes of procedure; the drawing may page 16 be made direct on the stone with lithographic ink or crayon—both being mixtures of tallow, wax, soap and shellac, with a sufficiency of pigment to render the drawing visible to the artist—or else the drawing may be made upon transfer paper.
The former method, although the more satisfactory and often used by artists, is seldom pursued in scientific drawings except when professional draughtsmen are employed. In such cases it may be necessary to reverse the drawing, which is conveniently done by viewing it in a mirror, and, of course, all lettering must be reversed.
The majority of amateur draughtsmen make their drawings in pencil or ink and these the lithographer traces upon lithographic transfer paper and transfers them to the stone; he, the lithographer, may merely trace the salient features and work the drawing up on the stone. The transfer papers are coated with gelatine, starch or gum, or mixtures of these substances, the idea being to interpose between the real paper and the pigment—in the form of lithographic crayon or ink—some substance soluble in water which will hold the pigment and prevent it soaking into the paper, so that a transfer has only to be damped through the back, pressed on to the stone and peeled off. The work, together with more or less of the film, will thus be transferred on to the stone and, of course, will be reversed, since the part uppermost on the stone will be the back of the original drawing.
The original drawings may be made upon the transfer paper direct, and in so doing mistakes in tracing will be obviated. Suitable papers are made for various purposes, e.g., smooth for ink work and variously granulated for crayon (see Plate 1, which was drawn by Mr. Harry Becker on transfer paper).
Another advantage in drawing directly upon the transfer paper is that the draughtsman can make corrections page 17 pretty easily for, if needs be, a bad piece of work can be entirely cut out and a fresh piece of paper inserted.
Assuming that the transfer method has been employed, the stone must be prepared according as the drawing is made with ink or with crayon.
The stone is first thoroughly ground, in order to rid it of all traces of previous work, and then polished for ink work or grained—i.e. roughened—for crayon work, the small points produced taking up the crayon in proportion to the amount present on the transfer and the pressure used.
The transfer is then damped with water, sometimes with a dilute solution of nitric acid, and placed in position on the stone, which is then passed two or three times through the lithographic press until dry. Then the back of the paper is damped and the sheet peeled off.
The stone is next proved, i.e., prepared for printing.
It is first carefully examined for broken lines and other blemishes, which are touched up with ink or crayon. The stone is then painted over with a solution of gum in water which is allowed to dry, it is then washed in water and rolled up with ink. The drawing will now be clearly visible, for if properly inked the clear parts of the stone will not take the pigment, so that any parts which require cleaning up may be deleted. This is accomplished by means of a pencil of snake stone, a piece of pumice stone, an acid stump—a rod of hard wood, the sharpened end of which is dipped into nitric acid—or with a scraper. The stone is again washed and rolled up strongly with ink and etched with a dilute solution of nitric acid which is applied with a sponge; then the surface is again gummed and the stone allowed to dry. It is sometimes necessary to re-etch the stone; if so, the damp stone is rolled up with thin ink and allowed to dry, it is then dusted over with finely powdered resin, the superfluous resin is removed by means of a wet sponge, and the surface is page 18 painted over with a solution of gum arabic mixed with dilute nitric acid. If the resin is well incorporated with the ink, the work will suffer no damage in the process. The acid gum is then dabbed off with a rag, the stone is cleaned up with turpentine, rolled up once more, gummed and finally set aside to dry.
All this appears complicated, but it is very necessary to get a good surface for printing. The action of the gum does not appear to be clearly understood, the nitric acid obviously will etch the stone, so that the gum will easily penetrate. It is sometimes supposed that the arabic acid of the gum enters into a chemical composition with the calcium carbonate, making a film which is the real ink-resisting surface. This film has not a long life, so that in printing it is necessary to renew it periodically by the application of gum solution.
If possible, the stone should be allowed to rest for a day or two after proving, in order that the ink may sink well in.
Before printing, the gum is washed off and the stone allowed to remain in the press-room until its temperature is the same as its surroundings. The stone is then thoroughly and evenly damped all over, placed in the press, and rolled up with lithographic ink; the paper is then laid on, and the whole passed through the lithographic press. After the first few pulls it will be seen whether all is well. The essentials of a good impression are these: the lines must be black and not grey, provided black ink is used; the lines must not be wider or blacker ("smutty") than those on the stone, nor must they be ragged or broken ("rotten").
In printing, the stone must be damped and inked before each impression is taken, and occasionally re-gumming is required. Good printing requires a considerable amount of ability, especially in the case of crayon drawings.
page 19The paper used is a very important matter, the selection of which can be safely left to the lithographer, provided he be a good one, unless the author possesses the necessary technical knowledge. If a smooth paper is required, and the paper is not to be damped before printing, India paper is best and plate paper next best. All coarse or grained papers must be damped before printing.
As has already been remarked, lithography is a good process for scientific work; but, unfortunately, considering the number of lithographic plates published, really first-class examples are rare. This is largely due to the original draughtsman; it is unreasonable to expect a lithographer, in all probability ignorant of the subject of the plate, to turn out first-class reproductions of drawings which are obviously bad. On the other hand, lithographers vary greatly in their capabilities, and indifferent plates may be entirely due to their ability not being first rate.
As drawings have to be traced, mistakes are apt to occur; the proofs should, therefore, be carefully examined, for a certain amount of correction can be made on the stone.
The following works contain excellent lithographs, which should be studied by those interested in the subject.
Bornet et Thuret: Notes Algologiques. Paris, 1876-1880. This contains some of the best work, illustrative of science, known to the present author. The original drawings mostly were made by Bornet, and the lithography was carried out by Riocreux—one of the best if not the greatest of botanical artists—Arnoul, Picart and Pierre.
Davis and Thurnam: Crania Britannica. London, 1865.
Mirbel: Sur le Cambium, Paris, 1842. The plates provide excellent examples of ink lithography by Laplante.
page 20Von Mohl: Schriften botanischen Inhalts. Tübingen, 1845. Good examples by Federer.
The first volumes of the Annales des Sciences Naturelles (Paris) may be referred to for lithographic work earlier than the above (1820).
For more modern examples the following may be consulted:
Blackman and Welsford: Fertilisation in Lilium, Annals of Botany, Vol. 27, 1913.
Gravis: Recherches anatomiques sur les organes végétatifs de l'Urtica Dioica, Bruxelles, 1885. This memoir contains both good and indifferent plates.
Keibel: Normentafeln zu Entwicklungsgeschichte der Wirbeltiere, Jena, 1904.
Reed: A Study of the Enzyme-secreting Cells in the Seedlings of Zea Mais and Phœnix dactylifera. Annals of Botany, Vol. 18, 1904.
Semon: Zoologische Forschungsreisen in Australien, Jena, 1904.
Vaizey: On the Morphology of the Sporophyte of Splachnum luteum, Annals of Botany, Vol. 5, 1890.
Woodburn: Spermatogenesis in Blasia pusilla, Annals of Botany, Vol. 27, 1913.
Several memoirs in the Fauna und Flora des Golfes von Neapel (Berlin) are illustrated by excellent lithographic plates. Many good examples of chromolithography also will be found there.
CHROMOLITHOGRAPHY. Lithography is much used for the reproduction of coloured pictures and illustrations, the process being termed chromolithography. The principles involved are the same as for ordinary work, but it is necessary to print from several stones, one for each colour. It is obvious that much skill is required, for the employment of different colours will page 21 give a large number of secondary and tertiary tints when printed one above the other in various combinations. Thus, by printing part of a design in yellow and the other part in blue, the finished product would show three colours—yellow, green and blue, and by the use of three primary colours a large number of different tints may be obtained.
As already mentioned, each colour is printed by a separate stone, there is thus no limit—excepting that of expense—to the number of different colours which can be obtained.
In practice it is usual to make an outline of the essential parts of the composition on a stone, known as the keystone, which is not necessarily used in printing the picture. An impression of this outline is taken upon a sheet of paper, which is used to transfer the design on to the stones, on each of which the artist will draw only those parts which he desires to be printed in one particular pigment.
Although the sequence of colours is generally blue, red and yellow, it is obvious that various changes in this order must be made according to the colours used and the exact tint required. For instance, a body colour such as cadmium yellow would precede a glaze such as madder-lake; again, two distinct tints may be obtained from red and blue, for example, according to the order of printing—red upon blue will give a mauve, whilst blue upon red will give a purple.
A knowledge of pigments is thus all important, and in printing, the superposition must be perfect.
Plate 2 is an example of a chromolithograph. Miss O. Johnston first drew the outline of the plant, which was phototransferred on to the stone. An impression was then pulled and tinted by the artist, and from this tinted impression the colour stones were made by the lithographer. It may be added that only three colours were used in printing the plate.
page 22Examples:
Baur: Einführung in die experimentelle Vererbungslehre (Plate 1). Berlin, 1911.
Bruce and others: A Note on the Occurrence of a Trypanosome in the African Elephant. Proceedings of the Royal Society of London, B. Vol. 81, 1909.
Cropper: The Development of a Parasite of Earthworms. Id. Vol. 85, 1912.
Oliver: On Sarcodes sanguinea. Annals of Botany, Vol. 4, 1889-1891.
Rubbel: UEber Perlen ... Zoologische Jahrbuecher, Vol. 32, 1911-12.
Biometrika, 1906-7, Vol. 5, Plate 23.
Mention has been made of the value of a knowledge of colours. The subject is much too extensive to be considered adequately on the present occasion even if it were desirable; its importance, however, warrants a few passing remarks.*
*See Ridgway: Color Standards and Color Nomenclature.
No two people will describe in the same way the colour of, say, a rose petal; both will have a different conception of the colour "crimson." The majority have but a limited sense of colour, and even when this faculty is possessed, the personal equation looms large; further, the ordinary names of colours are quite inadequate for descriptive purposes. For these reasons the importance of a scientific system of colour nomenclature and colour standards is all important. By the use of such a scheme, the exact colour of an object can be found by comparison with an adequate chart, and the name there given will convey to others exactly what colour is described or desired. The plumage of a bird or the colour of a flower can thus be described correctly, and an author can indicate exactly the colour desired in certain parts of a chromolithograph or other reproduction in colour.
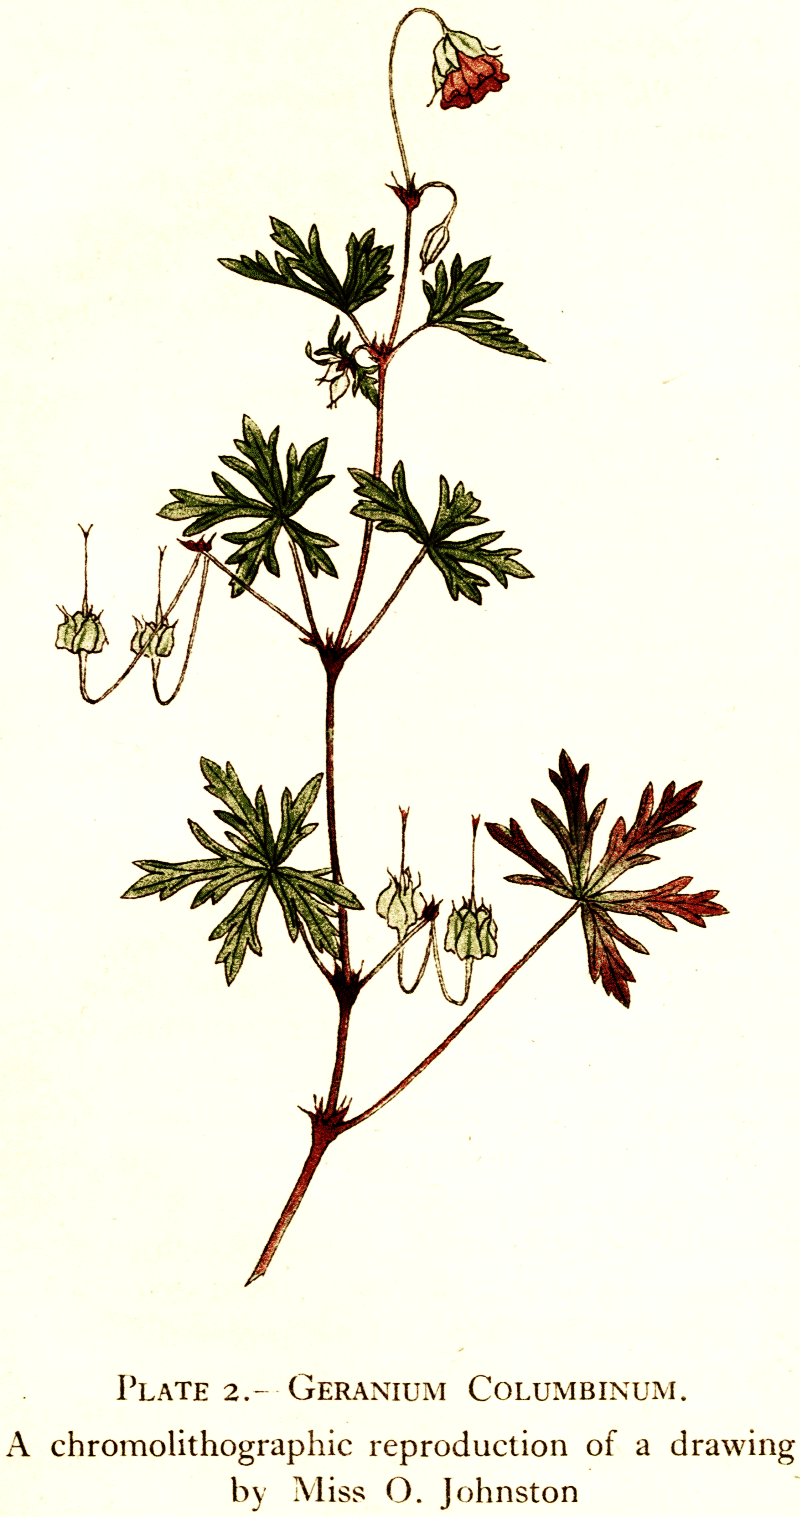
A chromolithographic reproduction of a drawing by Miss O. Johnston
PHOTOLITHOGRAPHIC PROCESSES.—Of these methods of reproduction there are several, their value lying in the fact that the originals can be reduced or enlarged with the greatest of ease. The general principles are as follows.
A photographic negative is taken of the original drawing and a positive made on a film of bichromate gelatine. Wherever light reaches the film, the gelatine is rendered more or less insoluble according to the intensity of the light acting upon it; through the dark parts of the negative but little light will pass, so that the gelatine will remain soluble.
The exposure of the positive having been made, the film, which may be mounted on paper, is inked with lithographic ink in the dark room and then washed. The pigment will adhere to those parts acted on by light, but will wash away from those regions unacted upon; obviously the half-tones will retain ink in direct proportion to their density.
The developed positive is then transferred to a stone or zinc plate and impressions taken as in pure lithography for the dark parts are resistant to water and will take the ink, whilst the high lights will retain water and so will not be inked. The intermediate tones will take the pigment according to their density.
In distinction to the previous methods, corrections cannot be made except in so far as the negative can be touched up.
COLLOTYPE.—Of the various photolithographic methods which have from time to time been employed, collotype is the one in most general use at the present time, especially for the reproduction of photographs.
Collotype is a simple process which does not require so extensive a technical knowledge and ability as some of those previously described. But notwithstanding this, page 24 the results are sometimes unsatisfactory and unequal; faults due to indifferent originals and to unsatisfactory conditions obtaining in the work rooms. The great drawbacks to good collotype are cold and dampness, and it is for these reasons that continental firms, blessed with a more stable climate, often produce much the best work. Provided the workshops are properly heated, the collotypers of this country ought to be able to turn out good work at all times of the year; indeed, the best firms do.
For this and for other processes in which photographs form the originals to be reproduced, authors should send the negative to the collotyper; if this be impossible, positives of the best possible quality, printed on ordinary P.O.P. paper, toned to various shades of purple, and also on smooth bromide paper, in ordinary black tones, should be provided in order that the collotyper can choose the print he most prefers to work with. Also, it is usual to glaze the prints.
The method is as follows. A piece of british plate glass, about half-an-inch in thickness, is ground on one side with fine emery powder, and then thoroughly washed and dried. The plate is covered with a filtered mixture of the colloids sodium silicate and dextrine or albumin, and placed in a warm oven to dry. If metal plates are used, such as zinc or copper, this preliminary coating is unnecessary; glass plates, however, must have the substratum in order that the sensitised gelatine—which is next put on—may stick.
When the plate is dry, it is thoroughly washed with water in order to remove any free silicate; it is then dried and put away until required for use.
The sensitising solution is made up of gelatine and bichromate of potash dissolved in water; before use it is filtered, freed from air bubbles and heated to not more than 120° F. The plate is now placed on a stand, which page 25 is provided with levelling screws, in the oven, and, when the temperature has reached 120° F., an amount of the bichromate gelatine solution sufficient to make a thickness of film proper for the mode of printing to be employed is poured upon the plate.
The oven is kept at a constant temperature, 120° F., until the gelatine is dry, when it is allowed to cool gradually.
Whilst the gelatine is setting, precautions against vibration must be taken else the plate will be spoilt.
When dry, the collotype plate is sensitive to light and moisture; its surface shows a more or less regular series of convolutions which resemble those of the outer surface of the human brain, although, of course, very much smaller. The character of the grain is very important, for if it be too fine it will not take up a sufficiency of ink, and, on the other hand, if too coarse it will yield coarse impressions.
A reversed negative, of a quality beyond reproach, must be made of the original; if the subject is dark or has heavy shadows the negative is frequently slightly over exposed so as to soften them.
The collotype plate is then exposed under the negative and washed in cold water until the yellow bichromate no longer comes away. It is then dried.
In printing, the plate is damped and rolled up with ink as in lithographic printing; the amount of ink adhering to the film depends on the extent to which the different parts have been acted on by the light, as has already been mentioned. The moistening of the plate—mis-termed etching—is best done with dilute glycerine containing 75 per cent. of water, which when first applied should be allowed to remain on for about half-an-hour. The excess of moisture is taken up with a sponge or a ball of rag, and then the plate is inked and printed in a lithographic or a collotype press. The picture is usually masked with tin foil in order that its edges may be quite clean.
page 26Of the faults which may occur, the following may be alluded to. A mottled appearance may obtain in the high lights; this is due to the coating of gelatine being too thick. More commonly, the reproductions may appear flat owing to the degradation of the high lights; this is a sign that the sensitive film has been acted upon by moisture during its critical existence between the drying and the washing out of the potassium bichromate, or that the temperature has been too low.
The following contain good examples of collotype.
Karsten and Schenck: Vegetationsbilder, Jena.
Oliver: Notes on Trigonocarpus and Polylophospermum. New Phytologist, Vol. 3, 1904.
Semon: Zoologische Forschungsreisen in Australien. Jena. 1912.
Thompson: The Anatomy and Relationships of the Gnetales. Annals of Botany, Vol. 26, 1912.
See also Plates 3, 4, 5 and 9 in the present work.
THE PREPARATION OF ILLUSTRATED PAGES. Of the processes dealt with, photogravure lithography and collotype are those most generally used at the present day for the printing of plates or insets. Half-tone also is employed, a process which will be considered later since it is essentially relief printing. This, therefore, is a convenient opportunity to make a few general observations on plates.
Plates should only be employed for the reproduction of subjects of such complexity that cannot be reproduced satisfactorily by figures in the text.
A plate or page made up of several illustrations should look well as a whole; in other words, it should not outrage all the canons of composition, it should have some pictorial effect. At the same time, for facility of reference, the individual figures should run in a convenient sequence. page 27 This latter point is so important that a plate composed really well is distinctly rare, for a compromise nearly always has to be made. At the same time there are, apparently, comparatively few authors who pay much attention to plate design.
Although it is not desired to write of the laws of pictorial composition, attention may be drawn to a few points which are amongst those generally neglected.
The figures should not be crowded together; a reasonable amount of margin should be left around each. They should be arranged, as far as possible, in such a way that a sense of balance is maintained. As to how this is to be accomplished will depend upon the nature of the illustrations; if they are all about equal in tone, the largest ones should preponderate towards the base of the plate, and not vice versâ. The difference which this makes will be obvious if the two accompanying illustrations (Figs. 1 and 2, Plate 3) be compared. The first is a reduced copy of the plate as it was published: it will be noticed that it has a top-heavy appearance, which is corrected in the second figure by the simple device of turning it upside down.
If, on the other hand, the figures are some lighter and others darker, the latter should form the base, since low tones give the idea of solidity; this is so marked that in cases where the figures vary much in size and tone, the darker ones may nearly always be situated at the base or at any rate low down on the plate unless they are very much smaller than the lighter toned ones.*
*If, of course, the reader understands chiaroscuro, he will take no notice of this paragraph, but arrange his plates in accordance with his ability.
An examination of the figures on Plates 4 and 5 will roughly illustrate these points. The upper figure of Plate 4 is well designed, and no improvement could be made, bearing in mind the compromise alluded to above. The lower figure is, however, not so good, it was page 28 obviously a difficult one to arrange; it would have been improved if Figs. 23, 26 and 28 could have been placed in the top tier, but this would have seriously disturbed the sequence. The first illustration on Plate 5 is well designed; it would, however, have been improved by interchanging 8A and 11B.

We may now pass on to the individual figures; these should shew the essential features, together with some surrounding and comparatively extraneous matter; often there is included too much of unimportance and its retention means a waste of valuable space. The first thing to do, therefore, is to trim, if needs be, the figures; their shape is more or less immaterial, provided that in cases where there are a large number of illustrations on one plate, they are not all alike. The American fashion of circular figures is particularly displeasing, at any rate to the author.
Having trimmed the figures, the next point to decide is whether any require reduction; if they do, cut out pieces of paper (referred to as patterns below) of the size which the figures will ultimately appear: on the whole, it is better to avoid reduction of the originals, for without a good deal of experience it is very difficult to judge exactly what the result will be; a good idea, however, may be gained by the use of a diminishing glass.
The size of the available surface of the plate should now be ruled on a white sheet of fairly thick cardboard, and the figures, or their patterns, arranged so as to be easy of reference, to compose as well as may be, and spaced in such a way that, in the case of a quarto plate to be folded vertically, no figure is placed so that the fold will pass through its centre. Nothing is more irritating than having an illustration spoilt in this way.
All this may be done by arranging in different ways page 29 until a satisfactory result is obtained, a process which may take an hour or two. The figures should then be pasted down, covered with several sheets of blotting paper and placed in a press. A press is seldom available; when such is the case, a number of heavy books serve equally well.
The lettering must next be attended to. The individual figures are usually designated by numbers; this is a bad method, since it involves referring to the description of the plate. The best way is to use a number, and after it to add the name of the plant or animal, and, if needs be, a description as short as may be. If the author can "print" or write reasonably well, well and good; if not, it is better to attach a slip to the plate with full directions relating to lettering, and to write in pencil on the plate the titles, etc., required in the proper places for the guidance of the craftsman. The typewriter is sometimes employed for this purpose by authors; it is purely a matter of taste, but some readers feel a slight shock when this method is resorted to.
In some cases a key to the plate printed on tough translucent tissue paper and having the necessary information, guide lines, etc., is inserted with the plate.*
*See Kerner and Oliver: Natural History of Plants (First Edition) London, 1894.
In the case of glossy chromolithographs this practice is best avoided, for the key is apt to stick to the plate if too much pressure is used when the book is bound.
With regard to the "catch letters" used to indicate different parts: these should be as obvious as possible, and the guide lines should be either in black or in white ink, according to the general tone of the illustration. These lines should be conspicuous without being heavy. Not infrequently they, together with the lettering, are printed on the plate by a second impression in red ink.
page 30The foregoing is primarily the business of the author; with regard to editors and publishers, all plates should be mounted in a manner to facilitate reference and should be printed on suitable paper; the former is seldom or never done. All plates which must be constantly referred to in reading the text should have a selvedge as broad as the book, so that when unfolded the whole plate is visible, no matter what page is being read. This would, no doubt, prove an additional expense, but this should not militate against the suggestion here made, not by any means an innovation, for in many cases it would save the expense of mounting on guards, and, further, the additional expenditure could be saved several times over in other ways.
With regard to paper, this generally is satisfactory; unfortunately, highly glazed paper, mis-termed art paper, with an enamelled or chromo surface, and consisting chiefly of china clay and size, is generally used for printing the best half-tone reproductions. For this purpose a paper with a suitable surface, obtained by means other than those mentioned and not too costly, is highly desirable, since art paper has the reputation of being not at all permanent, owing to the deleterious action of moisture, and is somewhat brittle. When used, art paper, if folded, should have a proper paper hinge along the fold.
Half-tones are occasionally printed on a kind of vegetable parchment, a paper which should be more extensively used since it will sometimes, but not always, give as good a reproduction as art paper, and the final result is more pleasing from the artistic point of view.
G. Oliver, del.
|
Little maid, little maid, Whither goest thou? Down in the meadow To milk my cow. |
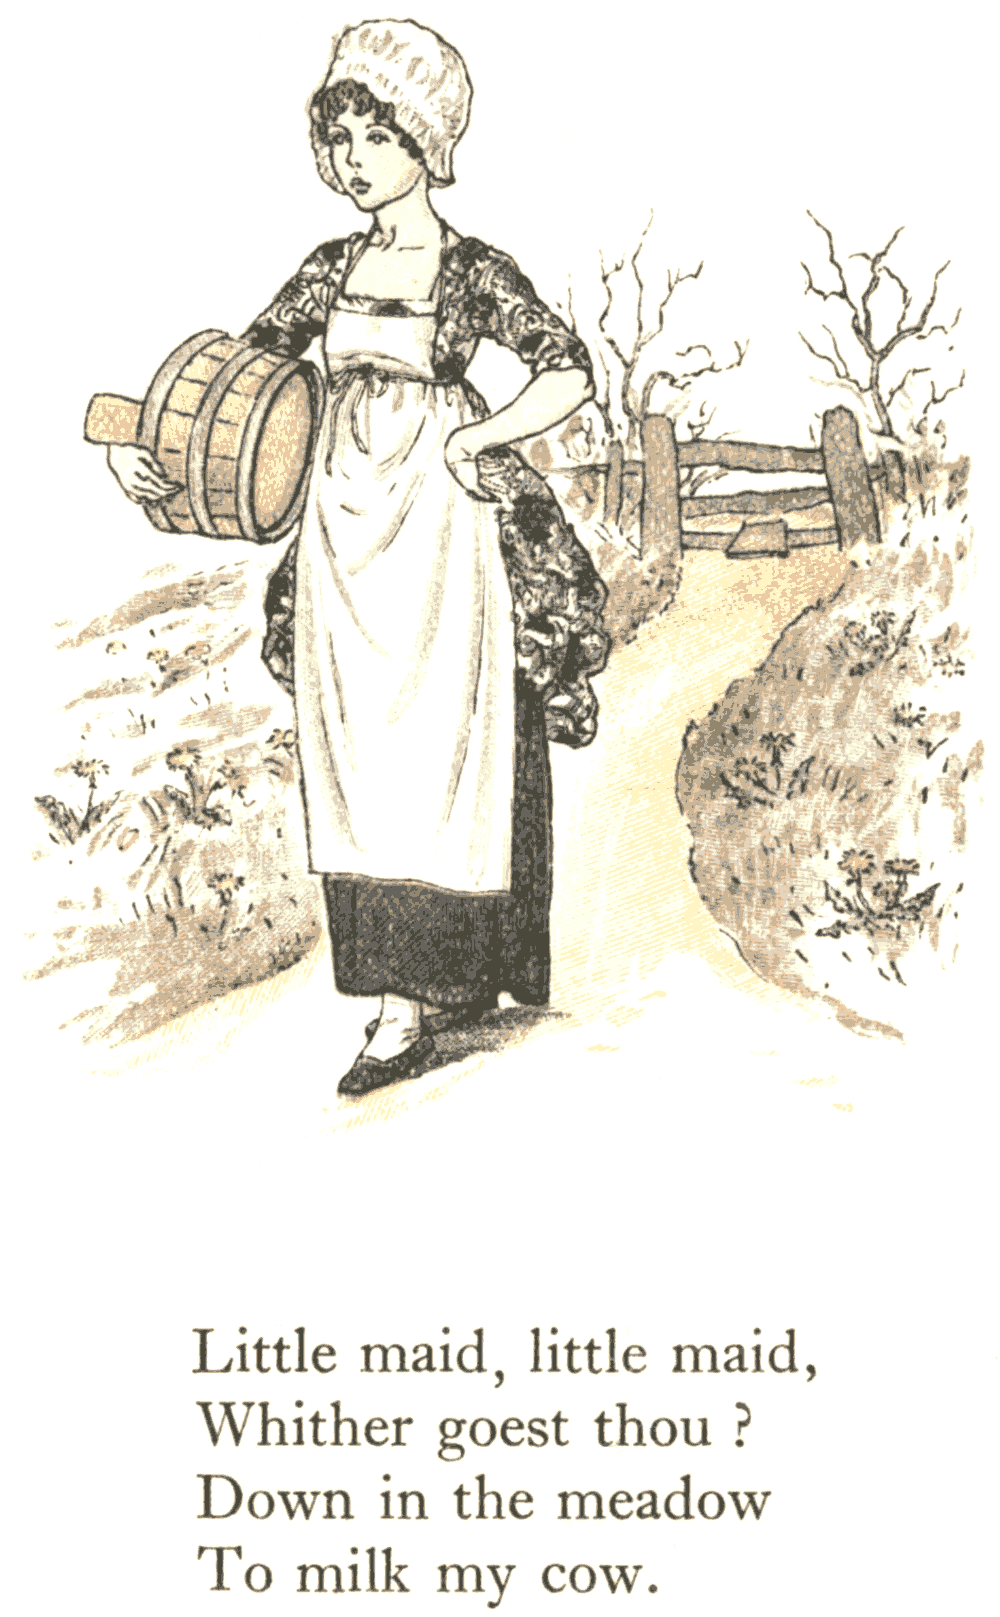
Fig. 1.—A wood engraving, by Edmund Evans, from
the original drawing by Kate Greenaway.
Reproduced by permission of the publishers, Fredk. Warne & Co.
I N order that illustrations may be incorporated in the text, the blocks used must be in relief the same as the type; a mixture of intaglio and relief is impossible, for the whole surface must be level in order to be inked by the rollers, which deposit the pigment evenly, so that only one tone of colour—that of the ink—is possible.
Up to quite recent times wood cuts and engravings were the only means available for text-illustrations, so that this method may next be considered.*
*See Treviranus, C.L.: Die Anwendung des Holtzschnitts zur bildlichen Darstellung von Pflanzen. Leipzig, 1855.
WOOD CUTS AND ENGRAVINGS. The invention of illustrating by means of wood blocks followed closely on the heels of the use of moveable types for printing. The Chinese were the first, as far as is known, to use these methods of printing and illustration; in the western world the first wood blocks date from the beginning of the fifteenth century.
All the earlier cuts were made, commonly on pear wood, on the longitudinal face of the wood, in technical language "on the plank," and seemingly, in many instances, were made from drawings in ink. By cutting on the plank, the craftsmen were enabled to make large blocks, but were prohibited from doing anything more than relatively simple and straightforward work. Such blocks are known as wood cuts; wood engravings were not made until the possibilities of a hard wood like box carved upon the transverse section were discovered at a much later date. This is, strictly speaking, wood engraving, an art which almost entirely, if not quite, superseded the older craft, on account of its great possibilities; page 34 indeed, wood engravers imitated metal engraving so closely as to deceive many. But such work was enormously laborious; for instance, in the case of a fishing net, if the string were to be printed black, the engraver would have to cut out hundreds of small diamond-shaped pieces of wood in order that the string of the net should be in relief. But few artists would do this of their own free will, and generally such laborious work will only be found in wood-engravings which were intended for the reproduction of ink drawings or other kinds of pictures where the lines, shading, etc., had to be faithfully copied. This point may be illustrated by the accompanying cut (Fig. 2), which was made by my friend Mr. Geoffrey Oliver, who at the time was totally uninstructed in the art and knew nothing of its literature. It will be seen that he, quite unconsciously, treated his wood in the same way as an engraver would his metal; the result, of course, is just the opposite to metal engraving since the printing of the wood block is the reverse to intaglio.
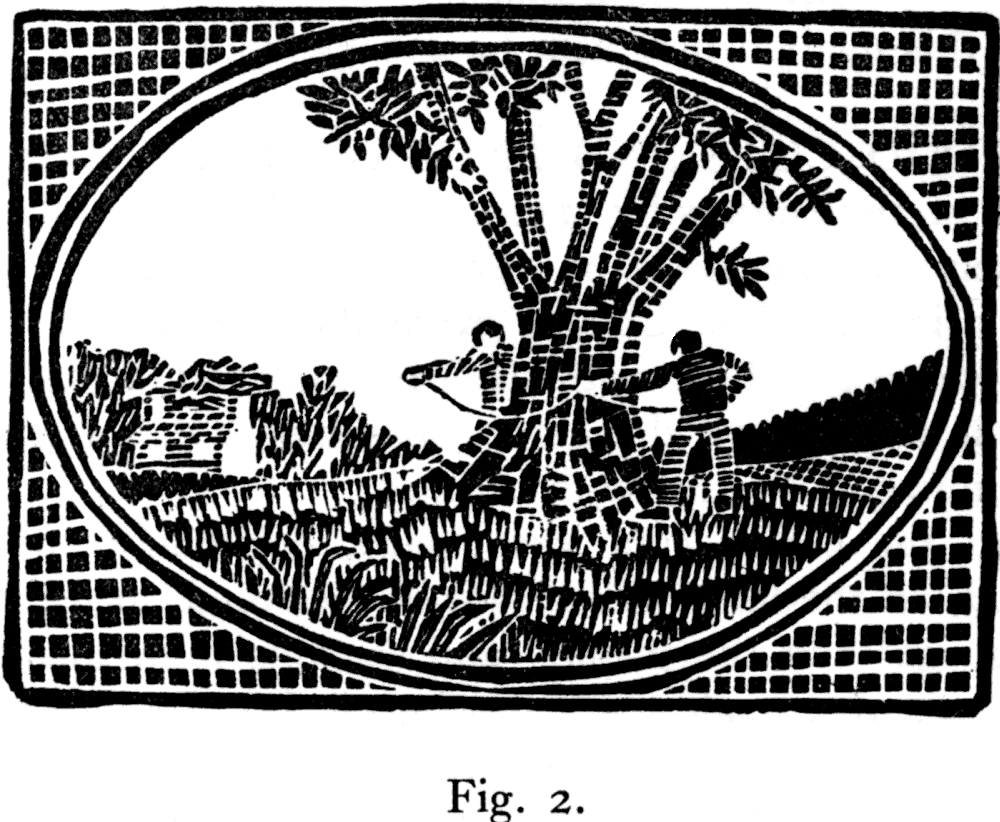
In fact, the cut illustrates the three fundamentals of wood engraving; the white line made by cutting out the wood so that no impression will be obtained when printed; the white space which is similarly obtained; and the black space, which is made by leaving the wood untouched. It was, however, necessary to employ the black line, otherwise the tape with which the two men—the artist and his father—are measuring the trunk of the tree would be invisible where it crosses the sky. In a word, the little picture illustrates very nicely the legitimate use of wood in the graphic arts.
As already remarked, the majority of the earlier wood cuts and engravings are reproductions of line drawings, so that although we may admire and often marvel at the technical ability of the engraver, the credit for what artistic merit such illustrations may possess must, in the majority of cases, go to the draughtsman.
The work of the earlier wood engravers may be conveniently studied in A Lyttel Booke of Nonsense, by R. D., London, 1912. (See also the relevant works cited under Literature, p. 94).
Bewick, of course, is an outstanding example of an artist who used wood engraving for illustrating natural history; the methods he pursued may be studied in the tailpiece on p. 11, which was printed from an electrotype of the original block.
Wood engraving, up to quite recent times, was the method of reproducing text figures; not only for scientific books and periodicals, but also for general literature and journals.
Much of this work is of outstanding excellence; for scientific work the following may be studied:
Duchartre: Eléments de Botanique. Paris, 1867. The drawings were made by Riocreux and engraved by Leblanc.
page 36Baillon: Histoire des Plantes, Paris, 1887. This work contains some beautiful wood engravings, reproductions of drawings by Faguet.
Bentham: Handbook of the British Flora, London, 1865. The engravings are from drawings by W. H. Fitch.
Deschanel: Natural Philosophy, London, 1890. The engravings, many of which are of excellent quality, are by Laplante, Rapine and others. In many cases, notably in the representation of the rays of light passing through lenses and also in the illustrations of snow crystals, the use of the white line is admirably demonstrated.
Kerner: Pflanzenleben, Leipzig, 1888. This contains some excellent engravings by Winkler and others.
Le Maout et Decaisne; Traité général de Botanique, Paris, 1876. This work contains splendid examples by Riocreux and Steinheil (see Fig. 8).
Oliver: First Book of Indian Botany, London, 1869. This contains some characteristic work of W. H. Fitch.
It does not appear to be generally known that excellent reproductions in colour may be obtained from wood blocks by superposed printing in a manner comparable to that followed in chromolithography although, of course, in the present instance, the blocks are in relief (Fig. 1).
From the foregoing account it is obvious that the engraving even of a small illustration, except it be in mere outline, involves a considerable amount of labour; in fact, if the subject were large it was usual to cut it up into areas and distribute between several engravers, the finished blocks finally being joined together to make the block of the whole picture. Hence it is not surprising page 37 to find that when the photo-mechanical processes were perfected, the older methods of reproduction were ousted by the newer, more especially since they are much less expensive; these, therefore, may next be considered.
THE HALF TONE PROCESS.—For the making of a relief block by photo-mechanical means, the main difficulty is the proper rendition of the tones intermediate between black and white; this has been solved, at any rate in part, by the discovery of the half-tone process.
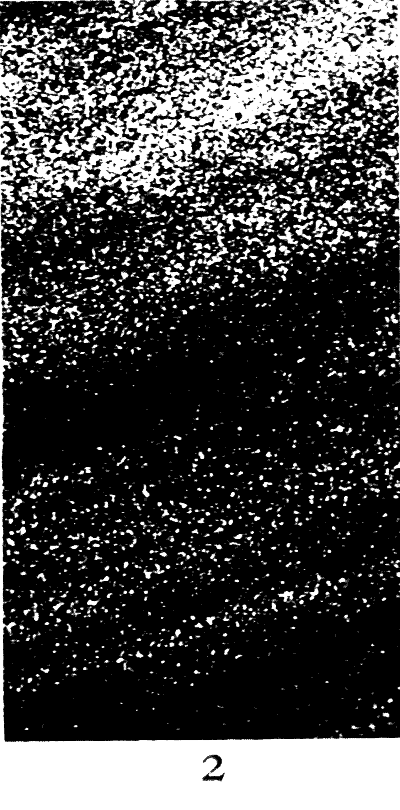
If an ordinary photographic negative be highly magnified, it will be seen that the high lights, the low lights, and the intermediate tones are made by the varying density of the reduced silver. In the lighter parts the small black particles are surrounded by colourless areas, whilst in the dark regions small colourless patches are surrounded by black areas owing to the closeness of the particles of silver (Plate 5, Fig. 2).
What is required, therefore, is a relief block which will print a number of dots of equal density but of unequal size. Vervasser illustrates the point in an ingenious way: a plate, covered with a number of cones, is supposed to be acted upon by light in such a way that the cones are truncated in varying degrees according to intensity of the light falling upon them. The section of such a plate would therefore shew a curve (Fig. 3); now if the truncated cones be brought down to one level and a print taken from them, the high lights would be represented by black dots surrounded by white areas and so on.
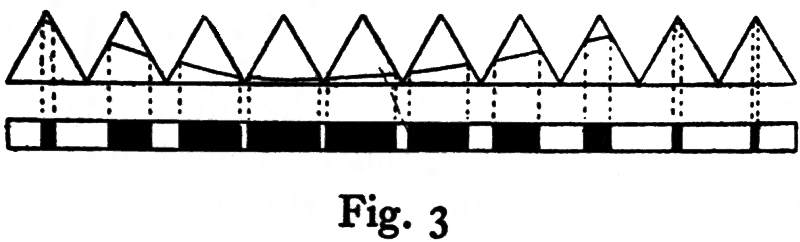
This illustrates the principle which obtains in the page 38 making of half-tones in which the image is made up of a large number of dots varying in size but all equally dense, so that when viewed from a suitable distance the dots are individually invisible but compose to give gradations of light and shade. In other words, the structure obtaining in a photographic negative is, in a sense, realised by optical chemical means, although the dots in a half-tone block are much coarser than those in a negative (Plate 5, Fig. 3).
This result is obtained by interposing between the diaphragm of the camera and the negative—for the half-tone process is a photo-mechanical one—a glass screen covered with intersecting engraved lines (Fig. 4). As a matter of fact, each screen consists of two plates of glass similarly ruled and cemented face to face so that the lines intersect.
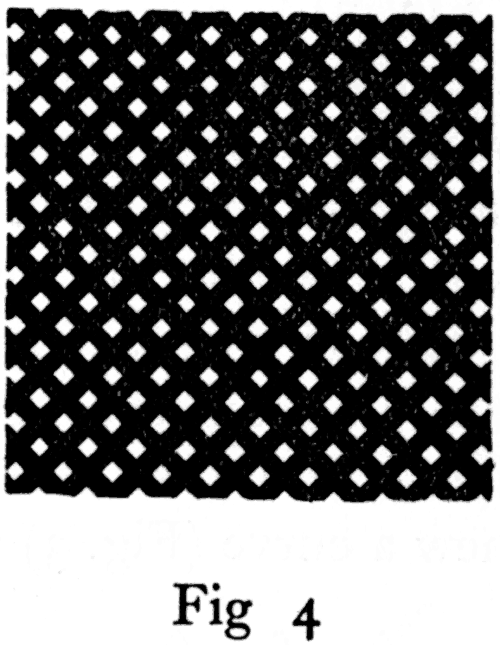
It may at first be thought that the effect of such a screen placed in front of the negative would be to produce merely a cross hatching on the reproduction; this, however, is not the case; if the screen be placed in a proper position relative to the negative and the size of the diaphragm of the camera, the picture will be reproduced in a series of dots of varying size.
The optical and other reasons for this phenomenon page 39 must be sought elsewhere,* but the following brief consideration will serve to illustrate what happens. The rays of light which ultimately reach the sensitive plate are acted upon by two lenses, that of the camera and the meshes of the screen, each one of which acts as a lens on the principle of the pin-hole camera. Each mesh, therefore, brings the image of the diaphragm to a focus on the negative, but the lens of the camera focusses the picture as a whole, thus the amount of light falling on the different pin-holes will vary in intensity, and hence the dots produced will vary in size, for it is assumed, with good reason, that each dot is built up from its centre and radially expands according to the amount of light acting upon it.
*See Verfasser, loc. cit., p. 94.
It is obvious that the quality of the resulting picture will depend, other things being equal, upon the coarseness of the screen employed. Screens are ruled with lines varying from 50 to 400 to the inch: the lower rulings give very coarse reproductions, and are only used for posters, whilst the higher rulings yield very fine impressions and are employed only for the best work. It is hardly necessary to remark that the finer the screen the better must be the skill of the printer. To illustrate the difference in the results obtained by the use of different screens, the two figures on Plate 6 have been prepared; both were made from the same negative, but for the upper figure a 100-line screen was used, and for the lower a 200-line screen. It will be observed that there is more contrast in the former, and more detail in the latter. Authors should therefore mention when sending in their original pictures the qualities they require in the reproduction; it must, however, be remembered that the blocks made from the finer ruled screens will not print satisfactorily except on more or less highly glazed paper, page 40 to the use of the "art" varieties of which there are objections on æsthetic and other grounds.
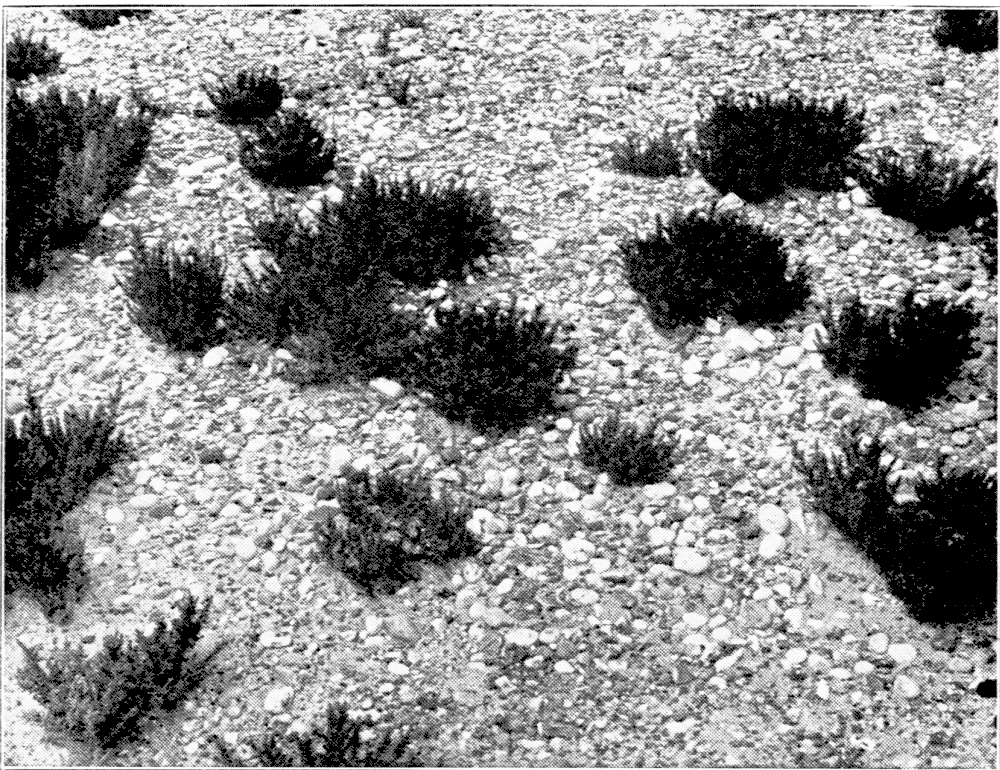
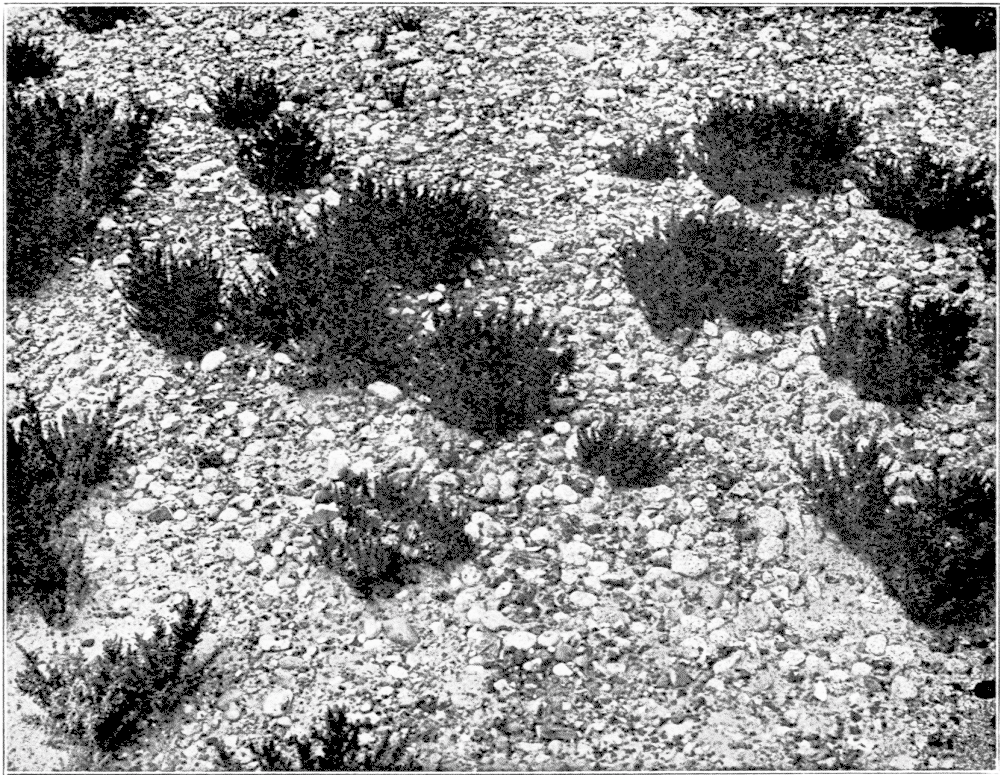
Half Tone reproduction of a photograph by Mr. W. Rowan.
Part of a shingle beach shewing plants of Sea Blite (Suaeda fruticosa) and a ring plover's nest with four eggs.
Before passing on it may be mentioned that screens with patterns other than that represented in Fig. 4 are sometimes employed; for instance, the wavy-line screen gives the impression of coarse collotype.
The preparation of the blocks may now be briefly dealt with.
A negative of the picture, using a screen suitable for the purpose, is taken on a special dry gelatine plate ("process" plates) or on some other form of negative, e.g., wet collodion which is most commonly employed. This negative requires very careful development in order to get the dots right.
From the negative a positive is made upon a copper or zinc plate, suitably coated with a sensitive film. The usual practice is to coat the polished metal plate with a mixture of water, albumen, fish glue, ammonium bichromate, chromic acid and ammonia; the plate is then dried and, when cooled, exposed under the negative. The action of the light on such a film, the essentials of which are the albumen, the glue or gelatine and a chromate, has already been described. The mixture becomes more or less insoluble in water, according to the intensity of the light falling upon it.
The positive is now rinsed in water, and is sometimes stained with an aniline dye in order to render the film more visible. Next it is developed in a stream of water until the surface of the metal is visible between the dots, the last traces of the soluble gelatine being removed with warm water. After drying, the plate is evenly heated over a Bunsen burner until the dots of gelatine mixture turn chocolate colour, when the plate is allowed to cool gradually. This is known as burning in. The plate, if necessary, is now touched up and the back, sides and margins varnished in order to protect them from the page 41 acid: when the varnish is dry, the plate is etched in a weak solution (about 2½ per cent.) of nitric acid if the metal be zinc; if the plate be copper, it is usually etched with a solution of iron perchloride.
On taking a proof, there is almost certain to be a lack of contrast, the plate is then fine etched, by which means a considerable improvement can be made; and, by covering certain parts with an acid-resisting substance ("stopping out"), it is possible to fine etch locally.
Incidentally it may be mentioned that machine etching, by which a fine spray of the etching fluid is distributed over the plate, has recently come into vogue, for it is claimed that the results print better and are in other ways an improvement upon the older method.
The plate may now pass through the hands of an engraver, who removes any blemishes, as far as is possible, improves the high lights, and so on; in fact, a skilful engraver can improve the plate considerably.
After the plate is trimmed, and the superfluous metal cut out by means of a routing machine, it is firmly tacked to a wooden mount, usually of oak, but sometimes of mahogany, especially if the plate is large. In order to obtain the best results, the printing, in a typographical machine, should be done on highly calendered paper—so-called "art" paper; in fact, this is absolutely essential if a fine screen has been used; it is only the blocks made with the coarser screens that will give fair prints on ordinary paper. For this reason reproductions made by the half-tone process are very generally treated as plates unless the glazed paper is used throughout the book. The process is used principally for the reproduction of photographs, and for pencil or wash drawings.
With regard to photographs, it has already been mentioned that authors should send the negative or two or three prints differently toned, in order that the operator can choose the one most likely to give the best result.
page 42It is sometimes difficult in a photograph of a landscape to obtain a negative in which the particular feature it is desired to represent—e.g., in photographs of vegetation—stands out with the requisite contrast. This is due to the position of the sun at the time of exposure, or to the use of ordinary plates. The remedy for the first is to take the photograph when the proper light obtains; with regard to the second, the use of colour correct plates, together with a colour screen in front of the lens, will obviate the defect. Since for scientific purposes the correct interpretation of the various tones of the vegetation, for example, may not be essential, variously coloured screens may be used in order to emphasise a particular feature. For instance, it will be noticed how well the bushes in Plate 7 stand out. This effect was obtained by the use of a panchromatic plate in conjunction with a red colour screen.
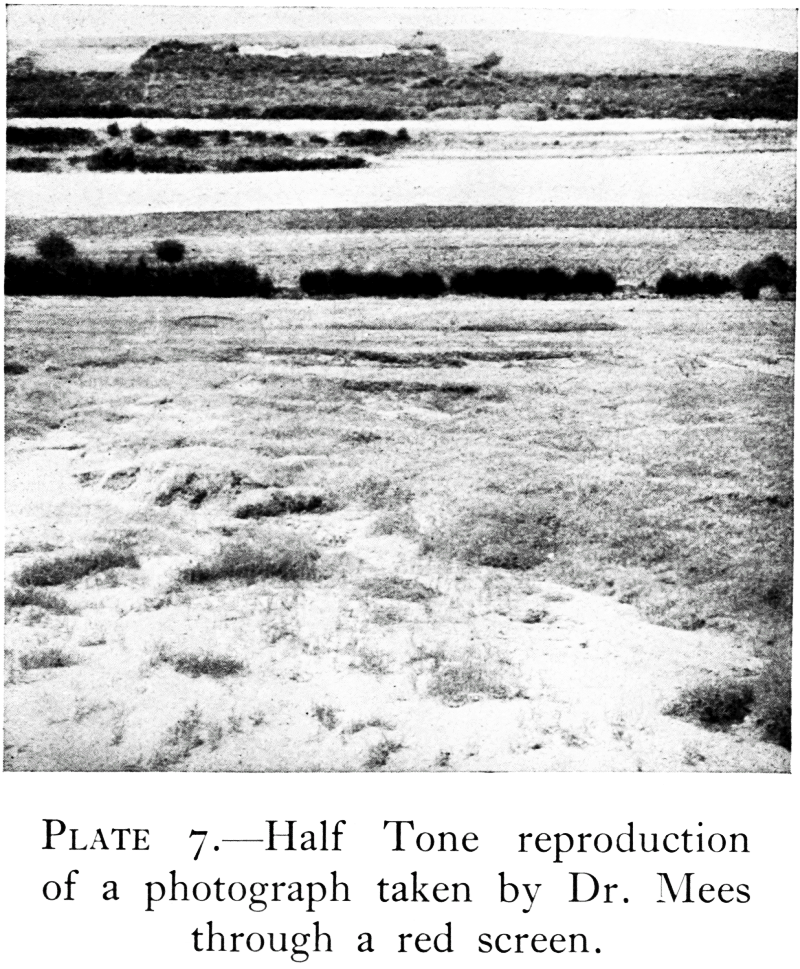
of a photograph taken by Dr. Mees through a red screen.
With regard to drawings in wash, charcoal or pencil, in which there are half-tones; these are better drawn on an enlarged scale, especially if the author is not a skilled draughtsman, for improper gradations in shading and other imperfections will not appear so noticeable in the reduced reproduction. Originals should all be made in one colour; in the case of wash drawings, diluted Indian ink (really Chinese ink) will give excellent results.
In making pencil drawings, a fairly stout hand-made paper with not too much grain should be used. If the drawing is to be of some size, the paper may be damped and pasted by its edges on to the drawing board, it will then be stretched quite flat and will not cockle when dry.
The outline of the object may first be sketched in lightly with a soft pencil and then the shading may be proceeded with. To do this, broad-pointed soft pencils, 2 B, 3 B, or 4 B, should be used, and it is better generally to work from the high lights to the shadows. To avoid rubbing finished parts, the work should proceed from the page 43 top of the board downwards, especially in the case of large drawings.
In order to obtain a nice gradation and a more smooth appearance—more especially when a very coarse paper has been used—the work may be gone over with paper stumps of appropriate size and softness, and, of course, India rubber may be employed where it is desired to reduce the density of the shading.
When finished, the edges of the various parts may appear woolly owing to the rubbing of the lead; this may be cured by cleaning up the edges with a trimmed piece of India rubber, but in so doing there is always a risk of rubbing out part of the shading, especially if the outline be at all intricate. If preferred, all the shaded parts may be fixed by painting them over with a suitable solution, gelatine for instance, paying particular attention in following the correct outline. When dry, the application of soft india-rubber will soon clean up the blurred edges.
If charcoal be used the same procedure may be followed. Charcoal and pencil drawings should be fixed, in order to prevent rubbing, before sending to the block makers. A suitable fixative may be purchased or one may be made by dissolving white resin in alcohol and applying it to the paper by means of a scent spray or an atomizer. A very good fixative may be made by dissolving a little gelatine in hot water and applying it whilst hot by means of a broad, flat camel hair brush, or ordinary milk may be used in a similar way. After the fixative has been put on, the drawing should be pinned up by one corner—unless, of course, it was pinned up before the fixative was employed, which is the best way when the fixative is an alcoholic solution—and allowed to dry; it may then be placed under pressure in order to flatten it, for fixed drawings generally shew a tendency to curl, especially page 44 when the preparation used for fixing has only been applied to one surface of the paper.
In making drawings for reproduction by means of the half-tone process, there are a few general points to which attention should be paid.
It should be remembered that there is not infrequently a tendency towards flatness in the reproduction; it is therefore important that the originals should be "plucky," and, on the whole, it is better to exaggerate with regard to high light and shade, especially if there is much modelling or perspective.
Finally, with regard to lighting, it is better for the majority in drawing their objects—solid objects in relief are referred to—to use a more or less lateral illumination and to represent only the high lights, shades and shadows referable to this main direction of illumination. A high relief will thus be obtained, and the effect will prove more satisfactory than if minor sources of illumination are unsuccessfully dealt with. This is especially important in drawing complicated structures such as models of vascular tissues, embryos, etc.
In cases where many such figures are to occur on one page, it is highly desirable that the lighting of each should be from the same direction.
The use of the half-tone block is now almost universal, so that it is hardly necessary to mention examples, more especially as they are hard to judge without seeing the original picture. Those in the present book are all of a high quality. Excellent examples will also be found in Tansley's Types of British Vegetation (Cambridge, 1911) and in the Journal of the Royal Horticultural Society.
Proofs should be carefully compared with the originals, particular attention being paid to the rendering of the tones; as already remarked, fine etching will clear up a block and will often prove a remedy to flatness.
page 45An author will naturally consider whether a photograph is to be reproduced by means of photogravure, collotype or half-tone. It is impossible to lay down any laws on the subject, but the following points should be considered.
If it is essential to have the reproduction in the text, a half-tone block must be used; it must, however, be remembered that the paper used for the letterpress may be very unsuited for the printing of half-tones. On the other hand, if it be immaterial where the picture is placed, then the relative merits of photogravure, collotype and kindred processes and half-tone must be weighed.
Provided that expense need not be considered, photogravure will, in the majority of cases, give the best results; on the other hand, if this process is too costly, then the choice lies between collotype and half-tone. The latter method will often give a result with more contrast as compared with collotype, whilst collotype will give a truer interpretation of the tones.
As has already been remarked, the best results with half-tone blocks only are to be obtained by the employment of a paper which seemingly has no lasting qualities; it therefore follows that if the reproduction forms an important record, the use of collotype is indicated, since many varieties of good paper are available. As a general rule photo-micrographs are best reproduced by collotype.
In order that the respective qualities of these three processes—photogravure, collotype and half-tone—may be compared, Plates 8, 9, and 10 have been made from the same photograph, a view taken by Dr. F. F. Blackman of the Bouche d'Erquy, a salt marsh in Brittany, which was selected chiefly on account of the large number of tones it contains.
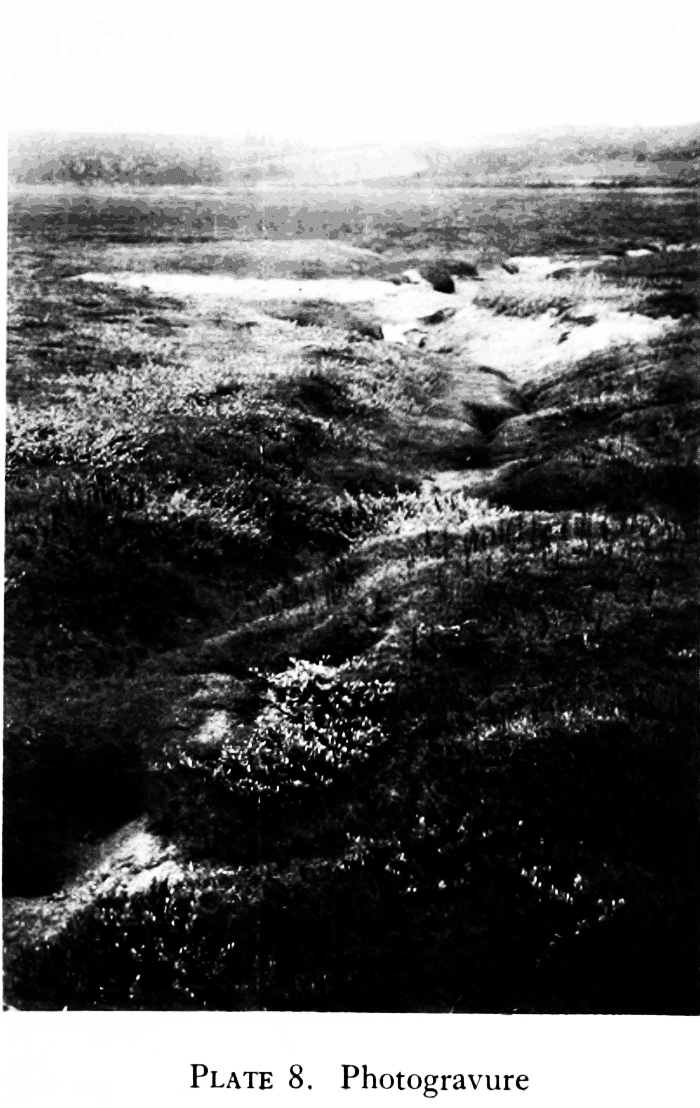
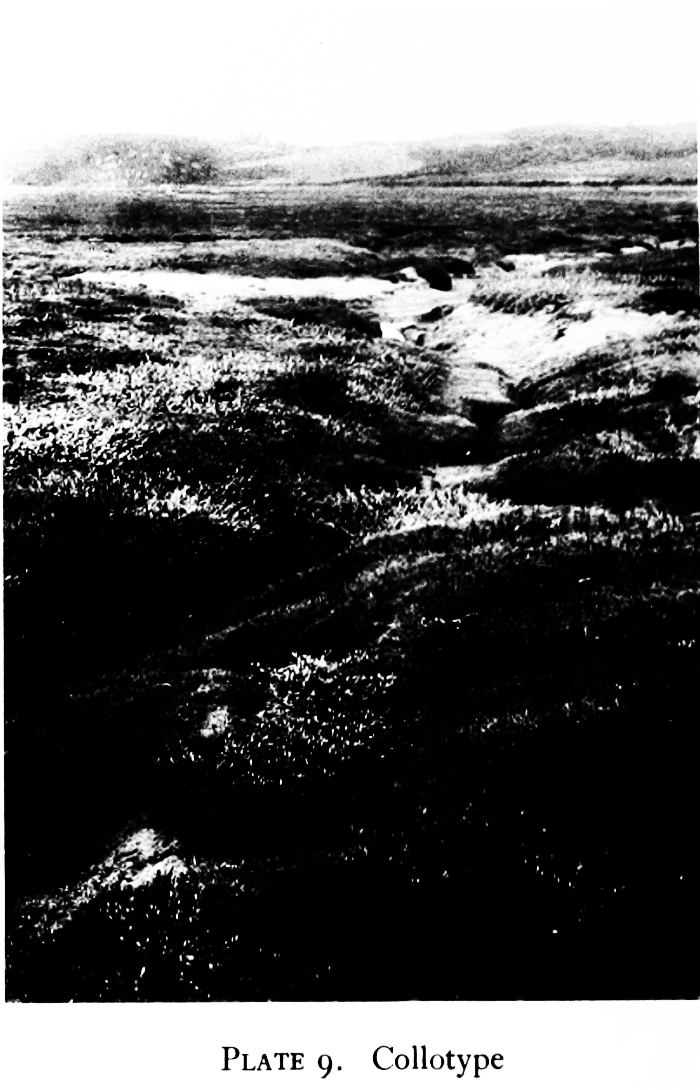
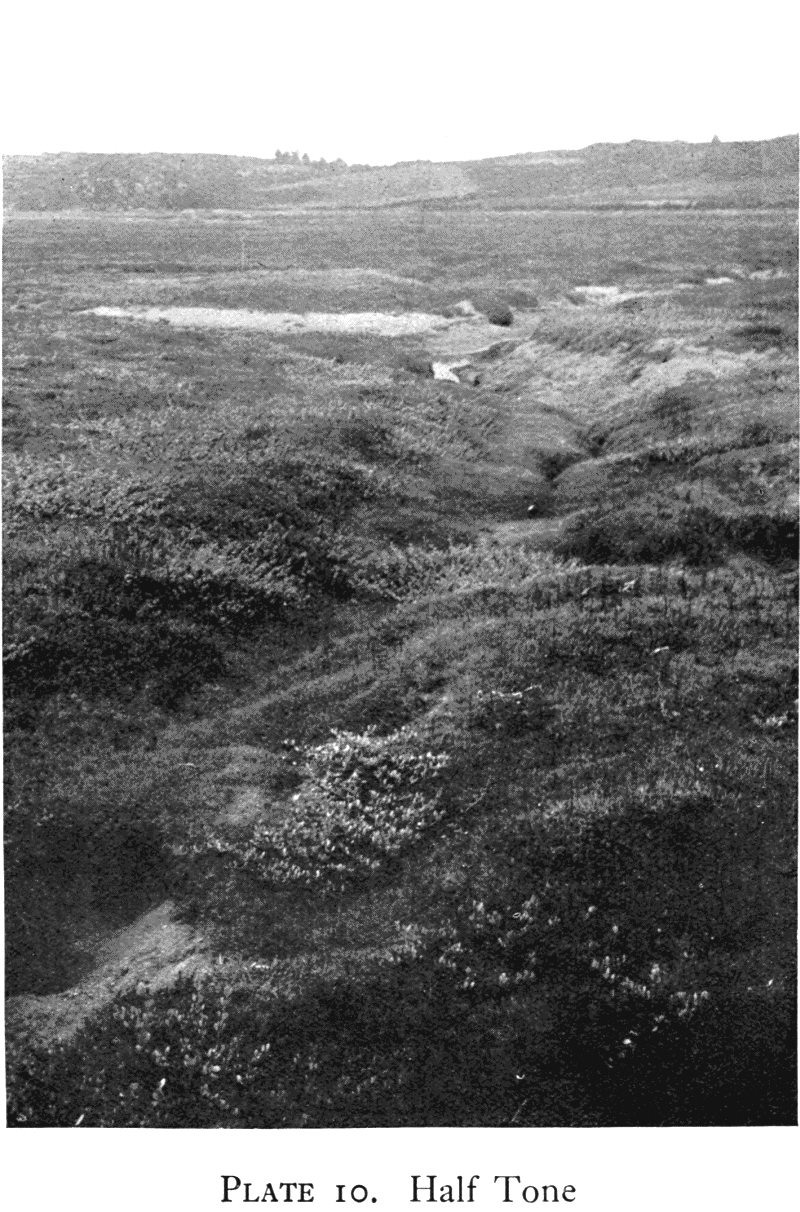
These three plates are not entirely comparable, since the heavy shadows in the right hand bottom portion of the photogravure have been touched up by the engraver. page 46 This was not intended by the author, but the plate was retained as it shews that directions regarding this point should not be omitted when sending the drawing or photograph to be reproduced. It also indicates that for critical work, when an exact a facsimile as possible is required, collotype should be used, for the plate cannot be touched up.
With regard to the reproduction of drawings shaded by means of wash or pencil, the same remarks apply, with the addition that if it be possible to express what is desired by other means, suitable for reproduction by line block, these latter should be employed. To illustrate this point, Figures 5, 6, and Plate 11 have been inserted; all illustrate the vascular skeleton of a fern (Marattia fraxinea), the first one is in outline and the second is shaded by lines of varying thickness; both of these are reproduced by means of the line block, whilst the third is a reproduction by half-tone of a pencil-shaded drawing. In order to obtain a fair comparison, the half-tone is reproduced as a plate, owing to the fact that it would not print satisfactorily on the paper used for the letterpress.
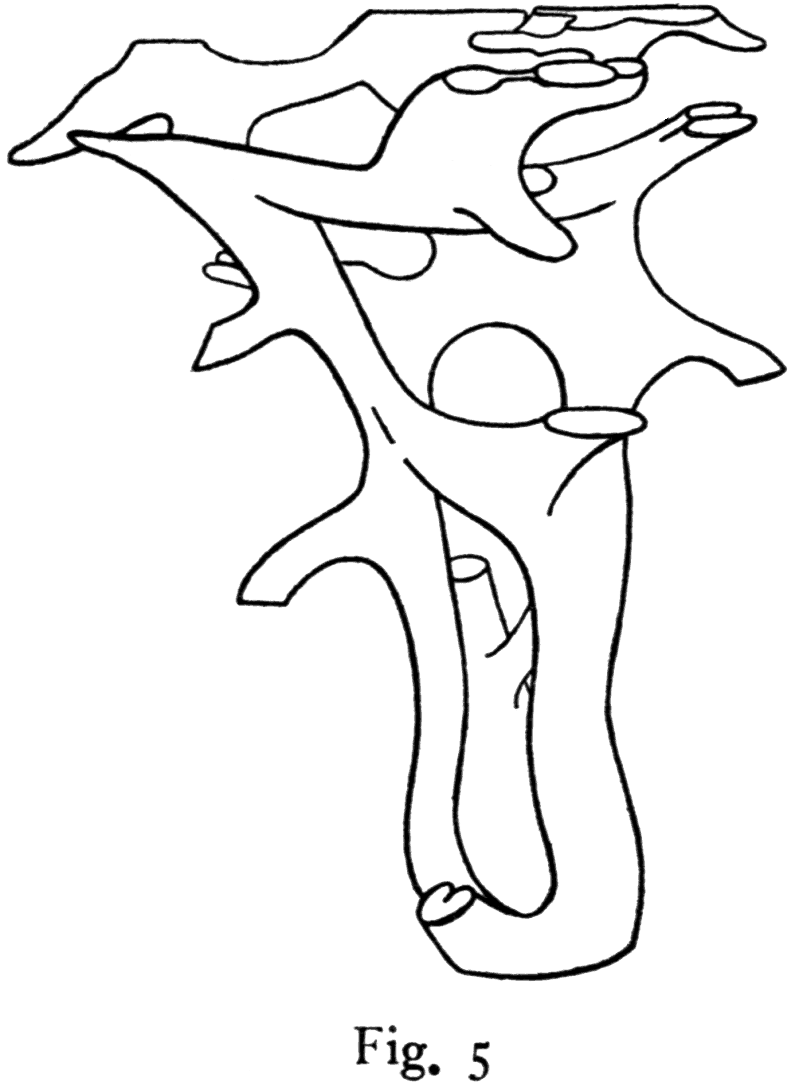
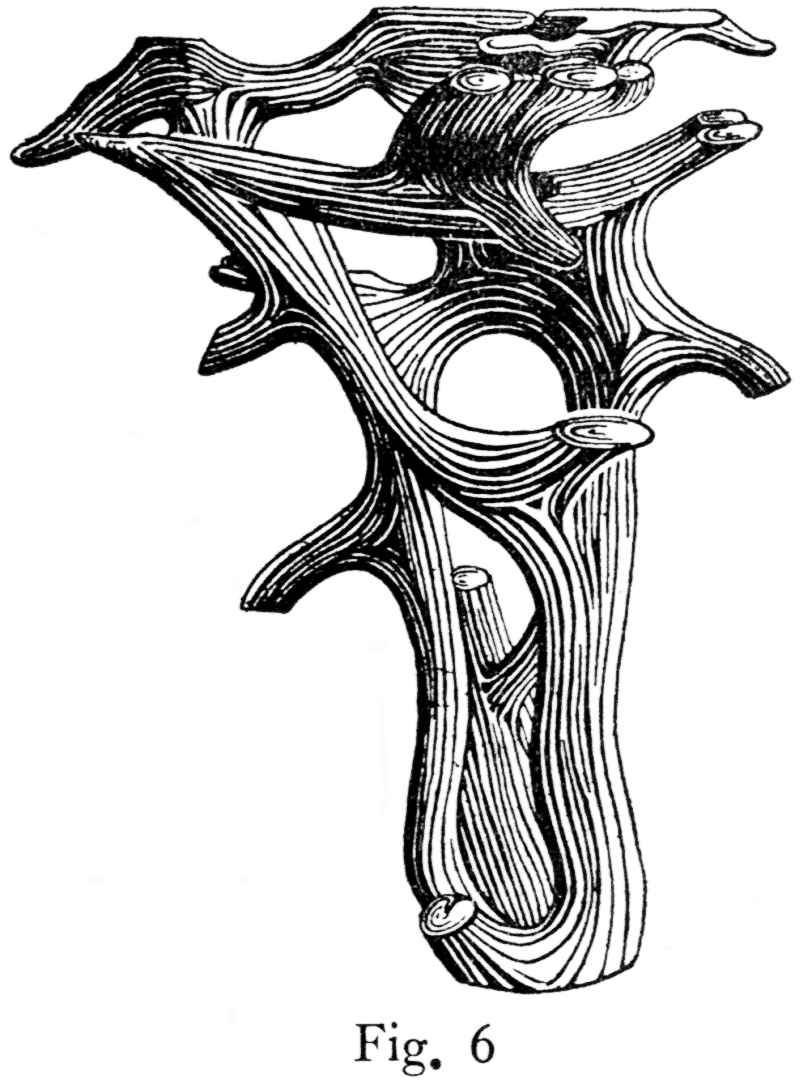
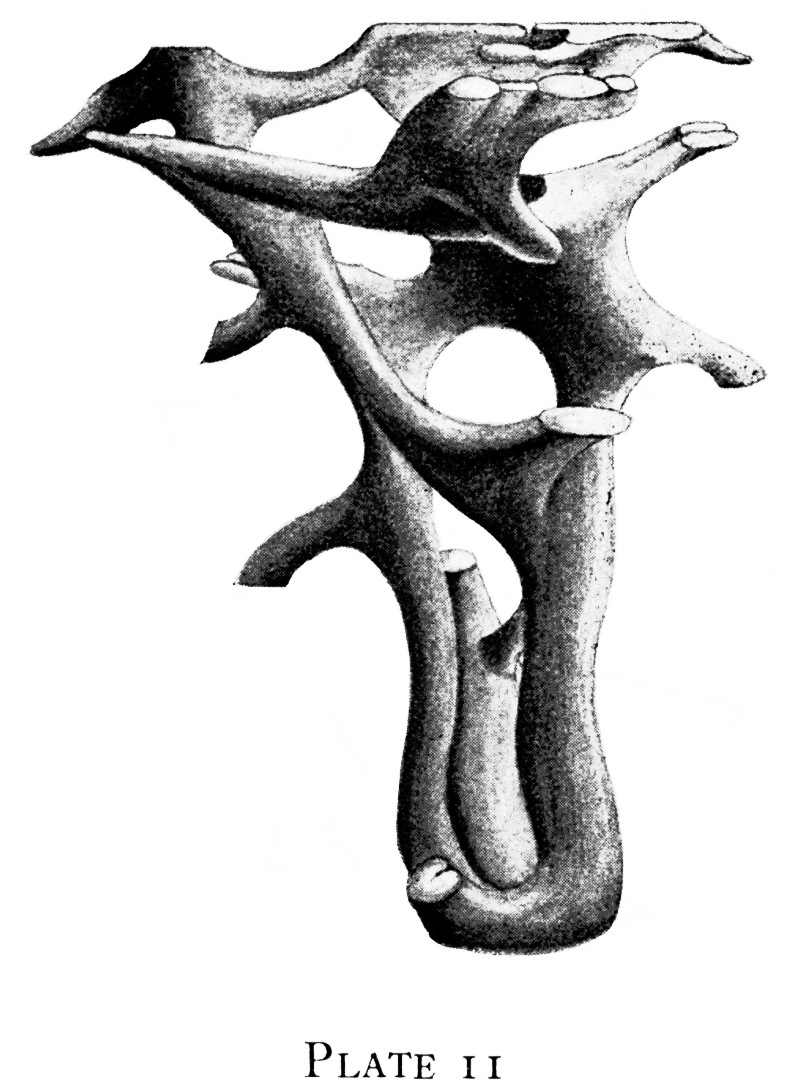
THE HALF-TONE THREE COLOUR PROCESS.—This process is much used for colour reproductions of various subjects; and, in view of the fact that the best results can only be obtained by the best photography, the object should, if possible, be sent to specialists for reproduction. In many cases, however, this is impossible, e.g., landscapes and animal and plant portraits amidst their natural surroundings, so that the scientist, if unable to make a water colour drawing, which will give by far the best result, must make his own negatives.
The first thing to do is to purchase a set of colour-filters, adapted to the colour-correct plates to be used, from firms who specialize in these matters, Messrs. page 48 Paget or Messrs. Wratten for instance, and from them the inexperienced should obtain full information regarding exposure, etc., for it is essential that the exposure of the negatives should be correlated in order that all may have the same tone-value.
The colour-screens, blue, green and orange, are made by dyeing gelatine with suitable stains; the films are stuck on to perfectly plane glass and are mounted in frames. In practice these screens are usually placed behind the lens, in which case a special camera is necessary, or they may be adapted to fit on to the front of the lens. In either case the procedure is the same; three negatives are taken one after the other through each colour filter, the exposure being modified in order that the tones in each case may be of equal value.
There are thus obtained three negatives which, of course, yield positives which look very different one from the other. These prints may be sent to the block makers, but it is better, on the whole, to send the negatives with clear indications as to the colour of each.
From each negative there is made by contact a transparency, and from these positives there are prepared a set of half-tone negatives from which are made the half-tone blocks.
The reproductions are made by superposed printing of the three blocks, yellow being printed first, then red, and finally blue (Plate 12).
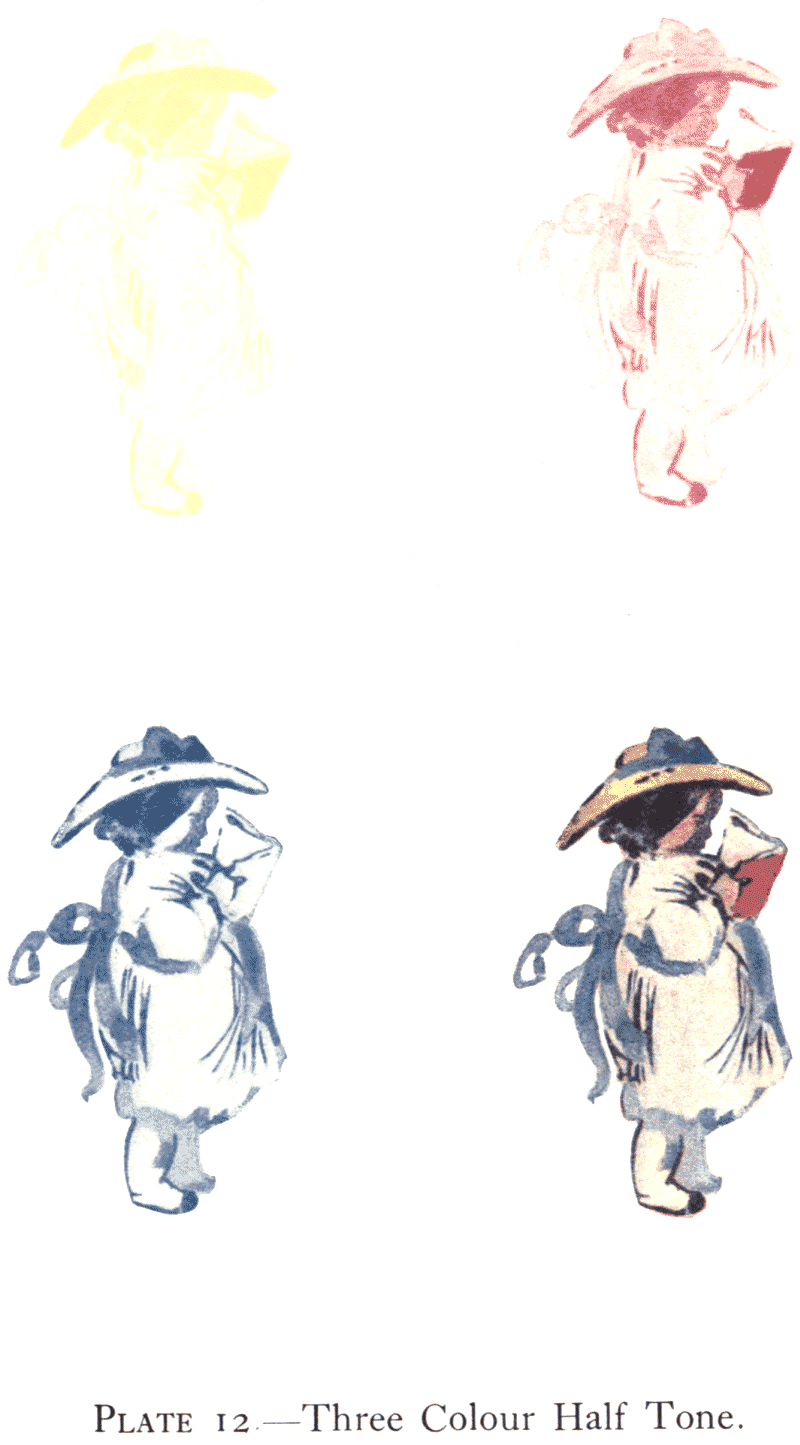
As indicated above, it is hardly worth while to make negatives for this process unless the operator is a really skilful or at least an efficient photographer, and even then the final product may prove unsatisfactory.
Better results are generally to be obtained by sending to the block maker a Lumiere colour photograph with full instructions regarding any corrections in the colours which may be necessary.
page 49Examples:—
Bateson: Mendel's Principles of Heredity, Cambridge, 1909. Church: Types of Floral Mechanism, Oxford, 1908. Seward: Darwin and Modern Science, Cambridge, 1909.
PHOTO-MECHANICAL LINE BLOCKS.—The photo-mechanical line block, commonly known as a zinco, is in a sense the lineal descendant of the wood block. As a means of reproduction the possibilities of line blocks are very great, for not only is it possible to reproduce by their means all kinds of line drawings, but also drawings in charcoal and crayon, provided they be suitably executed on a proper grained surface. In fact, an artist or draughtsman who has a thorough knowledge of the process and its capabilities can obtain extraordinary results. The process has the further advantage of being both quick and inexpensive, a few hours only being required to make the finished product.
Their mode of manufacture is the same in principle as for half-tone blocks; in the case of the latter, the method known as the enamel process was described; in the present instance a different procedure may be dealt with.
A photograph of the drawing is taken on a negative, the wet collodion process being generally followed, although dry process plates may be used.
A highly polished zinc plate is sensitised with bichromate of potash and gelatine, or by other means, and, when dry, is exposed under the negative.
The exposed metal plate is then taken into the dark room and evenly, but thinly, coated with etching ink. When the ink is dry, the plate is developed in water; the unexposed gelatine, and with it, the ink, will come away, its removal being helped by the judicious application of a dabber of wet cotton wool.
The plate may next be "rolled over" with an ink which page 50 will more stoutly resist the action of the acid than that used in the first inking, but prior to this it is usual to soak the plate in a mixture of gallic acid, phosphoric acid and gum. This second rolling up must be carried out as if the plate were for lithographic reproduction; and, when dry, powdered resin may be applied, in order to make a better acid-resist, as in the preparation of a lithographic stone.
The plate is now etched slightly in a weak solution of nitric acid; it is then rinsed, dabbed dry and placed upon a hot plate until the resin has stuck well to the ink. When cool, the margins, sides and back are protected from the action of the acid by means of a varnish and the plate is given its first real etch, which is a very slight one. After rinsing and drying, the plate is again heated until the ink and resin have melted and flowed down the exposed sides of the ridges of metal produced in the first etching. This application of ink and resin must be repeated in order that the exposed sides of the ridges may be well covered with the acid-resist and so will not be undercut. The plate is then given its second etch, and this is done with a stronger acid, after which the sides of the lines are again protected with resinous material in the same way as before. The third etch follows, after which the metal is thoroughly cleansed from all the ink, etc.
In order to smooth the shoulders of the lines, the plate is given a finishing etch: the cleaned plate is warmed and rolled up with hard etching ink; the metal is then heated until the ink becomes glazed, and, when cool, is placed in the acid bath for the requisite amount of time. If necessary the plate, after cleaning, is touched up with a graver, and the superfluous metal is cut away. Finally it is mounted on a block of wood, and after the corners and sides have been trimmed square, the block is ready for the press.
page 51To illustrate the enormous improvement which may result from the block passing through the hands of a skilful engraver, two line blocks of a wood engraving by Riocreux (see p. 36) have been prepared. Fig. 7 is the impression given by the block as ordinarily turned out, whilst Fig. 8 is a precisely similar block which has been worked up by an engraver.
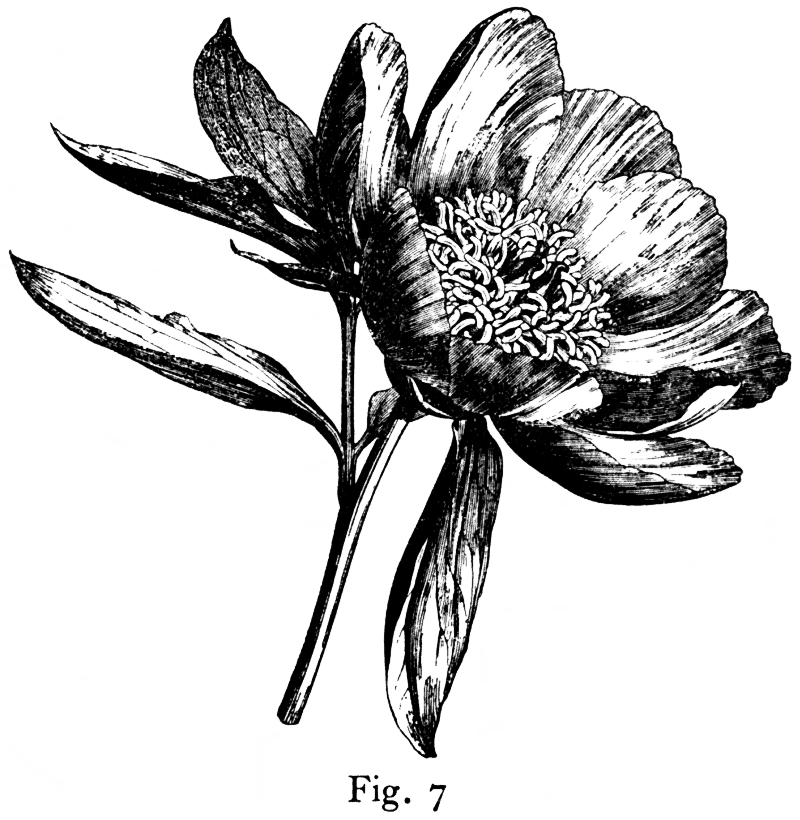
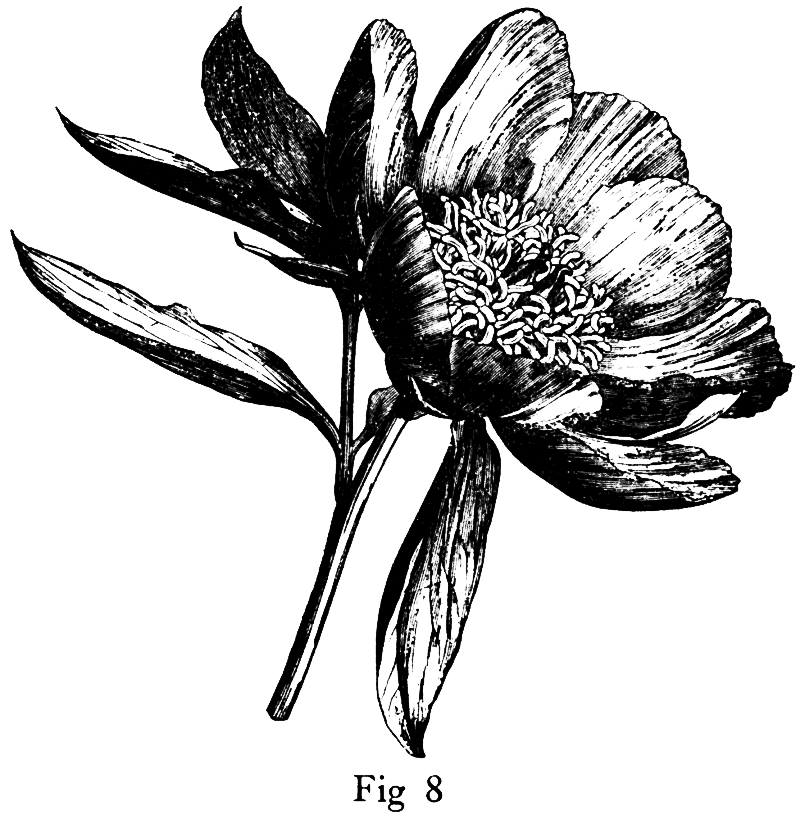
There are several other methods of making the blocks, but the principles are the same as in the foregoing process.
In examining the proofs it must be remembered that deletions are not the only alterations that can be made in the finished block; not only can lines be cut away, or their character altered by removing part of the metal from them, but additions can be made in reason. For instance, lines can be added across open spaces, and if part of the printing surface has been accidentally removed in cutting away the superfluous metal, the damage can be made good by building up with solder and working on this with the graver. If, however, the additions required are at all extensive or complicated, it is better to have a new block made.
Inasmuch as scientific illustrations are to describe and explain definite facts, the drawings must needs be materialistic rather than suggestive; in other words, a more or less conventional system must be employed.
In making their drawings for reproduction by line blocks, authors have at their disposal the black line, the white line, the black space, the white space, the black dot and the white dot, all of which may be combined in various ways. No tones, other than black and white, are available; if it be desired to represent half-tones, they must be rendered by the above-mentioned means.
In the majority of cases the originals should be made with black ink on white Bristol board or smooth white paper; ordinary lead pencil drawings on smooth paper are useless, and lead pencil, black crayon or charcoal in combination page 52 with grained paper or board should not be employed unless the draughtsman has the requisite skill and knows exactly the limitations of the line block. For all ordinary folk black ink and Bristol board cannot be improved upon.
The drawing may be made first with a soft lead pencil, using the camera lucida or other optical aids to correct delineation. The pencil lines are then gone over with ink; for this purpose a good black ink is necessary. Wolff's Indian ink, Higgins' waterproof ink and Steuber's waterproof drawing ink are highly satisfactory, and there are many others. With regard to pens, a suitable implement is all-important; Gillott's lithographic pens and Brandauer's No. 515 are recommended. For straight lines of an even thickness a ruling pen is very useful, and these may be obtained fitted with an adjustment which enables the worker to rule a line of a definite thickness, e.g., .5 mm. and so on.
All drawings should be made larger than it is intended page 53 the reproduction to be, for slight inaccuracies, ragged lines, and other blemishes will thus appear less obvious. This drawing on a large scale is often a stumbling block, because the work appears too open and the draughtsman is tempted to put in too much; this must be avoided, else the crowded lines may join together in the reduced reproduction. Also it must be remembered not to draw too finely, else the work in parts may disappear entirely in the reproduction. In drawing on an enlarged scale a certain amount of exaggeration may be employed, in order that when reduced the drawing may not be quite spiritless.
When representing a solid object, such as a plant or an animal, to shew the external morphology, it is to be borne in mind that form is the main thing to represent, and this can be expressed by outline drawing alone. In fact, more or less primitive methods must be employed, and better models cannot be followed than the best wood cuts.
page 54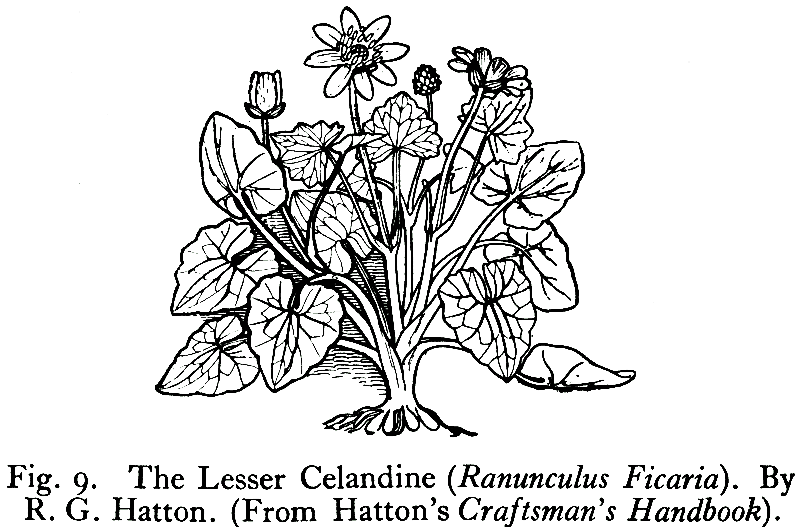
By R. G. Hatton. (From Hatton's Craftsman's Handbook).
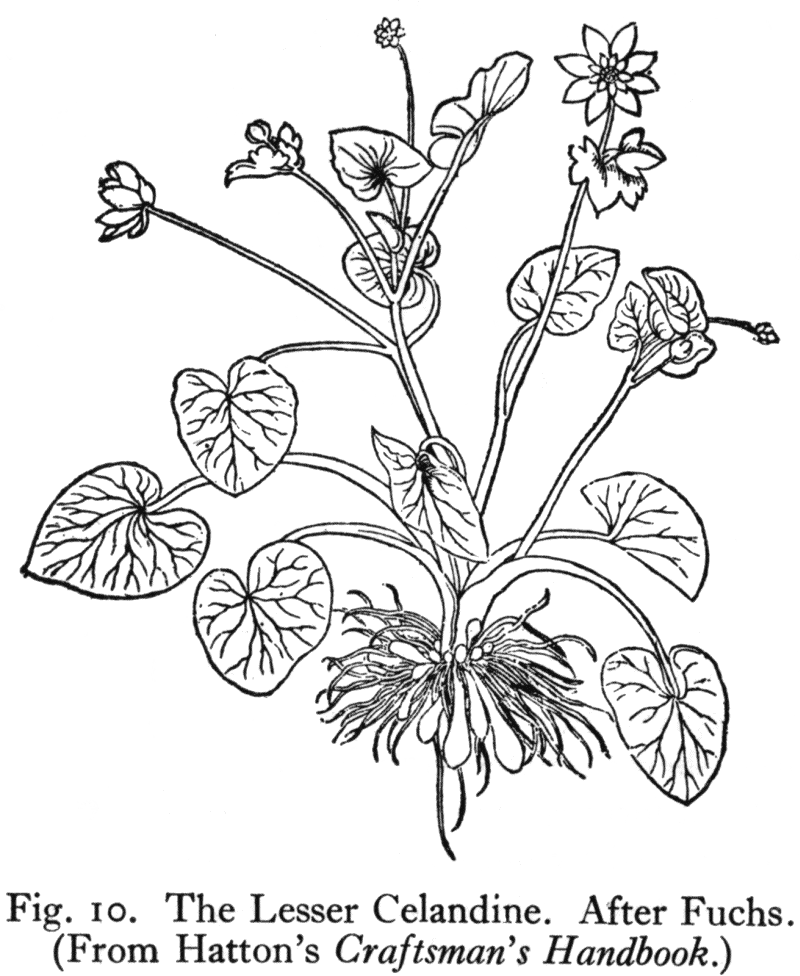
(From Hatton's Craftsman's Handbook.)
An examination of figures 10 and 12 will shew that Fuchs* attained his object by simple outline drawings; he never employed local colour, and shading he used very sparsely indeed, and then only to give expression to the form of some thick part. Fuchs's celandine (Fig. 10) should be compared with the drawing of the same plant (Fig. 9) by R. G. Hatton.
*The methods followed by the illustrators of the Herbals may be conveniently studied in Hatton's "The Craftsman's Plant Book," London, 1909, and Arber's "Herbals," Cambridge, 1912.

(From Hatton's Craftsman's Handbook).
The methods of Matthiolus (Figs. 11 and 13) were somewhat more advanced, for he used shading not only to express form but also to give a certain amount of page 56 relief. It will be noticed that he shaded by lines which followed the moulding of the parts.
The work of Riocreux (Fig. 8) should also be studied; it will be observed that he managed to get a very high relief in his drawings by the simple means of straight or curved lines, according to the shape of the part, of varying thicknesses.

(From Hatton's Craftsman's Handbook)
There is no necessity for keeping all the lines of even thickness. For instance, provided the character of the form is not altered, the outline on the shaded side may page 57 be made thicker than on the illuminated side; also distance can be indicated by the use of thinner lines, for these, although really black, will give the impression of greyness. Then again, a line may be drawn with local increases and decreases in thickness, as in ordinary writing, and such lines drawn by a skilled hand can be made to express a marvellous amount of modelling.
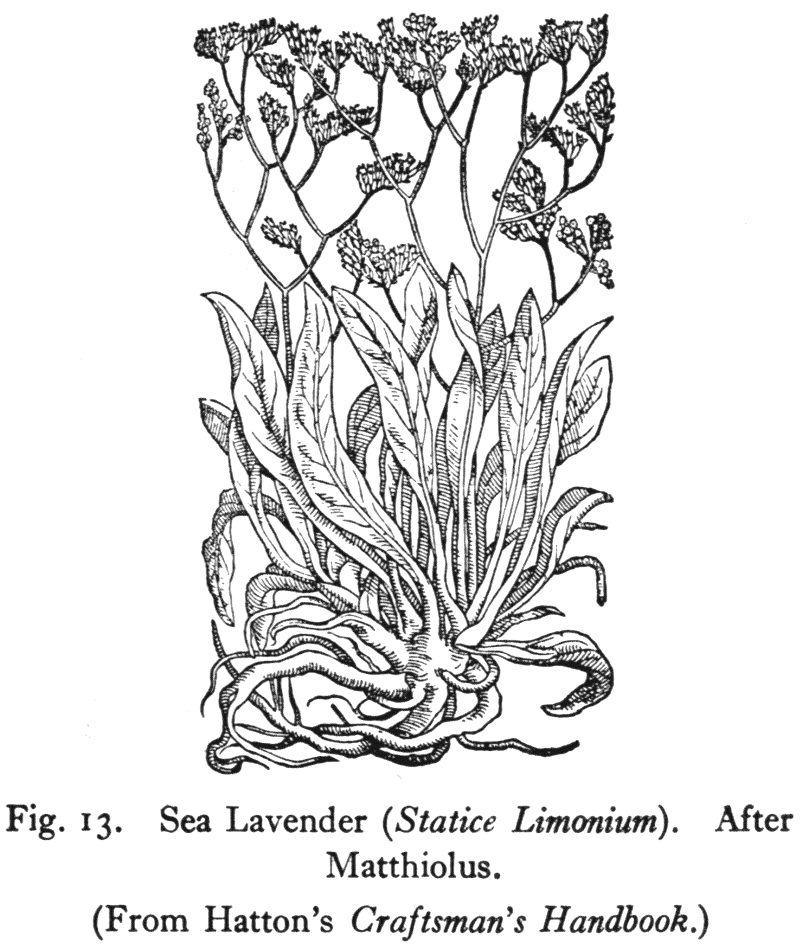
(From Hatton's Craftsman's Handbook.)
The draughtsman, however, is not restricted to lines; any marks which can be made with a pen and black ink may be employed, provided they be sufficiently firm and large.
page 58The accompanying figure (14) which is a reduction of an illustration in Church's Floral Mechanisms, illustrates the use of lines of varying lengths for shading.
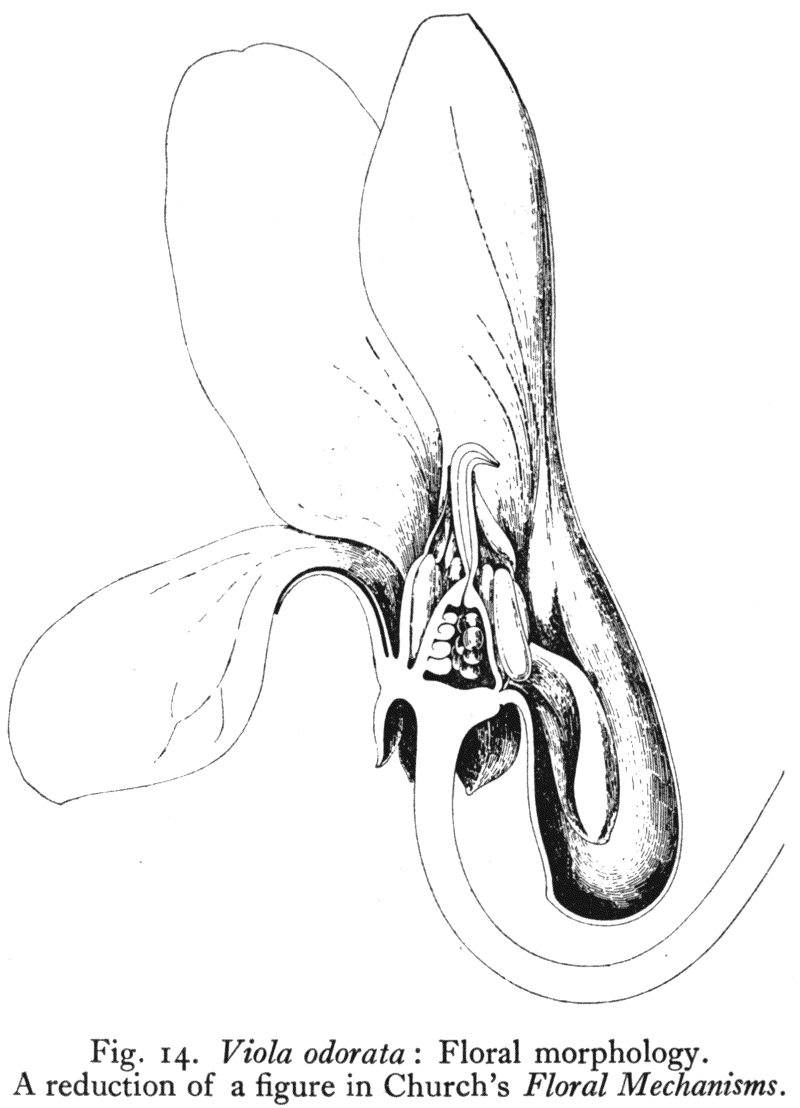
A reduction of a figure in Church's Floral Mechanisms.
In shading, the effect of shadow may be obtained by increasing the thickness of the lines, but they must not be drawn too closely together; on the other hand, the page 59 lighter parts can be represented by thinner lines placed further and further apart, and the lightest parts by the white of the paper. Cross hatching may also be employed (see Fig. 15), but the crossed lines must not be too close together, for otherwise they will tend to thicken in the making of the block and so will print too black.
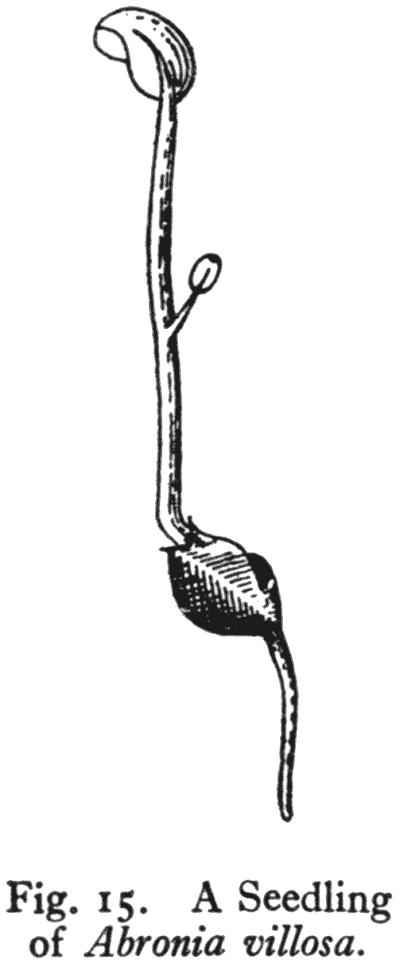
For very delicate shading and tinting, stipple may be employed, but the dots must be quite definite, sufficiently large to stand reduction, and not too close together (Figs. 18, 28c, and 32). A particularly good example of this method will be found in Butler's paper on Allomyces in the Annals of Botany, 1911, vol. 25. Dots have also been employed in Fig. 28c (p. 69).
With regard to local colour; this may be indicated by shading, by a white space, or by a black space.
Hitherto, drawing with black ink on white paper alone has been considered, but the reverse is equally available; much can be expressed by drawing with white ink on black paper.
Drawing in white upon a black ground is not frequently attempted, but an excellent example by Miss Janet Robertson is shewn in figure 16, which is well worthy of study, since it illustrates to a nicety some of the means at the disposal of the draughtsman for line blocks. The black surface is best obtained by the use of a waterproof Indian ink applied with a brush to a white surface, the drawing being made with a dense white ink, using a pen or a brush. The white ink may be made by diluting any good opaque white water-colour paint, or process white may be used. The composition of this should be zinc page 60 oxide or baryta, for these do not darken with age; the author once used for this purpose a white pigment which proved excellent at the time; the drawings, however, subsequently turned dark brown owing to the fact that the basis of the paint was apparently a compound of silver.
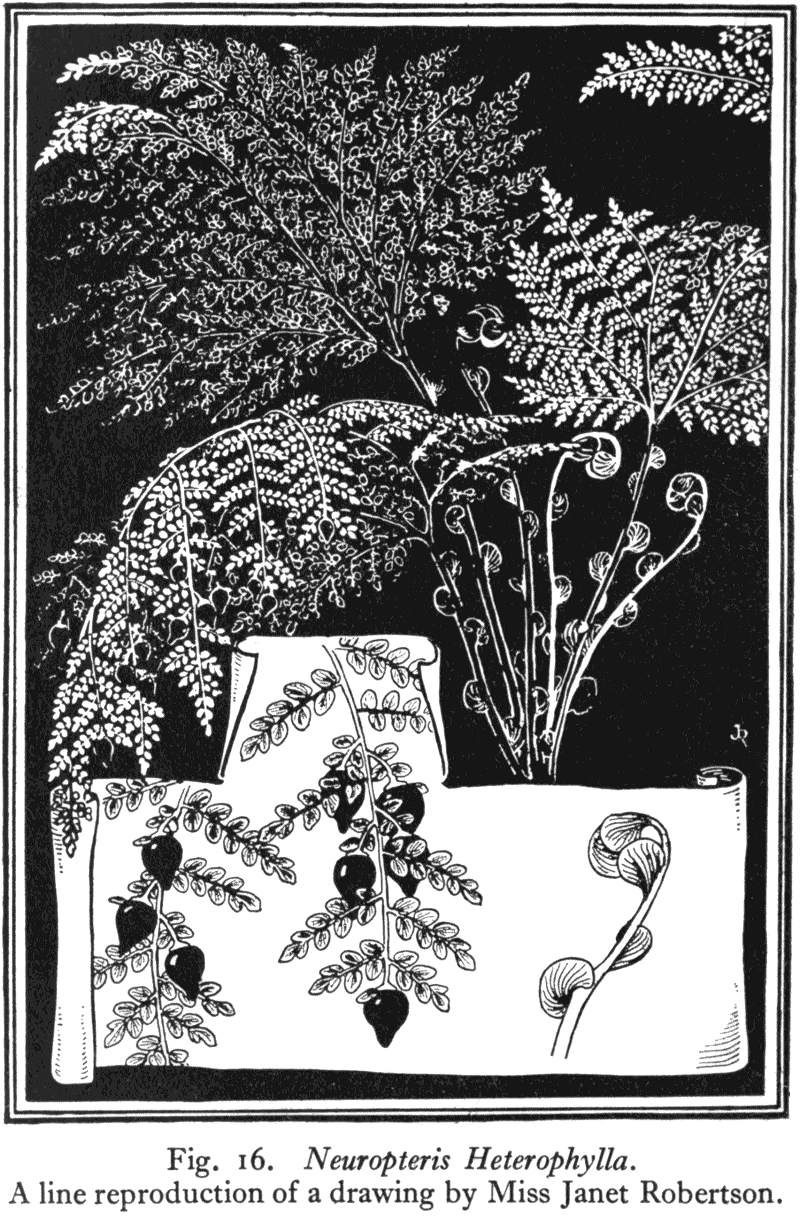
A line reproduction of a drawing by Miss Janet Robertson.
The top part of the drawing (Fig. 16), shewing the general morphology of the plant, was drawn with a brush charged with white ink upon a black ground. In the simplest possible way relief has been obtained by representing the leaflets of the nearer fronds by white spaces, whilst those further away are represented by white outlines. An enlargement of a frond is shewn on the lower part of the picture, and here the parts are represented in black on a white ground. The leaflets are in black outline and the fruits are made to stand out, as in the upper part, by the use of local colour—in this instance black—their shape being indicated by the curve of the higher lights. In brief, a very effective drawing has been made by the simplest use of the white line, the white space, the black line and the black space.
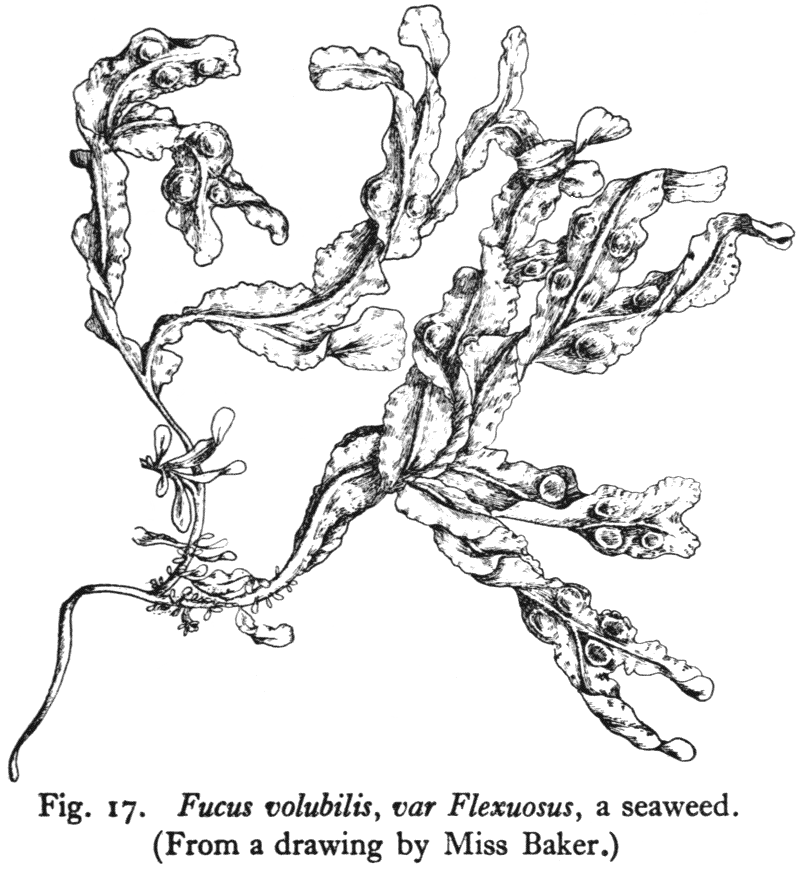
(From a drawing by Miss Baker.)
This may be compared with figure 17, which was drawn by Miss Baker; the method pursued is entirely different to the last, it being a pure pen and ink drawing on white paper. No local colour has been employed, and the modelling has been expressed by the lines used for shading which have been made by short strokes with a fine pen. The result is suggestive of an engraving but this was not intentional; under no circumstances should an attempt be made to imitate in a relief block effects which can only be obtained by intaglio.
From what has been said it is obvious that the photo-mechanical line block can be used for the reproduction of all kinds of drawings in pure black and white; to illustrate this figures 18-26 have been inserted.
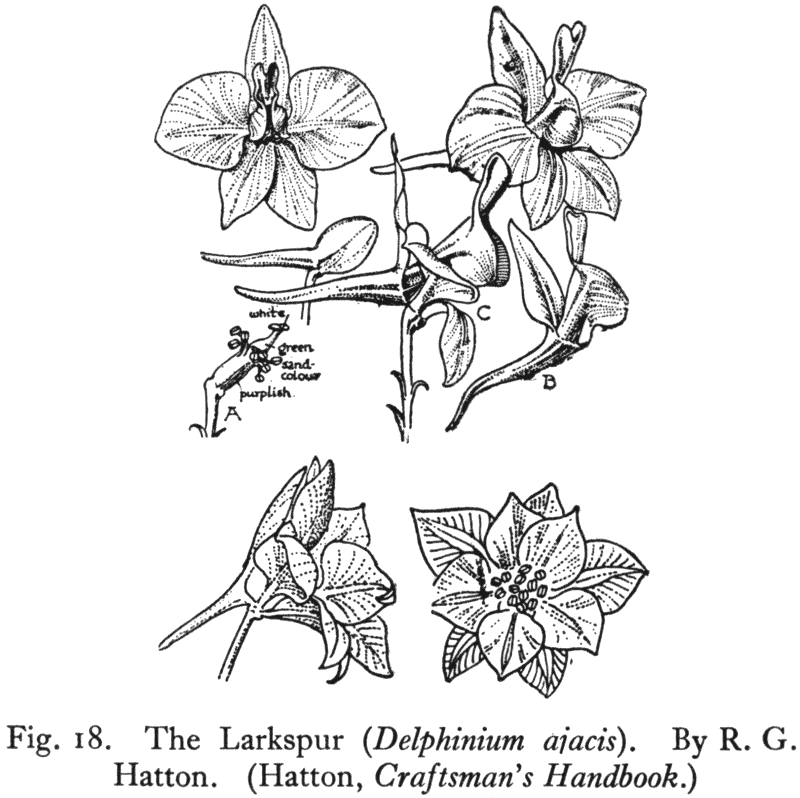
By R. G. Hatton. (Hatton, Craftsman's Handbook.)
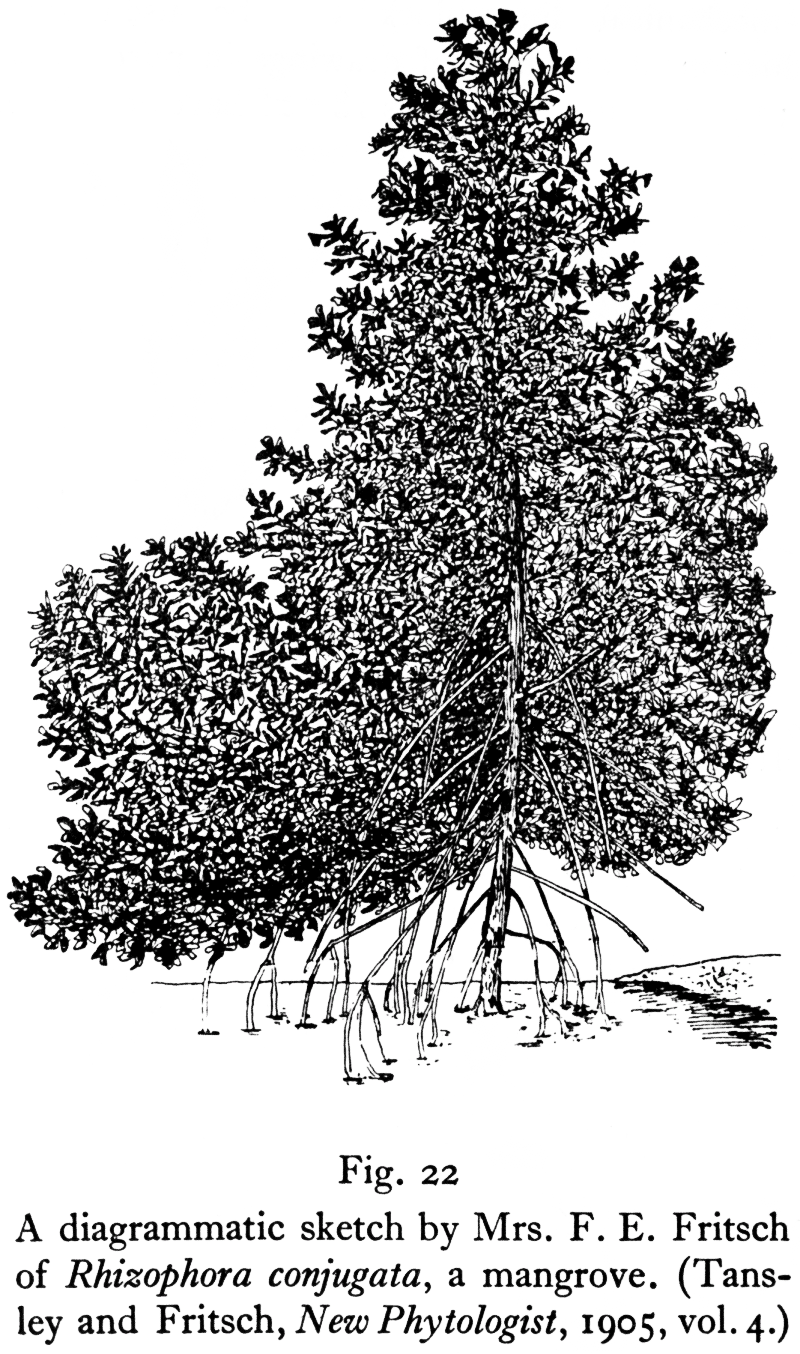
A diagrammatic sketch by Mrs. F. E. Fritsch
of Rhizophora conjugata, a mangrove.
(Tansley
and Fritsch, New Phytologist, 1905, vol. 4.)

A shoot of Acanthus ilicifolia, a mangrove. Drawn by
Mrs. F. E. Fritsch.
(Tansley and Fritsch, New Phytologist,
1905, vol. 4.)
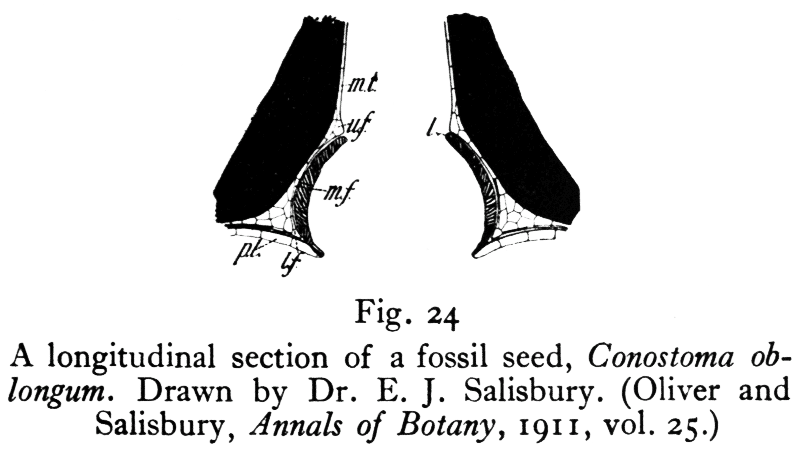
A longitudinal section of a fossil seed, Conostoma oblongum.
Drawn by Dr. E. J. Salisbury. (Oliver and Salisbury, Annals of Botany, 1911, vol. 25.)
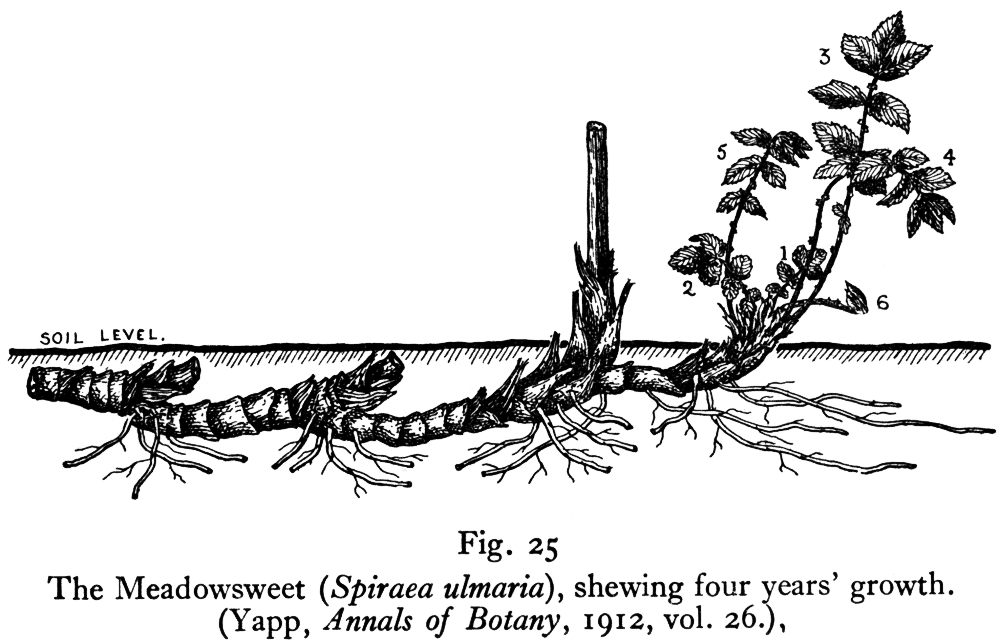
The Meadowsweet (Spiraea ulmaria), shewing four years' growth. (Yapp, Annals of Botany, 1912, vol. 26.).
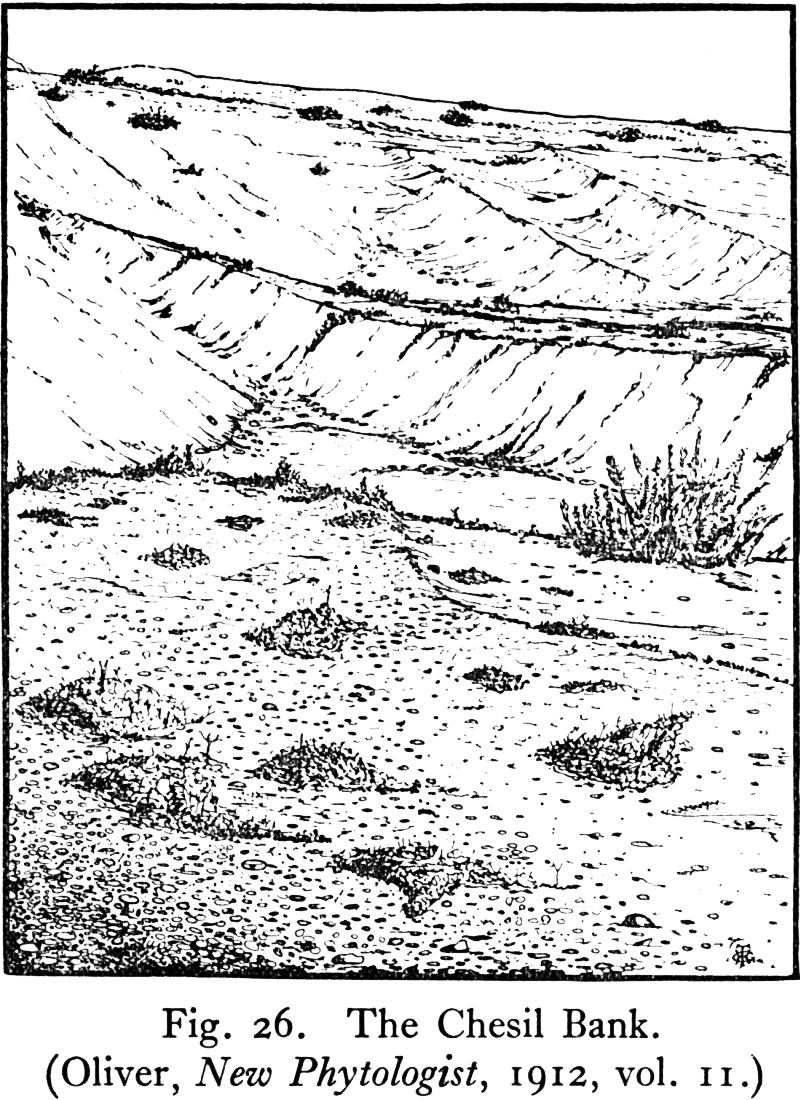
(Oliver, New Phytologist, 1912, vol. 11.)
Questions relating to the drawing of microscope sections may now be dealt with. Usually these are drawn in pencil and reproduced by means of lithography; this is quite wrong, for in addition to its being an unnecessary expense, it is also an inconvenience to a reader, since the figures are necessarily divorced from the letterpress. There are very few histological details which cannot be represented by line blocks, and with a proper co-operation between the author, the block maker, the printer and the publisher, even the delicacies of karyokinesis could be reproduced in the text.
page 68For demonstration purposes, transverse sections of plant-structures may first be taken.
The walls of the various elements may be represented by lines of more or less equal breadth, but in those cases where the walls are particularly thick, e.g., the elements of the wood, the thickening may be represented by an additional line. This is seen in Fig. 27, in which it will be noticed that the middle lamellæ of the wood-elements are represented by black lines.
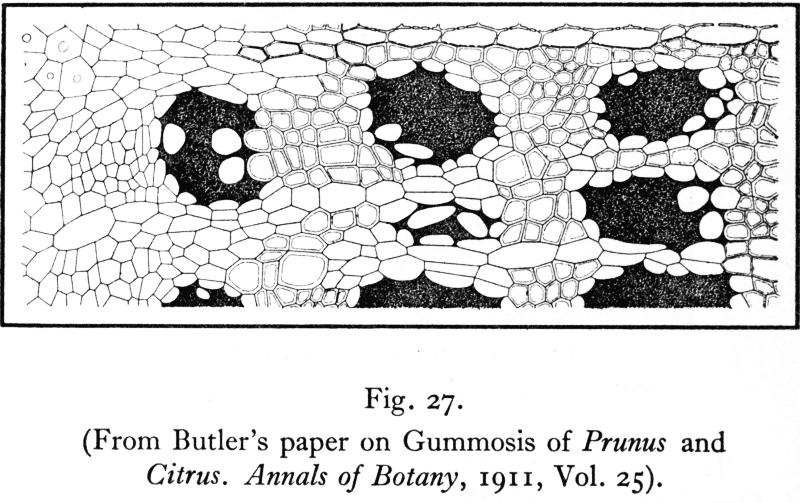
(From Butler's paper on Gummosis of Prunus and
Citrus. Annals of Botany, 1911, Vol. 25).
This is a particularly good drawing, but, unfortunately, it has been over reduced.
On the other hand, the various tissues may be represented by lines of varying breadths, the thickest walled cells having the same double contour as in the above, but with the addition of local colour in the shape of diagonal shading. This is not uncommonly found in papers dealing with the anatomy of plants by French authors; it is illustrated in Figure 28 a. If preferred, such thick-walled page 69 elements may be entirely represented by thick black lines as in Figure 28b, and when such cells are relatively few in number, this method has much to recommend it since a greater relief is obtained.
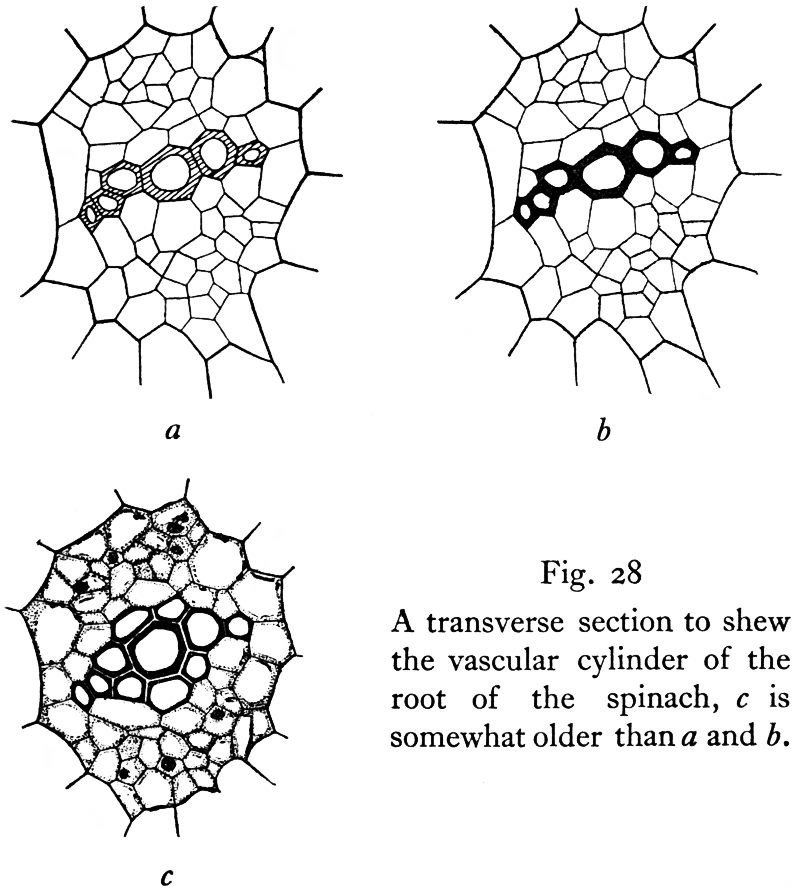
|
|
|
|
Fig. 28.A transverse section to shew |
Finally, an attempt may be made to draw in a more detailed fashion as in Figure 28c. Here the thickness of the cells of the wood is represented by broad black lines, the middle lamellæ being left white. The lines marking the boundaries of the other cells vary slightly in thickness, but this is to a great extent masked by the representation of the cell contents, which consist entirely of dots in the case of the protoplasm, whilst the nuclei are represented page 70 by dark ovals—black relieved with small white areas. By varying the size of the dots and their distance apart, varying densities can be indicated.
It has been mentioned above that it is possible to reproduce fine detail by means of the line block; this is illustrated in Figs. 29 and 30.
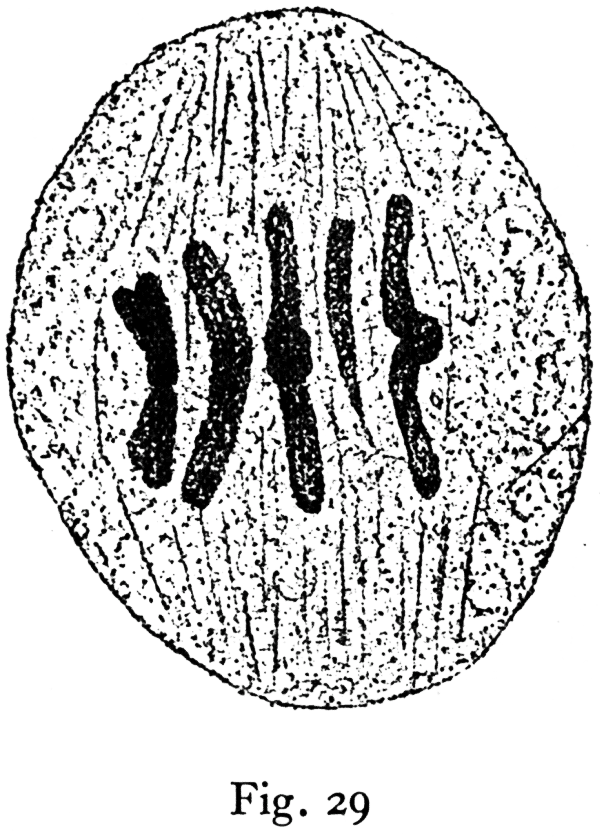
Fig. 29, which illustrates a stage in the division of a nucleus, was drawn with black crayon on a rough-grained piece of Whatman's water-colour paper. The cytologist will, doubtless, criticize its coarseness, but it may be mentioned that the roughest paper at hand was designedly employed in order to illustrate the point raised. That a finer grained paper will give more delicate results is shewn by Fig. 30, which is a reproduction of a drawing, kindly lent by Dr. W. G. Ridewood, made with ordinary lead pencil on grained Bristol board. Its delicacy is obvious, and at first sight it could easily be mistaken for a lithograph.*
*Many similar examples will be found in Ridewood's memoir On the Cranial Osteology of the Clupeoid Fishes, Proc. Zoo. Soc., Lond., 1904, vol. 11, p. 448.
page 71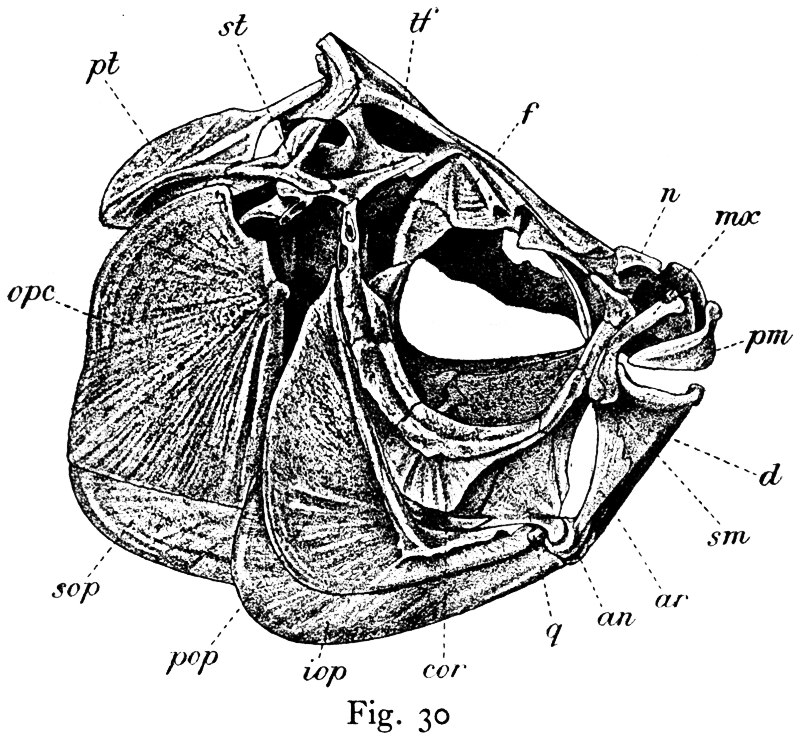
A half-tone can be put on to a line block during its manufacture. All that the draughtsman has to do, is to indicate by blue pencil lines those parts on which he requires the dots, which give the half-tone, to be placed, and to select the pattern of the stipple he desires to be used. The result may appear somewhat mechanical since the dots are regularly arranged, but a drawing sometimes may be considerably improved by this means if used with judgment. It is frequently employed in representing drapery, and many examples may be found on those pages of newspapers devoted to ladies' dress (Fig. 31; see also Fig. 32).
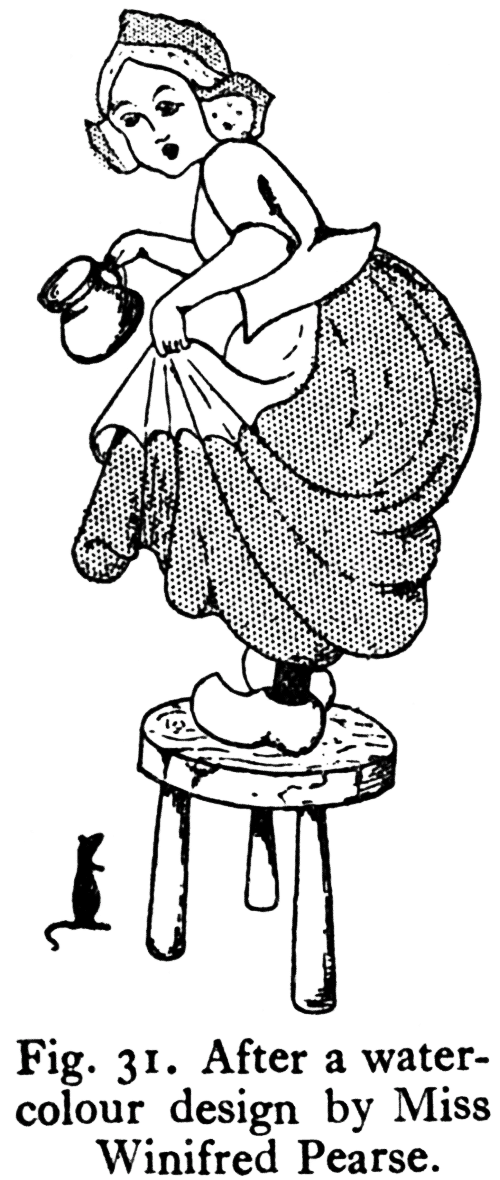
THE DRAWING OF DIAGRAMS AND APPARATUS. Much valuable information may be conveyed by diagrams; in fact, these could be used more freely than they are.
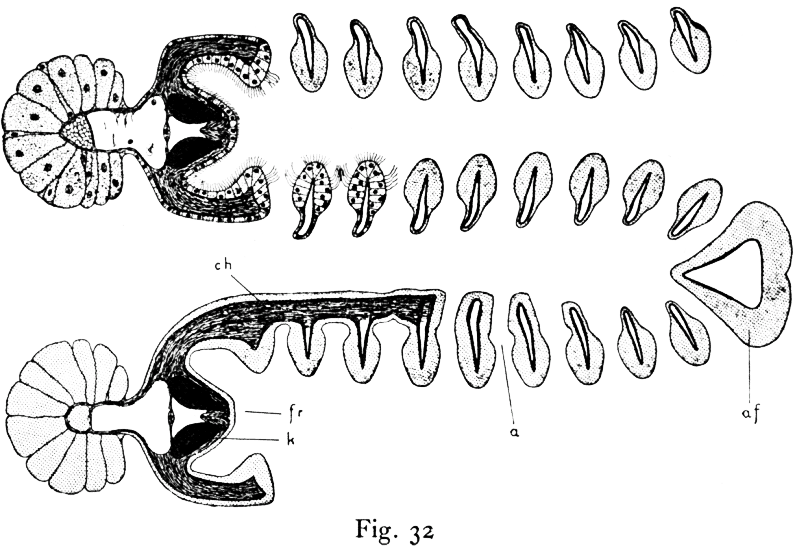
The principles to be borne in mind are the same as for other ink drawings. They should always be drawn upon an enlarged scale, and with as little detail as possible, which generally should be indicated in the page 73 most conventional ways—dots, black spaces, lines, and so on (Figures 33 and 34). The main thing to be aimed at is clearness, so that it is often necessary to sacrifice true relative proportions in order to gain this end (Fig. 34).
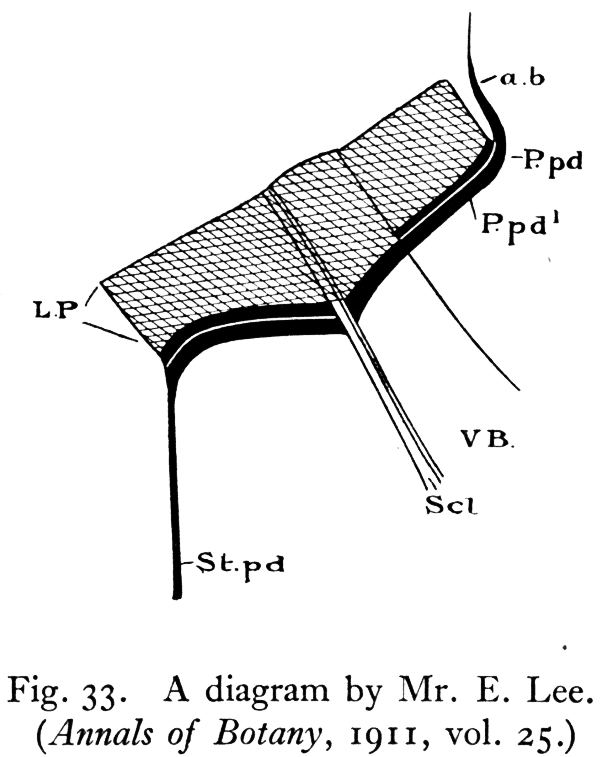
(Annals of Botany, 1911, vol. 25.)
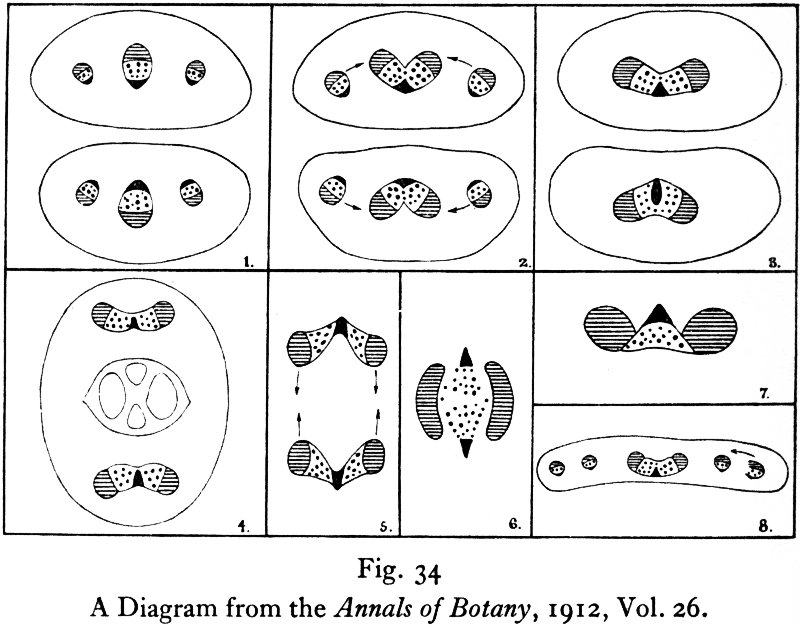
A Diagram from the Annals of Botany, 1912, Vol. 26.
In certain cases it is possible to combine detail and diagram in one drawing; this is shewn in Fig. 32, taken from Dr. Ridewood's admirably illustrated memoir on the Gills of Lamellibranchiata (Transactions of the Royal Society of London, B. vol. 195, 1903). The shading employed was either done by the draughtsman (at ch and in the cells with irregularly arranged dots), or else was put on the block during its manufacture (af). If a lens be used, the difference will at once be obvious.
The finished drawing should be bold and neat, and all lettering should be very clear. If several figures are page 74 included in one diagram they may be separated one from the other by ruled lines, and in no case should one tier of figures—taking the frames as the boundaries—unevenly overlap another tier, otherwise the diagram, to use an expressive phrase, will look "like a pig with one ear."
Under the heading of diagrams must be included the representation of apparatus. There are two ways of drawing apparatus; the objects may be drawn as a study in still life, as, for example, in many of the figures illustrating Deschanel's Natural Philosophy (London, 1890) or they may be represented in a purely conventional fashion. The latter is the better way, and it is preferable to draw for the most part in section in order that all connections, inlets, outlets, etc., may be clearly shewn.
page 75A study of a good example is infinitely better than a written description, wherefore Figure 35 has been inserted.
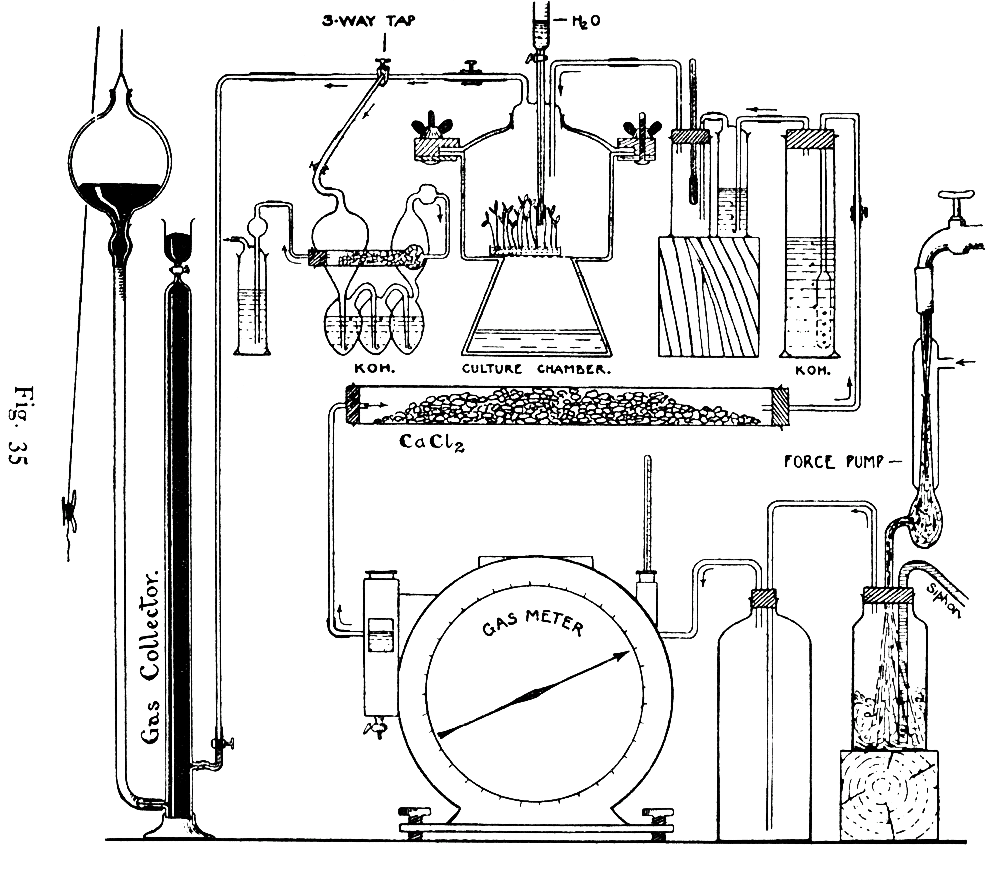
It will be observed that all glass vessels and tubing are represented in section, and in the thermometers, the fine capillary bores are represented by a single line in each case; corks by diagonal shading; wood by lines in imitation of its grain; metal parts by vertical shading or dead black; more or less still liquids by a series of lines broken below and continuous at the surface, and gradually becoming closer and closer together towards the surface. Mercury, on the other hand, may be indicated by dead black relieved by a few white lines to represent its reflecting surface, also its free surface may be drawn convex. Finally thumb screws may be shewn by a combination of black areas and vertical shading.
These conventionalities need not all be followed; for instance, rubber connexions may be indicated by broad black lines and wood by diagonal shading.
The drawing should be very bold and the different parts clearly and freely indicated by writing or "printing."
THE DRAWING OF MAPS. In the drawing of maps for reproduction by the line block process, if an existing map serves the purpose, a tracing may be made in ink on translucent linen. If, on the other hand, the author has to make his own map, the problem becomes more difficult.
For the obtaining of the data for map making information must be sought for elsewhere, since we are only concerned in the preparation of the map for publication. And as regards this, but few general rules can be laid down since the character of maps is so diverse.
The amount of detail in the physical features represented depends to a great extent upon the scale. Thus streams of a greater breadth than, say, 10 feet, may in large scale maps be represented by double lines, whilst no stream less than 2 feet in breadth will be shewn in low scale maps.
page 77
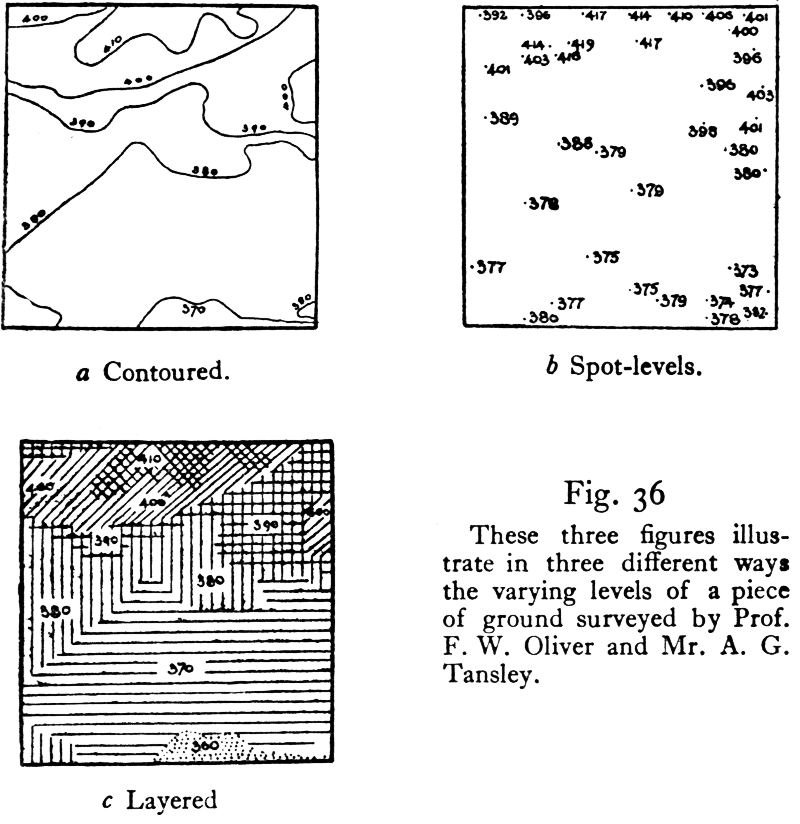
|
|
|
|
Fig. 36These three figures illustrate in three different ways the varying levels of a piece of ground surveyed by Prof. F. W. Oliver and Mr. A. G. Tansley. |
The indication of hills is always a problem; the most satisfactory way is by the drawing of contours (Figure 36a), and this whenever possible should be followed, since it is scientifically the most correct method, inasmuch as when properly drawn the form of the hill is shewn exactly; further, contours obscure the detail to a much less extent than does shading, and but little artistic talent is required to draw them. If, however, contouring be impossible, the various heights above the datum may be shewn by spot levels (Figure 36b) or the relative levels may be shewn by layers; that is to say, by a system of shading each kind of which indicates a certain level. Thus dots may be used for all parts not more than 100 page 78 feet above sea level, vertical lines for regions between 100 and 200 feet, horizontal lines for parts between 200 and 300 feet, and so on (Figure 36c). It is obvious that this method cannot be pursued if vegetation also is to be shewn. The last choice is to represent the hill by shading in much the same way as many of us did when children; the method referred to was known as "herring bones" or "hairy caterpillars."
The sea or a broad expanse of water may be indicated by fine lines which follow the coast-line and which may be placed at gradually increasing distances apart.
If geological strata are to be represented, the accepted symbols should be used; if the map is intended to represent the distribution of soils, convenient signs may be employed, e.g., large dots for shingle or gravels, small dots for sand, black areas for clay, and so on; finally, if the distribution of plants or of animals is to be shewn, symbols again may be employed. These, however, must be quite simple and as far as possible give an idea of the organism represented. This, in the case of animals, may be a difficulty, but, with regard to plants, simple signs are easily inserted which give a very good idea of the plant it is intended to represent. Many of the signs used by the Ordnance Survey are ready to hand, and these can often be used to designate plant associations.
The delimitation of areas should always be clearly shewn, and all names should be very clearly "printed" indeed, and if they must be placed on a dark portion of the map, they should have a good white border around them.
The north should always be indicated. This may be done by drawing in its proper position a representation of a compass or merely an arrow pointing to the north. Unless otherwise stated, the arrow is assumed to point to the magnetic north, and if no north be actually shewn it is taken for granted by an intelligent reader that one of the page 79 vertical sides is a true north and south line, with the north at the top. Finally, under no circumstances should a scale be omitted—it is the first thing a reader should look for.
For a map to look well two things are all-important, neatness and clearness; both of these may nearly always be secured by drawing on a large scale, bearing in mind what has been said about crowding the detail, etc., and carefully considering how much reduction the original can stand. This last point is of vital importance, for an over-reduced map is an abomination; we have seen really good maps absolutely ruined by this stupid error.
The inexperienced author should study the methods pursued by Prof. Yapp in Figure 37. For comparison, the simpler way adopted by Mr. Wilson may be studied (Annals of Botany, 1911, Vol. 25).
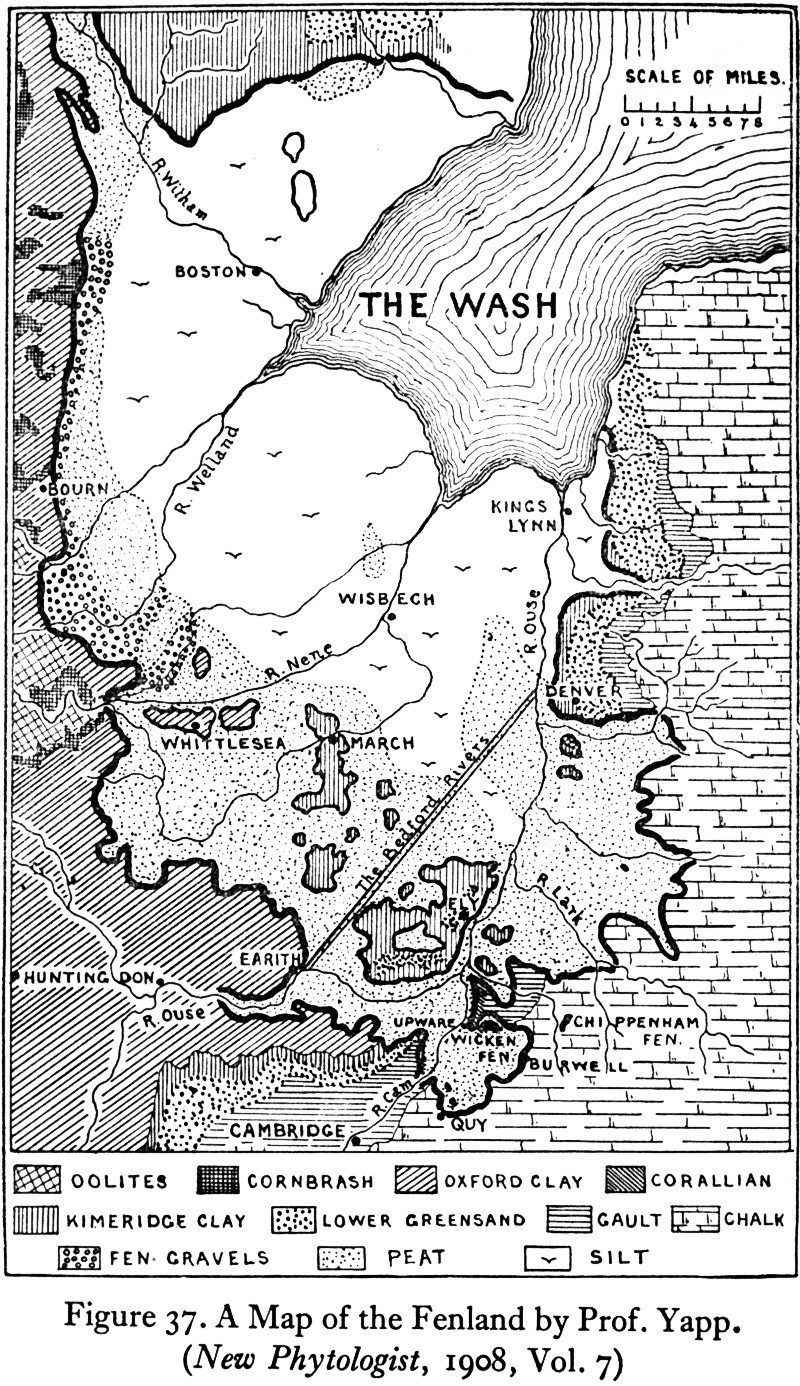
(New Phytologist, 1908, Vol. 7)
GRAPHS OR CURVES. Simple though it be, the
plotting of a curve for reproduction requires thought and
care. In the first instance, the curve is drawn on squared
paper, and the question naturally arises—To what extent
are the squares to be represented? If it be desired to
reproduce all the lines, say the paper is ruled in millimetres,
a half-tone may be employed, or all these lines
can be ruled over in black ink where the reproduction
by line block is possible. It is, however, seldom necessary
to represent all the smallest squares; it will generally be
found that the centimetre squares are sufficient. If the
original be plotted on paper which is ruled in pale blue,
it can be reproduced by line block without re-drawing,
since the blue will photograph as white with the plates
commonly used; all the essential lines and curves must,
of course, be in black. If, however, the rulings of the
squared paper are in red, yellow, or dark blue, a tracing
must be made. The horizontal and vertical sides should be
ruled with a broad black line, but the internal intersecting
page 81
lines should be much thinner. The actual curve may
be in a continuous line if one only be shewn on the
graph; if more are drawn, then each must be different, the
obvious variations being
the thick continuous line ——,
the thin continuous line ————,
dashes either thick or
thin — — —, or —— —— ——,
dots · · · · · · ·,
and finally
combinations of dots and dashes — · — · — ·
Owing to the difficulty which some experience in drawing freehand a continuous line, the plot should be made twice the linear size of the intended reproduction. A good rule to follow in drawing lines is to keep the eye fixed on the point where the line is to end, the hand will then guide the pen in the right path, especially after a little practice. In many cases the ruler may be used, not only for straight but also for curved lines, for good curve rules may be purchased.
In order that the figure may look neat, the lines should be of an even thickness throughout their length; this is easily accomplished by means of a ruling pen.
It has been stated above that Bristol board is the best material to use for the making of drawings for line blocks; other materials may, however, be employed, although they are not so nice to work upon.
For instance, it may be necessary to reproduce a map; this, as has already been mentioned, may be conveniently done by pinning over the map a sheet of pale blue tracing linen, and tracing the map on this with Indian ink. The fact that the linen is blue does not matter, for it will photograph as if it were white.
Then again, many subjects may be of so complicated a nature as to be beyond the skill of the author to draw. In such a case a good plan is to take a photograph of the object and make a positive on smooth bromide paper, which need only be developed sufficiently far to give a print which just shows the features. The print, when page 82 dry, can then be worked on with fixed Indian ink. The finished drawing, when quite dry, may be immersed in any solution which will dissolve out the silver; a solution of iodine in potassium iodide answers sufficiently well. The print will turn very dark, but it must be allowed to remain in the bath until all the silver has dissolved; it is then removed, rinsed under the tap and placed in an ordinary fixing bath of hyposulphite of soda. All the colouration will be quickly removed so that the ink drawing will stand out well against the white paper. All that it now requires is a thorough washing in water; when dry it may be touched up and then placed under pressure in order to make it quite flat.*
*The chief disadvantage of iodine solution is its slowness of action; the following methods are much quicker.
(a) To a solution of 4 oz. of hyposulphite of soda in one pint of water, add a 10 per cent. aqueous solution of potassium ferricyanide until the mixture is lemon coloured. When the silver image has quite disappeared, wash the print thoroughly in water. Since the mixture does not keep, the ferricyanide solution should be added to the hyposulphite solution immediately before use.
(b) Mix 125 ccs. of a 10 per cent. alcoholic solution of iodine with 21 ccs. of a 10 per cent. aqueous solution of potassium cyanide, add to the mixture 1 litre of water. When the image has disappeared, which will be in less than a minute, wash for five minutes in water and dry.
This method of drawing over photographic prints will often save a considerable amount of time. For instance, it may be desired to reproduce a consecutive series of drawings to illustrate the microscopic structure of the subject. The ordinary way of doing this is to make camera lucida drawings of the sections, which is a lengthy and tiresome process; a photograph of each section will take much less time and will give quite as good results.
Before sending any line drawings to press they should be carefully examined; pencil marks may be rubbed out, lines touched up, unnecessary lines removed by painting them out with white or black ink according to the background, and, finally, a frame ruled around, if necessary.
page 83The amount of reduction, which should be marked clearly on the margin, requires very careful consideration since under reduction may cause the reproduction to appear too coarse whilst over-reduction may result in the loss of the finer detail and the drawing may, moreover, appear spiritless.
It must also be remembered that a reduction of, say, ½ linear means that the reproduction will be a quarter the area of the original.
The best way to indicate the reduction required is to draw a vertical or horizontal line, parallel to a side or the base of the picture, of the exact length; or, the line may be roughly drawn and its length indicated by figures thus ——————2½"—————.
The question arises as to when line drawings for reproduction by the zinc block should be employed.
The answer is, Whenever possible.
The advantages to a reader of having the illustrations in the text has already been commented upon. It is about the only method commonly employed in which practically everything depends on the draughtsman; the author thus exercises the greatest control. Finally the fact that it is very inexpensive will appeal to editors and publishers.
As a matter of curiosity, the present writer picked out at random a recent volume of a scientific journal to examine the illustrations; although there were a number of text figures, an examination of the plates—chiefly lithographs and collotypes—showed that there were a large number of figures which ought to have been in the text. A more detailed inspection of the plates was therefore made, with the result that nearly 200 figures were found which with the minimum amount of alteration—merely drawing in ink instead of pencil in the majority of cases, and leaving out unnecessary shading in the others—could have been reproduced by line blocks. If page 84 this had been done, a saving of over 20 per cent. could have been effected on the plates. Some of this would, of course, have been absorbed in the making of zincos, but not much, since line blocks of excellent quality can be obtained for 2½d. and 3d. per square inch. The above relates only to the most obvious examples; the saving in plates would have been enormous if the authors had drawn for the line process.
THE SWELLED GELATINE PROCESS. From the foregoing account of the line-block it may, perhaps, be thought that a drawing shewing the finest detail cannot be reproduced in the text by a relief block made by photo-chemical means. This is not the case; the swelled gelatine process is such that at its best the very finest work can be so reproduced. The method is not extensively used, chiefly owing to the remarkable amount of skill required to produce the best results and to the facts that the blocks take longer to make and are more expensive than the ordinary line block. This, however, should not militate against its use, for the increased cost is but very little, and the longer time in making, say two days, should not be of any consequence in a monthly or quarterly periodical. The great point in its favour is its great fidelity as compared with the ordinary photo-chemical relief blocks: for instance, a close cross-hatching reproduced by a line block will often come out as a series of white dots owing to the fact that at the points of intersection the black lines tend to thicken; hence, on printing, the white spaces, instead of being sharply cut and diamond-shaped, are rounded. This will not occur in a good block made by the swelled gelatine method. Further, the process does not restrict the draughtsman to dead black ink; the drawings may be made in pencil, crayon, or in ordinary writing ink: it is even claimed that wash drawings and photographs page 86 can be reproduced satisfactorily by this method. In the case of pencil drawings, the best results will be given when the surface of the paper used by the draughtsman is slightly rough; a pencil drawing on Bristol board, for example, will not be so well reproduced as one on ordinary smooth drawing paper. In brief, the process is as follows: a photographic negative of the drawing is made, and under it is exposed a bichromate gelatine plate. This plate is then developed in water. As already described, the gelatine will swell up in proportion to the amount of light to which it was exposed. The "positive" thus obtained will be in relief, the high lights being at a higher level than the shadows. A wax mould of the gelatine positive is then taken, covered with a thin layer of plumbago and electrically covered with copper. The "casting" so obtained is built up with metal and then mounted on wood in the same way as a zinco or a half-tone. The capabilities of the process may be judged by a study of Fig. 38, which is an extremely faithful reproduction of a lithograph, by S. Prout, by the swelled gelatine process.
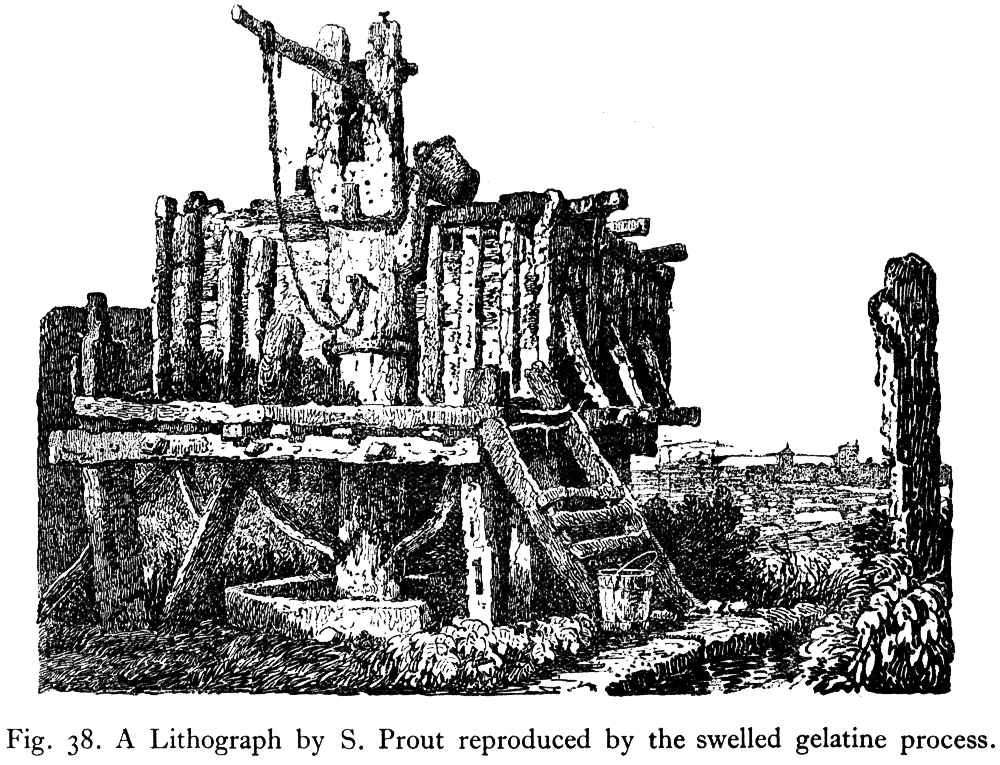
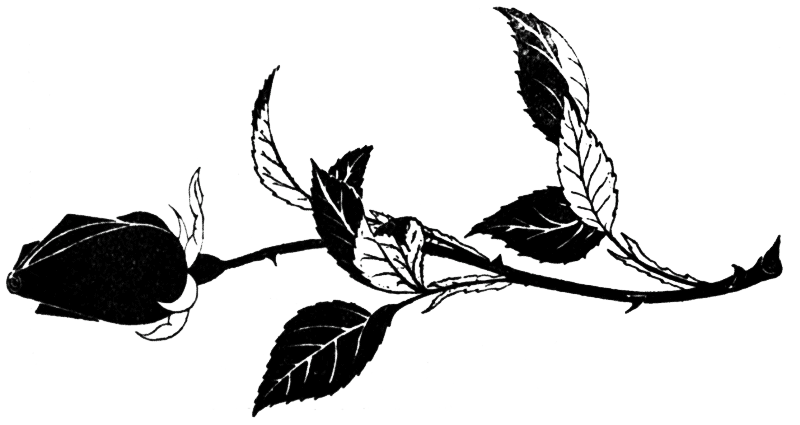
T HE question of cost is one of very great difficulty; in all probability no two firms will agree in their quotations for different kinds of work, and the reason for this lies in the large number of factors involved, many of which are very difficult to compute exactly. With respect to line engravings, etching, mezzotint, wood cuts and wood engravings, it is impossible to give any idea of the cost. It depends entirely on the complexity of the subject and the artist employed.
As regards lithographic processes for reproduction in one colour the cost varies with the nature of the work. If an artist be commissioned to make an autolithograph, the fee would be agreed upon beforehand. Photolithography and collotype, on the other hand, are processes which do not require the hand of an artist, and these methods of reproduction are relatively inexpensive. The price quoted by the lithographer or collotyper is for printing so many copies, hence the relative cost per copy depends upon the run and on the quality of the paper used. Lithography is cheaper than collotype; but if several illustrations are sent at the same time to be reproduced by collotype, the cost for each would be less than if sent separately.
In chromolithography a separate stone is necessary for each colour, hence the cost depends upon the number of stones used, and as several may be necessary to obtain a first-rate reproduction, it is obvious that the process may prove very expensive.
Turning to photomechanical processes, the prices vary according to the grade of work required—the best possible, page 90 good, and, lastly, cheap work. By best possible is meant the best that can be made under existing conditions, the price being immaterial; in good work the cost will be a limiting but not a preponderating factor, hence the work will be open to criticism; finally, in cheap work, the price is all important, so that the result is a block or a plate which will print well but which must not be criticized as regards its being a faithful reproduction of the original.
It is obvious that in the last two cases the quality of the work will depend upon the agreed price, whilst in the first case the cost will depend on the amount of time and skill required.
It is obvious, therefore, that a comparison of cost cannot be made between these grades; it is, however, possible to draw up a scale of relative cost of the processes under consideration for work of the same grade. In the table given below, A represents the best possible work, B indicates good work, and C stands for cheap work. Since the line block is the least expensive it is taken as the unit of price; that is to say, if a line block costs 3d. per square inch the cost of half tone, three colour half tone and photogravure would be 7¼d., 3s., and 1s. 2½d. respectively.
| A | B | C | |
| Line | 1 | 1 | 1 |
| Half tone and swelled gelatine | 2½ | 2¼ | 2 |
| Half tone three colour (three plates required) |
9 | 12 | 10½ |
| Photogravure | 4½ | 4¾ | 5 |
It must not be thought that if the area of a block is 3 square inches, the cost will, therefore, be 9d. There is, for obvious reasons, a minimum size at which the block or plate is charged although it may be smaller. These minima vary; in general terms they may be taken as 12 inches for line, half tone and swelled gelatine blocks, and 20 inches for page 91 half tone three colour blocks and photogravure plates. The measurements are the areas of the etched surface, the actual plate or block may be larger, but for this margin no charge is made.
With regard to cost of printing, nothing need be said about blocks which are set up with the type, namely line, swelled gelatine and coarse half tone blocks. The price of printing fine half tones and three colour blocks depends upon the quality of the paper used and the fineness of the work. Photogravure plates must be hand printed (photogravure printing on rotary machines is not considered here), and skill is required; for ordinary printing on good plate paper the price would be 10s. to 12s. 6d. per hundred copies, whilst for India printing the cost would be about 25s. for the same number.
Barnes: Illustrating Botanical Papers, Botanical Gazette, Vol. 43, 1907.
Bock: Zincography, London, 1910.
Cumming: Handbook of Lithography, London, 1904.
Cundall: A Brief History of Wood-Engraving from its Invention, London, 1895.
Gamble: Line Photo-engraving, London, n.d.
Hamerton: Drawing and Engraving, London, 1892.
Etching and Etchers, London, 1880.
The Graphic Arts, London, 1882.
Pennell: Lithography and Lithographers, London.
Richmond: Grammar of Lithography, London, 1909.
Robertson: The Art of Etching, London, 1885.
Verfasser: The Half-tone Process, London, n.d.
Wilkinson: Photo-mechanical Processes, London, n.d.
Transcriber's Note:Some extraneous (duplicated) Headings on otherwise blank pages have been removed. Each Footnote has been indented and placed beneath the paragraph to which it refers. The Plates, which were on un-numbered pages, and some of the Figures, have been moved to (usually) below the paragraphs which first refer to them. page 35: 'revelant' corrected to 'relevant' ... "See also the relevant works cited under Literature" page 90: The Table of Costings does not appear to make sense, but has been left as in the original. Hyphenation is not consistent in this book. |
End of the Project Gutenberg EBook of The Essentials of Illustration, by
T. G. (Thomas George) Hill

*** END OF THIS PROJECT GUTENBERG EBOOK THE ESSENTIALS OF ILLUSTRATION ***

***** This file should be named 34869-h.htm or 34869-h.zip *****
This and all associated files of various formats will be found in:
        https://www.gutenberg.org/3/4/8/6/34869/

Produced by Lesley Halamek, Chris Curnow and the Online
Distributed Proofreading Team at https://www.pgdp.net (This
file was produced from images generously made available
by The Internet Archive)


Updated editions will replace the previous one--the old editions
will be renamed.

Creating the works from public domain print editions means that no
one owns a United States copyright in these works, so the Foundation
(and you!) can copy and distribute it in the United States without
permission and without paying copyright royalties.  Special rules,
set forth in the General Terms of Use part of this license, apply to
copying and distributing Project Gutenberg-tm electronic works to
protect the PROJECT GUTENBERG-tm concept and trademark.  Project
Gutenberg is a registered trademark, and may not be used if you
charge for the eBooks, unless you receive specific permission.  If you
do not charge anything for copies of this eBook, complying with the
rules is very easy.  You may use this eBook for nearly any purpose
such as creation of derivative works, reports, performances and
research.  They may be modified and printed and given away--you may do
practically ANYTHING with public domain eBooks.  Redistribution is
subject to the trademark license, especially commercial
redistribution.


*** START: FULL LICENSE ***

THE FULL PROJECT GUTENBERG LICENSE
PLEASE READ THIS BEFORE YOU DISTRIBUTE OR USE THIS WORK

To protect the Project Gutenberg-tm mission of promoting the free
distribution of electronic works, by using or distributing this work
(or any other work associated in any way with the phrase "Project
Gutenberg"), you agree to comply with all the terms of the Full Project
Gutenberg-tm License (available with this file or online at
https://gutenberg.org/license).


Section 1.  General Terms of Use and Redistributing Project Gutenberg-tm
electronic works

1.A.  By reading or using any part of this Project Gutenberg-tm
electronic work, you indicate that you have read, understand, agree to
and accept all the terms of this license and intellectual property
(trademark/copyright) agreement.  If you do not agree to abide by all
the terms of this agreement, you must cease using and return or destroy
all copies of Project Gutenberg-tm electronic works in your possession.
If you paid a fee for obtaining a copy of or access to a Project
Gutenberg-tm electronic work and you do not agree to be bound by the
terms of this agreement, you may obtain a refund from the person or
entity to whom you paid the fee as set forth in paragraph 1.E.8.

1.B.  "Project Gutenberg" is a registered trademark.  It may only be
used on or associated in any way with an electronic work by people who
agree to be bound by the terms of this agreement.  There are a few
things that you can do with most Project Gutenberg-tm electronic works
even without complying with the full terms of this agreement.  See
paragraph 1.C below.  There are a lot of things you can do with Project
Gutenberg-tm electronic works if you follow the terms of this agreement
and help preserve free future access to Project Gutenberg-tm electronic
works.  See paragraph 1.E below.

1.C.  The Project Gutenberg Literary Archive Foundation ("the Foundation"
or PGLAF), owns a compilation copyright in the collection of Project
Gutenberg-tm electronic works.  Nearly all the individual works in the
collection are in the public domain in the United States.  If an
individual work is in the public domain in the United States and you are
located in the United States, we do not claim a right to prevent you from
copying, distributing, performing, displaying or creating derivative
works based on the work as long as all references to Project Gutenberg
are removed.  Of course, we hope that you will support the Project
Gutenberg-tm mission of promoting free access to electronic works by
freely sharing Project Gutenberg-tm works in compliance with the terms of
this agreement for keeping the Project Gutenberg-tm name associated with
the work.  You can easily comply with the terms of this agreement by
keeping this work in the same format with its attached full Project
Gutenberg-tm License when you share it without charge with others.

1.D.  The copyright laws of the place where you are located also govern
what you can do with this work.  Copyright laws in most countries are in
a constant state of change.  If you are outside the United States, check
the laws of your country in addition to the terms of this agreement
before downloading, copying, displaying, performing, distributing or
creating derivative works based on this work or any other Project
Gutenberg-tm work.  The Foundation makes no representations concerning
the copyright status of any work in any country outside the United
States.

1.E.  Unless you have removed all references to Project Gutenberg:

1.E.1.  The following sentence, with active links to, or other immediate
access to, the full Project Gutenberg-tm License must appear prominently
whenever any copy of a Project Gutenberg-tm work (any work on which the
phrase "Project Gutenberg" appears, or with which the phrase "Project
Gutenberg" is associated) is accessed, displayed, performed, viewed,
copied or distributed:

This eBook is for the use of anyone anywhere at no cost and with
almost no restrictions whatsoever.  You may copy it, give it away or
re-use it under the terms of the Project Gutenberg License included
with this eBook or online at www.gutenberg.org

1.E.2.  If an individual Project Gutenberg-tm electronic work is derived
from the public domain (does not contain a notice indicating that it is
posted with permission of the copyright holder), the work can be copied
and distributed to anyone in the United States without paying any fees
or charges.  If you are redistributing or providing access to a work
with the phrase "Project Gutenberg" associated with or appearing on the
work, you must comply either with the requirements of paragraphs 1.E.1
through 1.E.7 or obtain permission for the use of the work and the
Project Gutenberg-tm trademark as set forth in paragraphs 1.E.8 or
1.E.9.

1.E.3.  If an individual Project Gutenberg-tm electronic work is posted
with the permission of the copyright holder, your use and distribution
must comply with both paragraphs 1.E.1 through 1.E.7 and any additional
terms imposed by the copyright holder.  Additional terms will be linked
to the Project Gutenberg-tm License for all works posted with the
permission of the copyright holder found at the beginning of this work.

1.E.4.  Do not unlink or detach or remove the full Project Gutenberg-tm
License terms from this work, or any files containing a part of this
work or any other work associated with Project Gutenberg-tm.

1.E.5.  Do not copy, display, perform, distribute or redistribute this
electronic work, or any part of this electronic work, without
prominently displaying the sentence set forth in paragraph 1.E.1 with
active links or immediate access to the full terms of the Project
Gutenberg-tm License.

1.E.6.  You may convert to and distribute this work in any binary,
compressed, marked up, nonproprietary or proprietary form, including any
word processing or hypertext form.  However, if you provide access to or
distribute copies of a Project Gutenberg-tm work in a format other than
"Plain Vanilla ASCII" or other format used in the official version
posted on the official Project Gutenberg-tm web site (www.gutenberg.org),
you must, at no additional cost, fee or expense to the user, provide a
copy, a means of exporting a copy, or a means of obtaining a copy upon
request, of the work in its original "Plain Vanilla ASCII" or other
form.  Any alternate format must include the full Project Gutenberg-tm
License as specified in paragraph 1.E.1.

1.E.7.  Do not charge a fee for access to, viewing, displaying,
performing, copying or distributing any Project Gutenberg-tm works
unless you comply with paragraph 1.E.8 or 1.E.9.

1.E.8.  You may charge a reasonable fee for copies of or providing
access to or distributing Project Gutenberg-tm electronic works provided
that

- You pay a royalty fee of 20% of the gross profits you derive from
     the use of Project Gutenberg-tm works calculated using the method
     you already use to calculate your applicable taxes.  The fee is
     owed to the owner of the Project Gutenberg-tm trademark, but he
     has agreed to donate royalties under this paragraph to the
     Project Gutenberg Literary Archive Foundation.  Royalty payments
     must be paid within 60 days following each date on which you
     prepare (or are legally required to prepare) your periodic tax
     returns.  Royalty payments should be clearly marked as such and
     sent to the Project Gutenberg Literary Archive Foundation at the
     address specified in Section 4, "Information about donations to
     the Project Gutenberg Literary Archive Foundation."

- You provide a full refund of any money paid by a user who notifies
     you in writing (or by e-mail) within 30 days of receipt that s/he
     does not agree to the terms of the full Project Gutenberg-tm
     License.  You must require such a user to return or
     destroy all copies of the works possessed in a physical medium
     and discontinue all use of and all access to other copies of
     Project Gutenberg-tm works.

- You provide, in accordance with paragraph 1.F.3, a full refund of any
     money paid for a work or a replacement copy, if a defect in the
     electronic work is discovered and reported to you within 90 days
     of receipt of the work.

- You comply with all other terms of this agreement for free
     distribution of Project Gutenberg-tm works.

1.E.9.  If you wish to charge a fee or distribute a Project Gutenberg-tm
electronic work or group of works on different terms than are set
forth in this agreement, you must obtain permission in writing from
both the Project Gutenberg Literary Archive Foundation and Michael
Hart, the owner of the Project Gutenberg-tm trademark.  Contact the
Foundation as set forth in Section 3 below.

1.F.

1.F.1.  Project Gutenberg volunteers and employees expend considerable
effort to identify, do copyright research on, transcribe and proofread
public domain works in creating the Project Gutenberg-tm
collection.  Despite these efforts, Project Gutenberg-tm electronic
works, and the medium on which they may be stored, may contain
"Defects," such as, but not limited to, incomplete, inaccurate or
corrupt data, transcription errors, a copyright or other intellectual
property infringement, a defective or damaged disk or other medium, a
computer virus, or computer codes that damage or cannot be read by
your equipment.

1.F.2.  LIMITED WARRANTY, DISCLAIMER OF DAMAGES - Except for the "Right
of Replacement or Refund" described in paragraph 1.F.3, the Project
Gutenberg Literary Archive Foundation, the owner of the Project
Gutenberg-tm trademark, and any other party distributing a Project
Gutenberg-tm electronic work under this agreement, disclaim all
liability to you for damages, costs and expenses, including legal
fees.  YOU AGREE THAT YOU HAVE NO REMEDIES FOR NEGLIGENCE, STRICT
LIABILITY, BREACH OF WARRANTY OR BREACH OF CONTRACT EXCEPT THOSE
PROVIDED IN PARAGRAPH 1.F.3.  YOU AGREE THAT THE FOUNDATION, THE
TRADEMARK OWNER, AND ANY DISTRIBUTOR UNDER THIS AGREEMENT WILL NOT BE
LIABLE TO YOU FOR ACTUAL, DIRECT, INDIRECT, CONSEQUENTIAL, PUNITIVE OR
INCIDENTAL DAMAGES EVEN IF YOU GIVE NOTICE OF THE POSSIBILITY OF SUCH
DAMAGE.

1.F.3.  LIMITED RIGHT OF REPLACEMENT OR REFUND - If you discover a
defect in this electronic work within 90 days of receiving it, you can
receive a refund of the money (if any) you paid for it by sending a
written explanation to the person you received the work from.  If you
received the work on a physical medium, you must return the medium with
your written explanation.  The person or entity that provided you with
the defective work may elect to provide a replacement copy in lieu of a
refund.  If you received the work electronically, the person or entity
providing it to you may choose to give you a second opportunity to
receive the work electronically in lieu of a refund.  If the second copy
is also defective, you may demand a refund in writing without further
opportunities to fix the problem.

1.F.4.  Except for the limited right of replacement or refund set forth
in paragraph 1.F.3, this work is provided to you 'AS-IS' WITH NO OTHER
WARRANTIES OF ANY KIND, EXPRESS OR IMPLIED, INCLUDING BUT NOT LIMITED TO
WARRANTIES OF MERCHANTIBILITY OR FITNESS FOR ANY PURPOSE.

1.F.5.  Some states do not allow disclaimers of certain implied
warranties or the exclusion or limitation of certain types of damages.
If any disclaimer or limitation set forth in this agreement violates the
law of the state applicable to this agreement, the agreement shall be
interpreted to make the maximum disclaimer or limitation permitted by
the applicable state law.  The invalidity or unenforceability of any
provision of this agreement shall not void the remaining provisions.

1.F.6.  INDEMNITY - You agree to indemnify and hold the Foundation, the
trademark owner, any agent or employee of the Foundation, anyone
providing copies of Project Gutenberg-tm electronic works in accordance
with this agreement, and any volunteers associated with the production,
promotion and distribution of Project Gutenberg-tm electronic works,
harmless from all liability, costs and expenses, including legal fees,
that arise directly or indirectly from any of the following which you do
or cause to occur: (a) distribution of this or any Project Gutenberg-tm
work, (b) alteration, modification, or additions or deletions to any
Project Gutenberg-tm work, and (c) any Defect you cause.


Section  2.  Information about the Mission of Project Gutenberg-tm

Project Gutenberg-tm is synonymous with the free distribution of
electronic works in formats readable by the widest variety of computers
including obsolete, old, middle-aged and new computers.  It exists
because of the efforts of hundreds of volunteers and donations from
people in all walks of life.

Volunteers and financial support to provide volunteers with the
assistance they need are critical to reaching Project Gutenberg-tm's
goals and ensuring that the Project Gutenberg-tm collection will
remain freely available for generations to come.  In 2001, the Project
Gutenberg Literary Archive Foundation was created to provide a secure
and permanent future for Project Gutenberg-tm and future generations.
To learn more about the Project Gutenberg Literary Archive Foundation
and how your efforts and donations can help, see Sections 3 and 4
and the Foundation web page at https://www.pglaf.org.


Section 3.  Information about the Project Gutenberg Literary Archive
Foundation

The Project Gutenberg Literary Archive Foundation is a non profit
501(c)(3) educational corporation organized under the laws of the
state of Mississippi and granted tax exempt status by the Internal
Revenue Service.  The Foundation's EIN or federal tax identification
number is 64-6221541.  Its 501(c)(3) letter is posted at
https://pglaf.org/fundraising.  Contributions to the Project Gutenberg
Literary Archive Foundation are tax deductible to the full extent
permitted by U.S. federal laws and your state's laws.

The Foundation's principal office is located at 4557 Melan Dr. S.
Fairbanks, AK, 99712., but its volunteers and employees are scattered
throughout numerous locations.  Its business office is located at
809 North 1500 West, Salt Lake City, UT 84116, (801) 596-1887, email
business@pglaf.org.  Email contact links and up to date contact
information can be found at the Foundation's web site and official
page at https://pglaf.org

For additional contact information:
     Dr. Gregory B. Newby
     Chief Executive and Director
     gbnewby@pglaf.org


Section 4.  Information about Donations to the Project Gutenberg
Literary Archive Foundation

Project Gutenberg-tm depends upon and cannot survive without wide
spread public support and donations to carry out its mission of
increasing the number of public domain and licensed works that can be
freely distributed in machine readable form accessible by the widest
array of equipment including outdated equipment.  Many small donations
($1 to $5,000) are particularly important to maintaining tax exempt
status with the IRS.

The Foundation is committed to complying with the laws regulating
charities and charitable donations in all 50 states of the United
States.  Compliance requirements are not uniform and it takes a
considerable effort, much paperwork and many fees to meet and keep up
with these requirements.  We do not solicit donations in locations
where we have not received written confirmation of compliance.  To
SEND DONATIONS or determine the status of compliance for any
particular state visit https://pglaf.org

While we cannot and do not solicit contributions from states where we
have not met the solicitation requirements, we know of no prohibition
against accepting unsolicited donations from donors in such states who
approach us with offers to donate.

International donations are gratefully accepted, but we cannot make
any statements concerning tax treatment of donations received from
outside the United States.  U.S. laws alone swamp our small staff.

Please check the Project Gutenberg Web pages for current donation
methods and addresses.  Donations are accepted in a number of other
ways including including checks, online payments and credit card
donations.  To donate, please visit: https://pglaf.org/donate


Section 5.  General Information About Project Gutenberg-tm electronic
works.

Professor Michael S. Hart was the originator of the Project Gutenberg-tm
concept of a library of electronic works that could be freely shared
with anyone.  For thirty years, he produced and distributed Project
Gutenberg-tm eBooks with only a loose network of volunteer support.


Project Gutenberg-tm eBooks are often created from several printed
editions, all of which are confirmed as Public Domain in the U.S.
unless a copyright notice is included.  Thus, we do not necessarily
keep eBooks in compliance with any particular paper edition.


Most people start at our Web site which has the main PG search facility:

     https://www.gutenberg.org

This Web site includes information about Project Gutenberg-tm,
including how to make donations to the Project Gutenberg Literary
Archive Foundation, how to help produce our new eBooks, and how to
subscribe to our email newsletter to hear about new eBooks.