The Project Gutenberg EBook of Handicraft for Girls, by Idabelle McGlauflin

This eBook is for the use of anyone anywhere at no cost and with
almost no restrictions whatsoever.  You may copy it, give it away or
re-use it under the terms of the Project Gutenberg License included
with this eBook or online at www.gutenberg.org


Title: Handicraft for Girls
       A Tentative Course in Needlework, Basketry, Designing,
              Paper and Cardboard Construction, Textile Fibers and Fabrics
              and Home Decoration and Care

Author: Idabelle McGlauflin

Release Date: January 5, 2011 [EBook #34854]

Language: English

Character set encoding: ISO-8859-1

*** START OF THIS PROJECT GUTENBERG EBOOK HANDICRAFT FOR GIRLS ***


Produced by Chris Curnow, Emmy and the Online Distributed
Proofreading Team at https://www.pgdp.net (This file was
produced from images generously made available by The
Internet Archive)

The exercises in this five-year course are based upon an estimated time of one hour per week in the first two years, and one and one-half hours in the last three, the school year consisting of thirty-eight weeks.
All materials, with the exception of that used for the full-sized garments and some of the Christmas gifts, are supposed to be furnished by the Board of Education. In many instances the pupils are allowed the privilege of supplying themselves with a better grade of material if they wish. In every case a substitute is given for the full-sized garment if the home cannot furnish the material. All supplies can be purchased by the class collectively or individually, if the Board of Education so desires.
Every exercise in handicraft should embody an educational principle, making sure the training of the judgment, the eye, or the memory, and tending to develop skill, patience, accuracy, perseverance, dexterity or artistic appreciation.
| CHAPTER I.—Suggestions to Teachers | 7 |
| General Directions for Pupils of Sewing Classes. Drills for Beginners. | |
CHAPTER II—Course of Instruction | 11 |
| First Year—Third Grade. Detailed Description of Exercises. | |
CHAPTER III.—Course of Instruction | 19 |
| Second Year—Fourth Grade. Detailed Description of Exercises. | |
CHAPTER IV.—Course of Instruction | 28 |
| Third Year—Fifth Grade. Detailed Description of Exercises. | |
CHAPTER V.—Course of Instruction | 39 |
| Fourth Year—Sixth Grade. Detailed Description of Exercises. | |
CHAPTER VI.—Course of Instruction | 50 |
| Fifth Year—Seventh Grade. Detailed Description of Exercises. | |
CHAPTER VII.—Description of Stitches | 62 |
| Stitches Used in Plain Sewing. Ornamental Stitches. Miscellaneous. | |
CHAPTER VIII.—Textile Fibers and Fabrics | 90 |
| Silk. Cotton. Flax. Wool. | |
CHAPTER IX.—Dress and Its Relation to Art | 98 |
CHAPTER X.—Paper, Cloth and Cardboard Construction | 101 |
CHAPTER XI.—Home Furnishing, Decoration and Care | 112 |
CHAPTER XII.—Basketry | 114 |
| General Directions for making the Coil Basket. The Sewed Baskets. |
The teacher's preparation for the lesson consists in doing each exercise before presenting the lesson to the class. It will take some of your time to do so, but it will save hours of time and much worry in the end, and you will thus discover how best to present the difficult points of the lesson. A well finished piece gives to the child a complete mental picture of what she is undertaking, and acts as an inspiration; she will work quicker, easier, and better because of it. This impulse and a clear demonstration of the method of doing, will enable her to work far more independently of the teacher than would otherwise be possible, and will give more satisfactory results.
What are designated as "electives" in this book are designed to meet the needs of classes or individuals doing the work a second time or of teachers who find the regular work too difficult.
Large classes can be handled with less wasted energy by dividing the class into groups that are doing the same work. This saves endless repetition and enables the teacher to give better general supervision. This is the most vulnerable point in class work. A teacher may work laboriously and still waste her own and the children's time by too close an adherence to the individual method of instruction. Those children whose turn comes toward the end of the line will have lost much of the value of the lesson. Children require constant supervision. It is not teaching to examine the work when finished and order it ripped out. The fault is then with the teacher and not with the child. Each successive step should be inspected and corrected before the next one is taken. I would go still farther and have every pupil, even in the advanced grades, submit a sample of her work on every stitch to be used in each exercise. Children are always eager to begin a new piece, and if required to practice until the result is satisfactory will very soon do good work. You then have this to refer to and can hold them to their best.
There is absolutely no value in poor, careless, puttering work. Unless the child has a high ideal and strives to reach it, the time of the lesson[8] is wasted. Encourage self-criticism. Work should be done to one's own satisfaction whether it is to be seen by others or not.
Do not allow pupils to take their work home unless it is some required practice work. It is not the object to cover a certain amount of ground, but to inculcate high standards of excellence and some technical skill. They cannot accomplish this by themselves. I would prefer that classes do not complete the entire course rather than have good work sacrificed to quantity. There is a difference between careful, painstaking effort, and the puttering away of valuable time.
Avoid delay in distributing supplies.
Be sure that every member of the class understands clearly the object of the lesson.
Do not encourage waste by a too liberal supply of material.
Too much stress cannot be laid upon the careful preparation of the cloth to be used. Trim all edges neatly before hemming, facing, gathering, etc. Do not allow children to sew without basting. The time required for careful basting is well spent.
It is not expected that the various pupils of the class will advance with the same degree of proficiency. Some will require a much longer time on an exercise than others. As it is greatly to the advantage of the class in the end, and saves time and tiresome repetition to give each new exercise or stitch as a class lesson, the average pupils should regulate the time for taking up new work. A teacher of resources will find ways and means of bringing up the work of slow pupils, and profitable 'busy work' for those who work more rapidly. For the former, a little extra time each day—not as a punishment, but as an opportunity to catch up—would be all that is necessary. For the latter, there is a great variety of interesting, useful work.
It is a pedagogic truism that every teacher, consciously or unconsciously, imparts to her class her own inclinations. An enthusiastic class indicates an ardent interest on the part of the teacher, and a distaste for work and a lack of zeal on the part of the pupils are equally indicative of the teacher's attitude. Bear in mind that an unprepared teacher or a poorly presented lesson can make almost any exercise difficult and distasteful to the class. Do not blame pupils for poor work for which you are yourself responsible.
1. Be sure that the hands are clean.
2. Always sit erect—well back in the seat—with the light coming over the left shoulder, both feet upon the floor, because the body will not become as tired, the hand will not shade the work and it is easier to see the stitches. Do not fasten the work to the knee, because a stooping position easily becomes a habit.
3. Place the thimble upon the second finger of the right hand. Either the side or end of the thimble can be used. Never sew without one.
4. Measure the thread either from shoulder to shoulder or from the end of the finger to the elbow. A long thread becomes soiled and worn before being used up and is more liable to knot.
5. Wind the thread once around the forefinger and break from the spool, because the broken thread twists more easily to a point than when cut. Cut the thread from the work when finished to avoid drawing the stitches or breaking at the wrong place.
6. Thread the needle from the end that hangs from the spool. In this way you are working with the twist of the thread and there is less danger of knotting and kinking.
7. Do not wet the thread in the mouth. Roll the end of the thread between the thumb and forefinger and place through the eye of the needle.
8. To tie a knot wind the thread around the forefinger once and a little over, and twist by rubbing the finger down the side of the thumb. With the nail of the second finger bring the knot thus formed to the end of the thread.
9. Hold the unfinished work in the left hand.
10. Do not bite the threads.
11. Trim the selvedge, as it is hard to sew through and draws up when washed.
12. The knot is always buried except in the basting which is to be removed.[10]
Drill 1. Threading the needle with cotton. Needle No. 8; colored thread.
Drill 2. Making the knot.
Drill 3. Use of the thimble.
Drill 4. Threading the yarn needle.
| Needles No. | 10 | will carry | thread No. | 100 | 90 | 80 | |
| Needles No. | 9 | will carry | thread No. | 90 | 80 | 70 | 60 |
| Needles No. | 8 | will carry | thread No. | 70 | 60 | 50 | 40 |
| Needles No. | 7 | will carry | thread No. | 50 | 40 | 30 | 20 |
| Needles No. | 6 | will carry | thread No. | 20 | 10 | ||
| Needles No. | 5 | will carry | Linen thread—Luster cotton | ||||
| EQUIPMENT. |
| Sewing box. |
| Pin cushion—20 pins. |
| Thimble. |
| Needles. |
| Scissors. |
| Thread cards. |
| Practice Piece—Unbleached muslin, 9" × 6". |
Prepare Thread Cards—Cardboard 4" × 4", designed and cut for four kinds of thread.
Teach: One inch, one-half inch, one-fourth inch.
Practice: "Drills for Beginners," page 10.
Materials: Unbleached muslin 5" × 8" stamped with the three basting stitches, No. 1, page 64; colored thread No. 50; needle No. 7.
Make pupils perfectly familiar with the name and use of this stitch. See "Description of Stitches Used in Plain Sewing," page 63.
Beginning at the right hand follow the lines of the design with the thread, placing the knots over the dots on the right hand side and fastening over the dots at the left. Under each stamped row of stitches put in one, two, three or more rows, depending upon the rapidity with which each individual works. This will help to keep the class uniform.
Materials: Stamped running design No. 1, page 12. Unbleached muslin 6" × 8"; colored thread No. 50; needle No. 7.
Make pupils perfectly familiar with the name and use of this stitch. See "Description of Stitches Used in Plain Sewing," page 63.
The object of this model is to give the pupils practice in the running stitch. These designs are more interesting than practicing on plain cloth, so if the work is not satisfactory, cut the knot, pull out the thread, and try again. Give special attention to the knots and the fastening of the threads and the general neatness of the work. Place the knot on the wrong side and follow the lines of the design with the running stitch.
Materials: Practice piece; colored thread No. 50; needle No. 7. Teach the Overhanding Stitch on the Practice Piece. See "Description of Stitches Used in Plain Sewing," page 63. Change the color of the[14] thread once or twice and teach the joining of the thread. Baste two folded edges together and insist upon neat, careful work.
Materials: Weaving frame; netting needles; candle wicking in two colors; brass rings.
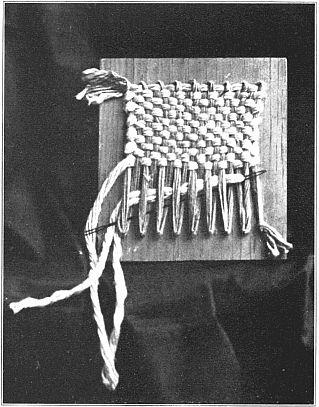 THE WOVEN POT HOLDER MADE OF CANDLE WICKING.
Teach the principles of cloth weaving and the terms warp, woof and selvedge.
The weaving frames are made from one-inch board, 8" × 8". Three-fourths of an inch from and parallel to the top and bottom drive a row of[15] nails, having very small heads, one-half inch apart, leaving an inch margin at both sides.
Tie a slip knot in the end of the wicking and slip it over one of the corner nails. Pass the wicking back and forth around the nails first on one side and then the other. This forms the warp. Draw the threads fairly tight and tie around the last nail. Thread the other color of wicking into the netting needles, weave across the warp threads alternately taking up and passing over them. In alternate rows take up the threads passed over in the preceding row. Do not draw the woof threads tight enough to draw the holder in at the sides. Slip from the frame and fasten the loose ends by weaving them back into the holder. Work a brass ring with the blanket stitch, using a strand of the wicking and sew it to one of the corners.
Materials: Running design No. 2, page 12, 6" × 8"; colored thread No. 50; needle No. 7.
Follow the lines of the design with the running stitch.
Materials: White thread No. 50; needle No. 7. Running designs 1 and 2 are to be overhanded together. Turn a quarter-inch fold on the long side of both pieces. Baste the folded edges together and overhand.
Materials: Running design No. 3, page 12, 6" × 8"; colored thread No. 50; needle No. 7.
Follow the lines of the design with the running stitch.[16]
Materials: Paper 4½" × 7".
Fold the long way of the paper. First fold of the hem, one-fourth of an inch. Turn half an inch hem on one side and an inch hem on the other. Have each child cut from a card a gauge for measuring the hems and insist that the hems be turned evenly.
Teach the hemming stitch on the Practice Piece with colored thread. Trim the edge neatly, fold the hem accurately and baste in place. Bad habits, that are hard to correct later, can so easily be formed in making this stitch that I wish to caution teachers in regard to the position of the needle in relation to the hem, the amount of cloth taken on the needle and the tendency toward making the blind stitch or the damask hem instead of the plain hemming stitch.
Materials: Crash, 9" woof, 6" warp; white thread No. 50; needle No. 7; tape 4½ inches.
Turn one-fourth inch fold on each side and across the bottom and baste. Turn the second fold one-fourth of an inch on the sides and baste. Hem the sides. Turn an inch hem at the bottom, baste and hem, giving special attention to the corners where the bottom hem is turned over the side hems. Hem the top with a quarter-inch hem if there is no selvedge. Sew a loop in the middle of the top on the selvedge edge as follows: Turn in one-fourth of an inch at both ends of the tape. Place the ends of the tape side by side and down one-fourth of an inch from the edge of the towel. Hem around the ends of the tape and back-stitch across the tape just at the edge of the towel.
Materials: Running design No. 4, page 12, 6" × 8"; colored thread No. 50; needle No. 7.
Follow the lines of the design with the running stitch.[17]
Materials: White thread No. 50; needle No. 7.
Running designs 3 and 4 are to be overhanded together. Turn a quarter-inch fold on the long sides of both pieces. Baste the folded edges together and overhand. Running designs 1 and 2 are to be overhanded to 3 and 4. Turn a quarter-inch fold at the top of one piece and the bottom of the other, baste the folded edges together and overhand.
 DOLL'S QUILT—ELECTIVE.
[5] Running designs No. 3 and 4 may be omitted, (this will also cut out Exercise No. 10) and selections from the following substituted to fill in the time, pupils furnishing their own materials and teachers planning their own designs:
| Pen wipers. |
| Pin disks. |
| Needle books. |
| Small pin cushions for the sewing box. |
| A wiper for eye-glasses. |
[6] The four running designs in Exercise No. 10 may be made into a doll's quilt by basting to a lining, turning in and overhanding the edges together and tacking. Pupils will furnish their own materials for the lining.
[7] Instead of the small towel encourage children to ask their mothers for a dish towel which they can bring from home to hem. Some house-keeper of the neighborhood might be glad to have her dish-towels hemmed for her by the class.
[8] Instead of the pot holder a child's picture-book may be substituted. See "Paper, Cloth and Cardboard Construction," page 101.
| EQUIPMENT. |
| Sewing box. |
| Pin cushion—20 pins. |
| Thimble. |
| Needles. |
| Scissors. |
| Thread cards. |
| Practice Piece—Unbleached muslin 9" × 12". |
Prepare Thread Cards—Cardboard 4" × 4", designed and cut for four kinds of thread.
Review: One inch, one-half inch, one-fourth inch.
Teach: One-eighth inch, three-eighths inch, seven-eighths inch.
Materials: Plain percale 10" warp, 12" woof; white thread No. 50; needle No. 7.
Five exercises of the Second Year Sewing will consist of seam work on the Seam Sampler. Each stitch will be first taught on the Practice Piece. Make pupils perfectly familiar with the names and uses of the different stitches as they are taught. As the year's work progresses compare the different seams and teach when, where and why these various seams are used in garment making. See "Description of Seams," page 85. That the pupils may not lose interest in their sewing the seam work is alternated with miscellaneous exercises.
Fold the percale with the warp into three equal pieces. Cut off one piece. Have each pupil label her large piece with her name. Collect and put them away until ready for Seam B. Do not leave them in the boxes or they will be lost, or soiled with too much handling.
See description of "Seam Sampler" given above.
Materials: First section of Seam Sampler.
Fold with the warp through the center, and cut on the fold. Baste these two edges together one-fourth of an inch from the edge. Sew with the Combination Stitch three-eighths of an inch from the edge.
Materials: Unbleached muslin, 6½" × 6½"; red cashmere 6½" × 6½" (this amount provides for four); thread, yellow, white and red; emery powder; needles No. 7 and No. 3; green luster cotton.
To cut the pattern of the strawberry emery ball: Draw a circle three inches in radius, and cut on the line.[21]
Cut a circle from the unbleached muslin for the lining and one a quarter of an inch larger from the cashmere for the outside; cut both into quarters.
To make the case: Fold the two edges of the muslin together and sew in a seam with the combination stitch, rounding the point to give the strawberry shape. Turn in a good seam at the top and gather. Fill with the powdered emery and fasten the gathering thread by overhanding over the top.
 THE COMPLETED SEAM SAMPLER ILLUSTRATING EXERCISES NOS. 11, 13, 15, 17, AND 19.
Before sewing up the outside put in the stitches, with yellow thread, to represent the seeds of the strawberry as follows: Hold the wrong side of the cloth toward you and put in a row of tiny stitches half an inch[22] apart. One-fourth of an inch above these put in another row with the stitches midway between those of the last row, and so continue. If desired these may be omitted and the seeds represented by French knots when the strawberry is finished.
Seam up the outside, slip it over the case, arranging the seams on opposite sides to avoid the possibility of powder sifting through. Overhand the top and cover with the green luster cotton to represent the calyx, leaving a loop for the stem.
Materials: Second section of Seam Sampler.
Fold with the warp through the center and cut on the fold. Baste these two edges together one-fourth of an inch from the edge. Stitch three-eighths of an inch from the edge.
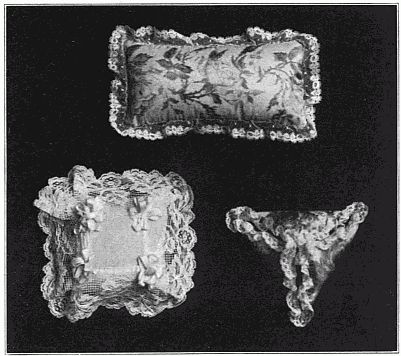
The Christmas Piece will consist of bags of any size, shape or style for which the pupils wish to furnish their own materials. This gives the teacher an opportunity to exercise her own ingenuity and taste and to have some individuality in her work. There is a great variety, from the utility bag made of cheap, pretty material, costing only a few pennies, to the more elaborate ones made of dainty silk or ribbon. A little tact will easily adapt the style of bag to the home into which it is to go, for the purpose for which it is to be used, and the purse of the donor.
Following are the directions for a simple button-bag:
Materials: A soft washable fabric, 14" warp, 6" woof; thread; needles; narrow tape 26 inches.
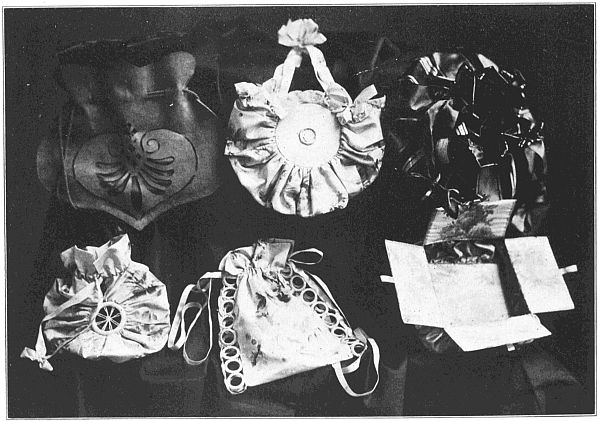 BAGS TO ILLUSTRATE EXERCISE NO. 14.
Crease an inch hem at each end. Fold the cloth with the two hems right sides together and baste from the lower edge of the hems to the bottom of the bag. Stitch a quarter-inch seam. Turn in the ends of the hems even with the sides of the bag and overhand from the top five-eighths of an inch, leaving an opening for the tapes three-eighths of an inch wide at the bottom of the hem. Baste and hem the hems, fastening securely[24] at each side of the tape openings, as there is considerable strain when the tapes are drawn. Put in a row of running stitches parallel to and five-eighths of an inch from the top of the bag, for the tape opening. With a tape needle draw in the two tapes, sew the ends of each together and draw out of opposite openings so that the place of joining will not show. Overcast the seams.
Materials: First and second sections of the Seam Sampler.
Baste the two sections together one-fourth of an inch from the edge. Sew with the half-back stitch three-eighths of an inch from the edge.
Materials: Imitation Butchers' Linen 9" × 9"; white luster cotton; needle No. 5.
An exercise in paper cutting for the doily design. Have pupils provide themselves with ten or twelve pieces of paper eight inches square for practice cutting. Fold the first paper three times and cut a convex, concave or compound curve from corner to corner. Open and study these curved lines and select the most graceful. Cut again making corrections. Cut a design in straight lines. Cut one composed of both straight and curved lines. Do not work haphazard, but criticise, compare and reject. The surface requires little decoration if the doily is pleasing in outline. That which is placed upon it should have some relation to the outline. Study the space to be decorated and how it can be divided or ornamented by lines, curved or straight, that may serve as a real decoration, but avoid too elaborate designs. Before beginning the doily have a finished pattern. The pattern may be transferred to the cloth by tracing the pattern with a hard pencil, using carbon paper between pattern and cloth, or the pattern may be pinned on and the outline drawn and the design put on freehand.[25]
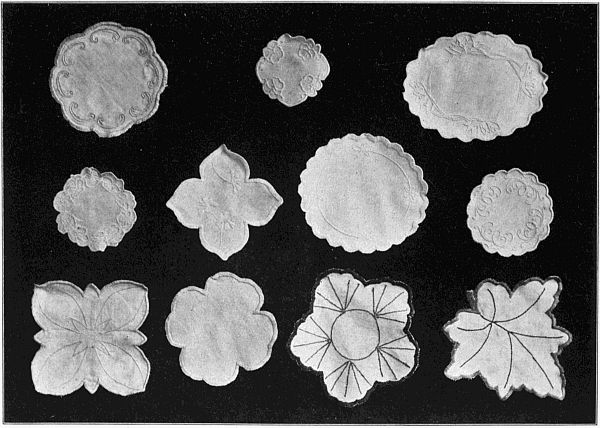 ORIGINAL DESIGNS FOR THE DOILY BY FOURTH GRADE GIRLS.
To work the Doily. Finish the edge with the blanket stitch. See "Blanket Stitch," page 73. Work the lines of the design with the Kensington Outline Stitch.
Materials: Third section of the Seam Sampler.
Fold with the warp through the center and cut on the fold. Follow the directions for the French Seam.
Materials: Two pieces bleached muslin 7½" warp, 8½" woof; white thread No. 50; needle No. 7.
In a pillow case the warp threads should run lengthwise of the pillow. Crease a quarter-inch fold across one end and on both sides. Fold with the warp through the center so that the seam just turned comes on the inside, baste the folded edges together on the right side. Overhand on the right side, using no knot, but sewing over the end of the thread. Turn a three-quarter inch hem, baste and hem. Trim the seam and overcast.
Materials: Seam Sampler.
Sew Section Three of the Seam Sampler to the others with the French Fell. Follow directions for the French Fell.
Under the heading "Textile Fibers and Fabrics," page 90, will be found subject matter which can be used in correlation with the geography, language and history work. The fourth grade subject is silk. Secure if possible the silk cocoon and make a collection of silk fabrics. Language papers on the subject can be illustrated with pictures cut from papers and magazines.[27]
[13] A choice may be had between the strawberry and the tomato emery ball.
Tomato Emery Ball—Materials: Unbleached muslin 6" × 3"; red cashmere 6" × 3"; emery powder; red thread No. 50; green luster cotton.
To cut the pattern: Draw a circle one and one-fourth inches in radius and cut on the line.
Cut the two pieces for the lining and the two for the outside of the same size. Place the right sides of the two pieces of cashmere together between the two pieces of lining. Baste all together. Sew with the back stitch one-fourth of an inch from the edge, leaving an opening for turning and filling. Turn in a seam at the opening, fill with powder and close by overhanding the edges together. Flatten as much as possible and make the creases seen in the tomato by tightly drawing the thread of luster cotton from the center around the outside and back to the center, repeating several times. Make a little tuft of the luster cotton in the middle at the top.
[14] The order of the doily and the bag may be reversed, using the doily for the Christmas piece instead of the bag, or the paper box may be substituted. See "Cloth and Cardboard Construction," page 102.
[15] Simple toilet articles in white, such as a handkerchief case, may be substituted for the doily, teachers planning their own designs.
[16] One pillow-case may be omitted and a pillow for the other case made instead. This may be stuffed with crumpled bits of paper. Use unbleached muslin for the pillow.
| EQUIPMENT. |
| Sewing box. |
| Pin cushion—30 pins. |
| Thimble. |
| Needles. |
| Scissors. |
| Thread cards. |
| Practice Piece—Unbleached muslin 9" × 12". |
Prepare Thread Cards—Cardboard 4" × 4" designed and cut for four kinds of thread.
Review the divisions of the inch.
Materials: Gingham 8" warp, 13" woof; white thread No. 60; needle No. 8.
It is desirable that each girl cut the two patches and the two pieces to be patched from the same piece of cloth, that there may be no difficulty in matching the pattern, when patching or when later sewing the two patched pieces together.
Fold the piece of gingham, eight inches by thirteen inches woof, with the warp into three sections, two of them eight inches warp by five inches woof, and the third eight inches warp by three inches woof. Fold the three-inch piece across the warp in the center for the two patches. Cut on the creases. Pin one patch to one of the large pieces, label with the girl's name and put it away for Exercise No. 23.
Materials: First section of Patching Sampler.
The hemmed patch is the strongest and the one most commonly used for repairing garments. The patch will not be noticeable if the pattern is skilfully matched. When matching stripes or plaids always turn on the line where the color changes, never through the middle of a stripe. Ten minutes spent on a paper pattern will prevent the mistakes beginners usually make in this exercise.
Trim the patch and crease a quarter-inch fold on the four sides. Place the patch in the center of the large piece (which we will imagine to be worn) and baste around it, matching the pattern carefully. Do not allow pupils to go any farther until the patch is basted on exactly right. Turn to the right side and cut out the part supposed to be worn by the following successive steps:
 THE MITERED CORNER.
Materials: Paper.
Teach the mitered corner on paper only. Have it done over and over until every pupil understands how it is done, and can do it alone, rapidly and perfectly. Ask pupils to bring paper from home, as almost any kind[31] will do for this practice work. Have it made in hems of several widths. See description of "Miscellaneous" exercises, page 79.
Materials: Second section of the Patching Sampler.
The overhand patch is used on very thin material, such as lawn, dimity or organdy, where strength is not required and where the two thicknesses of cloth around the edge of the hemmed patch would be too noticeable. The pattern should be as carefully matched as in the hemmed patch and equal care given to the corners. A paper pattern will assist beginners.
Fold the large piece of gingham with the four corners together and clip off the point from the center. The following are the successive steps for making the overhand patch:
The two patched pieces are to be overhanded together. Turn a quarter-inch fold on each with the warp, matching the pattern, baste together and overhand.
Teach the Overcasting on the Practice Piece and overcast all raw edges on the Patching Sampler.
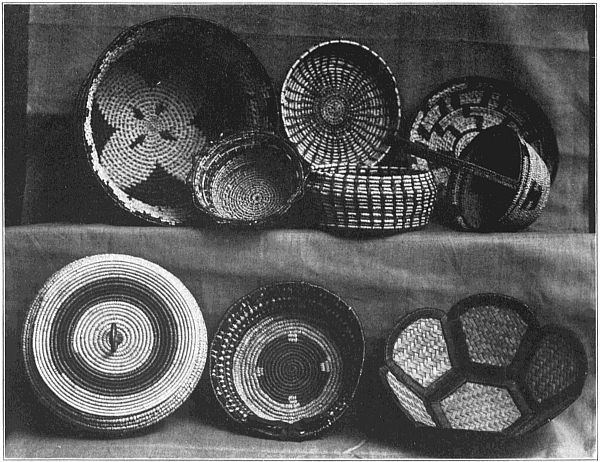
This subject has such limitless possibilities and its success or failure rests so entirely with the teacher that it will be necessary for each teacher to[32] prepare herself to teach it and decide upon the style, size and general character of the design of the baskets to be made by her class, allowing the pupils as far as possible to work out their individual tastes.
See chapter on "Basketry," page 114.
Materials: Damask 8½" × 8½"; white thread No. 60; needle No. 8.
See Description of the Damask Hem, page 70.
Trim the napkin square. Crease a half-inch hem on the four sides. The corners are to be mitered, and this is more easily done by basting the side hems in place, skipping across the corners when basting. Turn out the corners and miter them. Hem the corners with the flat hem and the sides with the damask hem.
Materials: Flannel 6½" × 6½", patch 3" × 3"; sewing silk; needle No. 8.
See description of the Herringbone Stitch, page 77.
Cut from the center of the large piece of flannel a two-inch square. Trim the patch square and place it over this hole. Baste at both edges. Teach the herringbone stitch on the practice piece, and herringbone over the raw edges of the patch. Turn one fold three-eighths of an inch wide on the four sides of the large piece, baste and herringbone stitch the raw edge. Keep the raw edges trimmed.
Materials: Cotton twill 8½" × 11"; tape 36"; ribbon elastic 4"; white thread No. 60; needle No. 8.
 A COOKING SET, CONSISTING OF AN APRON (EXERCISE NO. 33), SLEEVE PROTECTORS (EXERCISE NO. 27), AND A HOLDER AND CASE (AN ELECTIVE FOR EXERCISE NO. 24).
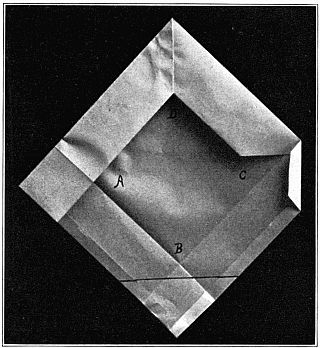
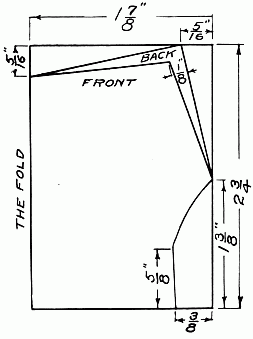
To cut the pattern of a sleeve protector: Cut an oblong eight inches by ten and one-half inches. Fold through the center the long way. Mark the top of the folded edge A, the bottom B, the upper right hand corner C and the lower D. Measure down on the folded edge from A four inches[34] and mark E. Measure down from C four inches and mark F. Measure up from D five inches and mark G. Measure on the line B D three and one fourth inches from B and mark H. Connect G and H with a straight line. With E as the center and E A as the radius draw a quarter of a circle connecting A and F. Cut on the lines H G, and A F.
Cut the sleeve protectors from the pattern. Beginning at the center of the bottom and holding the wrong side of the cloth next to you, baste the edge of the sleeve protector to the line running through the middle of the tape. Make a tiny pleat in the tape at each corner so that when doubled over it will round the corners smoothly. Join the ends of the tape by folding back both ends and overhanding them together on the wrong side. Hem the tape down on the right side. Before basting the tape down on the wrong side, fasten the elastic in place on one side of the sleeve protector. The elastic is in two pieces, two inches in length. Place the first piece one inch from the bottom and the second piece three inches above the first. Baste the tape down on the wrong side and hem, leaving the opening for the other end of the elastic, which is fastened in place after the hemming is done. Lay the binding smooth over the elastic and stitch along the edge of the tape, through the elastic, to hold in place.
Ask every pupil to bring some article from home, in preference a garment, to be mended. There is no home that cannot furnish a garment that needs repairing. This is a practical application of Exercises 21, 23 or 26, and is a valuable experience for the children.
Materials: These will be furnished by the pupils.
Pupils and teachers will plan their own designs, adapting them to the material furnished. The cushions may be of any size, shape or kind. Do not have the children incur expense, as small pieces of ribbon, silk or bright bits of many kinds of cloth can be made into attractive cushions. Hardwood sawdust, sifted, makes an excellent filling.[35]
Under the heading "Textile Fibers and Fabrics," page 92, will be found subject matter which can be used in correlation with the geography, language and history work. The fifth grade subject is cotton. Many interesting collections can be made that will be instructive for the children.
 PIN CUSHIONS TO ILLUSTRATE EXERCISE NO. 29.
[21] The round holder and case may be substituted for the basketry, or a blank book with paper cover or the folding envelope case may be made instead. See "Paper, Cloth and Cardboard Construction," page 104.
[22] The pin cushion may be substituted for the basketry and the book cover, or the book bag, or the round holder given for Exercise No. 29.
[23] A book cover or a book bag for carrying books may be substituted for the pin cushion.
Materials: Unbleached muslin, 14" × 7"; bleached muslin 15" × 7¾"; strap 18" × 1½"; bias binding 25" × 1"; wadding.
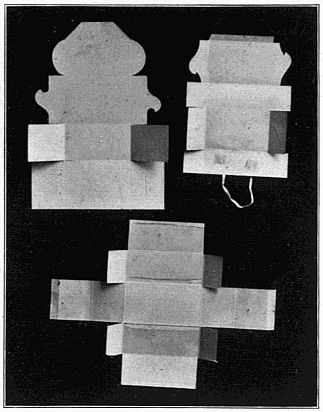
To cut the Circular Pattern: Cut a square of paper eight inches by eight inches and fold it three times. Measure three and five-eighth inches from the point on each folded edge and once between these edges. Draw a curved line connecting these points and cut on the line. The case is cut from this pattern, a circle having a radius of three and five-eighth inches and the holder from a pattern one-fourth of an inch smaller with a radius of three and three-eighth inches.
The Holder: Cut from the unbleached muslin two circular pieces. Turn in one-fourth of an inch around both pieces. Place the wadding between them; pin and baste together. Overhand the folded edges. Quilt the holder in a simple pattern with the running stitch.
The Case: Cut from the bleached muslin two circular pieces. Fold one piece with the warp through the center and cut on the fold. Turn an eighth of an inch hem on each of the straight edges just cut, and hem. The pupils who work rapidly could design a simple decoration for the front of the case. This could be traced, or drawn with a hard pencil and worked with a coarse, colored thread in any decorative stitch, before making the case. Place the half circles on the large circle and baste around the edge. This will leave an opening of about half an inch into which the holder will easily slip. Make the strap by which the[37] holder case is hung from the belt, by folding in the edges at the sides and across one end and overhanding together. The raw end of the strap is then fastened at one end of the case-opening, so that it will come under the binding. See description of the Bias, page 79. Teach the cutting and joining of bias pieces, first with paper and then with the cloth. In order to give the pupil this valuable experience cut the binding in three pieces and join them together. Stitch along the edge of the binding where it folds back against the strap. Slip the holder into the case.
Materials: Grass linen or Holland 15" woof by 10" warp; white thread No. 60; needles Nos. 8 and 5; luster cotton.
The Design: Start several weeks before the class is ready to make it, arouse an interest, and study designs for book covers. Ask pupils to bring from home books having good designs on the covers. Have them tell why they like certain ones and do not favor others. In a word, educate their tastes in this line before expecting them to originate designs. Do not attempt anything elaborate. Many artistic effects can be obtained by interlacing straight lines and these have the advantage of being easily worked. Paper cutting is an excellent medium for experimenting, if a unit is to be repeated or if curves are desired in the outline. For example, fold an oblong, four and one-half by seven inches, through the center both ways, and cut on a slightly curving line from the folded edges to the corner. Quite a variety of simple, graceful outlines can be made by slightly varying these curves, which, with a simple unit repeated around the center or in each corner makes an effective design. Have the finished pattern before starting the book cover. Trace on the cloth by means of the carbon paper. It will be necessary to crease the cover over the book before putting on the design, so that it may be placed just right.
To Make the Book Cover: Work the design with the outline stitch before sewing up the seams. Overcast the raw edges at the top and bottom of the cover and hem with a quarter-inch hem the two ends that fold into the book. The raw-edged hem, finished with the herringbone[38] stitch, could be used in place of the plain hem, if desired. Turn in the top and bottom of the cover so that the book will slip in easily. Overhand that part which folds into the books to the outside, at top and bottom, thus forming the pockets into which the covers of the book slip. Do the overhanding on the wrong side and then turn it to the right side.
Materials: Galatea, kaiki or burlap 15" woof, 13" warp; two strips for handles 14" warp by 3" woof; thread No. 40; needle No. 7.
The decoration of the bag should be done before sewing up the ends. Very artistic effects can be obtained in the applique. See directions for the design of the book cover, page 37.
Cut a three-inch strip from the length of the piece for the end pieces. Divide this into two pieces seven and one-half by three inches. Find the middle of one end of both end pieces and notch them. Fold the large piece with the warp through the center and notch at both ends of the fold. Turn in a quarter of an inch around the large piece and baste. Turn in a quarter of an inch across the notched end and sides of the end pieces. Place the notch at the end of one side piece to one in the large piece, right sides together, and pin in place. Overhand on the wrong side the two together across the end and up both sides. Put in the other end piece in the same way. Trim the end pieces even with the top of the case. Turn a three-quarter inch hem at the top. Before hemming make the straps for the handles by turning in and overhanding the edges. Insert both ends of one strap under the hem of the right side of the bag, two inches from the middle or four inches apart and the other strap on the left side. Hem, and fasten the handles to the edge of the hem by backstitching.
[24] A cover for a pin cushion affords a good application for the mitered corner. This can be made any size, square or oblong. Ornament with fine feather stitching and the star stitch.
| Equipment. |
| Sewing box. |
| Pin cushion—30 pins. |
| Thimble. |
| Needles. |
| Scissors. |
| Thread cards. |
| Practice Piece—unbleached muslin 9" × 12". |
Prepare Thread Cards—Cardboard 4" × 4"—designed and cut for four kinds of thread.
Teach the yard measure and its divisions.
See note under Exercise No. 35—Buttonholes.
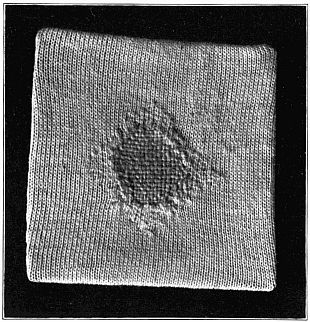 STOCKINET DARNING.
Materials: Stockinet 4" × 4"; cardboard 3" × 3"; darning cotton; darning needle; a pair of worn stockings.
See description of Stocking Darning, page 67.
Pupils will furnish their own cardboard and have it cut and ready for the lesson, also a pair of worn stockings.
The cardboard is a substitute for the darning ball. Do not stretch the cloth too tightly over the card, nor put in a needless number of stitches at the back to hold it on, five or six being sufficient to hold it temporarily[41] in place. The darning cotton winds from the spool in several strands loosely twisted together. Separate and use two, three or more strands, depending upon the texture of the cloth to be darned. Take care not to split the threads when weaving across them, and also avoid putting the threads so far apart that holes are left between them. In fact, try to have pupils understand that they are supplying a piece of cloth that has been worn away, and that when finished should match as nearly as possible in color and texture the cloth that is being repaired. Stockinet, like stockings, is a knitted, not a woven fabric, and as every stitch is drawn through the one below it, it is very necessary that the loops be caught before they ravel back. Prepare the hole for darning by whipping the edge with fine thread, catching up all the severed loops. Either a round or an oblong hole may be cut in the stockinet, the round hole being three-fourths of an inch across, and the oblong three-fourths of an inch by one inch.
Follow the exercise in stockinet darning, in which the principles of darning have been taught, with the darning of a pair of worn stockings that the pupils have brought from home. Every child in the class must be given this practical and useful experience. If there is difficulty in securing these stockings, members of the class or the teacher can readily supply the deficiency.
Materials: Calico 12" woof, 14" warp; facings and bands 58" × 2"; white thread No. 60; needle No. 8.
See description of Plackets, page 81.
Upon this sampler is taught the placket, the gusset, the nightgown opening and two different methods of putting on bands, and in addition a review of the French seam and the French fell. It is made in sections which are combined later. These lessons are interspersed with other exercises that the pupils may not become tired of this piece. Teach the placket and the nightgown opening first on paper. It will save time and trouble in the end. Fold the large piece of calico across the warp through the center and cut on the fold. Fold one of these pieces with the warp, through the center and cut. The first exercise of the "Placket Sampler"[42] is done on one of these quarters. As these sections are to be sewed together later each girl must have her own pieces. To avoid the possibility of their being lost or soiled, those not in use should be wrapped in paper, labeled and collected by the teacher and kept until ready for Exercise No. 34.
 PLACKET SAMPLER (FRONT VIEW).
First section of the Placket Sampler: Fold the piece of calico with the warp, through the center and cut an opening on this fold five inches in length. Then follow the directions for making Placket B. Facing eleven inches by two inches.[43]
Materials: Pupils will select and furnish their own materials for an apron. This may be of any style or kind, and will afford an excellent opportunity for carrying out their individual tastes. This may necessitate the teaching of the principles of bands which can be done with the practice piece. See description of Bands, page 79.
 PLACKET SAMPLER (BACK VIEW).
 APRONS—EXERCISE NO. 33.
Second section of the Placket Sampler.
Materials: The second quarter of the large piece of calico; a two-inch square of calico for the gusset.
Fold with the warp through the center, and cut an opening on this fold five inches in length. Then follow the directions for making the gusset. Sew the two sections together with the French fell. Hem the sides with a quarter-inch hem.
Materials: Blue Percale 9" woof by 4" warp; scraps of calico for practice pieces; white thread No. 40 and No. 80; needles No. 7 and No. 8.
Remember the old adage Practice Makes Perfect.
See description of the Buttonhole, page 63.
Note: Scraps and odd pieces of calico can be used for the practice work on buttonholes. As the buttonhole requires a great deal of practice it is well to keep these pieces in the sewing box and work at it at odd times during the progress of the years' work. Encourage the girls, too, to practice on the buttonhole for home work. In this way they will gradually acquire the skill which only comes with practice. Fold the cloth, wrong side out, with the woof and through the center, and baste the edges together. Begin with the blind buttonhole.
The buttonhole model is intended to show how much skill has been acquired. Fold the percale through the center, with the woof, and baste the edges together. Make the buttonholes three-fourths of an inch long and one inch apart.
Materials: Half of the large piece of calico; facing 18" × 2".
Fold with the warp through the center and cut an opening on this fold[46] five inches in length. Then follow the directions for the Nightgown Opening. Hem the side of the narrower part with a quarter-inch hem.
Materials: Butcher's linen, collar 15½" warp by 3" woof, India linen band 15½" warp by 1½" woof; practice piece 6" warp by 4" woof; white thread No. 80; needle No. 8.
Measure the neck and decide upon the length of collar and width of hem before trimming.
See directions for Hemstitching, page 76.
Put the collar band on the collar. The collars may be still further ornamented with fine feather stitching, the star stitch or French knots.
See description of Bands and Gathering, pages 68 and 79.
To avoid soiling the cloth put the bands on before seaming the halves of the Placket Sampler together. This can be done with the exception of the band on the long side of the nightgown opening, which will have to be done after this side is basted to the other section, cut off and hemmed, and will therefore be the last thing to be done on the Sampler. Put the hemmed bands on the side having the placket and the gusset, and the overhand bands on the side of the nightgown opening.
Length of bands: On the first half, short bands cut two inches, one and one-half inches finished; long band cut four inches, three and one-half inches finished; on the last half, bands cut three and three quarters inches, three and one-quarter inches finished.
Sew the two sections of the Sampler together with the French seam. The section having the two openings is a little narrower than the other. Baste the two sections together, basting the little pleats at the end of the placket and the nightgown opening, and sew them into the seam. Do not cut off the long side until basted nearly across, then cut off and hem the side. Finish with the last band.[47]
Materials: Pupils will furnish their own material for an underskirt for themselves. The patterns which their mothers use can be secured from the home, or one pattern used by all the members of the class. These skirts may be made plain or trimmed with tucked ruffles of cloth or with embroidery, depending upon the wishes of the mothers, the skill and taste of the individuals and the material furnished. Should there be difficulty in securing material for the garment, a small model on the half-inch scale or one of the electives can be substituted. Insist that the work be well done, neatly finished and first class throughout. Use sewing machines when available.
Points to emphasize in the making of a skirt:
Under the heading "Textile Fibers and Fabrics," page 94, will be found subject matter which can be used in correlation with the geography, language and history work. The sixth grade subject is Flax. Make a collection of the flax products, fabrics, etc. A class set of compositions, each member of the class taking different subdivisions of the subject, would make an interesting collection which could be put together in a simple binding done by members of the class.
See "Paper and Cardboard Construction," page 101.[48]
[28] Placket A may be substituted for the gusset, if desired.
[29] A pin cushion cover may be hemstitched in place of the collar. Make this a square seven inches by seven inches, or an oblong five inches by nine inches, or any size to fit a particular cushion that can be cut from these pieces, or any size for which the pupils furnish their own material.
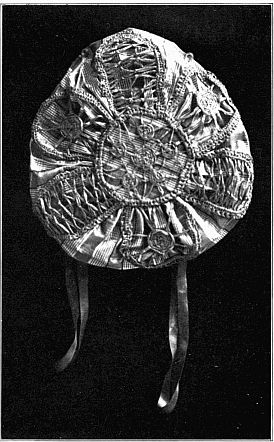 ROUND BOTTOM BAG WITH RAFFIA COVERING.
[30] Pupils who desire to furnish their own materials for a linen handkerchief may substitute this for the hemstitched collar.
[31] Basketry may be substituted for the apron, or a clipping case or a postal-card album may be made instead.
See "Paper, Cloth and Cardboard Construction," page 107.[49]
Make the bag any size desired; a circle of three or four inches in diameter makes a practical one. Draw the pattern for the raffia covering on paper, the circle for the bottom being the same size as that of the bottom of the bag. The design for the sides may be in as many sections as desired. The tops of these sections may be shaped to suit one's taste—round, pointed or fancy. When the pattern is completed baste a strand of raffia on the pattern, following the lines of the design. Then closely blanket stitch with raffia on both sides of these strands. The spaces may then be filled with fancy lace stitches.
| EQUIPMENT. |
| Sewing box. |
| Pin cushion—30 pins. |
| Thimble. |
| Needles. |
| Scissors. |
| Thread cards. |
| Practice Piece—Unbleached muslin 12" × 9". |
Prepare Thread Cards—Cardboard 4" × 4", designed and cut for four kinds of thread.
Review Divisions of the Foot and Yard Measure.
Materials: India linen 8" × 8", ruffle 12" woof, 2" warp; white thread No. 70; needle No. 8.
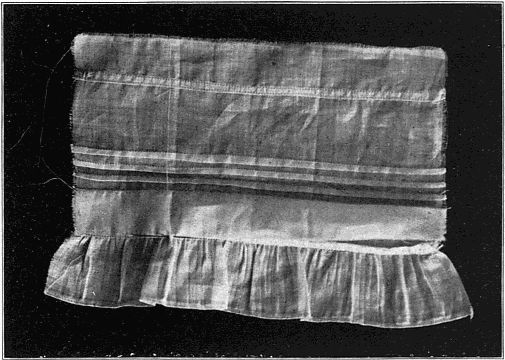 A TRIAL PIECE, GIVING PRACTICE ON THE HEMMED SEAM, TUCKING, AND PUTTING A RUFFLE INTO A HEM-TUCK.
Hemmed Seam: One inch and a quarter from the top crease a fold with the warp. Cut on this crease.
See description of the Hemmed Seam, page 86.
Putting a ruffle into a hem-tuck and tucking: Measure up from the bottom two and one-fourth inches—or twice the width of the hem-tuck[52] plus one-fourth inch for the seam—and crease with the warp, across the piece. Stitch, or run by hand an inch tuck, taking care to measure and make perfectly even. Measure up three-eighths of an inch from this stitching and crease for another tuck. Stitch, or run by hand an eighth of an inch tuck. Measure up three-eighths of an inch for another tuck. Put in a cluster of three tucks. Hem the ruffle with an eighth of an inch hem, gather and stroke the gathers.
See description of gathering and sewing a ruffle to a straight edge, page 69.
Place the wrong sides of the cloth and ruffle together and baste to the edge extending below the hem-tuck, bringing the seam exactly to the edge of the tuck. Baste and stitch the edge of the hem-tuck over the seam of the ruffle.
Materials: Pupils may furnish their own materials for an underwaist such as they wear. This may be of any style. Patterns can be secured from the mothers. If there is any difficulty in securing supplies from the home, a child's waist on a small scale may be substituted.
Materials: Bleached muslin 24" woof by 10" warp, bias facings 54" by 1"; white thread No. 70; needle No. 8.
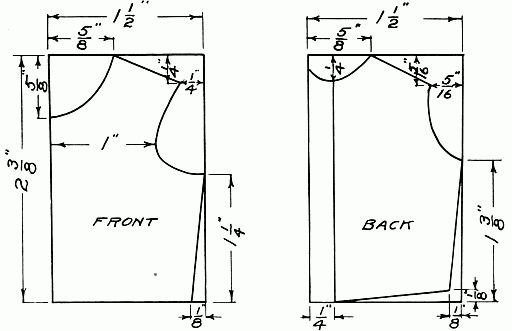
See the draft for the pattern of the small underwaist, page 53.
Patterns: Multiply all dimensions by four. Each girl can draft her pattern from the teacher's dictation, or one pattern can be drafted before the lesson and the members of the class cut their patterns from this one. Insist that the patterns be exact. Have the patterns pinned on, and submitted for inspection before the cutting is done, to avoid blunders and waste of material. Cut the front double. One inch has been allowed for the hem on the backs.
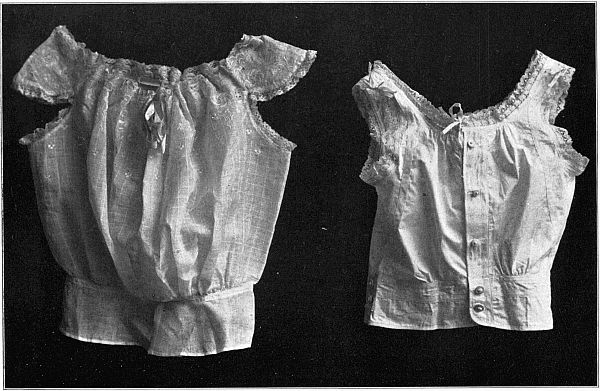 FRONT OF CORSET COVER AND BACK OF GIRL'S UNDERWAIST.
Baste, half-back stitch and fell the seams. Turn the hems at the back, baste and hem. See description of the Bias, page 79. Put the bias facing[55] on the bottom first, then around the neck, and last around the armholes. Teach the joining of the bias facing by having the bottom facing in two pieces and then insist that the ends of the armhole facing be joined in the same way. Overhand neatly the ends of the bottom and neck facings. Make four quarter-inch buttonholes and sew on the buttons.
The styles of dressing the neck vary greatly from season to season. This is also modified by the taste of individuals. Pupils may furnish their own material for any kind of collar desired, after thoughtful consideration of the prevailing styles. It is possible to make a great variety of useful and dainty articles at a trifling expense which will be most acceptable Christmas gifts. If so intended, lead the pupils to study the appropriateness of their gifts. Those pupils who find it difficult to furnish their own material may substitute a collar made from an imitation of linen which will afford the same experience in making, but will not be quite as desirable an article to wear.
Materials: Imitation linen 15" woof, 8" warp. This amount will cut either the Dutch collar by piecing the band, or the ordinary stiff collar. The patterns for both, or the collars from which patterns can be cut, can be brought from home by some member of the class. Be absolutely sure of the size before cutting out the collar, as a quarter of an inch will make a difference in the comfort and fit. It is an excellent plan to have collars of different sizes—12, 12½, 13, 13½—in the class, try them on, and mark the buttonholes on the bands from the right sized collars. The "Dutch" collar can be made with a plain hem and finished with the fine featherstitching or any of the ornamental stitches, or it can be embroidered in a simple pattern with the eyelet embroidery. This gives an excellent opportunity for an original design, or if so desired a pattern can be transferred by the use of the carbon paper. The stiff collar, if made double, is first sewed up on the wrong side and then turned and stitched along the edge on the right. It is then put into the double band, which has been made in the same way. If so desired the collar can be made of a single embroidered piece with the worked edge, or finished with the hemstitched edge and ornamented with fancy stitches.[56]
The success of this exercise will depend entirely upon the interest and ingenuity of the teacher.
See "Home Furnishing, Decoration and Care," page 112.
Materials: French flannel 3½" warp by 6½" woof; twist; sewing silk; needle No. 7 and No. 8.
See description of the Buttonhole, page 63.
Pupils will furnish their own twist and flannel for the practice work. It is not necessary that these should match in color. Double the flannel through the center the long way, baste along the folded edge and around the piece. Overcast the raw edges. Begin one-half inch from the top and make the buttonholes three-fourths of an inch long and three-fourths of an inch apart. Strand, overcast and finish with the bar.
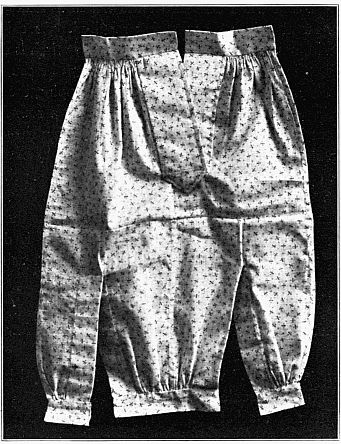
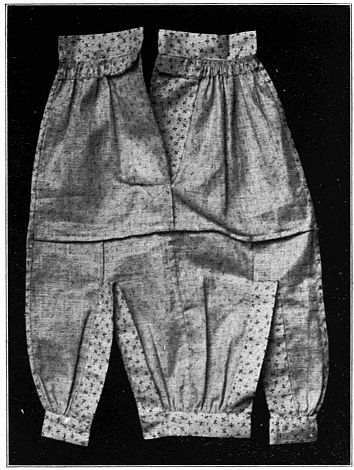
Materials: Pupils may furnish their own materials for a full-sized garment. This may be made in any style. Patterns can be secured from the mothers or exchanged among the members of the class, or a pattern may be drafted from the diagram. Secure the pattern first and have the girls measure it to determine the amount of material needed. If there is any difficulty in securing supplies from the home, a pair of child's drawers on a smaller scale may be substituted. The directions for making the small drawers will assist in making the full-sized garment.
Materials: Bleached muslin 36" woof, 11" warp; ruffling, India linen 36" woof, 1½" warp; white thread No. 70; needle No. 8.[57]
 DRAFT FOR A PATTERN OF A PAIR OF DRAWERS.
Patterns: See the draft for the drawers pattern, page 57. Multiply the dimensions by four. Each girl can draft a pattern from the teacher's dictation, or one pattern can be drafted and cut before class time, and the members of the class cut their patterns from this one.
A strip of muslin thirty-six inches by eleven inches will cut the drawers by careful management. The lesson in economy and the experience of cutting from a close pattern is a valuable one for the girls, as it is a problem which will confront them many times in life. Fold the cloth the short way through the center, and pin the selvedge edges together. Allow three and one-half inches from the fold for the placket facings and bands, thus keeping the extra cloth in one large piece. Pin the pattern in position, and cut the two lengths, at the same time taking care that the lengthwise fold of the pattern is straight with the warp threads. If the pattern does not allow for hem and tucks, provide the extra length when cutting. The right sides are now together; mark them before separating, and avoid the chance of making both pieces for the same leg, a mistake easily made by more experienced needlewomen.
Finish the bottom of the drawer legs with one-eighth inch tucks, one-half inch hem-tuck and the ruffle as in Exercise No. 41. One-half inch in front of the side fold cut an opening, with the warp, four inches in length. This may be made in both legs or in the right one only, and may be finished with the gusset, placket A or placket B, keeping in mind that the back buttons over the front. Finish all seams with the French seam except where the ends of the ruffle are joined with the hemmed seam. Gather the fullness at the top on both sides of the front and the back seams, and draw up to the desired length of band. If two openings have been cut at the sides make the back band one inch longer than the front. Place buttons and make buttonholes where desired.
Materials: Albatros 4" × 5"; sewing silk; needle No. 8; beeswax.
See description of Cloth Darning, page 68.
Four holes, cut as follows, are to be darned on this piece of cloth:[59]
No. 1. In the lower left hand corner one inch from the bottom and the side, cut one inch straight with the warp. Darn with split sewing silk on the wrong side.
No. 2. In the upper left hand corner, one inch from the top and side, cut one inch with the warp and one inch with the woof. This will serve for a three-cornered tear. Darn on the right side with ravelings. Spread the stitches at the corner like the sticks of a fan.
No. 3. In the lower right-hand corner, one inch from the bottom and the side cut one inch on the bias. Darn with split sewing silk on the wrong side.
No. 4. In the upper right-hand corner, one inch from the top and the side cut one inch across the warp. This will serve for a worn place in the cloth. Place the patch under it and baste around the edge. Darn with ravelings on the right side. Trim the edges of the patch smooth and herringbone stitch with ravelings around it.
Finish the edge of the piece with the blanket stitch.
Follow this exercise with the repairing of some article brought from home that will give a practical experience in cloth darning. Should there be any difficulty in securing these articles there are plenty of homes that will supply enough for the entire class. This must be done under the teacher's supervision.
Under the heading "Textile Fibers and Fabrics," page 95, will be found subject matter which can be used in correlation with the geography, language and history work. The seventh grade subject is Wool.[60]
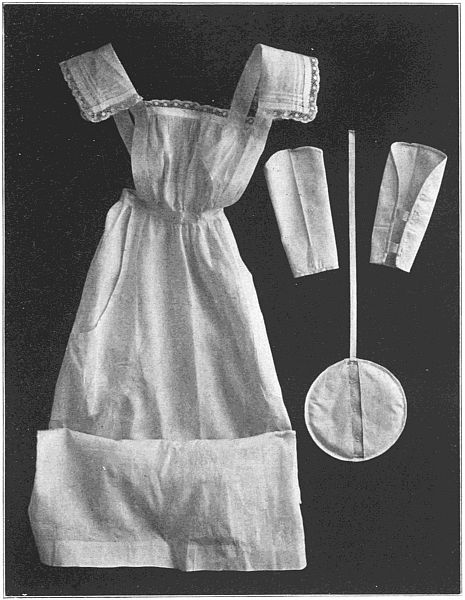
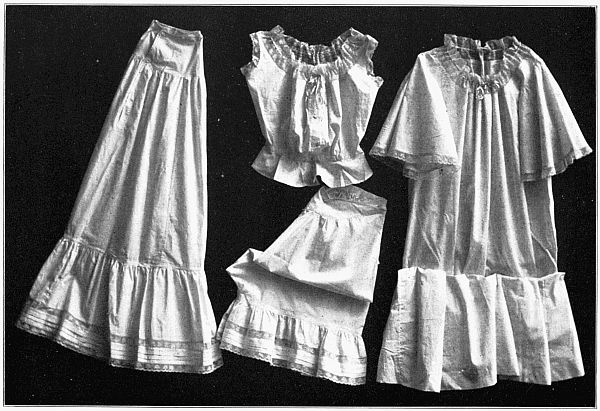 A SET OF UNDERWEAR.
[34] An exercise in paper and cardboard construction, adapted to the skill of the class, may be substituted for the Christmas Exercise. See chapter on "Paper and Cardboard Construction," page 101.
[35] In connection with the study of home furnishing and decoration an exercise in passepartout or the making of lamp shades would be excellent.
Stitches Used in Plain Sewing. | |
| 1. | Basting. |
| 2. | Blind Stitch. |
| 3. | Buttonholes. |
| 4. | Combination Stitch. |
| 5. | Darning. |
| 6. | Gathering. |
| 7. | Half-back Stitch. |
| 8. | Hemming. |
| 9. | Overcasting. |
| 10. | Overhanding. |
| 11. | Running. |
| 12. | Slip Stitch. |
| 13. | Stitching. |
Ornamental Stitches. | |
| 1. | Bands. |
| 2. | Blanket Stitch. |
| 3. | Chain Stitch. |
| 4. | Couching. |
| 5. | Feather Stitch. |
| 6. | French Knots. |
| 7. | Hemstitching. |
| 8. | Herringbone Stitch. |
| 9. | Kensington Outline. |
| 10. | Lazy Daisy or Star Stitch. |
Miscellaneous. | ||
| 1. | Bias. | |
| 2. | Cloth. | |
| 3. | Eyelets and Loops. | |
| 4. | Joining and Fastening Threads. | |
| 5. | Mitered Corner. | |
| 6. | Patterns. | |
| 7. | Plackets. | |
| 8. | Putting in Sleeves. | |
| 9. | Seams. | |
| A. Bound Seam. | ||
| B. Flannel Seam. | ||
| C. French Fell. | ||
| D. French Seam. | ||
| E. Hemmed Seam. | ||
| 10. | Sewing on Buttons. | |
| 11. | Sewing on Hooks and Eyes. | |
| 12. | Sewing on Lace. | |
| 13. | Tucking. | |
Basting.—Basting is temporary sewing used to hold the cloth in place while putting in permanent stitches. As the basting threads are to be removed, place the knot on the right side. Fasten the threads securely by taking two or three backstitches. In removing basting threads clip the threads at short intervals that they may be taken out easily. Much of the success of the work depends upon careful basting. The extra time required will be repaid ten-fold. One stitch at a time for beginners, later two or three stitches may be taken. In basting hems, baste not on the edge, but very near it. Do not baste on the line where you expect to stitch, but as near it as possible.
A. An even basting is used on hems, seams of garments, or wherever two pieces of cloth are to be held firmly together. Take up one-fourth of an inch and skip one-fourth.
B. Uneven basting is used where very careful basting is unnecessary, as in the seams of skirts, or in working on a material that clings together, as a guide for stitching. Take up an eighth of an inch and skip three-eighths. When only loose basting is required, as when holding the lining and outside together, a long stitch and two short ones may be used.
Blind Stitch.—The blind stitch and slip stitch are used to fasten a hem lightly where it is desired to conceal the stitches. To blind stitch a hem, turn back the edge of the hem to the basting and, holding the cloth along the edge of the finger, catch first cloth and then hem with a single stitch that does not show on either side. A slip stitch is a long stitch on the wrong side and a blind stitch on the hem. It is used on the milliner's fold.
Buttonholes.—A buttonhole is a slit cut and worked to admit a button for fastening purposes. It is much easier for beginners to commence on the blind buttonhole. This is made by working around a line instead of cutting the hole. The stitch, the fan, and the finishing can thus be learned without the care of the raw edge. The directions for making the buttonhole are as follows:[64]
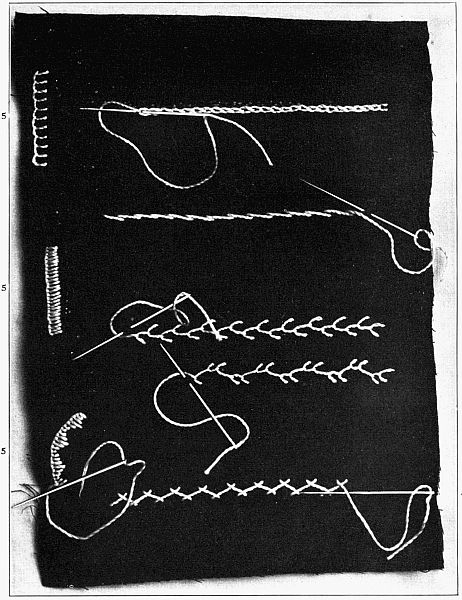
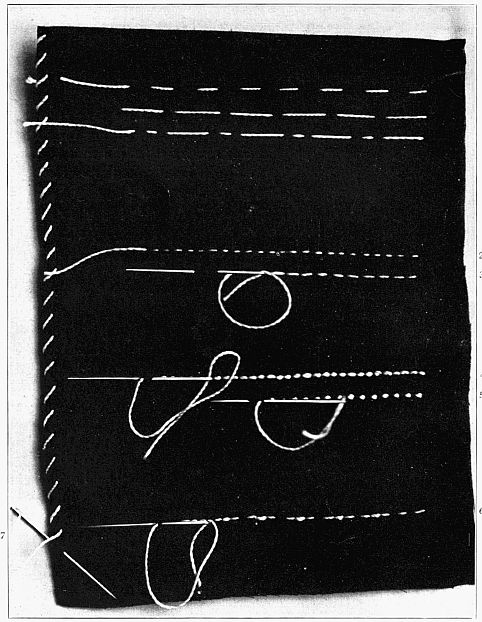 STITCHES USED ON PLAIN SEWING.
| 1—Three styles of basting. |
| 2—The running stitch. |
| 3—The gathering. |
| 4—The backstitch. |
| 5—The half-back stitch. |
| 6—The combination stitch. |
| 7—The overcasting. |
a. Cutting—With the buttonhole scissors cut the hole one-fourth of an inch from the folded edge and straight with the threads of the cloth.
b. Stranding—The strand consists of carrying the thread along the edge of the buttonhole near enough to be easily covered by the buttonhole stitch, for the purpose of adding strength to the buttonhole. Thread two needles, one with fine thread or sewing silk and the other with coarser thread or twist, depending upon the kind of buttonhole to be made. Place a knot in the coarse thread or twist, and with the folded edge of the cloth toward the left hand, bring the needle out just below the lower right hand end of the buttonhole, which is the end farthest from the folded edge. At the other end put the needle into the cloth just below the end of the cut and bring it out just above, which will carry the thread along the edge of the buttonhole. Repeat the same on the other side bringing the thread out at the point of starting. Do not cut this thread, as this is ready to begin the buttonhole stitch after the overcasting.
c. Overcasting—With the fine thread or sewing silk begin at the lower right-hand end. The object of the overcasting is to prevent raveling while working the buttonhole and the fewer stitches which will accomplish this purpose the better. As the overcasting must be covered by the buttonhole stitch do not take over two or three threads deep and just as few stitches on each side as is absolutely necessary to prevent the loosening of the threads. Some materials do not require overcasting.
a. The Stitch—Determine how deep a stitch is necessary so that the threads will not pull out, always keeping in mind that the shorter the stitch the better the buttonhole will look. This depends upon the kind of material in use. The first stitch begins one thread beyond the end of the slit. Holding the buttonhole along the cushion of the left forefinger with the folded edge of the cloth toward the left, place the needle into the slit under the lower edge of the buttonhole and draw the needle half way through. With the needle still[66] pointing toward the chest take up the double thread at the eye of the needle and place it under the point, passing from right to left. Draw the needle and thread out, and from you, so that the purl or twist comes to the edge of the slit. (This makes a firmer edge than when the thread is carried around the needle from left to right.) Each stitch is a repetition of the above. Place the stitches about the width of a thread apart, as this will avoid a crowded appearance and makes a firm, hard edge. Do not jerk the thread, but draw steadily and tight; otherwise the edge will be rough. Avoid stretching the buttonhole; the edges should touch when finished.
b. The Fan—At the end near the folded edge—the round end—spread the stitches like the sticks of a fan, drawing them closer at the top and spreading at the bottom. Five stitches will work nicely around the end, the third stitch being straight with the buttonhole.
a. The simplest manner of finishing is as follows: The buttonhole stitches at this end are at right angles to the slit, and not rounding as at the other end. After finishing the last buttonhole stitch, pass the needle down between the first and second stitch, and bring it out between the last and next to the last stitch. Draw the thread tight so as to bring the edges of the buttonhole together. Put in several stitches in the same place. Pass the needle to the under side and fasten the thread.
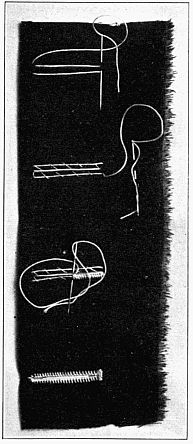 METHOD OF BUTTONHOLING.
b. The Bar—The thread being at the top of the last stitch, pass the needle down between the first and second stitch and out at the bottom of the last stitch. Put in three threads across the width of the buttonhole, bringing the thread out at the bottom of the last buttonhole stitch. Turn the cloth so that the thumb covers the thread and the buttonhole, and work the bar by bringing the needle out each time over the thread, as in the blanket stitch. Draw the purl edge toward the buttonhole. Do not put in too many stitches, as it makes the loop stand away from the buttonhole. Near the middle of the bar take one stitch through the cloth to hold it down.
c. Caution—Be sure that the thread is long enough to work the buttonhole, but not over-long, as the thread wears and is more liable to break. Use care and not break the thread, but in case this happens, take out the last few stitches, thread the needle on this short end, pass through the last purl, and fasten the thread on the under side. With the new thread fasten without a knot on the wrong side, bring through the last purl at the edge of the buttonhole and continue.
On cloth that ravels badly put in two parallel rows of running stitches and then cut the buttonhole between the rows.
Combination Stitch.—The Combination stitch consists of three little running stitches and a backstitch over the last running stitch. Take three running stitches on the needle and pull it through. Take up the last running stitch for the first of the next group of three. It is a little stronger than the running stitch.
Darning.—The object in darning is to repair a rent, if possible so that it cannot be perceived. The warp and woof threads that have been worn away are to be rewoven into the cloth. No knots are needed. Leave a short end of thread to be clipped when the darn is finished.
Stockings should be darned on the wrong side. A square hole makes a more symmetrical darn than a round one, and should be used wherever there is no widening or narrowing in the knitting, as on the leg of a stocking. A round hole is better for the heel and toe. Cut away the part that is badly worn. First put in the warp threads, taking care to take up on the needle all the little loops around the hole and making the darn[68] symmetrical in shape. Then put in the woof threads, weaving carefully across the warp over the hole, passing over the threads that were taken up on the preceding row. Give special attention to the edge of the hole, passing first over and then under the edge, that there may be no ridge. If the hole is large or stretched out of shape, draw up the edges by whipping with fine thread. The darning stitches should extend only as far as the worn part. If the warp threads have strengthened the worn part sufficiently the woof threads may be extended only far enough over the edge to fasten securely. In darning a large hole it is sometimes wise to begin putting in the warp threads at the center first to prevent stretching. Do not draw the threads too tight, as they will shrink when washed.
This may be done with thread, ravelings or hair. In darning with thread darn on the wrong side, with ravelings or hair on the right. Darn at right angles to the tear or cut. Continue the darning stitches on each side of the tear only far enough to strengthen the worn part, usually a quarter, sometimes an eighth of an inch, is sufficient. Continue the darn an eighth of an inch beyond the end of the tear. The repairing shows less if the rows of darning stitches are of unequal length. In darning take up the threads of cloth passed over in the preceding row, slipping the needle over one edge of the tear and under the other going one way and reversing this order going the other way. This makes the edge smooth and does not throw it up in a ridge. If the material to be darned is thin or stretches easily, place the rent over a piece of glazed paper and baste around it before darning. If the cloth is worn and thin, place a piece of cloth under and darn through the two thicknesses. Take great care not to stretch the hole or to draw the threads tight enough to pucker.
Gathering.—Gathering is an uneven stitch made by passing over twice as much as is taken on the needle. When the thread is drawn up this gives the appearance of fine gathering on the right side and admits of considerable cloth being gathered into a small space.
Gathering is used in joining a full part to a straight piece, as the skirt to the band, etc. Gather with a strong single thread a little longer than than the space to be gathered. Never use a double thread. If the thread becomes knotted a new thread must be put in from the beginning. Hold[69] the cloth, as in the running stitch, with the right side toward you, using the wrist motion. Make a large knot in the thread so that it cannot slip through the cloth, and place the knot on the wrong side. At the end of the gathering slip the needle off and make a knot in the thread, that it may not pull out.
For stroking or placing gathers use a coarse needle or a pin. Draw up the gathering thread just tightly enough so that the pin can be easily inserted between the gathers and fasten by winding over a pin placed at right angles to the last stitch. Begin at the left hand, placing the pin in the fold of the first stitch and stroke gently downward, holding the pin obliquely. After each successive stroke press the pleat under the thumb of the left hand. Continue the same with every stitch.
Divide both into halves, quarters or eighths, depending upon the length, and pin the points of division together. Draw up the gathering thread to the proper length and fasten by winding over a pin. Arrange the gathers even before basting. Baste just above the gathers, holding the gathered piece next to you. Stitch just below the gathering thread.
Gauging or double gathering is done by having a second row of gathering stitches of equal length and directly below those of the first (so that when both threads are drawn up the cloth lies in pleats). In heavy material three or four threads may be put in. Gauging is usually used on heavy material or on a folded edge that is to be overhanded to a band.
Ruffles of lawn, linen or embroidery are sometimes put upon the edge instead of into a facing or seam, and when so placed it is desirable to avoid the raw edge on the under side. Hold the work over the left forefinger and roll the edge toward you between the thumb and forefinger. Place the needle under the roll on the right side, passing out at the top of the roll. Whip about one inch and draw up the thread. It is necessary to use a strong thread for whipping and gathering the edge of a ruffle.[70]
Half-Back Stitch.—Half-back stitching is similar to the stitching. The long forward stitch on the under side is three times the length of the backstitch on the upper side, and a space the length of the backstitch is left between the stitches. See Stitching, page 63.
Hemming.—A hem is a fold made by twice turning over the edge of a piece of cloth, and then sewing it down. The first fold is most important; if that is turned even there will be little trouble with the second. Trim the edge of the cloth before turning the hem. It is well to make and use a gauge of the required width. If a wide hem is turned, baste along the second fold or bottom of the hem first, and then at the top. On woolen goods or material that does not crease easily it is necessary to baste the first fold. Either bury the knot between the folds of the hem or leave one-half inch of thread and hem over it.
Hold the hem across the cushion of the left forefinger and point the needle a little to the left across the middle of the thumb. Take up a few threads of the cloth and a few threads of the fold and draw the needle through. Take care that the stitches are regular, of equal length and of equal distance apart. Do not confuse the hemming stitch with the blind stitch, or the damask hem. Join the threads by leaving a half-inch of the old thread and a half-inch of the new to be tucked under the edge of the hem and be hemmed over.
Teachers will find the following suggestions helpful in teaching the hemming stitch:
Put the needle in almost straight with the hem, not at right angles to it. Take up as little cloth on the needle as possible; bring the needle directly through the hem, making one stitch of it instead of dividing the stitch as in the blind stitch. Crowd the point of the needle under the edge of the hem. Do not insert the needle a distance from the hem, trusting to puckering it up.
Damask is a heavy fabric woven of heavy threads of one color in which the pattern is brought out by a change in the direction of the threads, and when new is stiff with much dressing. From the very nature[71] of the cloth it is impossible to hem well with the flat hem. The two folds of the hem are turned the desired width and the hem is then turned back flat to the cloth and creased. The edge of the hem and the crease thus formed are overhanded together with fine even stitches. When laundered this irons perfectly smooth and the stitches do not show on the right side. Do not confuse this method of hemming with the flat hem, as each has its own use.
Overcasting.—Overcasting is done by taking loose stitches over the raw edge of cloth from right to left to keep it from raveling. The depth of the stitch depends upon the material to be overcast, usually an eighth of an inch is sufficient. The stitches should be twice as far apart as they are deep. The needle is inserted from the under side of the cloth and points a little to the left, making a slanting stitch. Keep the spaces even and the stitches of equal length. Always trim the edges before overcasting. Do not overcast a selvedge edge. Take only one stitch at a time and be careful not to draw the edge of the cloth.
Overhanding.—Overhanding is done by sewing closely over two edges of cloth from right to left. The cloth may have a folded or selvedge edge. Careful basting is necessary to good overhanding. The needle is placed at a right angle to the seam and should point to the chest. No knot is used; a short end of the thread is left and overhanded under. Hold the work horizontally along the edge of the cushion of the left forefinger and the thumb. Do not wind the cloth over the end of the finger. The stitches are straight on the under side and slanting on the top. Do not draw the threads tight enough to make a hard seam and also avoid a loose stitch that will not hold the edges together when the seam is opened. A deep stitch is not necessary for strength and will not look well on the right side when opened. To join the threads leave a half-inch of the old and a half-inch of the new, lay them along the edge and overhand over them.
Running.—Running is done by taking up and slipping over an equal amount of cloth.
Running is used for seams that do not require great strength, and also for tucking. Care should be taken not to draw the thread tight enough[72] to pucker. Make a small knot in the thread and conceal it on the wrong side or in the folds of the cloth. Hold the work in the left hand between the thumb and cushion of the forefinger; hold the needle in the work between the thumb and forefinger of the right hand. Use the wrist motion.
Fasten the thread by passing the needle through to the wrong side and taking two backstitches.
Slip Stitch.—See Blind Stitch, page 63.
Stitching.—Stitching is so called because it resembles machine stitching. It is also known as backstitching. Stitching is done by taking a stitch backward on the upper side of the cloth and a long stitch forward on the underside, making the stitches meet on the top as in machine stitching. Use a small knot in beginning. Hold the work over the cushion of the left forefinger.
Fasten the threads on the wrong side by taking several backstitches, one over the other, through one thickness of the cloth. To join threads in stitching fasten securely on the wrong side and begin with a small knot, bringing the thread through at the proper place for beginning the new stitch. It is used where strength is required, or on garments too small to go into a machine conveniently.[73]
Applique.—This is an ornamentation produced by cutting a design from one kind or color of cloth and placing it upon another. Very beautiful effects can be obtained, with perfect harmony of color and the proper combinations of textiles. The edge can be finished with the blanket, couching, Kensington or chain stitch.
Blanket Stitch.—The blanket stitch, often erroneously called the buttonhole stitch, is used for finishing raw edges. It is worked from left to right, and the buttonhole stitch from right to left. The depth of the stitch and the space between stitches may be varied and will depend upon its use. If the thread is not fastened and joined carefully the symmetry of the stitches will be broken. A new thread must come up through the loop of the last stitch.
Insert the needle at a point the desired depth of the blanket stitch and take one or two running stitches to the edge of the cloth, which will bring the thread in position for the first stitch. Make the first blanket stitch over these running stitches. Holding the edge of the cloth toward you insert the needle at the same point as before and bring the needle out over the thread and draw the loop thus made to the edge of the cloth. Repeat for successive stitches. For a simple finish for a flannel edge the stitches should not be placed too close together. As far apart as the depth of the stitch is a good rule, unless greater ornamentation is desired, when three, five or seven stitches may radiate from one point.
| 1—The chain stitch. |
| 2—The Kensington stitch. |
| 3—Two styles of feather stitching. |
| 4—The herringbone stitch. |
| 5—Three styles of blanket stitch. |
The stitches are the same as in "A" but should be placed close enough together so that the threads touch, making a firm edge. The embroidery should be done before the edge is cut. It can then be finished in various ways. The narrow edge can be turned back and whipped down on the wrong side, or blanket stitched just over the edge with fine cotton thread. On lingerie pieces the edge is not cut until after the first laundering. If desired the edge can be padded before working with the blanket stitch.[75] The padding is done with a soft, coarse thread by working along the edge with either the Kensington or chain stitch, or it may be heavily "padded" by filling the space.
Chain Stitch.—The chain stitch is used for outlining a design, marking garments, etc. Insert the needle on the line and draw the thread through to the knot. Insert again at the same point and take up on the needle cloth for the desired length of stitch and draw the needle out over the thread. In placing the needle for succeeding stitches begin inside the preceding stitch. The Half-Chain Stitch is very effective for stems of flowers, or wherever a fine outline stitch can be used. This is made the same as the chain stitch, except that the needle is inserted just outside and to the right of the loop instead of in the end of the loop.
Couching.—Couching is a coarse blanket stitch done over two or three strands of silk, linen or cotton floss. It makes an attractive finish for a hem line and also for finishing the edge in applique.
Feather Stitch.—The principal use of the feather stitch being that of ornamentation requires that it shall be evenly and carefully done, or it fails in its purpose. The feather stitch consists of alternating stitches, or groups of stitches, slanting toward a center line. The stitch may be varied greatly by the length of the stitch, the slant of the stitch, and the number of stitches on each side. The tendency is to gradually increase the length of the stitch which must be carefully avoided, as well as a change in the slant. Do not make too long a stitch, as there is danger of catching and breaking the thread. The feather stitch can be used very effectively in scroll designs for the ornamentation of sofa pillows, cushion covers, collars, underwear, etc.
Work toward you, holding the cloth over the left forefinger. With a knot in the thread insert the needle from the under side a short distance to the right or left of the line the feather stitching is to follow (which may[76] be designated the center line) and draw the thread through. Place the left thumb over the thread to hold it down, and on the opposite side take up a slanting stitch, the top of which is as far from the center line as the length of the stitch, and the bottom touching the center line. Draw the needle out over the thread which will thus form a loop of the thread from the first stitch. On the opposite side take up another slanting stitch the top of which is an equal distance from the center line and even with the bottom of the last stitch. Repeat for successive stitches. At the end of a thread fasten by passing the needle down where the thread last came through the cloth, thus holding the loop from the last stitch in place. Begin a new thread by passing the needle up through this loop.
This consists of alternating groups of two, three or more stitches instead of single stitches. The successive stitches of each group must be placed directly under the first stitch of the group.
French Knot.—Bring the needle through from the under side. With the needle in the right hand, take hold of the thread with the left hand about an inch from the cloth and, holding it taut, wind it several times around the point of the needle. Return the needle to the same hole through which it came out, and draw it back to the under side.
Hemstitching.—Hemstitching is a method of hemming in which a few parallel threads are drawn, the hem turned to the line thus formed, and hemmed down with the same stitch that separates the cross threads in successive clusters. There are several modifications of the hemstitch. The following methods have been selected as being the best for four reasons: (1) The thread is thrown under the edge of the hem, and consequently wears longer and shows less. (2) The only part of the thread showing on the right side is the loop around the cross threads. (3) It is readily taught to children, as it is simple, easy to remember, and can be given as two distinct parts. (4) It is the natural way to hold the hem.
a. Drawing the threads—Measuring from the edge of the cloth, allow twice the width of the desired hem when finished, plus the first fold, and draw several threads, the exact number depending upon[77] the texture of the fabric. Draw the first thread the entire length before starting the second, as it is liable to break where the first one did. The first thread being drawn, the second will come more readily. Beginners are inclined to draw too many threads. Unless both edges are to be hemstitched the opening should be narrow enough so that the threads at the top will not loosen.
b. The Hem—Turn the first fold of the hem and baste to the exact line of the opening. Careful basting is indispensable to good hemstitching, and especially so at a corner where two hems cross. Miter all corners of hems that are more than one-fourth of an inch in width.
c. The Stitch—Hold the cloth over the left forefinger as in ordinary hemming. Bury the knot by inserting the needle under the edge of the hem and drawing it through. The stitch consists of two distinct parts, (1) forming the loop around the cross threads, and (2) catching down to the edge of the hem:
(1) Pointing the needle toward you and holding the thread under the left thumb, take up on the needle three or four of the cross threads. Draw the needle out over the thread, thus forming the loop, and tight enough to separate the cross threads.
(2) Insert the needle under the edge of the hem only and take an ordinary hemming stitch. Repeat 1 and 2 for the next stitch.
Herringbone Stitch.—The herringbone or catch stitch is a cross stitch used to finish the raw edges of flannel or heavy material. It serves both the purpose of overcasting over a raw edge and that of hemming. It is used on raw edged hems to avoid the ridge formed by the first fold of a hem, on the flannel patch and for finishing the flannel seam, which may be pressed open and both single edges herringbone stitched, or both folded to one side and finished over the double edge. In most cases the open seam looks better.
The stitch consists of single, alternating running stitches made first to the right and then to the left, working from you instead of toward you as in ordinary running. The thread being carried across from one stitch to another, gives the appearance of a cross stitch. The stitches on each side must be in straight rows, with the outer row just over the edge of the flannel.[78] The stitch should be no deeper than necessary to prevent pulling out. A good rule for beginners is to make the top of each stitch even with the bottom of the last stitch. Point the needle toward you in making the stitch, but work away from you. The edge of the flannel must be kept smooth. This being a cross stitch the thread of one part of the stitch is on top and the other underneath. Be sure that this is regular, those slanting in the same direction should be always either to the top or to the bottom.
Kensington Outline Stitch.—This stitch is used to follow the line of a design for ornamentation. To avoid the knot, when starting begin half an inch from the end of the line to be followed, and put in three or four running stitches, bringing the thread out at the proper place for starting. Turn the cloth around, holding it over the left forefinger, and work from you. Pointing the needle toward you, take a short running stitch directly on the line keeping the thread always on the right side of the needle, except on a line curving sharply to the left when the thread will fall more naturally to the left side. The thread being carried from one stitch to another gives the effect of a long diagonal stitch on the right side and running stitches on the wrong. The length of the stitch will be determined by the size of the thread, and the character of the line to be covered, a curved line requiring a shorter stitch than a straight one.
Lazy Daisy or Star Stitch.—This is a variation of the blanket stitch. Insert the needle at the point desired for the center of the flower and draw the thread through. Insert again at the same place and take up the desired length of stitch on the needle, drawing the needle out over the thread. Pass the needle down through the cloth at the point where it came out, but on the other side of the loop, thus forming a second loop at the end of the petal to hold it in place, and return the needle again to the center of the flower. Make as many petals as desired and finish with the French knot in the center of the flower. This stitch also makes a pretty star, using six points and finishing without the French knot.[79]
Bands.—A band is a straight piece of cloth used to finish garments at the neck, wrist or waist. It may be sewed to a straight, gathered or pleated edge. A band cut with the warp is stronger than one cut with the woof.
See description of the Gathering, page 68. Gather as desired. Place the right sides of the cloth and band together and baste just above the gathering thread, taking care that the gathers are arranged perfectly even. Stitch just below the gathering thread. Turn in a fourth of an inch at the ends and along the other side of the band. Fold the band over just covering the gathers, and baste. Hem or stitch along the edge, overhanding the ends of the band.
See description of Gauging, page 69. Make the band by turning in one-fourth of an inch all around, folding and basting the edges together. Overhand the ends of the band. The whipping of the full part to the band will be sufficient to hold the two sides of the band together. Turn back the raw edges of the piece to be gathered one-half inch and gather once, twice or three times as desired. Pin to the band and overhand, taking a stitch for each pleat of the gathers. Fasten all bands very securely.
Bias.—A bias is a diagonal cut. To cut a true bias, fold over the corner of the cloth so that the warp and woof threads are parallel. A choice bias is a true bias, having the twill of the cloth at right angles to the cut. Great care should be taken in measuring and cutting bias strips to have them the same width throughout the length. Also avoid stretching after cutting.
a. To cut a bias facing, bias binding or fold, measure in the desired width on the true bias at a number of points. Draw a line, crease in a fold or baste where the facing is to be cut off.
b. To put on a bias facing, place the edge of the strip, right sides together, even with the edge of the cloth to be faced, baste and stitch.[80] Turn the facing back exactly in the seam and baste along the edge so that the facing will not show on the right side. Turn the fold at the top, baste and hem.
A bias facing for a curve should be cut narrow enough so that by stretching one edge of the facing it will lie perfectly smooth when finished.
c. To join two bias strips—Cut the ends to be joined straight with the threads of the cloth and place the right sides together, slipping the top piece past the under piece the width of a seam, but having the top edges even. Stitch where the facings cross, open the seam and crease; or, after trimming, a seam may be turned back at the end of each piece and the folded edges overhanded together.
Cloth.—A fabric woven of fibers, either animal or vegetable. The edges of cloth are known as the selvedge, the threads running lengthwise the warp, and those crossing the warp from selvedge to selvedge the woof. The selvedge should be trimmed off, as it is hard to sew through and draws up when wet.
Eyelets and Loops.—An eyelet is a small hole made and worked in a garment to receive a cord, stud or loop of a button. Punch the hole with a stiletto, pushing the threads apart rather than breaking them. Overhand closely from right to left with short even stitches. A large eyelet may be cut out and worked around with the buttonhole stitch. A blind loop is made in place of the eye to receive a hook. Put three or four long stitches in the same place beginning at the left, so that the thread will be at the proper place for working the loop with the blanket stitch.
Joining and Fastening Thread.—When sewing, care should be taken in joining threads. The manner in which it is done depends upon the stitch in use. In hemming, leave a half-inch of the old and a half-inch of the new thread, tuck both under the hem and continue hemming over the threads. The same plan is followed in overhanding. In the blanket stitch, feather stitch, herringbone, chain and buttonhole stitch the new thread must come out through the last stitch. Thoughtful attention should be given to the fastening of threads, as careful, painstaking work may soon be rendered useless by the loosening of the thread from the end.[81] After fastening securely clip off all threads that the work may be not only strong, but neat. The usual fastening consists of several backstitches taken in the same place.
Mitered Corner.—Two hems crossing at right angles may be finished either with the square or the mitered corner. To miter a corner, turn and crease a quarter-inch fold on both sides. Turn the second fold of the hem the desired width on both sides and crease. Open out the corner and place a dot where the inner creases cross. Place a second dot a quarter of an inch from the first toward the corner. Through this second point draw a line passing from side to side, across the corner, being careful that the line is an equal distance from the corner on both sides. Cut off the corner on this line. Fold both hems again on the creases before made and pin the hem on one side in place. Make a pin hole as near the exact point where the hems cross as possible, passing through both hems. Fold in the bias edge on the hem that is not pinned down, exactly from the pin hole to the corner, causing the edges of the two hems to meet at an angle of forty-five degrees.
Patterns.—With the varied, complex and ever-changing styles of fashion, individual pattern drafting (except for a very simple article) is impracticable, usually resulting in commonplace garments and involving useless time and labor. For the trifling sum of ten or fifteen cents reliable, up-to-date patterns can be secured which are cut to established measurements by a fashion expert. A good needlewoman supplies herself with a good pattern and then cuts accurately, bastes carefully, and finishes neatly, and in nearly all cases, results will be satisfactory.
Plackets.—A placket is an opening made in a garment. There are several ways of finishing an opening, but in all cases, except when the gusset is used, the underside should extend some distance under the top to prevent gaping.
This is the placket used on children's drawers, night shirts, under garments, etc.
Cut the opening the desired length. Cut the facing with the warp a little more than twice the length of the opening and twice the desired[82] width when finished, plus one-fourth inch, or more, allowed for seams. The following are the successive steps for making the placket:
a. Fold the cloth, right sides together, in a line with the opening.
b. Double the facing across the warp, through the center, wrong sides together.
c. Slip this between the folds of the cloth so that the fold of the facing will just come to the end of the opening. This will bring the right side of facing to the right side of the cloth.
d. Baste the facing to the cloth down one side and up the other side of the opening.
e. Stitch with an eighth of an inch seam, which will render unavoidable a small pleat at the end of the opening the width of the seam.
f. Crease the facing back over the opening exactly in the seam.
g. Turn an eighth of an inch fold the length of the facing down the other side.
h. Fold this over the seam to the stitching, baste, and hem.
i. At the top of the opening fold the right-hand facing back and stitch along the edge to hold in place.
This is the placket used on dress skirts, petticoats and carefully tailored garments.
Follow the directions for the successive steps for making Placket A through "g," as the two plackets are the same to this point.
The left side of the facing will consist of an extension hem the same as in Placket A, the only difference in the plackets being the manner of finishing the right side or top facing.
h. After turning the fold the length of the facing, place the edge of this fold to the stitching on the other side of the seam, and crease the facing through the center the long way, as in Placket A.
i. As the right side is to be hemmed down as a facing, it is desirable to cut out one thickness of the cloth, leaving, of course, the quarter-inch inside the long crease, and also at the cross fold, at the end of the opening as the first fold on the facing.[83]
j. Baste this facing flat to the cloth, and hem.
k. Stitch once across the top facing only, just at the bottom end of the opening.
As this consists of an extra piece which extends over the opening, it is necessary to allow for this in cutting, so that the middle of this piece will come in the center when finished. When cutting this opening in a nightgown, cut to the right of the center one-half the width the facing is to be when finished. The following are the successive steps for making the nightgown opening:
a. Cut the opening the desired length. Cut the facing in two pieces, one a little more than twice the length of the opening, and the other the length of the opening plus the width of the facing, both pieces to be the desired width plus the allowance for seams. (These two pieces will be designated the long and the short facings.)
b. Place the short facing to the right-hand side of the opening, right sides of cloth together and even at the top. Pin in place.
c. Place the long facing to the back of this same side with the right side of facing to the wrong side of the cloth, thus having the three thicknesses of cloth together. Pin in place and baste a quarter of an inch from the edge. Stitch an eighth of an inch seam.
d. The long facing is a continuous facing, the same as in Plackets A and B. Baste up the other side and stitch, the seam being on the right side of the cloth.
e. Crease both facings open in the seams. Turn in a fold on the other side of the short facing and turn the end to a square point.
f. Turn a fold the length of the long facing so that it matches the width of the short piece.
g. Baste the two facings together and the flat facing to the cloth.
h. Stitch around the short facing and twice across it at the end of the opening. Stitch or hem the under side of the flat facing.
This method of finishing an opening is sometimes used on drawers and night-shirts instead of Placket A. The following are the successive steps for making the gusset:[84]
a. Cut the opening the desired length.
b. Hem both sides with a very narrow hem running to a point at the end of the opening.
c. Cut a piece of cloth one and one-half inches square. On this square fold down one corner three-fourths of an inch on the sides and cut it off. Turn a fold one-eighth of an inch all around this piece. Place the corner which is opposite the diagonal cut to the middle of this cut and crease.
d. To sew the gusset in, place the apex of the triangle to the end of the opening and overhand on the wrong side to the crease before made.
e. Fold over the remaining part to the wrong side, baste and hem. Stitch along the fold of the gusset to strengthen it.
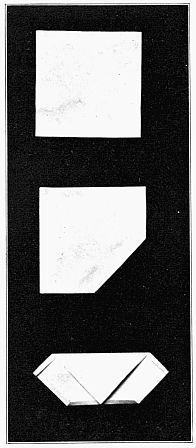 FORMATION OF GUSSET.
Putting in Sleeves.—After trimming the arm hole, measure one inch back from the shoulder seam and mark with a pin. Fold the garment at the arm hole with this pin at the top of the fold and place another directly opposite it. Call this point A. Remove the first pin to avoid confusion. For a sleeve for an adult, measure from the shoulder seam five inches on the front and mark with a pin. Call this point B. Measure from the shoulder seam three inches on the back and mark with a pin. Call this point C. With the sleeve right side out place the under seam of the sleeve at A and pin together at this point. The gathers are to come at the top of the sleeve between B and C. For misses and children the measurements should be decreased proportionately. Measure the sleeve on the arm-hole and cut small notches at B and C. Gather the sleeve between these[85] notches one-fourth of an inch from the edge, with a strong thread a little longer than the distance to be gathered. Put in a second gathering one-eighth of an inch from the first. Put in place at points A B and C; draw up the gathering threads to the proper length and fasten by winding around a pin. Arrange the gathers between B and C, pushing them a little closer together in front of the shoulder seam. Hold the inside of the sleeve next to you and, beginning at B, baste first around the plain part, then the gathered part. Stitch inside the basting and bind the seam.
Seams.—A seam is formed by sewing together two pieces of cloth. There are several different methods of joining them. Those known as the raw seams may be joined by stitching, half-back stitching, overhanding or the combination stitch. The closed or finished seams are known as the French Fell, French Seam, Hemmed Seam, Flannel Seam and the Bound Seam. No garment should be finished with a raw seam, which is only properly used when covered with a lining, or as the first step in one of the finished seams.
Place the two pieces to be joined, right sides together, edges even and baste one-fourth of an inch from the edge. Sew with the combination stitch (or machine stitching) three-eighths of an inch from the edge. Trim three-sixteenths of an inch from the under side of the seam and crease the upper side of the seam over this. (In hand sewing there is a long stitch on the under side. Be sure to trim from this side so that the short stitch comes on the top.) On the right side of the garment crease carefully and baste along the edge of the seam to prevent the fullness which beginners are so liable to have over the French Fell on the right side. Turn to the wrong side, baste the seam flat to the cloth, and hem.
Place together the wrong sides of the pieces to be joined, and baste one-fourth of an inch from the edge. With the running stitch sew one-eighth of an inch from the edge. Carefully trim off the ravelings, fold the right sides together and crease exactly in the seam, baste and stitch the seam, taking care that no ravelings can be seen and that the seam is perfectly smooth on the right side.[86]
This is used for joining thin material, lace, etc. On one piece fold an eighth of an inch seam (or more, if necessary) to the right side of the cloth, and on the other piece fold an eighth of an inch seam to the wrong side. Place the right sides of the two pieces together with the raw edge of one piece under and to the folded edge of the other. Baste this fold down over the raw edge sewing through the three thicknesses of cloth. Fold over in the crease and baste through the four thicknesses. Stitch, or hem by hand, along the edge of the seam on both sides of the cloth.
The flannel seam is used on material so thick that it is necessary to finish over a raw edge, instead of with a seam involving several thicknesses of cloth. Place together the right sides of the two pieces to be joined and baste one-eighth of an inch from the edge. Stitch one-fourth of an inch from the edge and remove the bastings. Trim the seams smooth, open and baste flat to the cloth. Herringbone stitch over the raw edge of both sides of the seam. One side of the herringbone stitch should come just over the raw edge of the flannel. The edges must be kept smooth, and unless the flannel ravels easily, the herringbone stitch should be not over one-eighth of an inch deep and close together. This stitch is used also on the flannel patch.
Seams may be bound with the two parts of the seam together, or they may be pressed open and bound separately. This may be done with a bias strip, binding ribbon or tape.
a. Binding the entire seam—Place together the two right sides of the pieces to be joined and baste one-eighth of an inch from the edge. Place the bias binding (three-fourths of an inch wide) with the wrong side of the cloth up and the edge of the binding one-eighth of an inch from the edge of the seam, and baste in place. Stitch through the three thicknesses of cloth a quarter of an inch from the edge. Turn in one-eighth of an inch on the other side of the binding and hem it down just above the stitching on the other side of the seam. This method of binding is used on the arm-holes of garments or wherever it is not feasible to open the seam and bind separately.[87]
b. The Open Bound Seam—Prepare the seam as above without the bias binding. Trim and press the seam open. Double the binding ribbon through the center and crease. Place the raw edge of the seam to the fold of the ribbon and run along the edge, catching through to the under fold. Tape may be used for binding, but must be basted on first and hemmed down.
Sewing on Buttons.—There are two important requirements for sewing on buttons—to put in sufficient thread, and to fasten this thread securely that it may not loosen from the end. In sewing flat buttons on coats, jackets, etc., place a small button on the under side and sew through it to avoid having the stitches show on the under side.
a. The Loop or Shank Button—Place the button in position with the loop at right angles to the edge of the cloth. Hold the button with the left hand and overhand the loop to the cloth. Pass the thread to the under side and fasten.
b. Four-Hole Button—In sewing on flat buttons insert the needle from the right side and back in order to hide the knot under the button. Place the button in position and hold a pin across the button for the purpose of lengthening the stitches. Put in five or six stitches diagonally across the button and over the pin. Change the position of the pin and repeat. Slip the pin out, pass the needle through the cloth only, and wind the thread around the threads between the button and the cloth. Pass the needle through the cloth and fasten securely.
c. Two-Hole Button—Place the button so that the stitches will come at right angles to the edge of the cloth, with the pin across the button. Proceed as with the four-hole button.
Sewing on Hooks and Eyes.—In sewing hooks and eyes on a garment it is best, where practicable, to cover the ends with the lining of the garment or with a piece of tape. In sewing them on the edge of a hem or facing turn the edge of the hem back over the ends of the hooks and eyes and hem it down. Where they are to be covered they should be strongly overhanded to the garment first. When covering is not feasible place the hook or eye in position and buttonhole around the top, beginning[88] at the right-hand side and inserting the needle under and up through the hole, throwing the thread around the needle as in the buttonhole stitch. The hook should be sewed down at the point before breaking the thread. The worked loop is often used in place of the metal eye. For this purpose cut a stiff pointed piece of cardboard the length of the desired loop and work the loop over this, when the cardboard can be easily slipped out. The loop is worked from left to right with the blanket stitch the same as the bar of the buttonhole.
Sewing on Lace.—When sewing lace to an edge always hold the lace next to you. Lace may be put on straight or gathered. At the top of most laces will be found a coarse thread woven into the lace for the purpose of gathering. Before drawing this up divide the lace and the edge upon which it is to be placed into halves, quarters or eighths, depending upon the length, and pin, with right sides together, at points of division. Then draw up the thread, arrange the gathers even, and overhand to the edge with fine even stitches. If the gathering thread is not in the lace, put it in and proceed as above. If the lace is to be put on plain hold it loosely to the edge and overhand.
When sewing the lace on plain to round a corner, overhand to a point as far from the corner as the width of the lace. (This point may be designated A, and a point an equal distance from the corner on the other side B.) From A measure on the lace twice its width and pin at the corner. Allow the same fullness on the other side and pin at B. Continue overhanding from B, leaving the corner until later, when the gathering thread will be put in, gathers arranged and the lace overhanded to the edge. If the lace is wide baste it in place at the corners before overhanding.
When sewing gathered lace to an edge, to round a corner proceed as above with this exception: The same fullness must be allowed on the corner that is allowed on the straight edge, in addition to that required to carry the lace around the corner without drawing. For example: If one-half the length of the lace is allowed for fullness on the straight edge, at the corner allow two and one-half times the width of the lace instead of twice its width.[89]
The manner of sewing two ends of lace together will depend upon the kind of lace to be joined, the pattern, strength, etc. The first aim to be considered is to have the joining strong enough so that it will not pull apart. The second is to join it so that it will show as little as possible. Several methods are suggested:
a. Lace made up of units can be easily joined by overhanding these units together.
b. If the pattern permits, cut the lace with the pattern, lay one edge over the other and buttonhole over each raw edge with fine thread.
c. Sew the lace right sides together, in a narrow seam. Lay the seam flat and buttonhole over the raw edge and at the same time down to the lace.
d. Turn a narrow fold on one piece to the right side and on the other piece to the wrong side, slip one under the other and hem down the two edges as in the hemmed seam.
Tucking.—Crease the first tuck where desired. For the second tuck measure from the first and allow twice the width of the tuck plus the desired space between. Repeat for the successive tucks.
This makes an excellent finish for the bottom of underskirts, petticoats and drawers. Measure up from the bottom twice the width of the desired hem plus one-fourth of an inch for the seam and crease for a tuck. Stitch the tuck. This will leave the raw edge extending one-fourth of an inch below the edge of the tuck. Place the ruffle along this edge, wrong sides together, and baste in a quarter-inch seam. Baste the tuck over the seam and stitch along the edge.
The fibers used in the manufacture of cloth are of two different natures, vegetable and animal.
The vegetable fibers may be divided into three distinct classes:
1. The cotton, having soft, lint-like fibers, one-half to two inches in length, is obtained from the seed-pods, called "bolls."
2. The fibers from flax, hemp and jute are flexible and of soft texture, ten to one hundred inches in length.
3. The hard or leaf fibers, including manila, sisal, istle and the New Zealand fibers, all having rather stiff woody fibers, one to ten feet long, are obtained from the leaf or the leaf stem.
The animal fibers are obtained from the wool bearing animals such as common sheep, Angora and Cashmere goats and the hair of the camel.
The silk fiber is obtained from the cocoon of a caterpillar.
Silk is the most beautiful of all fabrics. It is made from the fiber produced by the silk-worm which is a species of caterpillar. So perfectly does this little worm do its work that no spinning is required. This fiber, placed under a microscope, looks like a glass thread. It is the light playing along this smooth surface that gives to silk its beautiful luster.
Silk first came to Europe from China where the industry had been cultivated for many centuries. It is said this was begun by a woman, the wife of an Emperor, in the year 2600 B. C., and the culture of the mulberry, upon the leaves of which the silk-worm feeds and thrives, forty years later.
Several unsuccessful attempts have been made to introduce the cultivation of the silk industry into the United States. As the business requires a large amount of cheap labor for a short time during the year,[91] it has not as yet been found profitable. Machines are of little use, except in reeling the silk.
The moth lays its eggs, about five hundred in number, in August or September, and they hatch the following May, just at the time the mulberry comes into leaf. These little caterpillars are hatched and fed in-doors, and they eat like hungry school-boys for a month or more, until they are about three inches long. At this period they sicken and cast their skins, after which they begin eating as eagerly as ever. In about a month, however, the worms stop eating altogether, crawl up on the twigs which are placed on large trays, and begin to spin their cocoons. There are two little openings in the head of the worm, from which comes two thread-like substances resembling glue, from which the silk is made. These stick close together and form a flat thread. The silk-worm by moving its head about, wraps this thread around its body, wrapping from the outside inward, until it has completely inclosed itself in this silken blanket. Then it goes to sleep. If left to itself it would in two or three weeks bore its way out of this silky covering and come forth a feeble white moth. But as the cutting of this hole in the cocoon injures the fibers, only just enough for the next year's crop are allowed to come out. The rest are stifled in a hot oven.
After the outsides of the cocoons are removed they are placed in hot water which softens the gum that is in the silk so that it can be wound off on reels. The silk fiber is all in one piece, and about one thousand feet long. There is always a portion of the cocoon which is too tangled to be wound, and it is made into what is called spun silk. Spun silk is carded like wool. The removal of the natural gum, by boiling in strong soap suds, effects a considerable loss in weight, the cleansing process, however, causing it to take on very beautiful tints. This loss has led to the weighting of silk by mixing cheaper materials with it.
An artificial silk is made from the fiber of the ramie plant which grows in China and Malay. This is sometimes known as China silk. Mercerized cotton has also been treated so as to very successfully imitate silk.[92]
The Plant.—Cotton is one of the most important vegetable fibers, distinguished from all other fibers by the peculiar twist it possesses which makes it especially adapted to spinning. It is cultivated between the twentieth and thirty-fifth parallels north of the equator. This is known as the cotton belt. Within this belt lie the cotton districts of the United States, Northern Mexico, Egypt, Northern Africa, Asia and India.
Although cotton is cultivated mainly for the fiber surrounding the seeds, its by-products, the seeds and stalks, are of great commercial importance, being manufactured into oil-meal, oil cakes, cottolene, etc. There are about fifty species of the cotton plant but only a few are cultivated, the best known and most commonly used being the "American Upland," which is now cultivated in many parts of the world. The two varieties grown in the United States are the "Sea Island" and the "Upland." The former is much more valuable because its fiber is longer. It is cultivated on the islands and low-lying coasts of South Carolina, Georgia and Florida. The latter, while not so valuable, furnishes most of the crop and is grown over a wide area.
The plant grows from seven to ten feet high. The leaves are sprinkled with small black dots. The hollyhock-like flowers are white and yellow when they first open, but two days later they turn a dull red. Surrounding the flowers are three or four cup-shaped green leaves which together are called squares. These remain after the petals have dropped, to serve as a protection to the bolls.
Cotton thrives best in a rich, deep soil with a hot, steamy atmosphere. It should have plenty of moisture while growing and a dryer period during the ripening and gathering of the crop. The most of the cotton crop is planted by the twentieth of May. Six weeks after it begins blossoming the first bolls are ready for picking. This is done by hand, and as the bolls do not all ripen at the same time, it is necessary to go over the field many times, and the picking often lasts until the middle of December. The cotton is gathered into baskets hung from the shoulders of the pickers.
The Preparation of the Fiber.—After the cotton is picked it is taken to the gin which separates the fiber from the seed. Until the cotton[93] gin was invented in 1793, by a Connecticut teacher, then living in Georgia, the cultivation of cotton was not profitable, as one person could only clear the seeds from five or six pounds a day. This machine has revolving teeth which drag the cotton between parallel wires, leaving the seeds behind. With this machine a slave could clean about a thousand pounds in a day. This gave a wonderful impetus to the cotton industry, and its cultivation increased enormously.
After the seeds are removed the cotton is put up into bales weighing
about five hundred pounds each, and is then ready for shipping. When
these bales are received at the factory the cotton is so closely matted
together that it must be broken up or loosened. This is done in the
blending room where it is first run through heavily weighted and spiked
rollers which pull the cotton apart. It is then blended or mixed to make
it of uniform quality. After this it is taken to the carding room. Here
the fibers are drawn parallel to one another and bits of leaves and unripe
fibers removed, when it is put through the drawing frame, consisting of
a pair of rollers. These parallel, untwisted fibers are now called "slivers."
From the drawing frame these "slivers" go to the slubbing machines
where it is lightly twisted and wound on bobbins. This process is repeated
on similar machines each one drawing the thread out and twisting it
a little more, until it is finally ready for spinning.
Spinning.—Two systems of spinning are in use at the present time, ring spinning and self-acting mule spinning. The former is done mostly by women and children, and produces a hard, round irregular yarn. The latter machines, operated only by men and very strong women, are complicated, but produce an exceedingly soft and fine yarn.
The thread used for sewing and for the manufacture of lace is made
by twisting several fine threads together. Sewing thread is usually composed
of from six to nine threads spun separately and then twisted into
one. Thread is sometimes passed very rapidly through a flame which
burns off the fuzz making it very smooth.
Weaving.—Three operations are necessary in the manufacture of cloth; First, the separation of the warp threads on the loom, so that the shuttle containing the woof can pass through. Second, the movement of[94] the shuttle, back and forth, among the warp threads. Third, the beating up the woof.
The fibers of flax are spun and woven into a fabric called linen. This
is one of the most ancient industries known to man. Linen is often mentioned
in the Bible and the ancient Egyptians wrapped their mummies
in this fabric. It is said that the finest linen of the present day looks
coarse beside that from the Egyptian looms in the days of the Pharaohs.
The Hebrew and Egyptian priests wore garments made of this fine linen.
The Plant.—Flax grows from two to three feet high, and has a blue flower. A field of flax in blossom is very beautiful.
While it is grown extensively in many parts of Europe, Asia and America, the soil and climate of Ireland, France and the Netherlands are especially adapted to its growth, and it is in these countries that it reaches its greatest perfection.
The fiber of the bark is the part of the plant used in the manufacture of
cloth. Linseed oil is expressed from the seed.
The Preparation of the Fiber.—When the plant is ripe it is pulled up by the roots and beaten to loosen the seeds which are then shaken out. Next the stems are steeped in soft water and afterward allowed to ferment. They are then dried and passed between fluted rollers which breaks the woody part of the stems which are again beaten to remove this woody part from the fiber. The fiber is then made into bundles and sent to the mill to be spun, where it is first roughly sorted, the longest and best portions being separated from the short raveled ones. These inferior portions are called "tow."
The treatment of the flax fiber for spinning is similar to that of the
cotton (page 92), being drawn and twisted and drawn out again, repeating
this process several times.
Spinning.—Coarse and heavy yarns are spun dry, but fine yarn must be spun wet. Some varieties of velvet and velveteen are made from linen. Much of the so-called linen cloth of the present day is mixed with cotton[95] or jute. The principles of weaving are the same as that of the cotton. See page 93.
For many centuries the weaving of linen was conducted as a household industry. The first attempt to manufacture it on a large scale was in England in 1253. It is now one of the national industries. Linen is bleached after it is woven. In the olden times it was spread upon the grass, or lawn, and the action of the sun, air and moisture whitened it, and for this reason it was called "lawn," and it is still so designated. In the modern process of bleaching, the linen is first singed by being passed rapidly over hot cylinders which makes the cloth smooth. It is then boiled in lime water, washed and afterwards scoured in a solution of sulphuric acid, exposed to the air for a time and again scoured. Lastly, it is boiled in soda-lye water and dried over hot tin rollers. The gloss on linen is made by first mangling, then starching, and finally running it between heavy rollers.
Linen is chiefly manufactured in France, Belgium, Germany, England and the United States. France is noted for the finest kinds of lawn and cambric, while Ireland excels in the production of table linen. The largest portion of the sheeting and toweling is made in Scotland. The linen manufactures of the United States consist principally of toweling and twine.
Wool is the fleecy covering of sheep. It is distinguished by its waviness and the scaly covering of the fibers. The scales are more pointed and protrude more than those of hair. This gives it a tendency to mat or felt. The waviness of wool is due to the spiral structure of the fibers. Next to cotton, wool is the most extensively used of all the textile fibers.
The Romans developed a breed of sheep having wool of exceeding fineness,
and later introduced their sheep into Spain. Here they were still
further improved, and it was not many years until Spain led the world
in the production of wool. The fine wooled Merino sheep originated
here. Australia and the United States are also great wool-producing
countries.[96]
Classification.—There are three classes of wool, classified according to the length, fineness and felting qualities:
Wool on different parts of the same animal varies greatly, that on the shoulders being the finest and most even. All unwashed wool contains a fatty or greasy matter called yolk or suint. This keeps the fiber from matting together and also protects the fleece from injury. The yolk must be removed before the wool is manufactured into cloth. When the fleece is cut from the body of the sheep it sticks together so that it can be spread out like the hide of an animal, and each fleece is tied in a separate bundle. A few years ago sheep shearing was done by hand. This was a busy time, especially on large ranches where thousands of sheep were to be sheared and it required a large crew to do the work. It is now accomplished with much less time, labor and expense by machinery.
Alpaca and Mohair are classed as wools, but the former is produced
by the Alpaca goat and the latter by the Angora goat. Cashmere wool
comes from the Cashmere goat, found in Thibet, and is very costly, as
only the finest parts of the fleece are used. In the far eastern countries
beautiful, costly fabrics are made from the long hair of the camel.
Preparation.—When wool comes to the factory in the raw state it must be scoured. This is done by passing it through machines containing strong soap suds, and afterwards rinsing it. After the wool is dry it is mixed or blended. Mixing is an operation of great importance and is done to make the wool of uniform quality. Portions of wool from different lots, qualities and colors are placed in alternate layers and blended. If it is desired to mix other materials with the wool, such as silk, cotton or shoddy, it is added at this time.
The wool is harsh to the touch after it has been scoured, owing to the
removal of the yolk. To restore its natural softness it is slightly sprinkled
with oil during the process of mixing.
Carding and Spinning.—The process of carding produces a thread
having fibers projecting loosely from the main thread in little ends which[97]
form the nap of the finished cloth. After it is carded it is wound on
spools and is ready for the spinning. In spinning the threads are held
together by their scales and the waviness of the fiber which prevents them
from untwisting. Another valuable feature of wool is its elasticity, which
makes it soft to the touch and this is retained in the manufactured goods.
Woolens.—There are two classes of woolen textiles, woolens and worsteds, depending upon the character of the fiber used, and the treatment to which it is subjected. The shorter varieties of wool are used in woolens, while the long fibers are combed out and used for the worsteds. In making woolen yarns the wool is simply carded and very loosely spun, but in making worsted thread the wool is combed out and hard twisted. Owing to the nap of the woolen goods the weaving is scarcely visible, but in the manufacture of worsteds the weave is evident and a great variety of designs is possible.
A variety of effects can also be produced by the character of the finish. Among the principal varieties are:
While the finish may differ, the general treatment of the cloth is practically the same. The first step is called pulling, when the cloth is soaked in hot water and pulled by a pulling machine. It is soaked, pulled and beaten until it is only half its original length and breadth. It is then rinsed and stretched on a frame where it will dry without a wrinkle. At this time the nap is raised by beating the cloth with the spike head of the teasel plant or its substitute. The pile or nap is then trimmed so as to present a uniform surface, when it is wound tightly around a huge drum and immersed in hot water. Finally it is pressed in a hydraulic press, during which time steam is forced through it. This is to give solidity and smoothness to the cloth and also to add luster to the finished fabric.
Art education should bring to every girl a greater appreciation of beauty and a sufficient knowledge to enable her to beautify her home and to dress herself becomingly. This is the real "applied art" or "applied design" of which we have heard much but seen little.
The power and skill necessary to originate an intricate and artistic design, and a technical knowledge of color-blending are worth something to the individual, but the ability to apply this knowledge later to the decoration of her home and to the selection of her own wardrobe is of vastly greater importance.
An artist who paints the human figure, draws and erases and draws again, and yet again, that the contour of the form he creates may be right in proportion and graceful in line. He studies his coloring, he compares, rejects and blends for a particular shade or tint that makes for complete harmony. No discordant note of color nor turn of line that detracts from the beauty of the whole is allowed. And there are artistic makers-of-garments who put into the costumes they create the same thought and care that the artist spends upon his canvas, but the prices of both are within the reach of very few. Nearly every woman must plan her own wardrobe and choose the furnishings for her home and this is what "Art" and "Domestic Art" in the public schools should train the girl of to-day—the woman of the future—to do.
Art on paper is the preparation for a journey—packing the suitcase, as it were, necessary but toilsome; the application of art principles to the problems of real life, the delightful excursion, opening the eyes to real beauty and its possibilities. May the children in our schools have something more than the drudgery of preparation.
Clothing was first designed in the early ages, no doubt, as a covering and protection to the body; it has come, however, to mean something more than this. It is an expression of the character, the nicety of taste—or lack of it—the discrimination and judgment of the individual. In the selection[99] of one's garments there are a number of points which must be taken into consideration, such as health and comfort, cost, fitness, color and style, as well as beauty. And above all, the average woman must pause and consider last season's garments, that are too good to be discarded and must form a part of this year's wardrobe. It is quite disastrous to plunge ahead and buy a blue dress, because blue happens to be stylish, if the hat to be worn with it is a green or brown "left over."
While a due regard to the opinions of others demands a certain conformity to the customs of the time and place in which one lives, there is always a latitude allowed which enables one to exercise individual needs, taste and preference.
Health and comfort should take rank before everything else. A style which interferes with either is an absurdity which anyone of good sense will avoid.
Neatness should be considered above beauty or style. A soiled collar, hooks, eyes and buttons missing, gloves out at finger ends, shoes dusty and unpolished, braid hanging from the skirt, the waist and skirt separated are all accidents which may befall anyone, but are most deplorable when they become chronic.
It has been wisely said that the best dressed woman is she of whose clothing one is unconscious, whose dress is neither conspicuous from extreme style nor too noticeable from a total disregard of the custom of the times. Good taste demands that one be not overdressed. Street and business suits and young girls' school dresses should be plain, well made and neat, of subdued and becoming color.
"Costly thy habit as thy purse can buy," wrote Shakespeare, and the advice still holds good. Economy does not consist, however, of buying cheap, shoddy material. Trimming can be dispensed with to the improvement of the average garment, but a dress made of good cloth will out-wear, look better, give greater self-respect, and in the end cost less than several dresses made of cheap stuff, as the cost of making is no more for the one than the other. This is a principle that applies as well to underwear. Simple garments, well made of firm fine cambric are much to be preferred to those overtrimmed with cheap lace and sleazy embroidery.
Some colors and styles are becoming to certain complexions and forms[100] and are quite the reverse to others. A short stout person should avoid plaids, while one overly tall should never select stripes. The lines of the garment are equally important—any method of trimming that gives length, the long lines of the "princess" and the "empire" styles are a boon to the short figure, while the overskirt, the deep flounce, and the bands of trimming running around the skirt, all help to break the long lines for the tall woman. Belts that by contrast divide the figure are not good unless one wishes to shorten the height. Waists and skirts of the same color usually have more style and give better form.
Give careful heed to the selection of color, not only to the dress but to the accessories, hat, gloves, collar, belt and shoes, as well. In fact, consider the costume as a whole made up of parts, each one of which must harmonize with every other.
Before sewing machines were to be found in every home and ready made clothing in the stores styles did not change so rapidly. Commercial conditions now make it to the advantage of a great army of people that the styles in dress change often and radically. The manufacturers of cloth, the wholesale merchants with their agents, the retailers and their numerous clerks, wholesale garment-makers and their many employes, pattern-makers, dress-makers, milliners and the manufacturers of all minor articles of clothing are all benefitted by this oft recurring change in style. This condition has come about so gradually that we hardly realize to what extent we are victims of trade-tricks. It is not necessary nor desirable that woman should enslave herself to follow all the vagaries of style.
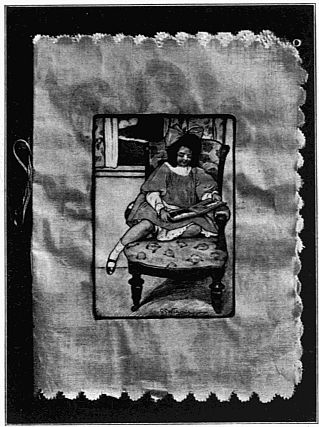 CHILD'S PICTURE BOOK.
Materials: Pink, blue or yellow paper cambric 27 inches; coarse thread; coarse needle; bright, pretty pictures which the children have cut from papers, magazines, cards, etc.; paste.
Fold the cloth through the center with the warp and cut on the fold. Fold both strips into three equal pieces with the woof, and cut. Fold each[102] piece through the center parallel to the selvedge. Place two pieces together and pin at the fold, and "pink" through the four thicknesses, around the edges with a "pinking iron." Do the same with the other pieces. When finished place them all together and stitch at the fold at follows:
1. Mark three holes on the fold with the needle, one in the middle and one two inches above it, and another two inches below it.
2. Tie a large knot two inches from the end of the thread.
3. Insert the needle at the lowest hole, from the inside, and draw it through leaving two inches of the thread to tie.
4. Pass over the middle hole and down through the upper one, out through the middle hole on one side of the long thread, and back through the same hole on the other side of the thread, and tie the two ends of the thread together.
Paste a pretty card or large picture on the outside for the cover. Page the book with neat figures and write the name of the child for whom the book is designed on the inside of the cover. Arrange and paste in the pictures neatly.
Materials: Cardboard for foundation 9" × 9"; cover 7" × 7"; colored paper for covering; strips of cloth or glue-tape for staying corners; glue. Use tooth-picks in applying the glue.
 GROUP OF BOXES.
Find the center of the card by drawing both diagonals. Measure two and one-half inches from the center toward the sides. Draw straight lines passing through these points connecting opposite edges, thus forming a five-inch square in the center. Cut out the corners on these lines. Hold the edge of a ruler firmly to the lines of the square and bend the cardboard. Fold the strip of cloth or tape through the center and put the glue on this, using very little, and taking care to keep it back from the edge. Cover the corners with the cloth. Cut a strip of the colored paper twenty-one inches by two and three-fourth inches. Put a very little glue on the outside of the box and cover with the colored paper. Turn over the edges and glue them down. Follow the same directions for making the cover, measuring two and five-eighth inches from the[104] center of the seven-inch square of cardboard. Cover the sides and top with the colored paper, the strip for the sides being twenty-two inches by one and one-half inches, and the top a five-inch square. This box can be made in any size or shape, the same general plan being followed.
 A BLANK BOOK.
Materials: Strong felt paper 9" × 10"; book cloth for back 10" × 3¼", for corners 4 pieces 2" × 1¾"; lining paper for covers, 2 sheets 4¼" × 9½"; number of sheets of paper desired for the book 8½" × 9½"; coarse thread; coarse needle; glue. Use tooth-picks in applying the glue.
Draw a line on the felt paper through the middle the long way and fold on the line. Measure on the outside one and one-fourth inches from the corners along both edges, and place points. Connect these points with straight lines. Place the long edge of the cloth corner to this line, and fold it over the corner and crease. Remove and trim it even before gluing on. Put the glue always on the cloth and use as little as possible. Crease the strip of book-cloth for the back, through the center, but do not glue in place until after the leaves are sewed in. Fold the sheets of paper through the center of the book. Follow the same directions for sewing the leaves together as given in the description of "A Child's Picture Book," page 101. Finish by gluing the paper lining on the inside of the cover and the strip of book-cloth down the back.
This book could be made any size or shape, and decorated as desired.
Materials: Strong felt paper, or its substitute; (a sheet 20" × 30" cut through the center the short way will make two cases. If two harmonious[105] colors be selected, the corners cut from one case can be used to decorate another); book cloth in one-inch strips for binding; glue. Use tooth-picks in applying the glue.
 BACK AND FRONT VIEWS OF A FOLDING ENVELOPE CASE FOR PAPERS.
On the wrong side, find the center of the paper twenty inches by fifteen inches by drawing both diagonals. Measure four and one-fourth inches from the center toward the sides. Draw straight lines passing through these points connecting opposite sides, thus forming an eight-and-a-half inch square in the center. Cut out the four corners on these lines. Fold in the four sides on the lines of the square. A strap, which will fasten the case by slipping through a slit cut in the opposite side, is to be made on one of the long flaps as follows:[106]
Place a point at the middle on the edge of the flap, and measure an inch along the edge on both sides of this point. Measure down two inches from these last points and place dots. Connect these dots by straight lines with the top and sides. Cut the corners out on these lines. Trim the end of the strap to a point beginning one-half inch from the corners and cutting to the center point.
It is necessary to trim the edges of the flaps that there may be no difficulty in folding one over another. Measure one-half inch from the corners of the flaps and connect this point with the corner of the square, and cut on these lines. Fold the half-inch strip of book-cloth through the center; place the glue on the cloth and glue it for a binding around the raw edges of the case. Finish the corners of the binding with the square or mitered corner. Fold the fastening strap over the opposite side, and place a point at the corners to locate the place where the slit is to be cut. Connect these two points by a straight line and draw another parallel to, and three-fourths of an inch from it. Cut on these lines with a knife. This slit must be strengthened by the book-cloth. Cut a piece two and three-fourths inches by one and one-fourth inches and glue over the strip on the wrong side; clip the edges at the ends of the slit, and bring through to the right side, and glue them down. The piece for the covering of the right side may be cut the exact width of the slit, and the ends cut in some fancy shape. This may be cut from the cloth, or the paper used in the design. The front of the case can be decorated as desired. Very beautiful effects can be obtained by cutting out the design from paper that harmonizes in color and gluing it on. This makes a very useful case for holding school papers, and if neatly and carefully done, is an excellent exercise.[107]
Materials: 4 envelopes, 41/8" × 9½"; 4 strips of book-cloth 9½" × 1"; 1 strip of book-cloth 10" × 3½"; 4 pieces of book-cloth 2" × 1¼"; heavy felt paper 9" x 10"; 2 sheets lining paper 4¼" x 9½"; glue. Put the glue on the cloth each time with tooth-picks.
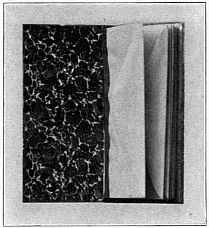 CLIPPING CASE.
Follow the directions for making the cover of the "Blank Book with Paper Cover Re-inforced with Cloth," page 104. The envelopes take the place of the sheets of paper and are fastened in place as follows:
1. On the back and front of the envelopes draw a line parallel to and one-half inch from the bottom.
2. Fold a strip of book-cloth one inch by nine and one-half inches through the center the long way.
3. Glue one-half of this folded strip to the half-inch below the line on the back of one envelope and the other half to the half-inch below the line on the front of another envelope. Continue thus until the four envelopes are fastened together.
4. Glue half of a strip of the cloth to the front of the first envelope and the other half to the front of the cover to hold in the desired position. Do the same at the back.[108]
5. Glue in the lining papers on the covers.
The outside may be decorated as desired.
Materials: Paper for leaves of book; pulp board in three pieces, 5" × 8", 5" × 6¾", 5" × 1"; book-cloth in two pieces 6" × 9"; lining paper in two pieces 4¾" × 7¾"; glue; eyelet punch and eyelets.
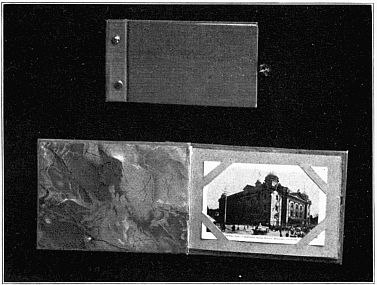 TWO VIEWS OF A POST CARD ALBUM—CLOSED AND OPEN.
To be of value the work in this exercise must be exact, with measurements perfectly accurate. The glue is to be used sparingly and spread upon the cloth and not on the pulp board.
Draw on the book-cloth an oblong five by eight inches, which will leave a margin of one-half inch. Put the glue on the cloth and place the pulp board five by eight inches over the oblong. Turn over the edges and finish. Glue the lining paper in place. Place under weight as soon as finished. The front cover is made the same with the exception of a joint in the pulp board. Draw on the second piece of book-cloth an oblong[109] five by eight inches. Draw a line one inch from and parallel to one end of the oblong. Draw a second line one-fourth of an inch from this. Spread the glue on the cloth and place the two pieces of pulp board on the oblong with a quarter-inch space between them, and proceed as before. Both covers can be made with the joint if desired. Punch with the eyelet tool two holes in each cover three inches apart and one-half inch from the edge, and put in the eyelets. Take care that these holes are directly opposite. Cut the paper for the book into sheets four and one-half by seven and three-fourths inches (or four and one-half by fifteen and one-half inches), and fold. Punch the eyelets exactly even with those in the cover. Place a postal-card three and one-half by five and one-half inches on the sheets with a half-inch margin at top, bottom and end, and make two points on each of the four sides, one one-half inch from the corner, and the other one inch. Connect corresponding points by slant lines and cut with a knife on these lines. The outside cover can be decorated in any way desired. This style of cover can be used for a book of any size or shape.
Select a mount of the proper color for the picture to be used, and passepartout paper to harmonize. Cut to the desired size and shape. Cut a piece of cardboard to the same size. Have a glass cut to the size of the mount, also a mat for the picture, if desired. Place the picture in position on the mount, and draw guide lines to aid in pasting the picture in place. Put the two rings used for the purpose of hanging the picture, into the cardboard back before putting the parts together. The rings should be placed exactly even, measuring down from the top about one-third of the width of the picture, and in at the sides one inch. Clean the glass carefully, and place it over the picture. Between the cardboard back and the picture place two or three layers of newspaper. Be sure that the back is placed with the rings toward the top. Tie all together very tightly with a strong cord, passing the cord only around one way of the picture. Cut the passepartout paper the length of the picture and crease it over the edges. Moisten the paper and stick it first to the glass and then draw[110] it firmly over the edge and down on the cardboard back. It is necessary to work rapidly after the paper is moistened. Finish the other edge in the same manner. Before removing the cord, tie another around the other way. Finish the two ends in the same manner as the sides, with the exception of the corners. Cut the passe-partout paper an inch longer than the side to be covered, and do not fasten down quite to the corner. Trim for a mitered corner on the glass side and cut a narrow strip the thickness of the glass, and stick it down along the other edge. Tie a cord into the rings for hanging.
Materials: Cardboard; book-cloth or Japanese tissue paper; passe-partout paper.
Cut a pattern of one section of the shade in the form of a trapezoid having the longer parallel five and seven-eighth inches, the shorter parallel one and three-eighth inches and the altitude four and one-half inches. Candle shadeholders are uniform in size being six and one-half inches in circumference. To fit this circular holder, the shade may be rounded out at the top, although it can be used with the straight edge. Cut a strip[111] of cardboard five inches wide, and from this cut the four sides of the shade.
The decoration of the shade may be varied greatly. The design may be drawn upon the back of the cardboard and cut out the same as a stencil, care being taken that the proper bridges are in place. The book-cloth is then pasted on the back. If the cardboard is intended as a framework only, construct a second trapezoid one-half inch inside the other, and cut on the lines. The possibilities for decoration are limitless. A design may be stenciled, embroidered, or worked with any of the fancy stitches upon any thin material through which the light will shine, and then pasted over the back of the frame-work. Fancy silks are also very effective.
When the sections are finished, fasten them together with the passe-partout paper. Lay them all face downward with the sides to be joined placed as closely together as possible, and stick the moistened paper over adjoining edges. Book-cloth or any firm material can be used instead of the passe-partout paper.
Bright, clean, tasteful and well regulated homes will add more to the sum of human happiness than anything else in life. A happy home does not always mean a costly one. The simple, tidy home of the day laborer may have the home-atmosphere that the mansion may lack. A home can be tastefully, even if cheaply, furnished.
A thoughtful teacher can impart to her class a love of home and a respect and honor for the labor that keeps that home clean, attractive and wholesome, and instill womanly traits that may add greatly to the happiness of the individuals and the betterment of all with whom they come in contact. A familiarity with the conditions of an ideal home and the aroused interest of the girls who will be the home-makers in a few years will have an influence and value that is limitless. The parents, also, may receive suggestions through their children that will react on the present home conditions.
Every teacher will invent her own method of reaching her particular class, depending upon their needs and environment, using all necessary tact. An outline is given below which will suggest a few topics and one method of conducting the lessons. There are many kindred subjects, such as good ventilation, plenty of sunlight, good house-keeping, etc., that can be brought into the discussions, but the enthusiasm which is aroused is really the vital point of the lesson.
When furnishing a home take into consideration sanitary conditions, use, convenience, economy and artistic effects.
1. Ask pupils to make clippings of house plans from papers, magazines, etc. Study and compare them.
2. Decide upon a plan for a simple house, and have some member of the class draw the floor plans upon the blackboard where it can remain for a time.
3. Several points must be considered in conjunction, that there may may be harmony throughout the house as the rooms open into each other.
4. Divide the class into sections and assign a room to each section to suggest detail in style of furnishing and decorating.
| a. Living Room. |
| b. Dining Room. |
| c. Kitchen. |
| d. Pantry. |
| e. Hall. |
| f. Sleeping Rooms. |
| g. Bath. |
| h. Laundry. |
5. Avoid over-crowding the rooms with furniture and cluttering with too many pictures and useless and inartistic bric-a-brac, and dust-collectors.
6. The Care of the Home: This topic will enable the teacher to give many helpful suggestions. Assign sub-divisions of the subject to different members of the class:
| a. Sweeping. |
| b. Dusting. |
| c. Care of bare floors. |
| d. Window washing. |
| e. Dish washing. |
| f. Care of cupboards. |
| g. Care of book-shelves, daily papers, magazines, etc. |
| h. Care of sleeping rooms, beds, etc. |
| i. Care of bath rooms. |
Basketry is one of the oldest handicrafts known to man, but it reached its greatest excellence with the tribes of American Indians who wove baskets from the grasses, reeds and rushes which they gathered as they wandered from place to place in their nomadic life. These materials were colored with dyes made by cooking the bark of certain trees and the roots and bulbs of plants, a knowledge of which was handed down from mother to daughter.
The designs were not meaningless, but represented by symbols their prayers to the Deity for rain, success to a war party, or a petition for favorable crops. Or it might be they chronicled the victory over a hostile tribe, a maiden's love for a stalwart brave, or a thousand other events of their lives in conventionalized symbolic form. The shape, size and use varied as much as the design.
The material used by the Indians is not available for us but imported raffia, rattan and rushes form excellent substitutes. Raffia, a product of the Island of Madagascar, is a soft, pliable, yellowish fiber growing next to the bark of a species of palm tree. Rattan is the product of a kind of palm which grows in India. It is stripped of leaves and split into round or flat strips of different sizes.
A more instructive occupation cannot be found for children than basketry and its allied subjects. It not only is fascinating in itself, but develops patience, judgment, dexterity and skill, and embodies the satisfaction of making a beautiful and useful article. It is not only an educative occupation for school, but for the home as well.
Baskets are known as the woven baskets made of the round or flat rattan and the sewed baskets made from the raffia and reeds.
Preparation of Materials.—Round reeds are sold in sizes from the very fine Number 0 to the coarse Number 8. Hemp cord of different sizes may be substituted for the reeds of a flexible basket if desired.[115]
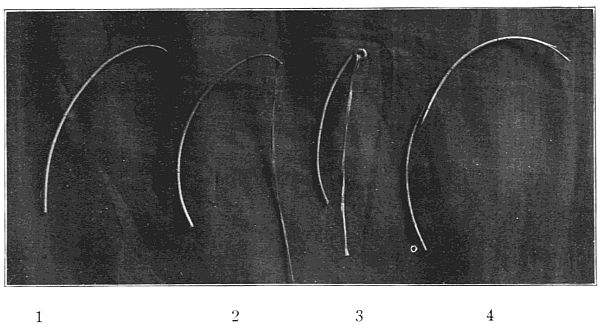 BEGINNING A BASKET IN ANY WEAVE.
| 1—The reed sharpened to a flat point. |
| 2—The end of the sharpened reed wound with raffia. |
| 3—The end of the reed curled into a small "button." |
| 4—Splicing reeds by cutting both to a flat point. |
Beginning about two inches from one end of the reed, sharpen to a
flat point. Coil the other end, leaving ten or fifteen inches uncoiled, and
tie with raffia two or three times. Soak the reeds in water until very
pliable, then remove and wipe dry before using. The raffia may be used
wet or dry as one prefers. It may be used in coarse strands for the large
baskets or split to any size desired for the finer stitches, but should be
kept uniform. The basket sewing requires either the sharp or blunt
tapestry needle, varying in size between Number 18 and Number 22.
Thread the end of the raffia that has been cut from the tree into the
needle, thus working with the fiber, as it is less liable to split. Much of
the beauty of the basket will depend upon the smoothness and neatness
of the work.[116]
Beginning the Basket.—Baskets may be classified as round or oval.
Draw the sharpened end of the pliable reed between the thumb and finger into the smallest possible coil. Lay the end of the raffia to the point and along the sharpened end of the reed and hold it in place with the left hand. By a sharp turn in the thread begin winding over the reed and raffia to the point. Then shape into the coil by sewing through the center, thus forming the "button" as in the illustration.
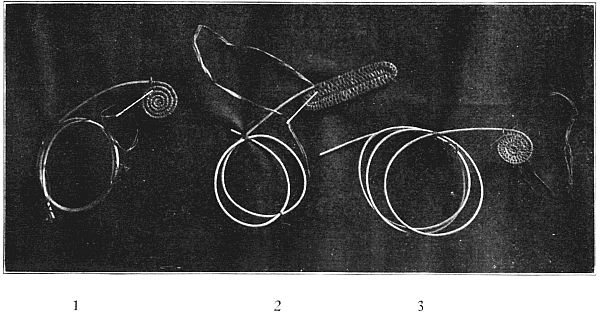 BASKETS BEGUN IN THREE DIFFERENT WEAVES.
| 1—Round basket in the Navajo weave. |
| 2—Oval basket in the Lazy Squaw weave. |
| 3—Round basket in the Mariposa weave |
The end of the reed is not sharpened, and must be very soft and pliable,
or it cannot be bent together at the desired length, two, three, four, five
or more inches from the end, without breaking. It will do no special
harm if it splits, however, as it is to be covered with the raffia. Lay the
end of the raffia to the end of the reed, along the reed and around the[118]
bend, and by a sharp turn in the thread wind four or five times over the
raffia, covering the bend in the reed. The two reeds may then be caught
together by the stitch selected for the basket, or the "Navajo" or "figure
eight stitch" may be used and the other stitch introduced on the second
round.
Splicing the Reed.—As the reed naturally coils somewhat take care
to splice it so that the coil in the two pieces remains the same, otherwise it
would draw apart. Sharpen the top side of one reed and the underside
of the other to a long flat point and slip one past the other until the two
together form the uniform size of the reed. It is sometimes advisable for
a novice to wind the spliced reeds with fine thread, but experience will
teach one to do the splicing with the sewing of the basket.
Splicing the Thread.—When a new thread is needed lay the end
of the old thread along the reed and place the new thread over it, and by
a sharp turn in the thread, wind once or twice over both, and continue
the stitch as before. When the ends are firmly fastened clip them off.
Shaping the Basket.—Coiled basketry admits of the greatest variety in shape and size, from the simple table mat to the exquisitely beautiful jar and vase forms, while the stitches lend themselves to an endless variety of design ranging from the simplest to the most intricate patterns.
It is well to have in mind the shape and design before beginning the
basket, as haphazard work is not apt to be satisfactory. Baskets can be
easily shaped to any desired form, as this depends entirely upon the position
of each succeeding reed upon the one below it.
Introduction of Color.—All reeds in the coiled basket are wound twice with the raffia. It is important to keep this in mind when putting in designs. The colored raffia is introduced in the same manner that the thread is spliced, by laying it along the reed and sewing over it. When working out designs in color do not cut the thread when changing from one to another, but lay the thread not in use along the reed and sew over it, bringing it out when ready to use it again.
As an aid in dividing the space for a design a piece of paper may be cut and folded into the desired number of sections, and these marked on[119] the basket. These spaces are then filled in without regard to the exact number of stitches required to cover the reeds.
Beginners should make a study of Indian baskets and their designs.
Finishing the Basket.—Cut the end of the reed to a flat point two inches in length, and gradually taper the stitching off so that it shows where it ends as little as possible. The last two rows of the basket might be stitched with colored raffia unless it detracts from the design.
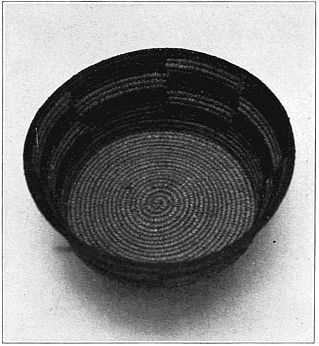 BASKET SHOWING THE NAVAJO WEAVE.
The stitching proceeds along a continuous coil, so that each stitch is passed beneath the stitches of the coil beneath.
For convenience in analyzing these stitches the two reeds may be
designated as the loose reed and the fastened reed.
The Navajo Stitch (Figure Eight).—Hold the commenced coil in the left hand which will cause the work to proceed from the right toward the left.[120]
(a) Pass the thread between the two reeds toward you, (b) over the loose reed from you, (c) between the two reeds toward you, (d) down between the stitches of the fastened reed from you, and beginning again at (a) pass the thread between the two reeds toward you completing the figure eight. Draw the two reeds firmly together.
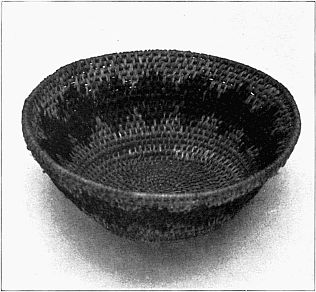 BASKET SHOWING THE LAZY SQUAW WEAVE.
This is the stitch used by the Indians in making the baskets which they
ornamented with feathers, wampum, shells and beads.
The Lazy Squaw Stitch.—This stitch is made up of two parts, a long and a short stitch.
Hold the commenced coil in the left hand and work from right to left. (a) Wrap the thread toward you over and around the loose reed once, (b) then over the loose reed again, (c) and down from you between the stitches of the fastened reed and back to (a). This completes the long-and-short stitch.
The story of the origin of the name "Lazy-Squaw" stitch is interesting. If the squaw was inclined to slight her work she would wrap the loose[121] reed several times before taking the long and more difficult stitch which bound the two reeds together. She would then receive from her companions the ignominious title of "lazy-squaw."
As a modification of this stitch the wrapping of the loose reed is omitted, and the long stitch only is used. This passes each time between the stitches of the coil beneath.
 BASKET SHOWING THE MARIPOSA WEAVE.
The Mariposa Stitch (Knotted).—In analyzing this stitch we find that it is made up of three parts. It is the same as the Lazy Squaw Stitch with the addition of the knotted effect obtained by passing the thread around the long stitch.
Hold the commenced coil in the left hand and work from right to left,
(a) Wrap the thread toward you over and around the loose reed once,
(b) then over the loose reed again, (c) and down from you between the[122]
stitches of the fastened reed, thus binding the two reeds together, (d)
bring the needle up between the two reeds at the left side of the long
stitch, (e) cross over this stitch, going down between the two reeds at
the right of the long stitch. Bring the thread over the loose reed and
begin wrapping again as at (a).
The Samoan Stitch (Lace Effect).—Baskets that are to be lined are very pretty made of this stitch. It is also very effective combined with other stitches, or as the finishing coil of a basket.
The Samoan Stitch is a modification of the Mariposa Stitch, the only difference being in the space between the reeds and the passing of the thread around the long stitch two, three or more times, which gives the lace effect. The reeds must be held firmly, however, and the thread passed around the long stitch times enough to make the basket firm.
This book has been written by a grade teacher and art worker to help teachers in acquiring the technique of clay working, and to give them suggestions concerning the teaching of the several types of clay work suited to pupils in the elementary schools. It covers the study of natural forms, the human figure in relief and the round, animal forms, story illustration, architectural ornament, tiles, hand-built pottery and pottery decoration. The book is richly illustrated with more than fifty half-tone and line cuts showing processes, designs, and the work of children from ten to twelve years of age. Price, $1.00.
A concise up-to-date, richly illustrated brochure on the teaching of applied design. Price, 50 cents.
A brief, clear, comprehensive text printed in sepia and illustrated with wash drawings and a water-color painting by the author. Price, 50 cents.
A book of simple problems covering the essentials of mechanical perspective. It is planned for pupils of high school age who have already received some elementary training in mechanical drawing. It is simple, direct and practical. Price, 75 cents.
This contains seven full-page plates of drawings of kites and fifteen figures—over forty kites shown. Details of construction given; a kite tournament is described. Full of interesting suggestions. Price, 20 cents.
Contains working drawings and suggestions for teaching a course of work in thin wood that is full of fun for the children, and affords ample means for training in form study, construction, invention and careful work. Has been called "applied mechanics for the fourth grade." Price, 20 cents.
A collection of sixteen problems in woodworking made to meet the needs of busy teachers of manual training. Each problem has been put to the test and has proven satisfactory to the teacher who designed it and the pupil who made it. Price, 20 cents.
A full and clear description in detail of the fundamental processes of elementary benchwork in wood. This description is given through directions for making a few simple, useful articles suitable either for school or home problems. Price, $1.00.
A notable book on woodworking. It is the result of extensive research and long experience in teaching and in training teachers. It is a comprehensive and scholarly treatment of the subject and is the one book of reference which teachers of woodworking feel that they must always have at hand. Price, $2.00.
A text book on woodworking tools, materials and processes to supplement the instruction given by the teacher. Very fully illustrated. Price, $1.25.
This is the American edition of an English book containing 120 practical problems, many of which have been designed to correlate mathematics and physical science with manual training. Price, 75 cents.
A convenient collection of good problems ready to place in the hands of the pupil. Price, 75 cents.
Thirty-two plates of working drawings of simple, artistic furniture, with notes on construction, finish and design. Price, $1.00.
The purpose of this book is to furnish teachers of classes beginning mechanical drawing with a large number of simple, practical problems in convenient form for immediate use. Price, $1.00.
A collection of problems presented in the form of 25 plates excellent in draftsmanship. Contains a brief, clear text on the science and art of wood-turning; also a chapter on "Form and Proportion," which shows how accepted principles of art may be applied in designing objects to be turned in wood. Price, 80 cents.
Published bi-monthly. Price, $1.50 a year.
Obvious punctuation errors repaired. Unless an obvious majority appeared, varied hyphenation was retained.
Page 28, the anchor for footnote 18 was missing in the original. It was added.
Pages 31 and 36, there one reference but two different notes for the basketry substitute project. To make this easier, the second reference was changed to 22 which necessitated changing the third reference to 23 and so on. This same issue arose on pages 46 and 48 and was edited in the same way.
Page 38, "kaiki" is a little used but actual variant of "khaki" and was retained.
Page 44, the anchor for footnote 31 was missing in the original. It was added.
The remaining corrections made are indicated by dotted lines under the corrections. Scroll the mouse over the word and the original text will appear.
End of Project Gutenberg's Handicraft for Girls, by Idabelle McGlauflin

*** END OF THIS PROJECT GUTENBERG EBOOK HANDICRAFT FOR GIRLS ***

***** This file should be named 34854-h.htm or 34854-h.zip *****
This and all associated files of various formats will be found in:
        https://www.gutenberg.org/3/4/8/5/34854/

Produced by Chris Curnow, Emmy and the Online Distributed
Proofreading Team at https://www.pgdp.net (This file was
produced from images generously made available by The
Internet Archive)


Updated editions will replace the previous one--the old editions
will be renamed.

Creating the works from public domain print editions means that no
one owns a United States copyright in these works, so the Foundation
(and you!) can copy and distribute it in the United States without
permission and without paying copyright royalties.  Special rules,
set forth in the General Terms of Use part of this license, apply to
copying and distributing Project Gutenberg-tm electronic works to
protect the PROJECT GUTENBERG-tm concept and trademark.  Project
Gutenberg is a registered trademark, and may not be used if you
charge for the eBooks, unless you receive specific permission.  If you
do not charge anything for copies of this eBook, complying with the
rules is very easy.  You may use this eBook for nearly any purpose
such as creation of derivative works, reports, performances and
research.  They may be modified and printed and given away--you may do
practically ANYTHING with public domain eBooks.  Redistribution is
subject to the trademark license, especially commercial
redistribution.


*** START: FULL LICENSE ***

THE FULL PROJECT GUTENBERG LICENSE
PLEASE READ THIS BEFORE YOU DISTRIBUTE OR USE THIS WORK

To protect the Project Gutenberg-tm mission of promoting the free
distribution of electronic works, by using or distributing this work
(or any other work associated in any way with the phrase "Project
Gutenberg"), you agree to comply with all the terms of the Full Project
Gutenberg-tm License (available with this file or online at
https://gutenberg.org/license).


Section 1.  General Terms of Use and Redistributing Project Gutenberg-tm
electronic works

1.A.  By reading or using any part of this Project Gutenberg-tm
electronic work, you indicate that you have read, understand, agree to
and accept all the terms of this license and intellectual property
(trademark/copyright) agreement.  If you do not agree to abide by all
the terms of this agreement, you must cease using and return or destroy
all copies of Project Gutenberg-tm electronic works in your possession.
If you paid a fee for obtaining a copy of or access to a Project
Gutenberg-tm electronic work and you do not agree to be bound by the
terms of this agreement, you may obtain a refund from the person or
entity to whom you paid the fee as set forth in paragraph 1.E.8.

1.B.  "Project Gutenberg" is a registered trademark.  It may only be
used on or associated in any way with an electronic work by people who
agree to be bound by the terms of this agreement.  There are a few
things that you can do with most Project Gutenberg-tm electronic works
even without complying with the full terms of this agreement.  See
paragraph 1.C below.  There are a lot of things you can do with Project
Gutenberg-tm electronic works if you follow the terms of this agreement
and help preserve free future access to Project Gutenberg-tm electronic
works.  See paragraph 1.E below.

1.C.  The Project Gutenberg Literary Archive Foundation ("the Foundation"
or PGLAF), owns a compilation copyright in the collection of Project
Gutenberg-tm electronic works.  Nearly all the individual works in the
collection are in the public domain in the United States.  If an
individual work is in the public domain in the United States and you are
located in the United States, we do not claim a right to prevent you from
copying, distributing, performing, displaying or creating derivative
works based on the work as long as all references to Project Gutenberg
are removed.  Of course, we hope that you will support the Project
Gutenberg-tm mission of promoting free access to electronic works by
freely sharing Project Gutenberg-tm works in compliance with the terms of
this agreement for keeping the Project Gutenberg-tm name associated with
the work.  You can easily comply with the terms of this agreement by
keeping this work in the same format with its attached full Project
Gutenberg-tm License when you share it without charge with others.

1.D.  The copyright laws of the place where you are located also govern
what you can do with this work.  Copyright laws in most countries are in
a constant state of change.  If you are outside the United States, check
the laws of your country in addition to the terms of this agreement
before downloading, copying, displaying, performing, distributing or
creating derivative works based on this work or any other Project
Gutenberg-tm work.  The Foundation makes no representations concerning
the copyright status of any work in any country outside the United
States.

1.E.  Unless you have removed all references to Project Gutenberg:

1.E.1.  The following sentence, with active links to, or other immediate
access to, the full Project Gutenberg-tm License must appear prominently
whenever any copy of a Project Gutenberg-tm work (any work on which the
phrase "Project Gutenberg" appears, or with which the phrase "Project
Gutenberg" is associated) is accessed, displayed, performed, viewed,
copied or distributed:

This eBook is for the use of anyone anywhere at no cost and with
almost no restrictions whatsoever.  You may copy it, give it away or
re-use it under the terms of the Project Gutenberg License included
with this eBook or online at www.gutenberg.org

1.E.2.  If an individual Project Gutenberg-tm electronic work is derived
from the public domain (does not contain a notice indicating that it is
posted with permission of the copyright holder), the work can be copied
and distributed to anyone in the United States without paying any fees
or charges.  If you are redistributing or providing access to a work
with the phrase "Project Gutenberg" associated with or appearing on the
work, you must comply either with the requirements of paragraphs 1.E.1
through 1.E.7 or obtain permission for the use of the work and the
Project Gutenberg-tm trademark as set forth in paragraphs 1.E.8 or
1.E.9.

1.E.3.  If an individual Project Gutenberg-tm electronic work is posted
with the permission of the copyright holder, your use and distribution
must comply with both paragraphs 1.E.1 through 1.E.7 and any additional
terms imposed by the copyright holder.  Additional terms will be linked
to the Project Gutenberg-tm License for all works posted with the
permission of the copyright holder found at the beginning of this work.

1.E.4.  Do not unlink or detach or remove the full Project Gutenberg-tm
License terms from this work, or any files containing a part of this
work or any other work associated with Project Gutenberg-tm.

1.E.5.  Do not copy, display, perform, distribute or redistribute this
electronic work, or any part of this electronic work, without
prominently displaying the sentence set forth in paragraph 1.E.1 with
active links or immediate access to the full terms of the Project
Gutenberg-tm License.

1.E.6.  You may convert to and distribute this work in any binary,
compressed, marked up, nonproprietary or proprietary form, including any
word processing or hypertext form.  However, if you provide access to or
distribute copies of a Project Gutenberg-tm work in a format other than
"Plain Vanilla ASCII" or other format used in the official version
posted on the official Project Gutenberg-tm web site (www.gutenberg.org),
you must, at no additional cost, fee or expense to the user, provide a
copy, a means of exporting a copy, or a means of obtaining a copy upon
request, of the work in its original "Plain Vanilla ASCII" or other
form.  Any alternate format must include the full Project Gutenberg-tm
License as specified in paragraph 1.E.1.

1.E.7.  Do not charge a fee for access to, viewing, displaying,
performing, copying or distributing any Project Gutenberg-tm works
unless you comply with paragraph 1.E.8 or 1.E.9.

1.E.8.  You may charge a reasonable fee for copies of or providing
access to or distributing Project Gutenberg-tm electronic works provided
that

- You pay a royalty fee of 20% of the gross profits you derive from
     the use of Project Gutenberg-tm works calculated using the method
     you already use to calculate your applicable taxes.  The fee is
     owed to the owner of the Project Gutenberg-tm trademark, but he
     has agreed to donate royalties under this paragraph to the
     Project Gutenberg Literary Archive Foundation.  Royalty payments
     must be paid within 60 days following each date on which you
     prepare (or are legally required to prepare) your periodic tax
     returns.  Royalty payments should be clearly marked as such and
     sent to the Project Gutenberg Literary Archive Foundation at the
     address specified in Section 4, "Information about donations to
     the Project Gutenberg Literary Archive Foundation."

- You provide a full refund of any money paid by a user who notifies
     you in writing (or by e-mail) within 30 days of receipt that s/he
     does not agree to the terms of the full Project Gutenberg-tm
     License.  You must require such a user to return or
     destroy all copies of the works possessed in a physical medium
     and discontinue all use of and all access to other copies of
     Project Gutenberg-tm works.

- You provide, in accordance with paragraph 1.F.3, a full refund of any
     money paid for a work or a replacement copy, if a defect in the
     electronic work is discovered and reported to you within 90 days
     of receipt of the work.

- You comply with all other terms of this agreement for free
     distribution of Project Gutenberg-tm works.

1.E.9.  If you wish to charge a fee or distribute a Project Gutenberg-tm
electronic work or group of works on different terms than are set
forth in this agreement, you must obtain permission in writing from
both the Project Gutenberg Literary Archive Foundation and Michael
Hart, the owner of the Project Gutenberg-tm trademark.  Contact the
Foundation as set forth in Section 3 below.

1.F.

1.F.1.  Project Gutenberg volunteers and employees expend considerable
effort to identify, do copyright research on, transcribe and proofread
public domain works in creating the Project Gutenberg-tm
collection.  Despite these efforts, Project Gutenberg-tm electronic
works, and the medium on which they may be stored, may contain
"Defects," such as, but not limited to, incomplete, inaccurate or
corrupt data, transcription errors, a copyright or other intellectual
property infringement, a defective or damaged disk or other medium, a
computer virus, or computer codes that damage or cannot be read by
your equipment.

1.F.2.  LIMITED WARRANTY, DISCLAIMER OF DAMAGES - Except for the "Right
of Replacement or Refund" described in paragraph 1.F.3, the Project
Gutenberg Literary Archive Foundation, the owner of the Project
Gutenberg-tm trademark, and any other party distributing a Project
Gutenberg-tm electronic work under this agreement, disclaim all
liability to you for damages, costs and expenses, including legal
fees.  YOU AGREE THAT YOU HAVE NO REMEDIES FOR NEGLIGENCE, STRICT
LIABILITY, BREACH OF WARRANTY OR BREACH OF CONTRACT EXCEPT THOSE
PROVIDED IN PARAGRAPH 1.F.3.  YOU AGREE THAT THE FOUNDATION, THE
TRADEMARK OWNER, AND ANY DISTRIBUTOR UNDER THIS AGREEMENT WILL NOT BE
LIABLE TO YOU FOR ACTUAL, DIRECT, INDIRECT, CONSEQUENTIAL, PUNITIVE OR
INCIDENTAL DAMAGES EVEN IF YOU GIVE NOTICE OF THE POSSIBILITY OF SUCH
DAMAGE.

1.F.3.  LIMITED RIGHT OF REPLACEMENT OR REFUND - If you discover a
defect in this electronic work within 90 days of receiving it, you can
receive a refund of the money (if any) you paid for it by sending a
written explanation to the person you received the work from.  If you
received the work on a physical medium, you must return the medium with
your written explanation.  The person or entity that provided you with
the defective work may elect to provide a replacement copy in lieu of a
refund.  If you received the work electronically, the person or entity
providing it to you may choose to give you a second opportunity to
receive the work electronically in lieu of a refund.  If the second copy
is also defective, you may demand a refund in writing without further
opportunities to fix the problem.

1.F.4.  Except for the limited right of replacement or refund set forth
in paragraph 1.F.3, this work is provided to you 'AS-IS' WITH NO OTHER
WARRANTIES OF ANY KIND, EXPRESS OR IMPLIED, INCLUDING BUT NOT LIMITED TO
WARRANTIES OF MERCHANTIBILITY OR FITNESS FOR ANY PURPOSE.

1.F.5.  Some states do not allow disclaimers of certain implied
warranties or the exclusion or limitation of certain types of damages.
If any disclaimer or limitation set forth in this agreement violates the
law of the state applicable to this agreement, the agreement shall be
interpreted to make the maximum disclaimer or limitation permitted by
the applicable state law.  The invalidity or unenforceability of any
provision of this agreement shall not void the remaining provisions.

1.F.6.  INDEMNITY - You agree to indemnify and hold the Foundation, the
trademark owner, any agent or employee of the Foundation, anyone
providing copies of Project Gutenberg-tm electronic works in accordance
with this agreement, and any volunteers associated with the production,
promotion and distribution of Project Gutenberg-tm electronic works,
harmless from all liability, costs and expenses, including legal fees,
that arise directly or indirectly from any of the following which you do
or cause to occur: (a) distribution of this or any Project Gutenberg-tm
work, (b) alteration, modification, or additions or deletions to any
Project Gutenberg-tm work, and (c) any Defect you cause.


Section  2.  Information about the Mission of Project Gutenberg-tm

Project Gutenberg-tm is synonymous with the free distribution of
electronic works in formats readable by the widest variety of computers
including obsolete, old, middle-aged and new computers.  It exists
because of the efforts of hundreds of volunteers and donations from
people in all walks of life.

Volunteers and financial support to provide volunteers with the
assistance they need are critical to reaching Project Gutenberg-tm's
goals and ensuring that the Project Gutenberg-tm collection will
remain freely available for generations to come.  In 2001, the Project
Gutenberg Literary Archive Foundation was created to provide a secure
and permanent future for Project Gutenberg-tm and future generations.
To learn more about the Project Gutenberg Literary Archive Foundation
and how your efforts and donations can help, see Sections 3 and 4
and the Foundation web page at https://www.pglaf.org.


Section 3.  Information about the Project Gutenberg Literary Archive
Foundation

The Project Gutenberg Literary Archive Foundation is a non profit
501(c)(3) educational corporation organized under the laws of the
state of Mississippi and granted tax exempt status by the Internal
Revenue Service.  The Foundation's EIN or federal tax identification
number is 64-6221541.  Its 501(c)(3) letter is posted at
https://pglaf.org/fundraising.  Contributions to the Project Gutenberg
Literary Archive Foundation are tax deductible to the full extent
permitted by U.S. federal laws and your state's laws.

The Foundation's principal office is located at 4557 Melan Dr. S.
Fairbanks, AK, 99712., but its volunteers and employees are scattered
throughout numerous locations.  Its business office is located at
809 North 1500 West, Salt Lake City, UT 84116, (801) 596-1887, email
business@pglaf.org.  Email contact links and up to date contact
information can be found at the Foundation's web site and official
page at https://pglaf.org

For additional contact information:
     Dr. Gregory B. Newby
     Chief Executive and Director
     gbnewby@pglaf.org


Section 4.  Information about Donations to the Project Gutenberg
Literary Archive Foundation

Project Gutenberg-tm depends upon and cannot survive without wide
spread public support and donations to carry out its mission of
increasing the number of public domain and licensed works that can be
freely distributed in machine readable form accessible by the widest
array of equipment including outdated equipment.  Many small donations
($1 to $5,000) are particularly important to maintaining tax exempt
status with the IRS.

The Foundation is committed to complying with the laws regulating
charities and charitable donations in all 50 states of the United
States.  Compliance requirements are not uniform and it takes a
considerable effort, much paperwork and many fees to meet and keep up
with these requirements.  We do not solicit donations in locations
where we have not received written confirmation of compliance.  To
SEND DONATIONS or determine the status of compliance for any
particular state visit https://pglaf.org

While we cannot and do not solicit contributions from states where we
have not met the solicitation requirements, we know of no prohibition
against accepting unsolicited donations from donors in such states who
approach us with offers to donate.

International donations are gratefully accepted, but we cannot make
any statements concerning tax treatment of donations received from
outside the United States.  U.S. laws alone swamp our small staff.

Please check the Project Gutenberg Web pages for current donation
methods and addresses.  Donations are accepted in a number of other
ways including including checks, online payments and credit card
donations.  To donate, please visit: https://pglaf.org/donate


Section 5.  General Information About Project Gutenberg-tm electronic
works.

Professor Michael S. Hart was the originator of the Project Gutenberg-tm
concept of a library of electronic works that could be freely shared
with anyone.  For thirty years, he produced and distributed Project
Gutenberg-tm eBooks with only a loose network of volunteer support.


Project Gutenberg-tm eBooks are often created from several printed
editions, all of which are confirmed as Public Domain in the U.S.
unless a copyright notice is included.  Thus, we do not necessarily
keep eBooks in compliance with any particular paper edition.


Most people start at our Web site which has the main PG search facility:

     https://www.gutenberg.org

This Web site includes information about Project Gutenberg-tm,
including how to make donations to the Project Gutenberg Literary
Archive Foundation, how to help produce our new eBooks, and how to
subscribe to our email newsletter to hear about new eBooks.