| INTRODUCTION | vii |
| TOOLS, HOOKS, AND MATERIALS | 1 |
| Tools--Fly-Tiers Vise Hackle Pliers, scissors | |
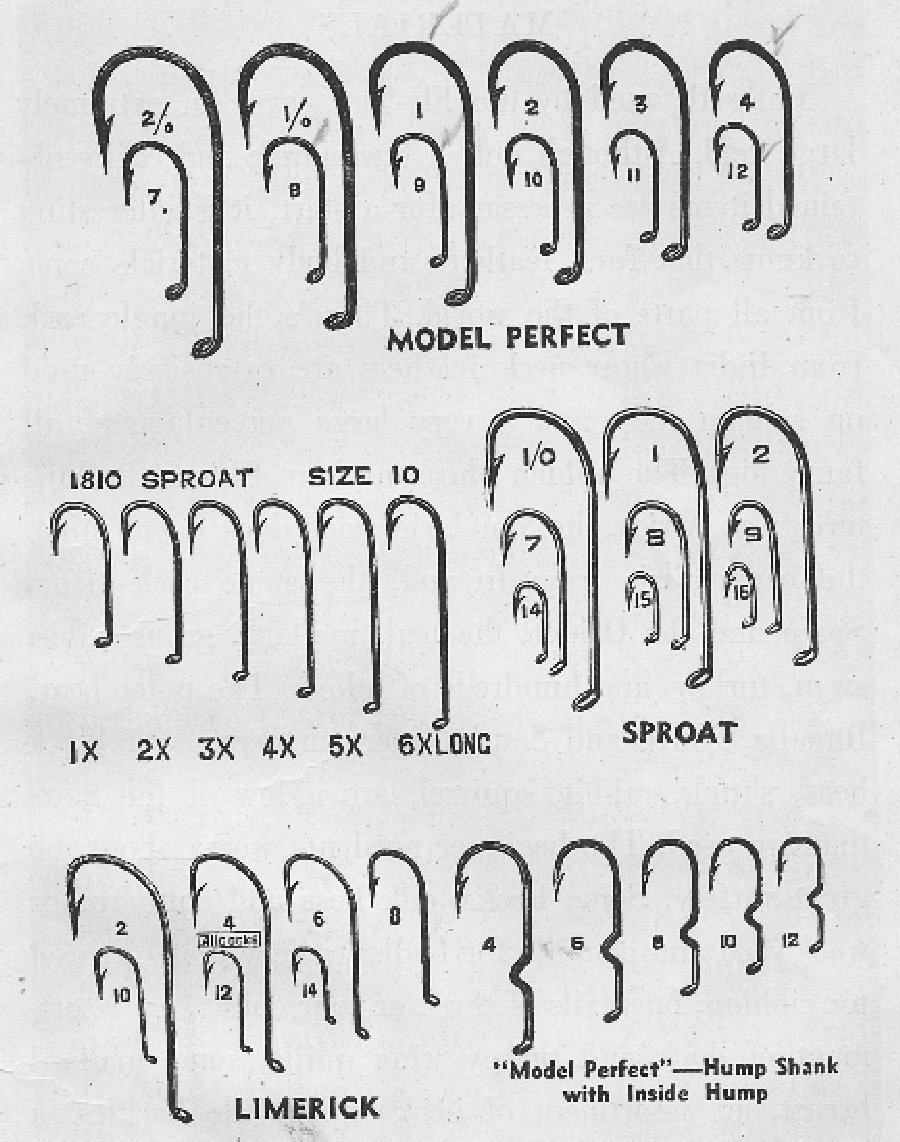
| Hooks | |
| Materials--Quill Bodies, Herl Bodies, Hackles | |
| Tails, Cheeks or Shoulders, Ribbing, | |
| Wings, Tying Silk | |
| BUCKTAIL STREAMERS | 15 |
| WET FLIES | 22 |
| DRY FLIES | 27 |
| NYMPHS and Their Construction | 32 |
| Nymphs: Their Construction | |
| The Helgramite | |
| BASS FLIES AND FEATHER STREAMERS | 42 |
| FAMOUS BUCKTAIL AND FEATHER STREAMERS | 47 |
| FLOATING BUGS and Their Construction | 49 |
| Cork Bodied Bass Bugs | |
| ANGLER'S KNOTS | 61 |
| MY FAVORITE FLIES | 62 |
| STANDARD DRESSINGS OF 334 FLIES | 69 |
{vi}
{vii}
The object of this book will be throughout its entirety to teach in a practical manner the art of Fly Tying in all its branches. The principles used herein, and the methods of construction employed, are those used by the professional fly-tier who practices fly-making for the sake of art, and tries to achieve with each finished fly, a masterpiece.
None of the short-cuts employed by those whose business is quantity production will be attempted. Only the making of flies of the very highest quality and most durable construction will be attempted. In describing the principals of construction with the following illustrations, it will be impossible to describe in detail each standard pattern; however, it must be remembered that the fundamentals applying to each style of fly will be the principal bases of construction of all flies of that style, and that the use of different body materials, hackles, wings or size will simply change the pattern and not the fundamental points of construction.
Dressings for hundreds of standard patterns will be found fully described elsewhere in this book. For clearness {viii} of understanding please note that where a fly is described in this book as having grey wings, or red body, etc., and no particular feather or material is specified, it means that any feather or body material may be used. When a particular feather, body, hackle, tail, etc., must be used it will be so stated.
Each year a steadily increasing number of anglers are learning to tie their own flies. Not many years ago, there were few in America outside of professional tiers who understood the art. Now on each angling trip, at least one is sure to be met, who has discovered the great thrill of taking fish on flies of his own tying.
To those who are anticipating the making of their own flies for the first time, there is the opportunity to exercise one's ingenuity in the creation of new patterns. To prolong your fishing seasons throughout the long winter evenings, in the confines of your own den, where, with a supply of fur, feathers and tinsel, can be enjoyed a profitable, artistic and pleasant hobby. And the thrill of seeing in each finished imitation of Ephemeridae, Muscidae and Formicidae, a masterpiece to bring the joy of living and dreams of spring to the angler's heart.
Beginners are requested to reject any inclination to skip over the first part of this book, nor to attempt the tying of the more delicate and difficult dry flies before they have had sufficient preliminary training. {ix} This book is so written that the easier flies to make are the first encountered. Although you may not expect to use Bucktail Streamers, the fundamental principles employed in their construction, the knack of handling fur, feathers and tinsel, will be acquired, and a sense of proportion will be realized. I sincerely encourage you to begin at the beginning, and by careful and patient study the satisfactory result will be the ability to make flies that are second to none.
The illustrations in this book are all drawn to correct proportions except the tying silk, which is purposely drawn large for clearness of illustration. Follow these illustrations, and begin by making a very careful study of Diagram 3, "Bucktails" (page 15). Here will be learned how to overcome some of the difficulties encountered by beginners. Many of the fundamentals learned in tying Bucktails are used in tying all of the flies to follow. For instance, in putting the wings or tail on a wet fly, the same method of holding the wing between the thumb and finger and making the loose loop, are explained as when putting the hair or tail on a Bucktail. Putting the wings on a fly correctly seems to be the greatest difficulty encountered by the beginner. Consequently, the necessity of carefully studying Figs. 4, 5, 10, and 11 of Diagram 3 cannot be too greatly emphasized. Before tying any other part of the fly, place a bare hook in the vise, and practice tying on the tail, {x} and then the wings, until you have mastered this knack, and have the wings and tail setting straight on top of the hook, as in Figs. 4, 5, 10 and 11 of Diagram 3. First using hair and then a section of feather.
Other faults of the beginner where literal descriptions are followed entirely or where illustrations are not drawn to correct proportions or followed closely are as follows. The wings are usually too large, and much too long for the size of the hook, and the tail is most always too long, as are the hackles. The bodies seldom have a nicely tapered shape, and most always start too far back on the hook shank. The ribbing is seldom put on in even tight spirals. The hair on hair flies is always too long, and too much is used. The head is too large, because the tying silk is not wound tightly and smoothly. The eye of the hook on the finished fly is filled with hair, tying silk, hackles and cement.
I do not mean to criticize these common mistakes of the beginner. Instead, I merely wish to call them to your mind, and assure you that they are not necessary, and will not happen if you will diligently follow instructions in this book.
{xi}
{xii}
{1}
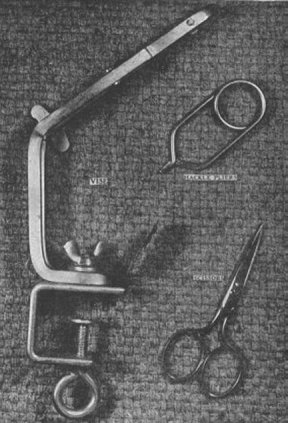
Very few tools are required by the Fly-Tier. Those that are necessary are inexpensive, and most of them can be homemade. However, as with any other craft good tools are an asset. I advise the beginner to procure the following:
Fly-Tiers' vise. There are many styles of fly-tying vises on the market. The simplest is just a slot cut in a 3/8" piece of square steel with a hacksaw, and a thumb screw to tighten the slot. This type of vise will work all right, although rather clumsy and hard to tighten enough to hold the hook truly. Another simple vise is just a small pin chuck, soldered to one end of a 1/4" brass rod, bent at the desired angle, and the other end of the rod soldered to a small C clamp. However, I prefer a vise of the cam lever type. That is, a vise that has a cam lever for opening and closing the jaws. These vises, of which there are several makes, are {2} adjustable to various angles and hook sizes. They will hold all sizes of hooks very firmly, and are easily and quickly opened with a flip of the lever.
Hackle Pliers. These can be purchased for about fifty cents and will prove a worthwhile investment, as they are rather difficult to make satisfactorily.
Scissors. One pair with curved blades and sharp points for small flies and one pair with small straight blades. A needle pushed into a stick, for picking out hackles that are wound under, and for putting lacquer on the finished head, completes the list of necessary tools.
Hooks used for fly-tying differ somewhat from those used for bait fishing etc., inasmuch as they are usually hollow ground, and tapered shank especially those used for dry flies. The tapered shank next to the eye allows the head of the fly to be tied smaller, and also reduces the weight of the hook, an advantage for dry flies. Of course flies may be tied on any style or grade of hook, but considering the work involved in making the fly, and realizing that with an old razor blade the fly can be quickly removed from the hook should the first attempts prove unsatisfactory, you will see the advantage in using good hooks.
{3}
{4}
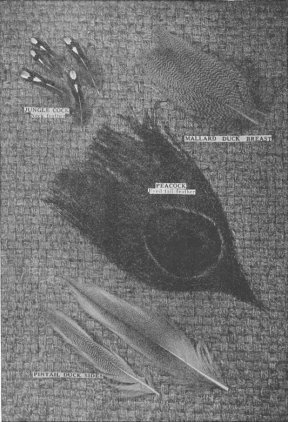
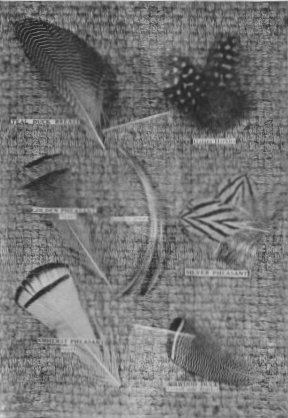
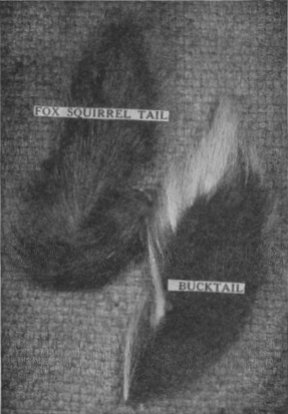
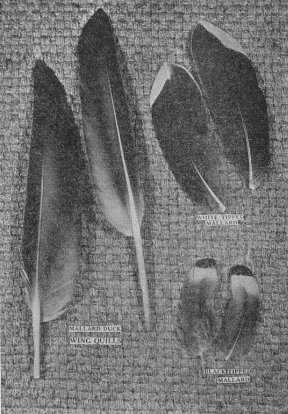
Materials used by the Fly-Tier cover an extremely large field. Although only a few simple and easily obtained items are necessary for a start, it is interesting to know that furs, feathers and body materials come from all parts of the world. There's the jungle cock from India whose neck feathers are extensively used on salmon flies and a very large percentage of all fancy flies. The golden pheasant from China, the bustard from Africa, the Mandarin wood duck from China, the capercailzie from Ireland, the game cocks from Spain and the Orient, the teal, mallard, grouse, ibis, swan, turkey, and hundreds of others. The polar bear, Impala, North and South American deer, seal, black bear, skunk, rabbit, squirrel, are a few of the hairs that are used. The beginner need not worry about the great variety. Some hooks, silk floss and spun fur or wool yarn and chenille for bodies, a few sizes of tinsel for ribbing, bucktails of three or four colors, an assortment of duck and turkey wing quills some mallard breast, an assortment of neck and saddle hackles, a spool of tying silk, a piece of wax, a bottle of head lacquer, and many of the popular patterns can be made. Numerous other items can be added from time to time, and the novice Fly-Tier will soon find himself in possession of a collection of fuzzy furs and feathers that will delight the heart of any professional, and from which any conceivable lure can be made to attract the denizens of the shady pools.
{5}
{6}
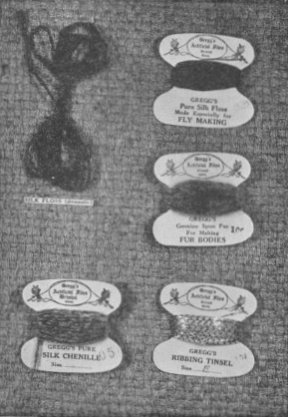
BODY MATERIAL: Tinsel, Silk Floss, Fur, Chenille, Wool, Quill and Cork are used for bodies. The most commonly used for Bucktail Streamers is flat tinsel ribbed with oval tinsel or no ribbing at all. About the easiest body to make is one of chenille ribbed with tinsel. Silk floss is mostly used for wet and dry fly bodies. The domestic silk floss, which is called rope, can be successfully used for the larger flies, by untwisting and using a few of the smaller strands. An imported floss of one single strand, with a very slight twist, is especially made for fly-tying; this will work much better on the smaller hooks. Fur for fur bodies, which formerly had to be plucked from the hide, dyed the desired color, and spun on the waxed tying silk, can now be obtained in all standard fly colors. It is called Spun Fur, and is very convenient to use in this manner.
QUILL BODIES: Quill makes an excellent and very lifelike body, especially on dry flies. The quill from the eyed peacock tail feather is mostly used. That taken from the eye of the feather when stripped of its fibers has a two tone effect, and when wound upon the hook without overlapping makes a very lifelike and delicate appearing body.
{7}
{8}
HERL BODIES: Both peacock and ostrich herl is used for bodies. These make a fuzzy body. Tie in one or two strands by the tip end and wind on edgewise.
HACKLES: These are the most important part of the dry fly. Only those from the neck of a mature cock are satisfactory. Hackles for the dry fly must be stiff with very little or no web. With such hackles a dry fly can be sparsely dressed as it should be and still maintain its natural balance and floating qualities. On the other hand, a wet fly should sink readily, and should be made with very soft webby hackles. These absorb water quickly, and have better action in the water. Contrary to the customary way to tie hackles on the wet fly, as explained in the chapter "Wet Flies", I find it very convenient and economical to strip the fibers from any size hackle, clip off the butt ends to the desired length and tie them on the bottom of the hook, the same as buck tail is tied on. As wet flies should have hackles only on the bottom or underneath side, many hackles that are otherwise too large can be used in this way.
TAILS: A few fibers from a golden or silver pheasant neck tippet, whisks from a hackle feather, a strip of wing or breast feather, a few hairs, etc., are used for tails. Many of the standard patterns are tied without tails; however, on all of my dry flies, I tie three or four stiff fibers or hairs. They balance the fly and help it to float much better.
{9}
{10}
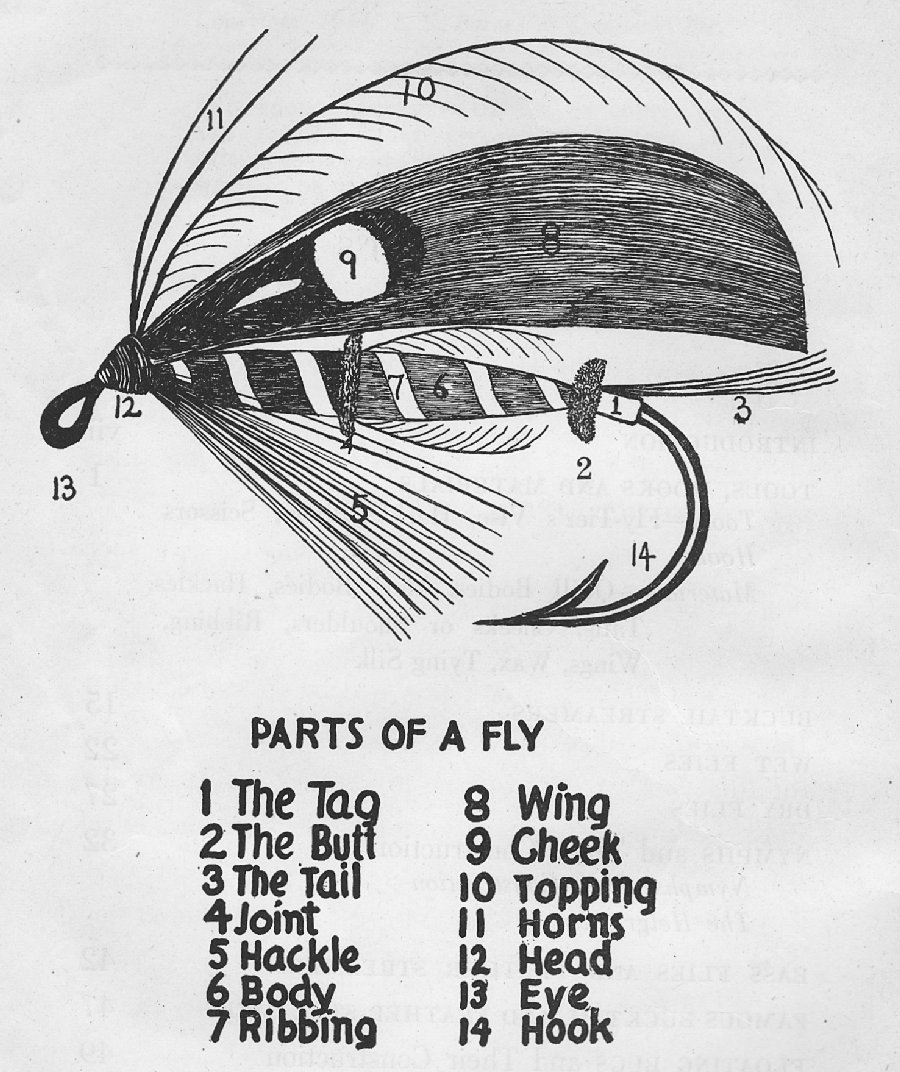
CHEEKS OR SHOULDERS: As per Fig. 9, Diagram 1, these are used on a great many of the fancy flies. These are straps of one or several feathers of contrasting colors. Jungle cock feathers, golden pheasant tippets, silver pheasant body feathers, as on the Grey Ghost streamer fly, blue chatterer, and many other fancy feathers according to pattern and fancy are used for this purpose. A pair of jungle cock tippets often called eyes, added to a Bucktail Streamer will often take trout, when the same pattern without the jungle cock will not.
RIBBING: Tinsel, Wool, Silk, Horse Hair, Quill, etc., are used for ribbing. The tinsel from your Xmas tree will do, but it is much better to use tinsel made for the purpose, as it will not tarnish so quickly and is much stronger. It is advisable before using tinsel to place a drop of good, clear head lacquer between the thumb and finger and draw the tinsel through it. This makes it tarnish-proof, and is particularly advisable with the oval and round tinsel that is wound over a silk core. Besides tarnish-proofing it, it will keep the tinsel from coming apart. Tinsel bodies should be lacquered after they are finished.
{11}
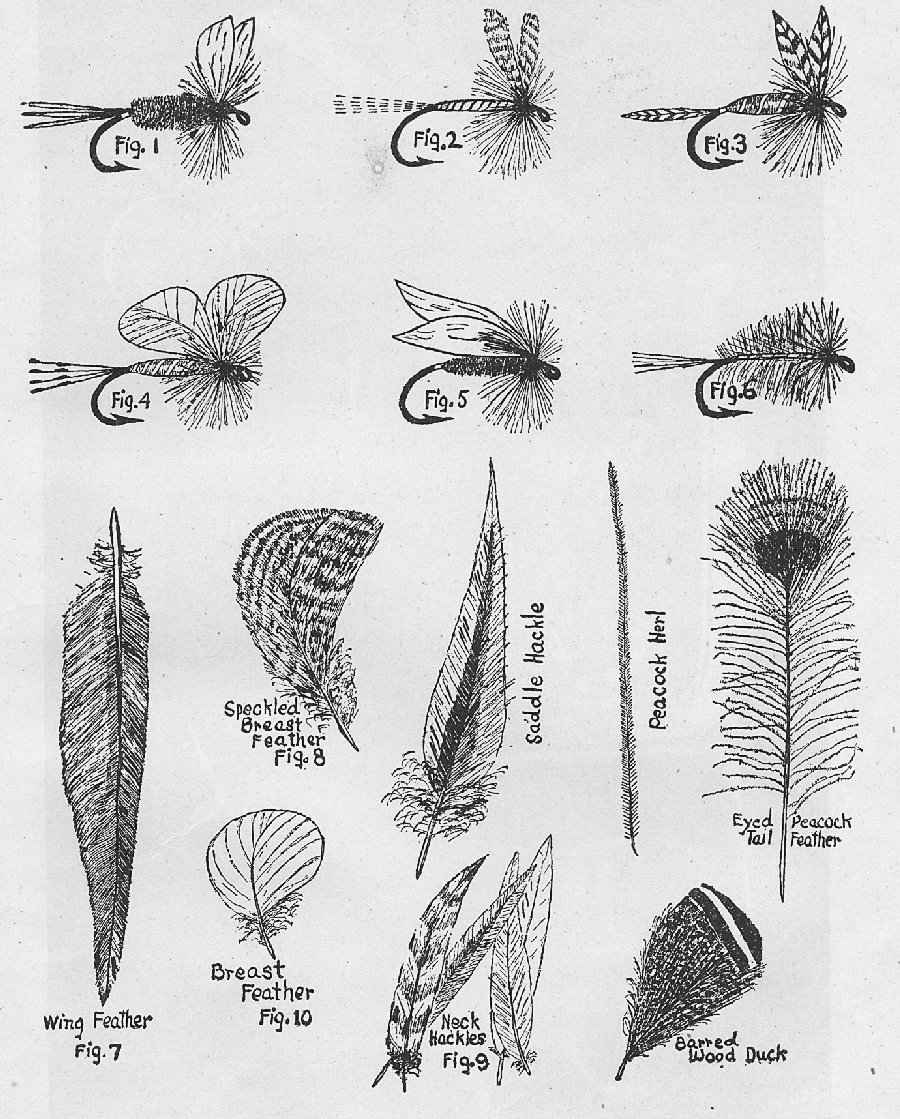
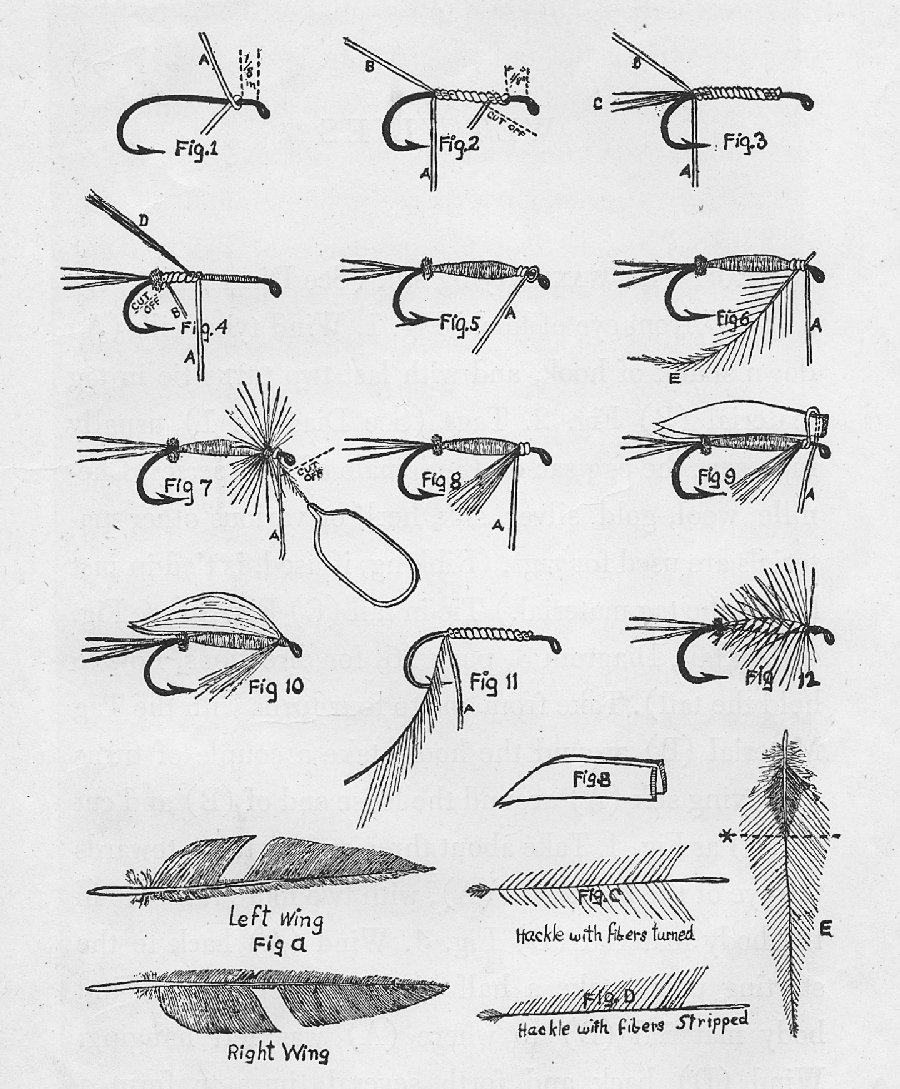
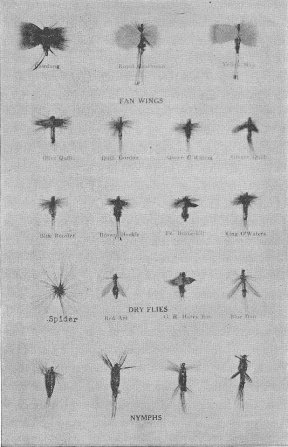
WINGS: Several styles of wings are used, see Diagram 2, page xi, those on Fig. 1, and are cut from a pair of matched wing quill feathers, like Fig. 7. Those in Fig. 2 are buzz wings taken from a pair of breast feathers {12} (mallard, wood duck, etc.) shown in Fig. 8. Fig. 3 shows hackle tip wings, tips of two hackle feathers, see Fig. 9. Fan wings, Fig. 4, are a matched pair of small breast feathers, see Fig. 10 (white duck, mallard, teal, grouse, etc.). In fact there is hardly a bird that flies that does not supply some of its plumage to the Fly-Tier. Flies of the order Diptera (land flies), such as the Bee, Cowdung, Blue Bottle, etc., should be tied with flat wings as in Fig. 5. A Bi-visible is shown in Fig. 6. This is a fly without wings, hackle tied palmer (that is hackle wound the full length of the hook, usually tied without a body, and the dark patterns have a turn or two of white hackle in front).
All of the flies on Diagram 2 are shown as dry flies; however, the same feathers are used for wet flies, streamers, etc., the difference being the style in which they are tied, which is explained elsewhere.
WAX: Use a good grade of wax for fly-tying. The proper wax will work much better than shoemaker's wax or beeswax. Wax for fly-tying should be quite sticky so that when the waxed tying silk is let go of, it will not unwind while tying the fly.
{13}
{14}
TYING SILK: Ordinary sewing silk is too coarse for ordinary fly-tying and it doesn't seem to have the strength. Size 00 is a good size for all flies including bucktails and streamers. For dry flies and small wet flies a gossamer silk size 000 and 0000 is the best to use. Although the strength of this fine silk is much less than the size 00, it has the advantage that more turns can be used, and the heads can be made much smaller.
{15}
{16}
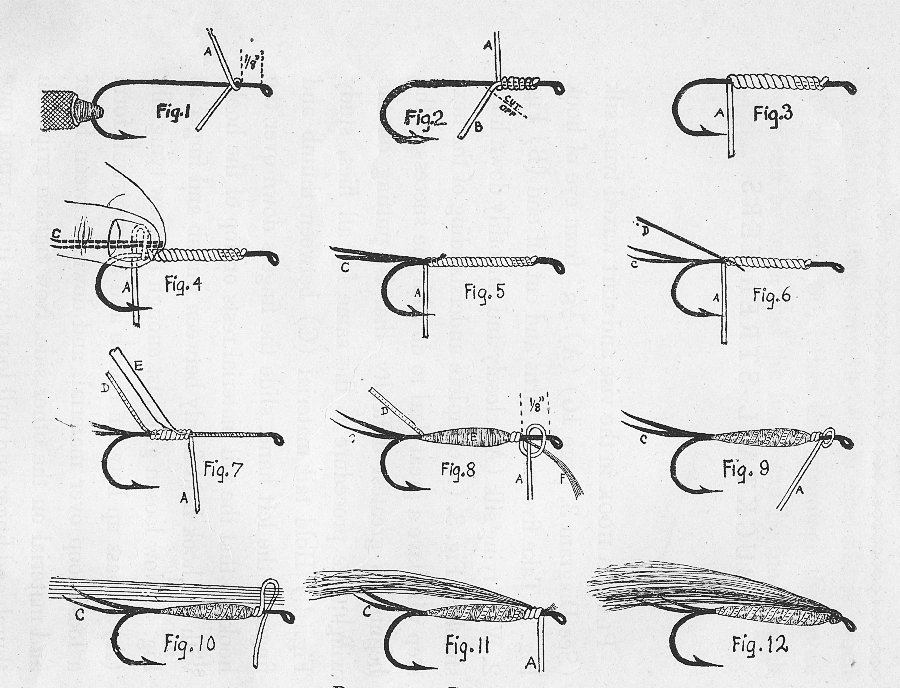
Place a hook in the vise and start waxed tying silk (See Diagram 3, page 15) (A) 1/8" from eye of hook Fig. 1. Take five or six turns and cut off end (B) Fig. 2. Wind tying silk (A) closely and smoothly down hook shank as Fig 3. (A complete understanding of the next step will have a great deal to do with the success of the beginner's greatest difficulty, that is, putting on the wings; the procedure is the same for all flies, study Fig. 4.) Hold tail material (C) between thumb and finger of the left hand, slide the fingers down over the hook, so that the tail material rests on top of the hook, with the hook held firmly between thumb and finger as Fig. 4. Now loosen grip just enough to allow tying silk (A) to pass up between thumb and tail material, form a loose loop over material, and down, between finger and material on the other side. Now tighten grip with thumb and finger and pull loop down tight; repeat once more, see Fig. 5. (This knack of holding the material and hook firmly together, until the loose loop is drawn down tightly keeps the tail, or wings, on top of the {17} hook, and at the same time keeps them from splitting or turning sidewise.) Now that the tail is in place, with two turns of the tying silk (A) tie in ribbing (D) Fig. 6. Now take six or eight close tight turns with the tying silk towards the eye of the hook, with two more turns tie in the body material (E) Fig. 7. IF USING TINSEL FOR BODY MATERIAL, BE SURE AND CUT THE END TO A TAPER BEFORE TYING IN as (E) Fig. 7; this tends to make a smoother body and prevents a bunch where the body material is tied in. Next wind tying silk (A) back to the starting point, take a half hitch and let it hang. Now wind body material (E) clockwise (all windings are clockwise) tightly and smoothly back towards the barb, to the extreme rear end of the body, pull tight and wind forward to within 1/8" of the eye, wind back and forth to form smooth tapered body as Fig. 8 (tinsel bodies are not tapered). (If using silk floss, untwist the floss and use only one half or one third of the strands, do not let it twist, wind tight, and it will make a nice smooth body.) Take two turns and a half hatch with the tying silk, and cut off end of the material (F) Fig. 8. Take one tight turn with ribbing (D) over butt of tail close to rear end of the body, also one turn under the tail if tail is to be cocked. Wind ribbing spirally around the body and tie off with two turns and a half hitch of tying silk as Fig. 9.
{18}
{19}
{20}
Take about three dozen hairs of colored bucktail, cut off butt ends to the length wanted for the finished fly, not more than one half again as long as the hook, place these on top of the hook as Fig. 10 with butt ends about 1/16" back of the eye (this is held the same as when putting on the tail, Fig. 4). Pull down two or three loops, Fig. 11. Now take about 175 hairs of other colored bucktail, place this on top of the first colored bucktail the same as Fig. 10. Repeat the same operation as Fig. 11. Before finishing the head put a drop of head lacquer on the butt ends of the hairs to cement them in place, finish by making a smooth tapered head with the tying silk, take three or four half hitches, paint the head with two or three coats of lacquer and the job is complete, unless you wish to add jungle cock cheeks, or other combinations of feathers. This of course is done before the head is completed.
{21}
{22}
Start the waxed tying silk (See Diagram 4, page 21) 1/8" from eye of hook, Fig. 1. Wind tying silk (A) down shank of hook, and with last two turns tie in tag material (B) Fig. 2. Tags (see diagram 1) usually represent the egg sac on the female of the species. Chenille, wool, gold, silver, silk, herl, or various other materials are used for tags. (Ribbing, if used, is tied in just before the tag material.) Tie in tail (C) Fig. 3 (see Fig. 4 Bucktail, Diagram 3, page 15, for directions, how to hold the tail. Take from one to four turns with the Tag Material (B) around the hook, take a couple of turns with tying silk (A) around the loose end of (B) and cut off (B) as Fig. 4. Take about three or four turns towards the eye of the hook with (A), with two more turns tie in the body material (D) Fig. 4. Wind (A) back to the starting point, take a half hitch and let hang. Wind body material (D) to where (A) was left hanging. Wind (D) back and forth several times to form a tapered body, fasten with two or three turns and a half hitch with (A) Fig. 5. Next take hackle (E), and strip off soft web fibers on dotted line, Fig. E. Hold hackle {23} (E) by the tip with thumb and finger of the left hand, with the shiny side of the hackle to the right, place the butt diagonally under the hook and take four or five tight turns and a half hitch with (A) Fig. 6. Be sure that the hackle is tied on edgewise with the shiny side to the front. Now grasp the tip of the hackle with the hackle pliers and wind four or five turns clockwise around the hook. If the hackle starts winding edgewise it will go on without any trouble, if not better take it off and try again until you get the knack of tying the butt in at just the right angle. Take three or four turns over the hackle tip with (A) and clip off the tip close as Fig. 7. With the thumb and finger of the left hand, reach from under the hook and pull all the fibers down to the bottom, take three or four turns over them with (A) towards the barb of the hook, to hold them in place, and to keep them pointing well back, as Fig. 8. Next take a pair of matched (one right and one left) turkey, goose, or other wing feathers, Fig. A, and cut a section from each about 1/4" wide, place the two sections with tips even and concave sides together as Fig. B. Cut off the butt ends to the right length, that is so that the tips come even, or a little beyond the bend of the hook. Place on top of hook as Fig. 9 and tie on the same as previously explained in tying hair on Bucktails (Diagram 3, page 15, Figs. 4 and 10). Finish off with a smooth tapered head, two or three half hitches {24} and a couple of coats of good head lacquer, Fig. 10. Many patterns are tied palmer, that is the hackle is wound the whole length of the body. Many of the dry flies are tied this way, especially the Bi-visibles. To tie a palmer hackle, prepare the hackle by holding the tip of the hackle between the thumb and finger of the left hand, and with the thumb and finger of the right hand, stroke the fibers back so that they point towards the butt, instead of towards the tip, Fig. C, Diagram 4. With the shiny side of the hackle up, strip off the fibers from the bottom side as Fig. D. Now tie the hackle in by the tip as Fig. 11. Make the body the same as before. Wind the hackle spirally around the body and tie off the butt, Fig. 12. To make the hackle more full near the head, one or more hackles are tied in at the same time as Figs. 6 and 7, the palmer hackle is wound to within 1/8" of the eye and the butt tied in and cut off the same as the tip was cut off Fig. 7.
{25}

{26}
{27}
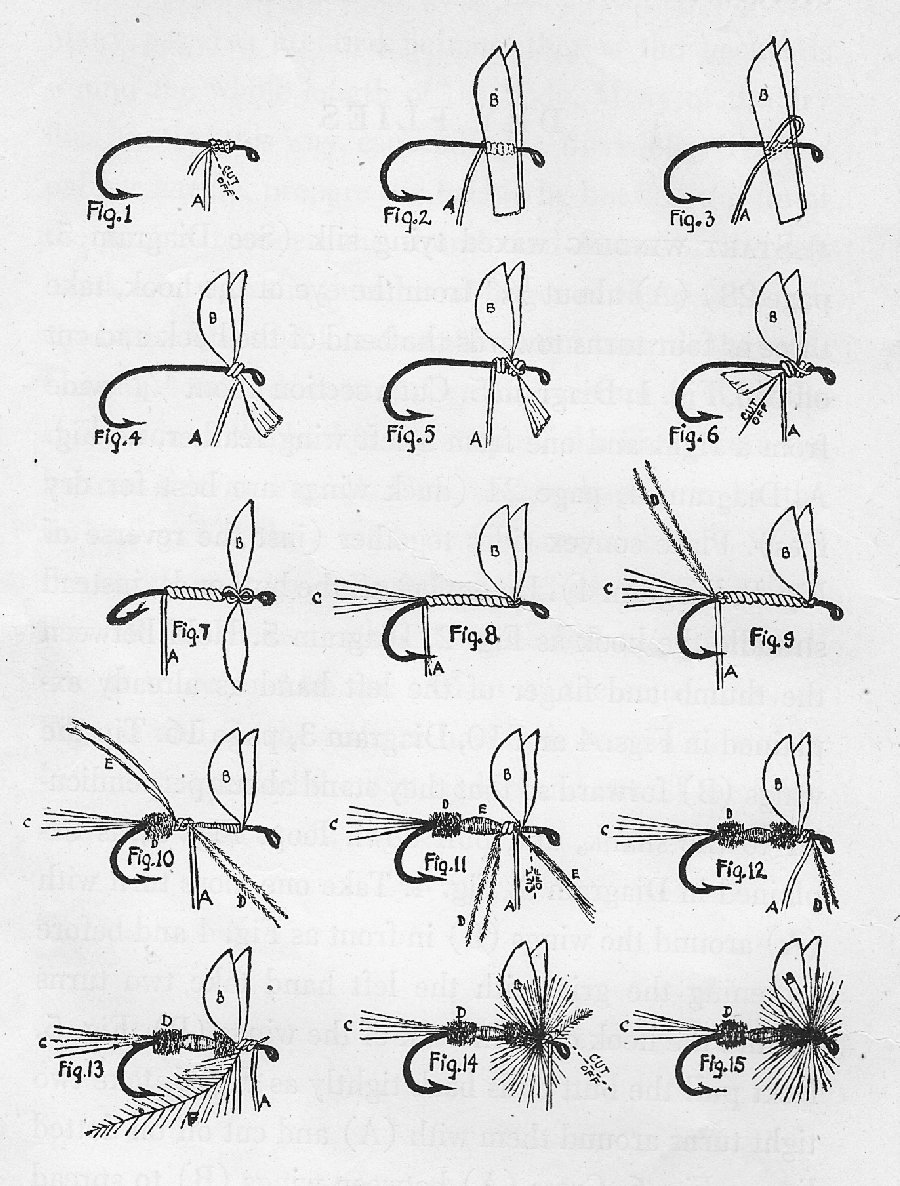
Start winding waxed tying silk (See Diagram 5, page 28) (A) about 1/8" from the eye of the hook, take three or four turns towards the bend of the hook and cut off end, Fig. 1, Diagram 5. Cut a section about 1/4" wide from a right and one from a left wing feather, as Fig. A Diagram 4, page 21 (duck wings are best for dry flies). Place convex sides together (just the reverse of Fig. B, Diagram 4). Do not cut off the butt ends, instead straddle the hook as Fig. 2, Diagram 5. Hold between the thumb and finger of the left hand as already explained in Figs. 4 and 10, Diagram 3, page 15. Tip the wings (B) forward so that they stand about perpendicular to the shank, and pull down loop, Fig. 3, as explained in Diagram 3, Fig. 4. Take one more turn with (A) around the wings (B) in front as Fig. 4 and before loosening the grip with the left hand take two turns around the hook close in back of the wings (B), Fig. 5. Next pull the butt ends back tightly as Fig. 6, take two tight turns around them with (A) and cut off on dotted line as Fig. 6. Cross (A) between wings (B) to spread them, and wind tying silk (A) down shank of the hook as Fig. 7.
{28}
{29}
{30}
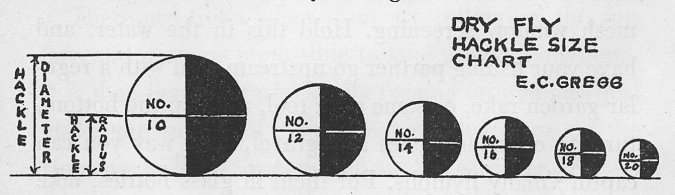
From now on the body is made as previously explained, so for the sake of variation we will tie a band in the centre, the same as a Royal Coachman. Tie in tail (C) Fig. 8. Tie in two or three strands of peacock herl (D) Fig. 9 with (A) and wind (A) four or five turns towards the eye of the hook. Take three or four turns with herl (D). Tie in two strands of silk floss (E) Fig. 10, take a few more turns with (A) over the loose ends of (D) towards the eye of the hook. Wind silk floss (E) over the herl about half way up the hook. Take a turn or two around silk floss (E) with (A) and cut off end of (E) as Fig. 11. Carry (A) up to the front of the wings. Finish body with herl (D) wound tight against the back of the wings. (This helps to push the wings forward and to hold them in place.) Tie off herl (D) with (A) Fig. 12. The next step of putting on the hackle (F) is done the same as Fig. 6, Diagram 4, page 21. But here the hackle is much more important than on the wet fly. The floating qualities of a dry fly depend entirely upon stiff neck hackle of the proper size. (Use Hackle Chart.) Sometimes two hackles are used, these are laid together, and both butts tied in at the same time. One hackle of the proper size and stiffness is usually enough, so we will use one tied in as Fig. 13 and explained in Fig. 6, Diagram 4, page 21. Clip the hackle pliers to the tip of hackle (F) and wind about two turns edgewise in front of the wings, wind two turns close {31} in back of the wings. Take two or three more turns in front of the wings, all the while keeping the hackle edgewise, with the shiny side towards the eye of the hook. Wind the hackle close so as not to fill up the eye of the hook and to leave room for the head. Tie in the tip with a couple of turns of (A) Fig. 14. The hackle should now be standing straight out from the hook, with the most of it in front of the wings. Shape a tapered head with (A). (Head should be about 1/16" long on a size 12 hook.) Finish with two or three half hitches and a drop of head lacquer, Fig. 15.
Various feathers are used for wings of dry flies, such as breast feathers from mallard, teal; partridge, grouse, black duck, wood duck. Hackle tips, starling, duck, turkey, goose, pheasant, wing feathers, etc.
Two whole feathers of the proper size, with the natural curve are used for fan wings. The tips of two feathers, or a section may be cut from two matched feathers. All of these wings are tied on in the same manner as previously explained. See Diagram 2 for flies tied with different style wings.
{32}
Nymphs are larvae of all aquatic insects. Together with minnows, crawfish, etc., they represent about ninety per cent of the trout's regular diet. Considering this fact, it is obvious that nymphs will take trout throughout the entire season. It will greatly surprise the novice to learn of the great amount of underwater insect life present in any stream. Next time you go fishing, hold your landing net close to the bottom, in a foot or so of fast water. Reach upstream and loosen the stones and gravel. Raise your landing net, and notice the numerous nymphs that have been washed from under the stones, and have attached themselves to your net. Better still, make a screen about two feet square, from regular 14 mesh window screening. Hold this in the water, and have your fishing partner go upstream, and with a regular garden rake, or some such tool, rake up the bottom, turning over the stones and gravel. This way you can capture many nymphs. Put them in glass bottles, take them home, and make copies of them. When next you {33} go fishing open the first trout you catch, examine the contents of its stomach, and determine which of the copies you have made is the proper nymph or fly for the occasion. To fish with an imitation of the fly or nymph upon which they are feeding, will result in a heavier creel.
When nymph fishing it is important to use a long, finely tapered leader. A 4x is about right. Fish in the same waters, and very much the same way as with a dry fly except that the nymph is allowed to sink. Fish upstream, or up and across the current. In the ripples. Around boulders. At the edge of fast water. Let the nymph drift with the current. Follow it with your rod tip, and be prepared to set the hook at the least hesitation of the line. Trout will sometimes take a drifting nymph and eject it, without being felt on the most delicate rod, so be ever on the alert when nymph fishing. A nymph fished down stream, and retrieved with slow, short jerks, will often work very well. When fished in this manner, trout will strike quite hard, and usually hook themselves.
There are times when trout are rolling on the surface and it seems impossible to take them on anything. It is then that they are usually feeding on nymphs, just under the surface. I remember one such time on the Housatonic River in Connecticut last summer. Just at dark, I was standing knee deep in very fast water. Trout {34} were breaking all around me. I knew, they were feeding on nymphs, and tried in every way to catch them. The water was so fast, it was impossible to keep the nymph just the right depth below the surface. I tried every trick that I knew, but could not get a strike. Finally reaching my hand in my pocket, I discovered several large buckshot. Removing the nymph from the tip of the leader, I attached five of these large shots, to the very tip of the leader, with a piece of 3x gut tippet about four inches long. I connected the nymph to the leader about sixteen inches from the tip. Within the next few minutes I took several nice trout, within rod's length of where I was standing. What actually happened, the lead was so heavy that it immediately sank straight to the bottom, and my taut line held the nymph suspended about two inches below the surface. The short gut between the nymph and the leader allowed the nymph to quiver much as the natural was doing. All the various common nymphs can be faithfully copied, by learning to tie the various styles of those herein illustrated. Simply alter the sizes, and color combinations, according to those found in the waters where you fish.
Remember nearly all the nymphs have flat bodies, and dark backs. The bodies may be flattened by thoroughly lacquering them, and when nearly dried squeezing them flat with an ordinary pair of pliers; or by {35} cutting a piece of quill the shape of the body from a turkey or goose wing. Bind this on top of the hook for the foundation of the body, and build the body over this. When finished, lacquer the entire body.
Most any body materials that are used for the making of other flies can be used; however, wool is mostly used for nymphs. Silk floss wound over a quill foundation and then lacquered, makes a very smooth, realistic body.
{36}
{37}
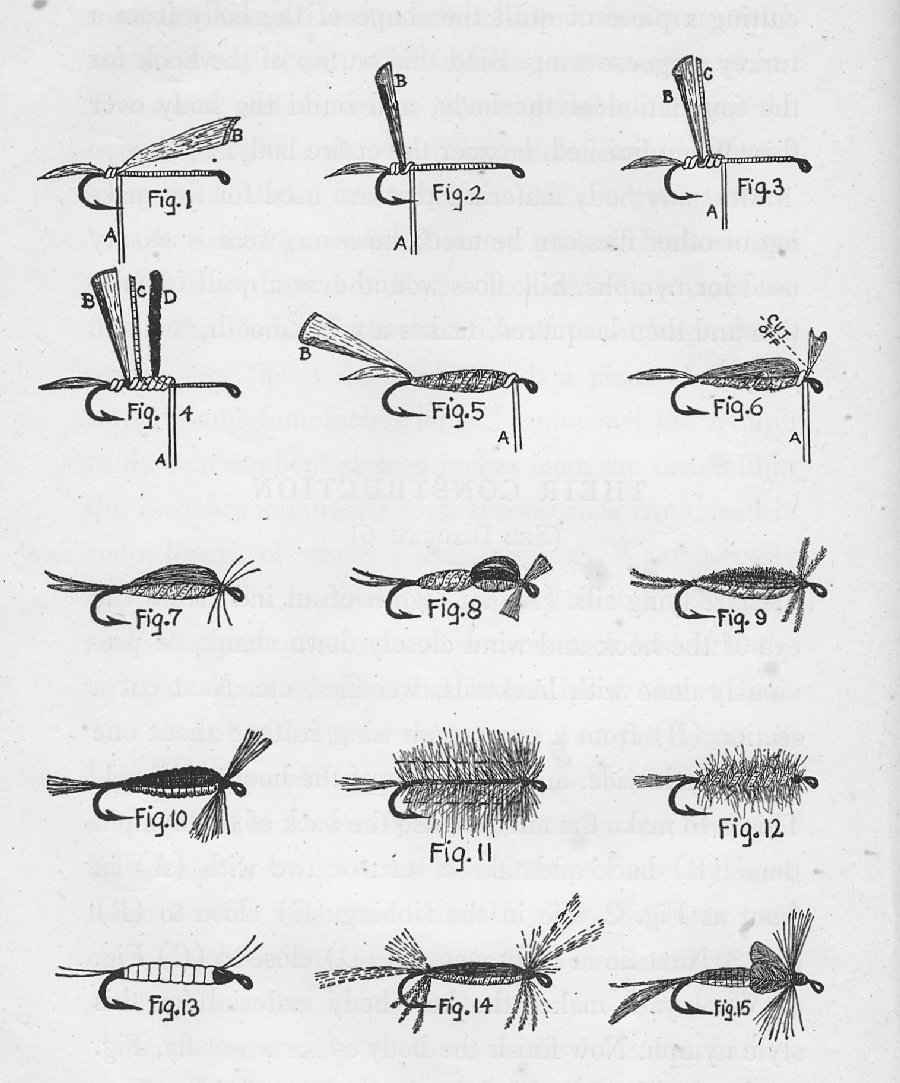
Start tying silk (A) an eighth of an inch from the eye of the hook and wind closely down shank, as previously done with bucktails, wet flies etc. Next cut a section (B) from a grey goose wing feather about one eighth inch wide, and tie on top of the hook as Fig. 1. This is to make the tail and also the back of the nymph. Bend (B) back and take a turn or two with (A) in front as Fig. 2. Tie in the ribbing (c) close to (B) Fig. 3. Next tie in body material (D) close to (C) Fig. 4. Wool yarn makes the best body material for this style nymph. Now finish the body as for a wet fly, Fig. 5, then pull (B) tightly over the top, finish off as Fig. 6. This makes a sort of hard shell over the back. Next turn the hook upside down in the vise, and lay three horse hairs across, just in back of where the head is to be made, crisscross (A) between the hairs to spread them and make them look like legs, and your nymph should look like Fig. 7. Nymphs of this style as well as Figs. 8, 9, 10, 14 and 15 look more natural if the bodies are flattened. Fig. 8 is tied nearly the same as Fig. 7, the difference being that (C) and (D) are both wound over (B) about two-thirds of the length of the body, then (B) is turned back, the body finished as before, (B) brought forward loosely to form the humpbacked wing case, and (B) being cut off as was done with Fig. 6, and instead of the butt end of (B) being cut off as was done with Fig. 6 it is split by crisscrossing (A) through it to form small wings as Fig. 8. Fig. 9 is made in the same way except that several strands of peacock herl is used for the dark back, tail, and feelers.
Fig. 10 is a very effective nymph, the body made entirely of natural raffia (soaked in water before using), with black hair used for the tail and feelers The body coated with lacquer as before mentioned and pressed flat when dry; paint the back with dark brown or black lacquer.
Fig. 11 is made by close wound palmer hackle cut off on dotted lines. Fig. 12 is a fur body, made by spinning rabbit's fur or other fur on waxed tying silk and ribbing with gold; the tougher this nymph looks the more effective it seems to be. Fig. 13, the Caddis {38} worm can be more naturally reproduced with a common rubber band than any other way I know. Get a dirty, white, rubber band about 1/8" wide, taper one end for about 1/2". Lay two horse hairs lengthwise on top of the hook for the feelers, wind tying silk over them down the hook, tie in the rubber band by the very tip of the taper, wind the tying silk back to the starting point, and be sure that the tying silk is wound smoothly. If not, any roughness will show through the rubber band. Wind the rubber band tightly to about 1/4" back of the eye. Wind back down and take one turn under the horsehair at the tail end, wind up to the head and tie off with the tying silk. This now makes three thicknesses of the rubber band. Form a large head with the tying silk, fasten securely and you have a very realistic Caddis worm. Fig. 14 is tied about the same as Fig. 7, with a considerable amount of speckled mallard, and peacock herl used for both the front and back feelers as well as the legs.
Fig. 15. The Damsel Nymph has a body of dark grey wool with a back of dark brown or black lacquer. Wings, small red-brown wood duck breast feathers, feelers dark brown hackle, and a large black head.
{39}
The Helgramite Nymph, larva of the Dobson Fly, is such an excellent bass and trout food, that the making of this nymph deserves special mention. As my personal way of making this particular nymph differs considerably from those previously explained, I consider it advisable to go into further details concerning the construction of this pattern.
I personally like the winged style. That is, with small imitation wings and horns, or feelers. This represents the nymph in its final underwater stage, just before emerging from the water as the Dobson Fly. I find black skunk tail the most satisfactory material for the body of this nymph. Either light grey swan sides, or light grey pigeon breast feathers for the wing and legs.
{40}
{41}
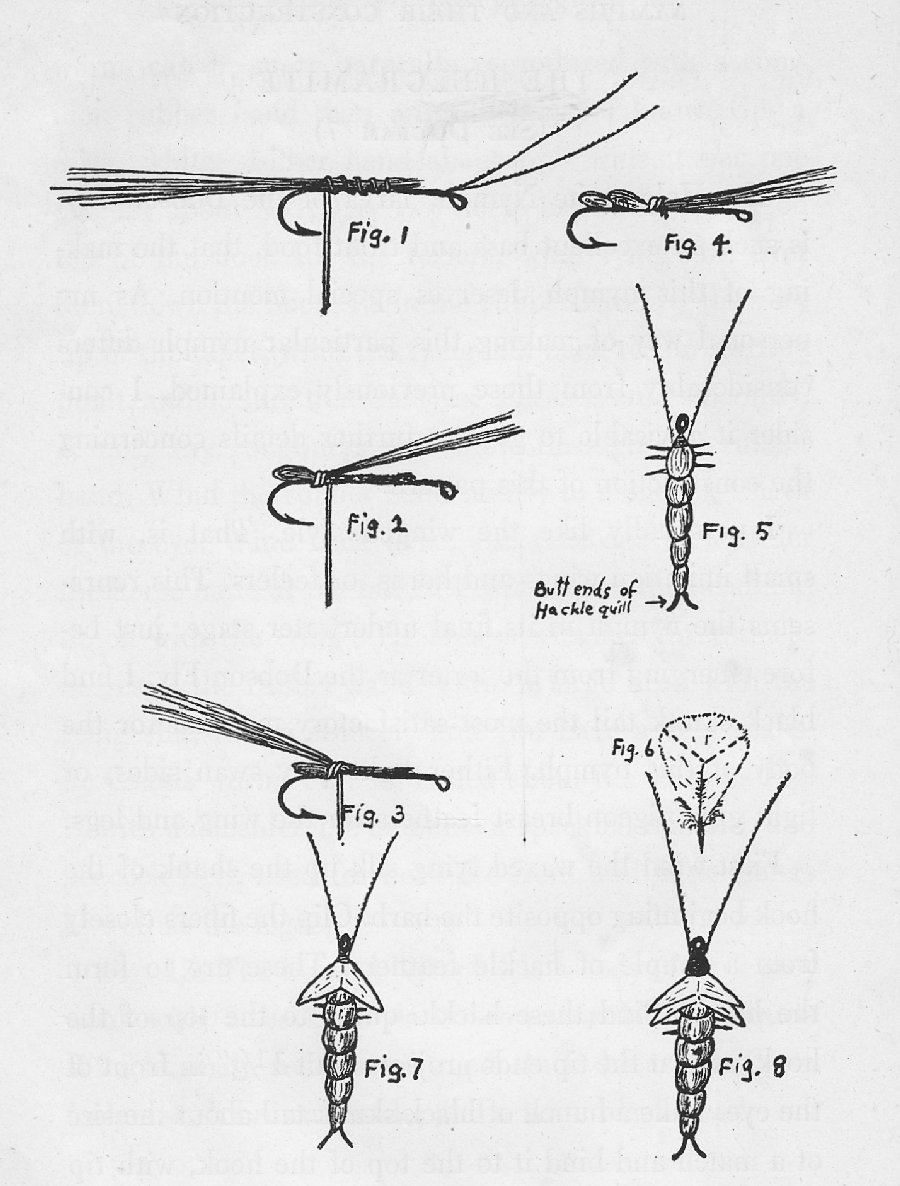
First wind the waxed tying silk up the shank of the hook beginning opposite the barb. Clip the fibers closely from a couple of hackle feathers. These are to form the horns. Bind these hackle quills to the top of the hook, so that the tip ends project about 1 1/2" in front of the eye. Take a bunch of black skunk tail about the size of a match and bind it to the top of the hook, with tip ends towards the eye of the hook as in Diagram 7, Fig. 1. Next fold the hair forward and bind down tightly as in Fig. 2. Again fold the hair back and tie down as in Fig. 3. Then again as in Fig. 4. Notice that each time the hair is folded back upon itself and tied down, that it forms a segment of the body, and that each segment increases in size, until your nymph looks like Fig. 5. At this stage turn the nymph over and tie a piece of light grey feather about 1/8" wide across the bottom, separate the fibers with the tying silk to form the legs. Now cut a small light grey pigeon feather with the centre quill, as dotted line in Fig. 6. Give this a coat of clear lacquer: when dry, tie flat, on the back of the nymph to form the first set of wings, as in Fig. 7. Cut another feather and treat the same way, tie these slightly forward of the first set of wings, and you have a Dobson Nymph that is very lifelike in appearance.
{42}
It will appear obvious from a study of Diagram 8, page (43) that the tying of bass flies and Feather Streamers differs so little from the tying of wet flies and bucktails that a detailed description will be unnecessary.
Bass flies are little more than large trout lies, the principal difference being the feathers that are used for the wings although the same feathers can be used as for trout flies. It is customary with commercial tiers to use two whole feathers for the wings, or the tips of two wings feathers, etc. Place the concave sides together and tie in the butt ends the same as for a wet fly. Bass flies to be used as spinner flies, that is, flies to be used with a spinner in front, should be tied on ring eyed hooks instead of hooks with turned down or turned up eyes.
{43}
{44}

{45}
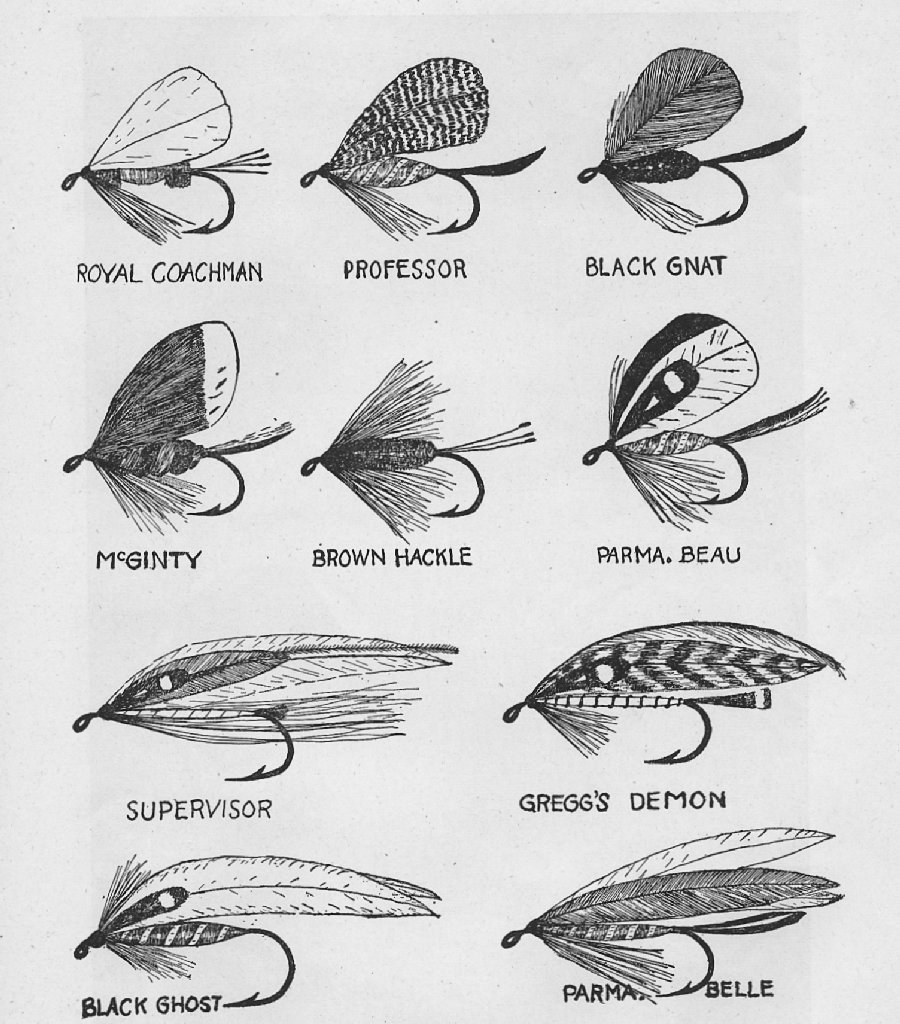
Certain patterns of these flies have for a long time been famous as salmon flies in northern New England and Canada and the past few years have seen them steadily growing in popularity with anglers of Connecticut, especially for Rainbow Trout. The feathers that are used for wings are saddle hackles, and from four to eight feathers are used, hackles of the same size are selected, the tip ends placed even, and the concave sides of those used for the left side are placed next to the concave sides of those used for the right side, in other words, both the right and left side of the wing will be convex, or outside of the feather. Any of the standard pattern flies can be tied as streamers. Some of the patterns however, are very elaborate flies; the Supervisor, for instance, has wings of light blue with shorter feathers of green on each side, with peacock herl along each wing, polar bear hair, jungle cock shoulders, a silver body, and a red tag. This fly was developed a few years ago by Mr. Joseph Stickney, Supervisor of Wardens, State of Maine, to imitate the smelt, a natural salmon food. The riginal Supervisor did not have the jungle cock or the peacock heal. Mr. Stickney suggested the addition of these feathers to me last year, and I believe that this is now the approved dressing.
{46}
{47}
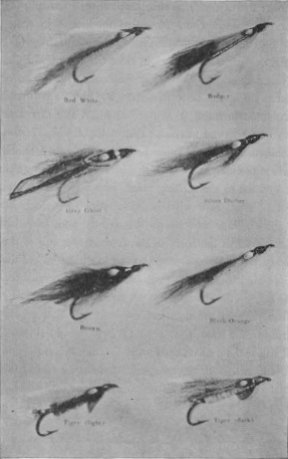
SUPERVISOR: WINGS, Blue saddle hackle with polar bear hair, and peacock herl down each side. CHEEKS, green hackle tip and jungle cock. BODY silver. TAG, red wool.
TIGER: (light) WINGS, brownish yellow bucktail or red squirrel tail. BODY yellow chenille. TAG, gold. TAIL, barred wood duck. CHEEKS, jungle cock. THROAT, scarlet.
TIGER: (dark) WINGS, yellow bucketful. BODY peacock herl. TAG, gold. TAIL, barred wood duck. CHEEKS, jungle cock. Short red fin.
GREGG'S DEMON: WINGS, grizzly saddle hackle dyed brown. BODY, silver ribbed with gold. CHEEKS, jungle cock. TAIL, barred wood duck. TOPPING, golden pheasant crest. HACKLE, Orange.
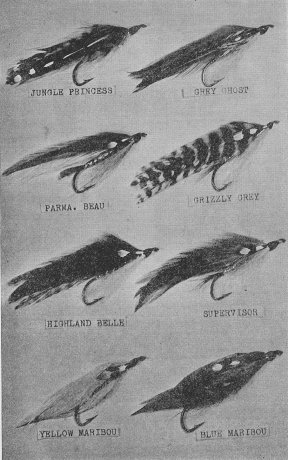
JUNGLE PRINCESS: WINGS grizzly saddle hackle dyed yellow with large jungle cock. CHEEKS, blue chatterer. BODY gold tinsel. HACKLE, white.
GRIZZLY GREY: WINGS, grizzly saddle hackles. CHEEKS, jungle cock. TAIL, orange. BODY, silver tinsel. HACKLE, white bucktail.
{48}
HIGHLAND BELLE: WINGS orange saddle hackles inside, grizzly saddle hackles outside. CHEEKS, jungle cock. BODY, gold tinsel ribbed with silver tinsel. HACKLE, white bucktail.
SPENCER BAY SPECIAL: WINGS blue saddle hackles inside with furnace saddle hackles outside. CHEEKS, jungle cock. TAIL, golden pheasant tippet. BODY, silver tinsel ribbed with oval silver tinsel. HACKLE, yellow and blue mixed.
BLACK GHOST: WINGS, white saddle hackle. BODY, black silk floss ribbed with silver. CHEEKS, jungle cock. HACKLE, yellow.
GREY GHOST: WINGS, grey saddle hackle with peacock herl and white bucktail. BODY, orange floss ribbed with gold. CHEEKS, silver pheasant feather and jungle cock.
BROWN GHOST: WINGS, brown saddle hackle. BODY, brown floss ribbed with gold. CHEEKS, jungle cock. TOPPING, golden pheasant crest. TAIL, golden pheasant crest. HACKLE, yellow.
WARDEN'S WORRY: WINGS one red and one grizzly saddle hackle. HACKLE, yellow, tied very full.
WHITE MARIBOU: WINGS, white caribou. CHEEKS, large jungle cock and small red feather. TOPPING, golden pheasant crest.
YELLOW MARIBOU: WINGS, yellow caribou. CHEEKS, large Jungle cock and small red feather. TOPPING peacock herl. Two complete caribou feathers can be used, or sections of the feathers, depending upon the size of the hook. Size 4 long shank hook is a good size to tie them for salmon.
{49}
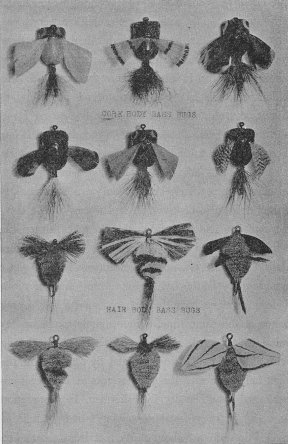
A style of fishing becoming more popular each year is that of Fly Rod fishing with Floating Bugs. These Bugs represents the large moth, butterfly, etc., and are constructed of a large variety of materials. Some have cork bodies. Some have Balsa Wood bodies. Others all hair bodies. Bodies covered with chenille, and other materials. One of the easiest to make and I believe one of the most successful styles, is entirely constructed from the body hair of the deer, reindeer, or caribou. All of these hairs are rather coarse and hollow consequently are very buoyant, and when properly made into a copy of the living insect, they have a soft, lifelike body that appears very natural when taken by a fish. These soft bodied Bugs are not so apt to be ejected before the Angler has time to set the hook, as are those with hard bodies.
{50}
Although the object of this book is to teach the Angler how to tie his own flies a few words in regards to the writer's personal experiences in using these Bugs might not be amiss at this time. Floating Bugs are mostly tied on large size hooks and generally used for {51} bass. However, I have had a great deal of luck and many pleasant experiences with them tied as small as a #14 Model Perfect hook, and used with a 4x Leader. The small sizes will take many large trout, and are readily accepted by all pan fish. When fishing in still waiters with the Floating Bugs, whether it be for bass, pickerel, trout or pan fish I use a light leader, treated so that it will sink. I cast to a likely looking spot, beside an old stump along lily pads, or to an opening in the lily pads themselves. I let the Bug hit the water with quite a splash, as a living moth of the same size would, and there I let it lie, absolutely motionless, as though stunned by the blow. By all means do not be impatient, let the Bug lie perfectly still for two or three minutes, and then simply move the tip of your rod just enough to cause the Bug to quiver on the surface. Again let it lie perfectly still for a minute or two; usually about the second time the Bug is made to quiver you can expect a strike, and when a big bass comes after one of these Bugs, he comes full of action. When fishing fast water, I fish them exactly as I would a dry fly, upstream or up and across the current. My personal choice for color is the natural brownish grey body hair from either the deer, reindeer, or caribou. Wings, tail and body all the same natural color. I tie this pattern from size 2/0 Model perfect hook down to size 14, and us {52} the larger sizes for bass and pickerel, and the smaller sizes for trout and pan fish. I remember one very pleasant experience that happened in northern Maine three years ago. There is a small, deep, spring fed lake of about ten acres in area, completely surrounded by wilderness; this lake had been stocked with, Rainbow Trout and closed to all fishing for five years. I was fortunate in being there about two months after it had been opened to fishing and was invited to try my luck, after first being advised that although some very nice catches were regularly being taken on a Streamer Fly fished deep, also on live bait and worms with a spinner, no one had even been able to take fish on the surface. I arrived at this lake about one hour before dark, and it was one of those evenings when the water was actually boiling with rising trout. In fact never before or since have I seen so many fish breaking water at the same time. I immediately made up my mind to take fish on the surface. I began fishing with a small spider, and changed fly after fly for the next half hour with the same results as had been experienced by other dry fly fishermen. In desperation and with darkness fast approaching I tied on a size 4 Grey Bug and cast about thirty feet from shore. The Bug hit the water with quite a splash and didn't even as much as put down one fish, and several continued to {53} rise from within a few inches to a few feet from where the Bug landed. I waited a couple of minutes and gave the Bug a little twitch, nothing happened, again I twitched and again nothing happened. I began to believe I was stumped when again the Bug was moved ever so slightly for the fifth time, and remember this was at least seven minutes after it first hit the water. A fish struck. In a few minutes I landed a 2 1/4 pound Rainbow. Before darkness had brought the day to a close I had landed three more beautiful Rainbows averaging 2 pounds each. I had never since had the opportunity to fish in this beautiful little lake. Some day I hope to return, and again try, and I believe succeed in taking these beautiful Rainbow Trout on the conventional dry fly. However, this one little experience proved conclusively to me the absolute necessity of patience in fishing Floating Bugs.
First let us begin by making the most simple; that is, one that has the Body, Wings, and Tail, all of the same material and color. Follow the illustrations carefully and even your first attempt will be a masterpiece.
{54}
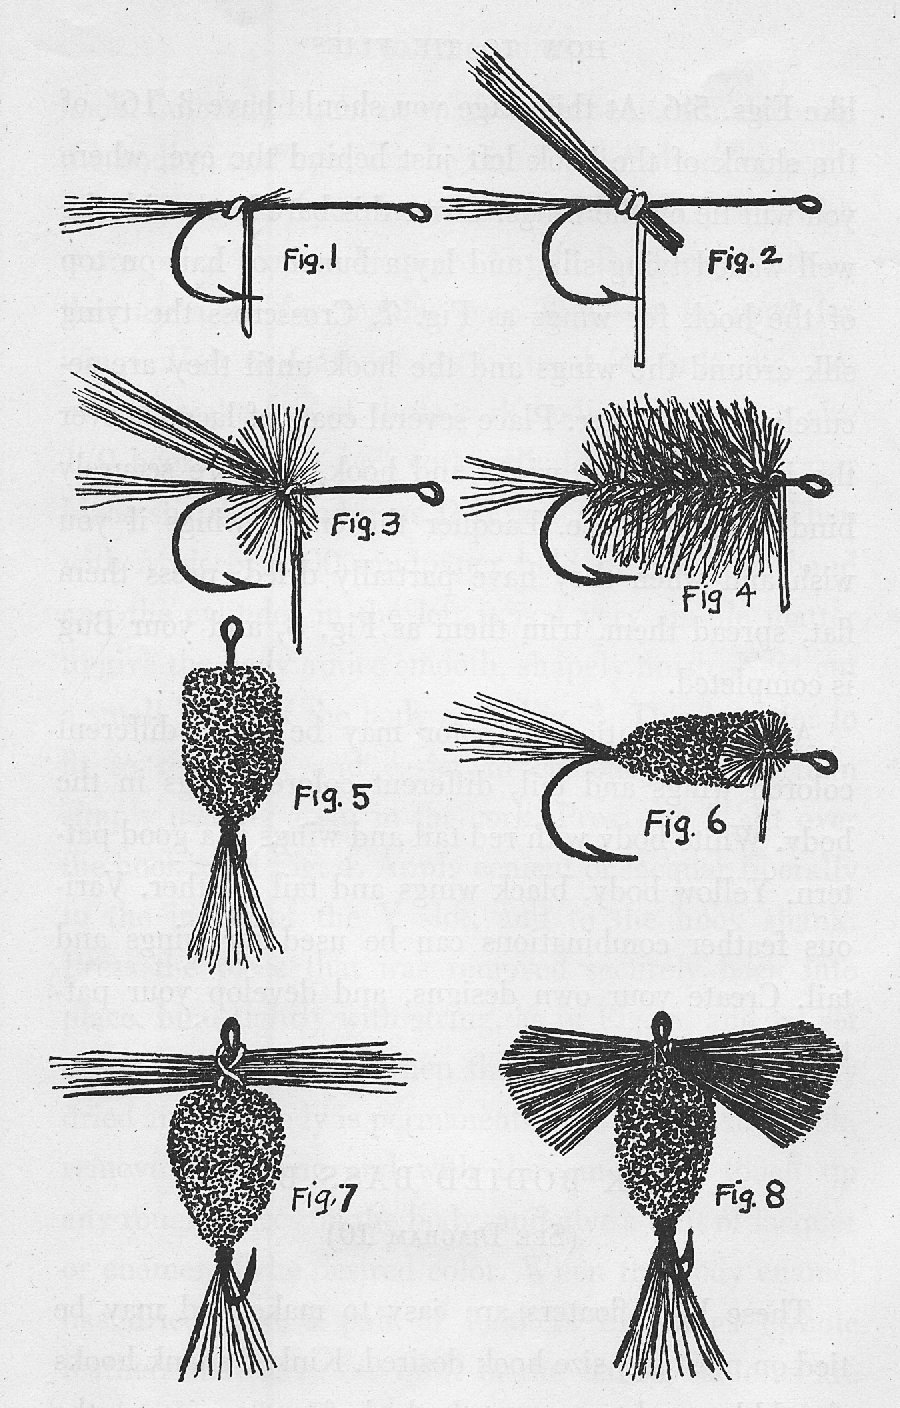
Although I use well waxed 00 tying silk, you will find that regular sewing silk size A will work best on your first attempt. First wax your thread thoroughly and take a few turns around the shank of the hook and tie in a small bunch of hairs for the tail, as in Diagram 9, Fig. 1, page (55). We will assume that we are using regular deer hair cut from the hide. Next clip a small bunch of hairs, about the size of a match, close to the hide. You will notice there is some fuzz mixed with the hair at the base close to the skin, pick out the fuzz and place the butts of the hairs under the hook as in Fig. 2, Take a couple of loose turns with the tying silk, hold the tips of the hair with the thumb and finger of the left hand, and pull the tying silk down tight. You will notice that the hairs spin around the hook and the butt ends will stand out pretty much at right angles to the hook, as in Fig. 3. Cut off the tip end of the hairs on the dotted line, press the hairs back tightly, apply a drop of water-proof lacquer to the base of the hairs and the hook, and repeat the same process of tying on a small bunch of hair, each time pressing it back tightly. Remember this is important, because the hair must be as close together as possible to make a firm, smooth, buoyant body.
{55}
{56}
When you have built the body up until it looks something like Fig. 4, remove it from the vise and with a sharp pair of scissors trim and shape it until it looks like Figs. 5 and 6. At this stage you should have 3/16" of the shank of the hook left just behind the eye, where you will tie on the wings. Cover this bare hook with the well waxed tying silk, and lay a bunch of hair on top of the hook for wings as Fig. 7. Crisscross the tying silk around the wings and the hook until they are securely tied together. Place several coats of lacquer over he junction of the wings and hook, to more securely bind them in place. Lacquer the entire wings if you wish and when they have partially dried, press them flat, spread them, trim them as Fig. 8, and your Bug is completed.
Any combination of color may be used, different colored wings and tail, different colored rings in the body. White body with red tail and wings is a good pattern. Yellow body, black wings and tail another. Various feather combinations can be used for wings and tall. Create your own designs, and develop your patterns.
{57}
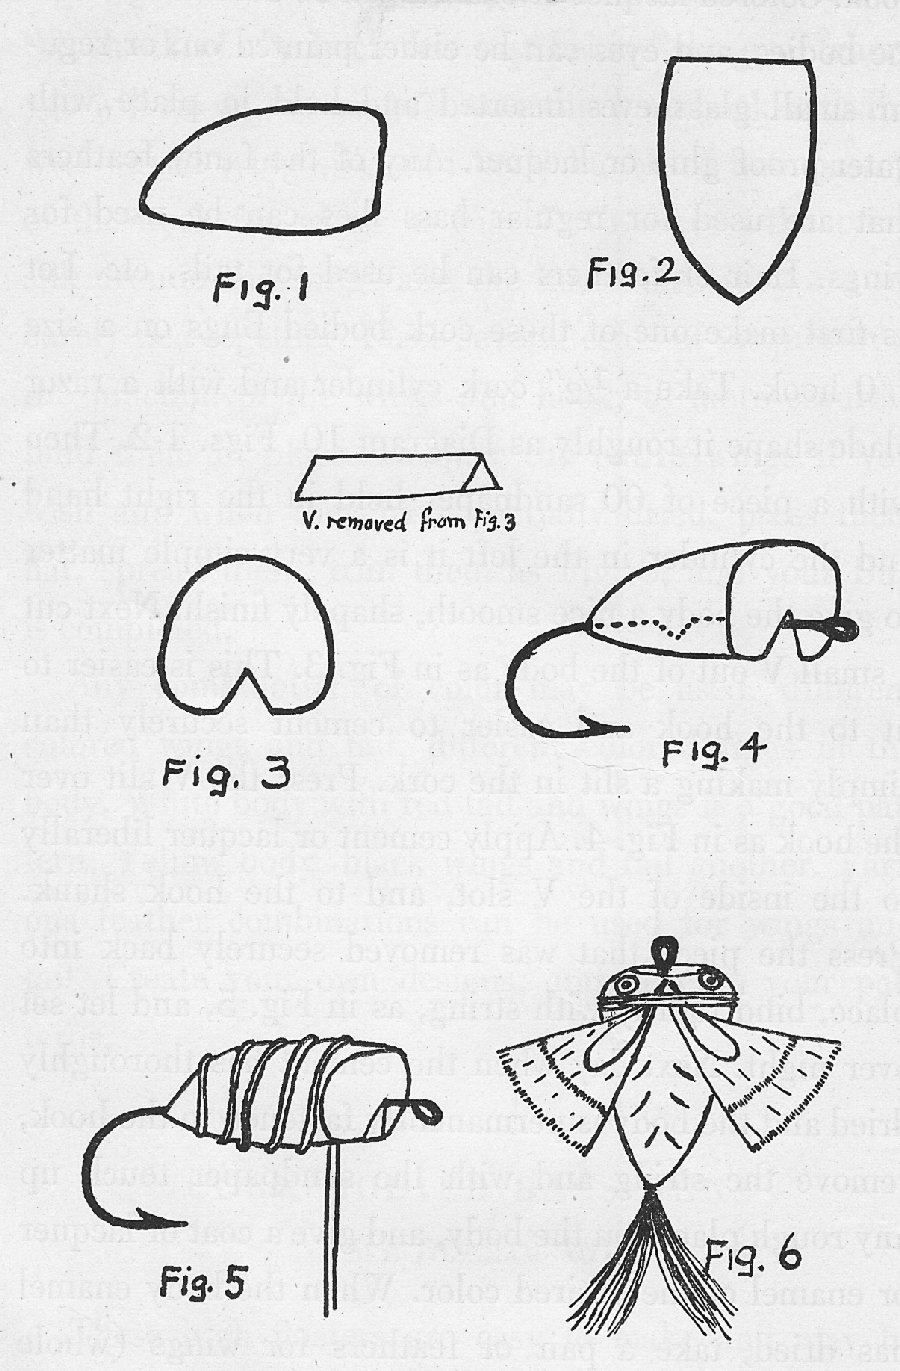
These high floaters are easy to make and may be tied on most any size hook desired. Kinked shank hooks should be used to prevent the body from turning on the hook. Colored lacquer or enamel can be used to decorate the bodies, and eyes can be either painted on, or regular small glass eyes inserted and held in place with water-proof glue or lacquer. Any of the fancy feathers that are used for regular bass flies can be used for wings. Hair or feathers can be used for tails, etc. Let us first make one of these cork bodied Bugs on a size 1/0 hook. Take a 1/2" cork cylinder and with a razor blade shape it roughly as Diagram 10, Figs. 1 and 2. Then with a piece of 00 sandpaper held in the right hand and the cylinder in the left it is a very simple matter to give the body a nice smooth, shapely finish. Next cut a small V out of the body as in Fig. 3. This is easier to fit to the hook and easier to cement securely than simply making a slit in the cork. Press the V slit over the hook as in Fig. 4. Apply cement or lacquer liberally to the inside of the V slot, and to the hook shank. Press the piece that was removed securely back into place, bind tightly with string, as in Fig. 5, and let set over night. Next day when the cement has thoroughly dried and the body is permanently fastened to the hook, remove the string and with the sandpaper touch up any rough places on the body, and give a coat of lacquer or enamel of the desired color.
{58}
{59}
When the body enamel has dried, take a pair of feathers for wings (whole feathers that have the quill in the centre, same as are used for regular bass fly wings are best), and with the tying silk bind these fast to the top side of the shoulders as in Fig. 6. Tie on a tail close to the body, paint on the eyes, paint any other color or designs you wish on the body, and the Bug is completed.
{60}
{61}
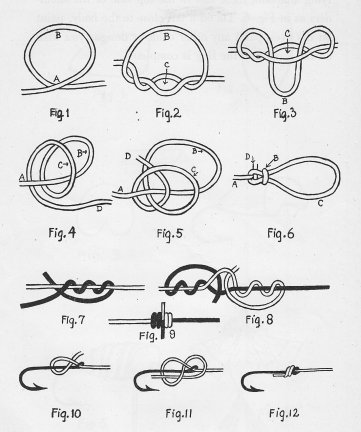
Figs. 1, 2 and 3 in Diagram 11, page (60) show a very convenient way to tie a dropper loop in the leader; roll the gut between thumb and finger at (A) Fig. 1, next invert loop (B) through (C) Figs. 2 and 3.
Figs. 4, 5, and 6 make the best knot for or a loop in the end of a leader, gut snells etc. Pull loop (C) through loop (B) Figs. 5 and 6.
Figs. 7, 8, and 9 are about the easiest and most secure knots for making leaders, the ends are in the centre of the finished knot and can be clipped close.
Figs. 10, 11, and 12, the figure eight knot, is the best for tying flies to the leader, it won't slip, and the pull is in line with the hook shank.
{62}
Quite frequently I am asked which fly I like the best, or which particular patterns I would choose should I carry only a few flies with me on a trip. That is rather a difficult question to answer. The season, the type of fishing and location must be taken into consideration.
There must be some reason for so many hundreds of patterns. I hardly believe that any half dozen patterns can be used with constant success throughout the season, even in one particular locality. There are times, when fish are feeding, that they will take anything; again one may change fly after fly without success, when finally a fly will be tried that will take fish on every cast. Suppose that particular fly wasn't included in the chosen few, the answer is obvious.
However, I will endeavor to choose six patterns each of the various styles, and to give my reasons for their choice, but here I assure you there will always be many more patterns in my fly box for further trial, after I have exhausted my favorite six.
Beginning with dry flies, my first choice would be {63} a Quill Gordon, on a size 16 hook. This fly closely represents the numerous duns that are on or about the water, to some extent, during the entire season. I have little faith in color in the dry fly, except light or dark shades. I do believe that the size and shape have a great deal more to do with the success of a dry fly than color. I have proven to my own satisfaction that a Quill Gordon sparsely dressed as it should be, but tied with a black hackle and yellow mallard wings, is just as successful as the customary dressing.
My second choice would be the Red Ant. Although this fly belongs to the order Hymenoptera, it can be used when many of the Diptera order are on the water, such as Cowdung, Blue bottle, Bee, etc. This family all have flat wings and make an entirely different appearance than the aforementioned Quill Gordon. I tie the Red Ant on a size 14 hook. I build the body first of red silk floss, shape it like the body of an ant, give it a couple of coats of clear lacquer and let it dry hard and shiny. This body will reflect light, much as the natural insect. I then tie on two hackle tips for wings. Have them about as long as the hook, spread them so they are at about a 30 degree angle from the body and very flat. I then use a brown saddle hackle with fibers about 3/4" long for legs. I put on only two or three turns of the hackle, and then clip off all of the top and bottom hackles, leaving only about six fibers sticking {64} straight out on each side. This fly will float very close to the water, and because of its sparse dressing, slightly heavy body because of the lacquer, it is not a good floater. It also has the disadvantage of being hard to see. However, it is still my second choice, and properly dressed, and fished with a very fine leader, will take many nice fish.
My third choice is the Fan Wing Royal Coachman. This fly was never supposed to represent any particular family but I believe it is taken by fish for the Lepidoptera, large-winged moths and butterflies. It seems to be very successful when these are about in the evening.
My fourth choice is the Furnace Spider. This fly I tie on a size 16 short shank hook, by winding only about three turns of a furnace saddle hackle, with fibers about three fourths of an inch long. Tied in this manner, without any body or tail, the fly will alight on the water with the hook down, and looked at from beneath, against the light, only the little black spot will be noticeable. This I believe represents some of the order Coleoptera (beetles) and also the small black gnat (Empidae). I know if no other ways to tie the Black Gnat small enough to represent the natural insect, and even on the very smallest hook, the artificial is usually many times larger than the natural. The small black centre of the furnace saddle hackle tied in this manner seems to represent the size of the natural very {65} closely. This fly is a very good floater and an excellent fly when trout are feeding on those small insects.
My fifth choice is the Grannon. This fly is of the order of Trihoptera, and has different shaped wings than any of those previously mentioned, the wings being quite full and roof shaped. It is on the water a good part of the season, and can be used when other flies with this shape wing are about, such as the alder fly, cinnamon fly, etc.
My next and sixth choice of dry fly would be the Brown Palmer, made on a size 12 long shank hook with a full body of peacock herl, and palmer hackle, wound not too full. This I believe is taken by the trout for many of the caterpillars.
My personal choice of these six patterns should now appear quite obvious, should it be necessary for me to limit myself to such a small selection. I have selected one each of the six most prominent orders, and should any one of the hundreds of families of these orders be in prominence on the water, I would at least have the correct size or color.
My choice of the standard pattern wet flies, Feather Streamers, Bucktail Streamers, and nymphs would be a little more difficult. I am a firm believer that color plays a very important part in the dressing of wet flies, as well as size and style. I offer my personal choice of these styles because of the consistency with which they {66} have taken fish for me during many years of fishing all parts of the country.
I do not hesitate to say that I have taken more trout, of all kinds, on a brown hackle with peacock herl body, than any of the other common wet fly patterns. This is probably because I have used it more. I do believe that in the north, and especially for brook trout, a fly with a little red in it is more productive. Therefore, for northern fishing I would select Royal Coachman, Parmachene Belle, and Montreal. Other favorite flies that are good most anywhere in North America are Grizzly King, Queen O'Waters; Cahill, and Grey Hackle.
Feather Streamers and Hair Streamers are being more extensively used each year. Many authorities are of firm conviction that these flies unquestionably represent small minnows, upon which the fish are in the habit of feeding. This may be true, but I have seen many rubber, metal and composition minnows, that were exact replicas of the naturals, both as to color and size, and they would not take fish as would the Feather or Hair Streamers, fished in the same waters at the same time.
Most of my experience with Feather Streamers and also Hair Streamers has been for Landlocked Salmon and Rainbow Trout, in big waters. So I will list these according to the way they have produced for me. The {67} Black Ghost on a #4 long shank hook has been my most successful Feather Streamer. Probably because its white streamers are easily seen by the fish. It will most always raise fish, even if not the proper fly to make them strike. The Grey Ghost is another, and one of the most popular streamers in the North for Landlocked Salmon. This fly, as well as the Supervisor, Spencer Bay Special and numerous other flies of this style, were originally designed by their creators to represent the smelt, a favorite food of the salmon. These flies vary so in their color combinations that I wonder what the fish do take them for. However, I do know that a Grey Ghost will work when a Supervisor will not, and vice versa. One is grey and the other is blue. When fishing in lakes with a Feather Streamer for trout I have consistently had most luck with a creation of my own, Gregg's Demon. This fly was never tied to represent anything, but I have taken many nice fish on it, and have seen little fellows hardly as long as the fly itself chase it, and try their best to bite it in two. There is just something about it that has "fish appeal."
A Brown Bucktail with a silver body on a #6 3x long shank hook rates number one in Bucktail streamers. Another excellent fly that has been a favorite for years, is a Yellow and Red Bucktail, with a silver body, the red only a narrow streak through the centre. This fly has recently been named "Mickey Finn." A red and {68} white, with silver or gold body is a real good pattern where there are brook trout, and tied on a large hook is very good for bass.
I use one with all white bucktail and silver body, the same as I do a Black Ghost, for locating fish. I find they will most always show their presence, one way or another when a white fly is cast near them.
An all yellow with black streak in the centre same as the "Mickey Finn" is another very good combination. This is an excellent pickerel and bass fly. In fact, most any of these Feather Streamers and Bucktail Streamers tied on larger hooks, and used with or without a spinner, are excellent lures for both bass and pickerel.
Nymphs: I have explained elsewhere my liking these lures, and can say little more except that I always carry the following color combinations in various sizes. All tied according to styles illustrated in the diagrams. Cream Belly with Dark Back; Yellow Belly with Black Ribs and Dark Back; Green Belly with Dark Back; Grey Belly and Gold Ribs with Dark Back; Brown Belly and Gold Ribs with Black Back; Orange Belly and Black Ribs with Dark Back.
{69}
| STANDARD DRESSINGS OF 334 FLIES |
| ALPHABETICALLY ARANGED |
[Transcriber's Note: Some of the names are not in strict alphabetical order.]
| NAME | TAG | TAIL | RIBS | BODY | HACKLE | WINGS |
| Abbey | Orange&black | Gold | Red Floss | Brown | Grey Mottled (mallard) | |
| Adams | Gold | Golden tippet | Grey Wool | Brown and grizzly | Grey Mottled (mallard) | |
| Alexandra | Peacock herl | Silver | Black | Peacock sward and jungle cock | ||
| Alder | Peacock herl | Black | Dark speckled Turkey or Groused | |||
| Apple Green | Brown | Green Silk | Brown | Dark Grey | ||
| Ash Dun | Grey | Silver Grey | Grey | Lt. Starling | ||
| August Dun | Redish | Yellow | Lt. Brown Floss | Redish Brown | Hen Pheasant | |
| Autumn Dun | Black | Yellow | Black | Grey | Teal Breast | |
| Babcock | Black and Yellow | Gold | Cardinal Red | Black | Black and Yellow | |
| Barrington | Grey Speckled | Peacock Herl | Brown | Grey Speckled | ||
| Beauty | Silver | Black | Badger | Spotted Golden | ||
| Beaverkill | Gold | Grey Speckled | White Floss | Brown tied palmer | Grey | |
| Bee | Gold | Black&Yellow chenille | Brown | Brown | ||
| Belgrade | Peacock herl | Scarlet and white | Yellow | Claret tied palmer | Red, white and jungle cock | |
| Blue Rooster | Tan mottled wood duck | Condor Quill | Blue Andalusian | Tan mottled wood duck | ||
| Blue Bi-visible | Blue floss | Blue tied palmer | ||||
| Black Bi-visible | Black floss | Black, tied palmer | ||||
| Blue Winged Olive | Brown | Green | Golden Brown | Blue dun hackle tips |
{70}
| NAME | TAG | TAIL | RIBS | BODY | HACKLE | WINGS |
| Blue Professor | Gold | Scarlet | Gold | Blue floss | Ginger | Grey speckled |
| Black Nymph | Brown mottled | Black herl | Partridge | |||
| Brown Nymph | Brown mottled | Brown herl | Partridge | |||
| Br. Bi-Visible | Silver or none | Brown | Brown | |||
| Brown Spider | Brown | Brown | ||||
| Black Spider | Black | Black | ||||
| Brown Dun | Brown | Brown | Brown | Starling | ||
| Black Midge | Black | Black | ||||
| Black Prince | Silver | Scarlet | Silver | Black floss | Black | Black |
| Blue Dun | Pale blue hackle | Pale blue fur | Pale blue dun | Blue grey | ||
| Blue Bottle | White silk | Black or Gold | Steel blue silk or dk. blue chenille | |||
| Black Gnat | Gold | Black Chenille | Black | Grey | ||
| Black Hackle | Gold | Black Chenille | Black | |||
| Blue Upright | Pale blue hackle | Pale blue fur | Pale blue dun | Blue Grey | ||
| Brown Hackle | Gold | Golden tippet | Peacock herl | Brown | ||
| Brown Palmer | Gold | Golden tippet | Peacock herl | Brown tied palmer | ||
| Brown Hen | Red Silk | Peacock herl | Brown | Brown mottled | ||
| Blue Quill | Blue dun hackle | Quill | Blue Dun | Blue Grey | ||
| Black and Silver | Golden tippet | Silver | Black | Black | ||
| Black and Claret | Golden tippet | Silver | Claret Wool | Black | Black | |
| Black June | Silver | Peacock herl | Black | Dark Grey | ||
| Black Moose | Green and Yellow | Green | Black tied palmer | Guinea | ||
| Black Quill | Black | Quill | Black | Dark Grey | ||
| Black Ant | Black chenille | Black Silk | Black | Slate |
{71}
| NAME | TAG | TAIL | RIBS | BODY | HACKLE | WINGS |
| Blue and Black | Golden tippet | Black | Black | |||
| Blue Jay | Gold | Scarlet | Gold | Red | Red | Blue Jay |
| Blue Quill | Blue Dun | Quill | Blue Dun | Grey | ||
| Bonnie View | Gold | Grey | Gold | Olive Brown | Brown | Grey |
| Boots Black | Gold | Speckled | Gold | Red Wool | Black | Black |
| Bandreth | Gold | Scarlet | Gold | Yellow | Scarlet and yellow | Grey speckled |
| Brown Adder | Red | Black&Br. mottled | Brown silk | Brown, tied palmer | Black and brown mottled | |
| Brown Sedge | Gold | Gold | Brown Silk | Brown | Brown | |
| Bustard and Black | Silver | Golden tippet | Silver | Black Wool | Black | |
| Bustard and Orange | Gold | Golden tippet | Gold | Orange Wool | Orange | |
| Butcher | Scarlet | Silver | Black | Blue black | ||
| Caddis | Gold | Grey | Gold | Brown Silk | Brownish Red | Grey |
| Cahill, Dark | Gold | Tan Mottled | Grey Wool or Fur | Brown | Tan mottled wood duck | |
| Cahill, Light | Gold | Tan Mottled | Buff Wool | Ginger | Tan Mottled | |
| Cahill Quill | Tan Mottled | Quill | Grey | Tan Mottled | ||
| Canada | Gold | Claret | Gold | Bright Red | Brown | Mottled Turkey |
| Carpenter | Rusty red wool | Red | Hen Pheasant | |||
| Cardinal | Gold | Red | Gold | Red Wool | Light red | Red |
| Claret Gnat | Claret Wool | Claret | Dark Grey | |||
| Cinnamon | Golden tippet | Gold | Lemon&Black Wool | Brown | Cinnamon | |
| Coachman | Gold | Golden tippet | Peacock Herl | Brown | White | |
| Coachman Leadwing | Gold | Golden tippet | Peacock Herl | Brown | Dark Grey | |
| Cock-y-bondhu | Gold | Gold | Peacock Herl | Furnace | ||
| Col. Fuller | Black and yellow | Yellow silk | Scarlet | Yellow | Yellow and scarlet |
{72}
| NAME | TAG | TAIL | RIBS | BODY | HACKLE | WINGS |
| Cow Dung | Dirty orange herl or yel. green wool | Brown | Grey | |||
| Critchley Fancey | Gold | Yellow | Gold | Yellow | Yellow and grey | Grizzly and scarlet |
| Cupsuptic | Golden tippet | Silver | Red Silk Floss | Brown | Yellow | |
| Dark Sedge | Gold Wire | Dk. Green Wool | Blood Red | |||
| Dark Stone | Yellow Silk | Grey Wool | Grey | Dark Grey | ||
| Dr. Breck | Grey Speckled | Silver | Scarlet | White and Scarlet | ||
| Dorset | Furnace | Green Wool | Furnace | Teal | ||
| Downlooker | Brown Floss | Brown, tied palmer | Brown and black mottled turkey | |||
| Deer Fly | Black | Bright Green | White | White | ||
| Dusty Miller | Grey speckled | Gold Wire | Grey wool mohair | Grey | Dirty Grey Turkey | |
| Dark Miller | Br. Hackle | Brown Silk | Scarlet | Yellow and black | ||
| Emerald | Gold | Gold | Lt. Green | t. Brown | Brown Mottled | |
| Evening Dun | Lt. Blue | Buff Wool | Lt. Blue | Starling | ||
| Epting | Grey speckled | Red, orange,&yel. chenille | Black | Grey Speckled | ||
| Female Beaverkill | Yellow chenille | Grey speckled | Grey silk or wool | Brown | Dark Grey | |
| Female Grannon | Green | Brown Floss | Partridge | Brown mottled partridge | ||
| Fem. March Br. | Yellow Silk | Dk. brown floss | Brown mottled turkey or grouse | |||
| Ferguson | Scarlet yel. and herl | Mottled turkey tail, yellow and red | ||||
| Fern Fly | Orange Floss | Lt. Red | Dark Starling | |||
| Feted Green | Green | Green | Green | Green |
{73}
| NAME | TAG | TAIL | RIBS | BODY | HACKLE | WINGS |
| Fiery Brown | gold | Golden tippet | Gold | Redish brown mohair or wool | R. I. Red | Bronze |
| Flights Fancy | Ginger | Gold | Pale Yel. Floss | Ginger | Lt. grey | |
| Francis Fly | Red Silk | Peacock Herl | Grizzly Dun | |||
| Furnace Dun | Gold | Furnace | Br.&orange wool | Furnace | Dark Starling | |
| Furnace Hackle | Peacock Herl | Furnace | ||||
| Gen. Hooker | Yellow | Green Floss | Brown | Mottled grey and brown | ||
| Great Dun | Brown hairs | Gold | Gold | Brown Floss | Brown | Dark Grey |
| Grey Bi-Visible | Silver or none | Grizzly | ||||
| Green Nymph | Green | Gold | Green Wool | Green | ||
| Grey Spider | Grey | Grizzly | ||||
| Gld. Midge | Gold | Pale Green | Dun | |||
| Great Dun | Gold | Brown Hairs | Gold | Brown Silk | Brown | Dark Grey |
| Ginger Palmer | Silver | Silver | Yellow or ginger floss | Ginger, tied palmer | ||
| Ginger Quill | Ginger | Quill | Ginger | Lt. Grey | ||
| Golden Dun | Gold | Grey Speckled | Gold | Gold or orange | Red | Lt. Grey |
| Golden Dun Midge | Gold | Grey Hairs | Gold | Pale Green Wool | Light Grey | Lt. Grey |
| Gold Spinner Gold Eyed |
Grey Speckled | Gold | Red | Dark Grey | ||
| Gold Eyed Gauze Wing | Blue Dun | Pale yel. and green silk | Blue Dun | Blue dun hackle tips | ||
| Gold Monkey | Yellow Silk Floss | Grey Speckled | Dark Grey | |||
| Gold Ribbed Hare's Ear | Gold | Dark Hairs | Gold | Rabbit's Fur | Grey |
{74}
| NAME | TAG | TAIL | RIBS | BODY | HACKLE | WINGS |
| Gold Stork | Grey speckled | Gold | Brown | Grey speckled | ||
| Golden Eyed Gauze Wing | Pale Grey | Pale Grey | Pale Green | |||
| Good Evening | Gold | Orange | Gold | Scarlet | Brown | Dark blue with white tip |
| Gordon | Gold | Brown speckled | Gold | Yellow | Grey | Brown speckled wood duck |
| Govenor | Peacock Herl | Brown | Brown mottled turkey | |||
| Gov. Alford | Scarlet | Green Herl | Brown | Black and Brown | ||
| Grannon | Brown fur or wool | Brown or grizzly | Dark Partridge | |||
| Gravelbed | Dark Grey | Black | Woodcock | |||
| Grey Drake | Grey Speckled | Black | White Floss | Grey | Grey speckled | |
| Grey Hackle peacock | Peacock Herl | Grizzly | ||||
| Grey Hackle | Gold | Golden tippet | Red wool or silk | Grizzly | ||
| Grey Hackle yellow | Gold | Golden tippet | Yellow wool or silk | Grizzly | ||
| Grey Marlow | Gold | Gold | Red Wool | Grey | Grey | |
| Grey Miller | Grey Wool | Grey | Grey | |||
| Great Dun | Brown and Grey | Maroon Purple and Red Floss | Grey or Black | Grey or Black | ||
| Great Red spinner | Black and white | Gold | Red Floss | Brown | Slate Grey | |
| Grey Bodied Ashy | Golden tippet | Brown, black, or green herl or wool | Grey | |||
| Green Drake | Brown pheasant | Brown Floss | Raffia or lemon silk | Partridge&ginger | Yellowish Olive | |
| Green Insect | Green Herl | Green |
{75}
| NAME | TAG | TAIL | RIBS | BODY | HACKLE | WINGS |
| Greenwell's Glory | Yellow | Gold | Olive or Yellow | Furnace | Mottled woodcock | |
| Grizzly King | Gold | Scarlet | Gold | Dark Green | Grizzly | Grey Speckled |
| Grouse&Black | Gold | Golden tippet | Gold | Black Fur | Black | Grouse |
| Grouse&Claret | Gold | Golden tippet | Gold | Claret mohair or wool | Claret | Grouse |
| Grouse&Green | Gold | Golden tippet | Gold | Green Wool | Ginger | Grouse |
| Grouse&Orange | Gold | Golden tippet | Gold | Orange Wool | Orange | Grouse |
| Grouse&Peacock | Gold | Golden tippet | Gold | Peacock Herl | Dark Red | Grouse |
| Grouse&Purple | Gold | Golden tippet | Gold | Purple Wool | Purple | Grouse |
| Grouse Spider | Orange Floss | Grouse | Grouse | |||
| Half Stone | Yellow | Honey Dun | Woodcock | |||
| Hazel-Fly | Green Herl | Furnace | ||||
| Hemsworth | Gold&herl | Golden tippet | ||||
| Hammond's Adopted | Gold | Gold | Lt. Brown | Ginger | Mottled woodcock | |
| Hare's Ear | Yellow Silk | Rabbit's fur | Yel. or None | Grey | ||
| Harlequin | Orange and lt. blue wool | Black | Grey | |||
| Hawthorn | Black hackle | Black ostrich herl | Black | Lt. Grey | ||
| Hen. Guinea | Gold | Scarlet | Gold | Red wool | Red | Guinea Fowl |
| Henshall | Peacock Herl | Peacock Herl | Lt. Grey | Grey Speckled | ||
| Hod | Gold | Gold | Pea-Green | Dark Ginger | Hen Pheasant | |
| Hofland Fancy | Brown | Red (dark) | Brown | Brown and Yellow | ||
| Hoskins | Golden tippet | Lemon | Blue Dun | Woodcock | ||
| House Fly | Dun Condor Quill | Black | Dark Starling | |||
| Howell | Gold | Scarlet | Gold | Peacock Herl | Claret | White tip turkey tail |
| Ibis and White | Gold | Red&White | Gold | Red floss | Rd/&White | Red and White |
{76}
| NAME | TAG | TAIL | RIBS | BODY | HACKLE | WINGS |
| Imbrie | Gold | Golden tippet | Gold | White | Lt. Red | Dark Starling |
| Indian Yellow | Ginger | Yellow | Lt. Brown | Ginger | Goose | |
| Iron Blue Dun | Yellow | Blue Dun | Bluish Black | |||
| Iron Blue Quill | Blue Dun | Quill | Blue Dun lt. | Blue Dun Hkl. Tip | ||
| Iron Blue Nymph | Honey Dun | Honey Dun | ||||
| July Dun | Dun | Yellow | Dark Dun | Starling | ||
| Joe Killer | Barred woodduck |
Silver | Short red bucktail | Yel.&white peacock swd.&jungle cock |
||
| Jenni | Lavender or blue |
Gold | Yellow floss | Scarlet | Lavender or lt. blue | |
| Jock Scott | Black silk | Yellow&Scarlet | White floss | Yellow floss | Grouse&Guinea | Yel.&grey speckled scarlet&jungle cock |
| Jennie Spinner | Orange and brown |
Cream hackle | White horse hair | Silver Blue | Silver blue hackle tips or none |
|
| Jungle Cock | Scarlet | Gold or white | Blue grey fur | Claret or blk. | Dark brown and jungle cock |
|
| Katy-did | Black Hairs | Gold Wire | Green floss | Green | Green | |
| King O'Waters | Gold | Grey Speckled | Gold | Red floss | Brown | Grey Speckled |
| Kingdon | Gold | Green floss | White floss | Dark | Woodcock | |
| King Fisher | Silver | Lt. Blue | Kingfisher | |||
| Kitson | Gold | Black Hairs | Gold | Yellow | Claret | Yellow with black cheeks |
| La Branche | Gold | Grey | Gold | Blue Grey Fur | Blue Dun | Grey |
| Lady Doctor | Gold and red wool |
Two yellow hackle |
Yellow Wool | Yel. tied palm. | Polar bear and Black hair and jungle cock | |
| Lady Beaverkill | Yellow chenille |
Grey Speckled | Grey (dark) | Brown | Dark Grey |
{77}
| NAME | TAG | TAIL | RIBS | BODY | HACKLE | WINGS |
| Lake Edward | Golden Crest | Gold | Claret Wool | Claret | Pea Green | |
| Lake George | White and scarlet | Gold | Scarlet floss | White | White&Scarlet | |
| Lake Green | Green Silk | Canary yellow | Ginger | Teal Breast | ||
| Laramie | Scarlet | Silver | Scarlet floss | Dark Blue | Grey Mottled | |
| Lt. Stone | Grey | Yellow Silk | Grey | Black and jungle | ||
| Little Marryat | Brown | Lt. grey or herl | Brown | Dark grey | ||
| Ld. Baltimore | Black Silk | Orange Silk | Black | Black and jungle | ||
| Lowery | Peacock Herl | Brown | Lt. Brown | |||
| Lt. Montreal | Gold | Grey Mottled | Gold | Scarlet | Claret | Grey Speckled |
| Lt. March Br. | Partridge hackle | Olive&Br. fur | Partridge | Lt. mottled partridge | ||
| Magpie | Black Hairs | Black | Black | Black with whit tip | ||
| Mallard&Amber | Gold | Golden tippet | Gold | Amber floss | Lt. Red | Brown mallard breast |
| Mallard&Claret | Gold | Golden tippet | Gold | Claret wool | Lt. Red | Brown mallard breast |
| Mallard&Green | Gold | Golden tippet | Gold | Green Wool | Lt. Red | Brown mallard breast |
| Mallard&Red | Gold | Golden tippet | Gold | Red wool | Lt. Red | Brown mallard breast |
| March Brown | Grouse | Yellow Silk | Br. or Grey fur | Grouse | Dark Brown mottled turkey or grouse |
|
| March Br. Ginger | Ginger | Brown fur | Ginger | Dark Brown mottled turkey or grouse |
||
| March Br. Nymph | Partridge | Gold | Yellow wool | Partridge | ||
| Markam | Scarlet and white |
Yellow | Scarlet | Dark Brown with white tips |
||
| Marlow Buzz | Gold | Peacock Herl | Furnace | |||
| Marston's Fancy | Brown Fur | Brown | Dark Grey | |||
| Massasaga | Gold | Ibis | Gold | Green floss | Canary Yellow | Canary Yellow |
| Maxwell Blue | Lt. Blue | Silver | Grey | Lt. Blue | ||
| McGinty | Grey speckled and scarlet |
Black and Yel. chenille |
Brown | Brown with white tip |
{78}
| NAME | TAG | TAIL | RIBS | BODY | HACKLE | WINGS |
| Mealy Moth | Silver | Lt. Grey Wool | White | White | ||
| Mershon | Silver | Black Hairs | Silver | Black | Black | Dark blue with whit tip |
| Merson White | Black Hairs | White | Black | Dark blue | ||
| Mole | Brown Hairs | Gold | Dk. brown floss | Brown tied palmer | Brown mottled mallard | |
| Montreal | Gold | Scarlet | Gold | Claret floss | Claret | Brown mottled turkey tail or grouse |
| Montreal Claret | Gold | Claret | Gold | Claret floss | Claret | Brown mottled turkey tail or grouse |
| Montreal Silver | Scarlet | Silver | Claret | Brown mottled turkey tail or grouse |
||
| Montreal Yellow | Gold | Scarlet | Gold | Yellow floss | Claret | Brown mottled turkey tail or grouse |
| Morison | Black | Black | Claret | Black | Black | |
| Mowry | Black Hairs | Black | Black | Black with white tip | ||
| Needle Brown | Orange | Dark Brown | ||||
| Neversink | Black | Pale buff wool | Yellow | Teal breast | ||
| New Page | Gold | Gold | speckled | Yellow floss | Brown | Mottled brown and red |
| Olive Dun | Gold | Olive Dun | Gold or none | Olive Wool | Olive Dun | Lt. blue grey or olive dun hackle tips |
| Olive Quill | Olive | Quill | Olive | Olive | ||
| Orange&Bk. | Gold | Golden tippet> | Gold | Orange Wool | Black | |
| Orange Dun | Orange Wool | Dk. Brown | Lt. Brown | |||
| Olive Nymph | Olive | Mot. Br. wool | Olive | |||
| Orange Miller | Gold | Orange floss | White | White | ||
| Orange Sedge | Gold | Orange floss | Brown tied palmer |
Red, Brown | ||
| Oriole | Yellow | Gold | Black floss | Black | Yellow |
{79}
| NAME | TAG | TAIL | RIBS | BODY | HACKLE | WINGS |
| Oak | Black | Orange floss | Brown | Dark grey and Lt. Brown mottled |
||
| Pale Blue Dun | Pale Blue | Pale Blue Fur | Pale Blue | Pale blue hackle tips or none |
||
| Pale Buff | Pale Buff | Pale Buff Wool | Pale Buff | Pale Buff | ||
| Pale Eve. Dun | Br. silk or none |
Lemon floss | Lt. blue grey or grizzly |
Lt. Blue Grey | ||
| Pale Sulphur | Pale Yel. Hairs | Pale Yellow | Pale Yellow | Pale Yellow | ||
| Orange Tag | ||||||
| Pale Watery | Yellow | Olive Wool | Pale Yellow | Grey | ||
| Pale Watery Quill | Yellow | Quill | Pale Yellow | Grey | ||
| Pale Yellow | Yellow | Yellow | Pale Yellow | |||
| Parmachene Beau | Peacock herl |
Scarlet and white | Gold | Yellow floss or mohair |
Scarlet and white | Scarlet, White jungle cock |
| Parmachene Belle | Peacock herl | Scarlet and white | Gold | Yellow floss or mohair |
Scarlet and White |
Scarlet&white |
| Parson | Golden tippet | Silver wire | Silver | Black | Bronze | |
| Peter Ross | Golden tippet | Bright Yel. | Ginger | |||
| Pheasant | Gold | Yellow floss | Ginger | Bronze | ||
| Pheasant, Gold | Golden tippet | Gold Wire | Gold | Pheasant | Pheasant, Wing | |
| Pheasant, Silver | Golden tippet | Silver Wire | Silver | Pheasant | Pheasant, Wing | |
| Pheasant&Yel. | Golden tippet | Gold | Yellow floss | Pheasant | Pheasant, Wing | |
| Pink Lady | Gold | Pheasant | Gold | Pink floss | Brown | Grey Speckled |
| Pink Wickhams | Brown | Pink floss | Brown tied palmer |
Grey Speckled | ||
| Polka | Gold | Scarlet | Gold | Scarlet floss | Scarlet | Guinea |
| Poor Mans Fly | Ginger | Brown Wool | Ginger | Grey Speckled |
{80}
| NAME | TAG | TAIL | RIBS | BODY | HACKLE | WINGS |
| Portland | Grey Speckled | Gold | Red floss | Red | Teal breast | |
| Preston's Fancy | Brown Hairs | Gold | Brown | Grey with white spot | ||
| Priest | Red Ibis | Silver | Silver | Badger | ||
| Prime Gnat | Brown> | Brown | Dark Grey | |||
| Professor | Gold | Scarlet | Gold | Yellow floss | Brown | Grey Speckled |
| Quaker | Silver | Grey Wool | Grey | Grey Speckled | ||
| Queen O'Waters | Gold | Orange floss | Br. Palmer | Grey Speckled | ||
| Quill Gordon | Tan speckled | Gold Wire or none |
Quill | Blue Dun | Tan speckled wood duck | |
| Raven | Golden tippet | Black chenille | Black | Black Crow | ||
| Red Ant | Herl | Red floss | Brown | Dark Grey | ||
| Red Fox | Speckled Teal | Redish Brown or wool |
||||
| Red Quill | Dark Red | Red Quill | Dark Red | Med. Starling | ||
| Red Ibis | Scarlet | Gold | Scarlet floss | Scarlet | Scarlet | |
| Red Spinner | Gold | Brown Hairs | Gold | Red | Brown | Dark Grey |
| Red Tag | Red Silk | Red | Peacock Herl | Brown | ||
| Rd. Body Ashy | Red Wool | Brown Palmer | ||||
| Ross McKenney | Gold | Barred wood duck |
Gold | Brown Wool | White and red bucktail and jungle cock |
|
| Royal Coachman | Gold | Golden tippet | Peacock herl with scarlet red band |
Hackle Brown | White | |
| Rube Wood | Red | Grey Speckled | White Chenille | Lt. Brown | Grey Speckled | |
| Ruben Wood | Tan speckled | White Chenille | Lt. Brown | Tan speckled | ||
| Saltoun | Ginger | Silver | Black floss | Black | Lt. Starling | |
| Sand-Fly | Lt. Ginger | Copper Brown | Lt. Ginger | Yellowish Brown | ||
| Sassy Cat | Scarlet | Peacock Herl | Yellow | Yellow, scarlet cheeks |
{81}
| NAME | TAG | TAIL | RIBS | BODY | HACKLE | WINGS |
| Seth Green | Yellow | Green floss | Grey speckled | |||
| Seth Green Claret | Yellow | Green floss | Claret | Grey speckled | ||
| Turkey | Yellow | Green floss | Brown | Brown mottled | ||
| Shad Fly | Green | Peacock Herl | Brown mottled | |||
| Shoemaker | Tan speckled | Pink&Grey | Brown | Mottled Woodcock | ||
| Silver Doctor | Yel. blue green and red |
Silver | Blue&Guinea | Brown, red, blue, green and yellow | ||
| Silver Horns | Copper floss | Grouse | ||||
| Silver Sedge | Silver | Brown Palmer | Brown | |||
| Silver Stock | Grey Speckled | Silver | Brown | Teal breast | ||
| Soldier Palmer | Gold | Red Wool | Brown Palmer | |||
| Spent Gnat | Brown | Peacock herl | Wt. Floss or Quill | Blue Hkl. tips | ||
| Sedge, light | Pale Buff wool | Ginger | Hen pheasant | |||
| Sniper&Yel. | Pale Yel. floss | Snipe | ||||
| Stebbins | Grey Speckled | Peacock Herl | Grouse | Dark Starling | ||
| Stone | Grey | Yellow | Grey Wool | Grey | Grey | |
| Sunset | Green chenille |
Yellow chenille | Yellow | White | ||
| Swiftwater | Grey Speckled | Peacock herl | Brown | White | ||
| Teal&Black | Golden tippet | Black wool | Black | Teal breast | ||
| Teal&Orange | Gold | Golden tippet | Gold | Orange wool | Olive | Teal breast |
| Teal&Gold | Golden tippet | Gold | Dk. Brown | Teal breast | ||
| Teal&Red | Gold | Golden tippet | Gold | Red wool | Olive | Teal breast |
| Teal&Silver | Golden tippet | Silver | Badger | Teal breast | ||
| Teal&Yellow | Silver | Golden tippet | Silver | Yellow wool | Ginger | Teal breast |
{82}
| NAME | TAG | TAIL | RIBS | BODY | HACKLE | WINGS |
| Tippet&Black | Silver | Golden tippet | Silver | Black wool | Black | Golden tippet |
| Tippet&Red | Silver | Golden tippet | Silver | Red wool | Dk. Brown | Golden tippet |
| Tippet&Silver | Silver | Golden tippet | Silver | Silver | Badger | Golden tippet |
| Tootle Bug | Blue | Scarlet | Orange&Yel. | Br. palmer | Brown Mottled | |
| Tups Indispensable | Honey Dun | Yellow | Honey Dun | |||
| Turkey Brown | Red | Brown | Brown | Brown | ||
| Turkey Professor | Gold | Red | Yellow floss | Brown | Brown mottled | |
| Van Patten | Scarlet | Gold | White | Brown | Grey speckled | |
| Varient, Gold | Gold | Blue Dun | Starling | |||
| Water Cricket | Black | Orange | Black | |||
| Watson's Fancy | Gold | Golden tippet | Gold | Red&Blk. wool | Black | Black hackle tips |
| Welshman's Button |
Peacock Herl | Furnace | Landrail | |||
| Western Bee | Yellow&Black chenille |
Brown | Dark Grey | |||
| Whirling Blue Dun | Gold | Ginger | Blue Grey Fur | Ginger | Blue Grey | |
| White Hackle | Silver | White floss | White | |||
| White Miller | Silver | White floss | White | White | ||
| White Moth | Silver | White Chenille | White | White | ||
| Wickham's Fancy | Brown hairs | Gold | Br. palmer | Grey | ||
| Wickham Pink | Red | Red&Gold | Lt. Reddish | Landrail | ||
| Widow | White | Purple Floss | Black | Black | ||
| Willow | Yellow | Green | Brown | Dark Grey | ||
| Wilkson | Orange | Orange | Teal breast | |||
| Witch Gold | Gold | Red Ibis | Gold | Grey Wool | Badger | |
| Whitechurch Dun | Grey Speckled | Yellow floss | Ginger | Lt. Grey | ||
| White Wickhams | Brown Hairs | White floss | White, palmer | Grey |
{83}
| NAME | TAG | TAIL | RIBS | BODY | HACKLE | WINGS |
| Woodcock&Gold | Golden tippet | Silver | Gold | Gingerr | Mottled Woodcock | |
| Woodcock&Grn. | Golden tippet | Silver | Green wool | Green | Mottled Woodcock | |
| woodcock&Red | Golden tippet | Silver | Red wool | Reddish brown | Mottled Woodcock | |
| Woodcock&Yellow | Golden tippet | Silver | Yellow wool | Woodcock | Mottled Woodcock | |
| Worm Fly | Peacock Herl | Ginger | ||||
| Yel. Bi-visible | Yellow wool | Yel. and white palmer |
||||
| Yel. Coachman | Peacock Herl | Brown | Yellow | |||
| Yel. Dun | Yel. wool | Honey Dun | Lt. Starling | |||
| Yel. Hackle | Gold | Yellow floss | Yellow | |||
| Yel. Professor | Gold | Scarlet | Gold | Yellow floss | Brown | Yellow Speckled |
| Yel. May | Yel. Speckled | Gold or black |
Yellow floss | Yellow | Yellow Speckled | |
| Yel. Miller | Gold | Yel.&Herl | White | White | ||
| Yel. Spider | Yellow | Yellow | Yel. (long) | |||
| Yel. Sally | Yellow | Gold | Yellow | Yellow | Yellow | |
| Zulu | Gold | Red | Peacock Herl | Black |
| The Barnes Sports Library |
| This library of practical sports books covers fundamentals, techniques, coaching and playing hints and equipment for each sport. Leading coaches and players have been selected to write these books, so each volume is authoritative and based upon actual experience. Photographs or drawings, or both, illustrate techniques, equipment and play. |
| ARCHERY | LACROSSE | ||||
| by Reichart&Keasey | by Tad Stanwick | ||||
| BAIT CASTING | LAWN GAMES | ||||
| by Gilmer Robinson | by John R. Tunis | ||||
| BASEBALL | PHYSICAL CONDITIONING | ||||
| by Daniel E. Jessee | by Stafford&Duncan | ||||
| BASKETBALL | RIDING | ||||
| by Charles C. Murphy | by J.J. Boniface | ||||
| BASKETBALL FOR GIRLS | RIFLE MARKSMANSHIP | ||||
| by Meissner&Meyers | by Lt. Wm. L. Stephens | ||||
| BASKETBALL OFFICIATING | ROPING | ||||
| by Dave Tobey | by Bernard S. Mason | ||||
| BETTER BADMINTON | SIX-MAN FOOTBALL | ||||
| by Jackson&Swan | by Ray O. Duncan | ||||
| BICYCLING | SKATING | ||||
| by Ruth and Raymond Benedict | by Putman&Parkinson | ||||
| BOWLING FOR ALL | SKIING | ||||
| by Falcaro&Goodman Benedict | by Walter Prager | ||||
| BOXING | SOCCER AND SPEEDBALL FOR GIRLS | ||||
| by Edwin L. Haislet | by Florence L. Hupprich | ||||
| FENCING | SOFTBALL | ||||
| by Joseph Vince | by Arthur T Noren | ||||
| FIELD HOCKEY FOR GIRLS | SOFTBALL FOR GIRLS | ||||
| by Josephine T. Lees | by Viola Mitchell | ||||
| FLY CASTING | SWIMMING | ||||
| by Gilmer Robinson | by R. J. H. Kiphuth | ||||
| FOOTBALL | TABLE TENNIS | ||||
| by W. Glenn Killinger | by Jay Purves | ||||
| GOLF | TENNIS | ||||
| by Patty Berg | by Helen Jacobs | ||||
| HANDBALL | TOUCH FOOTBALL | ||||
| by Bernath E. Phillips | by John V. Grombach | ||||
| HOW TO TIE FLIES | TRACK AND FIELD | ||||
| by E. C. Gregg | by Ray M. Conger | ||||
| ICE HOCKEY | VOLLEY BALL | ||||
| by Edward Jeremiah | by Robert Laveaga | ||||
| THE SCIENCE OF COACHING | MAN-TO-MAN DEFENSE AND ATTACK | ||||
| ZONE DEFENSE AND ATTACK | DRILLS AND FUNDAMENTALS |