The Project Gutenberg EBook of Textiles and Clothing, by Kate Heintz Watson

This eBook is for the use of anyone anywhere at no cost and with
almost no restrictions whatsoever.  You may copy it, give it away or
re-use it under the terms of the Project Gutenberg License included
with this eBook or online at www.gutenberg.org


Title: Textiles and Clothing

Author: Kate Heintz Watson

Release Date: May 19, 2007 [EBook #21534]

Language: English

Character set encoding: ISO-8859-1

*** START OF THIS PROJECT GUTENBERG EBOOK TEXTILES AND CLOTHING ***


Produced by Stan Goodman, Karen Dalrymple, and the Online
Distributed Proofreading Team at https://www.pgdp.net

ISABEL BEVIER, Ph. M.
ALICE PELOUBET NORTON, M. A.
S. MARIA ELLIOTT
ANNA BARROWS
ALFRED CLEVELAND COTTON, A. M., M. D.
BERTHA M. TERRILL, A. B.
KATE HEINTZ WATSON
MARION FOSTER WASHBURNE
MARGARET E. DODD
AMY ELIZABETH POPE
MAURICE LE BOSQUET, S. B.
ELLEN H. RICHARDS
MARY HINMAN ABEL
THOMAS D. WOOD, M. D.
H. M. LUFKIN, M. D.
OTTO FOLIN, Ph. D.
T. MITCHELL PRUDDEN, M. D., LL. D.
FRANK CHOUTEAU BROWN
MRS. MELVIL DEWEY
HELEN LOUISE JOHNSON
FRANK W. ALLIN, M. D.
MAURICE LE BOSQUET, S. B.
MRS. ARTHUR COURTENAY NEVILLE
MISS MARIA PARLOA
MRS. MARY HINMAN ABEL
MISS ALICE RAVENHILL
MRS. ELLEN M. HENROTIN
MRS. FREDERIC W. SCHOFF
MRS. LINDA HULL LARNED
MRS. WALTER McNAB MILLER
MRS. J. A. KIMBERLY
MRS. JOHN HOODLESS
 DRESS MAKING IN MEXICO
| Primitive Methods | 3 |
| Weaving | 14 |
| Fibers | 29 |
| Cotton | 29 |
| Wool | 37 |
| Flax | 43 |
| Silk | 53 |
| Modern Methods | 59 |
| Weaving | 69 |
| Weaves | 72 |
| Bleaching and Dyeing | 78 |
| Printing | 81 |
| Finishing | 83 |
| Cotton Goods | 85 |
| Linens | 86 |
| Woolens and Worsteds | 88 |
| Silks | 90 |
| Names of Fabrics | 94 |
| Bibliography on Textiles | 103 |
| Hand Sewing | 107 |
| Ornamental Stitches | 114 |
| Hems | 123 |
| Tucks and Seams | 128 |
| Plackets | 135 |
| Sewing on Bands | 138 |
| Fastenings | 141 |
| Patching | 149 |
| Darning | 155 |
| Mitering Embroidery, Joining Lace | 158 |
| Machine Sewing | 162 |
| Dressmaking | 167 |
| Patterns | 171 |
| Making Seven-Gored Skirt | 172 |
| Making Shirt Waists | 182 |
| Lined Waist | 186 |
| Sleeves | 194 |
| Collars | 198 |
| Seamless Yokes | 200 |
| Pressing | 201 |
| Construction and Ornament in Dress | 203 |
| Ornament of Textiles | 212 |
| Color | 214 |
| Children's Clothes | 216 |
| Care of Clothing | 219 |
| Cleaning | 221 |
| Repairing | 225 |
| Bibliography on Sewing and Dressmaking | 229 |
| References: History of Costume; Ornament and Design | 234 |
| Program for Supplemental Study | 236 |
| Index | 241 |
 "THE THREAD OF LIFE"
Spinning and weaving are among the earliest arts. In the twisting of fibers, hairs, grasses, and sinews by rolling them between the thumb and fingers, palms of the hands, or palms and naked thigh, we have the original of the spinning wheel and the steam-driven cotton spindle; in the roughest plaiting we have the first hint of the finest woven cloth. The need of securing things or otherwise strengthening them then led to binding, fastening, and sewing. The wattle-work hut with its roof of interlaced boughs, the skins sewn by fine needles with entrails or sinews, the matted twigs, grasses, and rushes are all the crude beginnings of an art which tells of the settled life of to-day.
Nothing is definitely known of the origin of these arts; all is conjecture. They doubtless had their beginning long before mention is made of them in history, but these crafts—spinning and weaving—modified and complicated by inventions and, in modern times transferred largely from man to machine, were distinctively woman's employment.
The very primitive type of spinning, where no spindle was used, was to fasten the strands of goats' hair or wool to a stone which was twirled round until the yarn was sufficiently twisted when it was wound upon the stone and the process repeated over and over.
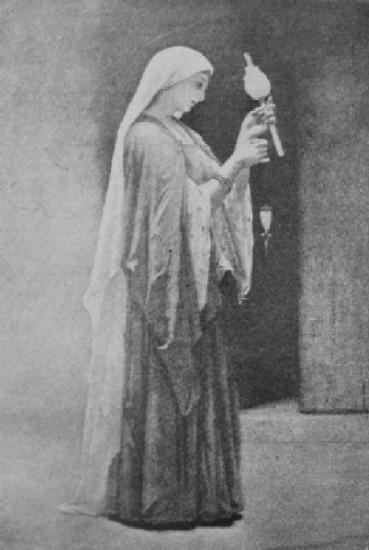
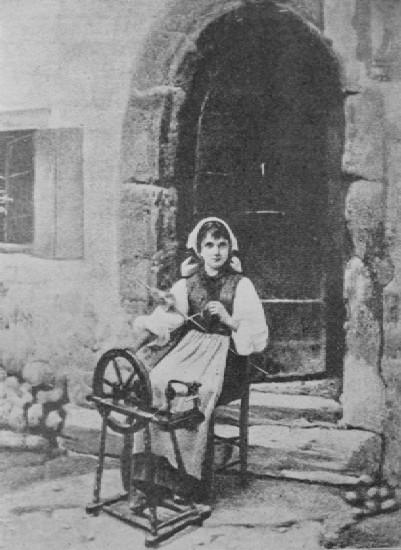
 ITALIAN WOMAN SPINNING FLAX
 RUSSIAN SPINNING
The next method of twisting yarn was with the spindle, a straight stick eight to twelve inches long on which the thread was wound after twisting. At first it had a cleft or split in the top in which the thread was fixed; later a hook of bone was added to the upper end. The spindle is yet used by the North American Indians, the Italians, and in the Orient. The bunch of wool or flax fibers is held in the left hand; with the right hand the fibers are drawn out several inches and the end fastened securely in the slit or hook on the top of the spindle. A whirling motion is given to the spindle on the thigh or any convenient part of the body; the spindle is then dropped, twisting the yarn, which is wound on the upper part of the spindle. Another bunch of fibers is drawn out, the spindle is given another twirl, the yarn is wound on the spindle, and so on.
A spindle containing a quantity of yarn was found to rotate more easily, steadily and continue longer than an empty one, hence the next improvement was the addition of a whorl at the bottom of the spindle. These whorls are discs of wood, stone, clay, or metal which keep the spindle steady and promote its rotation. The process in effect is precisely the same as the spinning done by our grandmothers, only the spinning wheel did the twisting and reduced the time required for the operation.
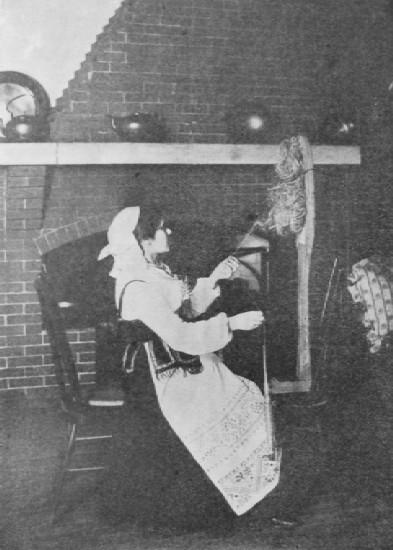
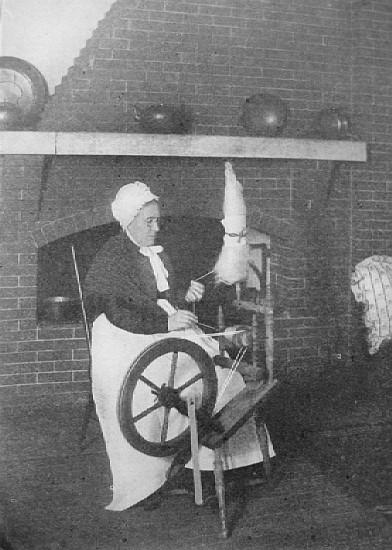
 SPINNING WITH CRUDE WHEEL AND DISTAFF
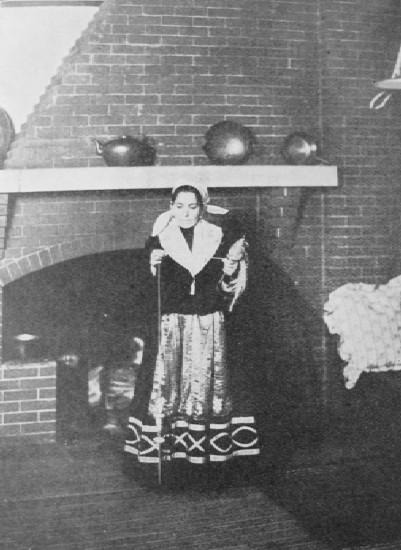
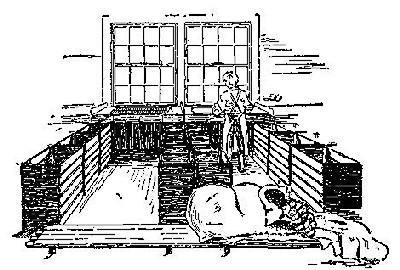
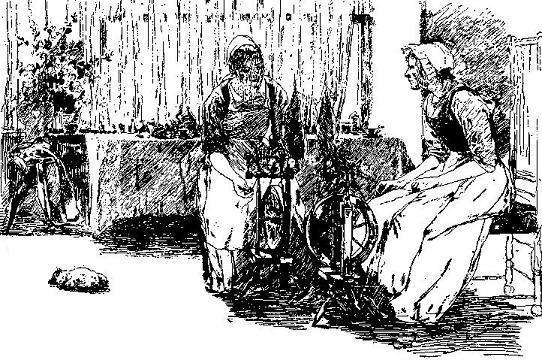 "GOSSIP" IN THE OLDEN TIMES
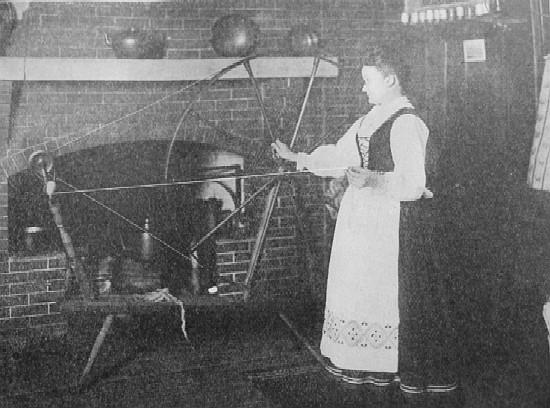 COLONIAL WOOL WHEEL
 COLONIAL FLAX WHEEL
 DUTCH WHEEL
Later the distaff was used for holding the bunch of wool, flax, or other fibers. It was a short stick on one end of which was loosely wound the raw material. The other end of the distaff was held in the hand, under the arm or thrust in the girdle of the spinner. When held thus, one hand was left free for drawing out the fibers.
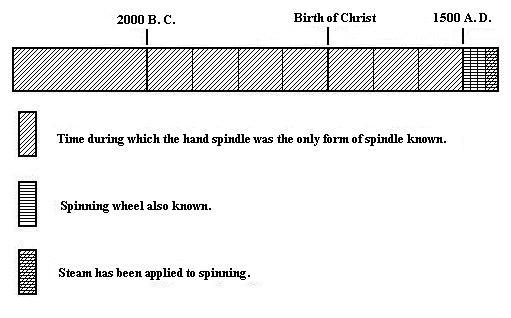 Graphic Diagram Showing Time During which Different
Methods of Spinning Has Been Used.
Graphic Diagram Showing Time During which Different
Methods of Spinning Has Been Used.
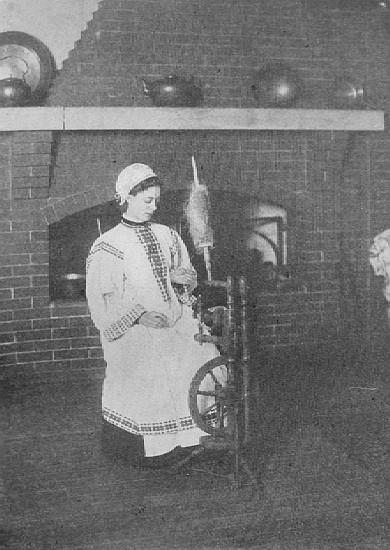
On the small spinning wheel the distaff was placed in the end of the wheel bench in front of the "fillers"; this left both hands free to manage the spindle and to draw out the threads of the fibers.
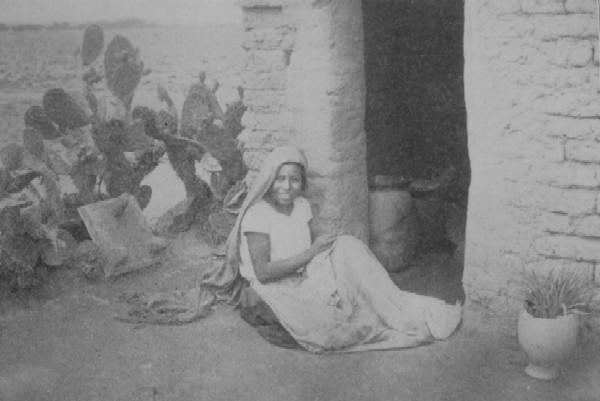
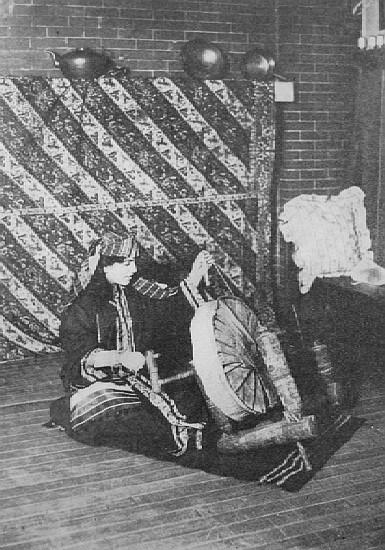 SYRIAN SPINNING
The flax spinning wheel, worked by means of a treadle, was invented in the early part of the sixteenth[Pg 14] century and was a great improvement upon the distaff and spindle. This it will be seen was a comparatively modern invention. The rude wheel used by the natives of Japan and India may have been the progenitor of the European wheel, as about this time intercourse between the East and Europe increased. These wheels were used for spinning flax, wool, and afterwards cotton, until Hargreaves' invention superseded it.
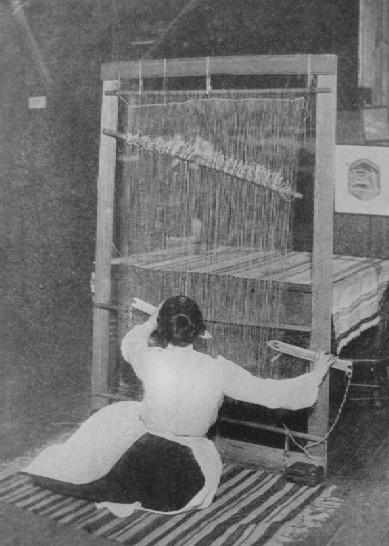
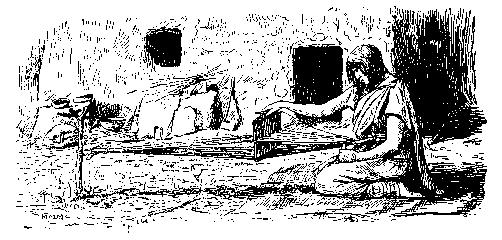 PUEBLO WOMAN WORKING HEDDLE IN WEAVING A BELT
Someone has said that "weaving is the climax of textile industry." It is an art practiced by all savage tribes and doubtless was known before the dawn of history. The art is but a development of mat-making and basketry, using threads formed or made by spinning in place of coarser filaments.
 A NAVAJO BELT WEAVER
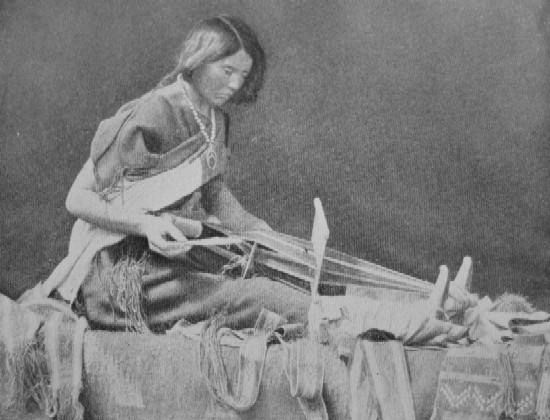 ZUNI WOMAN WEAVING CEREMONIAL BELT
In the beginning of the art the warp threads were stretched between convenient objects on the ground or from horizontal supports. At first the woof or filling threads were woven back and forth between the warp threads as in darning. An improvement was the device called the "heald" or "heddle," by means of which alternate warp threads could be drawn away from the others, making an opening through which the filling thread could be passed quickly. One form of the heddle was simply a straight stick having loops of cord or sinew through which certain of the warp threads were run. Another form was a slotted frame having openings or "eyes" in the slats. This was carved from one piece of wood or other material or made from many. Alternate warp threads passed through the eyes and the slots. By raising or lowering the heddle frame, an opening was formed through which the filling thread, wound on a rude shuttle, was thrown. The next movement of the heddle frame crossed the threads over the filling and made a new opening for the return of the shuttle. At first the filling thread was wound on a stick making a primitive bobbin. Later the shuttle to hold the bobbin was devised.
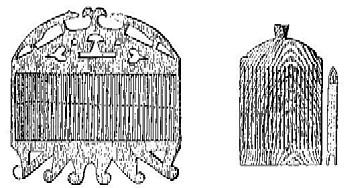 PRIMITIVE HEDDLES
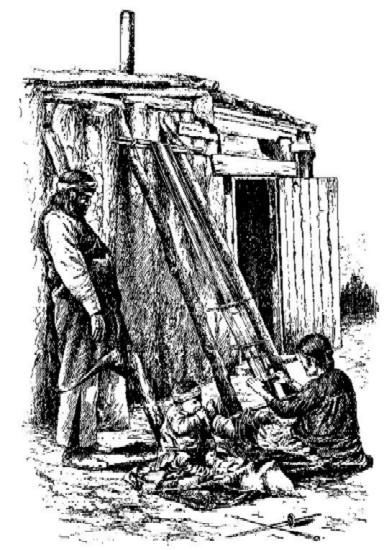
 NAVAJO LOOM
 SIMPLE COLONIAL LOOM
Before the "reed" was invented, the filling threads were drawn evenly into place by means of a rude comb and driven home by sword-shaped piece of wood or "batten." The reed accomplished all this at one time.
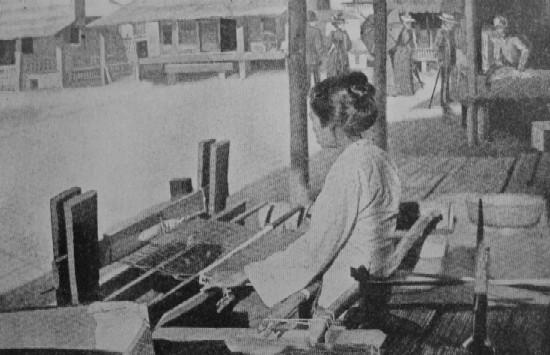 A JAPANESE LOOM.
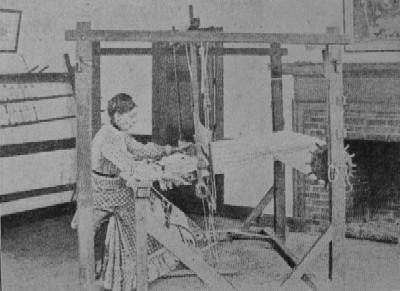
 A FOUR HARNESS HAND LOOM
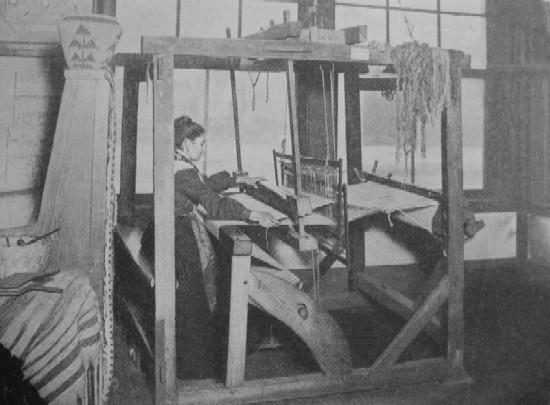 TYPICAL COLONIAL HAND LOOM
It is probable that the European looms were derived from those of India as they seem to be made on the same principle. From crude beginnings, the hand loom of our grandmothers' time developed. A loom has been defined as a mechanism which affects the following necessary movements:
1. The lifting of the healds to form an opening, or shed, or race for the shuttle to pass through.
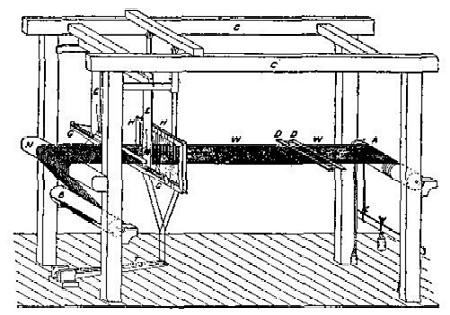 DIAGRAM OF A HAND LOOM
2. The throwing of the weft or filling by means of a shuttle.
3. The beating up of the weft left in the shed by the shuttle to the cloth already formed. This thread may be adjusted by means of the batten, needle, comb, or any separate device like the reed.
4 & 5. The winding up or taking up of the cloth as it is woven and the letting off of the warp as the cloth is taken up.
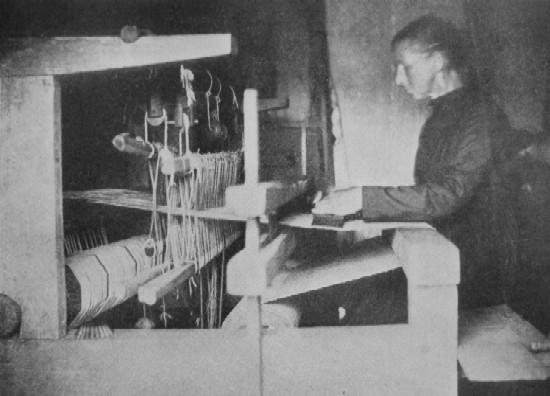
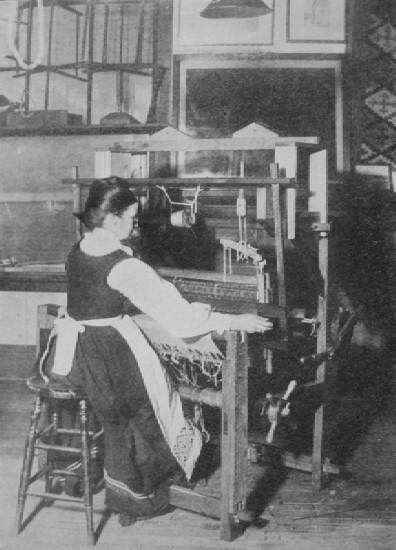 SWEDISH HAND LOOM
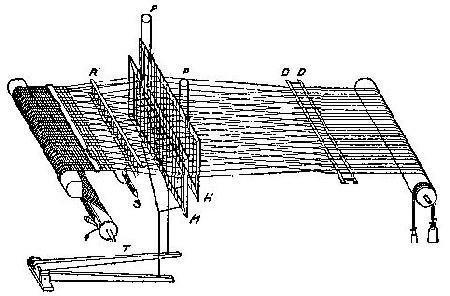 DIAGRAM OF THE WORKING PARTS OF A LOOM.
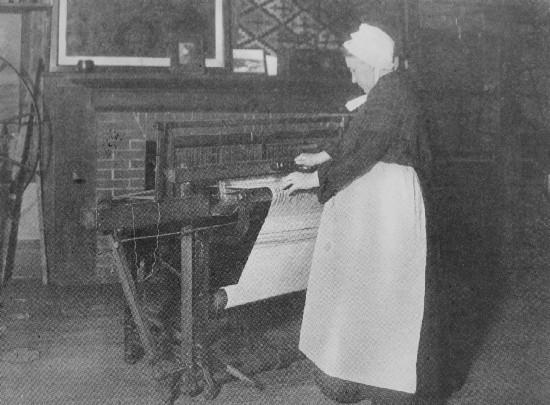
No essential changes have been made since our grandmothers made cloth a hundred years ago. The "harnesses" move part of the warp now up, now down, and the shuttle carries the weft from side to side to be driven home by the reeds to the woven cloth. Our grandmothers did all the work with swift movements of hands and feet. The modern weaver has her loom harnessed to the electric dynamo and moves her fingers only to keep the threads in order. If she wishes to weave a pattern in the cloth, no longer does she pick up threads of warp now here, now there, according to the designs. It is all worked out for her on the loom. Each thread with almost human intelligence settles automatically into its appointed place, and the weaver is only a machine tender.
 FLY SHUTTLE HAND LOOM.
No textiles of primitive people were ever woven in "pieces" or "bolts" of yards and yards in length to be cut into garments. The cloth was made of the size and shape to serve the particular purpose for which it was designed. The mat, robe, or blanket had tribal outlines and proportions and was made according to the materials and the use of common forms that prevailed among the tribes. The designs were always conventional and sometimes monotonous. The decoration never interfered with its use. "The first beauty of the savage woman was uniformity which belonged to the texture and shape of the product." The uniformity in textile, basketry, or pottery, after acquiring a family trait, was never lost sight of. Their designs were suggested by the natural objects with which they were familiar.
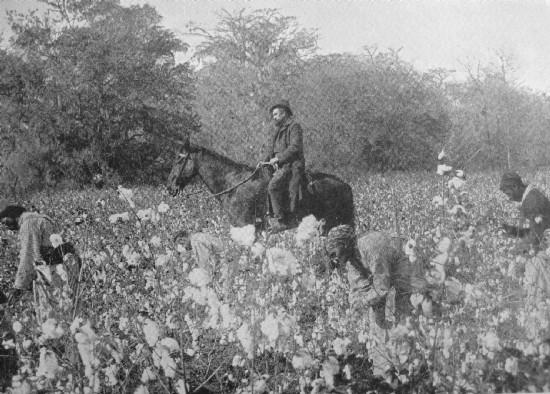 PICKING COTTON.
Both the animal and vegetable kingdoms furnish the materials for clothing as well as for all the textiles used in the home. The fleece of sheep, the hair of the goat and camel, silk, furs, and skins are the chief animal products. The principal vegetable fibers are cotton, flax, ramie, jute, and hemp.
Cotton linen, wool, and silk have heretofore formed the foundation of all textiles and are the principal fibers used for clothing materials. Ramie or China grass and pineapple fibers are sometimes used as adulterants in the manufacture of silk. When woven alone, they give soft silky textiles of great strength and beauty.
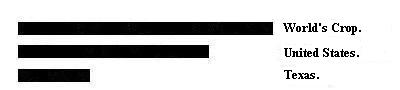 PRODUCTION OF COTTON
Cotton is now our chief vegetable fiber, the yearly crop being over six billion pounds, of which the United States raises three-fourths. Texas is the largest producer, followed by Georgia, Alabama, and Mississippi. The remainder of the world supply comes chiefly from India, Egypt, Russia, and Brazil. The Hindoos were the first ancient people to make extensive use of the cotton fiber. Not until the invention of the cotton gin by Eli Whitney in 1794 did the cotton begin to reach its present importance. Only[Pg 30] four or five pounds of the fiber could be separated by hand from the seed by a week's labor. The modern saw gins turn out over five thousand pounds daily.
Cotton is the white downy covering of the seed of several special of cotton of cotton plant. It is a native of many parts of the world, being found by Columbus growing in the West Indies and on the main land, by Cortez in Mexico, and Pizarro in Peru.
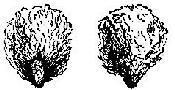 COTTON FIBER ATTACHED TO SEED
The value of cotton depends upon the strength, and evenness of the fiber. In ordinary cotton the individual fiber is about an inch in length. The sea island cotton grown chiefly on the islands off the coast of Georgia, Carolina, and Florida is the most valuable variety, having a fine fiber, one and one-half to two inches in length. Some of the Egyptian cotton belongs to this species. Sea island cotton is used chiefly for fine laces, thread and knit goods and for the finest lawns and muslins.
The short fiber or upland cotton is the most common and useful variety. It is grown in Georgia, North and South Carolina and Alabama. Texas cotton is similar to upland, but sometimes is harsh with shorter fiber. Gulf cotton occupies a position between upland and sea island cotton.
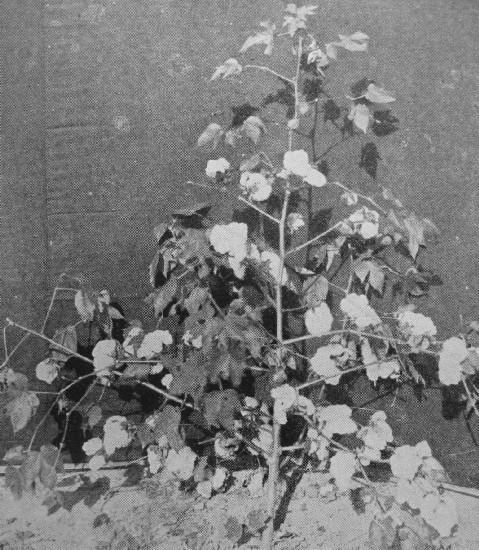 UPLAND COTTON PLANT WITH FULLY DEVELOPED BOLES
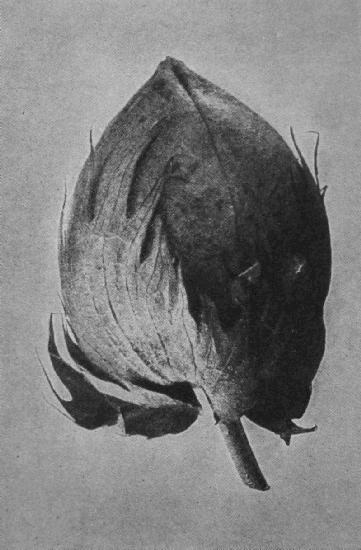 COTTON BOLE FULLY DEVELOPED
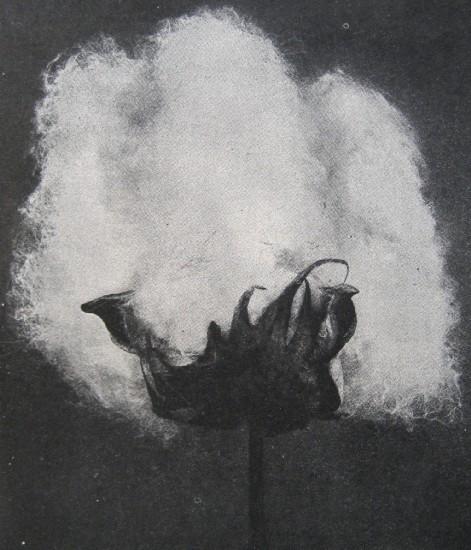 BOLE OPENED, COTTON READY FOR PICKING
The Brazilian and Peruvian cotton yields a long staple and is sometimes used to adulterate silk and[Pg 34] other fibers. Some varieties of this cotton are harsh and wooly and are prized for use in mixing with wool.
The Nankin cotton grown in China and India and in the southwestern part of Louisiana is characterized by its yellow color. It is used in weaving cloth of various kinds in the "fireside industries" which have become popular in the United States and England.
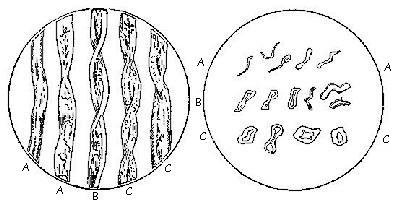 COTTON FIBERS
Very fine yarn can be spun from cotton because of the spiral character of the fibers. This twist of the fibers is peculiar to cotton, being present in no other animal or vegetable fiber. On account of this twist, cotton cloths are much more elastic in character than those woven from linen, the fibers of which are stiff and straight.
After the removal of the seed, no other fiber is so free from impurities—5 per cent is the loss sustained[Pg 35] by cleaning and bleaching. In its natural condition, cotton will not dye readily because of a waxy substance on the surface of the fibers. This must be removed by washing.
Cotton should be picked only when it is fully ripe when the pods are fully burst and the fibers expanded. The unripe fiber is glassy, does not attain its full strength and resists the dye. After picking, the cotton is sent to the ginning factory to have the seed removed. It is then pressed into bales by hydraulic presses, five hundred pounds being the standard bale in the United States.
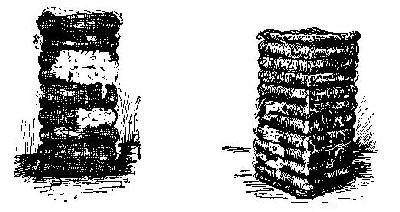 COTTON BALES
Purified bleached cotton is nearly pure cellulose. It resists the action of alkalis well, but is harmed by hot, strong acids, or if acid is allowed to dry on the fabric. It is not harmed by high temperature, and so may be ironed with a hot iron.
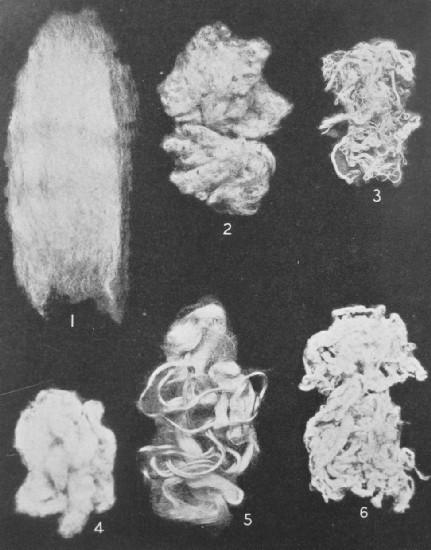 WOOL FIBER AND SUBSTITUTES
Wool is the most important animal fiber. Strictly speaking the name applies only to the hairy covering of sheep, but the hair of certain goats and of camels is generally classified under the same terms. The wool fiber is distinguished by its scale-like surface which gives it its felting and spinning properties. Hair as distinguished from wool has little or no scaly structure being in general a smooth filament with no felting properties and spinning only with great difficulty. Fur is the undergrowth found on most fur-bearing animals and has in a modified way the scaly structure and felting properties of wool.
 MICROSCOPIC APPEARANCE OF WOOL FIBERS
The great value of wool as a fiber lies in the fact that it is strong, elastic, soft, very susceptible to dye stuffs and being woven, furnishes a great number of[Pg 38] air spaces, rendering clothing made from it very warm and light.
Climate, breed, and food influence the quality of the wool. Where the pasturage is barren and rocky, the wool is apt to be coarse.
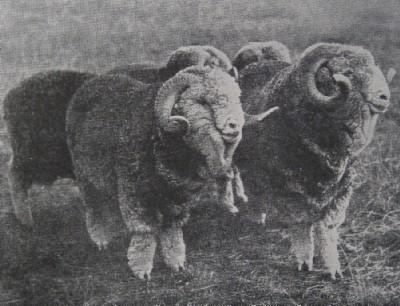 MERINO RAMS
There are supposed to be about thirty distinct varieties of sheep, nearly half of which are natives of Asia, one-third of Africa, and only four coming from Europe, and two from America. Wool is divided into two general classes—long and short staple, according[Pg 39] to the average length of fiber. The long fiber wool is commonly carded, combed and spun into worsted yarn. The short fiber is usually carded and spun into woolen yarn. The short fiber obtained in combing long staple wool is called "noil." It is used for woolens.
Alpaca, Vicuna and Llama wools are obtained from animals which are native to the mountains of Peru and Chile. The Angora goat, originally from Asia Minor, furnishes the mohair of commerce. This fiber does not resemble the hairs of common goats in any respect. It is a very beautiful fiber of silky luster, which constitutes its chief value.
[Pg 40]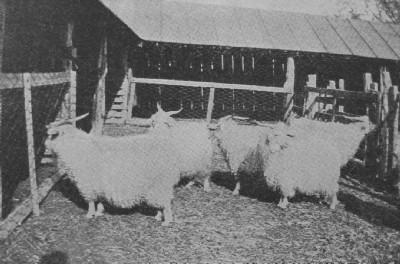 ANGORA GOATS
The fur of beavers and rabbits can be and is used in manufacture, either spun into yarn or made into felt. The fibers of both animals enter largely into the manufacture of felt hats.
The fleece of sheep after being sheared is divided into different parts or sorted, according to the quality of the wool, the best wool coming from the sides of the animal.
 WOOL FIBERS
As it comes from the sheep, the wool contains many substances besides the wool fiber which must be removed before dyeing or spinning. This cleansing is called scouring. Before scouring, the wool is usually dusted by machines to remove all loose dirt. The scouring must be done by the mildest means possible in order to preserve the natural fluffiness and brilliancy of the fiber. The chief impurity is the wool[Pg 41] grease or "yolk" which is secreted by the skin glands to lubricate the fiber and prevent it from matting.
 ONE METHOD OF WOOL SORTING
In the scouring of wool, soap is the principal agent. Soft soap made from caustic potash is generally used as it is less harmful than ordinary hard soda soap. Potassium carbonate—"pearl ash"—is often used in connection with the soap. If the water for scouring is hard, it is softened with pearl ash. The temperature[Pg 42] of wash water is never allowed to go above 120° F. The scoured wool weighs from a little over a half to one-third or less of the weight of the fleece.
Wool has the remarkable property of absorbing up to 30 per cent or more of its weight of water and yet not feel perceptibly damp to the touch. This is called "hydroscopic moisture." To this property wool owes its superiority as a textile for underclothing.
 WOOL SORTING
The thoroughly cleansed fiber is made up chiefly of the chemical substance keratin, being similar in composition to horn and feathers. In burning it gives off a characteristic disagreeable odor. It is a substance very weakly acid in its nature, for which reason it combines readily with many dyes. Wool resists the action of acids very well, but is much harmed by the alkalis, being dissolved completely by a warm solution of caustic soda. High temperature harms wool.
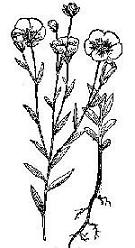 FLAX
FLAX
Next to wool and cotton, flax is used most largely in our textile manufactures. The linen fiber consists of the bast cells of certain species of flax grown in Europe, Africa, and the United States. All bast fibers are obtained near the outer surface of the plant stems. The pith and woody tissues are of no value. The flax plant is an annual and to obtain the best fibers it must be gathered before it is fully ripe. To obtain seed from which the best quality of linseed oil can be made it is usually necessary to sacrifice the quality of the fibers to some extent.
Unlike cotton, flax is contaminated by impurities from which it must be freed before it can be woven into cloth. The first process to which the freshly pulled flax is submitted is that of "rippling" or the removal of the seed capsules. Retting, next in order, is the most important operation. This is done to remove the substances which bind the bast fibers to each other and to remove the fiber from the central woody portion of the stem. This consists of steeping the stalks in water.
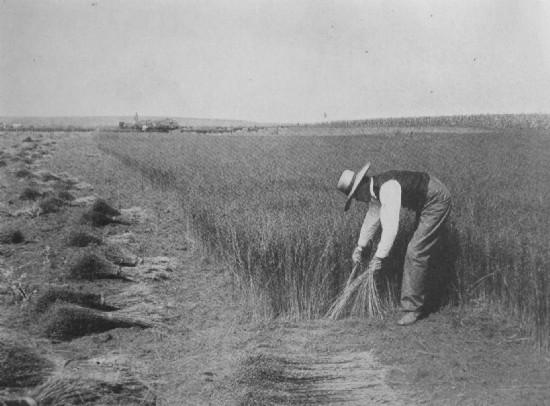 A FIELD OF FLAX IN MINNESOTA
(1) Cold water retting, either running or stagnant water.
(2) Dew retting.
(3) Warm water retting.
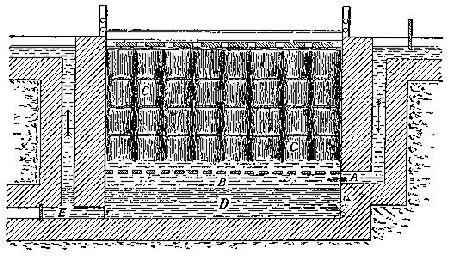 RETTING TANK
Cold water retting in running water is practiced in Belgium. Retting in stagnant water is the method usually employed in Ireland and Russia. The retting in stagnant water is more rapidly done, but there is danger of over-retting on account of the organic matter retained in the water which favors fermentation. In this case the fiber is weakened.
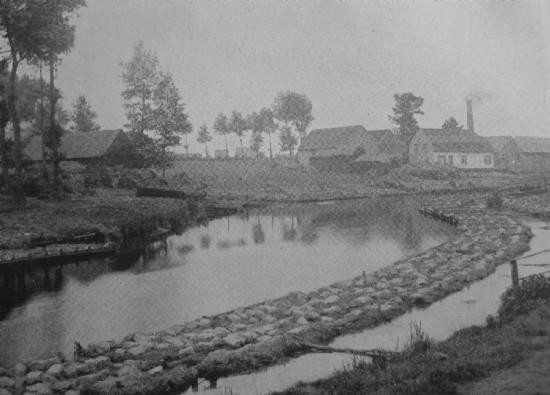 RETTING FLAX IN THE RIVER LYS, BELGIUM
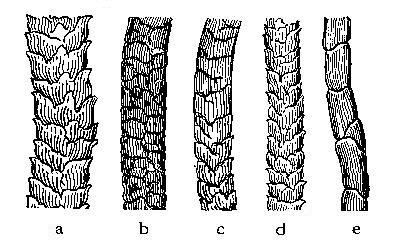
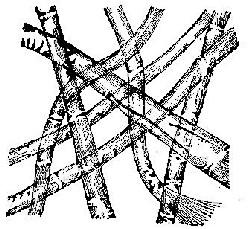 FIBERS OF FLAX
In dew retting, the flax is spread on the field and exposed to the action of the weather for several weeks[Pg 47] without any previous steeping. This method of retting is practiced in Germany and Russia. Warm water retting and chemical retting have met with limited success.
When the retting is complete, the flax is set up in sheaves to dry. The next operations consist of "breaking," "scutching," and "hackling" and are now done by machinery.
Breaking removes the woody center from the retted and dried flax by being passed through a series of fluted rollers. The particles of woody matter adhering to the fibers are detached by scutching.
Hackling or combing still further separates the fibers into their finest filaments—"line" and "tow." The "flax line" is the long and valuable fiber; the tow, the short coarse tangled fiber which is spun and used for weaving coarse linen.
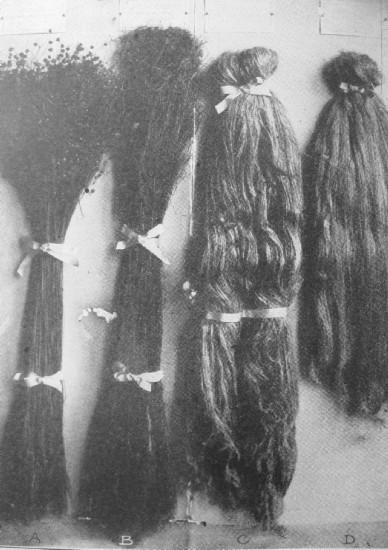 FLAX
FLAX
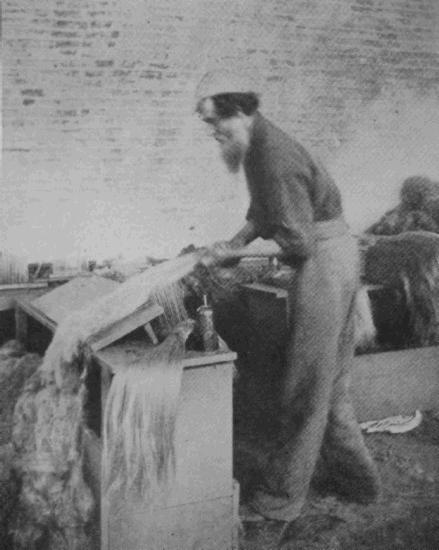 HACKLING FLAX BY HAND
When freed from all impurities the chief physical characteristics of flax are its snowy whiteness, silky luster and great tenacity. The individual fibers may [Pg 50]be from ten to twelve inches in length; they are much greater in diameter than cotton. It is less pliant and elastic than cotton and bleaches and dyes less readily. Linen cloth is a better conductor of heat than cotton and clothing made from it is cooler. When pure, it is, like cotton, nearly pure cellulose.
Besides the linen, there is a great number of bast fibers fit for textile purposes, some superior, some inferior. India alone has over three hundred plants that are fiber yielding. One-third of these furnish useful fibers for cordage and fabrics. The next in importance to linen is ramie or rhea, and China grass. China grass comes from a different plant but is about the same as ramie. The staple is longer and finer than linen. The great strength of yarn made from it is due to length of the staple.
The variety and great value of the ramie fibers has long been recognized, but difficulties attending the separation and degumming of the fibers have prevented its employment in the manufactures to any great extent. The native Chinese split and scrape the plant stems, steeping them in water. The common retting process used for flax is not effective on account of the large amount of gummy matter, and although easy to bleach it is difficult to dye in full bright shades without injuring the luster of the fibers.
Jute and hemp belong to the lower order of bast fibers. The fiber is large and is unfit for any but the coarsest kind of fabrics. Jute is mainly cultivated in Bengal. The fiber is separated from the plant by retting, beating, etc.
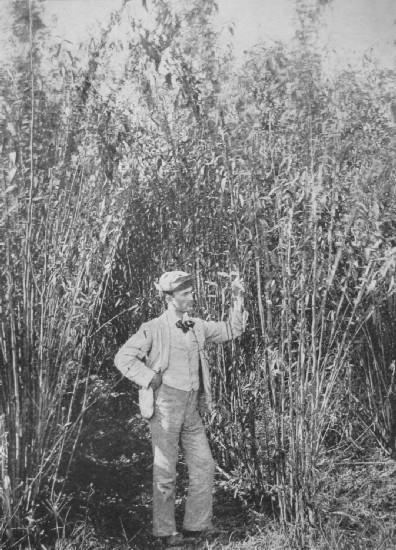 JUTE GROWING IN LOUISIANA.
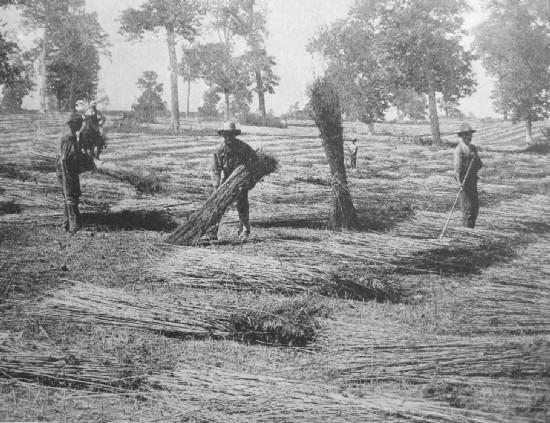 DRYING HEMP IN KENTUCKY
Olona, the textile fiber of Hawaii, is found to have promising qualities. This plant resembles ramie and belongs to the nettle family also, but it is without the troublesome resin of the ramie. The fiber is fine, light, strong, and durable.
The Philippines are rich in fiber producing plants. The manila hemp is the most prominent, of which coarse cloth is woven, besides the valuable cordage. The sisal hemp, pineapple, yucca, and a number of fiber plants growing in the southern part of the United States are worthy of note. These fiber industries are conducted in a rude way, the fiber being cleaned by hand, except the pineapple.
The silk fiber is the most perfect as well as the most beautiful of all fibers. It is nearly faultless, fine and continuous, often measuring from 1000 to 4000 feet long, without a scale, joint, or a blemish, though not of the same diameter or fineness throughout its entire length, as it becomes finer as the interior of the cocoon is approached. Silk differs from all other vegetable or animal fibers by being devoid of all cellular structure.
Southern Europe leads in the silk worm culture—Italy, southern France, and Turkey, with China and India. Several species of moths, natives of India, China, and Japan, produce the wild silk. The most[Pg 54] important of the "wild silks" are the Tussah. Silk plush and the coarser varieties of buff colored fabrics are made of this silk. While manufacturers do not favor the wild silk, the coarse uneven weave and softness make it a favorite with artists and it is being used for interior decoration as well as for clothing.
The silk of commerce begins with an egg no bigger than a mustard seed, out of which comes a diminutive caterpillar, which is kept in a frame and fed upon mulberry leaves. When the caterpillars are full grown, they climb upon twigs placed for them and begin to spin or make the cocoon. The silk comes from two little orifices in the head in the form of a glutinous gum which hardens into a fine elastic fiber. With a motion of the head somewhat like the figure eight, the silk worm throws this thread around the body from head to tail until at last it is entirely enveloped. The body grows smaller and the thread grows finer until at last it has spun out most of the substance of the body and the task is done.
If left to itself, when the time came, the moth would eat its way out of the cocoon and ruin the fiber. A few of the best cocoons are saved for a new supply of caterpillars; the remainder are baked at a low heat which destroys the worm but preserves the silk. This now becomes the cocoon of commerce.
Next the cocoons go to the reelers who wind the filaments into the silk yarn that makes the raw [Pg 55]material of our mills. The cocoons are thrown into warm water mixed with soap in order to dissolve the gum. The outer or coarser covering is brushed off down to the real silk and the end of the thread found. Four or five cocoons are wound together, the sticky fibers clinging to each other as they pass through the various guides and are wound as a single thread on the reels. The silk is dried and tied into hanks or skeins. As the thread unwinds from the cocoon, it becomes smaller, so other threads must be added.
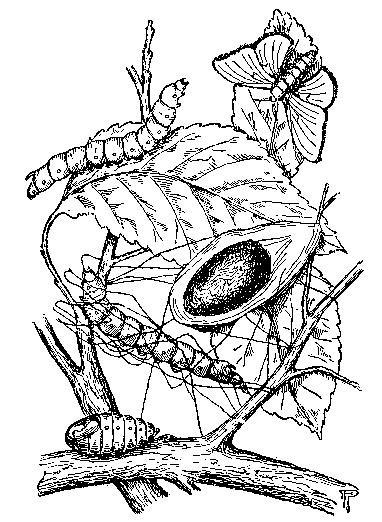 SILK:—CATERPILLAR, COCOON, CHRYSALIS, MOTH
At the mill the raw silk goes to the "throwster" who twists the silk threads ready for the loom. These threads are of two kinds—"organize" or warp and "tram" or filling. The warp runs the long way of woven fabric or parallel with the selvage and it must be strong, elastic, and not easily parted by rubbing. To prepare the warp, two threads of raw silk are slightly twisted. Twist is always put into yarn of any kind to increase its strength. These threads are united and twisted together and this makes a strong thread capable of withstanding any reasonable strain in the loom and it will not roughen. For the woof or tram which is carried across the woven cloth on the shuttle, the thread should be as loose and fluffy as possible. Several threads are put together, subjected to only a very slight twist—just enough to hold the threads together so they will lie evenly in the finished fabric.
After the yarn leaves the spinners it is again run off on reels to be taken to the dye house. First the yarn is boiled off in soapy water to remove the remaining gum. Now the silk takes on its luster. Before it was dull like cotton. The silk is now finer and harder and is known as "souple."
The silk fiber has a remarkable property of absorbing certain metallic salts, still retaining much of its[Pg 57] luster. This process is known as "loading" or "weighting," and gives increased body and weight to the silk. Silk without weighting is known as "pure dye," of which there is little made, as such goods take too much silk.
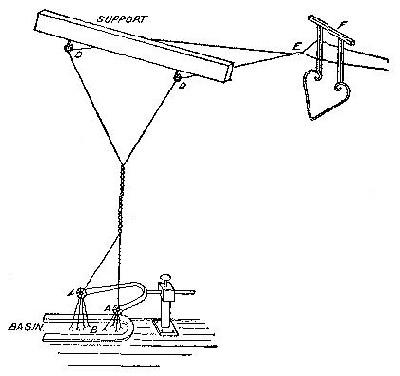 REELING SILK
For the weighting of white or light colored silk goods, tin crystals (stanous chloride) are used and for dark shades and black, iron salts and tannin. By this means the original weight of the fiber may be increased three or four hundred per cent. This result is not attained, however, except through the weakening of the fiber.[Pg 58]
Common salt has a very curious action on weighted silk. It slowly weakens the fiber. A silk dress may be ruined by being splashed with salt water at the seashore. Most often holes appear after a dress comes back from the cleaners; these he may not be to blame for, as salt is abundant in nearly all the bodily secretions,—tears, perspiration, urine.
Artificial silk is made by dissolving cellulose obtained from cotton. It is lacking in strength and water spoils all kinds manufactured at present.
Silk, like wool, has the property of absorbing considerable moisture without becoming perceptibly damp. Like wool and all the animal fibers, it is harmed by alkalis. The important physical properties of silk are its beautiful luster, strength, elasticity and the readiness with which it takes dyes. Silk combines well with other fibers, animal and vegetable.
A comparison of the relative value of textile fibers may be seen from the following approximate prices:
Cotton—$.07 to $.14 per pound; loss in cleaning and bleaching 5 per cent.
Flax—$.12 to $.30 per pound; loss in cleaning and bleaching about 20 per cent.
Wool—$.15 to $.30 per pound; loss in scouring 20 to 60 per cent.
Raw Silk—$7.00 to $10.00 per pound; loss in "boiling off" about 30 per cent which is made up and much more by "loading."
All the complex processes and machinery of the textile industry are but developments of the old-time methods of the home. Brief outlines only will be given here for the processes are most intricate in detail.
The spinning of cotton yarn (thread) is typical of all the fibers. The stages may be divided into—
The picking and carding have for their object the removal of all foreign substances with as little damage to the fiber as possible. The foreign substances in cotton are sand, dirt, pieces of leaves, seed, husk, etc., which have become mixed with the fiber during the process of growing, ginning and transportation.
The cotton bales are opened and thrown into the automatic feeder which carries up a layer of cotton on a spiked apron from which it is removed by a rapidly revolving "doffer" underneath which is a screen which catches some of the dirt. It is next fed between rolls in front of a rapidly revolving blunt-edged knife which throws out more of the dirt through a screen. There is a suction of air through the screen which helps remove the foreign substances. The cotton passes[Pg 60] through several of such machines, being formed into a soft web or "lap" which is wound into a roll.
The carding machine further cleans the fibers and lays them in a general parallel position. From this machine the web is formed into "sliver," a loose rope of cotton fiber about two inches in diameter. This is received in circular cans.
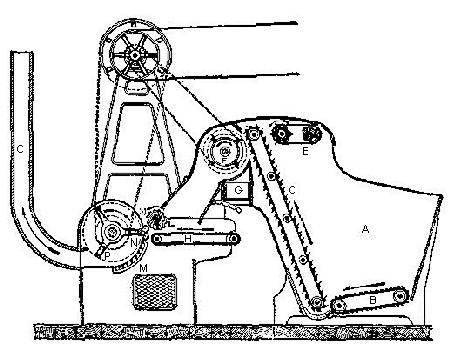 COTTON OPENER AND PICKER
The combing is omitted for short fiber cotton, but is used in worsted spinning and with long staple cotton to remove the short fibers. Cotton to be used for[Pg 61] making yarn suitable for hosiery, underwear, sewing thread, lace, and for very fine cotton fabrics is carded.
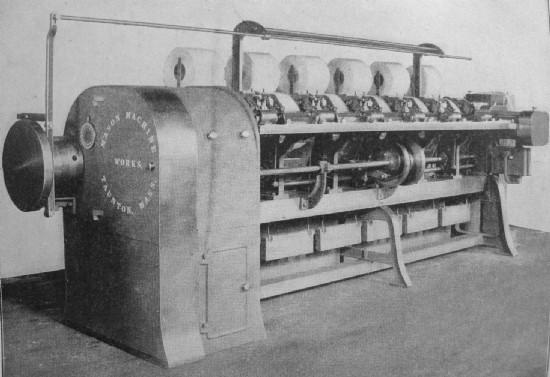
In drawing, from six to sixteen "slivers" are run together and the fibers drawn out in several stages until the soft rope is about an eighth of an inch in diameter, called "roving." This tends to get rid of any unevenness and makes the fibers all parallel. From this machine the roving is wound on a bobbin ready for the spinning frame.
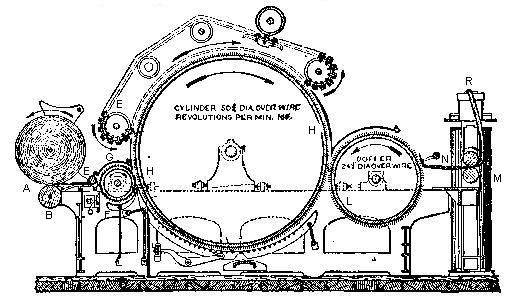 COTTON CARD
The spinning frame may have a hundred spindles or more, each one of which is drawing out its supply of "roving" to the required size of yarn and giving it the twist necessary to bind the fibers together. The yarn to be used for the warp is given a harder twist so that it may be strong enough to stand the strain in weaving. The yarn for filling is usually left soft.
 COTTON COMB, USED FOR LONG STAPLE
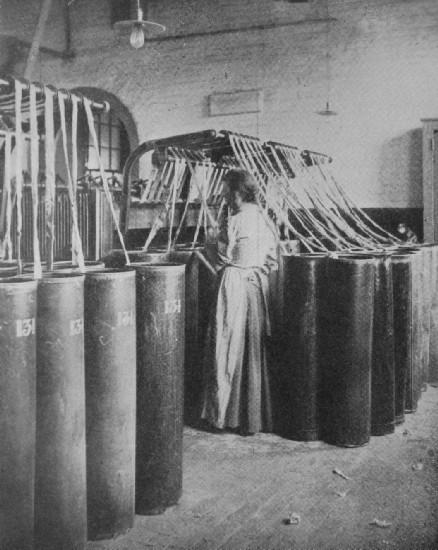 RECEIVING THE "SLIVER" AT THE BACK OF THE DRAWING
FRAME.
RECEIVING THE "SLIVER" AT THE BACK OF THE DRAWING
FRAME.
 DRAWING FRAME
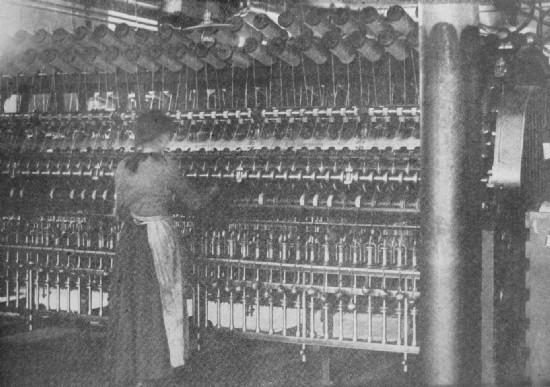 A FLY SPINNING FRAME
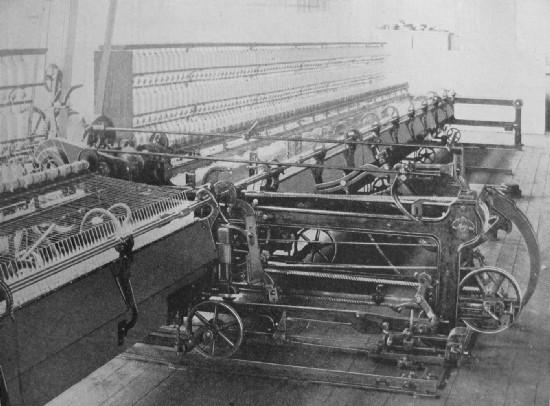 MULE DRAWING AND SPINNING FRAME
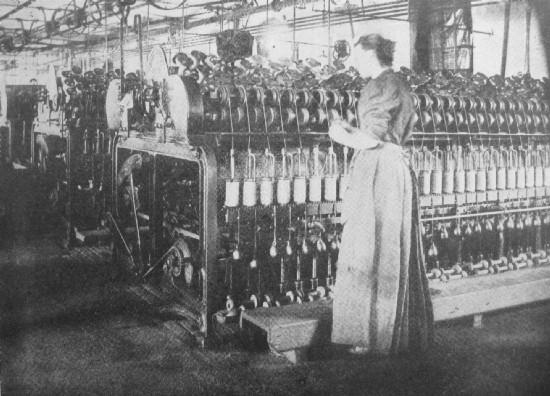
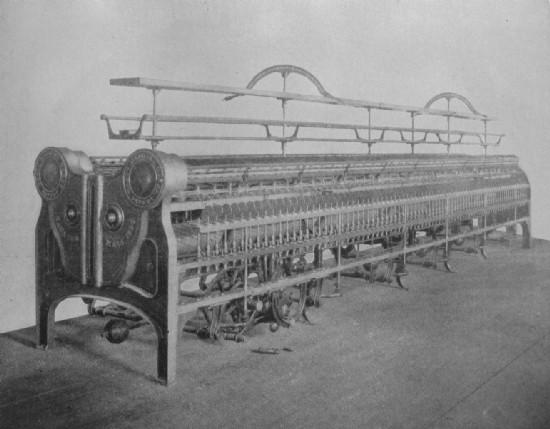 MODERN RING SPINNING FRAME FOR COTTON. SIXTY-EIGHT
SPINDLES
MODERN RING SPINNING FRAME FOR COTTON. SIXTY-EIGHT
SPINDLES
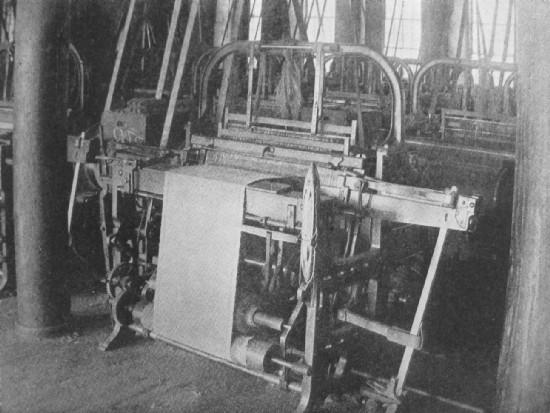 A PLAIN POWER LOOM WEAVING LINEN
The yarn for warp is now usually given a coating or "sizing" of starch and gums so that the thread may not become unwound and break during weaving.
The process of spinning is much the same for flax and for wool, although somewhat differently constructed machines must be used. Flax is usually spun wet.
The modern power driven loom is a wonderful piece of machinery. The principle of its operation is essentially the same as the hand loom, but it is almost perfectly automatic in its action, a man or woman being able to tend from ten to fifteen looms weaving plain cotton goods.
The yarn coming from the spinning frame is sometimes dyed before weaving. The warp is formed by winding as many threads as the width of the fabric is to contain on a slowly revolving drum, called a "beam," in the same relative position in which they are to appear in the finished cloth. From its position on the beam at the back of the loom, each thread is brought through its particular loop or eye with the heddle, then passes through its own slot in the reed, and down to the roller or "cloth beam" that is to take up the woven cloth. This is called "drawing in the warp." If there is a piece of cloth coming from the loom, the work is very simple, for the ends of the new warp are tied to the ends remaining from the warp that has been woven out.[Pg 70]
The shuttle with its bobbin, containing the yarn of the filling, is much the same as is used in the hand looms, except for form and size, which varies according to the requirements and size of the warp being used. At first only one shuttle was used, but in 1760 Robert Kay invented a mechanism by which several shuttles containing different grades or colors of yarn might be used. Each throw of the shuttle across the width of the goods is called a "pick."
In making a cloth with plain weave, that is, with every thread interlacing with every other, as in darning, only two harnesses are required, but the modern loom may have up to about twenty-four harnesses so that an infinite variety of weaves may be obtained. Various cams and levers move the harness frame and so raise or lower the threads required for the design.
The Jacquard loom is arranged on a different principle. In this loom, all kinds of fancy weaves may be obtained as in table linen, tapestries and carpets. Each warp thread is supplied with a separate hook and by means of perforated card the desired threads are raised or depressed at each throw of the shuttle. The cards are worked out by the designer. A set of a thousand or more cards may be required to produce the desired design. Jacquard looms are sometimes to be seen at fairs and expositions weaving handkerchiefs with some picture design.
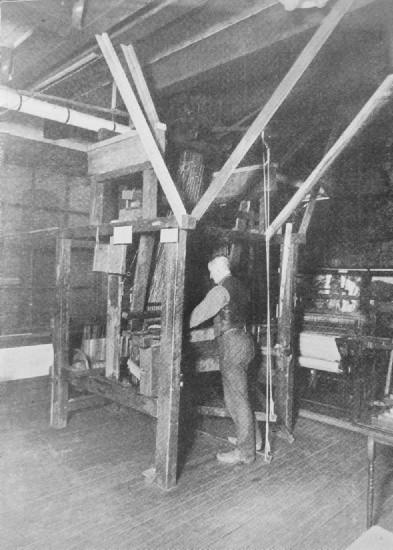 JACQUARD HAND LOOM
The great variety of weaves found in the textiles of to-day are modifications of a few fundamental weaves invented in the earliest times.
The chief fundamental weaves are:
To which may be added the derivatives—
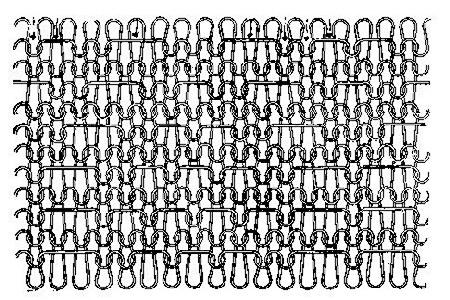 DIAGRAM OF FANCY KNIT GOODS
These do not include the many fancy weaves, too numerous to classify, and the open work weaves, made in the Leno loom, in which some of the threads are crossed. Knit goods are made by the interlooping of a single thread, by hand or on circular knitting [Pg 73]machines and lace by an analogous process, using several systems of threads. Felt is made up of matted fibers of fur and wool and has no thread structure.
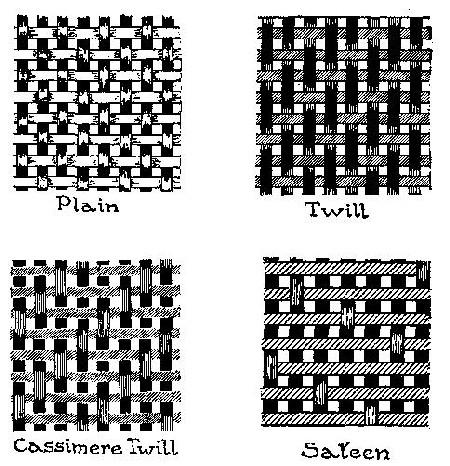 WEAVE DIAGRAMS
The plain weave is the most common, nearly all light weight goods being thus woven. In plain weaving, each thread of both warp and filling passes alternately over and under the threads at right angles. This makes a comparatively open cloth, requiring the[Pg 74] smallest amount of yarn for the surface covered. This weave is used in nearly all cotton goods, as in muslins, sheetings, calicoes, ginghams, and thin woolen goods. Even in the plain weave variety is obtained by having some of the threads larger than others, either in warp or filling or both, thus producing stripes and checked effects.
 SECTIONS OF WEAVES
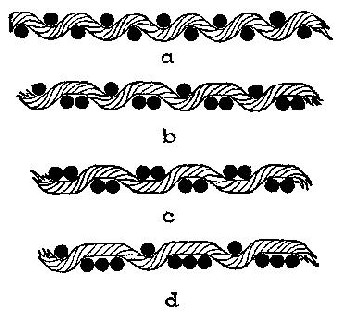
After the plain weave the twill is the most common, being much used for dress goods, suitings, etc., as well as some of the thicker cottons. In this weave the intersections of the threads produce characteristic lines diagonally across the fabric, most often at an angle of 45°. The twill may be hardly visible or very[Pg 75] pronounced. The simplest twills are the so-called "doeskin" and "prunella." In the doeskin the filling threads pass over one and under two of the warp threads and in the prunella twill over two and under one. The most common twill is the cassimere twill in which both the warp and filling run over two and under two of the threads at right angles.
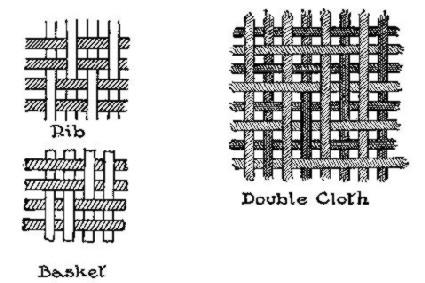 DIAGRAM OF RIB AND BASKET WEAVE AND DOUBLE CLOTH
A twill made by running both warp and filling under one and over three threads is called a swansdown twill and the reverse is known as the crow weave. In these the diagonal twilled effect is much more marked. Various twills are often combined with each other and with plain weave, making a great variety of texture. Numerous uneven twills are made, two over and three under, etc., etc.[Pg 76]
In the sateen weave, nearly all of either the warp or the filling threads are on the surface, the object being to produce a smooth surface fabric like sateen. With this weave it is possible to use a cotton warp and silk filling, having most of the silk appear on the surface of the fabric.
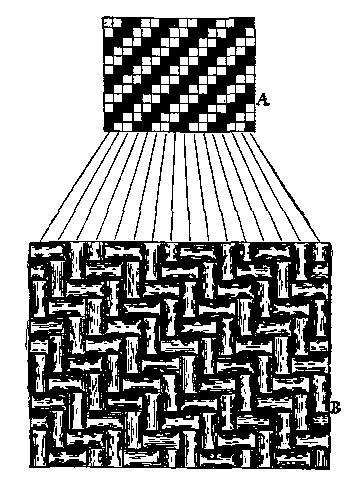 TEXTILE DESIGN
The rib and basket weaves are derivatives of the plain weave, two or more threads replacing the single[Pg 77] strand. In the rib weave, either the warp or the filling threads run double or more, thus making a corded effect. In the basket weave, both warp and filling are run double or treble, giving a coarse texture. This weave is sometimes called the panama weave.
In the thicker fabrics like men's suitings and overcoatings, there may be a double series of warp threads, only one series appearing on the face of the goods, and in the still thicker fabrics, there may be a double set of both warp and filling threads, making double cloth, the two sides of which may be entirely different in color and design.
In weaving plush, velvet and velveteen, loops are made in the filling or warp threads which are afterwards cut, producing the pile.[Pg 78]
When the cloth comes from the loom it is by no means ready for the market. Nearly all kinds are washed and pressed and in some classes of goods the finishing process is very elaborate.
The fiber may be dyed in a loose or unspun state, as is customary with wool; after it has been spun and is in the form of yarn, as in the case of silk and linen; and when it has been woven to form cloth, as is most commonly the case with cotton.
The bleaching of cotton involves a number of steps, the most thorough process being called the "madder bleach," in which the cloth is (1) wet out, (2) boiled with lime water, (3) rinsed, (4) treated with acid, (5) rinsed, (6) boiled with soap and alkali, (7) rinsed, (8) treated with bleaching powder solution, (9) rinsed, (10) treated with acid, (11) finally rinsed again. All this is done by machines and hundreds of yards go through the process at a time. The product is a pure white cloth suitable for dyeing light shades and for white goods. When cloth is to be dyed a dark shade the treatment is less elaborate.
If the cloth is to be printed for calicoes, before bleaching it is singed by passing through gas flames or over a red hot plate and then sheared in a shearing machine constructed somewhat on the principle of the[Pg 79] lawn mower, the cloth being run close to the rapidly revolving knives.
Although cotton is usually dyed in the piece, it may be dyed in the form of yarn, as for ginghams, and sometimes before being woven, in the loose state.
Cotton is more difficult to dye than wool or silk. Although there are now what are called "direct" cotton colors, the usual process is to first treat the cotton goods with a "mordant"—various salts of aluminum, chromium, iron, tin and copper, fixing these on the fiber by means of tannin or alkali. The mordanted cloth is then entered into the dye bath and boiled for an hour or longer, until the desired shade is obtained or the dye bath exhausted. The salts of aluminum are used as mordants for the lighter shades, the salts of chromium for the medium shades, and iron for the dark shades. In general, chromium mordants give the fastest dyes.
The discovery of the so-called aniline dyes has greatly increased the variety of colors available. Although some of the first aniline dyes to be made were not fast to washing or to light and they thus received a bad reputation, they are now to be obtained which compare favorably in fastness with the natural dye stuffs such as cochineal, madder, etc., provided sufficient time and care are given to dyeing. The chief trouble is that in the endeavor to furnish cheap goods, processes are hurried and results are unsatisfactory.[Pg 80]
Home dyeing is practically confined to the use of direct aniline colors. These are put up in small quantities and sold in many places. Directions for their use are given on the packages. The chief precautions are to have the goods perfectly clean and thoroughly wet before entering into the dye bath (this is by no means as easy as one might think), and to keep the goods in motion while dyeing so as to prevent unevenness of shade. Wool and silk dyes cannot be used for cotton and linen, nor the reverse. Of course cloth already colored cannot be dyed a lighter shade of the same color and the original shade must be very light to enable one to change the color, say from red to blue, etc. The original color always modifies that of the dye somewhat and it is best to experiment first with a small portion of the dye and cloth. Rather dark shades are apt to be most successful.
Indigo for blue, madder for Turkey red, logwood with fustic for black, cutch or gambia for browns on cotton are about all the natural dyestuffs which are used to any extent commercially at the present time. The artificial product alizerin, the active principle of madder, has about superseded the natural dyestuff, and artificial indigo is gaining on the natural product.
Linen is bleached and dyed in much the same manner as cotton, although the process is more difficult. The process of bleaching weakens linen more than cotton.
Woolen and silk may be dyed directly with a great variety of dyes without the addition of a mordant,[Pg 81] although they are often mordanted. Both must be well washed or scoured before dyeing. When white or delicate shades on woolen or silk are desired they are bleached. The bleaching is usually done with sulphurous acid gas, the cloth or yarn being exposed in a damp condition to the fumes of burning sulphur.
Were it not for the expense, hydrogen peroxide would be the ideal bleaching agent for the animal fibers.
A great variety of colored designs are produced on the loom by using different colored warp and filling yarns and different weaves, but in all these the designs are easily made only in somewhat rectangular patterns.
Print goods have doubtless evolved from the decoration of fabrics with the brush. Block printing was first used, the design being engraved in relief on blocks of wood. These are dipped in the colored paste, spread thinly, and applied to successive portions of the cloth by hand. These blocks are now replaced in the printing machine by engraved copper rolls, the design being such that it is repeated once or a number of times in each revolution of the cylinder. There is a printing roll for each color of the design. Sometimes both the background and the design are printed on the cloth, but the more common process is for the design only to be printed on the cloth which may be dyed afterwards. In the paste of the printed design there[Pg 82] is some chemical which prevents the portions printed from taking the dye, consequently these remain white or a different color. This is called the "resist" process. Another process is to first dye the cloth and then print on some chemical which, when the calico is steamed, discharges the color. This is called the "discharge" process. Sometimes this weakens the goods in the places where the color has been discharged.
The color paste used for printing contains both the dye and the mordant. After the calico has been printed it is steamed to develop and fix the color, washed, sometimes very slightly bleached, to clear the whites, and usually given a sizing of starch or gum, and then pressed and dried by passing over slowly revolving, steam-heated drums.
In general print goods are not so fast to washing and to light as those that have been dyed in the regular way, although the better grades are reasonably fast.
Prints are sometimes made in imitation of the more costly gingham or other goods in which the color design is made in the weaving. It is easy to detect the imitation as the design of printed fabrics does not penetrate to the back of the cloth.
Sometimes the warps are printed before the cloth is woven, thus giving very pretty indefinite designs, especially in silk.
The finishing of woolen and worsted goods has much to do with their appearance. No cloth comes from the loom in a perfect condition, therefore inspection is the first process. Loose threads and knots are carefully cut off by the "burler" and imperfections in the weaving rectified by the "menders." The goods may now be singed and sheared.
Woolens, and sometimes worsteds, are next "fulled" or felted by being run round and round in a machine while moistened with soap. The friction of the cloth on itself produces some heat which, with the moisture and soap, causes the goods to shrink in length and width while increasing in thickness. During this process, "flocks" are often added, especially for smooth finished woolen goods. These flocks are fine fibers of wool obtained from the shearing machine or made by cutting up old woolen cloth. They are felted with the fibers of the goods and add weight and firmness.
After the fulling, the goods is washed to remove the soap, dyed, if desired, and often "speck dyed" with a special dye which colors the bits of burs, remaining in the cloth, but not the wool. The next process is the "gigging" which raises the nap. The cloth is run close to rapidly revolving "teazels" and also may be run through a napping machine. It may be sheared again and then steamed and pressed. This is but a brief outline; there are generally more processes.
Woolen cloth coming from the loom may be so[Pg 84] treated in the finishing room as to produce fabrics entirely different in appearance. One of the chief objects of the finishing is to give to the cloth as fine an appearance as possible to attract the buyer. Much of the fine finish disappears through wear, especially with inferior goods made from poor materials. The wearing quality of the goods is primarily dependent upon the strength and quality of the fibers of which it is made, so that the yarn of the filling and the warp should be examined when selecting materials. In general hard twisted yarn will give the better wearing cloth.
The present day shops offer such a great variety of fabrics that only a few of the most important can be mentioned here.
Cotton is cool and heavy, is a non-conductor of heat, crushes easily, but like all vegetable fibers it may be laundered without injury to the fibers. Cotton does not take the darker dyes as well as animal fibers and for this reason it does not combine satisfactorily with wool. As an adulterant it wears shabby and loses its brightness. It is only when cotton does not pretend to be anything else that it is our most useful and durable textile. The readiness with which cotton takes the lighter dyes and improved methods of ginning, spinning, and weaving have made cotton goods superior to any other for summer use.
Muslin, calico, and gingham must always head the list of cotton goods. Muslin is coarse and fine, bleached, unbleached, and half bleached, twilled or plain weave. Under the head of muslin brought to a high degree of perfection in weave and finish will be found dimity, mull, Indian lawn, organdie, Swiss, and Madras, and a host of others equally beautiful. Madras muslin has a thin transparent ground with a heavily raised pattern woven of a soft, thick thread unlike the ground work. Waste is used for the pattern. Organdie muslin is soft, opaque, white, or colored, with[Pg 86] raised dots of pattern and plain weave. Dimity has a fine cord running with the selvage.
Gingham is a smooth, close cotton usually woven in checks or stripes. The yarn is dyed before being woven, making the cloth alike on both sides, and the weave is either plain or twilled. Ginghams are also woven of silk and cotton mixed or of silk and ramie.
Cretonne, chintz, dress linings, crape, velveteen, and lace are made of cotton.
Flannelette, which is woven to imitate flannel, is soft and light and is preferred by many who find woolen irritating. It does not shrink as woolen does and is made in beautiful, soft colors and the best grades do not fade. For nightdresses, underwear, and sheets, during cold weather this inexpensive fabric is unequaled.
Among the heavier cotton fabrics may be mentioned denim and ticking which are now printed in beautiful designs and colors and used for interior decoration as well as for clothing and bedding.
The great variety of fibers, the many different ways of preparing each for manufacture, the differences in the preparatory processes in spinning, weaving, or in any of the later processes of finishing produce the varied appearance of the finished product in cotton as in other fabrics.
Linen is one of the oldest textiles; it was used by the early Egyptians for the priests' garments and for[Pg 87] the wrappings of mummies. Many housekeepers think that there is no material for sheets and pillow cases comparable to linen, but it is not an ideal dressing for beds, for in spite of its heavier body, it wrinkles and musses much more readily than good cotton. For table service, however, for the toilet, and for minor ornamental purposes linen has no equal. Its smoothness of texture, its brilliancy which laundering increases, its wearing qualities, its exquisite freshness, make it the one fabric fit for the table.
Table linen is woven plain and figured, checked and diapered. In the figured or damask cloth the patterns stand out distinctly. This is due to the play of light and shade on the horizontal and vertical lines. In some lights the pattern is scarcely noticeable. When buying a cloth, let it be between the observer and the light, for in this position the pattern will show to the best advantage. There is a certain amount of shade on all horizontal lines or of shadow cast by them, while the vertical lines are illuminated, thus although the warp and woof threads are of the same color, the pattern seems to stand out from the background.
Linen should not be adulterated. It should be for use and not for show, for use brightens and whitens it.
Linen adulterated with cotton becomes fuzzy through wear because of the much shorter cotton fibers. The tendency can often be seen by rolling the goods between the thumb and fingers.[Pg 88]
Crash of different widths and quality furnishes tea towels, "huck," damask and other weaves come in various widths and may be purchased by the yard. Russia crash is best for kitchen towels.
The many grades of wool with the great variety of weaves and finish make an almost infinite variety of woolen and worsted fabrics. New goods are constantly being put upon the market, or old goods with new names. Standard goods, such as serges, cashmere, Henrietta cloth, and covert cloth, are always to be found in the shops. These are all twilled goods. The serges are woven of combed wool and are harsh, tough, springy, worsted fabrics of medium and heavy weight, with a distinct twill, rather smooth surface, and plainer back. There are also loosely woven serges. Cashmere and Henrietta cloth have a fine, irregular twill—the finest made. They are woven with silk, wool, and cotton warp, but the latter gives an inferior textile.
Tweeds and homespuns are names given to coarse cloth of which the wool is spun by hand and woven on hand looms. These goods vary according to the locality in which they are made. The wool is mixed without regard to color, the yarn being spun and twisted in the most primitive manner, giving the cloth an uneven, unfinished appearance. These are among the best wearing cloths on the market and are [Pg 89]especially suitable for suits that will receive hard wear. Scotland and Ireland are famous for their tweeds and homespuns and what are known as the "cottage industries" have been recently revived in those countries as the products of their hand looms have become deservedly popular abroad.
The "Harris Tweeds," made on the Island of Lewis and Harris, north of Scotland, are in the old style by the "crofters." After weaving the goods are "waulked"—milled or felted—with the bare feet, accompanied by singing the waulking song and beating time with the feet. The dyeing is done in pots in the old-fashioned way and until recently the dyestuffs were obtained from mosses, lichens, heather, broom, and other plants. Now, however, some of the best aniline dyes are being used. A peculiar characteristic of the Harris tweed is the peat smoke smell caused by the fabric being woven in the crofters' cottages, where there is always a strong odor of peat "reek" from the peat which is burned for fuel. The ordinary so-called Harris tweeds sold in this country are made on the southern border of Scotland, in factories, and are but imitations of the real Harris tweeds.
The light colored tweeds—natural color of wool—come from the island of St. Kilda. This island stands out in mid ocean, barren and wild, devoid of plants or shrubs of any kind for making dyes. The crofters content themselves without dyestuffs. The industry[Pg 90] is maintained by nobility to help the islanders and the fabrics are fashionable and high priced.
Covert cloth is a twilled woven cloth of great beauty and durability. It is rather heavy, of hard finish and is used for jackets and winter suits. To this list of woolen goods may be added the crape cloth with crinkled, rough surface, nun's veiling, flannel which is woven in a variety of ways, broadcloth, wool canvas, and poplins. This list includes only a few of the fabrics manufactured, but these are always to be found on the market, are always good in color and are the best of all wool textiles for wear.
Mohair is a material made from the hair of the angora goat, woven with silk, wool, worsted, or cotton warp. It is a dust-shedding material, does not shrink, and bears hard wear well. Alpaca, on account of its softness, elasticity, and exemption from shaggy defects, combines admirably with cotton in the manufacture of fine goods, which attains almost the glossy brightness of silk. The yarn is used for weaving alpaca linings and light coatings for warm climates.
Many silks can be washed without injury to the fibers, but they cannot be boiled without destroying the luster. Silks may be had in various widths and endless variety of weaves. Many are reversible.
Silks are adulterated with cotton and ramie fibers. The chemicals used in "loading" or "dynamiting" to give the weight lost by cleaning or removing the gum[Pg 91] from the raw silk give to the cheaper grades the stiff, harsh feeling and cause the splitting and cracking of the silk, hence the quality of the fiber should be considered when selecting a silk, not the weight. Taffeta is often heavily loaded.
Foulard and surah are twilled silks. Corded silks are woven with a cord running from selvage to selvage. To this class belong the grosgrains, Ottoman, faille Francaise—a silk resembling grosgrain, but softer and brighter. Irish poplins and bengalines have wool for the filling instead of silk.
Great improvement has been made in the manufacture of wash silks. They are fine in color and have a glossy surface. Pongee is a beautiful, durable silk in different shades of natural color. It is woven in different widths. This silk is especially valuable for underwear. The first cost is greater, but it outwears muslin or linen. It is also used for children's garments and for outside wraps. For many purposes, no better textile can be found.
Crepe de Chine is an incomparable textile possessing as much softness as strength. It is always supple, never creases, launders well, and comes in the most beautiful soft shades as well as in black and dark colors.
Satin is distinguished by its glossy, lustrous surface, obtained in the weaving.
Piled fabrics are rich, thick materials made of silk, wool, mohair, and cotton, comprising the velvets, velveteens, plushes, corduroys, and wilton and velvet [Pg 92]carpets. The soft, raised pile is first woven in loops—Brussels carpet is a good example—and the loops are cut. The back of the goods is plain.
Velvet has always and justly been regarded as the most beautiful of textiles. No matter how fashions change in regard to other materials, velvet never loses its vogue. For robes and cloaks, for mantles and jackets, for hats and bonnets, for trimming and decoration, velvet has been popular for a greater period than the life of any living mortal, but never before has it been so cheap, so varied and so beautiful as it is now. One can in the passing throng of pedestrians on any crowded street see the use and abuse of this noble material. There is scarcely an article of dress into whose composition it does not enter and it is worn upon all occasions. Many things have brought about this result. The tendency of fashion is towards the decorative and picturesque and in these qualities velvet excels all other fabrics. Silk waste and thread are cheaper than ever before so that velvet costs much less than formerly. The men behind the looms have evolved more designs and novelties in the making of velvet than has ever been known and colors beautiful in themselves are seemingly enhanced when applied to velvet.
All that has been said in favor of velvet applies equally as well to the best velveteen,—in fact it is a textile of even greater value and beauty than velvet. The best grades are not cheap, but they wear better[Pg 93] than silk velvet, are fine and silky, excellent in color and sheen, launder well, and do not press-mark as does silk velvet. Velveteen takes the dye so beautifully and finishes so well that it has taken rank with our best standard fabrics. It is made entirely of cotton. It varies in width but is always wider than velvet.
A knowledge of the various widths of textiles is important in buying. Transparent fabrics are usually wider than heavier goods made of the same fiber. Muslin is wider than calico or ordinary print, and thin silk fabrics such as mull and chiffon are wider than velvet.
In wool dress goods various distinct widths are known as single—thirty and thirty-six inches—double fold (forty-five and fifty-four inches), etc. Silk, velvet, and velveteen are single width. The velvet ranges from eighteen to twenty-four inches in width and velveteen twenty-seven. Bodice linings vary from thirty-five to thirty-eight inches; skirt linings come in both single and double fold.
Household linen including bedding varies in width from one yard to two and one-fourth and two and one-half yards for sheeting and from thirty-eight to fifty-four inches for pillow case muslin.
Table linen is woven in both square and circular cloths of various sizes, and napkins vary in width from the small sizes to a yard square.
No fixed widths can be given for any textile as width often changes with the weave.
[Pg 94]Textiles usually take their names from the country, city, port, or province from whence they originated; from the names of the makers; and methods of weaving, dyeing, ornamentation, etc. The fixing of localities, methods, etc., is oftentimes guesswork. The textiles of to-day bearing the same name as those of the middle ages have nothing in common. Buckram was originally made in and called from Bokkara. In the middle ages it was costly, fine, and beautiful, used for church vestments, veils for covering lecterns, cathedral flags, and in the 16th century for the lining of velvet gowns. The coarse, heavy, plain-woven linen or cotton material known as buckram today is used for stiffening, etc.
Fustian, a kind of corduroy or velveteen, was originally woven at Fustat on the Nile. The warp was stout linen, the woof of cotton so twilled and cut that it gave a low thick pile. Chaucer's knight in the fourteenth century wore fustian. In the fifteenth century Naples was famous for the weaving of fustians.
A cloth made in France at a town called Mustrevilliers was known as "mustyrd devells."
China is supposed to be the first country to weave patterned silks. India, Persia, Syria, and Byzantine Greece followed. Those were known as "diaspron" or diaper, a name given them at Constantinople. In the twelfth century, the city of Damascus, long famed[Pg 95] for her beautiful textiles, outstripped all other places for beauty of design and gave the Damascen or damask, so we have in modern times all fabrics whether of silk, cotton, wool, or linen, curiously woven and designed, known as damask, and diaper, which means pattern, is almost forgotten, or only a part of the elaborate design on damask. Bandekin, a costly cloth, took its name from Bagdad. Dorneck an inferior damask woven of silk, wool, linen, thread and gold, was made in Flanders at the city of Dorneck.
From the Asiatic city Mosul came the muslin used then as it is now throughout the world. So skilled were its weavers that the threads were of hair-like fineness. This was known as the invisible muslin, the weaving of which has become a lost art. To this beautiful cloth were given many fanciful and poetic names. It was woven with strips of gold and silver.
Calico derives its name from the city of Calicut in India. The city is scarcely known to-day; it was the first Indian city visited by Europeans.
In the thirteenth century Arras was famous for its areste or tapestry, "the noblest of the weaving arts"; in it there is nothing mechanical. Mechanical weaving repeats the pattern on the cloth within comparatively narrow limits and the number of colors is in most cases limited to four or five.
Silks and cottons are distinguished through their colors and shades. Tarsus was a purple silk. Other cities gave their name to various shades, according as[Pg 96] they were dyed at Antioch, Alexandria, or at Naples. Watered or moire silk takes its name from the finish.
From "canabis," the Latin name for hemp or flax, we have the word "canvas" to mean any texture woven of hempen thread.
To this list of fabrics might be added many others of cotton, linen, wool, and silk with new names, closely resembling the old materials, having greater or less merit.
The following lists of fabrics and terms may be helpful for reference:
Art linen—With round, hard twisted threads.
"Albert cloth"—Named for England's prince, is a reversible all-wool material each side of different colors and so finished that no lining is required. It is used chiefly for overcoats and better known as "golf cloth," "plaid back," etc.
Armure—A cloth woven in miniature imitation of feudal metal armor plates, heraldic devices, diamonds, birdseye, and seeded effects.
Astrakhan—A woolen or silk material with a long and closely curled pile in imitation of the fur from which it is named.
Backed-cloth worsteds or other fabrics which are woven with an extra layer of warp or other filling underneath the face, usually for increased weight and bulk.
Batiste—The French word for lawn, fine white cotton or linen fabric. Sometimes printed.
Batting or padding, cotton or wool prepared in sheets for quilting or interlining.
Beaver—Similar to Kersey, but with a longer nap, soft, thick nap inside.
Bedford cord—A closely woven woolen or cotton cloth having a raised corded surface similar to pique, used for women's suits.
Bonde—A loosely woven fabric with a curly, hairy surface, usually made with a jersey or stockinet body.
Bourette—An effect of weaving produced by fancy yarns showing in lumps at intervals over the face of the cloth; used for women's and children's suits.
Beverteen—A heavy cotton cloth used for men's hunting garments.
Broadcloth—A fine woolen cloth with a glossy finished surface, the better grades being woven with a twilled back. It takes its name from its width. It is used for men's and women's wear.
Buckram—A coarse, heavy, plain-woven linen or cotton material used for stiffening.
Buckskin—A stout doe skin with a more defined twill.
Butternut—The coarse brown twilled homespun cloth woven of wool prior to the Civil War—colored brown with dye from the butternut or walnut tree; used for men's wear and for decorative purposes.
Cambric—Fine white linen, also made in cotton in imitation.
Camel's hair—A beautiful, soft, silky fabric, usually woven like cheviot of hair of camel and goat.
Canvas—A linen, cotton, silk, or wool cloth of different weaves and widths, used for many purposes—clothing, as a background for embroidery, hangings, spreads, etc.
Canton flannel—A stout, twilled cotton cloth with a nap on one or both sides, used for clothing and decorative purposes.
Cassimere—A general term for all-wool fabrics woven either plain or twilled, coarse or fine, of woolen yarn. The pattern is always woven plain and distinct and the cloth is never napped.
Castor Beaver—A heavy, milled, face-finished, all-wool cloth lighter in weight than ordinary beaver.
Chinchilla—A thick, heavy, double woven fabric with a long napped surface curled up into little tufs in imitation of chinchilla fur; used for coats.
Clan Tartan—The plaids of the various highland clans of Scotland.
Clay—A name given to serges, worsteds, and diagonals woven after a process of J. & P. Clay of Haddersfield, England.
Coating—Those woolen and worsted fabrics most especially adapted to men's dress and overcoats.
Corduroy—A thick cotton pile material, corded or ribbed on the surface; used for men's, women's and children's wear.
Corkscrew-worsted goods—So-called from its fancied resemblance to the twists of the corkscrew.
Cotton worsted—All cotton or part cotton worsted-wove cloth.
Cottonade—Stout cotton cloth in imitation of woolen or worsted; used for men's trousers.
Covert—A twill-woven cloth sometimes with full face, sometimes sheared to imitate whipcord.
Crape cloth—A stout worsted fabric with surface in imitation of silk crape, used for dress coats.
Crash—A strong, course linen cloth of different widths, used for towels, suits, table linen, hangings, bed spreads; in fact, there is no end to the uses to which this textile can be adapted.
Cravenette—Cloths treated and finished before weaving by an improved process which renders them rainproof. A secret process owned by the Cravenette Company and by Priestly & Company of England and the United States.
Crepe—A light weight silk, silk and wool, or all wool or cotton cloth of irregular weave.
Diagonal—A worsted cloth with prominent diagonal ridges.
Doeskin—A compact twilled woolen, soft and pliable.
Drap D'Alma—A fine, close, flat-ribbed, twilled fabric of wool or silk and wool, finished on but one side.
Drap D'Ete—A fine, light worsted fabric woven in longitudinal cords.
Drilling—General term for various cotton stuffs used for lining men's wear, and general purposes.
Empress cloth—A heavy dress goods with napped or corded surface, named for the Empress Eugenia; sometimes called Electrol cloth or Beretz.
Etamine—A light woolen cloth similar to batiste and nun's cloth, used for women's and children's wear.
Faille Francaise—A soft, lustrous silk of wider cord than grosgrain, but narrower than ottoman.
Farmer Satin—A lining of cotton chain or warp and wool filling, finished with a high lustre, also called Italian cloth.
Flannel—A soft, light weight woolen fabric of which the yarn is but lightly twisted, plain weave or twilled; used for clothing etc.
Flannelette—A half cotton or all cotton flannel-like fabric.
Frieze—A thick, shaggy, heavy nap woolen overcoat cloth.
Gingham was first manufactured in Gonghamp in France and was known as Madras gingham. Seersucker gingham was originally a thin linen fabric made in the East Indies. Zephyr gingham is a soft fine variety of Scotch and French ginghams, are superior qualities, heavier in weight.
Fur Beaver—A long napped cloth imitation fur.
Grass cloth—A fine, smooth, linen woven in checks of blue and white, red and white, etc., used for dish towels; also a thin dress material of ramie and cotton, etc.
Grenadine—A thick silk gauze, either plain with a solid design or pattern upon it or combined in stripes with other weaves, as satin, moire, etc.
Grosgrain—A close-woven, finely ribbed or corded silk with but little lustre.
Haircloth—A cloth woven of horse hair, from which it takes its name, for weft with cotton or linen warp; used for facings, linings, furniture cover, etc.
Holland—A stout, plain-wove, unbleached, linen cloth used for linings, window shades, etc.
Homespun—A cloth woven on hand looms or made in imitation of such cloth for both men's and women's wear.
Hop-sacking—A plain woven canvas dress fabric of wool.
Huchaback—A corruption of huckster-back, meaning originally pedler's ware—Toweling made of all linen, linen and cotton, cotton and wool, either by the yard or as separate towels; the part wool huck always separate towels.
Irish linen—Full bleached, fine, plain woven linen used for shirts, collars, cuffs, etc., of different widths.
Jersey cloth—Woolen stockinette.
Kaikai—A thin Japanese silk.
Kersey—A heavy, closely woven cloth with a smooth face and glossy finish.
Kerseymere—A fine, twilled, woolen cloth of peculiar texture, one thread of warp and two of wool being always above.
Khaki—A light, yellow-brown colored cotton cloth used for army service in hot countries.
Ladies' cloth—A fine, wide, wool flannel, slightly napped, similar to broadcloth.
Lusterine—A thin, twilled, cotton lining finished with high lustre in imitation of silk.
Marseilles—A sort of figured pique, used for women's and children's clothes and for men's coats.
Matelasse—A silk and wool or all wool brocade, usually for coats.
Melton—A stout woolen cloth, fulled, sheared, and finished without a nap; like Kersey, but without a gloss.
Merino—A thin woolen fabric made of the fine wool of the marion sheep, generally used for women's and children's wear, vestings, and underclothing.
Mohair—A shiny fabric of great durability, made from the wool of the Angora goat; used for both men's and women's clothing.
Moire—The water effect produced on silk, moreen, and like fabrics. The finest watered silks are known as Moire Antique. Moreen is a woolen or mixed fabric to which the same process has been applied.
Moleskin—A medium heavy twilled cotton cloth, napped inside; used for men's wear and ornamental purposes.
Muslin—A cotton fabric of various classes and names; bleached and unbleached, half bleached, cambric, book muslin, long cloth, mull, organdie, lawns, etc.; used for all purposes.
Nankeen—A peculiar fabric of a pale dull yellow or orange color, woven out of the fibrous tissue which lies between the outer and sap-wood of a tree or shrub that grows in the East Indies and especially in China. The name is derived from the city of Nankin. An imitation is made out of cotton, colored with Annato. The genuine nankeen is never more than eighteen or twenty inches wide and is used for light summer clothing.
Overcoating—Fabrics woven especially for overcoats—covert, kersey, melton, beaver, frieze, vicuna, whipcord, cheviot, chinchilla, etc., made of both wool and worsted.
Pique—A heavy cotton cloth having a surface that is corded or having a raised lozenge pattern; used for women's and children's suits, men's vests, etc.
Prunella—Lasting cloth.
Sateen—A close twilled cotton fabric, soft and glossy, used for lining.
Satin—A silk fabric having a high lustre on its face.
Satinet—A cheap clothing material similar to cassimere, made with a cotton warp and a filling of short, inferior, shoddy wool which is mixed with enough long wool to enable it to be spun and woven in a way to bring that filling to the surface of the cloth; afterwards fulled, sheared, and the pattern printed on the face.
Serge—A lining of cotton or linen warp and a wool or mohair filling, woven three-leaf twill.
Serge—A fine, diagonal, twilled, worsted—both all worsted and with a worsted warp and woolen filling; used for men's and women's suits.
Shetlands—Very shaggy overcoatings, named from the Shetland pony, the coat of which it is supposed to imitate in appearance.
Shoddy—Waste thrown off in spinning—shredded rags, and bits of cloth manipulated into new cloth.
Sicilian—A mohair fabric.
Silesia—A light, close-woven, fine twilled cotton fabric used for dress linings, etc.
Stockinet—A plain, elastic texture made on a knitting frame, used for underwear, etc.
Surah—A twilled silk similar to serge; first made in Surat, India.
Tricot—A double-twill cloth having both a warp and filling effect.
Tweed—Much like homespun in appearance, both being either twilled or plain. They are made from rough worsted yarn spun at home. In tweed the yarn is harder twisted, giving a more distinct twill. It is generally more compact, less rough, and better finished than homespun.
Uniform cloth—Cloth suitable for uniforms, usually a stout, fulled, woolen cloth, similar to kersey.
Venetian—A cloth milled and cropped bare in finish.
Vicuna—A soft twilled cloth similar to cheviot, made of the Andes vicuna, hence its name.
Whipcord—A worsted cloth having a small, prominent twill.
Yacht cloth—A flannel heavier than ordinary serge or flannel.
Cord—The general term is applied to any fabric in which the lines run in the same direction as the selvage.
Count—In spinning, the number given to any thread or yarn, except silk, to indicate its relative fineness, based on the number of yards required to weigh one pound.
Felt—A cloth of wool, hair, fur, etc., not woven, but felted together; used for hats, slippers, boot tops, etc.
Flock—Finely divided woolen waste used in finishing cheap woolens.
Kemps—Fibers or hair like structure that sometimes come in wool, always in goat hair. They do not take the dye.
Mercerized—A term applied to cotton fabrics of which the yarn is chemically treated with a strong solution of caustic soda, giving the appearance of silk, more or less permanent; named after Mercer, discoverer of the process.
Mill ends—Trade term referring to short lengths, seconds, damaged pieces, etc., of cloth, embroideries, etc., that accumulate in mills and shops and are usually sold at a nominal price.
Narrow cloth—Trade term for fabrics less than 29 inches wide. Wider cloths are called broad cloths.
Oil-boiled—Trade term for colors so treated to insure permanence.
Oiled silk—The plain silk boiled in oil. Silk boiled in oil and dried, becoming translucent and waterproof; used as a perspiration guard.
Pepper-and-salt—A black and white or grayish mixture, effected in weaving.
Rubber cloth—Usually cotton sheeting or drilling with a coating of rubber on one side; used as a protective cloth for various purposes.
Shepherd check—Tiny checks, usually black and white.
Twilled—Woven in such a manner as to produce lines or ribs diagonally or across the surface of the fabric.
Woolens—Name of fabrics or carded wool, usually soft woven.
Worsteds—Fabrics made of combed wool, usually hard woven. The combing is the process of arranging the fibers of wool, mohair, cotton, linen, into a parallel condition, preparatory to spinning into a smooth, even and regular yarn. The perfected application of the combing principle.
| Arts and Crafts Essays | $1.00 | |
| Morris, Crane, et al. | Postage | .10 |
| Colonial Days in Old New England | 1.25 | |
| Alice Morse Earle. | Postage | .12 |
| The Primitive Family | 1.25 | |
| Starcke. | Postage | .12 |
| Man Before Metals | 1.75 | |
| Joly. | Postage | .14 |
| Origin of Inventions | 1.50 | |
| Mason. | Postage | .16 |
| Woman's Share in Primitive Culture | 1.75 | |
| Mason. | Postage | .16 |
| Textiles—The Lesser Arts | 1.00 | |
| William Morris. | Postage | .10 |
| Industrial Evolution of the United States | 1.25 | |
| Carroll D. Wright. | Postage | .16 |
Through a special arrangement with the American School of Correspondence we are able to lend or sell to our students some of their textile books, which are technical though simple. Price 50 cents per part, postage 4c.
| Textile Chemistry and Dyeing. 4 Parts. | ||
| Part I. Textile Fibers. | ||
| Part II. Bleaching. | ||
| Part III. Mordants and Natural Dyes. | ||
| Part VI. Artificial Dyestuffs. | ||
| Cotton Fiber. | ||
| Cotton Spinning. 5 parts. | ||
| Weaving. 3 Parts.[Pg 104] | ||
| Textile Design. 5 Parts. | ||
| Woolen and Worsted Spinning. 4 parts. | ||
| Woolen and Worsted Finishing. 4 parts. | ||
| Textile Fibers | $3.50 | |
| Mathews. | Postage | .16 |
| Textile Fabrics | .90 | |
| Rock. | Postage | .08 |
| Dyeing of Textile Fabrics | 1.75 | |
| Hummell. | Postage | .12 |
| Bleaching and Calico Printing | 4.00 | |
| Duerr. | Postage | .14 |
Note.—Books may be ordered through the School or may be borrowed by members for one week. Send postage with request.
Free of the Department of Agriculture, Washington, D. C.:
For sale by the Superintendent of Documents, Washington, D. C. Send coin or money order,—stamps not accepted:
The following questions constitute the "written recitation" which the regular members of the A. S. H. E. answer in writing and send in for the correction and comment of the instructor. They are intended to emphasize and fix in the memory the most important points in the lesson.
Read Carefully. Place your name and address on the first sheet of the test. Use a light grade of paper and write on one side of the sheet only. Leave space between the answers for the notes of the instructor. Answer every question fully. Read the lesson paper a number of times before attempting to answer the question.
1. Give a brief outline of the craft of spinning, primitive and modern.
2. Outline the same for weaving.
3. Describe the hand loom.
4. Describe the cotton fiber. What kinds are there?
5. Who invented the cotton gin and how did this invention affect the cotton industry?
6. Give the chief characteristics of wool. Name the wool and fur bearing animals. How does wool differ from hair?
7. Trace briefly the preparation of wool from the fleece to the finished product.
8. Describe flax and outline the method for the preparation of the fibers. What is the name of the manufactured product of flax?
9. Name some other bast fibers and their products?
10. How do the textile fibers compare in the raw state in condition and price?
11. Give a brief description of silk from the egg to the woven cloth.
12. (a) What is the chief constituent of the vegetable fibers? (b) How does their affinity for dyestuffs compare with wool and silk? (c) How do the alkalies affect wool?
13. Describe the principal weaves and give examples of each.
14. (a) How are cotton and flax bleached? (b) What is a mordant? (c) How should material be prepared for dyeing? (d) State what you know about old time methods of dyeing.
15. How are print goods made? Name some printed fabrics.
16. Define woolens and worsteds.
17. Describe the finishing of woolen and worsted cloths.
18. What is noil; shoddy; felt; flocks?
19. With what dress goods have you had experience, and with what results?
20. What factors determine the use of fabrics?
21. Of what value is the study of textiles? What have you gained by the study of this lesson?
Note.—After completing the test sign your full name.
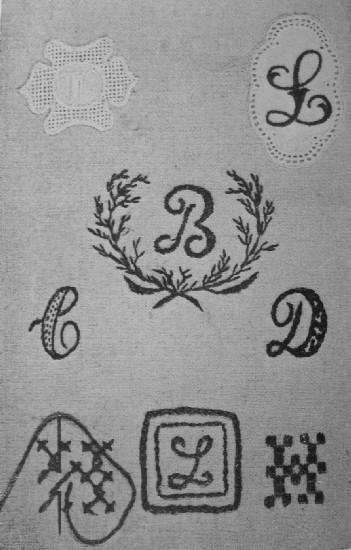 EMBROIDERED INITIALS
Good sewing, good pressing, well finished ends and corners, lightness of touch which holds the work without apparently touching it, thus giving to the finished garment a fresh look—all these are important considerations.
The sewing done on wool, silk, and dresses of all kinds differs from that on underwear and white work. Muslin underwear requires frequent washing and ironing, hence the first essential is durability; close, small stitches, all raw edges carefully turned and stitched securely. Seams that are to come close to the body should lie perfectly flat. A round seam would wear out sooner by coming into frequent contact with the washboard and iron, besides irritating the skin. In dressmaking, unless the stitching is used for ornamental purposes, it should never show on the outside.
Periods of beautiful and dignified costume have been periods of fine needlework—one art leading to and helping on the production of the other.
Stitches may be divided into plain and ornamental. The plain stitches are the (1) basting, (2) running, (3) the running and back stitch, (4) half back stitch, (5) back stitch, (6) overhand or whipping stitch, (7) overcast, (8) hemming, and (9) blind or slip stitch.
[108]The ornamental stitches most frequently used are (1) outline, (2) chain, (3) cat or herringbone, (4) blanket or loop, (5) feather, coral or briar, (6) hemstitching, (7) French knots, (8) button hole, and (9) cross stitch. Excepting the cross stitch, these are all variations of the plain and button hole stitches.
The plain stitches may be used for ornamental purposes. The basting stitch is known as Queen Anne darned work. The back stitch, known as "seed work," is used in embroidering letters and monograms. The overhand stitch is used as an ornamental stitch for joining selvages and in hemming. The chain stitch, besides being ornamental, makes one of the best darning stitches, reproducing the stitch in knitting. The cat stitch is also useful in binding down open seams for flannel hems, patching, etc.
(1) Basting proper is used only in the preparation of work to hold the stuff and lining, or any two or more parts of the work together while it is being stitched, none being left in the finished garment. It is also used as a guide for sewing, feather stitching, etc.
The slanting basting stitch or "tacking" is used in dressmaking for holding linings. The needle is pointed towards the worker. Even basting is used for holding several thicknesses of cloth and if the garment is to be fitted, the stitches should be placed rather close. Uneven basting is used for hems and seams to be machine stitched. Several short stitches with one long one are[109] used to baste crape and wiry fabrics, for this method holds them better than stitches of equal length.
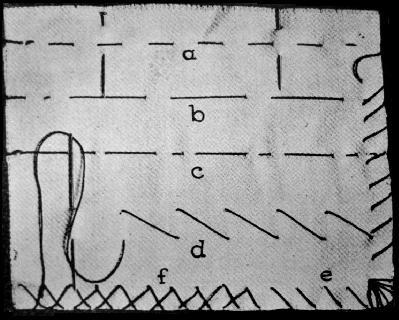 BASTING STITCHES
All basting should be fastened at start with a knot or knot and back stitch and finished with two or three back stitches. The length of thread may be broken or cut from the spool, but should always be cut from the work. Breaking weakens the fastening and biting off soils delicate work with the moisture from the breath, to say nothing of the injury to the teeth. Basting for large work should usually be done with the goods lying flat on the sewing table.[110]
For ordinary work, basting threads should be cut every few inches and drawn out. In velvet, every alternate stitch should be cut and drawn out on the right side with the pile of the goods. In the basting for velvet where the slanting stitch is used, only one end of the stitch touches the line of the seam—the rest is on the outside of the seam. Silk thread should be used to baste velvet and gauze; the thread should be used for basting.
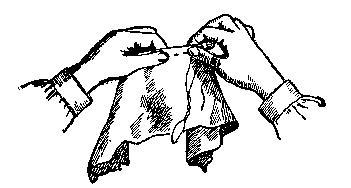 POSITION OF THE HANDS IN RUNNING
(2) Running is closely related to basting. It is not used for any seams that have to bear great strain, but for joining seams in this material, gathering, tucking, making cords, etc. The stitches are usually of equal length on both sides. Take one stitch in the seam and hold the goods between the thumb and first finger of each hand, as shown in the illustration, with the back of the thimble on the eye of the needle. Then, with as free wrist motion as possible, run or shake the needle through the material. The motion of the hand should come from the elbow joint.[111]
Gathering, gauging, casing, etc., are used for drawing up the fullness of skirts, ruffles, flounces, etc., into a given space. The running stitch is used for these.
For gathering, the cloth is held in the same manner as for running. The needle, ordinarily, need not be taken out of the work, the stitches being pushed back over the eye as they are made; but for running long skirt seams in delicate material which would crinkle at the line of sewing and roughen the seam, the needle should be drawn through and the line of sewing smoothed on the thread at each needleful of stitches.
Never use a double thread for gathering, as it is apt to knot, but put in two lines of gathering threads—one a full one-eighth of an inch below the other—and slip the stitches along the needle as described above. This method is a saving of time in the end. When the gathering threads are in, remove the needle, place a pin vertically close to the last stitch, and wind the thread around it a few times in the form of a figure eight. Use a coarse needle for stroking. Hold the work between the thumb and fingers of the left hand with the thumb on the gathering threads. To place the gathers, put the point of the needle under the lower gathering thread and press the plait or gather under the thumb, drawing the needle down, or simply pressing on the needle. Care must be taken not to scratch or tear the material. Continue entirely across the gathers, putting the needle under each stitch and holding the plait firmly between the thumb and finger: turn[112] the material and stroke the upper edge of the gathers.
The gauging stitch is usually longer on the face than on the back, draws the material up into distinct plaits, making it easy to dispose of the fullness neatly, regularly and securely by overhanding the top edge of each plait to the bottom edge of the band. The right side of the skirt and the right side of the belt are placed against each other and each gather oversewed to the belt. The space into which the material is to be gathered determines the length of the long stitch. The succeeding rows of stitches should be directly under those of the first.
(3) The running and back stitch is made by taking a few running stitches, drawing out the needle and making a back stitch over the last running stitch to strengthen the seam. Care must be taken not to hold the side next the worker too full and not to miss the under material, but to take the stitches even on both sides.
(4) The half-back stitch is made by taking one stitch and placing the needle half way back, then bringing it out twice the length of the stitch and placing the needle half way back each time from where the last stitch ended. The appearance on the right side will be of regular space as in the running stitch.
(5) The back stitch is made by placing the needle back to the last stitch, bringing it out once the length of the last stitch, then placing the needle back into the[113] last stitch, and so on, making the stitches follow each other without any space between. This is used in all places that are to bear great strain.
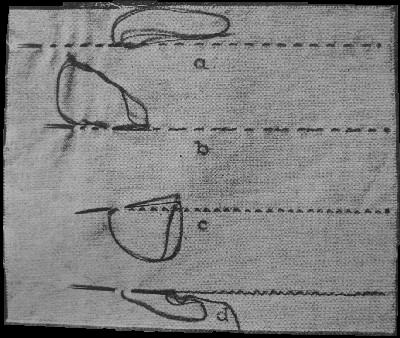 PLAIN STITCHES
(6) Overhanding, oversewing, whipping, top sewing are one and the same—small stitches taken over edges, to join folded edges or selvages, for sewing bands on gathers, sewing lace and insertion, and for sewing carpet strips together. The pieces for an overhand seam should be pinned carefully, placing the pins at right angles to the edge. The folded edges or selvages are placed together, the right side of the goods[114] being in. Do not use a knot to begin sewing, but leave the knot end of the thread and sew it in with the first stitches, carrying the thread on top of the seam. To finish off the seam, overhand back over the last few stitches.
In sewing this seam, the goods should be held between the thumb and first finger of the left hand parallel with the chest, not over the end of finger. Point the needle towards the left shoulder, thus giving a slanting stitch. Care should be taken not to pucker or draw the seam. When the seam is finished, it should be opened and pressed flat.
(7) Overcasting is a slanting stitch used to keep raw edges from ravelling. This stitch, like oversewing, may be worked from right to left or from left to right.
The hem stitch and blind or slip stitch will be considered under hems.
Never use a knot in any embroidery, but start by running a few stitches along the line which is to be covered.
(1) The outline stitch is the simplest of all embroidery stitches. Take a long stitch on the surface, with the needle pointing towards the chest in the line to be covered, and a short back stitch on the under side of the material. The effect of the under or wrong side of the material is exactly that of an ordinary back stitch. The beauty of this stitch depends upon its regularity and in always keeping the thread on the same side of the needle.
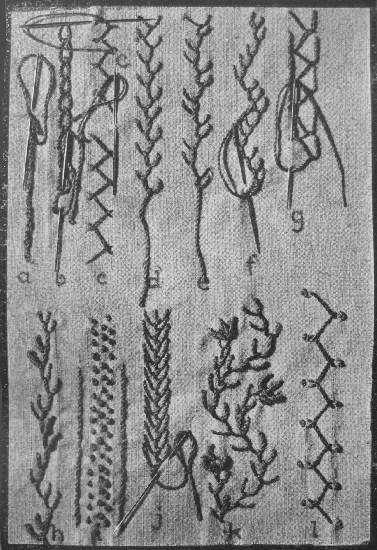 ORNAMENTAL STITCHES
[116](2) The chain stitch when perfectly done should look like the stitch made by a single-thread machine. This stitch is made by taking the thread toward the worker, and before the needle is drawn out of the cloth the thread is held by the thumb under the point of the needle, as in a buttonhole, making a loop. The needle is inserted in the last loop for the next stitch. The chain stitch is used in modern embroidery as an outline and for darning, but in old embroidery, the outline and chain stitches were used for filling as well. They are found in Persian, Indian, and Italian Renaissance work. Like the feather stitch, the chain stitch is worked towards the worker.
(3) The cat stitch or herringbone stitch is an alternate slanting back stitch, the needle being placed first to the right and then to the left. This stitch must be worked evenly to be effective. It is used to finish flannel seams and hems, fasten down linings, opened seams, and canvas facings and featherbone, in millinery—in fact, this stitch is one of the most useful in sewing. The catch stitch is a variation of the cat stitch. Instead of pointing the needle towards the chest, the stitch is taken parallel with the chest. It is used for about the same purposes as the cat stitch. As with the outline stitch, the cat stitch is worked from the worker.
(4) Blanket or loop stitch, used to ornament the edge of blankets, etc., and for finishing the edge of stockinet or web material, is worked from left to right, the edge of the material being held towards the worker. Start with three or four running stitches along the edge so the line of stitching will cover them. Insert the needle the desired width from the edge, draw it towards you down over the thread, being careful not to draw the thread too tightly over the edge of the flannel. Fasten the thread by taking running stitches under the last blanket stitch on the wrong side.
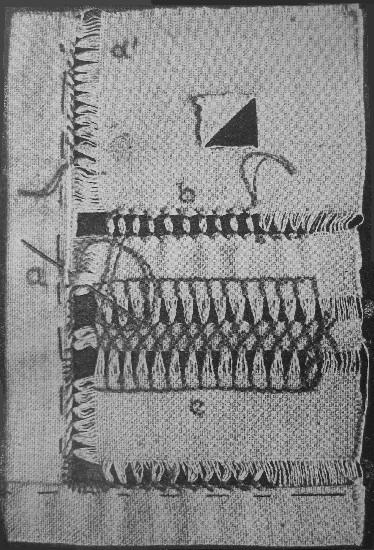 HEM STITCHING
[118](5) Single, double, and triple feather or coral stitches may be made very ornamental and are used in all kinds of sewing and on all materials. They are always made towards the worker, the stitches being taken alternately to the right and left of the line of the design. The thread should always be carried under the needle as in a buttonhole stitch. The design may be varied by taking the stitches diagonally or straight, by making them close or separated, etc.
(6) Hemstitching is used for ornament in making hems and tucks. The first step in hemstitching is the drawing of threads. Rubbing the cloth along the line of threads to be drawn will make the drawing easier if the cloth is sized. After the threads are drawn, the hem is turned and basted even with the lowest edge of the drawn space. Insert the needle into the edge of the hem and material, taking up a cluster of threads bring the thread under the needle to form a buttonhole stitch or make a simple stitch in the edge of the fold. The number of threads drawn and the number in a cluster must be determined by the coarseness or fineness [119]of the material, the greater number being drawn and taken in fine material. There are several methods of hemstitching, but the results are about the same.
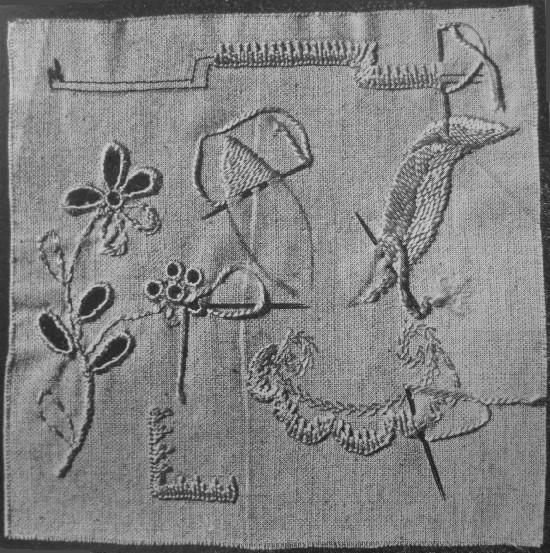 EMBROIDERY STITCHES
(7) French knots are used in connection with other stitches for borders enclosed in outline and chain stitches, in initials, centers of flowers, and as a filling-in stitch. The simplest method is of taking a small back stitch, bringing the thread from the eye of the needle under the point from right to left and drawing[120] the needle perpendicularly from the cloth. Place the needle back of the knot and bring the point out in the place where the next knot is to be made. The size of the thread will determine the size of the knot.
(8) The embroidery buttonhole stitch has many possibilities and many variations. It is worked from left to right instead of from right to left as in a buttonhole. The thread from the work is carried under the point of the needle from left to right, just the reverse of the buttonhole. This stitch is used on flannel and in embroidery of all kinds; it may be padded or worked flat and the stitches may be taken a distance apart or near together.
(9) The cross stitch is worked on linen, scrim, canvas, or any open-meshed material. If done on a flat, smooth surface, it will be necessary to work over canvas, afterwards drawing out the canvas threads. The canvas should be well basted on the material, the warp threads of the canvas lying perfectly straight on a line with the warp threads of the material on which the pattern is worked. The stitches should always run the same way. If the first ground stitches are made from left to right, from bottom towards the top, the cross stitches should be made from right to left from the top towards the bottom. All the ground stitches run one way and the cross stitches in the opposite way.
This stitch is used for marking table linen, underwear, and embroidery designs. When marking linen and unlined work, make the under side very neat by running the thread under the stitches already made,[121] instead of taking a long stitch when beginning in another part of the letter or design.
(10) The satin stitch is an over and over stitch and is used on materials of all kinds for marking linen, etc.
The padding is the first step and should be done in long even stitches placed closely and over one another in the center. The size and proportions of the figure or letters determine the size of the thread. Fine thread gives the best results. The outline should be run twice; this keeps the edge firm. An even darning or basting stitches, chain stitches or outline stitch may be used if the space is not too small. The padding may be worked in an embroidery hoop to keep it smooth and even. Scallops may be padded in the same way or worked flat.
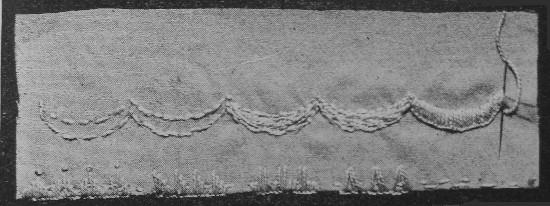 EMBROIDERY BUTTON HOLE AND BLANKET STITCHES
In large figures the stitches are laid closely and exactly parallel the entire length of the form. They may be straight across or at an angle, but the one slant must be maintained throughout. In small curved figures,[122] the stitches may be placed more closely at the inner edge and spread slightly at the outer edge. In flat work where the leaf or petal is large, two or three stitches taken in the cloth, back of the face stitch, holds them even and prevents misplacement in laundering. (All embroidery should be ironed on the wrong side.)
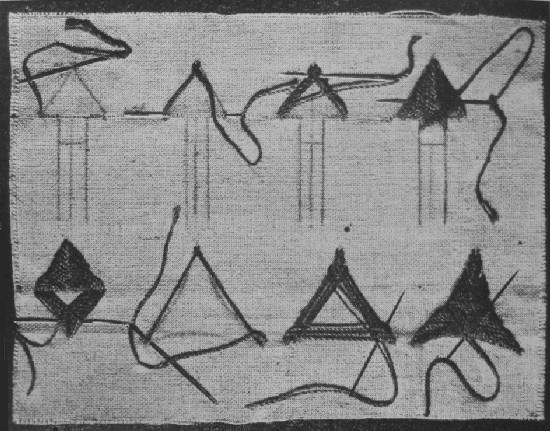 ARROW HEAD, DOUBLE ARROW HEAD AND CROW'S FOOT.
Eyelet embroidery is a simple over and over stitch forming a smooth, round edge. Like satin stitch, all outlines are run with an even darning stitch, except the very small eyelet holes, made with a stiletto. Long or oval openings must be cut through the center.[123]
Shadow embroidery is worked on the wrong side of thin material, using the cat stitch. The outline of the design only shows on the right side, the body of the design being seen dimly through the material.
The arrow head and crow's foot are ornamental fastenings used in fine tailoring as endings for seams, tucks, plaits, and at corners. They are made as shown in the illustration.
Mercerized cotton, linen, or any of the embroidery silks can be used for these stitches, in all sizes and colors, or they can be worked with ordinary thread, cotton or linen, sewing silk, or twist. Cotton thread wears better than linen.
A hem is a fold of goods twice folded to protect a raw edge. The first turn or fold of the hem is the most important. It should be straight and even, folded to a thread, for upon it depends the beauty of the hem. The hem should always be turned towards the worker and creased firmly, but never pleated along the fold. First crease the narrow fold, then crease the second fold the desired width, marking by a measure and baste not too near the edge. The first fold along the woof threads should be at least one-fourth of an inch in width, as the woof threads give or stretch more than the warp threads; otherwise it will not lie flat.
In sewing the hem, the needle should take up only the edge to be hemmed down and just enough to hold on the cloth or lining. In white work the stitches should be fine, showing as little as possible.[124]
All bias and curved edges should have the first fold basted. In cloth or silk this first basting thread should match the material and not be taken out.
A facing or faced hem is also used as a protection to the edge of a garment. A true bias or fitted facing should be used for a facing if the edges of the garment are curved. An extension hem is one in which the whole width of the hem is used.
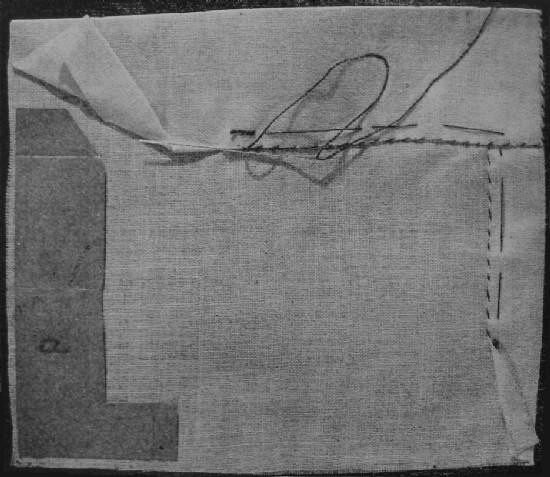 HEMMING
Slip-stitching or invisible hemming is done on silk, wool, and thick material. The hem is pressed with an iron, a stitch as fine as possible is taken on the surface of the cloth and the needle slipped under and through the first fold, drawing the thread lightly. The needle and thread used in this stitch must be very fine.
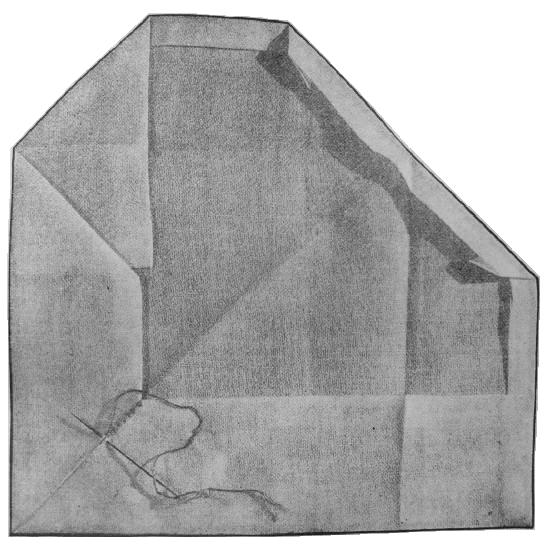 MITERED CORNERS
Rolled hem and whipped gathers are made with the wrong side of the material next the worker. Make a tiny roll of the edge towards the worker, using the left thumb and index finger, rolling an inch at a time (and no more) before hemming. Make fine, even stitches in the roll and goods. Keep the hem perfectly round, firm and not too large. This hem is adapted only to fine material and the edge across the warp is the more easily rolled.
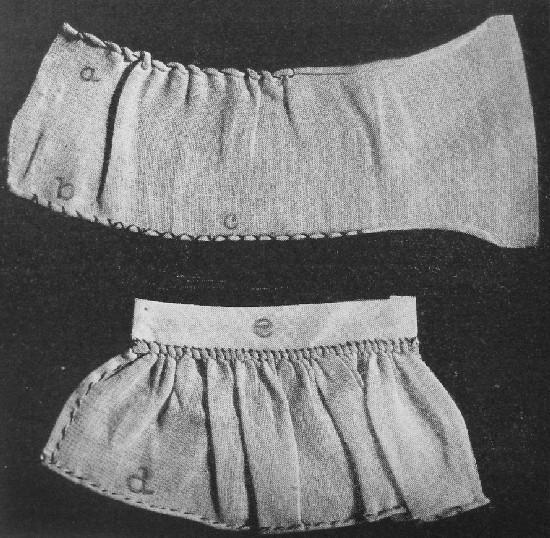 ROLLED HEM AND WHIPPED GATHERS
[127]To gather, whip the rolled hem without hemming, making overcasting stitches towards you, even and not too fine. Use coarser thread than for hemming. This gathering thread is used to hold down the edge as well as for drawing up the gathers and it not to be taken out, as is the ordinary gathering thread. It should not catch in the roll. Have the thread the length of the plain space to which it is to be sewed and regulate the gathers as you do the gathering. After the edge is rolled, whipped and gathered, it is sewed to the garment by the little scallops or raised parts made by the whipping. This is used only for making ruffles or gathering on very fine hand work.
The French hem is used for table linen. Fold as in an ordinary hem, then fold the hem back on the right side and overhand the edge formed, taking fine stitches. Press the hem flat from the right side.
Flannel hems should not be twice folded, for there will be a ridge instead of a flat surface after the garment has been laundered, owing to the felting properties of the wool. Hems on flannel should not be stitched by hand or machine, but cat stitched on the wrong side and finished on the right side with any ornamental stitch.
Hems in infants' clothing may be turned on the right side and made ornamental by feather stitching.
No selvage should ever be used on a hem. The selvage is more closely woven and will draw or pucker in laundrying.[128]
Tucks are folds made on thin material for ornament, to shorten or to provide for lengthening a garment. If done by hand, a card measure is preferable to a tape measure for marking the space and width of the tucks. The folds should be creased to a thread, basted and sewed with a running stitch showing but little on the face, or stitched on the machine. Fine thread should be used.
A seam is the line of sewing that joins material; it may be plain or ornamental. The most important are the overhand, felled, French, slot, lapped, flannel, and beaded.
The overhand seam is described under the overhand stitch.
A fell is a seam hemmed down to the goods to protect the raw edge. It is usually made in night dresses, drawers, corset covers, etc. Baste with the piece farthest from the worker extended one-eighth of an inch beyond the other and sewed with the grain of the goods, beginning at the widest part of any bias. Press the seam with the nail on the right side, turn the wide edge down flat to cover the raw edge and line of sewing, and hem flat either by hand or machine. Care should be taken to keep the seam flat on the right as well as on the wrong side. If the felling is done with the machine hemmer, the wide edge must be on the opposite side. The seam may be basted with both edges even if preferred, cutting off one edge after stitching.
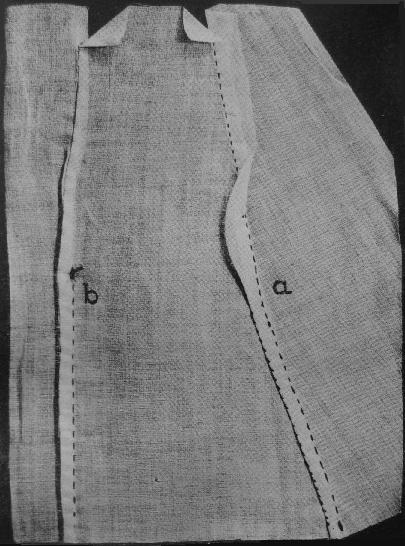 SEAMS
SEAMS
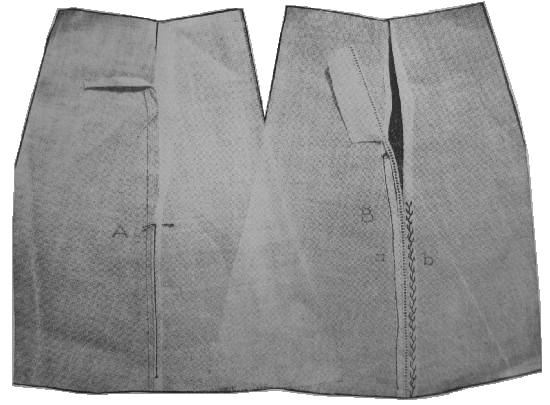 BEADED AND TAPED SEAMS
A French seam is sewed twice—first on the right side as near the raw edge as possible. Cut off all frayed edges, turn the material by folding on the seam or line of sewing, so the seam is folded inside and the second sewing is on the wrong side below the raw edges. This is not a good seam for underwear worn next the body, as it leaves a ridge on the wrong side, but it is useful for skirts of thin material, etc. It is more easily made than a fell.
Beaded seams used for fine white work have a line of beading overhanded between gores, hems, or gathers. The hem along the seam should be folded on the right side, leaving a perfectly flat surface to iron on the wrong side, and finished with an ornamental stitch covering the hem.
The slot seam, used in cloth dresses and jackets, requires exact basting with silk or very fine thread with small, even stitches. If a coarse thread is used, the material will be badly marked. After basting, press the seam open as if it had been stitched, and baste the strap or under strip of the dress material (which has been cut perfectly straight and even) over the wrong side of the seam, having the center of the seam on the center of the strap. Stitch any width desired beyond the center through the three thicknesses. This will hold the seam in position. Now remove the bastings from the seam and the slot effect is complete. If desired, there may be a double row of stitching, an extra row on the edge of the fold or plait. These seams may be finished at the bottom with arrow heads or stitched designs. The lines of machine stitching should not end without some ornament to appear to hold the plait.
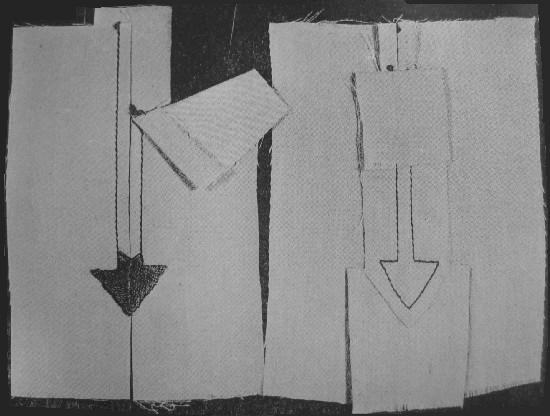 SLOT SEAM FINISHED WITH ARROW HEAD
In the lapped seam the edges are folded each within the other or one over the other so that both sides are alike. If made of heavy material, the raw edges are left unturned; in muslin or linen the edges are inturned, lapped, basted and the hem stitched on both edges or hemmed down on both sides by hand.
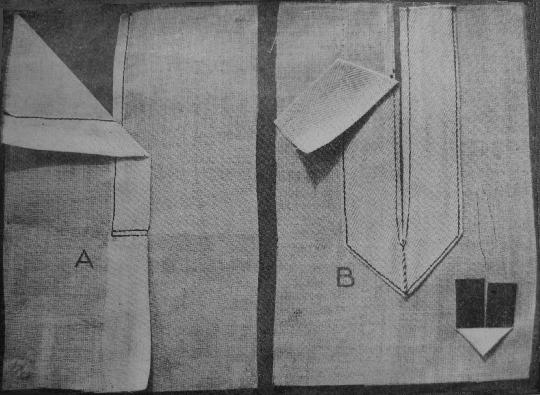 PLACKETS
[135]Flannel seams should be stitched, opened and pressed flat, either on the right or wrong side of the garment. If on the right side, taffeta ribbon should be basted over the seam, so that the raw edges of flannel will not show, and cat stitched or buttonhole stitched on both sides of the ribbon, or any fancy stitch—not too long—may be used. This is the Dorothy seam. For the seam on the wrong side, the edges should be cat stitched with fine thread. Any ornamental stitch may be used on the right side of the seam. Always press flannel seams and hems before finishing. Flannel should never be hem stitched.
A placket is an opening in a garment allowing it to be put on. The simplest placket is made by cutting a slit and folding a wide hem over a narrow one turned on the face of the goods; this makes a pleat below the vent. There should be a double line of stitching across the bottom of the hem to strengthen the placket.
The tape faced placket is stronger and may be used in children's drawers, etc., in place of a gusset to strengthen the end of the opening. A single piece of tape folded back as for a loop is stitched along all edges, making an opening without a lap. This offers as much resistance as a gusset and is more quickly done.
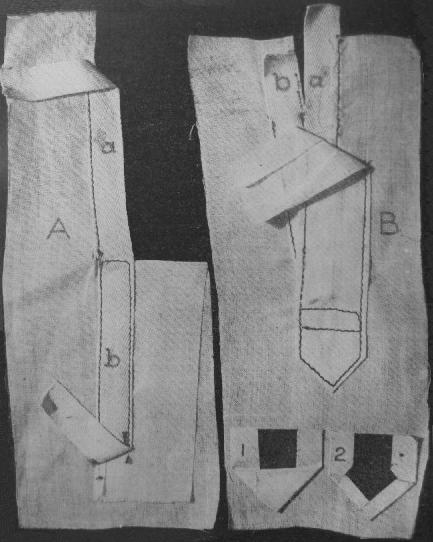 FACED PLACKET
In a third kind of placket, the opening is faced with a continuous piece of tape on both sides and finished with a piece of material on the outside. See illustration. This makes a strong and simple placket. When a tape cannot be used, a hem or facing may be made on the under side of the opening and a facing on the upper side, over which the on-set piece is stitched. The on-set piece and facing may be cut from one piece, but the fitting is more troublesome. In figured goods, the piece set on should match the pattern exactly.
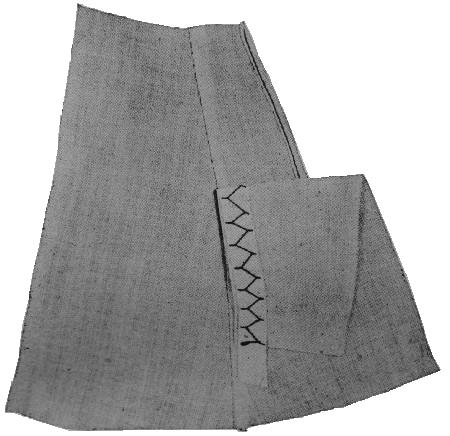 SKIRT PLACKET WITH LAP
[138]A simple placket for underwear is made from a single strip of the goods put on like an extension hem. On drawers it may be turned in at the buttonhole end, but not stitched down except at the band.
The placket of a skirt should have an underlap extending well below the opening.
Divide the top of unhemmed edge of the garment in halves and mark with a cross stitch, notch or pin. Gather from the placket to the middle of the front gore, if a skirt, apron, or dress. Take a new thread and gather the remainder. Put in a second gathering thread one-eighth to one-fourth of an inch below the first. Two gathering threads are better than one and they should be longer than the length of space to be gathered. Stroke or lay the gathers above and below the threads. Divide the band and pin the middle to the center of the garment, placing the right side of the band on the wrong side of the garment. Pin in the middle and at each end, secure the gathering threads by winding around the pin, adjust the gathers, and baste between the gathering threads. Stitch just below the line of basting. Fold the band over on the right side, press, baste over the line of stitching, press again, then stitch on the right side after having turned in both ends and over-sewed. Turn the top of the band over on the right side one-eighth or one-fourth of an inch and stitch securely. This upper fold keeps the edge from wearing and stretching and is a stay for children's skirts and drawers where button holes are used and serves as a finish for the top of the band.
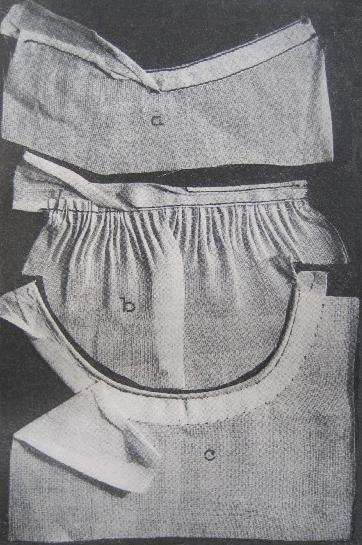 FINISHES
[140]For flannel, pleating or gathers may be used to put fullness into a band. Two rows of gathering threads should be used and the stitches should not be too fine. The band should be made of cotton or at least lined with it to avoid clumsiness and prevent shrinking. Ruffles are set in hems, etc., in the same manner.
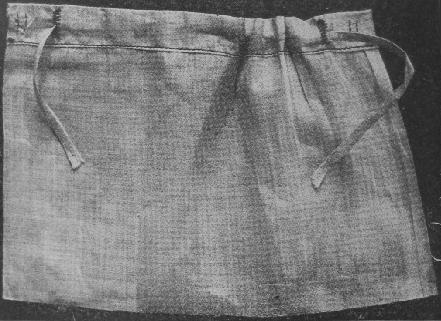 DRAW TAPE FINISH FOR UNDER SKIRT
In finishing the top of an underskirt, many like to dispense with the placket and fitted band. This may be done by using drawing tapes at the back. The upper edge is faced with a piece of material which should be bias in front to accommodate it to the curve, but may be straight across the back. Work a button hole[141] at each side of the back, insert a tape through one button hole and draw it over an inch beyond the opposite one and fasten securely by two lines of stitching across the tape. A second tape is put through the other button hole and fastened in the same way. By pulling the tape on each side the fullness may be adjusted.
All facings around curves, such as arm holes and neck, should be a true bias which is cut by holding the warp threads diagonally across the woof threads. These strips for facings, pipings, ruffles, etc., should be cut exactly even in width. All bands, ruffles, etc., of serge, twilled, or diagonal materials should be cut across the twill and not with it, in order to have the ruffle hang well.
The standard fastenings are buttons and button holes, hooks and eyes or hand made loops, lacings through rings and eyelet holes, loops over buttons, and fancy frogs, clasps, studs, ball and socket, "notta-hooks," etc.
Button holes should be carefully measured and marked before cutting. They should be a little longer than the diameter of the button for flat buttons and one and one-quarter the diameter for round buttons. Having decided upon the distance apart they are to be placed, cut a marker from a piece of cardboard and measure off the space, marking with pins, French chalk, pencil, or thread. The distance from the edge (one-fourth inch), as well as the length of the button[142] hole may also be marked with the card. The scissors should be sharp, the hand must be steady, and the cut should be made with one firm slash, not with two or three jerks. Great care must be taken that each button hole is of the same length. The goods should be cut to a thread, for it is impossible to make a neat buttonhole if it is improperly cut. In cutting a round end buttonhole for thick goods, a punch may be used for the end, after which the remainder of the buttonhole is cut directly on a line with the center of the circle.
The same marker may be used to mark the position for the buttons. All markings for buttons and buttonholes, or for hooks and eyes, should be made at one time.
After cutting, the button holes are overcast. This should always be done directly after cutting, especially if the goods ravels easily, otherwise it will be impossible to work a neat buttonhole. Overcasting should be done with very fine thread (No. 150 for white goods), split silk for wool and silk. Three overcast stitches on each side are sufficient for an ordinary size buttonhole.
A very good plan to follow in cutting a buttonhole in heavy material or material that frays easily is to chalk the position and length of the buttonhole, then stitch a row of machine stitching each side of this mark, the two rows being a little more than one-eighth of an inch apart. This holds all the thicknesses together and the buttonhole may then be cut easily. It also serves as a guide in working the buttonhole stitches.
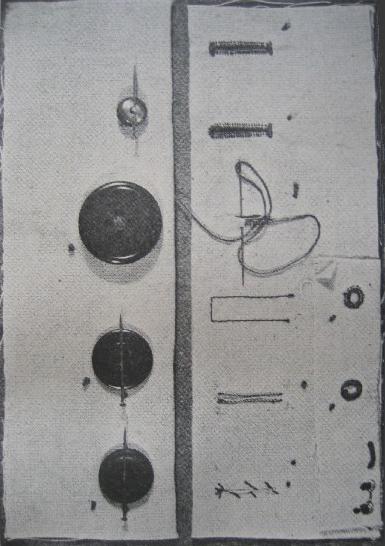 BUTTONS, BUTTON HOLES, EYELETS, LOOPS
[144]The buttonholing is begun at the inner side of the slit. Always place the knot on the outside of the garment a short distance to the right of the buttonhole, leaving a long stitch underneath which can be cut off when the buttonhole is finished. A buttonhole should be completed with one thread if possible as it is difficult to mend the thread securely and neatly. Letter D for twist is usually employed.
Insert the needle in the edge of the material and when half way through, take the two threads at the eye of the needle, bringing them towards you at the right and under the point of the needle, and draw the thread from you, making the purl or loop stitch directly on the edge of the buttonhole. The stitches should be about the width of the needle apart to allow for the purl. Be careful to complete each stitch with a uniform movement so that the line will be perfectly straight and not wavy. The stitches are placed more closely together in the rounded end of the buttonhole where the chief wear comes.
Many workers, particularly tailors, always "stay" or "bar" around a buttonhole before working. This may be done with several threads of twist or with a cord so that the worked edge of the buttonhole will be firm and distinct. Tailors usually use a cord as this makes the edges heavier. It is always well to stay [145]buttonholes in heavy material as it strengthens them very much and improves their appearance.
When the buttonhole has been worked all around, the end is completed with a bar tack made by taking two or three stitches across the end of the buttonhole, drawing the edges closer together. This bar is covered with buttonhole stitches worked close together. The thread is fastened securely on the wrong side.
After very large buttonholes are finished, their straight edges should be closely basted together by an over and over stitch and then pressed under a damp cloth. Before they are dry, a bodkin or stiletto should be pushed vigorously up through each eyelet until that opening becomes perfectly round and the stitches on its edges are regular and distinct. When the basting is removed, the buttonhole will be symmetrical in appearance.
Buttonholes which are to bear a strain are cut in the direction of the pull, but sometimes they are cut in the opposite direction, as for a shirt waist. Such a buttonhole may be completed with a bar tack on each end.
Ordinary buttons should never be sewed down tightly, but the thread should be loose so that it may be wound around at the end, thus protecting the holding threads from wear. The shank prevents the buttonhole from being crowded out of shape. Loose sewing can most easily be done by placing a pin or needle across the top of the button and sewing over[146] it. If a button is much concaved, the pin may be placed underneath. The pin is removed before winding.
In sewing on a four-hole button, the stitches should be made symmetrically, either parallel or crossed, but not both. If parallel or in a two-holed button the stitches should run in the line of the buttonhole. The thread should always be fastened at the beginning and at the end of the work. Place the knot upon the outside of the garment where it may be cut off when the button is sewed securely. The knot is sometimes placed under the button.
In sewing buttons on a cloak or coat an extra strip of canvas or silesia over the canvas interlining should be placed the entire length of the buttoning for strength. This should be applied before the work on the garment is too far advanced and if cut sufficiently wide, will allow any slight alteration. The sewing should go through the canvas facing and stay, but not through the under side or facing of the material.
In sewing buttons on bodices a tape should be sewed over the front basting for a stay. If sufficient material has not been allowed for a lap, this should be added, as a lap is necessary under the opening of such buttonholes.
Buttons may be sewed through lining having a small button on the wrong side. This method prevents the cloth from tearing and makes an ornamental finish as well as a substantial one.[147]
Buttons which are supplied with wire shanks should be sewed down firmly as the shank already provided permits the buttons to set up well from the material. They should be placed in such a position that the wire shank will run parallel with the buttonhole and not cross it.
The position for hooks and eyes should be marked before sewing on. The simplest, though least desirable, method of sewing-on these fastenings is to place the eye at the edge of the seam or facing and the hook sufficiently far back from the opposite side to give a lap. A much preferable method is to baste a bias strip of crinoline along the positions to be occupied by the hooks and eyes; this gives strength to the finish. Sufficient material should be allowed for folding over the shanks after the hooks and eyes have been sewed on, or they may be covered with silk ribbon, slipping the edge under the beak of each hook and then catstitched in position.
The hooks and eyes are sewed securely through the crinoline and one thickness, but the stitches should not show on the outside. Over and over stitches are taken through the small rings in the line of the full and again on each bar of the eye and on the shank of the hook so that they may be held in position securely. In many cases, it is advisable to have an underlap of the material. This should be slip-stitched in position on the garment after the eyes have been sewed in place.
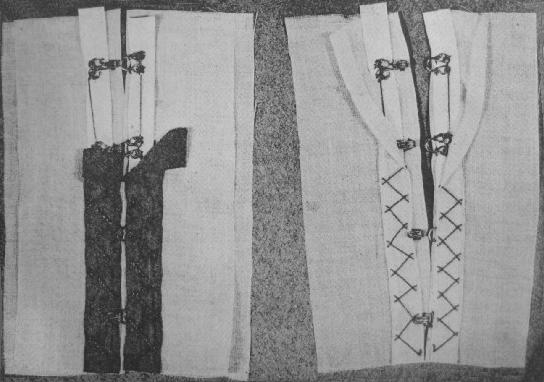 HOOKS AND EYES
Eyelet holes are made with a stiletto which forces the threads aside, but does not cut them. The edge is finished with over and over stitches placed closely together, or with a buttonhole stitch making the purl on the outer edge of the stitches. Loops are made by buttonholing very closely over several foundation threads, making the purl on the outside edge. The needle may be run under the loop eye first if preferred.
With the underset patch have the part to be patched pressed smooth, baste the patch on the wrong side of the garment before cutting out the worn place. (If the garment or article to be mended is worn or faded and shrunken by laundering, boil the piece in soap, soda and water to fade the patch, if of cotton or linen.) After basting, cut away all the worn cloth, making a square or oblong hole. Cut to a thread. Cut each corner, diagonally, one-eighth or one-quarter of an inch, turn all four edges of the garment towards the wrong side. Begin at the center of one side and hem all around the square, taking slanting even stitches, not too close together. Remove the basting, trim the edges of the patch, press the patch on the wrong side and catch stitch to the garment. This shows less on the right side and does not make a hard line as if the patch were turned back on the edge. If the cloth has a pattern or stripe, match it perfectly, having the warp threads of both running the same way. Cut both hole and patch square. An oval or round patch is unworkmanlike and does not wear well. Keep the corners square and hem down well. The object of pressing is to keep both garment and patch flat and even. Flannel patches should be cat-stitched on the right side. No flannel edges should ever be inturned.
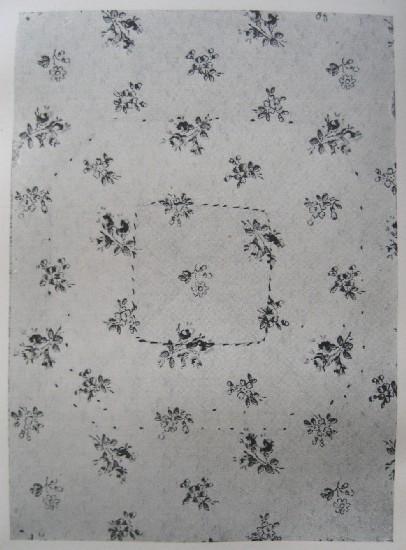 UNDERSET PATCH, RIGHT SIDE, EDGE TURNED AND HEMMED TO
PATCH
UNDERSET PATCH, RIGHT SIDE, EDGE TURNED AND HEMMED TO
PATCH
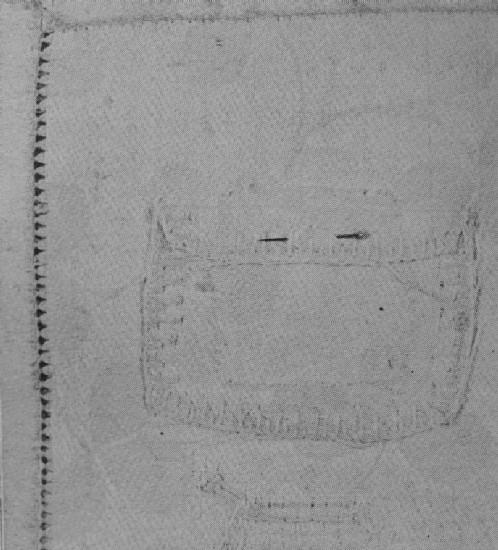 WRONG SIDE OF PATCH IN TABLE CLOTH—RAW EDGE OVERCAST
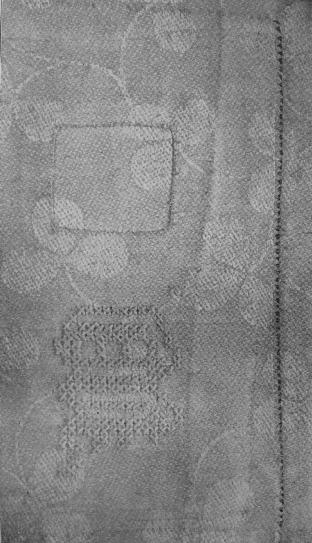 LINEN PATCH; CROSS STITCH INITIAL
[154]The onset patch is used on lined garments and linings. The patch should be rectangular and larger than the worn place. Fold the four edges on the wrong side of the patch, place the patch with its wrong side on the right side of the garment directly over the center of the hole. This will bring the folded edges of the patch between the two pieces of cloth and both right sides towards the worker. Do not baste, but pin carefully. After the garment has been folded back until there are two folded edges side by side, overhand the seam with even slanting stitches. See that the corners are well sewed, that warp and woof threads run in the same direction, that pattern and stripes match.
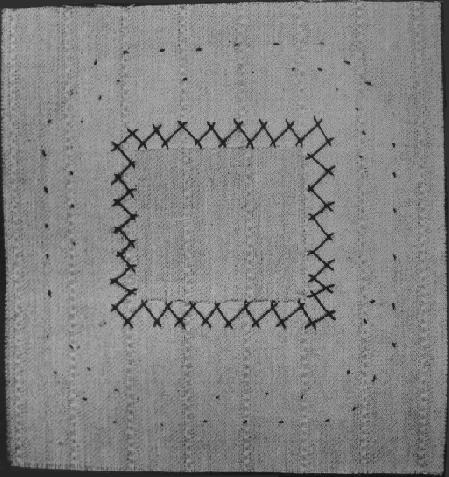 RIGHT SIDE OF FLANNEL PATCH
[155]The worn part of the garment under the patch is cut away, leaving one-fourth of an inch on the three sides. Cut the corners diagonally and turn back the edge quarter of an inch, overcast and press. If this patch is sewed on a lining, the worn part is not cut away. If this patch is used to repair skirts near the band, only three sides are oversewed, the upper edge should be gathered into the band. A large patch is less conspicuous than a small one.
An onset patch may be used for the seats of trousers by shaping the patch like the pieces on the seats of bicycle trousers and stitching on the machine. Heavy cloth will need no inturned edges. The same precautions are necessary regarding warp and woof, pattern, etc.
Darning is usually done with a running stitch, with or without a piece of net or cloth underset. Thread for darning should be as near as possible the size of the threads in the garment. Whenever it can be done, a warp thread of the garment should be used. No sewing silk is fine enough to use without separating the thread and using one of the strands. Never use the thread as it is, as it is too hard twisted. Cotton and linen thread of the finest quality, untwisted, should be used for darning stockings and underwear. Linen may[156] be darned with linen or mercerized cotton. Cotton is preferable.
A long slender needle with a large eye should be used. Darning should never be commenced with a knot, nor finished with a back stitch.
A bias or diagonal cut and a three-cornered tear are the most difficult to repair. If the place is badly pulled and frayed, a piece of the same material should be basted on the wrong side of the material and darned in even stitches. Always darning parallel with the warp threads and the woof threads. In the diagonal tear, as the threads are cut diagonally, to prevent drawing apart, the darning threads must cross each other.
The stitches around any darn should not end in a stiff even line; this makes a hard edge which does not wear and is unsightly, and uncomfortable if on underwear.
The three-cornered tear may be darned in two ways. Begin by darning diagonally through the center, darning back and forth towards the end of the tear until one-half has been finished; then begin at the center and work in the opposite direction. At the corner, the stitches should form the shape of a fan. The other method, which is the stronger, is done by darning a square in the angle, first with the warp threads, then with the woof threads and finishing each end across the tear.
Stocking darning may be done on the right side. Begin by picking up the stitches and drawing the[157] edges together. This should always be done in any kind of stocking darning, but not so close as to make a wrinkle.
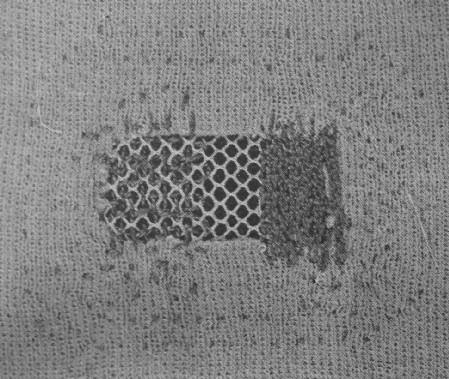 STOCKINET DARNING OVER NET
In knees and heels of stockings, or knitted underwear, a piece of net large enough to extend beyond the thin part should be basted carefully; then darn down the outer edges of the net and finally the hole or thin place. This makes a strong, neat piece of mending. If the hole is large, the net may be covered with the[158] chain stitch, thus imitating the knitting stitch. This should be done on the right side of the garment.
If the hole is to be filled in with the interlaced stitches, draw the edges together, darn beyond the thin places lengthwise of the knitted garment, making each line of stitches longer until the center of the hole is reached, then decrease in the same manner, making a diamond in shape. Darn across the hole in the same way, taking up every alternate stitch as in weaving. Leave a tiny loop at the end of each row of darning, so that the threads will not draw.
Darning, satisfactory for some purposes, may be done quickly on a double thread sewing machine. It is best done in an embroidery ring, first drawing the edges together. Loosen the tension on the presser foot, use fine thread with light tension. Sew back and forth, first along the warp threads and then at right angles along the woof threads. The machine will be sewing backwards part of the time, but if the pressure is light, there will be no difficulty. For large holes, paper may be placed underneath.
The mitering of lace or embroidery is often necessary in making collars and in finishing corners. Before applying, plan carefully and select a scallop or portion of the embroidery which will produce the best effects when finished. This can be accomplished by folding the embroidery over at various portions of the pattern until a suitable point is found. Fold over at right angles and mark along the line to be mitered. The triangle may now be cut, but an extra width must always be allowed for the seam, as there is frequently a slight unevenness and one side may have to be held a little full or stretched to make a perfect match. The mitered seam is over-sewed.
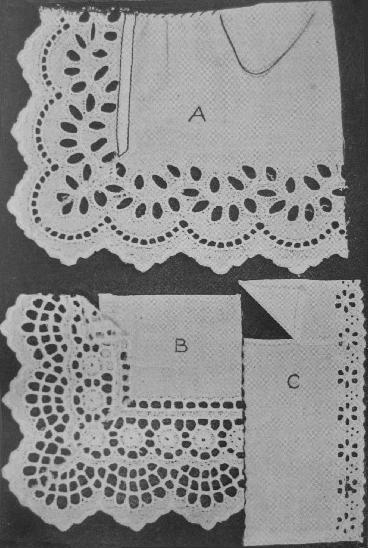 MITERING AND JOINING EMBROIDERY
[160]After the corner is properly made, cut away the cloth of the embroidery, allowing only enough for an inturned seam on the edge. This seam may be stitched on the machine on both edges, or oversewed to the goods, or the embroidery may be securely sewed on the plain part, after which the underlying cloth may be cut away. This will make an almost perfect corner.
Lace may be matched and mitered in a similar way.
In joining lace, avoid a seam if possible. Select portions of the design that will match, placing one pattern of the same design over the other. Cut away a portion of the thick part of the pattern underneath and hem the edges and inner part of the design down with fine thread.
Smyrna or Torchon lace is more difficult to hem or join when very open or very fine. A small, felled seam is better than lapping and trying to match the pattern.
Embroidery can be matched in the same way. Never let two heavy designs lap over each other. The one[161] on the wrong side should be cut out and the edge sewed securely to the upper part of the design.
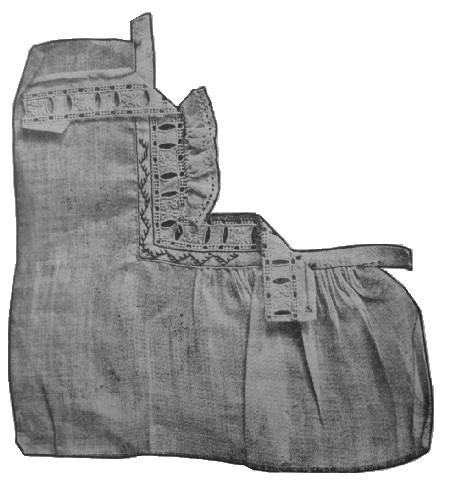 INSERTION WITH MITRED CORNER, TAPED AND FACED; EMBROIDERY
ROLLED WHIPPED AND GATHERED
INSERTION WITH MITRED CORNER, TAPED AND FACED; EMBROIDERY
ROLLED WHIPPED AND GATHERED
The plain material above the embroidery can be joined by a lapped seam, turning first the right side and then the wrong side and hemming on both sides of the seam.[162]
The sewing machine has taken away much of the drudgery of home sewing, but its use does not lessen the need of skill in hand work. No machine can finish ends of belts, collars, sew on trimmings, fastenings, and like work and the finish has much to do with the general appearance of a garment.
All the prominent makes of sewing machines were invented in the decade following Howe's patent in 1846. The two chief types of machines are the lock stitch, using double thread, and the chain or loop stitch, using a single thread. Whatever the make of machine it should be run in accordance with the rules accompanying it. The worker should familiarize herself with the directions for setting and threading the needle, winding the bobbin, regulating the tension and the stitch and all other technicalities of the particular machine she has to operate. Agencies of the various machines usually have skilled workers to give instruction to beginners. While it is not always an economy of time to use the attachments for hemming, tucking, etc., unless much work is to be done, it is worth while to know how to use them if desired. As much or more skill is required for neat machine work as for hand sewing. Results will not be satisfactory without careful basting.
The machine should be kept well oiled, free from dust and gum and it should he run evenly. In case it becomes "gummed" a drop of kerosene on the parts[163] that have been oiled will cut the gum. Remove the shuttle and run the machine rapidly for a moment, then wipe off all the kerosene and oil the machine carefully with good machine oil—only the best should be used. A machine should always be wiped thoroughly before any work is placed upon it.
As in hand sewing, needles and thread should be selected with care. A blunt or bent needle should never be used, it should have a fine sharp point and the eye should be sufficiently large to carry the thread easily. The needle and thread should be suitable for the material to be sewed. Glazed thread should never be used in a machine. The best quality of thread and silk should be purchased but only enough for immediate use, as it loses strength with age, chiefly because of the action of the dyes and chemicals. Even white thread may become "tender" from the chemicals used in bleaching it. Sewing silk and cotton should be kept in a closed box to exclude the light and air.
For sewing cotton or linen the best cotton thread should be used. Woolen, silk, and velvet should be stitched with the best machine silk. The thread should match the material in color. Cotton thread fades or loses its brightness when exposed to the light, therefore for stitching that will show it is always better to use silk. The thread on the bobbin should be wound evenly and carefully to insure an even stitch and the tension of both threads should be equal, otherwise the stitch will not be perfect. As a lock stitch machine[164] requires two threads while in hand sewing only one is used, the two need not be as coarse as the single thread. For ordinary home sewing, underwear, thin gowns and the like, No. 70 to No. 100 will be found satisfactory. Finer thread may be used when the materials demand it, but no coarser than No. 50 should be used in the machine and this only with the coarsest material.
Much time may be saved in fastening the threads at the ends of tucks, hems on sheets, towels, etc., by careful manipulation of the machine. For example, on sheets begin to stitch along the hem at the selvage, or if the end of the hem is over-sewed, begin an inch from the edge and stitch the hem towards the selvage, then lift the presser-foot so as to turn the work, and retrace the bit of stitching, continuing across the whole hem. When the end is reached, release the presser-foot, turn the work, and stitch back for an inch or more in the same line, as was done at the beginning of the hem. By this method the threads are fastened much more easily and quickly than by drawing them through on to the wrong side and tying or sewing them by hand and, of course, it is more satisfactory than the "shop" way of cutting them off short. Tucks or seams may be fastened in the same way. If fine thread is used the double stitching at the ends is hardly noticeable.
When stitching a seam having one bias and one straight side, let the bias side come next to the feed,[165] that is, on the underside. This is especially important in thin materials. If the material is very sheer, strips of soft paper—newspaper will answer for ordinary purposes—should be sewed in the seam. This will insure a seam free from puckers and when finished the paper can be pulled away easily.
In sewing gathers on a band they should also come next the "feed," as it takes up the side next to it a little faster than the upper side. When the bias, or cross-way side of the seam, or gathers are next to the "feed" the material runs along smoothly, but if the straight side is towards it there is apt to be a pucker.
Stitching can be done more easily on the right of the presser foot with the bulk of the material lying to the left. The tendency of the "feed" or teeth is to crowd the work off the edge as well as forward and the stitching may be guided better on the right side.
All straight seams should be stretched to the full extent of their straight edge in stitching, as the work passes under the presser foot.
When a large amount of machine sewing is to be done—such as household linen, sheets, pillow cases and underwear—it is a good plan to do all the basting and hand work first and keep the machine stitching for a rainy or a damp day, as the thread is then less apt to break. A current of air or a breeze from an open window on a dry day will often cause the thread to snap. For the same reason the machine should never stand near the fire or radiator.
Read Carefully. This test consists of two parts,—answers to the questions and the making of models. Both should be sent to the School for inspection and correction. All models should be made about 4 by 6 inches so that they may be put into the envelope provided without being folded. Two series of models are given; either or both may be made.
1. What instruction have you ever had in sewing?
(b) Has the subject any educational value?
2. What are the common basting stitches, and for what are they used?
3. Can you make the running stitch properly? How is it done?
4. For what purpose may the cat stitch be used?
5. Hems and Seams: Describe the different kinds for thick and thin materials, including those for flannel and state when they should be used.
6. Describe three kinds of plackets.
7. How are gathers made, and how sewed into a band?
8. What can you say of fastenings?
9. With what sewing machine are you most familiar, and what are its peculiarities?
10. What stitches or methods described in this lesson are new to you?
Note: After completing the answers, sign your full name.
I. Stitches. On a piece of cotton about 4 by 6 inches, make with colored thread (1) a line of even basting stitches, (2) uneven basting stitches, (3) tacking, (4) running, (5) back stitch, (6) running and back, (7) half back.
With embroidery silk make a row each of (1) cat stitch, (2) single feather, (3) double feather, (4) chain, (5) rows of French knots with border of outline stitch.
Make your initial in one corner, using any stitch preferred.
Overcast one long edge of the model, double overcast the opposite side, finish one end with plain loop or blanket stitch, and the other end with some fancy loop stitch. Fasten all threads as described in the text.
II. Seams and Hems. (a) Join two pieces of fine cotton with a French seam at the long edge, about 2 by 5-1/2 inches, with warp running lengthwise. (b) Cut a piece of muslin on a true bias and attach the bias edge to a with a felled seam. (c) Trim the model and hem all sides so that the finished model may measure 4 by 6 inches.
III. Darning and Patching. (a) In gingham or figures cotton, make an underset patch of a square hole, matching the goods. (b) Darn a three-cornered tear.
IV. Fastenings. The proper distance from the edge of folded goods make (a) button hole, one end rounded and the other finished with a bar tack. (b) Under it make a partly finished, barred buttonhole. (c) Below this make an eyelet hole, (d) below the eyelet hole a loop, and sew on an eye.
On a second piece of folded goods opposite the first buttonhole, (a) sew a four-hole button, corresponding in size to the buttonhole. (b) Opposite the second buttonhole sew on a two-hole button; (c) below, sew on two hooks corresponding in position to the loop and eye. Make the two parts of the model so that the corresponding fastenings will join.
V. Apron. Using fine muslin, make a doll's apron, gathering into band at top. Above hem at the bottom, make two clusters of tucks of three each.
I. Rolled Hem; Hem Stitching. Make a doll's apron of fine muslin, attach top to band with rolled, whipped gathers. Make two clusters of tucks of three each at the bottom and hem stitch the bottom hem.
II. Sleeve Placket. Make a taped sleeve placket as shown in the illustration.
III. Make a Slot Seam, using dress goods and finish with an arrow head. (b) Make a large cloak buttonhole.
IV. Mitre Embroidery and finish as shown in the illustration. (b) Match and join the same.
V. Embroidery: Make something small and useful—a doily, stock, collar—illustrating some style of embroidery, or make a model of the first series which will afford you the most new experience.
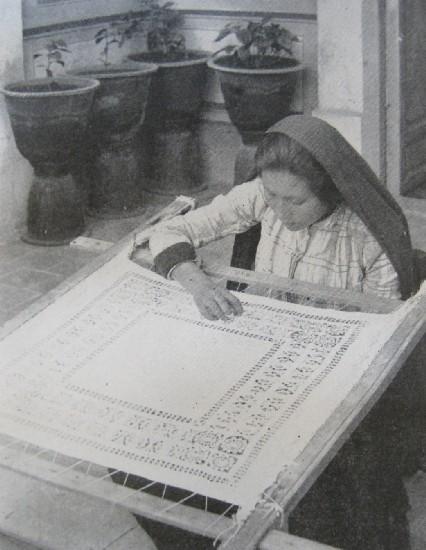 MAKING MEXICAN DRAWN-WORK
The greatest obstacle to home sewing of any kind is the failure to provide suitable materials with which to do the work. To do good work—to make attractive gowns—the simple tools which the work requires must be provided. First, there should be needles and pins of the best quality and make. They should be fine and well pointed. The needle should be suitable to the material to be sewn and sufficiently large to carry the thread easily. A blunt or bent needle should never be used. Long or milliner's needles are preferred by many for basting.
A good supply of thread should be kept on hand—not too great a quantity, but the stock should be added to as it is used. There should be both silk and colored cotton, also twist for button holes, loops and arrow heads and knitting silk to sew on and finish feather bone.
Two pairs of scissors are required—one with long, sharp blades, and a pair of medium sizes for snipping machine stitches.
Among the other necessary articles are a tape measure, cake of wax, pencils or tailor's chalk, tracing wheel, emery, lap board.[168]
Canvas, scrim, or any like material should be kept in the sewing room, as these are invaluable for facings, linings of collars, cuffs, etc. Hooks, eyes, buttons, tape, linings, featherbone and shields are requisites not to be forgotten.
Tape is constantly needed. Linen tape is thinner and makes a neater finish for some purposes than cotton tape. The bias tape or binding now kept by the larger stores is very useful for binding curved edges and for other purposes.
If a regular cutting table is not available, the dining room table should be used. Skirts, bodices, ruffles, and bias bands should be cut on firm, even, and large surfaces. If cut upon the floor or bed and pressed on a coarse crash towel, the garment will have the undesirable home-made look.
A good pressing board should be provided and if possible a sleeve board. In the process of garment making of any kind too much stress cannot be laid upon constant and careful pressing.
The ironing board should have for its outside cover a finely woven, perfectly smooth cloth, tightly stretched, free from wrinkles, and securely tacked.
Where there is gas, a small, portable stove should be kept near the sewing table with a medium-sized flat iron. Lacking gas, one of the single burner oil stoves may be used. An electric flat iron is especially convenient.
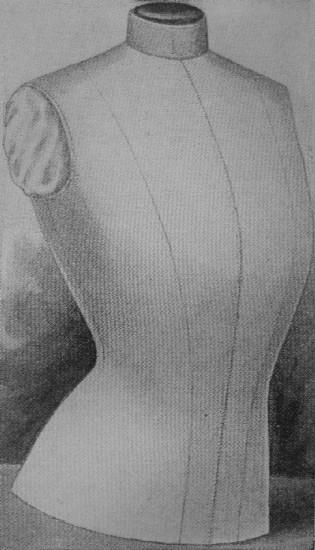 PADDED BUST FORM
[170]A bust form is a great convenience in fitting and almost a necessity for one who does much home dressing. These may be purchased at department stores. Some kinds are adjustable, but it is always best to make a carefully fitted lining for it and pad out to the correct shape and size. The pattern should be one that extends well over the hips and heavy unbleached muslin may be used. After padding firmly, the front opening should be oversewed. Special care should be taken with shoulders and neck and the neck band should be carefully adjusted on the figure.
A padded sleeve lining is also very useful in making sleeves.
Dressmaking never should be begun until each needed article required for the work has been purchased. The sewing room should be in order; the machine well oiled and wiped before any work is undertaken.
If the finished garment is to be perfect, careful attention must be given to every detail of the cutting and making up. To possess mechanical skill alone is not sufficient. A successful garment depends not only upon the dexterity with which the worker manipulates the actual tools of her craft, but upon all her faculties and her power of applying them. She must have a comprehension of the laws of beauty in dress, construction, ornament, color, selection, economy. The artisan knows the technical part only, and looks upon each dress—each piece of lace and velvet—as so much material to be snipped and cut and sewed, copying from the fashion plate, making gown after gown alike. The artist, on the other hand, makes the gown[171] to suit the individual wearer, considering each dress no matter how simple—and the simpler, the more artistic—as a creation designed to suit the woman for whom it was planned.
People who study economy from principle will never adopt anything extreme in weave, or color, or make. These extreme fashions are never lasting; they are too conspicuous and are vulgarized by bad copies, while a thing which is known to be good and beautiful once will remain so for all time. Those who are beginners in the art of dressmaking should select plain designs until skill is acquired. The making up and finishing of new fabrics and new or untried methods are problems that often dismay even the most experienced dressmaker.
The makers of good and reliable patterns are many. Always buy patterns of firms that make proportion of figure as well as fashion a study. These patterns state length of skirt, waist and hip measure and quantity of material required in all widths. Buy a skirt pattern with correct hip size, as it is much more difficult to change this than to alter the dimensions of a waist. Adjust the pattern to the figure for which the garment is to be cut and see that it is right in all of its proportions. Always follow the notches indicated in the seams of the pattern, and thus avoid putting wrong pieces together. Be sure that the pattern is[172] placed correctly upon the material with the straight grain or warp threads of the goods running directly on a line with the straight perforations indicated in the pattern. Lay the entire pattern upon the cloth. This gives an idea just where every piece is to come out.
All patterns give one-half of the bodice and the skirt, from center of back to center of front. The plain waist pattern consists of back, curved side piece, under arm piece (sometimes these two pieces are in one) front, upper and under sleeve, collar or neck band. Some patterns allow for seams—others do not. Skirt patterns give only one-half of the front gore. The seam edges of front gore are marked by one notch near the waist line. The front or straight edge of the first side gore has one notch, and two on the back edge of side gore. All the gores may be distinguished from the edges of the back gores by the lesser number of notches. This is true of all skirt patterns. If the patterns are studied carefully, all skirt cutting becomes very easy.
The object of goring a garment is to take out unnecessary fullness at the top; reducing the weight, making the garment less clumsy, and giving a nicety of finish which could not be done in heavy material if all the goods were left to fit into a band. Skirts may be lined or unlined, gored or full.
The style may vary with the fashion, but a well-fitting skirt should hang even around the bottom edge,[173] should fit easily around the hips without being strained or defining the figure too closely, or "ride up" when sitting, should flare slightly from hips to the bottom of the skirt, should not fall in between the feet, the back should fall well behind the figure. For heavy goods, as little material as possible consistent with the prevailing style should be used.
To lengthen or shorten a skirt pattern, measure the figure and regulate the length of the patterns by making a fold in each gore two-thirds of the way from the top of the pattern if too long. This is for the simplest skirt pattern. The shape of the skirt may require two folds, one two-thirds from the top and a small fold near the bottom to preserve the outline.
If too short pin the pattern on the material, cut[174] around the top of gore and on each side two-thirds of the distance from the top of gore. Unpin and draw the pattern down to the bottom and cut the required length. Except for wash material, do not turn a gored skirt up at the bottom to form a wide hem, as the fullness made by turning is hard to dispose of neatly and the right curve at the bottom of the skirt may be lost.
Another way to lengthen the pattern is to cut it in two, two-thirds the distance from the top. See that all pleats or tucks are exactly the same width and at the exact distance from the top or bottom of the gore, also that all seams are of the right length. A shorter skirt must be proportionately narrower.
It is well to test the skirt and waist patterns by using inexpensive materials, such as calico, gingham, or cheap lining. Cut, baste, fit, and make this as carefully as if it were the best cloth or silk. If the skirt and waist are satisfactory, the pattern will do duty for several seasons. The plain waist pattern is the foundation for any waist and many changes can be made easily with a well-fitting skirt and plain waist pattern as a basis.
As paper patterns soon wear out, after a waist and skirt have been perfectly fitted, it is a good plan to cut an exact pattern of cambric, both skirt and waist, tracing seams and notching the parts. This will enable the home dressmaker to cut and make all ordinary dresses with little trouble and with but one trying on. It is always well to try on once, as materials differ in texture and a slight change may be necessary.
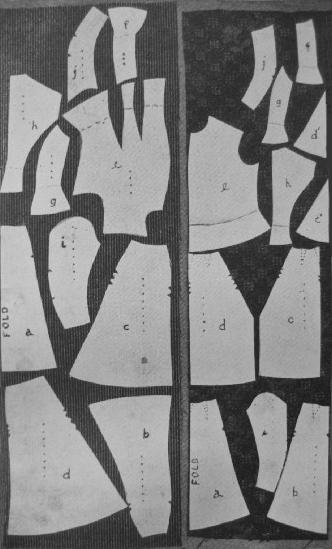 PLACING PATTERNS
[176]If the material is plain, has no nap, or if the design is perfectly symmetrical, the gores may be alternated, the top of one gore coming opposite the bottom of the next. The half pattern of the front gore is always laid on a lengthwise fold of the goods. If the goods is wide, the other gores may be cut double with the cloth folded lengthwise. With narrow goods, the cloth may be folded end to end after the middle gore has been cut out, and the other gores cut double. Care should be taken that the line of holes in the middle of the gores runs exactly in a line with the warp of the material, i. e., parallel to the selvage.
If the goods has a figure, the design should run upwards. Any nap should run downward, except with velvet or velveteen, in which it should run upwards. With such goods, the gores if cut double must be placed on a lengthwise fold, with the lengths running the same way. If the goods is narrow, the gores may have to be cut single, reversing the pattern (turning it over) so that both pieces may not be for the same side.
Pin the middle of the pattern to the goods and smooth towards each end, pinning securely at top and bottom. Avoid too many pins and pin carefully, otherwise the pattern will be displaced.
After the pattern is securely pinned, cut out the gores, using long, sharp shears. Care should be taken not to lift the material from the table, not to have jagged, uneven edges, as both time and material will[177] be wasted in straightening them. Open the shears as wide as possible, taking a long sweep of the material, and do not allow the points of the shears to come together. Mark all notches with basting thread, tailor's chalk, or notch the goods if it does not ravel.
The back gores should be cut in the same way. They are usually wider than the front gores and may require piecing, which should be done along the warp threads.
Now remove the pattern, pin carefully all pieces together and fold as little as possible. The trinity—pin, baste, press—should be written in large letters in every sewing room, for much of the beauty of the gown depends upon these three.
To join the skirt, pin the side gores to the front gores, beginning at the top, with pins running across the seams, then begin at the top of the skirt and baste downward, allowing all unevenness to come out at the bottom. Baste straight and evenly, taking one stitch at a time. Several stitches should never be taken at once on thick or piled goods, as the side next to the sewer is apt to be fuller in that case. When all seams are basted, try on the skirt and make all changes necessary before stitching. Both the outside skirt and any under or "drop" skirt should be fitted as carefully as a waist.
If the skirt is to be lined the lining should be made and fitted first, then ripped and the outside carefully basted on the lining, being well stretched over the lining, care being taken to have the warp of the outside[178] and the lining run the same way. This will prevent the lining from drawing the goods.
A stitch of medium length should be used on all seams whether white goods or cloth. If the stitch is too long, the seam will "gap" and will show the thread; if too short, the seam is apt to draw. The line of stitching must be absolutely parallel inside or outside of the basting or the curve will be ruined. Use silk or the best cotton for stitching skirts and be sure that the needle is not too coarse.
After stitching, all bastings along the seams should be taken out by cutting the thread in several places. Never pull a basting the length of the skirt. The seams should be opened and pressed according to directions. The seams may be finished with a taffeta binding, overcast, stitched flat or notched, as the case demands.
If stiffening is used at the bottom of a lined skirt it should be fitted to each lining gore separately and securely stitched. A light weight canvas should be stitched to a heavy cloth skirt at the bottom, if several rows of stitching or braid are to finish the bottom of the skirt.
The placket may be finished before the two back gores are pinned to the front, if preferred. If done before joining the gores the placket can be pressed better and the front is not so liable to be crushed. On the left side of the skirt sew an underlap of sufficient length to extend well below the end of the opening. Face the right side of the opening with a piece of the goods,[179] or tape not too wide, hem or cat-stitch to the skirt, and finish with hooks and eyes, loops, or any fastening that will secure the placket.
The skirt is now ready for the band, which should be narrow. Always cut parallel with the selvage and the length of the underlap longer than the waist measure, allowing for turning at the ends. The band should never be thick and clumsy and not too tight. Try on the skirt and fit the band carefully, marking the seam with pins, a line of basting, or chalk. Hold the skirt easy on the band and baste with small stitches, then stitch on the machine. If the skirt is too tight around the hips the plaits will fall apart at the back. If the skirt is stretched on the band the seams will not fall in a straight line. After the band is securely stitched and finished with hooks and eyes adjust the length by turning under at the bottom and pinning, after which baste all around and try on again to make sure that the length is correct.
A gored outside garment should be finished with a true bias or a fitted facing, carefully stitched on. It is possible to finish the bottom of a simple house dress or thin skirt with a hem if the fullness made by turning is disposed of in gathers or fine pleats. A bias facing, however, is always preferable. If of heavy or lined goods the finish should be velveteen or braid the same color as the skirt. These bindings come in different widths and grades. Braids should always be shrunken by wetting and drying thoroughly; one wetting is[180] not enough. Velveteen should be applied loosely, so as not to shrink or draw after it becomes damp on the skirt.
The right side of the velveteen should be carefully basted with small, even stitches to the edge of the facing. It may be hemmed to the facing or machine stitched just inside the basting, which need not be removed. It is then turned, allowing a very narrow portion to show below the edge, and basted with close stitches, pressed, hemmed down to the facing by hand, or cat stitched without turning the edge. Be careful not to let the stitches show on the right side, nor let the binding twist or pucker. The joining of the velveteen should be near the seam in the back.
Another method is to cut off the bottom edge of the skirt a quarter of an inch from the turning line; apply the wrong side of the velveteen to the right side of the skirt, baste carefully close to the edge and stitch on the machine through velveteen, cloth, and lining (or facing) just inside the basting which is left in. The bottom of the raw edge is turned up, basted close to the edge allowing the velveteen to show a very little. The upper edge of the velveteen is secured as before by turning and hemming or catstitched without turning. The illustration shows this method of applying the velveteen which is first stitched to the lining and turned with the edge. This makes a firm, rather stiff finish.
Braid is stitched on to the bottom of a skirt with[181] a narrow edge showing, or it may be applied like the velveteen, with a doubled edge at the bottom. The doubled edge will wear better.
Skirts that are to be washed and therefore which are very likely to shrink must be finished at the bottom with a wide hem—at least six inches—the fullness made by turning being disposed of carefully in pleats or gathers.
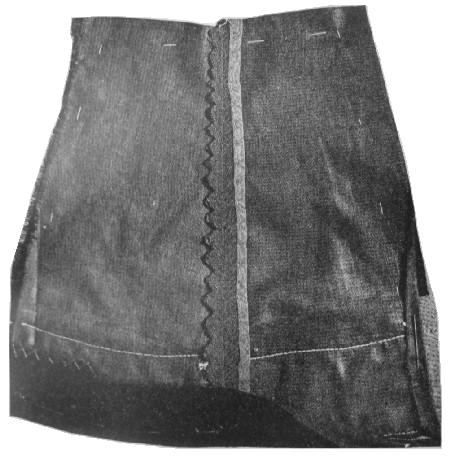 APPLYING VELVETEEN BINDING
[182]If desired, the bias seam down the back of the skirt may have a narrow woven tape or selvage of thin goods stitched in with the seam. This strengthens the seam and prevents dragging. The skirt when finished should always be longer in front than in the back.
All cloth dresses demand every detail of finish to make them complete and able to stand hard usage, but simple house dresses and thin summer dresses do not require such careful finish.
In planning a waist the same rules should be observed in placing patterns, etc., as described for skirts, except that the lines and seams should be traced with a tracing wheel or marked carefully. In making a waist of any kind care must be taken to cut all the pieces the proper way of the material.
The difficulty of putting garments together after they have been cut properly is due to undue haste, lack of care in details and insufficient pressing. The apparently simple act of basting is really of primal importance, particularly in the making of a waist. One need never be afraid of basting too much or too carefully. Economize cloth and time in cutting, but use basting lavishly.
The waist pattern may be made shorter by laying folds across both back and front. The fold across the back should be two inches above the waist line and across the front two inches below the arm's eye (in the back). Securely pin or baste the folds in the pattern.[183] If the pattern is of nearly the correct size it may be only necessary to make the waist shorter and smaller. The neck and arm's eye will seldom need altering. The sleeves may be shortened in the same way by laying folds in the pattern, above and below the elbow.
After the waist is cut, remove and care for the patterns.
Make the sleeves, cuffs and collar band first.
Make box plait on right or left side as liked by the wearer and hem on the other side or face.
Baste shoulders and under-arm seams.
Try on the waist, making all changes necessary by enlarging or taking up seams.
Pin for neck band and mark for seams.
Fit sleeves and mark places for seams.
Arrange fullness and place tape at back of waist line.
If the pattern is for a plain, one-seam sleeve with the cuff opening at the end of the seam, hem each side of the opening one or two inches from the bottom, gather the bottom between the notches, lay the gathers, baste the right side of the sleeve band or cuff to the wrong side of the sleeve, stitch and press, fold in a hem on all edges of the cuff, fold the cuff over on the wrong side of the sleeve, baste, oversew the ends of the cuff, press and stitch the cuff close to all edges. After thus attaching the cuff, baste and stitch the long seam of the sleeve and gather at the top between notches. The cuff is usually cut in the direction of the warp of the goods.[184]
The sleeve described is the simplest that can be made. If the sleeve is to open at the back and finished with a tape, with a placket, strap or fancy lap, the seam in the sleeve is stitched first and the cuff afterward adjusted.
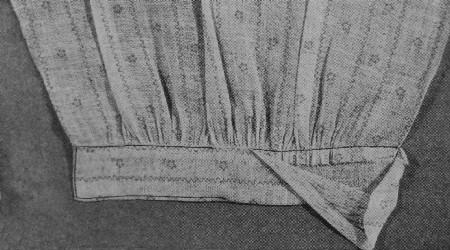 PLAIN SLEEVE WITH CUFF, SHOWING GENERAL METHODS OF SEWING
ON BANDS
PLAIN SLEEVE WITH CUFF, SHOWING GENERAL METHODS OF SEWING
ON BANDS
The box plait is made if desired and the under arm and shoulder seams basted when the shirt waist is ready to try on. Make any change in the seams necessary. The neck band is put on in the same way as the cuffs, sleeves sewed in, fullness arranged at the back and a tape placed at the waist line. Three hooks or other fastenings should always be placed at the back to attach to corresponding fastenings in the skirt band. The bottom edge of the waist may be finished by overcasting.[185]
If it is desired to have the fullness cut away at the waist line in front, determine the length, allowing sufficient for a blouse, gather the waist at the bottom and sew the fullness on to a band. Sometimes this band is carried entirely around the waist.
The fit of the collar or neck band is very important in any kind of a waist. Both the front and the back may be cut higher than the pattern, as it is easy to cut off in adjusting and more goods cannot be added.
To the unskilled the simplest garment is sufficiently difficult. It is wiser to make two or three perfectly plain garments before attempting to make an elaborate one.
After the pattern has been tested, fitted and all necessary changes made, cut a pattern from the fitted waist of cambric or cheap new muslin and mark or trace all seams. (Never use old, worn-out sheets from which to cut a pattern.) After this permanent pattern has been made, do not change a single line.
If a plaited or tucked waist is to be made, all plaiting and tucking should be done first, after which the same order of making is to be followed for a plain waist. No waist should draw or strain across the bust. This is especially important in tucked or pleated waists. To guard against this tendency, a graduated tuck can be pinned on either side of the front, beginning with nothing at the shoulders and widening at the waist line. This is done before the pattern is cut and will allow for especially full bust. The fold should be on a thread of the goods.[186]
The plain, closely fitted, lined waist, with the curved back and side forms is the most difficult to make and requires the greatest nicety in handling from beginning to finish.
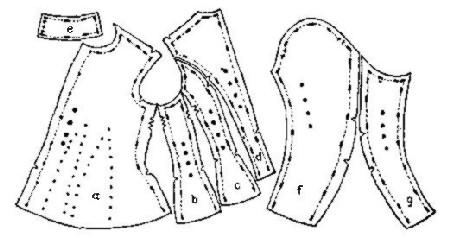 TYPICAL BODICE PATTERNS
The pattern for a bodice of this kind should be of such a shape that in each part the woof threads will go as straight around the waist as possible. This makes the warp threads perpendicular and will give almost a perfect bias on the current seams in the back. Do not cut the side forms out of any piece that is big enough, without regard to the warp and woof threads. If this is done, the threads in each will run differently and all ways but the right one. In a well-designed pattern the back forms should be nearly as wide at the[187] arm's eye as they are at the waist line. The swell of bust and shoulders should be accommodated by the back and front forms.
When material is to be cut on the bias be careful to have a true bias (the diagonal of a square) around the waist and up the front and back seams.
Pin pattern to lining, cut out trace seams.
Baste all seams on traced lines.
Try on lining. Make changes.
Rip lining, baste on outside and cut by fitted lining.
Baste seams and try on. Make changes if necessary.
Mark the turn for hem down the front, face and mark for fastenings.
Stitch and finish seams. Put on featherbone.
Put on collar; sew in sleeves.
Finish.
In making a lined waist, the lining is cut, basted, and fitted before the outside is cut. After fitting, the lining is ripped apart and the outside cut by it. For all firm, heavy materials the lining should be slightly fuller than the outside, that is, the dress goods should be well stretched over the lining, just as in a lined skirt, and basted closely and evenly, the warp and the woof threads of the outside and lining corresponding.
In laying the pattern for cutting the lining, just as much attention should be paid to the direction of the threads as in cutting a striped or figured goods.[188]
All seams should be traced on the lining with the tracing wheel, with a slow backward and forward movement, making the perforations clear and distinct. Soft spongy goods that cannot be traced may be marked with a line of basting, tailor's chalk or by taking stitches with a pin along the line to be marked and twisting them in the goods. This will make holes that can be seen, but the twisting does not harm the goods. Always trace or mark the waist line, as this is the starting point from which to pin or baste. Bodice seams should never be begun at the top or bottom, but at the marks or notches that show the waist line, working towards the top and bottom.
After the lining is cut out, the seams should be basted exactly along the traced lines, with seams out, when it is ready to be tried on.
If the pattern has been cut or drafted by the correct bust measure, the back seams should never be changed. If possible, make all changes required by letting out or taking in on the straight under-arm seams, leaving the curved ones and the darts untouched.
Pins should be used plentifully while the fitting is being done, but they should be replaced with regular basting as soon as they are removed. Do not be afraid of taking up fullness in the lining by darts crosswise at the top of the corset or where the fullness naturally falls in front or back. Such darts should be basted, stitched and pressed flat. If the lining is too short, it may be lengthened by letting out the shoulder seams.[189]
After the lining is fitted, it is ripped apart, the outside cut, basted to it and the seams are basted, beginning at the waist line. Never use a long thread in basting and always use short, even stitches, especially where any curved seams are to be stitched on the machine. This rule must be followed invariably if puckering is to be avoided.
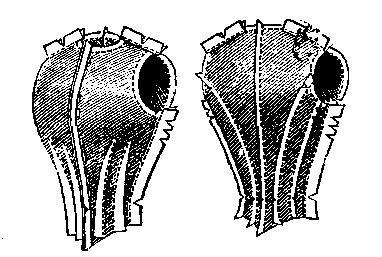 WAIST LINING BASTED, SEAMS OUT
The pattern at the shoulder seams should be shorter in front than at the back. In joining this seam, pin the two portions so that the ends of the seam meet exactly at the neck and arm's eye. In basting, stretch the front piece to fit the back, holding it in or puckering it if need be. Pressing will banish the pucker and give an easy seam that will hug the curve of the shoulder, as in a man's coat.[190]
When the waist is on the figure, pull it well down to the waist line, pin the front linings together beginning with the neck, then lift the waist a little in front to give fullness and pin to the waist line. Mark for the hem down the front, finish the edge with a well-fitted facing under which is a thin bias strip of canvas interlining for buttons or hooks and eyes. Marks showing the position of fastenings should be made at this time.
The neck and arm's eye should be fitted by making slashes in the curve—never cut around the curve. For the collar or neck band have a true bias of thin canvas or crinoline and draw it around the neck and pin with the ends out, towards the worker. (Never lap any edges of waist, belt or collar when fitting.) Mark on the waist where the lower edge of the neck band touches. Draw the sleeve on the arm, pin and mark where it sets right, seeing that the elbow fullness is in the right place and that it does not twist at the hand.
As in the lining, all changes necessary in fitting should, if possible, be made in the straight seams, as it is difficult to preserve the proper lines of the curved ones. The shoulder seams should be the last one to be basted.
After all faults are remedied, the seams are carefully stitched along the line or basting, the bastings removed, the seams pressed and finished. The last seam to be stitched securely should be the one at the shoulder. By leaving this open, all fullness can be smoothed upwards and any trimming can be let into the seam.
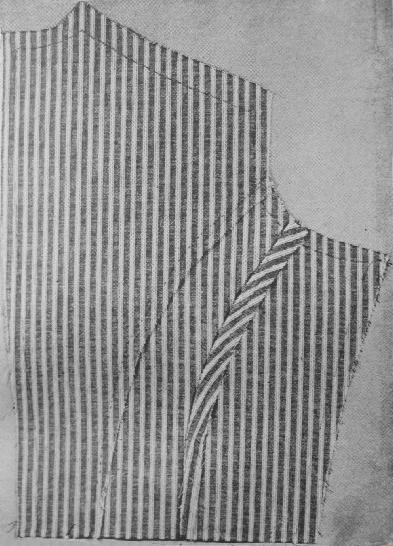 BACK OF WAIST, WELL MATCHED
Sew in featherbone by cat stitching to the seam, first finishing the ends by button-holing. All seams should be stretched well when sewing on bones of any kind.
Curved seams should be notched every one or two inches at the curve and bound or overcast. This allows them to lie flat.
In a draped waist the lining is made separate and not stitched into any seam of the outside except at the shoulder. In fitting the outside the back is pinned on to the lining firmly, then the front and finally at the underarm seams. The seams are then basted, the waist tried on again, alterations made, if necessary, seams stitched and the bottom finished with the lining, as desired.
Three eyes or other fastenings should always be sewed at the seams in the waist line at the back to secure the skirt to the waist, thus preventing it from sinking below the waist line.
The finish of the lower edge of the waist is often a problem. If the waist is to be worn under the skirt, just how to finish or whether to finish it at all is a question. The first step is to trim the edges evenly. A line of stitching and simple overcast will show less through a close-fitting skirt of light weight material. When binding is used, it should lie perfectly flat, twice stitched and pressed well.
If the waist is to be worn outside the skirt, a narrow bias strip of canvas should be basted on the wrong side, the waist turned up over this as directed for[193] sleeve and collar finish. Over this a bias facing of silk may be hemmed or cat-stitched.
In spite of careful measuring and all care in cutting, the waist may not fit, owing to some deformity or peculiarity of the figure. Such figures require especially careful fitting and the hollow place should be filled out with wadding. This needs to be done with the greatest care and nicety.
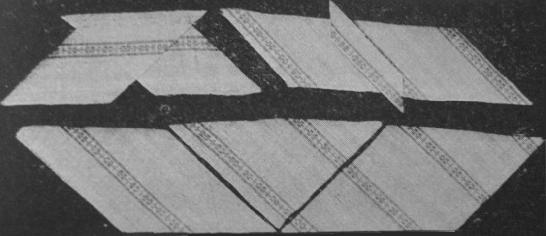 MAKING BIAS STRIPS FOR FACINGS
Avoid too frequent fittings. The bias portions of the bodice are liable to stretch out of shape and too much handling of the waist takes away the freshness. This is one reason why it is advisable to make the sleeves and collar first in order that the whole waist may be fitted at once and all alterations made to fit both sides. A perfect figure is the exception rather than the rule and the side that is not developed should be well fitted, whether sleeve or bodice.[194]
If it is necessary to lengthen the sleeve, say two inches, cut the pattern at right angles to the lines indicated by the dots, above and below the elbow. The slashing should be done exactly at the same distance apart in the upper and under portions of the sleeve in order to retain the proper shape and size of the top and bottom. Separate the parts, allowing one inch above and one inch below the elbow.
To shorten the sleeve, lap the slashed part or lay a fold in the pattern instead of slashing. In either case, care should be taken that the fold or lap is of even width all the way across, so that the original shape of the sleeve will not be lost.
Too much care cannot be taken in arranging the pattern of the sleeve according to the thread of the goods. Especially is this the case in the two-piece or coat sleeve. Generally the top part of the outside seam and the lower part of the same side should be placed at the edge or fold of the goods, so that the two run in the same straight line. In all cases, the foundation sleeve or lining should be cut and fitted before the outer portion is adjusted. Ample time should be given to the fitting and basting of the sleeve. The "set" of the sleeve is very often unsatisfactory because the cutting and original basting was done in a careless manner. Remember that greater care is required in sleeve making than in any part of the garment. Each sleeve is complete in itself and one must not deviate from the[195] other in size, arrangement or ornament, or general appearance. They should be cut, basted and fitted alike and if the arms differ in size or length the sleeves must be so adjusted as to conceal the inequality.
The sleeves should be made at the same time and before the cuffs, then the cuffs, puffs, or whatever special trimming is to be applied to them should be put on both sleeves at the same time. If the second sleeve is not made or trimmed until after the first is finished, it will be much more difficult to secure exactly the same effect. If it is impossible to complete both sleeves at one time, make the sleeves one day and the cuffs or trimming the next day.
In making the coat sleeves the general methods are the same, but each season brings out new styles which the maker will have to understand before proper making and finishing can be acquired. Always master the simple and standard patterns and the minor changes dictated by fashion—new fancies and effects—will not be difficult to acquire after a little experience has been gained.
The lining for both sleeves should be fitted and the outside cut by them.
After economical cutting, trace the seams carefully, and baste the outside to the lining, basting both uppers before the under sections. Join the under and upper parts by pinning and basting, the outside seam first, beginning in the middle of the sleeve and working toward each end. The outside seams should be begun at the[196] notch at the elbow, working toward each end. Where the sleeve calls for gathering the fullness should be distributed between the notches and the two portions of the sleeve should be secured at this point, before or after basting the upper or lower portions of each sleeve.
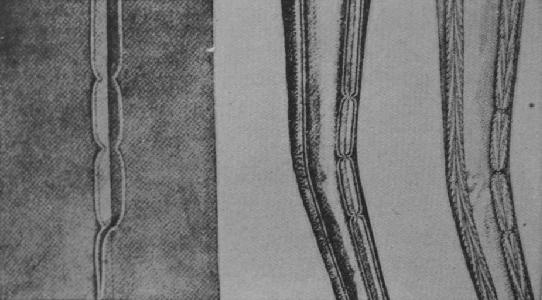 FINISHING OF SEAMS
Stitch the seams just outside the basting, then remove the line of basting along the seam and press. Trim off all rough edges. The inside seam is opened and notched at the bend of the elbow and an inch or two above and below and bound with silk binding ribbon or evenly overcast with twist or mercerized cotton.
If an elaborate cuff or trimming is to be added to the sleeve, whether full or plain, it should be made separately and blind stitched to the faced sleeve. In case[197] the sleeve is gathered the fullness can be put into a narrow band, the exact size of the cuff, the cuff then sewed on the band.
In putting the sleeve in the armhole, be sure that both seams are at the same point, that both have the same amount of fullness at the top, and that the plaits or gathers are equally distributed from front to back. The sleeve should be held next to the worker and should lie easy from seam to seam at the under arm. Baste with close, even stitches or back stitch with coarse cotton or twist the same color as the waist. Stitch in the sleeves on this line of basting, keeping the armholes curved while the stitching is being done. Trim off edges and finish with binding or close overcasting. The most careful binding is clumsy compared to the overcast finish. Turn the seam toward the shoulder and hem to the lining over the shoulders. This will do away with the stand-up look that sleeves sometimes have.
For the sleeve finished plainly around the wrist, a piece of bias crinoline should be fitted at the hand. To do this, turn the sleeve right side out and slip the crinoline in the sleeve over the left hand and adjust by moving the fingers until the crinoline shapes itself to the sleeve perfectly, then pin and baste at the top and bottom. In this way the crinoline will be neither too short nor too loose and all wrinkling will be prevented. Turn the sleeve inside out and cut off the crinoline one-fourth of an inch from the edge, keeping a [198]perfectly true edge, turn the sleeve over the crinoline, baste the outside part of the sleeve and cat-stitch to the crinoline, then cat-stitch the crinoline to the lining. Remove the lower basting and press. A bias strip of silk sufficiently wide to cover the crinoline is hemmed at the lower edge and to the sleeve lining just above the interlining. Whenever it is possible to do so use the cat-stitch. It is a neat finish, easily and quickly done, takes less time than hemming, besides being less bulky.
If the bottom of a coat sleeve is to be left open at the back or slashed, an interfacing of light weight canvas will be necessary. Turn the outside portion of the sleeve over the canvas, care being taken to turn all corners at the slash, and curves, press and stitch, face after the stitching is done. It may be stitched better if the back seam is left open.
In the coat sleeve both seams are curved and should be pressed on a curved board. A rocking chair inverted, with the rocker covered with soft cloth, makes a good board on which to press the curved seams of a sleeve.
The shaped, standing collar is worn with waists of all kinds and is always a popular neck finish. In a close-fitting collar made of heavy material an interlining of canvas or crinoline is necessary. The interlining should be cut one-fourth of an inch smaller all around if the collar is to be blind stitched to the waist.[199] If it is to be sewed to the neck, in a seam, the lining should be the same size as the collar at the neck. Baste this interlining to the collar material, cut out the corners of the material, and hem the extended portion to the interlining. The interlining should always be cut bias, whether the outside is bias or straight. Hem the collar lining to the collar.
To sew the collar to the neck of the garment, first pin, beginning at the back seam and baste towards the end. The lining may be left free at the lower edge and felled over the neck edge after the collar has been stitched to the garment, or the lining may be stitched in the seam, the seam pressed open and a bias facing of silk or light weight material hemmed on over the seam.
The beauty of collars and cuffs depends largely upon the exact turning of corners and finish of ends. These should never be left bulky or clumsy. If preferred, the lining and outside of collar may be seamed and turned. Place the right sides of outside and lining together, the interlining next to the lining, stitch around both ends and top of collar, then turn and press. These rules may be followed in making sailor or any lined collars. Collars made of all over embroidery should be faced with tape on the wrong side before the trimming is applied to cover the edge of ruffle or lace.
The plain or shirt waist pattern will do duty for many garments—corset cover, night dress, dressing jacket, etc. The upper part of the waist will answer for yoke pattern of different shapes.[200]
To make a pattern for a seamless yoke baste together the shoulder seams of the fitted waist pattern, place the upper part of the pattern on cambric or stiff paper, with the front of waist on straight edge or fold of paper, trace the shape of the neck yoke any desired depth below the neck line. The lower edge can be cut in any shape, the neck either high or low, round or square. This perfectly fitted yoke pattern can be used for a foundation for lace, velvet, ribbon, net, or any thin material. The circular yoke made of lace and ribbon or bias strips can be made to open in front or back. The strips of inserting and ribbon should be basted on the paper pattern and joined by fancy stitches or over sewed. The parts next the neck will need to be held fuller than the outside curve of the inserting.
All yokes to be worn under the gown should be made on a well-fitted lining. Never trust to pinning, basting, or hooking the yoke to the waist.
The finish of collar, cuffs, girdle and placket are hallmarks of good dressmaking. Well finished ends and corners, the careful adjustment of fastenings, shields carefully fitted to the arm's eye and caught smoothly to the lining—all these are little things that count for more than money spent in expensive ornament.[201]
The success of the finish of every garment depends upon the pressing, whether the material be heavy or light, cotton or wool. Garments are always pressed on the wrong side, when being made. The iron used should neither be too hot nor too heavy and the work should be done on a perfectly smooth, well-covered board. For pressing black or dark cloth, the cover of the board should be dark and free from lint, while a perfectly clean light cover should be substituted when white or light goods are to be pressed.
The whole face of an iron should never be put down on a seam or any part of a waist, but the side or point should be used, care being taken not to stretch a curved seam. A small rolling pin, a broom stick, a chair rocker, or any rounded stick well covered can be used for pressing curved seams or sleeves. This lessens the danger of marking the seams on the right side. These are only makeshifts; a regular half round sleeve bound should be obtained if much work is to be done.
In pressing, the iron should never be shoved or pushed, as in ironing. Only heavy materials require great strength. It is possible to press too much as well as too little. Whatever the material, pressing is work that requires to be done carefully and slowly. Allow the iron to touch only the center of the seam, the edges of the seam will not then be outlined upon the goods. Piled goods require infinite care. Uncut[202] velvet, crape, etc., should never be pressed with the iron flat on the seam. The seam should be opened carefully and over the rounded surface of the board, covered with very soft cotton flannel into which the pile can sink without being flattened. Run the iron with the pile, or the iron may be placed on the side or flat end and the seams drawn slowly along the edge of the iron the same way the pile runs—only the edge of the iron touching the edge of the seam. Corded seams should be pressed in the same way to avoid flattening the cord.
Very heavy cloths and chinchilla should have a small stream of water carried along the seam, followed by the iron; or the seam may be dampened by a soft cloth—very wet. This is the "wet pressing" used by tailors, which is adapted to the requirements of materials used by them, such as serge, tweeds, etc. Pressing on the right side under a damp cloth is apt to give marks if the cloth gets too dry or if the iron is too hot, but is necessary on finished wool garments.
Silk scorches easily and should be pressed very carefully with a cool iron, light in weight.
Some light colors fade or change in pressing. Try a piece of the goods before pressing the garment. If the color does not come back when cold or when exposed to the light, do not use a hot iron on the garment.[203]
Many of the principles governing architecture and art apply equally as well to art in dress. Both in architecture and dress, construction should be decorated—decoration should never be purposely constructed. It is by the ornament of a building that one can judge more truly of the creative power which the artist has brought to bear upon his work. The general proportion may be good, the mouldings accurate, but the instant ornament is attempted, the architect or the dressmaker reveals how much of an artist he is. To put ornament in the right place—where it serves a purpose—is indeed difficult; to render that ornament at the same time an added beauty and an expression of the desired unity is far more difficult.
All decoration should be planned to enrich—not to assert. All jewelry or ornament should form a note in the general harmony of color—a decorative touch to add beauty and to be subordinated to the object decorated. It should serve the purpose of seeming to strengthen the whole or to protect the parts receiving most wear. Ornament is everywhere attempted. We see ornament at every turn—good and bad alike—in our homes, on clothes, linen, and kitchen utensils. Carlyle tells us that "The first want of barbarous man is decoration." We have no record of when this need was felt first. Primitive man after supplying his actual needs, seemed to develop a longing for the beautiful, so he ornamented his own body, scratched rude patterns on his tools and weapons and gradually [204]developed the artistic sense. This love of ornament dates back to the beginnings of the human race and there are no records of a race or a period devoid of it.
We see gowns totally lacking in good results because too much has been attempted. The wearer has not considered the effect as a whole, but has gratified her liking for a multiplicity of ornaments and color which, perhaps would be good in themselves, if applied separately, but which becomes an incongruous mixture when brought together on one garment.
Garments which seem to have required great effort in the making and which appear complex in construction should be avoided, for the effect is not pleasing. The gown should set off the wearer, not the wearer the gown.
To avoid committing errors against good taste it is essential first to consider the use of any garment and see if it answers the purpose for which it was designed. If any part appears meaningless, this is a sure indication that it is wanting in grace and beauty. The ornament should harmonize with the materials, use, and construction of the object to which it is applied. The color must be massed with effect and detailed with care.
There can be no ornamentation equal to that which is worked into the material, such as embroidery. The design should be appropriate in form and color and always conventional. Flowers are used most frequently for embroidery and passementerie and the[205] simple, single flowers are the most effective, such as the daisy, the wild rose, and the flowers of the lily family. These simple flowers are the best because they radiate from a central point, have strong forms and decided proportions, can be most fully expressed in a few stitches requiring the fewest shades of color, and are admirably adapted for amateur workers.
Old Indian stuffs, jewelry, and enamels are rich in suggestions of conventionalized flowers. The simple, single flowers are repeated constantly, the daisy appearing to be the favorite in these beautiful ornaments. The most beautiful of all conventional flower work, jewel studded, is found in samples of work of the fifteenth century. They simply suggest the forms of nature. The repetition of the same flower in all its aspects is more pleasing and less tiresome to the eye than a variety of flowers or figures.
We find upon analysis that the simple forms are the basis of all decorative art work. Geometrical designs and arabesques are the most difficult, requiring the most exacting and careful work. Narrow bands, braided, outlined, or chain-stitched in simple designs are effective, easily done, and wear well. Braids and any of these stitches may be combined, making durable and effective trimming for sleeves and neck. These simple designs are also appropriate for children's frocks. The French knots are ornamental and durable. All embroidery and passementerie should be rich, close, and continuous. It should not be cut up into[206] pieces and sewed on where it does not serve, or appear to serve, a purpose.
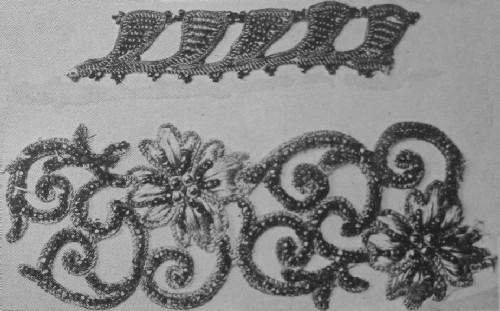 PASSEMENTERIE OF GOOD DESIGN
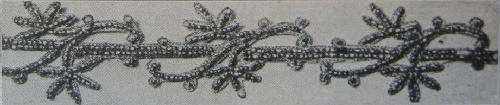 POOR DESIGN, WEAK CONNECTION
There is very little passementerie that is at all suitable for forming edges, as it is not sufficiently substantial, but when it can be found firm and of the right shade it is one of the most beautiful ornaments to edge neck and sleeves. It may be allowed to extend beyond[207] the dress material, so that the flesh tints may show through the design, thus gradually softening the outline. Often a narrow passementerie can be found with one strong edge and a good border can be made by joining the two. This cannot be done where the pattern is united by a band running through the center of the ornament.
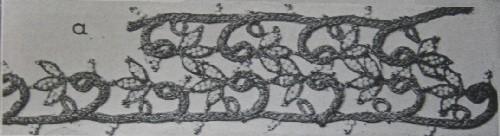 JOINING NARROW PASSEMENTERIE TO FORM A BORDER
A band of velvet or cloth embroidered in outline stitch and French knots of same shade as the garment is a satisfactory edge. Except for yokes, the knots should always be held together with the outline edge.
The rich silk braids and passementeries are made of silk wound or woven over cotton and should be used only on dresses which are not intended for hard wear. Such trimmings are, of course, inappropriate on serges and homespuns and soon become shabby if given much rough service.
Laces, like all trimmings, have defined limits within which they should be used, though they are often worn indiscriminately. Machine made laces, often good in[208] make and design, are now very common, but the best machine-made laces are not cheap in price.
Handsome lace should be applied rather plainly, as the pattern is often lost in the gathers. Fine laces are out of harmony with heavy or coarse materials. When lace is desired for flounces that with running patterns which neither advance nor retreat, except in the folds which may be made, will be found most pleasing. Distinct objects, such as baskets, crowns, vases, etc., which suggest weight, are unsuitable patterns for so light a fabric as lace.
Attention to details is essential in the placing of these decorations, as in the selection or making of them. The worker should take into consideration the shape and size of the bands or pieces of trimming and should note carefully the chief characteristics of the design and above all the junction of leaves, flowers, arabesques, especially in the finishing of the corners of collars and cuffs.
Those at all skillful with the use of the needle can attain the most beautiful and artistic results if right laws in color and design are adhered to, even by the use of the simplest stitches, for the beauty of dress lies not so much in the richness and variety of material used as upon simplicity and harmony—a fact too often disregarded.
Perhaps no ornament is more abused than the bow. In order not to appear intrusive, ribbons require the most delicate handling. The only excuse for a ribbon[209] as an ornament is when it makes a pretense of tying. When used as a sash where folds or gathers are confined, the tone of the ribbon should, in general, vary scarcely from that of the dress.
Whatever the ornament used, whether embroidered band, a ribbon, a cord that laces, a diamond pin, or a jeweled buckle, though it may possess great intrinsic value and beauty, it cannot be considered of real worth as an ornament unless it fulfills the most important condition—fitness of place.
Although the art of dress admits of innumerable variations, like all other arts it is subject to the three rules of beauty—order, proportion and harmony.
Ornaments are appropriate on the hems or edges of garments where it serves the purpose of strengthening and protecting the parts most worn, and not simply where fancy or fashion dictates.
The natural fastenings and fold centers should be along the axis or center of the body. Any jewelry, buckle, brooch, or ornament used to fasten, secure, or strengthen these centers or to hold bands of embroidery, collar, or folds together should be sufficiently strong to serve the purpose. There must be a reason for position and the purpose of its use must be apparent to satisfy the eye. The eye is unconsciously and irresistibly drawn to these natural centers and demands some object there on which to rest—some substance from which the fold emanate—some reason for their detention. If this ornament at the throat or waist[210] fastening collar or holding folds by a girdle or clasp is omitted, the eye is disappointed. This does not mean that the ornament, jewel, passementerie, or embroidery should always be placed in the axis or central line of the figure—this may be carried too far. Slight irregularities often give an effect to hat or gown that is charming.
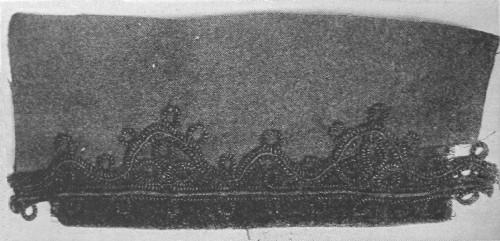 PASSEMENTERIE COVERING FACING
Remember that trimming is not intended to cover up, but to beautify and strengthen. When, for economy's sake, it is used to cover worn places or other defects, it must be selected and applied with great care or it will loudly proclaim its mission.
Trimming should mean something—whether jewelry or passementerie. Bands that bind nothing, straps, bows, buckles, or pins that confine nothing offend the taste. A girdle should seem, even if it does not, to belt[211] in fullness; it has no use on a close-fitting, plain waist. No draperies should be invisibly held; supply some apparent means of confining the gathers. To preserve the lines of the figure there should be unity in the dress. A tight-fitting skirt below a gathered waist or a full, gathered skirt below a plain waist gives the appearance of two portions of the body instead of the oneness desired.
The figure should never be cut across, either above or below the waist-line with contrasting colors, different shades of the same color, or bands of different texture. Below the waist-line the figure should suggest the elements of strength and these horizontal bands cut the lines of the figure at an angle of opposition, destroying the rhythm and grace of the lines.
Much experience is required in placing horizontal lines of ornament on a skirt effectively. In general, rows of tucks or ornament should diminish in width from the bottom towards the top. The plain spaces should be greater than those ornamented. When ornament gives absolute evenness of space division in skirt or waist the effect is apt to be monotonous and unsatisfactory.
The natural places of support for garments are the neck, shoulders and waist. Ornamentation which emanates from these centers or when used for borders, if appropriate in design, is usually successful.[212]
In addition to ornament added to garment, the ornament in the textile itself must be considered.
Textiles may be beautiful in weave, but spoiled by the design. Quite as important as intrinsic beauty is appropriateness of pattern. How often do we see woven on our curtains, carpets, and garment materials fans, bunches of roses tied with ribbons—bows with long, fluttering ends—landscapes, snow scenes, etc. Nothing is beautiful out of its place. A fan suggests coolness and grace of motion, but woven in our textiles it gives the same impression as a butterfly mounted on a pin—something perverted, imprisoned, or robbed of its natural use. Nothing is or ever can be beautiful without use—without harmony. Decorations on textiles are not to tell stories. There is a difference between landscape painting and using landscapes as a motive for decorating textiles or pottery. In one case the aim is to annihilate surface by producing the impression of distance; in the other, the object is to glorify the surface only.
For the woman of limited income it is wiser to select plain material of good texture and weave. Such material is never conspicuous, can be made over, and is always restful and may be interesting. Any good textile must impress itself upon the mind by its suggestiveness and beauty of color. There is a difference between what may be called artistic and decorative[213] embellishment of textiles. Each has its place in the world of beauty, but one is the poetry, the other the prose of the art.
There is a dignity and restfulness in plain material which is never obtained by varied patterns. When a stripe is used to vary the material, the style of the textile is changed, elongated if the stripe is vertical, and widening if it is horizontal. If the main stripe is cut at right angles with a second stripe, the textile appears more complicated and repose is lost. The same is true of checks, but no pattern is more distracting than large plaids, especially when used for waists, because the regularity of the design renders very conspicuous any inequalities in the shoulders or bust, and the great variety of colors detracts from the dignity of the dress. With small checks and narrow, self-colored stripes the effect is different, causing the texture to appear only shaded and not destroying the unity.
On garment fabrics the ornamentation should be flat, without shadow or relief. The pattern must enhance and not mar the figure. If flowers, foliage, or other natural objects are used for the designs, they should be conventionalized—not direct copies of nature. A figured textile requires more careful planning than plain material. It may be beautiful when used properly, but it will appear hideous if distorted in the making. A conventional fleur-de-lis pattern, or a long dash which appears and disappears when used in long,[214] graceful folds, adds to the apparent height. These same figures wrongly used spread out awkwardly or become distorted.
The size of the design should be regulated by the material—small patterns being used for close, thick fabrics and larger designs, with more delicate colors, for thin material of open texture. Thick, heavy fabrics require rich, warm colors and the pattern likewise should be rich and decorative. Velvets, velveteens, and heavy cloths for dresses are beautiful in themselves and should not be marred by patterns or trimmings.
Spirals or curved lines running crosswise on textiles distort the natural curves of the figure by making seeming undulations where none should be and accentuating the prominence of hips and bust. Such patterns should not be used in folds.
Much is to be considered in choosing colors and it is folly to suggest a particular shade for a person without taking into account texture of the textile. Though the color may be good, the weave may destroy what might otherwise have been a success.
Not only must color in itself be studied, but quality of color in textiles as well. A shade of red, for example, in dull silk or lusterless material may be most unbecoming for a woman of a certain type, while it may be worn successfully if made in rich velvet or glossy silk.[215]
Some women maintain that they cannot wear green, but nearly all can dress becomingly in this color if the shade and texture is selected carefully. The same may be said of other colors for the many variations should be taken into consideration.
The average woman in selecting materials for gowns or house furnishings is apt to be influenced too much by details, as she would judge the merits of a fine piece of needlework, hence the value of good, broad color schemes fails to appeal to her. The chenille curtain, perhaps, suits her because it is full of complex decoration.
After having determined the prevailing color of a costume, the details should be in harmony, rather than in contrast with it. Different tones of one color are more satisfactory than striking contrasts, and even strong patches of light and shade of the same color should be avoided, as well as patches of crude and vivid color. The pleasing contrasts found in nature cease to be happy when attempted in textiles.
Use few colors, avoid bright shades except in small quantities. All bright colors should be placed near the face, rather than on or near the bottom of skirts or the edge of sleeves. Avoid strong contrasts; the brighter the color and the greater the contrast with other colors, the louder and cruder will be the effect. "No color harmony is of a high order unless it involve indescribable tints."[216]
Plainness, purity, softness of texture rather than elaborate ornament should be the main consideration for infants' clothes. The finest and softest of French and Scotch flannels, French linen, dimity, nainsook, and India silk are always dainty and they should be made up very simply with little trimming, but that of the finest.
Hems and seams should be small and neatly done with, perhaps, the daintiest beading inset by hand and feather stitched. Hemstitching is always beautiful, but makes a weak spot which is apt to give out in the constant laundering necessary for children's clothes.
The skirt and shirt made in one piece, with sleeves to slip into the little outside garment, both to open down the back so that all may be slipped on at the same time without worry to either nurse or baby, will be found a great convenience.
Stockinet or webbing, all wool, partly wool, or all cotton, is preferred by many to the plain cloth. The cotton is non-shrinkable, easily made, and finished. This garment fabric has reached such a high degree of perfection that for infants and children of larger growth nothing better can be desired for shirts, skirts, drawers, and tights. It may be had in either light or heavy weight, is easily laundered and elastic, having all the qualities desired in undergarments. Garments made of this material in the manner described give [217]perfect freedom for all organs, besides evenness of covering for the body and lightness of weight—all important considerations in infants' and children's clothing.
There should be the same simplicity in construction and material in the garments of children of larger growth. The design should be smaller, more realistic and the color brighter than for grown people.
For children's dresses, the pretty ginghams in small checks, chambray, dimity, serge, flannels, cashmere are appropriate and serviceable.
In making up these simple materials nothing better can be suggested than the plain, straight waist, fitting easily, to which a full skirt is fastened. The sleeves may be of any fashion to add variety. Such a frock is simple and dignified and has a certain archaic beauty and quaintness that the huge, ugly collars and like ornament can never give.
With the plain body the grace of the childish form is not lost. The body may be short or long, with the trimming at the bottom or edge of the skirt. The gathers fall in long lines or folds, no element of opposition destroying the rhythm and grace of the figure contour, when the trimming is placed at the bottom of the frock instead of several bands dividing the skirt.
The waist should always be wider in front than in the back. The discomfort and injury caused by ill fitting garments, graded according to age instead of according to size, thus restricting the expansion of the chest and the play of the lungs, cannot be estimated.[218]
With the proper kind of frock a child can indulge in any game without becoming in the least disordered. Dresses for little girls may have drawers made of the same material, thus permitting them the same freedom as the boys. The life of the child is play. Unfortunate is the child whose clothing is too good to play in. Of course there should be frocks for gala occasions. Children are sensitive to color and receive much innocent enjoyment from being prettily dressed. A child may be made unhappy and timid by ugly clothes, but plainness need not mean ugliness. There are many artistic and simple patterns now being put on the market and many of the ready-made frocks found in the best shops are satisfactory.
Ruskin says, "Clothes carefully cared for and rightly worn, show a balance of mind and self respect."
The freshness of gown or wrap may be preserved by the little attentions bestowed upon it each time it is worn, which take but a few minutes and mean so much in all departments of dress. By carefully brushing and shaking into folds, removing all spots, hanging right side out, picking and pulling straight flowers, bows, and ribbons as soon as removed, adding buttons and taking up dropped stitches when needed,—all these little attentions if given promptly will keep a wardrobe fresh and in good order. New braid on the bottom of skirts, sponging and pressing, little alterations and addition of new trimming to collar and cuffs, will help to preserve the original freshness of the gown and cause the wearer to appear well dressed.
Waists should be turned wrong side out when removed and allowed to air near a window. Shields should be cleansed with alcohol and water. Ribbons should be rolled up immediately when taken off and if treated in this way will last much longer and look much daintier.
Clothing if moist and dusty and tossed into a dark corner of a closet or trunk can never appear fresh again, and will betray the character of the wearer. It is not the wearing of clothes which tells so sadly upon them, but the manner in which they are cared for. A few garments nicely made, well fitted and properly[220] cared for are far preferable to twice the number of inferior quality and make.
Skirts of thin material having ruffles around the bottom should be hung upside down by loops sewed under the ruffles at the seams. By hanging in the opposite direction from which they fall when worn, ruffles regain their freshness.
All clothing for the season should be put away in perfect order to be ready for any sudden emergency which may arise. No clothing of any kind should be stored for the season without thorough cleaning and repairing where necessary. Garments that are outgrown should be disposed of, instead of packing them away. Wool garments should be carefully brushed and hung in the sun to remove and destroy any eggs of moths which may be present. They may be hung in tight cotton bags or packed in tight boxes with all openings posted over as a protection against moths. Tailors' boxes which come flat are not expensive and are useful for this. They should be plainly labeled with their contents.
To fold, lay all articles on the bed or table and fold on the seams if possible. Particular attention should be given to sleeves and collars. Coat lapels should be turned to lie flat, collars turned up, and the coat folded directly through the center seam.
Skirts and coats with bias seams are not improved by hanging as the bias parts are apt to stretch out of shape.[221]
No clothing should be put away for the night, even, without first removing all steel pins, as the least dampness may cause rust spots.
Clothes forms and hangers are so inexpensive that every gown and coat should have its own. Skirts should be hung exactly on the form and no part of the band should be allowed to sag.
If fancy waists are put in drawers or boxes, they should have the sleeves filled with tissue paper and the collars and bows should be pulled straight.
Large garments require the greatest care in handling and in order to be done successfully, they should be sent to the professional cleaner.
All stains and spots should be removed as soon as possible. Fruit and wine stains may be removed by stretching the fabric over a vessel and pouring boiling water through the cloth from a height of a foot or two. The water must be boiling.
Ink stains can be taken out of clothing by dipping the cloth in milk, squeezing the blackened milk into one dish and dipping immediately into clear milk until the stain has disappeared. Then finish by washing the cloth in warm water and in soapy water to remove the fat in the milk.
Iron rust may be removed from linen and cotton by using lemon juice and salt. Wet the spot with the juice of a lemon, cover with salt and lay in the sun,[222] repeating the operation until the stain is removed, then rinse out the lemon and salt thoroughly. This of course cannot be used on colored fabrics, as it fades the color.
Grease is one of the worst foes to garments and the greatest care is needed to remove such spots from delicate fabrics. If not done at once, the dust and grease together often prove ruinous. When the color and fabric will not be injured by it, warm water and soap is the best agent, otherwise absorbents may be used. French chalk or magnesia powdered, placed upon the spot, and allowed to remain for a time will often absorb the grease effectually. If the first application is not effective, brush off, and apply again until the spot disappears. Where water can be used without injuring the cloth, the chalk or magnesia can be made into a paste and spread over the spot. When dry, brush off with a soft brush.
In removing fresh grease spots, blotting paper with a warm iron may often be used effectively. If the heat changes the color of the cloth, the iron should be held above the goods.
Blood stains may be removed by making a paste of starch and applying it to the spot. Several applications may be necessary.
Only the best and purest benzine, naphtha, gasoline, and turpentine should be used for cleaning garments. For removing paints from coarse cloth, pure turpentine is useful, while for silks, velvets and woolens, benzine, naphtha and gasoline are to be preferred.[223] The secret of success in the use of any of these cleansing agents lies in immersing the garments in large quantities of the liquid. Not less than a gallon should be used for a waist and two gallons will do the work far more satisfactorily. An effort should be made to remove all the worst spots before immersing the whole garment. Those which have not disappeared should then be marked with white thread, colored thread may leave a mark. It is a good plan to enclose the spot with a line of basting. Soak the garment for some time in the liquid, then soap all spots thoroughly and rub gently between the hands until they disappear. Finally wash and rinse the garment in clear liquid and hang in the open air until all odor has passed away. Soap may be used freely with gasoline with good effect. Some professional cleaners use a little of the strongest ammonia in their gasoline tanks. The goods should be shaken well and all folds pulled out straight with the threads of the goods. Velveteen, corduroy, and like piled fabrics can be cleaned successfully if not too much worn, but no amount of cleaning will restore the pile that is worn off.
If allowed to stand until the impurities have settled and the clear liquid poured into clean bottles, it may be used for a number of times. This should always be done in the open air.
Chloroform may be used for cleaning the most delicate silks, though this is rather expensive.
Whenever any of these liquids are used to remove spots alone, the spots should be placed upon a soft pad of several thicknesses of old cloth or blotting paper to[224] absorb the surplus liquid and the spot should be rubbed from the outside towards the center. A hole may be cut in very soft cloth or blotting paper and placed around the spot to absorb the solvent around the stain and prevent the dark ring being formed. The cloth should be rubbed lightly and briskly until it is dry. If the fabric is light colored, a sponge or a soft piece of light cloth should be used, while for dark fabrics, the cloth used for rubbing the spot should also be dark and free from lint. The rubbing should be done lightly so as not to wear or injure the texture of the fabric. The blotting paper or cloth underneath should be changed frequently until the spot has entirely disappeared.
Velvet hats and bonnets, after all trimming is removed, may be cleaned by repeated dippings in benzine or gasoline. The vessel used should be large enough to hold a sufficient quantity of the liquid to completely cover the hat. Of course all dust should be carefully brushed off and all folds ripped and loosened before putting the hat into the liquid. The secret of success lies in having the article entirely free from dust and using a large quantity of the benzine or gasoline.
Before sending out garments to be dyed or cleaned, be sure that they are in good condition. All worn places should be mended carefully and all buttons should be removed. Garments that are ripped should have all cut threads pulled out and be free from dust. Dust silk fabrics with a piece of clean flannel and woolen material with a brush or broom.[225]
Fabrics are so much cheaper and so much easier to obtain that patching has almost become one of the lost arts. The twentieth century woman feels that her time is too valuable to be spent in mending the old clothes and that she can better afford to buy new. However that may be, no one disputes the utility of mending. Like so many other duties, mending is half done when well begun. A well made garment of good material should not be discarded when slightly worn, for a patch well put in or a neat piece of darning detracts in no way from the value of a garment and may even be a work of art. The children's clothes particularly should be kept in good order, for they are made uncomfortable by wearing garments that are out of repair, to say nothing of the demoralizing effect upon their characters.
Laundering is the great ally to tears and not only doubles the size of the hole, but pulls the threads apart so that it is impossible to make the mended place neat and smooth, therefore all clothing should be mended before washing. Stockings and woven underwear are much worn by the rubbing on the washboard and thin places going into the washing frequently come out as holes, so that it is true economy of effort and time to "run" or darn the thin places before they are worn through. It requires much less time and the garments last longer.[226]
It is a good plan, especially in knees of stockings and knitted underwear, to baste a piece of fine net over a worn or broken place and darn over it. (See Darning.) Thread used for darning should be as near as possible the size of the threads in the garment. Darning cotton, linen, wool, and silk of all shades can be bought, so that the problem of matching is no longer a difficult one.
In mending the knees of boys' trousers a round patch should never be used. The seams should be ripped and the piece set in then, if the seams are pressed well, the patch will scarcely be noticeable.
When bodices are worn under the arm, rip the seams and set in a new "under arm" piece. A good plan for one whose dresses are apt to wear through quickly is to have the under arm pieces and the adjacent parts of the front made of two thicknesses of the goods; then, as the outside wears through, the edges can be hemmed down or taken into the seam.
When table cloths begin to wear in the middle fold or along the edge of the table, a few inches cut off one end and one side of the cloth will change the fold and the place where it falls over the table and give it a new lease of life. If the hem is turned down once and cat stitched, it will resemble the selvage more than a twice turned hem.
In repairing or lengthening garments that have become too short, much can be done by adding to the bottom of the skirt and sleeves material of different[227] texture. A cloth or serge skirt may be lengthened by facing with velvet of the same shade, covering the line of sewing with cord, braid, or passementerie of the same shade or black. There should be an underfacing of light-weight crinoline to make the bottom of the skirt firm and to give strength. The same facing and passementerie may be used at neck and sleeves.
Thin gowns of lawn, dimity, etc., can be lengthened with a faced or extension hem, the line of sewing to be covered with feather stitch or any of the fancy stitches of white or colored thread. If the lawn or dimity has a colored figure, the embroidery silk or cotton may match this. Under skirts and drawers may be lengthened in the same way or rows of tucks may be added.
In waist repairing, the sewing silk should match the material. Set the patch into the seams when possible and trust to careful pressing. If the material begins to wear near the end of the bones, cut off the bones an inch and take in the dart or seam. If the silk wears off around the hooks and eyes, move them along ever so little. Make a virtue of worn out seams by taking them in and covering them with fancy stitching. If the garment is lined, the outside should be carefully basted to the lining before stitching to take in the seam. It has been said that silk waists are serviceable as long as the upper parts of the sleeves remain good.
If garments have not been well cared for from the first and beyond a certain point, "making over" is poor[228] economy. Never attempt cleaning and making over old clothes unless the material is good enough to make it worth while to do the work well.
The mending basket is an important adjunct of mending and should be well supplied with darning cotton of all colors and sizes, good English tape, black and white, of different widths, linen tape, bias tape, different kinds and sizes of needles,—sewing, darning, shoe, carpet, and tape needles.
For repairing bands and facings, where buttons have been torn off by wringer or iron, and for strengthening weak places, tape is invaluable. It saves the time required to turn in the edges of the cloth and is less clumsy and bungling.
The mender should use good judgment as to the amount of work to be applied to each garment. She should substitute the machine needle whenever possible and not put tiny stitches by hand into half worn garments or in unseen places. Ripped tucks and bands can be sewed in a few minutes on the machine. Serviceable darning can be done on the machine.
Before putting away freshly laundered clothes it is a good plan to take out the clothes already in the drawers and lay the ones washed last on the bottom, thus all garments will wear alike, each article in its regular turn.[229]
Home and School Sewing, Frances Patton, ($.60, postage 6c).
School Needlework, Olive C. Hapgood, ($.75, postage 6c).
Sewing Course for Schools, Mary Schenck Woolman, ($3.50, postage 20c).
Progressive Lessons in Needlework, Catherine F. Johnson, ($.90, postage 8c).
Sewing and Garment Drafting, Margaret L. Blair, ($1.25, postage 10c).
Manual of Exercises in Hand Sewing, Margaret L. Blair, ($1.25, postage 10c).
Dressmaking Up to Date, Butterick Pub. Co., ($.25, postage 8c).
Note: The above books may be borrowed, one at a time, by members of the School. Send the postage given with request. They may be purchased if desired.[230]
The following questions constitute the "written recitation" which the regular members of the A. S. H. E. answer in writing and send in for the correction and comment of the instructor. They are intended to emphasize and fix in the memory the most important points in the lesson.
[231]Read Carefully. To make this test of greatest value to you, write fully from your personal standpoint and experience. Try as many methods given in the text as your time will allow so that you may ask for explanation if the descriptions are not clear to you. Methods are many; if you do not agree with these given, suggest better ones.
1. (a) What are the requisites for good dressmaking? (b) How does dressmaking differ from white sewing in make, finish, and ornamentation?
2. From your point of view what do you consider a successful garment?
3. Give methods of altering patterns.
4. Give briefly the cutting and making of a wool garment from patterns: (a) waist, (b) sleeve, (c) skirt, (d) collar, including methods of stitching, pressing and finish, stating how patterns should be placed on lining and outside materials.
5. How may pressing be done to give the best results? What garments require little or no pressing, and why?
6. (a) State some of the principles and purposes of ornament. (b) What is your idea of ornament applied to garments? (c) Give some errors in ornamentation not named in text.
7. Cut from magazines illustrations showing your idea of good and faulty ornamentation in dress. Give reason for your opinion.
8. Illustrate in some way, either by picture, drawing, embroidery, braid, or stitching, some design appropriate for ornament work on neck or sleeve.
9. Where should ornament be placed, and why?
10. (a) Give your idea of appropriate design on textiles. (b) The advantage and disadvantage of plain materials.
11. Make a color card of silk, wool, paper or raffia showing colors that contrast. (b) Colors that harmonize.
12. What colors do you find satisfactory for your own wear, and why?
13. What materials are best suited for infants' garments? (b) What can you say in regard to children's clothing?
14. What is your opinion of the care of clothing? (b) What experience have you had in cleaning (a) cotton, (b) wool, (c) linen, (d) silk, (e) velvet?
15. Do you consider it economy to repair garments? Can you suggest better methods than those given in the text?
16. If possible make some garment, shirt waist, skirt, or simple dress while studying this lesson and describe in detail how you went about it, the result, time taken, total cost. Tell why you selected the design, the color, the material.
17. Have you found the ready made garments satisfactory in underwear and dresses?
18. Tell of some of your failures in dressmaking and give the reasons for your lack of success.
19. What methods, new to you, have you tried in connection with this lesson? What questions have you to ask?
20. Can you add any suggestions that would be helpful to others in this work?
21. Wherein have the lessons been of practical value to you?
22. For Teachers. Draw up an outline for a course in sewing to combine two considerations: (a) adaptability to the child's interests and capacities, (b) orderly sequence in the technical part.
Note: After completing the answers, sign your full name.
Bachelder—Principles of Design in America. ($3.00.)
Brown—History of Decorative Art. ($1.25.)
Carter, Mrs. H. J.—Historic Ornament in Color. (15c. a sheet). Prang.
Clifford—Period Decoration. ($3.00.)
Crane—Claims of Decorative Art. (Out of print.)
Crane—Line and Form. ($2.25.)
Daniels—Teaching of Ornament. ($1.50.)
Day—Application of Ornament. ($1.25.)
Day—Nature in Ornament. ($4.00.)
Day—Ornamental Design. (Out of print.)
Day—Planning of Ornament. (Out of print.)
Day—Decorative Design of all Ages. ($0.40.)
Day—Ornament and Its Application. ($3.25.)
Day—Ornamental Design, Anatomy of Pattern, Planning of Ornament. ($3.00.)
Day—Some Principles of Everyday Art. (Out of print.)
Glazier—Manual of Historic Ornament. (New edition in press.)
Hulme—Birth and Development of Ornament. (Out of print.)
Jones—Grammar of Ornament. ($18.00.)
Prang—Art and Ornament in Egypt. ($1.50.)
Note—The books out of print may be found in some public libraries.[235]
Earle—Costume of Colonial Times. ($1.25.)
Earle—Two Centuries of Costume in America, 2 vols. ($2.50 each.)
Evans—Chapters on Greek Dress. (Out of print.)
Fairholt—Costume of England, 2 vols. ($1.50 each.)
Hill—History of English Dress. (Out of print.)
McClellan—Historic Dress in America. ($10.00.)
Planchet—History in British Costume. ($1.50.)
Quegly—What Dress Makes of Us. ($1.25.)
Racinet—Costume. ($2.00.)
Rhead—Chats on Costume. ($1.50.)
Schild—Old English Peasant Costume from Boadicea to Queen Victoria. (Out of print.)
Primitive Methods
Endeavor to obtain a Colonial spinning-wheel in working order, and get some one to operate it.
If possible, obtain samples of weaving done on a hand loom.
Examine a hand-loom if possible. They may be seen at the manufacturers of rag and remade carpets.
References: Woman's Share in Primitive Culture, Mason, Chapter III, The Weaver. ($1.75, postage 16c.)
Colonial Days in Old New England, by Earle. ($1.25, postage 12c.)
Textile Fibres
Collect an exhibit of raw fibres and fibres in process of manufacture. Send to the U. S. Department of Agriculture, Department of Botany, Washington, D. C., for small samples; to manufacturers of thread; to friends in manufacturing towns.
Test the various fibres by burning. Examine under a microscope with a small hand-glass, if greater power cannot be obtained. Try warm acid—sulphuric, hydrochloric, or oxalic—on the fibres; let the fibres dry. Also try a solution of caustic soda on the fibres.
References: The Textile Fibres, by Matthews. ($3.50, postage 16c.)
Textile Fibres and Cotton Fibre, pamphlets of the American School of Correspondence. (50c. each, postage 4c. each.)[237]
Send for all the Government Bulletins mentioned in the Bibliography, page 104. Note that the free bulletins are obtained simply by addressing the Department of Agriculture, Washington, D. C., but the sale bulletins only by sending coin or money order to the Superintendent of Documents, Washington, D. C.
Modern Methods
Visit a textile mill if possible, after studying the text.
Practice home dyeing. Read carefully the directions given by the manufacturers of the dyes. See the booklet "Diamond Dyes," to be obtained at many drug stores, or send for it to Wells Richardson, Burlington, Vermont.
References: Text-books of the American School of Correspondence—especially Textile Chemistry and Dyeing. (Parts I, II, III, and IV, postage 4c. each.)
The Dyeing of Textile Fabrics, by Hummell. ($1.75, postage 12c.)
Bleaching and Calico Printing (containing samples), by Duerr. ($4.00, postage 14c.)
Weaves and Fabrics
Show as many different kinds of weaves as possible. Separate the threads and examine under a hand microscope.
Get the local dry-goods or department store to co-operate with you in getting up an exhibit of samples of standard goods—cotton, woolen, worsted, linen, and silk. Label each sample with the width and price.
Test some of the samples of wash goods for fastness to washing and light, by washing in warm water and soap (or boiling in the soap and water) and expose to sunlight all day for three or four days. Keep a part of each sample for comparison.
(Select a composite set of answers to the Test Questions on Part I and send to the School, with report on the supplemental work done and Meetings I and II.)
Sewing: Plain Stitches
Send to manufacturers for samples showing the process of manufacture of pins, needles, etc.
Demonstrate different ways of making the same stitches; discuss best methods.
Embroidery
Show how all the embroidery stitches are made.
Get up an exhibit of all kinds of embroidery, including Oriental, Japanese, old samplers, etc.
Have members make Model I, First Series.
References: Home and School Sewing, by Patton. ($0.60, postage 6c.)
School Needlework, by Hapgood. ($0.75, postage 6c.)
Manual of Exercise in Hand Sewing, by Blair. ($1.25, postage 10c.)
Topic: Educational Value of Sewing in the Public Schools.
Methods. See "A Sewing Course," by Mary S. Woolman, Introduction ($3.50, postage 20c.), and "The Teaching of Domestic Science in the United States of America," by Alice Ravenhill, pages 9-10, 43-46. ($0.75, postage 12c.)
Hems, Seams, Fastenings, Darning, Patching
Have all members make models II, III, IV, and V.
Previously assign members to furnish models or examples of all other hems, seams, fastenings, patches, darns, etc., illustrated or described in the text, and as many more as possible.
Machine Sewing
Get the local sewing machine agent to give a demonstration of the workings of the attachments of the machine.
(Select models and answers to Test Questions on Part II and send them to the School, with a report of Meetings III and IV.)
Dressmaking
Get the local dry-goods or department store to lend different kinds of dress forms.
Show how patterns are altered to suit the figure. (See text and "Dressmaking Up to Date.")
As many as possible cut out and begin making a simple shirt-waist or skirt. Show finished garment at next meeting, giving accurate account of cost and time spent.
References: Dressmaking Up to Date, The Butterick Co. ($0.25, postage 8c.)
Sewing and Garment Drafting, by Margaret L. Blair. ($1.25, postage 12c.)
Construction and Ornament in Dress; Color
Collect illustrations showing good and faulty ornamentation.
Procure samples of fabrics showing good and faulty ornamentation.
Make a color card showing contrast and harmony of color. (See Question 11.)
Children's Clothing
Get up an exhibit of simple and satisfactory clothing for children, including color, material, style and make.
Discuss children's clothes in reference to laundering.
Care and Repair of Clothes
Show examples of successful repairing.
Try some of the methods of cleaning. (See, also Chemistry of the Household pages 73-84.)
(Select answers to Test Questions on Part III and send them to the School, with report on Meetings V and VI.)
Adulteration of linen, 87
Alpaca, 90
Altering sleeve patterns, 194
Angora wool, 39
Aniline dyes, 79
Arrow heads, 123
Back stitch, 112
Basting, 108
Bibliography, 103, 229
Bleaching, 78
Bobbin, 19
Boning waist, 192
Bow, the, 208
Burling, 83
Bust form, 168
Button holes, 141
large, 145
making, 144
Buttons, sewing on, 145
Carding, 59
Care of clothing, 219
Cassimere twills, 73, 75
Cat stitch, 116
Catch stitch, 116
Chain stitch, 116
Checks, 213
Children's clothes, 216, 217
Cleaning, 59, 221
Collars, 198
putting on, 199
Color in dress, 214
Colors, mordant, 79
Combing, 60
Conventional designs, 213
Costumes, references, 234
Cotton, 29
boles, 32
fibers, 34
Cotton goods, 85
home of, 30
Nankin, 34
sea island, 30
upland, 30
Cross stitch, 120
Cuffs, 196
Cutting table, 168
Darning, 155
on machine, 158
over net, 157
Decorations, placing, 208
Distaff, 12
Double cloth, 77
Draped waist, 192
Drawing tapes, 140
Dressmaking, 167
Dyeing, 78
home, 80
Dyes, aniline, 79
Dyestuffs, natural, 80
Embroidery, 204
as ornament, 204
eyelet, 122
shadow, 123
stitches, 114
Extension hem, 227
Eyelet embroidery, 122
Eyelets, 149
Fabrics, 85
list of, 96 -102
names of, 94
primitive, 27
width of, 93
Facing, bias, 141
skirt, 179
Fastening the thread, 109
Fastenings, 141
[242]
Feather stitch, 118
Fibers, 29
cotton, 29
flax, 43
silk, 53
wool, 37
Finishes, 139
Finishing skirt, 179
seams, 196
waist, 192
Finishing, woolens, 83
Fitting, 173, 193
sleeves, 190
waists, 190
Flax, 43
fibers, 47
hackling, 44, 47
Flocks, 83
Folding garments, 220
French hem, 127
knots, 119
seam, 131
Fulling, 83
Fur, 40
Gathering, 111, 138
Gathers, whipped, 127
Gauging, 112
Gigging, 83
Gingham, 86
Grease spots, 122
Hand sewing, 107
Harmony in dress, 215
Harness, the, 70
Heddle, 17
Hemp, 50
Hem stitch, 118
Hems, 123
bias, 124
faced, 124
flannel, 127
French, 127
folding, 123
Hems, rolled, 126
Herringbone stitch, 116
Home dyeing, 80
Hook and eyes, 147
Hydroscopic moisture, 42
Jacquard loom, 70
Joining lace, 160
Jute, 50
Knit goods, 72
Lace, design of, 208
Laces, use of, 207
Laundering, 225
Lengthening garments, 226
Linen, 86
adulteration of, 87
characteristics of, 47
Lining, cutting, 188
Loading silk, 56
Looms, 17
Colonial, 19, 21, 22
development of, 19
diagram of, 23
fly shuttle, 26
four harness, hand, 21
Jacquard, 70
Japanese, 20
modern, 25, 69
Navajo, 18
Swedish hand, 24
Loop stitch, 116
Madder bleach, 78
Machine darning, 158
sewing, 162
Mending, 83, 225
Mitering embroidery, 158
Modern methods, 59
Mohair, 90
Mordant colors, 79
Muslin, 85
Nankin cotton, 34
Natural dyestuffs, 80
[243]
Olona, 53
Ornament, 203
embroidery as, 204
fitness of, 209
flowers as, 205
of textiles, 212
Ornamental stitches, 108, 114
Ornamentation, errors in, 204
Outline stitch, 114
Overcasting, 114, 142
Oversewing, 113
Packing clothing, 220
Passementerie, 206
Patching, 149
Patterns, 171
altering, 173
cloth, 174
lengthening, 173
pinning, 176
placing, 176
selection of, 171
testing, 174
use of, 172
Picking, 59
Piled fabrics, 91
Plackets, 135
faced, 137
Plaids, 213
Plain material, 212
Plush, 77
Pressing, 201
board, 168, 201
wet, 202
Primitive methods, 3
Printing, 81
block, 81
machine, 81
warps, 82
Ramie, 50
Raw silk, 56
Reed, 19
Reeling silk, 54
Repairing, 225
Retting flax, 45
Roving, 61
Running stitch, 110
Sateen weave, 79
Satin, 91
stitch, 121
Scouring agents, 41
Sea island cotton, 30
Seams, 128
beaded, 131
felled, 128
flannel, 135
French, 131
lapped, 133
slot, 131
Serges, 88
Seven-gored skirt, 172
Sewing, hand, 107
machine, 162
Sewing machines, 162
care of, 162
types of, 162
use of, 164
Shadow embroidery, 123
Sheep, 39
Shirt waists, cutting, 182
plan for making, 183
Shuttle, 19
Silk, 53
artificial, 58
boiling off, 56
fiber, 53
loading, 56, 90
production, 53
raw, 56
twilled, 91
Silk, wash, 91
Silk worm, 54
Silks, 90
Singeing, 78
Skirt, 172
band, 179
[244]
Skirt binding, 180
braid, 180
making, 177
placket, 178
plan of making, 173
stiffening, 178
Sleeve making, 183
patterns, 194
Sleeves, cutting, 194, 195
finish of, 197
pressing, 198
putting in, 197
Slip-stitching, 125
Slot seams, 131
Speck dye, 83
Spindle, 6
whorl, 6
Spinning, 3, 59
primitive, 3
wheel, 12
with spindle, 6
Stains, 221
Stitches, 107
ornamental, 108, 114
plain, 107
Stockinet undergarments, 216
Stripes, 213
Stroking gathers, 111
Table linen, 87
Teazels, 83
Textile arts, origin of, 3
Textiles, 85, 212
design of, 212
list of, 96, 102
ornament of, 212
weaves, 72
Texture, 214
Trimming, 210
Tweeds, 88
Harris, 89
Twills, 74
Cassimere, 73, 75
uneven, 75
Tucked waist, 185
Tucking, 108
Tucks, 128
Unity in dress, 211
Upland cotton, 30
Velvet, 92
weave of, 77
Velveteen, 92
Waists, 185
lined, 186
plan for making, 187
repairing, 227
tucked, 185
Wash silk, 91
Warping, 69
Weave, 72
diagrams, 73
plain, 73
basket, 76
double cloth, 77
rib, 76
sateen, 76
twill, 74
velvet, 77
Weaving, 14, 69
Wet Pressing, 202
Wheel spinning, 12
Whipping stitch, 113
Whorl, spindle, 6
Widths of fabrics, 93
Wool, 37
characteristics of, 37
fiber, 36
quality of, 38
scouring, 40
sorting, 40
value for clothing, 37
Woolens, 88
Worsteds, 88
Yokes, 200
End of Project Gutenberg's Textiles and Clothing, by Kate Heintz Watson

*** END OF THIS PROJECT GUTENBERG EBOOK TEXTILES AND CLOTHING ***

***** This file should be named 21534-h.htm or 21534-h.zip *****
This and all associated files of various formats will be found in:
        https://www.gutenberg.org/2/1/5/3/21534/

Produced by Stan Goodman, Karen Dalrymple, and the Online
Distributed Proofreading Team at https://www.pgdp.net


Updated editions will replace the previous one--the old editions
will be renamed.

Creating the works from public domain print editions means that no
one owns a United States copyright in these works, so the Foundation
(and you!) can copy and distribute it in the United States without
permission and without paying copyright royalties.  Special rules,
set forth in the General Terms of Use part of this license, apply to
copying and distributing Project Gutenberg-tm electronic works to
protect the PROJECT GUTENBERG-tm concept and trademark.  Project
Gutenberg is a registered trademark, and may not be used if you
charge for the eBooks, unless you receive specific permission.  If you
do not charge anything for copies of this eBook, complying with the
rules is very easy.  You may use this eBook for nearly any purpose
such as creation of derivative works, reports, performances and
research.  They may be modified and printed and given away--you may do
practically ANYTHING with public domain eBooks.  Redistribution is
subject to the trademark license, especially commercial
redistribution.


*** START: FULL LICENSE ***

THE FULL PROJECT GUTENBERG LICENSE
PLEASE READ THIS BEFORE YOU DISTRIBUTE OR USE THIS WORK

To protect the Project Gutenberg-tm mission of promoting the free
distribution of electronic works, by using or distributing this work
(or any other work associated in any way with the phrase "Project
Gutenberg"), you agree to comply with all the terms of the Full Project
Gutenberg-tm License (available with this file or online at
https://gutenberg.org/license).


Section 1.  General Terms of Use and Redistributing Project Gutenberg-tm
electronic works

1.A.  By reading or using any part of this Project Gutenberg-tm
electronic work, you indicate that you have read, understand, agree to
and accept all the terms of this license and intellectual property
(trademark/copyright) agreement.  If you do not agree to abide by all
the terms of this agreement, you must cease using and return or destroy
all copies of Project Gutenberg-tm electronic works in your possession.
If you paid a fee for obtaining a copy of or access to a Project
Gutenberg-tm electronic work and you do not agree to be bound by the
terms of this agreement, you may obtain a refund from the person or
entity to whom you paid the fee as set forth in paragraph 1.E.8.

1.B.  "Project Gutenberg" is a registered trademark.  It may only be
used on or associated in any way with an electronic work by people who
agree to be bound by the terms of this agreement.  There are a few
things that you can do with most Project Gutenberg-tm electronic works
even without complying with the full terms of this agreement.  See
paragraph 1.C below.  There are a lot of things you can do with Project
Gutenberg-tm electronic works if you follow the terms of this agreement
and help preserve free future access to Project Gutenberg-tm electronic
works.  See paragraph 1.E below.

1.C.  The Project Gutenberg Literary Archive Foundation ("the Foundation"
or PGLAF), owns a compilation copyright in the collection of Project
Gutenberg-tm electronic works.  Nearly all the individual works in the
collection are in the public domain in the United States.  If an
individual work is in the public domain in the United States and you are
located in the United States, we do not claim a right to prevent you from
copying, distributing, performing, displaying or creating derivative
works based on the work as long as all references to Project Gutenberg
are removed.  Of course, we hope that you will support the Project
Gutenberg-tm mission of promoting free access to electronic works by
freely sharing Project Gutenberg-tm works in compliance with the terms of
this agreement for keeping the Project Gutenberg-tm name associated with
the work.  You can easily comply with the terms of this agreement by
keeping this work in the same format with its attached full Project
Gutenberg-tm License when you share it without charge with others.

1.D.  The copyright laws of the place where you are located also govern
what you can do with this work.  Copyright laws in most countries are in
a constant state of change.  If you are outside the United States, check
the laws of your country in addition to the terms of this agreement
before downloading, copying, displaying, performing, distributing or
creating derivative works based on this work or any other Project
Gutenberg-tm work.  The Foundation makes no representations concerning
the copyright status of any work in any country outside the United
States.

1.E.  Unless you have removed all references to Project Gutenberg:

1.E.1.  The following sentence, with active links to, or other immediate
access to, the full Project Gutenberg-tm License must appear prominently
whenever any copy of a Project Gutenberg-tm work (any work on which the
phrase "Project Gutenberg" appears, or with which the phrase "Project
Gutenberg" is associated) is accessed, displayed, performed, viewed,
copied or distributed:

This eBook is for the use of anyone anywhere at no cost and with
almost no restrictions whatsoever.  You may copy it, give it away or
re-use it under the terms of the Project Gutenberg License included
with this eBook or online at www.gutenberg.org

1.E.2.  If an individual Project Gutenberg-tm electronic work is derived
from the public domain (does not contain a notice indicating that it is
posted with permission of the copyright holder), the work can be copied
and distributed to anyone in the United States without paying any fees
or charges.  If you are redistributing or providing access to a work
with the phrase "Project Gutenberg" associated with or appearing on the
work, you must comply either with the requirements of paragraphs 1.E.1
through 1.E.7 or obtain permission for the use of the work and the
Project Gutenberg-tm trademark as set forth in paragraphs 1.E.8 or
1.E.9.

1.E.3.  If an individual Project Gutenberg-tm electronic work is posted
with the permission of the copyright holder, your use and distribution
must comply with both paragraphs 1.E.1 through 1.E.7 and any additional
terms imposed by the copyright holder.  Additional terms will be linked
to the Project Gutenberg-tm License for all works posted with the
permission of the copyright holder found at the beginning of this work.

1.E.4.  Do not unlink or detach or remove the full Project Gutenberg-tm
License terms from this work, or any files containing a part of this
work or any other work associated with Project Gutenberg-tm.

1.E.5.  Do not copy, display, perform, distribute or redistribute this
electronic work, or any part of this electronic work, without
prominently displaying the sentence set forth in paragraph 1.E.1 with
active links or immediate access to the full terms of the Project
Gutenberg-tm License.

1.E.6.  You may convert to and distribute this work in any binary,
compressed, marked up, nonproprietary or proprietary form, including any
word processing or hypertext form.  However, if you provide access to or
distribute copies of a Project Gutenberg-tm work in a format other than
"Plain Vanilla ASCII" or other format used in the official version
posted on the official Project Gutenberg-tm web site (www.gutenberg.org),
you must, at no additional cost, fee or expense to the user, provide a
copy, a means of exporting a copy, or a means of obtaining a copy upon
request, of the work in its original "Plain Vanilla ASCII" or other
form.  Any alternate format must include the full Project Gutenberg-tm
License as specified in paragraph 1.E.1.

1.E.7.  Do not charge a fee for access to, viewing, displaying,
performing, copying or distributing any Project Gutenberg-tm works
unless you comply with paragraph 1.E.8 or 1.E.9.

1.E.8.  You may charge a reasonable fee for copies of or providing
access to or distributing Project Gutenberg-tm electronic works provided
that

- You pay a royalty fee of 20% of the gross profits you derive from
     the use of Project Gutenberg-tm works calculated using the method
     you already use to calculate your applicable taxes.  The fee is
     owed to the owner of the Project Gutenberg-tm trademark, but he
     has agreed to donate royalties under this paragraph to the
     Project Gutenberg Literary Archive Foundation.  Royalty payments
     must be paid within 60 days following each date on which you
     prepare (or are legally required to prepare) your periodic tax
     returns.  Royalty payments should be clearly marked as such and
     sent to the Project Gutenberg Literary Archive Foundation at the
     address specified in Section 4, "Information about donations to
     the Project Gutenberg Literary Archive Foundation."

- You provide a full refund of any money paid by a user who notifies
     you in writing (or by e-mail) within 30 days of receipt that s/he
     does not agree to the terms of the full Project Gutenberg-tm
     License.  You must require such a user to return or
     destroy all copies of the works possessed in a physical medium
     and discontinue all use of and all access to other copies of
     Project Gutenberg-tm works.

- You provide, in accordance with paragraph 1.F.3, a full refund of any
     money paid for a work or a replacement copy, if a defect in the
     electronic work is discovered and reported to you within 90 days
     of receipt of the work.

- You comply with all other terms of this agreement for free
     distribution of Project Gutenberg-tm works.

1.E.9.  If you wish to charge a fee or distribute a Project Gutenberg-tm
electronic work or group of works on different terms than are set
forth in this agreement, you must obtain permission in writing from
both the Project Gutenberg Literary Archive Foundation and Michael
Hart, the owner of the Project Gutenberg-tm trademark.  Contact the
Foundation as set forth in Section 3 below.

1.F.

1.F.1.  Project Gutenberg volunteers and employees expend considerable
effort to identify, do copyright research on, transcribe and proofread
public domain works in creating the Project Gutenberg-tm
collection.  Despite these efforts, Project Gutenberg-tm electronic
works, and the medium on which they may be stored, may contain
"Defects," such as, but not limited to, incomplete, inaccurate or
corrupt data, transcription errors, a copyright or other intellectual
property infringement, a defective or damaged disk or other medium, a
computer virus, or computer codes that damage or cannot be read by
your equipment.

1.F.2.  LIMITED WARRANTY, DISCLAIMER OF DAMAGES - Except for the "Right
of Replacement or Refund" described in paragraph 1.F.3, the Project
Gutenberg Literary Archive Foundation, the owner of the Project
Gutenberg-tm trademark, and any other party distributing a Project
Gutenberg-tm electronic work under this agreement, disclaim all
liability to you for damages, costs and expenses, including legal
fees.  YOU AGREE THAT YOU HAVE NO REMEDIES FOR NEGLIGENCE, STRICT
LIABILITY, BREACH OF WARRANTY OR BREACH OF CONTRACT EXCEPT THOSE
PROVIDED IN PARAGRAPH F3.  YOU AGREE THAT THE FOUNDATION, THE
TRADEMARK OWNER, AND ANY DISTRIBUTOR UNDER THIS AGREEMENT WILL NOT BE
LIABLE TO YOU FOR ACTUAL, DIRECT, INDIRECT, CONSEQUENTIAL, PUNITIVE OR
INCIDENTAL DAMAGES EVEN IF YOU GIVE NOTICE OF THE POSSIBILITY OF SUCH
DAMAGE.

1.F.3.  LIMITED RIGHT OF REPLACEMENT OR REFUND - If you discover a
defect in this electronic work within 90 days of receiving it, you can
receive a refund of the money (if any) you paid for it by sending a
written explanation to the person you received the work from.  If you
received the work on a physical medium, you must return the medium with
your written explanation.  The person or entity that provided you with
the defective work may elect to provide a replacement copy in lieu of a
refund.  If you received the work electronically, the person or entity
providing it to you may choose to give you a second opportunity to
receive the work electronically in lieu of a refund.  If the second copy
is also defective, you may demand a refund in writing without further
opportunities to fix the problem.

1.F.4.  Except for the limited right of replacement or refund set forth
in paragraph 1.F.3, this work is provided to you 'AS-IS' WITH NO OTHER
WARRANTIES OF ANY KIND, EXPRESS OR IMPLIED, INCLUDING BUT NOT LIMITED TO
WARRANTIES OF MERCHANTIBILITY OR FITNESS FOR ANY PURPOSE.

1.F.5.  Some states do not allow disclaimers of certain implied
warranties or the exclusion or limitation of certain types of damages.
If any disclaimer or limitation set forth in this agreement violates the
law of the state applicable to this agreement, the agreement shall be
interpreted to make the maximum disclaimer or limitation permitted by
the applicable state law.  The invalidity or unenforceability of any
provision of this agreement shall not void the remaining provisions.

1.F.6.  INDEMNITY - You agree to indemnify and hold the Foundation, the
trademark owner, any agent or employee of the Foundation, anyone
providing copies of Project Gutenberg-tm electronic works in accordance
with this agreement, and any volunteers associated with the production,
promotion and distribution of Project Gutenberg-tm electronic works,
harmless from all liability, costs and expenses, including legal fees,
that arise directly or indirectly from any of the following which you do
or cause to occur: (a) distribution of this or any Project Gutenberg-tm
work, (b) alteration, modification, or additions or deletions to any
Project Gutenberg-tm work, and (c) any Defect you cause.


Section  2.  Information about the Mission of Project Gutenberg-tm

Project Gutenberg-tm is synonymous with the free distribution of
electronic works in formats readable by the widest variety of computers
including obsolete, old, middle-aged and new computers.  It exists
because of the efforts of hundreds of volunteers and donations from
people in all walks of life.

Volunteers and financial support to provide volunteers with the
assistance they need, is critical to reaching Project Gutenberg-tm's
goals and ensuring that the Project Gutenberg-tm collection will
remain freely available for generations to come.  In 2001, the Project
Gutenberg Literary Archive Foundation was created to provide a secure
and permanent future for Project Gutenberg-tm and future generations.
To learn more about the Project Gutenberg Literary Archive Foundation
and how your efforts and donations can help, see Sections 3 and 4
and the Foundation web page at https://www.pglaf.org.


Section 3.  Information about the Project Gutenberg Literary Archive
Foundation

The Project Gutenberg Literary Archive Foundation is a non profit
501(c)(3) educational corporation organized under the laws of the
state of Mississippi and granted tax exempt status by the Internal
Revenue Service.  The Foundation's EIN or federal tax identification
number is 64-6221541.  Its 501(c)(3) letter is posted at
https://pglaf.org/fundraising.  Contributions to the Project Gutenberg
Literary Archive Foundation are tax deductible to the full extent
permitted by U.S. federal laws and your state's laws.

The Foundation's principal office is located at 4557 Melan Dr. S.
Fairbanks, AK, 99712., but its volunteers and employees are scattered
throughout numerous locations.  Its business office is located at
809 North 1500 West, Salt Lake City, UT 84116, (801) 596-1887, email
business@pglaf.org.  Email contact links and up to date contact
information can be found at the Foundation's web site and official
page at https://pglaf.org

For additional contact information:
     Dr. Gregory B. Newby
     Chief Executive and Director
     gbnewby@pglaf.org


Section 4.  Information about Donations to the Project Gutenberg
Literary Archive Foundation

Project Gutenberg-tm depends upon and cannot survive without wide
spread public support and donations to carry out its mission of
increasing the number of public domain and licensed works that can be
freely distributed in machine readable form accessible by the widest
array of equipment including outdated equipment.  Many small donations
($1 to $5,000) are particularly important to maintaining tax exempt
status with the IRS.

The Foundation is committed to complying with the laws regulating
charities and charitable donations in all 50 states of the United
States.  Compliance requirements are not uniform and it takes a
considerable effort, much paperwork and many fees to meet and keep up
with these requirements.  We do not solicit donations in locations
where we have not received written confirmation of compliance.  To
SEND DONATIONS or determine the status of compliance for any
particular state visit https://pglaf.org

While we cannot and do not solicit contributions from states where we
have not met the solicitation requirements, we know of no prohibition
against accepting unsolicited donations from donors in such states who
approach us with offers to donate.

International donations are gratefully accepted, but we cannot make
any statements concerning tax treatment of donations received from
outside the United States.  U.S. laws alone swamp our small staff.

Please check the Project Gutenberg Web pages for current donation
methods and addresses.  Donations are accepted in a number of other
ways including including checks, online payments and credit card
donations.  To donate, please visit: https://pglaf.org/donate


Section 5.  General Information About Project Gutenberg-tm electronic
works.

Professor Michael S. Hart was the originator of the Project Gutenberg-tm
concept of a library of electronic works that could be freely shared
with anyone.  For thirty years, he produced and distributed Project
Gutenberg-tm eBooks with only a loose network of volunteer support.


Project Gutenberg-tm eBooks are often created from several printed
editions, all of which are confirmed as Public Domain in the U.S.
unless a copyright notice is included.  Thus, we do not necessarily
keep eBooks in compliance with any particular paper edition.


Most people start at our Web site which has the main PG search facility:

     https://www.gutenberg.org

This Web site includes information about Project Gutenberg-tm,
including how to make donations to the Project Gutenberg Literary
Archive Foundation, how to help produce our new eBooks, and how to
subscribe to our email newsletter to hear about new eBooks.