Project Gutenberg's The First Book of Farming, by Charles L. Goodrich

This eBook is for the use of anyone anywhere at no cost and with
almost no restrictions whatsoever.  You may copy it, give it away or
re-use it under the terms of the Project Gutenberg License included
with this eBook or online at www.gutenberg.org


Title: The First Book of Farming

Author: Charles L. Goodrich

Release Date: October 18, 2005 [EBook #16900]

Language: English

Character set encoding: ISO-8859-1

*** START OF THIS PROJECT GUTENBERG EBOOK THE FIRST BOOK OF FARMING ***


Produced by Audrey Longhurst, Jeannie Howse and the Online
Distributed Proofreading Team at https://www.pgdp.net
The most successful farmers of the present day are those who work in harmony with the forces and laws of nature which control the growth and development of plants and animals. These men have gained their knowledge of those laws and forces by careful observation, experiment and study.
This book is a result of the author's search for these facts and truths as a student and farmer and his endeavor as a teacher to present them in a simple manner to others.
The object in presenting the book to the general public is the hope that it may be of assistance to farmers, students and teachers, in their search for the fundamental truths and principles of farming.
In the first part of the book an attempt has been made to select the most important and fundamental truths and principles underlying all agriculture and to present them in the order of their importance, beginning with the most important.
An endeavor has been made to present these truths to the reader and student in a simple and interesting manner. As far as possible each advance step is based on a previously stated fact or truth. A number of side truths are introduced at various places.
A number of simple experiments have been introduced into the text in the belief that they will make the work more interesting to the general reader, and will aid the student in learning to make simple investigations for himself.
The author recommends all who use the book to perform the experiments and to make the observations, and so come actively in touch with the work.
The observations begin on the farm. The author considers the plant the central and all-important factor or agent on the farm.
The root is regarded as the most important part of the plant to itself, and consequently to the plant grower.
The general truths or principles which state the conditions necessary for the growth and development of plant roots are regarded as the foundation truths or fundamental principles of all agriculture. These truths are as follows:
The roots of farm plants need for their best growth and development:
The first two chapters lead the reader quickly through logical reasoning to these fundamental truths, on which the remainder of the work is based.
A study of soils is made in connection with the root studies, as the two are so closely related.
After the study of roots and soils the other parts of the plant are considered in the order of their importance to the farmer or plant grower. The aim is always to get at fundamental facts and principles underlying all agricultural and horticultural practice.
The author regards the conditions necessary to root growth and development as the important factor constituting soil fertility, and in the last ten chapters takes up the discussion of certain farm operations and practices and their effects on these necessary conditions, and consequently their effect on the fertility of the soil.
The author extends gratitude to all who have in any way assisted in the preparation of this book, whether through advice, preparation of the text, preparation of the illustrations, or any other way in which he has received assistance.
C.L. GOODRICH.
| Chapter | Page | |
| I. | Introduction to Plants | 3 |
| II. | Roots | 9 |
| Uses of roots to plants | 9 | |
| Habit of growth of roots | 11 | |
| Conditions necessary for root growth | 20 | |
| III. | Soils | 23 |
| Relation of soil to plants | 23 | |
| Classification of soils | 26 | |
| How were soils made? | 30 | |
| Soil texture | 37 | |
| IV. | Relation of Soils to Water | 39 |
| Importance of water to plants | 39 | |
| Sources of soil water | 40 | |
| Attitude of soils toward water: | ||
| Percolation | ||
| Absorption from below | ||
| Power to hold water | 40 | |
| The effect of working soils when wet | 45 | |
| V. | Forms of Soil Water | 48 |
| Free water | 48 | |
| Capillary water | 49 | |
| Film water | 50 | |
| VI. | Loss of Soil Water | |
| By surface wash | ||
| By percolation and leaching | ||
| By evaporation | ||
| By transpiration | ||
| How to check these losses | 53 | |
| VII. | Soil Temperature | 57 |
| How soils are warmed | 58 | |
| How soils lose heat | ||
| How to check loss of heat | 59 | |
| Conditions which influence soil temperature | 60 | |
| Value of organic matter | 61 | |
| VIII. | Plant Food in the Soil | 63 |
| IX. | Seeds | 70 |
| Conditions necessary for sprouting | 70 | |
| Seed testing | 75 | |
| How the seeds come up | 77 | |
| Use of cotyledons and endosperm | 79 | |
| X. | Seed Planting | 81 |
| Depth of planting: | ||
| Operation of planting | ||
| Planting machines | 81 | |
| Seed classification | 85 | |
| Transplanting | 87 | |
| XI. | Spading and Plowing | 90 |
| Spading the soil | 90 | |
| Plowing | 91 | |
| Why we spade and plow | 91 | |
| Parts of a plow | 92 | |
| Characteristics of a good plow | 95 | |
| The furrow slice | 96 | |
| How deep to plow | 96 | |
| "Breaking out the middles" | 97 | |
| Ridging the land | 98 | |
| Time to plow | 98 | |
| Bare fallow | 100 | |
| XII. | Harrowing and Rolling | 101 |
| Harrowing: | ||
| Why we harrow | ||
| Time to harrow | 101 | |
| Types of harrows | 102 | |
| Rolling | 106 | |
| XIII. | Leaves | 108 |
| Facts about leaves | 108 | |
| The uses of leaves to plants: | ||
| Transpiration | ||
| Starch making | ||
| Digestion of food | ||
| Conditions necessary for leaf work | 109 | |
| How the work of leaves is interfered with | 115 | |
| XIV. | Stems | 120 |
| What are stems for? | 120 | |
| How the work of the stem may be interfered with | 126 | |
| XV. | Flowers | 128 |
| Function of flowers | 128 | |
| Parts of flowers | 129 | |
| Functions of the parts: | ||
| Cross pollination | 130 | |
| Value of a knowledge of the flowers | 134 | |
| Fruit | 136 |
| Chapter | Page | |
| XVI. | A Fertile Soil | 141 |
| Physical properties: | ||
| Power to absorb and hold water | ||
| Power of ventilation | ||
| Power to absorb and hold heat | 142 | |
| Biological properties | 143 | |
| Nitrogen-fixing germs | 144 | |
| Nitrifying germs | 145 | |
| Denitrifying germs | 147 | |
| Chemical properties: | ||
| Nitrogen in the soil | ||
| Phosphoric acid in the soil | ||
| Potash in the soil | ||
| Lime in the soil | ||
| Great importance of physical properties | 147 | |
| Maintenance of fertility | 150 | |
| XVII. | Soil Water | 151 |
| Importance of soil water | 151 | |
| Necessity of soil water | 151 | |
| Sources and forms of soil water | 153 | |
| Too much water | 154 | |
| Not enough water | 154 | |
| Loss of soil water | 155 | |
| How some farm operations influence soil water | 156 | |
| Hoeing, raking, harrowing and cultivating | 158 | |
| Manures and soil water | 159 | |
| Methods of cropping and soil water | 159 | |
| Selection of crops with reference to soil water | 160 | |
| XVIII. | The After-cultivation of Crops | 164 |
| Loss of water by evaporation | 164 | |
| Loss of water through weeds | 165 | |
| Saving the water | 165 | |
| Time to cultivate | 166 | |
| Tools for after-cultivation | 167 | |
| Hilling and ridging | 169 | |
| XIX. | Farm Manures | 171 |
| The functions of manures and fertilizers | 171 | |
| Classification | 171 | |
| Importance of farm manures | 172 | |
| Barn or stable manure | 173 | |
| Loss of value | 173 | |
| Checking the losses | 176 | |
| Applying the manure to the soil | 177 | |
| Proper condition of manure when applied | 179 | |
| Composts | 181 | |
| XX. | Farm Manures, Concluded | 183 |
| Green-crop manures: | ||
| Functions | 183 | |
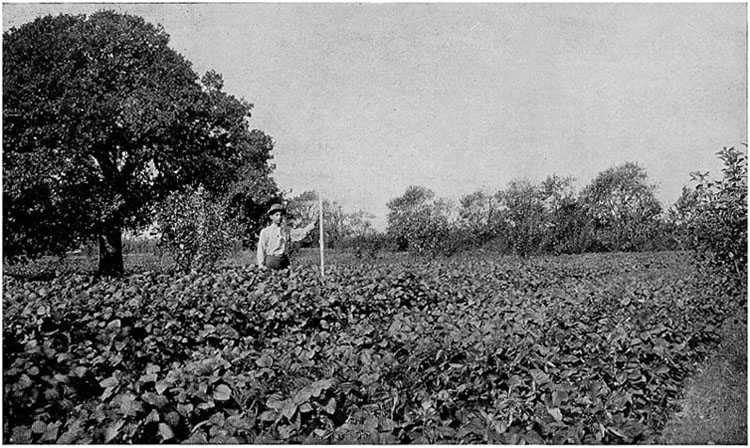
| Benefits | 185 | |
| Character of best plants for green-crop manuring | 185 | |
| The time for green-manure crops | 186 | |
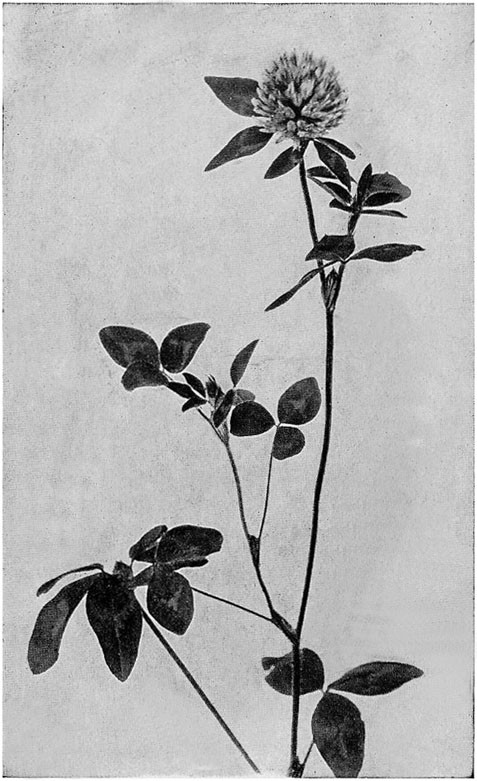
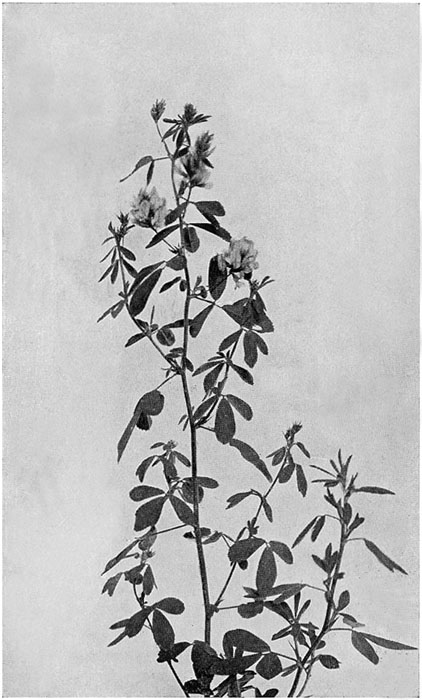
| Leguminous green-manure crops | 186 | |
| Non-leguminous green-manure plants | 191 | |
| XXI. | Commercial Fertilizers | 192 |
| The raw materials | 192 | |
| Sources of nitrogen | 193 | |
| Sources of phosphoric acid | 195 | |
| Sources of potash | 199 | |
| Sources of lime | 200 | |
| XXII. | Commercial Fertilizers, Continued | 202 |
| Mixed fertilizers: | ||
| What they are | ||
| Many brands | ||
| Safeguard for the farmer | ||
| Low grade materials | ||
| Inflating the guarantee | 202 | |
| Valuation | 205 | |
| Low grade mixtures | 207 | |
| Buy on the plant food basis | 209 | |
| XXIII. | Commercial Fertilizers, Concluded | 211 |
| Home mixing of fertilizers | 211 | |
| Kind and amount to buy | 212 | |
| The crop | 213 | |
| The soil | 215 | |
| The system of farming | 215 | |
| Testing the soil | 215 | |
| XXIV. | Rotation of Crops | 219 |
| Systems of cropping | 219 | |
| The one crop system | 221 | |
| Rotation of crops | 224 | |
| Benefits derived from rotation of crops | 230 | |
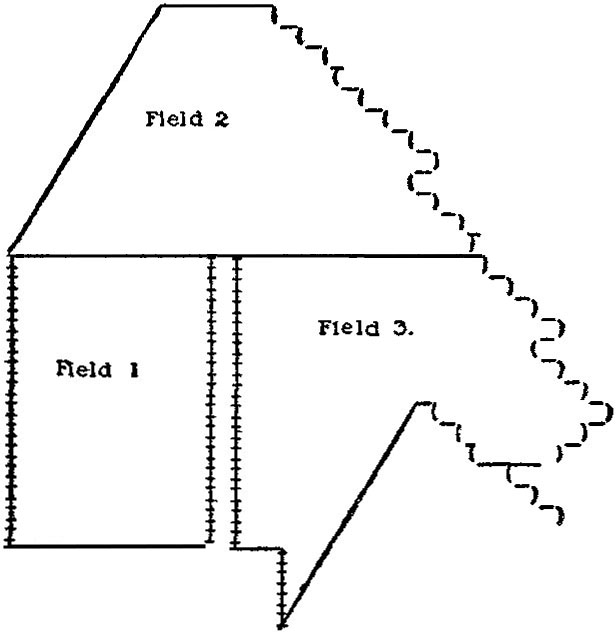
| The typical rotation | 231 | |
| Conditions which modify the rotation | 232 | |
| General rules | 233 | |
| Length of rotation | 233 | |
| XXV. | Farm Drainage | 235 |
| How surplus water affects fertility | 235 | |
| Indications of a need of drainage | 235 | |
| Drains: | ||
| Surface drains | ||
| Open ditch drains | ||
| Covered drains or under drains | 236 | |
| Influence of covered drains on fertility | 237 | |
| Location of drains: | ||
| Grade | ||
| Tile drains | 238 | |
| Glossary | 241 |
Our object in reading and studying this book is to find out some facts that will help those of us who are thinking of going into farming and gardening as a business or recreation to start right, and will also help those of us that are already in the business to make our farms and gardens more productive.
In order to make the book of greatest value to you, I would urge you not only to read and study it, but also to make the excursions suggested and to perform the experiments. In other words, it will be of much greater value to you if you will make the observations and investigations and find out for yourselves the important facts and principles rather than simply take statements of the book unquestioned.
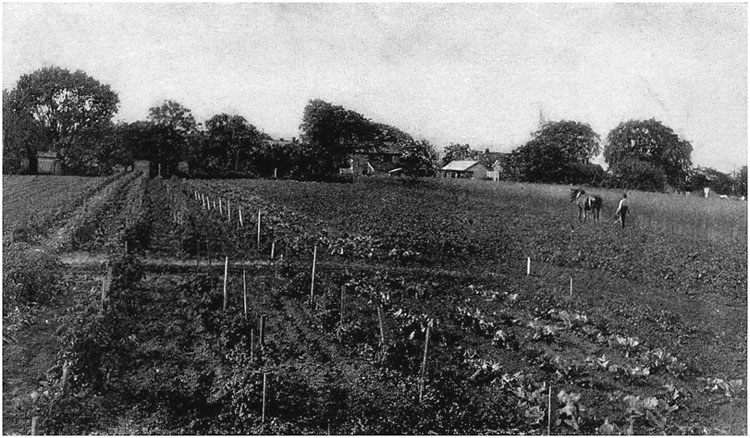
A very good time to begin this work is during the latter part of the summer, when the summer crops are ripening and the fall and winter crops are starting into growth. So suppose we begin our study with a visit to some farm in early September, to bring to mind the many things a farmer works with, the many things he has to think about and know about.
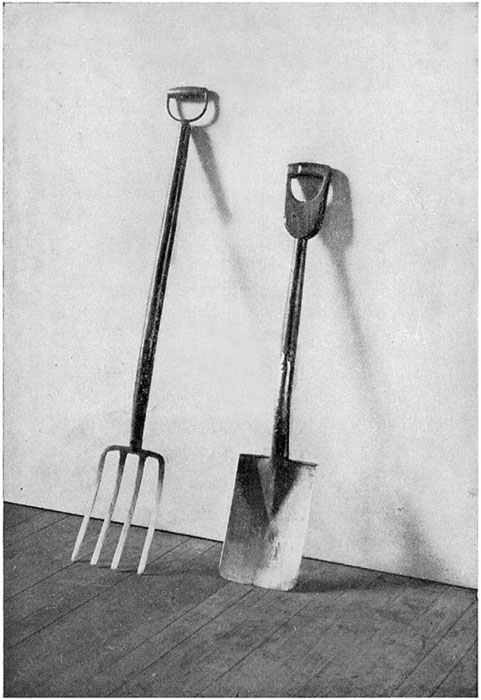
As we approach the farm we will probably see first the farm-house surrounded by shade trees, perhaps elms or maples, with the barns and other buildings grouped nearby. As we pass up the front walk we notice more or less lawn of neatly clipped grass, with flower beds bordering the walk, or we may find a number of chickens occupying the front yard, and the flower beds, placed in red half-barrels, set upon short posts. In the flower beds we may find petunias, nasturtiums, geraniums, rose bushes and other flowering plants. Going around the house, we come upon the dairy, with its rack of cans and pans set out for the daily sunning and airing. Nearby is a well with its oaken bucket; at the barn we find the farmer, and he very kindly consents to go with us to answer questions. In the barn and sheds we find wagons, plows, harrows, seed drills, hoes, rakes, scythes and many other tools and machines. Passing on to the fields, we go through the vegetable garden, where are carrots, parsnips, cabbages, beets, celery, sage and many other vegetables and herbs.
On the right, we see a field of corn just ready to harvest, and beyond a field of potatoes. On the left is the orchard, and we are invited to refresh ourselves with juicy apples. In the field beyond the hired man is plowing with a fine team of horses. In the South we would find a field of cotton and one of sweet potatoes, and perhaps sugar cane or peanuts. We have not failed to notice the pig weeds in the corn field nor the rag weed in the wheat stubble, and many other weeds and grasses in the fence corners.
Perhaps we may meet the cows coming from pasture to the stable. All the way we have been trampling on something very important which we will notice on our way back. In this field we find a coarse sandy soil, in the next one a soil that is finer and stiffer. The plow is turning up a reddish soil. In the garden we find the soil quite dark in color.
But these are only a few of the things we have found. If you have used your notebook you will discover that you have long lists of objects which you have noticed, and these may be grouped under the following headings: Animals, Plants, Soils, Buildings, Tools, etc.
The farmer, then, in his work on the farm deals with certain agents, chief among which are Soils, Plants, Animals, Tools and Buildings. Other agents which assist or retard his work according to circumstances are the air, sunlight, heat, moisture, plant food, microscopic organisms called bacteria, etc. These agents are controlled in their relations to one another by certain forces which work according to certain laws and principles of nature. To work intelligently and to obtain the best results the farmer must become familiar with these agents and must work in harmony with the laws and principles which control them.
Let us take up the study of some of these groups of agents, beginning with the most important or central one on the farm.
Which do you think is the most important group? Some will say "tools." The majority will probably say, study the soil first, "because we must work the soil before we can grow good crops." Some few will mention "plants." This last is right. The farm animals are dependent on plants for food. We till or work the soil to produce plants. Plants are living, growing things, and certain requirements or conditions are necessary for their growth and development; we cannot intelligently prepare the soil for plant growth until we know something about the work of plants and the conditions they need to do their work well.
For our first study of plants let us get together a number of farm and garden plants. Say, we have a corn plant, cotton, beet, turnip, carrot, onion, potato, grass, geranium, marigold, pigweed, thistle, or other farm or garden plants. In each case get the entire plant, with as much root as possible. Do these plants in any way resemble one another? All are green, all have roots, all have stems and leaves, some of them have flowers, fruit, and seeds, and the others in time will produce them.
Why does the farmer raise these plants? For food for man and animals; for clothing; for ornamental purposes; for pleasure, etc.
Which part of any or all of these farm plants is of greatest importance to the plant itself?
I am sure that you will agree that the root is the part most important to the plant itself, for if any part of a plant be separated from the root, that part ceases growth and will soon die, unless it is able to put out new roots. But the root from which the plant was cut will generally send up new shoots, unless it has nearly completed its life work. When a slip or cutting is placed in water or in moist sand it makes a root before it continues much in growth. When a seed is planted its first effort is to send a rootlet down into the soil.
Experiment to see if this is true by planting slips of willow, or geranium, or by planting corn or beans in a glass tumbler of soil, or in a box having a glass side, placing the seeds close to the glass; then watch and see what the seed does. Figs. 2 and 3.
Which of the parts of the plant is of greatest importance to the farmer or any plant grower, or to which part of a plant should the plant grower give his best attention? You will probably mention different parts of the different plants in answering this question. For instance, some will say, "The seed is the most important part of the wheat plant to the farmer, for that is what the wheat is grown for." "The fruit is the most important part of the apple plant for the same reason." "The leaves and grain of the corn, the leaves of the cabbage, are the important parts of these plants and should have the best attention of the grower, because they are the parts for which he grows the plants." But you must remember that all of these parts are dependent on the root for life and growth, as was brought out in the answer to the last question, and that if the farmer or plant grower desires a fine crop of leaves, stems, flowers, fruit or seeds, he must give his very best attention to the root. Judging from the poor way in which many farmers and plant growers prepare the soil for the plants they raise, and the poor way they care for the soil during the growth of the plants, they evidently think least of, and give least attention to, the roots of the plants.
Then, in studying our plants, which part shall we study first? Why, the roots, of course: To find out what they do for the plant, how they do this work, and what conditions are necessary for them to grow and to do their work well.
Of what use are roots to plants, or, what work do they perform for the plants?
If the reader has ever tried to pull up weeds or other plants he will agree that one function of the roots of plants is to hold them firmly in place while they are growing.
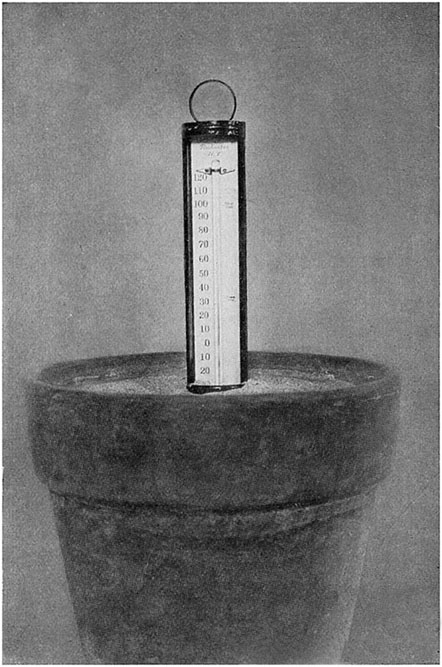
Experiment.—Pull two plants from the soil, shake them free of earth, and place the roots of one in water and expose the roots of the other to the air. Notice that the plant whose roots are exposed to the air soon wilts, while the one whose roots were placed in water keeps fresh. You have noticed how a potted plant will wilt if the soil in the pot is allowed to become dry (see Fig. 4), or how the leaves of corn and other plants curl up and wither during long periods of dry weather. It is quite evident roots absorb moisture from the soil for the plant.
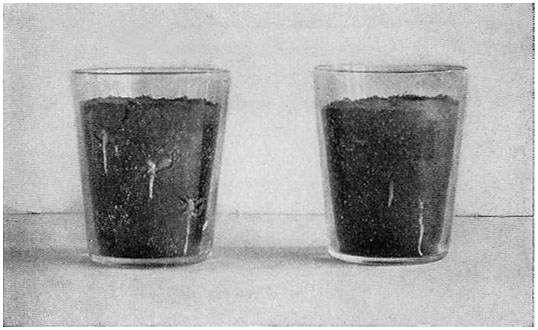
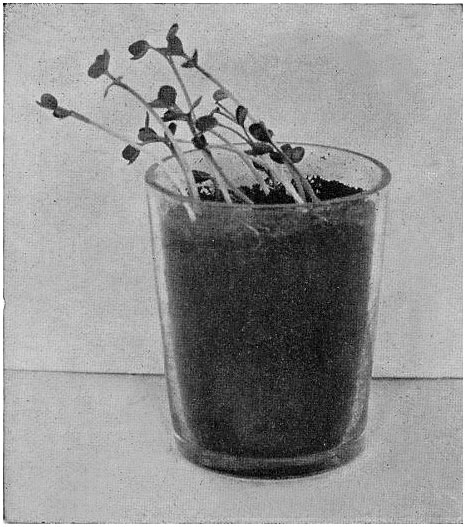
Experiment.—Plant some seeds in tumblers or in boxes filled with sand and in others filled with good garden soil. Keep them well watered and watch their progress for a few weeks (see Fig. 5). The plants in the garden soil will grow larger than those in the sand. The roots evidently must get food from the soil and those in the good garden soil get more than those in the poorer sand. Another important function of plant roots then is to take food from the soil for the plant.
You know how thick and fleshy the roots of radishes, beets and turnips are. Well, go into the garden and see if you can find a spring radish or an early turnip that has sent up a flower stalk, blossomed and produced seeds. If you are successful, cut the root in two and notice that instead of being hard and fleshy like the young radish or turnip, it has become hollow, or soft and spongy (see Fig. 6). Evidently the hard, fleshy young root was packed with food, which it afterwards gave up to produce flower stalk and seeds.
A fourth use of the root, then, is to store food for the future use of the plant.
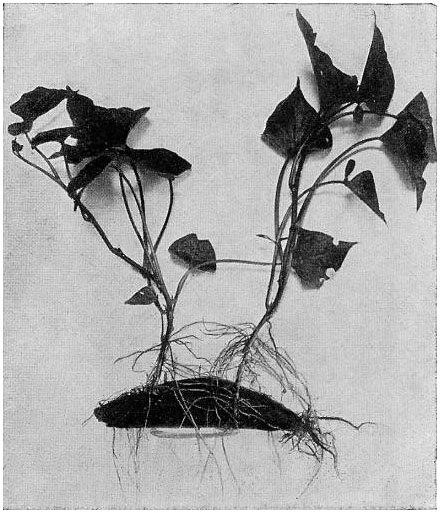
Experiment.—Plant a sweet potato or place it with the lower end in a tumbler of water and set it in a warm room. Observe it from day to day as it puts out new shoots bearing leaves and roots (see Fig. 7). Break these off and plant them in soil and you have a number of new plants. If you can get the material, repeat this experiment with roots of horse-radish, raspberry, blackberry or dahlia. From this we see that it is the work of some roots to produce new plants. This function of roots is made use of in propagating or obtaining new plants of the sweet potato, horse-radish, blackberry, raspberry, dahlia and other plants.
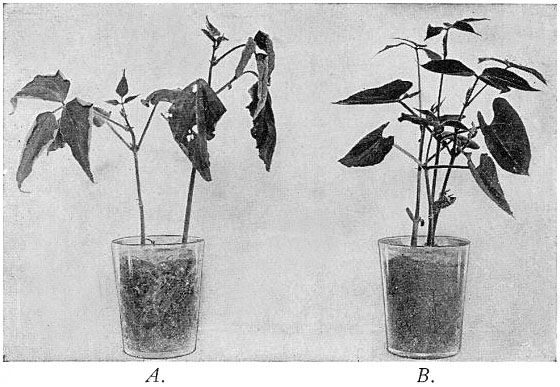
FIG. 4.
To show that plant-roots take water from the soil, the plants in A
are suffering from thirst. B has sufficient water.ToList
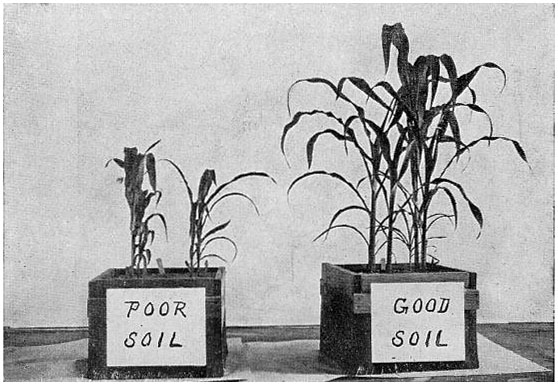
FIG. 5.
To show that plant-roots take food from the soil. Both boxes were
planted at the same time.ToList
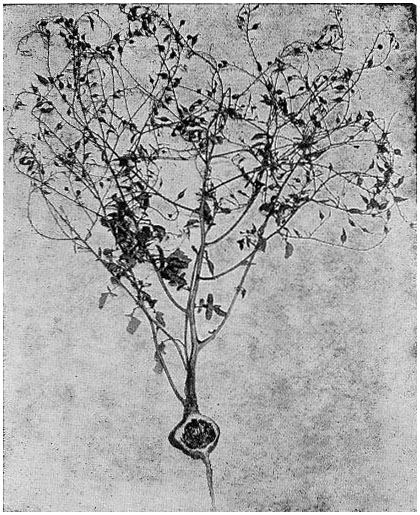
FIG. 6.
A radish root, from which the stored food has been used to help
produce a crop of seeds.
Notice the spindle shaded seed-vessels.ToList
We have now learned five important things that roots do for plants, namely:
Roots hold plants firmly in place.
They absorb water from the soil for the plants.
They absorb food from the soil for the plants.
Some roots store food for the future use of the plant.
Some roots produce new plants.
How do the roots do this work? To answer this question it will be necessary to study the habit of growth of the roots of our plants.
The proper place to begin this study is in the field or garden. So we will make another excursion, and this time we will take with us a pick-axe or mattock, a shovel or two, a sharp stick, a quart or half-gallon pitcher, and several buckets of water. Arrived in the field, we will select a well-developed plant, say, of corn, potato or cotton. Then we will dig a hole about six feet long, three feet wide, and five or six feet deep, close to the plant, letting one side come about four or five inches from the base of the plant. It will be well to have this hole run across the row rather than lengthwise with it. Then with the pitcher pour water about the base of the plant and wash the soil away from the roots. Gently loosening the soil with the sharpened stick will hasten this work. In this way carefully expose the roots along the side of the hole, tracing them as far as possible laterally and as deep as possible, taking care to loosen them as little as possible from their natural position. (See Figs. 8 and 9.) Having exposed the roots of one kind of plant to a width and depth of five or six feet, expose the roots of six or eight plants of different kinds to a depth of about eighteen inches. As this may require more time than we can take for it in one day, it will be well to cover the exposed roots with some old burlaps or other material until we have them all ready, in order to keep them from drying and from injury.
When all is ready we will study the root system of each plant and answer these four questions:
In what part of the soil are most of the roots?
How deep do they penetrate the soil?
How near do they come to the surface of the soil?
How far do they reach out sidewise or laterally from the plant?
To the first question, "In what part of the soil are most of the roots?" you will give the following answers: "In the upper layer." "In the surface soil." "In the softer soil." "In the darker soil." "In the plowed soil."
These are all correct, but the last is the important one. Most of the roots will be formed in that part of the soil that has been plowed or spaded.
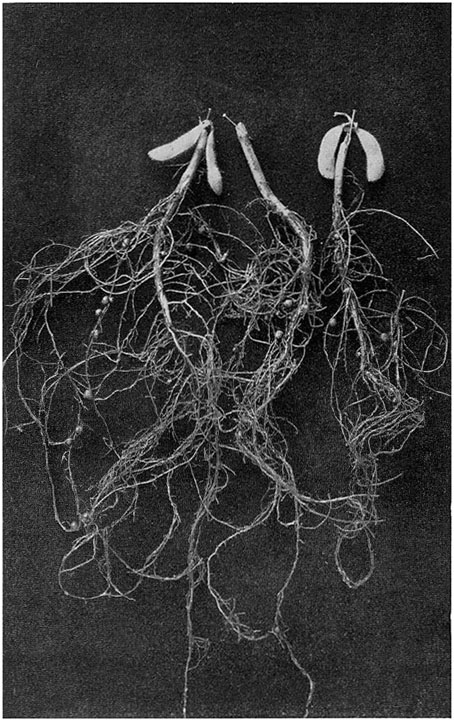
The second question, "How deep do the roots penetrate the soil?" is easily answered. Roots will be found penetrating the soil to depths of from two to six feet or more. (See Fig. 8.) The author has traced the roots of cowpea and soy bean plants to depths of five and six feet, corn roots four and five feet, parsnips over six feet. The sweet-potato roots illustrated in Fig. 8 penetrated the soil to a depth of over five feet. The roots of alfalfa or lucern have been traced to depths of from thirteen to sixteen feet or more.
How near to the surface of the soil do you find roots? Main side or lateral roots will be found within two or three inches of the surface, and little rootlets from these will be found reaching up as near the surface as there is a supply of moisture. After a continued period of wet weather, if the soil has not been disturbed, roots will be found coming to the very surface and even running along the top of the soil.
As to the fourth question, How far do roots reach out sidewise or laterally from the plant? you will find roots extending three, four, five and even six or more feet from the plant. They have numerous branches and rootlets, which fill all parts of the upper soil. Tree roots have been found thirty or forty feet in length.
We started on this observation lesson to find out something about the habit of growth of roots, so that we could tell how the roots do their work for the plant. But before going on with that question, let us stop right here and see whether we cannot find some very important lessons for the farmer and plant grower from what we have already seen. Is a knowledge of these facts we have learned about roots of any value to the farmer? Let us examine each case and see.
Of what value is it to the farmer to know that the larger part of the roots of farm plants develop in that part of the soil that has been plowed or spaded? It tells him that plowing tends to bring about the soil conditions which are favorable to the growth and development of roots. Therefore, the deeper he plows, the deeper is the body of the soil having conditions best suited for root growth, and the larger will be the crop which grows above the soil.
Of what value is it to the farmer to know that the roots of farm plants penetrate to depths of five or six feet in the soil? To answer this question it will be necessary for us to know something of the conditions necessary for root growth. So we will leave this till later.
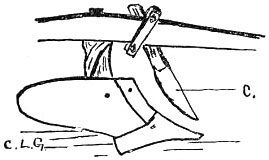
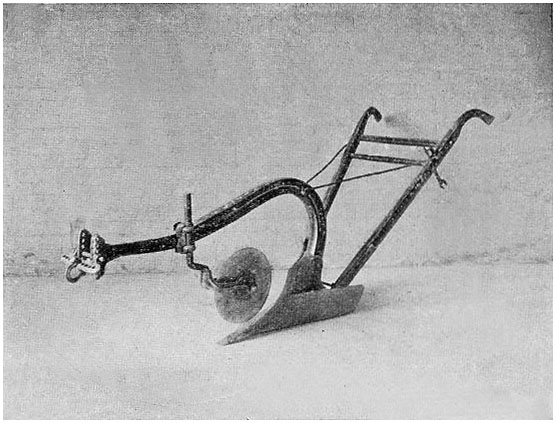
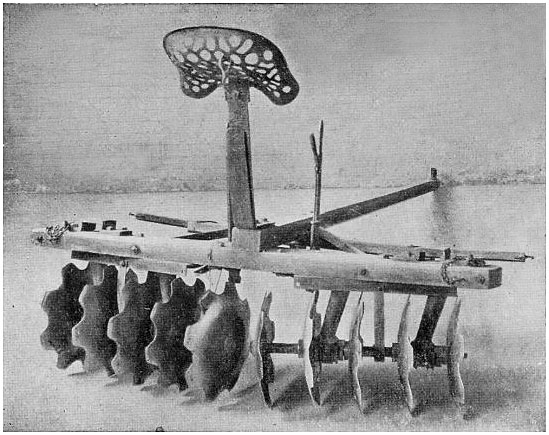
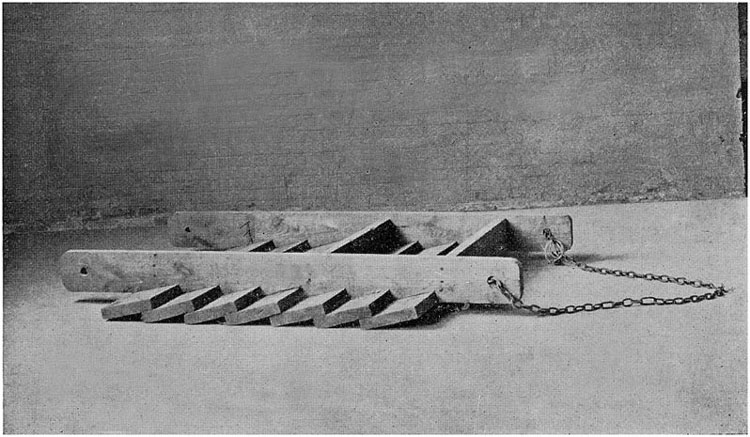
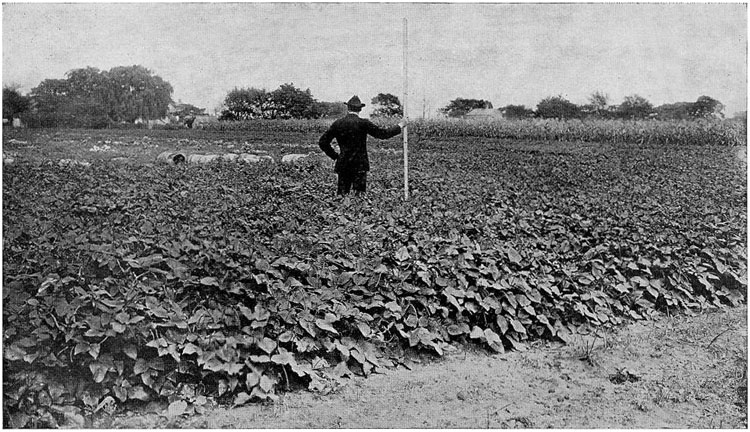
Of what value is it to the farmer to know that many of the roots of his farm plants come very near the surface of the soil? It tells him that he should be careful in cultivating his crop to injure as few of these roots as possible. In some parts of the country, particularly in the South, the tool commonly used for field cultivation is a small plow. This is run alongside of the row, throwing the soil from the crop, and then again throwing the soil to the crop. Suppose we investigate, and see how this affects the roots of the crop.
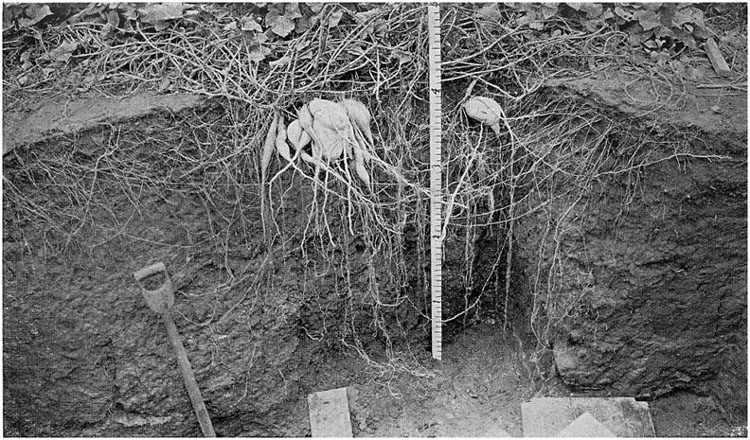
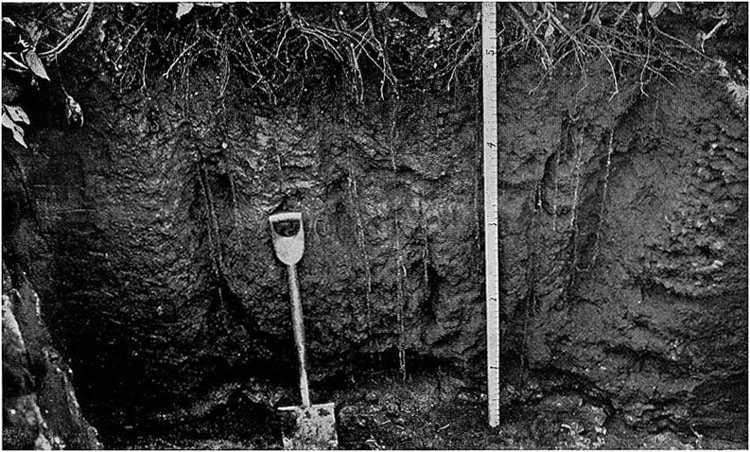
FIG. 8.
Sweet potato roots. The great mass of the roots is in the plowed soil.
Many of them reach out 5 to 7 feet from the plant.
Some reach a depth
of more than 5 feet, and others come to the very surface of the soil.ToList
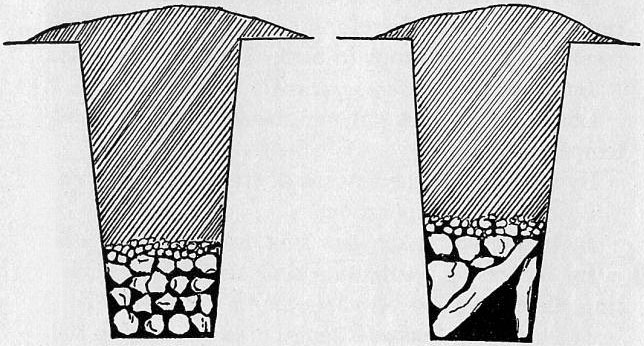
Let us visit a field where some farmer is working a crop with a plow, or get him to do it, for the sake of the lesson. We will ask him to stop the plow somewhere opposite a plant, then we will dig a hole a little to one side of the plow and wash away the soil from over the plow (see Fig. 10), and see where the roots are. We will find that the plow-point runs under many strong-feeding lateral roots and tears them off, thus checking the feeding power of the plant, and consequently checking its growth. Now, if we can get a cultivator, we will have that run along the row and then wash away the loosened soil. It will be found that few, if any, of the main lateral roots have been injured.
Is it of any value to the farmer to know that roots extend laterally three to six feet and more on all sides of the plant, and that every part of the upper soil is filled with their branches and rootlets? This fact has a bearing on the application of manures and fertilizers. It tells the farmer that when he applies the manure and fertilizers to the soil he should mix the most of them thoroughly all through the soil, placing only a little directly in the row to start the young plant.
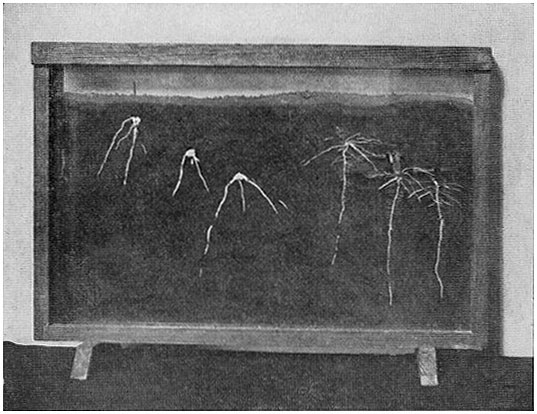
To find out how quickly the roots reach out into the soil, wash the soil away from some seedlings that have been growing only a few days, say, seven, ten and fifteen. (See Fig. 11.)
From our observations, then, we have learned the important lessons of deep, thorough plowing, careful shallow after-cultivation, and that fertilizers should be well mixed with the soil.
We are now ready to go back to our study of the habit of growth of roots, and can perhaps tell something of how the root does its work for the plant.
It is very easy to see how the roots hold the plant firmly in place, for they penetrate so thoroughly every part of the soil, and to such distances, that they hold with a grip that makes it impossible to remove the plant from the soil without tearing it free from the roots.
It is also on account of this very thorough reaching out through the soil that the roots are able to supply the plant with sufficient moisture and food.
We have doubtless observed that most of these roots are very slender and many very delicate. How did they manage to reach out into the soil so far from the plant? Or where does the root grow in length? To answer this question I will ask you to perform the following experiment:
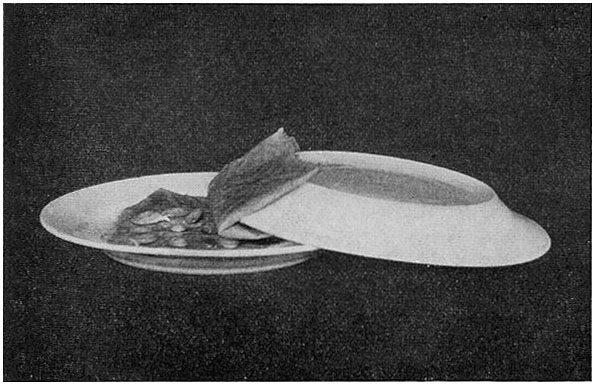
Experiment.—Place some kernels of corn or other large seeds on a plate between the folds of a piece of wet cloth. Cover with a pane of glass or another plate. Keep the cloth moist till the seeds sprout and the young plants have roots two or three inches long. Now have at hand a plate, two pieces of glass, 4 by 6 inches, a piece of white cloth about 4 by 8 inches, a spool of dark thread, and two burnt matches, or small slivers of wood. A shallow tin pan may be used in place of the plate. Lay one pane of glass on the plate, letting one end rest in the bottom of the plate and the other on the opposite edge of the plate. At one end of the piece of cloth cut two slits on opposite sides about an inch down from the end and reaching nearly to the middle. Wet the cloth and spread it on the glass. Take one of the sprouted seeds, lay it on the cloth, tie pieces of thread around the main root at intervals of one-quarter inch from tip to seed. Tie carefully, so that the root will not be injured. Place the second pane of glass over the roots, letting the edge come just below the seed, slipping in the slivers of wood to prevent the glass crushing the roots. Wrap the two flaps of the cloth about the seed. Pour some water in the plate and leave for development. (Fig. 12.) A day or two of waiting will show conclusively that the lengthening takes place at the tip only, or just back of the tip. Is this fact of any value to the farmer? Yes. The soft tender root tips will force their way through a mellow soil with greater ease and rapidity than through a hard soil, and the more rapid the root growth the more rapid the development of the plant. This teaches us again the lesson of deep, thorough breaking and pulverizing of the soil before the crop is planted.
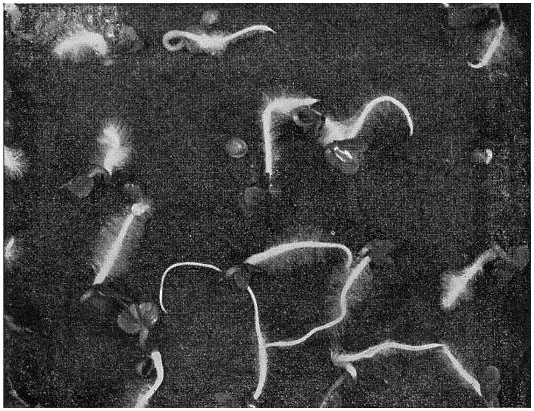
We have learned that the roots grow out into the soil in search of moisture and food, which they absorb for the use of the plant. How does the root take in moisture and food? Many people think that there are little mouths at the tips of the roots, and that the food and moisture are taken in through them. This is not so, for examination with the most powerful microscopes fails to discover any such mouths. Sprout seeds of radish, turnip or cabbage, or other seeds, on dark cloth, placed in plates and kept moist. Notice the fuzz or mass of root hairs near the ends of the tender roots of the seedlings (Fig. 13). Plant similar seed in sand or soil, and when they have started to grow pull them up and notice how difficult it is to remove all of the sand or dirt from the roots. This is because the delicate root hairs cling so closely to the soil grains. The root hairs are absorbing moisture laden with plant food from the surface of the soil particles. The root hairs are found only near the root tips. As the root grows older, its surface becomes tougher and harder, and the hairs die, while new ones appear on the new growth just back of the root tips, which are constantly reaching out after moisture and food. The moisture gets into the root hairs by a process called osmose. The following interesting experiment will give you an idea of this process or force of osmose.
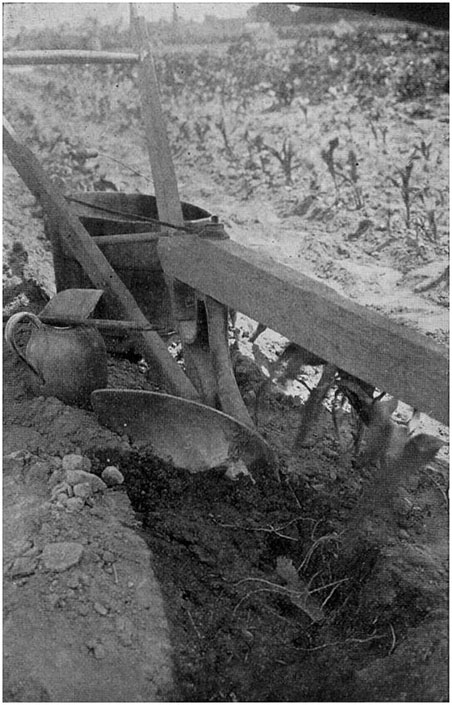
FIG. 10.
A plow stopped in the furrow, to show what it does to the roots of
plants when used for after-cultivation. Notice the point of the plow
under the roots.ToList
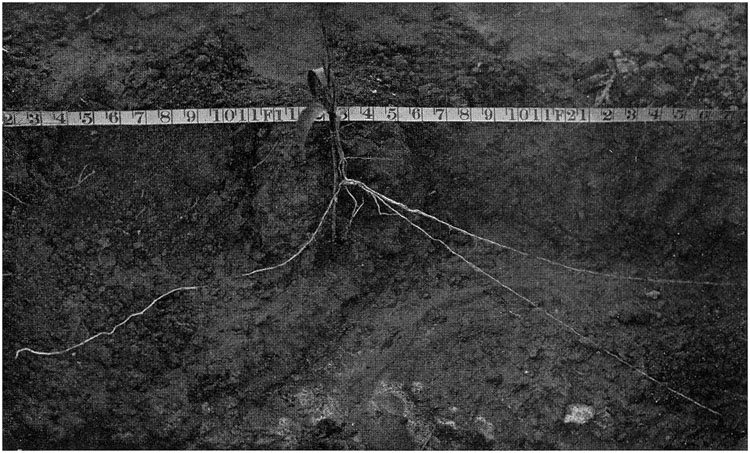
FIG. 11.
A corn-plant ten days after planting the seed. To show how quickly the
roots reach out into the soil. Some of the roots were over 18 inches
long.ToList
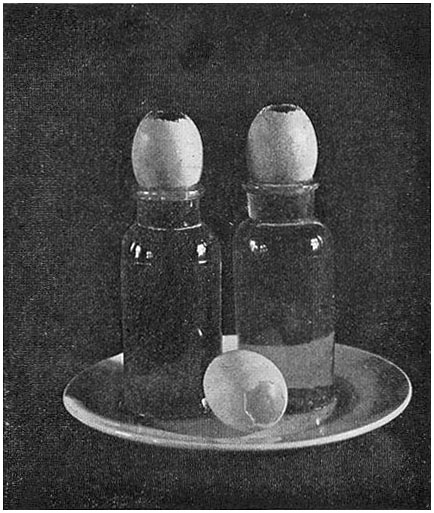
Experiment.—Procure a wide-mouthed bottle, an egg, a glass tube about three inches long and a quarter-inch in diameter, a candle, and a piece of wire a little longer than the tube. Remove a part of the shell from the large end of the egg without breaking the skin beneath. This is easily done by gently tapping the shell with the handle of a pocket-knife until it is full of small cracks, and then, with the blade of the knife, picking off the small pieces. In this way remove the shell from the space about the size of a nickel. Remove the shell from the small end of the egg over a space about as large as the end of the glass tube. Next, from the lower end of the candle cut a piece about one-half inch long. Bore a hole in this just the size of the glass tube. Now soften one end of the piece of candle with the hole in it and stick it on to the small end of the egg so that the hole in the candle comes over the hole in the egg. Heat the wire, and with it solder the piece of candle more firmly to the egg, making a water-tight joint. Place the glass tube in the hole in the piece of candle, pushing it down till it touches the egg. Then, with the heated wire, solder the tube firmly in place. Now run the wire down the tube and break the skin of the egg just under the end of the tube. Fill the bottle with water till it overflows, and set the egg on the bottle, the large end in contact with the water (Fig. 14). In an hour or so the contents of the egg will be seen rising in the glass tube. This happens because the water is making its way by osmose into the egg through the skin, which has no openings, so far as can be discovered. If the bottle is kept supplied with water as fast as it is taken up by the egg, almost the entire contents of the egg will be forced out of the tube. In this way water in which plant food is dissolved enters the slender root hairs and rises through the plant.
Experiment.—This process of osmose may also be shown as follows (Fig. 15): Remove the shell from the large end of an egg without breaking the skin, break a hole in the small end of the egg and empty out the contents of the egg; rinse the shell with water. Fill a wide-mouthed bottle with water colored with a few drops of red ink. Fill the egg-shell partly full of clear water and set it on the bottle of colored water. Colored water will gradually pass through the membrane of the egg and color the water in the shell. Prepare another egg in the same way, but put colored water in the shell and clear water in the bottle. The colored water in the shell will pass through the skin and color the water in the bottle. Sugar or salt may be used in place of the red ink, and their presence after passing through the membrane may be detected by taste.
We have learned some of the things that the roots do for plants and a little about how the work is done. The next thing to find out is:
What conditions are necessary for the root to do its work?
Another condition needed by roots we will find out by experiment.
Experiment.—Take two wide-mouthed clear glass bottles (Fig. 16); fill one nearly full of water from the well or hydrant; fill the other bottle nearly full of water that has been boiled and cooled; place in each bottle a slip or cutting of Wandering Jew (called also inch plant, or tradescantia, and spiderwort), or some other plant that roots readily in water. Then pour on top of the boiled water about a quarter of an inch of oil—lard oil or cotton-seed oil or salad oil. This is to prevent the absorption of air. In a few days roots will appear on the slip in the hydrant water, while only a very few short ones, if any, will appear in the boiled water, and they will soon cease growing. Why is this? To answer this question, try another experiment. Take two bottles, filled as before, one with hydrant water and the other with boiled water; drop into each a slip of glass or a spoon or piece of metal long enough so that one end will rest on the bottom and the other against the side of the bottle, and let stand for an hour or so (Fig. 17). At the end of that time bubbles of air will be seen collecting on the glass or spoon in the hydrant water, but none in the boiled water. This shows us that water contains more or less air, and that boiling the water drives this air out. The cutting in the boiled water did not produce roots because there was no air in it and the oil kept it from absorbing any.
Experiment.—Into some tumblers of moist sand put cuttings of several kinds of plants that root readily (Fig. 18), geranium, tradescantia, begonia, etc. Put cuttings of same plants into tumblers filled with clay that has been wet and stirred very thoroughly, until it is about the consistency of cake batter. Keep the sand and puddled clay moist; do not allow the clay to crack, which it will do if it dries. The cuttings in the sand will strike root and grow, while most, if not all, those in the clay will soon die. The reason for this is that the sand is well ventilated and there is sufficient air for root development, while the clay is very poorly ventilated, and there is not sufficient air for root growth.
These experiments show us that to develop and do their work roots need air or a well-ventilated soil.
We have found the conditions which are necessary for the growth and development of plant roots, namely:
These are the most important facts about plant growth so far as the plant grower is concerned. In other words, these conditions which are necessary for root growth and development are the most important truths of agriculture, or they are the foundation truths or principles upon which all agriculture is based. Having found these conditions, the next most important step is to find out how to bring them about in the soil, or, if they already exist, how to keep them or to improve them. This brings us, then, to a study of soils.
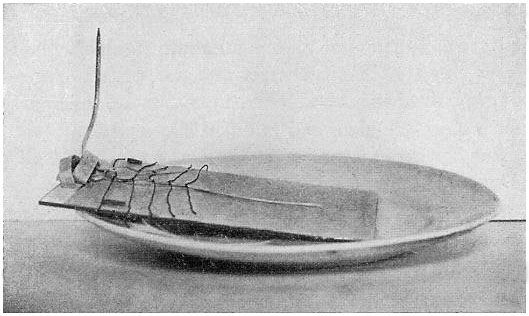
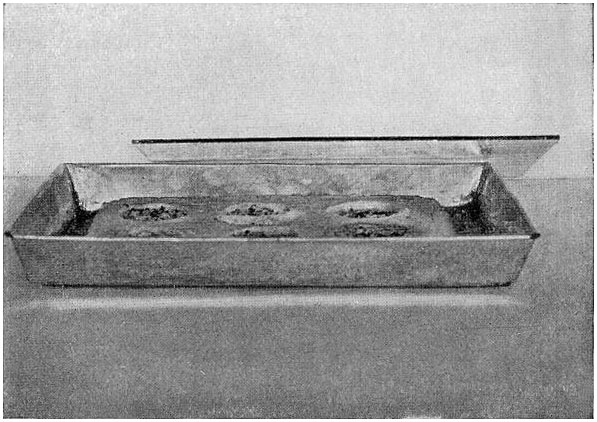
FIG. 12.
To show where growth in length of the root takes place. Forty hours
before the photograph was taken the tip of the root was ¼ inch from
the lowest thread. The glass cover was taken from this in order to get
a good picture of the root.ToList
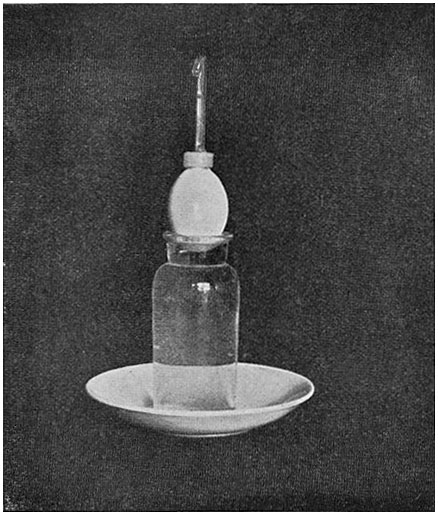
FIG. 14.
To show how water gets into the roots of plants. Water passed up into
the egg through the skin, or membrane, and forced the contents up the
glass tube until it began to overflow.ToList
The soil considered agriculturally, is that part of the earth's crust which is occupied by the roots of plants and from which they absorb food and moisture.
We have learned that plant roots penetrate the soil to hold the plant in a firm and stable position, to absorb moisture and with it plant food. We learned also that for roots to do these things well, the soil in which they grow must be mellow and firm, and must contain moisture and plant food, air must circulate in its pores and it must be warm.
How can we bring about these conditions? To answer this question intelligently it will be necessary for us to study the soil to find out something about its structure, its composition, its characteristics; also, how it was made and what forces or agencies were active in making it. Are these forces acting on the soil at the present time? Do they have any influence over the conditions which are favorable or unfavorable to plant growth? If so, can we control them in their action for the benefit or injury of plants?
We will begin this soil study with an excursion and a few experiments.
Go to the field. Examine the soil in the holes dug for the root lessons, noticing the difference between the upper or surface soil and the under or subsoil. Examine as many kinds of surface soils and subsoils as possible, also decayed leaf mould, the black soil of the woods, etc. If there are in the neighborhood any exposed embankments where a road has been cut through a hill, or where a river or the sea water has cut into a bank of soil, visit them and examine the exposed soils.
Experiment.—Place in separate pans, dishes, plates, boxes, or on boards, one or two pints each of sand, clay, decayed vegetable matter or leaf mould or woods soil, and garden soil. The soil should be fresh from the field. Examine the sand, clay and leaf mould, comparing them as to color; are they light or dark, are they moist or not? Test the soils for comparative size of particles by rubbing between the fingers (Fig. 19), noticing if they are coarse or fine, and for stickiness by squeezing in the hand and noting whether or not they easily crumble afterwards.
Experiment.—Take samples, about a teaspoonful, of sand, clay and leaf mould. Dry them and then place each in an iron spoon or on a small coal shovel and heat in stove to redness. It will be found that the leaf mould will smoke and burn, and will diminish in amount, while the sand and clay will not.
Experiment.—Take two wide-mouthed bottles; fill both nearly full of water. Into one put about a teaspoonful of clay and into the other the same amount of sand; shake both bottles thoroughly and set on table to settle (Fig. 20). It will be found that the sand settles very quickly and the clay very slowly.
As the result of our three experiments we will find something as follows:
Experiment.—We now have knowledge and means for making simple tests of soils. Repeat the last three experiments with the garden soil. We will find, perhaps, that it is dark in color and some of it burns away when placed in the fire, therefore it contains organic matter or decaying vegetable matter or humus, as it is called. This sample has perhaps fine particles and coarse particles; part of it will settle quickly in water while part settles very slowly, and it is sticky. Therefore we conclude that there are both clay and sand in it. If we shake a sample of it in a bottle of water and let it settle for several days, we can tell roughly from the layers of soil in the bottom of the bottle the relative amounts of sand and clay in the soil. Also if we weigh a sample before and after burning we can tell roughly the amount of organic matter in the soil. Test a number of soils and determine roughly the proportions of sand, clay and organic matter in them.
Experiment.—Take the pans of soil used in our first soil experiment and separate the soils in the pans into two parts by a trench across the centre on the pan. Now wet the soil in one side of the pan and stir it with a stick or a spoon, carefully smooth the surface of the soil in the other side of the pan and pour or sprinkle some water on it, but do not stir it. Set the pans aside till the soils are dry. This drying may take several days and in the meantime we will study the classification of soils.
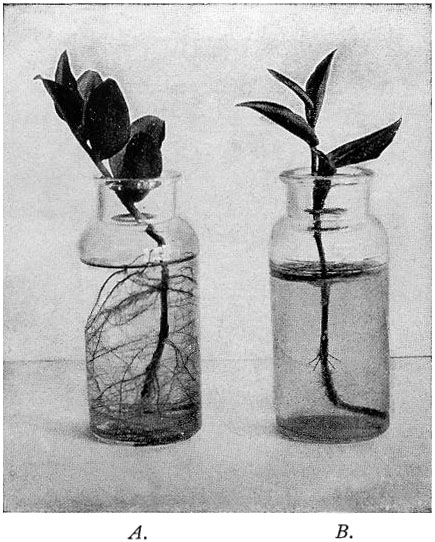
FIG. 16.
To show that roots need air. Bottle A was supplied with fresh water,
and bottle B with water that had been boiled to drive the air out
and then cooled.ToList

FIG. 17.
Bottle A contains fresh water, bottle B contains boiled water.
Notice the air bubbles in bottle A.ToList
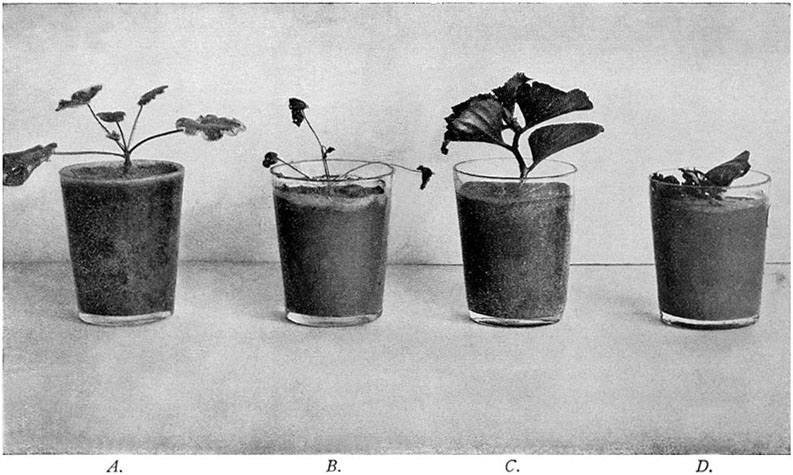
FIG. 18.
Tumblers A and C contained moist sand, B and D contained
puddled clay. Cuttings in B and D died, because there was not
sufficient ventilation in the clay for root-development.ToList
Soil materials and soils are classified as follows:
Stones.—Coarse, irregular or rounded rock fragments or pieces of rock.
Gravel.—Coarse fragments and pebbles ranging in size from several inches in diameter down to 1/25 inch.
Sand.—Soil particles ranging from 1/25 of an inch down to 1/500 of an inch in diameter. Sand is divided into several grades or sizes.
These grades of sand correspond very nearly with the grains of granulated and soft sugar and fine table salt.
Silt.—Fine soil particles ranging from 1/500 to 1/5000 of an inch in diameter. It feels very fine and smooth when rubbed between the fingers, especially when moist. A good illustration of silt is the silicon used for cleaning knives, a small amount of which can be obtained at most any grocery store. By rubbing some of this between the fingers, both dry and wet, one can get a fair idea of how a silty soil should feel. Silt when wet is sticky like clay.
Clay.—The finest of rock particles, 1/5000 to 1/250000 of an inch in diameter, too small to imagine. Clay when wet is very soft, slippery and very sticky. Yellow ochre and whiting from the paint shop are good illustrations of clay.
Humus, or decaying vegetable and animal matter. This is dark brown or almost black in color—decaying leaves and woods soil are examples.
Soils composed of the above materials:
Sands or Sandy Soils.—These soils are mixtures of the different grades of sand and small amounts of silt, clay and organic matter. They are light, loose and easy to work. They produce early crops, and are particularly adapted to early truck, fruit and bright tobacco, but are too light for general farm crops. To this class belongs the so-called Norfolk Sand. This is a coarse to medium, yellow or brown sand averaging about five-sixths sand and one-sixth silt and clay and is a typical early truck soil found all along the eastern coast of the United States.
"It is a mealy, porous, warm sand, well drained and easily cultivated. In regions where trucking forms an important part of agriculture, this soil is sought out as best adapted to the production of watermelons, canteloupes, sweet potatoes, early Irish potatoes, strawberries, early tomatoes, early peas, peppers, egg plant, rhubarb and even cabbage and cauliflower, though the latter crops produce better yields on a heavier soil."
A very similar sand in the central part of the country is called Miami Sand and, on the Pacific Coast, Fresno Sand. These names are given to these type soils by the Bureau of Soils of the United States Department of Agriculture.
Loams or Loamy Soils, consist of mixtures of the sands, silt and clay with some organic matter. The term loam is applied to a soil which, from its appearance in the field and the feeling when handled, appears to be about one-half sand and the other half silt and clay with more or less organic matter. These are naturally fine in texture and quite sticky when wet. They would be called clay by many on account of their stickiness. They are good soils for general farming and produce good grain, grass, corn, potatoes, cotton, vegetables, etc.
Sandy Loams, averaging about three-fifths sand and two-fifths silt and clay. These soils are tilled easily and are the lightest desirable soil for general farming. They are particularly adapted to corn and cotton and in some instances are used for small fruits and truck crops.
Silt Loam consists largely of silt with a small amount of sand, clay, and organic matter. These soils are some of the most difficult to till, but when well drained they are with careful management good general farming soils, producing good corn, wheat, oats, potatoes, alfalfa and fair cotton.
Clay Loams.—These soils contain more clay than the silt loams. They are stiff, sticky soils, and some of them are difficult to till. They are generally considered the strongest soils for general farming. They are particularly adapted to wheat, hay, corn and grass.
Gravelly loams are from one-fourth to two-thirds coarse grained; the remaining fine soil may be sandy loam, silt or clay loam. They are adapted to various crops according to the character of the fine soil. Some of them are best planted to fruit and forest.
Stony Loam.—Like the gravelly loam the stony loams are one-fourth to three-fourths sandy, silty or clay loam, the remainder being rock fragments of larger size than the gravel. These fragments are sometimes rough and irregular and sometimes rounded. The stones interfere seriously with tillage, and naturally the soils are best planted with forest or fruit.
Clay Soils.—Clay soils are mixtures of sand, silt, clay and humus, the clay existing in quite large quantities, there being a greater preponderance of the clay characteristics than in the clay loams; they are very heavy, sticky, and difficult to manage. Some clay soils are not worth farming. Those that can be profitably tilled are adapted to wheat, corn, hay and pasture.
Adobe Soils.—These are peculiar soils of the dry West. They are mixtures of clay, silt, some sand and large amounts of humus. Their peculiar characteristic is that they are very sticky when wet and bake very hard when dry and are, therefore, very difficult to manage, though they are generally very productive when they are moist enough to support crops.
Swamp Muck is a dark brown or black swamp soil consisting of large amounts of humus or decaying organic matter mixed with some fine sand and clay. It is found in low wet places.
Peat is also largely vegetable matter, consisting of tough roots, partially decayed leaves, moss, etc. It is quite dense and compact and in some regions is used for fuel.
As a help in finding the answer to this question collect and examine a number of the following or similar specimens:
Brick.—Take pieces of brick and rub them together. A fine powder or dust will be the result.
Stones.—Rub together pieces of stone; the same result will follow, except that the dust will be finer and will be produced with greater difficulty because the stones are harder. Some stones will be found which will grind others without being much affected themselves.
Rock Salt or Cattle Salt.—This is a soft rock, easily broken. Place on a slate or platter one or two pieces about the size of an egg or the size of your fist. Slowly drop water on them till it runs down and partly covers the slate, then set away till the water dries up. Fine particles of salt will be found on the slate wherever the water ran and dried. This is because the water dissolved some of the rock.
Lime Stone.—This is harder. Crush two samples to a fine powder and place one in water and the other in vinegar. Water has apparently no effect on it, but small bubbles are seen to rise from the sample in vinegar. The vinegar which is a weak acid is slowly dissolving the rock. The chemists tell us water will also dissolve the limestone, but very slowly. There are large areas of soil which are the refuse from the dissolving of great masses of limestone.
We find that the rocks about us differ in hardness: they are ground to powder when rubbed together, some are easily dissolved in water, others are dissolved by weak acids.
Geologists tell us that the whole crust of the earth was at one time made up of rocks, part of which have been broken down into coarse and fine particles which form the gravel, sand and clay of our soils. The organic matter of our soils has been added by the decay of plants and animals. Several agencies have been active in this work of breaking down the rocks and making soils of them. If we look about we can perhaps see some of this work going on now.
Work of the Sun.—Examine a crockery plate or dish that has been many times in and out of a hot oven, noticing the little cracks all over its surface. Most substances expand when they are heated and contract when they are cooled. When the plate is placed in the oven the surface heats faster than the inner parts, and cools faster when taken out of the oven. The result is that there is unequal expansion and contraction in the plate and consequently tension or pulling of its parts against each other. The weaker part gives way and a crack appears. If hot water is put into a thick glass tumbler or bottle, the inner surface heats and expands faster than the outer parts and the result is tension and cracking. If cold water be poured on a warm bottle or piece of warm glass, it cracks, because there is unequal contraction. In the early part of a bright sunny afternoon feel of the surface of exposed rocks, bricks, boards, or buildings on which the sun has been shining. Examine them in the same way early the next morning. You will find that the rocks are heated by the sun just as the plate was heated when put into the oven, and when the sun goes down the rocks cool again. This causes tension in the rocks and little cracks and checks appear in them just as in the heated plate, only more slowly. This checking may also be brought about by a cool shower falling on the sun heated rocks just as the cool water cracked the warm glass. Many rocks if examined closely will be found to be composed of several materials. These materials do not expand and contract alike when heated and cooled and the tendency for them to check is greater even than that of the plate. This is the case with most rocks.
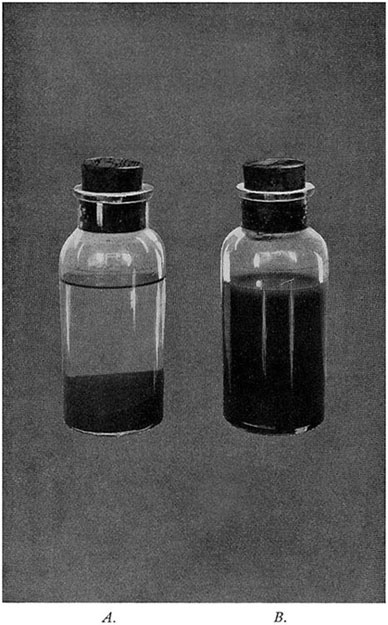
FIG. 20.—WATER TEST OF SOILS.
Bottle
A contains sand and water, bottle B clay and water. The
sand settles quickly, the clay very slowly.ToList
Work of Rain.—Rain falling on the rocks may dissolve a part of them just as it dissolved the rock salt; or, working into the small cracks made by the sun, may wash out loosened particles; or, during cold weather it may freeze in the cracks and by its expansion chip off small pieces; or, getting into large cracks and freezing, may split the rock just as freezing water splits a water pitcher or the water pipes.
Work of Moving Water.—Visit some neighboring beach or the banks of some rapid stream. See how the waves are rolling the sand and pebbles up and down the beach, grinding them together, rounding their corners and edges, throwing them up into sand beds, and carrying off the finer particles to deposit elsewhere. Now visit a quiet cove or inlet and see how the quiet water is laying down the fine particles, making a clay bed. Notice also how the water plants along the border are helping. They act as an immense strainer, collecting the suspended particles from the water, and with them and their bodies building beds of soil rich in organic matter or humus.
The sun, besides expanding and cracking the rocks by its heat, helps in another way to make soils. It warms the water that has been grinding soil on the beach or along the river banks and causes some of it to evaporate. This vapor rises, forms a cloud and floats away in the air. By and by the vapor forms into rain drops which may fall on the top of some mountain. These rain drops may wash loosened particles from the surface or crevices of exposed rocks. These drops are joined by others until, by and by, they form a little stream which carries its small burden of rock dust down the slope, now dropping some particles, now taking up others. Other little streams join this one until they form a brook which increases in size and power as it descends the mountain side. As it grows by the addition of other streams it picks up larger pieces, grinds them together, grinds at its banks and loads itself with rocks, pebbles, sand and clay. As the stream reaches the lower part of the mountain where the slope is less steep, it is checked in its course and the larger stones and pebbles are dropped while the sand and finer particles are carried on and deposited on the bottom of some broad quiet river farther down, and when the river overflows its banks, are distributed over the neighboring meadows, giving them a new coating of soil and often adding to their fertility. What a river does not leave along its course it carries out to sea to help build the sand bars and mud flats there. The rain drops have now gotten back to the beach where they take up again the work of grinding the soil.
The work of moving water can be seen in almost any road or cultivated field during or just after a rain, and particularly on the hillsides, where often the soil is loosened and carried from higher to lower parts, making barren sand and clay banks of fertile hillsides and destroying the fertility of the bottom lands below.
We have already noticed the work of freezing water in splitting small and large fragments from the rocks. Water moving over the surface of the earth in a solid form, or ice, was at an earlier period in the history of the earth one of the most powerful agencies in soil formation. Away up in Greenland and on the northern border of this continent the temperature is so low that most if not all of the moisture that falls on the earth falls as snow. This snow has piled up until it has become very deep and very heavy. The great weight has packed the bottom of this great snow bank to ice. On the mountains where the land was not level the masses of snow and ice, centuries ago, began to slide down the slopes and finally formed great rivers of solid water or moving ice.
The geologists tell us that at one time a great river of ice extended from the Arctic region as far south as central Pennsylvania and from New England to the Rocky Mountains. This vast river was very deep and very heavy and into its under surface were frozen sand, pebbles, larger stones and even great rocks. Thus it acted as a great rasp or file and did an immense amount of work grinding rocks and making soils. It ground down mountains and carried great beds of soil from one place to another. When this great ice river melted, it dropped its load of rocks and soils, and as a result we find in that region of the country great boulders and beds of sand and clay scattered over the land.
Work of the Air.—The air has helped in the work of wearing down the rocks and making soils. If a piece of iron be exposed to moist air a part of the air unites with part of the iron and forms iron rust. In the same way when moist air comes in contact with some rocks part of the air unites with part of the rock and forms rock rust which crumbles off or is washed away by water. Thus the air helps to break down the rocks. Moving air or wind picks up dust particles and carries them from one field to another. On sandy beaches the wind often blows the sand along like snow and piles it into drifts. The entire surface of sandy regions is sometimes changed in this way. Sands blown from deserts sometimes bury forests which with their foliage sift the fatal winding sheet from the dust-laden winds.
The Work of Plants.—Living plants sometimes send their roots into rock crevices; there they grow, expand, and split off rock fragments. Certain kinds of plants live on the surface of rocks. They feed on the rocks and when they die and decay they keep the surface of the rocks moist and also produce carbonic acid which dissolves the rocks slowly just as the vinegar dissolved the limestone in our experiment.
Dead decaying roots, stems, and leaves of plants form largely the organic matter of the soil. When organic matter has undergone a certain amount of decay it is called humus, and these soils are called organic soils or humus soils. The black soils of the woods, swamps and prairies, contain large amounts of humus.
Work of Animals.—Earth worms and the larvæ of insects which burrow in the soil eat soil particles which pass through their bodies and are partially dissolved. These particles are generally cast out on the surface of the soil. Thus these little animals help to move soil, to dissolve soil, and to open up passages for the entrance of air and rain.
We have seen that the soil particles vary in size and that for the best development of the plant the particles of the soil must be so arranged that the delicate rootlets can readily push their way about in search of food, or, in other words, that the soil must have a certain texture. By the texture of the soil we mean the size of its particles and their relation to each other. The following terms are used in describing soil textures: Coarse, fine, open, close, loose, hard, stiff, compact, soft, mellow, porous, leachy, retentive, cloddy, lumpy, light, heavy. Which of these terms will apply to the texture of sand, which to clay, which to humus, which to the garden soil, which to a soil that plant roots can easily penetrate? We find then that texture of the soil depends largely on the relative amounts of sand, silt, clay and humus that it contains.
We learned in a previous paragraph that plant roots take moisture from the soil. What becomes of this moisture? We will answer this question with an experiment.
Experiment.—Take a pot or tumbler in which a young plant is growing, also a piece of pasteboard large enough to cover the top of the pot or tumbler; cut a slit from the edge to the centre of the board, then place it on top of the pot, letting the stem of the plant enter the slit. Now close the slit with wax or tallow, making it perfectly tight about the stem. If the plant is not too large invert a tumbler over it (Fig. 21), letting the edge of the tumbler rest on the pasteboard; if a tumbler is not large enough use a glass jar. Place in a sunny window. Moisture will be seen collecting on the inner surface of the glass. Where does this come from? It is absorbed from the soil by the roots of the plant and is sent with its load of dissolved plant food up through the stem to the leaves. There most of the moisture is passed from the leaves to the air and some of it is condensed on the side of the glass.
By experiments at the Cornell University Agricultural Experiment Station, Ithaca, N.Y., it has been found that during the growth of a sixty bushel crop of corn the plants pump from the soil by means of their roots, and send into the air through their leaves over nine hundred tons of water. A twenty-five bushel crop of wheat uses over five hundred tons of water in the same way. This gives us some idea of the importance of water to the plant and the necessity of knowing something of the power of the soil to absorb and hold moisture for the use of the plant. Also the importance of knowing if we can in any way control or influence the water-holding power of the soil for the good of the plant.
From what sources does the soil receive water? From the air above, in the form of rain, dew, hail and snow, falling on the surface, and from the lower soil. This water enters the soil more or less rapidly.
Which soils have the greater power to take in the rain which falls on their surface?
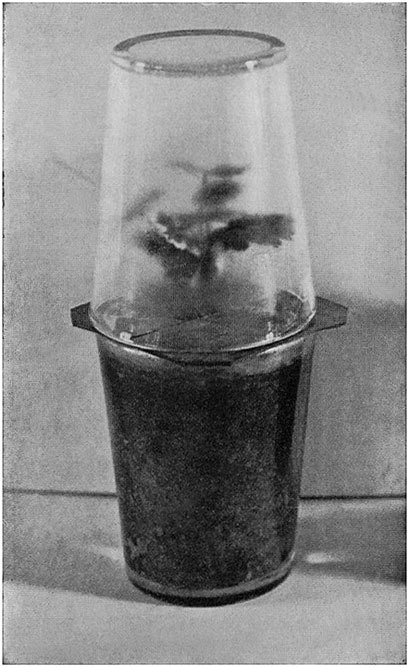
FIG. 21.
To show what becomes of the water taken from the soil by roots.
Moisture, sent up from the roots, has been given off by the leaves and
has condensed on the glass.ToList
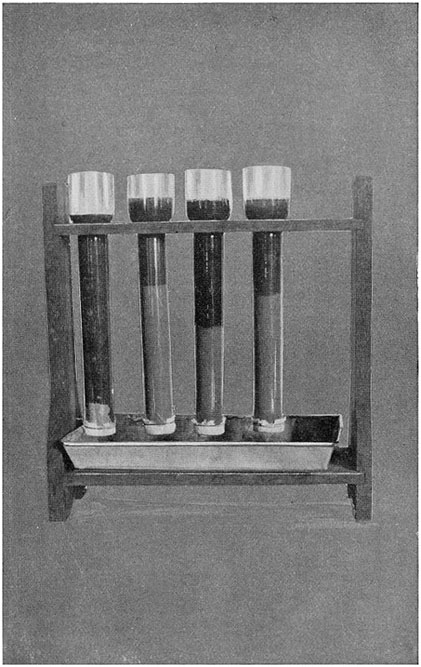
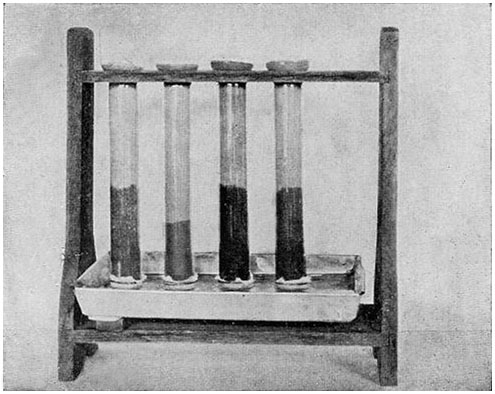
FIG. 22.—PERCOLATION EXPERIMENT.
To show the relative powers of soils to take in water falling on the
surface. A, sand; B, clay; C, humus; D, garden soil.ToList
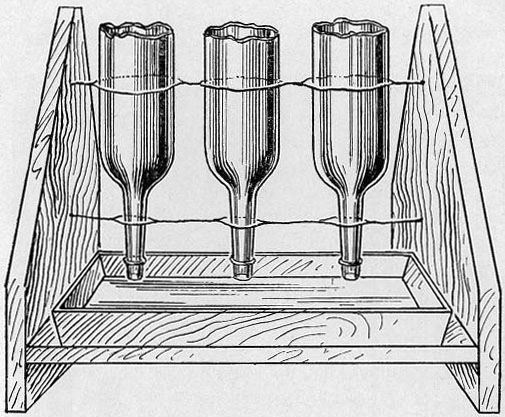
Experiment.—Take four student-lamp chimneys. (In case the chimneys cannot be found get some slender bottles like salad oil bottles or wine bottles and cut the bottoms off with a hot rod. While the rod is heating make a shallow notch in the glass with the wet corner of a file in the direction you wish to make the cut. When the rod is hot lay the end of it lengthwise on the notch. Very soon a little crack will be seen to start from the notch. Lead this crack around the bottle with the hot rod and the bottom of the bottle will drop off.) (Fig. 23.) Make a rack to hold them. Tie a piece of cheese cloth or other thin cloth over the small ends of the chimneys. Then fill them nearly full respectively, of dry, sifted, coarse sand, clay, humus soil, and garden soil. Place them in the rack; place under them a pan or dish. Pour water in the upper ends of the tubes until it soaks through and drips from the lower end (Fig. 22). Ordinary sunburner lamp chimneys may be used for the experiment by tying the cloth over the tops; then invert them, fill them with soil and set in plates or pans. The sand will take the water in and let it run through quickly; the clay is very slow to take it in and let it run through; the humus soil takes the water in quite readily. Repeat the experiment with one of the soils, packing the soil tightly in one tube and leaving it loose in another. The water will be found to penetrate the loose soil more rapidly than the packed soil. We see then that the power of the soil to take in rainfall depends on its texture or the size and compactness of the particles.
If the soil of our farm is largely clay, what happens to the rain that falls on it? The clay takes the water in so slowly that most of it runs off and is lost. Very likely it carries with it some of the surface soil which it has soaked and loosened, and thus leaves the farm washed and gullied.
What can we do for our clay soils to help them to absorb the rain more rapidly? For immediate results we can plow them and keep them loose and open with the tillage tools. For more permanent results we may mix sand with them, but sand is not always to be obtained and is expensive to haul. The best method is to mix organic matter with them by plowing in stable manures, or woods soil, or decayed leaves, or by growing crops and turning them under. The organic matter not only loosens the soil but also adds plant food to it, and during its decay produces carbonic acid which helps to dissolve the mineral matter and make available the plant food that is in it.
Clay soils can also be made loose and open by applying lime to them.
Experiment.—Take two bottles or jars, put therein a few spoonsful of clay soil, fill with water, put a little lime in one of them, shake both and set them on the table. It will be noticed that the clay in the bottle containing lime settles in flakes or crumbs, and much faster than in the other bottle. In the same manner, lime applied to a field of clay has a tendency to collect the very fine particles of soil into flakes or crumbs and give it somewhat the open texture of a sandy soil. Lime is applied to soil for this purpose at the rate of twenty bushels per acre once in four or five years.
Which soils have the greater power to absorb or pump moisture from below?
Experiment.—Use the same or a similar set of tubes as in the experiment illustrated in Fig. 23. Fill the tubes with the same kinds of dry sifted soils. Then pour water into the pan or dish beneath the tubes until it rises a quarter of an inch above the lower end of the tubes (Fig. 24). Watch the water rise in the soils. The water will be found to rise rapidly in the sand about two or three inches and then stop or continue very slowly a short distance further. In the clay it starts very slowly, but after several hours is finally carried to the top of the soil. The organic matter takes it up less rapidly than the sand, faster than the clay, and finally carries it to the top. By this and further experiments it will be found that the power of soils to take moisture from below depends on their texture or the size and closeness of their particles.
We found the sand pumped the water only a short distance and then stopped.
What can we do for our sandy soils to give them greater power to take moisture from below? For immediate results we can compact them by rolling or packing. This brings the particles closer together, makes the spaces between them smaller, and therefore allows the water to climb higher. For more lasting results we can fill them with organic matter in the shape of stable manures or crops turned under. Clay may be used, but is expensive to haul.
Which soils have greatest power to hold the water which enters them?
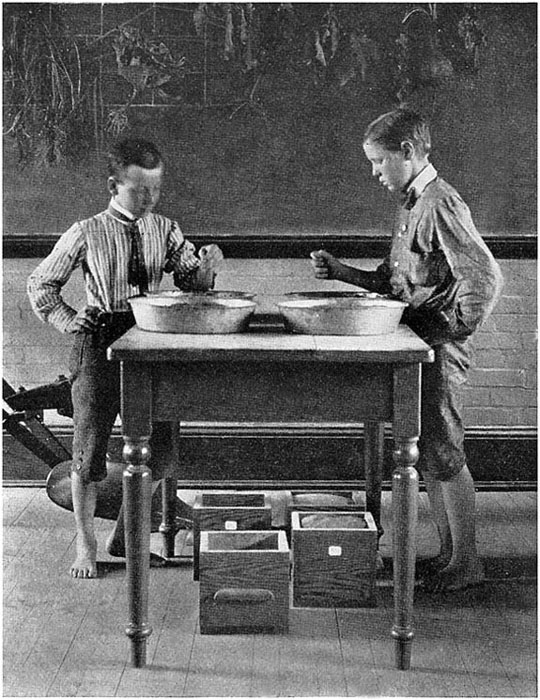
Experiment.—Use the same or similar apparatus as for the last experiment. After placing the cloth caps over the ends of the tubes label and carefully weigh each one, keeping a record of each; then fill them with the dry soils and weigh again. Now place the tubes in the rack and pour water in the upper ends until the entire soil is wet; cover the tops and allow the surplus water to drain out; when the dripping stops, weigh the tubes again, and by subtraction find the amount of water held by the soil in each tube; compute the percentage. It will be found that the organic matter will hold a much larger percentage of water than the other soils; and the clay more than the sand. The tube of organic soil will actually hold a larger amount of water than the other tubes. (See also Fig. 25.)
In the experiment on page 40 we noticed that the sand took in the water poured on its surface and let it run through very quickly. This is a fault of sandy soils.
What can we do for our sandy soils to help them to hold better the moisture which falls on them and tends to leach through them? For immediate effect we can close the pores somewhat by compacting the soil with the roller. For more lasting effects, we can fill them with organic matter.
Which soils will hold longest the water which they have absorbed? Or which soils will keep moist longest in dry weather?
Experiment.—Fill a pan or bucket with moist sand, another with moist clay, and a third with moist organic matter; set them in the sun to dry and notice which dries last. The organic matter will be found to hold moisture much longer than the other soils. The power of the other soils to hold moisture through dry weather can be improved by mixing organic matter with them.
We find then that the power of soils to absorb and hold moisture depends on the amount of sand, clay, or humus which they contain, and the compactness of the particles. We see also how useful organic matter is in improving sandy and clayey soils.
By this time the soils we left in the pans (see page 26), sand, clay, humus and garden soil, must be dry. If so, examine them. We find that the clay which was stirred when wet has dried into an almost bricklike mass, while that which was not stirred is not so hard, though it has a thick, hard crust. The sand is not much affected by stirring when wet. The organic matter which was stirred when wet has perhaps stiffened a little, but very easily crumbles; the unstirred part was not much affected by the wetting and drying.
The garden soil after drying is not as stiff as the clay nor as loose as the sand and humus. This is because it is very likely a mixture of all three, the sand and the humus checking the baking. This teaches us that it is not a good plan to work soils when they are wet if they are stiff and sticky; and that our stiff clay soils can be kept from drying hard or baking by the use of organic matter. "And that's a witness" for organic matter.
The relation of the soil to moisture is very important, for moisture is one of the greatest factors if not the greatest in the growth of the crop.
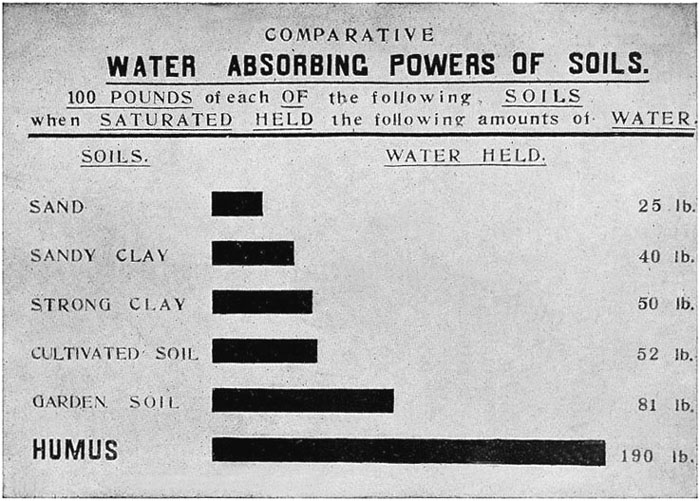
The power to absorb or soak up moisture from any source is greatest in those soils whose particles are smaller and fit closer together.
It is for this reason that strong loams and clay soils absorb and hold three times as much water as sandy soils do, while peaty or humus soils absorb a still larger proportion.
The reason why crops burn up so quickly on sandy soils during dry seasons is because of their weak power to hold water.
The clay and humus soils carry crops through dry weather better because of their power to hold moisture and to absorb or soak up moisture from below. It is for this reason also that clay and peaty soils more often need draining than sandy soils.
When rain falls on a sandy soil it enters readily, but it is apt to pass rapidly down and be, to a great extent, lost in the subsoil, for the sand has not sufficient power to hold much of it.
When rain falls on a clay soil it enters less readily because of the closeness of the particles, and during long rains or heavy showers some of the water may run off the surface. If the surface has been recently broken and softened with the plow or cultivator the rain enters more readily. What does enter is held and is not allowed to run through as in the case of the sand.
Humus soil absorbs the rain as readily as the sand and holds it with a firmer grip than clay.
This fact gives us a hint as to how we may improve the sand and clay.
Organic matter mixed with these soils by applying manures or plowing under green crops will cause the sand to hold the rain better and the clay to absorb it more readily.
Water which comes to the soil and is absorbed exists in the soil principally in two forms: Free water and capillary water.
Free water is that form of water which fills our wells, is found in the bottoms of holes dug in the ground during wet seasons and is often found standing on the surface of the soil after heavy or long continued rains. It is sometimes called ground water or standing water and flows under the influence of gravity.
Is free water good for the roots of farm plants? If we remember how the root takes its food and moisture, namely through the delicate root hairs; and also remember the experiment which showed us that roots need air, we can readily see that free water would give the root hairs enough moisture, but it would at the same time drown them by cutting off the air. Therefore free water is not directly useful to the roots of house plants or farm plants, excepting such as are naturally swamp plants, like rice, which grows part of the time with its roots covered with free water.
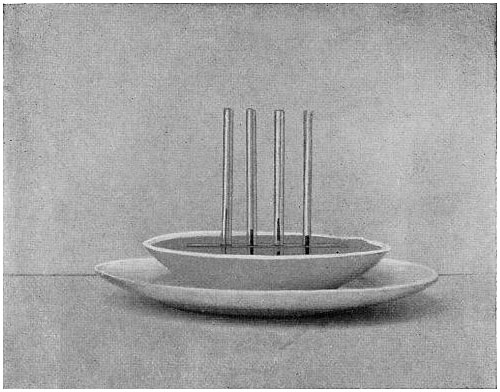
FIG. 26.—CAPILLARY TUBES.
To show how water rises in small tubes or is drawn into small spaces.ToList

FIG. 27.—CAPILLARY PLATES
Water is drawn to the highest point where the glass plates are closest
together.ToList
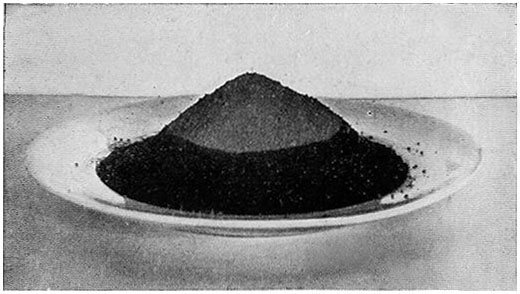
FIG. 28.
A cone of soil to show capillarity. Water poured about the base of
this cone of soil has been drawn by capillary force half-way to the
top.ToList
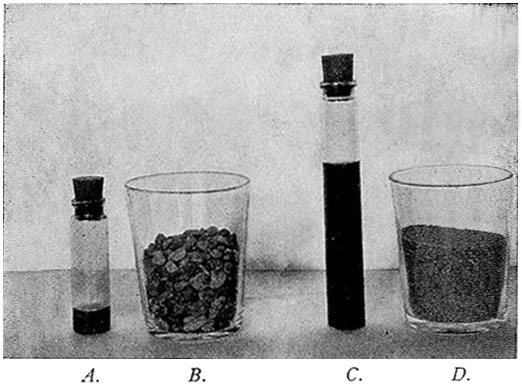
FIG. 29.
To show the relative amounts of film-moisture held by coarse and fine
soils. The colored water in bottle A represents the amount of water
required to cover the half pound of pebbles in the tumbler B with a
film of moisture. The colored water in bottle C shows the amount
required to cover the soil grains in the half pound of sand in tumbler
D.ToList
If you will take a number of glass tubes of different sizes, the largest not more than one-fourth of an inch in diameter, and hold them with one end of each in water or some colored liquid, you will notice that the water rises in the tubes (Fig. 26), and that it rises highest in the smallest tube. The force which causes the water to rise in these tubes is called the capillary force, from the old Latin word capillum (a hair), because it is most marked in hair-like tubes, the smaller the tube the higher the water will rise. The water which rises in the tubes is called capillary water.
Another method of illustrating capillary water is to tie or hold together two flat pieces of glass, keeping two of the edges close together and separating the opposite two about one-eighth of an inch with a sliver of wood. Then set them in a plate of water or colored liquid and notice how the water rises between the pieces of glass, rising higher the smaller the space (Fig. 27). It is the capillary force which causes water to rise in a piece of cloth or paper dipped in water.
Take a plate and pour onto it a cone-shaped pile of dry sand or fine soil; then pour water around the base of the pile and note how the water is drawn up into the soil by capillary force (Fig. 28).
Capillary water is the other important form of water in the soil. This is moisture which is drawn by capillary force or soaks into the spaces between the soil particles and covers each particle with a thin film of moisture.
Take a marble or a pebble, dip it into water and notice the thin layer or film of water that clings to it. This is a form of capillary water and is sometimes called film water or film moisture. Take a handful of soil that is moist but not wet, notice that it does not wet the hand, and yet there is moisture all through it; each particle is covered with a very thin film of water.
Now this film water is just the form of water that can supply the very slender root hairs without drowning them, that is, without keeping the air from them. And the plant grower should see to it that the roots of his plants are well supplied with film water and are not drowned by the presence of free water. Capillary water may sometimes completely fill the spaces between the soil particles; when this occurs the roots are drowned just as in the case of free water as we saw when cuttings were placed in the puddled clay (see Fig. 18). Free water is indirectly of use to the plant because it serves as a supply for capillary and film moisture.
Now I think we can answer the question which was asked when we were studying the habit of growth of roots but was left unanswered at the time (see page 14). The question was this: Of what value is it to the farmer to know that roots enter the soil to a depth of three to six feet? We know that roots will not grow without air. We also know that if the soil is full of free water there is no air in it, and, therefore, roots of most plants will not grow in it. It is, therefore, of interest to the farmer to see that free water does not come within at least three or four feet of the surface of the soil so that the roots of his crops may have plenty of well ventilated soil in which to develop. If there is a tendency for free water to fill the soil a large part of the time, the farmer can get rid of it by draining the land. We get here a lesson for the grower of house plants also. It is that we must be careful that the soil in the pots or boxes in which our plants are growing is always supplied with film water and not wet and soggy with free water. Water should not be left standing long in the saucer under the pot of a growing plant. It is best to water the pot from the top and let the surplus water drain into the saucer and then empty it out.
Which soils have the greatest capacity for film water?
Experiment.—Place in a tumbler or bottle one-half pound of pebbles about the size of a pea or bean; pour a few drops of water on them and shake them; continue adding water and shaking them till every pebble is covered with a film of water; let any surplus water drain off. Then weigh again; the difference in the two weights will be approximately the weight of the film water that the pebbles can carry. Repeat this with sand and compare the two amounts of water. A striking illustration can be made by taking two slender bottles and placing in them amounts of colored water equal to the amounts of film water held by the pebbles and sand respectively. In the accompanying illustration (Fig. 29), A represents the amount of water that was found necessary to cover the pebbles in tumbler B with a film of moisture. C is the amount that was necessary to cover with a film the particles of sand in D. The finer soil has the greater area for film moisture. It has been estimated that the particles of a cubic foot of clay loam have a possible aggregate film surface of three-fourths of an acre.
We noticed in previous paragraphs that soil might at times have too much water in it for proper ventilation and so check the growth of the roots of the plant. Now is it possible that soil water may be lost or wasted and if so can we check the loss?
In the experiment to find out how well the soils would take in the rainfall (page 40) we noticed that the clay soil took in the water very slowly and that on a field of clay soil part of the rain water would be likely to run off over the surface and be lost. Free water may be lost then, by surface wash.
We noticed methods of checking this loss, namely, pulverizing the soil with the tillage tools and putting organic matter into it to make it absorb the rain more readily.
We noticed that water poured on the sand ran through it very quickly and was apt to be lost by leaching or percolation. This we found could be checked by rolling the soil and by putting organic matter into it to close the pores.
We learned that roots take water from the soil for the use of the plant and send it up to the leaves, which in turn send it out into the air, or transpire it, as this process is called. We learned also that the amount transpired is very great. Now water that is pumped up and transpired by the crops we are growing we consider properly used. But when weeds grow with the crop and pump and transpire water we consider this water as lost or wasted.
Water may be lost then by being pumped up and transpired by weeds. And this is the way weeds do their greatest injury to crops during dry weather. The remedy is easily pointed out. Kill the weeds or do not let them get a start.
There is another way, which we are not apt to notice, by which water may be lost from the soil. When the soil in the pans in a previous experiment (page 26) had been wet and set aside a few days it became very dry. How did the water get out of this soil? That at the surface of the soil evaporated or was changed into vapor and passed into the air. Then water from below the surface was pumped up by capillary force to take its place just as the water was pumped up in the tubes of soil. This in turn was evaporated and the process repeated till all of the water in the soil had passed into the air. Now this process is going on in the field whenever it is not raining or the ground is not frozen very hard.
Water then may be lost by evaporation.
How can we check this loss?
Suppose we try the experiment of covering the soil with some material that cannot pump water readily.
Experiment.—Take four glass fruit jars, two-quart size, with straight sides. If you cannot get them with straight sides cut off the tops with a hot iron just below the shoulder; tin pails will do if the glass jars cannot be had. Fill these with moist soil from the field or garden, packing it till it is as hard as the unplowed or unspaded soil. Leave one of them in this condition; from two of them remove an inch or two of soil and replace it in the case of one with clean, dry, coarse sand, and in the case of the other with chaff or straw cut into half-inch lengths. Stir the soil in the fourth one to a depth of one inch, leaving it light and crumbly. Now weigh the jars and set them aside. Weigh each day for several days. The four jars illustrated in Fig. 30 were prepared in this way and allowed to stand seven days. In that time they lost the following amounts of water:
Amounts of water lost from jars of prepared soil in seven days.
No. 1 packed soil—lost 5.5 oz. equal to about 75 tons per acre.
No. 2 covered with straw—lost 2 oz. equal to about 27 tons per acre.
No. 3 covered with dry sand—lost 0 oz. equal to about tons per acre.
No. 4 covered with crumbled soil—lost 2.5 oz., equal to about 34 tons
per acre.
Why did not 2, 3 and 4 lose as much water as No. 1?
The soil in jar No. 1 was packed and water was pumped to the surface by capillary force and was evaporated as fast as it came to the surface.
In No. 2 the water could rise rapidly until it reached the straw, then it was stopped almost entirely. But the straw being coarse, the air circulated in it more or less freely and there was a slow loss by evaporation. In jar No. 3 the water could rise only to the sand, which was so coarse that the water could not climb on it to the surface, and the air circulated in the sand so slowly that there was not sufficient evaporation to affect scales weighing to one-quarter ounce. No. 4 lost less than No. 1 because, as in the case of the sand, the water could not climb rapidly to the surface on the coarse crumbs of soil. The loss that did take place from No. 4 was what the air took from the loosely stirred soil on the surface with a very little from the lower soil. Simply stirring the surface of the sod in No. 4 reduced the loss of water to less than half the loss from the hard soil in No. 1.
This experiment gives us the clew to the method of checking loss of water from the soil by evaporation. It is to keep the water from climbing up to the surface, or check the power of the soil to pump the water to the surface by making it loose on top. This loose soil is called a soil mulch. Everything that we do to the soil that loosens and crumbles the surface tends to check the loss of water by evaporation from the soil below.
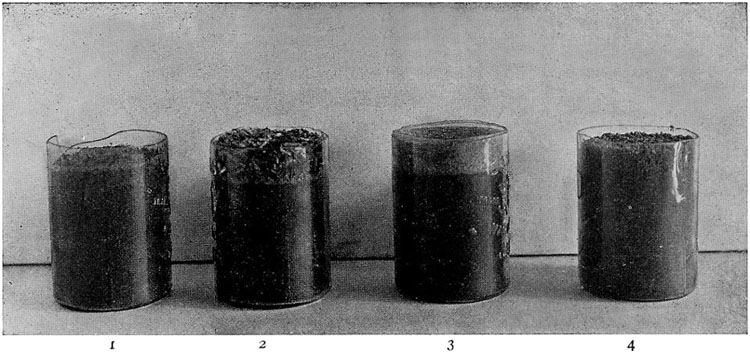
FIG. 30.—TO SHOW THE EFFECT OF A SOIL MULCH
1. Packed soil, lost in 7 days 5.5 ozs. water, equal to 75 tons per acre.
2. Packed soil, covered with straw, lost in 7 days 2 ozs. water, equal to 27 tons per acre.
3. Packed soil, covered with sand, lost in 7 days 0 ozs. water, equal to tons per acre.
4. Packed soil, covered with soil mulch, lost in 7 days 2.5 ozs. water, equal to 34 tons per
acre.ToList
We learned that roots need heat for their growth and development. Now what is the relation of the different kinds of soil toward heat or what are their relative powers to absorb and hold heat?
Experiment.—Some days before this experiment, spread on a dry floor about a half bushel each of sand, clay and decayed leaf mould or black woods soil. Stir them occasionally till they are thoroughly dry. When they are dry place them separately in three boxes or large flower pots and keep dry. In three similar boxes or pots place wet sand, wet clay, and wet humus. Place a thermometer in each of the soils, placing the bulb between one and two inches below the surface (Fig. 31). Then place the soils out of doors where the sun can shine on them and leave them several days. If a rain should come up protect the dry soils. Observe and make a record of the temperatures of each soil several times a day. Chart the average of several days observations. Fig. 32 shows the averages of several days observations on a certain set of soils.
It will be noticed that the temperature of the soils increased until the early part of the afternoon and after that time they lost heat.
Experiment.—Hold your hand in bright sunlight or near a warm stove or radiator. Your hand is warmed by heat radiated from the sun or warm stove through the air to your body. In the same manner the rays of the sun heat the surface of the soil.
Experiment.—Take the stove poker or any small iron rod and hold one end of it in the fire or hold one end of a piece of wire in a candle or lamp flame. The end of the rod or wire will quickly become very hot and heat will gradually be carried its entire length until it becomes too hot to hold. This carrying of the heat from particle to particle through the length of the rod is called heating by conduction. Now when the warm rays of the sun reach the soil, or a warm wind blows over it, the surface particles are warmed and then pass the heat on to the next ones below, and these in turn pass it to others and so on till the soil becomes heated to a considerable depth by conduction.
A clay soil will absorb heat by conduction faster than a sandy soil because the particles of the clay lie so close together that the heat passes more readily from one to another than in the case of the coarser sand.
If the soil is open and porous, warm air and warm rains can enter readily and carry heat to the lower soil.
You have noticed how a pile of stable manure steams in cold weather. You doubtless know that manure from the horse stable is often used to furnish heat for hotbeds and for sweet potato beds.
Now the heat which warms the manure and sends the steam out of it, and warms the hotbed and sweet potato bed, is produced by the decaying or rotting of the manure. More or less heat is produced by the decay of all kinds of organic matter. So if the soil is well supplied with organic matter, the decay of this material will add somewhat to the warmth of the soil.
Wet one of your fingers and hold your hand up in the air. The wet finger will feel colder than the others and will gradually become dry. This is because some of the heat of your finger is being used to dry up the water or change it into a vapor, or in other words to evaporate it.
In the same manner a wet soil loses heat by the evaporation of water from its surface.
Experiment.—Heat an iron rod, take it from the fire and hold it near your face or hand. You will feel the heat without touching the rod. The heat is radiated from the rod through the air to your body and the rod gradually cools. In the same way the soil may lose its heat by radiating it into the air. A clay soil will lose more heat by radiation than a sandy soil because the clay is more compact.
It will be noticed that the dry soils are warmer than the wet ones. Why is this? Scientists tell us that it takes a great deal more heat to warm water than it does to warm other substances. Therefore when soil is wet it takes much more heat to warm it than if it were dry.
It will be seen that of the dry soils the humus is the warmest. Why?
Experiment.—Take two thermometers, wrap the bulb of one with a piece of black or dark colored cloth and the bulb of the other with a piece of white cloth, then place them where the sun will shine on the cloth covered bulbs. The mercury in both thermometers will be seen to rise, but in the thermometer with the dark cloth about the bulb it will rise faster and higher than in the other. This shows that the dark cloth absorbs heat faster than the white cloth. In the same manner a dark soil will absorb heat faster than a light colored soil; therefore it will be warmer if dry.
Why was the dry clay warmer than the dry sand?
Because its darker color helped it to absorb heat more rapidly than the sand, and, as the particles were smaller and more compact, heat was carried into it more rapidly by conduction.
Why were the wet humus and clay cooler than the wet sand?
As they were darker in color and the clay was more compact than the sand, they must have absorbed more heat, but they also held more water, and, therefore, lost more heat by evaporation.
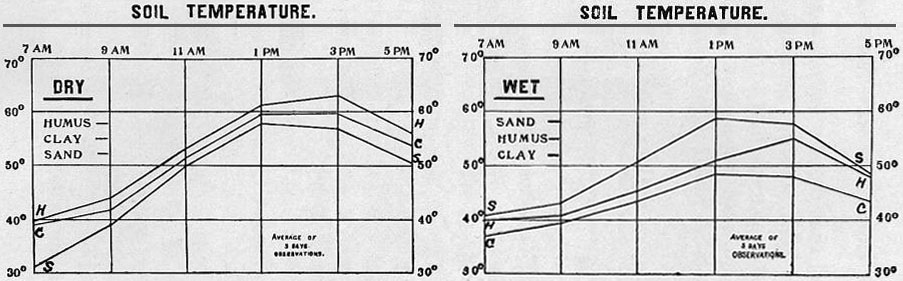
FIG. 32.
Charts showing average temperature of a set of dry and wet soils
during a period of five days. H, humus; C, clay; S, sand.ToList
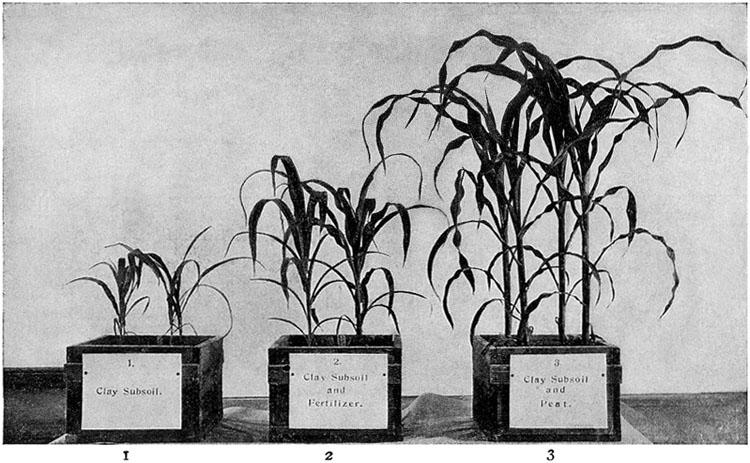
FIG. 33.
To show the value of organic matter. 1 contains clay subsoil; 2, clay
subsoil and fertilizer; 3, clay subsoil and organic matter.
All planted at the same time.ToList
Of the dry soils, then, the humus averaged warmest, because, on account of its dark color, it absorbed heat more readily than the others. The dry clay was warmer than the sand on account of its color and compact texture. Of the wet soils the sand was the warmest, because, on account of its holding less moisture, less heat was required to raise its temperature and there was less cooling by evaporation, while the other soils, although they absorbed more heat than the sand, lost more on account of greater evaporation, due to their holding more moisture. Why are sandy soils called warm soils and clay soils said to be cold?
How may we check losses of heat from the soil?
If we make a mulch on the surface of the soil evaporation will be checked and therefore loss of heat by evaporation will be checked also. The mulch will also check the conduction of heat from the lower soil to the surface and therefore check loss of heat by radiation from the surface.
Figure 33 illustrates a simple way to show the value of organic matter in the soil. The boxes are about twelve inches square and ten inches deep. They were filled with a clay subsoil taken from the second foot below the surface of the field. To the second box was added sufficient commercial fertilizer to supply the plants with all necessary plant food. To the third box was added some peat or decayed leaves, in amount about ten per cent. of the clay subsoil. The corn was then planted and the boxes were all given the same care. The better growth of the corn in the third box was due to the fact that the organic matter not only furnished food for the corn but during its decay prepared mineral plant food that was locked up in the clay, and also brought about better conditions of air and moisture by improving the texture of the soil. The plants in the second box had sufficient plant food, but did not make better growth because poor texture prevented proper conditions of air and moisture. "And that's another witness" for organic matter. Decaying organic matter or humus is really the life of the soil and it is greatly needed in most of the farm soils of the eastern part of the country. It closes the pores of sandy soils and opens the clay, thus helping the sand to soak up and hold more moisture and lessening excessive ventilation, and at the same time helping the roots to take a firmer hold. It helps the clay to absorb rain, helps it to pump water faster, helps it to hold water longer in dry weather, increases ventilation, favors root penetration and increases heat absorption. We can increase the amount of organic matter in the soil by plowing in stable manure, leaves and other organic refuse of the farm, or we can plow under crops of clover, grass, grain or other crops grown for that purpose.
We learned in previous paragraphs that the roots of plants take food from the soil, and that a condition necessary for the root to do its work for the plant was the presence of available plant food in sufficient quantities.
What is plant food? For answer let us go to the plant and ask it what it is made of.
Experiment.—Take some newly ripened cotton or cotton wadding, a tree branch, a cornstalk, and some straw or grass. Pull the cotton apart, then twist some of it and pull apart; in turn break the branch, the cornstalk and the straw. The cotton does not pull apart readily nor do the others break easily; this is because they all contain long, tough fibres. These fibres are called woody fibre or cellulose. The cotton fibre is nearly pure cellulose.
Experiment.—Get together some slices of white potato, sweet potato, parsnip, broken kernels of corn, wheat and oats, a piece of laundry starch and some tincture of iodine diluted to about the color of weak tea. Rub a few drops of the iodine on the cut surfaces of the potatoes, parsnip, and the broken surfaces of the grains. Notice that it turns them purple. Now drop a drop of the iodine on the laundry starch. It turns that purple also. This experiment tells us that plants contain starch.
Experiment.—Chew a piece of sorghum cane, sugar cane, cornstalk, beet root, turnip root, apple or cabbage. They all taste sweet and must therefore contain sugar.
Examine a number of peach and cherry trees. You will find on the trunk and branches more or less of a sticky substance called gum.
Experiment.—Crush on paper seeds of cotton, castor-oil bean, peanuts, Brazil nuts, hickory nuts, butternuts, etc. They make grease spots; they contain fat and oil.
Experiment.—Chew whole grains of wheat and find a gummy mucilaginous substance called wheat gum, or wet a pint of wheat flour to a stiff dough, let it stand about an hour, and then wash the starch out of it by kneading it under a stream of running water or in a pan of water, changing the water frequently. The result will be a tough, yellowish gray, elastic mass called gluten. This is the same as the wheat gum and is called an albuminoid because it contains nitrogen and is like albumen, a substance like the white of an egg.
If we crush or grate some potatoes or cabbage leaves to a pulp and separate the juice, then heat the clear juice, a substance will separate in a flaky form and settle to the bottom of the liquid. This is vegetable albumen.
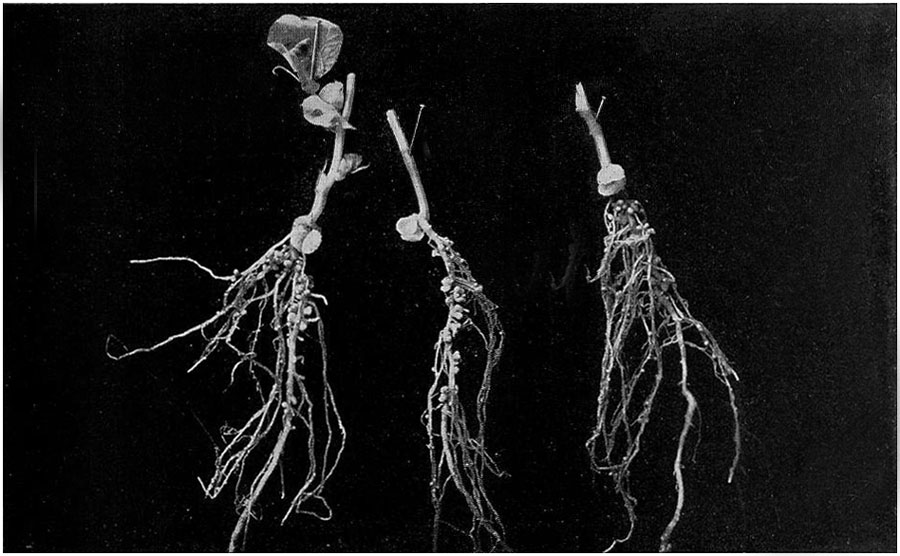
FIG. 35.
Garden-pea roots, showing tubercles or nodules, the homes of
nitrogen-fixing bacteria.ToList
Experiment.—Crush the leaves or stems of several growing plants and notice that the crushed and exposed parts are moist. In a potato or an apple we find a great deal of moisture. Plants then are partly made of water. In fact growing plants are from 65 to 95 per cent. water.
Experiment.—Expose a plant or part of a plant to heat; the water is driven off and there remains a dry portion. Heat the dry part to a high degree and it burns; part passes into the air as smoke and part remains behind as ashes.
We have found then the following substances in plants: Woody fibre or cellulose, starch, sugar, gum, fats and oils, albuminoids, water, ashes. Aside from these are found certain coloring matters, certain acids and other matters which give taste, flavor, and poisonous qualities to fruits and vegetables. More or less of all these substances are found in all plants. Now these are all compound substances. That is, they can all be broken down into simpler substances, and with the exception of the water and the ashes, the plants do not take them directly from the soil.
The chemists tell us that these substances are composed of certain chemical elements, some of which the plant obtains from the air, some from the soil and some from water.
The following table gives the substances found in plants, the elements of which they are composed, and the sources from which the plants obtain them:
| Substances found in plants. | Elements of which they are made. | Sources from which plants obtain them. | ||
| Cellulose or woody fibre | } | |||
| Starch | } | Carbon | Air | |
| Sugar | } | Oxygen | } | |
| Gum | } | Hydrogen | } | Water |
| Fat and Oil | } | |||
| { | Carbon | Air | ||
| { | Oxygen | } | ||
| Albuminoids | { | Hydrogen | } | Water |
| { | Nitrogen | } | ||
| { | Sulphur | } | ||
| { | Phosphorus | } | ||
| } | Phosphorus | } | Soil | |
| } | Potassium | } | ||
| Ashes | } | Calcium | } | |
| } | Magnesium | } | ||
| } | Iron | } | ||
| Water | } | Oxygen | } | |
| } | Hydrogen | } | Soil |
Here is a brief description of these chemical elements.
Oxygen, a colorless gas, forms one-fifth of the air.
Hydrogen, a colorless gas, forms a part of water.
Carbon, a dark solid, forms nearly one-half of all organic matter; charcoal is one of its forms. The lead in your pencil is another example.
Nitrogen, a colorless gas, forms four-fifths of the air. Found in all albuminoids.
Sulphur, a yellow solid.
Phosphorus, a yellowish white solid.
Potassium, a silver white solid.
Calcium, a yellowish solid. Found in limestone.
Magnesium, a silver white solid.
Iron, a silver gray solid.
Of these elements the nitrogen, sulphur, phosphorus, potassium, calcium, magnesium, and iron must not only exist in the soil but must also be there in such form that the plant can use them. The plant does not use them in their simple elementary form but in various compounds. These compounds must be soluble in water or in weak acids.
Of these seven elements of plant food the nitrogen, phosphorus, and potassium and calcium are of particular importance to the farmer, because they do not always exist in the soil in sufficient available quantities to produce profitable crops. Professor Roberts, of Cornell University, tells us that an average acre of soil eight inches deep contains three thousand pounds of nitrogen. The nitrogen exists largely in the humus of the soil and it is only as the humus decays that the nitrogen is made available. Here is another reason for keeping the soil well supplied with organic matter. The decay of this organic matter is hastened by working the soil; therefore good tillage helps to supply the plant with nitrogen.
If the nitrogen becomes available when there is no crop on the soil it will be washed out by rains and so lost. Therefore the soil, especially if it is sandy, should be covered with a crop the year through. Many lands lose large amounts of plant food by being left bare through the fall and winter, especially in those parts of the country where the land does not freeze. The phosphorus, potassium and calcium also exist in most soils in considerable quantities, but often are not available; thorough tillage and the addition of organic matter will help to make them available, and new supplies may be added in the form of fertilizers. Calcium is found in nearly all soils in sufficient quantities for most crops, but sometimes there is not enough of it for such crops as clover, cowpea, alfalfa, etc. It is also used to improve soil texture. The entire subject of commercial fertilizers is based almost entirely on the fact of the lack of these four elements in the soil in sufficient available quantities to grow profitable crops. The plant gets its phosphorus from phosphoric acid, its potassium from potash, and its calcium from lime.
There is a class of plants which have the power of taking free nitrogen from the air. These are the leguminous plants; such as clover, beans, cowpeas, alfalfa, soy bean, etc. They do it through the acid of microscopic organisms called bacteria which live in nodules or tubercles on the roots of these plants (Figs. 34-35). Collect roots of these plants and find the nodules on them. The bacteria take nitrogen from the air which penetrates the soil and give it over to the plants. Here is another reason for good soil ventilation.
This last fact brings us to another very important property of soils. Soils have existing in them many very small plants called bacteria. They are so very small that it would take several hundred of them to reach across the edge of this sheet of paper. We cannot see them with the naked eye but only with the most powerful microscopes. Some of these minute plants are great friends to the farmer, for it is largely through their work that food is made available for the higher plants. Some of them break down the organic matter and help prepare the nitrogen for the larger plants. Others help the leguminous plants to feed on the nitrogen of the air. To do their work they need warmth, moisture, air, and some mineral food; these conditions we bring about by improving the texture of the soil by means of thorough tillage and the use of organic matter.
In the spring comes the great seed-planting time on the farm, in the home garden and in the school garden. Many times the questions will be asked: Why didn't those seeds come up? How shall I plant seeds so as to help them sprout easily and grow into strong plants? To answer these questions, perform a few experiments with seeds, and thus find out what conditions are necessary for seeds to sprout, or germinate. For these experiments you will need a few teacups, glass tumblers or tin cans, such as tomato cans or baking-powder cans; a few plates, either of tin or crockery; some wide-mouth bottles that will hold about half a pint, such as pickle, olive, or yeast bottles or druggists' wide-mouth prescription bottles; and a few pieces of cloth. Also seeds of corn, garden peas and beans.
Experiment.—Put seeds of corn, garden peas, and beans (about a handful of each) to soak in bottles or tumblers of water. Next day, two hours earlier in the day, put a duplicate lot of seeds to soak. When this second lot of seeds has soaked two hours, you will have two lots of soaked seeds of each kind, one of which has soaked twenty-four hours and the other two hours. Now take these seeds from the water and dry the surplus water from them by gently patting or rubbing a few at a time in the folds of a piece of cloth, taking care not to break the skin or outer coating of the seed. Place them in dry bottles, putting in enough to cover the bottoms of the bottles about three seeds deep; cork the bottles. If you cannot find corks, tie paper over the mouths of the bottles. Label the bottles "Seeds soaked 24 hours," "Seeds soaked 2 hours," and let them stand in a warm place several days. If there is danger of freezing at night, the bottles of seeds may be kept in the kitchen or living room where it is warm, until they sprout.
Observe the seeds from day to day. The seeds that soaked twenty-four hours will sprout readily (Fig. 36), while most, if not all, of those that soaked only two hours will not sprout. Why is this? It is because the two-hour soaked seeds do not receive sufficient moisture to carry on the process of sprouting.
Our experiment teaches us that seeds will not sprout until they receive enough moisture to soak them through and through.
This also teaches that when we plant seeds we must so prepare the soil for them and so plant them that they will be able to get sufficient moisture to sprout.
Experiment.—Soak some beans, peas or corn, twenty-four hours; carefully dry them with a cloth. In one half-pint bottle place enough of them to cover the bottom of the bottle two or three seeds deep; mark this bottle A. Fill another bottle two-thirds full of them and mark the bottle B (Fig. 37). Cork the bottles and let them stand for several days. Also let some seeds remain soaking in the water. The few seeds in bottle A will sprout, while, the larger number in bottle B will not sprout, or will produce only very short sprouts. Why do not the seeds sprout easily in the bottle which is more than half full?
To answer this question try the following experiment:
Experiment.—Carefully loosen the cork in bottle B (the bottle containing poorly sprouted seeds), light a match, remove the cork from the bottle and introduce the lighted match. The match will stop burning as soon as it is held in the bottle, because there is no fresh air in the bottle to keep the match burning. Test bottle A in the same way. What has become of the fresh air that was in the bottles when the seeds were put in them? The seeds have taken something from it and have left bad air in its place; they need fresh air to help them sprout, but they have not sprouted so well in bottle B because there was not fresh air enough for so many seeds. The seeds in the water do not sprout because there is not enough air in the water. Now try another experiment.
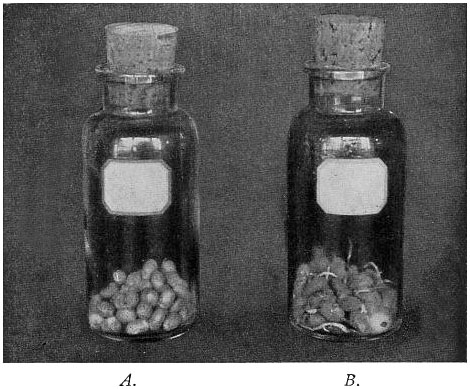
FIG. 36.
To show that seeds need water for germination. The beans in bottle A
were soaked 2 hours, those in bottle B were soaked 24 hours. They
were then removed from the water and put into dry bottles.ToList
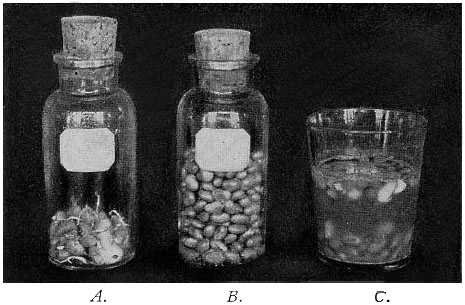
FIG. 37.
To show that seeds need air for germination. The beans in both bottles
were soaked 24 hours, and then were put into dry bottles Bottle A
contained sufficient air to start the few seeds. Bottle B had not
enough. The water in the tumbler C did not contain sufficient air
for germination. See experiment, page 72.ToList
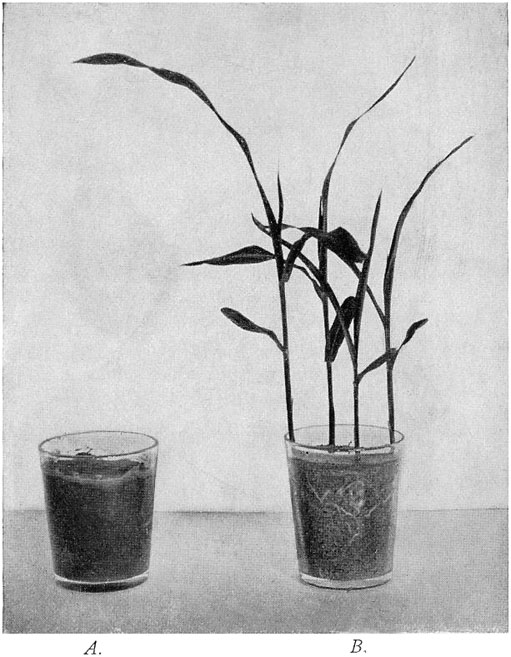
FIG. 38.
To show that seeds need air for germination. Corn planted in puddled
clay in tumbler A could not get sufficent air for sprouting. The
moist sand in tumbler B admitted sufficient air for germination.ToList
Experiment.—Fill some tumblers or teacups or tin cans with wet sand and others with clay that has been wet and then thoroughly stirred till it is about the consistency of cake batter or fresh mixed mortar. Take a tumbler of the wet sand and one of the wet clay and plant two or three kernels of corn in each, pressing the kernels down one-half or three-quarters of an inch below the surface; cover the seeds and carefully smooth the surface. In other tumblers plant peas, beans, and other seeds. Cover the tumblers with saucers, or pieces of glass or board to keep the soil from drying. Watch them for several days. If the clay tends to dry and crack, moisten it, fill the cracks and smooth the surface. The seeds in the sand will sprout but those in the clay will not (see Fig. 38). Why is this? Water fills the small spaces between the particles of clay and shuts out the fresh air which is necessary for the sprouting of the seeds.
This teaches us that when we plant seeds we must so prepare the soil, and so plant the seeds that they will get enough fresh air to enable them to sprout, or, in other words, the soil must be well ventilated.
Experiment.—Plant seeds of corn and beans in each of two tumblers; set one out of doors in a cold place and keep the other in a warm place in the house. The seeds kept in the house will sprout quickly but those outside in the cold will not sprout at all. This shows us that seeds will not sprout without heat.
If the weather is warm place one of the tumblers in a refrigerator.
Why don't we plant corn in December?
Why not plant melons in January?
Why not plant cotton in November?
The seeds of farm crops may be divided into two classes according to the temperatures at which they will germinate or sprout readily and can be safely planted.
Class A. Those seeds that will germinate or sprout at an average temperature of forty-five degrees in the shade, or at about the time the peach and plum trees blossom:
| Barley | Beet | Parsley |
| Oats | Carrot | Parsnip |
| Rye | Cabbage | Onion |
| Wheat | Cauliflower | Pea |
| Red Clover | Endive | Radish |
| Crimson Clover | Kale | Turnip |
| Grasses | Lettuce | Spinach |
These can be planted with safety in the spring as soon as the ground can be prepared, and some of them, if planted in the fall, live through the winter.
Class B. Those seeds that will germinate or sprout at an average temperature of sixty degrees in the shade, or when the apple trees blossom:
| Alfalfa | Soy Bean | Squash |
| Cow Pea | Pole Bean | Cucumber |
| Corn | String Bean | Pumpkin |
| Cotton | Melon | Tomato |
| Egg Plant | Okra | Pepper |
We are now ready to answer the question: What conditions are necessary for seeds to sprout or germinate? These conditions are:
The presence of enough moisture to keep the seed thoroughly soaked.
The presence of fresh air.
The presence of more or less heat.
This teaches us that when we plant seeds in the window box or in the garden or on the farm we must so prepare the soil and so plant the seeds that they will be able to obtain sufficient moisture, heat, and air for sprouting. The moisture must be film water, for if it is free water or capillary water filling the soil pores, there can be no ventilation and, therefore, no sprouting.
In a previous experiment (page 73) the seeds planted in the wet clay did not sprout (see Fig. 38). In answer to the question, "Why is this?" some will say the seeds were bad. It often happens on the farm that the seeds do not sprout well and the farmer accuses the seedsman of selling him poor seed, but does not think that he himself may be the cause of the failure by not putting the seeds under the proper conditions for sprouting. How can we tell whether or not our seeds will sprout if properly planted? We can test them by putting a number of seeds from each package under proper conditions of moisture, heat and air, as follows:
For large seeds take two plates (see Fig. 39) and a piece of cloth as wide as the bottom of the plate and twice as long. Count out fifty or one hundred seeds from a package, wet the cloth and wring it out. Place one end of the cloth on the plate, place the seeds on the cloth and fold the other end of the cloth over them. On a slip of paper mark the number of seeds and date, and place on the edge of the plate. Now cover the whole with another plate, or with a pane of glass to keep from drying. Set the plate of seeds in a warm room and examine occasionally for several days. If the cloth tends to dry, moisten it from time to time. As the seeds sprout take them out and keep a record of them. Or leave them in the plate and after four or five days count those that have sprouted. This will give the proportion of good seeds in the packages.
For small seeds fold the cloth first and place the seeds on top of it.
Another good tester for small seeds is made by running about an inch of freshly mixed plaster of Paris into a small dish or pan and moulding flat cavities in the surface by setting bottles into it. The dish or pan and bottles should be slightly greased to prevent the plaster sticking to them. When the cast has hardened it should be turned out of the mould and set in a large dish or pan. One hundred small seeds are then counted out and put into one of the cavities, others are put into the other cavities. Water is then poured into the pan till it rises half way up the side of the plaster cast or porous saucer. The whole thing is then covered to keep in the moisture (Fig. 40).
Another method is to get boxes of finely pulverized sand or soil and carefully plant in it fifty or one hundred seeds of each kind to be tested. Then by counting those that come up, the proportion of good seeds can easily be found.
In every case the testers should be kept at a temperature of about seventy degrees or about that of the living room.
Plant a few seeds of corn, beans and garden peas in boxes or tumblers each day for several days in succession. Then put seeds of corn, beans and garden peas to soak. After these have soaked a few hours, examine them to find out how the seed is constructed. Note first the general shape of the seeds and the scar (Fig. 41-4) on one side as in the bean or pea and at one end or on one edge in the corn. This scar, also called hilum, is where the seed was attached to the seed vessel.
Cut into the bean and pea, they will be found to be protected by a tough skin or coat. Within this the contents of the seed are divided into two bodies of equal size lying close to each other and called seed leaves or cotyledons (Fig. 41-5). Between them near one end or one side will be found a pair of very small white leaves and a little round pointed projection. The part bearing the tiny leaves was formerly, and is sometimes now, called the plumule, but is generally called the epicotyl, because it grows above or upon the cotyledons. The round pointed projection was formerly called the radicle, but is now spoken of as the hypocotyl, because it grows below or under the cotyledons.
Examine a dry kernel of corn and notice that on one side there is a slight oval-shaped depression (Fig. 41-1). Now take a soaked kernel and cut it in two pieces making the cut lengthwise from the top of the kernel through the centre of the oval depression and examine the cut surface. A more or less triangular-shaped body will be found on the concave side of the kernel (see Figs. 41-2 and 41-3). This is the one cotyledon of the corn. Besides this will be found quite a mass of starchy material packed in the coverings of the kernel and in close contact with one side of the cotyledon. This is sometimes called the endosperm.
Within the cotyledon will be found a little growing shoot pointed toward the top of the kernel. This is the epicotyl, and another growing tip pointed toward the lower end of the kernel; this is the hypocotyl or the part which penetrates the soil and forms roots.
Now examine the seeds that were planted in succession. Some will be just starting a growing point down into the soil. Some of them have probably come up and others are at intermediate stages.
How did the bean get up?
After sending down a root the hypocotyl began to develop into a strong stem which crooked itself until it reached the surface of the soil and then pulled the cotyledons or seed-leaves after it (Fig. 42). These turn green and after a time shrink and fall off.
The pea cotyledons were left down in the soil, the epicotyl alone pushing up to the surface. The corn pushed a slender growing point to the surface leaving the cotyledon and endosperm behind in the soil but still attached to the little plant (Fig. 43).
Experiment.—Plant some beans in a pot or box of soil and as soon as they come up cut the seed-leaves from some of them and watch their growth for several days. It will soon be seen that the plants on which the seed-leaves were left increase in size much more rapidly than those from which the seed-leaves were removed (see Figs. 43 and 44). Sprout some corn in the seed tester. When the seedlings are two or three inches long, get a wide-mouthed bottle or a tumbler of water and a piece of pasteboard large enough to cover the top. Cut a slit about an eighth of an inch wide from the margin to the centre of the pasteboard disk. Take one of the seedlings, insert it in the slit, with the kernel under the pasteboard so that it just touches the water. Take another seedling of the same size, carefully remove the kernel from it without injuring the root, and place this seedling in the slit beside the first one (Fig. 45). Watch the growth of these two seedlings for a few days. Repeat this with sprouted peas. In each case it will be found that the removal of the seed-leaves or the kernel checks the growth of the seedling. Therefore, it must be that the seed-leaves which appear above ground, as in the case of the bean, or the kernel of the corn which remains below the surface of the soil, furnish the little plant with food until its roots have grown strong enough to take sufficient food from the soil.
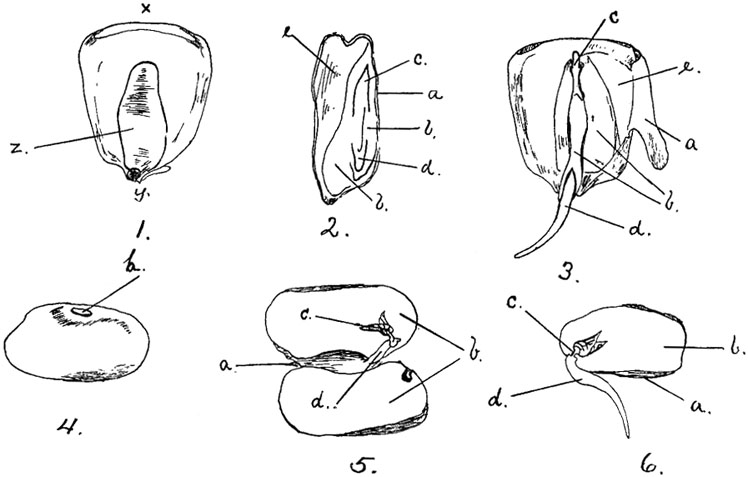
FIG. 41.
1. Corn-kernel showing depression at z. 2. Section of same after
soaking. 3. Corn-kernel after germination has begun. The seed-coat a
has been partly removed. 4. Bean showing scar or hilum at h. 5. The
same, split open. 6. Bean with one cotyledon removed, after sprouting
had begun. a, Seed-coat; b, cotyledon; c, epicotyl; d,
hypocotyl; e, endosperm.
(Drawings by M.E. Feltham.)ToList
Experiment.—Plant several kernels of corn in moist soil in a glass tumbler or jar. Put one kernel at the bottom and against the side of the glass, place the next one a half inch or an inch higher and an inch and a half to one side of the first seed and against the glass. Continue this till the top of the glass is reached (Fig. 2). Leave the last seed not more than one-fourth inch below the top of the soil. The soil should be moist at the start and the seeds should all be against the glass so they can be seen. This can best be done by planting as you fill the glass with soil. Plant peas and beans in the same way. Do not water the soil after planting. Set aside in a warm place and wait for the seeds to come up.
Another method of performing this experiment is to make a box having one side glass (Fig. 46). The length and the depth of the box will depend upon the size of the glass you use. Fill the box nearly full of moist soil and plant seeds of corn and beans and peas at depths of one-quarter inch, one inch, two inches, three inches, and four inches. These seeds can best be put in as the box is being filled. Hold each individual seed against the glass with a stick so that when planted they may be seen through the glass. Protect the seeds and roots from light by using a sheet of cardboard, tin or wrapping paper or a piece of board, and set in a warm place.
Many of the seeds planted only one-quarter inch deep will not sprout because the soil about them will probably dry out before they take from it enough moisture to sprout. The one and two-inch deep seeds will probably come up all right. Of the three and four-inch deep seeds, the corn and peas will probably make their way to the surface because they send up only a slender shoot, which can easily force its way through the soil. The deep-planted beans will make a strong effort but will not succeed in forcing their way to the surface because they are not able to lift the large seed-leaves through so much soil, and will finally give up the struggle. If any of the deeper beans do get up, the seed-leaves will probably be broken off and the little plant will starve and be dwarfed. This experiment teaches us that we should plant seeds deep enough to get sufficient moisture for sprouting and yet not so deep that the young seedlings will not be able to force their way to the surface.
Seeds which raise their cotyledons above the soil should not be planted as deep as those which do not. Large, strong seeds like corn, peas, etc., which do not lift their cotyledons above the surface, can be planted with safety at a depth of from one to four or five inches.
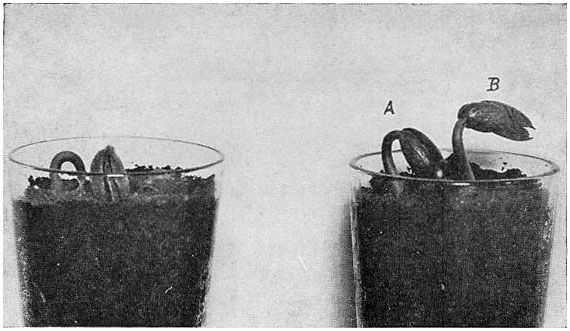
FIG. 42.
To show how the bean plant gets up. Notice the curved hypocotyls
pulling the seed-leaves or cotyledon out of the soil.ToList
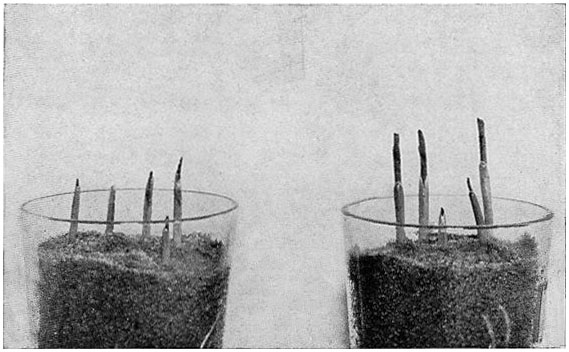
FIG. 43.
To show how the corn-plant gets out of the soil. A slender growing
point pushes straight up through the soil, leaving the kernel behind.ToList
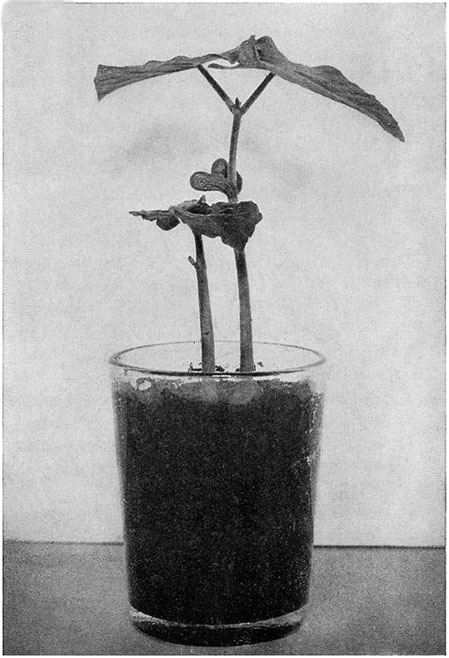
FIG. 44.
To show the use of the cotyledons. These are the plants shown in
tumbler 2, Fig 42, forty-eight hours after removing the cotyledons
from plant B. Plant B, although first up, has been handicapped by
the loss of its cotyledons.ToList
Seeds of carrot, celery, parsley, parsnip and egg plant are weak and rather slow in germinating. It is customary to plant them rather thickly in order that by the united strength of many seeds they may more readily come to the surface. This point should be observed also in planting seeds in heavy ground that is liable to pack and crust over before the seeds germinate.
Seed should always be sown in freshly stirred soil and may be planted by hand or with a machine.
For the home garden and the school garden, and when only small quantities of any one variety are planted, a machine is hardly desirable and hand planting is preferable.
The rows are marked out with the garden marker, or the end of a hoe or rake handle (Fig. 47), using a line or the edge of a board as a guide. The seeds are then carefully and evenly dropped in the mark or furrow.
The covering is done with the hand or a rake or hoe, and the soil is pressed over the seeds by patting it with the covering tool or walking on the row and pressing it with the feet. This pressing of the soil over the seeds is to bring the particles of soil close to each other and to the seed so that film water can climb upon them and moisten the seed sufficiently for sprouting.
A convenient way of distributing small seeds like those of turnip and cabbage, is to take a small pasteboard box or tin spice or baking-powder box, and punch a small hole in the bottom near one end or side. Through this the seeds can be sifted quite evenly.
For the larger operations of the farm and market garden, hand and horse-power drills and broadcasters are generally used, though some farmers still plant large fields by hand.
The grasses and clovers are generally broadcasted by hand or machine, and are then lightly harrowed and are generally rolled.
The small grains (wheat, oats, etc.) are broadcasted by many farmers, but drilling is considered better. With the grain drill the seed is deposited at a uniform depth and at regular intervals. In broadcasting, some of the seeds are planted too deep, and some too shallow, and others are left on the surface of the soil.
From experiment it has been found that there is a loss of about one-fifth of the seed when broadcasted as compared with drilling.
As in the case of grass seed, the grains are generally rolled after sowing.
Corn is planted by hand, or by hand- and horse-corn-planters, which drop a certain number of seeds at any required distance in the row.
There are a number of seed drills made for planting vegetable seeds which are good machines.
The main points to be considered in seed drills or seed planting machines are:
Simplicity and durability of structure.
Uniformity in quantity of seed planted, and in the distances apart and depth to which they are planted.
The distances apart at which seeds are planted vary according to the character of the plant. Bushy, spreading plants and tall plants require more room than low and slender-growing plants.
Visit the neighboring hardware stores and farms and examine as many seed-growing tools as possible to see how they are constructed and how properly used. Practice planting with these tools, if possible.
Illustrations of grain drills and other seed-planting machines will be found in seed catalogues, hardware catalogues, and in the advertising columns of agricultural papers.
In order to become familiar with the farm and garden seeds, obtain samples of as many of them as possible. Put them in small bottles—homœopathic vials for instance—or stick a few of each kind on squares of cardboard. Arrange them in groups according to resemblances or relationships, comparing not only the seeds but the plants on which they grew. If you cannot recall the plants, and there is no collection available, study the illustrations in seed catalogues which can be obtained from seedsmen. The following groups contain most of the farm and garden seeds, excepting flower seeds:
| Grass Family: | Mustard Family: | Nightshade Family: |
| Corn, | Mustard, | Potato, |
| Wheat, | Cabbage, | Tomato, |
| Oats, | Cauliflower, | Egg Plant, |
| Rye, | Collards, | Pepper. |
| Barley, | Brussels Sprouts, | |
| Sorghum, | Kale, | Goosefoot Family: |
| Orchard Grass, | Kohl Rabi, | Beet, |
| Red Top Grass, | Radish, | Chard, |
| Timothy, | Ruta Baga, | Spinach, |
| Kentucky Blue Grass. | Turnips, | Mangle Wurzel. |
| Watercress. | ||
| Gourd Family: | Pea or Legume Family: | |
| Canteloupe, | Thistle Family: | Garden Pea, |
| Citron, | Artichoke, | Canada Field Pea, |
| Cucumber, | Cardoon, | Cow Pea, |
| Gourd, | Chicory, | Soy Bean, |
| Muskmelon, | Dandelion, | Bush Bean, |
| Pumpkin, | Endive, | Lima Bean, |
| Squash, | Lettuce, | Velvet Bean, |
| Watermelon, | Salsify, | Vetch, |
| Cymling. | Sunflower, | Clover, |
| Tansy. | Alfalfa. | |
| Parsley Family: | ||
| Caraway, | Lily Family: | Mallow Family: |
| Carrot, | Asparagus, | Okra, |
| Celery, | Garlic, | Cotton. |
| Coriander, | Leek, | |
| Cumin, | Onion. | |
| Fennel, | ||
| Parsley, | ||
| Parsnip. |
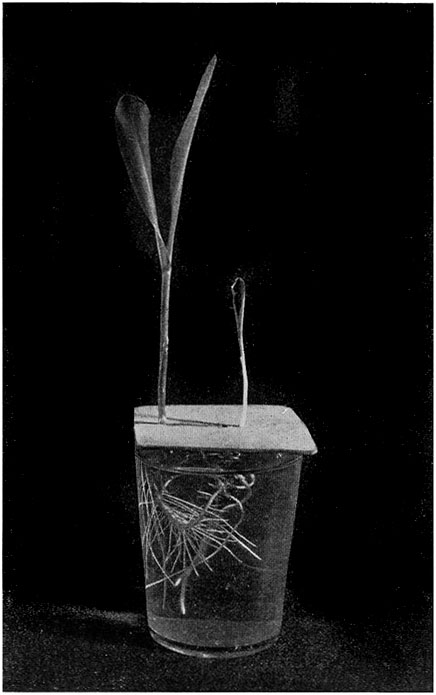
FIG. 45.
To show the use of the kernel to the young corn-plant. The kernel was
carefully removed from the plant on the right when both plants were of
the same size. The result is a dwarfing of the plant.ToList

FIG. 46.
To show how deeply seeds should be planted. Seeds 1 and 5 did not
sprout because they were not deep enough to get sufficient moisture.
The corn-plants from sprouting seeds 2, 3 and 4 all pushed their
slender growing points to the surface. Of the beans, No. 6 succeeded
in pulling the cotyledons to the surface, and has made a good plant.
Nos. 7 and 8, although they made a hard struggle, were not able to
raise the cotyledons through so great a depth of soil, and finally
gave up the struggle.ToList
The seeds of some crops—cabbage, tomato, lettuce, for example—are planted in window boxes, hot-beds, cold frames or a corner of the field or garden. When the seedlings have developed three or four leaves or have become large enough to crowd one another, they are thinned out or are transplanted into other boxes, frames or plots of ground, or are transplanted into the field or garden.
The time and method of transplanting depend largely on
For best results in field planting the plant should be well grown, strong and stocky, with well developed roots and three or four strong leaves.
The soil should be thoroughly prepared, moist and freshly stirred. A moist day just before a light shower is the best time. These conditions being present, the plants are carefully lifted from the seed bed with as little disturbance of the roots as possible and carried to the field or garden. Some plants, like cabbage, will stand considerable rough treatment, while others, like the eggplant, require greater care.
In the field or garden a hole is made for each plant with the hand, a stick or dibber or any convenient tool, the roots of the plant are carefully placed in it and the soil is pressed about them. If the soil is moist and freshly stirred, new roots will generally start in a very short time.
Plants that have been grown in pots, small boxes or tin cans, as tomatoes and eggplants are sometimes grown, may be quickly transplanted in the field in the following manner: Open the furrow with a small plow, knock the plants out of the pots or cans and place them along the land side of the furrow at the proper distances, then turn the soil back against them with the plow.
When there is a large number of plants to be set, as in planting cabbage, sweet potatoes, etc., by the acre, it is not always convenient to wait for a cloudy day or to defer operations till the sun is low in the afternoon. In such cases the roots of the plants should be dipped in water or in thin mud just before setting them, or a little water may be poured into each hole as the plant is put in. The soil should always be well firmed about the roots. The firming of the soil about the roots of a newly set plant is as important as firming it over planted seeds. The soil should be packed so tightly that the individual leaves will be torn off when an attempt is made to pull the plant up by them.
In dry or warm weather it is a good plan to trim the tops of plants when setting them. This can be done readily with some plants, such as cabbage and lettuce, by taking a bundle of them in one hand and with the other twisting off about half of their tops.
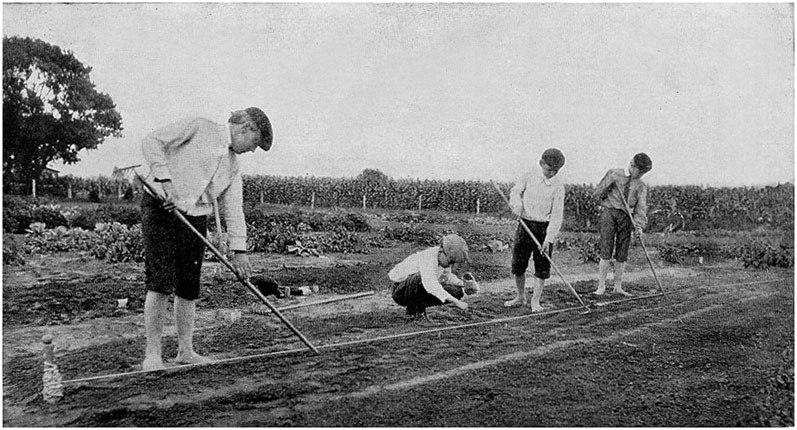
FIG. 47.
Operations of seed-planting: 1, making the drill; 2, dropping the
seeds; 3, covering the seeds; 4, packing the soil over the seeds.ToList

FIG. 48.
A collection of planting machines. The large central machine is a
grass and grain planter. The one on the left, a potato planter. The
one on the right, a corn, bean, and pea planter. The three smaller
machines in front are hand seed planters.ToList
The proper time to transplant fruit and ornamental trees and shrubs is during the fall, winter and early spring, which is their dormant or resting season, as this gives the injured roots a chance to recover and start new rootlets before the foliage of the plant makes demands on them for food and moisture.
In taking up large plants many roots are broken or crushed. These broken and injured roots should be trimmed off with a smooth cut. The tree or shrub is then placed in the hole prepared for it and the soil carefully filled in and packed about the roots. After the plant is set, the top should be trimmed back to correspond with the loss of root. If the plant is not trimmed, more shoots and leaves will start into growth than the damaged roots can properly furnish with food and water, and the plant will make a weak growth or die.
There are on the market a number of hand transplanting machines which, from their lack of perfection, have not come into general use. Many of them require more time to operate than is consumed in hand planting. A number of large machines for transplanting are in successful and satisfactory use on large truck and tobacco farms. These machines are drawn by horses and carry water for watering each plant as it is set.
Practice transplanting in window boxes or in the open soil and see how many of your plants will survive the operation.
We have learned the important conditions necessary for the sprouting of seeds and for the growth and development of roots. We have also learned something about the soil, its properties, and its relation to, or its behavior toward these important conditions. We are therefore prepared to discuss intelligently methods of treating the soil to bring about, or maintain, these conditions.
The typical tool for preparing the soil for root growth is a spade or spading fork (Fig. 49). With this tool properly used we can prepare the soil for a crop better than with any other.
In spading, the spade or fork should be pushed into the soil with the foot the full length of the blade and nearly straight down. The handle is then pulled back and the spadeful of earth is pried loose, lifted slightly, thrown a little forward, and at the same time turned. The lumps are then broken by striking them with the blade or teeth of the tool. All weeds and trash should be covered during the operation. A common fault of beginners is to put the spade in the soil on a slant and only about half the length of the blade, and then flop the soil over in the hole from which it came, often covering the edge of the unspaded soil. The good spader works from side to side across his piece of ground, keeping a narrow trench or furrow between the spaded and unspaded soil, into which weeds and trash and manure may be drawn and thoroughly covered, and also to prevent covering the unspaded soil. If this work has been well done with the ordinary spade or fork and finished with a rake, the result will be a bed of soil twelve to fifteen inches deep, fine and mellow and well prepared for root penetration, for good ventilation, for the absorbing and holding of moisture and warmth.
This method should always be employed for small gardens and flower beds.
For preparing large areas of soil the plow is the tool most generally used.
To break and pulverize the soil and make it soft and mellow, so the roots of plants may enter it in search of food, and get a firm hold for the support of the plant which is above ground.
To make the soil open and porous, so that it can more readily absorb rain as it falls on the surface.
To check loss of water by evaporation.
To admit air to the roots of plants. Also to allow air to act chemically on the mineral and organic matter of the soil and make them available to the crop.
To raise the temperature of soils in the spring, or of damp soils at any time.
To mix manures and organic matter with the soil. The more thoroughly manure is distributed through the soil the more easily plants will get it and the greater will be its effect on the soil.
To destroy the insect enemies of the plant by turning them up to the frost and the birds.
To kill weeds. Weeds injure crops:
They waste valuable moisture by pumping it up from the soil and sending it out into the air through their leaves. In this way they do their greatest injury to crops.
They crowd and shade the crop.
They take plant food which the plant should have.
Spading and plowing bring about conditions necessary for the sprouting or germination of seeds.
Spading and plowing also tend to bring about conditions necessary for the very important work of certain of the soil bacteria.
It will be found that a good farm plow has the following parts (Fig. 50):
A standard or stock, the central part of the plow to which many of the other parts are attached.
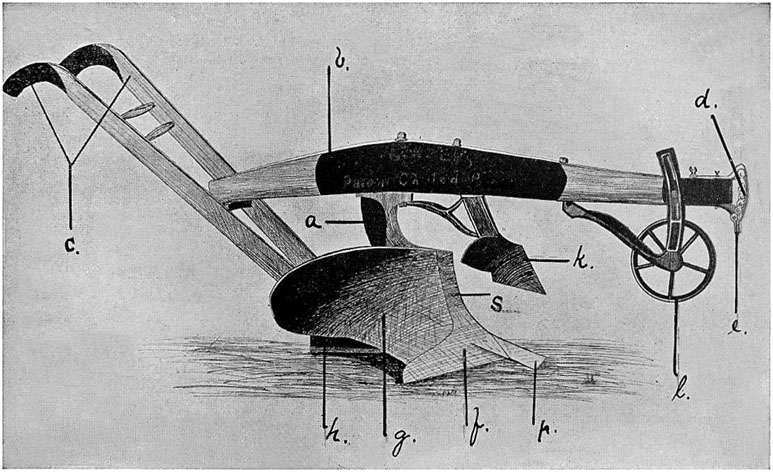
FIG. 50.—A WOOD BEAM-PLOW
a, stock; b, beam; c, handles; d, clevis, e, shackle, f,
share; g, mould board; h, landside; k, jointer or skimmer,
l, truck or wheel, p, point or nose, s, shin.ToList
A beam, to which the power is attached by which the plow is drawn. Some plows have wooden beams and others have iron beams.
Handles by which the plowman guides and steadies the plow and also turns it at the corners of the plowed ground in going about the field.
A clevis, which is attached to the end of the beam and is used to regulate the depth of plowing. To the clevis is attached a draft ring or shackle, to which the horse or team is fastened. To make the plow run deep the draft ring or shackle is placed in the upper holes or notches of the clevis; to make it run shallow the ring is placed in the lower holes. On some plows there are only notches in the clevis for holding the ring, they answer the same purpose as holes. The clevis is also used on some plows to regulate the width of the furrow. By moving the draft ring or shackle towards the plowed land the plow is made to cut a wider furrow, moving it away from the plowed land causes the plow to cut narrower.
Some plows have a double clevis so that the draft ring may be raised or lowered, or moved to right or left. With some plows the width of the furrow is adjusted by moving the beam at its attachment to the handles.
A share, called by some the point, which shears the bottom of the furrow slice from the land. The share should be sharp, especially for plowing in grass land and land full of tough roots. If the share, particularly the point, becomes worn so that it bevels from beneath upwards it will be hard to keep the plow in the soil, for it will tend to slide up to the surface. If this happens the share must be renewed or sharpened. Plows are being made now with share and point separate, and both of these reversible (Fig. 51), so that if either becomes worn on the under side it can be taken out and turned over and put back and it is all right, they thus become self-sharpening.
A mouldboard. This turns and breaks the furrow slice. The degree to which the mouldboard pulverizes depends on the steepness of its slant upward and the abruptness of its curve sidewise. The steeper it is and the more abrupt the curve, the greater is its pulverizing power. A steep, abrupt mouldboard is adapted to light soils and to the heavier soils when they are comparatively dry. This kind of a plow is apt to puddle a clay soil if it is quite moist. For breaking new land a plow with a long, gradually sloping share and mouldboard is used.
A landslide, which keeps the plow in place.
A coulter. Some plows have a straight knife-like coulter (Fig. 52) which is fastened to the beam just in front of the mouldboard and serves to cut the furrow slice from the land. In some plows this is replaced by an upward projection of the share; this is wide at the back and sharp in front and is called the shin of the plow from its resemblance to the shin bone. The coulter is sometimes made in the form of a sharp, revolving disk (Fig. 53), called a rolling coulter. This form is very useful in sod ground and in turning under vines and tall weeds. It also lessens the draft of the plow.
A jointer or skimmer which skims stubble and grass from the surface of the soil and throws them into the bottom of the furrow where they are completely covered. The jointer helps also to pulverize the soil.
A truck or wheel, attached under the end of the beam. This truck makes the plow run steadier. This is sometimes used to make the plow run shallower by setting it low down. This is not right, for it then acts as a brake and makes the plow draw harder. The depth of the furrow should be adjusted at the clevis.
A plow not only has parts but it has character also.
A good plow should be strong in build and light in weight.
The draft should be as light as possible.
The plow should run steadily.
A good plow should not only turn the soil but should pulverize it as well.
When plowing, the team should be hitched to the plow with as short traces as possible, and the plow should be so adjusted that it will cut furrows of the required width and thickness with the least possible draft on the team and the least exertion on the part of the plowman.
In plowing, the furrow slice may be cut thin and wide and be turned over flat. This method is adapted to breaking new land and heavy sod land.
It may be cut thick and narrow and be turned up on edge.
Or it may be cut of such a width and depth that the plow will turn it at an angle of about forty-five degrees. By this last method the greatest amount of soil can be turned at least expense of labor; the furrow slice can be more thoroughly broken; the greatest surface is exposed to the action of the air, and plant food is more evenly distributed through the soil.
We learned in a previous chapter that the roots of farm plants develop largely in that part of the soil which is worked by the plow; therefore, to have as much tilled soil as possible for root growth, we should generally plow as deep as possible without turning too much of the subsoil to the surface. Lands that have been plowed deep should be deepened gradually by plowing up a half-inch to an inch of subsoil each year until the plow reaches a depth of at least nine or ten inches.
There is an opinion among many farmers that sandy soils should not be plowed deep. But as these soils are apt to be leachy it seems best to fill them with organic matter to as great a depth as possible to increase their water-holding power, and this can best be done by plowing farm manures in deep.
In many parts of the South the farmers use very small plows and small animals to draw them. The result is that the soil is not prepared to a sufficient depth to allow of the large root development necessary for large crops. These farmers need larger tools and heavier animals if they expect to make much improvement in the yield of their crops. These small plows and this shallow plowing have done much to aid the washing and gulleying of the hill farms by rain. The shallow layer of loose soil takes in the rain readily, but as the harder soil beneath does not take the water as readily, the shallow plowed soil soon fills, then becomes mud, and the whole mass goes down the slope. The land would wash less if it had not been plowed at all, and least of all if it were plowed deep, for then there would be a deep reservoir of loose soil which would be able to hold a large amount of water until the harder lower soil could take care of it.
Some farmers have a way when getting the land ready for a crop, of plowing the rows first and then "breaking out the middles" or spaces between after the crop is planted. This is a poor practice, as it interferes with thorough preparation of the soil. The ground can be more thoroughly plowed and broken up before the crop is planted than afterwards. This practice of leaving the middles interferes with proper harrowing and after-cultivation.
Many farmers throw the land up into ridges with the plow and then plant on the ridge. When land is thrown into ridges a greater amount of surface is exposed to the air and a greater loss of moisture by evaporation takes place, therefore ridge culture is more wasteful of soil water than level culture. For this reason dry soils everywhere and most soils in dry climates should, wherever practicable, be left flat. On stiff, heavy soils which are slow to dry out, and on low bottom lands it may be desirable to ridge the land to get the soil dried out and warmed quicker in the spring. Late fall and early planter truck crops are often planted on the southern slopes of low ridges thrown up with the plow for warmth and protection from cold winds.
The time of plowing will depend somewhat on the nature of the soil, climate and the crop.
More plowing is done in the spring just before planting spring and summer crops than at any other time, excepting in localities that plant large areas of winter grain and truck. This spring plowing should be done early, for the spring plowing tends to dry the loosened soil somewhat and allows it to become warm at an earlier date, and at the same time the loosened soil tends to hold water in the lower soil for future use by the crop and allows the soil to take in spring rains more readily. If a cover crop or green manure crop is to be turned under in the spring it should be done early so as to prevent the crop to be turned under from pumping too much water out of the soil and thus interfering with the growth of the crop for which the land is being prepared.
There are some particular advantages to be gained by fall plowing in heavy soils:
Immediately after harvest the land is usually dry and easy to work.
The soil plowed at this time and left rough is acted upon physically by frost which pulverizes it, and chemically by rain and air which renders plant food available.
Insects are turned up and exposed to frost and birds.
A great number of weeds are destroyed and the land is more easily fitted for crops in the spring. Fall plowing should be done as early as possible, especially in the dryer regions, to catch all water possible. It is not advisable to plow sandy soils in the fall lest plant food be washed out of them.
When possible a cover crop should be put on fall plowed land where there is likely to be loss of plant food by leaching.
The term "fallowing" is sometimes applied to the operation of plowing, and sometimes the land is left bare without a crop sometime after plowing; this is called "bare fallowing" the land.
Bare fallowing should not be practiced on all soils. It is adapted:
To dry climates and dry seasons where it is desirable to catch and save every possible drop of rainfall, and where plant food will not be washed out of the exposed soils by rains.
To heavy clay lands.
To lands that are foul with weeds and insects.
To sour soils which are sweetened by exposure to air and rain.
Light sandy soils should not be subjected to bare fallow unless they are very foul with weeds. They should always be covered with a crop to prevent loss of plant food by leaching.
After spading or plowing the next operation in the preparation of the soil is generally raking, harrowing or dragging. The objects of these operations are:
To break lumps and clods left by the plow and spade and to further pulverize the soil.
Harrowing and raking aid in controlling soil ventilation, and put the soil in better condition to absorb moisture.
They check the loss of moisture by making a mulch of fine loose earth on the surface.
The harrow and rake destroy the weeds.
The harrow brings about conditions favorable to the even distribution of seeds.
It is also the tool generally used to cover seeds sown broadcast.
Harrowing is generally done just before planting, and with some crops just after, to cover seeds or to smooth the ground. Harrowing is also done in the first stages of growth of some crops to kill weeds and make a soil mulch. The harrow should always follow the plow within a few hours unless it is desired to leave the land in a bare fall or winter fallow. At other times of the year the lumps of earth are apt to dry out and become hard and difficult to break. If there is but one work team on the farm it is a good plan during the plowing season to stop the plow in time to harrow the day's plowing before the day's work ends.
There are several types of harrows in use. They may be classified according to the style of their teeth or cutting parts; they are as follows:
Rolling cutter harrows.
Spring-toothed harrows.
Spike-toothed harrows.
Coulter-toothed harrows.
Chain harrows.
Brush harrows.
Plank or drag harrows.
These types vary in the depth to which they cut, and the degree to which they pulverize the soil.
Rolling cutter harrows. Harrows of this type (see Fig. 54) consist of one or more revolving shafts on which are arranged a number of concave disks. These disks are either entire, notched, or made of several pieces fastened together. Examples of these are the disk, cutaway and spading harrows. These harrows cut and move the soil deeper than the other types. They are especially adapted to work on heavy clay soils.
The value of this type of harrow as moisture preservers depends on the manner in which they are used. If the disks are so set that they cover but a portion of the surface with a mulch of fine earth they leave a ridge exposed to the action of the wind and sun and the rate of evaporation is greatly increased. The disks should be set at such an angle that the whole surface shall be stirred or covered. Soils which need the disk harrow should generally be gone over again with some shallower working tool to smooth the surface. An objection to the rolling cutters is that unless great care is taken they will leave the land in ridges and valleys.
The two gangs of disks throw the earth in opposite directions. They are generally set to throw it from the centre and the result is a shallow double furrow the width of the machine. By lapping each time the furrow is partially filled, but to get the land smooth a smoothing harrow should be used after the rolling cutter.
Spring-toothed harrows (Fig. 55). Spring-toothed harrows with their curved spring teeth enter the soil readily, draw moderately easy and pass over obstructions without much difficulty. They are very useful in new land that is full of roots and stumps and also stony land. They pulverize the soil to an average depth. They leave the soil in ridges. The ridges can be leveled by a smoother in the shape of a piece of plank attached to the rear of the harrow. On newly plowed grass land they tend to tear up the sod and leave it on the surface. They also tend to drag out coarse manures when plowed in.
The original and more common form of the spring-toothed harrow is a floating harrow when at work. That is, it rests on the points of the teeth and is dragged or floated over the ground. A newer form of spring-toothed harrow, sometimes called the fallow cultivator, is mounted on high wheels and its action is largely controlled by them. This form of harrow is claimed to do much better work than the floating harrow and may in a large measure displace the rolling cutter. The weight of this harrow is entirely taken from the soil except in the wheel tracks, and the entire action is that of pulverizing and lightening the soil.
Spike-toothed harrows (Fig. 56). The teeth of these harrows are round, square or diamond-shaped spikes fastened into a wood or iron frame. The teeth are set in a vertical position or are inclined to the rear. These harrows are shallow in their action; they run easily but tend to compact the soil more than the other types and are therefore better adapted to loose soils and to finishing off after the work of the deep cutting harrows. They are also used for covering seeds.
Coulter-toothed harrows. The coulter-toothed harrows (Fig. 57) have teeth resembling the coulter of a plow twisted or bent into various shapes. The Acme is a good example of this class of harrow. It cuts, turns and pulverizes the surface soil somewhat after the manner of the plow. It prepares a fine mulch and leaves an excellent seed bed. It is an excellent harrow to finish off with after using a rolling cutter.
Chain harrows. The chain harrow consists of a web of chains linked together. They have a wonderful power for breaking clods and are useful for collecting weeds. They shake the dirt from the weeds and roll them into heaps. Chain harrows tend to compact the soil.
Brush harrows. The brush harrow is a primitive form made by fastening brush to a long pole. Brush harrows are quite useful for brushing in seed and for pulverizing manure broadcasted on grass lands.
Plank harrows. The plank harrow (see Fig. 58) is made of several planks fastened together so that each plank overlaps the next one to it, like the clapboards of a house. This harrow is as good as a roller in fining and smoothing the surface soil. It is an excellent tool to use alternately with a spike or coulter-toothed harrow on lumpy soil. This tool rasps or grinds many of the lumps or clods which slip by the harrow teeth and presses others into the ground so that the harrow following can get a grip on them. It is a harrow that can be made on any farm. This planker is an excellent tool to smooth the surface, for broadcasting small seeds and for planting truck crops.
The objects of rolling are:
To compress the surface soil so that the harrow will do its work more efficiently, also to break clods or lumps that may have resisted the action of the harrow.
To smooth the surface of the soil for an even distribution of small seeds, and to firm the soil around such seeds after they are planted so that they will keep moist and sprout readily.
To give compactness to soils that are light and loose and thus enable them to hold moisture and plant food better.
To press into the ground the roots of plants partly dislodged by the frost.
To remove the conditions favorable to the development of many kinds of insects.
To sink surface stones so that they will not interfere with harvesting the crop.
Light porous soils may be rolled at any time, but clay soils can be rolled to advantage only when they are stiff and cloddy.
Spring-sown grain is often rolled as soon as sown. This is all right in ordinary spring weather, but if showers are frequent and the soil is quite moist the rolling should be omitted till after the grain is up. The same practice will apply to autumn-sown grain also. If the soil is dry the rolling helps it to pump water up to the seeds. But if it is moist and showers are frequent the combined action of the roller and the rain is to make so thick a crust that many of the seeds will not be able to force their way through it or will be smothered by poor ventilation. After the grain is up the rolling may be done to advantage, as it then makes a firm soil about the roots of the plants, a condition of benefit to grain crops.
The most simple form of roller is a solid or hollow cylinder of wood fastened into a frame by which it is drawn. Some rollers have spikes or blunt attachments fastened to their surfaces for breaking clods. A roller that is quite popular consists of a cylinder of pressed steel.
We found in an earlier lesson that all of our farm plants have roots, stems, leaves, flowers, fruit and seeds. We studied the root first as being the most important part of the plant to the farmer. The seed was the next part studied, for that was considered the next most important, because the seed is the main reliance for new plants. The part next in importance is the leaf and that we will now study.
If you will go into the field and observe the leaves on a number of plants, you will find that the following facts are true:
They are all green.
They are flat and thin.
Many of them are very broad.
Some of the leaves on a single branch are larger than others on the same branch, and some have longer stems than others.
Most of them have a rather dark glossy upper surface and a lighter rougher under surface.
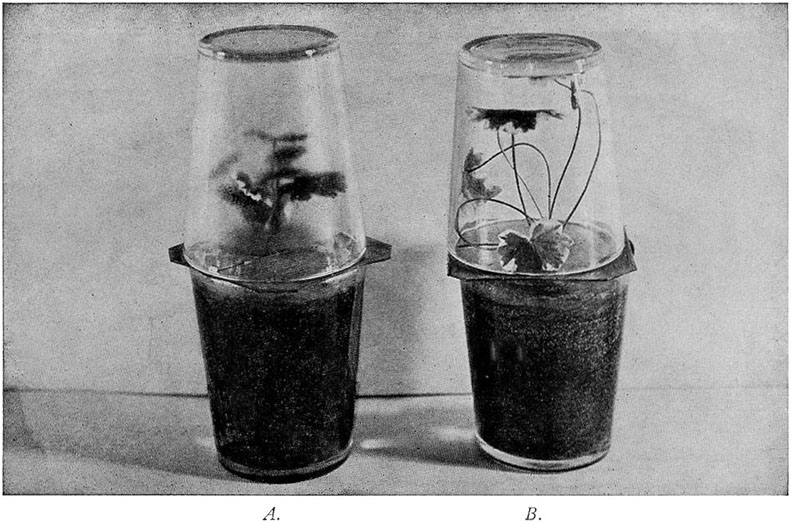
FIG. 59.
To show transpiration. Plant A was set in the sunlight, plant B
was left in the darker part of the room. A has transpired much more
than B, showing that sunlight is necessary for this
work.ToList
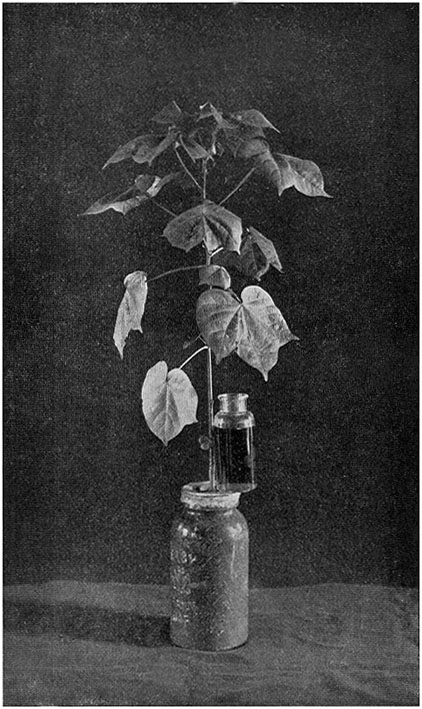
FIG. 60.—AMOUNT OF TRANSPIRATION
This plant transpired within 48 hours an amount of water equal to the
colored liquid in the bottle standing on the jar, more than 6
ounces.ToList
The leaves on the lower branches of the trees are spread out in a more or less flat layer and have their glossy surfaces all turned up, while those on branches in the tops of trees or shrubs are arranged all around the branch, the glossy surface being turned up.
What are the reasons for these facts?
A study of the work of the leaves and the conditions necessary for them to perform their work will help us to answer this question.
Experiment.—(See Fig. 59). Take a pot or tumbler in which a young plant is growing, also a piece of pasteboard large enough to cover the top of the pot; cut a slit from the edge to the centre of the pasteboard, then place it on the top of the pot, letting the plant enter the slit. Now close the slit with wax or tallow, making it perfectly tight about the stem. If the plant is not too large, invert a tumbler over it, letting the edge of the tumbler rest on the pasteboard; if a tumbler is not large enough use a glass jar. If a potted plant is not convenient a slip or a seedling bean or pea placed in a tumbler of water will serve the purpose. Prepare several and place some in a sunny window and leave others in the room where it is darker, and observe them from time to time. In the case of those plants that were set in the sunny window moisture will be seen collecting on the inner surface of the tumbler. Where does this come from? It is absorbed from the soil by the roots and is sent with its load of dissolved plant food up through the stems to the leaves. There most of the water is passed from the leaves to the air and is condensed on the sides of the glass. A work of leaves then is to throw off or to transpire moisture and thus make room for a new supply of food-laden moisture. This water is thrown off through little pores or mouths or stomata which are very small and very numerous on the under side of the leaf. It will be noticed that the plant not placed in the sunlight transpires very little moisture, showing that sunlight helps the leaves in this work of transpiration.
How much water does a plant transpire or throw off from its leaves?
Experiment.—(See Fig. 60). Fill a common quart fruit jar or can with soil and plant in it a kernel of corn, a bean, a cotton seed or seed of some other plant. After the plant has grown to be twelve or fifteen inches high, cut a piece of pasteboard a little larger than the top of the jar, cut a hole in the centre as large as the stem of the plant and make a slit from edge to centre. Soak the pasteboard in melted wax or paraffine candle. Cool it and then place it over the jar, slipping it around the plant stem. Now solder the pasteboard to the jar with melted candle making the joints tight all the way around. Then close up the slit and the hole about the stem. The jar is now completely sealed and there is no way for water to escape except through the plant. The plant should be well watered before the jar is closed. Now weigh the jar and set in the sunlight. Weigh again the next day. The difference in the two weights will represent the amount of water transpired by the plant. The weighings may be repeated until moisture gives out. If it is desired to continue this experiment some time, a small hole should be cut in the pasteboard before it is fastened to the jar. This hole is for adding water to the jar from time to time. The hole should be kept closed with a cork. The amount of water added should always be weighed and account taken of it in the following weighings. While this plant is growing it will be well to wrap the jar with paper to protect the roots from the light.
It has been found that the amount of water necessary to grow a plant to maturity is equal to from 300 to 500 times the weight of the plant when dry.
This gives us an idea of the very great importance of water to plants.
Experiment.—Take a few leaves from a plant of cotton, bean, clover or other plant that has been growing in the sunlight; boil them for a few minutes to soften the tissues, then place them in alcohol for a day or until the green coloring matter is extracted by the alcohol. Wash the leaves by taking them from the alcohol and putting them in a tumbler of water. Then put them in saucers in a weak solution of iodine. The leaf will be seen to gradually darken; this will continue until it becomes dark purple or almost black (Fig. 61). We have already learned that iodine turns starch this color, so we conclude that leaves must contain starch. (Five or ten cents worth of tincture of iodine from a drug store diluted to about the color of weak tea will be sufficient for these leaf experiments.)
Experiment.—If a potted plant was used for the last experiment, set it away in a dark closet after taking the leaves for the experiment. A day or two after, take leaves from it before removing it from the closet. Boil these leaves and treat them with alcohol as in the previous experiment. Then wash them and test them with iodine as before. No starch will be found in the leaves (Fig. 62). The starch that was in them when placed in the closet has disappeared. Now paste some thick paper labels on some of the leaves of a plant exposed to the sunlight. After a few hours remove the leaves that have the labels on them, boil, treat with alcohol and test with the iodine. In this case starch will be found in all parts of the leaf except the part over which the label was pasted (Fig. 63). If the sunlight is intense and the label thin, some starch will appear under it.
According to these last experiments, leaves contain starch at certain times, and this starch seems to appear when the leaf is in the sunlight and to disappear when the light is cut off. The fact is that the leaves manufacture starch for the plant and sunlight is necessary for this work. The starch is then changed to sugar which is carried by the sap to other parts of the plant where it is again changed to starch to be built into the plant structure or stored for future use.
Experiment.—Take leaves from a plant of silver-leaf geranium growing in the sunlight. If this plant cannot be had, the leaves from some other variegated white and green leaved plant will do. Boil these leaves, treat with alcohol, wash and test with iodine (Fig. 64). Starch will be found in the leaf wherever there was green coloring matter in it, while the parts that were white will show no starch. The green coloring matter seems to have something to do with the starch making, in fact starch is manufactured only where it is present. This coloring matter is called chlorophyl or leaf green.
We are told by the chemists that this starch is made from carbon and water. There exists in the air a gas called carbonic acid gas; this gas is composed of carbon and oxygen. It is breathed out of the lungs of animals and is produced by the burning and decay of organic matter. The under side of the leaf contains hundreds of little pores or mouths called stomata. This gas mixed with air enters these mouths. The green part of the leaf aided by the sun takes hold of the gas and separates the carbon from the oxygen. The oxygen is allowed to go free, but the carbon is made to unite with water and form starch.
Experiment.—The escape of this oxygen gas may be seen by taking some water weed from either fresh or salt water and placing it in a glass jar of the kind of water from which it came, then set the jar in the sunlight. After a time bubbles of gas will be seen collecting and rising to the surface. If a mass of weed like the green scum of fresh water ponds or green sea lettuce be used, the bubbles of gas will become entangled in the mass and will cause it to rise to the surface of the water. At the same time prepare another jar of the weed and place it somewhere out of the sun; very few bubbles will be seen to rise and the weed will settle to the bottom of the jar (Fig. 65).
All of the food of the plant, whether taken from the air or from the soil is digested in the leaves, and sunlight and air are necessary for this work.
Another function of leaves then is to digest food for the plant.
Important functions of leaves then are:
To transpire moisture sent up by the roots.
To manufacture starch by combining some of the water sent up by the roots with carbon taken from the air.
To digest the starch and food sent up by the roots.
To do these things well leaves must be connected with a strong, healthy root system and must have plenty of light and air.
We are now ready to give reasons for the facts about leaves mentioned in the first part of the chapter (see page 109).
Leaves are green because the green coloring matter is necessary for the leaf to do its work.
Leaves are flat and thin and broad in order that they may present a large surface to the air and sunlight.
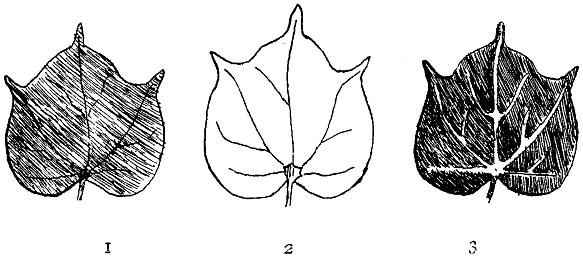
FIG. 61.
To show that growing leaves contain starch. 1. Represents a green
cotton leaf as picked from the plant. 2. Is the same leaf after taking
out the green coloring matter; the leaf is white. 3. The same leaf
after treatment with weak iodine turned to a dark purple, showing the
presence of starch. (Drawings by M.E.
Feltham.)ToList
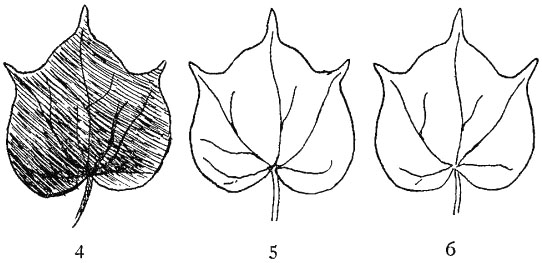
FIG. 62.
To show that starch disappears from the leaf when the plant is placed
in the dark. The plant from which was taken the leaf represented in
Fig 61, was immediately placed in a dark closet for 24 hours. Then
leaf 4 was taken from it; 5 represents this leaf after the chlorophyl
was taken from it: it is white; 6 is the same after treatment with
iodine. The leaf remains white, showing no starch. (Drawings by M.E.
Feltham.)ToList
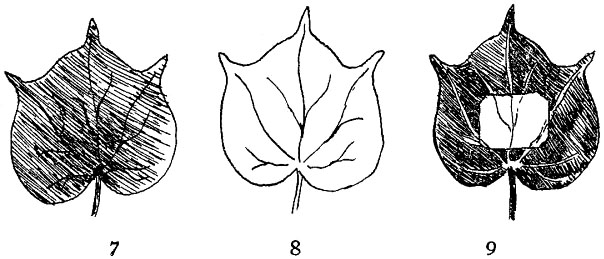
FIG. 63.
To show that sunlight is necessary for starch-making by leaves. Leaf 7
had a paper label stuck to its upper surface a couple of hours while
the plant was exposed to sunlight; 8 is the same leaf after the
chlorophyl was taken out, and 9 represents it after treatment with
iodine. The leaf turned purple in all parts except the part that was
shaded by the label. Starch was removed from the portion under the
label, but was not renewed because the label kept out the necessary
sunlight.
(Drawings by M.E. Feltham.)ToList
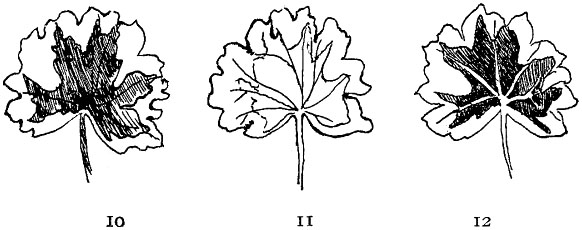
FIG. 64.
To show that chlorophyl is necessary for starch formation in the leaf.
10 is a variegated leaf from a silver-leaved geranium; the center is
an irregular patch of green, with an irregular border of white. 11,
after taking out the green. 12, after iodine treatment, the leaf turns
purple only where it was originally green, showing that no starch
forms in the white border.
(Drawings by M.E. Feltham.)ToList
Some leaves on the branch are larger than others because in the struggle for light and air they have had a better chance than the others or they have had more of the food which has come up from the root.
Some of the leaves have developed longer stems than others in their effort to reach out after light and air.
Most leaves have the little mouths through which air is taken in and water and oxygen given out on the rough side, and that side is turned down toward the earth probably so that rain and dust will not choke the little pores.
The leaves of the lower branches tend to spread out in a broad, flat plane because in the effort to get light no leaf will grow directly under and in the shadow of another, while on those branches which grow straight up from the top of the tree the leaves can get light from all sides and so arrange themselves around the stem.
Is it of any value to the plant grower to know these facts about leaves? It is, for knowing these things he can better understand the necessity of caring for the leaves of his growing plants to see that their work is not interfered with.
Many people who grow house plants have trouble in keeping them well clothed with leaves, for instance, the geranium and the rubber plant. The leaves are constantly turning yellow and dropping off or drying up. This sometimes occurs from over-watering or not sufficiently watering the soil in the pot or box. If the watering is all right the trouble may occur in this way: The air of the house is quite dry, especially in winter. As a result transpiration from the leaf may be excessive. More water is transpired than is necessary, consequently more is pumped by the roots and with it more food is sent to the leaf than it can take care of. As the excess of water is transpired the excess of food is left in the leaf. The tendency is to clog its pores and therefore interfere with its work, and gradually weaken and finally kill it. The remedy for this is to spray the leaves frequently so as to keep the air about them moist and so check transpiration. Keeping a vessel of water near them helps also as this tends to keep the air moist. Dust sometimes chokes the leaves. Washing or spraying remedies this.
Sometimes house plants, and out-door plants as well, become covered with a small, green insect called the plant louse or aphis. This insect has a sharp beak like a mosquito and it sucks the juices from the leaf and causes it to curl up, interfering with its work and finally killing it. Frequent spraying with water will tend to keep these away. A surer remedy against them is to spray the plants with weak tobacco water made by soaking tobacco or snuff in water, or to fumigate them with tobacco smoke. Sometimes the under side of the leaf becomes infested with a very small mite called red spider because it spins a web. These mites injure the leaf by sucking sap from it. They can be kept in check by frequent spraying for they do not like water. If, then, we are careful to frequently spray the leaves of our house plants we will have very little trouble from aphis, red spider or over transpiration. The aphis, or plant louse, is often very numerous on out-door plants, for instance, the rose, chrysanthemum, cabbage, and fruit trees. They vary in color from green to dark brown or black. They are treated in the same way as those on the house plants. Some familiar out-door insects which interfere with leaf work are the common potato bug, the green cabbage worm, the rose slug, the elm tree leaf beetle, the canker worm, the tomato worm. These insects and many others eat the leaves (Fig. 67). They chew and swallow their food and are called chewing insects. All insects which chew the leaves of plants can be destroyed by putting poison on their food. The common poisons used for this purpose are Paris green and London purple, which contain arsenic, and are used at the rate of one teaspoonful to a pail of water or one-fourth pound to a barrel of water. This is sprinkled or sprayed on the leaves of the plants. Another poison used is white hellebore. This loses its poisoning qualities when exposed to the air for a time. Therefore it is safer to use about the flower garden and on plants which are soon to be used as food or whose fruit is to be used soon, like cabbages and current bushes. This hellebore is sifted on the plant full strength, or it may be diluted by mixing one part of hellebore with one or two parts of flour, plaster, or lime. It is also used in water, putting one ounce of hellebore in three gallons of water and then spraying it on the plants. Plants may be sprayed by using a watering pot with a fine rose or sprinkler, or an old hair-brush or clothes-brush. For large plants or large numbers of smaller plants spray pumps of various sizes are used. Sometimes chewing insects on food plants and sucking insects on all plants are treated by spraying them with soapy solutions or oily solutions which injure their bodies.
The work of the leaf is also interfered with by diseases which attack the leaves and cause parts or the whole leaf to turn yellow or brown or become blistered or filled with holes. The common remedy for most of these diseases is called the "Bordeaux Mixture." It is prepared as follows: Dissolve four pounds of blue vitriol (blue stone, or copper sulphate) in several gallons of water. Then slake four pounds of lime. Mix the two and add enough water to make a barrelful. The mixture is then sprayed on the plants.
For more detailed directions for spraying plants and combating insects and diseases write to your State Experiment Station and to the United States Department of Agriculture at Washington, D.C.
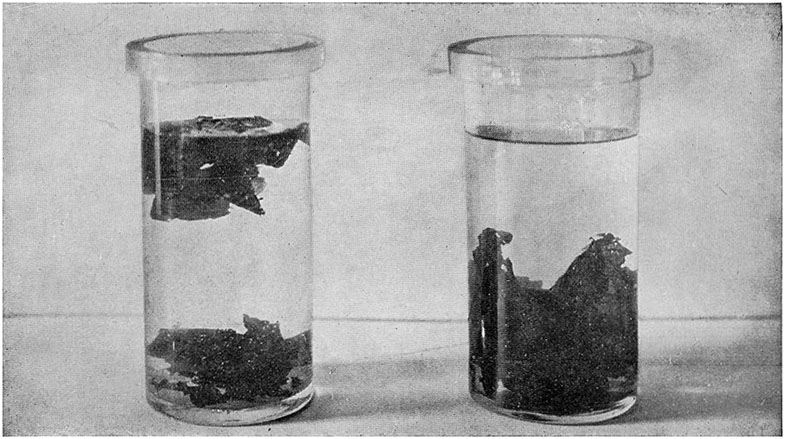
FIG. 65.
To show the giving off of gas by leaves, and that sunlight is
necessary for it. The jars contain seaweed. A was set in the sun and
developed enough gas to float part of the plant. B was left in the
darker part of the room and developed very little
gas.ToList
The work of the leaves of house plants is often interfered with by not giving them sufficient sunlight. Garden and field plants are sometimes planted so thick that they crowd each other and shut the light and air from each other, or weeds are allowed to grow and do the same thing, the result being that the leaves cannot do good work and the plant becomes weak and sickly. Weeds are destroyed by pulling them up and exposing their roots to the sun. This should be done before the weeds blossom, to prevent them from producing fresh seeds for a new crop of weeds. Some weeds have fleshy roots—for example, dock, thistle—in which food is stored; these roots go deep in the ground, and when the upper part of the plant is cut or broken off the root sends up new shoots to take the place of the old. Some have underground stems in which food is stored for the same purpose. The surest way to get rid of such weeds, in fact, of all weeds, is to prevent their leaves from growing and making starch and digesting food for them. This is accomplished by constantly cutting off the young shoots as soon as they appear above the soil, or by growing some crop that will smother them. The constant effort to make new growth will soon exhaust the supply of stored food and the weed will die.
Visit the farm or garden and the fields to examine stems and study their general appearances and habits of growth. Notice that many plants, like the trees, bushes and many vegetable and flowering plants, have stems which are very much branched, while others have apparently single stems with but few or no branches. Examine these stems carefully and note that there are leaves on some part of all of them and that just above the point where each leaf is fastened to the stem there is a bud which may sometime produce a new branch (Fig. 68). If the stems of trees and other woody plants be examined in the winter after the leaves have fallen, it will be seen that the buds are still there, and that just below each bud is a mark or leaf scar left by the fallen leaf. These buds are the beginnings of new branches for another year's growth. On some branches will be found also flowers and fruit or seed vessels.
Buds and leaves or buds and leaf scars distinguish stems from roots. Some plants have stems under the soil as well as above it. These underground stems resemble roots but can be distinguished from them by the rings or joints where will be found buds and small scale-like leaves (Fig. 69). Quitch-grass or wiregrass, Burmuda grass, white potato and artichoke are examples of underground stems.
Now study the habit of growth of these stems. Notice that:
Some plants grow erect with strong, stiff stems, for example, corn, sunflower, maple, pine, elm and other trees. Many of these erect stems have branches reaching out into the air in all directions. Stand under a tree close to the stem or trunk and look up into the tree and notice that the leaves are near the outer ends of the branches while in the centre of the tree the branches are nearly bare. Why is this? If you remember the work of leaves and the conditions necessary for their work you will be able to answer this question. Leaves need light and air for their work, and these erect, branching stems hold the leaves up and spread them out in the light and air.
Notice that where several trees grow close together, they are one-sided, and that the longest and largest branches are on the outside of the group and that they have more leaves than the inner branches. Why? Why do the trees in thick woods have most of the living branches and bear most of their leaves away up in the top of the tree?
Some stems instead of standing up erect climb up on other plants or objects by means of springlike tendrils which twist about the object and so hold up the slender stem. On the grape vine these tendrils are slender branches. On the sweet pea and garden pea they are parts of the leaves. The trumpet creeper and English ivy climb by means of air roots. The nasturtium climbs by means of its leaf stems.
Other stems get up into the light and air with their leaves by twining about upright objects. For example, the morning glory and pole bean.
Some stems will be found that spread their leaves out to the sun by creeping over the ground. Sweet potato, melon, squash, and cucumber vines are examples of such plants.
One use of the stems of plants then is to support the leaves, flowers and fruit, and expose them to the much needed light and air.
Experiment.—Get a piece of grape vine and cut it into pieces four or five inches long; notice that the cut surface appears to be full of little holes. Cut a piece from between joints, place one end in your mouth and blow hard. It will be found that air can be blown through the piece of vine. Now pour about an inch of water in a tumbler or cup and color it with a few drops of red ink. Then stand some of the pieces of grape vine in the colored water. In a few hours the colored water will appear at the upper ends of the sticks. Capillary force has caused the colored water to rise through the small tubes in the vine. Repeat this experiment with twigs of several kinds of trees and soft green plants, as elm, maple, sunflower, corn, etc. It will not be possible to blow through these twigs, but the red water will rise through them by osmose, and in a few hours will appear at the upper ends. If some leaves are left on the stems the colored water will appear in them. Some white flowers can be colored in this way.
In this manner the stem carries plant food dissolved in water from the roots to the leaves, and after the leaves have digested it carries it back to various parts of the plant.
The stem then serves as a conductor or a passage for food and moisture between roots and leaves.
Visit a strawberry bed or search for wild strawberry plants. Notice that from the older and larger plants are sent out long, slender, leafless stems with a bud at the tip. These stems are called runners. Find some runners that have formed roots at the tip and have developed a tuft of leaves there, forming new plants. Find some black raspberry plants and notice that some of the canes have bent over and taken root at the tips sending up a new shoot and thus forming a new plant. You know how rapidly wire grass and Bermuda grass will overrun the garden or farm. One way in which they do this is by sending out underground stems which take root at the joints and so form new plants.
Another use of the stem then is to produce new plants.
On the farm we make use of this habit of stems when we wish to produce new white potato plants. We cut an old potato in pieces and plant them. The buds in the eyes grow and form new plants. One way of getting new grape plants is to take a ripened vine in the fall and cut it in pieces with two or three buds and plant them so that one or both of the buds are covered with soil. The pieces will take root and in the spring will send up new shoots and thus form new plants.
You can obtain new plants from geranium, verbena, nasturtium and many other flowering plants, by cutting and planting slips or parts of the stems from them.
In parts of the South new sweet potato plants are obtained by cutting parts of the stems from growing plants and planting them.
Florists produce large numbers of new plants by taking advantage of this function of stems.
Experiment.—Take a white potato which is a thickened stem and place it in a warm, dark place. It will soon begin to sprout or send out new stems, and as these new stems grow the potato shrinks and shrivels up. Why is this? It is because the starch and other material stored in the potato are being used to feed the new branches. When we plant potatoes in the garden and field the new plants produced from the eyes of the potato are fed by the stored material until they strike root and are able to take care of themselves.
All stems store food for the future use of the plant.
Annual plants, or those which live but one year, store food in their stems and leaves during the early part of their growth. During the fruiting or seed forming season this food material is transferred to the seeds and there stored, and the stems become woody. This is a fact to bear in mind in connection with the harvesting of hay or other fodder crops. If we let the grass stand until the seeds form in the head, the stem and leaves send their nourishment to the seeds and become woody and of less value than if cut before the seeds are fully formed.
In plants of more than one year's growth the stored food is used to give the plant a start the following season, or for seed production.
The rapid growth of leaf and twig on trees and shrubs in spring is made from the food stored in the stem the season before.
Sago is a form of starch stored in the stem of the sago palm for the future use of the plant.
Maple sugar is made from the food material stored in the trunk of the maple tree for the rapid growth of twig and leaf in the spring.
Cane sugar is the food stored in the sugar cane to produce new plants the next season.
If we examine the stem of a tree that has been cut down we find that it is woody, that the wood is arranged in rings or layers and that the outer part of the stem is covered with bark. We will notice also that the wood near the centre of the tree is darker than the outer part. This inner part is called the heart wood of the tree. The lighter wood is called the sap wood. It is through the outer or sap wood that the water taken in by the root is passed up to the leaves where the food which it carries is digested and then sent back to the plant. The returning digested food is sent back largely through the bark. Between the bark and the wood is a very thin layer which is called cambium. This is the active growing tissue of the stem. In the spring it is very soft and slippery and causes the bark to peel off easily. This cambium builds a new ring of wood outside of the old wood and a new ring of bark on the inside of the bark. In this way the tree grows in diameter.
Now if the bark is injured, or any part of the stem, all parts below the wound are cut off from the return supply of digested food and their growth is checked. When such a wound does occur, or if a wound is made by cutting off a branch, the cambium sets to work to repair the damage by pushing out a new growth which tends to cover the wound. We can help this by covering the wound and keeping the air from it to prevent its drying and to keep disease from attacking it before it is healed.
If there are any peach trees near by, examine the trunks close to the ground, even pulling away the soil for a few inches. You will very likely find a mass of gummy substance oozing from the tree. Pull this away and in it and in the wood under it will be found one or more yellowish white worms. These are tree borers. They will be found in almost all peach trees. They interfere with the work of the stem and in many cases kill the trees. These worms may be kept somewhat in check by keeping papers wrapped about the lower part of the tree. But the surest way to keep them in check is to dig them out, spring and fall, with a knife and wire.
Borers attack the other fruit trees and also ornamental trees and shrubs.
Rabbits sometimes gnaw the bark from trees during severe winters.
Careless workmen sometimes injure the bark of trees by allowing plows and mowing machines or other tools which they are using among them to come in contact with the trees and injure the bark.
Young trees purchased from the nursery generally have a label fastened to them with a piece of wire. Unless this wire is removed or is carefully watched and enlarged from time to time it will cut into the bark as the stem grows and interfere with its work and often kill the top of the tree or injure a main branch.
These are a few ways in which the work of the stem is sometimes checked and the plant injured thereby.
In our study of the parts of plants the flower and fruit have been given the last place because in the growing of most farm plants a knowledge of the functions of the flower is of less importance than that of the roots, leaves and stems. However, a knowledge of these parts is necessary for successful fruit culture and some other horticultural industries.
As with the other parts of the plant our study will not be exhaustive but will be simply an attempt to bring out one or two important truths of value to most farmers.
In the study of flowers the specimens used for study will depend upon the time of the year in which the studies are made and need not necessarily be the ones used here for illustration.
Of what use is the flower to the plant?
You have doubtless noticed that most flowers are followed by fruit or seed vessels. In fact, the fruit and seeds are really produced from the flower, and the work of most flowers is to produce seeds in order to provide for new plants.
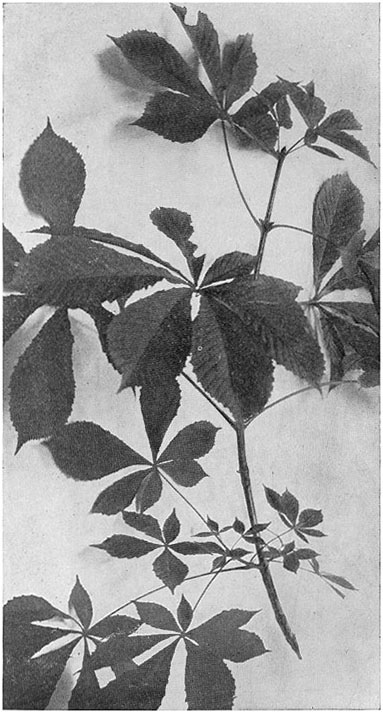
FIG. 68.
A horse-chestnut stem showing leaves, buds, and scars where last year's leaves dropped
off.ToList
To understand how this comes about it will be necessary to study the parts of the flower and find out their individual uses or functions.
If we take for our study any of the following flowers: cherry, apple, buttercup, wild mustard, and start from the outside, we will find an outer and under part which in most flowers is green. This is called the calyx (Figs. 70-73 and 74). In the buttercup and mustard the calyx is divided into separate parts called sepals. In the cherry, peach and apple, the calyx is a cup or tube with the upper edge divided into lobes.
Above the calyx is a broad spreading corolla which is white or brightly colored and is divided into several distinct parts called petals. The petals of one kind of flower are generally different in shape, size and color from those of other flowers. In some flowers the petals are united into a corolla of one piece which may be funnel-shaped, as in the morning glory or petunia of the garden, or tubular as in the honeysuckle, wheel-shaped as in the tomato and potato, or of various other forms.
Within the corolla are found several bodies having long, slender stems with yellow knobs on their tips. These are called stamens. The slender stems are called stalks or filaments and the knobs anthers. The anthers of some of the stamens will very likely be found covered with a fine, yellow powder called pollen. This pollen is produced within the anther which, when ripe, bursts and discharges the pollen.
The stamens vary greatly in number in different kinds of flowers. In the centre of the cherry, peach, or mustard flower will be found an upright slender body called the pistil. In the peach and cherry the pistil has three parts, a lower rounded, somewhat swollen part called the ovary, a slender stem arising from it called the style, and a slight enlargement at the top of the style called the stigma. The stigma is generally roughened or sticky. If the ovary is split open, within it will be found a little body called an ovule, which is to develop into a seed.
In the apple flower the pistils will be found to have one ovary with five styles and stigmas and in the ovary will be several ovules.
In the buttercup will be found a large number of small pistils, each consisting of an ovary and stigma.
The parts of different flowers will be found to vary in color, in shape, in relative size and in number. In some flowers one or more of the parts will be found wanting.
Examine a number of flowers and find the parts.
Now what are the uses of these parts of the flower?
If we watch a flower of the peach or cherry from week to week, we will see that the pistil develops into a peach or cherry which bears within a seed from which a new plant will be produced if the seed is placed under conditions necessary for germination or sprouting.
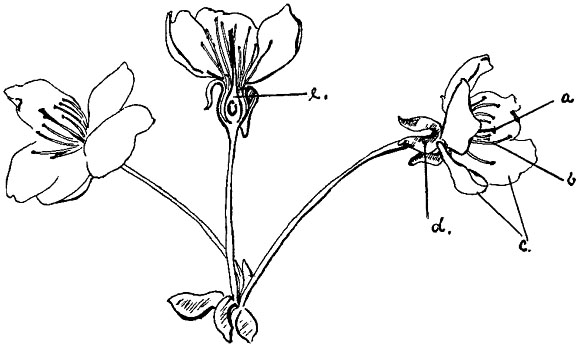
FIG. 70.—FLOWER OF CHERRY.
a, pistil; b, stamen; c, corolla; d, calyx; e, section of
flower showing ovary with ovule.
(Drawing by M.E. Feltham.)ToList

FIG. 71.
1. Flower of apple; b, stamens; c, corolla; d, calyx. 2. Section
of same; a, style; e, compound ovary; f, filament; g, anther.
(Drawing by M.E. Feltham.)ToList
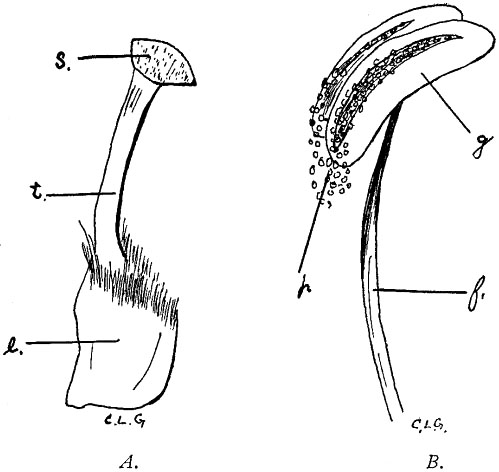
FIG. 72.
A. Pistil of flowering raspberry; e, ovary; t, style; s,
stigma. B. Stamen of flowering raspberry; f, filament; g,
anther; p, pollen.ToList
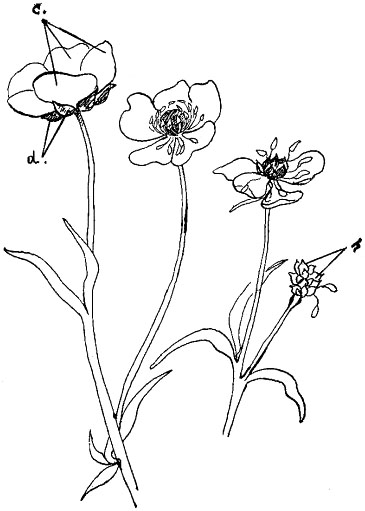
FIG. 73.—FLOWER OF BUTTERCUP.
c, petals; d, sepals; h, ripened pistils, or fruit.
(Drawing by M.E. Feltham.)ToList
The pistils of the flowers of other plants will be found to develop into fleshy fruits, hard nuts, dry pods or husks containing one or more seeds.
The work of the pistil or pistils of flowers then is to furnish seeds for the production of new plants.
The botanists tell us that a pistil will not produce seeds unless it is fertilized by pollen from the same kind of flower falling on its stigma.
The work of the stamen then is to produce pollen to fertilize the pistils. Pistils and stamens are both necessary for the production of fruit and seed. They are therefore called the essential or necessary parts of the flower.
The botanists also tell us that nature has provided that in most cases the pistils shall be fertilized by the pollen of some other flower than their own, as this produces stronger seeds.
How is the pollen carried from flower to flower?
Go into the garden or field and watch the bees and butterflies flying about the flowers, resting on them and crawling into them. They are seeking for nectar which the flower secretes. As they visit plant after plant, feeding from many flowers, their bodies become more or less covered with pollen as they brush over the stamens. Some of this pollen in turn gets rubbed off on the stigmas of the pistils and they become fertilized. Thus the bees and some other insects have become necessary as pollen carriers for some of the flowers and the flowers in turn feed them with sweet nectar.
This gives us a hint as to one use of the corollas which spreads out such broad, brightly-colored, conspicuous petals. It must be that they are advertisements or sign boards to attract the bees and to tell them where they can find nectar and so lead them unconsciously to carry pollen from flower to flower to fertilize the pistils. The act of carrying pollen to the pistil is called pollination, and carrying pollen from the stamens of one flower to the pistil of another flower is called cross pollination.
If we examine a blossom bud just before it opens we will see only the calyx. Everything else will be wrapped up inside of it. Evidently, then, the calyx is a protecting covering for the other parts of the flower until blossoming time.
The corolla will be found carefully folded within the calyx and also helps protect the stamens and pistil.
Some flowers do not produce bright-colored corollas to attract the bees, for examples, the flowers of the grasses, wheat, corn, and other grains, the willows, butternuts, elms, pines and others. But they produce large amounts of pollen which is carried by the wind to the pistils.
You have sometimes noticed in the spring that after a rain the pools of water are surrounded by a ring of yellow powder and you have perhaps thought it was sulphur. It was not sulphur but was composed of millions of pollen grains from flowers. One spring Sunday I laid my hat on the seat in church. When I picked it up at the end of the service I found considerable dust on it. I brushed the dust off, but on reaching home I found some remaining and noticed that is was yellow, so I examined it with a magnifying glass and found that it was nearly all pollen grains. Then I rubbed my finger across a shelf in my room and found it slightly dusty; the magnifying glass showed me that this dust was half pollen. This shows what a great amount of pollen is produced and discharged into the air, and it shows that very few pistils could escape even if they were under cover of a building.
To make sure of cross pollination nature has in some cases placed the stamens and pistils in different flowers on the same plant. This will be found true of the flowers of the squashes, melons and cucumber. Below some of the flower buds will be seen a little squash, melon or cucumber (Fig. 75). These are the ovaries of pistils and the stigmas will be found within the bud or will be seen when the bud opens. But no stamen will be found here. Other flowers on these plants will be found to possess only stamens. These staminate flowers produce pollen and then die. They do not produce any fruit, but their pollen is necessary for the little cucumbers, squashes and melons to develop.
Another example is the corn plant. Here the pistils are on the ear, the corn silk being the styles and stigmas, while the pollen is produced in the tassel at the top of the plant.
With some plants we find that not only are the pistils and stamens in separate flowers but the staminate and pistilate flowers are placed on different plants. This will be found true of the osage orange and the willow.
In many flowers that have both stamens and pistils or are perfect flowers the stigmas and pollen ripen at different times.
With some varieties of fruit it is found that the pistils cannot be fertilized by pollen of the same variety. This is true of most of our native plums. For example, the pistils of the wild goose plum cannot be fertilized by pollen of wild goose plums even if it comes from other trees than the one bearing the pistils. They must have pollen from another variety of plum.
Many times it happens that a farmer or a gardener wants to start a strawberry bed and buys plants of a variety of berries that have the reputation of being very productive. He plants them and cultivates them carefully, and at the proper time they blossom very freely, and there is promise of a large crop, yet very few berries appear and this continues to be the case. Not satisfied with them he buys another variety and plants near them, and after that the old bed becomes very productive. Now why is this? It happens that the flowers of some varieties of strawberries have a great many pistils but no stamens, or very few stamens, and there is not pollen enough to fertilize all of the blossoms, and when such a variety is planted it is necessary to plant near it some variety that produces many stamens and therefore pollen enough to fertilize both varieties in order to be sure of a crop. Those strawberries which produce flowers with only pistils are called pistilate varieties, while those with both stamens and pistils are called perfect varieties (Fig. 78). In planting them there should be at least one row of a perfect variety to every four or five pistilate rows.
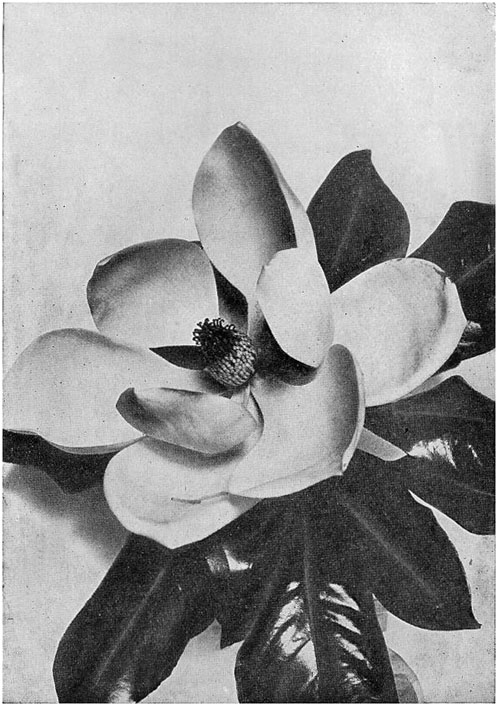
FIG. 74.
A magnolia flower showing central column of pistils and stamens, the
pistils being above and the stamens below them.ToList
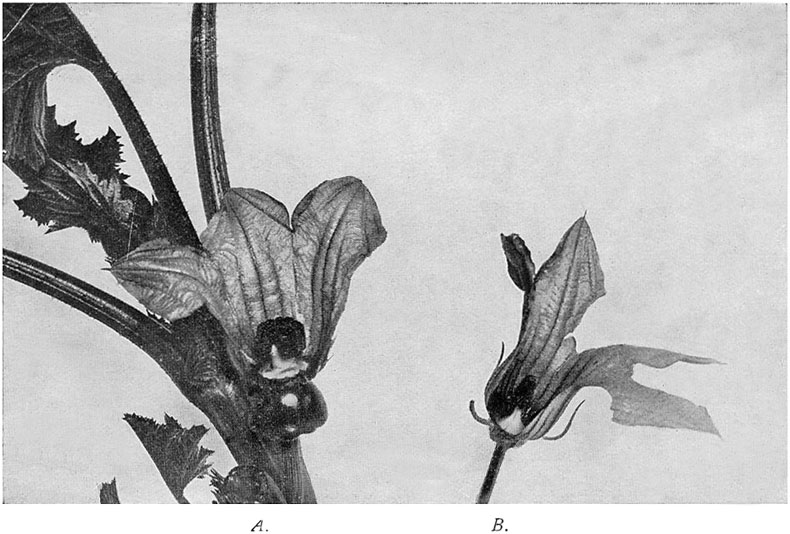
FIG. 75.—FLOWERS OF SQUASH.
A, pistillate flower; B, staminate flower. A means of insuring
cross-pollination.ToList
We have learned that certain varieties of plums cannot be fertilized by pollen from the same variety, and to make them fruitful some other variety must be planted among them to produce pollen that will make them fruitful. This is more or less true of all our fruits. Therefore it is not best generally to plant one variety of fruit by itself. Not knowing this some orchardists have planted large blocks of a single variety of fruit which has been unfruitful till some other varieties have been planted near them or among them.
A knowledge of the necessity of pollination is very important to those gardeners who grow cucumbers, tomatoes, melons and other fruiting plants in greenhouses. Here in most cases the pollination is done by hand.
We noticed that nature provides that most of the flowers shall be cross pollinated. This is particularly true of the flowers of the fruit trees, and for this reason it is impossible to get true varieties of fruit from seed. For example, if we plant seeds of the wine sap apple, the new trees produced from them will not produce the same kind of apple but each tree will produce something different and they will very likely all be poorer than the parent fruit. This is because of the mixture of pollens which fertilize the pistils. Knowing this fact the nurseryman plants apple seeds and grows apple seedlings. When these get to be the size of a lead pencil he grafts them, that is, he digs them up, cuts off the tops away down to the root and then takes twigs from the variety he wishes to grow and sets or splices these twigs in the roots of the seedlings and then plants them. The root and the new top unite and produce a tree that bears the same kind of fruit as that produced by the tree from which the twig was taken.
These are a few of the reasons why it is well to know something about flowers and their work.
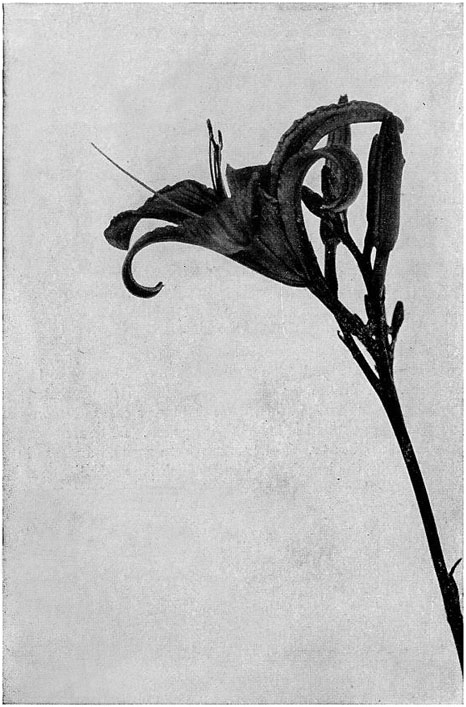
FIG. 76.—FLOWER OF A LILY.
Notice how the stigma and the anthers are kept as far as possible from
each other to guard against self-pollination and to insure
cross-pollination.ToList
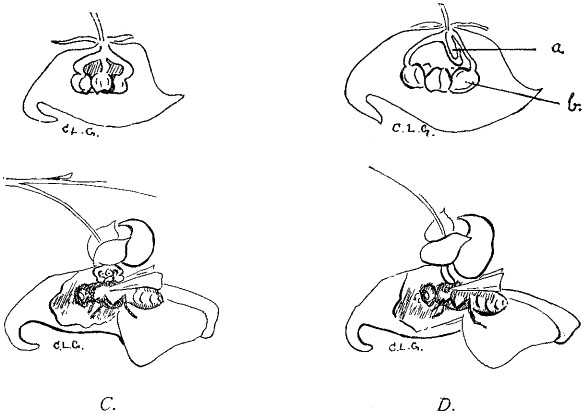
FIG. 77.
Bud and flower of jewel-weed, or "touch-me-not." A. Interior of bud.
Stamens are seen, but there appears to be no pistil. B. Section of
bud showing the pistil concealed behind the stamens. C. Bee entering
flower comes in contact with stamens and is loaded with pollen. D.
Same bee entering older flower. The stamens have ripened and been
pushed off by the lengthened pistil, which is brushed by the back of
the bee, and thus is pollinated. This is a contrivance to insure
cross-pollination.ToList
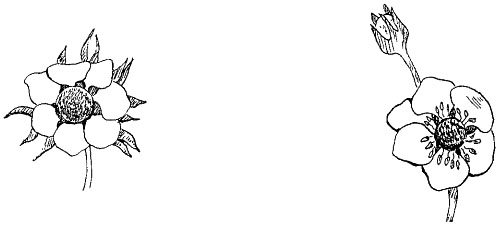
FIG. 78.
A. Pistillate flower of strawberry. B. Perfect flower of strawberry.
(Drawing by M.E. Feltham.)ToList
The pistil develops and forms the fruit of the plant. This fruit bears seed for the production of new plants. This fruit may be a dry pod like the bean or pea, or it may be a fleshy fruit like the apple or plum. Now the developing pistil or fruit may be checked in its work of seed production by insects and diseases, and to secure good fruit it is in many cases necessary to spray the fruits just as the leaves are sprayed, to keep these insects and diseases in check.
The fruits of most plants, like the leaves, need light and air for their best development, and it sometimes happens that the branches of the fruit trees grow so thick that the fruits do not get sufficient light and air. This makes it necessary to thin the branches or in other words to prune the tree. Some trees also start more fruit than they can properly feed and as a result the ripened fruits are small and the tree is weakened. This makes it necessary to thin the fruits while they are young and undeveloped.
What is a fertile soil?
The expression a fertile soil is often used as meaning a soil that is rich in plant food. In its broader and truer meaning a fertile soil is one in which are found all the conditions necessary to the growth and development of plant roots.
These conditions, as learned in Chapter II, are as follows:
The root must have a firm yet mellow soil.
It must be well supplied with moisture.
It must be well supplied with air.
It must have a certain amount of heat.
It must be supplied with available plant food.
In order to furnish these needs or conditions the soil must possess certain characteristics or properties.
These properties may be grouped under three heads:
Physical properties; the moisture, heat and air conditions needed by the roots.
Biological properties; the work of very minute living organisms in the soil.
Chemical properties; plant food in the soil.
Three very important physical properties of a fertile soil are its
Power to take water falling on the surface.
Power to absorb water from below.
Power to hold water.
The fertile soil must possess all three of these powers. The relative degrees to which these three powers or properties are possessed determine more than anything else the kind of crops or the class of crops that will grow best on a given soil.
These powers depend, as we learned in Chapter IV, on the texture of the soil or the relative amounts of sand, silt, clay and humus contained in the soil.
The power of admitting a free circulation of air through its pores is also an important property of a fertile soil, for air is necessary to the life and growth of the roots. This property is dependent also on texture.
Two other important properties of a fertile soil are power to absorb and power to hold heat. These depend upon the power of the soil to take in warm rain and warm air, and also upon density and color. The denser or more compact soil and the darker soil having greater power to absorb heat.
The compactness of the soil which gives it greater powers to absorb heat weakens its powers to hold it, because the compactness allows more rapid conduction of heat to the surface, where it is lost by radiation.
The more moisture a soil holds, the weaker is its heat-holding power, because the heat is used in warming and evaporating water from the surface of the soil.
These important properties or conditions of moisture, heat and air, are, as we have seen, dependent on soil texture and color, which in turn are dependent upon the relative amounts of sand, clay and humus in the soil. We are able to control soil texture and therefore these physical properties to a certain degree by means of tillage and the addition of organic matter or humus (see Chapter IV).
Biology is the story or science of life; and the biological properties of the soil have to do with living organisms in the soil.
The soil of every fertile field is full of very small or microscopic plants called bacteria or germs. They are said to be microscopic because they are so small that they cannot be seen without the aid of a powerful magnifying glass or microscope. They are so small that it would take about 10,000 average-sized soil bacteria or soil germs placed side by side to measure one inch.
A knowledge of three classes of these soil germs is of great importance to the farmer. These three classes of germs are:
Nitrogen-fixing germs.
Nitrifying germs.
Denitrifying germs.
We learned in Chapter VIII that nitrogen is one of the necessary elements of plant food, and that although the air is four-fifths nitrogen, most plants must take their nitrogen from the soil. There is, however, a class of plants called legumes which can use the nitrogen of the air. Clover, alfalfa, lucern, cowpea, soy bean, snap bean, vetch and similar plants are legumes. These legumes get the nitrogen from the air in a very curious and interesting manner. It is done through the aid of bacteria or germs.
Carefully dig up the roots of several legumes and wash the soil from them. On the roots will be found many small enlargements like root galls; these are called nodules or tubercles. On clover roots these nodules are about the size of the head of a pin while on the soy bean and cowpea they are nearly as large as a pea (see Fig. 34). These nodules are filled with bacteria or germs and these germs have the power of taking nitrogen from the air which finds its way into the soil. After using the nitrogen the germ gives it to the plant which then uses it to build stem, leaves and roots. In this way the legumes are able to make use of the nitrogen of the soil air, and these germs which help them to do it by catching the nitrogen are called nitrogen-fixing germs.
The work of these germs makes it possible for the farmer to grow nitrogen, so to speak, on the farm.
By growing crops of legumes and turning them under to decay in the soil, or leaving the roots and stubble to decay after the crop is harvested, he can furnish the following crop with a supply of nitrogen in a very cheap manner and lessen the necessity of buying fertilizer.
Almost all the nitrogen of the soil is locked up in the humus and cannot in that condition be used by the roots of plants. The nitrogen caught by the nitrogen-fixing germs and built into the structure of leguminous plants which are grown and turned under to feed other plants cannot be used until the humus, which is produced by their partial decay, is broken down and the nitrogen built into other substances upon which the root can feed. The breaking down of the humus and building of the nitrogen into other substances is the work of another set of bacteria or germs called nitrifying germs.
These nitrifying germs attack the humus, break it down, separate the nitrogen, cause it to unite with the oxygen of the air and thus build it into nitric acid which can be used by plant roots. This nitric acid if not immediately used will unite with lime or potash or soda or other similar substances and form nitrates, as nitrate of lime, nitrate of potash or common saltpetre. These nitrates are soluble in water and can be easily used by plant roots. If there are no plant roots to use them they are easily lost by being washed out of the soil. The work of the nitrifying germs is called nitrification.
To do their work well the nitrogen-fixing germs and the nitrifying germs require certain conditions.
The soil must be moist.
The soil must be well ventilated to supply nitrogen for the nitrogen-fixing germs and oxygen for the nitrifying germs.
The soil must be warm. Summer temperature is the most favorable. Their work begins and continues slowly at a temperature of about forty-five degrees and increases in rapidity as the temperature rises until it reaches ninety or ninety-five.
The nitrifying germs require phosphoric acid, potash and lime in the soil.
Direct sunlight destroys these bacteria, therefore they cannot work at the surface of the soil unless it is shaded by a crop.
From this we see that these bacteria or germs work best in the soil that has conditions necessary for the growth and development of plant roots.
These germs live on the coarse organic matter of the soil. Like the nitrifying germs they need oxygen, and when they cannot get it more readily elsewhere they take it from the nitric acid and nitrates. This allows the nitrogen of the nitrates to escape as a free gas into the air again, and the work of the nitrogen-fixing and nitrifying germs is undone and the nitrogen is lost. This loss of nitrogen is most apt to occur when the soil is poorly ventilated, because of its being very compact, or when the soil spaces are filled with water. This loss of nitrogen by denitrification can be checked by keeping the soil well ventilated.
By the term chemical properties we have reference to the chemical composition of the soil, the chemical changes which take place in the soil, and the conditions which influence these changes.
The sand, clay and humus of the soil are made up of a great variety of substances. The larger part of these act simply as a mechanical support for the plants and also serve to bring about certain physical conditions. Only a very small portion of these substances serve as the direct food of plants and the chemical conditions of these substances are of great importance.
In Chapter VIII we learned that plants are composed of several elements and that seven necessary elements are taken from the soil. These seven are nitrogen, phosphorus, potassium, magnesium, calcium, iron and sulphur.
Now a fertile soil must contain these seven elements of plant food and they must be in such form that the plant roots can use them.
Plant roots can generally get from most soils enough of the magnesium, calcium, iron, and sulphur to produce well developed plants. But the nitrogen, phosphorus and potassium, although they exist in sufficient quantities in the soil, are often in such a form or condition that the roots cannot get enough of one or more of them to produce profitable crops. For this reason these three elements are of particular importance to the farmer for, in order to keep his soil fertile, he must so treat it that these elements will be made available or he must add more of them to the soil in the proper form or condition.
Nitrogen in the soil.—Plant roots use nitrogen in the form of nitric acid and salts of nitrogen called nitrates. But the nitrogen of the soil is very largely found in the humus with the roots cannot use. A chemical change must take place in it and the nitrogen be built into nitric acid and nitrates. This, we have learned, is done through the aid of the nitrifying germs.
Phosphoric acid in the soil.—Phosphorus does not exist pure in the soil. The plant finds it as a phosphoric acid united with the other substances forming phosphates. These are often not available to plants, but can to a certain extent be made available through tillage and by adding humus to the soil.
Potash in the soil.—The plant finds potassium in potash which exists in the soil. Potash like phosphoric acid often exists in forms which the plant cannot use but may be made available to a certain extent by tillage, the addition of humus, and the addition of lime to the soil.
Lime in the soil.—Most soils contain the element calcium or lime, the compound in which it is found, in sufficient quantities for plant food. But lime is also of importance to the farmer and plant grower because it is helpful in causing chemical changes in the soil which tend to prepare the nitrogen, phosphoric acid and potash for plant use. It is also helpful in changing soil texture.
The chemical changes which make the plant foods available are dependent on moisture, heat, and air with its oxygen, and are therefore dependent largely on texture, and therefore on tillage.
When good tillage and the addition of organic matter and lime do not render available sufficient plant food, then the supply of available food may be increased by the application of manure and fertilizers.
It will be seen that all these classes of properties are necessary to furnish all the conditions for root growth.
The proper chemical conditions require the presence of both physical and biological properties and the biological work in the soil requires both chemical and physical conditions.
From the farmer's standpoint the physical properties seem to be most important, for the others are dependent on the proper texture, moisture, heat and ventilation which are controlled largely by tillage.
Therefore the first effort of the farmer to improve the fertility of his soil should be to improve his methods of working the soil.
Every one of these properties of the fertile soil, and consequently every one of the conditions necessary for the growth and development of plant roots, is influenced in some way by every operation performed on the soil, whether it be plowing, harrowing, cultivating, applying manure, growing crops, harvesting, or anything else, and the thoughtful farmer will frequently ask himself the question: "How is this going to effect the fertility of my soil or the conditions necessary for profitable crop production?"
The important factors in maintaining or increasing the fertility of the soil are:
The mechanical operations of tillage, especially with reference to the control of soil water.
The application of manures and fertilizers, especially with reference to maintaining a supply of humus and plant food.
Methods or systems of cropping the soil, with reference to economizing fertility.
The more important tillage tools and tillage operations we studied in Chapters XI and XII. They will be noticed here only in connection with their influence over soil water, for in the regulation of this important factor in soil fertility the other conditions of fertility are also very largely controlled.
"Of all the factors influencing the growth of plants, water is beyond doubt the most important," and the maintaining of the proper amount of soil water is one of the most important problems of the thinking farmer in controlling the fertility of his soil.
The decay of mineral and organic matter in the soil, and the consequent setting free of plant food, can take place only in the presence of moisture. The plant food in barn manures and crops plowed under for green moisture, can be made available only when there is sufficient moisture in the soil to permit breaking down and decomposition.
The presence of moisture in the soil is necessary for the process of nitrification to take place.
Soil moisture is necessary to dissolve plant food. Plant roots can absorb food from the soil only when it is in solution, and it seems to be necessary that a large quantity of water pass through the plant tissues to furnish the supply of mineral elements required by growth.
Moisture is necessary to build plant tissues. The quantity of water entering into the structure of growing plants varies from sixty to as high as ninety-five per cent, of their total weight.
During the periods of active growth there is a constant giving off of moisture by the foliage of plants and this must be made good by water taken from the soil by their roots.
In a series of experiments at the University of Wisconsin Agricultural Experiment Station, it was found that in raising oats, every ton of dry matter grown required 522.4 tons of water to produce it; for every ton of dry matter of corn there were required 309.8 tons of water; a ton of dry red clover requires 452.8 tons of water to grow it. At the Cornell University Agricultural Experiment Station, a yield of potatoes at the rate of 450 bushels per acre represented a water requirement of 1310.75 tons of water.
The soil which is occupied by the roots of plants receives moisture in the form of rain, snow and dew from above and free and capillary water rising from below.
"Free water is that form of water which fills our wells, is found in the bottom of holes dug in the ground during wet seasons, and is often found standing on the surface of the soil after heavy or long continued rains. It is sometimes called 'ground water' or 'standing water,' and flows under the influence of gravity." Free water is not used directly by plants unless they are swamp plants, and its presence within eighteen inches of the surface is injurious to most farm plants. Free water serves as the main source of supply for capillary water.
"Capillary water is water which is drawn by capillary force or soaks into the spaces between the soil particles and covers these particles with a thin film of moisture." It is a direct source of water to plants. Capillary water will flow in any direction in the soil, the direction of flow being determined by texture and dryness, the flow being stronger toward the more compact and drier parts. If the soil is left lumpy and cloddy then capillary water cannot rise readily from below to take the place of that which is lost by evaporation. If, however, the soil is fine and well pulverized, the water rises freely and continuously to supply the place of that taken by plant roots or evaporation from the surface.
Some farm lands contain too much water for the growth of farm crops; for example, bottom lands which are so low that water falling on the surface cannot run off or soak down into the lower soil. The result is that the spaces between the soil particles are most of the time filled with water, and this checks ventilation, which is a necessary factor in soil fertility. This state of affairs occurs also on sloping uplands which are kept wet by spring water or by seepage water from higher lands. Some soils are so close and compact that water falling on the surface finds great difficulty in percolating through them, and therefore renders them too wet for profitable cropping during longer or shorter periods of the year. Nearly all such lands can be improved by removing the surplus water through drains. (See Chapter XXV.)
Percolation and ventilation of close compact soils can be improved by mixing lime and organic matter with them.
In some sections of the country, particularly the arid and semi-arid sections of the West, the soil does not receive a sufficient supply of rain water for the production of profitable yearly crops. These soils are rendered unfertile by the lack of this one all important factor of fertility. They can be made fertile and productive by supplying them with sufficient water through irrigation.
The crop-producing power of some lands is lowered even in regions where the rainfall is sufficient, because these lands are not properly prepared by tillage and the addition of organic matter to absorb and hold the water that comes to them, or part of the water may be lost or wasted by lack of proper after-tillage or after-cultivation. This state of affairs is of course improved by better preparation to receive water before planting the crop and better methods of after-cultivation to save the water for the use of the crop.
Aside from what is used by the crops the soil may lose its water in the following ways:
Rain water which comes to the soil may be lost by running off over the surface of the land. This occurs especially on hilly farms and in the case of close, compact soils.
Water may be lost from the soil by leaching through the lower soil.
Water may be lost from the soil by evaporation from the surface.
The soil may lose water by the growth of weeds which are continually pumping water up by their roots and transpiring it from their leaves into the air.
Plowing and soil water. One of the first effects of deeply and thoroughly plowing a close, compact soil, is that rain will sink into it readily and not be lost by surface wash. In many parts of the country, especially the South, great damage is done by the surface washing and gulleying of sloping fields.
The shallow layer of soil stirred up by small plows and practice of shallow plowing so prevalent in the South takes in the rain readily, but as the harder soil beneath does not easily absorb the water the shallow layer of plowed soil soon fills, then becomes mud, and the whole mass goes down the slope. Where the land is plowed deep there is prepared a deep reservoir of loose soil that is able to hold a large amount of water till the harder lower soil can gradually absorb it.
The soil stirred and thoroughly broken by the plow serves not only as a reservoir for the rainfall, but also acts as a mulch over the more compact soil below it, thus checking the rapid use of capillary water to the surface and its consequent loss by evaporation. The plow which breaks and pulverizes the soil most thoroughly is the one best adapted to fit the soil for receiving and holding moisture.
If the plowing is not well done or if the land is too dry when plowed and the soil is left in great coarse lumps and clods, the air circulates readily among the clods and takes from them what little moisture they may have had and generally the soil is left in a worse condition than if it had not been plowed at all.
Fall plowing on rolling land and heavy soil leaving the surface rough helps to hold winter snows and rains when they fall, giving to such fields a more even distribution of soil water in the spring.
Spring plowing should be done early, before there is much loss of water from the surface by evaporation.
Professor King, of the University of Wisconsin Agricultural Experiment Station, carried on an experiment to see how much soil water could be saved by early plowing. He selected two similar pieces of ground near each other and tested them for water April 29th. Immediately after testing one piece was plowed. Seven days later, May 6th, he tested them for water again and found that both had lost some water, but that the piece which was not plowed had lost 9.13 pounds more water per square foot of surface than the plowed piece. This means that by plowing one part a week earlier than the other he saved in it water equal to a rainfall of nearly two inches or at the rate of nearly 200 tons of water per acre.
These operations when properly and thoroughly done tend to supplement the work of the plow in fitting the soil to absorb rain and in making a mulch to check loss by surface evaporation. The entire surface should be worked and the soil should be left smooth and not in ridges. Rolling cutters and spring-toothed harrows are apt to leave ridges and should have an attachment for smoothing the surface or be followed by a smoothing harrow. Cultivators used to make mulches to save water should have many narrow teeth rather than few broad ones. If a large broad-toothed tool is used to destroy grass and large weeds it should be followed by a smoother to level the ridges and thus lessen the evaporating surface. The soil should be cultivated as soon after a rain as it can be safely worked.
Rolling compacts the soil and starts a quicker capillary movement of water toward the surface and a consequent loss by evaporation. When circumstances will permit, the roller should be followed by a light harrow to restore the mulch.
Ridging the land tends to lessen the amount of moisture in the soil because it increases the evaporating surface. It should be practiced only on wet land or in early spring to secure greater heat.
Drains placed in wet land remove free water to a lower depth and increase the depth of soil occupied by capillary water and therefore increase the body of soil available to plant roots.
Humus, as we learned in Chapter IV, has a very great and therefore important influence over the water-absorbing and water-holding powers of soils. Therefore, any of the farm practices that tend to increase or diminish the amount of humus in the soil are to be seriously considered because of the effect on the water content of the soil. For this reason the application of barn manures and green crops turned under tend to improve the water conditions of most soils.
The mixing of heavy applications of coarse manures or organic matter with light sandy soils may make them so loose and open that they will lose moisture rapidly. When this practice is necessary the land should be rolled after the application of the manure.
Constant tillage hastens the decay of organic matter in the soil. Hence any method or system of cropping which does not occasionally return to the soil a new supply of humus tends to weaken the powers of the soil toward water.
All of the operations and practices which influence soil water also affect the other conditions necessary to root growth; namely, texture, ventilation, heat, and plant food, and those operations and practices which properly control and regulate soil water to a large degree control and regulate soil fertility.
While climatic conditions determine the general distribution of plants, the amount of water which a soil holds and can give up to plants during the growing season determines very largely the crops to which it is locally best adapted.
With crops that can be grown on a wide range of soils the water which the soil can furnish largely determines the time of maturing, the yield, and often the quality of the crop. With such a crop a small supply of water tends to hasten maturity at the expense of yield.
The sweet potato, when wanted for early market and high prices, is grown on the light sandy soils called early truck soils. These soils hold from five to seven per cent, of water. That is, the texture is such that during the early part of the growing season one hundred pounds of this soil is found to hold an average of from five to seven pounds of water under field conditions. This soil, holding little water, warms up early and thus hastens growth. Then as the warmer summer weather advances, the water supply diminishes, growth is checked, and the crop matures rapidly. On account of the small amount of water and the early checking of growth, the yield of the crop is less than if grown on a soil holding more water, but the earlier maturity makes it possible to realize a much higher price per bushel for the crop. A sweet potato grown on such a light soil is dry and starchy, a quality which brings a higher price in the northern markets than does the moist, soggy potato grown on heavier soils which contain more water and produce larger yields.
Early white potatoes, early cabbage, water melons, musk-melons, tomatoes and other early truck and market garden crops are also grown on light soil holding from five to seven per cent. of water. The main crop of potatoes and cabbage and the canning crop of tomatoes are grown on the loam soils holding from ten to eighteen per cent. of water. Such soils produce a later though much larger yield.
Upland cotton produces best on a deep loam that is capable of furnishing a uniform supply of about ten or twelve per cent. of water during the growing season.
Sea Island Cotton grows best on a light, sandy soil holding only five per cent. of water.
On light, sandy soils the Upland Cotton produces small plants with small yield of lint, while on clay and bottom land, which are apt to have large amounts of water, the plants grow very large and produce fewer bolls, which are very late in maturing.
Corn, while it will grow on a wide range of soils, produces best on loam or moist bottom lands holding about fifteen per cent. of water during the growing season.
The grasses and small grains do best on cool, firm soils holding eighteen to twenty-two per cent. of water.
Sorghum or "Molasses Cane" grows best on good corn soil, while the sugar cane of the Gulf States requires a soil with twenty-five per cent. of water for best growth.
While the amount of water which a soil will hold is determined largely by texture, it is also considerably influenced by the amount and frequency of rainfall and the location of the soil as to whether it be upland or bottom land.
The average percentage of water held by a soil during the growing season may be approximately determined in the following manner:
Sample the soil in one of the following methods:
Take to the field a spade, a box that will hold about half a bushel, and a pint or quart glass jar with a tight cover. If a cultivated field, select a place free from grass and weeds. Dig a hole one foot deep and about eighteen inches square. Trim one side of the hole square. Now from this side cut a slice about three inches thick and one foot deep, quickly place this in the box and thoroughly break lumps and mix together, then fill jar and cork tightly.
Another method is to take a common half-inch or two-inch carpenter's auger and bore into the soil with it. Pull it out frequently and put the soil which comes up with it into the jar until you have a sample a foot deep. If one boring twelve inches deep does not give sufficient soil make another boring or two close by and put all into the jar.
Take the sample, by whatever method obtained, weigh out ten or twenty ounces of the moist soil and dry it at a temperature just below 212 degrees. When it is thoroughly dry weigh again. The difference between the two weights will be the amount of water held by the sample. Now divide this by the weight of the dry sample and the result will be the per cent. of water held by the soil.
Several samples taken from different parts of the field will give an average for the field. Repeat this every week or oftener through the season and an approximate estimate of the water-holding capacity of the soil will be obtained and consequently an indication of the crops to which the soil is best adapted.
This soil held a little over twelve per cent. of water. If this soil continues to give about the same result for successive tests during the growing season, the results would indicate a soil adapted to cotton, late truck or corn.
The term "after-cultivation" is here used in referring to those tillage operations which are performed after the crop is planted. Synonymous terms are "cultivation," "inter-tillage," "working the crop."
After-cultivation influences the texture, ventilation, heat, plant food and moisture factors of fertility, but most particularly the moisture factor.
Under ordinary circumstances the greatest benefit derived from after-cultivation when properly performed is the saving of soil water for the use of the crop.
Soil water is seldom at rest unless the soil be frozen solid. When rain falls on a fertile soil there is a downward movement of water. When the rain ceases, water begins to evaporate from the surface of the soil. Its place is taken by water brought from below by capillarity. This is in turn evaporated and replaced by more from below. This process continues with greater or less rapidity according to the dryness of the air and the compactness of the soil.
We learned in a former chapter that during their growth farm plants require an amount of water equal to from 300 to 500 times their dry weight. Weeds require just as much water and some of them probably more than the cultivated plants. This water is largely absorbed by the roots and sent up to the leaves where it is transpired into the air and is lost from the soil, and therefore is unavailable to the growing crop until it again falls onto the soil.
In some parts of the country, particularly the semi-arid West, the rainfall is not sufficient to supply the soil with enough water to grow such crops as it could otherwise produce. In the moister regions the rainfall is not evenly distributed throughout the growing season, and there are longer or shorter intervals between rains when the loss of water through evaporation and weeds is apt to be greater than the rainfall. For these reasons it is best to check these losses and save the water in the soil for the use of the crops.
This can be done by:
Preventing the growth of weeds and by checking losses by evaporation with a soil mulch.
A seedling plant is easiest killed just as it has started into growth. The best time to kill a plant starting from an underground stem or a root is just as soon as it appears above the surface in active growth.
The best time to cultivate, then, to kill weeds is as soon as the weeds appear. At this time large numbers can be killed with the least of effort. Do not let them get to be a week or two old before getting after them.
In planting some crops the ground between the rows becomes trampled and compact. This results in active capillarity which brings water to the surface and it is lost by evaporation.
Every rainfall tends to beat the soil particles together and form a crust which enables the capillary water to climb to the surface and escape into the air. This loss by evaporation should be constantly watched for and the soil should be stirred and a mulch formed whenever it becomes compact or a crust is formed.
The proper time to cultivate, then, to save water is as soon as weeds appear or as soon as the surface of the soil becomes compact or crusted by trampling, by the beating of rain or from any other cause, whether the crop is up or not. The cultivation should start as soon after a rain as the soil is dry enough to work safely.
The surface soil should always be kept loose and open. The efficacy of the soil mulch depends on the thoroughness and frequency of the operation. It is particularly beneficial during long, dry periods. During such times it is not necessary to wait for a rain to compact the soil; keep the cultivators going, rain or no rain.
The main objects of after-cultivation are to destroy weeds and to form a soil mulch for the purpose of controlling soil moisture. These ends are secured by shallow surface work. It is not necessary to go more than two or three inches deep. Deeper work will injure the roots of the crop. Therefore the proper tools for after-cultivation in the garden are the hoe and rake and for field work narrow-toothed harrows and cultivators or horse-hoes which stir the whole surface thoroughly to a moderate depth. These field tools are supplemented in some cases by the hand hoe, but over wide areas of country the hoe never enters the field.
A light spike-toothed harrow can be used on corn, potatoes, and similar crops, and accomplish the work of cultivation rapidly until they get to be from four to six inches high; after that cultivators which work between the rows should be used.
A very useful class of tools for destroying weeds in the earlier stages are the so-called "weeders." They somewhat resemble a horse hay rake and have a number of flexible wire teeth which destroy shallow rooted weeds but slip around the more firmly rooted plants of the crop. These weeders must be used frequently to be of much value, for after a weed is well rooted the weeder cannot destroy it.
There is a larger class of hand wheel hoes which are very useful in working close planted garden and truck crops. They either straddle the row, working the soil on both sides at the same time, or, running between the rows, work the soil to a width of from six to eighteen inches.
For best results with the weeder and hand wheel hoes the soil should be thoroughly prepared before planting by burying all trash with the plow and breaking all clods with harrow and roller.
The objection made to the deep-working implements, like the plow, is that they injure the crop by cutting its feeding roots, and this has been found by careful experiment and observation to diminish the crop.
Some farmers object to using a light harrow for cultivation in the early stages of the crop because they say the harrow will destroy the crop as well as the weeds. This danger is not so great as it seems. The seeds of the crop are deeper in the soil than the seeds of the weeds which germinate and appear so quickly. The soil has also been firmed about them. Hence they have a firmer hold on the soil and but few of them are destroyed if the work is carefully done.
In working crops not only should weeds be destroyed but also surplus plants of the crop, as these have the same effect as weeds; namely, they occupy the soil and take plant food and moisture which if left to fewer plants would produce a larger harvest.
Except in low, wet ground, the practice of hilling or ridging up crops is now considered by those who have given the matter thorough study, to be unnecessary, flat and shallow culture being cheaper. It saves more moisture, and for this reason, in the majority of cases, produces larger crops.
Sometimes during very long-continued periods of wet weather weeds and grass become firmly established among the plants of the crop. Under such circumstances it is necessary to use on the cultivator teeth having long, narrow sweeps that will cut the weeds just beneath the surface of the soil. Sometimes a broad-toothed tool is used that will throw sufficient soil over the large weeds near the rows to smother them.
The condition to be met and the effect of the operation should always be given serious thought.
We have considered after-cultivation as influencing soil fertility by checking a loss of water by evaporation and weed transpiration, and this is its main influence but other benefits follow.
Keeping the surface soil loose and open benefits fertility because it directly aids the absorption of rain, favors ventilation, and has a beneficial influence over soil temperature. Indirectly through these factors it aids the work of the beneficial soil bacteria and the chemical changes in the process of preparing plant food for crop use.
In Chapter II we learned that the roots of plants for their growth and development need a soil that is firm yet mellow, moist, warm, ventilated and supplied with plant food. We also learned that of the plant foods there is often not enough available nitrogen, phosphoric acid, potash and lime for the needs of the growing plants.
Manures and fertilizers are applied to the soil for their beneficial effects on these necessary conditions for root growth and therefore to assist in maintaining soil fertility.
Manures may be classified as follows:
| Farm manures. | { Barn or stable manures, |
| { Green-crop manures, | |
| { Composts. | |
| Commercial fertilizers or artificial manures. |
{ Materials furnishing nitrogen, |
| { Materials furnishing phosphoric acid, | |
| { Materials furnishing potash, | |
| { Materials furnishing lime. | |
Of these two classes of manures the farmer should rely chiefly on the farm manures letting the commercial fertilizers take a secondary place because:
Farm manures are complete manures; that is they contain all the necessary elements of plant food.
Farm manures add to the soil large amounts of organic matter or humus.
The decay of organic matter produces carbonic acid which hastens the decay of mineral matter in the soil and so increases the amount of available plant food.
The organic matter changes the texture of the soil.
It makes sandy soils more compact and therefore more powerful to hold water and plant food.
It makes heavy clay soils more open and porous, giving them greater power to absorb moisture and plant food. This admits also of better circulation of the air in the soil, and prevents baking in dry weather.
Farm manures influence all of the conditions necessary for root growth while the commercial fertilizers influence mainly the plant food conditions.
The farm manures are good for all soils and crops.
They are lasting in their effects on the soil.
Barn or stable manure consists of the solid and liquid excrement of any of the farm animals mixed with the straw or other materials used as bedding for the comfort of the animals and to absorb the liquid parts.
The liquid parts should be saved, as they contain more than half of the nitrogen and potash in the manure.
The value of barn manure for improving the soil conditions necessary for root growth depends in a measure upon the plant food in it, but chiefly upon the very large proportion of organic matter which it contains when it is applied to the soil.
These factors are influenced somewhat: by the kind of animal that produces the manure; by the kind of food the animal receives; by the kind and amount of litter or bedding used; but they depend particularly on the way the manure is cared for after it is produced.
Improper care of the manure may cause it to diminish in value very much.
Loss by leaching.
If the manure is piled against the side of the stable where water from the roof can drip on it, as is often the case, or if it is piled in an exposed place where heavy rain can beat on it, the rain water in leaching through the manure washes out of it nitrogen and potash, which pass off in the dark brown liquid that oozes from the base of the pile.
Loss by heating or fermenting.
When barn manure is thrown into piles it soon heats and throws off more or less steam and gas. This heating of the manure is caused by fermentation or the breaking down of the materials composing the manure and the forming of new compounds. This fermentation is produced by very small or microscopic plants called bacteria.
The fermentation of the manure is influenced by the following conditions:
A certain amount of heat is necessary to start the work of the bacteria. After they have once started they keep up and increase the temperature of the pile until it gets so hot that sometimes a part of the manure is reduced to ashes. The higher the temperature the more rapid the fermentation. This can be seen particularly in piles of horse manure.
The bacteria which produce the most rapid fermentation in manure need plenty of air with its oxygen. Therefore fermentation will be more or less rapid according as the manure is piled loosely or in a close compact mass.
A certain amount of moisture is necessary for the fermentation to take place, but if the manure is made quite wet the temperature is lowered and the fermentation is checked. The water also checks the fermentation by limiting the supply of air that can enter the pile.
The composition of the manure influences the fermentation. The presence of considerable amounts of soluble nitrogen hastens the rapidity of the fermentation.
Now when the manure ferments a large part of the organic matter in it is broken down and changed into gases. The gas formed most abundantly by the fermentation is carbonic acid gas, which is produced by the union of oxygen with carbon of the organic matter. The formation of this gas means a loss of humus. This loss can be noticed by the fact that the pile gradually becomes smaller.
The next most abundant product of the fermentation is water vapor which can often be seen passing off in clouds of steam.
When manure ferments rapidly the nitrogen in it is changed largely into ammonia. This ammonia combines with part of the carbonic acid gas and forms carbonate of ammonia, a very volatile salt which rapidly changes to a vapor and is lost in the atmosphere. This causes a great loss of nitrogen during the rapid decomposition of the manure. This loss can be detected by the well known odor of the ammonia which is particularly noticeable about horse stables and piles of horse manure.
Besides these gases a number of compounds of nitrogen, potash, etc., are formed which are soluble in water. It is these that form the dark brown liquid that sometimes oozes out from the base of the manure heap.
At the Cornell University Agricultural Experiment Station, the following experiment was carried out to find out how much loss would take place from a pile of manure:
"Four thousand pounds of manure from the horse stable were placed out of doors in a compact pile and left exposed from April 25th to September 22d. The results were as follows:"
| April 25. | Sept. 22. | Loss per cent. | |
| Gross weight | 4,000 lbs. | 1,730 lbs. | 57 |
| Nitrogen | 19.6 lbs. | 7.79 lbs. | 60 |
| Phos. acid | 14.8 lbs. | 7.79 lbs. | 47 |
| Potash | 36 lbs. | 8.65 lbs. | 76 |
| Value of plant food per ton | $2.30 | $1.06 |
This shows a loss of more than half the bulk of the manure and more than half the plant food contained in it.
The first step to be taken in preserving the manure or in checking losses is to provide sufficient bedding or litter in the stable to absorb and save all the liquid parts.
The losses from fermentation of hot manures like horse manure may be largely checked by mixing with the colder manure from the cow stable.
Losses from fermentation may also be checked.
By piling compactly, which keeps the air out.
By moistening the pile, which lowers the temperature and checks the access of oxygen.
The manure may be hauled directly to the field each day and spread on the surface or plowed in. This method is the best when practicable because fermentation of the manure will take place slowly in the soil and the gases produced will be absorbed and retained by the soil.
Gypsum or land plaster is often sprinkled on stable floors and about manure heaps to prevent the loss of ammonia.
Copperas or blue stone, kainite and superphosphate are sometimes used for the same purpose. There is, however, nothing better nor so good for this purpose as dry earth containing a large percentage of humus.
Losses from washing or leaching by rain may be prevented by piling the manure under cover or by hauling it to the field as soon as produced and spreading it on the surface or plowing it under.
From ten to twenty tons per acre is considered a sufficient application of barn manure for most farm crops. Larger amounts are sometimes applied to the soil for truck and market garden crops.
Barn manures are applied to the soil by these methods:
The manure is sometimes hauled out from the barn and placed in a large pile in the field or in many small piles where it remains for some time before being spread and plowed or harrowed in.
Some farmers spread it on the field and allow it to lie some time before plowing it in.
It is sometimes spread as soon as hauled to the field and is immediately plowed in or mixed with the soil. This last is the safest and most economical method so far as the manure alone is concerned.
When the manure is left in a large pile it suffers losses due to fermentation and leaching.
At the Cornell University Agricultural Experiment Station, five tons of manure from the cow stable, including three hundred pounds of gypsum which was mixed with it, were exposed in a compact pile out of doors from April 25th to September 22d. The result was as follows:
| April 25. | Sept. 22. | Loss per cent. | |
| Gross weight | 10,000 lbs. | 5,125 lbs. | 49 |
| Nitrogen | 47 lbs. | 28 lbs. | 41 |
| Phos. acid | 32 lbs. | 26 lbs. | 19 |
| Potash | 48 lbs. | 44 lbs. | 8 |
| Value of plant food per ton | $2.29 | $1.06 |
When distributed over the field in small piles and allowed to remain so for some time, losses from fermentation take place, and the rain washes plant food from the pile into the soil under and immediately about it. This results in an uneven distribution of plant food over the field, for when the manure is finally scattered and plowed in, part of the field is fertilized with washed out manure while the soil under and immediately about the location of the various piles is often so strongly fertilized that nothing can grow there unless it be rank, coarse weeds.
When the manure is spread on the surface and allowed to lie for some time it is apt to become dry and hard, and when finally plowed in, decays very slowly.
When the manure is plowed in or mixed with the soil as soon as applied to the field there results an even distribution of plant food in the soil, fermentation takes place gradually and all gases formed are absorbed by the soil, there is very little loss of valuable nitrogen and organic matter, and the fermentation taking place in the soil also aids in breaking down the mineral constituents of the soil and making available the plant food held by them.
Therefore it seems best to spread the manure and plow it in or mix it with the soil as soon as it is hauled to the field, when not prevented by bad weather and other more pressing work.
A large part of the value of barn manure lies in the fact that it consists largely of organic matter, and therefore has an important influence on soil texture, and during its decay in the soil produces favorable chemical changes in the soil constituents. Therefore it will produce its greatest effect on the soil when applied fresh. For this reason it is generally best to haul the manure to the field and mix it with the soil as soon after it is produced as possible.
If coarse manures are mixed with light, sandy soils it is best to follow with the roller, otherwise the coarse manure may cause the soil to lie so loose and open that both soil and manure will lose moisture so rapidly that fermentation of the manure will be stopped and the soil will be unfit for planting.
If it is desired to apply manure directly to delicate rooted truck and vegetable crops it is best to let it stand for some time until the first rank fermentation has taken place and the manure has become rotten.
A good practice is to apply the manure in its fresh condition to coarse feeding crops like corn, and then follow the corn by a more delicate rooted crop which requires the manure to be in a more decomposed condition than is necessary for the corn. In this case the corn is satisfied and the remaining manure is in proper condition for the following crop when it is planted.
Another practice is to broadcast the coarse manure on grass land and then when the hay is harvested the sod and remaining manure are plowed under for the following crop.
A study of root development in Chapter II. tells us that most of the manure used for cultivated crops should be broadcasted and thoroughly mixed with the soil. A small amount may be placed in the drill or hill and thoroughly mixed with the soil for crops that are planted in rows or furrows in order to give the young plant a rapid start. For the vegetable garden and flower garden and lawns, it is best to apply only manure that has been piled for some time and has been turned over several times so that it is well rotted and broken up.
There may not be a single farm where it will be possible to carry out to the letter these principles applying to the treatment and application of barn manures.
This is because climate, crops and conditions vary in different parts of the country and on different farms. Therefore we should study carefully our conditions and the principles and make our practice so combine the two as to produce the best and most economical results under the circumstances.
If we can get manure out in the winter it will very much lessen the rush of spring work.
In some parts of the country on account of deep snows, heavy rainfall and hilly fields, it is not advisable to apply manure in the winter. This will necessitate storing the manure.
If conditions are such that we can get the manure on to the land as soon as it is made, it should be applied to land on which a crop is growing or land which is soon to be planted. If land is not intended for an immediate crop, put a cover crop on it.
Composts are collections of farm trash or rubbish, as leaves, potato tops, weeds, road and ditch scrapings, fish, slaughter-house refuse, etc., mixed in piles with lime, barn manure, woods-earth, swamp muck, peat and soil.
The object of composting these materials is to hasten their decay and render available the plant food in them.
There are certain disadvantages in composting, namely:
Expense of handling and carting on account of bulk.
Low composition.
Loss of organic matter by fermentation.
Compost heaps serve as homes for weed seeds, insects and plant diseases.
Nevertheless, all waste organic matter on the farm should be saved and made use of as manure. These materials when not too coarse may be spread on the surface of the soil and plowed under; they should never be burned unless too coarse and woody or foul with weed seeds, insects and disease.
Green-crop manures are crops grown and plowed under for the purpose of improving the fertility of the soil.
The main object of turning these crops under is to furnish the soil with humus. Any crop may be used for this purpose.
By growing any of the class of crops called Legumes we may add to the soil not only humus but also nitrogen. Cowpeas, beans, clover, vetch and plants having foliage, flowers, seed pods and seeds like them are called Legumes.
Most of the farm plants take their nitrogen from the soil. This nitrogen is taken in the form of nitric acid and nitrogen salts dissolved in soil water. The legumes, however, are able to use the free nitrogen which forms four-fifths of the atmosphere. This they do not of their own power but through the aid of very minute plants called bacteria or nitrogen-fixing germs. These germs are so small that they cannot be seen without the use of a powerful microscope. It would take ten thousand average sized bacteria placed side by side to measure one inch.
These little germs make their homes in the roots of the legumes, causing the root to enlarge at certain points and form tubercles or nodules (Figs. 34 and 35).
Carefully dig up a root of clover, cowpea, soy bean or other legume and wash the soil from it. You will find numbers of the little tubercles or nodules. On the clover they will be about the size of a pin head or a little larger. On the soy bean they will be nearly as large as the beans. These nodules are filled with colonies or families of bacteria which take the free nitrogen from the air which penetrates the soil and give it over to the plant in return for house rent and starch or other food they may have taken from the plant.
In an experiment at Cornell University Agricultural Experiment Station, in 1896, clover seeds were sown August 1st, and the plants were dug November 4th, three months and four days after the seeds were sown. The clovers were then weighed and tested and the following results were obtained:
| Nitrogen in an Acre of Clovers. | |||
| Lbs. in tops. | Lbs. in roots. | Lbs., total. | |
| Crimson Clover | 125.28 | 30.66 | 155.94 |
| Mammoth Clover | 67.57 | 78.39 | 145.96 |
| Red Clover | 63.11 | 40.25 | 103.36 |
A large part of the nitrogen found in these plants was undoubtedly taken by the roots from the soil air.
Besides adding humus and nitrogen to the soil the legumes, being mostly deep-rooted plants, are able to take from the subsoil food which is out of reach of other plants. This food is distributed throughout the plant and when the plant is plowed under the food is deposited in the upper soil for the use of shallow-rooted plants.
The benefits derived from green crop manuring then are as follows:
We add to the soil organic matter or humus which is so helpful in bringing about the conditions necessary for root growth.
By using the legumes for our green manure crops we may supply the soil with nitrogen taken from the air.
We return to the surface soil not only the plant food taken from it but also plant food brought from the subsoil by the roots of the green manure plants.
The plants best adapted to green crop manuring are deep-rooted, heavy-foliaged plants. Of these the legumes are by far the best, as they collect the free nitrogen from the air which other plants cannot do. This enables the farmer to grow nitrogen which is very expensive to buy.
Green manure crops may be grown at any time that the soil is not occupied by other crops, provided other conditions are suitable. Land which is used for spring and summer crops often lies bare and idle during fall and winter. A hardy green manure crop planted after the summer crop is harvested will make considerable growth during the fall and early spring, and this can be plowed under for the use of the following summer crops. If there is a long interval of time during spring or summer when the land is bare, that is a good time for a green manure crop.
Green manure crops are often planted between the rows of other crops such as corn or cotton at the last working of the crop for the benefit of the crop which is to follow.
It is advisable to arrange for a green manure crop at least once in three or four years.
Cowpea. (Field pea, stock pea, black pea, black-eyed pea, clay pea, etc.) (Fig. 79.)
The cowpea is perhaps the most important leguminous plant grown for soil improvement in the South. It will grow anywhere south of the Ohio River and can be grown with fair success in many localities farther north.
It is a tender annual, that is, it is killed by frost and makes its entire growth from seed to seed in a single season. It should therefore be planted only during the spring and summer. This crop not only has power like the other legumes to take nitrogen from the air, but it is also a strong feeder, that is, it can feed upon mineral plant food in the soil that other plants are unable to make use of. For this reason it will grow on some of the poorest soils, and is a good plant with which to begin the improvement of very poor land. It is a deep-rooted plant. On the farm of the Hampton Normal and Agricultural Institute cowpea roots have been traced to the depth of sixty-one inches.
Cowpeas will grow on almost any land that is not too wet. From one and one-half to three bushels of seed are used per acre. These are sown broadcast and harrowed in or are planted in drills or furrows and cultivated a few times. Aside from its value as a green manure crop the cowpea is useful as food for man and the farm animals. The green pods are used as string beans or snaps. The ripened seeds are used as a food and the vines make good fodder for the farm animals.
"Experiments at the Louisiana Experiment Station show that one acre of cowpeas yielding 3,970.38 pounds of organic matter, turned under, gave to the soil 64.95 pounds of nitrogen, 20.39 pounds of phosphoric acid and 110.56 pounds of potash."—Farmer's Bulletin, 16 U.S. Dept. of Agriculture.
"It is now grown in all the States south of the Ohio River, and in 1899 there were planted nearly 800,000 acres to the crop. Basing our estimate on the amount of nitrogen stored in the soil by this crop, it is fair to say that fully fifteen million pounds of this valuable substance were collected and retained as a result of the planting of the cowpea alone. This at fifteen cents per pound (the market price of nitrogen) would be worth something more than $2,000,000 for nitrogen alone."—Year Book of the Department of Agriculture, 1902.
The Clovers.—These are the most extensively grown plants for green manure purposes in the United States. They are deep-rooted, and are able to use mineral food that is too tough for other plants. They furnish large crops of hay or green forage and a good aftermath and sod to turn under as green manure, or the entire crop may be plowed under.
Red Clover is the most widely planted (Fig. 80). It is a perennial plant and grows from the most northern States to the northern border of the Gulf States. It grows best on the loams and heavier soils well supplied with water, but not wet. It is sown broadcast at the rate of from ten to twenty pounds of seed per acre. In the North it is generally sown in the spring on fields of winter grain. In the South, September and October are recommended as the proper sowing times. It is the custom to let it grow two years, cutting it for hay and seed, and then to turn the aftermath and sod under.
Mammoth Red Clover, also called sapling clover and pea-vine clover, closely resembles the red clover, but is ranker in growth and matures two or three weeks later. It is better adapted to wet land than the red clover.
Crimson Clover, also called German clover and Italian clover, is a valuable green manure crop in the central and southern States east of the Mississippi. It is a hardy annual in that section and is generally sown from the last of July to the middle of October, either by itself or with cultivated crops at their last working. Fifteen and twenty pounds of seed are used to the acre. It makes a good growth during the fall and early winter and is in blossom and ready to cut or plow under in April or May. It grows at a season when the cowpea will not live. Crimson clover will grow on soils too light for other clovers.
The Soy Bean, also called soja bean and Japanese pea, is another leguminous crop used for green manuring (Fig. 81). It was introduced into this country from Japan and in some localities is quite extensively planted. It grows more upright than the cowpea and produces a large amount of stem and foliage which may be used for fodder or turned under for green manure The seeds are used for food for man and beast. The soy bean is planted and cared for in the same manner as the cowpea.
The Canadian Field Pea is sometimes grown in the north as a green manure crop.
White Sweet Clover, white melitot or Bokhara clover, grows as a weed from New England to the Gulf of Mexico. In the Gulf States it is regarded as a valuable forage and green manure plant. One or two pecks of seed per acre are sown in January or February.
Alfalfa, or lucern, though grown more for a forage crop than for green manuring, should be mentioned here, for wherever grown and for whatever purpose, its effects on the soil are beneficial (Fig. 82). This plant requires a well prepared soil that is free from weeds. Twenty to twenty-five pounds of seed are planted per acre. In the north the seeding is generally done in the spring after danger of frost is past, as frost kills the young plants. In the South fall seeding is the custom in order to give the young plants a long start ahead of the spring weeds. One seeding if well cared for lasts for many years. Alfalfa is pastured or cut for hay, four to eight tons being the yield. Many fields run out in five or six years and the sod is plowed under. This plant sends its roots thirteen, sixteen, and even thirty feet into the soil after water and food, and when these roots decay they furnish the lower soil with organic matter and their passages serve as drains and ventilators in the soil. Alfalfa is grown extensively in the semi-arid regions of the country.
Among the non-leguminous green manure plants are rye, wheat, oats, mustard, rape, buckwheat. Of these the rye and buckwheat are most generally used, the rye being a winter crop and the other a warm weather plant. They are both strong feeders and can use tough plant food. They do not add new nitrogen to the soil though they furnish humus and prepare food for the weaker feeders which may follow them.
Next to the soil itself, the farmer's most important sources of plant food are the farm manures. But most farms do not produce these in sufficient quantities to keep up the plant food side of fertility. Therefore the farmer must resort to other sources of plant food to supplement the farm manures.
There is a large class of materials called Commercial Fertilizers, which, if judiciously used, will aid in maintaining the fertility of the farm with economy.
We learned in a previous chapter that the plant foods, nitrogen, phosphoric acid, potash and lime, are apt to be found wanting in sufficient available quantities to supply the needs of profitable crops. We learned also that lime is useful in improving the texture of the soil and in making other plant foods available. Now the commercial fertilizers are used to supply the soil with these four substances and they may be classified according to the substance furnished as follows:
Nitrogen is the most expensive of plant foods to buy, therefore special attention should be given to producing it on the farm by means of barn manures and legumes plowed under.
The principal commercial sources of nitrogen are: Nitrate of soda, sulphate of ammonia, dried blood, tankage, dry ground fish, cotton-seed meal.
Nitrate of Soda or Chile saltpetre containing 15.5 per cent. of nitrogen, is found in large deposits in the rainless regions of western South America. In the crude state as it comes from the mine it contains common salt and earthy matter as impurities. To remove these impurities the crude nitrate is put into tanks of warm water. The nitrate dissolves and the salt and earthy matter settle to the bottom of the tank. The water with the nitrate in solution is then drawn off into other tanks from which the water is evaporated, leaving the nitrate, a coarse, dirty looking salt which is packed in three-hundred-pound bags and shipped.
Plants that take their nitrogen from the soil take it in the form of nitrate. Hence nitrate of soda, which is very soluble in water, is immediately available to plants and is one of the most directly useful nitrogen fertilizers. It is used for quick results and should be applied only to land that has a crop or is to be immediately planted, otherwise it is liable to be lost by leaching.
Sulphate of Ammonia contains 20 per cent. of nitrogen. It is a white salt, finer and cleaner looking than the nitrate. It is a by-product of the gas works and coke ovens. The nitrogen in it is quite readily available.
Dried Blood contains 8 to 12 per cent. of nitrogen. This is blood collected in slaughter-houses and dried by steam or hot air. It decays rapidly in the soil and is a quick acting nitrogen fertilizer.
Tankage contains 4 to 8 per cent. of nitrogen and 7 to 20 per cent. of phosphoric acid. Slaughter-house waste, such as meat and bone scrap, are boiled or steamed to extract the fat. The settlings are dried and ground and sold as tankage. It is much slower in its action than dried blood and supplies the crop with both nitrogen and phosphoric acid.
Dried Fish Scrap is a by-product of the fish oil factories and the fish canning factories. It contains 7 to 9 per cent. of nitrogen and 6 to 8 per cent. of phosphoric acid. It undergoes nitrification readily and is a quick acting organic source of nitrogen and phosphoric acid.
Cotton-seed Meal contains 7 per cent. of nitrogen, about 2.5 phosphoric acid, and 1.5 per cent. of potash. It is a product of the cotton oil factories and is obtained by grinding the cotton seed cake from which the oil has been pressed. It is a most valuable source of nitrogen for the South.
The nitrogen in the dried blood, tankage, fish scrap and cotton-seed meal, being organic nitrogen, must be changed by the process of nitrification to nitric acid or nitrate before it is available. They are therefore better materials to use for a more gradual and continuous feeding of crops than the nitrate of soda or sulphate of ammonia.
Scrap leather, wool waste, horn and hoof shavings are rich in nitrogen but they decay so slowly that they make poor fertilizers. They are used by fertilizer manufacturers in making cheap mixed fertilizers.
The principal commercial sources of phosphoric acid are:
Phosphate Rocks.
Bones.
Fish scrap.
Phosphate slag.
The Phosphate Rocks are found in shallow mines in North and South Carolina, Georgia, Florida and Tennessee, and also as pebbles in the river beds. They are the fossil remains of animals. After being dug from the mines the rock is kiln dried and then ground to a very fine powder called "floats" which is used on the soil. The phosphoric acid in the floats is insoluble and becomes available only as the phosphate decays. This is too slow for most plants so it is treated with oil of vitriol or sulphuric acid to make it available. The phosphoric acid in the ground rock is combined with lime, forming a phosphate of lime which is insoluble. When treated with the oil of vitriol or sulphuric acid, the sulphuric acid takes lime from the phosphate and forms sulphate of lime or gypsum. The phosphoric acid is left combined with the smallest possible amount of lime and is soluble in water. It is then called soluble or water soluble phosphoric acid.
Now if this soluble form remains unused it begins to take on lime again and turns back toward its original insoluble form. After a time it gets to such a state that it is no longer soluble in water but is soluble in weak acids. It is then said to be reverted phosphoric acid. Reverted phosphoric acid is also called citrate soluble phosphoric acid, because in testing fertilizers the chemists use ammonium citrate to determine the amount of reverted phosphoric acid.
This form still continues to take on lime and by and by gets back to the original insoluble form called insoluble phosphoric acid.
The soluble phosphoric acid and reverted phosphoric acid are available to plant roots. The insoluble form is not.
The rock phosphates contain from 26 to 35 per cent. of insoluble phosphoric acid. The acid phosphates or dissolved rock phosphates contain from 12 to 16 per cent. of available phosphoric acid and from 1 to 4 per cent. of insoluble.
Bone Fertilizers. Bones have long been a valuable and favored source of phosphoric acid. In addition to phosphoric acid they contain some nitrogen which adds to their value. They are organic phosphates and are quite lasting in their effect on the soil as they decay slowly.
The terms "Raw Bone," "Steamed Bone," "Ground Bone," "Bone Meal," "Bone Dust," "Bone Black," "Dissolved Bone," indicate the processes through which the bone has passed in preparation, or the condition of the material as put on the market and used on the soil.
Ground bone, bone meal, bone dust, indicate the mechanical conditions of the bones.
The bones are sometimes ground "raw" just as they come from the slaughter-house or kitchen, or they are sometimes first "steamed" to extract the fat for soap, and the nitrogenous matter for glue.
Raw Bone. Analysis: Nitrogen, 2.5 to 4.5 per cent. Available phosphoric acid, 5 to 8 per cent. Insoluble phosphoric acid 15 to 17 per cent.
Steamed Bone contains 1.5 to 2.5 per cent. of nitrogen, 6 to 9 per cent. of available phosphoric acid and 16 to 20 per cent. of insoluble phosphoric acid.
Steamed bone pulverizes much finer than raw bone and decays more rapidly in the soil because the fat has been extracted from it.
Dissolved Bone. Ground bone is sometimes treated with sulphuric acid to render the phosphoric acid in it more available. It is then called dissolved bone and contains thirteen to fifteen per cent. of available phosphoric acid and two to three per cent. of nitrogen.
Dissolved Bone Black. Bone charcoal is used for refining sugar. It is then turned over to the fertilizer manufacturers who sell it as "Bone Black" or treat it with sulphuric acid and then put it on the market as dissolved bone black.
The bone black contains thirty to thirty-six per cent. of insoluble phosphoric acid.
The dissolved bone black contains 15 to 17 per cent. of available phosphoric acid and 1 to 2 per cent. insoluble.
"Thomas Slag," "Phosphate Slag," "Odorless Phosphate." Phosphorous is an impurity in certain iron ores. In the manufacture of Bessemer steel this is extracted by the use of lime which melts in the furnace, unites with the phosphorous and brings it away in the slag. This slag is ground to a fine powder and used as a fertilizer. It contains 11 to 23 per cent. of phosphoric acid, most of which is available.
Superphosphate. The term superphosphate is applied to the phosphates that have been treated with sulphuric acid to make the phosphoric acid available. Dissolved bone, dissolved bone black, and the dissolved phosphate rocks are superphosphates.
Fish Scrap, mentioned as a source of nitrogen, is also a valuable source of phosphoric acid, containing 6 to 8 per cent., which is quite readily available owing to the rapid decay of the scrap.
The chief sources of potash used for fertilizers are the potash salts from the potash mines at Stassfurt, Germany, where there is an immense deposit of rock salt and potash salts.
The principal products of these mines used in this country are the crude salts:
Kainite, containing 12 per cent. of potash.
Sylvinite, containing 16 to 20 per cent. of potash, and the higher grade salts manufactured from the crude salts:
Muriate of Potash, containing 50 per cent. potash.
High grade Sulphate of Potash, containing 50 per cent. potash.
Low grade Sulphate of Potash, containing 25 per cent. potash.
Wood Ashes, if well kept and not allowed to get wet and leach, contain 4 to 9 per cent. of potash.
Cotton Hull Ashes contain 20 to 30 per cent, of potash and 7 to 9 per cent. of phosphoric acid.
The potash in all these forms is soluble in water and equally available to plants. The crude salts, kainite and sylvinite, and the muriate contain chlorine and are not considered good for potatoes and tobacco as the chlorine lowers the quality of these products.
In tobacco regions tobacco refuse is a valuable source of potash, the stems are about five per cent. potash.
Lime is generally supplied to the soil in the form of quicklime made by burning lime stone or shells. Other forms are gypsum or land plaster, gas lime (a refuse from gas works) and marl. Most soils contain sufficient lime for the food requirements of most plants. Some soils, however, are deficient in lime and some crops, particularly the legumes, are benefitted by direct feeding with lime.
Lime is valuable for its effect on the soil properties which constitute fertility.
Physically lime acts on the texture of the soil making clay soils mealy and crumbly, and causing the lighter soils to adhere or stick together more closely.
Chemically, lime decomposes minerals containing potash and other plant foods, thus rendering them available for the use of plants. It also aids the decay of organic matter and sweetens sour soils.
Biologically lime aids the process of nitrification.
The action of lime is greatest in its caustic or unslacked form.
Too much or too frequent liming may injure the soil. It should be carefully tried in a small way, and its action noted, before using it extensively.
A common way of using lime is to place twenty to forty bushels on an acre in heaps of three to five bushels, covering them with soil until the lime slacks to a fine powder. The lime is then spread and harrowed in. Lime tends to hasten the decay of humus. It should not be applied oftener than once in four or five years.
Gypsum, a sulphate of lime, is similar to lime in its action on the soil. Its most important effect is the setting free of potash from its compounds.
Gas lime should be used with great care as it contains substances that are poisonous to plant roots. It is best to let it lie exposed to the weather several months before using.
Marl is simply soil containing an amount of lime varying from five to fifty per cent. It has value in the vicinity of marl beds but does not pay to haul very far.
What they are.
There are a large number of business concerns in the country which buy the raw materials described in Chapter XXI, mix them in various proportions, and sell the product as mixed or manufactured fertilizers. If these mixtures contain the three important plant foods, nitrogen, phosphoric acid and potash, they are sometimes called "complete" manures or fertilizers. In some parts of the country all commercial fertilizers are called "guano."
Many brands.
These raw materials are mixed in many different proportions and many dealers have special brands for special crops. There are consequently large numbers of brands of fertilizers which vary in the amounts, proportions and availability of the plant foods they contain. For instance, in 1903, twenty-three fertilizer manufacturers offered for sale ninety-six different brands in the State of Rhode Island. In Missouri one hundred and ten brands, made by sixteen different manufacturers, were offered for sale. Eighty-three manufacturers placed six hundred and forty-four brands on the market in New York State during the same year. Of one hundred and twenty brands registered for sale in Vermont in the spring of 1904, there were seventeen mixtures for corn and thirty-four for potatoes.
The result of this is more or less confusion on the part of the farmer in purchasing fertilizers, and with many a farmer it is a lottery as to whether or not he is buying what his crop or his soil needs.
Some of the manufacturers are not above using poor, low grade, raw materials in making these mixtures.
This means that the farmer should make himself familiar with the subject of fertilizers if he desires to use them intelligently and economically.
Safeguard for the farmer.
As a safeguard to the buyer of fertilizers the State laws require that every brand put on the market shall be registered and that every bag or package sold shall have stated on it an analysis showing the amounts of nitrogen, or its equivalent in ammonia, the soluble phosphoric acid, the reverted phosphoric acid, the insoluble phosphoric acid, and the potash.
This registration is generally made at the State experiment station, and the director of the station is instructed to take samples of these brands and have them analyzed, and publish the results together with the analysis guaranteed by the maker.
These analyses are published in bulletin form and should be in the hands of every farmer who makes a practice of using commercial fertilizers.
The manufacturers of fertilizers comply with the law by printing on the bag or package the per cents of plant food in the fertilizers, and these statements in the great majority of cases agree favorably with the analyses of the experiment stations, but they do not in all cases state what materials were used to furnish the different kinds of plant food, and it is not always possible to find this out by analysis.
Low grade materials.
For instance in mixing a fertilizer one manufacturer may use dried blood to furnish nitrogen and another may use leather waste or horn shavings. The latter contains more nitrogen than the dried blood, but they are so tough and decay so slowly that they are of little benefit to a quick growing plant.
Inflating the guarantee.
Although the dealer states correctly the per cents of plant food in the fertilizer, he is quite frequently inclined to repeat this in a different form, and thus give the impression that the mixture contains more than it really does.
The dealers also give the nitrogen as ammonia because it makes a larger showing.
Phosphoric acid is often stated as "bone phosphate" because in this the amount appears to be greater.
For example, an analysis taken from a fertilizer catalogue reads as follows:
| Ammonia | 2 to 3 per cent. |
| Available Phosphoric Acid | 8 to 10 per cent. |
| Total Phosphoric Acid | 11 to 14 per cent. |
| Total Bone Phosphate | 23 to 25 per cent. |
| Actual Potash | 10 to 12 per cent. |
| Sulphate of Potash | 18 to 20 per cent. |
A better statement would be as follows:
| Nitrogen | 1.65 per cent. |
| Available Phosphoric Acid | 8 per cent. |
| Total Phosphoric Acid (furnished in Bone Phosphate) | 11 per cent. |
| Potash (furnished in Sulphate of Potash) | 10 per cent. |
Ammonia is reduced to terms of nitrogen by multiplying by .824. All bone phosphate is forty-six per cent. phosphoric acid. When bone phosphate is given instead of phosphoric acid it simply makes the mixture appear to have more in it, and when both phosphoric acid and bone phosphate are stated one is merely a repetition of the other. The same is true of the statements, potash and sulphate of potash, one is a repetition of the other only a different form.
The experiment stations not only publish comparative analyses of the registered fertilizers but they also compute the market values of the plant food contained in them and compare these valuations with the selling price of the fertilizers.
They also furnish a list of trade values of the plant foods in raw materials for the convenience of fertilizer buyers in testing the values of the brands offered them on the markets.
In the following list are given the "trade values agreed upon by the Experiment Stations of Massachusetts, Rhode Island, Connecticut, New Jersey and Vermont, after a careful study of prices ruling in the larger markets of the southern New England and Middle States."
Trade values of fertilizing ingredients in raw materials and chemicals for 1904:
| Cents per lb. | |
| Nitrogen in Nitrates | 16 |
| Nitrogen in Ammonia Salts | 17½ |
| Organic Nitrogen in dry and fine ground fish, blood, and meat, and in mixed fertilizers | 17½ |
| Organic Nitrogen in fine ground bone and tankage | 17 |
| Organic Nitrogen in coarse bone and tankage | 12½ |
| Phosphoric Acid soluble in water | 4½ |
| Phosphoric Acid soluble in ammonium citrate | 4 |
| Phosphoric Acid in fine ground bone and tankage | 4 |
| Phosphoric Acid in coarse bone and tankage | 3 |
| Phosphoric Acid (insoluble in water and in ammonium citrate) in mixed fertilizer | 2 |
| Potash as high-grade sulphate and in mixtures free from muriate (chloride) | 5 |
| Potash as muriate | 4¼ |
For example, in calculating the commercial value of the plant food in a fertilizer we will take the formula mentioned on page 205, namely:
| Ammonia | 2 to 3 per cent. |
| Available Phosphoric Acid | 8 to 10 per cent. |
| Total Phosphoric Acid | 11 to 14 per cent. |
| Total Bone Phosphate | 23 to 25 per cent. |
| Actual Potash | 10 to 12 per cent. |
| Sulphate of Potash | 18 to 20 per cent. |
This fertilizer is evidently a mixture of bone meal and sulphate of potash and the plant food contained in it is as follows:
| Nitrogen | 1.65 per cent. |
| Available Phosphoric Acid | 8 per cent. |
| Insoluble Phosphoric Acid | 3 per cent. |
| Potash | 10 per cent. |
One hundred pounds of the mixture would contain:
| Pounds. | Value per 100 lbs. | |
| Nitrogen | 1.64 value at 17½¢ | .29 |
| Available Phosphoric Acid | 8 value at 4¢ | .32 |
| Insoluble Phosphoric Acid | 3 value at 2¢ | .06 |
| Potash | 10 value at 5¢ | .50 |
| —— | ||
| Total | $1.17 |
In one ton the whole value would be twenty times this or $23.40. Add to this $8, which is about the average charge for mixing, bagging, shipping, selling and profit, and we find that $32 is probably the lowest figure at which this fertilizer could be purchased on the markets, and very likely the price would be higher as we have taken the lowest guaranteed per cent. of plant food for our basis of calculation.
Fertilizers are generally mixed and sold to the farmer on the ton basis.
Most dealers, to meet a certain demand, furnish mixtures ranging from $15 to $25 per ton. These mixtures are necessarily low grade and are more expensive than the higher priced high grade mixtures.
For example:
A certain potato fertilizer on the market, which we will call mixture A, has the following guaranteed analysis:
| Ammonia | 7 to 8 per cent. |
| Available Phosphoric Acid | 6 to 7 per cent. |
| Actual Potash | 5 to 6 per cent. |
A ton of this would contain:
| Pounds. | ||
| Nitrogen | 115.4 value at 17½¢ | $20.19 |
| Available Phosphoric Acid | 120 value at 4¢ | 4.80 |
| Potash | 100 value at 5¢ | 5.00 |
| —— | —— | |
| Totals | 335.4 | $29.99 |
Add to this the average charge for mixing, bagging, selling, profit, etc., $8, and the cost will be $37.99.
The selling price of this fertilizer would probably be not less than $40. Now suppose the farmer thinks this a high priced and expensive fertilizer and looks about for something cheaper. He finds a low grade potato fertilizer, which we will call mixture B, that has the following guarantee:
| Ammonia | 3½ to 4 per cent. |
| Available Phosphoric Acid | 3 to 3½ per cent. |
| Actual Potash | 2½ to 3 per cent. |
Just one-half the guarantee of the high grade mixture A. A ton of this contains:
| Pounds. | ||
| Nitrogen | 57.7 value at 17½¢ | $10.10 |
| Available Phosphoric Acid | 60 value at 4¢ | 2.40 |
| Potash | 50 value at 5¢ | 2.50 |
| —— | —— | |
| Totals | 167.7 | $15.00 |
| Add average charge for mixing, etc. | 8.00 | |
| —— | ||
| $23.00 | ||
The selling price of this would very likely be not less than $25.
This seems at first sight to be cheaper and more reasonable. But let us see.
In a ton of mixture A he gets 335.4 pounds of plant food for $40, or at an average cost of twelve cents per pound, while in a ton of mixture B he gets 167.7 pounds of plant food for $25, or at an average cost of fifteen cents per pound.
To put it another way, in a ton of the high grade mixture A, he gets 335.4 pounds of plant food for $40. To get the same amount of plant food, 335.4 pounds, in the low grade mixture, B, it will be necessary to buy two tons at a cost of $50.
A low grade fertilizer is always expensive even if the plant food is furnished by high grade materials.
The farmer generally buys his fertilizer on the ton basis. A better method is to buy just as the fertilizer manufacturers buy the raw materials they use for mixing, namely, on the basis of actual plant food in the fertilizer. The dealers have what they call the "unit basis," a "unit" meaning one per cent. of a ton or twenty pounds of plant food. A ton of nitrate of soda, for instance, contains 310 pounds or 15½ units of nitrogen, which at $3.20 cents per unit would cost $49. Buy your mixture of a reliable firm, find out the actual amounts of the plant foods in the mixture and pay a fair market price for them.
When a considerable amount of fertilizer is used a better plan than buying mixed fertilizer is to buy the raw materials and mix them yourself. For example, a farmer is about to plant five acres of cabbages for the market. He finds that a certain successful cabbage grower recommends the use of fifty pounds nitrogen, fifty pounds phosphoric acid and seventy pounds potash per acre. For the five acres this will mean 250 pounds nitrogen, 250 pounds phosphoric acid and 350 pounds potash. To furnish the nitrogen he can buy 1,613 pounds of nitrate of soda or 2,500 pounds dried blood or 1,250 pounds sulphate of ammonia, or a part of each. To furnish the phosphoric acid he can buy 1,786 pounds acid phosphate. Seven hundred pounds of either sulphate or muriate of potash will furnish the potash. These materials can be easily mixed by spreading in alternate layers on a smooth floor and then shovelling over the entire mass several times. The mixture can be further improved by passing it through a sand or coal screen or sieve.
By following this method of buying the raw materials and mixing them on the farm, the farmer can reduce his fertilizer bill by quite a considerable amount and at the same time can obtain just the kinds and proper amounts of plant foods needed by his crops.
The farmer should make the best use of farm manures and through tillage to render plant food available for his crops before turning to commercial fertilizer for additional plant food.
If he grows leguminous crops for green manuring, for feeding stock or for cover crops, he can in many cases secure, chiefly through them, sufficient high priced nitrogen for the needs of his crops, and it is necessary only occasionally to purchase moderate amounts of phosphoric acid, potash and lime.
For special farming and special crops it may be necessary to use the commercial fertilizer more freely.
It is impossible to say here just what amounts or what kinds of fertilizer should be purchased, because no two farms are exactly alike as to soil, methods of cropping or methods of tillage.
There are certain factors, however, which will serve as a general guide and which should be considered in determining the kind and amount of fertilizer to buy.
Crop roots differ in their powers of feeding, or their powers of securing plant foods. Some roots can use very tough plant foods, while others require it in the most available form. Some roots secure nitrogen from the air. The cowpea roots, for example, can take nitrogen from the air and they can use such tough phosphoric acid and potash that it seldom pays to feed them directly with fertilizers.
A bale per acre crop of cotton requires for the building of roots, stems, leaves, bolls, lint and seed:
and yet experiment and experience have proved that the best fertilizer for such a crop contains the following amounts of plant food:
| Nitrogen | 20 pounds |
| Phosphoric Acid | 70 pounds |
| Potash | 20 pounds |
This means that cotton roots are fairly strong feeders of nitrogen and potash, but are weak on the phosphoric acid side.
The small grains, wheat, oats, barley and rye, can use tough phosphoric acid and potash, but are weak on nitrogen, and as they make the greater part of their growth in the cool spring before nitrification is rapid, they are benefitted by the application of nitrogen, particularly in the form of nitrate, which is quickly available.
Clover, peas, beans, etc., have the power of drawing nitrogen from the air, but draw from the soil lime, phosphoric acid and potash. Hence the phosphates, potash manures and lime are desirable for these crops.
Root and tuber crops are unable to use the insoluble mineral elements in the soil, hence they require application of all the important plant foods in readily available form. Nitrogen is especially beneficial to beets. Turnips are benefitted by liberal applications of soluble phosphoric acid. White and sweet potatoes require an abundance of potash.
If we are growing tender, succulent market garden crops, we need nitrogenous manures, which increase the growth of stem and foliage.
Fruit trees are slow growing plants and do not need quick acting fertilizers.
The small fruits, being more rapid in growth, require more of the soluble materials.
A dark, healthy green foliage indicates a good supply of nitrogen, while a pale yellowish green may indicate a need of nitrogen.
A well developed head of grain, seed pod or fruit indicates liberal supplies of phosphoric acid and potash.
Soils that are poor in humus are generally in need of nitrogen.
Heavy soils are generally supplied with potash but lack phosphoric acid.
Sandy soils are apt to be poor in potash and nitrogen.
A system of general or diversified farming embracing crop products and stock raising, requires much less artificial manuring than does a system which raises special crops or quick growing crops in rapid succession, as in the case of truck farming or market gardening.
Every farmer should be more or less of an investigator and experimenter.
The factors mentioned previously as indicating the presence or absence of sufficient quantities of certain plant foods serve as a general guide, but are not absolute. The best method of determining what plant foods are lacking in the soil is to carry on some simple experiments.
The following plan for soil testing with plant foods is suggestive: To test the soil for a possible need of the single plant foods, a series of five plots may be laid off. These plots should be long and narrow and may be one-twentieth, one-sixteenth, one-tenth, one eighth acre or larger. A plot one rod wide and eight rods long will contain one-twentieth acre. The width of the plot may be adjusted to accommodate a certain number of rows of crop and the length made proper to include an even fraction of an acre. A strip three or four feet in width should be left between each two plots. These strips are to be left unfertilized and are for the purpose of preventing one plot being affected by the plant food of another.
The plots are all plowed, planted and cared for alike, the only difference in treatment being in the application of plant food. If the plots are one-twentieth acre in size, plant foods may be applied as follows.
| Plot 1. | Nitrate of Soda 8 lbs. |
| Plot 2. | Acid Phosphate 16 lbs. |
| Plot 3. | Nothing. |
| Plot 4. | Muriate of Potash 8 lbs. |
| Plot 5. | Lime 1 bushel. |
Plot 3 is a check plot for comparison.
The measuring of the plots, weighing and application of the fertilizers, planting and care of the crops, weighing and measuring at harvest, should be carefully and accurately done.
A number of additional plots may be added if desired to test the effect of plant foods in combination. For instance:
| Plot 6. | Nitrate of Soda 8 lbs. Acid Phosphate 16 lbs. |
| Plot 7. | Nitrate of Soda 8 lbs. Muriate of Potash 8 lbs. |
| Plot 8. | Nothing. |
| Plot 9. | Muriate of Potash 8 lbs. Acid Phosphate 16 lbs. |
| Plot 10. | Nitrate of Soda 8 lbs. Acid Phosphate 16 lbs. Muriate of Potash 8 lbs. |
If the amount of fertilizer is too small to distribute evenly over the plot, mix it thoroughly with a few quarts of dry earth or sand to give it more bulk and then apply it.
In the use of fertilizers it should always be remembered that small crops are not always due to lack of plant food, but may be caused by an absence of the other conditions necessary for root growth and development. The soil may not be sufficiently moist to properly supply the plants with water. Too much water may check ventilation. Poor tillage may check root development. Unless the physical conditions are right the possible effects of additional plant food in the form of fertilizers are greatly diminished. The farmer who gets the largest return from fertilizers is the one who gives greatest attention to the physical properties of the soil. He makes use of organic matter and is very thorough in his methods of tillage. Every farmer should apply to his State Experiment Station for bulletins on the subject of fertilizers.
There are two methods or systems of cropping the soil:
The One Crop System, or the continuous cropping of the soil year after year with one kind of crop.
The Rotation of Crops or the selection of a given number of different crops and growing them in regular order.
The purpose of this chapter is to inquire into the effect of these two systems of cropping:
This inquiry and the conclusion will be based on the following facts learned in the foregoing chapters.
Plant roots need for their growth and development (see Chapter II):
Decaying organic matter or humus is one of the most important ingredients of our soils. Because:
It greatly influences soil texture and therefore the conditions necessary for root growth.
Its presence or absence greatly influences the attitude of soils toward water, the most important factor in plant growth. Its presence helps light, sandy soils to hold more water and to better pump water from below, while it helps close, heavy soils to better take in the water which falls on their surface. Its absence causes an opposite state of affairs.
The presence of organic matter checks excessive ventilation in too open, sandy soil by filling the pores, and improves poor ventilation in heavy clay soils by making them more open.
Humus, on account of its color, influences the heat absorbing powers of soils.
The organic matter is constantly undergoing more or less rapid decay unless the soil be perfectly dry or frozen solid. Stirring and cultivating the soil hasten this decay.
As the organic matter decays it adds available plant food to the soil, particularly nitrogen.
As it decays, it produces carbonic acid and other acids which are able to dissolve mineral plant food not soluble in pure water and thus render it available to plants.
Plants, although they require the same elements of plant food, take them in different amounts and different proportions.
Plants differ in the extent and depth of root growth and therefore take food from different parts of the soil. Some are surface feeders while others feed on the deeper soil.
Plants differ in their power to take plant food from the soil; some are weak feeders, and can use only the most available food; others are strong feeders, and can use tougher plant food.
Plants vary in the amount of heat they require to carry on their growth and development.
We are now ready for the question. What effect has the continuous cultivation, year after year, of the same kind of crop on the soil conditions necessary to the best growth and development of that crop or any other crop? Suppose we take cotton for example.
How does cotton growing affect soil humus?
During the cultivation of cotton, the organic matter or humus of the soil decays in greater quantities than are added by the stalks and leaves of the crop. Therefore, cotton is a humus wasting crop, and the continuous cultivation of this crop tends to exhaust the supply of organic matter in the soil.
How does cotton growing affect soil texture?
Cotton growing wastes soil humus and therefore injures soil texture by making the lighter soils more loose and open, and the heavier soils more dense and compact.
How does cotton growing affect soil water?
By wasting humus cotton growing injures soil texture and so weakens the water holding and water pumping power of light soils and weakens the water absorbing power of heavy soils. Therefore the continuous cultivation of cotton weakens the power of the soil over water, that most important factor in crop growth.
How does cotton growing affect soil ventilation?
Continuous cotton culture, by wasting humus, injures texture and therefore injures soil ventilation, causing too much ventilation in the lighter soils and too little in heavier soils.
How does cotton culture affect plant food in the soil?
Continuous cotton growing wastes plant food:
Because it wastes organic matter which contains valuable plant food, particularly nitrogen.
Because by wasting organic matter it increases the leaching of the lighter soils and the surface washing of the heavier soils.
Because its roots occupy largely the upper soil and do not make use of much food from the lower soil.
Because it grows only during the warm part of the year and there is no crop on the land to check loss of plant food from leaching and surface wash during the winter.
Because it is a weak feeder of phosphoric acid, and can use only that which is in the most available form. In applying fertilizer to cotton it is necessary for best results to apply at least twice as much phosphoric acid as the crop can use, because it can use only that which is in the most available form and the remainder is left in the soil unused.
Continuous cotton culture then has an injurious effect on all the important soil conditions necessary to its best growth and development, and the result is a diminishing yield or an increasing cost in maintaining fertility by the use of fertilizer.
How does continuous cotton culture affect the economics of the farm?
The injury to the soil conditions necessary to root growth diminishes the yield and therefore increases the cost of production.
The poor soil conditions tend not only to diminish yield but also to diminish the quality of the crop, which tends to lower the price received for the cotton.
Keeping the land constantly in cotton tends to increase the insect enemies and the diseases of the crop.
The continuous growing of cotton does not permit the constant employment of one set of laborers throughout the year.
The continuous growing of cotton generally means that most of the farm goes into cotton. A small patch of corn is planted for the stock, which are apt to suffer from a lack of variety in food.
The same is true with reference to home supplies. Very few vegetables are grown for the table and there is little milk, butter or eggs for home use or exchange for groceries or drygoods at the store.
Thus we see that the continuous growing of cotton on the soil, year after year, has a bad effect on conditions necessary to its best growth and development and also on the economics of the farm.
These facts are true to a greater or less degree in the case of nearly all of the farm crops. The grain crops are often considered as humus makers because of the stubble turned under, but Professor Snyder, of Minnesota, found that five years' continuous culture of wheat resulted in an annual loss of 171 pounds of nitrogen per acre, of which only 24.5 was taken by the crop, the remaining 146.5 pounds were lost through a waste of organic matter.
Now, suppose that instead of growing cotton on the same soil year after year, we select four crops—cotton, corn, oats and cowpea—and grow them in regular order, a rotation practiced in some parts of the South.
We will divide the farm into three fields and number them 1, 2 and 3, and will plant these crops as indicated by the following diagrams:
Plan for planting.
| Field 1. | Field 2. | Field 3. | |
| 1st year or 1905 |
Cotton. | Oats, harvested in spring, followed by Cowpeas. |
Corn, followed by oats, planted in fall. |
| 2d year or 1906. |
Corn, followed by oats, planted in fall. |
Cotton. | Oats, harvested in spring, followed by Cowpeas. |
| 3d year or 1907. |
Oats, harvested in spring, followed by Cowpeas. |
Corn, followed by oats, planted in fall. |
Cotton. |
Each of these crops occupies one-third of the farm each year, and yet the crop on each field changes each year so that no one kind of crop is grown on any field oftener than once in three years. The cotton is grown for market, the corn partly to sell, partly to feed, the oats to feed and the cowpeas to plow under. All cotton and corn refuse is plowed under.
What effect will such a system have on the conditions necessary for plant growth? Suppose we follow the crops on Field 1. Cotton, corn, and oats are humus wasting crops but the pea crop which is grown the third year is plowed under, and largely, if not entirely, remedies the loss by furnishing a new supply of organic matter, and the ill effects which we noticed would follow the loss of organic matter due to the continuous growing of cotton are avoided, soil texture is preserved, soil ventilation is not injured, and the power of the soil over water is preserved.
What is the effect on plant food in the soil?
Before answering this question let us see what amounts of plant foods these crops take out of the soil.
We will assume that the soil is a good loam at the start and will produce:
One bale of five hundred pounds of lint cotton per acre, sixty bushels shelled corn per acre, thirty bushels oats per acre, or two tons cowpea hay per acre.
Such a yield of crop would take from the soil the following amounts of plant food per acre:
| Nitrogen, pounds. |
Phosphoric Acid, pounds. |
Potash, pounds. |
|
| Cotton (whole plant) | 103 | 41 | 65 |
| Corn (whole plant) | 84 | 26 | 61 |
| Oats (whole plant) | 32 | 13 | 27 |
| Cowpea | 78 | 23 | 66 |
Now suppose we sell the lint of the cotton, keeping all the rest of the plant, including the seed, on the farm and turning it back into the soil.
Of the corn suppose we sell one-half the grain and keep the other half and the fodder for use on the farm.
Suppose the oats be made into oat hay and be fed on the farm and the cowpeas be turned under.
Assuming that the cowpeas take half their nitrogen from the air.
This will mean that in the course of three years we take out of the soil of each acre in the crops:
| Nitrogen. | Phosphoric Acid. | Potash. |
| 258 pounds. | 103 pounds. | 219 pounds. |
but we return to the soil in crop refuse and manure from the stock:
| Nitrogen. | Phosphoric Acid. | Potash. |
| 256 pounds. | 87 pounds. | 197 pounds. |
This assumes that we have taken from the farm in products sold:
| Nitrogen, pounds. |
Phosphoric Acid, pounds. |
Potash, pounds. |
|
| Cotton Lint | 2 | 1 | 2 |
| Corn | 28 | 12 | 10 |
| Animal products | 11 | 3 | 10 |
| Totals | 41 | 16 | 22 |
The plant food charged to animal products is twenty per cent. of that in the grain and forage fed to the stock.
At the end of the three years the plant food account will balance up with:
| Nitrogen | a gain of 2 pounds. |
| Phosphoric Acid | a loss of 16 pounds. |
| Potash | a loss of 22 pounds |
This result is of course approximate. There will be some loss of nitrogen through leaching and denitrification. Some of the potash and phosphoric acid will be converted into unavailable forms. This can be made good by applying to the cotton a fertilizer containing twenty pounds of nitrogen, sixty pounds of phosphoric acid and twenty pounds of potash.
Additional nitrogen and organic matter can be grown to turn under by planting crimson clover in the cotton at the last working for a winter cover crop to be turned under for the corn, and by planting cowpeas or soy beans between the rows of corn.
If this is done it may not be necessary to add any nitrogen in the fertilizer, letting that supply only phosphoric acid and potash.
If commercial fertilizer is used on the cotton, it would be a good plan to apply the manure from the stock to the corn.
To follow our crop on Field 1 through the three years we will have, first, cotton drawing large amounts of plant food from the soil and diminishing the humus of the soil.
Growing a winter crop of crimson clover, turning back all the cotton refuse except the lint and oil, and applying the barn manure will furnish ample plant food for the corn and replenish the organic matter.
The corn is a rather stronger feeder of phosphoric acid than cotton and will be able to get sufficient from that left by the cotton.
The oats will be able to get a full ration after the corn, and the cowpeas will readily take care of themselves on the score of plant food and will put the soil in fine condition for cotton again.
The peas may be left on the ground to turn under in the spring at cotton planting time, or they may be plowed under in the early fall and a crimson clover or vetch cover crop planted, which will be plowed under for the cotton.
These same facts will be true of each of the three fields. The humus and, therefore, texture will be taken care of; ventilation, soil temperature and plant food will be controlled to advantage.
Each of the crops will be represented on the farm each year and the yields of each crop will be better than if grown continuously alone. The quality and therefore the market value will be greater. Insects and disease will be easier kept in control, and stock will be more economically furnished with a variety of foods.
Rotation of crops economizes the natural plant food of the soil and also that which is applied in the form of manure and fertilizer. This is because:
Crops take food from the soil in different amounts and different proportions.
Crops differ in their feeding powers.
Crops differ in the extent and depth to which they send their roots into the soil in search of food and water.
Crops differ in the time of year at which they make their best growths.
Rotation helps to maintain or improve the texture of the soil because the amount of humus in the soil is maintained or increased by turning under green manure and cover crops which should occur in every well-planned rotation.
Rotation helps to maintain or increase the plant food in the surface soil. When crops like cowpeas or clover which take mineral food from the subsoil and nitrogen from the air, are plowed under, they give up the plant food in their leaves, stems and upper roots to the surface soil, and thus help to maintain or increase fertility.
Rotation tends to protect crops from injurious insects and diseases. If one kind of crop is grown continuously on one piece of land the soil becomes infested with the insects and diseases which injure that particular crop. If the crop is changed, the insects and diseases find difficulty in adapting themselves to the change and consequently diminish in numbers.
Rotation helps to keep the soil free from weeds. "If the same kind of crop were grown year after year on the same field, the weeds which grow most readily along with that crop would soon take possession of the soil." For example, chick weed, dock, thistle, weeds peculiar to grain and grain crops tend to increase if the land is long occupied by these crops.
Rotation helps the farmer to make a more even distribution of labor throughout the year. This is because crops differ as to the time of year at which they are planted and harvested.
Rotation of crops enables the farmer to provide for his stock more economically. Live stock fares better on a variety of food, which is more cheaply secured by a system of rotation than otherwise.
A typical rotation for general farming should contain at least:
One money crop which is necessarily an exhaustive crop.
One manurial crop which is a soil enricher.
One feeding crop which diminishes fertility only a little.
One cleansing crop, a hoed or cultivated crop.
There are certain conditions which tend to modify the rotation or to influence the farmer in his choice of crops. They are as follows:
First of all the climate will set a limit on the number and varieties of crops from which a choice can be made for a given locality.
The kind of farming which he chooses to carry on, whether stock raising, grain farming, truck farming, or a combination of two or more of these, or others.
Kind of soil. Certain soils are best adapted to particular crops. For example, heavy soils are best suited to wheat, grass, clover, cabbages, etc. Light, sandy soils to early truck, certain grades of tobacco, etc.
The demand for crops and their market value.
Facilities for getting crops to market, good or bad country roads, railroads and water transportation.
The state of the land with respect to weeds, insect pests and plant diseases.
A few general rules may be made use of in arranging the order of the crops in the rotation though they cannot always be strictly followed.
Crops that require the elements of plant food in the same proportion should not follow each other.
Deep-rooted crops should alternate with shallow-rooted crops.
Humus makers should alternate with humus wasters.
Every well arranged rotation should have at least one crop grown for its manurial effect on the soil, as a crop of cowpeas, or one of clover, to be turned under.
The objection often made to this last rule is that, aside from the increase in fertility, there is no direct return for the time, labor and seed, and the land brings no crop for a year. It is not necessary to use the entire crop for green manuring—a part of it may be used for hay or for pasture with little loss of the manurial value of the crop, provided the manure from that part of the crop taken off is returned and the part of the crop not removed is turned under.
The length of the rotation may vary from a two-course or two crop rotation to one of several courses. Crimson clover may be alternated with corn, both crops being grown within a year.
A three-course rotation, popular in some parts of the country, is wheat, clover, and potatoes; potatoes being the money crop and cleansing crop, wheat a secondary money crop or feeding crop, and clover the manurial and feeding crop.
A popular four-course rotation is corn, potatoes or truck, small grain, clover; the potatoes being the chief money crop, corn the feeding crop, the small grain the secondary money or feeding crop, and clover the manurial and feeding crop.
On many New England farms near towns, hay and straw are the chief money crops. Here the rotation is grass two or more years, then a cleansing crop and a grain crop. A Canadian rotation is wheat, hay, pasture, oats, peas. A rotation for the South might be corn, crimson clover, cotton, crimson clover; this rotation covering a period of two years. A South Carolina rotation is oats, peas, cotton, corn—a three-year rotation. It might be improved as follows: Oats, peas, crimson clover, cotton, crimson clover, corn.
Some farm lands contain so much water that the conditions of fertility are interfered with and therefore the crop producing power of these lands is lowered.
This surplus water diminishes fertility by reducing the area of film water in the soil.
It checks soil ventilation.
It tends to keep the soil cold.
It dilutes plant food in the soil.
It interferes with proper tillage.
The above-mentioned state of affairs occurs sometimes in fields at the foot of hills, or on sloping uplands which receive spring water or seepage water from higher lands. Some fields are underlaid by a close, compact subsoil which so checks percolation that the surface soil is too wet for tillage operations the greater part of the year. In such cases:
A need of drainage is generally indicated by the presence of more or less free water standing on the surface.
In some lands the surface water does not appear as free water standing on the surface. In such cases:
A need of drainage is indicated by the curling and wilting of the leaves of corn and other crops during dry, hot weather. This curling and wilting is due to the fact that during the early growth of the crop free water stands so high in the soil that the crop roots are confined to a shallow layer of soil. When dry, hot weather comes, the free water recedes, the upper soil dries out, and the roots cannot get sufficient water to supply the demands of transpiration, hence the curling and wilting of the leaves.
If drains are placed in this soil, the free water will be kept at a lower level in the spring and the plant roots will develop deeper in the soil, where there will be constant supply of film water during the dryer and warmer summer weather.
The wiry and spindling growth of grass and grain crops may indicate too much water.
The growth of moss on the surface of the ground and the cracking of the soil in dry weather are also indications of too much water.
How can we get rid of this surplus free water?
We can make passageways through the soil to a lower level and then let gravity pull the water through them to lower ground below. These passageways are called drains.
Drains may be classed as:
Surface drains which are shallow, open channels made in the soil with a plow, hoe or other tool, to carry off surface water. They are temporary and need frequent renewing.
Open-ditch drains are deeper, more permanent water passageways around or across the fields.
Surface and open-ditch drains take only surface water. They also carry off surface soil and manures washed into them. They frequently become choked or stopped by trash and soil, and are in the way of cultivation and harvesting operations.
Covered drains, under drains or blind ditches are water passageways made of brush, poles, stones, tiles, etc. (Figs. 80-81), placed in the bottoms of ditches and then covered with soil.
Influence on soil water.
Covered or under drains take not only surface water, but also remove free water from the soil beneath down to nearly the level of the bottom of the drains, and thus increase the area of film water. Removing the free water enables the soil to absorb more readily rain water falling on the surface and therefore checks surface wash and the gullying of fields.
Influence on soil ventilation.
Lowering the free water allows a deeper penetration of air and, therefore, a deeper root development and enables crops to better resist dry periods.
Influence on soil temperature.
Lowering the free water in the soil influences soil temperature:
By diminishing the amount of water to be heated.
By checking evaporation.
By letting warm showers sink down into the soil.
By increasing ventilation and therefore permitting the circulation of warm air in the soil.
The cropping season is lengthened by causing the soil to be warmer and drier earlier in the spring and later in the fall.
Influence on plant food in the soil.
Covered or under drains check losses of plant food that occur with surface and open ditch drains. They render available more plant food, for lowering free water and increasing ventilation:
Deepen the feeding area of the roots.
Aid the process of nitrification.
Aid chemical changes which make plant food available.
Check denitrification.
As gravity is the force that is to take the surplus water from the soil, the outlet of the drainage system should be at the lowest part of the area to be drained.
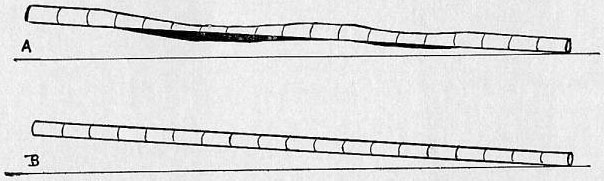
FIG. 86.
A represents a poorly laid tile-drain. It is poorly graded, and has
partly filled with soil. It has lost more than half its water carrying
capacity. B was properly graded, and has kept free from
sediment.ToList
The main drains should be located in the lowest parts of the fields, indicated by courses taken by water after a rain or by small streams running through the farm.
The lateral drains, if surface or open ditch drains, should run across the slopes; if under drains, they should run up and down the slopes.
Grade or slope of the drain.
The grade of the drain should be sufficient to cause a flow of the water. In the case of open ditches it should not be steep enough to cause too rapid a current and a consequent serious washing of the banks of the ditch. Large, deep ditches will carry water with a grade of one inch to a hundred feet.
Tile drains.
Covered or under drains are made of brush, poles, planks, stones, tiles, etc. (Figs. 83-84). Where tiles can be obtained at reasonable prices they are considered best. Tiles are made of clay and are burnt like brick. They are more lasting than wood and are easier and cheaper to lay than stone, unless the stone must be gotten rid of.
The most approved form of drain tile is the round or circular form. These are made in sizes ranging from two and one-half to six and eight inches in diameter, and in pieces one foot in length.
The size used depends on the length of the drain, the amount of water to carry, the frequency of heavy rainfalls and the character of the soil.
The distance apart varies from twenty-five feet in heavy soils to over two hundred feet in light soils. The usual depth is about three feet, though the farther apart the deeper they are put.
A lateral tile drain should enter a main at an acute angle to prevent too great a check in the current.
In putting in a drainage system the first thing to be done is to make a plan of the ground and determine the slope of the land and the grade of the drain. The ditches are then staked out and the digging proceeds. In digging the ditches plows are sometimes used to throw out the top soil, then the work is finished with spades and shovels.
Professional ditchers use special tools and they take out only sufficient earth to make room for the tiles (Fig. 85). The tiles are then laid end to end, the joints covered with a piece of sod, some grass, straw, paper or clay, to prevent loose soil sifting in. As the tiles are laid, enough soil is placed on them to hold them in place until the ditch is filled.
In laying the tiles an even grade should be maintained (Fig. 86). A lessening of the grade checks the current of water and tends to cause a stoppage of the drain.
The water gets into the drain through the joints where the tiles come together.
The outlet of a tile drain should be protected by brick work or should be of glazed tile such as the so-called terra-cotta tile, to prevent injury by frost.
The mouth of the drain should be protected by a screen of wire to prevent the entrance of rats and other small animals.
Acid, a chemical name given to many sour substances.
Albumen, a nitrogenous organic compound.
Albuminoid, a nitrogenous substance resembling albumen.
Ammonia, a gas containing nitrogen produced by the decay of organic matter.
Annual, a plant that lives only one year; corn and sunflower are examples.
Anther, the part of a stamen that bears the pollen.
Available, that which can be used.
Bacteria, very small plants, so small that they cannot be seen without the aid of a powerful microscope. They are sometimes called "germs." Some of them are beneficial, some do great harm and some produce disease.
Biennial, a plant that lives two years, usually producing seeds the second year.
Bordeaux mixture, a mixture of copper sulphate, lime and water used to prevent plant diseases. It was invented in Bordeaux, France.
Bud, an undeveloped branch.
Calyx, the outermost part of a flower.
Cambium, the active growing layer between the bark and the wood of a tree.
Capillary, Hair-like. A name given to very small spaces through which water flows by the force of capillary attraction.
Carbohydrate, an organic substance made of oxygen, hydrogen and carbon, but containing no nitrogen; cellulose or woody fibre, sugar, starch are examples.
Carbon, a chemical element. Charcoal is nearly pure carbon.
Carbonic acid gas, a gas consisting of carbon and oxygen. It is produced from the lungs of animals, and by the decay or burning of organic matter.
Catch crop, a crop growing during the interval between regular crops.
Cereal, a name given to the grain crops that are used for food.
Chlorophyl, the green matter in plants.
Commercial fertilizers, materials containing plant food which are bought and sold in the markets to improve the soil.
Compost, a mixture of decaying organic matter used to enrich the soil.
Cross pollination, the pollination of a flower by pollen brought from some other flower.
Cover crop, a crop to cover the soil during the interval between regular corps.
Cultivator, a farm implement used to loosen the surface of the soil and to kill weeds after a crop has been planted.
Cutting, a part of a plant placed in moist soil, water or other medium with the object of its producing roots and making a new plant.
Dormant, said of plants when they are resting or inactive. Most plants are dormant during the winter season.
Drainage, the method by which surplus water is removed from the land.
Element, a substance that cannot be divided into simpler substances.
Fermentation, the process by which organic substances are broken down or changed and new substances formed.
Fertility, that state or condition of the soil which enables it to produce crops.
Fibre, long thread-like structure.
Flocculate, to make crumbly.
Free water, standing water or water which flows under the influence of gravity.
Function, the particular action of any part of an organism.
Furrow, the trench left by the plow.
Furrow slice, the strip of earth which is turned by the plow.
Germinate, to sprout.
Grafting, the process of inserting a cion or bud in a stock plant.
Green manure crops, crops intended to be plowed under to improve the soil.
Harrow, an implement used to pulverize the surface of the soil.
Heavy soils, soils that are hard to work; stiff, cloddy soils.
Horticulture, that branch of agriculture which deals with the growing of fruits, vegetables, flowers and ornamental plants.
Humus, partially decayed animal and vegetable matter in the soil.
Hydrogen, a gaseous, chemical element, one of the constituents of water.
Inter-tillage, tillage between plants.
Irrigation, the practice of supplying plants with water by artificial means.
Kainite, a potash salt used in making fertilizer.
Kernel, a single seed or grain.
Leaching, passing through and going off in drainage water.
Legume, a plant belonging to the bean, pea and clover family.
Light soils, soils which are loose and open and easy to work.
Loam, a mixture of sand, clay and organic matter.
Mould board, the curved part of the plow which turns the furrow slice.
Mulch, a covering on the soil. It may be of straw, leaves, pulverized soil or other material.
Nectar, a sweet substance in flowers from which bees make honey.
Nitrate, a soluble form of nitrogen.
Nitrification, the changing of nitrogen into a nitrate.
Nitrogen, a gas forming four-fifths of the air. Nitrogen is a very necessary food of plants.
Organic matter, substances produced by the growth of plants and animals.
Osmose, the movement of fluids through membranes or thin partitions.
Oxygen, a gas which forms one-fifth of the air. Its presence is necessary to the life of all green plants and all animals.
Ovary, the part of the pistil that bears the developing seeds.
Ovule, an immature seed in the ovary.
Perennial, living through several years.
Phosphoric acid, an important plant food found in phosphates.
Pistil, the part of the flower which produces seeds.
Propagate, to increase in number.
Pollen, the powdery substance produced by stamens.
Pollination, the transfer of pollen from stamens to pistils.
Potash, an important plant food.
Pruning, removing parts of a plant for the good of what remains.
Retentive, holding, retaining, said of soil which holds water.
Reverted, said of phosphoric acid in the process of becoming insoluble.
Rotation of crops, a change of crops in regular order.
Sap, the juice or liquid contents of plants.
Seed bed, the earth in which seeds are sown.
Seedling, a young plant just from the seed. Also a plant raised from a seed in distinction from one produced from a graft or a cutting.
Sepal, one of the parts of the calyx.
Slip, a cutting placed in water or moist soil or other substance to produce roots and form a new plant.
Soil, that part of the earth's crust into which plants send their roots for food and water.
Stamen, that part of a flower which bears the pollen.
Stigma, the part of the pistil which receives the pollen.
Stomata, breathing pores in plants.
Subsoil, that part of the soil which lies beneath the soil that is worked with the tillage tools.
Sap root, a main root that runs straight down into the soil.
Tillage, stirring the soil.
Transpiration, the giving off of water from plants.
Tubercle, a small nodular growth on the roots of plants.
Under drainage, drainage from below.
Vitality of seeds, the ability of seeds to grow.
End of Project Gutenberg's The First Book of Farming, by Charles L. Goodrich

*** END OF THIS PROJECT GUTENBERG EBOOK THE FIRST BOOK OF FARMING ***

***** This file should be named 16900-h.htm or 16900-h.zip *****
This and all associated files of various formats will be found in:
        https://www.gutenberg.org/1/6/9/0/16900/

Produced by Audrey Longhurst, Jeannie Howse and the Online
Distributed Proofreading Team at https://www.pgdp.net


Updated editions will replace the previous one--the old editions
will be renamed.

Creating the works from public domain print editions means that no
one owns a United States copyright in these works, so the Foundation
(and you!) can copy and distribute it in the United States without
permission and without paying copyright royalties.  Special rules,
set forth in the General Terms of Use part of this license, apply to
copying and distributing Project Gutenberg-tm electronic works to
protect the PROJECT GUTENBERG-tm concept and trademark.  Project
Gutenberg is a registered trademark, and may not be used if you
charge for the eBooks, unless you receive specific permission.  If you
do not charge anything for copies of this eBook, complying with the
rules is very easy.  You may use this eBook for nearly any purpose
such as creation of derivative works, reports, performances and
research.  They may be modified and printed and given away--you may do
practically ANYTHING with public domain eBooks.  Redistribution is
subject to the trademark license, especially commercial
redistribution.


*** START: FULL LICENSE ***

THE FULL PROJECT GUTENBERG LICENSE
PLEASE READ THIS BEFORE YOU DISTRIBUTE OR USE THIS WORK

To protect the Project Gutenberg-tm mission of promoting the free
distribution of electronic works, by using or distributing this work
(or any other work associated in any way with the phrase "Project
Gutenberg"), you agree to comply with all the terms of the Full Project
Gutenberg-tm License (available with this file or online at
https://gutenberg.org/license).


Section 1.  General Terms of Use and Redistributing Project Gutenberg-tm
electronic works

1.A.  By reading or using any part of this Project Gutenberg-tm
electronic work, you indicate that you have read, understand, agree to
and accept all the terms of this license and intellectual property
(trademark/copyright) agreement.  If you do not agree to abide by all
the terms of this agreement, you must cease using and return or destroy
all copies of Project Gutenberg-tm electronic works in your possession.
If you paid a fee for obtaining a copy of or access to a Project
Gutenberg-tm electronic work and you do not agree to be bound by the
terms of this agreement, you may obtain a refund from the person or
entity to whom you paid the fee as set forth in paragraph 1.E.8.

1.B.  "Project Gutenberg" is a registered trademark.  It may only be
used on or associated in any way with an electronic work by people who
agree to be bound by the terms of this agreement.  There are a few
things that you can do with most Project Gutenberg-tm electronic works
even without complying with the full terms of this agreement.  See
paragraph 1.C below.  There are a lot of things you can do with Project
Gutenberg-tm electronic works if you follow the terms of this agreement
and help preserve free future access to Project Gutenberg-tm electronic
works.  See paragraph 1.E below.

1.C.  The Project Gutenberg Literary Archive Foundation ("the Foundation"
or PGLAF), owns a compilation copyright in the collection of Project
Gutenberg-tm electronic works.  Nearly all the individual works in the
collection are in the public domain in the United States.  If an
individual work is in the public domain in the United States and you are
located in the United States, we do not claim a right to prevent you from
copying, distributing, performing, displaying or creating derivative
works based on the work as long as all references to Project Gutenberg
are removed.  Of course, we hope that you will support the Project
Gutenberg-tm mission of promoting free access to electronic works by
freely sharing Project Gutenberg-tm works in compliance with the terms of
this agreement for keeping the Project Gutenberg-tm name associated with
the work.  You can easily comply with the terms of this agreement by
keeping this work in the same format with its attached full Project
Gutenberg-tm License when you share it without charge with others.

1.D.  The copyright laws of the place where you are located also govern
what you can do with this work.  Copyright laws in most countries are in
a constant state of change.  If you are outside the United States, check
the laws of your country in addition to the terms of this agreement
before downloading, copying, displaying, performing, distributing or
creating derivative works based on this work or any other Project
Gutenberg-tm work.  The Foundation makes no representations concerning
the copyright status of any work in any country outside the United
States.

1.E.  Unless you have removed all references to Project Gutenberg:

1.E.1.  The following sentence, with active links to, or other immediate
access to, the full Project Gutenberg-tm License must appear prominently
whenever any copy of a Project Gutenberg-tm work (any work on which the
phrase "Project Gutenberg" appears, or with which the phrase "Project
Gutenberg" is associated) is accessed, displayed, performed, viewed,
copied or distributed:

This eBook is for the use of anyone anywhere at no cost and with
almost no restrictions whatsoever.  You may copy it, give it away or
re-use it under the terms of the Project Gutenberg License included
with this eBook or online at www.gutenberg.org

1.E.2.  If an individual Project Gutenberg-tm electronic work is derived
from the public domain (does not contain a notice indicating that it is
posted with permission of the copyright holder), the work can be copied
and distributed to anyone in the United States without paying any fees
or charges.  If you are redistributing or providing access to a work
with the phrase "Project Gutenberg" associated with or appearing on the
work, you must comply either with the requirements of paragraphs 1.E.1
through 1.E.7 or obtain permission for the use of the work and the
Project Gutenberg-tm trademark as set forth in paragraphs 1.E.8 or
1.E.9.

1.E.3.  If an individual Project Gutenberg-tm electronic work is posted
with the permission of the copyright holder, your use and distribution
must comply with both paragraphs 1.E.1 through 1.E.7 and any additional
terms imposed by the copyright holder.  Additional terms will be linked
to the Project Gutenberg-tm License for all works posted with the
permission of the copyright holder found at the beginning of this work.

1.E.4.  Do not unlink or detach or remove the full Project Gutenberg-tm
License terms from this work, or any files containing a part of this
work or any other work associated with Project Gutenberg-tm.

1.E.5.  Do not copy, display, perform, distribute or redistribute this
electronic work, or any part of this electronic work, without
prominently displaying the sentence set forth in paragraph 1.E.1 with
active links or immediate access to the full terms of the Project
Gutenberg-tm License.

1.E.6.  You may convert to and distribute this work in any binary,
compressed, marked up, nonproprietary or proprietary form, including any
word processing or hypertext form.  However, if you provide access to or
distribute copies of a Project Gutenberg-tm work in a format other than
"Plain Vanilla ASCII" or other format used in the official version
posted on the official Project Gutenberg-tm web site (www.gutenberg.org),
you must, at no additional cost, fee or expense to the user, provide a
copy, a means of exporting a copy, or a means of obtaining a copy upon
request, of the work in its original "Plain Vanilla ASCII" or other
form.  Any alternate format must include the full Project Gutenberg-tm
License as specified in paragraph 1.E.1.

1.E.7.  Do not charge a fee for access to, viewing, displaying,
performing, copying or distributing any Project Gutenberg-tm works
unless you comply with paragraph 1.E.8 or 1.E.9.

1.E.8.  You may charge a reasonable fee for copies of or providing
access to or distributing Project Gutenberg-tm electronic works provided
that

- You pay a royalty fee of 20% of the gross profits you derive from
     the use of Project Gutenberg-tm works calculated using the method
     you already use to calculate your applicable taxes.  The fee is
     owed to the owner of the Project Gutenberg-tm trademark, but he
     has agreed to donate royalties under this paragraph to the
     Project Gutenberg Literary Archive Foundation.  Royalty payments
     must be paid within 60 days following each date on which you
     prepare (or are legally required to prepare) your periodic tax
     returns.  Royalty payments should be clearly marked as such and
     sent to the Project Gutenberg Literary Archive Foundation at the
     address specified in Section 4, "Information about donations to
     the Project Gutenberg Literary Archive Foundation."

- You provide a full refund of any money paid by a user who notifies
     you in writing (or by e-mail) within 30 days of receipt that s/he
     does not agree to the terms of the full Project Gutenberg-tm
     License.  You must require such a user to return or
     destroy all copies of the works possessed in a physical medium
     and discontinue all use of and all access to other copies of
     Project Gutenberg-tm works.

- You provide, in accordance with paragraph 1.F.3, a full refund of any
     money paid for a work or a replacement copy, if a defect in the
     electronic work is discovered and reported to you within 90 days
     of receipt of the work.

- You comply with all other terms of this agreement for free
     distribution of Project Gutenberg-tm works.

1.E.9.  If you wish to charge a fee or distribute a Project Gutenberg-tm
electronic work or group of works on different terms than are set
forth in this agreement, you must obtain permission in writing from
both the Project Gutenberg Literary Archive Foundation and Michael
Hart, the owner of the Project Gutenberg-tm trademark.  Contact the
Foundation as set forth in Section 3 below.

1.F.

1.F.1.  Project Gutenberg volunteers and employees expend considerable
effort to identify, do copyright research on, transcribe and proofread
public domain works in creating the Project Gutenberg-tm
collection.  Despite these efforts, Project Gutenberg-tm electronic
works, and the medium on which they may be stored, may contain
"Defects," such as, but not limited to, incomplete, inaccurate or
corrupt data, transcription errors, a copyright or other intellectual
property infringement, a defective or damaged disk or other medium, a
computer virus, or computer codes that damage or cannot be read by
your equipment.

1.F.2.  LIMITED WARRANTY, DISCLAIMER OF DAMAGES - Except for the "Right
of Replacement or Refund" described in paragraph 1.F.3, the Project
Gutenberg Literary Archive Foundation, the owner of the Project
Gutenberg-tm trademark, and any other party distributing a Project
Gutenberg-tm electronic work under this agreement, disclaim all
liability to you for damages, costs and expenses, including legal
fees.  YOU AGREE THAT YOU HAVE NO REMEDIES FOR NEGLIGENCE, STRICT
LIABILITY, BREACH OF WARRANTY OR BREACH OF CONTRACT EXCEPT THOSE
PROVIDED IN PARAGRAPH F3.  YOU AGREE THAT THE FOUNDATION, THE
TRADEMARK OWNER, AND ANY DISTRIBUTOR UNDER THIS AGREEMENT WILL NOT BE
LIABLE TO YOU FOR ACTUAL, DIRECT, INDIRECT, CONSEQUENTIAL, PUNITIVE OR
INCIDENTAL DAMAGES EVEN IF YOU GIVE NOTICE OF THE POSSIBILITY OF SUCH
DAMAGE.

1.F.3.  LIMITED RIGHT OF REPLACEMENT OR REFUND - If you discover a
defect in this electronic work within 90 days of receiving it, you can
receive a refund of the money (if any) you paid for it by sending a
written explanation to the person you received the work from.  If you
received the work on a physical medium, you must return the medium with
your written explanation.  The person or entity that provided you with
the defective work may elect to provide a replacement copy in lieu of a
refund.  If you received the work electronically, the person or entity
providing it to you may choose to give you a second opportunity to
receive the work electronically in lieu of a refund.  If the second copy
is also defective, you may demand a refund in writing without further
opportunities to fix the problem.

1.F.4.  Except for the limited right of replacement or refund set forth
in paragraph 1.F.3, this work is provided to you 'AS-IS' WITH NO OTHER
WARRANTIES OF ANY KIND, EXPRESS OR IMPLIED, INCLUDING BUT NOT LIMITED TO
WARRANTIES OF MERCHANTIBILITY OR FITNESS FOR ANY PURPOSE.

1.F.5.  Some states do not allow disclaimers of certain implied
warranties or the exclusion or limitation of certain types of damages.
If any disclaimer or limitation set forth in this agreement violates the
law of the state applicable to this agreement, the agreement shall be
interpreted to make the maximum disclaimer or limitation permitted by
the applicable state law.  The invalidity or unenforceability of any
provision of this agreement shall not void the remaining provisions.

1.F.6.  INDEMNITY - You agree to indemnify and hold the Foundation, the
trademark owner, any agent or employee of the Foundation, anyone
providing copies of Project Gutenberg-tm electronic works in accordance
with this agreement, and any volunteers associated with the production,
promotion and distribution of Project Gutenberg-tm electronic works,
harmless from all liability, costs and expenses, including legal fees,
that arise directly or indirectly from any of the following which you do
or cause to occur: (a) distribution of this or any Project Gutenberg-tm
work, (b) alteration, modification, or additions or deletions to any
Project Gutenberg-tm work, and (c) any Defect you cause.


Section  2.  Information about the Mission of Project Gutenberg-tm

Project Gutenberg-tm is synonymous with the free distribution of
electronic works in formats readable by the widest variety of computers
including obsolete, old, middle-aged and new computers.  It exists
because of the efforts of hundreds of volunteers and donations from
people in all walks of life.

Volunteers and financial support to provide volunteers with the
assistance they need, is critical to reaching Project Gutenberg-tm's
goals and ensuring that the Project Gutenberg-tm collection will
remain freely available for generations to come.  In 2001, the Project
Gutenberg Literary Archive Foundation was created to provide a secure
and permanent future for Project Gutenberg-tm and future generations.
To learn more about the Project Gutenberg Literary Archive Foundation
and how your efforts and donations can help, see Sections 3 and 4
and the Foundation web page at https://www.pglaf.org.


Section 3.  Information about the Project Gutenberg Literary Archive
Foundation

The Project Gutenberg Literary Archive Foundation is a non profit
501(c)(3) educational corporation organized under the laws of the
state of Mississippi and granted tax exempt status by the Internal
Revenue Service.  The Foundation's EIN or federal tax identification
number is 64-6221541.  Its 501(c)(3) letter is posted at
https://pglaf.org/fundraising.  Contributions to the Project Gutenberg
Literary Archive Foundation are tax deductible to the full extent
permitted by U.S. federal laws and your state's laws.

The Foundation's principal office is located at 4557 Melan Dr. S.
Fairbanks, AK, 99712., but its volunteers and employees are scattered
throughout numerous locations.  Its business office is located at
809 North 1500 West, Salt Lake City, UT 84116, (801) 596-1887, email
business@pglaf.org.  Email contact links and up to date contact
information can be found at the Foundation's web site and official
page at https://pglaf.org

For additional contact information:
     Dr. Gregory B. Newby
     Chief Executive and Director
     gbnewby@pglaf.org


Section 4.  Information about Donations to the Project Gutenberg
Literary Archive Foundation

Project Gutenberg-tm depends upon and cannot survive without wide
spread public support and donations to carry out its mission of
increasing the number of public domain and licensed works that can be
freely distributed in machine readable form accessible by the widest
array of equipment including outdated equipment.  Many small donations
($1 to $5,000) are particularly important to maintaining tax exempt
status with the IRS.

The Foundation is committed to complying with the laws regulating
charities and charitable donations in all 50 states of the United
States.  Compliance requirements are not uniform and it takes a
considerable effort, much paperwork and many fees to meet and keep up
with these requirements.  We do not solicit donations in locations
where we have not received written confirmation of compliance.  To
SEND DONATIONS or determine the status of compliance for any
particular state visit https://pglaf.org

While we cannot and do not solicit contributions from states where we
have not met the solicitation requirements, we know of no prohibition
against accepting unsolicited donations from donors in such states who
approach us with offers to donate.

International donations are gratefully accepted, but we cannot make
any statements concerning tax treatment of donations received from
outside the United States.  U.S. laws alone swamp our small staff.

Please check the Project Gutenberg Web pages for current donation
methods and addresses.  Donations are accepted in a number of other
ways including including checks, online payments and credit card
donations.  To donate, please visit: https://pglaf.org/donate


Section 5.  General Information About Project Gutenberg-tm electronic
works.

Professor Michael S. Hart was the originator of the Project Gutenberg-tm
concept of a library of electronic works that could be freely shared
with anyone.  For thirty years, he produced and distributed Project
Gutenberg-tm eBooks with only a loose network of volunteer support.


Project Gutenberg-tm eBooks are often created from several printed
editions, all of which are confirmed as Public Domain in the U.S.
unless a copyright notice is included.  Thus, we do not necessarily
keep eBooks in compliance with any particular paper edition.


Most people start at our Web site which has the main PG search facility:

     https://www.gutenberg.org

This Web site includes information about Project Gutenberg-tm,
including how to make donations to the Project Gutenberg Literary
Archive Foundation, how to help produce our new eBooks, and how to
subscribe to our email newsletter to hear about new eBooks.